Embed Size (px)
Citation preview

18 Word 2013
Font: Use the drop-down arrow to select a new font for your text.
Tools & Terms You’ll Use:
Lesson Overview:Your younger brother just got his first cell phone. Before he can start to text, he needs to know the language of texting. He asks you to explain texting phrases and their meanings. Because of his young age, you decide to add some formatting to the list to make it more exciting for him to read.
In this lesson, you will create a list of the most popular texting phrases and their meaning. You will also be introduced to some of the most common formatting options in Word.
New Skills: Changing Font and Font Size
Changing Font Color
Applying Bold, Italic, Underline, Strikethrough
Clearing All Formatting
Unit 2: Formatting Text
Texting 101Formatting Text
Lesson 2.1
Font Size: Use the drop-down arrow to change the size of your text.
Font Color: Use the drop-down arrow to change the color of your text.
Bold: Use this icon to make your text bold for emphasis.
Italic: Use this icon to italicize your text.
Underline: Use this icon to underline your text.
Strikethrough: Use this icon to cross something out by drawing a line through it.
Clear All Formatting: Use this icon to remove all formatting (such as bold, italics, underline, and strikethrough) from the selection, leaving only the normal, unformatted text.
Not
e: T
his i
s a d
raft
onl
y. T
he co
nten
t has
not
bee
n fin
aliz
ed fo
r pre
ss.
DRAFT

19Word 2013
Instructions
Lesson 2.1
4
1 Using Microsoft Word 2013, create a new Blank document.
2 Save the fi le as 2.1 Texti ng 101 in your My Word Projects folder.
3 At the top of the document, key the text as shown in 2.1 Source Doc. A.
4 From the HOME tab, Font group, do the following:
a. Change the font size of the ti tle [The Most Popular Texti ng Phrases and Their Meanings] to 20
b. Change the font of [NP – No Problem] to Times New Roman
c. Change the font size of [LOL – Laugh Out Loud] to 16
d. Change the color of [TX – Thanks] to Blue
e. Bold [BRB – Be Right Back]
f. Italicize [OMW – On My Way]
g. Underline [LMK – Let Me Know]
h. Apply strikethrough to [BFF – Best Friends Forever]
i. Change the color of [BFF – Best Friends Forever] to Yellow
j. Using the Clear All Formatti ng tool, clear the previously applied formatti ng to [BFF – Best Friends Forever]
k. Apply strikethrough to [Too Much Informati on]
l. Change the font of [TTYL – Talk to You Later] to Comic Sans MS
Unit 2: Formatting Text
Formatting Text
4b.
4d.
Not
e: T
his i
s a d
raft
onl
y. T
he co
nten
t has
not
bee
n fi n
aliz
ed fo
r pre
ss.
DRAFT

20 Word 2013
Formatting Text
m. Change the font size of [B4- Before] to 8
n. Change [L8R – Later] to Red
o. Bold [IDK – I Don’t Know]
p. Italicize [TMRW]
q. Underline [LMK – Let Me Know]
r. Apply strikethrough to [BBL – Be Back Later]
s. Clear the previously applied formatti ng to [BBL – Be Back Later]
5 When complete, your document should look similar to 2.1 Source Doc. B.
Proof Save Print
Lesson 2.1
Unit 2: Formatting Text
Not
e: T
his i
s a d
raft
onl
y. T
he co
nten
t has
not
bee
n fi n
aliz
ed fo
r pre
ss.
DRAFT

21Word 2013
Formatting Text Lesson 2.1
Unit 2: Formatting Text
The Most Popular Texting Phrases and Their Meanings
NP – No Problem
LOL – Laugh Out Loud
TX – Thanks
BRB – Be Right Back
OMW – On My Way
LMK – Let Me Know
BFF – Best Friends Forever
TMI – Too Much Information
TTYL – Talk To You Later
WYWH – Wish You Were Here
B4 – Before
L8R – Later
IDK – I Don’t Know
TMRW – Tomorrow
LMK – Let Me Know
BBL – Be Back Later
2.1 Source Doc. A
Not
e: T
his i
s a d
raft
onl
y. T
he co
nten
t has
not
bee
n fi n
aliz
ed fo
r pre
ss.
DRAFT

22 Word 2013
Formatting TextLesson 2.1
Unit 2: Formatting Text
The Most Popular Texting Phrases and Their Meanings NP – No Problem
LOL – Laugh Out Loud
TX – Thanks
BRB – Be Right Back
OMW – On My Way
LMK – Let Me Know
BFF – Best Friends Forever
TMI – Too Much Information
TTYL – Talk To You Later
WYWH – Wish You Were Here
B4 – Before
L8R – Later
IDK – I Don’t Know
TMRW – Tomorrow
LMK – Let Me Know
BBL – Be Back Later
2.1 Source Doc. B
Not
e: T
his i
s a d
raft
onl
y. T
he co
nten
t has
not
bee
n fi n
aliz
ed fo
r pre
ss.
DRAFT

72 Excel 2013
Tools & Terms You’ll Use:
Comma Style: This option allows you to format numbers with a thousands separator.
Increase/Decrease Decimal: This option allows you to show more or fewer decimal places for a more precise value.
Accounting Number Format: This option allows you to format numbers as Dollars, Euros or other currency.
Percent Style: This option allows you to format numbers as a percent.
Lesson Overview:You have decided to watch some movies and want to only watch the top movies to date of the current year. A quick search allows you to make a list of the top 15 movies and helps you to organize your viewing schedule.
In this lesson, you will create a new worksheet containing the information about the top grossing movies as of September 1, 2013. You will then learn to format the numbers in your worksheet.
New Skills: Applying Accounting Number Format
Applying Percent Style
Applying Comma Style
Applying Increase/ Decrease Decimal
Unit 4: Working with Numbers & Formulas
Top Grossing MoviesFormatting Numbers
Lesson 4.1 N
ote:
Thi
s is a
dra
ft o
nly.
The
cont
ent h
as n
ot b
een
final
ized
for p
ress
.
DRAFT

73Excel 2013
Instructions
1 Using Microsoft Excel 2013, create a new Blank workbook.
2 Save the fi le as 4.1 Top Grossing Movies in your My Excel Projects folder.
3 At the top of the worksheet, key the data as shown in 4.1 Source Doc. A.
4 Make the following formatti ng changes:
a. Resize the column widths so that all data displays properly
b. Change the Orientati on to Landscape
c. Insert a blank row before Row 2
d. Change the font of A1 through I18 to Times New Roman
e. Right align cell A3, D3, E3, and F3
f. Change the font size of A1 to 16
g. Merge and Center cells A1 through F1
h. Change the font size of Row 3 to 14
i. Change the font color of Row 1 to Blue
j. Change the row height of Rows 1 to .5”
k. Cut Cell A21 and Paste it to Cell F21
l. Right align the text in cell F21
m. Italicize the text in cell F21
Unit 4: Working with Numbers & Formulas
Lesson 4.1Formatting Numbers
5
Not
e: T
his i
s a d
raft
onl
y. T
he co
nten
t has
not
bee
n fi n
aliz
ed fo
r pre
ss.
DRAFT

74 Excel 2013 Unit 4: Working with Numbers & Formulas
Formatting NumbersLesson 4.1
5 From the HOME tab, Number group, do the following:
a. Select Column D and format as dollars
b. Select Column E and format with a thousands separator (comma)
c. Select Column E and decrease the decimal twice
d. Select Column F and format as a percent
e. Select Column F and increase the decimal once
6. When complete, your document should look similar to 4.1 Source Doc. B.
Proof Save Print
5
Not
e: T
his i
s a d
raft
onl
y. T
he co
nten
t has
not
bee
n fi n
aliz
ed fo
r pre
ss.
DRAFT

75Excel 2013
1234567891011121314151617181920
A B C D E F2013 Domestic Grosses as of September 1, 2013Rank Movie Title Studio Total Gross # Theatres % of Total by this Date
1 Iron Man 3 Buena Vista 408834393 4253 12 Despicable Me 2 Universal 354699250 4003 0.9683 Man of Steel Warner Bros. 290650276 4207 0.9994 Monsters University Buena Vista 263568953 4004 0.9825 Fast & Furious 6 Universal 238664225 3771 16 Oz The Great and Powerful Buena Vista 234911825 3912 17 Star Trek Into Darkness Paramount 228225160 3907 0.9988 World War Z Paramount 200286551 3607 0.999 The Croods Fox 187116898 4065 1
10 The Heat Fox 157305506 3184 0.98611 The Great Gatsby (2013) Warner Bros. 144840419 3550 112 Identity Thief Universal 134506920 3230 113 The Conjuring Warner Bros. 133896232 3115 0.97414 Grown Ups 2 Sony 130019905 3491 0.97315 The Wolverine Fox 127822228 3924 0.965
Source: boxofficemojo.com
4.1 Source Doc. A
Lesson 4.1Formatting Numbers
Unit 4: Working with Numbers & Formulas
Not
e: T
his i
s a d
raft
onl
y. T
he co
nten
t has
not
bee
n fi n
aliz
ed fo
r pre
ss.
DRAFT

76 Excel 2013
1 2 3 4 5 6 7 8 9 10 11 12 13 14 15 16 17 18 19 20 21
AB
CD
EF
Ran
kM
ovie
Titl
eSt
udio
Tota
l Gro
ss#
Thea
tres
% o
f Tot
al1
Iron
Man
3B
uena
Vis
ta40
8,83
4,39
3.00
$
4,25
310
0.0%
2D
espi
cabl
e M
e 2
Uni
vers
al35
4,69
9,25
0.00
$
4,00
396
.8%
3M
an o
f Ste
elW
arne
r Bro
s.29
0,65
0,27
6.00
$
4,20
799
.9%
4M
onst
ers U
nive
rsity
Bue
na V
ista
263,
568,
953.
00$
4,
004
98.2%
5Fa
st &
Fur
ious
6U
nive
rsal
238,
664,
225.
00$
3,
771
100.0%
6O
z Th
e G
reat
and
Pow
erfu
lB
uena
Vis
ta23
4,91
1,82
5.00
$
3,91
210
0.0%
7St
ar T
rek
Into
Dar
knes
sPa
ram
ount
228,
225,
160.
00$
3,
907
99.8%
8W
orld
War
ZPa
ram
ount
200,
286,
551.
00$
3,
607
99.0%
9Th
e C
rood
sFo
x18
7,11
6,89
8.00
$
4,06
510
0.0%
10Th
e H
eat
Fox
157,
305,
506.
00$
3,
184
98.6%
11Th
e G
reat
Gat
sby
(201
3)W
arne
r Bro
s.14
4,84
0,41
9.00
$
3,55
010
0.0%
12Id
entit
y Th
ief
Uni
vers
al13
4,50
6,92
0.00
$
3,23
010
0.0%
13Th
e C
onju
ring
War
ner B
ros.
133,
896,
232.
00$
3,
115
97.4%
14G
row
n U
ps 2
Sony
130,
019,
905.
00$
3,
491
97.3%
15Th
e W
olve
rine
Fox
127,
822,
228.
00$
3,
924
96.5%
Source: b
oxofficem
ojo.com
2013
Dom
estic
Gro
sses
as o
f Sep
tem
ber 1
, 201
3
4.1 Source Doc. B
Lesson 4.1 Formatting Numbers
Unit 4: Working with Numbers & Formulas
Not
e: T
his i
s a d
raft
onl
y. T
he co
nten
t has
not
bee
n fi n
aliz
ed fo
r pre
ss.
DRAFT

77Excel 2013
Tools & Terms You’ll Use:
Lesson Overview:You want to watch all of the movies made by studio. To do this, you can sort the studio column alphabetically to find all the movies made by the same studio.
In this lesson, you will recall the Top Grossing Movies worksheet and sort a column alphabetically.
Lesson 4.2
New Skills: Sorting Text
Unit 4: Working with Numbers & Formulas
Top Grossing Movies 2Sorting Text
Sort & Filter: This pull down arrow allows you to organize your data so it’s easier to analyze. You can sort the selected data from smallest to largest, largest to smallest, or filter out specific values.
Not
e: T
his i
s a d
raft
onl
y. T
he co
nten
t has
not
bee
n fin
aliz
ed fo
r pre
ss.
DRAFT

78 Excel 2013
Lesson 4.2
Instructions
4
c.1 Open your existi ng document 4.1 Top Grossing Movies.
2 Save the fi le as 4.2 Top Grossing Movies 2 in your My Excel Projects folder.
3 Make the following formatti ng change:
a. Insert a blank row above Row 4
4 From the HOME tab, Editi ng group, do the following:
a. Select cells C5 to C19
b. Select Sort A-Z
c. Choose Expand the Selecti on and Sort
5 When complete, your document should look similar to 4.2 Source Doc. B.
Proof Save Print
Unit 4: Working with Numbers & Formulas
Sorting Text N
ote:
Thi
s is a
dra
ft o
nly.
The
cont
ent h
as n
ot b
een
fi nal
ized
for p
ress
.
DRAFT

79Excel 2013
Lesson 4.2
1 2 3 4 5 6 7 8 9 10 11 12 13 14 15 16 17 18 19 20 21
AB
CD
EF
Ran
kM
ovie
Titl
eSt
udio
Tota
l Gro
ss#
Thea
tres
% o
f Tot
al b
y Se
pt. 1
1Ir
on M
an 3
Bue
na V
ista
408,
834,
393.
00$
4,
253
10
0.0%
2D
espi
cabl
e M
e 2
Uni
vers
al35
4,69
9,25
0.00
$
4,00
3
96.8
%3
Man
of S
teel
War
ner B
ros.
290,
650,
276.
00$
4,
207
99
.9%
4M
onst
ers U
nive
rsity
Bue
na V
ista
263,
568,
953.
00$
4,
004
98
.2%
5Fa
st &
Fur
ious
6U
nive
rsal
238,
664,
225.
00$
3,
771
10
0.0%
6O
z Th
e G
reat
and
Pow
erfu
lB
uena
Vis
ta23
4,91
1,82
5.00
$
3,91
2
100.
0%7
Star
Tre
k In
to D
arkn
ess
Para
mou
nt22
8,22
5,16
0.00
$
3,90
7
99.8
%8
Wor
ld W
ar Z
Para
mou
nt20
0,28
6,55
1.00
$
3,60
7
99.0
%9
The
Cro
ods
Fox
187,
116,
898.
00$
4,
065
10
0.0%
10Th
e H
eat
Fox
157,
305,
506.
00$
3,
184
98
.6%
11Th
e G
reat
Gat
sby
(201
3)W
arne
r Bro
s.14
4,84
0,41
9.00
$
3,55
0
100.
0%12
Iden
tity
Thie
fU
nive
rsal
134,
506,
920.
00$
3,
230
10
0.0%
13Th
e C
onju
ring
War
ner B
ros.
133,
896,
232.
00$
3,
115
97
.4%
14G
row
n U
ps 2
Sony
130,
019,
905.
00$
3,
491
97
.3%
15Th
e W
olve
rine
Fox
127,
822,
228.
00$
3,
924
96
.5%
Source: b
oxofficem
ojo.com
2013
Dom
estic
Mov
ie G
ross
es
4.2 Source Doc. A
Unit 4: Working with Numbers & Formulas
Sorting Text
Not
e: T
his i
s a d
raft
onl
y. T
he co
nten
t has
not
bee
n fi n
aliz
ed fo
r pre
ss.
DRAFT

80 Excel 2013
Lesson 4.2
1 2 3 4 5 6 7 8 9 10 11 12 13 14 15 16 17 18 19 20 21 22
AB
CD
EF
Ran
kM
ovie
Titl
eSt
udio
Tota
l Gro
ss#
Thea
tres
% o
f Tot
al b
y Se
pt. 1
1Ir
on M
an 3
Bue
na V
ista
408,
834,
393.
00$
4,
253
10
0.0%
4M
onst
ers U
nive
rsity
Bue
na V
ista
263,
568,
953.
00$
4,
004
96
.8%
6O
z Th
e G
reat
and
Pow
erfu
lB
uena
Vis
ta23
4,91
1,82
5.00
$
3,91
2
99.9
%9
The
Cro
ods
Fox
187,
116,
898.
00$
4,
065
98
.2%
10Th
e H
eat
Fox
157,
305,
506.
00$
3,
184
10
0.0%
15Th
e W
olve
rine
Fox
127,
822,
228.
00$
3,
924
10
0.0%
7St
ar T
rek
Into
Dar
knes
sPa
ram
ount
228,
225,
160.
00$
3,
907
99
.8%
8W
orld
War
ZPa
ram
ount
200,
286,
551.
00$
3,
607
99
.0%
14G
row
n U
ps 2
Sony
130,
019,
905.
00$
3,
491
10
0.0%
2D
espi
cabl
e M
e 2
Uni
vers
al35
4,69
9,25
0.00
$
4,00
3
98.6
%5
Fast
& F
urio
us 6
Uni
vers
al23
8,66
4,22
5.00
$
3,77
1
100.
0%12
Iden
tity
Thie
fU
nive
rsal
134,
506,
920.
00$
3,
230
10
0.0%
3M
an o
f Ste
elW
arne
r Bro
s.29
0,65
0,27
6.00
$
4,20
7
97.4
%11
The
Gre
at G
atsb
y (2
013)
War
ner B
ros.
144,
840,
419.
00$
3,
550
97
.3%
13Th
e C
onju
ring
War
ner B
ros.
133,
896,
232.
00$
3,
115
96
.5%
Source: b
oxofficem
ojo.com
2013
Dom
estic
Mov
ie G
ross
es
4.2 Source Doc. B
Unit 4: Working with Numbers & Formulas
Sorting Text N
ote:
Thi
s is a
dra
ft o
nly.
The
cont
ent h
as n
ot b
een
fi nal
ized
for p
ress
.
DRAFT
1PowerPoint 2013
New Skills: Creating a blank presentation
Keying text using text boxes
Inserting new slides
Saving a presentation
Viewing a presentation
Closing a presentation
Closing PowerPoint
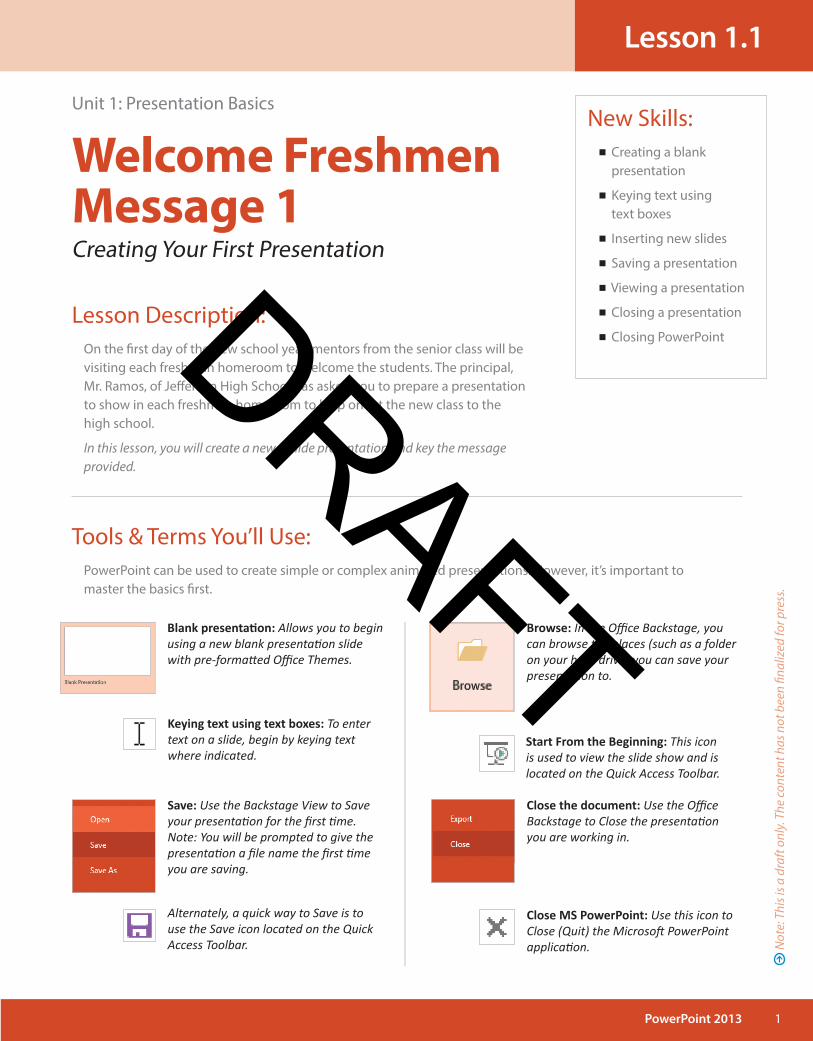
Tools & Terms You’ll Use:PowerPoint can be used to create simple or complex animated presentations. However, it’s important to master the basics fi rst.
Lesson Description:On the fi rst day of the new school year, mentors from the senior class will be visiting each freshman homeroom to welcome the students. The principal, Mr. Ramos, of Jeff erson High School has asked you to prepare a presentation to show in each freshman homeroom to help orient the new class to the high school.
In this lesson, you will create a new 6-slide presentation and key the message provided.
Unit 1: Presentation Basics
Welcome Freshmen Message 1Creating Your First Presentation
Lesson 1.1
Close the document: Use the Offi ce Backstage to Close the presentati on you are working in.
Start From the Beginning: This icon is used to view the slide show and is located on the Quick Access Toolbar.
Blank presentati on: Allows you to begin using a new blank presentati on slide with pre-formatt ed Offi ce Themes.
Keying text using text boxes: To enter text on a slide, begin by keying text where indicated.
Save: Use the Backstage View to Save your presentati on for the fi rst ti me. Note: You will be prompted to give the presentati on a fi le name the fi rst ti me you are saving.
Alternately, a quick way to Save is to use the Save icon located on the Quick Access Toolbar.
Browse: In the Offi ce Backstage, you can browse the places (such as a folder on your hard drive) you can save your presentati on to.
Close MS PowerPoint: Use this icon to Close (Quit) the Microsoft PowerPoint applicati on. N
ote:
Thi
s is a
dra
ft o
nly.
The
cont
ent h
as n
ot b
een
fi nal
ized
for p
ress
.
DRAFT

2 PowerPoint 2013
Instructions
Lesson 1.1
Unit 1: Presentation Basics
Creating Your First Presentation
8
21 Launch Microsoft PowerPoint 2013.
2 From the Start screen, select Blank Presentati on.
3 You are launched into your fi rst slide, Slide 1. Following the screen prompt to “Click to add ti tle”, key the ti tle [Welcome]. Then key the subti tle [Freshman Class] as shown in 1.1 Source Doc.
4 From the HOME tab, Slides group, do the following:
a. Select New Slide to insert your next slide, then select Title and Content from Offi ce Theme.
b. Key the text provided for Slide 2 as shown in 1.1 Source Doc.
5 Conti nue to add new slides using the Offi ce Theme indicated for each slide and key the text provided as shown in 1.1 Source Doc.
6 To view your presentati on, choose the Start From the Beginning icon from the Quick Access Toolbar.
Note: Any elements not uti lized on an Offi ce Theme slide layout will not display when viewing the slide show.
7 Proofread your presentati on screens for accuracy.
8 From the FILE tab, click Save.
9 Click the Browse butt on and locate the folder named My PowerPoint Projects on your hard drive or network. Name the fi le 1.1 Welcome Freshmen Message 1 and click Save.
10 From the FILE tab, click Close.
11 To close PowerPoint, click on the X in the top right corner of the screen.
Proof View Save
8
10
9
6
4a.
4
Not
e: T
his i
s a d
raft
onl
y. T
he co
nten
t has
not
bee
n fi n
aliz
ed fo
r pre
ss.
DRAFT

3PowerPoint 2013
LessonFormatting Text
Unit 1: Presentation Basics
Enjoy your school year!Navigating High School
DO’s• Work hard• Get involved• Check the school website regularly
• Check out the mentoring program and homework club
DON’T’s• Fall behind• Shy away from activities• Ignore school communications such as the school website and announcements
• Overlook help and support systems
Lockers
• If you did not receive a locker assignment over the summer, stop by the Assistant Principal’s office
• Don’t leave valuables in your locker• Plan your day ahead to minimize stops at your locker• Why? Don’t be late to class
Get Involved
• Clubs and Organizations: Mrs. Smith• Sports: Mr. Wreidt• Culinary: Mr. Wish• Band/Chorus: Ms. Daly• Internships: Mrs. Boudle• CHECK THE SCHOOL WEBSITE!
Your Schedule
• Daily schedule is posted on TV screens in main lobby• Students can replace lost schedules in Guidance office• Passing time between classes is 4 minutes• Don’t be late to class
WelcomeFreshmen Class
Lesson 1.1Creating Your First Presentation
Slide 2Office Theme: Title and Content
Slide 3 Office Theme: Title and Content
Slide 4Office Theme: Title and Content
Slide 5Office Theme: Comparison
Slide 6Office Theme: Title Only
Slide 1Office Theme: Default first slide is Title and Subtitle
1.1 Source Doc.
Not
e: T
his i
s a d
raft
onl
y. T
he co
nten
t has
not
bee
n fin
aliz
ed fo
r pre
ss.
DRAFT

4 PowerPoint 2013
Lesson 1.2
Tools & Terms You’ll Use:
Open Recent Presentation: From the File tab, use the Backstage View to open a previously saved recent presentation. If the file you are looking for is not there, click Open Other Documents.
Save as: From the File tab, use the Backstage View to save an existing presentation with a new name.
Lesson Description:The first day of school was very hectic, and the Senior mentors did not have a chance to visit the freshman homerooms. There will be an extended homeroom tomorrow to accomplish this task. Principal Ramos would like you to make a few formatting changes to the presentation you prepared to make it more eye catching.
In this lesson, you will retrieve and make changes to the 6-slide presentation you prepared in Lesson 1.1.
New Skills: Opening an existing presentation
Revising an existing presentation
Using Save As
Selecting text on a slide
Changing text format [Applying Bold, Under-line, Italics, Shadow; Changing Font, Font size, Color, and Case]
Unit 1: Presentation Basics
Welcome Freshmen Message 2Basic Editing & Formatting Text
Font: Use the pull down arrow to select a new font for your text.
Font Size: Use the pull down arrow to change the size of your text.
Font Color: Use the pull down arrow to change the color of your text.
Bold: Use this icon to make your text bold for emphasis.
Italic: Use this icon to italicize your text.
Underline: Use this icon to underline your text.
Shadow: Use this icon to enhance the look of your text.
Selecting text: There are several ways to select text.
1. Position the cursor at the beginning of the word, left click the mouse, and drag to the right to the end point of the text you want to select.
2. To select a single word, double click on the word.
3. To select an entire line of text within a text box, triple-click within the line of text.
4. To select all of the text within a text box, click inside the text box and hold the CTRL key and press A.
Not
e: T
his i
s a d
raft
onl
y. T
he co
nten
t has
not
bee
n fin
aliz
ed fo
r pre
ss.
DRAFT

5PowerPoint 2013
Instructions
Unit 1: Presentation Basics
1 To open an existi ng document, launch PowerPoint 2013.
2 From the PowerPoint Start screen, do the following:
a. Choose Open Other Presentati ons
b. Click Open
c. Click Computer
d. Click Browse
e. Choose the fi le named 1.1 Welcome Freshmen Message 1 located in the My PowerPoint Projects folder.
Note: You can also look in the Recent list of presentati ons.
Make the following changes to each slide as indicated below. Use 1.2 Source Doc as a guide:
Note: In this lesson, you will be required to select text. To select text, positi on the cursor at the beginning of the word, left click the mouse, and drag to the right to the end point of the text you want to select.
3 SLIDE 1:
From the HOME tab, Font group, do the following:
a. Select the text [Welcome] and increase the font size to 72.
b. Select the text [Welcome] and bold
c. Increase the font size of [Freshmen Class] to 60
d. Change the font of [Freshmen Class] to Arial Black
e. Italicize the text [Freshmen Class]
Basic Editing & Formatting Text Lesson 1.2
2a.
2b.
2c.
2d.
3
Not
e: T
his i
s a d
raft
onl
y. T
he co
nten
t has
not
bee
n fi n
aliz
ed fo
r pre
ss.
DRAFT

6 PowerPoint 2013
3
Unit 1: Presentation Basics
Lesson 1.2 Basic Editing & Formatting Text
f. Change the color of [Freshmen Class] to Blue
g. Add a Shadow to the text [Freshmen Class]
4 SLIDES 2-4:
a. Increase the font size of the ti tles [Your Schedule], [Lockers] and [Get Involved] to 60.
5 SLIDE 5:
From the HOME tab, Font group, do the following:
a. Increase the font size of [Navigati ng High School] to 60
b. Italicize and Underline the column ti tles, [DO’s] and [DON’T’s]
6 SLIDE 6:
From the HOME tab, Font group, do the following:
a. Change the text [Enjoy Your School Year!] to UPPERCASE
b. Increase the font size of [Enjoy Your School Year!] to 66.
7 From the FILE tab, click Save As. Name the fi le 1.2 Freshmen Welcome Message 2.
Note: Your original fi le, 1.1 Freshmen Welcome Message 1, remains unchanged.
8 When complete, your presentati on should look similar to the slides in 1.2 Source Doc.
Proof View Save
3f.
7
Not
e: T
his i
s a d
raft
onl
y. T
he co
nten
t has
not
bee
n fi n
aliz
ed fo
r pre
ss.
DRAFT

7PowerPoint 2013 Unit 1: Presentation Basics
Lesson 1.2Basic Editing & Formatting Text
ENJOY YOUR SCHOOL YEAR!Navigating High SchoolDO’s• Work hard• Get involved• Check the school website regularly
• Check out the mentoring program and homework club
DON’T’s• Fall behind• Shy away from activities• Ignore school communications such as the school website and announcements
• Overlook help and support systems
Lockers• If you did not receive a locker assignment over the summer, stop by the Assistant Principal’s office
• Don’t leave valuables in your locker• Plan your day ahead to minimize stops at your locker• Why? Don’t be late to class
Get Involved• Clubs and Organizations: Mrs. Smith• Sports: Mr. Wreidt• Culinary: Mr. Wish• Band/Chorus: Ms. Daly• Internships: Mrs. Boudle• CHECK THE SCHOOL WEBSITE!
Your Schedule• Daily schedule is posted on TV screens in main lobby• Students can replace lost schedules in Guidance office• Passing time between classes is 4 minutes• Don’t be late to class
WelcomeFreshmen Class
Slide 3
Slide 5 Slide 6
Slide 4
Slide 2 Slide 1
1.2 Source Doc.
Not
e: T
his i
s a d
raft
onl
y. T
he co
nten
t has
not
bee
n fin
aliz
ed fo
r pre
ss.
DRAFT
8 PowerPoint 2013
Lesson 1.3
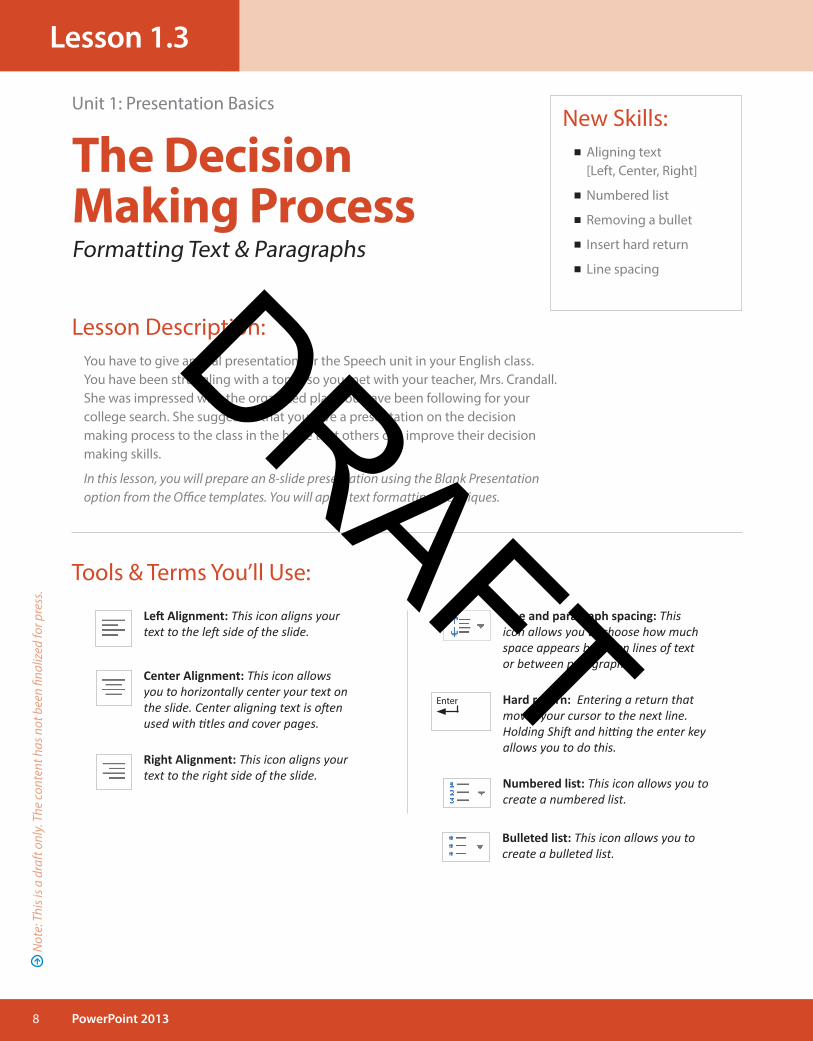
New Skills: Aligning text [Left, Center, Right]
Numbered list
Removing a bullet
Insert hard return
Line spacing
Unit 1: Presentation Basics
The Decision Making ProcessFormatting Text & Paragraphs
Tools & Terms You’ll Use:
Line and paragraph spacing: This icon allows you to choose how much space appears between lines of text or between paragraphs.
Hard return: Entering a return that moves your cursor to the next line. Holding Shift and hitting the enter key allows you to do this.
Left Alignment: This icon aligns your text to the left side of the slide.
Right Alignment: This icon aligns your text to the right side of the slide.
Center Alignment: This icon allows you to horizontally center your text on the slide. Center aligning text is often used with titles and cover pages.
Numbered list: This icon allows you to create a numbered list.
Lesson Description:You have to give an oral presentation for the Speech unit in your English class. You have been struggling with a topic, so you met with your teacher, Mrs. Crandall. She was impressed with the organized plan you have been following for your college search. She suggested that you give a presentation on the decision making process to the class in the hope that others can improve their decision making skills.
In this lesson, you will prepare an 8-slide presentation using the Blank Presentation option from the Office templates. You will apply text formatting techniques.
Enter
Bulleted list: This icon allows you to create a bulleted list.
Not
e: T
his i
s a d
raft
onl
y. T
he co
nten
t has
not
bee
n fin
aliz
ed fo
r pre
ss.
DRAFT
9PowerPoint 2013 Unit 2: Presentation Basics
Instructions
Lesson 1.3Formatting Text & Paragraphs
1 Launch PowerPoint 2013.
2 From the PowerPoint Start screen, select Blank Presentati on.
3 Save the fi le as 1.3 Decision Making in your My PowerPoint Projects folder.
4 Insert seven additi onal slides using the Offi ce Themes as indicated in 1.3 Source Doc A.
5 Key the text provided on each slide as provided in 1.3 Source Doc A.
Make the following changes to each slide as indicated below. Use 1.1 Source Doc. B as a guide.
6 SLIDE 1:
a. Bold the ti tle [The Decision Making Process].
b. Increase the font size of [Choosing the Right College] to 36 and format with Shadow.
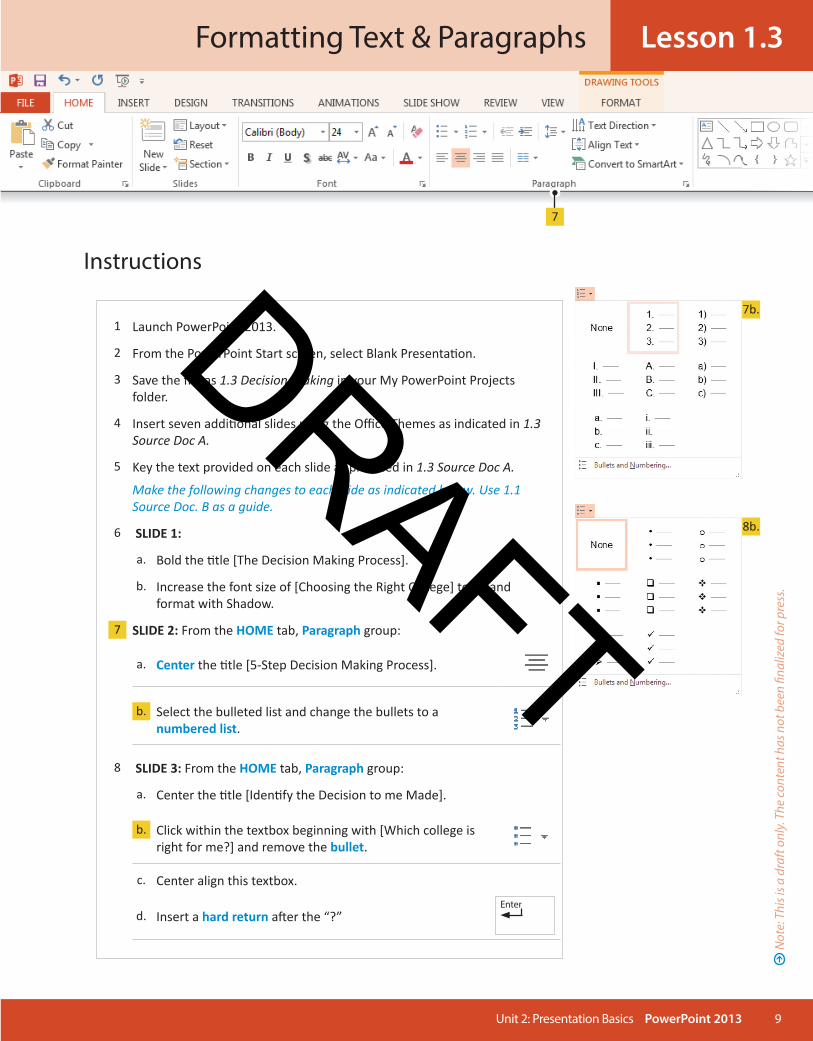
7 SLIDE 2: From the HOME tab, Paragraph group:
a. Center the ti tle [5-Step Decision Making Process].
b. Select the bulleted list and change the bullets to a numbered list.
8 SLIDE 3: From the HOME tab, Paragraph group:
a. Center the ti tle [Identi fy the Decision to me Made].
b. Click within the textbox beginning with [Which college is right for me?] and remove the bullet.
c. Center align this textbox.
d. Insert a hard return aft er the “?” Enter
7b.
8b.
7
Not
e: T
his i
s a d
raft
onl
y. T
he co
nten
t has
not
bee
n fi n
aliz
ed fo
r pre
ss.
DRAFT

10 PowerPoint 2013
Formatting Text & Paragraphs
Unit 1: Presentation Basics
Lesson 1.3
9 SLIDES 4 and 5:
a. Center align the ti tles [Identi fy Possible Choices/Opti ons] and [Gather Informati on on Your Opti ons].
10 SLIDE 6:
a. Center the ti tle [Make the Decision].
b. Underline the column ti tles [List the PRO’s] and [List the CON’s].
11 SLIDE 7:
a. Center the ti tle [Evaluate Your Decision]
12 SLIDE 8: From the HOME tab, Paragraph group:
a. Decrease the font size of [~Michelle Obama] to 22.
b. Right align the text in this slide.
c. Increase the line spacing in this slide to 2.
13 When complete, your presentati on slides should look similar to the slides in 1.3 Source Doc B.
Proof View Save
12c.
12
Not
e: T
his i
s a d
raft
onl
y. T
he co
nten
t has
not
bee
n fi n
aliz
ed fo
r pre
ss.
DRAFT

11PowerPoint 2013
Lesson
Unit 1: Presentation Basics
Formatting Text & Paragraphs
Slide 7 | Office Theme: Title and Content Slide 8 | Office Theme: Tile Only
Slide 6 | Office Theme: ComparisonSlide 5 | Office Theme: Title and Content
Slide 3 | Office Theme: Title and Content Slide 4 | Office Theme: Title and Content
Slide 2 | Office Theme: Title and ContentSlide 1 | Office Theme: Title
“You can’t make decisions based on fear and the possibility of what might happen.”~Michelle Obama
Evaluate Your Decision
• Since you have not actually attended the school, you have to go with your “gut” feeling
• Is your choice shared by Parent/Guardian?
Make the decision
List the PRO’s• College#1: mid‐sized; majors in my interest; affordable
• College #2: Small; majors in my interest; good location
• College #3: mid‐sized; good location; friendly atmosphere; many clubs and organizations
List the CON’s• Questionable social life as most go home on weekends
• Expensive with limited financial aid
• 5 hour drive away; limited majors in my interest
Gather information on your options
• Visit websites of the schools on your list.• Read the reviews on sites such as: collegeprowler.com, collegeboard.org and U.S. News and World Report.
• Schedule to visit schools on your list• Talk to students you know who are already in college
Identify the decision to be made
• Which college is right for me? Looking at who you are and why you are going to college is a good place to start.
Identify possible choices/options
• What size school is right for you?• Does the school have majors that match your interests?• Does the school align with your strengths and weaknesses? (academic, social, emotional)
• How is the school’s financial aid?• Develop a list of schools
5‐Step Decision Making Process
• Identify the decision to be made• Identify possible choices/options• Gather information on your options• Make the decision• Evaluate your decision
The Decision Making ProcessChoosing the Right College
1.3 Source Doc. A
Not
e: T
his i
s a d
raft
onl
y. T
he co
nten
t has
not
bee
n fin
aliz
ed fo
r pre
ss.
DRAFT

12 PowerPoint 2013
Lesson 1.3 Formatting Text & Paragraphs
Unit 1: Presentation Basics
“You can’t make decisions based on fear and the
possibility of what might happen.”~Michelle Obama
Evaluate Your Decision
• Since you have not yet actually attended the school, you have to go with your “gut” feeling.
• Is your choice shared by parent/guardian?
Make the decision
List the PRO’s• College#1: mid‐sized; majors in my interest; affordable
• College #2: Small; majors in my interest; good location
• College #3: mid‐sized; good location; friendly atmosphere; many clubs and organizations
List the CON’s• Questionable social life as most go home on weekends
• Expensive with limited financial aid
• 5 hour drive away; limited majors in my interest
Gather information on your options
• Visit websites of the schools on your list.• Read the reviews on sites such as: collegeprowler.com, collegeboard.org and U.S. News and World Report.
• Schedule to visit schools on your list• Talk to students you know who are already in college
Identify possible choices/options
• What size school is right for you?• Does the school have majors that match your interests?• Does the school align with your strengths and weaknesses? (academic, social, emotional)
• How is the school’s financial aid?• Develop a list of schools
Identify the decision to be made
Which college is right for me? Looking at who you are and why you are going to college is a good
place to start.
5‐Step Decision Making Process
1. Identify the decision to be made2. Identify possible choices/options3. Gather information on your options4. Make the decision5. Evaluate your decision
The Decision Making ProcessChoosing the Right College
1.3 Source Doc. B
Slide 7 Slide 8
Slide 6Slide 5
Slide 3 Slide 4
Slide 2Slide 1
Not
e: T
his i
s a d
raft
onl
y. T
he co
nten
t has
not
bee
n fin
aliz
ed fo
r pre
ss.
DRAFT

10 Access 2013
Lesson 1.3
New Skills: Formatting Currency Fields
Formatting Yes/No Fields
Tools & Terms You’ll Use:
Yes/No Fields: Formats the data in that field to allow you to choose yes or no.
Currency Fields: Formats the data in that field to display with decimal points and currency signs.
Lesson Overview:Assume you are enrolled in a yearbook course at your school. As part of your duties, you are required to track all yearbook sales. Keeping the records that show the proper amount that people owe and whether or not they have paid yet is crucial to your bottom line. Using an Access database allows you to do both of these things.
In this lesson, you will create a database that stores and tracks information about yearbook sales.
Unit 1: Creating Databases in Table View
Yearbook SalesWorking with Different Data Types
Not
e: T
his i
s a d
raft
onl
y. T
he co
nten
t has
not
bee
n fin
aliz
ed fo
r pre
ss.
DRAFT

11Access 2013
Instructions
Lesson 1.3Working with Diff erent Data Types
Unit 1: Creating Databases in Table View
1 Launch Microsoft Access 2013.
2 From the Start screen, select Blank desktop database.
3 Enter the File Name 1.3 Yearbook Sales in your My Access Projects folder.
4 Set up the database table by using the database structure provided below.
Data Type Field Name
Short Text First Name
Short Text Last Name
Short Text Grade
Short Text Homeroom
Currency Amount Owed
Yes/No Paid in Full
5 Key the data as shown in 1.3 Source Doc.
Note: Dollar signs will automati cally appear in the Amount Owed fi eld that is formatt ed for currency. Click in the Paid in Full box (as shown) to indicate that the person had paid in full.
6 Adjust the column widths so that all data displays properly.
7 Save the Table as Sales Figures.
Proof Save Print
5
4
Not
e: T
his i
s a d
raft
onl
y. T
he co
nten
t has
not
bee
n fi n
aliz
ed fo
r pre
ss.
DRAFT

12 Access 2013
1.3 Source Doc.
Unit 1: Creating Databases in Table View
Working with Diff erent Data TypesLesson 1.3
ID First Name Last Name Grade Homeroom Amount Owed Paid In Full
1 Nancy Boss 12 409 $65.00
2 Patricia Warren 12 407 $70.00
3 Kaley Barrington 11 305 $65.00
4 Michael Norris 10 203 $65.00
5 Morgan Nance 9 106 $130.00
6 John Davey 12 408 $75.00
7 Sarah Angell 9 105 $65.00
8 Jack Joseph 9 108 $75.00
9 Anne Norton 12 406 $75.00
10 Tyler Ahn 10 204 $65.00
11 Ryan Joseph 10 205 $130.00
12 Gabriella Lincoln 9 106 $75.00
13 Joseph Gendron 11 309 $65.00
14 Leah Hoff man 12 409 $75.00
15 Alex Cary 9 107 $65.00
16 Kathleen Daniels 12 408 $75.00
17 Michael Rowe 12 407 $65.00
18 Patrick Michaels 11 307 $130.00
19 Daniel Stephens 11 306 $75.00
20 Andrea Greenvale 11 306 $65.00
21 Kevin Patrick 10 204 $75.00
22 Patricia McGuinness 10 203 $130.00
23 Alana Mackenzie 9 104 $65.00
24 Daniel March 9 105 $75.00
25 Maureen Johns 12 407 $130.00
Not
e: T
his i
s a d
raft
onl
y. T
he co
nten
t has
not
bee
n fi n
aliz
ed fo
r pre
ss.
DRAFT


![[ArkAn] 030314 Vital Ayat V0_4](https://img.pdfslide.net/doc/110x75/55cf85105503465d4a8b641f/arkan-030314-vital-ayat-v04.jpg)