Embed Size (px)
Citation preview

MultiNet for OpenVMS User's Guide and Master Index
Part Number: N-0705-54-NN-A
November 2011
This document describes how to use the MultiNet user commands. Included are easy to follow instructions for beginning users and command pages for advanced users.
Revision/Update: This manual supersedes the MultiNet User's Guide, V5.3
Operating System/Version: VAX/VMS V5.5-2 or later, OpenVMS VAX V6.2 or later, OpenVMS Alpha V6.2 or later, OpenVMS I64 V8.2 or later
Software Version: MultiNet V5.4
Process SoftwareFramingham, MassachusettsUSA

The material in this document is for informational purposes only and is subject to change without notice. It should not be construed as a commitment by Process Software. Process Software assumes no responsibility for any errors that may appear in this document.
Use, duplication, or disclosure by the U.S. Government is subject to restrictions as set forth in subparagraph (c)(1)(ii) of the Rights in Technical Data and Computer Software clause at DFARS 252.227-7013.
The following third-party software may be included with your product and will be subject to the software license agreement.
Network Time Protocol (NTP). Copyright © 1992-2004 by David L. Mills. The University of Delaware makes no representations about the suitability of this software for any purpose.
Point-to-Point Protocol. Copyright © 1989 by Carnegie-Mellon University. All rights reserved. The name of the University may not be used to endorse or promote products derived from this software without specific prior written permission. Redistribution and use in source and binary forms are permitted provided that the above copyright notice and this paragraph are duplicated in all such forms and that any documentation, advertising materials, and other materials related to such distribution and use acknowledge that the software was developed by Carnegie Mellon University. The name of the University may not be used to endorse or promote products derived from this software without specific prior written permission. THIS SOFTWARE IS PROVIDED ``AS IS'' AND WITHOUT ANY EXPRESS OR IMPLIED WARRANTIES, INCLUDING, WITHOUT LIMITATION, THE IMPLIED WARRANTIES OF MERCHANTIBILITY AND FITNESS FOR A PARTICULAR PURPOSE.
RES_RANDOM.C. Copyright © 1997 by Niels Provos <[email protected]> All rights reserved. Redistribution and use in source and binary forms, with or without modification, are permitted provided that the following conditions are met:1. Redistributions of source code must retain the above copyright notice, this list of conditions and the following disclaimer. 2. Redistributions in binary form must reproduce the above copyright notice, this list of conditions and the following disclaimer in the documentation and/or other materials provided with the distribution.3. All advertising materials mentioning features or use of this software must display the following acknowledgement: This product includes software developed by Niels Provos.4. The name of the author may not be used to endorse or promote products derived from this software without specific prior written permission.
Copyright © 1990 by John Robert LoVerso. All rights reserved. Redistribution and use in source and binary forms are permitted provided that the above copyright notice and this paragraph are duplicated in all such forms and that any documentation, advertising materials, and other materials related to such distribution and use acknowledge that the software was developed by John Robert LoVerso.
Kerberos. Copyright © 1989, DES.C and PCBC_ENCRYPT.C Copyright © 1985, 1986, 1987, 1988 by Massachusetts Institute of Technology. Export of this software from the United States of America is assumed to require a specific license from the United States Government. It is the responsibility of any person or organization contemplating export to obtain such a license before exporting. WITHIN THAT CONSTRAINT, permission to use, copy, modify, and distribute this software and its documentation for any purpose and without fee is hereby granted, provided that the above copyright notice appear in all copies and that both that copyright notice and this permission notice appear in supporting documentation, and that the name of M.I.T. not be used in advertising or publicity pertaining to distribution of the software without specific, written prior permission. M.I.T. makes no representations about the suitability of this software for any purpose. It is provided "as is" without express or implied warranty.
DNSSIGNER (from BIND distribution) Portions Copyright (c) 1995-1998 by Trusted Information Systems, Inc.Portions Copyright (c) 1998-1999 Network Associates, Inc. Permission to use, copy, modify, and distribute this software for any purpose with or without fee is hereby granted, provided that the above copyright notice and this permission notice appear in all copies. THE

SOFTWARE IS PROVIDED "AS IS" AND TRUSTED INFORMATION SYSTEMS DISCLAIMSALL WARRANTIES WITH REGARD TO THIS SOFTWARE INCLUDING ALL IMPLIED WARRANTIESOF MERCHANTABILITY AND FITNESS. IN NO EVENT SHALL TRUSTED INFORMATION SYSTEMS BE LIABLE FOR ANY SPECIAL, DIRECT, INDIRECT, OR CONSEQUENTIAL DAMAGES OR ANY DAMAGES WHATSOEVER RESULTING FROM LOSS OF USE, DATA OR PROFITS, WHETHER IN AN ACTION OF CONTRACT, NEGLIGENCE OR OTHER TORTIOUS ACTION, ARISING OUT OF OR IN CONNECTION WITH THE USE OR PERFORMANCE OF THIS SOFTWARE.
ERRWARN.C. Copyright © 1995 by RadioMail Corporation. All rights reserved. Redistribution and use in source and binary forms, with or without modification, are permitted provided that the following conditions are met:1. Redistributions of source code must retain the above copyright notice, this list of conditions and the following disclaimer.2. Redistributions in binary form must reproduce the above copyright notice, this list of conditions and the following disclaimer in the documentation and/or other materials provided with the distribution.3. Neither the name of RadioMail Corporation, the Internet Software Consortium nor the names of its contributors may be used to endorse or promote products derived from this software without specific prior written permission. THIS SOFTWARE IS PROVIDED BY RADIOMAIL CORPORATION, THE INTERNET SOFTWARE CONSORTIUM AND CONTRIBUTORS ``AS IS’’ AND ANY EXPRESS OR IMPLIED WARRANTIES, INCLUDING, BUT NOT LIMITED TO, THE IMPLIED WARRANTIES OF MERCHANTABILITY AND FITNESS FOR A PARTICULAR PURPOSE ARE DISCLAIMED. IN NO EVENT SHALL RADIOMAIL CORPORATION OR CONTRIBUTORS BE LIABLE FOR ANY DIRECT, INDIRECT, INCIDENTAL, SPECIAL, EXEMPLARY, OR CONSEQUENTIAL DAMAGES (INCLUDING, BUT NOT LIMITED TO, PROCUREMENT OF SUBSTITUTE GOODS OR SERVICES; LOSS OF USE, DATA, OR PROFITS; OR BUSINESS INTERRUPTION) HOWEVER CAUSED AND ON ANY THEORY OF LIABILITY, WHETHER IN CONTRACT, STRICT LIABILITY, OR TORT (INCLUDING NEGLIGENCE OR OTHERWISE) ARISING IN ANY WAY OUT OF THE USE OF THIS SOFTWARE, EVEN IF ADVISED OF THE POSSIBILITY OF SUCH DAMAGE. This software was written for RadioMail Corporation by Ted Lemon under a contract with Vixie Enterprises. Further modifications have been made for the Internet Software Consortium under a contract with Vixie Laboratories.
IMAP4R1.C, MISC.C, RFC822.C, SMTP.C Original version Copyright © 1988 by The Leland Stanford Junior University
ACCPORNAM technology Copyright (c) 1999 by Brian Schenkenberger - TMESIS SOFTWARE
NS_PARSER.C Copyright © 1984, 1989, 1990 by Bob Corbett and Richard StallmanThis program is free software. You can redistribute it and/or modify it under the terms of the GNU General Public License as published by the Free Software Foundation, either version 1, or (at your option) any later version. This program is distributed in the hope that it will be useful, but WITHOUT ANY WARRANTY; without even the implied warranty of MERCHANTABILITY or FITNESS FOR A PARTICULAR PURPOSE. See the GNU General Public License for more details. You should have received a copy of the GNU General Public License along with this program; if not, write to the Free Software Foundation, Inc., 675 Mass Ave, Cambridge, MA 02139 USA
IF_ACP.C Copyright © 1985 and IF_DDA.C Copyright © 1986 by Advanced Computer Communications
IF_PPP.C Copyright © 1993 by Drew D. Perkins
ASCII_ADDR.C Copyright © 1994 Bell Communications Research, Inc. (Bellcore)
DEBUG.C Copyright © 1998 by Lou Bergandi. All Rights Reserved.
NTP_FILEGEN.C Copyright © 1992 by Rainer Pruy Friedrich-Alexander Universitaet Erlangen-Nuernberg
RANNY.C Copyright © 1988 by Rayan S. Zachariassen. All Rights Reserved.

MD5.C Copyright © 1990 by RSA Data Security, Inc. All Rights Reserved.
Portions Copyright © 1981, 1982, 1983, 1984, 1985, 1986, 1987, 1988, 1989 by SRI International
Portions Copyright © 1984, 1989 by Free Software Foundation
Portions Copyright © 1993, 1994, 1995, 1996, 1997, 1998 by the University of Washington. Permission to use, copy, modify, and distribute this software and its documentation for any purpose and without fee is hereby granted, provided that the above copyright notices appear in all copies and that both the above copyright notices and this permission notice appear in supporting documentation, and that the name of the University of Washington or The Leland Stanford Junior University not be used in advertising or publicity pertaining to distribution of the software without specific, written prior permission. This software is made available "as is", and THE UNIVERSITY OF WASHINGTON AND THE LELAND STANFORD JUNIOR UNIVERSITY DISCLAIM ALL WARRANTIES, EXPRESS OR IMPLIED, WITH REGARD TO THIS SOFTWARE, INCLUDING WITHOUT LIMITATION ALL IMPLIED WARRANTIES OF MERCHANTABILITY AND FITNESS FOR A PARTICULAR PURPOSE, AND IN NO EVENT SHALL THE UNIVERSITY OF WASHINGTON OR THE LELAND STANFORD JUNIOR UNIVERSITY BE LIABLE FOR ANY SPECIAL, INDIRECT OR CONSEQUENTIAL DAMAGES OR ANY DAMAGES WHATSOEVER RESULTING FROM LOSS OF USE, DATA OR PROFITS, WHETHER IN AN ACTION OF CONTRACT, TORT (INCLUDING NEGLIGENCE) OR STRICT LIABILITY, ARISING OUT OF OR IN CONNECTION WITH THE USE OR PERFORMANCE OF THIS SOFTWARE.
Portions Copyright © 1980, 1982, 1985, 1986, 1988, 1989, 1990, 1993 by The Regents of the University of California. All rights reserved.Redistribution and use in source and binary forms, with or without modification, are permitted provided that the following conditions are met:1. Redistributions of source code must retain the above copyright notice, this list of conditions and the following disclaimer.2. Redistributions in binary form must reproduce the above copyright notice, this list of conditions and the following disclaimer in the documentation and/or other materials provided with the distribution.3. All advertising materials mentioning features or use of this software must display the following acknowledgement:This product includes software developed by the University of California, Berkeley and its contributors.4. Neither the name of the University nor the names of its contributors may be used to endorse or promote products derived from this software without specific prior written permission.THIS SOFTWARE IS PROVIDED BY THE REGENTS AND CONTRIBUTORS ``AS IS'' AND ANY EXPRESS OR IMPLIED WARRANTIES, INCLUDING, BUT NOT LIMITED TO, THE IMPLIED WARRANTIES OF MERCHANTABILITY AND FITNESS FOR A PARTICULAR PURPOSE ARE DISCLAIMED. IN NO EVENT SHALL THE REGENTS OR CONTRIBUTORS BE LIABLE FOR ANY DIRECT, INDIRECT, INCIDENTAL, SPECIAL, EXEMPLARY, OR CONSEQUENTIAL DAMAGES (INCLUDING, BUT NOT LIMITED TO, PROCUREMENT OF SUBSTITUTE GOODS OR SERVICES; LOSS OF USE, DATA, OR PROFITS; OR BUSINESS INTERRUPTION) HOWEVER CAUSED AND ON ANY THEORY OF LIABILITY, WHETHER IN CONTRACT, STRICT LIABILITY, OR TORT (INCLUDING NEGLIGENCE OR OTHERWISE) ARISING IN ANY WAY OUT OF THE USE OF THIS SOFTWARE, EVEN IF ADVISED OF THE POSSIBILITY OF SUCH DAMAGE.
Portions Copyright © 1993 by Hewlett-Packard Corporation.Permission to use, copy, modify, and distribute this software for any purpose with or without fee is hereby granted, provided that the above copyright notice and this permission notice appear in all copies, and that the name of Hewlett-Packard Corporation not be used in advertising or publicity pertaining to distribution of the document or software without specific, written prior permission. THE SOFTWARE IS PROVIDED "AS IS" AND HEWLETT-PACKARD CORP. DISCLAIMS ALL WARRANTIES WITH REGARD TO THIS SOFTWARE, INCLUDING ALL IMPLIED WARRANTIES OF MERCHANTABILITY AND FITNESS. IN NO EVENT SHALL HEWLETT-PACKARD CORPORATION BE LIABLE FOR ANY SPECIAL, DIRECT, INDIRECT, OR CONSEQUENTIAL DAMAGES OR ANY DAMAGES WHATSOEVER RESULTING

FROM LOSS OF USE, DATA OR PROFITS, WHETHER IN AN ACTION OF CONTRACT, NEGLIGENCE OR OTHER TORTIOUS ACTION, ARISING OUT OF OR IN CONNECTION WITH THE USE OR PERFORMANCE OF THIS SOFTWARE.
Portions Copyright © 1995 by International Business Machines, Inc.International Business Machines, Inc. (hereinafter called IBM) grants permission under its copyrights to use, copy, modify, and distribute this Software with or without fee, provided that the above copyright notice and all paragraphs of this notice appear in all copies, and that the name of IBM not be used in connection with the marketing of any product incorporating the Software or modifications thereof, without specific, written priorpermission. To the extent it has a right to do so, IBM grants an immunity from suit under its patents, if any, for the use, sale or manufacture of products to the extent that such products are used for performing Domain Name System dynamic updates in TCP/IP networks by means of the Software. No immunity is granted for any product per se or for any other function of any product. THE SOFTWARE IS PROVIDED "AS IS", AND IBM DISCLAIMS ALL WARRANTIES, INCLUDING ALL IMPLIED WARRANTIES OF MERCHANTABILITY AND FITNESS FOR A PARTICULAR PURPOSE. IN NO EVENT SHALL IBM BE LIABLE FOR ANY SPECIAL, DIRECT, INDIRECT, OR CONSEQUENTIAL DAMAGES OR ANY DAMAGES WHATSOEVER ARISING OUT OF OR IN CONNECTION WITH THE USE OR PERFORMANCE OF THIS SOFTWARE, EVEN IF IBM IS APPRISED OF THE POSSIBILITY OF SUCH DAMAGES.
Portions Copyright © 1995, 1996, 1997, 1998, 1999, 2000 by Internet Software Consortium. All Rights Reserved. Permission to use, copy, modify, and distribute this software for any purpose with or without fee is hereby granted, provided that the above copyright notice and this permission notice appear in all copies. THE SOFTWARE IS PROVIDED "AS IS" AND INTERNET SOFTWARE CONSORTIUM DISCLAIMS ALL WARRANTIES WITH REGARD TO THIS SOFTWARE INCLUDING ALL IMPLIED WARRANTIES OF MERCHANTABILITY AND FITNESS. IN NO EVENT SHALL INTERNET SOFTWARE CONSORTIUM BE LIABLE FOR ANY SPECIAL, DIRECT, INDIRECT, OR CONSEQUENTIAL DAMAGES OR ANY DAMAGES WHATSOEVER RESULTING FROM LOSS OF USE, DATA OR PROFITS, WHETHER IN AN ACTION OF CONTRACT, NEGLIGENCE OR OTHER TORTIOUS ACTION, ARISING OUT OF OR IN CONNECTION WITH THE USE OR PERFORMANCE OF THIS SOFTWARE.Copyright (c) 1996-2000 Internet Software Consortium.Use is subject to license terms which appear in the file named ISC-LICENSE that should have accompanied this file when you received it. If a file named ISC-LICENSE did not accompany this file, or you are not sure the one you have is correct, you may obtain an applicable copy of the license at: http://www.isc.org/isc-license-1.0.html. This file is part of the ISC DHCP distribution. The documentation associated with this file is listed in the file DOCUMENTATION, included in the top-level directory of this release. Support and other services are available for ISC products - see http://www.isc.org for more information.ISC LICENSE, Version 1.01. This license covers any file containing a statement following its copyright message indicating that it is covered by this license. It also covers any text or binary file, executable, electronic or printed image that is derived from a file that is covered by this license, or is a modified version of a file covered by this license, whether such works exist now or in the future. Hereafter, such works will be referred to as "works covered by this license," or "covered works."2. Each source file covered by this license contains a sequence of text starting with the copyright message and ending with "Support and other services are available for ISC products - see http://www.isc.org for more information." This will hereafter be referred to as the file's Bootstrap License.3. If you take significant portions of any source file covered by this license and include those portions in some other file, then you must also copy the Bootstrap License into that other file, and that file becomes a covered file. You may make a good-faith judgement as to where in this file the bootstrap license should appear.4. The acronym "ISC", when used in this license or generally in the context of works covered by this license, is an abbreviation for the words "Internet Software Consortium."5. A distribution, as referred to hereafter, is any file, collection of printed text, CD ROM, boxed set, or other collection, physical or electronic, which can be distributed as a single object and which contains one or more works covered by this license.6. You may make distributions containing covered files and provide copies of such distributions to whomever you choose, with or without charge, as long as you obey the other terms of this license. Except as stated in (9), you may include as many or as few covered files as you choose in such distributions.

7. When making copies of covered works to distribute to others, you must not remove or alter the Bootstrap License. You may not place your own copyright message, license, or similar statements in the file prior to the original copyright message or anywhere within the Bootstrap License. Object files and executable files are exempt from the restrictions specified in this clause.8. If the version of a covered source file as you received it, when compiled, would normally produce executable code that would print a copyright message followed by a message referring to an ISC web page or other ISC documentation, you may not modify the the file in such a way that, when compiled, it no longer produces executable code to print such a message.9. Any source file covered by this license will specify within the Bootstrap License the name of the ISC distribution from which it came, as well as a list of associated documentation files. The associated documentation for a binary file is the same as the associated documentation for the source file or files from which it was derived. Associated documentation files contain human-readable documentation which the ISC intends to accompany any distribution.
If you produce a distribution, then for every covered file in that distribution, you must include all of the associated documentation files for that file. You need only include one copy of each such documentation file in such distributions.
Absence of required documentation files from a distribution you receive or absence of the list of documentation files from a source file covered by this license does not excuse you from this from this requirement. If the distribution you receive does not contain these files, you must obtain them from the ISC and include them in any redistribution of any work covered by this license. For information on how to obtain required documentation not included with your distribution, see: http://www.isc.org/getting-documentation.html.
If the list of documentation files was removed from your copy of a covered work, you must obtain such a list from the ISC. The web page at http://www.isc.org/getting-documentation.html contains pointers to lists of files for each ISC distribution covered by this license.
It is permissible in a source or binary distribution containing covered works to include reformatted versions of the documentation files. It is also permissible to add to or modify the documentation files, as long as the formatting is similar in legibility, readability, font, and font size to other documentation in the derived product, as long as any sections labeled CONTRIBUTIONS in these files are unchanged except with respect to formatting, as long as the order in which the CONTRIBUTIONS section appears in these files is not changed, and as long as the manual page which describes how to contribute to the Internet Software Consortium (hereafter referred to as the Contributions Manual Page) is unchanged except with respect to formatting.
Documentation that has been translated into another natural language may be included in place of or in addition to the required documentation, so long as the CONTRIBUTIONS section and the Contributions Manual Page are either left in their original language or translated into the new language with such care and diligence as is required to preserve the original meaning.
10. You must include this license with any distribution that you make, in such a way that it is clearly associated with such covered works as are present in that distribution. In any electronic distribution, the license must be in a file called "ISC-LICENSE".
If you make a distribution that contains works from more than one ISC distribution, you may either include a copy of the ISC-LICENSE file that accompanied each such ISC distribution in such a way that works covered by each license are all clearly grouped with that license, or you may include the single copy of the ISC-LICENSE that has the highest version number of all the ISC-LICENSE files included with such distributions, in which case all covered works will be covered by that single license file. The version number of a license appears at the top of the file containing the text of that license, or if in printed form, at the top of the first page of that license.
11. If the list of associated documentation is in a seperated file, you must include that file with any distribution you make, in such a way that the relationship between that file and the files that refer to it is clear. It is not permissible to merge such files in the event that you make a distribution including files from more than one ISC distribution, unless all the Bootstrap Licenses refer to files for their lists of associated documentation, and those

references all list the same filename.
12. If a distribution that includes covered works includes a mechanism for automatically installing covered works, following that installation process must not cause the person following that process to violate this license, knowingly or unknowingly. In the event that the producer of a distribution containing covered files accidentally or wilfully violates this clause, persons other than the producer of such a distribution shall not be held liable for such violations, but are not otherwise excused from any requirement of this license.
13. COVERED WORKS ARE PROVIDED "AS IS". ISC DISCLAIMS ALL WARRANTIES WITH REGARD TO COVERED WORKS INCLUDING THE IMPLIED WARRANTIES OF MERCHANTABILITY AND FITNESS FOR A PARTICULAR PURPOSE.
14. IN NO EVENT SHALL ISC BE LIABLE FOR ANY SPECIAL, INDIRECT, OR CONSEQUENTIAL DAMAGES OR ANY DAMAGES WHATSOEVER RESULTING FROM LOSS OF USE, DATA OR PROFITS, WHETHER IN AN ACTION OF CONTRACT, NEGLIGENCE OR OTHER TORTIOUS ACTION, ARISING OUT OF OR IN CONNECTION WITH THE USE OF COVERED WORKS.
Use of covered works under different terms is prohibited unless you have first obtained a license from ISC granting use pursuant to different terms. Such terms may be negotiated by contacting ISC as follows:
Internet Software Consortium 950 Charter Street Redwood City, CA 94063 Tel: 1-888-868-1001 (toll free in U.S.) Tel: 1-650-779-7091 Fax: 1-650-779-7055 Email: [email protected] Email: [email protected]
DNSSAFE LICENSE TERMSThis BIND software includes the DNSsafe software from RSA Data Security, Inc., which is copyrighted software that can only be distributed under the terms of this license agreement.
The DNSsafe software cannot be used or distributed separately from the BIND software. You only have the right to use it or distribute it as a bundled, integrated product.
The DNSsafe software can ONLY be used to provide authentication for resource records in the Domain Name System, as specified in RFC 2065 and successors. You cannot modify the BIND software to use theDNSsafe software for other purposes, or to make its cryptographic functions available to end-users for other uses.
If you modify the DNSsafe software itself, you cannot modify its documented API, and you must grant RSA Data Security the right to use, modify, and distribute your modifications, including the right to useany patents or other intellectual property that your modifications depend upon.
You must not remove, alter, or destroy any of RSA's copyright notices or license information. When distributing the software to the Federal Government, it must be licensed to them as "commercial computer software" protected under 48 CFR 12.212 of the FAR, or 48 CFR 227.7202.1 of the DFARS.
You must not violate United States export control laws by distributing the DNSsafe software or information about it, when such distribution is prohibited by law.
THE DNSSAFE SOFTWARE IS PROVIDED "AS IS" WITHOUT ANY WARRANTY WHATSOEVER. RSA HAS NO OBLIGATION TO SUPPORT, CORRECT, UPDATE OR MAINTAIN THE RSA SOFTWARE. RSA DISCLAIMS ALL WARRANTIES, EXPRESS, IMPLIED OR STATUTORY, AS TO ANY MATTER WHATSOEVER, INCLUDING ALL IMPLIED WARRANTIES OF MERCHANTABILITY, FITNESS FOR A

PARTICULAR PURPOSE AND NON-INFRINGEMENT OF THIRD PARTY RIGHTS.If you desire to use DNSsafe in ways that these terms do not permit, please contact: RSA Data Security, Inc. 100 Marine Parkway Redwood City, California 94065, USAto discuss alternate licensing arrangements.
Secure Shell (SSH). Copyright © 2000. This License agreement, including the Exhibits (“Agreement”), effective as of the latter date of execution (“Effective Date”), is hereby made by and between Data Fellows, Inc., a California corporation, having principal offices at 675 N. First Street, 8th floor, San Jose, CA 95112170 (“Data Fellows”) and Process Software, Inc., a Massachusetts corporation, having a place of business at 959 Concord Street, Framingham, MA 01701 (“OEM”).
All other trademarks, service marks, registered trademarks, or registered service marks mentioned in this document are the property of their respective holders.
MultiNet is a registered trademark and Process Software and the Process Software logo are trademarks of Process Software.
Copyright ©1997, 1998, 1999, 2000 Process Software Corporation. All rights reserved. Printed in USA.
Copyright ©2000, 2001, 2004, 2005, 2007, 2008 Process Software, LLC. All rights reserved. Printed in USA.
If the examples of URLs, domain names, internet addresses, and web sites we use in this documentation reflect any that actually exist, it is not intentional and should not to be considered an endorsement, approval, or recommendation of the actual site, or any products or services located at any such site by Process Software. Any resemblance or duplication is strictly coincidental.

Contents
Contents
PrefaceObtaining Customer Support ........................................................................................................ xvBefore Contacting Customer Support........................................................................................... xvSending Electronic Mail .............................................................................................................xviiCalling Customer Support ..........................................................................................................xviiContacting Customer Support by Fax........................................................................................xviiiObtaining Online Help...............................................................................................................xviiiMultiNet Frequently Asked Questions List ...............................................................................xviiiAccessing the MultiNet Public Mailing List .............................................................................xviiiProcess Software World Wide Web Server.................................................................................. xixObtaining Software Patches Over the Internet ............................................................................ xixDocumentation Comments ........................................................................................................... xx
Chapter 1 Exploring Your Network EnvironmentSpecifying Remote Hosts ...............................................................................................................1-1
Displaying Names of Other Users ...............................................................................................1-1Displaying Host Information .......................................................................................................1-2Displaying User Information .......................................................................................................1-2Interacting with Another User .....................................................................................................1-4
Restrictions for Using TALK ...................................................................................................1-5Sending Reminders to Yourself ...................................................................................................1-6
Chapter 2 Sending and Receiving Electronic MailUsing OpenVMS Mail Across the Network ...................................................................................2-1
Specifying Addresses ...............................................................................................................2-1
ix
Contents
Specifying a Host Alias ........................................................................................................... 2-3Specifying Individual Aliases .................................................................................................. 2-3
Using Mail Under ALL-IN-1 ...................................................................................................... 2-4
Chapter 3 Using Kerberos AuthenticationUnderstanding Kerberos................................................................................................................. 3-1
Making Sure Kerberos is Available............................................................................................. 3-2Acquiring and Deleting Tickets................................................................................................... 3-2
Obtaining Tickets Under Another User Name ........................................................................ 3-3Using Kerberos with the RCP, RLOGIN, RSHELL, and TELNET Commands ........................ 3-3Checking Ticket Status ................................................................................................................ 3-3Changing Your Kerberos Password............................................................................................. 3-4
Chapter 4 Accessing Remote Systems with the RSHELL,RLOGIN, and TELNET Utilities
Executing Commands on a Remote System Using RSHELL........................................................ 4-1Using RSHELL ........................................................................................................................ 4-1Interrupting and Terminating RSHELL .................................................................................. 4-2
Logging Into a Remote System with RLOGIN........................................................................... 4-2Using RLOGIN ........................................................................................................................ 4-2Terminating an RLOGIN Session ........................................................................................... 4-3"R" Services Authentication .................................................................................................... 4-3Host Equivalences ................................................................................................................... 4-3User Equivalences ................................................................................................................... 4-4Cautions Concerning Use of Equivalences ............................................................................. 4-4
Logging Into a Remote System with TELNET........................................................................... 4-5Starting a TELNET Connection .............................................................................................. 4-5Using TELNET Commands .................................................................................................... 4-5Using TELNET Control Sequences ........................................................................................ 4-7Running Applications over TELNET Connections ................................................................. 4-8Accessing IBM Hosts with the TELNET Command .............................................................. 4-9Starting TELNET with an IBM Terminal Emulator ............................................................... 4-9Stopping an IBM Emulator Session ...................................................................................... 4-10IBM 3278 Models .................................................................................................................. 4-10Mapping Your Keyboard ....................................................................................................... 4-10Displaying the Current Keyboard Mapping .......................................................................... 4-11Keyboard Mapping File Format ............................................................................................ 4-13Functions ............................................................................................................................... 4-13Specifying Multiple Keystrokes ............................................................................................ 4-13TN3270 Function Key Mapping ............................................................................................ 4-14TN5250 Function Key Mapping ............................................................................................ 4-16Editing the Keyboard Mapping File ...................................................................................... 4-18
x

Contents
Capturing Screen Output and Printing Screen Captures ........................................................4-18Using Transparent Mode ........................................................................................................4-18Application Keypad Access for TN3270 and TN5250 ..........................................................4-19TN3270 Emulation .................................................................................................................4-19TN3270 Translation Table Mapping .....................................................................................4-19Kerberos V5 Authentication and Encryption .........................................................................4-21Troubleshooting TELNET .....................................................................................................4-21Connection Problems .............................................................................................................4-21Problems Logging In ..............................................................................................................4-21
Chapter 5 Remote File Access with the RCP, FTP, and TFTP UtilitiesCopying Files Using RCP...............................................................................................................5-1
Requirements for RCP .................................................................................................................5-1Using RCP ...................................................................................................................................5-2Inhibiting Output from SYLOGIN.COM and LOGIN.COM......................................................5-3Accessing Files with FTP ............................................................................................................5-3
Requirements for Using FTP ...................................................................................................5-3Invoking FTP and Logging In ..................................................................................................5-3Using FTP Commands .............................................................................................................5-5Getting FTP Command Help ...................................................................................................5-5Using Basic FTP Commands ...................................................................................................5-6Specifying TCP Window Size with FTP .................................................................................5-6File Name Translations ............................................................................................................5-7Listing the Contents of a File .................................................................................................5-10Working with Directories ......................................................................................................5-10Commands for Copying Files ................................................................................................5-10Parameters for Copying Files .................................................................................................5-11FTP VMS Structure ...............................................................................................................5-11FTP Commands While a Transfer is in Progress ...................................................................5-12Issuing FTP Commands From the DCL Command Line ......................................................5-12FTP Command Scripts ...........................................................................................................5-13Ending an FTP Session ..........................................................................................................5-13Using FTP over TLS (FTPS) .................................................................................................5-14FTP Log Files ........................................................................................................................5-14Anonymous FTP ....................................................................................................................5-16Transferring Files From Behind a Firewall ...........................................................................5-16FTP Initialization File ............................................................................................................5-17Troubleshooting FTP .............................................................................................................5-17General Troubleshooting Tips ...............................................................................................5-17Transmitted Files Are Corrupt ...............................................................................................5-18
Copying Files Using TFTP ........................................................................................................5-18Requirements for TFTP .........................................................................................................5-18Using TFTP ............................................................................................................................5-18
xi

Contents
Chapter 6 Using DECwindows with MultiNetRunning DECwindows Applications ............................................................................................. 6-1Authorizing Remote Systems......................................................................................................... 6-2
Chapter 7 Accessing Remote Systems with the Secure Shell (SSH) UtilitiesSSH Protocol Support .................................................................................................................... 7-1SSH Client Return Status Codes .................................................................................................... 7-2Secure Shell Client (remote login program)................................................................................... 7-2Initial Server System Authentication ............................................................................................. 7-4
Hostbased Authentication ........................................................................................................ 7-4Publickey Authentication ........................................................................................................ 7-5Password Authentication ......................................................................................................... 7-6Using Publickey Authentication with SSH ............................................................................. 7-6
Break-in and Intrusion Detection ................................................................................................ 7-7Session Termination .................................................................................................................... 7-7X11 Forwarding........................................................................................................................... 7-7
Configuring the SSH Client ........................................................................................................... 7-8Authorization File Options ........................................................................................................ 7-13
Options that can be specified: ................................................................................................ 7-14SSH Client/Server Authentication Configuration Examples ....................................................... 7-15
Hostbased Authentication Example ....................................................................................... 7-15Publickey Authentication Example ........................................................................................... 7-16
SSH1 Example ....................................................................................................................... 7-17SSH2 User Authentication Using Certificates: ..................................................................... 7-19SSH2 Hostkey Authentication Using Certificates ................................................................. 7-20 For testing purposes, you can use HostCANoCRLs instead of HostCA to disable CRL checking. 7-20
Host Key Verification Using DNS ............................................................................................... 7-21Port Forwarding............................................................................................................................ 7-21
Other Files ................................................................................................................................. 7-24SSHKEYGEN .............................................................................................................................. 7-28SSHAGENT (authentication agent) ............................................................................................. 7-31
DESCRIPTION ......................................................................................................................... 7-31FILES ..................................................................................................................................... 7-32
SSHADD...................................................................................................................................... 7-32DESCRIPTION ......................................................................................................................... 7-32
OPTIONS .............................................................................................................................. 7-32FILES ..................................................................................................................................... 7-33
CERTTOOL ................................................................................................................................. 7-33Description ................................................................................................................................ 7-34
xii

Contents
Valid Options .............................................................................................................................7-34Example: ....................................................................................................................................7-36
CERTVIEW..................................................................................................................................7-36Description.................................................................................................................................7-36Valid Options .............................................................................................................................7-36Example: ....................................................................................................................................7-37
CMPCLIENT................................................................................................................................7-37Description.................................................................................................................................7-37Command Parameters ................................................................................................................7-37Valid Options .............................................................................................................................7-37Examples:...................................................................................................................................7-39
Public-key Subsystem...................................................................................................................7-39Publickey Assistant Commands ...................................................................................................7-39
Publickey Assistant Qualifiers...................................................................................................7-40Other Implementations ...........................................................................................................7-40
Chapter 8 Secure File TransferSCP-SERVER1...............................................................................................................................8-2SCP2 ...............................................................................................................................................8-2
Usage ........................................................................................................................................8-2Qualifiers ..................................................................................................................................8-3
File Specifications ..........................................................................................................................8-4Logicals...........................................................................................................................................8-8SFTP2 ...........................................................................................................................................8-11
File Specifications......................................................................................................................8-11SFTP2 Command Syntax and Qualifiers...................................................................................8-11
Usage ......................................................................................................................................8-11Qualifiers ................................................................................................................................8-11
Configuration File Parameters ......................................................................................................8-20FTP over SSH ...............................................................................................................................8-21
Appendix A DCL User CommandsCommand Summary ......................................................................................................................A-1
Appendix B FTP Command ReferenceCommand Summary ...................................................................................................................... B-1
xiii

Appendix C TELNET Command ReferenceCommand Summary.......................................................................................................................C-1
Appendix D TFTP Command ReferenceCommand Summary...................................................................................................................... D-1
Index
Reader’s Comments

PrefaceThis document contains information you might find helpful when using MultiNet for OpenVMS.
• Chapter 1, Exploring Your Network Environment, understanding your network environment.• Chapter 2, Sending and Receiving Electronic Mail, sending and receiving e-mail.• Chapter 3, Using Kerberos Authentication, acquiring and releasing Kerberos authentication
tickets for use with the RCP, RLOGIN, RSHELL, and TELNET commands.• Chapter 4, Accessing Remote Systems with the RSHELL, RLOGIN, and TELNET Utilities,
logging into a remote system.• Chapter 5, Remote File Access with the RCP, FTP, and TFTP Utilities, transferring files to or
from a remote system.• Chapter 6, Using DECwindows with MultiNet, using DECwindows with MultiNet.• Chapter 7, Accessing Remote Systems with the Secure Shell (SSH) Utilities.• Chapter 8, Secure File Transfer.
This Preface also contains more information in the next sections about getting help directly from Process Software Customer Support.
Obtaining Customer SupportProcess Software provides customer support if you have a current Maintenance Service Agreement. If you obtained MultiNet from an authorized distributor or partner, you receive your customer support directly from them.
You can contact Customer Support by:
• Sending electronic mail (see the section Sending Electronic Mail).• Calling the Customer Support Specialist (see the section Calling Customer Support).• Fax a description of your problem to the Customer Support Group (see the section Contacting
Customer Support by Fax).
Before Contacting Customer SupportBefore you call, or send e-mail or a fax, please:
xv
Preface
1 Verify that your Maintenance Service Agreement is current.2 Read the online Release Notes, available either in BookReader format or in
SYS$HELP:MULTINETnnn. RELEASE_NOTES (nnn) is the current MultiNet software version installed on your system.
3 Have the following information available:
• Your name• Your company name• Your e-mail address• Your voice and fax telephone numbers• Your Maintenance Agreement Number• OpenVMS architecture• OpenVMS version• MultiNet layered products and versions
4 Have complete information about your configuration, error messages that appeared, and problem specifics.
5 Be prepared to let an engineer connect to your system either with TELNET or by dialing in using a modem. Be prepared to give the engineer access to a privileged account to diagnose your problem.
You can obtain information about your OpenVMS architecture, OpenVMS version, MultiNet version, and layered products with the MULTINET SHOW /LICENSE command. For example:
$ MULTINET SHOW /LICENSE
Process Software MultiNet V5.4, VAXstation 4000-90, OpenVMS VAX V7.1
In this example:
• The machine or system architecture is VAX.• The OpenVMS version is V7.1.• The MultiNet version is V5.4.
xvi

Preface
You can use the following table as a template to record the relevant information about your system.
Sending Electronic MailFor many questions, electronic mail is the preferred communication method. Customer support via electronic mail is available to customers with a current support contract. Send electronic mail to [email protected]
At the beginning of your mail message, include the information listed in the section Before Contacting Customer Support. Continue with the description of your situation and problem specifics. Include all relevant information to help your Customer Support Specialist process and track your electronic support request.
Electronic mail is answered Monday through Thursday from 8:30 a.m. to 7:00 p.m., and on Friday from 8:30 a.m. to 5:00 p.m. United States Eastern Time.
Calling Customer SupportFor regular support issues, call 800-394-8700 or 508-628-5074 for support Monday through Thursday from 8:30 a.m. to 7:00 p.m., and on Friday from 8:30 a.m. to 5:00 p.m. United States Eastern Time.
For our customers in North America with critical problems, an option for support 7 days per week, 24 hours per day is available at an additional charge. Please contact your account representative for further details.
Before calling, have available the information described in Before Contacting Customer Support. When you call, you will be connected to a Customer Support Specialist.
Be prepared to discuss problem specifics with your Customer Support Specialist and to let that person connect to your system.
If a Specialist is not available immediately, your call will be returned as soon as possible.
Required Information Your System Information
Your nameCompany nameYour e-mail addressYour voice and fax telephone numbersSystem architectureOpenVMS versionMultiNet versionMultiNet optional software components:- MultiNet NFS Client- MultiNet NFS Server- TCP/IP applications- Online documentation- MultiNet Programmer's Kit
VAX | Alpha
Installed? Yes | NoInstalled? Yes | NoInstalled? Yes | NoInstalled? Yes | NoInstalled? Yes | No
xvii

Preface
Contacting Customer Support by FaxYou can send fax transmissions directly to Customer Support at 508-879-0042.
Before faxing comments or questions, complete the steps in Before Contacting Customer Support and include all your system information at the beginning of your fax message. Continue with the description of your situation and problem specifics. Include all relevant information to help your Customer Support Specialist process and track your fax support request.
Faxed questions are answered Monday through Thursday from 8:30 a.m. to 7:00 p.m., and on Friday from 8:30 a.m. to 5:00 p.m. United States Eastern Time.
Obtaining Online HelpExtensive information about MultiNet is provided in the MultiNet help library. For more information, use the following command:
$ HELP MULTINET
MultiNet Frequently Asked Questions ListYou can obtain an updated list of frequently asked questions (FAQs) and answers about MultiNet products from the Process Software home page located at http://www.process.com/techsupport/multinet.html.
Accessing the MultiNet Public Mailing ListProcess Software maintains two public mailing lists for MultiNet customers:
• [email protected]• [email protected]
The [email protected] mailing list is a forum for discussion among MultiNet system managers and programmers. Questions and problems regarding MultiNet can be posted for a response by any of the subscribers. To subscribe to Info-MultiNet, send a mail message with the word “SUBSCRIBE” in the body to [email protected]. The information exchanged over Info-MultiNet is also available via the USENET newsgroup vmsnet.networks.tcp-ip.multinet.
You can retrieve the Info-MultiNet archives by anonymous FTP to ftp.multinet.process.com. The archives are located in the directory [INFO-MULTINET].
You can also find the Info-MultiNet archives on the MultiNet consolidated CD-ROM in the [CONTRIBUTED-SOFTWARE.LIST-ARCHIVES.INFO-MULTINET] directory.
The [email protected] mailing list is a one-way communication (from Process Software to you) used for the posting of announcements relating to MultiNet (patch releases, product releases, etc.). To subscribe to MultiNet-Announce, send a mail message with the word “SUBSCRIBE” in the body to [email protected].
xviii

Preface
Process Software World Wide Web ServerElectronic support is provided through the Process Software World Wide Web server, which you can access with any World Wide Web browser; the URL is http://www.process.com (select Customer Support).
Obtaining Software Patches Over the InternetProcess Software provides software patches in save set and ZIP format on its anonymous FTP server, ftp.multinet.process.com. For the location of software patches, read the .WELCOME file in the top-level anonymous directory. This file refers you to the directories containing software patches.
To retrieve a software patch, enter the following commands:
$ MULTINET FTP /USERNAME=ANONYMOUS/PASSWORD="emailaddress" FTP.MULTINET.PROCESS.COM
A message welcoming you to the Process Software FTP directory appears next followed by the FTP prompt. Enter the following at the prompts:
FTP>CD [PATCHES.MULTINETnnn]FTP>GET update_filename
• emailaddress is your e-mail address in the standard user@host format.• nnn is the version of MultiNet you want to transfer.• update_filename is the name of the file you want to transfer.
To transfer files from Process Software directly to an OpenVMS system, you can use the GET command without any other FTP commands. However, if you need to transfer a software patch through an intermediate non-OpenVMS system, use BINARY mode to transfer the files to and from that system.
In addition, if you are fetching the software patch in save set format, make sure the save set record size is 2048 bytes when you transfer the file from the intermediate system to your OpenVMS system:
• If you use the GET command to download the file from the intermediate system, use the FTP RECORD-SIZE 2048 command before transferring the file.
• If you use the PUT command to upload the file to your OpenVMS system, log into the intermediate system and use the FTP quote site rms recsize 2048 command before transferring the file.
Process Software also supplies UNZIP utilities for OpenVMS VAX and Alpha for decompressing ZIP archives in the [THIRD_PARTY_TOOLS.VMS] directory. To use ZIP format kits, you need a copy of the UNZIP utility.
The following example shows how to use the UNZIP utility, assuming you have copied the appropriate version of UNZIP.EXE to your current default directory.
$ UNZIP := $SYS$DISK:[]UNZIP.EXE
xix
Preface
$ UNZIP filename.ZIP
Use VMSINSTAL to upgrade your MultiNet system with the software patch.
Documentation CommentsYour comments about the information in this guide can help us improve the documentation. If you have corrections or suggestions for improvement, please let us know.
Be as specific as possible about your comments: include the exact title of the document, version, date, and page references as appropriate.
You can send your comments by e-mail to: [email protected] or mail the completed form to:
Process Software959 Concord StreetFramingham, MA 01701-4682Attention: Marketing Manager
You can also fax the form to us at 508-879-0042.
Your comments about our documentation are appreciated.
xx

Chapter 1
Exploring Your Network EnvironmentThis chapter helps you start exploring your network environment and covers the following topics:
Specifying Remote HostsMost MultiNet applications allow you to specify a remote host by either name or Internet address. To access a host by name, the remote host must either be listed in the local system's host database or registered with a DNS (Domain Name System) server accessible from the local system. If you have difficulty accessing a remote host by its host name, contact your system manager or network administrator.
Displaying Names of Other UsersYou can display a list of users on your system or on a remote system with the RUSERS command. For example:
$ MULTINET RUSERSSURETE RICK PATRICKMIFIVE MATT MATT MATT MATTKGB KEN KEN GIGI KEN JOEL JOEL JOEL JOELSCIENCE RICK RICK RICK RICKWHO PATRICK PATRICK PATRICK PATRICK PATRICK PATRICK ROB ROBDESIGN BRUCE BRUCE BRUCE BRUCE BRUCE
Specifying Remote Hosts
Displaying Names of Other Users Sending Reminders to Yourself
Displaying Host Information Appendix A
Displaying User Information
Contacting other users over the network (using TALK)
Restrictions for Using TALK
1-1

Exploring Your Network Environment
CHAZ GEORGE GEORGE GEORGE RICK RICK RICK GEORGE GEORGE GEORGE
The RUSERS utility uses the RUSERS Remote Procedure Call (RPC) service to display information about users logged into the local system or a remote system. It can display information about a particular system, or, if supported by the network hardware, use broadcasts to display information about all remote systems on directly connected networks. RUSERS uses UDP/IP (User Datagram Protocol/Internet Protocol) as the transport mechanism for the RPC services it calls. When using RUSERS, the command can appear to hang, but is in fact waiting for a timeout period to ensure that the last packet is received.
Note! If the system you are querying does not support the RUSERS RPC service, you will not receive any response (the RPC call times out silently).
Displaying Host InformationUse the WHOIS command to display information about a user, host, or domain accessed from the Internet's repository of information. The WHOIS command sends your request across the Internet to the NIC (at the RS.INTERNIC.NET host) and displays the information returned.
For example:
$ WHOIS ULANOVUlanov, V.I. [email protected], Incorporated100 Nevsky StreetAnytown, CA 95060(408) 555-1212Record last updated on 31-March-03.
The InterNIC Registration Services Host contains only Internet information (Networks, ASN's, Domains, and POC's).$
Because RS.INTERNIC.NET is heavily used, you may receive a message stating that "the network is busy, try later." As an alternative, you can ask your system manager about possibly selecting another WHOIS server.
Displaying User InformationYou can display information about a domain, host, IP address, or single user. The FINGER utility accesses information on your local system or on a remote system.
You can display information about your host, as shown in the following example:
$ MULTINET FINGER/NOCLUSTERMonday, March 15, 2004 7:59PM-EST Up 1 10:33:01nn+0 Jobs on CHUCKO Load ave 0.02 0.01 0.02
User Personal Name Job Subsys Terminal Console LocationBROWN John Brown 40A0022C MM 6.FTA13
1-2
Exploring Your Network Environment
40A0022D EMACS 1:20.FTA14 40A0022E *DCL* 22.FTA15 40A0025F *DCL* 3:46.FTA23 40A00260 *DCL* 3:33.FTA24 40A00261 FINGER .FTA25SYSTEM System Manager 23000120 *DCL* BIRD$RTA1 KARLA::PIPER 23000121 *DCL* BIRD$RTA2 KARLA::PIPER
If you want to display FINGER information about every node in a VMScluster, omit the /NOCLUSTER qualifier. To display information about another host, add its name to the end of the command:
$ MULTINET FINGERMonday, March 15, 2004 7:59PM-EST Up 1 10:33:01nn+0 Jobs on CHUCKO Load ave 0.02 0.01 0.02
User Personal Name Job Subsys Terminal Console LocationBROWN John Brown 40A0022C MM 6.FTA13 40A0022D EMACS 1:20.FTA14 40A0022E *DCL* 22.FTA15 40A0025F *DCL* 3:46.FTA23 40A00260 *DCL* 3:33.FTA24 40A00261 FINGER .FTA25SYSTEM System Manager 23000120 *DCL* BIRD$RTA1 KARLA::PIPER 23000121 *DCL* BIRD$RTA2 KARLA::PIPERRICH I. M. Rich 23200227 *DCL* CODEZ$NTY1 Rich.ABC.COMPOOR U. R. Poor 2280027B *DCL* 4$FTA4JONES Mary Jones 21C00C04 EMACS SYS1$NTY5 BigBird.ABC.COM
You can only display information about another system if a FINGER server is running there and if the system permits it (some do not). The information you receive can vary depending on the FINGER server in use.
To display information about users at a specific IP address, use this command format:
$ MULTINET FINGER @192.192.192.1Monday, March 15, 2004 7:59PM-EST Up 1 10:33:01nn+0 Jobs on CHUCKO Load ave 0.02 0.01 0.02User Personal Name Job Subsys Terminal Console LocationBROWN John Brown 40A0022C MM 6.FTA13 40A0022D EMACS 1:20.FTA14 40A0022E *DCL* 22.FTA15 40A0025F *DCL* 3:46.FTA23 40A00260 *DCL* 3:33.FTA24 40A00261 FINGER .FTA25SYSTEM System Manager 23000120 *DCL* BIRD$RTA1 KARLA::PIPER 23000121 *DCL* BIRD$RTA2 KARLA::PIPER
1-3

Exploring Your Network Environment
The load average information displayed at the beginning of the FINGER output is the average number of processes waiting for the CPU for the last one, two, and five minutes. For more information, ask your system manager.
To display information about a single user, use this command format:
$ MULTINET FINGER BROWNBROWN John 40A0022C MM 11.FTA13 40A0022D EMACS .FTA14 40A0022E *DCL* 27.FTA15 40A0025F FINGER .FTA23 40A00260 *DCL* 3:39.FTA24 40A00261 *DCL* 2.FTA25Mail from [email protected] (Rufus T. Firefly) at Mon 15-Mar-2004 7:53 PM-EST Last read on Mon 15-Mar-2004 7:59 PM-ESTPlan: At the beach today. The higher, the fewer!-- Alexander in the colony of free spirits (ST-TNG)
If you want specific information to be available when someone seeks information about you with FINGER, create a PLAN.TXT text file in your login directory. If you want to have a plan file on a UNIX system, create a .plan file in your login directory.
The information in this file is available even when you are not logged in. When you create this file, ensure the file has world read access (W:R) and your login directory has world execute permissions (W:E). You can insert any text (except control characters which are filtered out), and the file can be any length you want.
• If you FINGER a single user on a VMS system running MultiNet, the utility looks for a file named PLAN.TXT in that user's login directory. If that file does not exist, it looks for a file named .PLAN.
• If you FINGER a single user on a UNIX system, FINGER looks for a file named .plan.
Interacting with Another UserYou can communicate with another user over the network using the TALK utility. TALK is similar to the OpenVMS PHONE utility except TALK can work with some non-OpenVMS operating systems.
TALK divides the screen into two sections; it displays text you enter in one section, and text entered by the other user in the other. You can then converse with each other until one of you presses Ctrl/C to end the session.
Use the following keystrokes during a TALK session:
Press.. To... Press... To...
Delete Delete the last character typed Ctrl/L Redraw the screen
Ctrl/C Exit and return to DCL command mode Ctrl/W Delete the last word typed
1-4

Exploring Your Network Environment
Restrictions for Using TALKSome restrictions apply when using TALK:
• You and the person with whom you wish to TALK need to be on systems with the same byte-ordering scheme (either "Big Endian" or "Little Endian").For example, if the other person is using a Sun workstation or a terminal connected to one, they cannot use the TALK command. Sun users need to use the NTALK command. NTALK is provided on the MultiNet software distribution CD-ROM in the [CONTRIBUTED- SOFTWARE.APPLICATIONS.NTALK] directory, or elsewhere as public domain software. Your system manager can provide more information.
• Both of your terminals must be able to accept broadcasts. Use these commands to enable broadcasts but suppress mail broadcasts:
$ SET TERMINAL /BROADCAST$ SET BROADCAST=NOMAIL
• Your terminal type must be listed in the OpenVMS TERMTABLE.TXT database. As shipped with OpenVMS, this database includes all HP VT-series terminals. If you have a non-HP terminal, check with your system manager.
• The other person's system must be known to your system. TALK must be able to translate the remote system's IP address into its name. Your system must be using the Domain Name System (DNS) or have the remote system recorded in its host tables.
When a user uses TALK to call you, a message of the following form appears on your terminal:
Message from [email protected] at 1:53PM-PDTConnection request by username[Respond with: TALK username@hostname]Type a TALK command to start the conversation:$ TALK username@hostname
Once communication is established, you and the other user can type simultaneously, with your output appearing in separate windows.
If you try to TALK with a user who has disabled reception of broadcast messages, this message appears:
[Your party is refusing messages]
The TALK Server uses the PHONE operator class.
Note! To prevent users from attempting to TALK with you, use the SET BROADCAST=NOPHONE command.
1-5
Exploring Your Network Environment
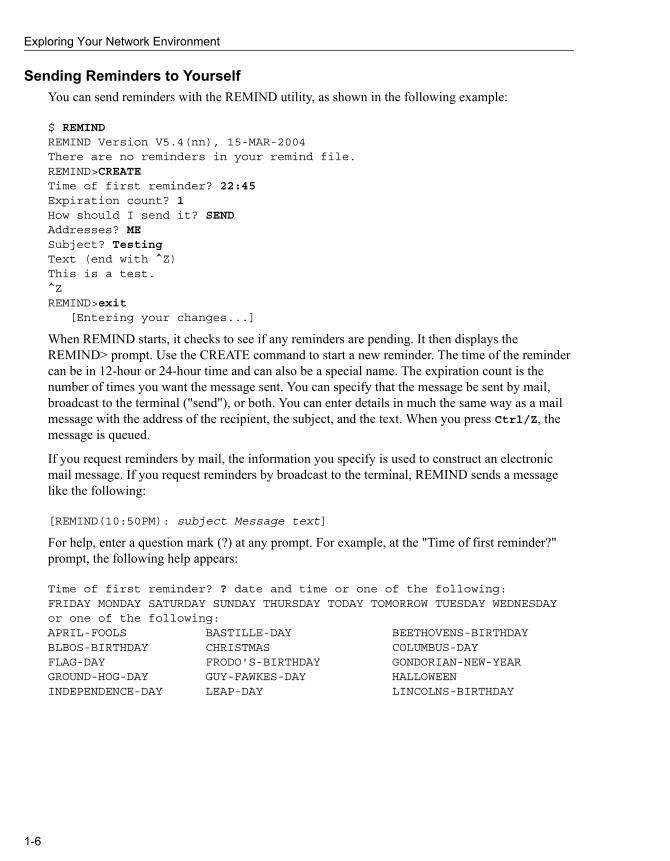
Sending Reminders to YourselfYou can send reminders with the REMIND utility, as shown in the following example:
$ REMINDREMIND Version V5.4(nn), 15-MAR-2004There are no reminders in your remind file.REMIND>CREATETime of first reminder? 22:45Expiration count? 1How should I send it? SENDAddresses? MESubject? TestingText (end with ^Z)This is a test.^ZREMIND>exit [Entering your changes...]
When REMIND starts, it checks to see if any reminders are pending. It then displays the REMIND> prompt. Use the CREATE command to start a new reminder. The time of the reminder can be in 12-hour or 24-hour time and can also be a special name. The expiration count is the number of times you want the message sent. You can specify that the message be sent by mail, broadcast to the terminal ("send"), or both. You can enter details in much the same way as a mail message with the address of the recipient, the subject, and the text. When you press Ctrl/Z, the message is queued.
If you request reminders by mail, the information you specify is used to construct an electronic mail message. If you request reminders by broadcast to the terminal, REMIND sends a message like the following:
[REMIND(10:50PM): subject Message text]
For help, enter a question mark (?) at any prompt. For example, at the "Time of first reminder?" prompt, the following help appears:
Time of first reminder? ? date and time or one of the following:FRIDAY MONDAY SATURDAY SUNDAY THURSDAY TODAY TOMORROW TUESDAY WEDNESDAY or one of the following:APRIL-FOOLS BASTILLE-DAY BEETHOVENS-BIRTHDAYBLBOS-BIRTHDAY CHRISTMAS COLUMBUS-DAYFLAG-DAY FRODO'S-BIRTHDAY GONDORIAN-NEW-YEARGROUND-HOG-DAY GUY-FAWKES-DAY HALLOWEENINDEPENDENCE-DAY LEAP-DAY LINCOLNS-BIRTHDAY
1-6

Chapter 2
Sending and Receiving Electronic MailThis chapter describes how to use OpenVMS MAIL and ALL-IN-1 Mail with MultiNet and covers the following major topics:
Using OpenVMS Mail Across the NetworkMultiNet enhances OpenVMS Mail so you can send and receive mail across the network.
Specifying AddressesWhen you use OpenVMS Mail to send mail to a host outside your VMScluster, the message is sent via SMTP (Simple Mail Transfer Protocol). For this reason, you must specify the address so that SMTP accepts the mail correctly. The format for the address is:
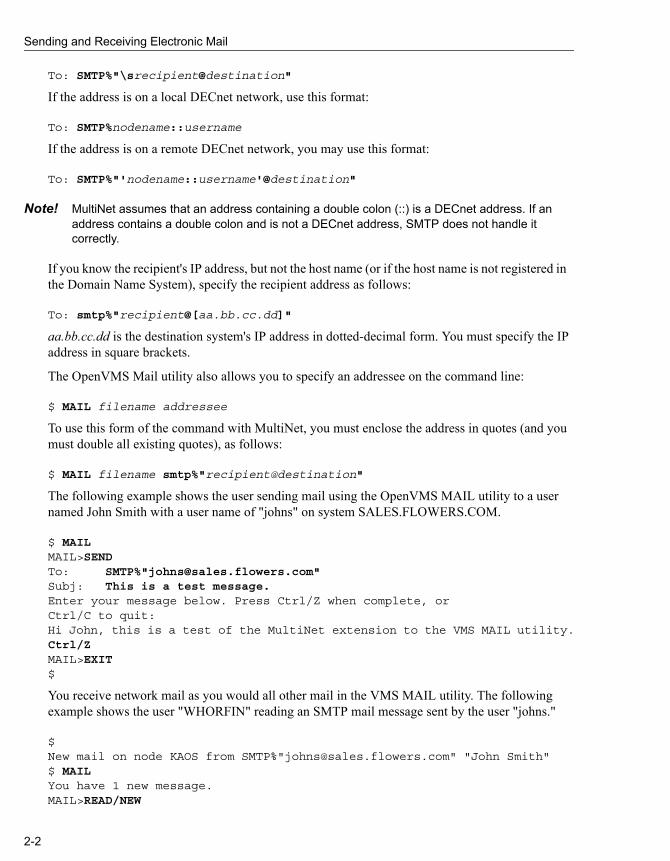
To: SMTP%"recipient@destination"
The string SMTP and the destination system name are not case-sensitive; that is, you can type them in either uppercase or lowercase letters. The destination recipient specification may be case- sensitive, however, depending on the destination system's software. On some UNIX systems, ROOT and root specify two different user names (and hence different electronic mail addresses).
If the address contains an apostrophe, enter the address with either \' or \s as shown in the following example formats:
To: SMTP%"Thomas.O\'[email protected]"To: SMTP%"Thomas.O\[email protected]"
For the address <Thomas.O'[email protected]>.
To: SMTP%"\'recipient@destination"
or
Using OpenVMS Mail Across the Network Using Mail Under ALL-IN-1
2-1
Sending and Receiving Electronic Mail
To: SMTP%"\srecipient@destination"
If the address is on a local DECnet network, use this format:
To: SMTP%nodename::username
If the address is on a remote DECnet network, you may use this format:
To: SMTP%"'nodename::username'@destination"
Note! MultiNet assumes that an address containing a double colon (::) is a DECnet address. If an address contains a double colon and is not a DECnet address, SMTP does not handle it correctly.
If you know the recipient's IP address, but not the host name (or if the host name is not registered in the Domain Name System), specify the recipient address as follows:
To: smtp%"recipient@[aa.bb.cc.dd]"
aa.bb.cc.dd is the destination system's IP address in dotted-decimal form. You must specify the IP address in square brackets.
The OpenVMS Mail utility also allows you to specify an addressee on the command line:
$ MAIL filename addressee
To use this form of the command with MultiNet, you must enclose the address in quotes (and you must double all existing quotes), as follows:
$ MAIL filename smtp%"recipient@destination"
The following example shows the user sending mail using the OpenVMS MAIL utility to a user named John Smith with a user name of "johns" on system SALES.FLOWERS.COM.
$ MAILMAIL>SENDTo: SMTP%"[email protected]"Subj: This is a test message.Enter your message below. Press Ctrl/Z when complete, orCtrl/C to quit:Hi John, this is a test of the MultiNet extension to the VMS MAIL utility.Ctrl/ZMAIL>EXIT$
You receive network mail as you would all other mail in the VMS MAIL utility. The following example shows the user "WHORFIN" reading an SMTP mail message sent by the user "johns."
$New mail on node KAOS from SMTP%"[email protected]" "John Smith"$ MAILYou have 1 new message.MAIL>READ/NEW
2-2

Sending and Receiving Electronic Mail
#1 03-15-2004 10:05:40.79From: SMTP%"[email protected]" "John Smith"To: WHORFINCC:Subj: Re: This is a test message.Date: Mon, 15 Mar 2004 10:04:50 ESTFrom: [email protected] (John Smith)Message-Id: <[email protected]>Subject: Re: This is a test message.To: [email protected]: SMTP%"[email protected]"Glad to see your test worked.This is my response.MAIL>EXIT
Specifying a Host AliasMultiNet allows a system to have multiple names-or host aliases-with respect to electronic mail delivery. You can specify the host alias you want to use by defining the MULTINET_SMTP_FROM_HOST logical name. The alias you choose must be one of the SMTP host name aliases registered on the system (see the translation of the logical name MULTINET_SMTP_HOST_NAME and the contents of the file MULTINET_HOST_ALIAS_FILE). If the alias you use is unknown, the setting of MULTINET_SMTP_FROM_HOST is ignored.
The host alias feature allows users from different administrative units within an organization to have their return address reflect the name of their unit, even though mail for all units is handled by one system.
Note! You can control the envelope by using the MULTINET_SMTP_ENVELOPE_FROM_HOST logical. In MultiNet v4.4 or higher this can be configured via MULTINET CONFIGURE/MAIL.
Specifying Individual AliasesMultiNet supports both system-wide and per-user mail aliases. Using these aliases, you can refer to electronic mail addresses with names that are meaningful to you. Per-user mail aliases are kept in the file SMTP_ALIASES. in your login directory.
The format for alias entries is:
alias: real_address[,...];
alias is an alphanumeric string and real_address is an electronic mail address. You can specify multiple addresses by separating them with commas (,). The alias definition may span multiple lines, if needed, and must always be terminated with a semicolon (;).
For example, a local user may have a user name of JB134A, but you want to send mail to him as john. Add the following line to your SMTP_ALIASES. file:
john: jb134A;
2-3
Sending and Receiving Electronic Mail
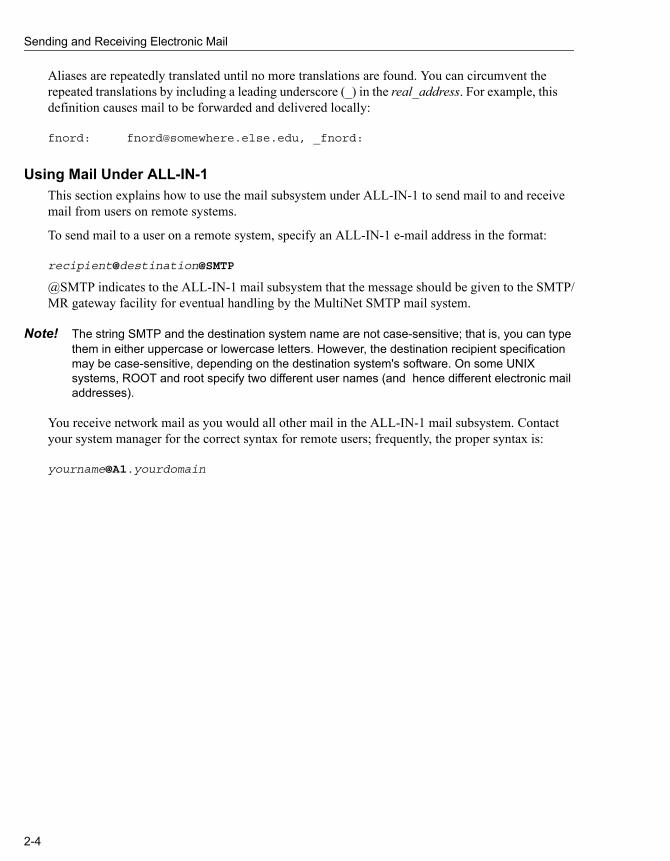
Aliases are repeatedly translated until no more translations are found. You can circumvent the repeated translations by including a leading underscore (_) in the real_address. For example, this definition causes mail to be forwarded and delivered locally:
fnord: [email protected], _fnord:
Using Mail Under ALL-IN-1This section explains how to use the mail subsystem under ALL-IN-1 to send mail to and receive mail from users on remote systems.
To send mail to a user on a remote system, specify an ALL-IN-1 e-mail address in the format:
recipient@destination@SMTP
@SMTP indicates to the ALL-IN-1 mail subsystem that the message should be given to the SMTP/MR gateway facility for eventual handling by the MultiNet SMTP mail system.
Note! The string SMTP and the destination system name are not case-sensitive; that is, you can type them in either uppercase or lowercase letters. However, the destination recipient specification may be case-sensitive, depending on the destination system's software. On some UNIX systems, ROOT and root specify two different user names (and hence different electronic mail addresses).
You receive network mail as you would all other mail in the ALL-IN-1 mail subsystem. Contact your system manager for the correct syntax for remote users; frequently, the proper syntax is:
2-4

Chapter 3
Using Kerberos AuthenticationThis chapter explains how to use the Kerberos authentication system, and covers the following topics:
Understanding KerberosKerberos provides a secure way of proving a user's identity across an unsecure network. It does this without transmitting passwords where an intruder could see them. MultiNet has several enhanced or Kerberized commands including RCP, RLOGIN, RSHELL, and TELNET.
The process of proving one's identity is called authentication. Deciding whether or not to allow access to a resource is called authorization. Kerberos is an authentication system. Because authentication is a prerequisite to authorization, an application can make an authorization decision (for example, deciding to permit you to log in) based on your identity as authenticated by Kerberos.
Kerberos maintains a list of users and their encrypted passwords. Before you can use Kerberized commands, your system manager must have added your name to this list. You can only use Kerberized commands if you have a ticket for the command you wish to use. Analogous to the tickets you purchase when you go to a movie, Kerberos tickets permit you to invoke Kerberized utilities while you are logged in.
To use Kerberos, you must first:
• Acquire an initial ticket when you log in. This initial ticket, known as a ticket-getting ticket (or TGT), enables you to automatically get other tickets you will need to access application servers. You may also need to acquire another TGT when a previous one expires.
Understanding Kerberos Using Kerberos with the RCP, RLOGIN, RSHELL, and TELNET Commands
Making Sure Kerberos is Available Checking Ticket Status
Acquiring and Deleting Tickets Changing Your Kerberos Password
3-1

Using Kerberos Authentication
• Delete tickets before you log out. It is very important to remember to delete your tickets any time you leave your terminal! If another user "borrows" your tickets, you can be locked out of the network or impersonated by the intruder.
• Always run Kerberized utilities with the /AUTH qualifier. (The full form of the qualifier is /AUTHENTICATION=KERBEROS.)
• Change your Kerberos password at least once a month.
Note! The instructions in this chapter apply to Kerberos V4. MultiNet has added Kerberos V5 functionality to the TELNET and SSH applications only. Kerberos V5 database and ticket management functionality can be obtained with the HP Kerberos for OpenVMS product.
Kerberos security helps protect you and other users from data theft and other possible security breaches. You are the ultimate security element in making sure your files are safe; it is up to you to choose a password that is not easily guessed, and delete your tickets before you log out.
Making Sure Kerberos is AvailableBefore continuing with this chapter, make sure Kerberos is available on your system by asking your system manager these questions:
1 Is Kerberos enabled?2 Has a Kerberos principal been created for me?3 Do I need to get and delete Kerberos tickets?
• If the answer to all three questions is yes, read this chapter.• If Kerberos is not enabled, skip to the next chapter.• If no Kerberos principal exists, your system manager must add one for you before you can
use Kerberos.• If you answered no only to question 3, and yes to questions 1 and 2, you only need to read the
section on changing your Kerberos password for information on changing your Kerberos password. All other commands are handled automatically on your system.
Acquiring and Deleting TicketsTo acquire your initial ticket-getting ticket, enter this command from the DCL command line:
$ MULTINET KERBEROS INITThis node is: holmes.flowers.comKerberos Initialization for "john"Password: password
If you need to be authenticated as another user, use the /USERNAME qualifier. Use the /REALM qualifier to be authenticated in another realm. (A realm is an administrative name for a site, system, or other organizational entity.)
You can delete tickets with this command:
3-2

Using Kerberos Authentication
$ MULTINET KERBEROS DESTROY
Obtaining Tickets Under Another User NameYou can use the MULTINET KERBEROS INIT command with the /USERNAME qualifier to obtain tickets under another user name. For example, if you gained access to the system through a GUEST login, but you want to continue access to the network as yourself, you could use the /USERNAME qualifier with the MULTINET KERBEROS INIT command to specify your own user name. When you issue this form of the command, you are prompted for the other user's Kerberos password.
To access a remote system as another user, use both the /AUTH and /USERNAME qualifiers with the RCP, RLOGIN, RSHELL, and TELNET commands.
Using Kerberos with the RCP, RLOGIN, RSHELL, and TELNET CommandsThe RCP, RLOGIN, RSHELL, and TELNET commands all support the /AUTHENTICATION=KERBEROS qualifier (specify this qualifier first before any other qualifiers). You can shorten this qualifier to /AUTH. For example:
$ RLOGIN/AUTH FLOWERS.COM
You can use the /USERNAME qualifier with the /AUTH qualifier to specify the user name you want to use to log into the remote system.
Checking Ticket StatusYou can check the status of your tickets with the MULTINET KERBEROS LIST utility. For example, to test the status from the command line, enter:
$ MULTINET KERBEROS LISTPrincipal: [email protected] Expires PrincipalJune 13 16:16:47 June 14 00:16:47 [email protected]$
The utility also provides the /CHECK_TGT qualifier so you can test whether your ticket-getting ticket has already expired. If the ticket has expired, run MULTINET KERBEROS INIT again. The following command procedure tests your ticket status:
$! Test ticket status$!$ MULTINET KERBEROS LIST /CHECK_TGT$ IF $STATUS THEN WRITE SYS$OUTPUT "Okay"
If the tickets are valid, $STATUS is true. If the tickets have expired, $STATUS is false.
3-3
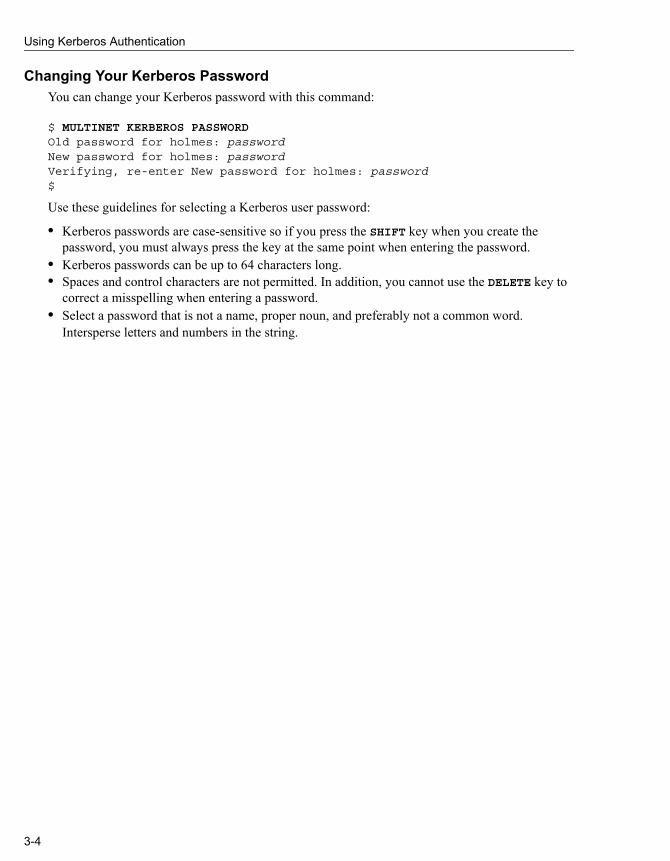
Using Kerberos Authentication
Changing Your Kerberos PasswordYou can change your Kerberos password with this command:
$ MULTINET KERBEROS PASSWORDOld password for holmes: passwordNew password for holmes: passwordVerifying, re-enter New password for holmes: password$
Use these guidelines for selecting a Kerberos user password:
• Kerberos passwords are case-sensitive so if you press the SHIFT key when you create the password, you must always press the key at the same point when entering the password.
• Kerberos passwords can be up to 64 characters long.• Spaces and control characters are not permitted. In addition, you cannot use the DELETE key to
correct a misspelling when entering a password.• Select a password that is not a name, proper noun, and preferably not a common word.
Intersperse letters and numbers in the string.
3-4

Chapter 4
Accessing Remote Systems with the RSHELL,RLOGIN, and TELNET Utilities
This chapter describes how to execute commands on remote systems using the RSHELL utility, and how to log into remote systems using the RLOGIN and TELNET utilities. The chapter covers the following topics:
Executing Commands on a Remote System Using RSHELL
The RSHELL utility lets you execute commands on remote hosts. RSHELL connects to the specified host and creates an RSHELL server process to execute the commands you enter. If the remote command requires input, data is read from SYS$INPUT and sent over the network to the remote process. Output from the remote command is copied back over the network and displayed on SYS$OUTPUT.
Using RSHELLBefore you can execute a remote command successfully, the remote system must determine that you are allowed to do so. The RSHELL server checks the "R" services equivalence files to determine whether or not you are authorized to execute commands remotely. RSHELL uses the same authentication scheme as other "R" services. See the "R" Services Authentication and the Host Equivalences sections.
The following example shows how to use RSHELL to get a directory listing on the UNIX system UNIX.FLOWERS.COM from a local OpenVMS system:
$ RSHELL UNIX.FLOWERS.COM ls -l
Executing Commands on a Remote System Using RSHELL
Logging Into a Remote System with TELNET
Logging Into a Remote System with RLOGIN
4-1

Accessing Remote Systems with the RSHELL, RLOGIN, and TELNET Utilities
This command assumes that the remote user name is the same as the local user name. To specify a different remote user name, use the /USERNAME qualifier as shown in the following command:
$ RSHELL /USERNAME=zeno UNIX.FLOWERS.COM ls -l
If "R" services equivalence files are not set up, you can still use the RSHELL command by specifying the /PASSWORD qualifier. When a password is specified, rather than connecting to the RSHELL server, the RSHELL client connects to the REXEC server on the remote system. REXEC is identical in function to RSHELL, except that it uses a user name and password to perform authentication rather than equivalence files. The command format for specifying a password is as follows:
$ RSHELL /USERNAME=zeno /PASSWORD=race UNIX.FLOWERS.COM ls -l
Note! If you specify /PASSWORD without a value, you are prompted for the password.
You can modify where the remote command standard input is read and where standard output and standard errors are written. Normally, RSHELL uses SYS$INPUT, SYS$OUTPUT, and SYS$ERROR for input, output, and error. You can redirect the input, output, or error streams using the /INPUT, /OUTPUT, or /ERROR qualifiers, respectively.
If you want to execute a command with RSHELL, but do not want your terminal to be tied up during the remote command execution, include the qualifier /INPUT=NLA0: on the RSHELL command to specify a null device. The remote command will see an end-of-file if it attempts to read from standard input.
Note: OpenVMS 7.3-1 introduced a new SYSMAN parameter, DELPRC_EXIT. When left at the default value of 5 after an RSHELL command is executed, the message “%SYSTEM-F-EXITFORCED, forced exit of image or process by SYS$DELPRC” is displayed. This does not interfere with the execution of the command on the remote system. Using SYSMAN to set this dynamic parameter to 0 (zero) will stop the display of the SYSTEM-F-EXITFORCED message.
Interrupting and Terminating RSHELLNormally, RSHELL terminates when the remote command terminates. However, if you press Ctrl/C while RSHELL is running, the interrupt is sent to the remote process. If the remote command is being executed on a UNIX system, the Ctrl/C is perceived as an interrupt signal.
Logging Into a Remote System with RLOGINThe RLOGIN command lets you interactively log into a remote system from your local system. RLOGIN is similar to TELNET, except that support for RLOGIN is not as widespread, and the authentication method relies on equivalence files that identify trusted hosts rather than passwords.
Using RLOGINIf your user name is the same on the local and remote systems, or the "R" services equivalence files are set up appropriately, you can use the following command format to log in:
$ RLOGIN hostname
4-2
Accessing Remote Systems with the RSHELL, RLOGIN, and TELNET Utilities
To use a different remote user name, use the following command format:
$ RLOGIN hostname /USERNAME=remote_user
Once an RLOGIN session has been established, the following character sequences typed at the beginning of a line have the effect described:
Terminating an RLOGIN SessionYou terminate your session with the remote host by logging out as you normally would.
"R" Services AuthenticationThe "R" services RLOGIN, RSHELL, RCP, and RMT use trusted users and trusted hosts listed in two files on the destination system for access control: MULTINET:HOSTS.EQUIV and SYS$LOGIN:.RHOSTS.
Host EquivalencesThe MULTINET:HOSTS.EQUIV file (/etc/hosts.equiv on UNIX systems) provides a list of hosts to receive access on a system-wide basis. All users on the specified hosts can access the target system without specifying a user name or password. Each entry in this file consists of a host name.
Note! You cannot use the MULTINET:HOSTS.EQUIV file to allow access to an individual user; user names specified in this file are ignored.
The following example shows a sample HOSTS.EQUIV file.
localhostsales.flowers.comflowers.combubba.flowers.com
If the HOSTS.EQUIV file shown in the previous example exists on the system such as the example SALES.FLOWERS.COM, the following statements are true:
• Users on SALES.FLOWERS.COM will have RLOGIN, RCP, and RSHELL access to their own accounts on the system. (Allowed by the first two entries.)
• FLOWERS.COM and BUBBA.FLOWERS.COM are identified (in the last two entries) as trusted hosts, allowing any user on either of these systems to have RLOGIN, RCP, and RSHELL access to their own user name on SALES.FLOWERS.COM without specifying the user name or a password.
~. A tilde followed by a period disconnects the session and exits RLOGIN.
~Ctrl/Z A tilde followed by Ctrl/Z creates and connects you to a subprocess on the local system. When you log out of the subprocess, you return to your RLOGIN session.
~~ Two consecutive tildes transmit a single tilde to the remote system.
4-3

Accessing Remote Systems with the RSHELL, RLOGIN, and TELNET Utilities
User EquivalencesThe SYS$LOGIN:.RHOSTS file (~/.rhosts on UNIX systems) allows remote users access to your user name. The format of an entry in this file consists of a host name and an optional user name:
hostname [username]
Each entry specifies that username on system hostname can access your user name on the target without specifying a password (you may omit username if your user names are identical on the two systems).
The following example contains an example .RHOSTS file.
flowers.com systemunix.flowers.com root
If the .RHOSTS file shown in the previous example belongs to the user FNORD on SALES.FLOWERS.COM, the following statements are true:
• The first entry grants access to user name FNORD on SALES.FLOWERS.COM from user SYSTEM on host FLOWERS.COM.
• The second entry grants access to user name FNORD from user ROOT on host UNIX.FLOWERS.COM.
Hence, either of these two remote users can use RLOGIN, RCP, or RSHELL to access FNORD's account on SALES.FLOWERS.COM without specifying a password.
Cautions Concerning Use of EquivalencesThe following cautions apply when using "R" services equivalence files:
• When specifying a user in any authentication file (particularly on UNIX systems), make sure to specify the user name in the correct case. "ROOT" and "root" are treated as different user names on case-sensitive systems.
• The host initiating the RLOGIN, RCP, or RSHELL request must be listed in the destination host's host name database by DNS, or its name must be resolvable by DNS (if domain name service is enabled). If the destination host cannot determine the initiating host's name from the IP address in the connection request, it rejects the request.
• The resolved host name must be an exact match. For example, if the IP address resolves to FNORD.FOO.COM, it is not correct to put only FNORD in the HOST.EQUIV or .RHOSTS file. In addition to being fully qualified, entries must be of the same case.
• The MultiNet RLOGIN, RCP, and RSHELL servers cache the contents of the .RHOSTS and HOSTS.EQUIV files in memory for ten minutes to improve performance. This means changes to the .RHOSTS and HOSTS.EQUIV file may not be noticed by the network immediately. Your system manager can use the following command to flush the cache before the timeout period:
$ MULTINET NETCONTROL RLOGIN FLUSH
• Access control requirements differ between RLOGIN and other "R" services. RLOGIN requires both NETWORK and LOCAL access, while RSHELL, RMT, and RCP only require
4-4

Accessing Remote Systems with the RSHELL, RLOGIN, and TELNET Utilities
NETWORK access.
Logging Into a Remote System with TELNETThe MultiNet TELNET utility uses the standard Internet TELNET protocol to establish a virtual terminal connection between the interactive session on your OpenVMS system and a remote host. You can connect to any remote host on the network that supports the TELNET protocol, and perform any operation as if you were using a terminal physically connected to the remote host.
Refer to the Accessing IBM Hosts with the TELNET Command section for information on using the TELNET TN3270 and TN5250 features for accessing IBM hosts.
Starting a TELNET ConnectionYou can start TELNET and establish a connection to a remote host in either of two ways:
• From the DCL prompt• Interactively from within the TELNET utility
The following example shows how to run TELNET and connect to a host in a single step.
$ telnet remote_hostTrying... Connected to remote_host, a host_type running os_type
In the next example, you invoke the TELNET utility. Once TELNET starts, you specify the remote host to which you want to connect.
$ telnetSIMPLE.EXAMPLE.COM MultiNet TELNET-32 5.4(103)TELNET>connect remote_hostTrying... Connected to remote_host, a host_type running os_type
In either case, TELNET informs you of the CPU type and operating system software on the remote host (if that information is available from DNS or the host table).
Once you have logged in, proceed as though you were connected to the remote host via a locally attached terminal. Use the command syntax conventions native to the remote host.
Using TELNET CommandsYou can only execute TELNET commands in command mode; that is, when you see the TELNET> prompt (before a connection is established) or the host> prompt (after a connection has been established).
You can force TELNET into command mode by entering the current escape character followed by an X. The default ESCAPE character is Ctrl/^ (control-caret).
The following example shows how to force TELNET into command mode:
$ Ctrl/^ Xhost>
Use the STATUS command to determine the state of all parameters associated with the TELNET
4-5

Accessing Remote Systems with the RSHELL, RLOGIN, and TELNET Utilities
session. The following example shows typical STATUS command output.
$ Ctrl/^ XFLOWERS.COM>status
This is BUBBA.FLOWERS.COM, VAX/VMS Version V5.5Connected to host IRIS.COM, a VAXSTATION-4000-60 running VMS via TCP.Remote host is echoingHost is not sending binaryClient is not sending binaryNO Abort Output character setNO Interrupt Process character setNO Are-You-There character setNO Erase Character character setNO Erase Line character setNormal End Of Line mappingLocal Flow controlNo log fileRemote host status reply:KAOS::_VTA23: 11:24:21 (DCL) CPU=00.00.10.92 PF=322 IO=78 MEM=218
In general, when you type the TELNET ESCAPE character Ctrl/^, the next character you type is interpreted as follows:
To send the ESCAPE character itself to the remote host, type the ESCAPE character twice.
To change the ESCAPE character, use the DCL qualifier /ESCAPE_CHARACTER. For example, to change from the default ESCAPE character Ctrl/^ to Ctrl/A, type:
TELNET>set escape "^A"
? Prints help information on TELNET escape commands.
A Sends an "Attention" request to the remote host.
B Sends a "Break" request to the remote host.
C Closes the connection to the remote host.
O Sends an "Abort Output" request to the remote host.
P Spawns a new process (or attaches to a parent process, if there is one).
Q Quits TELNET.
S Prints the status of the TELNET connection.
T Sends an "Are-You-There" request to the remote host.
X Enters extended TELNET command mode.
4-6
Accessing Remote Systems with the RSHELL, RLOGIN, and TELNET Utilities
or:
$ TELNET /ESCAPE_CHARACTER="^A" flowers.com
You can determine all the available TELNET commands at any time by typing a question mark (?) at the TELNET> prompt.
Using TELNET Control SequencesYou can establish mappings between control characters and certain TELNET control sequences. This can often significantly improve terminal response. These mappings can also be used to provide a certain amount of system independence in the command interface across different systems. Consult the TELNET RFCs (854, 855, 856, 857, 1041, 1073, 1079, 1080, 1091) for additional information on TELNET control sequences (also known as IACs).
Normally, in a TELNET session, all characters typed at the terminal are inserted in the TELNET stream sequentially and interpreted sequentially at the remote system. Hence, even control characters that you want interpreted immediately (like Ctrl/C or Ctrl/O on an OpenVMS system) are interpreted on the remote system only after all characters that precede them in the command stream.
TELNET control sequences, however, can cause the remote system to perform their function before processing characters already in the input stream.
To specify control characters that map to these commands, specify them from the DCL command line:
$ TELNET /ABORT_OUTPUT="^O" flowers.com
or, using the SET command from within TELNET; for example:
TELNET>set abort-output "^O"
Table 4-1 summarizes the possible TELNET control sequences:
Table 4-1 TELNET Control Sequences
Sequence Name Action
Equivalent OpenVMS Function
ABORT-OUTPUT Cancels any output in progress and sends an Abort Output command to the TELNET server. Additionally, if the AUTO-FLUSH feature is enabled, a Timing Mark command is sent to the TELNET server; the TELNET client begins discarding any buffered output until a Timing Mark command is received in the response.
Ctrl/O
ARE-YOU-THERE Sends an Are You There command to the TELNET server.
Ctrl/T
4-7

Accessing Remote Systems with the RSHELL, RLOGIN, and TELNET Utilities
You can also specify control characters from the DCL command line; for example:
$ telnet/abort_output=^O flowers.com
Running Applications over TELNET ConnectionsA TELNET connection normally exists between a remote pseudo-terminal (for example, NTYx:) and the TELNET user program. Characters received from the user's terminal are sent through the network to the remote pseudo-terminal and vice versa. Using the DCL qualifier /CREATE_NTY or the TELNET CREATE-NTY command, you can also connect the local end of the connection to a pseudo-terminal. Once the local end is connected to a pseudo-terminal, you can run other applications (such as KERMIT) over the TELNET connection.
The CREATE-NTY command first attempts to negotiate BINARY mode. BINARY mode ensures the connection is as transparent as possible. Then, a new NTYx terminal is created and the connection attached to it. Finally, the NTYx terminal is allocated to your current process and TELNET exits.
The following example shows how to use the DCL /CREATE_NTY qualifier.
$ TELNET/CREATE_NTY bubbaTrying... Connected to BUBBA, a VAX running VMS.Welcome to BUBBAUsername: JOEPassword:Welcome to VAX/VMS version V5.5 on node BUBBALast interactive login on Tuesday, 16-MAR-2004 13:34Last non-interactive login on Wednesday, 17-MAR-2004 13:32[ Process _VTA13: on BUBBA::VTA13: ]$ Ctrl/^ XBUBBA>create-ntyTELNET session now connected to _NTY3:%DCL-I-ALLOC, _NTY3: allocated
BREAK-CHARACTER Sends a Break command to the TELNET server. BREAK
ERASE-CHARACTER Sends an Erase Character command to the TELNET server.
<x
ERASE-LINE Sends an Erase Line command to the TELNET server.
Ctrl/U
INTERRUPT-PROCESS Sends an Interrupt Process command to the TELNET server.
Ctrl/C
Table 4-1 TELNET Control Sequences (Continued)
Sequence Name Action
Equivalent OpenVMS Function
4-8
Accessing Remote Systems with the RSHELL, RLOGIN, and TELNET Utilities
$ kermitVMS Kermit-32 version 3.3.111Default terminal for transfers is: _TWA2:Kermit-32>set line nty3:Kermit-32>connect[Connecting to _NTY3:. Type ^]C to return to VAX/VMS Kermit-32]$
The following example shows how to use TELNET CREATE-NTY.
$ TELNET BUBBATrying... Connected to BUBBA, a VAX running VMS.Welcome to BUBBAUsername: JOEPassword:Welcome to VAX/VMS version V5.5 on node BUBBALast interactive login on Tuesday, 16-MAR-2004 13:34Last non-interactive login on Wednesday, 16-MAR-2004 13:32[ Process _VTA13: on BUBBA::VTA13: ]$ Ctrl/^ XBUBBA>CREATE-NTYTELNET session now connected to _NTY3:%DCL-I-ALLOC, _NTY3: allocated$ kermitVMS Kermit-32 version 3.3.111Default terminal for transfers is: _TWA2:Kermit-32>set line nty3:Kermit-32>connect[Connecting to _NTY3:. Type ^]C to return to VAX/VMS Kermit-32]$
Accessing IBM Hosts with the TELNET CommandTELNET provides two IBM terminal emulations for accessing IBM hosts. The /TN3270 and /TN5250 qualifiers provide IBM 3270 and IBM 5250 terminal emulations, respectively. Using TELNET TN3270 and TN5250, you can:
• Log into IBM hosts• Display and define your own keyboard map• Capture screen output• Print screen capture output
Both TN3270 and TN5250 modes use the OpenVMS screen management (SMG) runtime routines to create a full-screen IBM 3270 or 5250 mode display on your terminal. These TELNET modes give the appearance of being logged into the remote host from an IBM terminal.
Starting TELNET with an IBM Terminal EmulatorTo start TELNET in TN3270 mode, enter the following command:
$ MULTINET TELNET /TN3270
4-9

Accessing Remote Systems with the RSHELL, RLOGIN, and TELNET Utilities
To force TN3270 emulation, enter:
$ MULTINET TELNET /TN3270=FORCE
This qualifier is useful when communicating with a system that supports 3270 mode, but cannot negotiate it automatically, such as IBM mainframes running ACCESS/VMS. To start TELNET in TN5250 mode, enter:
$ MULTINET TELNET /TN5250
To force TN5250 emulation, enter:
$ MULTINET TELNET /TN5250=FORCE
Stopping an IBM Emulator SessionExit a TN3270 or TN5250 session by pressing Ctrl/C.
IBM 3278 ModelsIn TN3270 mode, TELNET emulates an IBM 3278 terminal. The model number depends on the terminal "window" size (page width and length). The terminal (or window on a workstation) on which TN3270 mode TELNET is running must have at least 80 columns and 24 rows. Table 4-2 describes the actual emulation used, based on the terminal/window size.
TN5250 TELNET mode emulates a TN5251-11 terminal with 24 rows and 80 columns and has only one screen mode.
Mapping Your KeyboardTN3270 and TN5250 modes use the OpenVMS SMG runtime routines and the files MULTINET:MAP3270.DAT and MULTINET:MAP5250.DAT, respectively, to perform terminal emulation on the local system. These files contain the terminal key sequence to IBM terminal key mappings for a wide variety of terminals. Only those terminals with entries in both MAP3270.DAT or MAP5250.DAT and the OpenVMS SMG terminal definition library (SYS$SYSTEM:TERMTABLE.TXT) can use the IBM terminal modes.
Table 4-2 3278 Model Window Size
Minimum Size (Rows x Columns) Emulated Terminal
24 x 80 3278 model 2
32 x 80 3278 model 3
43 x 80 3278 model 4
27 x 132 3278 model 5
4-10

Accessing Remote Systems with the RSHELL, RLOGIN, and TELNET Utilities
Displaying the Current Keyboard MappingPress the HELP key to display the current key mappings from the current key mapping data file (such as MAP3270.DAT). The help screen reformats and improves readability of the information in the mapping file.
The following is an example help screen for MAP3270.DAT:
TN3270 Key Definitions (Press Help to dismiss)PFK1 = "KP1" or "ESC 1" PFK22 = "PF2 KP2" or "^F 2 2"PFK2 = "KP2" or "ESC 2" PFK23 = "PF2 KP3" or "^F 2 3"PFK3 = "KP3" or "ESC 3" PFK24 = "PF2 KP4" or "^F 2 4"PFK4 = "KP4" or "ESC 4" PA1 = "ESC PF1" or "^P 1"PFK5 = "KP5" or "ESC 5" PA2 = "ESC PF2" or "^P 2"PFK6 = "KP6" or "ESC 6" LEFT = "^H" or "LEFT"PFK7 = "KP7" or "ESC 7" RIGHT = "^L" or "RIGHT"PFK8 = "KP8" or "ESC 8" UP = "^K" or "UP"PFK9 = "KP9" or "ESC 9" DOWN = "^J" or "DOWN"PFK10 = "PF1 KP0" or "ESC 0" CLEAR = "^Z" or "KP_ENTER"PFK11 = "PF1 KP1" or "ESC -" ENTER = "^M"PFK12 = "PF1 KP2" or "ESC =" ESCAPE = "^C"PFK13 = "PF1 KP3" or "^F 1 3" CAPTURE= "^T" or "DO"PFK14 = "PF1 KP4" or "^F 1 4" TAB = "^I"PFK15 = "PF1 KP5" or "^F 1 5" BTAB = "^B"PFK16 = "PF1 KP6" or "^F 1 6" INSRT = "" or "ESC SPACE"PFK17 = "PF1 KP7" or "^F 1 7" DELETE = "^D"PFK18 = "PF1 KP8" or "^F 1 8" ERASE =PFK19 = "PF1 KP9" or "^F 1 9" EEOF = "^E"PFK20 = "PF2 KP0" or "^F 2 0" EINP = "^W"PFK21 = "PF2 KP1" or "^F 2 1" HOME = "KP_PERIOD"
The 3270.DAT file viewed without the HELP formatting is as follows:
vt100|vt200|vt220|vt240|vt200-80|vt300|vt400|vt100nam|pt100| {enter = '^m';clear = '^z' | '\EOM' | '\3M';help = '\E[28~' | '\EH' | '\C28~';capture = '^t' | '\E[29~'| '\C29~';nl = '^?';tab = '^i';btab = '^b';left = '^h' | '\E[D' | '\EOD' | '\3D' | '\CD';right = '^l' | '\E[C' | '\EOC' | '\3C' | '\CC';up = '^k' | '\E[A' | '\EOA' | '\3A' | '\CA'down = '^j' | '\E[B' | '\EOB' | '\3B' | '\CB';home = '\EOn' | '\3n';fm = '^y';delete = '^d';eeof = '^e';einp = '^w';insrt = '^ ' | '\E ';
4-11
Accessing Remote Systems with the RSHELL, RLOGIN, and TELNET Utilities
# pf keyspfk1 = '\EOq' | '\E1' | '\3q';pfk2 = '\EOr' | '\E2' | '\3r';pfk3 = '\EOs' | '\E3' | '\3s';pfk4 = '\EOt' | '\E4' | '\3t';pfk5 = '\EOu' | '\E5' | '\3u';pfk6 = '\EOv' | '\E6' | '\3v';pfk7 = '\EOw' | '\E7' | '\3w';pfk8 = '\EOx' | '\E8' | '\3x';pfk9 = '\EOy' | '\E9' | '\3y';pfk10 = '\EOP\EOp' | '\E0' | '\3P\3p';pfk11 = '\EOP\EOq' | '\E-' | '\3P\3q';pfk12 = '\EOP\EOr' | '\E=' | '\3P\3r';pfk13 = '\EOP\EOs' | '^f13' | '\3P\3s';pfk14 = '\EOP\EOt' | '^f14' | '\3P\3t';pfk15 = '\EOP\EOu' | '^f15' | '\3P\3u';pfk16 = '\EOP\EOv' | '^f16' | '\3P\3v';pfk17 = '\EOP\EOw' | '^f17' | '\3P\3w';pfk18 = '\EOP\EOx' | '^f18' | '\3P\3x';pfk19 = '\EOP\EOy' | '^f19' | '\3P\3y';pfk20 = '\EOQ\EOp' | '^f20' | '\3Q\3p';pfk21 = '\EOQ\EOq' | '^f21' | '\3Q\3q';pfk22 = '\EOQ\EOr' | '^f22' | '\3Q\3r';pfk23 = '\EOQ\EOs' | '^f23' | '\3Q\3s';pfk24 = '\EOQ\EOt' | '^f24' | '\3Q\3t';
# program attention keyspa1 = '\E\EOP' | '^p1' | '\E\3P';pa2 = '\E\EOQ' | '^p2' | '\E\3Q';
# local control keys
escape = '^c' | '^^'; # escape to telnet command modemaster_reset = '^g';
# local editing keyssettab = '\E;';deltab = '\E\'';clrtab = '\E:';setmrg = '\E,';sethom = '\E.';coltab = '\E\E[B' | '\E\EOB' | '\E\3B' | '\E\CB';colbak = '\E\E[A' | '\E\EOA' | '\E\3A' | '\E\CA';indent = '\E\E[C' | '\E\EOC' | '\E\3C' | '\E\CC';undent = '\E\E[D' | '\E\EOD' | '\E\3D' | '\E\CD';} # end of vt100, etc.
On terminals without a HELP key, edit the MAP3270.DAT or MAP5250.DAT file and assign a value to the "help" function. For example, to assign the help function to either Ctrl/X h or ESC h, add this line to the file:
4-12

Accessing Remote Systems with the RSHELL, RLOGIN, and TELNET Utilities
help = '^XH' | '\EH';
For VT-class terminals without a HELP key, TELNET supports ESC h by default. On these terminals, you do not need to modify the MAPxxxx.DAT files.
Keyboard Mapping File FormatThe keyboard mapping files contain mappings between characters entered from your keyboard, and 3270 or 5250 keycodes. The first line specifies all of the terminal types supported. For example, these mappings specify HP VT100-VT400 terminals:
vt100 | vt200 | vt200-80| vt220 | vt240| vt300 | vt400
Subsequent lines specify the IBM keycode followed by an equals sign (=) and the keystrokes (in single quotes) you press to send the keycode. Each key definition ends with a semicolon (;). Some reserved characters are:
• Caret (^) begins a Ctrl character sequence.• Backslash and the letter "E" (\E) represents an ESCAPE character.• Caret-question mark (^?) represents rub out.
For example, this key sequence:
delete = '^d';
sends the IBM DELETE code when you press Ctrl/D.
FunctionsThe following is a list of the TN3270 and TN5250 functions that can be used in the MAP3270.DAT and MAP5250.DAT files.
aplend cursel escape left2 right upaploff delete ferase lprt right2 vertical_baraplon deltab fieldend master_reset sethom werase attn disc flinp monocase setmrg wordbacktabbtab down fm nl ettab wordendcapture dp help pa1-pa3 space wordtabcentsign dvcnl home pcoff synchclear eeof indent pcon tabclrtab einp init pfk1-pfk36 testcolbak enter insrt reset treqcoltab erase left reshow undent
Specifying Multiple KeystrokesYou can assign multiple keystrokes to a single code by separating each set of keystrokes with a vertical bar ( | ) operator. The following example sends the delete keycode to the host when you press either Ctrl/D or Ctrl/?.
delete = '^d' | '^?';
4-13

Accessing Remote Systems with the RSHELL, RLOGIN, and TELNET Utilities
TN3270 Function Key MappingTable 4-3 lists the mappings between 3270 function keys and the keys on HP VT100, VT200, VT300, and VT400 series terminals.
Table 4-3 TN3270 Function Key Mappings
IBM Function VT Terminal Key Sequences
Enter Ctrl/M or RETURN
Clear Ctrl/Z or ENTER
Input Editing Functions
New line DELETE
Tab TAB or Ctrl/1
Backtab Ctrl/B
Left Ctrl/H or LEFT ARROW
Right Ctrl/L or RIGHT ARROW
Up Ctrl/K or UP ARROW
Down Ctrl/J or DOWN ARROW
Home Keypad
Delete Ctrl/D
Erase to EOF Ctrl/E
Erase Input Ctrl/W
Insert Ctrl/Space or ESC + Space
Attention Keys
PA1 ESC + PF1 or Ctrl/P + 1
PA2 ESC + PF2 or Ctrl/P + 2
Local Control Keys
TELNET Escape Ctrl/C or Ctrl/[
Master Reset Ctrl/G
Local Editing Keys
Set Tab ESC + ;
4-14
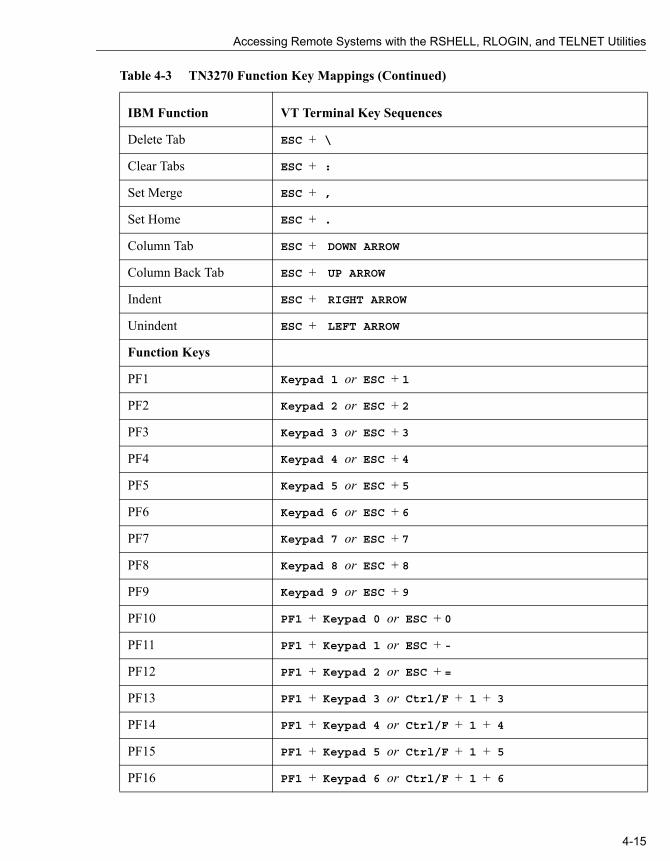
Accessing Remote Systems with the RSHELL, RLOGIN, and TELNET Utilities
Delete Tab ESC + \
Clear Tabs ESC + :
Set Merge ESC + ,
Set Home ESC + .
Column Tab ESC + DOWN ARROW
Column Back Tab ESC + UP ARROW
Indent ESC + RIGHT ARROW
Unindent ESC + LEFT ARROW
Function Keys
PF1 Keypad 1 or ESC + 1
PF2 Keypad 2 or ESC + 2
PF3 Keypad 3 or ESC + 3
PF4 Keypad 4 or ESC + 4
PF5 Keypad 5 or ESC + 5
PF6 Keypad 6 or ESC + 6
PF7 Keypad 7 or ESC + 7
PF8 Keypad 8 or ESC + 8
PF9 Keypad 9 or ESC + 9
PF10 PF1 + Keypad 0 or ESC + 0
PF11 PF1 + Keypad 1 or ESC + -
PF12 PF1 + Keypad 2 or ESC + =
PF13 PF1 + Keypad 3 or Ctrl/F + 1 + 3
PF14 PF1 + Keypad 4 or Ctrl/F + 1 + 4
PF15 PF1 + Keypad 5 or Ctrl/F + 1 + 5
PF16 PF1 + Keypad 6 or Ctrl/F + 1 + 6
Table 4-3 TN3270 Function Key Mappings (Continued)
IBM Function VT Terminal Key Sequences
4-15
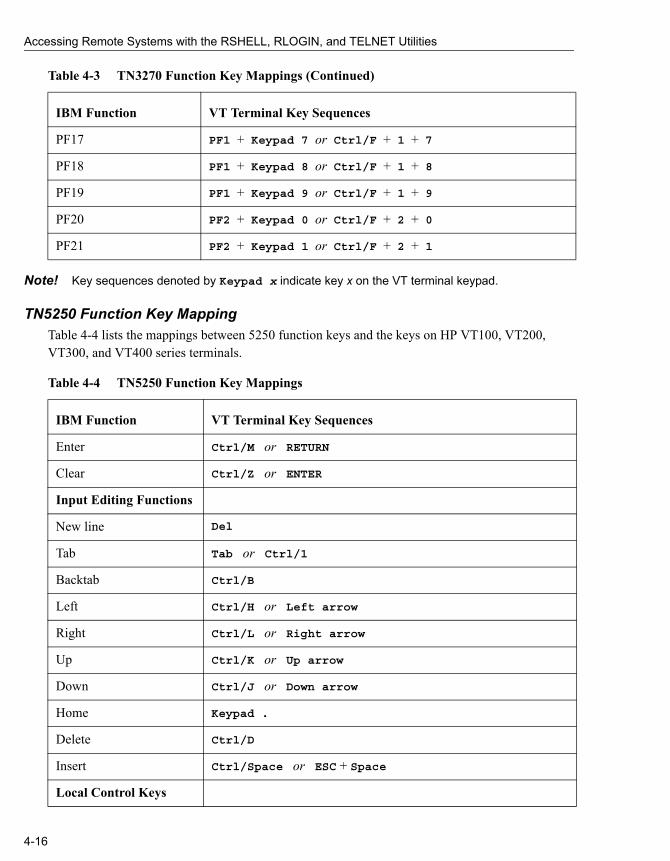
Accessing Remote Systems with the RSHELL, RLOGIN, and TELNET Utilities
Note! Key sequences denoted by Keypad x indicate key x on the VT terminal keypad.
TN5250 Function Key MappingTable 4-4 lists the mappings between 5250 function keys and the keys on HP VT100, VT200, VT300, and VT400 series terminals.
PF17 PF1 + Keypad 7 or Ctrl/F + 1 + 7
PF18 PF1 + Keypad 8 or Ctrl/F + 1 + 8
PF19 PF1 + Keypad 9 or Ctrl/F + 1 + 9
PF20 PF2 + Keypad 0 or Ctrl/F + 2 + 0
PF21 PF2 + Keypad 1 or Ctrl/F + 2 + 1
Table 4-4 TN5250 Function Key Mappings
IBM Function VT Terminal Key Sequences
Enter Ctrl/M or RETURN
Clear Ctrl/Z or ENTER
Input Editing Functions
New line Del
Tab Tab or Ctrl/1
Backtab Ctrl/B
Left Ctrl/H or Left arrow
Right Ctrl/L or Right arrow
Up Ctrl/K or Up arrow
Down Ctrl/J or Down arrow
Home Keypad .
Delete Ctrl/D
Insert Ctrl/Space or ESC + Space
Local Control Keys
Table 4-3 TN3270 Function Key Mappings (Continued)
IBM Function VT Terminal Key Sequences
4-16
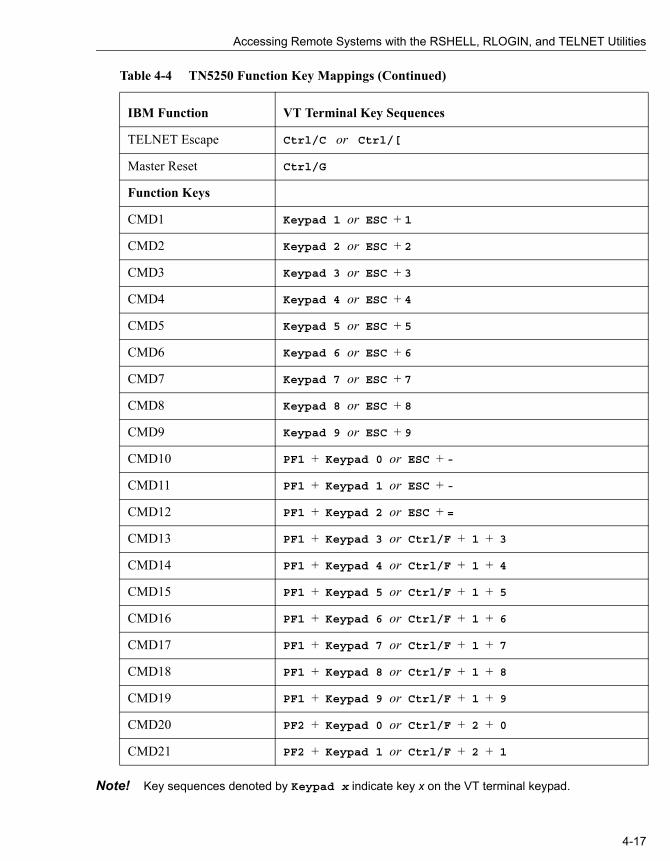
Accessing Remote Systems with the RSHELL, RLOGIN, and TELNET Utilities
Note! Key sequences denoted by Keypad x indicate key x on the VT terminal keypad.
TELNET Escape Ctrl/C or Ctrl/[
Master Reset Ctrl/G
Function Keys
CMD1 Keypad 1 or ESC + 1
CMD2 Keypad 2 or ESC + 2
CMD3 Keypad 3 or ESC + 3
CMD4 Keypad 4 or ESC + 4
CMD5 Keypad 5 or ESC + 5
CMD6 Keypad 6 or ESC + 6
CMD7 Keypad 7 or ESC + 7
CMD8 Keypad 8 or ESC + 8
CMD9 Keypad 9 or ESC + 9
CMD10 PF1 + Keypad 0 or ESC + -
CMD11 PF1 + Keypad 1 or ESC + -
CMD12 PF1 + Keypad 2 or ESC + =
CMD13 PF1 + Keypad 3 or Ctrl/F + 1 + 3
CMD14 PF1 + Keypad 4 or Ctrl/F + 1 + 4
CMD15 PF1 + Keypad 5 or Ctrl/F + 1 + 5
CMD16 PF1 + Keypad 6 or Ctrl/F + 1 + 6
CMD17 PF1 + Keypad 7 or Ctrl/F + 1 + 7
CMD18 PF1 + Keypad 8 or Ctrl/F + 1 + 8
CMD19 PF1 + Keypad 9 or Ctrl/F + 1 + 9
CMD20 PF2 + Keypad 0 or Ctrl/F + 2 + 0
CMD21 PF2 + Keypad 1 or Ctrl/F + 2 + 1
Table 4-4 TN5250 Function Key Mappings (Continued)
IBM Function VT Terminal Key Sequences
4-17
Accessing Remote Systems with the RSHELL, RLOGIN, and TELNET Utilities
Editing the Keyboard Mapping FileTo customize a keyboard mapping file:
1 Copy the appropriate file (MAP3270.DAT or MAP5250.DAT) from the MULTINET: directory to your login directory; for example, USERS:[IGUANA]MAP3270.DAT.
2 Define the MAP3270 or MAP5250 logical name to point to that file instead of the version in the MULTINET: directory; for example:
$ DEFINE/JOB MAP3270 "@USERS:[IGUANA]MAP3270.DAT"
Note! You must use the @ (at-sign) at the start of the file name.
3 Edit the file with any text editor.
To test a particular entry for a terminal in the MAP3270 or MAP5250 file, define the KEYBD logical name for your entry; for example:
$ DEFINE KEYBD "my_new_vt420"
Capturing Screen Output and Printing Screen CapturesYou can press the Do key at any time during a TN3270 or TN5250 session to store the contents of the current screen in a file in the current directory (the default directory when the TELNET session started). The output file is named TN3270.LIS or TN5250.LIS and captures only the current screen. Each time you press the Do key, a new version of this file is created.
For keyboards that do not have a Do key, assign a value to the capture function in the MAPxxxx.DAT file. For example, assign the capture function to accept Ctrl/T as follows:
capture = '^t'
On VT-style keyboards without a Do key, TELNET supports Ctrl/T by default. For these terminals, you don't need to modify the MAPxxxx.DAT files.
The MULTINET_TN3270_PRINTER logical name lets you direct TN3270 screen output to a print queue. To use this feature, enter:
$ DEFINE MULTINET_TN3270_PRINTER queue_name
The MULTINET_TN5250_PRINTER logical name lets you direct TN5250 screen output to a print queue. To use this feature, enter:
$ DEFINE MULTINET_TN5250_PRINTER queue_name
Using Transparent ModeTN3270 supports a transparent mode similar to the transparent mode offered by the IBM 7171 ASCII device controller. This feature is enabled automatically by TELNET when transparent mode information is received from the IBM host. You can disable this feature before entering TN3270 with the following command:
4-18

Accessing Remote Systems with the RSHELL, RLOGIN, and TELNET Utilities
$ DEFINE MULTINET_TN3270_TRANSPARENT_MODE DISABLED
Application Keypad Access for TN3270 and TN5250You can enable or disable access to the application keypad in TN3270 mode with the MULTINET_TN3270_ APPLICATION_KEYPAD logical name. The default value is ON. Disable access by defining the logical name as follows:
$ DEFINE MULTINET_TN3270_APPLICATION_KEYPAD OFF
You can enable or disable access to the application keypad in TN5250 mode with the MULTINET_TN5250_APPLICATION_KEYPAD logical. The default value is ON. Disable access by defining the logical as follows:
$ DEFINE MULTINET_TN5250_APPLICATION_KEYPAD OFF
TN3270 EmulationThe Yale Improved Null (/[NO]YALE) qualifier is enabled by default. Yale Improved Null replaces NULL characters found in fields with spaces when the TN3270 client writes the fields back to the server. Use the /NOYALE qualifier to disable this feature.
$ TELNET /TN3270/NOYALE
To disable text colors, use this command:
$ TELNET /TN3270/NOCOLOR
Note! You can use /NOCOLOR for TN3270 in DPC emulation mode and for TN5250.
TN3270 Translation Table MappingTN3270 uses the MULTINET_TN3270_LANGUAGE logical to specify the regional language for the international character set translation table. Translation tables are stored in the TN3270.TRANSLATION file. When TELNET is invoked, the translation file is searched for in the SYS$LOGIN directory. If it is not found, the MULTINET: directory is searched.
An entry in the translation table begins with the name of the language starting in the first column in the line. Use this value to define the MULTINET_TN3270_LANGUAGE logical. For example, this command specifies a translation table for a UK English keyboard:
$ DEFINE MULTINET_TN3270_LANGUAGE "UK_ENGLISH_DEC_MULTI"
The remainder of an entry consists of lines preceded with whitespace (either tabs or spaces). Each line contains these three values:
1 An EBCDIC+ code to be sent to the IBM host2 The ASCII code to be displayed for that EBCDIC value3 The ASCII character sent from the keyboard that causes the EBCDIC value to be sent to the host
A pound sign (#) specifies a comment and can appear in any column on a line, including lines containing translation codes. When specified on a line containing a translation code, the comment
4-19

Accessing Remote Systems with the RSHELL, RLOGIN, and TELNET Utilities
character must be preceded by at least one whitespace character. An entry is terminated by the first line following the entry that contains a "printable" character in column one. Entry names must start in the first column, and must consist only of uppercase letters, numbers, and the underbar sign. The maximum length of an entry name is 255 characters.
The file name of the translation table can be changed with the MULTINET_TN3270_TRANSLATION_TABLES logical. For example, to define a translation table named US_FOO.DAT, enter:
$ DEFINE MULTINET_TN3270_TRANSLATION_TABLES "US_FOO.DAT"
+ EBCDIC stands for Extended Binary-Coded-Decimal Interchange Code.
An error message is issued if either logical name, MULTINET_TN3270_LANGUAGE or MULTINET_TN3270_TRANSLATION_TABLES, points to a non-existent entry.
The following example contains a sample translation file. In this example, the first line of the UK_ ENGLISH_DEC_MULTI entry indicates that for the EBCDIC character 0x5b, the ASCII character 0xa3 is displayed. When the ASCII character 0xa3 is received from the keyboard, the EBCDIC character 0x5b is sent to the host.
## UK EBCDIC mapped into The HP Multinational Character Set# Use following command to specify this table:# $ DEFINE MULTINET_TN3270_LANGUAGE "UK_ENGLISH_DEC_MULTI"#UK_ENGLISH_DEC_MULTI0x5b 0xa3 0xa3 # British monetary pound sign0x4a 0x24 0x24 # Dollar sign ($)### Austrian German mapped into The HP Multinational Character# Set. Use following command to specify this table:# $ DEFINE MULTINET_TN3270_LANGUAGE "AUSTRIAN_GERMAN_DEC_MULTI"##AUSTRIAN_GERMAN_DEC_MULTI0x4a 0xc4 0xc4 # A with umlaut0x5a 0xdc 0xdc # U with umlaut0x6a 0xf6 0xf6 # o with umlaut0x79 0x60 0x60 # Grave0x5b 0x24 0x24 # Dollar sign0x7b 0x23 0x23 # Hash sign0x7c 0xa7 0xa7 # Section sign0x5f 0x5e 0x5e # Carat sign0xa1 0xdf 0xdf # Beta sign0xc0 0xe4 0xe4 # a with umlaut0xd0 0xfc 0xfc # u with umlaut0xe0 0xd6 0xd6 # O with umlaut0x4f 0x21 0x21 # Exclamation point
4-20

Accessing Remote Systems with the RSHELL, RLOGIN, and TELNET Utilities
0x7f 0x22 0x22 # Double quote
Kerberos V5 Authentication and EncryptionWhen a Kerberos V5 ticket has been acquired (for example, from HP’s Kerberos for OpenVMS product), a TELNET session can be started with both Kerberos V5 authentication and DES encryption. The following example shows how to specify authentication and DES encryption when logging into a remote host:
$ telnet /auth/enc (remote host)
Note! The /encryption option will function with Kerberos V5 authentication only.
Troubleshooting TELNETThis section describes common problems that can occur when using TELNET to connect to a remote host.
Connection ProblemsIf you cannot connect to the remote host, use PING as follows to discover any network problems. For information about starting PING, refer to the MultiNet for OpenVMS Administrator's Reference.
1 Ping the loopback address of your workstation, 127.0.0.1 to verify that MultiNet is working properly and that it can send and receive messages.
2 Ping your workstation by its IP address to verify that it is recognized on the network.3 Ping your workstation by its host name to verify that it is recognized on the network and that its
host name is being resolved.4 Ping the broadcast address on your network to verify that your network can broadcast messages.5 Ping another host on the same network by IP address to verify that the workstation can
communicate with other hosts on the network.6 Ping another host on the same network by host name to verify that host names are being
resolved.7 Ping a host on a different network, first by IP address and then by host name, to verify the default
route is correct and that host names are being resolved.
Problems Logging InIf you cannot log into the remote host:
1 Make sure you have a valid user name on the remote host.2 Make sure you are entering the correct user name and password.
If you still have difficulties logging in, contact your network administrator.
4-21


Chapter 5
Remote File Access with the RCP, FTP, andTFTP Utilities
This chapter describes how to copy files between your local system and a remote system using the RCP, FTP, and TFTP utilities, and covers the following topics:
The FTP commands for renaming files, deleting files, and creating and deleting directories are described in the FTP command reference in Appendix B.
Copying Files Using RCPThe MultiNet RCP utility uses the 4.3BSD UNIX "rcp" (remote copy) protocol to transfer files between the local host and a remote host. The Kerberos version of RCP also provides authenticated access between the two systems.
When the index file creates new buckets (the space allocated to store units of data) beyond the previous End-Of-File mark, but the End-Of-File is not updated to reflect the new buckets, RCP transfers the allocated buckets to the End-Of-File. You can turn this feature off by defining the logical MULTINET_RCP_INDEX_UPTO_EOF.
Requirements for RCPThe requirements for using the RCP utility are:
• Both the local and remote host must support the rcp protocol.• You must specify the names of files on the remote host using the file-naming conventions of the
remote host.• If the remote host is an OpenVMS system, you must ensure that neither the system-wide login
command procedure nor your local LOGIN.COM file displays any text. See section Inhibiting
Copying Files Using RCP Copying Files Using TFTP
Accessing Files with FTP
5-1

Remote File Access with the RCP, FTP, and TFTP Utilities
Output from SYLOGIN.COM and LOGIN.COM for more information on inhibiting output from these command procedures.
The "R" services authentication database files on the server system must be configured to allow RCP access from the local system. See the Using RCP section for additional information on "R" services authentication.
Using RCPYou can use RCP interactively or via a command file in batch mode.
Before you can copy files using RCP, the remote system must determine that you are allowed to do so. Normally, the remote system's RCP server checks the "R" services host equivalence files to determine whether or not you are authorized to copy files to or from the remote system. RCP uses the same authentication scheme as RLOGIN and RSHELL.
However, if you are using RCP with Kerberos authentication, authentication is handled by acquiring “tickets" that permit access to cooperating systems. (See Chapter 4 for more information.)
The following is an example using RCP to copy the file /etc/hosts from the UNIX system UNIX.SPROCKETS.COM to the user's current default directory on the local OpenVMS system.
Note! The double quotation marks around "/etc/hosts" are necessary to prevent the slashes in the path name from being interpreted by DCL.
$ RCP UNIX.SPROCKETS.COM::"/etc/hosts" []
This command assumes the remote user name is the same as the local user name. To specify a different remote user name, use the /USERNAME qualifier as shown in the following command:
$ RCP /USERNAME=JETSON UNIX.SPROCKETS.COM::.cshrc [.UNIX-FILES]
If the host equivalence files are not set up, you can still use the RCP command by specifying the /PASSWORD qualifier. In that case, REXEC authentication is used instead. The command format for specifying a password is as follows:
$ RCP /USERNAME=JETSON /PASSWORD=ASTRO -_$ UNIX.SPROCKETS.COM::report.july [.REPORTS]
Note! If you specify /PASSWORD without a value, you are prompted for the password with echoing disabled.
To copy files with RCP using Kerberos authentication, use the following format:
$ RCP /AUTHENTICATION=KERBEROS UNIX.SPROCKETS.COM::"etc/hosts" []
or
$ RCP /AUTHENTICATION UNIX.SPROCKETS.COM::"etc/hosts" []
5-2

Remote File Access with the RCP, FTP, and TFTP Utilities
Inhibiting Output from SYLOGIN.COM and LOGIN.COMThe rcp protocol requires that neither the system-wide login command procedure (SYS$MANAGER:SYLOGIN.COM) nor users' LOGIN.COM procedures display any output. The following example shows commands to add to your LOGIN.COM and the system-wide SYLOGIN.COM to prevent any output from being displayed when they are executed.
$ VERIFY = 'F$VERIFY(0) ! Turn off verify without echoing$ IF F$MODE() .EQS. "OTHER" THEN EXIT ! If a DETACHED process (RSHELL)...$ IF VERIFY THEN SET VERIFY ! If a batch job, may want to turn ! verify back on.
Accessing Files with FTPThe FTP utility uses the Internet standard File Transfer Protocol (FTP) to transfer files between the local host and a remote host. FTP also allows you to perform directory and file operations, such as changing the working directory, listing files, renaming directories and files, and deleting directories and files.
The FTP utility has a command-line interface. Each action, such as copying files, requires a specific command.
Requirements for Using FTPRequirements for using the FTP utility include the following:
• Both the local and remote host must support the Internet standard File Transfer Protocol.• The names of files on the remote host must be specified using the file-naming conventions of the
remote host.
Invoking FTP and Logging InYou can use FTP interactively or in batch mode with a command file.
When you invoke FTP, an FTP server process is created on the remote host. You can perform a limited set of operations on the files and directories that you have permission to access. FTP authenticates you on the remote host by checking the user name and password you specify against those in the authorization database on the remote host. For simplicity in this discussion, this verification process is referred to as logging in; however, you do not actually log in interactively to the remote host.
To illustrate, assume you are a user on the local system and you want to log into the remote host RESEARCH.FLOWERS.COM. You can log in as yourself (by entering your name) or you can log in as any other user on RESEARCH, for example, "MARK" or "BUBBA," as long as the specified user name is valid on the remote host and you know Mark's or Bubba's password.
5-3
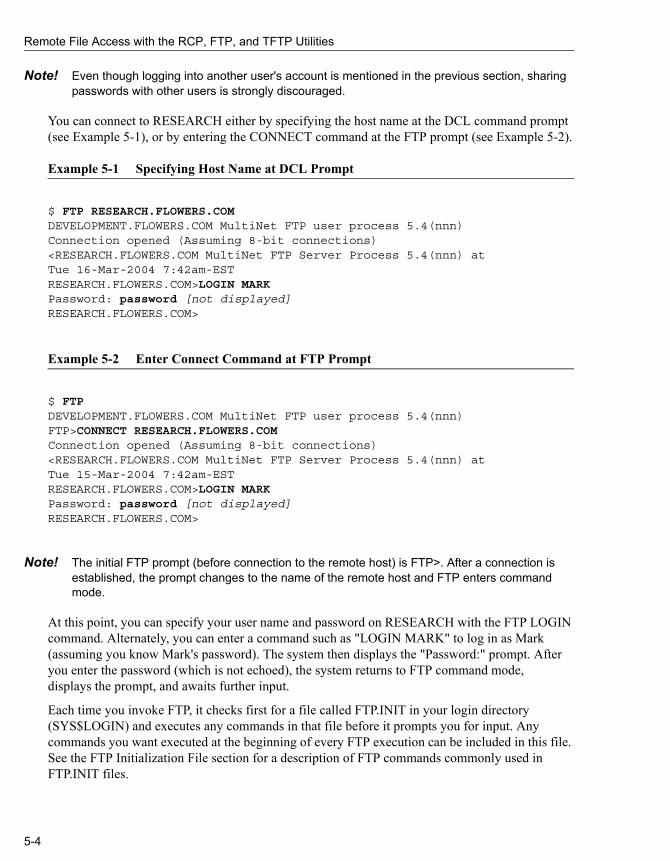
Remote File Access with the RCP, FTP, and TFTP Utilities
Note! Even though logging into another user's account is mentioned in the previous section, sharing passwords with other users is strongly discouraged.
You can connect to RESEARCH either by specifying the host name at the DCL command prompt (see Example 5-1), or by entering the CONNECT command at the FTP prompt (see Example 5-2).
Example 5-1 Specifying Host Name at DCL Prompt
$ FTP RESEARCH.FLOWERS.COMDEVELOPMENT.FLOWERS.COM MultiNet FTP user process 5.4(nnn)Connection opened (Assuming 8-bit connections)<RESEARCH.FLOWERS.COM MultiNet FTP Server Process 5.4(nnn) atTue 16-Mar-2004 7:42am-ESTRESEARCH.FLOWERS.COM>LOGIN MARKPassword: password [not displayed]RESEARCH.FLOWERS.COM>
Example 5-2 Enter Connect Command at FTP Prompt
$ FTPDEVELOPMENT.FLOWERS.COM MultiNet FTP user process 5.4(nnn)FTP>CONNECT RESEARCH.FLOWERS.COMConnection opened (Assuming 8-bit connections)<RESEARCH.FLOWERS.COM MultiNet FTP Server Process 5.4(nnn) atTue 15-Mar-2004 7:42am-ESTRESEARCH.FLOWERS.COM>LOGIN MARKPassword: password [not displayed]RESEARCH.FLOWERS.COM>
Note! The initial FTP prompt (before connection to the remote host) is FTP>. After a connection is established, the prompt changes to the name of the remote host and FTP enters command mode.
At this point, you can specify your user name and password on RESEARCH with the FTP LOGIN command. Alternately, you can enter a command such as "LOGIN MARK" to log in as Mark (assuming you know Mark's password). The system then displays the "Password:" prompt. After you enter the password (which is not echoed), the system returns to FTP command mode, displays the prompt, and awaits further input.
Each time you invoke FTP, it checks first for a file called FTP.INIT in your login directory (SYS$LOGIN) and executes any commands in that file before it prompts you for input. Any commands you want executed at the beginning of every FTP execution can be included in this file. See the FTP Initialization File section for a description of FTP commands commonly used in FTP.INIT files.
5-4

Remote File Access with the RCP, FTP, and TFTP Utilities
Note! Because the FTP server process is started by running SYS$SYSTEM:LOGINOUT.EXE, both the system-wide login command procedure (SYS$MANAGER:SYLOGIN.COM) and the specific user's LOGIN.COM are executed. As a result, any customization such as specifying default file protection, or process/job logical name definitions, and so on, are invoked in these command procedures and are available under the FTP server process.
All standard OpenVMS security-checking mechanisms are used to validate the FTP server process creation. If either of these command procedures contain any commands that are specific to interactive jobs (SET TERMINAL commands, for example), the FTP server process may crash. The easiest way to avoid this problem, without altering the functionality of these command procedures, is to use the DCL lexical function F$MODE together with interactive specific commands. For example:
$ IF F$MODE() .EQS. "INTERACTIVE" THEN SET TERMINAL /INQUIRE
The FTP Log Files section provides more information to assist you in determining the cause of any problems with the FTP server.
Using FTP CommandsAfter you have logged into a remote host, as described in the Invoking FTP and Logging In section, you can use FTP commands for operations such as copying files between hosts, changing working directories, listing directories, removing files, and renaming files. All FTP commands are described in Appendix B.
The FTP user interface looks very similar to the TOPS-20 command interface. In particular:
• You can type an ESC (escape character) at any point to attempt to complete (fill in) the current command, parameter (including file names), or qualifier.
• You can type a question mark (?) at any time for help on what to enter next.• A question mark entered at the current FTP prompt displays the currently available commands.
The commands that are available depend on whether or not a connection to a remote server has been established. Some commands are always recognized; others are recognized only before or after a connection has been made.
Getting FTP Command HelpThe HELP command displays a brief description of a specified FTP command, general help information, or a list of available HELP topics. The format of the HELP command is as follows:
FTP>HELP [command]
If you specify the command name, HELP displays information for the specified command. If you type a ? in place of a command, HELP displays general help information. If you request HELP without an argument, the HELP facility lists available help topics and instructions for obtaining additional information.
Note! The available commands vary depending on whether you have an open connection to a remote host.
5-5

Remote File Access with the RCP, FTP, and TFTP Utilities
Using Basic FTP CommandsSome commands simply set or reset various FTP options. They can be explicitly set using the ON argument or reset using the OFF argument. The default, if no argument is typed, is TOGGLE. Hence, if an option is on, executing the command controlling the option sets it to off. Executing the command a second time resets it to on. For example, when you first invoke FTP, the VERBOSE option (which gives detailed messages) is off. The following command would toggle VERBOSE on:
FTP>VERBOSE
You can reset the VERBOSE option to off by executing the above command a second time, hence "toggling" the setting back and forth.
You can display the state of a MultiNet FTP Server at any given time using the STATUS command. The following example shows the information reported by the STATUS command. Note, however, that some FTP implementations do not support the STATUS command.
RESEARCH.FLOWERS.COM>STATUS<RESEARCH.FLOWERS.COM MultiNet FTP Server Process 5.4 (nnn)User MARK logged into directory USERS:[MARK]<The current transfer parameters are:< MODE S< STRU O VMS< TYPE A N<A connection is open to host DEVELOPMENT.FLOWERS.COM<The data connection is CLOSED.
Specifying TCP Window Size with FTPThe FTP Server and Client let you specify the TCP window sizes to use during an FTP transfer. The value to be used is determined as follows:
If none of these criteria exist, then use the default value 32768.
In all cases, the value must be between NET_MIN_TCPWINDOW and NET_MAX_TCPWINDOW (presently 512 and 1073741824, respectively). The size of the send and receive buffers is set to the specified value.
Table 5-1 TCP Window Size During an FTP Transfer
If... Then use...
The logical name MULTINET_FTP_WINDOW_SIZE is defined
Its equivalence string as the value.
The /WINDOW_SIZE qualifier is specified with FTP [/SERVER]
The value specified with the qualifier.
A value is specified with [SITE] WINDOW-SIZE size The value specified.
5-6

Remote File Access with the RCP, FTP, and TFTP Utilities
File Name TranslationsWhen you issue an FTP GET command to a host running the UNIX Operating System and you do not specify an output file name, the resulting VMS file name can contain unexpected characters. These characters occur because the UNIX Operating System has case-sensitive characters and special symbols that require conversion before they can be used with VMS.
You can use the /FDL qualifier with the FTP client GET and PUT commands for compatibility with HP’s TCP/IP Services for OpenVMS (formerly UCX). When you create a file with the PUT /FDL qualifier, a file description language (FDL) file is created at the same time as the original file. The contents of the original file are transmitted in IMAGE (binary) mode.
The FDL file has the same name except that "FDL" is appended to the file name extension.
An example of the PUT command is:
host>PUT /FDL AFILE.TXT BFILE.TXT<ASCII Store of USERS:[ME]BFILE.TXTFDL;1 started.<Transfer completed. 888 (8) bytes transferred.<IMAGE Store of USERS:[ME]BFILE.TXT;1 started.<Transfer completed. 6 (8) bytes transferred.
This command copies AFILE.TXT to BFILE.TXT on the system to which you are connected, then creates another file, BFILE.TXTFDL.
The BFILE.TXTFDL file is in ASCII format and resembles:
IDENT " 15-MAR-2004 17:13:24 VAX/VMS FDL$GENERATE Routine"SYSTEM SOURCE VAX/VMSFILE ALLOCATION 5 BEST_TRY_CONTIGUOUS no BUCKET_SIZE 0 CONTIGUOUS no DEFERRED_WRITE no EXTENSION 0 GLOBAL_BUFFER_COUNT 0 MT_BLOCK_SIZE 512 MT_PROTECTION 32 MAX_RECORD_NUMBER 0 MAXIMIZE_VERSION no NAME "USERS:[ME]AFILE.TXT;1" ORGANIZATION sequential OWNER [STAFF,ME] PROTECTION (system:RWED, owner:RWED,group:,world:) READ_CHECK no SUPERSEDE no WRITE_CHECK noRECORD BLOCK_SPAN yes CARRIAGE_CONTROL carriage_return CONTROL_FIELD_SIZE 0
5-7
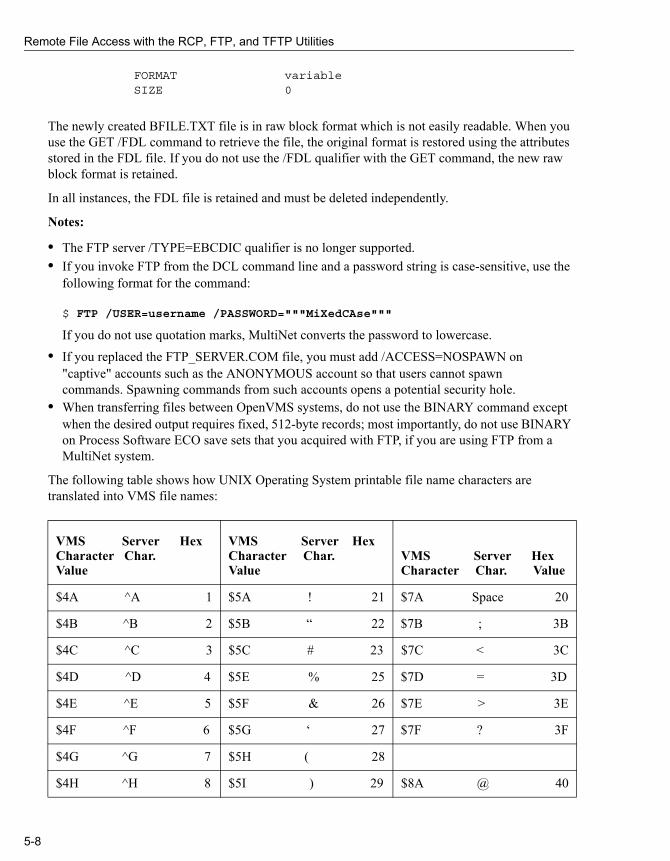
Remote File Access with the RCP, FTP, and TFTP Utilities
FORMAT variable SIZE 0
The newly created BFILE.TXT file is in raw block format which is not easily readable. When you use the GET /FDL command to retrieve the file, the original format is restored using the attributes stored in the FDL file. If you do not use the /FDL qualifier with the GET command, the new raw block format is retained.
In all instances, the FDL file is retained and must be deleted independently.
Notes:
• The FTP server /TYPE=EBCDIC qualifier is no longer supported.• If you invoke FTP from the DCL command line and a password string is case-sensitive, use the
following format for the command:
$ FTP /USER=username /PASSWORD="""MiXedCAse"""
If you do not use quotation marks, MultiNet converts the password to lowercase.• If you replaced the FTP_SERVER.COM file, you must add /ACCESS=NOSPAWN on
"captive" accounts such as the ANONYMOUS account so that users cannot spawn commands. Spawning commands from such accounts opens a potential security hole.
• When transferring files between OpenVMS systems, do not use the BINARY command except when the desired output requires fixed, 512-byte records; most importantly, do not use BINARY on Process Software ECO save sets that you acquired with FTP, if you are using FTP from a MultiNet system.
The following table shows how UNIX Operating System printable file name characters are translated into VMS file names:
VMS Server HexCharacter Char. Value
VMS Server HexCharacter Char. Value
VMS Server HexCharacter Char. Value
$4A ^A 1 $5A ! 21 $7A Space 20
$4B ^B 2 $5B “ 22 $7B ; 3B
$4C ^C 3 $5C # 23 $7C < 3C
$4D ^D 4 $5E % 25 $7D = 3D
$4E ^E 5 $5F & 26 $7E > 3E
$4F ^F 6 $5G ‘ 27 $7F ? 3F
$4G ^G 7 $5H ( 28
$4H ^H 8 $5I ) 29 $8A @ 40
5-8
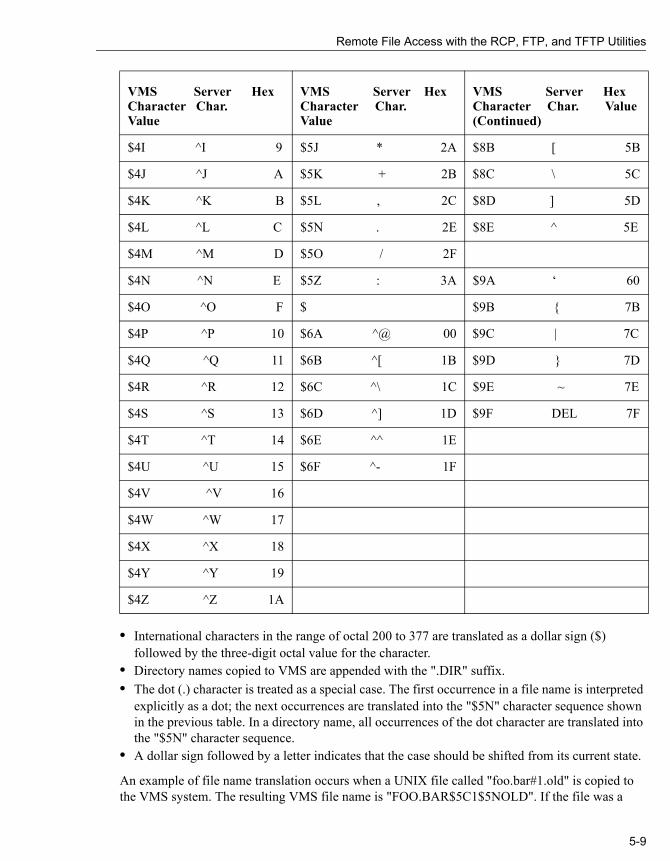
Remote File Access with the RCP, FTP, and TFTP Utilities
• International characters in the range of octal 200 to 377 are translated as a dollar sign ($) followed by the three-digit octal value for the character.
• Directory names copied to VMS are appended with the ".DIR" suffix.• The dot (.) character is treated as a special case. The first occurrence in a file name is interpreted
explicitly as a dot; the next occurrences are translated into the "$5N" character sequence shown in the previous table. In a directory name, all occurrences of the dot character are translated into the "$5N" character sequence.
• A dollar sign followed by a letter indicates that the case should be shifted from its current state.
An example of file name translation occurs when a UNIX file called "foo.bar#1.old" is copied to the VMS system. The resulting VMS file name is "FOO.BAR$5C1$5NOLD". If the file was a
$4I ^I 9 $5J * 2A $8B [ 5B
$4J ^J A $5K + 2B $8C \ 5C
$4K ^K B $5L , 2C $8D ] 5D
$4L ^L C $5N . 2E $8E ^ 5E
$4M ^M D $5O / 2F
$4N ^N E $5Z : 3A $9A ‘ 60
$4O ^O F $ $9B { 7B
$4P ^P 10 $6A ^@ 00 $9C | 7C
$4Q ^Q 11 $6B ^[ 1B $9D } 7D
$4R ^R 12 $6C ^\ 1C $9E ~ 7E
$4S ^S 13 $6D ^] 1D $9F DEL 7F
$4T ^T 14 $6E ^^ 1E
$4U ^U 15 $6F ^- 1F
$4V ^V 16
$4W ^W 17
$4X ^X 18
$4Y ^Y 19
$4Z ^Z 1A
VMS Server HexCharacter Char. Value
VMS Server HexCharacter Char. Value
VMS Server HexCharacter Char. Value (Continued)
5-9

Remote File Access with the RCP, FTP, and TFTP Utilities
directory, the translated name would be "FOO$5NBAR$5C1$5NOLD.DIR". If the UNIX file name was "Foo.BAr#1.old", the translated case-sensitive VMS file name would be "$F$OO.$BA$R$5C1$5NOLD".
Listing the Contents of a FileYou can use the GET command to list the contents of a file as follows:
$ GET filename TT:
This command displays a list of the files on your terminal, and works with all FTP servers.
Working with DirectoriesWhen you open a connection to a remote host and log in, your default directory is set to your login directory on the remote system. If you log in as another user, your default directory is set to that user's login directory. You can find out the path name of this directory with the command:
FTP>PWD
You can list the contents of your current working directory on the remote host with the command:
FTP>DIR
You can change the working directory on the remote host to remote_directory with the command:
FTP>CD remote_directory
To change the working directory on the local host to local_directory, use the command:
FTP>LCD local_directory
Commands for Copying FilesThe GET and PUT commands are the two basic commands for copying files between your system and a remote host. The GET command copies a single file from the remote host to your system. The PUT command copies a single file from your system to the remote host. These commands have the following format:
FTP>GET remote_file local_fileFTP>PUT local_file remote_file
Under OpenVMS, the GET and PUT commands create new files. For other operating systems, the file is only created if it does not exist; if the file exists, an error displays. The AGET and APUT commands can be used to append to an existing file. These two commands have the following format:
FTP>AGET remote_file local_fileFTP>APUT local_file remote_file
5-10
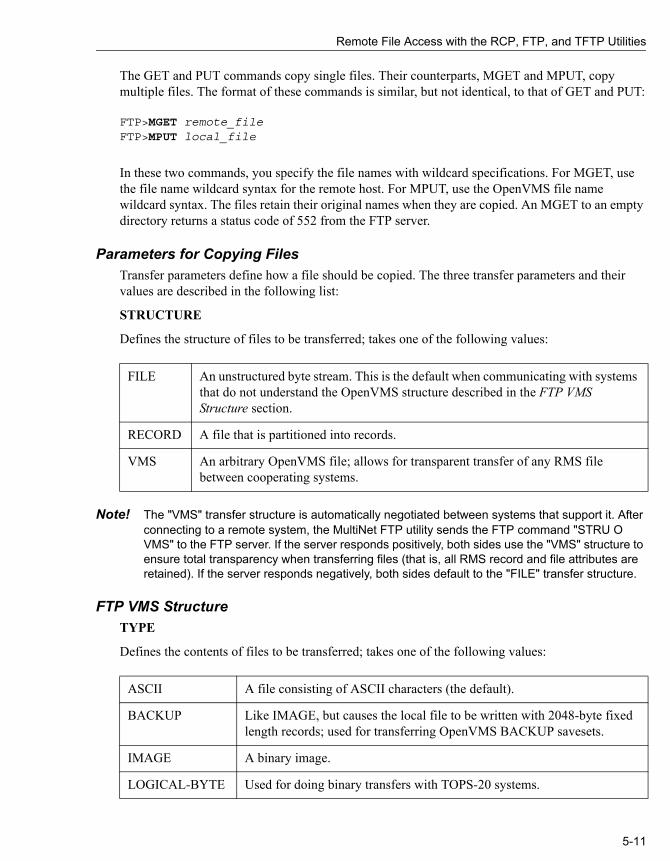
Remote File Access with the RCP, FTP, and TFTP Utilities
The GET and PUT commands copy single files. Their counterparts, MGET and MPUT, copy multiple files. The format of these commands is similar, but not identical, to that of GET and PUT:
FTP>MGET remote_fileFTP>MPUT local_file
In these two commands, you specify the file names with wildcard specifications. For MGET, use the file name wildcard syntax for the remote host. For MPUT, use the OpenVMS file name wildcard syntax. The files retain their original names when they are copied. An MGET to an empty directory returns a status code of 552 from the FTP server.
Parameters for Copying FilesTransfer parameters define how a file should be copied. The three transfer parameters and their values are described in the following list:
STRUCTURE
Defines the structure of files to be transferred; takes one of the following values:
Note! The "VMS" transfer structure is automatically negotiated between systems that support it. After connecting to a remote system, the MultiNet FTP utility sends the FTP command "STRU O VMS" to the FTP server. If the server responds positively, both sides use the "VMS" structure to ensure total transparency when transferring files (that is, all RMS record and file attributes are retained). If the server responds negatively, both sides default to the "FILE" transfer structure.
FTP VMS StructureTYPE
Defines the contents of files to be transferred; takes one of the following values:
FILE An unstructured byte stream. This is the default when communicating with systems that do not understand the OpenVMS structure described in the FTP VMS Structure section.
RECORD A file that is partitioned into records.
VMS An arbitrary OpenVMS file; allows for transparent transfer of any RMS file between cooperating systems.
ASCII A file consisting of ASCII characters (the default).
BACKUP Like IMAGE, but causes the local file to be written with 2048-byte fixed length records; used for transferring OpenVMS BACKUP savesets.
IMAGE A binary image.
LOGICAL-BYTE Used for doing binary transfers with TOPS-20 systems.
5-11

Remote File Access with the RCP, FTP, and TFTP Utilities
MODE
Defines how the file should be transferred; takes one of the following values:
FTP commands copy files using the current transfer parameters. When you first start FTP, the default transfer parameters are FILE structure, ASCII type, and STREAM mode. VMS structure is used if the FTP Server supports it. Use the following commands to change the transfer parameters from their defaults:
FTP>TYPE type_nameFTP>STRUCTURE struct_nameFTP>MODE mode_name
There are a number of command synonyms for the TYPE and STRUCTURE commands; see Appendix B for a complete list.
FTP Commands While a Transfer is in ProgressControl characters entered during an FTP file transfer have the following effects:
Aborting a file transfer does not work correctly with servers that do not support the ABOR (abort) command. If attempted, the connection to the server may be lost.
Issuing FTP Commands From the DCL Command LineYou usually run the FTP utility by typing the FTP command then issuing additional commands once the program starts. If you are only interested in transferring one file, or issuing a single FTP command, you can specify the command on the DCL command line. See MULTINET FTP in Appendix A for the complete DCL command syntax.
For example, if you wish to retrieve the file "pub/hack.c" via anonymous login to the host FLOWERS.COM, you might issue the DCL command:
$ FTP /USER=ANONYMOUS /PASSWORD=GUEST FLOWERS.COM GET pub/hack.c hack.c
COMPRESSED Run length-encoded compression.
STREAM Normal data transfer (the default).
Press... To
Ctrl/G Send an abort command to the remote server, thus aborting a data transfer.
Ctrl/A Display the state and progress of the file transfer.
Ctrl/P Suspend the transfer and spawn a new DCL subprocess. The file transfer will continue upon return to the FTP program from the spawned DCL subprocess.
5-12

Remote File Access with the RCP, FTP, and TFTP Utilities
To get a listing of the "pub" directory on this same system, you would use the command:
$ FTP /USER=ANONYMOUS /PASSWORD=GUEST FLOWERS.COM DIR pub
If you want to retrieve all files in the "pub" directory and copy them to your current directory on your local system, you might use the command:
$ FTP /USER=ANONYMOUS /PASSWORD=GUEST FLOWERS.COM MGET pub/*
FTP Command ScriptsFTP commands are usually entered directly from the keyboard. You can, however, execute a predefined sequence of FTP commands by redirecting standard input (SYS$INPUT) interactively, or from within a DCL command procedure.
The following example shows an interactive session that uses a predefined command script, in this case in the file FTP.COM, to control FTP:
$ FTP /TAKE=FTP.COM
The following example shows a sample FTP.COM file. The italicized comments are provided only to explain each line in the FTP.COM file; do not include them in the actual file!
SET FLOWERS.COM /USER:BOOJUM /PASS:SNARK Set user & passwordCONNECT FLOWERS.COM Open connectionGET FOO.BAR NEWFOO.BAR Execute an FTP commandEXIT Conclude session
The following example shows a DCL command procedure that runs FTP to get the file FOO.BAR from the remote host FLOWERS.COM.
$! FTP DCL command procedure$ FTPSET FLOWERS.COM /USER:BOOJUM /PASS:SNARKCONNECT FLOWERS.COMGET FOO.BAR NEWFOO.BAREXIT$! continue with any other commands
Ending an FTP SessionOnce you have finished with your FTP session, you can either break the connection with the remote system while still remaining in FTP command mode, or you can log out from the remote host, exit FTP, and return to DCL.
To close the current connection without terminating in FTP, enter the command:
FTP>BYEFTP>
5-13

Remote File Access with the RCP, FTP, and TFTP Utilities
To close the connection and return to DCL, enter the command:
FTP>EXIT$
Using FTP over TLS (FTPS)The FTP client can use FTP over TLS as specified in RFC 4217. Use the AUTHENTICATE command before the USER command to start a session with a secure command stream. The PROTECTION PRIVATE command can then be used to set file transfers to be encrypted. The CCC command will return the command stream to clear text mode, which is often necessary when traversing a firewall. The FTP client can also be started with /AUTHENTICATE=TLS to automatically enter TLS authentication after connection to the remote system.
FTP Log FilesThe MultiNet FTP Server keeps a log of all FTP transactions that occur between the client and server after login in the file FTP_SERVER.LOG in the login directory on the server system. The following sample log file contains the FTP transactions involved in a user logging in under the user name SMITH, issuing a "DIRECTORY" command, and then retrieving the file "FOO.BAR."
Note! If the MultiNet FTP server process does not start or mysteriously disappears, examine the beginning of the FTP_SERVER.LOG file for any error messages.
Because the system-wide login command procedure (SYS$MANAGER:SYLOGIN.COM) and the user's LOGIN.COM are executed as part of the server process creation, any errors in these procedures can cause the server process to die suddenly. In most instances, however, the reason for the process terminating will appear at the beginning of the FTP_SERVER.LOG file.
-------------------------------------------------------FTP Login request received at Tue Mar 16 15:30:27 2004 from remote IP address 127.0.0.1------------------------------------------------------->>> 230 User SMITH logged into U1:[SMITH] at Tue 16-Mar-04 15:30, job 3a.<<< TYPE A>>> 200 Type A ok.<<< STRU F>>> 200 Stru F ok.<<< MODE S>>> 200 Mode S ok.<<< PORT 127,0,0,1,4,14>>> 200 Port 4.14 at Host 127.0.0.1 accepted.<<< LIST>>> 150 List started.>>> 226 Transfer completed.<<< PORT 127,0,0,1,4,15>>> 200 Port 4.15 at Host 127.0.0.1 accepted.<<< RETR foo.bar>>> 150 ASCII retrieve of USERS:[SMITH]FOO.BAR;1 started (210 bytes).>>> 226 Transfer completed. 210 (8) bytes transferred.
5-14

Remote File Access with the RCP, FTP, and TFTP Utilities
<<< QUIT>>> 221 QUIT command received. Goodbye.SMITH job terminated at 16-MAR-2004 15:31:23.08
5-15

Remote File Access with the RCP, FTP, and TFTP Utilities
Anonymous FTPMany system managers use "anonymous FTP" to allow network access to files of general interest on their system, without having to assign a user name to each user who wants access to the files. Anonymous FTP means that the ANONYMOUS login is created on a system to permit anyone access to that system. When using anonymous FTP, connect to the remote system as you would normally, but instead of specifying your user name, specify the user name "anonymous" and the password "guest." In many implementations, you are restricted to read-only access of the files in a certain directory or a certain directory tree.
Note! While many systems allow you to use any password, some systems only allow anonymous FTP access with the password "guest." Many systems prefer you to enter your e-mail address (username@host) instead of the "guest" password; either method works. Also, specify the "anonymous" user name in lowercase, as many systems (primarily those running UNIX) support case-sensitive user names. Hence, "anonymous" and "ANONYMOUS" are considered different user names, and only the former can be used for anonymous FTP access.
Transferring Files From Behind a FirewallThe MultiNet FTP Client PASSIVE command allows a range of control of the PASV directive for transferring files from FTP servers when your system is located behind a "firewall" gateway. The list of parameters and an explanation of how they work follows:
• an ON parameter (the default setting)• an OFF parameter• a NEGOTIATED parameter• a /PASV DCL qualifier, allows you to specify the PASSIVE command setting as you start up the
FTP Client (at the FTP> prompt, you may specify either PASSIVE or PASV; the two are interchangeable)
Note! If the change in the default setting causes you problems or changes the way things have worked for you in the past, you may control the default setting for your site by putting the appropriate PASSIVE command in the file MULTINET:FTP.INIT.
With PASSIVE mode ON, the Client sends the PASV directive to the Server, instructing it to wait for the Client to make the data connection. If the Server does not understand the PASV command, the connection is aborted. The default for PASSIVE is ON to help facilitate transfers through a firewall. Under certain conditions, this default might cause problems. Use the MultiNet FTP client logical MULTINET_FTP_NONPASV to turn off the PASSIVE mode default or use the passive command on the command line. When you define this logical, passive mode is not used as the default.
With PASSIVE mode OFF, the FTP Client expects the FTP Server to establish the connection over which data is transferred. (Note that this may not work through firewalls as some FTP Servers do not support the PASSIVE command.)
With PASSIVE mode NEGOTIATED, the FTP Client sends the PASV command as with PASSIVE mode ON, but switches the mode to OFF if the FTP Server generates an error in response.
5-16

Remote File Access with the RCP, FTP, and TFTP Utilities
The /NONPASV, /PASV, and /PASV=NEGOTIATE qualifiers allow you to specify each of the PASSIVE mode settings as you start up the FTP Client.
When an IPv6 connection is in use the FTP Client sends the EPSV command instead of the PASV command. All user commands and behavior described above remain the same.
FTP Initialization FileOn startup, FTP executes commands in the FTP.INIT file in your login directory (if the file exists), to allow you to customize your FTP sessions. Table 5-2 lists commands you may find useful to have in your FTP.INIT file.
If you invoke FTP with the /NOINITIALIZATION qualifier, the FTP.INIT file is not processed.
The commands in Table 5-2 are more completely documented in Appendix B.
Troubleshooting FTPAs the first step in any FTP troubleshooting, check the FTP_SERVER_LOG file for error messages.
General Troubleshooting TipsIf the logged information does not help, check the following:
1 Make sure the FTP server is running on the remote system.
Table 5-2 FTP Commands for the FTP.INIT File
BELL ON Rings the terminal bell when a file transfer operation is completed.
EXIT-ON-ERROR ON Causes FTP to exit after any error occurs.
HASH ON Prints a pound sign (#) for each data buffer transferred.
PROMPT-FOR-MISSING-ARGUMENTS OFF
Disables FTP prompting for missing command line arguments.
PROMPT-ON-CONNECT ON Automatically prompts for user name and password when a connection to the remote system is established.
SET host /USERNAME:username [/PASSWORD:password]
Sets the default user name or default user name and password for the specified host. If you place SET commands containing passwords in your FTP.INIT file, be careful to protect the file from access by others.
STATISTICS ON Upon completion of file transfers, displays transfer timing statistics.
VERBOSE ON Displays all responses from the remote FTP server as they are received.
5-17
Remote File Access with the RCP, FTP, and TFTP Utilities
2 Ping the FTP server to make sure it is available through the network.3 If the remote host is on the other side of a firewall, try Passive Mode.4 Make sure you entered the correct user name and password for the remote system.
Transmitted Files Are CorruptIf you can copy files, but the files are corrupted after transmission, verify that you are using the correct transfer mode-ASCII or binary. Use ASCII mode for text files and binary mode for executable files, compressed files, graphics files, and any other non-text files. Use Logical-Byte mode if the remote system does not use the standard 8-bit byte.
Copying Files Using TFTPLike the FTP, TFTP copies files between your system and a remote host. Unlike FTP, you cannot perform operations other than copying files between your system and a remote one (you cannot list directories, delete files, and so on). Also, TFTP does not perform any authentication when transferring files, so a user name and password on the remote host are not required. In general, only files with world read (W:R) access in certain directories on the remote host are available for reading, and only certain directories are available for writing.
Note! TFTP does not check the permissions of directories before attempting to access them. Because the TFTP protocol does not specify any user login or validation, the remote system will probably have some sort of file-access restrictions. The exact restrictions are site-specific and thus cannot be documented here.
The mail option of TFTP, as defined in RFC-783, is obsolete and not supported under the MultiNet TFTP server.
Requirements for TFTPWhen you copy a file from a remote host, it must be world-readable (W:R). When copying a file to a remote host:
• A file of the same name must already exist on the remote host.• The file must be world-writable (W:W).
If these two conditions are not met, TFTP will fail.
Using TFTPTo start TFTP, enter the following command:
$ tftp remote_hosttftp>
remote_host is the name of the remote system with which you want to transfer files.
To transfer a file from your system to a remote host, enter a TFTP command in the following format:
5-18

Remote File Access with the RCP, FTP, and TFTP Utilities
tftp>put local_file remote_file
For example, suppose you want to transfer the file "user:[boojum]accts.log" from your system to the file "/x/boojum/accts.log" on the remote host sales.flowers.com. To do this, you would enter the following commands:
$ tftp sales.flowers.comtftp>put user:[boojum]accts.log /x/boojum/accts.log
Both the directory "/x/boojum" and the file "accts.log" must already exist on the remote host, and "accts.log" must be world-writable.
To transfer a file to your system from a remote host, issue a TFTP command in the following format:
$ tftp sales.flowers.comtftp>get remote_file local_file
For example, suppose you want to transfer the file "/x/boojum/accts.log" from the remote host "sales.flowers.com" to the file "user:[boojum]accts.log" on the your system. To do this, you would enter the following commands:
$ tftp sales.flowers.comtftp>get /x/boojum/accts.log user:[boojum]accts.log
The file "/x/boojum/accts.log" must be world-readable.
local_file Identifies the file you are transferring.
remote_file Specifies the name you want the file to have on the remote system. If you specify a file name, it must be an absolute path name (device, directory, and file name). If you do not specify a file name, it defaults to the same name as local_file.
local_ file Specifies the name you want the file to have on your system. If you do not specify a file name, it defaults to the same name as the remote_file.
remote_file Identifies the file you want to transfer from the remote host. You must supply an absolute path name (device, directory, and file name).
5-19

Remote File Access with the RCP, FTP, and TFTP Utilities
5-20

Chapter 6
Using DECwindows with MultiNetStarting with V5.3, OpenVMS supports running DECwindows applications over TCP/IP. This feature provides the ability to run X Windows applications not only between OpenVMS and ULTRIX systems, but also using non-Hewlett-Packard computer systems that support X Windows (for example, UNIX workstations, Apple Macintosh systems, PCs, and so on). For more information about running DECwindows applications over a network, see the VMS DECwindows User's Guide.
For information about Running DECwindows applications over MultiNet TCP/IP see the Running DECwindows Applications section.
For information about Authorizing remote systems to access the local display see the Authorizing Remote Systems section.
Running DECwindows ApplicationsTo run a DECwindows application on an OpenVMS system over TCP/IP using MultiNet, you must first use the DCL command SET DISPLAY to indicate to DECwindows which system display it should use for the application's user interface.
Note! If you are accessing a remote system using TELNET, RLOGIN, or RSHELL, SET DISPLAY is performed automatically.
Use the /NODE qualifier to specify the remote host name or IP address, and the /TRANSPORT qualifier to specify "TCPIP" transport. The following example shows how to run the application SYS$SYSTEM:DECW$PUZZLE.EXE on the local OpenVMS system, and direct the output to an ULTRIX host named ZEPHYR.FLOWERS.COM.
$ SET DISPLAY /CREATE /NODE=ZEPHYR.FLOWERS.COM /TRANSPORT=TCPIP$ RUN SYS$SYSTEM:DECW$PUZZLE
6-1

Using DECwindows with MultiNet
Authorizing Remote SystemsBefore running a DECwindows application on a remote system and directing the user interface to an OpenVMS workstation running MultiNet, you must authorize the remote system to have access to the local display. Under the DECwindows Session Manager Customize menu, select the Security option. When the Customize Security dialog box appears, specify TCPIP for the Transport, the Internet host name of the remote host for the Node, and a question mark (?) for the Username for each host you wish to grant access to the local display.
Note! EACH user on a workstation who wishes to allow access to the local display from a remote system must specify the remote system under the Customize Security dialog box. A different list is maintained for each user.
6-2

Chapter 7
Accessing Remote Systems with the SecureShell (SSH) Utilities
The SSH implementation for MultiNet provides the client software for allowing secure interactive connections to other computers in the manner of rlogin/rshell/telnet.
The following topics describe how to configure, maintain, and use the following MultiNet client and utilities:
•Secure Shell Client (remote login program)•SSHKEYGEN•SSHAGENT (authentication agent)•SSHADD•CERTTOOL•CERTVIEW•CMPCLIENT•Public-key Subsystem
SSH Protocol SupportThe SSH client software supports both the SSH1 and SSH2 protocols. SSH1 and SSH2 are different, and incompatible protocols. The SSH1 implementation is based on the V1.5 protocol and 1.3.7 F-Secure code base, and the SSH2 implementation is based on the V2 protocol and the F-Secure 3.2.0 code base. While SSH2 is generally regarded to be more secure than SSH1, both protocols are offered by MultiNet, and although they are incompatible, they may exist simultaneously on server systems, including MultiNet servers. The SSH client identifies the protocol(s) offered b3y any given server. If both SSH2 and SSH1 protocols are offered, the client will always use SSH2. Otherwise, the client will use the correct protocol based on the server’s capability.
The cryptographic library used by MultiNet SSH2 (this does not apply to SSH1 sessions) is compiled from unaltered cryptographic source code from F-Secure which is FIPS 140-2 level 2 compliant, as determined by the Computer Security Division of the National Institute of Science and Technology (NIST).
7-1
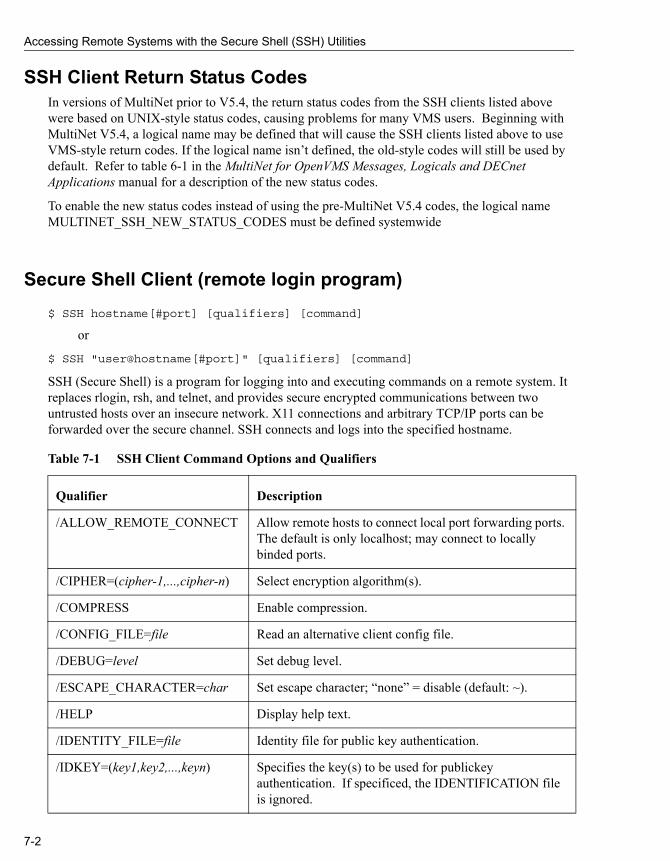
Accessing Remote Systems with the Secure Shell (SSH) Utilities
SSH Client Return Status CodesIn versions of MultiNet prior to V5.4, the return status codes from the SSH clients listed above were based on UNIX-style status codes, causing problems for many VMS users. Beginning with MultiNet V5.4, a logical name may be defined that will cause the SSH clients listed above to use VMS-style return codes. If the logical name isn’t defined, the old-style codes will still be used by default. Refer to table 6-1 in the MultiNet for OpenVMS Messages, Logicals and DECnet Applications manual for a description of the new status codes.
To enable the new status codes instead of using the pre-MultiNet V5.4 codes, the logical name MULTINET_SSH_NEW_STATUS_CODES must be defined systemwide
Secure Shell Client (remote login program)$ SSH hostname[#port] [qualifiers] [command]
or
$ SSH "user@hostname[#port]" [qualifiers] [command]
SSH (Secure Shell) is a program for logging into and executing commands on a remote system. It replaces rlogin, rsh, and telnet, and provides secure encrypted communications between two untrusted hosts over an insecure network. X11 connections and arbitrary TCP/IP ports can be forwarded over the secure channel. SSH connects and logs into the specified hostname.
Table 7-1 SSH Client Command Options and Qualifiers
Qualifier Description
/ALLOW_REMOTE_CONNECT Allow remote hosts to connect local port forwarding ports. The default is only localhost; may connect to locally binded ports.
/CIPHER=(cipher-1,...,cipher-n) Select encryption algorithm(s).
/COMPRESS Enable compression.
/CONFIG_FILE=file Read an alternative client config file.
/DEBUG=level Set debug level.
/ESCAPE_CHARACTER=char Set escape character; “none” = disable (default: ~).
/HELP Display help text.
/IDENTITY_FILE=file Identity file for public key authentication.
/IDKEY=(key1,key2,...,keyn) Specifies the key(s) to be used for publickey authentication. If specificed, the IDENTIFICATION file is ignored.
7-2

Accessing Remote Systems with the Secure Shell (SSH) Utilities
/IPV4 Use IPV4 protocol to connect.
/IPV6 Use IPV6 protocol to connect.
/LOCAL_FORWARD=([protocol/]listen-port:host:port,...)
Causes the given port on the local (client) host to be forwarded to the given host and port on the remote side. The system to which SSH connects acts as the intermediary between the two endpoint systems. Port forwardings can be specified in the configuration file. Only system can forward privileged ports.
See the Port Forwarding section for more details.
/LOG_FILE=logfilename Log all terminal activity to the specified log file. Defaults to SYS$DISK:[]SSH.LOG if “logfilename” is not specified.
/MAC=(mac-1,...,mac-n) Select MAC algorithm(s).
/NO_AGENT_FORWARDING Disable authentication agent forwarding.
/NO_X11_FORWARDING Disable X11 connection forwarding.
/OPTION=(option-1,...option-n) Gives options in the format used in the configuration file. This is useful for specifying options for which there is no separate command-line flag. The option has the same format as a line in the configuration file, and are processed prior to any keywords in the configuration file.
For example: /OPTION=(CompressionLevel=6)
/PORT=port Connect to this port on server system. Server must be listening on the same port.
/QUIET Quiet Mode. Causes all warning and diagnostic messages to be suppressed. Only fatal errors display.
/REMOTE_FORWARD=([protocol/]listen-port:host:port,...)
Forward remote port to local address. These cause ssh to listen for connections on a port, and forward them to the other side by connecting to host port.
USE_NONPRIV_PORT Use a non-privileged (>1023) source port.
USER=user Log in to the server system using this user name.
VERBOSE Display verbose debugging messages. Equal to“/DEBUG=2”.
Table 7-1 SSH Client Command Options and Qualifiers (Continued)
Qualifier Description
7-3

Accessing Remote Systems with the Secure Shell (SSH) Utilities
Initial Server System AuthenticationWhen an initial connection is made from the client system to the server system, a preliminary authentication of the server is made by the client. To accomplish this, the server system sends its public key to the client system.
SSH maintains a directory containing the public keys for all hosts to which it has successfully connected. For each user, this is the [.SSH2.HOSTKEYS] directory off the individual SYS$LOGIN directory1. In addition, a system-wide directory of known public keys exists in the system directory pointed to by the logical name MULTINET_SSH2_HOSTKEY_DIR, and this may be populated by the system manager. Both directories are searched as needed when establishing a connection between systems. Any new host public keys are added to the user's HOSTKEYS directory. If a host's identification changes, SSH warns about this and disables password authentication to prevent a trojan horse from getting the user's password. Another purpose of this mechanism is to prevent man-in-the-middle attacks that could be used to circumvent the encryption. The SSH configuration option StrictHostKeyChecking can be used to prevent logins to a system whose host key is not known or has changed.
Hostbased AuthenticationHostbased authentication relies on two things: the existence of the user's system and username in either SSH_DIR:HOSTS.EQUIV or in the individual user's SYS$LOGIN:.RHOSTS or SYS$LOGIN:.SHOSTS file; and the server system having prior knowledge of the client system's public host key.
•For SSH2 When a user logs in:
1 The server checks the SSH_DIR:HOSTS.EQUIV file, and the user's SYS$LOGIN:.RHOSTS and SYS$LOGIN:.SHOSTS files for a match for both the system and username. Wildcards are not permitted.
2 The server checks to see if it knows of the client's public host key (SSH2_DIR:HOSTKEY.PUB on VMS client systems) in either the user’s SYS$LOGIN:[SSH2.KNOWNHOSTS] directory or in the system-wide directory pointed to by the MULTINET_SSH2_KNOWNHOSTS_DIR logical name. The key file is named <FQDN>_<algorithm>.PUB. For example, if the client
/VERSION Display version number of the client.
1. In this chapter, the [.SSH] subdirectory in the user’s login directory displays as SYS$LOGIN:[.SSH][.SSH2] displays as SYS$LOGIN:[.SSH2]
Table 7-1 SSH Client Command Options and Qualifiers (Continued)
Qualifier Description
7-4

Accessing Remote Systems with the Secure Shell (SSH) Utilities
system is “foo.bar.com” and its key uses the DSS algorithm, the file that would contain its key on the server would be “FOO_BAR_COM_SSH-DSS.PUB”. This key file must exist on the server system before attempting hostbased authentication.
3 If the key file is found by the server, the client sends its digitally-signed public host key to the server. The server will check the signature for validity.
•For SSH1This form of authentication alone is not allowed by the server because it is not secure. The second (and primary) authentication method is the RHOSTS or HOSTS.EQUIV method combined with RSA-based host authentication. It means that if the login would be permitted by .RHOSTS, .SHOSTS, SSH_DIR:HOSTS.EQUIV, or SSH_DIR:SHOSTS.EQUIV file, and if the client’s host key can be verified (see SYS$LOGIN:[.SSH]KNOWN_HOSTS and SSH_DIR:SSH_KNOWN_HOSTS), only then is login permitted. This authentication method closes security holes due to IP spoofing, DNS spoofing, and routing spoofing.
Note! To the administrator: SSH_DIR:HOSTS.EQUIV,.RHOSTS, and the rlogin/rshell protocol are inherently insecure and should be disabled if security is desired.
Publickey AuthenticationThe SSH client supports DSA-based authentication for SSH2 sessions, and RSA-based authentication for SSH1 sessions. The scheme is based on public-key cryptography. There are cryptosystems where encryption and decryption are done using separate keys, and it is not possible to derive the decryption key from the encryption key.
•For SSH1SSH supports RSA-based authentication. The scheme is based on public-key cryptography. There are cryptosystems where encryption and decryption are done using separate keys, and it is not possible to derive the decryption key from the encryption key.
RSA is one such system. The idea is that each user creates a public/private key pair for authentication purposes. The server knows the public key (SYS$LOGIN:[.SSH]AUTHORIZED_KEYS lists the public keys permitted for log in), and only the user knows the private key.
When the user logs in:
1 The SSH client program tells the server the key pair it would like to use for authentication.2 The server checks if this key pair is permitted.
If it is permitted, the server sends the SSH client program running on behalf of the user a challenge (a random number) encrypted by the user's public key. The challenge can only be decrypted using the proper private key.
3 The user's client then decrypts the challenge using the private key, proving that he/she knows the private key but without disclosing it to the server.
4 SSH implements the RSA authentication protocol automatically.
7-5

Accessing Remote Systems with the Secure Shell (SSH) Utilities
The Key Identity files are created with SSHKEYGEN. To create the RSA key pair files with MultiNet:
• Run SSHKEYGEN to create the RSA key pair: IDENTITY and IDENTITY.PUB. Both of these files are stored in the user’s SYS$LOGIN:[.SSH]directory. IDENTITY.; is the private key; IDENTITY.PUB is the public key.
Once you have created your identity files:
1 Transfer the IDENTITY.PUB file to the remote machine.2 Update the AUTHORIZED_KEYS file on the remote machine by appending the contents of the
public key file to the SYS$LOGIN:[.SSH]AUTHORIZED_KEYS file on the remote host. The format of the AUTHORIZED_KEYS file requires that each entry consists of a single long line.
After this, the user can log in without giving the password. RSA authentication is much more secure than rhosts authentication. The most convenient way to use RSA authentication may be with an authentication agent. See Publickey Authentication for more information.
•For SSH2When the user logs in:
1 The client reads possible keys to be used for authentication from its IDENTIFICATION file. Note that this file does not contain the actual keys; rather, it contains the name of the key files.
2 The client sends to the server its list of keys.3 The server compares each key that it received to see if it can match this key with one of those
specified in the AUTHORIZATION file.4 The server tells the client the key that was accepted. The client then “signs” the key with a digital
signature that only the server with the proper key could verify, and sends the signature to the server.
5 The server verifies the signature.
Password AuthenticationThe password is sent to the remote host for checking. The password cannot be seen on the network because all communications are encrypted. When the server accepts the user's identity it either executes the given command or logs into the system and gives the user a normal shell on the remote system. All communication with the remote command or shell will be encrypted automatically.
Using Publickey Authentication with SSHWhen a parameter such as a username or hostname is quoted, it’s always passed verbatim to the other side. When it’s not quoted, it’s lowercased. The username entered is used when constructing the digital signature for a key.
On the host side, the uppercase username will be used, and on the server side, the lowercased username (the default on the server since VMS isn’t case-sensitive) will be used to generate the digital signature of the public key that’s being used, as shown in the following examples:
7-6

Accessing Remote Systems with the Secure Shell (SSH) Utilities
$ MULTINET SSH2 ”XXXXXXX@HOSTNAME” commandXXXXXXX is the username that was specified in all uppercase letters.Public key authentication fails.
$ MULTINET SSH2 “xxxxxxx@HOSTNAME commandxxxxxx is the username that was specified in all lowercase letters.Public key authentication is successful.
Break-in and Intrusion DetectionCare must be exercised when configuring the client to minimize problems due to intrusion records created by OpenVMS security auditing. The SSH user should consult the system manager to determine the authentication methods offered by the SSH server. Examples of such authentication methods include HostBased, PublicKey, and Password. The client should be configured to not attempt any authentication method that is not offered by the server.
If a client attempts authentication methods not offered by the server, the OpenVMS security auditing system may log several intrusion records for each attempt to create a session to that server. The result being that the user could be locked out and prevented from accessing the server system without intervention from the server's system manager.
Session TerminationThe user can disconnect with “~.”. All forwarded connections can be listed with “~#”. All available escapes can be listed with “~?”. A single tilde character can be sent as “~~” (or by following the tilde with a character other than those described above). The escape character must always follow a carriage return to be interpreted as special. The escape character “~” can be changed in configuration files or on the command line.
The session terminates when the command or shell on the remote system exits, or when the user logs out of an interactive session, and all X11 and TCP/IP connections have been closed. The exit status of the remote program is returned as the exit status of SSH.
X11 ForwardingWith X11 in use, the connection to the X11 display forwards to the remote side any X11 programs started from the interactive session (or command) through the encrypted channel. Also, the connection to the real X server is made from the local system. The user should not set DECW$DISPLAY manually. Forwarding of X11 connections can be configured on the command line or in configuration files.
The DECW$DISPLAY value set by SSH points to the server system with a display number greater than zero. This is normal and happens because SSH creates a “proxy" X server on the server system for forwarding the connections over the encrypted channel.
SSH sets up “fake” Xauthority data on the OpenVMS server, as OpenVMS does not support Xauthority currently. It generates a random authorization cookie, stores it in Xauthority on the server, and verifies that any forwarded connections carry this cookie and replace it by the real cookie when the connection is opened. The real authentication cookie is never sent to the server system (and no cookies are sent in plain text).
7-7

Accessing Remote Systems with the Secure Shell (SSH) Utilities
Configuring the SSH ClientThe SSH client uses only SSH2 configuration keywords. There are no SSH1-specific configuration keywords for the SSH client.
The SSH client obtains configuration data from the following sources (in this order):
1 Command line options. See Table 7-1 for details.2 User’s configuration file (SYS$LOGIN [.SSH2]SSH2_CONFIG). See Table 7-2 for details.3 System-wide configuration file (SSH2_DIR:SSH2_CONFIG). See Table 7-2 for details.
For each parameter, the first obtained value is used. The configuration files contain sections bracketed by “Host" specifications. That section applies only for hosts that match one of the patterns given in the specification. The matched host name is the one given on the command line. Since the first obtained value for each parameter is used, more host-specific declarations should be given near the beginning of the file, and general defaults at the end.
Table 7-2 SSH2_CONFIG File Configuration Keywords
Keyword Value Default Description
AllowedAuthentications List All methods except for hostbased
Permitted techniques, listed in desired order of attempt. These can be the following: keyboard-interactive, password, publickey, [email protected], [email protected], [email protected], [email protected], and hostbased. Each specifies an authentication method. The authentication methods are tried in the order in which they are specified with this configuration parameter.
AuthenticationSuccessMsg Y/N Y Print message on successful authentication
AuthorizationFile Filename Authorization Authorization file for publickey authentication. See below for more information on the contents of this file.
7-8
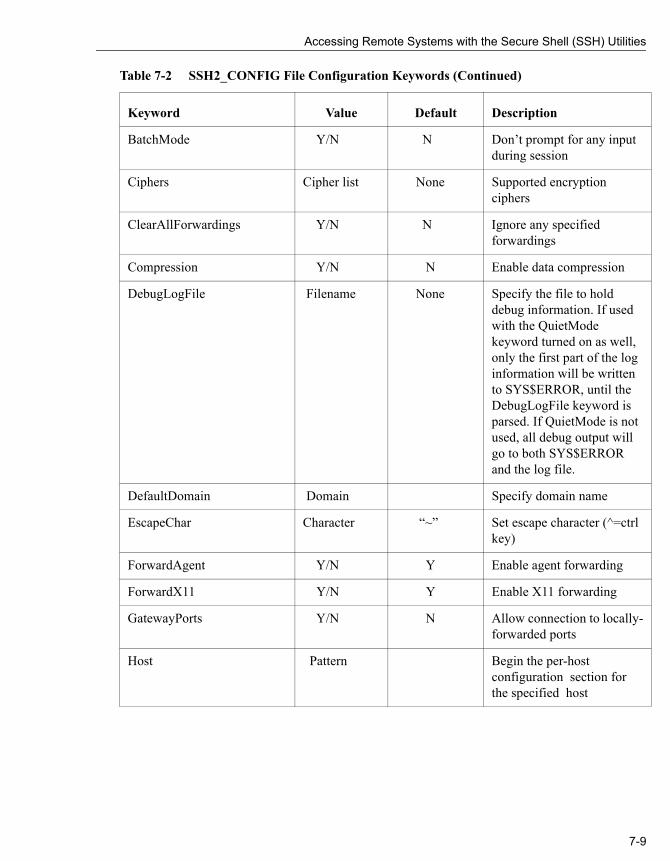
Accessing Remote Systems with the Secure Shell (SSH) Utilities
BatchMode Y/N N Don’t prompt for any input during session
Ciphers Cipher list None Supported encryption ciphers
ClearAllForwardings Y/N N Ignore any specified forwardings
Compression Y/N N Enable data compression
DebugLogFile Filename None Specify the file to hold debug information. If used with the QuietMode keyword turned on as well, only the first part of the log information will be written to SYS$ERROR, until the DebugLogFile keyword is parsed. If QuietMode is not used, all debug output will go to both SYS$ERROR and the log file.
DefaultDomain Domain Specify domain name
EscapeChar Character “~” Set escape character (^=ctrl key)
ForwardAgent Y/N Y Enable agent forwarding
ForwardX11 Y/N Y Enable X11 forwarding
GatewayPorts Y/N N Allow connection to locally-forwarded ports
Host Pattern Begin the per-host configuration section for the specified host
Table 7-2 SSH2_CONFIG File Configuration Keywords (Continued)
Keyword Value Default Description
7-9
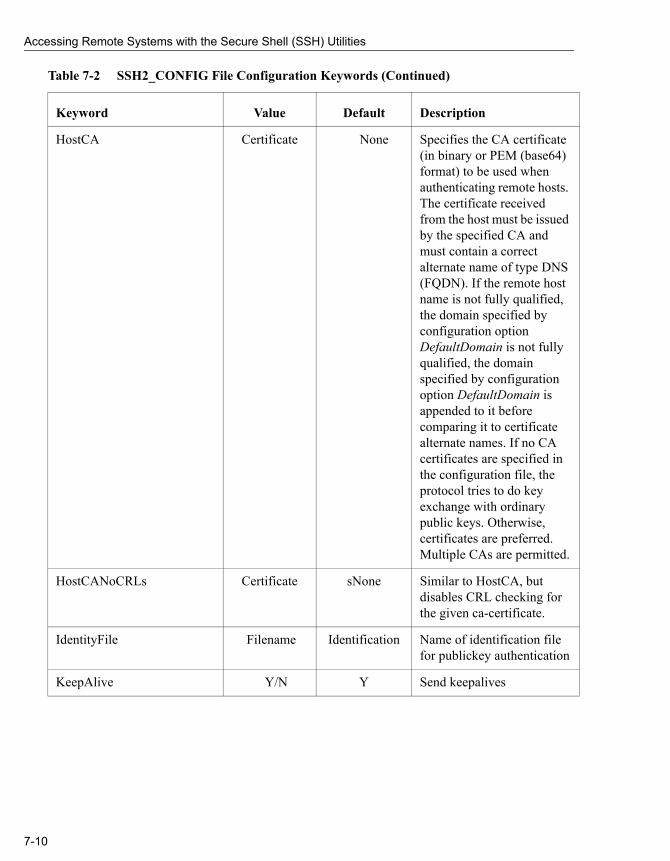
Accessing Remote Systems with the Secure Shell (SSH) Utilities
HostCA Certificate None Specifies the CA certificate (in binary or PEM (base64) format) to be used when authenticating remote hosts. The certificate received from the host must be issued by the specified CA and must contain a correct alternate name of type DNS (FQDN). If the remote host name is not fully qualified, the domain specified by configuration option DefaultDomain is not fully qualified, the domain specified by configuration option DefaultDomain is appended to it before comparing it to certificate alternate names. If no CA certificates are specified in the configuration file, the protocol tries to do key exchange with ordinary public keys. Otherwise, certificates are preferred. Multiple CAs are permitted.
HostCANoCRLs Certificate sNone Similar to HostCA, but disables CRL checking for the given ca-certificate.
IdentityFile Filename Identification Name of identification file for publickey authentication
KeepAlive Y/N Y Send keepalives
Table 7-2 SSH2_CONFIG File Configuration Keywords (Continued)
Keyword Value Default Description
7-10
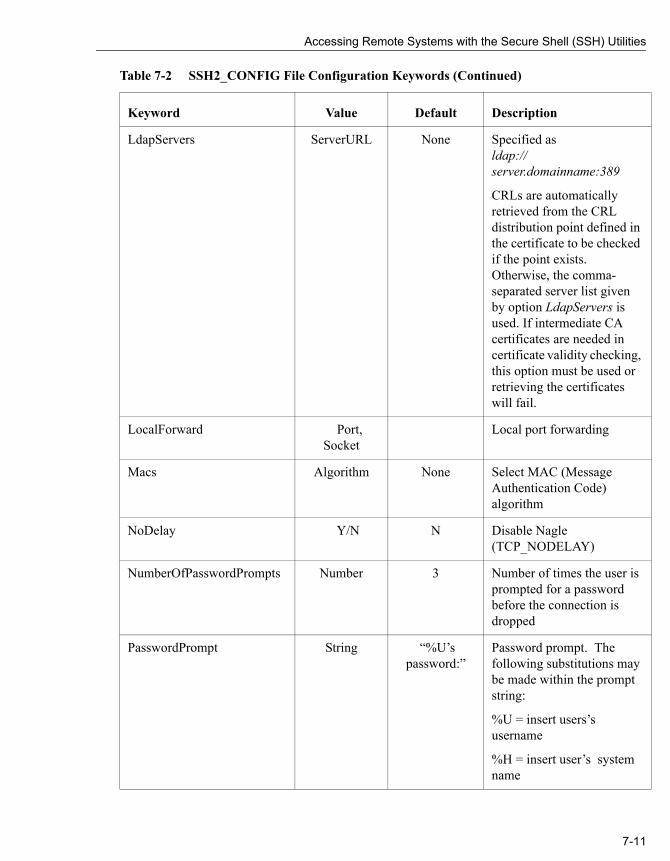
Accessing Remote Systems with the Secure Shell (SSH) Utilities
LdapServers ServerURL None Specified asldap://server.domainname:389
CRLs are automatically retrieved from the CRL distribution point defined in the certificate to be checked if the point exists. Otherwise, the comma-separated server list given by option LdapServers is used. If intermediate CA certificates are needed in certificate validity checking, this option must be used or retrieving the certificates will fail.
LocalForward Port, Socket
Local port forwarding
Macs Algorithm None Select MAC (Message Authentication Code) algorithm
NoDelay Y/N N Disable Nagle (TCP_NODELAY)
NumberOfPasswordPrompts Number 3 Number of times the user is prompted for a password before the connection is dropped
PasswordPrompt String “%U’s password:”
Password prompt. The following substitutions may be made within the prompt string:
%U = insert users’s username
%H = insert user’s system name
Table 7-2 SSH2_CONFIG File Configuration Keywords (Continued)
Keyword Value Default Description
7-11
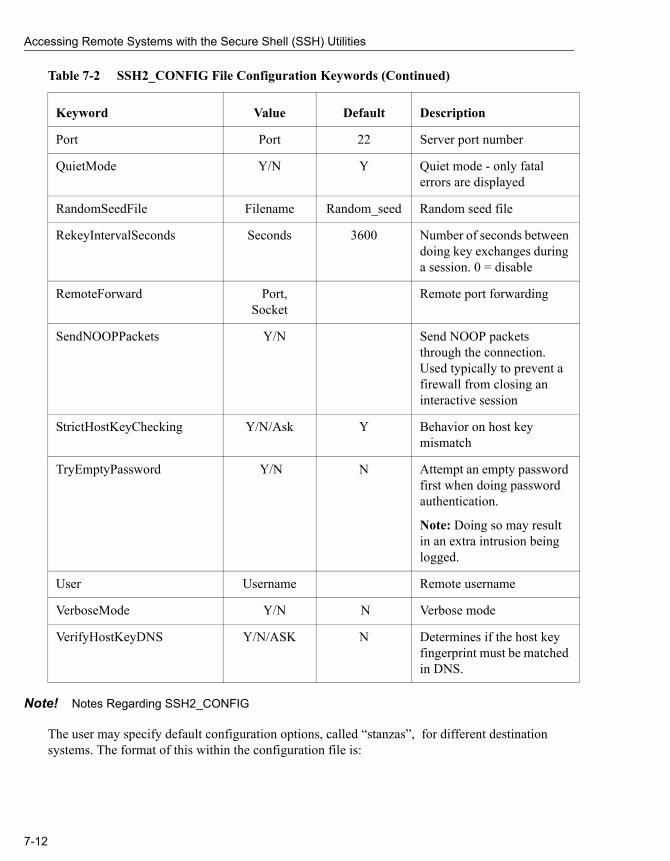
Accessing Remote Systems with the Secure Shell (SSH) Utilities
Note! Notes Regarding SSH2_CONFIG
The user may specify default configuration options, called “stanzas”, for different destination systems. The format of this within the configuration file is:
Port Port 22 Server port number
QuietMode Y/N Y Quiet mode - only fatal errors are displayed
RandomSeedFile Filename Random_seed Random seed file
RekeyIntervalSeconds Seconds 3600 Number of seconds between doing key exchanges during a session. 0 = disable
RemoteForward Port, Socket
Remote port forwarding
SendNOOPPackets Y/N Send NOOP packets through the connection. Used typically to prevent a firewall from closing an interactive session
StrictHostKeyChecking Y/N/Ask Y Behavior on host key mismatch
TryEmptyPassword Y/N N Attempt an empty password first when doing password authentication.
Note: Doing so may result in an extra intrusion being logged.
User Username Remote username
VerboseMode Y/N N Verbose mode
VerifyHostKeyDNS Y/N/ASK N Determines if the host key fingerprint must be matched in DNS.
Table 7-2 SSH2_CONFIG File Configuration Keywords (Continued)
Keyword Value Default Description
7-12
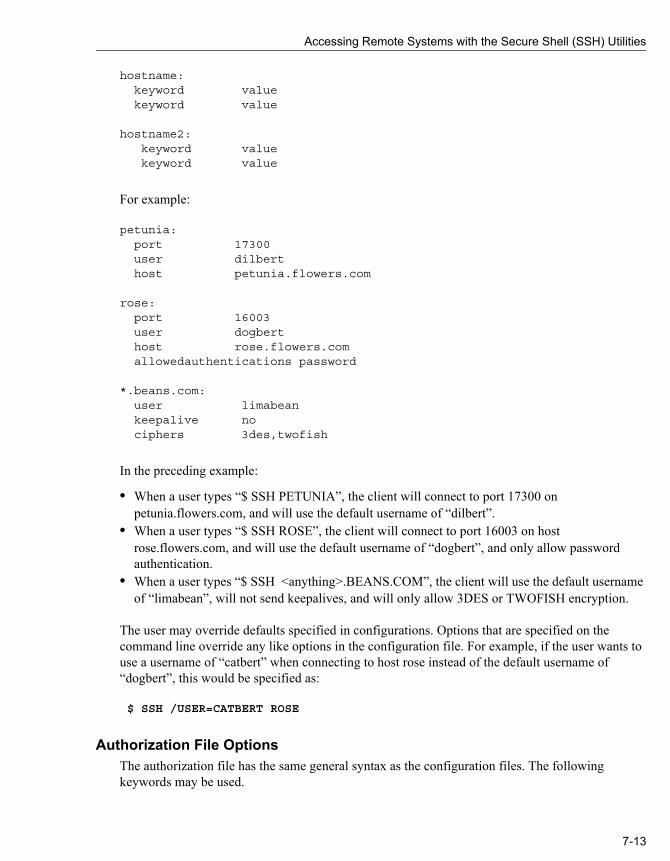
Accessing Remote Systems with the Secure Shell (SSH) Utilities
hostname: keyword value keyword value
hostname2: keyword value keyword value
For example:
petunia: port 17300 user dilbert host petunia.flowers.com
rose: port 16003 user dogbert host rose.flowers.com allowedauthentications password
*.beans.com: user limabean keepalive no ciphers 3des,twofish
In the preceding example:
• When a user types “$ SSH PETUNIA”, the client will connect to port 17300 on petunia.flowers.com, and will use the default username of “dilbert”.
• When a user types “$ SSH ROSE”, the client will connect to port 16003 on host rose.flowers.com, and will use the default username of “dogbert”, and only allow password authentication.
• When a user types “$ SSH <anything>.BEANS.COM”, the client will use the default username of “limabean”, will not send keepalives, and will only allow 3DES or TWOFISH encryption.
The user may override defaults specified in configurations. Options that are specified on the command line override any like options in the configuration file. For example, if the user wants to use a username of “catbert” when connecting to host rose instead of the default username of “dogbert”, this would be specified as:
$ SSH /USER=CATBERT ROSE
Authorization File OptionsThe authorization file has the same general syntax as the configuration files. The following keywords may be used.
7-13

Accessing Remote Systems with the Secure Shell (SSH) Utilities
KeyThis is followed by the filename of a public key in the [.SSH2] directory file that is used for identification when contacting the host. If there is more than one key, they are all acceptable for login.
OptionsThis keyword, if used, must follow the “Key” keyword above. The various options are specified as a comma-separated list. See below for documentation of the options.
CommandThis keyword is deprecated (though it still works). Use Options instead.
Options that can be specified:
allow-from and deny-fromSpecifies that in addition to public-key authentication, the canonical name of the remote host must match the pattern(s). These parameters follow the logic of {Allow,Deny} Hosts described in detail in sshd2_config. Specify one pattern per keyword, and multiple keywords can be used.
command=“command”This is used to specify a “forced command” that will be executed on the server side instead of anything else when the user is authenticated. This option might be useful for restricting certain public keys to perform just a specific operation. An example might be a key that permits remote backups but nothing else. Notice that the client may specify TCP/IP and/or X11 forwarding, unless they are explicitly prohibited.
idle-timeout=timeSets idle timeout limit to time in seconds (s or nothing after number), in minutes (m), in hours (h), in days (d), or in weeks (w). If the connections have been idle (all channels) for that long a period of time, the connection is closed down.
no-port-forwardingForbids TCP/IP forwarding when this key is used for authentication. Any port forward requests by the client will return an error. This might be used, for example, in connection with the command option.
no-x11-forwardingForbids X11 forwarding when this key is used for authentication. An X11 forward request by the client will return an error.
7-14
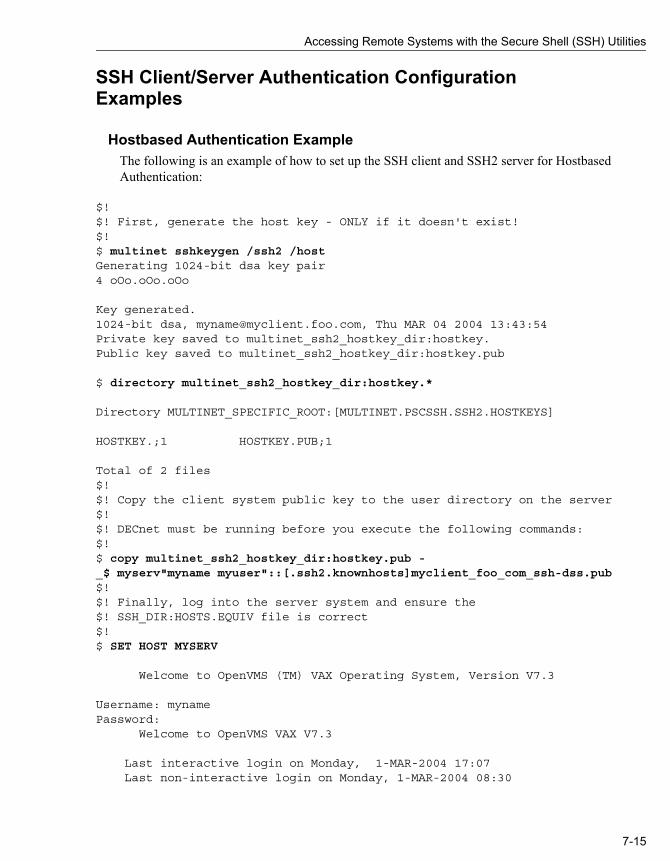
Accessing Remote Systems with the Secure Shell (SSH) Utilities
SSH Client/Server Authentication Configuration Examples
Hostbased Authentication ExampleThe following is an example of how to set up the SSH client and SSH2 server for Hostbased Authentication:
$!$! First, generate the host key - ONLY if it doesn't exist!$!$ multinet sshkeygen /ssh2 /hostGenerating 1024-bit dsa key pair4 oOo.oOo.oOo
Key generated.1024-bit dsa, [email protected], Thu MAR 04 2004 13:43:54Private key saved to multinet_ssh2_hostkey_dir:hostkey.Public key saved to multinet_ssh2_hostkey_dir:hostkey.pub
$ directory multinet_ssh2_hostkey_dir:hostkey.*
Directory MULTINET_SPECIFIC_ROOT:[MULTINET.PSCSSH.SSH2.HOSTKEYS]
HOSTKEY.;1 HOSTKEY.PUB;1
Total of 2 files$!$! Copy the client system public key to the user directory on the server$!$! DECnet must be running before you execute the following commands:$!$ copy multinet_ssh2_hostkey_dir:hostkey.pub -_$ myserv"myname myuser"::[.ssh2.knownhosts]myclient_foo_com_ssh-dss.pub$!$! Finally, log into the server system and ensure the $! SSH_DIR:HOSTS.EQUIV file is correct$!$ SET HOST MYSERV
Welcome to OpenVMS (TM) VAX Operating System, Version V7.3
Username: mynamePassword: Welcome to OpenVMS VAX V7.3
Last interactive login on Monday, 1-MAR-2004 17:07 Last non-interactive login on Monday, 1-MAR-2004 08:30
7-15
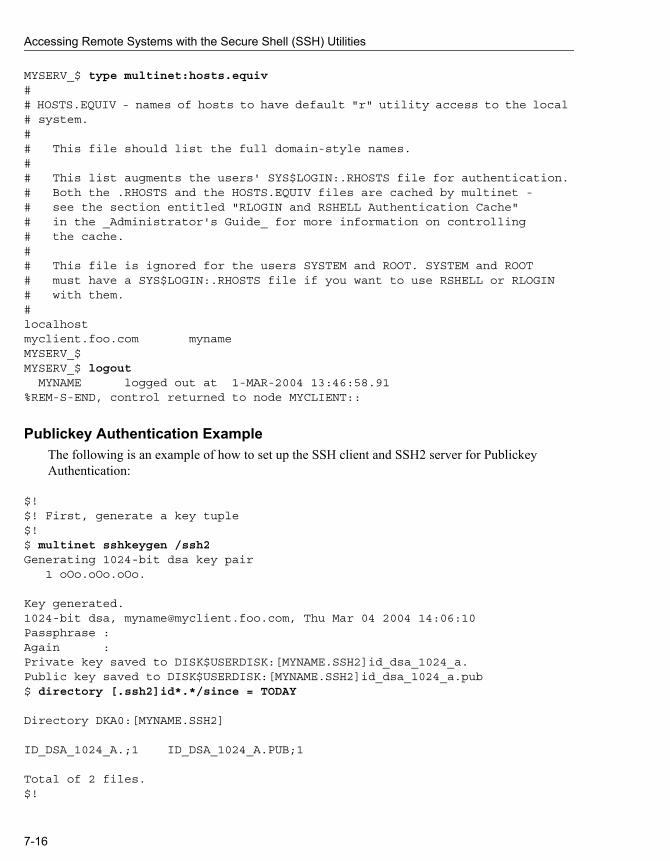
Accessing Remote Systems with the Secure Shell (SSH) Utilities
MYSERV_$ type multinet:hosts.equiv## HOSTS.EQUIV - names of hosts to have default "r" utility access to the local # system.## This file should list the full domain-style names.## This list augments the users' SYS$LOGIN:.RHOSTS file for authentication.# Both the .RHOSTS and the HOSTS.EQUIV files are cached by multinet -# see the section entitled "RLOGIN and RSHELL Authentication Cache"# in the _Administrator's Guide_ for more information on controlling# the cache.## This file is ignored for the users SYSTEM and ROOT. SYSTEM and ROOT# must have a SYS$LOGIN:.RHOSTS file if you want to use RSHELL or RLOGIN# with them.#localhostmyclient.foo.com mynameMYSERV_$MYSERV_$ logout MYNAME logged out at 1-MAR-2004 13:46:58.91%REM-S-END, control returned to node MYCLIENT::
Publickey Authentication ExampleThe following is an example of how to set up the SSH client and SSH2 server for Publickey Authentication:
$!$! First, generate a key tuple$!$ multinet sshkeygen /ssh2Generating 1024-bit dsa key pair 1 oOo.oOo.oOo.
Key generated.1024-bit dsa, [email protected], Thu Mar 04 2004 14:06:10Passphrase :Again :Private key saved to DISK$USERDISK:[MYNAME.SSH2]id_dsa_1024_a.Public key saved to DISK$USERDISK:[MYNAME.SSH2]id_dsa_1024_a.pub$ directory [.ssh2]id*.*/since = TODAY
Directory DKA0:[MYNAME.SSH2]
ID_DSA_1024_A.;1 ID_DSA_1024_A.PUB;1
Total of 2 files.$!
7-16

Accessing Remote Systems with the Secure Shell (SSH) Utilities
$! Now create the IDENTIFICATION. file. This contains the name of$! all the keys you wish to use for public-key authentication.$!$ set default [.ssh2]$ copy tt: identification. idkey id_dsa_1024_a ^Z$!$! Copy the key to the user's [.ssh2] directory on the server system$!$ copy id_dsa_1024_a.pub myserv"myname mypass"::[.ssh2]$!$! Now log into the server system and create the AUTHORIZATION file$!$ set host myserv
Welcome to OpenVMS (TM) VAX Operating System, Version V7.3
Username: mynamePassword: Welcome to OpenVMS VAX V7.3
Last interactive login on Tuesday, 2-MAR-2004 13:46 Last non-interactive login on Tuesday, 2-MAR-2004 13:47
$ set default [.ssh2]$ directory [.ssh2]id*.*
Directory DKA0:[MYNAME.SSH2]
ID_DSA_1024_A.PUB;1
Total of 1 file.$ copy tt: authorization.key id_dsa_1024_a.pub^Z$ logout MYNAME logged out at 2-MAR-2004 14:10:26.16%REM-S-END, control returned to node MYCLIENT::
Note! The public key assistant and subsystem can also be used to transfer public keys and maintain the authorization file to implementations that support the public key subsystem.
SSH1 Example
$ ! An example of the procedure of setting up SSH to enable$ ! RSA-based authentication.$ ! Using SSH client node to connect to an SSH server node.$ !$ ! On the client node
7-17

Accessing Remote Systems with the Secure Shell (SSH) Utilities
$ !$ MULTINET SSHKEYGEN /SSH1Initializing random number generator...Generating p: ...............................++ (distance 662)Generating q: .................++ (distance 370)Computing the keys...Testing the keys...Key generation complete.Enter file in which to save the key (DISK$SYS_LOGIN:[MYNAME.ssh]identity.):Enter passphrase:Enter the same passphrase again:Your identification has been saved inDISK$SYS_LOGIN:[MYNAME.ssh]identity..Your public key is:1024 33 13428..........29361 [email protected] public key has been saved in DISK$SYS_LOGIN:[MYNAME.ssh]identity.pub$ !$ ! A TCP/IP stack must be loaded on the remote system.$ !$ FTP DAISY /USER=MYNAME/PASSWORD=DEMONSOFSTUPIDITY -_$ PUT DISK$SYS_LOGIN:[MYNAME.ssh]identity.PUB -_$ DISK$SYS_LOGIN:[MYNAME.ssh]identity.PUBlong.hair.com MultiNet FTP user process V4.4(119)Connection opened (Assuming 8-bit connections)<daisy.hair.com MultiNet FTP Server Process V4.4(16) at Thu 4-Mar-2004 3:20PM-EDT[Attempting to log in as myname]<User MYNAME logged into DISK$SYS_LOGIN:[MYNAME] at Thu 4-MAR-2004 3:21PM-EDT, job 20e00297.<VMS Store of DISK$SYS_LOGIN:[MYNAME.SSH]IDENTITY.PUB; started.<Transfer completed. 395 (8) bytes transferred.<QUIT command received. Goodbye.$$ TELNET DAISYTrying... Connected to DAISY.HAIR.COM.
Authorized Users Only (TM) VAX Operating System, Version V7.1
Username: MYNAMEPassword: Welcome to OpenVMS (TM) VAX Operating System, Version V7.1 on node DAISY Last interactive login on Thursday, 4-MAR-2004 08:07 Last non-interactive login on Thursday, 6-MAR-2004 15:21 Logged into DAISY at 4-MAR-2004 15:22:43.68$ !$ ! For the first entry into the AUTHORIZED_KEYS file copy$ ! (or rename) the file [.SSH]IDENTITY.PUB to [.SSH]AUTHORIZED_KEYS.
7-18

Accessing Remote Systems with the Secure Shell (SSH) Utilities
$ !$ COPY [.SSH]IDENTITY.PUB [.SSH]AUTHORIZED_KEYS.$$ ! FOR SUBSEQUENT ENTRIES use the APPEND command$ !$ APPEND [.SSH]IDENTITY.PUB [.SSH]AUTHORIZED_KEYS.$$ ! A sanity check of the file protections shows$ !$ DIRECTORY/PROTECTION [.SSH]*.*
Directory DISK$SYS_LOGIN:[MYNAME.SSH]
AUTHORIZED_KEYS.;1 (RWE,RWED,RE,E)IDENTITY.;1 (RWD,RWD,,)IDENTITY.PUB;1 (RWE,RWED,RE,E)KNOWN_HOSTS.;1 (RWD,RWD,,)RANDOM_SEED.;1 (RWD,RWD,,)
Total of 5 files.$ !$ DIRECTORY/PROTECTION SSH.DIR
Directory DISK$SYS_LOGIN:[MYNAME]
SSH.DIR;1 (RWD,RWD,,)
Total of 1 file.
SSH2 User Authentication Using Certificates:Client setup:
1. Copy the private key and certificate (.crt) into the user’s [.ssh2] directory, and edit the [.ssh2] identification file, adding entry “certkey private key name”.
$ dir [.ssh2]
Directory DKA0:[DILBERT.SSH2]
AUTHORIZATION.;13 IDENTIFICATION.;1 MYCERT.;1 MYCERT1.CRT.;2
Total of 4 files.
$ type [.ssh2]identification.
certkey mycert1
$
Server setup:
1. Copy the CA certificate into your SSH2_DIR: directory.
2. Add the following entries in SSH2_DIR:SSHD2_CONFIG:
7-19

Accessing Remote Systems with the Secure Shell (SSH) Utilities
Pki SSH2_DIR:<CAcertname>
Mapfile SSH2_DIR:<CAcertname>.map
The Pki keyword begins an authority block for a given CA certificate. There might be more than one CA certificate along with its own mapping file.
The Mapfile keyword specifies the location of the certificate to username mapping file.
In addition, for testing, you might use PkiDisableCRLs yes to disable CRL checking for the given authorization block.
3. Create the mapping file SSH2_DIR:<CAcertname>.map
The mapping file consists of rows of the following format:
userid mappingrule mapdata
Userid is the userid that’s allowed to login for the given cert (there might be multiple userids for a given certificate).
Mapping rule is one of subject, email, serialandissuer and emailregex.
Subject means that the following mapdata is matched against the subject of the certificate:
Email is the e-mail alternative subject extension (with emailregex can be used regular expressions - e.g., %subst% emailregex ([a-z}|+)@foo\.com would be any trusted certificate having e-mail alternative name of <username>@foo.com to login with userid <username>)
SerialAndIssuer is the serial number and DN of the issuer separated by whitespace.
DNs are used in reverse LDAP order (e.g., c=US,o=Foobar,cn=Dilbert Dogbert).
SSH2 Hostkey Authentication Using CertificatesServer setup:
1. Create a certificate for the server. Host certificate must contain FQDN as DNS alternative name.
2. Copy the private key and certificate into MULTINET_SSH2_HOSTKEY_DIR directory.
3. Add the following entries into ssh2_dir:sshd2_config file
HostKeyFile multinet_ssh_hostkey_dir:<hostcert>HostCertificateFile multinet_ssh_hostkey_dir:<hostcert>.crt
Client setup:
1. Copy the CA certificate in MULTINET_SSH2_HOSTKEY_DIR directory.
2. Add the following entries into ssh2_dir:ssh2_config
HostCA multinet_ssh_hostkey_dir:<CAcert>.crtDefaultDomain <domain of the FQDN of the client>
For testing purposes, you can use HostCANoCRLs instead of HostCA to disable CRL checking.
7-20
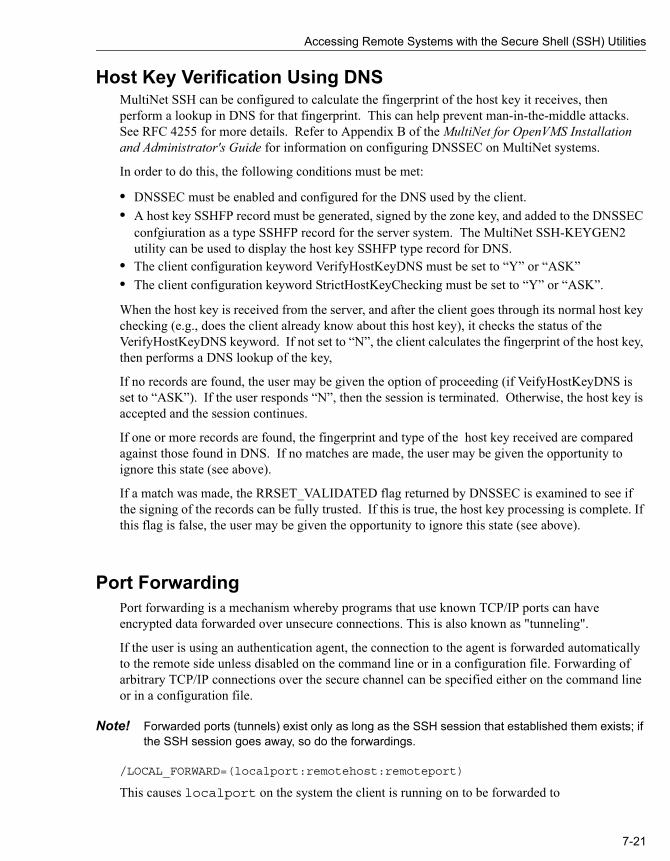
Accessing Remote Systems with the Secure Shell (SSH) Utilities
Host Key Verification Using DNSMultiNet SSH can be configured to calculate the fingerprint of the host key it receives, then perform a lookup in DNS for that fingerprint. This can help prevent man-in-the-middle attacks. See RFC 4255 for more details. Refer to Appendix B of the MultiNet for OpenVMS Installation and Administrator's Guide for information on configuring DNSSEC on MultiNet systems.
In order to do this, the following conditions must be met:
• DNSSEC must be enabled and configured for the DNS used by the client.• A host key SSHFP record must be generated, signed by the zone key, and added to the DNSSEC
confgiuration as a type SSHFP record for the server system. The MultiNet SSH-KEYGEN2 utility can be used to display the host key SSHFP type record for DNS.
• The client configuration keyword VerifyHostKeyDNS must be set to “Y” or “ASK”• The client configuration keyword StrictHostKeyChecking must be set to “Y” or “ASK”.
When the host key is received from the server, and after the client goes through its normal host key checking (e.g., does the client already know about this host key), it checks the status of the VerifyHostKeyDNS keyword. If not set to “N”, the client calculates the fingerprint of the host key, then performs a DNS lookup of the key,
If no records are found, the user may be given the option of proceeding (if VeifyHostKeyDNS is set to “ASK”). If the user responds “N”, then the session is terminated. Otherwise, the host key is accepted and the session continues.
If one or more records are found, the fingerprint and type of the host key received are compared against those found in DNS. If no matches are made, the user may be given the opportunity to ignore this state (see above).
If a match was made, the RRSET_VALIDATED flag returned by DNSSEC is examined to see if the signing of the records can be fully trusted. If this is true, the host key processing is complete. If this flag is false, the user may be given the opportunity to ignore this state (see above).
Port ForwardingPort forwarding is a mechanism whereby programs that use known TCP/IP ports can have encrypted data forwarded over unsecure connections. This is also known as "tunneling".
If the user is using an authentication agent, the connection to the agent is forwarded automatically to the remote side unless disabled on the command line or in a configuration file. Forwarding of arbitrary TCP/IP connections over the secure channel can be specified either on the command line or in a configuration file.
Note! Forwarded ports (tunnels) exist only as long as the SSH session that established them exists; if the SSH session goes away, so do the forwardings.
/LOCAL_FORWARD=(localport:remotehost:remoteport)
This causes localport on the system the client is running on to be forwarded to
7-21

Accessing Remote Systems with the Secure Shell (SSH) Utilities
remotehost:remoteport. The system to which SSH2 connects acts as the intermediary between the two endpoint systems.
For example: Use port forwarding to allow a system (midsys) to encrypt and forward TELNET sessions between itself (mysys) that's outside a corporate firewall to a system (remotesys) that is inside a corporate firewall. Note that the use of port 2300 in the examples is arbitrary.
From the DCL prompt on mysys:
$ SSH midsys /local_forward=(2300:remotesys:23)
With the SSH session to midsys now active, type in another window on mysys:
$ telnet localhost /port=2300
Note! The SSH session must remain active for port forwarding activity.
This causes a connection to mysys:2300. The SSH2 client has bound to this port, and will see the connection request. SSH sends an "open channel" request to midsys, telling it there's a connect request for port 23 on remotesys. Midsys will connect to remotesys:23, and send back the port information to mysys. Mysys completes the connection request, and the TELNET session between mysys and remotesys is now in place, using the tunnel just created through the firewall between mysys and midsys.
All traffic between mysys and midsys (through the firewall) is encrypted/decrypted by SSH on mysys and SSHD on midsys, and hence, is safe. TELNET does not know this, of course, and does not care.
Note that ports can also be forwarded from a localhost to the remotehost that's running SSHD, as
7-22

Accessing Remote Systems with the Secure Shell (SSH) Utilities
illustrated in this figure.
In this example, port 2300 on mysys is being forwarded to remotesys:23. To do this, use SSH on mysys:
$ SSH remotesys /local_forward=(2300:remotesys:23)
Then, also on mysys, type:
$ telnet localhost /port=2300
When SSH and SSHD start their dialog, SSHD on remotesys connects back to itself, port 23, and the TELNET session is established.
/REMOTE_FORWARD=(remoteport1:remotehost:remoteport2)
This causes remoteport1 on the system to which SSH connects to be forwarded to remotehost:remoteport2. In this case, the system on which the client is running becomes the intermediary between the other two systems.
For example, a user wants to use mysys to create a tunnel between sys1:4000 and sys2:23, so that TELNET sessions that originate on sys1:4000 get tunneled to sys2 through the firewall. On mysys:
7-23

Accessing Remote Systems with the Secure Shell (SSH) Utilities
$ SSH sys1 /remote_forward=(4000:sys2:23)
Now, on sys1, a user could establish a TELNET session to sys1 by doing:
$ telnet localhost /port=4000
The mechanism used for making the TELNET connection (setting up the tunnel) is essentially the same as described in the /LOCAL_FORWARD example above, except that the roles of SSH and SSHD in the dialog are reversed.
Other FilesThe files in Table 7-3 are used by SSH. Note that these files generally reside in the [.SSH2] subdirectory from the user’s SYS$LOGIN directory. The [.SSH2] subdirectory is created automatically on your local system the first time SSH is executed, and on a remote OpenVMS system the first time an SSH connection is made to that system. File protection for SYS$LOGIN:SSH2.DIR should be (S:RWD, O:RWD, G:, W:).
Table 7-3 SSH2 Files
File NameResides On Description
[.SSH2]SSH2_CONFIG. Client System
This is the individual configuration file. This file is used by the SSH2 client. It does not contain sensitive information. The recommended file protection is (S:RWD,O:RWD,G:,W:).
[.SSH2]IDENTIFICATION Client System
Contains the information about private keys that can be used for public-key authentication, when logging in.
7-24

Accessing Remote Systems with the Secure Shell (SSH) Utilities
[.SSH2]ID_alg_bits_seq Client System
Contains a private key for authentication.
• alg is either RSA or DSA• bits is the length of the key• seq is an incrementing alphabetic
value
Thus, a key named ID_DSA_1024_A. indicates this is a private DSA key 1024 bits long, and it is the first time the key was generated using SSHKEYGEN. A user may have multiple private key files in a directory.
[.SSH2]ID_alg_bits_seq.PUB Client Systemand Server System
Contains a public key for authentication.
• alg is either RSA or DSA• bits is the length of the key• seq is an incrementing alphabetic
value
Thus, a key named ID_DSA_1024_B.PUB indicates this is a public DSA key 1024 bits long, and it is the second time the key was generated using SSHKEYGEN. A user may have multiple public key files in a directory.
Table 7-3 SSH2 Files (Continued)
File NameResides On Description
7-25

Accessing Remote Systems with the Secure Shell (SSH) Utilities
[.SSH2.HOSTKEYS]xxx.PUB Client System
Contains public host keys for all hosts the user has logged into. The files specifications have the format KEY_port_hostname.PUB
• port is the port over which the connection was made
• hostname is the hostname of the key's host.
For example, if tulip.flowers.com was accessed via port 22, the keyfile would be "KEY_22_TULIP_FLOWERS_COM.PUB". If this file changes on the host (for example, the system manager regenerates the host key), SSH2 will note this and ask if you want the new key saved. This helps prevent man-in-the-middle attacks.
[.SSH2]RANDOM_SEED. Client System
Seeds the random number generator. This file contains sensitive data and MUST have a protection of no more than (S:RWD,O:RWD,G:,W:), and it must be owned by the user. This file is created the first time the program is run and is updated automatically. The user should never need to read or modify this file. On OpenVMS systems, multiple versions of this file will be created; however, all older versions of the file may be safely purged.
Use the DCL command: SET FILE /VERSION_LIMIT=n RANDOM_SEED to set a limit on the maximum number of versions of this file that may exist at any given time.
Table 7-3 SSH2 Files (Continued)
File NameResides On Description
7-26

Accessing Remote Systems with the Secure Shell (SSH) Utilities
MULTINET:.RHOSTS Server System
Is used in hostbased authentication to list the host/user pairs that are permitted to log in.
Each line of the file contains a host name (in the fully-qualified form returned by name servers), and then a user name on that host, separated by a space. This file must be owned by the user, and must not have write permissions for anyone else. The recommended permission is read/write for the user, and not accessible by others.
MULTINET:.SHOSTS Server System
Is used the same way as .RHOSTS.
MULTINET:HOSTS.EQUIV Server System
Is used during .rhosts authentication. It contains fully-qualified hosts names, one per line. If the client host is found in this file, login is permitted provided client and server user names are the same. Additionally, successful RSA host authentication is required. This file should only be writable by SYSTEM.
MULTINET:SHOSTS.EQUIV Server System
Is processed exactly as SSH_DIR:HOSTS.EQUIV. This file may be useful to permit logins using SSH but not using rshell/rlogin.
SSH2_DIR:SSH2_CONFIG Client System
This is a system-wide client configuration file. This file provides defaults for those values that are not specified in a user’s configuration file, and for users who do not have a configuration file. This file must be world-readable.
Table 7-3 SSH2 Files (Continued)
File NameResides On Description
7-27

Accessing Remote Systems with the Secure Shell (SSH) Utilities
SSHKEYGENGenerates authentication key pairs. The format of the keys is incompatible between SSH1 and SSH2. Therefore, the correct format keys must be generated for each version of the protocol to be supported.
There is no way to recover a lost passphrase. If the passphrase is lost or forgotten, you need to generate a new key and copy the corresponding public key to other systems.
Each key may be protected via a passphrase, or it may be left empty. Good passphrases are 10-30 characters long and are not simple sentences or otherwise easily guessable. Note that the passphrase can be changed later, but a lost passphrase cannot be recovered, as a “one-way” encryption algorithm is used to encrypt the passphrase.
Note! The Host Key has no password.
SSH1
MULTINET SSHKEYGEN /SSH1 [/BITS=n] [/IDENTITY_FILE=file] [/PASSPHRASE=passphrase] [/COMMENT=comment]MULTINET SSHKEYGEN /SSH1 /CHANGE_PASSPHRASE [/PASSPHRASE=old_passphrase]
MULTINET_SSH2_KNOWNHOSTS_DIR
Server System
Contains public host keys for all hosts the system has logged into. The files specifications have the format KEY_port_hostname.PUB
• port is the port over which the connection was made
• hostname is the hostname of the key's host.
For example, if tulip.flowers.com was accessed via port 22, the keyfile would be "KEY_22_TULIP_FLOWERS_COM.PUB". If this file changes on the host (for example, the system manager regenerates the host key), SSH will note this and ask if you want the new key saved. This helps prevent man-in-the-middle attacks.
Table 7-3 SSH2 Files (Continued)
File NameResides On Description
7-28

Accessing Remote Systems with the Secure Shell (SSH) Utilities
[/NEW_PASSPHRASE=new_passphrase]MULTINET SSHKEYGEN /SSH1 /CHANGE_COMMENT [/PASSPHRASE=passphrase] [/COMMENT=comment]MULTINET SSHKEYGEN /SSH1 /CHANGE_CIPHER [/IDENTITY_FILE=file] [/PASSPHRASE=passphrase]MULTINET SSHKEYGEN /SSH1 /HOST [/BITS=n][/COMMENT=comment]
Table 7-4 SSH1 SSHKEYGEN Options
SSH2
MULTINET SSHKEYGEN /SSH2[/BITS=n][/COMMENT=comment][/KEYTYPE=type] [/KEYS=(key1...keyn)] [/PASSPHRASE=ppp|/NOPASSPHRASE][/STIR=file][/QUIET]MULTINET SSHKEYGEN /SSH2/HOST [/BITS=n][/COMMENT=comment][/STIR=file][/QUIET]MULTINET SSHKEYGEN /SSH2/DERIVE_KEY=fileMULTINET SSHKEYGEN /SSH2/EDIT=fileMULTINET SSHKEYGEN /SSH2/FINGERPRINT=fileMULTINET SSHKEYGEN /SSH2/INFO=file [/BASE=n]MULTINET SSHKEYGEN /SSH2/SSH1_CONVERT=fileMULTINET SSHKEYGEN /SSH2/X509_CONVERT=fileMULTINET SSHKEYGEN /SSH2/PKCS_CONVERT=fileMULTINET SSHKEYGEN /SSH2/EXTRACT_CERTS=fileMULTINET SSHKEYGEN /SSH2/HELPMULTINET SSHKEYGEN /SSH2/VERSION
Option Description
/BITS=nnn Specify key strength in bits (default = 1024).
/CHANGE_PASSPHRASE Change the passphrase of private key file.
/CHANGE_COMMENT Change the comment for a key.
/CHANGE_CIPHER Change the cipher to current default (3DES).
/COMMENT=”comment” Provide the comment.
/HOST Generate the host key.
/IDENTITY_FILE=file Specify the name of the host key file.
/PASSPHRASE=ppp Provide the current passphrase.
/NEW_PASSPHRASE=ppp Provide new passphrase.
/VERSION Print sshkeygen version number.
7-29
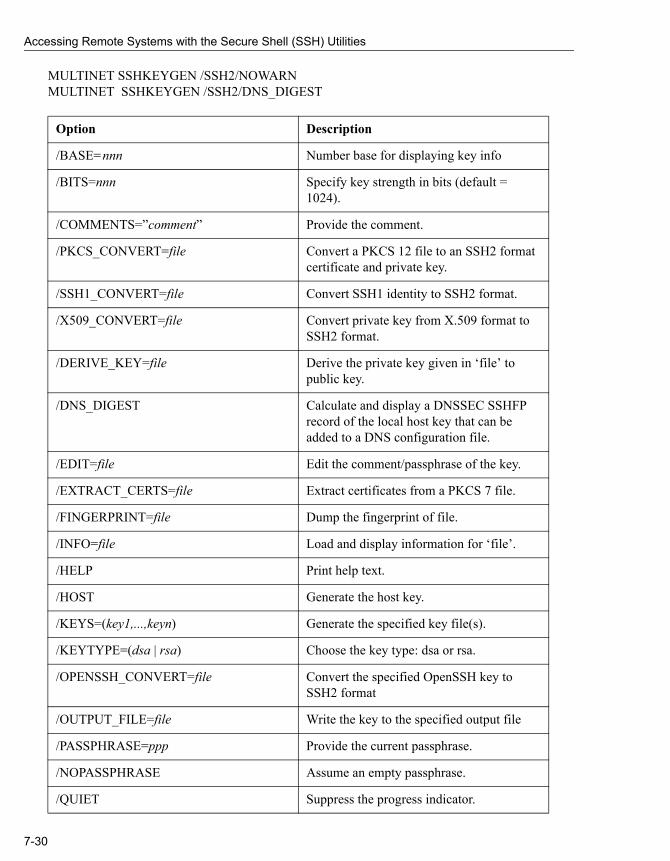
Accessing Remote Systems with the Secure Shell (SSH) Utilities
MULTINET SSHKEYGEN /SSH2/NOWARNMULTINET SSHKEYGEN /SSH2/DNS_DIGEST
Option Description
/BASE=nnn Number base for displaying key info
/BITS=nnn Specify key strength in bits (default = 1024).
/COMMENTS=”comment” Provide the comment.
/PKCS_CONVERT=file Convert a PKCS 12 file to an SSH2 format certificate and private key.
/SSH1_CONVERT=file Convert SSH1 identity to SSH2 format.
/X509_CONVERT=file Convert private key from X.509 format to SSH2 format.
/DERIVE_KEY=file Derive the private key given in ‘file’ to public key.
/DNS_DIGEST Calculate and display a DNSSEC SSHFP record of the local host key that can be added to a DNS configuration file.
/EDIT=file Edit the comment/passphrase of the key.
/EXTRACT_CERTS=file Extract certificates from a PKCS 7 file.
/FINGERPRINT=file Dump the fingerprint of file.
/INFO=file Load and display information for ‘file’.
/HELP Print help text.
/HOST Generate the host key.
/KEYS=(key1,...,keyn) Generate the specified key file(s).
/KEYTYPE=(dsa | rsa) Choose the key type: dsa or rsa.
/OPENSSH_CONVERT=file Convert the specified OpenSSH key to SSH2 format
/OUTPUT_FILE=file Write the key to the specified output file
/PASSPHRASE=ppp Provide the current passphrase.
/NOPASSPHRASE Assume an empty passphrase.
/QUIET Suppress the progress indicator.
7-30

Accessing Remote Systems with the Secure Shell (SSH) Utilities
There is also a comment field in the public key file that is for the convenience to the user to help identify the key. The comment can tell what the key is for, or whatever is useful. The comment is initialized to nnn-bit dsa, username@hostname, ddd mm-dd-yyyy hh:mm:ss when the key is created unless the /COMMENT qualifier is used, and may be changed later using the /EDIT qualifier.
Note! When the /HOST qualifier is used, the /KEYS=(key1,...keyn) qualifier is ignored.
Note! The public key file must be world-readable.
SSHAGENT (authentication agent)MULTINET SSHAGENT
DESCRIPTIONSSHAGENT is a program that holds authentication private keys. Both SSH1 and SSH2 keys are supported by SSHAGENT. SSHAGENT may be started in the beginning of a login session by including the commands to start it in, for example, LOGIN.COM. It may also be started interactively at any time during a login session.
To start SSHAGENT, one of the three methods may be used:
1. Start it in a separate window:
$ MULTINET SSHAGENT
2. Spawn it as a subprocess:
$ SPAWN/NOWAIT MULTINET SSHAGENT
3. Run it in a detached process:
$ RUN/DETACHED/OUTPUT=AGENT.OUT/INPUT=NLA0:/PROCESS_NAME="SSH AGENT" SSH_EXE:SSH-AGENT2
/STIR=file Stir data from file to random pool.
/VERSION Print sshkeygen version number.
/[NO]WARN Enable or disable warnings if the process of generating host keys using /HOST will cause existing host keys to be overwritten. If enabled, the user will be prompted to overwrite them. If disabled, no warnings or prompts are issued if the host keys exist. Default is /WARN.
7-31

Accessing Remote Systems with the Secure Shell (SSH) Utilities
The agent is used for Publickey Authentication when logging to other systems using SSH. A connection to the agent is available to all programs run by all instances of the user on a specific system. The name of the mailbox used for communicating with the agent is stored in the MULTINET_SSH_AGENT_ username logical name. Note that while the agent mailbox is accessible only by the user that starts the agent, a user with sufficient VMS privileges could access the agent mailbox and steal or modify keys currently loaded into the agent (although, the keys as stored on disk cannot be modified simply by accessing the agent).
The agent does not have any private keys initially. Keys are added using SSHADD. When executed without arguments, SSHADD adds the user’s identity files. If the identity has a passphrase, SSHADD asks for the passphrase. It then sends the identity to the agent. Several identities can be stored in the agent; the agent can use any of these identities automatically. $ MULTINET SSHADD /LIST displays the identities currently held by the agent. The idea is that the agent is run on the user's workstation.
FILES
SSHADDAdds identities for the authentication agent.
MULTINET SSHADD [OPTIONS] [FILE[,FILE,FILE]]
DESCRIPTIONSSHADD adds identities to SSHAGENT, the authentication agent. When run without arguments, SSHADD adds the file [.SSH]IDENTITY. Alternative file names can be given on the command line. If any file requires a passphrase, SSHADD asks for the passphrase from the user.
The authentication agent must be running and must have been executed by the user for SSHADD to work.
“File” is an identity or certificate file. If no file is specified, the files in the users[.SSH2] directory are used.
OPTIONS
[.SSH]IDENTITY in SYS$LOGIN:
Contains the RSA authentication identity of the user. This file should not be readable by anyone but the user. It is possible to specify a passphrase when generating the key. That passphrase is used to encrypt the private part of this file. This file is not used by SSHAGENT, but is added to the agent using SSHADD at login.
/HELP Display help text.
7-32

Accessing Remote Systems with the Secure Shell (SSH) Utilities
FILESThese files exist in SYS$LOGIN:
CERTTOOLmultinet certtool [options] /pk10 /subject=<subject> /key_usage=<flags>
/extended_key_usage=<flags>
/LIST List all identities currently represented by the agent.
/LOCK Lock the agent with a password.
/NOSSH1 Agent cannot use SSH1 keys.
/PURGE Remove all identities from the agent.
/REMOVE Remove the identity from the agent. In order to remove identities, you must either issue the command from the subdirectory that the identities are located in, or issue the command using the full path name of the identity (as is seen in an SSHADD /LIST command).
/TIMEOUT=n Agent should delete this key after the timeout value (in minutes) expires.
/UNLOCK Unlock the locked agent.
/URL Give key to the agent as a URL.
[.SSH]IDENTITY Contains the RSA authentication identity of the user. This file should not be readable by anyone but the user. It is possible to specify a passphrase when generating the key. That passphrase is used to encrypt the private part of this file. This is the default file added by SSHADD when no other files have been specified.
If SSHADD needs a passphrase, it reads the passphrase from the current terminal if it was run from a terminal. If SSHADD does not have a terminal associated with it but DECW$DISPLAY is set, it opens an X11 window to read the passphrase.
[.SSH]IDENTITY.PUB Contains the public key for authentication. The contents of this file should be added to [.SSH]AUTHORIZED_KEYS on all systems where you want to log in using RSA authentication. There is no need to keep the contents of this file secret.
[.SSH]RANDOM_SEED Seeds the random number generator. This file should not be readable by anyone but the user. This file is created the first time the program is run, and is updated every time SSHKEYGEN is run.
7-33

Accessing Remote Systems with the Secure Shell (SSH) Utilities
multinet certview [options] /pk12 /input_files=<objects>
DescriptionThe CERTTOOL utility is used for different needs concerning X.509 certificates.
Valid Options
/BITS=n Key strength in bits (default 2048)
/DEBUG=n Set debug level to n
/EXTENDED_KEY_USAGE
=(flag1...flagn)
(PKCS#10 only)
Extended key usage flags, as a comma-separated list. Valid values are:
• anyExtendedKeyUsage• ServerAuth• clientAuth• codeSigning• emailprotectionNo extended flags are set by default.
/HELP[=(PK10,PK12)] Display help. More detailed help on manipulating PKCS#10 and PKCS#12 certs is available by adding the PK10 and PK12 qualifier, respectively, to the HELP switch.
/INPUT_FILES=(file1...filen) (PKCS#12 only)
List of files to include in the PFX package.
/KEY_TYPE=type Create a new key of type DSA or RSA.
7-34

Accessing Remote Systems with the Secure Shell (SSH) Utilities
/KEY_USAGE=(flag1...flagn) (PKCS#10 only)
Key usage flags, as a comma-separated list. Valid values are:
• digitalSignature• nonRepudiation• keyEncipherment• dataEncipherment• keyAgreement• keyCertSign• CRLSign• encipherOnly• decipherOnlyDefault values are digitalSignature and keyEncipherment.
/OPTION=(x,y) Set ceriticate option x to y. The options that can be set are dependant upon the type of certificate (PKCS#10 or PKCS#12) being afffected.
For PKCS#10:
• DNS - set certificate DNS names• Email - set certificate email addresses
For PKCS#12:
• KeyPBE - set the PBE scheme for shroud-ing keys. “default” means pbeWithSHAAnd3-KeyTripleDES-CBC.
• SafePBE - set the PBE scheme for protect-ing safes. “default” means pbeWithSHAAand40BitRC2-CBC.
/OUTPUT_FILE=prefix Use prefix as the prefix for all output filenames. Private key filenames will be prefix.SSH2 and PKCS#10 fiels will be prefix.PKCS10.
/PRIVATE_KEY=keyname Use keyname as the private key.
/SUBJECT=”subject” (PKCS#10 only)
Use subject as the certificate subject.
/VERSION Display the version of CERTTOOL.
7-35

Accessing Remote Systems with the Secure Shell (SSH) Utilities
Example:$ MULTINET CERTTOOL /PK10 /SUBJECT=(“cn=john doe,cn=lima,cn=beans”-$_ /PRIVATE_KEY=DKA0:[JOHENDOE.SSH2]ID_DSA_1024_A PKCS#10 creation succcesful.Wrote certificate request to output.pkcs10.
CERTVIEWmultinet certview [options] certificate [, certificate, ..., certificate]
DescriptionCERTVIEW can be used to view certificates and check their validity. This tool can also be used to output the data in format that is suitable for insertion in the SSH2_DIR:SSHD2_CONFIG configuration file.
Valid Options
/COMMENT Prepend information lines with “#” (comment mark)
/DEBUG=n Set debug level to n
/FORMAT_OUTPUT Output data in a format suitable for insertion to user-map
/HELP Display help
/QUIET Don’t display certificate information
/VALIDATE=certificate Validate using the CA certificate certificate
/VERBOSE Increase verbosity (display extensions).
/VERSION Display version information
7-36

Accessing Remote Systems with the Secure Shell (SSH) Utilities
Example:
$ MULTINET CERTVIEW MYCERT_PKCS7.P7B-1_SSH2_CRT Certificate MYCERT_PKCS7.P7B-1_SSH2_CRT Certificate issuer ........... : [email protected], C=US, ST=CO, L=Colorado Springs, CN=FOOCA Certificate serial number .... : 20668029027158235697617769792662904421 Certificate subject .......... : MAILTO=foo@bar,com, C=US, ST=CO, L=Colorado Springs, CN=FOOCA
CMPCLIENTmultinet cmpclient [options]/ca_access_url=“<url>”/subject=“<subject>”cert-file [private-key]
DescriptionAllows users to enroll certificates. It will connect to a CA (certification authority) and use the CMPv2 protocol for enrolling a certificate. The user may supply an existing private key when creating the certification request or allow a new key to be generated.
Command Parameters
Valid Options
url Specifies the URL for the Certification Authority
Subject Specifies the subject name for the certificate. For example,
“c-ca,o=acme,ou=development,cn=Bob Jones”
Cert file Specifies the file the certification is written to.
Private key Specifies the private key to be written to.
/BASE=<name> Specify base prefix for the generated files.
/BITS=n Specify the key length in bits.
/CA__URL=“<url>” Specify the URL of the Certification Authority.
/DEBUG=n Set debug to level n (0-60).
/ENROLLMENT_PROTOCOL=prot
Use specified enrollment protocol (SCEP or CMP).
/EXTENSIONS Enable extensions in the subject name.
7-37
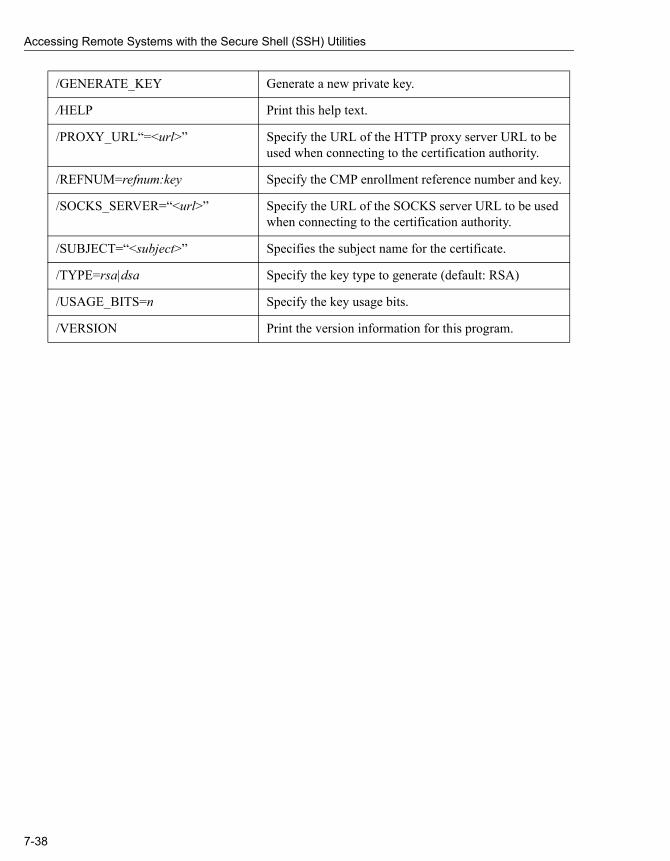
Accessing Remote Systems with the Secure Shell (SSH) Utilities
/GENERATE_KEY Generate a new private key.
/HELP Print this help text.
/PROXY_URL“=<url>” Specify the URL of the HTTP proxy server URL to be used when connecting to the certification authority.
/REFNUM=refnum:key Specify the CMP enrollment reference number and key.
/SOCKS_SERVER=“<url>” Specify the URL of the SOCKS server URL to be used when connecting to the certification authority.
/SUBJECT=“<subject>” Specifies the subject name for the certificate.
/TYPE=rsa|dsa Specify the key type to generate (default: RSA)
/USAGE_BITS=n Specify the key usage bits.
/VERSION Print the version information for this program.
7-38

Accessing Remote Systems with the Secure Shell (SSH) Utilities
Examples:1 Enroll a certificate and generate a DSA private key:
$ multinet cmpclient/type=dsa/generate_key/base=mykey/refnum=1234:abc -_$ /ca_access_url=“http://www.ca-auth.domain:8080/pkix/”-_$ /subject=“c=us,o=foobar,cn=Dilbert Dogbert” ca-certification.crt
This will generate a private key called mykey.prv and a certificate called mykey-0.crt.
2 Enroll a certificate using a supplied private key and provide an e-mail extension:
$ multinet cmpclient/base=mykey/refnum=12345:abcd -_$ /ca_access_url=“http://www.ca-auth.domain:8080/pkix/”-_$ /subject=“c=us,o=foobar,cn=Dilbert Dogbert:[email protected]” -_$ ca-certification.crt my_private_key.prv
This will generate and enroll a certificate called mykey-0.crt.
Note! SSH stores and uses software certificates in DER encoded binary format. You can use sshkeygen to import and convert PKCS#12 packages (/pkcs_convert=file) into private key/certificate pair, X.509 format private key into SSH private key (/x509_convert=file) or PKC#7 into certificate (/extract_certs=file).
Public-key SubsystemThe public-key subsystem and assistant that can be used to add, remove and list public keys stored on a remote server. The public key assistant and server are based upon a recent IETF draft, so other implementations of SSH may not yet offer this functionality.
The Publickey assistant can be started with:
$ MULTINET PUBLICKEY_ASSISTANT [qualifiers] [[user@]host[#port]]
Publickey Assistant CommandsADD key file name - Transfers the key file name to the remote system. The file name specified is expected to be in the SSH2_CONFIG directory from the user's login directory. e.g., ADD ID_DSA_1024_A.PUB will transfer the public key in ID_DSA_1024_A.PUB to the remote system and updates the AUTHORIZATION. file on the remote system to include this key name.
CLOSE - Closes the connection to the remote system
DEBUG {no | debug_level} - Sets debug level (like in SFTP2)
DELETE key finger-print- Deletes the key that matches the fingerprint specified. It is necessary to do a LIST command before this to get a list of the finger prints (and for the program to build its internal database mapping fingerprints to keys).
7-39

Accessing Remote Systems with the Secure Shell (SSH) Utilities
EXIT- Exits the program.
HELP - Displays a summary of the commands available
LIST- Displays the fingerprint and attributes of keys stored on the remote system. The attributes that are listed will vary with key.
Example Output:
Fingerprint: xozil-bemup-favug-fimid-tohuk-kybic-huloz-fukuc-kuril-gezah-loxex
key type: ssh-dss
Comment: 1024-bit dsa, [email protected], Wed Jun 05 2002 21:05:40
OPEN [user@]host[#port] Opens a connection to a remote publickey subsystem.
QUIT- Quits the program.
UPLOAD key file name - Transfers the key file name to the remote system. The file name specified is expected to be in the SSH2_CONFIG directory from the user's login directory. e.g., ADD ID_DSA_1024_A.PUB will transfer the public key in ID_DSA_1024_A.PUB to the remote system and updates the AUTHORIZATION. file on the remote system to include this key name.
VERSION [protocol version] - Displays or sets the protocol version to use. The protocol version can only be set before the OPEN command is used. The default version is 1.
Publickey Assistant Qualifiers/BATCHFILE - Provides file with publickey assistant commands to be executed. Starts SSH2 in batch mode. Authentication must not require user interaction.
/CIPHER - Selects encryption algorithm(s).
/COMPRESS - Enables SSH data compression.
/DEBUG - Sets debug level (0-99).
/HELP - Displays a summary of the qualifiers available.
/MAC - Selects MAC algorithm(s). /MAC=(mac-1,...,mac-n)
/PORT - Tells sftp2 which port sshd2 listens to on the remote machine.
/VERBOSE - Enables verbose mode debugging messages. Equal to "/debug=2". You can disable verbose mode by using “debug disable.”
/VERSION - Displays version number only.
Other Implementations VanDyke includes this in their SecureFX and VShell products. VanDyke also has a patch available for a server for OpenSSH.
7-40

Accessing Remote Systems with the Secure Shell (SSH) Utilities
7-41

Accessing Remote Systems with the Secure Shell (SSH) Utilities
7-42

Chapter 8
Secure File TransferThere are three methods to do secure file transfer: SCP2, SFTP2, and FTP over SSH2. SCP2 and SFTP2 communicate with SSH2 for authentication and data transport (which includes encryption) to remote systems and to activate the SFTP-SERVER2 image. An SCP1 server is provided for compatibility with OpenSSH SCP.
The following diagram illustrates the relationship among the client and server portions of an SCP2 or SFTP2 file transfer:
8-1

Secure File Transfer
SCP file transfers are different from FTP file transfers. With FTP a file can be transferred as ASCII, BINARY, RECORD, or in OpenVMS format (if MultiNet or TCPware is in use). In SCP the primary transfer format is BINARY. Also, the defined syntax for a file specification is UNIX syntax. Due to these restrictions, files that are transferred from dissimilar systems may or may not be useful. ASCII transfers are done by searching the transferred data for the specified newline sequence and making the specified substitution. Process Software has used methods available in the protocol to attempt to improve the chances that files will be useful upon transfer. The SSH File Transfer Protocol is an evolving specification, and some implementations may not support all options available in the protocol, or worse, not tolerate some optional parts of later versions of the protocol.
Process Software has used the defined extensions in the protocol to transfer information about the VMS file header characteristics such that when a file is transferred between two VMS systems running MultiNet v4.4 or higher, TCPware v5.6, and/or SSH for OpenVMS, the file header information will also be transferred and the file will have the same format on the destination system as it had on the source system. Also, when a text file is transferred to a non-VMS system, a method has been provided to convert those files that can be translated into a format that will be usable on the remote system. Files that are converted from non-VMS systems are stored as stream files on the VMS system, which provides compatibility for text files from those systems. Filenames are SRI-encoded when files are stored on ODS-2 disks.
SCP-SERVER1The SCP-SERVER1 program is used when a system with OpenSSH initiates an SCP command. OpenSSH uses RCP over SSH2 instead of the SFTP protocol. SCP-SERVER1 will always convert VMS text files (if possible) when copying a file from VMS. Converted VMS text files may have some trailing nulls at the end of them, due to the RCP protocol not being able to tolerate a file that comes up short of the reported size. SCP-SERVER1 (and SFTP-SERVER2) use sophisticated methods to estimate the amount of user data in the file to minimize this. On ODS-5 disks the estimation routine uses the file size hint if it is valid. On ODS-2 disks (and ODS-5 without a valid size hint), the size of the file and file characteristics are used to estimate the amount of user data. The method provides as accurate an estimate as possible without actually reading the file and never underestimates the amount of data in the file. Underestimating would cause significant problems as the programs use the size of the file to determine how much data to expect.
SCP2
Usage
SCP2 [qualifiers] [[user@]host[#port]::]file [[user@]host[#port]::]file
Note! The source and destination file specification must be quoted if they contain a user specification or a non-VMS file specification.
8-2

Secure File Transfer
Qualifiers
Table 8-1 SCP Qualifiers
Qualifier Description
/ASCII[=newline convention] Newline convention is one of dos, mac, unix, vms, or sftp. The newline convention specified is the newline convention to use if a newline convention is not specified by the server. Allowed values: dos (\r\n), mac (\r) , unix (\n ), vms (\n ) , sftp (\r\n). Default = unix.
/BATCH Starts SSH2 in batch mode. Authentication must be possible without user interaction.
/BUFFER_SIZE=integer Number of bytes of data to transfer in a buffer.Default is 7500. Minimum value is 512.
/CIPHER=(cipher-1,...,cipher-n) Selects an encryption algorithm(s).
/COMPRESS Enables SSH data compression.
/CONCURRENT_REQUEST=integerNumber of concurrent read requests to post to the source file. Default is 4.
/DEBUG=level Sets a debug level. (0-99)
/DIRECTORY Forces the target to be a directory.
/HELP Displays the help text.
/IDENTITY_FILE=file Identifies the file for public key authentication.
/OVERWRITE Overwrite existing file instead of deleting first.
/PORT=number Tells SCP2 which port SSHD2 listens to on the remote machine.
/PRESERVE Preserves file attributes and timestamps.
/NOPROGRESS Does not show progress indicator.
/QUIET Does not display any warning messages.
8-3

Secure File Transfer
Note! /ASCII, /VMS and /TRANSLATE_VMS are mutually exclusive
File SpecificationsThe source and destination strings are changed to lowercase unless they are enclosed in quotes, in which case they are left the same. File specification must be in UNIX format for remote systems, unless the remote system is running TCPware 5.6, MultiNet v4.4 or higher, or SSH for OpenVMS, and /VMS or /TRANSLATE_VMS (source files only) are used. UNIX format file specifications need to be enclosed in quotes (") if they contain the / character to prevent the DCL parsing routines from interpreting the string as a qualifier.
Qualifiers
/ASCII[=newline convention]Uses the newline convention specified if the server does not specify a newline convention. Available conventions are: dos (\r\n), mac (\r) , unix (\n ), vms (\n ) , sftp (\r\n). Default = unix.
/RECORD
Open the source file in VMS Record mode if possible. This is equivalent to record mode transfer in SFTP2. The file is transferred as a stream of records with no carriage control added between them.
/RECURSIVE Processes the entire directory tree.
/REMOVE Removes the source files after copying.
/TRANSLATE_VMS=(ALL, NONE, VARIABLE, FIXED, VFC)
Selects the VMS text files to be translated (default=ALL).
Note that /ASCII performs a similar function and may be supported in other SCP products.
/VERBOSE Displays verbose debugging messages. Equal to "/debug=2".
/VERSION Displays the version number only.
/VMS Negotiates the ability to transfer VMS file information.
Table 8-1 SCP Qualifiers (Continued)
Qualifier Description
8-4
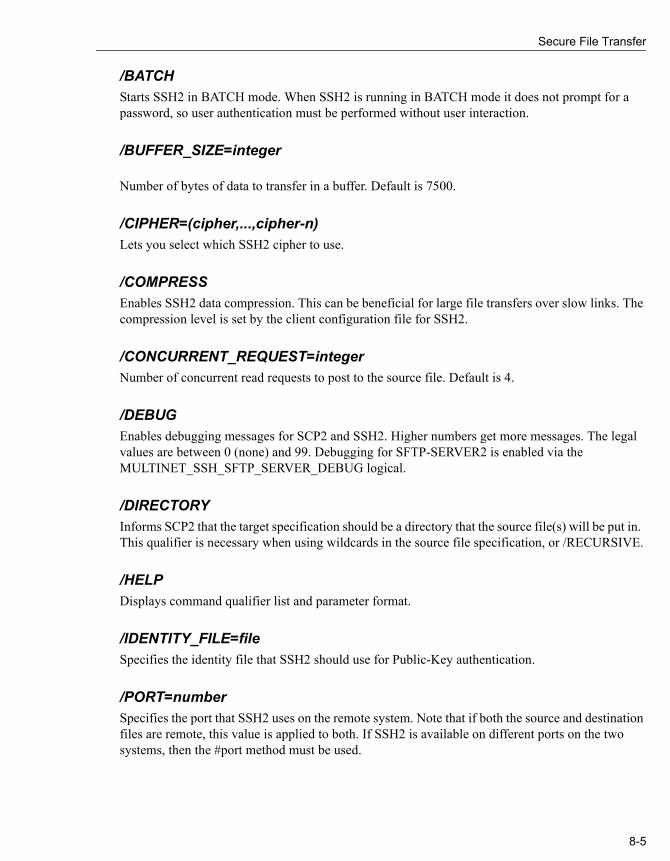
Secure File Transfer
/BATCHStarts SSH2 in BATCH mode. When SSH2 is running in BATCH mode it does not prompt for a password, so user authentication must be performed without user interaction.
/BUFFER_SIZE=integer
Number of bytes of data to transfer in a buffer. Default is 7500.
/CIPHER=(cipher,...,cipher-n)Lets you select which SSH2 cipher to use.
/COMPRESSEnables SSH2 data compression. This can be beneficial for large file transfers over slow links. The compression level is set by the client configuration file for SSH2.
/CONCURRENT_REQUEST=integerNumber of concurrent read requests to post to the source file. Default is 4.
/DEBUGEnables debugging messages for SCP2 and SSH2. Higher numbers get more messages. The legal values are between 0 (none) and 99. Debugging for SFTP-SERVER2 is enabled via the MULTINET_SSH_SFTP_SERVER_DEBUG logical.
/DIRECTORYInforms SCP2 that the target specification should be a directory that the source file(s) will be put in. This qualifier is necessary when using wildcards in the source file specification, or /RECURSIVE.
/HELPDisplays command qualifier list and parameter format.
/IDENTITY_FILE=fileSpecifies the identity file that SSH2 should use for Public-Key authentication.
/PORT=numberSpecifies the port that SSH2 uses on the remote system. Note that if both the source and destination files are remote, this value is applied to both. If SSH2 is available on different ports on the two systems, then the #port method must be used.
8-5

Secure File Transfer
/PRESERVESets the Protection, Owner (UIC), and Modification dates on the target file to match that of the source file. The adjustment of timestamps for timezones is dependent upon the logical SYS$LOCALTIME being set correctly. This is defined automatically on VMS V7 and can be defined similarly on earlier versions of VMS. /PRESERVE is not very useful when the target machine is a VMS system as VMS does not provide runtime library calls for setting the file attributes (owner, protection) and timestamps. Note that the VMS modification date (not the creation date) is propagated to the remote system. When files are copied between two VMS systems and /VMS is used /PRESERVE is implied and the process of transferring VMS attributes preserves the information about the protection, dates, and file characteristics.
/NOPROGRESSSCP2, by default, updates a progress line at regular intervals when it is run interactively to show how much of the file has been transferred. This qualifier disables the progress line.
/QUIETDisables warning messages. Note that it does not disable warning messages from SFTP-SERVER2, which return on the error channel.
/RECORDOpen the source file in VMS record mode. This copies the source file to the destination as records converted to a stream of bytes without any carriage control between records. This is equivalent to RECORD mode transfer in SFTP.
/RECURSIVECopies all of the files in the specified directory tree. Note that the top level directory on the local system is not created on the remote system. Only the most recent version is copied unless in VMS mode and the MULTINET_SFTP_VMS_ALL_VERSIONS logical is defined to be TRUE.
/REMOVEDeletes the source files after they have been copied to the remote system.
/TRANSLATE_VMSTranslates VMS text files in the copying process to byte streams separated by linefeeds because the defined data transfer format for SCP2 is a binary stream of bytes.
/TRANSLATE_VMS is only applicable to the source specification. If a remote source file is specified, then that system must be running MultiNet v4.4 or higher, TCPware 5.6, or SSH for OpenVMS. If /TRANSLATE_VMS is specified with no value, then VARIABLE, FIXED, and VFC (Variable, Fixed Control) files are translated to stream linefeed files. If the value is NONE, no files are translated. VARIABLE, FIXED, and VFC can be combined in any manner. The SFTP-SERVER2 process uses the value of the logical
8-6
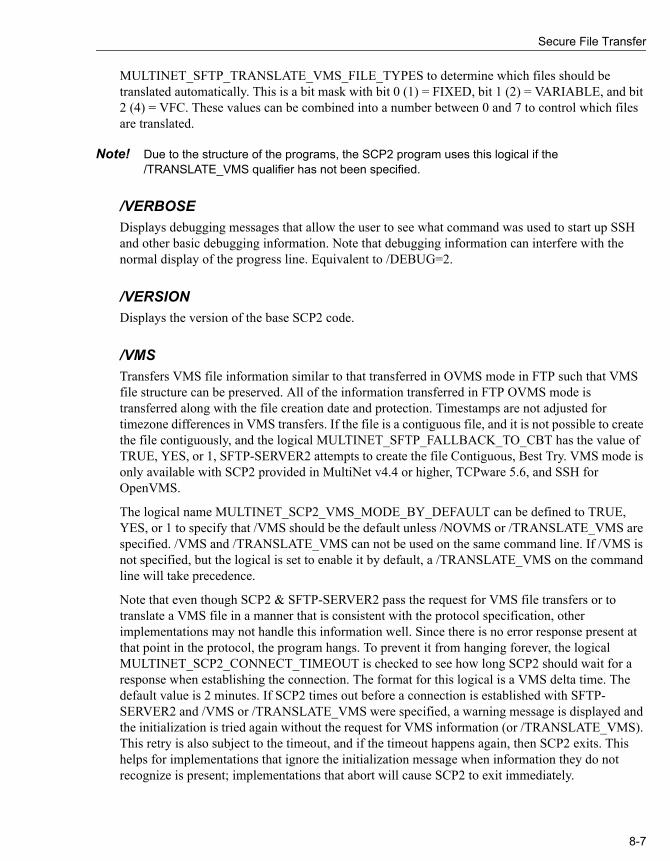
Secure File Transfer
MULTINET_SFTP_TRANSLATE_VMS_FILE_TYPES to determine which files should be translated automatically. This is a bit mask with bit 0 (1) = FIXED, bit 1 (2) = VARIABLE, and bit 2 (4) = VFC. These values can be combined into a number between 0 and 7 to control which files are translated.
Note! Due to the structure of the programs, the SCP2 program uses this logical if the /TRANSLATE_VMS qualifier has not been specified.
/VERBOSEDisplays debugging messages that allow the user to see what command was used to start up SSH and other basic debugging information. Note that debugging information can interfere with the normal display of the progress line. Equivalent to /DEBUG=2.
/VERSIONDisplays the version of the base SCP2 code.
/VMSTransfers VMS file information similar to that transferred in OVMS mode in FTP such that VMS file structure can be preserved. All of the information transferred in FTP OVMS mode is transferred along with the file creation date and protection. Timestamps are not adjusted for timezone differences in VMS transfers. If the file is a contiguous file, and it is not possible to create the file contiguously, and the logical MULTINET_SFTP_FALLBACK_TO_CBT has the value of TRUE, YES, or 1, SFTP-SERVER2 attempts to create the file Contiguous, Best Try. VMS mode is only available with SCP2 provided in MultiNet v4.4 or higher, TCPware 5.6, and SSH for OpenVMS.
The logical name MULTINET_SCP2_VMS_MODE_BY_DEFAULT can be defined to TRUE, YES, or 1 to specify that /VMS should be the default unless /NOVMS or /TRANSLATE_VMS are specified. /VMS and /TRANSLATE_VMS can not be used on the same command line. If /VMS is not specified, but the logical is set to enable it by default, a /TRANSLATE_VMS on the command line will take precedence.
Note that even though SCP2 & SFTP-SERVER2 pass the request for VMS file transfers or to translate a VMS file in a manner that is consistent with the protocol specification, other implementations may not handle this information well. Since there is no error response present at that point in the protocol, the program hangs. To prevent it from hanging forever, the logical MULTINET_SCP2_CONNECT_TIMEOUT is checked to see how long SCP2 should wait for a response when establishing the connection. The format for this logical is a VMS delta time. The default value is 2 minutes. If SCP2 times out before a connection is established with SFTP-SERVER2 and /VMS or /TRANSLATE_VMS were specified, a warning message is displayed and the initialization is tried again without the request for VMS information (or /TRANSLATE_VMS). This retry is also subject to the timeout, and if the timeout happens again, then SCP2 exits. This helps for implementations that ignore the initialization message when information they do not recognize is present; implementations that abort will cause SCP2 to exit immediately.
8-7

Secure File Transfer
LogicalsFor the following logicals, all that start MULTINET_SFTP apply to the SCP2 client, SFTP2 client and SFTP2 server.
MULTINET_SFTP_FALLBACK_TO_CBTWhen defined to TRUE, YES, or 1 (the number 1) and a VMS file transfer is being performed, this logical creates a Contiguous file if that file has Contiguous characteristics. The file will be created as Contiguous Best Try if there is insufficient space to create it as Contiguous.
MULTINET_SFTP_TRANSLATE_VMS_FILE_TYPESThis is a bit mask that determines which VMS file types should be translated when not operating in VMS mode.
• Bit 0 (1) = FIXED• Bit 1 (2) = VARIABLE• Bit 2 (4) = VFC
The values are:
• 0 (zero) = NONE• 7 = ALL
Note that this logical affects SCP2 as well as the server, as SCP2 has the server built into it for handling local file access. If this logical is not defined, the value 7 will be used.
MULTINET_SCP2_CONNECT_TIMEOUTThis logical defines a number specifying how long SCP2 should wait for a response to the INITIALIZE command from the server program. This is a VMS delta time number. The default is 2 minutes.
MULTINET_SCP2_VMS_MODE_BY_DEFAULTWhen defined to TRUE, YES, or 1, this logical chooses the /VMS qualifier if /TRANSLATE_VMS or /NOVMS has not been specified.
MULTINET_SFTP_RETURN_ALQWhen defined to TRUE, YES, or 1 (the number one) and files are being transferred in VMS mode, this logical includes the Allocation Quantity for the file in the file header information. This is disabled by default because copying a small file from a disk with a large cluster size to a disk with a small cluster size causes the file to be allocated with more space than necessary. You have the option of retaining the allocated size of a file if it was allocated the space for a reason. Some combinations of file characteristics require that the Allocation Quantity be included in the file attributes; this is handled by SCP2/SFTP-SERVER2.
8-8

Secure File Transfer
MULTINET_SSH_SCP_SERVER_DEBUGEnables debugging messages for the SCP-SERVER1 image that provides service to SCP commands that use the RCP over SSH2 protocol (OpenSSH). When this is defined, the file SCP-SERVER.LOG is created in the user’s login directory. These files are not purged. Larger values yield more debugging information.
MULTINET_SSH_SFTP_SERVER_DEBUGEnables debugging messages for the SFTP-SERVER2 image that provides service to SCP2 commands that use the SFTP protocol. When this is defined, the file SFTP-SERVER.LOG is created in the user’s login directory. These files are not purged. Larger values yield more debugging information
MULTINET_SFTP_MAXIMUM_PROTOCOL_VERSIONThis logical can be used to limit the version of the SSH File Transfer Protocol that the SFTP client and Server use. This can sometimes provide a work-around for problems encountered with different implementations of the protocol. The default value is 4. Protocol versions 2 and 3 are also used by popular implementations.
MULTINET_SFTP_VMS_ALL_VERSIONSThis logical controls whether or not all versions of a file are returned. The values TRUE, YES or 1 (the number one) will cause all versions to be returned, any other value is to only return the name of the file without a version. The default is to return only one filename without the version number.
MULTINET_SFTP_NEWLINE_STYLEThis logical controls the newline style that SFTP uses. Which can be helpful in transfering text files. The values are: UNIX <lf>, VMS <lf>, MAC <cr>. If the logical is not defined, or defined to any other value, then <cr><lf> will be used for the text line separator as documented in the SSH File Transfer specification.
MULTINET_SFTP_CASE_INSENSITIVEThis logical causes SFTP to treat filenames in a case insensitive manner when it is defined to TRUE, YES, or 1 (the number one).
MULTINET_SFTP_ODS2_SRI_ENCODINGThis logical controls whether or not SRI encoding is used for filenames on VMS ODS-2 disks. If the logical is not defined, or is defined to TRUE, YES, or 1 (the number one) then SRI encoding is used on ODS-2 disks for filenames that contain uppercase letters and special characters.
MULTINET_SFTP_FILE_ESTIMATE_THRESHOLDThis logical controls the minimum number of blocks that a text file must be for an estimated transfer size to be returned instead of an exact size. The default is to estimate the transfer size for
8-9
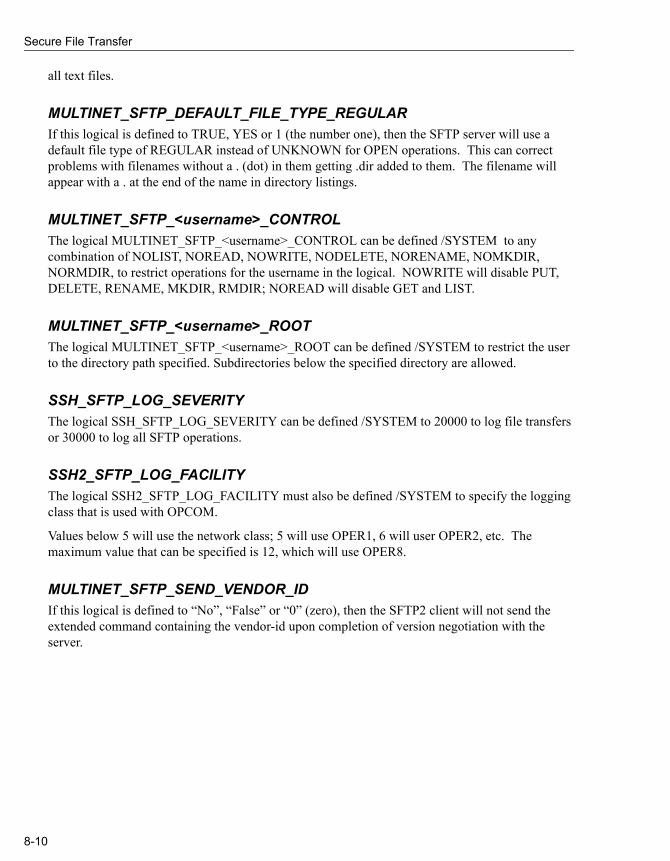
Secure File Transfer
all text files.
MULTINET_SFTP_DEFAULT_FILE_TYPE_REGULARIf this logical is defined to TRUE, YES or 1 (the number one), then the SFTP server will use a default file type of REGULAR instead of UNKNOWN for OPEN operations. This can correct problems with filenames without a . (dot) in them getting .dir added to them. The filename will appear with a . at the end of the name in directory listings.
MULTINET_SFTP_<username>_CONTROLThe logical MULTINET_SFTP_<username>_CONTROL can be defined /SYSTEM to any combination of NOLIST, NOREAD, NOWRITE, NODELETE, NORENAME, NOMKDIR, NORMDIR, to restrict operations for the username in the logical. NOWRITE will disable PUT, DELETE, RENAME, MKDIR, RMDIR; NOREAD will disable GET and LIST.
MULTINET_SFTP_<username>_ROOTThe logical MULTINET_SFTP_<username>_ROOT can be defined /SYSTEM to restrict the user to the directory path specified. Subdirectories below the specified directory are allowed.
SSH_SFTP_LOG_SEVERITYThe logical SSH_SFTP_LOG_SEVERITY can be defined /SYSTEM to 20000 to log file transfers or 30000 to log all SFTP operations.
SSH2_SFTP_LOG_FACILITYThe logical SSH2_SFTP_LOG_FACILITY must also be defined /SYSTEM to specify the logging class that is used with OPCOM.
Values below 5 will use the network class; 5 will use OPER1, 6 will user OPER2, etc. The maximum value that can be specified is 12, which will use OPER8.
MULTINET_SFTP_SEND_VENDOR_IDIf this logical is defined to “No”, “False” or “0” (zero), then the SFTP2 client will not send the extended command containing the vendor-id upon completion of version negotiation with the server.
8-10
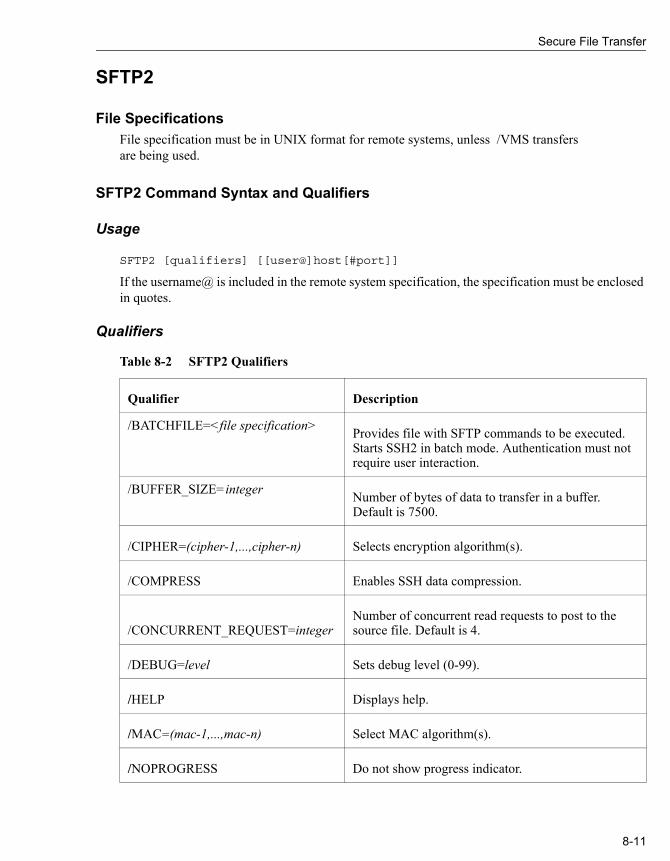
Secure File Transfer
SFTP2
File SpecificationsFile specification must be in UNIX format for remote systems, unless /VMS transfers are being used.
SFTP2 Command Syntax and Qualifiers
Usage
SFTP2 [qualifiers] [[user@]host[#port]]
If the username@ is included in the remote system specification, the specification must be enclosed in quotes.
Qualifiers
Table 8-2 SFTP2 Qualifiers
Qualifier Description
/BATCHFILE=<file specification> Provides file with SFTP commands to be executed. Starts SSH2 in batch mode. Authentication must not require user interaction.
/BUFFER_SIZE=integer Number of bytes of data to transfer in a buffer. Default is 7500.
/CIPHER=(cipher-1,...,cipher-n) Selects encryption algorithm(s).
/COMPRESS Enables SSH data compression.
/CONCURRENT_REQUEST=integerNumber of concurrent read requests to post to the source file. Default is 4.
/DEBUG=level Sets debug level (0-99).
/HELP Displays help.
/MAC=(mac-1,...,mac-n) Select MAC algorithm(s).
/NOPROGRESS Do not show progress indicator.
8-11

Secure File Transfer
/PORTTells SFTP2 which port the SSHD2 server is listening on.
/VERBOSE Enables verbose mode debugging messages. Equal to "/debug=2". You can disable verbose mode by using “debug disable.”
/VERSION Displays version number only.
/[NO]VMS Negotiates ability to transfer VMS file information. VMS transfer mode will be automatically negotiated if SFTP2 detects that the server is capable of doing VMS transfers unless /NOVMS is specified.
Table 8-2 SFTP2 Qualifiers (Continued)
Qualifier Description
8-12

Secure File Transfer
SFTP2 Commands
Table 8-3 SFTP2 Commands
SFTP2 Command Description
ASCII[{-s | <remote> [<local>]}] With “-s” option, shows current newline convention. <remote nl conv> sets remote newline convention. <local nl conv> operates on local side, but is not as useful (the correct local newline convention is usually compiled in, so this is mainly for testing). You can set either of these to “ask”, which will cause sftp to prompt you for the newline convention when needed. With the exception of “-s” option, this command sets transfer mode to ascii. Available conventions are “dos”, “unix”, “sftp”, “vms”, or “mac”, using “\r\n”, “\n”, “\r\n”, “\n” and “\r” as newlines, respectively.
Note that some implementations of SFTP may check to see if a file can be transferred in ASCII mode before doing so, and return errors for files that cannot be transferred. SSH for OpenVMS, MultiNet, and TCPware make this check.
AUTO Sets the transfer mode (ASCII or BINARY) to depend upon the extension of the file specification.
BINARY Sets the transfer mode to be binary. (This is the default.)
BUFFERSIZE [number] Sets the size of the buffer used for file transfer. A larger buffer size helps speed large transfers. Displays the current buffersize when no parameter is specified.
8-13

Secure File Transfer
CD <directory specification> Changes current directory on remote system. VMS file specifications may be used when operating in VMS mode. A logical name must include the trailing colon so that it can be recognized as such. SFTP from other vendors cannot use VMS specifications due to the way that SFTP works.
CHMOD [-R] <mode> file [file...] Change the protection on a file or directory to the specified octal mode. (Unix values). -R recurses over directories.
CLOSE Closes connection to the remote server.
DEBUG {disable | no |<debug level>} Sets the debug level for SFTP2. It does not change the current debug level for SSH2 for an existing connection, but will be used with SSH2 for a new connection. With “disable” or “no”, this disables all debugging current sessions for SFTP2.
DELETE <file specification> Removes the specified file from the remote system.
DIRECTORY [<file |directory specification>] Displays the contents of the current directory or specified directory in VMS format when the transfer mode is VMS. File names are displayed as they would be with a DIRECTORY command from DCL.
EXIT Exits SFTP client.
Table 8-3 SFTP2 Commands (Continued)
8-14

Secure File Transfer
GET [--preserve-attributes | -p ] <file1> [ <file2>...]
Retrieves the specified file(s) from the remote system and stores it in the current working directory on the local system. File names are case sensitive and in UNIX format. When operating in VMS mode, either UNIX or VMS-style file specifications can be used. Directories are recursively copied with their contents. Multiple files may be specified by separating the names with spaces.
If --preserve-attributes or -p is specified, then SFTP attempts to preserve timestamps and access permissions.
Note that a target filename cannot be provided.
GETEXT Displays the list of file extensions to use ASCII transfers when in AUTO mode. The initial value is txt,htm*,pl,php*
HELP Displays help on commands.
LCD <directory specification> Changes the current directory on the local system. VMS file specifications may be used when in VMS mode.
LCHMOD [-R] <mode> file [file...] Change the protection on a file or directory on the local connection to the specified octal mode. (Unix values). -R recurses over directories.
LCLOSE Close the local connection.
LDELETE <file> Removes the specified file from the local system. VMS file specifications may be used when in VMS mode.
LDIRECTORY [<file |directory specification>] Displays the contents of the current directory for the local system in VMS format when the transfer mode is VMS. File names are displayed as they would be with a DIRECTORY command from DCL.
Table 8-3 SFTP2 Commands (Continued)
8-15
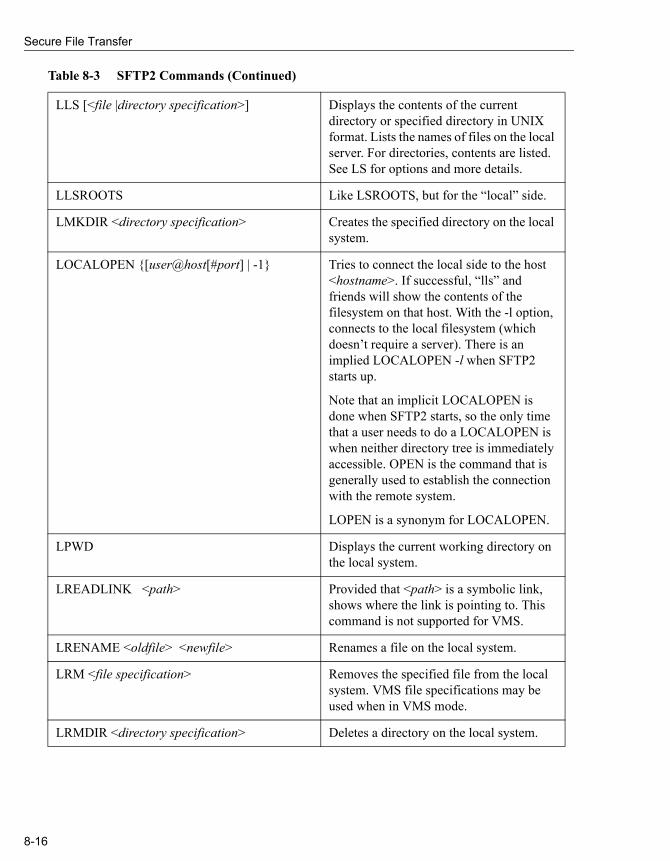
Secure File Transfer
LLS [<file |directory specification>] Displays the contents of the current directory or specified directory in UNIX format. Lists the names of files on the local server. For directories, contents are listed. See LS for options and more details.
LLSROOTS Like LSROOTS, but for the “local” side.
LMKDIR <directory specification> Creates the specified directory on the local system.
LOCALOPEN {[user@host[#port] | -1} Tries to connect the local side to the host <hostname>. If successful, “lls” and friends will show the contents of the filesystem on that host. With the -l option, connects to the local filesystem (which doesn’t require a server). There is an implied LOCALOPEN -l when SFTP2 starts up.
Note that an implicit LOCALOPEN is done when SFTP2 starts, so the only time that a user needs to do a LOCALOPEN is when neither directory tree is immediately accessible. OPEN is the command that is generally used to establish the connection with the remote system.
LOPEN is a synonym for LOCALOPEN.
LPWD Displays the current working directory on the local system.
LREADLINK <path> Provided that <path> is a symbolic link, shows where the link is pointing to. This command is not supported for VMS.
LRENAME <oldfile> <newfile> Renames a file on the local system.
LRM <file specification> Removes the specified file from the local system. VMS file specifications may be used when in VMS mode.
LRMDIR <directory specification> Deletes a directory on the local system.
Table 8-3 SFTP2 Commands (Continued)
8-16

Secure File Transfer
LS [-R] [-l] [-S] [-r] [ <file> ...] Displays the contents of the current
directory or specified directory in UNIX format. Lists the names of files on the remote server. For directories, contents are listed. When the -R is given, directory trees are listed recursively. (By default, subdirectories of the arguments are not visited.) When the -l option is given, permissions, owners, sizes, and modification times are also shown. When the -S options is specified sorting is based upon file size instead of alphabetically. The -r option reverses the sort order. When no arguments are given, it assumes that the contents of “.” (current working directory) are being listed. Currently, the options -R and -l are mutually incompatible. Ls will fill a screen with output, then wait for the user to decide if they want more or have seen enough.
LSROOTS Displays the virtual roots of the server. (This VanDyke Software’s V Shell extension. Without this you can’t know the filesystem structure of a V Shell server). This is also a VMS extension to display the roots (devices) on the VMS system. Though the commands are the same, the information provided is not compatible with what is displayed by VanDyke Software’s Secure FX.
LSYMLINK <targetpath> <linkpath> Like SYMLINK, but for the “local” side.
MGET [--preserve-attributes | -p] <file1> [<file2>...]
Retrieves multiple files from the remote system and stores them in the current working directory on the local system.
If --preserve-attributes or -p is specified, then SFTP attempts to preserve timestamps and access permissions.
MKDIR <directory specification> Creates the specified directory on the remote system.
Table 8-3 SFTP2 Commands (Continued)
8-17

Secure File Transfer
MPUT [--preserve-attributes | -p] <file1> [<file2>...]
Stores multiple files in the current working directory on the remote system. File names are case-sensitive and in UNIX format. When operating in VMS mode, either UNIX or VMS-style file specifications can be used. Directories are recursively copied with their contents. Multiple files may be specified by separating the names with spaces.
If --preserve-attributes or -p is specified, then SFTP attempts to preserve timestamps and access permissions.
OPEN {-1| [user@]host[#port]} Tries to connect to the host<hostname>. Or with the -l option, connects the remote side to the local filesystem (which doesn’t require a server).
PUT [--preserve-attributes | -p] <file1> [<file2>...]
Stores the specified file in the current working directory on the remote system. File names are case-sensitive and in UNIX format. When operating in VMS mode, either UNIX or VMS-style file specifications can be used. Directories are recursively copied with their contents. Multiple files may be specified by separating the names with spaces.
If --preserve-attributes or -p is specified, then SFTP attempts to preserve timestamps and access permissions.
Note that a target filename cannot be provided.
PWD Displays the current working directory on the remote system. Displayed in VMS format when in VMS mode; otherwise displayed in UNIX format.
QUIT Exits SFTP client.
Table 8-3 SFTP2 Commands (Continued)
8-18

Secure File Transfer
READLINK <targetpath> <linkpath> Provided that <path> is a symbolic link,
shows where the link is pointing to. Not valid for VMS systems as VMS does not have symbolic links.
RECORD Enters record transfer mode if the server supports Process Software’s record open. The direction in which record transfer mode is possible will be displayed in response to this command. In record transfer mode the source file is opened as binary records and the destination file is opened as binary. This produces the same effect as MultiNet’s FTP server BINARY transfer when a BLOCK_SIZE has not been specified, and can be used to transfer a file that contains VMS records to a system that can only handle “flat” files.
RENAME <oldfile> <newfile> Renames file on the remote system.
RM <file specification> Removes the specified file from the remote system.
RMDIR <directory specification> Deletes a directory on the remote system.
SETEXT <ext1>[<ext2>...] Sets the list of file extensions to use ASCII transfers when in AUTO mode. Individual file extensions must be separated by spaces.
STATUS Shows the transfer mode, remote server name, and remote server version. The current newline sequence is displayed if operating in ASCII or AUTO mode.
SYMLINK <targetpath> <linkpath> Creates symbolic link <linkpath>, which will point to <targetpath>. Not valid for VMS systems as VMS does not have symbolic links.
VERBOSE Enables verbose mode (identical to “/DEBUG=2” command-line option). You may later disable verbose mode by “debug disable”.
Table 8-3 SFTP2 Commands (Continued)
8-19

Secure File Transfer
LogicalsThe following logicals are specific to SFTP2.
MULTINET_SFTP_VMS_MODE_BY_DEFAULT When defined to TRUE, YES, or 1, this logical chooses the /VMS qualifier if /NOVMS has not been specified.
Configuration File ParametersThe system wide configuration file (SSH2_DIR:SSH2_CONFIG.) or the user’s configuration file (SYS$LOGIN:[.SSH2]SSH2_CONFIG.) can be used to specify the following parameters. The user’s configuration file takes precedence over the system configuration file.
The system server configuration file (SSH2_DIR:SSHD2_CONFIG.) can include parameters to control which users can perform remove SSH commands (including SSH terminal sessions) as well as SFTP2 access.
VMS Sets the transfer mode to include VMS file information.
Table 8-4 SFTP/SCP2 user configuration parameters
FilecopyMaxBuffers This is equivalent to the /CONCURRENT_REQUEST qualifier on the SFTP2 or SCP2 command line. The command line qualifier will supercede any value in the configuration file.
FilecopyMaxBuffersize This is equivalent to the SFTP2 BUFFERSIZE command or the SCP2 /BUFFER_SIZE qualifier. The command or qualifier takes precedence.
Table 8-5 SSH2 terminal restriction parameters
Terminal.AllowUsers Allow users in the specified list to create SSH2 terminals and do interactive commands
Terminal.DenyUsers Prevent users in the specified list from creating SSH2 terminals and performing interactive commands. The users can still use the SFTP2, SCP1 and Public Key servers.
Terminal.AllowGroups Allow groups in the specified list to create SSH2 terminals and do interactive commands
Table 8-3 SFTP2 Commands (Continued)
8-20

Secure File Transfer
FTP over SSHSSH2 can be used to set up port forwarding that can be used for FTP. This allows users to use the richness of the FTP command set to access files on a remote system and have their control and data information encrypted. The command format to set up the SSH port forwarding is:
$ ssh <remote_host_name>/local_forward=(“ “ “ftp/<forwarded_port_number>:localhost:21” ” ”)
The usual SSH authentication mechanisms come into play, so there may be a request for a password and a terminal session is established to the remote host. As long as this terminal session is alive, other users on the local system can use FTP to access the remote system over an encrypted channel. The location of the quotes is important, as it is necessary to prevent DCL from interpreting the / in the local forwarding information as the start of a new qualifier, and SSH2 does not know or expect to find the ( ) around the forwarding information. Note that the “localhost” inside of the forwarding string is important, as it will make the connection to FTP on the remote system come from localhost, which will then allow FTP to open the data port.
When a user desires to use an encrypted FTP connection, the following sequence of commands would be issued:
PORT <forward_port_number>OPEN LOCALHOST
Normal FTP authentication takes place and multiple FTP sessions may use a single forwarded port. The FTP protocol filter in SSH2 scans the FTP command stream for the FTP PORT and PASV commands and their replies, and makes substitutions in these commands and replies to use a secure data stream through the SSH2 session that has been set up. This command will establish an encrypted FTP session with the remote host that the SSH connection is sent to.
To allow a single system to act as a gateway between two networks, add/ALLOW_REMOTE_CONNECT to the SSH command that initiates the connection.
Terminal.DenyGroups Prevent groups in the specified list from creating SSH2 terminals and performing interactive commands. The groups can still use the SFTP2, SCP1 and Public Key servers.
Table 8-5 SSH2 terminal restriction parameters (Continued)
8-21

Secure File Transfer
8-22

Appendix A
DCL User CommandsThis appendix lists the commands you can invoke from the DCL command line.
Command SummaryTable A-1 lists the MultiNet user DCL commands:
Table A-1 DCL Command Summary
Utility Description
MULTINET DECODE Decodes a file encoded by the MultiNet SMTP mail handler.
MULTINET FINGER Displays information about users currently logged into local or remote systems.
MULTINET FTP Uses the standard Internet FTP protocol to transfer files between TCP/IP hosts, and allows you to manipulate them.
MULTINET KERBEROS DESTROY Deletes Kerberos authentication tickets you previously acquired.
MULTINET KERBEROS INIT Acquires the initial ticket that allows client programs to obtain tickets to access network services.
MULTINET KERBEROS LIST Displays your ticket status.
MULTINET KERBEROS PASSWORD
Changes your Kerberos password.
MULTINET LPRM Cancels print jobs, specified by job number, from the SYS$PRINT queue.
A-1
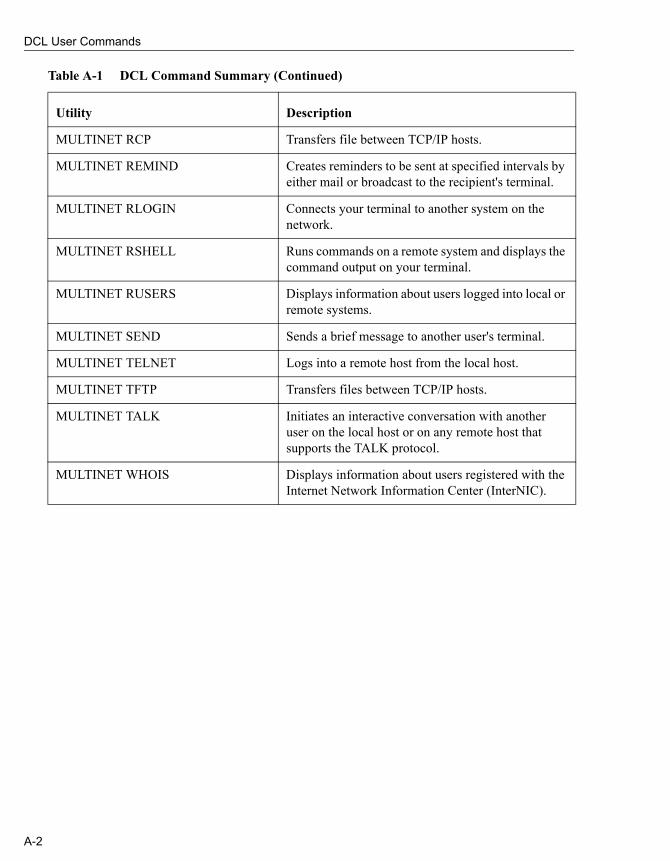
DCL User Commands
MULTINET RCP Transfers file between TCP/IP hosts.
MULTINET REMIND Creates reminders to be sent at specified intervals by either mail or broadcast to the recipient's terminal.
MULTINET RLOGIN Connects your terminal to another system on the network.
MULTINET RSHELL Runs commands on a remote system and displays the command output on your terminal.
MULTINET RUSERS Displays information about users logged into local or remote systems.
MULTINET SEND Sends a brief message to another user's terminal.
MULTINET TELNET Logs into a remote host from the local host.
MULTINET TFTP Transfers files between TCP/IP hosts.
MULTINET TALK Initiates an interactive conversation with another user on the local host or on any remote host that supports the TALK protocol.
MULTINET WHOIS Displays information about users registered with the Internet Network Information Center (InterNIC).
Table A-1 DCL Command Summary (Continued)
Utility Description
A-2

MULTINET DECODE DCL User Commands
MULTINET DECODEDecodes a file encoded by the MultiNet SMTP mail handler.
FORMATMULTINET DECODE input_file output_file
PARAMETERSinput_file
Specifies the name of a file containing the encoded file, including the RFC822 headers at the top of the message. The message must include MIME-Version, Content-Type, and Content-Transfer-Encoding headers in order to be decoded. Only the APPLICATION/RMS content-type and base64 content-transfer-encoding are supported.
output_file
The name for the resulting decoded file.
EXAMPLEBinary files can be sent via SMTP using the undocumented /FOREIGN qualifier of the OpenVMS Mail SEND command. The following example shows how to send such a file and use DECODE to translate the corresponding mail message:
1 First, send a executable file using OpenVMS Mail:
$ MAILMAIL>SEND /FOREIGN /NOEDIT BINARY.EXETo: SMTP%"[email protected]"Subj: BINARY.EXE
2 When the file arrives, store the ASCII-encoded mail as a text file:
$ MAILMAIL>EXTRACT/NOHEADER BINARY.TXT
3 Finally, decode the BINARY.TXT file into an executable file:
$ MULTINET DECODE BINARY.TXT BINARY.EXE
A-3

DCL User Commands MULTINET FINGER
MULTINET FINGERDisplays information about users currently logged into local or remote systems.
FORMATMULTINET FINGER [user_name] [@host_name]
PARAMETERSuser_name
Specifies the user name about which to obtain detailed information. If not specified, brief information is displayed about users currently logged in.
host_name
The name (or network address) of the host to which a connection should be made. If you do not specify a host name, information about the local host is displayed. The host name can be specified as an IP address; for example:
$ MULTINET FINGER @127.0.0.1
QUALIFIERS/NOCLUSTER
Restricts output to that of a single system instead of its VMScluster.
/CLUSTER
Displays all cluster users.
RestrictionsTo display information about users logged into a remote system, that system must have a FINGER server enabled.
EXAMPLE
$ MULTINET FINGERFriday, April 9,2004 12:39AM-PDT Up 0 02:10:27 4+0 Load ave 0.24 0.25 0.19User Personal Name Job Subsys TTY Console LocationSYSTEM System Manager 37 *DCL* TTA3 Macintosh SESMITH L. Stuart Smith 32 FINGER FTA1 Console 33 *DCL* FTA2 Console 35 *DCL* FTA3 Console
A-4

MULTINET FTP DCL User Commands
MULTINET FTPUses the standard Internet FTP protocol to transfer files between TCP/IP hosts, and allows you to manipulate them.
FORMATMULTINET FTP [host] [command]
PARAMETERShost
Specifies the name of a remote host to which you want to connect. You can also specify the host name as an IP address. If you enter the name of a remote host on the DCL command line, FTP immediately attempts to connect to the FTP server on that host. If you do not specify a remote host, FTP enters its TOPS-20 style command interpreter and prompts for FTP commands.
command
Specifies an FTP command to execute. If you do not specify a command, FTP starts interactive mode and prompts for commands.
Note! You must specify all FTP DCL qualifiers on the command line before any command.
If command causes an FTP error to occur, the error condition is reported back to DCL in the $STATUS symbol. To determine if an FTP error occurred, examine the hexadecimal value of $STATUS. If the lower byte is the value %X2C, the FTP error code can be determined by dropping the high order four bits of the 32-bit condition code and examining the next twelve. For example, if you specify the incorrect remote password, the FTP error status code returned by the server will be the decimal value 530. As the FTP image exits, the error status (and hence the $STATUS symbol) is set to the value %X1212002C (decimal 530 is the same as hexadecimal %X212).
QUALIFIERS/ACCOUNT=account_name
Specifies your account name. In addition to a user name and password for validation, some systems require an account string. MultiNet preserves the case of characters placed within quotation marks. Characters not placed within quotation marks are converted to lowercase. Be aware the some systems might not recognize these lowercase characters and deny access.
/BINARY
Equivalent to /TYPE=IMAGE, this qualifier allows you to transfer binary files. You can override the /BINARY qualifier with the TYPE command in interactive mode.
/IMAGE
Equivalent to /TYPE=IMAGE, this qualifier allows you to transfer binary files. You can override the /IMAGE qualifier with the TYPE command in interactive mode.
A-5

DCL User Commands MULTINET FTP
/INITIALIZATION (default) /NOINITIALIZATION
Tells FTP to read commands from your SYS$LOGIN:FTP.INIT file when invoked. Use the /NOINITIALIZATION qualifier to disable this behavior.
{ STREAM (default) }/MODE= { COMPRESS } { user-defined-mode }
Specifies the file transfer mode. You can change the MODE by using the MODE command in in-teractive mode, and default to STREAM. A user-defined mode can be created as an executable file.
/PASSWORD=password
Specifies the password to use on the remote host, which must be specified in conjunction with the /USERNAME qualifier. If not specified, FTP prompts for the password. MultiNet preserves the case of characters placed within quotation marks. Characters not placed within quotation marks are converted to lowercase. Be aware the some systems might not recognize these lowercase characters and deny access.
/PORT=port
Specifies an alternate TCP port number to use when connecting to the FTP control port on the remote host. You should only use this qualifier when communicating with an FTP server that uses a non-standard control port number.
{ CONNECT, }/PROMPT[=( { NOMISSING_ARGUMENTS } )]
Modifies the operation of FTP. If /PROMPT=CONNECT is used following a successful connection FTP prompts for a user name and password to send to the remote system. The same result can be achieved by adding the line PROMPT-ON-CONNECT ON to your SYS$LOGIN:FTP.INIT file.
If you use /PROMPT=NOMISSING_ARGUMENTS, FTP does not prompt you for missing com-mand line arguments. The same behavior can be accomplished by adding the line PROMPT-FOR-MISSING-ARGUMENTS OFF to your SYS$LOGIN:FTP.INIT file.
For compatibility with previous releases of MultiNet, using the /PROMPT qualifier alone implies /PROMPT=CONNECT.
/STATISTICS /NOSTATISTICS (default)
Sets the FTP STATISTICS flag so FTP displays transfer timing statistics upon completion of file transfers.
A-6
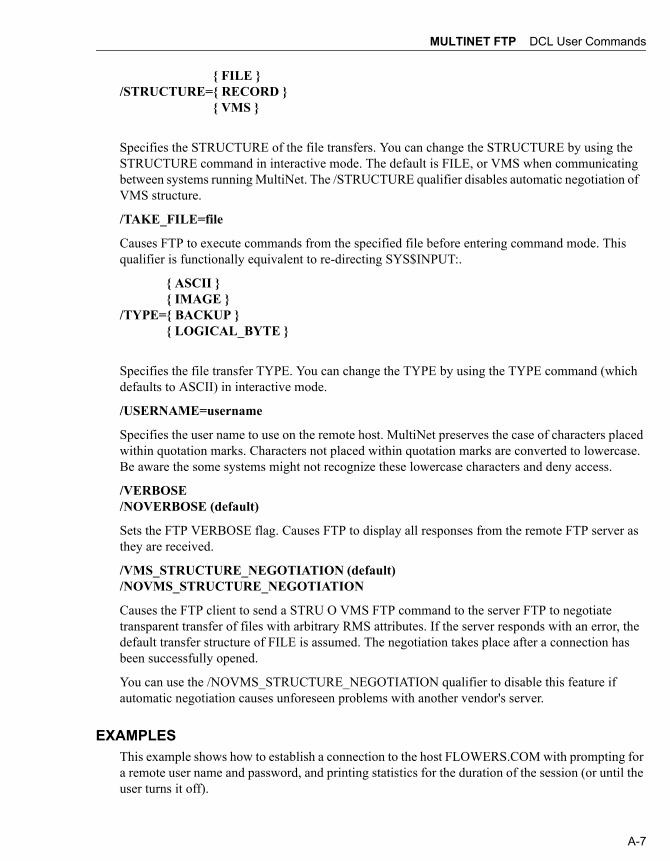
MULTINET FTP DCL User Commands
{ FILE }/STRUCTURE={ RECORD } { VMS }
Specifies the STRUCTURE of the file transfers. You can change the STRUCTURE by using the STRUCTURE command in interactive mode. The default is FILE, or VMS when communicating between systems running MultiNet. The /STRUCTURE qualifier disables automatic negotiation of VMS structure.
/TAKE_FILE=file
Causes FTP to execute commands from the specified file before entering command mode. This qualifier is functionally equivalent to re-directing SYS$INPUT:.
{ ASCII } { IMAGE }/TYPE={ BACKUP } { LOGICAL_BYTE }
Specifies the file transfer TYPE. You can change the TYPE by using the TYPE command (which defaults to ASCII) in interactive mode.
/USERNAME=username
Specifies the user name to use on the remote host. MultiNet preserves the case of characters placed within quotation marks. Characters not placed within quotation marks are converted to lowercase. Be aware the some systems might not recognize these lowercase characters and deny access.
/VERBOSE /NOVERBOSE (default)
Sets the FTP VERBOSE flag. Causes FTP to display all responses from the remote FTP server as they are received.
/VMS_STRUCTURE_NEGOTIATION (default) /NOVMS_STRUCTURE_NEGOTIATION
Causes the FTP client to send a STRU O VMS FTP command to the server FTP to negotiate transparent transfer of files with arbitrary RMS attributes. If the server responds with an error, the default transfer structure of FILE is assumed. The negotiation takes place after a connection has been successfully opened.
You can use the /NOVMS_STRUCTURE_NEGOTIATION qualifier to disable this feature if automatic negotiation causes unforeseen problems with another vendor's server.
EXAMPLESThis example shows how to establish a connection to the host FLOWERS.COM with prompting for a remote user name and password, and printing statistics for the duration of the session (or until the user turns it off).
A-7

DCL User Commands MULTINET FTP
$ MULTINET FTP FLOWERS.COM /PROMPT=CONNECT /STATISTICS
This example shows how to establish a connection to the host DS.INTERNIC.NET, log in with the user name ANONYMOUS and password GUEST, and fetch the file RFC:RFC959.TXT (the FTP Request for Comments), placing it in the file RFC959.TXT in your default directory.
$ MULTINET FTP /USER=ANONYMOUS /PASSWORD=GUEST DS.INTERNIC.NET -_$ GET RFC:RFC959.TXT RFC959.TXT
A-8

MULTINET KERBEROS DESTROY DCL User Commands
MULTINET KERBEROS DESTROYDeletes Kerberos authentication tickets you previously acquired.
FORMATMULTINET KERBEROS DESTROY
QUALIFIERS/QUIET (default) /NOQUIET
Determines if the terminal bell sounds when tickets cannot be destroyed.
/STATUS (default) /NOSTATUS
Determines if a message appears when the tickets are destroyed.
EXAMPLEThis example shows how to destroy your tickets.
$ MULTINET KERBEROS DESTROYTickets destroyed.$
A-9
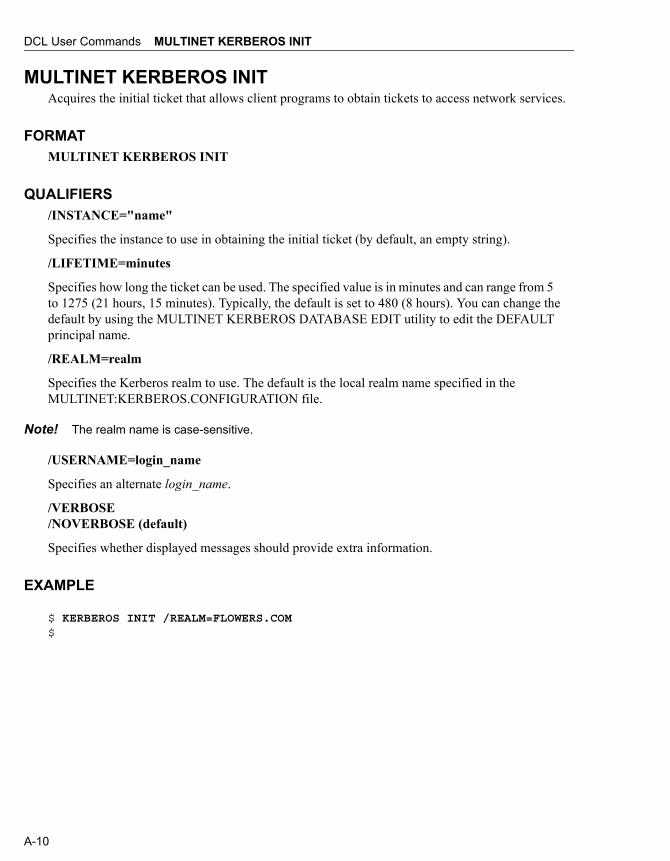
DCL User Commands MULTINET KERBEROS INIT
MULTINET KERBEROS INITAcquires the initial ticket that allows client programs to obtain tickets to access network services.
FORMATMULTINET KERBEROS INIT
QUALIFIERS/INSTANCE="name"
Specifies the instance to use in obtaining the initial ticket (by default, an empty string).
/LIFETIME=minutes
Specifies how long the ticket can be used. The specified value is in minutes and can range from 5 to 1275 (21 hours, 15 minutes). Typically, the default is set to 480 (8 hours). You can change the default by using the MULTINET KERBEROS DATABASE EDIT utility to edit the DEFAULT principal name.
/REALM=realm
Specifies the Kerberos realm to use. The default is the local realm name specified in the MULTINET:KERBEROS.CONFIGURATION file.
Note! The realm name is case-sensitive.
/USERNAME=login_name
Specifies an alternate login_name.
/VERBOSE /NOVERBOSE (default)
Specifies whether displayed messages should provide extra information.
EXAMPLE
$ KERBEROS INIT /REALM=FLOWERS.COM$
A-10

MULTINET KERBEROS LIST DCL User Commands
MULTINET KERBEROS LISTDisplays your ticket status.
FORMATMULTINET KERBEROS LIST
QUALIFIERS/BRIEF /NOBRIEF (default)
Lists only the acquired tickets without issuance dates, expiration dates, principal name, or the ticket file name.
/CHECK_TGT /NOCHECK_TGT (default)
Determines if the tickets are still valid and returns an exit status of either success or failure. (TGT stands for ticket-getting ticket.) The default is to indicate ticket status with a message on the screen.
/SRVTAB
Lists the contents of the MULTINET:KERBEROS.SRVTAB file which indicates what services are available. This can provide an administrator with useful information about what services are configured in the Kerberos database.
EXAMPLEThis example shows how to list the ticket status.
$ MULTINET KERBEROS LISTPrincipal: [email protected] Expires PrincipalJune 12 16:16:47 June 13 02:16:47
$ MULTINET KERBEROS LIST /SRVTABServer key file: multinet:kerberos.srvtabService Instance Realm Key Version----------------------------------------------------changepw iris FLOWERS.COM 1rcmd iris FLOWERS.COM 1$
Indicates that CHANGEPW service is configured, as is the RCMD service used by RCP, RLOGIN, and RSHELL.
A-11
DCL User Commands MULTINET KERBEROS PASSWORD
MULTINET KERBEROS PASSWORDChanges your Kerberos password.
FORMATMULTINET KERBEROS PASSWORD
QUALIFIERS/INSTANCE="name"
Specifies the instance to change (by default, an empty string).
/REALM=realm
Specifies the Kerberos realm to use. The default is the local realm name specified in the MULTINET:KERBEROS.CONFIGURATION file.
Note! The realm name is case-sensitive.
/USERNAME=login_name
Specifies an alternate login_name.
EXAMPLE
$ MULTINET KERBEROS PASSWORD
A-12
MULTINET LPRM DCL User Commands
MULTINET LPRMCancels print jobs, specified by job number, from the SYS$PRINT queue. When you issue this command without arguments, the currently active job is cancelled.
FORMATMULTINET LPRM job-ID(s)[,username(s)]
PARAMETERSjob-ID(s)[,username(s)]
Specifies a comma-separated list of job ID numbers and/or user names. You can only specify job ID numbers of jobs you submitted that originated on your system (unless you are authorized to use /SUPERUSER). Enter a user name to indicate that you want all jobs submitted by the specified user to be removed. If you do not specify /SUPERUSER, you can only specify your user name.
QUALIFIERS/ALL
Cancels all jobs on the specified printer.
/NODE=remote_print_queue
Specifies the name of a print queue on a remote system.
/QUEUE=queue
Specifies an alternate print queue.
/SUPERUSER
Indicates you have SYSTEM privilege and can delete all jobs in the specified queue.
/USER=user_name
Specifies the user name of the print job to be deleted. To use this qualifier, you must have SYSPRV or OPER privilege.
EXAMPLEThis example invokes LPRM to remove print jobs in the HP_LPD print queue. Job ID numbers 9, 42, and 66 are removed if you submitted them and they originated on your system. In addition, if you are named Lang, all your print jobs are removed from the system. If you are not named Lang, or you did not submit any of the other jobs, the requests are ignored unless you use the /SUPERUSER qualifier.
$ MULTINET LPRM /QUEUE=HP_LPD 9,42,66,LANG
A-13

DCL User Commands MULTINET RCP
MULTINET RCPTransfers file between TCP/IP hosts. Uses the 4.3BSD UNIX "rcp" (remote copy) to copy files between TCP/IP hosts. If the remote host you specify in the input or output file specification is an OpenVMS system running MultiNet, the MultiNet RCP utility automatically negotiates transparent transfer of any OpenVMS file, retaining all RMS attributes.
FORMAT MULTINET RCP input_file_spec output_file_spec
PARAMETERSinput_file_spec
Specifies the name of one or more files to be copied. This parameter may be either a local OpenVMS file specification or a remote file specification of the form:
hostname::input_file_spec
If input_file_spec is not a full directory and file specification, it is interpreted relative to your login directory on hostname. If the directory/file specification on the remote host contains special characters (including mixed-case directory and file names), you should enclose it within double quotation marks.
input_file_spec can be a directory specification if used with the /RECURSIVE qualifier. See the /RECURSIVE qualifier for more details.
You may use wildcards in either the local or remote file specification. For remote file specifica-tions, however, you must use the wildcard characters normally used on the remote system.
output_file_spec
Specifies the name(s) of the output file(s) into which the input file(s) are to be copied. This parameter may be either a local OpenVMS file specification or a remote file specification of the form:
hostname::output_file_spec
If output_file_spec is not a full directory and file specification, it is interpreted relative to your login directory on hostname. If the directory and file specification on the remote host contains special characters (including mixed-case directory and file names), you should enclose it within double quotation marks.
You may use wildcards in either the local or remote file specification. For remote file specifica-tions, however, you must use the wildcard characters normally used on the remote system.
QUALIFIERS/AUTHENTICATION=KERBEROS
If you specify /AUTHENTICATION=KERBEROS, command authentication is performed using Kerberos; you will not be prompted for authentication information. (KERBEROS is currently the
A-14

MULTINET RCP DCL User Commands
only value supported by this qualifier.)
/EXACT /NOEXACT (default)
Disables the automatic conversion of file names to lowercase. When DCL passes command line parameters and qualifiers to RCP, it converts them to uppercase unless you explicitly enclose them within double quotation marks. Because lowercase file names are preferred by UNIX, and since OpenVMS file names are case-insensitive, RCP converts file names to lowercase. You can use mixed case file names if you enclose them in double quotation marks, and specify them with the /EXACT qualifier.
/LOG=log_spec /NOLOG (default)
Specifies whether RCP should display the file specifications and transfer information of each file copied. log_spec can take the values SIZE or TIME (or both if enclosed in parentheses and separated by commas). If you specify only /LOG, /LOG=SIZE is assumed.
When you use the /LOG qualifier, RCP displays the following information for each file copied:
• The names of the input and output files• The number of blocks copied if you specify /LOG=SIZE• The data transfer rate (in bytes or kilobytes per second) if you specified /LOG=TIME• Both the number or blocks and the data transfer rate if you specified /LOG=(SIZE,TIME)
/PASSWORD=password
Specifies the password to use on the remote host which you must specify with the /USERNAME qualifier. If you specify /PASSWORD without a value, RCP prompts for the password (terminal echoing is disabled).
/RECURSIVE /NORECURSIVE (default)
Specifies that the directory subtree rooted at the directory named by input_file_spec should be copied recursively, that is, the directory and all files and directories below it. If you specify the local file specification with an ellipsis ([...]), the /RECURSIVE qualifier is assumed.
/TRUNCATE_USERNAME /NOTRUNCATE_USERNAME (default)
Causes RCP to truncate your OpenVMS user name to be no longer than eight characters. Some RSHELL server implementations, notably UNIX, assume that the remote user name is not longer than eight characters and dies with the error "remuser too long" if it is longer. You can use this qualifier to communicate with those systems.
/USERNAME=username
Specifies the user name to use on the remote host.
A-15
DCL User Commands MULTINET RCP
/VMS[={TCPWARE | MULTINET}] (default) /NOVMS
If /VMS is omitted, RCP by default attempts a MultiNet style VMS mode transfer. This retains VMS file attributes across copies. Use /VMS=TCPWARE to do a transfer involving a TCPware machine. /NOVMS disables maintaining VMS file attributes during a third-party copy.
RestrictionsThe MultiNet RCP utility does not support third-party copies, so either the input or output file specification may contain remote host information, but not both.
You may use wildcards in either the local or remote file specification. For remote file specifications, however, you must use the wildcard characters normally used on the remote system.
You must specify at least one field in the local file specification. If you do not specify the device or directory, your current default device and directory are used. For a local output specification, RCP fills in any other missing fields (file name, file type, version) with the corresponding field of the input file specification.
RCP fails if a login command procedure displays information. Ensure your OpenVMS login command procedure contains the following lines at the start of the file:
$ VERIFY := 'F$VERIFY(0)'$ IF F$MODE() .EQS. "OTHER" THEN EXIT
You should also add this line to the end of your login command procedure:
$ IF VERIFY THEN SET VERIFY
For UNIX login scripts (such as .profile), ensure the file does not display any information.
EXAMPLESThis command copies the file JETSON.LOG from your login directory on the host SPROCKETS.COM to your default directory (USERS:[SPACELY]) on the local host.
$ RCP SPROCKETS1COM::JETSON.LOG [] /LOG%RCP-I-COPIED, SPROCKETS.COM::JETSON.LOG;8 copied to USERS:[SPACELY]JETSON.LOG;1 (1 block)
This command copies the file LOGIN.COM in your default directory on the local system to the login directory of the user GIGI on the host BIGBOOTE.FLOWERS.COM.
$ RCP /USER=GIG2 /PASS=RABBIT LOGIN.COM BIGBOOTE.FLOWERS.COM::
In this example, you copy all files in the "tmp" subdirectory of your login directory on the host UNIX.SPROCKETS.COM into your default directory on the local system.
Note! The double quotation marks enclosing "tmp/*" are required to prevent DCL from interpreting the slashes.
A-16

MULTINET RCP DCL User Commands
$ RCP /LOG U3IX.SPROCKETS.COM::"tmp/*" [] %RCP-I-COPIED UNIX.SPROCKETS.COM::tmp/work.order copied to USERS:[SPROCKETS]WORK.ORDER;1 (9 blocks) %RCP-I-COPIED UNIX.SPROCKETS.COM::tmp/judy.note copied to USERS:[SPROCKETS]JUDY.NOTE;1 (4 blocks)%RCP-I-NEWFILES, 2 files created
This command copies all directories and files under the "/src" directory tree on UNIX.SPROCKETS.COM. The command creates a comparable directory structure on the local host starting at the current default directory (USERS:[JETSON]), and places the files into this tree. As in the previous example, the double quotation marks enclosing "tmp/*" are required to prevent DCL from interpreting the slashes.
$ RCP /RECURSIVE /LOG UNIX.SPROCKETS.COM::"/src" [...]%RCP-I-CREATED, created directory USERS:[JETSON.SRC]%RCP-I-COPIED, UNIX.SPROCKETS.COM::/src/hack.c copied to USERS:[JETSON.SRC]HACK.C;1 (20 blocks)%RCP-I-COPIED UNIX.SPROCKETS.COM::/src/hack.h copied to USERS:[JETSON.SRC]HACK.H;1 (2 blocks) %RCP-I-COPIED created directory USERS:[JETSON.SRC.DATA] %RCP-I-COPIED, UNIX.SPROCKETS.COM::/src/data/test copied to USERS:[JETSON.SRC.DATA]TEST.;1 (100 blocks) %RCP-I-NEWFILES, 3 files created
A-17
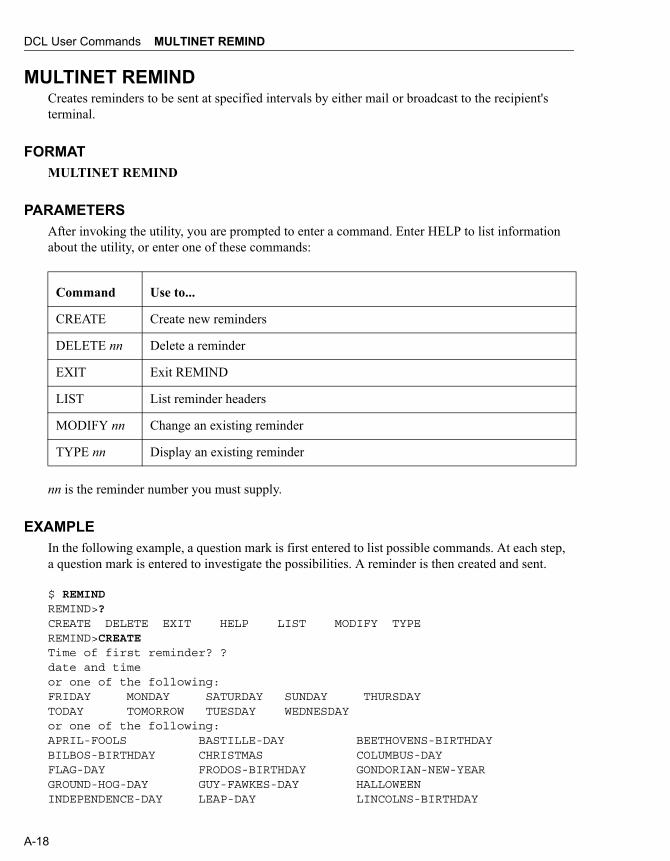
DCL User Commands MULTINET REMIND
MULTINET REMINDCreates reminders to be sent at specified intervals by either mail or broadcast to the recipient's terminal.
FORMATMULTINET REMIND
PARAMETERSAfter invoking the utility, you are prompted to enter a command. Enter HELP to list information about the utility, or enter one of these commands:
nn is the reminder number you must supply.
EXAMPLEIn the following example, a question mark is first entered to list possible commands. At each step, a question mark is entered to investigate the possibilities. A reminder is then created and sent.
$ REMINDREMIND>?CREATE DELETE EXIT HELP LIST MODIFY TYPEREMIND>CREATETime of first reminder? ?date and timeor one of the following:FRIDAY MONDAY SATURDAY SUNDAY THURSDAYTODAY TOMORROW TUESDAY WEDNESDAYor one of the following:APRIL-FOOLS BASTILLE-DAY BEETHOVENS-BIRTHDAYBILBOS-BIRTHDAY CHRISTMAS COLUMBUS-DAYFLAG-DAY FRODOS-BIRTHDAY GONDORIAN-NEW-YEARGROUND-HOG-DAY GUY-FAWKES-DAY HALLOWEENINDEPENDENCE-DAY LEAP-DAY LINCOLNS-BIRTHDAY
Command Use to...
CREATE Create new reminders
DELETE nn Delete a reminder
EXIT Exit REMIND
LIST List reminder headers
MODIFY nn Change an existing reminder
TYPE nn Display an existing reminder
A-18

MULTINET REMIND DCL User Commands
MAY-DAY MEMORIAL-DAY NEW-YEARSSAINT-PATRICKS-DAY SHERLOCK-RV-BIRTHDAY VALENTINES-DAYTime of first reminder? GROUND-HOG-DAYExpiration count? ? Number of times to repeat messagedecimal numberExpiration count? 1How should I send it? ? one of the following:BOTH MAIL SENDHow should I send it? MAILAddresses? [email protected]? Happy Ground Hog Day!!!Text (end with ^Z)If you see your shadow, consider moving to Santa Cruz.-Watson^ZREMIND> EXIT$
A-19

DCL User Commands MULTINET RLOGIN
MULTINET RLOGINConnects your terminal to another system on the network. RLOGIN is similar to TELNET, except support for the protocol is not as wide-spread and the protocol automatically authenticates the user instead of requesting a user name and password. Local flow control (instead of remote) is also negotiated dynamically. RLOGIN permits the use of X applications without issuing a SET DISPLAY command.
FORMATMULTINET RLOGIN host_name
PARAMETERShost_name
Specifies the remote host to which to connect.
QUALIFIERS/AUTHENTICATION=KERBEROS
If you specify /AUTHENTICATION=KERBEROS, command authentication is performed using Kerberos; you will not be prompted for authentication information. (KERBEROS is currently the only value supported by this qualifier.)
/BUFFER_SIZE=number
Changes the maximum size of write operations to the terminal. A large write size is more efficient, but a smaller size makes RLOGIN more responsive to output flushing (Ctrl/O). The default buffer size is 1024 bytes; the value for number can range from 20 bytes to 1024 bytes. Number is reset to 20 bytes if you specify a value below 20; a value for number above 1024 bytes is reset to 1024.
/DEBUG
Displays any out-of-band control information that arrives during the session.
/EIGHT_BIT
Forces RLOGIN to set the OpenVMS terminal to 8-bit mode for the duration of the session. The default behavior is to use the current setting of the OpenVMS terminal parameter EIGHT_BIT.
/PORT=number
Specifies a non-standard TCP port number to which to connect (the default port is 513).
/TRUNCATE_USERNAME /NOTRUNCATE_USERNAME (default)
Truncates your VMS user name to a maximum of eight characters. Some RLOGIN server imple-mentations, notably UNIX, assume the remote user name is not longer than eight characters and fail with the error "remuser too long" if it is longer. You can use this qualifier when communicating with such hosts.
A-20

MULTINET RLOGIN DCL User Commands
/USERNAME=username
Specifies an alternative remote user name. By default, the requested remote user name is the same as your local user name.
EXAMPLEThis example shows an OpenVMS user using RLOGIN to connect to a UNIX system.
$ RLOGIN UNIX.FLOWERS.COMLast login: Thu Dec 7 22:43:48 from VMS.FLOWERS.COMSun UNIX 4.3 Release 3.5 (UNIX) #1: Fri Apr 9 17:07:00 PDT 2004%
A-21
DCL User Commands MULTINET RSHELL
MULTINET RSHELLRuns commands on a remote system and displays the command output on your terminal.
FORMATMULTINET RSHELL host_name command_line
PARAMETERShost_name
Specifies the remote host on which to execute the command. You can also specify the host name as an IP address.
command_line
Specifies the command line to execute on the remote system. By default, the command line is converted to lowercase. If uppercase characters are required, specify them by enclosing the entire line in double quotations ("command_line").
You can specify multiple commands to the OpenVMS RSHELL server by separating them with a backslash-semicolon (\;). Ensure the multiple command string does not exceed the DCL limit of 256 bytes for reading command lines.
QUALIFIERS/ERROR=filename
Specifies the error file name (by default, error output goes to SYS$ERROR).
/INPUT=filename
Specifies the input file name (by default, SYS$INPUT). To spawn an RSHELL that does not require input, specify /INPUT=NL: to prevent RSHELL from reading data from your terminal.
/OUTPUT=filename
Specifies the output file name (by default, SYS$OUTPUT).
/PASSWORD[=password]
Indicates that the REXEC protocol should be used with the specified password instead of the RSHELL protocol. The two protocols are identical except REXEC requires a password, and RSHELL validates on the basis of trusted user names and systems. If you specify /PASSWORD with no password, a password prompt appears with echoing disabled.
/PORT=number
Specifies a non-standard TCP port number to which to connect (by default, port 514 unless you specify /PASSWORD; in that case, port 512 is used).
A-22

MULTINET RSHELL DCL User Commands
/TRUNCATE_USERNAME /NOTRUNCATE_USERNAME (default)
Truncates your VMS user name to no longer than eight characters. Some RSHELL server imple-mentations, notably UNIX, assume the remote user name is not longer than eight characters and exit with the error "remuser too long" if it is longer. You can use this qualifier to communicate with those systems.
/USERNAME=username
Specifies an alternative remote user name. By default, the remote user name is the same as your local user name.
DESCRIPTIONThe MultiNet RSHELL utility uses the 4.3 BSD UNIX rsh (remote shell) protocol to log on, execute a command, and log out. Normally, it authenticates your use of the remote host with its database of trusted hosts and trusted users. However, if you use the /PASSWORD qualifier, the RSHELL utility uses the password you specify and the 4.3 BSD UNIX rexec (remote execution) protocol to authenticate your use of the remote host.
Restrictions
• RSHELL cannot be used to run interactive programs such as editors; use RLOGIN for these applications instead.
• RSHELL permits the use of X Windows applications without the need to issue a SET DISPLAY command.
EXAMPLE
$ rshell unix ls -ltotal 216-rwxr-xr-x 1 smith 212992 Sep 25 07:37 foo-rw-r--r-- 1 smith 111 Nov 19 22:51 foo.c$
A-23

DCL User Commands MULTINET RUSERS
MULTINET RUSERSDisplays information about users logged into local or remote systems. RUSERS can display information about a particular system or, if supported by the network hardware, use broadcasts to display information about all remote systems on directly connected networks. RUSERS uses UDP/IP as its communication protocol.
FORMATMULTINET RUSERS [host-name]
PARAMETERS[host-name]
Specifies the name (or network address) of the host from which the remote user information is to be gathered. If you specify the host specified as an asterisk (*), a broadcast RPC gathers information from all directly-connected hosts. If you do not specify a host, a default of * is used.
QUALIFIERS/ALL
Displays all remote hosts, even those on which there are no users logged in.
/NOALL
Displays only hosts on which there are users logged in (the default).
/FULL
Displays remote users in a longer format, including time of login, idle time, terminal line name, and remote host.
/NOFULL
Displays remote users as a summary line, showing only the system name and user names for that system (the default).
A-24
MULTINET SEND DCL User Commands
MULTINET SENDSends a brief message to another user's terminal.
FORMATMULTINET SEND address [message]
PARAMETERSaddress
Specifies the user name or remote address in the form user@hostname.
Note! Many SMTP implementations do not support the SEND facility that this command uses to send messages.
message
Specifies optional text of the message. If omitted, you are prompted for the message text.
QUALIFIERS/AND_MAIL
Specifies the message should be both mailed to the user and displayed on the user's terminal.
/OR_MAIL
Specifies the message should be mailed to the user if it cannot be displayed on the user's terminal.
A-25
DCL User Commands MULTINET TALK
MULTINET TALKInitiates an interactive conversation with another user on the local host or on any remote host that supports the TALK protocol. Start a conversation by specifying another user's name and host name, if necessary; for example, [email protected]. End TALKing by pressing Ctrl/C. TALK uses the VMS Screen Management (SMG) runtime routines to create a multiwindow display on your terminal through which the conversation takes place. TALK fails if you specify only the person's login name.
FORMATMULTINET TALK user_name[@host_name]
PARAMETERSuser_name
Specifies the remote user name to talk with.
host_name
Specifies the name (or network address) of the host to which a connection should be made. If you do not specify a host name, the local host name is used.
QUALIFIERS/OLD
Uses the 4.4BSD-compatible TALK protocol. By default, the 4.4BSD-compatible TALK protocol is used. If you are not sure whether to use the new or old TALK, try each. Systems with different system byte-ordering schemes (such as Sun workstations) must use NTALK instead of TALK.
RESTRICTIONSThe restrictions for using TALK include:
You and the person with whom you want to talk need to be on systems with the same byte-ordering scheme (either "Big Endian" or "Little Endian"). While this is not easy to determine, the easiest rule is that if the other person is using a Sun workstation or a terminal connected to one, TALK does not work at their end. Sun users must use the NTALK command. NTALK is provided on the MultiNet software distribution CD-ROM in the [CONTRIBUTED-SOFTWARE.APPLICATIONS.NTALK] directory, and elsewhere as public domain software.
The [CONTRIBUTED-SOFTWARE.APPLICATIONS.NTALK] directory contains documentation describing how to access the file. NTALK is distributed as a UNIX tar file. Use these steps to make it available for use:
1 Copy the NTALK tar archive to a UNIX system.2 Use tar to retrieve the archived files.3 Use make to compile the files into binary source. (The make file assumes you have the UNIX cc
compiler.)
A-26

MULTINET TALK DCL User Commands
• Both of your terminals must accept broadcasts. Use these commands to enable broadcasts and to suppress mail broadcasts:
$ SET TERMINAL /BROADCAST$ SET BROADCAST=NOMAIL
• The terminal type must be listed in the OpenVMS TERMTABLE.TXT database. As shipped with OpenVMS, this database supports all Compaq Computer VT-series terminals. If you have a non-Compaq Computer terminal, check with your system manager.
• The other person's system must be known to your system. TALK must be able to translate the remote system's IP address into its name. Therefore, your system must be using the Domain Name System (DNS), or have the remote system listed in its host tables.
USAGE NOTESUse the following keystrokes during a TALK session:
When someone calls you using TALK, a message similar to the following appears on your terminal:
Message from [email protected] at 1:53PM-PDTConnection request by username[Respond with: TALK username@host]
Use this TALK command to answer the remote user's TALK request:
$ TALK username@host
Once communication is established, you and the other user can type simultaneously, and your output appears in separate windows.
If the user being called has disabled reception of broadcast messages, this message appears:
[Your party is refusing messages]
EXAMPLE
$ TALK [email protected]
Press... To... Press... To...
Ctrl/W Delete the last word typed (left of the cursor) Ctrl/L Redraw the screen
Delete Delete the last character typed Ctrl/C Exit to DCL
A-27
DCL User Commands MULTINET TELNET
MULTINET TELNETLogs into a remote host from the local host. TELNET uses the standard Internet TELNET protocol to establish a virtual terminal connection between a terminal connected to your VMS system and a remote host.
FORMATMULTINET TELNET [host]
PARAMETERShost
Specifies the name or numeric network address of the remote host to which you wish to connect. If you don't specify a host name, TELNET enters a TOPS-20 style interactive mode. If you specify the name of a remote host on the DCL command line, TELNET immediately attempts to connect to the remote host. If you don't specify a remote host, TELNET enters its TOPS-20 style command interpreter and prompts you for TELNET commands.
QUALIFIERS/ABORT_OUTPUT_CHARACTER=character
Sets the TELNET ABORT-OUTPUT character which, when typed during a TELNET session, sends a TELNET ABORT OUTPUT sequence to the remote host. Specify control characters with a caret (^) followed by a letter. By default, there is no ABORT OUTPUT character; specifying this qualifier without a value sets the character to ^O (a caret followed by uppercase O, to represent Ctrl/O).
/ARE_YOU_THERE_CHARACTER=character
Sets the TELNET ARE-YOU-THERE character which, when typed during a TELNET session, sends a TELNET ARE YOU THERE sequence to the remote host. By default, there is no ARE-YOU-THERE character; specifying that qualifier without a value sets the character to ^T (a caret followed by uppercase T, to represent Ctrl/T).
/AUTHENTICATION=KERBEROS
Uses the Kerberos authentication system.
/AUTOFLUSH
Activates the AUTOFLUSH feature. When used with the /ABORT_OUTPUT_CHARACTER, /BREAK_CHARACTER, and /INTERRUPT_PROCESS_CHARACTER qualifiers, the /AUTOFLUSH qualifier causes TELNET to flush any data which may be in the network buffers when the ABORT-OUTPUT, INTERRUPT_PROCESS, or BREAK character is used. Data is flushed by sending a TIMING-MARK command to the TELNET server and discarding all data until one is received in response.
/BREAK_CHARACTER=character
Sets the TELNET BREAK character which, when typed during a TELNET session, sends a
A-28
MULTINET TELNET DCL User Commands
TELNET BREAK sequence to the remote host. By default there is no BREAK character; specifying this qualifier without a value sets the character to ^C (a caret followed by uppercase C, to represent Ctrl/C).
/BUFFER_SIZE=number
Changes the maximum size of terminal write operations to the specified number of bytes. A large write size is more efficient, but a smaller size makes TELNET more responsive.
The default buffer size is 512 bytes. The value for number can range from 20 to 1024 bytes. If you specify a value below 20, the buffer size is reset to 20. If you specify a value above 1024, it is reset to 1024.
/CREATE_NTY[=(options)]
Performs the same function as the CREATE-NTY command (available in command mode once a connection has been made). When specified without options, /CREATE_NTY causes TELNET to make a temporary connection to the specified host, attach this connection to an NTY device, and exit immediately. You can then run another application, such as KERMIT or SET HOST/DTE through this pseudo-terminal device. The TELNET_NTY logical name is defined to be the NTY device created. Use it as you would any other terminal device. When you are finished with the terminal, use the DEALLOCATE command to dismantle the connection and associated NTY device control blocks. Alternatively, the connection will be dismantled when you log out.
$ TELNET /CREATE_NTY[=([PERMANENT] - [,NAME=logical_name] - [,TABLE=logical_name_table] - [,MODE={EXECUTIVE|SUPERVISOR}] - [/PORT=target-TCP-port] -host
The options contain a comma-separated list beginning with:
PERMANENT Specifies that the NTY device will persist after you close the TELNET connection. To delete the permanent NTY device, use the MULTINET TELNET /DELETE_NTY=logical_name command.
and continuing with any of the following:
NAME=logical_name Specifies the NTY device's logical name. The default logical name is TELNET_NTY.
TABLE=logical_name_table Specifies the logical name table to which the new NTY device name is added. The default logical name table is LNM$PROCESS_PROCESS.
MODE=access_mode Specifies the logical name's access mode. access_mode is either SUPERVISOR (the default) or EXECUTIVE.
A-29

DCL User Commands MULTINET TELNET
Privileged users can use /CREATE_NTY options to establish permanent NTY devices. In this case, the NTY device is created but no connection is made to the specified host until the first I/O operation.
Use this qualifier only with permanent NTY devices.
/DELETE_NTY=logical_name
Deletes a permanent NTY device named by logical_name. Create permanent NTY devices with the MULTINET TELNET /CREATE_NTY command.
/DEBUG /NODEBUG (default)
Sets the TELNET debug flag. When you specify /DEBUG, TELNET prints all option negotiations made with the remote host.
/ERASE_CHARACTER_CHARACTER=character
Sets the TELNET ERASE-CHARACTER character which, when typed during a TELNET session, sends a TELNET ERASE CHARACTER sequence to the remote host. By default, there is no ERASE-CHARACTER character. Specifying this character without a value sets this character to ̂ ? (a caret followed by a question mark, to represent Delete).
/ERASE_LINE_CHARACTER=character
Sets the TELNET ERASE-LINE character which, when typed during a TELNET session, sends a TELNET ERASE LINE sequence to the remote host. By default, there is no ERASE LINE character; specifying this qualifier without a value sets the character to "^U" (a caret followed by uppercase U, representing Ctrl/U).
/ESCAPE_CHARACTER=character
Sets the TELNET ESCAPE character. When you type the TELNET ESCAPE character during a TELNET session, communication with the remote host temporarily stops, and TELNET interprets the next character you type as a TELNET command. The ESCAPE character defaults to ^^ (two consecutive carets, representing Ctrl/^).
After you type the TELNET ESCAPE character, the next character you type is interpreted according to the following list:
Character Action
? Displays information about TELNET escape commands.
A Sends an INTERRUPT PROCESS command to the remote host.
B Sends a BREAK command to the remote host.
C Closes the connection to the remote host.
O Sends an ABORT OUTPUT command to the remote host.
A-30

MULTINET TELNET DCL User Commands
Type the ESCAPE character twice to send it to the remote host.
/INTERRUPT_PROCESS_CHARACTER=character
Sets the TELNET INTERRUPT-PROCESS character which, when typed during a TELNET session, sends an INTERRUPT PROCESS sequence to the remote host. By default, there is no INTERRUPT PROCESS character; specifying this qualifier without a value sets the character to ^C (a caret followed by uppercase C, representing Ctrl/C).
/LOCAL_FLOW_CONTROL /NOLOCAL_FLOW_CONTROL
Specifies that Ctrl/Q and Ctrl/S should be treated by the local terminal driver as XON and XOFF, instead of being passed down the network connection for processing by the remote terminal driver. Use of this qualifier makes XOFF more responsive, which helps prevent data loss; however, the remote system will never see any Ctrl/S character.
The default flow control setting depends on the setting of the VMS terminal characteristic TT$_TTSYNC (set by the DCL command SET TERMINAL /TTSYNC or by many full-screen editors). Specify /LOCAL_FLOW_CONTROL to force TELNET into local flow control mode. Specify /NOLOCAL_FLOW_CONTROL to force TELNET into remote flow control mode.
/LOG_FILE=[file-spec] /NOLOG_FILE (default)
Specifies a file in which to log a transcript of the TELNET session. Everything received by the local system from the remote system is recorded in this file. If you specify the /LOG_FILE qualifier without a value, the default file specification TELNET.LOG is used. The log file is created in the directory from which TELNET is run. /LOG_FILE is not supported in 3270 or 5250 mode.
/PORT=port-spec
Specifies the port to which a connection is to be made. If you do not specify this qualifier, the standard TELNET port for the specified protocol is used. For the TCP/IP protocol, use a port number or a port defined in MULTINET:HOSTS. service file.
When connecting via TCP/IP to a port other than the default TELNET port (23), full VMS command line editing is available on command input.
P Spawns a new DCL process (or attaches to a parent process).
S Displays the status of the TELNET connection.
T Sends an ARE YOU THERE (AYT) command. On a MultiNet server, this command is mapped to Ctrl/T.
Q Quits TELNET.
X Enters extended TELNET command mode.
Character Action
A-31
DCL User Commands MULTINET TELNET
/PRINT_ESCAPE_CHARACTER
Displays the ESCAPE character used to access TELNET command mode. If you use this qualifier, the escape character is displayed when a connection occurs:
Escape character is '^^'
You can also use the logical name MULTINET_TELNET_PRINT_ESCAPE_CHARACTER to set this feature. If this logical is defined, a message will be output.
/PROTOCOL=protocol-spec
Specifies the protocol to be used in making the connection to the remote system. The protocol specification can be either TCP or IP (TCP is the default).
/TCP
Used as an abbreviation for /PROTOCOL=TCP.
/TERMINAL_TYPE
Specifies the terminal type to be negotiated with the remote TELNET server. This qualifier has the same function as the TERMINAL-TYPE command.
/TN3270=AUTOMATIC (default) FORCE /NOTN3270
Allows the negotiation of IBM 3270 terminal emulation mode. AUTOMATIC (the default) causes TELNET to automatically negotiate IBM 3270 emulation mode with the remote host. TELNET enters 3270 mode only if the remote host supports it.
Use FORCE to force TELNET into IBM 3270 emulation mode when communicating with a system that supports 3270 mode, but cannot negotiate it automatically. (IBM mainframes running ACCESS/MVS have this restriction.) Use /NOTN3270 to disable IBM 3270 emulation mode entirely.
/TN5250=AUTOMATIC (default) FORCE/NOTN5250
Allows the negotiation of IBM 5250 terminal emulation mode. Use AUTOMATIC (the default) to cause TELNET to automatically negotiate IBM 5250 emulation mode with the remote host. TELNET enters 5250 mode only if the remote host supports it. FORCE is used to force TELNET into IBM 5250 emulation mode when communicating with a system that supports 5250 mode, but cannot negotiate it automatically. IBM MVS does not support 5250. Use /NOTN5250 to disable IBM 5250 emulation mode entirely.
/UNIX /NOUNIX (default)
Uses the 4.3BSD UNIX end-of-line specification, <CR><NL>, instead of the standard end-of-line specification, <CR><LF>. This qualifier is useful when using TELNET to connect to 4.3BSD UNIX systems.
A-32

MULTINET TELNET DCL User Commands
/VERSION
Displays version information about the TELNET utility. If you use this qualifier, all other parameters and qualifiers are ignored and a TELNET session is not started.
Note! To specify a control character for the value of character in any of the preceding qualifiers, type it as a ^ (caret) followed by the appropriate character, all enclosed within double quotes.
EXAMPLESThis command creates a permanent NTY device pointing at port 9100 on WHORFIN.FLOWERS.COM, and creates the logical name WHORFINDEVICE (in the system logical name table in executive mode) that translates to the NTY device name.
1 $ MULTINET TELNET FLOWERS.COM
2 $ MULTINET TELNET SALES.FLOWERS.COM /LOG_FILE=SALES.LOG
3 $ MULTINET TELNET LOCALHOST /PORT=SMTP
4 $ MULTINET TELNET /ABORT_OUTPUT_CHARACTER="^A"
5 $ MULTINET TELNET /PORT=9100 /CREATE_nty=PERMANENT, -_$ NAME=WHORFINDEVICE, TABLE=SYSTEM, MODE=EXECUTIVE -_$ WHORFIN.FLOWERS.COM
A-33
DCL User Commands MULTINET TFTP
MULTINET TFTPTransfers files between TCP/IP hosts. The TFTP utility uses the Internet standard Trivial File Transfer Protocol to transfer files between Internet hosts. TFTP uses the User Datagram Protocol (UDP), and performs no user authentication.
FORMATTFTP [host [port]]
PARAMETERShost
Specifies the name or numeric address of the remote host to which you want to connect.
port
Specifies the UDP port number on the server to which you want to connect. If you do not specify the port number, the standard TFTP UDP server port number (69) is used.
EXAMPLEThis example shows how to use TFTP to connect to the host FLOWERS.COM.
$ TFTP FLOWERS.COMtftp>
A-34

MULTINET WHOIS DCL User Commands
MULTINET WHOISDisplays information about users registered with the Internet Network Information Center (InterNIC). The default WHOIS server is RS.INTERNIC.NET.
FORMATMULTINET WHOIS name
PARAMETERSname
Specifies the name or handle of the registered user about whom you want to retrieve information.
For more information and help from the InterNic type WHOIS HELP from the DCL prompt.
QUALIFIERS/HOST=hostname
Specifies the remote host to which to connect. The default is RS.INTERNIC.NET, but can be changed by a system manager. The connection is done to the NICNAME port.
/OUTPUT=filespec
Specifies an output file in which to store WHOIS output.
/PORT= port number
Specifies the number of a non-standard port.
EXAMPLEThis example shows how to display information about the user "Smith" from the InterNIC database.
$ WHOIS SMITH
SMITH, J.R. [email protected] ABC, Incorporated 101 Elm Street Surf City, CA 95060 (408) 555-1212 Record last updated on 1-Jun-00.
The InterNIC Registration Services Host ONLY contains Internet Information Networks, ASN's, Domains, and POC's).
A-35


Appendix B
FTP Command ReferenceThe MultiNet FTP utility uses the Internet-standard FTP (File Transfer Protocol) to transfer files between the local host and a remote host. This appendix lists the commands you can use during an FTP session.
Command SummaryTable B-1 lists the MultiNet FTP commands:
Table B-1 FTP Command Summary
Command Description
ACCOUNT Sends an account name to the remote FTP server.
AGET Appends a remote file to a file on the local host.
APPEND GET Appends remote_file from the remote host to local_file on the local host.
APPEND PUT Appends local_file on the local host to remote_file on the remote host.
APPEND RECEIVE Appends remote_file from the remote host to local_file on the local host.
APPEND SEND Appends local_file on the local host to remote_file on the remote host.
APUT Appends local_file on the local host to remote_file on the remote host.
ASCII Sets the transfer type to ASCII for transferring text files.
B-1

FTP Command Reference
ATTACH Detaches the terminal from the calling process and reattaches it to another process.
AUTHENTICATE Requests the FTP server to enter into TLS authentication mode as defined in RFC 4217. This can be done after connecting to the remote server and before sending the USER command.
BELL Turns on, off, or toggles the sounding of a bell when a file transfer completes.
BINARY Sets the transfer type for transferring binary files.
BLOCK Reads files of TYPE I, STRUCTURE FILE using block I/O.
BYE Closes the current FTP connection, but remains in the FTP command interpreter.
BYTE Sets the transfer byte size to size.
CCC Changes an encrypted command connection back to clear text. This command is provided so that an encrypted command connection can be put in clear text mode allowing firewalls and NAT devices to recognize and process PORT/PASV commands and their responses. The file transfer protection level should be established before setting the command channel to clear text mode.
CD Changes the current working directory on the remote host to dir.
CDUP Changes the current working directory on the remote host by moving up one level in the directory system.
CLOSE Closes the current FTP connection, but remains in the FTP command interpreter.
CONFIRM Turns on, off, or toggles (the default) interactive confirmation of each command in a MULTIPLE command.
CONNECT Establishes a connection to the FTP server on host.
CPATH Changes the current working directory on the remote host to dir.
CREATE-DIRECTORY Creates the directory dir on the remote host.
CWD Changes the current working directory on the remote host to dir.
DELETE Deletes a file on the remote host.
Table B-1 FTP Command Summary (Continued)
Command Description
B-2

FTP Command Reference
DIRECTORY Obtains an annotated listing of the files on the remote host.
DISCONNECT Closes the current FTP connection without waiting for a confirming response from the remote host, but remains in the FTP command interpreter.
EXIT Closes the current FTP connection and exits FTP.
EXIT-ON-ERROR Turns on, off, or toggles (the default) whether or not FTP automatically exits when an error occurs.
GET Copies remote_file from the remote host to local_file on the local host.
HASH Turns on, off, or toggles (the default) the display of hash marks (#) for each data buffer transferred.
HELP Displays FTP help information.
LCD Changes the current working directory on the local host to dir.
LDIR Displays the contents of your local working directory. LDIR is the same as LOCAL-DIRECTORY.
LIST Displays automatic login information for host.
LOCAL-CD Changes the current working directory on the local host to dir.
LOCAL-DIRECTORY Displays the contents of your local working directory.
LOCAL-PWD Displays the current working directory on the local host.
LOGIN Identifies you to a remote FTP server.
LPWD Displays the current working directory on the local host.
LS Displays a names-only listing of files on the remote host.
MDELETE Deletes multiple files on the remote host.
MGET Copies multiple files from the remote host to the local host.
MKDIR Creates the directory dir on the remote host.
MPUT Copies multiple files from the local host to the remote host.
MULTIPLE DELETE Deletes multiple files on the remote host.
MULTIPLE GET Copies multiple files from the remote host to the local host.
Table B-1 FTP Command Summary (Continued)
Command Description
B-3

FTP Command Reference
MULTIPLE PUT Copies multiple files from the local host to the remote host. MULTIPLE PUT is a synonym for MULTIPLE SEND. See MULTIPLE SEND for more information.
MULTIPLE RECEIVE Copies multiple files from the remote host to the local host.
MULTIPLE SEND Copies multiple files from the local host to the remote host.
OPEN Establishes a connection to a host system.
PASSIVE Enables or disables "passive" mode for file transfers with FTP servers on the opposite side of "firewall" gateways.
PASSWORD Sends a password to the remote FTP server explicitly, which normally happens automatically during login.
PORT Specifies a TCP port number to use for the FTP control connection.
PROMPT-FOR-MISSING-ARGUMENTS
Turns on, off, or toggles (the default) whether or not FTP prompts for missing command arguments automatically.
PROMPT-ON-CONNECT Turns on, off, or toggles (the default) whether or not FTP prompts for a user name and password after making a connection automatically.
PROTECTION Sets the protection level for data transfers as specified in RFC 4217. Use CLEAR to transfer files over a clear text connection. This is the default after specifying the username and password to an authenticated connection. Use PRIVATE to transfer files over a encrypted connection with data integrity checking.
PUSH Starts and attaches a DCL subprocess.
PUT Copies local_file on the local host to remote_file on the remote host.
PWD Displays the current working directory on the remote host.
QUIT Closes the current FTP connection and exits FTP.
QUOTE Sends a string to the FTP server verbatim.
RECEIVE Copies remote-file from the remote host to local-file on the local host.
RECORD-SIZE Sets or displays the record size for IMAGE mode transfers.
Table B-1 FTP Command Summary (Continued)
Command Description
B-4
FTP Command Reference
REMOTE-HELP Displays information about commands available on the FTP server.
REMOVE-DIRECTORY Deletes a directory on the remote host. REMOVE-DIRECTORY is the same as RMDIR.
RENAME Renames files on the remote host.
RETAIN Turns on, off, or toggles (the default) the retention of OpenVMS version numbers in file transfers.
RM Deletes a file on the remote host.
RMDIR Deletes a directory on the remote host.
SEND Copies local_file on the local host to remote_file on the remote host.
SET Sets automatic login information for host.
SHOW-DIRECTORY Displays the current working directory on the remote host. SHOW DIRECTORY is the same as PWD.
SITE Specifies commands that are interpreted by the MultiNet FTP server for use on the server host.
SPAWN Executes a single DCL command, or if entered without options, starts a subprocess with the same effect as PUSH.
STATISTICS Turns on, off, or toggles (the default) STATISTICS mode.
STATUS Displays the status of the FTP server.
STREAM Turns on, off, or toggles (the default) the creation of binary output files as Stream_LF files.
STRUCTURE Sets the transfer structure to structure.
TAKE Interprets FTP commands in a file.
TENEX Changes the byte size for transferring binary files to or from a TOPS-20 system.
TYPE Sets the transfer type to type.
USER Identifies you to the remote FTP server.
VERBOSE Turns on, off, or toggles (the default) VERBOSE mode.
Table B-1 FTP Command Summary (Continued)
Command Description
B-5

FTP Command Reference
VERSION Prints information about the FTP program_version.
Table B-1 FTP Command Summary (Continued)
Command Description
B-6

ACCOUNT FTP Command Reference
ACCOUNTSends an account name to the remote FTP server. Use this command when connecting to hosts that require account specifications in addition to a user name.
FORMATACCOUNT account
PARAMETERSaccount
Specifies the name of the account to be sent to the remote FTP server.
RestrictionsUse this command only when connected to a remote host.
EXAMPLE
FLOWERS.COM> account sales<Account “sales" acceptedFLOWERS.COM>
B-7

FTP Command Reference AGET
AGETAppends a remote file to a file on the local host. AGET is a synonym for APPEND GET.
FORMATAGET remote_file [local_file]
B-8

APPEND GET FTP Command Reference
APPEND GETAppends remote_file from the remote host to local_file on the local host. APPEND uses the current settings for type, mode, and structure during file transfers. APPEND GET is the same as AGET and APPEND RECEIVE.
FORMATAPPEND GET remote-file [local-file]
PARAMETERSremote_file
Specifies the name of the file on the remote host from which to copy.
local_file
Specifies the name of a file on the local host to which the file is to be appended.
Restrictions
• Use this command only when connected to a remote host.• Most remote hosts require that you log in before using the GET command.• You cannot use the APPEND GET command in STRUCTURE VMS mode. If you try to do this,
FTP toggles temporarily into STRUCTURE FILE mode for the transfer.
EXAMPLEThis example shows how to append a remote file to a file on the local host.
FLOWERS.COM> append get login.comTo local file: RETURN<ASCII retrieve of USERS:[HOLMES]LOGIN.COM;1 started.<Transfer completed. 2498 (8) bytes transferred.FLOWERS.COM>
B-9

FTP Command Reference APPEND PUT
APPEND PUTAppends local_file on the local host to remote_file on the remote host. APPEND PUT is a synonym for APPEND SEND.
FORMATAPPEND PUT local_file remote_file
B-10

APPEND RECEIVE FTP Command Reference
APPEND RECEIVEAppends remote_file from the remote host to local_file on the local host. APPEND RECEIVE is a synonym for APPEND GET.
FORMATAPPEND RECEIVE remote_file [local_file]
B-11

FTP Command Reference APPEND SEND
APPEND SENDAppends local_file on the local host to remote_file on the remote host. APPEND SEND uses the current settings for type, mode, and structure during file transfers. APPEND SEND is the same as APUT and APPEND PUT.
FORMATAPPEND SEND local_file remote_file
PARAMETERSlocal_file
Specifies the name of the file on the local host to be copied.
remote_file
Specifies the destination file name on the remote host.
Restrictions
• Use this command only when connected to a remote host.• Most remote hosts require that you log in before using the APPEND SEND command.• The MultiNet FTP Server cannot APPEND to a file in STRUCTURE VMS mode.
EXAMPLEThis example shows how to append the LOGIN.COM file to the remote file FOO.COM.
FLOWERS.COM>append send login.com foo.com<ASCII Store of ST_ROOT:[TMP]FOO.COM;12 started.<Transfer completed. 2498 (8) bytes transferred.FLOWERS.COM>
B-12

APUT FTP Command Reference
APUTAppends local_file on the local host to remote_file on the remote host. APUT is a synonym for APPEND PUT and APPEND SEND.
FORMATAPUT local_file remote_file
B-13

FTP Command Reference ASCII
ASCIISets the transfer type to ASCII for transferring text files. ASCII is a synonym for TYPE.
FORMATASCII
B-14
ATTACH FTP Command Reference
ATTACHDetaches the terminal from the calling process and reattaches it to another process. Use the SPAWN SHOW PROCESS /SUBPROCESSES command to list the names of subprocesses. Use the DCL LOGOUT command to return to the original process. If the MULTINET_DISABLE_SPAWN logical is enabled, ATTACH does not work.
FORMATATTACH process-name
PARAMETERSprocess_name
Specifies the name of a process to which you want your terminal attached. (Not all subprocesses can be attached; some testing may be required.)
B-15
FTP Command Reference BELL
BELLTurns on, off, or toggles the sounding of a bell when a file transfer completes.
FORMATBELL mode
PARAMETERSmode
Specifies a value of ON, OFF, or TOGGLE.
EXAMPLEThis example shows how to toggle the bell feature.
FTP>bell[Bell will now ring when operations complete]FTP>
B-16

BINARY FTP Command Reference
BINARYSets the transfer type for transferring binary files. BINARY is a synonym for TYPE.
FORMATBINARY
B-17
FTP Command Reference BLOCK
BLOCKReads files of TYPE I, STRUCTURE FILE using block I/O.
FORMATBLOCK
RestrictionsUse this command only when connected to a remote host.
B-18

BYE FTP Command Reference
BYECloses the current FTP connection, but remains in the FTP command interpreter.
FORMATBYE
RestrictionsUse this command only when connected to a remote host.
EXAMPLEThis example shows how to disconnect an FTP connection.
FLOWERS.COM>bye<QUIT command received. Goodbye.FTP
B-19
FTP Command Reference BYTE
BYTESets the transfer byte size to size.
FORMATBYTE size
PARAMETERSsize
Specifies the size to which to set the transfer byte size. The only permitted value is 8 bits.
EXAMPLEThis example shows how to set the transfer byte size to 8 bits.
FLOWERS.COM>byteType: Logical-Byte (Byte Size 8), Structure: VMS, Mode: StreamFLOWERS.COM>
B-20

CD FTP Command Reference
CDChanges the current working directory on the remote host to dir. CD is the same as CPATH and CWD.
FORMATCD dir
PARAMETERSdir
Specifies the name of the directory to use as the current working directory.
Restrictions
• Use this command only when connected to a remote host.• Most remote hosts require that you log in before using the CD command.
EXAMPLEThis example shows how to change the default directory on the remote host to USERS:[ANONYMOUS].
FLOWERS.COM>cd [anonymous]<Connected to USERS:[ANONYMOUS].FLOWERS.COM>
B-21
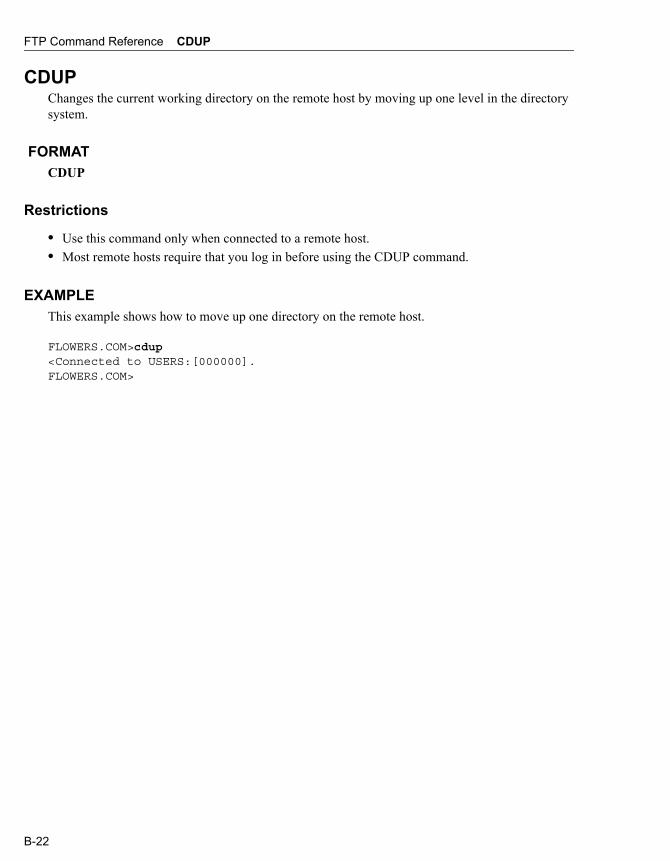
FTP Command Reference CDUP
CDUPChanges the current working directory on the remote host by moving up one level in the directory system.
FORMATCDUP
Restrictions
• Use this command only when connected to a remote host.• Most remote hosts require that you log in before using the CDUP command.
EXAMPLEThis example shows how to move up one directory on the remote host.
FLOWERS.COM>cdup<Connected to USERS:[000000].FLOWERS.COM>
B-22

CLOSE FTP Command Reference
CLOSECloses the current FTP connection, but remains in the FTP command interpreter. CLOSE is a synonym for BYE.
FORMATCLOSE
B-23
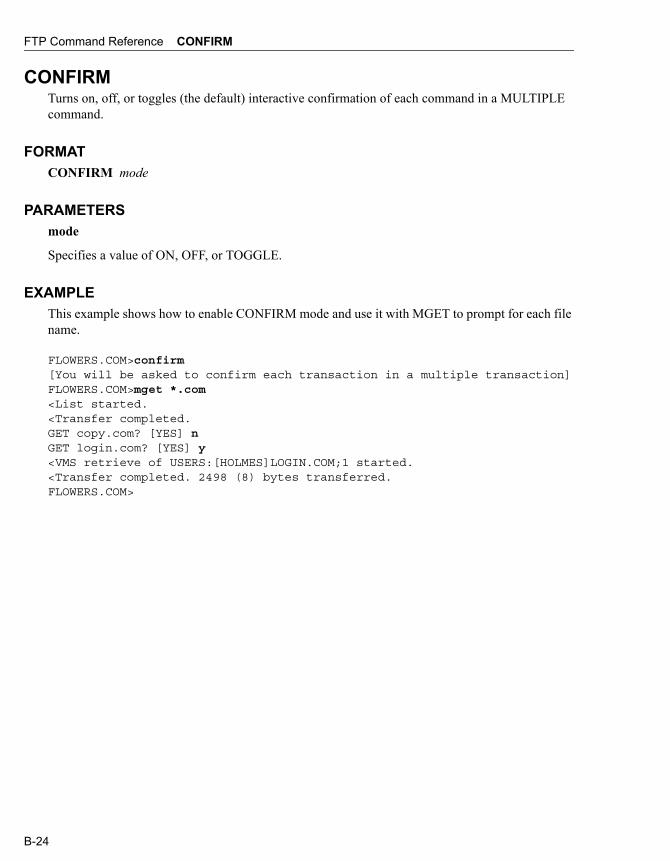
FTP Command Reference CONFIRM
CONFIRMTurns on, off, or toggles (the default) interactive confirmation of each command in a MULTIPLE command.
FORMATCONFIRM mode
PARAMETERSmode
Specifies a value of ON, OFF, or TOGGLE.
EXAMPLEThis example shows how to enable CONFIRM mode and use it with MGET to prompt for each file name.
FLOWERS.COM>confirm[You will be asked to confirm each transaction in a multiple transaction]FLOWERS.COM>mget *.com<List started.<Transfer completed.GET copy.com? [YES] nGET login.com? [YES] y<VMS retrieve of USERS:[HOLMES]LOGIN.COM;1 started.<Transfer completed. 2498 (8) bytes transferred.FLOWERS.COM>
B-24
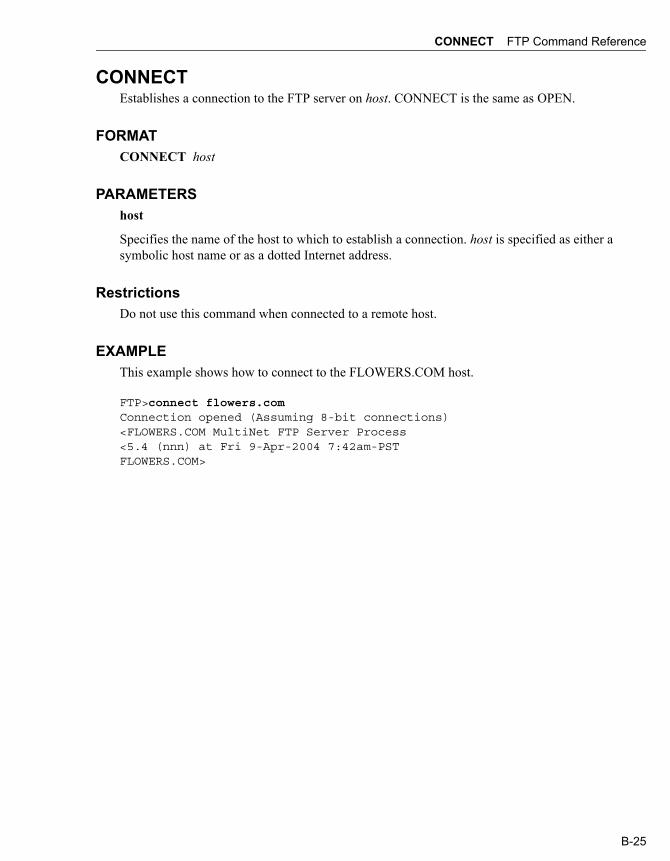
CONNECT FTP Command Reference
CONNECTEstablishes a connection to the FTP server on host. CONNECT is the same as OPEN.
FORMATCONNECT host
PARAMETERShost
Specifies the name of the host to which to establish a connection. host is specified as either a symbolic host name or as a dotted Internet address.
RestrictionsDo not use this command when connected to a remote host.
EXAMPLEThis example shows how to connect to the FLOWERS.COM host.
FTP>connect flowers.comConnection opened (Assuming 8-bit connections)<FLOWERS.COM MultiNet FTP Server Process<5.4 (nnn) at Fri 9-Apr-2004 7:42am-PSTFLOWERS.COM>
B-25

FTP Command Reference CPATH
CPATHChanges the current working directory on the remote host to dir. CPATH is a synonym for CD.
FORMATCPATH dir
B-26

CREATE-DIRECTORY FTP Command Reference
CREATE-DIRECTORYCreates the directory dir on the remote host. CREATE DIRECTORY is the same as MKDIR.
FORMATCREATE-DIRECTORY dir
PARAMETERSdir
Specifies the name of the directory to create.
Restrictions
• Use this command only when connected to a remote host.• Most remote hosts require that you log in before using the CREATE-DIRECTORY command.
EXAMPLEThis example shows how to create the subdirectory "test".
FLOWERS.COM>create-dir test<“USERS:[HOLMES.TEST]” Directory createdFLOWERS.COM>
B-27

FTP Command Reference CWD
CWDChanges the current working directory on the remote host to dir. CWD is a synonym for CD.
FORMATCWD dir
B-28
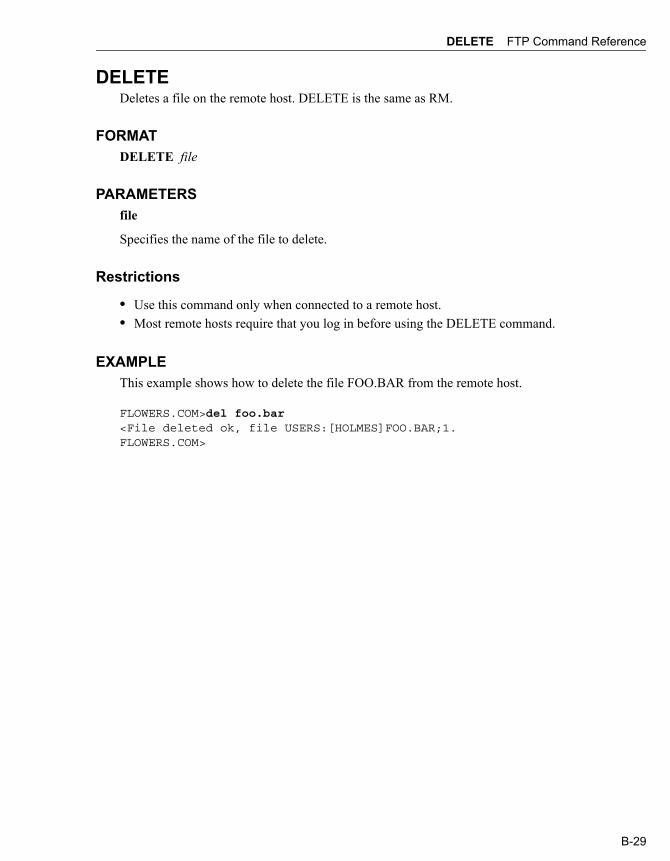
DELETE FTP Command Reference
DELETEDeletes a file on the remote host. DELETE is the same as RM.
FORMATDELETE file
PARAMETERSfile
Specifies the name of the file to delete.
Restrictions
• Use this command only when connected to a remote host.• Most remote hosts require that you log in before using the DELETE command.
EXAMPLEThis example shows how to delete the file FOO.BAR from the remote host.
FLOWERS.COM>del foo.bar<File deleted ok, file USERS:[HOLMES]FOO.BAR;1.FLOWERS.COM>
B-29

FTP Command Reference DIRECTORY
DIRECTORYObtains an annotated listing of the files on the remote host.
FORMATDIRECTORY [file_spec] [output_file]
PARAMETERSfile_spec
Specifies the file specification to use in the directory lookup on the remote host. If you do not specify file_spec, the current working directory on the remote host is used. Any wildcards you specify are interpreted in the context of the remote host operating system.
output_file
Specifies the name of the file to which to write the directory listing. If you do not specify output_file, the list is directed to SYS$OUTPUT:.
Restrictions
• Use this command only when connected to a remote host.• Most remote hosts require that you log in before using the DIRECTORY command.
EXAMPLEThis example shows how to retrieve list of files that match the wildcard "*.COM".
FLOWERS.COM>dir *.com<List started.USERS: [HOLMES]COPY.COM;4 2 1-APR-2004 08:49 [HOLMES] (RWD,RWD,R,R)LOGIN.COM;1 5 1-APR-2004 01:25 [HOLMES] (RWD,RWD,R,R)Total of 7 blocks in 2 files.<Transfer completed.FLOWERS.COM>
B-30
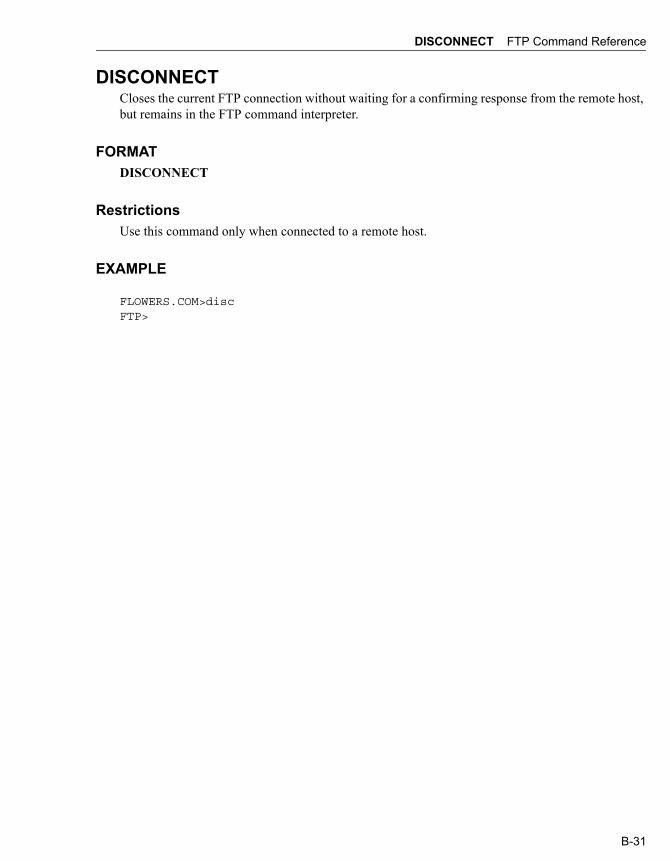
DISCONNECT FTP Command Reference
DISCONNECTCloses the current FTP connection without waiting for a confirming response from the remote host, but remains in the FTP command interpreter.
FORMATDISCONNECT
RestrictionsUse this command only when connected to a remote host.
EXAMPLE
FLOWERS.COM>discFTP>
B-31
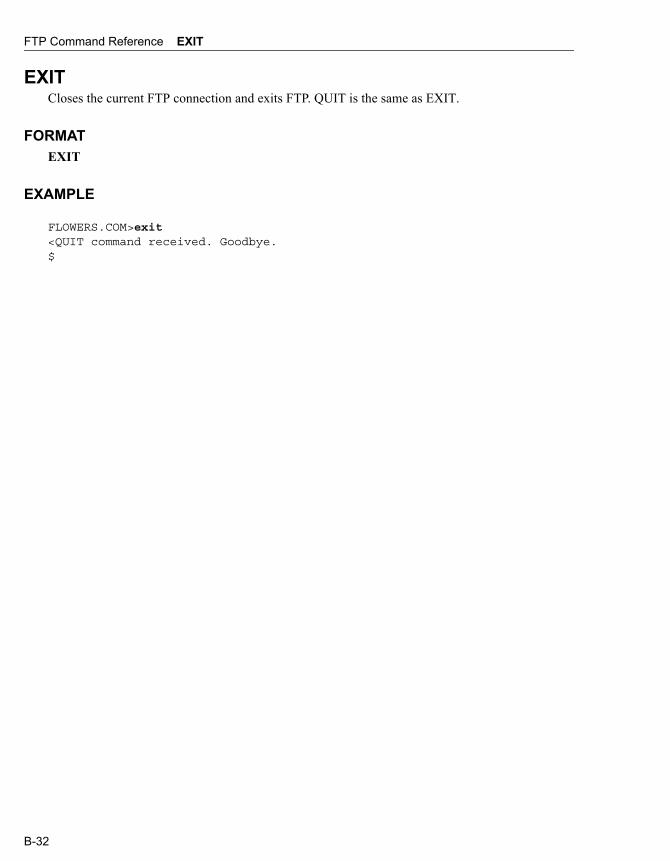
FTP Command Reference EXIT
EXITCloses the current FTP connection and exits FTP. QUIT is the same as EXIT.
FORMATEXIT
EXAMPLE
FLOWERS.COM>exit<QUIT command received. Goodbye.$
B-32

EXIT-ON-ERROR FTP Command Reference
EXIT-ON-ERRORTurns on, off, or toggles (the default) whether or not FTP exits automatically when an error occurs.
If EXIT-ON-ERROR is enabled, FTP exits automatically if an error occurs. After exiting, the DCL symbol $STATUS contains the status code of the last error to occur. If the last error was reported by the FTP server, it contains the value %X1000002C + (%X10000 * ftp_error_code).
FORMATEXIT-ON-ERROR mode
PARAMETERSmode
Specifies a value of ON, OFF, or TOGGLE.
EXAMPLEThis example shows how to use EXIT-ON-ERROR to exit automatically when an error occurs. Here the error was not an FTP error.
FTP>exit-on-error[Will exit when an error occurs]FTP>connect 1.2.3.41.2.3.4: %MULTINET-F-ETIMEDOUT, Connection timed out$ sho symbol $status$STATUS == "%X100081E4"
This example shows how EXIT-ON-ERROR exits when an error occurs automatically. Here the FTP Server responded as follows to the command user unknown password:
FTP>exit-on-error[Will exit when an error occurs]FTP>connect somehostConnection opened (Assuming 8-bit connections)<Somehost MultiNet FTP Server Process V5.4(15) at Thu 4-Mar-03 2:37PM-PDTSOMEHOST>user unknown password<%SYSTEM-F-INVLOGIN, login information invalid at remote node$ show symbol $status$STATUS == "%X1212002C"$ write sys$output ($status-%X1000002C)/%X10000530
530 %SYSTEM-F-INVLOGIN, login information invalid at remote node
B-33

FTP Command Reference FACT
FACTSets or displays the file facts that will be set to match the facts of the source file after transfer. The facts currently supported are:
MODIFICATION_TIME
FORMATFACT [MFMT]
PARAMETERSMFMT
File modification time will be set after transferring files provided the FTP server supports the necessary commands.
EXAMPLE
FTP>FACT MFMTFTP>PUT FILE.EXE
B-34

GET FTP Command Reference
GETCopies remote_file from the remote host to local_file on the local host. The current settings for type, mode, and structure are used during file transfers. GET is the same as RECEIVE.
FORMATGET remote-file [local-file]
PARAMETERSremote-file
Specifies the name of the file on the remote host.
local-file
Specifies the name of the file on the local host.
QUALIFIERS/FDL
Obtains a file previously saved with the PUT /FDL command. When you create a file with the PUT /FDL qualifier, a file description language (FDL) file is created at the same time as the original file. The output file is converted to raw block format. When you retrieve a file with GET /FDL, the original format is restored using the attributes stored in the FDL file. If you don't use the /FDL qualifier with the GET command, the new raw block format is retained. In any case, the FDL file is retained and must be deleted independently. The /FDL qualifier provides compatibility with HP TCP/IP Services for OpenVMS (formerly UCX). The FDL file has the same name except the string FDL is appended to the end.
/RESTART
For STREAM mode transfers restart the transfer where it was interrupted. The client verifies that the server supports the RFC 3659 SIZE and REST commands, and ignores the qualifier if it does not.
This does NOT work for VMS mode transfers (STRU VMS), and if the remote system is a VMS system it is recommended that a STRU FILE be done before the transfer commnd and to include /NOVMS on the command line when starting FTP.
GET/RESTART is not supported in ASCII mode to systems that support VMS mode transfers due to problems with properly concatenating a possibly broken line of text. It is recommended that the file be ZIPped and then transfer the .ZIP file in binary mode.
Restrictions
• Use this command only when connected to a remote host.• Most remote hosts require that you log in before using the GET command.
B-35
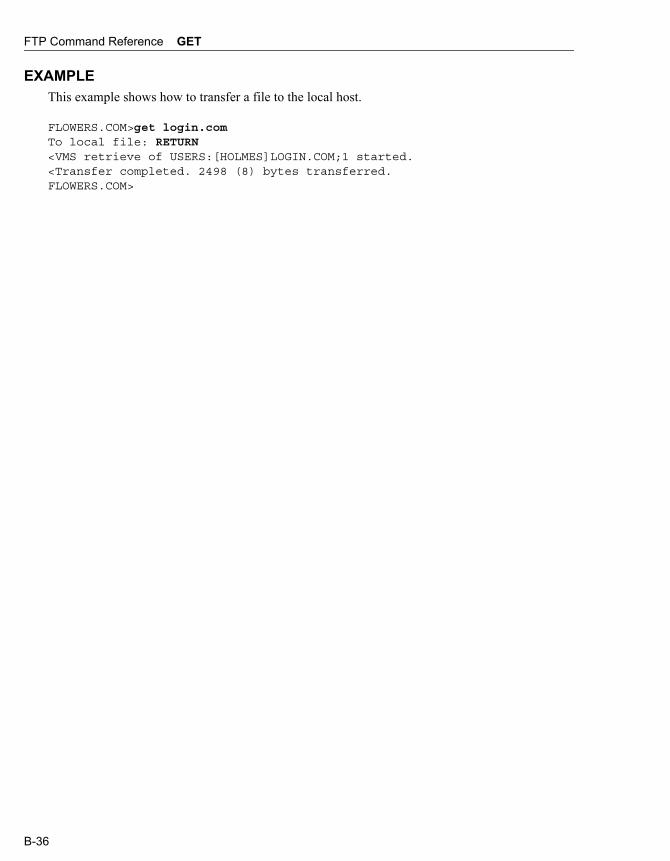
FTP Command Reference GET
EXAMPLEThis example shows how to transfer a file to the local host.
FLOWERS.COM>get login.comTo local file: RETURN<VMS retrieve of USERS:[HOLMES]LOGIN.COM;1 started.<Transfer completed. 2498 (8) bytes transferred.FLOWERS.COM>
B-36
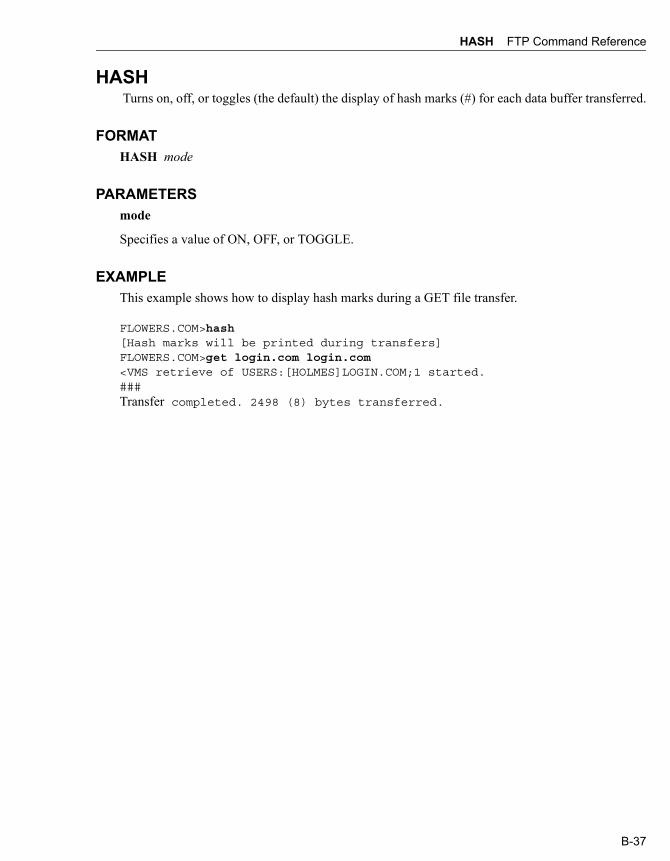
HASH FTP Command Reference
HASH Turns on, off, or toggles (the default) the display of hash marks (#) for each data buffer transferred.
FORMATHASH mode
PARAMETERSmode
Specifies a value of ON, OFF, or TOGGLE.
EXAMPLEThis example shows how to display hash marks during a GET file transfer.
FLOWERS.COM>hash[Hash marks will be printed during transfers]FLOWERS.COM>get login.com login.com<VMS retrieve of USERS:[HOLMES]LOGIN.COM;1 started.###Transfer completed. 2498 (8) bytes transferred.
B-37

FTP Command Reference HELP
HELPDisplays FTP help information. Type HELP ? to see a list of HELP topics. Type HELP without an argument to display general help information.
FORMATHELP [command]
PARAMETERScommand
Specifies the name of the command about which you want help.
EXAMPLE
FTP>help
The HELP command prints on-line help for the FTP user program. The argument to HELP selects the particular FTP command about which help is desired. In addition to the FTP commands, several control characters can be typed while file transfers are in progress:
Control-A shows the progress of a data transfer. Control-G aborts the file transfer and returns to FTP command level. Control-P spawns a new command interpreter.FTP>
B-38

LCD FTP Command Reference
LCDChanges the current working directory on the local host to dir. LCD is a synonym for LOCAL-CD.
FORMATLCD dir
B-39

FTP Command Reference LDIR
LDIRDisplays the contents of your local working directory. LDIR is the same as LOCAL-DIRECTORY.
FORMATLDIR
EXAMPLE
FTP>ldir *.comUSERS:[FLOWERS.DOC.V32]DOC.COM;2 1 1-APR-2004 01:36 FLOWERS_FILES (RWED,RWED,,)LOGIN.COM;3 5 1-APR-2004 19:07 FLOWERS_FILES (RWED,RWED,,)LOGIN.COM;2 5 1-APR-2004 19:04 FLOWERS_FILES (RWED,RWED,,)LOGIN.COM;1 5 1-APR-2004 18:49 FLOWERS_FILES (RWED,RWED,,)Total of 16 blocks in 4 files.FTP>
B-40
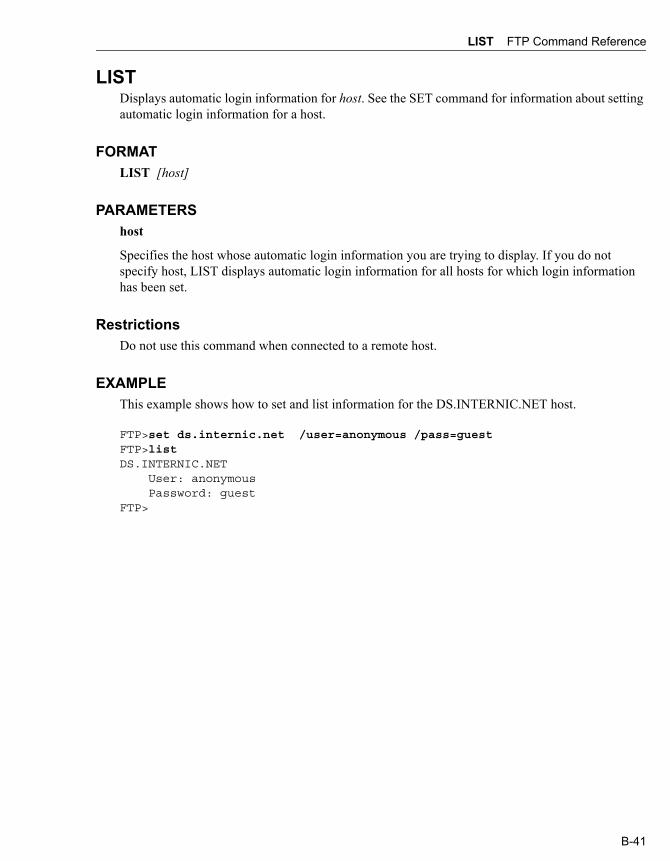
LIST FTP Command Reference
LISTDisplays automatic login information for host. See the SET command for information about setting automatic login information for a host.
FORMATLIST [host]
PARAMETERShost
Specifies the host whose automatic login information you are trying to display. If you do not specify host, LIST displays automatic login information for all hosts for which login information has been set.
RestrictionsDo not use this command when connected to a remote host.
EXAMPLEThis example shows how to set and list information for the DS.INTERNIC.NET host.
FTP>set ds.internic.net /user=anonymous /pass=guestFTP>listDS.INTERNIC.NET User: anonymous Password: guestFTP>
B-41

FTP Command Reference LOCAL-CD
LOCAL-CDChanges the current working directory on the local host to dir. LOCAL-CD is the same as LCD.
FORMATLOCAL-CD dir
PARAMETERSdir
Specifies the name of the directory to which to change the current working directory.
EXAMPLE
FTP>lcd [-]Connected to USERS:[FLOWERS.DOC].FTP>
B-42

LOCAL-DIRECTORY FTP Command Reference
LOCAL-DIRECTORYDisplays the contents of your local working directory. LOCAL-DIRECTORY is a synonym for LDIR.
FORMATLOCAL-DIRECTORY
B-43

FTP Command Reference LOCAL-PWD
LOCAL-PWDDisplays the current working directory on the local host. LOCAL-PWD is a synonym for LPWD.
FORMATLOCAL-PWD
B-44

LOGIN FTP Command Reference
LOGINIdentifies you to a remote FTP server. LOGIN is the same as USER.
FORMATLOGIN user [password]
PARAMETERSuser
Specifies your user name on the remote server.
password
Specifies your password on the remote server. If you do not specify password and the remote site requires one, you are prompted for it. In either case, the password is not echoed.
Restrictions
• Use this command only when connected to a remote host.• Most remote hosts do not allow you to use LOGIN once you have already logged in.
EXAMPLEThis example shows how to connect to a remote host and log in.
$ ftp irisd.comConnection opened (Assuming 8-bit connections)<IRISD.COM MultiNet FTP Server Process 5.4(nn) at Fri 9-Apr-2004 7:42 am PSTIRISD.COM>login HOLMES password<User HOLMES logged into U1:[HOLMES] at Fri 9-Apr-2004, 19:13, job 433.IRISD.COM>
B-45

FTP Command Reference LPWD
LPWDDisplays the current working directory on the local host. LPWD is the same as LOCAL-PWD.
FORMATLPWD
EXAMPLE
FTP>lpwdConnected to USERS:[FLOWERS.DOC].FTP>
B-46

LS FTP Command Reference
LSDisplays a names-only listing of files on the remote host. You can use wildcard specifications.
FORMATLS [file_spec] [output_file]
PARAMETERSfile_spec
Specifies the file specification to use in the directory lookup on the remote host. If you do not specify file_spec, the current working directory on the remote host is used. Any wildcards used are interpreted in the context of the remote host operating system.
output_file
Specifies the name of the file to which to write the directory listing. If output_file is not specified, the list is directed to SYS$OUTPUT:.
Restrictions
• Use this command only when connected to a remote host.• Most remote hosts require that you log in before using the LS command.
EXAMPLEThis example shows how to retrieve the directory listing of the files matching the wildcard character *.
FLOWERS.COM>ls *.<List started.$mailinterface.mymail.todo.<Transfer completed.FLOWERS.COM>
B-47

FTP Command Reference MDELETE
MDELETEDeletes multiple files on the remote host. MDELETE is a synonym for MULTIPLE DELETE.
FORMATMDELETE files
B-48

MGET FTP Command Reference
MGETCopies multiple files from the remote host to the local host. MGET is a synonym for MULTIPLE GET.
FORMATMGET files
B-49

FTP Command Reference MKDIR
MKDIRCreates the directory dir on the remote host. MKDIR is a synonym for CREATE-DIRECTORY.
FORMATMKDIR dir
B-50

MODE FTP Command Reference
MODESets the transfer mode to COMPRESSED or STREAM (the default).
FORMATMODE mode
PARAMETERSmode
Specifies one of two values: COMPRESSED or STREAM (the default).
Restrictions
• The MODE command can only be used when connected to a remote host.• Not all modes are supported by all remote hosts.
EXAMPLEThis example shows how to enable COMPRESSED mode.
FLOWERS.com>mode cType: Ascii (Non-Print), Structure: VMS, Mode: CompressionFLOWERS>COM>
B-51
FTP Command Reference MPUT
MPUTCopies multiple files from the local host to the remote host. MPUT is a synonym for MULTIPLE SEND.
FORMATMPUT files
B-52
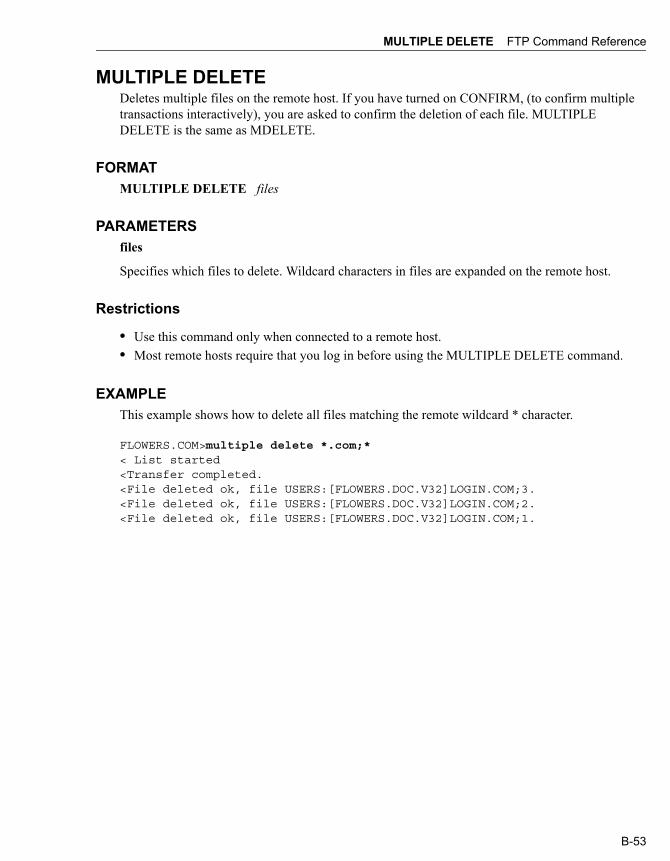
MULTIPLE DELETE FTP Command Reference
MULTIPLE DELETEDeletes multiple files on the remote host. If you have turned on CONFIRM, (to confirm multiple transactions interactively), you are asked to confirm the deletion of each file. MULTIPLE DELETE is the same as MDELETE.
FORMATMULTIPLE DELETE files
PARAMETERSfiles
Specifies which files to delete. Wildcard characters in files are expanded on the remote host.
Restrictions
• Use this command only when connected to a remote host.• Most remote hosts require that you log in before using the MULTIPLE DELETE command.
EXAMPLEThis example shows how to delete all files matching the remote wildcard * character.
FLOWERS.COM>multiple delete *.com;*< List started<Transfer completed.<File deleted ok, file USERS:[FLOWERS.DOC.V32]LOGIN.COM;3.<File deleted ok, file USERS:[FLOWERS.DOC.V32]LOGIN.COM;2.<File deleted ok, file USERS:[FLOWERS.DOC.V32]LOGIN.COM;1.
B-53
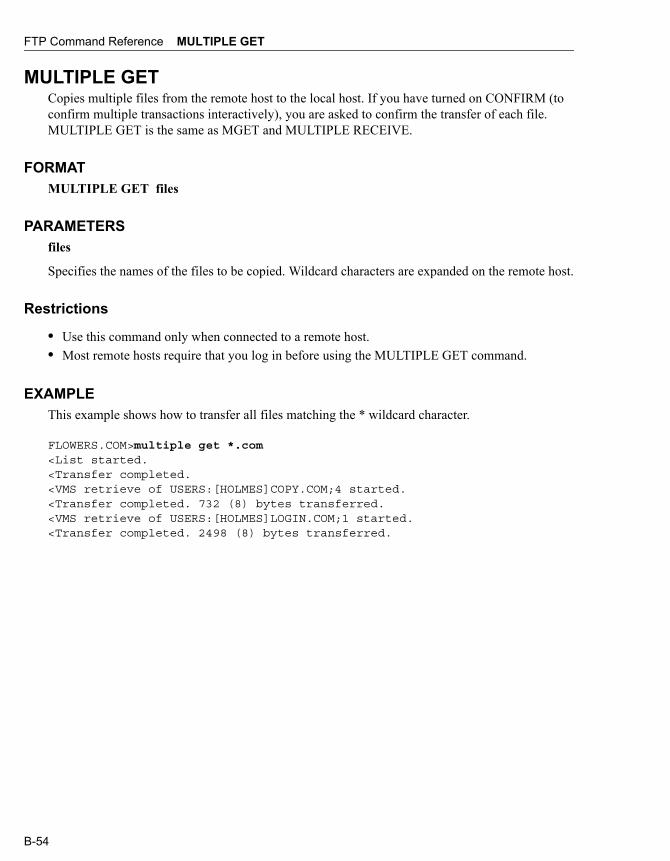
FTP Command Reference MULTIPLE GET
MULTIPLE GETCopies multiple files from the remote host to the local host. If you have turned on CONFIRM (to confirm multiple transactions interactively), you are asked to confirm the transfer of each file. MULTIPLE GET is the same as MGET and MULTIPLE RECEIVE.
FORMATMULTIPLE GET files
PARAMETERSfiles
Specifies the names of the files to be copied. Wildcard characters are expanded on the remote host.
Restrictions
• Use this command only when connected to a remote host.• Most remote hosts require that you log in before using the MULTIPLE GET command.
EXAMPLEThis example shows how to transfer all files matching the * wildcard character.
FLOWERS.COM>multiple get *.com<List started.<Transfer completed.<VMS retrieve of USERS:[HOLMES]COPY.COM;4 started.<Transfer completed. 732 (8) bytes transferred.<VMS retrieve of USERS:[HOLMES]LOGIN.COM;1 started.<Transfer completed. 2498 (8) bytes transferred.
B-54

MULTIPLE PUT FTP Command Reference
MULTIPLE PUTCopies multiple files from the local host to the remote host. MULTIPLE PUT is a synonym for MULTIPLE SEND.
FORMATMULTIPLE PUT files
B-55

FTP Command Reference MULTIPLE RECEIVE
MULTIPLE RECEIVECopies multiple files from the remote host to the local host. MULTIPLE RECEIVE is a synonym for MULTIPLE GET.
FORMATMULTIPLE RECEIVE files
B-56
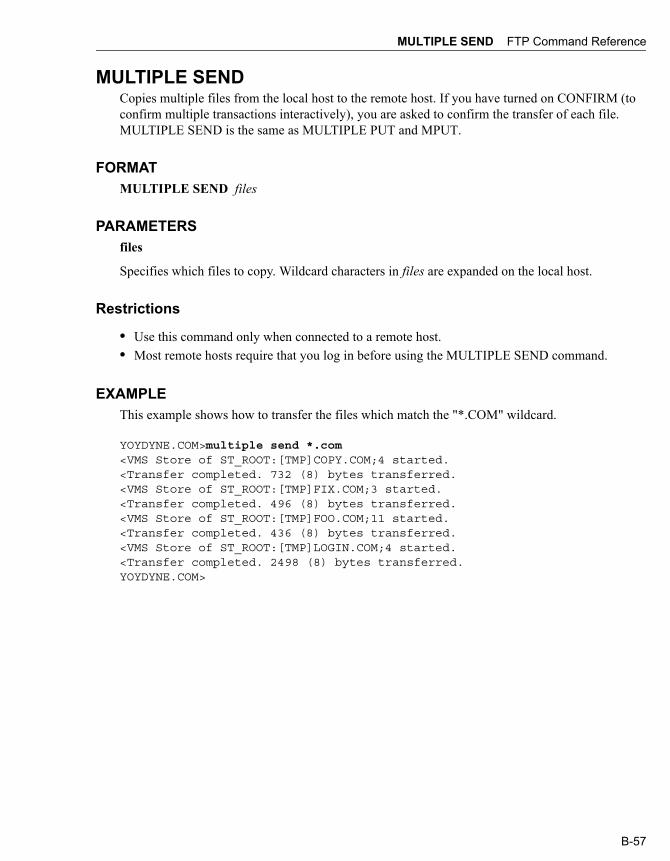
MULTIPLE SEND FTP Command Reference
MULTIPLE SENDCopies multiple files from the local host to the remote host. If you have turned on CONFIRM (to confirm multiple transactions interactively), you are asked to confirm the transfer of each file. MULTIPLE SEND is the same as MULTIPLE PUT and MPUT.
FORMATMULTIPLE SEND files
PARAMETERSfiles
Specifies which files to copy. Wildcard characters in files are expanded on the local host.
Restrictions
• Use this command only when connected to a remote host.• Most remote hosts require that you log in before using the MULTIPLE SEND command.
EXAMPLEThis example shows how to transfer the files which match the "*.COM" wildcard.
YOYDYNE.COM>multiple send *.com<VMS Store of ST_ROOT:[TMP]COPY.COM;4 started.<Transfer completed. 732 (8) bytes transferred.<VMS Store of ST_ROOT:[TMP]FIX.COM;3 started.<Transfer completed. 496 (8) bytes transferred.<VMS Store of ST_ROOT:[TMP]FOO.COM;11 started.<Transfer completed. 436 (8) bytes transferred.<VMS Store of ST_ROOT:[TMP]LOGIN.COM;4 started.<Transfer completed. 2498 (8) bytes transferred.YOYDYNE.COM>
B-57

FTP Command Reference OPEN
OPENEstablishes a connection to a host system. OPEN is a synonym for CONNECT.
FORMATOPEN host
B-58

PASSIVE FTP Command Reference
PASSIVEEnables or disables "passive" mode for file transfers with FTP servers on the opposite side of "firewall" gateways.
FORMATPASSIVE [state] [negotiate]
PARAMETERSstate
Specifies a value of ON, OFF, or TOGGLE.
DESCRIPTIONTypically, when an FTP client requests data from an FTP server, the server attempts to establish a connection with the client over which it transfers the data. If a "firewall" gateway separates the FTP client and server, the gateway may prohibit incoming connections. The solution is to enable "passive" mode transfers, in which the FTP server asks the FTP client to initiate the connection.
Note! Not all FTP servers support passive mode transfers.
The PASSIVE command lets you enable or disable passive mode explicitly. When you do not specify a state, the current state is toggled.
EXAMPLEThis example uses PASSIVE to allow the server to transfer a directory listing across a connection established by the FTP client rather than the server.
FTP>connect ftp.abc.comConnection opened (Assuming 8-bit connections)<HQ.ABC.COM MultiNet FTP Server Process 5.4(14) at Wed 8-Mar-03 10:57 AM- PSTHQ.ABC.COM>user anonymous<anonymous user ok. Send real ident as password.Password:********************<Welcome to ABC's Anonymous FTP directory<Guest User [email protected] logged into USERS:[ANONYMOUS.ABC] at Wed 8-Mar-03 11:15AM-PST, job 208040a2.<Directory and access restrictions applyHQ.ABC.COM>passive on[Passive mode is ON for transfers]HQ.ABC.COM>dir<List started.FTP_ANON:[000000].INDEX;32 3 6-APR-2004 00:00 [WEBMASTER] R,RWED,RWED,R).WELCOME;4 2 16-MAR-2004 17:19 [WEBMASTER] R,RWED,RWED,R)
B-59

FTP Command Reference PASSIVE
ABOUT.TXT;8 5 27-MAR-2004 14:54 [WEBMASTER] R,RWED,RWED,R)COMPANY_INFORMATION.DIR;1| 1 3-JAN-2004 13:54 [WEBMASTER] (R,RWED,RWED,R)CUSTOMER_SUPPORT.DIR;1 1 3-JAN-2004 13:55 [WEBMASTER] R,RWED,RWED,R) 544 27-MAR-2004 10:29 [WEBMASTER] R,RWED,RWED,R)NFSACL.PS;1 72 27-MAR-2004 10:29 [WEBMASTER] R,RWED,RWED,R)NFSACL.TXT;1 13 27-MAR-2004 10:29 [WEBMASTER] R,RWED,RWED,R)PRODUCTS_AND_SERVICES.DIR;1 1 3-JAN-2004 13:58 [WEBMASTER] (R,RWED,RWED,R)SERVER_MAP.TXT;54 60 6-APR-2004 00:04 [WEBMASTER] (RWED,RWED,RWED,R)SET2048.MAR;2 5 27-MAR-2004 10:29 [WEBMASTER] (R,RWED,RWED,R)THIRD_PARTY_TOOLS.DIR;1 1 3-JAN-2004 13:58 [WEBMASTER] (R,RWED,RWED,R)UNZIP.EXE;3 155 27-MAR-2004 10:29 [WEBMASTER] R,RWED,RWED,R)UNZIP_ALPHA.EXE;1 163 27-MAR-2004 10:29 [WEBMASTER] (R,RWED,RWED,R)VMSIO.H;12 7 27-MAR-2004 10:29 [WEBMASTER] (R,RWED,RWED,R)WHATS_NEW.TXT;1 1 5-MAR-2004 16:31 [WEBMASTER] (R,RWED,RWED,R)Total of 1033 blocks in 15 files.<Transfer completed.HQ.ABC.COM>
B-60
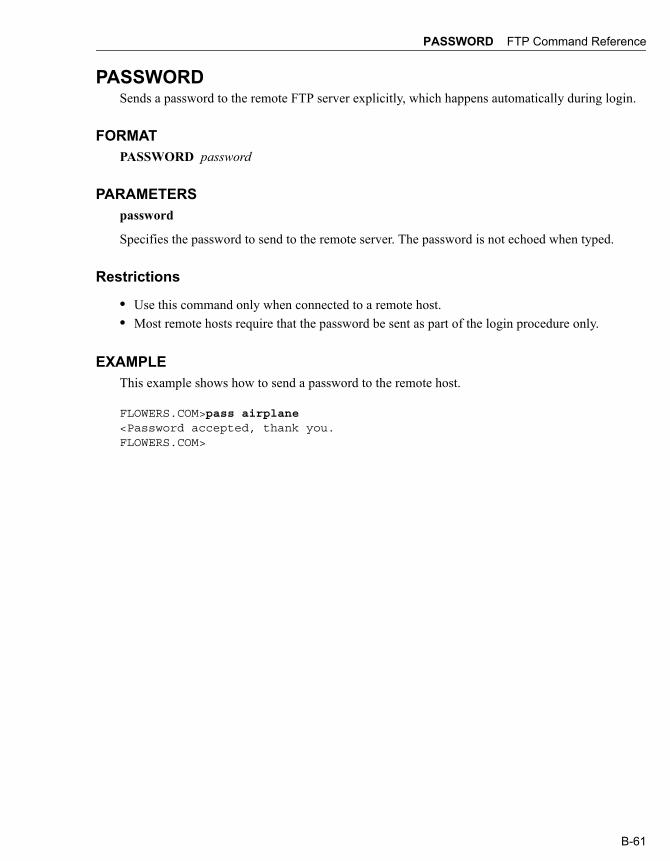
PASSWORD FTP Command Reference
PASSWORDSends a password to the remote FTP server explicitly, which happens automatically during login.
FORMATPASSWORD password
PARAMETERSpassword
Specifies the password to send to the remote server. The password is not echoed when typed.
Restrictions
• Use this command only when connected to a remote host.• Most remote hosts require that the password be sent as part of the login procedure only.
EXAMPLEThis example shows how to send a password to the remote host.
FLOWERS.COM>pass airplane<Password accepted, thank you.FLOWERS.COM>
B-61
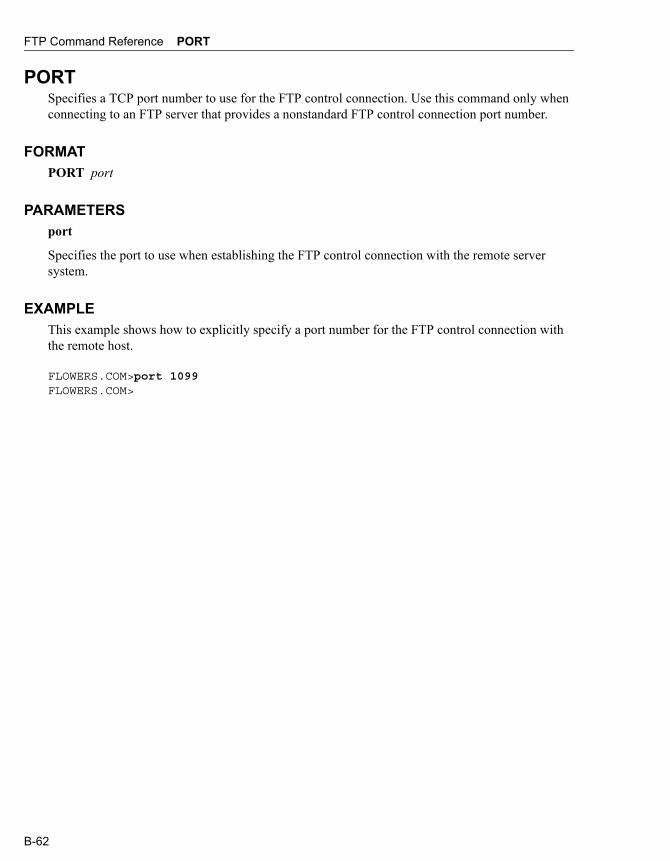
FTP Command Reference PORT
PORTSpecifies a TCP port number to use for the FTP control connection. Use this command only when connecting to an FTP server that provides a nonstandard FTP control connection port number.
FORMATPORT port
PARAMETERSport
Specifies the port to use when establishing the FTP control connection with the remote server system.
EXAMPLEThis example shows how to explicitly specify a port number for the FTP control connection with the remote host.
FLOWERS.COM>port 1099FLOWERS.COM>
B-62

PROMPT-FOR-MISSING-ARGUMENTS FTP Command Reference
PROMPT-FOR-MISSING-ARGUMENTSTurns on, off, or toggles (the default) whether or not FTP prompts for missing command arguments automatically.
FORMATPROMPT-FOR-MISSING-ARGUMENTS mode
PARAMETERSmode
Specifies a value of ON, OFF, or TOGGLE.
EXAMPLEThis example shows how to use the PROMPT-FOR-MISSING-ARGUMENTS command.
FTP>prompt-for-missing-arguments{Will NOT prompt for missing arguments];SALES.FLOWERS.COM>get?Missing remote filenameSALES.FLOWERS.COM>
B-63
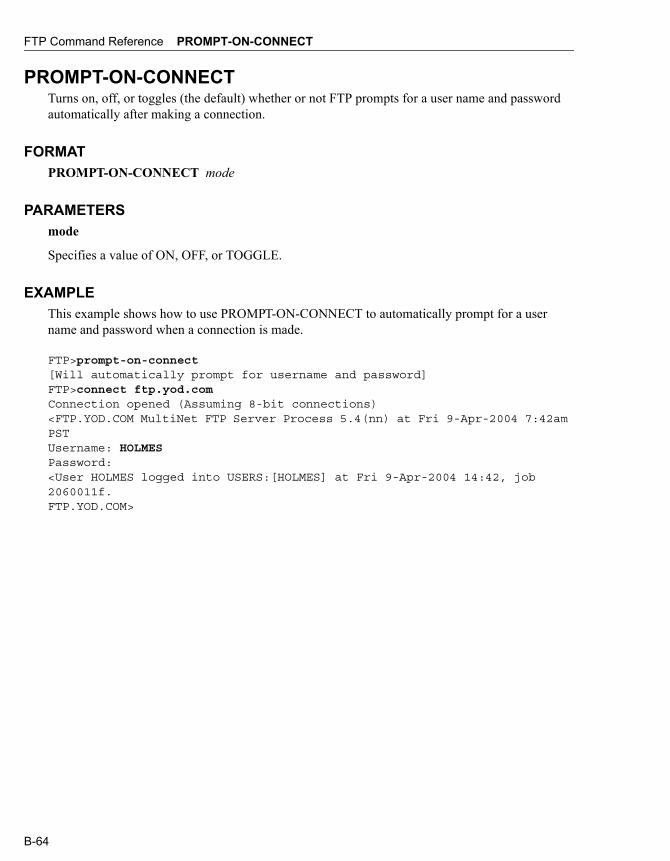
FTP Command Reference PROMPT-ON-CONNECT
PROMPT-ON-CONNECTTurns on, off, or toggles (the default) whether or not FTP prompts for a user name and password automatically after making a connection.
FORMATPROMPT-ON-CONNECT mode
PARAMETERSmode
Specifies a value of ON, OFF, or TOGGLE.
EXAMPLEThis example shows how to use PROMPT-ON-CONNECT to automatically prompt for a user name and password when a connection is made.
FTP>prompt-on-connect[Will automatically prompt for username and password]FTP>connect ftp.yod.comConnection opened (Assuming 8-bit connections)<FTP.YOD.COM MultiNet FTP Server Process 5.4(nn) at Fri 9-Apr-2004 7:42am PSTUsername: HOLMESPassword:<User HOLMES logged into USERS:[HOLMES] at Fri 9-Apr-2004 14:42, job 2060011f.FTP.YOD.COM>
B-64

PUSH FTP Command Reference
PUSHStarts and attaches a DCL subprocess. If a parent process exists, attach to it. To return from DCL, use the ATTACH or the LOGOUT command. To switch back from a DCL subprocess, use the ATTACH command. If the MULTINET_DISABLE_SPAWN logical is set, PUSH does not work.
FORMATPUSH
B-65
FTP Command Reference PUT
PUTCopies local_file on the local host to remote_file on the remote host. The current settings for type, mode, and structure are used during file transfers. PUT is the same as SEND.
FORMATPUT local_file remote_file
PARAMETERSlocal-file
Specifies the name of the file on the local host.
remote-file
Specifies the name of the file on the remote host.
QUALIFIERS/FDL
Puts a file in FDL format. When you create a file with the PUT /FDL qualifier, a file description language (FDL) file is created at the same time as the original file. The output file is converted to raw block format. When you retrieve a file with GET /FDL, the original format is restored using the attributes stored in the FDL file. If you do not use the /FDL qualifier with the GET command, the new raw block format is retained. In any case, the FDL file is retained and must be deleted independently. The /FDL qualifier provides compatibility with HP TCP/IP Services for OpenVMS (formerly UCX). The FDL file has the same name except the string FDL is appended to the end of the file name.
/RESTART
For STREAM mode transfers restart the transfer where it was interrupted. The client verifies that the server supports the RFC 3659 SIZE and REST commands, and ignores the qualifier if it does not.
This does NOT work for VMS mode transfers (STRU VMS), and if the remote system is a VMS system it is recommended that a STRU FILE be done before the transfer commnd and to include /NOVMS on the command line when starting FTP.
GET/RESTART is not supported in ASCII mode to systems that support VMS mode transfers due to problems with properly concatenating a possibly broken line of text. It is recommended that the file be ZIPped and then transfer the .ZIP file in binary mode.
Restrictions
• Use this command only when connected to a remote host.• Most remote hosts require that you log in before using the PUT command.
B-66

PUT FTP Command Reference
EXAMPLESThis example copies the file LOGIN.COM to the remote file FOO.COM.
FLOWERS.COM>put login.com foo.com<VMS Store of ST_ROOT:[TMP]FOO.COM;12 started.<Transfer completed. 2498 (8) bytes transferred.FLOWERS.COM>
This example copies AFILE.TXT to BFILE.TXT and creates the additional BFILE.TXTFDL file. The BFILE.TXTFDL file is in ASCII format and is an appropriate FDL description of AFILE.TXT.
FLOWERS.COM>PUT /FDL AFILE.TXT BFILE.TXT<ASCII Store of USERS:[HOLMES]BFILE.TXTFDL;1 started.<Transfer completed. 888 (8) bytes transferred.<IMAGE Store of USERS:[HOLMES]BFILE.TXT;1 started.<Transfer completed. 6 (8) bytes transferred.flowers.com
B-67

FTP Command Reference PWD
PWDDisplays the current working directory on the remote host. PWD is a synonym for SHOW-DIRECTORY.
FORMATPWD
B-68

QUIT FTP Command Reference
QUITCloses the current FTP connection and exits FTP. QUIT is a synonym for EXIT.
FORMATQUIT
B-69
FTP Command Reference QUOTE
QUOTESends a string to the FTP server verbatim. You can use QUOTE to access non-standard commands on the FTP server.
FORMATQUOTE string
PARAMETERSstring
Specifies a string to send to the server.
RestrictionsUse this command only when connected to a remote host.
EXAMPLEThis example shows how to send a NOOP command to the remote host.
FLOWERS.COM>quote noop<NOOP command successful.FLOWERS.COM>
B-70

RECEIVE FTP Command Reference
RECEIVECopies remote-file from the remote host to local-file on the local host. The current settings for type, mode, and structure are used during file transfers. RECEIVE is a synonym for GET.
FORMATRECEIVE remote-file [local-file]
PARAMETERSremote-file
Specifies the name of the file on the remote host.
local-file
Specifies the name of the file on the local host.
QUALIFIERS/FDL
Gets a file previously saved with the PUT /FDL command. When you create a file with the PUT /FDL qualifier, a file description language (FDL) file is created at the same time as the original file. The output file is converted to raw block format. When you retrieve a file with RECEIVE /FDL, the original format is restored using the attributes stored in the FDL file. If you do not use the /FDL qualifier with the RECEIVE command, the new raw block format is retained. In any case, the FDL file is retained and must be deleted independently. The /FDL qualifier provides compatibility with HP TCP/IP Services for OpenVMS (formerly UCX). The FDL file has the same name except the string FDL is appended to the end of the file name.
Restrictions
• Use this command only when connected to a remote host.• Most remote hosts require that you log in before using the GET command.
EXAMPLEThis example shows how to transfer a file to the local host.
FLOWERS.COM>receive login.comTo local file: RETURN<VMS retrieve of USERS:[HOLMES]LOGIN.COM;1 started.<Transfer completed. 2498 (8) bytes transferred.FLOWERS.COM>
B-71

FTP Command Reference RECORD-SIZE
RECORD-SIZESets or displays the record size for IMAGE mode transfers.
FORMATRECORD-SIZE [size]
PARAMETERSsize
Specifies the record size for IMAGE mode transfers. Values range from 1 to 32767. When omitted, the current setting is displayed. The default record size is 512 bytes.
EXAMPLE
$ ftp ftp.yod.comFTP.YOD.COM MultiNet FTP user process 5.4(nnn)Connection opened (Assuming 8-bit connections)<FTP.YOD.COM MultiNet FTP Server Process 5.4(nnn) at Fri 9-Apr-2004 7:42am-PSTFTP>record 1024FTP>recordRecord size for IMAGE files: 1024FTP>
B-72
REMOTE-HELP FTP Command Reference
REMOTE-HELPDisplays information about commands available on the FTP server.
FORMATREMOTE-HELP
RestrictionsUse this command only when connected to a remote host.
EXAMPLEThis example shows how to retrieve help from a remote host.
UNIX.FLOWERS.COM>remote-help<The following commands are recognized (* =>'s unimplemented).< USER PORT STOR MSAM* RNTO NLST MKD CDUP< PASS PASV APPE MRSQ* ABOR SITE XMKD XCUP< ACCT* TYPE MLFL* MRCP* DELE SYST RMD STOU< SMNT* STRU MAIL* ALLO CWD STAT XRMD SIZE< REIN* MODE MSND* REST XCWD HELP PWD MDTM< QUIT RETR MSOM* RNFR LIST NOOP XPWD<Direct comments to [email protected]>
B-73

FTP Command Reference REMOVE-DIRECTORY
REMOVE-DIRECTORYDeletes a directory on the remote host. REMOVE-DIRECTORY is the same as RMDIR.
FORMATREMOVE-DIRECTORY dir
PARAMETERSdir
Specifies the name of the directory to be removed.
Restrictions
• Use this command only when connected to a remote host.• Most remote hosts require that you be logged in before using the REMOVE-DIRECTORY
command.
EXAMPLEThis example shows how to delete the "test" subdirectory from the remote host.
FLOWERS.COM>remove-directory test<“USERS:[HOLMES.TEST]” Directory deletedFLOWERS.COM>
B-74

RENAME FTP Command Reference
RENAMERenames files on the remote host.
FORMATRENAME file1 file2
PARAMETERSfile1
Specifies the name of the file to be renamed.
file2
Specifies the new name of file1.
Restrictions
• Use this command only when connected to a remote host.• Most remote hosts require that you log in before using the RENAME command.
EXAMPLEThis example shows how to rename COPY.COM to NEWCOPY.COM on the remote host.
FLOWERS.COM>rename Copy.com newcopy.com<Old FILE renamed to USERS:[HOLMES]NEWCOPY.COM;1.FLOWERS.COM>
B-75

FTP Command Reference RETAIN
RETAINTurns on, off, or toggles (the default) the retention of OpenVMS version numbers in file transfers. By default, version numbers are stripped from OpenVMS file names before they are sent over the network.
FORMATRETAIN mode
PARAMETERSmode
Specifies a value of ON, OFF, or TOGGLE.
EXAMPLEThis example shows how to enable retention of OpenVMS version numbers.
FTP>retain[Transferred files will retain their version numbers]FTP>
B-76

RM FTP Command Reference
RMDeletes a file on the remote host. RM is a synonym for DELETE.
FORMATRM file
B-77

FTP Command Reference RMDIR
RMDIRDeletes a directory on the remote host. RMDIR is a synonym for REMOVE-DIRECTORY.
FORMATRMDIR dir
B-78

SEND FTP Command Reference
SENDCopies local_file on the local host to remote_file on the remote host. The current settings for type, mode, and structure are used during file transfers. SEND is the same as PUT.
FORMAT
SEND local_file remote_file
PARAMETERSlocal_file
Specifies the name of the file on the local host to be copied.
remote_file
Specifies the destination file name on the remote host.
QUALIFIERS/FDL
Sends a file in FDL format. When you create a file with the SEND /FDL qualifier, a file description language (FDL) file is created at the same time as the original file. The output file is converted to raw block format. When you retrieve a file with GET /FDL, the original format is restored using the attributes stored in the FDL file. If you do not use the /FDL qualifier with the GET command, the new raw block format is retained. In any case, the FDL file is retained and must be deleted independently. The /FDL qualifier provides compatibility with HP TCP/IP Services for OpenVMS (formerly UCX). The FDL file has the same name except the string FDL is appended to the end of the file name.
Restrictions
• Use this command only when connected to a remote host.• Most remote hosts require that you log in before using the SEND command.
EXAMPLEThis example shows how to transfer the file LOGIN.COM to the remote file FOO.COM.
FLOWERS.COM>send login.com foo.com<VMS Store of ST_ROOT:[TMP]FOO.COM;12 started.<Transfer completed. 2498 (8) bytes transferred.
B-79

FTP Command Reference SET
SETSets automatic login information for host.
FORMATSET host
PARAMETERShost
Specifies the host for which you want to set automatic login information.
QUALIFIERS/USER:username
Specifies the user name sent when a connection is made to host.
/PASSWORD:password
Specifies the password sent when a connection is made to host.
/ACCOUNT:account
Specifies the account is sent when a connection is made to host.
DESCRIPTIONWhen a connection to host is made, FTP uses the information set to automatically log in. This command is usually used in the FTP.INIT file to specify a list of hosts and their login information. If FTP.INIT contains passwords in clear text, it is imperative that you protect the file from access by other users. If you specify /USER but not /PASSWORD, an automatic login is attempted and, if necessary, a password prompt displayed.
RestrictionsDo not use this command when connected to a remote host.
USAGE NOTEIf you do not specify any qualifiers, any automatic login information is cleared.
EXAMPLEThis example sets the user name and password for the host DS.INTERNIC.NET.
FTP>ds.internic.net /user:anonymous /pass:guest
B-80

SHOW-DIRECTORY FTP Command Reference
SHOW-DIRECTORYDisplays the current working directory on the remote host. SHOW DIRECTORY is the same as PWD.
FORMATSHOW-DIRECTORY
Restrictions
• Use this command only when connected to a remote host.• Most remote hosts require that you log in before using the SHOW-DIRECTORY command.
EXAMPLEThis example shows how to retrieve the remote default directory.
FLOWERS.COM>show<“ST_ROOT: [TMP]” is current directory.FLOWERS.COM>
B-81

FTP Command Reference SITE
SITESpecifies commands that are interpreted by the MultiNet FTP server for use on the server host.
FORMATSITE command
PARAMETERScommand
Selects a command from the following:
RMS RECSIZE n Indicates a non-default record size for files transferred in IMAGE mode to the FTP server. Record size values can range from 1 to 32767; the default is 512 bytes.
SPAWN Allows users to execute commands on the server host. The command must not require a terminal device, and must exit on completion. You cannot use this command during an anonymous FTP session.
B-82

SPAWN FTP Command Reference
SPAWNExecutes a single DCL command, or if entered without options, starts a subprocess with the same effect as PUSH. To return from DCL, use the LOGOUT command. If the MULTINET_DISABLE_SPAWN logical is set, SPAWN does not work.
FORMATSPAWN [command]
PARAMETERScommand
Specifies a command to execute. If you omit command, a DCL command line subprocess is created.
QUALIFIERS/INPUT=file-spec
Specifies an input file to the command you enter with SPAWN.
/LOGICAL_NAMES /NOLOGICAL_NAMES
Specifies that logical names and logical name tables are not copied to the subprocess.
/SYMBOLS /NOSYMBOLS
Specifies that global and local names are not passed to the subprocess.
/WAIT /NOWAIT
Returns control without waiting for the command to complete. Do not use this qualifier with commands that have prompts or screen displays.
/OUTPUT=file-spec
Specifies a file that retains the output of the command invoked with SPAWN. This qualifier only works when a single command is entered without creating a DCL subprocess. In addition, this qualifier is positional; you must enter it immediately after SPAWN or other qualifiers.
B-83
FTP Command Reference STATISTICS
STATISTICSTurns on, off, or toggles (the default) STATISTICS mode. In STATISTICS mode, FTP displays, upon completion of file transfers, timing statistics about the transfer.
If the logical MULTINET_FTP_STATISTICS_IN_HHMMSS is defined with either 1, T, or Y, then the elapsed time displays in HH:MM:SS format if statistics are requested using the STATISTICS mode.
FORMATSTATISTICS mode
PARAMETERSmode
Specifies a value of ON, OFF, or TOGGLE.
EXAMPLEThis example shows how to enable STATISTICS mode.
FTP>statistics[Transfer statistics printing is ON]FTP>
B-84
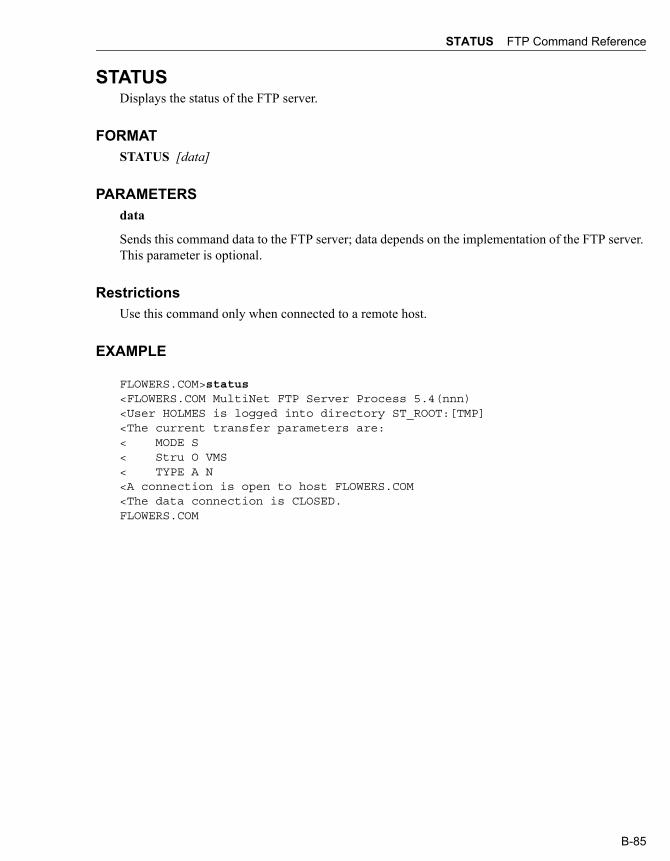
STATUS FTP Command Reference
STATUSDisplays the status of the FTP server.
FORMATSTATUS [data]
PARAMETERSdata
Sends this command data to the FTP server; data depends on the implementation of the FTP server. This parameter is optional.
RestrictionsUse this command only when connected to a remote host.
EXAMPLE
FLOWERS.COM>status<FLOWERS.COM MultiNet FTP Server Process 5.4(nnn)<User HOLMES is logged into directory ST_ROOT:[TMP]<The current transfer parameters are:< MODE S< Stru O VMS< TYPE A N<A connection is open to host FLOWERS.COM<The data connection is CLOSED.FLOWERS.COM
B-85

FTP Command Reference STREAM
STREAMTurns on, off, or toggles (the default) the creation of binary output files as Stream_LF files.
FORMATSTREAM mode
PARAMETERSmode
Specifies ON, OFF, or TOGGLE.
EXAMPLE
FLOWERS.COM>stream[ IMAGE files will be written as Stream_LF format]FLOWERS.COM>
B-86

STRUCTURE FTP Command Reference
STRUCTURESets the transfer structure to structure.
FORMATSTRUCTURE structure
PARAMETERSstructure
Specifies a value of FILE, RECORD, or VMS.
• Use FILE (the default) when connecting to systems that do not support VMS structure negotiation.
• Use RECORD to transfer files when you want to preserve the record boundaries.• Use VMS to transfer files with arbitrary RMS attributes transparently. Transparent transfer is
negotiated automatically between systems that support it. RMS semantics are passed along with the data.
RestrictionsUse this command only when connected to a remote host.
EXAMPLE
FLOWERS.COM>stru rType:Ascii (Non-Print), Structure: Record, Mode: StreamFLOWERS.COM>
B-87
FTP Command Reference TAKE
TAKEInterprets FTP commands in a file. When the end of the file is encountered, the FTP command interpreter returns to its previous input source. You can nest TAKE commands up to ten levels deep.
FORMATTAKE file
PARAMETERSfile
Specifies the name of the file that contains commands to be interpreted.
EXAMPLEThis example shows how to take commands from the file FTP.COMMANDS.
FTP>take ftp.commands
B-88

TENEX FTP Command Reference
TENEXChanges the byte size for transferring binary files to or from a TOPS-20 system.
FORMATTENEX
RestrictionsUse this command only when connected to a remote host.
EXAMPLEThis example shows how to set the transfer type to TENEX.
FLOWERS.COM>tenexType: Logical-Byte (Byte Size 8), Structure: File, Mode: StreamFLOWERS.COM>
B-89
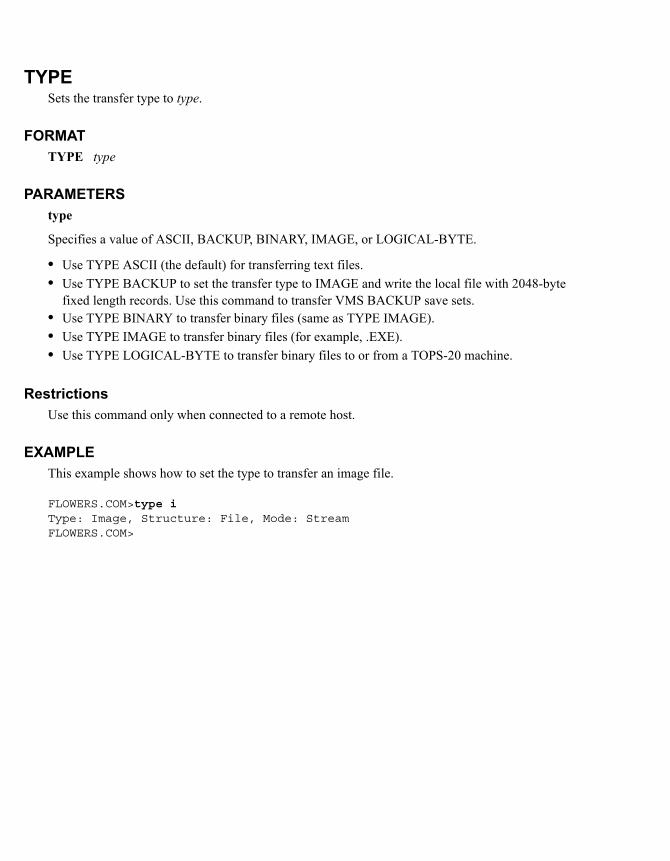
TYPESets the transfer type to type.
FORMATTYPE type
PARAMETERStype
Specifies a value of ASCII, BACKUP, BINARY, IMAGE, or LOGICAL-BYTE.
• Use TYPE ASCII (the default) for transferring text files.• Use TYPE BACKUP to set the transfer type to IMAGE and write the local file with 2048-byte
fixed length records. Use this command to transfer VMS BACKUP save sets.• Use TYPE BINARY to transfer binary files (same as TYPE IMAGE).• Use TYPE IMAGE to transfer binary files (for example, .EXE).• Use TYPE LOGICAL-BYTE to transfer binary files to or from a TOPS-20 machine.
RestrictionsUse this command only when connected to a remote host.
EXAMPLEThis example shows how to set the type to transfer an image file.
FLOWERS.COM>type iType: Image, Structure: File, Mode: StreamFLOWERS.COM>

USER FTP Command Reference
USERIdentifies you to the remote FTP server. USER is a synonym for LOGIN.
FORMATUSER user [password]
B-91

FTP Command Reference VERBOSE
VERBOSETurns on, off, or toggles (the default) VERBOSE mode. VERBOSE mode causes FTP to display all responses from the remote FTP server as they are received.
FORMATVERBOSE mode
PARAMETERSmode
Specifies a value of ON, OFF, or TOGGLE.
EXAMPLEThis example shows how to enable VERBOSE mode.
FTP>verbose[Verbose reply printing is ON]FTP>
B-92

VERSION FTP Command Reference
VERSIONPrints information about the FTP program version.
FORMATVERSION
EXAMPLEThis example shows how to print the FTP program version number.
FLOWERS.COM>versionFLOWERS.COM MultiNet FTP user process 5.4(nnn)FLOWERS.COM>
B-93

FTP Command Reference WINDOW-SIZE
WINDOW-SIZEDisplays or sets the TCP window size to be used on data transfers
FORMATWINDOW-SIZE [size]
PARAMETERsize - Integer value to use for TCP window size.
EXAMPLEThis example shows how to display the current TCP window size.
EXAMPLE.COM>window-sizeTCP window size: 32768EXAMPLE.COM>
B-94

Appendix C
TELNET Command ReferenceThe MultiNet TELNET utility uses the Internet-standard TELNET protocol to establish a virtual terminal connection between your terminal and a remote host. This appendix lists the commands you can use during a TELNET session.
Command SummaryTable C-1 lists the TELNET commands:
Table C-1 TELNET Command Summary
Command: Description:
ABORT Sends an ABORT OUTPUT sequence to the remote host.
ATTACH Detaches the terminal from the calling process and reattaches it to another process.
ATTN Sends an INTERRUPT PROCESS sequence to the remote host.
AYT Sends an ARE YOU THERE sequence to the remote host.
BINARY Attempts to negotiate binary (8-bit) mode with the remote system.
BREAK Sends a BREAK sequence to the remote host.
BYE Closes any open TELNET connection and exits to DCL.
CLOSE Closes the TELNET connection.
C-1

TELNET Command Reference
CONNECT Establishes a TELNET connection to a host.
CREATE-NTY Connects the local end of a TELNET connection to an NTY pseudo-terminal device.
DEBUG Displays TELNET option negotiations.
ECHO Turns on or off remote host character echoing.
EXIT Closes any open TELNET connection and exits to DCL. EXIT is the same as BYE and QUIT.
HELP Displays help information for the specified TELNET command.
LOG-FILE Enables or disables logging of the TELNET session.
PUSH Starts and attaches a DCL subprocess.
QUIT Closes any open TELNET connection and exits to DCL. QUIT is the same as EXIT.
SET ABORT-OUTPUT-CHARACTER
Sets the character that TELNET maps to the ABORT OUTPUT sequence.
SET ARE-YOU-THERE-CHARACTER
Sets the character that TELNET maps to the ARE YOU THERE sequence.
SET AUTO-FLUSH Turns auto-flushing on or off.
SET BREAK-CHARACTER Sets the character that TELNET maps to the BREAK sequence.
SET DEBUG Enables or disables the display of TELNET option negotiations.
SET ERASE-CHARACTER-CHARACTER
Sets the character that TELNET maps to the ERASE CHARACTER sequence.
SET ERASE-LINE-CHARACTER Sets the character that TELNET maps to the ERASE LINE sequence.
SET ESCAPE-CHARACTER Sets the character that switches TELNET to command mode.
SET EXTENDED Causes TELNET to go into extended command mode automatically whenever you type the TELNET ESCAPE character, Ctrl/^ by default.
Table C-1 TELNET Command Summary (Continued)
Command: Description:
C-2

TELNET Command Reference
SET INTERRUPT-PROCESS-CHARACTER
Sets the character that TELNET maps to the INTERRUPT PROCESS sequence.
SET LOCAL-FLOW-CONTROL Specifies whether or not Ctrl/S and Ctrl/Q should be treated by the local terminal driver as XON and XOFF.
SET LOG-FILE Enables or disables logging of the TELNET session.
SET REMOTE-USERNAME Specifies the user name to which you want to log in using Kerberos.
SET UNIX-LINE-TERMINATOR Causes TELNET to use the 4.3BSD UNIX end-of-line specification, Ctrl/NULL.
SPAWN Executes a single DCL command, or if entered without options, starts a subprocess with the same effect as PUSH.
STATUS Displays the status of the current TELNET connection and parameters.
TERMINAL-TYPE Specifies a terminal type for the TELNET session.
VERSION Displays the TELNET version number.
Table C-1 TELNET Command Summary (Continued)
Command: Description:
C-3

TELNET Command Reference ABORT
ABORTSends an ABORT OUTPUT sequence to the remote host. If the remote host is running MultiNet, the TELNET ABORT OUTPUT sequence is treated as a Ctrl/O.
FORMATABORT
RestrictionsUse this command only in extended mode.
EXAMPLEThis example sends the ABORT OUTPUT sequence to the remote system.
TELNET>abort
C-4

ATTACH TELNET Command Reference
ATTACHDetaches the terminal from the calling process and reattaches it to another process. Use the SPAWN SHOW PROCESS /SUBPROCESSES command to list the names of subprocesses. Use the DCL LOGOUT command to return to the original process. If the MULTINET_DISABLE_SPAWN logical is enabled, ATTACH does not work.
FORMATATTACH process-name
PARAMETERSprocess-name
Specifies the name of a process to which you want your terminal attached. (Not all subprocesses can be attached; some testing may be required.)
C-5
TELNET Command Reference ATTN
ATTNSends an INTERRUPT PROCESS sequence to the remote host. If the remote host is also running MultiNet, the TELNET INTERRUPT PROCESS sequence is treated as a Ctrl/C.
FORMATATTN
RestrictionsUse this command only in extended mode.
EXAMPLEThis example sends the INTERRUPT PROCESS sequence to the remote system.
TELNET>attn
C-6
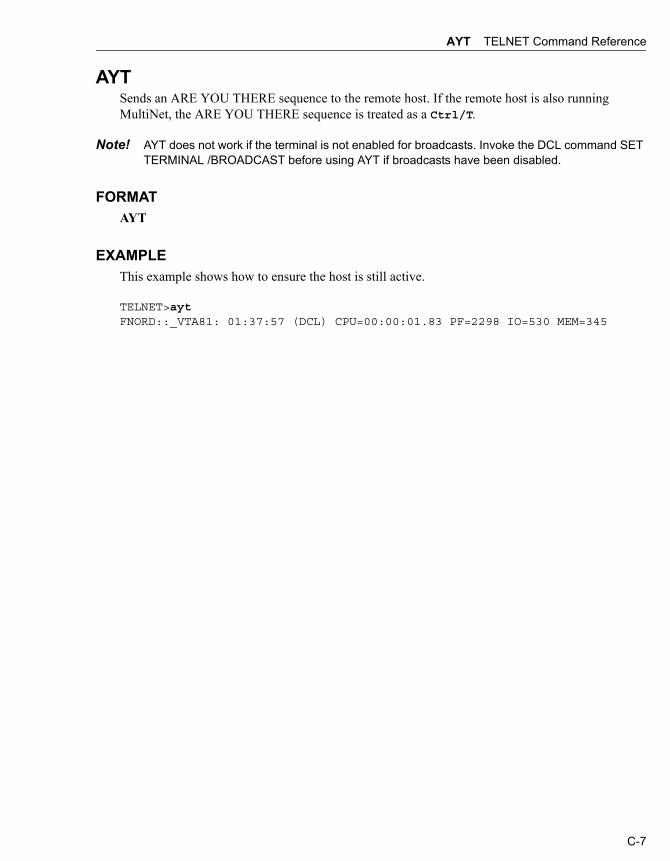
AYT TELNET Command Reference
AYTSends an ARE YOU THERE sequence to the remote host. If the remote host is also running MultiNet, the ARE YOU THERE sequence is treated as a Ctrl/T.
Note! AYT does not work if the terminal is not enabled for broadcasts. Invoke the DCL command SET TERMINAL /BROADCAST before using AYT if broadcasts have been disabled.
FORMATAYT
EXAMPLEThis example shows how to ensure the host is still active.
TELNET>aytFNORD::_VTA81: 01:37:57 (DCL) CPU=00:00:01.83 PF=2298 IO=530 MEM=345
C-7

TELNET Command Reference BINARY
BINARYAttempts to negotiate binary (8-bit) mode with the remote system.
FORMATBINARY
RestrictionsUse this command only in extended mode.
EXAMPLE
TELNET>binary
C-8

BREAK TELNET Command Reference
BREAKSends a BREAK sequence to the remote host. If the remote host is running MultiNet, the BREAK sequence is treated as a Ctrl/C.
FORMATBREAK
RestrictionsUse this command only in extended mode.
EXAMPLE
TELNET>break
C-9

TELNET Command Reference BYE
BYECloses any open TELNET connection and exits to DCL. BYE is the same as EXIT.
FORMATBYE
EXAMPLE
TELNET>bye$
C-10

CLOSE TELNET Command Reference
CLOSECloses the TELNET connection.
FORMATCLOSE
USAGE NOTESIf you specified the remote host in the DCL TELNET command, exit to DCL. If you connected to the remote host in TELNET command mode, return to general command mode.
On most remote hosts, closing the connection is seen as a modem-style terminal hangup. If the remote host is also running MultiNet and OpenVMS virtual terminals are enabled, the remote login session becomes detached.
RestrictionsUse this command only in extended mode.
EXAMPLE
TELNET>close
C-11

TELNET Command Reference CONNECT
CONNECTEstablishes a TELNET connection to a host. TELNET connections may be established using INTERNET protocols; the default is INTERNET.
FORMATCONNECT [protocol] host [port]
PARAMETERSprotocol
Specifies the protocol to use to establish the connection. The protocol is INTERNET (the default).
host
Specifies the host to which to establish the connection. With the INTERNET protocol, the host can be a name or a numeric IP address.
port
Specifies the remote port number or name to use for the connection. With the INTERNET protocol, the default is the TELNET port.
RestrictionsDo not use this command in extended mode.
EXAMPLEThis example shows how to connect to a remote system.
TELNET>connect internet unixTrying... Connected to UNIX.FLOWERS.COM, a VAXSTATION-II running UNIX.4.3 BSD UNIX (unix.FLOWERS.com)login:
C-12

CREATE-NTY TELNET Command Reference
CREATE-NTYConnects the local end of a TELNET connection to an NTY pseudo-terminal device. This device can be used by other applications such as KERMIT. This command includes the remote host and port number in the SHOW TERMINAL “remote port information” field.
FORMATCREATE-NTY
EXAMPLE
TELNET>create-ntyTELNET session now connected to _NTY3:%DCL-I-ALLOC, _NTY3: allocated$
C-13

TELNET Command Reference DEBUG
DEBUGDisplays TELNET option negotiations.
FORMATDEBUG [mode]
PARAMETERSmode
Specifies whether debugging is enabled (default) or disabled (OFF). Debug mode causes TELNET to display option negotiations between the local host and the foreign host.
EXAMPLEThis example shows how to enable DEBUG mode.
TELNET>debug on
C-14

ECHO TELNET Command Reference
ECHOTurns on or off remote host character echoing.
FORMATECHO mode
PARAMETERSmode
Specifies whether the server handles character echoing. If you specify OFF, TELNET performs local character echoing. If you specify ON, the remote system performs the echoing.
RestrictionsUse this command only in extended mode.
EXAMPLE
TELNET>echo off
C-15
TELNET Command Reference EXIT
EXITCloses any open TELNET connection and exits to DCL. EXIT is the same as BYE and QUIT.
FORMATEXIT
EXAMPLEThis example shows how to exit TELNET.
TELNET>exit$
C-16
HELP TELNET Command Reference
HELPDisplays help information for the specified TELNET command. Type HELP ? to see a list of HELP topics, or type HELP with no argument to see general information regarding TELNET.
FORMATHELP [command]
PARAMETERScommand
Specifies information about this command.
EXAMPLE
TELNET>help HELP Displays help information for the specified TELNET command.Type HELP ? to see a list of HELP topics, or type HELP with noargument to see general information regarding TELNET. Format HELP [command] Additional information available:
ATTACH BYE CONNECT DEBUG EXIT HELP LOG-FILEPUSH QUIT SET SPAWN STATUS TERMINAL-TYPEVERSIONTopic?
C-17
TELNET Command Reference LOG-FILE
LOG-FILEEnables or disables logging of the TELNET session. If you specify log_file, everything received by the local system from the remote system is copied into this file.
FORMATLOG-FILE log_file
PARAMETERSlog_file
Specifies a file to which to write a log of the TELNET session. If you do not specify a file, logging is enabled to the file TELNET.LOG. If you specify the file name NONE, logging is disabled.
RestrictionsLOG-FILE is not supported in 3270 or 5250 modes.
EXAMPLEThis example shows how to enable TELNET output to be logged to the file ST_TMP:FNORD.LOG.
TELNET>log-file st_tmp:fnord.log[Log file open (ST_TMP:<TMP>FNORD.LOG.1)]TELNET>
C-18

PUSH TELNET Command Reference
PUSHStarts and attaches a DCL subprocess. If a parent process exists, attach to it. To return from DCL, use the ATTACH or the LOGOUT command. To switch back from a DCL subprocess, use the ATTACH command. If the MULTINET_DISABLE_SPAWN logical is set, PUSH does not work.
FORMATPUSH
C-19
TELNET Command Reference QUIT
QUITCloses any open TELNET connection and exits to DCL. QUIT is the same as EXIT.
FORMATQUIT
EXAMPLEThis example shows how to exit TELNET.
TELNET>quit$
C-20

SET ABORT-OUTPUT-CHARACTER TELNET Command Reference
SET ABORT-OUTPUT-CHARACTERSets the character that TELNET maps to the ABORT OUTPUT sequence. The value set by this command is not the character passed to the remote host. The remote host receives an ABORT OUTPUT sequence; SET ABORT-OUTPUT-CHARACTER defines the key you press to tell TELNET to send an ABORT OUTPUT sequence. This character can also be set by invoking TELNET with the /ABORT_OUTPUT_CHARACTER qualifier.
FORMATSET ABORT-OUTPUT-CHARACTER character
PARAMETERScharacter
Specifies which character sends the ABORT OUTPUT sequence to the TELNET server.
If you type the command without specifying character, it defaults to Ctrl/O.
EXAMPLEThis example sets the ABORT OUTPUT character to Ctrl/A.
TELNET>set abort "^A"[Abort Output character set to ^A]TELNET>
C-21

TELNET Command Reference SET ARE-YOU-THERE-CHARACTER
SET ARE-YOU-THERE-CHARACTERSets the character that TELNET maps to the ARE YOU THERE sequence. The value set by this command is not the character passed to the remote host. The remote host receives an ARE YOU THERE sequence; SET ARE-YOU-THERE-CHARACTER defines the key you press to tell TELNET to send an ARE YOU THERE sequence. This character can also be set by invoking TELNET with the /ARE_YOU_THERE_CHARACTER qualifier. The ARE YOU THERE sequence can be sent by pressing the ARE YOU THERE character or by issuing the TELNET AYT command.
Note! The ARE YOU THERE sequence only displays an information line from the host if broadcasts are enabled for the terminal.
FORMATSET ARE-YOU-THERE-CHARACTER character
PARAMETERScharacter
Specifies which character sends the ARE YOU THERE sequence to the TELNET server.
If you type the command without specifying character, it defaults to Ctrl/T.
EXAMPLEThis example sets the ARE YOU THERE character to Ctrl/T.
TELNET>set are-you-there "^T"[Are-You-There character set to ^T]TELNET>
C-22

SET AUTO-FLUSH TELNET Command Reference
SET AUTO-FLUSHTurns auto-flushing on or off. You can also set this mode by invoking TELNET with the /AUTOFLUSH qualifier.
When you define an ABORT-OUTPUT character, enabling AUTO-FLUSH (SET AUTO-FLUSH ON) causes TELNET to flush any data which may be in the network buffers when the ABORT-OUTPUT character is typed. The TELNET client does this by sending a TIMING-MARK command to the TELNET server and discarding all data until one is received in response.
FORMATSET AUTO-FLUSH mode
PARAMETERSmode
Turns auto-flush ON or OFF. If you do not specify mode, it defaults to ON.
EXAMPLEThis example sets the Auto Flush option on.
TELNET>set auto-flush onTELNET>
C-23

TELNET Command Reference SET BREAK-CHARACTER
SET BREAK-CHARACTERSets the character that TELNET maps to the BREAK sequence. The value set by this command is not the character passed to the remote host. The remote host receives a BREAK sequence; SET BREAK-CHARACTER defines the key you press to tell TELNET to send a BREAK sequence. You can also set this character by invoking TELNET with the /BREAK_CHARACTER qualifier.
FORMATSET BREAK-CHARACTER character
PARAMETERScharacter
Specifies which character sends the BREAK sequence to the TELNET server.
If you type the command without specifying character, it defaults to Ctrl/A.
EXAMPLEThis example sets the BREAK character to Ctrl/A.
TELNET>set break "^A"[Break character set to ^A]TELNET>
C-24

SET DEBUG TELNET Command Reference
SET DEBUGEnables or disables the display of TELNET option negotiations. You can also set this mode by invoking TELNET with the /DEBUG qualifier.
FORMATSET DEBUG [mode]
PARAMETERSmode
Turns debugging ON or OFF. If mode is not specified, the default is ON.
EXAMPLEThis example enables DEBUG mode.
TELNET>set debug on
C-25

TELNET Command Reference SET ERASE-CHARACTER-CHARACTER
SET ERASE-CHARACTER-CHARACTERSets the character that TELNET maps to the ERASE CHARACTER sequence. The value set by this command is not the character passed to the remote host. SET ERASE-CHARACTER-CHARACTER defines the key you press to tell TELNET to send an ERASE CHARACTER sequence. This character can also be set by invoking TELNET with the /ERASE_CHARACTER_CHARACTER qualifier.
FORMATSET ERASE-CHARACTER-CHARACTER character
PARAMETERScharacter
Specifies which character sends the ERASE CHARACTER sequence to the TELNET server.
If you type this command without specifying character, it defaults to DEL.
EXAMPLEThis example sets the ERASE CHARACTER to Ctrl/A.
TELNET>set erase "^A"[Erase character set to "^A"]TELNET>
C-26

SET ERASE-LINE-CHARACTER TELNET Command Reference
SET ERASE-LINE-CHARACTERSets the character that TELNET maps to the ERASE LINE sequence. The value set by this command is not the character passed to the remote host; SET ERASE-LINE-CHARACTER defines the key you press to tell TELNET to send an ERASE LINE sequence. This character can also be set by invoking TELNET with the /ERASE_LINE_CHARACTER qualifier.
FORMATSET ERASE-LINE-CHARACTER character
PARAMETERScharacter
Specifies which character sends the ERASE LINE sequence to the TELNET server.
If you type the command without specifying character, it defaults to Ctrl/U.
EXAMPLEThis example sets the ERASE LINE character to Ctrl/U.
TELNET>set erase-line “^U”[Escape Line character set to ^UTELNET>
C-27

TELNET Command Reference SET ESCAPE-CHARACTER
SET ESCAPE-CHARACTERSets the character that switches TELNET to command mode. This character can also be set by invoking TELNET with the /ESCAPE_CHARACTER qualifier.
FORMATSET ESCAPE-CHARACTER character
PARAMETERScharacter
Specifies which character is used as the TELNET ESCAPE character.
If you type the command without specifying character, it defaults to Ctrl/^.
EXAMPLEThis example sets the ESCAPE character to Ctrl/^.
TELNET>set escape "^\"[Escape character set to ^\]TELNET>
C-28

SET EXTENDED TELNET Command Reference
SET EXTENDEDCauses TELNET to go into extended command mode automatically whenever you type the TELNET ESCAPE character, Ctrl/^ by default.
FORMATSET EXTENDED mode
PARAMETERSmode
Turns extended mode ON or OFF. If you do not specify mode, it defaults to ON.
EXAMPLEThis example enables the extended option.
TELNET>set extended onTELNET>
C-29

TELNET Command Reference SET INTERRUPT-PROCESS-CHARACTER
SET INTERRUPT-PROCESS-CHARACTERSets the character that TELNET maps to the INTERRUPT PROCESS sequence. The value set by this command is not the character passed to the remote host. The remote host receives an INTERRUPT PROCESS sequence; SET INTERRUPT-PROCESS-CHARACTER defines the key you press to tell TELNET to send an INTERRUPT PROCESS sequence. You can also set this character by invoking TELNET with the /INTERRUPT_PROCESS_CHARACTER qualifier.
FORMATSET INTERRUPT-PROCESS-CHARACTER character
PARAMETERScharacter
Specifies which character sends the INTERRUPT PROCESS sequence to the TELNET server.
If you type the command without specifying character, it defaults to Ctrl/C.
EXAMPLEThis example sets the INTERRUPT PROCESS character to Ctrl/C.
TELNET>set interrupt-process "^C"[Interrupt Process character set to ^C]TELNET>
C-30

SET LOCAL-FLOW-CONTROL TELNET Command Reference
SET LOCAL-FLOW-CONTROLSpecifies whether or not Ctrl/S and Ctrl/Q should be treated by the local terminal driver as XON and XOFF. You can also set this mode by invoking TELNET with the /LOCAL_FLOW_CONTROL qualifier.
Use of this qualifier causes a more responsive XOFF, which helps prevent data loss, but the remote system is unable to see any Ctrl/S characters.
The default under the MultiNet TELNET utility is to use the current setting of the VMS terminal characteristic TT$_TTSYNC (set by the DCL command SET TERMINAL/TTSYNC), unless the remote host supports the TOGGLE-FLOW-CONTROL TELNET option. In that case, the LOCAL-FLOW-CONTROL option is set automatically by the TELNET server.
FORMATSET LOCAL-FLOW-CONTROL mode
PARAMETERSmode
Turns local flow control ON or OFF. If mode is not specified, it defaults to ON.
EXAMPLEThis example enables local processing of Ctrl/S and CtrlQ.
TELNET>set local-flow onTELNET>
C-31
TELNET Command Reference SET LOG-FILE
SET LOG-FILEEnables or disables logging of the TELNET session. You can also set a log file by invoking TELNET with the /LOG_FILE qualifier.
FORMATSET LOG-FILE log_file
PARAMETERSlog_file
Specifies a file to which to write the log of the TELNET session. If you specify log_file, everything received by the local system from the remote system is copied into this file. If you do not specify a file, logging is enabled to the file TELNET.LOG. If you specify the file name NONE, logging is disabled.
Restrictionslog_file is not supported in 3270 and 5250 modes.
C-32

SET REMOTE-USERNAME TELNET Command Reference
SET REMOTE-USERNAMESpecifies the user name to which you want to log in using Kerberos. If you are not logging in with the /AUTH qualifier, TELNET prompts you to supply a user name.
FORMATSET REMOTE-USERNAME username
PARAMETERSusername
Specifies the user name to which you want to log in using Kerberos.
C-33

TELNET Command Reference SET UNIX-LINE-TERMINATOR
SET UNIX-LINE-TERMINATORCauses TELNET to use the 4.3BSD UNIX end-of-line specification, Ctrl/NULL. You can also set this mode by invoking TELNET with the /UNIX qualifier. This command is useful when using TELNET to connect to 4.3BSD UNIX systems whose TELNET server does not conform to the TELNET specification.
FORMATSET UNIX-LINE-TERMINATOR mode
PARAMETERSmode
If mode is ON, TELNET uses the 4.3BSD UNIX end-of-line specification, Ctrl/NULL.
If mode is OFF (the default), TELNET uses the standard end-of-line specification, Ctrl/LF.
EXAMPLEThis example enables use of a 4.3BSD UNIX-style line terminator.
TELNET>set unix-line-terminator onTELNET>
C-34

SPAWN TELNET Command Reference
SPAWNExecutes a single DCL command, or if entered without options, starts a subprocess with the same effect as PUSH. To return from DCL, use the LOGOUT command. If the MULTINET_DISABLE_SPAWN logical is set, SPAWN does not work.
FORMATSPAWN [command]
PARAMETERScommand
Specifies a command to execute. If you omit command, a DCL command line subprocess is created.
QUALIFIERS/INPUT=file-spec
Specifies an input file to the command you enter with SPAWN.
/LOGICAL_NAMES /NOLOGICAL_NAMES
Specifies that logical names and logical name tables are not copied to the subprocess.
/SYMBOLS /NOSYMBOLS
Specifies that global and local names are not passed to the subprocess.
/WAIT /NOWAIT
Returns control without waiting for the command to complete. Do not use this qualifier with commands that have prompts or screen displays.
/OUTPUT=file-spec
Specifies a file that retains the output of the command invoked with SPAWN. This qualifier only works when a single command is entered without creating a DCL subprocess. In addition, this qualifier is positional; you must enter it immediately after SPAWN or other qualifiers.
C-35

TELNET Command Reference STATUS
STATUSDisplays the status of the current TELNET connection and parameters.
FORMATSTATUS
EXAMPLE
TELNET>statusThis is FNORD.FOO.COM, VMS Version V6.0Connected to host CONE.FOO.COM, a VAXSTATION-4000-90 running VMS via TCP.Remote host is echoingHost is not sending binaryClient is not sending binaryNO Abort Output characterNO Interrupt Process characterNO Are-You-There characterNO Break Character characterNO Erase Character characterNO Erase Line characterEscape Character character is '^^'Normal End Of Line mappingLocal Flow controlNo log fileTerminal type is vt100Remote host status reply:FNORD::_VTA12: 16:40:02 (DCL) CPU=00:00:03.21 PF=686 IO=196 MEM=514
C-36

TERMINAL-TYPE TELNET Command Reference
TERMINAL-TYPESpecifies a terminal type for the TELNET session.
FORMATTERMINAL-TYPE type
PARAMETERStype
Refer to RFC-1340 for a list of possible terminal types. RFCs are provided on the MultiNet CD-ROM. MultiNet TELNET permits you to specify any terminal type, even if the terminal type is not listed in the RFC. The TERMINAL-TYPE command has the same effect as invoking TELNET with the /TERMINAL_TYPE qualifier.
EXAMPLE
TELNET>terminal-type dec-vt220
C-37

TELNET Command Reference VERSION
VERSIONDisplays the TELNET version number.
FORMATVERSION
EXAMPLE
TELNET>versionThis is MultiNet K5-TELNET V5.4(13)TELNET>
C-38
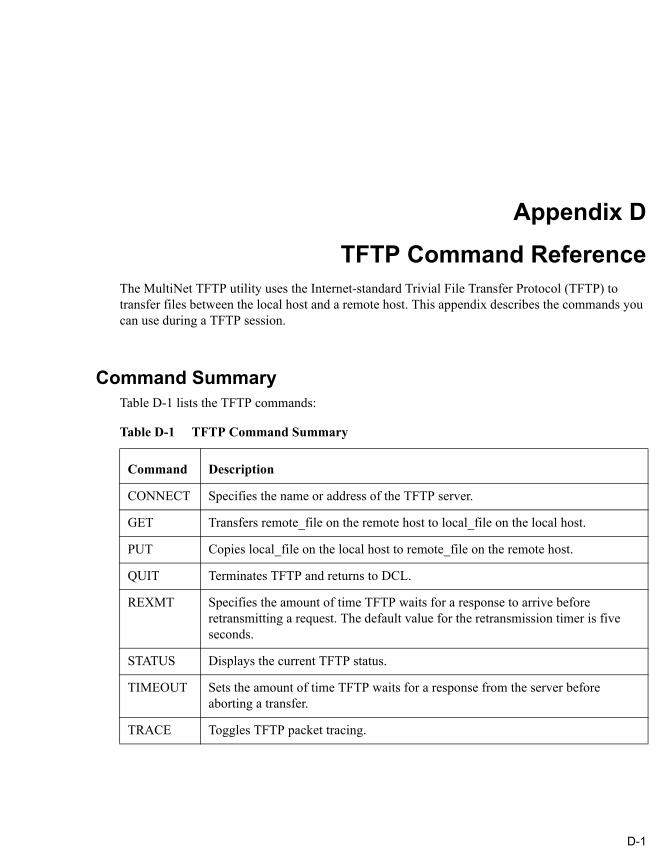
Appendix D
TFTP Command ReferenceThe MultiNet TFTP utility uses the Internet-standard Trivial File Transfer Protocol (TFTP) to transfer files between the local host and a remote host. This appendix describes the commands you can use during a TFTP session.
Command SummaryTable D-1 lists the TFTP commands:
Table D-1 TFTP Command Summary
Command Description
CONNECT Specifies the name or address of the TFTP server.
GET Transfers remote_file on the remote host to local_file on the local host.
PUT Copies local_file on the local host to remote_file on the remote host.
QUIT Terminates TFTP and returns to DCL.
REXMT Specifies the amount of time TFTP waits for a response to arrive before retransmitting a request. The default value for the retransmission timer is five seconds.
STATUS Displays the current TFTP status.
TIMEOUT Sets the amount of time TFTP waits for a response from the server before aborting a transfer.
TRACE Toggles TFTP packet tracing.
D-1

TFTP Command Reference CONNECT
CONNECTSpecifies the name or address of the TFTP server. This value overrides the command line host specification. You may use either a symbolic host name or an Internet address.
This command does not cause any network action, but sets the destination address for the TFTP UDP packets. If the host cannot be reached, an error is not displayed until a GET or PUT command is attempted.
FORMATconnect host
PARAMETERShost
Specifies a remote host.
EXAMPLEThis example connects to the host FLOWERS.COM.
tftp>connect flowers.com
D-2

GET TFTP Command Reference
GETTransfers remote_file on the remote host to local_file on the local host.
You must specify an absolute path name (device, directory, and file name) for remote_file, and typically the server requires the file to be world-readable. If you do not specify local_file, the default is the same name and directory as remote_file.
FORMATget remote_file [local_file]
PARAMETERSremote_file
Specifies the name of the input file on the remote host.
local_file
Specifies the name of the output file on the local host.
EXAMPLEThis example retrieves the file USERS:[SMITH]LOGIN.COM and stores it in the file LOGIN.COM.
tftp>get users:[smith]login.com login.comReceived 2361 bytes in 1 seconds.tftp>
D-3

TFTP Command Reference PUT
PUTCopies local_file on the local host to remote_file on the remote host.
You must use absolute pathnames on remote_file, and typically the server requires the file to already exist and be world-writable (W:W). If you do not specify remote_file, it defaults to the same name and directory as local_file.
FORMATput local_file [remote_file]
PARAMETERSlocal_file
Specifies the name of the input file on the local host.
remote_file
Specifies the name of the output file on the remote host.
EXAMPLEThis example transfers SYS$LOGIN:LOGIN.COM to the remote file specification "/tmp/foo".
tftp>put sys$login:login.com /tmp/fooSent 2361 bytes in 1 second.tftp>
D-4

QUIT TFTP Command Reference
QUITTerminates TFTP and returns to DCL.
FORMATquit
EXAMPLE
tftp>quit$
D-5

TFTP Command Reference REXMT
REXMTSpecifies the amount of time TFTP waits for a response to arrive before retransmitting a request. The default value for the retransmission timer is five seconds.
FORMATrexmt seconds
PARAMETERSseconds
Sets the TFTP retransmission timer to the specified number of seconds.
EXAMPLEThis example sets the TFTP retransmission timer to 10 seconds.
tftp>rexmt 10
D-6

STATUS TFTP Command Reference
STATUSDisplays the current TFTP status.
FORMATSTATUS
EXAMPLEThis example shows how to display TFTP status after a connection has been made to FLOWERS.COM. All values shown are the defaults.
tftp>statusConnected to FLOWERS.COM.Mode: octet Tracing: offRexmt-interval: 5 seconds, Max-timeout: 25 secondstftp>
D-7

TFTP Command Reference TIMEOUT
TIMEOUTSets the amount of time TFTP waits for a response from the server before aborting a transfer.
The REXMT command controls how often the request is retransmitted. The default value for the maximum timeout is 25 seconds.
FORMATtimeout seconds
PARAMETERSseconds
Specifies the number of seconds for the maximum timeout allowed per TFTP packet.
EXAMPLEThis example shows how to set the maximum timeout to 50 seconds.
tftp> timeout 50tftp>
D-8

TRACE TFTP Command Reference
TRACEToggles TFTP packet tracing.
FORMATtrace
EXAMPLESThis example shows how to enable TFTP packet tracing. Issue the command a second time to disable packet tracing.
tftp>tracePacket tracing on.tftp>
This example shows a transfer with packet tracing enabled.
get use2s:[smith]login.com .com
sent LOCALHOST.69 RRQ <file=users:[smith]login.com, mode=octet>received LOCALHOST.69 DATA <block=1, 512 bytes>sent LOCALHOST.69 ACK <block=1>received LOCALHOST.69 DATA <block=2, 512 bytes>sent LOCALHOST.69 ACK <block=2>received LOCALHOST.69 DATA <block=3, 512 bytes>sent LOCALHOST.69 ACK <block=3>received LOCALHOST.69 DATA <block=4, 512 bytes>sent LOCALHOST.69 ACK <block=4>received LOCALHOST.69 DATA <block=5, 313 bytes>Received 2361 bytes in 2 seconds.tftp>
D-9

Index
Symbols/BUFFER_SIZE 8-3/CONCURRENT_REQUESTS 8-3/HELP 7-2, 7-32/LOCK 7-33/NO_AGENT_FORWARDING 7-3/NOSSH1 7-33/QUIET 7-3/REMOVE 7-33/TIMEOUT=n 7-33/UNLOCK 7-33/URL 7-33/VERSION 7-4
AALL-IN-1, using mail under 2-4authentication private keys 7-31
BBatchMode 7-9
CCERTENROLL 7-33ClearAllForwardings 7-9Compression 7-9
DDCL command
MULTINET DECODE A-3
MULTINET FINGER A-4MULTINET FTP A-5MULTINET KERBEROS DESTROY A-9MULTINET KERBEROS INIT A-10MULTINET KERBEROS LIST A-11MULTINET KERBEROS PASSWORD A-12MULTINET LPRM A-13MULTINET RCP A-14MULTINET REMIND A-18MULTINET RLOGIN A-20MULTINET RSHELL A-22MULTINET RUSERS A-24MULTINET SEND A-25MULTINET TALK A-26MULTINET TELNET A-28MULTINET TFTP A-34MULTINET WHOIS A-35
DECwindows, running 6-1documentation
comments 1-xxonline help 1-xviii
Eencrypted data 7-21
FFAQs 1-xviiifirewalls, transfering files from 5-16forwarded ports
tunnels 7-21FTP
anonymous 5-16command
ACCOUNT B-7AGET B-8APPEND GET B-9APPEND PUT B-10
Index-1
Index
APPEND RECEIVE B-11APPEND SEND B-12APUT B-13ASCII B-14ATTACH B-15BELL B-16BINARY B-17BLOCK B-18BYE B-19BYTE B-20CD B-21CDUP B-22CLOSE B-23CONFIRM B-24CONNECT B-25CPATH B-26CREATE-DIRECTORY B-27CWD B-28DELETE B-29DIRECTORY B-30DISCONNECT B-31EXIT B-32EXIT-ON-ERROR B-33GET B-35HASH B-37HELP B-38LCD B-39LDIR B-40LIST B-41LOCAL-CD B-42LOCAL-DIRECTORY B-43LOCAL-PWD B-44LOGIN B-45LPWD B-46LS B-47MDELETE B-48MGET B-49MKDIR B-50MPUT B-52MULTIPLE DELETE B-53MULTIPLE GET B-54MULTIPLE PUT B-55MULTIPLE RECEIVE B-56MULTIPLE SEND B-57OPEN B-58PASSIVE B-59PASSWORD B-61PORT B-62PROMPT-FOR-MISSING-ARGUMENTS B-
63PROMPT-ON-CONNECT B-64PUSH B-65PUT B-66PWD B-68QUIT B-69QUOTE B-70
RECEIVE B-71RECORD-SIZE B-72REMOTE-HELP B-73REMOVE-DIRECTORY B-74RENAME B-75RETAIN B-76RM B-77RMDIR B-78SEND B-79SET B-80SHOW-DIRECTORY B-81SITE B-82SPAWN B-83STATISTICS B-84STATUS B-85STREAM B-86STRUCTURE B-87TAKE B-88TENEX B-89TYPE B-90USER B-91VERBOSE B-92VERSION B-93
command scripts 5-13initialization file 5-17log files 5-14troubleshooting 5-17using commands 5-5VMS structure 5-11
Hhelp
by electronic mail 1-xviiby fax 1-xviii
hostalias specifying 2-3equivalences 4-3information, displaying 1-2
HOST.EQUIV 4-4
IIBM 3278 models 4-10individual aliases, specifying 2-3insecure network 7-2
KKerberos
password, changing 3-4
Index-2

Index
understanding 3-1keyboard mapping file format 4-13
LLogical
MULTINET_SSH_NEW_STATUS_CODES 7-2logical
MULTINET_DISABLE_SPAWN B-15, B-65, B-83, C-5, C-19, C-35
MULTINET_FTP_NONPASV 5-16MULTINET_FTP_WINDOW_SIZE 5-6MULTINET_HOST_ALIAS_FILE 2-3MULTINET_RCP_INDEX_UPTO_EOF 5-1MULTINET_SFTP_FALLBACK_TO_CBT 8-8MULTINET_SFTP_TRANSLATE_VMS_FILE_TYPE
S 8-8MULTINET_SMTP_FROM_HOST 2-3MULTINET_SMTP_HOST_NAME 2-3MULTINET_TELNET_PRINT_ESCAPE_CHARACTE
R A-32MULTINET_TN3270_ APPLICATION_KEYPAD 4-
19MULTINET_TN3270_LANGUAGE 4-19, 4-20MULTINET_TN3270_PRINTER 4-18MULTINET_TN3270_TRANSLATION_TABLES 4-20MULTINET_TN5250_APPLICATION_KEYPAD 4-19MULTINET_TN5250_PRINTER 4-18TCPWARE_SCP2_CONNECT_TIMEOUT 8-8TCPWARE_SCP2_VMS_MODE_BY_DEFAULT 8-8TCPWARE_SSH_SCP_SERVER_DEBUG 8-9TCPWARE_SSH_SFTP_SERVER_DEBUG 8-9
LOGIN.COM, inhibiting output from 5-3
MMULTINET
HOSTS.EQUIV 4-3MultiNet
public mailing list 1-xviiisoftware patches 1-xix
MULTINET SSHADD 7-32MULTINET SSHAGENT 7-31MULTINET SSHKEYGEN 7-29MULTINET_SFTP_RETURN_ALQ 8-8MULTINET_SSH_SFTP_SERVER_DEBUG 8-9
NSFTP2 qualifiers
/ 8-12
Oonline help 1-xviiiOpenVMS mail, using across the network 2-1
Ppassphrase 7-32, 7-33
forgotten 7-28lost 7-28
PORT 8-12port forwarding
definition 7-21public-key cryptography 7-5
Qqualifiers
DCLCREATE_NTY 4-8ESCAPE_CHARACTER 4-6
DECwindowsNODE 6-1TRANSPORT 6-1
FINGERCLUSTER A-4NOCLUSTER 1-3, A-4
FTPACCOUNT A-5BINARY A-5FDL 5-7, 5-8IMAGE A-5INITIALIZATION A-6MODE A-6NOINITIALIZATION 5-17NONPASV 5-17NOVMS_STRUCTURE_NEGOTIATION A-7PASSWORD A-6PASV 5-17PASV DCL 5-16PASV=NEGOTIATE 5-17PORT A-6PROMPT A-6STATISTICS A-6STRUCTURE A-7TAKE_FILE A-7TYPE A-7TYPE=EBCDIC 5-8USERNAME A-7VERBOSE A-7VMS_STRUCTURE_NEGOTIATION A-7WINDOW_SIZE 5-6
Index-3

Index
GETFDL B-35
KERBEROSAUTH 3-2, 3-3AUTHENTICATION=KERBEROS 3-3CHECK_TGT 3-3REALM 3-2USERNAME 3-2, 3-3
KERBEROS DESTROYQUIET A-9STATUS A-9
KERBEROS INITINSTANCE A-10LIFETIME A-10REALM A-10USERNAME A-10VERBOSE A-10
KERBEROS LISTBRIEF A-11CHECK_TGT A-11SRVTAB A-11
KERBEROS PASSWORDINSTANCE A-12REALM A-12USERNAME A-12
LPRMALL A-13NODE A-13QUEUE A-13SUPERUSER A-13USER A-13
PUTFDL B-66
RCPAUTHENTICATION=KERBEROS A-14EXACT A-15LOG A-15PASSWORD 5-2, A-15RECURSIVE A-14, A-15TRUNCATE_USERNAME A-15USERNAME 5-2, A-15VMS_ATTRIBUTES A-16
RECEIVEFDL B-71
RLOGINAUTHENTICATION=KERBEROS A-20BUFFER_SIZE A-20DEBUG A-20EIGHT_BIT A-20PORT A-20TRUNCATE_USERNAME A-20USERNAME A-21
RSHELLERROR 4-2, A-22INPUT 4-2, A-22INPUT=NLA0
4-2
OUTPUT 4-2, A-22PASSWORD 4-2, A-22, A-23PORT A-22TRUNCATE_USERNAME A-23USERNAME 4-2, A-23
RUSERSALL A-24FULL A-24NOALL A-24NOFULL A-24
SENDAND_MAIL A-25FDL B-79FOREIGN A-3OR_MAIL A-25
SETABORT_OUTPUT_CHARACTER C-21ACCOUNT B-80ARE_YOU_THERE_CHARACTER C-22AUTH C-33AUTOFLUSH C-23BREAK_CHARACTER C-24DEBUG C-25ERASE_CHARACTER_CHARACTER C-26ERASE_LINE_CHARACTER C-27ESCAPE_CHARACTER C-28INTERRUPT_PROCESS_CHARACTER C-
30LOCAL_FLOW_CONTROL C-31LOG_FILE C-32PASSWORD B-80UNIX C-34USER B-80
SPAWNINPUT B-83, C-35LOGICAL_NAMES B-83, C-35OUTPUT B-83, C-35SYMBOLS B-83, C-35WAIT B-83, C-35
TALKOLD A-26
TELNETABORT_OUTPUT_CHARACTER A-28ARE_YOU_THERE_CHARACTER A-28AUTHENTICATION=KERBEROS A-28AUTOFLUSH A-28BREAK_CHARACTER A-28BUFFER_SIZE A-29CREATE_NTY A-29DEBUG A-30DELETE_NTY A-30ERASE_CHARACTER_CHARACTER A-30ERASE_LINE_CHARACTER A-30ESCAPE_CHARACTER A-30INTERRUPT_PROCESS_CHARACTER A-
31
Index-4

Index
LOCAL_FLOW_CONTROL A-31LOG_FILE A-31PORT A-31PRINT_ESCAPE_CHARACTER A-32PROTOCOL A-32TCP A-32TERMINAL_TYPE A-32, C-37TN3270=AUTOMATIC A-32TN5250 4-9TN5250=AUTOMATIC A-32UNIX A-32VERSION A-33
TN3270NOCOLOR 4-19YALE 4-19
WHOISHOST A-35OUTPUT A-35PORT A-35
RR services
authentication 4-3RCP
requirements 5-1using 5-1, 5-2using Kerberos with 3-3
RekeyIntervalSeconds 7-12remote hosts, specifying 1-1remote login program
host-based authentication 7-4password authentication 7-6public-key authentication 7-5
RemoteForward 7-12RHOSTS 4-4RLOGIN
terminating 4-3using 4-2using Kerberos with 3-3
RSA authentication 7-32RSA authentication identity 7-33RSA-based authentication 7-5RSA-based host authentication 7-5RSHELL
executing commands 4-1using 4-1using Kerberos with 3-3
SSCP
qualifiers 8-3
SCP switchASCII 8-3BATCH 8-3CIPHER 8-3COMPRESS 8-3DEBUG 8-3DIRECTORY 8-3HELP 8-3IDENTITY_FILE 8-3NOPROGRESS 8-3OVERWRITE 8-3PORT 8-3PRESERVE 8-3QUIET 8-3RECORD 8-4RECURSIVE 8-4REMOVE 8-4TRANSLATE_VMS 8-4VERBOSE 8-4VERSION 8-4VMS 8-4
SCP2 7-31command syntax and qualifiers 8-2
SCP2 qualifier/BATCH 8-5/CIPHER 8-5/COMPRESS 8-5/DEBUG 8-5/DIRECTORY 8-5/HELP 8-5/IDENTITY_FILE 8-5/NOPROGRESS 8-6/PORT 8-5/PRESERVE 8-6/QUIET 8-6/RECURSIVE 8-6/REMOVE 8-6/TRANSLATE_VMS 8-6/VERBOSE 8-7/VERSION 8-7/VMS 8-7
SCP-SERVER1 8-2secure shell
configuration files 7-21secure shell client 7-2SendNOOPPackets 7-12SFTP2
qualifiers 8-11SFTP2 command
ASCII 8-13AUTO 8-13
SFTP2 commandsBINARY 8-13BUFFERSIZE 8-13CD 8-14CLOSE 8-14
Index-5

Index
DEBUG 8-14DELETE 8-14DIRECTORY 8-14EXIT 8-14GET 8-15GETEXT 8-15HELP 8-15LCD 8-15LDELETE 8-15LDIRECTORY 8-15LLS 8-16LMKDIR 8-16LOCALOPEN 8-16LPWD 8-16LREADLINK 8-16LRENAME 8-16LRM 8-16LRMDIR 8-16LS 8-17LSROOTS 8-17LSYMLINK 8-17MGET 8-17MKDIR 8-17MPUT 8-18OPEN 8-18PUT 8-18PWD 8-18QUIT 8-18READLINK 8-19RENAME 8-19RM 8-19RMDIR 8-19SETEXT 8-19STATUS 8-19SYMLINK 8-19VERBOSE 8-19VMS 8-20
SFTP2 qualifiers/BATCHFILE 8-11/BUFFER_SIZE 8-11/CIPHER 8-11/COMPRESS 8-11/CONCURRENT_REQUEST 8-11/DEBUG 8-11/HELP 8-11/MAC 8-11/NOPROGRESS 8-11/PORT 8-12/VERSION 8-12VERBOSE 8-12
spoofingDNS 7-5IP 7-5routing 7-5
SSHauthentication agent 7-31
break-in and intrusion detection 7-7command options 7-2host-based authentication example 7-15public-key authentication example 7-16server system authentication 7-4session termination 7-7X11 forwarding 7-7
SSH command/USER 7-3ALLOW_REMOTE_CONNECT 7-2CIPHER 7-2COMPRESSION 7-2DEBUG 7-2ESCAPE_CHARACTER 7-2HELP 7-2IDENTITY_FILE 7-2IDKEY 7-2LOCAL_FORWARD 7-3LOG_FILE 7-3MAC 7-3NO_AGENT_FORWARDING 7-3NO_X11_FORWARDING 7-3OPTION 7-3PORT 7-3QUIET 7-3REMOTE_FORWARD 7-3USE_NONPRIV_PORT 7-3USER 7-3VERBOSE 7-3
SSH command IPV4 7-3SSH command IPV6 7-3SSH files
CONFIG. 7-24IDENTITY 7-25IDENTITY. 7-24IDENTITY.PUB 7-25KNOWN_HOSTS 7-26MULTINET
.RHOSTS 7-27
.SHOSTS 7-27HOSTS.EQUIV 7-27SHOSTS.EQUIV 7-27
RANDOM_SEED. 7-26RHOSTS 7-27SHOSTS 7-27SSH_KNOWNHOSTS_DIR 7-28SSH2_DIR
SSH2_CONFIG 7-27SSH_DIR
RHOSTS 7-27SHOSTS 7-27
SSH2client configuration 7-8client keyword
AllowedAuthentication 7-8AuthenticationNotify 7-8
Index-6
Index
AuthorizationFile 7-8BatchMode 7-9Ciphers 7-9ClearAllForwardings 7-9Compression 7-9DebugLogFile 7-9DefaultDomain 7-9EscapeChar 7-9ForwardAgent 7-9ForwardX11 7-9GatewayPorts 7-9Host 7-9HostCA 7-10HostCANoCRLs 7-10IdentityFile 7-10KeepAlive 7-10LdapServers 7-11LocalForward 7-11Macs 7-11NoDelay 7-11NumberOfPasswordPrompts 7-11PasswordPrompt 7-11Port 7-12QuietMode 7-12RandomSeedFile 7-12RekeyIntervalSeconds 7-12RemoteForward 7-12SendNOOPPackets 7-12StrictHostKeyChecking 7-12User 7-12VerboseMode 7-12
SSh2client keyword
Compression 7-9DebugLogFile 7-9
SSHADD 7-32SSHADD option
LIST 7-33PURGE 7-33
SSHAGENT 7-31authentication agent 7-32authentication private keys 7-31
SSHKEYGEN 7-28, 7-33file
IDENTITY 7-33IDENTITY.PUB 7-33RANDOM_SEED 7-33
StrictHostKeyChecking 7-12SYLOGIN.COM, inhibiting output from 5-3SYS$LOGIN
.RHOSTS 4-3, 4-4
TTCPware
Secure Shell (SSH) client 7-1TCPWARE_SFTP_RETURN_ALQ 8-8TELNET
commandABORT C-4ATTACH C-5ATTN C-6AYT C-7BINARY C-8BREAK C-9BYE C-10CLOSE C-11CONNECT C-12CREATE-NTY C-13DEBUG C-14ECHO C-15EXIT C-16HELP C-17LOG-FILE C-18PUSH C-19QUIT C-20SET ABORT-OUTPUT-CHARACTER C-21SET ARE-YOU-THERE-CHARACTER C-22SET AUTO-FLUSH C-23SET BREAK-CHARACTER C-24SET DEBUG C-25SET ERASE-CHARACTER-
CHARACTER C-26SET ERASE-LINE-CHARACTER C-27SET ESCAPE-CHARACTER C-28SET EXTENDED C-29SET INTERRUPT-PROCESS-
CHARACTER C-30SET LOCAL-FLOW-CONTROL C-31SET LOG-FILE C-32SET REMOTE-USERNAME C-33SET UNIX-LINE-TERMINATOR C-34SPAWN C-35STATUS C-36TERMINAL-TYPE C-37VERSION C-38
commands, using 4-5control sequence
ABORT-OUTPUT 4-7ARE-YOU-THERE 4-7BREAK-CHARACTER 4-8ERASE-CHARACTER 4-8ERASE-LINE 4-8INTERRUPT-PROCESS 4-8
control sequences, using 4-7logging in with 4-5starting 4-5troubleshooting 4-21using Kerberos with 3-3
TELNET sessions 7-22TFTP
Index-7

commandCONNECT D-2GET D-3PUT D-4QUIT D-5REXMT D-6STATUS D-7TIMEOUT D-8TRACE D-9
copying files using 5-18requirements 5-18using 5-18
ticket status, checking 3-3tickets, acquiring and deleting 3-2TN3270
application keypad access 4-19emulation 4-19function key mapping 4-14translation table mapping 4-19using transparent mode 4-18
TN5250application keypad access 4-19
TN5250 function key mapping 4-16TryEmptyPassword 7-12tunneling 7-21
Uunsecure connections 7-21untrusted hosts 7-2User 7-12user
equivalences 4-4information, displaying 1-2
utilityPHONE 1-4RLOGIN 4-1RSHELL 4-1TALK 1-4TELNET 4-1
VVerboseMode 7-12VerifyHostKeyDNS 7-12VMS 8-12
WWHOIS A-35
XXauthority data 7-7

Reader’s CommentsMultiNet for OpenVMS User’s Guide, v5.4 Part Number: N-0705-54-NN-A
Your comments and suggestions will help us to improve the quality of our future documentation. Please note that this form is for comments on documentation only.
I rate this guide’s: Excellent Good Fair PoorAccuracy o o o o Completeness (enough information) o o o oClarity (easy to understand) o o o oOrganization (structure of subject matter) o o o oFigures (useful) o o o oIndex (ability to find topic) o o o oEase of use o o o o
1. I would like to see more/less:_________________________________________________________________
2. Does this guide provide the information you need to perform daily tasks?_______________________________
3. What I like best about this guide:______________________________________________________________
4. What I like least about this guide:______________________________________________________________
5. Do you like this guide’s binding? If not, what would you prefer?______________________________________
My additional comments or suggestions for improving this guide: __________________________________________________________________________________________________________________________________________________________________________________________
I found the following errors in this guide:
Page Description_______ _______________________________________________________________________________
_______ _______________________________________________________________________________
Please indicate the type of user/reader that you most nearly represent:
System Manager o Educator/Trainer oExperienced Programmer o Sales oNovice Programmer o Scientist/Engineer oComputer Operator o Software Support oAdministrative Support o Other (please specify) o ___________________________
Name:_________________________________________ Dept._____________________Company:______________________________________ Date_____________________Mailing Address:____________________________________________________________
After filling out this form, FAX or mail it to:Process Software, 959 Concord Street, Framingham, MA 01701-4682
Attention: Technical Publications FAX 508-879-0042 e-mail:[email protected]