Embed Size (px)
Citation preview

MULTIZOOM AZ100 MULTI-PURPOSE ZOOM MICROSCOPE
Instruction Manual
M403 E 06.12.NF.1


1
Introduction
Thank you for purchasing the Nikon products. This instruction manual is written for the users of the Nikon “MULTI-PURPOSE ZOOM MICROSCOPE MULTIZOOM AZ100”. To ensure correct usage, read this manual carefully before operating the instrument.
• It is prohibited to reproduce or transmit this manual in part or whole without Nikon’s expressed permission • The contents of this manual are subject to change without notice. • Although every effort has been made to ensure the accuracy of this manual, if you note any points that are
unclear or incorrect, contact your nearest Nikon representative. • Some of the products described in this manual may not be included in the set you have purchased. • Also be sure to read the manuals for any other products that you are using with this system. • Not following the instructions specified by the manufacturer may adversely affect the safety of the
production.

2
Safety Precautions
To ensure correct and safe operation, read this manual before using the product.
Warning/Caution Symbols Used in This Manual
Although Nikon products are designed to provide you with the utmost safety during use, incorrect usage or disregard of the instructions can cause personal injury or property damage and will lead to the forfeiture of all claims against warranty. For your safety, read the instruction manual carefully and thoroughly before using the product. Do not discard this manual but keep it near the product for easy reference. In this manual, safety instructions are indicated with the symbols shown below. Be sure to follow the instructions indicated with these symbols.
Symbol Details
Warning Disregarding instructions marked with this symbol may lead to death or serious
injury.
Caution Disregarding instructions accompanying this symbol may lead to injury or property
damage.
Warning
1. Intended application of this product This product should only be used for microscopic observation. Do not use this product for other purpose.
2. Do not disassembly. Disassembling may cause malfunction and will lead to the forfeiture of all claims against warranty. Do not disassemble the section which is not indicated in this manual. If you notice any abnormalities, contact your nearest Nikon representative.
3. Read the instruction manual carefully. To ensure safety, carefully read this manual and the manuals for other equipment used with this product. Especially be sure to follow the warnings and cautions indicated in the first of this manual.
Caution
1. Do not wet the microscope nor allow foreign matter to be intruded. Do not wet the microscope. Water splashed onto any component of this product may result in malfunction. Also, malfunctions may occur if foreign matters intrude. If any liquid or foreign matters intrude, do not use the microscope, but contact your nearest Nikon representative.
2. Notes on handling a hazardous sample Check to determine whether the specimen is hazardous before handling. If the specimen is hazardous, follow your standard facility procedures.

Safety Precautions
3
Notes on Handling the System
1. Carefully handle the product. This product is a precision instrument. Handle it carefully and do not subject it to damage or vibrations. Especially, the accuracy of the objective may be adversely affected by even a slight damage.
Cautions in carrying the product • Securely hold the bottom front of the microscope base and indentations at the bottom back of the
stage pillar when carrying the microscope. • Do not grasp the stand pillar, elevating section, stage, stage height adjustment knob, focus knob,
eyepiece tube, or zoom body when carrying the microscope to avoid breakage, adverse effect on its performance, or malfunctions.
2. Installation or storage location The microscope is a precision optical instrument. Using or storing the product under unsuitable conditions may damage it or may have an adverse effect on its performance. The following conditions must be considered when selecting the installation or storage location.
• For installation, select a location with a temperature from 0 to 40ºC and a relative humidity of 85 % or less (no condensation). For storage, select a location with a temperature from -20 to 60ºC and a relative humidity of 90% or less (no condensation). If the product is installed or stored in a location subject to high temperatures and humidity, mold or condensation may form on the lens, resulting in lowered performance and possible damage to the microscope.
• Avoid installing in a place exposed to direct sunlight, or directly under room lights or any other bright place. The image quality deteriorates in bright surroundings because of the extraneous light entering the objective.
• Install in a place with little dust and dirt.
• Install in a place with little vibrations.
• Install and store the product on a sturdy desk or table that can bear the weight of the product.
• Install the product in the location of 10 cm or more away from the surrounding walls.
• Do not install in the narrow space such as shelf or locker.
• Do not place anything on the product.
• Cover the product to avoid dust when storing.
3. Notes on handling optical parts Scratch or dirt such as fingerprints on the optical parts such as lens or filter affects the viewing of the image. Carefully use the optical parts without scratching. If any dirt attaches to the product, clean it according to Chapter 6, “Care and Maintenance”.
4. Handling the stage height adjustment knob and focus knob • Do not rotate the right and left stage height adjustment knobs or the focus knobs in opposite
directions to avoid damage. Do not rotate those knobs in such a way.
• Do not rotate the coarse focus knob further in the same direction after it comes in contact with the limited position to avoid malfunctions.
5. Cover the vertical tube. The eyepiece tube is equipped with the vertical tube. To keep out ambient light and dust, always attach the provided cap to the vertical tube that is not currently in use.

4
Contents Introduction ............................................................................................................................................1
Safety Precautions .................................................................................................................................2 Warning/Caution Symbols Used in This Manual........................................................................... 2 Notes on Handling the System...................................................................................................... 3
Chapter 1 Part Names ..........................................................................................................................5
Chapter 2 Microscopy ..........................................................................................................................6
Chater 3 Operation Procedures ........................................................................................................8 Operation of the Eyepiece Tube Part............................................................................................ 8
Change of the Optical Path................................................................................................. 8 Angle Adjustment of the Binocular Part Angle .................................................................... 8 Adjustment of the Interpupillary Distance ........................................................................... 9 Adjustment of the Diopters ................................................................................................. 9
Operation of the Stage................................................................................................................ 10 Place a Specimen ............................................................................................................. 10 Stage Movement ............................................................................................................... 10
Zoom Operation .......................................................................................................................... 11 Selection of an Objective (for the Triple Nosepiece) .................................................................. 11 Focus on the Specimen .............................................................................................................. 12 Operation of the Aperture Diaphragm......................................................................................... 14 Set of the DIC Prism Slider ......................................................................................................... 15
Chapter 4 Assembly ...........................................................................................................................16 System Configuration.................................................................................................................. 17 Installation of the Episcopic Stand .............................................................................................. 18 Installation of the EPI Stage........................................................................................................ 18 Installation of the Single/Triple Nosepiece.................................................................................. 19 Installation of the Focusing Mount Adapter................................................................................. 19 Installation of the Zoom Body...................................................................................................... 20 Attaching an Objective(s) ............................................................................................................ 20 Installation of the Eyepiece Tube................................................................................................ 21 Attaching Eyepieces.................................................................................................................... 21 Attaching the Photographic Device (Option)............................................................................... 21
Chapter 5 Troubleshooting................................................................................................................22 Troubleshooting on Image Viewing............................................................................................. 22 Troubleshooting on Operation .................................................................................................... 23
Chapter 6 Care and Maintenance ......................................................................................................24 Cleaning the Lenses ................................................................................................................... 24 Cleaning the Product................................................................................................................... 24 Decontamination ......................................................................................................................... 24 Storage of the Product ................................................................................................................ 24 Regular Inspections (With Charge)............................................................................................. 24
Chapter 7 Specifications....................................................................................................................25

5
Part Names 1
The Nikon MULTI PURPOSE ZOOM MICROSCOPE MULTIZOOM AZ100 is the macro/mono zoom microscope that is suitable for observation or photomicrography in the range from macro to medium magnification. The microscope can use five types of objectives: 0.5x, 1x, 2x, 4x, and 5x objectives. The product can zoom in or out in the magnification range of 1x to 8x for each objective. (The total magnification range is 0.5x to 40x.)
Focus knobs(coarse and fine knobs,
both sides)
Stage height adjustment knob(coarse and fine knobs, both sides)
Elevating section
Stage movement knob(X direction / Y direction)
Coarse movement leverCoarse / fine movement
selector switchFiber Illuminator(C-FI115D / C-FI115 / C-FI230)
Coaxial episcopic illuminator(AZ-ICI)
Eyepiece(AZ-W10X)
Diopter adjustment ring
Binocular part
Zoom body (lens barrel)(AZ100)
Aperture diaphragmopen/close dial
Slider slot
CLICK ON/OFF lever
Triple nosepiece /Single nosepiece
(AZ-NP3 / AZ-NPS)
Optical path selector lever
Zoom knobs (both sides)
EPI stage(AZ-STGE)
Light guide fiber(provided with the AZ-ICI)
Objective
EPI stand(AZ-STE)
Focusing mount adapter(AZ-FM)
Ergonomic trinocular tube(AZ-TE80 / AZ-TE100)
Vertical tube
Configuration example: The above figure shows the configuration example of the following parts: AZ-TE80 Ergonomic Trinocular Tube 80, AZ-W10X Eyepiece 10X, AZ100 Zoom Body, AZ-FM AZ (Focusing Mount) Adaptor, objectives, AZ-NP3 Triple Nosepiece, AZ-STE Episcopic Stand, AZ-STGE EPI Stage, AZ-ICI Coaxial Episcopic Illuminator (with a light guide fiber), and the C-FI115D/C-FI115/C-FI230 Fiber Illuminator.
Use of the illuminator To perform the microscopy, a specimen must be illuminated with a light source or an illuminator. • AZ-LED LED Ring Illuminator: This light source is attached to the tip of the objective. • AZ-ICI Coaxial Episcopic Illuminator: This illuminator is used for the episcopic illumination. It is
attached to the portion between the zoom body and the eyepiece tube with the Fiber Illuminator as a light source. (Refer to the figure shown above.)
• AZ-STD Diascopic Stand and AZ-STGD DIA Stage: The stand and the stage are used for the diascopic illumination with the Fiber Illuminator as a light source.
• AZ-FL Epi-Fluorescence Attachment: This illuminator is used for the epi-fl microscopy. It is attached in place of the focus mounting adapter and requires a mercury lamp light source.

6
Microscopy 2
This chapter indicates the standard procedure for the microscopy with the AZ100.
1 Set the optical path selector to the binocular part position. Press the optical path selector lever to use the optical path of the binocular part.
2 Set the specimen on the stage.
3 Turn on the light source for the illuminator to be used and adjust its brightness. Adjust the brightness properly with the brightness control knob on the light source and the ND filter.
4 Adjust the interpupillary distance of the binocular part. Adjust the distance between the eyepieces to fit the distance between the user’s eyes so that the image viewed through the eyepieces with both eyes coincides.
5 Adjust the diopters of the eyepieces. Adjust the diopters of the right and left eyepieces to fit the user’s eyesight. 1. Loosen the clamp screws on the diopter adjustment rings on the right and left eyepieces
and align the rings to the zero position. 2. Set the zoom magnification to 1x. 3. Focus on the specimen with the focus knob or the stage height adjustment knob. 4. Set the zoom magnification to 8x. 5. Focus on the specimen with the focus knob or the stage height adjustment knob again. 6. Set the zoom magnification to 1x. 7. Focus on the specimen with the diopter adjustment rings on the eyepieces.
Look through the left eyepiece with your left eye and the right eyepiece with your right eye and adjust the right and left eyepieces individually.
8. Repeat step 4 to step 7 until the image stays in focus even though the zoom magnification is changed.
9. Lightly tighten the clamp screws to secure the right and left diopter adjustment rings.
6 Place an objective into the optical path (when the triple nosepiece is used). When the triple nosepiece is used, objectives can be selected.
7 For the episcopic illumination, adjust the aperture diaphragm. For the diascopic illumination, adjust the condenser, the aperture diaphragm, and the field diaphragm. Adjust the brightness if necessary.
8 Focus on the specimen by adjusting the position of the specimen. • Adjust the position of the specimen with the stage movement knob until the observation point is
located at the center of the viewfield. • Focus on the specimen with the stage height adjustment knobs and the focus knobs.
9 Observe the specimen under a magnification adjusted by zoom operation. The magnification can be changed with the zoom knob in the range as follows: 1 multiplied by the magnification of the objective to 8 multiplied by the magnification of the objective.

Chapter 2 Microscopy
7
10 After observation, turn off the light source. • After observation, turn off the light source and the lamp. • If the microscope or the light source is to be covered by a dust cover, cool down the light source
sufficiently.
Bright-field microscopy under epi-illumination
2 Set the specimen.
6 Place an objective into the optical path.
7 Episcopic illumination: Adjust the aperture diaphragm.
9 Observe the specimen under a magnification adjusted by zoom operation.
Turn on the light source and adjust the brightness.
4 Adjust the interpupillary distance of the binocular part.
5 Adjust the diopters of the eyepieces.
1Set the optical path selector to the binocular part position.
8Focus on the specimen.
8Adjust the position of the specimen and then
focus on the specimen.
3
10 After observation, turn off the light source.
Diascopic illumination: Adjust the condenser, the aperture diaphragm, and the field diaphragm.

8
Operation Procedures3
This chapter indicates the operation procedures of each component of the AZ100.
Operation of the Eyepiece Tube Part
Change of the Optical Path When the AZ-TE80 Ergonomic Trinocular Tube 80 or the AZ-TE100 Ergonomic Trinocular Tube 100 is used, the optical path of the eyepiece tube can be changed with the optical path selector lever. The light distribution between the binocular part and vertical tube can be changed by pushing or pulling the lever.
Optical path selector lever
BINO (push the lever)
PHOTO (pull the lever)
AZ-TE80 Binocular part: 100% Vertical tube: 0%
Binocular part: 20%Vertical tube: 80%
AZ-TE100 Binocular part: 100% Vertical tube: 0%
Binocular part: 0% Vertical tube: 100%
Optical path selector lever
Change of the optical path
Angle Adjustment of the Binocular Part Angle
The binocular part of the ergonomic eyepiece tube can be elevated in the range from 0 (horizontal direction) to 30 degrees. Adjust the angle so that observation can be easily performed.
For the angle adjustment of the binocular part, operate the binocular part with holding it with both hands. At this time, be careful not to pinch your hand or finger.
30
Horizontal direction Adjustment of the binocular part angle

Chapter 3 Operation Procedures
9
Adjustment of the Interpupillary Distance
Adjust the distance between the eyepieces according to the interpupillary distance so that the images viewed through the eyepieces with both eyes coincide. The binocular eyepiece has a scale for interpupillary distance. It is recommended to memorize or record your interpupillary distance, so that the interpupillary adjustment can be performed easily next time.
Viewfields coincide.
For the interpupillary adjustment, operate the binocular part with holding it by both hands and be careful not to pinch your fingers.
Interpupillary adjustment
Adjustment of the Diopters
Adjust the eyepiece diopters according to the eyesight.
1. Place a specimen on the stage.
2. Loosen the clamp screw on the diopter adjustment ring and adjust the ring on the right and left eyepieces to the “0 (zero) position”.
3. Set the zoom knob to 1x.
4. Focus on the specimen with the focus knobs and the stage height adjustment knobs.
5. Set the zoom knob to 8x
6. Focus on the specimen again.
7. Return the zoom knob to 1x
Diopter adjustment ring
Clamp screws
Diopter Adjustment
8. Look though the right eyepiece with your right eye and the left eyepiece with your left eye, and rotate the diopter adjustment ring of the eyepiece to focus on the specimen. Adjust the right and left eyepieces respectively.
9. Repeat step 5 and step 8 until the image stays in focus even though the objective magnification is changed.
10. Secure the diopter adjustment ring by slightly tightening the clamp screw.
Chapter 3 Operation Procedures
10
Operation of the Stage
Place a Specimen
Sufficiently lower the stage by rotating the stage height adjustment knob and place a specimen on the stage without being touched to the objective.
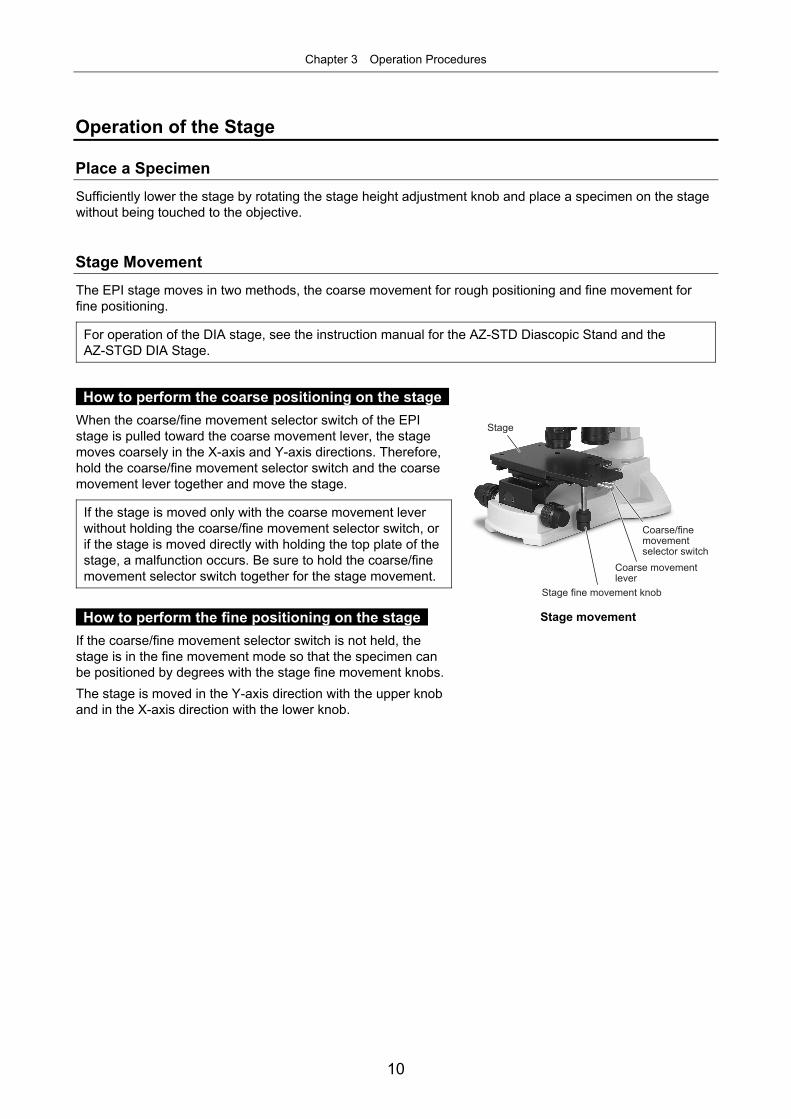
Stage Movement The EPI stage moves in two methods, the coarse movement for rough positioning and fine movement for fine positioning.
For operation of the DIA stage, see the instruction manual for the AZ-STD Diascopic Stand and the AZ-STGD DIA Stage.
How to perform the coarse positioning on the stage When the coarse/fine movement selector switch of the EPI stage is pulled toward the coarse movement lever, the stage moves coarsely in the X-axis and Y-axis directions. Therefore, hold the coarse/fine movement selector switch and the coarse movement lever together and move the stage.
If the stage is moved only with the coarse movement lever without holding the coarse/fine movement selector switch, or if the stage is moved directly with holding the top plate of the stage, a malfunction occurs. Be sure to hold the coarse/fine movement selector switch together for the stage movement.
How to perform the fine positioning on the stage If the coarse/fine movement selector switch is not held, the stage is in the fine movement mode so that the specimen can be positioned by degrees with the stage fine movement knobs.The stage is moved in the Y-axis direction with the upper knob and in the X-axis direction with the lower knob.
Stage
Stage fine movement knob
Coarse movement lever
Coarse/fine movement selector switch
Stage movement

Chapter 3 Operation Procedures
11
Zoom Operation
The zoom knobs are located on the both sides of the zoom body. Rotation of these knobs allows the zoom magnification to be changed in the range of 1x to 8x continuously.
Total magnification The zoom magnification is indicated on the left zoom knob. The microscope total magnification is determined with the following formula:
Total magnification = zoom magnification x objective magnification x eyepiece magnification
When the vertical tube is used, change the eyepiece magnification to the vertical tube magnification (0.6x) to calculate the total magnification. The magnification of the AZ-ICI Coaxial Episcopic Illuminator is 1.25x. Therefore, when the AZ-ICI is used, the total magnification is obtained by multiplying the above formula by 1.25.
Zoom knob click ON/OFF When the click ON/OFF lever on the bottom of the right zoom knob is flicked to the “ON” side, the click-stop positions on the zoom knob are provided at the integral multiples of the zoom magnification (2x, 3x, 4x, 5x, 6x, and 7x).
Zoom knob
Click ON/OFFlever
Zoom operation
Selection of an Objective (for the Triple Nosepiece)
When the AZ-NP3 Triple Nosepiece is used, it can be attached with up to three objectives. To select an objective, rotate the nosepiece to a click-stop position manually.
Triple nosepiece
Rotate the part manually
Selection of an objective

Chapter 3 Operation Procedures
12
Focus on the Specimen
Caution
To avoid malfunctions, do not rotate the right and left focus knobs and the right and left stage height adjustment knobs in an opposite direction. Additionally, do not rotate those knobs excessively. Do not rotate the fine focus knob with holding the coarse focus knob nor vice versa.
On this product, two types of height adjustment can be performed: the stage height adjustment and the zoom body height adjustment. Use any appropriate knob for your convenient.
Zoom body height adjustment
The focus knobs are located on the both sides of the stand elevating section. These knobs are used to adjust the height of the zoom body to focus on the specimen. The coarse focus knob and fine focus knob are provided for this purpose. One revolution of the coarse focus knob allows the stage to move by 18.5 mm and that of the fine focus knob allows by 3.27 mm.
Torque of the focus knob
The torque adjustment ring is located inside the left focus knob. Insert the hexagonal screwdriver into the hole on the ring and adjust the torque enough to prevent the zoom body from descending with its own weight. The torque is increased by rotating the torque adjustment ring upward and decreased by rotating the ring downward.
Stage height adjustment
The stage height adjustment knobs are located on the both sides of the stand elevating section. The coarse focus knob and fine focus knob are provided. One revolution of the coarse focus knob allows the stage to move by 37.7 mm and that of the fine focus knob allows by 0.27 mm. The center of the elevating range (reference position) is marked on the right elevating section of the stage. When the mark is located at the height of the microscope base part, the stage is located at the center of the elevating range. (Refer to the right figure.)
Torque of the stage height adjustment knobs
The torque adjustment ring is located on the left stage height adjustment knob. The torque required to rotate the knob can be adjusted by rotating this ring. The torque is increased by rotating the torque adjustment ring in the direction of arrow. Adjust the torque enough to prevent the zoom body from descending with its own weight.
Coarse focus knob
Focus knobs(both sides)
Zoom body
Stage
Fine focusknob
Fine focus knob
Torque adjustment ring
Coarse focusknob
Stage height adjustment knobs(both sides)
Zoom body height adjustment
Mark
Mark on the stage elevating section

Chapter 3 Operation Procedures
13
Focus on the Specimen (Continued)
Focusing Procedure
Focus on the specimen according to the following procedures. 1. Check the working distance of the objective.
The distance between the focal plane and the lower end of the objective is called “working distance.” Focusing will be easier by adjusting the distance between the specimen and the objective considering the working distance. Refer to “Attaching An Objective(s)” in page 20 for the working distance of each objective.
2. Focus on the specimen. Rotate the focus knob on the zoom body to move the zoom body vertically and focus on the specimen.Insert the hexagonal screwdriver into the hole on the ring and adjust the torque enough to prevent the zoom body from descending with its own weight. Operate the coarse focus knob for the coarse adjustment and the fine focus knob for the fine adjustment. Especially, the fine focus knob is useful for focusing on the specimen at a high magnification.

Chapter 3 Operation Procedures
14
Operation of the Aperture Diaphragm
The aperture diaphragm open/close dial is located on the front of the zoom body. The aperture diaphragm controls the numerical aperture of the illumination system, closely related to the optical image brightness, contrast, resolution, and depth of focus. The aperture diaphragm of the zoom body is adjusted with the aperture diaphragm open/close dial and the image changes in response to the adjustment as below.
Aperture diaphragm Close ⇔ Open
Brightness Dark Bright
Depth of focus Great Shallow
The more the aperture diaphragm is closed, the greater the depth of focus becomes, but the resolution deteriorates. Under a low magnification, effect of the aperture diaphragm operation is smaller.
Aperture diaphragmopen/close dial
Aperture diaphragm operation

Chapter 3 Operation Procedures
15
Set of the DIC Prism Slider
For the DIC prism slider installation, the zoom body is provided with a slot for it. To perform the differential interference contrast (DIC) microscopy, remove the cover of the slot and attach a slider suitable to the microscopy method and the illumination method. The slider must be selected depending on the illumination method, the episcopic illumination or the diascopic illumination.
To perform the DIC microscopy, an illuminator for the episcopic illumination or the diascopic illumination is required. For the procedure of the DIC microscopy, see the instruction manual for the AZ-ICI Coaxial Episcopic Illuminator or the instruction manual for the AZ-STD Diascopic Stand and the AZ-STGD DIA Stage.
Attaching the DIC prism slider
For the episcopic illumination: Attach the AZ-PH EPI DIC Prism Holder to the slot on the AZ100 and insert a DIC prism slider for the episcopic illumination into the slot on the prism holder. Select a DIC prism slider suitable to the objective in use. (Refer to the following table.)
For the diascopic illumination: Two DIC prisms are required. The first prism is inserted to the position above the objective. Attach the AZ-AN DIA DIC Prism Holder with Analyzer to the slot on the AZ100 and insert a DIC prism slider for the diascopic illumination into the slot on the prism holder. Select a DIC prism slider suitable to the objective in use. (Refer to the following table.) The second prism is inserted to the position at the illumination side below the specimen. Select a DIC prism according to the magnification of the objective and insert it into the DIC slot on the AZ-STD Diascopic Stand. For details, see the instruction manual for “AZ-STD Diascopic Stand the AZ-STGD DIA Stage.”
Prism holder oranalyzer (for the diascopic illumination)
DIC prism slider Set of the DIC Prism slider
Selection of a DIC prism slider
Each DIC prism slider has the same color code symbol of the corresponding objective. Check the color code symbol on the objective to be used and use the DIC prism slider corresponding to the color code.
Ojective Color Code DIC Prism Silder (for the episcopic illumination)
DIC Prism Silder (for the diascopic illumination)
1x Gold AZ-EPS1 AZ-DPS1
4x Red AZ-EPS1 AZ-DPS1
5x Orange AZ-EPS5 AZ-DPS5
* The DIC microscopy cannot be performed with the Plan Apo 0.5x or Plan Fluor 2x.
Operation of the DIC prism slider
Loosen the clamp screw on the side of the prism holder or the analyzer (for the diascopic illumination). To place the DIC prism into the optical path, push in the DIC prism slider as far as it goes. To remove the DIC prism from the optical path, pull the slider fully. Note that if the clamp screw is loosened too much the DIC prism slider will be detached. For the interference color adjustment, place the DIC prism into the optical path and rotate the prism position knob at the edge of the slider to move the prism.

16
Assembly 4
Caution
Be sure to read the “Safety Precautions” and follow the all instructions given there before assembling the product.
This chapter describes the procedure for assembling the AZ100 with the following parts.
AZ-TE80 Ergonomic Trinocular Tube 80, AZ-W10X Eyepiece 10X, AZ100 Zoom Body, AZ-FM AZ (Focusing Mount) Adapter, AZ-NPS Single Nosepiece, AZ-STE Episcopic Stand, and AZ-STGE EPI Stage.
* For the installation procedure of the Coaxial Episcopic Illuminator AZ-ICI, AZ-STD Diascopic Stand, AZ-STGD DIA Stage, AZ-FL Epi-Fluorescence Attachment, AZ-LED LED Ring Illuminator, refer to their instruction manuals.
Necessary tools The following tools are required to assembly the product.
Tool Appearance Remark
Hexagonal screw driver (size 2 mm) Provided with the AZ100 zoom body
Hexagonal wrench (size 2.5 mm)
Provided with the AZ100 zoom body
Hexagonal wrench (size 3 mm)
Provided with the EPI stage
Hexagonal wrench (size 4 mm)
Provided with the AZ100 zoom body

Chapter 4 Aseembly
17
System Configuration
The AZ series system configuration is shown below.
Stand
NosepieceLED illuminator
Objective
Eyepiece
Eyepiece tube
Digital camera for microscope
Stage and holder
A A
G
I
H
B
G
A
C
D
B
D E
FF
F
B
HI
E
CD E
AZ-TE80Ergonomic TrinocularTube 80
AZ-W10XEyepiece 10x
AZ-TPDSC Tube0.6x
AZ100 zoom body
AZ-TE100Ergonomic TrinocularTube 100
AZ-DPS1DIA DIC Prism Slider1-4x
AZ-DPS5DIA DIC Prism Slider5x
AZ-STDDiascopic Stand
AZ-STEEpiscopic Stand
AZ-AN DIA DICPrism Holder withAnalyzer
C-mount direct TVadapter
AZ-PHDIA DICPrism Holder
AZ-EPS1EPI DIC Prism Slider1-4x
AZ-EPS5EPIDIC Prism Slider5x
AZ-DP1DIA Prism 1x
AZ-OI diagonal illuminator slider
DIADIC prism
AZ-DP5DIA Prism 5x
AZ-DP4DIA Prism 4x
AZ-DL DIA DICLambda Plate
AZ-RP RotatablePolarizer
Digital Sight Series
AZ-FMAZ (Focusing Mount) Adapter
AZ-EL EPI DICLambda plate
AZ-ICI
AZ-NCB NCB filterfor Corxial Epi Illuminator
YM-ND 25ND4/ND16
Fluorescencefilter cubes
AZ-QLL 1/4 LambdaPlate 0.5x
AZ-QLM1/4 Lambda Plate 1x
AZ-QLH1/4 Lambda Plate 4-5x
AZ-Plan Apo0.5x
AZ-Plan Apo1x
AZ-Plan Fluor2x
AZ-Plan Apo4x
AZ-Plan Fluor5x
AZ-NPS SingleNosepiece
AZ-NP3Triple NosepieceAZ-LED RED Ring
Illuminator
AZ-FLEpi-Fluorescence Attachment
C-FIDBirfurcated FiberIlluminator SL
AZ-ND128FLDIC
C-FI115Fiber Illuminator
AZ-STGDDIA Stage
AZ-SGStage Glass
AZ-SRPRotatable Plate
AZ-STAThermo Plate Adapter
AZ-SDADish Holder Adapter
TE/TS series holderSMZ transparent glass Thermo Plate
DXM1200Series
AZ-STGEEPI Stage
AZ-HGAHG LamphouseAdapter
C-FC Epi-FlCollector Lens
AZ-HGFAFiber Adapter
C-HGFIF15HG fiber (1.5m)/C-HGFIF30HG fiber (3m)
Mercury lamphouse 4BL/mercury socket
C-HGFIIntensilight
C-HGFIEIntensilight�(motorized model)
C-HGFIE-CHG controller
AZ-FLDICFL-DICPrism Holder
C-SHG 100Wmercury starter
AZ series system configuration
Chapter 4 Aseembly
18
Installation of the Episcopic Stand
Install the episcopic stand on a level and stable surface. Refer to page 3, “Notes on Handling the System” for installation location.
Removing cushioning materials The substage section is secured with cushioning materials. Turn the stage height adjustment knob to raise the substage and remove the cushioning materials.
The AZ-STD Diascopic Stand is required to use the diascopic illumination. For the installation of the diascopic stand, see the instruction manual for the AZ-STD Diascopic Stand and the AZ-STGD DIA Stage.
Clamp screw holes The Episcopic stand has two clamp screw holes on the back. They can be used for fixing the stand to a base or a pedestal. For the dimensions of the screw holes, refer to the right figure.
Removing cushioning materials
200
20
2-M6 depth12
Clamp screw hole dimensions
Installation of the EPI Stage
Attach the EPI stage to the substage of the episcopic stand.
1. Remove the fastening hardware from the stage board. The fastening hardware is secured with four hexagonal socket head screws. Remove the screws with the 3 mm hexagonal wrench provided with the stage.
2. Place the EPI stage on the substage and secure it by fixing the provided four M4 screws. Secure the screws with the 3 mm hexagonal wrench provided with the stage.
For the installation of the AZ-STGD DIA Stage, see the instruction manual for the AZ-STD Diascopic Stand and the AZ-STGD DIA Stage.
EPI stage installation
Substage
EPI stage
Remove the cushioning materials.

Chapter 4 Aseembly
19
Installation of the Single/Triple Nosepiece
The product can be used with the AZ-NPS Single Nosepiece or AZ-NP3 Triple Nosepiece to attach an objective (objectives). Before attaching the zoom body or the focusing mount adapter, attach a nosepiece. The single nosepiece is attached to the bottom of the zoom body. The triple nosepiece is attached to the bottom of the focusing mount adapter.
Attaching the single nosepiece When only one objective is used and does not need to be changed, attach the AZ-NPS Single Nosepiece to the lower surface of the zoom body. Attach the single nosepiece to the lower surface of the zoom body with aligning the locating pin with the reference position and secure it by tightening four screws upward from the bottom with the hexagonal wrench (size: 2.5 mm) provided with the zoom body.
OFFCLICK
ON
Single nosepiece installation
Attaching the triple nosepiece When the objective needs to be changed attach the AZ-NP3 Triple Nosepiece to the lower surface of the focusing mount adapter.
1. Rotate the triple nosepiece disc part to a click-stop position.
2. Align the locating pin with the reference hole and insert the protruding part of the triple nosepiece into the hole on the bottom of the focusing mount adapter.
3. Secure the nosepiece by tightening three clamp screws near the center of the triple nosepiece upward from the bottom with the hexagonal wrench (size: 4 mm) provided with the zoom body.
* The clamp screws do not drop off from the triple nosepiece.
Triple nosepiece installation
Installation of the Focusing Mount Adapter
Attach the focusing mount adapter to the pillar of the episcopic stand.
1. Remove the two clamp screw covers on the right of the focusing mount adapter and sufficiently loosen the two clamp screws with the hexagonal wrench (size: 4mm) provided with the product.
2. Align the dovetail groove of the focusing mount adapter with the dovetail joint of the episcopic stand pillar and slide down the focusing mount adapter to be attached. Be sure to slide down the focusing mount adapter as far as it goes.
3. Tighten the two clamp screws to secure the focusing mount adapter and attach the clamp screw covers.
* For the triple nosepiece configuration,
attach the nosepiece to the focusing mount adapter before this step.
Focusing mount adapter installation
Focusing mount adapter
Clamp screw
Dovetail joint
Attach the adapter with aligning the dovetail groove with the dovetail joint.
Align the locating pin with the reference hole and secure the part with four screws.
Single nosepiece
Triple nosepiece(Set to a click- stop position)
Align the locating pin with the reference hole and secure the part with three screws near the center.
Zoom body
Focusing mount adapter

Chapter 4 Aseembly
20
Installation of the Zoom Body
Attach the AZ100 zoom body to the focusing mount adapter.
1. Remove the two clamp screw covers on the right of the zoom body and sufficiently loosen the two clamp screws with the hexagonal wrench (size: 4mm) provided with the product.
2. Align the dovetail groove of the zoom body with the dovetail joint of the focusing mount adapter and slide down the zoom body. Be sure to slide down the zoom body as far as it goes.
3. Tighten the two clamp screws to secure the zoom body and attach the clamp screw covers.
OFFCLICK
ON
* For the single nosepiece configuration, attach the nosepiece to the zoom body before this step.
Zoom body installation
Attaching an Objective(s)
Screw an objective (objectives) into the single or triple nosepiece. Raise the elevating section of the stand and lower the stage. And then screw the objective into the attachment hole. Be careful to avoid bumping the objective. The objectives below are applicable.
Objective Magnification Working distance Color code *
AZ-Plan Apo 0.5x 0.5 54 Silver
AZ-Plan Apo 1x 1 35 Gold
AZ-Plan Fluor 2x 2 45 White
AZ-Plan Apo 4x 4 20 Red
AZ-Plan Fluor 5x 5 15 Orange * The color codes are used to select the DIC slider for the DIC
microscopy or to select the condenser or the filters for the diascopic stand.
OFFCLICK
ON
Attaching an objective
Zoom body (and single nosepiece)
Clamp screw
Dovetail joint
Attach the adapter with aligning the dovetail groove with the dovetail joint.
Focusing mount adapter
Screw the objective into the attachment hole.
Objective

Chapter 4 Aseembly
21
Installation of the Eyepiece Tube
Attach the eyepiece tube to the upper surface of the zoom body. The AZ-TE80 Ergonomic Trinocular Tube, the AZ-TE100 Ergonomic Trinocular tube 100, or the photo adapter for the AZ-TP series are available for the zoom body.
1. Sufficiently loosen the eyepiece tube clamp screw on the right of the zoom body with the provided hexagonal wrench.
2. Align the circular dovetail joint on the lower part of the eyepiece tube with the mounting location of the zoom body with inclining the eyepiece tube to the left, backward, and attach the eyepiece tube to the zoom body. Check that the eyepiece tube is attached horizontally.
3. Tighten the eyepiece tube clamp screw to secure the eyepiece tube.
OFFCLICK
ON
Eyepiece tube installation
Attaching Eyepieces
Attach the eyepieces to the binocular part of the eyepiece tube. Insert the eyepieces as far as they go.
Firmly hold the rubber cover base when inserting an eyepiece. Insertion with grasping the diopter adjustment ring may result in malfunctions.
Attaching eyepieces
Attaching the Photographic Device (Option)
Use the optional C-mount direct TV adapter to attach a photographic device, such as a digital camera for microscope, to the vertical tube of the eyepiece tube. Attach the photographic device according to the following procedure.
1. Attach the C-mount direct TV adapter to the photographic device such as a digital camera for microscope. For details on installation , see the instruction manual for the photographic device.
2. Sufficiently loosen the clamp screw on the vertical tube with the provided hexagonal wrench.
3. Remove the protective cap from the vertical tube.
4. Insert the C-mount direct TV adapter to the vertical tube as far as it goes.
5. Tighten the clamp screw on the vertical tube and secure the adapter.
A C-mount adapter embedding a lens such as 0.7x or 0.55x cannot be used for the product.
Attaching the Photographic device
Eyepiece tube
Eyepiece tube clamp screw
Mounting location
Place the tube on the mounting location with aligning the circular dovetail joint and secure it with the clamp screw.
C-mount directTV adapter Insert the adapter
as far as it goes and secure it with a clamp screw.
Photographic device(ex. DS-Fi1)
Attach the adapter to the Photographic device

22
Troubleshooting5
Misuse of the product, although it does not cause a malfunction, may adversely affect performance. If any of the following troubles come, be sure to check the following table for possible causes before requesting service. If the troubles cannot be resolved by taking the following measures, contact your nearest Nikon representative.
Troubleshooting on Image Viewing
Trouble Cause Countermeasure
The product is not installed properly. Install the product correctly. (p.16 to 21)
The optical path selector lever on the eyepiece tube is located in an intermediate position.
Adjust the lever correctly. (p.8)
The nosepiece is not rotated to the clickstop position. (For triple nosepiece)
Rotate the nosepiece to the clickstop position and move the objective into the optical path. (p.11)
Dirt or dust is attached to the lens (objective and eyepiece) or the specimen.
Clean the lenses and specimen. (p.24)
The opening size of the aperture diaphragm is too small.
Increase in the opening size appropriately. (p.14)
The field of view is vignetted, not visible, or uneven in brightness. Or the image is too dark.
An unnecessary filter is in the optical path.
Set only a necessary filter into the optical path.
Dirt or dust is attached to a lens (objective and eyepiece). Clean the lenses. (p.24)
Dirt or dust is attached to the specimen. Clean the specimen. Dirt or dust is seen in the
field of view.
The opening size of the aperture diaphragm is too small.
Increase in the opening size appropriately. (p.14)
The image is partially dim. The stage is inclined. Attach the stage correctly. (p.18)
The specimen is inclined with respect to the stage surface.
Place the specimen on the stage correctly. (p.10) The image moves during
operation. The stage is inclined. Attach the stage correctly. (p.18)

Chapter 5 Troubleshooting
23
Troubleshooting on Operation
Trouble Cause Countermeasure
The image is not in focus although the zoom body is moved to the lowest position.
The position of the specimen is extremely low.
Adjust the position of the specimen with the stage height adjustment knob. (p.12)
The image is not in focus although the stage is moved to the higher limit position.
The zoom body is raised too high. Adjust the position of the zoom body with the focus knob. (p.12)
After changing the zoom magnification, the specimen goes out of focus.
The diopter adjustment has not been performed. Perform the diopter adjustment. (p.9)
After changing the objective the specimen goes out of focus.
The diopter adjustment has not been performed. Perform the diopter adjustment. (p.9)
The interpupillary adjustment has not been performed.
Perform the interpupillary adjustment. (p.9) The images viewed through
the binocular eyepieces do not merge into one. The diopter adjustment has not been
performed. Perform the diopter adjustment. (p.9)
The interpupillary adjustment has not been performed.
Perform the interpupillary adjustment. (p.9)
The diopter adjustment has not been performed.
Perform the diopter adjustment on the right and left eyepieces. (p.9)
Eyes get tired during observations.
The brightness is insufficient. Adjust the environmental light.
The coarse focus knob and the coarse stage height adjustment knob are too tight.
The torque adjustment knob is tightened extremely. Loosen the knob properly. (p.12)
The specimen goes out of focus over time. (The zoom body or the stage descends with its own weight.)
A torque adjustment knob is loosened.
Tighten the coarse torque adjustment knobs to increase the torque so that the zoom body and the stage do not descending with their own weight. (p.12)

24
Care and Maintenance 6
Cleaning the Lenses
Keep the lens from dust particles or fingerprints. Dirt on the lens or filter adversely affects the viewing of the image. If any of the lenses get dirty, clean them as described below. • Remove dust particles with a soft brush or lightly wipe off with a gauze. • Only when fingerprints or oily substances are attached, use soft clean lens tissue, cotton cloth or gauze
with a little absolute alcohol (ethyl alcohol or methyl alcohol) moistened to remove the dirt. • Do not use any solvents other than absolute alcohol as they may damage the lens adhesion surfaces.
Especially, do not use petroleum benzine for the lens or filter. • Absolute alcohol is extremely flammable. Keep these flammable solvents away from fire or sparks emitted
when turning on/off the power switch. • Use absolute alcohol according to the instructions provided by the manufacturer.
Cleaning the Product
• We recommend that you use a silicon cloth to clean the product. • For persistent dirt, dampen a piece of gauze with neutral detergent and wipe lightly. • Use of organic solvent could result in discoloration of the plastic parts.
Decontamination
• We recommend that you use 70% medical alcohol for decontamination of the product. • When a specimen is dropped onto the microscope, check that the specimen is hazardous or not.
If the specimen is hazardous, follow the standard procedure of your laboratory. • Use of organic solvent may result in discoloration of the plastic parts.
Storage of the Product
• Store the product in a dry place where mold hardly grow. • We especially recommend that the objectives and eyepieces be stored in a container (such as a
desiccator) with desiccant in it • Cover the product with a dust protection cover when storing so that it will not get dusty. • Cover a dust protection cover after turning off the power source (press the front-half of the power switch)
and the lamp cools sufficiently.
Regular Inspections (With Charge)
Regular inspection (with charge) is recommended to maintain the performance of the product. Contact your nearest Nikon representative for details.

25
Specifications 7
AZ100 Zoom Body
Magnification: 1x to 8x (zoom ratio, 8 : 1) Aperture diaphragm: ø6 mm to ø20 mm Zoom knobs: Right and left knobs are connected,
with the clickstop positions at integral magnifications Slot: DIC prism slot
AZ-STE Episcopic Stand
Substage: Stroke in the vertical direction: 10 mm Coaxial coarse/fine focus knobs (torque is adjustable) • Coarse focus: 37.7 mm per cycle • Fine focus: 0.27 mm per cycle Maximum weight of the specimen:
1 kg (for the AZ-STGE EPI stage) Focus mounting section:
Stroke in the vertical direction: 85 mm Coaxial coarse/fine focus knobs (torque is adjustable) • Coarse focus: 18.5 mm per cycle • Fine focus: 3.27 mm per cycle
AZ-STGE EPI Stage
Stroke: 150 mm x 150 mm Stage movement: Coarse focus: with the coarse/fine focus selector switch
Fine focus: vertically-arranged coaxial XY knobs
AZ-NPS Single Nosepiece
Number of attachable objectives: One piece Objective attachment screw: M38 x 1.25
AZ-NP3 Triple Nosepiece
Number of attachable objectives: Three pieces Objective attachment screw: M38 x 1.25
AZ-TE80 Ergonomic Trinocular Tube 80 and AZ-TE100 Ergonomic Trinocular Tube 100
Configuration: Trinocular eyepiece tube (erect image trinocular eyepiece tube and vertical tube)
Optical path selector: Manual (lever pressing/pulling type) • Binocular part 100% : Vertical tube 0% or
Binocular part 20% : Vertical tube 80% (AZ-TE80) • Binocular part 100%: Vertical tube 0% or
Binocular part 0% : Vertical tube 100% (AZ-TE100) Binocular part: Type: Siedentopf
Interpupillary adjustment: 50 mm to 75 mm Diopter adjustment: use the adjustment function of the eyepiece
Vertical tube: Able to attach the C mount adapter Magnification: Binocular part 1x, vertical tube 0.6x Field number: Binocular part ø22, vertical tube ø11
General specification With the following configuration: AZ100 Zoom Body AZ-STE Episcopic Stand AZ-STGE EPI Stage AZ-NPS Single Nosepiece AZ-NP3 Triple Nosepiece AZ-TE80 Ergonomic Trinocular Tube 80
External dimensions: 300 (width) x 427 (depth) x 637 (height) mm (excluding protrusions such as those on the stage)
Weight: Approximately 20 kg Operation condition: Temperature: 0 to +40°C
Humidity: 85% RH maximum (no condensation) Altitude: 2000 m maximum Pollution degree: Degree 2 Installation category: Category II
Storage condition: Temperature: -20 to +60°C Humidity: 90% RH maximum (no condensation)