Embed Size (px)
Citation preview

1DRI1001-B
Operating Instructions
Music Management Software
rekordbox™

2DRI1001-B
En2
ContentsHow to read this manualThe names of displays, menus, and buttons in this manual are enclosed in brack-ets. (e.g. [Collection] pane, [File] menu, [f])
About rekordboxFeatures of rekordbox .....................................................................................................3Preparing for playback with rekordbox .........................................................................3Using rekordbox in combination with a DJ player .......................................................4Launching rekordbox ......................................................................................................4Names of parts ................................................................................................................5
Preparing for playback on rekordboxAdding music files to Collection ....................................................................................6Editing the information on a music file .........................................................................6Listening to music files ...................................................................................................7Setting Cue ......................................................................................................................8Setting Loop .....................................................................................................................8Save Cue or Loop in the memory ...................................................................................9Setting Hot Cue ...............................................................................................................9Organizing music files by using Playlist .....................................................................10Organizing Hot Cue by using Hot Cue Bank List .......................................................11
Playback on a DJ playerPlayback with a USB device .........................................................................................12Playback with a LAN cable connection (PRO DJ LINK) ............................................13
Additional informationSetting Preferences ......................................................................................................14Menu List .......................................................................................................................14Genre List .......................................................................................................................15Troubleshooting ............................................................................................................16COPYRIGHT WARNING ................................................................................................16Disclaimer ......................................................................................................................16

3DRI1001-B
En 3
Ab
out rekordb
ox
About rekordboxFeatures of rekordboxrekordbox is an application for managing music files which can be played back on a Pioneer DJ Player (i.e. CDJ-2000, CDJ-900).
— rekordbox can be used to classify and search for music files stored on your computer and create playlists used for DJ performance.
— rekordbox allows you to detect, measure and adjust the beats, tempos (BPM) and other elements of your music files prior to performance.
— rekordbox can be used to set and store point information (for cueing, looping, hot cueing, etc.) prior to performance.
Data that has been detected and measured, as well as any points which have been set and stored using rekordbox, can be used in combination with a Pioneer DJ Player (i.e. CDJ-2000, CDJ-900) to achieve outstanding DJ performance.
QUANTIZEBy detecting and adjusting the beats of music files ahead of time using rekord-box, cue and loop points, etc., can be set and played on beat even when the DJ player buttons are pressed roughly.
CUE/ LOOP POINT MEMORYBy creating and saving cue/ loop points ahead of time using rekordbox, the cue/
loop points can be called out on the DJ players. Up to 10 cue/ loop points per music file can be saved with rekordbox.
HOT CUEBy creating hot cues ahead of time on rekordbox, the hot cues can be called out on the DJ players. Up to 3 hot cues per music file can be saved with rekordbox.
PLAYLISTBy creating playlists of favorite music files ahead of time using rekordbox, music files can be selected quickly on the DJ players.
HOT CUE BANK LISTCombinations of three hot cues (A, B and C) to be used on the DJ player can be created with rekordbox as hot cue bank lists. Cues of different music files can be combined and registered on the hot cue bank lists.Multiple hot cue bank lists can be prepared, allowing you to quickly call out and play a greater number of hot cue combinations than ever before on the DJ players.
TAG LISTIn addition to playlists, music files you plan to play next can be temporarily col-lected in rekordbox’s tag list. The rekordbox tag list can be shared on DJ play-ers connected to the computer by LAN cable (up to 4 players). This function is extremely convenient for selecting tracks during live performances using mul-tiple DJ players reciprocally. For details, see Playback with a LAN cable connection (PRO DJ LINK) on page 4.
HISTORYThe history of music files played on DJ players (track and point information) can be fed back to rekordbox.
Preparing for playback with rekordboxInstall rekordbox on your computer from the included CD-ROM before use. See “Read Before Use (separate document)” for details about the software end user license agreement, system requirements, installation procedures, and support and disclaimer for rekordbox.
rekordbox
Music files
1 Import music files into your computer
2 Add music files to the collection on rekordbox
3 Prepare for playback on rekordbox
4 Playback in combination with a DJ player
Computer
1 Importing music files into your computer.Have music files ready on your computer.! rekordbox does not have the capability of importing music files from an
audio CD. Also, it cannot help you purchase music files on the Internet. It is recommended to have music files ready on your computer which have been imported by another application.
2 Add music files to the collection on rekordbox.Analyze and measure the beat and tempo (BPM) of a music file.! You can import the tag information of music files (MP3, AAC, etc.) as well as
information on music files from the iTunes library.
3 Preparing for playback on rekordbox.Set various performance points (Cue, Loop, and Hot Cue).! Create playlists (Playlist and Hot Cue Bank List). ! You can import a Playlist (M3U and PLS) created by other software pro-
grams as well as a Playlist from the iTunes library.
4 Playback in combination with a DJ player.You can play music files on a Pioneer DJ player (i.e. CDJ-2000, CDJ-900) by using the point information and playlists prepared with rekordbox in advance.! Playback history, playback count, and point information which is saved on a
Pioneer DJ player (i.e. CDJ-2000, CDJ-900) can be imported and applied to the rekordbox collection.

4DRI1001-B
En4
Using rekordbox in combination with a DJ playerBe sure to read the notes on installation and the connection procedure found in the operating instructions for your Pioneer DJ player before connecting it to your computer.Read the operating instructions for your Pioneer DJ player for details about SD memory cards or USB devices (flash memory or hard disk) that can be used on the DJ player.Up-to-date information regarding which Pioneer DJ Players can be used in com-bination with rekordbox can be found at the website: http://www.prodjnet.com/rekordbox/support/
Playback with a USB deviceYou can deliver music files and their related data saved with rekordbox to your DJ player by using USB devices (flash memory or hard disk) without the hassle of bringing your computer to the DJ booth (page 12).! With some DJ players (i.e. CDJ-2000), SD memory cards can be used instead
of USB devices.
rekordbox
Computer USB device
Pioneer DJ player
Playback with a LAN cable connection (PRO DJ LINK)
PRO DJ LINK functions are not supported in rekordbox v1.0. rekordbox can be downloaded to obtain these features (see Using the support site on page 16).
You can load music files and their related data saved with rekordbox onto your DJ player in real time if you connect the DJ player to a computer with a LAN cable (page 13).
rekordbox
LAN cableComputer
Pioneer DJ player
You can load the music files and their related data saved with rekordbox onto up to 4 DJ players if you connect the computer to a DJ player with a LAN cable and a switching hub (page 13).
rekordboxSwitching hub
LAN cable
LAN cable × 4Computer
Pioneer DJ player × 4
Launching rekordboxLog on as the user which was set as the computer’s administrator before using rekordbox.
For Mac OS X:
Open the [Application] folder with Finder, then double-click [rekordbox 1.x.x.app].The 1.x.x indicates the rekordbox version.
For Windows Vista® or Windows® XP:
Click on the windows [Start] menu button, then [All Programs] > [Pioneer] > [rekordbox 1.x.x] > [rekordbox 1.x.x].The 1.x.x indicates the rekordbox version.

5DRI1001-B
En 5
Ab
out rekordb
ox
Names of parts
a
Browser Panel
Player Panel
Link Status Panel
7
6
5
4
3
2
1
8
9a
b
2
345
i
j1
9a b c fde g h86 7
Player Panel
1 +/ / –Enlarges or reduces waveform displays.
2 f (page 7)
3 CUE (page 8)
4 m/ nPress and hold during playback to fast-forward or fast-rewind (search).
5 o/ pMoves to the beginning of a track (track search).! Click [p] to move to the beginning of the next track.! Click [o] to move to the beginning of the track currently being played.
Press twice to move to one track before the current track.
6 HOT CUE (A, B, C) (page 9)
7 LOOP IN/ LOOP OUT (page 8)
8 QUANTIZE (page 8)
9 RELOOP (page 8)
a Auto Beat Loop (4, 8, 16, 32) (page 8)
b Time display (TIME/ REMAIN), minute (M), second (S), millisecond (MS)
1000 milliseconds equal 1 second.! Click [TIME] to switch [REMAIN (time remaining display)].! Click [REMAIN] to switch [TIME (time elapsed display)].
c BPM display (BPM) (page 7)Displays BPM (Beats Per Minute) of the track currently being played.
d Waveform display
e Enlarged waveform displayDrag to the left or to the right to move the playback position forward or backward.
f Artwork image (page 6, 10, 11)
g Cue/Loop Call (page 9)
h MEMORY (page 9)
i VolumeDrag up or down to adjust the volume.
j MutePress to mute the sound.
Browser Panel
1 Collection (page 6)Displays the [Collection] pane in the browser panel.
2 Playlist (page 10)Displays the [Playlist] pane in the browser panel.
3 H. Cue Bank (page 11)Displays the [Hot Cue Bank List] pane in the browser panel.
4 Bridge (page 6)Displays the [Bridge] pane in the browser panel.
5 Device (page 12)Displays the [Device] pane in the browser panel.
6 Info (page 6)Displays the [Information] pane in the browser panel.
7 Tag List (page 13)1Displays the [Tag List] pane in the browser panel.
8 Display panes side by sideDisplays panes side by side to the right of the pane currently being displayed. To close a pane being displayed on the right side, click [c] in the top left corner of the pane.
9 Category filter (page 7)
a Search filter (page 6)
b Column header (page 7)
Link Status Panel (page 13)1
1 PRO DJ LINK functions (Link Status and Tag List) are not supported in rekordbox v1.0. rekordbox can be downloaded to obtain these features (see Using the support site on page 16).

6DRI1001-B
En6
Preparing for playback on rekordboxAdding music files to CollectionRegister the music files saved on your computer as a music collection of rekordbox.
1 Click .The [Collection] pane is displayed.
2 Select [File] menu > [Import] > [File].The [Add to Collection] window is displayed.
3 Select a music file and click [Open].The music file is added to Collection, and the tag information of the music file
is registered and displayed. Analysis of the music file begins, and is displayed to the left of the music file being analyzed. The status then disappears when the analysis is completed.! To add all music files contained in a folder, select [File] menu > [Import] >
[Folder].! You can also add a music file by opening Finder or Windows Explorer and
dragging the music file to the [Collection] pane.! The tag information may not be displayed when a WAV or AIFF file is added
to Collection. The tag information types which can be registered from a music file are ID3 tags (v1, v1.1, v2.2.0, v2.3.0, and v2.4.0) or meta tags.
! To remove a music file from Collection, right click the music file to be deleted in the [Collection] pane and choose [Remove] from the shortcut menu which appears. The music file itself is not deleted from the computer although it is removed from Collection.
Adding music files from the iTunes library
1 Click .The [Collection] pane is displayed.
2 Click [d] on the right of .The [Collection] pane and the [Bridge] pane are displayed on the left and right sides of the browser panel respectively.
3 Click [+] on the left of [Bridge-iTunes], then click [All Tracks].A list of the iTunes music files is displayed.
4 Drag the iTunes music file from the [Bridge] pane to the [Collection] pane.The music file is added to Collection and the information of the music file is registered from iTunes and displayed.! Music files can also be added by right-clicking the iTunes music file in the
[Bridge] pane and selecting [Add to Collection].
Editing the information on a music file
1 Click .The [Collection] pane is displayed.
2 Click [d] on the right of .The [Collection] pane and the [Information] pane are displayed on the left and right sides of the browser panel respectively.
3 Click a music file in the [Collection] pane.The [Summary] tab is displayed in the [Information] pane.
4 Click the [Info] tab in the [Information] pane.The [Info] tab is displayed in the [Information] pane.
5 Select and edit an item.The information for the music file is changed.
Adding an artwork image to a music fileThe artwork image formats which can be added to a music file are JPEG and PNG (extensions: “jpg”, “jpeg”, “png”).
1 Click the [Artwork] tab in the [Information] pane.
2 Open Finder/ Windows Explorer.
3 Drag an image file from Finder/ Windows Explorer to the [Artwork] tab.The artwork image is added to the music file.
Reload the tag information of a music fileWhen an external application is used to modify the music file tag information, this tag information must be reloaded in rekordbox to properly display any changes.! When a music file’s tag information is reloaded, the contents edited at
the [Information] and [Artwork] tabs are replaced with the reloaded tag information.
1 Click the [Info] tab in the [Information] pane.
2 Click in the top-left corner of the [Info] tab.The tag information of a music file is reloaded.! You can reload the tag information of a music file by selecting [File] menu >
[Reload Tags].
Search for a music file using Search filter
1 Click .The [Collection] pane is displayed.
2 Click on the left of [Search filter].A pop-up menu is displayed.
3 Select and click an item from the pop-up menu.
4 Enter characters in [Search filter] with the computer keyboard.The music files containing these characters are filtered based on the item selected in step 3.! The original track list reappears if you delete the search term entered.

7DRI1001-B
En 7
Prep
aring for p
layback on rekord
box
Changing the arrangement of music files
1 Click .The [Collection] pane is displayed.
2 Click a column header.
The arrangement of music files is changed.! Each time you click, the arrangement toggles between ascending and
descending orders.
� Searching for a music file by character entry
Enter a character with the computer keyboard as a continuation of step 2.The cursor moves to a music file starting with the character entered.! If you enter another character, the cursor moves to the first music file in
alphabetical order beginning with the current character combination.
Changing the arrangement of a column
1 Click .The [Collection] pane is displayed.
2 Drag the column header to the left or to the right.The arrangement of the column is changed.
� Toggling between showing and hiding a column
Right-click the column header, then select the target item from the pop-up list.The mode toggles between showing and hiding a column.
Searching a music file with the category filter
1 Click .The [Collection] pane is displayed.
2 Click .A category ([Genre], [Artist], or [Album]) is displayed.
3 Select and click a category.Only the music files in the selected category are displayed.
Listening to music filesPlay a music file and check the beat and tempo (BPM).
1 Drag a music file from the browser panel to the player panel.The music file is loaded.
2 Click [f].Playback starts.! The enlarged waveform display shows the beat grid which is generated when
the music file was added.! The BPM display shows the tempo measured when the music file was added.
Adjusting the beat gridThe enlarged waveform display shows the beat grid in white vertical dashes. The beat grid can be adjusted by the following procedure.
1 Click [f] during playback.Playback is paused.
2 Drag the enlarged waveform display to the left or to the right.Adjust the beat grid such that the desired position fits into the white line in the middle of the enlarged waveform display.
3 Right-click the enlarged waveform display and select [Adjust Beat Grid].The paused position is set as the foundation point for the beat grid, and the white beat marks appearing before and after are adjusted accordingly.
� Re-analyzing music files
Right-click a music file and select [Analyze Track].The waveform data of a music file is analyzed. The detected beat and the mea-sured tempo are saved on your computer.! If you re-analyze a music file, any previous adjustments to the beat grid will
be overwritten by the newly-resulting beat grid from the re-analysis.

8DRI1001-B
En8
Setting CueSet the Cue Point.
1 Click [f] during playback.Playback is paused.
2 Click [CUE].The paused position is set as a Cue Point. The CUE indicator lights up, and the f indicator flashes. Sound is not output at this time.! When a new Cue Point is set, the previously set Cue Point is deleted.! When you load another music file, the previously set Cue Point is deleted. See
Save Cue or Loop in the memory on page 9 for how to save a Cue Point.
Returning to Cue Point (Back Cue)
Click [CUE] during playback.Playback instantaneously returns to and pauses at the set Cue Point.! To start playback from the Cue Point, click [f].
Checking Cue Point (Cue Point Sampler)
Press and hold [CUE] after returning to the Cue Point.Playback starts from the Cue Point while you press and hold [CUE].
Setting Cue Point during playback (Real Time Cue)
Click [LOOP IN] during playback at the position where you want to set the Cue Point.The clicked position is set as a Cue Point.! When [QUANTIZE] is turned on, the Cue Point is automatically adjusted to
the beat grid near the position where you clicked [LOOP IN].
Setting Loop
1 Click [LOOP IN] during playback at the position (Loop In Point) where you want to start Loop playback.Loop In Point is set.! This operation is not necessary if you have already set a Cue Point as a Loop
In Point.
2 Click [LOOP OUT] at the position (Loop Out Point) where you want to end Loop playback.The Loop Out Point is set, and Loop playback starts from the Loop In Point.! When [QUANTIZE] is turned on, the Loop Point is automatically adjusted to
the beat grid near the position where you clicked [LOOP IN] or [LOOP OUT].! When the Loop Point is newly set, the previously set Loop Point is deleted.! When you load another music file, the previously set Loop Point is deleted.
See Save Cue or Loop in the memory on page 9 for how to save a Loop Point.
Canceling Loop playback (Loop Exit)
Click [RELOOP] during Loop playback.Playback continues after the Loop Out Point without returning to the Loop In Point.
Returning to Loop playback (Reloop)
Click [RELOOP] during playback after Loop has already exited.Playback returns to the previously set Loop In Point, and Loop playback resumes.
Setting Loop automatically (Auto Beat Loop)A 4/ 8/ 16/ 32 beat Loop is automatically set from the clicked position correspond-ing to the BPM of the music file currently being played.
Click [4], [8], [16], or [32] during playback.Loop playback starts.! When [QUANTIZE] is turned on, the Loop Point is automatically adjusted to
the beat grid near the position where you clicked [4], [8], [16], or [32].

9DRI1001-B
En 9
Prep
aring for p
layback on rekord
box
Save Cue or Loop in the memoryYou can save multiple Cue and Loop Points which have been set for a specific track. Once saved, these points can be called out from the memory at a later time.
1 Set Cue Point or Loop Point.
2 Click [MEMORY].The points saved are displayed in the Cue/Loop Call button.! By using the Cue/Loop Call button, up to ten Cue or Loop Points can be saved
for each music file.! Click [MEMORY] during Loop playback to save a Loop Point. The Loop Point
is displayed in the Cue/Loop Call button.
Calling Cue or Loop from memory
1 Load a music file for which you want to call a Cue Point or Loop Point.The Cue Point or Loop Point is displayed in the Cue/Loop Call button.
2 Click the Cue/Loop Call button to start playback from the set Cue/ Loop Point position.The playback position is moved to the selected point and paused.
3 Click [f].Playback starts from the Cue or Loop point.! To delete the already saved Cue Point or Loop Point, click [7] on the right of
the Cue/Loop Call button whose Cue/ Loop Point you wish to delete.
Setting Hot CueYou can set a Cue Point or Loop Point to [HOT CUE] (A, B, C). Press [HOT CUE] to start playback instantaneously from the point saved in the button.
Click any of [HOT CUE] (A, B, or C) during playback or pause at the position you want to set to a Hot Cue.The clicked position or Loop playback is set as [HOT CUE]. The recorded position is displayed in [HOT CUE].
Checking Hot Cue
Click [HOT CUE] where the recorded position is displayed.Playback starts instantaneously from the point recorded in the button.! To delete the recorded point, click [7] on the right of the [HOT CUE] you want
to delete.
Setting Cue or Loop saved in the memory as Hot Cue
1 Load a music file in which a Cue Point or Loop Point is saved.The Cue Point or Loop Point is displayed in the Cue/Loop Call button.
2 Click the Cue/Loop Call button you want to set as a Hot Cue.The playback position is moved to the selected point and paused.
3 Click any of [HOT CUE] (A, B, or C) you want to record.The recorded position is displayed in [HOT CUE].
10DRI1001-B
En10
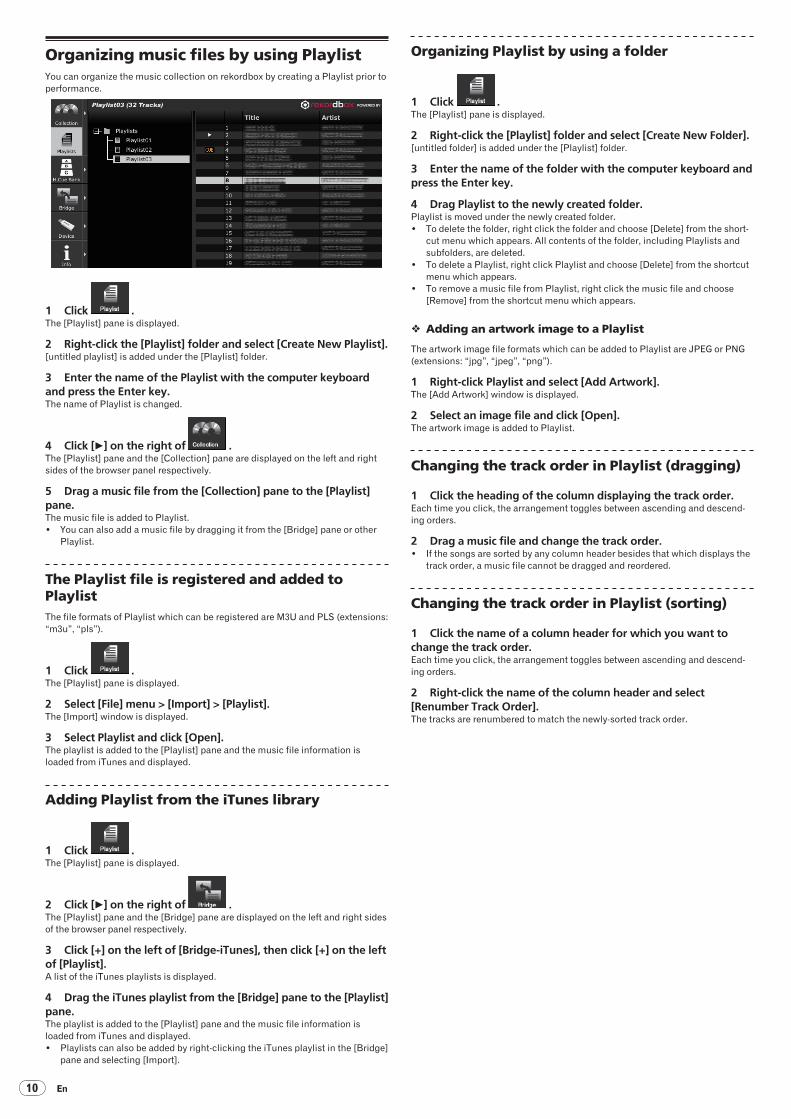
Organizing music files by using PlaylistYou can organize the music collection on rekordbox by creating a Playlist prior to performance.
1 Click .The [Playlist] pane is displayed.
2 Right-click the [Playlist] folder and select [Create New Playlist].[untitled playlist] is added under the [Playlist] folder.
3 Enter the name of the Playlist with the computer keyboard and press the Enter key.The name of Playlist is changed.
4 Click [d] on the right of .The [Playlist] pane and the [Collection] pane are displayed on the left and right sides of the browser panel respectively.
5 Drag a music file from the [Collection] pane to the [Playlist] pane.The music file is added to Playlist.! You can also add a music file by dragging it from the [Bridge] pane or other
Playlist.
The Playlist file is registered and added to PlaylistThe file formats of Playlist which can be registered are M3U and PLS (extensions: “m3u”, “pls”).
1 Click .The [Playlist] pane is displayed.
2 Select [File] menu > [Import] > [Playlist].The [Import] window is displayed.
3 Select Playlist and click [Open].The playlist is added to the [Playlist] pane and the music file information is loaded from iTunes and displayed.
Adding Playlist from the iTunes library
1 Click .The [Playlist] pane is displayed.
2 Click [d] on the right of .The [Playlist] pane and the [Bridge] pane are displayed on the left and right sides of the browser panel respectively.
3 Click [+] on the left of [Bridge-iTunes], then click [+] on the left of [Playlist].A list of the iTunes playlists is displayed.
4 Drag the iTunes playlist from the [Bridge] pane to the [Playlist] pane.The playlist is added to the [Playlist] pane and the music file information is loaded from iTunes and displayed.! Playlists can also be added by right-clicking the iTunes playlist in the [Bridge]
pane and selecting [Import].
Organizing Playlist by using a folder
1 Click .The [Playlist] pane is displayed.
2 Right-click the [Playlist] folder and select [Create New Folder].[untitled folder] is added under the [Playlist] folder.
3 Enter the name of the folder with the computer keyboard and press the Enter key.
4 Drag Playlist to the newly created folder.Playlist is moved under the newly created folder.! To delete the folder, right click the folder and choose [Delete] from the short-
cut menu which appears. All contents of the folder, including Playlists and subfolders, are deleted.
! To delete a Playlist, right click Playlist and choose [Delete] from the shortcut menu which appears.
! To remove a music file from Playlist, right click the music file and choose [Remove] from the shortcut menu which appears.
� Adding an artwork image to a Playlist
The artwork image file formats which can be added to Playlist are JPEG or PNG (extensions: “jpg”, “jpeg”, “png”).
1 Right-click Playlist and select [Add Artwork].The [Add Artwork] window is displayed.
2 Select an image file and click [Open].The artwork image is added to Playlist.
Changing the track order in Playlist (dragging)
1 Click the heading of the column displaying the track order.Each time you click, the arrangement toggles between ascending and descend-ing orders.
2 Drag a music file and change the track order.! If the songs are sorted by any column header besides that which displays the
track order, a music file cannot be dragged and reordered.
Changing the track order in Playlist (sorting)
1 Click the name of a column header for which you want to change the track order.Each time you click, the arrangement toggles between ascending and descend-ing orders.
2 Right-click the name of the column header and select [Renumber Track Order].The tracks are renumbered to match the newly-sorted track order.

11DRI1001-B
En 11
Prep
aring for p
layback on rekord
box
Organizing Hot Cue by using Hot Cue Bank ListA Hot Cue Bank can be used to save Hot Cue information from different music files. Up to three points can be saved as Hot Cue Banks A, B, and C. These are collectively referred to as a Hot Cue Bank List.You can load Hot Cue Bank Lists onto a DJ player, which while performing, can be used in rhythmic succession to create combinations of samples from different tracks.! With some DJ players (i.e. CDJ-900), Hot Cue Bank Lists cannot be loaded
onto the DJ player.
1 Click .The [Hot Cue Bank List] pane is displayed.
2 Right-click the [Hot Cue Bank List] folder and select [Create New Hot Cue Bank List].[untitled hot cue bank list] is added under the [Hot Cue Bank List] folder.
3 Enter the name of the list with the computer keyboard and press the Enter key.The name of Hot Cue Bank List is changed.
Setting Hot Cue Bank
Click any of the Hot Cue Bank buttons (A, B, or C) during playback or pause at the position where you want to set to the Hot Cue Bank.The clicked position or Loop playback is set to the Hot Cue Bank button. The recorded point is also displayed in the Hot Cue Bank button.
Checking Hot Cue Bank
Click the Hot Cue Bank button where the recorded point is displayed.The track displayed beside the button is loaded, and playback starts instanta-neously from the recorded point.! To delete the recorded point, click [7] on the right of the Hot Cue Bank you
want to delete.
Setting Cue or Loop saved in the memory as Hot Cue Bank
1 Load a music file in which a Cue Point or Loop Point is saved.The Cue Point or Loop In Point is displayed in the Cue/Loop Call button.
2 Click the Cue/Loop Call button you want to set as the Hot Cue Bank.The playback position is moved to the selected point and paused.
3 Click the Hot Cue Bank button (A, B, or C) you want to record.The recorded point is displayed in the Hot Cue Bank button.
Setting Hot Cue to Hot Cue Bank
1 Load a music file in which the Hot Cue is recorded.The recorded point is displayed in [HOT CUE].
2 Click [f] if a music file is being played back.Playback is paused.
3 Click the [HOT CUE] you want to set to a Hot Cue Bank.The playback position is moved to the selected point and paused.
4 Click the Hot Cue Bank button (A, B, or C) you want to record.The recorded point is displayed in the Hot Cue Bank button.
Organizing Hot Cue Bank List by using a folder
1 Click .The [Hot Cue Bank List] pane is displayed.
2 Right-click the [Hot Cue Bank List] folder and select [Create New Folder].[untitled folder] is added under the [Hot Cue Bank List] folder.
3 Enter the name of the folder with the computer keyboard and press the Enter key.
4 Drag Hot Cue Bank List to the newly created folder.Hot Cue Bank List is moved under the newly created folder.! To delete the folder, right click the folder and choose [Delete] from the short-
cut menu which appears. All contents of the folder, including Hot Cue Bank Lists and subfolders, are deleted.
! To delete a Hot Cue Bank List, right click Hot Cue Bank List and choose [Delete] from the shortcut menu which appears.
� Adding an artwork image to Hot Cue Bank List
The artwork image file formats which can be added are JPEG or PNG (exten-sions: “jpg”, “jpeg”, “png”).
1 Right-click Hot Cue Bank List and select [Add Artwork].The [Add Artwork] window is displayed.
2 Select an image file and click [Open].The artwork image is added to Hot Cue Bank List.

12DRI1001-B
En12
Playback on a DJ playerPlayback with a USB deviceYou can deliver music files and their related data saved with rekordbox to your DJ player by using USB devices (flash memory or hard disk) without the hassle of bringing your computer to the DJ booth.
Setting the USB device
1 Click .The [Device] pane is displayed.
2 Click for the USB device whose settings you want to change.! The following settings are changed.
General
Device NameSet the name to be displayed when the device is connected to the DJ player.
Background Color
Set the background color to be displayed when the device is connected to the DJ player.
CategoryActive Catego-ries
Select the categories and their order for display on the DJ player. For instructions on using the Library Browsing function with DJ players, refer to the DJ player’s operating instructions.
SortActive Sort Options
Select the sort options and their order for display on the DJ player. For instructions on using the Library Browsing function with DJ players, refer to the DJ player’s operating instructions.
Color
Pink
You can change the color description representing any of the eight colors used to categorize music files on the DJ player. For instructions on using the Library Browsing function with DJ players, refer to the DJ player’s operating instructions.
Red
Orange
Yellow
Green
Aqua
Blue
Purple
Saving music files in a USB device
1 Click .The [Device] pane is displayed.
2 Click [+] on the left of the mark for the music file you want to save.The contents of the USB device are displayed.
3 Click [All Tracks].
4 Click [d] on the right of .The [Device] pane and the [Collection] pane are displayed on the left and right sides of the browser panel respectively.
5 Drag a music file from the [Collection] pane to the [Device] pane.The music file and its related data are saved in the USB device.! You can also add a music file by dragging it from the [Bridge] pane to the
[Device] pane.
Saving Playlist in a USB device
1 Click .The [Device] pane is displayed.
2 Click [+] on the left of the mark for the playlist you want to save.The contents of the USB device are displayed.
3 Click [+] on the left of the [Playlist] folder.
4 Click [d] on the right of .The [Device] pane and the [Playlist] pane are displayed on the left and right sides of the browser panel respectively.
5 Drag Playlist from the [Playlist] pane to the [Device] pane.Both the Playlist and its music files are saved in the USB device.! This can also be accomplished by dragging a Playlist from the [Bridge] pane
to the [Device] pane.
Saving Hot Cue Bank List in a USB device
1 Click .The [Device] pane is displayed.
2 Click [+] on the left of the mark for the hot cue bank list you want to save.The contents of the USB device are displayed.
3 Click [+] on the left of the [Hot Cue Bank List] folder.
4 Click [d] on the right of .The [Device] pane and the [Hot Cue Bank List] pane are displayed on the left and right sides of the browser panel respectively.
5 Drag Hot Cue Bank List from the [Hot Cue Bank List] pane to the [Device] pane.Both the Hot Cue Bank List and its music files are saved in the USB device.
Playback by connecting a USB device to a DJ playerFor details about settings or playback from a USB device, refer to the operating instructions for the DJ player.! With some DJ players (i.e. CDJ-2000), SD memory cards can be used instead
of USB devices.! With some DJ players (i.e. CDJ-900), Hot Cue Bank Lists cannot be loaded
onto the DJ player.

13DRI1001-B
En 13
Playb
ack on a DJ
player
Creating a Playlist based on the order of tracks played back on a DJ player
1 Connect the USB device that was used for playback on the DJ player to the computer.If a playback history on the DJ player is recorded on a USB device, the [Save History as Playlist] window is displayed.
2 Press [OK].A Playlist is created based on the playback history.! When the Playlist is created, the playback history recorded on a USB device
is deleted.
� Creating a Playlist from a playback history after the [Save History as Playlist] window has been cancelled
1 Click .The [Device] pane is displayed.
2 Click the [HISTORY] folder to display the playback history list from the DJ player.
3 Right-click the playback history you want to save and select [Save as Playlist].A Playlist is created on the [Playlist] pane.
Register the information for the music files updated on a DJ player
1 Connect the USB device that was used for playback on the DJ player to the computer.
2 Click .The [Device] pane is displayed.
3 Right-click on the USB device from which you want to import information and select [Update Collection].The [Update Collection with USB Device] window is displayed.! The information on the music file is updated.! The [Update Collection with USB Device] window is automatically closed
when the update is completed.! The following information is updated.
— Cue Point and Loop Point— Hot Cue
! If you click [Cancel] during the update process, the [Update Collection with USB Device] window is closed.
Playback with a LAN cable connection (PRO DJ LINK)PRO DJ LINK functions (Link Status and Tag List) are not supported in rekord-box v1.0. rekordbox can be downloaded to obtain these features (see Using the support site on page 16).
You can load the music files and their related data saved with rekordbox in real time if you connect your computer to a DJ player with a LAN cable. The music files and their related data can be transmitted to up to four DJ players by making a connection to a switching hub.! If you connect the computer to a DJ player, a DJ player icon is displayed on
the link status panel.! For details about connections, refer to the operating instructions for the DJ
player.! You can change the order of the DJ player icons displayed in the link status
panel by dragging them to the left or to the right.
Loading music files onto a DJ player
1 Click .The [Collection] pane is displayed.
2 Drag a music file from the [Collection] pane to .The music file is loaded onto the DJ player, and playback starts.! You can also load a music file by dragging it from the [Playlist] pane or the
[Bridge] pane.
Sharing music files by using Tag ListTag List is a reference list to be shared with multiple DJ players displayed in the link status panel in real time.If you add a music file from rekordbox to the Tag List, you can load and play back the added music file through the DJ player.
1 Click .The [Collection] pane is displayed.
2 Click [d] on the right of .The [Collection] pane and the [Tag List] pane are displayed on the left and right sides of the browser panel respectively.
3 Drag a music file from the [Collection] pane to the [Tag List] pane.The music file is added to the [Tag List] pane.! You can also add a music file by dragging it from the [Playlist], [Bridge], or
[Device] pane.! You can add up to sixty music files.
Playback on a DJ player by using Tag ListFor details about how to access the Tag List from a DJ player displayed in the link status panel, refer to the operating instructions for the DJ player.
The DJ player connected by LAN cable is not interconnected with the player panel of rekordbox. The player panel of rekordbox cannot be controlled by operating the DJ player.

14DRI1001-B
En14
Additional informationSetting PreferencesSelect [File] menu > [Preferences] to open the [Preferences] window.
General / Audio / Keyboard
General
Language Set the language to be used in the display.
Tooltips Set whether or not pop-up hints are displayed.
Location of Track Analysis Files
Set where to save the analyzed waveform data of a music file.
Audio
Audio Device Set the audio output device.
Sample Rate1 Set the sampling frequency of audio data sent to an audio device.
Buffer Size2 Set the number of samples sent to an audio device for each data transmission.
Output ChannelsSet the audio output channel when there are multiple outputs from an audio device.
Keyboard Assigns a keyboard shortcut to each button in the player panel.
1 A high sampling rate allows the user to achieve a playback quality close to that of the original track. However, as the amount of audio data increases, the load on the audio device also increases.
2 A large buffer size reduces audio skipping (audio interruption). However, as the trans-mission delay (latency) increases, the time gap also increases between the playback position of the music file displayed on the screen and the actual audio output.
Export/ Color
Export
Category
Select the categories and their order for display on the DJ player. For instructions on using the Library Browsing function with DJ players, refer to the DJ player’s operating instructions.
Sort
Select the sort options and their order for display on the DJ player. For instructions on using the Library Browsing function with DJ players, refer to the DJ player’s operating instructions.
Color
You can change the color description representing any of the eight colors used to categorize music files on the DJ player. For instructions on using the Library Browsing function with DJ players, refer to the DJ player’s operating instructions.
! This setting applies to all DJ players displayed in the link status panel.! This setting is applied as the [Device] pane’s default. It can be set separately for differ-
ent USB devices (page 12).
Menu List[File] Menu
Import > File (page 6)
Import > Folder (page 6)
Import > Playlist (page 10)
Preferences
Exit
[View] Menu
Full Screen Display the rekordbox window in full view.
[Help] Menu
rekordbox Help Open the operating instructions for this software.
Support Site Access the support site for this software.
About rekordbox Display the version of this software.

15DRI1001-B
En 15
Ad
ditional inform
ation
Genre ListIf a genre name does not exist in the tag information of a music file, the genre code is converted into one of the following categories in English.Blues Blues
Classic Rock Classic Rock
Country Country
Dance Dance
Disco Disco
Funk Funk
Grunge Grunge
Hip-Hop Hip-Hop
Jazz Jazz
Metal Metal
New Age New Age
Oldies Oldies
Other Other
Pop Pop
R&B R&B
Rap Rap
Reggae Reggae
Rock Rock
Techno Techno
Industrial Industrial
Alternative Alternative
Ska Ska
Death Metal Death Metal
Pranks Pranks
Soundtrack Soundtrack
Euro-Techno Euro-Techno
Ambient Ambient
Trip-Hop Trip-Hop
Vocal Vocal
Jazz+Funk Jazz+Funk
Fusion Fusion
Trance Trance
Classical Classical
Instrumental Instrumental
Acid Acid
House House
Game Game
Sound Clip Sound Clip
Gospel Gospel
Noise Noise
Alternative Rock Alternative Rock
Bass Bass
Soul Soul
Punk Punk
Space Space
Meditative Meditative
Instrumental Pop Instrumental Pop
Instrumental Rock Instrumental Rock
Ethnic Ethnic
Gothic Gothic
Darkwave Darkwave
Techno-Industrial Techno-Industrial
Electronic Electronic
Pop-Folk Pop-Folk
Eurodance Eurodance
Dream Dream
Southern Rock Southern Rock
Comedy Comedy
Cult Cult
Gangsta Gangsta
Top 40 Top 40
Christian Rap Christian Rap
Pop/ Funk Pop/Funk
Jungle Jungle
Native American Native American
Cabaret Cabaret
New Wave New Wave
Psychedelic Psychedelic
Rave Rave
Showtunes Showtunes
Trailer Trailer
Lo-Fi Lo-Fi
Tribal Tribal
Acid Punk Acid Punk
Acid Jazz Acid Jazz
Polka Polka
Retro Retro
Musical Musical
Rock & Roll Rock & Roll
Hard Rock Hard Rock
Folk Folk
Folk/ Rock Folk/Rock
National Folk National Folk
Swing Swing
Fast fusion Fast Fusion
Bebop Bebop
Latin Latin
Revival Revival
Celtic Celtic
Bluegrass Bluegrass
Avantgarde Avantgarde
Gothic Rock Gothic Rock
Progressive Rock Progressive Rock
Psychedelic Rock Psychedelic Rock
Symphonic Rock Symphonic Rock
Slow Rock Slow Rock
Big Band Big Band
Chorus Chorus
Easy Listening Easy Listening
Acoustic Acoustic
Humour Humour
Speech Speech
Chanson Chanson
Opera Opera
Chamber Music Chamber Music
Sonata Sonata
Symphony Symphony
Booty Bass Booty Bass
Primus Primus
Porn Groove Porn Groove
Satire Satire
Slow Jam Slow Jam
Club Club
Tango Tango
Samba Samba
Folklore Folklore
Ballad Ballad
Power Ballad Power Ballad
Rhythmic Soul Rhythmic Soul
Freestyle Freestyle
Duet Duet
Punk Rock Punk Rock
Drum Solo Drum Solo
A Capella A Capella
Euro-House Euro-House
Dance Hall Dance Hall
Goa Goa
Drum & Bass Drum & Bass
Club-House Club-House
Hardcore Hardcore
Terror Terror
Indie Indie
BritPop BritPop
Negerpunk Negerpunk
Polsk Punk Polsk Punk
Beat Beat
Christian Gangsta Rap Christian Gangsta Rap
Heavy Metal Heavy Metal
Black Metal Black Metal
Crossover Crossover
Contemporary Christian Contemporary Christian
Christian Rock Christian Rock
Merengue Merengue
Salsa Salsa
Thrash Metal Thrash Metal
Anime Anime
Jpop Jpop
Synthpop Synthpop

16DRI1001-B
En16
Troubleshooting
Using the support siteBefore making an inquiry about rekordbox operations and technical support, refer to the operating instructions for rekordbox and check the FAQs published on the sup-port site for rekordbox.
<Support Site for rekordbox>http://www.prodjnet.com/rekordbox/support/! To make an inquiry about rekordbox, you need to register as a user in advance on the support site for rekordbox.! You need to enter the license key for your user registration. Have the license key ready. Also, be sure not to forget the login name (your e-mail address) and the password
specified for your user registration, as well as the license key.! Pioneer Corporation collects your personal information for the following purposes:
1 To provide customer support for your purchased product2 To inform you of product or event information by e-mail3 To reflect your opinions collected by survey on product planning— Your personal information is kept confidential corresponding to the privacy policy set forth by our company.— You can check our privacy policy on the support site for rekordbox.
! When making inquiries regarding rekordbox, please be sure to furnish your computer type and specifications (CPU, installed memory, other connected peripherals, etc.), the operating system and version used, and concrete information regarding the issue at hand.— For an inquiry about configuring your computer with peripheral devices other than our products and the corresponding technical support, contact each
manufacturer or retailer.! rekordbox is subject to upgrade for enhanced function and performance. The upgrade program can be downloaded on the support site. We strongly recommend you
upgrade your software on a regular basis to keep the latest updates on your system.
COPYRIGHT WARNING! The use of rekordbox is restricted with regard to the playing and copying of copy-protected music contents.
— The program may not operate properly if copy-protect encryption data is embedded in recorded media.— Playback, analysis, and other operations may stop if copy-protect encryption data is detected to be embedded in recorded media.
! The materials you record are for your own listening enjoyment, and cannot be used for other purposes without permission from the copyright owner.— Music recorded from CDs and other media may be protected by the copyright laws of individual countries as well as by international convention. You are solely
responsible for the lawful use of the recordings you make.— When handling music that has been downloaded over the Internet, the person who has downloaded the music is fully responsible for using the music in compliance
with his/ her contract with the site from which the music was downloaded.
Disclaimer! Please note that Pioneer will accept no responsibility whatsoever for any loss of information registered using this software. Therefore, please write down this registration
information and safeguard it carefully.! Please note that the music files that can be read and played with this software are as shown on the table below.
Music files Compatible formats Encoding method Bit depth Bit rate Sampling frequency File extension
MP3 filesMPEG-1 AUDIO LAYER-3 CBR, VBR 16 bit 32 kbps to 320 kbps 32 kHz, 44.1 kHz, 48 kHz .mp3
MPEG-2 AUDIO LAYER-3 CBR, VBR 16 bit 16 kbps to 160 kbps 16 kHz, 22.05 kHz, 24 kHz .mp3
AAC files MPEG-4 AAC LC CBR, VBR 16 bit 8 kbps to 320 kbps16 kHz, 22.05 kHz, 24 kHz, 32 kHz, 44.1 kHz, 48 kHz
.m4a, .mp4
WAVE files Uncompressed PCM 16 bit, 24 bit - 44.1 kHz, 48 kHz .wav
AIFF files Uncompressed PCM 16 bit, 24 bit - 44.1 kHz, 48 kHz .aif, .aiff
— It may not be possible to read or play music files including both audio and video or copyright-protected music files.
! Pioneer and rekordbox are trademarks or registered trademarks of the Pioneer Corporation.! Microsoft®, Windows Vista®, and Windows® are registered trademarks or trademarks of Microsoft Corporation in the United States and/ or other countries.! Apple, Macintosh, Mac OS, iTunes, and Finder are registered trademarks of Apple Inc. in the United States and/ or other countries.! The audio compression technology for MP3 is offered under the license of Fraunhofer IIS and Thomson Multimedia. This product has been licensed for nonprofit use. This product has not been licensed for commercial purposes (for profit-making use), such as broadcasting (terrestrial,
satellite, cable or other types of broadcasting), streaming on the Internet, Intranet (a corporate network) or other types of networks or distributing of electronic information (online digital music distribution service). You need to acquire the corresponding licenses for such uses. For details, visit http://www.mp3licensing.com.
! The names of companies and products mentioned herein are the trademarks of their respective owners.
Published by Pioneer Corporation. Copyright © 2009 Pioneer Corporation.
All rights reserved.PIONEER CORPORATION4-1, MEGURO 1-CHOME, MEGURO-KU, TOKYO 153-8654, JAPAN
<DRI1001-B>
rekordbox version 1.0.1


![SYSTÈME DJ XDJ-R1 - Pioneer Electronics USA€¦ · Le Mode d’emploi de rekordbox peut être consulté par le menu [Aide] de rekordbox après l’installation de rekordbox. Informations](https://img.pdfslide.net/doc/110x75/5b9ddb1909d3f253158cf12d/systeme-dj-xdj-r1-pioneer-electronics-le-mode-demploi-de-rekordbox-peut.jpg)