Embed Size (px)
Citation preview

My CoughAssistA patient guide to CoughAssist E70
Airway clearance
2
Muscles located in our rib cage, neck and abdomen play
an important role during coughing. With many diseases, a
weakened ability to remove secretions increases the chance of
a respiratory infection.
If coughing becomes difficult, your physician may prescribe
the use of a manual and/or mechanical-assisted coughing
technique. A manual cough assist involves applying firm and
rapid pressure to the upper abdomen and/or thorax, forcing air
out of the lungs.
Irritation Inspiratory phase Compressive phase Expulsive phase
The different steps of coughing
A natural part of lifeCoughing. We often think of a cough as a symptom of a cold
or a means to clear our throat. Truth is, the ability to cough is
essential to life. Normally, the lining of the airways produces
small amounts of mucus, which trap dirt and bacteria. If allowed
to accumulate, these secretions can result in infection.
Coughing is the body’s way of clearing mucus from the lungs.
A cough begins with a deep breath in. The glottis (the opening
at the top of the voice box) closes, allowing the pressure to
build up in the lungs. The respiratory muscles contract and the
glottis opens, forcing air back out of the lungs.
3
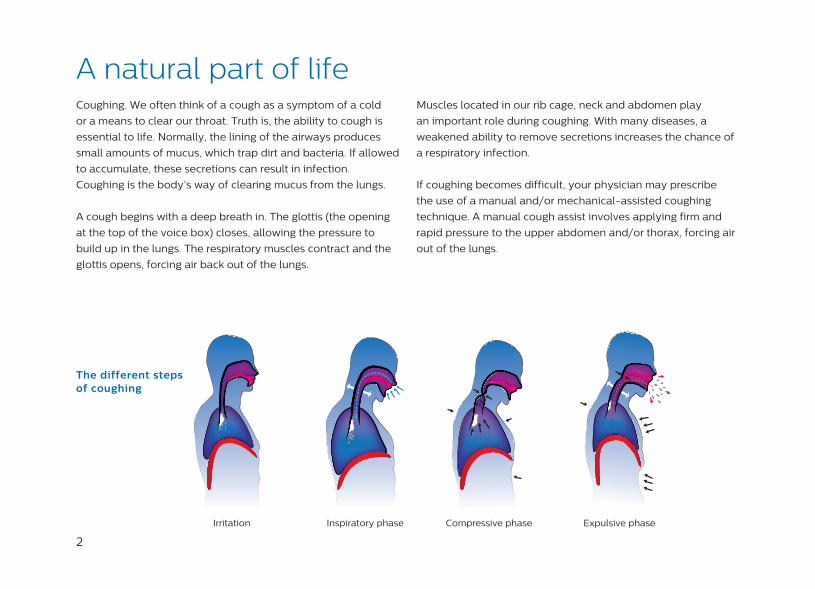
CoughAssist E70 is a mechanical insufflation-exsufflation
device that simulates a natural cough by gradually delivering
a large volume of air to your lungs, similar to a normal deep
breath, when you breathe in (positive pressure), and then
quickly reversing the flow to pull secretions out (negative
pressure). CoughAssist E70 makes your cough more effective
to help keep your airways clear, reducing the occurence of
respiratory infections.
4
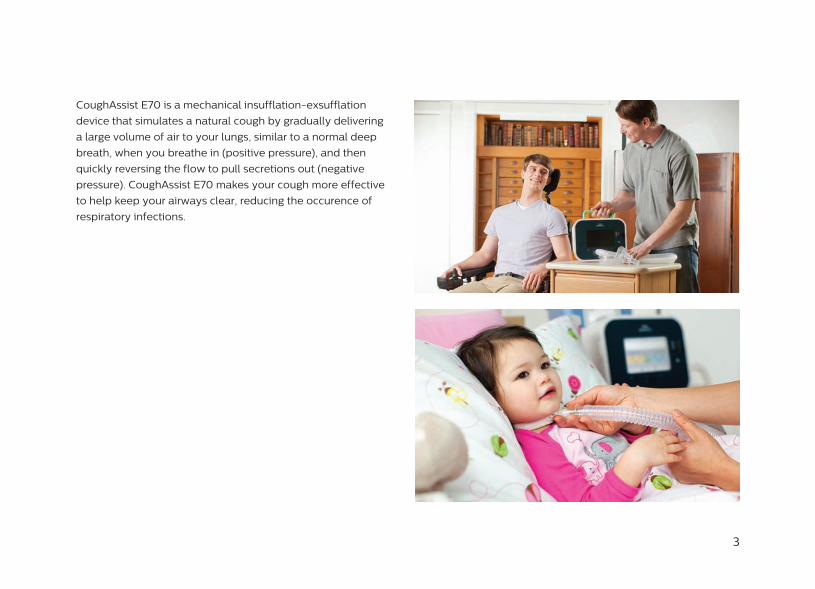
1 – Buttons. Allow you to perform certain actions specified
on the screen.
2 – Power On / power Off button.
Turns the device on or off.
3 – Manual switch. Activates the insufflation and
exsufflation phases*.
Pressing switch to the right (+) activates the insufflation
phase. Pressing switch to the left (-) activates
exsufflation phase. The center position activates the
pause phase.
4 – Display screen. Allows you to view settings and system
status information.
5 – Breathing circuit connection. Connect your circuit to the
outlet of the device.
*Blue: inhale, Yellow: exhale and Green: pause
1
2
34
5
Product description
5
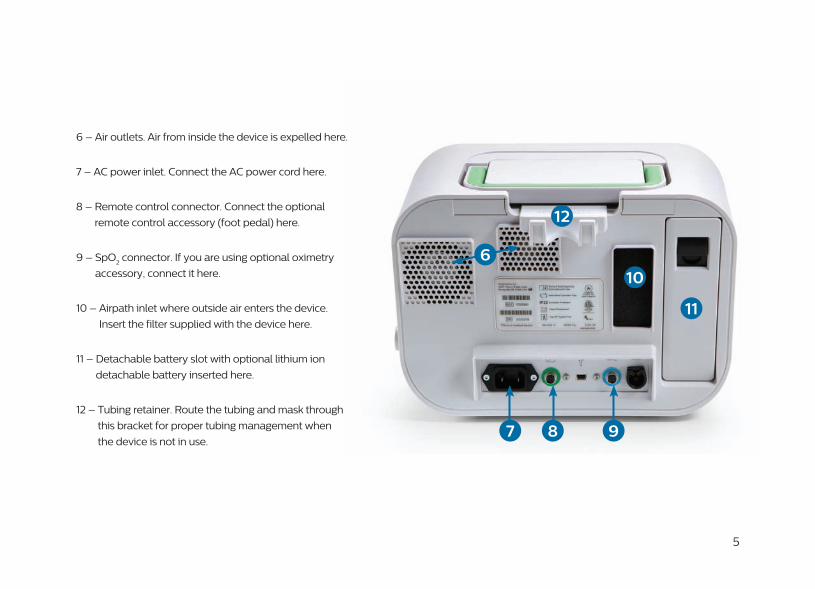
6 – Air outlets. Air from inside the device is expelled here.
7 – AC power inlet. Connect the AC power cord here.
8 – Remote control connector. Connect the optional
remote control accessory (foot pedal) here.
9 – SpO2 connector. If you are using optional oximetry
accessory, connect it here.
10 – Airpath inlet where outside air enters the device.
Insert the filter supplied with the device here.
11 – Detachable battery slot with optional lithium ion
detachable battery inserted here.
12 – Tubing retainer. Route the tubing and mask through
this bracket for proper tubing management when
the device is not in use.
6
12
10
11
7 8 9
6
A cough cycle is composed of an inhale time, an exhale time, and a pause time.
Four to six cycles represent a sequence. Between each sequence, you may rest
for 20 to 30 seconds or more. This resting time allows you or your caregiver
to remove secretions from the mask, mouthpiece, or trach tube. Four to six
sequences represent a typical treatment. The number of treatments you take
each day may vary.
During a treatment, you should sit upright as tolerated.
You may want to agree on a signal with your caregiver in the event you wish to
alert them that you want to stop treatment.
Treatment delivery can be manual or automatic. This means that cycles can be
started either by the manual switch, foot pedal, or automatically, based on your
inspiratory effort or a set time. Cough-Trak is available in Auto mode, allowing
you to control when you want to start the inspiratory phase. CoughAssist E70’s
Cough-Trak will detect when you are ready to inhale and will deliver the set
pressure. In addition, CoughAssist E70’s oscillation feature can be added to your
therapy to increase loosening of secretions.
Your device allows up to three prescription settings. Your clinician will advise you
on which prescription preset to use.
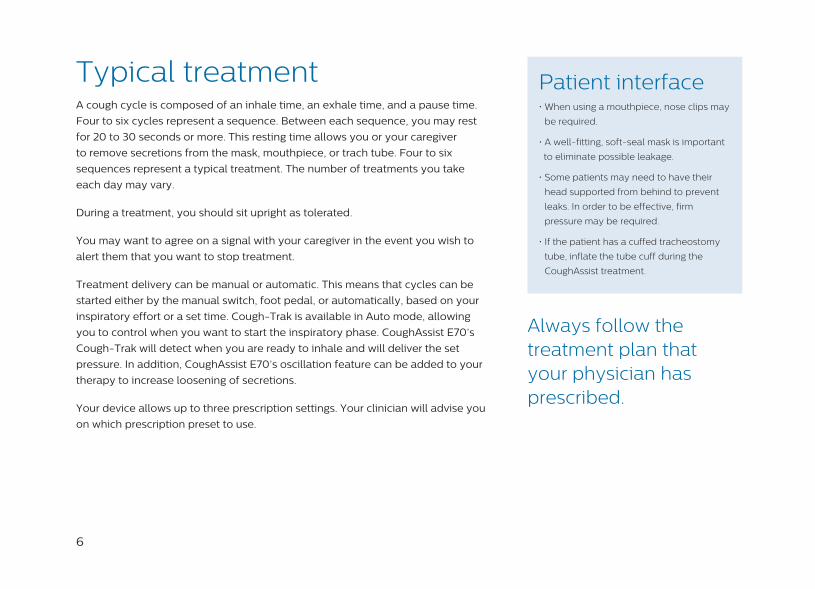
Patient interface• When using a mouthpiece, nose clips may
be required.
• A well-fitting, soft-seal mask is important
to eliminate possible leakage.
• Some patients may need to have their
head supported from behind to prevent
leaks. In order to be effective, firm
pressure may be required.
• If the patient has a cuffed tracheostomy
tube, inflate the tube cuff during the
CoughAssist treatment.
Always follow the treatment plan that your physician has prescribed.
Typical treatment
7
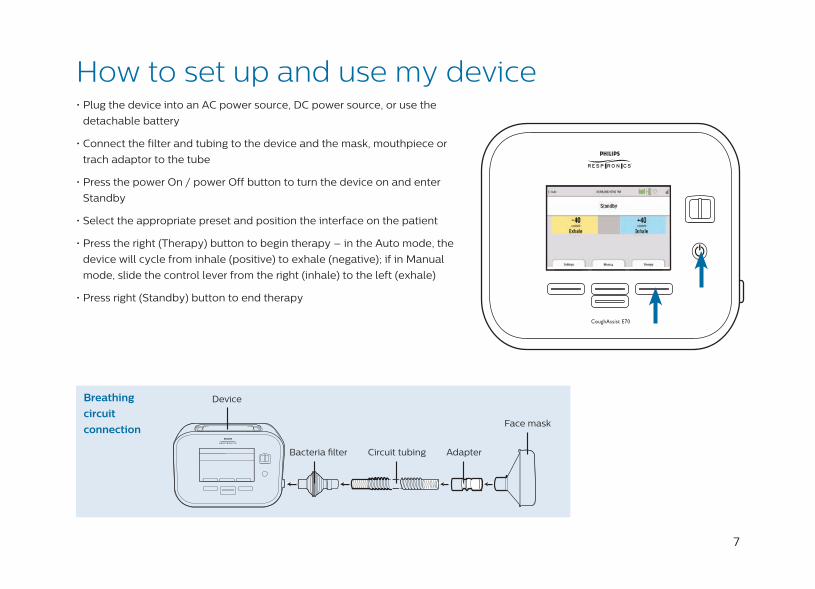
• Plug the device into an AC power source, DC power source, or use the
detachable battery
• Connect the filter and tubing to the device and the mask, mouthpiece or
trach adaptor to the tube
• Press the power On / power Off button to turn the device on and enter
Standby
• Select the appropriate preset and position the interface on the patient
• Press the right (Therapy) button to begin therapy – in the Auto mode, the
device will cycle from inhale (positive) to exhale (negative); if in Manual
mode, slide the control lever from the right (inhale) to the left (exhale)
• Press right (Standby) button to end therapy
Breathing
circuit
connection
Device
Bacteria �lter Circuit tubing Adapter
Face mask
How to set up and use my device
8
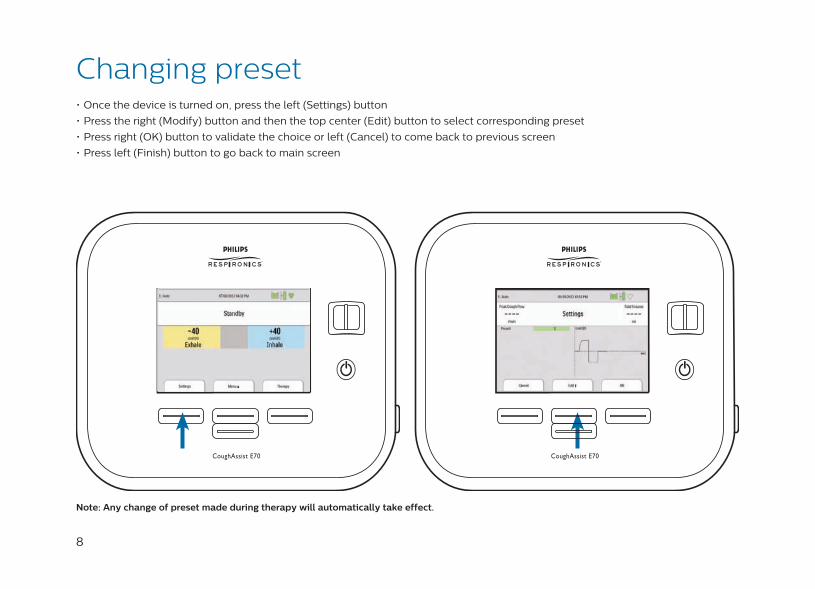
Note: Any change of preset made during therapy will automatically take effect.
• Once the device is turned on, press the left (Settings) button
• Press the right (Modify) button and then the top center (Edit) button to select corresponding preset
• Press right (OK) button to validate the choice or left (Cancel) to come back to previous screen
• Press left (Finish) button to go back to main screen
Changing preset
9
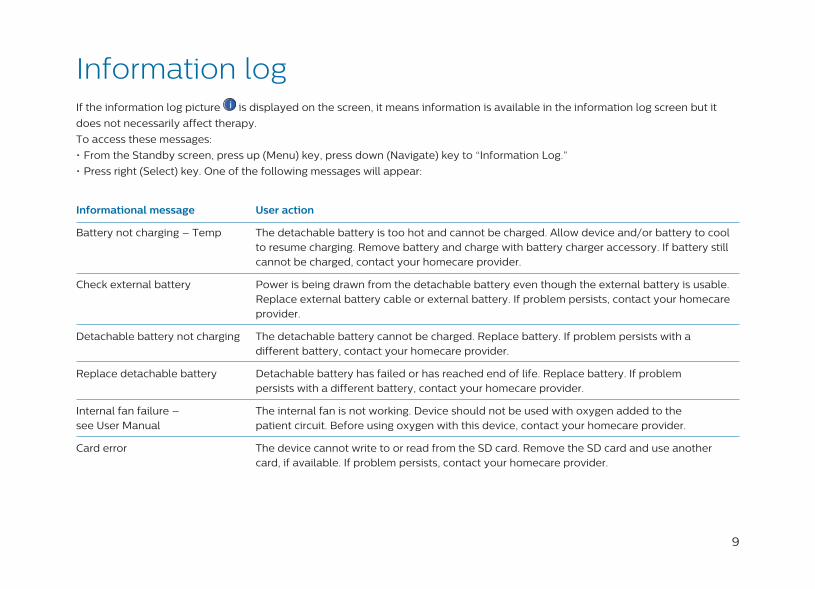
Information logIf the information log picture is displayed on the screen, it means information is available in the information log screen but it
does not necessarily affect therapy.
To access these messages:
• From the Standby screen, press up (Menu) key, press down (Navigate) key to “Information Log.”
• Press right (Select) key. One of the following messages will appear:
Informational message User action
Battery not charging – Temp The detachable battery is too hot and cannot be charged. Allow device and/or battery to cool to resume charging. Remove battery and charge with battery charger accessory. If battery still cannot be charged, contact your homecare provider.
Check external battery Power is being drawn from the detachable battery even though the external battery is usable. Replace external battery cable or external battery. If problem persists, contact your homecare provider.
Detachable battery not charging The detachable battery cannot be charged. Replace battery. If problem persists with a different battery, contact your homecare provider.
Replace detachable battery Detachable battery has failed or has reached end of life. Replace battery. If problem persists with a different battery, contact your homecare provider.
Internal fan failure – The internal fan is not working. Device should not be used with oxygen added to thesee User Manual patient circuit. Before using oxygen with this device, contact your homecare provider.
Card error The device cannot write to or read from the SD card. Remove the SD card and use another card, if available. If problem persists, contact your homecare provider.
10
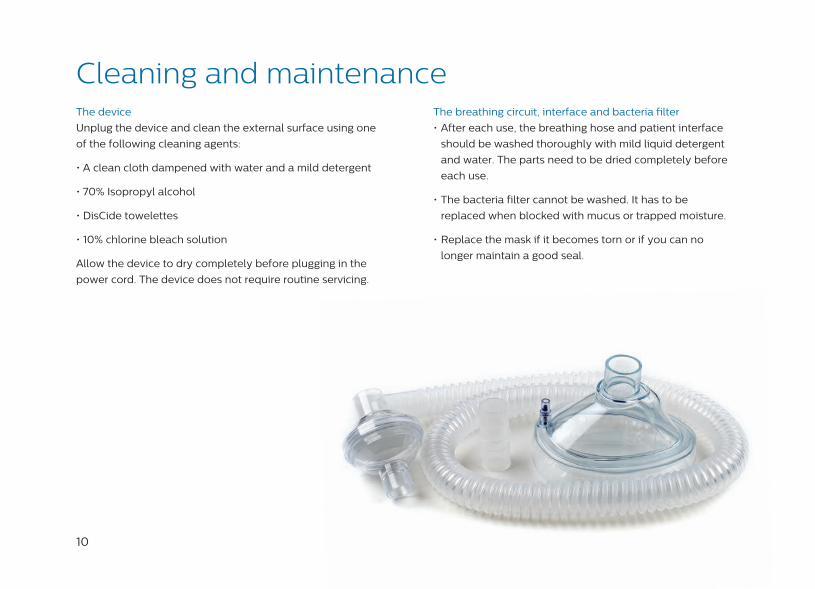
Cleaning and maintenanceThe device
Unplug the device and clean the external surface using one
of the following cleaning agents:
• A clean cloth dampened with water and a mild detergent
• 70% Isopropyl alcohol
• DisCide towelettes
• 10% chlorine bleach solution
Allow the device to dry completely before plugging in the
power cord. The device does not require routine servicing.
The breathing circuit, interface and bacteria filter
• After each use, the breathing hose and patient interface
should be washed thoroughly with mild liquid detergent
and water. The parts need to be dried completely before
each use.
• The bacteria filter cannot be washed. It has to be
replaced when blocked with mucus or trapped moisture.
• Replace the mask if it becomes torn or if you can no
longer maintain a good seal.
11
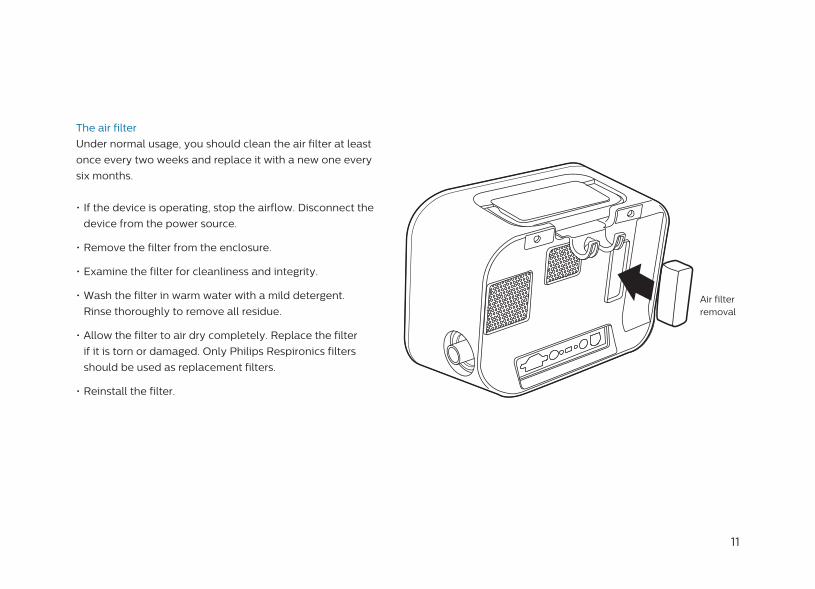
Air filterremoval
The air filter
Under normal usage, you should clean the air filter at least
once every two weeks and replace it with a new one every
six months.
• If the device is operating, stop the airflow. Disconnect the
device from the power source.
• Remove the filter from the enclosure.
• Examine the filter for cleanliness and integrity.
• Wash the filter in warm water with a mild detergent.
Rinse thoroughly to remove all residue.
• Allow the filter to air dry completely. Replace the filter
if it is torn or damaged. Only Philips Respironics filters
should be used as replacement filters.
• Reinstall the filter.

12
My doctor: My homecare provider: My mask and tubing size:
SD cardThe CoughAssist E70 comes with an SD card inserted in the SD
card slot on the side of the device. Your clinician may use this card
to record information and might ask you to remove the card and
forward for evaluation.
To remove the SD card:
• Select “Safely Remove SD Card” option from the Main menu.
• After the “Safely remove SD Card” message appears, remove
the card.
13
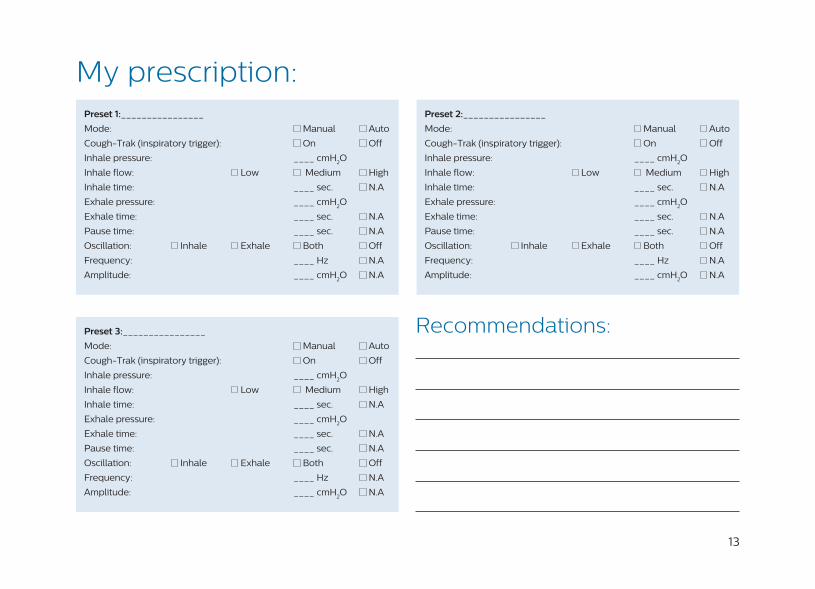
Preset 1:________________
Mode: Manual Auto
Cough-Trak (inspiratory trigger): On Off
Inhale pressure: ____ cmH2O
Inhale flow: Low Medium High
Inhale time: ____ sec. N.A
Exhale pressure: ____ cmH2O
Exhale time: ____ sec. N.A
Pause time: ____ sec. N.A
Oscillation: Inhale Exhale Both Off
Frequency: ____ Hz N.A
Amplitude: ____ cmH2O N.A
Preset 2:________________
Mode: Manual Auto
Cough-Trak (inspiratory trigger): On Off
Inhale pressure: ____ cmH2O
Inhale flow: Low Medium High
Inhale time: ____ sec. N.A
Exhale pressure: ____ cmH2O
Exhale time: ____ sec. N.A
Pause time: ____ sec. N.A
Oscillation: Inhale Exhale Both Off
Frequency: ____ Hz N.A
Amplitude: ____ cmH2O N.A
Preset 3:________________
Mode: Manual Auto
Cough-Trak (inspiratory trigger): On Off
Inhale pressure: ____ cmH2O
Inhale flow: Low Medium High
Inhale time: ____ sec. N.A
Exhale pressure: ____ cmH2O
Exhale time: ____ sec. N.A
Pause time: ____ sec. N.A
Oscillation: Inhale Exhale Both Off
Frequency: ____ Hz N.A
Amplitude: ____ cmH2O N.A
My prescription:
Recommendations:

14
Notes:

15

CoughAssist, Cough-Trak and Philips Respironics are trademarks of Koninklijke Philips N.V. and its affiliates. All rights reserved.
DisCide is a registered trademark of AliMed, Inc.
This guide contains abstracted information from the User Manual; please refer to the latest for complete information regarding the
CoughAssist E70 device.
©2016 Koninklijke Philips N.V. All rights are reserved. Philips Healthcare reserves the right to make changes in specifications
and/or to discontinue any product at any time without notice or obligation and will not be liable for any consequences resulting from
the use of this publication.
Broudy FD 1/7/16 MCI 4107100 PN 1099519
Philips Respironics 1010 Murry Ridge Lane Murrysville, PA 15668 USA
www.philips.com/respironics