Embed Size (px)
Citation preview
Page 1 of 14 November 17
MY EXPENSES & MILEAGE
This option enables the user to create and submit expense & mileage claims and to view previously entered claims. Users are also able to save incomplete claims, update claims and delete them. Users are recommended to start a claim form each month, saving after every entry until all expenses have been claimed before submitting the request.
A receipt MUST support every entry of a claim. Scanned or photographed receipts must contain all information from the front and reverse of the receipt and be clearly legible, as required by HMRC.
After uploading copies of receipts it is recommended that you retain the paper receipts for your own records.
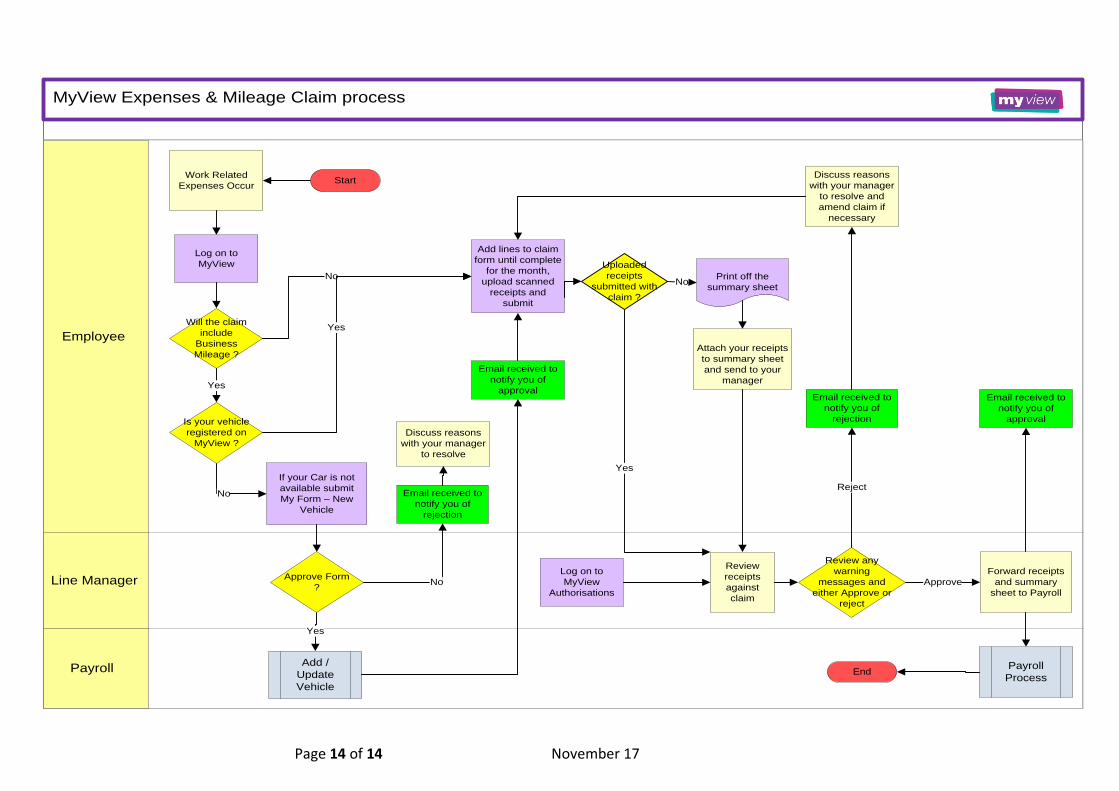
At the end of this document you will find a process flowchart.
CREATING A NEW EXPENSES
CLAIM
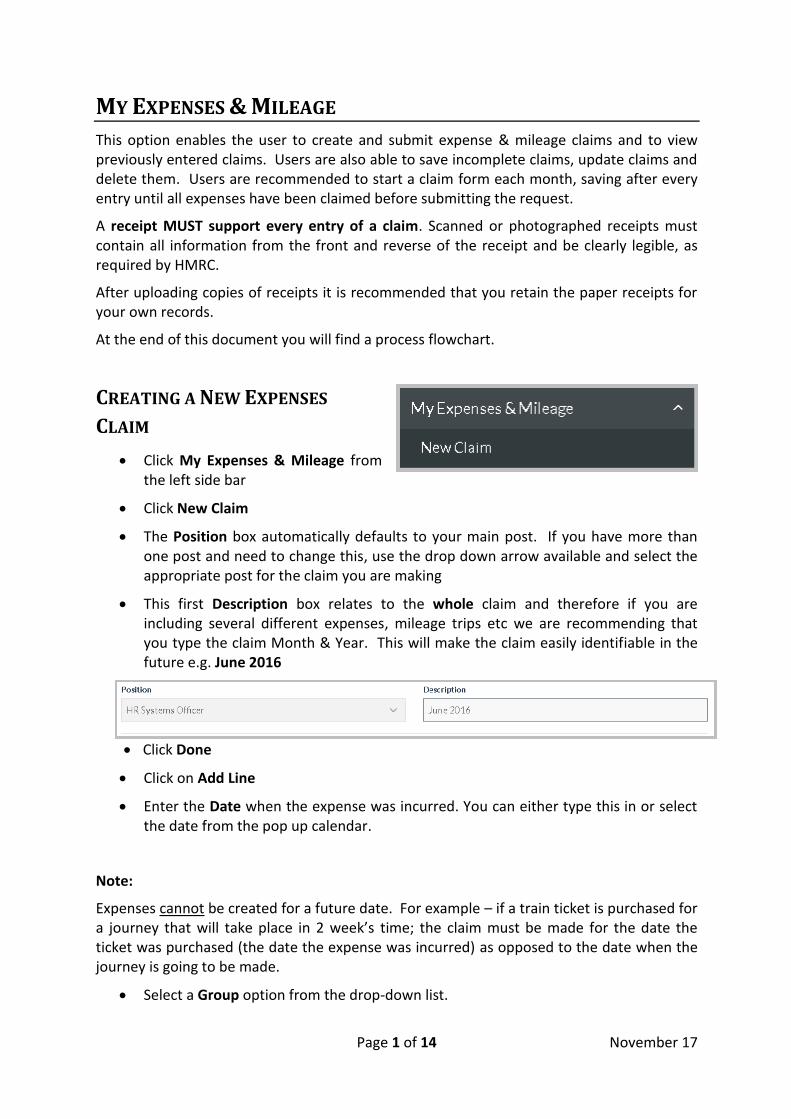
Click My Expenses & Mileage from the left side bar
Click New Claim
The Position box automatically defaults to your main post. If you have more than one post and need to change this, use the drop down arrow available and select the appropriate post for the claim you are making
This first Description box relates to the whole claim and therefore if you are including several different expenses, mileage trips etc we are recommending that you type the claim Month & Year. This will make the claim easily identifiable in the future e.g. June 2016
Click Done
Click on Add Line
Enter the Date when the expense was incurred. You can either type this in or select the date from the pop up calendar.
Note:
Expenses cannot be created for a future date. For example – if a train ticket is purchased for a journey that will take place in 2 week’s time; the claim must be made for the date the ticket was purchased (the date the expense was incurred) as opposed to the date when the journey is going to be made.
Select a Group option from the drop-down list.
Page 2 of 14 November 17
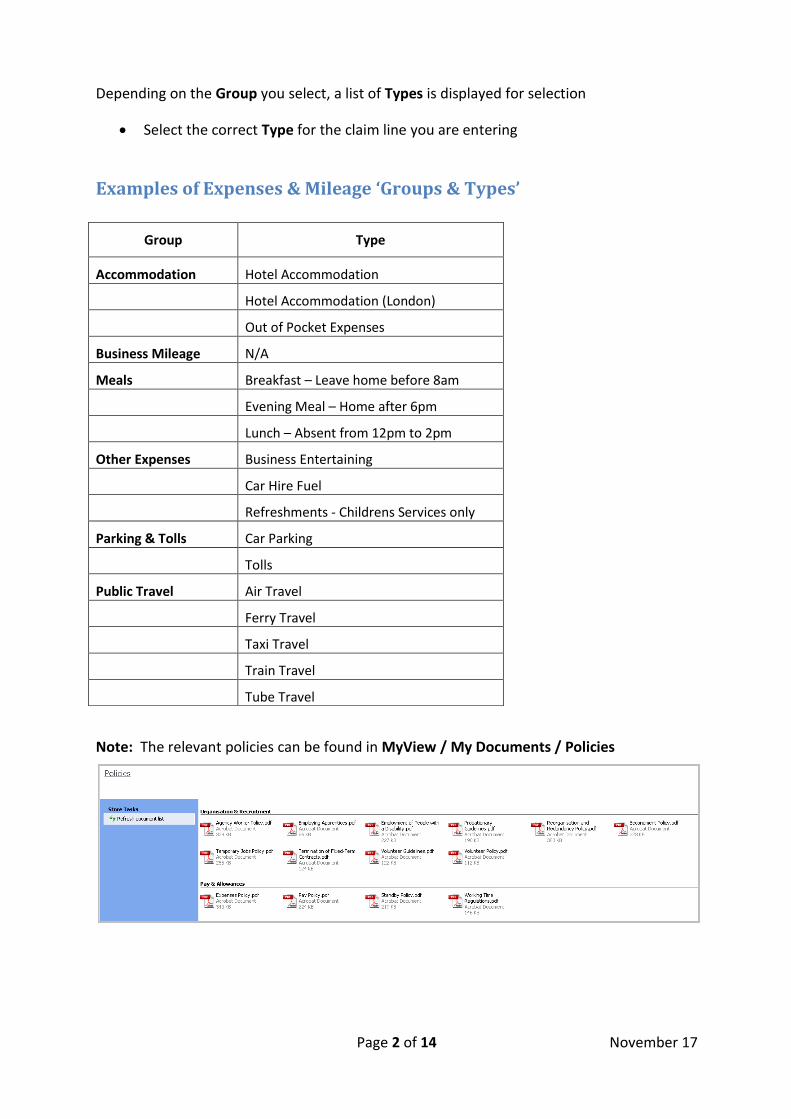
Depending on the Group you select, a list of Types is displayed for selection
Select the correct Type for the claim line you are entering
Examples of Expenses & Mileage ‘Groups & Types’
Note: The relevant policies can be found in MyView / My Documents / Policies
Group Type
Accommodation Hotel Accommodation
Hotel Accommodation (London)
Out of Pocket Expenses
Business Mileage N/A
Meals Breakfast – Leave home before 8am
Evening Meal – Home after 6pm
Lunch – Absent from 12pm to 2pm
Other Expenses Business Entertaining
Car Hire Fuel
Refreshments - Childrens Services only
Parking & Tolls Car Parking
Tolls
Public Travel Air Travel
Ferry Travel
Taxi Travel
Train Travel
Tube Travel
Page 3 of 14 November 17
BACK TO COMPLETION OF THE EXPENSES CLAIM…
At this point you will have -
Selected the correct post (if required)
Added a description which is relevant to the whole claim (i.e. June 2016)
Clicked on ‘Add Line’
Entered the date the expense was incurred
Selected the appropriate Group & Type
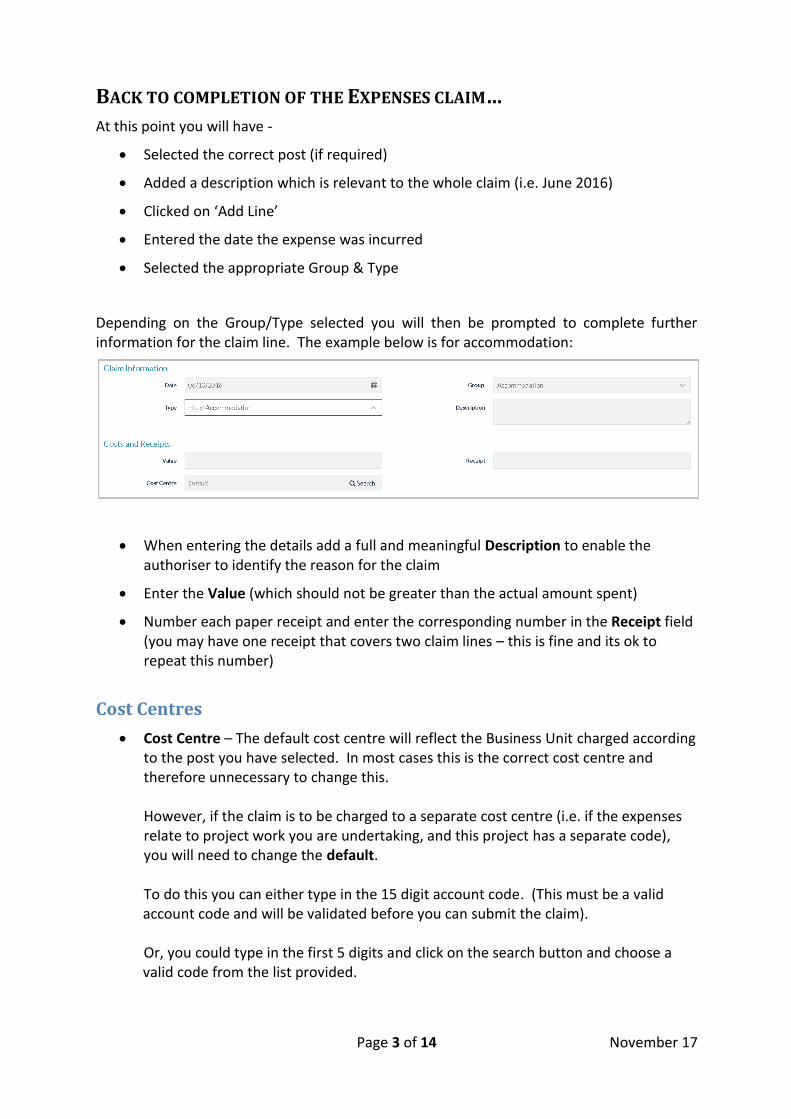
Depending on the Group/Type selected you will then be prompted to complete further information for the claim line. The example below is for accommodation:
When entering the details add a full and meaningful Description to enable the authoriser to identify the reason for the claim
Enter the Value (which should not be greater than the actual amount spent)
Number each paper receipt and enter the corresponding number in the Receipt field (you may have one receipt that covers two claim lines – this is fine and its ok to repeat this number)
Cost Centres
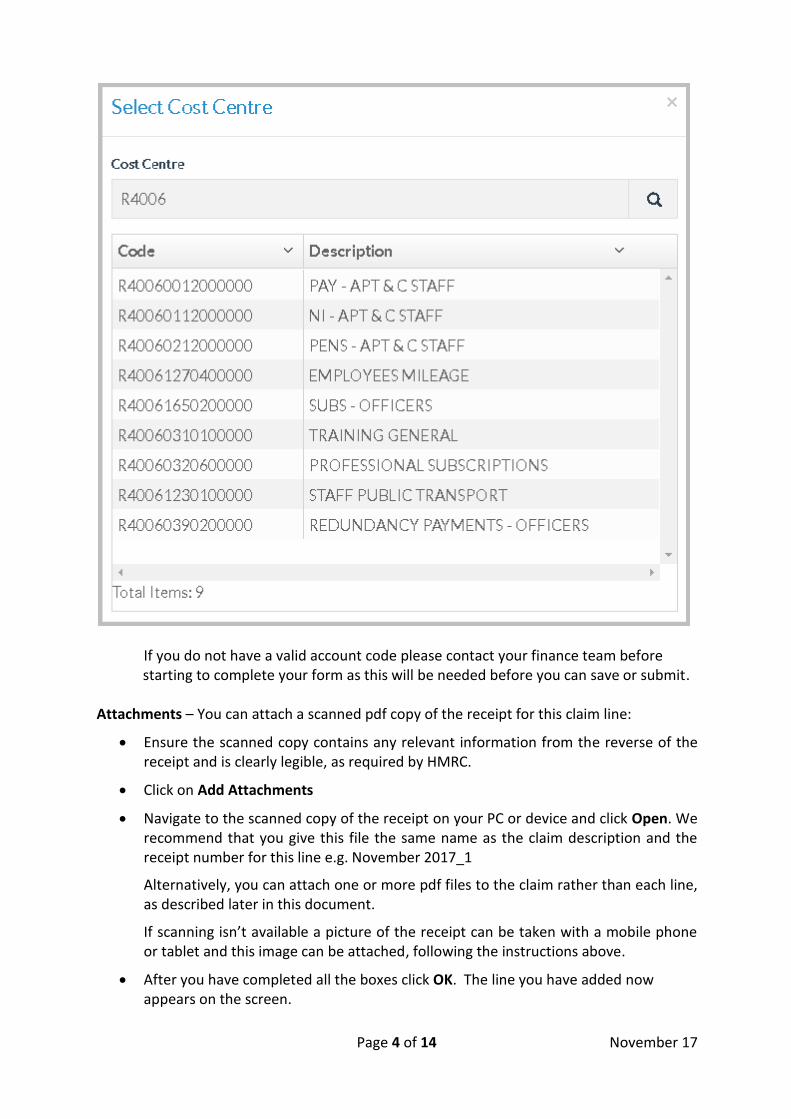
Cost Centre – The default cost centre will reflect the Business Unit charged according to the post you have selected. In most cases this is the correct cost centre and therefore unnecessary to change this. However, if the claim is to be charged to a separate cost centre (i.e. if the expenses relate to project work you are undertaking, and this project has a separate code), you will need to change the default.
To do this you can either type in the 15 digit account code. (This must be a valid account code and will be validated before you can submit the claim). Or, you could type in the first 5 digits and click on the search button and choose a valid code from the list provided.
Page 4 of 14 November 17
If you do not have a valid account code please contact your finance team before starting to complete your form as this will be needed before you can save or submit.
Attachments – You can attach a scanned pdf copy of the receipt for this claim line:
Ensure the scanned copy contains any relevant information from the reverse of the receipt and is clearly legible, as required by HMRC.
Click on Add Attachments
Navigate to the scanned copy of the receipt on your PC or device and click Open. We recommend that you give this file the same name as the claim description and the receipt number for this line e.g. November 2017_1
Alternatively, you can attach one or more pdf files to the claim rather than each line, as described later in this document.
If scanning isn’t available a picture of the receipt can be taken with a mobile phone or tablet and this image can be attached, following the instructions above.
After you have completed all the boxes click OK. The line you have added now appears on the screen.
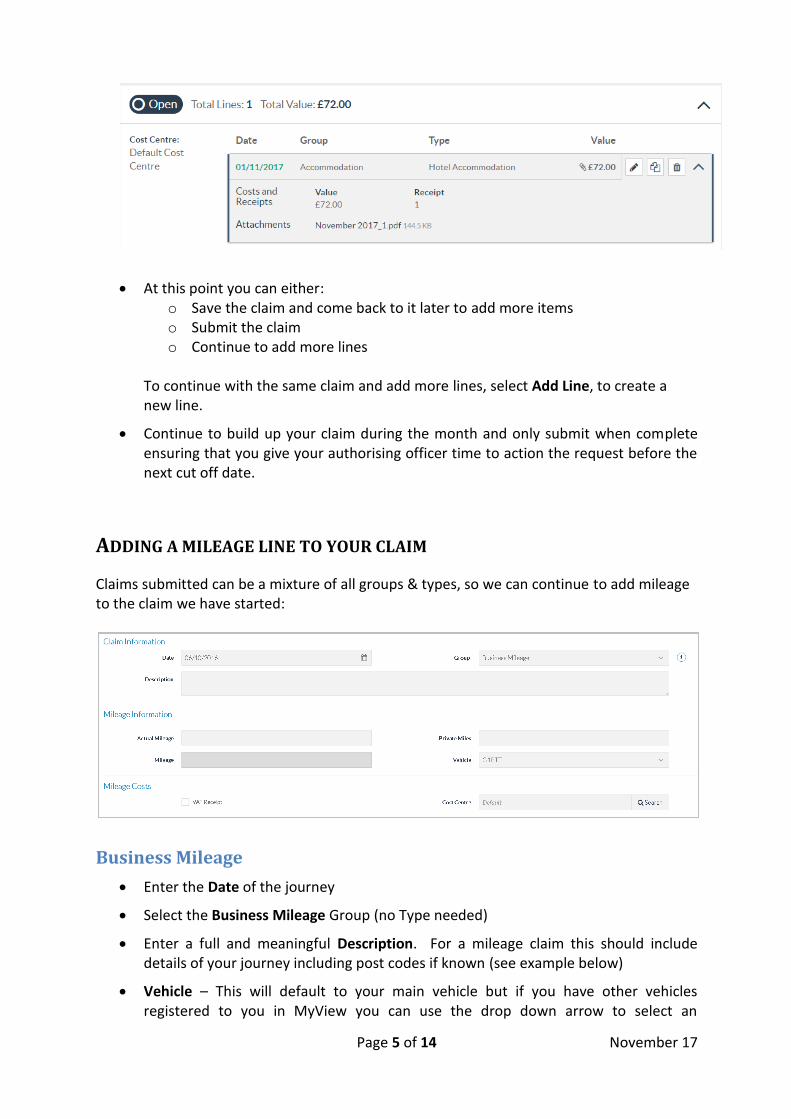
Page 5 of 14 November 17
At this point you can either: o Save the claim and come back to it later to add more items o Submit the claim o Continue to add more lines
To continue with the same claim and add more lines, select Add Line, to create a new line.
Continue to build up your claim during the month and only submit when complete ensuring that you give your authorising officer time to action the request before the next cut off date.
ADDING A MILEAGE LINE TO YOUR CLAIM
Claims submitted can be a mixture of all groups & types, so we can continue to add mileage to the claim we have started:
Business Mileage
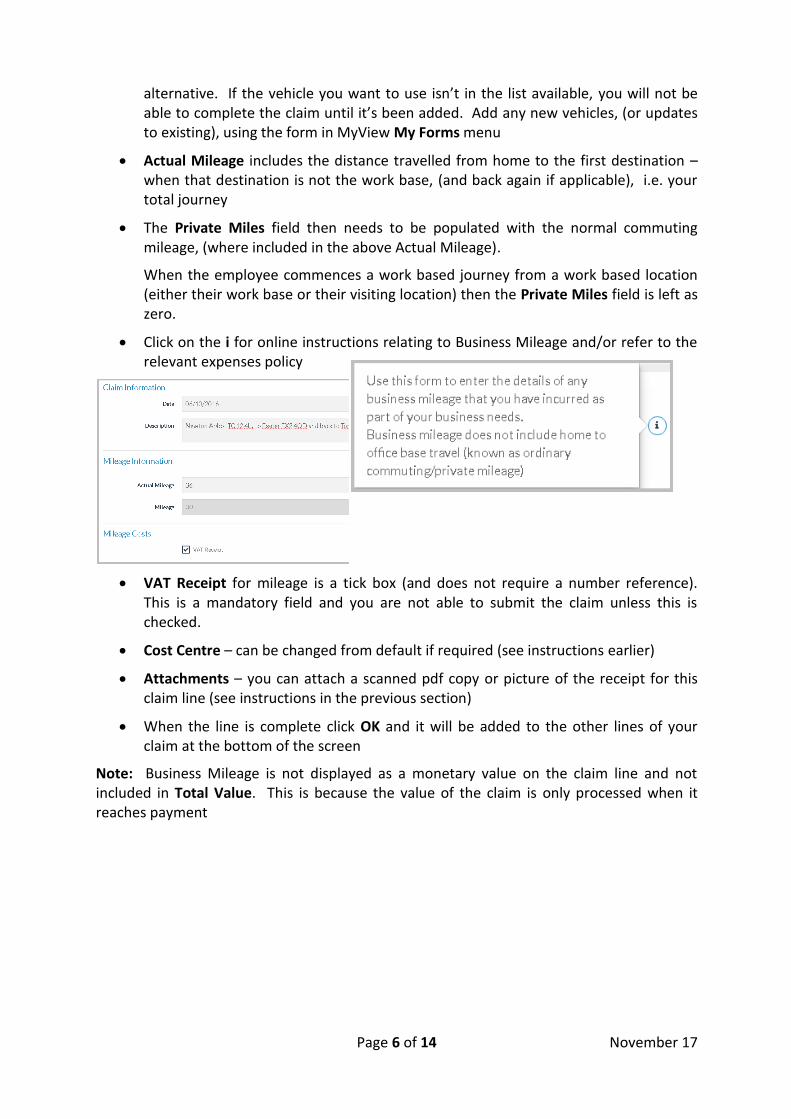
Enter the Date of the journey
Select the Business Mileage Group (no Type needed)
Enter a full and meaningful Description. For a mileage claim this should include details of your journey including post codes if known (see example below)
Vehicle – This will default to your main vehicle but if you have other vehicles registered to you in MyView you can use the drop down arrow to select an
Page 6 of 14 November 17
alternative. If the vehicle you want to use isn’t in the list available, you will not be able to complete the claim until it’s been added. Add any new vehicles, (or updates to existing), using the form in MyView My Forms menu
Actual Mileage includes the distance travelled from home to the first destination – when that destination is not the work base, (and back again if applicable), i.e. your total journey
The Private Miles field then needs to be populated with the normal commuting mileage, (where included in the above Actual Mileage).
When the employee commences a work based journey from a work based location (either their work base or their visiting location) then the Private Miles field is left as zero.
Click on the i for online instructions relating to Business Mileage and/or refer to the relevant expenses policy
VAT Receipt for mileage is a tick box (and does not require a number reference). This is a mandatory field and you are not able to submit the claim unless this is checked.
Cost Centre – can be changed from default if required (see instructions earlier)
Attachments – you can attach a scanned pdf copy or picture of the receipt for this claim line (see instructions in the previous section)
When the line is complete click OK and it will be added to the other lines of your claim at the bottom of the screen
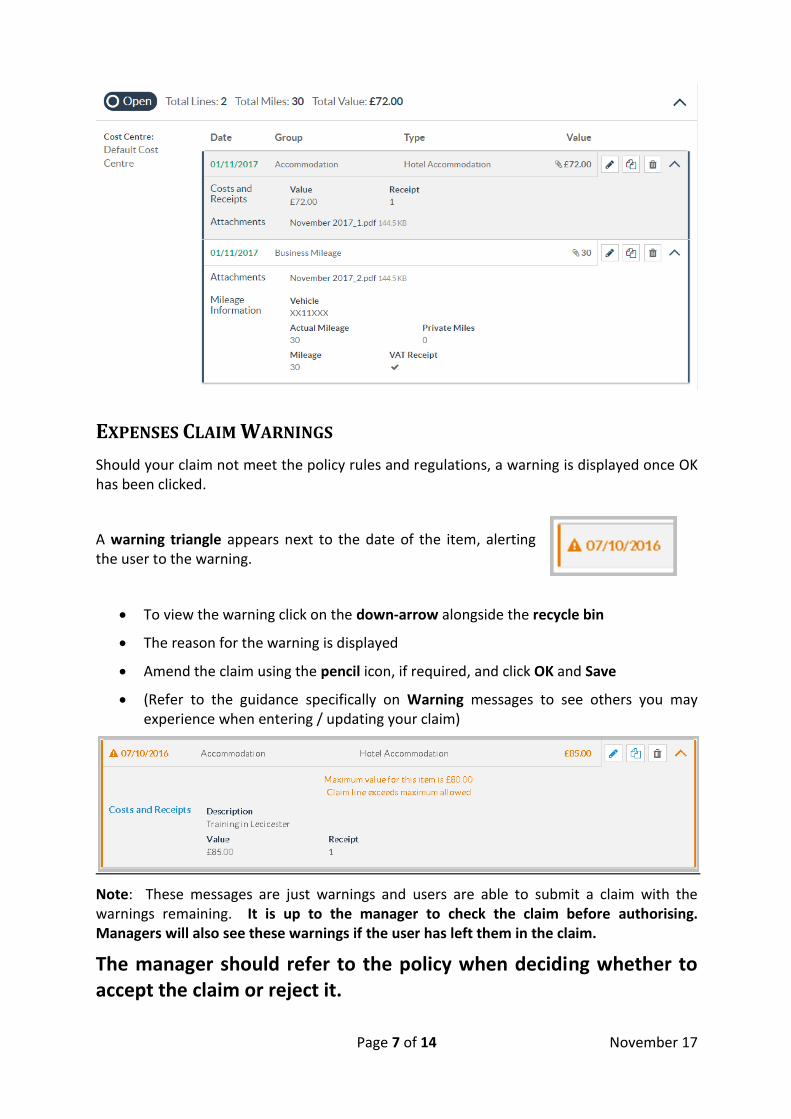
Note: Business Mileage is not displayed as a monetary value on the claim line and not included in Total Value. This is because the value of the claim is only processed when it reaches payment
Page 7 of 14 November 17
EXPENSES CLAIM WARNINGS
Should your claim not meet the policy rules and regulations, a warning is displayed once OK has been clicked.
A warning triangle appears next to the date of the item, alerting the user to the warning.
To view the warning click on the down-arrow alongside the recycle bin
The reason for the warning is displayed
Amend the claim using the pencil icon, if required, and click OK and Save
(Refer to the guidance specifically on Warning messages to see others you may experience when entering / updating your claim)
Note: These messages are just warnings and users are able to submit a claim with the warnings remaining. It is up to the manager to check the claim before authorising. Managers will also see these warnings if the user has left them in the claim.
The manager should refer to the policy when deciding whether to accept the claim or reject it.
Page 8 of 14 November 17
SAVING A CLAIM
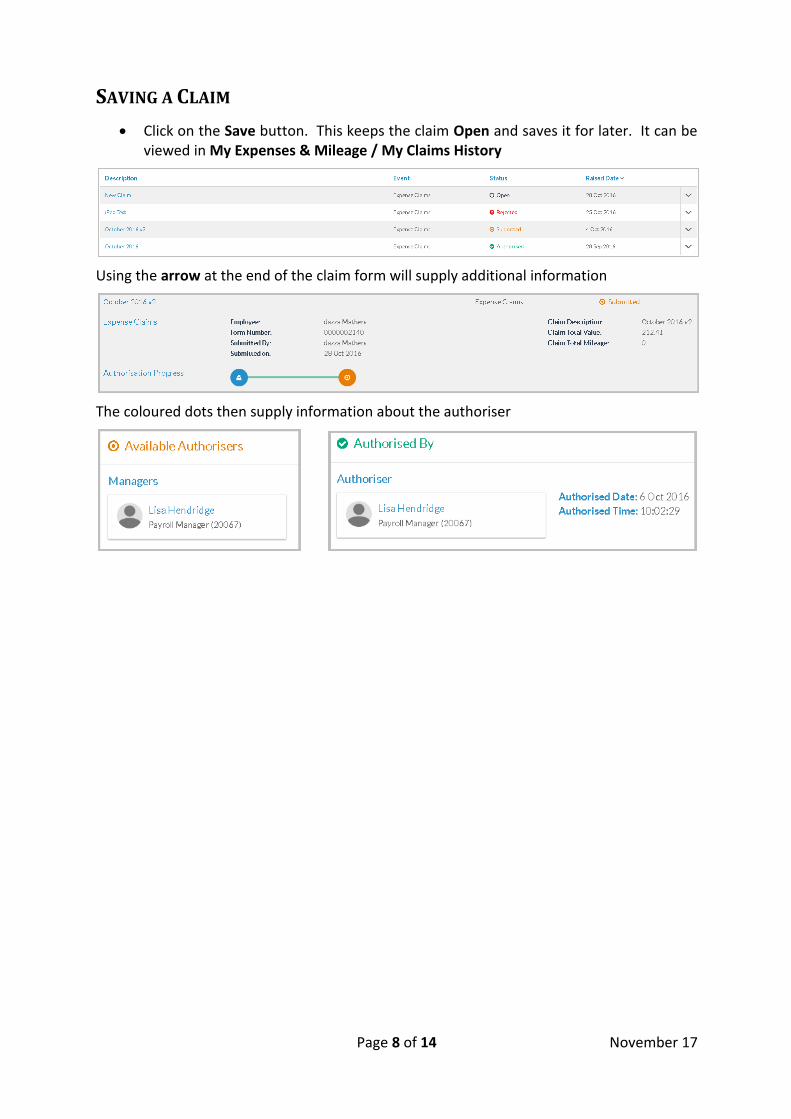
Click on the Save button. This keeps the claim Open and saves it for later. It can be viewed in My Expenses & Mileage / My Claims History
Using the arrow at the end of the claim form will supply additional information
The coloured dots then supply information about the authoriser
Page 9 of 14 November 17
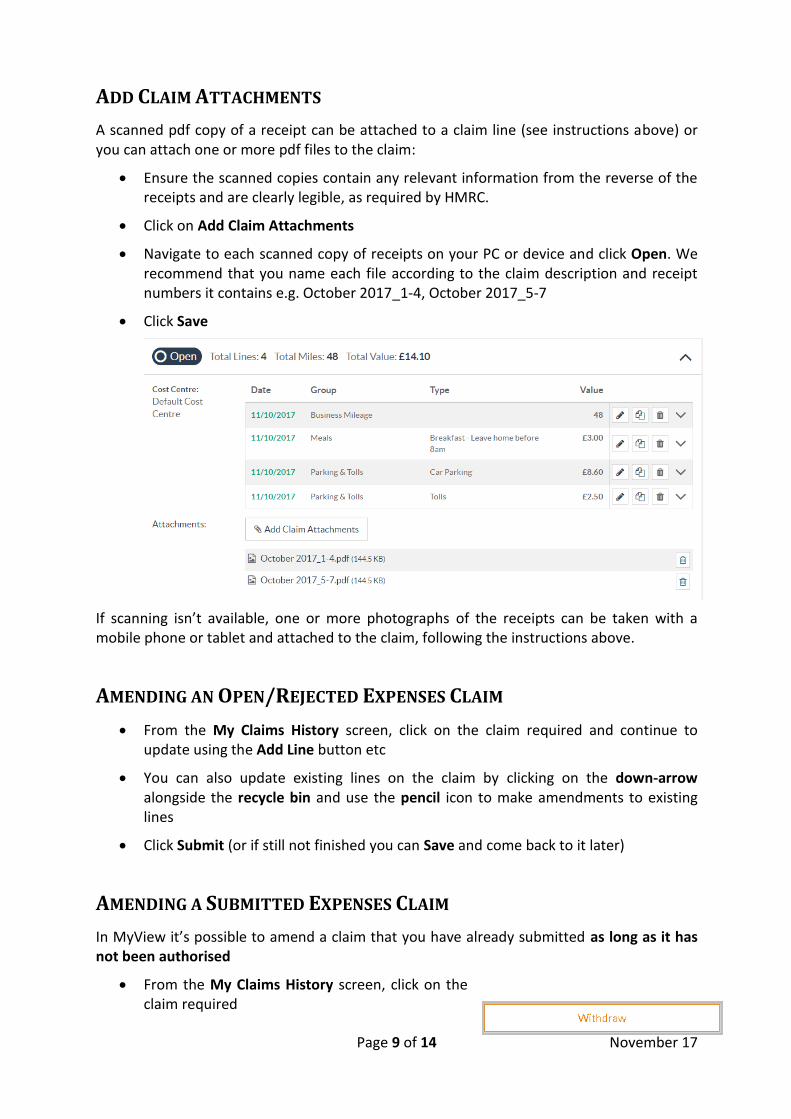
ADD CLAIM ATTACHMENTS
A scanned pdf copy of a receipt can be attached to a claim line (see instructions above) or you can attach one or more pdf files to the claim:
Ensure the scanned copies contain any relevant information from the reverse of the receipts and are clearly legible, as required by HMRC.
Click on Add Claim Attachments
Navigate to each scanned copy of receipts on your PC or device and click Open. We recommend that you name each file according to the claim description and receipt numbers it contains e.g. October 2017_1-4, October 2017_5-7
Click Save
If scanning isn’t available, one or more photographs of the receipts can be taken with a mobile phone or tablet and attached to the claim, following the instructions above.
AMENDING AN OPEN/REJECTED EXPENSES CLAIM
From the My Claims History screen, click on the claim required and continue to update using the Add Line button etc
You can also update existing lines on the claim by clicking on the down-arrow alongside the recycle bin and use the pencil icon to make amendments to existing lines
Click Submit (or if still not finished you can Save and come back to it later)
AMENDING A SUBMITTED EXPENSES CLAIM
In MyView it’s possible to amend a claim that you have already submitted as long as it has not been authorised
From the My Claims History screen, click on the claim required
Page 10 of 14 November 17
Click on Withdraw
Continue to update using the Add Line button etc
You can also update existing lines on the claim by clicking on the down-arrow alongside the recycle bin and use the pencil icon to make amendments to existing lines
Click Submit (or if still not finished you can Save and come back to it later)
SUBMITTING AN EXPENSES CLAIM
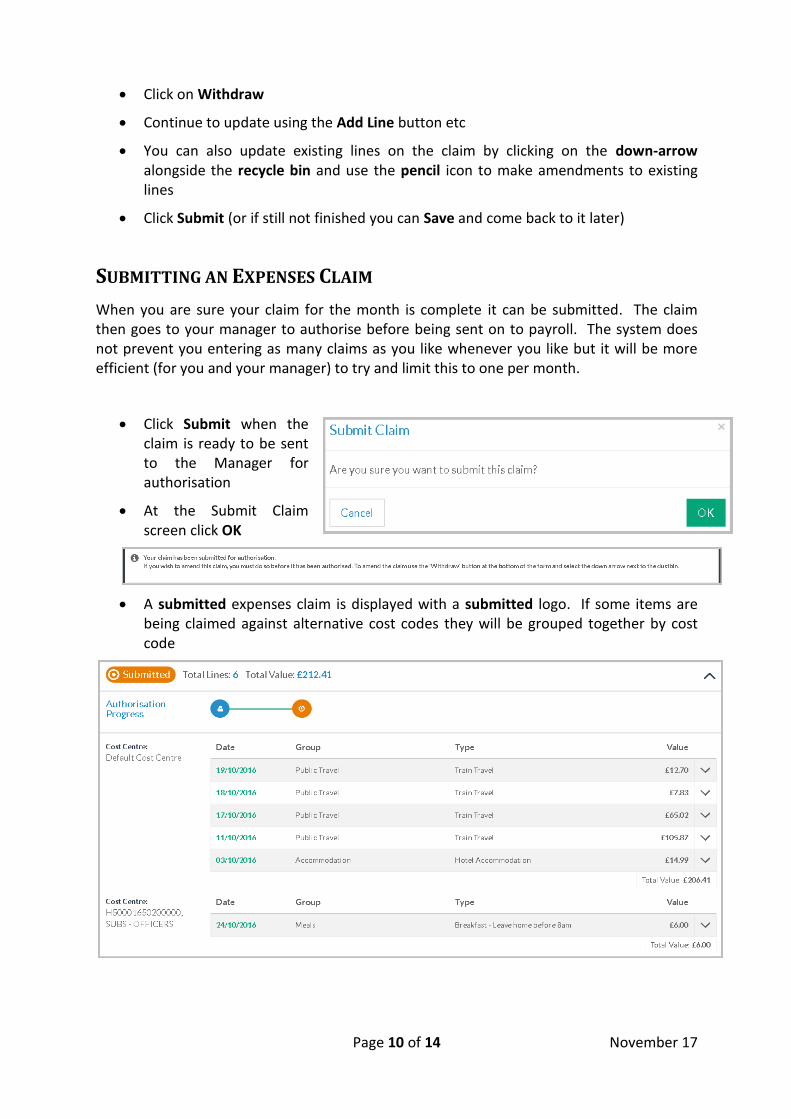
When you are sure your claim for the month is complete it can be submitted. The claim then goes to your manager to authorise before being sent on to payroll. The system does not prevent you entering as many claims as you like whenever you like but it will be more efficient (for you and your manager) to try and limit this to one per month.
Click Submit when the claim is ready to be sent to the Manager for authorisation
At the Submit Claim screen click OK
A submitted expenses claim is displayed with a submitted logo. If some items are being claimed against alternative cost codes they will be grouped together by cost code
Page 11 of 14 November 17
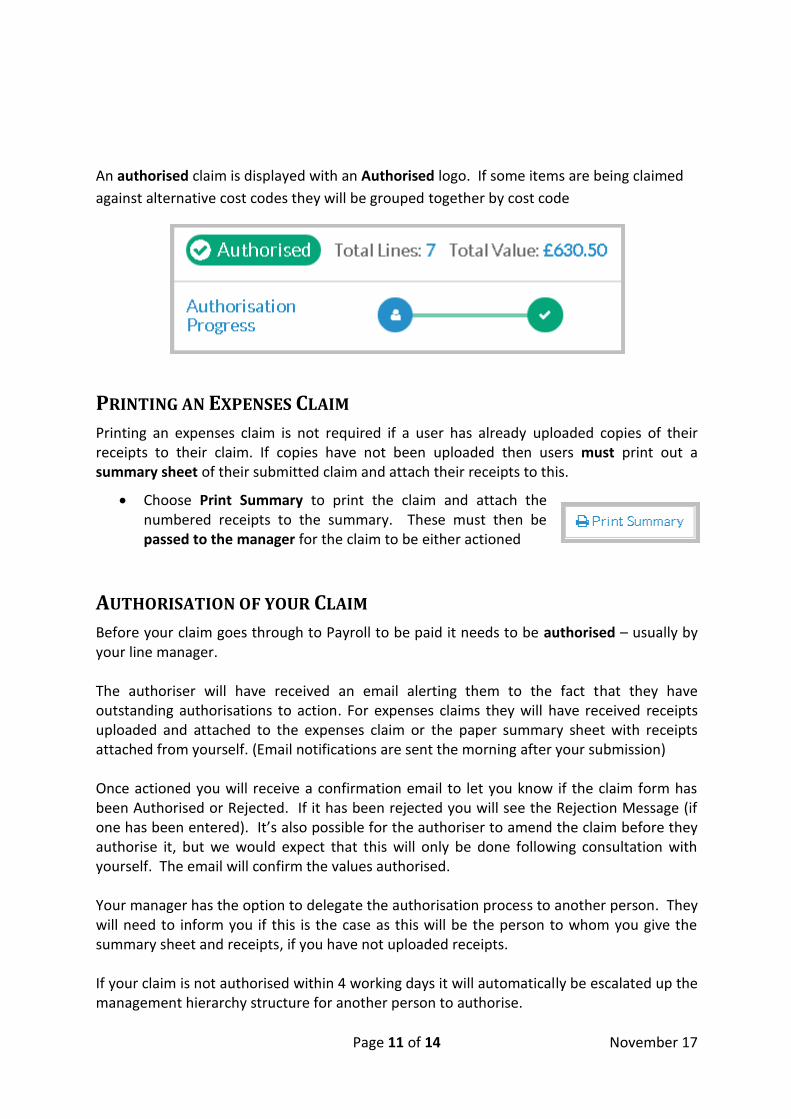
An authorised claim is displayed with an Authorised logo. If some items are being claimed
against alternative cost codes they will be grouped together by cost code
PRINTING AN EXPENSES CLAIM
Printing an expenses claim is not required if a user has already uploaded copies of their receipts to their claim. If copies have not been uploaded then users must print out a summary sheet of their submitted claim and attach their receipts to this.
Choose Print Summary to print the claim and attach the numbered receipts to the summary. These must then be passed to the manager for the claim to be either actioned
AUTHORISATION OF YOUR CLAIM
Before your claim goes through to Payroll to be paid it needs to be authorised – usually by your line manager. The authoriser will have received an email alerting them to the fact that they have outstanding authorisations to action. For expenses claims they will have received receipts uploaded and attached to the expenses claim or the paper summary sheet with receipts attached from yourself. (Email notifications are sent the morning after your submission) Once actioned you will receive a confirmation email to let you know if the claim form has been Authorised or Rejected. If it has been rejected you will see the Rejection Message (if one has been entered). It’s also possible for the authoriser to amend the claim before they authorise it, but we would expect that this will only be done following consultation with yourself. The email will confirm the values authorised. Your manager has the option to delegate the authorisation process to another person. They will need to inform you if this is the case as this will be the person to whom you give the summary sheet and receipts, if you have not uploaded receipts. If your claim is not authorised within 4 working days it will automatically be escalated up the management hierarchy structure for another person to authorise.
Page 12 of 14 November 17
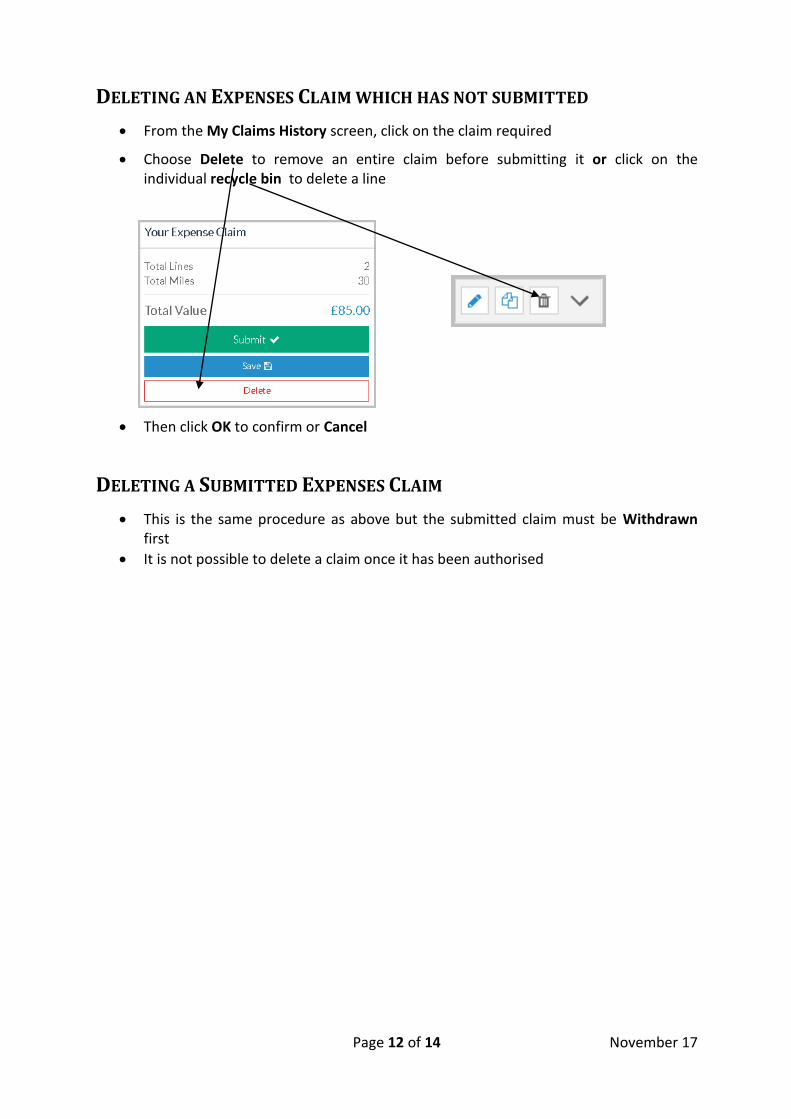
DELETING AN EXPENSES CLAIM WHICH HAS NOT SUBMITTED
From the My Claims History screen, click on the claim required
Choose Delete to remove an entire claim before submitting it or click on the individual recycle bin to delete a line
Then click OK to confirm or Cancel
DELETING A SUBMITTED EXPENSES CLAIM
This is the same procedure as above but the submitted claim must be Withdrawn first
It is not possible to delete a claim once it has been authorised
Page 13 of 14 November 17
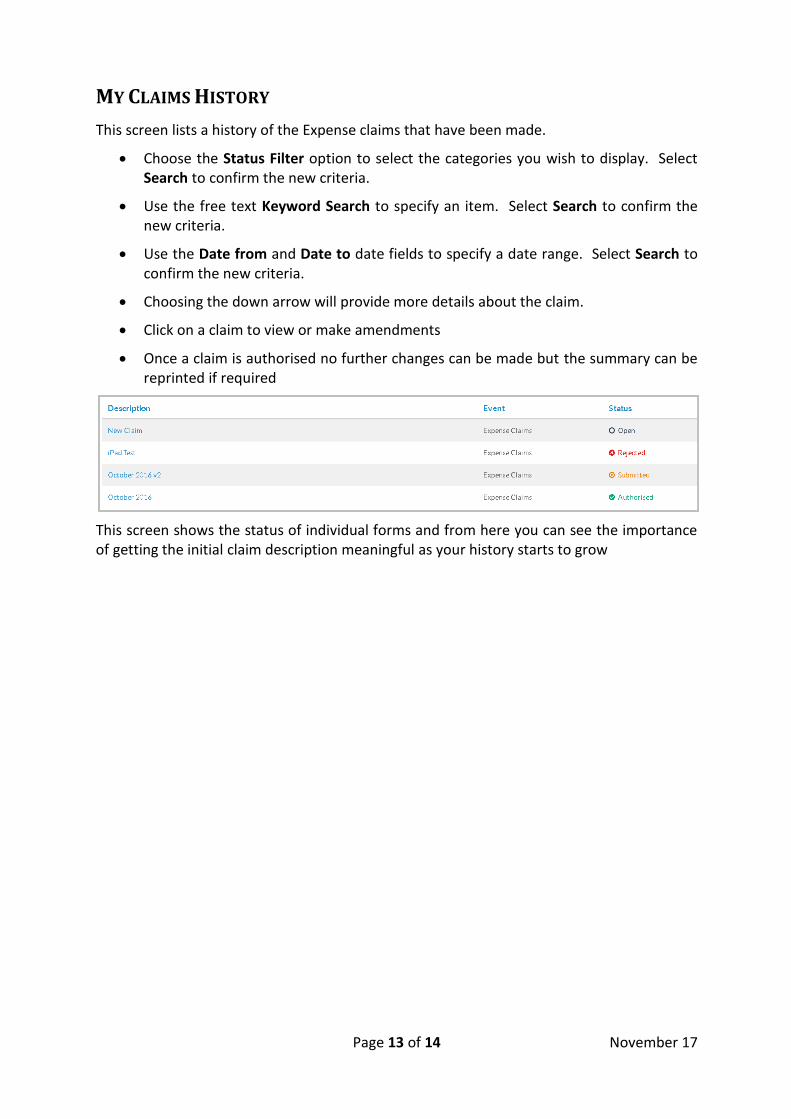
MY CLAIMS HISTORY
This screen lists a history of the Expense claims that have been made.
Choose the Status Filter option to select the categories you wish to display. Select Search to confirm the new criteria.
Use the free text Keyword Search to specify an item. Select Search to confirm the new criteria.
Use the Date from and Date to date fields to specify a date range. Select Search to confirm the new criteria.
Choosing the down arrow will provide more details about the claim.
Click on a claim to view or make amendments
Once a claim is authorised no further changes can be made but the summary can be reprinted if required
This screen shows the status of individual forms and from here you can see the importance of getting the initial claim description meaningful as your history starts to grow
Page 14 of 14 November 17
Payroll
Line Manager
Employee
MyView Expenses & Mileage Claim process
Work Related
Expenses Occur
Add lines to claim
form until complete
for the month,
upload scanned
receipts and
submit
Review any
warning
messages and
either Approve or
reject
Approve
Payroll
Process
Log on to
MyView
Authorisations
Reject
End
Print off the
summary sheet
Attach your receipts
to summary sheet
and send to your
manager
Review
receipts
against
claim
Forward receipts
and summary
sheet to Payroll
If your Car is not
available submit
My Form – New
Vehicle
Is your vehicle
registered on
MyView ?
Yes
Add /
Update
Vehicle
Email received to
notify you of
rejection
No
Email received to
notify you of
approval
Log on to
MyView
Will the claim
include
Business
Mileage ?
No
Yes
Yes
No
Approve Form
?
Discuss reasons
with your manager
to resolve
Email received to
notify you of
rejection
Email received to
notify you of
approval
Discuss reasons
with your manager
to resolve and
amend claim if
necessary
Start
Uploaded
receipts
submitted with
claim ?
No
Yes


![Tabe of Contents - FNF Intranet Login · [7] Mileage Expenses With Mileage Expenses you will need to enter the date of travel, Expense Type (you have two choices for Expense Type](https://img.pdfslide.net/doc/110x75/5b16e1027f8b9a596d8e7b9a/tabe-of-contents-fnf-intranet-login-7-mileage-expenses-with-mileage-expenses.jpg)