Embed Size (px)
Citation preview
Page 1 of 14
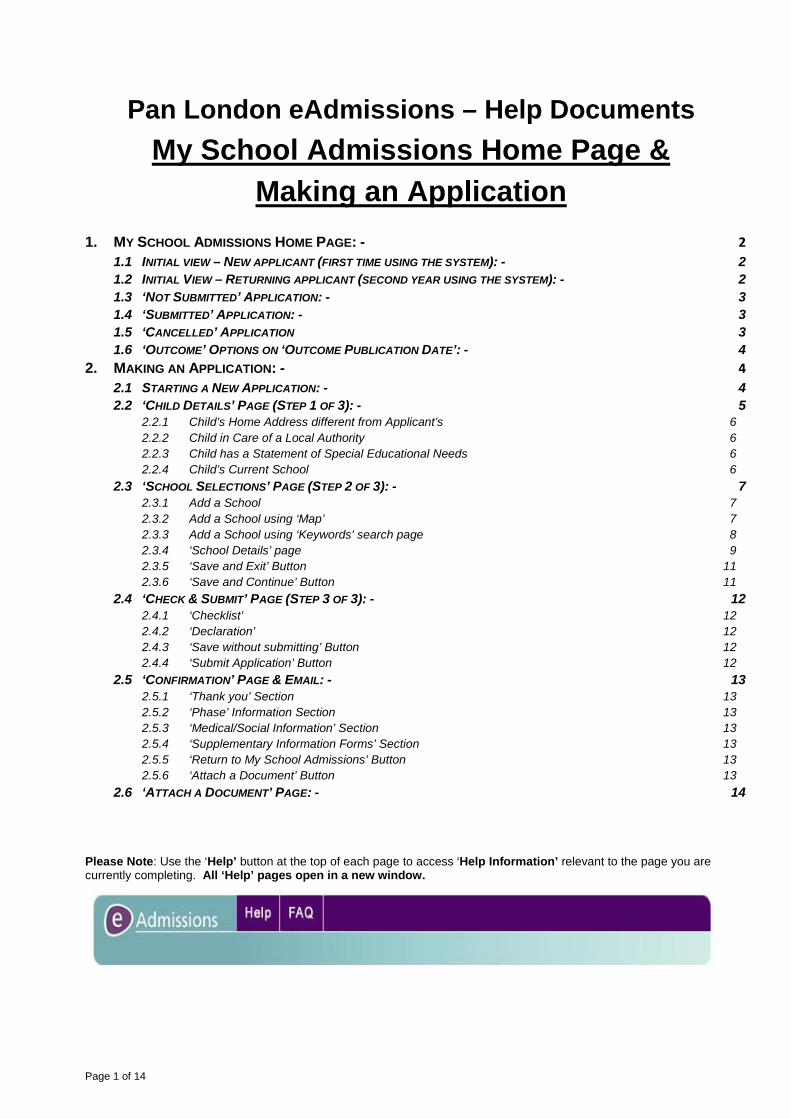
Pan London eAdmissions – Help Documents My School Admissions Home Page &
Making an Application
1. MY SCHOOL ADMISSIONS HOME PAGE: - 2 1.1 INITIAL VIEW – NEW APPLICANT (FIRST TIME USING THE SYSTEM): - 2 1.2 INITIAL VIEW – RETURNING APPLICANT (SECOND YEAR USING THE SYSTEM): - 2 1.3 ‘NOT SUBMITTED’ APPLICATION: - 3 1.4 ‘SUBMITTED’ APPLICATION: - 3 1.5 ‘CANCELLED’ APPLICATION 3 1.6 ‘OUTCOME’ OPTIONS ON ‘OUTCOME PUBLICATION DATE’: - 4
2. MAKING AN APPLICATION: - 4 2.1 STARTING A NEW APPLICATION: - 4 2.2 ‘CHILD DETAILS’ PAGE (STEP 1 OF 3): - 5
2.2.1 Child’s Home Address different from Applicant’s 6 2.2.2 Child in Care of a Local Authority 6 2.2.3 Child has a Statement of Special Educational Needs 6 2.2.4 Child’s Current School 6
2.3 ‘SCHOOL SELECTIONS’ PAGE (STEP 2 OF 3): - 7 2.3.1 Add a School 7 2.3.2 Add a School using ‘Map’ 7 2.3.3 Add a School using ‘Keywords’ search page 8 2.3.4 ‘School Details’ page 9 2.3.5 ‘Save and Exit’ Button 11 2.3.6 ‘Save and Continue’ Button 11
2.4 ‘CHECK & SUBMIT’ PAGE (STEP 3 OF 3): - 12 2.4.1 ‘Checklist’ 12 2.4.2 ‘Declaration’ 12 2.4.3 ‘Save without submitting’ Button 12 2.4.4 ‘Submit Application’ Button 12
2.5 ‘CONFIRMATION’ PAGE & EMAIL: - 13 2.5.1 ‘Thank you’ Section 13 2.5.2 ‘Phase’ Information Section 13 2.5.3 ‘Medical/Social Information’ Section 13 2.5.4 ‘Supplementary Information Forms’ Section 13 2.5.5 ‘Return to My School Admissions’ Button 13 2.5.6 ‘Attach a Document’ Button 13
2.6 ‘ATTACH A DOCUMENT’ PAGE: - 14 Please Note: Use the ‘Help’ button at the top of each page to access ‘Help Information’ relevant to the page you are currently completing. All ‘Help’ pages open in a new window.
Page 2 of 14
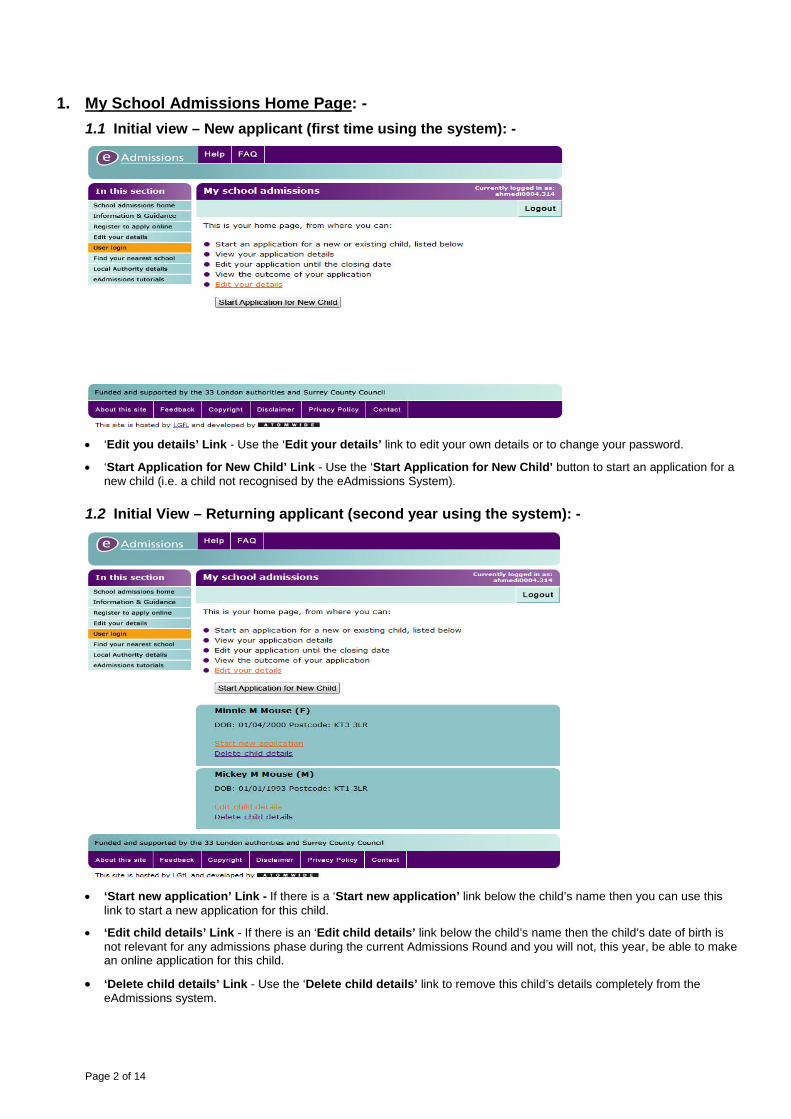
1. My School Admissions Home Page: - 1.1 Initial view – New applicant (first time using the system): -
• ‘Edit you details’ Link - Use the ‘Edit your details’ link to edit your own details or to change your password.
• ‘Start Application for New Child’ Link - Use the ‘Start Application for New Child’ button to start an application for a new child (i.e. a child not recognised by the eAdmissions System).
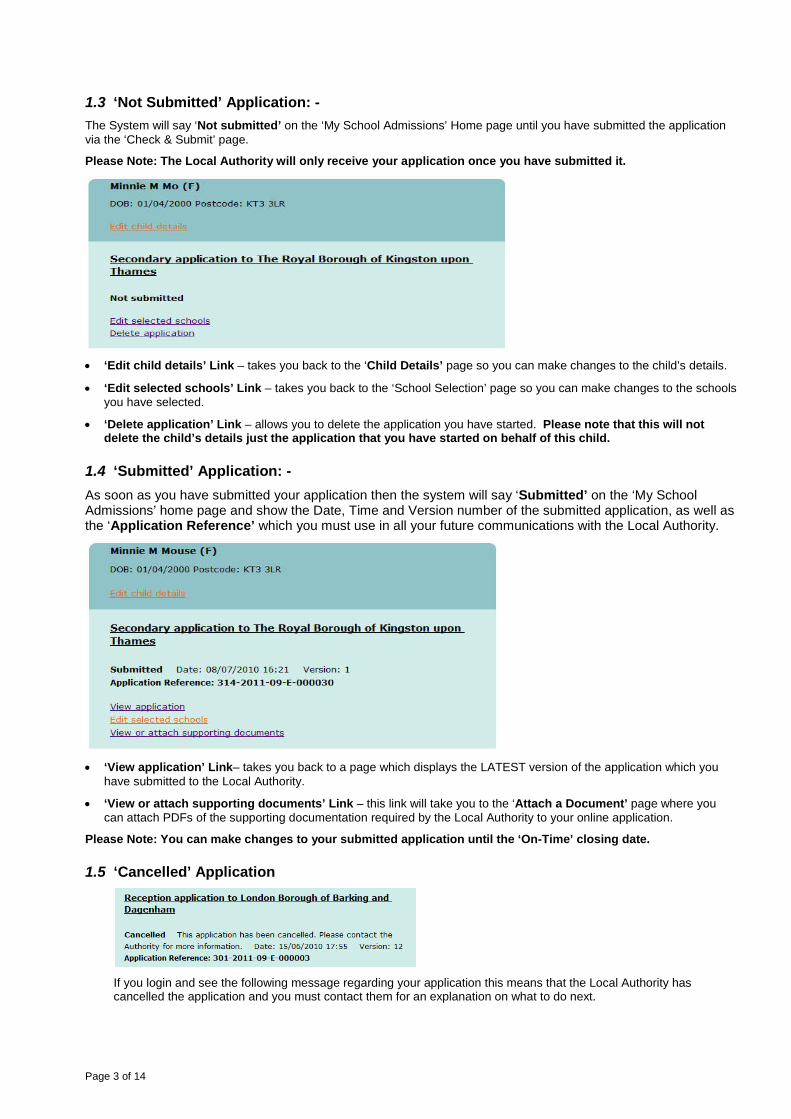
1.2 Initial View – Returning applicant (second year using the system): -
• ‘Start new application’ Link - If there is a ‘Start new application’ link below the child’s name then you can use this
link to start a new application for this child.
• ‘Edit child details’ Link - If there is an ‘Edit child details’ link below the child’s name then the child’s date of birth is not relevant for any admissions phase during the current Admissions Round and you will not, this year, be able to make an online application for this child.
• ‘Delete child details’ Link - Use the ‘Delete child details’ link to remove this child’s details completely from the eAdmissions system.
Page 3 of 14
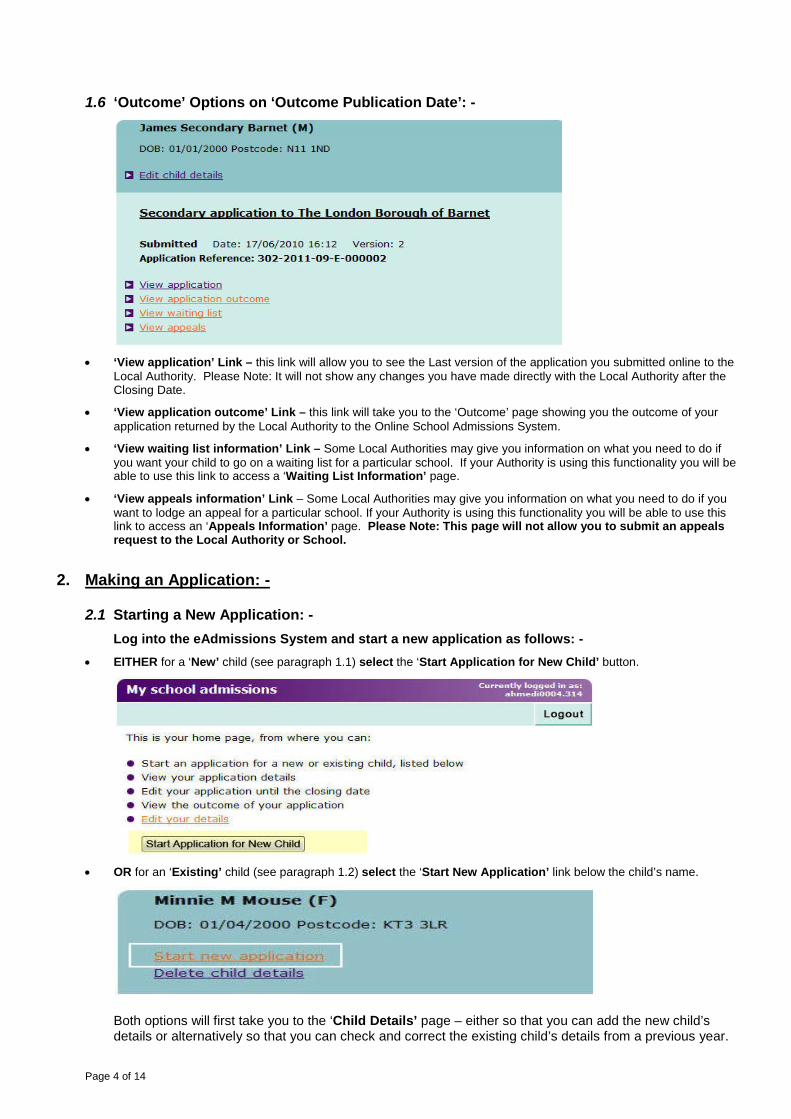
1.3 ‘Not Submitted’ Application: - The System will say ‘Not submitted’ on the ‘My School Admissions’ Home page until you have submitted the application via the ‘Check & Submit’ page.
Please Note: The Local Authority will only receive your application once you have submitted it.
• ‘Edit child details’ Link – takes you back to the ‘Child Details’ page so you can make changes to the child’s details.
• ‘Edit selected schools’ Link – takes you back to the ‘School Selection’ page so you can make changes to the schools you have selected.
• ‘Delete application’ Link – allows you to delete the application you have started. Please note that this will not delete the child’s details just the application that you have started on behalf of this child.
1.4 ‘Submitted’ Application: - As soon as you have submitted your application then the system will say ‘Submitted’ on the ‘My School Admissions’ home page and show the Date, Time and Version number of the submitted application, as well as the ‘Application Reference’ which you must use in all your future communications with the Local Authority.
• ‘View application’ Link– takes you back to a page which displays the LATEST version of the application which you
have submitted to the Local Authority.
• ‘View or attach supporting documents’ Link – this link will take you to the ‘Attach a Document’ page where you can attach PDFs of the supporting documentation required by the Local Authority to your online application.
Please Note: You can make changes to your submitted application until the ‘On-Time’ closing date.
1.5 ‘Cancelled’ Application
If you login and see the following message regarding your application this means that the Local Authority has cancelled the application and you must contact them for an explanation on what to do next.
Page 4 of 14
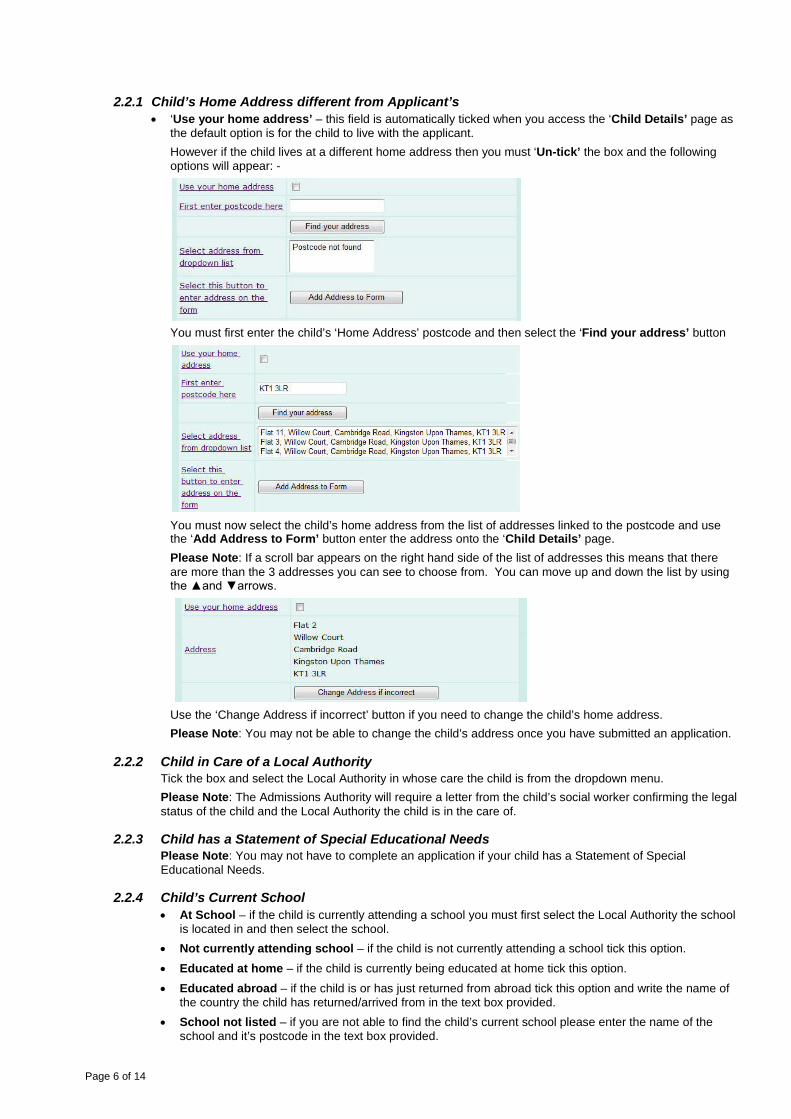
1.6 ‘Outcome’ Options on ‘Outcome Publication Date’: -
• ‘View application’ Link – this link will allow you to see the Last version of the application you submitted online to the
Local Authority. Please Note: It will not show any changes you have made directly with the Local Authority after the Closing Date.
• ‘View application outcome’ Link – this link will take you to the ‘Outcome’ page showing you the outcome of your application returned by the Local Authority to the Online School Admissions System.
• ‘View waiting list information’ Link – Some Local Authorities may give you information on what you need to do if you want your child to go on a waiting list for a particular school. If your Authority is using this functionality you will be able to use this link to access a ‘Waiting List Information’ page.
• ‘View appeals information’ Link – Some Local Authorities may give you information on what you need to do if you want to lodge an appeal for a particular school. If your Authority is using this functionality you will be able to use this link to access an ‘Appeals Information’ page. Please Note: This page will not allow you to submit an appeals request to the Local Authority or School.
2. Making an Application: -
2.1 Starting a New Application: - Log into the eAdmissions System and start a new application as follows: -
• EITHER for a ‘New’ child (see paragraph 1.1) select the ‘Start Application for New Child’ button.
• OR for an ‘Existing’ child (see paragraph 1.2) select the ‘Start New Application’ link below the child’s name.
Both options will first take you to the ‘Child Details’ page – either so that you can add the new child’s details or alternatively so that you can check and correct the existing child’s details from a previous year.

Page 5 of 14
2.2 ‘Child Details’ Page (Step 1 of 3): -
• Fill in details of the child you want to make an online school application for. Please Note: Criteria which are purple and underlined (e.g. Use your home address) will open a separate help page dedicated to that particular field. All help pages open in a new window.
Page 6 of 14
2.2.1 Child’s Home Address different from Applicant’s • ‘Use your home address’ – this field is automatically ticked when you access the ‘Child Details’ page as
the default option is for the child to live with the applicant. However if the child lives at a different home address then you must ‘Un-tick’ the box and the following options will appear: -
You must first enter the child’s ‘Home Address’ postcode and then select the ‘Find your address’ button
You must now select the child’s home address from the list of addresses linked to the postcode and use the ‘Add Address to Form’ button enter the address onto the ‘Child Details’ page. Please Note: If a scroll bar appears on the right hand side of the list of addresses this means that there are more than the 3 addresses you can see to choose from. You can move up and down the list by using the ▲and ▼arrows.
Use the ‘Change Address if incorrect’ button if you need to change the child’s home address. Please Note: You may not be able to change the child’s address once you have submitted an application.
2.2.2 Child in Care of a Local Authority Tick the box and select the Local Authority in whose care the child is from the dropdown menu. Please Note: The Admissions Authority will require a letter from the child’s social worker confirming the legal status of the child and the Local Authority the child is in the care of.
2.2.3 Child has a Statement of Special Educational Needs Please Note: You may not have to complete an application if your child has a Statement of Special Educational Needs.
2.2.4 Child’s Current School • At School – if the child is currently attending a school you must first select the Local Authority the school
is located in and then select the school. • Not currently attending school – if the child is not currently attending a school tick this option.
• Educated at home – if the child is currently being educated at home tick this option.
• Educated abroad – if the child is or has just returned from abroad tick this option and write the name of the country the child has returned/arrived from in the text box provided.
• School not listed – if you are not able to find the child’s current school please enter the name of the school and it’s postcode in the text box provided.
Page 7 of 14
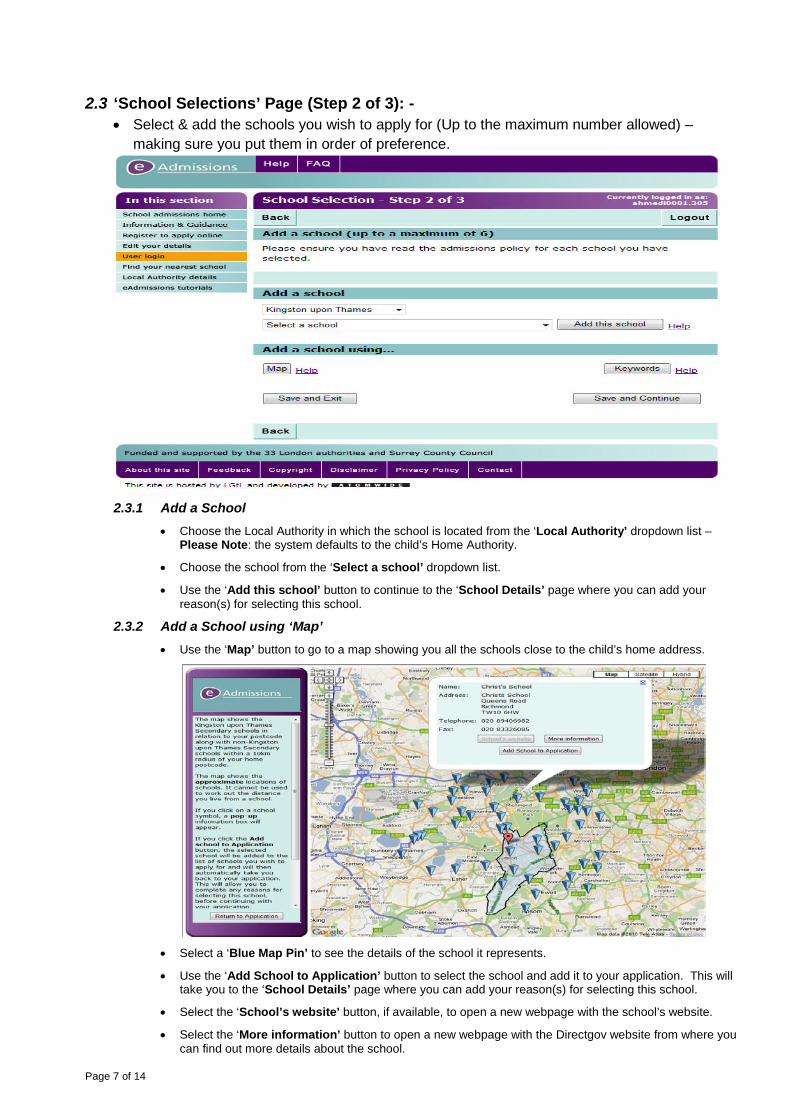
2.3 ‘School Selections’ Page (Step 2 of 3): - • Select & add the schools you wish to apply for (Up to the maximum number allowed) –
making sure you put them in order of preference.
2.3.1 Add a School
• Choose the Local Authority in which the school is located from the ‘Local Authority’ dropdown list – Please Note: the system defaults to the child’s Home Authority.
• Choose the school from the ‘Select a school’ dropdown list.
• Use the ‘Add this school’ button to continue to the ‘School Details’ page where you can add your reason(s) for selecting this school.
2.3.2 Add a School using ‘Map’ • Use the ‘Map’ button to go to a map showing you all the schools close to the child’s home address.
• Select a ‘Blue Map Pin’ to see the details of the school it represents.
• Use the ‘Add School to Application’ button to select the school and add it to your application. This will take you to the ‘School Details’ page where you can add your reason(s) for selecting this school.
• Select the ‘School’s website’ button, if available, to open a new webpage with the school’s website.
• Select the ‘More information’ button to open a new webpage with the Directgov website from where you can find out more details about the school.
Page 8 of 14
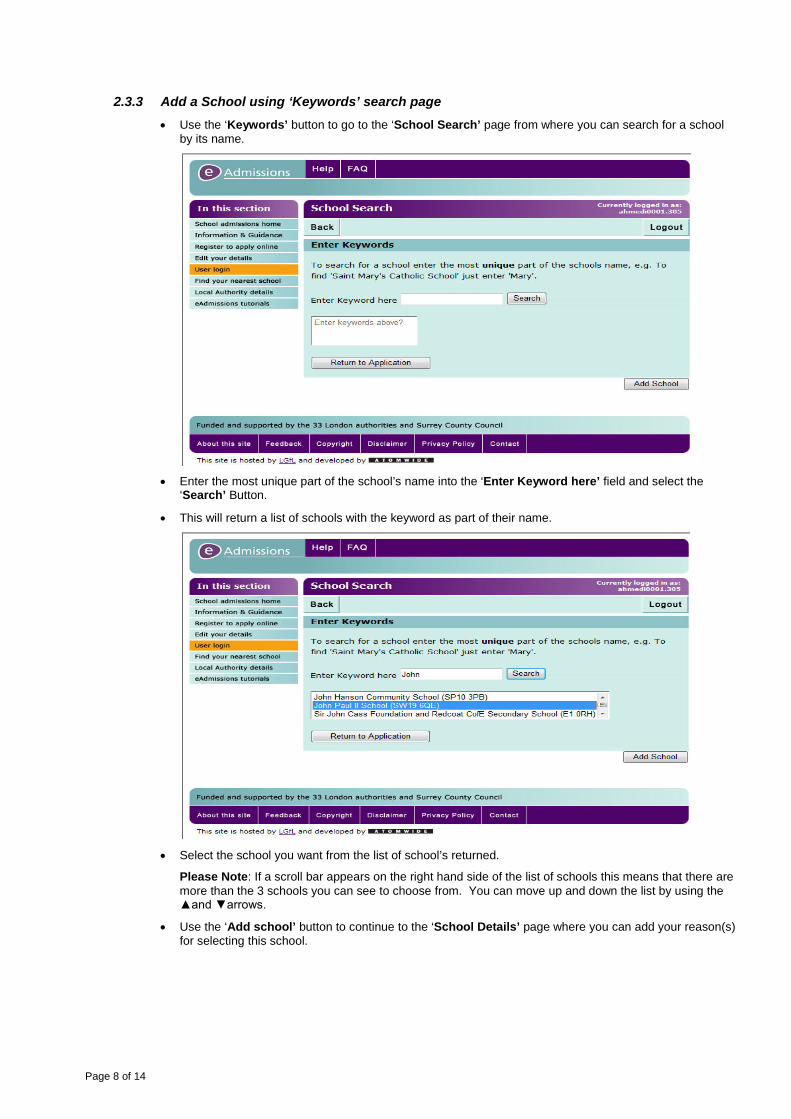
2.3.3 Add a School using ‘Keywords’ search page • Use the ‘Keywords’ button to go to the ‘School Search’ page from where you can search for a school
by its name.
• Enter the most unique part of the school’s name into the ‘Enter Keyword here’ field and select the
‘Search’ Button.
• This will return a list of schools with the keyword as part of their name.
• Select the school you want from the list of school’s returned.
Please Note: If a scroll bar appears on the right hand side of the list of schools this means that there are more than the 3 schools you can see to choose from. You can move up and down the list by using the ▲and ▼arrows.
• Use the ‘Add school’ button to continue to the ‘School Details’ page where you can add your reason(s) for selecting this school.

Page 9 of 14
2.3.4 ‘School Details’ page
• Enter your reasons for selecting this school on the ‘School Details’ page • Use the ‘Save and Continue’ button at the bottom of the page to add the school and return to
the ‘School Selection’ page when you have completed all your reasons. Please Note: Criteria which are purple and underlined (e.g. Further Information) will open a separate help page dedicated to the relevant section. All help pages open in a new window.

Page 10 of 14
Reasons for Selecting a School: -
• Selected School
This section shows the name, address and contact details of the school.
• Admissions Criteria
This section will give you a link to either a PDF of the Maintaining ‘Authority’s Admissions Booklet’ or to a webpage with the ‘School’s Admissions Criteria’.
Please Note: You must ensure that you have read and understood the admissions criteria for each school you select.
•
• Sibling Information
If there is a sibling who will be attending the school at the date the applicant child is to start at the school please say ‘Yes’ and select the ‘Add Sibling’ button to go to the ‘Sibling Details’ page.
• Fill in the sibling’s details on the ‘Sibling Details’ page
• Use the ‘Save and Continue’ button to add the sibling and return to the ‘School Details’ page.
Please Note: You will not get the option to select a ‘Current School’ for the sibling if the date of birth indicates that they child will have left the school before next September. Either correct the date of birth OR use the ‘Back’ button to return to the ‘School Details’ page without adding the sibling.
•
• Exceptional Medical or Social Reasons
If there is an exceptional Medical or Social Reason for selecting the school you must select either ‘Medical’ or ‘Social’ and then ensure you comply with the Local Authority’s information requirements to support your case.
•
• Supplementary Information Form
This section will only appear if the school requires you to provide supplementary information.
Please make sure you complete the Supplementary Information Form(s) and return directly to the school by the school’s supplementary information deadline.
•
• Reasons for Preference (Optional)
This section allows you add additional reasons for selecting this school.
Please do not enter sibling information in this field.1
Page 11 of 14
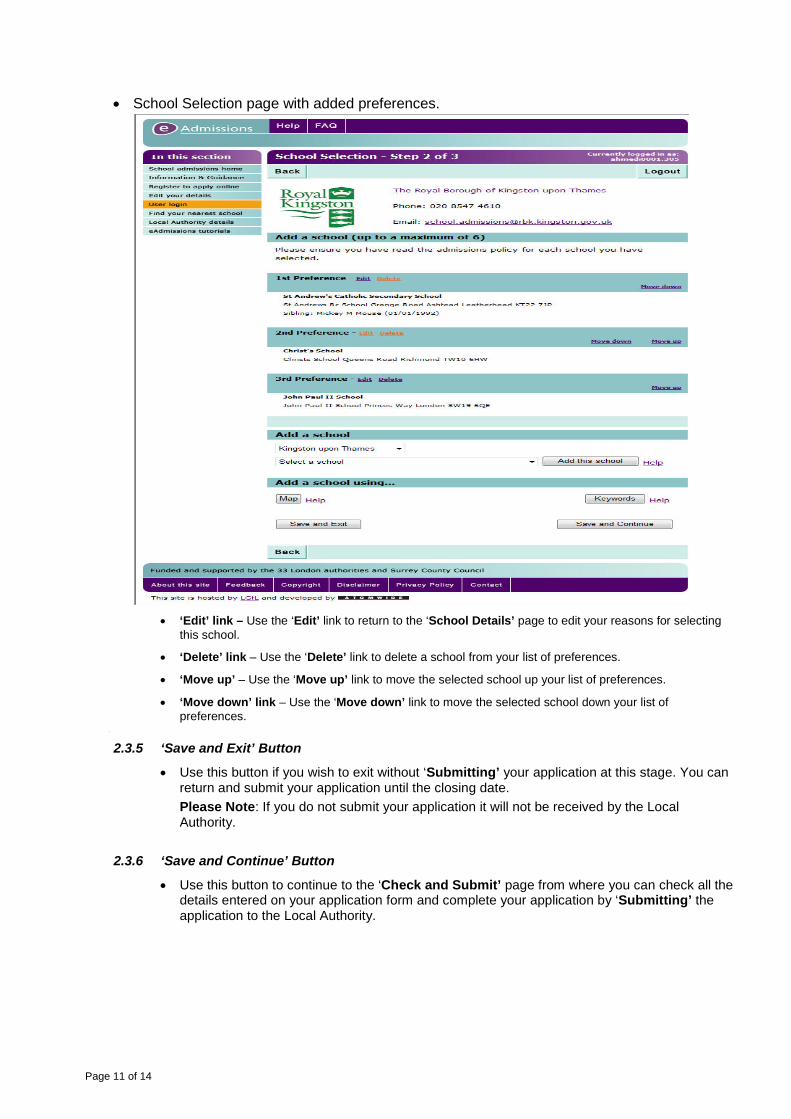
• School Selection page with added preferences.
• ‘Edit’ link – Use the ‘Edit’ link to return to the ‘School Details’ page to edit your reasons for selecting
this school.
• ‘Delete’ link – Use the ‘Delete’ link to delete a school from your list of preferences.
• ‘Move up’ – Use the ‘Move up’ link to move the selected school up your list of preferences.
• ‘Move down’ link – Use the ‘Move down’ link to move the selected school down your list of preferences.
•
2.3.5 ‘Save and Exit’ Button
• Use this button if you wish to exit without ‘Submitting’ your application at this stage. You can return and submit your application until the closing date. Please Note: If you do not submit your application it will not be received by the Local Authority.
2.3.6 ‘Save and Continue’ Button
• Use this button to continue to the ‘Check and Submit’ page from where you can check all the details entered on your application form and complete your application by ‘Submitting’ the application to the Local Authority.

Page 12 of 14
2.4 ‘Check & Submit’ Page (Step 3 of 3): - • Check all the details you have entered on your application form before you submit the application to
the Local Authority.
2.4.1 ‘Checklist’
Make sure you have read the checklist thoroughly so that you know what you need to do next.
2.4.2 ‘Declaration’ Make sure have read and understood the Declaration you are agreeing to.
2.4.3 ‘Save without submitting’ Button You are able to exit the application without submitting it – Please Note: the Local Authority will only receive ‘Submitted’ Applications.
2.4.4 ‘Submit Application’ Button Use the ‘Submit Application’ button to submit your application. Once you have submitted your application you will be taken to the ‘Confirmation’ page.

Page 13 of 14
2.5 ‘Confirmation’ Page & Email: - Once you have submitted your application successfully you will be taken to a ‘Confirmation’ page and will also be sent a ‘Confirmation Email’ with an outline of your application and the information displayed on the ‘Confirmation’ page. Please Note: If you do not see this page or receive your ‘Confirmation email’ then you may not have submitted your application correctly.
2.5.1 ‘Thank you’ Section
This section will give you your Application reference number and show you the closing and outcome publication date and time.
2.5.2 ‘Phase’ Information Section This section will contain information from your Local Authority about what happens next.
2.5.3 ‘Medical/Social Information’ Section If you have indicated that you have a Medical or a Social reason for selecting a school this section will list the information you must provide to the Local Authority to support your application under the Medical or Social Criterion.
2.5.4 ‘Supplementary Information Forms’ Section If you have a selected a school which requires you to complete and return a Supplementary Information Form, it will be listed in this section. You must ensure that you complete and return all Supplementary Information Forms directly to the schools that require them by the given deadline(s).
2.5.5 ‘Return to My School Admissions’ Button Use this button to return to the ‘My School Admissions’ page, where you will now be able to see the Application Reference as well as the date and time you submitted your application. (See paragraph 1.4)
2.5.6 ‘Attach a Document’ Button Use this button to access the ‘Attach a Document’ page, where you can upload and attach PDF documents to your application. (See paragraph 2.6)
Page 14 of 14
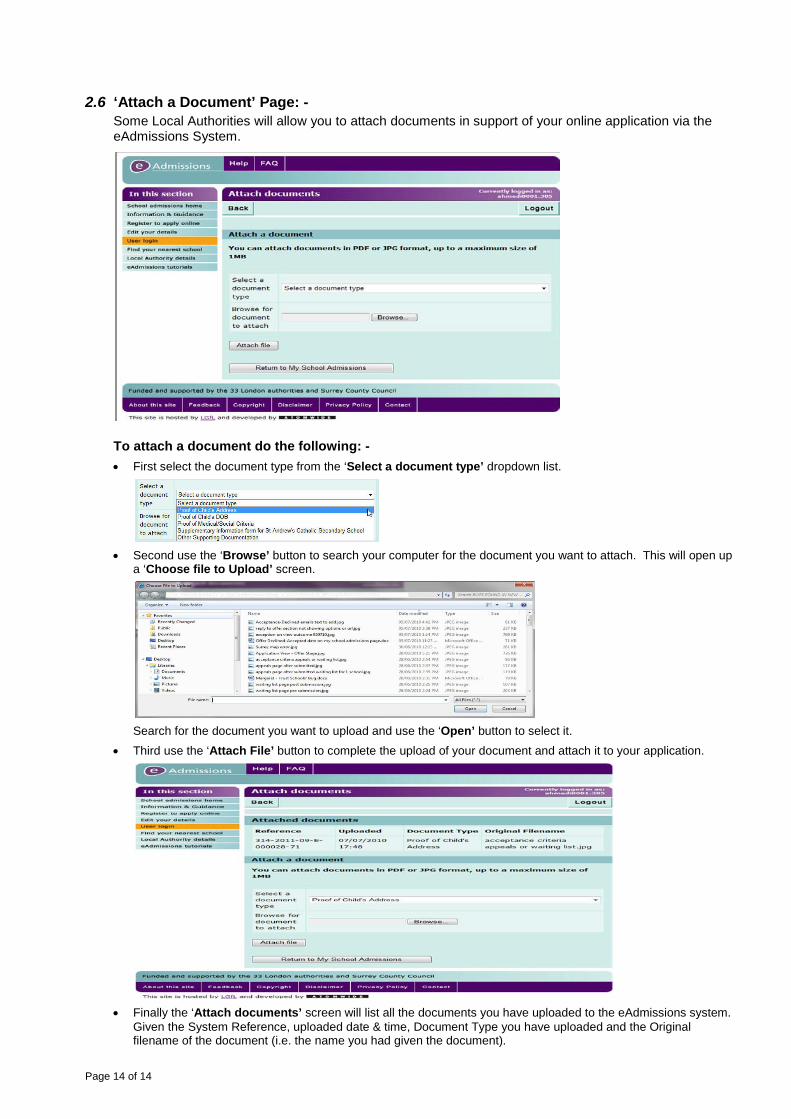
2.6 ‘Attach a Document’ Page: - Some Local Authorities will allow you to attach documents in support of your online application via the eAdmissions System.
To attach a document do the following: - • First select the document type from the ‘Select a document type’ dropdown list.
• Second use the ‘Browse’ button to search your computer for the document you want to attach. This will open up
a ‘Choose file to Upload’ screen.
Search for the document you want to upload and use the ‘Open’ button to select it.
• Third use the ‘Attach File’ button to complete the upload of your document and attach it to your application.
• Finally the ‘Attach documents’ screen will list all the documents you have uploaded to the eAdmissions system.
Given the System Reference, uploaded date & time, Document Type you have uploaded and the Original filename of the document (i.e. the name you had given the document).