Embed Size (px)
Citation preview

Rev.06 1
MyCampy: the Campagnolo app
• Introduction page 2
• Information and compatibility page 5
• Download, installation and registration page 6
• Opening and using page 7
• My Garage page 12
• My Sessions page 24
• Notices page 28
• Connecting to 2016 EPS groupset page 33
• Functions for 2016 EPS groupset page 35
• Functions for professional mechanics page 58

Rev.06 2
Introduction
The MYCAMPY app was developed with a number of goals:
• Managing your Campagnolo products being able to viewthe km travelled with them and receiving tips on servicefor them.
• Providing customer with more information about theirproducts or on matters which may be of particularinterest to them
• Allowing customers to interface with the EPS 2016groupset, to obtain information and access personalisedsettings concerning the functions of the groupset itself
• Offering mechanics a tool allowing them to provide ascomprehensive and professional service as possible
MyCampy
“The Campagnolo world in your hands”

Rev.06 3
Introduction
MyCampy
EPS
manageme
nt
Looking after
your bikes
Managing
your user
profile
Advice
and
dedicate
d info
Push
notificati
ons
Technical
analysis
of
sessions

Rev.06 4
Introduction
MyCampy
The 3 main areas of the App are:
My Garage: looking after your bike, your groupset and your
wheels. Stay constantly up to date on the state of your
equipment. Receive alerts and notifications.
My Sessions: log your training sessions, import them and record
the use of your equipment. Use the EPS to record each shift and
derail operation for advanced analysis of your performances
My EPS: connect to your EPS, manage it, customise it. Change the
operating parameters, the multi-shifting and create your riding
style. Update it to the latest version, detect errors and check its
operation

Rev.06 5
Information and compatibility
MyCampy
There will be an area of the Campagnolo website with the
Specifications of electronic devices compatible with MyCampy
Bluetooth Smart Ready Tablets and smartphones with Android operating system version
4.3 or later. These include, for example, the following devices from the world's leading
smartphone manufacturer, Samsung:
Tab 4, Tab S and Tab Pro tablets (from January 2014)
S4, S5, … smartphones
However, to be sure that you have full app functionality, particularly for the connection
with the 2016 EPS, see the list of compatible mobile phones.
Bluetooth Smart Ready Tablets and smartphones with iOS operating system version 8 or
later:
Apple iPad Air, Mini, 3rd and 4th generation
Apple iPhone 6 Plus, 6, 5s, 5c, 5 and 4s (from October 2011)

Rev.06 6
MyCampy
Android/iOS
Access the respective Google or Apple store, search for the MY CAMPY app, then
download the app.
The MY CAMPY app will be automatically installed on the smartphone or tablet.
Apple Store
Download, installation and registration

Rev.06 7
MyCampy
Opening and using app
When activating the App:
A. register the app if it is the first time it is used
B. log in if the app has already been used and registered

Rev.06 8
MyCampy
A. Registration
Any of these methods may be used to register. In all four
cases, the identifying details of the customer are stored on a
Campagnolo server
• Register with Campagnolo
Name
Surname
Language
Country
e-mail address (this will be the username for logging in)
Password (for logging in)
• I can register using Facebook, Strava or Google credentials
if I already have an account with these Apps
Rev.06 9
MyCampy
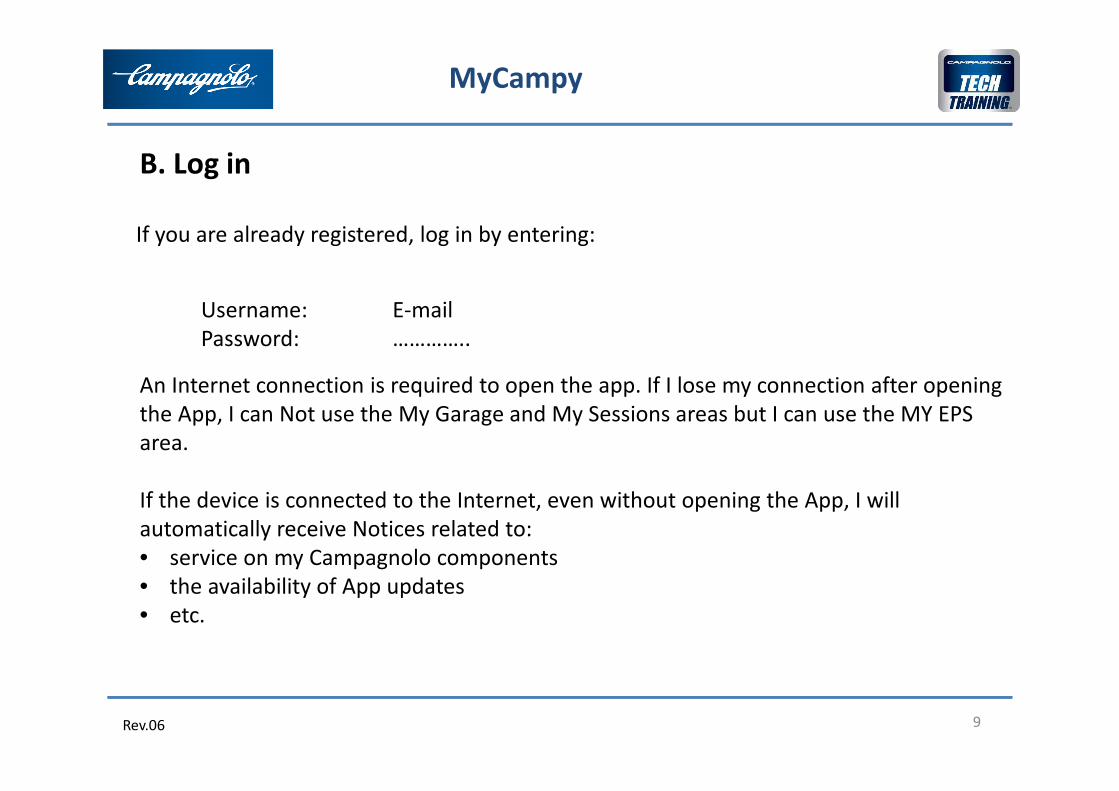
B. Log in
Username: E-mail
Password: …………..
If you are already registered, log in by entering:
An Internet connection is required to open the app. If I lose my connection after opening
the App, I can Not use the My Garage and My Sessions areas but I can use the MY EPS
area.
If the device is connected to the Internet, even without opening the App, I will
automatically receive Notices related to:
• service on my Campagnolo components
• the availability of App updates
• etc.

Rev.06 10
MyCampy
B. Log in
Rev.06 11
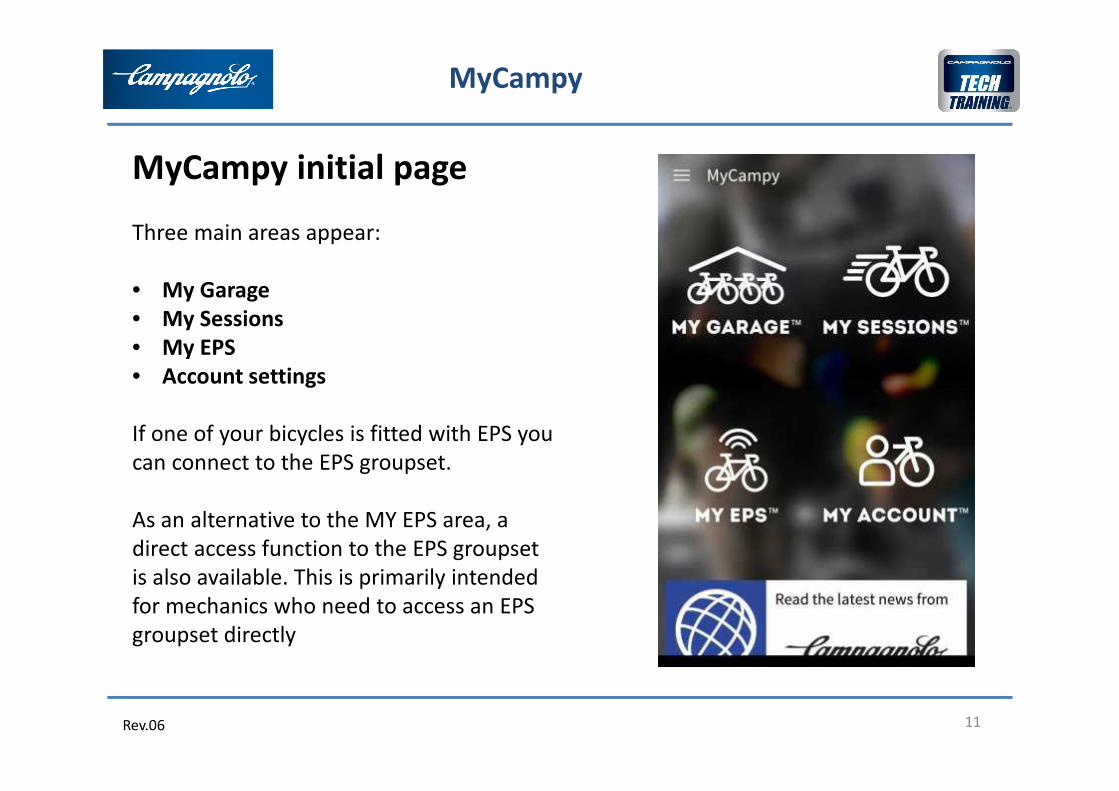
MyCampy initial page
Three main areas appear:
• My Garage
• My Sessions
• My EPS
• Account settings
If one of your bicycles is fitted with EPS you
can connect to the EPS groupset.
As an alternative to the MY EPS area, a
direct access function to the EPS groupset
is also available. This is primarily intended
for mechanics who need to access an EPS
groupset directly
MyCampy

Rev.06 12
My Garage
On the COMPONENTS page I select the
components I own:
• Wheels
• Sprocket pack
• Groupset
• Crankset
I can select all the wheels or components
that I have.
And I can enter mileage if they are not
new components.
MyCampy

Rev.06 13
My Garage
Therefore I could have, for example, two
sprocket packs.
MyCampy

Rev.06 14
My Garage
So I would compose:
the wheels + sprocket pack
Subsequently, or before a new outing, I
can match a new sprocket pack by
tapping on the pencil (edit) icon and
matching another sprocket pack.
MyCampy

Rev.06 15
My Garage
So I would compose:
the groupset + crankset
If subsequently I need to match a new
crankset, I tap on the pencil (edit) icon
and match another crankset.
MyCampy

Rev.06 16
My Garage
When I create a groupset a new
chain is also matched.
MyCampy

Rev.06 17
My Garage
No I move to the BIKES page and I can
create a bicycle by entering a series of
identifying data on the bike itself.
It is also possible to create the bike
directly without having entered the
components first: the components will
be automatically saved in the
components area.
MyCampy

Rev.06 18
My Garage
Step 1/5
I enter the data and the image of the
bike
MyCampy

Rev.06 19
My Garage
Step 2/5
I select a groupset from the garage or I
create a new groupset
MyCampy

Rev.06 20
My Garage
Step 3/5
I select a crankset from the garage or I
create a new crankset selecting a pair
of chainrings
MyCampy

Rev.06 21
My Garage
Step 4/5
I select a new wheel from the garage or
I create a new wheel
MyCampy

Rev.06 22
My Garage
Step 5/5
I select a sprocket pack from the garage
or I create a new groupset selecting the
type of sprocket pack
MyCampy
Rev.06 23
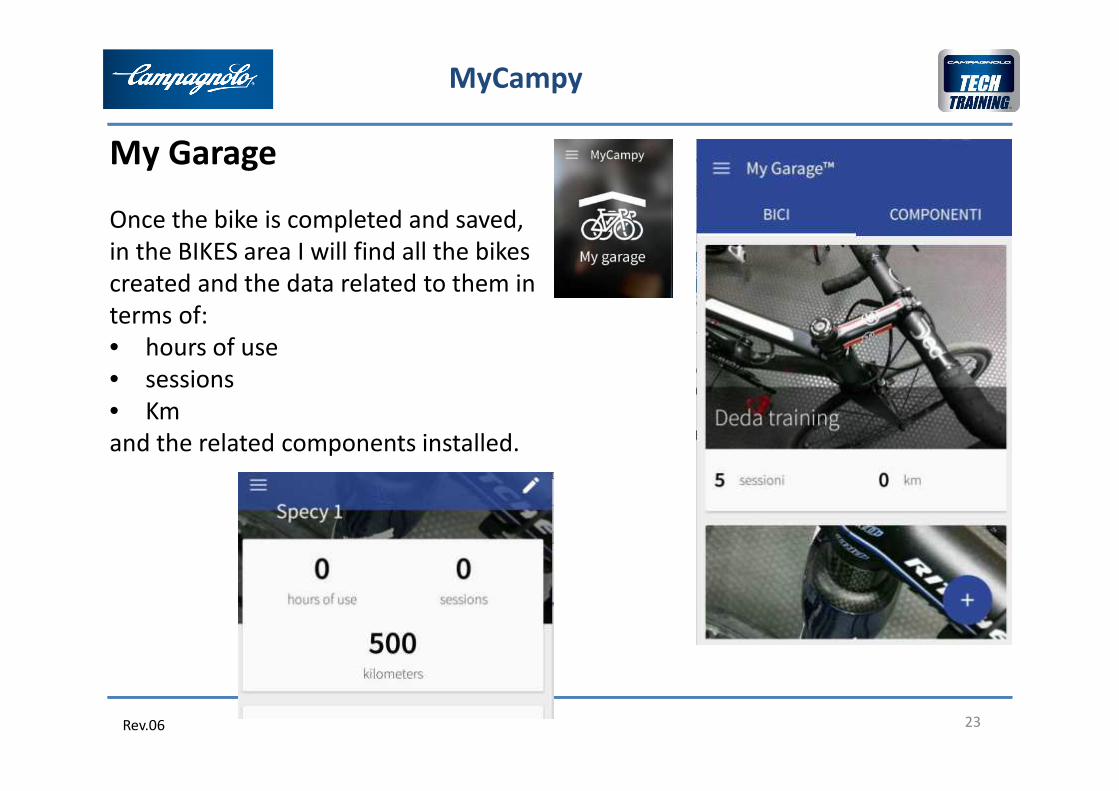
My Garage
Once the bike is completed and saved,
in the BIKES area I will find all the bikes
created and the data related to them in
terms of:
• hours of use
• sessions
• Km
and the related components installed.
MyCampy

Rev.06 24
MyCampy
My Sessions
In this area of the NEW SESSION page I
select one of my saved bikes and, by
tapping on Start session, I see the
mileage travelled during my outing. If
my bike is fitted with EPS connection
to the EPS groupset will be requested.

Rev.06 25
My Sessions
Whilst tracking my activity an
indication of this appears in the
notices area (MyCampy can even
be closed).
Once the session has ended I tap
STOP
In the case of an EPS groupset,
during the session an indication of
which gear ratio I am using also
appears.
MyCampy
Rev.06 26
My Sessions
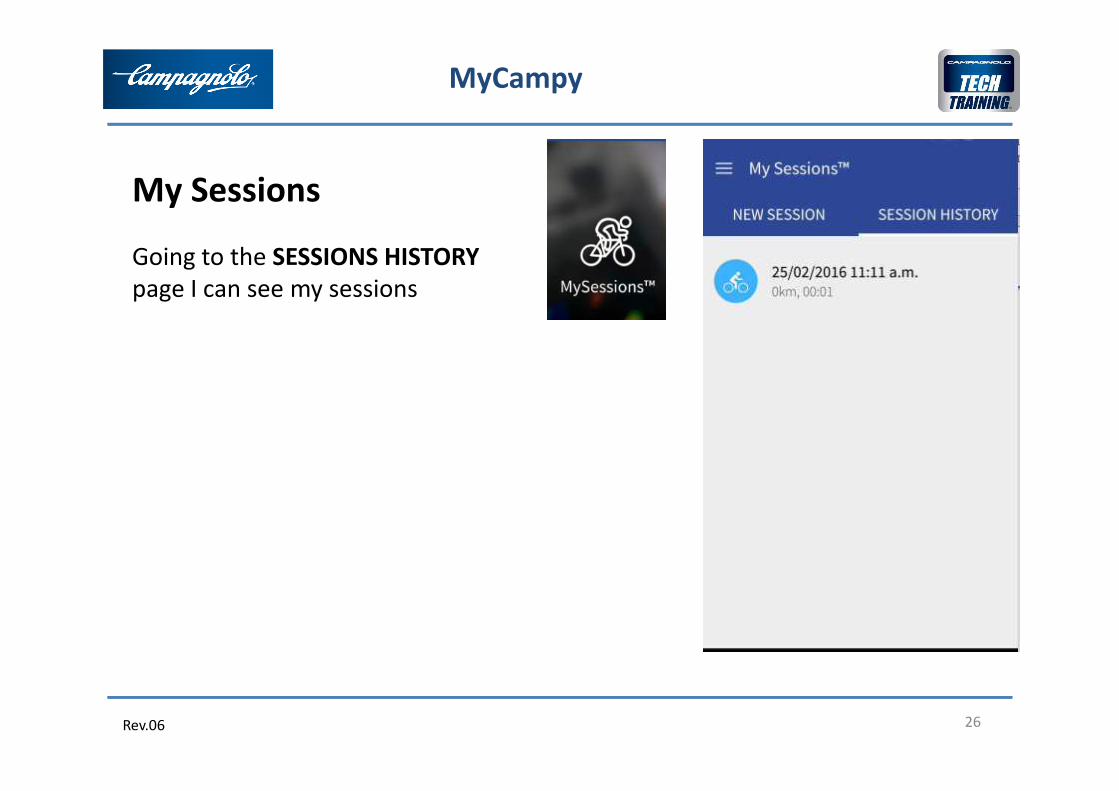
Going to the SESSIONS HISTORY
page I can see my sessions
MyCampy
Rev.06 27
My Sessions
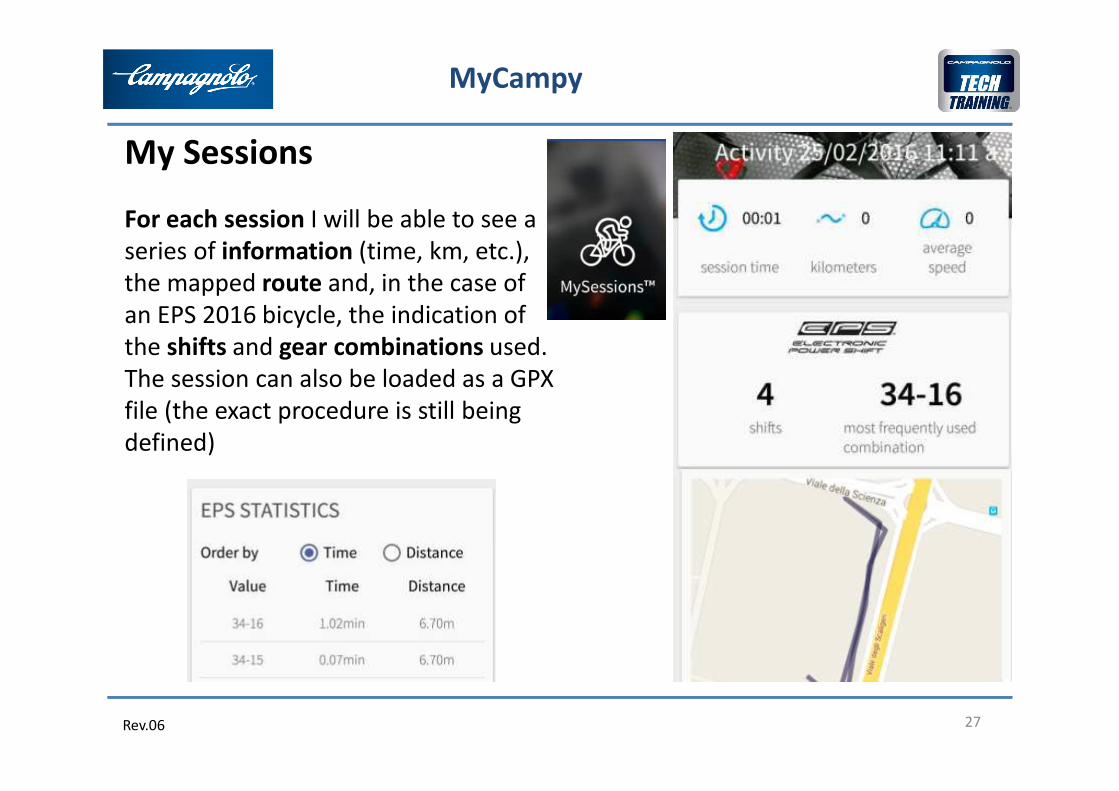
For each session I will be able to see a
series of information (time, km, etc.),
the mapped route and, in the case of
an EPS 2016 bicycle, the indication of
the shifts and gear combinations used.
The session can also be loaded as a GPX
file (the exact procedure is still being
defined)
MyCampy

Rev.06 28
Notices
When using components, when I
reach a certain mileage threshold
where cleaning, a check or
service or replacement is
scheduled for a component I will
receive a notice on my device
outside of the App.
MyCampy
Compact notice
Full notice
Rev.06 29
Notices
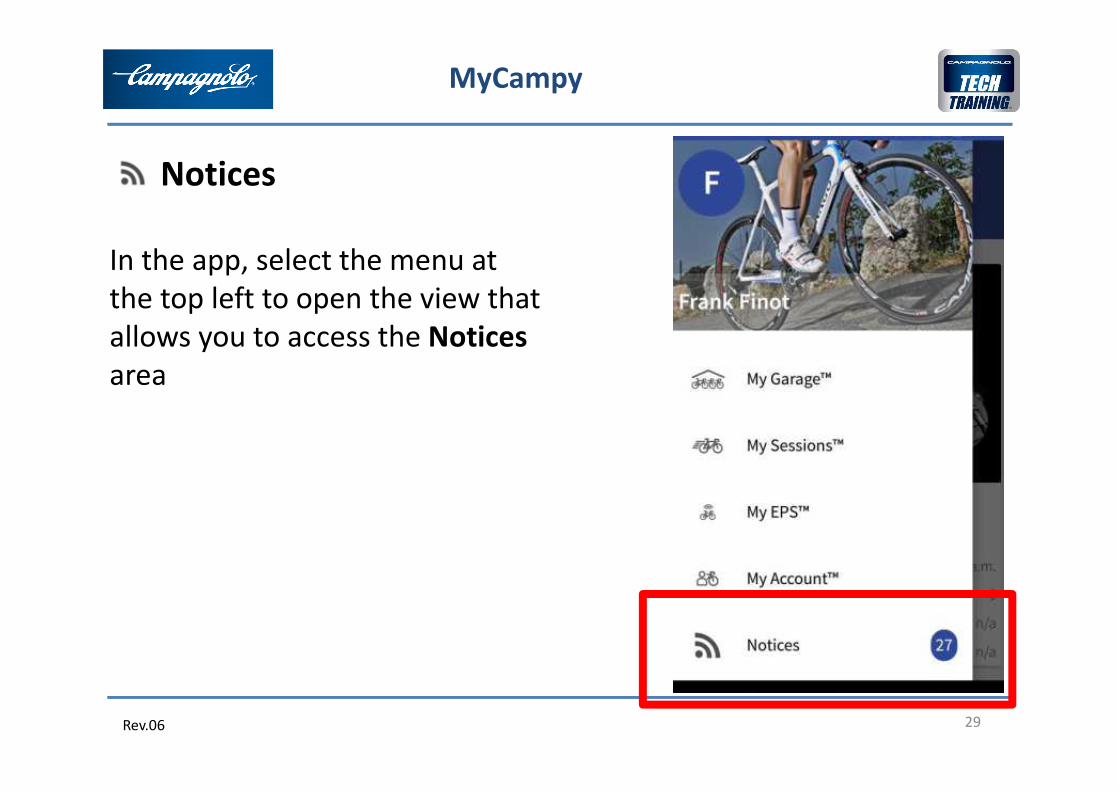
In the app, select the menu at
the top left to open the view that
allows you to access the Notices
area
MyCampy
Rev.06 30
Notices
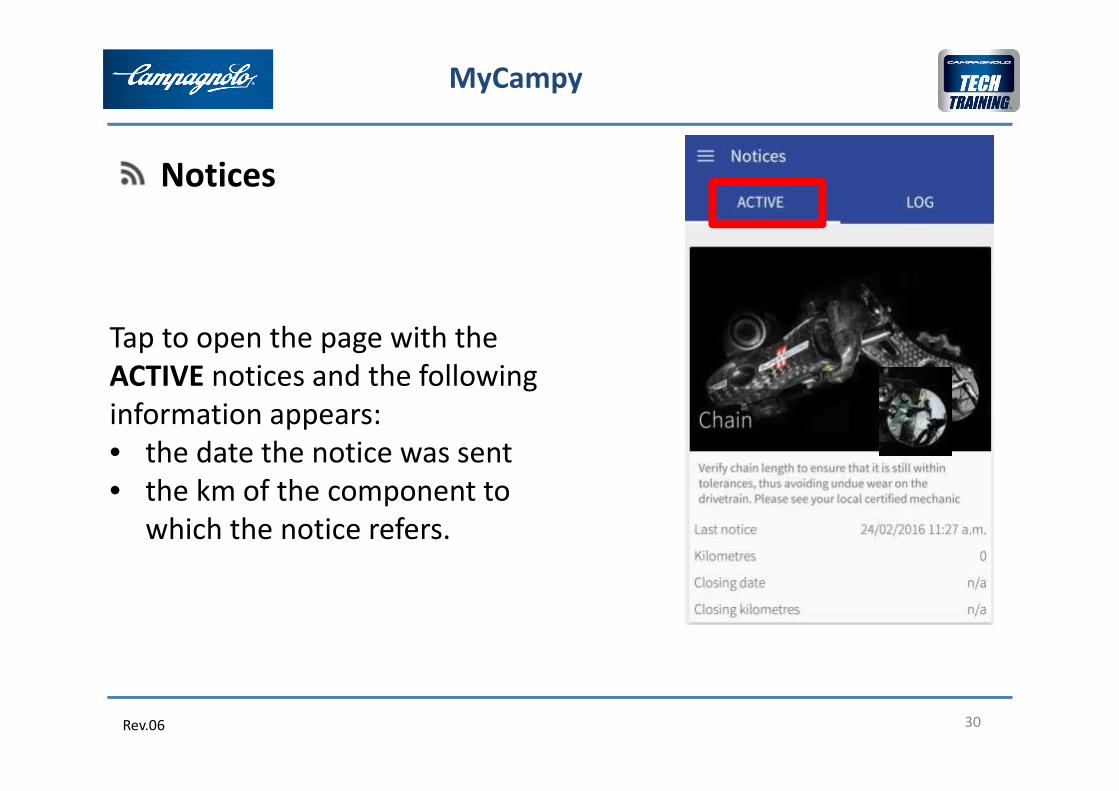
Tap to open the page with the
ACTIVE notices and the following
information appears:
• the date the notice was sent
• the km of the component to
which the notice refers.
MyCampy
Rev.06 31
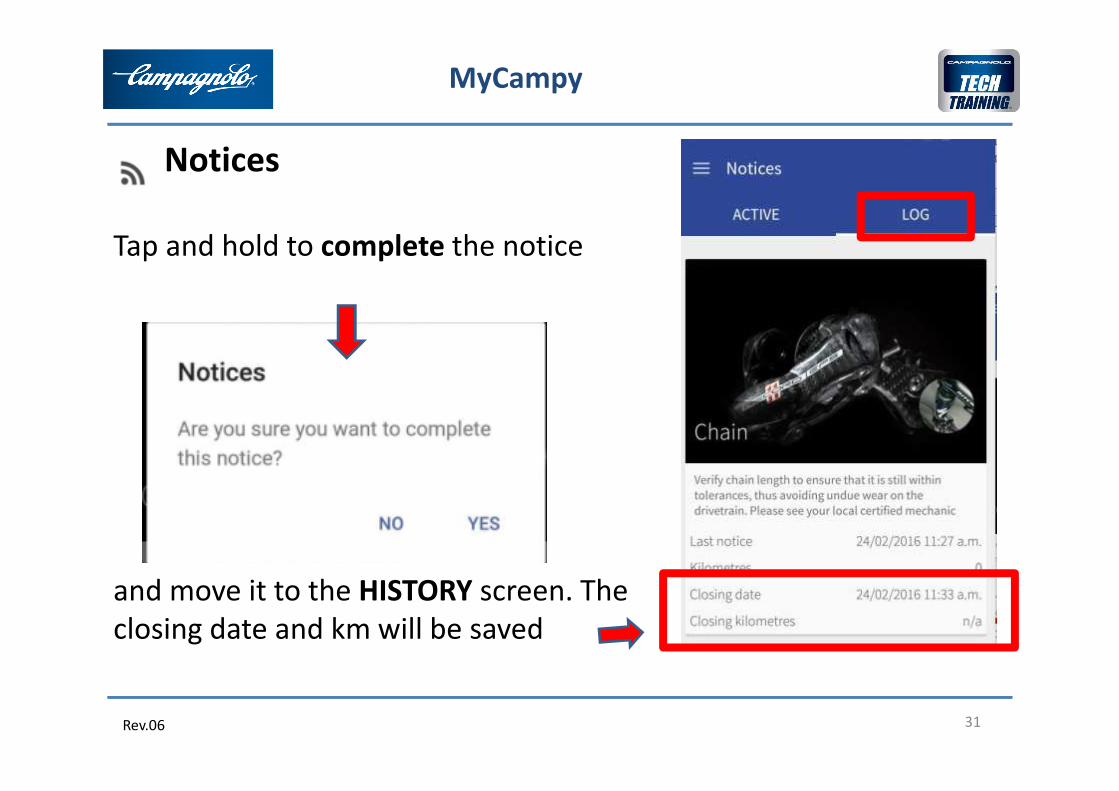
Notices
Tap and hold to complete the notice
and move it to the HISTORY screen. The
closing date and km will be saved
MyCampy

Rev.06 32
My Garage
If the chain is replaced, on the lower
part of the groupset the chain
change and subsequent chain
changes will be memorised in the
CHAIN HISTORY area
MyCampy

Rev.06 33
Before tapping on the EPS area the EPS Bluetooth
must be activated by pressing one of the two
MODE buttons and verifying that the interface LED
lights up (indication of the battery charge status
but also confirmation that I have «woken up» the
Bluetooth).
If it is the first connection between the device and
the interface, once I have tapped on My EPS, the
device will ask me to enter the numerical code (6
digits) in the device's Bluetooth area for the
interface that I want to connect to.
The code is on the lower part of the interface.
MyCampy
Connecting to the EPS groupset

Rev.06 34
This establishes a protected and encrypted, in
the case of Campagnolo, 1-to-1 connection
between your device and the EPS system: this is
called pairing.
If it is not the first connection the device will
not ask for the pairing code again.
If the device is connected to the Internet and I
use the MODE button to activate one or more
EPS systems simultaneously, the various EPS
units I have connected to in the past will be
displayed and they can be identified by the bike
name as long as the customer has ‘’created’’ it.
MyCampy
Connecting to the EPS groupset

Rev.06 3535
MyCampy
Once you are connected, the initial EPS
screen is called “DASHBOARD’’
In the upper part of the screen, all the
most important and readily
understandable information for the
customer can be viewed.
In the lower part of the screen, you can
customise the performance of the EPS by
setting a series of parameters.
Functions for EPS 2016 groupset
Rev.06 3636
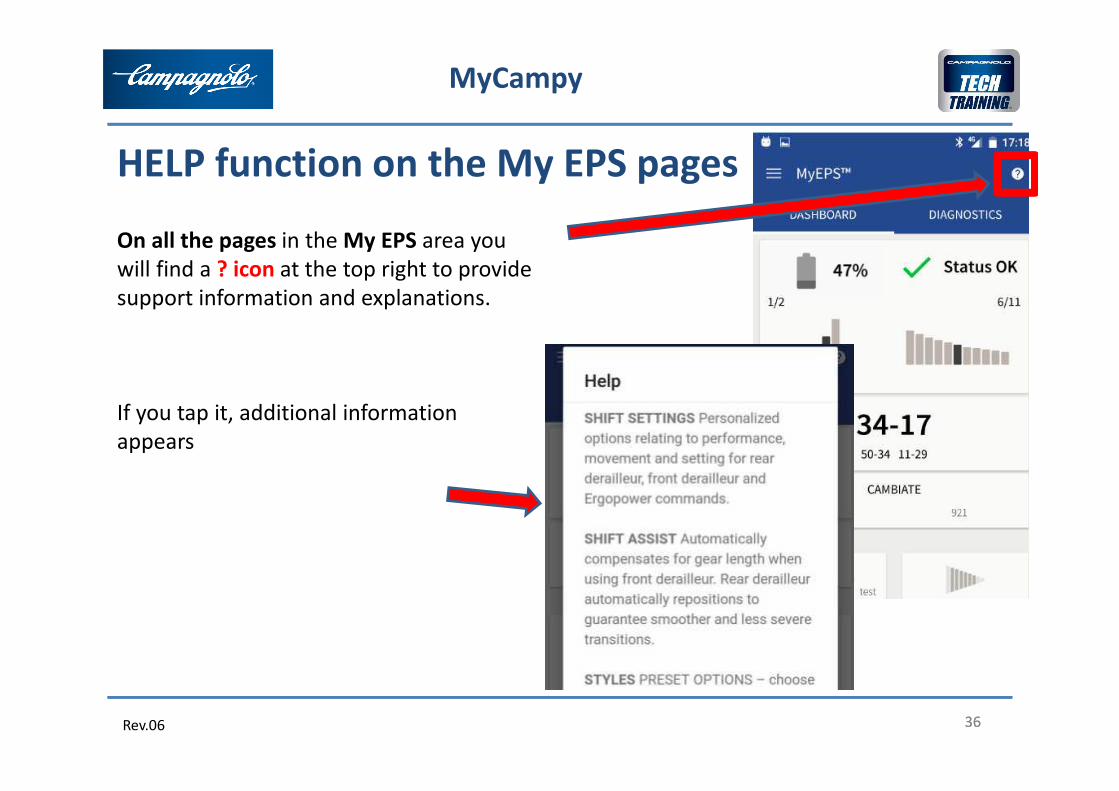
MyCampy
On all the pages in the My EPS area you
will find a ? icon at the top right to provide
support information and explanations.
If you tap it, additional information
appears
HELP function on the My EPS pages
Rev.06 37
MyCampy
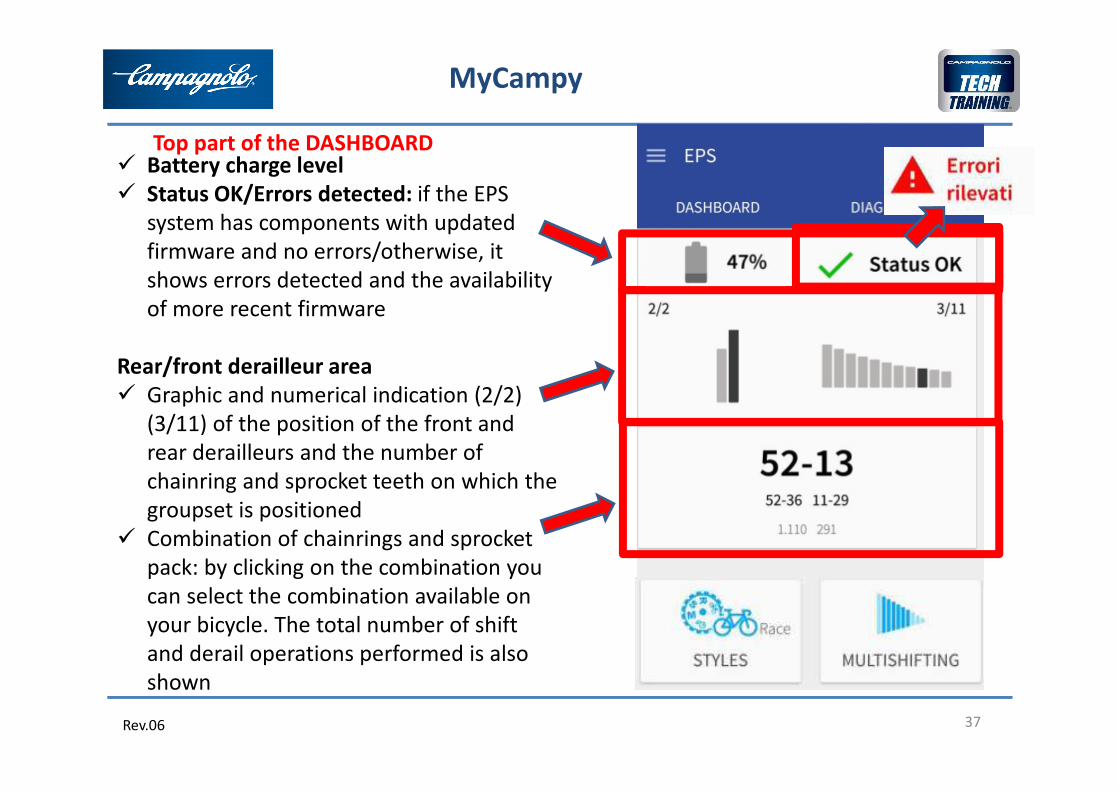
� Battery charge level
� Status OK/Errors detected: if the EPS
system has components with updated
firmware and no errors/otherwise, it
shows errors detected and the availability
of more recent firmware
Rear/front derailleur area
� Graphic and numerical indication (2/2)
(3/11) of the position of the front and
rear derailleurs and the number of
chainring and sprocket teeth on which the
groupset is positioned
� Combination of chainrings and sprocket
pack: by clicking on the combination you
can select the combination available on
your bicycle. The total number of shift
and derail operations performed is also
shown
Top part of the DASHBOARD
Rev.06 38
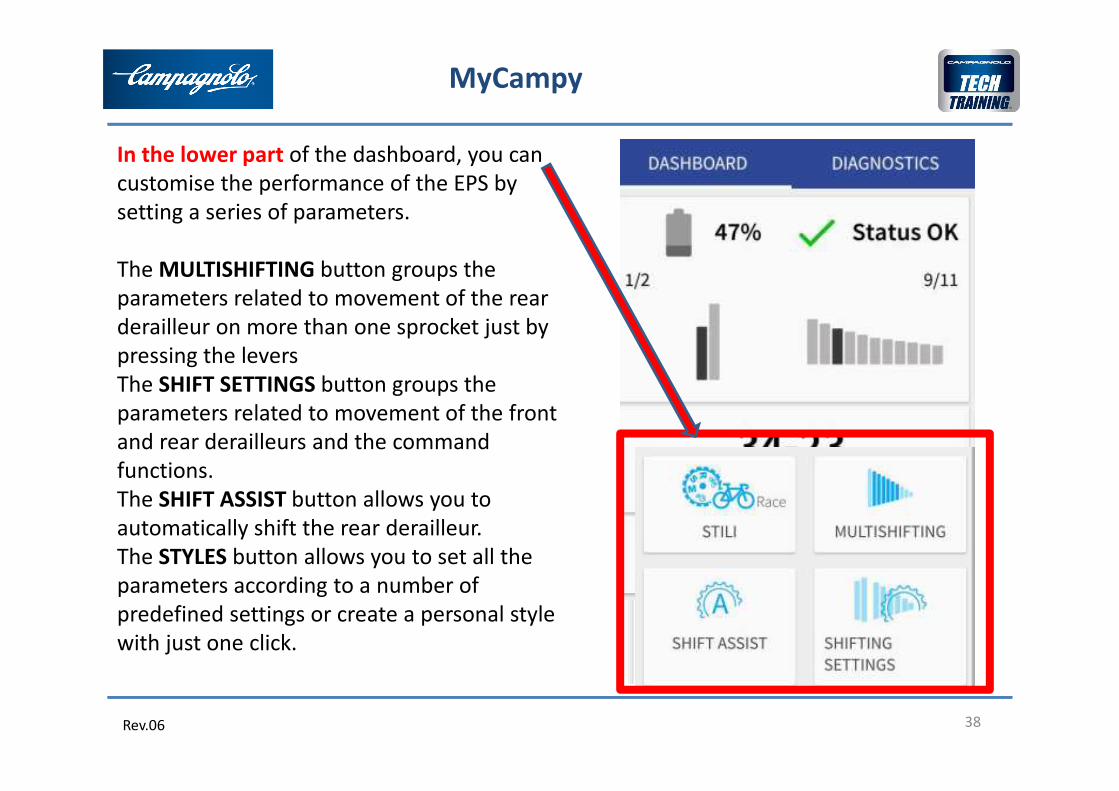
MyCampy
In the lower part of the dashboard, you can
customise the performance of the EPS by
setting a series of parameters.
The MULTISHIFTING button groups the
parameters related to movement of the rear
derailleur on more than one sprocket just by
pressing the levers
The SHIFT SETTINGS button groups the
parameters related to movement of the front
and rear derailleurs and the command
functions.
The SHIFT ASSIST button allows you to
automatically shift the rear derailleur.
The STYLES button allows you to set all the
parameters according to a number of
predefined settings or create a personal style
with just one click.
Rev.06 39
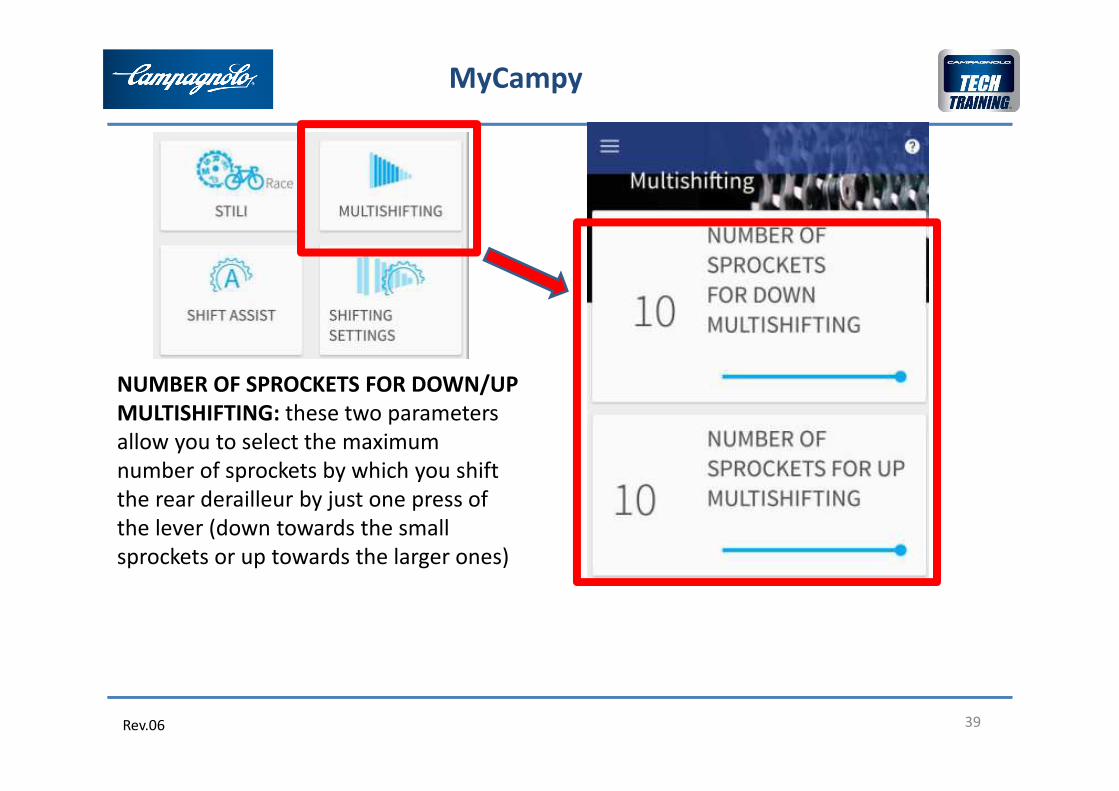
NUMBER OF SPROCKETS FOR DOWN/UP
MULTISHIFTING: these two parameters
allow you to select the maximum
number of sprockets by which you shift
the rear derailleur by just one press of
the lever (down towards the small
sprockets or up towards the larger ones)
MyCampy

Rev.06 40
MyCampy
Rev.06 41
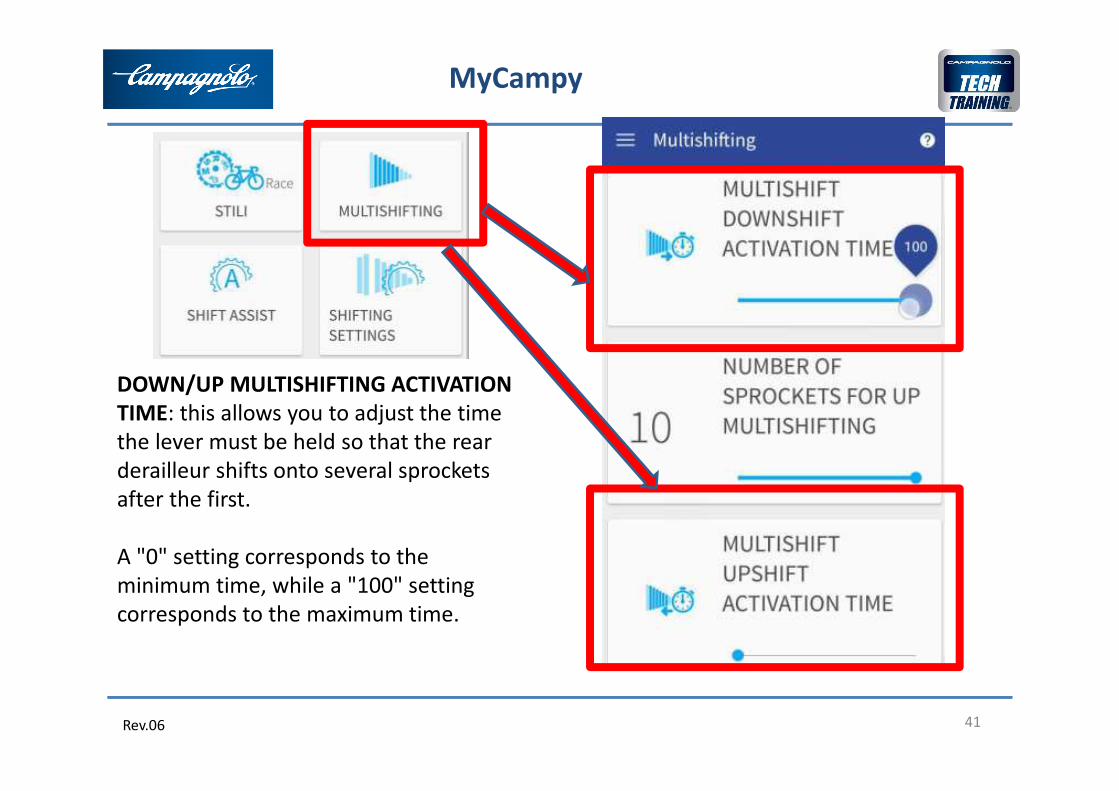
DOWN/UP MULTISHIFTING ACTIVATION
TIME: this allows you to adjust the time
the lever must be held so that the rear
derailleur shifts onto several sprockets
after the first.
A "0" setting corresponds to the
minimum time, while a "100" setting
corresponds to the maximum time.
MyCampy

Rev.06 42
FRONT/REAR DERAILLEUR MODE: allows
softer and quieter (SOFT), normal
(NORMAL) or more "aggressive" and fast
(RACE) shifting of the chain on the
sprockets.
MyCampy

Rev.06 43
COMMAND MODE:
This mode allows you to customise
control of the EPS groupset by assigning
different functions to the levers and
MODE buttons.
This is the only function that is not
modified by the STYLE you set on your
EPS.
NOTE To make the adjustment and/or to
reset the rear and/or front derailleur the
control mode must be set to STANDARD.
MyCampy

Rev.06 44
MODE
1. EPS control only with Right Hand
MyCampy

Rev.06 45
2. EPS control only with Left Hand
MODE
MyCampy

Rev.06 46
3. Standard mode EPS control
MODE
MyCampy

Rev.06 47
4. Inverted Standard mode EPS control
MODE
MyCampy

Rev.06 48
5. EPS Sprinter Control A
MODE
MyCampy

Rev.06 49
6. EPS Sprinter Control B
MODE
MyCampy

Rev.06 50
AUTOMATIC GEAR SHIFT AFTER DERAILING:
This allows you to reduce the jump in the
transmission ratio which occurs when
derailing by automatically operating the rear
derailleur. When shifting up to the larger
chainring, the system subsequently makes
the rear derailleur shift up by 0/1/2/3 larger
sprockets (if it is not already on the largest
or the one next to it) and vice versa. That is,
if down-shifted, the rear derailleur drops by
0/1/2/3 smaller sprockets.
MyCampy
Rev.06 51
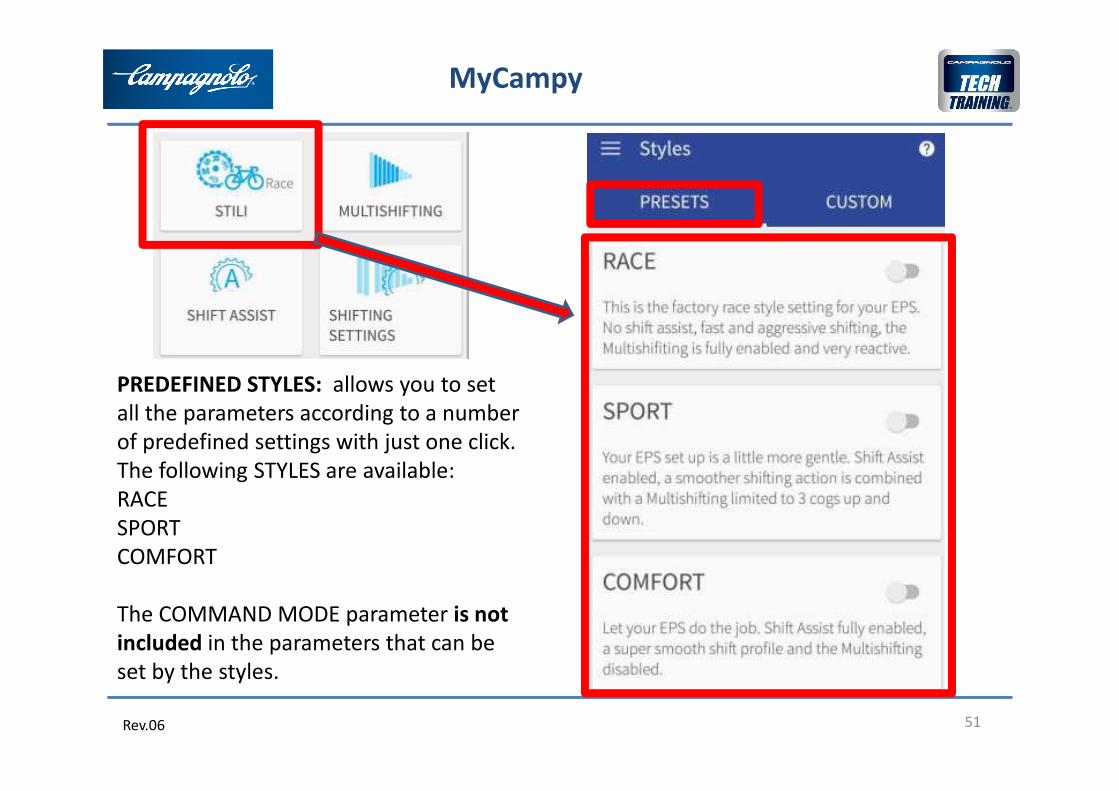
PREDEFINED STYLES: allows you to set
all the parameters according to a number
of predefined settings with just one click.
The following STYLES are available:
RACE
SPORT
COMFORT
The COMMAND MODE parameter is not
included in the parameters that can be
set by the styles.
MyCampy

Rev.06 52
STYLES:
MyCampy
Description Race Sport Comfort Values
FRONT DERAILLEUR MODE HARD NORMAL SOFT HARD, NORM, SOFT
REAR DERAILLEUR MODE HARD NORMAL SOFT HARD, NORM, SOFT
NUMBER OF SPROCKETS FOR
DOWN MULTISHIFTING10 3 1 1…10
NUMBER OF SPROCKETS FOR
UP MULTISHIFTING10 3 1 1…10
DOWN MULTISHIFT LATENCY 0% 50% 100% 0 – 100 %
DOWN MULTISHIFT LATENCY 0% 50% 100% 0 – 100 %
AUTOMATIC GEAR SHIFT
AFTER DERAILING0 1 2 0…3

Rev.06 53
CUSTOMISED STYLES: you can create
(with a title and subtitle), save and
cancel your settings.
The various parameters are set and
subsequently saved in your account
through this screen, creating a STYLE that
will be associated to the set parameters.
The styles are saved on the Internet in
your account and can therefore be saved
in different EPS groupsets
MyCampy

Rev.06
The screen on the right side of the
DASHBOARD screen is called
‘’DIAGNOSTICS’’
In the upper part of the screen, you can
access the area where the firmware version
of some of the components can be seen and
where you can update them.
In the lower part of the screen there is an
area reserved for professional mechanics
where diagnostics can be performed to show
any detailed errors detected by the EPS
system and perform a series of tests to help
diagnose any errors not detected by the
system.
54
MyCampy
DIAGNOSTICS

Rev.06 55
MyCampy
FIRMWARE UPDATE screen
On this screen the data read within each
individual component is indicated:
INTERFACE
WIRELESS MODULE
For each component the following
information is indicated:
Serial number
Hardware version
Firmware version

Rev.06 56
MyCampy
FIRMWARE UPDATE screen
If the App detects that the firmware of an
individual component is:
• not the latest version available on the
Internet, the DOWNLOAD option and
the related icon will appear
• an older version than the one in your
device, the UPDATE option and the
related icon will appear
• the latest available version, the App
will display UPDATED and the related
icon on the screen
WIRELESS MODULE
WIRELESS MODULE
WIRELESS MODULE
WIRELESS MODULE

Rev.06 57
MyCampy
FIRMWARE UPDATE PROCEDURE
For example, the WIRELESS MODULE has
firmware version 8.
The App shows me that a new version is
available on the Internet and therefore it
indicates DOWNLOAD
After tapping DOWNLOAD and
downloading the file onto the mobile
phone,
the App allows me to carry out the UPDATE
and download the new firmware into the
wireless module.
WIRELESS MODULE
WIRELESS MODULE
Rev.06 58
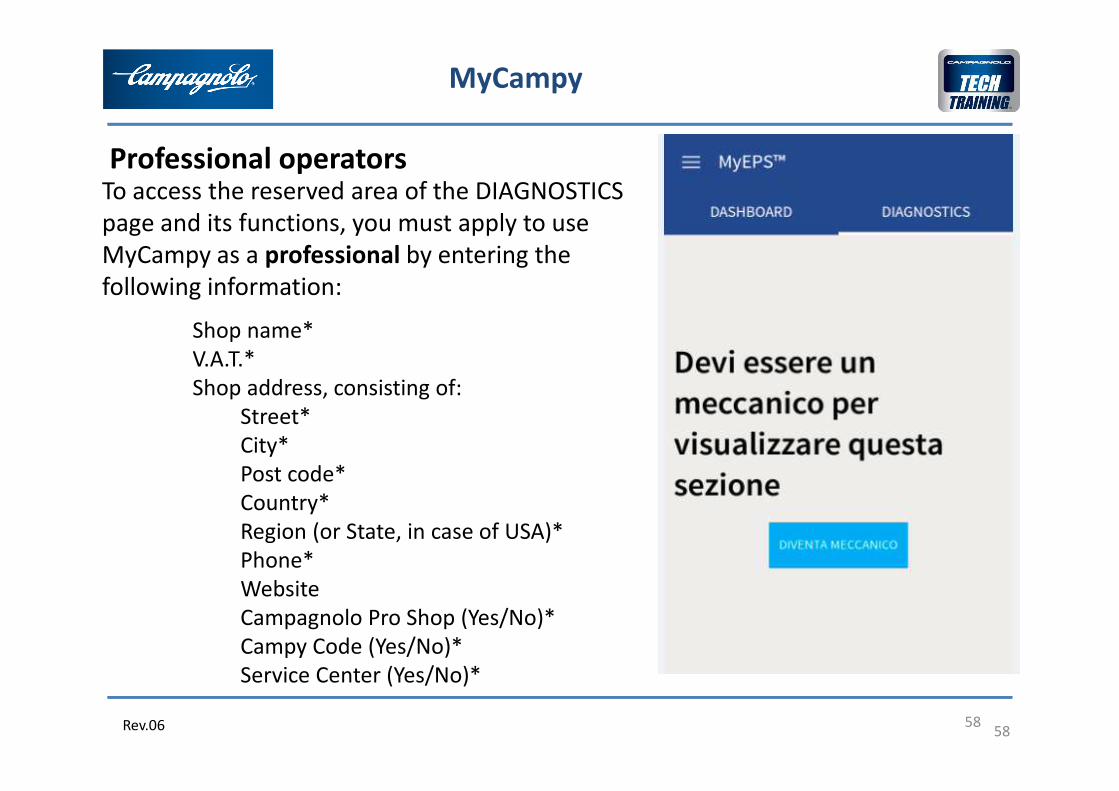
MyCampy
58
Professional operatorsTo access the reserved area of the DIAGNOSTICS
page and its functions, you must apply to use
MyCampy as a professional by entering the
following information:
Shop name*
V.A.T.*
Shop address, consisting of:
Street*
City*
Post code*
Country*
Region (or State, in case of USA)*
Phone*
Website
Campagnolo Pro Shop (Yes/No)*
Campy Code (Yes/No)*
Service Center (Yes/No)*

Rev.06 59
MyCampy
Campagnolo disclaims all liability
deriving from the downloading of these
additional functions by any person, who
must accept direct liability for their
actions.
About 24 hours after the request the
system, after automatically checking the
compulsory fields, will advise the user
with a notice that they can access the
reserved functions in the DIAGNOSTICS
area.
Professional operators

Rev.06 60
MyCampy
The ERRORS screen indicates any errors
detected by the EPS system (the following
will appear on the initial screen):
When an error appears, click on it to open
a page that will tell you the checks to be
performed to identify the defective
component.

Rev.06 61
MyCampy
TEST screen
The COMMAND test allows you to check
the correct operation of all the command
levers and buttons:
for example, the screen will confirm that
by operating the inner command lever (or
the bar end, if present), the signal is
received correctly by the interface.
This test may be particularly useful when
the system does not indicate any error and
you suspect that the problem is caused by
the control area (command and interface)
or by the operating area (power unit and
rear derailleur).

Rev.06 62
MyCampy
TEST screen
The FRONT AND REAR DERAILLEUR test
allows you to operate the front and rear
derailleurs by means of the app without
using the commands.
This test may be particularly useful for
checking whether, regardless of the
commands, the front and rear derailleurs
move correctly.
IMPORTANT: the crankset must be turned
while operating the front and rear
derailleurs!

Rev.06 63
MyCampy
TEST screen
The LED TEST allows you to check whether
the interface LED correctly changes to the
various colours.
By looking at the indication on the app,
while at the same time looking at the
interface LED, you can check whether the
indications match.
Rev.06 64
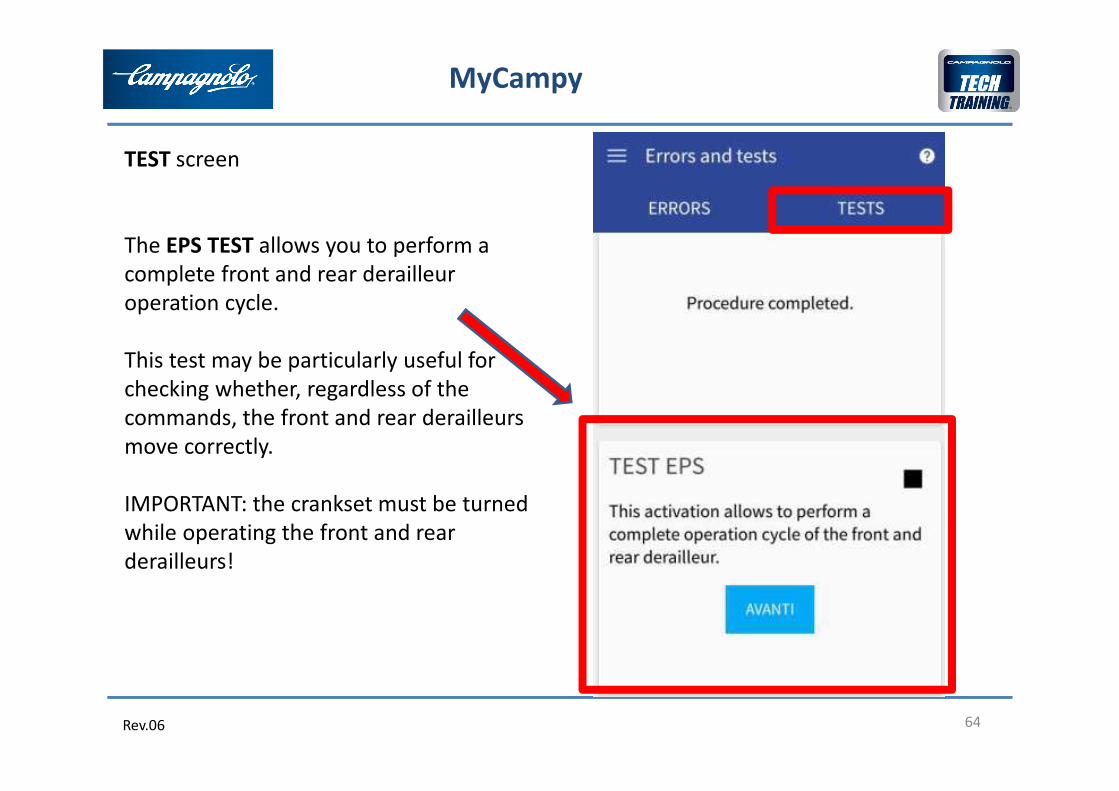
MyCampy
TEST screen
The EPS TEST allows you to perform a
complete front and rear derailleur
operation cycle.
This test may be particularly useful for
checking whether, regardless of the
commands, the front and rear derailleurs
move correctly.
IMPORTANT: the crankset must be turned
while operating the front and rear
derailleurs!

Rev.06 65
MyCampy
FIRMWARE UPDATE screen
On this screen, in addition to the
components that are already visible:
INTERFACE
WIRELESS MODULE
the POWER UNIT is also visible

Rev.06 66
MyCampy
FIRMWARE UPDATE PROCEDURE
For example, the Power unit has firmware
version 8.
The App shows me that a new version is
available on the Internet and therefore it
indicates DOWNLOAD
After tapping DOWNLOAD and
downloading the file onto the mobile
phone,
the App allows me to carry out the UPDATE
and download the new firmware into the
Power unit.

Rev.06 67
MyCampy
FIRMWARE UPDATE
Follow the instructions
During this phase the interface LED turns
orange in colour