Embed Size (px)
Citation preview

MYEDUCATION BC GRADES MANAGEMENT USER GUIDE
(SECONDARY SCHOOLS)

1
Grades Management
Contents:
Initial Set-Up Procedures
a. Grades Management School Preferences p.2
b. Preparing Grade Terms p.4
c. Grade Term Cover Map p.6
d. Course Attributes p.6
c. Transcript Definitions p.7
d. Apply Transcript Definitions to Courses p.7
e. Prepare Grade Input for All Classes p.8
f. Grade Post Controls p.11
Course Dates for DL & CE and Secondary Schools p.11
Entering Grades for Teachers p.16
Making Corrections to Posted Grades p.21
Update Teacher Gradebooks p.23
Viewing and Editing Transcript Records for All Students p.24 Calculate Averages p.26 Calculate Credits p.26
Report Cards p.26
a. Report Card Message p.26
b. Comment Bank p.26
c. Grades Post Verification Report p.27
d. Transcript Audit Report p.28
e. Printing/Publishing Report Cards p.29
Identifying Students at Risk by Grades p.33
Other Reports p.34
Glossary of Terms p.36
Appendix A (Comment Bank) p.37

2
Grades Management
Initial Set-Up Procedures:
a. Grades Management School Preferences
School View > School top tab > Setup side tab > Preferences side sub tab > Category: Grade (found in the upper right corner of the screen).
Allow multiple posts by Staff checkbox: can teachers post marks to the report card more than
once?
o Checked: teachers can post grades from the term grade entry screen to report cards,
make a change if necessary, then post again, as long as the grade post window set by
the school is open.
o Unchecked: teachers can post grades from the term grade entry screen to the report
card once. After they have done so, all changes for report card marks must be done at
the office.
Current classes day offset: how many days do you want classes to appear in the teacher’s
“current classes” window after the term has finished.
Add/Drop ignore window (days): how many days to you want the system to refrain from
displaying drops/adds in the gradebook at the beginning of the school year.
Decimals: how many decimal points for grade calculation
Credit update procedure: This is a system procedure that should not be changed!

3
Report card message: The message the school wants to have appear on every report card
generated in the school. This should be updated before printing report cards every term.
Honor roll qualification list: this can be left blank at this time. Custom reports are being
created for BC.
Add/drop align gradebook scores behavior: Select one of the following to determine what
happens to a student’s assignment scores when the student transfers from one course section
to another:
o Department: The assignment scores are copied to the student’s new course if the
course’s previous and new department match. The assignment categories must be the
same in both sections. The total points for both assignments must be the same.
o Course number: The assignment scores are copied if the previous and new course
numbers match. The assignment categories must be the same in both sections. The total
points for both assignments must be the same.
o Do not copy: The assignment scores are not copied.
Semester cumulative average: check to enable a semester running average column for students,
based on assignments, not term grades, in the staff view for teachers.
Overall cumulative average: check to enable a full year running average column for students, based
on assignments, not term grades, in the staff view for teachers.
Allow editing of term weights by staff: check to allow teachers to customize the weight of each
term in calculating a final grade
Transcript Auto-calculation options: The School Setup document contains a detailed table of these
settings. It is recommended that the Transcript auto-calculation fields are never set to “Force.”
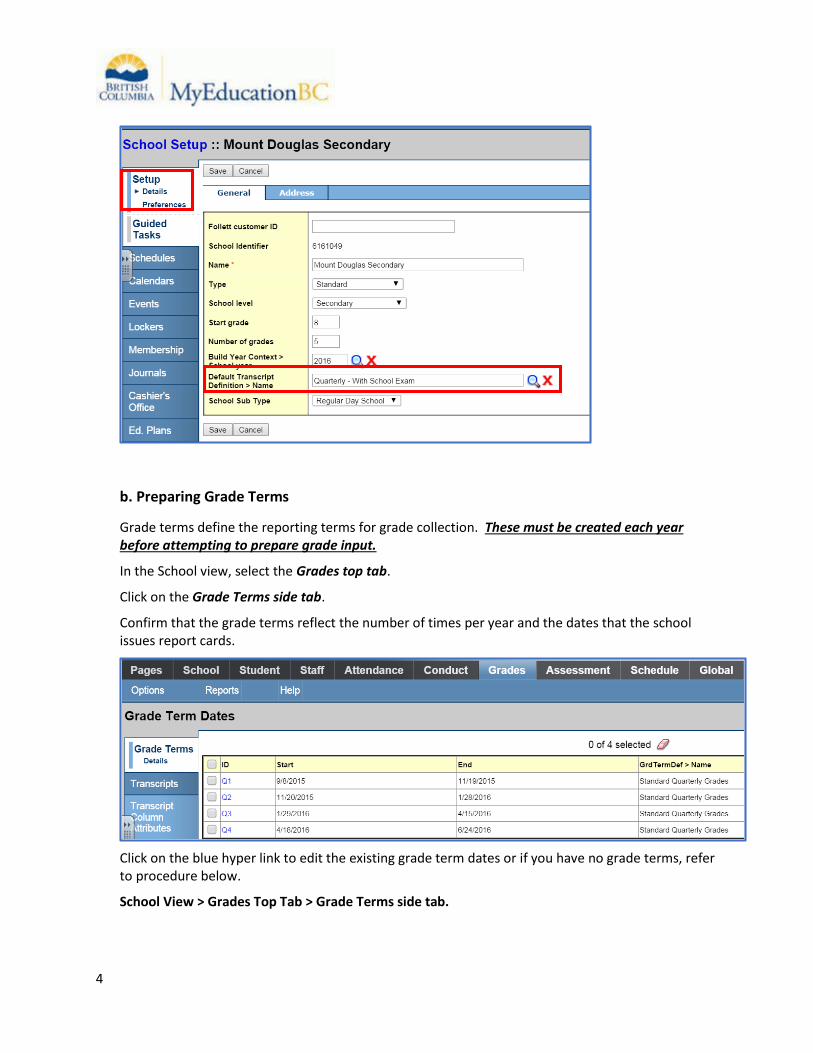
School Top Tab>Set-Up side tab>Details Leaf
Set the Default Transcript Definition: Using the magnifying glass use the pick list to select Quarterly
With School Exam (Any new courses brought down to the school course catalogue will default with
the selected transcript definition).
4
b. Preparing Grade Terms
Grade terms define the reporting terms for grade collection. These must be created each year before attempting to prepare grade input.
In the School view, select the Grades top tab.
Click on the Grade Terms side tab.
Confirm that the grade terms reflect the number of times per year and the dates that the school issues report cards.
Click on the blue hyper link to edit the existing grade term dates or if you have no grade terms, refer to procedure below.
School View > Grades Top Tab > Grade Terms side tab.

5
Options>Add
Select Standard Quarterly Grades Q1
Click OK
Enter the start date and end date for the trimester.
Click Save
Repeat the above process of adding Q2, Q3 and Q4 with the start and end dates for each quarter.
The Grade Terms side tab will now display all four quarters and their start and end dates.
6
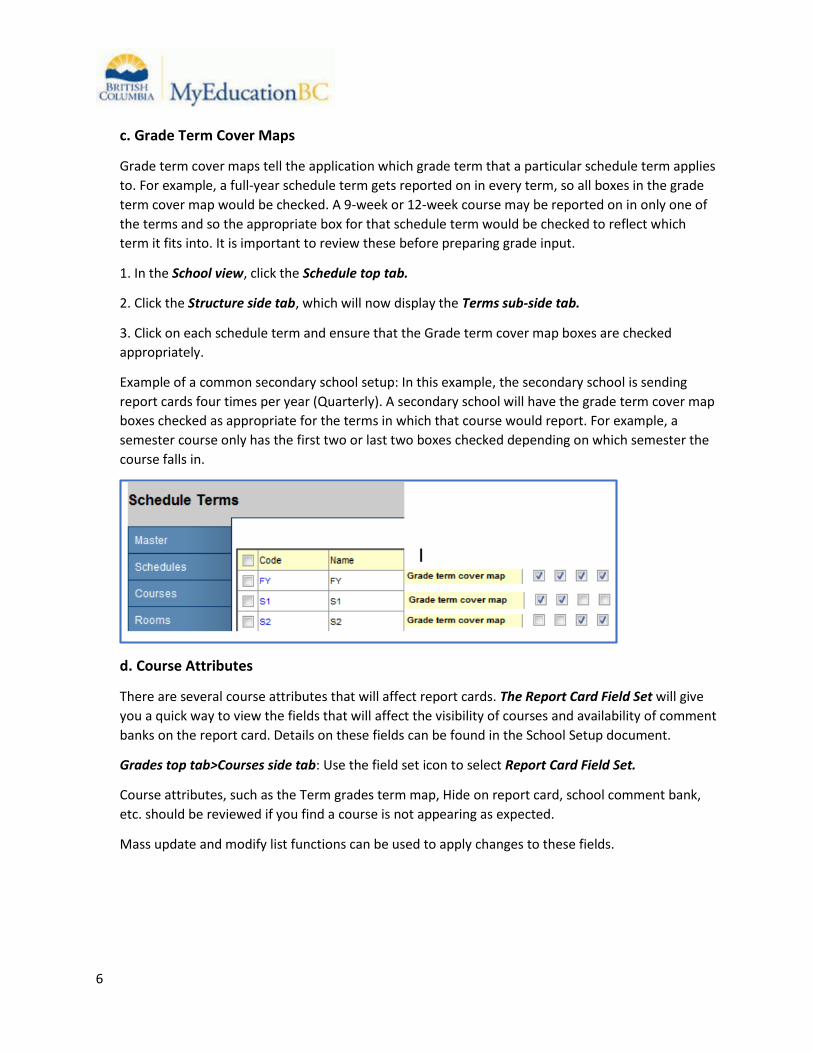
c. Grade Term Cover Maps
Grade term cover maps tell the application which grade term that a particular schedule term applies
to. For example, a full-year schedule term gets reported on in every term, so all boxes in the grade
term cover map would be checked. A 9-week or 12-week course may be reported on in only one of
the terms and so the appropriate box for that schedule term would be checked to reflect which
term it fits into. It is important to review these before preparing grade input.
1. In the School view, click the Schedule top tab.
2. Click the Structure side tab, which will now display the Terms sub-side tab.
3. Click on each schedule term and ensure that the Grade term cover map boxes are checked
appropriately.
Example of a common secondary school setup: In this example, the secondary school is sending
report cards four times per year (Quarterly). A secondary school will have the grade term cover map
boxes checked as appropriate for the terms in which that course would report. For example, a
semester course only has the first two or last two boxes checked depending on which semester the
course falls in.
d. Course Attributes
There are several course attributes that will affect report cards. The Report Card Field Set will give
you a quick way to view the fields that will affect the visibility of courses and availability of comment
banks on the report card. Details on these fields can be found in the School Setup document.
Grades top tab>Courses side tab: Use the field set icon to select Report Card Field Set.
Course attributes, such as the Term grades term map, Hide on report card, school comment bank,
etc. should be reviewed if you find a course is not appearing as expected.
Mass update and modify list functions can be used to apply changes to these fields.

7
e. Transcript Definitions
All courses must have a transcript definition if grades, comments or work habits are to be entered
against them. The most commonly applied transcript definition for secondary schools is Quarterly-
With School Exam, which allows for 4 formal reporting periods and gives teachers the option of
including a school based course exam in a separate calculation when determining a final mark for a
student. This transcript definition is also currently the only one that allows MyEducation BC to
calculate GPA for students.
Apply Transcript Definitions to Courses
Schedule Top Tab>Courses Side Tab (Be sure the filter is set to Current Year)
Select all courses that require an update to the transcript definition.
Options>Show Selected (Important: You must show selected before performing a mass
update)
Once the list shows all courses you wish to apply a single transcript definition to, go to
Options>Mass Update
From the Field drop down menu select Transcript Definition
Use the magnifying glass to open the pick list and select Quarterly-With School Exam
Click Update

8
f. Prepare Grade Input for All Classes *Important Note: Be sure the correct transcript
definitions have been applied to all courses before preparing grade input.
Preparing grade input is the process of creating the columns that users will see for entering grades, work habits and comments for the report card. If grade input is not prepared, users will have not have fields to enter data into.
Go to Grades top tab > Grade Input Side Tab > Options > Prepare Grade Input.
Step 1 of the Wizard
Select an option to Prepare for: Use the selection tools to choose which sections you want
to prepare grade input for. If your school`s master schedule is mostly settled for the year,
there is no harm in preparing grade input for all sections.
Current Selection: will show all sections unless you selected sections on the Classes
list and went to Options > Show Selected.
Selected Sections: gives you the opportunity to select specific sections from a pop-
up window.
All Sections: allows you to prepare all sections of all classes.
Click Next.
Step 2 of the Wizard

9
From the Report Type dropdown, select Term.
Select the correct term from the Term dropdown.
Do not select Replace Existing Columns checkbox. This is only used on rare occasions when errors
have been made in entering grades for a class, the window is reopened for corrections, and this
option is selected to wipe out the existing data. Replace Existing Columns should never be done
once grade data has been entered and posted for a student. Checking this box will delete all data
entered for the term selected. There are very few circumstances where this would be done. Log a
Pando ticket with the MyEducation BC support team to ensure it is the appropriate action for what
you wish to accomplish.
Step 3 of the Wizard.
Enter the beginning and ending dates for the grading window to be open. The window will
be open until midnight of the end date. This reflects the period of time for which you want
users to be able to enter data. Once the End Date has passed, all changes would need to be
made at the office
Allow Posting for All Students
Click Next

10
Step 4 of the Wizard
This is a confirmation screen.
Click Finish to complete the Prepare Grade Input process.

11
g. Grade Post Controls
These are created when you prepare grade input. Grade post controls are the `windows` of time set
for your staff to be able to enter marks. Once the end date has passed, all mark changes have to be
made through the office. To adjust the end date of a grade post control:
In the School view, select the Grades top tab.
Click on the Grade Post Controls side tab.
Click on the blue hyperlink for the GradeTerm>ID to be adjusted.
Adjust the Start date or End date as necessary.
Click Save
To view the post controls that were created, go to: Grades > Grade Post Controls.
If you are at the last date teachers are allowed to post and you want to close the post
window immediately, you can come to this screen and set the end date back one day.
*Select the Posts Leaf to view a list of classes that marks have posted with a date/time
stamp.
Course Dates for DL & CE and Secondary Schools
Preparing Grade Input for Course Dates:
In addition to preparing grade input for terms to enable grade entry, DL and CE schools will
need to prepare grade input for course dates. This is necessary to create the columns for
entering course dates relevant to DL and CE schools. Standard secondary schools should
also prepare course dates for Grade 10 – 12 courses.
The course date columns that are created are:
Start Date: The course start date.
Active Date: The date the student has met the requirements to be counted for
funding.
% Complete: The percentage of the course the student has completed at the time of
posting.
Completion: The date the student completed the course. This will be automatically
populated when a Final mark is entered and posted.

12
To prepare grade input for course dates:
In the School view, click on the Grades top tab
Click on the Grade Input side tab. You will only see classes that have students in
them.
In the Options menu, select Prepare Grade Input. This launches a wizard.
Use the selection tools to choose which sections you want to prepare grade input
for. If your school`s master schedule is mostly settled for the year, there is no harm
in preparing grade input for all sections.
Click Next.
Choose the Report type of Course. The Grade Term selection disappears as the terms are
not relevant to course dates.
Replace Existing Columns should never be done once data has been entered and posted for
a student. Read the warning! Checking this box will delete any dates entered previously.
There are very few circumstances where this would be done. Log a Pando ticket with the
MyEducation BC support team to ensure it is the appropriate action for what you wish to
accomplish.
Click Finish.
Entering Course Dates – DL and CE Schools
Course start dates, active dates and completion dates all provide necessary information for
1701 and SADE extracts for DL schools. Entering and posting course dates will cause a
student transcript record to be created with the dates that have been entered. Standard
secondary schools do not need to populate these dates – the process of posting course
dates will populate the course start and end dates based on the schedule term associated
to the course.
Note: In this screenshot below disregard the black push pins. The course dates do not
observe the grade post controls the way term grades do. Course dates can be entered and
posted at any point during the school year, even though the push pins are black.
To populate course dates:
In the School view, select the Grades top tab.
Click the Grade Input side tab and click the blue hyperlink for the course with dates
to be posted. This will produce the Input Grid.
Set the Grade Columns drop-down to Post Columns – Course
Click into the desired date cell next to the student and enter the necessary dates.

13
Note: The Active Date is populated automatically when a teacher enters a first assignment mark.
The Completion date will be populated automatically when a final mark is entered and posted
for the course. All fields can be populated, modified or deleted and posted by a teacher or office
admin staff.
Posting Course Dates
Course dates are created in student transcript records when they are either manually entered on the
transcript records or when staff “Post course dates” from the Grade Input screen (Gradebook).
To post course dates: By individual course
In the School view, select the Grades top tab.
Click the Grade Input side tab and click the blue hyperlink for the course with dates to be
posted. This will produce the Input Grid.
Enter the necessary dates.
In the Options menu, select Post Grades.
In the Post Grades pop-up window, check the box for Post course dates. The Grade Term box
will go blank as the terms are not relevant to course dates.
Grades to post will change to Course dates for all students

14
Click OK.
For multiple courses:
This assumes all necessary dates have been entered into the input grid for each course.
In the School view, select the Grades top tab.
Click the Grade Input side tab.
In the Options menu, select Post Grades.
In the Post Grades pop-up window, check the box or Post course dates. The Grade Term box will
go blank as the terms are not relevant to course dates.
Grades to post will change to Course dates for all students
Click OK
Adjusting Course Dates After Initial Posting
If changes to course dates are required, it is recommended that the change be made in the grade input
grid for the course and re-posted. This will update the student transcript record with the new date and
15
keep the data stream intact. The process listed below should only be used with the full understanding
that it requires an additional process to update the input grid after changes are made.
To adjust course dates for multiple or random records:
In the School view, select the Grades top tab.
Select the Transcripts side tab.
Set the dictionary icon to All.
Set the field set selection to Active Dates. This will display the course dates.
In the Options menu, select Modify List.
Click the pencil icon at the top of the column to activate the dates for the column to be updated.
Populate the dates as required.
Click the green check mark to save the entries.
Repeat for other date columns as necessary.
Note: The Options > Mass Update function can also be used, but should be used with great care as date
fields can only be updated to contain a value or to change a value. They cannot be changed back to
blank, using the mass update function. If course dates are populated “en masse” through the Grades top
tab > Transcripts side tab, it is important to know that this does not automatically populate the Grade
Input grid with these values. Therefore, the Update Gradebooks function should be used to push these
dates back to the grade input grid to avoid them being overwritten by blanks or previously entered
values if course dates are posted from the Grade Input grid at a later date.

16
Entering Grades for a Teacher
In the event of an absence, office users can enter or modify grades for a teacher using the following steps. Manual changes made to a grade for a student will appear with a blue exclamation mark beside them. This indicates to the teacher that admin staff have entered or modified the grade. An “Update” button will appear in the Final column in the final reporting period for courses. Clicking the Update button will populate the final mark according to the calculation applied in the transcript definition. Grades top tab > Grade Input side tab Check the box beside the desired class Click Input Grid side tab or double click on the blue hyperlink
Enter Term Grades
Select Post Columns-Term from the Grade Columns drop down window
Select the appropriate term from the Term drop down window
Click in the grade field next to the student and type in a percent
Type Return to move down the column or Tab to move across the row
Enter Term Work Habits
Click in the WH (Work Habits) field and type in an upper case E, G, S, or N
*Control>D fills in all cells below with the same work habit
Black pushpins with no shape beside them appear in the column headers prior to the dates defined
for mark entry and appear in the Grade Post Controls.
Green pushpins with a triangle beside them appear during the dates defined for mark entry. This
lets the teacher know that the grade post window is open and they can enter marks and post them.

17
Red pushpins with a red square beside them appear when the Post button has been pushed.
(Note: The screen shots below are from a middle school class, but the process is identical except the term will be a quarter Q1, Q2, Q3, or Q4)
Enter Term Comments
See Appendix A for details on modifying the school comment bank
Clicking the paper icon in the comments field will open a pop-up window

18
Select the comment category
Click the comment to add it to the text box (multiple comments can be added)
Click OK
Use Control>D to fill in the same comments to all field in the column below
Important Note: Be sure to use control>D to fill down a comment that applies to all
students first, then click the paper icon next to a specific student to add or edit the
comment. CTRL>D will overwrite any existing comments! Do not use CNTRL>D when
applying comments that contain tokens to insert names, etc.
Type in this text box or click on the black
triangle in the upper right corner to open
the comment bank

19
Blue Exclaimation marks indicate that someone other than the gradebook owner
(Teacher) has posted marks for this class. These exclamation marks will appear in the
teachers gradebook.
Once all grades are entered, they must be “posted” to the transcript record for the student.
This becomes the “official” term mark for the students. Grades can be posted by individual class
or all classes at once.
If a mark change is made after grades have been posted, the user must post grades again to
update the transcript record.
Term marks entered at the school level will be saved in the teacher gradebook, before or after
posting.
Posting Grades For Individual Classes: (If a teacher has entered values, but has not clicked “Post
Grades…”
Grades top tab>Grade Input Side Tab
Select the class by clicking the check box beside the course and clicking the Input Grid leaf, OR
click the blue hyperlink of the course. This will take you to the class list with students for grade
entry.
Confirm grade entry is complete.
Options > Post Grades. Confirm the correct Class is displayed.
Select the appropriate Grade Term.
Grades to post should be Term grades for all students.
Click OK.
Posting Grades For All Classes:
Grades Top Tab>Grade Input Side Tab

20
Options>Post Grades.
Select the appropriate Grade Term.
Grades to post should be Term grades for all students.
In the “Post for. . .” section, select All Classes.
Click OK.
The push pins will turn red indicating that marks have been posted to the office
Depending on school preferences, teachers can re-post marks until the grade post period expires
and the push pins turn black
For Posting Final Grades : Click on Update
The system will calculate final marks based on the grade calculation weights set up from the
details side tab. (View the calculation by clicking on the “Final” blue hyperlink)
Manual entry of final marks, overriding the auto-calculation is possible
Click Post Grades
Use the records navigation tool to advance to the next class on the list.

21
Note: A school user will appear in the Grade Post Verification report in place of the teacher.
Making Corrections to Posted Grades
a. Reopen the Window by Deleting Post Control: This will wipe out all posted marks for the
class.
Grades > Grade Post Controls.
Click the Posts leaf.
Search the list of Posts for the correct class, section, and teacher
Select the checkbox in front of the post
In the Options menu, click Delete
Make Grade Changes on the Student Transcript
Student Top Tab>Select the student>Transcript side tab
Filter to Current Year, Current School, or All Records
Use the Data Dictionary to select the correct transcript definition or select All

22
Select the transcript record to edit by double clicking on the blue hyperlink
The user may then edit the final mark in the top section of the page or individual term marks, comments or work habits in the bottom section of the page.
Click Save
After the course dates and grade input has been prepared it is necessary to withdraw a student from a course to remove it from the student transcript record.
Drop the course from the student schedule
Go to the transcript record for the student and find the course that was dropped
Put in a W in the final mark
Make sure the credits are at 0.0
Enter the date of the Withdrawal into the completion date window.
Data Dictionary

23
Update Teacher Gradebooks
This function pushes any changes made directly on the transcripts back to the teacher gradebook. If you make manual changes to term grades in the school view transcript screen, they are not automatically reflected in the teacher’s screen. If a transcript record is changed by the office from the student top tab while a course is still in progress it is necessary to update the change in the teacher gradebook. Teachers should be aware of this process before it is executed as it will affect the marks they see in their term screen.
Grades top tab > Transcript side tab
Select all records that have been changed(Consider sorting the list by teacher name)
Options>Show Selected
Options >Update Gradebooks
Select the correct transcript definition and column to update from the pick list
Click OK

24
Viewing and Editing Transcript Records for All Students
Each student has a transcript record for each class that marks have been posted for.
Grades top tab > Transcript side tab
Filter to Current Year, Current Students, All Records, or Grade Level=?
Use the Data Dictionary to select the correct transcript definition or select All
Select the record to be edited and go to Details click on the blue hyperlink
Data Dictionary

25
The user may then edit the final mark in the top section of the page or individual term
marks, comments or work habits in the bottom section of the page.
Click Save
Calculate Averages This function takes the term marks on a transcript record and calculates a final mark. DO NOT use
this function on converted historical transcript records. Converted records may only have a final
mark.
Using this function will average all terms and create a final mark based on the transcript definition
applied to the course. Running this procedure on converted records with no term marks would set
all final marks for those historical records to blank. This procedure should only be used on current
year marks.
To use the Calculate Averages function:
Go to the Grades top tab and select the Transcripts side tab.
Select the records requiring a final mark calculation.
In the Options menu, select Calculate Averages.
In the pop-up window, set the Column field to the field for which to calculate the average.
At the Grade Term field, select the term you want to calculate averages for.
a. For example, if you are calculating final grades, you might select Q4 at the Grade Term field.
The system calculates final grades only for courses that meet Q4. It does not recalculate grades
for courses that ended at the end of the first semester in Q2. If you do not select a grade term,
the system calculates final grades for all transcripts.
In the Calculate for section, ensure the number of records represents the correct number of
records to be included in the calculation, based on the selection in step 2.

26
Skip adjusted averages checkbox: skips any averages manually adjusted in the School view,
Skip existing averages checkbox: skips any averages that already exist in the column.
Calculate Credits When an administrative staff member posts final grades in the School view, credits are not
automatically calculated. The Calculate Credits function will populate the credit value based on the
system credit procedure.
To calculate credits:
In the School view, select the Grades top tab.
Click the Transcripts side-tab.
Select the records requiring a credit value.
In the Options menu, select Calculate Credits. The Calculate Credits dialog box appears.
Choose the appropriate option to calculate credits for the current selection or for all
transcript records.
Click OK.
The system will assign credit values based on the system credit procedure rules.
Report Cards- Printing/Publishing report cards for the entire school a. Enter the school message to appear on all report cards:
School Top Tab>Setup Side Tab>Preferences Leaf>Category Drop Down>Grade
Type in the message to appear on the report card. This may be customized for each term.
Click Save
b. Comment Bank If a school is intending to use only a school comment bank, comments can be created, edited and
deleted directly within the school comment bank. Teachers will see the school comment bank and

27
can add their comments to the school comment bank. It is important to note that comments added
to the school comment bank by an individual teacher are scoped to that teacher and are not visible
to other teacher users.
School view
Click on the Admin top tab.
Select the Comments side tab.
If a school comment bank has been converted, it is visible here. Click the blue hyperlink on
the name and the comments entries are displayed.
Click on the icon and change the filter to All Records.
See Appendix A of this document for details on editing school comment banks.
c. Run the Grade Post Verification Report
This will indicate which teachers have and have not posted marks to the office.
Grades Top Tab>Grade Input Side Tab>Reports Drop Down Menu>Grade Post Verification
Select the term
Select Post Type
Exclude Empty will not produce reports for classes without students enrolled
Choose the sort order
Click Run
The result will indicate which teachers have not posted grades for the selected term.
Communication with the teacher can then take place.

28
d. Run the Transcript Audit Report
This will indicate which students do not have a mark posted for the chosen grade column.
Grades Top Tab>Reports Drop Down window>Transcript Audit
Select the Grade Column
Select the sort order (Teacher)
Click Run
The result will be a list of students who do not have a mark for the selected grade column.
Communication with the teacher can then take place.

29
The user may also sort the list from the Transcripts side tab to locate any empty fields, using a
custom field set that contains the required columns (Q1 Grade, Q1 Comment, Q1 WH, etc.)
e. Printing/Publishing Report Cards
When the school is satisfied all marks have been posted report cards can then be run.
Student Top Tab>Reports Drop Down Menu>Report Cards>Middle Years and Secondary
Or…
Grades Top Tab>Transcripts Side Tab>Reports Drop Down Menu>Report Cards>Middle Years and
Secondary
Report Card Type=Secondary
Verify School Year
Select the current term
Select the desired sort order
Make all other selections as required

30

31
When family and student portal accounts are created schools will have the option to publish report
cards for viewing from within the portal.

32
To print report cards set delivery type to blank.
To publish report cards to the portal click on the Publish tab
Set Delivery type to Publish
Enter in an email message that will automatically be sent to notify contacts designated to
receive emails that report cards are available for viewing/downloading, for a specified time
period, within the portal.
Click Run

33
Figure 1 Family Portal home page after a report card has been published
Using the Transcript Side Tab to Identify Students at Risk
Create a custom field set to include the desired field such as Q1 Grade.
Sort the list to group the list by student name, course, teacher, grade, etc.
Export as a CSV to save or print
Query the list to view only student failing or in danger of failing a course in a given term.
Based on the results of the above query, perform a group quick report to group students and courses in
which they are not passing together.

34
Other Reports
Grades Distribution
Grades Top Tab>Transcripts Side Tab>Reports Drop Down Window>Grades Distribution
Choose the Transcript column
Choose the courses and students to include
Choose the sort order
Click Run
Blank Grading Sheets
Grades Top Tab>Grade Input Side Tab>reports Drop Down Window>Blank Grading Sheets
Select the number of columns
Select the Sections to include: Run for a single teacher or for all classes
Enter a search value if identifying a single teacher
Choose the sort order
Click Run

35
Student Acheivement Data Extract (SADE)
Student Top Tab>Reports Drop Down Menu> Student Acheivement Data Extract or Student
Acheivement Data Extract Exemptions
Please see the Ministry website for details on SADE data collection:
https://www.bced.gov.bc.ca/datacollections/sade/
Individual Student Report Card:
Student top tab>Reports drop down menu>Report Cards>Middle Years and Secondary
Permanent Student Record:
Student Top Tab>Select the student>Details or Transcript side tabs>Reports drop down
window>Permanent Student Record
Diploma Verification and School Transcript:
Student top tab>select the student>Transcript side tab>Reports drop down menu>Grad
Reports>Diploma Verification or School Transcript
Official School Transcript or Student Transcript Sheet:
Student top tab>select the student>Reports drop down menu>Other Jurisdiction>Official School
Transcript or Student Transcript Sheet

36
Glossary of Terms:
Transcript Definitions: These are set up at the enterprise level and define the columns of
information that will be collected for report cards (ex. Term grade, work habit, comment, final
mark). These are attached to all courses in the school.
Schedule Terms: Duration of a course (ex. Full year, semester, 9-week, etc.). These are
attached to course sections.
Grade Terms: Used to define how many times you collect grades and issue report cards. (ex. If
you send report cards home four times per year, you will have four grade terms).
Transcript: The record of all student grade information. The transcript will display both historic
and current year marks.
Post grades: Refers to the action of formalizing the mark as a term mark to appear on the
report card. This action creates a transcript record on the student transcript screen.
Grade Post Controls: This refers to the window of time that teachers have to enter marks at the
end of the term. They are initially created during grade input preparation, but dates may be
adjusted to restrict or allow additional time for grade entry and posting.
1.
•Transcript Definitions assigned to courses.
•This contains the fields users will have to enter data such as grades, comments and work habits, as well as the calculations for final marks.
2.
•Prepare Grade Input
•This process looks at the transcript definitions assigned to the course and creates the fields for the users to enter data through the Input Grid.
•Once data has been entered into these columns, the transcript definition on that course should not be re-prepared.
3.
•Grade Entry & Posting Grades
•Users enter the data into the fields created through grade input and use the process of "posting" to create a transcript record for each student in that course.

37
Appendix A
Reviewing and Editing the School Comment Bank
Categories within comment banks create filters for users that allows them to narrow the list of
comments they see in the entry screen. Do some testing with categories on the comment bank as well
as the codes, then view them from the grade entry screen to see if you have achieved the desired result.
Go to the School View
Admin Top Tab>Comments Side Tab
Click on the Codes Leaf
1. To delete a comment select (by checking)
a single or group of comments you wish to delete
Options>Show Selected
Options>Delete
2. To edit an existing comment click on the blue hyperlink to open the details of the comment.
Edit the ID, Category, Comment Preview and Comment fields as necessary
Click Save
o The ID should be unique for each comment and can be used to sort comments, but does
not appear in the teachers view. This value is often numeric, but can also be alpha or
alpha numeric.
o The Category is used to group comments creating a filter for users when they enter
comments. For example, a comment may be in the General category. The user will be
able to select General from a drop down menu and see the comments that have a
Category 1 of General. Other comments may have a category of English or Work Habit.
o Category 2 and 3 are optional, but can be used to further filter comments.
o The Comment Preview is a shortened version of the comment
o The Comment Field is the entire comment
o The Disabled Indicator check box will remove the comment from view for teachers.
3. To add a new comment
From the Codes leaf go to Options>Add
Enter the ID, Comment Preview, Comment and Category fields as necessary
Click Save

38
Adding a Teacher Comment to the School Comment Bank
As only one comment bank can be added to a course, and this is done at the school level, a teacher
wanting to create their own custom comments will add their comments to the existing school comment
bank. Only the teacher creating the comment will see these.
Log in with a teacher account.
Click on Change View and select Staff view, if necessary.
Click the Tools top tab.
Select the Comments side tab.
The School Comment bank appears.
Click the Codes leaf.
To add a new code, go to the Options menu and select Add.
Fill in the fields according to the table below. A red asterisk on the field indicates that it is
required before you can save the comment
Using Tokens (replacement Characters)
MyEducation BC has the ability to use replacement characters for name, gender, he/she, etc. These are
called “tokens”. The codes to be used for character replacement are as defined in the table below.