Embed Size (px)
Citation preview
MZ ETZ250 Project – 2013
Skip to latest
I have always thought highly of the early ETZ250 machines. I am quite tall and they are physically
bigger than the TS250, have a decent front brake, positive oil feed and good 12v electrics. Also
having 18” wheels front and back makes tyre selection easier. The drawback is the engine which I
find peaky and not as pleasant in general use as the TS250. They also seem to have a high fuel
consumption typically 60mpg against the 75-80 I regularly get from a TS250. The solution might be
to install a TS250 motor into the ETZ250 chassis and this is about to become my latest project.
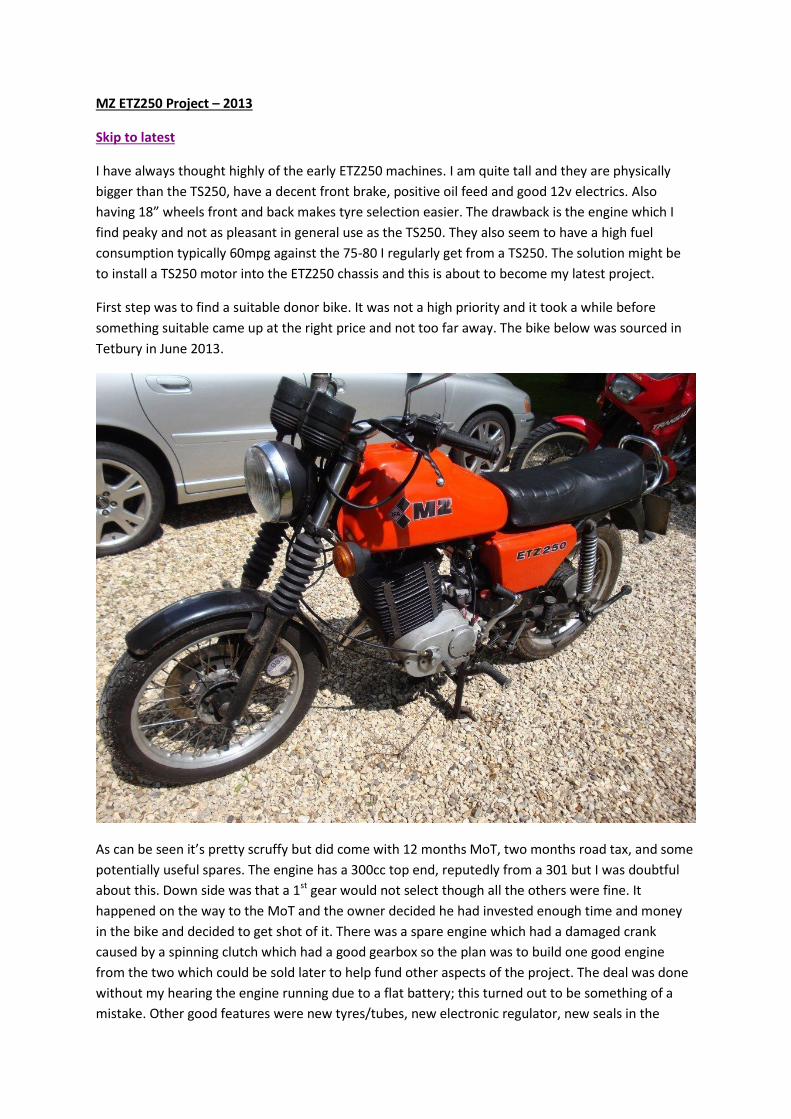
First step was to find a suitable donor bike. It was not a high priority and it took a while before
something suitable came up at the right price and not too far away. The bike below was sourced in
Tetbury in June 2013.
As can be seen it’s pretty scruffy but did come with 12 months MoT, two months road tax, and some
potentially useful spares. The engine has a 300cc top end, reputedly from a 301 but I was doubtful
about this. Down side was that a 1st gear would not select though all the others were fine. It
happened on the way to the MoT and the owner decided he had invested enough time and money
in the bike and decided to get shot of it. There was a spare engine which had a damaged crank
caused by a spinning clutch which had a good gearbox so the plan was to build one good engine
from the two which could be sold later to help fund other aspects of the project. The deal was done
without my hearing the engine running due to a flat battery; this turned out to be something of a
mistake. Other good features were new tyres/tubes, new electronic regulator, new seals in the
master cylinder and a new battery (though this conflicted with the evidence given that it was totally
flat when viewed). There was also another 250 barrel piston and cylinder head. Anyway the deal was
done and the bike plus spares trailered home. Parking it up I found it also the newer style two-spring
side stand which automatically retracts when the weight is taken off. This could be a good thing as
many a time I have tried to ride an MZ with the side stand still down.
Tuesday 16th June 2013
First job was to sort out what I had in the way of spares and examine the spare engine. The first part
was easy enough and there were some useful electrical components plus a set of seals for the
calliper all of which were stored away. There was the usual variety of damaged bits and pieces and
non MZ stuff which mostly went into the bin; so far so good. The spare engine was stripped on the
drive side, not that it took much as it was only held on by a couple of screws. The dismantled clutch
had already been found in the spares box and the inner taper was totally trashed. First problem was
getting the drive gear off the crank. The previous owner had made up a tapered shim presumably to
take up the wear in the clutch body. It was well and truly stuck on the crank and prevented the drive
gear from being removed. At first I Thought I would have to drill it off but eventually it sprang of
under the influence of some stout tyre levers. The drive gear itself was ok but the outer thrust
washer bore signs of damaged and the crank taper was also damaged. Curiously the damage did not
seem to be caused by the spinning clutch centre but by attempts to clean it up and possibly make
the shaped shim fit. Either way the shaft was well and truly trashed. The crank was also stiff to turn
over. It was not central in the cases and tapping the alternator side with a hide mallet did free it up.
The drive side end of the crankshaft was also partially broken away and the clutch body was
damaged so someone had clearly taken a big hammer to it. In the end I just put it back together,
minus clutch. One good thing was the fact that the top end on the spare engine looked like it might
be from an ETZ251 which supposedly has better porting than the earlier ETZ250 motor. So I retained
this assembly, put the spare ETZ250 top end on instead and stored the motor on the shelf.
By this time the battery was charged so I ran the engine. It started easily but my goodness what a
racket. Sounded more like engine than gearbox but either way it could not be used until stripped
and examined.
Wednesday 19th June 2013
Draining the oil from the 300 engine gave a clue as to the gearbox problem as a piece of a tooth was
stuck to the magnetic drain plug. The rest of the engine came apart fairly easily and apart from a
missing thrust washer on the selector shaft the gearbox bits looked perfect. Certainly there were no
missing teeth or other broken parts visible so I imagine the bit of tooth was left over from a previous
rebuild. Failure to select 1st gear is not a common problem on the MZ 250 motors and my guess is
that piece of broken tooth got stuck in the selector drum and was dislodged when I removed the
engine from the bike. The cause of the rattle was obvious; there was considerable vertical play in the
big end. Someone had replaced one of the main bearing with a Koyo, the other was an original DDR
Nylon caged bearing.
I was a bit annoyed that the noisy bottom end had not been mentioned by the previous owner. My
own fault for not insisting on getting it running but when bought through the club you tend to take
things on trust. In my spares box was a new conrod and big end assembly but when I offered it up I
found that it was for a TS250 and would not fit. As the long term intention is to fit a TS250 motor to
the bike I don’t want to spend much if any money on the ETZ motors so current plan is to strip the
conrod/bigend assembly from the spare engine and use this in 300 motor. A friend has a suitable
press and is confident that we can true up the cranks. With the damaged crank apart it may be
possible to clean up the taper in the lathe as well though this is a long shot. Anyway I spent the
afternoon totally stripping the spare ETZ250 motor. Damaged crank apart it seemed to be in perfect
condition. I now have both cranks on the bench and just need my friend to find a window in his
calendar to press them apart.
Thursday 20th June 2013
I forgot to mention that the TS250 motor destined for the bike is currently in use in another friend’s
bike. I have now rebuilt his engine but need to do an engine swap to regain control of my own
engine and this will not be possible for a week or so. With work on the engines stalled I decided to
have a go at the cosmetics and cycle parts. One of my phobias is rust of which there was plenty in
evidence. Long term the frame and other major components will be powder coated but I believe in
fully building a project bike to make sure everything fits and works first. For now I have just rubbed
down and wired brushed the worst parts of the frame etc and then painted them satin black which
blends in nicely with the existing paintwork and does not look so obvious as a bodge job as gloss
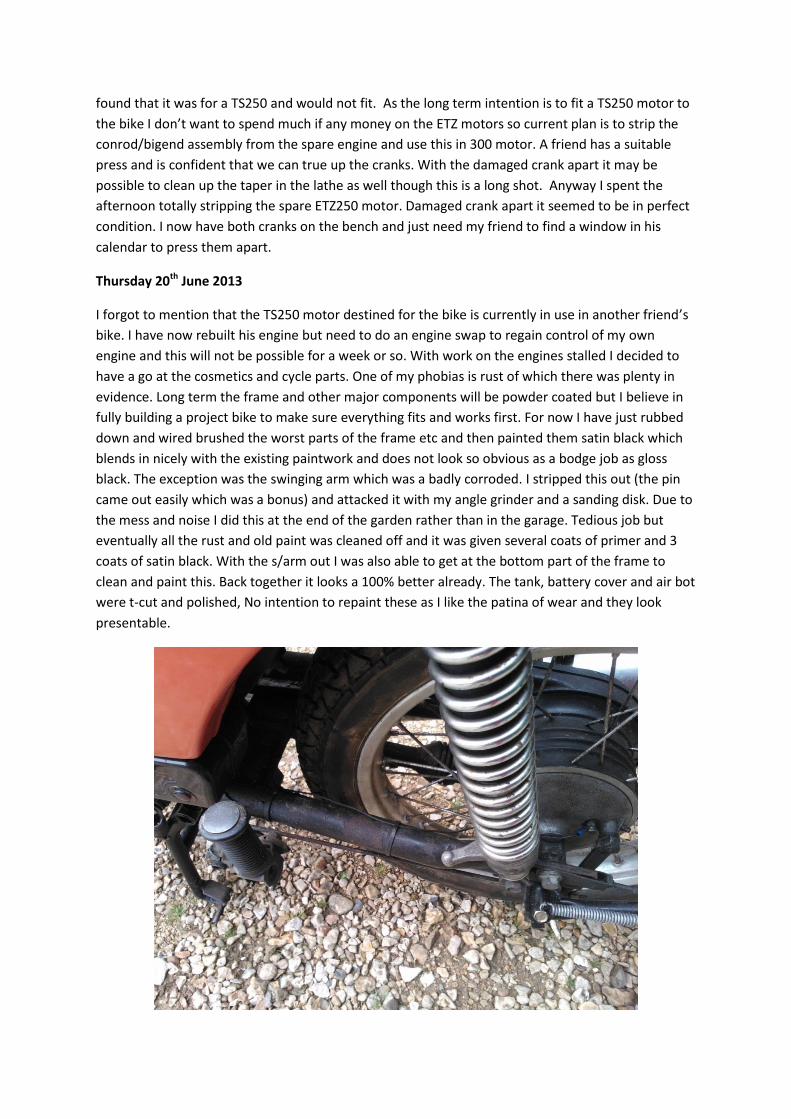
black. The exception was the swinging arm which was a badly corroded. I stripped this out (the pin
came out easily which was a bonus) and attacked it with my angle grinder and a sanding disk. Due to
the mess and noise I did this at the end of the garden rather than in the garage. Tedious job but
eventually all the rust and old paint was cleaned off and it was given several coats of primer and 3
coats of satin black. With the s/arm out I was also able to get at the bottom part of the frame to
clean and paint this. Back together it looks a 100% better already. The tank, battery cover and air bot
were t-cut and polished, No intention to repaint these as I like the patina of wear and they look
presentable.
My other pet hate is rusty spokes and dirty wheels so they got the treatment next. The back cleaned
up quite nicely and the alloy now shines. The spokes have a reasonable amount of chrome so the
rusty parts will be treated with Kurust to contain the damage. Eventually I will rebuild it with new
s/s spokes. The cheapest place to get s/s spokes is from an internet shop in Germany but this will
have to wait until I have a large enough order to justify the postage. The front did not respond so
well, the rim is nice and shiny but the spokes are quite far gone and will probably have to be painted
for now. The hub is also badly corroded but I need to get it out of the bike to remove the disk before
I can do much about this. Left this job for another day and did an easier but more visually satisfying
job of replacing most of the nuts/bolts with s/s items. The whole thing looks a lot better already.
Saturday 22nd June 2013
Front wheel is out and disk removed so that I can get to things more easily. Very tedious job but I did
manage to remove most of the corrosion and paint off the hub. The outer ring is fairly easy but the
inner part is a devil. Washed it all down with cellulose thinners, sprayed several coats of satin black
paint and left it t to harden off overnight. The drawback to this method is that the bottom part of
the spokes also get sprayed black so tomorrows job will be to clean up the spokes and decide
whether to silver paint them or just Kurust the worst bits. Rest of the day was spent tidying up the
garage which has become a bit of tip. Cleared out a a large bin of scrap metal, two black bags of
general rubbish and a bucket full of dead spray cans – where does it all come from?
Monday 1st July 2013
I have not found time to write up the diary for a few days as things have been quite hectic and what
is reported below may not be in chronological sequence.
The front wheel has been tidied up and the spokes treated with Kurust for now. Decided not to
bother painting them because I needed to place an order with my German site for various parts and
added the s/s spokes to the list. I also ordered a complete new ETZ250 crankshaft which cost £70,
this was cheaper than having a new big end fitted to one of my existing cranks or even having them
dismantled to build one good crank from the two. The bits were ordered on 28th June and should be
here within 5-7 days. As an aside, we tried splitting the damaged cranks in a friend’s hydraulic press
but its 8 ton capacity was nothing like man enough. Pity because it would have been a useful
technique for future rebuilds.
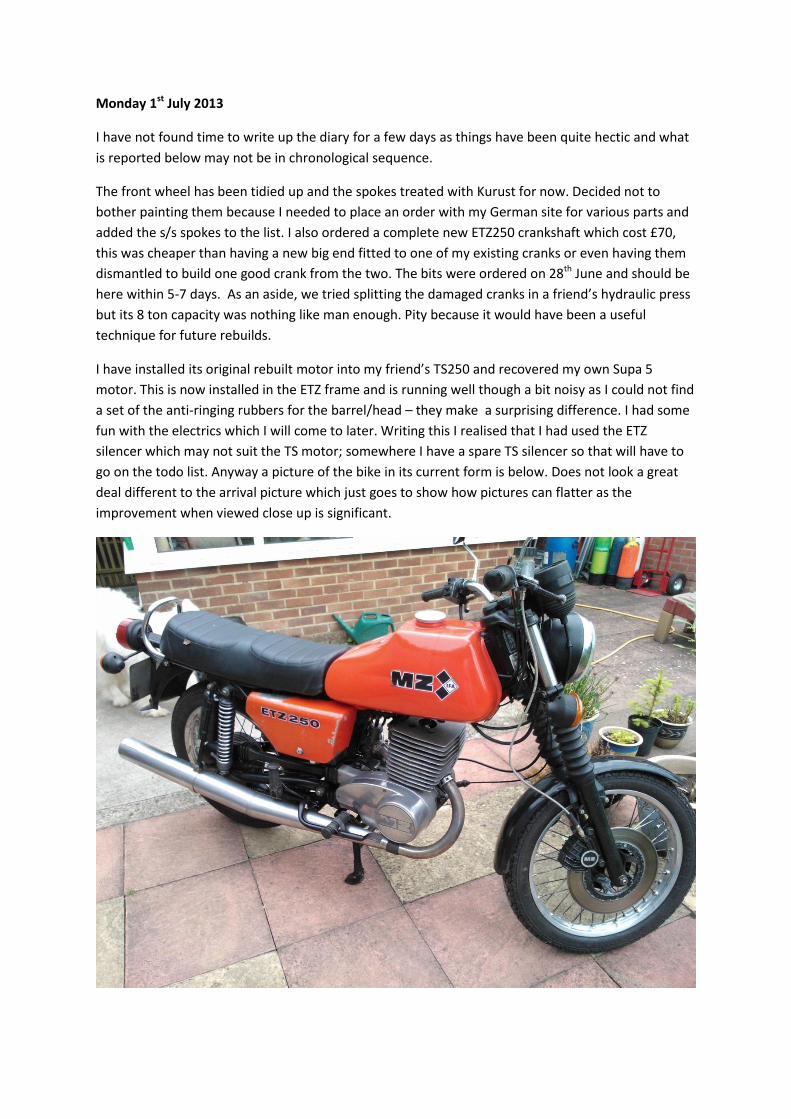
I have installed its original rebuilt motor into my friend’s TS250 and recovered my own Supa 5
motor. This is now installed in the ETZ frame and is running well though a bit noisy as I could not find
a set of the anti-ringing rubbers for the barrel/head – they make a surprising difference. I had some
fun with the electrics which I will come to later. Writing this I realised that I had used the ETZ
silencer which may not suit the TS motor; somewhere I have a spare TS silencer so that will have to
go on the todo list. Anyway a picture of the bike in its current form is below. Does not look a great
deal different to the arrival picture which just goes to show how pictures can flatter as the
improvement when viewed close up is significant.
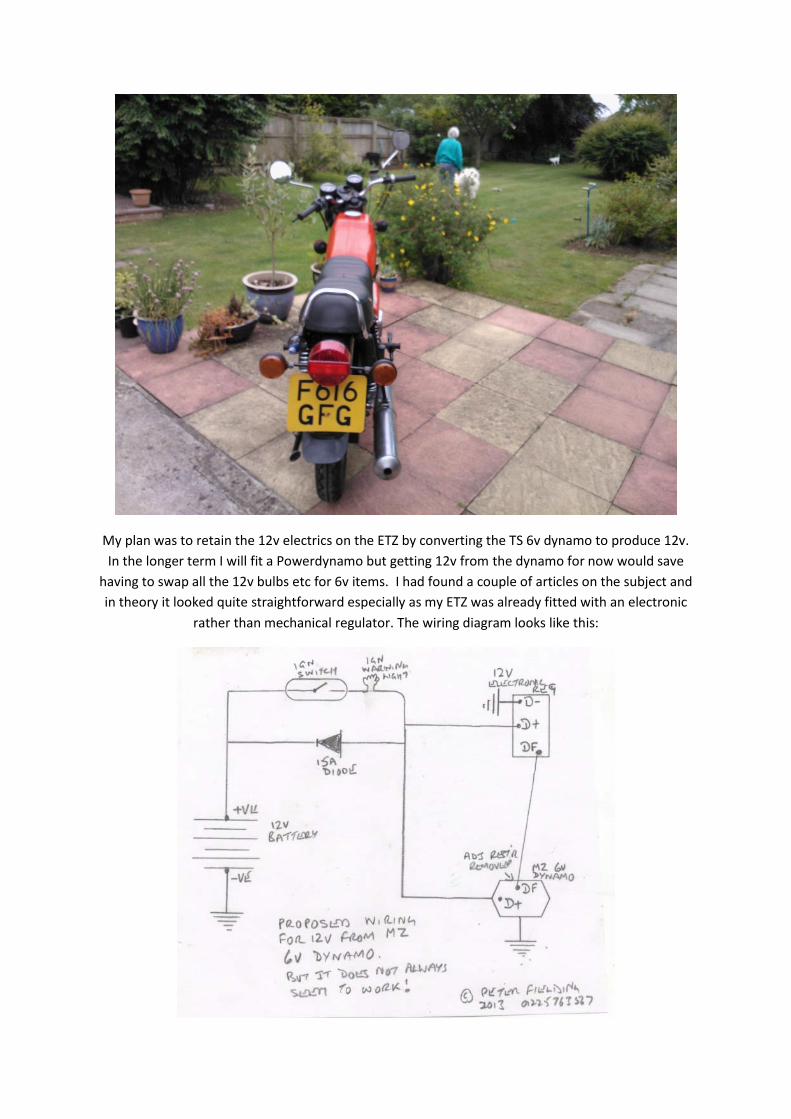
My plan was to retain the 12v electrics on the ETZ by converting the TS 6v dynamo to produce 12v.
In the longer term I will fit a Powerdynamo but getting 12v from the dynamo for now would save
having to swap all the 12v bulbs etc for 6v items. I had found a couple of articles on the subject and
in theory it looked quite straightforward especially as my ETZ was already fitted with an electronic
rather than mechanical regulator. The wiring diagram looks like this:
I hasten to add that this is my interpretation of the descriptions I found on the net as none actually
provided a complete diagram. I spent the best part of two days experimenting with this and briefly I
did get it to work. However, for no apparent reason it stopped working and eventually I gave up.
Very disappointing as it’s not often I get beaten and I have posted a message on the MZ Riders web
site to see if anyone can tell me where I am going wrong. In the interim I have swapped the 12v
regulator for a 6v type and fitted a 6v battery, 6v flasher unit, 6v headlight bulb and 6v coil. The bike
now charges properly and all the major electrical components work well enough. The horn is bit
feeble and the flashers a bit faint but I can live with that for now.
So far all I have done is a 2 mile trip round my test route with no obvious problems. A longer run is
on the cards when the sun comes out. In the interim I have sold the spare engine and a load of
redundant (to me) other MZ spares which has de-cluttered my garage considerably and will pay for
some of the things listed below. Current list of things to consider include:
Identify a match for the orange paint so I can touch up.
Locate a set of engine rubbers and a petrol cap with measuring cup.
Have another play with getting the dynamo to run at 12v.
Rebuild the wheels with s/s spokes when they arrive from Germany.
Locate and fit a TS250 silencer – longer term possibly buy a new one.
Have the mudguards, stand, brake pedal and rear light bracket powder coated.
Paint the silencer support arm – rubber bushes preclude powder coating.
Spray the front fork sliders satin black.
Rebuild the ETZ300 engine with the new crank. What to do with it long term is unclear.
Save up for a Powerdynamo setup and convert to full 12v system.
If I take to the bike have the frame & s/arm powder coated.
Sunday 28th July 2013
A long time since I wrote up the project as it has been a very hectic month. However, reviewing the
list above I can report quite a lot of progress. Thanks to the MZ Riders internet Forum, I have
identified a suitable paint and touched up the worst bits. The colour is Rover Vermillion Red and it’s
a spot on match. The same forum also produced as a gift from long time friend Andrew Long, a set of
engine rubbers. I tried to make a measuring cup but in the end just borrowed one from the TS250
for now, The s/s spokes have arrived but the wheel rebuild can wait as the clean-up I did looks quite
acceptable for now. I found the TS250 silencer but it was so tatty I have left the original ETZ250
silencer in place and until reading this list today had completely forgotten about it. The bike runs
well so I don’t think it’s a priority. None of the other cosmetics improvements have been attempted
as yet nor have I done anything further about the 12v conversion. It seems to be happy enough
running 6v though I did find the headlight a bit dim when riding home from a club meeting one
night. Realistically, I think that the Powerdynamo route is the only sensible option if I retain the
TS250 motor.
On the mechanical front the ETZ300 engine has been rebuilt with new crank, bearings and seals and
now resides under the bench whilst I decide what to do with it. So far I am very happy with my
hybrid. The motor is a bit noisy as it has done a considerable mileage but has plenty of poke and is
returning around 75mpg ridden quite briskly. I am using an 18 tooth gearbox sprocket and it romps
away so I may try replacing the 19t sprocket to see if it copes. Overall, it’s such fun to ride that it has
become my bike of choice for the last couple of weeks and has done over 400 miles.
29th August 2013
Another month has gone by with the ETZ being used regularly. Nothing has gone awry and the only
change has been to replace the 18t gearbox sprocket with a 19t which is the standard size as I felt it
would pull the higher gearing. This has proved to be the case. Curious really as it was common with
the correct ETZ motor to drop a tooth to make 5th gear more useable. This tends to prove my belief
that he TS250 motor has a lot more torque in the low-mid rev band than the ETZ motor; even if it is
down on ultimate power.
The tax runs out tomorrow so I am going to SORN it for a month or so whilst I do some of the
cosmetics. This afternoon I removed the front and rear mudguards (including the rear light and
indicator brackets) the stand, the footrest the rear brake pedal, the silencer support arm and the
rear brake torque arm. These will be going for powder coating tomorrow with the hope that they
will be ready for collection when I get back from my E2E adventure mid-September. The mudguard
bits will be silver, the rest gloss black. While the bits are away, I will clean up and paint the exposed
parts of the frame and the fork legs. I will also make up a deflector for the back part of the rear
mudguard from old inner tube to stop the swinging arm being shot blasted. The front wheel will also
be treated to new s/s spokes. If I get time and the inclination I will dig out my zinc plating kit to
brighten up various ancillary pieces as well.
One thing I did find was that the seat base appears to be rather thin in places. Ideally I should strip it
completely, make any necessary repairs then have the base powder coated as well. However, I think
I may leave this as for phase two which will be powder coating the frame and swinging arm. This is
scheduled for some time over the winter or perhaps even next spring.
31st August 2013
A small amount of progress. The bits are now at the powder coater’s; well all except the centre
stand which I removed, then replaced so I could swap the front wheel for a spare, then forgot about.
However, it will give me an excuse for a bike ride on Monday. The deflector for the back part of the
mudguard has been fabricated but not yet fitted as it will be easier to do this when the back wheel is
out. The front wheel has been rebuilt with shiny s/s spokes and the disk centre has been sprayed
satin black to tidy it up; likewise the front fork legs. I noticed that the chrome on the top of the
stanchions is a bit pitted and am hoping to get some new ones from a friend in the MZ club. Another
option would be to replace the ETZ front headlight with a TS type and use TS shrouds as well. I have

the latter on the shelf but gave away my last TS headlamp a while ago so this option may have to go
on the back burner for now.
Saturday 28th September 2013
The bits finally came back from the powder coating shop last Tuesday, not really fussed about the
length of time as in the interim I had prepared for and completed a ride from John O’ Groats to
Lands End on my VH500 Ariel. Over the last couple of days I have refitted all the painted parts and
put the bike back on its wheels. As expected, the rear mudguard had some rust problems nd is
actually perforated in one place. Most of it does not show once back on the bike and the bit that did
show is covered by some aluminium tape which almost matches the paintwork. After a good clean it
now looks like this.
The red ETZ251 seat is only a temporary measure. When I examined the original seat more carefully
it was rather worse than I had realised and needed to be stripped down for repairs now rather than
later. Actually the ETZ shape looks quite good in my opinion though the red does clash a bit with the
orange paintwork. I also exercised my zinc plating kit to brighten up some of the brackets and
bought a few more s/s items. Have I mentioned that I do like shiny things. The bike is now on SORN
and I don’t plan to tax it until 1st November as I will not have much opportunity to ride it in October.
It will then become the winter hack whislt I tackle a couple of other projects.
I think that about completes this stage of the ETZ250 project. I will start a new diary if and when I get
on to Phase Two – there’s that ETZ300 motor gathering dust in the garage just begging to be used!

Tuesday 5th November 2013
I taxed the ETZ from 1st November and intend using it as my main winter bike. I put an advert on the
MZRC web site recently for a good seat base and had two responses so I now have a spare seat for
the bike of the correct type. It came from the Editor of the club magazine strangely enough. The
base is very sound which is wanted and I am going to fit the cover from my original seat which was in
good condition. Gave it a good clean today and repaired a couple of small splits to make it look even
better and I will fit it late this week.
Sunday 24th November 2013
Work on the BK350project has rather sidetracked the work on the ETZ though it has been ridden
quite a lot. Some time over the last 3 weeks I did fi the repaired cover to the new seat base and the
original style seat has been back on the bike for a few weeks now.
The TS engine though performing well was beginning to worry me due to the increasing rattles so
yesterday I decided to remove it for a major overhaul and to fit the original ETZ engine. This engine
had been rebuilt some months ago and to be honest I had been keen to give it a test run even
though I don’t have any plans to use it long term. As part of the swap-over I will need to convert all
the electrics to 12v but this will be useful. I have just ordered a Powerdynamo kit for the TS motor
which is 12v and will be fitted to the TS motor when it eventually goes back into the ETZ chassis.
First part of the exercise was to get the old motor out, not really a difficult job on an MZ and the TS
motor was soon sitting on the garage floor. The ETZ motor was just the bottom end as I wanted to
keep the weight down until it was mounted into the frame. It went straight in no problems, then so
it should since it’s the bikes original engine anyway. Putting the 300 top end on was a tad more
difficult. Though you can remove and fite a complete engine with the petrol tank in place, I found
the same is not true when you want to assemble (and presumably remove( the barrel and head. So
the seat and tank had to come off as well. The piston was armed up in the oven and went on fairly
easily though I did lose one of the circlips – fortunately I have spares. Some while back I bought a
piston ring clamp suitable for 75mm bores. Don’t usually bother with such things on MZ rebuilds as
the rings always seem slide up the barrel quite easily due to the very pronounced taper. On 300
barrels its more difficult as the taper is completely removed by boring out from 69mm to 75mm and
the barrel is wafer thin. Anyway the ring clamp was fitted and tightened down so that it was just
possible to move. I also remembered to fit the cylinder base gasket.
At this point I hit the first of a number of snags. No way the barrel would go over the studs, even
with the tank removed there was insufficient room. In the end I found that if I removed one
particular stud there was just enough room. However, the ETZ like all MZ studs has a flange at the
bottom which is larger in diameter than the hole through the barrel and is also slightly larger than
the hole in the base gasket. I turned down the flange so tha it cleared the gasket but it would still not
go through the barrel top down so in the end I fitted it loose bottom up and held it in place with an
elastic band. Finally the barrel went over the 3 remaining studs and onto the piston. The ring clamp
did its job and the barrel was on. So easy, just wish I had bought one years ago as without one fitting
300 barrel is a nightmare. Anyway the 4th stud was screwed in place and I was able to turn the
engine over with the kickstarter – everything smooth.
As well as losing the bottom taper on a 300 bore barrel, you also lose the lip at the top which helps
to locate the compression gaskets. In its place you have a couple of pins in the top which mate with
holes in the head. The gaskets have to be punched or drilled to locate on these pins and indeed the
two gaskets which I had removed when the engine was stripped had such holes. Unfortunately they
did not seem to quite line up whichever way I tried to fit them and it was obvious this was a long
standing problem as one of the pins was pushed almost flush with the top of the barrel anyway.
Finally I managed to get them in what seemed like the right place and screwed down the head ready
to check the squish thickness. Second problem, the engine would not turnover tdc; something was
locking it up. I slackened the head bolts and the engine immediately turn over but it was clicking at
tdc some it was obviously hitting something.
When I removed the head and looked more carefully I could see part of the problem though this
took several goes and is now being written with the wisdom of hindsight and some guesswork. On
my engine the piston actually protrudes from the top of the barrel by perhaps .8 mm at tdc. My first
thought was the pattern crankshaft being too long but then I remembered the lip at the top which
had been removed when it was bored to 75mm. This lip is part of the liner standing about 1mm
proud and would obviously have contained the piston in the 250 engine. Looking at the head, the
squish band was still only 75mm wide and was actually very slightly less in diameter than the piston
and it was this plus a slight overlap of the compression shim which was causing the lockup. I could
now see why there were two shims and why they were so thick. One .4mm and one .8mm giving
1.2mm. Internally the shims were 75mm which left no margin for error so I carefully trimmed both
by 1mm to give me some latitude when fitting. With this mod the engine would turn over with no
evidence of the piston hitting shims or head. Job done or so I thought until I checked the squish gap
which was as near as dammit 2mm - compared to the .9-1.2 specified in the manual.
I removed the .4mm shim and tried again but it was obvious that the piston was very close to the
head with just the .8mm shim in place so I had to settle for 1.2mm of shims and a 2mm squish gap. I
was going to ring my friend Terry to ask of he would be able to machine the head to widen the
squish band by 1mm giving a diameter of 77mm to allowing more clearance for the piston. The
depth of the squish band in the head is around 2mm which means that on the 250 motor the barrel
lip would protrude partly into the head helping location, gas sealing and allowing the squish gap to
be set correctly. However wiser counsels prevailed as it is obvious to me that my 300cc top end was
not an original factory job but something conjured up by a previous owner. The head was still in
250cc form and if I simply widen the squish band to allow the head to clear the piston, I am likely to
raise the compression ratio way too high. Indeed it may already be too high. I need to not only
widen the squish band but also increase the overall capacity of the head by around 5cc to
compensate for the additional 50cc of swept volume. Before doing this I would prefer to get hold of
a properly converted head or better still a 301 head to measure where and how much to remove.
For now all I can do is complete the rebuild and see how the motor feels. I doubt its going to give its
full potential with a squish gap too wide and potentially too high a compression ratio. If it feels to
bad then I do have a standard 250 top end with new piston which can be fitted but the whole object
of this stage of the project was to try a 300 motor to see how they performed. I think ‘oh b****r
sums it up nicely.
Anyway the rest of the rebuild proceeded quite well until I tried to fit my shiny stainless steel down
pipe which I have kept in reserve for quite a while. I could see immediately it was fitted to the head

that it was sitting way below the support bracket on the crankcase. I managed to switch round the
bracket and offered up the silencer but it just looked all wrong. Fortunately another look in the
spares box produced a brand new ETZ pipe which was a perfect fit, Must have come with the bike
when I bought it and it was a bit of a relief as my only other ETZ pipe is really scabby. Putting the
chain on was the usual messy business and though I am using the same size sprocket (19t) I had to
adjust the back wheel to get enough slack. I also reconnected the pipe from oil tank to pump and
bled it through. I did not connect the cable though as I have a full tank of 50:1 petroil at present;
combining pump and petroil would make for a very smokey engine. Leaving the pump on tickover
setting will minimise what is getting to the engine but leave it with some lubrication. I normally run
newly built ETZ engines on petroil anyway just to ensure the pump is working properly before
making it the sole source of lubrication.
With the mechanical bit done I could turn my attention to fitting the 12v regulator, 12v coil, 12
battery and reverting the wiring to standard ETZ alternator electrics. I also set the timing while I was
wiring up the alternator. Normally I use 2.7mm btdc but for now I reduced this to 2.5mm. Even if the
cr is ok it will still run pretty well and it will give the engine an easier time if it’s too high. All that was
then left was to swap all the 6v bulbs and the flasher unit. I found that I had never replaced the rear
and stop light bulbs so they must have been a bit dim; but then I don’t think I have ever ridden this
bike at night anyway. With the tank in place I was able to connect up the fuel pipe and was finally in
a position to run the engine. I would like to say that the bike started first kick but initially it was dead
as a dodo. The plug I had used when I was testing the timing was something out of the spares box so
I swapped it for a new BH8S. Still nothing so I turned off the cold start and opened the throttle wide
and suddenly it burst into life so I must have flooded it while using the old plug. The engine sounded
fine and restarted quite easily a couple of times so I think it’s over the sulks. Pleasingly the ignition
warning light went out but I connected up the voltmeter to be sure and got a reading of 14.1v when
I revved the engine so that seems fine as well. Remembered that I needed to fill the gearbox and fit
the engine damper rubbers but these took only minutes. With these in place the engine sounds
really good. Writing this I have just realised that there was no kicking back at all when starting the
engine so perhaps the cr is ok and I have retarded it more than was needed. Called it a day as I had
some domestic chores to complete while it was still daylight but hopefully tomorrow we will have a
successful test ride.
Monday 25th November 2013
Took the bike out for its first road test this morning. It started easily and sounded fine so I was
hoping for great things. Sadly though the bike ran without any issues the motor performed just as
disappointingly as all the previous ETZs I had owned if not rather worse. Fine if you rev it hard but
absolutely no pulling power below 3000 revs and not really much happening until you get beyond
4000. Up my usual test hill which the TS150 will climb easily in top reaching 50mph, I had to drop to
4th gear and rev hard and even then it struggled to reach 50mph before I reached the roundabout at
the end. In top gear it just bogs down at anything less than 40-45mph (3-3.5k). Really galling the
bike with the TS250 motor which I have temporarily removed would fly up the same hill easily
exceeding 55mph and will pull top from under 3000rpm on the same gearing.
Some of this may be due to the cylinder head issues documented above and I have placed an advert
on the MZRC web site to see if I can buy or at least borrow an ETZ301 head to see if that helps. I will
also experiment with the ignition timing, perhaps I retarded it too much as it still hardly ever kicks
back whereas normally a properly tuned MZ 250 motor will do so if you are too timid on the
kickstarter. I also had to adjust the carb to get a reliable tickover even though it had previously been
set perfectly for the TS motor. Overall the bike is perfectly rideable so will get used even though its
performance is disappointing, I will simply have to adjust my riding style.
Friday 29th November 2013
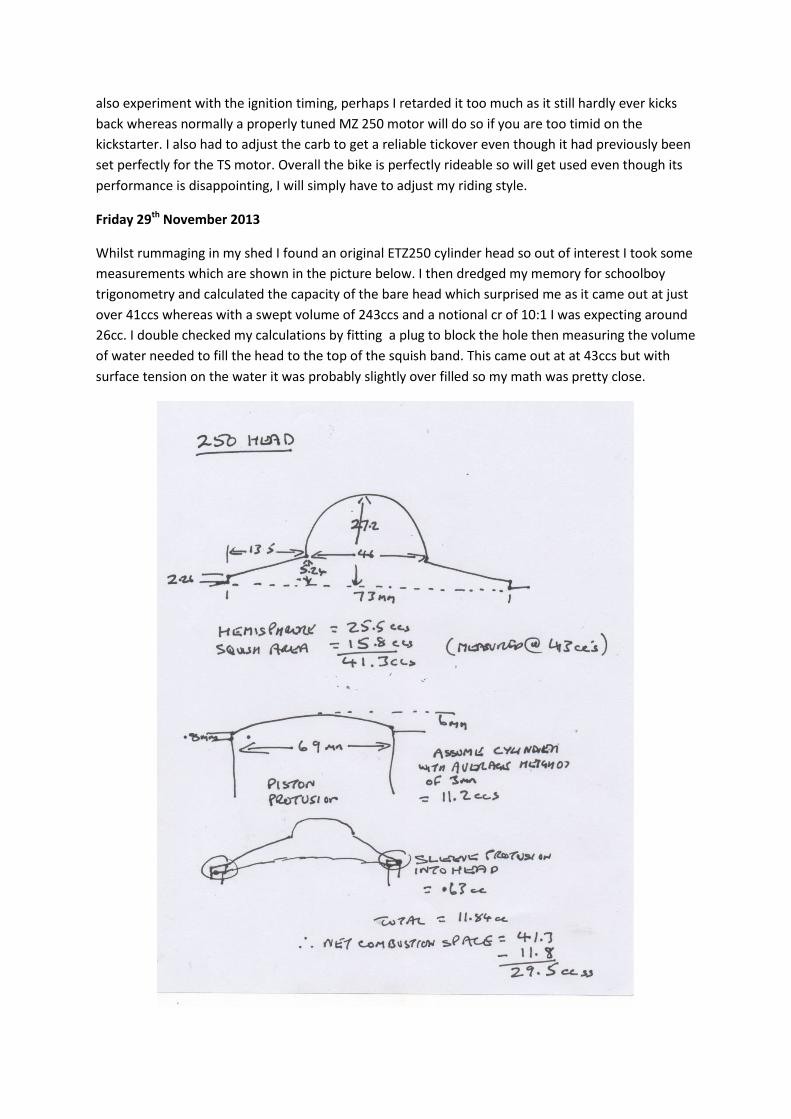
Whilst rummaging in my shed I found an original ETZ250 cylinder head so out of interest I took some
measurements which are shown in the picture below. I then dredged my memory for schoolboy
trigonometry and calculated the capacity of the bare head which surprised me as it came out at just
over 41ccs whereas with a swept volume of 243ccs and a notional cr of 10:1 I was expecting around
26cc. I double checked my calculations by fitting a plug to block the hole then measuring the volume
of water needed to fill the head to the top of the squish band. This came out at at 43ccs but with
surface tension on the water it was probably slightly over filled so my math was pretty close.
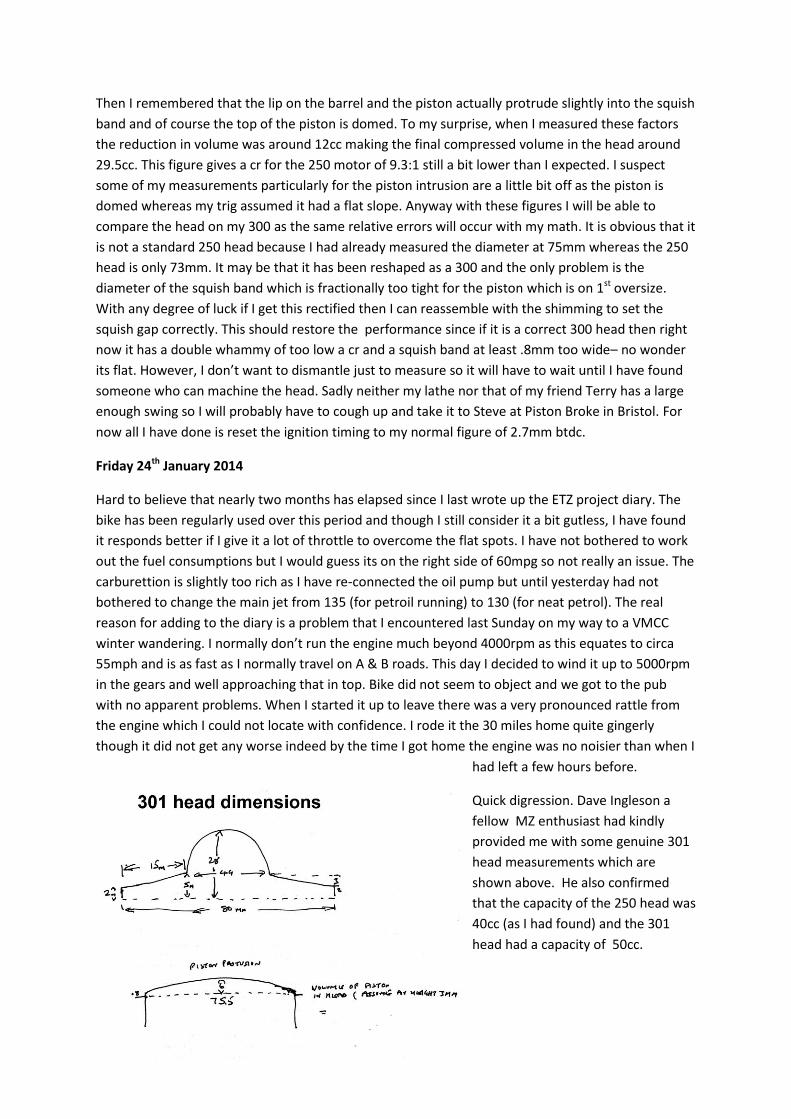
Then I remembered that the lip on the barrel and the piston actually protrude slightly into the squish
band and of course the top of the piston is domed. To my surprise, when I measured these factors
the reduction in volume was around 12cc making the final compressed volume in the head around
29.5cc. This figure gives a cr for the 250 motor of 9.3:1 still a bit lower than I expected. I suspect
some of my measurements particularly for the piston intrusion are a little bit off as the piston is
domed whereas my trig assumed it had a flat slope. Anyway with these figures I will be able to
compare the head on my 300 as the same relative errors will occur with my math. It is obvious that it
is not a standard 250 head because I had already measured the diameter at 75mm whereas the 250
head is only 73mm. It may be that it has been reshaped as a 300 and the only problem is the
diameter of the squish band which is fractionally too tight for the piston which is on 1st oversize.
With any degree of luck if I get this rectified then I can reassemble with the shimming to set the
squish gap correctly. This should restore the performance since if it is a correct 300 head then right
now it has a double whammy of too low a cr and a squish band at least .8mm too wide– no wonder
its flat. However, I don’t want to dismantle just to measure so it will have to wait until I have found
someone who can machine the head. Sadly neither my lathe nor that of my friend Terry has a large
enough swing so I will probably have to cough up and take it to Steve at Piston Broke in Bristol. For
now all I have done is reset the ignition timing to my normal figure of 2.7mm btdc.
Friday 24th January 2014
Hard to believe that nearly two months has elapsed since I last wrote up the ETZ project diary. The
bike has been regularly used over this period and though I still consider it a bit gutless, I have found
it responds better if I give it a lot of throttle to overcome the flat spots. I have not bothered to work
out the fuel consumptions but I would guess its on the right side of 60mpg so not really an issue. The
carburettion is slightly too rich as I have re-connected the oil pump but until yesterday had not
bothered to change the main jet from 135 (for petroil running) to 130 (for neat petrol). The real
reason for adding to the diary is a problem that I encountered last Sunday on my way to a VMCC
winter wandering. I normally don’t run the engine much beyond 4000rpm as this equates to circa
55mph and is as fast as I normally travel on A & B roads. This day I decided to wind it up to 5000rpm
in the gears and well approaching that in top. Bike did not seem to object and we got to the pub
with no apparent problems. When I started it up to leave there was a very pronounced rattle from
the engine which I could not locate with confidence. I rode it the 30 miles home quite gingerly
though it did not get any worse indeed by the time I got home the engine was no noisier than when I
had left a few hours before.
Quick digression. Dave Ingleson a
fellow MZ enthusiast had kindly
provided me with some genuine 301
head measurements which are
shown above. He also confirmed
that the capacity of the 250 head was
40cc (as I had found) and the 301
head had a capacity of 50cc.

Perhaps I should also record that the even though the bottom end was totally rebuilt, the engine has
always seemed rattly and there has always been a tad more vibration through bars and footrests
than I was used to but neither was enough to worry about. I was pretty sure that the latest rattling
was caused by the piston hitting the head as regular readers will remember the problems I found in
setting the squish band of the 300 motor. Indeed when I turned the engine over by hand you could
hear a slight noise at tdc. What was of more concern was whether this in turn had caused any
crankshaft damage or a bent rod. Nothing for it but to strip the top end for inspection an easy
enough job on an MZ. The head bolts were not very tight and there were signs of leakage from the
head joint so I think that my previous squish settings were only just enough and revving the engine a
bit harder had created enough extra throw to make contact. This is compounded by the fact that the
lip which normally provides secure location was removed when it was overbored to 300cc so it could
have moved slightly.
Straight away you could see a thin line on both piston and head where the former had been
touching the edge of the squish band which has too narrow a diameter. Measuring the head gave a
capacity of 40cc and the outer diameter of the squish band was only 75mm so it was clearly a totally
standard 250cc head as I had always suspected. To get the bike back on the rode I did two things.
Firstly I used a dremel to crudely reshape the edge of the squish band to give the piston crown a bit
more clearance. Secondly I fitted two extra 301 head shims to give a further 1mm of squish
clearance making a total of 3mm. Rotating the engine confirmed that everything was now clear and
running the engine later it was noticeably quieter what rattle was left was piston slap from the worn
piston and not of concern. As far as I can tell the bottom end suffered no lasting damage from the
problem. By my calculations I now have a cr of about 105:1 which is standard for the ETZ engines it
must have been about 11.5:1 previously so no wonder it was a bit rough. However the squish band
is now 3 times what it’s supposed to be so who knows what effect this will have on performance –
nothing beneficial I suspect. However, the bike is now running again and will resume service as my
winter hack. Despite the problems it is proving a useful and reliable tool and the plan to fit the TS250
motor is on indefinite hold as this engine is now in my ISDT bike whilst I sort out a gearbox problem
with the G5 motor.
Friday 14th February 2014
Not a huge amount to report even though its now three weeks since I last updated the diary. About
10 days ago I fitted a windscreen which had been lying around the garage for a while mainly to see if
it offered any benefits. Its quite a big thing and it took me several attempts to get it to a satisfactory
position. I then took the bike on an 80 mile wet and very windy round trip to the Bristol Section
MZRC meeting at Ham on 8th February. It is now running with a 130 main jet which is carrect for the
oil injection engine. Not sure if its this change or the barn door windscreen but in the windy
conditions the bike felt even more flat than before and seemed reluctant to hold top gear below 3.5-
4k. Still it got me there and back even though the conditions were a bit scary at times. Once benfit I
ddi notice from the windscreen was that virtually no rain hit my tank top bag and presumably the
front of my riding jacket also benefitted; think I’ll leave it on for now. I have made an additionl
bracket to support the bottom of the screen. The standard fittings are just handlebar clamps and it
wobbled more than I felt comfortable with in the windy conditions. The bracket seems to do the
trick, looks quite need and provides a useful place to mount the clock.

I also checked the needle position in the carb which was on its weakest setting so I raised it two
notches to richen it up.. Hopefully this will reduce the flat spot at low-mid throttle openings;
certainly helped on the ISDT bike when it had similar problems.
It has been left standing for several days and I noticed a small oil slick underneath this morning so I
put it on the ramp to inspect. Slightly embarrassing as it seems almost certain the leak was a double
own goal. The tube for the clutch cable was not screwed tightly into the primary drive cover and the
oil level was about 1/3rd litre overfilled.
As the weather is still appalling and gives no incentive to go out unless you really have too, I have
been pottering a lot in the garage catching up on non-urgent jobs. Today it was the turn of the back
wheel of the ETZ to be rebuilt with the s/s spokes I bought last year . Tedious but not difficult though
most of the spokes were well rusted into the nipples and about half had to be cut out with the angle
grinder (wonder why they are called that?). Very satisfying job once completed and I do like shiny
wheels. Made the front one look a bit sad so I gave it a clean and polish as well. Sadly it won’t last
given the present road conditions which are likely to be with us for some time.
During the week a new silencer arrived for the bike, part of a number of items bought on my behalf
from OST2RAD in Germany by a local friend. No plans to fit this until the spring arrives so the old
rusty relic will have to serve a bit longer.
They are forecasting a short break in the bad weather on Sunday so I may be able to take it out for a
test ride.
Tuesday 25th February 2014
Finally got the bike on the road today to go to Salisbury for Dennis Poulter’s funeral. Lovely do and
nice to meet a number of other MZ club members who until now have just been names and possibly
photos in the magazine. Some people came a long way which shows how much he was liked.
The bike struggled a bit today as it was very windy with strong gusts which made for unpleasant
riding and meant that 4th gear was in regular use. I felt that the flat spot was less obvious but I am
still not happy with the overall performance of the engine. It seems to rattle a lot more than a rebuilt
engine should. But of course I did not do any work on the top end and I fancy a lot of the noise is
piston slap – I remember when I had a 300 some years ago it was very noisy for the same reason.
The screen also reflects noise and adds its own contribution of rattles at low revs. I have not kept a
record of mileage at fill-ups (pity there is no trip on the earlier MZs) so I do not know for sure how
many miles I have done since I filled up last but the tank looked to be near reserve when I got home
today. I will fill it up tomorrow and dead reckon the mileage but I fancy I am getting less than 50mpg
at present. Perhaps the time has come to make rebuilding a Supa5 engine a priority. I recently
bought a rather tatty Supa5 to use as a rolling test bed for rebuilt engines; this may be its first
customer. The Supa5 came with a Honda twin leading shoe front wheel which I have swapped for a
standard MZ wheel. If the Honda wheel cleans up ok I may well fit it to the ETZ250 as it would look a
bit more classic than the disk currently fitted.
Monday 10th March 2014
Another reasonable trip to the Bristol Section MZRC meeting at Ham followed by a diversion to
Gastard on the way home to meet up with some VMCC friends. The bike went really well despite the
rattles and maybe it’s partly in the mind as one or two people at Ham commented how quiet the
motor was. I must say that I always think other people’s engines are quieter than mine and it
probably has a lot to do with where you are positioned. Standing alongside the bike or away from it
they seem quitter mechanically than if you are sat on the seat where the tank can echo noises and in
my case the screen also amplifies things as well as vibrating and rattling in its own right. Anyway on
the way home I decided to try one more modification to this engine before fitting the TS250 motor
which is now under test in the Scruffy TS250 I bought last week. Sitting on the shelf in my garage is
an ETZ250 barrel which has been rebored to fit a genuine MZ piston from the stock I bought in
Chippenham. There is also the correct head. These are going to be fitted in place of the 300 top end
which has never really been satisfactory. I don’t honestly think I will notice any much if any
difference in power by losing the 37cc’s. In fact it will probably be better overall because of the
rebore and new piston. Anyway time will tell.
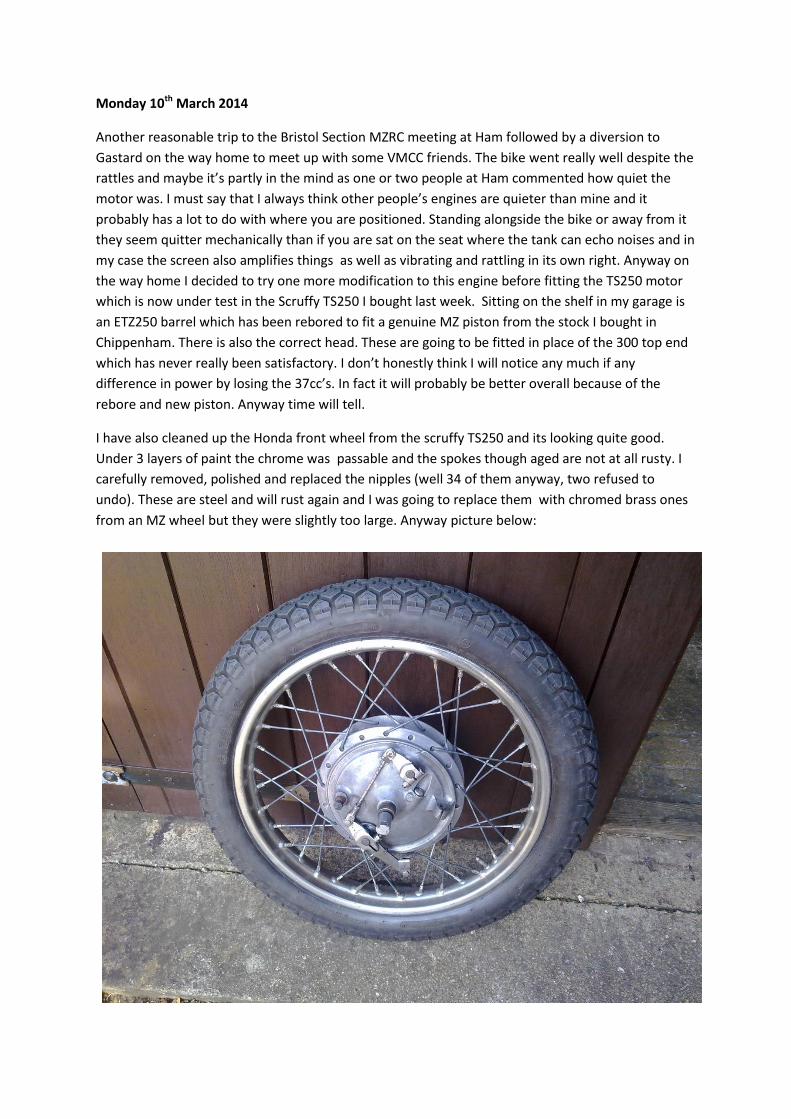
I have also cleaned up the Honda front wheel from the scruffy TS250 and its looking quite good.
Under 3 layers of paint the chrome was passable and the spokes though aged are not at all rusty. I
carefully removed, polished and replaced the nipples (well 34 of them anyway, two refused to
undo). These are steel and will rust again and I was going to replace them with chromed brass ones
from an MZ wheel but they were slightly too large. Anyway picture below:
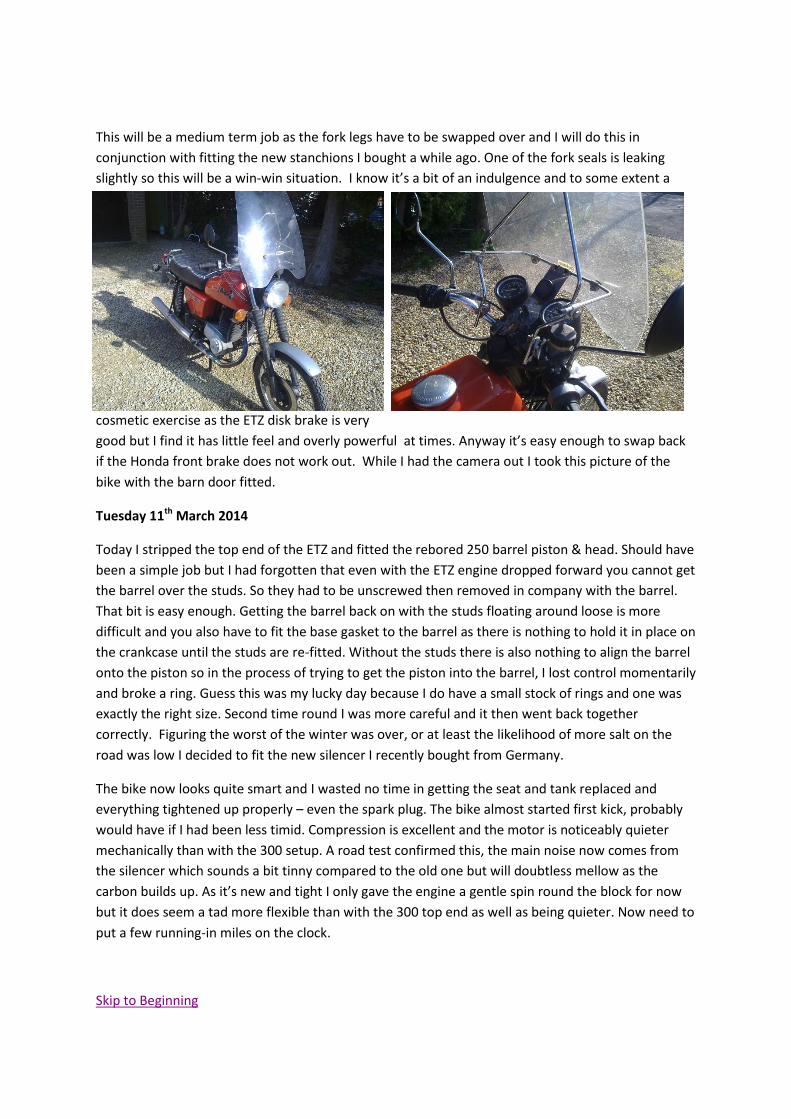
This will be a medium term job as the fork legs have to be swapped over and I will do this in
conjunction with fitting the new stanchions I bought a while ago. One of the fork seals is leaking
slightly so this will be a win-win situation. I know it’s a bit of an indulgence and to some extent a
cosmetic exercise as the ETZ disk brake is very
good but I find it has little feel and overly powerful at times. Anyway it’s easy enough to swap back
if the Honda front brake does not work out. While I had the camera out I took this picture of the
bike with the barn door fitted.
Tuesday 11th March 2014
Today I stripped the top end of the ETZ and fitted the rebored 250 barrel piston & head. Should have
been a simple job but I had forgotten that even with the ETZ engine dropped forward you cannot get
the barrel over the studs. So they had to be unscrewed then removed in company with the barrel.
That bit is easy enough. Getting the barrel back on with the studs floating around loose is more
difficult and you also have to fit the base gasket to the barrel as there is nothing to hold it in place on
the crankcase until the studs are re-fitted. Without the studs there is also nothing to align the barrel
onto the piston so in the process of trying to get the piston into the barrel, I lost control momentarily
and broke a ring. Guess this was my lucky day because I do have a small stock of rings and one was
exactly the right size. Second time round I was more careful and it then went back together
correctly. Figuring the worst of the winter was over, or at least the likelihood of more salt on the
road was low I decided to fit the new silencer I recently bought from Germany.
The bike now looks quite smart and I wasted no time in getting the seat and tank replaced and
everything tightened up properly – even the spark plug. The bike almost started first kick, probably
would have if I had been less timid. Compression is excellent and the motor is noticeably quieter
mechanically than with the 300 setup. A road test confirmed this, the main noise now comes from
the silencer which sounds a bit tinny compared to the old one but will doubtless mellow as the
carbon builds up. As it’s new and tight I only gave the engine a gentle spin round the block for now
but it does seem a tad more flexible than with the 300 top end as well as being quieter. Now need to
put a few running-in miles on the clock.
Skip to Beginning