Embed Size (px)
Citation preview

NATIONAL OPEN UNIVERSITY OF NIGERIA
COURSE CODE : CIT101
COURSE TITLE:
COMPUTERS IN SOCIETY
ii
COURSE
GUIDE
CIT101
COMPUTERS IN SOCIETY
Course Team Prof. R.O. Ayeni (Developer/Writer) - LAUTECH
Dr. S.I. Ogunrinde (Programme Leader) - NOUN
Mr. A. Balogun (Coordinator) - NOUN
Mrs. C. Okonkwo (Co-coordinator) - NOUN
Course Reviewer Prof. David. O. Adewunmi Dean, School of Science and Technology National Open University of Nigeria.
NATIONAL OPEN UNIVERSITY OF NIGERIA
CIT101 COURSE GUIDE
National Open University of Nigeria
Headquarters
14/16 Ahmadu Bello Way Victoria Island
Lagos
Abuja Office
5, Dar es Salaam Street Off Aminu Kano Crescent
Wuse II, Abuja Nigeria
e-mail: @nou.edu.ng
URL: .nou.edu.ng
Published By:
National Open University of Nigeria
First Printed 2006
Reprinted 2010
ISBN 978-058-204-5
All Rights Reserved
Printed by:
iii

iv
CONTENTS PAGE
Introduction…………………………………………….………… 1
What you will Learn in this Course................................................ 1 Working through the Course........................................................... 1
Assessment ..................................................................................... 1 How to Get the Most from this Course ............................................ 1
Summary ......................................................................................... 2
Introduction The aim and objective of Computers in Society as a course is computer
literacy. Information Technology is the frontier hero of the new century,
driven by ambition and full of courage, replicating itself like a virus and
sweeping all before it. So in order not to be marginalized one needs to
get involved as Information Technology influences virtually all the areas
of human endeavour.
What You will Learn in this Course This course will give you in brief what you need to know in Computer
Science and Technology. At the end of the course you will be an expert
of some sort in Computer Science and Technology.
Working through this Course Each module, each unit, in the course contains notes as well as set
exercises. The set exercises are listed in form of a table. The table has
two volumes. The last column contains the heading “what you do” while
the right column is headed “comments/prompts”. The left column
contains the steps that you must follow. The right column serves as
additional information.
Computers will be provided at study centres and will be equipped with
the required programs. If you have the means, buy your PC and the
stipulated software.
Each unit contains a Tutor-Marked Assignment, which must be done as
stipulated and handed to the tutor on schedule.
Assessment The final grade in the course will have two components; continuous
assessment and final examination. Basically, the tutor-marked
assignment will form the continuous assessments while NOUN will
inform you about the final examination.
How to Get Most from this Course In distance learning, the study units replace the University lecturer. This
is one of the great advantages of distance learning, you can read and
work through specially designed study materials at your own pace, and
at a time and place that suits you best. Think of it as reading the lecture
instead of listening to a lecturer. Just as a lecturer might give you an in-

CIT101 COMPUTERS IN SOCIETY
ii
class exercise, your study units provide exercises for you to do at
appropriate points.
Working through the assignments and exercises will help you to achieve
the objectives of the unit and prepare you for the final examination. If
you run into trouble, arrange to meet your training tutor. Note the
following:
1. Read this course guide thoroughly
2. Organise a study schedule. Whatever method you choose to use,
you should decide on it and write in your own dates for working
on each. 3. Once you have created your own study schedule, do everything
you can to stick to it. The major reason that students fail is that
they get behind with their course work.
4. For each unit, read the introduction and the objectives.
5. Read through the materials. Work through the unit.
6. At the end of the unit, review the objective and see how many of
them you have achieved. 7. Do the tutor-marked assignment and submit as required.
8. Proceed unit by unit throughout the course.
Summary
Computers in Society intend to make you computer literate. At the end
of the course you will achieve the objective if you follow the
instructions and do what you are expected to do.
We wish you a huge success.

CIT101 COMPUTERS IN SOCIETY
iii
Course Code CIT101
Course Title Computers in Society
Course Team Prof. R.O. Ayeni (Developer/Writer) - LAUTECH
Dr. S.I. Ogunrinde (Programme Leader) - NOUN
Mr. A. Balogun (Coordinator) - NOUN
Mrs. C. Okonkwo (Co-coordinator) - NOUN
NATIONAL OPEN UNIVERSITY OF NIGERIA

CIT101 COMPUTERS IN SOCIETY
iv
National Open University of Nigeria
Headquarters 14/16 Ahmadu Bello Way
Victoria Island
Lagos
Abuja Office
5, Dar es Salaam Street
Off Aminu Kano Crescent Wuse II, Abuja
Nigeria
e-mail: @nou.edu.ng
URL: .nou.edu.ng
Published By:
National Open University of Nigeria
First Printed 2006
Reprinted 2010
ISBN 978-058-204-5
All Rights Reserved
Printed by:

CIT101 COMPUTERS IN SOCIETY
v
CONTENTS PAGE Module 1 …………..………………………………………….…… 2
Unit 1 What is Computer?........................................................ 2
Unit 2 Element of a Computer: Hardware………………….. 6
Unit 3 Elements of a Computer: Software…………………... 12
Unit 4 How to Work with a Computer: Switching On and Off the PC………………………….……….………. 17
Unit 5 Using a Mouse……………………………………….. 24
Module 2 ………………………………………………………. 35
Unit 1 Operating System………………………………...…. 35
Unit 2 Window 98……………………………………..…… 40 Unit 3 Files…………………………………………............ 49
Unit 4 Word Processing………………………………..….. 53 Unit 5 Further Word Processing Program Facilities……… 59
Module 3 ………………………………………………………… 65 Unit 1 Word Processing Continued……………………..….. 65
Unit 2 Copying a Text, Saving Changes to a Document and
Formatting……………………..………………….…. 72
Unit 3 Paragraph Formatting: The Spelling Checker and
Introduction to Printing a Document…………..…….. 78 Unit 4 Spreadsheet………………………………..………… 86
Unit 5 Entering and Correcting Data……………..………… 93
Module 4 …………………………………………………………100 Unit 1 Using Formulas……………………………………. 100
Unit 2 Spreadsheet: Numeric Formats…………………….. 104 Unit 3 Creating Charts…………………………………….. 108
Unit 4 Charts from Non-adjacent Data, Embedded Charts
and Charts Links………………………………….... 122 Unit 5 Chart Types………………………………………... 130
Module 5 ……………………………………………………… 138
Unit 1 PowerPoint and Presentations……………………... 138
Unit 2 Powerpoint Presentation Screen…………………… 144
Unit 3 Creating New Presentations………………….......... 151 Unit 4 Naming Presentation, Saving Presentation and
Formatting Slides…………….…………………… 157 Unit 5 Using Autoshapes……………………….………… 165

CIT101 COMPUTERS IN SOCIETY
vi
Module 6 ………………………………………………………. 172
Unit 1 Networking, Internet and E-mail………………… 172
Unit 2 Internet……………………………………………. 179
Unit 3 Further Practical Works on the Internet………….. 187 Unit 4 Electronic Mail…………………………………… 193
Unit 5 Reading and Responding to an E-mail Message….. 202
Questionnaire …………………………………………………… 209

CIT101 COMPUTERS IN SOCIETY
1
INTRODUCTION Computer education is the dissemination of computer knowledge into
the learners. Computer has influenced virtually all areas of human
endeavour. Education is being revolutionized by computers.
Advantages of computer education include the following:
• It enhances use of visualisation tools
• It enhances use of simulation tools
• It enhance introduction of distributed multi-media environment.
• It enhances video conferencing tutorials.
• It assists the implementation of resources sharing in electronic
media of library holding and teachers instruction.
The aim of the course is to teach you the fundamentals of Computer
Science and its applications. You will be taken through different areas of
the computer and will be able to see how all the components fit together:
We will look at hardware, software including operating systems and
programs. This course has been divided into 6 Modules, which are made
up as follows.
In module 1, you will be introduced to the Principles of Computer
Hardware and Software. In addition to this, you will learn the
fundamentals of how a computer works.
In module 2, you will be taught the basics of what is meant by the term
“Operating System”. An overview of Windows 98 is presented in this
module. Module 3 introduces you to what the functions are of a word
processing program. You will apply the theory that you learn through
using Microsoft Word 2000.
Module 4 introduces you to the basics of spreadsheeting. The program
that you will be using to gain this knowledge is Microsoft Excel 2000.
Module 5 is devoted to the subject of charting and presentations. Here
you will use Microsoft Excel 200 as the simple program for charting and
Microsoft Power Point 2000 for presentations.
Finally in module 6, you will have an opportunity to learn more about
Networking, the Internet and using Electronic mail (E-mail).

CIT101 COMPUTERS IN SOCIETY
2
MODULE 1
Unit 1 What is Computer?
Unit 2 Element of a Computer: Hardware Unit 3 Elements of a Computer: Software
Unit 4 How to Work with a Computer: Switching On and Off the PC
Unit 5 Using a Mouse
UNIT 1 WHAT IS COMPUTER?
CONTENTS
1.0 Introduction
2.0 Objectives
3.0 Main Content 3.1 The Computer System
3.1.1 What is a Computer? 3.1.2 The Digital Computer
3.1.3 History of the Digital Computer
3.1.4 Different Types of Computers 4.0 Conclusion
5.0 Summary 6.0 Tutor-Marked Assignment
7.0 References/Further Reading
1.0 INTRODUCTION
No previous computer experience is required to complete this
introductory course.
2.0 OBJECTIVES
At the end of this unit, you should be able to:
• define what is meant by the term “Computer”
• record brief history of the computer.
3.0 MAIN CONTENT
3.1 The Computer System
We will begin this course by taking a closer look at what makes up a
Computer System.

CIT101 COMPUTERS IN SOCIETY
3
3.1.1 What is a Computer? What is a Computer? Throughout history there have been many forms of
computers used by man. However, the modern computer is basically an
electronic device which can respond to commands.
A modern computer is designed to receive either a set of instructions
from the operator or a program, and then carry out the required tasks by
performing calculations on numerical data or by compiling and
correlating other forms of information.
Without the development of the computer, our modern world of high
technology would not have developed. Computers affect us all and are
used in many of today’s industries, some of which are:
• Banking transactions (Autobanks)
• Household accounts (Budgets)
• Automated manufacturing (Producing a modern car)
• Communications (Telephone systems)
• Shopping (Buying over the Internet)
In the modern computer world, there are two main types of computers in
use, namely analog and digital. This course concentrates on the digital
computer, which basically solves problems by performing sums and by
dealing with each number digit by digit.
3.1.2 The Digital Computer A digital computer bases its whole operation on the ability to determine
if a switch (sometimes called a gate), is either open or closed. As this
type of computer can only recognized two states, its microcircuits are
either on or off, while in the case of letters and numbers only O’s and
1’s are used (e.g. the letter “a” would be represented to the PC as
something similar to “00110101).
It would appear from the above that the digital computer performs a
relatively simple task, So what makes it so special? There are 2 things
that makes a computer special, the first is the speed at which a computer
performs this simple task and the second is the amount (volume) of data
the computer handles at any one time.
A computer’s speed called “clock speed” is measured in millions of
cycles per second (megahertz or MHZ), which means that a computer
with a clock speed of 66 MHz, for example an 80486DX 66MHz, is
capable of executing 66 million operations each second.

CIT101 COMPUTERS IN SOCIETY
4
As mentioned above, the amount of data computer handles during each
cycle also makes it special. A computer performs checks on groups of
switches, increasing the number of operations it can recognize in each
cycle, which means a computer checking two switches at one time, can
execute one of four instructions at each cycles.
3.1.3 History of the Digital Computer
1946 saw the development of the first general-purpose all-electronic
computer called ENIAC (Electronic Numerical Integrators and
Computer). ENIC contained in excess of 18,000 vacuum tubes and had a
speed of several hundred multiplications per minute.
The first commercially available electronic computer was called
UNIVAC 1. This computer marked the beginning of the computer era.
By 1960 transistors had replaced vacuum tubes as logical components of
a computer. This change meant that computer components used less
power and had a much longer life span. Computers using this
technology were referred to as second generation computers.
Late in the 1960s the integrated circuit was developed which allowed
many transistors to be fabricated on one circuit board with inter-
connecting wires plated in place.
The microprocessor became a reality in the mid-1970s with introduction
of the large scale integrated circuit, which accommodated many
thousands of interconnected transistors etched into a single circuit board.
Computers developed in the 1970s were able check eight switches at
every cycle. Since then the development of processors that can handle
16, 32 and 64 bits of data at a time had increased the speed of
computers.
3.1.4 Different Types of Computers
In the digital computer world there are currently different types of
categories, which are based on price and performance. Two of these are:
Personal Computer (PC’s)
A PC is a relative low-cost machine usually of desktop size (laptops,
notebooks and palmtops are mush smaller).
CIT101 COMPUTERS IN SOCIETY
5
Main Frames A mainframe is a large expensive electronic machine with the capability
of serving the needs of major business enterprises, government
departments and scientific research establishments (the largest and
fastest of these are called supercomputers).
SELF ASSESSMENT EXERCISE Answer True or False
1. Digital Computer uses only 0 and 1.
2. Computer developed in the 70’s were able to check eight
switches at every cycle.
4.0 CONCLUSION A computer is an electronic device that is designed to receive either a set
of instructions from the operator or a program, and then carryout the
required tasks by performing calculations on numerical data or by
compiling and correlating other forms of information which normally
results to information.
5.0 SUMMARY You have learnt the term “Computer” and a brief history of the
computer
ANSWER TO SELF ASSESSMENT EXERCISE
1. True
2. True
6.0 TUTOR-MARKED ASSIGNMENT 1. What is a Computer?
2. Give a brief history of computers.
7.0 REFERENCES/FURTHER READING Ayo, C. K. (1998). Computer Literacy Operations and Appreciation.
(2nd
ed.). Mckay Consult.
Milan, Milenkovic Operating Systems, Concepts and Design.
(2nd ed.). Tata McGraw Hill.

CIT101 COMPUTERS IN SOCIETY
6
UNIT 2 ELEMENTS OF A COMPUTER: HARDWARE
CONTENTS
1.0 Introduction
2.0 Objectives 3.0 Main Content
3.1 Elements of Computer Hardware
3.1.1 Central Processing Unit (CPU) of Microprocessor 3.1.2 Input Devices
3.1.3 Output Devices 3.1.4 Storage Devices
4.0 Conclusion 5.0 Summary
6.0 Tutor-Marked Assignment
7.0 References/Further Reading
1.0 INTRODUCTION
A digital computer is a system which comprises of several elements
some of which are listed in this unit. The system may be divided
into two main categories, namely, Hardware and Software. It is not
within the scope of this course to engage in a detailed explanation of the
technical details of a computer and so this section is simply an overview.
2.0 OBJECTIVES
At the end of this unit, you should be able to:
• identify the main hardware elements of a computer
• identify some computer peripherals.
3.0 MAIN CONTENT
3.1 Elements of a Computer: Hardware
A typical computer system includes the following hardware
components:
3.1.1 Central Processing Unit (CPU) of Microprocessor
The CPU is located on your computer’s main circuit board usually
referred to as (Motherboard) which is basically the brain of your PC. The
CPU may either consist of a single chip of series of chips that perform
two main functions. The first of these functions is to perform
arithmetic and logical calculation, while

CIT101 COMPUTERS IN SOCIETY
7
the second function is to time and control the operations of the other
elements of your computer.
3.1.2 Input Devices Computer operators communicates with the computer’s CPU by using
various input devices to enter data, run programs, or give commands to
the CPU. These devices include the following:
Keyboards The keyboard uses a key arrangement similar to that of an ordinary
typewriter, with the addition of some special function keys and a
numeric keypad.
Mouse When using a mouse, one is able to move the cursor around the screen
with speed and simplicity. Most have two buttons, which will execute
commands according to an application’s control instructions.
Scanners
A scanner reads information from paper, and transfers this as text or
graphics onto a PC where it is stored and can be edited for subsequent
use.
Modems
Modems are expansion cards or external units, which send information
from one PC to another via the telephone cables. A modem is necessary
if you wish to have access to the Internet.
Light Pens A light pen transfers graphics information from electronic pads into the
computer.
Voice
Voice recognition software translates the spoken word into digital
signals, which the computer understands.
Joystick
Similar to a mouse, the joystick also translates physical motion into
motion on a computer video display screen.

CIT101 COMPUTERS IN SOCIETY
8
3.1.3 Output Devices
We have briefly looked at how we transfer information in the computer
with the use of various input devices. Now let’s look at how the
computer communicates with us.
Monitors
The most common output device used with a desktop computer is the
monitor, which is used to display characters and graphics on a screen
similar to that of an ordinary television set. Smaller portable computers,
such as notebooks and laptops, use liquid crystal display (LCD) screens.
Modem
A modem links two or more computers by translating digital signals into
analog signals so that data can be transmitted via telephone lines.
Printers
Another standard output device is the printer. Printers provide us with a
paper copy of the PC’s result. Various types of printers are available in
the market place. Some of there are listed below.
Dot-matrix Printers
Dot-matrix printers have a set of pins, which impact upon the ribbon
against the paper, producing varying qualities of printout Modern dot-
matrix printers are capable of fairly high quality printout at high speed
and are used for the end product in a wide range of commercial
environments.
Ink-jet and Bubble-jet Printers
These printers are a successful compromise between dot-matrix and the
much higher laser printer quality. It may be as small as and not much
more expensive than the dot-matrix printer. The quality is much higher
and as an almost silent printer, it has gained enormous popularity among
users.
Laser Printer
Offering very high resolutions, laser printers suit a wide range of
business and media-oriented applications. They are expensive, but often
more economical when speed, durability and professional print quality
are considered. Laser printers produce extremely high-resolution
graphics. Colour options are available, but at a high cost.
CIT101 COMPUTERS IN SOCIETY
9
3.1.4 Storage Devices Computers can store data either internally (in memory) or externally (on
storage devices)
Internal Storage
There are two areas in a PC where instructions and data can be
temporarily stored called memory. The first type of memory is known
either as RAM (Random Access Memory) or as DRAM (Dynamic
Random Access Memory) while the second type is known as ROM
(Read Only Memory).
RAM
RAM comes in the form of silicon memory chips called SIMM’s which
are mounted directly on the computer’s main circuit board or in chips
mounted on peripheral cards that plug into computer’s main circuit
boards. RAM chips consists of switches that are sensitive to changes in
electric current. RAM chips hold their stored information of data as long
as the circuits receive a constant current flow. The data is lost if the PC
is switched off.
RAM chips are upgradeable, that is, can add more.
ROM
ROM chips are also made of silicon. However, all of the switches on
these chips are already set. The patterns on the ROM chips form
commands, data, or programs that the computer needs to function
correctly.
External Storage External storage devices, such as a hard disk, can physically reside
within the computer’s casing. However, the drives remain external to the
main circuit board. Some of the external devices are listed below.
Hard Disk The most common external storage device used in a PC is the hard or
“fixed” disk. Hard disks are usually fixed in their disk drive cabinets,
which contain the electronics needed to read and write data onto the
disks’ magnetic surfaces. Hard disks cannot be removed.

CIT101 COMPUTERS IN SOCIETY
10
Removable Disks
As the hard disk is usually a permanent fixture inside the PC’s casing,
removable disks were originally used to make a copy of information
(back-up) or transfer information from one unit to another. The most
common removable disk at present is known as a Stiffy Disk.
CD-ROM
Data may be stored on a CD-ROM. The same technology is used as the
laser techniques that are used to create audio compact disk. In order to
store on a CD-ROM you require a special devices known as a CD-ROM
writer.
Magnetic Tapes
High-speed tape drives are used to copy data and information from the
hard disk onto removable tapes. The process of copying data from one
type of storage device to another is known as “backing up”. The storage
capacity of a magnetic tape far outweighs that of a stiffy disk and is thus
popular when backing up hard disks.
4.0 CONCLUSION
A typical computer system consists of five functional units: Input,
Output, Control, Arithmetic/Logic Unit (Central Processing Units) and
the Main Memory Units.
5.0 SUMMARY
All other components of the computer system beside the CPU are
collectively called peripheral devices or simply peripherals.
SELF ASSESSMENT EXERCISE
1. A mouse is an example of
(a) Output device (b) Storage device (c) Input device
(d) Switching devices
2. True or false – High speed tape devices are used to copy data.
6.0 TUTOR-MARKED ASSIGNMENT
1. Discuss the functions of the central processing unit
2. Write a short note on two input devices. 3. Write a short note on two output devices.

CIT101 COMPUTERS IN SOCIETY
11
7.0 REFERENCES/FURTHER READING Ayo, C. K. (1998). Computer Literacy: Operations and Appreciation.
(2nd
ed.), Mckay Consult.

CIT101 COMPUTERS IN SOCIETY
12
UNIT 3 ELEMENT OF A COMPUTER: SOFTWARE
CONTENTS
1.0 Introduction
2.0 Objective 3.0 Main Content
3.1 Software
3.1.1 Operating Systems 3.1.2 Languages
3.1.3 Language Translators 3.1.4 Software Generations
3.1.5 Application Software 4.0 Conclusion
5.0 Summary
6.0 Tutor-Marked Assignment 7.0 References/Further Reading
1.0 INTRODUCTION
In unit 2, we discovered the component of a computer called the
hardware. Software means computer programs that run on a computer.
2.0 OBJECTIVE
At the end of this unit, you should be able to:
• explain the subject, “software”.
3.0 MAIN CONTENT
3.1 Software
So far we have looked at the major hardware components of a modern
PC. Next we will turn our attention to the software elements of a
computer. The software of a computer refers to the computer
programs that are used on a computer. What is a program?
A program is a set of instructions that instructs the computer what to
do. Programs may be divided into two broad categories, namely:
Operating Systems and Application Programs.
3.1.1 Operating Systems
An operating system, which is sometimes referred to as the OS for
short, is the software responsible for controlling the allocation and
usage of hardware resources. For example, the allocation of memory,
controlling the central processing unit time allowed per task, controlling
the amount of disk space used and finally, how the peripheral devices,
such as printers, operate. The operating system is the basis on which all

CIT101 COMPUTERS IN SOCIETY
13
computer application programs, such as word-processing and
spreadsheet programs are produced.
There are many different operating systems available in the modern PC world. The
system that you are most likely to encounter is one of the versions of the
Windows operating system. For this reason, on this course you be introduced to
the operating system Windows 98. Although a more recent version of Windows,
that is Windows Millennium Edition, or as it is often referred to Windows ME,
which is also available.
The operating systems have the following features:
• They are supplied by the manufacturer of the hardware or
purchased as utility from a software company.
• They assist in running other programs.
• They serve as intermediaries between the hardware and
application programs.
• They simplify the use of the software.
• They control the operations of the hardware.
The operating systems as defined here include Language translators and utilities or
service programs.
The operating system is often called the resource manager or supervisor and the
resources to be managed include: • The processor
• The input/output devices
• The primary memory
• The secondary storage devices
Apart from Windows cited above, examples of operating systems include MS-
DOS, PC-DOS, UNIX, XENIX, NT, WINDOWS 95, 98, 2000
3.1.2 Languages
The hierarchies of computer languages are as follows:
1. Machine Language
2. Low-level Language 3. High-level Language
The machine language consists of series of binary numbers (digit consisting
of zero (0) one (1)) which is the languages the computer understands. A low-
level language is a machine-oriented language consisting of symbolic codes
in which instructions correspond or resemble machine languages and it
depends on the machine e.g. Assembly Language.
A high level language is a problem-oriented language which is a restricted
form of the natural languages. Such languages include BASIC (Beginners All
Purpose Symbolic Instruction Code), FORTRAN (Formula Translator).
CIT101 COMPUTERS IN SOCIETY
14
COBOL (Common Business Oriented Language), ALGOL (Algorithmic
Language), PL/1 (Programming Language 1), RPG (Report Program
Generator), PASCAL, C etc.
3.1.3 Language Translators
A language translator translates high-level languages to the language of the
computer. A language translator could be any of the following:
(i) Interpreter
An interpreter is a program which translates the source program into machine
language statement by statement. It translates a statement and executes before
taking on the next statement.
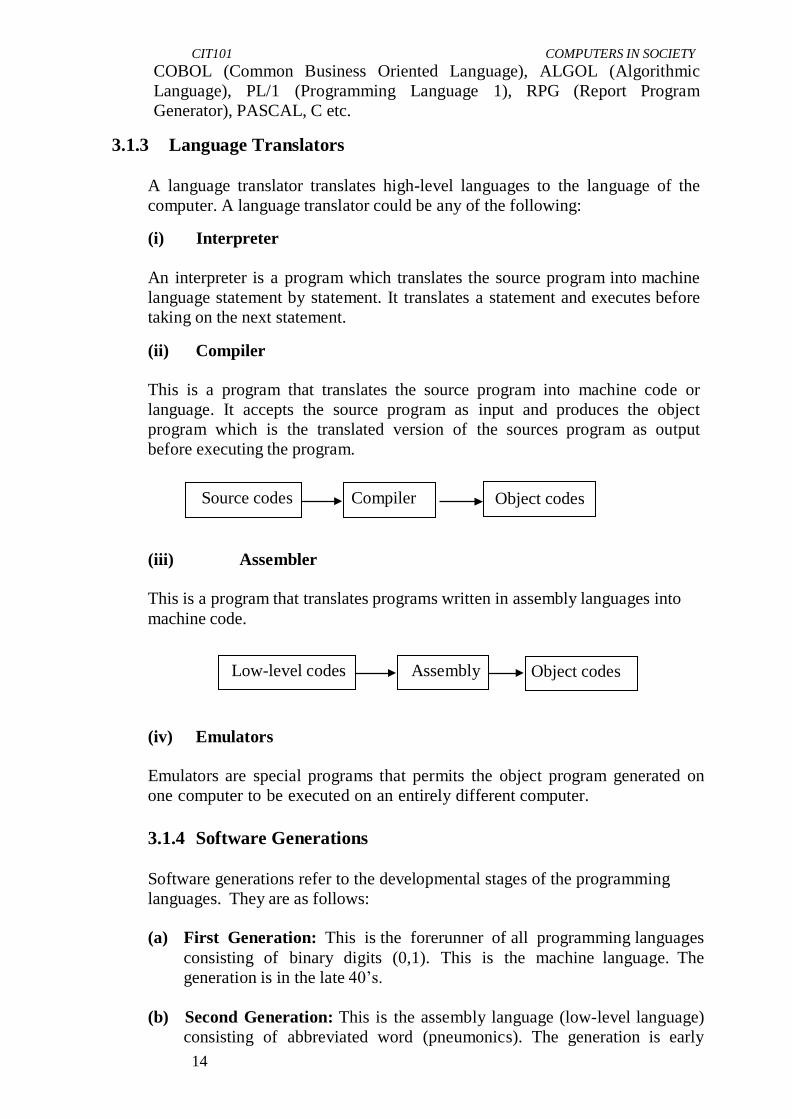
(ii) Compiler This is a program that translates the source program into machine code or
language. It accepts the source program as input and produces the object
program which is the translated version of the sources program as output
before executing the program.
Source codes Compiler Object codes
(iii) Assembler
This is a program that translates programs written in assembly languages into
machine code.
Low-level codes Assembly Object codes
(iv) Emulators Emulators are special programs that permits the object program generated on
one computer to be executed on an entirely different computer.
3.1.4 Software Generations Software generations refer to the developmental stages of the programming
languages. They are as follows:
(a) First Generation: This is the forerunner of all programming languages
consisting of binary digits (0,1). This is the machine language. The
generation is in the late 40’s.
(b) Second Generation: This is the assembly language (low-level language)
consisting of abbreviated word (pneumonics). The generation is early

CIT101 COMPUTERS IN SOCIETY
15
50’s.
(c) Third Generation: This consists of the high level languages where
programming is done in languages. The generation is in the late 60’s.
(d) Fourth Generation: This is an application generation that automates the
routines involved in programming and its features include:
(i) Setting up data entry screens
(ii) Creating files (iii) Querying data
(iv) Report generation.
Examples of fourth generation software are the data base packages (D
base), spreadsheet and graphics packages.
(e) Fifth Generation: They are declarative languages where
programmers state the problem and the languages sort out the solution.
Such systems are called expert systems.
Examples are Turbo PROLOG (Programming in Logic) and LISP (List
Processing).
3.1.5 Application Software As you learned earlier, computer software contains instructions that are
processed and executed by a PC. Application software is the software that
actually addresses user’s specific needs. In the business world of today, you
will find four major application categories. These are:
• Word-processing
• Spreadsheets
• Presentations
• Databases
User software is also included in the application software. A user software is a
program developed by the user personally or by commissioned agents. Such
programs are directed towards solving the user’s specific. The scope of such
programs varies from one user to the other.
SELF ASSESSMENT EXERCISE Answer True or False
1. Storage is a term commonly applied to storage devices.
2. A computer is a program.
4.0 CONCLUSION
Other resources of a computer that are not hardware are often referred to
as the software.
CIT101 COMPUTERS IN SOCIETY
16
5.0 SUMMARY
The software and hardware components of a computer complement each
other.
6.0 TUTOR-MARKED ASSIGNMENT
1. What is the function of a program?
2. What is the function of the operating system?
7.0 REFERENCES/FURTHER READING
Ayo, C. K. (1998). Computer Literacy: Operations and Application.
(2nd
ed.). Mckay Consult.
CIT101 COMPUTERS IN SOCIETY
17
UNIT 4 HOW TO WORK WITH A COMPUTER: SWITCHING
ON AND OFF THE PC
CONTENTS
1.0 Introduction
2.0 Objectives 3.0 Main Content
3.1 Switching On Your PC 3.2 Turning Off Your PC
4.0 Conclusion 5.0 Summary
6.0 Tutor-Marked Assignment
7.0 References/Further Reading
1.0 INTRODUCTION In this unit you will learn how to switch on and turn off your PC.
2.0 OBJECTIVES At the end of this unit, you should be able to:
• switch on your PC
• turn off your PC.
3.0 MAIN CONTENT
3.1 Switching on Your PC In order that you may use a PC, the first task you must perform is to
switch on (or boot) the PC. To switch the PC on first ensure that the
power cable, which is supplied with your PC, is connected to the
electrical mains supply to your computer.
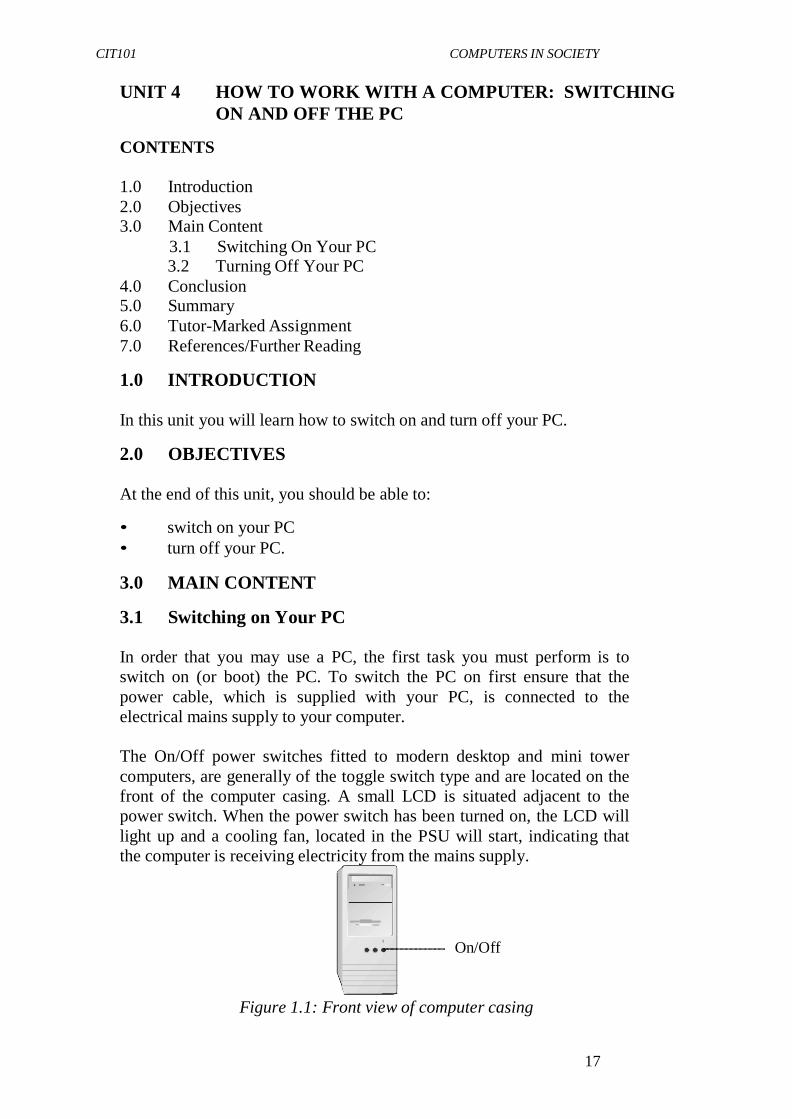
The On/Off power switches fitted to modern desktop and mini tower
computers, are generally of the toggle switch type and are located on the
front of the computer casing. A small LCD is situated adjacent to the
power switch. When the power switch has been turned on, the LCD will
light up and a cooling fan, located in the PSU will start, indicating that
the computer is receiving electricity from the mains supply.
On/Off
Figure 1.1: Front view of computer casing

CIT101 COMPUTERS IN SOCIETY
18
Monitors, generally receive power directly from the computer, with a
power cable connecting the PSU to the back of the Monitor. The
monitor toggle power switch will be found either on the front or on the
side of the monitor. Once you have turned on the computer, if the
monitor is already switched on, a small indicator light near the monitor
on/off switch will become illuminated. If the light remains off, push the
monitor power switch to turn it on.
Function adjustment button
Indicator light
On/Off

CIT101 COMPUTERS IN SOCIETY
19
Figure 1.2 Monitor Power Switch
Start up sequence
When turning on your PC, the following sequence of events will take
place.
1. The PC will perform some standard systems checks covering
areas such as:
• Motherboard
• Processor
• Memory and
• Disk Drives
2. The message “Starting Windows ‘98” will be displayed on your
monitor, followed by the Windows ‘98 logo.
3. After a few seconds, the Windows 98 desktop will be displayed.
One of the first checks the system will perform is to check the
available base memory your system has at its disposal. You will
see a message similar to the following appear on screen whilst
this check is in progress.
007936 KB OK
WAIT…..
Figure 1.3 Memory Check
The removable disk indicator light will briefly glow as the disk drives
are checked before the hard disk is checked. Then the screen will display
system information in accordance with the components and setting that
the system has located during its tests. The screen will appear similar to
the shown below.
Main Processor : 80486DX2 Base Memory Size : 640 KB
Numeric Processor : Present Ext. Memory Size : 7296KB Floppy Drive A : 1.2 MB, 5 ¼” Hard Disk C: Type : 47 Floppy Drive B : 1.44 MB, 3½” Hard Disk D: Type : None Display Type : VGA/PGA/EGA Serial Port(s) : 3F8, 2F8
AMIBIOS Date : 04/04/93 Parallel Port(s) : 378
128 KB CACHE MEMORY
5OMHZ DX2 CPU
Figure 1.4: System Information

CIT101 COMPUTERS IN SOCIETY
20
It is at this point that the computer has completed the majority of its
hardware checks. If there are any errors found during these checks the
system will indicate the fault either on screen or with a series of beeps.
Now the computer is ready to load an operating system. Window 98 is
loaded automatically. When complete, the Windows 98 desktop will be
displayed.

CIT101 COMPUTERS IN SOCIETY
21
Figure 1.5: The Window 98 desktop
Although the most current version of the Window operating systems is
Windows Millennium, the majority of copies of Windows currently in use,
that is at the time of going to print, is Windows 98. For this reason will look
at the WINDOWS ’98 operating system on this course. You will learn about
Windows in more detail later.
SELF ASSESSMENT EXERCISE 1
Switching on and Loading Windows 98
Before you begin: Ensure that your PC is currently switched off
What you do Comments/Prompts
1. Switch on your computer system
After a few moment, the system
will perform the standard system check
Next you will see: “Starting Window 98…”
The screen will temporarily go black before
displaying the Windows ’98 desktop
2. Observe the
Windows ’98
Desktop
Locate the following elements:
“My Computer”, “Recycle Bin”. “Taskbar” and
the “Start Button”.

CIT101 COMPUTERS IN SOCIETY
22
3.2 Turning off Your PC Before you turn off your computer, it is important that you shut down Windows
98 correctly. One of the methods of shutting down Windows ‘98 is
accomplished by holding down the <Alt> key and pressing the <F4> function
key at the same time.
A “Shut Down Windows” dialogue box will appear which contain a list of choices
relevant to closing Windows. The standard default dialogue box lists the following
choices:
Figure 1.6: The Shut Down Windows dialog box
The options listed in Figure 1.6 above are in the form of “radio” buttons, which
means only one option can be selected at a time. Once you have selected the
required option by using the UP < - > arrow or the DOWN < ¯ > arrow on your
keyboard, you will press (ENTER) key, which will activate the selected command
button. Windows ‘98 will now perform the relevant routine.
Shut Down This shuts down windows and displays the messages “It is now safe to turn
off your computer”. When this message appears on the screen you can safely
switch off your computer.
Restart the Computer This option reboots (restarts) your computer and loads Windows ‘98. This
option is used when system settings have been changed. In order for
Windows to recognize the new settings, Windows must reboot.
Restart the Computer in MS-DOS mode
Should you wish to run your PC in MS-DOS mode this option is used to
restart your computer in DOS mode.
SELF ASSESSMENT EXERCISE 2
Shutting Down Windows and your PC

CIT101 COMPUTERS IN SOCIETY
23
What you do Comments/Prompts
1. Press and hold down the <Alt> key
Press and release the <F4>
function
The following Shut Down
Windows dialog box is displayed
The Shut down option is pre-selected
2. Press <Enter> After a few moments a message appears on your monitor, informing you that is safe to turn off your company
3. Either press the reset button on the front of your PC, or press <CTRL> +
<ALT> + <DEL> keys
You have just performed a soft boot. After a few moments, the Windows desktop is displayed.
4.0 CONCLUSION In this unit, you learn how to switch off your PC and how to turn on your PC.
SELF ASSESSMENT EXERCISE 1
Boot is another term for switch on. Answer Yes or No.
5.0 SUMMARY Here you are introduced to the rudiments of starting and closing a computer.
6.0 TUTOR-MARKED ASSIGNMENT What happens to data currently held in RAM when the PC is switched off?
7.0 REFERENCES/FURTHER READING Ayo, C. K. (1998). Computer Literacy: Operations and Application.
(2nd ed.). Mckay Consult.
CIT101 COMPUTERS IN SOCIETY
24
UNIT 5 USING A MOUSE
CONTENTS
1.0 Introduction
2.0 Objectives 3.0 Main Content
3.1 using the mouse
3.1.1 Basic Techniques in the use of mouse 3.1.2 Using the Mouse to Draw a Picture
4.0 Conclusion 5.0 Summary
6.0 Tutor-Marked Assignment 7.0 References/Further Reading
1.0 INTRODUCTION
A mouse is another input device which you will use to give your
computer instructions. In this unit we will look at how a mouse works
and then we will look at the basic techniques of how to use a mouse.
2.0 OBJECTIVES
At the end of this unit, you should be able to:
• use the mouse to give your computer instructions
• use the mouse to draw a picture.
3.0 MAIN CONTENT
3.1 Using a Mouse
The mouse became popular by its inclusion as standard equipment with
the early Apple Macintosh computer system. With the increased
popularity of GUI’s (GRAPHICAL USER INTERFACE), the use of
the mouse has grown throughout the personal computer and workstation
worlds.
The basic features of a mouse are a casing, which has a flat bottom and
is gripped by one hand. With one or more buttons on the top, the mouse
has a multidirectional detection device, which is usually a ball on the
bottom, and cable connecting the mouse to the computer.

CIT101 COMPUTERS IN SOCIETY
25
Figure 1.7 Typical two button mouse
By moving the mouse on a flat surface (such as a desk or mouse pad),
the ball turns inside the mouse, moving two sets of rollers that control an
on-screen cursor.
A mouse is classified as a relative pointing device because there are
no defined limits to the mouse’s movement and because its placement on
a surface does not map directly to a specific screen location. To
select items or choose commands on the screen, the user presses one
of the mouse’s buttons, which produces a “mouse click”
Mouse
Roller
Figure 1.8: Mouse ball and rollers
3.1.1 Basic Mouse Techniques
To use a mouse is relatively easy, but like most things, “practice makes perfect”.
The following list details the basic mouse and cursor movements:
Mouse Movement Cursor Movement
Push the mouse away from you (from the front to the back of the desk)
The cursor will move to the top of the screen
Pull the mouse toward you (from the back to the front of the desk)
The cursor will move to the bottom of the screen
Slide the mouse to the right The cursor will move to the right of the screen
Slide the mouse to the left The cursor will move to the left of the screen

CIT101 COMPUTERS IN SOCIETY
26
SELF ASSESSMENT EXERCISE 1
Using the Mouse to Launch a Program
What you do Comments/Prompts
1. Start your computer and wait until WINDOWS loads and the desktop is displayed.
2. Locate the mouse pointer on the screen, it is a small white arrow
3. Slide the mouse away from the front of the desk toward the back of the desk. As you do this watch the pointer on the screen.
The mouse pointer will move towards the top of the screen
4. Slide the mouse in any direction of your choice (remember to keep it on a flat surface). As you do this watch the pointer on the screen.
The mouse pointer will move in accordance with your instructions.
5. Next we will practice single clicking. Move the pointer until it is positioned on the Program Icon titled “My Computer”. Click the left mouse button once.
The “My Computer” icon will become selected (The icon and title will become highlighted).
6. Repeat the above process Selecting any another Program icon of your choice (remember to click once).
The program icon you selected will become highlighted.
Next you will use the Start
button on open the Paint game.
7. Positioned in the bottom left- hand corner of the desktop is the Start button. Click once on this button.
The start menu is displayed, which
Should look similar to the
following example:

CIT101 COMPUTERS IN SOCIETY
27
8. Position your mouse pointer on The menu items named Programs.
A sub-menu is displayed, similar to the following diagram:
9. Position your mouse pointer on the Menu item named Accessories
A further sub-menu is displayed, similar to the following diagram:
10. Select and click on the menu item named Paint.
The Paint program is displayed, similar to Figure 1.9

CIT101 COMPUTERS IN SOCIETY
28
Figure 1.9: The Paint Window
3.1.2 Using the Mouse to Draw a Picture
The next exercise will afford you the opportunity to use the mouse to
draw the picture illustrated below.
Figure 1.10
SELF ASSESSMENT EXERCISE 2
Using the Mouse to Draw a Picture
Objective: To draw the picture illustrated in Figure 1. 10 above
What you do Comments/Prompts
1. Position the mouse printer on the centre of your screen.
Observe the shape of the
mouse pointer.
The mouse pointer changes to the shape of a pencil.
2. Locate the rectangle tool on
the drawing toolbox on the
The screen tip reads “rectangle”

CIT101 COMPUTERS IN SOCIETY
29
left side of the screen.
3. Position the mouse pointer on the rectangle tool. Click the left mouse button on the Rectangle tool. Position the mouse pointer in the centre of the screen.
The mouse pointer has changed shape to a cross-community referred to as “cross-hairs”
4. Look at the bottom of the window on the status bar. You will notice two numbers separated by a comma.
The first number indicates the horizontal position of the mouse pointer on the screen, while the second number indicates the vertical position of the mouse pointer on the screen.
5. Move the mouse pointer around on the screen and notice how the numbers change accordingly.
The screen is divided into Invisible dots called “pixels”. These numbers refer to the pixel number that the mouse pointer is positioned on.
6. Please position the mouse pointer so that the pixel numbers are approximately 50,100
7. Press and hold down the left mouse button. You will notice that another set of numbers have appeared to the right of the pixel indicators.
These numbers represent the size of the rectangle.
8. While pressing down the mouse button move the mouse down and to the right until the size indicators are approximately 450 x 175 Release the mouse button.
It does not matter if the numbers vary slightly. Use Figure 1.10 above as a reference.
9. Select the Line tools on the drawing toolbox s by positioning the mouse pointer over the tool and clicking the left mouse button once.
10. Position the mouse on the top line of the rectangle that you
The objective of this step is to position the mouse pointer

CIT101 COMPUTERS IN SOCIETY
30
have drawn so that the pixel indicator reads 200,100
approximately one third along the top line of the rectangle. If necessary
adjust the position of your mouse
pointer accordingly.
11. Press and hold down the <Shift> key on the keyboard. While holding down this key, press and hold down the left mouse button and draw the line from the top of the rectangle to the bottom of the rectangle.
If you hold down the <Shift> key
while drawing a line, it will be
straight.
12. Position the mouse on the top
line of the rectangle that you have drawn
so that the pixel indicator reads 350,100
The objective of this step is to
position the mouse pointer
approximately two thirds alone
the topline of the rectangle. If necessary adjust the position of
your mouse pointer accordingly.
13. Press and hold down the <Shift> key on the keyboard. While holding
down this key, press and hold down
the left mouse button and draw the line
from the top of the rectangle to the
bottom of the rectangle.
The original rectangle has been divided into three equal boxes.
14. Locate the rounded rectangle
tool on the drawing toolbox on the
left side of the screen.
The screen tip reads “rounded
rectangle”.
15. Position the mouse pointer on
the rounded rectangle tool. Click the
left mouse button on the rounded
rectangle tool.
The screen tip reads “rounded
rectangle”.
16. Position the mouse pointer in
the first of the three boxes of the
rectangle, that is, the left most box.
17. Position the mouse so that the
pixel Indicator reads 60,110
18. While pressing down the
mouse button move the mouse down
and to the right until the size indicators
are approximately 130 x 155. Release
the mouse button.
The rounded rectangle appears in
the first box.

CIT101 COMPUTERS IN SOCIETY
31
19. Locate the ellipses tool on the
drawing toolbox on the left
side of the screen.
The screen tip reads “ellipses”.
20. Position the mouse pointer on
the ellipses tool. Click the left
mouse button on the ellipse
tool.
21. Position the mouse pointer in
the last of the three boxes of
the rectangle that is, the
rightmost box.
22. Position the mouse so that the
pixel indicator reads 370,130
23. Hold down the <Shift> key.
While holding down the
<Shift> key, press down
the mouse button and move
the mouse down and to
the right until the size indicators
are approximately 111 x 111.
Release the mouse button.
The circle appears in the third
box. The <Shift> key ensures that
a perfect circle is drawn.
24. Locate the Line tools on the
drawing toolbox on the left
side of the screen
The screen tip reads “Line”.
25. Position the mouse pointer on
the Line tool. Click the left
mouse button on the Line
tool
26. Position the mouse pointer On
the middle box of the three
boxes of the rectangle
27. Position the mouse so that the pixel indicator reads 200,100
28. Press and hold down the left
mouse button. Drag the
mouse down to the opposite lower right corner of
the centre box.
Release the mouse button.
The size indicator should read
approximately 150 x 175
29. Locate the Fill with Colour
tools on the drawing toolbox
on the left side of the screen
This tool enables you to fill a
drawn object with the colour of
your choice

CIT101 COMPUTERS IN SOCIETY
32
30. Position the mouse pointer on
the Fill with Colour tools.
Click the left mouse button
on the tool.
Next you will select the colour of your choice.
31. Position the mouse pointer on
the colour of your choice on
the colour palette at the
bottom of the screen.
32. Click the left mouse button on
the colour of your choice
Not black or white please!.
33. Position the mouse pointer
inside the rounded rectangle
that you drew in the first of the
three boxes.
Notice that the mouse pointer has
changed shape to that of a bucket
of paint.
34. Click the left mouse button Once
The object is filled with the colour of your choice. Next, you
will fill the two triangles that
appear in the centre box.
35. Position the mouse pointer on
the colour of your choice on
the colour palette at the bottom of the screen
36. Click the left mouse button on the colour of your choice.
Not black or white please!
37. Position the mouse pointer
inside the lower triangle that
you created in the centre box of the rectangle.
Notice that the mouse pointer still
has the shape of a buckler of
paint.
38. Click the left mouse button
once. Next you will fill the
remaining triangle.
The object is filled with the
colour of your choice.
39. Position the mouse pointer on
the colour of your choice on
the colour at the bottom of the
screen.
40. Click the left mouse button on
the colour of your choice
Not black or white please!
41. Position the mouse pointer
inside the upper triangle that
you created in the centre box of the rectangle.
Notice that the mouse pointer still
has the shape of a bucket of paint.

CIT101 COMPUTERS IN SOCIETY
33
42. Click the left mouse button once.
The object is filled with the
colour of your choice. The last
object to be filled is the circle.
43. Position the mouse pointer on the colour of your choice on
the colour palette at the bottom
of the screen.
44. Click the left mouse button on
the colour of your choice
Not black or white please!
45. Position the mouse pointer
inside the circle that you
created in the right box of the
rectangle.
Notice that the mouse pointer still
has the shape of a bucket of paint.
46. Click the left mouse button once.
The object is filled with the colour of your choice.
47. Compare your picture to Figure
1.10 on page 18
If they looks similar – well done!
You have learned to use the
mouse.
Next you will exit the Paint program.
48. Click on File on the menu bar The File menu is displayed
49. Click on Exit You will be asked whether you wish to save changes to untitled?
50. Click on the No button The Paint program is closed and
you are returned to the Windows
desktop.
4.0 CONCLUSION
A mouse is used to give instructions to a computer.
5.0 SUMMARY
Here you learned the use of a mouse and the basic techniques of how to
use a mouse.
6.0 TUTOR-MARKED ASSIGNMENT
Explain how you will use a mouse to draw the following picture:

CIT101 COMPUTERS IN SOCIETY
34
7.0 REFERENCES/FURTHER READING
Gottfried, B. S. (1994). Programming with Pascal (Schav’s Series) (2nd
ed.).

CIT101 COMPUTERS IN SOCIETY
35
MODULE 2 Unit 1 Operating System
Unit 2 Windows 98 Unit 3 Files
Unit 4 Word Processing Unit 5 Further Word Processing Program Facilities
UNIT 1 OPERATING SYSTEM CONTENTS
1.0 Introduction
2.0 Objectives 3.0 Main Content
3.1 What is an Operating System? 3.1.1 Basic Windows Functions
3.2 Loading the Operating System Window 98 3.3 Windows 98
3.3.1 Elements of the Desktop
3.3.2 Windows Terminology 4.0 Conclusion
5.0 Summary 6.0 Tutor-Marked Assignment
7.0 References/Further Reading
1.0 INTRODUCTION The Operating System provides facilities that enable other programs to
use the hardware in a safe and controlled way.
2.0 OBJECTIVES At the end of this unit, you should be able to:
• learn what is meant by operating system
• load the operating system windows
• be introduced to Windows 98
• explore the general characteristics of a window.

CIT101 COMPUTERS IN SOCIETY
36
3.0 MAIN CONTENT
3.1 What is An Operating System?
An operating system is the software responsible for controlling the
allocation and usage of hardware and software resources. The operating
system is the basis on which all computer application programs run.
3.1.1 Basic Windows Functions
The windows operating system enables users to perform the following
functions:
• Run programs
• Run multiple programs simultaneously
• Control Printers
• Format Disks
• Copy of Move files
• Organise the storage area on the computer
• Share information across a network
3.2 Loading the Operating System Window 98
In Module 1 you learned that to load Windows 98, you simply turn on
your Personal computer (PC) and the operating system will load
automatically. To recap, the startup sequence of events is as follows:
The PC will perform some standard system checks covering areas such
as:
• Motherboard
• Processor
• Memory and
• Disk Drives
• Next the message “Starting Windows 98…” will be displayed on
your monitor, followed by the Windows ’98 logo.
• After a few seconds, the Windows ’98 desktop will be displayed.
The desktop is the main working area where you will perform the
majority of functions when using Windows ’98.

CIT101 COMPUTERS IN SOCIETY
37
SELF ASSESSMENT EXERCISE 1
Switching on and Loading Windows 98
Before you begin: Ensure that your PC is currently switched off
What you do Comments/Prompts
1. Switch on your computer system
After a few seconds, the system will perform the standard system checks. Next you will see: “Starting Windows 98” The screen will temporarily go black before displaying the Windows ‘98 desktop.
3.3 Windows 98
When starting Windows ’98 you are presented with the Windows ’98
desktop. The desktop is the key to all actions performed within
Windows ’98. When using Windows ’98, you will see that every action
performed in the operating system normally begins at the desktop.
My Computer
Program icon Desktop
Recycle Bin
Windows Explorer
Start button Clock
Taskbar
Figure. 2.1 The Windows ’98 Desktop
3.3.1 Elements of the Desktop
The desktop is fully customizable; however the basic desktop layout
contains the following standard elements:
Taskbar The Taskbar provides quick access to information and
to applications which are active (opened). The default
location for the Taskbar is at the bottom of the

CIT101 COMPUTERS IN SOCIETY
38
desktop. The Taskbar also contains a clock, which is
displayed in the right hand corner.
Start button/menu The Start button is located at the far-left corner of
the taskbar (when the taskbar is in the default
location). The Start button opens a menu, referred to
as the Start menu. This menu enables users to open
documents, launch programs, and perform other
common tasks.
Desktop The Desktop is the main area of the screen where the
Program Icons and Shortcuts are displayed.
Program Icon Program Icons are used by the operator to launch
or (run) the relevant program. Program icons
and shortcuts can be placed anywhere on the desktop:
Shortcut A Shortcut gives the operator quick and easy access to
frequently used programs or information. The
Shortcuts are placed on the desktop.
My Computer This utility provides quick and easy access to
information related to your computer, such as drives,
files and folders.
Recycle Bin All files deleted from your PC are stored in the
Recycle Bin. This enables files to be easily undeleted it
also axists the user to keep track of deleted item or files
Inbox If you are using electronic mail (e-mail) the inbox will
be displayed. All incoming messages are stored in the
Inbox.
3.3.2 Windows Terminology
When working with Windows, certain terms and terminologies are used
to describe processes and concepts. Table 1 below describes some of
these terms.
Terminology Description
Application This refers to either a Windows or MS-DOS program
Folder This is the new name for a directory
Icon A small picture that represents either a programme or a shortcut
Mouse This is the pointing device which you will use
constantly whilst performing tasks in windows
CIT101 COMPUTERS IN SOCIETY
39
‘98
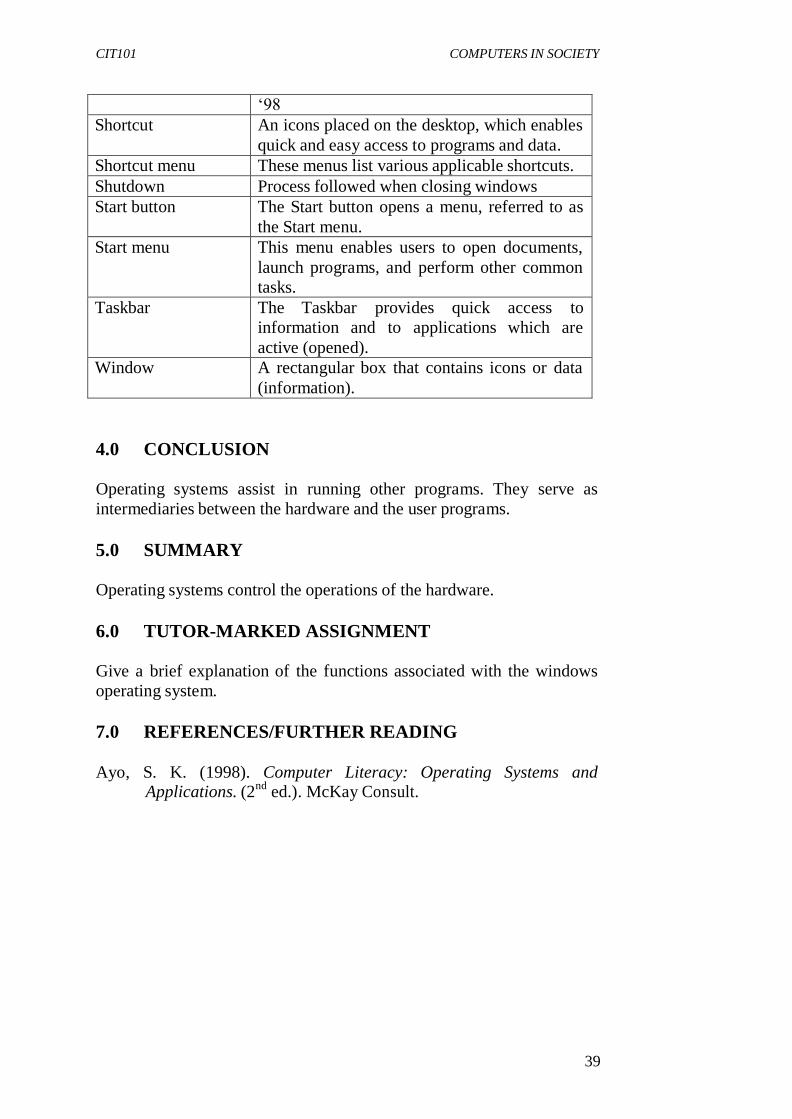
Shortcut An icons placed on the desktop, which enables
quick and easy access to programs and data.
Shortcut menu These menus list various applicable shortcuts.
Shutdown Process followed when closing windows
Start button The Start button opens a menu, referred to as
the Start menu.
Start menu This menu enables users to open documents,
launch programs, and perform other common
tasks.
Taskbar The Taskbar provides quick access to
information and to applications which are
active (opened).
Window A rectangular box that contains icons or data
(information).
4.0 CONCLUSION
Operating systems assist in running other programs. They serve as
intermediaries between the hardware and the user programs.
5.0 SUMMARY
Operating systems control the operations of the hardware.
6.0 TUTOR-MARKED ASSIGNMENT
Give a brief explanation of the functions associated with the windows
operating system.
7.0 REFERENCES/FURTHER READING
Ayo, S. K. (1998). Computer Literacy: Operating Systems and
Applications. (2nd
ed.). McKay Consult.
CIT101 COMPUTERS IN SOCIETY
40
UNIT 2 WINDOWS 98
CONTENTS
1.0 Introduction
2.0 Objective
3.0 Main Content 3.1 Examining the Start Menu
3.2 Windows Elements 3.3 Moving and Sizing a Window
4.0 Conclusion 5.0 Summary
6.0 Tutor-Marked Assignment
7.0 References/Further Reading
1.0 INTRODUCTION
Windows consist of sets of standard operations which can be used by the
higher level software to interact with graphical user interface (GUI).
2.0 OBJECTIVE
At the end of this unit, you should be able to:
• explore further the characteristics of Windows ’98.
3.0 MAIN CONTENT
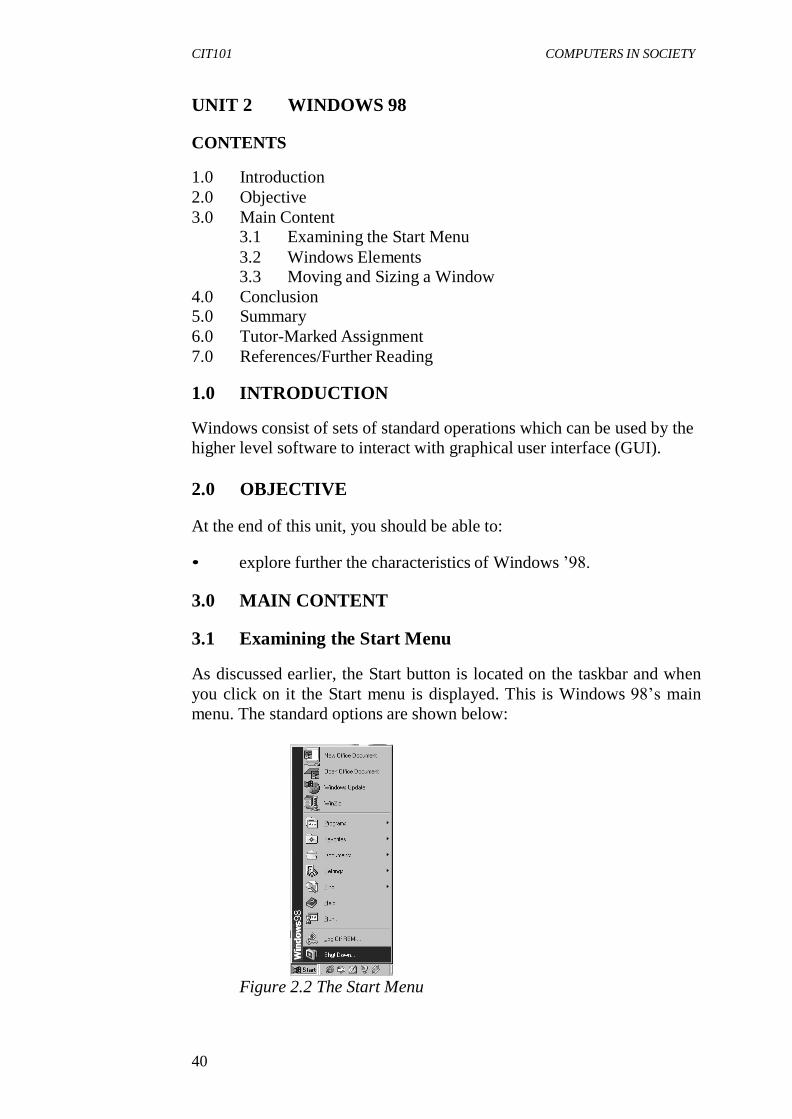
3.1 Examining the Start Menu
As discussed earlier, the Start button is located on the taskbar and when
you click on it the Start menu is displayed. This is Windows 98’s main
menu. The standard options are shown below:
Figure 2.2 The Start Menu

CIT101 COMPUTERS IN SOCIETY
41
Programs The Programs option provides quick access to the
various applications that are installed on your
computer
Favourites This option allows you to quickly open a favourite file,
folder or website.
Documents The Documents option lists the last 15 opened
documents. Documents can be reopened from the list by simply clicking on the relevant filename.
Settings The Settings option allows you to change various
system and Windows settings.
It also allows you to set up new printers or view
information about the documents(s) being printed.
Find The Find option allows you to search through your
system for a particular file.
Help The help option provides access to the Window 98
online Help system.
Run The Run option allows you to run a particular
application, such as a setup program, from the command line.
Log Off This option is used to log off your computer so that
another individual using Window 98 with different
settings can log on. Shut Down The Shut Down option is used to either shut down or
restart the computer.
SELF ASSESSMENT EXERCISE 1
Exploring the Start Menu
Before you begin: Ensure that the Windows `98 desktop is displayed
What you do Comments/Prompts
1. Click the Start button on the Taskbar
The Standard menu is displayed.

CIT101 COMPUTERS IN SOCIETY
42
2. Using your mouse, point to the Programs option on the menu.
The following Programs submenu is displayed.
NOTE: The submenus on your
screen may differ slightly.
3. Point to Accessories (found on
the Programs submenu)
The Accessories submenu is
displayed.
4. Point to the System Tools
option (on the Accessories
submenu).
The System Tools submenu is
Displayed
5. Now point to the Documents
option (on the Start menu).
The most recently opened
document names are listed
(maximum 15).

CIT101 COMPUTERS IN SOCIETY
43
6. Point to the Settings option (on to (Start menu).
The Settings submenu is displayed.
7. To turn off any menu simply
point to any blank area of the
desktop and click the primary
mouse button.
All menus are closed and you are
returned to the Window ’98
desktop.
3.2 Windows Elements
When working in Windows 98, you will work in rectangular areas of all
different shapes and sizes. These areas are called windows. Even though
the windows on your computer will vary in appearance, you will find
that virtually all of the windows consist of similar elements. Figure 2.3
below represents a typical window.
Minimize Maximize
Title bar
Menu bar
Tool bar
Format bar
Close
Border
Document
Window
Figure 2.3 Sample Window
Title bar The title bar displays the title of the relevant
application. If you maximise a document in an
application window, the name of the documents will
also appear next to the name of the application title in
the title bar. You can also use the title bar to move a
window.
Close button The close button is used to close the window and exit
from the application.
Maximize button This button is used to display a full-screen view of the
window.

CIT101 COMPUTERS IN SOCIETY
44
Restore button The restore button is only available if a window has
been maximized and is used to restore the window
back to its original size.
Minimize button This button is used to minimize the window, reducing
it to a button on the Taskbar (the application remains
running in the background).
Menu bar The menu bar displays the primary commands of the
relevant application. Selecting one of these commands
displays a menu of command options from which you
can make additional selections.
Toolbar This bar displays shortcut button for performing
common operations, such as saving a file and copying
data.
Format bar This bar also displays shortcut buttons as well as
various boxes for performing formatting operations,
such as text alignment, changing the font and font
size.
Document window The document window is the rectangular area,
which occupies majority of the screen. This is the
area in which you work whilst in an application area.
Status bar This bar displays messages and other information as
you use the application.
SELF ASSESSMENT EXERCISE 2
Exploring a Window
Before you begin: Ensure that the Windows 98 desktop is displayed
Objective: To launch an application called WordPad and experiment
with some of its window elements.
What you do Comments/Prompts
1. Click the Start button on the
Taskbar.
The standard Start menu is
displayed.

CIT101 COMPUTERS IN SOCIETY
45
2. Using your mouse, point to the Programs option on the menu.
NOTE: The submenus on your
screen may differ slightly.
The following Programs submenus is displayed.
3. Point to Accessories (found on the Programs/submenu).
The Accessories submenu is displayed
4. Click on the WordPad icon. The WordPad application will be launched and a window similar to
the one below will appear on your
screen.

CIT101 COMPUTERS IN SOCIETY
46
5. Identify the windows elements
that we have just discussed.
Use Figure 2.3 on page 35 if
necessary
3.3 Moving and Sizing a Window
A window may not always appear in the most suitable location on the
screen. It may also not be the correct shape and/or size. It is possible to
move and/or resize a window.
SELF ASSESSMENT EXERCISE 3
Move and Size a Window
Before you begin ensure that WordPad is still open on the desk.
Objective: To move and change the size of the current window.
What you do Comments/Prompts
1. Click on the title bar of the
window and use the drag & drop method to move the
window to another position
on the desktop.
The window will be displayed in the
new location.
2. Position your mouse pointer on the border, which
is located around the edge
of the window.
You will notice that your cursor shape will change to a double-
headed arrow when the cursor is
placed over the border.
CIT101 COMPUTERS IN SOCIETY
47
3. Click and drag the border of
the window until you have
resized the window to any size
you like, then release your mouse button.
The window size has been changed.
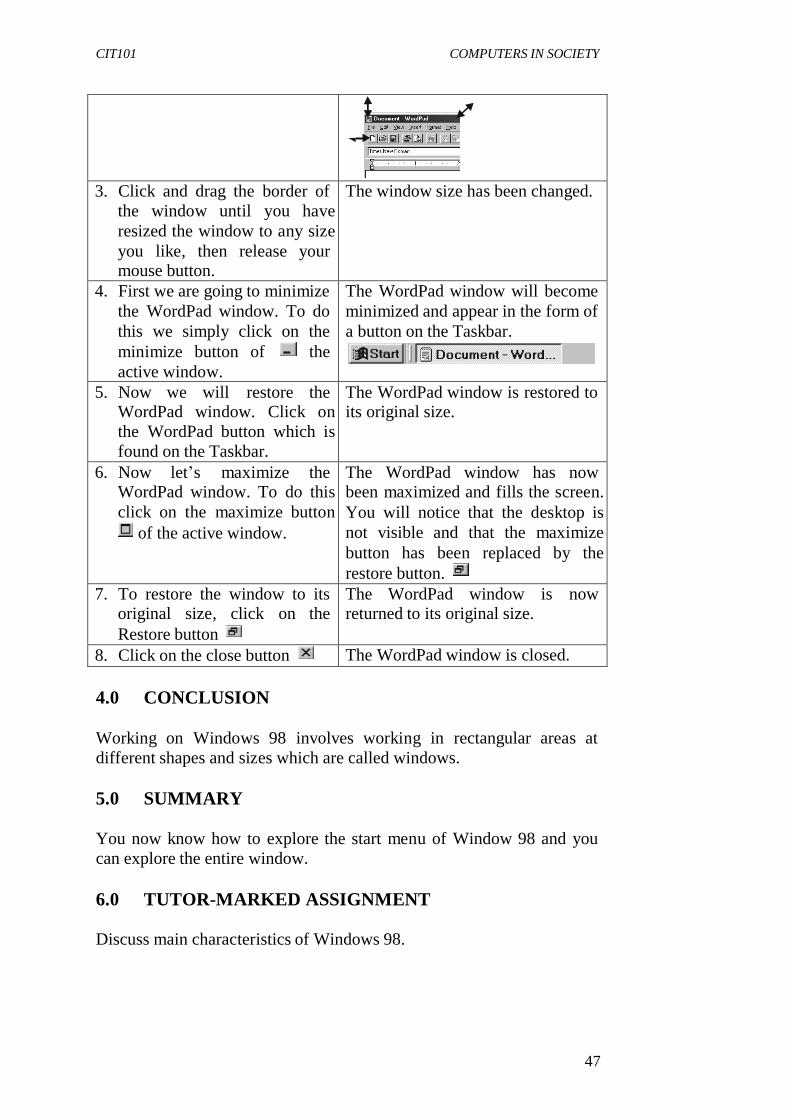
4. First we are going to minimize
the WordPad window. To do
this we simply click on the
minimize button of the
active window.
The WordPad window will become
minimized and appear in the form of
a button on the Taskbar.
5. Now we will restore the WordPad window. Click on
the WordPad button which is
found on the Taskbar.
The WordPad window is restored to its original size.
6. Now let’s maximize the WordPad window. To do this
click on the maximize button
of the active window.
The WordPad window has now been maximized and fills the screen.
You will notice that the desktop is
not visible and that the maximize
button has been replaced by the
restore button.
7. To restore the window to its original size, click on the
Restore button
The WordPad window is now returned to its original size.
8. Click on the close button The WordPad window is closed.
4.0 CONCLUSION
Working on Windows 98 involves working in rectangular areas at
different shapes and sizes which are called windows.
5.0 SUMMARY
You now know how to explore the start menu of Window 98 and you
can explore the entire window.
6.0 TUTOR-MARKED ASSIGNMENT
Discuss main characteristics of Windows 98.

CIT101 COMPUTERS IN SOCIETY
48
7.0 REFERENCES/FURTHER READING
C. S. French (2000). Computer Science. (5th
ed.) Ashford Colour
Press Gosport, Hants.
CIT101 COMPUTERS IN SOCIETY
49
UNIT 3 FILES
CONTENTS
1.0 Introduction
2.0 Objective
3.0 Main Content
3.1 File Handling
3.2 Creating a New Folder 3.3 Shutting Down Window ’98
4.0 Conclusion 5.0 Summary
6.0 Tutor-Marked Assignment
7.0 References/Further Reading
1.0 INTRODUCTION Each document is stored in a computer individually by name in what is
called a file.
2.0 OBJECTIVE At the end of this unit, you should be able to:
• handle a file.
3.0 MAIN CONTENT
3.1 File Handling All information found in a computer that is both data and programs, are
stored in files. Folders are used to hold related files, as well as other
related folders.
In many ways, Window 98 folder can be compared to a paper folder in
that both are used to store and organise information in one location.
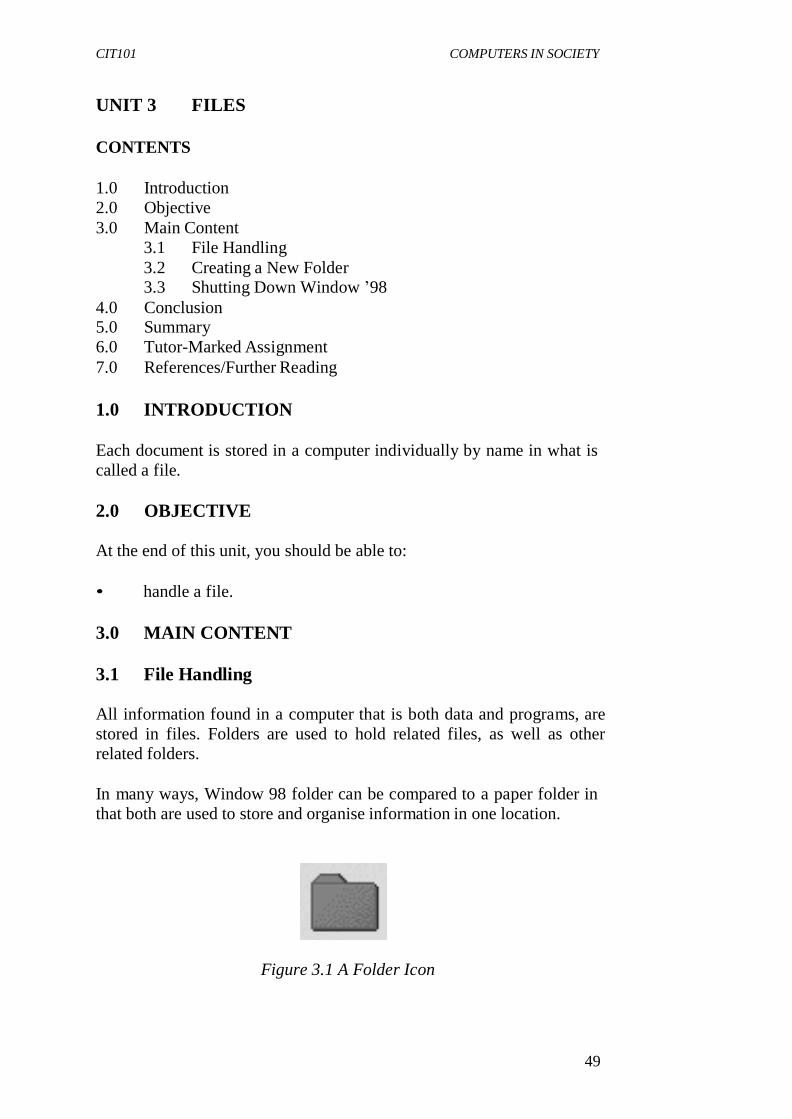
Figure 3.1 A Folder Icon
CIT101 COMPUTERS IN SOCIETY
50
3.2 Creating a New Folder
Before we can use a folder we must first create it.
To create a new folder:
• Double-click on the My Computer icon on the desktop
• In the My Computer window, open the relevant drive icon.
• In the drive window, select (from the menu) the File, New
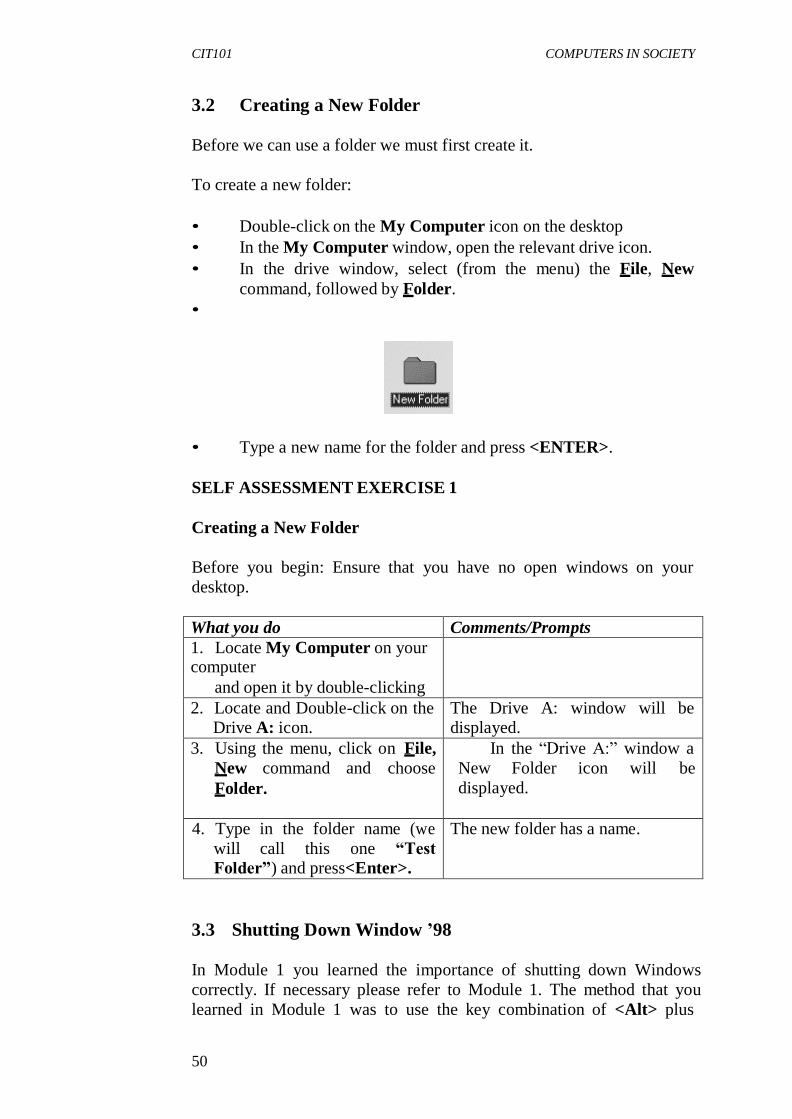
command, followed by Folder.
•
• Type a new name for the folder and press <ENTER>.
SELF ASSESSMENT EXERCISE 1
Creating a New Folder
Before you begin: Ensure that you have no open windows on your
desktop.
What you do Comments/Prompts
1. Locate My Computer on your computer
and open it by double-clicking
the icon.
2. Locate and Double-click on the Drive A: icon.
The Drive A: window will be displayed.
3. Using the menu, click on File,
New command and choose
Folder.
In the “Drive A:” window a
New Folder icon will be
displayed.
4. Type in the folder name (we
will call this one “Test Folder”) and press<Enter>.
The new folder has a name.
3.3 Shutting Down Window ’98
In Module 1 you learned the importance of shutting down Windows
correctly. If necessary please refer to Module 1. The method that you
learned in Module 1 was to use the key combination of <Alt> plus

CIT101 COMPUTERS IN SOCIETY
51
<F4>. You will end this lesson by shuttting down Windows 98 using an
alternative method.
SELF ASSESSMENT EXERCISE 2
Shutting Down Windows and your PC
What you do Comments/Prompts
1. Click the Start button
on the Taskbar
The standard Start menu is displayed.
Shut down
2. Select Shut Down from the start menu
The Shut Down Windows dialog box is displayed.
3. Ensure that Shut
Down is selected and
press <Enter>
After a few moments, a message
appears on your monitor, informing you
that is safe to turn off your
4.0 CONCLUSION
Many document files take the form of a formatted sequence of
characters.
5.0 SUMMARY
Document files that take form of formatted sequence of characters are
called text files because they consist of printable characters organised
into lines of text.
6.0 TUTOR-MARKED ASSIGNMENT
Explain how to create a new folder.

CIT101 COMPUTERS IN SOCIETY
52
7.0 REFERENCES/FURTHER READING
French, C. S. (2000). Computer Science (5th
ed.) Gosport, Hants:
Ashford Colour Press.

CIT101 COMPUTERS IN SOCIETY
53
UNIT 4 WORD PROCESSING
CONTENTS 1.0 Introduction
2.0 Objectives
3.0 Main Content
3.1 Introduction to Word Processing 3.1.1 Starting Word
3.1.2 Exiting from Word 3.2 Creating a New Blank Document and the Basics of
Entering Text 3.2.1 A New Blank Document
3.2.2 The Text Area
3.2.3 Using the <Enter> Key 3.3.4 Nonprinting Characters
4.0 Conclusion 5.0 Summary
6.0 Tutor-Marked Assignment 7.0 References/Further Reading
1.0 INTRODUCTION A word processing program allows the user to create, edit, format, store
and print text documents.
2.0 OBJECTIVES
At the end of this unit, you should be able to:
• use Microsoft Word 2000
• exit the Word 2000 program
• create a new blank document
• enter text
• identify nonprinting characters.
3.0 MAIN CONTENT
3.1 Introduction to Word Processing Word processing is the use of computers to create, revise, and save
documents for printing and future retrieval. You enter information into
the computer by using a keyboard. As you type, your words are
displayed on a monitor, or screen, and are stored in computer memory
rather than on paper.

CIT101 COMPUTERS IN SOCIETY
54
Because typing information is a separate task from printing it, word
processors enable you to change information easily without retyping
entire documents. For example, you can change margins, add and delete
text, move paragraphs, and correct spelling errors. All revisions are
made within the computer and are then saved on a disk and printed.
3.1.1 Starting Word
To use Word, you must load the program from the hard disk into the
computer’s memory. You can store your data files (documents) in a
folder on the hard drive, or on a floppy disk. In order to use Word, you
need to install Microsoft Windows 95, 98, Millennium Edition or NT
4.0 on your computer.
To start Word using the Start menu:
1. Turn on your computer
2. In the Taskbar, click on Start 3. Choose the Programs menu choice.
4. Click on the Microsoft Word menu choice to start the program.
If you have a shortcut set up for Word, you can start Word from the
shortcut by double-clicking on the Word shortcut icon.
SELF ASSESSMENT EXERCISE 1
Starting Word
Before you begin: Ensure that your computer is on and that Word 2000
has been correctly installed.
What you do Comments/Prompts
1. Click on the Start button on the displayed.
The Start menu is displayed.
2. Click on Programs on the
Start Menu
The Programs sub-menu is
displayed.
3. In the sub-menu click on
Microsoft Word.
Microsoft Word is launched.
4. Observe the on-screen Office Assistant. To show the Office
Assistant if it is currently
hidden choose: Help, Show the
Office Assistant
The Office Assistant is an animated online Help system that
provides Help topics and tips while
you work.
5. Click on the “Paperclip” (or
any alternate office assistant
symbol that has been set) to
close the text.

CIT101 COMPUTERS IN SOCIETY
55
6. If necessary, in the Office 2000 Registration Wizard dialog box
click on Register Later and
Exit.
To register at a later time.
7. To close the Office Assistant
Choose:
Help, Hide the Office
Assistant
To close the Office Assistant. You
can also hide the Office Assistant
by right clicking on it and choosing the Hide command.
3.1.2 Exiting from Word
To exit the Word 2000 program,
1. Click on File
2. Click on Exit
SELF ASSESSMENT EXERCISE 2
Exiting from Word
What you do Comments/Prompts
1. Click on File The File drop-down menu appears.
2. Click on Exit Microsoft Excel is closed.
Further Practice Exercise
1. Start Word 2000 again.
Hint: If you need help, refer to Exercise 7.
3.2 Creating a New Blank Document and the Basics of
Entering Text
Word is a WYSIWYG (what-you-see-is-what-you-get) word processor.
Depending on which view Word is in, the screen display will show you
how the text will look when you print the document.
3.2.1 A New Blank Document
At startup, Word provides you with a new unnamed document. You can
begin typing in that document, open an existing document, or create a
new one. To create a new document, click on the New Blank Document
button on the Standard toolbar or press <Ctrl> + N To create a new
document by using the menu, choose File, New and click on OK.

CIT101 COMPUTERS IN SOCIETY
56
3.2.2 The Text Area
Every document has a text area. As you type, characters are inserted in
the text area at the insertion point. To place the insertion point, position
the mouse pointer (whenever it appears as an I-beam) and click the
mouse button. Alternatively, you may make use of keyboard
combinations to move the cursor to the correct position.
3.2.3 Using the <Enter> Key
In word processing, you must not press the <Enter> key to each line of
text. When text does not fit on a line, it automatically flows to the
beginning of the next line. This is called word wrap.
However, you do use the <Enter> key to:
• end a short line (one that does not extend to the right margin);
• end a paragraph; or
• create a blank line.
3.2.4 Nonprinting Characters
Word can display a number of special symbols on the screen that
indicate each time you have pressed <Enter>, <Spacebar>, and
<Tab>, among others. These nonprinting characters are especially
useful when you are editing documents. To display these special
symbols, click on the Show/Hide button on the Standard toolbar.
Show/Hide button
SELF ASSESSMENT EXERCISE 4
Creating a New Documents, Entering Text, and Identifying
Nonprinting Characters
What you do Comments/Prompts
1. Move the mouse pointer over the first button on the
Standard toolbar.
Observe the Screen Tip.
(The Standard toolbar is the leftmost
toolbar or the top bar if the Standard
and Formatting toolbars are
displayed separately)
“New Blank Documents” is
displayed.
2. Click on the New Blank
Document button.
To create a new document.

CIT101 COMPUTERS IN SOCIETY
57
3. Observe the insertion point This is the blinking vertical bar that always appears on the first line in the
upper-left corner of a new document.
Its location determines where text or
other items will be entered into the
document.
4. Observe the mouse pointer The mouse pointer is usually an I-
beam when it is in the text area.
When moved outside the text area,
the mouse pointer becomes an arrow.
5. Type: Interoffice Memo To enter the characters at the insertion point.
6. Press: <Enter> To end the line.
7. Press: <Enter> again To create a blank line.
8. Type: To:
9. Observe the screen Each time you pressed Enter, Word
placed a paragraph mark ( ) in the
document. Each time you pressed the
Spacebar, Word placed a space mark
(.) in the document. These
nonprinting characters appear only
on the screen, not on the printed
document. If these are not currently
visible, then they have been hidden.
10. On the Standard toolbar,
click on the Show/Hide button
(This button might be displayed
on the standard docked toolbar.
Depending on your monitor size and
settings, the placement of buttons
will vary. If you cannot find a button
on the toolbar, it will be the docked
toolbar.) To hide the nonprinting
characters.
11. Observe the screen The nonprinting characters do not appear on the screen.
12. Display the nonprinting
characters.
(Click on the Show/Hide button).
4.0 CONCLUSION
A word processing program provides facilities to edit documents and
define their layout and enable them to be printed.

CIT101 COMPUTERS IN SOCIETY
58
5.0 SUMMARY
Word processing is the use of computers to create, revise and save
documents for printing and future retrieval.
6.0 TUTOR-MARKED ASSIGNMENT
Give examples of at least three tasks in which you would make use of a
word processing program.
7.0 REFERENCES/FURTHER READING
French, C. S. (2000). Computer Science (5th
ed.) Gosport, Hants:
Ashford Colour Press.

CIT101 COMPUTERS IN SOCIETY
59
UNIT 5 FURTHER WORD PROCESSING PROGRAM
FACILITIES CONTENTS
1.0 Introduction
2.0 Objectives
3.0 Main Content 3.1 Using the Tab Key
3.2 Using the Backspace Key 3.3 Autocomplete
3.4 Saving a File 3.4.1 The Save as Command
3.4.2 Naming a Document
3.4.3 The Save as Dialog Box 3.4.4 Closing a Document
4.0 Conclusion 5.0 Summary
6.0 Tutor-Marked Assignment 7.0 References/Further Reading
1.0 INTRODUCTION The advantages of word processing include the ability to:
• Store typed documents in the computer
• View the document on screen before printing
• Correct mistakes
• Insert or delete words
• Move sections of text to another part of the documents
• Incorporate other text without having to retype it
• Store documents on backing store for later recall
• Change layout of the document
• Print the document many times.
2.0 OBJECTIVES At the end of this unit, you should be able to:
• use tab key
• use some other facilities of Microsoft Word 2000.

CIT101 COMPUTERS IN SOCIETY
60
3.0 MAIN CONTENT
3.1 Using the Tab Key
Tabs make it easier to align text precisely. Pressing the Tab key inserts a
tab characters, moving the insertion point to the next tab stop. Tab stops
are preset at 1.27cm increments.
3.2 Using the Backspace Key
By pressing the Backspace key, you can delete the character or space
immediately to the left of the insertion point.
3.3 Autocomplete
As you type certain common words, dates, or names, Word will suggest
the complete word or phrase after you type the first few letters. This
feature is called AutoComplete. When the suggestion appears, you can
press <Enter> or <F3> to accept the suggestion, or just keep typing to
reject. For instance, when you are typing a letter and you do not know
exactly who will be reading it, you would normally type “To Whom it
May Concern”. Using AutoComplete, you can just type “To W’ and
press <F3>. Word will automatically finish the typing for you with type
“To Whom it May Concern.” You can also add your own AutoComplete
entries and delete them as needed.
SELF ASSESSMENT EXERCISE 1
Using Tab, Autocomplete, Backspace, and the Word-wrap Feature
while Entering Text
Before you begin: The insertion point should be at the end of the “To:”
line.
What you do Comments/Prompts
1. Press: <Tab> To insert a tab character, moving the
insertion point to the first default tab
stop, 1.27cm from the left margin.
Default tab stops are set at every 1.27cm 2. Observe the nonprinting
mark for <Tab>
Each time you press <Tab>, an arrow
is placed in the document.
3. Type: Johanna Burger
Press: <Enter>
To end the line and move the insertion
point to the next line.
4. Type: From: Press: <Tab>

CIT101 COMPUTERS IN SOCIETY
61
5. Type: Kathleen de Winter. Press: <Enter>
6. Type: Subj
Observe the text
The first four letters of the word
“Subject:” Sub jec t
Subj
Just above the text you typed is a box
with the word “Subject:” in it. This
ScreenTip is displayed because there
is an AutoComplete entry for the
word “Subject.”
7. Press: <Enter> The word “Subject” is completed
8. Press: <Tab>
Observe the tab stop
Because the word “Subject:” extends
beyond the 1.27cm mark, pressing
<Tab> moves the insertion point to
the next default tab stop at 2.54cm
9. Press: <Backspace>
nine times.
To remove the tab character and the
text “Subject:”.
10. Type: Re:
11. Press: <Tab> To move the insertion point to the
first default tab stop at 1.27cm
12. Type: Client Referral
13. Press: <Enter> twice
14. Type: I have a client
referral for you. The
gentleman is looking for a
house in your territory.
Please see me urgently for
more details. Observe the text
The words automatically flow to the
next line.
3.4 Saving a File
Before you save a document, it exists only in computer memory, a
temporary storage area. For permanent storage, a document must be
saved to some location, such as a hard drive or a floppy disk.
To save a document, you use either the File, Save As… or the File, Save
command.

CIT101 COMPUTERS IN SOCIETY
62
3.4.1 The Save as Command
The File, Save As… command enables you to:
• save a document for the first time;
• save a document with a new filename; and
• save a document in a different location (on another disk or in a
different folder).
To use the File, Save As… command choose File, Save As… to display
the Save As dialog box. In the Save In list box, select the appropriate
location (disk, drive, or folder). in the File Name text box, type the
name of the file. Click on Save.
When you save a file, Word adds the filename extension. DOC to
identify the file as a document file. You should avoid adding filename
extensions yourself.
3.4.2 Naming a Document
When you save a file for the first time, Word automatically assigns a
filename by using the first words of your document. You can accept this
default name or name it something different.
A filename should be descriptive so that you can remember the file’s
contents. A filename in Word can contain up to 255 characters, spaces,
and other punctuation. A file cannot contain any of the following
characters: ?”< >|. For example, a file cannot be A: Drive. (These
constraints are determined by the Windows operating system.)
3.4.3 The Save as Dialog Box
The Save As dialog box displays five folders on the left side of the
dialog box: History, My Documents, Desktop, Favorites, and Web
Folders. These folders make accessing previous documents and saving
new documents easier by enabling you to click on and open a folder
directly. To open one of these folders, click on the folder.
3.4.4 Closing a Document
When you have finished with a document, choose File, Close to close
the document window or double-click on the window’s Control-menu
icon.

CIT101 COMPUTERS IN SOCIETY
63
SELF ASSESSMENT EXERCISE 2
Saving a Document for the First Time and Closing a Document
What you do Comments/Prompts
1. Choose: File, Save As
To display the Save As dialog box.
2. The Save In list box should be set to drive
A:
If it is not set to Drive A:, please call your training adviser to assist you.
3. If necessary, select the text in the File name
text box. To do this,
click and drag the
mouse over the text
Interoffice Memo.
The text interoffice Memo is highlighted.
4. Type: My Memo To name the document My Memo.
5. Click on Save To save the file.
6. Observe the title bar It has changed to display the document’s
name, My Memo.
7. Choose: File, Close To close the document and remove it from memory.
4.0 CONCLUSION
Word processing has many advantages over using a typewriter.
5.0 SUMMARY
Here you learned how to use some of the facilities of Microsoft Word
2000. the knowledge you have gained here will be useful in the next units.
CIT101 COMPUTERS IN SOCIETY
64
6.0 TUTOR-MARKED ASSIGNMENT
Please create a new document in Microsoft Word 2000. Type the
following text taking care of use capital letters as well as bold, italics
and underline formats as found in the example.
“Word Processing is the use of computers to create, revise and save
documents for printing and future retrieval. You enter information into
the computer by using a keyboard. As you type, the words are displayed
on a monitor, or screen, and are stored in computer memory rather than
on paper. Therefore, a Word Processing program can be used on a daily
basis by school teachers to simplify tedious tasks.”
Save the file as Typing1. Close the file.
7.0 REFERENCES/FURTHER READING
French, C. S. (2000). Computer Science (5th
ed.) Gosport, Hants:
Ashford Colour Press.

CIT101 COMPUTERS IN SOCIETY
65
MODULE 3
Unit 1 Word Processing Continued
Unit 2 Copying a Text, Saving Changes to a Document and
Formatting Unit 3 Paragraph Formatting: The Spelling Checker and
Introduction to Printing of a Document
Unit 4 Spreadsheet Unit 5 Entering and Correcting Data
UNIT 1 WORD PROCESSING CONTINUED
CONTENTS
1.0 Introduction
2.0 Objectives 3.0 Main Content
3.1 Opening and Editing a Document 3.1.1 The File, Open Command
3.1.2 Editing a Document
3.2 Using Overtype Mode
3.3 Selecting Text
3.4 Deleting Text 3.5 Replacing Text
3.6 Moving and Copying Text 3.6.1 The Clipboard
3.6.2 Cutting and Pasting Text 4.0 Conclusion
5.0 Summary
6.0 Tutor-Marked Assignment 7.0 References/Further Reading
1.0 INTRODUCTION
Text files can be created and modified with the aid of a special
program called an editor. Many documents not requiring anything but a
very basic page layout are prepared this way.
2.0 OBJECTIVES At the end of this unit, you should be able to:
• use file and open documents
• edit a text a document

CIT101 COMPUTERS IN SOCIETY
66
• select a text
• delete a text
• replace a text
• move a text
• copy a text.
3.0 MAIN CONTENT
3.1 Opening and Editing a Document
3.1.1 The File, Open Command
The File, Open command places a copy of a file on disk into an active
document window. The Open dialog box lists all of the document files
on the current disk, in the current folder.
To open a listed file, either click on the filename in the File name list
box on Open, or double-click on the filename. A copy of the file is
placed in an active document window.
To make recently used documents more accessible, Word also tracks
documents that have been opened and places their names as choices at
the bottom of the File menu.
To open one of these listed files, choose File and click on the document
name.
3.1.2 Editing a Document
By default, Word is in insert mode; as you type, text to the right of the
insertion point is pushed to the right. To insert text, place the insertion
point where you want to add text and begin typing.
To place the insertion point, position the I-beam at the desired
location and click the mouse button.
3.2 Using Overtype Mode
Word gives you the option of turning off insert mode and turning on
overtype mode. Instead of pushing text to the right as you type, overtype
mode replaces existing text one character at a time.
You can turn on overtype mode by double-clicking on OVR on the
status bar or by pressing the <Insert> key on the keyboard. If you
accidentally turn on the overtype mode, you can double-click on OVR
or press the <Insert> key to turn it off.

CIT101 COMPUTERS IN SOCIETY
67
3.3 Selecting Text
Before you can delete, move, copy, or format text, you must select it.
Table 1 below details various techniques for selecting text.
Table 1
Selection method Technique
Drag Point at one end of the text to be selected.
Press and hold the mouse button. Move the
mouse to the other end of the text; this creates a
highlight (selection) between the two ends. Then
release the mouse button.
Select a word Point anywhere inside the word and double-
click the mouse button. The trailing space is
automatically selected along with the word.
Select a sentence Point anywhere inside the sentence. While
pressing <Ctrl>, click the mouse button. End
punctuation and trailing spaces are automatically
selected along with the sentence
3.4 Deleting Text
• To delete the character immediately to the right of the insertion
point, press the <Delete> key.
• To delete the character or space immediately to the left of the
insertion point, press the <Backspace> key.
• To delete selected text, select the text and press <Delete>.
• To delete an extra line (paragraph mark), you can place the
insertion point at the beginning of the line below the blank line
and press the <Backspace> key.
3.5 Replacing Text
There may be times you want to replace existing text with new text,
when it is just more efficient or retype text than it is to edit it. To do this,
select the text you want to replace and begin typing the new text.
SELF ASSESSMENT EXERCISE 1
Opening a Document and Inserting Text
What you do Comments/Prompts
1. Choose: File, Open… To display Open dialog box.
2. The Look in: list box
should be set to A:
If it is not, please ask your
training adviser for assistance.

CIT101 COMPUTERS IN SOCIETY
68
3. From the list of filenames, select My Memo
4. Click on Open To open the document
5. Point to the left of the h in
house located in the second
sentence of the body paragraph
The gentleman is looking for a house in
6. Click the mouse button To place the insertion point before “house.”
This is where the new text will
be inserted.
7. Type: large Existing text is pushed to the
right of the new text.
8. Press: <Spacebar> To insert a space between the
words “large” and “house”
9. Hold down the <Ctrl> key
and press the < End> Key.
To move the cursor to the end of
the document.
10. Press: <Enter> twice To end the paragraph and to insert a blank line before typing
the next paragraph.
11. Type: Joan Brown informs me that you have numerous
properties available in your
region at the moment
12. Press: <Enter>
SELF ASSESSMENT EXERCISE 2
Deleting Selected Text
What you do Comments/Prompts
1.
urgent located in the last
sentence of the first paragraph
2. Press and hold the mouse button.
3. Drag over the world urgent
and
then release the mouse button.
To select the text.
4. To delete the selected text.
SELF ASSESSMENT EXERCISE 3
Replacing Selected Text
What you do Comments/Prompts
1. The name is selected

CIT101 COMPUTERS IN SOCIETY
69
click
2. Type: Joe “Joe” replaces “Johanna.”
3. Select the word House.
4. Type: property To replace “house” with “property”
3.6Moving and Copying Text
After you have edited text, you might want to move or copy that text
to another part of the document. The Clipboard enables you to do that.
3.6.1 The Clipboard
The Windows environment provides a temporary storage area called
the Clipboard for those times when you move or copy text. When you
cut or copy selected text, it is placed on the Clipboard. Pasting inserts a
copy of the Clipboard contents at the insertion point. Entries remain on
the Clipboard until you cut or copy another entry to it or until you exit
Windows. If you have placed text or graphics on the Clipboard and you
exit Windows, the Clipboard content is erased.
3.6.2 Cutting and Pasting Text
To move text within a document, the following process applies:
1. Select the text to be moved.
2. Click on Cut button (or choose Edit, Cut or use <Ctrl + X)
3. Place the insertion point where you want the text to be placed.
4. Click on Paste button (or choose Edit, Paste or use <Ctrl + V)
SELF ASSESSMENT EXERCISE 4
Moving Selected Text
What you do Comment/Prompts
1. Select the entire paragraph that
begins Joan Brown informs
me and the blank line following it.
2. On the standard docked
toolbar, Click on the Cut button
Hint: (if you cannot see this
button, click on more buttons
button and select it from the
list of “more button”)
To remove the selected text
from the document and place it on
the Clipboard.
3. Place the insertion point at the

CIT101 COMPUTERS IN SOCIETY
70
beginning of the paragraph that begins with I have a client
referral
4. Click on Paste button To paste a copy of the
Clipboard contents at the insertion
point.
5. Save the file
4.0 CONCLUSION
An editor is a program used to create text files or make changes to
existing files.
5.0 SUMMARY
Basically you learned how to open and edit a document. You are now
also in a position to select, delete or replace text.
6.0 TUTOR-MARKED ASSIGNMENT
1. In this exercise, you will open the letter that was addressed to
Mr. and Mrs. Van Tonder. A similar letter needs to be addressed
to Mr. and Mrs. Padget-Brown concerning their son Charles.
Rather than retype the entire letter, simply make the necessary
changes.
Open the document Typing 2. Change the relevant address and
greetings as necessary. Print and then save the document as Typing 3.
2. Please set at exam paper using Microsoft Word. The subject
matter of the exam may be any of your choice. However, it is
necessary to comply with the following specifications:
• The name of the school should appear in capital letters in font
Times New Roman, size 14, centered at the top of the page.
• The subject, grade or form, total marks as well as the duration of
the exam should appear just below the heading at the top of the
page.
• A minimum of ten questions must appear in the exam paper.
• The value of each question must be indicated.
• Please include at least two multiple choice and two “fill in”
questions.

CIT101 COMPUTERS IN SOCIETY
71
3. Please type the following document exactly as it appears below.
The number in brackets shows the font size of the text.
Jss 3 Class List (14)
Name (14)
Surname
House
Peter (12)
Appleby
Red
Robbert Archer Blue
Simon Bester Blue
Arnie Cook Green
Jason De Winter Blue
Scott Heard Red
Anash Naidoo Red
David Munroe Green
Lucas Marosho Red
7.0 REFERENCES/FURTHER READING
French, C.S. (2000). Computer Science (5th
ed.) Gosport, Hants:
Ashford Colour Press.
CIT101 COMPUTERS IN SOCIETY
72
UNIT 2 COPYING A TEXT, SAVING CHANGES TO A
DOCUMENT AND FORMATTING
CONTENTS
1.0 Introduction
2.0 Objectives
3.0 Main Content 3.1 Copying Text
3.2 Saving Changes to a Document 3.3 Formatting Text
3.3.1 Character Formatting 4.0 Conclusion
5.0 Summary
6.0 Tutor-Marked Assignment 7.0 References/Further Reading
1.0 INTRODUCTION
Here we will consider more aspect of word processing.
2.0 OBJECTIVES
At the end of this unit, you should be able to:
• copy a text
• save changes to a document
• format a text.
3.0 MAIN CONTENT
3.1 Copying Text
To copy text within a document, the following process should be followed
1. Select the text to be copied.
2. Click on the Copy button (or choose Edit, Copy or use <Ctrl> +
C).
3. Place the insertion point where you want the text to be placed.
4. Click on the Paste button (or choose Edit, Paste or use <Ctrl> +
V).

CIT101 COMPUTERS IN SOCIETY
73
SELF ASSESSMENT EXERCISE 1
Copying Selected Text
What you do Comment/Prompts
1. Select the text Kathleen de
Winter
Kathleen de Winter
2. From the Standard toolbar,
click on the Copy button To place a copy of the
selected text on the Clipboard.
3. Press and hold down <Ctrl>
and press <End>
The insertion point will move to
the end of the document
4. Press: <Enter> three times
5. Click on the Paste button To paste a copy of the Clipboard
contents at the insertion point.
3.2 Saving Changes to a Document
To save a document with its current name, use the File, Save command.
You can access this command by clicking on the Save button on the
Standard toolbar, or by choosing File, Save. This command does not
enable you to rename the document or change its location. The File,
Save command updates the file on disk, replacing the original file with
the document in the active window.
Some general rules for saving a document are:
• Save at least once every 15 minutes.
• Save before printing
• Save before spell-checking.
SELF ASSESSMENT EXERCISE 2
Saving Changes to a Document
What you do Comment/Prompts
1. Observe the title bar at the top of the window
The document has already been named My Memo.
2. Click on the Save button
To save the document with the
same name in the same location.

CIT101 COMPUTERS IN SOCIETY
74
(Clicking on the save button is the
same as choosing File, Save.)
3.3 Formatting Text
It is possible to change the appearance and position of text by applying
various formatting options. On this course you will be introduced briefly
to two kinds of formatting namely, character and paragraph.
3.3.1 Character Formatting
Character formats – such as bold, italics, underlining, font face and font
size — can be used to emphasize a text in a document.
The Formatting toolbar, shown in Figure 1 below, has been designed
specifically for formatting. The more commonly used formats have been
assigned tools on this toolbar. If an option that you wish to set were not
available from the toolbar, you would have to make use of the Format,
Font… dialog box.
Font Bold Und erline
Font size Italic s
Figure 1: The Formatting Toolbar
You can use buttons on the Formatting toolbar to change the appearance
of all or part of a document quickly.
Formatting may be applied to:
1. Existing text
or 2. May be selected before entering text.
If you wish to apply formatting to a text that has already been
typed, select the text the appearance of which you would like to change,
and then click on the button of your choice. For example, to apply
boldface to existing text, select the text and then click on the Bold button.

CIT101 COMPUTERS IN SOCIETY
75
If you wish to apply formatting before typing, simply select the
formatting options that you wish to apply and then type the text. When
you no longer wish the format to apply, turn the formatting option off,
or change it to an alternative, whichever is applicable.
Some Formatting buttons are toggles, that is, the same button is used to
turn a formatting feature “on” and “off”. Examples of toggle buttons are
bold, italic and underline. To remove the formatting after it has been
applied, select the text, the formatting of which you would like to
remove, and click on the corresponding button on the Formatting
toolbar.
Some Formatting features, such as the Font and Font size options, are
not toggling buttons. These features require that some selection always
be made. In other words, you cannot turn the Font option “off”; you can
only change it to a different Font.
To apply formatting on a single word, place the insertion point in the
word and apply the formats.
Table 2 below includes among others a list of shortcut keys that may be
used for character formatting. Only the most frequently used formatting
options have been assigned shortcut keys. They are worth learning, as
typing speed is not compromised when applying formatting using this
method.
Table 2
Shortcut key combination Formatting result
<Ctrl> + B Bold
<Ctrl> + I Italic
<Ctrl> + U Underline
SELF ASSESSMENT EXERCISE 3
Using the Formatting Toolbar to apply and remove Character
Formats
Before you begin: The document My Memo should still be open on
your screen.
What you do Comment/Prompts
1. Select the word numerous in
the first paragraph of text.
2. Using the Formatting toolbar,
click on Italic button. If it is not
currently visible, look on I To apply the italic format to the

CIT101 COMPUTERS IN SOCIETY
76
the formatting docked toolbar. word “numerous”.
3. Select the text Client Referral
above the first paragraph
4. Using the Formatting toolbar,
click on the Underline button.
Observe the text
U To apply underline format to a
selected text.
5. Select the name Kathleen de
Winter at the bottom of the
document
6. Click on the Bold button B To apply the bold format to the selected text
7. Select the name Joe Burger The text is highlighted
8. On the Formatting toolbar,
Observe the Font drop-down
list
The font “Times New Roman” is
selected
9. From Font drop-down list,
select Arial (Remember, to
open or “expand” the box, you
must click on the down arrow).
To format the selected text with
the Arial font
10. Using the Formatting toolbar,
display the Font size
drop- down list and
observe the current font
size
The font size is set to 12.
11. Select: 14
The font size is reset to 14.
4.0 CONCLUSION
Copying texts, and saving changes to a document and formatting are
important in word processing.
CIT101 COMPUTERS IN SOCIETY
77
5.0 SUMMARY Copying a text required four processes. Here you also learned two kinds
of formatting: character and paragraph.
6.0 TUTOR-MARKED ASSIGNMENT Open the file Typing 1. Insert the text “around the world” in the last
sentence just after the word “teachers”. Insert the words “and or
repetitive” before the last word of the paragraph. The revised sentence
should read as follows: (changes have been underlined).
“Therefore, a Word Processing program can be used on a daily basis by
school teachers around the world to simplify tedious and/or repetitive
tasks”
Save and close the file.
7.0 REFERENCES/FURTHER READING French, C.S. (2000). Computer Science (5
th ed.). Gosport Hants:
Ashford Colour Press.

CIT101 COMPUTERS IN SOCIETY
78
UNIT 3 PARAGRAPH FORMATTING: THE SPELLING
CHECKER AND INTRODUCTION TO
PRINTING A DOCUMENT
CONTENTS
1.0 Introduction
2.0 Objectives
3.0 Main Content 3.1 Paragraph Formatting
3.2 The Spelling Checker 3.3 Introduction to Printing a Document
4.0 Conclusion
5.0 Summary 6.0 Tutor-Marked Assignment
7.0 References/Further Reading
1.0 INTRODUCTION
You need to pay much attention to paragraph formatting and printing of
documents.
2.0 OBJECTIVES
At the end of this unit, you should be able to:
• select the paragraph
• apply the format
• check selected text
• print a document.
3.0 MAIN CONTENT
3.1 Paragraph Formatting
Paragraph formatting, such as alignment, indents, and tabs can be used
to affect the appearance of your document. To apply a paragraph format,
you select the paragraph and apply the format. However, you can select
the paragraph by just placing the insertion point in the paragraph, or by
selecting any amount of text in the paragraph. The formats you apply
will affect the entire paragraph.
Paragraph alignment may be applied before typing a paragraph or after
the paragraph has been typed. Paragraph alignment determines how text
is positioned between the left and right indents. There are four alignment
options.

CIT101 COMPUTERS IN SOCIETY
79
1. Left Alignment
Align Left:
Lines of text are aligned along the left indent. The text along the right
side of the paragraph appears ragged. Left aligned is the default
paragraph-alignment setting.
2. Center Alignment
Center: Lines of text are aligned between the indents. Both the left and right
sides of the paragraph appear ragged.
3. Right Alignment
Align Right
Lines of text are aligned along the right indent. The left and right indents
are even with the left margins by default. If you apply paragraph
alignment to a selected paragraph, the text will appear to align (left,
center, right and justified) with the margins. The text along the left side
of the paragraph appears ragged.
4. Justified
Justify: Lines of text are aligned along both the left and right indents. Word
adjusts the spacing between words so that they stretch from left indent to
right indent. When the last line of a justified paragraph is short,
however, it will not be stretched out.
Various methods are available by which you can apply paragraph
alignment. in this course you will be introduced to one of the most
common methods used in applying alignment, namely, selecting one of
the alignment buttons on the Formatting toolbar. Table 3.1 on page 21
illustrates these buttons.
Table 3.1
Alignment Button
Justify
Right
Left
Center

CIT101 COMPUTERS IN SOCIETY
80
SELF ASSESSMENT EXERCISE 3
Using Paragraph Alignments
Before you begin: The document My Memo should still be open on
your screen.
What you do Comment/Prompts
1. Place the insertion point in the
last paragraph of the document
“I have a client referral for you…”
2. On the Formatting toolbar,
observe the Alignment buttons
3. Click on the Center alignment
Button
To center each line of the selected
paragraph between the left and
right indents.
4. Click on the Right alignment
Button
To right align the paragraph
5. Click on the Left alignment
button
The paragraph is left aligned.
6. Click on the Justify alignment button
The paragraph is justified.
7. Select the first paragraph of text The paragraph is once again
centered
8. Click on the Justify alignment
button The paragraph is justified
9. Select File, Save
10.Select File, Close
3.2 The Spelling Checker
No matter how carefully you type or proofread a document, errors
inevitably creep into documents. Word 2000 has provided certain proof
reaching tools to help eliminate such as errors from your final document.
One of these is the Spell Checker.
Although a spelling checker is not a substitute for proofreading, you
can use this feature to help you create and edit your documents.
Word checks each word in a document against its dictionaries, then
highlights those words that it does not recognize. The spelling checker
also checks

CIT101 COMPUTERS IN SOCIETY
81
for such common typing mistakes as repeated words such as (“the the”)
and, in conjunction with the AutoCorrect feature, it checks for such
error as irregular capitalization (“the”).
To check selected text, make the selection and click on the Spelling and
Grammar button located on the Standard toolbar. To check an entire
document, deselect any selected text, and place the insertion point at the
top of the document before clicking on the Spelling and Grammar
button.
When the spelling checker highlights a possible error, a list of suggested
words may appear in the Suggestions list box, depending on whether the
dictionary contains a word that is similarly spelled or not The first word
in the suggestion list is automatically selected. If Word’s dictionaries
do not recognize the highlighted word or if it has irregular
capitalization, then you can choose from the following spelling options:
• Correct the spelling. If the correction that you want is
highlighted in the Suggestions text box, click on Change. If the
correction that you want is in the Suggestions list box but not
highlighted, click on that word and click on Change. If the
correction that you want is not suggested, type the correction in
the top text box and click on Change. To automatically change
all occurrences of the word throughout the document, click on
Change All.
• Leave the word unchanged. If you want to leave the word as it
is and continue the spell check, click on Ignore. To automatically
ignore all further occurrences of the word, click on Ignore All.
• Add the word to a dictionary. If you want to add the word to a
custom dictionary, click on Add.
• Stop the spell-check procedure. If you want to cancel the spell-
check procedure at any point, click on Cancel. All changes made
up to that point will be preserved. If you used the Change All or
Delete All options, some instances of those words might not be
changed or deleted.
• Add the word to the AutoCorrect list. You can add a mis-
spelled word and its correct spelling to the AutoCorrect list by
clicking on the AutoCorrect button.
If the error is that of repeated words, you can click on Delete to delete
the second instance of the word.
CIT101 COMPUTERS IN SOCIETY
82
What you do Comments/Prompts
1. Open: Spelling
Hint: File, Open
The file Spelling appears on your
screen
2. Select Tools, Options… on the
menu bar at the top of the
screen
To verify that certain options have been deselected.
3. Please ensure that the following
checkboxes have been
deselected (turned off)
Check spelling as you type
Check grammar as you type
Check grammar with spelling
For this particular exercise we do
not want these features activated
automatically.
4. Click on OK
5. Make sure that the insertion
point is at the top of the
document
The Spelling and Grammar dialog box is displayed.
Click on the Spelling and
Grammar button
7. Observe the dialog box The first unrecognized word in the
Document for example“rright,” is
automatically highlighted.
NB: Always check that the correct
word has been selected in the Suggestions box before clicking on
Change.
8. Click on: Change The wrongly spelled word“rright” is changed to “right”. The
next unrecognized word in the
document “douts” is highlighted. 9. Ensure that “douts” has been
selected in the list of suggested
words then click on: Change
“douts” is changed to “douts The next unrecognized word in the
document “confidence” is
highlighted.
The Automatic Spell Check feature informs you of spelling errors as
you type. It can be enabled or disabled by choosing Tools, Options…
and selecting the Spelling & Grammar tab. Then, under Spelling,
select Check spelling As You Type. When you mis-spell a word, it will
be underlined in red. To correct the spelling, right-click on the word to
display a shortcut menu with alternate spelling suggestions and select
the correctly spelled word.
SELF ASSESSMENT EXERCISE 4
Checking the Spelling of an Entire Document
6.

CIT101 COMPUTERS IN SOCIETY
83
10. Ensure that “confidence” has been selected in the list of
suggested words the click on:
Change
“confidence” is changed to “confidence”. The next
unrecognized word in the
document “diminished” is
highlighted.
11. Ensure that “diminished” has
been selected in the list of
suggested words then click on:
Change
“diminished” is changed to
“diminished”. The next
unrecognized word in the
document “psychologists” is
highlighted.
12. Ensure that “psychologists” has been selected in the list of
suggested words then click on:
Change
“psychologists” is changed to “psychologists”. The next possible
error in the document “of’ is
highlighted
13. Observe the dialog box Although “of’ is not mis-spelled, it
has been typed twice. (repeated)
14. Click on Delete To delete the second “of’ and to
have the Spelling and Grammar
check continue.
15. Please continue with the spell
check until all correction have
been made. Please note: The word
“Midpower” will be shown as
unknown. It is in fact correct. Please select Ignore when this
word appears in the dialog box.
16. Click on OK To close the message box that
reads, “The spelling check is
complete.”
3.3 Introduction to Printing a Document
The final step in the production of a document is printing. Learning
about finer print details does not lie within the scope of this course and
will be dealt with on program specific course. We will therefore
concentrate on the basic principles of printing only.
To print the document in the above window environment, the following
process must be followed:
1. Choose File, Print (or press <Ctrl> + P). This display the Print
dialog box see figure 3 below.

CIT101 COMPUTERS IN SOCIETY
84
Figure 3: The Print dialog box
2. If you have access to more than one printer from your computer,
select the correct printer in the printer Name box.
3. Select what you want to print in the Page range (By default, the
entire document is printed, but you can choose to print the current page, multiple pages, or selected text.)
4. Select how many copies you wish to print.
5. Click on the Options button to locate additional print settings if
required. 6. Click on OK to start the printing process.
Or
Click on Cancel to close the dialog box and return to the document
without printing.
The Print button on the Standard docked toolbar sends the document
directly to the printer, bypassing the Print dialog box. Therefore, the
default settings will be used.
Print Button
SELF ASSESSMENT EXERCISE 5
Printing the Finished Document
What you do Comments/Prompts
1. Open: My Memo
2. Choose: File, Print… To display the print dialog box
3. Examine the print options in
the dialog box
4. Click on Cancel To cancel the print command and

CIT101 COMPUTERS IN SOCIETY
85
close the print dialog box. (Or click on OK to print the document)
5. Select File, Exit to exit Word
2000
4.0 CONCLUSION
Word adjusts the spacing between words so that they stretch from left
indent to right indent.
5.0 SUMMARY
Although a spelling checker is no substitute for proofreading, spelling
checker could be used to create and edit documents.
6.0 TUTOR-MARKED ASSIGNMENT
Type a letter to the parents of students of Slugger Van Tonder under the
following institutions:
• The letter is to be typed in Times Roman Font at a font size of 12,
• The address of Mr. and Mrs. Van Tonder as well as the current
date, should be aligned to the right of the document.
• The greeting is to be followed by a suitable heading, which is to
be underlined and centered across the page.
• The body of the letter should assist a minimum of two paragraphs
of the text. The alignment of this text should be justified.
• Your name at the conclusion of the letter should be typed in
capital letters with bold and italics applied.
Spell check the letter, taking care to correct all spelling errors.
If you have access to a printer, please print the completed letter.
Save the document as Typing. Close the file.
7.0 REFERENCES/FURTHER READING
French, C.S. (2000). Computer Science (5th
ed.). Gosport Hants: Ashford
Colour Press.

CIT101 COMPUTERS IN SOCIETY
86
UNIT 4 SPREADSHEET
CONTENTS
1.0 Introduction
2.0 Objectives 3.0 Main Content
3.1 Definition of a Spreadsheet 3.2 The Paper Spreadsheet
3.3 The Excel Program
3.3.1 Starting (Launching) Excel 3.4 The Workbook Environment
3.4.1 The Excel Workbook Structure 4.0 Conclusion
5.0 Summary 6.0 Tutor-Marked Assignment
7.0 References/Further Reading
1.0 INTRODUCTION
A spreadsheet comprises a grid of numbered rows and lettered column
intersecting in cells. A cell can contain either text or numbered values.
2.0 OBJECTIVES
At the end of this unit, you should be able to:
• define a spreadsheet
• discover some of the features and limitations of a paper
spreadsheet
• start Excel
• identify the features of a workbook.
3.0 MAIN CONTENT
3.1 Definition of a Spreadsheet
Before we compare the paper spreadsheet with the electronic
spreadsheet, it is important to clarify exactly what is meant by the
spreadsheet.
A spreadsheet consists of information written in tabular form; a other
words, rows and/or columns of figures and/or text. A series of data
depicted horizontally is called a “row” while a series of data depicted
vertically is called a “column”. These data may consist of text, “raw”
numbers or of calculated results. The primary objective for example of a
spreadsheet is to keep a record of numerical information.

CIT101 COMPUTERS IN SOCIETY
87
3.2 The Paper Spreadsheet In order to appreciate the Excel software program, it is helpful to
understand the limitations of a “paper spreadsheet”. By “paper
spreadsheet” we mean a non-electronic spreadsheet that has either been
hand-written or typed.
Working with a paper spreadsheet can be complicated and time
consuming. Information that changes must be erased and rewritten,
causing computations to be incorrect until they are redone. If any raw
number changes, calculations dependent on that number have to be
re-calculated. Failure to do so will result in incorrect answers. This
causes a domino effect; in other words, if information at the top of the
spreadsheet needs to be recalculated, all subsequent calculations which
are related to the initial calculation, would need to be recalculated.
For example, an incorrect entry in a chequebook can throw off a running
balance; when the error is found, a significant number of computations
may need to be redone to arrive at the correct current balance.
Paper spreadsheets have limited functionality because they are static. In
other words their practical application is limited because of its
inflexibility. Soon you will see that “electronic spreadsheets” do not
have this limitation.
Figure 4.1 is an example of a paper statement. In Exercise 11, you will
examine the various elements of the paper spreadsheet.
Personal Budget for the First Quarter
Monthly income (Net) ........... >
R 1.475.00
Quarter
Rent
January 600.00
February 600.00
March 600.00
Totals R1.800.00
Telephone 48.25 43.50 42.10 R 133.85
Utilities 67.27 75.92 62.89 R 206.08
Charge Cards 200.00 110.00 70.00 R 380.00
Heating Oil 125.52 150.57 50.32 R 326.41
Auto Insurance 150.00 — — R 150.00
Cable TV 30.25 30.25 30.25 9075
Monthly Totals: R 1,221.29 R 1.010.24 R 855.56
Balance: R 253.71 R 464.76 R 619.44
Figure 4.1: A sample of paper spreadsheet.

CIT101 COMPUTERS IN SOCIETY
88
SELF ASSESSMENT EXERCISE 1
Examine a Paper Spreadsheet
Objective: To discover some of the features and limitations of a paper
spreadsheet.
What you do Comments/Prompts
1. Look at Figure 4.1 It illustrates a typical paper
spreadsheet
2. Observe how the information is
Arranged
It is laid out in columns and rows.
3. Look at the entries in the
Spreadsheet
The spreadsheet contain text,
straight or “raw” numbers, and
numbers that are the result of computations.
4. Look at the calculated values in
the Quarter Totals column and
the Monthly Totals and Balance
rows at the bottom of the
spreadsheet.
If you change any of the numbers
that contribute to these calculated
values, the totals will have to be
recalculated. This is one of the
limitations of using paper
spreadsheet.
5. Notice the appearance of the
Totals
The computations in Quarter
Totals and Monthly Totals include
rand signs to signify currency
6. Observe the column widths Some columns are wider than others are.
Further Practice Exercise
1. In Figure 4.1, cross out the current amount for the January telephone
bill and change it to 55.
2. Circle the number that must be recalculated because of this change.
3.3 The Excel Program
Excel is a software application that provides an “electronic spreadsheet,”
or worksheet environment. Excel’s worksheet is an electronic
replacement for traditional planning tools: the pencil and eraser, the
accountant’s ledger sheet and the calculator.
An Excel file, called workbook, can contain worksheets. Excel can be
used to manage numbers and calculations. You may use Excel for
purposes such as the setting up of profit and loss statements, cash flow
forecasts, sales reports, product lists inventories, budgeting, project
planning etc.

CIT101 COMPUTERS IN SOCIETY
89
Unlike the paper spreadsheet, you can set up an Excel workbook as a
responsive and dynamic work environment; you can create formulas in
Excel that will get automatically update when you change your data.
3.3.1 Starting (Launching) Excel
To start Excel:
1. Turn on your computer
2. Click on the Windows Start button to access the start menu
3. Choose Programs, Microsoft Excel.
SELF ASSESSMENT EXERCISE 2
Starting Excel
Before you begin: Ensure that the computer has been turned on, and that
the Windows desktop is displayed.
Objective: To Start Excel and to Exit from Excel
What you do Comments/Prompts
1. Click on the Start button on
the Taskbar
The Start menu is displayed.
2. Click on Programs on the Start menu.
The Programs sub-menu is displayed.
3. In the sub-menu click on
Microsoft Excel
Microsoft Excel is launched. Next
you will exit from Excel
4. Click on File The File drop-down menu appears.
5. Click on Exit Microsoft Excel is closed.
Further Practice Exercise
1. Start Excel again.
Hint: If you need help, refer to Exercise 12.
2. Exit from Excel.
Hint: If you need help, refer to Exercise 12.
3.4 The Workbook Environment
The Excel worksheet consists of various elements. In order for you to be
able to capture and manipulate data, it is necessary to be familiar with
certain elements found in the worksheet as well as with some of the
terminology associated with spreadsheets.

CIT101 COMPUTERS IN SOCIETY
90
3.4.1 The Excel Workbook Structure
The workbook window displays the workbook – an Excel file in which
you can work and store your data. A workbook is made up of
worksheets. Different types of sheets may appear in a workbook.
The components of the workbook window are the workbook itself, scroll
bars, sheet tabs, and stab crolling buttons.
• Workbook: The default Excel workbook contains 3 worksheet
names Sheet1 sheet2 Sheet3. The sheet names appear on tabs at
the bottom of the workbook. A new Excel workbook file can
contain up to 255 separate worksheets. The Excel worksheet is a
grid of 256 columns by 65,536 rows. Columns are designated by
letter running down across the top of the worksheet, and rows are
designated by numbers running down the left border of the
worksheet. Column headings begin with letter “A” and continue
through the letter “Z.” After the 26th column (Column Z),
headings become double letters, From “AA” to “IV”. Row
headings begin with number 1 and continue through the number
65536.
• Cells: the intersection of a column and a row. Cells are typically
referred to by their column and row location. For instance,
column A, row 1 is cell A1. You enter data (text or numbers)
directly into any cell that is active. A thick, dark border
distinguishes the active cell.
• Formula bar: a bar located near the top of the window that
displays the constant value or formula used in the active cell.
• Scroll bars: to the right of and below the worksheet grid. Use
the scroll bars to display different areas of the active worksheet.
• Sheet tabs: at the bottom of the workbook. You can click on the
sheet tabs to move from one sheet to another in a workbook.
• Tab scrolling buttons: to the left of the sheet tabs. You can
click on the tab scrolling buttons to scroll the display of sheet
tabs one at a time, or to display the first or last grouping of sheet
tabs within a workbook.
The other parts that complete the full Excel screen are the standard
elements associated with a “Window”, for example, a title bar, a menu
bar, a toolbar, etc. You have already been introduced to these elements
in Module 2 of this course. Detailed explanations of these elements may
be found in Module 2.
CIT101 COMPUTERS IN SOCIETY
91
SELF ASSESSMENT EXERCISE 3
Identifying the Features of a Workbook
What you do Comments/Prompts
1. Start Excel
2. Observe the workbook and its tabbed worksheets
It is like a stack of paper spreadsheets. The tabs would
enable you to move from one
worksheet to another. There are 3
sheets in workbook, and you can
add more to have as many as 255
sheets in a single workbook.
3. Observe the top portion of the screen.
At the very top of the window is the Excel title bar. Just below it is
the menu bar followed by the two
toolbars arranged in a single row,
and then formula bar.
4. Observe the column headings Located at the top of the
worksheet, column headings label
the columns with the letters “A” to
“IV”. A column extends down
through all of the rows.
5. Observe the row headings Located on the left side of the worksheet, row headings number
the rows from 1 to 65536 and
extend through all of the columns
6. Examine a cell A cell is the intersection of a
column and a row. Cells are named
by their column and row locations; for example, A1, C12, or IV65536.
7. Look for the active cell A bold border surrounds the active
cell. When a new worksheet is
created, the active cell is cell A1.
8. Notice the cell reference area
in (Hint. The formula bar is
located just above the column
heading).
On the far-left side of the formula
bar, the reference area identifies
the current or active cell.
4.0 CONCLUSION
You have examined the various elements of the paper spreadsheet.
Moreover, you can start Excel and exit from Excel and identify the
features of a workbook.

CIT101 COMPUTERS IN SOCIETY
92
5.0 SUMMARY
Spreadsheet packages provide a wide range of facilities for creating and
manipulating formulated tables and charts of values.
6.0 TUTOR-MARKED ASSIGNMENT
Please create the spreadsheet below taking special note of the following:
• The label in cell A1 is set to font size 12. All remaining data is
set to 10
• Ensure that column A is wide enough to accommodate the label
in cell A11 and that column F is set to accommodate the text in
cell F4.
• The labels in the range B4: F4 are right aligned
• Ensure that bold is applied where necessary
Save the workbook as Spreadsheet1. Close the file.
7.0 REFERENCES/FURTHER READING
Ayo, S.K. (1998). Computer Literacy Operating System and Application
(2nd
ed.). Mckay Consult.

CIT101 COMPUTERS IN SOCIETY
93
UNIT 5 ENTERING AND CORRECTING DATA
CONTENTS 1.0 Introduction
2.0 Objectives 3.0 Main Content
3.1 Entering and Correcting Data
3.1.1 Suggested Steps for Creating a Worksheet
3.1.2 Entering Data
3.2 Replacing Cell Contents 3.3 Changing Entries as you Type
3.4 Entering Numbers 3.5 Saving a File
3.5.1 The File, Save and the File, Save as… Commands
4.0 Conclusion 5.0 Summary
6.0 Tutor-Marked Assignment 7.0 References/Further Reading
1.0 INTRODUCTION You will learn here how to enter data into Excel
worksheet.
2.0 OBJECTIVES At the end of this unit, you should be able to:
• create your own workbook in Excel
• replace text in a cell
• correct an entry before entering it
• enter numbers.
3.0 MAIN CONTENT
3.1 Entering and Correcting Data
3.1.1 Suggested Steps for Creating a Worksheet
First, Review your objectives for creating a worksheet and the type of
information you want to include. Get some idea of how you want the
worksheet to like. For example, do you want the months to appear
across a row or down a column?

CIT101 COMPUTERS IN SOCIETY
94
You might find it helpful to sketch a draft of your objectives on a piece
of paper to create the structure before you begin typing data. When you
are entering data in an Excel worksheet, the following order is being
suggested:
1. Type the text information to create a structure.
2. Type the numbers
3. Add the formulas, copying where possible 4. Add a title to the top of the worksheet
5. Format the text, numbers, and formulas.
3.1.2 Entering Data
To create your own workbook in Excel, you will need to enter data. To
enter data:
1. Select, or activate, the cell in which you want to display the data;
use the mouse pointer to point to a cell and then click to select it
or use the arrow movement keys on your keyboard to select a
cell.
2. Type the data. 3. Enter the data into the cell by using any of these techniques:
• press the <Enter> key;
• click on the <Enter> button in the formula bar (the boxed
checkmark);
• or press any of the keyboard movement keys, such as <Right
Arrow> or <Tab>.
Worksheet cells can contain constant values (text or numbers) or
formulas. In a worksheet, text is used to organize and identify the
numerical information. By default, text is left aligned in the cell.
Figure 5.1: An example of text and number entered in a worksheet

CIT101 COMPUTERS IN SOCIETY
95
SELF ASSESSMENT EXERCISE 1
Entering Text
What you do Comments/Prompts
1. Look at the mode indicator (Located in the left corner of the
status bar). The mode is Ready.
2. Place the mouse pointer on Cell
A2.
The mouse pointer becomes a
cross. You click on a cell to select
it.
3. Type: Months Do not press <Enter>
The word appears both in the
formula bar and in the cell, but it is
not yet entered.
4. Note the Cancel, Enter, and Edit Formula buttons
=
Located in the formula bar. They
are used for data entry with the
mouse.
5. Press: <Enter> To enter the text and move down
one cell. Cell A3 is now the active,
or selected cell. The mode
indicator returns to Ready.
6. Select cell B2 You can either click on the cell or
use the Right Arrow and Up Arrow
keys on your keyboard to select
cell B2.
7. Type: Sales Press: <Enter>
To enter the text into cell B2
Further Practice Exercise
1. Enter the following information in cell listed:
In cell C2, enter Expenses
In cell D2, enter Totals
CIT101 COMPUTERS IN SOCIETY
96
3.2 Replacing Cell Contents
One method you can use to correct an item after it is entered into a cell
is to retype the entry and press <Enter> again. The new entry replaces
the old entry.
SELF ASSESSMENT EXERCISE 2
Replacing Text in a Cell
What you do Comments/Prompts
1. Select cell D2
2. Type: Profits The new text is displayed in the formula
bar and in the cell.
3. Press: <Enter> The word “Profit” replaces the word
“Total”, and the active cell moves to cell D3.
3.3 Changing Entries as you Type
To change an entry before it is entered into a cell:
• Press <Backspace> to delete individual characters.
• Press <Esc> or click on the Cancel button (the X in the formula
bar) to clear the entire entry.
SELF ASSESSMENT EXERCISE 3
Correcting an Entry Before Entering it
What you do Comments/Prompts
1. Select cell A4
Type: January
Do not press <Enter>
2. Press: <Esc> The text in the formula bar and in
cell A4 is erased.
3. Select cell A3
4. Type: January
Do not press <Enter>
5. Press: <Backspace> 4 times To erase the letters “uary.”
6. Press: <Enter> The text “Jan” is entered into cell
A3 and the active cell is now A4.
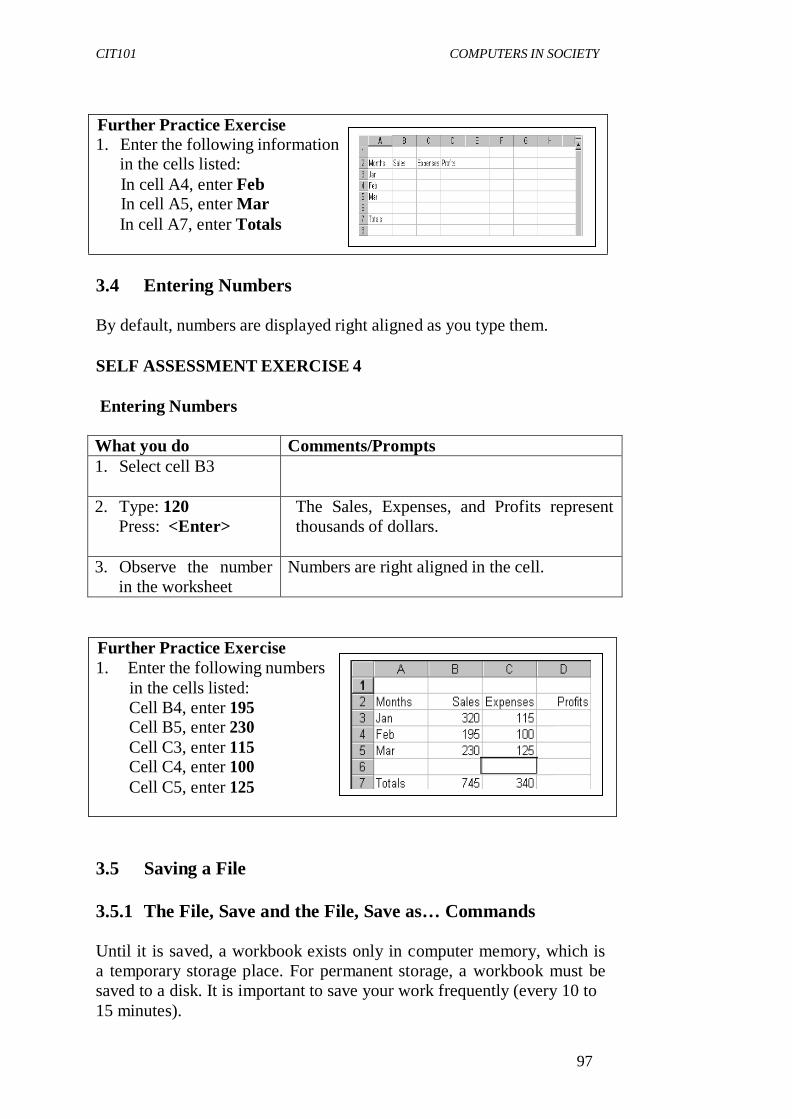
CIT101 COMPUTERS IN SOCIETY
97
Further Practice Exercise 1. Enter the following information
in the cells listed:
In cell A4, enter Feb In cell A5, enter Mar
In cell A7, enter Totals
3.4 Entering Numbers
By default, numbers are displayed right aligned as you type them.
SELF ASSESSMENT EXERCISE 4
Entering Numbers
What you do Comments/Prompts
1. Select cell B3
2. Type: 120
Press: <Enter>
The Sales, Expenses, and Profits represent
thousands of dollars.
3. Observe the number
in the worksheet
Numbers are right aligned in the cell.
Further Practice Exercise
1. Enter the following numbers
in the cells listed:
Cell B4, enter 195 Cell B5, enter 230
Cell C3, enter 115 Cell C4, enter 100
Cell C5, enter 125
3.5 Saving a File
3.5.1 The File, Save and the File, Save as… Commands
Until it is saved, a workbook exists only in computer memory, which is
a temporary storage place. For permanent storage, a workbook must be
saved to a disk. It is important to save your work frequently (every 10 to
15 minutes).
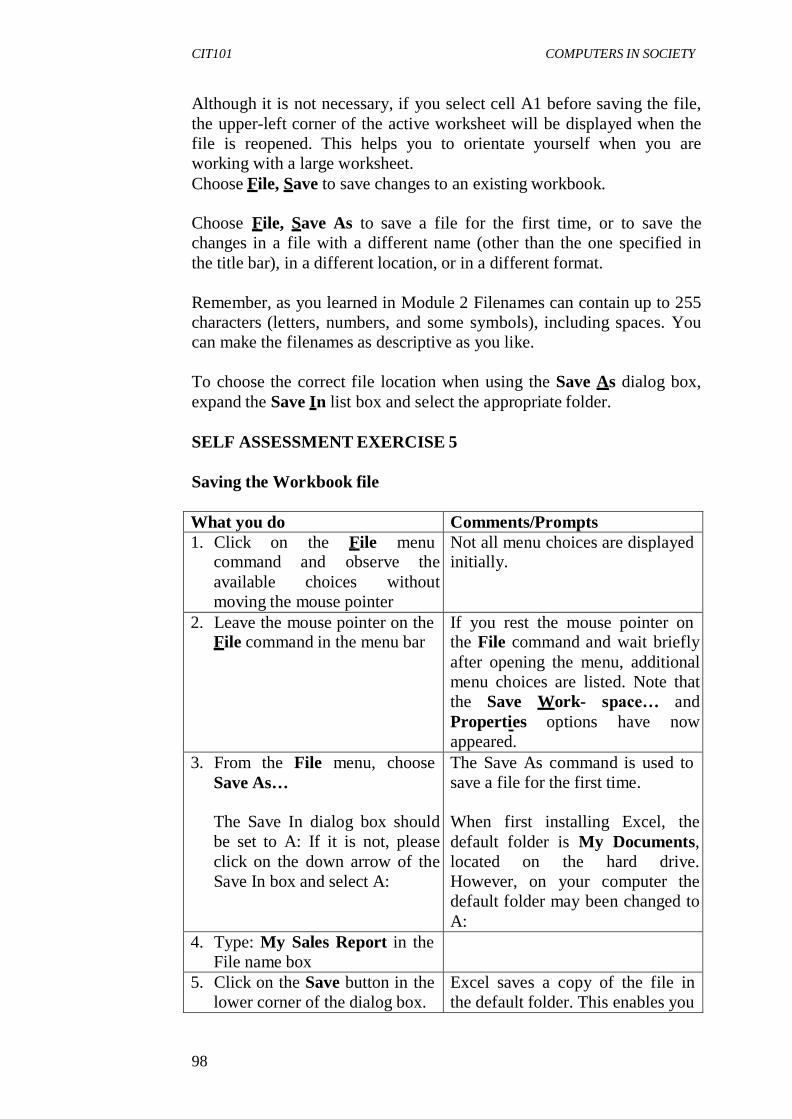
CIT101 COMPUTERS IN SOCIETY
98
Although it is not necessary, if you select cell A1 before saving the file,
the upper-left corner of the active worksheet will be displayed when the
file is reopened. This helps you to orientate yourself when you are
working with a large worksheet.
Choose File, Save to save changes to an existing workbook.
Choose File, Save As to save a file for the first time, or to save the
changes in a file with a different name (other than the one specified in
the title bar), in a different location, or in a different format.
Remember, as you learned in Module 2 Filenames can contain up to 255
characters (letters, numbers, and some symbols), including spaces. You
can make the filenames as descriptive as you like.
To choose the correct file location when using the Save As dialog box,
expand the Save In list box and select the appropriate folder.
SELF ASSESSMENT EXERCISE 5
Saving the Workbook file
What you do Comments/Prompts
1. Click on the File menu command and observe the
available choices without
moving the mouse pointer
Not all menu choices are displayed initially.
2. Leave the mouse pointer on the File command in the menu bar
If you rest the mouse pointer on the File command and wait briefly
after opening the menu, additional
menu choices are listed. Note that
the Save Work- space… and
Properties options have now
appeared.
3. From the File menu, choose
Save As…
The Save In dialog box should
be set to A: If it is not, please
click on the down arrow of the
Save In box and select A:
The Save As command is used to
save a file for the first time.
When first installing Excel, the
default folder is My Documents,
located on the hard drive.
However, on your computer the
default folder may been changed to
A:
4. Type: My Sales Report in the
File name box
5. Click on the Save button in the
lower corner of the dialog box.
Excel saves a copy of the file in
the default folder. This enables you

CIT101 COMPUTERS IN SOCIETY
99
to continue working with same file.
6. Observe the title bar (at the top
of the window)
The file’s new name, My Sales
Report, is displayed.
4.0 CONCLUSION
Worksheet cells can contain constant values or formulas.
5.0 SUMMARY
Creating a worksheet involves steps. In fact entering data, entering text,
replacing text in a cell etc. also involve steps which you need to follow.
6.0 TUTOR-MARKED ASSIGNMENT
Create the spreadsheet below taking special note of the following using
Microsoft Excel.
Open the file Spreadsheet 1
Create a formula in cell E5 to calculate the total marks obtained by
Appleby, P. (The correct answer is 225). Enter similar formulas to
obtain totals for the remaining pupils.
If F5 enter a formula to calculate the average mark obtained by Appleby,
P. (The correct answer is 75). Enter similar formulas to obtain the
average mark of each of the remaining pupils.
Enter formulas in the range B11:F11 to complete the set spreadsheet. If
you have a printer, please print the spreadsheet. Save and close the file.
7.0 REFERENCES/FURTHER READING
Ayo, S.K. (1998). Computer Literacy, Operating System and
Application (2nd
ed.). McKay Consult.

CIT101 COMPUTERS IN SOCIETY
100
MODULE 4
Unit 1 Using Formulas
Unit 2 Spreadsheets: Numeric Formats
Unit 3 Creating Charts Unit 4 Charts from Non-adjacent Data, Embedded Charts and
Chart Links Unit 5 Chart Types
UNIT 1 USING FORMULAS
CONTENTS
1.0 Introduction
2.0 Objectives
3.0 Main Content
3.1 Using Formulas 3.1.1 Mathematical Operators
3.2 Clearing Cell Contents 3.3 Using Undo
3.4 File Handling Techniques
3.4.1 Closing Files
3.4.2 Creating a New Workbook
3.5 Formatting a Worksheet 3.5.1 Working with Ranges
3.5.2 Using Toolbar Buttons to Format a Worksheet 3.5.3 Adding Border and Colour to Cells
4.0 Conclusion 5.0 Summary
6.0 Tutor-Marked Assignment
7.0 References/Further Reading
1.0 INTRODUCTION
Here you will learn how to enter formulas, clear contents of a cell and
use the UNDO button. You will be able to change text appearance.
2.0 OBJECTIVES
At the end of this unit, you should be able to:
• enter formulas
• clear contents in a cell
• close workbooks
• use button to change text appearance
• add borders and colour.
CIT101 COMPUTERS IN SOCIETY
101
3.0 MAIN CONTENT
3.1 Using Formulas
Formulas are instructions that you enter to perform calculations.
You can create formulas by using numbers (for example, 350+450);
however, it is preferable to construct formulas that refer to worksheet
cells. This way, the results of the formulas update automatically when
you change numbers in your worksheet. In Excel, you create formulas
by preceding the expression with an equal sign (=). For example, if you
were to enter the number 350 in cell B1, the number 450 in B2 and the
formula = B1 + B2 in cell, the value 800 would displayed in cell B3.
were you subsequently to change the value in cell B1 or B2, Excel
would recalculate the value of cell B3.
When entering a formula, you can type in cell references or click on the
desired cells. Clicking on the cells may eliminate typing errors and
prevent mistakes as you determine the cell reference by looking at them.
3.1.1 Mathematical Operators
The mathematical operators that are used in an electronic environment
differ slightly from those used manually. Table 1 below compares the
symbols used.
FUNCTION MANUAL COMPUTER
Division ÷ /
Multiplication X *
Addition + +
Subtraction – –
Table 1: Mathematical Operators
In the above table the two shaded operators are those that require your
special attention. The symbol used to indicate exponentiation (i.e to the
power of) is the caret (Ù) symbol.
MANUAL COMPUTER RESULT
102 10^2 100
103 10^3 1000
Table 2: Exponentiation
In the next exercise you will practice entering some formulas

CIT101 COMPUTERS IN SOCIETY
102
SELF ASSESSMENT EXERCISE 1
Entering Formulas
Objective: To use cell referencing in formulas.
What you do Comments/Prompts
1. Selects cell B7
2. Type: = b3+b4+b5
Press: <Enter>
To add the numbers in cells B3, B4, and
B5 and display the sum in the active cell
(B7)
3. Look at the current value
in cell B7
The value is 545.
4. In cell B3, enter 320 Press: <Enter>
The result of the formula in cell B7 reflects this change
5. In cell D3, enter the
formula =b3-c3 Press: <Enter>
To calculate January’s Profits by
subtracting Expenses (C3) from Sales (B3).
Further Practice Exercise
1. Enter following formulas in
The cells listed:
In cell D4, enter = b4 – C4 In cell D5, enter = b4 – C5
In cell C7, enter = c3 + c4 + c5
In cell D7, enter = d3 + d4 + d5
3.2 Clearing Cell Contents
To remove the contents of a single cell, select the cell and press
<Delete>.
3.3 Using Undo
To reverse you last action in Excel, click on the Undo button (or choose
Edit, Undo). The speed key combination <Ctrl + Z will have the same
effect.
Note: Not all actions can be undone in Excel. For example, you cannot
undo a File, Save.

CIT101 COMPUTERS IN SOCIETY
103
SELF ASSESSMENT EXERCISE 2
Clearing the Contents of a Cell; Using the Undo Button
What you do Comments/Prompts
1. Selects cell A2 This cells contains the text “Months” This
text is not needed in the worksheet.
2. Press: <Delete> To clear the contents of cell A2
3. Click on the Undo
Button
To undo the deletion of the word Months.
3.4 File Handling Techniques
This section recaps on a few of the basic file handling techniques that
you were introduced to in Module 3.
3.4.1 Closing Files
To close a single file, choose File, Close.
SELF ASSESSMENT EXERCISE 3
Closing Workbooks
What you do Comments/Prompts
1. Choose: File, Close A message appears asking if you would like to save changes to
My Sales Report.
2. Click on Yes To save and close the file
3.4.2 Creating a New Workbook
When you launch Excel, you see a new, blank workbook called Book 1,
However, should you require a new workbook at a later stage you do not
have to restart Excel to get a new workbook. To create a new workbook
without restarting Excel, click on the New button, or choose File, New
…. The speed key combination of <Ctrl> + N will have the same result.
CIT101 COMPUTERS IN SOCIETY
104
SELF ASSESSMENT EXERCISE 4
Creating a New Workbook
What you do Comments/Prompts
1. Click on the New button
You can use the New button to create a
new workbook either when no other files
are open or when you have another file
open.
2. Close the file
3.5 Formatting a Worksheet
Formatting changes the way numbers and text are displayed in the
worksheet. For example, the number ten can appear as 10, 10.00, R10,
and so on. Applying a format changes only the appearance of a number,
not its value. You can change the appearance of text on a worksheet in a
number of ways, for example, you can emphasize certain words by
applying boldface or underlining.
Categories of Formatting may be summarized as follows:
Number : Changes the way numbers, dates and times are
displayed
Alignment : Governs where data is positioned within a
particular cell Font : Controls the style and typeface of data
Border : Applies and controls the style of lines which are
drawn around cells Patterns : Used to add a shaded colour or pattern to the
background of a cell
In addition to the above, setting column-widths and row-heights are also
considered part of formatting a worksheet. On this course we will
investigate some of the font style options as well as number, alignment,
border and patterns formatting briefly.
3.5.1 Working with Ranges
A range is a group of adjacent cells that forms a rectangular shape.
Before you can use a cell or a range of cells in a worksheet, it is
necessary to indicate which cells or range of cell you want to work with.
This process is known as selecting. So far you have only been working
with a single

CIT101 COMPUTERS IN SOCIETY
105
cell at a time. It may be necessary to work with more than one cell at a
time, for example when formatting.
Selecting Cells
There are various methods that may be used to select a range of cells.
Two of these are as follows:
1. With the mouse pointer, point to the centre of the cell in one
corner of the range; press and hold the mouse button while
dragging to the opposite corner of the range; and release the
mouse button.
2. Select one corner of the range; press and hold the <Shift> key;
and click on the opposite corner of the range to select all cells
within the range.
3.5.2 Using Toolbar Buttons to Format a Worksheet
You can use button on the Formatting toolbar to quickly change the
appearance of all or part of a worksheet. Select the cell or cells whose
appearance you would like to change, and then click on the buttons of
your choice. For example, to apply boldface to text in cell B5, select cell
B5 and then click on the Bold button.
Some Formatting button are toggles. To remove the formatting after it
has been applied, select the cell whose formatting you would like to
remove, and click on the corresponding button on the Formatting
toolbar.
In Exercise 5 below you will have the opportunity to practice applying
bold, italic and underline font styles to cells.
SELF ASSESSMENT EXERCISE 5
Using Buttons on the Formatting Toolbar to change Text
Appearance
What you do Comments/Prompts
1. Open Australian And
European
Divisions’ Report
2. Select cell B1
3. Click on the Bold button
(On the Formatting toolbar.) To
make the text boldface. The buttons
on the Formatting toolbar appear

CIT101 COMPUTERS IN SOCIETY
106
“pushed in” when they are selected.
4. Select cell B3
5. Click on the Italic button
On the Formatting toolbar,
click on the Italic button again
To remove the Italic attribute. The
buttons on the Formatting toolbar
are toggle buttons.
6. Select the range C12: G16
7. Click on the Underline button
(On the Formatting toolbar.)
3.5.3 Adding Border and Colour to Cells
To emphasize data, you can add borderline or colour to cells. A variety
of border types, widths, and colours are available in Excel. To apply
borders or colours, select the cells that you want to affect; click on the
drop-down arrow next to the Borders or Fill Colour buttons on the
Formatting toolbar; and selected an option from the palette.
SELF ASSESSMENT EXERCISE 6
Adding Borders and Colour
What you do Comments/Prompts
1. If necessary, select the range
B12:G16
2. In the Formatting toolbar,
click on the down-pointing
arrow beside the Borders
button
If necessary, use the More Buttons
button.
3. Click on the Outside Borders
button
(In the third row down, the third
column from the left.)
4. With the range B12: G16 still
selected, on the Formatting
toolbar, click on the down
Arrow beside the Fill Colour
button
To display the palette of available
colours.
5. Select the colour Turquoise Use Screen Tips to identity each color.
6. Deselect the range (click on
any cell)
To view the formatting.

CIT101 COMPUTERS IN SOCIETY
107
4.0 CONCLUSION Formulas are used to perform calculations.
5.0 SUMMARY You are now in a position that you can enter formulas, clear contents, of
a cell, close workers and add borders and colour.
6.0 TUTOR-MARKED ASSIGNMENT Open the file Spreadsheet 2. Apply the following formatting options:
• Apply outside border to the range A3:D8
• Apply a bottom border to the range A7:D7
• Apply a bottom border to the range A3: D3
• Apply the fill colour of your choice to the range A3: D3
• Print, Save and Close the Workbook.
7.0 REFERENCES/FURTHER READING Ayo, S. K. (1998). Computer Literacy, Operating Systems and
Applications. (2nd
ed.). Mckay Consult.

CIT101 COMPUTERS IN SOCIETY
108
UNIT 2 SPREADSHEETS: NUMERIC FORMATS
CONTENTS
1.0 Introduction
2.0 Objectives
3.0 Main Content 3.1 Numeric Formats
3.1.1 Selecting the Entire Worksheet 3.1.2 Categories of Numeric Formats
3.1.3 Details of Numeric Formats 3.2 Text and Number Alignment
3.2.1 Aligning Cell Contents
3.3 Column Widths 3.4 Row Heights
3.5 Printing 3.5.1 Printing the Active Worksheet
4.0 Conclusion
5.0 Summary
6.0 Tutor-Marked Assignment
7.0 References/Further Reading
1.0 INTRODUCTION
In this unit you will be exposed to categories of numeric formats, text
and number alignment and printing.
2.0 OBJECTIVES
At the end of this unit, you should be able to:
• format a cell
• align text in a cell
• change column widths
• change row heights
• print the active worksheet.
3.0 MAIN CONTENT
3.1 Numeric Formats
3.1.1 Selecting the Entire Worksheet
You can select the entire worksheet by clicking on the Select All button,
which is the intersection of the row and column headings in the upper-
left corner of the worksheet.

CIT101 COMPUTERS IN SOCIETY
109
3.1.2 Categories of Numeric Formats Many number formats can be applied by using the Formatting toolbar.
Number formats are divided into several categories, such as Currency,
Percentage, Scientific Accounting, and Fraction. The options not
available on the toolbar may be selected through the Format Cells dialog
box (accessed from either Format menu or the shortcut menu).
3.1.3 Details of Numeric Formats You can use Excel’s built-in formats to change the appearance of
numbers. In the Format Cells dialog box, select the Number tab and
choose the options you would like to use and click on OK. Some of the
commonly used numeric formatting options may also be accessed using
the formatting toolbar.
Figure 1 below indicate the button available on the Formatting toolbar
by default.
Currency Comma
Decrease Decimal
Percentage Increase Decimal
Figure 2.1: Formatting Tools
The numeric formatting buttons as listed in Figure 1, are used to produce
the following formats:
Currency Apply a currency symbol to a cell or range of cells.
Percentage
Multiply the cell contents by 100 and place a % symbol to the right of
the number
Comma
Enable two formatting features. Firstly, all negatives will be displayed in
brackets. Secondly, a comma (or space – depending on the settings of

CIT101 COMPUTERS IN SOCIETY
110
your computer) will appear as a separator between millions and
thousands. For example, 1000000 will be displayed as 1,000,000 or 1
000 000.
Increase Decimals
Each time you click on the Increase Decimal button, an extra decimal
place is displayed to the right of the decimal point.
Decrease Decimals
Each time you click on the Decrease Decimal button, one decimal place
fewer is displayed.
SELF ASSESSMENT EXERCISE 1
Formatting a Cell
What you do Comments/Prompts
1. Select cells C12:G12
2. Click on the Increase Decimal
button.
All values in the range are displayed
with 2 decimal place.
3.2 Text and Number Alignment
3.2.1 Aligning Cell Contents
You can change the alignment of text or numbers in a cell. Right
aligned, left aligned, and centered are the most common alignments. To
align the contents of a cell, select the cell and then click on the desired
Formatting toolbar button.
By default, text entries are left aligned while numeric entries and
calculated results are right aligned. This may lead to data that does not
appear neatly aligned within your spreadsheet. When attempting to
correct this, the most favourable option would be to re-align the label
entries, not the values.
Figure 2 below displays three examples. Example 1 shows the data as
originally entered. Example 2 shows the data with the numbers having
been re-aligned, while Examples 3 shows the data with the text in cell
B1 having been re-aligned. While all three examples display the correct
information, Example 3 is visually the most successful.

CIT101 COMPUTERS IN SOCIETY
111
Example 1 Example 2 Example 3
Figure 2.2: Data Alignment
SELF ASSESSMENT EXERCISE 2
Aligning Text in a Cell
What you do Comments/Prompts
1. Select the range C5: G5
2. Click on the Align Right
button
(On the Formatting toolbar.) To
align the text in the selected range
along the right edge of the cells.
3.3 Column Widths
If the number in the active cell is too wide for the column, the column
width will adjust automatically so that the number is displayed. You can
also change the width of worksheet columns manually. There are several
ways, including the following:
• Place the mouse pointer on the boundary to the right of a column
heading, and drag the divider to the right (to expand the column
width) or to the left ( to shrink the column width).
• Place the mouse pointer on the boundary to the right of a column
heading and double-click the mouse button. The column width is
calculated to accommodate the longest entry in the column.
When the total (number of characters of numeric data is greater than the
column width, number signs (# # # # #), commonly referred to as “hash”
symbols, are displayed in the cell if you have manually changed the
column width. To display the number, you can change the formatting or
enlarge the width of the column.
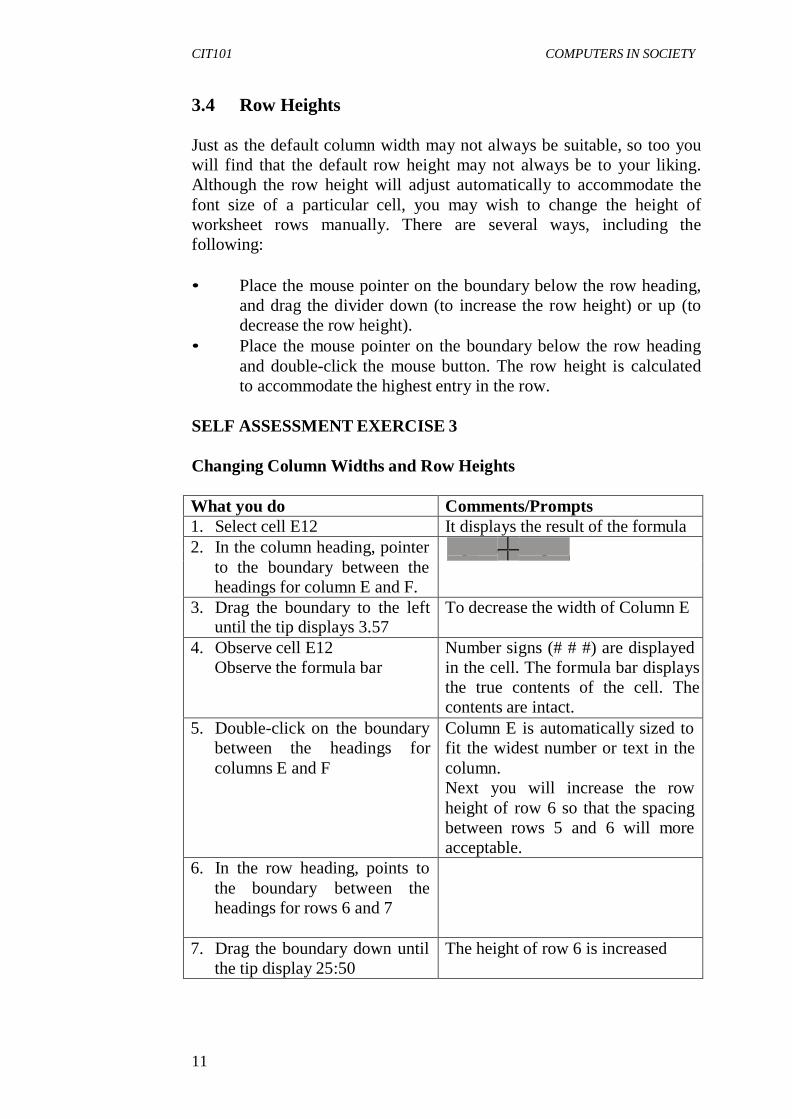
CIT101 COMPUTERS IN SOCIETY
112
3.4 Row Heights
Just as the default column width may not always be suitable, so too you
will find that the default row height may not always be to your liking.
Although the row height will adjust automatically to accommodate the
font size of a particular cell, you may wish to change the height of
worksheet rows manually. There are several ways, including the
following:
• Place the mouse pointer on the boundary below the row heading,
and drag the divider down (to increase the row height) or up (to
decrease the row height).
• Place the mouse pointer on the boundary below the row heading
and double-click the mouse button. The row height is calculated
to accommodate the highest entry in the row.
SELF ASSESSMENT EXERCISE 3
Changing Column Widths and Row Heights
What you do Comments/Prompts
1. Select cell E12 It displays the result of the formula
2. In the column heading, pointer
to the boundary between the
headings for column E and F.
3. Drag the boundary to the left until the tip displays 3.57
To decrease the width of Column E
4. Observe cell E12
Observe the formula bar
Number signs (# # #) are displayed
in the cell. The formula bar displays
the true contents of the cell. The
contents are intact.
5. Double-click on the boundary
between the headings for
columns E and F
Column E is automatically sized to
fit the widest number or text in the
column.
Next you will increase the row
height of row 6 so that the spacing
between rows 5 and 6 will more
acceptable.
6. In the row heading, points to
the boundary between the
headings for rows 6 and 7
7. Drag the boundary down until
the tip display 25:50
The height of row 6 is increased

CIT101 COMPUTERS IN SOCIETY
113
3.5 Printing All default print options are listed in the Print dialog box. If you activate
the print process through the Print button, Excel will use the default
setting that appear in the print dialog box. Should you wish to change
any of these setting, you would have to use the file, prints commands to
display the Print dialog box. Figure 3 below displays the print dialog
box.
Figure 2.3 – The Print Dialog Box
Options that may be selected in the Print dialog box include the
following:
Printer Name Box Use this list box to select a
printer.
Copies Selects the number of copies you wish to print Print Range By default all pages of the worksheet will print.
However, you can select to print specific pages
only. Print What Selection: Prints Only the area specified by user
Selected Sheet(s): Prints the current worksheet (default setting)
Entire Workbook: Prints all worksheets in a
workbook
3.5.1 Printing the Active Worksheet A quick way to print your whole worksheet is to click on the print
button on the standard toolbar. Warning When you use this button, the
print dialog box does not appear on the screen. For every click of the
mouse on this button, your printer will print another copy.
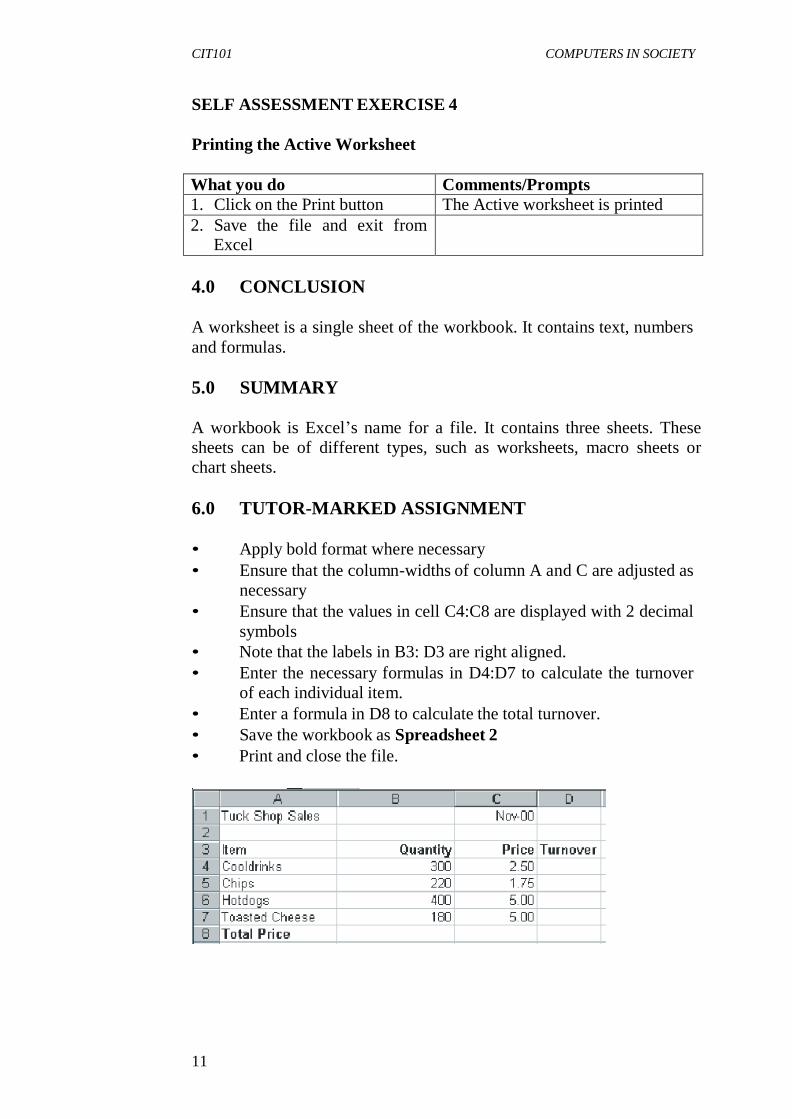
CIT101 COMPUTERS IN SOCIETY
114
SELF ASSESSMENT EXERCISE 4
Printing the Active Worksheet
What you do Comments/Prompts
1. Click on the Print button The Active worksheet is printed
2. Save the file and exit from Excel
4.0 CONCLUSION
A worksheet is a single sheet of the workbook. It contains text, numbers
and formulas.
5.0 SUMMARY
A workbook is Excel’s name for a file. It contains three sheets. These
sheets can be of different types, such as worksheets, macro sheets or
chart sheets.
6.0 TUTOR-MARKED ASSIGNMENT
• Apply bold format where necessary
• Ensure that the column-widths of column A and C are adjusted as
necessary
• Ensure that the values in cell C4:C8 are displayed with 2 decimal
symbols
• Note that the labels in B3: D3 are right aligned.
• Enter the necessary formulas in D4:D7 to calculate the turnover
of each individual item.
• Enter a formula in D8 to calculate the total turnover.
• Save the workbook as Spreadsheet 2
• Print and close the file.
CIT101 COMPUTERS IN SOCIETY
115
7.0 REFERENCES/FURTHER READING French, C.S. (2000). Computer Science (5
th ed.). Gosport, Hants:
Ashford Colour Press.

CIT101 COMPUTERS IN SOCIETY
116
UNIT 3 CREATING CHARTS
CONTENTS
1.0 Introduction
2.0 Objectives
3.0 Main Content
3.1 Creating Chart
3.1.1 Creating a Basic Chart 3.1.2 Examining the Results and Learning about Chart
Terminology
4.0 Conclusion
5.0 Summary
6.0 Tutor-Marked Assignment
7.0 References/Further Reading
1.0 INTRODUCTION
You will learn to create charts and other graphic objects using Excel in
this unit.
2.0 OBJECTIVES
At the end of this unit, you should be able to:
• create column charts on chart sheets using the <F11> functions
key
• apply chart terminology.
3.0 MAIN CONTENT
3.1 Creating Chart
As you learned earlier in this course, Excel 2000 is an integrated
worksheet package that runs with the Microsoft Windows 95, Window
98, Windows Millennium Edition and Windows NT 4.0 operating
systems. In addition to its worksheet capabilities, Excel enables you to
create charts and other graphic objects.
3.1.1 Creating a Basic Chart
After you have created a worksheet, you can graphically represent the
worksheet data by creating a chart. Charts often make worksheet data
clearer and easier to understand.

CIT101 COMPUTERS IN SOCIETY
117
What is a chart? It is information presented in the form of a table, graph
or diagram. When using the term chart in Excel, we are specifically
referring to the graph element of charting. For the duration of this
course, these two terms will be used interchangeably.
What exactly is meant by the term graph? A graph is a diagram showing
a relationship between variable quantities, usually of two, each measured
along one of a pair of axes at right angles. Pie, Doughnut and Radar
graphs are a few of the exceptions where the axes are either displayed in
an unusual format, or not at all.
In summary, a graph is a “pictorial” presentation of a series of values. It
is not possible to plot a graph without values. The Excel spreadsheet
provides the values that are to be plotted. In addition to numeric data,
cells containing text will also be included in the data that is to be plotted
as a graph.
Excel enables you to create charts sheets, which are separate sheets of a
workbook file that contain only charts. Excel also enables you to create
embedded charts, which are displayed on the same sheet as the
worksheet.
Chart sheets enable you to print a chart that is separate from data. You
can use page setup options to control how the chart will print. Creating a
chart on a separate sheet is useful when you want to show overhead
projections of your charts as part of a presentation or a slide show.
Use an embedded chart when you want to print a worksheet and a chart
on a single sheet of paper. Embedded charts enable you to print a chart
and its associated data side by side on the same printed page. It is easier
to compare actual worksheet data to the graphical representation of that
data when you use an embedded chart.
To create a chart on a chart sheet, you can either use the Chart Wizard or
press the <F11> key. The Chart Wizard feature leads you through a
step-by-step process to create a chart.
When you use the <F11> key to create a chart, Excel applies the default
chart format the new chart. The default chart format is a column chart
with a legend displayed and some formatting applied.
To create a chart using the <F11> function key, the following process
applies:

CIT101 COMPUTERS IN SOCIETY
118
1. Create or Open the file containing the data that is to be plotted
2. Select the range containing the data that is to be included in the
chart 3. Press <F11>.
SELF ASSESSMENT EXERCISE 1
Creating a Chart Using the <F11> Function Key
Before you begin: Please ensure that Microsoft Windows and Office
2000 have been installed on the hard disk and the computer is on.
Objective: To create a column chart to represent the quarterly sales data
entered in the worksheet.
What you do Comments/Prompts
1. Starts Excel 2000 Excel 2000 is launched
2. If necessary, close the Office
Assistant
(Right-click on the Office Assistant,
and choose Hide from the shortcut
menu.)
3. Choose: File, Open… The Open dialog box is displayed
4. In the Look in: drop-down list
box, select drive A:
5. Open: Charts This file contains quarterly sales
data for Books and Beyond, Inc.
6. Select the range: A5:E9 You will chart the quarterly sales data for each location.
7. Press: <F11> To create the chart.
8. If necessary, choose Selection
in the Zoom drop down list
box in order to view the whole
graph.
This box is located on the standard
toolbar.
50%
9. Examine the sheet tabs A new sheet named Chart1 has
been inserted before the Chart Data
worksheet. This sheet contains only
the chart.
10. Examine the Chart toolbar By default, the Chart toolbar is
displayed when a chart is active.
11.If the toolbar is currently
displayed over the graph,
move or dock the Chart
toolbar.
To view the entire chart.

CIT101 COMPUTERS IN SOCIETY
119
3.1.2 Examining the Results and Learning about Chart
Terminology Figure 3.1 below shows the spreadsheet data from which the graph in
Figure 3.2 below has been plotted.
When you create a chart, values from worksheet cells – or data points –
create data markers that can be displayed as bars, column, lines, pie
slices, or other shapes. A data marker is a chart symbol that represents a
single data point.
All of the data points in a column or row on the worksheet combine on
the chart to create a data series, which is displayed on the chart as a
group of data markers distinguished by the same colour or pattern. For
example, all of the entries in the Australia row of the worksheet
correspond with the Australia data series of the chart.
Figure 3.1: Spreadsheet data used to plot the graph in Figure 3.2
R
R
R
R
R
R
R
Qtr Qtr Qtr Qtr
Figure 3.2: Result of graph based on selected data in Figure 3.1
A sample of each series’ marker colour and pattern is displayed in the
legend along with the series name (taken from the column or row of
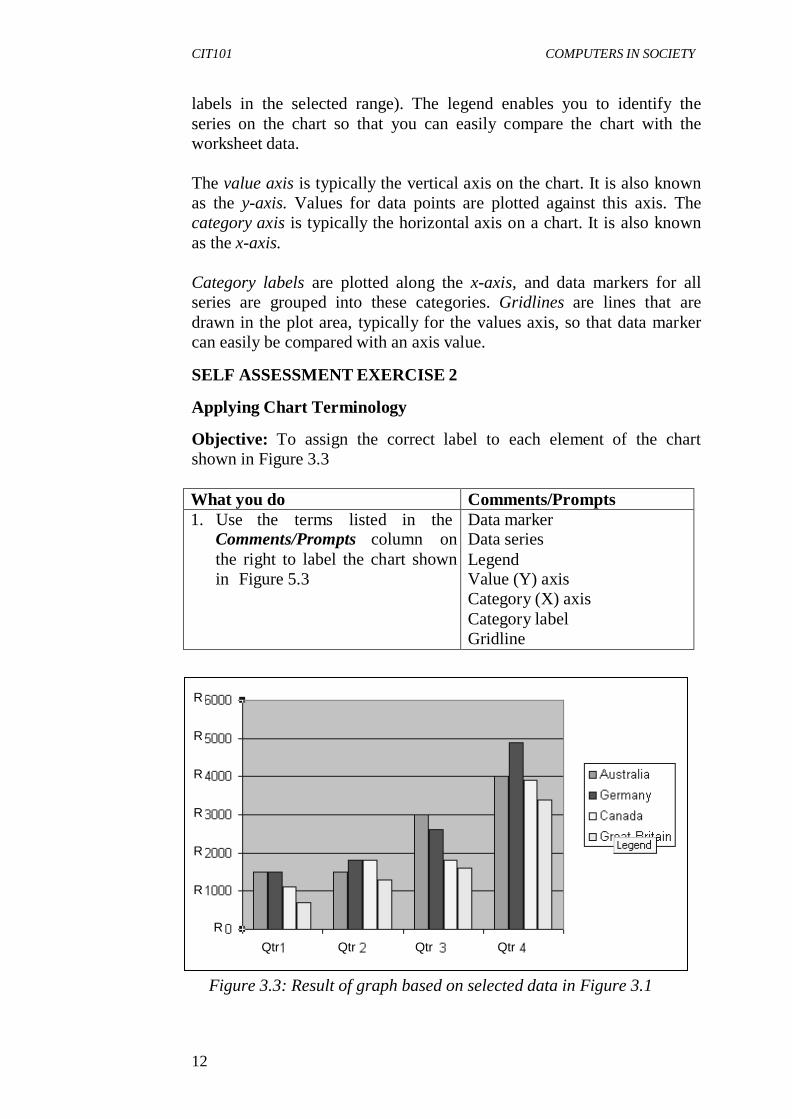
CIT101 COMPUTERS IN SOCIETY
120
labels in the selected range). The legend enables you to identify the
series on the chart so that you can easily compare the chart with the
worksheet data.
The value axis is typically the vertical axis on the chart. It is also known
as the y-axis. Values for data points are plotted against this axis. The
category axis is typically the horizontal axis on a chart. It is also known
as the x-axis.
Category labels are plotted along the x-axis, and data markers for all
series are grouped into these categories. Gridlines are lines that are
drawn in the plot area, typically for the values axis, so that data marker
can easily be compared with an axis value.
SELF ASSESSMENT EXERCISE 2
Applying Chart Terminology
Objective: To assign the correct label to each element of the chart
shown in Figure 3.3
What you do Comments/Prompts
1. Use the terms listed in the Comments/Prompts column on
the right to label the chart shown
in Figure 5.3
Data marker Data series
Legend Value (Y) axis
Category (X) axis
Category label
Gridline
R
R
R
R
R
R
R
Qtr Qtr Qtr Qtr
Figure 3.3: Result of graph based on selected data in Figure 3.1
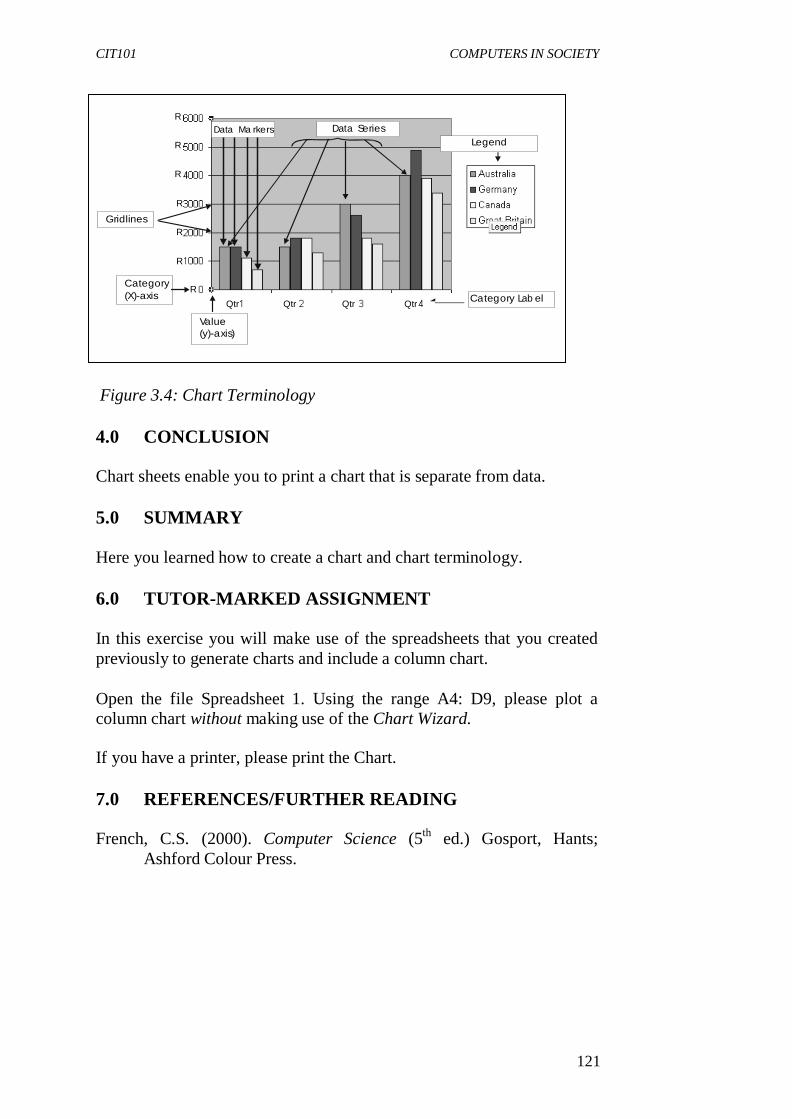
CIT101 COMPUTERS IN SOCIETY
121
R
R
R
R
Gridlines
R
Data Ma rkers
Data Series
Legend
R
Category
(X)-axis
R
Value
Qtr Qtr Qtr Qtr
Category Lab el
(y)-axis)
Figure 3.4: Chart Terminology
4.0 CONCLUSION Chart sheets enable you to print a chart that is separate from data.
5.0 SUMMARY Here you learned how to create a chart and chart terminology.
6.0 TUTOR-MARKED ASSIGNMENT In this exercise you will make use of the spreadsheets that you created
previously to generate charts and include a column chart.
Open the file Spreadsheet 1. Using the range A4: D9, please plot a
column chart without making use of the Chart Wizard.
If you have a printer, please print the Chart.
7.0 REFERENCES/FURTHER READING
French, C.S. (2000). Computer Science (5th
ed.) Gosport, Hants;
Ashford Colour Press.

CIT101 COMPUTERS IN SOCIETY
122
UNIT 4 CHARTS FROM NON-ADJACENT DATA,
EMBEDDED CHARTS AND CHART LINKS
CONTENTS
1.0 Introduction
2.0 Objectives 3.0 Main Content
3.1 Charting Non-adjacent Worksheet Data 3.2 Embedded Charts
3.2.1 Creating an Embedded Chart
3.3 Moving an Embedded Chart 3.4 Sizing an Embedded Chart
3.5 Deleting Chart Items 3.6 Chart Links
4.0 Conclusion 5.0 Summary
6.0 Tutor-Marked Assignment
7.0 References/Further Reading
1.0 INTRODUCTION
Here you will learn how to create a chart from non-adjacent data on the
worksheet. You will also learn how to use the Chart Wizard.
2.0 OBJECTIVES
At the end of this unit, you should be able to:
• chart non-adjacent worksheet data
• use Chart Wizard
• create a pie chart
• move an embedded chart
• delete chart items
• examine links between Worksheets data and charts.
3.0 MAIN CONTENT
3.1 Charting Non-adjacent Worksheet Data
You can create a chart from non-adjacent data on a worksheet. To do so,
select the first range of data, and then press the <Ctrl> key while you
select the second range of data. Press <F11> to create the chart from the
selected ranges.

CIT101 COMPUTERS IN SOCIETY
123
Note: The non-adjacent selections must be valid ranges. In some cases,
cells might contain text for series and category names, To chart the data
correctly, select a blank cell in the upper-left corner of the range.
SELF ASSESSMENT EXERCISE 1
Charting Non-adjacent Worksheet Data
Objective: To create a column chart to represent non-adjacent
worksheet data.
What you do Comments/Prompts
1. Select the Chart data
sheet tab (at the bottom of
the screen)
To display the sheet containing the
sales report. The range A5: E9 is
selected.
2. Select the range: A5: B9
3. While pressing <Ctrl>, select the range E5: E9
To select the data for only Quarters
1 and 4
4. Press <F11> To add a second chart sheet after
the first, and to create a column
chart representing only the Qtr 1
and Qtr 4 sales data.
3.2 Embedded Charts
The Chart Wizard feature leads you through a step-by-step process to
create a chart and displays sample views as you build it.
3.2.1 Creating an Embedded Chart
When you use the Chart Wizard feature, Excel draws the chart
according to the selections you make in the Chart Wizard dialog boxes
and embeds the chart as an object on the worksheet. Embedding a chart
enables you to work with it directly on the worksheet.
To create a chart using the Chart Wizard the following steps apply:
1. Create or open the relevant spreadsheets
2. Select the range containing the data to be plotted
3. Click on the Chart Wizard tool located on the Standard toolbar
4. Follows the four steps as prompted by Chart Wizard.

CIT101 COMPUTERS IN SOCIETY
124
SELF ASSESSMENT EXERCISE 2
Creating a Pie Chart; Reviewing the Chart Wizard Dialog Boxes
Objective: To create a chart on the same sheet as the worksheet data.
What you do Comments/Prompts
1. Select the Chart Data sheet
2. Selects the range: A5:A9 (The country names and the column
label)
3. While pressing <Ctrl>, select the range F5: F9
(The totals and the column label.)
4. Click on the Chart Wizard button
On the Standard toolbar, If necessary,
use the More Buttons button to find
it. The first of the four Chart Wizard
dialog boxes is displayed.
You can click on Cancel or get Help
from any Chart Wizard dialog box.
5. If necessary, close the Office
Assistant
By clicking on No, Don’t Provide Help Now.
6. In the Chart Type list box,
select Pie
7. Observe the Chart Sub-
Type options
You can choose from several
different types of pie charts
8. Press and hold the mouse
button on Press and Hold to
View Sample
To view the chart
9. Release the mouse button

CIT101 COMPUTERS IN SOCIETY
125
10. Click on Next>
To second step (Chart Source Data)
is displayed. The range that you
selected before you clicked on the
Chart Wizard button is entered in
the Data Range text box as an
absolute reference; it is selected.
11. Click on Next
To accept the data range and move
to the next step (Chart Options),
which contains options for the titles,
legends, and data labels.
12. Select the Data Labels tab
13. Under data labels, select Show label and percent
To display da ta label and percent value for each section of the pie.
14. Click on Next>
To display the fourth and last step
(Chart Location).
15. Click on Finish To accept the default to place the
chart as an object in the Chart Data
worksheet.
You can now move and size the chart.

CIT101 COMPUTERS IN SOCIETY
126
3.3 Moving an Embedded Chart
Because an embedded chart is an object on the worksheet, you can move
it around the worksheet by dragging. To move an embedded chart, select
the chart and drag it to another location on the worksheet. As you drag,
an outline of the chart area is displayed, so that you can fit and align the
chart where you want in on the worksheet.
SELF ASSESSMENT EXERCISE 3
Moving an Embedded Chart
What you do Comments/Prompts
1. Observe the pie chart on the worksheet
Selection handles are displayed. The chart covers some of the worksheet
data.
2. Move the mouse pointer
over various items of the
pie chart
Excel displays the name and value of each item in Screen Tip.
3. Point to a blank area of the chart
To display the Chart Area Screen Tip.
4. Drag the chart to cell A12 (So that its upper-left corner is in cell
A 12.) The chart is now displayed
below the data.
5. Click on cell G12 to
deselect the chart.
6. Press the down arrow key
until you can see the whole
chart.
3.4 Sizing an Embedded Chart
You can size an embedded chart by using the selection handles that are
displayed around it when it is selected. When you place the mouse
pointer on one of the selection handles the pointer changes to a two-
headed arrow. You can then drag in the direction of either arrow to
enlarge or reduce the size of the chart. When you size an embedded
chart, its dimensions remains proportional.
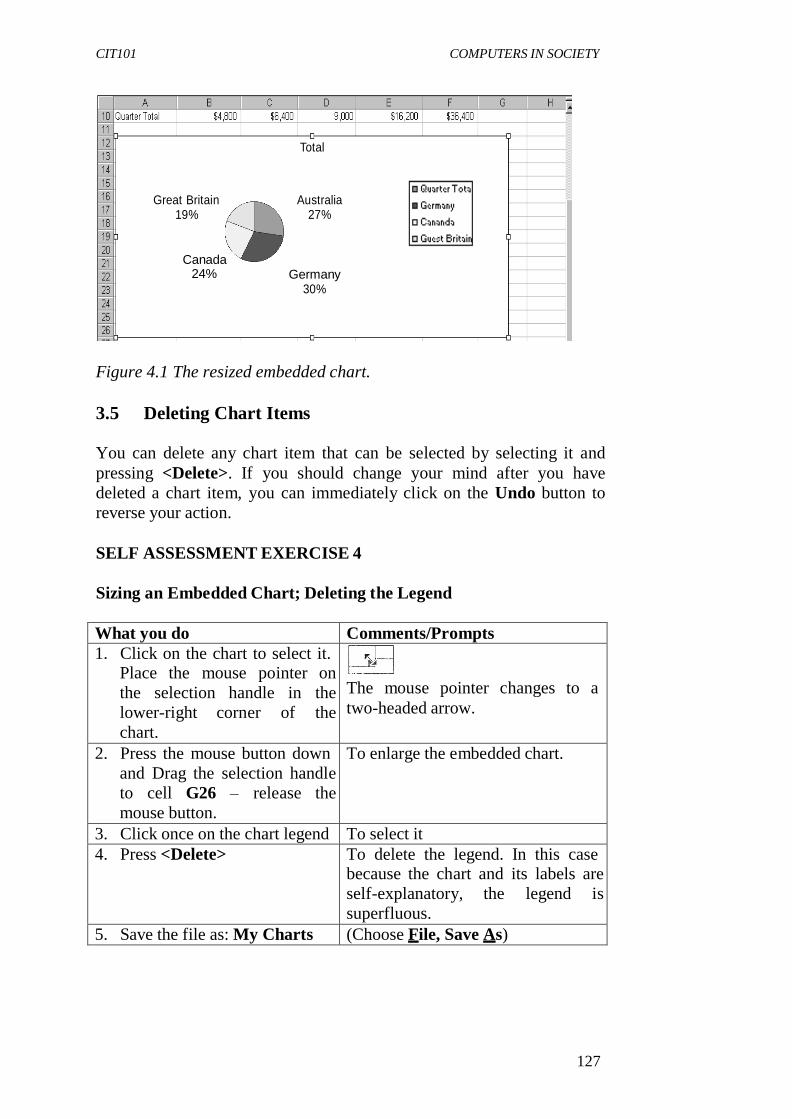
CIT101 COMPUTERS IN SOCIETY
127
Total
Great Britain 19%
Australia 27%
Canada 24% Germany
30%
Figure 4.1 The resized embedded chart.
3.5 Deleting Chart Items
You can delete any chart item that can be selected by selecting it and
pressing <Delete>. If you should change your mind after you have
deleted a chart item, you can immediately click on the Undo button to
reverse your action.
SELF ASSESSMENT EXERCISE 4
Sizing an Embedded Chart; Deleting the Legend
What you do Comments/Prompts
1. Click on the chart to select it. Place the mouse pointer on
the selection handle in the
lower-right corner of the
chart.
The mouse pointer changes to a
two-headed arrow.
2. Press the mouse button down
and Drag the selection handle
to cell G26 – release the
mouse button.
To enlarge the embedded chart.
3. Click once on the chart legend To select it
4. Press <Delete> To delete the legend. In this case because the chart and its labels are
self-explanatory, the legend is
superfluous.
5. Save the file as: My Charts (Choose File, Save As)
CIT101 COMPUTERS IN SOCIETY
128
3.6 Chart Links
When you create a chart worksheet data, Excel creates an active link
between the worksheet values and the chart data points. When you
change a worksheet value, the chart data point is updated. The link to
worksheet data is the same whether a chart is embedded or is stored on a
chart sheet.
SELF ASSESSMENT EXERCISE 5
Examining the Link between Worksheet Data and Charts
What you do Comments/Prompts
1. Select cell D6 Observe its current values
(R3,000)
2. Change the value to 20000
3. Observe the change in the Australia section of the pie
chart
It increased from 27 percent to 51 percent.
The embedded chart data markers
are linked to the worksheet data.
4. Select the Chart 1 sheet
5. Observe the change in the Qtr 3
Australia section of the chart
The chart sheets are also linked to
the worksheet data from which
they were created.
6. Select the Chart Data sheet
7. Click on the Undo button
The Australia section returns to 27
percent.
8. Save the file The embedded chart is part of the worksheet.
The worksheet and chart sheets
are saved as part of the workbook file.
9. Close the file
4.0 CONCLUSION
Excel draws the chart according to the selections that is made in the
Chart Wizard dialog boxes.
5.0 SUMMARY
Excel could be used to draw charts and Excel creates an active link
between the worksheet values and the chart data points.

CIT101 COMPUTERS IN SOCIETY
129
6.0 TUTOR-MARKED ASSIGNMENT A pie graph will illustrate the percentage contribution of each food item
available in the school tuck shop. You will use the data in Spreadsheet
to plot an embedded pie chart.
Open the file Spreadsheet 2. Employing the Chart Wizard plot an
embedded 3-D Pie chart using the range A4: B7. The end result should
be similar to the chart below and should appear in range A10: F23.
7.0 REFERENCES/FURTHER READING
French, C.S. (2000). Computer Science (5th
ed.). Gosport, Hants: Asford
Colour Press.

CIT101 COMPUTERS IN SOCIETY
130
UNIT 5 CHART TYPES
CONTENTS
1.0 Introduction
2.0 Objectives 3.0 Main Content
3.1 Chart Types
3.1.1 Changing Chart Types
3.2 Formatting the Chart
3.2.1 Accessing Format Dialog Boxes 3.2.2 Formatting the Plot Area
3.2.3 Formatting Data Markers 3.3 Previewing and Printing Charts
3.3.1 Print Preview
3.3.2 Printing a Chart 4.0 Conclusion
5.0 Summary 6.0 Tutor-Marked Assignment
7.0 References/Further Reading
1.0 INTRODUCTION
Excel provides many different chart types to choose from. A chart
selection is based on the type of data that you are putting in a chart.
2.0 OBJECTIVES
At the end of this unit, you should be able to:
• change the chart type
• add a border to the chart title
• format the plot area
• format the data markers
• print the formatted chart.
3.0 MAIN CONTENT
3.1 Chart Types
Excel provides many different chart types to choose from. The type of
chart you choose depends on the type of data you are charting.

CIT101 COMPUTERS IN SOCIETY
131
3.1.1 Changing Chart Types
You can change the chart types by clicking on the downward-pointing
arrow next to the Chart Type button on the Chart toolbar.
Chart type button
A drop-down menu including buttons for 18 different chart types is
displayed. Click on the button that corresponds to the chart type of your
choice.
SELF ASSESSMENT EXERCISE 1
Changing the Chart Type
What you do Comments/Prompts
1. Open: Modified Charts.xls (Located on the disk in drive A:)
2. Select the Chart – All Qtrs
Sheet
3. Point to the Chart Type button
(On the Chart toolbar.)
4. Click on the drop-down arrow
next to the Chart Types
button.
To display a menu of chart types
5. Click on the Bar Chart button
6. Observe the chart The chart has changed from the
default column chart to a bar chart.
7. Observe the Chart Type
Button
It displays the chart type that was
last selected.
8. Click on the Chart Type drop-
down arrow.
(Next to the Chart Type button.)
9. Click on the 3-D Column Chart button
10. Observe the chart The chart has changed from the bar
chart to a 3-D column chart.
Depending on the size of your
monitor, some of the data markers, might not be visible
11.Close the file without saving

CIT101 COMPUTERS IN SOCIETY
132
3.2 Formatting the Chart
To make you charts more attractive, you can add formatting to chart
items. It is possible to add border around the titles, the legend, and the
text boxes. In addition to this, the colour, thickness, and style of the
border, as well as the colour of the area within the border can be
changed.
3.2.1 Accessing Format Dialog Boxes
Each item on a chart has its own unique formatting dialog box, which
contains options specific to that particular item. The easiest method
available for accessing the format dialog boxes is simply to double-click
on the item.
In Exercise 19, you will be required to add a border to the Chart Title.
The Format Chart Title dialog box consists of three page tabs, Patterns,
Font, Alignment as shown in Figure 5.1 below.
Patterns tab Font tab Alignment tab
Figure 5.1: Format Chart Title tabs
SELF ASSESSMENT EXERCISE 2
Adding a Border around the Chart Title
What you do Comments/Prompts
1. Open: Format. xls Remember that you are working on the data disk in drive A:
2. Select the Chart-All Qtrs
Sheet
3. Right-click on the chart title (Book and Beyond, Inc.) To select
it and display the shortcut menu.
4. Choose: Format Chart
Title…
To display the Format Chart Title
dialog box.

CIT101 COMPUTERS IN SOCIETY
133
5. Verify that the Patterns tab is selected.
6. Under Border, select Custom
7. From the style: drop-down
list, Select a style of your
choice
The Sample box displays the new
border style.
8. From the Color: drop-down
list, Select a color of your
choice
The sample box displays the new
border colour.
9. From the Weight: drop-down
list, Select a weight of your
choice
The Sample box displays the new
line width.
10. Click on OK
11. Press: <ESC> To deselect the chart title and view
the chart.
3.2.2 Formatting the Plot Area
The plot area is the gray background behind the chart. For printing or
presentation purposes, you might need to format the plot area to make it
easier to view the information it contains. The Format Plot Area dialog
box contains a single tab, namely the Pattern tab, only.
To format the plot area:
1. Double-click on the area to display the Format Plot Area dialog
box
2. Select a border style, a colour and weight, and area colour,
pattern, and border.
SELF ASSESSMENT EXERCISE 3
Formatting the Plot Area
Objective: To change the gray background of the plot area to white.
What you do Comments/Prompts
1. Double-click on the gray chart background.
The Format Plot Area dialog box is displayed
2. Under Border, from the Color drop-down list, select black.
3. Under Area, from the colour
palette, select white
4. Click on OK The chart background is white
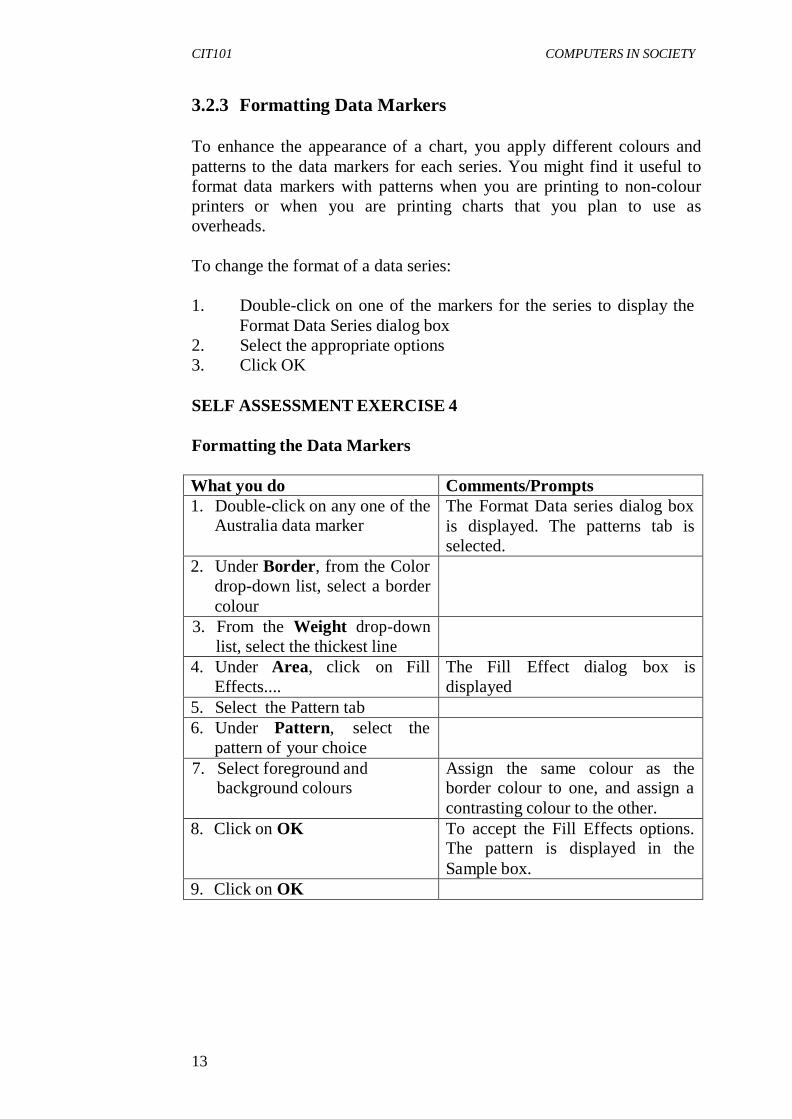
CIT101 COMPUTERS IN SOCIETY
134
3.2.3 Formatting Data Markers
To enhance the appearance of a chart, you apply different colours and
patterns to the data markers for each series. You might find it useful to
format data markers with patterns when you are printing to non-colour
printers or when you are printing charts that you plan to use as
overheads.
To change the format of a data series:
1. Double-click on one of the markers for the series to display the
Format Data Series dialog box
2. Select the appropriate options
3. Click OK
SELF ASSESSMENT EXERCISE 4
Formatting the Data Markers
What you do Comments/Prompts
1. Double-click on any one of the Australia data marker
The Format Data series dialog box
is displayed. The patterns tab is
selected.
2. Under Border, from the Color
drop-down list, select a border
colour
3. From the Weight drop-down
list, select the thickest line
4. Under Area, click on Fill
Effects....
The Fill Effect dialog box is
displayed
5. Select the Pattern tab
6. Under Pattern, select the
pattern of your choice
7. Select foreground and background colours
Assign the same colour as the border colour to one, and assign a
contrasting colour to the other.
8. Click on OK To accept the Fill Effects options. The pattern is displayed in the
Sample box.
9. Click on OK

CIT101 COMPUTERS IN SOCIETY
135
3.3 Previewing and Printing Charts
3.3.1 Print Preview
The Print Preview command enables you to view your printouts on
screen before you print them. By using this tool, you can adjust the print
settings before you send your print job to printer. To activate the Print
Preview command you may
1. Select File, Print Preview
2. Click on the Print Preview tool on the Standard toolbar.
3.3.2 Printing a Chart
It is possible to print a chart sheet, an embedded chart separately or the
embedded chart as part of the worksheet.
To print a chart sheet:
1. Select the chart sheet
2. Select File, Print…
3. Click on OK
To print an embedded chart as part of the worksheet:
1. Verify that the embedded chart is not selected
2. Select File, Print… 3. Click on OK
To print an embedded chart by itself:
1. Select the embedded chart
2. Select File, Print….
3. Click on O
SELF ASSESSMENT EXERCISE 5
Previewing and Printing the Formatted Chart
What you do Comments/Prompts
1. Click on the Print Preview
Button
2. Place the mouse pointer over
any portion of the previewed
chart
The mouse pointer changes to a
magnifying glass.
3. Click on any portion of the That portion of the chart is

CIT101 COMPUTERS IN SOCIETY
136
Chart magnified.
4. Click on the Chart To restore the preview to its
previous size
5. Click on the Close button on the preview toolbar to close
Print Preview.
6. Choose: File, Print… The Print dialog box is displayed.
7. Under Print what, observe
the options.
Active Sheet(s) is selected
NB: If you do not wish to print at
this time, please select cancel and
omit step 8 below
8. Click on Ok The Chart is printed
9. Save the file
10. Exit from Excel
4.0 CONCLUSION
A legend is used to identify each series in a chart. It contains a sample of
the marker colour and pattern of each series.
5.0 SUMMARY
The plot area is the gray background behind the chart. The Format plot
Area contains a single tab i.e. the patterns tab.
6.0 TUTOR-MARKED ASSIGNMENT
Using the Microsoft Paint program (located on the Accessories sub
menu), please create the following picture taking care to comply with
the specifications, listed below the picture.
NB: You are not required to include the text boxes or arrows. These
have been included to assist you when interpreting the
specifications.
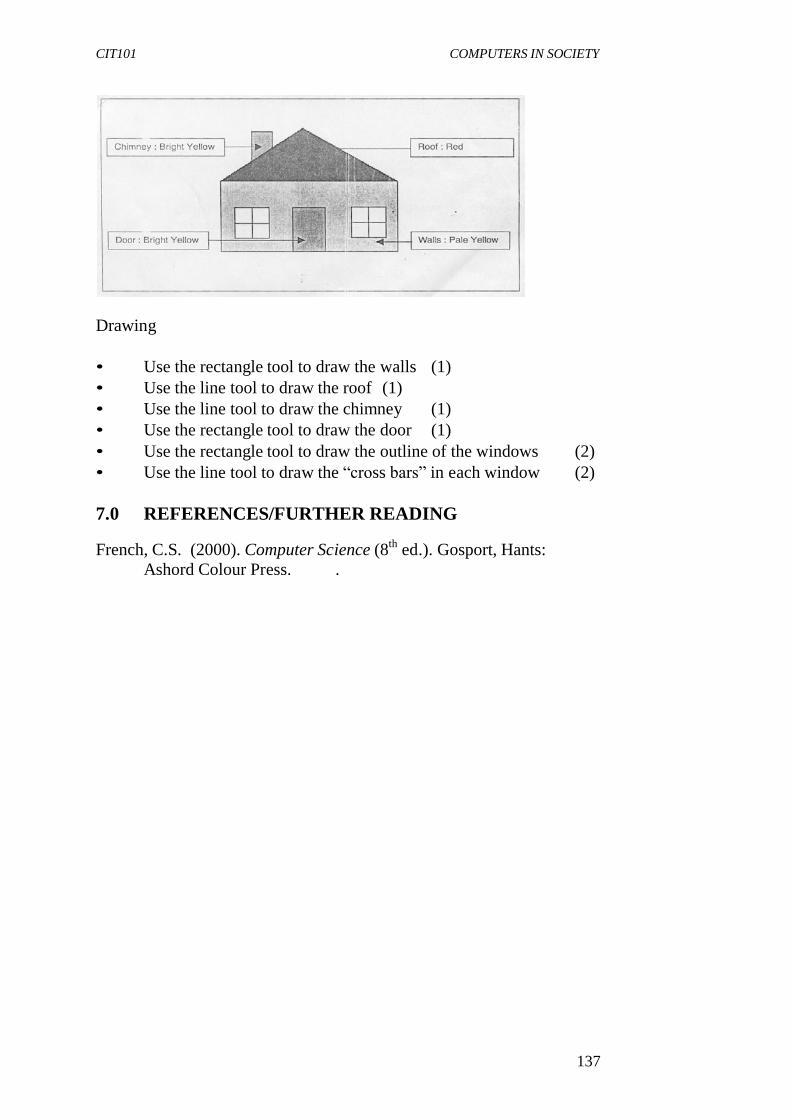
CIT101 COMPUTERS IN SOCIETY
137
Drawing
• Use the rectangle tool to draw the walls (1)
• Use the line tool to draw the roof (1)
• Use the line tool to draw the chimney (1)
• Use the rectangle tool to draw the door (1)
• Use the rectangle tool to draw the outline of the windows (2)
• Use the line tool to draw the “cross bars” in each window (2)
7.0 REFERENCES/FURTHER READING
French, C.S. (2000). Computer Science (8th
ed.). Gosport, Hants:
Ashord Colour Press. .

CIT101 COMPUTERS IN SOCIETY
138
MODULE 5
Unit 1 PowerPoint and Presentations
Unit 2 PowerPoint Presentation Screen
Unit 3 Creating New Presentations
Unit 4 Naming Presentation, Saving Presentation and Formatting
Slides
Unit 5 Using Autoshapes
UNIT 1 POWERPOINT AND PRESENTATIONS
CONTENTS
1.0 Introduction
2.0 Objective
3.0 Main Content 3.1 Starting PowerPoint and Opening a Presentation
3.1.1 Starting PowerPoint 3.1.2 Opening a Presentation
3.2 Running a Slide Show 4.0 Conclusion
5.0 Summary
6.0 Tutor-Marked Assignment 7.0 References/Further Reading
1.0 INTRODUCTION
In this unit you will learn what a PowerPoint is and what presentations
are.
2.0 OBJECTIVE
At the end of this unit, you should be able to:
• open an existing PowerPoint presentation and view a slide show.
3.0 MAIN CONTENT
3.1 Starting PowerPoint and Opening a Presentation
PowerPoint is an application program used to create presentations.
Presentations are delivered to an audience using different media such as
slides, overhead transparencies, and automated shows viewed on a
computer or broadcast over the Web. You create a presentation file,

CIT101 COMPUTERS IN SOCIETY
139
which combines various objects such as text, graphs, organization
charts, clip art, WordArt and templates.
3.1.1 Starting PowerPoint
To use PowerPoint, you must load the program from the hard disk into
the computer’s memory. You can store your data files (presentations) in
a folder on the hard disk drive, or on a floppy disk. In order to use
PowerPoint, you need to install Microsoft Windows 95, 98, Millennium
Edition or NT 4.0 installed on your computer.
To start PowerPoint using the Start menu:
1. Turn on your computer.
2. In taskbar, click on Start.
3. Select Programs from the list of menu choices.
4. In the Programs sub-menu click on Microsoft PowerPoint to
start the program.
3.1.2 Opening a Presentation
After starting PowerPoint software, a dialog box is displayed which
enables you to create a new presentation or open an existing
presentation. To open an existing presentation:
1. Select Open an existing presentation
2. Click on OK
3. In the Open dialog box that is now displayed, select the folder
and filename of the presentation that you want to open. 4. Click on Open to open the presentation file.
SELF ASSESSMENT EXERCISE 1
Starting PowerPoint and Opening a Presentation
Before you begin: Please ensure that your computer is switched on.
What you do Comments/Prompts
1. Click on the Start button on the Taskbar
The Start menu is displayed
2. Click on Programs on the Start
menu
The Programs sub-menu is
displayed

CIT101 COMPUTERS IN SOCIETY
140
3. In the Sub-menu click on Microsoft PowerPoint
Microsoft PowerPoint is activated. This is the PowerPoint window. The
PowerPoint program automatically
displays the Startup dialog box for
either creating a new presentation or
opening an existing presentation. In
addition to the PowerPoint window,
the Office Assistant may be
displayed.
4. Click on the Open an
existing presentation radio
button
5. Click on OK To display the Open dialog box
6. Observe the Look In: list box
at the top of the dialog box. Expand the list box and click
on 31/2 Floppy (A:)
If you are unable to see a list of file
names including Preview
Presentation.ppt please call your
training advisor for assistance.
7. In the file list box, select
Preview Presentation.ppt
A preview of the presentation is
displayed to the right of the file name
list box.
8. Click on Open
Open
To open the presentation. The first
slide is displayed.

CIT101 COMPUTERS IN SOCIETY
141
3.2 Running a Slide Show
You can display a presentation on your computer screen by running a
slide show.
To run a slide show, press <F5>
Only one slide is displayed at a time. You can advance the slides
manually, or you can have PowerPoint advance the slides automatically.
To advance slides manually, click the left mouse button to move
one slide.
To move backward one slide, click the right mouse button and choose
Previous from the shortcut menu.
You can also use the <Page Up> and <Page Down> keys and the <Up
Arrow> and <Down Arrow> keys to navigate through a slide show.
To end a slide show, press <Esc>
SELF ASSESSMENT EXERCISE 2
Running a Slide Show
Objective: To preview a completed presentation.
Before you begin: Ensure that Preview Presentation.ppt is open and
the first slide is displayed.
What you do Comments/Prompts
1. In the menu bar located at the top of the presentation window,
click on Slide Show and
then on View Show.
To start the slide show.
2. Observe the first slide The title slide of the presentation
fills the screen.
3. Click the left mouse button To advance to the next slide in the
presentation. The bullet slide
“Why A Relocation Team?” is
displayed.
4. Click the left mouse button The third slide contains additional
bullet text.
5. Click the left mouse button The fourth slide contains drawing
objects.
6. Advance to the next slide (Click the left mouse button). The fifth slide contains clip art.
7. Advance to the next slide The seventh slide contains Word
Art

CIT101 COMPUTERS IN SOCIETY
142
8. Advance to the next slide The seventh slide contains an
organization chart.
9. Advance to the next slide The eight slide contains a bar
chart.
10. Press: <Page Up> To return to the previous slide.
11. Press <Page Down> To return to the next slide. You
can use the <Up Arrow>
and <Down Arrow> keys to
navigate through the slide show presentation.
12. Observe that the current slide
is slide number eight
(The bar chart.) This is the last
slide in the presentation.
13. Click the left mouse button The slide show ends. A black
screen containing the text “End
of slide show, click to exit” may
be displayed.
If so, please proceed to step 14,
else do not.
14. Click the left mouse button To display the first slide in
Normal view.
4.0 CONCLUSION
PowerPoint is an application program used to create presentations.
5.0 SUMMARY
Here you learned how to start PowerPoint and open a presentation. Also
you can now run a slide show.
6.0 TUTOR-MARKED ASSIGNMENT
Using Microsoft PowerPoint, create a presentation consisting of a
minimum of four slides to be used in a subject that you teach. The
following specifications need to be adhered to:
• Each slide must be appropriated not only to the subject matter
portrayed but must be suitable for the age group to whom it will
be presented.
• Assign a Design Template to the Presentation
• Include a Title slide and at least one bullet list
• At least one AutoShape and one clip art picture must appear in
the presentation
• Use WordArt on at least one slide.

CIT101 COMPUTERS IN SOCIETY
143
Save the presentation as Presentation 1. Run the slide show. Close the
presentation.
7.0 REFERENCES/FURTHER READING Ayo, S. K. (1988). Computer Literacy, Operating System and
Application (2nd
ed.) McKay Consult.

CIT101 COMPUTERS IN SOCIETY
144
UNIT 2 POWERPOINT PRESENTATION SCREEN
CONTENTS
1.0 Introduction
2.0 Objectives 3.0 Main Content
3.1 Orientation to the PowerPoint Presentation Screen
3.1.1 The PowerPoint Window
3.1.2 Moving between Slides
3.1.3 Slide Views 3.2 Closing a Presentation and Existing PowerPoint
3.2.1 Closing a Presentation 3.2.2 Exiting PowerPoint
4.0 Conclusion
5.0 Summary 6.0 Tutor-Marked Assignment
7.0 References/Further Reading
1.0 INTRODUCTION
In this unit, you will learn how to use the PowerPoint window.
2.0 OBJECTIVES
At the end of this unit, you should be able to:
• move between slides in a presentation
• change views
• close a presentation
• exit from a PowerPoint.
3.0 MAIN CONTENT
3.1 Orientation to the PowerPoint Presentation Screen
The PowerPoint window has many of the more common elements that
you have been introduced to in both Excel as well as Word. We will
focus on the elements that are unique to PowerPoint.
3.1.1 The PowerPoint Window
View buttons are located above the Drawing toolbar and on the left side
of the window. Clicking on one of these buttons displays one of five
views: Normal view, Outline view, Slide view, Slide Sorter view, and
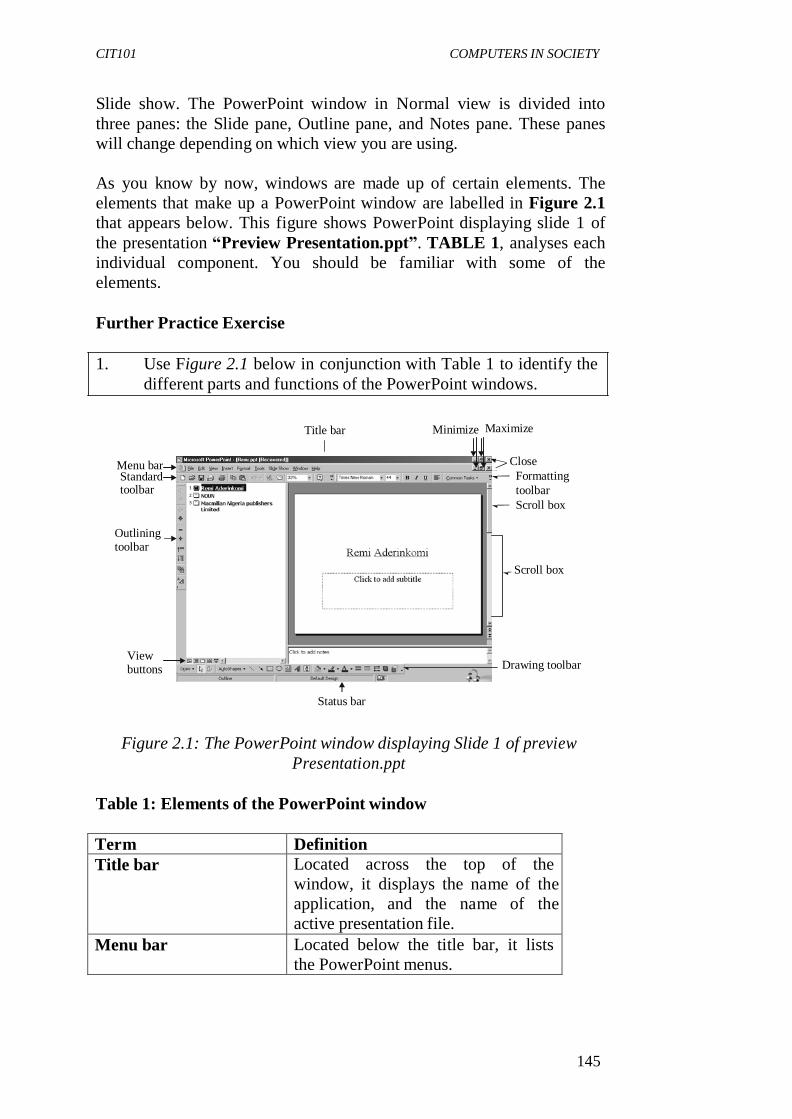
CIT101 COMPUTERS IN SOCIETY
145
Slide show. The PowerPoint window in Normal view is divided into
three panes: the Slide pane, Outline pane, and Notes pane. These panes
will change depending on which view you are using.
As you know by now, windows are made up of certain elements. The
elements that make up a PowerPoint window are labelled in Figure 2.1
that appears below. This figure shows PowerPoint displaying slide 1 of
the presentation “Preview Presentation.ppt”. TABLE 1, analyses each
individual component. You should be familiar with some of the
elements.
Further Practice Exercise
1. Use Figure 2.1 below in conjunction with Table 1 to identify the
different parts and functions of the PowerPoint windows.
Title bar Minimize Maximize
Menu bar Standard toolbar
Outlining toolbar
View buttons
Close
Formatting
toolbar
Scroll box
Scroll box Drawing toolbar
Status bar
Figure 2.1: The PowerPoint window displaying Slide 1 of preview
Presentation.ppt
Table 1: Elements of the PowerPoint window
Term Definition
Title bar Located across the top of the
window, it displays the name of the
application, and the name of the
active presentation file.
Menu bar Located below the title bar, it lists
the PowerPoint menus.

CIT101 COMPUTERS IN SOCIETY
146
Standard and Formatting
Toolbars
Located below the menu bar, they provide quick access to some of the
most frequently used commands in
PowerPoint.
Drawing toolbar Located just above the Status bar
contains buttons which allow quick
access to the commands most frequently used when drawing.
Outlining Toolbar Located on the left of the screen.
Used to access outlining features
quickly.
Note: Please do not be concerned if
your screen does not currently
display this toolbar. Later in this
course you will learn how to switch
toolbars on and off.
Scroll bar Located along the right side of the
window, it is used to view different
slides in the active presentation.
Status bar Located across the bottom of the
window, it displays information
about the active presentation, such as the current slide number and the
name of the design template applied
to the slide.
View buttons Located above the status bar, they are
used to switch views.
3.1.2 Moving between Slides
Use the vertical scroll bar to move among the slides in a presentation.
Drag the scroll box up or down to move to a particular slide. As you
drag, the slide-indicator box shows the slide number and slide title.
Release the mouse button when the slide-indicator box displays the
correct slide number. At the bottom of the scroll bar are the Previous
Slide button and the Next Slide button. You can also click on these
buttons to move through the presentation one slide at a time.
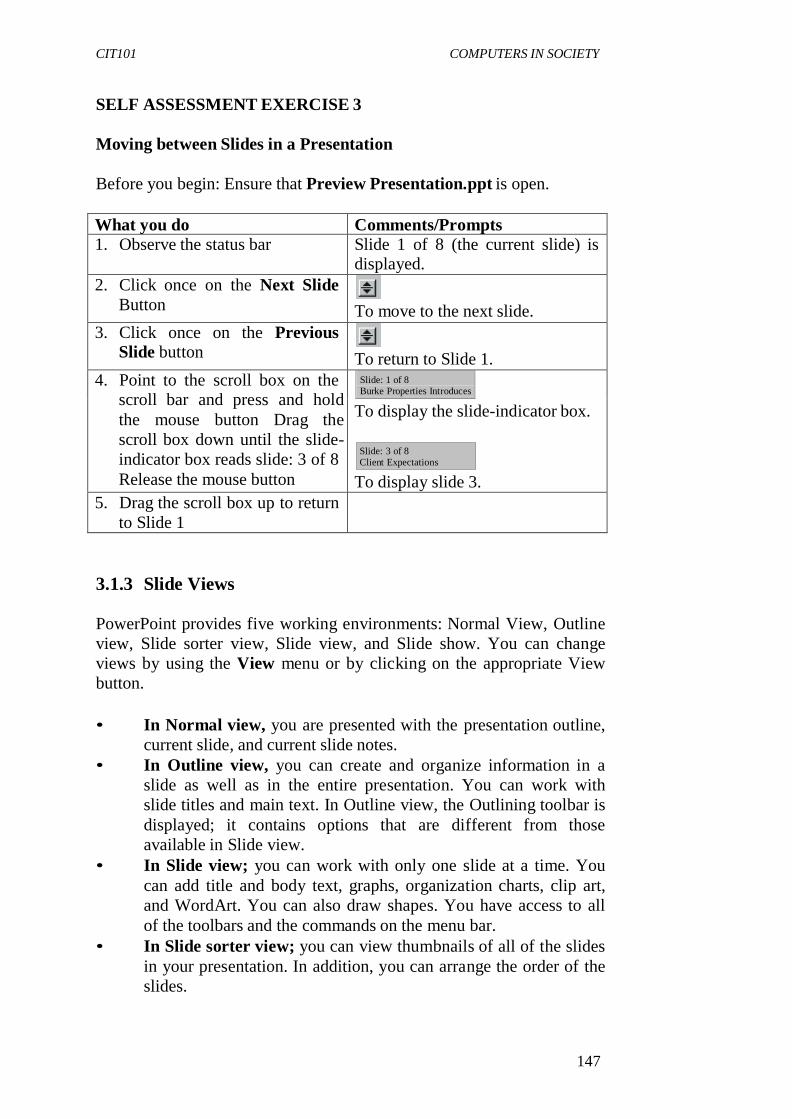
CIT101 COMPUTERS IN SOCIETY
147
SELF ASSESSMENT EXERCISE 3
Moving between Slides in a Presentation
Before you begin: Ensure that Preview Presentation.ppt is open.
What you do Comments/Prompts
1. Observe the status bar Slide 1 of 8 (the current slide) is displayed.
2. Click once on the Next Slide
Button
To move to the next slide.
3. Click once on the Previous Slide button
To return to Slide 1.
4. Point to the scroll box on the scroll bar and press and hold
the mouse button Drag the
scroll box down until the slide-
indicator box reads slide: 3 of 8
Release the mouse button
Slide: 1 of 8 Burke Properties Introduces
To display the slide-indicator box.
Slide: 3 of 8 Client Expectations
To display slide 3.
5. Drag the scroll box up to return
to Slide 1
3.1.3 Slide Views
PowerPoint provides five working environments: Normal View, Outline
view, Slide sorter view, Slide view, and Slide show. You can change
views by using the View menu or by clicking on the appropriate View
button.
• In Normal view, you are presented with the presentation outline,
current slide, and current slide notes.
• In Outline view, you can create and organize information in a
slide as well as in the entire presentation. You can work with
slide titles and main text. In Outline view, the Outlining toolbar is
displayed; it contains options that are different from those
available in Slide view.
• In Slide view; you can work with only one slide at a time. You
can add title and body text, graphs, organization charts, clip art,
and WordArt. You can also draw shapes. You have access to all
of the toolbars and the commands on the menu bar.
• In Slide sorter view; you can view thumbnails of all of the slides
in your presentation. In addition, you can arrange the order of the
slides.

CIT101 COMPUTERS IN SOCIETY
148
• In Slide show, you can see your presentation displayed on the
full screen of your computer monitor. Any transitions, builds, and
timings are visible during the show.
SELF ASSESSMENT EXERCISE 2
Changing Views
Objective: To observe the various ways that you can view a
presentation
Before you begin: Ensure that Preview Presentation.ppt is open and
that Slide 1 is displayed.
What you do Comments/Prompts
1. Click on the Outline View
button
To change to Outline view.
2. Observe the slide text
Observe the Colour preview
pane
Outline view provides you with an overview of all of the text in your
presentation. In Outline view you can
create, edit, and organize slides.
A preview of the selected slide is
displayed.
3. Observe the Outlining
toolbar
The Outlining toolbar is located to
the left of the Outline pane.
Note: If the Outlining toolbar is not
displayed, choose View, Toolbars,
Outlining.
4. Click on the Slide View
button
Slide view enables you to work on
one slide at a time.
5. Click on the Slide Sorter
View button
Slide Sorter view provides you with
a thumbnail sketch of each slide in
your presentation. You can use Slide
Sorter view to rearrange slides.
6. Point to (Do not click on)
the Slide Show button
Clicking on this button is equivalent
to choosing Slide Show, View Show.
7. Click on the Normal View button

CIT101 COMPUTERS IN SOCIETY
149
3.2 Closing a Presentation and Existing PowerPoint
The methods used for closing a file, or as it is known in PowerPoint, a
presentation, and existing PowerPoint are similar to those applicable to
both Word and Excel.
3.2.1 Closing a Presentation
Each file that you open remains open until you close it. Because having
several files opened reduces available memory, it is suggested that you
close presentation files when you have finished working with them. To
close a PowerPoint presentation, choose File, Close.
3.2.2 Exiting PowerPoint
To exit PowerPoint and return to the Windows environment, choose
File, Exit. As a safeguard, if you have not saved changes in any open
presentation, PowerPoint will prompt you to save those changes.
SELF ASSESSMENT EXERCISE 3
Closing a Presentation and Exiting from PowerPoint
Before you begin: Ensure that Preview Presentation.ppt is open.
What you do Comments/Prompts
1. Choose File, Close To close the presentation.
2. Observe the window The PowerPoint application is still
active, but no files are open.
3. Choose File, Exit Remember that you may have to wait a few seconds for the full menu to be
displayed in order to select the Exit
option. The PowerPoint program is
closed and the screen returns to the
windows desktop.
4.0 CONCLUSION
Although Excel, Word and PowerPoint window have common elements
but some elements are unique to PowerPoint.
5.0 SUMMARY
Here you learned how use PowerPoint window. In particular you learned
five working environments of PowerPoint.

CIT101 COMPUTERS IN SOCIETY
150
6.0 TUTOR-MARKED ASSIGNMENT
Create a different presentation following the guidelines in 1.6.
Save the presentation as Presentation 2. Run the slide show. Close the
presentation.
7.0 REFERENCES/FURTHER READING
Ayo, S. K. (1988). Computer Literacy, Operating System and
Application (2nd
ed.) McKay Consult.
CIT101 COMPUTERS IN SOCIETY
151
UNIT 3 CREATING NEW PRESENTATIONS
CONTENTS 1.0 Introduction
2.0 Objectives 3.0 Main Content
3.1 Creating a New Presentation
3.1.1 Presentation Design Tips
3.1.2 Entering Text on a Slide
3.1.3 Adding a New Slide 3.1.4 Adding a Bullet Slide
4.0 Conclusion 5.0 Summary
6.0 Tutor-Marked Assignment
7.0 References/Further Reading
1.0 INTRODUCTION In this unit, you will learn how to choose a presentation and slide type.
Furthermore you will be able to create a title slide and enter text on a
slide.
2.0 OBJECTIVES At the end of this unit, you should be able to:
• choose a presentation and slide type
• create a title slide
• add a bullet slide.
3.0 MAIN CONTENT 3.1 Creating a New Presentation
When you create a presentation in PowerPoint, you can choose from
three categories in the New Presentation dialog box below:
1. General: For a blank presentation
2. Design Templates: For templates that you can apply to a new
PowerPoint presentation to define how it will look. 3. Presentation: For pre-designed PowerPoint presentations.
Twenty-four pre-designed presentations are supplied with the
PowerPoint program; each one contains placeholders for the title-
object area and the text-object area.

CIT101 COMPUTERS IN SOCIETY
152
3.1.1 Presentation Design Tips
Before beginning a new PowerPoint presentation, it is a good idea to
review the basic guidelines for creating an effective presentation. The
design tips listed in Table 2 below, are only recommendations; they may
be modified depending on what type of information you are presenting.
Table 2
Design element Design guideline
Text A slide that is in portrait mode (vertical)
should be limited to a maximum of:
• 8 lines of text
• 6 words per line.
A slide that is in landscape mode (horizontal) should be limited to a maximum of:
• 6 lines of text
• 8 words per line
Font size Titles: 44 points (or larger) Text: 32 points (or larger)
Subtext: 28 points (or larger)
Font type Limit to less than three font types per slide.
Background For on-screen presentation, use dark, gradated
backgrounds with contrasting text. For
overhead transparencies, use clear, light
backgrounds with contrasting text.
Templates Use simple templates and limit the number of
lines, textures, and other simple effects. Use
clip art or graphics to enhance the template.
Text slides Avoid using more than three in a row. Use
tables or charts when appropriate.
Colour In excess of 10% of the male population is
colour blind. Take this into consideration
when selecting, greens, reds and blues.
Case Avoid typing in uppercase only.
SELF ASSESSMENT EXERCISE 1
Choosing a Presentation and Slide Type
What you do Comments/Prompts
1. Start PowerPoint
2. Choose: Open an Existing
Presentation and click on OK
3. Double click on Preview Next you will close this file, but

CIT101 COMPUTERS IN SOCIETY
153
Presentation.ppt not exit PowerPoint
4. Select File, Close
5. Select File, New… To display the New Presentation
dialog box.
6. Observe the New Presentation dialog box
You can choose from three tabbed categories:
General, Design Templates, and Presentations.
7. If necessary, select the general tab
To display the selections in the General category
8. Select the Design Templates
tab
To display the selection of design
templates.
9. Select Expedition
10. Observe the Preview box (Located to the right of the design
templates list.)
It displays the template design and
colour scheme.
11. Select the Presentations tab To display a selection of pre- designed presentations.
12. Select the Business Plan The template is displayed in the
Preview box.
13. Select the Design Templates
tab
14. Select Lock And Key
15. Click on OK To display the New Slide dialog
box.
16. In the New Slide dialog box,
verify that the first slide is
selected.
17. Observe the lower-right corner
of the dialog box
It displays the description “Title
Slide.”
18. Scroll through and select other descriptions.
Twenty-four AutoLayouts are available.
19.Select the Title Slide
AutoLayout
20. Click on OK
21. Observe the slide The left side of the slide contains a
graphic object as well as two text
placeholders

CIT101 COMPUTERS IN SOCIETY
154
3.1.2 Entering Text on a Slide
To type text in a placeholder, select the placeholder by clicking on it,
and then start typing.
SELF ASSESSMENT EXERCISE 2
Creating a Title Slide
What you do Comments/Prompts
1. Click once on the title
placeholder to select it.
A selection box appears around the
title, placeholder, and an insertion
points is displayed.
2. Type: Burke Properties
Introduces
On the Outline pane, the text
wraps onto two lines.
3. Click on the subtitle
placeholder
To select it.
4. Type: Our New Relocation
Team
5. Click in a blank area of the
slide
To deselect the subtitle
placeholder.
3.1.3 Adding a New Slide
To insert a new slide into a presentation, New Slide Button
1. Click on the New Slide button on the Standard toolbar.
2. The new slide dialog box will appear.
3. Select the AutoLayout of your choice.
3.1.4 Adding a Bullet Slide
The New Slide dialog box contains an AutoLayout for bullet lists. This
layout is divided into two areas: the title placeholder and the bullet-list
placeholder.
To add text to the bullet-list placeholder:
1. Click on the bullet-list placeholder. The first bullet is displayed.
2. Type the bullet text for the first bullet and press <Enter>. A
second bullet is displayed.
3. Continue typing bullet items. Press <Backspace> to delete an
unwanted bullet.
4. Click away from the bullet-list placeholder to deselect it.
CIT101 COMPUTERS IN SOCIETY
155
SELF ASSESSMENT EXERCISE 3
Adding a Bullet Slide
What you do Comments/Prompts
1. Click on the New Slide button
2. Observe that the Bulleted List AutoLayout is selected
(The logical sequence following a title slide.)
3. Click on OK
4. Observe the slide The slide has a vertical graphic on the left and includes a title
placeholder and bullet-list
placeholder.
5. Add the title Why A
Relocation Team
(Select the title placeholder, and then type the text)
6. Select the bullet-list
placeholder
The selection box and the first
bullet are displayed.
7. Type: Market trend
8. Press: <Enter> A new line and a second bullet are
displayed.
9. Type: Consumer demand
10. Press: <Enter>
11. Type: Competition
12. Press <Enter>
13. Press: <Backspace> To delete the new bullet.
4.0 CONCLUSION
PowerPoint has three tabbed categories in the New Presentation dialog
box.
5.0 SUMMARY
Here you learned how to choose a presentation and a slide. You can now
enter a text on a slide and add a bullet slide.
6.0 TUTOR-MARKED ASSIGNMENT
1. Create a different presentation following the guidelines in 1.6
2. Save the presentation as Presentations 3. Run the slide show.
Close the presentation.

CIT101 COMPUTERS IN SOCIETY
156
7.0 REFERENCES/FURTHER READING
Ayo, S. K. (1988). Computer Literacy, Operating System and
Application (2nd
ed.). McKay Consult.

CIT101 COMPUTERS IN SOCIETY
157
UNIT 4 NAMING PRESENTATION, SAVING
PRESENTATION AND FORMATTING SLIDES
CONTENTS
1.0 Introduction
2.0 Objectives 3.0 Main Content
3.1 Saving a Presentation 3.1.1 The File, Save as Command
3.1.2 The File’ Save Command 3.2 Naming a Presentation
3.3 Formatting Slides
3.3.1 Attributes 3.3.2 The Edit, Undo Command
3.4 Working with Drawing Tools
3.4.1 The Drawing Toolbar
3.5 Creating an Object 4.0 Conclusion
5.0 Summary
6.0 Tutor-Marked Assignment 7.0 References/Further Reading
1.0 INTRODUCTION In this unit, you will learn how to store a presentation for permanent
usage.
2.0 OBJECTIVES At the end of this unit, you should be able to:
• save a presentation
• name a presentation
• format slides
• work with drawing tools
• create objects.
3.0 MAIN CONTENT
3.1 Saving a Presentation Before you save a presentation, it only exists in computer memory, a
temporary storage area. For permanents storage, a presentation must be
saved to some location, such as a hard drive or a floppy disk.

CIT101 COMPUTERS IN SOCIETY
158
To save a presentation, you either the File, Save As… or the File, Save
command.
3.1.1 The File, Save as Command
The File, Save As… command enables you to:
• save a presentation for the first time;
• save a presentation with a new filename;
• save a presentation in a different location (on another disk or in a
different folder).
To save a presentation with a new name or in a new destination:
1. Choose File, Save As… to display the Save As dialog box.
2. In the Save In list box, select the appropriate location (disk, drive
or folder). 3. In the File Name text box, type the name of the file.
4. Click on the Save button in the lower right corner of the dialog
box.
After the presentation has been saved, its filename will be displayed in
the title bar while it is open.
When you save a file, PowerPoint adds the filename extension.PPT to
identify the file as a PowerPoint file. You should avoid adding filename
extensions yourself.
3.1.2 The File, Save Command
The File, Save command enables you to:
• re-save a presentation that has been saved previously.
When updating the saved version of a presentation using this command,
no dialog boxes are displayed. You cannot rename the file or save it in a
different location.
To update the saved version of a presentation:
1. Choose File, Save or click on the Save button on the Standard
toolbar.
3.2 Naming a Presentation
When you save a file for the first time, PowerPoint automatically
assigns a filename by using the Title line of the first slide in the

CIT101 COMPUTERS IN SOCIETY
159
presentation. You can accept this default name or name it something
different.
A filename should be descriptive so that you can remember the file’s
contents. A filename in PowerPoint can contain up to 255 characters,
spaces, and other punctuations. A file cannot contain any of the
following characters: ^ : ; * ? < > |.
SELF ASSESSMENT EXERCISE 1
Saving the Presentation
What you do Comments/Prompts
1. Choose: File, Save As… To display the Save As dialog box.
2. The default folder is listed in
the Save in list box
By default, PowerPoint uses the
folder My Documents. This may
have been reset on your computer. For the purposes of this course, you will be saving all documents to the
A: drive.
3. Expand the Save In list box
by clicking on the down
arrow
Even if the default has already been set to the A: drive, please complete
this step so that you can practice
how to do so if necessary.
4. Click on 31/2 Floppy (A) This setting is reflected in the Save
In list box. Next you will assign a file name.
5. If necessary, select the text in the File Name text box
(Hint: Position the mouse
pointer to the left of the file
name. Press and hold down
the mouse button and drag it
over the text.)
The text Interoffice Memo is highlighted.
6. Type: My Presentation To name the presentation, My
Presentation
7. Click on the Save button in
the lower Right corner of the
dialog box
To save the file.
8. Observe the title in the title
bar
My Presentation is displayed.
3.3 Formatting Slides
“Formatting” refers to the appearance or text, not the text itself. You can
change the appearance of text by changing its attributes, indentation and

CIT101 COMPUTERS IN SOCIETY
160
line spacing. In order to change the appearance of existing text, the text
has to be selected. Various selecting techniques are available in
PowerPoint. The most common way of selecting text is to “click and
drag” the mouse over the relevant text.
3.3.1 Attributes
Text attributes include the following:
• Font
• Size
• Style
• Colour
You can use the text-formatting buttons to apply certain text attributes,
such as font, font size, bold, italics, underline, shadow, and colour,
quickly. The text-editing buttons work like toggle switches: click once
to turn an option on, and click again to turn the option off.
3.3.2 The Edit, Undo Command
You can use the Edit, Undo command or the Undo button to reverse
changes that you make in your presentation. For example, if you
accidentally delete text, you can restore the text by using the Undo
command.
The speed key combination of <Ctrl> + Z may be used in the place of
the menu commands.
SELF ASSESSMENT EXERCISE 3
Formatting Text
What you do Comments/Prompts
1. On Slide 2, click on the title The title place holder will be
selected and the I-beam will be
flashing.
2. Double-click on the word
Relocation
To select just the word.
3. Click on the Bold button
To bold the text.
4. Click on the Italic button
5. Double-click on the word
Market
6. Bold the text (Click on the Bold button)
7. Press: <Ctrl> + Z The Bold attribute is removed

CIT101 COMPUTERS IN SOCIETY
161
(undone). The word “Market” is still selected.
8. Bold the text (Click on the Bold button)
9. Select: Consumer (Double-click to select the word)
10. Bold the text
11. Select: Competition
12. Bold the text
13. Save and close the presentation
3.4 Working with Drawing Tools
PowerPoint enables you to create drawn objects using a set of tools
located on the Drawing toolbar. The drawing tools include buttons that
enable you to automatically draw circles, rectangles, lines, and other
geometric shapes. Drawn objects can be edited like PowerPoint objects.
It is possible to duplicate, resize, move, colour, cut, and paste drawn
objects. You can also add attributes such as borders, fills, and shadows,
to drawn objects. In addition to this, drawn objects can be aligned and
rotated. Text may be added to drawn objects.
3.4.1 The Drawing Toolbar
The Drawing toolbar is one of the default toolbars displayed when you
start PowerPoint. It contains various tools to draw boxes, lines, and
circles, as well as tools to alter those objects.
Two of the buttons that are found on the Drawing toolbar are Draw and
AutoShapes. If you click on the Draw button, a pop-up menu is
displayed. The commands on this menu enable you to group and
ungroup, rotate and flip, and move objects in front of or behind each
other, to name but a few. The AutoShapes button is firstly used to select
from over 150 shapes and secondly to draw that shape on the
PowerPoint slide.
You can move any toolbar by pointing between buttons and dragging or
by dragging its title bar.
SELF ASSESSMENT EXERCISE 3
The Drawing Toolbar
What you do Comments/Prompts
1. Open: Drawing Presentation
and move to Slide 3
2. Add a new slide (Click on the New Slide button.)
CIT101 COMPUTERS IN SOCIETY
162
3. In the New Slide dialog box,
double-click on the Blank
AutoLayout
The Slide is blank, but it still
contains the background including
the vertical graphic. (Key on the
left)
3.5 Creating an Object
To create an object using the drawing toolbar, the following steps apply:
1. From the Drawing toolbar, click on the drawing tool that you
intend to use.
2. Move the mouse pointer to where you want to begin drawing the
object. The mouse pointer changes to a crosshair.
3. Drag the crosshair until the object is the desired shape and size.
4. Release the mouse button. The object is completed and is
automatically selected.
Figure 4.1: Drawn objects
SELF ASSESSMENT EXERCISE 4
Creating Objects
What you do Comments/Prompts
1. From the Drawing toolbar,
select the Rectangle tool
2. Place the mouse pointer in the
upper-left portion of the blank
slide
The mouse pointer changes to a crosshair.
You will use the crosshair to draw
a rectangle.

CIT101 COMPUTERS IN SOCIETY
163
3. Using Figure 4.1 as a guide,
drag diagonally to create a
rectangle displayed. Release the mouse button
As you drag, an outline of the rectangle is shown.
The rectangle is completed and
filled.
4. Select the Line tool
Selecting a tool deselects the
object. Clicking anywhere outside
of the object also deselects the
object.
5. Please the crosshair below the rectangle
The mouse pointer changes to a
crosshair whenever a drawing tool
is selected.
6. Press: <Shift> To constrain the angle as you draw.
7. Drag across the slide to draw a
horizontal line
8. Release the mouse button
9. Release <Shift> The rectangle is deselected and the
new drawn object is selected.
The line is complete.
10. Select the Oval tool. Place the
mouse pointer on the bottom
right the slide below the line
11. While pressing <Shift>, drag
diagonally to draw a circle.
Release the mouse button,
and then release <Shift>
The circle is completed and filled.
4.0 CONCLUSION
For permanent storage, a presentation must be saved to some location,
such as hard drive or a floppy disk.
5.0 SUMMARY
You learned here how to save a presentation and also name a
presentation using PowerPoint.
6.0 TUTOR-MARKED ASSIGNMENT
Create a different presentation following the guidelines in 1.6.
Save the presentation as Presentation 4. Run the slide show. Close the
presentation.
CIT101 COMPUTERS IN SOCIETY
164
7.0 REFERENCES/FURTHER READING
Ayo, S. K. (1988). Computer Literacy, Operating System and
Application (2nd
ed.). McKay Consult.

CIT101 COMPUTERS IN SOCIETY
165
UNIT 5 USING AUTOSHAPES
CONTENTS 1.0 Introduction
2.0 Objectives 3.0 Main Content
3.1 Using AutoShapes
3.2 Using Clip Art
3.2.1 Adding a Clip Art Graphic to a Slide
3.3 Using WordArt 3.3.1 Selecting a Style and Adding Text
3.3.2 The WordArt Toolbar 4.0 Conclusion
5.0 Summary
6.0 Tutor-Marked Assignment 7.0 References/Further Reading
1.0 INTRODUCTION You will learn in this unit that AutoShapes button provides access to
over 150 shapes. You will learn how to use AutoShapes button in this
unit.
2.0 OBJECTIVES At the end of this unit, you should be able to:
• use AutoShapes
• select a clip art Autolayout
• select a WordArt “Style Type” and add text.
3.0 MAIN CONTENT
3.1 Using AutoShapes The AutoShapes button provides access to over 150 shapes. When you
click on the AutoShapes button, a pop-up menu is displayed with nine
choices. If you choose a submenu choice and a shape, the mouse pointer
shape changes into a crosshair, enabling you to draw that particular
shape.
To draw an AutoShape
1. Click on the AutoShape button.
2. Choose a submenu choice and a shape.
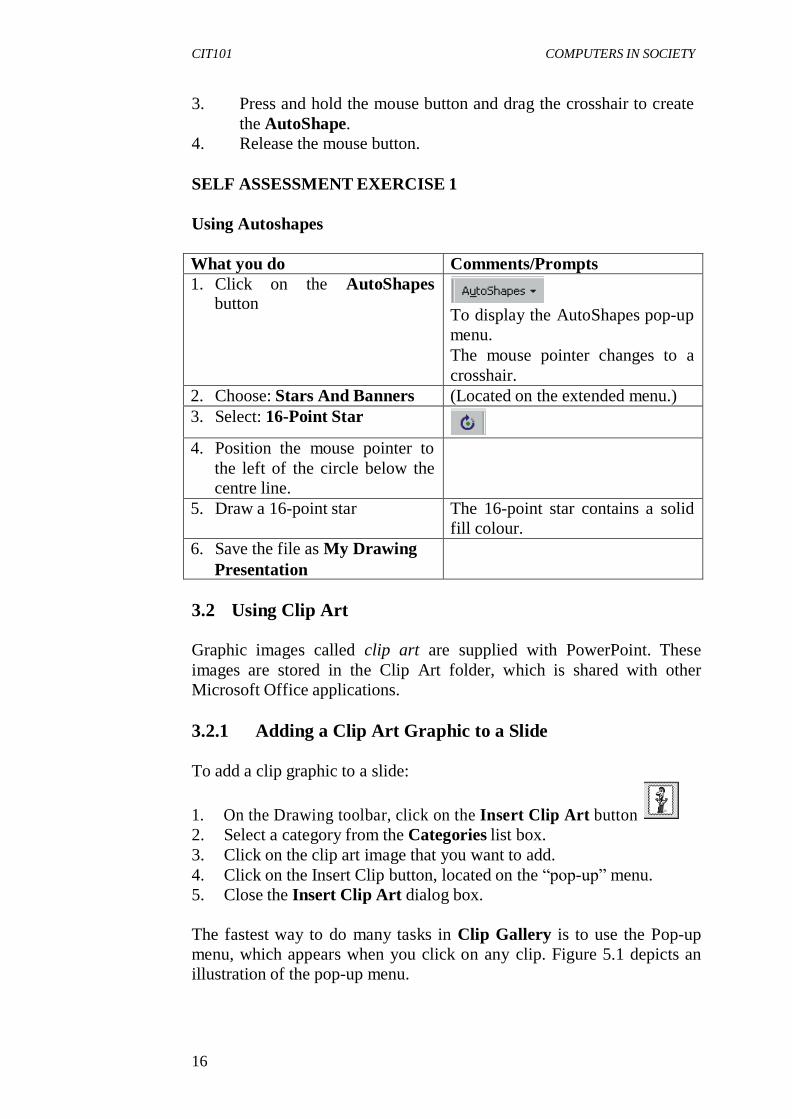
CIT101 COMPUTERS IN SOCIETY
166
3. Press and hold the mouse button and drag the crosshair to create
the AutoShape.
4. Release the mouse button.
SELF ASSESSMENT EXERCISE 1
Using Autoshapes
What you do Comments/Prompts
1. Click on the AutoShapes button
To display the AutoShapes pop-up
menu.
The mouse pointer changes to a
crosshair.
2. Choose: Stars And Banners (Located on the extended menu.)
3. Select: 16-Point Star
4. Position the mouse pointer to
the left of the circle below the
centre line.
5. Draw a 16-point star The 16-point star contains a solid
fill colour.
6. Save the file as My Drawing
Presentation
3.2 Using Clip Art
Graphic images called clip art are supplied with PowerPoint. These
images are stored in the Clip Art folder, which is shared with other
Microsoft Office applications.
3.2.1 Adding a Clip Art Graphic to a Slide
To add a clip graphic to a slide:
1. On the Drawing toolbar, click on the Insert Clip Art button
2. Select a category from the Categories list box.
3. Click on the clip art image that you want to add.
4. Click on the Insert Clip button, located on the “pop-up” menu.
5. Close the Insert Clip Art dialog box.
The fastest way to do many tasks in Clip Gallery is to use the Pop-up
menu, which appears when you click on any clip. Figure 5.1 depicts an
illustration of the pop-up menu.

CIT101 COMPUTERS IN SOCIETY
167
Insert a clip button
Preview clip button
Add clip to category button
Find similar clips button
Figure 5.1: The Clip Art Pop-Up Menu
SELF ASSESSMENT EXERCISE 2
Selecting a Clip Art AutoLayout: Viewing and Inserting a Clip art
Picture
Before you begin: Ensure that PowerPoint is open and that My Drawing
Presentation is open.
What you do Comments/Prompts
1. Move to Slide 4
2. Add a new slide
3. Double-click on the Clip Art
& Text AutoLayout
4. Add the title Relocation Team
5. Double-click on the “Double
click to add clip art”
placeholder
To display the Microsoft Clip
Gallery dialog box.
6. If necessary, select the Pictures
tab
To view the available clip art
categories.
7. In the Search For Clips text
box, select the existing text and
type: work
To search for clip art relating to
work.
8. Press: <Enter> To display work-related clip art.
9. Scroll through the clip art and
locate the image of two people
shaking hands
10. Click on the picture
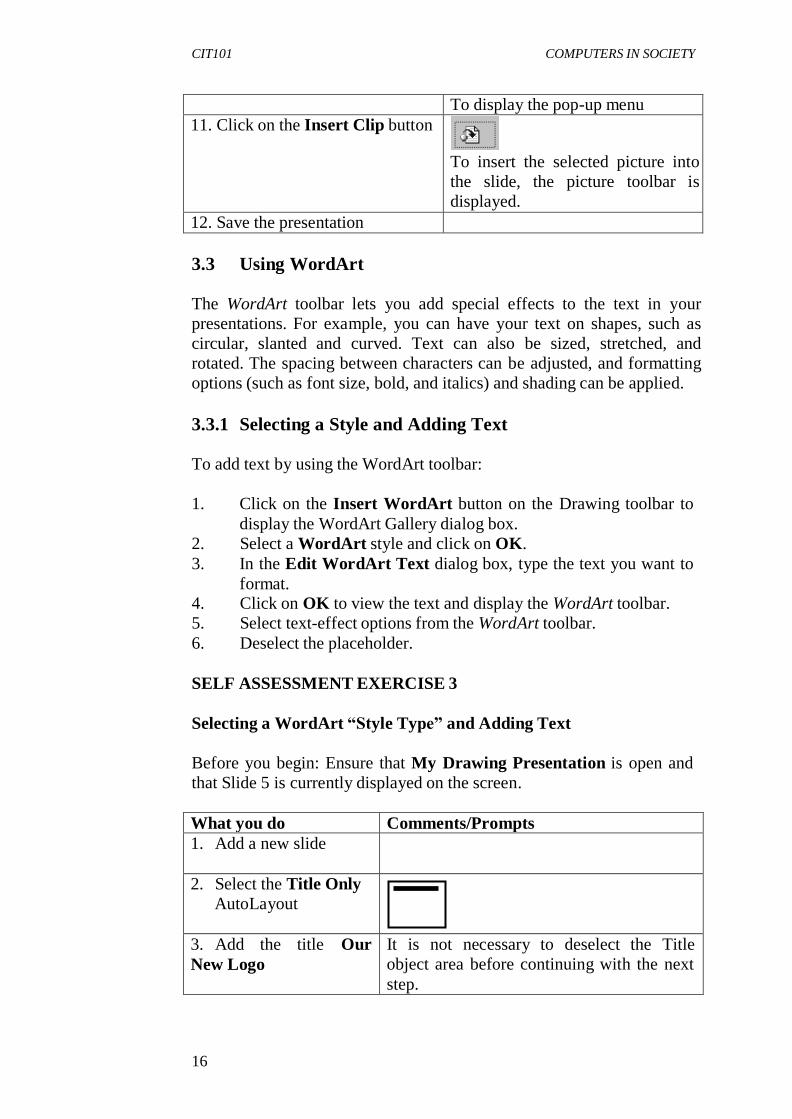
CIT101 COMPUTERS IN SOCIETY
168
To display the pop-up menu
11. Click on the Insert Clip button
To insert the selected picture into
the slide, the picture toolbar is
displayed.
12. Save the presentation
3.3 Using WordArt
The WordArt toolbar lets you add special effects to the text in your
presentations. For example, you can have your text on shapes, such as
circular, slanted and curved. Text can also be sized, stretched, and
rotated. The spacing between characters can be adjusted, and formatting
options (such as font size, bold, and italics) and shading can be applied.
3.3.1 Selecting a Style and Adding Text
To add text by using the WordArt toolbar:
1. Click on the Insert WordArt button on the Drawing toolbar to
display the WordArt Gallery dialog box.
2. Select a WordArt style and click on OK.
3. In the Edit WordArt Text dialog box, type the text you want to
format. 4. Click on OK to view the text and display the WordArt toolbar.
5. Select text-effect options from the WordArt toolbar.
6. Deselect the placeholder.
SELF ASSESSMENT EXERCISE 3
Selecting a WordArt “Style Type” and Adding Text
Before you begin: Ensure that My Drawing Presentation is open and
that Slide 5 is currently displayed on the screen.
What you do Comments/Prompts
1. Add a new slide
2. Select the Title Only
AutoLayout
3. Add the title Our
New Logo
It is not necessary to deselect the Title
object area before continuing with the next
step.

CIT101 COMPUTERS IN SOCIETY
169
4. Click on the Insert
WordArt
button
To display the WordArt Gallery dialog
box.
5. Observe the WordArt
Gallery dialog box
You can select one of the 30 WordArt
styles.
6. Select the WordArt
style of your
choice
7. Click on OK To accept the WordArt style and display the
Edit WordArt Text dialog box.
8. Type: Relocation
Team
The text is displayed in the Edit WordArt Text dialog box.
9. Click on OK To display the text inside the slide
placeholder. The WordArt toolbar is displayed.
10. Deselect the WordArt
placeholder
To view the slide. The WordArt toolbar is
no longer visible.
longer visible.
11. Observe the slide The WordArt text is centred on the slide,
but is not very large.
not very large.
12. Click on Relocation
Team
To select the object. The WordArt toolbar is
displayed.
3.3.2 The WordArt Toolbar
The WordArt toolbar enables you to create and edit text effects by using
the available options. Tools on the Drawing toolbar may also be used to
change the effect. Figure 5.2 below, is a picture of the WordArt toolbar.
The buttons used in this section have been labelled.
Insert Word Art Word Art Shape
Format Word Art
Word Art Gallery
Figure 5.2: The WordArt Toolbar
CIT101 COMPUTERS IN SOCIETY
170
What you do Comments/Prompts
1. Verify that the WordArt text is
selected
2. Use the corner resize handles
to enlarge the object
proportionally
(Place the mouse pointer over a
corner resize handle and drag away
from the object to enlarge it.)
3. On the Word Art toolbar, click on the WordArt Gallery button
To display the WordArt
Gallery dialog box.
4. Select the style of your choice
5. Click on OK To apply a new Word Art style
6. If necessary, move the object to the centre of the slide
7. On the Word Art toolbar, click
on the Word Art Shape button
To display a palette of shapes.
8. Select a shape
To apply the new Word Art shape.
SELF ASSESSMENT EXERCISE 3
Running your Slide Show
What you do Comments/Prompts
1. Select Slide 1
2. Press: <F5> When you have finished running
the slide show, close the
presentation.
3. Click on the left mouse button to move to the next slide
4. Repeat step 3 above until the
slide show comes to an end
5. Exit PowerPoint
4.0 CONCLUSION
Graphic images, called clip art, which are supplied with PowerPoint are
stored in the Clip Art folder.

CIT101 COMPUTERS IN SOCIETY
171
5.0 SUMMARY You can now use AutoShapes and run slide shows.
6.0 TUTOR-MARKED ASSIGNMENT 1. Create a different presentation following the guidelines in 1.6.
2. Save the presentation as Presentation 5. Run the slide show.
Close the presentation.
7.0 REFERENCES/FURTHER READING Ayo, S. K. (1988). Computer Literacy, Operating System and
Application (2nd
ed.). McKay Consult.

CIT101 COMPUTERS IN SOCIETY
172
MODULE 6
Unit 1 Networking, Internet and E-mail
Unit 2 Internet
Unit 3 Further Practical Work on the Internet Unit 4 Electronic Mail
Unit 5 Reading and Responding to an E-Mail Message
UNIT 1 NETWORKING, INTERNET AND E-MAIL
CONTENTS
1.0 Introduction
2.0 Objectives 3.0 Main Content
3.1 Terminology 3.1.1 Networks
3.2 Local Area Network (LAN’s)
3.2.1 Network Components 3.3 Wide Area Networks (WAN’s)
3.4 Overview of the Internet and the World Wide Web 3.4.1 What is the Internet?
3.4.2 What is the World Wide Web?
3.5 Browser 3.6 Hyperlinks
3.7 Home Pages
4.0 Conclusion
5.0 Summary 6.0 Tutor-Marked Assignment
7.0 References/Further Reading
1.0 INTRODUCTION
An interconnected set of two or more computers with data
communication devices may be called a computer network. The wired
arrangement consists of a communication software (Network Operating
System), computer systems (Nodes), Network interface cards
(connectors) and network cable (medium).
2.0 OBJECTIVES
At the end of this unit, you should be able to:
• state the principles of Networking
• explain Local Area Network

CIT101 COMPUTERS IN SOCIETY
173
• explain Wide Area Network
• explain what internet is
• explain what is World Wide Web.
The objective of this section of Module 6 is to give you a brief
overview of the principles of Networking.
3.0 MAIN CONTENT
3.1 Terminology
You will hear talk of LAN, MAN, WAN and WWW. This is often
confusing, but let’s attempt to define the terms:
LAN Stands for Local Area Network and refers to a network set
up in one building.
MAN is a Metropolitan Area Network and refers to two LANs
linked between two buildings in the same metropolis.
WAN is a Wide Area Network and refers to LANs or MANs
that are connected between cities.
WWW is a World Wide Web and refers to the linking up the world’s
LANs, MANs and WANs to form a web of networks that cover the
earth.
3.1.1 Networks
When two or more computers are interconnected this is generally
referred to as a network. Networks have become increasingly popular
over the last decade. There are a various reasons for this phenomenon.
The two main reasons are firstly convenience, and secondly cost
savings.
Networks can be used to transfer information between computers,
even if they use different operating systems. A network can also be used
to send data to remote storage devices and printers, without having to
send all of the signals through an expensive mainframe computer.
Generally networks provide an inexpensive way to interconnect any
number of systems and make communication and sharing of data quick
and easy.
There are two main categories of networks used in the industry, which
are LAN’s (Local Area Network) and WAN’s (Wide Area Network).
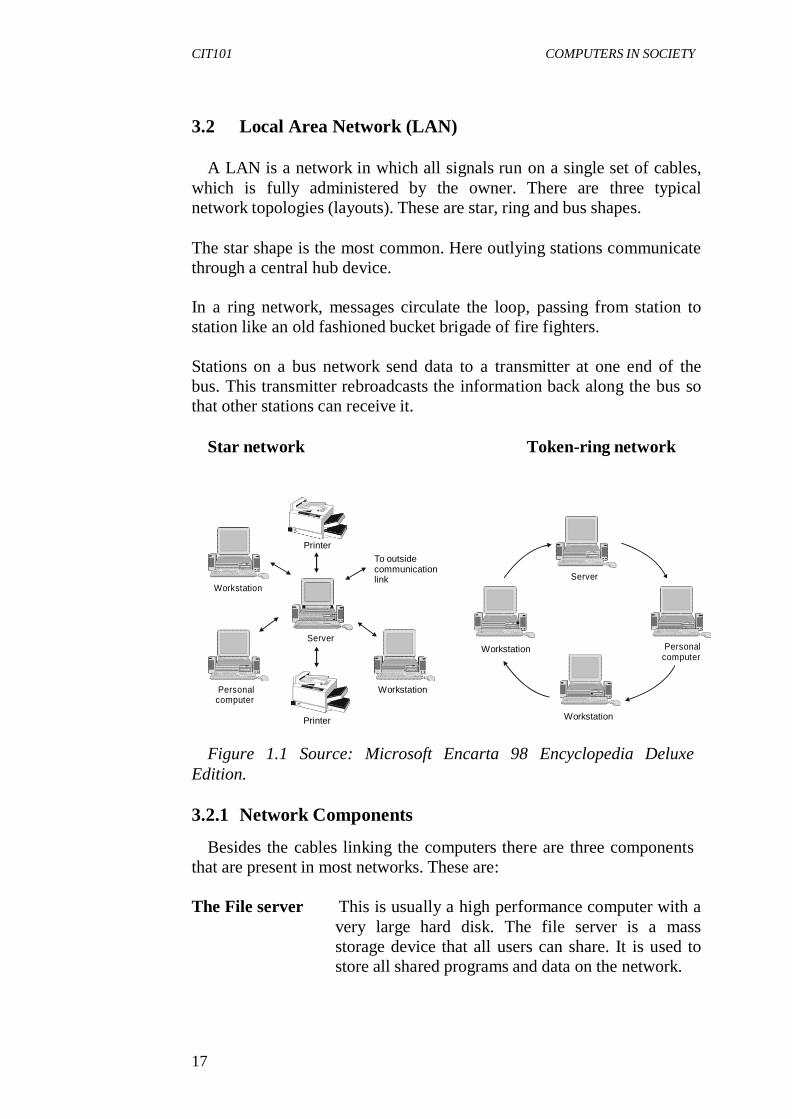
CIT101 COMPUTERS IN SOCIETY
174
3.2 Local Area Network (LAN)
A LAN is a network in which all signals run on a single set of cables,
which is fully administered by the owner. There are three typical
network topologies (layouts). These are star, ring and bus shapes.
The star shape is the most common. Here outlying stations communicate
through a central hub device.
In a ring network, messages circulate the loop, passing from station to
station like an old fashioned bucket brigade of fire fighters.
Stations on a bus network send data to a transmitter at one end of the
bus. This transmitter rebroadcasts the information back along the bus so
that other stations can receive it.
Star network Token-ring network
Workstation
Printer To outside communication link
Server
Server Workstation Personal
computer
Personal
computer
Printer
Workstation
Workstation
Figure 1.1 Source: Microsoft Encarta 98 Encyclopedia Deluxe
Edition.
3.2.1 Network Components
Besides the cables linking the computers there are three components
that are present in most networks. These are:
The File server This is usually a high performance computer with a
very large hard disk. The file server is a mass
storage device that all users can share. It is used to
store all shared programs and data on the network.

CIT101 COMPUTERS IN SOCIETY
175
Workstations These are the computers on a network that users
work on. Each computer has a network card
installed in it, which allows the machine to receive
and transmit messages on the network cable.
Shared equipment All users attached to a network can also make use
of certain shared equipment.
It doesn’t just end with a single LAN of course. Some companies
prefer to keep separate workgroups (departments), which is
accomplished by giving each workgroup their own LAN.
3.3 Wide Area Networks (WAN’s)
LANs or MANs that are connected between cities are known as
WAN’s. Why do we need WAN’s?
A LAN only has a range of approximately one-kilometre. Even if it
could reach further, the cost of laying several hundred kilometres of
coaxial cable from one city to another is prohibitively expensive. A
better way to link remote computers together is to use a cable network
that is already in place and has been carrying long distance messages for
years – the telephone system.
To use the telephone system you first need to convert your electronic
signal into something more suitable for the phone lines. Telephone
transmits sounds, not the radio frequency signals that pulse around a
LAN. To do the conversion a device called a Modem is used. The name
is a contraction of Modulator-Demodulator. All that means is that the
device takes a series of electronic signals and converts them into pulses
of sound, which can be sent along the telephone lines.
A prime example of WAN is the Internet. The Internet could be
regarded as the largest of all WAN’s. It’s a global network of LAN’s all
connected together using the international telephone system. So you can
now send messages and data to people in Finland, China or any other
country that you can phone.
3.4 Overview of the Internet and the World Wide Web
3.4.1 What is the Internet?
The Internet is a global network of computers that are able to
communicate with one another, using a common language called HTML
(Hypertext Mark-up Language). These computers are connected

CIT101 COMPUTERS IN SOCIETY
176
worldwide and can be accessed from anywhere in the world. All you
need is a modem and the software to be able to get onto the internet.
The internet is similar to the international telephone system – no one
owns or controls the whole system, but it is connected in a way that
makes it function as a single big network.
3.4.2 What is the World Wide Web?
Millions of people have Internet access today. The World Wide Web
(the web or www) gives you a graphical, easy-to-navigate interface for
looking at documents on the Internet. These documents, as well as the
links between them, comprise a “web” of information.
The web lets you jump or “hyperlink” from one web page to other pages
on the web. You can think of the web as a big library. Web sites are like
the books, and web “pages” are like specific pages in the books. Pages
can contain news, images, movies, sounds, and 3D worlds – just about
anything.
Figure 1.2: Hyperlinks
These pages can be located on computers anywhere in the world. When
you are connected to the web, you have equal access to information
worldwide; there are no additional long-distance charges or restrictions.
Over the last few years, the web has grown to include a vast array of
information – everything from stock quotes to job opportunities, bulletin
boards to news, previews of movies, literary reviews, and games.
People often talk about “surfing” the web and visiting new sites.
“Surfing” means following hyperlinks to pages and subjects you may
never have heard about, meeting new people, visiting new places, and
learning about things from all over the world.
Remember that the Internet is not just about corporate information.
Because it is very easy to publish on the web, many individuals have set
up personal “home pages,” pages about themselves and their interests,

CIT101 COMPUTERS IN SOCIETY
177
pictures of themselves and more. Some even have pointers to what they
are wearing in the office that day, or their pet.
As mentioned earlier you can think of the World Wide Web as a big
library on the Internet. Web “sites” are like the books in the library and
web “pages” are like specific pages in the books. A collection of web
pages is known as a web site. You start your journey through the web
from a particular web site.
3.5 Browser
A “browser” is a software tool that you use to look at web pages. As
you learned, pages on the web are interconnected. You connect to other
pages by clicking text or graphics that are called hyperlinks.
3.6 Hyperlinks
Hyperlinks are underlined or bordered words and graphics that have
web addresses (also know as URL – Universal Resource Locator)
embedded in them. By clicking a hyperlink, you jump to a particular
page in a particular web site. You can easily identify a hyperlink.
Hyperlink text is a different colour from the rest of the text in a web site.
Surfing the web means following hyperlinks to different web pages. As
you surf around the web, you may find pages you have read about or
seen mentioned on television. Have fun surfing the web to learn about
subjects you are interested in and visiting new sites all over the world.
3.7 Home Pages
A “home page” is the starting point for a web site. It is something like
the cover page or the Table of Contents of a book.
Figure 1.3: Examples of Home Pages

CIT101 COMPUTERS IN SOCIETY
178
4.0 CONCLUSION
Computer Network can be categorised into two: wired network and
wireless network. The wireless network makes use of radio waves to
transmit data or information from one node to another.
5.0 SUMMARY
Here you learned important terms like LAN, MAN and WWW. You
will learn more about them in this module.
6.0 TUTOR-MARKED ASSIGNMENT
Briefly discuss the benefits of LAN and WAN.
7.0 REFERENCES/FURTHER READING
Ayo, C. K. (2001). Information Technology: Trends and Applications
in Science and Business. Concept Publications.

CIT101 COMPUTERS IN SOCIETY
179
UNIT 2 INTERNET
CONTENTS
1.0 Introduction
2.0 Objective 3.0 Main Content
3.1 Internet Addresses
3.2 Internet Service Providers (ISP) 3.3 Internet Terminology
3.4 Exercise 1: Examining the Start Page of Academy of Learning
4.0 Conclusion 5.0 Summary
6.0 Tutor-Marked Assignment
7.0 References/Further Reading
1.0 INTRODUCTION
There are local, national and international networks and most major
networks are interconnected. The Internet is a global network of
interconnected computer networks.
2.0 OBJECTIVE
At the end of this unit, you should be able to:
• work on the internet.
3.0 MAIN CONTENT
3.1 Internet Addresses
All home pages have what is called an Internet Address. It looks like
this: http://www.ananzi.com. You can go to this page directly if you use
this address in the address box.
The address box shows the address, or technically speaking, the URL of
the page that you are currently viewing in your browser. URL stands for
Universal Resource Locator, which is simply another word for address.
In our example home page, the address used is:

CIT101 COMPUTERS IN SOCIETY
180
Address:
Figure 2.1 URL Address
3.2 Internet Service Providers (ISP)
These are the people or companies who control the access to the web.
A person/user has to sign on with an ISP before he can get onto the
Internet. Normally a monthly or weekly fee is payable but there are also
contracts which reduce the monthly weekly costs.
There are many ISP available to user worldwide, you need to investigate
them and decide on which one you wish to subscribe to based on user
acceptability of the term. Once you have subscribed they help you set up
your Internet. They give you a POP address from which you can receive
e-mail and get connected to the web. Once you are set up you can then
get onto the Internet.
3.3 Internet Terminology
When working with the Internet, certain terms and terminologies are
commonly used to describe processes and concepts. A vast list of such
terminology is available. Table 1 below describes a few of the more
commonly used of these terms and terminologies.
Table 1
Terminology Definition
Access
Privileges
The privilege to access and make changes to
folders.
Address The unique code assigned to the location of a
file in storage, a device in a system or network,
or any other data source on a network.
Attachments Multimedia files that are ‘attached’ to an E- mail; can be text, graphics, sound, video,
spreadsheet, database or even an entire
application.
Baud The number of signalling elements that can be
transmitted per second on a circuit. Older term
being replaced by bps-bits per second
Bit The smallest amount of information that can be transmitted. A combination of bits can indicate
an alphabetic character, a numeric digit, or
perform signalling, switching or other functions.
Browser Application software that gives you a graphical
interactive interface for searching, finding,

CIT101 COMPUTERS IN SOCIETY
181
viewing and managing information over a network.
BBS (Bulleting
board system)
An electronic bulleting board where users can
leave messages. Many BBS’s are on a
membership basis.
Terminology Definition
Chat “Chat” is a term used to describe real-time
conferencing. For example, IRC,
“WebChat”, prodigy and aol chat rooms are
all examples of “chat”.
Client A computer that uses the services of
another computer (a server or host). If you
have a PC on your desk and you retrieve
information from the World Wide Web, your
PC is a client of the Web server to which it is
connected.
Cybercafe A café or bar allowing customers to
explore the World Wide Web whilst having a
drink or snack, usually charged per half-hour
of usage.
Cyberspace Originally used in “Neuromancer,”
William Gibson’s novel of direct brain-
computer networking referring to the
collective realms of computer-aided
communication.
Database A multi-user collection of information. Often supports random access selectivity and
multiple “views” or levels of abstraction of
the underlying data.
Dedicated Line A private line leased from a
telecommunications carrier.
Download To transfer programs or data from a
computer to a connected device, usually
from a server to a personal computer.
e-mail (Electronic
Mail)
Messages sent on the Internet to a particular individual.
File Server A computer that provides access to files for remote users (clients).
Firewall A firewall sits at the gateway of a private
network and only lets certain types of
information in from and out to the network.
Freeware Software allowed to be distributed free by
the author, but often with certain conditions
applying (i.e. the software cannot be
modified etc).

CIT101 COMPUTERS IN SOCIETY
182
Home Page On the World Wide Web, this is the main
navigation page owned by a company,
organisation, university, individual etc, from which hyperlinks are made to other pages on
the site (or other sites).
Terminology Definition
HTML (Hyper Text
Markup Language)
A “tag” language in which web pages are
formatted and web information is
distributed.
HTTP (Hypertext
Transfer Protocol)
The method by which documents are
transferred from the host computer or server
to browsers and individual users.
Hyperlink In World Wide Web pages, hyperlinks are highlighted text or images which, when
selected (usually by clicking the mouse
button), follow a link to another page.
Hyperlinks can also be used to
automatically download other files as well
as sounds and video clips.
MoDem
(MODulator-
DEModulator)
End of user computer interface that enables
digital data to be transmitted over analog
transmission facilities like phone lines.
Multimedia Computer systems that integrate audio,
video and data.
Network A system of inter-related elements that are interconnected in a dedicated or switched
linkage to provide local or remote
communication (of voice, video, data, etc.)
and to facilitate the exchange of information
between users with common interests.
Newsgroup A distributed bulletin board system about a
particular topic. Usenet news is a system
that distributes thousands of newsgroups to all parts of the Internet.
Page A hypermedia document on the web.
PKZIP PKZIP is a shareware compression utility
for PCs. A program called PKUNZIP is
used to decompress.
“POP” (point of
presence)
A “pop” is an Internet service provider’s
dial-up connection for modem users, used
particularly to describe local connections so
modem users don’t have to dial long distance. For example, a particular ISP
CIT101 COMPUTERS IN SOCIETY
183
might be based in Johannesburg, but have “POP’s” in Cape Town and Durban.
Server In a network, a host data station that
provides facilities to other stations.
Site Address location of a server on the Internet.
Terminology Definition
UNZIP To unzip a file means to decompress, or
expand a file that has been made smaller
using a compression utility.
URL (Uniform
Resource Locator)
The form of the site address that reveals the name of the server where the site’s files
are stored, the file’s directory path, and its
file name.
WWW (World
Wide Web)
Internet system for world-wide hypertext linking of multimedia documents, making
the relationship of information that is
common between documents easily
accessible and completely independent of
physical location.
ZIP When one “compresses” (i.e. makes a smaller but equal copy) a file using “pkzip”,
the resulting file is called a “zip” file. It
usually ends with the file extension “zip”.
3.4 Exercise 1: Examining the Start Page of Academy of
Learning
Objective: To open the Explorer, examine and change the start page
Before you begin: Ensure that you have the Windows desktop
displayed on your screen.
What you do Comments/Prompts
1. Locate and double-click on
your browser icon, which is
found on the desktop
The Internet Explorer is
launched and the start page is
displayed as shown below.
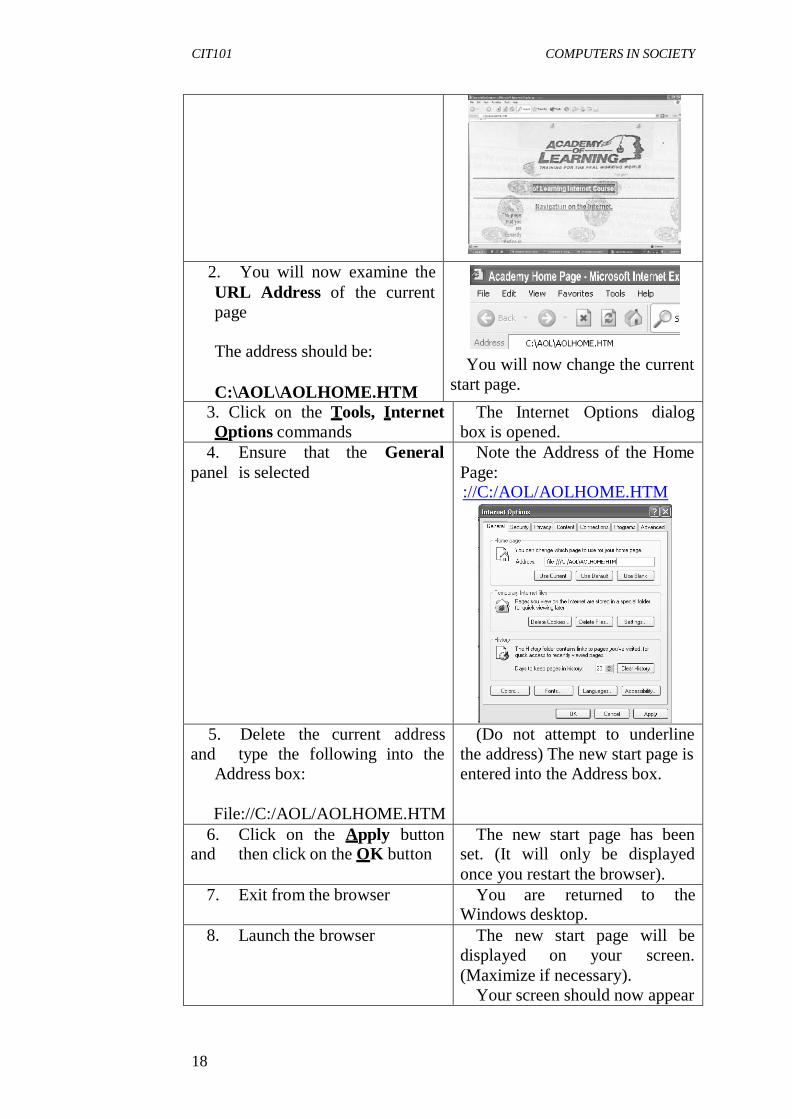
CIT101 COMPUTERS IN SOCIETY
184
2. You will now examine the
URL Address of the current
page
The address should be:
C:\AOL\AOLHOME.HTM
You will now change the current
start page.
3. Click on the Tools, Internet
Options commands
The Internet Options dialog
box is opened.
4. Ensure that the General
panel is selected
Note the Address of the Home
Page: ://C:/AOL/AOLHOME.HTM
5. Delete the current address
and type the following into the
Address box:
File://C:/AOL/AOLHOME.HTM
(Do not attempt to underline
the address) The new start page is
entered into the Address box.
6. Click on the Apply button and then click on the OK button
The new start page has been set. (It will only be displayed
once you restart the browser).
7. Exit from the browser You are returned to the Windows desktop.
8. Launch the browser The new start page will be
displayed on your screen.
(Maximize if necessary).
Your screen should now appear

CIT101 COMPUTERS IN SOCIETY
185
similar to the example shown on
the next page.
9. Click on the Tools, Internet
Options command.
10.
panel is selected
11. Delete the current address
and type the following into the Address box:
file://C:\AOLHOME.HTM
12. Click on the Apply button
and
The Internet Options dialog is
opened
Note the Address of the Home
page:
file:///C:/AOL/AOLHOME1.HTM
Next you will change the start
page back to the original home
page.
The new start page is entered
into the Address box
The new start page has been set.
13. Exit from the browser You are returned to the
Windows desktop.
14. Launch the browser The new start page will be
displayed on your screen.
Your screen should now appear
similar to the example shown on the next page.
15. Exit from the browser You are returned to the
Windows desktop.

CIT101 COMPUTERS IN SOCIETY
186
4.0 CONCLUSION
The Internet is used for
• Information browsing
• electronic mail (e-mail)
• Newsgroups
• File transfer
• Access to and use of other computers.
5.0 SUMMARY
The advantages and terminology of global network (Internet) were
outlined.
6.0 TUTOR-MARKED ASSIGNMENT
Discuss briefly the benefits Internet offers the Nigerian society as a
member of current global village.
7.0 REFERENCES/FURTHER READING
French, C. S. (2000). Computer Science (5th
ed.). Gosport, Hants:
Ashford Colour Press.

CIT101 COMPUTERS IN SOCIETY
187
UNIT 3 FURTHER PRACTICAL WORK ON THE
INTERNET
CONTENTS
1.0 Introduction
2.0 Objectives 3.0 Main Content
3.1 Exercise 2: Navigating the Start Page 3.2 Exercise 3: Links
3.3 Exercise 4: Using the Address Box 3.4 Newsgroups
4.0 Conclusion
5.0 Summary 6.0 Tutor-Marked Assignment
7.0 References/Further Reading
1.0 INTRODUCTION
In this unit you open the Explorer and navigate around the start page.
You will also use some of the links that are located in the start page
before you conclude the unit you will navigate using the address box.
2.0 OBJECTIVES
At the end of this unit, you should be able to:
• open the Explorer and navigate around the start page
• use some of the links located in the start page
• navigate using the address box.
CIT101 COMPUTERS IN SOCIETY
188
3.0 MAIN CONTENT
3.1 Exercise 2: Navigating the Start Page
Objective: To open the Explorer and navigate around the start page
Before you begin: Ensure that you have the Windows desktop
displayed on your screen.
What you do Comments/Prompts
1. Locate and double-click on
your browser icon, which is
found on the desktop
2. Press the down arrow↓ key on
your keyboard
Using the up arrow scroll to the
top of the document.
The down arrow key scrolls you
down the current documents, one
line at a time. You can use the up and down arrow keys to scroll the
current page within your browser
window.
3. Press the <Page Down>
key on your keyboard.
The current document moves
down one screen (page) at a time.
The <Page Up> key moves you up
one screen at a time.
4. Press the <Page Up> key
on your keyboard.
The current document moves up
to the top or start of the current
page.
5. Press the <Ctrl> + <End>
keys on your keyboard.
The current document moves
down to the bottom or end of the
current page.
6. Press the <Ctrl> +
<Home> keys on your
keyboard.
The current document moves up
to the top or start the current page.
Now you will use your mouse to
navigate in the current page.
7. Click on the scroll bar down
arrow at the bottom of the
vertical scroll bar.
The current document moves
down towards the bottom or end of
the current page.
8. Click on the scroll bar up arrow at the top of the vertical
scroll bar.
The current document moves up towards the top or start of the
current page.

CIT101 COMPUTERS IN SOCIETY
189
9. Click on the grey area of the scroll bar. (Between the scroll
bar down arrow and the grey
scroll box)
The current document moves down one screen (page) at a time.
Repeat the process to move back
to the top of the current page.
(Click between the scroll bar up
arrow and the grey scroll box).
10. Exit your browser. You are returned to the desktop.
3.2 Exercise 3: Links
Objective: To open the Explorer and use some of the links located in
the Start Page.
Before you begin: Ensure that you have the Windows desktop
displayed on your screen.
What you do Comments/Prompts
1. Locate and double-click on
your browser icon, which is found
on the desktop.
The Internet Explorer is launched and the
2. Scroll down the Start Page
until the following buttons are
visible.
The following buttons on the
Start Page are displayed.
3. Slide your cursor over the buttons.
As your cursor passes over a hotspot the cursor changes shape:

CIT101 COMPUTERS IN SOCIETY
190
4. When on a hotspot the status
bar displays the URL of the target
document.
The URL (similar to the
following example) is displayed in
the status bar:
5. Scroll to the bottom of the
Start Page.
The following text links are
visible:
What you do Comments/Prompts
6.
buttons.
As your cursor passes over a
text hotspot the cursor changes
shape as shown above. To activate a link, simply
position your cursor on the desired
hotspot and click your primary
mouse button.
We will activate the Company
Profile link.
7.
Company Profile button and
click your mouse once.
The following page will be
displayed in your browser. You
have just followed a link to
another web page.
Note the new URL address
displayed in the Address box.

CIT101 COMPUTERS IN SOCIETY
191
3.3 Exercise 4: Using the Address Box
Objective: To navigate using the address box
Before you begin: Ensure that your Internet Browser is open and that the
Start Page is displayed on the screen.
What you do Comments/Prompts
1. Click on the text entry in the
URL address box
The entry is selected.
2. Type: file://c:\aol\cartoon.htm
Press: <Enter>
The following age is loaded
3. Click on the text entry in the
URL address box
The entry is selected
4. Type: ://c:\aol\aolhome.htm Press: <Enter>
The Home Page is loaded
5. Close Internet Explorer
CIT101 COMPUTERS IN SOCIETY
192
3.4 Newsgroups
The next area of the Internet that we will be considering in this course,
is of Newsgroups. The area on the Internet that comprises thousands
newsgroups is known as the Usenet.
A Newsgroup is basically an electronic bulletin board where messages
are left (similar to e-mail – about which you will learn more in the
second part of this course) for others to see and respond to if necessary.
It is here that we have two-way communication. For example, you may
have a question regarding your PC that nobody (that you know) can help
you resolve. By using a newsgroup you can post the question and
receive replies from anywhere in the world.
Newsgroup messages are stored on Internet servers, called News
Servers, which are located throughout the world. Each Internet Service
Provider (ISP) supplies a news server for use by all of its subscribers.
The news server is divided into categories with each category being a
newsgroup and each newsgroup having links to other servers on the
Internet that contains the same category or newsgroup.
When you post a message to a newsgroup, it is posed onto your ISP’s
news server. When you view the messages in a newsgroup, the server
automatically activates the links and scans the other servers for
messages in the requested category. When you look at a list of articles in
a newsgroup you can see each message header, when the relevant header
is activated (double-clicked on) a connection with the appropriate server
is made and the message is displayed in your browser window.
The newsgroups can be accessed either from links in the Web pages or
from an integrated news browser which forms part of your Web
browser.
4.0 CONCLUSION
Here you opened the Explorer and carried out stipulated exercises.
5.0 SUMMARY
An important area of internet is the Newsgroups.
6.0 TUTOR-MARKED ASSIGNMENT

CIT101 COMPUTERS IN SOCIETY
193
You wish to send an e-Mail message to a fellow teacher in the same
school where you teach. Attached to this e-mail is a draft copy of an
exam paper that you have set. Explain how you would create the e-mail,
attaching the document containing the exam paper and finally
sending the e-Mail.
7.0 REFERENCES/FURTHER READING French, C. S. (1998). Data Processing and Information Technology.
Gosport, Hants: Ashford Colour Press.
UNIT 4 ELECTRONIC MAIL
CONTENTS
1.0 Introduction
2.0 Objective
3.0 Main Content 3.1 Electronic Mail
3.1.1 Microsoft Outlook – Inbox 3.2 Creating an E-Mail Message
3.3 Exercise 5: Creating and Sending E-mail
4.0 Conclusion 5.0 Summary
6.0 Tutor-Marked Assignment 7.0 References/Further Reading
1.0 INTRODUCTION

CIT101 COMPUTERS IN SOCIETY
194
Each main user has a “mailbox” which is accessed via a computer
terminal within the system by entering a password. Messages are drawn
to user’s attention when they enter the system.
2.0 OBJECTIVE
At the end of this unit, you should be able to:
• use the electronic mail (e-mail).
3.0 MAIN CONTENT
3.1 Electronic Mail
Electronic mail is a network feature that has no equivalent in
standalone computing. It is one of the most useful features of
networking. Electronic mail (or e-mail) allows users to send messages
and files to selected users or groups of users, while preserving the
privacy of sensitive information.
Another advantage of e-mail is that the person to whom a message is
addressed does not have to be attached to the network, when a message
is sent, to receive it. If a person, who is not attached to the network, is
sent a message, that message will be stored in the e-mail database until
that person attaches to the network.
Electronic mail can also be sent to remote locations via the telephone
system, provided the network software supports this feature. This makes
it easy to communicate with people anywhere in the world quickly and
cheaply. An e-mail message from South Africa to the UK costs about
half of what a fax containing the same message would cost.
On this course you will use the program Microsoft Outlook to learn how
to send mail.
3.1.1 Microsoft Outlook – Inbox
Microsoft Outlook provides an electronic mail tool called the Outlook
Inbox. As you work through this section you will be exposed to the two
basic Outlook operations, that of sending and receiving e-mail from
others in your workgroup.
By default, when Outlook is launched it will display your Inbox, listing
all received electronic mail. Should the Inbox not be the current folder,

CIT101 COMPUTERS IN SOCIETY
195
simply click on the Inbox shortcut, located in the Outlook Shortcuts
group. The following Inbox folder will be displayed.
Figure 4.1: The Inbox Folder
Figure 4.2: Standard Toolbar options available for the Inbox
Folder
Table 1 below: summarises the functions of the available tools.
Tool Function
New Mail Message
Activates the New Message dialog box;
used to create a new mail message.
Prints the active folder or selected items.
Please note that this method of activating print
does not call up the print dialog box. To set
print options, you would need to select File,
Print…
Move to Folder
Enables you to move the selected item or items to a specific folder.

CIT101 COMPUTERS IN SOCIETY
196
Delete
Used to delete items in a folder or the entire folder
Reply
Click on this button if you wish to reply to
the sender only. The Message Reply window
will be displayed.
Reply to All
Click on this button if you wish to reply to
the sender and all recipients of the message.
The Message Reply window will be
displayed.
Send/Receive
This button may be used to check for mail
waiting in your postbox or to send outgoing
mail.
Organize
This feature allows you to organise the
Inbox. You can create rules through which
future information will automatically be
organised, change view and manage junk e- mail messages. this is a new feature in
Outlook 2000.
Address Book
Used to look up e-mail and fax information
when you address messages.
Find a Contact
Used to find information about a contact
stored in the Contacts folder.
Microsoft Outlook
Help
Activates Microsoft Outlook Help.
3.2 Creating an E-Mail Message
The procedure to create an electronic e-mail is as follows:
• The first step is to click on the New Mail Message button located
on the standard toolbar (click on the picture, not the drop-down
arrow).
New Mail Message button

CIT101 COMPUTERS IN SOCIETY
197
• Outlook will display the following Message window with a label
of “Untitled”.
To…button
Cc…
Message
To
Subject box
Figure 4.3: The New Message Window
Study Figure 4.3 carefully.
The cursor automatically goes to the To… box. This is where the e-
mail address/addresses of the recipient/recipients is/are typed.
The Cc… box is used if you want to send the same message to
another person.
The Subject: box is for you to give your message a subject heading.
The box underneath subject is the Message detail box and is used to
write the contents of your message.
• The next step is to address the message. To do this we will select
the name of a recipient from the Post Office list. Click your
primary mouse button on the To button to display the following
Select Names dialog box:

CIT101 COMPUTERS IN SOCIETY
198
Postoffice Address List Subject box
Admin
Student1
Student2
Student3
Figure 4.4: Select Names dialog box
• Change the Address list to display the Post Office Address List
as shown above. When the Address List is changed, all available
recipients will be displayed in the Recipient List window.
• Select the name(s) of the individual(s) to receive your message
by double clicking on the name(s) displayed in the list of
recipients. (In Exercise 5 later in this module, you will send the
first message to Student2.)
• The name(s) of the chosen recipient(s) will display in the
Message Recipients window. Next click on the OK button. This
will close the Select Names dialog box and place the recipient
name(s) in the window of the new message.
• Type a subject heading in the Subject window. you will notice
that the Subject is used as the message title in the title bar.
• Enter the message details into the message window. The message
window will appear similar to Figure 4.5 below:
Figure 4.5: Completed message
• To send the message, click on the Send button located in the
message window
CIT101 COMPUTERS IN SOCIETY
199
Send button
3.3 Exercise 5: Creating and Sending E-mail
Objective: To create and send an e-mail message
Before you begin: Launch Outlook 2000. (In the first few steps of the
exercise you will be guided to select the user profile, Student1 and to
Logon as Student1)
What you do Comments/Prompts
1. When prompted select the
Profile
Name: Student1
Click on OK
2. In the Microsoft Mail logon
dialog box logon as:
Mailbox: Student
Password: Password Click on the OK button.
The Inbox folder for
Student1 will be displayed. (If
it is not, click on the Inbox
shortcut.
3. Click on the New Message
button.
The following message
window will appear.
4. Click on the To… button The following Select Names
dialog box will be displayed.
5. Click on Show Names
from the: drop-down arrow and
click
on the Post Office Address
List Option if Necessary.
The Post Office Address List is
selected and all available recipients
should appear in the Recipient List
window.
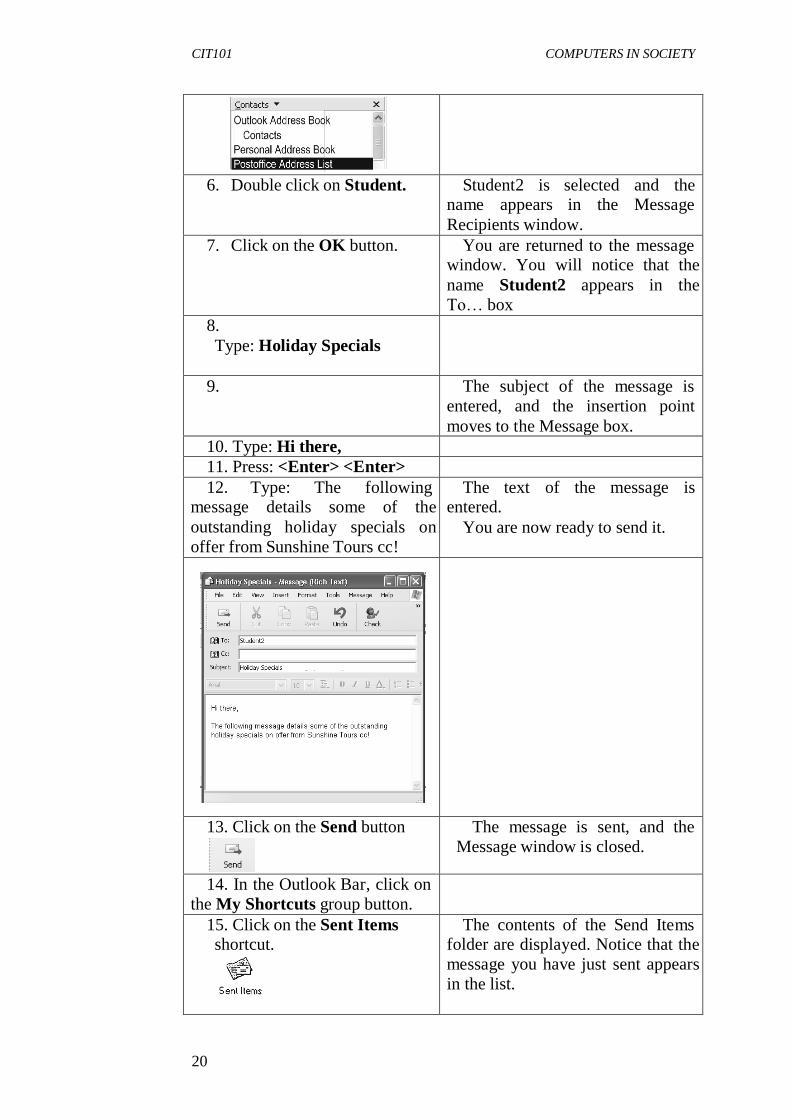
CIT101 COMPUTERS IN SOCIETY
200
6. Double click on Student. Student2 is selected and the name appears in the Message
Recipients window.
7. Click on the OK button. You are returned to the message window. You will notice that the
name Student2 appears in the
To… box
8.
Type: Holiday Specials
9. The subject of the message is
entered, and the insertion point
moves to the Message box.
10. Type: Hi there,
11. Press: <Enter> <Enter>
12. Type: The following message details some of the
outstanding holiday specials on
offer from Sunshine Tours cc!
The text of the message is entered.
You are now ready to send it.
13. Click on the Send button The message is sent, and the
Message window is closed.
14. In the Outlook Bar, click on
the My Shortcuts group button.
15. Click on the Sent Items shortcut.
The contents of the Send Items folder are displayed. Notice that the
message you have just sent appears
in the list.
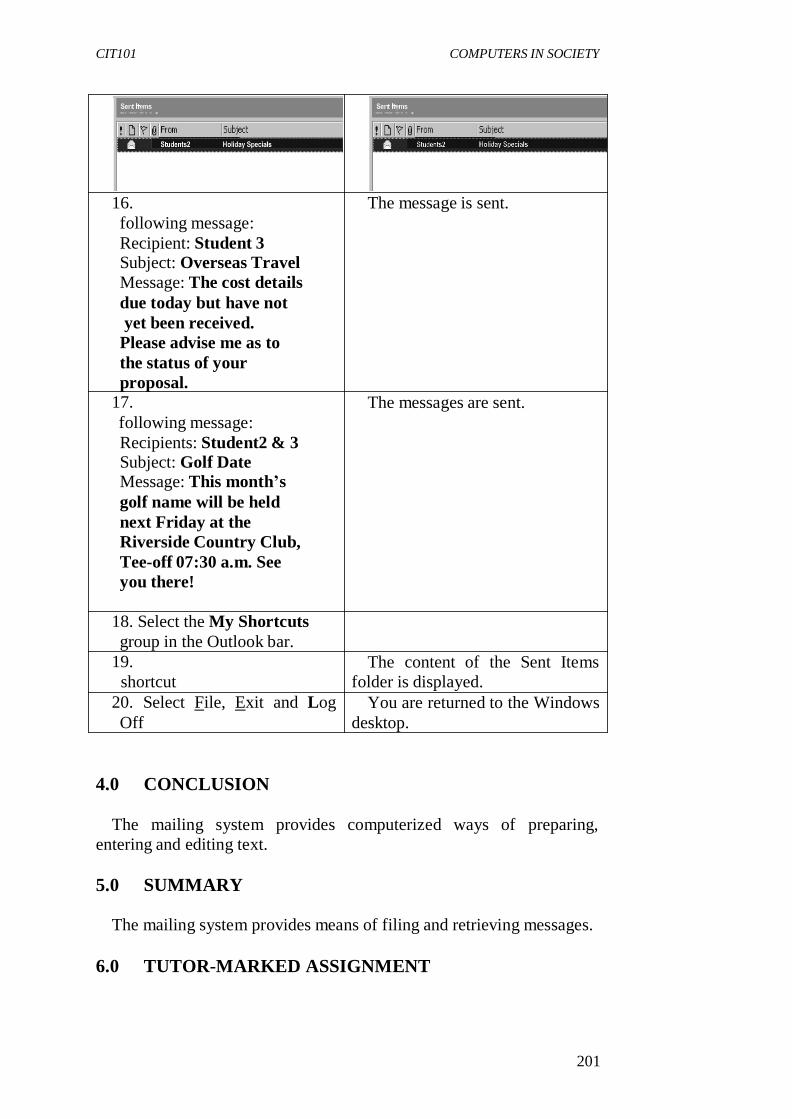
CIT101 COMPUTERS IN SOCIETY
201
16.
following message:
Recipient: Student 3 Subject: Overseas Travel
Message: The cost details
due today but have not
yet been received.
Please advise me as to
the status of your
proposal. 17.
following message:
Recipients: Student2 & 3 Subject: Golf Date Message: This month’s
golf name will be held
next Friday at the
Riverside Country Club,
Tee-off 07:30 a.m. See
you there!
The message is sent.
The messages are sent.
18. Select the My Shortcuts
group in the Outlook bar.
19.
shortcut
20. Select File, Exit and Log
Off
The content of the Sent Items
folder is displayed.
You are returned to the Windows
desktop.
4.0 CONCLUSION
The mailing system provides computerized ways of preparing,
entering and editing text.
5.0 SUMMARY
The mailing system provides means of filing and retrieving messages.
6.0 TUTOR-MARKED ASSIGNMENT

CIT101 COMPUTERS IN SOCIETY
202
Create an e-mail and send it to the Co-ordinator of National Open
University.
7.0 REFERENCES/FURTHER READING
French, C. S. (1998). Data Processing and Information Technology.
Gosport, Hants: Ashford Colour Press.
UNIT 5 READING AND RESPONDING TO AN E-MAIL
MESSAGE

CIT101 COMPUTERS IN SOCIETY
203
CONTENTS
1.0 Introduction
2.0 Objectives 3.0 Main Content
3.1 Reading and Responding to an E-Mail Message 3.2 Placing an Attachment to an E-Mail Message
3.3 Reading a Message Attachment
4.0 Conclusion 5.0 Summary
6.0 Tutor-Marked Assignment
7.0 References/Further Reading
1.0 INTRODUCTION
Here you will send more e-mail messages
2.0 OBJECTIVES
At the end of this unit, you should be able to:
• reply to an e-mail message
• place an attachment to an e-mail message
• read a message attachment.
3.0 MAIN CONTENT
3.1 Reading and Responding to an E-Mail Message
As mentioned earlier, all incoming mail messages are stored in the
Inbox.
The procedure to display an electronic mail message is detailed as
follows:
• Double click on the relevant message in the Inbox listing. The
message will open and be displayed in a message window.
• Whilst working in the message window, if you wish to view
either the next or the previous message, simply click on the up or
the down arrow.

CIT101 COMPUTERS IN SOCIETY
204
Previous Item button Next Item button
The procedure to respond to an electronic e-mail message is detailed as
follows:
• In the message window, if you wish to reply only to the sender,
click on the Reply button.
Reply button
• If you wish to reply to the sender and all of the recipients of the
message, click on the Reply to All button.
Reply to All button
When clicking on either of the above buttons the Message Reply
window will be displayed. By default the recipient name is
automatically entered together with the original message. Scroll to the
end of the original message and type your reply before clicking on the
send button.
SELF ASSESSMENT EXERCISE 1
Replying to a Message
Objective: To reply to an e-mail message.
Before you begin: Launch Outlook 2000. (NB: In the first step of the
Exercise you will be prompted to logon as Student2.
What you do Comments/Prompts 1.
Profile
Click on OK x
2.
dialog box logon as:
Mailbox: Student2
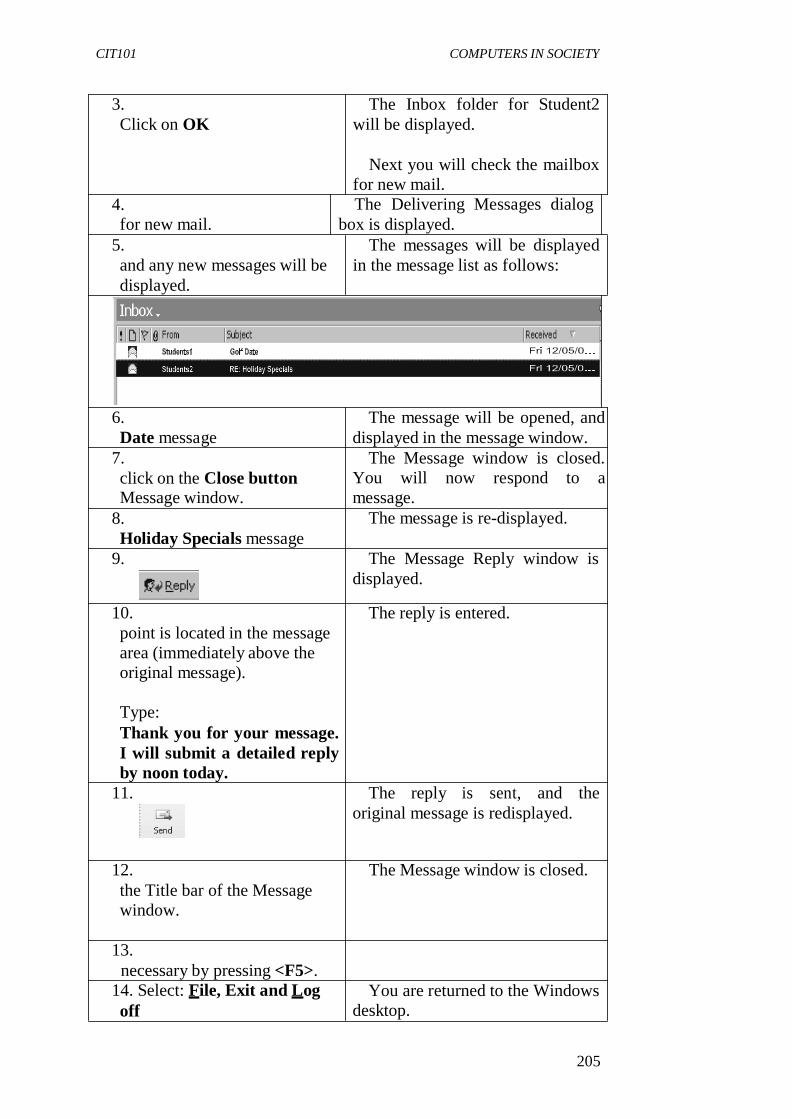
CIT101 COMPUTERS IN SOCIETY
205
3.
Click on OK
4.
for new mail.
5.
and any new messages will be
displayed.
The Inbox folder for Student2
will be displayed.
Next you will check the mailbox
for new mail.
The Delivering Messages dialog
box is displayed.
The messages will be displayed
in the message list as follows:
6.
Date message
7.
click on the Close button Message window.
8.
Holiday Specials message
The message will be opened, and
displayed in the message window.
The Message window is closed.
You will now respond to a
message.
The message is re-displayed.
9. The Message Reply window is
displayed.
10.
point is located in the message
area (immediately above the
original message).
The reply is entered.
Type:
Thank you for your message.
I will submit a detailed reply
by noon today.
11. The reply is sent, and the
original message is redisplayed.
12.
the Title bar of the Message
window.
The Message window is closed.
13.
necessary by pressing <F5>.
14. Select: File, Exit and Log
off
You are returned to the Windows
desktop.
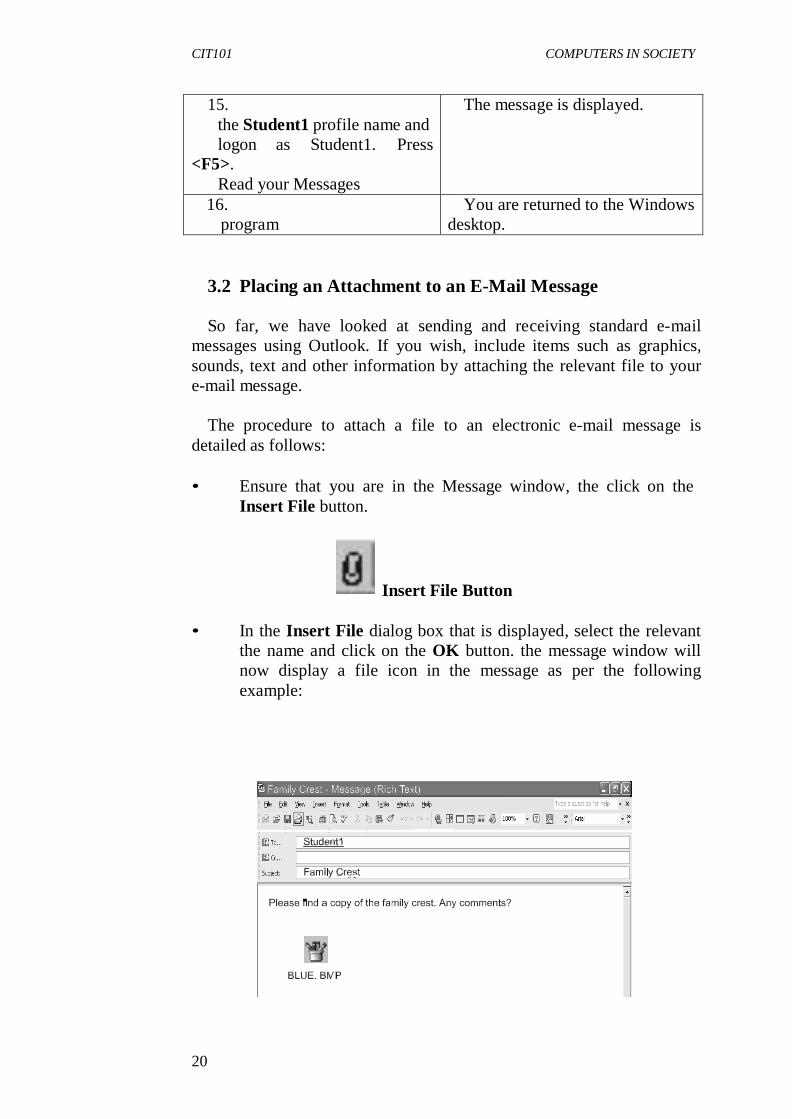
CIT101 COMPUTERS IN SOCIETY
206
15.
the Student1 profile name and
logon as Student1. Press <F5>.
Read your Messages
The message is displayed.
16.
program
You are returned to the Windows
desktop.
3.2 Placing an Attachment to an E-Mail Message
So far, we have looked at sending and receiving standard e-mail
messages using Outlook. If you wish, include items such as graphics,
sounds, text and other information by attaching the relevant file to your
e-mail message.
The procedure to attach a file to an electronic e-mail message is
detailed as follows:
• Ensure that you are in the Message window, the click on the
Insert File button.
Insert File Button
• In the Insert File dialog box that is displayed, select the relevant
the name and click on the OK button. the message window will
now display a file icon in the message as per the following
example:

CIT101 COMPUTERS IN SOCIETY
207
Figure 7.10: Message with a File Attachments
Click on the Send button.
5.3 Reading a Message Attachment
It is possible to read an attachment without saving it first. Remember
that you must have the application that the attachment is written in, in
order to read it. To identify whether a message has an attachment, you
will see a paperclip next to the message.
To read the attachment the mouse must be placed on the message. Click
the right hand button on the mouse. Select view and the attachment will
open.
SELF ASSESSMENT EXERCISE 2
Objective: To send a new e-mail message which contains an
attachment.
Before you begin: Launch Outlook 2000. (NB: In the first step of the
Exercise you will be prompted to logon as Student2.)
What you do Comments/Prompts
1. When logging onto Outlook,
use Profile Name: Student2
In the Microsoft Mail logon
dialog box, logon as:
Mailbox: Student2
Password: Password
The Inbox, folder for Student2
will be displayed.
2. Click on OK Next you will check the mailbox
for new mail using <F5>.
3. In the Inbox folder click on the New Mail Message button
The Message window is displayed.
4. Click on the To…button. The select Names dialog box is displayed.
5. In the list of users, double
click on the name Student 1,
then click on the Ok button
The recipient is selected, and the
Message windows is redisplayed.
6. Click in the Subject box. The subject of the message is
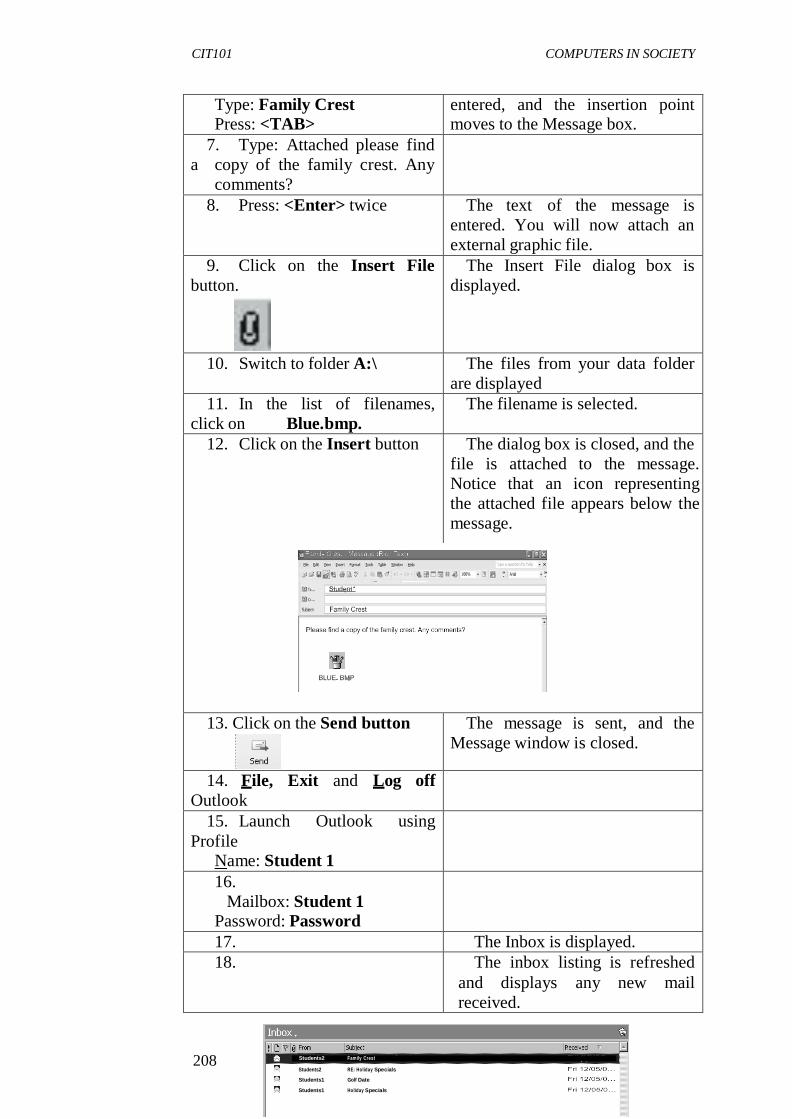
CIT101 COMPUTERS IN SOCIETY
Type: Family Crest Press: <TAB>
entered, and the insertion point moves to the Message box.
7. Type: Attached please find
a copy of the family crest. Any
comments?
8. Press: <Enter> twice The text of the message is
entered. You will now attach an
external graphic file.
9. Click on the Insert File
button.
The Insert File dialog box is
displayed.
10. Switch to folder A:\ The files from your data folder
are displayed
11. In the list of filenames,
click on Blue.bmp.
The filename is selected.
12. Click on the Insert button The dialog box is closed, and the
file is attached to the message.
Notice that an icon representing
the attached file appears below the
message.
13. Click on the Send button The message is sent, and the
Message window is closed.
14. File, Exit and Log off
Outlook
15. Launch Outlook using
Profile Name: Student 1
16.
Mailbox: Student 1 Password: Password
17. The Inbox is displayed.
18. The inbox listing is refreshed
and displays any new mail
received.
208 Students2 Family Crest
Students2 RE: Holiday Specials
Students1 Golf Date
Students1 Holiday Specials

CIT101 COMPUTERS IN SOCIETY
209
19.
Double click on the Family Crest
message.
The message is opened. Next
you will view the attachment.
20. In the newly displayed
message there is an icon labeled
Blue.BMP
Double click on this icon.
The attached file is opened and
displayed in Paint.
21. Exit Paint and Exit and
Logoff Outlook.
You are returned to the
Windows desktops.
4.0 CONCLUSION
You are now in a position to read and respond to e-mail messages.
5.0 SUMMARY
E-mail addresses have standard format.
6.0 TUTOR-MARKED ASSIGNMENT
Send another E-Mail message to the co-ordinator, National Open
University.
7.0 REFERENCES/FURTHER READING
French, C. S. (1998). Data Processing and Information Technology.
Gosport, Hants: Ashford Colour Press.

CIT101 COMPUTERS IN SOCIETY
NATIONAL OPEN UNIVERSITY OF NIGERIA
Form QST1
Questionnaire
Dear Student,
While studying the units of this course, you may have found certain portions
of the text difficult to comprehend. We wish to know your difficulties and
suggestions, in order to improve the course. Therefore, we request you to fill
out and send us the following questionnaire, while pertains to this course. If
you find the space provided insufficient kindly use additional sheet.
Course Code:
Course Title:
1. How many hours did you need for studying each of these units?
Unit 1 2 3 4 5 6 7 8 9 10 11 12 13 14 15 No. of
hours
Unit 1 2 3 4 5 6 7 8 9 10 11 12 13 14 15 No. of
hours
2. Which of these units do you find most difficult to understand?
3. Please give specific problem you find difficult with the unit.
4. How would you like the unit improved?
Please Mail to
The Course Coordinator…………………THROUGH the Study
Centre Manager
National Open University of Nigeria
Victoria Island,
Lagos.
210

CIT101 COMPUTERS IN SOCIETY
211
NATIONAL OPEN UNIVERSITY OF NIGERIA
Form QST2
Questionnaire
In the questions below, we ask you to reflect on your experience of the course
as a whole.
1. Course Code and Title……………………………………….………..
2. Mother tongue………………………………………………….……..
3. I am registered for a………………………………Degree/Programme
4. Why did I choose to take this course?.....................................................
5. Which study unit did I enjoy the most and why?.....................................
6. Which study unit did I enjoy the least and why?.....................................
7. Was the course material easy to understand or difficult?.........................
8. Which particular topic do I understand better than before and
how?.......…………………………………………...…………………
9. Does the course have any practical applications in the real world, e.g.
for the work I Currently do?...............YES/NO? Explain………………
10. What aspects would I like to know more about or study
further?...............………………………………………………………
11. How could the course be improved?........................................................
12. Other comments about the course (Please Tick)……………………….
Items Excellent Very Good Poor Give specific
Good examples if poor
Presentation
Quality
Language and Style
Illustrations Used
(diagrams, tables, etc.)
Conceptual Clarity
Self Assessment
Questions
Facilitators response
To TMA Questions


![NATIONAL OPEN UNIVERSITY OF NIGERIAnouedu.net/sites/default/files/2017-03/COP 311 MAIN TEXT.pdfNATIONAL OPEN UNIVERSITY OF NIGERIA ... [TMA]. The sources of ... to provide relevant](https://img.pdfslide.net/doc/110x75/5aacb5d47f8b9a693f8d673f/national-open-university-of-311-main-textpdfnational-open-university-of-nigeria.jpg)


