Embed Size (px)
Citation preview

SAVE FOR FUTURE REFERENCE
OWNER'SMANUAL
Model No. 415157030
Caution:Read and follow allSafety Statements, AssemblyInstructions, and Use and CareDirections before attemptingto assemble and cook.
Installer/assembler: Leavethese instructions withconsumer.
To Consumer:Keep thismanual for future reference.
,_ Some parts maycontain sharp edgesespecially as noted in themanual! Wear protectivegloves if necessary.
i
NATURAL GAS GRILL• Safety Rules
• Assembly Instructions
- Use and Care
• Troubleshooting
, Parts List
If you have questions or need assistance during assembly,please call t-800-241-7548 You will be speaking to arepresentative of the Grill manufacturer and not a Searsemployee If you would like to order replacement parts, pleasecontact Sears at 1-800-366-PART as noted on the back of thismanual
This Grill is for Outdoor Use Only
Sears, Roebuck and Co., Hoffman Estates, IL 60179 U.S.A

FOR YOUR SAFETY
1. Do not store or use gasoline or otherflammable vapors and liquids in thevicinity of this or any other appliance.
2. An LP Tank not connected for use shall
not be stored in the vicinity of this or anyother appliance.
FOR YOUR SAFETY
If you smell gas:
1, Shut off gas to the appliance.2. Extinguish any open flame.3. Open lid.
4. If odor continues, immediately call yourgas supplier or your fire department.
Safety Symbols• The symbols and boxes shown below explain what each
heading means Read and follow al! of the messages found
throughout the manual
For your safety please read all the assembly instructionsand use and care directions before proceeding withassembly or operation It is your responsibility to properly:
. Assemble• Install• Leak checkoOperate• Care for your gas grill
lfyou have questions or need assistance in missing partsduring the assembly, please call 1-80Q-24 t-7548, You willbe speaking to a representative of the grill manufacturer andnot a Sears employee,
All components referenced in the Parts List may beordered from 1-800-366-PART or any Sears Service Centerand most Sears Stores When requesting service or repairparts for your grill you must mention your Model Number;
415.157030
When ordering repair parts always give the followinginformation:
• The Model Number• The Name of the Item• The Part Description• The Part Number
If the parts you need are not stocked localty, your orderwill be transmitted to a Sears Repair Parts DistributionCenterforhandling
• DANGER: Indicates an imminentlyhazardoussituationwhich, if not avoided, will result in death or serious
injury.nil nl nnlll
I, WARNING: Be alert to the possibility of serious bodily I
!
i injury if the instructions are not followed Be sure to !i read and carefully fo!!ow,a!!,,o[,,themessages,
CAUTION,,,,,,,,,,,,,,,,,,,,,,,,,,,, ...........
• CAUTION: Indicates a potentiallyhazardous situation
which, if not avoided, may result in minor or moderateinjury
2 • 4638003
ModelNumber
Date Purchased
UPC Label Lot # GG
ii,,,i,illUl i in i
415.15703O
Gdils protectedunder one or rno_eof these US PaPerers:4,989,579; 4,955,358;5.220,764; 5.421,319; &441,226; 5.556,606; 5.931,149; 5,996,573; D291.768;D341,292 Assembly Instructions © 1998 Sears Corporation, All Rights Reserved

Warnings, ................................... 2
Introduction ........................................................... 2
Warranty Information ................................................. 2
Table of Contents ............................... 3
Installation Safety Precautions ..................................... 3
Before Beginning Assembly ................................... 3
Parts List ................................ 4
Parts Diagram ............................. 5
Assembly Instructions ........................................ 6-14
Use and Care ...................................................... 15-19
Troubleshooting ...................................... 20
Warranty .......................................... 21
Recipes .......................................................... 22-29
Installation of gdtl must conform with local codes, or inabsence of local codes, with National Fuel Gas Code,NFPA 541 ANSI Z223.1-1atestedition. Grill is not for use in oron recreational vehicles and/or boats.
if externa! electrical source is utilized with accessories (suchas rotisserie), they must be electrically grounded inaccordance with local codes or, in the absence of localcodes, with the National Electrical Code, ANSI I NFPA 70-latest edition. Keep any electrical cords andlor fuel supplyhoses away from any heated surfaces
Gdlt is for natural gas use at 7 inch water column supplypressure Verify supply pressure with your local gas companyNot for use with LP gas.
,ik ReadallassemblyinstructionsThepicturesareonlyforreference;
theydonotcontainall theinformationneededtocorrectlyassembly
yourgrill
•& Metaledgescanbesharp,Usecautionduringassemblyanduse
A Necessarytootsforassembtyofyourgrill includescrewdrivers(flatheadandPhillips@),pliersandadjustablewrench A3t8"and7116"nutdriverwouldbe ideal
Assembly Instructions _ t999 W C Bradley Co, AII Rights Reserved4638003 ° 3

Item No. Description _ Part No.
1 ....... Post assembly ...................... I .... 45046062 ......... Bolt, 318"-!6 x 2-1t2". ......... 4 ........40806773 ....... Flat washer, 3/8" ............ 4 ........40806414 ....... Hex nut, 3/8L16 ............. 6 .... 4080633
5 . Gas supptytube ............... 1 ....... 41563946 ........ Bolt, 3t8"-!6 x 1-1/2" .............. 2 .... 4080676
7 ........ Support tube .......................... I ........ 45022198 ........ Console ...................... 1 ........ 4525809
9 ..........Hex nut, #10424(keps) ..... 14 .......408020810.... Bolt, #I0-24 x t-1f2" ........................ 4080303 ..........STD511015
11 ...... Valve assembly ..................... 1 452405612 ....... Bolt, #10-24 x 318"................. 2 ....... 4080379 ..... STD51 t003
13 ..... Bolt, 114"-20x 1-1t2". ........... 2 ........ 4080324 ...... STD51251514 ...... Grill bottom ..................... 1 ........4581041
15 ..... Ignitor .................................... I ..... 415371316 ...... Knobs ................................... 2 ........4154203
17 ........ Hex nut, 1/4"-20 ................... 2 .........4080656 ...... STD541025
18 ........ Fire grate ........................ 1 .........415710119 ..... Burner assembly .................. 1 ........450501020 .... Electrode ................................ 1 ..... 5156119
2I ........ Ignitor Wire ............................... 1 .........415372022 ........ Screw, #6x3t8 .............. 1 ........ 408026423 ...... Collector box ..................... 1 .........4501543
24 ....... Screw, self-tap, #10 x 1f2" ....... 1 ........ 4080652 ..........STD61100525 ....... Screw, self4ap, #10 x 1-112" .._ 8 ....... 408075626 ........ Side shelf tube ............... 2 .........450221227 .... Side shelf .............................. 2 .....4154282
28 ...... End cap, 1". ............................ 4 .......408064229 ...... Drip VapoRISER Bar ................ 1 ....... 415641830 ...... Bolt, #10-24 x 3/4" .............. 8 ......... 408030131 ...... Grill lid .................................... 1 ...... 4581712
32 ........ Hitch pin, 3t4". ..................... 2 ........ 4156515
33 ........ Hinge pin, 1/4"x 1-1t8"........ 2 ........ 415651334 ..... Handle ............................ 1 ....... 4069516
35 ....... Bolt, #I0-24 x 1" .................... 3 ...... 4080302 ...........STD51101036 ....... Logo plate ...................... 1 ......... 415712237 ....... Pal nut, 3t16" ........................... 2 ...... 415309638 .........Heat indicator / bracket ........... 1 ........ 4156800
39 ........ Swing-grid .................. ! ......... 415645540 ....... Bolt, swing-grid, 1-3/4....................... 40806634! ...... Hex nut, 1/4"-20 ....................... 2 ........ 4080664
42 ....... Briquets .......................... - - -. ..... 4'15930043 ..... Cooking grate .............................. 415274144 ....... Grease clip ............................. 1 ...... 5156607
Standard No.
You may have hardware left over after completing assembly of your grill This is normal as in some cases we have included exta
hardware to ensure that you have enough. Size and type of hardware used in assembly of your grill may vary but will not affectgrillintegrity, performance or assembly4 • 4638003

38
36
__37
9
24
934
\
25
26
2--
4
2
15
31
28
10
J
16
12
27
.8
28
4638003 • 5

OPTIONALBASE POSTGROUNDMOUNTIn-ground mounting option for your new gril!° The accessory needed for this mounting option is available
through the retailer where your grill was originally purchased, or by calling 1-800-241-8981 and orderingModel # 4989050, Base Post Assembly.
=
Attaching Grill to Wood Deck
Tip: Usethe PostAssemblybaseas atempiatefordrillingholesintodeck
3Qty.4
4Qtyo4
2Qtyo4
A. Wrench tighten ali hex nuts_Makesurepostassembly isfully secured and plumb beforeproceeding.
® ®®
to right
®®
WoodDeck
..-----Gas Supply Tube
jl PostAssembty
, 4538003

4Qty,2
6Qty,2
Support Tube
10
'0
9
Qty.2
10(BEack)Qty,2
9
Console
Support, Tube
4638003 , 7

I2Q_.2
Gas
Supply
Tube.
I A Do not cross-threadfitting.A Wrench.tighten.
Console
17Qty,2
GrillBottom_,
_13
t3Qty,2
A When installing Ignitor do not
push on buttons This may causea minor shock.,
A See Use and Care forValve Check,
8 " 4638003
ControlKnobs
\17
®
Ibly
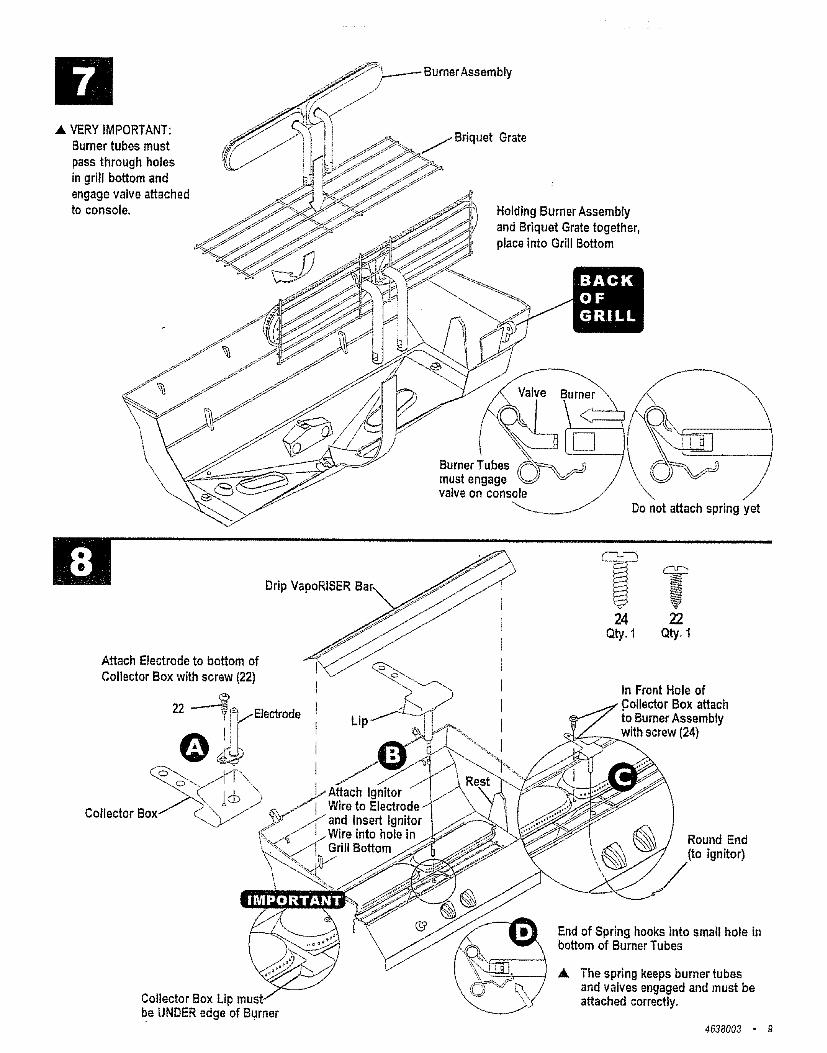
_i, VERYIMPORTANT:Burnertubes must
pass through holesin grill bottomandengagevalve attachedto console.
uet Grate
Holding Burner AssemblyandBriquet Gratetogether,place into Grill Bottom
Valve
BurnerTubesmust engagevatveon console
[]
Do not attach spring yet
Drip VapoRISER
AttachElectrodeto bottom of
Collector Box with screw (22)I
22 ?_rr....t:{ectroae I
t
Lip
tll1III!
24Qty.1
22Qty.1
In FrontHole of;ollectorBox attach
to BurnerAssemblywithscrew(24)
Collector
Round End(to ignitor)
CollectorBoxLipbe UNDERedgeof Burner
End of Spring hooks into smallhole inbottom of Burner Tubes
Ak The spring keepsburner tubesand valvesengagedandmust beattached correctly.
4638003 • 9

A
28Qty,4
25(Silver)Qty,8
A Repeat forsecond side
shetfassembly.
Maximum load forside shelves is 10 Ibs.
Bent endsofbracketsfacing u
Side Shelf28
DripVapoRtSERBar
Rest
I0
3O
ignitor
Round connectora_achesto ignitorbeneath console
Side ShelfAssembly

Heat Logo Plate
37Qty. 2
33Qty,2
33
Handle
37(Turn Clockwise)
A Do not overtightenNut or bend Bracket
Qty,2
9Qty.4
35Qty.3
4OQty.2
41Qty,2
4O
\
\\I Swing Grid
4638003 • 11

Connecting Grill to Natural Gas Source
,4k Gasat line leading to grill mustbe shut offbeforeconnectingto grill.
A Attach gas supply tube to gas line. Wrenchtighten°
_, The appliance and its individual shut off valve must be disconnected from the gas supply piping system during anypressuretesting of that system attest pressuresin excess of t/2 psig (3oSkPa),
A. The appliance must be isolated from the gas supply piping sustem by closingits individual manualshutoff valve duringany pressuretesting of the gas supply pipingsystem at test pressures equalto or iess than 112psi (3,5 kPa),
Connection fromgas source
GasSupply Tubeat backof grill
After connectinggrill to gasline,performteaktest
12 * 4638003

Leak Test
For your safety
• Do not smoke during leak test.• Do not use an open flame to check for gas leaks• Grill must be feak checked outdoors in welF
ventilated area, away from ignition sources such
as gas fired or electrical appliances. During leaktest, keep grill away from open flames or sparks
• Never remove opening at end of valve (A)
To leak test your grill: Use a clean paint brush and50/50 soap and water solution Use mild soap andwater. _k Do not use household cleaningagents_ Damage to gas train components can result
1. Turn control knobs to OFF.
2. Check to make sure grill is connected to natural
gas source and gas supply is turned on.3. Brush soapy solution onto following connections:
, Gas Supply Tube/Pipe (1) and all connections• Valve (2) behind console
• Gas supply tube and connection (3)
. If growing bubbles appear, there is a leak Turngas off at control knobs and gas source
immediateIy Retighten connections and repeatleak test procedures If leaks cannot be stopped,replace parts. Order new parts by giving theserial, model number and name of itemsneeded to the Gdll Manufacturer at
1-800.241.7548
4638003 • t3

Perform the "Burner Flame Check" in the Use and Care section.
A Let grill cool before placing briquets.
Place t6 briquets, Do not layer or stack just enough to cover fire grate surface
A Do not let briquets cover burner port holes _._
" i
Briquets
GrateRest
\
®
Cooking Grate
,GreaseClip
A Usean empty soup can to hang from the Grease Clip,
I4 • 4638003

For Safe Use Of Your Grill:
• Do not let children operate or play near grill, Keep gdll area clear and free from materials that bum.
. Do not block holes in bottom or back of grill.
. Check burner flames regularly• Use gdi only in well-ventilated space. NEVER use in
enclosed space such as carport, garage, porch, coveredpatio, or under a surface that can catch fire
. Use gdll at least 3 ft from any wal! or surface Maintain 10
ft. clearance to objects that can catch fire or sources ofignition such as pilot lights on water heaters, liveelectrical appliances, etc,
• Do not use charcoal in a gas grill.
, NEVER attempt to light burner with lid closed, A
buildup of non-ignited gas inside of closed grill ishazardous,
Hal Hlll l i i
Safety Tips
_k When grill is not in use, turn off all control knobs and gassource
_k Never move grill whi!e in operation or still hot& Use Iong-handled barbecue utensils to avoid bums and
splatters.A Maximum load for side shelves is 10lbs
& A soup can must be attached to grease clip and emptiedafter each use Do not remove soup can until grill hascompletely cooled
,_. If you notice grease or other hot material dripping from grill
onto valveor gas supply tube, turn off gas supply at onceDetermine the cause, correct, and clean valve and gassupply tube before continuing. Perform a leak test.
A. If you have a grill problem see the Troubleshooting Section.
a, CAUTION• Putting out grease fires by closing the lid is not
possible, Grills are well ventilated for safetyreasons,
• Do not use water on a grease fire, Personal injurymay result. If a grease fire develops turn knobsand gas source off,
. Do not leave grill unattended while preheating orburning off on high, If grill has not been regularlycleaned a grease fire can occur that may damagethe pi'oduct.
Before Your First Cookout
• Light burners, check to make sure they are lit, close the lidand warm up grill on HIGH for 15 minutes Curing of paint
and parts wilt produce an odor only on first lighting.
Ignitor Lighting _-\
Do not lean over grill while lighting, __Open lid_Turn on gas at gas source. %_"'_fTurn one knob to _ IGNITE. _'_
,tk12,3
5
Push IGNITOR Button _._ rapidly to light 8e sure burnerlights and stays lit.
Turn other knob to _ IGNITE to light other sidetf IGNITOR does not work, follow match lightinginstructions
After Lighting: Turn knobs to HiGH for warm-up
4638003 , 15

Match LightingA. Do not lean over grill while
lighting,
I Open lid, Turn on gas at gassource
2 Hace lit match into match
J
t / i! ._._j
Matchlighting
4,
lighting hole from outside grill bottom hole is in bottom(as shown),Push in and turn RIGHT knob to _ IGNITE Be sure
burner lights and stays lit,Light left burner (if featured) by pushing LEFT knob in andturning to _ IGNITE
After Light{ng: Turn Knob(s) to HIGH for warm-up
Burner Flame Check
• Light burner, rotate knobsfrom HiGH to LOW. Youshould see a smaller
flame in LOW position _ _ _ _ _ ethan seen on HIGH.
Always check flame prior to each use if only low flame isseen refer to "Sudden drop or low flame" in theTroubleshooting Section
Turning Grill Off• Turn all knobsto OFFposition.Turn gas OFFat gas source.
Ignitor Check
• Turn gas off at gas source. Press ignitor button rapidly"Click" should be heard and spark seen each time between
collector box or burner and electrode See Troubleshootingif no click or spark.
Valve Check
• Important: Make sure gas is OFF at gas source beforechecking valves. Knobs lock in OFF position To check
valves, first push in knobs and release, knobs should springback. If knobs do not spring back, replace valve assemblybefore using grill Turn knobs to LOW position then turn backto OFF position Vatves should turn smoothly.
General Grill Cleaning• Do not mistake brown or black accumulation of grease and
smoke for paint Interiors of gas grills are not painted at thefactory (and should never be painted) Apply a strong solutionof detergent and water or use a gd!l cleaner with scrub brushto insides of grill lid and bottom. Rinse and allow to
completely air dry. Do not apply a caustic grill/ovencleaner to painted surfaces,
• Plated wire grates: wash grates and Drip VapoRISER Bar
with concentrated grill cleaner or use soap and watersolution Dry thoroughly and store indoors between cookouts
Plastic side shelves: wash with warm soapy water andwipe dry. A Do not use citrisol, abrasive cleaners,
degreasers or a concentrated grill cleaner on plastic sideshelves Damage to and failure of shelves can result
Porcelain grate: because of glass-like composition, mostresidue can be wiped away with baking sodalwater solutionor specially formulated cleaner, Use nonabrasive scouringpowder for stubborn stains.
Briquet grate: will eventually decompose and weaken withuse. Remove grate from grill and tap to loosen any scaling.Brush grate vigorously with a wire brush to remove anyadditional scaling, rust or residue
Care Of Wood
• Wood items can be sanded lightly with fine grit sandpaper_Refinish with stain, paint or water sealant.
Post Inspection• If the in-ground post mount option is used, inspect post
annually for corrosion (rust)• Use only in-ground post mount with protection against
corrosion (paint or other coating) suitabJefor conditions inyour area, ChaFBroiP model #4989050 meets theserequirements
Repainting Your Grill• After extended use and exposure to weather, paint on grill
may deteriorate or become spotted Although this detractsfrom grill's appearance, it will not impair its performance.
To refinish your grill brush outside of gril; lid and bottom withwire brush and lightly sand with fine grit sandpaper SandingaIIows new paint to adhere more easily. Wash griil lid andbottom with soap and water to remove dust and grease. Donot use a grill cleaner on outside of grill, Wipe with vinegar.Refinish outside with heat-resistant paint, Do not paintinside of grill,
16 • 4638003

Cleaning The Burner Assembly
Follow these instructions to clean and/or replace parts of burnerassembly or if you have troubleignitinggdll
1 Turn gas off at control knobs and gas source.2 Remove cooking grate and Drip VapoRISER Bar3 Discard briquets before removing burner and briquet grate4 Remove can from grease clip5 Beneath console disconnect short ignitor wire from
ignitor(A)6 Remove screw holdingcollector box (B), Note which
hole on collector box used for attaching to burner, Removecollector box, clean ceramic portion of electrodewith rubbingalcohol and cloth.
7 Under console disengage burner spring to Valvefrom burner tube (C) Do not remove
spring from valve,8 Remove briquet grate and burner
together, slide backwards, lift up andout of grill (D) Separate burnerand ,4/_
briquet grate. Remove scale from ,\briquet grate, replace if necessary9 Clean outsideof burnerwith soap and
water Lay burner upsidedown on fiat surface,
insert gardenhose to force water throughtubes. Makesure water comes out of all burner
holes. Open clogged holes with a thin wire.Shake out excess water and examine holes.Due to normal wear and corrosionsome
holes may become enlarged, Ifany largecracks or holes are found replace burner
10 If gdi! is to be stored, coat burner lightlywffhcooking oil. Wrap in protectivecover to keep insectsout. If notstodng grill, hold bdquet grate and burnertogether, angle into grill bottom (D)
11, At_ercleaning, insertwireand electrodeinto hole in grillbottom (A) Reattachcollector box to burner with screw(B), Be sure to use correct hole.
12 Place end of spring into hole on underside of burner
tube as before (C) to secure burner
VERY IMPORTANT: Burner tubes must engage valveopenings as shown (E),
t3. Reattach round connectorof ignitorwire to ignitor.14 Do not use more than 16 new briquetson briquet grate around
burner Do not let briquetscover burner holes15 Reposition Drip VapoRISER Bar and cooking grate Reattach
clean can to grease clip,
16 Before cookingagain on grill, followBurner Flame Check
Screw
OI
Collector Box
Burner
, Spring
Wire
BriquetGrate
Roundend to
ignitor
Valve
Burner
I
Spring
CAUTIONi rl,ln ,,,lnHnu m i,nl im
• Clean burner prior to use after storing, at the beginningof gdlling season or a period of one month not beingused. Spiders and insects like to build nests inburner tubes (especially during coldermonths). These nests can cause firesin burner tubes or under grill
Typical spider websinside burner
i , i i i / ,,,i nlnHi
4638003 , 17
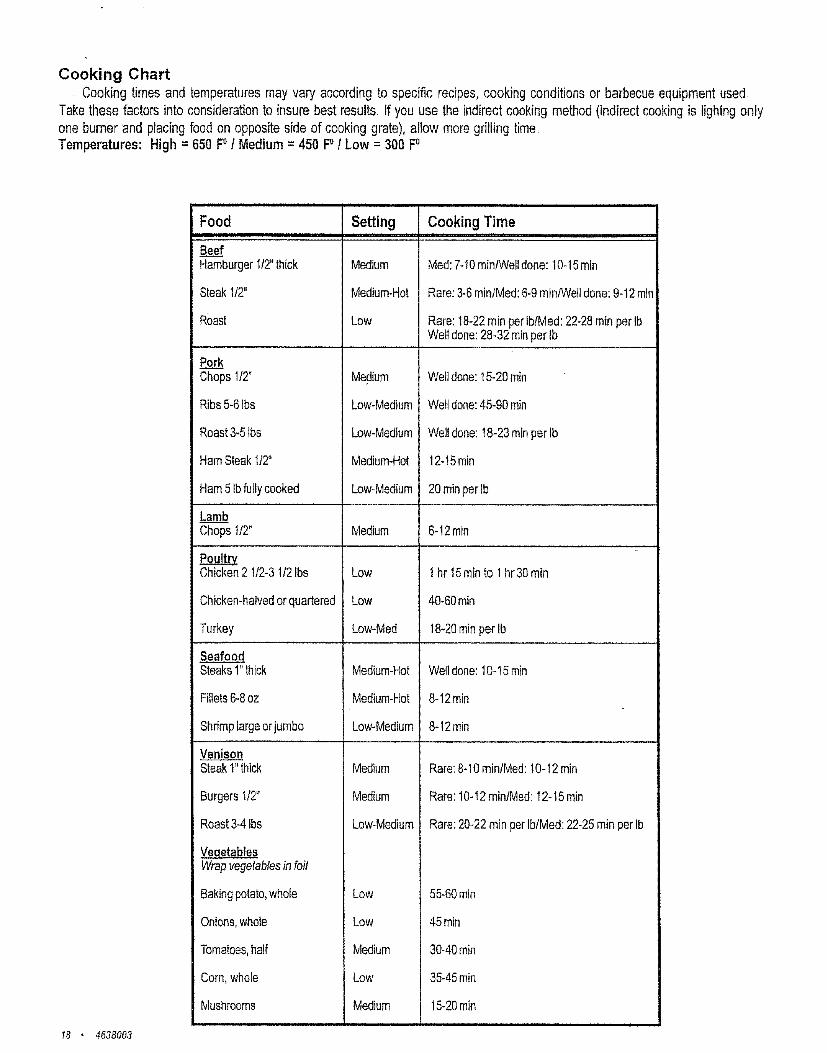
Cooking Chart
Cooking times and temperatures may vary according to specific recipes, cooking conditions or barbecue equipment usedTake these factors into consideration to insure best results If you use the indirect cooking method (indirect cooking is lightng only
one burner and placing food on opposite side of cooking grate), allow more grilling time,Temperatures: High = 650 P I Medium = 450 F° f Low = 300 F°
Foodi]1
BeefHamburger112"thick
Steak1/2"
Roast
Por___kkChops1t2"
Ribs5-6Ibs
Roast3-5]bs
HamSteakIt2"
Ham5Ibfullycooked
LambChops1t2"
Pou__Chicken2 112-31t2lbs
Chicken-halvedorquartered
Turkey
SeafoodSteaks1"thick
Fillets6-8oz
Shrimplargeorjumbo
Veniso_.___nSteak1"thick
Burgers112"
Roast34 tbs
VegetablesWrapvegetablesin foil
Bakingpotato,whole
Onions,whole
Tomatoes,half
Corn,whole
Mushrooms
Settingiii
Medium
Medium-Hot
Low
Medium
Low-Medium
Low-Medium
Medium-Hot
Low-Medium
Cooking Timeii, ,i lit ................... , ........
Med:7-10rain/Welldone:10-t5min
Rare:3-6minlMed:6-9min/We!]done:9-12min
Rare:t8-22 rainpertb/Med:22-28rainper IbWeltdone:28-32rainper lb
Welldone:t5-20rain
Welldone:45-90min
Weltdone:18-23rainper Ib
12-15rain
20rainperIb
Medium 6-12rain
Low
Low
Low-Med
1hr 15rainto I hr30 min
40-60rain
18-20minperlb
Medium-Hot
Medium-Hot
Low-Medium
Medium
Medium
Low-Medium
Low
Low
Medium
Low
Medium
Welldone:10-15rain
8-12rain
8-12rain
Rare:8-t0 rain/Meal:I0-t2 rain
Rare:10-12rain/Meal:12-15rain
Rare:20-22rainper]btMed:22-25rainper lb
55-60min
45min
30-40min
3545 min
t5-20min
18 • 46380e3

Food Safety
• Food safety is a very important part of enjoying the outdoor
cooking experience, To keep food safe from harmflHbacteria, follow these four basic steps:
Clean: Wash hands, utensils, and surfaces with hot soapy waterbefore and after handling raw meat and poultry,
Separate: Separate raw meats and poultry from ready-to-eat
foods to avoid cross contamination. Use a clean platter andutensils when removing cooked foods
Cook: Cook meat and poultry thoroughly to kilt bacteria. Use athermometer to ensure proper internal food temperatures.
Chill: Refrigerate prepared foods and leftovers promptly
For more information call: USDA Meat and Poultry Hotline
at 1-800-535-4555 In Washington, DC (202) 720-3333,10:00 am-4:00 pm EST
How To Tell If Meat is Grilled Thoroughly
• Meat and pouitry cooked on a grill oftenbrowns very fast onthe outside. Use a meat thermometer to be sure food has
reached a safe intemat temperature, and cut into food tocheck for visual signs of doneness
, Whole poultry should reach !800 F; breasts, 170oF Juicesshould run clear and flesh should not be pink.
Hamburgers made of any ground meat or poultry shouldreach 160o F, and be brown in the middle with no pinkjuices Beef, veal and lamb steaks, roasts and chops canbe cooked to 145oF,AII cuts of pork should reach 160° F-
, NEVER partially grill meat or poultry and finish cookinglater Cook food completely to destroy harmful bacteria,
• When reheating takeout foods or fully cooked meats like hot
dogs, grill to 165oF, or until steaming hot,
Storing Your Grill• Clean cooking grates and discard old briquets.
• Store in dry location.• Cover gril! if stored outdoors.• Storage of grill indoors is permissible ONLY if gas source is
disconnected.
• When removing grill from storage follow Cleaning BurnerAssembly instructions before starting grill
4638003 • 19

i n i n nn n nn
Probtem
Burner will not lightusing ignitor.
Burnerswill notmatchlight_
i i i,,i i,i, ,u,ll,l,,
Possible Causei , u, i, nll',,llll,
Wireand/orelectrodecoveredwithcookingresidue
Electrodeandburnerarewet,
Electrodecrackedorbroken"sparksatcrack"
Wireislooseordisconnected
Wireisshorting(sparking)betweenignitorandelectrode
Badignitor
Nogasflow
ObstruclJonofgasflow
Disengagementof burnertovalve
Isgrillassembledcorrectly?
Flames blow out. Highorgustingwinds
Flare-up.
Persistentgreasefire.
FlashbacL(fireinburnertube(s)
i i innnn
Greasebuildup
Excessivefatinmeat
Excessivecookingtemperature
Greasetrappedbyfoodbuilduparoundburnersystem
Greasesoakedintobriquets
Burnerandtorburnertubesareblocked
PreventionlCurei i ,i iii iiiiii I iiii iii Hill
Cleanwireandlorelectrodewithrubbinga_coho!andcleanswab
Wipedrywithcloth
Replaceelectrode
Reconnectwireorreplaceetectrodetwireassembly
Replaceignitorwirefelectrodeassembiy
Replaceignitor
Turngason at source.
Clearburnertubes.
Reengageburnerandvalve Reattachspringdip
Checkstepsinassemblyinstmctions, ,, ,,,, ,,,,,, ,,,,,,,,,,=,............
increaseflameheight
Cleangdll
Tdmfatfrommeatbeforegdlting
Adjust(lower)temperatureaccordingly
Turnknobsto OFF Turngasoffat gassource.Leavelid inpositionandletfireburnout Afiergrillcools,removeandcleana/lparts
Replacebriquetstfcookingwithfattymeatsremovebriquets
Cleanburnerandlorburnertubes.
20 • 4638003

Sears, warrants to the original consumer-purchaser that this product shall be free from defects in workmanship andmaterials under normal and reasonable use and correct assem bly (if assembled by consumer-purchaser), as follows:
(1) The aluminum top and bottom castings for the life of original purchase, excluding the paint finish;(2) The burner/venturi assembly for a period of three (3) years from the date of purchase; and(3) All other parts for a period of one (t) year from the date of purchaseSears will, at its option, refinish or replace any product or part found to be defective during the warranty period
Sears will require you to return the part(s) claimed to be defective, for its inspection, freigh t or postage prepaidIf you wish to obtain performance of any obligation under this limited warranty, you should write to,
Sears Roebuck and Co.
Dept_ 817WAHoffman Estates, IL 60179
Sears may require reasonable proof of purchase and we suggest you keep your receipt In the state of Californiaonly, if refinishing or replacement of the product is not commercially practicable, the retailer selling this product orSears will refund the purchase price paid for the product, less the amount directly attributable to use by the originalconsumer-purchaser prior to discovery of the nonconformity In addition, in the state of California only, you may take theproduct to the retail establishment from which it was purchased or to any retail establishment selling this product inorder to obtain performance under this warranty
This warranty does not include the cost on any inconvenience or property damage due to failu re of the product anddoes not cover damage due to misuse, abuse, accident, damage arising out of transportation of the product, or dan4ageincurred through commercial use of the product, This express warranty is the sole warranty given by the manufacturerand is in lieu of all other warranties, express or implied, including implied warranty of merchantability or fitness for aparticular purpose Neither Sears dealers nor the retail establishment selling this product has any authority to makeany warranties or to promise remedies in addition to or inconsistent with those stated above Sears maximum liability,in any event, shall not exceed the purchase price of the product paid by the original consumer-purchaser Some statesdo not allow the exclusion or limitation of incidental or consequential damages, So the above limitations or exclusionsmay not apply to you This warranty gives you specific legal rights and may also have other rights which vary from stateto state
Do not return your grill to the store.For Troubleshooting assistance call 1-800-241-7548.
For replacement parts call 1-800-366-PARTS.
4638003 • 21

For the repair or replacement parts you needdelivered dJrectny to your home
Call 7 am - 7 pm, 7 days a week
t -800-366-PART(1-800-366-7278)
For in-home major brand repair serviceCall 24 hours a day, 7 days aweek
1-800-4-REPAIR(1-800-473-7247)
For the location of a
Sears Parts and Repair Center in your areaCall 24 hours a day, 7 days a week
1-800-488-1222n nnenm Im mmnlllllnnnunnuuum
For information on purchasing a SearsMaintenance Agreement otto inquire
about an existing AgreementCall 9 am - 5pm, Monday-Saturday
1-800-827-6655
When ordering repair parts always give the followinginformation:
• Model Number
• Name of Item. Part Number
• Part Description
SEARSAmerica's Repair Specialists