Embed Size (px)
Citation preview
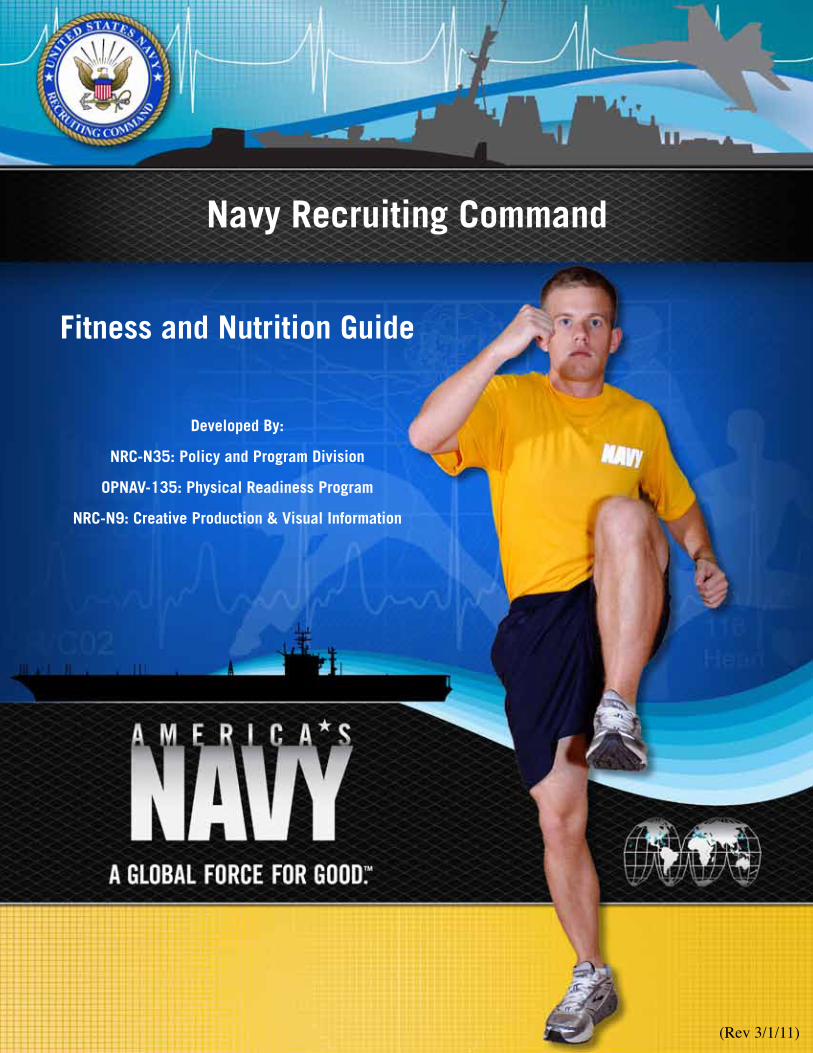
Navy Recruiting Command
Fitness and Nutrition Guide
Developed By:
NRC-N35: Policy and Program Division
OPNAV-135: Physical Readiness Program
NRC-N9: Creative Production & Visual Information
(Rev 3/1/11)
WELCOME ABOARD
During the next few weeks or months, you will begin your initial training as a proud member of the United States Navy. Whether you are attending Officer Candidate School (OCS), Officer Development School (ODS), or Recruit Training Command (RTC), you will be expected to meet rigorous physical demands. This guide will assist you in completing the physical fitness portion of OCS/ODS, or RTC and prepare you for success in the United States Navy. This guide is not designed to be a comprehensive physical training program that meets the needs of every individual. Rather it provides a basic template for you to use in preparation for the physical demands that you will be expected to meet at OCS/ODS or RTC and maintain a lifestyle conducive to long term health. Additionally, the following links will provide you with additional information to help you better prepare for your training: http://www.npc.navy.mil/commandsupport/physicalreadiness/, http://www.nmcphc.med.navy.mil/healthy_living/nutrition/nutrition_resources.aspx and www.navyfitness.org
Future Sailors in the Delayed Entry Program (DEP) and OCS/ODS candidates will have the opportunity to participate in organized physical fitness sessions. For Future Sailors, these sessions are held at DEP meetings and led by your Recruiter or other Recruiting personnel. Your Recruiter will provide you with a schedule and times of these meetings during your 72 hour indoctrination. Although strictly voluntary, you are strongly encouraged to participate in these sessions. These organized physical fitness sessions are designed to introduce you to a culture of fitness that is vital to the mission readiness of the United States Navy.
If you experience any pain or feel like your personal safety is ever at risk while participating in organized Physical Training, STOP and notify Recruiting personnel immediately. This program is designed to help you increase your level of physical fitness-not to cause injury or jeopardize your safety.
You will also be afforded the opportunity to take the Initial Fitness Assessment (IFA) prior to reporting for duty at RTC or OCS/ODS. This is strictly a voluntary option, but it is a very good measure of your fitness level and will inform you of the standard you must meet in order to graduate and begin your Naval career. This test will be administered in full accordance with all safety requirements outlined in OPNAVINST 6110.1 series. To ensure the safety of Future Sailors during these tests, there will be a certified Command Fitness Leader, (or Assistant Command Fitness Leader) present and at least one safety observer present for every 25 participants, both of whom are qualified in Cardiopulmonary Resuscitation (CPR). The results of your IFA must be documented and retained by your recruiter.
You will not be authorized to participate in any station level Physical Training unless you are within pre-accession body fat standards. To participate in the IFA, you must meet Navy body fat standards. In any case, you must have a signed Hold Harmless Agreement in your DEP Training Folder or your Officer Residual File.
2
FOR YOuR SAFEtY
Before your organized physical training and Initial Fitness Assessment, your Recruiter will be asking you a series of questions that are designed to ensure your safety. These questions will need to be answered honestly.
• Has a healthcare provider ever said that you have a heart condition and that you should only do physical activity recommended by a doctor?
• Do you feel pain in your chest when you do physical activity?
• In the past month have you had pain in your chest when not doing physical activity?
• Do you lose your balance because of dizziness or do you ever lose consciousness?
• Do you have a bone or joint problem that could be made worse by a change in your physical activity?
• Is your health care provider currently prescribing drugs (for example, water pills) for your blood pressure or heart condition?
• Do you know of any other reason why you should not do any physical activity?
• Are you a female who could possibly be pregnant?
• Are you dressed in attire not suitable for physical training? (i.e., street attire, footwear not designed for running, vinyl/plastic clothing meant to enhance perspiration, etc.)
If you have answered yes to any of the above questions, you will not be allowed to participate in the organized Physical Training or be allowed to take the Initial Fitness Assessment. If you are currently suffering from any self limiting illness or injury (cold, flu, surgery) you will not be permitted to participate in the organized Physical Training or the Initial Fitness Assessment.
3

FItNESS AND NutRItION PLAN
Introduction:
This Fitness and Nutrition Guide provides basic guidelines for the three primary elements of a physical fitness program: aerobic/cardio-respiratory activity, muscular strength and endurance exercises, and flexibility exercises. Research supports that participation in these activities prior to entering RTC, OCS/ODS will decrease your injury risk during initial training.
Physical Fitness Overview:
Physical fitness is an essential and critical component of readiness. Physical health and fitness is much more than the absence of disease. It is a state of being that includes strong, flexible muscles, tendons and joints and an efficient system for getting oxygen and nutrients to the body. Physical fitness is a state of being that must be maintained. An enhanced level of fitness is achievable by everyone, despite body type, family health history, and past habits. A physical activity program includes 3 primary components:
Aerobic/Cardio-respiratory: Aerobic activities, such as running and swimming, help the heart, lungs and blood vessels become more effective at delivering to the muscles what they need to function-oxygen and glucose.
Muscular Strength and Endurance: These activities include exercises such as pushups, curl-ups, or weight training. Muscular strength and endurance activities help your muscles become stronger, giving them both the raw strength and ability to work repeatedly without undue fatigue.
Flexibility: Flexibility or stretching exercises are necessary to prevent injury to the muscles, tendons, ligaments, and joints while increasing efficiency through a full range of motion.
Nutrition Overview:
Nutrition is vital in maintaining a healthy diet and providing your body with the proper nutrients needed for a lifestyle which promotes fitness and overall health. Excess weight and poor nutrition may lead to poor health and an increased risk of injury while you are at RTC, OCS/ODS.
4
RECOMMENDED ExERCISE SEquENCE
The recommended exercise sequence is outlined below. In order to improve performance and to reduce risk of injury; this exercise sequence should be conducted 3 to 5 days per week. If you feel any unusual pain or discomfort during your physical activity session, stop and contact your health care professional. There is some risk of injury associated with physical activity. To prevent injury, remember to pace yourself, especially if you have not participated regularly in an exercise program.
Warm-Up/Stretching: 5-10 Minutes
Physical Activity Session: 30-45 minutes(Aerobic/Cardio-respiratory and, or Muscular Strength and Endurance Exercises)
Cool Down/Stretching: 5-10 Minutes
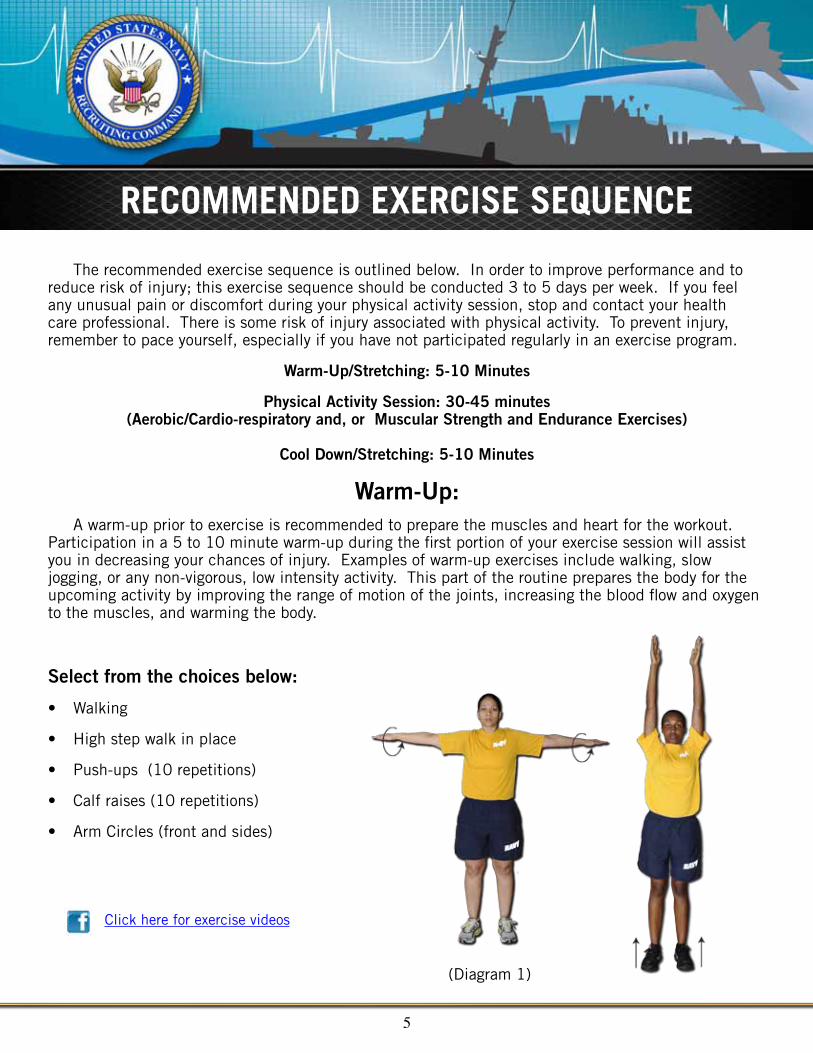
Warm-Up: A warm-up prior to exercise is recommended to prepare the muscles and heart for the workout.Participation in a 5 to 10 minute warm-up during the first portion of your exercise session will assist you in decreasing your chances of injury. Examples of warm-up exercises include walking, slow jogging, or any non-vigorous, low intensity activity. This part of the routine prepares the body for the upcoming activity by improving the range of motion of the joints, increasing the blood flow and oxygen to the muscles, and warming the body.
Select from the choices below:
• Walking
• High step walk in place
• Push-ups (10 repetitions)
• Calf raises (10 repetitions)
• Arm Circles (front and sides)
5
Click here for exercise videos
(Diagram 1)

StREtChING
Safe and effective stretching is necessary for your body’s major muscle groups. Stretching exercises should be conducted as part of the Warm-Up and Cool-Down exercise sequence. Stretches should be held for 15-30 seconds. Repeat one time for each muscle group. If you find that some muscles are tighter than others (hamstrings, chest), repeat these exercises for 3-5 repetitions. Here are 10 basics stretches you should incorporate into your workout.
(Diagram 2)
Neck Stretch Upper Back Stretch Triceps Stretch Chest & Biceps Stretch Lower Back Stretch (1 knee)
Quadriceps Stretch Calf Stretch Groin Stretch Hamstring Stretch Back Extension Stretch
6
Click here for exercise videos
PhYSICAL ACtIVItY SESSION
This section will help you prepare for the Aerobic/Cardio-respiratory and Muscle Strength and Conditioning demands that you will incur during initial training.
In addition to the warm-up, the first 5 minutes of an aerobic/cardio-respiratory activity should be at a lower intensity to prepare the body for the upcoming activity. For instance, if you were running, this would be a slow jog or fast walk. On the elliptical, this may be five minutes at a lower level of resistance (such as levels 1-5) while performing low RPMs. Examples of Aerobic/Cardio-respiratory activities and equipment include:
• Walking outside on a track or on a treadmill (increase difficulty by increasing the speed or incline on the treadmill)
• Swimming
• Bicycle (either outside or on an exercise bike in a gym)
• Elliptical or Rowing Machine
Below are examples of low, moderate, and high intensity aerobic/cardio-respiratory workouts:
Low Intensity Aerobic Workout (beginner to low fitness level):
This workout can be performed using any of the aerobic/cardio-respiratory activities or equipment listed above. After a 5 minute warm-up, increase the intensity (through speed, incline, levels, RPMs, etc) so you are exercising at 50-60% of your maximum effort. You should be breathing easily and able to talk comfortably while you are exercising at this level of effort. If not, decrease your intensity. Start out with 10 minutes of aerobic/cardio-respiratory activity. Finish up the activity with 5 minutes of cool-down. As your fitness level improves, increase the length of time you are exercising at 50-60% of your maximum effort until you are able to complete 20-30 minutes of consecutive aerobic/cardio-respiratory activity without resting.
Moderate Intensity Aerobic Workout (low to average fitness level):
This workout can be performed using any of the aerobic/cardio-respiratory activities or equipment listed above. After a 5 minute warm-up, increase the intensity (through speed, incline, levels, RPMs, etc) so you are exercising at 60-70% of your maximum effort. You should be able to carry on a normal conversation while you are exercising at this level of effort. If not, decrease your intensity. Start out with 15 minutes of aerobic/cardio-respiratory activity. Finish up the activity with 5 minutes of cool-down. As your fitness level improves, increase the length of time you are exercising at 60-70% of your maximum effort until you are able to complete 20-30 minutes of consecutive aerobic/cardio-respiratory activity without resting.
7
Sample Walk/Jog Interval Routine: This routine can be performed outside on a track/course or on a treadmill. Walk for the first 5 minutes. Begin a moderate jog for 30-60 seconds. Then speed walk for the same amount of time you jogged (30-60 seconds). Repeat the speed walk/jog intervals for a total of 20-30 minutes. Finish up the activity with 5 minutes of cool-down by speed walking. As your fitness level improves, increase your jogging time and reduce your rest time (ex: jog for 2 minutes and speed walk for 30 seconds in between). Your ultimate goal will be to complete 1.5-2.0 miles or 20 minutes with a moderate jog and no rest at 60-70% of your maximum effort. Once you reach this level, you could then focus on increasing your speed. This could be done with the high intensity jog/run routine listed below.
Sample Interval Elliptical, Rowing or Bicycle Machine Routine: Begin this activity with 5 minutes at a low intensity to get the body ready for the moderate intensity segments. Gradually increase the resistance to achieve a moderate level of effort. Either increase the resistance or RPMs (how fast you perform an entire cycle of motion) so you are performing at 60-70% of your maximum effort for the next 5 minutes. You should be able to carry on a conversation while performing this exercise. Every person will start at a different resistance level based on their fitness level. After minute 10, your body will need to recover, so reduce the resistance or RPMs for one minute. At minute 11, you will return to the higher level of effort and continue for another 5 minutes of 60-70% of your maximum effort. Lower the intensity for 1 minute and then continue the routing for a total of 20-30 minutes. Cool down by performing 5 minutes at a lower intensity on the machine.
High Intensity Aerobic Workout (average to high fitness level):
This workout can be performed using any of the aerobic/cardio-respiratory activities or equipment listed above. After a 5 minute warm-up, increase the intensity (through speed, incline, levels, RPMs, etc) so you are exercising at 70-85% of your maximum effort. Start out with 20 minutes of aerobic/cardio-respiratory activity. Finish up the activity with 5 minutes of cool-down. As your fitness level improves, increase the length of time you are exercising at 70-85% of your maximum effort until you are able to complete 30 minutes of consecutive aerobic/cardio-respiratory activity without resting.
Sample Jog/Run Interval Routine: This routine can be performed on a treadmill or outside on a running course or track. Jog for the first 5 minutes at a moderate pace. This will be used to prepare the body for the high intensity work. Then for minutes 6-10, increase your speed so you are running at 70% of your maximum speed. Minutes 11-12 will be used for recovery, so reduce your running down to a slow jog to catch your breath and let your body get ready for the next segment. Minutes 13-15, you should be running at 75-85% maximum effort and proceed to a 2 minute recovery jog. Continue this activity with 3 minutes of running followed by 2 minutes of slow jogging for a total of 30 minutes. As your fitness level improves, you can increase your running/recovery ratio to make it more difficult. Example: Run for 4-5 minutes and use 30-60 seconds of recovery, or run the entire 30 minutes.
Sample Elliptical, Rowing or Bicycle Machine Interval Routine: Begin this activity with 5 minutes at a low intensity to get the body ready for the higher intensity segments. Gradually increase the resistance to achieve a moderate level of effort. For minute six, either increase the resistance or RPMs (how fast you perform an entire cycle of motion) so you are performing at 70% of your maximum effort. For minute seven, increase either the resistance or your RPMs to provide 80-85% effort. At this point, you should find it challenging, but you should still be able to carry on a conversation while performing this exercise. Either decrease or increase your resistance level or RPMs to get to this level of difficulty. Every person will start at a different resistance level based on their current fitness level. After minute 10, your body will need to recover, so reduce the resistance or RPMs to the point where you can breathe easily and at a lower intensity level. Stay at this lower intensity for one minute. At minute 11, you will return to 3 minutes of higher intensity activity as you did for minutes 7-10 and then proceed back to one minute of recovery. Continue the 3 minute higher intensity work to 1 minute lower intensity ratio for a total of 20-30 minutes. Cool down by performing 5 minutes at a moderate to lower intensity on the machine.
8
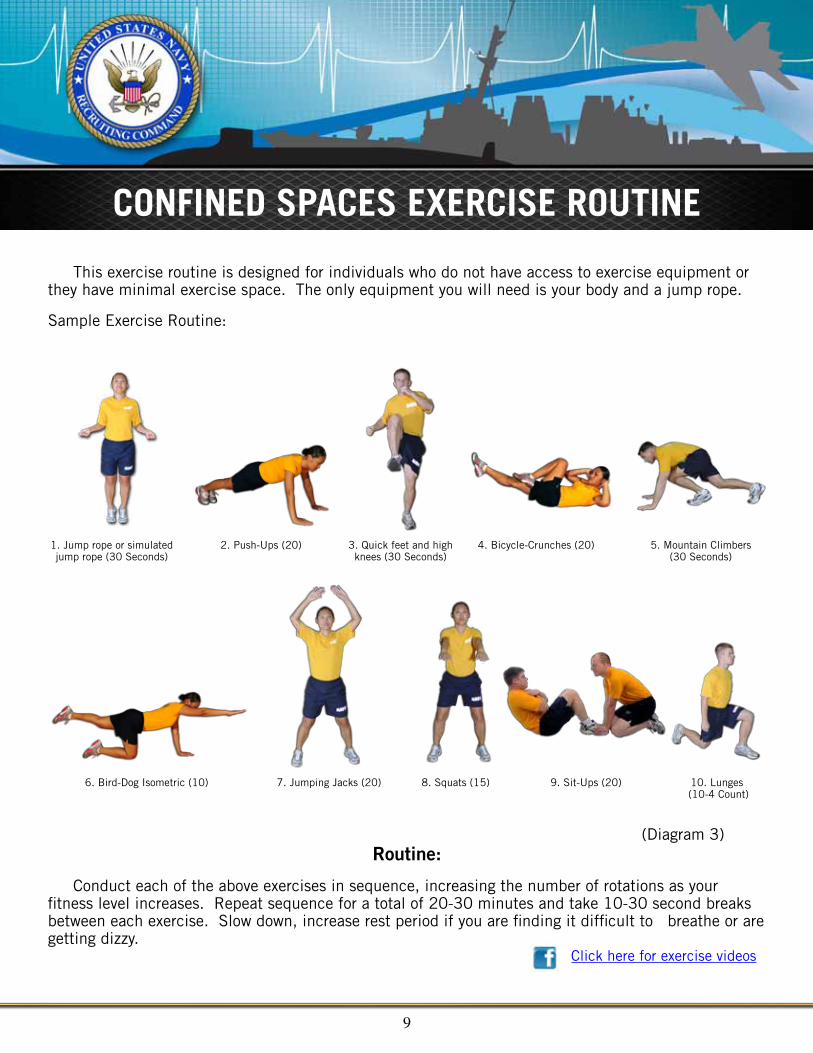
CONFINED SPACES ExERCISE ROutINE
This exercise routine is designed for individuals who do not have access to exercise equipment or they have minimal exercise space. The only equipment you will need is your body and a jump rope.
Sample Exercise Routine:
Routine:
Conduct each of the above exercises in sequence, increasing the number of rotations as your fitness level increases. Repeat sequence for a total of 20-30 minutes and take 10-30 second breaks between each exercise. Slow down, increase rest period if you are finding it difficult to breathe or are getting dizzy.
9
1. Jump rope or simulated jump rope (30 Seconds)
2. Push-Ups (20) 3. Quick feet and high knees (30 Seconds)
4. Bicycle-Crunches (20) 5. Mountain Climbers (30 Seconds)
6. Bird-Dog Isometric (10) 7. Jumping Jacks (20) 8. Squats (15) 9. Sit-Ups (20) 10. Lunges (10-4 Count)
Click here for exercise videos
(Diagram 3)
Muscular Strength and Endurance Exercises
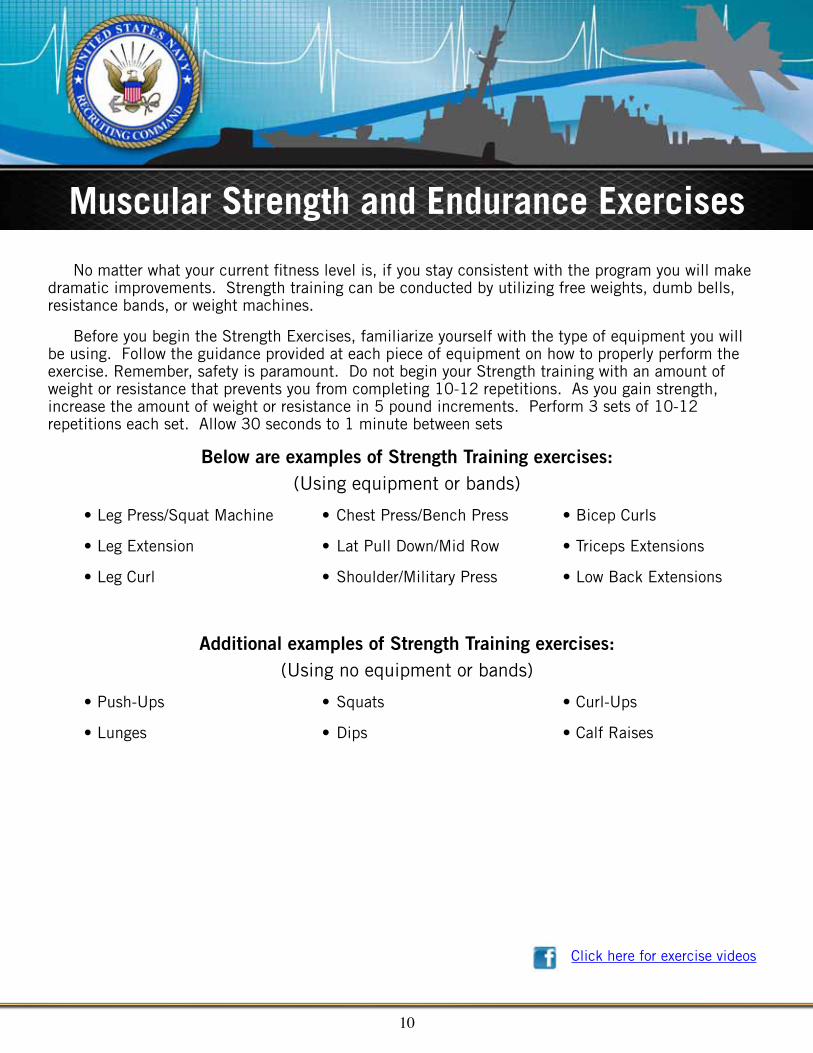
No matter what your current fitness level is, if you stay consistent with the program you will make dramatic improvements. Strength training can be conducted by utilizing free weights, dumb bells, resistance bands, or weight machines.
Before you begin the Strength Exercises, familiarize yourself with the type of equipment you will be using. Follow the guidance provided at each piece of equipment on how to properly perform the exercise. Remember, safety is paramount. Do not begin your Strength training with an amount of weight or resistance that prevents you from completing 10-12 repetitions. As you gain strength, increase the amount of weight or resistance in 5 pound increments. Perform 3 sets of 10-12 repetitions each set. Allow 30 seconds to 1 minute between sets
Below are examples of Strength Training exercises:(Using equipment or bands)
• Leg Press/Squat Machine • Chest Press/Bench Press • Bicep Curls
• Leg Extension • Lat Pull Down/Mid Row • Triceps Extensions
• Leg Curl • Shoulder/Military Press • Low Back Extensions
Additional examples of Strength Training exercises:(Using no equipment or bands)
• Push-Ups • Squats • Curl-Ups
• Lunges • Dips • Calf Raises
10
Click here for exercise videos
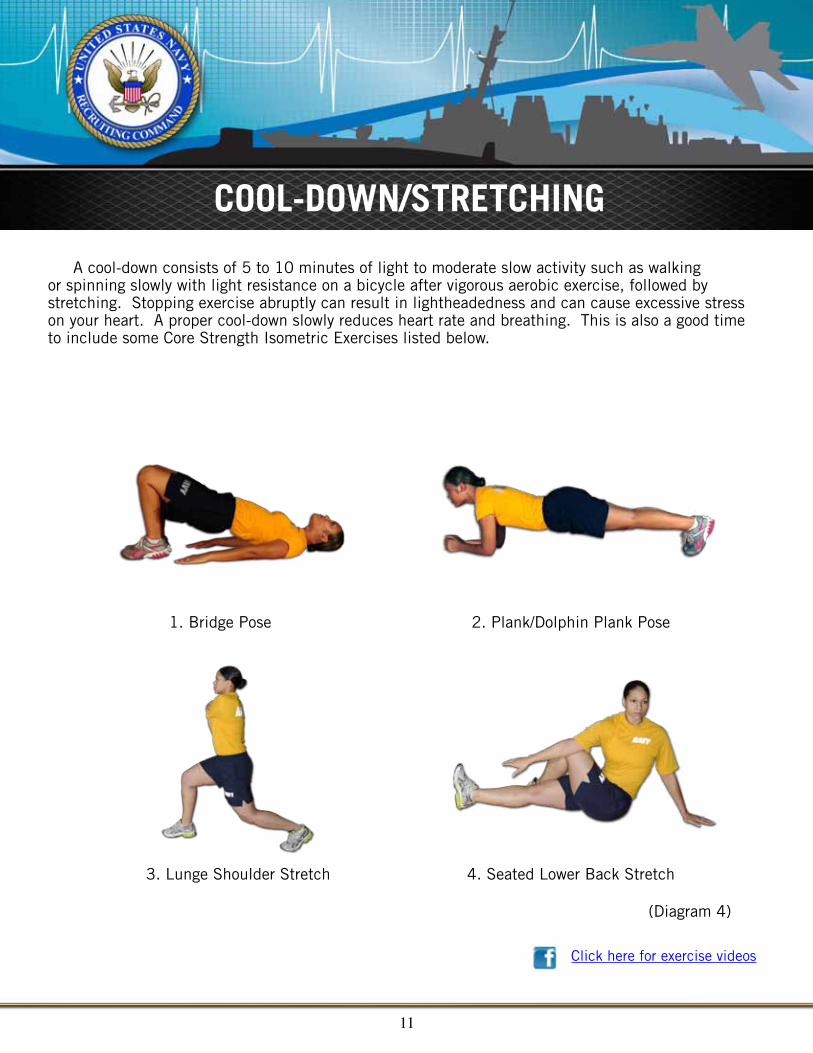
COOL-DOWN/StREtChING
A cool-down consists of 5 to 10 minutes of light to moderate slow activity such as walking or spinning slowly with light resistance on a bicycle after vigorous aerobic exercise, followed by stretching. Stopping exercise abruptly can result in lightheadedness and can cause excessive stress on your heart. A proper cool-down slowly reduces heart rate and breathing. This is also a good time to include some Core Strength Isometric Exercises listed below.
11
1. Bridge Pose 2. Plank/Dolphin Plank Pose
3. Lunge Shoulder Stretch 4. Seated Lower Back Stretch
Click here for exercise videos
(Diagram 4)
INItIAL FItNESS ASSESSMENt
Before your scheduled date to depart for Recruit Training Command or Officer Candidate School, you will have the opportunity to take the Initial Fitness Assessment (IFA). This assessment is strictly voluntary, but it will help you and your Recruiter determine your level of fitness. You will be required to successfully complete the elements of the IFA (known as the Physical Readiness Test (PRT)) throughout your naval career as this test is given semi-annually throughout the Navy.
The Initial Fitness Assessment is a four part fitness test that measures your overall Physical Fitness. [Note to Recruiters: This test will not be administered in extreme weather conditions. It will be conducted in accordance with all of the safety precautions outlined in OPNAVINST 6110.1 series.] Your overall health and safety are the primary concerns of the Navy. If at any time while you are participating in the IFA, you feel dizzy, or feel that you cannot continue, you are to immediately STOP and notify Recruiting personnel administering the IFA, who are CPR qualified and are continuously monitoring your health and well-being before, during, and after the IFA. The following section is an overview of the four events that comprise the IFA.
Physical Readiness Test (PRT):
The Navy PRT Score Categories are included on pages 15-16. You will be expected to score a “good” score for your age group during Initial Training in each of the following four phases that comprise the PRT.
(1) Sit Reach Test:
Although no flexibility test measures the flexibility of all joints, the sit and reach test serves as an important functional measure of hip and back flexibility. To perform the sit and reach test, sit with legs straight, feet together, with shoes off and toes pointed up. Slowly reach forward and attempt to touch the tips of the toes with fingertips of both hands. Hold the reach for one second; DO NOT BOUNCE OR LUNGE. The sit and reach exercise should only be used for testing purposes; it should NOT be included in your daily exercise program due to the excessive stress the stretch places on the lower back. The Hamstring Stretch shown in Diagram 2 is a safe and effective stretch for the hamstring muscle group.
12
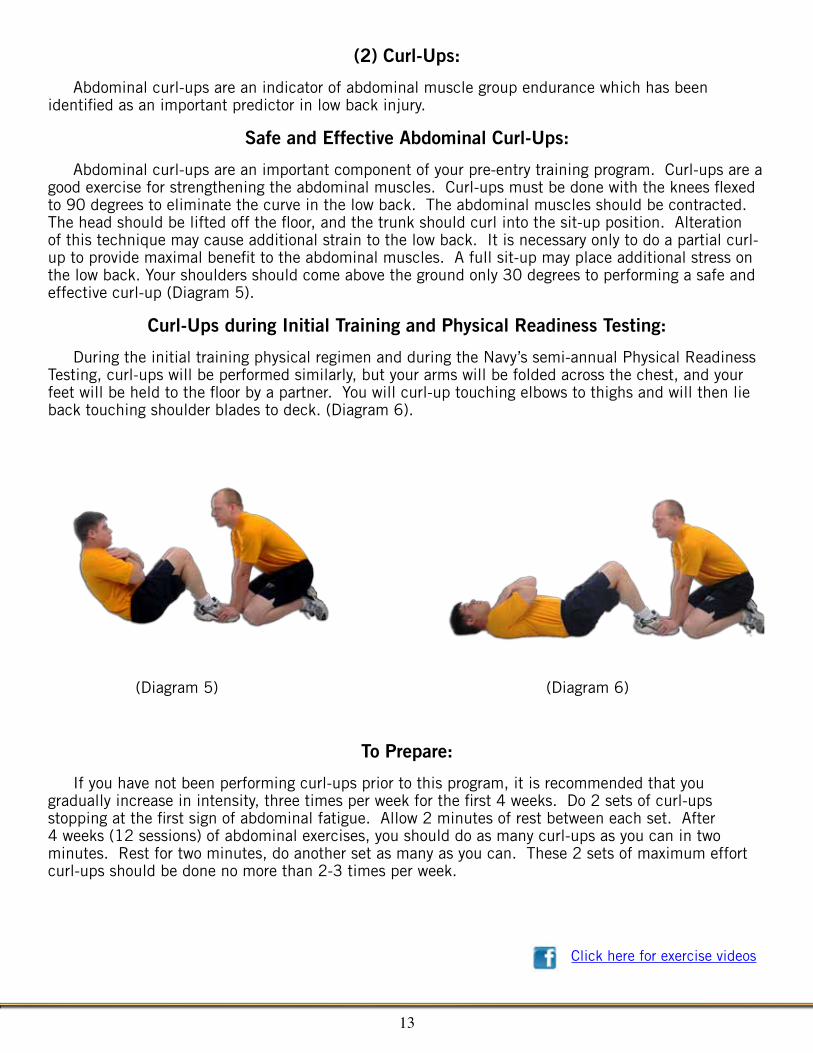
(2) Curl-Ups:
Abdominal curl-ups are an indicator of abdominal muscle group endurance which has been identified as an important predictor in low back injury.
Safe and Effective Abdominal Curl-Ups:
Abdominal curl-ups are an important component of your pre-entry training program. Curl-ups are a good exercise for strengthening the abdominal muscles. Curl-ups must be done with the knees flexed to 90 degrees to eliminate the curve in the low back. The abdominal muscles should be contracted. The head should be lifted off the floor, and the trunk should curl into the sit-up position. Alteration of this technique may cause additional strain to the low back. It is necessary only to do a partial curl-up to provide maximal benefit to the abdominal muscles. A full sit-up may place additional stress on the low back. Your shoulders should come above the ground only 30 degrees to performing a safe and effective curl-up (Diagram 5).
Curl-Ups during Initial Training and Physical Readiness Testing:
During the initial training physical regimen and during the Navy’s semi-annual Physical Readiness Testing, curl-ups will be performed similarly, but your arms will be folded across the chest, and your feet will be held to the floor by a partner. You will curl-up touching elbows to thighs and will then lie back touching shoulder blades to deck. (Diagram 6).
(Diagram 5) (Diagram 6)
To Prepare:
If you have not been performing curl-ups prior to this program, it is recommended that you gradually increase in intensity, three times per week for the first 4 weeks. Do 2 sets of curl-ups stopping at the first sign of abdominal fatigue. Allow 2 minutes of rest between each set. After 4 weeks (12 sessions) of abdominal exercises, you should do as many curl-ups as you can in two minutes. Rest for two minutes, do another set as many as you can. These 2 sets of maximum effort curl-ups should be done no more than 2-3 times per week.
13
Click here for exercise videos
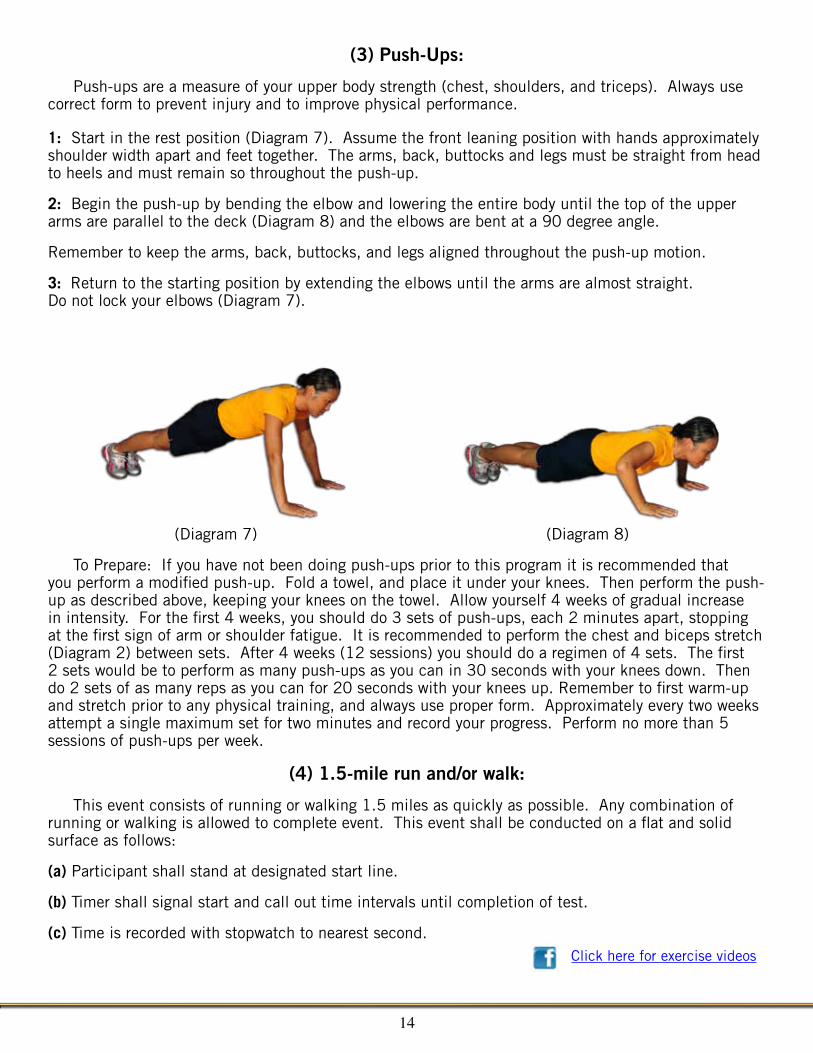
(3) Push-Ups:
Push-ups are a measure of your upper body strength (chest, shoulders, and triceps). Always use correct form to prevent injury and to improve physical performance.
1: Start in the rest position (Diagram 7). Assume the front leaning position with hands approximately shoulder width apart and feet together. The arms, back, buttocks and legs must be straight from head to heels and must remain so throughout the push-up.
2: Begin the push-up by bending the elbow and lowering the entire body until the top of the upper arms are parallel to the deck (Diagram 8) and the elbows are bent at a 90 degree angle.
Remember to keep the arms, back, buttocks, and legs aligned throughout the push-up motion.
3: Return to the starting position by extending the elbows until the arms are almost straight.Do not lock your elbows (Diagram 7).
(Diagram 7) (Diagram 8)
To Prepare: If you have not been doing push-ups prior to this program it is recommended that you perform a modified push-up. Fold a towel, and place it under your knees. Then perform the push-up as described above, keeping your knees on the towel. Allow yourself 4 weeks of gradual increase in intensity. For the first 4 weeks, you should do 3 sets of push-ups, each 2 minutes apart, stopping at the first sign of arm or shoulder fatigue. It is recommended to perform the chest and biceps stretch (Diagram 2) between sets. After 4 weeks (12 sessions) you should do a regimen of 4 sets. The first 2 sets would be to perform as many push-ups as you can in 30 seconds with your knees down. Then do 2 sets of as many reps as you can for 20 seconds with your knees up. Remember to first warm-up and stretch prior to any physical training, and always use proper form. Approximately every two weeks attempt a single maximum set for two minutes and record your progress. Perform no more than 5 sessions of push-ups per week.
(4) 1.5-mile run and/or walk:
This event consists of running or walking 1.5 miles as quickly as possible. Any combination of running or walking is allowed to complete event. This event shall be conducted on a flat and solid surface as follows:
(a) Participant shall stand at designated start line.
(b) Timer shall signal start and call out time intervals until completion of test.
(c) Time is recorded with stopwatch to nearest second.
14
Click here for exercise videos
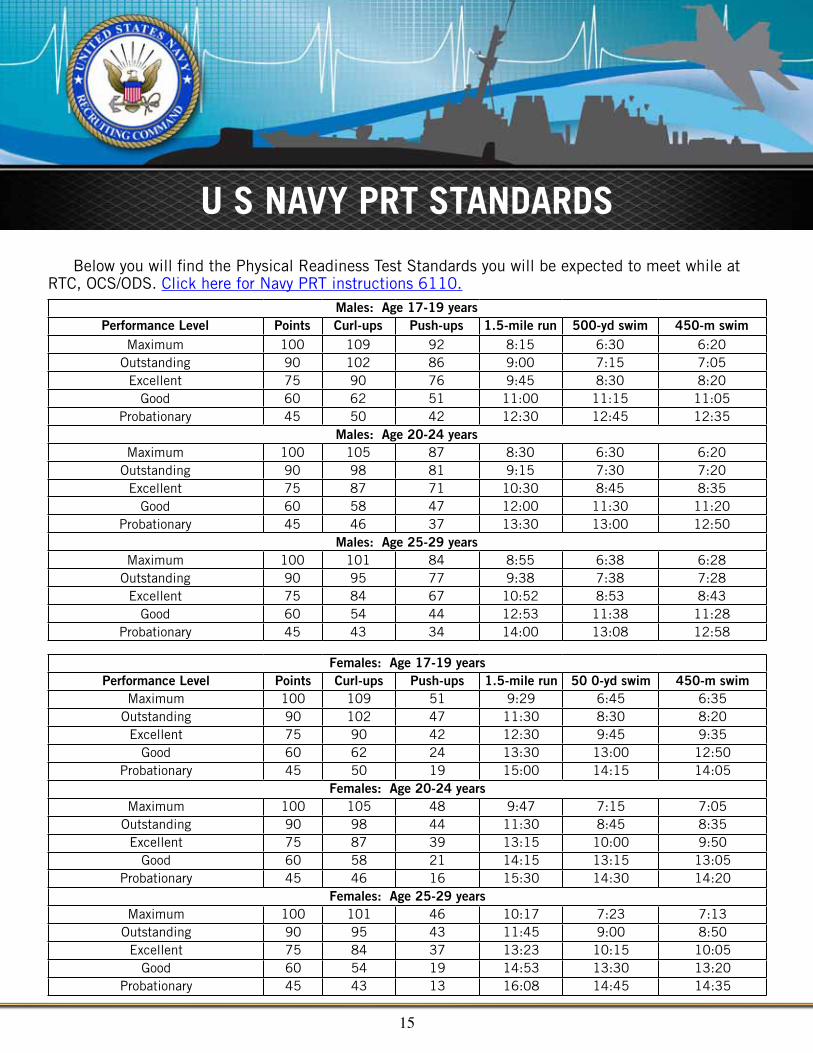
u S NAVY PRt StANDARDS
Below you will find the Physical Readiness Test Standards you will be expected to meet while at RTC, OCS/ODS. Click here for Navy PRT instructions 6110.
Males: Age 17-19 yearsPerformance Level Points Curl-ups Push-ups 1.5-mile run 500-yd swim 450-m swim
Maximum 100 109 92 8:15 6:30 6:20Outstanding 90 102 86 9:00 7:15 7:05
Excellent 75 90 76 9:45 8:30 8:20Good 60 62 51 11:00 11:15 11:05
Probationary 45 50 42 12:30 12:45 12:35Males: Age 20-24 years
Maximum 100 105 87 8:30 6:30 6:20Outstanding 90 98 81 9:15 7:30 7:20
Excellent 75 87 71 10:30 8:45 8:35Good 60 58 47 12:00 11:30 11:20
Probationary 45 46 37 13:30 13:00 12:50Males: Age 25-29 years
Maximum 100 101 84 8:55 6:38 6:28Outstanding 90 95 77 9:38 7:38 7:28
Excellent 75 84 67 10:52 8:53 8:43Good 60 54 44 12:53 11:38 11:28
Probationary 45 43 34 14:00 13:08 12:58
Females: Age 17-19 yearsPerformance Level Points Curl-ups Push-ups 1.5-mile run 50 0-yd swim 450-m swim
Maximum 100 109 51 9:29 6:45 6:35Outstanding 90 102 47 11:30 8:30 8:20
Excellent 75 90 42 12:30 9:45 9:35Good 60 62 24 13:30 13:00 12:50
Probationary 45 50 19 15:00 14:15 14:05Females: Age 20-24 years
Maximum 100 105 48 9:47 7:15 7:05Outstanding 90 98 44 11:30 8:45 8:35
Excellent 75 87 39 13:15 10:00 9:50Good 60 58 21 14:15 13:15 13:05
Probationary 45 46 16 15:30 14:30 14:20Females: Age 25-29 years
Maximum 100 101 46 10:17 7:23 7:13Outstanding 90 95 43 11:45 9:00 8:50
Excellent 75 84 37 13:23 10:15 10:05Good 60 54 19 14:53 13:30 13:20
Probationary 45 43 13 16:08 14:45 14:35
15
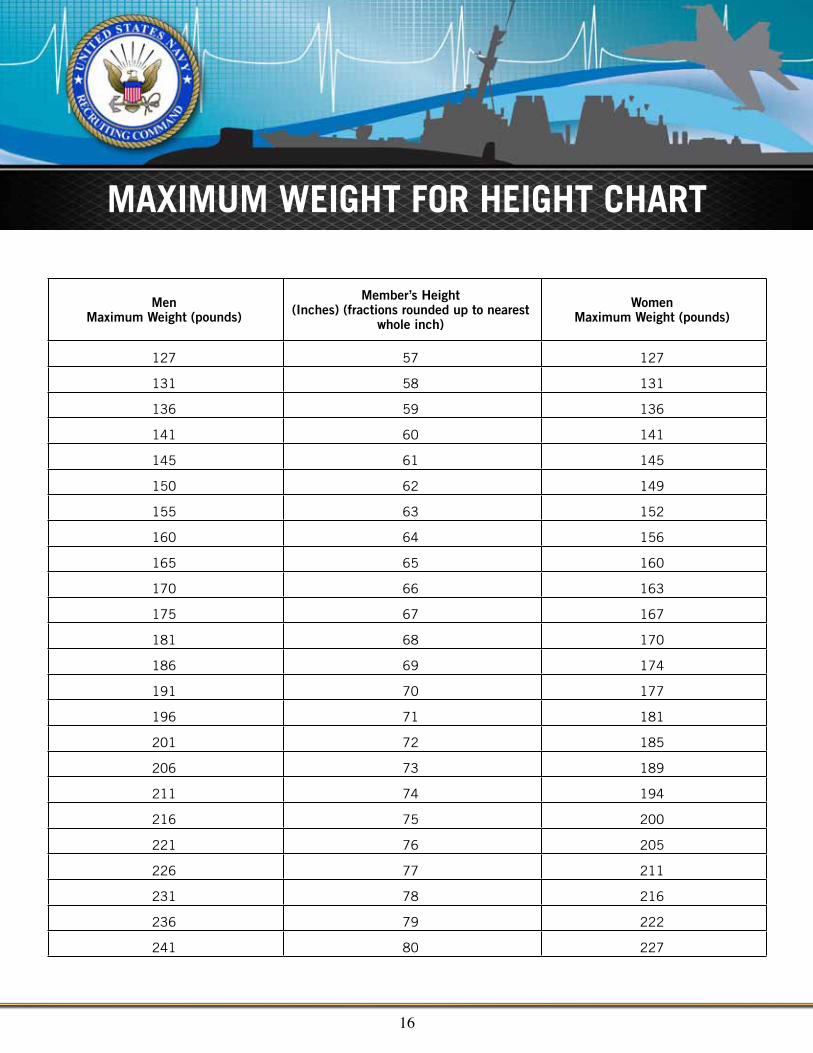
MAxIMuM WEIGht FOR hEIGht ChARt
MenMaximum Weight (pounds)
Member’s Height (Inches) (fractions rounded up to nearest
whole inch)
WomenMaximum Weight (pounds)
127 57 127
131 58 131
136 59 136
141 60 141
145 61 145
150 62 149
155 63 152
160 64 156
165 65 160
170 66 163
175 67 167
181 68 170
186 69 174
191 70 177
196 71 181
201 72 185
206 73 189
211 74 194
216 75 200
221 76 205
226 77 211
231 78 216
236 79 222
241 80 227
16
INjuRY PREVENtION
Injury Prevention during Physical Training:
Navy Initial Training experiences a 20% injury rate which is largely due to personnel arriving in poor physical condition. The goal of the Navy Physical Training Program is to provide you with guidelines for exercise so that you improve but not so much that you cause overuse, excessive overload leading to injury or illness. Overuse problems commonly occur at the beginning of a new exercise program and account for the majority of injuries. The body and muscles must be given time to gradually adapt to the new demands of a physical activity program. The first few months of a new physical conditioning program are the most critical.
Injury Prevention Overview:
Participation in physical exercise offers many benefits; these benefits far exceed the risk of injury. When you exercise, you intentionally use certain muscles to increase their strength and endurance. It is common to feel minor aches and soreness as your body adapts to these efforts.While injury is possible in any exercise program, following safety guidelines to prevent injuries and participating in a sensible strengthening and stretching program generally decrease risk of injury for those who participate in physical fitness programs. When beginning a physical training program, IT IS IMPORTANT TO GRADUALLY INCREASE YOUR EXERCISE INTENSITY AND DURATION. When in doubt about your physical activity program, it is better to cut back and take it easy rather than to do too much too soon.
• The one physical fitness component that stands out in virtually all studies for the prevention of injuries is aerobic fitness. Studies show that being aerobically conditioned prior to entering initial training will greatly decrease your chances of getting injured. The lower the initial level of fitness when beginning training, the greater the risk of experiencing training related injury.
• Though being aerobically conditioned is important for the prevention of injury, aerobic exercises such as running have the potential to cause injury through repetitive, forceful impact against hard surfaces. During your aerobic conditioning efforts, it is recommended to participate in different types of aerobic activities to prevent injury occurrence. Remember to gradually increase your exercise intensity and duration.
• When ligaments, tendons, muscle, and bone are strengthened through muscular exercise, risk of injury is decreased. Strong, flexible muscles and ligaments can better withstand the stress of many forceful landings during a workout. Many aerobic activities tend to develop strength in only a few groups of muscles, leaving others weak. For example, running strengthens quadriceps but leaves the hamstrings weak. Flexibility programs may decrease risk of injury. When tight muscles restrict the natural range of motion of a joint, the slightest unusual twist can cause a strain or pull, such as a strained hamstring. Inflexibility may also cause overuse injuries because inelastic muscles transfer excessive stress to even less flexible areas of the body.
17
AVOIDING COMMON INItIAL tRAINING INjuRIES
Common Injuries during Initial Training:
The five primary injuries most commonly incurred by personnel during Navy initial training schools include the following: ligament sprains, muscle strains, shin splints, stress fractures, and Runner’s Knee, also known as Iliotibial Band Friction Syndrome (ITBS). Approximately 20% of individuals participating in initial training will obtain these types of injuries, which could affect their successful completion of initial training. To best prepare you in preventing these injuries from occurring to you during initial training, this section will define each injury, explain the primary causes of each injury, and provide you with injury prevention guidelines, including muscle strengthening and stretching exercises.
Sprains:
A sprain is a partial or complete tear of a ligament, the tissue that binds bones together to form a joint. A sprain is most often a result of a sudden force, typically a twisting motion that surrounding muscles are not strong enough to control. Both ankles and knees are vulnerable to sprains during initial training. Strong, flexible muscles help protect against sprains. For example, to prevent ankle sprain, strengthen ankles with flexion, extension, inversion, and eversion exercises. Exercise tubing or bicycle tubing is needed during this exercise. Recommended exercise sequence is 3 sets of 10 repetitions/3 times per week.
Plantar flexion: Band around forefoot, point toe as far as possible.
Dorsi-flexion: Attach band to stationary object opposite of foot. Position band on top of foot and pull foot toward you.
Inversion: Attach band to inside of foot and a stationary object opposite it. Pull foot inwards.
Eversion: Attach band to inside of foot and a stationary object opposite it. Pull foot outwards.
18
Strains:
A muscle strain is a partial or complete tear of muscle fibers or a tendon and is sometimes referred to as a muscle “pull”. There are many different causes, but it most often results from a violent contraction of the muscle. A strain may be caused by fatigue, overexertion, muscle imbalance or weakness, or electrolyte or water imbalance. To prevent strains, complete a full-body warm-up before working out, take precautions not to overdo, and work toward balancing the strength and flexibility in opposing muscles.
Shin Splints:
A shin splint refers to any pain in the front of the lower leg (shin). Early signs are acute burning pain or irritation in the lower third front of the leg. This may progress to slight swelling, redness, warmth, and inflammation. Shin splints may come early in an exercise program and are particularly common in those who are out of shape, overweight, or who have anatomical/mechanical problems. Working out on very hard or very soft surfaces can cause shin splints, even if a person is in good physical condition. Switching from hard to a soft surface or vice versa, excessive mileage, improper footwear, poor foot mechanics, running on a road slope, and running the same direction all the time may cause shin splints. To prevent shin splints, you should avoid the identified causes of this injury.
Stress Fracture:
A stress fracture is a very small, microscopic break in a bone caused by overuse. Unlike a broken bone, which occurs with a distinct traumatic event, a stress fracture is the result of cumulative overload that occurs over many days or weeks. Doing too much too soon (overuse) is the major cause. Bone is living tissue that adjusts to exercise force demands placed on it. As force is applied, bone will remodel itself to better handle the force. If too much force is applied, the bone may fracture before it can successfully remodel. Running extreme mileage, doing impact activities such as running, wearing worn-out shoes, exercising on hard surfaces such as asphalt or concrete, and having poor foot mechanics may cause a stress fracture. Because they have smaller, lighter bones, women are more prone to stress fractures than are men. To prevent stress fractures, gradually work into a physical training program, and avoid the identified causes of stress fractures.
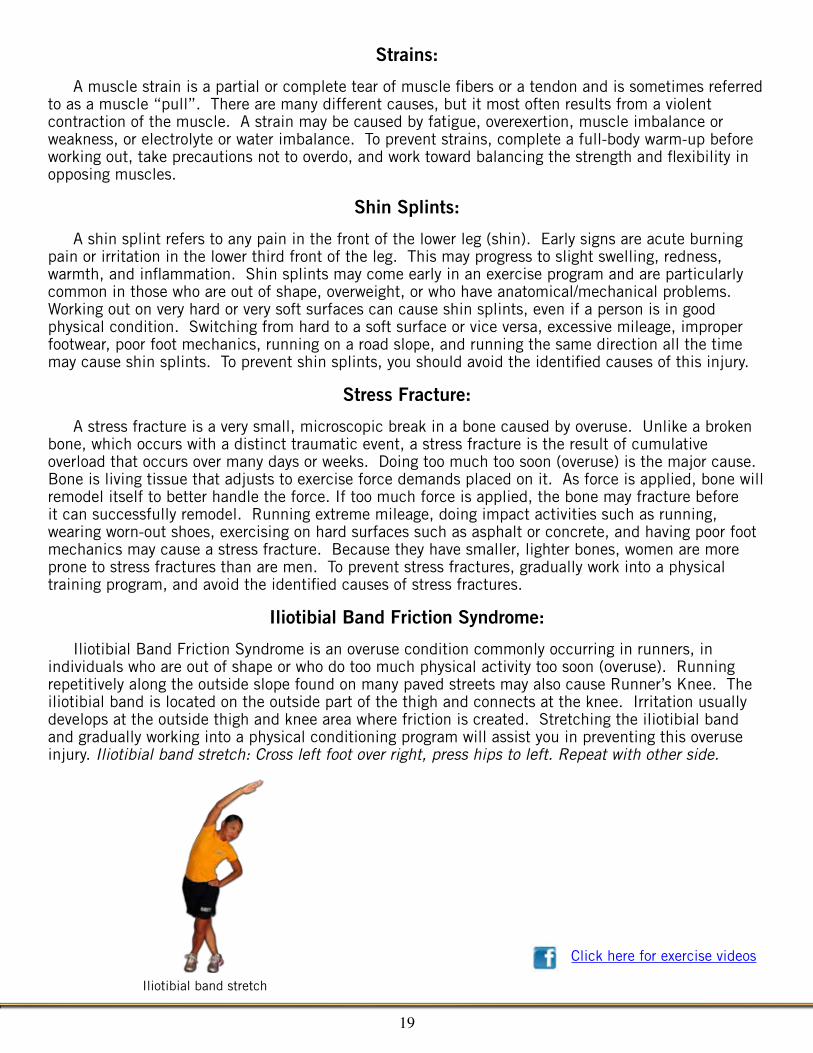
Iliotibial Band Friction Syndrome:
Iliotibial Band Friction Syndrome is an overuse condition commonly occurring in runners, in individuals who are out of shape or who do too much physical activity too soon (overuse). Running repetitively along the outside slope found on many paved streets may also cause Runner’s Knee. The iliotibial band is located on the outside part of the thigh and connects at the knee. Irritation usually develops at the outside thigh and knee area where friction is created. Stretching the iliotibial band and gradually working into a physical conditioning program will assist you in preventing this overuse injury. Iliotibial band stretch: Cross left foot over right, press hips to left. Repeat with other side.
19
Click here for exercise videos
Iliotibial band stretch
NutRItION
In the previous section of this handout you were introduced to a comprehensive Physical Fitness plan that will enable you to prepare yourself for the rigors of RTC, OCS/ODS. In order to be physically fit, you must be nutritionally fit. This section provides guidance on properly fueling your body. Nutrition is important in all that you do, not just exercise, although a healthy diet is an integral part in any fitness routine.
Your body is like a car. How well it performs is based on:
• Quality Fuel g Good Nutrition and Hydration
• How well it is Tuned g Exercise
• How much Drag Factor g Excess Weight
Here are some helpful guidelines to follow:
• Eat at least 3 meals per day. Avoid missing any meals
• Ensure you stay hydrated. Drink a minimum of 8-8 oz glasses of water daily.
• Eat 2-3 cups of fruit and vegetables per day
• Choose whole grains (“whole” wheat bread, cereal)
• Choose lean protein (non-fried chicken, fish, pork, beef)
• Limit sugary beverages (soda, energy drinks, punch)
• No more than one dessert or sweet per day
During the course of the day snacking on healthy foods can minimize the amount of sugars and unhealthy preservatives. Some healthy alternatives include:
• Whole grain bread • Fruit: apple, orange, banana, grapes
• Tuna • Nuts: almonds, walnuts
• Hummus with cut up vegetables • Instant oatmeal, raisins
• Vegetables: cherry tomatoes, carrot sticks, non-fat yogurt, cottage cheese
• Skim Milk
20
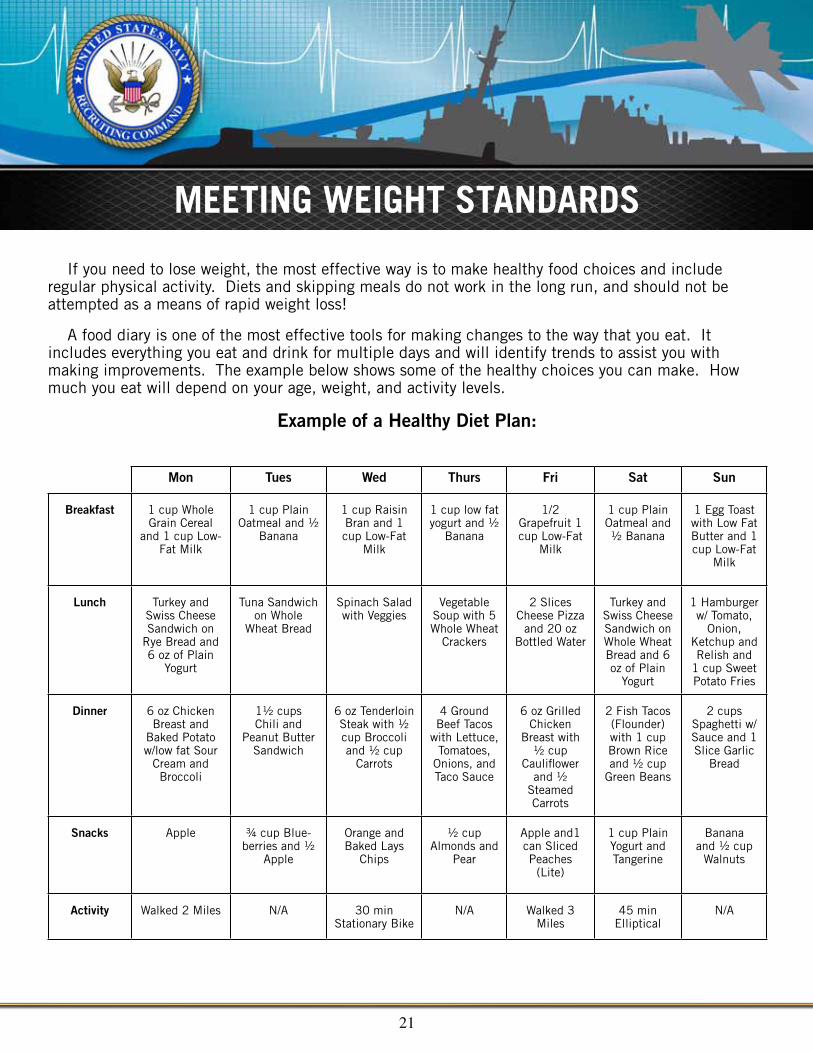
MEEtING WEIGht StANDARDS
If you need to lose weight, the most effective way is to make healthy food choices and include regular physical activity. Diets and skipping meals do not work in the long run, and should not be attempted as a means of rapid weight loss!
A food diary is one of the most effective tools for making changes to the way that you eat. It includes everything you eat and drink for multiple days and will identify trends to assist you with making improvements. The example below shows some of the healthy choices you can make. How much you eat will depend on your age, weight, and activity levels.
Example of a Healthy Diet Plan:
Mon Tues Wed Thurs Fri Sat Sun
Breakfast 1 cup Whole Grain Cereal
and 1 cup Low-Fat Milk
1 cup Plain Oatmeal and ½
Banana
1 cup Raisin Bran and 1 cup Low-Fat
Milk
1 cup low fat yogurt and ½
Banana
1/2 Grapefruit 1 cup Low-Fat
Milk
1 cup Plain Oatmeal and ½ Banana
1 Egg Toast with Low Fat Butter and 1 cup Low-Fat
Milk
Lunch Turkey and Swiss Cheese Sandwich on
Rye Bread and 6 oz of Plain
Yogurt
Tuna Sandwich on Whole
Wheat Bread
Spinach Salad with Veggies
Vegetable Soup with 5 Whole Wheat
Crackers
2 Slices Cheese Pizza
and 20 oz Bottled Water
Turkey and Swiss Cheese Sandwich on Whole Wheat Bread and 6 oz of Plain
Yogurt
1 Hamburger w/ Tomato,
Onion, Ketchup and Relish and
1 cup Sweet Potato Fries
Dinner 6 oz Chicken Breast and
Baked Potato w/low fat Sour
Cream and Broccoli
1½ cups Chili and
Peanut Butter Sandwich
6 oz Tenderloin Steak with ½ cup Broccoli and ½ cup
Carrots
4 Ground Beef Tacos
with Lettuce, Tomatoes,
Onions, and Taco Sauce
6 oz Grilled Chicken
Breast with ½ cup
Cauliflower and ½
Steamed Carrots
2 Fish Tacos (Flounder) with 1 cup Brown Rice and ½ cup
Green Beans
2 cups Spaghetti w/ Sauce and 1 Slice Garlic
Bread
Snacks Apple ¾ cup Blue-berries and ½
Apple
Orange and Baked Lays
Chips
½ cup Almonds and
Pear
Apple and1 can Sliced Peaches
(Lite)
1 cup Plain Yogurt and Tangerine
Banana and ½ cup
Walnuts
Activity Walked 2 Miles N/A 30 min Stationary Bike
N/A Walked 3 Miles
45 min Elliptical
N/A
21
22
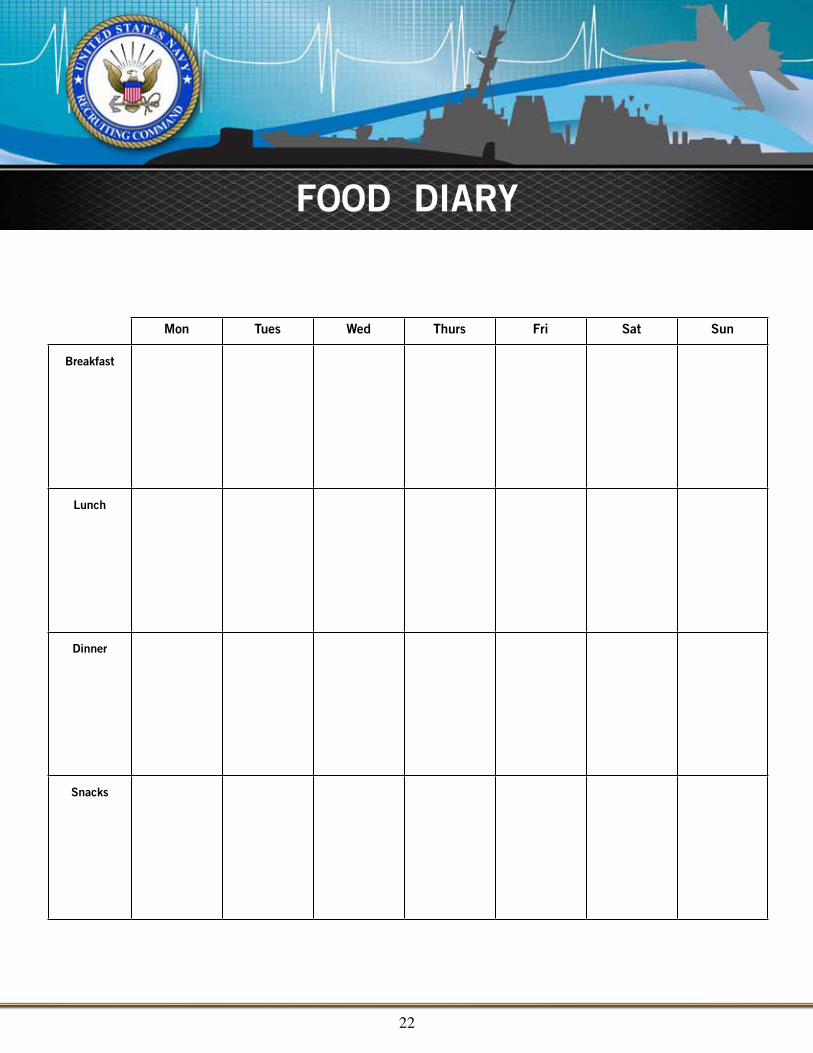
FOOD DIARY
Mon Tues Wed Thurs Fri Sat Sun
Breakfast
Lunch
Dinner
Snacks
SECRETS TO SUCCESS
There is no magic pill or fad diet that will help you achieve the results that you desire to achieve. Following these simple steps will help you prepare physically for RTC, OCS/ODS:
• Eat Breakfast everyday
• Be active 60 minutes per day
• Eat three balanced meals and stay hydrated throughout the day
• Sleep 7-8 hours per night
• Set realistic goals for fitness and weight loss: No more than 1-2 pounds of weight loss per week.
• Get support from your Recruiter and Never Give Up!
• Track your food intake on a food log (chart provided on pg. 22)
Learning and practicing sound nutrition habits is the foundation of a physically fit Sailor. Before looking for performance enhancing foods and supplements, get the basics down first. For more assistance on establishing a healthy diet, visit the Navy and Marine Corps Public Health Healthy Living website at:
http://www-nehc.med.navy.mil/Healthy_Living/
23