Embed Size (px)
Citation preview

NCR BACK OFFICE USER’S GUIDE
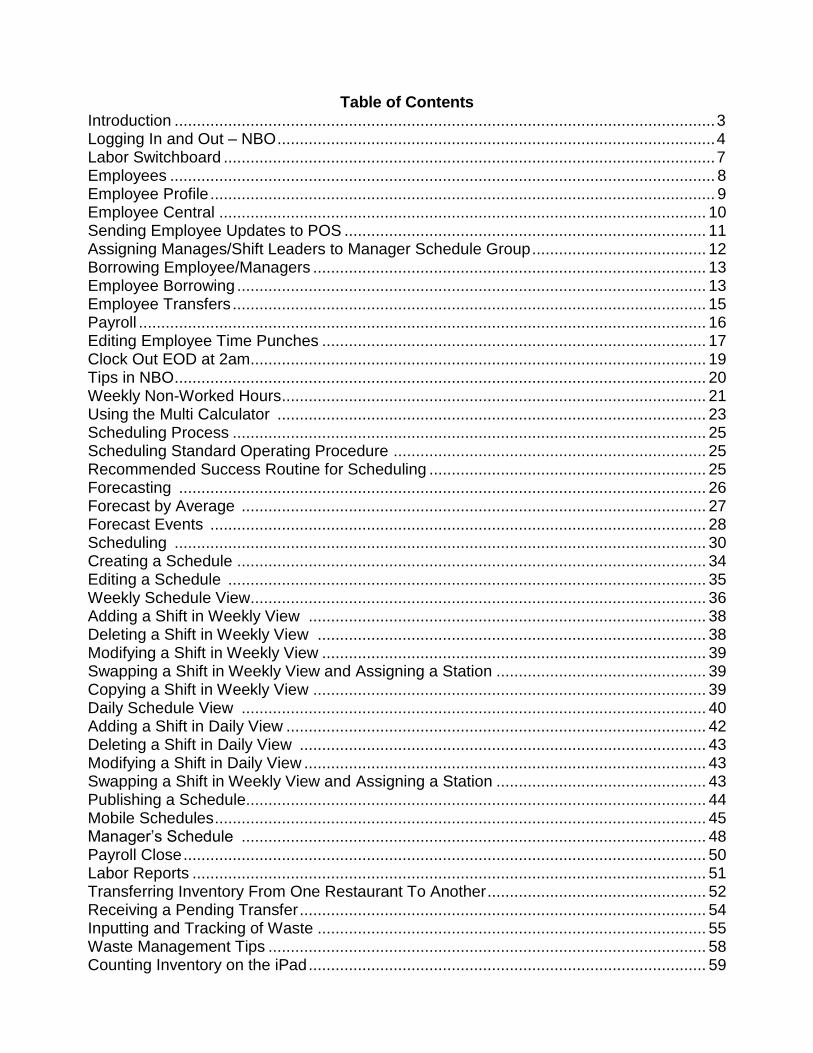
Table of Contents Introduction ......................................................................................................................... 3
Logging In and Out – NBO .................................................................................................. 4
Labor Switchboard .............................................................................................................. 7
Employees .......................................................................................................................... 8
Employee Profile ................................................................................................................. 9
Employee Central ............................................................................................................. 10
Sending Employee Updates to POS ................................................................................. 11
Assigning Manages/Shift Leaders to Manager Schedule Group ....................................... 12
Borrowing Employee/Managers ........................................................................................ 13
Employee Borrowing ......................................................................................................... 13
Employee Transfers .......................................................................................................... 15 Payroll ............................................................................................................................... 16
Editing Employee Time Punches ...................................................................................... 17
Clock Out EOD at 2am ...................................................................................................... 19
Tips in NBO ....................................................................................................................... 20
Weekly Non-Worked Hours ............................................................................................... 21
Using the Multi Calculator ................................................................................................ 23
Scheduling Process .......................................................................................................... 25
Scheduling Standard Operating Procedure ...................................................................... 25
Recommended Success Routine for Scheduling .............................................................. 25
Forecasting ...................................................................................................................... 26
Forecast by Average ........................................................................................................ 27
Forecast Events ............................................................................................................... 28
Scheduling ....................................................................................................................... 30
Creating a Schedule ......................................................................................................... 34 Editing a Schedule ........................................................................................................... 35
Weekly Schedule View ...................................................................................................... 36
Adding a Shift in Weekly View ......................................................................................... 38
Deleting a Shift in Weekly View ....................................................................................... 38
Modifying a Shift in Weekly View ...................................................................................... 39
Swapping a Shift in Weekly View and Assigning a Station ............................................... 39
Copying a Shift in Weekly View ........................................................................................ 39
Daily Schedule View ........................................................................................................ 40
Adding a Shift in Daily View .............................................................................................. 42
Deleting a Shift in Daily View ........................................................................................... 43
Modifying a Shift in Daily View .......................................................................................... 43 Swapping a Shift in Weekly View and Assigning a Station ............................................... 43 Publishing a Schedule....................................................................................................... 44
Mobile Schedules .............................................................................................................. 45
Manager’s Schedule ........................................................................................................ 48
Payroll Close ..................................................................................................................... 50
Labor Reports ................................................................................................................... 51
Transferring Inventory From One Restaurant To Another ................................................. 52
Receiving a Pending Transfer ........................................................................................... 54
Inputting and Tracking of Waste ....................................................................................... 55 Waste Management Tips .................................................................................................. 58
Counting Inventory on the iPad ......................................................................................... 59

To begin your counts......................................................................................................... 61
Adding Daily or Weekly Inventory Counts Manually (only if iPad is not working) .............. 62
Selecting Type of Inventory ............................................................................................... 63
Posting Inventory .............................................................................................................. 64
Working with Set-Up and Maintenance of Inventory Worksheets ..................................... 67
Manage Your Purchasing Worksheets .............................................................................. 69
Printing A GFS Order Guide ............................................................................................. 71
Placing a GFS Electronic Purchase Order ........................................................................ 74
Finalizing a GFS Electronic Invoice .................................................................................. 79 Restaurant Locating a “Credit” Invoice (Adjustment) ........................................................ 80
Manually Posting an Invoice ............................................................................................. 81
Enter Line Items for the Invoice ........................................................................................ 85
Working with Bob Evans Restaurant Suggested Prep and Interval Prep .......................... 86
Running a Workflow in NBO ............................................................................................. 95
Trouble Shooting Food Costs ........................................................................................... 96

Introduction
This user’s guide is designed to provide detailed instructions regarding NBO manager activities.
The NCR BackOffice (NBO) Program
This module identifies the various applications that are used to manage the day to day activities such as Employee Maintenance, Forecasting, Scheduling and Labor functions.
NCR BackOffice NBO is used by the manager on a daily basis. It is a complete in store back office system for managing all aspects of Purchases, Inventory Management, Cash Control, Timekeeping, a n d Employee/Manager Scheduling. NBO requires a login name and password that is unique to each Manager. For security purposes your password should never be shared with others. Only managers and Shift Leaders should be granted access to this tool. NBO Back Office Switchboard provides a graphical and user-friendly interface starting with a screen called a Switchboard. Switchboards group related tasks together for ease of use providing you access to complete your daily work; clear and easy to understand menu options guide you through your various tasks.

Updated 06/16 CONFIDENTIAL AND PROPRIETARY TO BOB EVANS FARMS, LLC
4
Logging In and Out – NBO
1. From the Desktop, double-click the icon to display the NBO Log-In dialog:
2. Type your NBO user ID (your 9 digit employee ID#) in the User Name field. 3. Tab to the Password field and type your NBO password. 4. Click .

Updated 06/16 CONFIDENTIAL AND PROPRIETARY TO BOB EVANS FARMS, LLC
5
5. The first time you log into NBO you will need to set up your password.
6. You will be prompted if your password does not meet the required criteria.
For added security, you will be prompted to change the initial password at your first login. You will also be prompted to change your password every 60 days.

Updated 06/16 CONFIDENTIAL AND PROPRIETARY TO BOB EVANS FARMS, LLC
6
7. After you log in, NBO displays the Main Switchboard, which defaults to Inventory. To access the Labor Suite, click the Labor icon on bottom right of screen. A tool bar in the top left corner of each switchboard contains easily accessible tabs
for: Tools, Security, and Help options.
For NBO How To Questions: There is a great tutorial with self-help information in the Help>Online Help option at the top left part of the Switchboard screen.

Updated 06/16 CONFIDENTIAL AND PROPRIETARY TO BOB EVANS FARMS, LLC
7
Labor Switchboard Employees- contains employee information Payroll- contains time keeping and payroll related information Scheduling- forecasting and employee/manager scheduling Staffing- general information Manager Tools- not used at this time
Reports- Various labor and payroll related reports Stop- To close NBO Workflow-Important daily/weekly tasks related to labor, payroll and other important tasks to run your restaurant. Help- To access the NBO Online Help Guide Inventory- To go back to Inventory Switchboard

Updated 06/16 CONFIDENTIAL AND PROPRIETARY TO BOB EVANS FARMS, LLC 8
Employees Employee Maintenance All employee HR related information is entered/ updated by the manager in Oracle. Oracle sends the employee information to NBO. NBO will send employee information to the POS system. Example of Oracle HR information:
New Hires/ Re-hires
Job and pay rate changes
Address and phone # changes
Transfers
LOAs

Updated 06/16 CONFIDENTIAL AND PROPRIETARY TO BOB EVANS FARMS, LLC 9
Employee Profile To view employee profile information in NBO, do the following:
1. Select Labor 2. Select Employee 3. Select Employee Maintenance 4. Select Employee Name
Employee Tab-Name, Employee #, Contact Information Emergency- If emergency contact information was entered in Oracle, this would be displayed here. Status- Active or Inactive, Schedule Group, Employment Type, FT/PT Status Type Job Code- Job Code assigned to the employee Point of Sale- POS Access level information Custom Fields- Send Employee to POS
PTO Hours - Remaining information for Managers

Updated 06/16 CONFIDENTIAL AND PROPRIETARY TO BOB EVANS FARMS, LLC 10
Employee Central To view employee information for all of your employees in NBO, you can do so by selecting Employee Central on the Labor switchboard:
1. Select Labor 2. Select Employees 3. Select Employee Central
You can drill into any information underlined and blue in Employee Central.

Updated 06/16 CONFIDENTIAL AND PROPRIETARY TO BOB EVANS FARMS, LLC 11
Sending Employee Updates to POS In order to send new/updated employee information from NBO to POS for same day use, the manager must manually send the update from NBO to the POS. If the manager does not perform this step, NBO will naturally update the POS with the employee’s information overnight for the next day. To send new/updated employee or manager information from NBO to POS:
1. Enter Employee Information in Oracle. 2. Oracle updates NBO every 15 minutes. 3. Select Labor. 4. Select Employees. 5. Select Employee Maintenance. 6. Verify Employee is in NBO. 7. Select Employee’s Name. 8. Select Custom Fields Tab. 9. In the Send Employee to POS field, type in “new” or some other letter or word if new is
already there (ex. new is displayed, type in “new 1”, “new 2” etc. 10. Select Save button. 11. NBO will now send the new/updated employee information to the POS system for
immediate use. The employee/manager can now clock in, out, use the POS. 12. If you experience any issues, please contact the Help Desk for assistance.

Updated 06/16 CONFIDENTIAL AND PROPRIETARY TO BOB EVANS FARMS, LLC 12
Assigning Managers/Shift Leaders to Manager Schedule Group In order to schedule a Manager or Shift Leader on the Manager Schedule, you must first assign the manager or Shift Leader to the Manager Schedule Group. To assign a Manager or Shift Leader to the Manager schedule group:
1. Select Labor. 2. Select Employees. 3. Select Employee Maintenance. 4. Select Manager/SL Name. 5. Select Status Tab in their Employee Profile. 6. Update Schedule Group to Manager. 7. Select Save. 8. The SL/manager’s name will now be visible on the manager’s schedule. 9. To remove a SL/manager name from the manager’s schedule, simply remove them from
the Manager schedule group in the Employee Profile.

Updated 06/16 CONFIDENTIAL AND PROPRIETARY TO BOB EVANS FARMS, LLC 13
Borrowing Employees/Managers
Employee Borrowing To borrow an employee/manager from one restaurant to another:
1. Oracle: Home Restaurant must process borrow in Oracle the day (or before) the borrowed employee/manager can work, clock in/out on the POS, ring orders, perform manager functions, etc. Oracle updates NBO ~every 15 minutes.
2. Check NBO: Once borrowed by the home restaurant in Oracle, the employee will be visible in the borrowed NCR Restaurant’s Employee Maintenance screen in NBO (Labor>Employees>Employee Maintenance).
3. Update POS: Borrowed Restaurant will need to update the POS so the employee can clock in/out, use the POS, assign biometrics, etc. for their shift:
To Send Employee Update the Aloha POS:
1. Log into NBO. 2. Select Workflow. 3. Select the ‘Same Day Employee Borrow’ workflow- this will allow the borrowed employee
to clock in/out and use the POS the same day they are borrowed. 4. Important!! This workflow will bring down your POS for several minutes, so pick the
appropriate time to do so. This is needed to update your POS so the borrowed employee/manager can clock in and use the POS system.
5. Select Run to run the workflow. 6. Manager can now assign biometrics to the borrowed employee. 7. Borrowed employee can clock in and use the POS. 8. The home restaurant has total control over jobs and pay rate information; this information
cannot be changed by the borrowed restaurant.

Updated 06/16 CONFIDENTIAL AND PROPRIETARY TO BOB EVANS FARMS, LLC 14
Once the borrowed employee/manager is processed by the home restaurant in Oracle; the borrowed employee information appears in NBO in Labor>Employees>Employee Maintenance. Select the employee to see home store job information, if needed.
Select Workflow to send the employee information to the POS
Select the Same Day Employee Borrow workflow.

Updated 06/16 CONFIDENTIAL AND PROPRIETARY TO BOB EVANS FARMS, LLC 15
Employee Transfers
To transfer an employee/manager from one restaurant to another:
1. Oracle: The employee/manager’s Home Restaurant must process the transfer in Oracle before the transferred employee/manager can work at their new restaurant, clock in/out, use the POS, etc. Oracle updates NBO ~every 15 minutes.
2. Check NBO: Once transferred by the home restaurant in Oracle, the employee/manager will be included in the new restaurant’s Employee Maintenance screen in NBO (Labor>Employees>Employee Maintenance).
3. In the event the transferred employee/manager is starting work at their new restaurant the same day the transfer was processed, see steps below, otherwise the employee information will naturally update from NBO overnight in the POS the next day.
To update the POS:
1. Log into NBO, Select Employees. 2. Select Employee Maintenance. 3. Select the Transferred Employee’s/ Manager’s name. 4. Select Custom Field tab. 5. Type in “new” or other letter or word if new already exists in the ‘Send Employee to POS’. 6. Select Save. 7. Transferred employee/manager is now updated in POS, can clock in/out, use POS, etc. 8. If you experience any issues, please contact the Help Desk.

Updated 06/16 CONFIDENTIAL AND PROPRIETARY TO BOB EVANS FARMS, LLC 16
Payroll The Payroll function in the Labor Switchboard allows you to manage employee hours for payroll purposes. Here you can edit the employee’s worked hours, add Weekly Non Worked hours such as PTO or other types of pay adjustments.

Updated 06/16 CONFIDENTIAL AND PROPRIETARY TO BOB EVANS FARMS, LLC 17
Editing Employee Time
Punches
In Payroll use the Shifts feature to access an employee’s time clock information for a selected day within the current pay period. Only previous day clock in and out information can be edited through NBO. Current day clock in and out adjustments must be performed directly on the POS terminals.
Editing previous day Time Clock Information in NBO 1. From Labor Switchboard, select Payroll button.
2. Select Shifts button. 3. The Modify Shifts screen will appear.
NOTE: The Worked option indicates will display employees that worked on the selected day. Unselect the Worked option to see all employees.
4. Select the Date: Business Date cannot be current day, but any prior day that current week.
5. Select the name of the employee and click Lookup (or double-click directly on the employee’s name in the Shifts screen).
This opens the Adjust Shifts screen.

Updated 06/16 CONFIDENTIAL AND PROPRIETARY TO BOB EVANS FARMS, LLC 18
In the Adjust Shifts window, you can modify an existing shift or add a new shift if needed by selecting Edit icon.
Make the appropriate adjustments to time, jobs, breaks, etc. Enter the audit reason for the change and any additional notes that are needed. Tips Declared Tips in NBO is the total of all cash and credit tips. Declared Tips must at least total the Charge Tips total. Tips are assigned to the job the employee worked. NOTE: It is advised that any time punch or tip adjustments that need to occur; the manager should make those adjustments out front on the POS the day they occur.

Updated 06/16 CONFIDENTIAL AND PROPRIETARY TO BOB EVANS FARMS, LLC 19
Clock Out EOD at 2am If an employee/manager does not clock out at the end of their shift, the NCR system will clock out the employee/manager at 2am that day. Daily & Weekly Workflows have been created to check for and remind the manager to verify all employees/managers have clocked out at the end of their shifts. In the event, an employee/manager did not clock out, and was clocked out at 2am. If not corrected, this could have a costly impact on the restaurant’s labor costs.
Any employee that was clocked out at 2AM will be displayed on the top of the Shifts screen for that day with a red ! in the far right column- Clocked out by Aloha End of Day; the employee’s out time will be show as being clocked out at 2AM. To resolve, the manager would select the employee’s name and edit the out time of the shift.
Updated 06/16 CONFIDENTIAL AND PROPRIETARY TO BOB EVANS FARMS, LLC 20
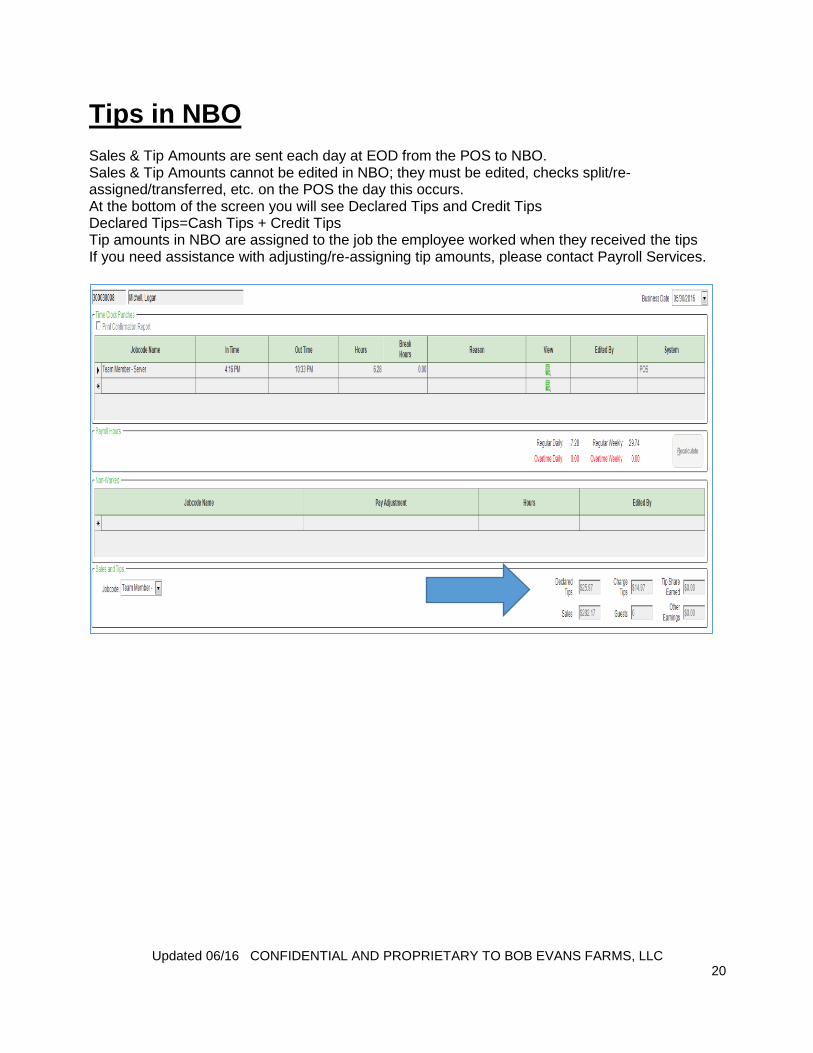
Tips in NBO Sales & Tip Amounts are sent each day at EOD from the POS to NBO. Sales & Tip Amounts cannot be edited in NBO; they must be edited, checks split/re-assigned/transferred, etc. on the POS the day this occurs. At the bottom of the screen you will see Declared Tips and Credit Tips Declared Tips=Cash Tips + Credit Tips Tip amounts in NBO are assigned to the job the employee worked when they received the tips If you need assistance with adjusting/re-assigning tip amounts, please contact Payroll Services.

Updated 06/16 CONFIDENTIAL AND PROPRIETARY TO BOB EVANS FARMS, LLC 21
Weekly Non-Worked Hours PTO and Other Pay Adjustments Within the Weekly Non Worked Hours function (located inside Shifts) you can edit the employee’s worked hours, add non-worked hours to account for occurrences such as PTO or other types of pay adjustments Prior Week Adjustments can be added for each individual day or by week. The types of pay adjustments that can be entered in Weekly Non Worked Hours: PTO- Used to pay PTO for hourly management (AGMs, AMs, and MIT’s). PRG- Prior week hours pay of hourly management and non- management employee’s BRV- for Bereavement pay JURY- for Jury Duty pay For more specific guidance and requirements on PTO refer to your PTO resource and policy information in the Bob Evans Restaurant Operations Manual under the PTO topic. For more specific guidance and requirements on Bereavement & Jury Duty pay, refer to your Employee Handbook.
Adding Non-Worked Hours
1. Log into NBO>Select LABOR>Select Shifts>Select Date.

Updated 06/16 CONFIDENTIAL AND PROPRIETARY TO BOB EVANS FARMS, LLC 22
2. Select Weekly Non-Worked.
3. Select Employee/Manager Name from the drop down. 4. Use the Tab button on your keyboard to tab over to business date. 5. Business Date: Enter in up to yesterday’s date in the current week. 6. Select Job Code. 7. Select Pay Adjustment Type. 8. Enter in Amount of Hours.
PTO can be added in increments of 0-10 hours per day.
If there are multiple days of PTO for a manager, you can either enter the hours for each individual day of PTO by business date or use the Multi Day Calculator. See instructions for the Multi Day Calculator on the next page.
9. Select SAVE to complete the transaction.

Updated 06/16 CONFIDENTIAL AND PROPRIETARY TO BOB EVANS FARMS, LLC 23

Updated 06/16 CONFIDENTIAL AND PROPRIETARY TO BOB EVANS FARMS, LLC 24
Using the Multi Calculator If there are non-worked hours for multiple days in the current week that need to be entered for an employee/manager, these can be entered using the Multi Day Calculator (for example a manager is on PTO for the entire week, 5 days, 50 hours). To use the Multi Day Calculator:
1. Log into NBO 2. Select Labor 3. Select Payroll 4. Select Shifts 5. Select Weekly Non Worked 6. Select Multi-Day Calculator
Enter the following information: Employee Name: Select Employee/Manager name Job Code Name: Select Job Code Pay Adjustment: Select Pay Adjustment type (in this case PTO) Total Hours: Enter in the Amount of Hours (in this case 50 hours for the current week) Business Date: Select date for the beginning of the current week Number of Days: (in this case 5 days of PTO) 5 days at 50 total hours=10 hours of PTO per day for the current week Select OK Select Cancel if you make a mistake and need to start over.

Updated 06/16 CONFIDENTIAL AND PROPRIETARY TO BOB EVANS FARMS, LLC 25
After Selecting OK, the information will populate, review for accuracy. Select Save to finalize your changes. Any Weekly Non Worked Hours added to an employee/manager can be seen in the 1.46 Payroll with Non –Worked Hours report in NBO. (Labor>Reports)
If you made a mistake select Exit to Previous. Then Select NO to start over.

Updated 06/16 CONFIDENTIAL AND PROPRIETARY TO BOB EVANS FARMS, LLC 26
Scheduling Process In order to write a great schedule for perfect shifts every day, the restaurant forecast must be accurate and the restaurant must be staffed appropriately with well- trained employees. Use your Staffing Calculator weekly/monthly and have regular conversations to review and anticipate staffing needs with your management team and Director of Operations. The company’s scheduling process and procedures are a 5 step process:
1. Forecasting: GM reviews/verifies forecast, makes any needed changes as needed. 2. Entering/Updating Availabilities & Time-Off Requests 3. Creating a Schedule that meets the business needs 4. Executing the Schedule for Perfect Shifts 5. Reporting/Measuring Results
Scheduling Standard Operating Procedure Schedules are to be completed using the 5 step process as outline above. The schedule must be completed, published, and posted on the schedule board for employees a minimum of ~2 weeks out. Schedules are to be completed in NBO each week by the GM or designated scheduling manager. If another manager other the GM is doing the schedules, the GM must review and approve before publishing the schedule. Reminders regarding the scheduling process have been built into the Scheduling and other workflows.
Recommended Success Routine for Scheduling Thursday mornings- System generates forecast for upcoming schedule period 2 weeks out. GM reviews forecast, makes any needed changes to the forecast for that week. Thursday/Friday- GM copies schedule from previous week. Makes adjustments based on forecasted business and recommended staffing levels. Complete and publish schedule (2 weeks out) by EOD Friday. Post completed schedule on schedule board at the restaurant.

Updated 06/16 CONFIDENTIAL AND PROPRIETARY TO BOB EVANS FARMS, LLC 27
Forecasting NBO automatically forecasts sales each week. The forecast is based on the last 6 weeks of histor ical sales and guest count information for your restaurant . Recommended Labor Deployment, Recommended Ordering and Daily Suggested Prep is determined by your Forecasted Sales & Guests. The NCR Forecast wil l not account for upcoming holiday periods, seasonal shif ts in business or local events that af fect business. The GM wil l have to adjust the forecasted sales and guest counts for those. The Forecast direct ly inf luences Employee Schedul ing, Recommended Food Orders, and Suggested Dai ly Prep. It is critical the GM review their forecast for the upcoming schedule p eriod to ensure it accurately reflects the expected business for that week. Workflows have been built to remind you of this important task. To Review/Adjust the forecast:
1. Log into NBO
2. From the Inventory Switchboard screen, select Sales.
The Forecast can also be accessed from the Labor Switchboard>Scheduling.
3. Select Forecasting
4. From the Forecasting page, you can select/enter new Periods, Week, and Fiscal year to
review or create a forecast. 5. You can then make any needed adjustments to your Sales and Guests for the week. 6. Select Save to save any changes. Your Forecast is now updated.
NOTE: To create a new Forecast for a selected time period, select New Forecast.

Updated 06/16 CONFIDENTIAL AND PROPRIETARY TO BOB EVANS FARMS, LLC 28
Forecast by Average The manager also has the option to increase or decrease the forecast by % of sales. Note: this does not update any needed changes to forecasted guest counts.
1. On the Forecasting page, select Forecast by Average. 2. In the % column on the right side of the screen, increase (ex. 10%) or decrease (ex. -5%)
the selected day. 3. Select Save to save your changes, the forecast will now be updated.
Forecasting

Updated 06/16 CONFIDENTIAL AND PROPRIETARY TO BOB EVANS FARMS, LLC 29
Forecast Events Managers can also use the Events diary on the Forecast page to forecast and record significant forecast/sales events such as Catering, CFRs, etc.

Updated 06/16 CONFIDENTIAL AND PROPRIETARY TO BOB EVANS FARMS, LLC 30
Select New to add a new event
Enter the following information for the New Event: Name: Enter Name of Event ID: not needed Event Type: Select Single Day or Date Range Event Date(s): Start Date of event Forecast: Default Forecast Method or Previous Sales Date Comments: Any pertinent comments about this event If this event is targeted to specific menu items: Menu items affected: Select All or Specific menu items % of Increase/Decrease Menu Items: Select the % of Increase/Decrease Select Save to save your Event. Your Event will now show up on your Event page. If you make a mistake, you can Delete the Event and re-enter, etc.
Updated 06/16 CONFIDENTIAL AND PROPRIETARY TO BOB EVANS FARMS, LLC 31
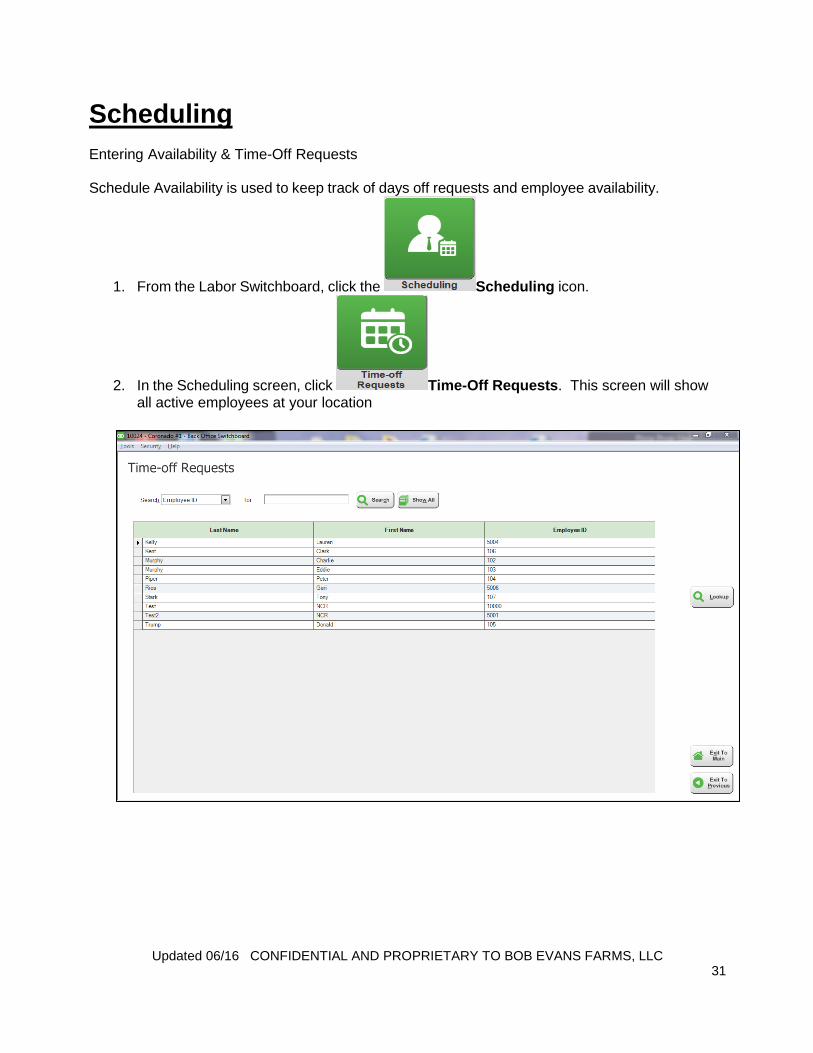
Scheduling Entering Availability & Time-Off Requests Schedule Availability is used to keep track of days off requests and employee availability.
1. From the Labor Switchboard, click the Scheduling icon.
2. In the Scheduling screen, click Time-Off Requests. This screen will show all active employees at your location

Updated 06/16 CONFIDENTIAL AND PROPRIETARY TO BOB EVANS FARMS, LLC 32
3. Select the employee you would like to adjust and click Lookup.
4. To add a schedule request, click Add. To adjust or delete an existing request, select the request and click Lookup. Both actions open the Availability Setting screen:

Updated 06/16 CONFIDENTIAL AND PROPRIETARY TO BOB EVANS FARMS, LLC 33
5. Select whether the Time Off request is Requested or Approved.
Requested time off appears in Yellow on the schedule and can be overwritten in the schedule.
Approved time off appears in Pink on the schedule and, depending on your system settings, may or may not be able to be overwritten in the schedule.
6. Select the reason for the time off. The available reasons for time off are configured by your system administrator.
7. Add comments to the comment section if desired. 8. In the Dates and Times Not Available section, select All Day if the request is for the
whole day. If the request is for multiple days or only a certain time on a single day, select
Time Range.

Updated 06/16 CONFIDENTIAL AND PROPRIETARY TO BOB EVANS FARMS, LLC 34
9. Depending on the nature of the availability request, adjust the settings to enter the request into NBO.
10. To keep your changes, click Save.
.

Updated 06/16 CONFIDENTIAL AND PROPRIETARY TO BOB EVANS FARMS, LLC 35
Creating a Schedule
With the Create Schedule function, you can create a new schedule from scratch or use an existing schedule as a starting point.
NOTE: Prior to creating a schedule, you should perform a Sales Forecast to review the labor percentage as it relates to scheduling. See Forecasting Sales.
1. From the Switchboard, click the Scheduling icon. 2. In the Scheduling screen, click Create Schedule. This opens the Create Schedule dialog. 3. In the Create Schedule dialog, select the date for the schedule you want to create.
NOTE: The date shown is the starting date of the week.
4. Select one of the following options:
Blank to create a blank schedule
Copy From to start with a previous schedule 5. Select one of the following view formats:
The Daily View displays the schedule in a graphical format where you can edit the schedule by ‘painting’ bars. The schedule displays one day at a time and shows the sales forecast, recommended staffing, and the variance between actual scheduled and recommended staffing figures.
The Weekly View displays the schedule in a text entry format and shows all seven days of the week at once. This format does not show the sales forecast or recommended staffing.
6. Click Continue. 7. The Schedule window appears based on the view format selected. 8. See Weekly Schedule View (p. 24) for instructions on editing shifts in the Weekly Schedule
View. See Daily Schedule View (p.26) for instructions on editing shifts in the Daily Schedule View.
9. Click Save to keep the changes.

Updated 06/16 CONFIDENTIAL AND PROPRIETARY TO BOB EVANS FARMS, LLC 36
Editing a Schedule
Use Edit Schedule to view or modify an existing schedule that was previously created through the Create Schedule feature.
1. From the Labor Switchboard, click the Scheduling icon. 2. In the Scheduling screen, click Edit Schedule.
3. In the Update Schedule dialog, select the schedule you want to update. Click the drop-down list button to view the list of available schedules, which are listed by date.
4. Select one of the following view formats:
The Daily View displays the schedule in a graphical format where you can edit the schedule by ‘painting’ bars. The schedule displays one day at a time and shows the sales forecast, recommended staffing, and the variance between actual scheduled and recommended staffing figures.
The Weekly View displays the schedule in a text entry format and shows all seven days of the week at once. This format does not show the sales forecast or recommended staffing.
5. Click Continue. The Schedule window appears based on the view format selected.
See Weekly Schedule View (p. 24) for instructions on editing shifts in the Weekly Schedule View.
See Daily Schedule View (p. 26) for instructions on editing shifts in the Daily Schedule View.
6. When you are done working with the schedule, click Save.

Updated 06/16 CONFIDENTIAL AND PROPRIETARY TO BOB EVANS FARMS, LLC 37
Weekly Schedule View
The Weekly Schedule View displays each day of the week on a separate page for ease of use. In contrast with the Daily Schedule View, the weekly view shows shifts for the entire week, but does not show forecast sales dollars or recommended staffing.
1. From the Labor Switchboard, click the Scheduling icon. 2. In the Scheduling screen, click Create Schedule. 3. In the Create Schedule dialog, select the date for the schedule you want to create. 4. Select Blank to create a blank schedule. 5. Select Weekly. 6. Click Continue to display the Weekly Scheduler view:

Updated 06/16 CONFIDENTIAL AND PROPRIETARY TO BOB EVANS FARMS, LLC 38
Employees – Filters Schedule to view by all or only scheduled employees Jobs – Filters schedule view by job assigned job code.
Schedule Notes - Press this button to add additional schedule notes
Schedule Legend - The Schedule Legend offers detail about Shift colors
Binocular - Filters Schedule by Employee
Schedule Report - Provides a graph of forecasted sales and scheduled staff for the selected day Forecasted Sales – Forecasted Sales for the day Scheduled Hours – Scheduled labor hours Scheduled OT Hours – Scheduled Overtime Hours Scheduled Dollars - Scheduled labor dollars for the day
% Forecasted Sales - Scheduled labor % of forecast sales
Employee Name - Employee list, affected by sorting and filtering options. The columns to the right of the employee's name shows total, regular, and overtime hours. Use the scroll bar at the bottom of the Employee/Total section to view these columns.

Updated 06/16 CONFIDENTIAL AND PROPRIETARY TO BOB EVANS FARMS, LLC 39
Adding a Shift in Weekly View 1. From the Weekly Scheduler view, locate the employee and day for which you would like to add
a shift. 2. In the employee’s row, click the dropdown for the day you would like to add the shift.
3. Type in the desired shift. (ex. ‘3:00pm-8:00pm’).
NOTE: NBO may adjust the formatting of this text after you enter it. If NBO cannot determine the start and end times if your entry, try using the above format.
4. Press the Enter key to move to the next field. 5. To keep your changes, click Save.
Deleting a Shift in Weekly View 1. From the Weekly Scheduler view, locate the employee and day you would like to delete a shift
for. 2. Select the shift by clicking the dropdown for the shift.
3. Change the shift to Off.

Updated 06/16 CONFIDENTIAL AND PROPRIETARY TO BOB EVANS FARMS, LLC 40
Modifying a Shift in Weekly View 1. From the Weekly Scheduler view, locate the employee and day you would like to change a shift
for. 2. Select the shift by clicking the dropdown for the shift. 3. Edit the text by using your keyboard.
Swapping a Shift in Weekly View and Assigning a Station 1. From the Weekly Scheduler view, locate the employee and day you would like to change a shift
for. 2. Right click on the shift
3. In the pop-up box swap a shift with another employee, assign a station or delete the shift entirely.
Copying a Shift in Weekly View 1. From the Weekly Scheduler view, select the shift you would like to copy by clicking the dropdown
for the shift. 2. Right click inside of the shift’s text and select Copy from the menu. 3. Select the shift you would like to copy to by clicking the dropdown for the shift. 4. Right click inside of the shift’s text and select Paste from the menu.
NOTE: You can also use the keyboard shortcuts CTRL+C to copy and CTRL+V to paste.

Updated 06/16 CONFIDENTIAL AND PROPRIETARY TO BOB EVANS FARMS, LLC 41
Daily Schedule View The Daily Schedule View displays each day of the week on a separate page for ease of use. In contrast with the Weekly Schedule View, the daily view shows forecasted sales, recommended staffing, and the variance between recommended and scheduled staffing levels per interval.
1. From the Labor Management screen, click the Scheduling icon. 2. In the Scheduling screen, click Create Schedule. 3. In the Create Schedule dialog, select the date for the schedule you want to create. 4. Select Blank to create a blank schedule. 5. Select Daily. 6. Click Continue to display the Daily Scheduler view:

Updated 06/16 CONFIDENTIAL AND PROPRIETARY TO BOB EVANS FARMS, LLC 42
The Forecasted Sales Total row displays the forecasted sales by the time interval set up in your system (typically half or quarter hours). The forecast is created through the Forecasting function.
The Employee Name section lists all employees as well as the total, regular, and overtime hours as currently scheduled. Use the scroll bar at the bottom of the employee name section to view.
NOTE: Your viewing options may affect which employees are displayed on this list, including total scheduled hours, scheduled overtime hours, scheduled labor dollars, and scheduled labor dollars as a percent of forecasted sales.
The Daily and Weekly Labor Metrics displays information about the current schedule, including total scheduled hours, scheduled overtime hours, scheduled labor dollars, and scheduled labor dollars as a percent of forecasted sales.
The Bar Graphs represent the scheduled shift for each employee. The color of the graph indicates information about the shift or employee as follows:
Blue Regular scheduled shift Green Employee and shift currently being modified. Orange Indicates the employee scheduled will be approaching overtime Red Indicates the employee is scheduled into overtime Purple Indicates a minor law violation (defined by system administrator) Gray Indicates the employee is already scheduled for a shift for another job type. Yellow Indicates the employee has a requested Not Availability Pink Indicates the employee has an approved Not Available setting.
When you are finished viewing or working with the Daily Scheduler view, click Exit to Main or Exit to Previous.

Updated 06/16 CONFIDENTIAL AND PROPRIETARY TO BOB EVANS FARMS, LLC 43
Adding a Shift in Daily View 1. From the Daily Scheduler view, select the day that you would like to add the shift to. 2. Select the Jobs and Employees that you would like to see in the list.
3. Locate the name of the employee to be scheduled.
4. The area to the right is where the shift will be created. Using the time line at the top of the schedule screen, locate the time the shift will begin in this area.
5. Click the area that represents that time to start the shift. 6. Holding the left mouse button down, drag the mouse across to the desired end time. 7. Release the mouse button and a bar appears to represent the scheduled shift of that
employee. 8. The bar (along with the employee's name) is green to indicate that is the currently selected
shift.

Updated 06/16 CONFIDENTIAL AND PROPRIETARY TO BOB EVANS FARMS, LLC 44
Deleting a Shift in Daily View
1. From the Daily Scheduler view, select the shift you want to delete by clicking inside the colored bar.
2. The shift turns green to indicate that it is the currently selected shift. 3. Press the delete button on your keyboard.
Modifying a Shift in Daily View
1. From the Daily Scheduler view, click either end of the shift you wish to change. 2. Hold the left mouse button down and drag the bar to the desired start or end time.
Swapping a Shift in Weekly View and Assigning a Station 1. From the Daily Scheduler view, locate the employee you would like to change a shift for. 2. Right click on the shift and proceed to swap a shift, assign a station or delete the shift entirely.

Updated 06/16 CONFIDENTIAL AND PROPRIETARY TO BOB EVANS FARMS, LLC 45
Publishing a Schedule After you have completed the Schedule, Save it and press exit to previous. Before being able to move forward to the next screen the system will prompt you to choose whether or not you want to publish the schedule. Upon publishing, employees will receive either an email and/or text message with their schedule information, depending on their set-up in Schedule Options on the POS terminal. It is recommended that the schedule should only
be published when the entire schedule has been completed and approved.
Updated 06/16 CONFIDENTIAL AND PROPRIETARY TO BOB EVANS FARMS, LLC 46
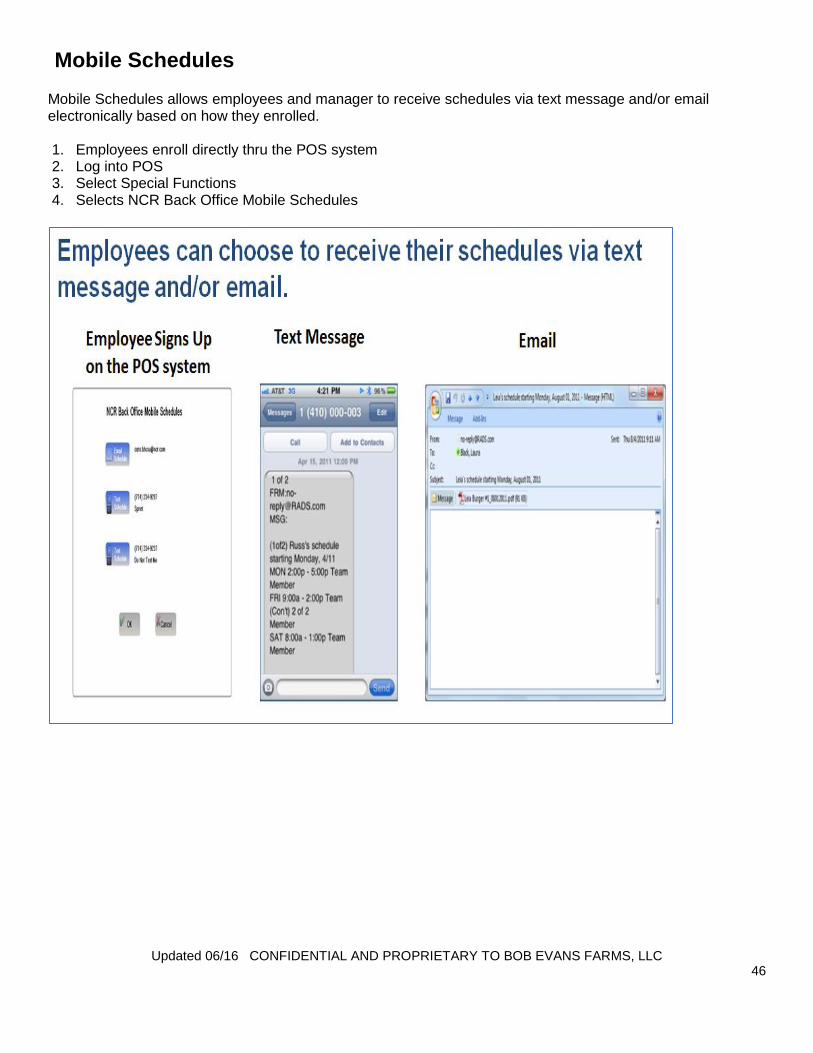
Mobile Schedules Mobile Schedules allows employees and manager to receive schedules via text message and/or email electronically based on how they enrolled. 1. Employees enroll directly thru the POS system 2. Log into POS 3. Select Special Functions 4. Selects NCR Back Office Mobile Schedules

Updated 06/16 CONFIDENTIAL AND PROPRIETARY TO BOB EVANS FARMS, LLC 47
Once employee self-enrolls, make sure to select My Schedules in the employee’s Employee Profile to activate Mobile Schedules for the employee. 1. Select Labor 2. Select Employees 3. Select Employee Maintenance 4. Select Employee’s Name
Select My Schedule Select Save to save changes

Updated 06/16 CONFIDENTIAL AND PROPRIETARY TO BOB EVANS FARMS, LLC 48
Managers can also send a message to employees that have enrolled in Mobile Schedules. This messaging capability is helpful for trying to quickly reach employees to cover an available shift, or important team/store information the team may need to know. You can access the messaging functionality directly in the Employee Schedule or in Employee Central by selecting the employee’s name. Employees are not required to enroll in Mobile Schedules, but the manager should inform the employees about this option.

Updated 06/16 CONFIDENTIAL AND PROPRIETARY TO BOB EVANS FARMS, LLC 49
Manager’s Schedule Standard Operating Procedure: The GM will need to enter the Manager’s Schedule into NBO by the 3rd week of each month for the following month. Up to 6 weeks of manager’s schedules can be entered into NBO.
The GM will notify their Director of Operations when the Manager’s Schedule has been entered into NBO.
The Director of Operations will review the Manager’s Schedule of all of their restaurants each month to ensure there is appropriate management coverage at the restaurant to meet the needs of the expected business.
Director of Operations can review all of their restaurants Manager’s Schedules in NBO directly in the Manager Schedule page by simply selecting the site they want to review.
To Enter a Manager’s schedule into NBO: All Managers and Shift Leaders are assigned to the Manager Schedule Group in Employee Maintenance.
Log into NBO>Labor>Employees>Employee Maintenance>Select Manager>Select Status tab>Schedule Group: Select Manager>Save to Update.
Enter any upcoming Time-Off Requests for the manager in Time-Off Requests.
In NBO>Select Labor>Select Scheduling>Select Manager Schedule

Updated 06/16 CONFIDENTIAL AND PROPRIETARY TO BOB EVANS FARMS, LLC 50
Manager’s Schedule Similar to the Employee Schedule, you have the option to:
Existing-Select an Existing Schedule to view or edit an existing schedule.
New-Copy a Previous schedule.
New-Use Blank Schedule to create a new one.
Number of Weeks: You can select up to 6 weeks for the schedule.
Once you select your options for the manager’s schedule, select Continue.

Updated 06/16 CONFIDENTIAL AND PROPRIETARY TO BOB EVANS FARMS, LLC 51
Payroll Close Validation of your restaurant’s labor and payroll each day and at the end of the week is a critical task to running a great restaurant and controlling your labor. Key steps have been built into your Daily & End of Week workflows to assist you with performing the key tasks to validating your daily labor and end of week payroll close.
Every Wednesday- Perform your Payroll Pre Close Steps:
1. Go to Workflow>Select Current Day Import to import current day information. 2. GM reviews the (1.15) Time Clock Detail report for the current week.
Verify Manager Hours are accurate for the week.
Verify hours for all employees that worked are accurate for the week. Any non-worked time (PTO, etc.) has been correctly entered in Weekly Non Worked Hours. Review the (1.46) Payroll with Non Worked Hours Report to verify Weekly Non Worked Hours.
IMPORTANT: Look for any employees/managers clocked out at 2AM, meaning they did not clock out and were auto clocked out by the system.
3. Check the Shift tab from the prior day to ensure all employees clocked out from the day before. 4. GM reviews the (1.20) Employee Punch Errors Report for the week for any rejected punches for the
week. If needed, contact the help desk to resolve the issue. 5. Review the (1.45) Hours and Tips Report for excessive tip issues (ex. Employee entered cash tip
incorrectly on POS for $10,000). If needed, correct the declared tip amount in NBO. 6. Review the (1.50) Weekly Tip Credit by Employee Report for any employees in a tip shortfall that
resulted in minimum wage make up pay; coach employee’s on tip reporting as needed. IMPORTANT: Thursday mornings before 11am the Opening Manager will need to confirm Step 3 again to check for any employees that may not have clocked out on Wednesday night, and as a result the NCR system clocked them out at 2AM on Thursday. NOTE: The system will automatically close out the restaurant’s payroll on Thursday mornings at 11am EST.

Updated 06/16 CONFIDENTIAL AND PROPRIETARY TO BOB EVANS FARMS, LLC 52
Labor Reports To access NBO Labor Reporting, select Labor> Select Reports There are many reports on the POS & NBO to assist you with labor performance, payroll, and employee information. In becoming an expert on the NCR system, begin to familiarize yourself with POS & NBO reporting. Some of the more critical NBO labor reports are: Payroll/Time Keeping 1.15 Time Clock Detail 1.20 Employee Punch Errors 1.25 Employees Clocked Out by NCR Aloha End of Day 1.45 Hours and Tips 1.50 Weekly Tip Credit by Employee 1.46 Payroll with Non- Worked Hours 1.55 Employee Shift Edit by Business Date Labor Performance 2.05 Proactive Labor Report 2.06 Reactive Labor Report 2.07 Labor Analysis 2.10 Approaching Overtime 3.06 Sales Comparison Scheduling 2.40 Employee Schedule Chart by Job 3.30 Weekly Schedule by Schedule Group 3.40 Manager Schedule 3.45 Time Off Request-Sortable Employee Information 4.35 Employee Central by Status Type

Updated 06/16 CONFIDENTIAL AND PROPRIETARY TO BOB EVANS FARMS, LLC 53
Transferring Inventory from One Restaurant to Another There are two functions to every transfer. First, the sending store (the lender) creates a Transfer Out. Second, the receiving store (the borrower) accepts the pending transfer. Both of these functions should be performed on the actual day of the product transfer from one store to the other, however it must be transferred and accepted before end of week. NOTE: The product doesn’t “leave” the transfer initiating site until the receiving store accepts the transfer in NBO. Creating a Transfer Out From the Desktop, log in to NBO. Click Inventory and Prep.
1. Click Transfers. The Inventory – Transfers screen appears.

Updated 06/16 CONFIDENTIAL AND PROPRIETARY TO BOB EVANS FARMS, LLC 54
2. Click New Transfer Out. The Transfer – Out screen appears
3. Use the drop-down arrow to choose the receiving site. 4. Add the products to be transferred by typing the name of the product in the Item Name field. 5. Tab to the Units field, and choose the correct unit. 6. Type the quantity in the quantity field. 7. The price and total fields will auto-populate. 8. Click Save.

Updated 06/16 CONFIDENTIAL AND PROPRIETARY TO BOB EVANS FARMS, LLC 55
Receiving a Pending Transfer
1. From the Desktop, log in to NBO. 2. Click Inventory and Prep. 3. Click Transfers. The Inventory – Transfers screen appears.
Note: All transfers need to be completed before end of week inventory counts per Bob Evans policies.
4. Click Pending- Other Sites tab. 5. Click the pending transfer so that it is highlighted.
At this point you will be able to preview the pending transfer.
Once verified product amounts are correct, you can accept transfer. 6. Click Accept.

Updated 06/16 CONFIDENTIAL AND PROPRIETARY TO BOB EVANS FARMS, LLC 56
Inputting and Tracking of Waste NBO allows you to track spoil and loss by entering items and giving a reason for the waste.
1. From the Desktop, log in to NBO.
2. Click Inventory and Prep.
3. Click Waste. The Inventory Waste screen appears.
4. Select an item type by clicking a radio button next to Menu, Prep or Raw.
You can also select All to view a list of all items if you are not sure of the category.
The Waste flag on the Inventory tab of Item Lookup determines if an item will appear in these lists.

Updated 06/16 CONFIDENTIAL AND PROPRIETARY TO BOB EVANS FARMS, LLC 57
5. Choose an item to waste by doing one of the following: 6. Select an item from the Item Name drop-down list.
Items in the drop-down list match the category selected in step 4. 7. Click the Find button to display the Inventory Waste Select window.
The items displayed in the window match the category selected in step 4. 8. Highlight a line item and click Select.
9. To account for spoiled/expired food, find the item Spoiled/Expired Product item and log by the appropriate unit.
The item populates the Inventory – Waste screen.

Updated 06/16 CONFIDENTIAL AND PROPRIETARY TO BOB EVANS FARMS, LLC 58
10. Verify the date and time the item was lost. By default, NBO displays the current date in the Business
Date field and the current time in the Time Item was lost field. You can change these to a date and time prior to the current date and time.
11. In the Enter Quantity field, enter the amount of the item that was wasted based on the corresponding per Unit ID (the unit of measure) that can be selected to the right.
12. In the Reason field, enter a brief reason as to why the waste occurred. Note: This field, if defined by your administrator, may have a drop-down list of possible waste reasons from which to choose.
13. After all information has been entered, click Add Item to add the item to this Waste list. NBO calculates and fills in the Cost Information for the waste.
14. Repeat steps 6 through 9 until all wasted items have been entered. 15. When the list is finished, click Save.
Updated 06/16 CONFIDENTIAL AND PROPRIETARY TO BOB EVANS FARMS, LLC 59
Waste Management Tips When a Prep Item or Menu Item is selected, all of the ingredients listed in their recipes are also wasted and will show in any of the Spoil and Loss reports. NBO does not save waste information in the database until you click Save. If you haven’t clicked Save yet, you can change the quantity wasted or reason by making the correction in the Qty or Reason fields in the Spoilage and Loss grid. If you entered the wrong amount for an item and have clicked Save, you can modify the quantity and/or reason by going to that item’s entry in the spoil and loss detail area and making changes. You cannot make changes to the item name or the units. If you need to remove an item from the spoil and loss screen, click the box to the left of the time entry to select the line and press the delete key on your keyboard.

Updated 06/16 CONFIDENTIAL AND PROPRIETARY TO BOB EVANS FARMS, LLC 60
Counting Inventory on the iPad Inventory counts are done on the iPad and posted from it. It is not finally posted until EOD ends at 2am. Some of the great features of doing your counts on the iPad are counting each item multiple ways (no conversions) and it eliminates double entry – it does not need to be entered into the back office computer unless the iPad is not functioning correctly. 1. Log into Pulse App with your credentials.
2. Select Inventory.
3. Select the type of Inventory you would like to perform. Daily, Weekly, Monthly or Daily Prep.
If “Weekly” select “Week”
Updated 06/16 CONFIDENTIAL AND PROPRIETARY TO BOB EVANS FARMS, LLC 61
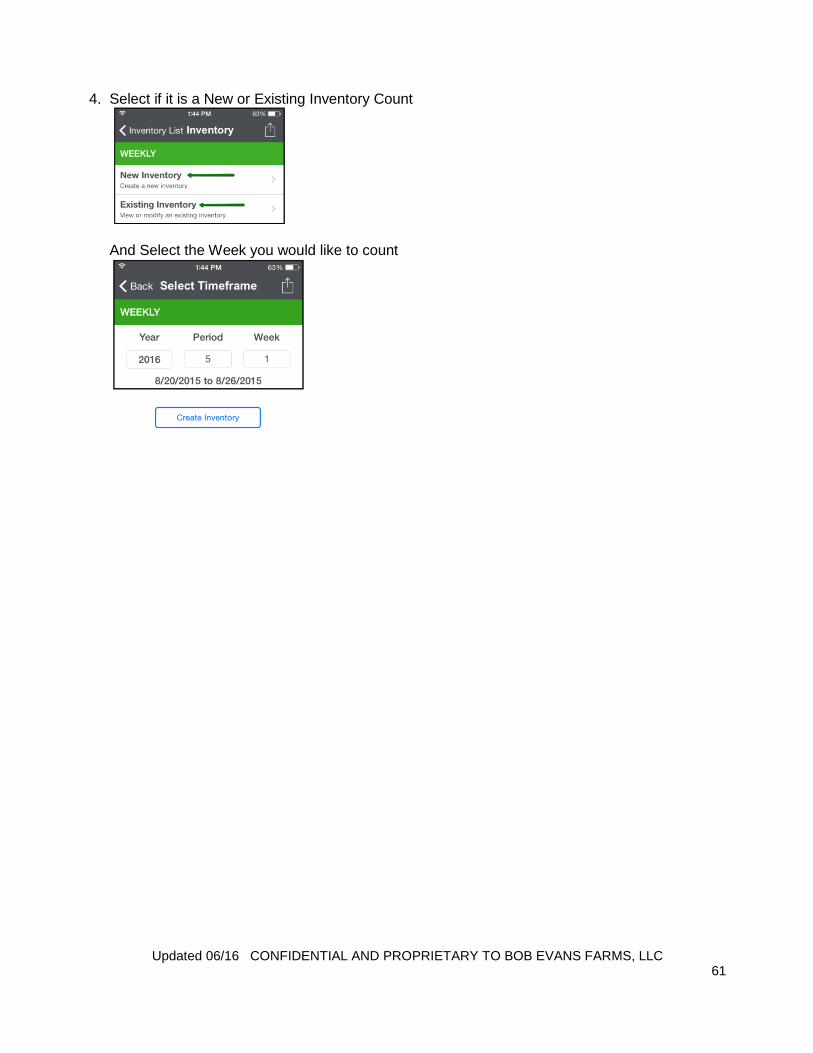
4. Select if it is a New or Existing Inventory Count
And Select the Week you would like to count

Updated 06/16 CONFIDENTIAL AND PROPRIETARY TO BOB EVANS FARMS, LLC 62
To begin your counts Think about what you’re doing when entering counts, don’t just go through the motions.
You must be completely connected to Wi-Fi when you select your inventory list. This gives the device an opportunity to connect with NCR Back Office (NBO) and tell it what is on the list you are about to count.
It is absolutely necessary to be connected to Wi-Fi when starting a new inventory. You must pull up the location count sheet before proceeding to the WIFI free area. You will not be able to pull up a count sheet in a Wi-Fi free zone.
You can now enter an area that has no Wi-Fi signal and begin your count.
Make sure that you return to an area that has Wi-Fi when you “Post” your inventory. The Pulse app will not let you post the inventory unless you are connected to the Wi-Fi+.
Once you select “post” on the iPad it saves your counts and the final posting will automatically occur at EOD 2 AM.
Be sure to select “post” after each area to save your counts in that area.
Please see user manual for details on how to conduct inventory if Wi-Fi is down.

Updated 06/16 CONFIDENTIAL AND PROPRIETARY TO BOB EVANS FARMS, LLC 63
Adding Daily or Weekly Inventory Counts Manually (only if iPad is not working)
Printing Worksheets 1. From the Desktop, log in to NBO. 2. Click Inventory and Prep.
3. Click Worksheet. The Inventory Worksheet Selection dialog appears.
4. Click Print Worksheet.

Updated 06/16 CONFIDENTIAL AND PROPRIETARY TO BOB EVANS FARMS, LLC 64
Selecting Type of Inventory
1. Select the appropriate inventory type.
NOTE: You cannot have two inventory types on the same day. After selecting the inventory type, click the print icon in the upper left corner.
2. Click Close and Exit to Previous when you are finished.

Updated 06/16 CONFIDENTIAL AND PROPRIETARY TO BOB EVANS FARMS, LLC 65
Posting Inventory 1. From the Desktop, log in to NBO. 2. Click Inventory and Prep.
3. Click Inventory Posting. The Inventory Posting Selection dialog appears.
4. Choose Inventory Type:
Weekly Food – Weekly Inventory List
Daily – Daily Inventory

Updated 06/16 CONFIDENTIAL AND PROPRIETARY TO BOB EVANS FARMS, LLC 66
5. After selecting the Inventory Type, verify the date for the inventory is correct.
6. Click Continue.

Updated 06/16 CONFIDENTIAL AND PROPRIETARY TO BOB EVANS FARMS, LLC 67
7. Use the arrows to move between counting locations. For example, Walk-In, Make table, etc.
8. Add the count quantities to the corresponding blank above the correct count unit. 9. Click Save.

Updated 06/16 CONFIDENTIAL AND PROPRIETARY TO BOB EVANS FARMS, LLC 68
Working with Set-up and Maintenance of Inventory Worksheets
1. From the main Inventory Switchboard click Inventory & Prep.
2. Click Worksheets.
3. Select Manage Inventory
Worksheets.

Updated 06/16 CONFIDENTIAL AND PROPRIETARY TO BOB EVANS FARMS, LLC 69
4. From the Location drop-down select which inventory location you wish to edit.
5. To re-order the worksheets, select an. To move hold down the right key of the mouse and
drag the item to the desired position. The location of the item during drag is defined by a strong black line.
6. To remove and/or add an item, use the Add Items and Remove Items buttons.

Updated 06/16 CONFIDENTIAL AND PROPRIETARY TO BOB EVANS FARMS, LLC 70
Manage Your Purchasing Worksheets Self to sheet or managing your purchasing worksheets is one of the great aspects of the NBO inventory system. This allows you to add or delete approved purchase items along with sequencing the list for ease of use. You have the ability to organize your purchasing sheets (order guide) in 3 different ways (alphabetical, by category and by sheet to shelf). It is recommended to use sheet to shelf.
Access NBO and use the Purchasing Module
Use the Worksheet function to manage the order in which your purchasable items appear
Select Manage Purchasing Worksheets

Updated 06/16 CONFIDENTIAL AND PROPRIETARY TO BOB EVANS FARMS, LLC 71
Select the Vendor to manage, in this example we will use Gordon Food Service
Drag and Drop items in the order that you choose
The Purchasing Worksheet will now appear in order in which the manager sets

Updated 06/16 CONFIDENTIAL AND PROPRIETARY TO BOB EVANS FARMS, LLC 72
Printing A GFS Order Guide
Click into Worksheets
Click into Print Condensed order guide

Updated 06/16 CONFIDENTIAL AND PROPRIETARY TO BOB EVANS FARMS, LLC 73
Select GFS
Ensure suggested order dates are correct. These will populate automatically when you start an order on the day it is due. Click OK

Updated 06/16 CONFIDENTIAL AND PROPRIETARY TO BOB EVANS FARMS, LLC 74
The order will populate all the information shown- name, vendor code, Unit of measure,
Required, Open PO’s, Theory on hand, suggested order and your purchasing history for that product, the last 3 times you ordered it.
Required= Amount of product that will be needed for the sales that are forecasted.
Open PO’s= product that has been order but not finalized in the system
Theory on hand= last inventory count + purchases- sales of that product.
Suggested order= a rounded amount of food needed to get through the sales period based on required and theory on hand.
Suggested ordering is a great feature in the NCR inventory system because it will help you manage your inventory more effectively. Suggested order is based on forecasted sales mix and theoretical on hand inventory. Theoretical on hand is a great feature for real time on hand. For this be accurate and useful, you must insure that all food PO’s are finalized and you have accurate inventory counts.

Updated 06/16 CONFIDENTIAL AND PROPRIETARY TO BOB EVANS FARMS, LLC 75
Placing a GFS Electronic Purchase Order 1. From the Desktop, log into NBO. 2. From the NBO Main Inventory Switchboard click Purchasing. 3. Click on Orders. 4. Click on Order By Vendor. 5. Select GFS.

Updated 06/16 CONFIDENTIAL AND PROPRIETARY TO BOB EVANS FARMS, LLC 76
Buttons
Toggle search- Search for items that are not order very often.
Accept all- Use “Accept all” to accept all suggested order recommendations.
Save- Use the save button when you want to save your work but not send the final order.
Add to this order- Another method of adding an item to the order.
Send order now- When order is complete, press send order now to complete process.

Updated 06/16 CONFIDENTIAL AND PROPRIETARY TO BOB EVANS FARMS, LLC 77
Using the numbers pad and the tab key, enter your order into this order guide. NOTE: The Suggested Order column will show a suggested order amount based on sales mix and theoretical inventory levels. It is highly recommended to take it into account what the suggested order amount is and possibly re-verify your actual inventory if the suggested order varies significantly from the actual order amount. Save and send order. Once you’re finished, press the Send Order Now button.

Updated 06/16 CONFIDENTIAL AND PROPRIETARY TO BOB EVANS FARMS, LLC 78
Receive a confirmation screen that says order was successfully sent. This means that the order was sent and not that GFS has received it.
If you receive an error, please follow the directions on the error message.

Updated 06/16 CONFIDENTIAL AND PROPRIETARY TO BOB EVANS FARMS, LLC 79
Review GFS purchase order acknowledgment for confirmation the order was received via email. This is also a great way to ensure that you will receive everything you ordered.

Updated 06/16 CONFIDENTIAL AND PROPRIETARY TO BOB EVANS FARMS, LLC 80
Finalizing a GFS Electronic Invoice Restaurant locating a “Pending” Invoice for Review From the main NBO Managers home screen they would select Inventory -> Purchasing -> Invoices -> Show Pending. They must make sure the correct radio button is selected. The Restaurant Manager can then select the Invoice of choice for review before approving or
rejecting it.
Once inside the Invoice you can review the details of the order and ensure that all amount/ dollar totals match. When all totals match, click finalize and exit.

Updated 06/16 CONFIDENTIAL AND PROPRIETARY TO BOB EVANS FARMS, LLC 81
Restaurant Locating a “Credit” Invoice (Adjustment) From the main NBO Managers home screen select Inventory -> Purchasing -> Invoices A credit Invoice also known as an adjustment invoice will display on the main Invoice window in NBO. A credit can usually be identified by two ways.
The first way will show a reference to the original Invoice that contained the charge and will display in the first Column under “Original Invoice ID”
The second method to identify a credit adjustment will be in the Total Column. This Column will display the amount in a parenthesis. This is a normal account practice to show a credit amount.
If the adjustment was just older than the invoice. Setting the date range back using the “Start Date” and “End Date” setting should revealed it. When searching for the original Invoice changes to the Display Options radio button may be needed. Using the Unfinalized filter even if the original is finalized, viewed on the same screen as the invoices. At the login of NBO an Unfinalized Invoice pop up may display advising the user action is needed. Once the Restaurant manager has located and reviewed the information they may follow normal business rules to finalize it.

Updated 06/16 CONFIDENTIAL AND PROPRIETARY TO BOB EVANS FARMS, LLC 82
Restaurant viewing “Finalized” Invoice 1. From the main NBO Managers home screen they would select Inventory -> Purchasing ->
Invoices. 2. From this screen a Restaurant manager can view recent finalized invoices.
Changing the date range will allow for older invoices to be retrieved should additional research or viewing be required.
Changing the “Display Options” radio button at the top will allow for the user to only view the invoices that have been “finalized.”
3. Invoices that have been “Finalized” can easily be identified by the check mark located in the “Finalized” Column.
4. Once the “finalized” Invoice has been located the user may double click to open it and view
the contents.
5. Options within the “finalized” invoice will be limited. Changes should only be made
following the approved SOPs.

Updated 06/16 CONFIDENTIAL AND PROPRIETARY TO BOB EVANS FARMS, LLC 83
Manually Posting an Invoice 1. From the Desktop, log in to NBO.
2. From the NBO Main Inventory Switchboard click Purchasing.
3. Click Invoices. The Invoice Selection screen appears.
4. Click New. The Purchasing – Invoices screen appears.

Updated 06/16 CONFIDENTIAL AND PROPRIETARY TO BOB EVANS FARMS, LLC 84
5. Type the Invoice number in the Invoice ID field. NOTE: The Invoice ID is a required filed and can be found on the hard copy of the original invoice.
6. Use the drop-down arrow to choose the vendor.
7. Use the drop-down arrow to choose the date of the invoice.
8. Choose the Due date for the invoice. 9. Choose the Delivered Date/Time. NOTE: The Delivered Date will determine which fiscal
week the invoice is going to be credited for.

Updated 06/16 CONFIDENTIAL AND PROPRIETARY TO BOB EVANS FARMS, LLC 85
Enter Line Items for the Invoice For certain vendors such as your main food suppliers, the items catalogue can be found by clicking the down arrow in the individual lines. For vendors that don’t have any items associated with them, press the Find hyperlink.
1. Select the item and tab to the received field and type the number of units received. Some items may be purchased in different units, therefor be sure to select the correct one.
2. Tab to the price field and type the price per unit. The system will calculate the total price based on units received and price per unit.
3. Verify and correct the price per unit as necessary. 4. Continue adding line items until complete. 5. After all line items are entered, verify that the Total Amount Payable equals the total of the
original invoice.
6. Click Save. 7. Press Finalize when you’re certain that no other adjustments or changes have to be made.
NOTE: Once an Invoice has been finalized, you will not be able to make any more changes to it. Only your Area Supervisor or System Administrator can un-finalize an Invoice.

Updated 06/16 CONFIDENTIAL AND PROPRIETARY TO BOB EVANS FARMS, LLC 86
Working with Bob Evans Restaurant Suggested Prep and Interval Prep
Perform daily prep count of all prep items (After 8pm, the prior night).
Ensure areas are organized and ready to count.
Ensure iPad with Pulse is set up to count all prep items.
Count all prep products that do not expire at end of day.
Count all items 6 days a week (Thursday to Tuesday). Do not count Wednesday.
Count should happen after 8:00pm and when sales are less than $150 an hour.
Count on IPAD
1. Log into Pulse App with your credentials
2. Select Inventory.
3. Select the type of Inventory you would like to perform - Daily Prep.

Updated 06/16 CONFIDENTIAL AND PROPRIETARY TO BOB EVANS FARMS, LLC 87
4. Select if it is a New or Existing Inventory Count
5. Select the Day you would like to count
To begin your counts:
You must be completely connected to Wi-Fi when you select your inventory list. This gives the device an opportunity to connect with NCR Back Office (NBO) and tell it what is on the
list you are about to count it is absolutely necessary to be connected to Wi-Fi when starting a new inventory. You must pull up the location count sheet before proceeding to the WIFI free area. You will not be able to pull up a count sheet in a Wi-Fi free zone.
You can now enter an area that has no Wi-Fi signal and begin your count.
Make sure that you return to an area that has Wi-Fi when you “Post” your inventory. The Pulse app will not let you post the inventory unless you are connected to the Wi-Fi.

Updated 06/16 CONFIDENTIAL AND PROPRIETARY TO BOB EVANS FARMS, LLC 88
Execute suggested prep: NOTE: The Opening workflow incorporates the suggested prep process by taking the manager directly to Suggested prep step c.
1. Click inventory prep. 2. Click inventory posting. 3. Click suggested prep.
Updated 06/16 CONFIDENTIAL AND PROPRIETARY TO BOB EVANS FARMS, LLC 89
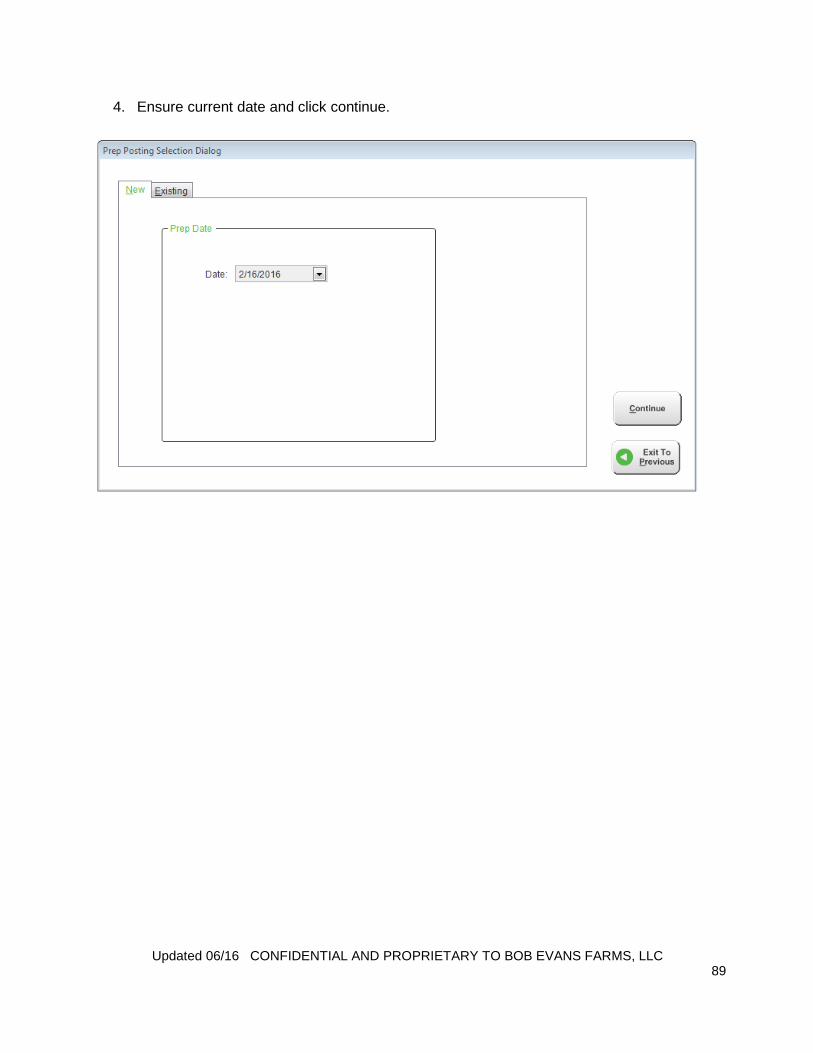
4. Ensure current date and click continue.

Updated 06/16 CONFIDENTIAL AND PROPRIETARY TO BOB EVANS FARMS, LLC 90
5. The missing count screen appears for items that have no ending inventory. 6. Click No to enter counts or click Yes and the system will use the theory on hand
calculations.
7. Suggested prep will appear. 8. Review each prep station for theory on hand accuracy and suggested prep amounts.
Suggested prep is calculated by subtracting the on hand from the forecasted sales mix.

Updated 06/16 CONFIDENTIAL AND PROPRIETARY TO BOB EVANS FARMS, LLC 91
9. Adjust on hand field if inaccurate. If changes are made, click recalculate. 10. Review suggested make column and decide if accurate. If accurate, skip to step J.
If changes need to be made, input the updated amounts in the adjusted make this column.
11. Once suggested prep list is done with correct counts click save.
12. A print question pops up, click yes to print the list.

Updated 06/16 CONFIDENTIAL AND PROPRIETARY TO BOB EVANS FARMS, LLC 92
Execute Prep list Intervals:
NOTE: The Opening workflow incorporates the Interval Prep process by taking the manager directly to Interval pre step c.
1. Click Reports from the main NBO page. 2. Click to Open report 3.15 Prep list Intervals by prep station. 3. Click ok.
4. Print 3.15 Prep List Intervals by Prep station

Updated 06/16 CONFIDENTIAL AND PROPRIETARY TO BOB EVANS FARMS, LLC 93
Viewing and Printing Reports 1. From the Desktop, log in to NBO. 2. From each main Switchboards (Inventory & Labor) click Reports. The Reports screen
appears.

Updated 06/16 CONFIDENTIAL AND PROPRIETARY TO BOB EVANS FARMS, LLC 94
3. Select the appropriate Report and click Preview or click Print. NOTE: Any report can be printed after previewing, so it is recommended you view the report first. Some reports are 100+ pages.
4. After previewing a report, you can choose to print All or selected pages.
5. Choose the radio button that corresponds to the desired time frame.
6. For certain selections, more information regarding the time frame is entered to the right.
Time Frame Settings
Day Select Date
Date Range Select beginning and ending dates
Week Choose reporting period, week #, and year
Period Choose reporting period and year
7. Each report can have different date selections available depending on the type of report. When you are finished viewing a report, click the Close button

Updated 06/16 CONFIDENTIAL AND PROPRIETARY TO BOB EVANS FARMS, LLC 95
Running a Workflow in NBO
Each day you will have to perform a series of Workflows in order to import all POS Sales and Labor Data into NBO, as well as perform all Manager Duties (adding Safe Count, entering the Bank deposit and making sure that all employees are properly clocked out). NOTE: If any report does not show data for a specific date, an import will fix this issue.
1. From the Desktop, log in to NBO. 2. From the main Inventory Switchboard click Workflow. 3. The Workflow screen appears with several different options.
4. Select the appropriate Workflow and follow the prompts.
Opening Shift – Will be used at open and this will walk you through opening tasks along with helping ensure you are setup for shift success. Areas covered are opening cash, overtime review, prep list, sales forecast verification, staffing verification, scheduling/labor plan verification and shiftly to-do list.
Mid-day – will be used by opening manager to finish their daily tasks. This will help ensure tasks for the shift are verified and completed. Areas covered are cash reconciliation including deposits, payroll verification, waste, and tomorrows planning.
PM Shift– Will be used by closing manager at the start of their shift and this will help ensure you are setup for shift success. Areas covered are prep list, sales forecast verification, staffing verification, scheduling/labor plan verification, shiftly to-do list and tomorrows planning.
End of Day (EOD) will be used by closing manager after close. This will help ensure tasks for the shift are verified and completed. Areas covered are cash reconciliation including deposits, payroll verification, waste, and verification of daily cycle counts and daily prep counts.
End of Week – will be used on Wednesday after food inventory by GM or person responsible for closing out the week. This will help ensure that food inventory and payroll for current week are completed. Areas covered are verification of food inventory, payroll and next weeks forecasted sales.
Purchasing – will be used for GFS purchasing and will help ensure that all steps for proper ordering are completed. Areas covered are GFS electronic order process.
Scheduling – will be used for forecasting and scheduling two weeks out. This will help ensure that all steps to proper forecasting and scheduling are completed for future success. Areas covered are sales forecasting and scheduling that meets staffing guidelines.
NOTE: If you haven’t completed all tasks, the workflow will prompt you to go back to the POS terminal to perform those functions. You will have to restart the Workflow after you’re done.

Updated 06/16 CONFIDENTIAL AND PROPRIETARY TO BOB EVANS FARMS, LLC 96
Trouble Shooting Food Costs In order to troubleshoot food cost it is important to know the following:
Where do the numbers come from and what can affect them?
What is the basic food cost calculation?
What is the difference between Actual and Theoretical Food Cost?
What causes variances between Actual and Theoretical Food Cost?
What reports should I use to get the information necessary to troubleshoot food cost?
Where do the numbers come from and what can affect them?
Beginning and ending inventory – these are the physical counts performed by the manager
Differences in counting methodology
What time is inventory counted? One day it’s counted in the morning and the following Week it’s counted at night?
How are containers counted? Does everyone use the same information? For example: the stainless steel container that the products are stored in. How much do you deduct when you weigh the container filled with product?
What items are counted and what are considered used? For example – do you count the oil in the fryer?
Are the items actually being weighed or are they estimated?
How are partial containers counted? .1, .2, .3 or are they weighed
Purchases – come from Invoices, Paid in/out, and Inventory transfers
Mistakes entering invoices - Do the units match the prices? Were all items entered?
Missing invoices or transfers
Prices – Invoices
Mistakes entering invoices – Do the units match the prices?
What is the basic food cost calculation?
Actual Food Cost = Beginning inventory + Purchases – Ending Inventory
Theoretical Food Cost = Sales mix compared to the recipes in MenuLink Note: These values can be in units or dollars.
What is the difference between Actual and Theoretical Food Cost?
Actual food cost is what was used by the restaurant
Theoretical food cost is what should have been used based on what was sold by the store
What causes variances between Actual and Theoretical Food Cost?
Inventory counting issues/differences
Mistakes on invoices
Over/under portioning
Waste
Theft

Updated 06/16 CONFIDENTIAL AND PROPRIETARY TO BOB EVANS FARMS, LLC 97
What Reports should I use to get the information necessary to troubleshoot Food Costs?
Top 20 Report- This report quickly identifies the top 20 items that are overused and the top 10 under used items start by looking at these.
Food Cost Inventory Summary for the same time frame. This will give you all of the necessary information to troubleshoot the variance. Using the actual food cost calculation verify the information is correct.
Are the beginning and ending inventory columns correct? You cannot fix the beginning inventory number but you can fix the ending inventory if it is incorrect. Look up the existing inventory, make the correction and re-post the inventory.
Is the purchases column correct? If not, find the invoice that is incorrect or missing and correct it.
Look up the item on the Purchasing History screen. Were there any purchases for the week? Do they look correct? You can see the invoice numbers if you need to correct an invoice.
Are there any negative actual usage numbers? If so, look at the beginning inventory, purchases and ending inventory. You may see that the ending inventory is larger than the beginning inventory and there are no purchases. If so, it usually means that an invoice is missing. Or, it could mean that the ending inventory value is incorrect.
Any changes you have made to the purchases or ending inventory will be reflected if you re-run your reports.
If you still can’t find the problem, recount the inventory of the product to verify what is in stock. Continue to re-run the Top 20 Item Usage Report and the Food Cost Inventory Summary to research variances until you are satisfied that the reported variances are accurate.
How to troubleshoot theoretical cost.
Is there sales mix for each day in the time period?
If not reimport the sales for the missing day.
Are there any items in the POS added category?
If so contact your system administrator to have a recipe added for the new items.
If sales mix does not reveal any discrepancies, go to the Recipes screen & then click on Where Used and make sure that the raw material is in the recipes you expect in the correct quantities.
Contact your system administrator if you find missing ingredients