Embed Size (px)
Citation preview

NEMID JS DEVELOPER SUPPORT SITE GUIDELINES, VERSION 0.4
DanID A/S 2 June 2014 Page 1-24
Nets DanID A/S
Lautrupbjerg 10
DK – 2750 Ballerup
T +45 87 42 45 00
F +45 70 20 66 29
www.nets-danid.dk
CVR no. 30808460
NemID JS Developer Support site
Guidelines

NEMID JS DEVELOPER SUPPORT SITE GUIDELINES, VERSION 0.4
DanID A/S 2 June 2014 Page 2-24
Table of Contents
1. NemID JS Developer Support Site .......................................... 4 1.1 Creating test users ............................................................... 5 1.2 Access to the tool ................................................................. 5 1.3 Start page ........................................................................... 5 Create new identity ......................................................................... 6 1.4 View existing identity ............................................................ 8 1.5 The identity ......................................................................... 8 1.5.1 The Code card .................................................................... 10 1.5.2 Usage log .......................................................................... 11 1.6 Demo logins....................................................................... 11 1.6.1 Customize parameters ........................................................ 13 1.7 SignText Viewer ................................................................. 15 1.7.1 Overview ........................................................................... 15 1.7.2 Plain text tab ..................................................................... 16 1.7.3 HTML tab ........................................................................... 17 1.7.4 XML tab ............................................................................. 18 1.7.5 PDF tab ............................................................................. 20 1.8 Error codes ........................................................................ 21 1.9 NemID parameters ............................................................. 22 1.10 NemID parameter validation ................................................ 22

NEMID JS DEVELOPER SUPPORT SITE GUIDELINES, VERSION 0.4
DanID A/S 2 June 2014 Page 3-24
History
2014-06-02 Version 0.4 PHJER
2014-05-12 Version 0.3 oyvmo
2014-01-31 Version 0.2 oyvmo
2013-11-15 Version 0.1 ksano

NEMID JS DEVELOPER SUPPORT SITE GUIDELINES, VERSION 0.4
DanID A/S 2 June 2014 Page 4-24
1. Purpose and target group
This document is a part of the NemID Service Provider Package.
Nets-DanID has created a web site where service providers can
create test users for NemID. The purpose of this document is to
provide guidance on the use of the website.
The document is aimed at testers and developers who have to
integrate with NemID.
NEMID JS DEVELOPER SUPPORT SITE GUIDELINES, VERSION 0.4
DanID A/S 2 June 2014 Page 5-24
Nets-DanID has developed a support website to assist service providers
implementing NemID JavaScript. The site allows for creation of NemID
test users and shows a sample implementation of NemID JavaScript.
2.1 Creating test users It is possible to create test users and view their data (such as OTP cards
and a transcript of the latest IVR call received). The tool can create
users of various types and can be used to bring them in various states.
All of which is intended to assist a service provider in testing how their
own NemID implementation handles the different response codes
NemID will return.
2.2 Access to the tool
The tool is accessible from this address:
https://appletk.danid.dk/developers
Access to this page is blocked by an IP filter and access is requested
through “Produktgruppen”.
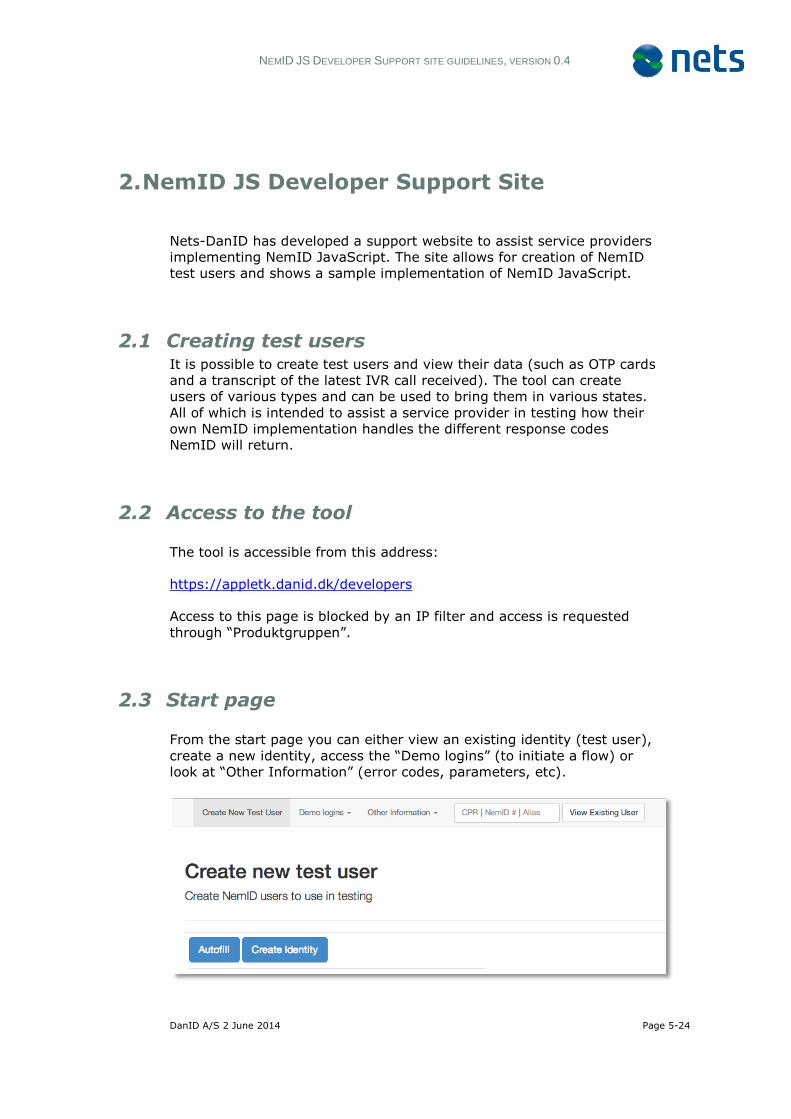
2.3 Start page
From the start page you can either view an existing identity (test user),
create a new identity, access the “Demo logins” (to initiate a flow) or
look at “Other Information” (error codes, parameters, etc).
2. NemID JS Developer Support Site

NEMID JS DEVELOPER SUPPORT SITE GUIDELINES, VERSION 0.4
DanID A/S 2 June 2014 Page 6-24
Create new identity
Press ”Create Identity” and fill out the form. (Alternatively press
“Autofill” and the form will get populated with random data.).

NEMID JS DEVELOPER SUPPORT SITE GUIDELINES, VERSION 0.4
DanID A/S 2 June 2014 Page 7-24
If Activate is checked, the system will auto generate a user alias and a
password. When selecting “Activate” the system will automatically
create a user that is ready for login. This is the fastest way to generate
a standard user.
If the form is filled in manually, do the following:
Fill in a random, fictitious address.
Also, fill in a random, fictitious CPR number (i.e. a personal identification
number). If the CPR number is already in use, an error message is
shown
Please note, that the CPR number must comply with the general rules
for CPR numbers (please refer to
http://en.wikipedia.org/wiki/Personal_identification_number_(Denmark)
), however, mod11 is not relevant here. A CPR number like e.g. 280871-
5999 comprises a person who will be born in 2071. You can in fact
create a test user like this, but the user will get the OCES004 error
code, because the user is not yet 15 years old.
“Handout OTP” and “Handout PIN” is selected if you have a physical
code card and an activation password, which is to be linked to the
specific test user. This is however not possible for service providers to
do.
The POCES Qualified and POCES Requested flags determine whether the
user gets an OCES digital signature and can use his NemID for logging
on to non-banks. By default, both parameters are checked.
The “POCES Qualified” checkbox indicates whether the user can get an
OCES digital signature or not. If not checked, the user can only logon to
online banks and to self-service on nemid.nu using the NemID for bank
login screen. You can create a “bank only” user for testing the error
messages OCES002 and OCES004
If the user is POCES Qualified and logs on to an OCES Service Provider,
i.e. a non-bank Service Provider, the user will be prompted for
extending his NemID with OCES digital signature. (This use case is
relevant for users, who initially ordered NemID from a bank.)
By checking the “POCES Requested” flag, an OCES digital signature will
be ordered for the user and issued at the first logon to an OCES Service
Provider.
When all information are provided, press ”Create Identity”. The system
will now redirect you to the ”identity” page.

NEMID JS DEVELOPER SUPPORT SITE GUIDELINES, VERSION 0.4
DanID A/S 2 June 2014 Page 8-24
2.4 View existing identity
Press ”View existing identity” and enter the CPR-number, NemID-
number or the userID (chosen) in the search field. Press ”Enter” or click
the button to the right of the textfield.
2.5 The identity
This is the main page for viewing and managing the active users
information.
From here you have access to the following information and links to
additional functionality:
NemID number (found under ”OTP Devices” - must be used at
the user’s first login/activation)
Alias, if chosen
Password Status, Preferred Device and a number of
authentication attempt counters.
Device action links (issuing/revoking devices and pins, setting
preferred device etc.)
Code card (link with the code card number is found under ”OTP
Cards”)
Any TOTP Gemalto tokens (if any have been issued for the user),
including the current (as of the latest page-refresh) key-value.
PIN codes used for activation (if “activate” was not checked
during user creation), password unlock and device unrevoke
procedures. All PIN codes are found under ”Pin Data” in the ”PIN
Codes” section

NEMID JS DEVELOPER SUPPORT SITE GUIDELINES, VERSION 0.4
DanID A/S 2 June 2014 Page 9-24
Usage log (from the menu under Current User – made visible
upon successful login)
Content of the certificate (under ”Private Keys” – provided the
certificate has been issued, which will happen the first time the
test user logs on using an OCES flow)

NEMID JS DEVELOPER SUPPORT SITE GUIDELINES, VERSION 0.4
DanID A/S 2 June 2014 Page 10-24
2.5.1 The Code card
Under ”OTP cards”, links to the test user’s code cards can be found.

NEMID JS DEVELOPER SUPPORT SITE GUIDELINES, VERSION 0.4
DanID A/S 2 June 2014 Page 11-24
2.5.2 Usage log
The usage log shows the most important events concerning the test
user. The log is accessible from the menu under Current User > Show
Usage Log. Note that the menu item “Current user” is only visible, if a
user is logged in or if you have searched for and selected a user.
2.6 Demo logins
From the menu it is possible to initiate some of the most common flows
directly, to display a list of standard flows (All Demo logins), or to
access a page for specifying parameters for any type of flow.

NEMID JS DEVELOPER SUPPORT SITE GUIDELINES, VERSION 0.4
DanID A/S 2 June 2014 Page 12-24
Selecting “All Demo logins” brings up a list of links that allow the user to
initiate flows with the most common modes and parameters. The flows
are initiated either as DemoBank (id 49) or as www.nemid.nu as the
OCES service provider (id 1).

NEMID JS DEVELOPER SUPPORT SITE GUIDELINES, VERSION 0.4
DanID A/S 2 June 2014 Page 13-24
2.6.1 Customize parameters
The direct links to start a flow will use typical or default values for the
relevant parameters. When other parameter values are required, the
customize parameters site allows you finer grained control of the
parameters and values that will be sent to the NemID Client.
The values specified for Width and Height define the dimensions of the
iframe in which the NemID client will be displayed.
Note that the buttons on the side of the Sign Text and Sign Text
Transformation text areas can be used to encode or decode any text
that has already been placed in the respective text areas.

NEMID JS DEVELOPER SUPPORT SITE GUIDELINES, VERSION 0.4
DanID A/S 2 June 2014 Page 14-24
Note that the “Sign Text Remote Hash” must be supplied for an external
PDF file, and that a tool is provided to easily produce a digest from a
locally stored file.
Note that the “Sign Text Format” must be explicitly set for signing flows
(the type is never inferred from the SignText itelf, nor from any file used
to calculate a SHA256 digest).
Checking the “Monospace Font for Plain text” checkbox will add
“SIGNTEXT_MONOSPACEFONT”: “true” as a parameter. This only has an
effect for signing flows with signtext format TEXT.
Checking the Allow 2-factor step up checkbox will add
“ALLOW_STEPUP”: “true” as a parameter. This will allow switching to 2-
factor authentication if an existing short-term session cannot be used.
Checking the “OCES Service Provider” checkbox will add
“OCES_SERVICEPROVIDER”: “true” as a parameter. This is only relevant
for initiating a short term flow as an OCES service provider.
Checking the “Do not show cancel in limited mode” checkbox will add
“LIMITED_MODE_DO_NOT_SHOW_CANCEL”: ”true” as a parameter This
will prevent the cancel button from displaying in the username and
password screen.
Checking the “Usage Data” checkbox will include “USAGEDATA”: “true”
as a parameter, which will enable the inclusion of BehavioSec data as
part of the Encrypted Assertion of the SAML response (short term only).

NEMID JS DEVELOPER SUPPORT SITE GUIDELINES, VERSION 0.4
DanID A/S 2 June 2014 Page 15-24
2.7 SignText Viewer
The SignText Viewer application enables previewing of sign text in plain
text, html, xml and pdf formats. The interface will be displayed in the
same way as the end user will see it, so a service provider can use it for
viewing and validating the visual layout of the sign text prior to
integrating signing in their own applications.
2.7.1 Overview
The SignText Viewer is accessible as a link via the menu.
NEMID JS DEVELOPER SUPPORT SITE GUIDELINES, VERSION 0.4
DanID A/S 2 June 2014 Page 16-24
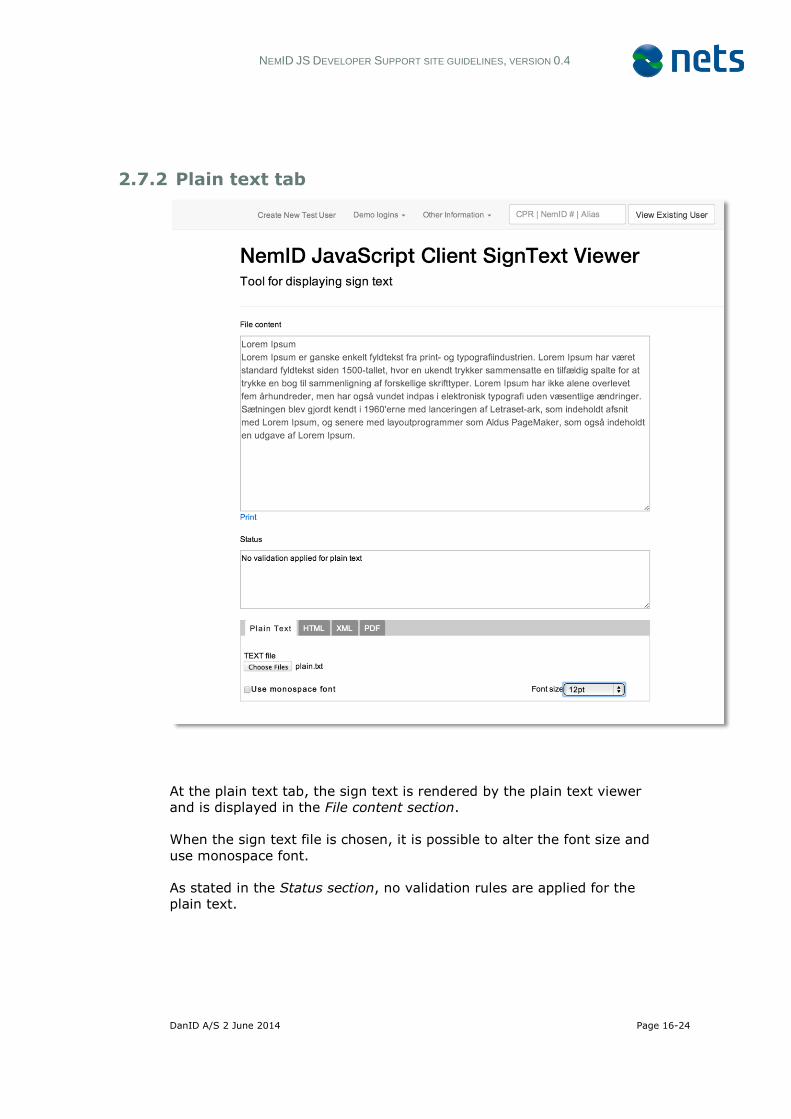
2.7.2 Plain text tab
At the plain text tab, the sign text is rendered by the plain text viewer
and is displayed in the File content section.
When the sign text file is chosen, it is possible to alter the font size and
use monospace font.
As stated in the Status section, no validation rules are applied for the
plain text.
NEMID JS DEVELOPER SUPPORT SITE GUIDELINES, VERSION 0.4
DanID A/S 2 June 2014 Page 17-24
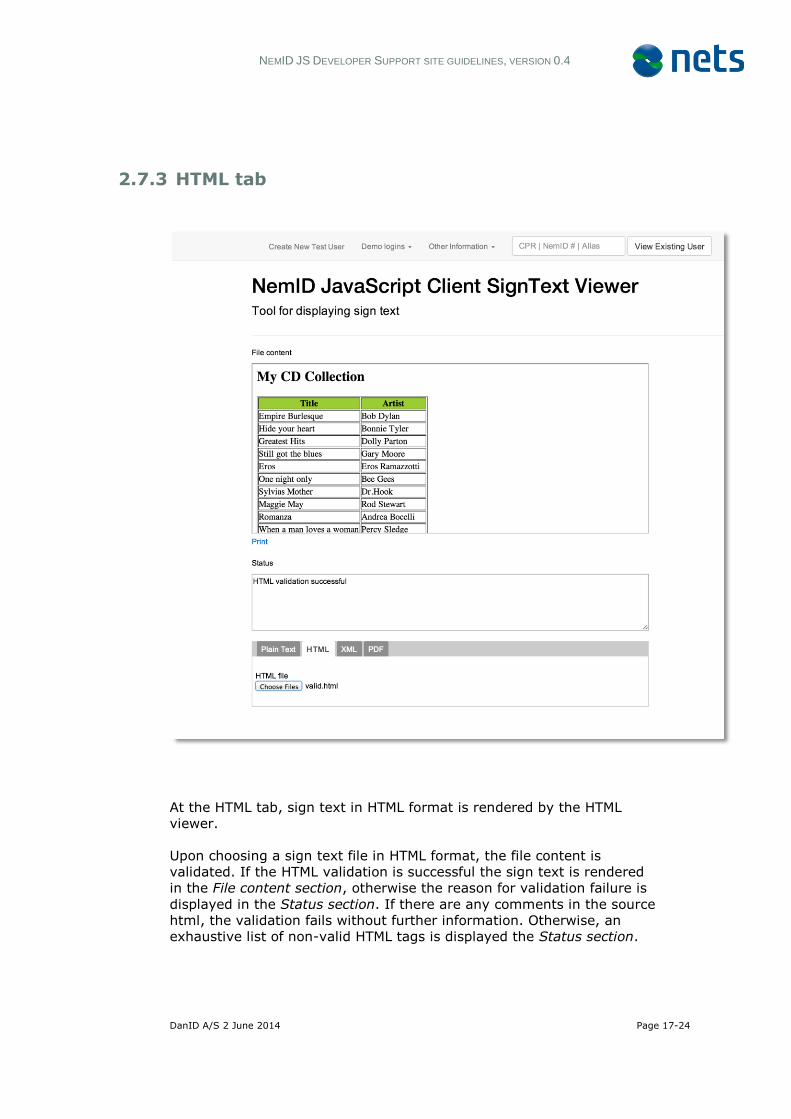
2.7.3 HTML tab
At the HTML tab, sign text in HTML format is rendered by the HTML
viewer.
Upon choosing a sign text file in HTML format, the file content is
validated. If the HTML validation is successful the sign text is rendered
in the File content section, otherwise the reason for validation failure is
displayed in the Status section. If there are any comments in the source
html, the validation fails without further information. Otherwise, an
exhaustive list of non-valid HTML tags is displayed the Status section.
NEMID JS DEVELOPER SUPPORT SITE GUIDELINES, VERSION 0.4
DanID A/S 2 June 2014 Page 18-24
Please refer to the NemID Integration document for a list of whitelisted
tags.
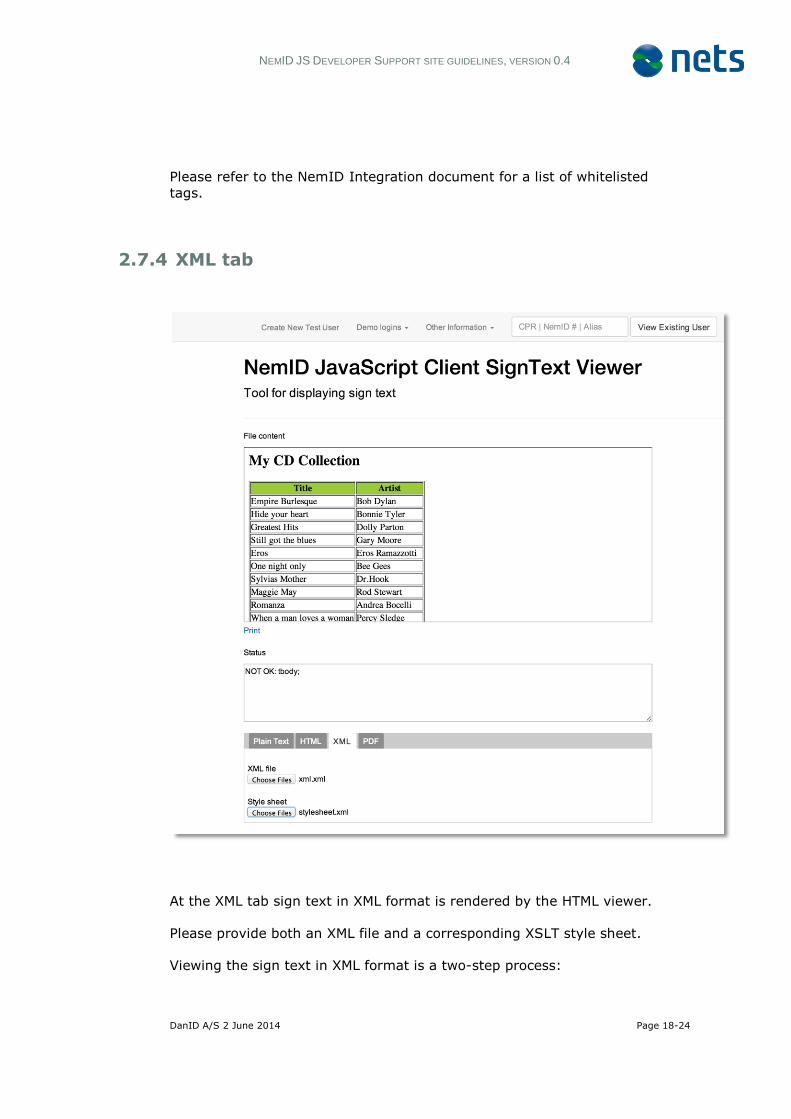
2.7.4 XML tab
At the XML tab sign text in XML format is rendered by the HTML viewer.
Please provide both an XML file and a corresponding XSLT style sheet.
Viewing the sign text in XML format is a two-step process:

NEMID JS DEVELOPER SUPPORT SITE GUIDELINES, VERSION 0.4
DanID A/S 2 June 2014 Page 19-24
1. The XML is transformed to HTML by applying the chosen XSLT
style sheet. Please note that the transformation is done by the
browser’s XSLT engine. Small differences in the XSLT support
and output may occur between different browsers, so it is highly
recommended that service providers test the document
transformation thoroughly across browsers.
2. The HTML validation rules are applied to the generated HTML. If
the HTML validation is successful the generated sign text in HTML
format is rendered in the File content section, otherwise an
exhaustive list of non-valid HTML tags are rendered in the Status
section. Comments are not allowed in the resulting html, and
their existence will cause an error to be displayed and block any
further errors from being listed.

NEMID JS DEVELOPER SUPPORT SITE GUIDELINES, VERSION 0.4
DanID A/S 2 June 2014 Page 20-24
2.7.5 PDF tab
NEMID JS DEVELOPER SUPPORT SITE GUIDELINES, VERSION 0.4
DanID A/S 2 June 2014 Page 21-24
On the PDF tab, the NemID PDF viewer renders sign text in PDF format.
If the PDF validation is successful the sign text is rendered in the File
content section, otherwise an exhaustive list of parse or validation errors
are displayed in the Status section.
The user interface for PDF sign text enables the user to scroll through
the document, zoom in or out, and also to view the document in full
screen mode.
Note, that the NemID PDF viewer uses certain HTML5 features not
supported by Internet Explorer 8, and thus end-users using IE 8 cannot
sign PDF documents. The NemID user interface will display an error
message to the user, if the user’s browser does not support the required
HTML5 features.
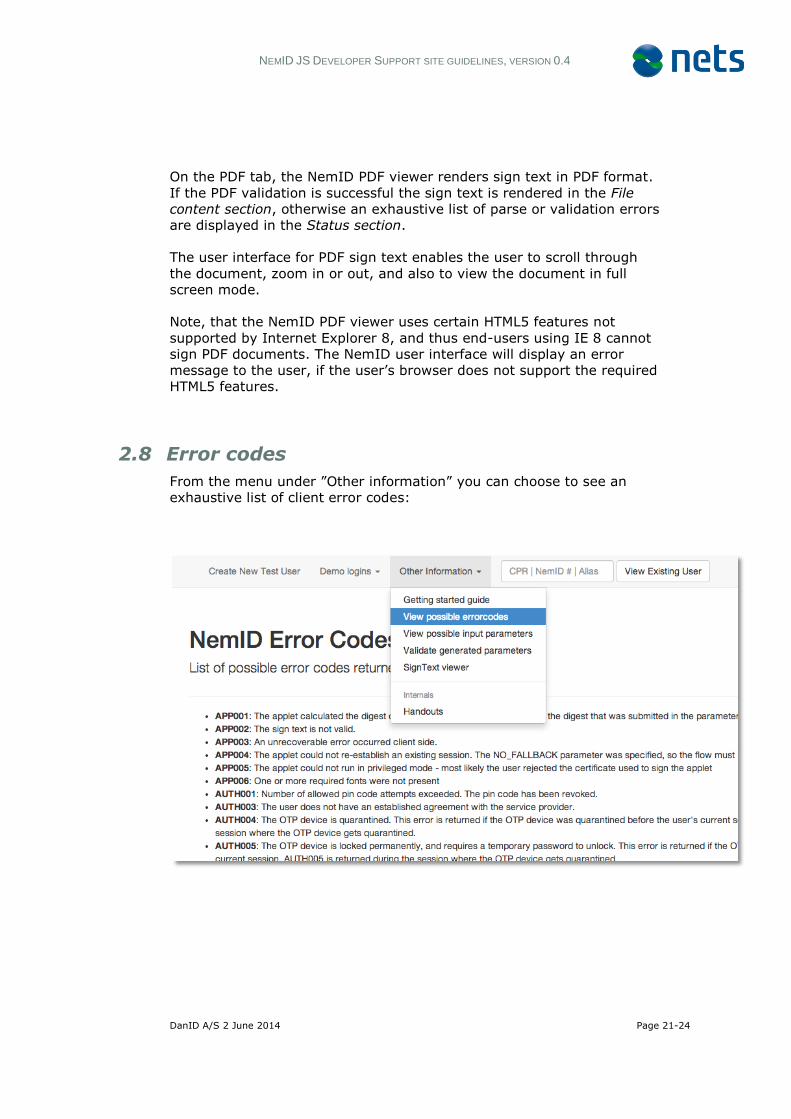
2.8 Error codes
From the menu under ”Other information” you can choose to see an
exhaustive list of client error codes:

NEMID JS DEVELOPER SUPPORT SITE GUIDELINES, VERSION 0.4
DanID A/S 2 June 2014 Page 22-24
2.9 NemID parameters From the menu ”Other information” you can choose to see an
exhaustive list of parameters that can be sent to the NemID client:
2.10 NemID parameter validation When selecting “Validate generated parameters” from the menu ”Other
information”, you can validate your parameters and the parameters
digest in JSON and validate your parameter digest:
The single textarea accepts JSON-formatted text and immediately
responds by:
- Stating whether the text is valid JSON.
- Displaying a table containing all of the parameters found in the JSON
text.

NEMID JS DEVELOPER SUPPORT SITE GUIDELINES, VERSION 0.4
DanID A/S 2 June 2014 Page 23-24
- Displaying parameter integrity errors (erroneous parameters are
marked with a red background in the table of parameters).
o Checks for the presence of required parameters.
o Checks for the validity of the parameter values.
o Checks whether values that must be BASE64 encoded appear
to actually have been encoded.
- Displaying the normalized string of parameters.
- Calculating and displaying the parameter digest
o Displays an error if the calculated parameter digest does not
match the value of the compulsory “PARAMS_DIGEST”
parameter.

NEMID JS DEVELOPER SUPPORT SITE GUIDELINES, VERSION 0.4
DanID A/S 2 June 2014 Page 24-24