Embed Size (px)
Citation preview
Net LineDancer User Guide
Version 14.06
July 22, 2014
LogicVein, Inc.
www.logicvein.com
Mail: [email protected]

Introduction
Thank you for your interest in Net LineDancer v14.06 (hereafter referred to as”netLD”). This
product reduces the strain of network device management and increases the robustness,
security and high availability of your network(s). We are very pleased to assist you with your
network environment and introduce you to our product! For a better understanding of netLD
please read the manual beginning with the introduction to familiarize yourself with netLD.
i

2
Figure 0.1.1: Features in netLD.
3
0.1 What is netLD?
netLD is designed to help network engineers manage the configurations of their networking
devices e.g. routers, switches, firewalls, etc., in their enterprise. Below is a brief summary of
what netLD can do:
• Automatic detection of network devices in your network. Once you specify
the range of IP addresses, you begin to discover devices within your network. This is
helpful when you do not have reliable documentation on device IP addresses. This
situation makes it difficult to understand the current state of your network.
• Grouping, automated login and backup. You can group devices so that the
devices share the same login credentials, reducing the effort to log in to each device.
Once you have created a credential set, netLD is then able to login to each device,
capturing it’s configurations, hardware information and much more.
• Fast, intuitive and automated access to the properties of each device. You
can see, compare and restore the backed-up state of the devices in few clicks! The
current state of each device is shown as an icon and you can easily find which devices
have issue.
• Manage thousands of devices . If you manage thousands of devices,
you will find it’s painstaking slow to configure them because their configurations are
almost the same but have small variations (such as IP addresses and device names). We
provide a scalable management method, Smart Change, for that purpose.
• Additional features include:
– Report Generation (Inventory, compliance violations, hardware and more).
– Automated detection and logging of configuration changes.
– Automated error reporting to other Network Management Systems.

4
0.1.1 Target Audience
The target audience for this manual is network administrators and network engineers, from
junior levels to senior management, who need assistance with their netLD network change
and configuration management product. We assume you are already familiar with IP
networks, concepts of device configurations, and CLI operation on your networking devices.
That said, we provide helpful explanation even for basic features.
0.1.2 About this manual
1. First, we give tutorials describing the basic installation and the initial setup so that you
can quickly start to manage the devices in your network(s).
2. Then, we give a concise explanation of various original concepts in netLD (for example,
networks, credentials, etc.) as well as most of the terms that we use throughout the
manual such as the names of the UI elements. If you feel you are already comfortable
with those concepts you can skip this section.
3. Next, we proceed to the usage of the basic tools. They are easy to follow if you have a
basic understanding of some concepts and UI elements of netLD. However, since the
UI elements are designed to be intuitive, you may be able to figure out how to use them
even before reading this section.
4. We then provide further instructions for the use of netLD’s advanced tools such as
Terminal Proxy, Smart Bridge and Cisco PnP.
5. The rest of the sections describe miscellaneous tools, tips, FAQs and default/internal
data, which may help you solve problems encountered during operation.
Note that you can start with any section if you are already familiar with netLD.

5
If you need further assistance or technical support regarding Net LineDancer, please feel free
to contact us.
LogicVein, Inc. Technical Support
Mail: [email protected]
We’re happy to help with any questions or issues you may have. Please note that we are
closed on weekends and national holidays. Thank you for your understanding.
Note: descriptions in this manual are based on the latest version of netLD (June 2014). We do
our best to keep the manual current and accurate, but we make no guarantees.

6
Notes Page


Section Content Page 0.1 What is netLD? iii
0.1.1 Target Audience iv
0.1.2 About this manual iv
1 Tutorial 1
1.1 Getting netLD 1
1.2 Installing netLD 4
1.2.1 Instruction on Windows 5
1.2.2 Instruction on Linux family of OS 11
1.3 Accessing the netLD Instance 15
1.4 Login 16
1.5 Initial configuration 17
1.5.1 Adding the Devices 18
1.5.2 Setting the Credentials 19
1.5.3 Performing a Backup 21
1.5.4 Scheduling the Backups 23
2 netLD Basics 25
2.1 Basic controls and UI elements 25
2.1.1 Panes 25
2.1.2 Menu and Submenu 26
2.1.3 Subtabs and Subpane 26
2.1.4 Window 26
2.2 Devices, Configurations and Backups 29
2.2.1 Adapters 30
2.3 Credentials, Network Groups, Protocols 31
2.3.1 Network Group 32
2.3.2 Protocols 33
2.4 Users and Roles 34
2.5 Networks 35
2.6 Service Management 35
3 Basic Tools 42
3.1 Credentials 42
3.1.1 Dynamic Setting Strategy 43
3.1.2 Static Setting Strategy 46
3.1.3 Import from an Excel spreadsheet 48
3.2 Users and Roles 50
3.2.1 Creating a Role 50
3.2.2 Creating a User 51
3.2.3 Quick Password Change 53
3.3 Tools for devices 54
3.3.1 Adding Devices 54
3.3.2 Discover New Devices 56
3.3.3 Adding Devices Manually 58
3.3.4 Editing and Deleting the Devices 60
3.3.5 Searching Devices 60
3.3.6 Exporting and Importing the Inventory 62
3.4 Configuration and Backup 64
3.4.1 Status Summary 65

3.4.2 Status after Performing Backup 66
3.4.3 Restoring the Configuration 67
3.4.4 Device Property 67
3.4.5 Comparing the configurations 71
3.4.6 Checking the Mismatch in startup-config and running-config 73
3.5 Tools Menu 74
3.5.1 DNS Lookup 74
3.5.2 IOS Show Commands 75
3.5.3 IP Routing Table 76
3.5.4 Ping 76
3.5.5 SNMP System Info 77
3.5.6 Interface Brief 77
3.5.7 Traceroute 78
3.5.8 Port Scan 78
3.5.9 Live ARP Table 79
3.6 Change Menu 79
3.6.1 Command Runner 80
3.6.2 Enable or Disable Interfaces 81
3.6.3 Login Banner (MOTD) 81
3.6.4 Name Servers Manager 82
3.6.5 NTP Servers 82
3.6.6 Port VLAN Assignment 83
3.6.7 SNMP Community String 84
3.6.8 SNMP Trap Hosts 84
3.6.9 Syslog Hosts 85
3.6.10 IOS Software Distribution 85
3.6.11 Manage OS Images 85
3.6.12 NEC WA Software Distribution 87
3.6.13 Retrieve OS Image Files 87
3.6.14 Add Static Route 89
3.6.15 Delete Static Route 89
3.6.16 Users 90
3.7 Job Management 92
3.7.1 Creating a New Job 93
3.7.2 Status Indicators in Job History Subtab 99
3.8 Reports 100
3.8.1 Issuing a Report Manually 105
3.8.2 Scheduling Reports 106
3.9 Smart Change 108
3.9.1 Creating a Smart Change Job 109
3.10. Compliance 116
3.10.1 Various Rule-related tabs 117
3.10.2 Creating a New Rule 121
3.10.3 Policy tab 125
3.11 Draft Configuration 131
3.11.1 Creating a Draft Configuration 131
3.11.2 Importing Configurations from Plain Texts 132
3.11.3 Comparing Configurations 134
3.11.4 Applying a Draft Configuration to a Device 134

3.12 Change Advisor 135
3.12.1 Executing Commands through Change Advisor 136
3.13 Search tab 137
3.13.1 Switch Port Search 137
3.13.2 ARP Search 137
4 Advanced
Tools
139
4.1 Terminal Proxy Tab 140
4.1.1 Available Commands 141
4.1.2 Setup the Terminal Proxy 142
4.1.3 Login 143
4.1.4 Terminal Proxy Log 145
4.1.5 Verifying the Log from Change History 146
4.1.6 Exporting Log Files 147
4.2 Cisco Plug and Play (Optional) 148
4.2.1 Requirements for Using Cisco PnP Feature 150
4.2.2 Setting up a DHCP Server 151
4.2.3 Template-Based Deployment 156
4.2.4 Importing the Replacement Values in Cisco PnP 161
4.2.5 Cisco PnP Self-Recovery 163
4.2.6 Cisco PnP Specific Device Recovery 165
4.2.7 Distributing Configurations via 3G network and VPN-capable Mobile
Router
167
4.2.8 Deploying Configurations Prior to Sending the Devices to Each base 169
4.2.9 Deploying a Bootstrap 170
4.3 Smart bridge (optional) 171
4.3.1 Installation 172
4.3.2 Registering Smart Bridges to the Core Server 175
4.3.3 Adding a Network for a SB 178
4.3.4 Adding devices to a SB 179
4.4 Integration with External Network Management Software 180
4.4.1 Interaction with SNMPc 180
4.4.2 Configuring SNMP trap send 183
4.5 Real-time Change Detection 185
4.5.1 Configuring your devices 185
4.5.2 Operation Check 186
5 Miscellaneous 187
5.1 Configurations Related to Devices and Operations 188
5.1.1 Modifying the Columns in Device View 188
5.1.2 Scheduler Filters 189
5.1.3 Device Tags 191
5.1.4 Display Neighbor Information 194
5.2 Configurations Available in Settings Window 194
5.2.1 Setting the Data Retention policy 195
5.2.2 System Backup and Restoration 195
5.2.3 Mail Server 197
5.2.4 Changing the Data Directory in Operation 199
5.2.5 netLD RADIUS External Authentication 199
5.2.6 Changing the Column Names of Custom Device Fields 201

5.2.7 Launchers (URL Launchers) 201
5.2.8 Network Servers 203
5.2.9 Software Update 205
5.3 Help Menu 206
5.3.1 FAQ 206
5.3.2 Manual 206
5.3.3 About 207
5.4 More Miscellaneous Operations 209
5.4.1 Security Certificate on Browsers 209
5.4.2 Software License Key 216
5.4.3 Resetting Client Settings 216
5.4.4 Upgrading netLD 218
5.4.5 Uninstalling netLD 218
6 FAQ 221
6.1 Devices are not successfully discovered nor added to the device list . . . . 222
6.2 Backup Fails! 222
6.3 Wrong IP address is displayed during the discovery 223
6.4 Is it possible to upgrade the firmware of our devices at once? 224
6.5 Is it possible to send a trap when the configurations were changed? 225
6.6 How many jobs can be run at the same time? 226
6.7 Error ”No connection-based protocol specified” occurs when I run a
change tool
227
7 Data 229
7.1 Port Usage 230
7.2 Directories 231
7.3 Permissions Configurable in Roles 232
7.3.1 List of Permissions 232
7.3.2 Permission vs Available Operations
7.4 Compliance Rules Provided by Default 235
7.5 Recommended System Requirements 236
7.6 Updates in version 13.08 237
7.7 The List of Available Device Adapters 238
7.7.1 Supported Device List - version14.06 239
7.7.2 IOS Software Distributing Exception 242
7.7.3 Getting the Latest Adapter Information 242
7.8 Contacts 242
8 Appendices 243
8.1 Cron tutorial 243
8.1.1 Scheduling patterns 244
8.1.2 Examples 245
8.2 Setting up Active Directory on Windows Server 2012 247
8.2.1 Installation 247
8.2.2 Configuration 248

Chapter 1
Tutorial
This chapter serves as a tutorial to assist you with the download and installation of netLD.
1.1 Getting netLD
If you are reading this manual before getting the software, we’ve included a brief introduction
to our website. Please understand that the website appearance is subject to change. If you
already have the software, you can ignore this section.
After you read the tutorial, you can obtain a free trial version of NetLD. The free version can
later be upgraded to the full version by adding a new license file. Navigate on your Web
browser (e.g. Google Chrome, Firefox, Internet Explorer) to http://www.logicvein.com ,
shown in the following pages. Follow the instructions in each figure and get the installer
binaries, which are usually named netld-Enterprise-<release-date>-<architecture>.
netLD is not available for 32bit Operating Systems.
1

2 CHAPTER 1. TUTORIAL
Copyrights ⃝C LogicVein.inc All rights reserved.
Figure 1.1.1: This is the LogicVein support page. Navigate to the Product highlighted in red.
Figure 1.1.2: Click on the green Download button in the middle of the page.

3 CHAPTER 1. TUTORIAL
Figure 1.1.3: Finally, on this page, choose either Windows (64bit), Linux (64bit)

4 CHAPTER 1. TUTORIAL
Copyrights ⃝C LogicVein.inc All rights reserved.
1.2 Installing netLD
After downloading, the next step is to install netLD.
1. Installation should be done by a user with Administrator privilege (on Microsoft
Windows). On Unix-like machines, you have to be able to log in as root user (or
sudoers if sudo is set up in the system). Login again as the appropriate user.
2. Check the minimum requirements of the installation.
3. Check the install dependency and the programs that are simultaneously installed into the
system and so on.
Minimum Requirements for 3,000 devices:
Operation Systems
Windows(64bit only) Windows Server 2008 SP2
Windows Server 2008 R2
Windows Server 2012
Linux(64bit only) Cent OS 5/6
RedHat 5/6 or later
Hardware Requirements
CPU Core Minimum 4
Memory Minimum 2GB
HDD 120GB 10K RPM RAID1
On the Client side, you can browse Net LineDancer Server with:
• Internet Explorer 7 or later
• FireFox
• Safari
• other conforming browser implementations.
Platform-specific installation notes follow this section. Windows and Linux
instruction is available. Instructions for Windows platform starts immediately after
this section. Linux instructions start in Sec. 1.2.2.

5 CHAPTER 1. TUTORIAL
1.2.1 Instructions f o r Windows
With a Windows installation there is little or no software dependency
when installing netLD. The installer sets everything up that you will
need at that time. Below is the list of automatically installed
software:
• Adobe Flash Player v.10.3 or above. Installation is system-
wide.
• Java7 SE Runtime Environment and ActivePerl. Installation is
package- local, so it does not conflict with the system-wide
installation of the Java environment or ActivePerl.
Below, we provide screen-by-screen instructions for the installation of
netLD. If you’re already familiar with the installation of windows, you
will find our installation very straightforward. However, please note: we
require an internet connection to automatically activate your license key or
you will be required to run an additional process to be explained later1.
On the server, double-click on the netLD installer to start the installation.
Select a language from the drop-down menu and click on the “OK” button to start the
Setup wizard.

6 CHAPTER 1. TUTORIAL
Copyrights ⃝C LogicVein.inc All rights reserved.
Next NetLD checks the port usage. The following error message will appear if the installer finds
any applications using the required port.
Click the “Next” button to see the License Agreement.

7 CHAPTER 1. TUTORIAL
License Agreement. Press t he down arrow to read the rest of the agreement and click “I Agree” to continue.
Specify the install directory by clicking “ Browse”. Click on the “Next” button to continue.

8 CHAPTER 1. TUTORIAL
Copyrights ⃝C LogicVein.inc All rights reserved.
Select the license. To activate the free trial version, select Activate Evaluation and enjoy the
30-day free trial. If you have already purchased netLD and have a license key, choose Activate with
existing License Key or License File.
If your environment is connected to the Internet, enter your serial number in the Internet
Activation Serial field and click on Next. Otherwise, get a license file from us
([email protected]), choose that file and click on Next. Note that the online serial
authentication may fail under LDAP certification.

9 CHAPTER 1. TUTORIAL
In the SSL Certificate dialog, enter the required information and click on the Install button.
Information entered here can be edited after the installation. See Sec. 5.4.1 for details.
Installation continues.
1 NetLD authenticates the serial number via Internet; Internet connection is required in order to activate it. Without
a n Internet connection, you have to obtain a static license file from us. Please contact [email protected] . Also,
when we issue a license file, we require the MAC Address of your server. MAC Address can be obtained by
ipconfig /all (on windows CUI) or ifconfig (on UNIX-like systems). If the server has multiple NICs, we
require only one of them.

10 CHAPTER 1. TUTORIAL
Copyrights ⃝C LogicVein.inc All rights reserved.
Click on the Next button if Installation Complete dialog is displayed.
Click on the Finish button to close the setup wizard.

11 CHAPTER 1. TUTORIAL
1.2.2 Instruction on Linux family of
OS
System Requirements The netLD server for Linux can be installed on CentOS 6, CentOS 7, RedHat 6, and RedHat
7. Only 64bit operation systems are supported. More details about the system requirements
can be found here: https://logicvein.com/system.php
Download the netLD installer The Linux installer can be downloaded from the LogicVein website here:
http://logicvein.com/download.php
To download the Linux installer for netLD...
1. Navigate to the LogicVein download page here: http://logicvein.com/download.php
2. From the download page select the Linux evaluation program download. (This download
same download can be used for evaluation downloads as well as for full licensed product.)
3. On the next page you will be asked for contact information. For evaluation installations this
information is required in order for the activation license to be automatically generated.
4. Once you have entered your information and click I Agree and Send your download will
begin. You will also be sent an email containing the activation license for your
evaluation. (If you already have a valid activation license for your system, you can
disregard this email)
The download is a zip file that contains the main netLD server installer (eg: netld-2014.06.0-
x86-64.bin) as well as the Linux SmartBridge installer (eg: netld-bridge-2014.06.0-
x86_64.bin).
Package Dependencies
All package dependencies will be automatically installed when installing with an internet
connection. But in the case that there is no internet connection the following packages are
required before the netLD installation can begin:
unzip, wget, gmp, iptables, iptables-ipv6, openssh, openssh-clients, shadow-utils, sudo
Additionally, for CentOS 6 the "compat-expat1" and "openssl098e-0.9.8e" packages are
required, but for CentOS 7 the "openssl098e" package is required.
Running the Installer
Unzip the netLD installer (netld-2014.06.0-x86-64.bin) from the downloaded zip file.
Change to the root user using the su command. (alternatively, if your user is configured as a
sudoer you can run all of the following commands using the sudo command)
Execute the netLD installer script:
sh netld-2014.06.0-x86-64.bin
You will asked if you would like to create a new certificate for this server. SSL is used for
communication between the netLD web interface and server. For this to work an SSL
certificate must be generated for this machine. This process will generate a self-signed

12 CHAPTER 1. TUTORIAL
certificate for your server, you can find more details on installing CA signed certificates
here: Importing Certificates
A certificate has already been created for this server. Would you like to overwrite it?
Overwrite [y/n]:
Type "y" to continue. (If this is not a fresh install, you can select "n" to prevent the existing
certificate from being overwritten.)
Finally you will be asked to enter the details for the new SSL certificate...
Net LineDancer clients use SSL to communicate with the server. An SSL certificate must
be generated for this machine. The hostname field below must accurately reflect the
hostname for this server. Only ASCII characters are supported.
Hostname (FQDN): documentation-test
Organization Unit: docs
Organization: LogicVein
City: Austin
State or Province: Texas
Country Code [JP/KR/US]: US
From here the installer will complete and if there are no problems you will see
the Installation Successful message. The netLD service will also be started automatically.
Connect to the netLD Server Once the service has started successfully you can now connect to it through the netLD web
interface. You can navigate to the web interface at https://localhost/
Note: The first time you connect to netLD from a browser, most browsers will display a
warning that the connection is insecure. This is because of the connection is using a self-
signed certificate. Once the certificate is installed into the browser, this warning message
will go away.
License Activation
When you connect to the netLD web interface after installing for the first time, you will be
presented with a license activation page. Enter your activation key here to activate your
server.
Logging In Once the server license has been activated, you will prompted with a login screen.
The default login credentials are..
Username: admin
Password: password

13 CHAPTER 1. TUTORIAL
Starting and Stopping the Service The netLD service is managed using a SysV init.d script. The service can be started and
stopped using theservice command as the root user.
To start the netLD service:
service netld start
To stop the netLD service:
service netld stop
Uninstalling
The netLD installation can be removed by using the yum command. Beware that
uninstalling netLD will remove all data as well, be sure to perform a system backup before
uninstalling.
To uninstall netLD, run the following command as root:
yum remove netld
Open the browser and access https://localhost/. If your installation is successful and the
server starts without error, it would show the uncertified SSL warnings, described in the next
section.

Copyrights ⃝C LogicVein.inc All rights reserved.
15
If you run into trouble:
If you are using virtualization software such as VirtualBox or VMware and run netLD in a
guest OS, pay special attention on how the network device on the guest OS is emulated. If
you are using any of the above and are having troubles running netLD, themethod below
may work for you:
• First of all, take a memo of your local IP address, for example 192.168.0.78.
• On a browser, try accessing the IP address (192.168.0.78) instead of localhost.
• If this does not work, see the log file.
– The log file is located in /usr/share/netld/, which is also the installation path.
– Below the directory, you will see netLD.log (via ls /usr/share/netld/.)
– Look into the log file and see the warning messages (via less netLD.log).
If you find java.net.UnknownHostException XXXX: XXXX: name or
service unknown or similar error messages, this is an system-dependent
problem.
∗ In this case, you have to resolve the name XXXX via /etc/hosts file or via
DNS.
∗ Let XXXX be centos-virtual for example. This is usually the hostname of
your machine (available via hostname command on the terminal).
∗ Add the following line to the /etc/hosts:
<real host IP address> centos-virtual
If the above example does not solve the problem, or if you have other setup issues, please
contact [email protected] with the above log file attached. Our professional support
team is ready to assist.

Copyrights ⃝C LogicVein.inc All rights reserved.
15
Notes

15
1.3 Accessing the netLD Instance After installation, the netLD server is automatically running in the background and you can
access its GUI. To do so, open a web browser and enter https://localhost/ in the address bar,
then hit Enter. If you are running netLD on a different machine than that you are trying to
access it on, then replace localhost with the machine’s IP address. The program is running as
a standard HTTP server and the default access port is 80, but this can be modified later.
If you are running a modern browser, the browser complains that you are trying to access
an insecure website. However, clearly this website is your own local web server, you do not
have to worry that it could be a malicious website.
The browser in this example is Mozilla Firefox. Click on Add exception. A similar
interface is provided in Microsoft Internet Explorer and Google Chrome. On IE, select
”Continue to this website (not recommended)”. On Chrome, select Proceed anyway.
This security certificate messages can be safely ignored in this case and does not affect
the behavior of the program. They are displayed because your browser is not aware of the
SSL credentials used by netLD. You can safely disable this dialog by adding the SSL
certification of your server to the browser. The instructions to add the credential is given later
in the manual, Sec. 5.4.1.

16 CHAPTER 1. TUTORIAL
Copyrights ⃝C LogicVein.inc All rights reserved.
1.4 Login
Voila! Now the netLD login screen should be displayed. For security reasons, whenever
you log in to netLD, you must provide a username and password. The username and
password for the initial login are shown below.
Username: admin
Password: password
Figure 1.4.1: The login screen
Figure 1.4.2: Enter the default passwords.2
†
If you are using the free trial version, the evaluation license expires in 30 days after the
first login. Similarly, if you have authenticated the license via a license file, it expires in 30
days after the date issued. In order to upgrade from the free version to the full version, you
have to add a permanent license file (Sec. 5.4.2).
2 IMPORTANT — please change the admin password later for more security. When you cannot change
the password immediately, disconnect the machine from the network at least. (However, it still allows
attackers to sneak into the system using viruses sent via devises such as USB flash drives.)
The instruction to change your password is further explained later in the manual, Sec. 3.2, but we also
describe it briefly here: after the login, click on the ”Settings” in the upper right corner of the screen, go to
”Users” section, double-click on the user ”admin” and then modify its password.
17 CHAPTER 1. TUTORIAL
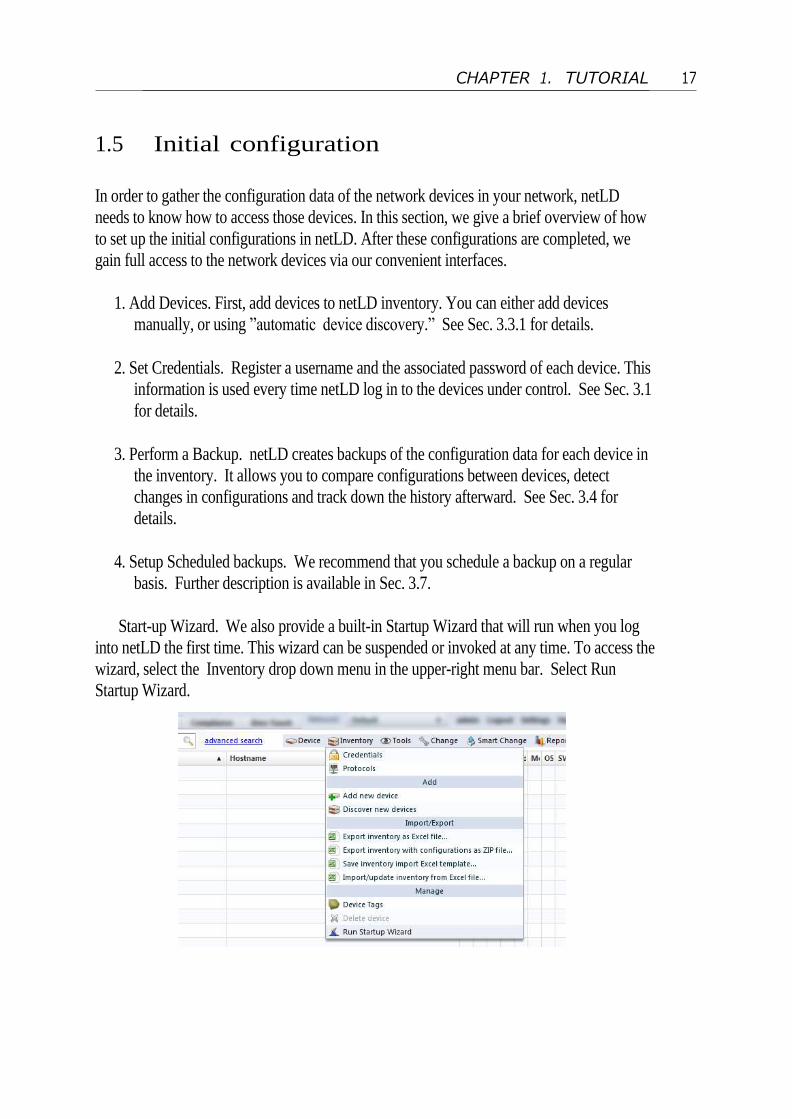
1.5 Initial configuration
In order to gather the configuration data of the network devices in your network, netLD
needs to know how to access those devices. In this section, we give a brief overview of how
to set up the initial configurations in netLD. After these configurations are completed, we
gain full access to the network devices via our convenient interfaces.
1. Add Devices. First, add devices to netLD inventory. You can either add devices
manually, or using ”automatic device discovery.” See Sec. 3.3.1 for details.
2. Set Credentials. Register a username and the associated password of each device. This
information is used every time netLD log in to the devices under control. See Sec. 3.1
for details.
3. Perform a Backup. netLD creates backups of the configuration data for each device in
the inventory. It allows you to compare configurations between devices, detect
changes in configurations and track down the history afterward. See Sec. 3.4 for
details.
4. Setup Scheduled backups. We recommend that you schedule a backup on a regular
basis. Further description is available in Sec. 3.7.
Start-up Wizard. We also provide a built-in Startup Wizard that will run when you log
into netLD the first time. This wizard can be suspended or invoked at any time. To access the
wizard, select the Inventory drop down menu in the upper-right menu bar. Select Run
Startup Wizard.

18 CHAPTER 1. TUTORIAL
1.5.1 Adding the Devices
You can add devices to the inventory either manually or automatically. First, we will
describe the automatic method. Open up Startup Wizard. You will see two input areas, IP
Address/CIDR and Community String. IP Address and CIDR specify the target range of the
IP Addresses with a subnet mask. Community String is the information netLD uses in the
SNMP communication during the automatic discovery. For most devices, the (read-only)
community string is public by default.
Example of Menu Items
IP Address/CIDR 192.168.0.1/24
Community String public
Once you have entered the required information, click the Discover button. A new table
shows up and tells you about the progress. The leftmost icons are supposed to show or
which indicates some information is missing. However, this is to be expected because we
have not yet entered the credential information. Credential information is described in the
next section.
Figure 1.5.1: Results after adding a device. Icons indicate the status of the device e.g. in this
figure, indicates successful addition.
The discovery can be run later (described in Sec. 3.3.1.) If you already have a CSV
spreadsheet containing the list of device IP addresses, Import from Excel option might be
useful. The specification of the spreadsheet columns is available in Sec. 3.3.6.

19 CHAPTER 1. TUTORIAL
1.5.2 Setting the Credentials
After the devices are added, you have to specify the login credentials for the devices in
order to allow netLD to freely login to the devices. In Startup Wizard, you can click on the
large Credentials icon to do this3
First, enter an arbitrary name for the network group. This can be modified later. In this
example, we used ”LogicVein”.
Next, choose the IP address by range (Dynamic) or by entering the IP address directly or,
from the spreadsheet (Static). In most cases, the Dynamic method is preferred for new users.
3 Clicking on the above icons will change the current tab in Startup Wizard, allowing you to go back
and forth at any time in this Startup Wizard. For instance, clicking back to Add Devices section to run
the discovery again. If the devices are not detected correctly, then you can repeatedly add the credential
information and retry the discovery. Similarly, you can add the credential information, try the backup,
discover more devices, and add the credential information . . . (looping). These cycles iteratively
improve the information accuracy and the completeness in the database. Note that during discovery and
backup, the device configurations are not modified and it is safe to run these operations repeatedly.

20 CHAPTER 1. TUTORIAL
Copyrights ⃝C LogicVein.inc All rights reserved.
Enter the login information for each device, or group of devices.
In VTY Username and VTY password area, enter the CUI login username and the password used during the SSH (or telnet) connection. If the devices have both the secret password and enable password, enter the secret password. If only the enable password is available on the device, enter the enable password. You can add multiple Network Groups. Also, you can register multiple Credentials and IP ranges per group. The concepts like Network Groups and †4 Credentials are described in detail in the later chapter Sec. 2.
4 The Credential feature is available outside of Startup Wizard just as Adding devices is. You can
change the value in Inventory → Credentials. Further description is available in Sec. 3.1.

24
Copyrights ⃝C LogicVein.inc All rights reserved.
CHAPTER 1. TUTORIAL
1.5.3 Performing a Backup
Once the devices are added to the inventory (or your discovery has completed),
perform the first backup by clicking on the Run Backup button.
The backup status of each device is indicated with an icon. Successful backups show a green
icon, Credential errors shows a yellow icon, Failures shows a red icon and so on. Details
are described in Sec. 2.2.
You may fail to get the complete backup of all devices in the first attempt due to incorrect
configurations on your network devices. This is a good example, showing that managing the
devices is difficult and requires considerable efforts. Now that you have netLD, you no longer have
to worry about this issue!
In order to increase the number of devices successfully backed up, quickly review the following
conditions on each device where the backup has failed.
• Go back to the previous section and check if the registered credentials (Username, Password,
Community, etc.) are consistent with the information on each device.
• Back to the previous section and check if no network groups are using the same range of IP
addresses.
• Required protocols (e.g., telnet, ssh, etc.) are already enabled on the device.
In order to do this, you have to manually log in to each device via CUI and change the
configurations. The required protocols are listed in Sec. 7.1.
• Certain ports for those communications are not blocked neither by any firewall(s) nor by any
antivirus software. The list of TCP/UDP ports used by netLD is available in Sec. 7.1.
• Check if your devices are supported. The available device adapter list is in Sec. 7.7.

25
Copyrights ⃝C LogicVein.inc All rights reserved.
CHAPTER 1. TUTORIAL
If the program is still not able to perform a backup even though the above conditions
have been met, please get the log file through the following steps and send it to our support office
1. Take a memo on the devices whose backup fails.
2. Click on the Close button in the bottom-right of the Startup Wizard dialog.
3. Find the Help section in the menu bar located in the upper right corner of the screen.
4. Navigate through Help → About → Adapter Logging.
5. Enter the IP addresses of the devices in IP/CIDR field. Check on Enable recording of adapter
operations and click on the OK button.
6. Perform a backup for those devices.
7. The log file is exported to C:ˇProgram FilesˇNet LineDancerˇscratch
ˇlogs (on Windows Server).
8. If you have setup the SMTP server setting, you can:
(a) Select Help menu located in the upper right corner of the screen and select About
option.
(b) Click on the Send Log and enter your e-mail address in Your E-Mail field, and
click on the OK button.
In order to setup the SMTP server, see Sec. 5.2.3. Otherwise, you can simply send an
email to [email protected] with the log file.
26
Copyrights ⃝C LogicVein.inc All rights reserved.
CHAPTER 1. TUTORIAL
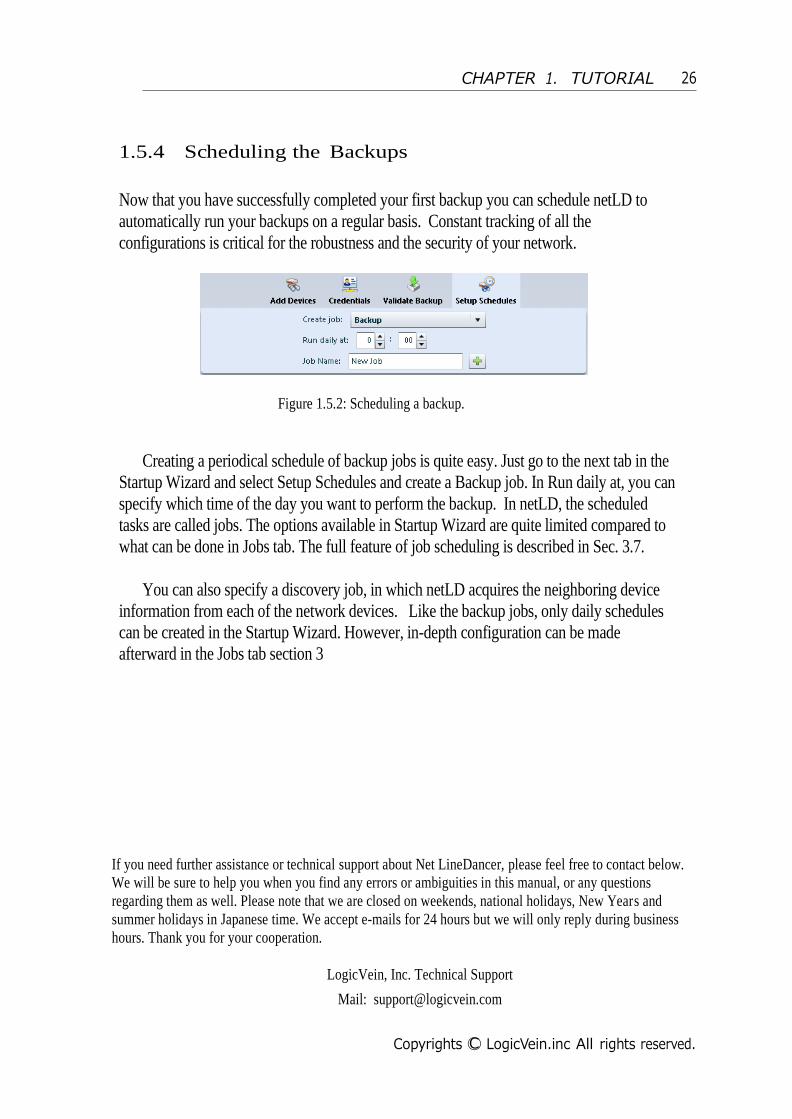
1.5.4 Scheduling the Backups
Now that you have successfully completed your first backup you can schedule netLD to
automatically run your backups on a regular basis. Constant tracking of all the
configurations is critical for the robustness and the security of your network.
Figure 1.5.2: Scheduling a backup.
Creating a periodical schedule of backup jobs is quite easy. Just go to the next tab in the
Startup Wizard and select Setup Schedules and create a Backup job. In Run daily at, you can
specify which time of the day you want to perform the backup. In netLD, the scheduled
tasks are called jobs. The options available in Startup Wizard are quite limited compared to
what can be done in Jobs tab. The full feature of job scheduling is described in Sec. 3.7.
You can also specify a discovery job, in which netLD acquires the neighboring device
information from each of the network devices. Like the backup jobs, only daily schedules
can be created in the Startup Wizard. However, in-depth configuration can be made
afterward in the Jobs tab section 3
If you need further assistance or technical support about Net LineDancer, please feel free to contact below.
We will be sure to help you when you find any errors or ambiguities in this manual, or any questions
regarding them as well. Please note that we are closed on weekends, national holidays, New Years and
summer holidays in Japanese time. We accept e-mails for 24 hours but we will only reply during business
hours. Thank you for your cooperation.
LogicVein, Inc. Technical Support
Mail: [email protected]

Chapter 2
netLD Basics
In this chapter, we define several basic concepts that are used throughout the manual. From
terms of the UI elements to the concepts that generalize the differences between the elements.
Descriptions in this manual depend on the definitions in this section, but since most of them
follow standard conventions, knowledgeable users can safely ignore this section, partly or
completely.
2.1 Basic controls and UI elements In this section, we define the names of the various UI elements in brief.
2.1.1 Panes
Panes are the divided sections within the netLD GUI. Fig. 2.1.1 shows an example of the
common netLD web-based GUI.
The most frequently used panes are the main pane and the status pane. When both panes are
open, you can hide either pane by clicking the up or down arrows located between the two panes.
Both panes contain multiple tabs.
Please keep in mind that each pane is independent. Therefore, you can keep the lower status pane
visible while you switch the main pane to another tab. This allows better multitasking, e.g.,
selecting devices from the main to be added to a job viewed in the lower pane. This action is
further described in the Creating a New Job section (Sec. 3.7.1).
25

2.1.2 Menu and Submenu
Fig. 2.1.1 shows the global menu and the tools menu. The tools menu is a menu in the Devices
Tab, highlighted in light blue. The global menu is highlighted in brown. From the global menu,
you are able to access the server settings by clicking the Settings button.
Figure 2.1.1: A screen capture of netLD Main UI.
Fig. 2.1.2 shows how a menu is composed. If you click on an item within a menu then a sub-
menu will open. The sub-menu may contain several sections divided by separators.
In this manual, we indicate a menu item A in submenu B by using A → B. We use the similar
notation if the element is located in section C e.g. A → B → C.
Figure 2.1.2: Menu items.

2.1. BASIC CONTROLS AND UI ELEMENTS 28
Copyrights ⃝C LogicVein.inc All rights reserved.
2.1.3 Subtabs and Subpane
In the previous figure Fig. 2.1.1, notice that the lower pane is divided vertically. In Fig. 2.1.3, this
is called a subpane. Additionally one of the subpanes in the right has its own tabs; we refer to
them as ”tabs” or sometimes” subtabs”.
Figure 2.1.3: Subtabs and Subpanes
2.1.4 Window
Windows are UI elements pop up individually within the browser. Small windows are also
called dialogs. The most common window that appears in this manual is the Server Settings
window, shown in Fig. 2.1.4. It is often referred to as the settings window.
Figure 2.1.4: Server Settings window. This window has various menus on the left side
and the settings can be modified on the right. The changes made in this window is
immediately applied when you click on the ”OK” button to close the window. If you click
on the ”cancel” button, then it discards the changes and closes the window.

2.2. DEVICES, CONFIGURATIONS AND BACKUPS 30
Copyrights ⃝C LogicVein.inc All rights reserved.
2.2 Devices, Configurations and Backups
Next, we describe the interfaces for configuring the devices. Fig. 2.2.1 shows the Devices Tab,
the primary tab for handling and viewing the devices. If you double-click on one or more rows,
then the status pane below will show the Device Properties (Sec. 3.4.4) and the backup history.
Figure 2.2.1: Device View.
Backup Status Icons - The status icons change upon the device backup or when a
compliance error is signaled. It is highlighted in pink in the figure.
Device View - All devices in the inventory are listed here. As stated above, you can check
the configurations stored/backed up in the server by double- clicking on each device. It is
highlighted in green.
Intuitively, each element in the Device View corresponds to one network device such as a
CISCO switch or router. The amount of information in the table varies among the device
vendor. For example, netLD does not show the serial number for Apresia devices.
Within Device View, you can click on the device to select it. Just as in the common file
manager software, you can select multiple devices by pressing Shift key or Control key to
select multiple devices. When you press Shift, the range of rows between your sections are
highlighted. When you use the Control key, the clicked row is added into the selection. This is
useful when you apply a single operation on many devices, and most table-like views in netLD
provide the same feature.
2.2. DEVICES, CONFIGURATIONS AND BACKUPS 31
Copyrights ⃝C LogicVein.inc All rights reserved.
If you have completed the tutorial and successfully run the backup, the Backup Status should
contain some icons . There are several other icons and their details described in section
(Sec. 3.4).
Successful backup
Credential error
Backup Failure
Devices can be added, modified, deleted, backed-up, tagged and searched for. Each feature can be
accessed from the following menu. The details are described in Sec. 3.3.
Adding the devices Inventory → Add.
Editing the properties of the selected devices Device → Edit device properties. You can manually modify the
IP address, hostname and the device type and vendors.
Delete the selected devices Inventory → Manage → Delete device.
Back up Device → Backup.
Search the inventory for devices Via the Search bar. It provides a useful incremental-search
interface.
Manipulate Tags on the selected devices Device → Associate/Dissociate tags, Inventory →
Manage → Device Tags. The Tag information can be used during the search.
2.2.1 Adapters An ‘Adapter’ means the model and the OS of a device. netLD has a module for each adapter type
and uses it to manipulate the device which belongs to that adapter. For example, many Cisco IOS
based devices (like CISCO2500) have a Cisco IOS adapter. Generally speaking, the devices of the
same adapter can be manipulated in the same command sequence.
netLD has several adapters and we are developing even more adapters for a more broad range of
support. The complete adapter list can be found in Sec. 7.7

2.2. DEVICES, CONFIGURATIONS AND BACKUPS 32
2.3 Credentials, Network Groups, Protocols
A Credential is the login/security (username/password) information of each device. You have
to specify login credential information within netLD in order to let it access a device.
Information can be added in the Credentials window, accessible via Inventory → Credentials.
Figure 2.3.1: Credentials w i n d o w .
In Credentials window, it is recommended you enter all the information needed to access the
devices (username, password, SNMP community, etc.). If there is any lack of credential
information, it may lead to login failure and associated operations may fail, e.g. reading and
writing information, backup or compare would not be successful. Credentials contains the
following information:

2.3. CREDENTIALS, NETWORK GROUPS, PROTOCOLS 32
Copyrights ⃝C LogicVein.inc All rights reserved.
Entry Description
VTY Username/password The username/password required by the login shell on each
network device. The login shell can be one of ssh and/or rlogin
remote terminal. Note that VTY stands for virtual tty console.
Enable Username
Enable Secret/Password
Administrative Username that is required when you modify the
configuration.
One of the two kinds of passwords for CISCO
devices
SNMP Get Community
SNMPv3 Authentication Username
SNMPv3 Authentication Password
SNMPv3 Privacy Password
These correspond to each field in the SNMP data- gram.
The name of Get Community in SNMP.
The name of Authorization Community defined in SNMPv3. The community’s login password defined in SNMPv3. The password used for the encryption during the connection.
2.3.1 Network Group
A set of credentials forms a Network Group. A network group can be defined by the
list of IP Address Ranges. Each network group may contain many credential sets.
When netLD attempts to log in to a device, it looks up the network group via the
corresponding IP address specified – if there is a match then netLD uses those
credentials. If more than one credential set is defined in a network group, netLD tries
each credential in the list, from top to bottom, to attempt to access the device.
Note that the IP ranges should be pairwise disjoint among network groups, or the
incorrect credential might be applied to the devices. This will lead to the backup
failure. In the initial configuration, there is only network group, Default.

2.3. CREDENTIALS, NETWORK GROUPS, PROTOCOLS 33
2.3.2 Protocols
Protocols specify the measure/standards used to connect the devices. Just like credentials,
protocols used by netLD can be customized in Inventory → Protocols.
For each protocol, you can define several network groups defined by an IP range, just like in
Credentials. Please note that network groups for credentials and for protocols are not
associated by its name. They are named independently and no relevance is detected.
In each network group, you can specify a list of protocols to be used for the given IP range.
The list is tried, upon connection, from top to bottom.
Initially, only the Default network group exists, and it is used by default.
Figure 2.3.2: Protocols window.
In each input field,
• Check the checkbox if the protocol could be used during a backup and other operations. In
the Default network group, all protocols are checked by default.
• Up/down arrow buttons move the order in the list and change the priority of the protocol.
netLD tries to use the protocol of the top priority. If it fails, then it tries to connect with the
protocol of the next priority.
• To add a new protocol specification, click on the and enter a name of the group.
• Enter the IP address ranges in Add address (IP, CIDR, Wildcard or Range)
field. Click on the to add it to the list on the left.

2.4. USERS AND ROLES 34
Copyrights ⃝C LogicVein.inc All rights reserved.
2.4 Users and Roles
Roles manage the user permissions in general. Each role defines a set of permissions such as
read/write permissions on devices. Each user belongs to exactly one such role, and the role
effectively controls the user’s access to those networks and operations. The complete list of
configurable permissions can be found in Sec. 7.3, p.232.
User experience Role(s)
0 yr backup only
2 yrs backup & schedule in Network A
5 yrs backup,schedule,modify in Networks A,B
15 yrs all features Configuration on the users and the roles can be done primarily in the settings window.
Figure 2.4.1: Roles section in Settings window.
In the factory configuration, only the Administrator role is available and there is only one user
named ”admin”, with the password set to ”password.” For the increased security, users are
highly recommended to change this password. Also, when more than one user will be using
netLD, it is recommended that additional roles be created based on their level of experience.

2.4. USERS AND ROLES 35
2.5 Networks
Networks in netLD are a way to partition and better manage your device inventory. Each
network has its own inventory, credentials and protocols. Users can create networks and
switch between networks as long as they have the permission to access these networks.
Networks are often closely tied to the Smart Bridge (SB) feature. Using SB, remote local
networks with independent IP space can also be represented as a network. Take an office
building for example, if every floor was a different LAN, you could create separate networks
for each floor to manage the whole building.
You can assign access permissions to each user, i.e. you can control which sets of network
devices they can read and write to and within what network(s). This is available in the Users
section in the Settings window. Details about Networks and Smart Bridge is described in
more detail in Sec. 4.3.
2.6 Service Management
netLD consists of two parts: the server program running in the background and the web-
based GUI. In order to access the GUI, you first have to launch the server program.
The netLD service starts automatically just after the installation. It is also launched
automatically after a system reboot. You can start or stop the service manually either by
clicking on the netLD icon in Windows’ Task Bar or via Service Manager.
netLD service must be restarted in the following cases;
• When IP address of the netLD server is changed manually
• When new device adapters are added manually
• When backed up files are restored manually
• When the license file is renewed manually
• When netLD upgrades
On Linux systems, NetLD daemon (Linux counterpart of windows’ service) can be
started/stopped via service start netld and service stop netld. For details, see the man
page of service by entering man service on console.

2.6. SERVICE MANAGEMENT 36
Copyrights ⃝C LogicVein.inc All rights reserved.
Figure 2.4.2: Users section in Settings window.
Figure 2.5.1: Network section in settings window.

2.6. SERVICE MANAGEMENT 37
Figure 2.6.1: Background Service and GUI concept.
Figure 2.6.2: This is the Task Bar Icon of netLD.
Figure 2.6.3: Right-click on the icon and the menu appears, then
start/stop the service.

2.6. SERVICE MANAGEMENT 38
Copyrights ⃝C LogicVein.inc All rights reserved.
Figure 2.6.4: netLD service can also be managed in Windows Service Manager. Select
the Services option from the Configuration menu and select Net LineDancer from Name
list. After the action list (Stop the service, Restart the service) is displayed for the selected
service, select the action to perform.

Chapter 3
Basic Tools
In this chapter, we go over our basic tool set and their functionality.
Contents
3.1 Credentials . . . . . . . . . . . . . . . . . . . . . . . . . . 42
3.1.1 Dynamic Setting Strategy . . . . . . . . . . . . . . . . . 43
3.1.2 Static Setting Strategy . . . . . . . . . . . . . . . . . . . 46
3.1.3 Import from an Excel spreadsheet . . . . . . . . . . . . 48
3.2 Users and Roles . . . . . . . . . . . . . . . . . . . . . . . 50
3.2.1 Creating a Role . . . . . . . . . . . . . . . . . . . . . . . 50
3.2.2 Creating a User . . . . . . . . . . . . . . . . . . . . . . . 51
3.2.3 Quick Password Change . . . . . . . . . . . . . . . . . . 53
3.3 Tools for Devices . . . . . . . . . . . . . . . . . . . . . . . 54
3.3.1 Adding Devices . . . . . . . . . . . . . . . . . . . . . . . 54
3.3.2 Discover New Devices . . . . . . . . . . . . . . . . . . . 56
3.3.3 Adding Devices Manually . . . . . . . . . . . . . . . . . 58
3.3.4 Editing and Deleting the Devices . . . . . . . . . . . . . 60
3.3.5 Searching Devices . . . . . . . . . . . . . . . . . . . . . 60
3.3.6 Exporting and Importing the Inventory . . . . . . . . . 62
3.4 Configuration and Backup . . . . . . . . . . . . . . . . . 64
3.4.1 Status Summary . . . . . . . . . . . . . . . . . . . . . . 65
3.4.2 Status after Performing Backup . . . . . . . . . . . . . . 66
3.4.3 Restoring the Configuration . . . . . . . . . . . . . . . . 67
3.4.4 Device Property . . . . . . . . . . . . . . . . . . . . . . 67
3.4.5 Comparing the configurations . . . . . . . . . . . . . . . 71
3.4.6 Checking the Mismatch in startup-config and running- config . . . . . . . . . . . . . . . . . . . . . . . . . . . . 73
39

40 40 CHAPTER 3. BASIC TOOLS
Copyrights ⃝C LogicVein.inc All rights reserved.
3.5 Tools Menu . . . . . . . . . . . . . . . . . . . . . . . . . . 74
3.5.1 DNS Lookup . . . . . . . . . . . . . . . . . . . . . . . . 74
3.5.2 IOS Show Commands . . . . . . . . . . . . . . . . . . . 75
3.5.3 IP Routing Table . . . . . . . . . . . . . . . . . . . . . . 76
3.5.4 Ping . . . . . . . . . . . . . . . . . . . . . . . . . . . . . 76
3.5.5 SNMP System Info. . . . . . . . . . . . . . . . . . . . . 77
3.5.6 Interface Brief . . . . . . . . . . . . . . . . . . . . . . . 77
3.5.7 Traceroute . . . . . . . . . . . . . . . . . . . . . . . . . 78
3.5.8 Port Scan . . . . . . . . . . . . . . . . . . . . . . . . . . 78
3.5.9 Live ARP Table . . . . . . . . . . . . . . . . . . . . . . 79
3.6 Change Menu . . . . . . . . . . . . . . . . . . . . . . . . . 79
3.6.1 Command Runner . . . . . . . . . . . . . . . . . . . . . 80
3.6.2 Enable or Disable Interfaces . . . . . . . . . . . . . . . . 81
3.6.3 Login Banner (MOTD) . . . . . . . . . . . . . . . . . . 81
3.6.4 Name Servers Manager . . . . . . . . . . . . . . . . . . 82
3.6.5 NTP Servers . . . . . . . . . . . . . . . . . . . . . . . . 82
3.6.6 Port VLAN Assignment . . . . . . . . . . . . . . . . . . 83
3.6.7 SNMP Community String . . . . . . . . . . . . . . . . . 84
3.6.8 SNMP Trap Hosts . . . . . . . . . . . . . . . . . . . . . 84
3.6.9 Syslog Hosts . . . . . . . . . . . . . . . . . . . . . . . . 85
3.6.10 IOS Software Distribution . . . . . . . . . . . . . . . . . 85
3.6.11 Manage OS Images . . . . . . . . . . . . . . . . . . . . . 85
3.6.12 NEC WA Software Distribution . . . . . . . . . . . . . . 87
3.6.13 Retrieve OS Image Files . . . . . . . . . . . . . . . . . . 87
3.6.14 Add Static Route . . . . . . . . . . . . . . . . . . . . . . 89
3.6.15 Delete Static Route . . . . . . . . . . . . . . . . . . . . 89
3.6.16 Users . . . . . . . . . . . . . . . . . . . . . . . . . . . . 90
3.7 Job Management . . . . . . . . . . . . . . . . . . . . . . . 92
3.7.1 Creating a New Job . . . . . . . . . . . . . . . . . . . . 93
3.7.2 Status Indicators in Job History Subtab . . . . . . . . . 99
3.8 Report . . . . . . . . . . . . . . . . . . . . . . . . . . . . . 100
3.8.1 Issuing a Report Manually . . . . . . . . . . . . . . . . 105
3.8.2 Scheduling the Reports . . . . . . . . . . . . . . . . . . 106
3.9 Smart Change . . . . . . . . . . . . . . . . . . . . . . . . 108
3.9.1 Creating a Smart Change Job . . . . . . . . . . . . . . . 109
3.10 Compliance . . . . . . . . . . . . . . . . . . . . . . . . . . 116
3.10.1 Various Rule-related tabs . . . . . . . . . . . . . . . . . 117

41 41 CHAPTER 3. BASIC TOOLS
3.10.2 Creating a New Rule . . . . . . . . . . . . . . . . .
.
.
. 121
3.10.3 Policy tab . . . . . . . . . . . . . . . . . . . . . . . . . . 125
3.11 Draft Configuration . . . . . . . . . . . . . . . . . . . . . 131
3.11.1 Creating a Draft Configuration . . . . . . . . . . . . . . 131
3.11.2 Importing Configurations from Plain Texts . . . . . . . 132
3.11.3 Comparing the Configurations . . . . . . . . . . . . . . 134
3.11.4 Applying a Draft Configuration to a Device . . . . . . . 134
3.12 Change Advisor . . . . . . . . . . . . . . . . . . . . . . . 135
3.12.1 Executing Commands through Change Advisor . . . . . 136
3.13 Search Tab . . . . . . . . . . . . . . . . . . . . . . . . . . 137
3.13.1 Switch Port Search . . . . . . . . . . . . . . . . . . . . . 137
3.13.2 ARP Search . . . . . . . . . . . . . . . . . . . . . . . . . 137

42 CHAPTER 3. BASIC TOOLS
Copyrights ⃝C LogicVein.inc All rights reserved.
3.1 Credentials
In this section, we show the process of adding credentials, or importing those credentials
via an excel spreadsheet. Let’s start with the brief overview on how you should set up
credentials and network groups.
If the number of credential information is limited, then a single Network Group might be
enough for you. In this case, the same credential set is applied to all devices in the
inventory. Just enter the required information to access the devices in the Credentials
window.
However, in some cases, the number of credentials gets quite large and it might be
practically impossible to manage them. In this case, you might have to divide the
credentials into several network groups.
Starting from the version 11.04, netLD provides two ways to add credential sets, called
the Dynamic setting strategy and the Static setting strategy. In Dynamic setting strategy,
you assign a range of IPs and a set of credentials of each network group. In Static setting
strategy, you specify the credentials for the devices one by one. Registering credential
information can be done by hand or by reading a Microsoft Excel spreadsheet. We also
generate an empty static credentials Excel template for convenience.

43 CHAPTER 3. BASIC TOOLS
3.1.1 Dynamic Setting Strategy
Here we show how to set up a network group in Dynamic setting strategy. First open Tools Menu → Inventory → Credentials.
Click on the in the lower left, or click on the button in the center. This empty screen
is shown only at the first visit.
Enter a new name of the network group. Select Dynamic - Credentials by CIDR, Range, Wildcard and click on the OK button to create a network group.

3.1. CREDENTIALS 44 44 CHAPTER 3. BASIC TOOLS
Copyrights ⃝C LogicVein.inc All rights reserved.
Enter the range of IP addresses specifying the devices in Add address IP, CIDR, Wildcard, or Range field. Click on the on the right. The address will be added into the table on the left.
Example
Single IP Address 10.0.0.1
2001:0DB8:AC10::
Range of IP Addresses 192.168.0.*
10.0.0.1-10.0.0.100
192.168.0.1/24
2001:0DB8:AC10::/64

3.1. CREDENTIALS 45 45 CHAPTER 3. BASIC TOOLS
After you entered a proper IP range, register the credential information. You can set upto three credentials for one network group. Click on the just under the Credentials field and enter a name of the new credential set.
1 †
Repeat these steps until all groups and credentials are added to the list. Click †2
on the OK button to finish.
1 If more than two credential sets are available for a group, netLD tries each set on the list in turn and uses the first valid credential.
2 Make sure that any groups do not share the same range of IP addresses. Otherwise, netLD might fail to save the backup of the devices.

3.1. CREDENTIALS 46 46 CHAPTER 3. BASIC TOOLS
Copyrights ⃝C LogicVein.inc All rights reserved.
3.1.2 Static Setting Strategy
Next, we show how to use Static setting strategy.
In the Static setting strategy, you should run the process by hand. Click on the in the lower left.
Enter a new name of the network group. Select Static - Credentials by specific IP address. Click on the OK button to specify the credential set for the group.

3.1. CREDENTIALS 47 47 CHAPTER 3. BASIC TOOLS
Click on the in the upper right corner of the screen to add a device credential.
Enter the required credential information of the device and click on the OK button.

3.1. CREDENTIALS 48 48 CHAPTER 3. BASIC TOOLS
Copyrights ⃝C LogicVein.inc All rights reserved.
Repeat these steps until all groups and credentials are added to the list. Click on the OK button to finish.
3.1.3 Import from an Excel spreadsheet
In the Static strategy, you can also import the credentials from a spreadsheet, instead of setting them manually. During the Static setting strategy described in the previous section, follow the instruction below:
Click on the and then select Save empty static credentials Excel Template.

3.1. CREDENTIALS 49 49 CHAPTER 3. BASIC TOOLS
Open the exported spreadsheet and enter the device IPs and the corresponding credential information accordingly. Once you have finished, save and close the file and get back to the netLD screen.
Click on the and select Import static credentials from Excel. . . to import the data from the spreadsheet you edited above. In the file selection dialog, choose the edited one and click on the OK button.
Importing data from the external resources may overwrite the existing cre- dential with the same IP. Ensure there is no unacceptable conflict in IP address between the existing data and the newly imported ones.

3.2. USERS AND ROLES 50 50 CHAPTER 3. BASIC TOOLS
Copyrights ⃝C LogicVein.inc All rights reserved.
3.2 Users and Roles
Description on Users and Roles is described in Sec. 2.4, p.34. Briefly speaking, each Role defines a set of available operations and a User has exactly one such role. The list of operations to be restricted, such as reading and writing the configuration (and more), are shown in Sec. 7.3.
In this section, we rather focus on the screen-by-screen instructions.
3.2.1 Creating a Role
Creating a Role is quite simple.
First, go to Setting window → Roles. Enter the name of the Role into the text area and click on .

3.2. USERS AND ROLES 51 51 CHAPTER 3. BASIC TOOLS
Select the permission of the role by toggling the checkbox. If the toggle is on, the permission to run the operation is granted to the user. Meaning of each checkbox is available at Sec. 7.3, p.232.
3.2.2 Creating a User
Creating a Role is also simple.
Go to Setting window → Users Again. Click on the below.

3.2. USERS AND ROLES 52 52 CHAPTER 3. BASIC TOOLS
Copyrights ⃝C LogicVein.inc All rights reserved.
There are various fields to be customized.
Menu Items Description
Username Enter the login username for the user.
Full Name Enter the full name of the user.
Email Address Enter the user’s E-mail address.
Role Select a role for the user from the dropdown list.
Password Enter a login password of the user.Confirm Pass- word Retype the password to confirm.
In Networks submenu, you can restrict the user’s network access. Toggle the available networks
for the user in this section. The user gains the permission to access the networks whose checkboxes are on.

3.2. USERS AND ROLES 53 53 CHAPTER 3. BASIC TOOLS
Similarly, when you restrict the user’s access to the custom fields, select Custom Fields and toggle the available custom fields. The user gain the permission to see the selected custom fields.
Click on the OK button to save the user.
3.2.3 Quick Password Change
There is a shorthand method to change the password if you are currently logged in as a user (only your own password can be modified.)3
Click on your own login username in the global menu. In the example below, ”admin” is the username, shown on the left of ”Logout”.
3 This feature is not available for users who logged in via RADIUS server authentication.

3.3. TOOLS FOR DEVICES 54 54 CHAPTER 3. BASIC TOOLS
Copyrights ⃝C LogicVein.inc All rights reserved.
Enter the new password in both New Password and Confirm fields. Then click on Change Password button to save the new password.
3.3 Tools for Devices
3.3.1 Adding Devices
Devices can be added, modified, deleted, backed-up, tagged and searched for, but the most important feature among these is adding the devices. Just as you have done in the tutorial, there are two ways to add devices to netLD inventory:
• The Automatic Discovery feature
• Adding devices manually
In order to discover the devices automatically, you have to configure both netLD and the device itself. If you encounter any trouble, first check Fig. 3.3.1.
Both menus for adding the devices are placed under Inventory → Add section in the Tools Menu. Add new device is for the manual process and Discover new devices is for the automated discovery.

3.3. TOOLS FOR DEVICES 55 55 CHAPTER 3. BASIC TOOLS
Figure 3.3.1: Requirements for Device Discovery.
1. your device is SNMP-compatible, and its SNMP feature is turned on,
2. you have registered all necessary information in the previous section, and
3. you have resolved any port-conflicts between netLD and other firewall/anti- virus software in your network. The port usage is listed in the Data section (Chapter 7)
4. The maximum number of IP addresses discovered is 66,000. We consider this is a sufficient
number because it is clearly a vast IP space for this enterprise- class software. For instance, 10.2.x.x already contains 65,025 addresses.
Figure 3.3.2: Inventory → Add

3.3. TOOLS FOR DEVICES 56 56 CHAPTER 3. BASIC TOOLS
Copyrights ⃝C LogicVein.inc All rights reserved.
3.3.2 Discover New Devices
Device Discovery is a wonderful tool as long as your devices follow the conditions described in Fig. 3.3.1.
During the discovery, netLD first asks each device in the given IP address range if they made their
ports open to netLD so that netLD can make a connection. If the answer was positive, it makes the device send an SNMP packet to the netLD host server. The device is then added to the Device View with the SNMP information.
To run the Discovery, open Discover new devices and follow the instruction below:
Specify all IP addresses or ranges to discover. Enter the IP/ranges in corresponding menu
and click on . Added elements are listed in the box located at the bottom of the menu.
Menu Items Example and Description
IP Address/CIDR Enter IP address/CIDR of the network to discover. (e.g.192.168.0.1/24).
IP Address Range Enter 2 IP addresses to specify the address range to discover. (e.g. 10.0.0.1-
10.0.0.100).
Single IP Address Enter an IP address of the single device to discover. (e.g. 192.168.0.1).
You can also import the range data from a text file (CSV). Write the discovering
addresses or networks in each line.

3.3. TOOLS FOR DEVICES 57 57 CHAPTER 3. BASIC TOOLS
Descriptions of the other options follows: Boundary Networks Enter the boundary network addresses to limit the range of discovery.
10.0.0.0/8, 172.16.0.0/16 and 192.168.0.0/16, FD00::/8 are set by default, and if you want to extend the search range, add a new address range in this field.
Crawl the network from the specified addresses Enable this checkbox to re-
cursively crawl and add the neighboring devices to the inventory. Include existing inventory in addresses to crawl Enable this checkbox to en- able
crawling on the neighbors of the devices that already exist in the inven- tory. Additional SNMP Community String Enter a community string to give prior use for
discovery.
Finally, click on the Run button to start discovery, and the devices are added
to the inventory. Discovery status is going to be show up in the status pane. †4
Status Description Device added. The device has been successfully discovered and added to the
device inventory.
There was no SNMP re- sponse.
The device has responded to Telnet, SSH or ping but did not respond to SNMP request.
No adapter matches. The device has responded to SNMP request but netLD does not have the adapter for the device.
Server protocol settings for SNMP for this device are disabled.
SNMP protocol in Inventory→ Protocols settings is disabled for the network group.
There was no ICMP ping response.
The device did not respond to ICMP ping request. (only in Single IP Address discovery)
Unable to establish TCP connection on port 22(Telnet) or 23 (SSH).
netLD failed to connect neither to port 22 nor 23 of the device (only in Single IP Address discovery)
During the discovery, netLD uses SNMP version 1 by default. To change the setting, use
Inventory → Protocols menu and select the proper SNMP option.
4 The discovery result only shows the devices which have responded to the Telnet/SSH/ping. Details for discovery status follows:

3.3. TOOLS FOR DEVICES 58 58 CHAPTER 3. BASIC TOOLS
Copyrights ⃝C LogicVein.inc All rights reserved.
3.3.3 Adding Devices Manually
You can also add the devices manually. Go to Inventory → Add New Device and you can add each device manually.
Menu Items Description
IP Address Specify an IP address of the device to add.
Adapter Select adapter ID from the dropdown list of the device to add.
Alternatively, you can do the same thing by importing a handwritten or the exported spreadsheet. This is described in Sec. 3.3.6.
We also provide a template spreadsheet to fill in the IP addresses etc. This is available in
Inventory → Save inventory import Excel template.
Open the Inventory submenu and save the template.
Open and edit the exported Excel file. When you finish editing the file, import it with the
Import/Update inventory from XLS file. . . menu and confirm all devices are added in inventory list.

3.3. TOOLS FOR DEVICES 59 59 CHAPTER 3. BASIC TOOLS
Figure 3.3.3: Specify the Version via the corresponding pull-down list.
Figure 3.3.4: Enter the IP address and the adapter.

3.3. TOOLS FOR DEVICES 60 60 CHAPTER 3. BASIC TOOLS
Copyrights ⃝C LogicVein.inc All rights reserved.
Parameter Description
IP Address (Required) Specify an IP address of the device to add.
Network (Required) Enter an existing network group to assign the device.
Adapter ID (Required) Enter the device adapter ID of the device.
Custom 1˜5 Optional text for the custom field.
Finally, click on the Inventory → Import/update inventory from Excel file. The same feature can also be accessed from Run Startup Wizard → Import from Excel.
3.3.4 Editing and Deleting the Devices
Although it is not a common practice, when you want to edit the IP Address, Hostname, Adapter ID, Network and Custom Fields of the specific device, click on the row of the device to edit and go to Device → Edit Device properties.
When you delete a set of devices, select the devices and go to Inventory → Delete device.
3.3.5 Searching Devices
In Device View, netLD provides a flexible search and filter function of the devices. There are two modes of the search function, Basic and Advanced Search, where the former is set as the default method. Note that the Filtering is done only within a same network. To change the current Network, select it in the drop down box in the global menu.
Basic Search
You can filter devices by just entering an IP address or a hostname in the search pane. It supports an incremental search feature, so the elements are gradually filtered as you type.
Figure 3.3.5: Simple-search pane. If you click on a label advanced search, the advanced search pane will show up.

3.3. TOOLS FOR DEVICES 61 61 CHAPTER 3. BASIC TOOLS
Advanced Search
Compared to the Basic Search, Advanced Search supports plenty of filters. Turn on the Advanced Search mode via ”advanced search” button in the Device View. The search can be done as you type.
Figure 3.3.6: Advanced Search panes.
Names for each custom field may be different if they were changed in Setting → Server Settings → Custom Device Fields menu.
IP/CIDR Enter an IP address/CIDR (e.g. 10.0.0.1 or 192.168.0.1/24)
Admin IP Enter an IP address. Note that only the devices already added in the Inventory
are subject to the search.
Hostname Enter a hostname (e.g. J2320 or J23*). Status
Select a backup status from the dropdown list. Changed Select the
time that the last backup was done.
Custom 1 to 5 Enter any text. It matches the custom field of each device (e.g. lvi, netLD, net, etc.)
Device with tags Select a device tag name from the list. You can use and/or radio buttons to toggle how queries are combined.
Vendor Select a device vendor name from the dropdown list. Model Enter a model name to filter devices by model name (e.g. J2320, J23*, etc.)
• This optional filter is available when the Vendor filter is used. Version Enter a version number of the devices’ Operation Systems and select an operator from
the dropdown list. (e.g. > 9.2)
• This optional filter is available when the Vendor filter is used.

3.3. TOOLS FOR DEVICES 62 62 CHAPTER 3. BASIC TOOLS
Copyrights ⃝C LogicVein.inc All rights reserved.
Serial# Enter a serial number in this field to filter devices by serial numbers. (e.g. 01621220*)
MAC Enter a MAC address (e.g. 000CCEC6EAE0). Only the full match is available and partial match is not supported right now.
Config Text Config Text search runs a full-text search in the device configura- tions. For
example, if you want to search the configurations that contain ”version” and ”12.1”, enter ”version AND 12.1” in Search field and click on
button. For details about the search query, refer to Query Syntax located in the right of the query field.
3.3.6 Exporting and Importing the Inventory
You can import and export the current Inventory status in a spreadsheet. These operations are available in Inventory→ Import/Export section. The form includes the IP address, the hostname and so on.
Figure 3.3.7: Inventory submenu.

3.3. TOOLS FOR DEVICES 63 63 CHAPTER 3. BASIC TOOLS
Exporting Inventory in a Spreadsheet
Select some of your devices and click on the Export inventory as Excel file entry, then you can save the sheet into a .xls file such as netLD-inventory (2014-03-25).xls. If you export all devices in the inventory, empty the selection and then run the export.
Similarly, you may also export a ZIP archive containing the data if the sheet gets too large. This option is available in Export inventory with configurations as ZIP style file. The output file is named such as ”netLD-configs (date of ex- port).zip”. The files in the archive are organized into subdirectories as follows:
• <filename>.zip
– <network name>
∗ 10.0.0.1 (1812J-B)
∗ 10.0.0.201 (cisco2500b.intra.dar.co.jp)
∗ 10.0.0.203 (cisco2600a.intra.dar.co.jp)
∗ 10.0.0.208 (C2801)
∗ . . .
Importing the Exported File
Also, you can then import(=add) and update(=overwrite) the exported spread- sheets. Click on the Import/update inventory from Excel file entry. It allows you to add a number of devices at once.

3.4. CONFIGURATION AND BACKUP 64 64 CHAPTER 3. BASIC TOOLS
Copyrights ⃝C LogicVein.inc All rights reserved.
3.4 Configuration and Backup
Configuration backup of devices are done via a set of commands corresponding to the model of the device. IOS devices, for example, can be backed up via the following sequence of commands:
copy running-config tftp
copy startup-config tftp
show access-lists
show diag
...
What netLD does is to automates these command-line sequences. Since these commands vary
among the vendors, maintenance of large number of devices by hand is quite inefficient, and there are many reinventions of wheels in each devel- oper’s personal shell scripts.
To take the backups of all the devices in Inventory, simply click on Device → Backup without selecting any device. If you want to backup certain devices only, select the devices prior to clicking the button. Alternatively, you can run the backup via the right-click menu which shows up when you select the devices and right-click the selected entries on the Device View.
Figure 3.4.1: Via the menu button
Once the backup is successfully performed, the information in Device View/Inventory is updated.

3.4. CONFIGURATION AND BACKUP 65 65 CHAPTER 3. BASIC TOOLS
3.4.1 Status Summary
Status icons in status pane show the status of the last backup performed. Each icon means the following:
Status Description Available Action in Status Sum- mery
Successes w/ Changes The backup was successful and more than one change was found in the configuration.
Success w/o Changes The backup was successful but there is no change in the config- uration from the last backup.
Invalid Credentials The icon indicates that the backup was inhibited during the authentication, which means the registered credential set was in- correct. If you click on the row, the error log shows up in the bot- tom. If you double-click on the icon then the Credentials dialog shows up, which is identical to what you find in Inventory →
Credentials, and you can check the current credential informa- tion.
Failures The icon indicates that netLD has failed to backup the config- uration due to the other causes. If you click on the row, the er- ror log shows up in the bottom. See Section 10-4 Status after Per- forming Backup for clearing each error.

3.4. CONFIGURATION AND BACKUP 66 66 CHAPTER 3. BASIC TOOLS
Copyrights ⃝C LogicVein.inc All rights reserved.
3.4.2 Status after Performing Backup
Status icons in the leftmost column in the device list show the backup status. You can see the detail by double-clicking on the icon.
Status Description Reason
Backed Up
Configuration Mismatch
Invalid Credential
Backup Failed
The configuration is backed up success- fully.
The running-config and startup-config were different. (Sec. 3.4.6) The credential set for the device was in- correct. If you double-click on the icon, Backup Error Detail dialog shows up. Review credential settings in Inventory → Credentials menu for the device.
UNAVAILABLE PROTOCOL
UNEXPECTED RESPONSE
DEVICE MEMORY ERROR
Compliance
netLD could not access devices with cer- tain protocols. Review the configuration or check the hardware, and also the Eth- ernet connection. The unintended answers are returned from the device. If you still have any troubles accessing the devices even af- ter checking Credentials and Protocols, please contact to our support. The startup-config is missing on the device.
Compliance Warning
Compliance Error
The configuration contains a violation of compliance, which signaled a severity level Warning. Details are described in the later sections. (see Sec. 3.10) The configuration contains a violation of compliance, which signaled a severity level Error.

3.4. CONFIGURATION AND BACKUP 67 67 CHAPTER 3. BASIC TOOLS
3.4.3 Restoring the Configuration
netLD allows you to restore the past configuration of a device. double-clicking on a device in Inventory shows its backup history in the status pane. Select a configuration to restore and click on Restore the configuration button .
Once you click on the OK button in the confirmation dialog, it starts restoring the
configuration.
At this point, internally, netLD issues copy tftp startup-config command to copy the selected configuration to the device’s startup-config. After reloading the device, restored configuration is applied. See Also: Sec. 2.3.2 †5
3.4.4 Device Property
Details of device hardware information and configuration backup are available by double-clicking on the device row. Information included in device property con- tains information that netLD has collected from the device in the backup and the neighbor information. Latest information can be obtained explicitly, by performing the backup or correcting the neighbor information.
5 Uploading a configuration again relies on the protocol settings. Therefore you must specify the correct protocol
to upload the configuration prior to the restoration. (See Sec. 2.3.2 (Pro- tocols) for details.) For example, you need to enable TFTP in Inventory → Protocols menu for Cisco IOS configuration.
However, if you did not change the protocol from the default settings you do not have to care much about that because all protocols are enabled in the default Protocol settings.

3.4. CONFIGURATION AND BACKUP 68 68 CHAPTER 3. BASIC TOOLS
Copyrights ⃝C LogicVein.inc All rights reserved.
Figure 3.4.2: Via the right click
Figure 3.4.3: Opening a device property in the status pane.

3.4. CONFIGURATION AND BACKUP 69 69 CHAPTER 3. BASIC TOOLS
General Tab
General tab displays the configurations or specifications of the devices. Note that information shown in this tab is based on the last backup netLD performed.
Compliance Tab
Compliance tab shows the violation contents if the device has violation against enabled policy. For more details, please refer to the Compliance section Sec. 3.10, p.116.
Hardware Tab
Hardware tab shows the hardware information of the device based on the last backup information.

3.4. CONFIGURATION AND BACKUP 70 70 CHAPTER 3. BASIC TOOLS
Copyrights ⃝C LogicVein.inc All rights reserved.
Interfaces Tab
Interfaces tab shows the interface status of the devices based on the last backup information.
ARP/MAC/VLAN Tab
ARP/MAC/VLAN tab shows ARP table, MAC table and VLAN member ports information of the device. Note that information shown in this tab is based on the last collect neighbor job netLD performed.
Before collecting the neighbor information, nothing is shown in left subpane. Click on the
Run Neighbor Collection Now to run the neighbor search.
And the result information is shown here.
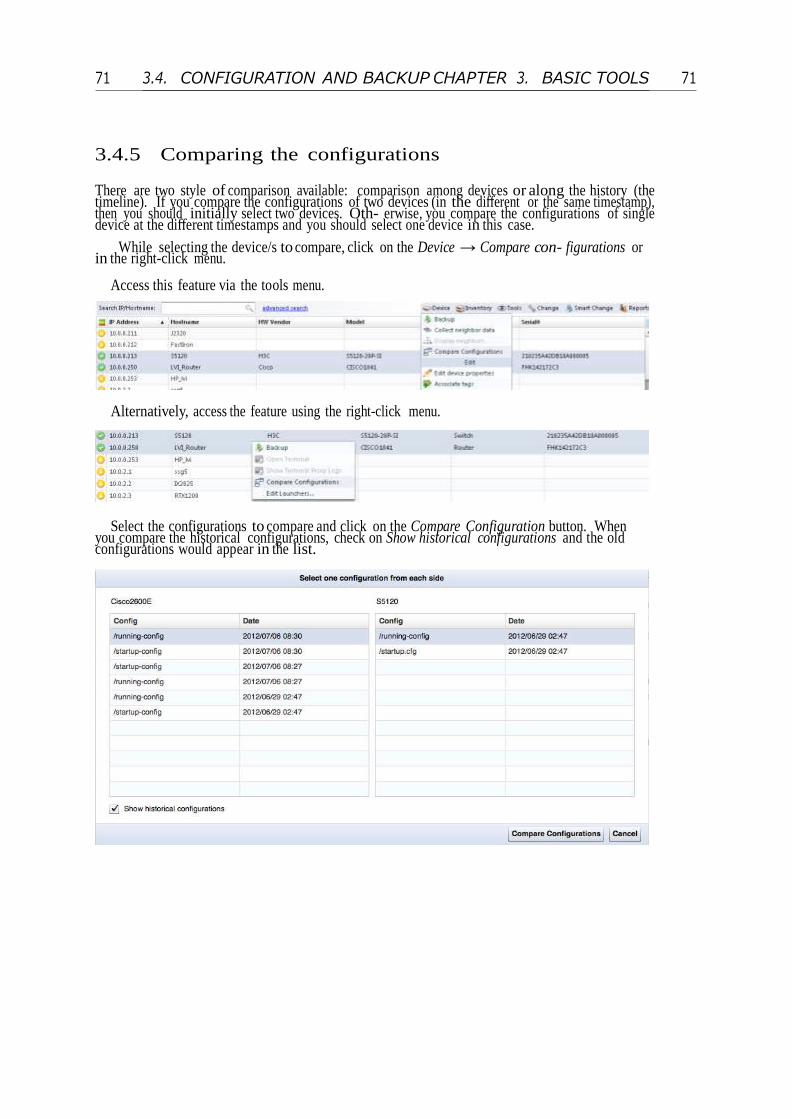
3.4. CONFIGURATION AND BACKUP 71 71 CHAPTER 3. BASIC TOOLS
3.4.5 Comparing the configurations
There are two style of comparison available: comparison among devices or along the history (the timeline). If you compare the configurations of two devices (in the different or the same timestamp), then you should initially select two devices. Oth- erwise, you compare the configurations of single device at the different timestamps and you should select one device in this case.
While selecting the device/s to compare, click on the Device → Compare con- figurations or
in the right-click menu.
Access this feature via the tools menu.
Alternatively, access the feature using the right-click menu.
Select the configurations to compare and click on the Compare Configuration button. When
you compare the historical configurations, check on Show historical configurations and the old configurations would appear in the list.

3.4. CONFIGURATION AND BACKUP 72 72 CHAPTER 3. BASIC TOOLS
Copyrights ⃝C LogicVein.inc All rights reserved.
More conveniently, we can also compare the configurations on the Device Information. Select two of them in the list and click on the upper-left icon. Currently we do not provides right-clicks on the device information.
The configuration diff is displayed in colors; red = removed, yellow = modified, and green =
added.

3.4. CONFIGURATION AND BACKUP 73 73 CHAPTER 3. BASIC TOOLS
3.4.6 Checking the Mismatch in startup-config and running-
config
Configuration Mismatch is signaled when you have a device that has two configu- rations called running-config and startup-config, and the two configurations differ to each other. startup-config is a configuration that is used when a device is rebooted, and it is supposed to be used in the regular operations, while the running-config is a temporary configuration. If someone made changes to the startup-config but forgot to restart the device, it is highly likely that your net- work is handled incorrectly. Also, If someone made changes to the running-config though they think the changes should be permanent, then the changes will be reset upon startup, and again the network is configured incorrectly.
If the device status indicates the configuration mismatch ( ), double-click on the icon to display configuration comparison in the status pane. Click on the buttons at the upper right corner of the screen to overwrite the startup configu- ration with the running configuration, to revert the running configuration to the startup configuration, or revert the running configuration to the startup configu- ration using the change adviser.
Figure 3.4.4: Comparison pane of a startup-config and running-config.
6 This feature is not available for all devices because some devices do not have running-config and startup-config. netLD does not show this icon ( ) for some devices even if there is a compliance violation.
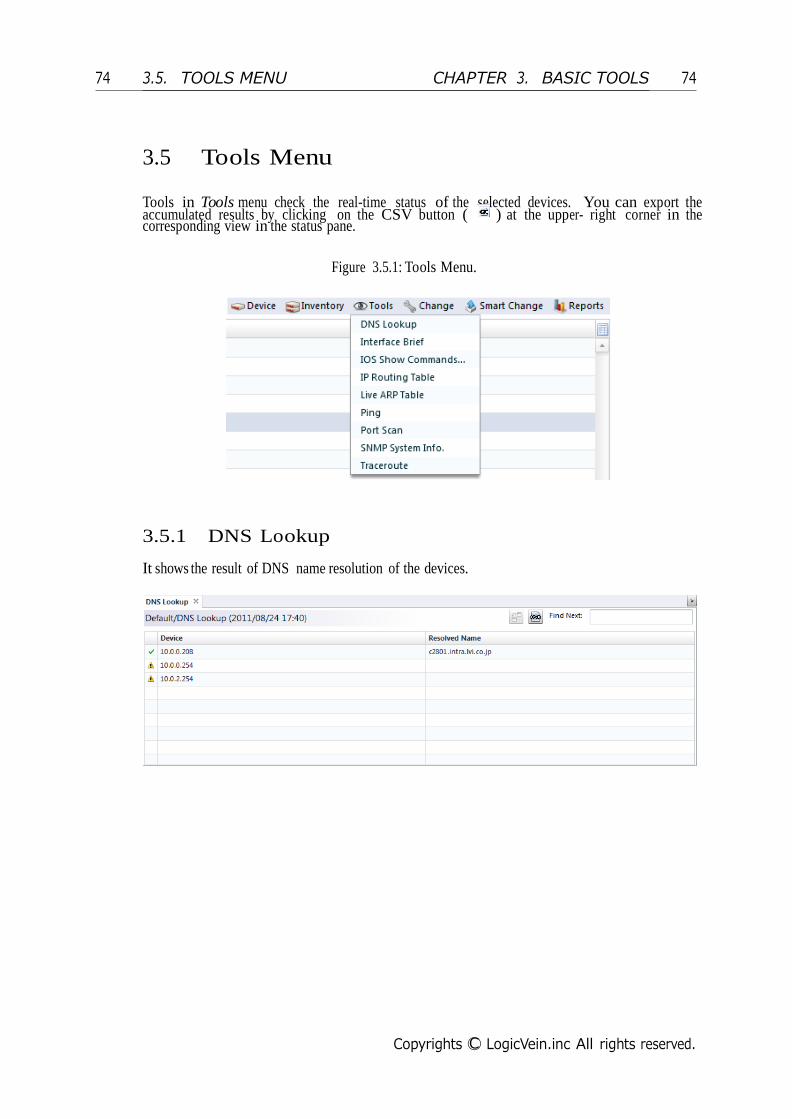
3.5. TOOLS MENU 74 74 CHAPTER 3. BASIC TOOLS
Copyrights ⃝C LogicVein.inc All rights reserved.
3.5 Tools Menu
Tools in Tools menu check the real-time status of the selected devices. You can export the accumulated results by clicking on the CSV button ( ) at the upper- right corner in the corresponding view in the status pane.
Figure 3.5.1: Tools Menu.
3.5.1 DNS Lookup
It shows the result of DNS name resolution of the devices.
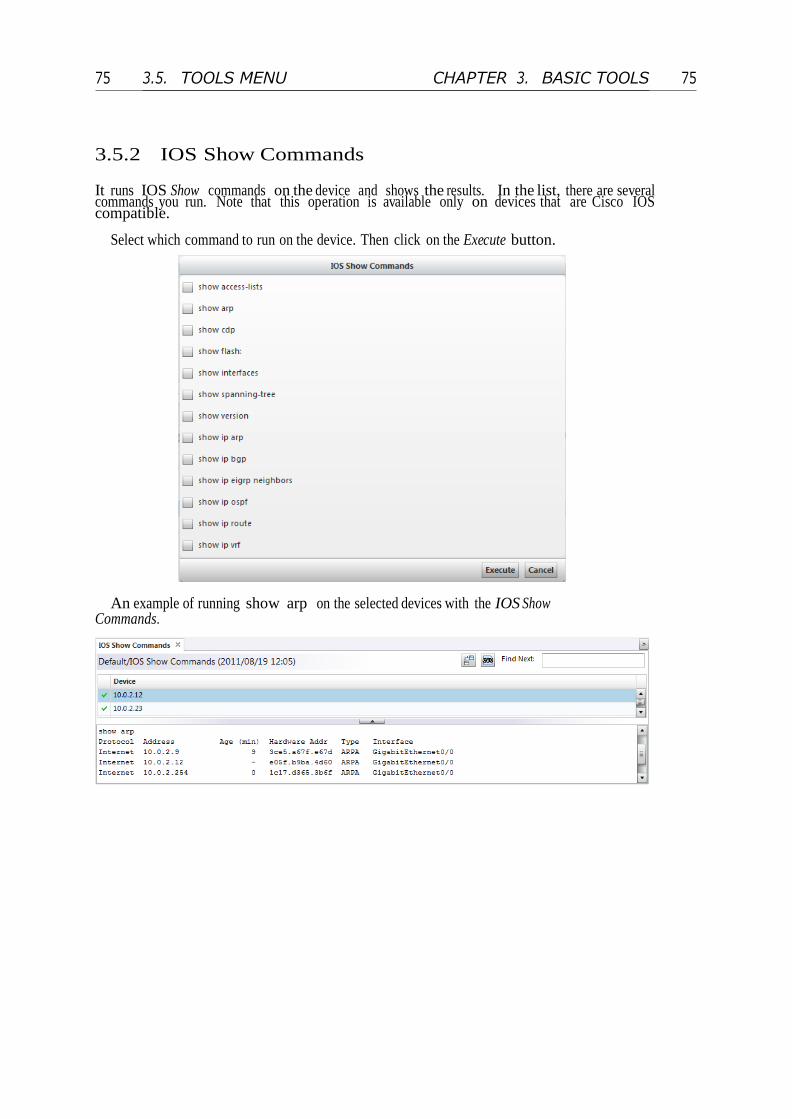
3.5. TOOLS MENU 75 75 CHAPTER 3. BASIC TOOLS
3.5.2 IOS Show Commands
It runs IOS Show commands on the device and shows the results. In the list, there are several commands you run. Note that this operation is available only on devices that are Cisco IOS compatible.
Select which command to run on the device. Then click on the Execute button.
An example of running show arp on the selected devices with the IOS Show Commands.

3.5. TOOLS MENU 76 76 CHAPTER 3. BASIC TOOLS
Copyrights ⃝C LogicVein.inc All rights reserved.
3.5.3 IP Routing Table
It shows the routing information of the device.
3.5.4 Ping
It sends a ping to the device and shows its response.

3.5. TOOLS MENU 77 77 CHAPTER 3. BASIC TOOLS
3.5.5 SNMP System Info.
It shows the SNMP system information of the devices.
3.5.6 Interface Brief
It shows the IP addresses of the device and UP/DOWN status of the interfaces on it.

3.5. TOOLS MENU 78 78 CHAPTER 3. BASIC TOOLS
Copyrights ⃝C LogicVein.inc All rights reserved.
3.5.7 Traceroute
Sends traceroute to the devices and shows the responses.
3.5.8 Port Scan
Shows port usages of the devices.

3.5. TOOLS MENU 79 79 CHAPTER 3. BASIC TOOLS
3.5.9 Live ARP Table
Shows the real-time status of ARP table of the devices.
3.6 Change Menu
(Configuration) Change tools perform operations related to the configuration changes on the selected devices. They are all located under Change submenu. In this sec- tion, we describe each feature in this submenu from the top to the bottom.
Change tools are placed under Change submenu in the tools menu.

3.6. CHANGE MENU 80 80 CHAPTER 3. BASIC TOOLS
Copyrights ⃝C LogicVein.inc All rights reserved.
3.6.1 Command Runner
Command Runner eases the effort of managing your devices by automating the iteration over them, e.g. you can schedule the execution of the hundreds of lines of commands with just one click. Available commands include those for fetching
†7 or pushing the configurations. 8 †
After the required fields are filled in, click on the Execute button.
The results are shown in the status pane.
7 Override the default prompt regex specifies the regular expression that matches to a specific prompt (like PS1 variable on the shell) on the device.
Specifying this field is required if some operation use the special input prompt, e.g. interactive input might respond with a prefix > on each line while the normal command responds with a prefix <username>#. In this case, you should specify a regular expression ^< (a line starting with <). Otherwise, netLD fails to distinguish the command output and the prompt for the next input.
8 However, you cannot respond to the input query interactively while iterating over the devices.
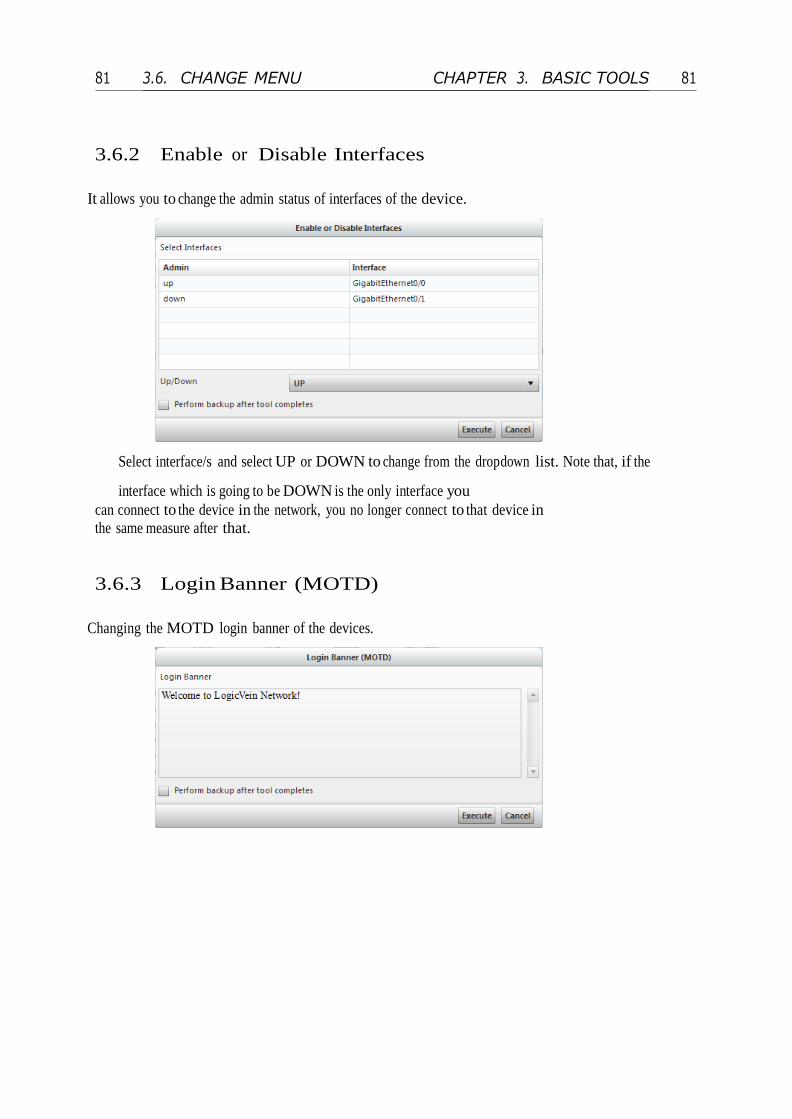
3.6. CHANGE MENU 81 81 CHAPTER 3. BASIC TOOLS
3.6.2 Enable or Disable Interfaces
It allows you to change the admin status of interfaces of the device.
Select interface/s and select UP or DOWN to change from the dropdown list. Note that, if the
interface which is going to be DOWN is the only interface you
can connect to the device in the network, you no longer connect to that device in the same measure after that.
3.6.3 Login Banner (MOTD)
Changing the MOTD login banner of the devices.
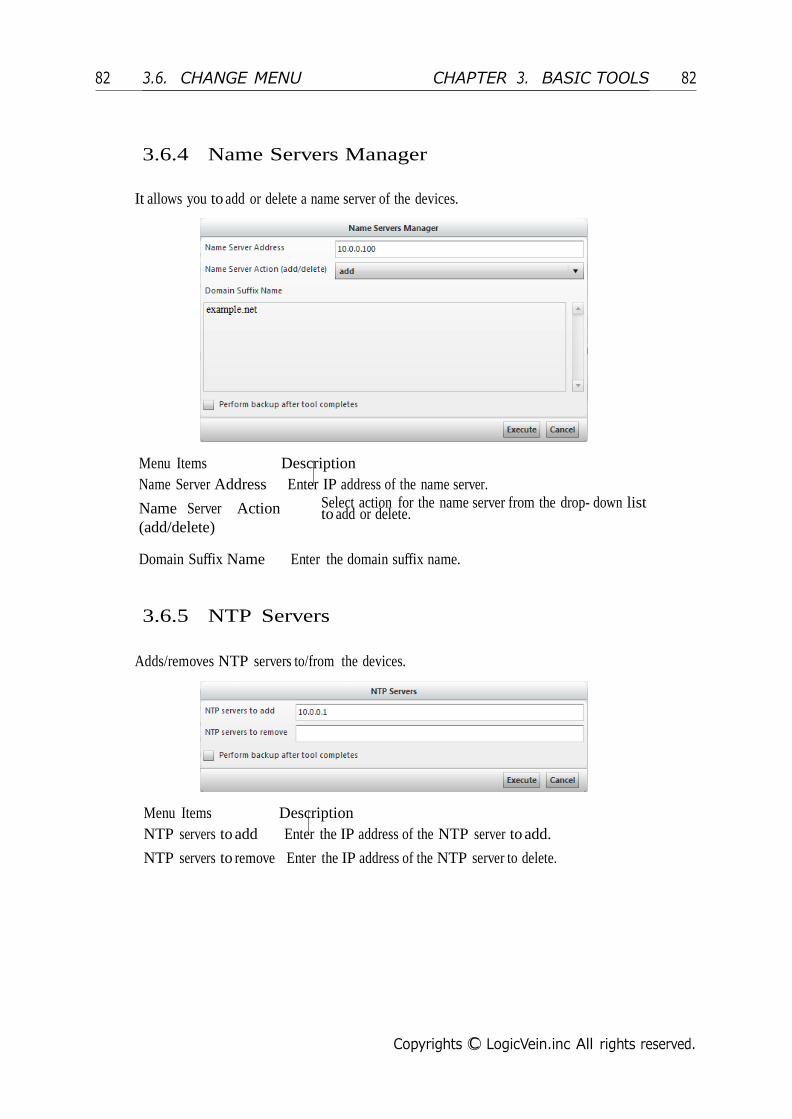
3.6. CHANGE MENU 82 82 CHAPTER 3. BASIC TOOLS
Copyrights ⃝C LogicVein.inc All rights reserved.
3.6.4 Name Servers Manager
It allows you to add or delete a name server of the devices.
Menu Items Description
Name Server Address Enter IP address of the name server.
Name Server Action (add/delete)
Select action for the name server from the drop- down list to add or delete.
Domain Suffix Name Enter the domain suffix name.
3.6.5 NTP Servers
Adds/removes NTP servers to/from the devices.
Menu Items Description
NTP servers to add Enter the IP address of the NTP server to add.
NTP servers to remove Enter the IP address of the NTP server to delete.

3.6. CHANGE MENU 83 83 CHAPTER 3. BASIC TOOLS
3.6.6 Port VLAN Assignment
It allows you to assign VLAN ports to the interfaces of the device.
After selecting one or more interfaces from the Select Interfaces list and the
VLAN name to assign, click on Execute button to run the tool.

3.6. CHANGE MENU 84 84 CHAPTER 3. BASIC TOOLS
Copyrights ⃝C LogicVein.inc All rights reserved.
9 IOS Software Distribution tool is not available for devices that boot from the flash memory e.g. Cisco 1600/Cisco 2500/Cisco AS5200.
3.6.7 SNMP Community String
It allows you to add or delete a SNMP community string for the devices.
Menu Items Description
Community String Enter SNMP community string to add or delete. Access Type Select access type of the community string to add or delete from
the dropdown list.
3.6.8 SNMP Trap Hosts
It allows you to add or delete a SNMP trap host for the devices.
Menu Items Description Trap Host Name/Address Enter the hostname or IP address of the trap host to add or delete. Community String Enter the community string of the trap host. Action (add/delete) Select the action from the dropdown list.

3.6. CHANGE MENU 85 85 CHAPTER 3. BASIC TOOLS
Copyrights ⃝C LogicVein.inc All rights reserved.
9 IOS Software Distribution tool is not available for devices that boot from the flash memory e.g. Cisco 1600/Cisco 2500/Cisco AS5200.
3.6.9 Syslog Hosts
It allows you to add or delete a syslog host of the devices.
Menu Items Description
Logging hosts to add Enter IP address of the syslog host to add.
Logging hosts to remove Enter IP address of the syslog host to delete.
3.6.10 IOS Software Distribution
netLD is able to distribute IOS software to the devices through the remote network. IOS images should be saved before using the tool. To save the image, see Sec. 3.6.13. †9
3.6.11 Manage OS Images
Specify the directory on the server’s file system and search for OS image files in that directory. The images found in this feature are later available in IOS Software Distribution(Sec. 3.6.10) and NEC WA Software Distribution(Sec. 3.6.12).
Click on to add an IOS image files.

3.6. CHANGE MENU 86 86 CHAPTER 3. BASIC TOOLS
Copyrights ⃝C LogicVein.inc All rights reserved.
9 IOS Software Distribution tool is not available for devices that boot from the flash memory e.g. Cisco 1600/Cisco 2500/Cisco AS5200.
Figure 3.6.1: IOS Software distribution
Menu Items Description Select an IOS image file to push. . . Destination flash loca- tion
Click on the . . . button on the right and select the image in a Browse OS image dialog.
Specify the name of the drive (e.g. flash, usbflash0, nvram) on the device.

3.6. CHANGE MENU 87 87 CHAPTER 3. BASIC TOOLS
Copyrights ⃝C LogicVein.inc All rights reserved.
9 IOS Software Distribution tool is not available for devices that boot from the flash memory e.g. Cisco 1600/Cisco 2500/Cisco AS5200.
Destination flash direc- tory
Destination flash parti- tion Remove the existing im- age from flash Boot from the new im- age Reload after image push Minimum DRAM in Kilobytes (from CCO)
Perform backup after tool completes
Enter the directory on the drive where the flash image is saved. If the directory does not exist, it will be created. Enter the drive partition. If the partition does not exist, the distribution fails.
–
–
Reload the new image after pushing the image. Enter minimum DRAM size (the information is available at Cisco.com.) This is an optional fea- ture to check if the device has enough space for the new image.
–

3.6. CHANGE MENU 88 88 CHAPTER 3. BASIC TOOLS
10 The time required to add an image varies. If you wait for a while and the image is not displayed yet, retry to add the file again.
Copyrights ⃝C LogicVein.inc All rights reserved.
You can add some directories. This can be achieved by click on the button in the previous figure.
After the image is successfully added to the list, click on the OK button to finish.
10 †
3.6.12 NEC WA Software Distribution
Similar to IOS distribution, netLD is also able to distribute NEC WA software to the devices through the remote network. The images should be saved before using the tool. To save the image, see Sec. 3.6.13.
3.6.13 Retrieve OS Image Files
This feature retrieves an IOS image file from the devices and store it internally. Those images can be used for IOS Software Distribution (Sec. 3.6.10) and NEC WA Software Distribution (Sec. 3.6.12).

3.6. CHANGE MENU 89 89 CHAPTER 3. BASIC TOOLS
10 The time required to add an image varies. If you wait for a while and the image is not displayed yet, retry to add the file again.
Copyrights ⃝C LogicVein.inc All rights reserved.
Figure 3.6.2: NEC WA Software distribution
Menu Items Description
Select an IOS image file to push. . . Remove the existing im- age from flash Boot from the new im- age
Click on the . . . button on the right and select the image in a Browse OS image dialog.
Enable it to remove the existing image from flash.
Enable it to boot from the new image.Reload after image push Enable it to reload the new image after pushing the image.
Perform Backup after – tool completes

89 CHAPTER 3. BASIC TOOLS 3.6. CHANGE MENU 89
3.6.14 Add Static Route
Here, you can add new static routes for the devices. Enter required information to add a static route and click on the Execute button.
Add Static Route window.
Menu Items Description
Destination Address (IP Address) Enter the destination IP address.
Destination Mask (IP Mask) Enter the destination subnet mask.
Gateway Address (IP Address) Enter the destination gateway address.
3.6.15 Delete Static Route
Here, you can delete static routes for the devices. Select the static routes to delete and click on the Execute button.
Delete Static Route window.

3.6. CHANGE MENU 90 90 CHAPTER 3. BASIC TOOLS
Copyrights ⃝C LogicVein.inc All rights reserved.
3.6.16 Users
It changes the user account and password on the devices.
Change Enable Password
It sets an enable password or an enable secret password for the devices. If both passwords are configured on the devices, it overwrites the enable secret password only.
Change VTY Password
It changes the VTY password of the devices.
Delete User Account
It deletes the existing user account on the device.

3.6. CHANGE MENU 91 91 CHAPTER 3. BASIC TOOLS
Add User Account
It adds a user account on the device.
Change Local User Password
It changes the local passwords for the username configured on the devices.
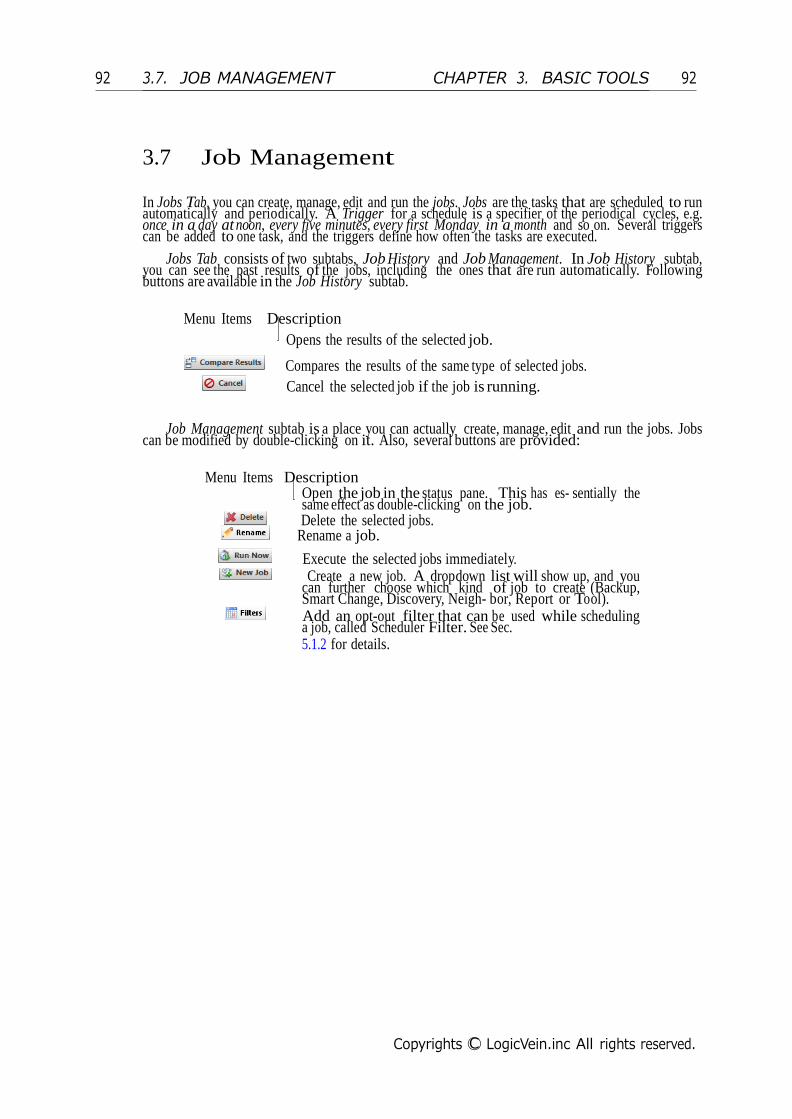
3.7. JOB MANAGEMENT 92 92 CHAPTER 3. BASIC TOOLS
Copyrights ⃝C LogicVein.inc All rights reserved.
3.7 Job Management
In Jobs Tab, you can create, manage, edit and run the jobs. Jobs are the tasks that are scheduled to run automatically and periodically. A Trigger for a schedule is a specifier of the periodical cycles, e.g. once in a day at noon, every five minutes, every first Monday in a month and so on. Several triggers can be added to one task, and the triggers define how often the tasks are executed.
Jobs Tab consists of two subtabs, Job History and Job Management. In Job History subtab,
you can see the past results of the jobs, including the ones that are run automatically. Following buttons are available in the Job History subtab.
Menu Items Description
Opens the results of the selected job.
Compares the results of the same type of selected jobs.
Cancel the selected job if the job is running.
Job Management subtab is a place you can actually create, manage, edit and run the jobs. Jobs can be modified by double-clicking on it. Also, several buttons are provided:
Menu Items Description Open the job in the status pane. This has es- sentially the same effect as double-clicking on the job.
Delete the selected jobs. Rename a job.
Execute the selected jobs immediately. Create a new job. A dropdown list will show up, and you
can further choose which kind of job to create (Backup, Smart Change, Discovery, Neigh- bor, Report or Tool).
Add an opt-out filter that can be used while scheduling a job, called Scheduler Filter. See Sec. 5.1.2 for details.

3.7. JOB MANAGEMENT 93 93 CHAPTER 3. BASIC TOOLS
3.7.1 Creating a New Job
Jobs can be created in New Job submenu. The basic process of creating a job is shared in all kind of jobs. Whenever you make a job, you are expected to:
1. Set a job name and select a feature,
2. enter the required parameters,
3. select the target devices, and
4. set the triggers (schedule) of the job.
We provide a screen-by-screen instruction now. Click on the New Job → Tool for example.
Set a Job Name and Select a Feature
First, enter the name and the comment in the fields and select the tool type from the dropdown list. Almost all tools in Devices Tab → tools menu → Change are available. Now we choose Change Enable Password for example.
Process 1.

3.7. JOB MANAGEMENT 94 94 CHAPTER 3. BASIC TOOLS
Copyrights ⃝C LogicVein.inc All rights reserved.
Enter the Required Parameters
Next, enter the required parameters in Input Parameters tab. Since we activated the Change Enable Password tool in the previous step, parameters fields for new password and confirmation are displayed.
Process 2.
Select the Target Devices
Next, we proceed to the Process 3. Currently, you are supposed to be opening a Jobs tab in the main pane and a new job in the status pane, which further opens Input Parameters subtab. Now, open the Devices subtab in the lower pane. A view similar to the advanced search pane in the device tab should be displayed in the status pane. You would also notice that there is an additional radio button, saying All Devices, Search, Static List.
In Process 3. You would use this default Search option more often. However, for the sake of
beginners, we choose Static List in this instruction. Then the screen should look like the following:

3.7. JOB MANAGEMENT 95 95 CHAPTER 3. BASIC TOOLS
This is the Static List option in Process 3.
Now, an important technique is introduced here. It might seem a bit
tricky, but once you get accustomed to it, you would soon feel it very comfortable. We call it a tab-switching technique, which effectively utilize the nature of the two panes available in the netLD interface, namely main and status pane.
You can move the upper main pane to the Devices Tab. Now you can choose the devices that a job is run. Select the devices in the Device View as usual and click on the Add selected from Device View search button in the lower status pane.

3.7. JOB MANAGEMENT 96 96 CHAPTER 3. BASIC TOOLS
Copyrights ⃝C LogicVein.inc All rights reserved.
Or select the radio button Search and use the Search feature in the status pane. The queries in the Device View (in main pane) can be copied into the status pane by Use search from Device View.
11
†
Adding a Trigger
Finally, we add the triggers (Process 4).
Move to Schedule subtab in the status pane. Click on the bottom-left to add a new
trigger.
11 If you use Search option while adding the devices to the job, the query is run each time the job is run, and the search results changes depending on the inventory at the time of the job to run.

3.7. JOB MANAGEMENT 97 97 CHAPTER 3. BASIC TOOLS
Set a trigger with the date and repetition cycle. Click on the Save button after all the required information is set.

3.7. JOB MANAGEMENT 98 98 CHAPTER 3. BASIC TOOLS
Copyrights ⃝C LogicVein.inc All rights reserved.
Name Specify the name of the trigger.
Time Specify the time and date to perform the job.
Schedule Select one of the following scheduling types.
Once the job is scheduled just once.
Daily the job is scheduled to run on every
1 + n × k
th day e.g.
n = 2
, the job is run on 1st, 3rd, 5th, . . . 31st.
Weekly execute the job every day of the week specified.
Monthly run the job every 1 + n × k months. Many options are available.
Cron to specify the job’s schedule with a cron expression.
• Refer to the Sec. 8.1 for cron configuration.
Timezone Specify the time zone.
Filter Select an opt-out filter applied to the schedule. The job is not executed on the timing specified by this filter. For further detail, see Sec. 5.1.2.
Do not forget clicking on the button to save the job. It is in the
upper-right corner of the status pane. If the button is active (red), some changes are not saved yet.

3.7. JOB MANAGEMENT 99 99 CHAPTER 3. BASIC TOOLS
3.7.2 Status Indicators in Job History Subtab
Here is the list of the status indicators.
Menu Items Description
netLD performed the job on all devices successfully.
netLD performed the job, but it failed on some devices.
netLD failed to perform the job on all devices.
The Data retention policy of the job history is described in Sec. 5.2.1.

3.8. REPORT 100 100 CHAPTER 3. BASIC TOOLS
Copyrights ⃝C LogicVein.inc All rights reserved.
3.8 Report
Net LineDancer provides several types of useful and informative reports on the devices. You can run it from the menu at any time, and it can be scheduled to run automatically.
Figure 3.8.1: The Report tools are available under Reports submenu.
We provides the following eight types of reports.
Inventory Report shows the hostname, IP address, model, OS version and serial number of the devices, as well as the date the last backup was performed on the device.

3.8. REPORT 101 101 CHAPTER 3. BASIC TOOLS
Configuration Change Report shows change history and details of configurations changed during specified period for the devices.
Software Summary shows OS information of all devices in Device View.

3.8. REPORT 102 102 CHAPTER 3. BASIC TOOLS
Copyrights ⃝C LogicVein.inc All rights reserved.
Network Hardware Summary shows pie charts where each color corresponds to a device hardware vendor and a device type (firewall, router or switch).
Hardware Report shows the hardware chassis information including type, slot, and serial
numbers for the devices.

3.8. REPORT 103 103 CHAPTER 3. BASIC TOOLS
Hardware Change Report shows the change history and the detailed status of hardware, whose configuration is changed during the specified period.
Backup Summary shows the backup status summary. Number of successes and failures are
summarized into a pie chart. Simple descriptions of failures are listed in the bottom of the report if any.

3.8. REPORT 104 104 CHAPTER 3. BASIC TOOLS
Copyrights ⃝C LogicVein.inc All rights reserved.
Protocol and Credentials shows the summaries of protocols and credentials used for all the devices in Device View.
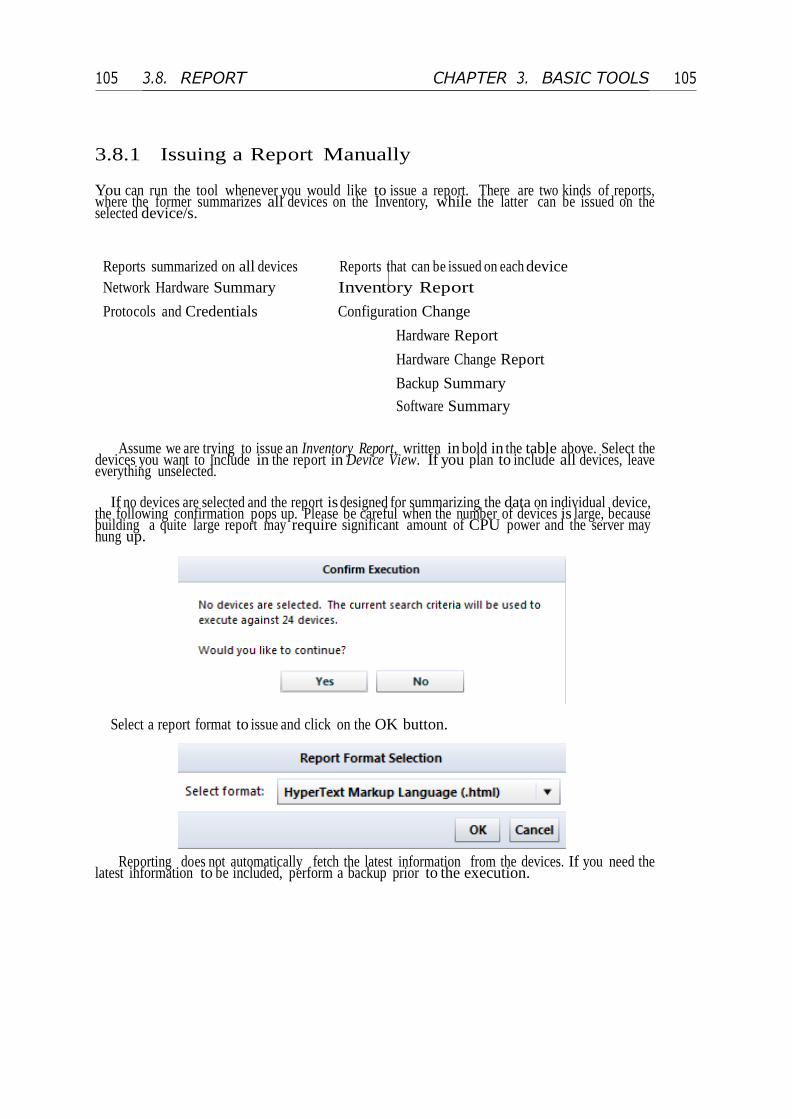
3.8. REPORT 105 105 CHAPTER 3. BASIC TOOLS
3.8.1 Issuing a Report Manually
You can run the tool whenever you would like to issue a report. There are two kinds of reports, where the former summarizes all devices on the Inventory, while the latter can be issued on the selected device/s.
Reports summarized on all devices Reports that can be issued on each device
Network Hardware Summary Inventory Report
Protocols and Credentials Configuration Change
Hardware Report
Hardware Change Report
Backup Summary
Software Summary
Assume we are trying to issue an Inventory Report, written in bold in the table above. Select the devices you want to include in the report in Device View. If you plan to include all devices, leave everything unselected.
If no devices are selected and the report is designed for summarizing the data on individual device,
the following confirmation pops up. Please be careful when the number of devices is large, because building a quite large report may require significant amount of CPU power and the server may hung up.
Select a report format to issue and click on the OK button.
Reporting does not automatically fetch the latest information from the devices. If you need the latest information to be included, perform a backup prior to the execution.

3.8. REPORT 106 106 CHAPTER 3. BASIC TOOLS
Copyrights ⃝C LogicVein.inc All rights reserved.
3.8.2 Scheduling the Reports
netLD has a feature which schedules a periodical report and e-mails the result to the administrator. The schedule can be configured in Job tab → New Job → Report.
Now, assume we are trying to issue an Inventory Report. Create a
new report.
Enter the name and the comment of the job, then select the desired report type from the dropdown
list, now it is Inventory Report. Click on the OK button.

3.8. REPORT 107 107 CHAPTER 3. BASIC TOOLS
A new tab opens in the status pane. In the Email Notification subtab, select the report format out of HTML and PDF. Enter the recipients in To and Cc fields. You need to setup an SMTP server to make this feature work. See Sec. 5.2.3 for details.
Using the tab-switching technique (described previously in Sec. 3.7, p.92), add the devices to the
Devices subtab in the status pane.

3.9. SMART CHANGE 108 108 CHAPTER 3. BASIC TOOLS
Copyrights ⃝C LogicVein.inc All rights reserved.
Set a trigger with the date and repetition cycle to issue the report. Details are described in Sec. 3.7, p.92.
Finally, do not forget to click on the button to save the job.
Once saved, reports are e-mailed automatically. See Sec. 3.7, p.92 for more details about setting the schedules.
3.9 Smart Change
Smart Change feature is similar to Command Runner Tool (Sec. 3.6.1, p.80) but allows for the more flexibility. It instead runs a command template, on which you can customize the unique value of each device. For example, the IP Address of the devices in a same network is always unique, and the Command Runner fails in this case. It is because they just run a static sequence of commands and do not send the right command with the right IP address.
In a command template, you can enter the required commands in a template and set the right value
for the corresponding device. In the following sections, we pro- vide a screen-to-screen instruction for making a command template for the Smart Change jobs. The instruction makes a template for changing the access-list of Cisco devices.
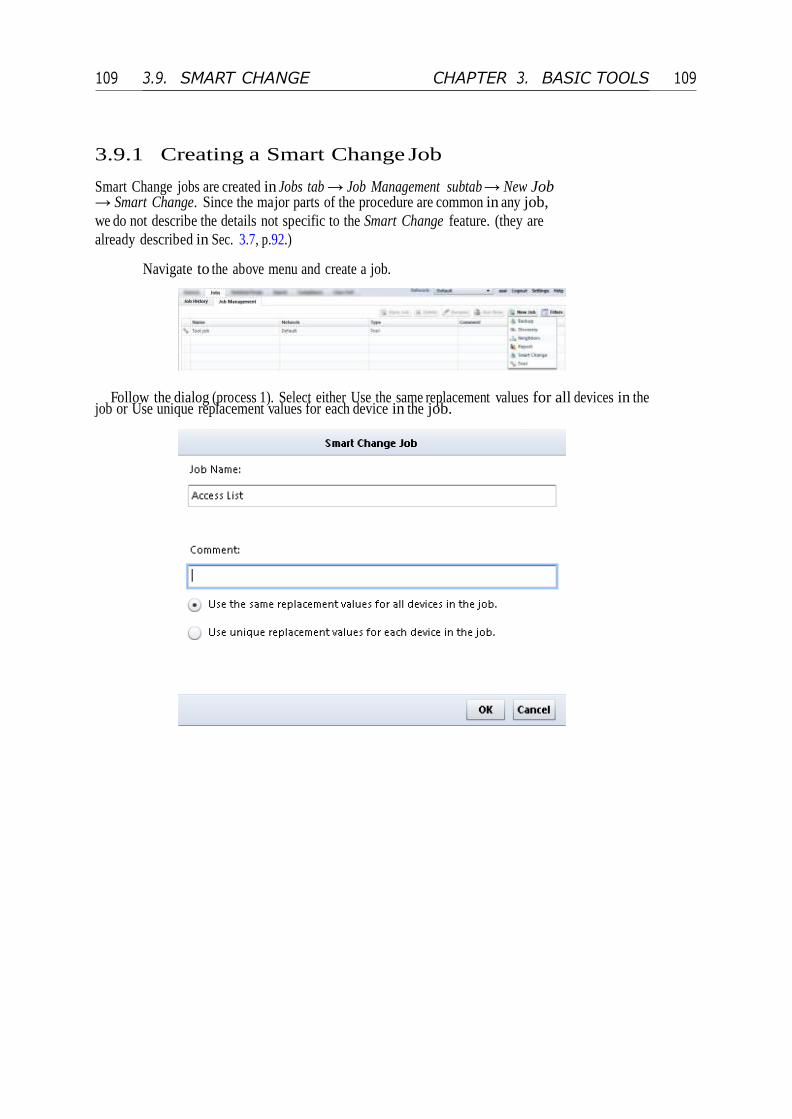
3.9. SMART CHANGE 109 109 CHAPTER 3. BASIC TOOLS
3.9.1 Creating a Smart Change Job
Smart Change jobs are created in Jobs tab → Job Management subtab → New Job → Smart Change. Since the major parts of the procedure are common in any job, we do not describe the details not specific to the Smart Change feature. (they are already described in Sec. 3.7, p.92.)
Navigate to the above menu and create a job.
Follow the dialog (process 1). Select either Use the same replacement values for all devices in the
job or Use unique replacement values for each device in the job.

3.9. SMART CHANGE 110 110 CHAPTER 3. BASIC TOOLS
Copyrights ⃝C LogicVein.inc All rights reserved.
Enter a sequence of ordinary commands in Commands field in the Template subtab. In the figure below, the commands for changing the access-list settings are entered. However, the commands are for one specific device only, since some values (IP address etc.) are specific to one device. We then change these commands into a template.
After entering the commands, select a portion of the text that should be replaced with
each device-specific value.
Then click on the to make them into a Replacement. Enter the name of the replacement and select its type. In the example below, we selected ”lvi-filter”, entered ”access-list name” as the name and selected Text type from the Type dropdown list. Click on the OK button.

3.9. SMART CHANGE 111 111 CHAPTER 3. BASIC TOOLS
Once the part is set as a replacement, it is highlighted in yellow in the Commands field. We next select an IP address to make it into a template.
Add a replacement of type IP address with a name ”Source IP” in the same manner. The IP
Address type requires the replacement value (specified later) to be a valid IP address.
Next we select 172.16.0.1 and add a Choice type replacement with a name ”Web Server”.

3.9. SMART CHANGE 112 112 CHAPTER 3. BASIC TOOLS
Copyrights ⃝C LogicVein.inc All rights reserved.
Now the replacement have two possible values, each corresponds to the IP address of the different web server which needs a logging. This can be later selected for each device in Replacement Values section. This feature is convenient when the number of choices are limited.
Adding another conditional type replacement with a name ”logging?” for the log entry.

3.9. SMART CHANGE 113 113 CHAPTER 3. BASIC TOOLS
Setting the Conditional Type replacement for the log entry.
When you reuse the same replacement several times in the different parts of the text, select each
portion of the text and drag-and-drop the replacements in the list directly onto the Commands field.
If the number of replacements get larger, click on to add a Replacement Group. Add some groups and manage the replacements with the arrow buttons. The navigation would be intuitive enough.
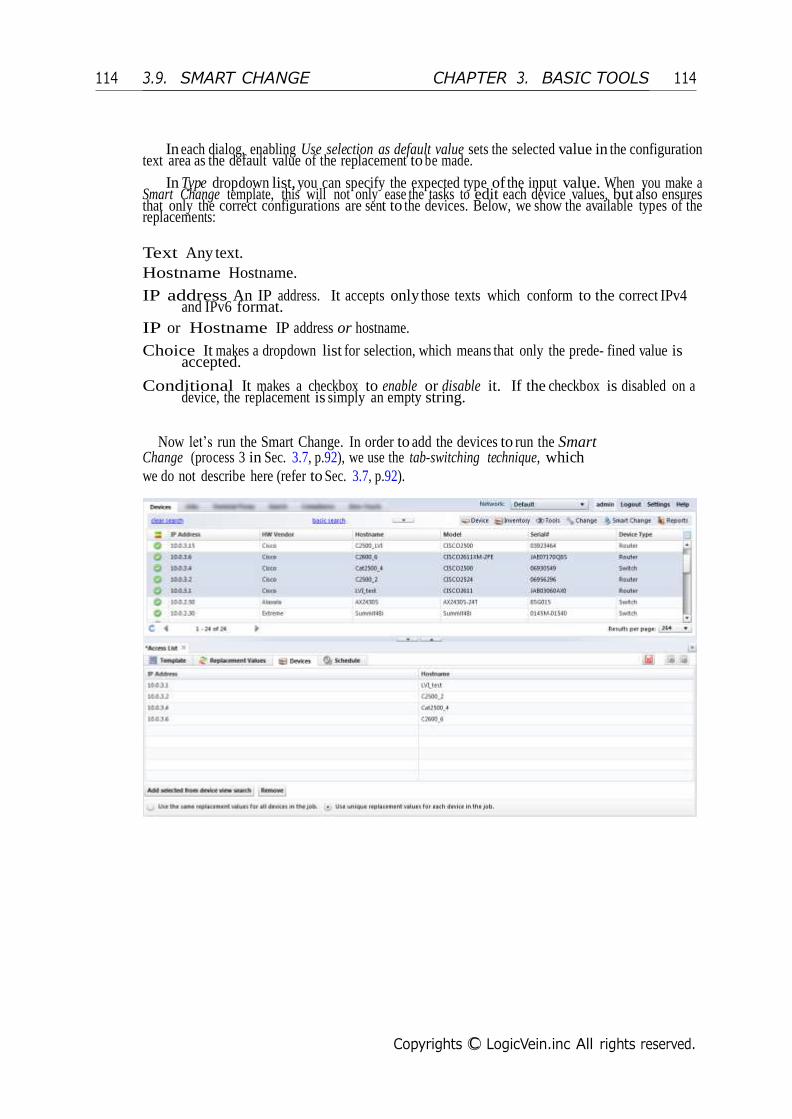
3.9. SMART CHANGE 114 114 CHAPTER 3. BASIC TOOLS
Copyrights ⃝C LogicVein.inc All rights reserved.
In each dialog, enabling Use selection as default value sets the selected value in the configuration text area as the default value of the replacement to be made.
In Type dropdown list, you can specify the expected type of the input value. When you make a
Smart Change template, this will not only ease the tasks to edit each device values, but also ensures that only the correct configurations are sent to the devices. Below, we show the available types of the replacements:
Text Any text.
Hostname Hostname.
IP address An IP address. It accepts only those texts which conform to the correct IPv4 and IPv6 format.
IP or Hostname IP address or hostname.
Choice It makes a dropdown list for selection, which means that only the prede- fined value is accepted.
Conditional It makes a checkbox to enable or disable it. If the checkbox is disabled on a
device, the replacement is simply an empty string.
Now let’s run the Smart Change. In order to add the devices to run the Smart Change (process 3 in Sec. 3.7, p.92), we use the tab-switching technique, which we do not describe here (refer to Sec. 3.7, p.92).

3.9. SMART CHANGE 115 115 CHAPTER 3. BASIC TOOLS
Open the Replacement Values subtab in the status pane and assign the replacement value to each device. The interface is dynamically generated according to which kind of replacements are included in this Smart Change.
12
†
On Schedule tab, add the trigger by clicking . For more details, see Sec. 3.7.
Finally, do not forget to click on the button to save the job. Now the Smart Change jobs are fully setup. Once you click on the Jobs tab → Run Now button, netLD runs the job immediately. †13
12 You can import/export the replacement values of IP address for devices in a spreadsheet. Click on the (export) and (import) in the top-right corner of the status pane.
13 You can also run the job from the Devices Tab. Tools menu → Smart Change shows the list of Smart Change jobs currently available. Click on the one you would like to execute.

3.10. COMPLIANCE 116 116 CHAPTER 3. BASIC TOOLS
Copyrights ⃝C LogicVein.inc All rights reserved.
3.10 Compliance
If you configure a compliance policy, the administrators are alarmed when some configuration is missing or invalid. It helps you keep the network stable, safe and robust. When a violation has occurred, Status Display, Pie Charts and Trap Handlers are the helpful tools. You can analyze the situation and fix the violation quickly.
In order to detect the erroneous and unsafe configurations, you have to define a Compliance Rule. A rule can be defined with four types of atomic matching query i.e. Stop on match, Stop if not match, Violation on match, Violation if not match. Each query has one matching string and netLD checks if a given configuration matches to the string. Once the query matches / does not match the configuration, above four queries have the following effects:
Violation on match If the query string matches the configuration, then it is a violation.
Violation if not match If the query string does not matches to any lines of the
configuration, then it is a violation.
Stop on match If the query string matches the configuration, then the configu- ration is OK regardless of the rest of the queries.
Stop if not match If the query string does not matches to any lines of the con- figuration,
then it is OK regardless of the rest of the queries.
In other words, ”Violation. . . ” act as black lists while ”Stop on. . . ” act as white lists. You can create, modify and delete these rules.
A set of compliance rules forms a Rule Set. Rule sets can also be created, modified, copied and deleted. However, you usually do not have to create their own because many useful rules are already provided by default. Entire default rules are listed in Data section in Sec. 7.4, p.235.
This is a rules-set provided by default, IOS Interface Auto-Duplex/Speed.
• Violation if the interface settings include the followings:
– no ip address: Stop on match
– shutdown command: Stop on match
– duplex auto:Violation if not matched
– speed auto: Violation if not matched
Additionally, at a higher level, you can define a Policy, which is what is actually applied to each device. A policy again consists of many rule sets. However, it also manages which device belongs to that policy, which kind of severity (error, warning or info) should a violation be assigned to, as well as current and historical status of the violations detected on those devices.

3.10. COMPLIANCE 117 117 CHAPTER 3. BASIC TOOLS
3.10.1 Various Rule-related tabs
To define rules, rule sets and policies, you have to open Compliance tab and edit the elements in each tab. Let’s review those tabs first.
Rule Sets Subtab
Rule Sets subtab (in main pane): contains some rule sets.
Figure 3.10.1: Rule Sets Subtab

3.10. COMPLIANCE 118 118 CHAPTER 3. BASIC TOOLS
Copyrights ⃝C LogicVein.inc All rights reserved.
Rules Subtab
double-clicking each Rule Set shows a new tab in the status pane. In the new tab, following subtabs exist:
Figure 3.10.2: Rules subtab (in status pane): contains some rules and provides an interface to modify them.
The items here have the following functions:
Violation Message The warning message to be seen when a violation is detected.
Start / End This is available only when Apply to blocks rule is selected. If ac- tivated, the beginning and the end of the block are searched with pattern matching, and the violation check is applied only within that block. For example, the expression below limits the violation check only to the specific part of the configuration that matches it. Corresponding code snippets are shown in Fig. 3.10.3.
• Example Start: line VTY ~variable~ (matches line 6)
• End: ! (matches line 9)
Match Expression the main query of the match used to determine the violation.
Action One of the following:
• Stop if not matched
• Stop on match
• Violation if not matched
• Violation on match
Variable Variables between tildes are added into the bottom window and any value can be entered. Without any filter, it means ”do not care”.
Type One of the four possible type of variables:

3.10. COMPLIANCE 119 119 CHAPTER 3. BASIC TOOLS
• Text
• IP address
• Host name
• Word Restriction If a violation query matches a line in the configuration, apply a regular expression
filter. If a line matches the violation query but the value of the variable does not match the filter, then the violation match is withdrawn.
Figure 3.10.3: Example code snippets
1: banner motd C
2: Welcome
3: !
4: line con 0
5: line aux 0
6: line vty 0 4 ; *
7: password lvi
8: login
9: ! ; *
10: !
11: end
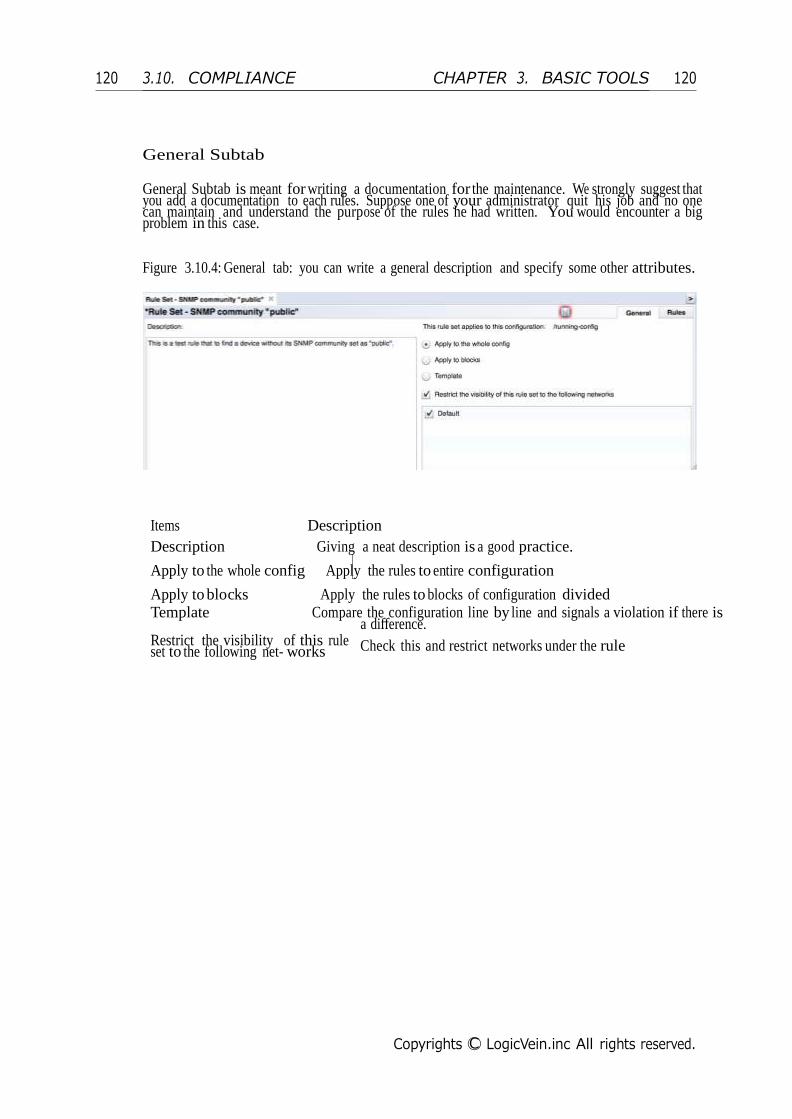
3.10. COMPLIANCE 120 120 CHAPTER 3. BASIC TOOLS
Copyrights ⃝C LogicVein.inc All rights reserved.
General Subtab
General Subtab is meant for writing a documentation for the maintenance. We strongly suggest that you add a documentation to each rules. Suppose one of your administrator quit his job and no one can maintain and understand the purpose of the rules he had written. You would encounter a big problem in this case.
Figure 3.10.4: General tab: you can write a general description and specify some other attributes.
Items Description
Description Giving a neat description is a good practice.
Apply to the whole config Apply the rules to entire configuration
Apply to blocks Apply the rules to blocks of configuration divided Template Compare the configuration line by line and signals a violation if there is
a difference.Restrict the visibility of this rule set to the following net- works Check this and restrict networks under the rule

3.10. COMPLIANCE 121 121 CHAPTER 3. BASIC TOOLS
3.10.2 Creating a New Rule
Here, we provide a screen-by-screen instruction. Now let’s create a rule here that will generate violation when SNMP community is ”public” in Cisco IOS device configurations.
Click on in Compliance → Rule Sets tab.
Enter a name for the rule, select the target adapter (the kind of device model) and which configuration to apply the rule to (running-config or startup-config). Click on the OK button.

3.10. COMPLIANCE 122 122 CHAPTER 3. BASIC TOOLS
Copyrights ⃝C LogicVein.inc All rights reserved.
In the Violation message field, enter the message to be shown when a violation occurs. The violation message in this example is ”public” is set in SNMP community. After that, click on the
.
Enter the violation search query in Match Expression and select Violation on match in
Action field.

3.10. COMPLIANCE 123 123 CHAPTER 3. BASIC TOOLS
To test the new rule, click on the select a test config link and select a device in the inventory.
Select Configuration window lists the devices that match the adapter you have selected when you
created this rule. In this case, only devices with IOS adapter are present in this list.

3.10. COMPLIANCE 124 124 CHAPTER 3. BASIC TOOLS
Copyrights ⃝C LogicVein.inc All rights reserved.
Violations are colored in red. Once you are satisfied, make up a policy from the set of rules in the next section.

3.10. COMPLIANCE 125 125 CHAPTER 3. BASIC TOOLS
3.10.3 Policy tab
Policy tab consists of the following subtabs: Device subtab allows you to select devices to which you will apply a policy. The interface is
exactly the same as those described in Jobs Management section (p.92).
Rule Sets subtab register the existing rule sets to the policy in this tab.
Item Description
All devices Apply the policy to all devices in the inventory.
Search Apply the policy to all devices that match the query. The search is conducted every time the violation check
was triggered. Static List Choose a set of devices by switching the main pane to the device tab,
create a static list and the violation check is applied only to the devices in the list. (tab switching technique)
Item Description
Adapter Specify the target adapter. Configuration Choose from either startup-config or running-
config. The check is applied to the specified configuration only.
Rules set Rules in this policy. Severity Either Error or Warning. This results in the different visual icons when a
violation occurred.

3.10. COMPLIANCE 126 126 CHAPTER 3. BASIC TOOLS
Copyrights ⃝C LogicVein.inc All rights reserved.
Creating a New Policy
Let’s create a policy here that will generate a violation for Cisco IOS device con- figurations.
Click on in Compliance → Policy tab.
Enter a policy name, select the target adapter and configuration, then click on the OK button.
Select Search. Enter a search query which selects the target devices. In this example, enter
*Cisco* in Model filter. As a result, the violation is checked against only those devices whose name contain a string Cisco.

3.10. COMPLIANCE 127 127 CHAPTER 3. BASIC TOOLS
This process is the same as that has appeared in Sec. 3.7 (Job Management). Consequently, the same characteristics apply to this device selection: if you define the target devices via Search, then the search is done in each time the policy is checked.
Click on in Rule Sets subtab in the status pane.
Select a rules-set and click on the Add button. In this example, we have selected IOS Interface
Auto-Duplex/Speed & IOS Secure Enable Passwords rules.

3.10. COMPLIANCE 128 128 CHAPTER 3. BASIC TOOLS
Copyrights ⃝C LogicVein.inc All rights reserved.
14 †
Select a Severity for the rule. Here we select different severity for each rule so that different violation icons will show up.
Click on the select a test config link and select a device to test the policy.
14 IMPORTANT NOTE: The rules that appear in this window is only those rules whose adapter type matches that of the current policy. If no rule appears in the candidates, then it means no rules are defined for the adapter which your policy is defined for. Please review the adapter type setting in your policy or rule-sets.

3.10. COMPLIANCE 129 129 CHAPTER 3. BASIC TOOLS
Select a test config.
Violations are colored in red. The top right number shows the total number of violations. When you are satisfied with the test results, you should then activate the policy. Note
that netLD does not run the violation check unless you activate it.

3.10. COMPLIANCE 130 130 CHAPTER 3. BASIC TOOLS
Copyrights ⃝C LogicVein.inc All rights reserved.
Activating the Policies
Once a policy was created, you should activate the policy to the devices. Make sure that the main pane shows Compliance → Policy subtab.
In Policy subtab, select a policy and click on the Enable button. You will see a pie graph in
violation summary on the right.
If any violation was found in the policy, its icon changes. Depending on the severity, there
will be an orange warning icon or a red error icon.
Then double-click on the violation icon. Status subtab opens in the status pane, showing
the detailed information of the violation.
15 †
15 Violation icons are also shown in Device View. To see the detailed information of the violation, double-click on the warning/error icon.
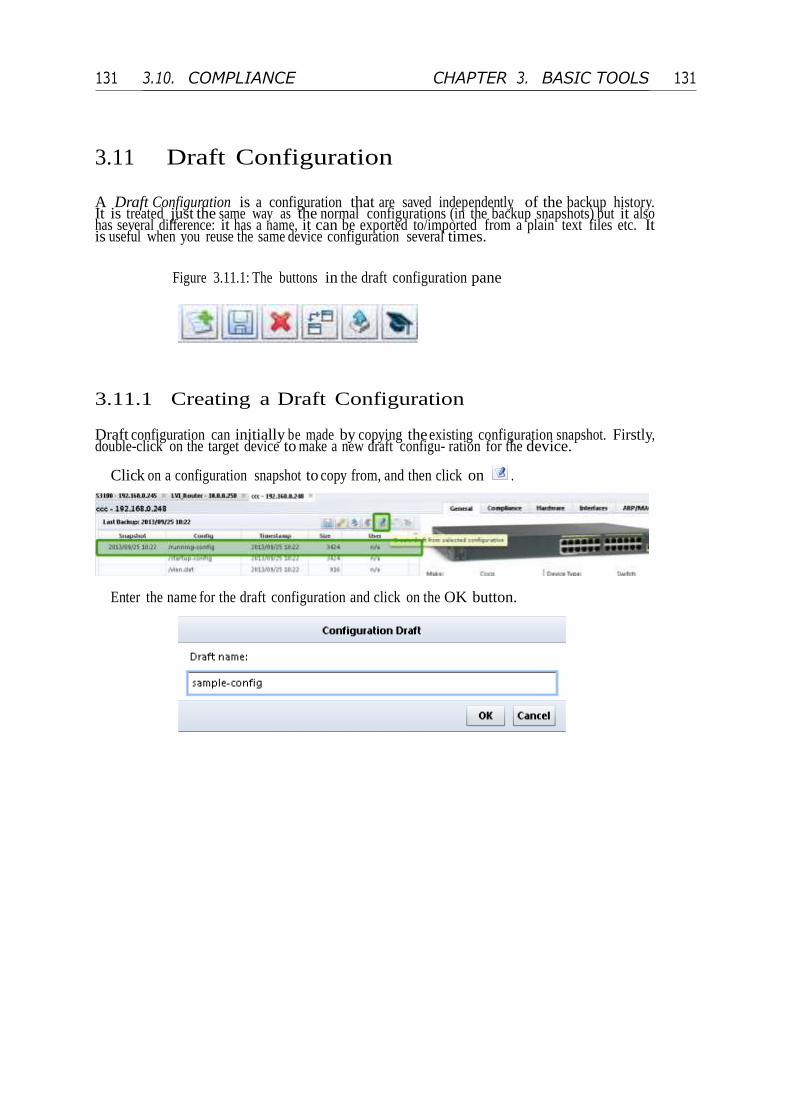
3.10. COMPLIANCE 131 131 CHAPTER 3. BASIC TOOLS
3.11 Draft Configuration A Draft Configuration is a configuration that are saved independently of the backup history. It is treated just the same way as the normal configurations (in the backup snapshots) but it also has several difference: it has a name, it can be exported to/imported from a plain text files etc. It is useful when you reuse the same device configuration several times.
Figure 3.11.1: The buttons in the draft configuration pane
3.11.1 Creating a Draft Configuration
Draft configuration can initially be made by copying the existing configuration snapshot. Firstly, double-click on the target device to make a new draft configu- ration for the device.
Click on a configuration snapshot to copy from, and then click on .
Enter the name for the draft configuration and click on the OK button.

3.11. DRAFT CONFIGURATION 132 132 CHAPTER 3. BASIC TOOLS
Copyrights ⃝C LogicVein.inc All rights reserved.
To modify a draft configuration, double-click on the entry.
Edit the configuration. When finished, save the configuration via .
Then the timestamp in the Last Edit is refreshed.
3.11.2 Importing Configurations from Plain Texts
To create a new draft configuration from an external text file, double-click on the target device in Device View and open up the configuration history in the status pane.
(We assume that you already have a text file containing a configuration.) Then click on
the .

3.11. DRAFT CONFIGURATION 133 133 CHAPTER 3. BASIC TOOLS
Select the file to import and click on the Open button just as in usual Windows software.
Then a new configuration is added to the list of Draft Configurations.
Exporting Drafts
Similarly, click on the to export the draft into a plain text.
Deleting Drafts
To remove a draft, click on the .

3.11. DRAFT CONFIGURATION 134 134 CHAPTER 3. BASIC TOOLS
Copyrights ⃝C LogicVein.inc All rights reserved.
3.11.3 Comparing the Configurations
You can compare the configurations via button. The methods for getting the comparison between snapshot-to-snapshot, snapshot-to-draft, and draft-to-draft are identical. For more information, see Sec. 3.4.5, p.71 (Compare).
Select two configurations for comparison and click on .
3.11.4 Applying a Draft Configuration to a Device
Similar to the comparison method, applying a draft is almost the same as applying (restoring) a past configuration snapshot to a device. However, there is a difference in one point (depending on the device):
Select a draft configuration for a push and click on .
Choose which configuration to push it to. (Either running-config or startup-config.) This is the only difference between restoring the configuration snapshot and uploading a draft configuration.

3.11. DRAFT CONFIGURATION 135 135 CHAPTER 3. BASIC TOOLS
Click on the OK button to initiate an upload.
3.12 Change Advisor
Change Advisor guesses the needs of the operator and automatically create a help- ful advice by comparing the latest configuration with the selected configuration. Note: This feature is supported only on Cisco IOS and similar operation systems.
Press to initiate Change Advisor.
1. double-click on a device in Device View.
2. Select a configuration either from draft or snapshot configurations.
3. Click on .
4. Change Adviser is invoked and suggests some commands in the lower window.
Change Adviser is initiated.

3.12. CHANGE ADVISOR 136 136 CHAPTER 3. BASIC TOOLS
Copyrights ⃝C LogicVein.inc All rights reserved.
3.12.1 Executing Commands through Change Advisor
You can push the commands provided by Change Advisor into a device. Before running the command suggested by the advisor, please re-check the generated commands again. Once you have noticed any unintended suggestion, you can edit the generated commands directly.
Re-check the generated commands again!
After that, click on Run and then confirm it by clicking on the Yes button to proceed.
You can see the results of the command executions in CLI as they progress. The results are
also shown in the job history Sec. 3.7.
16
†
16 During the configuration recovery and the draft configuration, the primary communication protocol is TFTP.
Therefore, these features are not available in devices with no support for TFTP. On the other hand, Change Advisor is available in all devices supporting some CLI(telnet/SSH).

3.12. CHANGE ADVISOR 137 137 CHAPTER 3. BASIC TOOLS
3.13 Search Tab
This section describes the various advanced search methods that are accessible in Search Tab. These methods do NOT have something to do with the device search. Search Tab consists of two subtabs, switch port search and ARP search.
3.13.1 Switch Port Search
Switch Port Search allows you to search devices by specifying FQDN (Fully Qual- ified Domain Name), IP address or MAC address of the device. It shows ARP and NDP of the nodes or the information of the Switch Port. The following example shows the result for switch port search by specifying an IP address ”10.0.2.254”.
Figure 3.13.1: Port search.
3.13.2 ARP Search
ARP Search searches for any device that has the query IP in its ARP table. In the example below, we have that the ARP table in a device ”10.0.0.213” contains the specified IP 10.0.0.254.

3.13. SEARCH TAB 138
Copyrights ⃝C LogicVein.inc All rights reserved.
Figure 3.13.2: ARP table search.

Chapter 4
Advanced Tools
In this chapter, we describe the tools which are required when you need to manage the professional and commercial large remote networks under the high availability constraints and the high maintenance costs that occur when the appropriate tools are not applied.
Contents
4.1 Terminal Proxy Tab . . . . . . . . . . . . . . . . . . . . . 140
4.1.1 Available Commands . . . . . . . . . . . . . . . . . . . . 141
4.1.2 Setup the Terminal Proxy . . . . . . . . . . . . . . . . . 142
4.1.3 Login . . . . . . . . . . . . . . . . . . . . . . . . . . . . 143
4.1.4 Terminal Proxy Log . . . . . . . . . . . . . . . . . . . . 145
4.1.5 Verifying the Log from Change History . . . . . . . . . 146
4.1.6 Exporting the Log Files . . . . . . . . . . . . . . . . . . 147
4.2 Cisco Plug and Play (Optional) . . . . . . . . . . . . . . 148
4.2.1 Requirements for Using Cisco PnP Feature . . . . . . . 150
4.2.2 Setting up a DHCP Server . . . . . . . . . . . . . . . . 151
4.2.3 Template-Based Deployment . . . . . . . . . . . . . . . 156
4.2.4 Importing the Replacement Values in Cisco PnP . . . . 161
4.2.5 Cisco PnP Self-Recovery . . . . . . . . . . . . . . . . . . 163
4.2.6 Cisco PnP Specific Device Recovery . . . . . . . . . . . 165
4.2.7 Distributing Configurations via 3G network and capable Mobile Router . . . . . . . . . . . . . . . VPN-
. . .
.
167
4.2.8 Deploying Configurations Prior to Sending the Devices
to Each Base . . . . . . . . . . . . . . . . . . . . . . . . 169
4.2.9 Deploying a Bootstrap . . . . . . . . . . . . . . . . . . . 170
4.3 Smart Bridge (Optional) . . . . . . . . . . . . . . . . . . 171
4.3.1 Installation . . . . . . . . . . . . . . . . . . . . . . . . . 172
4.3.2 Registering Smart Bridges to the Core Server . . . . . . 175
139

4.1. TERMINAL PROXY TAB 140 140 CHAPTER 4. ADVANCED TOOLS
Copyrights ⃝C LogicVein.inc All rights reserved.
4.3.3 Adding a Network for a SB . . . . . . . . . . . . . . . . 178
4.3.4 Adding devices to a SB . . . . . . . . . . . . . . . . . . 179
4.4 Integration with External Network Management Soft-
ware . . . . . . . . . . . . . . . . . . . . . . . . . . . . . . 180
4.4.1 Interaction with SNMPc . . . . . . . . . . . . . . . . . . 180
4.4.2 Configuring SNMP Trap Send . . . . . . . . . . . . . . . 183
4.5 Real-time Change Detection . . . . . . . . . . . . . . . . 185
4.5.1 Configuring your devices . . . . . . . . . . . . . . . . . . 185
4.5.2 Operation Check . . . . . . . . . . . . . . . . . . . . . . 186
4.1 Terminal Proxy Tab
Terminal Proxy feature allows remote clients to log in to the managed devices through netLD server. One useful aspect of using Terminal Proxy is that you do not have to input the login information on the console — netLD automatically feeds the information for you. It also logs all the operation history with various information that can be later reviewed when something happens.
Also, using this feature results in the more secure network because the password do not have to be
sent through the World Wide Web. Moreover, outsourcing the management effort is more secure because the operators do not have to know the actual device password. The outside operators, they just have to know the login passwords of Net LineDancer instances and NOT the device passwords, avoiding access to the critical security information in your network.
Consequently, Terminal Proxy provides a centralized management of the de- vices (even on the
devices beyond netLD backup coverage).
Figure 4.1.1: Operation Model of Terminal Proxy
To set up the Terminal Proxy feature, follow these steps described in this section:

4.1. TERMINAL PROXY TAB 141 141 CHAPTER 4. ADVANCED TOOLS
4.1.1 Available Commands
Command Example Description connect (IP address or host name) connect (ini- tials) device (IP address or host name)
device (initials)
exit
help
network
<network name>
version
connect
192.168.10.0; connect cisco
connect c
device
192.168.10.0; device cisco
device c
Connect to devices with either SSH or tel- net. (You have to set up the Credentials prior to the connection.) Show the list of upto 20 devices starting with the character.
Show the details of the device.
Show the list in just the same way as connect command does.
Terminate the SSH session with netLD.
Show the list of commands.
Switch the current network (in terms of Sec. 2.5) to the specified one.
Show the current version of netLD.

4.1. TERMINAL PROXY TAB 142 142 CHAPTER 4. ADVANCED TOOLS
Copyrights ⃝C LogicVein.inc All rights reserved.
4.1.2 Setup the Terminal Proxy
First, since this feature is disabled by default, enable Terminal Proxy in the settings window. Go to Settings → Network Servers and check on the Enable the Terminal Server Proxy (SSH). You can change the port that SSH communicate through with the Terminal Server Proxy SSH Port below. Click on the OK button to save the change. Remember that you must open the access to the SSH port in your firewall program!

4.1. TERMINAL PROXY TAB 143 143 CHAPTER 4. ADVANCED TOOLS
4.1.3 Login
Before trying to log in, take a memo of the netLD server IP address.
First, open and start an SSH client and connect to the netLD server. The type of the client does not matter – you can use a standard OpenSSH on various OSes like UNIX, Mac OSX, Linux and Windows machines (additional installation is required on Windows.) In this example, we assume the server is 192.168.0.77 and the client is bash. Again, remember that you must open the access to the SSH port in your firewall program!
bash>
Log in to the netLD server as an usual SSH session. The username and pass- word are the same
as those used in the usual browser GUI interface login. Note that you have to specify the appropriate port upon login. On Linux version it is 2222 and on windows version it is 22 (same as what SSH uses by default). Check the port at Terminal Server Proxy SSH port in Server Settings window → Network Servers.
bash> ssh [email protected] -p 2222
[email protected]’s password:
Active network: Default
Welcome to Net LineDancer - 2014/03/26 11:33:20 JST
netld#
Connect the IP address of a device with connect <IP address or host name>. You can
automatically login to the devices as an administrator, with already enabled state, as long as netLD already has the correct credential information of the device.
netld# connect 10.0.2.2
connect 10.0.2.2
Resolving device 10.0.2.2...
Connecting to device 10.0.2.2...
Warning: skipping login authentication until
an administrative user is added.
NEC Portable Internetwork Core Operating System Software
Copyright Notices:
Copyright (c) NEC Corporation 2001-2010. All rights reserved.
Copyright (c) 1985-1998 OpenROUTE Networks, Inc.
Copyright (c) 1984-1987, 1989 J. Noel Chiappa.
IX2025_LVI# enable-config
Enter configuration commands, one per line. End with CNTL/Z.
IX2025_LVI(config)#

4.1. TERMINAL PROXY TAB 144 144 CHAPTER 4. ADVANCED TOOLS
Copyrights ⃝C LogicVein.inc All rights reserved.
1 † When you are done, enter exit several times to go back to the netLD SSH session. (However
the number is device-specific.) The first exit is for exiting the enabled mode in the device CUI and the second exit is for exiting the session with the device. Upon logout, netLD takes a backup automatically. Also, when a configuration change has been detected, the event is automatically stored into the configuration history.
IX2025_LVI(config)# exit
exit
IX2025_LVI# exit
exit
Connection to 10.0.2.2 closed.
netld#
To exit the netLD session, again hit exit.
netld# exit
exit
Connection to 192.168.0.77 closed.
bash>
Auto completion
During the session with the netLD server, connect c shows the list of top 10 host names starting with c in your network. Enter the key number of the device, then hit Enter. It automatically tries to log in, and when successful, the prompt on the device appears. Also, the auto-completion is available, e.g., connect c <Tab> shows all host names starting from c. When the target device was not in the list, you can narrow down the list of the matched devices by entering additional characters, like cisco <Tab>, and the list contains only the devices starting with cisco.
1 You cannot login to the devices in the Network which you are not authorized. Without an authorization, you can login only to the devices in the Default network. To switch the network, enter network <network name>. More descriptions are available in Sec. 2.5, p.35.
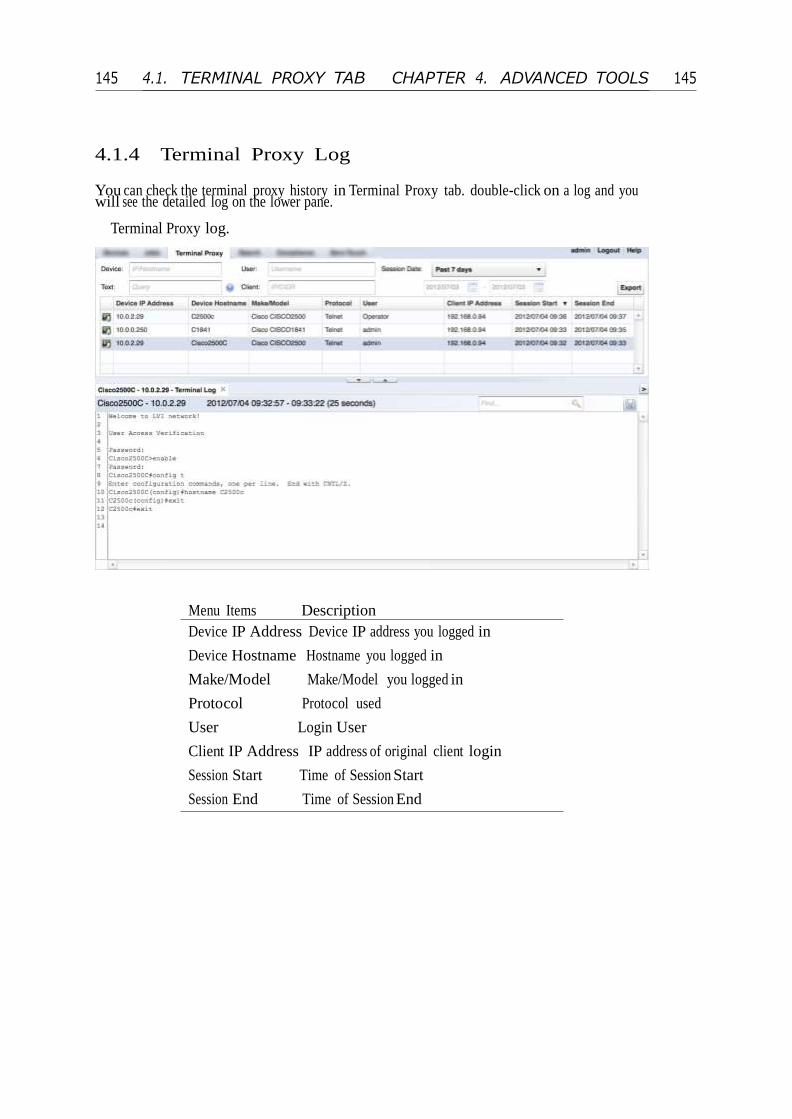
4.1. TERMINAL PROXY TAB 145 145 CHAPTER 4. ADVANCED TOOLS
4.1.4 Terminal Proxy Log
You can check the terminal proxy history in Terminal Proxy tab. double-click on a log and you will see the detailed log on the lower pane.
Terminal Proxy log.
Menu Items Description
Device IP Address Device IP address you logged in
Device Hostname Hostname you logged in
Make/Model Make/Model you logged in
Protocol Protocol used
User Login User
Client IP Address IP address of original client login
Session Start Time of Session Start
Session End Time of Session End
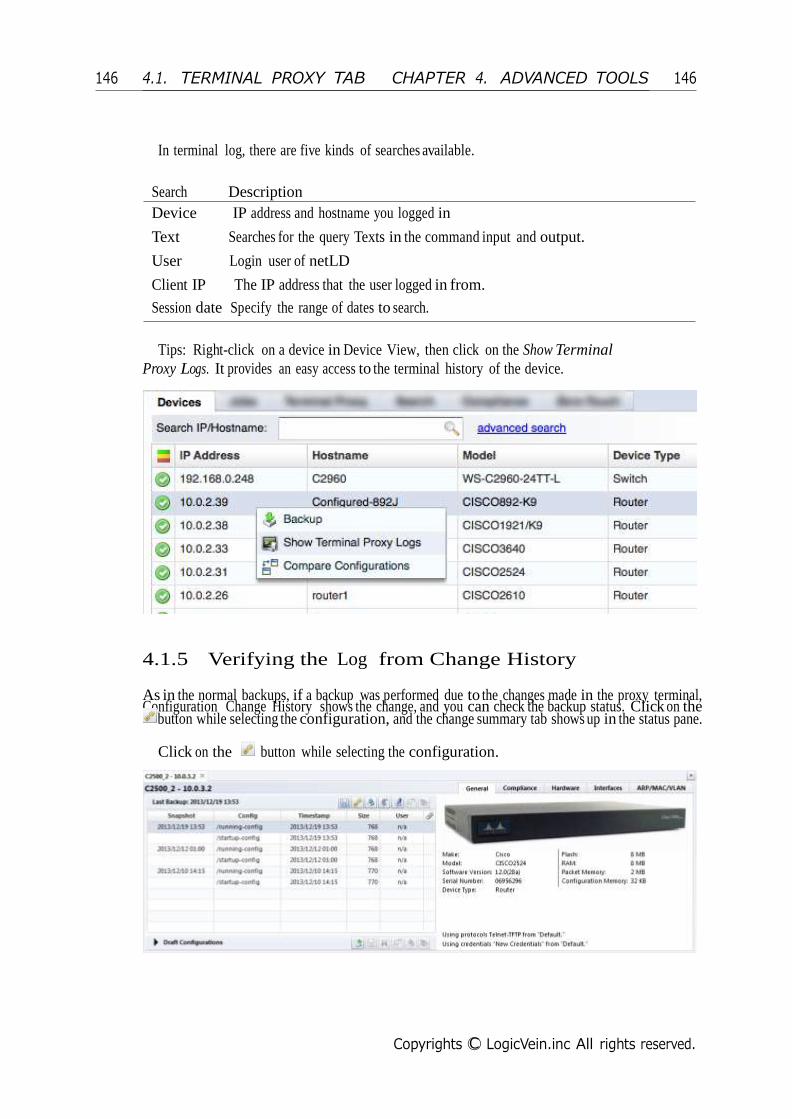
4.1. TERMINAL PROXY TAB 146 146 CHAPTER 4. ADVANCED TOOLS
Copyrights ⃝C LogicVein.inc All rights reserved.
In terminal log, there are five kinds of searches available.
Search Description
Device IP address and hostname you logged in
Text Searches for the query Texts in the command input and output.
User Login user of netLD
Client IP The IP address that the user logged in from.
Session date Specify the range of dates to search.
Tips: Right-click on a device in Device View, then click on the Show Terminal Proxy Logs. It provides an easy access to the terminal history of the device.
4.1.5 Verifying the Log from Change History
As in the normal backups, if a backup was performed due to the changes made in the proxy terminal, Configuration Change History shows the change, and you can check the backup status. Click on the
button while selecting the configuration, and the change summary tab shows up in the status pane.
Click on the button while selecting the configuration.

4.1. TERMINAL PROXY TAB 147 147 CHAPTER 4. ADVANCED TOOLS
The change summary tab shows up in the status pane.
4.1.6 Exporting the Log Files
Clicking the Export button in the Terminal Proxy Tab in the mane pane creates an zip archive in a specified folder.
The files in the archive are organized into subdirectories as follows:
• <filename>.zip
– <network name>
∗ 10.0.0.1 (1812J-B)
∗ 10.0.0.201 (cisco2500b.intra.dar.co.jp)
∗ 10.0.0.203 (cisco2600a.intra.dar.co.jp)
∗ 10.0.0.208 (C2801)
∗ . . .

4.2. CISCO PLUG AND PLAY (OPTIONAL) 148 148 CHAPTER 4. ADVANCED TOOLS
Copyrights ⃝C LogicVein.inc All rights reserved.
4.2 Cisco Plug and Play (Optional)
Cisco Plug and Play(PnP), formerly known as netLD Zero-touch, is a feature that deploys configurations into remote devices using Cisco IOS Auto Install and Cisco Networking Services (CNS) feature of the device. The name Cisco PnP is named after their characteristics which allow the network devices to be automatically located in a network, ”just like plugging a Plug-and-Play device into a computer.” As soon as the device is connected to the network, netLD detect it automatically, sends an appropriate configuration and backup the device.
There are three deployment types for Cisco PnP:
• Template based deployment
• Cisco PnP recovery for the identical device
• Cisco PnP recovery for the alternative device
netLD Cisco PnP distributes the configurations via the following protocols.
• DHCPʢDynamic Host Configuration Protocolʣ
• DHCP option 150 (Cisco Network Registrar)
• TFTPʢTrivial File Transfer Protocolʣ
• Cisco Auto Install
• Cisco Networking Services (CNS)

4.2. CISCO PLUG AND PLAY (OPTIONAL) 149 149 CHAPTER 4. ADVANCED TOOLS
Figure 4.2.1: Following figure shows the basic flows of Cisco PnP. For simplicity, DHCP, TFTP and netLD servers are displayed separately, but actually netLD runs all servers by itself.
Figure 4.2.2: Example of DHCP Relay

4.2. CISCO PLUG AND PLAY (OPTIONAL) 150 150 CHAPTER 4. ADVANCED TOOLS
Copyrights ⃝C LogicVein.inc All rights reserved.
4.2.1 Requirements for Using Cisco PnP Feature
To use Cisco PnP feature, make sure the following conditions are met:
• The target device is running IOS 12.2 or later releases with CNS Auto In- stall.2
• no startup-config - the device should not have a valid startup-config.3
• DHCP Server4 - if you choose to use netLD DHCP Sever feature, the target device must be in an environment where DHCP server can distribute an IP address to the device. See Figure 2 for more details.
2 You can check the available features of your IOS device in http://tools.cisco.com/ITDIT/
CFN/jsp/index.jsp 3 Select the option ”without default configuration in nvram” when you order the device. If you need to delete
configurations manually, use erase startup-config or erase nvram command and make the size of configuration in nvram to 0.
4 If necessary, there is an additional option that you use an external DHCP Server that sup- ports TFTP boot files option. If the target router is not connected directly to broadcast domain that netLD is locatable, you have to set DHCP relay on the relaying device and send DHCP requests to netLD.

4.2. CISCO PLUG AND PLAY (OPTIONAL) 151 151 CHAPTER 4. ADVANCED TOOLS
4.2.2 Setting up a DHCP Server
To use netLD DHCP server in netLD later than version 14.06, open Settings win- dow and go to Cisco Plug and Play section.
This is Cisco Plug and Play section in Settings window. Click on to add a new DHCP
pool.
Menu Items Description Enable DHCP Server Enable this checkbox to use the DHCP server fea- ture in netLD.
Lease Time Select the lease time from the dropdown list either 5 or 10 minutes.

4.2. CISCO PLUG AND PLAY (OPTIONAL) 152 152 CHAPTER 4. ADVANCED TOOLS
Copyrights ⃝C LogicVein.inc All rights reserved.
Enter the required information.
Menu Items Description
Pool Name Enter the name of a newly created DHCP pool. Relay Server CIDR Enter the range of IP addresses in which DHCP Relay servers
are running. Address Range The IP address range to deploy the configuration. Subnet Mask The subnet mask for the IP address range. Gateway (optional) The gateway address of the device that netLD
should use. netLD executes deployment through the gateway of DHCP relay agent if this option is
not specified. DNS Server (optional) An IP address of the DNS server used for the name
resolution of the server.
The boxes are filled in. Click on the OK button.
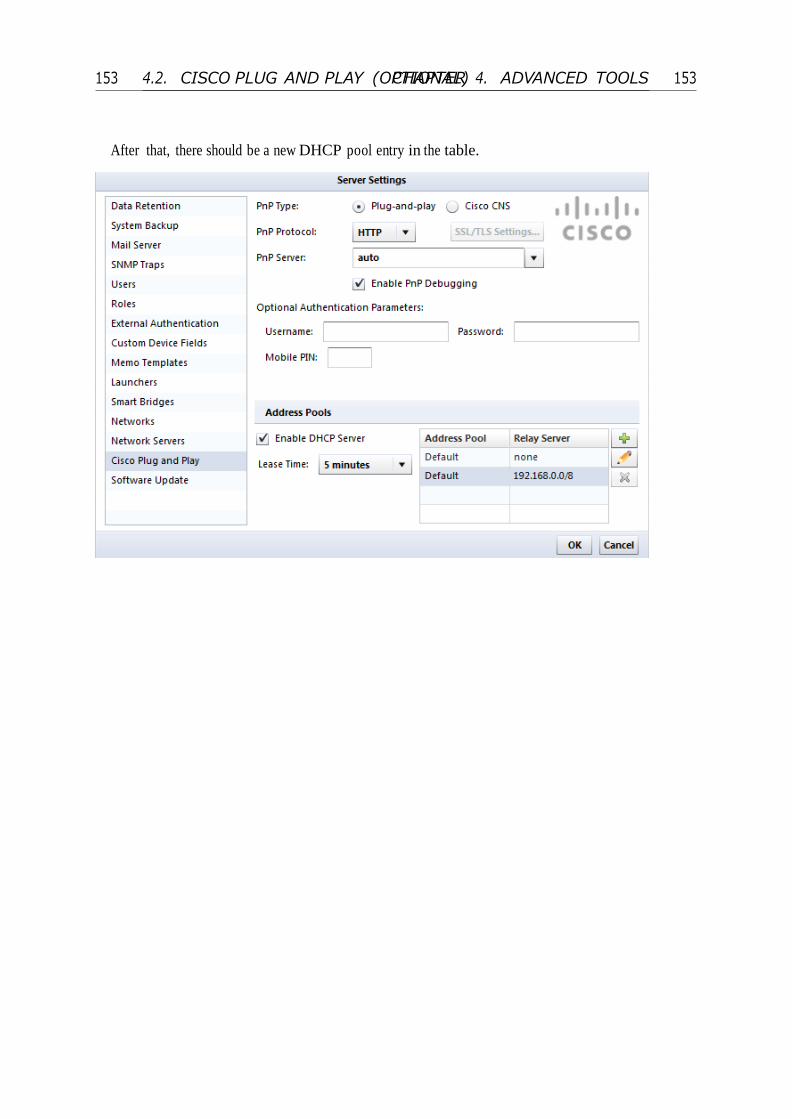
4.2. CISCO PLUG AND PLAY (OPTIONAL) 153 153 CHAPTER 4. ADVANCED TOOLS
After that, there should be a new DHCP pool entry in the table.

4.2. CISCO PLUG AND PLAY (OPTIONAL) 154 154 CHAPTER 4. ADVANCED TOOLS
Copyrights ⃝C LogicVein.inc All rights reserved.
Prior to netLD 13.08
Prior to netLD 13.08, DHCP server preferences can be configured in Zero-touch → Settings subtab. Move to the subtab and enter the required information.
Menu Items Description Enable DHCP Server Enable this checkbox to use the DHCP server fea- ture in
netLD. DHCP Relay CIDR Enter the range of IP addresses in which DHCP Relay servers
are running. Address Range The IP address range to deploy the configuration. Subnet Mask The subnet mask for the IP address range. Gateway (optional) The gateway address of the device that netLD
should use. netLD executes deployment through the gateway of DHCP relay agent if this option is
not specified.
TFTP Server (optional) The IP address of the TFTP server if you use a TFTP server other than that of netLD.
DNS Server (optional) An IP address of the DNS server used for the name resolution of the server.
Lease Time Select the lease time from the dropdown list either 5 or 10 minutes.
To save the change in DHCP Server settings, Click on Save button in the upper right corner.
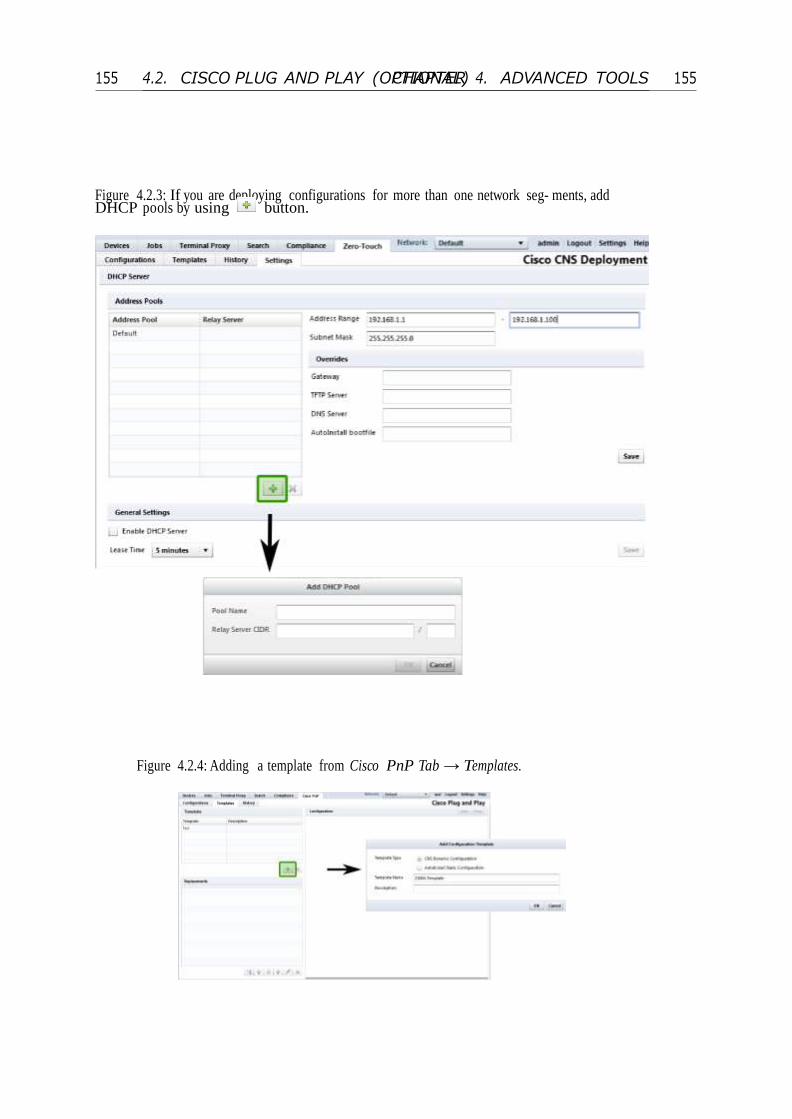
4.2. CISCO PLUG AND PLAY (OPTIONAL) 155 155 CHAPTER 4. ADVANCED TOOLS
Figure 4.2.3: If you are deploying configurations for more than one network seg- ments, add DHCP pools by using button.
Figure 4.2.4: Adding a template from Cisco PnP Tab → Templates.

4.2. CISCO PLUG AND PLAY (OPTIONAL) 156 156 CHAPTER 4. ADVANCED TOOLS
Copyrights ⃝C LogicVein.inc All rights reserved.
4.2.3 Template-Based Deployment
In a large network, sometimes there are many devices with similar configurations i.e. the difference is limited to the IP address, hostname, DNS or syslog servers. With aid of Master Configuration template, you can reduce the effort of customiz- ing the configuration files for those devices. We assume you are already familiar with using a template feature in netLD. If you are not, then we strongly suggest you to read the Smart Change section p.108 to understand the concept of template first.
To build a master template, follow the instructions below.
1. Move to Cisco PnP → Template Tab and click on to create a template (Fig. 4.2.4).
2. Select CNS Dynamic Configuration for the Template Type and enter the arbitrary template
name in the Template Name field. Add Description if you want. Click on the OK button to move to the next dialog.
3. Enter a base configuration into the text field on the right. In most cases, the easiest way to
achieve a base configuration is to copy the configuration from the other device.
4. Finally, follow the instructions in Smart Change section p.108 and make the configuration into a template.
Figure 4.2.5: When all the required replacements are added, save the template by clicking on the Save button in upper-right corner of the Configuration Editor.
5 † 5 If you do NOT want to save the configuration in the target device when it is deployed, add
no-persist at the end of the cns config initial... sentence Fig. 4.2.6.

4.2. CISCO PLUG AND PLAY (OPTIONAL) 157 157 CHAPTER 4. ADVANCED TOOLS
Figure 4.2.6: No-persist configuration
cns config initial ... no-persist
Registering devices
You have completed the preparation for the template required by Cisco PnP now. Next, you need to set the target devices and configurations to deploy, and set the replacement values if necessary.
First, move to Configurations subtab in the main pane, then click on .

4.2. CISCO PLUG AND PLAY (OPTIONAL) 158 158 CHAPTER 4. ADVANCED TOOLS
Copyrights ⃝C LogicVein.inc All rights reserved.
Then fill in the information in the dialog and click on the OK button. Select the Template in Deployment Type. The table below describes the meaning of each field.
Menu Items Description Device ID Specify a device ID according to the ID type selected in the above field.
Deployment Type
Select Template to deploy the configuration template you have created.
Template Specify the template to be deployed.Target configu- ration Automatically add to In- ventory and Backup after ZeroTouch Primary Man- agement Inter- face
Specify which configuration netLD should deploy the data to. Add the device to the inventory and get its backup con- figuration after Cisco PnP (Zero-Touch) is run.
Select the management interface to use while adding the device. netLD parses the template and automatically in- fer which interface is available on that device. If no in- terface description is found in the configuration, then no item would appear in the list.

4.2. CISCO PLUG AND PLAY (OPTIONAL) 159 159 CHAPTER 4. ADVANCED TOOLS
In the fields to the right, select each template variable and enter the parameter values for it.
If all the template value is filled in, then the leftmost status icon turns into .

4.2. CISCO PLUG AND PLAY (OPTIONAL) 160 160 CHAPTER 4. ADVANCED TOOLS
Copyrights ⃝C LogicVein.inc All rights reserved.
After connecting the target device to network, turn on the power of the device. As shown in Fig. 4.2.1, the device shifts to the Auto Install mode and tries to get an IP address by broadcasting DHCP/BOOTP request. After that, the device tries to receive a configuration file using TFTP. You can check the deployment job status in Live Status area.
Live Status shows the current status of the deployment process.
After the deployment is completed, the device reloads automatically and the deployed configuration is applied. You can see the history of Cisco PnP job in
†6 History tab.
6 The maximum size of the configuration file per device is about 20KB.

4.2. CISCO PLUG AND PLAY (OPTIONAL) 161 161 CHAPTER 4. ADVANCED TOOLS
4.2.4 Importing the Replacement Values in Cisco PnP
This is a new feature introduced in version 11.04. Follow the instruction below.
1. After you have set up the template, click on the Close button.
2. Click on button and select either Save empty Excel import file or Export configurations for template to Excel menu.
Showing Save empty Excel import file menu.
Menu Items Description Import configurations for template. . . Import an excel data which contains the replacement values
for the currently se- lected template.
Save empty Excel import file Export a template with no value listed.Export configuration for template to Ex- cel Export a template with replacement val- ues
currently set.
Open the exported file and edit or fill each replacement values. Save the change after
editing the file.

4.2. CISCO PLUG AND PLAY (OPTIONAL) 162 162 CHAPTER 4. ADVANCED TOOLS
Copyrights ⃝C LogicVein.inc All rights reserved.
Back to netLD, click on button and select Import configurations for template. . . menu.

4.2. CISCO PLUG AND PLAY (OPTIONAL) 163 163 CHAPTER 4. ADVANCED TOOLS
4.2.5 Cisco PnP Self-Recovery
You can recover the configuration that has previously been stored in netLD. This is effective when, for example, the device configuration was erased by mistake. The process is almost the same as using Template.
First, move to Configurations subtab in the main pane, then click on .

4.2. CISCO PLUG AND PLAY (OPTIONAL) 164 164 CHAPTER 4. ADVANCED TOOLS
Copyrights ⃝C LogicVein.inc All rights reserved.
Specify the necessary information in Cisco PnP Device Configuration dialog and click on the OK button. This time, select Self-Recovery option for Deployment Type.
After that, the configuration data already stored in netLD is restored back to the device. All remaining processes are the same as in Template-based deployment.
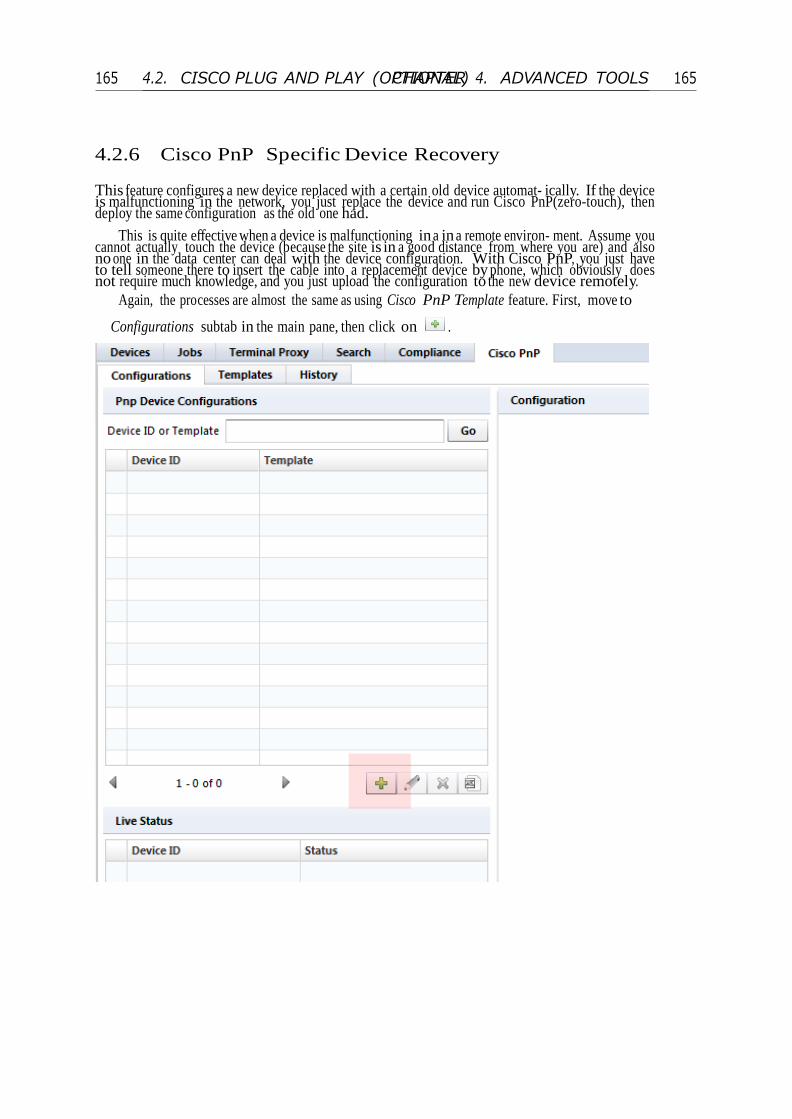
4.2. CISCO PLUG AND PLAY (OPTIONAL) 165 165 CHAPTER 4. ADVANCED TOOLS
4.2.6 Cisco PnP Specific Device Recovery
This feature configures a new device replaced with a certain old device automat- ically. If the device is malfunctioning in the network, you just replace the device and run Cisco PnP(zero-touch), then deploy the same configuration as the old one had.
This is quite effective when a device is malfunctioning in a in a remote environ- ment. Assume you
cannot actually touch the device (because the site is in a good distance from where you are) and also no one in the data center can deal with the device configuration. With Cisco PnP, you just have to tell someone there to insert the cable into a replacement device by phone, which obviously does not require much knowledge, and you just upload the configuration to the new device remotely.
Again, the processes are almost the same as using Cisco PnP Template feature. First, move to
Configurations subtab in the main pane, then click on .

4.2. CISCO PLUG AND PLAY (OPTIONAL) 166 166 CHAPTER 4. ADVANCED TOOLS
Copyrights ⃝C LogicVein.inc All rights reserved.
Specify the necessary information in Cisco PnP Device Configuration dialog and click on the OK button. Select Specific Device Recovery option as a Deployment Type.
Menu Items Description Recovery Device ID Similar to Device ID but it should be the ID of the old
device.
After that, the configuration data already stored in netLD is restored back to
†7 the device. All remaining processes are the same as in Template-based deployment.
7 To deploy a configuration from netLD Cisco PnP in a device that will be powered on for the first time, the device
must be dispatched by the vendor without startup-config in its NVRAM (e.g., CCP-CD-NOCF or CCP-EXPRESS-NOCF option to order devices.)

4.2. CISCO PLUG AND PLAY (OPTIONAL) 167 167 CHAPTER 4. ADVANCED TOOLS
4.2.7 Distributing Configurations via 3G network and VPN-
capable Mobile Router
netLD is able to distribute configurations via 3G network.
Sometimes, the device to be deployed should be sent to the remote base where various base-level services are not available. For instance, the network is not connected to the World Wide Web. The most reasonable reason is for the security, so the network may be physically disconnected from the Internet, or virtually, via firewall program. And if you are serious about security, you would understand the risk of changing the firewall settings each time the device configurations should be uploaded. Also, you might not gain access to the DNS, DHCP service in that network. Everything might be running on fixed IP tables and there might be no room for additional terminal devices to be inserted into.
These problems occurs mostly when the target network is not your own but rather a network of
your customer, and when you provide a specialized maintenance service to the customer. In these cases, 3G connection is important because if you upload the configuration through it, there is no need to use the network in the remote base.
Other big pros of using 3G network is the following:
• There is no need to set up PPPoE on the remote base thanks to the 3G network.
• Each 3G mobile router is reusable, so the cost of the router per remote base is quite limited.
In the following section, we describe how to set up a 3G-based configuration deployment.
Figure 4.2.7: Concept of 3G-based deployment
1. In Cisco PnP Tab, set up everything needed for the new Cisco device, i.e. setup the configuration templates and register its serial number in the netLD GUI.

4.2. CISCO PLUG AND PLAY (OPTIONAL) 168 168 CHAPTER 4. ADVANCED TOOLS
Copyrights ⃝C LogicVein.inc All rights reserved.
2. Power on the mobile router and make a VPN connection from netLD to the data center.
3. Connect a new Cisco device to the mobile router.
4. netLD receives the requests from the Cisco device and distributes the con- figuration via 3G.
5. Once the deployment is finished, connect the Cisco device to the target network.

4.2. CISCO PLUG AND PLAY (OPTIONAL) 169 169 CHAPTER 4. ADVANCED TOOLS
4.2.8 Deploying Configurations Prior to Sending the De-
vices to Each Base
Another way to deploy devices are using the configure-and-deliver strategy. Just upload the proper configurations with Cisco PnP in your office and send the devices to the remote bases. The pros of this strategy is its simplicity. However, the devices should first be at your office, so you cannot deliver the devices directory from the manufacturer.
Figure 4.2.8: Concept of configure-and-deliver strategy
1. Register the configurations and the serial numbers of the routers to the netLD server.
2. Power on the Cisco devices and distribute the configurations by netLD, in your office.
3. Deliver the devices to each base.
Contact LogicVein Technical Support ([email protected]) and we give the more detailed
instruction.
If you need further assistance or technical support about Net LineDancer, please fell free to contact below. We will be pleased to help you when you find any errors or ambiguities in this manual, or any questions regarding them as well. Please note that we are closed on weekends, national holidays, New Year and sum- mer holidays in Japanese time. We accept e-mails for 24 hours but we will only reply on those business hours. Thank you for your cooperation.
LogicVein, Inc. Technical Support
Mail: [email protected]

4.2. CISCO PLUG AND PLAY (OPTIONAL) 170 170 CHAPTER 4. ADVANCED TOOLS
Copyrights ⃝C LogicVein.inc All rights reserved.
4.2.9 Deploying a Bootstrap
netLD can deploy the configurations to the devices even when the device is in a network where DHCP is not available, by deploying a bootstrap in advance. The following is an example bootstrap for netLD Cisco PnP. Substitute <IP> with the actual IP address of the netLD server. For more information, please contact your distributors.
cns id hardware-serial
!
cns connect cns-profile ping-interval 10 retries 3 sleep 5
discover interface FastEthernet
template cns-profile
!
cns template connect cns-profile
cli description Basic CNS Initial Template
cli ip address dhcp
cli ip route 0.0.0.0 0.0.0.0 ${interface}
cli no shutdown
exit
!
cns config initial <IP> status http://<IP>/cns/config.asp
!
end

4.2. CISCO PLUG AND PLAY (OPTIONAL) 171 171 CHAPTER 4. ADVANCED TOOLS
4.3 Smart Bridge (Optional) netLD Smart Bridge (SB) feature allows you to manage the multiple separate remote networks from a single netLD server. Assume you are managing the devices in the corporation networks of your customers and those local networks do not share the local IP namespace. Without SB you had to set up a new netLD server in each networks, but now you can manage those network via a single terminal!
Figure 4.3.1: Smart Bridge concept
In Sec. 2.5, we described the concepts of Networks as a special terms for a device grouping
method in netLD. (do not confuse with network groups described in Sec. 3.1). The default network is named as Default while you can name the other networks as you like. You can also assign privileges to users on those networks.
Each SB-managed remote network is added to the list of networks, and devices in the remote networks are treated as a member of corresponding networks. You can manage those devices by simply switching to that network (through the drop- down menu in the global menu in the top-left corner.)
When you switch to a certain network, the graphical interface is identical to what it used to be - which means any operations described until now is also available in those remote networks, including credentials, access controls (Sec. 2.4) and so on.
Operating Smart Bridge reduces both the CPU workload on the server and the network bandwidth usage. Rather than making one netLD server monitors all devices in one network, you can subdivide a large network into a set of smaller networks and delegate server’s task to each Smart Bridge. The server only has to manage the result data sent from each SB and the workload on the server decreases. Also, on a system with Smart Bridges, the total amount of data communicated through the global network is significantly reduced because the data sent by each SB consist only of changes from the previous state.
In the following sections, we describe how to set up Smart Bridge feature into fully working state.

4.3. SMART BRIDGE (OPTIONAL) 172 172 CHAPTER 4. ADVANCED TOOLS
Copyrights ⃝C LogicVein.inc All rights reserved.
4.3.1 Installation
Smart Bridge program is a standalone program that works on the server. You need to install them in each network segment.
Save the netLD Smart Bridge install program (i.e. netld-Bridge-version-32bit or 64bit.exe) to
the target server and double-click on the program to start.
Select a language to use from the drop-down menu and click on the OK button to start the Setup
wizard.
Click on the Next to go to License Agreement dialog.

4.3. SMART BRIDGE (OPTIONAL) 173 173 CHAPTER 4. ADVANCED TOOLS
License Agreement dialog. Press page down key to read the rest of the agreement and click on the I Agree to continue.
Specify the install directory by clicking on Browse. . . button. Click on the Next button to continue.

4.3. SMART BRIDGE (OPTIONAL) 174 174 CHAPTER 4. ADVANCED TOOLS
Copyrights ⃝C LogicVein.inc All rights reserved.
Installation continues.
Click on the Next button if Installation Complete dialog is displayed.

4.3. SMART BRIDGE (OPTIONAL) 175 175 CHAPTER 4. ADVANCED TOOLS
Click on the Finish button to close the setup wizard.
4.3.2 Registering Smart Bridges to the Core Server
You have to register the installed Smart Bridges to the core netLD Server. Go to the settings window → Smart Bridges.
Click on the .

4.3. SMART BRIDGE (OPTIONAL) 176 176 CHAPTER 4. ADVANCED TOOLS
Copyrights ⃝C LogicVein.inc All rights reserved.
Enter the required information in Bridge Host dialog. Then click on the OK button to finish.
Menu Items Description
Name Enter a name for the Smart Bridge. Host or IP Specify a server by hostname or IP address that the Smart
Bridge is installed. Port Specify a port that the Smart Bridge uses by the up and down
arrow keys.
Once the Smart Bridge is added to the network list on the core server, you will be soon able to
check the connection status to the Smart Bridge in this dialog. The icons in the first column indicates the status of the Smart Bridge. Now, the status is because the connection is not established.

4.3. SMART BRIDGE (OPTIONAL) 177 177 CHAPTER 4. ADVANCED TOOLS
Sooner or later, if the configuration is correct, the icon should turn into . If it never do so, review the configuration again. If the problem still exists, please contact out support. †8
If you need further assistance or technical support about Net LineDancer, please fell free to contact below. We will be pleased to help you when you find any errors or ambiguities in this manual, or any questions regarding them as well. Please note that we are closed on weekends, national holidays, New Year and sum- mer holidays in Japanese time. We accept e-mails for 24 hours but we will only reply on those business hours. Thank you for your cooperation.
LogicVein, Inc. Technical Support
Mail: [email protected]
8 The name of Smart Bridge cannot be modified after it has been registered in the core server. If you do have to
change the name, you have to delete the original one and rerun the entire registration.

4.3. SMART BRIDGE (OPTIONAL) 178 178 CHAPTER 4. ADVANCED TOOLS
Copyrights ⃝C LogicVein.inc All rights reserved.
4.3.3 Adding a Network for a SB
Adding a network is exactly the same as what you do in order to add a local network, except that you should specify the registered Smart Bridge while adding it. First, Open Settings window → Networks section.
Click on the to create a new network.

4.3. SMART BRIDGE (OPTIONAL) 179 179 CHAPTER 4. ADVANCED TOOLS
Enter the required information in the dialog. In the Bridge Host field, select a SB that you have just added in the previous section. Finally, click on the OK button to save the network.
Menu Items Description
Name Enter a name for the new network. Bridge Host Select a Smart Bridge to use for the network from the
dropdown list.
Once a network is added, it appears in the Network dropdown list in the global menu. Selecting its entry switches the network.
4.3.4 Adding devices to a SB
Finally, add devices to the SB network. Again, the manipulation required to add devices, credentials and so on, in the remote network, is nearly exactly the same as those required in the local network.
The only difference is that you have to switch the current network to the target remote newtork
which was added in the previous section. Once you have switched to the appropriate network, you can discover, add and change the devices as usual. Credentials can also be handled just the same way as you did. When you add a device, it is polled, checked, backed up by the Smart Bridge, instead of the core netLD server.
For information on adding devices and credentials, see Sec. 3.3.1 and Sec. 3.1.

4.4. INTEGRATION WITH EXTERNAL NETWORK MANAGEMENT SOFTWARE 180
180 CHAPTER 4. ADVANCED TOOLS
Copyrights ⃝C LogicVein.inc All rights reserved.
4.4 Integration with External Network Manage-
ment Software
In this section, we describe the method to interact with external Network Man- agement Software (NMS) such as SNPMc.
4.4.1 Interaction with SNMPc
After version 10.10 or above, netLD and SNMPc network manager has the im- proved collaboration. netLD get a device configuration from SNMPc and manages the configuration history. Follow the instructions below, but we assume a windows environment.
First, create a following batch script:
-------------------------------------------
@echo off
@setlocal
set NETLD_SERVER=*********
set NETWORK=Default
for /f "tokens=1,2 delims=+ " %%a in ("%1") do set DEVICE1=%%a&set
DEVICE2=%%b
@set DEVICE1=%DEVICE1%@%NETWORK%
@set DEVICE2=%DEVICE2%@%NETWORK%
@explorer.exe
"https://%NETLD_SERVER%/#username=*****&password=******&random=%R
ANDOM%&action=diff&device=%DEVICE1%+%DEVICE2%"
exit
-------------------------------------------
However, please note that:
• set NETLD SERVER=******** – fill ***** with the netLD IP address or host name.
• username=******** – fill ***** with netLD login username.
• password=******** – fill ***** with netLD login password.
Save this batch script with an arbitrary name like ”diff.bat” into SNMPc Net- work Manager install directory.

4.4. INTEGRATION WITH EXTERNAL NETWORK MANAGEMENT SOFTWARE 181
181 CHAPTER 4. ADVANCED TOOLS
Second, create a custom menu in SNMPc. Add the following custom menu by selecting Add Custom Menu in Tool menu.
Here is an example of creating a custom menu to use the above batch script. Note that when you fill in the Argument field you specify the correct file name that you have saved the batch file as in the previous instruction.
Menu Name arbitrary
Type Run
Arguments cmd.exe /c diff.bat $A
Use Selected Object checkbox Enable
In order to check the menu behavior, select a map object in SNMPc map and click on the new
custom menu.

4.4. INTEGRATION WITH EXTERNAL NETWORK MANAGEMENT SOFTWARE 182
182 CHAPTER 4. ADVANCED TOOLS
Copyrights ⃝C LogicVein.inc All rights reserved.
netLD config diff screen opens if any object is selected. If you select two devices,
configurations comparison screen of the devices shows up.
9
†
9 To use this feature, configurations for the devices must already be stored in netLD by per- forming backup.

4.4. INTEGRATION WITH EXTERNAL NETWORK MANAGEMENT SOFTWARE 183
183 CHAPTER 4. ADVANCED TOOLS
4.4.2 Configuring SNMP Trap Send
netLD is able to send a trap to the network managers when:
1. the device configuration changes10
2. a new device was added to/deleted from the netLD inventory
3. netLD fails to run the backup job, and
4. a compliance status changes in some devices.
To set the trap destination, follow the instructions below.
In Settings window → SNMP Traps enable the checkboxes for the conditions in which netLD sends a trap.
10 Traps are sent only when the configuration differes from the last backup.

4.4. INTEGRATION WITH EXTERNAL NETWORK MANAGEMENT SOFTWARE 184
184 CHAPTER 4. ADVANCED TOOLS
Copyrights ⃝C LogicVein.inc All rights reserved.
Click on the at the bottom of the Trap receivers list to enter the hostname and the port
of the receiver. Also, enter the name of SNMP trap community into SNMP community string field. Click on the OK button to add the receiver to the list.
Confirm the receiver is correctly listed in the receivers list and click on the OK button to save the change.
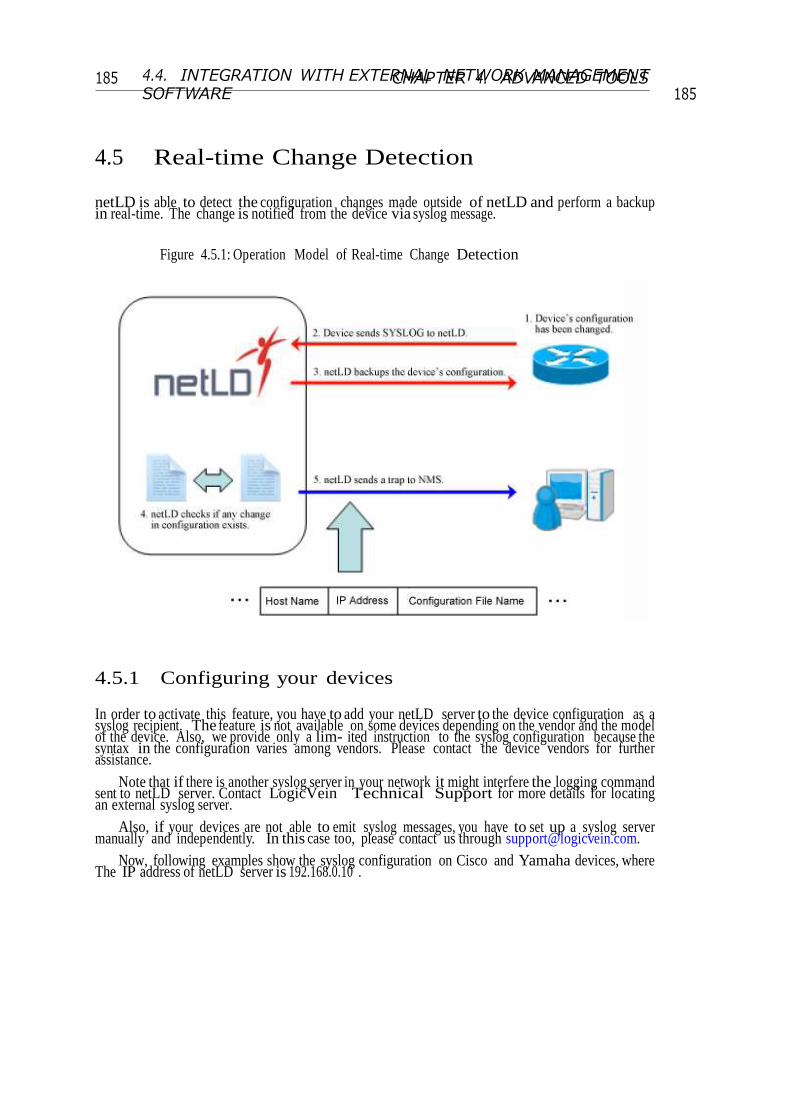
4.4. INTEGRATION WITH EXTERNAL NETWORK MANAGEMENT SOFTWARE 185
185 CHAPTER 4. ADVANCED TOOLS
4.5 Real-time Change Detection netLD is able to detect the configuration changes made outside of netLD and perform a backup in real-time. The change is notified from the device via syslog message.
Figure 4.5.1: Operation Model of Real-time Change Detection
4.5.1 Configuring your devices
In order to activate this feature, you have to add your netLD server to the device configuration as a syslog recipient. The feature is not available on some devices depending on the vendor and the model of the device. Also, we provide only a lim- ited instruction to the syslog configuration because the syntax in the configuration varies among vendors. Please contact the device vendors for further assistance.
Note that if there is another syslog server in your network it might interfere the logging command
sent to netLD server. Contact LogicVein Technical Support for more details for locating an external syslog server.
Also, if your devices are not able to emit syslog messages, you have to set up a syslog server
manually and independently. In this case too, please contact us through [email protected].
Now, following examples show the syslog configuration on Cisco and Yamaha devices, where The IP address of netLD server is 192.168.0.10 .

4.5. REAL-TIME CHANGE DETECTION 186
Copyrights ⃝C LogicVein.inc All rights reserved.
Cisco 2500
Router# configure terminal
Router(config)# logging 192.168.0.10
Router(config)# logging on
Router(config)# exit
Yamaha RT107
Yamaha# syslog host 192.168.0.10
Yamaha# syslog info on
Yamaha# save
4.5.2 Operation Check
Check netLD server log real-time events to test operations of this feature. netLD Server log files are saved in netLD install directory with a name netLD.log. When a change is detected, the following entry is added:
10:35:57 [RealtimeProvider] [Jetty-1] INFO - Added device 10.0.0.152 to real-time batch.
If no such entry is found, check another syslog log file (normally syslog.log in the same directory) to see if it is receiving any messages from the device.
Again, note that this feature is not available on some devices. It is either due to the hardware limitation, or because the device is the latest model. However, in the latter case, a future support is possible if the device has a specific login and logout events, or a syslog event for configuration change. For this kind of feature-request, contact LogicVein Technical Support ([email protected]).
If you need further assistance or technical support about Net LineDancer, please fell free to
contact below. We will be pleased to help you when you find any errors or ambiguities in this manual, or any questions regarding them as well. Please note that we are closed on weekends, national holidays, New Year and sum- mer holidays in Japanese time. We accept e-mails for 24 hours but we will only reply on those business hours. Thank you for your cooperation.
LogicVein, Inc. Technical Support
Mail: [email protected]

Chapter 5
Miscellaneous
In this chapter, we describe various tips that help fine-tune the interface and the security. We also include some features that are not used so often but are sometimes essentials.
Contents
5.1 Configurations Related to Devices and Operations . . 188
5.1.1 Modifying the Columns in the Device View . . . . . . . 188
5.1.2 Scheduler Filters . . . . . . . . . . . . . . . . . . . . . . 189
5.1.3 Device Tags . . . . . . . . . . . . . . . . . . . . . . . . . 191
5.1.4 Display Neighbor Information . . . . . . . . . . . . . . . 194
5.2 Configurations Available in Settings Window . . . . . 194
5.2.1 Setting the Data Retention policy . . . . . . . . . . . . 195
5.2.2 System Backup and Restoration . . . . . . . . . . . . . 195
5.2.3 Mail Server . . . . . . . . . . . . . . . . . . . . . . . . . 197
5.2.4 Changing the Data Directory in Operation . . . . . . . 199
5.2.5 netLD RADIUS External Authentication . . . . . . . . 199
5.2.6 Changing the Column Names of Custom Device Fields . 201
5.2.7 Launchers (URL Launchers) . . . . . . . . . . . . . . . . 201
5.2.8 Network Servers . . . . . . . . . . . . . . . . . . . . . . 203
5.2.9 Software Update . . . . . . . . . . . . . . . . . . . . . . 205
5.3 Help Menu . . . . . . . . . . . . . . . . . . . . . . . . . . 206
5.3.1 FAQ . . . . . . . . . . . . . . . . . . . . . . . . . . . . . 206
5.3.2 Manual . . . . . . . . . . . . . . . . . . . . . . . . . . . 206
5.3.3 About . . . . . . . . . . . . . . . . . . . . . . . . . . . . 207
5.4 Yet Other Miscellaneous Operations . . . . . . . . . . . 209
5.4.1 Security Certificate on Browsers . . . . . . . . . . . . . 209
5.4.2 Software License Key . . . . . . . . . . . . . . . . . . . 216
187

5.1. CONFIGURATIONS RELATED TO DEVICES AND OPERATIONS 188 188 CHAPTER 5. MISCELLANEOUS
Copyrights ⃝C LogicVein.inc All rights reserved.
5.4.3
Resetting Client Settings .
.
.
.
.
.
.
.
.
.
.
.
.
.
.
.
.
216
5.4.4 Upgrading netLD . . . . . . . . . . . . . . . . . . . . . . 218
5.4.5 Uninstalling netLD . . . . . . . . . . . . . . . . . . . . . 218
5.1 Configurations Related to Devices and Op-
erations
5.1.1 Modifying the Columns in the Device View
To modify the columns in the Device View, click on the top-right Select columns button ( ). The Customization dialog show up, so toggle each entry appropri- ately.
Click on the button.

5.1. CONFIGURATIONS RELATED TO DEVICES AND OPERATIONS 189 189 CHAPTER 5. MISCELLANEOUS
Toggle the checkboxes.
5.1.2 Scheduler Filters
You can use cron expression filters to set regular-basis job schedules. Added filters can be reused afterward while making a job schedule.
Select Job Management → Filters.

5.1. CONFIGURATIONS RELATED TO DEVICES AND OPERATIONS 190 190 CHAPTER 5. MISCELLANEOUS
Copyrights ⃝C LogicVein.inc All rights reserved.
Click on to create a filter.
Enter the required information. Click on the OK button to save the filter.
Field title Description
Name Enter a meaningful filter name.
Cron Expression Enter a cron expression. Timezone Select the timezone to calculate the event trigger- ing time.

5.1. CONFIGURATIONS RELATED TO DEVICES AND OPERATIONS 191 191 CHAPTER 5. MISCELLANEOUS
Confirm if the new filter is added and click on the OK button to finish.
5.1.3 Device Tags
You can group devices in netLD inventory by creating tags for each group. Device Tags can be used while searching the devices.
Open Inventory → Device Tags menu.

5.1. CONFIGURATIONS RELATED TO DEVICES AND OPERATIONS 192 192 CHAPTER 5. MISCELLANEOUS
Copyrights ⃝C LogicVein.inc All rights reserved.
Enter a name for the tag and click on .
Icons Description
Click on this icon to delete the tag. Click on this icon or double-click on a tag name in the
list to edit the tag.
Select devices in Device View and click on the Associate Tag or Disassociate tags buttons in
the Device tool bar.

5.1. CONFIGURATIONS RELATED TO DEVICES AND OPERATIONS 193 193 CHAPTER 5. MISCELLANEOUS
Enable checkboxes for each device tag to associate it with the devices, or leave checkbox empty (disassociate).
If you are selecting more than one device, tags shared by those devices are displayed in the
list. Finally, click on the OK button to save the change.

5.2. CONFIGURATIONS AVAILABLE IN SETTINGS WINDOW 194 194 CHAPTER 5. MISCELLANEOUS
Copyrights ⃝C LogicVein.inc All rights reserved.
5.1.4 Display Neighbor Information
netLD allows you to check the neighbor information of the device via Display neighbors in Device menu.
Select Device → Display neighbors.
The new tab appears in the status pane.
5.2 Configurations Available in Settings Window
In this section, we describe the configurations available in (Server) Settings win- dow. It opens when you click on the settings button on the global menu.

5.2. CONFIGURATIONS AVAILABLE IN SETTINGS WINDOW 195 195 CHAPTER 5. MISCELLANEOUS
5.2.1 Setting the Data Retention policy netLD stores all configuration data unless specified. However, it causes the size of the database to increase in the long run. You can set an expiration period of the data to avoid this problem. The configuration is available in Data Retention menu.
In Delete expired data weekly at this time, you can configure which timing you want to remove the old data. The rest determines just as it says:
• Duration to keep configuration history
• Duration to keep terminal proxy history
• Duration to keep job execution history
5.2.2 System Backup and Restoration All netLD internal data are saved in derby and lucene subdirectories (and also pgsql after version 14.06) under the netLD installation directory. netLD provides a convenient backup & restoration feature for those configurations. System backups can be scheduled and runs automatically. †2
In System Backup settings, you can modify the following contents:
Menu Items Description
Enable daily system backup Perform the system backup at this time Number of backups to keep
Enable this checkbox to enable daily system backup.
Specify the time to perform the system backup.
Specify the number of backups (7, 14, and 30) to keep in the local server.
Backup directory Specify a name of the directory that the back up files should be saved.
Perform System Backup Now System backup last per- formed
Click on this button to execute a system backup.
Shows the date and time last system backup was performed.
Backup data will be saved in a directory named backup yyyy-mm-dd, where yyyy,mm,dd
corresponds to year, month and date, respectively. The default direc- tory is <installdir>/backups, but you can also save the backup into the other path (e.g. D:ˇbackups). Backup data can be saved only in the local disks.
1 The latest configuration is always kept even if it is older than the duration setting. 2 These settings are independent of the backup schedule for the device configuration.

5.2. CONFIGURATIONS AVAILABLE IN SETTINGS WINDOW 196 196 CHAPTER 5. MISCELLANEOUS
Copyrights ⃝C LogicVein.inc All rights reserved.
Figure 5.2.1: Data Retention settings menu
Figure 5.2.2: System Backup settings menu

5.2. CONFIGURATIONS AVAILABLE IN SETTINGS WINDOW 197 197 CHAPTER 5. MISCELLANEOUS
Restoring the Backup Data
Note that there is no compatibility of the saved data between the different versions of netLD. This is usually not a problem because, when netLD is upgraded to a new version and it has some backup data, they are automatically migrated to the new version.
The problem occurs when you move or store the saved data manually. One such situation is
when you want to migrate the settings to the new machine. In this case, you should be careful about the compatibility.
To migrate the setting data manually, follow the instruction below:
1. Stop the running netLD service in the new and the old servers.
2. Copy derby and lucene (and pgsql after version 14.06) subdirectories (cf. Sec. 7.2, p.231) from the old server and save them into the netLD install directory of the new server.
3. Start netLD service in the new server.
5.2.3 Mail Server
You can set an SMTP server to allow netLD to send E-mails. Following configu- rations are available.

5.2. CONFIGURATIONS AVAILABLE IN SETTINGS WINDOW 198 198 CHAPTER 5. MISCELLANEOUS
Copyrights ⃝C LogicVein.inc All rights reserved.
Figure 5.2.3: Mail Server section in settings window
Menu Items Description
Mail server hostname or IP address The mail server by hostname or IP address.
From email address The sender email address.
From name The sender name.
Server requires authentication Enables the server authentication.
Mail server username Mail server username for the authentication.
Mail server password Mail server password for the authentication.

5.2. CONFIGURATIONS AVAILABLE IN SETTINGS WINDOW 199 199 CHAPTER 5. MISCELLANEOUS
5.2.4 Changing the Data Directory in Operation
You can customize not only the backup directory but also the current setting directories, while it requires some amount of operations.
1. Stop the running netLD service (via CLI, Service Manager or Task Tray. see Sec. 2.6)
2. Copy derby and lucene subdirectories (cf. Sec. 7.2, p.231) to the destination directory,
E://nlddata for example.
3. Open Net LineDancerˇosgi-configˇconfig.ini and find the following line:
netld.datadir=
Append the destination directory path to the line:
netld.datadir=E://nlddata
4. Start netLD service in CLI. (e.g., net start netld)
5.2.5 netLD RADIUS External Authentication
netLD provides the ability for users to be authenticated using an external Remote Access Dial In User Service (RADIUS) server. This guide will explain how to configure netLD to enable this integration.
Requirements
In order to run the RADIUS integration you must have a RADIUS capable server like Microsoft Active Directory or FreeRADIUS. The netLD server and RADIUS server must also be able to communicate using UDP on port 1812.

5.2. CONFIGURATIONS AVAILABLE IN SETTINGS WINDOW 200 200 CHAPTER 5. MISCELLANEOUS
Copyrights ⃝C LogicVein.inc All rights reserved.
Configuring RADIUS
In order for netLD to be able to authenticate, the RADIUS server only needs to be configured to handle Access-Request packets. After sending an Access-Request to the RADIUS server, netLD will listen for an Access-Accept response. The response should contain one or more Filter-Id attributes.
Here is an example configuration for a user named ”jdoe” in FreeRADIUS. . .
yamada Cleartext-Password := "password"
Filter-Id += "role:Administrator",
Filter-Id += "networks:*",
Filter-Id += "customFields:1,2,3,4,5"
This configuration tells FreeRADIUS that for an Access-Request for a user named ”jdoe” to
match the password ”password”. If the password matches an Access-Accept response will be sent with three Filter-Id attributes set. These three Filter-Id attributes control the access the user is granted.
Name Required Description
role
networks
customFields
Yes
No
No
The name of the netLD role to assign to this user. A comma separated list of the managed networks visible to the user. (Use ”*” to grant access to all networks) A comma separated list of the custom fields that should be visible to the user.
Configuring Net LineDancer
To configure RADIUS authentication you must tell netLD the hostname and shared secret for communicating with your RADIUS server. The RADIUS config- uration settings can be found in the Server Settings window.
Here you can enter the hostname or IP address of the RADIUS server and the shared secret
to use when making requests. You can test if the settings are correct by entering a test username and password into the Test Authentication area. Clicking the Test button will cause netLD to attempt an Access-Request against the specified server.
To enable the RADIUS integration check Allow authentication using an exter- nal RADIUS
server and click on OK.

5.2. CONFIGURATIONS AVAILABLE IN SETTINGS WINDOW 201 201 CHAPTER 5. MISCELLANEOUS
5.2.6 Changing the Column Names of Custom Device Fields
You can add arbitrary texts in the custom fields of the devices. In order to modify the value of custom field in each device, see Sec. 3.3.4. In this setting section, you can customize the titles of Custom Device Fields.
5.2.7 Launchers (URL Launchers)
In this setting section, you can create shortcuts to access certain URLs defined by the device in the right-click menu which appears in the inventory.
If you set a URL Launcher template (IP Address for example), an IP Address button appears
in the right-click menu in Device View. When you click on it, the template is instantiated with the device information, and the browser opens the result URL.
To add such a launcher, click on to insert the entry to the list. The URL may contain
some specific patterns surrounded with braces {} which are substituted with the actual value of each device.

5.2. CONFIGURATIONS AVAILABLE IN SETTINGS WINDOW 202 202 CHAPTER 5. MISCELLANEOUS
Copyrights ⃝C LogicVein.inc All rights reserved.
Figure 5.2.4: External Authentication section in Server Settings window.
Figure 5.2.5: Custom Device Fields

5.2. CONFIGURATIONS AVAILABLE IN SETTINGS WINDOW 203 203 CHAPTER 5. MISCELLANEOUS
For example, if you right-click on a device with IP 10.0.0.1 and click on the new entry IP Address added in the right-click menu, a pattern {device.ipAddress} in the URL of that entry is substituted with an actual IP address 10.0.0.1. Those patterns are added via ← buttons in URL Variables.
5.2.8 Network Servers
In Network Servers, you can modify the settings for Login Idle Timeout and Server Primary IP Address.
Login Idle Timeout
Login idle timeout for netLD console is set to 30 minutes by default. You can change it in the Network Servers. Follow the instruction below.
Disabling this feature is not available because it is a bad practice with regard to the security. If
someone get the configuration data while an administrator is leaving his desk for a while, it causes a serious system abuse. However, if you really want to do it, you are still able to achieve virtually the same results by setting the maximum value (526,000).
To change the value, change the number of minutes in User login idle timeout (minutes) dial box. Click on the OK button to save the value.

5.2. CONFIGURATIONS AVAILABLE IN SETTINGS WINDOW 204 204 CHAPTER 5. MISCELLANEOUS
Copyrights ⃝C LogicVein.inc All rights reserved.
Figure 5.2.6: URL Launchers
Figure 5.2.7: Network Servers

5.2. CONFIGURATIONS AVAILABLE IN SETTINGS WINDOW 205 205 CHAPTER 5. MISCELLANEOUS
Changing the Server Primary IP Address (Windows version only)
netLD primary server IP address will be automatically detected when the program is launched. To change the value, use Server Primary IP Address pull down list to change the IP address and click on the OK button.
Restart Required dialog will show up. Click on the Yes button to restart the server and apply
changes in the settings.
Changing the HTTPS port (Windows version only)
Enable Host the HTTPS web client on a non-standard port checkbox and change the port number, and click on the OK button.
Click on the Yes button in Restart Required dialog to restart netLD server.
Reference: Sec. 7.1, p.230
5.2.9 Software Update
netLD automatically checks for updates and notifies if any updates are available, including adapter or manual updates. Automatic update notification needs an Internet connection.
Usually you will find the update notified on the top of the screen.

5.3. HELP MENU 206 206 CHAPTER 5. MISCELLANEOUS
Copyrights ⃝C LogicVein.inc All rights reserved.
To update the software explicitly,
1. Click on the Install Update button to update. Click on the Yes button to confirm starting
the update.
2. Download starts automatically. When the update is complete, netLD service restarts, and then the new login screen appears.
Downloading the updates.
5.3 Help Menu
Help Menu is used to send a log, check the manual/FAQs and so on.
5.3.1 FAQ
Clicking on this menu opens FAQ page in our website.
5.3.2 Manual
Clicking on this menu opens netLD product manual.

5.3. HELP MENU 207 207 CHAPTER 5. MISCELLANEOUS
5.3.3 About
There are several features in Help → About and they are useful for debugging. To use the features in this section, you have to login with Administrator user.
Adapter Logging
Adapter Logging feature in the About menu allows you to issue a log for adapter operations. It is effective only in 5 minutes and is disabled after that. It is because this feature is quite CPU intensive, and there may be significant performance drawback if someone forgot to disable the feature.
To activate the adapter logging feature, first select the About in Help menu. Then click on
the Adapter Logging button.

5.3. HELP MENU 208 208 CHAPTER 5. MISCELLANEOUS
Copyrights ⃝C LogicVein.inc All rights reserved.
Enter an IP address of the target device in IP/CIDR and enable checkbox for Enable recording of adapter operations.
The log file have a filename much like the following:
C:ˇProgram FilesˇNet LineDancerˇscratchˇlogsˇSwitch_backup_10.0.2.3.log
Send Log
Send Log feature sends a set of log files to [email protected] when you are in troubles. The logging feature in netLD is quite exhaustive, e.g. it creates the logs even while using the Smart Bridge feature.
1. Select the About in the Help menu.
2. Click on the Send Log button.
Enter your E-mail address in Your E-Mail field and click on the OK button to send the log.

5.3. HELP MENU 209 209 CHAPTER 5. MISCELLANEOUS
5.4 Yet Other Miscellaneous Operations
We further describe the other operations hard to categorize.
5.4.1 Security Certificate on Browsers
Since we need to access netLD server with HTTPS, security certification error is issued on a browser when you access the netLD instance. Ignoring the error and accessing netLD’s interactive interface via a browser is completely safe, but you can also issue and install SSL certificate to suppress the error message. While the operation is instructed with Internet Explorer, the similar method can also be applied to the other browsers like Google Chrome and Mozilla Firefox.
Installing SSL Certificate
This instruction is for IE only. For the other browsers, refer to the guide provided by the browser vendor.
Start Internet Explorer browser and connect to netLD server, and select Continue to this website (not recommended).

5.4. YET OTHER MISCELLANEOUS OPERATIONS 210 210 CHAPTER 5. MISCELLANEOUS
Copyrights ⃝C LogicVein.inc All rights reserved.
Click on the Certificate Error to open the error message and click on View certificates to start an installation.
Click on the Install Certificate button.

5.4. YET OTHER MISCELLANEOUS OPERATIONS 211 211 CHAPTER 5. MISCELLANEOUS
Click on the Next button
Select Place all certificates in the following store and click on the Browse button.

5.4. YET OTHER MISCELLANEOUS OPERATIONS 212 212 CHAPTER 5. MISCELLANEOUS
Copyrights ⃝C LogicVein.inc All rights reserved.
Select Trusted Root Certification Authorities and click on the OK button.
Click on the Next button.

5.4. YET OTHER MISCELLANEOUS OPERATIONS 213 213 CHAPTER 5. MISCELLANEOUS
Click on the Finish button to save the change.
Click on the Yes button to install the certificate in Security Warning dialog.

5.4. YET OTHER MISCELLANEOUS OPERATIONS 214 214 CHAPTER 5. MISCELLANEOUS
Copyrights ⃝C LogicVein.inc All rights reserved.
Click on the OK button to finish the wizard.
Click on the OK button to close Certificate dialog.
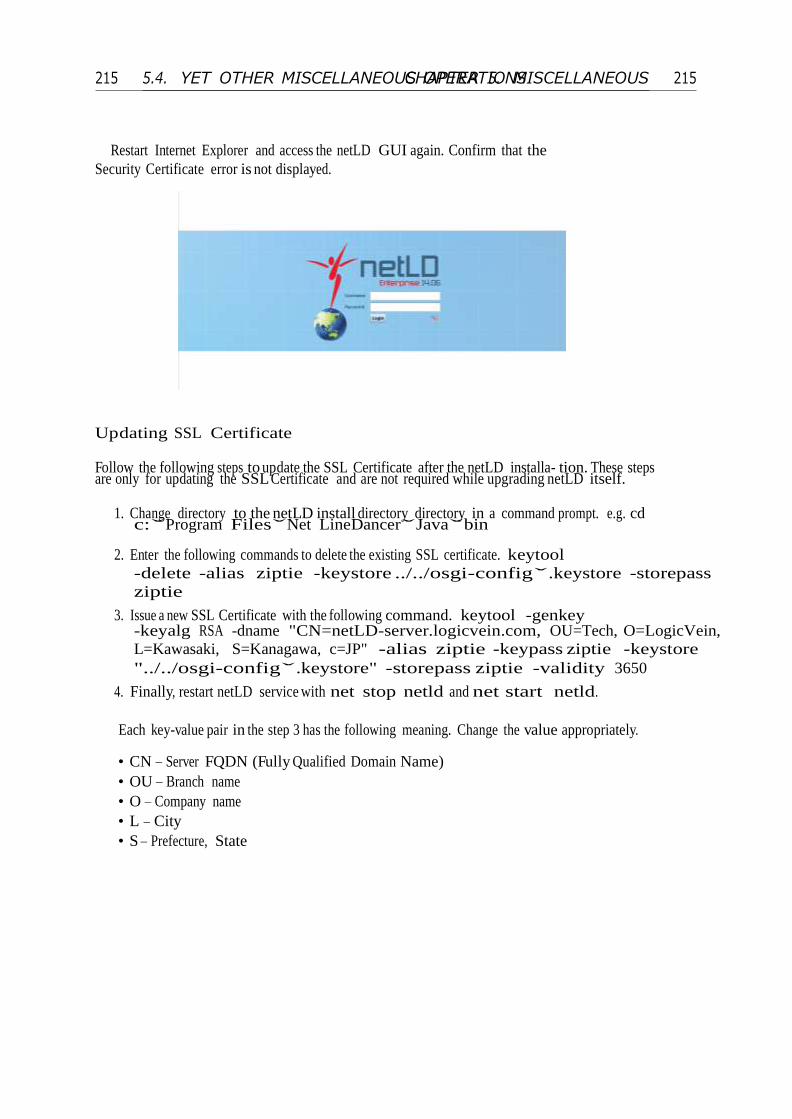
5.4. YET OTHER MISCELLANEOUS OPERATIONS 215 215 CHAPTER 5. MISCELLANEOUS
Restart Internet Explorer and access the netLD GUI again. Confirm that the Security Certificate error is not displayed.
Updating SSL Certificate
Follow the following steps to update the SSL Certificate after the netLD installa- tion. These steps are only for updating the SSL Certificate and are not required while upgrading netLD itself.
1. Change directory to the netLD install directory directory in a command prompt. e.g. cd
c:ˇProgram FilesˇNet LineDancerˇJavaˇbin
2. Enter the following commands to delete the existing SSL certificate. keytool
-delete -alias ziptie -keystore ../../osgi-configˇ.keystore -storepass
ziptie
3. Issue a new SSL Certificate with the following command. keytool -genkey -keyalg RSA -dname "CN=netLD-server.logicvein.com, OU=Tech, O=LogicVein,
L=Kawasaki, S=Kanagawa, c=JP" -alias ziptie -keypass ziptie -keystore
"../../osgi-configˇ.keystore" -storepass ziptie -validity 3650
4. Finally, restart netLD service with net stop netld and net start netld.
Each key-value pair in the step 3 has the following meaning. Change the value appropriately.
• CN – Server FQDN (Fully Qualified Domain Name)
• OU – Branch name
• O – Company name
• L – City
• S – Prefecture, State

5.4. YET OTHER MISCELLANEOUS OPERATIONS 216 216 CHAPTER 5. MISCELLANEOUS
Copyrights ⃝C LogicVein.inc All rights reserved.
5.4.2 Software License Key
We do not provide instructions to upgrade a software license key from the eval- uation version to the paid full version, or to the superior version (even larger number of devices can be added) due to the security consideration. We provides the instruction only from the LogicVein technical support.
If you need further assistance or technical support about Net LineDancer, please fell free to
contact below. We will be pleased to help you when you find any errors or ambiguities in this manual, or any questions regarding them as well. Please note that we are closed on weekends, national holidays, New Year and sum- mer holidays in Japanese time. We accept e-mails for 24 hours but we will only reply on those business hours. Thank you for your cooperation.
LogicVein, Inc. Technical Support
Mail: [email protected]
5.4.3 Resetting Client Settings
You can reset the client setting. It resets the miscellaneous status such as the checkboxes in the dialog.
1. Click on the current username located the upper right side of screen.
2. Click on the Reset client settings button and click on the OK button to save the change.

5.4. YET OTHER MISCELLANEOUS OPERATIONS 217 217 CHAPTER 5. MISCELLANEOUS
Figure 5.2.8: Software Update
Figure 5.4.1: Resetting the client settings.

5.4. YET OTHER MISCELLANEOUS OPERATIONS 218 218 CHAPTER 5. MISCELLANEOUS
Copyrights ⃝C LogicVein.inc All rights reserved.
5.4.4 Upgrading netLD
Also refer to the Sec. 5.2.9, p.205 (automatic update) section for a guide to run the automatic update via Internet. In this section, instead, we describe how to update your netLD from a binary installation.
1. Stop the netLD server first. The netLD service can be stopped from the system tray,
Windows’ Service Manager, or via CUI. See Sec. 2.6 for details.
2. Save the latest netLD install program to the target server and double-click on the program to start. The following procedure is just the same as that of the initial installation, except for the minor changes:
• License registration does not appear.
• Installation directory is not asked and confirmed.
5.4.5 Uninstalling netLD
To uninstall netLD, follow the instruction below.
In the Windows’ Programs and Features dialog, select Net LineDancer Enterprise from the Name list and click on the Uninstall button.
Then the following message is displayed to confirm the uninstallation. Click on the Yes button
if you want to keep the configuration data of netLD or click on the No button if you want to uninstall everything including all configurations.

5.4. YET OTHER MISCELLANEOUS OPERATIONS 219 219 CHAPTER 5. MISCELLANEOUS
If you choose Yes, the configuration is saved in the original installation direc- tory. Moving/copying the directory to the other devices or servers will help you migrate to the other environment.
After that,
• Click on the Next button.
• Click on the Uninstall button.
• Click on the Next button.
• Select Restart Now option and click on the Finish button to close the unin- stallation wizard.
Uninstalling Smart Bridge
The process is straightforward and same as uninstalling netLD.
1. In the Windows Programs and Features dialog, select Net LineDancer Smart Bridge from the Name list and click on the Uninstall button.
2. Confirm the directory to delete and click on the Uninstall button to start the
uninstallation process.
3. When uninstall process is completed, the following message will be displayed. Click on the Close button to end this wizard.


Chapter 6
FAQ
In this chapter, we answer the frequently asked question collected from the past user feedback.
If you need further assistance or technical support about Net LineDancer, please fell free to
contact below. We will be pleased to help you when you find any errors or ambiguities in this manual, or any questions regarding them as well. Please note that we are closed on weekends, national holidays, New Year and sum- mer holidays in Japanese time. We accept e-mails for 24 hours but we will only reply on those business hours. Thank you for your cooperation.
LogicVein, Inc. Technical Support
Mail: [email protected]
221

Copyrights ⃝C LogicVein.inc All rights reserved.
6.1. DEVICES ARE NOT SUCCESSFULLY DISCOVERED NOR ADDED TO THE DEVICE LIST 222
6.1 Devices are not successfully discovered nor
added to the device list
Confirm the followings:
1. SNMP is enabled on each device.
2. SNMP community name of the device is consistent with that of the registered element in the netLD inventory.
3. No firewall or antivirus software shuts the PING/SNMP access from netLD. See Also: Sec.
3.3.1 (Adding devices)
6.2 Backup Fails!
Please follow the instruction below precisely:
1. Confirm again the credential information set in netLD (username, password, community
names, etc.) matches the configurations in the device.
2. Confirm again the protocols enabled for the device in netLD are also enabled on the device.
3. Confirm again firewall/antivirus software does not block the required ports.
4. Confirm again NO TWO network groups share the same IP address.
5. Confirm the cable connection again.
If the backup still fails after all these efforts, get the log files by performing steps in Adapter Logging (Sec. 5.3.3, p.207) and send it to our technical support ( [email protected] ). Thank you for your patience.
See Also: Sec. 2.3, p.31 (Credentials, Network Groups, Protocols), Sec. 3.1, p.42 (Credentials),
Sec. 2.3.2, p.33 (Protocols), Sec. 5.3.3, p.207 (Adapter Log- ging)

223 CHAPTER 6. FAQ
6.3 The wrong IP address is displayed during the
discovery
netLD choose one IP address if the device has multiple addresses. Therefore, the detected address may be different than the one you expected. To use the other address for the device, add the device manually by using Inventory → Add New Device. During the discovery, it uses the following algorithm to guess the management IP address.
1. Runs show interface command on each device and gets the response.
2. Reads the result from the top, and search for the interface description. Once it finds an interface, it checks if it is a software loopback. If yes, it also reads the IP address written in the result.
3. Sends a ping to that address.
4. If the device responds, netLD selects the IP address as a management ad- dress. End the algorithm.
5. If the device does not respond, netLD goes back to 2 to try another address.
6. If none of the address responds, then pings to the non-loopback interfaces (similar to 3-5.) and selects the first IP address that responds.
An example of a result of running show Interface command on a device:
FastEthernet0/0 is up, line protocol is up
Hardware is AmdFE, address is 000c.cec6.eae0 (bia 000c.cec6.eae0)
Internet address is 10.0.0.216/24
MTU 1500 bytes, BW 100000 Kbit, DLY 100 usec,
...
FastEthernet0/1 is up, line protocol is up
Hardware is AmdFE, address is 000c.cec6.eae1 (bia 000c.cec6.eae1)
Internet address is 10.0.1.1/24
...
In the case above, since none of the interfaces are loopback interfaces, netLD jumps to 6, and
sends a ping to 10.0.0.216 first. If the device responds, it takes it as a management address. Otherwise it sends a ping to 10.0.1.1. If 10.0.1.1 does not respond, it means that the IP address has disappeared completely in the network. Please review the SNMP settings and other configurations on the device by connecting to the device directly e.g. via the serial port.

Copyrights ⃝C LogicVein.inc All rights reserved.
6.4. IS IT POSSIBLE TO UPGRADE THE FIRMWARES OF OUR DEVICES AT ONCE? 224
6.4 Is it possible to upgrade the firmwares of our
devices at once?
Yes. Use Command Runner tool (Sec. 3.6.1, p.80) to run the command for upgrading the firmware on the target devices. For Cisco devices, Change → IOS Software Distribution (Sec. 3.6.10, p.85) is convenient. Note that FTP and TFTP servers are required.
For Cisco devices : Change → IOS Software Distribution
For other devices : Change → Command Runner

225 CHAPTER 6. FAQ 6.6. HOW MANY JOBS CAN BE RUN AT THE SAME TIME? 226
6.5 Is it possible to send a trap when the config-
urations were changed? Yes. netLD sends a trap to notify such event as a configuration change. (Sec. 4.4.2, p.183)
The Trap information sent to NMS contains hostname, IP address, and configuration
file name of the device.

6.6. HOW MANY JOBS CAN BE RUN AT THE SAME TIME? 226 226 CHAPTER 6. FAQ
Copyrights ⃝C LogicVein.inc All rights reserved.
6.6 How many jobs can be run at the same time?
netLD runs up to 10 jobs at the same time by default. If the number of the current jobs exceeds 10, they are handled sequentially. This value is automatically configured by netLD, by analyzing the system performance of the server. Careful tuning is required, and so the manual configuration is not available. If you do need to configure this value, contact the technical support.
Even though the larger number might seem to allow for faster processing, the actual speed
depends on the computational power and the network speed. Generally the number of jobs should not be too much because too many jobs would flood the network with lots of packets and consume the bandwidth.
Running a job concurrently and/or in parallel.

6.6. HOW MANY JOBS CAN BE RUN AT THE SAME TIME? 226 227 CHAPTER 6. FAQ
6.7 Error ”No connection-based protocol speci-
fied. . . ” occurs when I try to run a change
tool
This error occurs when ”Credential and Protocol cache” was cleared by editing these settings. To solve this issue, run a backup on the device(s) before running change tool.


Chapter 7
Data
229

7.1. PORT USAGE 230 231 CHAPTER 7. DATA
Copyrights ⃝C LogicVein.inc All rights reserved.
7.1 Port Usage
The ports used by netLD are listed below. If you need to access the target devices through a firewall, configure the transmission policy of the firewall depending on which protocols to use.
Function Protocol Port UDP/TCP Direction from netLD
Cisco PnP DHCP 67 UDP netLD ← dest
68 UDP netLD → dest
HTTP 80 TCP netLD ← dest
TFTP 69 UDP netLD ← dest
ICMP - - netLD ← dest
Automatic Discovery SSH, Telnet 22,23 TCP netLD → dest
SNMP 161 UDP netLD → dest
ICMP - - netLD → dest
Setting Upload TFTP 69 UDP netLD ← dest
(restoring configurations)
Setting change tool 1 SSH, Telnet 22,23 TCP netLD → dest
Trap sending SNMP 162 UDP netLD → dest
Real-time change detection Syslog 514 UDP netLD ← dest
Backup tool 2 SSH, Telnet 22,23 TCP netLD → dest
SNMP 161 UDP netLD → dest
TFTP 69 UDP netLD ← dest
FTP 21 TCP netLD ← dest
Terminal Log
(Windows version) 3 SSH 22 TCP,UDP netLD ← Client
(Linux version) SSH 2222 TCP,UDP netLD ← Client
Client(Web Browser) 4 HTTPS 443 TCP netLD ← client (GUI)
Smart Bridge HTTPS 10443 TCP netLD → Smart Bridge
RADIUS Authentication RADIUS 1812 UDP netLD ↔ Radius Server
1 Configured CLI protocols are used. 2 The appropriate configuration depends on which models of devices are in use. For example,
1. Adapter for IOS: CLI (Telnet, SSH)only, or both CLI and TFTP.
2. Adapter for Alaxala: CLI (Telnet, SSH), FTP or SNMP.
3 On Windows version, the port usage can be modified in Settings window. See Sec. 5.2.8, p.205. 4 On Windows version, the port usage can be changed in Settings window. See Sec. 5.2.8,
p.205.

7.1. PORT USAGE 230 231 CHAPTER 7. DATA
7.2 Directories
netLD creates the following directory trees under the installation directory.
Directory Description
adapters Device interaction adapters.
backups Automated daily backups.
core Core service code.
crates Core service code.
derby Apache Derby database.
Java7 Java 7 Runtime distribution.
legal Open Source library licenses and legal acknowledgements.
lucene Apache Lucene full-text search indexes.
migration Version upgrades scripts.
osgi-config Internal configuration files.
Perl Perl Runtime distribution.
pgsql PostgreSQL Database.
real-time Real-time change detection scripts.
reports Internal report definition files.
scratch Internal temporary file storage directory.
sql Apache Derby database initialization files.
tmp Java 7 temporary file storage directory.
tools Device tool scripts.
ui Core service code.
update Online update temporary storage directory.
ztwrapper Net LineDancer service executable and configuration.

7.3. PERMISSIONS CONFIGURABLE IN ROLES 232
Copyrights ⃝C LogicVein.inc All rights reserved.
7.3 Permissions Configurable in Roles
7.3.1 List of Permissions
Here is the list of configurable permissions.
No. Descriptions of permissions
1 view compliance rule sets and policies.
1-1 create/update/delete a compliance policy.
1-2 create/update/delete a compliance rule set.
2 view device configurations.
3 administer credentials and protocols.
4 create/update/delete device information in the inventory.
5 assign names to custom fields.
6 tag/untag in the inventory.
7 administer scheduler filters.
8 run a backup job.
8-1 create/update/delete a backup job.
9 run a device discovery job.
9-1 create/update/delete a device discovery job.
10 run a tool.
10-1 create/update/delete a tool job.
10-2 run a tool which changes a device configuration.
11 run a report.
11-1 create/update/delete a report job.
12 run a restore job.
13 run a neighbor collection job.
13-1 create/update/delete a neighbor collection job.
14 run a Smart Change job.
14-1 create/update/delete a Smart Change job.
15 create/update/delete URL launchers.
16 create/update/delete memos.
17 create/update/delete managed networks.
18 create/update/delete Cisco PnP configurations.
19 create/update/delete Cisco PnP templates.
20 administer security settings.
21 create/update/delete inventory tags.
22 login using the terminal server proxy.
22-1 automatically log in to devices from the terminal server proxy.
23 view other user’s terminal proxy logs.

233 CH
APTER
7.
DATA
7.3.2 Permission vs Available Operations
1 1-1 1-2 2 3 4 5 6 7 8 8-1 9 9-1 10 10-1 10-2 11 11-1 12 13 13-1 14 14-1 15 16 17 18 19 20 21 22 22-1 23
Main Menu
Credentials
Protocols
Discover Devices
Add Devices
Device Tags
Scheduler Filters
OS Images
Server Settings
O
O
O
O
O
O
O
O
O
O
O
O
O
Devices
Search IP/Hostname
Advanced search
Run Backup
Command runner
Read tool
Change tool
Smart Change
Collect neighbor data
Create a new job
Terminal log
Export Inventory
Export configurations
Display configurations
Display neighbors
Run a report
Compare configurations
Launch a URL
Device IP, Adapter map
Delete the device
Associate tags
Dissociate tags
O
O
O
O
O
O
O
O
O
O
O
O
O
O
O
O
O
O
O
O
O
O
O
O
O
O
O
O
O
O
O
O
O
O
O
O
O
O
O
O
O
O
O
O
O
O
O
O
O
O
O
O
O
O
O
O
O
O
O
O
O
O
O
O
O
O
O
O
O
O
O
O
O
O
O
O
O
O
O
O
O
O
O
O
O
O
O
O
O
O
O
O
O
O
O
O
O
O
O
O
O
O
O
O
O
O
O
O
O
O
O
O
O
O
O
O
O
O
O
O
O
O
O
O
O
O
O
O
O
O
O
O
O
O
O
O
O
O
O
O
O
O
O
O
O
O
O
O
O
O
O
O
O
O
O
O
O
O
O
O
O
O
O
O
O
O
O
O
O
O
O
O
O
O
O
O
O
O
O
O
O
O
O
O
O
O
O
O
O
O
O
O
O
O
O
O
O
O
O
O
O
O
O
O
O
O
O
O
O
O
O
O
O
O
O
O
O
O
O
O
O
O
O
O
O
O
O

7.3
. PER
MIS
SIO
NS C
ON
FIG
UR
AB
LE IN
RO
LES
234
Copyrig
hts ⃝ C
LogicV
ein
.inc A
ll rights reserved.
1 1-1 1-2 2 3 4 5 6 7 8 8-1 9 9-1 10 10-1 10-2 11 11-1 12 13 13-1 14 14-1 15 16 17 18 19 20 21 22 22-1 23
Jobs Open Results Compare Results Open Job Delete Job Run Now New Job
O
O O
O O O O O O
O O O O O O
O O O O O O
O
O O O O O O
Terminal Proxy
Log in
Auto log in
O
O O
Search Configuration Search Switch Port Search ARP Search
O O
O O
O O
O O
O O
O O
O O
O O
O O
O O
O O
O O
O O
O O
O O
O O
O O
O O
O O
O O
O O
O O
O O
O O
O O
O O
O O
O O
O O
O O
O O
O O
O O
Compliance R compliance R/W rules R/W policies
O
O
O
O O O
Cisco PnP Configurations Templates History
Settings(DHCP Server)
O
O
O O
O

235 CHAPTER 7. DATA 7.5. RECOMMENDED SYSTEM REQUIREMENTS 235
7.4 Compliance Rules Provided by Default
These are the complete set of rules provided by default.
• IOS Interface Auto-Duplex/Speed
– Violation if interface settings include followings:
∗ no ip address: Stop on match
∗ shutdown command: Stop on match
∗ duplex auto:Violation if not matched
∗ speed auto: Violation if not matched
• IOS Secure Enable Passwords
– Violation if not matched.
∗ Service password-encryption:
∗ enable secret: Violation if not matched.
• IOS Telnet Restricted Access
– Violation if line vty setting:
∗ access-class : Violation if no ”variables” matched
• IOS SSH-only Restricted Access
– In line vty settings,
∗ transport input ssh: violation if not matched
∗ transport input telnet: violation on matched
• IOS Disabled Unneeded Service
– Violation if the followings are not matched
∗ no service tcp-small-servers
∗ no service udp-small-servers
∗ no ip bootp server
∗ no service finger
∗ no ip source-route
∗ no ip identd
∗ no ip http server
• IOS Session Idle Timeout
– line vty Settings
∗ exec-timeout minutes: Violation if no variables matched

7.5. RECOMMENDED SYSTEM REQUIREMENTS 236 236 CHAPTER 7. DATA
Copyrights ⃝C LogicVein.inc All rights reserved.
7.5 Recommended System Requirements
Minimum Requirements for 3,000 devices:
Operation Systems
Windows(64bit only) Windows Server 2008 SP2
Windows Server 2008 R2
Windows Server 2012
Linux(64bit only) Cent OS 5/6
RedHat 5/6 or later
Hardware Requirements
CPU Core Minimum 4
Memory Minimum 2GB
HDD 120GB 10K RPM RAID1
Minimum Requirements for 12,000 devices:
Windows(64bit only) Windows Server 2008 SP2
Windows Server 2008 R2
Windows Server 2012
Linux(64bit only) Cent OS 5/6
RedHat 5/6 or later
CPU Core Minimum 6
Memory Minimum 8GB
HDD 300GB 10K RPM RAID1
On the Client side, you can browse Net LineDancer Server with:
• Internet Explorer 7 or later
• FireFox
• Safari
or the other conforming browser implementation.

7.5. RECOMMENDED SYSTEM REQUIREMENTS 237 237 CHAPTER 7. DATA
7.6 Updates in version 13.08
• Draft Configurations Feature:
– Support for creating configuration drafts from existing device configu- rations, or importing from text files.
– Draft configurations can be edited directly and can then be pushed to the device (either running or startup configuration).
– Drafts can also be compared to existing configurations to verify that only the parts you expect to change are affected.
• Change Advisor Feature:
– This is new feature that is unique in the industry. – The Change Advisor can work with existing configurations or draft
configurations.
• Tera Term Integration
– Working in concert with the Terminal Proxy feature, which allows auto- mated login to devices and capture of terminal sessions, we have added the ability to simply right-click on a device in the inventory list and open a Tera Term session that jumps directly into the device – logging in automatically for you.
• Cisco PnP Feature(optional)
– We added the ability to create run after the Cisco PnP function, to back up add the inventory automatically.
• Add Supported Operating Systems
– Windows Server 2012
– Linux Cent OS / later than RedHat 5.x/6.x

7.7. THE LIST OF AVAILABLE DEVICE ADAPTERS 238 238 CHAPTER 7. DATA
Copyrights ⃝C LogicVein.inc All rights reserved.
7.7 The List of Available Device Adapters
Here are the lists of available devices at the time of this document (for different versions of netLD). If any of your devices are not listed above, please contact the Sales Team. LogicVein developer team starts the development as soon as possible, and your devices are supported usually within 3 weeks.
Figure 7.7.1: Supported Device List, version 13.08
Adtran Netvanta Alaxala AXS
Alcatel-Lucent OmniSwitch Allied Telesis 8700SL Series M
Allied Telesyn Telesis X Series M Allied Telesyn Switches
Allied Telesis CentreCOM FS917M Alteon AD3
Anritsu PureFlow APC smart-UPS
Apresia Aruba ArubaOS
Blue Coat ProxySG Brocade Silkworm
Check Point SecurePlatform CheckPoint VPN1 Edge Firewalls
Cisco ACNS Platforms Cisco Airespace Controller
Cisco CatOS Cisco CS500
Cisco CSS/ArrowPoint Cisco GSS Appliances
Cisco IOS Cisco LocalDirector
Cisco Nexus Cisco SAN-OS
Cisco Security Appliances Cisco VPN
Cisco VxWorks Cisco WAAS Platforms
Cisco WLSE Citrix NetScaler
Dell PowerConnect D-link DGS
Enterasys Matrix Enterasys SecureStack Switches
Enterasys SSR Enterasys VerticalHorizon
Extreme Extremeware Extreme XOS
F5 3DNS/BIG-IP v4 F5 BigIP
Fortinet Fortigate Foundry EdgeIron
Foundry FastIron Fujitsu SRS
H3C HP ProCurve
HP ProCurve M Juniper DX
Juniper JUNOS Juniper ScreenOS
NEC IX NEC WA1020
Nortel BayRS Nortel BayStack
Nortel Contivity Nortel Passport
Nortel Passport-1600 Nortel Tiara
Paloalto PA-500 Vyatta OFR
Yamaha RT/RTX

7.7. THE LIST OF AVAILABLE DEVICE ADAPTERS 239 239 CHAPTER 7. DATA
7.7.1 Supported Device List - version14.06
Figure 7.7.2: Supported Device List, part 1
Vendor Model/series/Operation System
A10 Networks ACOS
ADTRAN Netvanta
ALAXALA Networks AX-S Series
Alcatel-Lucent OmniSwitch
Allied Telesis 8700SL Series
X Series
FS900M
Allied Telesyn Switches
Alteon AD3
Anritsu PureFlow GS1
APC Smart-UPS
Aruba Networks ArubaOS
BlueCoat ProxySG
Brocade Fabric OS
Check Point SecurePlatform
VPN1 Edge Firewalls

7.7. THE LIST OF AVAILABLE DEVICE ADAPTERS 240 240 CHAPTER 7. DATA
Copyrights ⃝C LogicVein.inc All rights reserved.
Figure 7.7.3: Supported Device List, part 2
Vendor Model/series/Operation System
Cisco Systems ACNS Platforms
ArrowPoint
CatOS
CS500
GSS Appliances
IOS
Linksys
LocalDirector
MDS Series SAN-OS
Nexus
Security Appliances
VPN 3000 Series
VxWorks
WAAS Platforms
Wireless LAN Controller
WLSE
Citrix Systems NetScaler
Dell PowerConnect
D-Link DGS Series
Enterasys Matrix
SecureStack Switches
SSR
VerticalHorizon
Extreme Extremeware
XOS

7.7. THE LIST OF AVAILABLE DEVICE ADAPTERS 241 241 CHAPTER 7. DATA
Figure 7.7.4: Supported Device List, part 3
Vendor Model/series/Operation System
F5 Networks BIG-IP
3-DNS
Fortinet FortiGate
Foundry EdgeIron
FastIron
Fujitsu SR-S Series/Si-R Series
Furukawa electric FX Series
H3C Switches
Hitachi Metals Apresia
HP ProCurve M
ProCurve
Huawei VRP OS
Juniper Networks DX
Junos
ScreenOS
Wireless LAN Controller
NEC IX Series
WA Series
Nortel Accelar
BayRS
BayStack
Contivity
Passport-1600
Passport
Tiara
Palo Alto Networks PA-500 Series
Vyatta OFR
Yamaha RT/RTX
7.8. CONTACTS 242
Copyrights ⃝C LogicVein.inc All rights reserved.
7.7.2 IOS Software Distributing Exception
You can update or distribute Cisco IOS software images to devices by Net LineDancer except the following devices that are started up with flash. For more information, please contact [email protected].
• Cisco 1600
• Cisco 2500
• Cisco AS5200
7.7.3 Getting the Latest Adapter Information
Also, the latest information can be obtained in our website. We provide a more detailed version of the above list, Supported Device and Feature Matrix.
• http://www.logicvein.com/product/device.html
• http://www.logicvein.com/product/pdf/matrix.pdf
7.8 Contacts
If you need further assistance or technical support about Net LineDancer, please fell free to contact below. We will be pleased to help you when you find any errors or ambiguities in this manual, or any questions regarding them as well. Please note that we are closed on weekends, national holidays, New Year and summer holidays in Japanese time. We accept e-mails for 24 hours but we will only reply on those business hours. Thank you for your cooperation.
LogicVein, Inc. Technical Support
Mail: [email protected]

Chapter 8
Appendices
In this chapter, we describe:
1. the cron expression language and
2. the guide to set up Windows Active Directory on Windows Server 2012.
8.1 Cron tutorial This section introduces how to use cron to set job schedule in Net LineDancer. Most of the contents in this section are quoted from cron4j website (http://www. sauronsoftware.it/projects/cron4j/).
cron4j is a scheduler for the Java platform which is very similar to the UNIX cron daemon.
With cron4j you can launch, from within your Java applications, any task you need at the right time, according to some simple rules.
243

8.1. CRON TUTORIAL 244 244 CHAPTER 8. APPENDICES
Copyrights ⃝C LogicVein.inc All rights reserved.
8.1.1 Scheduling patterns
A UNIX crontab-like pattern is a string split in five space separated parts. Each part is intended as:
1. Minutes sub-pattern. During which minutes of the hour should the task been launched.
The values range is from 0 to 59.
2. Hours sub-pattern. During which hours of the day should the task been launched. The values range is from 0 to 23.
3. Days of month sub-pattern. During which days of the month should the task been
launched. The values range is from 1 to 31. The special value ”L” can be used to recognize the last day of month.
4. Months sub-pattern. During which months of the year should the task been launched. The
values range is from 1 (January) to 12 (December), otherwise this sub-pattern allows the aliases ”jan”, ”feb”, ”mar”, ”apr”, ”may”, ”jun”, ”jul”, ”aug”, ”sep”, ”oct”, ”nov” and ”dec”.
5. Days of week sub-pattern. During which days of the week should the task been launched.
The values range is from 0 (Sunday) to 6 (Saturday), other- wise this sub-pattern allows the aliases ”sun”, ”mon”, ”tue”, ”wed”, ”thu”, ”fri” and ”sat”. The star wildcard character is also admitted, indicating ”ev- ery minute of the hour”, ”every hour of the day”, ”every day of the month”, ”every month of the year” and ”every day of the week”, according to the sub-pattern in which it is used. Once the scheduler is started, a task will be launched when the five parts in its scheduling pattern will be true at the same time.

8.1. CRON TUTORIAL 245 245 CHAPTER 8. APPENDICES
8.1.2 Some examples:
5 * * * *
This pattern causes a task to be launched once every hour, at the beginning of the fifth minute (00:05, 01:05, 02:05 etc.).
* * * * *
This pattern causes a task to be launched every minute.
* 12 * * Mon
This pattern causes a task to be launched every minute during the 12th hour of Monday.
* 12 16 * Mon
This pattern causes a task to be launched every minute during the 12th hour of Monday, 16th, but only if the day is the 16th of the month. Every sub-pattern can contain two or more comma separated values.
59 11 * * 1,2,3,4,5
This pattern causes a task to be launched at 11:59AM on Monday, Tuesday, Wednesday, Thursday and Friday. Values intervals are admitted and defined using the minus character.
59 11 * * 1-5
This pattern is equivalent to the previous one. The slash character can be used to identify step values within a range. It can be used both in the form */c and a-b/c. The subpattern is matched every c values of the range 0,maxvalue or a-b.
*/5 * * * *
This pattern causes a task to be launched every 5 minutes (0:00, 0:05, 0:10, 0:15 and so on).
3-18/5 * * * *

8.1. CRON TUTORIAL 246 246 CHAPTER 8. APPENDICES
Copyrights ⃝C LogicVein.inc All rights reserved.
This pattern causes a task to be launched every 5 minutes starting from the third minute of the hour, up to the 18th (0:03, 0:08, 0:13, 0:18, 1:03, 1:08 and so on).
*/15 9-17 * * *
This pattern causes a task to be launched every 15 minutes between the 9th and 17th hour of the day (9:00, 9:15, 9:30, 9:45 and so on. . . note that the last execution will be at 17:45). All the fresh described syntax rules can be used together.
* 12 10-16/2 * *
This pattern causes a task to be launched every minute during the 12th hour of the day, but only if the day is the 10th, the 12th, the 14th or the 16th of the month.
* 12 1-15,17,20-25 * *
This pattern causes a task to be launched every minute during the 12th hour of the day, but the day of the month must be between the 1st and the 15th, the 17th, or the 20th and the 25. Finally cron4j lets you combine more scheduling patterns into one, with the pipe character:
0 5 * * *|8 10 * * *|22 17 * * *
This pattern causes a task to be launched every day at 05:00, 10:08 and 17:22.

8.1. CRON TUTORIAL 247 247 CHAPTER 8. APPENDICES
8.2 Setting up Active Directory on Windows Server
2012 A RADIUS server can be configured on Windows Server 2012 using Active Direc- tory and Network Policy Server.
8.2.1 Installation
Active Directory and Network Policy Server can be installed by going to the Server Manager and in the Dashboard and clicking Add roles and features.

8.2. SETTING UP ACTIVE DIRECTORY ON WINDOWS SERVER 2012 248 248 CHAPTER 8. APPENDICES
Copyrights ⃝C LogicVein.inc All rights reserved.
8.2.2 Configuration
1. Network Policy Server
(a) Top node ”NPS” → Right click → Register server in Active Directory
(b) RADIUS Clients → Right click → New
i. Friendly name : anything
ii. Address: netLD server IP address
iii. shared secret
iv. OK
(c) Network Policies → Right click → New
i. Policy name: anything ii. Next
iii. Conditions → Add → User Groups → Add → Add Groups → Domain Users
iv. Next
v. Permission, leave defaults (Access Granted)
vi. Next
vii. Authentication Methods → check: Unencrypted authentication
viii. Next
ix. Constraints, leave defaults
x. Next
xi. Settings → RADIUS Attributes → Standard → Add. . .
A. Attribute: Filter-Id → Add. . .
B. Attribute Information → Add..
C. String value: ’role:Administrator’ D.
OK
xii. OK
(d) Close
2. Next
3. Finish
This configuration allows netLD users to authenticate as a domain user and will grant the user the Administrator role. You can create any number of Net- work Policies; each one can represent a different group of users with different RADIUS attributes applied. For example, if you have two roles, Administrator and Operator, you can create one Network Policy for each and specify the Filter-Id appropriately for each.

8.2. SETTING UP ACTIVE DIRECTORY ON WINDOWS SERVER 2012 248 249 CHAPTER 8. APPENDICES