Embed Size (px)
Citation preview
NetBackup Self ServiceConfiguration Guide
7.7
Document version: 1
Documentation version: 7.7
Legal NoticeCopyright © 2015 Symantec Corporation. All rights reserved.
Symantec, the Symantec Logo, the Checkmark Logo, Veritas, the Veritas Logo, and NetBackupare trademarks or registered trademarks of Symantec Corporation or its affiliates in the U.S.and other countries. Other names may be trademarks of their respective owners.
This Symantec product may contain third party software for which Symantec is required toprovide attribution to the third party (“Third Party Programs”). Some of the Third Party Programsare available under open source or free software licenses. The License Agreementaccompanying the Software does not alter any rights or obligations you may have under thoseopen source or free software licenses. Please see the Third Party Legal Notice Appendix tothis Documentation or TPIP ReadMe File accompanying this Symantec product for moreinformation on the Third Party Programs.
The product described in this document is distributed under licenses restricting its use, copying,distribution, and decompilation/reverse engineering. No part of this document may bereproduced in any form by any means without prior written authorization of SymantecCorporation and its licensors, if any.
THE DOCUMENTATION IS PROVIDED "AS IS" AND ALL EXPRESS OR IMPLIEDCONDITIONS, REPRESENTATIONS AND WARRANTIES, INCLUDING ANY IMPLIEDWARRANTY OF MERCHANTABILITY, FITNESS FOR A PARTICULAR PURPOSE ORNON-INFRINGEMENT, ARE DISCLAIMED, EXCEPT TO THE EXTENT THAT SUCHDISCLAIMERSAREHELD TOBE LEGALLY INVALID. SYMANTECCORPORATIONSHALLNOT BE LIABLE FOR INCIDENTAL OR CONSEQUENTIAL DAMAGES IN CONNECTIONWITH THE FURNISHING, PERFORMANCE, OR USE OF THIS DOCUMENTATION. THEINFORMATION CONTAINED IN THIS DOCUMENTATION IS SUBJECT TO CHANGEWITHOUT NOTICE.
The Licensed Software and Documentation are deemed to be commercial computer softwareas defined in FAR 12.212 and subject to restricted rights as defined in FAR Section 52.227-19"Commercial Computer Software - Restricted Rights" and DFARS 227.7202, et seq."Commercial Computer Software and Commercial Computer Software Documentation," asapplicable, and any successor regulations, whether delivered by Symantec as on premisesor hosted services. Any use, modification, reproduction release, performance, display ordisclosure of the Licensed Software and Documentation by the U.S. Government shall besolely in accordance with the terms of this Agreement.

Symantec Corporation350 Ellis StreetMountain View, CA 94043
http://www.symantec.com
Technical SupportSymantec Technical Support maintains support centers globally. Technical Support’sprimary role is to respond to specific queries about product features and functionality.The Technical Support group also creates content for our online Knowledge Base.The Technical Support group works collaboratively with the other functional areaswithin Symantec to answer your questions in a timely fashion. For example, theTechnical Support group works with Product Engineering and Symantec SecurityResponse to provide alerting services and virus definition updates.
Symantec’s support offerings include the following:
■ A range of support options that give you the flexibility to select the right amountof service for any size organization
■ Telephone and/or Web-based support that provides rapid response andup-to-the-minute information
■ Upgrade assurance that delivers software upgrades
■ Global support purchased on a regional business hours or 24 hours a day, 7days a week basis
■ Premium service offerings that include Account Management Services
For information about Symantec’s support offerings, you can visit our website atthe following URL:
www.symantec.com/business/support/
All support services will be delivered in accordance with your support agreementand the then-current enterprise technical support policy.
Contacting Technical SupportCustomers with a current support agreement may access Technical Supportinformation at the following URL:
www.symantec.com/business/support/
Before contacting Technical Support, make sure you have satisfied the systemrequirements that are listed in your product documentation. Also, you should be atthe computer on which the problem occurred, in case it is necessary to replicatethe problem.
When you contact Technical Support, please have the following informationavailable:
■ Product release level
■ Hardware information
■ Available memory, disk space, and NIC information
■ Operating system
■ Version and patch level
■ Network topology
■ Router, gateway, and IP address information
■ Problem description:
■ Error messages and log files
■ Troubleshooting that was performed before contacting Symantec
■ Recent software configuration changes and network changes
Licensing and registrationIf your Symantec product requires registration or a license key, access our technicalsupport Web page at the following URL:
www.symantec.com/business/support/
Customer serviceCustomer service information is available at the following URL:
www.symantec.com/business/support/
Customer Service is available to assist with non-technical questions, such as thefollowing types of issues:
■ Questions regarding product licensing or serialization
■ Product registration updates, such as address or name changes
■ General product information (features, language availability, local dealers)
■ Latest information about product updates and upgrades
■ Information about upgrade assurance and support contracts
■ Information about the Symantec Buying Programs
■ Advice about Symantec's technical support options
■ Nontechnical presales questions
■ Issues that are related to CD-ROMs, DVDs, or manuals
Support agreement resourcesIf you want to contact Symantec regarding an existing support agreement, pleasecontact the support agreement administration team for your region as follows:
[email protected] and Japan
[email protected], Middle-East, and Africa
[email protected] America and Latin America
Technical Support ............................................................................................... 4
Chapter 1 Licensing ............................................................................... 10
Applying the full License ................................................................ 10
Chapter 2 Configuring a Self Service solution ................................. 11
About configuring a Self Service solution ........................................... 11Self service scheduled backup ....................................................... 12Configuration checklist .................................................................. 12
Chapter 3 Configuring a NetBackup master server ........................ 14
About configuring the NetBackup master server .................................. 14Enabling communication with a Windows NetBackup master
server .................................................................................. 15Enabling communication with a UNIX NetBackup master server ............. 15Enabling communication with a NetBackup appliance .......................... 17Creating NetBackup Template Policies .............................................. 17
Chapter 4 Configuring Self Service .................................................... 22
About Self Service configuration ..................................................... 22About integration settings and editing of Locations, Protection Levels,
and vCloud imports ................................................................. 23Configuring Locations ................................................................... 23Configuring Protection Levels ......................................................... 25Configuring Backup Now retention levels ........................................... 26Configuring Tenants ...................................................................... 27Registering computers ................................................................... 30Configuring the home page ............................................................ 32
Home page integration settings ................................................. 33
Chapter 5 Customizing Self Service ................................................... 36
Language settings ........................................................................ 36Creating or customizing a request form ............................................. 36
Contents
Themes ...................................................................................... 37Notices ....................................................................................... 37
Chapter 6 User authentication methods ........................................... 38
About user authentication methods .................................................. 38Forms based authentication ............................................................ 38Windows Authentication ................................................................. 39Active Directory Import .................................................................. 39Configuring Self Service to use Federated Single Sign-On .................... 40
Chapter 7 Troubleshooting .................................................................. 43
About troubleshooting ................................................................... 43Where to find troubleshooting information .......................................... 44Impersonation of a tenant user ........................................................ 46Issues with Remote PowerShell to Windows Master Servers ................. 46
Appendix A NetBackup policy types ..................................................... 51
List of NetBackup policy types ......................................................... 51
Appendix B Dashboard traffic light status and usage ...................... 53
About dashboard traffic light status and usage .................................... 53
Appendix C Synchronizing data from NetBackup .............................. 56
About synchronizing data from NetBackup ......................................... 56
Appendix D NetBackup Self Service data caching process .............. 58
About NetBackup Self Service data caching process ........................... 58Full Cache Build ........................................................................... 59NetBackup Data Synchronization ..................................................... 59Backup Now ................................................................................ 60Protect computer .......................................................................... 60Unprotect computer ...................................................................... 61
Appendix E Integration settings ............................................................ 62
About integration settings ............................................................... 62NetBackup Adapter ....................................................................... 64NetBackup Adapter Usage Section .................................................. 65NetBackup Adapter Access Rights Section ........................................ 66Action Request Types ................................................................... 67
8Contents
Machine Location ......................................................................... 68Protection Level ........................................................................... 70vCloud import .............................................................................. 71
Appendix F Policy Modifiers ................................................................... 73
About policy modifiers ................................................................... 73Template Policy Naming with Policy Modifiers .................................... 73Registering computers with Policy Modifiers ....................................... 74Policy Modifier Example ................................................................. 74
Appendix G Configuring Self Service Alternate vCloud ..................... 75
Configuring the Alternate vCloud Configuration ................................... 75Integration Settings and creating and editing Locations or Protection
Levels .................................................................................. 76Configuring vCloud Locations ......................................................... 76Configuring Protection Levels for vCloud .......................................... 79Configuring Alternate vCloud Backup Now retention levels .................... 80Configuring Tenants ...................................................................... 80Configuring the home page for Alternate vCloud configuration ............... 80
Appendix H Glossary ................................................................................. 83
Glossary ..................................................................................... 83
9Contents
Licensing
This chapter includes the following topics:
■ Applying the full License
Applying the full LicenseNetBackup Self Service 7.7 is shipped with a fully featured 60-day trial license. Aproduction license is available from your Customer Care team.
Access the NetBackup Self Service portal to apply the license. Select Admin >Settings > License > Update License Key. Copy and paste the new license key.Restart the Windows service after you apply the license key. If the application runsin a server farm environment, all application pools must be restarted.
In the License page, a message at the top of the page reports that other featuresare not included. All features that are required to operate a fully configuredNetBackup Self Service solution are, however, included.
Note: Internet Explorer 8 is a limited browser for high-quality display. The use ofthe standards mode, however, provides a reasonable display. Use of thecompatibility mode is not supported.
Additional information about prerequisites and requirements is available. Pleaserefer to the NetBackup Self Service Installation Guide for additional details.
1Chapter

Configuring a Self Servicesolution
This chapter includes the following topics:
■ About configuring a Self Service solution
■ Self service scheduled backup
■ Configuration checklist
About configuring a Self Service solutionNetBackup Self Service allows service providers to offer self-service backup andrestore to multiple customers, in a secure, and partitioned manner. In an enterpriseenvironment, business units and project teams can perform self-service backupand restore.
Self Service restore functionality is enabled but additionally you can choose toprovide self-service scheduled policy editing and support for on-demand BackupNow functionality.
Caution: All configuration data that is entered in NetBackup Self Service isconsidered case sensitive. It must match the associated data that is held inNetBackup.
The Self Service solution supports an inventory of computers and their owners.
You can populate the computer inventory multiple ways:
■ A source independent API
■ The Self Service portal
2Chapter
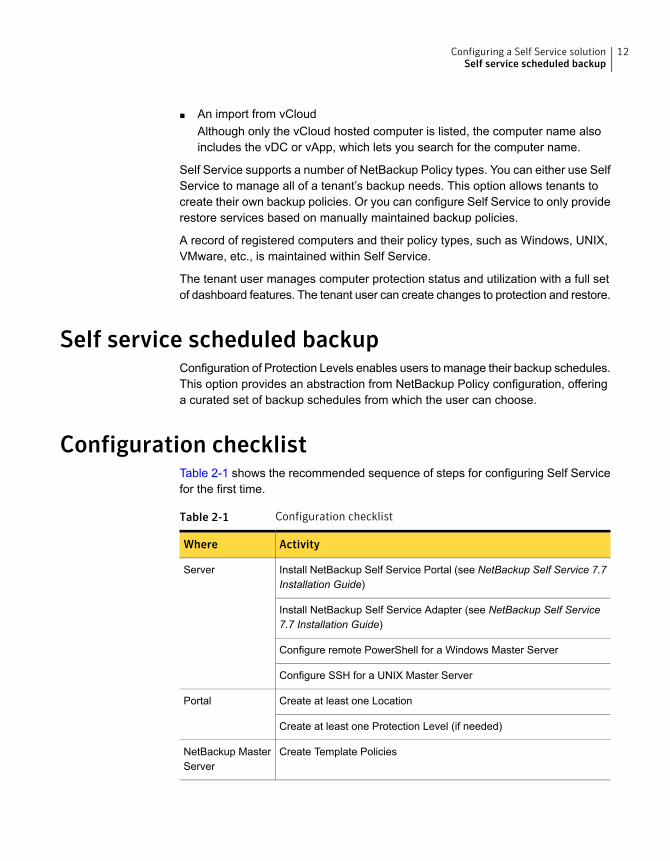
■ An import from vCloudAlthough only the vCloud hosted computer is listed, the computer name alsoincludes the vDC or vApp, which lets you search for the computer name.
Self Service supports a number of NetBackup Policy types. You can either use SelfService to manage all of a tenant’s backup needs. This option allows tenants tocreate their own backup policies. Or you can configure Self Service to only providerestore services based on manually maintained backup policies.
A record of registered computers and their policy types, such as Windows, UNIX,VMware, etc., is maintained within Self Service.
The tenant user manages computer protection status and utilization with a full setof dashboard features. The tenant user can create changes to protection and restore.
Self service scheduled backupConfiguration of Protection Levels enables users to manage their backup schedules.This option provides an abstraction from NetBackup Policy configuration, offeringa curated set of backup schedules from which the user can choose.
Configuration checklistTable 2-1 shows the recommended sequence of steps for configuring Self Servicefor the first time.
Table 2-1 Configuration checklist
ActivityWhere
Install NetBackup Self Service Portal (see NetBackup Self Service 7.7Installation Guide)
Server
Install NetBackup Self Service Adapter (see NetBackup Self Service7.7 Installation Guide)
Configure remote PowerShell for a Windows Master Server
Configure SSH for a UNIX Master Server
Create at least one LocationPortal
Create at least one Protection Level (if needed)
Create Template PoliciesNetBackup MasterServer
12Configuring a Self Service solutionSelf service scheduled backup
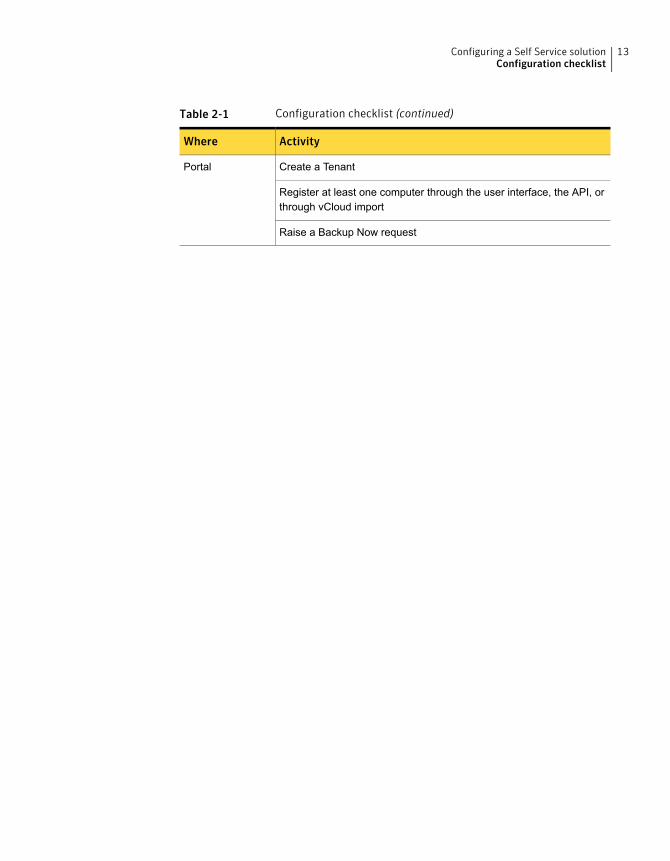
Table 2-1 Configuration checklist (continued)
ActivityWhere
Create a TenantPortal
Register at least one computer through the user interface, the API, orthrough vCloud import
Raise a Backup Now request
13Configuring a Self Service solutionConfiguration checklist

Configuring a NetBackupmaster server
This chapter includes the following topics:
■ About configuring the NetBackup master server
■ Enabling communication with a Windows NetBackup master server
■ Enabling communication with a UNIX NetBackup master server
■ Enabling communication with a NetBackup appliance
■ Creating NetBackup Template Policies
About configuring the NetBackup master serverA minimum of NetBackup 7.6.1 with the latest service pack is required.
Each NetBackup master server the system needs to communicate with must beconfigured as a Location. To manage locations, log on to the Self Service portalas an Admin user, and then go to the Locations tab on the home page.
Note: If you use a vCloud Integrated configuration, NetBackup must be configuredfor vCloud before you enable NetBackup Self Service. The VMware vCloud directormust support a minimum of API version 5.1.
3Chapter
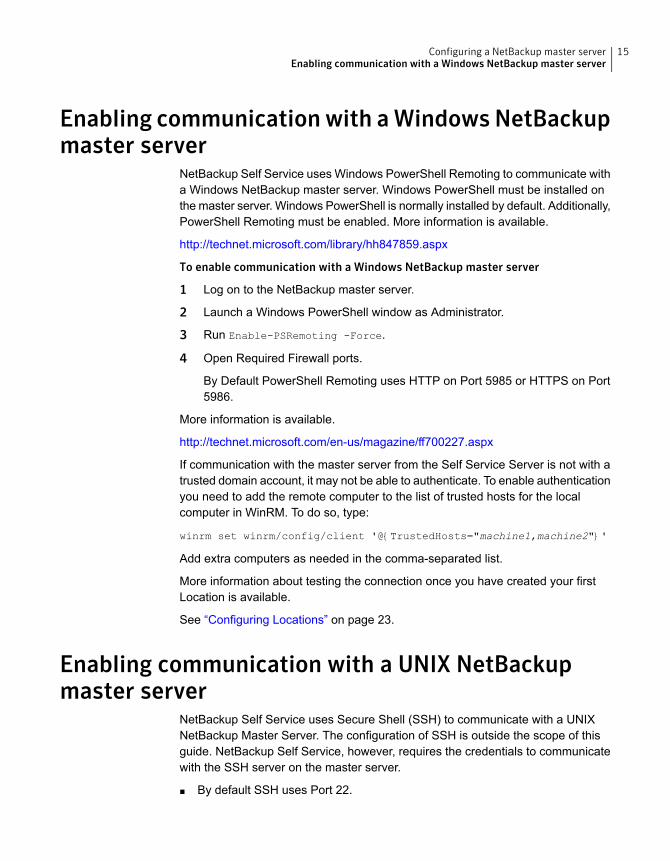
Enabling communication with aWindows NetBackupmaster server
NetBackup Self Service uses Windows PowerShell Remoting to communicate witha Windows NetBackup master server. Windows PowerShell must be installed onthe master server. Windows PowerShell is normally installed by default. Additionally,PowerShell Remoting must be enabled. More information is available.
http://technet.microsoft.com/library/hh847859.aspx
To enable communication with a Windows NetBackup master server
1 Log on to the NetBackup master server.
2 Launch a Windows PowerShell window as Administrator.
3 Run Enable-PSRemoting -Force.
4 Open Required Firewall ports.
By Default PowerShell Remoting uses HTTP on Port 5985 or HTTPS on Port5986.
More information is available.
http://technet.microsoft.com/en-us/magazine/ff700227.aspx
If communication with the master server from the Self Service Server is not with atrusted domain account, it may not be able to authenticate. To enable authenticationyou need to add the remote computer to the list of trusted hosts for the localcomputer in WinRM. To do so, type:
winrm set winrm/config/client '@{TrustedHosts="machine1,machine2"}'
Add extra computers as needed in the comma-separated list.
More information about testing the connection once you have created your firstLocation is available.
See “Configuring Locations” on page 23.
Enabling communication with a UNIX NetBackupmaster server
NetBackup Self Service uses Secure Shell (SSH) to communicate with a UNIXNetBackup Master Server. The configuration of SSH is outside the scope of thisguide. NetBackup Self Service, however, requires the credentials to communicatewith the SSH server on the master server.
■ By default SSH uses Port 22.
15Configuring a NetBackup master serverEnabling communication with a Windows NetBackup master server
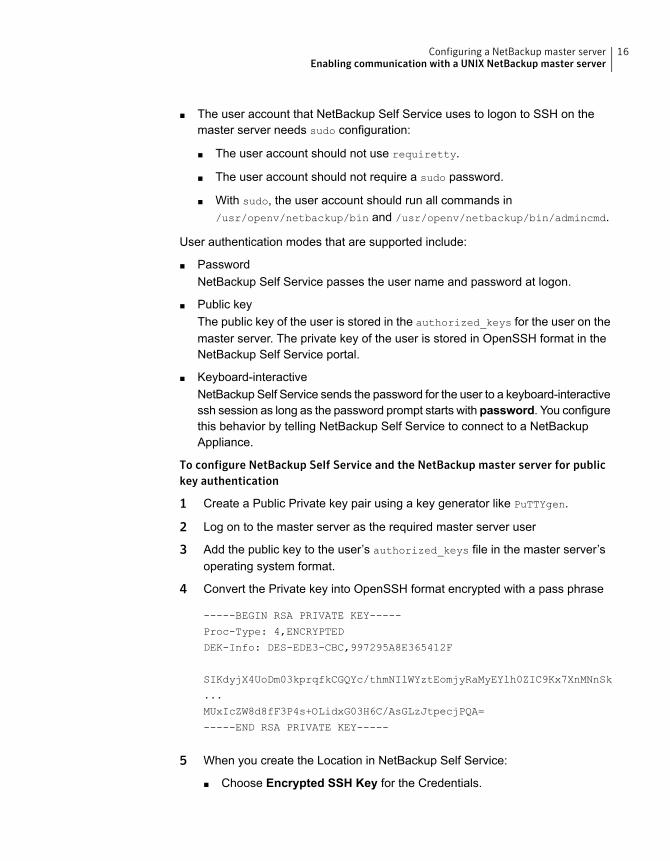
■ The user account that NetBackup Self Service uses to logon to SSH on themaster server needs sudo configuration:
■ The user account should not use requiretty.
■ The user account should not require a sudo password.
■ With sudo, the user account should run all commands in/usr/openv/netbackup/bin and /usr/openv/netbackup/bin/admincmd.
User authentication modes that are supported include:
■ PasswordNetBackup Self Service passes the user name and password at logon.
■ Public keyThe public key of the user is stored in the authorized_keys for the user on themaster server. The private key of the user is stored in OpenSSH format in theNetBackup Self Service portal.
■ Keyboard-interactiveNetBackup Self Service sends the password for the user to a keyboard-interactivessh session as long as the password prompt starts with password. You configurethis behavior by telling NetBackup Self Service to connect to a NetBackupAppliance.
To configure NetBackup Self Service and the NetBackup master server for publickey authentication
1 Create a Public Private key pair using a key generator like PuTTYgen.
2 Log on to the master server as the required master server user
3 Add the public key to the user’s authorized_keys file in the master server’soperating system format.
4 Convert the Private key into OpenSSH format encrypted with a pass phrase
-----BEGIN RSA PRIVATE KEY-----
Proc-Type: 4,ENCRYPTED
DEK-Info: DES-EDE3-CBC,997295A8E365412F
SIKdyjX4UoDm03kprqfkCGQYc/thmNIlWYztEomjyRaMyEYlh0ZIC9Kx7XnMNnSk
...
MUxIcZW8d8fF3P4s+OLidxG03H6C/AsGLzJtpecjPQA=
-----END RSA PRIVATE KEY-----
5 When you create the Location in NetBackup Self Service:
■ Choose Encrypted SSH Key for the Credentials.
16Configuring a NetBackup master serverEnabling communication with a UNIX NetBackup master server
■ Enter the user account to connect to the master server in User Account.
■ Paste the encrypted OpenSSH format private key inNetBackupOpenSSHKey.
■ Enter the pass phrase in Password and Confirm Password.
More information about testing the connection once you have created your firstLocation is available.
See “Configuring Locations” on page 23.
Enabling communicationwith aNetBackup applianceA connection to an appliance is configured similarly to a UNIX master server, butconfiguration of keys is not available. Use a previously created user name andpassword to make the connection.
Log on to CLISH on the appliance and create a new user:
Main_Menu > Manage > NetBackupCLI > Create UserName
See Creating NetBackup administrator user accounts in the NetBackup ApplianceAdministrator's Guide for further details.
Creating NetBackup Template PoliciesNumerous options are available when you create a NetBackup policy. TheNetBackup Administrator's Guide Volume I contains an entire chapter on creatingbackup policies. Please refer to that manual for details on the creation of backuppolicies.
Not all NetBackup policy options are required or used by Self Service templatepolicies. Table 3-1 details the relevant tab in the NetBackup policy creation screenand the corresponding information required for Self Service template policies. Forcomprehensive information on how to create NetBackup policies, please see theNetBackup Administrator’s Guide Volume 1.
Table 3-1 Requirement policy information for Backup Now policies
Additional detailsNetBackup policy tab
■ The policy must be deactivated.■ There is only a single Backup Now policy per policy type.
When you specify the storage option, be sure to specifyone that is large enough to successfully back up all thedata.
Attributes
17Configuring a NetBackup master serverEnabling communication with a NetBackup appliance
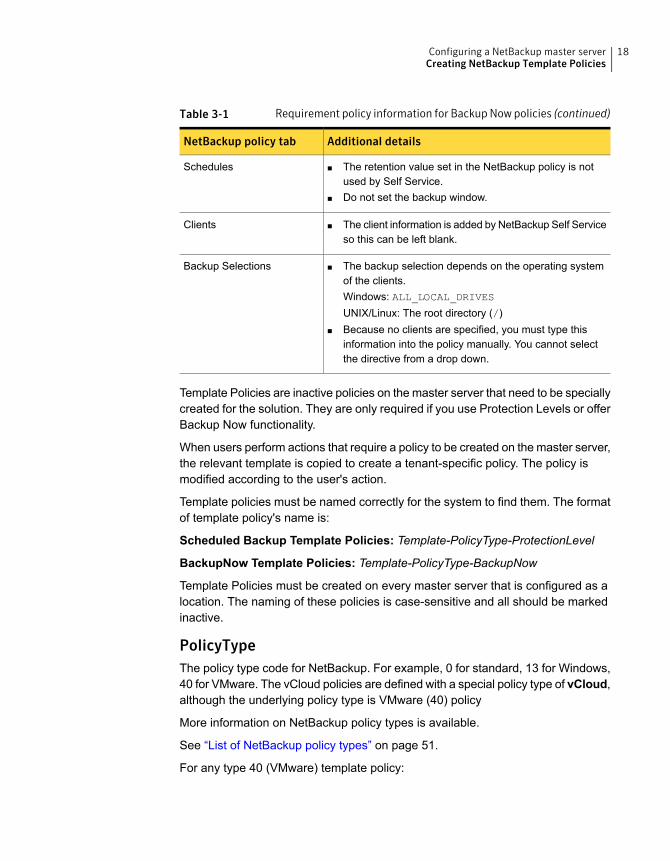
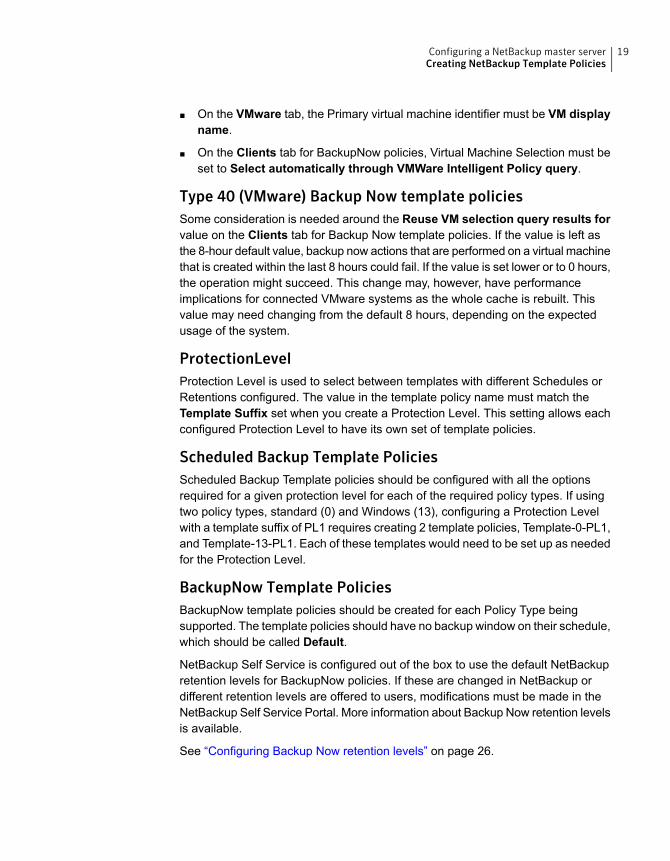
Table 3-1 Requirement policy information for Backup Now policies (continued)
Additional detailsNetBackup policy tab
■ The retention value set in the NetBackup policy is notused by Self Service.
■ Do not set the backup window.
Schedules
■ The client information is added by NetBackup Self Serviceso this can be left blank.
Clients
■ The backup selection depends on the operating systemof the clients.Windows: ALL_LOCAL_DRIVESUNIX/Linux: The root directory (/)
■ Because no clients are specified, you must type thisinformation into the policy manually. You cannot selectthe directive from a drop down.
Backup Selections
Template Policies are inactive policies on the master server that need to be speciallycreated for the solution. They are only required if you use Protection Levels or offerBackup Now functionality.
When users perform actions that require a policy to be created on the master server,the relevant template is copied to create a tenant-specific policy. The policy ismodified according to the user's action.
Template policies must be named correctly for the system to find them. The formatof template policy's name is:
Scheduled Backup Template Policies: Template-PolicyType-ProtectionLevel
BackupNow Template Policies: Template-PolicyType-BackupNow
Template Policies must be created on every master server that is configured as alocation. The naming of these policies is case-sensitive and all should be markedinactive.
PolicyTypeThe policy type code for NetBackup. For example, 0 for standard, 13 for Windows,40 for VMware. The vCloud policies are defined with a special policy type of vCloud,although the underlying policy type is VMware (40) policy
More information on NetBackup policy types is available.
See “List of NetBackup policy types” on page 51.
For any type 40 (VMware) template policy:
18Configuring a NetBackup master serverCreating NetBackup Template Policies
■ On the VMware tab, the Primary virtual machine identifier must be VM displayname.
■ On the Clients tab for BackupNow policies, Virtual Machine Selection must beset to Select automatically through VMWare Intelligent Policy query.
Type 40 (VMware) Backup Now template policiesSome consideration is needed around the Reuse VM selection query results forvalue on the Clients tab for Backup Now template policies. If the value is left asthe 8-hour default value, backup now actions that are performed on a virtual machinethat is created within the last 8 hours could fail. If the value is set lower or to 0 hours,the operation might succeed. This change may, however, have performanceimplications for connected VMware systems as the whole cache is rebuilt. Thisvalue may need changing from the default 8 hours, depending on the expectedusage of the system.
ProtectionLevelProtection Level is used to select between templates with different Schedules orRetentions configured. The value in the template policy name must match theTemplate Suffix set when you create a Protection Level. This setting allows eachconfigured Protection Level to have its own set of template policies.
Scheduled Backup Template PoliciesScheduled Backup Template policies should be configured with all the optionsrequired for a given protection level for each of the required policy types. If usingtwo policy types, standard (0) and Windows (13), configuring a Protection Levelwith a template suffix of PL1 requires creating 2 template policies, Template-0-PL1,and Template-13-PL1. Each of these templates would need to be set up as neededfor the Protection Level.
BackupNow Template PoliciesBackupNow template policies should be created for each Policy Type beingsupported. The template policies should have no backup window on their schedule,which should be called Default.
NetBackup Self Service is configured out of the box to use the default NetBackupretention levels for BackupNow policies. If these are changed in NetBackup ordifferent retention levels are offered to users, modifications must be made in theNetBackup Self Service Portal. More information about Backup Now retention levelsis available.
See “Configuring Backup Now retention levels” on page 26.
19Configuring a NetBackup master serverCreating NetBackup Template Policies
Template policy naming exampleIf you support standard (0) and Windows (13) policies, with two different ProtectionLevels (PL1 and PL2), six template policies must be created:
Template-0-PL1
Template-0-PL2
Template-0-BackupNow
Template-13-PL1
Template-13-PL2
Template-13-BackupNow
vCloud Template PoliciesvCloud template policies are created according to VMware template policies butwith different names.
vCloud Template Policies should be named:
vCloud Scheduled Backup Policies: Template-vCloud-ProtectionLevel
vCloud BackupNow Policies: Template-vCloud-BackupNow
Checking Template Policy CreationCheck the creation of Template Policies within Self Service to see that their namingis correct. You can also confirm that they were created on all master servers.
The Protection Levels tab on the Administrator's home page shows which masterservers have correctly named policies. If a policy is not present, the home pageshows the name of the missing policy. More information about protection levelconfiguration is available.
See “Configuring Protection Levels” on page 25.
Polices created by Self ServiceWhen a computer is protected or a backup now request is raised, Self Servicecreates policies on the appropriate NetBackup master server. For scheduledbackups, the format is CustomerCode-PolicyType-ProtectionLevelSuffix.
Example:
CUST1-0-PL1
CUST1-13-PL1
CUST1-vCloud-PL3
For backup now policies, the format isCustomerCode-RequestId-PolicyType-RetentionLevel-bn
Example:
20Configuring a NetBackup master serverCreating NetBackup Template Policies

CUST1-23451-0-3-bn
CUST1-23452-13-1-bn
CUST1-23453-vCloud-1-bn
21Configuring a NetBackup master serverCreating NetBackup Template Policies
Configuring Self Service
This chapter includes the following topics:
■ About Self Service configuration
■ About integration settings and editing of Locations, Protection Levels, and vCloudimports
■ Configuring Locations
■ Configuring Protection Levels
■ Configuring Backup Now retention levels
■ Configuring Tenants
■ Registering computers
■ Configuring the home page
About Self Service configurationYou can manage the key creation and editing configuration tasks from the mainpanel on the home page:
■ Locations
■ Protection Levels
■ Tenants
■ Machines
Any non-Tenant associated Administrator sees this home page panel.
4Chapter
About integration settings and editing of Locations,Protection Levels, and vCloud imports
Integrations Settings are a flexible store of named settings with values. They arean integral part of Self Service. You can access all integrations settings as anAdministrator from Admin > Settings > Integration Settings.
Settings are grouped into sections. Locations, Protection Levels, and vCloud importsexist in Self Service as Integration Settings that are grouped into a section. A singlesection defines each individual Location, Protection Level, and vCloud import. Whenyou use the Add function for each of these, they create Integration Settings behindthe scenes.
You can edit or delete these only through Integration Settings. Some advancedconfiguration options are only available there directly. Care must be taken, however,as no validation is performed when editing values directly through IntegrationSettings.
Configuring LocationsA location represents a connection to a NetBackup Master Server. The systemrequires at least one location to function.
New locations are created with Add Location on the home page Locations tab.The on-screen prompts should be completed. A Location Integration Setting sectionis created.
Once the location has been created the system returns to the main Locations tabwhere a Connectivity Check is started. The animated green cog on the CheckConnectivity icon indicates that the Connectivity Check is started.
Once the check has finished, the new Location is displayed with a green tick(passed) or a red cross (failed).
If the check has passed, no further action is required and your location is ready foruse. If it failed, click the red cross to bring up details of the failure.
Integration Settings that are used in a locationNone of these settings can be overridden at the tenant or the user level.
Additionally, the name of the section forming the Location must be in the formatMachine Location abc, where abc is the name of the location. Once computershave been added to the location, do not change the name of the location. Changingthe name of the location can result in computers being disassociated from thelocation.
23Configuring Self ServiceAbout integration settings and editing of Locations, Protection Levels, and vCloud imports
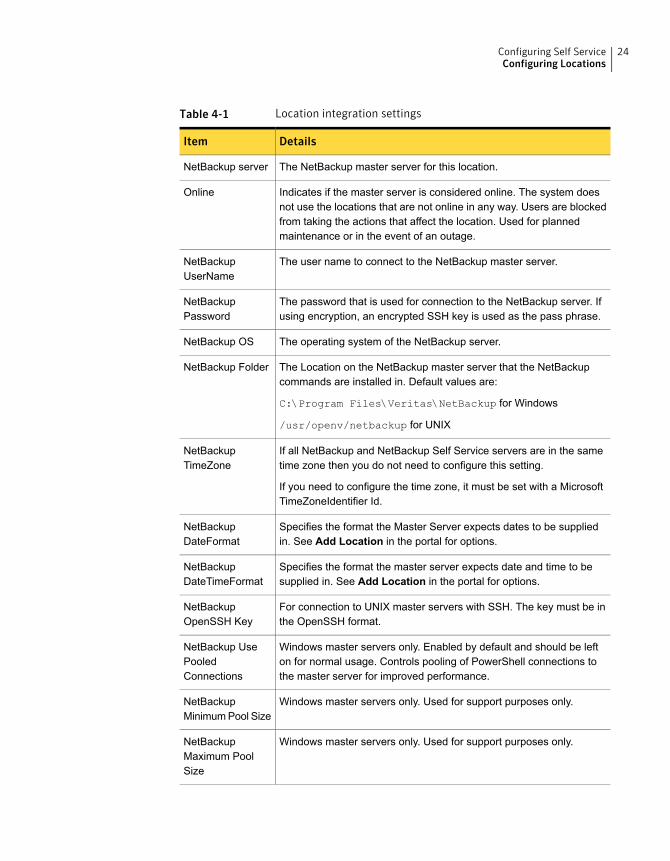
Table 4-1 Location integration settings
DetailsItem
The NetBackup master server for this location.NetBackup server
Indicates if the master server is considered online. The system doesnot use the locations that are not online in any way. Users are blockedfrom taking the actions that affect the location. Used for plannedmaintenance or in the event of an outage.
Online
The user name to connect to the NetBackup master server.NetBackupUserName
The password that is used for connection to the NetBackup server. Ifusing encryption, an encrypted SSH key is used as the pass phrase.
NetBackupPassword
The operating system of the NetBackup server.NetBackup OS
The Location on the NetBackup master server that the NetBackupcommands are installed in. Default values are:
C:\Program Files\Veritas\NetBackup for Windows
/usr/openv/netbackup for UNIX
NetBackup Folder
If all NetBackup and NetBackup Self Service servers are in the sametime zone then you do not need to configure this setting.
If you need to configure the time zone, it must be set with a MicrosoftTimeZoneIdentifier Id.
NetBackupTimeZone
Specifies the format the Master Server expects dates to be suppliedin. See Add Location in the portal for options.
NetBackupDateFormat
Specifies the format the master server expects date and time to besupplied in. See Add Location in the portal for options.
NetBackupDateTimeFormat
For connection to UNIX master servers with SSH. The key must be inthe OpenSSH format.
NetBackupOpenSSH Key
Windows master servers only. Enabled by default and should be lefton for normal usage. Controls pooling of PowerShell connections tothe master server for improved performance.
NetBackup UsePooledConnections
Windows master servers only. Used for support purposes only.NetBackupMinimumPool Size
Windows master servers only. Used for support purposes only.NetBackupMaximum PoolSize
24Configuring Self ServiceConfiguring Locations
Table 4-1 Location integration settings (continued)
DetailsItem
When Self Service synchronizes computer backup images fromNetBackup, they are retrieved in batches of this size. The systemdefaults to 25 but may need to be reduced for very busy systems withlots of backup activities. Reducing the number results in more calls toNetBackup to retrieve a given number of images. The total number ofimages that are retrieved remains the same.
Get BackupsChunk Size inHours
The maximum number of hours to allow a backup job to complete onNetBackup. Used by the synchronization engine to estimate a bufferperiod to synchronize backup images. Should only be changed ifproblems in backup image synchronization occur.
Maximum backupduration (hours)
Configuring Protection LevelsA Protection Level indicates the standard of protection that is applied to a computer.It corresponds to template policies on all of the NetBackup master servers in thesystem. These template policies can then have different schedules, retention levelsetc., allowing different Protection Levels to have different characteristics. Thisconfiguration provides users a level of abstraction away from more complexNetBackup concepts.
As an example the system can be configured with three Protection Levels: Bronze,Silver, and Gold. Increasing the retention level and frequency of backups as youwork up the scale of Protection Levels.
Use the Add Protection Level option on the home page Protection Levels tabto create New Protection levels. Follow the on-screen prompts to create acorresponding Protection Level Integration Setting section.
After you add a Protection Level the system initiates a connectivity check. The cogon the Check Connectivity icon becomes green and animated. This change indicatesthat the check is active. This check reviews each defined location in the system forTemplate Policies that correspond to the Protection Levels. Any missing TemplatePolicies are shown on screen with a red cross icon. Clicking this icon providesfurther details about the Template Policy that needs to be created. More informationabout template policy creation is available.
See “Creating NetBackup Template Policies” on page 17.
Once the missing Template Policies are created you can use Check Connectivityto confirm that they are correct.
25Configuring Self ServiceConfiguring Protection Levels
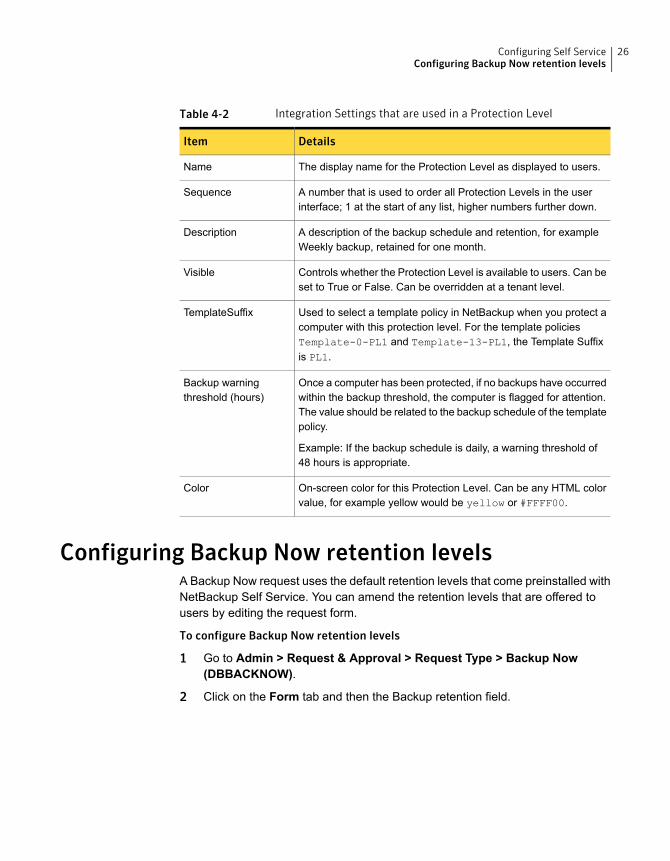
Table 4-2 Integration Settings that are used in a Protection Level
DetailsItem
The display name for the Protection Level as displayed to users.Name
A number that is used to order all Protection Levels in the userinterface; 1 at the start of any list, higher numbers further down.
Sequence
A description of the backup schedule and retention, for exampleWeekly backup, retained for one month.
Description
Controls whether the Protection Level is available to users. Can beset to True or False. Can be overridden at a tenant level.
Visible
Used to select a template policy in NetBackup when you protect acomputer with this protection level. For the template policiesTemplate-0-PL1 and Template-13-PL1, the Template Suffixis PL1.
TemplateSuffix
Once a computer has been protected, if no backups have occurredwithin the backup threshold, the computer is flagged for attention.The value should be related to the backup schedule of the templatepolicy.
Example: If the backup schedule is daily, a warning threshold of48 hours is appropriate.
Backup warningthreshold (hours)
On-screen color for this Protection Level. Can be any HTML colorvalue, for example yellow would be yellow or #FFFF00.
Color
Configuring Backup Now retention levelsA Backup Now request uses the default retention levels that come preinstalled withNetBackup Self Service. You can amend the retention levels that are offered tousers by editing the request form.
To configure Backup Now retention levels
1 Go to Admin > Request & Approval > Request Type > Backup Now(DBBACKNOW).
2 Click on the Form tab and then the Backup retention field.
26Configuring Self ServiceConfiguring Backup Now retention levels
3 At the base of the page, click on the Configuration tab.
4 Listed under the Items field is a list of retention levels that are available in theBackup Now request form.
You can delete existing levels using the trash can icon or add new levels. TheCodemust match the NetBackup retention number and the Description is whatthe user sees.
Configuring TenantsA Tenant is an organizational unit and at least one tenant must exist. A Tenant canbe created with the Add Tenant icon in the home page Tenants tab. The first(admin level) user of the tenant is created at the same time. If any vCloud Importsources are defined, the tenants credentials can be set. A tenant record, relatedtenant Integration Settings, and the user record are added to the database whenyou click OK.
A tenant’s details can be edited throughAdmin > Organization > Tenant. All usersassociated to the tenant are visible in theUsers tab. Tenant level Integration settingsare available in the Integration tab. vCloud credentials, and also additional vCloudimports, can be set here. Tenant level theming can be carried out in the Themestab.
You can also use an API to create Tenants. A PowerShell script is provided as astarting point for automating the creation of tenants and their users. It makes useof the Front Office SDK to call the Public Web Services.
Further information about the SDK is available in the help files. The help files arefound in the install location of the NetBackup Self-Service portal. By default, thefiles are located in C:\Program Files (x86)\Biomni\Front Office 8.3\Sdk\.Microsoft developers should use the SDK. Non-Microsoft developers can call theweb service directly. The URL is found inAdmin > Support > Configuration Checkin the Public Web Service section of the Server tab. The web service isDirectaApi.svc.
27Configuring Self ServiceConfiguring Tenants
Deactivating a TenantTo deactivate a tenant:
1 Go to Admin > Organization > Tenant.
2 Deactivate the tenant.
Deactivate the tenant with theDeactivate link on the right of the specific tenantrow from the entry page. Or deactivate the tenant from the Details tab bydeselecting the Active check box in tenant record.
This action prevents logon from Tenant users.
3 All computers, backup, protection, and usage data is deleted for the tenantduring the nightly scheduled task.
4 Delete all policies for the tenant in NetBackup.
You can identify the policies by their name if you used the naming conventionthat is detailed in the NetBackup Self Service Configuration Guide. Moreinformation about the naming convention is available.
See “About configuring the NetBackup master server” on page 14.
Adding usersYou can add additional users to the tenant in a number of ways:
■ Manually through the portal from the Admin > Organization > Tennant > Usertab
■ Active Directory (Admin > Organization > User right-click Import ActiveDirectory). The Cost Center Codemust be the same as that found in the Tenantrecord.
■ Master Data import through CSV (Admin > Organization > User right-clickImport / Export Users. Users tab in the Import File Template). The CostCenter Code must be the same as that found in the Tenant record.
■ Using the API
Note: Once a user is associated to a tenant this association cannot change.
A user record can be deactivated to prevent access to the system. If using FormAuthentication, password rules can be defined using a number of criteria. Theserules can be configured in Admin > Settings > System Configuration.
A tenant user with an Administrator access profile can manage their own userrecords.
28Configuring Self ServiceConfiguring Tenants
Access rightsBy default all users can carry out all possible actions on every computer that isregistered to their tenant. This ability depends on the functionality that the computercan support. All users can see the monthly usage data for their tenant. You cancontrol the available actions at three levels: globally, per tenant, or per user.
Control of these access rights is available throughAdmin > Settings > IntegrationSettings in the NetBackup Adapter Access Rights section. The access rightsare Allow Backup Now, Allow Protect Machine, Allow Restore File, AllowRestore Vm, Allow Unprotect Machine, Allow Register for File Restore, andAllow Usage Report.
To globally enable or disable an action for all users
1 Click the required Access Right in the NetBackup Adapter Access Rightssection.
2 Choose Enabled or Disabled in the Value field.
Ensure Allow Tenant Override is not checked.
Ensure Allow User Override is (None).
3 To allow different tenants to have different actions available to them.
■ Click the requiredAccess Right in theNetBackupAdapter Access Rightssection
■ Choose Enabled or Disabled in the Value field. This setting is the defaultfor any existing tenants or any new tenants
■ Check Allow Tenant OverrideEnsure Allow User Override is set to None.
Only a non-Tenant associated Administrator who has access to all of the Tenantscan change the value.
To configure the value of the Access Right for each tenant
1 Select the Integration tab in the Tenant Admin screen.
2 Admin > Organization > Tenant > Integration.
3 Click the required Access Right in the NetBackup Adapter Access Rightssection.
4 Choose Enabled or Disabled in the Value field.
29Configuring Self ServiceConfiguring Tenants
To allow different users to have different actions available to them
1 Click the required Access Right in the NetBackup Adapter Access Rightssection.
2 Choose Enabled or Disabled in the Value field. This setting is the default forany existing or any new users.
3 Ensure Allow Tenant Override is not checked.
4 Set Allow User Override to For User.
When For User overriding is chosen the value can be changed in any of the followingplaces:
■ By an Administrator user in the Integration tab of User Administration (Admin> Organization > User > Integration)
■ By an Administrator user in the Integration tab of Tenant User Administration(Admin > Organization > Tenant > Users > Select User > Integration)
■ By a Tenant Administrator in the Integration tab of their tenant's UserMaintenance screen (Admin >UserManagement > Select User > Integration).
■ Click the requiredAccess Right in theNetBackup Adapter Access Rightssection
■ Choose Enabled or Disabled in the Value field
Do not select the By User override option.
Registering computersComputers within the estate must be registered to NetBackup Self Service. Thisrequirement includes the name for display in the UI and configuration data for usewith NetBackup.
You can register a computer in three different ways: through the user interface,through the API, or automatically through vCloud import. A single tenant can havemore than one source of computer, for example, virtual machines imported fromvCloud and physical computers imported through the API.
Registering a computer with the user interfaceYou can register a computer from theMachines tab on the home page withRegisterMachine. Help text is available to assist in completion of the data. Fields arevalidated for accurate data either during entry or when you click OK.
To remove a computer registration, go to theMachines tab on the home page anduse the Remove Registration link. Computer registration cannot be edited so it isrecommended that a computer registration is deleted and recreated if changes are
30Configuring Self ServiceRegistering computers
required. Be sure to use the same computer code when you recreate a computerregistration.
The computer registration process includes an automatic refresh of protection dataand image data from NetBackup. Protection data indicates what is protected eitherby schedule or by a one-off Backup Now task. If you click Refresh NetBackupdata from the computer row on the list, you can synchronize protection and backupimages of a computer. Typically synchronization should not require manualintervention. Exceptions might be if you want to immediately see images from anew protection policy or images that have been created manually.
Registering a computer with the APIFor automated or bulk import of computer details, an API is available. The SDKallows clients to be written in .NET and is the preferred usage of the API. A RESTAPI can, however, be used outside Microsoft environments.
Please see the SDK documentation in Install directory.
Registering a computer from vCloud Director with an importYou can automatically import computers from vCloud Director and register thecomputers with NetBackup Self Service. The computers are imported on a tenantby tenant basis using individual credentials.
A vCloud import defines two things: the vCloud instance that computers are importedfrom and the NetBackup Self Service location that the computers are registered to.You can only register a vCloud computer to a single location and to a single tenant.
Use the Add vCloud Import option on the vCloud Imports tab to create a newvCloud Import. Follow the on-screen prompts to create a corresponding vCloudImport Integration Setting section.
Youmust specify logon credentials at a tenant level to enable import. The credentialsin vCloud are defined against an Organization and must have the General >Administrator View right. Only a single tenant can import computers from anyvCloud Organization.
When you create a new tenant, theAdd Tenant form supports specifying credentialsfor a single vCloud system as part of the tenant creation process. Further credentialscan be supplied either using the API or through the Integration Settings tab inTenant administration.
31Configuring Self ServiceRegistering computers
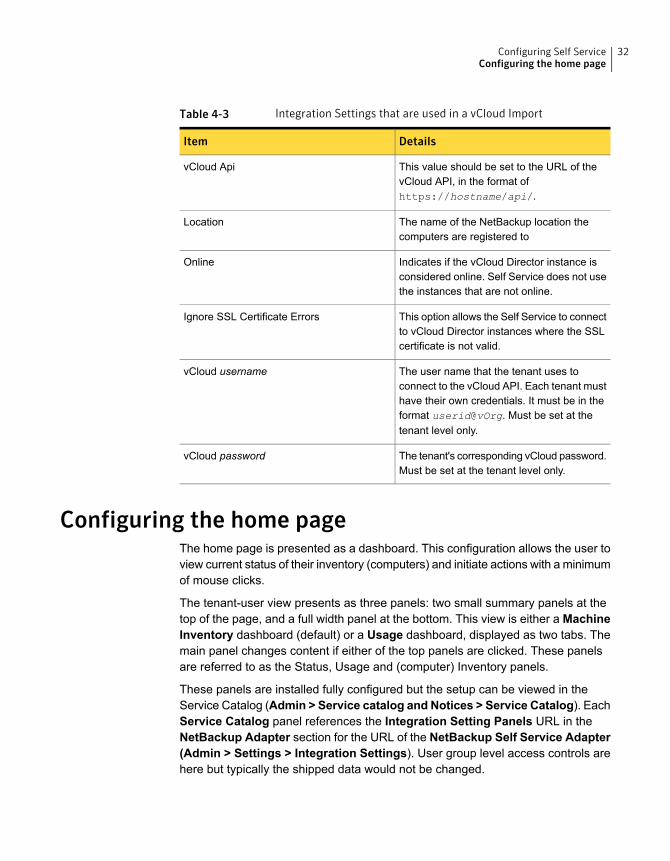
Table 4-3 Integration Settings that are used in a vCloud Import
DetailsItem
This value should be set to the URL of thevCloud API, in the format ofhttps://hostname/api/.
vCloud Api
The name of the NetBackup location thecomputers are registered to
Location
Indicates if the vCloud Director instance isconsidered online. Self Service does not usethe instances that are not online.
Online
This option allows the Self Service to connectto vCloud Director instances where the SSLcertificate is not valid.
Ignore SSL Certificate Errors
The user name that the tenant uses toconnect to the vCloud API. Each tenant musthave their own credentials. It must be in theformat userid@vOrg. Must be set at thetenant level only.
vCloud username
The tenant's corresponding vCloud password.Must be set at the tenant level only.
vCloud password
Configuring the home pageThe home page is presented as a dashboard. This configuration allows the user toview current status of their inventory (computers) and initiate actions with a minimumof mouse clicks.
The tenant-user view presents as three panels: two small summary panels at thetop of the page, and a full width panel at the bottom. This view is either a MachineInventory dashboard (default) or a Usage dashboard, displayed as two tabs. Themain panel changes content if either of the top panels are clicked. These panelsare referred to as the Status, Usage and (computer) Inventory panels.
These panels are installed fully configured but the setup can be viewed in theService Catalog (Admin > Service catalog and Notices > Service Catalog). EachService Catalog panel references the Integration Setting Panels URL in theNetBackup Adapter section for the URL of the NetBackup Self Service Adapter(Admin > Settings > Integration Settings). User group level access controls arehere but typically the shipped data would not be changed.
32Configuring Self ServiceConfiguring the home page
Home page integration settingsThe integration settings that are shown affect the display and information that isincluded in the Status and the Usage panels.
You can find the relevant Integration settings either by Admin > Settings >Integration Settings or Admin > Organization > Tenant > Integration.
Table 4-4 NetBackup Adapter
DetailsItem
Used to augment used space display;maintainable at tenant level.
Contracted Space (TB)
The number of months retained for display inUsage trend graph or list.
Usage Retention Period (months)
Warning period since last backup; used intraffic lights only when no protection levelsare specified.
Default backup warning threshold (hours)
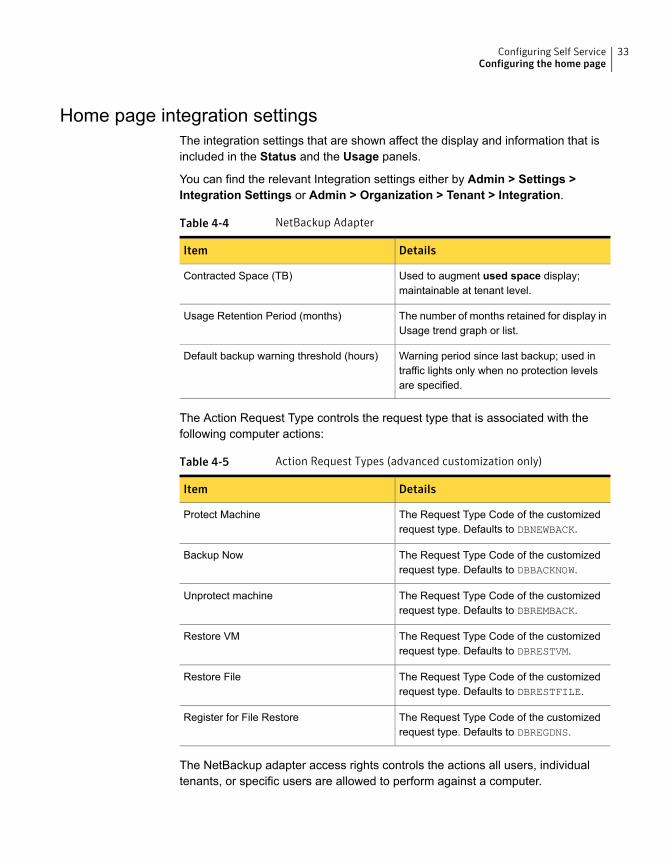
The Action Request Type controls the request type that is associated with thefollowing computer actions:
Table 4-5 Action Request Types (advanced customization only)
DetailsItem
The Request Type Code of the customizedrequest type. Defaults to DBNEWBACK.
Protect Machine
The Request Type Code of the customizedrequest type. Defaults to DBBACKNOW.
Backup Now
The Request Type Code of the customizedrequest type. Defaults to DBREMBACK.
Unprotect machine
The Request Type Code of the customizedrequest type. Defaults to DBRESTVM.
Restore VM
The Request Type Code of the customizedrequest type. Defaults to DBRESTFILE.
Restore File
The Request Type Code of the customizedrequest type. Defaults to DBREGDNS.
Register for File Restore
The NetBackup adapter access rights controls the actions all users, individualtenants, or specific users are allowed to perform against a computer.
33Configuring Self ServiceConfiguring the home page
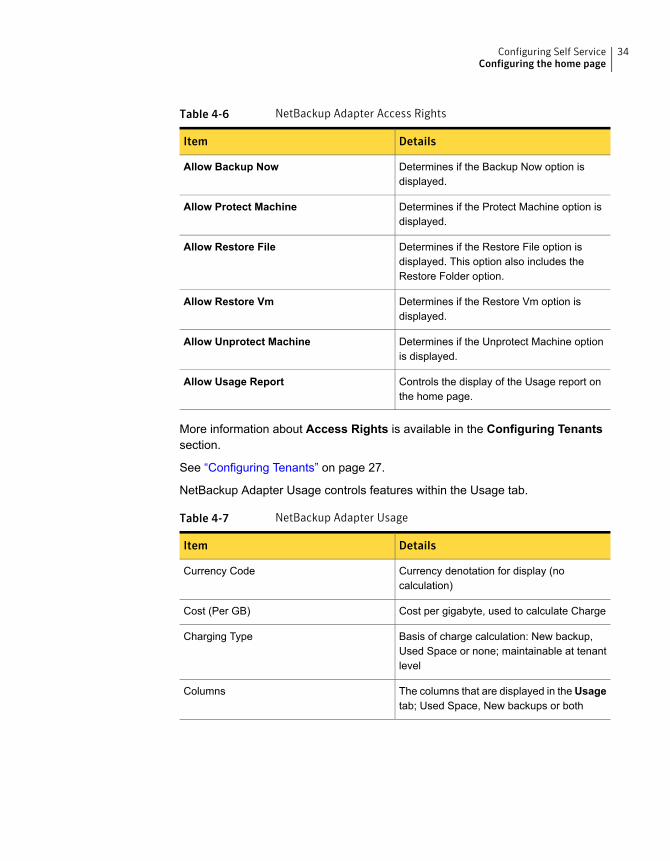
Table 4-6 NetBackup Adapter Access Rights
DetailsItem
Determines if the Backup Now option isdisplayed.
Allow Backup Now
Determines if the Protect Machine option isdisplayed.
Allow Protect Machine
Determines if the Restore File option isdisplayed. This option also includes theRestore Folder option.
Allow Restore File
Determines if the Restore Vm option isdisplayed.
Allow Restore Vm
Determines if the Unprotect Machine optionis displayed.
Allow Unprotect Machine
Controls the display of the Usage report onthe home page.
Allow Usage Report
More information about Access Rights is available in the Configuring Tenantssection.
See “Configuring Tenants” on page 27.
NetBackup Adapter Usage controls features within the Usage tab.
Table 4-7 NetBackup Adapter Usage
DetailsItem
Currency denotation for display (nocalculation)
Currency Code
Cost per gigabyte, used to calculate ChargeCost (Per GB)
Basis of charge calculation: New backup,Used Space or none; maintainable at tenantlevel
Charging Type
The columns that are displayed in the Usagetab; Used Space, New backups or both
Columns
34Configuring Self ServiceConfiguring the home page
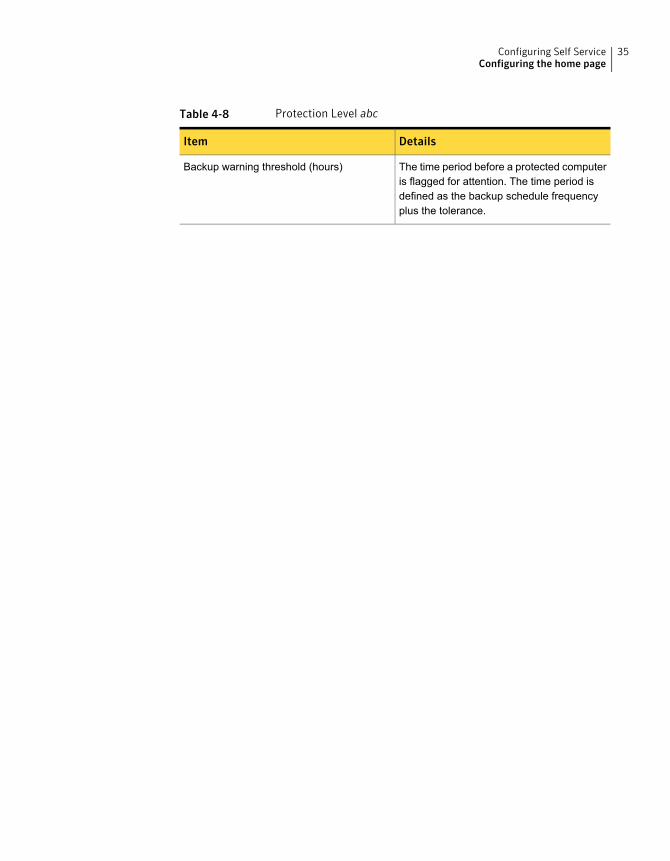
Table 4-8 Protection Level abc
DetailsItem
The time period before a protected computeris flagged for attention. The time period isdefined as the backup schedule frequencyplus the tolerance.
Backup warning threshold (hours)
35Configuring Self ServiceConfiguring the home page
Customizing Self Service
This chapter includes the following topics:
■ Language settings
■ Creating or customizing a request form
■ Themes
■ Notices
Language settingsAlthough the portal supports multiple languages, NetBackup Self Service solutiondata is currently only available in US English. This setting encompasses languageand regional settings, including date formats.
Creating or customizing a request formYou can customize a request type but normal operation does not require thiscustomization. All shipped request types are implementation-ready.
Note: If changes to a shipped request form are essential, it should be copied first,then you can edit the copy as required.
NetBackup Self Service is shipped with fully preconfigured request forms (requesttypes). These forms are launched when a backup or restore option is selected fromthe home page dashboard. If additional data or integration is required, you canoverride the default request form with an association to a customized form. Thisoverride takes effect at the system-wide level.
5Chapter
You should be aware that a customization may be overwritten on upgrade and anycustomizations must be reapplied.
The shipped request form should be selected from the list and then copied. Accessthe form through Admin > Request and Approval > Request Type. Additionalrequest fields, approval stages, or workflow can then be added and the RequestType Active check box enabled. Ensure that the Request Type Name is amendedto text suitable for viewing in the Request List.
Note: No shipped request fields or workflow steps should be removed. This facilityis available as a means of adding fulfillment steps or an approval process.
You should edit the relevant Action Request Typesetting from the IntegrationSettings section.
1 Access the setting through Admin > Settings > Integration Settings.
2 Edit it by replacing the existing value with the new Request Type Code.
3 You can then deactivate the shipped request form.
Note: The service catalog and a full list of shipped request types is available if arestore to default values is required. They can be found in the Configuration folder,under the Installation location.
ThemesThe pre-shipped NetBackup Self Service theme can be adjusted. Change the themein an Admin area screen by editing the colors that are used as well as many of theimages and styles. Many elements are editable by an edit page. You can also doadditional customized editing with an online CSS editor.
The shipped theme can be adjusted system wide with Admin > Settings > Themeor for an individual tenant with Admin > Organization > Tenant > Theme.
NoticesYou can display news ticker-style notices at the top of the home page. These noticescan be either alert type or information types. You can change the theme of thenotice and filter the notice by tenant. You can control the publication of a notice byboth start date and end dates. An API supports these notices.
A tenant with an access profile of Administrator can maintain their organization’snotices.
37Customizing Self ServiceThemes
User authenticationmethods
This chapter includes the following topics:
■ About user authentication methods
■ Forms based authentication
■ Windows Authentication
■ Active Directory Import
■ Configuring Self Service to use Federated Single Sign-On
About user authentication methodsNetBackup Self Service supports three different methods of authenticating users:
■ Forms based authentication that uses a user name and password. Thisconfiguration is the default configuration that ships with Self Service.
■ Windows authentication, optionally with an Active Directory Import. This optionis only suitable for Enterprise type deployments.
■ Federated Single Sign on by the WS-Federation Passive Protocol.
Forms based authenticationUsers access the Self Service portal by entering a user ID and password on thelogon page. This configuration is the default method of accessing the system andno additional configuration is required.
6Chapter
Password rules can be defined in the Password Policies category of Admin >Settings > System Configuration.
Windows AuthenticationTo use Windows Authentication, the users must be set up in the database with theuser names that match the users’ domain names. This format is eitherDOMAIN_NAME\username or username. The format depends on the system setting.
Configure Remove Domain Name in Admin > Settings > System Configuration.Switch it on if it uses firstname.lastname or switch off if it usesDOMAIN\firstname.lastname.
Once at least one Windows user has access to the Administration area, disableboth Anonymous Authentication and Forms Authentication in IIS. Then enableWindows Authentication. This configuration in IIS insures the web.config file isupdated and Self Service address is changed accordingly.
You can only use the shipped admin user ID to access the system until WindowsAuthentication is configured in IIS. After that point, no manual logon is available.
Note: If you use Active Directory to synchronize users, ensure that at least one useris associated to the Supervisor access profile on initial import. Otherwise, accessto the Admin area is compromised.
Note: These instructions only apply to configuration on initial implementation of thesystem and are not appropriate for later changes to the logon protocol. This limitationis due to effect on historical data.
Active Directory ImportYou can synchronize Self Service with Active Directory for easier maintenance.Import is managed from a scheduled import task. This process lets you specify atime or frequency for the process. The schedule should reflect the full user set asany user that is not included is deactivated in Self Service.
You can create multiple import profiles with a different source for each profile. Foreach profile a Self Service access profile, cost center, and user account status mustbe specified. The users may be automatically assigned to zero or more user groups.The user group, however, must already exist in Self Service. You can source theSelf Service user name from either Full Name (default) or Display Name. You canselect a language, otherwise the system base language is used. You can specify
39User authentication methodsWindows Authentication
an import profile by group or organizational unit, and with or without childrenincluded.
Import profiles are processed from the top of the list so you can modify the orderto fit your requirements. If the same user is present in multiple profiles, only theImported User Fields from the latest profile that is processed apply. User groupmembership is updated from all profiles.
The user that is specified within the Active Directory Import requires the ListContents and Read All Properties rights at the root level of the domain. Theserights are required so that the user can search all organizational units andorganizational groups and import all users.
A system configuration setting lets you control of whether the Domain Name ispre-pended to the user ID when you import it. Find the system configuration settinginAdmin > Settings > SystemConfiguration. Verify the appropriate setting valuebefore you create the first user accounts. Subsequent change causes new useraccounts to be created and existing accounts are disabled, along with the attendanteffect on accessing historical requests. A change of SAM account name causesthe creation of a new Self Service user account.
You can create locally maintained Self Service users for the records that are notmaintained in Active Directory. Active Directory update ignores these users.
Note: If you useWindows Authentication, ensure that at least one user is associatedto the Supervisor access profile on initial import. Otherwise access to theAdministration area is compromised.
Note: These instructions only apply to configuration on initial implementation of thesystem. They are not appropriate for later changes to the logon protocol due toeffect on the user-maintained method
Configuring Self Service to use Federated SingleSign-On
Self Service supports Federated Single Sign on through theWS-Federation PassiveProtocol. It is implemented with Microsoft Windows Identity Foundation (WIF), anduses Security Assertion Markup Language (SAML) tokens for claims transfer. Itdoes not, however, support the SAML2 Protocol, SAML-P.
When Self Service is installed, it is configured with Forms Authentication that requiresfirst logon to use the admin account.
40User authentication methodsConfiguring Self Service to use Federated Single Sign-On
To authenticate through the identity provider:
1 Create users in the Self Service database, who correspond to users in theidentity provider.
2 Edit the Self Service web.config file to enable federated single sign-on.
Create a user in Self ServiceThe User ID is used to identify users in Self Service. Claims are used to identifyusers in the identity provider. For authentication to succeed, users in Self Servicemust have a User ID that matches the value in one of the claims from the identityprovider.
Self Service looks at the following claims when it attempts to find the Self Serviceuser: Name, Email,Windows Account Name, and UPN. Typically Name andWindows Account Name have the format domain\username, and typically Emailand UPN have the format username@domain.
You can enter Users through the portal or import in bulk, either directly from ActiveDirectory or by a .CSV file.
Edit web.config to enable Federated Single Sign-OnTo change the web.config file to enable federated single sign-on:
1 Navigate to install_path\WebSite.
2 Open web.config with Notepad as Administrator.
3 Find the <modules> section and uncomment the two IdentityModelmodules.
4 Find the <authentication> section and change the mode to None.
5 Enter the URL of the WS-Federation website in the issuer attribute of the<wsFederation> element
6 Find the <trustedIssuers> section and enter the token-signing certificatethumbprint of the WS-Federation server.
Note: You should not use cut and paste for the thumbprint as it can inserthidden characters into the file which interfere with the thumbprint matching.
7 If these changes are on a test system that uses self-sign SSL certificates,uncomment the <certificateValidation> element.
8 Save the web.config file.
If you have to switch back to Forms Authentication, the web.config file can beedited and the authenticationmode set to forms: <authentication mode="Forms">.
41User authentication methodsConfiguring Self Service to use Federated Single Sign-On

One instance where you would switch back to Forms Authentication is to recoverfrom a problem.
Log on to Self ServiceTo confirm that the system is fully configured for Federated logon:
1 Close and re-open Internet Explorer
2 Enter the URL of Self Service
3 If your environment uses test certificates, accept the two certificate errors
4 Enter the credentials for the previously created user. The user shouldsuccessfully log on.
42User authentication methodsConfiguring Self Service to use Federated Single Sign-On

Troubleshooting
This chapter includes the following topics:
■ About troubleshooting
■ Where to find troubleshooting information
■ Impersonation of a tenant user
■ Issues with Remote PowerShell to Windows Master Servers
About troubleshootingThe first step in troubleshooting a problem is to determine if it lies with Self Serviceor NetBackup itself. Unless there is an error or a failure message that points in aclear direction, the best first course of action is to try and manually perform theaction on the NetBackup console. If this action fails it points to a NetBackup issue.Once NetBackup issues have been ruled out proceed with diagnosing in Self Service.
7Chapter
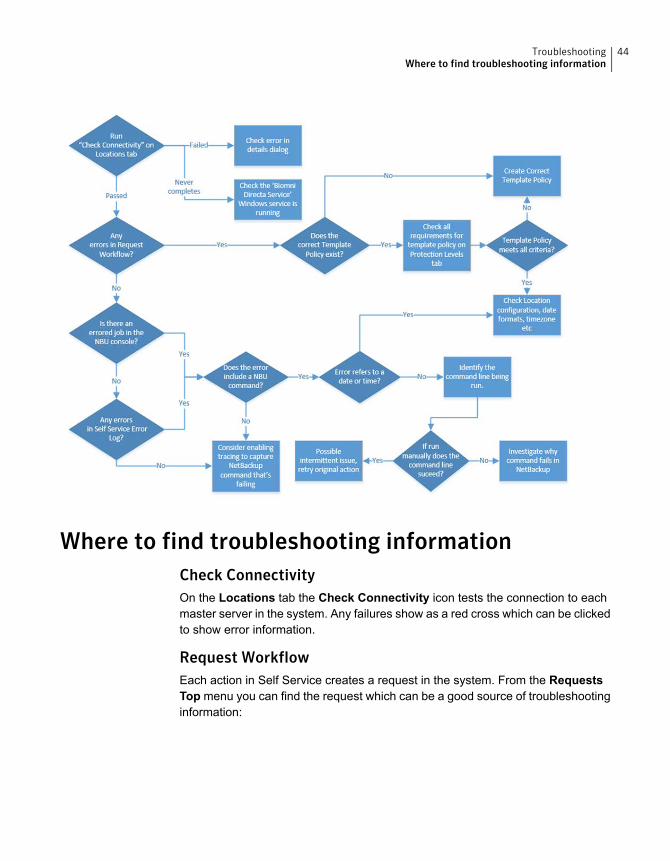
Where to find troubleshooting informationCheck ConnectivityOn the Locations tab the Check Connectivity icon tests the connection to eachmaster server in the system. Any failures show as a red cross which can be clickedto show error information.
Request WorkflowEach action in Self Service creates a request in the system. From the RequestsTopmenu you can find the request which can be a good source of troubleshootinginformation:
44TroubleshootingWhere to find troubleshooting information
Table 7-1 Tab information
DetailsTab name
Any failed steps are red and have errors against them.Fulfillment tab
Will show progress against the action and can also provide theNetBackup Job Id.
Audit tab
Self Service Error LogFound in Admin > Support > Error Log
Errors can contain a System Reference which can be used to tie it back to a specificRequest, and hence an Action.
If trying to locate failed NetBackup commands, performing a search for the text/bin or \bin can be helpful.
Additional activity reportingAn additional source of activity reporting can be found in the Support category ofthe Admin home page. This category includes access to Integration Logs, AuditLogs, and Email Logs, as well as a Task Queue and Email Queue.
NetBackup Command-Line ErrorsSelf Service works by running NetBackup Commands on the command line of themaster server. If there is a problem running a command, it is included in the errorin Self Service. Locating these errors is very helpful. Once you have an error witha NetBackup Command line, you can copy the command and try running it manuallyon the Master Server. This technique is useful for troubleshooting.
Errored Jobs in NetBackup ConsoleCheck for any errors on the NetBackup Activity Monitor especially against Job Idsthat are identified.
Checking Template PoliciesTemplate Policies must be configured in certain ways to function correctly. Whenyou check policy templates, refer to the Protection Levels tab in Admin. Makesure that the Template meets all the criteria that are displayed when you select thegreen tick that corresponds with its Protection Level.
Synchronization ErrorsCan be viewed as an MSP admin user in computer detail pop-up.
45TroubleshootingWhere to find troubleshooting information
Details incorrect for computerIn the case that image or protection details don’t seem correct for a computer, runRefresh NetBackup Data for the computer.
TracingTracing can be configured to analyze problems on a more detailed level. Thismethod is a more advanced troubleshooting method. Do not attempt this methodwithout the assistance of support. See the ReadMe.txt in Services Site\Logs andPanels Site\Logs.
Impersonation of a tenant userYou can impersonate a Tenant-user to see their home page view, as well as performactions on their behalf.
From the home page, when you mouse-over the logged on user name, the optionRaise a request for another user is displayed. If this option is selected, it displaysa user list. Select the required tenant-user and their home page view is displayed.
Issues with Remote PowerShell to Windows MasterServers
Concurrent Remote PowerShell Connection LimitsThe NetBackup master server limits the number of remote connections. The serverdefaults are typically sufficient.
In high usage installations it may be necessary to increase this limit. If the limit isexceeded the following error may occur:
NetBackup server name Connecting to remote server NetBackup server
name failed with the following error message : The WS-Management
service cannot process the request. The maximum number of concurrent
shells for this user has been exceeded. Close existing shells or
raise the quota for this user. For more information, see the
about_Remote_Troubleshooting Help topic.
46TroubleshootingImpersonation of a tenant user

To increase the limit:
1 On the NetBackup master server, run the PowerShell command that is shownto determine the number of connections allowed:
Get-Item WSMan:\localhost\Shell\MaxShellsPerUser
2 On the NetBackup master server, run the PowerShell command that is shownto increase the number of connections allowed:
Set-Item WSMan:\localhost\Shell\MaxShellsPerUser interger_value
Concurrent User Operation LimitsSymptom of reaching this limit is an error similar to:
RunCommand failed.
"C:\Program Files\Veritas\NetBackup\bin\admincmd\bpimagelist"
"-d" "03/02/2015 09:58:11" "-e" "03/02/2015 11:58:11"
"-json_compact"
Run-Process script threw exception:
Starting a command on the remote server failed with the following
error message : The WS- Management service cannot process the
request. This user is allowed a maximum number of 15 concurrent
operations, which has been exceeded. Close existing operations for
this user, or raise the quota for this user. For more information,
see the about_Remote_Troubleshooting Help topic.
Windows 2012 defaults to 1500, Windows 2008 R2 defaults to 15. On the masterserver, run the command that is shown to increase this limit:
winrm set winrm/config/Service
@{MaxConcurrentOperationsPerUser="1500"}
PowerShell Connection PoolingBy default, Windows locations use PowerShell Connection Pooling. This optionallows much higher throughput when you call PowerShell on the Master Server.Higher throughput is achieved because every call does not require the computerto create and destroy a new Run Space.
47TroubleshootingIssues with Remote PowerShell to Windows Master Servers
Settings
Table 7-2 Location integration settings that are used for PowerShellConnection Pooling
DetailsName
In the event of problems with connectionpooling, it can be switched off by changingthis setting to False.
NetBackup Use Pooled Connections
Minimum number of run spaces to keep inthe pool.
NetBackup Minimum Pool Size
Maximum number of run spaces to keep inthe pool.
NetBackup Maximum Pool Size
DiagnosticsThe diagnostic tracing captures a large amount of information about the PowerShellconnection creation, use, and disposal.
The following PowerShell script can be used to find information about theconnections to a master server:
$machineName = 'master_server_machine_name'
$userName = 'user_name_-_same_as_the_location_integration_setting'
$password = '<password>'
$connectionURI = ('http://{0}:5985/wsman' -f $machineName)
$securePassword = ConvertTo-SecureString $password -AsPlainText -Force
$credential = New-Object System.Management.Automation.PSCredential
($userName, $securePassword)
$connections = Get-WSManInstance -ConnectionURI $connectionURI
-Credential $credential -ResourceURI shell -Enumerate #| where
{ $_.Owner -eq $userName }
if($connections.length -eq 0) { "There are no remote PowerShell
connections" }
$connections | ForEach-Object {
# To remove the connection, uncomment the line below
# Remove-WSManInstance -ConnectionURI $connectionURI shell
@{ShellID=$_.ShellID}
48TroubleshootingIssues with Remote PowerShell to Windows Master Servers
$_
"Owner: {0}" -f $_.Owner
"HostName: {0}" -f (Resolve-DnsName $_.ClientIP | select
-expand NameHost)
"-------------------------------------------------------"
}
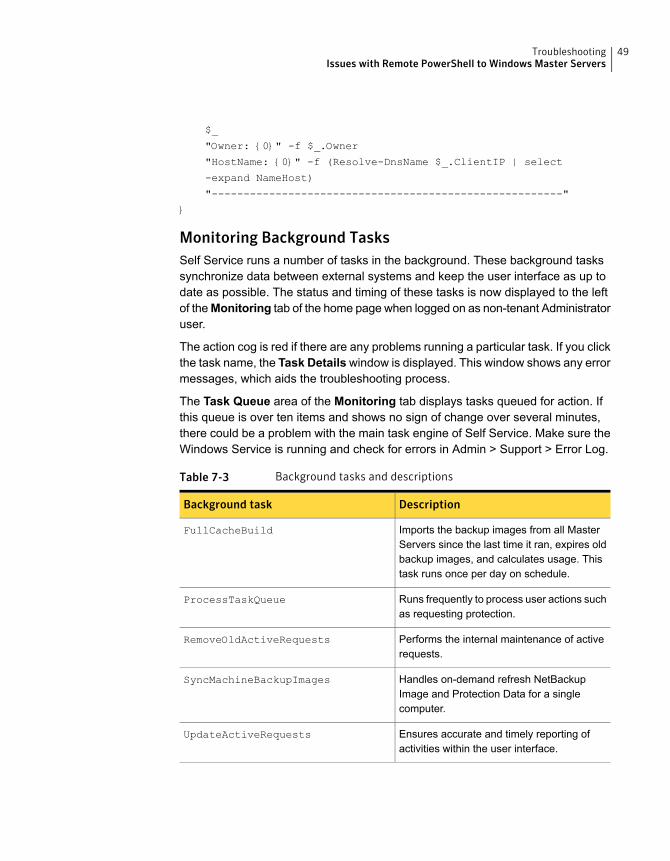
Monitoring Background TasksSelf Service runs a number of tasks in the background. These background taskssynchronize data between external systems and keep the user interface as up todate as possible. The status and timing of these tasks is now displayed to the leftof theMonitoring tab of the home page when logged on as non-tenant Administratoruser.
The action cog is red if there are any problems running a particular task. If you clickthe task name, the Task Detailswindow is displayed. This window shows any errormessages, which aids the troubleshooting process.
The Task Queue area of the Monitoring tab displays tasks queued for action. Ifthis queue is over ten items and shows no sign of change over several minutes,there could be a problem with the main task engine of Self Service. Make sure theWindows Service is running and check for errors in Admin > Support > Error Log.
Table 7-3 Background tasks and descriptions
DescriptionBackground task
Imports the backup images from all MasterServers since the last time it ran, expires oldbackup images, and calculates usage. Thistask runs once per day on schedule.
FullCacheBuild
Runs frequently to process user actions suchas requesting protection.
ProcessTaskQueue
Performs the internal maintenance of activerequests.
RemoveOldActiveRequests
Handles on-demand refresh NetBackupImage and Protection Data for a singlecomputer.
SyncMachineBackupImages
Ensures accurate and timely reporting ofactivities within the user interface.
UpdateActiveRequests
49TroubleshootingIssues with Remote PowerShell to Windows Master Servers

Table 7-3 Background tasks and descriptions (continued)
DescriptionBackground task
Synchronizes the computers from vCloudaccording to configured imports. This taskruns once per day on schedule but can beinitiated manually.
VCloudImport
50TroubleshootingIssues with Remote PowerShell to Windows Master Servers
NetBackup policy types
This appendix includes the following topics:
■ List of NetBackup policy types
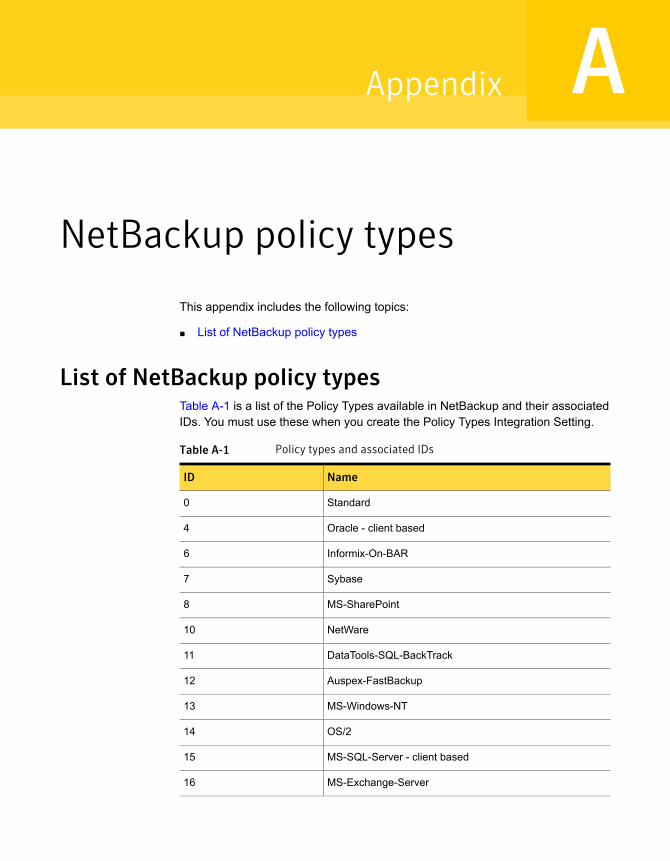
List of NetBackup policy typesTable A-1 is a list of the Policy Types available in NetBackup and their associatedIDs. You must use these when you create the Policy Types Integration Setting.
Table A-1 Policy types and associated IDs
NameID
Standard0
Oracle - client based4
Informix-On-BAR6
Sybase7
MS-SharePoint8
NetWare10
DataTools-SQL-BackTrack11
Auspex-FastBackup12
MS-Windows-NT13
OS/214
MS-SQL-Server - client based15
MS-Exchange-Server16
AAppendix
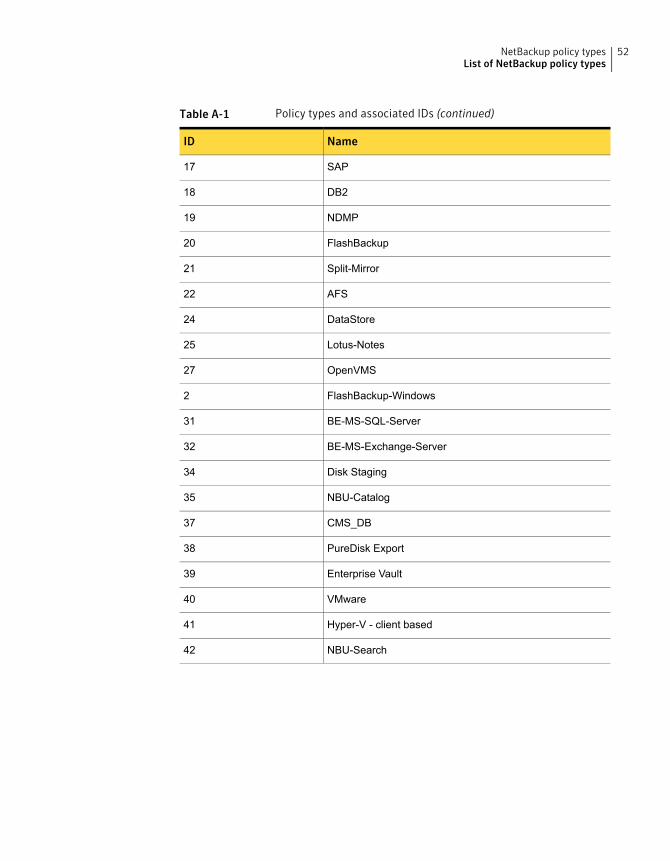
Table A-1 Policy types and associated IDs (continued)
NameID
SAP17
DB218
NDMP19
FlashBackup20
Split-Mirror21
AFS22
DataStore24
Lotus-Notes25
OpenVMS27
FlashBackup-Windows2
BE-MS-SQL-Server31
BE-MS-Exchange-Server32
Disk Staging34
NBU-Catalog35
CMS_DB37
PureDisk Export38
Enterprise Vault39
VMware40
Hyper-V - client based41
NBU-Search42
52NetBackup policy typesList of NetBackup policy types
Dashboard traffic lightstatus and usage
This appendix includes the following topics:
■ About dashboard traffic light status and usage
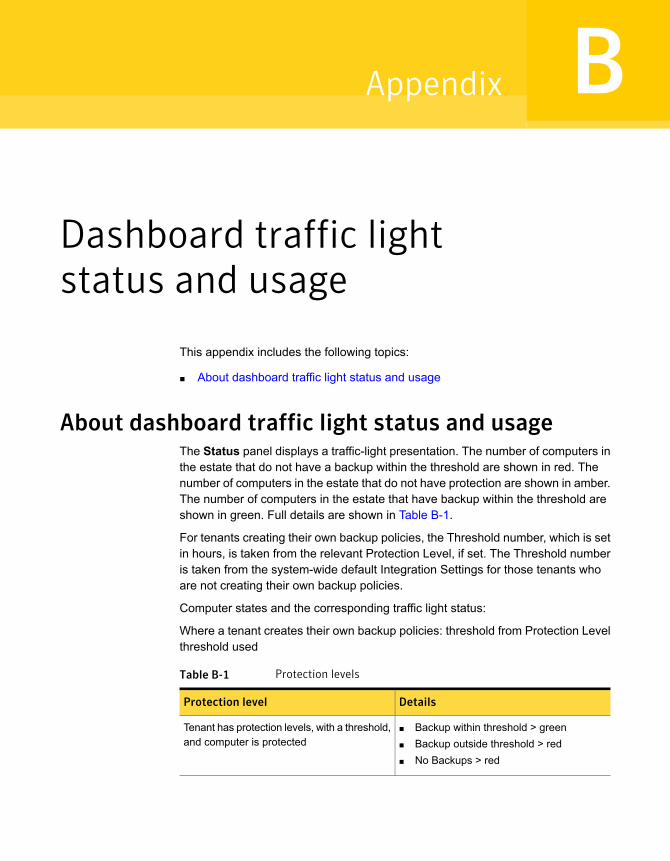
About dashboard traffic light status and usageThe Status panel displays a traffic-light presentation. The number of computers inthe estate that do not have a backup within the threshold are shown in red. Thenumber of computers in the estate that do not have protection are shown in amber.The number of computers in the estate that have backup within the threshold areshown in green. Full details are shown in Table B-1.
For tenants creating their own backup policies, the Threshold number, which is setin hours, is taken from the relevant Protection Level, if set. The Threshold numberis taken from the system-wide default Integration Settings for those tenants whoare not creating their own backup policies.
Computer states and the corresponding traffic light status:
Where a tenant creates their own backup policies: threshold from Protection Levelthreshold used
Table B-1 Protection levels
DetailsProtection level
■ Backup within threshold > green■ Backup outside threshold > red■ No Backups > red
Tenant has protection levels, with a threshold,and computer is protected
BAppendix
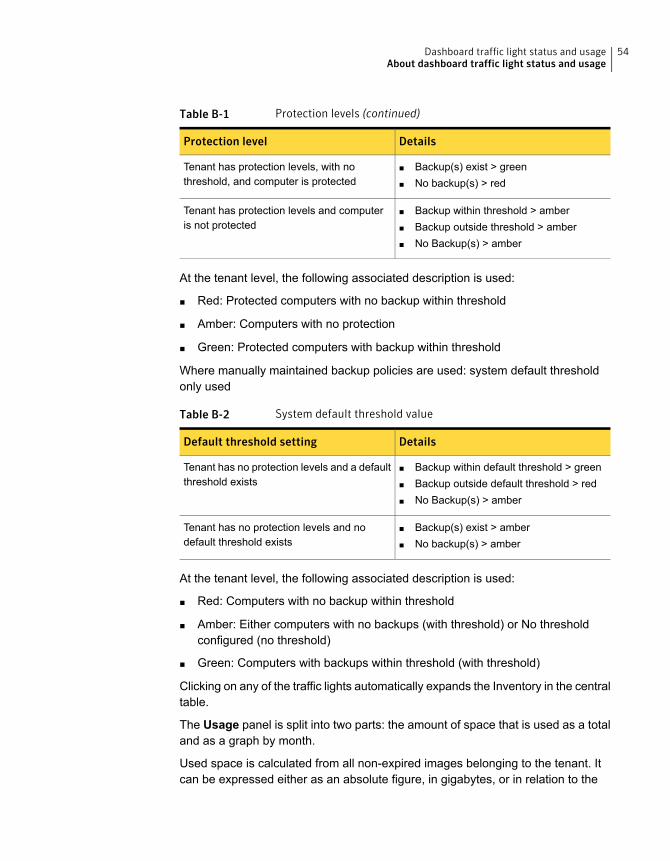
Table B-1 Protection levels (continued)
DetailsProtection level
■ Backup(s) exist > green■ No backup(s) > red
Tenant has protection levels, with nothreshold, and computer is protected
■ Backup within threshold > amber■ Backup outside threshold > amber■ No Backup(s) > amber
Tenant has protection levels and computeris not protected
At the tenant level, the following associated description is used:
■ Red: Protected computers with no backup within threshold
■ Amber: Computers with no protection
■ Green: Protected computers with backup within threshold
Where manually maintained backup policies are used: system default thresholdonly used
Table B-2 System default threshold value
DetailsDefault threshold setting
■ Backup within default threshold > green■ Backup outside default threshold > red■ No Backup(s) > amber
Tenant has no protection levels and a defaultthreshold exists
■ Backup(s) exist > amber■ No backup(s) > amber
Tenant has no protection levels and nodefault threshold exists
At the tenant level, the following associated description is used:
■ Red: Computers with no backup within threshold
■ Amber: Either computers with no backups (with threshold) or No thresholdconfigured (no threshold)
■ Green: Computers with backups within threshold (with threshold)
Clicking on any of the traffic lights automatically expands the Inventory in the centraltable.
The Usage panel is split into two parts: the amount of space that is used as a totaland as a graph by month.
Used space is calculated from all non-expired images belonging to the tenant. Itcan be expressed either as an absolute figure, in gigabytes, or in relation to the
54Dashboard traffic light status and usageAbout dashboard traffic light status and usage

amount of contracted space for the tenant, both as a percentage and as an absoluteamount against that total.
55Dashboard traffic light status and usageAbout dashboard traffic light status and usage
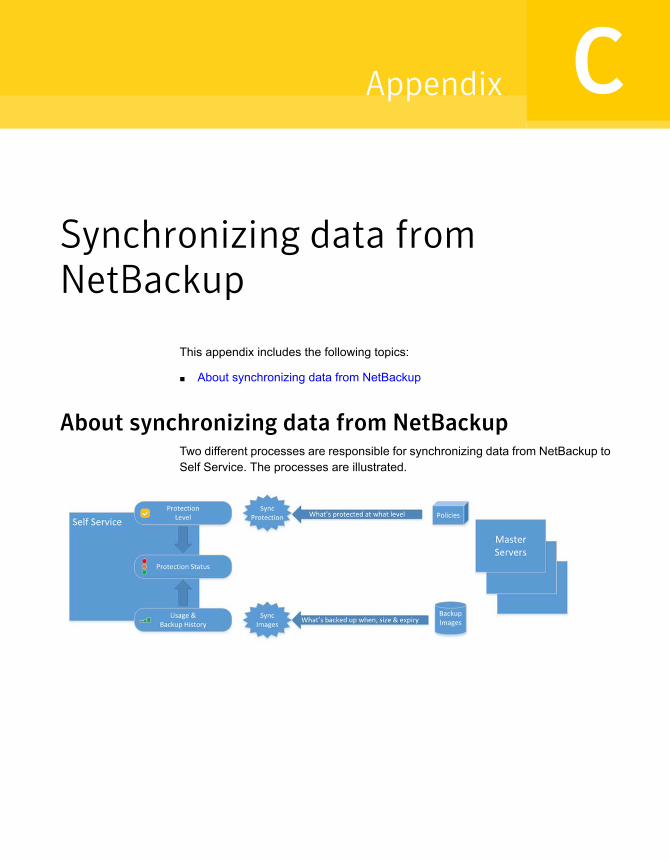
Synchronizing data fromNetBackup
This appendix includes the following topics:
■ About synchronizing data from NetBackup
About synchronizing data from NetBackupTwo different processes are responsible for synchronizing data from NetBackup toSelf Service. The processes are illustrated.
CAppendix
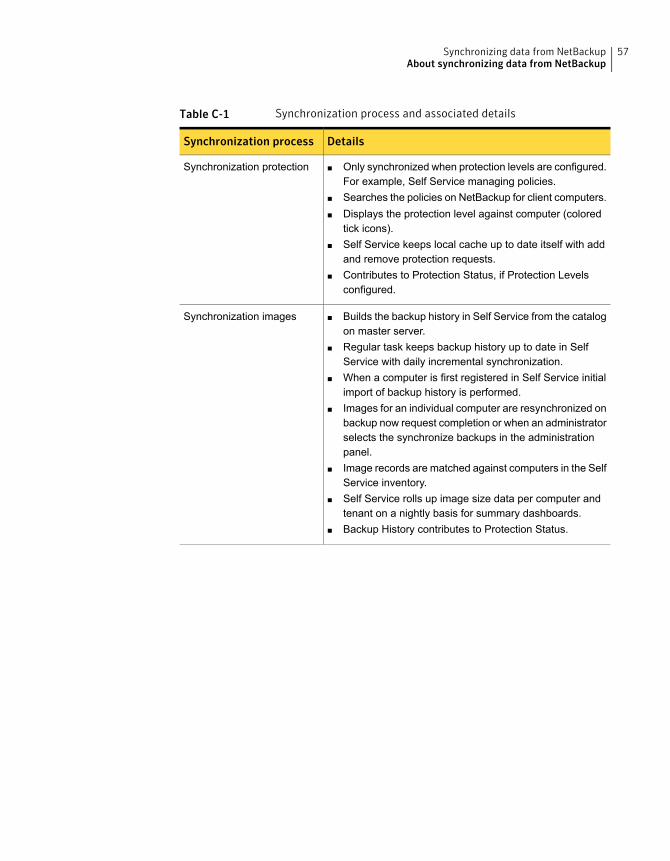
Table C-1 Synchronization process and associated details
DetailsSynchronization process
■ Only synchronized when protection levels are configured.For example, Self Service managing policies.
■ Searches the policies on NetBackup for client computers.■ Displays the protection level against computer (colored
tick icons).■ Self Service keeps local cache up to date itself with add
and remove protection requests.■ Contributes to Protection Status, if Protection Levels
configured.
Synchronization protection
■ Builds the backup history in Self Service from the catalogon master server.
■ Regular task keeps backup history up to date in SelfService with daily incremental synchronization.
■ When a computer is first registered in Self Service initialimport of backup history is performed.
■ Images for an individual computer are resynchronized onbackup now request completion or when an administratorselects the synchronize backups in the administrationpanel.
■ Image records are matched against computers in the SelfService inventory.
■ Self Service rolls up image size data per computer andtenant on a nightly basis for summary dashboards.
■ Backup History contributes to Protection Status.
Synchronization images
57Synchronizing data from NetBackupAbout synchronizing data from NetBackup
NetBackup Self Service datacaching process
This appendix includes the following topics:
■ About NetBackup Self Service data caching process
■ Full Cache Build
■ NetBackup Data Synchronization
■ Backup Now
■ Protect computer
■ Unprotect computer
About NetBackup Self Service data caching processThe NetBackup Adapter caches data about computers, protection, and backupimages for improved performance.
A Custom Task in the portal named Update Machine Cache runs every minuteand calls code in the Adapter that performs work on a schedule.
The scheduled pieces of work include:
■ Full Cache Build – runs daily at 12:15 AM.Imports the new computers and new or expired backup images. This scheduledwork also performs roll-up of image data into totals and calculates traffic lightstatuses. It also flags the new computers for NetBackup data synchronization.
■ Sync machine images – runs every minute.
DAppendix
Processes a batch of computers that are flagged for NetBackup datasynchronization. Imports the protection levels and backup images, thenrecalculates traffic light status.
■ Process task queue – runs every minute.Processes a batch of tasks that are queued, for example, when a Backup Nowrequest has completed, a computer is protected.
Full Cache BuildThe full cache build:
■ Imports images from the last day for all online locations. The import includes a24 hour overlap to get the backups that had started but not completed when thelast cache build took place.
■ Flags the expired images.
■ Updates the last backup time and calculates traffic light status.
■ Performs the roll-up calculations on images for computer utilization.
■ Deletes rolled up image data and expired images older than ‘Utilization RetentionPeriod (Months)’ integration setting.
Note:Adding a new location does not trigger any independent action in the system.Any new synchronizations or ongoing synchronizations now include this new location.For example, getting backup images or importing policies. Older images are notimported without manual intervention.
Integration settingsThe integration settings listed are relevant to the Full Cache Build.
Utilization Retention Period (Months) (NetBackup Adapterintegration section)The period of time which rollup data and expired backup images are retained forand the number of months displayed in the charts. After this period the rollup dataand expired images are deleted in the Full Cache Build as part of Rollup.
NetBackup Data SynchronizationWhen a computer is imported, Refresh NetBackup Data is clicked, orSyncNetBackupData is called in the API, the SyncNetBackupData flag on computeris set to true. This marks the computer as ready for synchronization and it is picked
59NetBackup Self Service data caching processFull Cache Build
up as part of the schedule that runs every minute. This process imports the protectionlevels and images, then recalculates traffic light status.
The task processes batches of 100 computers for 5 minutes (by default) or untilthere are no computers requiring import.
Computers added longest ago are processed first.
NetBackup data syncing has a priority value that is defined by the SyncPriorityIdfield in the computer. All computers have the same priority initially but if a ‘BackupNow’ is performed, that computer is marked as high priority.
If a synchronization fails, the synchronization is locked for a period of time usingthe SyncLockedUntil field on the computers table. This lock allows other computerswithout errors process.
Integration SettingsThe integration settings listed are relevant to the NetBackup Data Synchronization.
Image Import BatchProcessing (minutes) (NetBackupAdapterintegration section)The NetBackup data sync gets data for a period of time while there are computermarked for synchronization. This defaults to five minutes.
Image Import Lock Delay (minutes) (NetBackup Adapterintegration section)This value defines how long to lock a computer image synchronization for a computerif its image retrieval fails. This defaults to 60 minutes.
Backup NowWhen a Backup Now request completes, a BACKUPNOWCOMPLETE task is queued.This request runs the next time the scheduled task runs.
The task sets the SyncNetBackupData flag against the computer to true andSyncPriorityId set to high. These values are set so that the computer synchronizesthe new image as soon as possible.
Protect computerWhen a Protect Machine request completes, a MACHINEPROTECTED task is queued.This command runs the next time the scheduled task runs.
60NetBackup Self Service data caching processBackup Now
When the task runs, the protection level is added to the MachineProtectionLeveltable and the traffic light status is updated.
Unprotect computerWhen an Unprotect Machine request completes, a MACHINEUNPROTECTED task isqueued. This command runs the next time the scheduled task runs.
When the task runs, the protection level is removed from theMachineProtectionLevel table and the traffic light status is updated.
61NetBackup Self Service data caching processUnprotect computer
Integration settings
This appendix includes the following topics:
■ About integration settings
■ NetBackup Adapter
■ NetBackup Adapter Usage Section
■ NetBackup Adapter Access Rights Section
■ Action Request Types
■ Machine Location
■ Protection Level
■ vCloud import
About integration settingsIntegration Settings are used to configure the integration between NetBackup SelfService and NetBackup. Individual Settings are grouped within sections and areaccessed through Admin > Settings > More > Integration Settings. This sectionincludes the full list of Integration Settings relevant to the NetBackup Self Servicesolution. Individual sections or settings are referred to throughout the document, inthe appropriate functional area.
Some settings have Allow Tenant Override set to yes. These settings typicallyneed to be configured on a per tenant basis and should not normally be completedin the top level Integration Settings. Instead they are configured under the detailsfor the specific tenant. The NetBackup Adapter Access Rights settings also havethe option of user override (Systemwide > tenant > user). Read the Access Rightssection before use.
EAppendix
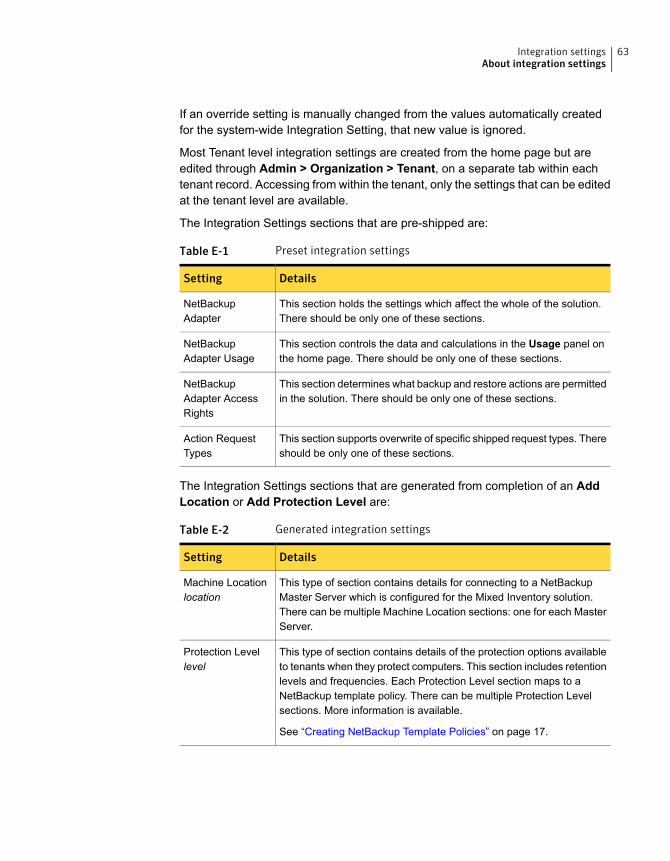
If an override setting is manually changed from the values automatically createdfor the system-wide Integration Setting, that new value is ignored.
Most Tenant level integration settings are created from the home page but areedited through Admin > Organization > Tenant, on a separate tab within eachtenant record. Accessing from within the tenant, only the settings that can be editedat the tenant level are available.
The Integration Settings sections that are pre-shipped are:
Table E-1 Preset integration settings
DetailsSetting
This section holds the settings which affect the whole of the solution.There should be only one of these sections.
NetBackupAdapter
This section controls the data and calculations in the Usage panel onthe home page. There should be only one of these sections.
NetBackupAdapter Usage
This section determines what backup and restore actions are permittedin the solution. There should be only one of these sections.
NetBackupAdapter AccessRights
This section supports overwrite of specific shipped request types. Thereshould be only one of these sections.
Action RequestTypes
The Integration Settings sections that are generated from completion of an AddLocation or Add Protection Level are:
Table E-2 Generated integration settings
DetailsSetting
This type of section contains details for connecting to a NetBackupMaster Server which is configured for the Mixed Inventory solution.There can be multiple Machine Location sections: one for each MasterServer.
Machine Locationlocation
This type of section contains details of the protection options availableto tenants when they protect computers. This section includes retentionlevels and frequencies. Each Protection Level section maps to aNetBackup template policy. There can be multiple Protection Levelsections. More information is available.
See “Creating NetBackup Template Policies” on page 17.
Protection Levellevel
63Integration settingsAbout integration settings
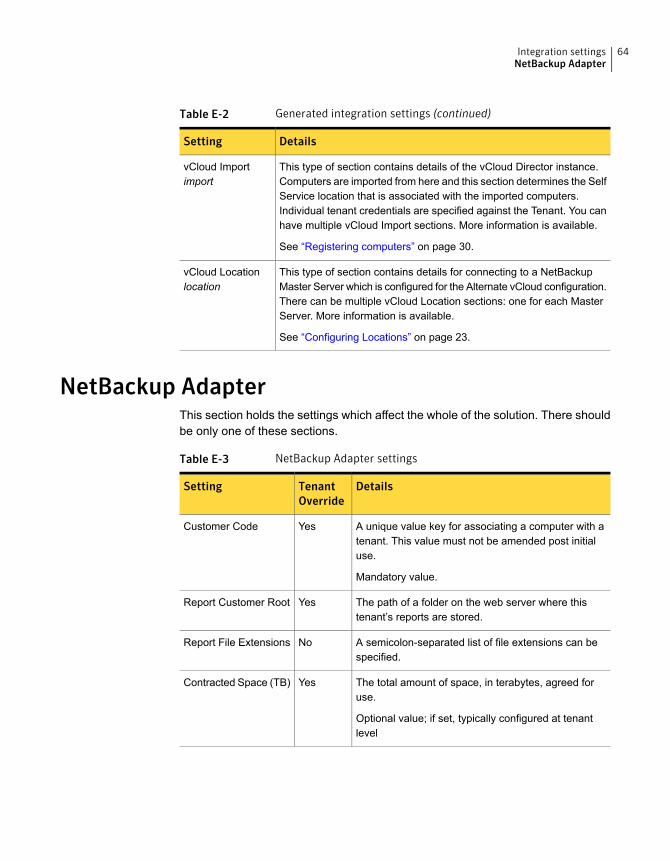
Table E-2 Generated integration settings (continued)
DetailsSetting
This type of section contains details of the vCloud Director instance.Computers are imported from here and this section determines the SelfService location that is associated with the imported computers.Individual tenant credentials are specified against the Tenant. You canhave multiple vCloud Import sections. More information is available.
See “Registering computers” on page 30.
vCloud Importimport
This type of section contains details for connecting to a NetBackupMaster Server which is configured for the Alternate vCloud configuration.There can be multiple vCloud Location sections: one for each MasterServer. More information is available.
See “Configuring Locations” on page 23.
vCloud Locationlocation
NetBackup AdapterThis section holds the settings which affect the whole of the solution. There shouldbe only one of these sections.
Table E-3 NetBackup Adapter settings
DetailsTenantOverride
Setting
A unique value key for associating a computer with atenant. This value must not be amended post initialuse.
Mandatory value.
YesCustomer Code
The path of a folder on the web server where thistenant’s reports are stored.
YesReport Customer Root
A semicolon-separated list of file extensions can bespecified.
NoReport File Extensions
The total amount of space, in terabytes, agreed foruse.
Optional value; if set, typically configured at tenantlevel
YesContracted Space (TB)
64Integration settingsNetBackup Adapter
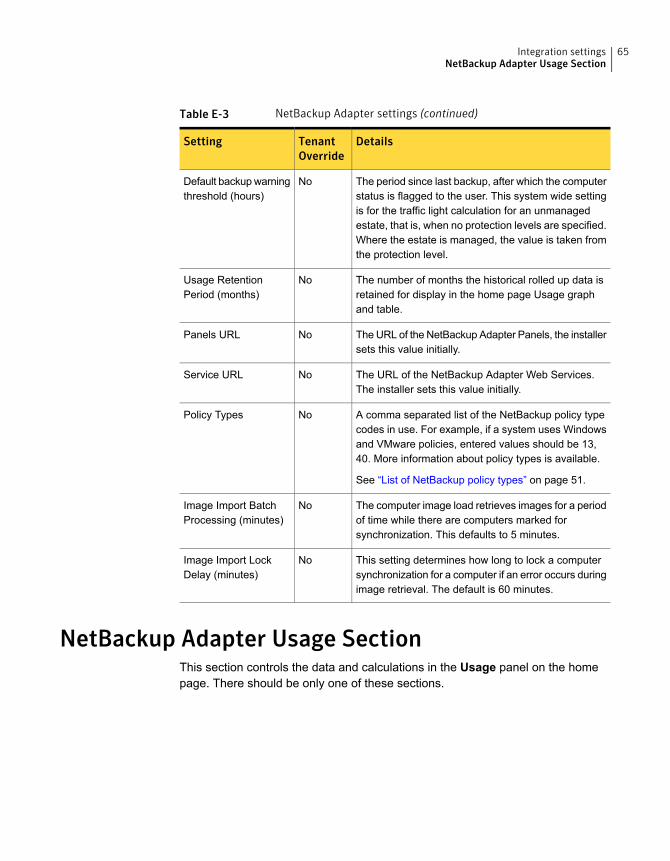
Table E-3 NetBackup Adapter settings (continued)
DetailsTenantOverride
Setting
The period since last backup, after which the computerstatus is flagged to the user. This system wide settingis for the traffic light calculation for an unmanagedestate, that is, when no protection levels are specified.Where the estate is managed, the value is taken fromthe protection level.
NoDefault backupwarningthreshold (hours)
The number of months the historical rolled up data isretained for display in the home page Usage graphand table.
NoUsage RetentionPeriod (months)
The URL of the NetBackup Adapter Panels, the installersets this value initially.
NoPanels URL
The URL of the NetBackup Adapter Web Services.The installer sets this value initially.
NoService URL
A comma separated list of the NetBackup policy typecodes in use. For example, if a system uses Windowsand VMware policies, entered values should be 13,40. More information about policy types is available.
See “List of NetBackup policy types” on page 51.
NoPolicy Types
The computer image load retrieves images for a periodof time while there are computers marked forsynchronization. This defaults to 5 minutes.
NoImage Import BatchProcessing (minutes)
This setting determines how long to lock a computersynchronization for a computer if an error occurs duringimage retrieval. The default is 60 minutes.
NoImage Import LockDelay (minutes)
NetBackup Adapter Usage SectionThis section controls the data and calculations in the Usage panel on the homepage. There should be only one of these sections.
65Integration settingsNetBackup Adapter Usage Section
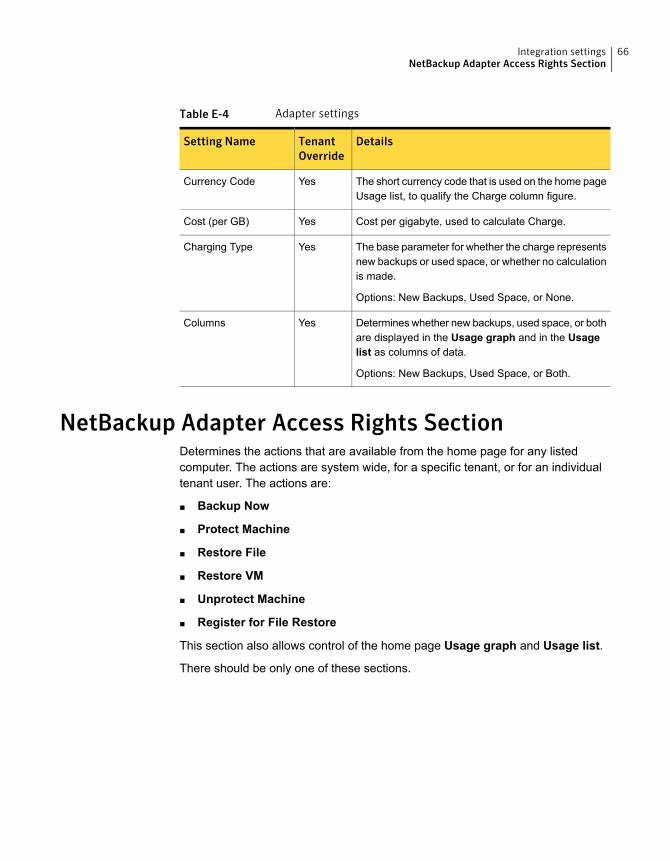
Table E-4 Adapter settings
DetailsTenantOverride
Setting Name
The short currency code that is used on the home pageUsage list, to qualify the Charge column figure.
YesCurrency Code
Cost per gigabyte, used to calculate Charge.YesCost (per GB)
The base parameter for whether the charge representsnew backups or used space, or whether no calculationis made.
Options: New Backups, Used Space, or None.
YesCharging Type
Determines whether new backups, used space, or bothare displayed in the Usage graph and in the Usagelist as columns of data.
Options: New Backups, Used Space, or Both.
YesColumns
NetBackup Adapter Access Rights SectionDetermines the actions that are available from the home page for any listedcomputer. The actions are system wide, for a specific tenant, or for an individualtenant user. The actions are:
■ Backup Now
■ Protect Machine
■ Restore File
■ Restore VM
■ Unprotect Machine
■ Register for File Restore
This section also allows control of the home page Usage graph and Usage list.
There should be only one of these sections.
66Integration settingsNetBackup Adapter Access Rights Section
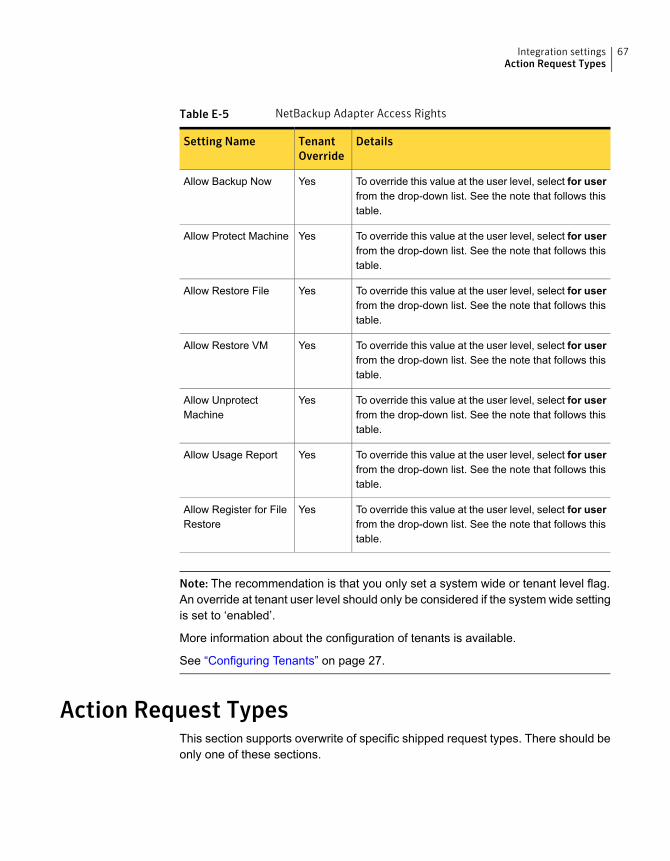
Table E-5 NetBackup Adapter Access Rights
DetailsTenantOverride
Setting Name
To override this value at the user level, select for userfrom the drop-down list. See the note that follows thistable.
YesAllow Backup Now
To override this value at the user level, select for userfrom the drop-down list. See the note that follows thistable.
YesAllow Protect Machine
To override this value at the user level, select for userfrom the drop-down list. See the note that follows thistable.
YesAllow Restore File
To override this value at the user level, select for userfrom the drop-down list. See the note that follows thistable.
YesAllow Restore VM
To override this value at the user level, select for userfrom the drop-down list. See the note that follows thistable.
YesAllow UnprotectMachine
To override this value at the user level, select for userfrom the drop-down list. See the note that follows thistable.
YesAllow Usage Report
To override this value at the user level, select for userfrom the drop-down list. See the note that follows thistable.
YesAllow Register for FileRestore
Note: The recommendation is that you only set a system wide or tenant level flag.An override at tenant user level should only be considered if the system wide settingis set to ‘enabled’.
More information about the configuration of tenants is available.
See “Configuring Tenants” on page 27.
Action Request TypesThis section supports overwrite of specific shipped request types. There should beonly one of these sections.
67Integration settingsAction Request Types
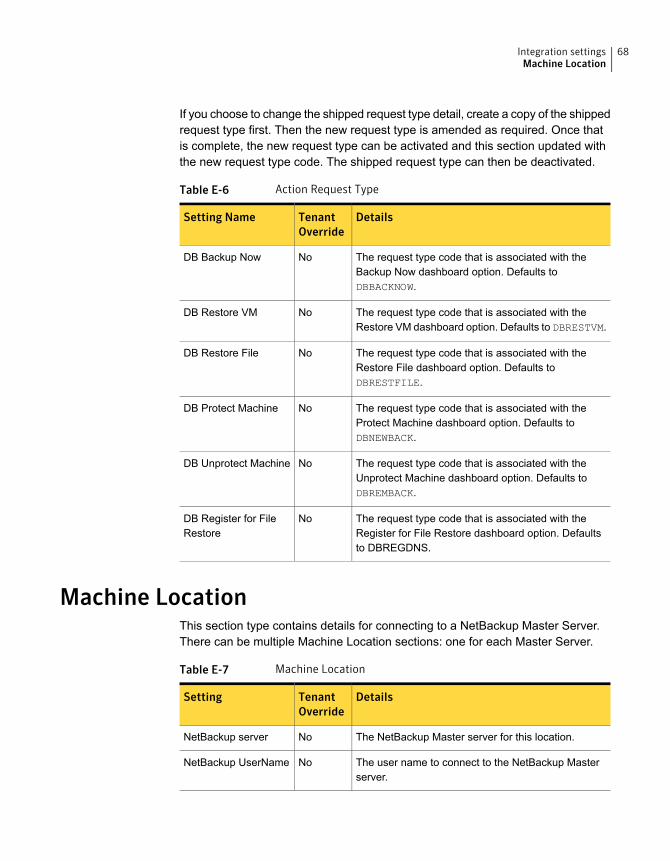
If you choose to change the shipped request type detail, create a copy of the shippedrequest type first. Then the new request type is amended as required. Once thatis complete, the new request type can be activated and this section updated withthe new request type code. The shipped request type can then be deactivated.
Table E-6 Action Request Type
DetailsTenantOverride
Setting Name
The request type code that is associated with theBackup Now dashboard option. Defaults toDBBACKNOW.
NoDB Backup Now
The request type code that is associated with theRestore VM dashboard option. Defaults to DBRESTVM.
NoDB Restore VM
The request type code that is associated with theRestore File dashboard option. Defaults toDBRESTFILE.
NoDB Restore File
The request type code that is associated with theProtect Machine dashboard option. Defaults toDBNEWBACK.
NoDB Protect Machine
The request type code that is associated with theUnprotect Machine dashboard option. Defaults toDBREMBACK.
NoDB Unprotect Machine
The request type code that is associated with theRegister for File Restore dashboard option. Defaultsto DBREGDNS.
NoDB Register for FileRestore
Machine LocationThis section type contains details for connecting to a NetBackup Master Server.There can be multiple Machine Location sections: one for each Master Server.
Table E-7 Machine Location
DetailsTenantOverride
Setting
The NetBackup Master server for this location.NoNetBackup server
The user name to connect to the NetBackup Masterserver.
NoNetBackup UserName
68Integration settingsMachine Location
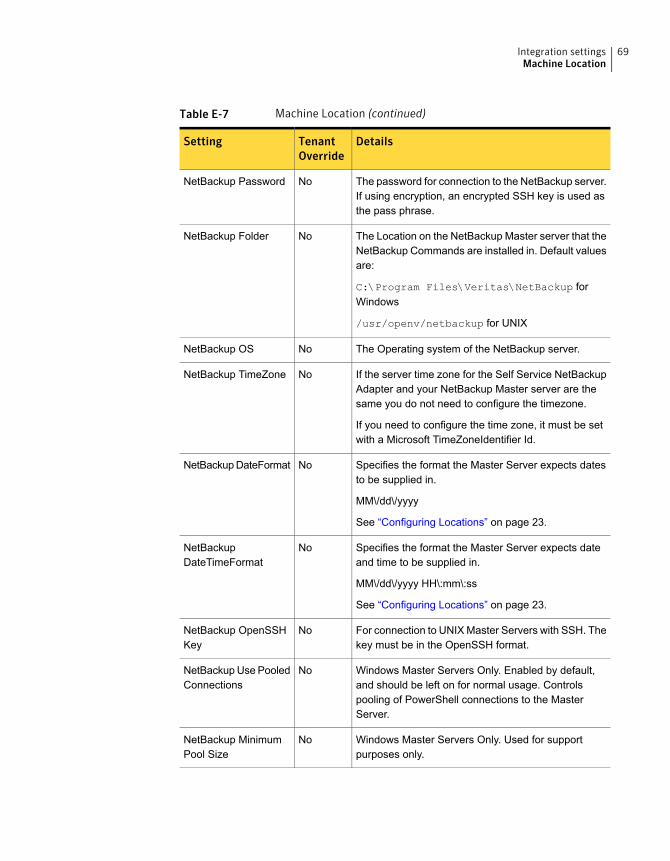
Table E-7 Machine Location (continued)
DetailsTenantOverride
Setting
The password for connection to the NetBackup server.If using encryption, an encrypted SSH key is used asthe pass phrase.
NoNetBackup Password
The Location on the NetBackup Master server that theNetBackup Commands are installed in. Default valuesare:
C:\Program Files\Veritas\NetBackup forWindows
/usr/openv/netbackup for UNIX
NoNetBackup Folder
The Operating system of the NetBackup server.NoNetBackup OS
If the server time zone for the Self Service NetBackupAdapter and your NetBackup Master server are thesame you do not need to configure the timezone.
If you need to configure the time zone, it must be setwith a Microsoft TimeZoneIdentifier Id.
NoNetBackup TimeZone
Specifies the format the Master Server expects datesto be supplied in.
MM\/dd\/yyyy
See “Configuring Locations” on page 23.
NoNetBackupDateFormat
Specifies the format the Master Server expects dateand time to be supplied in.
MM\/dd\/yyyy HH\:mm\:ss
See “Configuring Locations” on page 23.
NoNetBackupDateTimeFormat
For connection to UNIXMaster Servers with SSH. Thekey must be in the OpenSSH format.
NoNetBackup OpenSSHKey
Windows Master Servers Only. Enabled by default,and should be left on for normal usage. Controlspooling of PowerShell connections to the MasterServer.
NoNetBackup Use PooledConnections
Windows Master Servers Only. Used for supportpurposes only.
NoNetBackup MinimumPool Size
69Integration settingsMachine Location
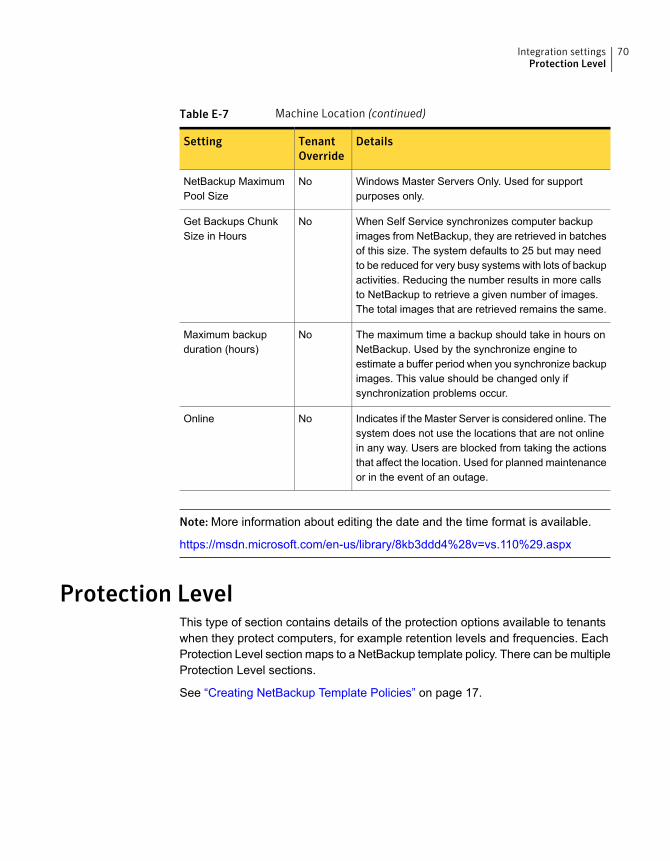
Table E-7 Machine Location (continued)
DetailsTenantOverride
Setting
Windows Master Servers Only. Used for supportpurposes only.
NoNetBackup MaximumPool Size
When Self Service synchronizes computer backupimages from NetBackup, they are retrieved in batchesof this size. The system defaults to 25 but may needto be reduced for very busy systems with lots of backupactivities. Reducing the number results in more callsto NetBackup to retrieve a given number of images.The total images that are retrieved remains the same.
NoGet Backups ChunkSize in Hours
The maximum time a backup should take in hours onNetBackup. Used by the synchronize engine toestimate a buffer period when you synchronize backupimages. This value should be changed only ifsynchronization problems occur.
NoMaximum backupduration (hours)
Indicates if the Master Server is considered online. Thesystem does not use the locations that are not onlinein any way. Users are blocked from taking the actionsthat affect the location. Used for planned maintenanceor in the event of an outage.
NoOnline
Note:More information about editing the date and the time format is available.
https://msdn.microsoft.com/en-us/library/8kb3ddd4%28v=vs.110%29.aspx
Protection LevelThis type of section contains details of the protection options available to tenantswhen they protect computers, for example retention levels and frequencies. EachProtection Level section maps to a NetBackup template policy. There can bemultipleProtection Level sections.
See “Creating NetBackup Template Policies” on page 17.
70Integration settingsProtection Level
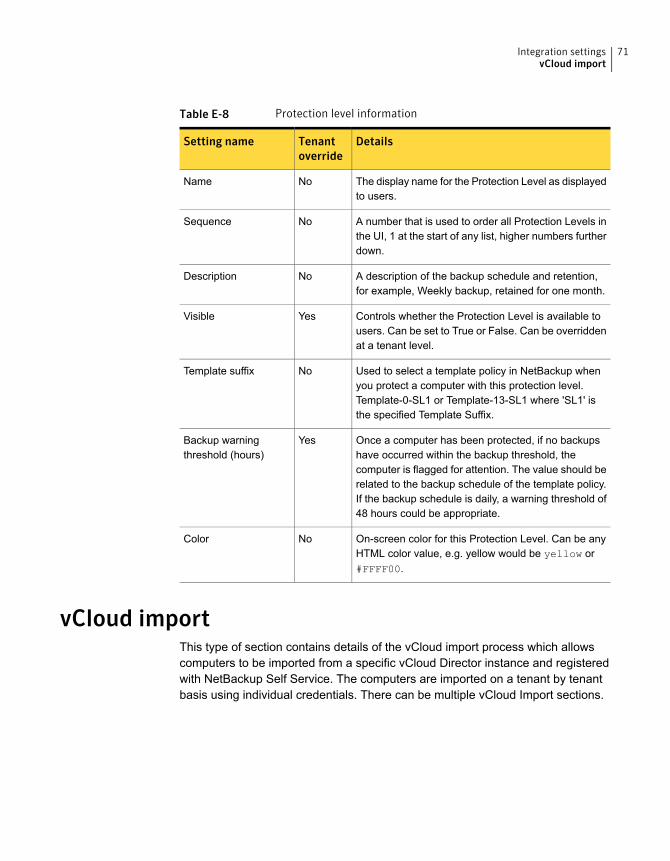
Table E-8 Protection level information
DetailsTenantoverride
Setting name
The display name for the Protection Level as displayedto users.
NoName
A number that is used to order all Protection Levels inthe UI, 1 at the start of any list, higher numbers furtherdown.
NoSequence
A description of the backup schedule and retention,for example, Weekly backup, retained for one month.
NoDescription
Controls whether the Protection Level is available tousers. Can be set to True or False. Can be overriddenat a tenant level.
YesVisible
Used to select a template policy in NetBackup whenyou protect a computer with this protection level.Template-0-SL1 or Template-13-SL1 where 'SL1' isthe specified Template Suffix.
NoTemplate suffix
Once a computer has been protected, if no backupshave occurred within the backup threshold, thecomputer is flagged for attention. The value should berelated to the backup schedule of the template policy.If the backup schedule is daily, a warning threshold of48 hours could be appropriate.
YesBackup warningthreshold (hours)
On-screen color for this Protection Level. Can be anyHTML color value, e.g. yellow would be yellow or#FFFF00.
NoColor
vCloud importThis type of section contains details of the vCloud import process which allowscomputers to be imported from a specific vCloud Director instance and registeredwith NetBackup Self Service. The computers are imported on a tenant by tenantbasis using individual credentials. There can be multiple vCloud Import sections.
71Integration settingsvCloud import
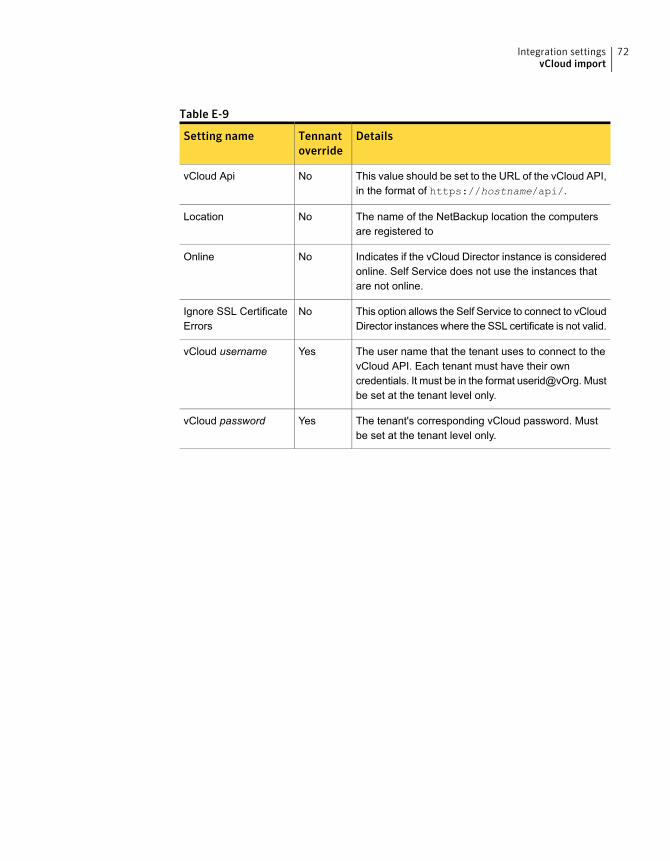
Table E-9
DetailsTennantoverride
Setting name
This value should be set to the URL of the vCloud API,in the format of https://hostname/api/.
NovCloud Api
The name of the NetBackup location the computersare registered to
NoLocation
Indicates if the vCloud Director instance is consideredonline. Self Service does not use the instances thatare not online.
NoOnline
This option allows the Self Service to connect to vCloudDirector instances where the SSL certificate is not valid.
NoIgnore SSL CertificateErrors
The user name that the tenant uses to connect to thevCloud API. Each tenant must have their owncredentials. It must be in the format userid@vOrg. Mustbe set at the tenant level only.
YesvCloud username
The tenant's corresponding vCloud password. Mustbe set at the tenant level only.
YesvCloud password
72Integration settingsvCloud import
Policy Modifiers
This appendix includes the following topics:
■ About policy modifiers
■ Template Policy Naming with Policy Modifiers
■ Registering computers with Policy Modifiers
■ Policy Modifier Example
About policy modifiersPolicy Modifiers are a method of selecting a set of Template Policies at a finer levelof control than either a location or a master server. This feature is an advancedfeature that should be used with care.
In a typical Self Service solution each Location and hence each NetBackup MasterServer has one set of Template Policies. All computers that are associated withthat location use the same Template Policies. If more flexibility is required it ispossible to set a Policy Modifier on a per computer basis. This option makes thesystem select a different set of Policy Templates for use with that computer.
Template Policy Naming with Policy ModifiersPolicyType and ProtectionLevel are as per normal Template Policy configuration.
Scheduled Backup: Template-PolicyModifier-PolicyType-ProtectionLevel
BackupNow: Template-PolicyModifier-PolicyType-BackupNow PolicyModifier
The actual policy modifier can be any arbitrary text, within the restrictions ofNetBackup policy naming.
FAppendix
Registering computers with Policy ModifiersYou cannot register a computer with a policy modifier through the Self ServicePortal. Policy Modifiers are only supported in the CreateMachine method of theNetBackup Adapter API. See the NetBackup Adapter API documentation in installdirectory for more information.
Policy Modifier ExampleWhen you use a single Master Server with multiple geographically separated mediaservers, you can associate each computer to its closest media server by setting apolicy modifier against it. Two sets of Template policies are then created on theMaster Server, each configured for a particular media server.
Given the following:
■ A single master server
■ Two media servers, one at SiteA and one at SiteB
■ Requirements to support policy type 0 (standard) and 13 (Windows), forscheduled backups and Backup Now
You can use Policy Modifiers of SiteA and SiteB for each media server. The MasterServer would need Template Policies created referring to each policy modifier:
Template-SiteA-0-PL1
Template-SiteA-13-PL1
Template-SiteA-0-BackupNow
Template-SiteA-13-BackupNow
Template-SiteB-0-PL1
Template-SiteB-13-PL1
Template-SiteB-0-BackupNow
Template-SiteB-13-BackupNow
The SiteA Template Policies would then be configured for one media server, andSiteB for the other. Computers can then be registered in the system with PolicyModifiers of SiteA or SiteB accordingly.
74Policy ModifiersRegistering computers with Policy Modifiers
Configuring Self ServiceAlternate vCloud
This appendix includes the following topics:
■ Configuring the Alternate vCloud Configuration
■ Integration Settings and creating and editing Locations or Protection Levels
■ Configuring vCloud Locations
■ Configuring Protection Levels for vCloud
■ Configuring Alternate vCloud Backup Now retention levels
■ Configuring Tenants
■ Configuring the home page for Alternate vCloud configuration
Configuring the Alternate vCloud ConfigurationThe vCloud integrated configuration of the previous Self Service versions is nowknown as Alternate vCloud Configuration. The Alternate vCloud Configurationin Self Service provides real-time interrogation of vCloud at the time a user wantsto protect, backup, or restore. It has no compatibility with the main Self Servicedashboards but does provide the extra flexibility of container level (vDC, vApp)backups.
You cannot use this configuration with the main dashboards of Self Service. Assuch, it has limited out of the box reporting.
It does not require you to import the vCloud infrastructure into Self Service onschedule. Instead, this option allows the user to browse the infrastructure at the
GAppendix
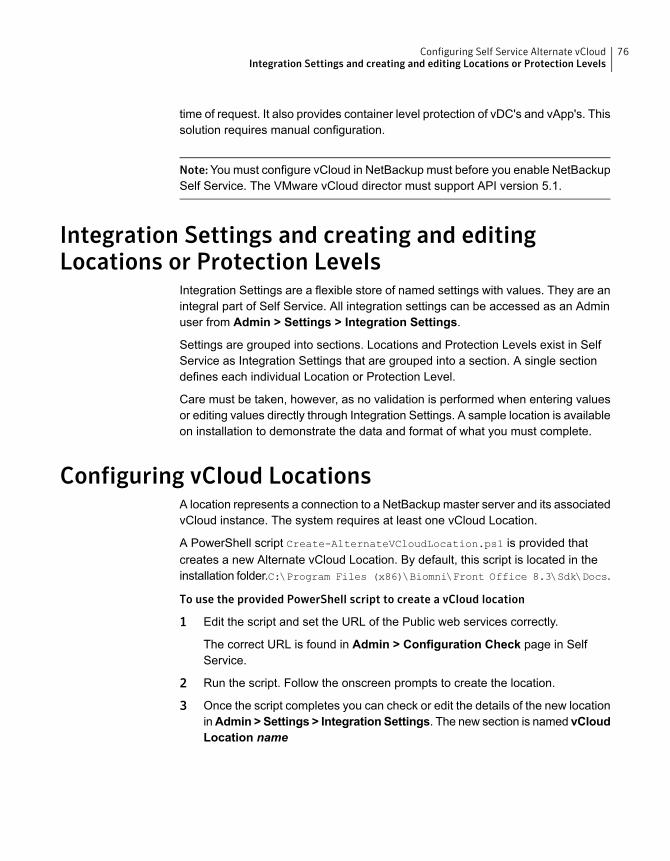
time of request. It also provides container level protection of vDC's and vApp's. Thissolution requires manual configuration.
Note:You must configure vCloud in NetBackup must before you enable NetBackupSelf Service. The VMware vCloud director must support API version 5.1.
Integration Settings and creating and editingLocations or Protection Levels
Integration Settings are a flexible store of named settings with values. They are anintegral part of Self Service. All integration settings can be accessed as an Adminuser from Admin > Settings > Integration Settings.
Settings are grouped into sections. Locations and Protection Levels exist in SelfService as Integration Settings that are grouped into a section. A single sectiondefines each individual Location or Protection Level.
Care must be taken, however, as no validation is performed when entering valuesor editing values directly through Integration Settings. A sample location is availableon installation to demonstrate the data and format of what you must complete.
Configuring vCloud LocationsA location represents a connection to a NetBackup master server and its associatedvCloud instance. The system requires at least one vCloud Location.
A PowerShell script Create-AlternateVCloudLocation.ps1 is provided thatcreates a new Alternate vCloud Location. By default, this script is located in theinstallation folder.C:\Program Files (x86)\Biomni\Front Office 8.3\Sdk\Docs.
To use the provided PowerShell script to create a vCloud location
1 Edit the script and set the URL of the Public web services correctly.
The correct URL is found in Admin > Configuration Check page in SelfService.
2 Run the script. Follow the onscreen prompts to create the location.
3 Once the script completes you can check or edit the details of the new locationinAdmin > Settings > Integration Settings. The new section is named vCloudLocation name
76Configuring Self Service Alternate vCloudIntegration Settings and creating and editing Locations or Protection Levels
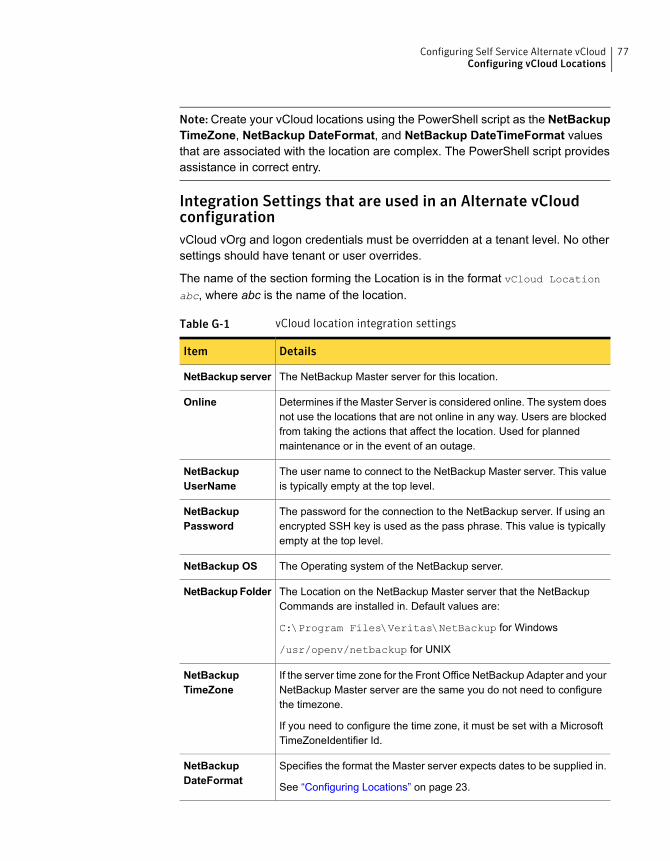
Note:Create your vCloud locations using the PowerShell script as the NetBackupTimeZone, NetBackup DateFormat, and NetBackup DateTimeFormat valuesthat are associated with the location are complex. The PowerShell script providesassistance in correct entry.
Integration Settings that are used in an Alternate vCloudconfigurationvCloud vOrg and logon credentials must be overridden at a tenant level. No othersettings should have tenant or user overrides.
The name of the section forming the Location is in the format vCloud Location
abc, where abc is the name of the location.
Table G-1 vCloud location integration settings
DetailsItem
The NetBackup Master server for this location.NetBackup server
Determines if the Master Server is considered online. The system doesnot use the locations that are not online in any way. Users are blockedfrom taking the actions that affect the location. Used for plannedmaintenance or in the event of an outage.
Online
The user name to connect to the NetBackup Master server. This valueis typically empty at the top level.
NetBackupUserName
The password for the connection to the NetBackup server. If using anencrypted SSH key is used as the pass phrase. This value is typicallyempty at the top level.
NetBackupPassword
The Operating system of the NetBackup server.NetBackup OS
The Location on the NetBackup Master server that the NetBackupCommands are installed in. Default values are:
C:\Program Files\Veritas\NetBackup for Windows
/usr/openv/netbackup for UNIX
NetBackupFolder
If the server time zone for the Front Office NetBackup Adapter and yourNetBackup Master server are the same you do not need to configurethe timezone.
If you need to configure the time zone, it must be set with a MicrosoftTimeZoneIdentifier Id.
NetBackupTimeZone
Specifies the format the Master server expects dates to be supplied in.
See “Configuring Locations” on page 23.
NetBackupDateFormat
77Configuring Self Service Alternate vCloudConfiguring vCloud Locations
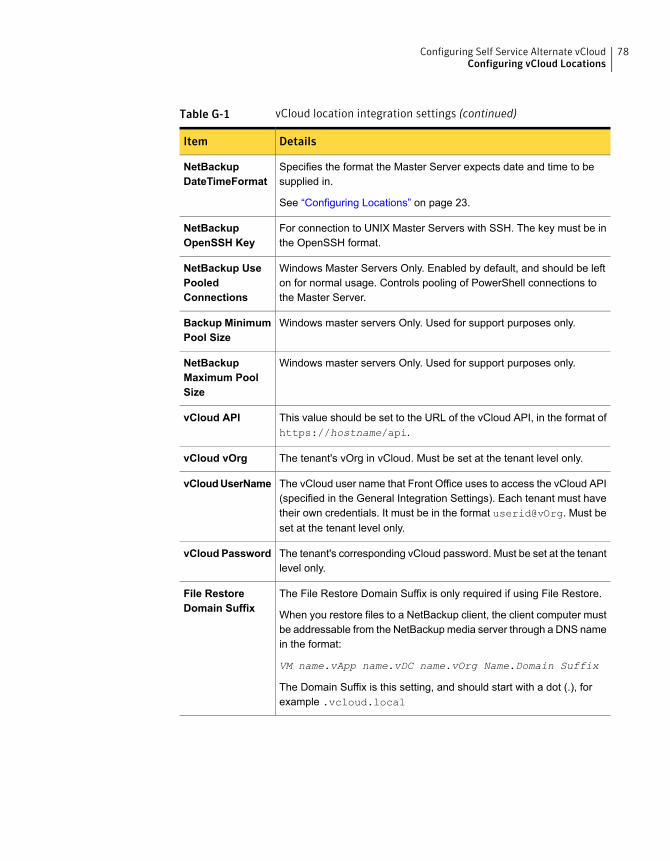
Table G-1 vCloud location integration settings (continued)
DetailsItem
Specifies the format the Master Server expects date and time to besupplied in.
See “Configuring Locations” on page 23.
NetBackupDateTimeFormat
For connection to UNIX Master Servers with SSH. The key must be inthe OpenSSH format.
NetBackupOpenSSH Key
Windows Master Servers Only. Enabled by default, and should be lefton for normal usage. Controls pooling of PowerShell connections tothe Master Server.
NetBackup UsePooledConnections
Windows master servers Only. Used for support purposes only.Backup MinimumPool Size
Windows master servers Only. Used for support purposes only.NetBackupMaximum PoolSize
This value should be set to the URL of the vCloud API, in the format ofhttps://hostname/api.
vCloud API
The tenant's vOrg in vCloud. Must be set at the tenant level only.vCloud vOrg
The vCloud user name that Front Office uses to access the vCloud API(specified in the General Integration Settings). Each tenant must havetheir own credentials. It must be in the format userid@vOrg. Must beset at the tenant level only.
vCloudUserName
The tenant's corresponding vCloud password. Must be set at the tenantlevel only.
vCloud Password
The File Restore Domain Suffix is only required if using File Restore.
When you restore files to a NetBackup client, the client computer mustbe addressable from the NetBackupmedia server through a DNS namein the format:
VM name.vApp name.vDC name.vOrg Name.Domain Suffix
The Domain Suffix is this setting, and should start with a dot (.), forexample .vcloud.local
File RestoreDomain Suffix
78Configuring Self Service Alternate vCloudConfiguring vCloud Locations
Configuring Protection Levels for vCloudA Protection Level indicates the standard of protection that is applied to a computer.The Protection Level corresponds to template policies on all of the NetBackupmaster servers in the system. These template policies can then have differentschedules, retention levels, etc., allowing different Protection Levels to have differentcharacteristics. This functionality provides users a level of abstraction away frommore complex NetBackup concepts.
As an example the system can be configured with three Protection Levels: Bronze,Silver, and Gold. Retention level and frequency of backups increase as you workup the scale of Protection Levels.
You must create your Protection Level or Levels inAdmin > Settings > IntegrationSettings. To add a new protection level, click Add Section at the top of the page.Enter the name of your protection level with the prefix Protection Level. Forexample, Protection Level name.
Once you have created the section, click Add Setting to insert each of the settingsin Table G-2. Use the value in the Item column as the setting name.
You can configure multiple protection levels in this fashion.
See “Creating NetBackup Template Policies” on page 17.
Table G-2 Integration Settings that are used in a Protection Level
DetailsItem
The display name for the Protection Level as displayed to users.Name
A number that is used to order all Protection Levels in the userinterface, 1 at the start of any list, higher numbers further down.
Sequence
A description of the backup schedule and retention, for exampleWeekly backup, retained for one month.
Description
Controls whether the Protection Level is available to users. Can beset to True or False. Can be overridden at a tenant level.
Visible
Used to select a template policy in NetBackup when you protect acomputer with this protection level. For Template-0-SL1 orTemplate-13-SL1 the specified Template Suffix is SL1.
TemplateSuffix
79Configuring Self Service Alternate vCloudConfiguring Protection Levels for vCloud

Configuring Alternate vCloud Backup Now retentionlevels
Backup Now requests use the default retention levels. The default retention levelscome preinstalled with NetBackup Self Service. You can, however, amend andmodify the retention levels that are offered to users if you edit the request form.
To edit the request form:
1 Go to Admin > Request & Approval > Request Type > Backup Now(VCDBACKNOW).
2 Click on the Form tab and then the Backup retention field.
3 At the base of the page, click on the Configuration tab.
4 Listed under the Items field is a paged list of retention levels that are availablein the Backup Now request form. You can add new levels or delete the existinglevels with the trashcan icon.
5 The code must match the NetBackup retention number. The description is whatthe user sees.
Configuring TenantsCreate and edit vCloud tenants with Admin > Organization > Tenant. Once thename is created, navigate to the Integration tab and complete the vCloud vOrg,vCloud UserName, and vCloud Password for all appropriate vCloud Locationsections.
You can also create tenants with an API. More information about the API and SDKsavailable can be found in the install location of the NetBackup Self Service portal.The default install location is C:\Program Files (x86)\Biomni\Front Office
8.3\Sdk\. Microsoft developers should use the SDK. Non-Microsoft developerscan call the web service directly. The URL can be found in Admin > Support >Configuration Check in the Public Web Service section of the Server tab. Theweb service is DirectaApi.svc.
Configuring the home page for Alternate vCloudconfiguration
NetBackup Self Service is shipped with the main dashboard configuration enabledand Alternate vCloud configuration disabled. If running in Alternate vCloud
80Configuring Self Service Alternate vCloudConfiguring Alternate vCloud Backup Now retention levels
configuration, it is necessary to disable the dashboard and enable the correct homepage panels and request types.
To configure the home page
1 Go to Admin > Service Catalog and Notices > Service Catalog.
2 Disable the Status Summary panel.
Click on the top left link Status Summary. From the next page, click the Editicon, at the top right of the page. Uncheck the Enabled field.
3 Disable the Usage Summary panel.
Click on the top right link Usage Summary. From the next page, click the Editicon, at the top right of the page. Uncheck the Enabled field.
4 Nomore than the six bespoke request types are needed to support the AlternatevCloud configuration. You must activate these request types. To activate theserequests, go toAdmin >Request &Approval > Request Type. Select Inactivefrom the Active filter and click Go. Activate the request types that are listed.All other Request Types shown in the Request Type list may be deactivated,as they are not used in this configuration.
VCDBACKUPNOWBackup Now
VCDNEWBACKProtect Machine
VCDREGDNSRegister VM for File Restore
VCDRESTFILERestore File
VCDRESTVMRestore Machine
VCDREMBACKUnprotect Machine
5 Enable the vCloud NetBackup Services panel.
■ Click on the link vCloud NetBackup services.
■ From the next page, click the Edit icon, at the top right of the page.
■ Check the Enabled field.
This Service Catalog category contains a list of Services, identified by an icon.Each service links to a request form:
■ Protect Machine
■ Backup Now
■ Unprotect Machine
81Configuring Self Service Alternate vCloudConfiguring the home page for Alternate vCloud configuration
■ Restore VM
■ Restore File
■ Register VM for File Restore (email notification only)
Services can be found in Admin > Service Catalog and Notices > Service.
6 Enable the vCloud Protected panel.
■ Click the vCloud Protected link.
■ From the next page, click the Edit icon, at the top right of the page.
■ Check the Enabled field.
This Service Catalog panel references the Integration Setting Panel's URL inthe NetBackup Adapter section for the URL of the NetBackup Self ServiceAdapter. Admin > Settings > Integration Settings.
7 Enable the vCloud Unprotected panel.
■ Click the vCloud Unprotected link.
■ From the next page, click the Edit icon, at the top right of the page.
■ Check the Enabled field.
This Service Catalog panel references the Integration Setting Panel's URL inthe NetBackup Adapter section for the URL of the NetBackup Self ServiceAdapter. Admin > Settings > Integration Settings.
82Configuring Self Service Alternate vCloudConfiguring the home page for Alternate vCloud configuration
Glossary
This appendix includes the following topics:
■ Glossary
GlossaryTable H-1 Glossary of terms
DefinitionTerm
When the NetBackup Self Service system is set up with vCloud;vCloud controls management of computers and tenant ownershipof them.
Alternate vCloudconfiguration
A user action in Self Service that creates a temporary Policy on themaster server and schedules it for immediate backup. The templatepolicy is deleted afterwards.
Backup Now
Any physical or any virtual machine that the solution is aware of.Computer
A unique code that is set at the tenant level of integration settings.Used in the policy names that are created for that tenant (Managedestate) and to associate a computer to a tenant.
Customer Code
Process where Self Service collects information about computerbackups from NetBackup.
Image Sync
Integration Settings are a flexible store of named settings withvalues held in the Self Service Portal. All integrations settings canbe accessed as an Admin user from Admin > Settings >Integration Settings. If they are configured with Tenant levelexceptions, you can access them from Admin > Organization >Tenant > Integration.
Integration Settings
HAppendix
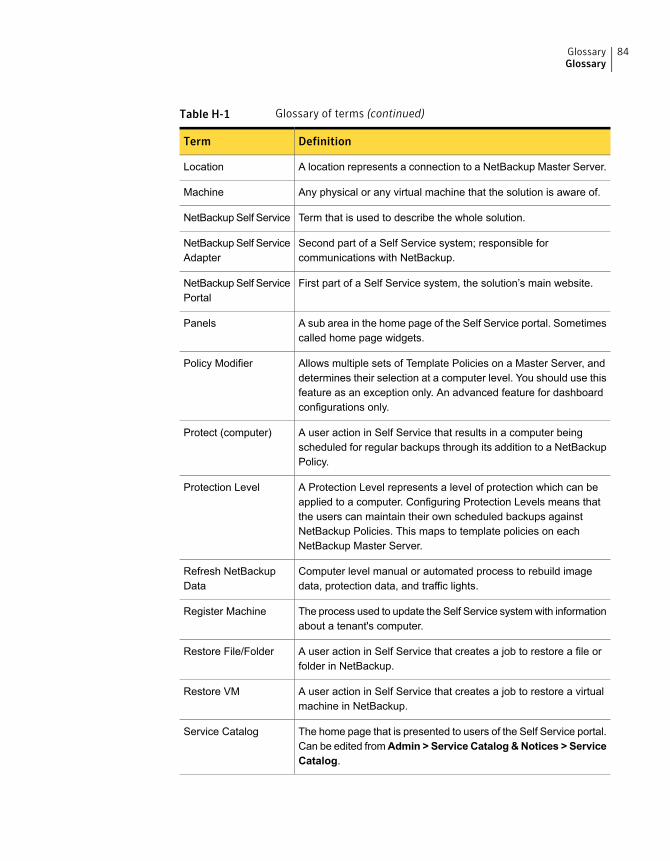
Table H-1 Glossary of terms (continued)
DefinitionTerm
A location represents a connection to a NetBackup Master Server.Location
Any physical or any virtual machine that the solution is aware of.Machine
Term that is used to describe the whole solution.NetBackup Self Service
Second part of a Self Service system; responsible forcommunications with NetBackup.
NetBackup Self ServiceAdapter
First part of a Self Service system, the solution’s main website.NetBackup Self ServicePortal
A sub area in the home page of the Self Service portal. Sometimescalled home page widgets.
Panels
Allows multiple sets of Template Policies on a Master Server, anddetermines their selection at a computer level. You should use thisfeature as an exception only. An advanced feature for dashboardconfigurations only.
Policy Modifier
A user action in Self Service that results in a computer beingscheduled for regular backups through its addition to a NetBackupPolicy.
Protect (computer)
A Protection Level represents a level of protection which can beapplied to a computer. Configuring Protection Levels means thatthe users can maintain their own scheduled backups againstNetBackup Policies. This maps to template policies on eachNetBackup Master Server.
Protection Level
Computer level manual or automated process to rebuild imagedata, protection data, and traffic lights.
Refresh NetBackupData
The process used to update the Self Service systemwith informationabout a tenant's computer.
Register Machine
A user action in Self Service that creates a job to restore a file orfolder in NetBackup.
Restore File/Folder
A user action in Self Service that creates a job to restore a virtualmachine in NetBackup.
Restore VM
The home page that is presented to users of the Self Service portal.Can be edited fromAdmin > Service Catalog &Notices > ServiceCatalog.
Service Catalog
84GlossaryGlossary
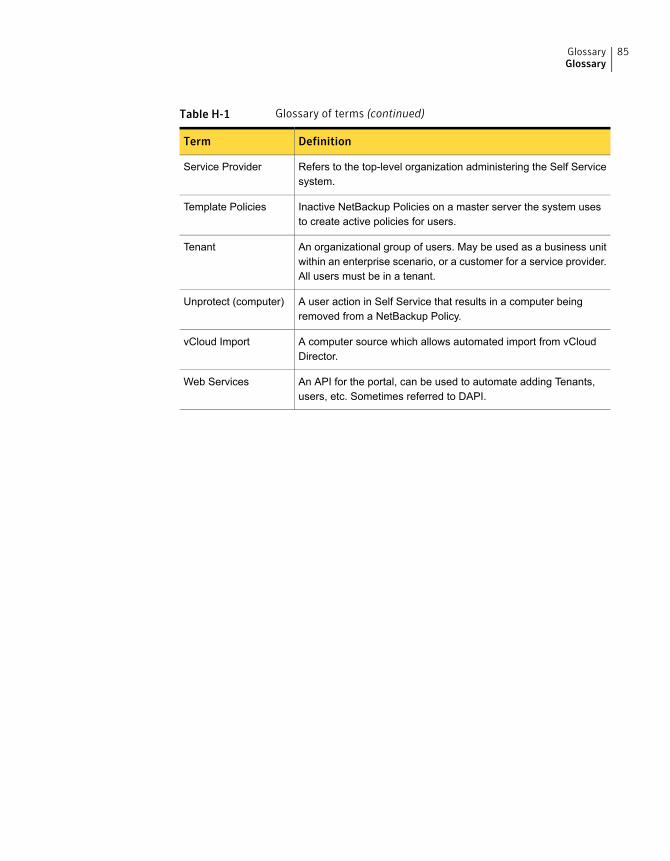
Table H-1 Glossary of terms (continued)
DefinitionTerm
Refers to the top-level organization administering the Self Servicesystem.
Service Provider
Inactive NetBackup Policies on a master server the system usesto create active policies for users.
Template Policies
An organizational group of users. May be used as a business unitwithin an enterprise scenario, or a customer for a service provider.All users must be in a tenant.
Tenant
A user action in Self Service that results in a computer beingremoved from a NetBackup Policy.
Unprotect (computer)
A computer source which allows automated import from vCloudDirector.
vCloud Import
An API for the portal, can be used to automate adding Tenants,users, etc. Sometimes referred to DAPI.
Web Services
85GlossaryGlossary