Embed Size (px)
Citation preview
Black plate (1,1)
NetBeans Guide: Faculty of Mathematics, Computingand Technology
NetBeans Guide
Contents
Credits 3
1 Introduction 4
2 The NetBeans IDE 6
2.1 What IDEs do 6
2.2 The NetBeans story 7
3 A trip round NetBeans 8
3.1 Getting started 8
3.2 Setting preferences in the IDE 19
3.3 Creating a new project 26
3.4 Adding a new class and using the Source Editor 31
3.5 Using ‘smart’ features in the Source Editor 40
3.6 Creating a project using existing source code 44
3.7 More on running projects 48
3.8 Adding a class library to a project 52
4 Working with packages 55
4.1 About packages 55
4.2 Creating a package 55
4.3 How a class can use a class from another package 56
4.4 Renaming a package 57
4.5 Package hierarchies 58
4.6 Moving classes between packages 59
4.7 Moving classes and packages between projects 59
4.8 Other file types in packages 59
5 Using the NetBeans GUI Builder 60
5.1 Starting the design 61
5.2 Adding Swing components to the GUI 66
5.3 Making the buttons active 74
5.4 About layouts 77
6 Using JUnit to test your code 78
6.1 A simple test case 79
6.2 Creating and using test objects 83
6.3 Test and fix 91
6.4 Running a test suite 94
SUP 02223 5
3.1
Copyright © 2007, 2008, 2010 The Open University
Printed in the United Kingdom by The CharlesworthGroup, Wakefield
*SUP022235*

Black plate (2,1)
7 Getting started with the GlassFish Server 95
7.1 Deploying a Web project 95
7.2 Modules associated with the enterprise server 98
Appendix A – NetBeans usability hints 100
A.1 Shortcut keys 101
A.2 Setting font sizes in NetBeans 103
Appendix B – Some common problems and their
solutions 104
Appendix C – Common Java layouts 109
Index 111
NetBeans Guide
2

Black plate (3,1)
Credits
This guide is an updated version of an earlier guide – this update was
produced by the following team.
Richard Walker, Author
Clive Buckland, Critical Reader
John Busvine, Curriculum Manager
Dave Evesham, Critical Reader
Sarah Mattingly, Academic Editor
Matthew Nelson, Critical Reader
Ian Blackham, Editor
Callum Lester, Software Developer
Yvonne Slater, Media Project Manager
Sue Stavert, Technical Testing Team
Andrew Whitehead, Graphic Artist
Kamy Yazdanjoo, Media Project Manager
Original team
Richard Walker, Author
Ralph Greenwell, Curriculum Manager
Darrel Ince, Critical Reader and Academic Editor
Sarah Mattingly, Critical Reader
Barbara Poniatowska, Curriculum Manager
Rita Tingle, Critical Reader
Ian Blackham, Editor
Anna Edgley-Smith, Editor
Phillip Howe, Compositor
Callum Lester, Software Developer
Neil Paterson, Media Assistant
Andy Seddon, Media Project Manager
Sue Stavert, Technical Testing Team
Andrew Whitehead, Graphic Artist
Kamy Yazdanjoo, Software Developer
3
Credits
Black plate (4,1)
1 Introduction
This guide is intended to give a practical introduction to NetBeans and to
familiarise you with the facilities required for your study. You should work
through the sections as directed by the instructions provided with your
module. Depending on what module you are studying you may need to
cover only part of the guide.
The guide covers all the main tasks needed to develop and run Java
programs in NetBeans. It also introduces the facilities NetBeans provides for
the interactive design of graphical user interfaces (GUIs), the bundled JUnit
testing framework, and the GlassFish enterprise server.
As well as being a hands-on introduction the guide should also act as a
useful reference that you can come back to later when you need to.
Section 2 outlines what an integrated development environment (IDE) is and
gives a brief history of NetBeans. Section 3 consists of a series of practical
activities that cover all the basic tasks involved in using NetBeans. Each
activity is designed to be short enough to be completed in a single session.
Section 4 provides some important background about how Java packages
work. This section consists only of reading; there are no activities involved.
Section 5 explains, via a series of linked practical activities, how to design a
GUI. Section 6 gives a hands-on introduction to the use of JUnit, an
integrated testing framework. Section 7 introduces the GlassFish enterprise
server and demonstrates how to run a simple web page.
NetBeans usability
NetBeans offers more than one way of doing most tasks. In general an
action can be carried out either by using the mouse or by keyboard
shortcuts. Some common actions can also be performed by clicking on
toolbar buttons. In the body of the guide we describe how to work with the
mouse and we also give the keyboard equivalents.
It is also possible to set the fonts used throughout NetBeans (not just in the
code display but across the user interface generally) to a larger size for ease
of reading.
A summary of useful keyboard commands and information on how to
change the font size in the NetBeans interface is contained in Appendix A.
Getting help
NetBeans provides extensive help files. If you press F1 at any time you will
be presented with a table of contents and a searchable index.
In Appendix B we have gathered together a short list of common pitfalls that
we have come across. Of course this does not come anywhere near covering
every kind of problem, but if you do hit an obstacle we hope this list will
sometimes help!
NetBeans Guide
4
Black plate (5,1)
Conventions used in this guide
Menu selections are indicated by giving the name of the menu followed by
the name of the item to be selected, separated by a vertical bar. For example,
‘select Window|Projects’ means ‘from the Window menu, select Projects’.
This notation can be extended to further tiers of menus, for instance, ‘View|
Code Folds|Collapse’ means ‘from the View menu select Code Folds and
then from Code Folds select Collapse’.
Keyboard commands are indicated by giving the modifier (i.e. Ctrl, Alt,
Shift) or modifiers, plus a character. For example, Ctrl+Shift+O means O
should be pressed while simultaneously holding down the Ctrl and Shift
keys.
Some keyboard commands consist of a function key alone, e.g. F11, or a
modifier and a function key, e.g. Ctrl+F4.
Screenshots in this guide
The exact appearance of many NetBeans windows will depend upon a
number of factors: not just on what version of NetBeans you are using and
whether you have installed any updates, but also on your operating system,
any NetBeans settings you may have chosen as you go along, and what
work you have done in the IDE previously. For this reason what you
actually see in your NetBeans window may, in some cases, differ in minor
ways from the screenshots shown in this guide, although the features should
all work in the same way and the instructions should not be affected.
Before you start
You will need to have installed NetBeans 6.9.1 or a later version (and for
Activity 16 you will need GlassFish 3 or later). This guide does not include
installation instructions, which are provided separately.
Please note that, for convenience, we are assuming that you have installed
the NBGuide2 folder containing the NetBeans projects into the default
location and, since the precise name of this location will depend on your
operating system, we will, when appropriate, refer to the folder location as it
would be for a computer running Windows Vista, that is Documents
\NBGuide2 (which is shorthand for C:\Users\<username>\Documents
\NBGuide2). On a computer running Windows XP the folder would be at
C:\Documents and Settings\<username>\My Documents\NBGuide2.
Aside: the folder is named NBGuide2 to distinguish it from project folders
associated with previous versions of NetBeans that you may have installed
from prior study.
5
1 Introduction
Black plate (6,1)
2 The NetBeans IDE
2.1 What IDEs do
NetBeans is an integrated development environment (IDE). An IDE is a
productivity tool that lets programmers write working code far more quickly
than they would be able to just using basic facilities such as those provided
by Sun as part of the Java Development Kit (JDK).
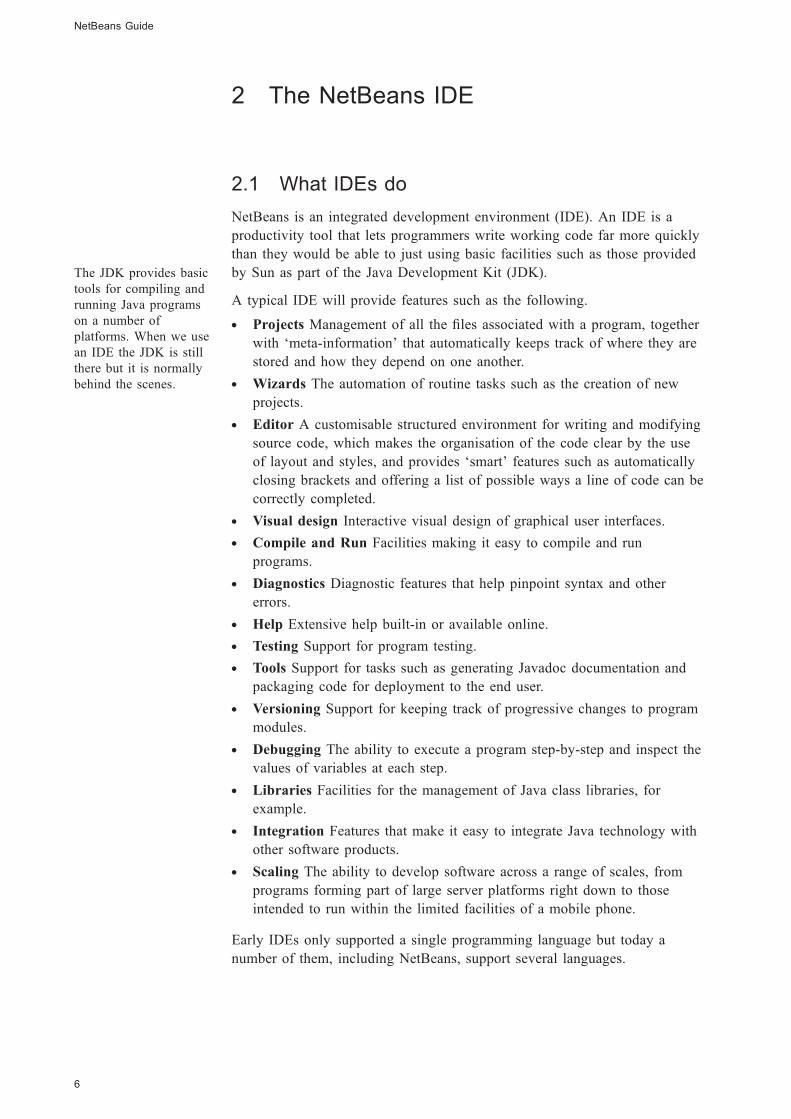
A typical IDE will provide features such as the following.
. Projects Management of all the files associated with a program, together
with ‘meta-information’ that automatically keeps track of where they are
stored and how they depend on one another.
. Wizards The automation of routine tasks such as the creation of new
projects.
. Editor A customisable structured environment for writing and modifying
source code, which makes the organisation of the code clear by the use
of layout and styles, and provides ‘smart’ features such as automatically
closing brackets and offering a list of possible ways a line of code can be
correctly completed.
. Visual design Interactive visual design of graphical user interfaces.
. Compile and Run Facilities making it easy to compile and run
programs.
. Diagnostics Diagnostic features that help pinpoint syntax and other
errors.
. Help Extensive help built-in or available online.
. Testing Support for program testing.
. Tools Support for tasks such as generating Javadoc documentation and
packaging code for deployment to the end user.
. Versioning Support for keeping track of progressive changes to program
modules.
. Debugging The ability to execute a program step-by-step and inspect the
values of variables at each step.
. Libraries Facilities for the management of Java class libraries, for
example.
. Integration Features that make it easy to integrate Java technology with
other software products.
. Scaling The ability to develop software across a range of scales, from
programs forming part of large server platforms right down to those
intended to run within the limited facilities of a mobile phone.
Early IDEs only supported a single programming language but today a
number of them, including NetBeans, support several languages.
NetBeans Guide
6
The JDK provides basic
tools for compiling and
running Java programs
on a number of
platforms. When we use
an IDE the JDK is still
there but it is normally
behind the scenes.

Black plate (7,1)
2.2 The NetBeans story
NetBeans grew out of a student project in the Czech Republic in 1996. It
was originally called Xelfi and was the first IDE written in Java. In time a
business was developed and the name NetBeans emerged.
In 1999 NetBeans was acquired by Sun Microsystems and launched as an
open source project. At the time of writing there have been more than
18 million downloads of NetBeans.
You can read more about the history of NetBeans and view an interactive
timeline at http://netbeans.org/about/history.html.
7
2 The NetBeans IDE
As of January 2010 Sun
Microsystems was
acquired by Oracle, who
continue to support
NetBeans.
Black plate (8,1)
3 A trip round NetBeans
In this section you will be introduced to all the basic functions needed to
write and run Java programs using NetBeans. The topics are introduced in a
series of practical activities, each short enough to be completed in a single
session.
You will also find this section a useful reference in the future if you need to
remind yourself how to carry out particular tasks.
3.1 Getting started
Activity 1
In this activity you will learn how to:
. launch NetBeans
. open an existing project
. view the project structure
. run a program
. halt a running program
. modify source code
. save changes
. close a project.
Launching the IDE
Launch NetBeans from the Start menu or by double-clicking on the desktop
icon. A splash screen will be displayed while the program is loaded.
NetBeans is a complex piece of software and loading it may take some time.
Eventually the main window will appear. If you are presented with a
dialogue inviting you to register the software you can dismiss it for now.
You can always register later if you wish.
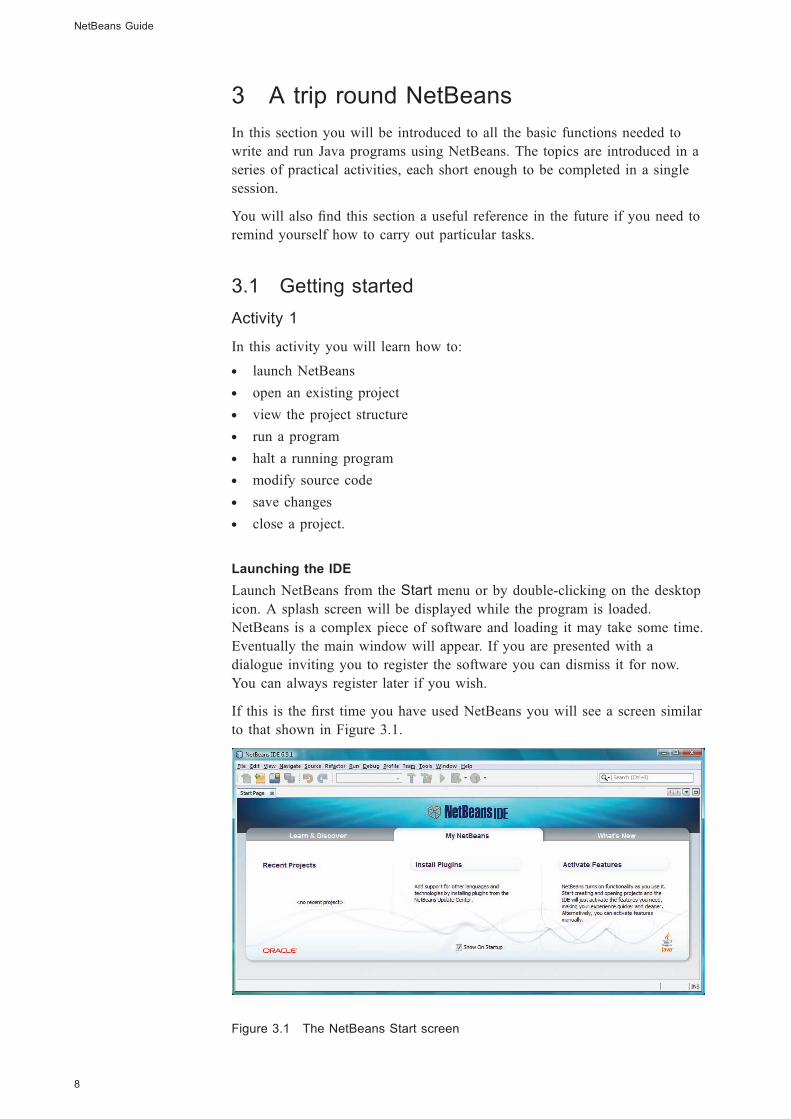
If this is the first time you have used NetBeans you will see a screen similar
to that shown in Figure 3.1.
Figure 3.1 The NetBeans Start screen
NetBeans Guide
8
Black plate (9,1)
If you do not wish to see the Start Page each time you run NetBeans you
can untick the Show On Startup checkbox. This will not affect the
operation of NetBeans, and you can always get the Start Page back by
choosing Window|Reset Windows. Click the button on the Start Page
tab to close it.
You may be offered one or more updates, if so please ignore them for now,
but you can accept when you next start NetBeans: updates will not cause
problems with any of the activities in this guide or in your module.
If a message ‘Cannot connect to internet’ is displayed you should ignore it at
this point.
If you have used NetBeans previously there may be other documents or
windows open within the main NetBeans window. In this case:
. press Ctrl+W repeatedly until all the windows within the main NetBeans
window are closed;
. press Ctrl+5, then Ctrl+2, then Ctrl+1, which will open the windows we
require.
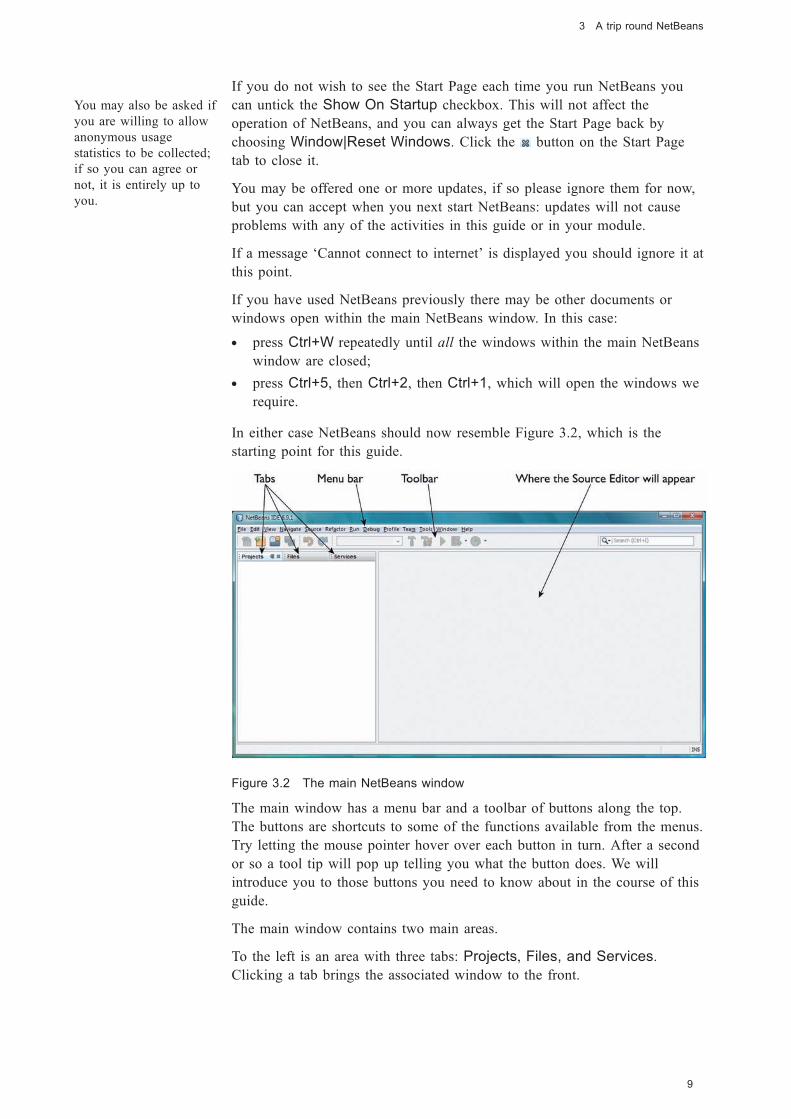
In either case NetBeans should now resemble Figure 3.2, which is the
starting point for this guide.
Figure 3.2 The main NetBeans window
The main window has a menu bar and a toolbar of buttons along the top.
The buttons are shortcuts to some of the functions available from the menus.
Try letting the mouse pointer hover over each button in turn. After a second
or so a tool tip will pop up telling you what the button does. We will
introduce you to those buttons you need to know about in the course of this
guide.
The main window contains two main areas.
To the left is an area with three tabs: Projects, Files, and Services.
Clicking a tab brings the associated window to the front.
9
3 A trip round NetBeans
You may also be asked if
you are willing to allow
anonymous usage
statistics to be collected;
if so you can agree or
not, it is entirely up to
you.
Black plate (10,1)
To the right there is a large area, which is currently empty. When we are
editing Java source files the Source Editor window will appear here.
If you have used this installation of NetBeans before, a project or projects
may already be open in the Projects and Files windows. If so, close them
from the File menu, which you can open from the menu bar or by pressing
Alt+F. You will see a menu option Close Project followed by the project
name in brackets. Select this option and the project will close. If there are
several projects, repeat the process until all are closed.
Minimising windows
Many of the windows in NetBeans can be minimised when not immediately
required and restored again on demand. This is a very useful feature that
helps to make good use of screen space, but it works in a slightly unusual
way, so before going any further we will quickly explore how to minimise a
window.
Click on the Files tab to bring the Files window to the front.
Immediately to the left of the standard Close button in the right-hand
corner of the Files window there is a minimise button . Click this, and the
Files window will be minimised and its icon displayed to the left of the
main window, leaving the Projects and Services windows still open. Click
the button for the Services and Projects windows to minimise them as
well.
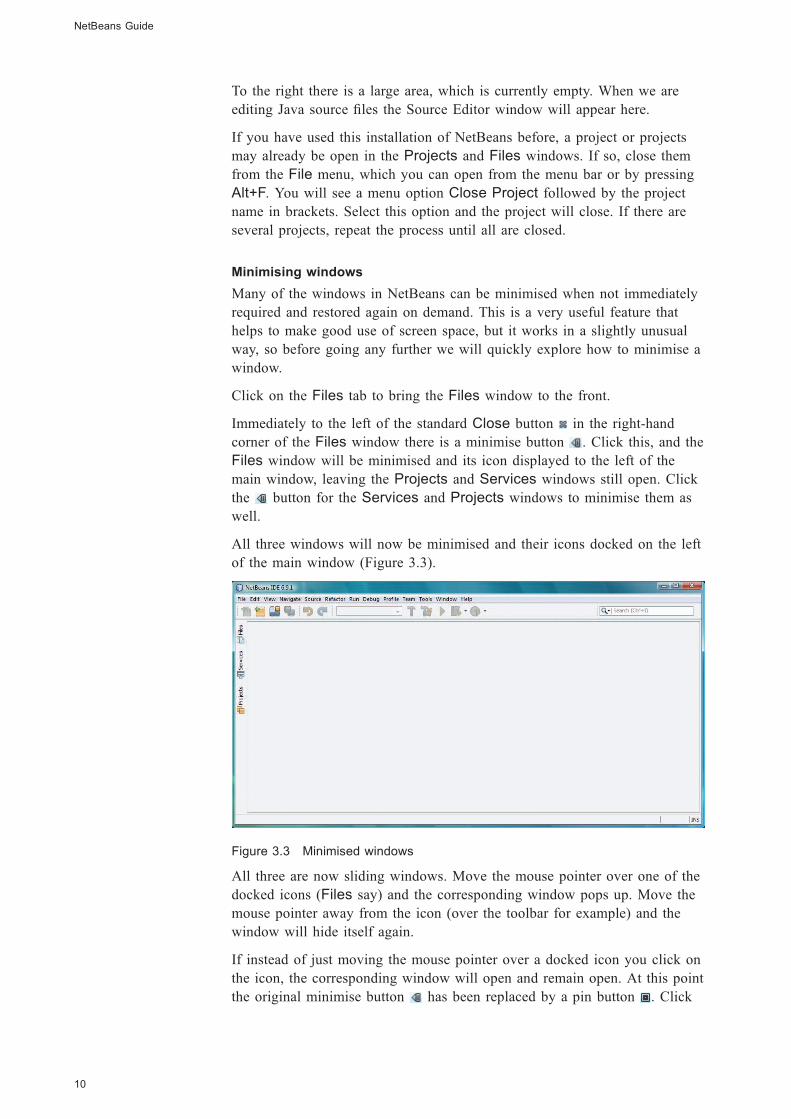
All three windows will now be minimised and their icons docked on the left
of the main window (Figure 3.3).
Figure 3.3 Minimised windows
All three are now sliding windows. Move the mouse pointer over one of the
docked icons (Files say) and the corresponding window pops up. Move the
mouse pointer away from the icon (over the toolbar for example) and the
window will hide itself again.
If instead of just moving the mouse pointer over a docked icon you click on
the icon, the corresponding window will open and remain open. At this point
the original minimise button has been replaced by a pin button . Click
NetBeans Guide
10
Black plate (11,1)
on this and it ‘pins’ the window: the button changes back to the minimise
button and the window reverts to its original state.
If you open and then pin first the Services and then the Files window you
should see the two tabs side by side as in Figure 3.4.
Figure 3.4 The Services and Files tabs restored
Restoring the Projects window in the same way will bring NetBeans back
to the position seen in Figure 3.2.
Opening a project
An application in NetBeans is made up of one or more projects. One of
these will typically be set as the main project, the one that will launch first
when the application is run. A project consists of a group of Java files,
together with all the associated information and resources needed to compile
and run the project.
To open a project select File|Open Project... or press Ctrl+Shift+O.
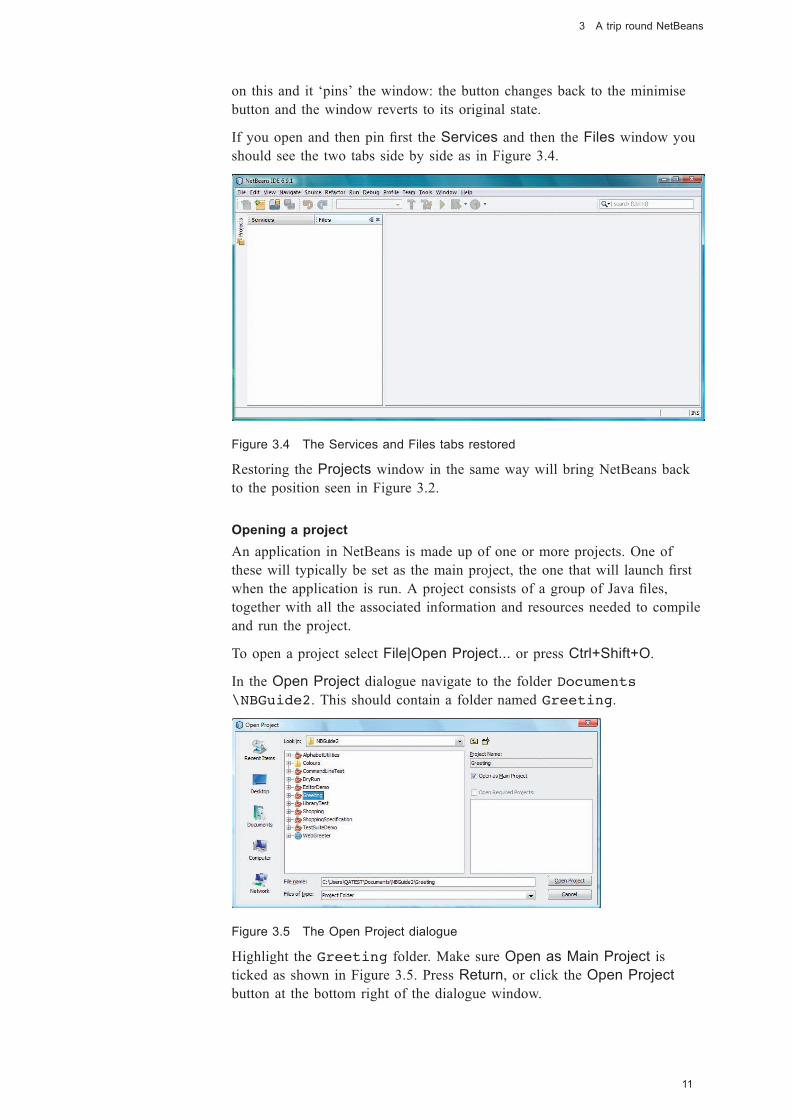
In the Open Project dialogue navigate to the folder Documents
\NBGuide2. This should contain a folder named Greeting.
Figure 3.5 The Open Project dialogue
Highlight the Greeting folder. Make sure Open as Main Project is
ticked as shown in Figure 3.5. Press Return, or click the Open Project
button at the bottom right of the dialogue window.
11
3 A trip round NetBeans
Black plate (12,1)
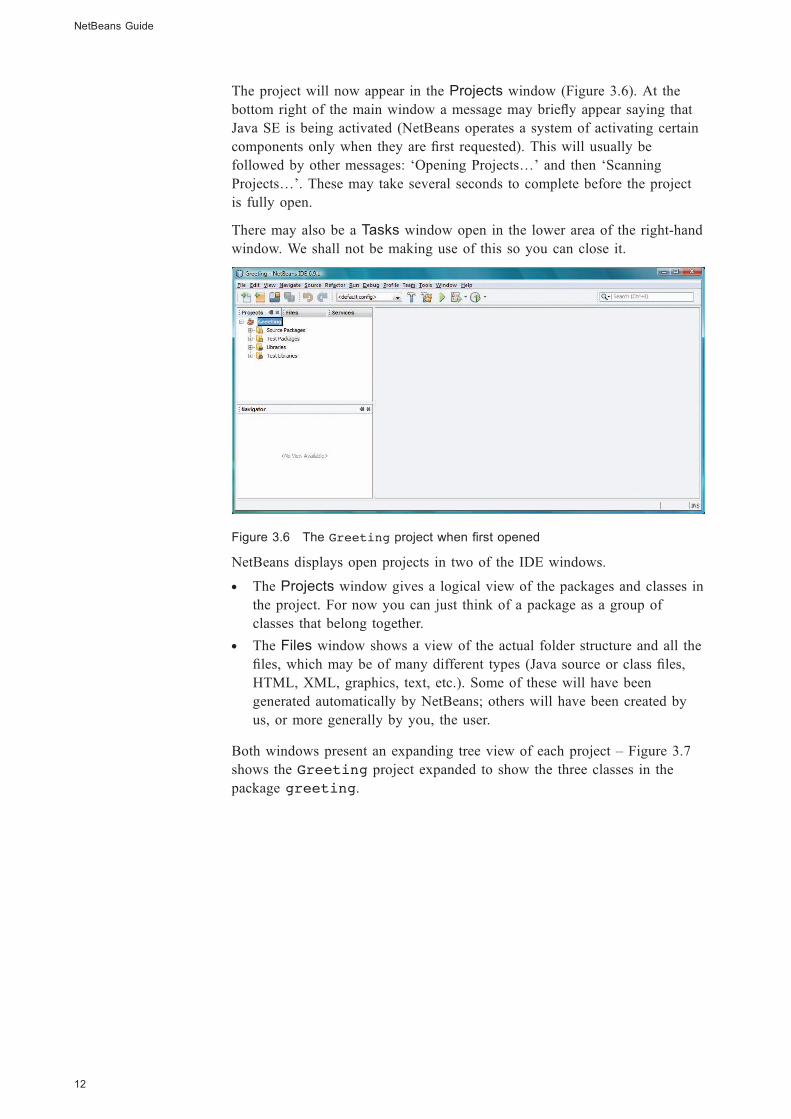
The project will now appear in the Projects window (Figure 3.6). At the
bottom right of the main window a message may briefly appear saying that
Java SE is being activated (NetBeans operates a system of activating certain
components only when they are first requested). This will usually be
followed by other messages: ‘Opening Projects…’ and then ‘Scanning
Projects…’. These may take several seconds to complete before the project
is fully open.
There may also be a Tasks window open in the lower area of the right-hand
window. We shall not be making use of this so you can close it.
Figure 3.6 The Greeting project when first opened
NetBeans displays open projects in two of the IDE windows.
. The Projects window gives a logical view of the packages and classes in
the project. For now you can just think of a package as a group of
classes that belong together.
. The Files window shows a view of the actual folder structure and all the
files, which may be of many different types (Java source or class files,
HTML, XML, graphics, text, etc.). Some of these will have been
generated automatically by NetBeans; others will have been created by
us, or more generally by you, the user.
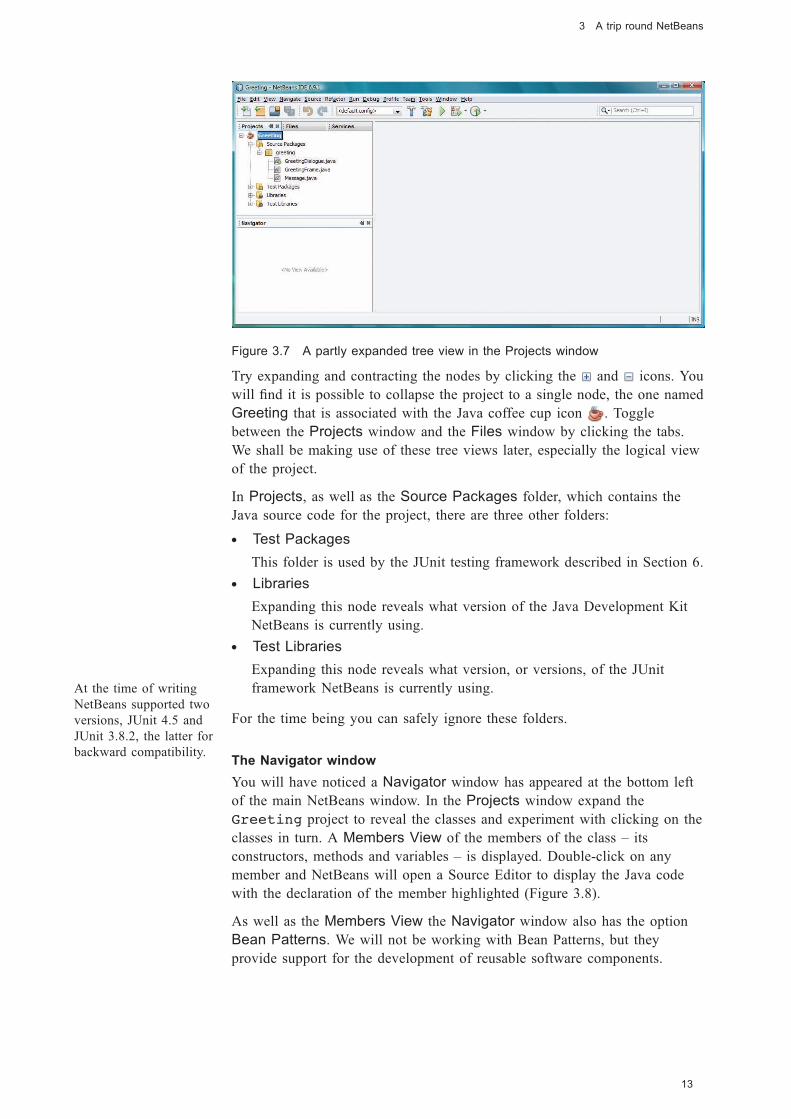
Both windows present an expanding tree view of each project – Figure 3.7
shows the Greeting project expanded to show the three classes in the
package greeting.
NetBeans Guide
12
Black plate (13,1)
Figure 3.7 A partly expanded tree view in the Projects window
Try expanding and contracting the nodes by clicking the and icons. You
will find it is possible to collapse the project to a single node, the one named
Greeting that is associated with the Java coffee cup icon . Toggle
between the Projects window and the Files window by clicking the tabs.
We shall be making use of these tree views later, especially the logical view
of the project.
In Projects, as well as the Source Packages folder, which contains the
Java source code for the project, there are three other folders:
. Test Packages
This folder is used by the JUnit testing framework described in Section 6.
. Libraries
Expanding this node reveals what version of the Java Development Kit
NetBeans is currently using.
. Test Libraries
Expanding this node reveals what version, or versions, of the JUnit
framework NetBeans is currently using.
For the time being you can safely ignore these folders.
The Navigator window
You will have noticed a Navigator window has appeared at the bottom left
of the main NetBeans window. In the Projects window expand the
Greeting project to reveal the classes and experiment with clicking on the
classes in turn. A Members View of the members of the class – its
constructors, methods and variables – is displayed. Double-click on any
member and NetBeans will open a Source Editor to display the Java code
with the declaration of the member highlighted (Figure 3.8).
As well as the Members View the Navigator window also has the option
Bean Patterns. We will not be working with Bean Patterns, but they
provide support for the development of reusable software components.
13
3 A trip round NetBeans
At the time of writing
NetBeans supported two
versions, JUnit 4.5 and
JUnit 3.8.2, the latter for
backward compatibility.
Black plate (14,1)
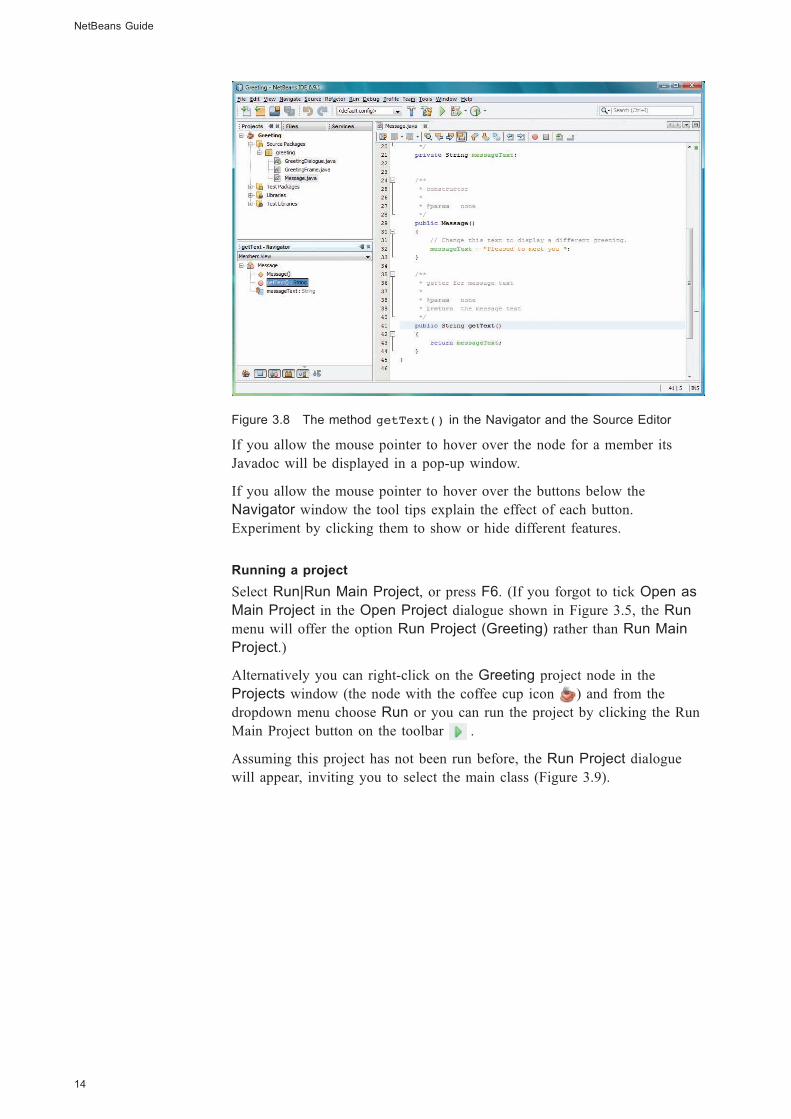
Figure 3.8 The method getText() in the Navigator and the Source Editor
If you allow the mouse pointer to hover over the node for a member its
Javadoc will be displayed in a pop-up window.
If you allow the mouse pointer to hover over the buttons below the
Navigator window the tool tips explain the effect of each button.
Experiment by clicking them to show or hide different features.
Running a project
Select Run|Run Main Project, or press F6. (If you forgot to tick Open as
Main Project in the Open Project dialogue shown in Figure 3.5, the Run
menu will offer the option Run Project (Greeting) rather than Run Main
Project.)
Alternatively you can right-click on the Greeting project node in the
Projects window (the node with the coffee cup icon ) and from the
dropdown menu choose Run or you can run the project by clicking the Run
Main Project button on the toolbar .
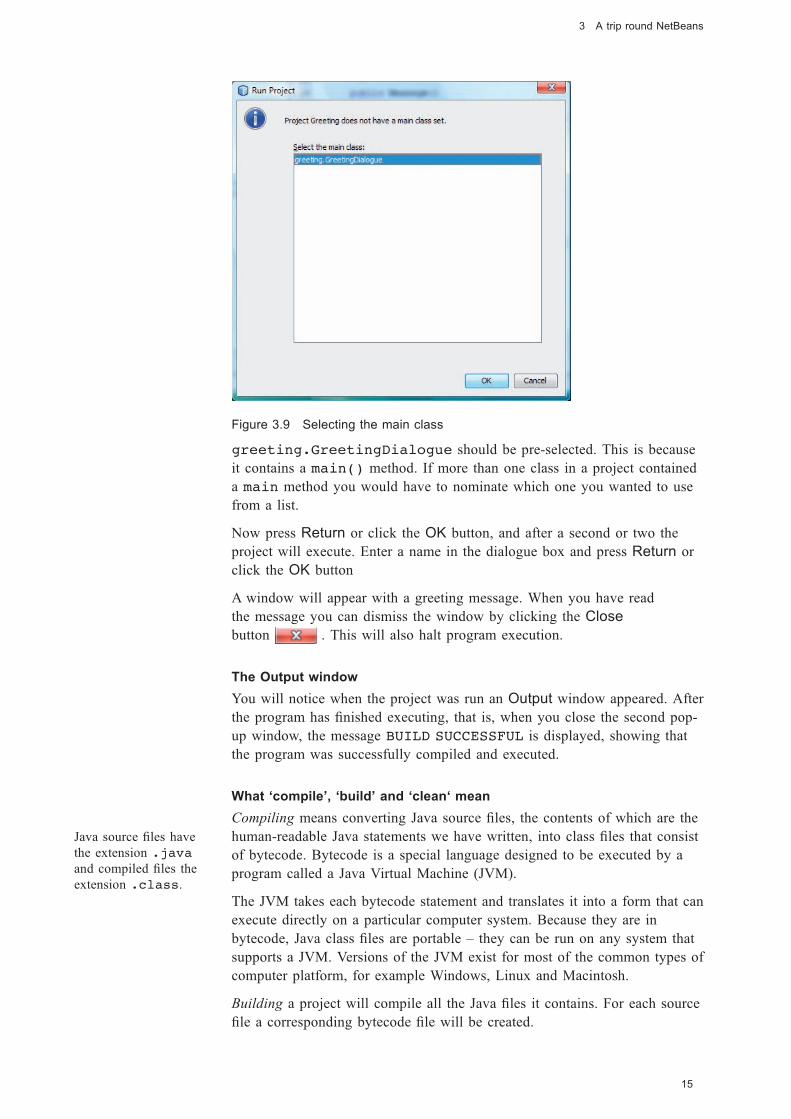
Assuming this project has not been run before, the Run Project dialogue
will appear, inviting you to select the main class (Figure 3.9).
NetBeans Guide
14
Black plate (15,1)
Figure 3.9 Selecting the main class
greeting.GreetingDialogue should be pre-selected. This is because
it contains a main() method. If more than one class in a project contained
a main method you would have to nominate which one you wanted to use
from a list.
Now press Return or click the OK button, and after a second or two the
project will execute. Enter a name in the dialogue box and press Return or
click the OK button
A window will appear with a greeting message. When you have read
the message you can dismiss the window by clicking the Close
button . This will also halt program execution.
The Output window
You will notice when the project was run an Output window appeared. After
the program has finished executing, that is, when you close the second pop-
up window, the message BUILD SUCCESSFUL is displayed, showing that
the program was successfully compiled and executed.
What ‘compile’, ‘build’ and ‘clean‘ mean
Compiling means converting Java source files, the contents of which are the
human-readable Java statements we have written, into class files that consist
of bytecode. Bytecode is a special language designed to be executed by a
program called a Java Virtual Machine (JVM).
The JVM takes each bytecode statement and translates it into a form that can
execute directly on a particular computer system. Because they are in
bytecode, Java class files are portable – they can be run on any system that
supports a JVM. Versions of the JVM exist for most of the common types of
computer platform, for example Windows, Linux and Macintosh.
Building a project will compile all the Java files it contains. For each source
file a corresponding bytecode file will be created.
15
3 A trip round NetBeans
Java source files have
the extension .java
and compiled files the
extension .class.
Black plate (16,1)
You will not normally need to compile files or build projects manually,
NetBeans takes care of everything. When you save a project NetBeans
automatically builds it. If you run the project NetBeans automatically saves
and builds the project, before calling the JVM to execute the compiled files.
There is also an option to clean projects. This removes any compiled files.
You might choose this option to ensure that no compiled versions of earlier
code have been retained, or if you were sending the project to someone else
and wanted to minimise the size of the folder by not including compiled
classes.
Halting a running program
Some programs will run for a time and terminate when they have completed.
In other cases it may be that the program can be terminated by closing the
user interface window (for example the Greeting program), or perhaps by
pressing a quit button.
On the other hand, some programs may have been written so that they
continue running even after the associated window has been closed. These
need to be halted, otherwise you will end up with many programs (or many
copies of the same program!) all running at once. Some programs may
contain endless loops, or may be malfunctioning, perhaps because of
programming errors; these also need to be terminated.
Run the Greeting program again but this time when the Input dialogue
box appears do not enter a name. Instead choose Run|Stop Build/Run:
Greeting (run). In the Output window you will see a message in red
BUILD STOPPED.
When multiple programs are running this option is replaced by Run|Stop
Build/Run…, and if you select that option NetBeans will present a list of
running processes for you to choose which to stop. You can select multiple
processes to stop with Shift+Click or Ctrl+Click in the usual way.
While a project is running you will also see a progress bar at the bottom
right of the main NetBeans window (Figure 3.10).
Figure 3.10 A project is running
Clicking the close button beside the progress bar will terminate the
project. You will be asked to confirm that you wish to cancel the running
task. If several tasks are running, clicking the progress bar will display a list,
allowing you to terminate individual projects.
Changing source code
Now you are going to change the greeting message that the program
displays.
In the Projects window, make sure the project is expanded so that the three
classes in the package greeting are displayed.
To make the change straightforward we have localised the code where the
message is set in the class Message.
NetBeans Guide
16
Black plate (17,1)
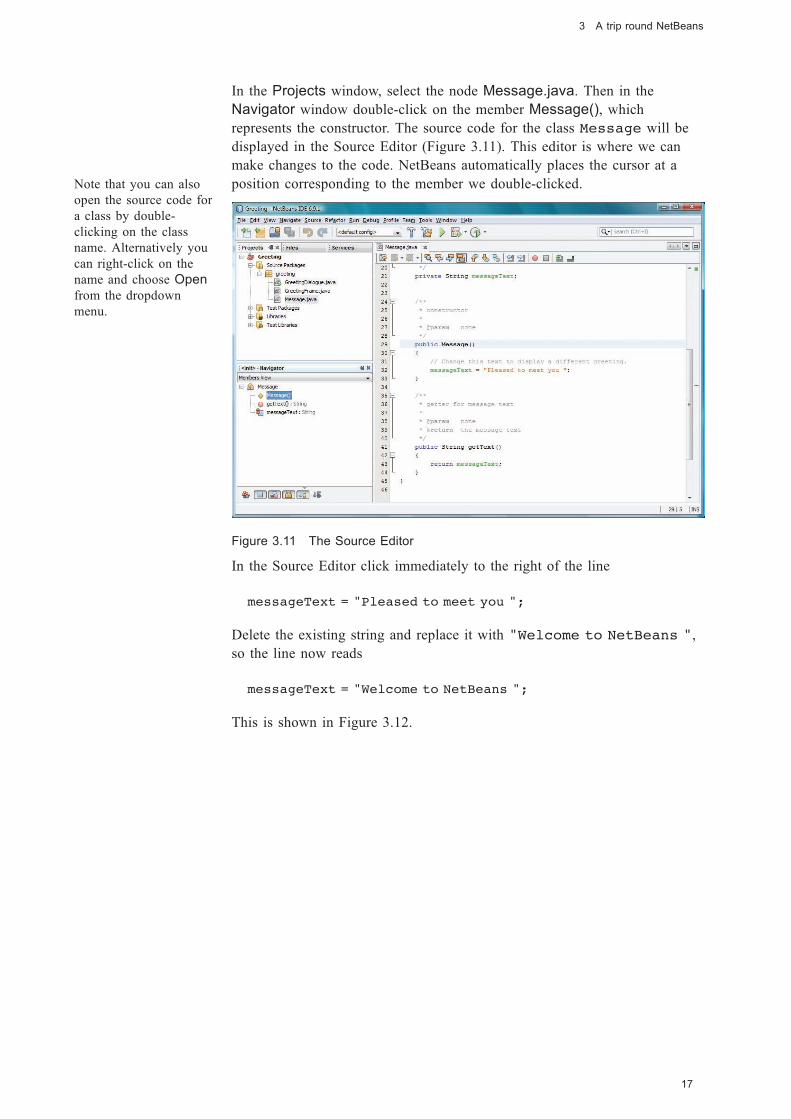
In the Projects window, select the node Message.java. Then in the
Navigator window double-click on the member Message(), which
represents the constructor. The source code for the class Message will be
displayed in the Source Editor (Figure 3.11). This editor is where we can
make changes to the code. NetBeans automatically places the cursor at a
position corresponding to the member we double-clicked.
Figure 3.11 The Source Editor
In the Source Editor click immediately to the right of the line
messageText = "Pleased to meet you ";
Delete the existing string and replace it with "Welcome to NetBeans ",
so the line now reads
messageText = "Welcome to NetBeans ";
This is shown in Figure 3.12.
17
3 A trip round NetBeans
Note that you can also
open the source code for
a class by double-
clicking on the class
name. Alternatively you
can right-click on the
name and choose Open
from the dropdown
menu.
Black plate (18,1)
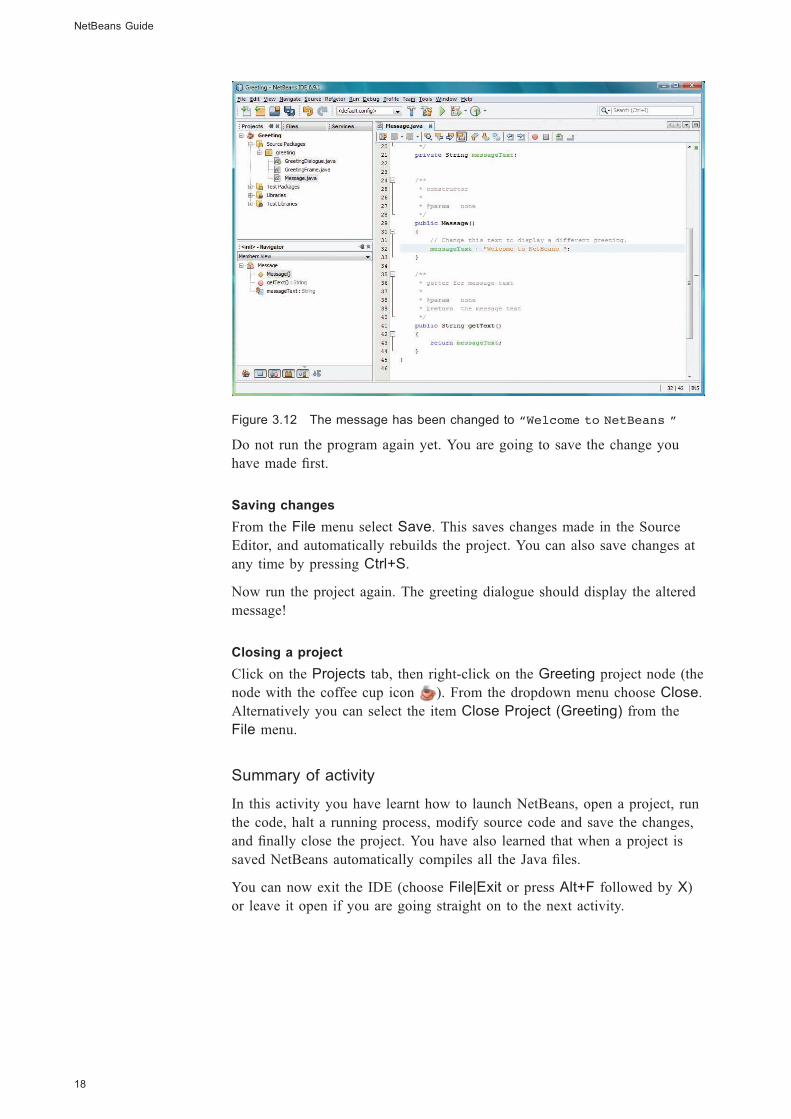
Figure 3.12 The message has been changed to “Welcome to NetBeans ”
Do not run the program again yet. You are going to save the change you
have made first.
Saving changes
From the File menu select Save. This saves changes made in the Source
Editor, and automatically rebuilds the project. You can also save changes at
any time by pressing Ctrl+S.
Now run the project again. The greeting dialogue should display the altered
message!
Closing a project
Click on the Projects tab, then right-click on the Greeting project node (the
node with the coffee cup icon ). From the dropdown menu choose Close.
Alternatively you can select the item Close Project (Greeting) from the
File menu.
Summary of activity
In this activity you have learnt how to launch NetBeans, open a project, run
the code, halt a running process, modify source code and save the changes,
and finally close the project. You have also learned that when a project is
saved NetBeans automatically compiles all the Java files.
You can now exit the IDE (choose File|Exit or press Alt+F followed by X)
or leave it open if you are going straight on to the next activity.
NetBeans Guide
18
Black plate (19,1)
3.2 Setting preferences in the IDE
Activity 2
In this activity you will learn how to:
. set the way NetBeans automatically formats code
. change code template settings
. set the fonts and colours used to display Java code to suit your own
preferences
. choose what browser you want NetBeans to use when it displays Java
documentation or launches a web page
. choose whether line numbers are displayed
. make the Java documentation available in the IDE.
Setting formatting options
Launch NetBeans if it is not already running. Choose Tools|Options. In the
window that opens click the Editor button.
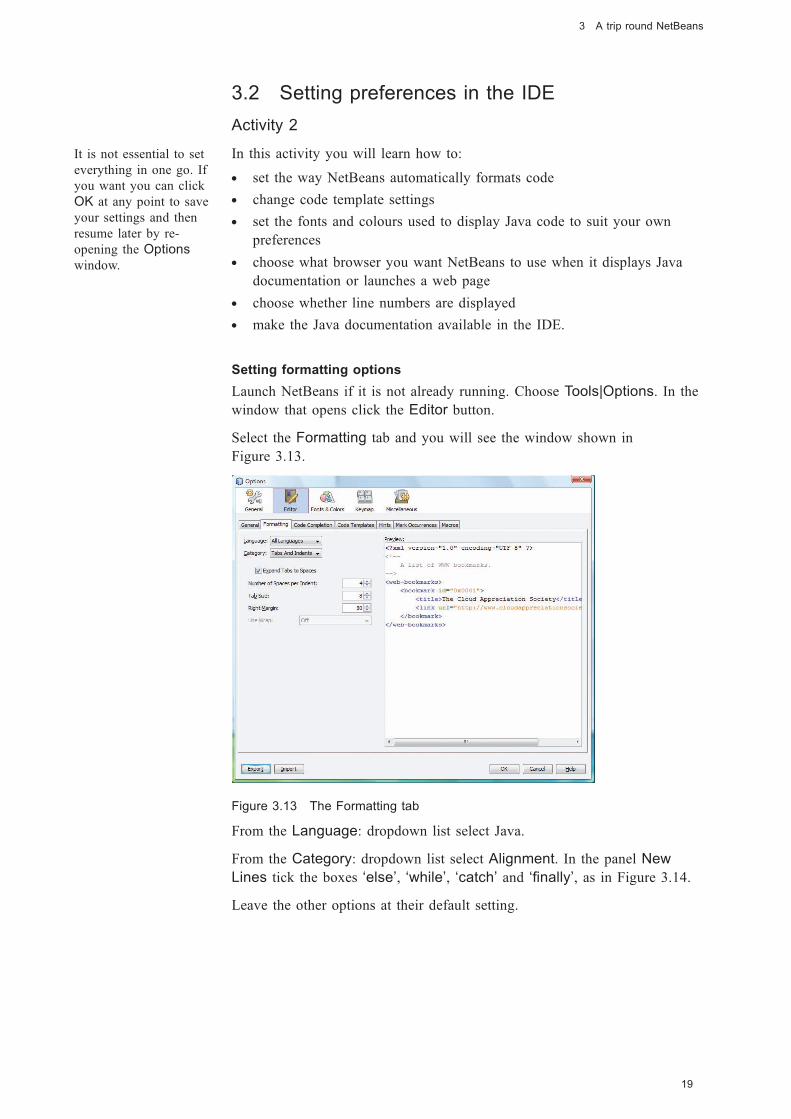
Select the Formatting tab and you will see the window shown in
Figure 3.13.
Figure 3.13 The Formatting tab
From the Language: dropdown list select Java.
From the Category: dropdown list select Alignment. In the panel New
Lines tick the boxes ‘else’, ‘while’, ‘catch’ and ‘finally’, as in Figure 3.14.
Leave the other options at their default setting.
19
3 A trip round NetBeans
It is not essential to set
everything in one go. If
you want you can click
OK at any point to save
your settings and then
resume later by re-
opening the Options
window.
Black plate (20,1)
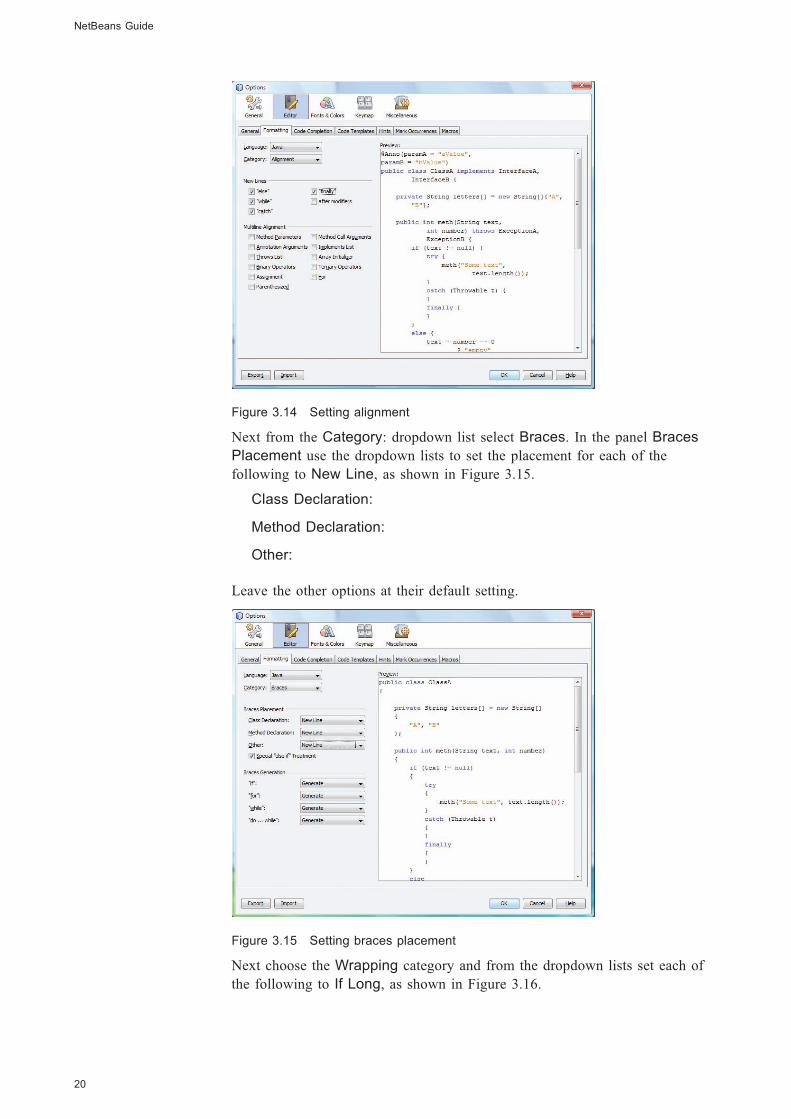
Figure 3.14 Setting alignment
Next from the Category: dropdown list select Braces. In the panel Braces
Placement use the dropdown lists to set the placement for each of the
following to New Line, as shown in Figure 3.15.
Class Declaration:
Method Declaration:
Other:
Leave the other options at their default setting.
Figure 3.15 Setting braces placement
Next choose the Wrapping category and from the dropdown lists set each of
the following to If Long, as shown in Figure 3.16.
NetBeans Guide
20

Black plate (21,1)
Extends/Implements Keywords:
Extends/Implements List:
Method Parameters:
Method Call Arguments:
Leave the other options at their default setting.
Figure 3.16 Setting wrapping
When you have set the Formatting options as described above your Java
code will be laid out in the same way as the Preview: shown in the right-
hand panel of Figure 3.16. This is the common ‘house style’ used by many
Open University modules. If your module uses a slightly different style you
should be able to adapt the instructions above to suit.
Code templates
Still in the Editor dialogue, click on the Code Templates tab. Code
templates are a set of useful abbreviations which can save you having to
type common combinations in full. At the bottom left is a dropdown box
labelled Expand Template on: . Change this setting from Tab to
Shift+Space. (This will mean that templates are expanded when you type a
space while holding down the shift key. The original setting required you to
type a tab, which we feel, on balance, is less intuitive.)
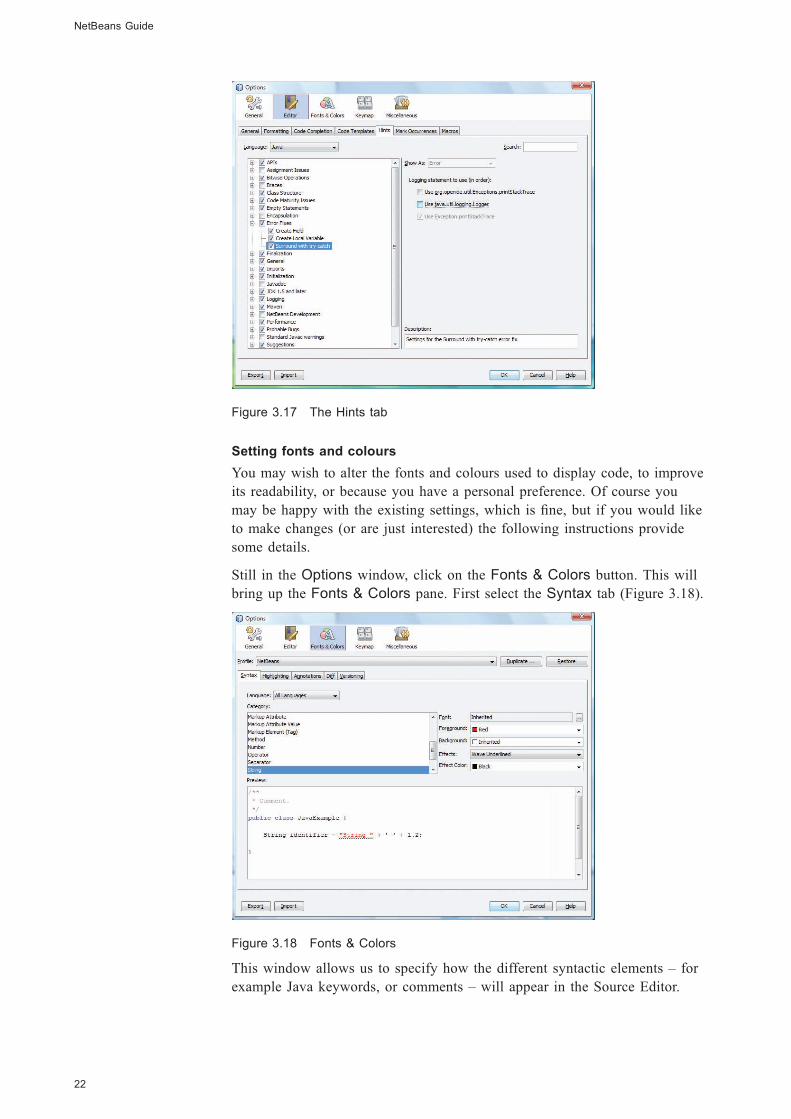
Next click the Hints tab. If necessary select Java from the Language:
dropdown list. In the tree view on the left expand the node Error Fixes, and
make sure the box Surround with try-catch is ticked. Select Surround with
try-catch and ensure the boxes on the right, Use org.openide.util.
Exceptions.printStackTrace and Use java.util.logging.Logger, are not
ticked. Leave all other options at their default setting, see Figure 3.17.
21
3 A trip round NetBeans
Black plate (22,1)
Figure 3.17 The Hints tab
Setting fonts and colours
You may wish to alter the fonts and colours used to display code, to improve
its readability, or because you have a personal preference. Of course you
may be happy with the existing settings, which is fine, but if you would like
to make changes (or are just interested) the following instructions provide
some details.
Still in the Options window, click on the Fonts & Colors button. This will
bring up the Fonts & Colors pane. First select the Syntax tab (Figure 3.18).
Figure 3.18 Fonts & Colors
This window allows us to specify how the different syntactic elements – for
example Java keywords, or comments – will appear in the Source Editor.
NetBeans Guide
22
Black plate (23,1)
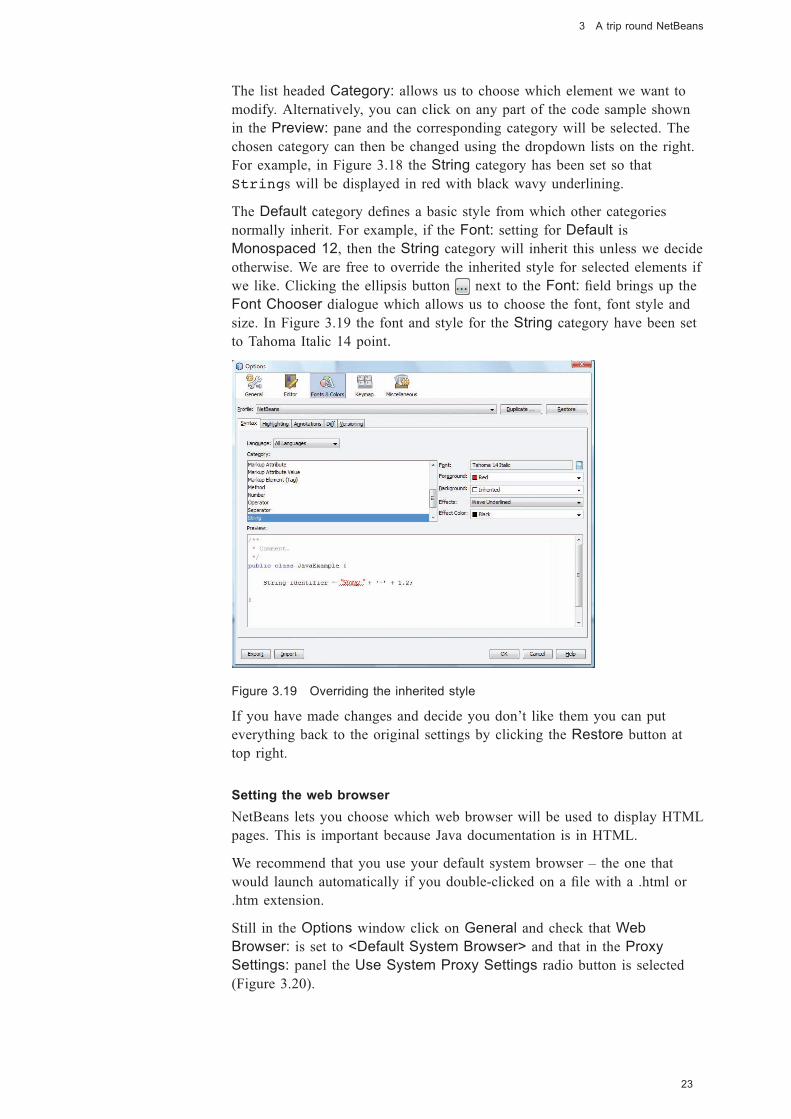
The list headed Category: allows us to choose which element we want to
modify. Alternatively, you can click on any part of the code sample shown
in the Preview: pane and the corresponding category will be selected. The
chosen category can then be changed using the dropdown lists on the right.
For example, in Figure 3.18 the String category has been set so that
Strings will be displayed in red with black wavy underlining.
The Default category defines a basic style from which other categories
normally inherit. For example, if the Font: setting for Default is
Monospaced 12, then the String category will inherit this unless we decide
otherwise. We are free to override the inherited style for selected elements if
we like. Clicking the ellipsis button next to the Font: field brings up the
Font Chooser dialogue which allows us to choose the font, font style and
size. In Figure 3.19 the font and style for the String category have been set
to Tahoma Italic 14 point.
Figure 3.19 Overriding the inherited style
If you have made changes and decide you don’t like them you can put
everything back to the original settings by clicking the Restore button at
top right.
Setting the web browser
NetBeans lets you choose which web browser will be used to display HTML
pages. This is important because Java documentation is in HTML.
We recommend that you use your default system browser – the one that
would launch automatically if you double-clicked on a file with a .html or
.htm extension.
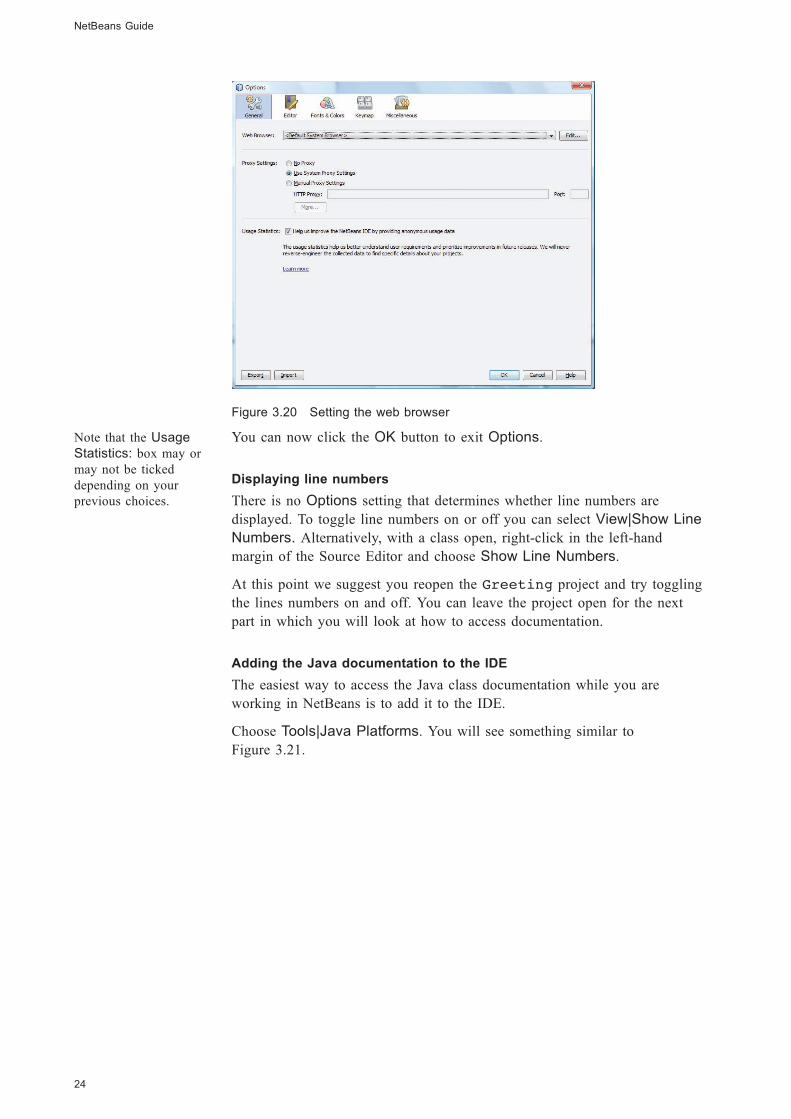
Still in the Options window click on General and check that Web
Browser: is set to <Default System Browser> and that in the Proxy
Settings: panel the Use System Proxy Settings radio button is selected
(Figure 3.20).
23
3 A trip round NetBeans
Black plate (24,1)
Figure 3.20 Setting the web browser
You can now click the OK button to exit Options.
Displaying line numbers
There is no Options setting that determines whether line numbers are
displayed. To toggle line numbers on or off you can select View|Show Line
Numbers. Alternatively, with a class open, right-click in the left-hand
margin of the Source Editor and choose Show Line Numbers.
At this point we suggest you reopen the Greeting project and try toggling
the lines numbers on and off. You can leave the project open for the next
part in which you will look at how to access documentation.
Adding the Java documentation to the IDE
The easiest way to access the Java class documentation while you are
working in NetBeans is to add it to the IDE.
Choose Tools|Java Platforms. You will see something similar to
Figure 3.21.
NetBeans Guide
24
Note that the Usage
Statistics: box may or
may not be ticked
depending on your
previous choices.
Black plate (25,1)
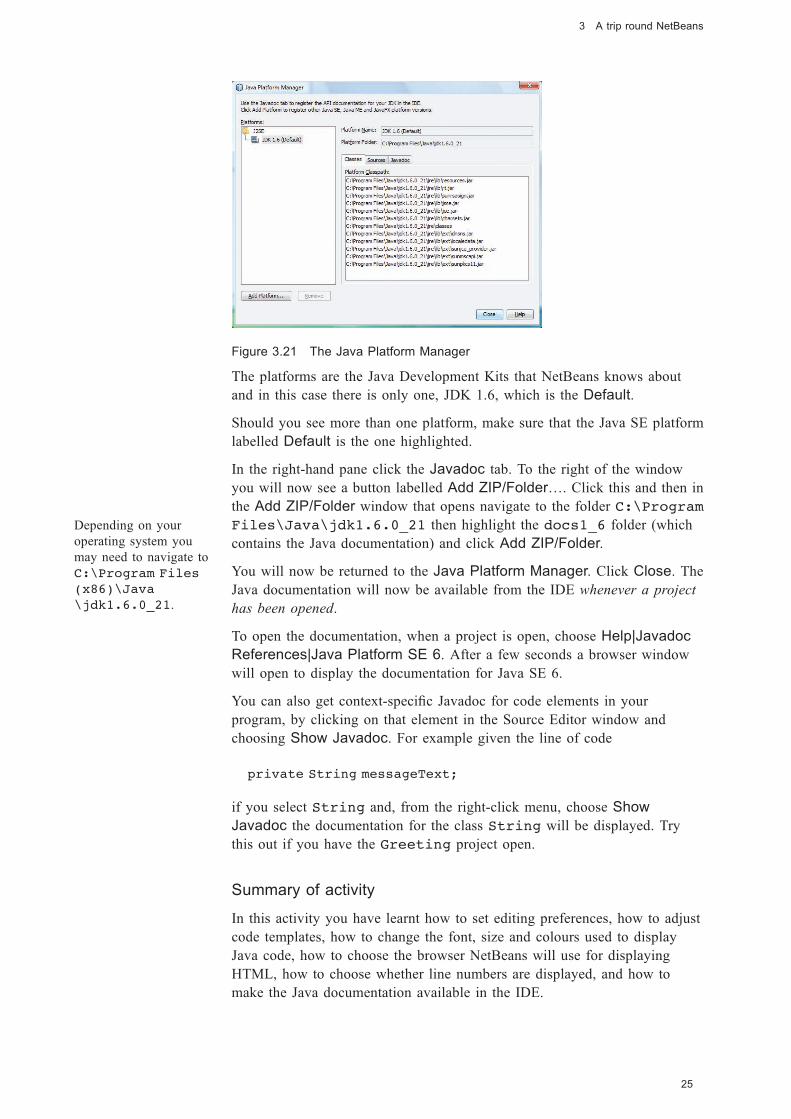
Figure 3.21 The Java Platform Manager
The platforms are the Java Development Kits that NetBeans knows about
and in this case there is only one, JDK 1.6, which is the Default.
Should you see more than one platform, make sure that the Java SE platform
labelled Default is the one highlighted.
In the right-hand pane click the Javadoc tab. To the right of the window
you will now see a button labelled Add ZIP/Folder…. Click this and then in
the Add ZIP/Folder window that opens navigate to the folder C:\Program
Files\Java\jdk1.6.0_21 then highlight the docs1_6 folder (which
contains the Java documentation) and click Add ZIP/Folder.
You will now be returned to the Java Platform Manager. Click Close. The
Java documentation will now be available from the IDE whenever a project
has been opened.
To open the documentation, when a project is open, choose Help|Javadoc
References|Java Platform SE 6. After a few seconds a browser window
will open to display the documentation for Java SE 6.
You can also get context-specific Javadoc for code elements in your
program, by clicking on that element in the Source Editor window and
choosing Show Javadoc. For example given the line of code
private String messageText;
if you select String and, from the right-click menu, choose Show
Javadoc the documentation for the class String will be displayed. Try
this out if you have the Greeting project open.
Summary of activity
In this activity you have learnt how to set editing preferences, how to adjust
code templates, how to change the font, size and colours used to display
Java code, how to choose the browser NetBeans will use for displaying
HTML, how to choose whether line numbers are displayed, and how to
make the Java documentation available in the IDE.
25
3 A trip round NetBeans
Depending on your
operating system you
may need to navigate to
C:\Program Files
(x86)\Java
\jdk1.6.0_21.
Black plate (26,1)
You can now exit the IDE or leave it open if you are going straight on to the
next activity.
3.3 Creating a new project
Activity 3
In this activity you will learn how to:
. create a new project from scratch
. save your project
. edit Java source code
. understand where your files are located in the Windows folder structure
. rename, move, copy and delete a project.
Creating a new project
Launch NetBeans if it is not already running. If you have any projects
currently open in the Projects window close them before proceeding.
Select File|New Project... (or click the New Project button on the
toolbar, or press Ctrl+Shift+N). The New Project wizard will be displayed
(Figure 3.22).
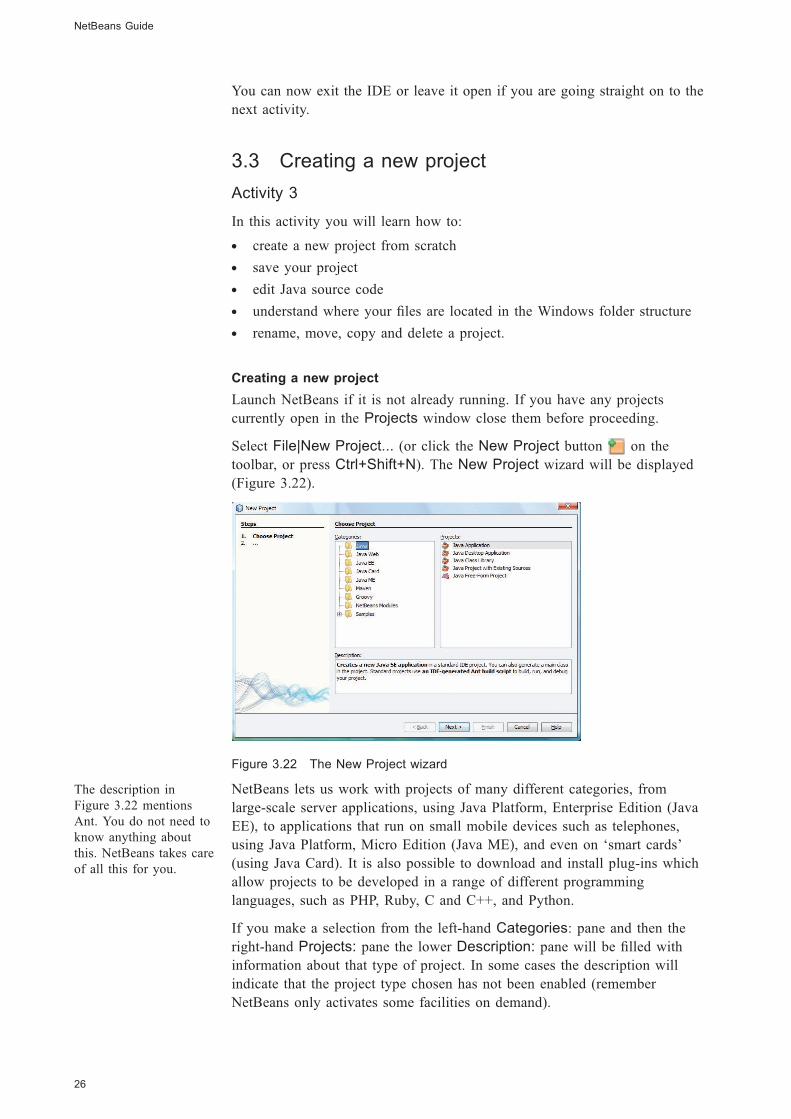
Figure 3.22 The New Project wizard
NetBeans lets us work with projects of many different categories, from
large-scale server applications, using Java Platform, Enterprise Edition (Java
EE), to applications that run on small mobile devices such as telephones,
using Java Platform, Micro Edition (Java ME), and even on ‘smart cards’
(using Java Card). It is also possible to download and install plug-ins which
allow projects to be developed in a range of different programming
languages, such as PHP, Ruby, C and C++, and Python.
If you make a selection from the left-hand Categories: pane and then the
right-hand Projects: pane the lower Description: pane will be filled with
information about that type of project. In some cases the description will
indicate that the project type chosen has not been enabled (remember
NetBeans only activates some facilities on demand).
NetBeans Guide
26
The description in
Figure 3.22 mentions
Ant. You do not need to
know anything about
this. NetBeans takes care
of all this for you.
Black plate (27,1)
However, for the purposes of this guide we are not interested in most of
these options. The only language we shall be using is Java and all our
projects except the one used in Activity 16 will use Java Platform, Standard
Edition (Java SE).
In this activity we are going to create a small stand-alone application to run
on a desktop computer.
Under Categories: highlight Java and under Projects: highlight Java
Application. Press Return or click Next >.
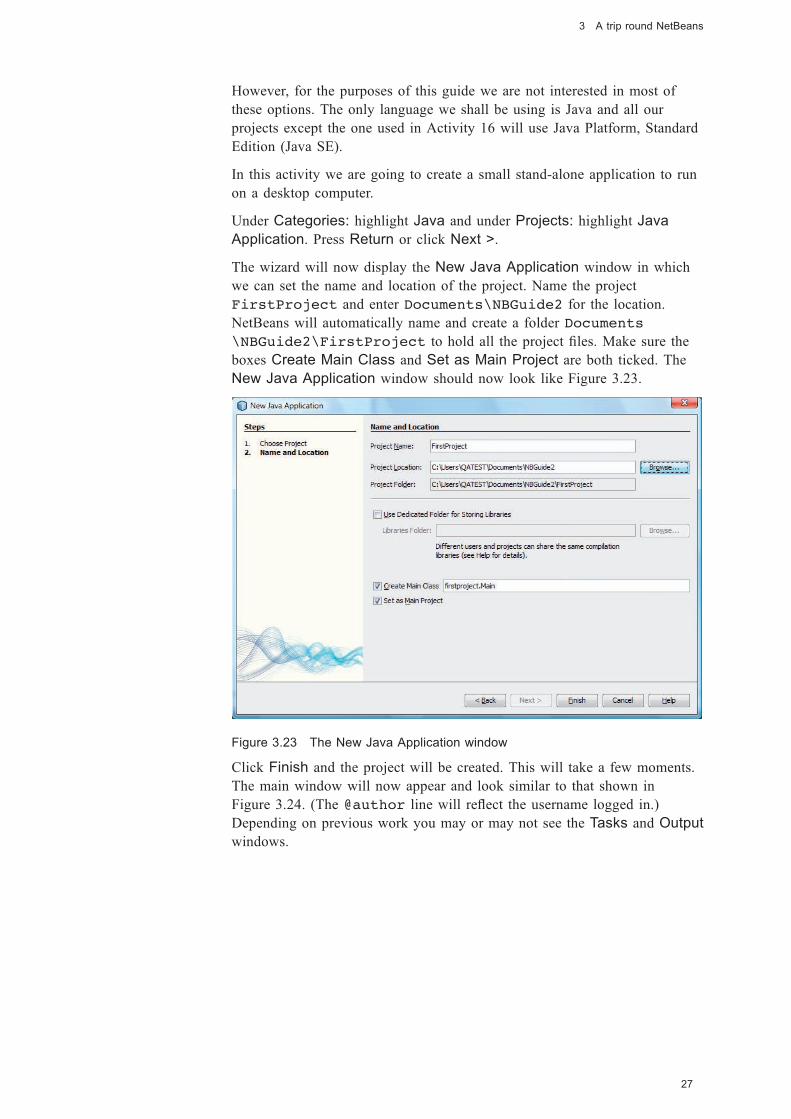
The wizard will now display the New Java Application window in which
we can set the name and location of the project. Name the project
FirstProject and enter Documents\NBGuide2 for the location.
NetBeans will automatically name and create a folder Documents
\NBGuide2\FirstProject to hold all the project files. Make sure the
boxes Create Main Class and Set as Main Project are both ticked. The
New Java Application window should now look like Figure 3.23.
Figure 3.23 The New Java Application window
Click Finish and the project will be created. This will take a few moments.
The main window will now appear and look similar to that shown in
Figure 3.24. (The @author line will reflect the username logged in.)
Depending on previous work you may or may not see the Tasks and Output
windows.
27
3 A trip round NetBeans
Black plate (28,1)
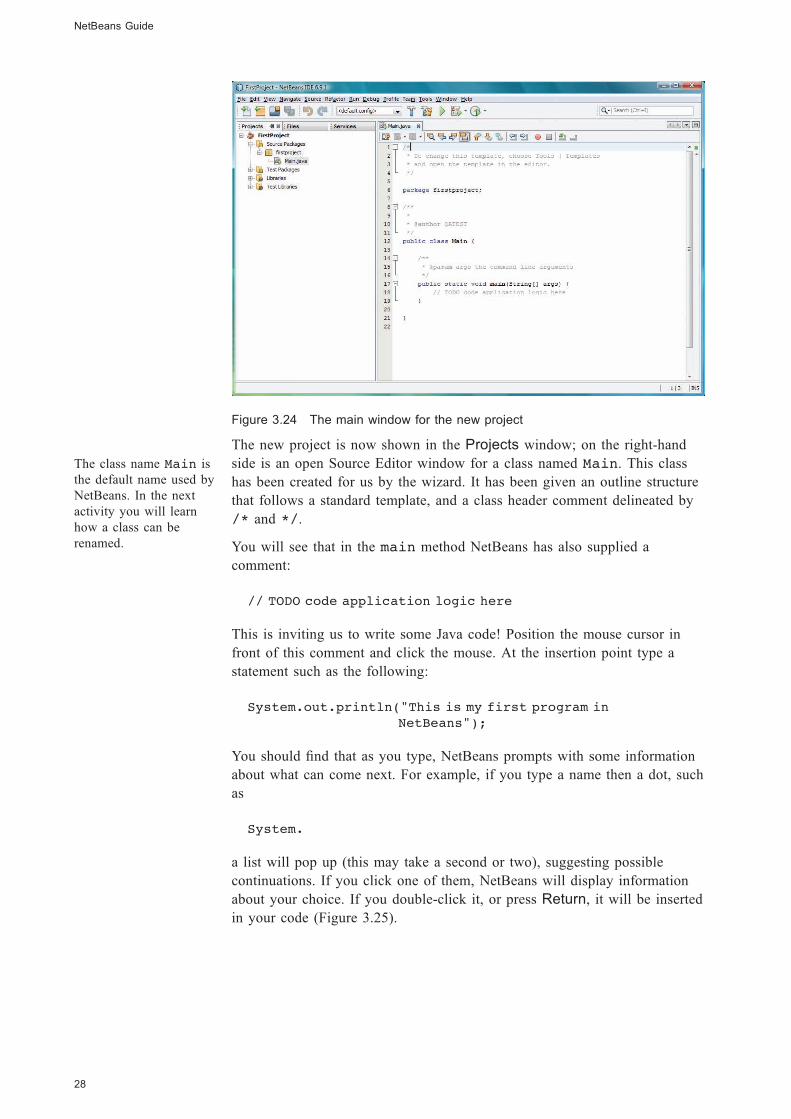
Figure 3.24 The main window for the new project
The new project is now shown in the Projects window; on the right-hand
side is an open Source Editor window for a class named Main. This class
has been created for us by the wizard. It has been given an outline structure
that follows a standard template, and a class header comment delineated by
/* and */.
You will see that in the main method NetBeans has also supplied a
comment:
// TODO code application logic here
This is inviting us to write some Java code! Position the mouse cursor in
front of this comment and click the mouse. At the insertion point type a
statement such as the following:
System.out.println("This is my first program in
NetBeans");
You should find that as you type, NetBeans prompts with some information
about what can come next. For example, if you type a name then a dot, such
as
System.
a list will pop up (this may take a second or two), suggesting possible
continuations. If you click one of them, NetBeans will display information
about your choice. If you double-click it, or press Return, it will be inserted
in your code (Figure 3.25).
NetBeans Guide
28
The class name Main is
the default name used by
NetBeans. In the next
activity you will learn
how a class can be
renamed.
Black plate (29,1)
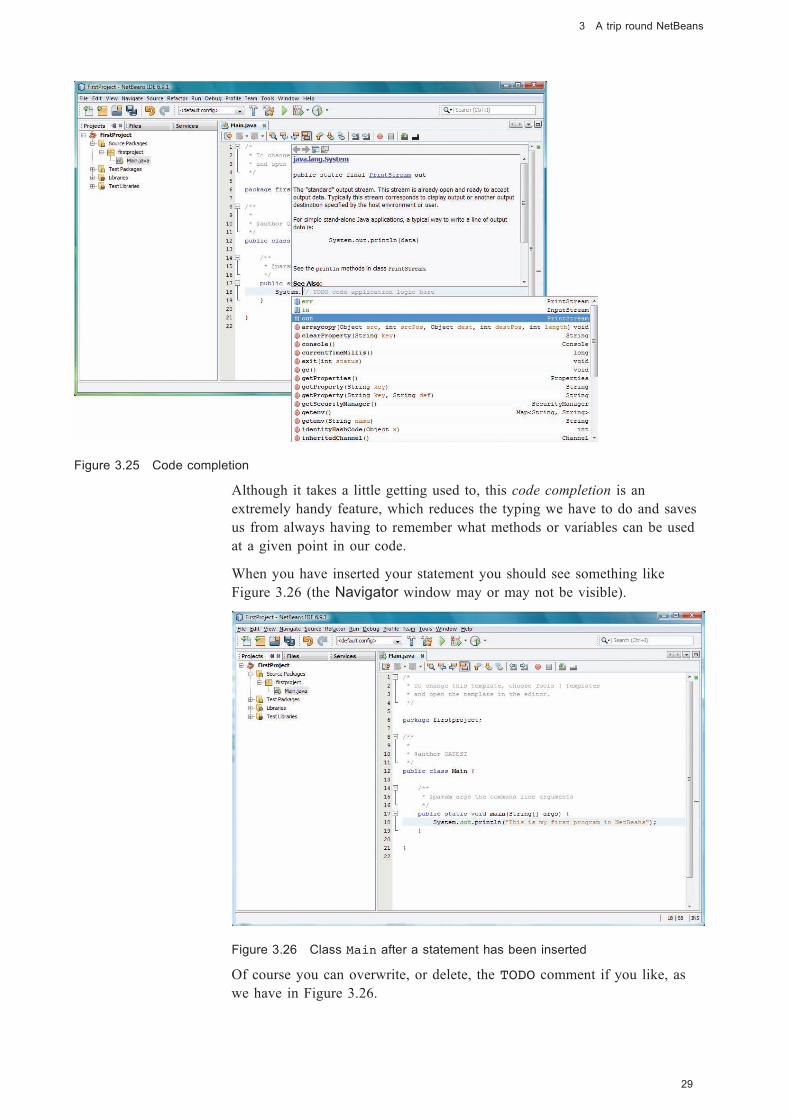
Figure 3.25 Code completion
Although it takes a little getting used to, this code completion is an
extremely handy feature, which reduces the typing we have to do and saves
us from always having to remember what methods or variables can be used
at a given point in our code.
When you have inserted your statement you should see something like
Figure 3.26 (the Navigator window may or may not be visible).
Figure 3.26 Class Main after a statement has been inserted
Of course you can overwrite, or delete, the TODO comment if you like, as
we have in Figure 3.26.
29
3 A trip round NetBeans

Black plate (30,1)
Now run the program as described in Activity 1. You should see your
message appear in the Output window, as shown in Figure 3.27.
Figure 3.27 Output from FirstProject
Congratulations – you have written your first program in NetBeans!
Saving your work
NetBeans automatically does a save before running a project, so your
FirstProject is safely saved.
You can also save the current file, i.e. whatever is displayed in the Source
Editor, at any time by choosing File|Save or by pressing Ctrl+S. If there
have been no changes since the current file was last saved or run the Save
option will be greyed out in the File menu.
If more than one file has been changed you can choose File|Save All or
click the Save All button .
If you ever exit NetBeans with unsaved changes you will be prompted to
save them.
Where are my files?
When you created a project called FirstProject in the project location
Documents\NBGuide2, NetBeans automatically created a folder
Documents\NBGuide2\FirstProject to house the project files.
Within this folder there will be a number of subfolders, most of which we
do not need to be concerned about. All you need to know is that:
. Java source files are stored within a special src subfolder, which in this
case will be Documents\NBGuide2\FirstProject\src
\firstproject
. Compiled class files are placed within a special build\classes
subfolder, which in this case will be Documents\NBGuide2
\FirstProject\build\classes\firstproject.
NetBeans Guide
30
Black plate (31,1)
Renaming, moving, copying or deleting a project
NetBeans lets you rename, move, copy and delete projects directly from the
Projects window. Simply right-click on the project node and select the
action you require. In the dialogue that appears supply any necessary details,
then confirm the action or cancel it.
If you rename a project there is a checkbox that facilitates renaming of the
corresponding project folder. If you delete a project there is a checkbox that
facilitates deletion of the corresponding sources.
If you like you can experiment with renaming, moving or copying
FirstProject, but don’t delete it. Deleting a project is irreversible and
FirstProject is needed again in the next activity!
Summary of activity
In this activity you have learnt how to create a new project, how to use the
Source Editor and code completion, how to save your work, where your
project files can be found in the Windows folder structure and how to
rename, move, copy and delete projects if required.
You can now exit the IDE or leave it open if you are going straight on to the
next activity.
3.4 Adding a new class and using the SourceEditor
Activity 4
In this activity you will learn how to:
. reopen a recent project
. set a project as the main project
. add a new class to a project
. reformat code
. add variables and methods to a class
. encapsulate a variable
. rename a variable, method, class or package
. delete a variable, method, class or package.
Reopening a project
Launch NetBeans if it is not already running and close any projects that are
open in the Projects window.
Any project can be opened by choosing File|Open Project…. However,
NetBeans also maintains a list of projects you have been working with
recently. File|Open Recent Project will present a dropdown list of projects
to choose from. This is useful because it saves having to navigate to the
project folder.
31
3 A trip round NetBeans
Black plate (32,1)
Reopen FirstProject using Open Recent Project. (If for any reason
FirstProject is not in the list offered by Open Recent Project then
open it using File|Open Project....)
Setting a project as the main project
NetBeans allows more than one project to be open at once. If we press F6
or click the button to run a project NetBeans uses the following rules to
decide which of them to run.
. If there is a main project set then that project is run.
. Otherwise if a project is selected in the Projects window NetBeans runs
that.
. Otherwise NetBeans runs the project at the top of the list in the Projects
window, i.e. the project whose name is first in alphabetical order.
If we intend to run a project over and over again it may be convenient to set
it as the main one. When a project is reopened using File|Open Recent
Project it is not automatically made the main project. To set
FirstProject as the main project, choose Run|Set Main Project|
FirstProject.
Alternatively you can right-click on the project node in the Projects window
and select Set as Main Project. When a project is the main one its name is
shown in bold in the Projects window.
Adding a new class
Now we will add a new class to FirstProject. The new class will be
named Account and have two instance variables representing the name of
the account holder and the current balance.
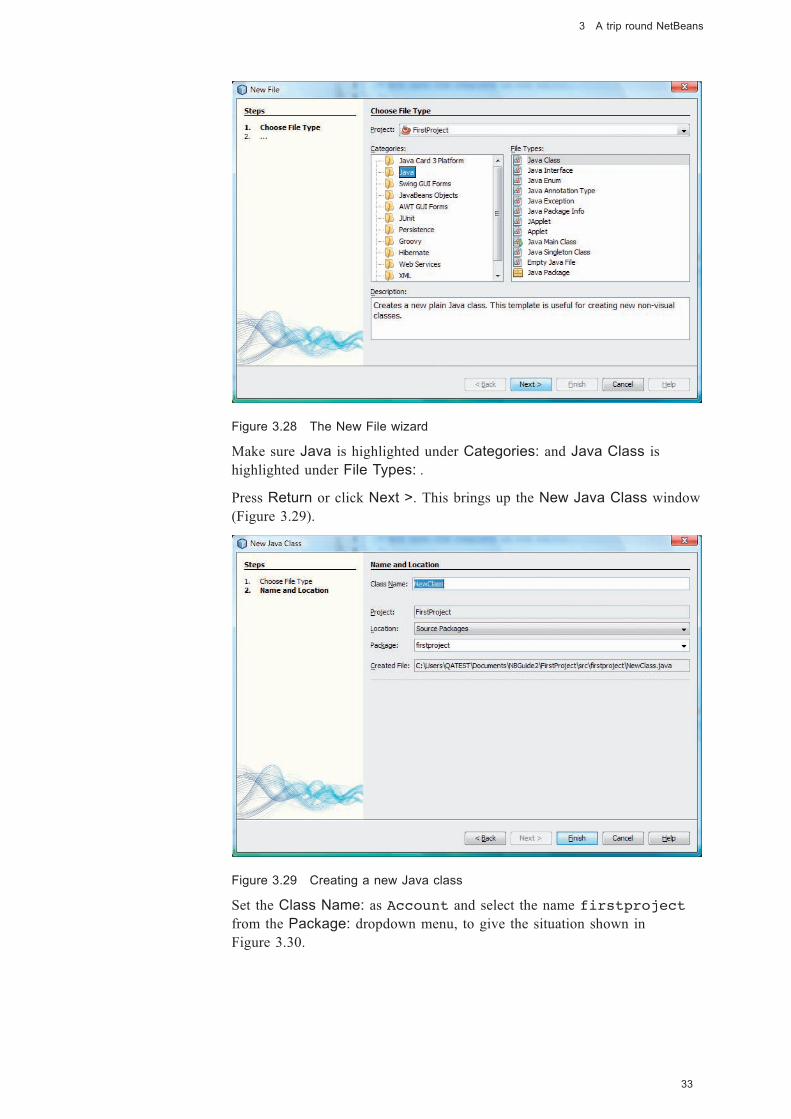
Choose File|New File… (or click the New File button on the toolbar, or
press Ctrl+N). The New File wizard appears (Figure 3.28). Highlighting an
item under Categories: gives a selection of file types to choose from.
Highlighting an item under File Types: results in a few details about the
item being displayed in the Description: pane.
NetBeans Guide
32
Black plate (33,1)
Figure 3.28 The New File wizard
Make sure Java is highlighted under Categories: and Java Class is
highlighted under File Types: .
Press Return or click Next >. This brings up the New Java Class window
(Figure 3.29).
Figure 3.29 Creating a new Java class
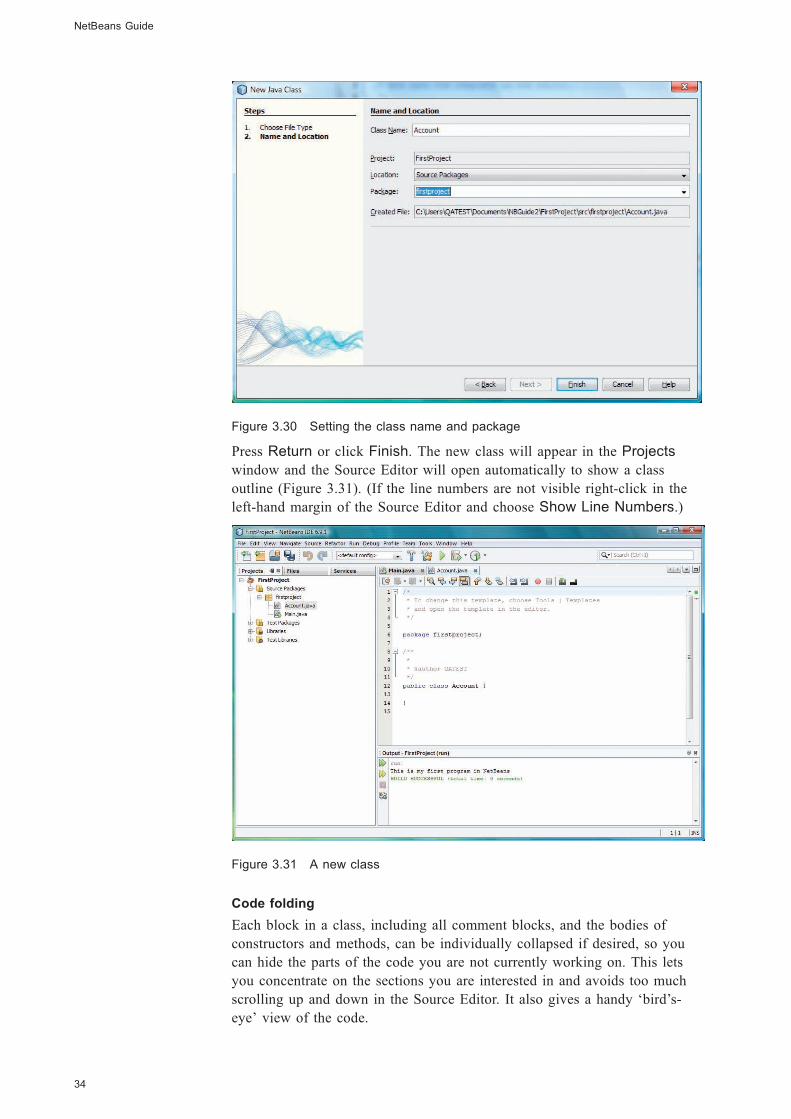
Set the Class Name: as Account and select the name firstproject
from the Package: dropdown menu, to give the situation shown in
Figure 3.30.
33
3 A trip round NetBeans
Black plate (34,1)
Figure 3.30 Setting the class name and package
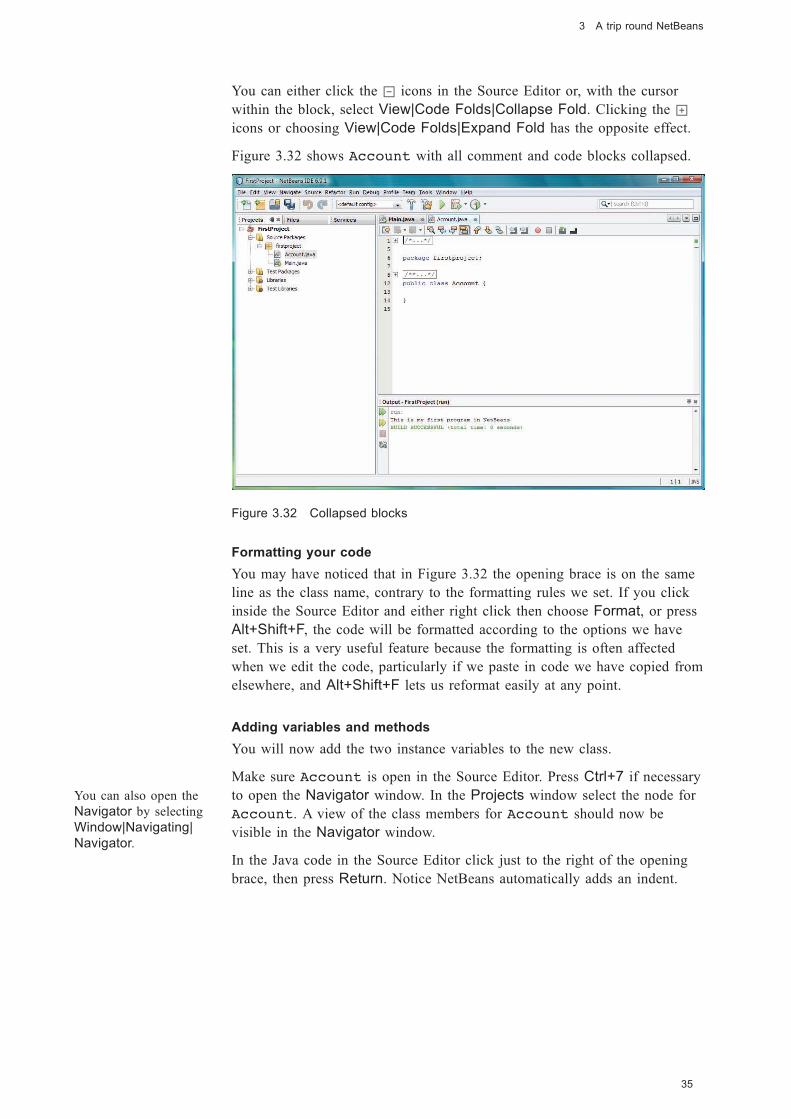
Press Return or click Finish. The new class will appear in the Projects
window and the Source Editor will open automatically to show a class
outline (Figure 3.31). (If the line numbers are not visible right-click in the
left-hand margin of the Source Editor and choose Show Line Numbers.)
Figure 3.31 A new class
Code folding
Each block in a class, including all comment blocks, and the bodies of
constructors and methods, can be individually collapsed if desired, so you
can hide the parts of the code you are not currently working on. This lets
you concentrate on the sections you are interested in and avoids too much
scrolling up and down in the Source Editor. It also gives a handy ‘bird’s-
eye’ view of the code.
NetBeans Guide
34
Black plate (35,1)
You can either click the icons in the Source Editor or, with the cursor
within the block, select View|Code Folds|Collapse Fold. Clicking the
icons or choosing View|Code Folds|Expand Fold has the opposite effect.
Figure 3.32 shows Account with all comment and code blocks collapsed.
Figure 3.32 Collapsed blocks
Formatting your code
You may have noticed that in Figure 3.32 the opening brace is on the same
line as the class name, contrary to the formatting rules we set. If you click
inside the Source Editor and either right click then choose Format, or press
Alt+Shift+F, the code will be formatted according to the options we have
set. This is a very useful feature because the formatting is often affected
when we edit the code, particularly if we paste in code we have copied from
elsewhere, and Alt+Shift+F lets us reformat easily at any point.
Adding variables and methods
You will now add the two instance variables to the new class.
Make sure Account is open in the Source Editor. Press Ctrl+7 if necessary
to open the Navigator window. In the Projects window select the node for
Account. A view of the class members for Account should now be
visible in the Navigator window.
In the Java code in the Source Editor click just to the right of the opening
brace, then press Return. Notice NetBeans automatically adds an indent.
35
3 A trip round NetBeans
You can also open the
Navigator by selecting
Window|Navigating|
Navigator.
Black plate (36,1)
Type
private String holder;
You will see that the new variable is displayed in the Navigator window as
you type.
Next you will add accessor methods for the new variable. It is perfectly
possible to simply type these methods into the source code using the editor;
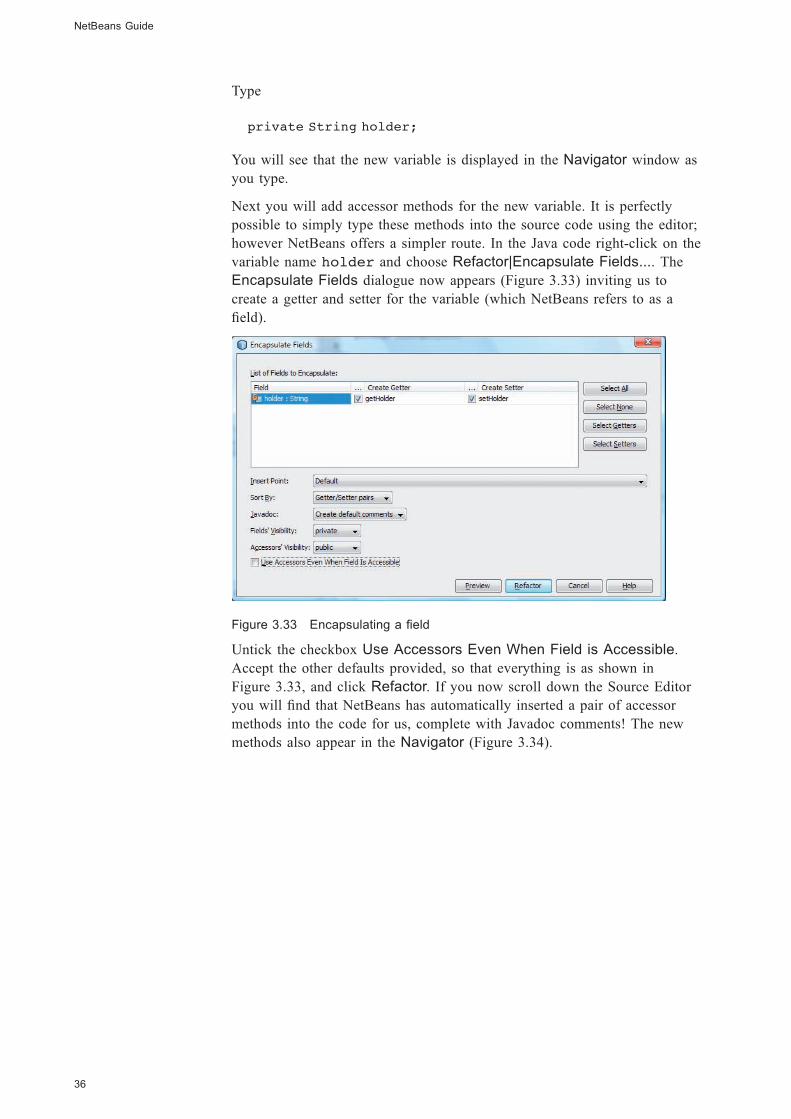
however NetBeans offers a simpler route. In the Java code right-click on the
variable name holder and choose Refactor|Encapsulate Fields.... The
Encapsulate Fields dialogue now appears (Figure 3.33) inviting us to
create a getter and setter for the variable (which NetBeans refers to as a
field).
Figure 3.33 Encapsulating a field
Untick the checkbox Use Accessors Even When Field is Accessible.
Accept the other defaults provided, so that everything is as shown in
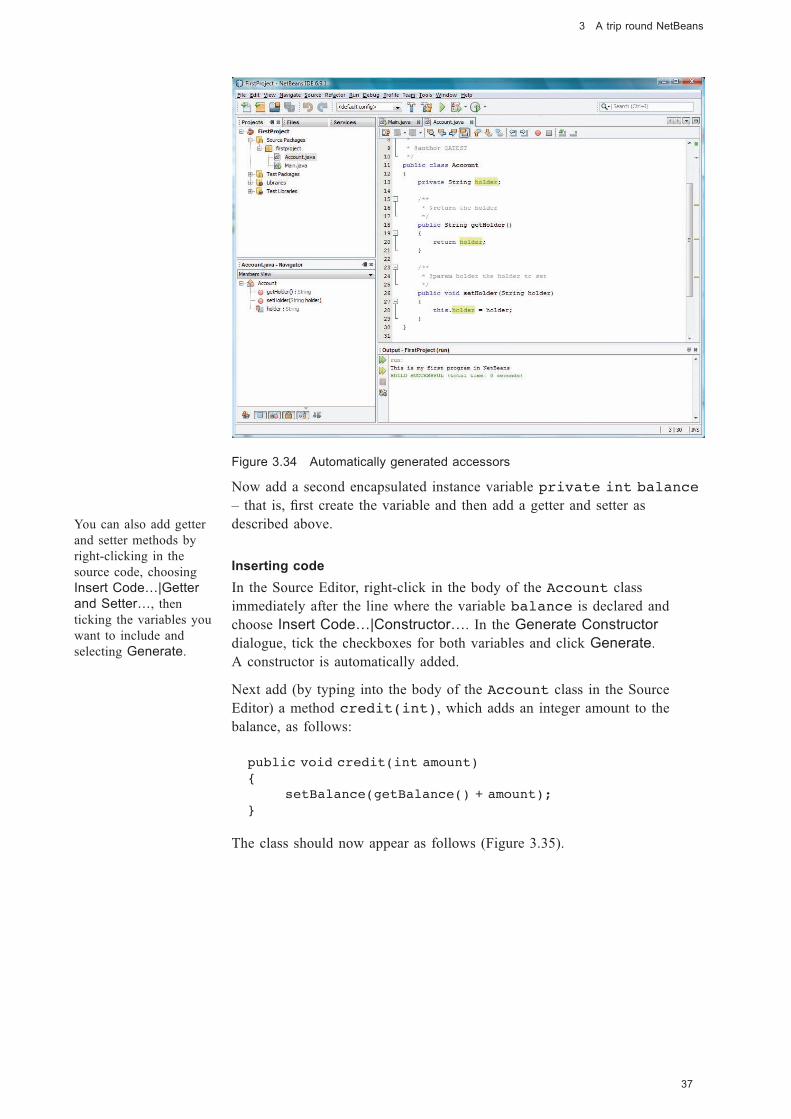
Figure 3.33, and click Refactor. If you now scroll down the Source Editor
you will find that NetBeans has automatically inserted a pair of accessor
methods into the code for us, complete with Javadoc comments! The new
methods also appear in the Navigator (Figure 3.34).
NetBeans Guide
36
Black plate (37,1)
Figure 3.34 Automatically generated accessors
Now add a second encapsulated instance variable private int balance
– that is, first create the variable and then add a getter and setter as
described above.
Inserting code
In the Source Editor, right-click in the body of the Account class
immediately after the line where the variable balance is declared and
choose Insert Code…|Constructor…. In the Generate Constructor
dialogue, tick the checkboxes for both variables and click Generate.
A constructor is automatically added.
Next add (by typing into the body of the Account class in the Source
Editor) a method credit(int), which adds an integer amount to the
balance, as follows:
public void credit(int amount)
{
setBalance(getBalance() + amount);
}
The class should now appear as follows (Figure 3.35).
37
3 A trip round NetBeans
You can also add getter
and setter methods by
right-clicking in the
source code, choosing
Insert Code…|Getter
and Setter…, then
ticking the variables you
want to include and
selecting Generate.
Black plate (38,1)
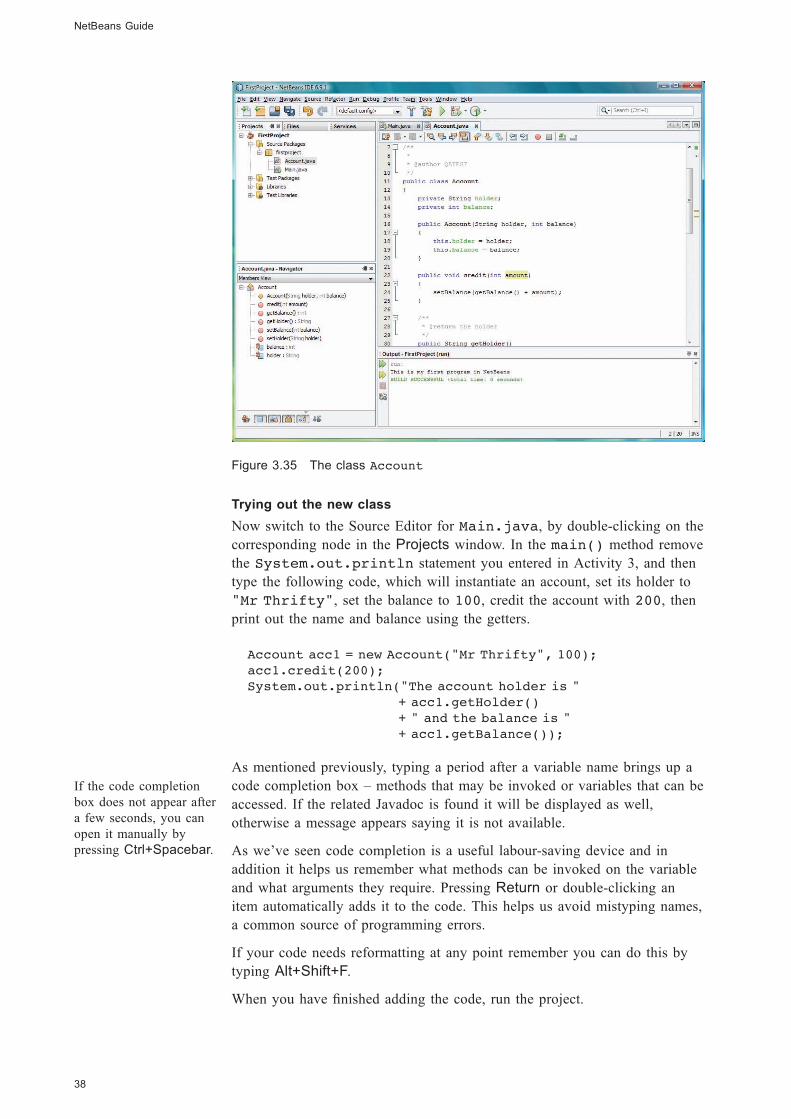
Figure 3.35 The class Account
Trying out the new class
Now switch to the Source Editor for Main.java, by double-clicking on the
corresponding node in the Projects window. In the main() method remove
the System.out.println statement you entered in Activity 3, and then
type the following code, which will instantiate an account, set its holder to
"Mr Thrifty", set the balance to 100, credit the account with 200, then
print out the name and balance using the getters.
Account acc1 = new Account("Mr Thrifty", 100);
acc1.credit(200);
System.out.println("The account holder is "
+ acc1.getHolder()
+ " and the balance is "
+ acc1.getBalance());
As mentioned previously, typing a period after a variable name brings up a
code completion box – methods that may be invoked or variables that can be
accessed. If the related Javadoc is found it will be displayed as well,
otherwise a message appears saying it is not available.
As we’ve seen code completion is a useful labour-saving device and in
addition it helps us remember what methods can be invoked on the variable
and what arguments they require. Pressing Return or double-clicking an
item automatically adds it to the code. This helps us avoid mistyping names,
a common source of programming errors.
If your code needs reformatting at any point remember you can do this by
typing Alt+Shift+F.
When you have finished adding the code, run the project.
NetBeans Guide
38
If the code completion
box does not appear after
a few seconds, you can
open it manually by
pressing Ctrl+Spacebar.
Black plate (39,1)
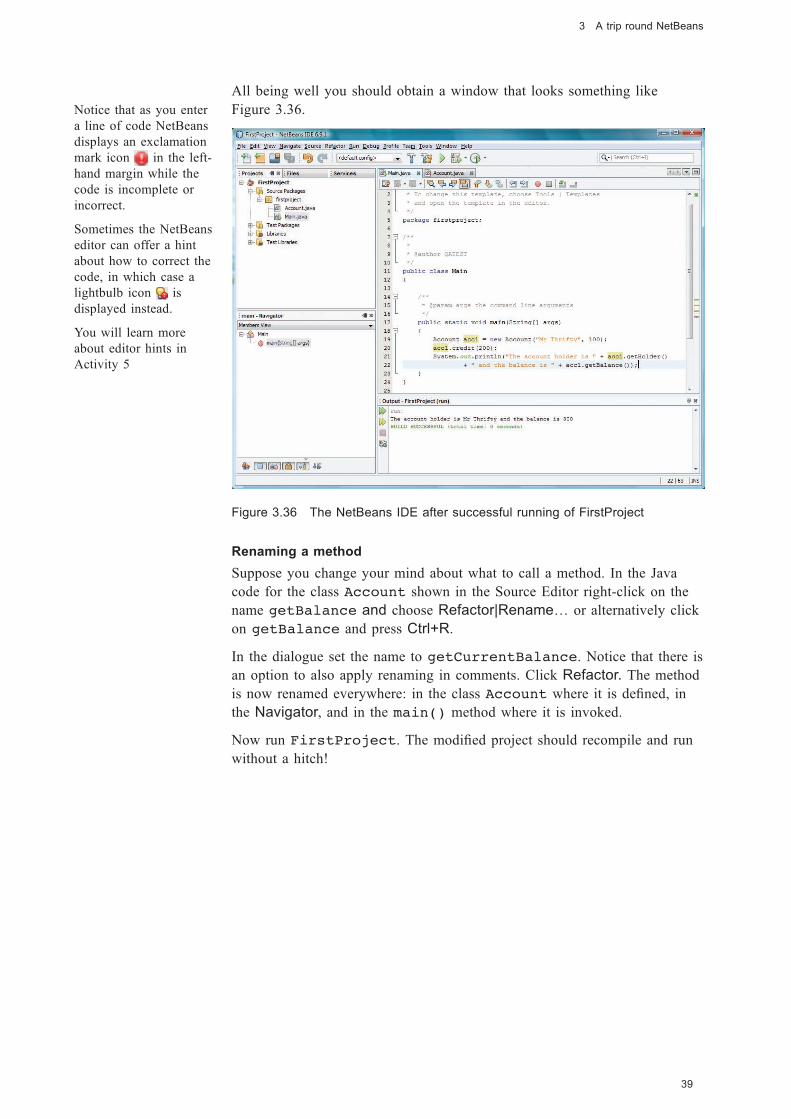
All being well you should obtain a window that looks something like
Figure 3.36.
Figure 3.36 The NetBeans IDE after successful running of FirstProject
Renaming a method
Suppose you change your mind about what to call a method. In the Java
code for the class Account shown in the Source Editor right-click on the
name getBalance and choose Refactor|Rename… or alternatively click
on getBalance and press Ctrl+R.
In the dialogue set the name to getCurrentBalance. Notice that there is
an option to also apply renaming in comments. Click Refactor. The method
is now renamed everywhere: in the class Account where it is defined, in
the Navigator, and in the main() method where it is invoked.
Now run FirstProject. The modified project should recompile and run
without a hitch!
39
3 A trip round NetBeans
Notice that as you enter
a line of code NetBeans
displays an exclamation
mark icon in the left-
hand margin while the
code is incomplete or
incorrect.
Sometimes the NetBeans
editor can offer a hint
about how to correct the
code, in which case a
lightbulb icon is
displayed instead.
You will learn more
about editor hints in
Activity 5
Black plate (40,1)
Renaming a variable, class or package
We can also rename a variable, class or package, by following precisely the
same steps as we used to rename a method. As before, right-click on the
name in the Source Editor, and choose Refactor|Rename… or simply select
the element and press Ctrl+R.
If you rename a class in this way NetBeans will automatically rename the
constructor(s) as well.
You can also rename a class or package from the Projects window, by right-
clicking on it and choosing Refactor|Rename… as before.
Removing a class or package
A class or package can be deleted from the Projects window. Click on the
corresponding node and press the Delete key, or right-click on the node and
choose Delete. There is no need to tick the Safely delete option, which is
designed for situations where a class or package is referred to in other
projects.
Revert Deleted
What if you delete a class or package and then change your mind? Luckily
NetBeans can come to the rescue. In the Projects window simply right-click
on the node for the project and choose Local History|Revert Deleted.
Summary of activity
In this activity you have learnt how to reopen a recent project and how to
set a project as the main one; how to add fields (instance variables) and
methods to a recently created class; how to reformat code; how to
encapsulate variables automatically and how to rename or delete variables,
methods, classes or packages.
You can now exit the IDE or leave it open if you are going straight on to the
next activity.
3.5 Using ‘smart’ features in the Source Editor
Activity 5
In this activity you will learn more about the assistance the Source Editor
provides to programmers, including
. bracket completion
. margin icons
. editor hints
. fixing imports
. abbreviations
. toggling comments.
NetBeans Guide
40
Black plate (41,1)
Investigating the Source Editor
Launch NetBeans if it is not already running. If you have any projects
currently open in the Projects window close them before proceeding.
Select File|Open Project... or press Ctrl+Shift+O.
In the Open Project dialogue navigate to the folder Documents
\NBGuide2 and open the project named EditorDemo. In the Projects
window expand the project and double-click on the class Main to open it in
the Source Editor.
At present the main method presents the user with a confirm dialogue and
assigns the result to the variable answer but does not do anything further
with it. The code of the method is as follows:
public static void main(String[] args)
{
int ok = JOptionPane.OK_OPTION;
int answer = JOptionPane.showConfirmDialog
(null, "Do you want to wait?");
}
In the subsections below you will experiment with a few of the
programming aids provided by the editor. Although these are just a small
subset of what is possible these are the features we have found most useful.
Bracket completion
Immediately following the line
int answer = JOptionPane.showConfirmDialog
(null, "Do you want to wait?");
type
if (
NetBeans automatically inserts the closing bracket and positions the cursor
to enter the condition. Type the condition answer == ok inside the
brackets.
On the next line type an opening brace { and press Return. NetBeans
automatically supplies the closing brace.
Margin icons
In the body of the if statement you have just created enter the following
lines
41
3 A trip round NetBeans
You are not required to
understand this code in
detail.
Many more features are
available from the
Source and Refactor
menus but unfortunately
we don’t have enough
space to describe them
all.
Black plate (42,1)
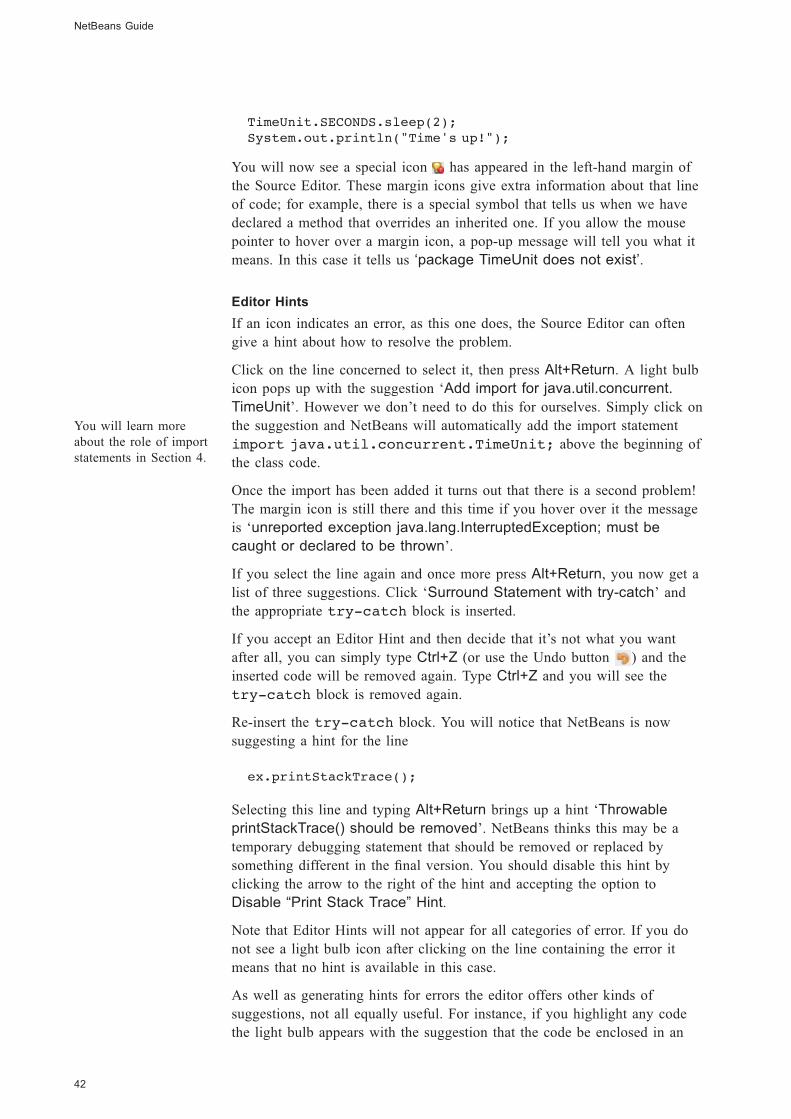
TimeUnit.SECONDS.sleep(2);
System.out.println("Time's up!");
You will now see a special icon has appeared in the left-hand margin of
the Source Editor. These margin icons give extra information about that line
of code; for example, there is a special symbol that tells us when we have
declared a method that overrides an inherited one. If you allow the mouse
pointer to hover over a margin icon, a pop-up message will tell you what it
means. In this case it tells us ‘package TimeUnit does not exist’.
Editor Hints
If an icon indicates an error, as this one does, the Source Editor can often
give a hint about how to resolve the problem.
Click on the line concerned to select it, then press Alt+Return. A light bulb
icon pops up with the suggestion ‘Add import for java.util.concurrent.
TimeUnit’. However we don’t need to do this for ourselves. Simply click on
the suggestion and NetBeans will automatically add the import statement
import java.util.concurrent.TimeUnit; above the beginning of
the class code.
Once the import has been added it turns out that there is a second problem!
The margin icon is still there and this time if you hover over it the message
is ‘unreported exception java.lang.InterruptedException; must be
caught or declared to be thrown’.
If you select the line again and once more press Alt+Return, you now get a
list of three suggestions. Click ‘Surround Statement with try-catch’ and
the appropriate try-catch block is inserted.
If you accept an Editor Hint and then decide that it’s not what you want
after all, you can simply type Ctrl+Z (or use the Undo button ) and the
inserted code will be removed again. Type Ctrl+Z and you will see the
try-catch block is removed again.
Re-insert the try-catch block. You will notice that NetBeans is now
suggesting a hint for the line
ex.printStackTrace();
Selecting this line and typing Alt+Return brings up a hint ‘Throwable
printStackTrace() should be removed’. NetBeans thinks this may be a
temporary debugging statement that should be removed or replaced by
something different in the final version. You should disable this hint by
clicking the arrow to the right of the hint and accepting the option to
Disable “Print Stack Trace” Hint.
Note that Editor Hints will not appear for all categories of error. If you do
not see a light bulb icon after clicking on the line containing the error it
means that no hint is available in this case.
As well as generating hints for errors the editor offers other kinds of
suggestions, not all equally useful. For instance, if you highlight any code
the light bulb appears with the suggestion that the code be enclosed in an
NetBeans Guide
42
You will learn more
about the role of import
statements in Section 4.
Black plate (43,1)
‘editor fold’ so it can be collapsed, but, given that all code blocks can be
collapsed anyway and we don’t often want to collapse a smaller section, this
has only limited use.
Fix imports
We saw above that NetBeans can add imports for us. In fact rather than
having to decide what classes need to be imported, when in the Source
Editor you can select Source|Fix Imports… or press Ctrl+Shift+I at any
time. NetBeans will then add import statements for any required classes, as
long as it can locate them in the standard libraries, or any other libraries or
projects that have been added to the current project. If there is more than
one class with the same name as the one that needs importing, NetBeans
shows the options in a dropdown box for you to choose which one is right.
Try deleting the import that was inserted earlier, and then type Ctrl+Shift+I
to see that the correct import is added again.
This is a feature of exceptional usefulness which programmers use
constantly, calling upon it at regular intervals, because keeping track of all
the imports needed for more complex projects can be very difficult.
Fix Imports does not merely add required imports; if you alter the code so
that an import becomes redundant then Ctrl+Shift+I will remove it again!
Abbreviations
NetBeans supports a number of predefined ‘code templates’ – abbreviations
which are expanded automatically to common idioms like public static
final int when Shift+Space is pressed. It is even possible to add your
own.
To see a particularly useful example, place the cursor on the line following
the closing brace of the if statement and type
sout
followed by Shift+Space. Insert a message of your choice!
Comment toggling
We often want to comment out sections of code when modifying or
debugging a program.
If you highlight a block of code and press Ctrl+/ you will finds NetBeans
automatically inserts // before each line, commenting it out.
This toggles on and off, so that selecting commented lines and typing Ctrl+/
will uncomment the code again.
Summary of activity
In this activity you have learnt about some of the ‘smart features’ of the
Source Editor that can help programmers, including the use of editor hints,
the fix imports feature, an especially useful abbreviation, and how to
comment and uncomment sections of code.
43
3 A trip round NetBeans
Black plate (44,1)
You can now exit the IDE or leave it open if you are going straight on to the
next activity.
3.6 Creating a project using existing source code
Activity 6
Sometimes you might be supplied with a Java program consisting of just the
source files. Imagine, for example, that a friend who does not use NetBeans
wants to share with you the workings of a program they have written. Since
they cannot send a NetBeans project the natural thing to do is send you the
source files and let you build your own project around them. This activity
shows how you can do that.
In this activity you will learn how to:
. create a project that uses existing source code files
. create copies of source files
. generate and view Javadoc for this or any other project.
Creating a project that uses existing source code files
Launch NetBeans if it is not already running. First make sure you have
closed any open projects.
Choose File|New Project... or do Ctrl+Shift+N. When the New Project
wizard appears, under Categories: select Java and under Projects: select
Java Project with Existing Sources. Click Next >.
In the New Java Project with Existing Sources window, name the project
SecondProject and make sure that Set as Main Project is ticked and
Documents\NBGuide2\SecondProject is the location for the project
folder. Leave the other options unchanged and click Next > or press Return.
You will now be asked to locate the source folder. Click on the button Add
Folder... next to Source Package Folders: and navigate to Documents
\NBGuide2. Highlight the folder Colours and click Open.
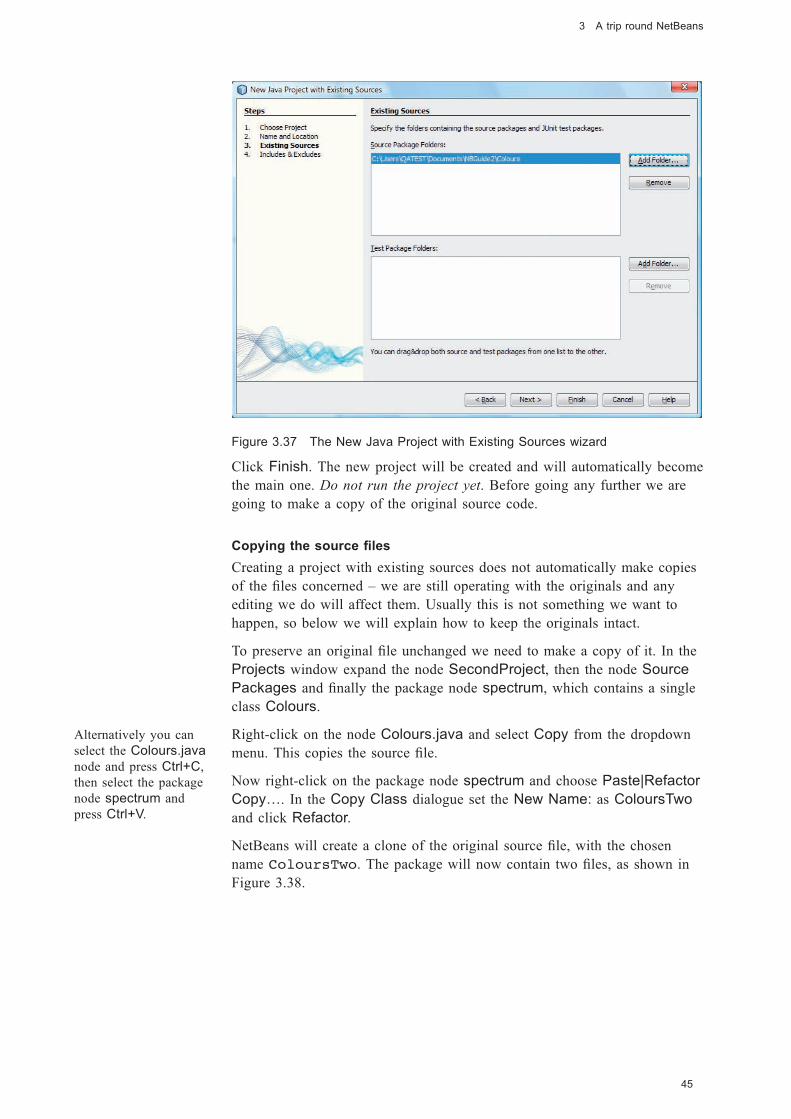
The wizard should now appear as in Figure 3.37.
NetBeans Guide
44
Black plate (45,1)
Figure 3.37 The New Java Project with Existing Sources wizard
Click Finish. The new project will be created and will automatically become
the main one. Do not run the project yet. Before going any further we are
going to make a copy of the original source code.
Copying the source files
Creating a project with existing sources does not automatically make copies
of the files concerned – we are still operating with the originals and any
editing we do will affect them. Usually this is not something we want to
happen, so below we will explain how to keep the originals intact.
To preserve an original file unchanged we need to make a copy of it. In the
Projects window expand the node SecondProject, then the node Source
Packages and finally the package node spectrum, which contains a single
class Colours.
Right-click on the node Colours.java and select Copy from the dropdown
menu. This copies the source file.
Now right-click on the package node spectrum and choose Paste|Refactor
Copy…. In the Copy Class dialogue set the New Name: as ColoursTwo
and click Refactor.
NetBeans will create a clone of the original source file, with the chosen
name ColoursTwo. The package will now contain two files, as shown in
Figure 3.38.
45
3 A trip round NetBeans
Alternatively you can
select the Colours.java
node and press Ctrl+C,
then select the package
node spectrum and
press Ctrl+V.
Black plate (46,1)
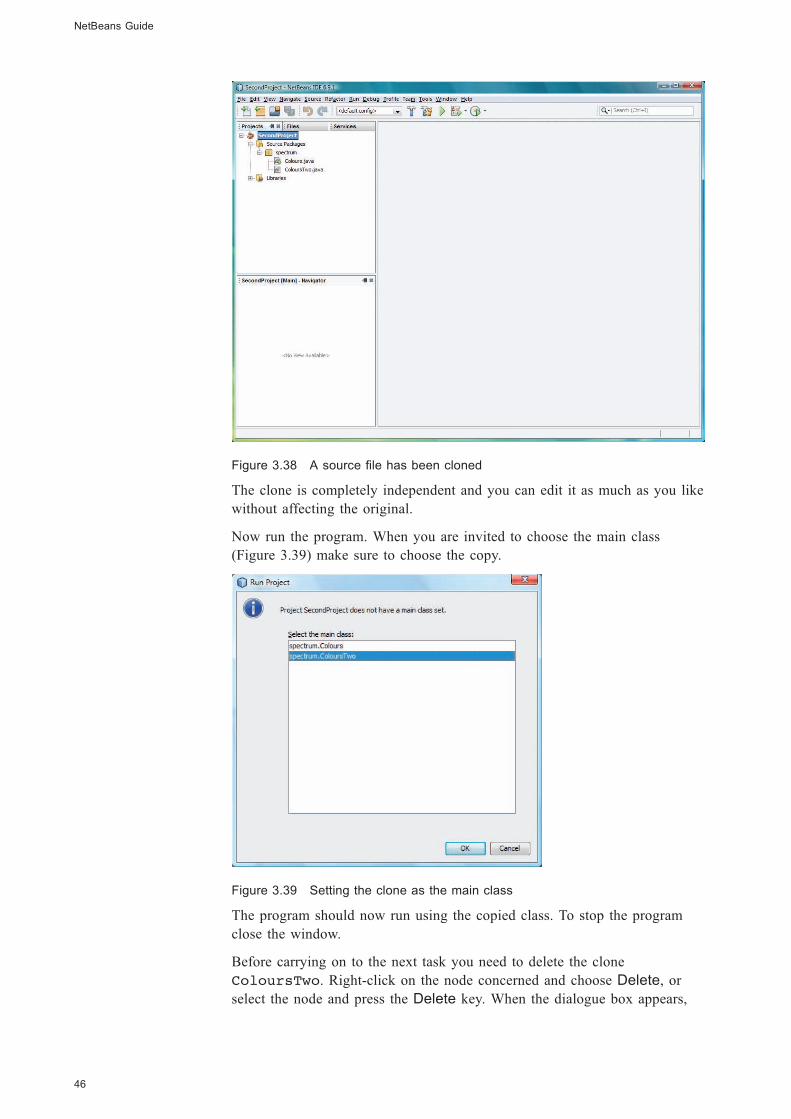
Figure 3.38 A source file has been cloned
The clone is completely independent and you can edit it as much as you like
without affecting the original.
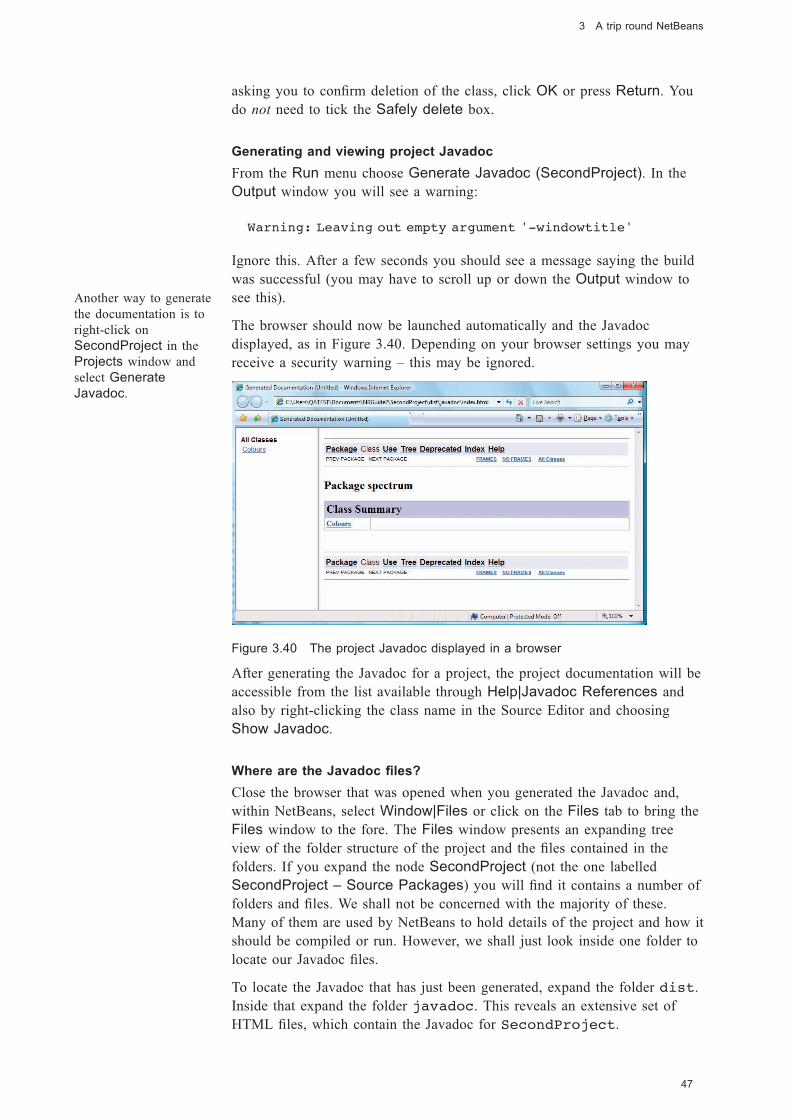
Now run the program. When you are invited to choose the main class
(Figure 3.39) make sure to choose the copy.
Figure 3.39 Setting the clone as the main class
The program should now run using the copied class. To stop the program
close the window.
Before carrying on to the next task you need to delete the clone
ColoursTwo. Right-click on the node concerned and choose Delete, or
select the node and press the Delete key. When the dialogue box appears,
NetBeans Guide
46
Black plate (47,1)
asking you to confirm deletion of the class, click OK or press Return. You
do not need to tick the Safely delete box.
Generating and viewing project Javadoc
From the Run menu choose Generate Javadoc (SecondProject). In the
Output window you will see a warning:
Warning: Leaving out empty argument '-windowtitle'
Ignore this. After a few seconds you should see a message saying the build
was successful (you may have to scroll up or down the Output window to
see this).
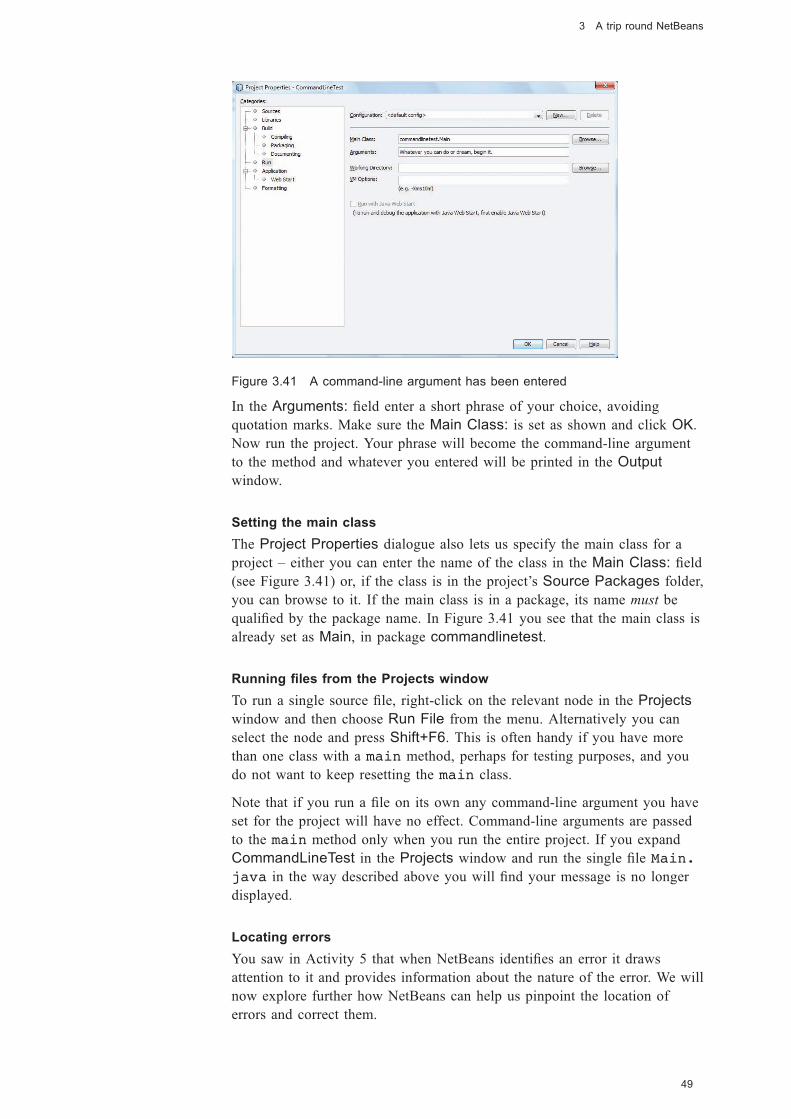
The browser should now be launched automatically and the Javadoc
displayed, as in Figure 3.40. Depending on your browser settings you may
receive a security warning – this may be ignored.
Figure 3.40 The project Javadoc displayed in a browser
After generating the Javadoc for a project, the project documentation will be
accessible from the list available through Help|Javadoc References and
also by right-clicking the class name in the Source Editor and choosing
Show Javadoc.
Where are the Javadoc files?
Close the browser that was opened when you generated the Javadoc and,
within NetBeans, select Window|Files or click on the Files tab to bring the
Files window to the fore. The Files window presents an expanding tree
view of the folder structure of the project and the files contained in the
folders. If you expand the node SecondProject (not the one labelled
SecondProject – Source Packages) you will find it contains a number of
folders and files. We shall not be concerned with the majority of these.
Many of them are used by NetBeans to hold details of the project and how it
should be compiled or run. However, we shall just look inside one folder to
locate our Javadoc files.
To locate the Javadoc that has just been generated, expand the folder dist.
Inside that expand the folder javadoc. This reveals an extensive set of
HTML files, which contain the Javadoc for SecondProject.
47
3 A trip round NetBeans
Another way to generate
the documentation is to
right-click on
SecondProject in the
Projects window and
select Generate
Javadoc.

Black plate (48,1)
Any HTML file in NetBeans can be viewed in a web browser by right-
clicking on the file in the Files or Projects window and choosing View
from the menu. Right-clicking on the one named index.html and
selecting View will display the Javadoc for the class as before.
Summary of activity
In this activity you have learnt how to create a project using existing source
code, how to clone source files and how to create and view the Javadoc for a
project.
You can now exit the IDE or leave it open if you are going straight on to the
next activity.
3.7 More on running projects
Activity 7
In this activity you will learn how to:
. set command-line arguments
. set the main class to a different choice
. run single files
. use some simple error-location aids.
Setting command-line arguments
When a Java program is executed it is possible to pass it some initial
information in the form of a command-line argument.
Launch NetBeans if it is not already running. Close any projects already
open.
Open the project Documents\NBGuide2\CommandLineTest. This
project contains a single class with a main method that prints out an array
of strings passed to the method as a command-line argument. Right-click on
the node for the project and choose Properties. In the tree view on the left,
click Run (Figure 3.41).
NetBeans Guide
48
If you accidentally select
Open instead of View
the file will not be
displayed in the browser.
Instead the actual HTML
will be displayed in the
Source Editor, which is
not what we want at all.
Black plate (49,1)
Figure 3.41 A command-line argument has been entered
In the Arguments: field enter a short phrase of your choice, avoiding
quotation marks. Make sure the Main Class: is set as shown and click OK.
Now run the project. Your phrase will become the command-line argument
to the method and whatever you entered will be printed in the Output
window.
Setting the main class
The Project Properties dialogue also lets us specify the main class for a
project – either you can enter the name of the class in the Main Class: field
(see Figure 3.41) or, if the class is in the project’s Source Packages folder,
you can browse to it. If the main class is in a package, its name must be
qualified by the package name. In Figure 3.41 you see that the main class is
already set as Main, in package commandlinetest.
Running files from the Projects window
To run a single source file, right-click on the relevant node in the Projects
window and then choose Run File from the menu. Alternatively you can
select the node and press Shift+F6. This is often handy if you have more
than one class with a main method, perhaps for testing purposes, and you
do not want to keep resetting the main class.
Note that if you run a file on its own any command-line argument you have
set for the project will have no effect. Command-line arguments are passed
to the main method only when you run the entire project. If you expand
CommandLineTest in the Projects window and run the single file Main.
java in the way described above you will find your message is no longer
displayed.
Locating errors
You saw in Activity 5 that when NetBeans identifies an error it draws
attention to it and provides information about the nature of the error. We will
now explore further how NetBeans can help us pinpoint the location of
errors and correct them.
49
3 A trip round NetBeans
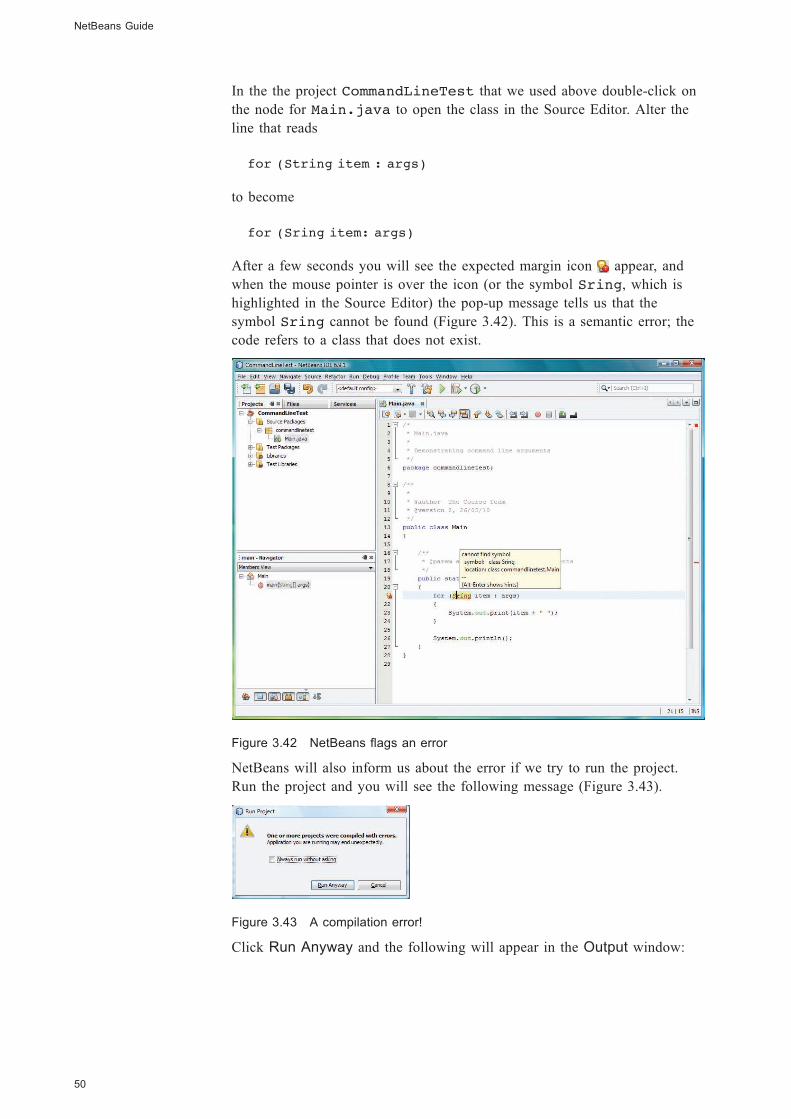
Black plate (50,1)
In the the project CommandLineTest that we used above double-click on
the node for Main.java to open the class in the Source Editor. Alter the
line that reads
for (String item : args)
to become
for (Sring item: args)
After a few seconds you will see the expected margin icon appear, and
when the mouse pointer is over the icon (or the symbol Sring, which is
highlighted in the Source Editor) the pop-up message tells us that the
symbol Sring cannot be found (Figure 3.42). This is a semantic error; the
code refers to a class that does not exist.
Figure 3.42 NetBeans flags an error
NetBeans will also inform us about the error if we try to run the project.
Run the project and you will see the following message (Figure 3.43).
Figure 3.43 A compilation error!
Click Run Anyway and the following will appear in the Output window:
NetBeans Guide
50
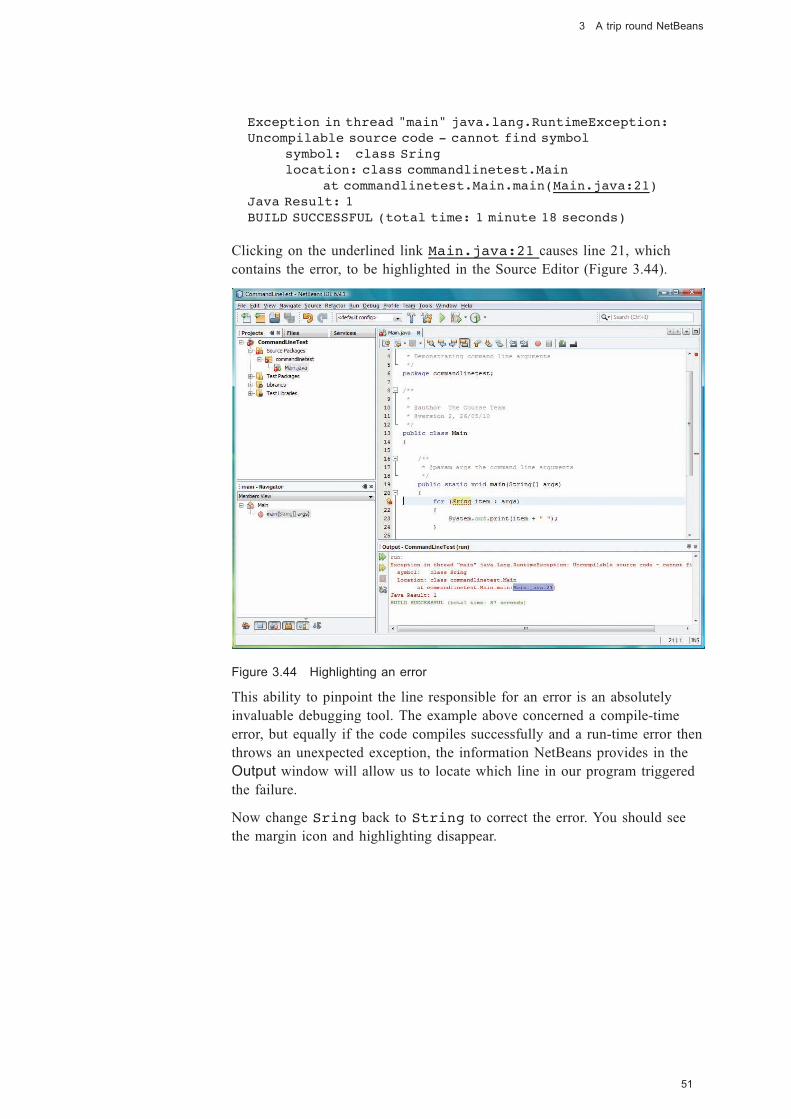
Black plate (51,1)
Exception in thread "main" java.lang.RuntimeException:
Uncompilable source code - cannot find symbol
symbol: class Sring
location: class commandlinetest.Main
at commandlinetest.Main.main(Main.java:21)
Java Result: 1
BUILD SUCCESSFUL (total time: 1 minute 18 seconds)
Clicking on the underlined link Main.java:21 causes line 21, which
contains the error, to be highlighted in the Source Editor (Figure 3.44).
Figure 3.44 Highlighting an error
This ability to pinpoint the line responsible for an error is an absolutely
invaluable debugging tool. The example above concerned a compile-time
error, but equally if the code compiles successfully and a run-time error then
throws an unexpected exception, the information NetBeans provides in the
Output window will allow us to locate which line in our program triggered
the failure.
Now change Sring back to String to correct the error. You should see
the margin icon and highlighting disappear.
51
3 A trip round NetBeans
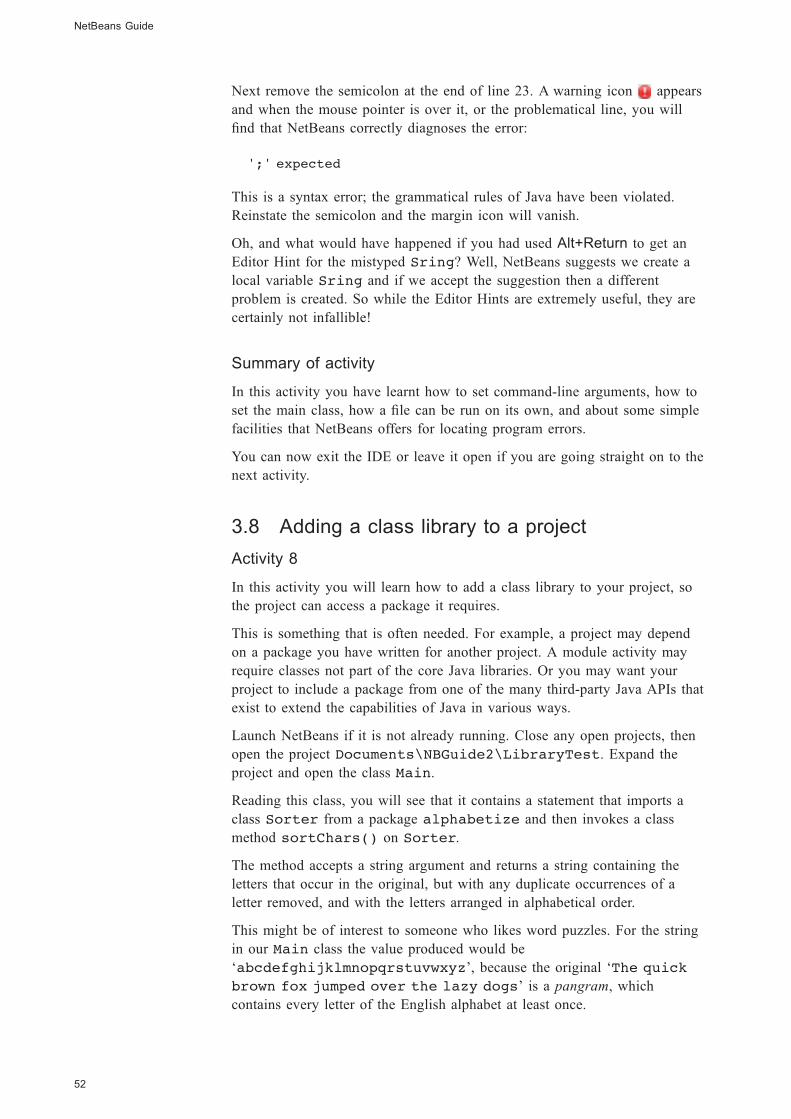
Black plate (52,1)
Next remove the semicolon at the end of line 23. A warning icon appears
and when the mouse pointer is over it, or the problematical line, you will
find that NetBeans correctly diagnoses the error:
';' expected
This is a syntax error; the grammatical rules of Java have been violated.
Reinstate the semicolon and the margin icon will vanish.
Oh, and what would have happened if you had used Alt+Return to get an
Editor Hint for the mistyped Sring? Well, NetBeans suggests we create a
local variable Sring and if we accept the suggestion then a different
problem is created. So while the Editor Hints are extremely useful, they are
certainly not infallible!
Summary of activity
In this activity you have learnt how to set command-line arguments, how to
set the main class, how a file can be run on its own, and about some simple
facilities that NetBeans offers for locating program errors.
You can now exit the IDE or leave it open if you are going straight on to the
next activity.
3.8 Adding a class library to a project
Activity 8
In this activity you will learn how to add a class library to your project, so
the project can access a package it requires.
This is something that is often needed. For example, a project may depend
on a package you have written for another project. A module activity may
require classes not part of the core Java libraries. Or you may want your
project to include a package from one of the many third-party Java APIs that
exist to extend the capabilities of Java in various ways.
Launch NetBeans if it is not already running. Close any open projects, then
open the project Documents\NBGuide2\LibraryTest. Expand the
project and open the class Main.
Reading this class, you will see that it contains a statement that imports a
class Sorter from a package alphabetize and then invokes a class
method sortChars() on Sorter.
The method accepts a string argument and returns a string containing the
letters that occur in the original, but with any duplicate occurrences of a
letter removed, and with the letters arranged in alphabetical order.
This might be of interest to someone who likes word puzzles. For the string
in our Main class the value produced would be
‘abcdefghijklmnopqrstuvwxyz’, because the original ‘The quick
brown fox jumped over the lazy dogs’ is a pangram, which
contains every letter of the English alphabet at least once.
NetBeans Guide
52
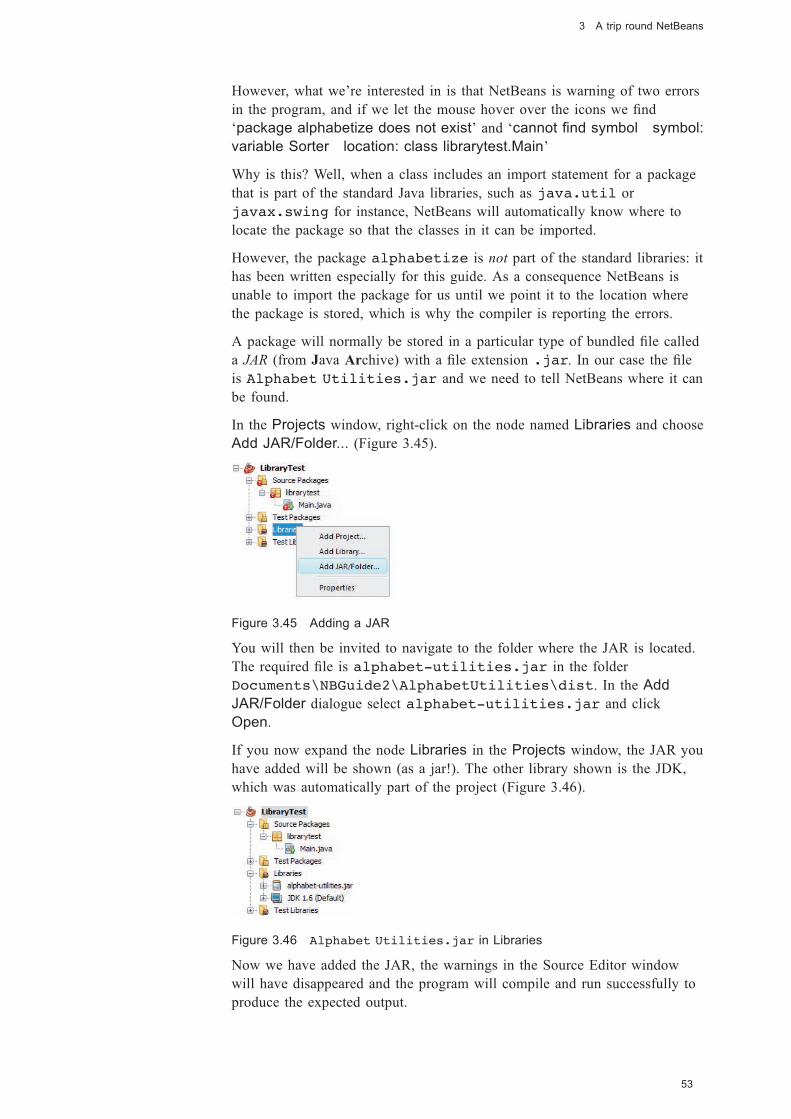
Black plate (53,1)
However, what we’re interested in is that NetBeans is warning of two errors
in the program, and if we let the mouse hover over the icons we find
‘package alphabetize does not exist’ and ‘cannot find symbol symbol:
variable Sorter location: class librarytest.Main’
Why is this? Well, when a class includes an import statement for a package
that is part of the standard Java libraries, such as java.util or
javax.swing for instance, NetBeans will automatically know where to
locate the package so that the classes in it can be imported.
However, the package alphabetize is not part of the standard libraries: it
has been written especially for this guide. As a consequence NetBeans is
unable to import the package for us until we point it to the location where
the package is stored, which is why the compiler is reporting the errors.
A package will normally be stored in a particular type of bundled file called
a JAR (from Java Archive) with a file extension .jar. In our case the file
is Alphabet Utilities.jar and we need to tell NetBeans where it can
be found.
In the Projects window, right-click on the node named Libraries and choose
Add JAR/Folder... (Figure 3.45).
Figure 3.45 Adding a JAR
You will then be invited to navigate to the folder where the JAR is located.
The required file is alphabet-utilities.jar in the folder
Documents\NBGuide2\AlphabetUtilities\dist. In the Add
JAR/Folder dialogue select alphabet-utilities.jar and click
Open.
If you now expand the node Libraries in the Projects window, the JAR you
have added will be shown (as a jar!). The other library shown is the JDK,
which was automatically part of the project (Figure 3.46).
Figure 3.46 Alphabet Utilities.jar in Libraries
Now we have added the JAR, the warnings in the Source Editor window
will have disappeared and the program will compile and run successfully to
produce the expected output.
53
3 A trip round NetBeans
Black plate (54,1)
If you were following this procedure to add a JAR from another project you
had written, you would have to check where the project folder was first.
Provided that the project had been compiled, you would then find a JAR in
the subfolder \dist.
If a third-party product were involved you would save the product to a
known location and then locate the JAR somewhere within its folder. This is
not normally difficult to do. In Windows the standard icon for a JAR is .
Adding the JAR should also have added the documentation for the package
alphabetize to the LibraryTest project. If you choose Help|Javadoc
References|alphabetize a browser will open and you can read the Javadoc.
Summary of activity
In this activity you have learnt how to add a non-standard class library to a
project and how to view the associated Javadoc.
You can now exit the IDE because the next section of the guide is for
reading only.
NetBeans Guide
54
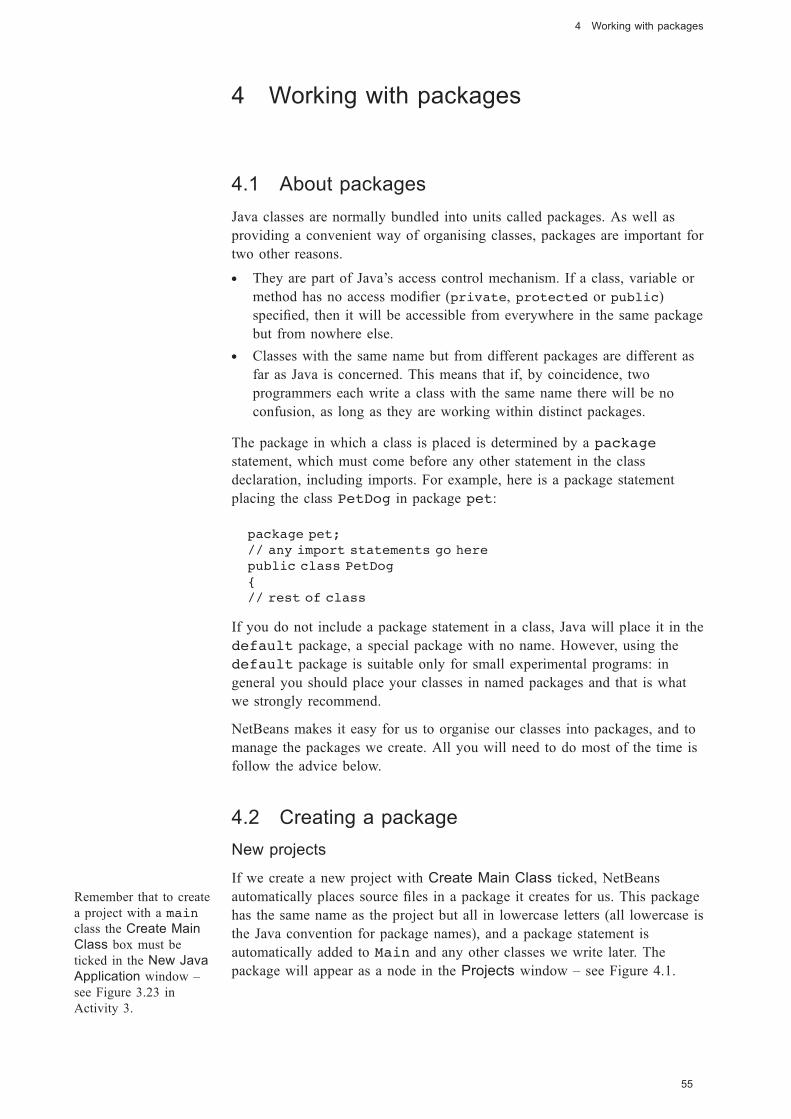
Black plate (55,1)
4 Working with packages
4.1 About packages
Java classes are normally bundled into units called packages. As well as
providing a convenient way of organising classes, packages are important for
two other reasons.
. They are part of Java’s access control mechanism. If a class, variable or
method has no access modifier (private, protected or public)
specified, then it will be accessible from everywhere in the same package
but from nowhere else.
. Classes with the same name but from different packages are different as
far as Java is concerned. This means that if, by coincidence, two
programmers each write a class with the same name there will be no
confusion, as long as they are working within distinct packages.
The package in which a class is placed is determined by a package
statement, which must come before any other statement in the class
declaration, including imports. For example, here is a package statement
placing the class PetDog in package pet:
package pet;
// any import statements go here
public class PetDog
{
// rest of class
If you do not include a package statement in a class, Java will place it in the
default package, a special package with no name. However, using the
default package is suitable only for small experimental programs: in
general you should place your classes in named packages and that is what
we strongly recommend.
NetBeans makes it easy for us to organise our classes into packages, and to
manage the packages we create. All you will need to do most of the time is
follow the advice below.
4.2 Creating a package
New projects
If we create a new project with Create Main Class ticked, NetBeans
automatically places source files in a package it creates for us. This package
has the same name as the project but all in lowercase letters (all lowercase is
the Java convention for package names), and a package statement is
automatically added to Main and any other classes we write later. The
package will appear as a node in the Projects window – see Figure 4.1.
55
4 Working with packages
Remember that to create
a project with a main
class the Create Main
Class box must be
ticked in the New Java
Application window –
see Figure 3.23 in
Activity 3.
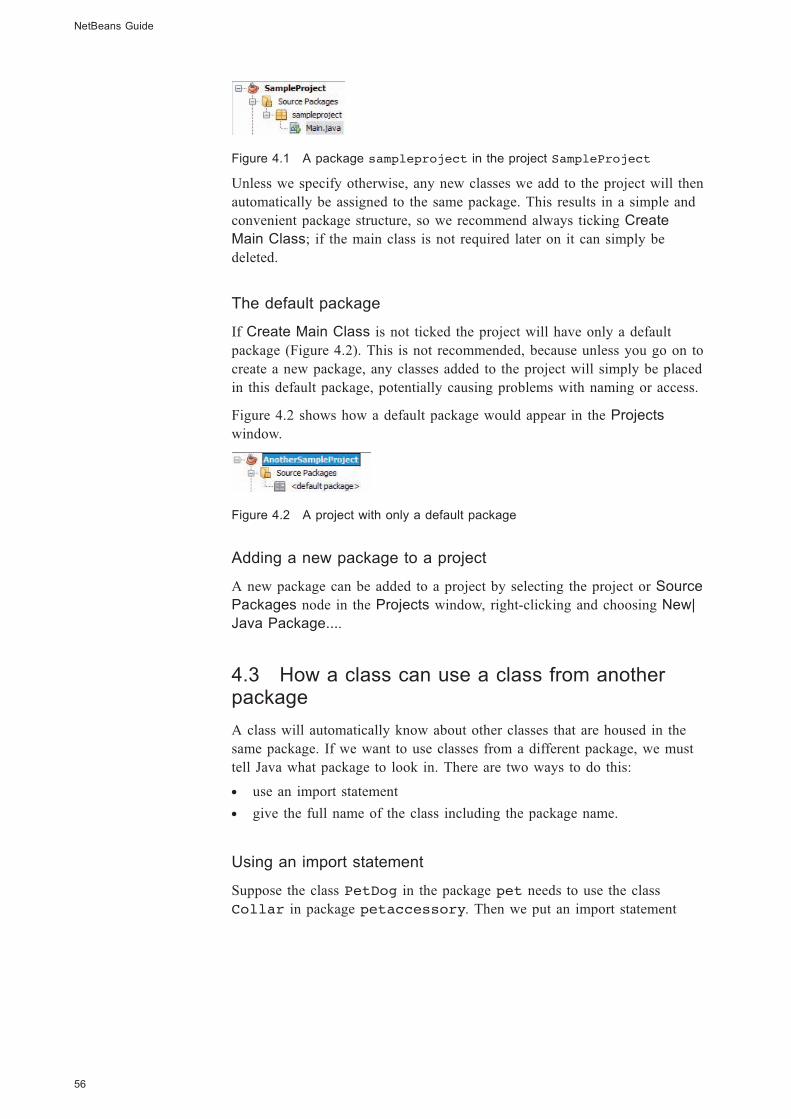
Black plate (56,1)
Figure 4.1 A package sampleproject in the project SampleProject
Unless we specify otherwise, any new classes we add to the project will then
automatically be assigned to the same package. This results in a simple and
convenient package structure, so we recommend always ticking Create
Main Class; if the main class is not required later on it can simply be
deleted.
The default package
If Create Main Class is not ticked the project will have only a default
package (Figure 4.2). This is not recommended, because unless you go on to
create a new package, any classes added to the project will simply be placed
in this default package, potentially causing problems with naming or access.
Figure 4.2 shows how a default package would appear in the Projects
window.
Figure 4.2 A project with only a default package
Adding a new package to a project
A new package can be added to a project by selecting the project or Source
Packages node in the Projects window, right-clicking and choosing New|
Java Package....
4.3 How a class can use a class from anotherpackage
A class will automatically know about other classes that are housed in the
same package. If we want to use classes from a different package, we must
tell Java what package to look in. There are two ways to do this:
. use an import statement
. give the full name of the class including the package name.
Using an import statement
Suppose the class PetDog in the package pet needs to use the class
Collar in package petaccessory. Then we put an import statement
NetBeans Guide
56
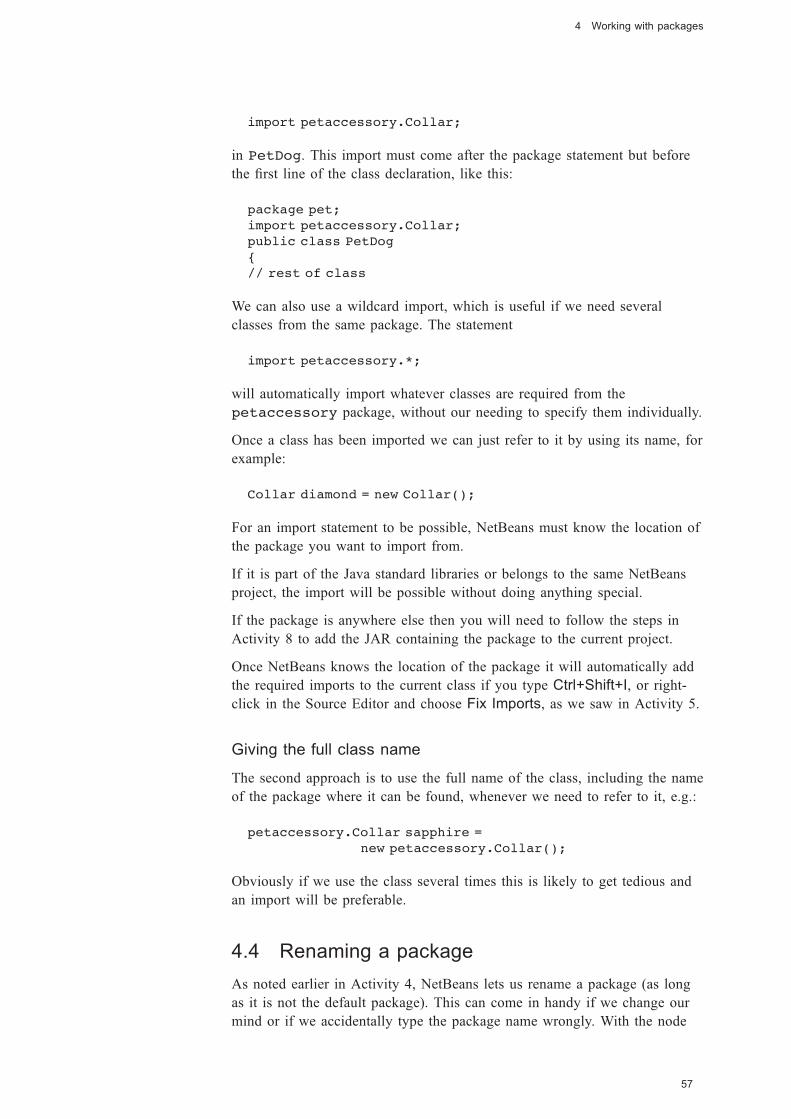
Black plate (57,1)
import petaccessory.Collar;
in PetDog. This import must come after the package statement but before
the first line of the class declaration, like this:
package pet;
import petaccessory.Collar;
public class PetDog
{
// rest of class
We can also use a wildcard import, which is useful if we need several
classes from the same package. The statement
import petaccessory.*;
will automatically import whatever classes are required from the
petaccessory package, without our needing to specify them individually.
Once a class has been imported we can just refer to it by using its name, for
example:
Collar diamond = new Collar();
For an import statement to be possible, NetBeans must know the location of
the package you want to import from.
If it is part of the Java standard libraries or belongs to the same NetBeans
project, the import will be possible without doing anything special.
If the package is anywhere else then you will need to follow the steps in
Activity 8 to add the JAR containing the package to the current project.
Once NetBeans knows the location of the package it will automatically add
the required imports to the current class if you type Ctrl+Shift+I, or right-
click in the Source Editor and choose Fix Imports, as we saw in Activity 5.
Giving the full class name
The second approach is to use the full name of the class, including the name
of the package where it can be found, whenever we need to refer to it, e.g.:
petaccessory.Collar sapphire =
new petaccessory.Collar();
Obviously if we use the class several times this is likely to get tedious and
an import will be preferable.
4.4 Renaming a package
As noted earlier in Activity 4, NetBeans lets us rename a package (as long
as it is not the default package). This can come in handy if we change our
mind or if we accidentally type the package name wrongly. With the node
57
4 Working with packages
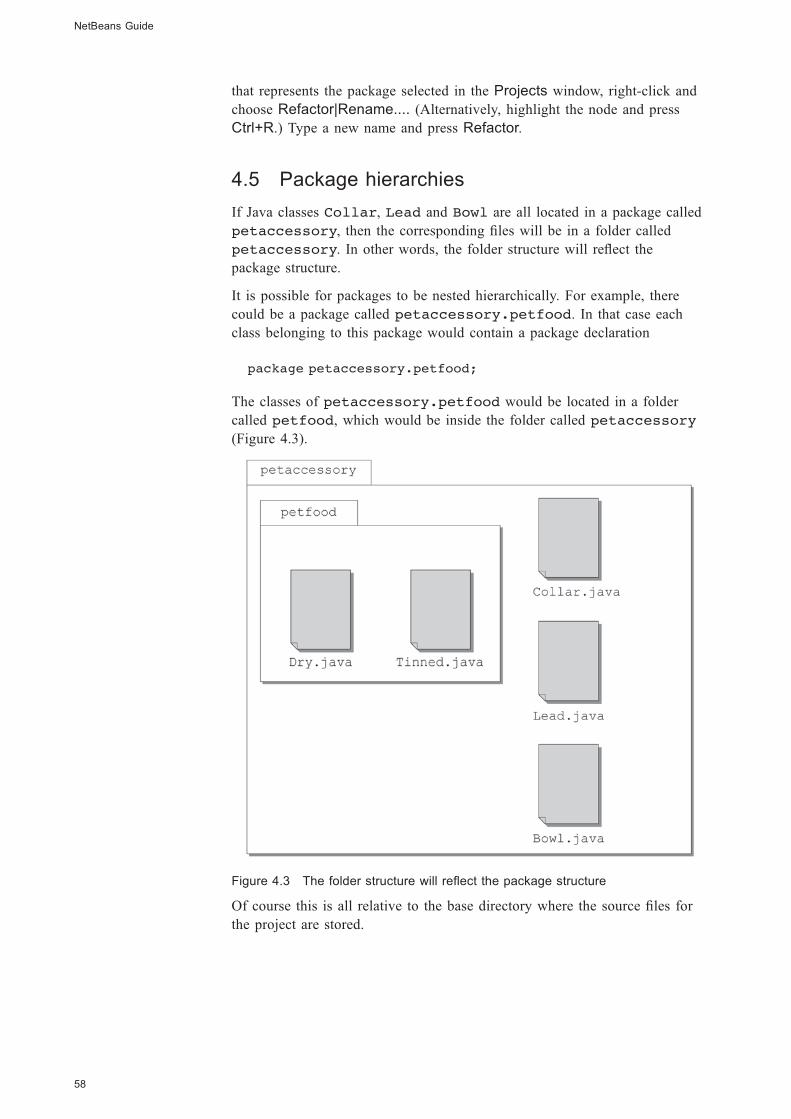
Black plate (58,1)
that represents the package selected in the Projects window, right-click and
choose Refactor|Rename.... (Alternatively, highlight the node and press
Ctrl+R.) Type a new name and press Refactor.
4.5 Package hierarchies
If Java classes Collar, Lead and Bowl are all located in a package called
petaccessory, then the corresponding files will be in a folder called
petaccessory. In other words, the folder structure will reflect the
package structure.
It is possible for packages to be nested hierarchically. For example, there
could be a package called petaccessory.petfood. In that case each
class belonging to this package would contain a package declaration
package petaccessory.petfood;
The classes of petaccessory.petfood would be located in a folder
called petfood, which would be inside the folder called petaccessory
(Figure 4.3).
Figure 4.3 The folder structure will reflect the package structure
Of course this is all relative to the base directory where the source files for
the project are stored.
NetBeans Guide
58
Black plate (59,1)
To import classes from petaccessory.petfood into a class in another
package we could use the statement:
import petaccessory.petfood.*;
Note that the wildcard applies only to classes, not to packages. A statement
such as
import petaccessory.*.*;
will not work.
4.6 Moving classes between packages
Classes can be readily moved between packages by using direct
manipulation in the Projects window. You can drag a file and drop it into
another package. This automatically brings up a Move Class dialogue.
When you click Refactor in this dialogue the class will automatically be
provided with an appropriate package statement for the new location.
Alternatively you can right-click on a node, select Cut or Copy, then click
on the node for a different package, right-click again and choose Paste|
Refactor Move or Paste|Refactor Copy as appropriate. In the Move
Class or Copy Class dialogue you can now rename the class if you wish
before clicking Refactor. As before the class will be provided with the
appropriate package statement.
4.7 Moving classes and packages betweenprojects
As well as moving files from package to package within the same project we
can also move or copy them to a package in any other project we have open,
just as described above.
We can also move or copy an entire package between projects. Drag the
package from the first project and drop it on to the Source Packages node
for the second project, or right-click on the package, choose Cut or Copy,
then right-click on the Source Packages node of the destination project
and choose Paste.
4.8 Other file types in packages
Programs very often have files of various kinds associated with them, for
example HTML, XML or image files. NetBeans allows any file type to be
housed in a package and they can all be copied or moved between packages
in a similar way to that described above, the only difference being that if a
file does not represent a Java class no Move Class or Copy Class dialogue
will appear.
59
4 Working with packages

Black plate (60,1)
5 Using the NetBeans GUI Builder
NetBeans provides powerful facilities, referred to as the NetBeans GUI
Builder, for the on-screen design of graphical user interfaces (GUIs). In this
section we explain how to get started on the design of a simple interface,
using this GUI Builder.
We are going to create a simple window that simulates a light bulb that can
be switched on and off. The window will have a panel at the top, with two
buttons On and Off. In the centre of the window a label will appear that
plays the part of the light bulb. Initially the light is off and the label is
coloured grey (Figure 5.1).
Figure 5.1 The window with the label coloured grey
When the On button is clicked, the light bulb changes its colour to yellow
(Figure 5.2).
Figure 5.2 The window with the label coloured yellow
When the Off button is clicked the light bulb goes back to grey again.
A Java GUI has three aspects:
1 A window that contains all the various visual components that the GUI
uses.
2 The visual components themselves. These can be of many different types:
panels, buttons, menus, labels, text fields and scroll bars are some
common ones. These components are all laid on the window that
contains them. Depending on their type, some components can be nested
inside other components.
3 Event listeners and handlers. Visual components are inert until we define
how they are to behave when the user interacts with them using the
mouse or keyboard. To this end we attach event listeners to components
and write event handler code for each event of interest. When an event
takes place – for example, the user may click on a button – the listener
NetBeans Guide
60
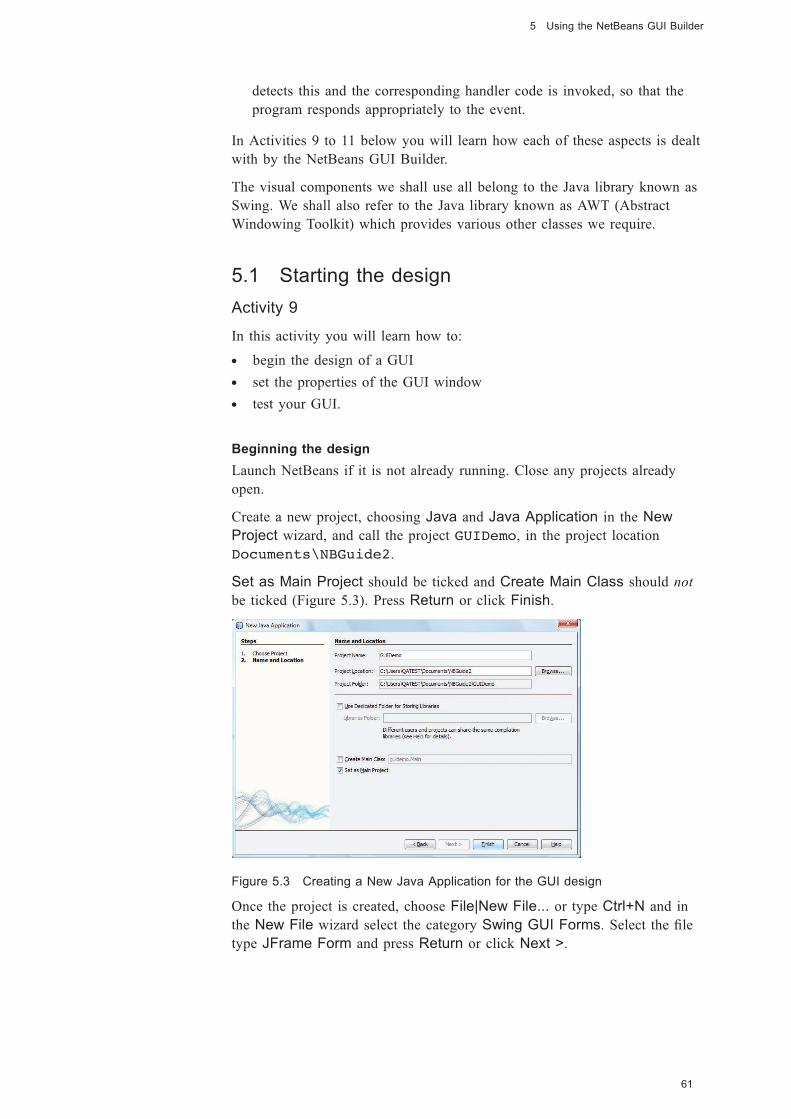
Black plate (61,1)
detects this and the corresponding handler code is invoked, so that the
program responds appropriately to the event.
In Activities 9 to 11 below you will learn how each of these aspects is dealt
with by the NetBeans GUI Builder.
The visual components we shall use all belong to the Java library known as
Swing. We shall also refer to the Java library known as AWT (Abstract
Windowing Toolkit) which provides various other classes we require.
5.1 Starting the design
Activity 9
In this activity you will learn how to:
. begin the design of a GUI
. set the properties of the GUI window
. test your GUI.
Beginning the design
Launch NetBeans if it is not already running. Close any projects already
open.
Create a new project, choosing Java and Java Application in the New
Project wizard, and call the project GUIDemo, in the project location
Documents\NBGuide2.
Set as Main Project should be ticked and Create Main Class should not
be ticked (Figure 5.3). Press Return or click Finish.
Figure 5.3 Creating a New Java Application for the GUI design
Once the project is created, choose File|New File... or type Ctrl+N and in
the New File wizard select the category Swing GUI Forms. Select the file
type JFrame Form and press Return or click Next >.
61
5 Using the NetBeans GUI Builder
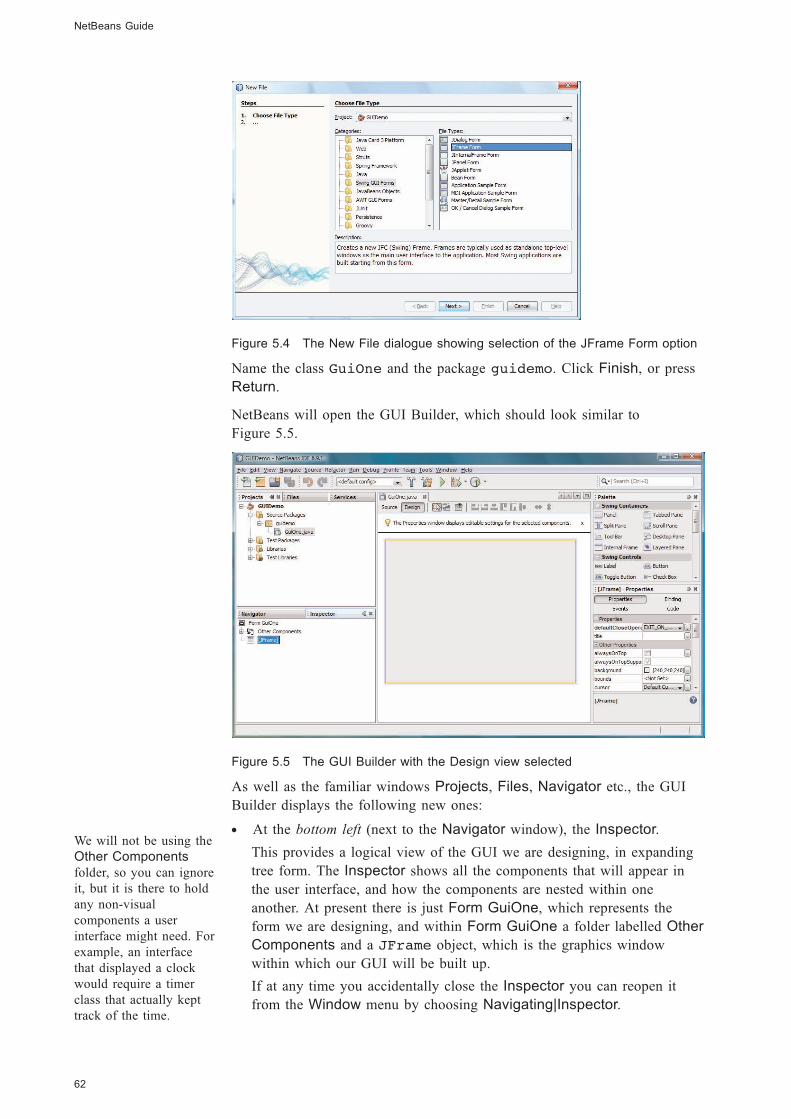
Black plate (62,1)
Figure 5.4 The New File dialogue showing selection of the JFrame Form option
Name the class GuiOne and the package guidemo. Click Finish, or press
Return.
NetBeans will open the GUI Builder, which should look similar to
Figure 5.5.
Figure 5.5 The GUI Builder with the Design view selected
As well as the familiar windows Projects, Files, Navigator etc., the GUI
Builder displays the following new ones:
. At the bottom left (next to the Navigator window), the Inspector.
This provides a logical view of the GUI we are designing, in expanding
tree form. The Inspector shows all the components that will appear in
the user interface, and how the components are nested within one
another. At present there is just Form GuiOne, which represents the
form we are designing, and within Form GuiOne a folder labelled Other
Components and a JFrame object, which is the graphics window
within which our GUI will be built up.
If at any time you accidentally close the Inspector you can reopen it
from the Window menu by choosing Navigating|Inspector.
NetBeans Guide
62
We will not be using the
Other Components
folder, so you can ignore
it, but it is there to hold
any non-visual
components a user
interface might need. For
example, an interface
that displayed a clock
would require a timer
class that actually kept
track of the time.
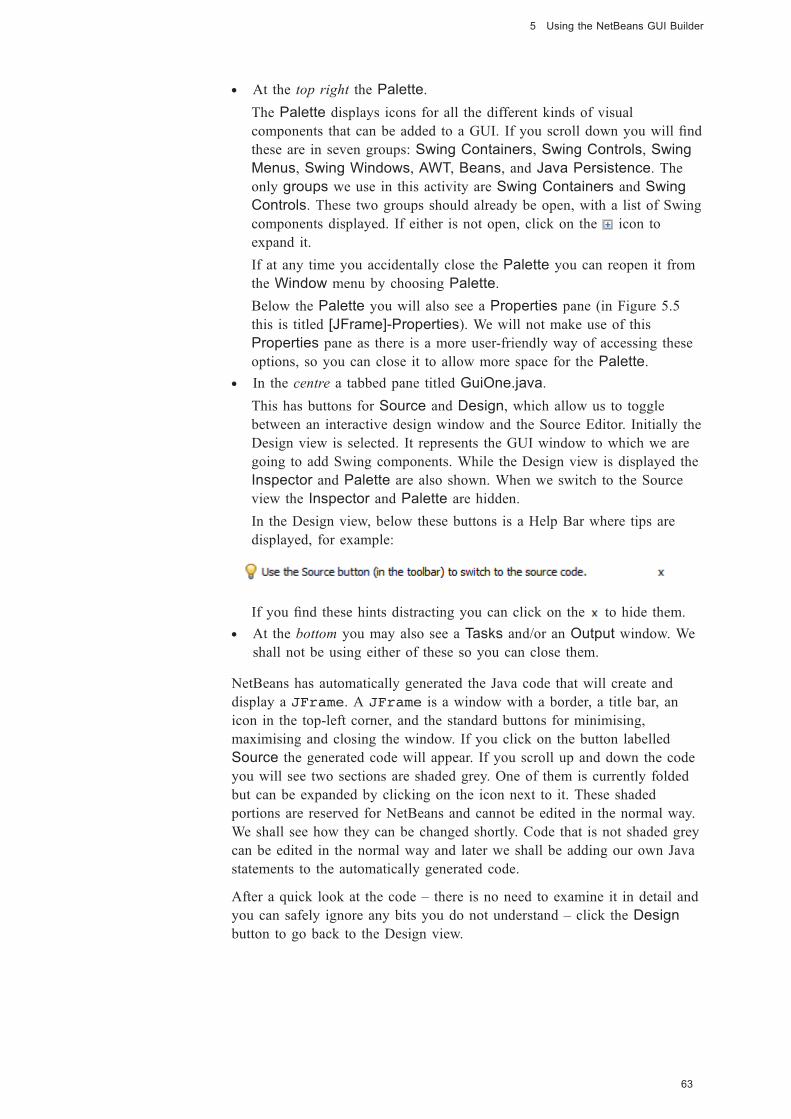
Black plate (63,1)
. At the top right the Palette.
The Palette displays icons for all the different kinds of visual
components that can be added to a GUI. If you scroll down you will find
these are in seven groups: Swing Containers, Swing Controls, Swing
Menus, Swing Windows, AWT, Beans, and Java Persistence. The
only groups we use in this activity are Swing Containers and Swing
Controls. These two groups should already be open, with a list of Swing
components displayed. If either is not open, click on the icon to
expand it.
If at any time you accidentally close the Palette you can reopen it from
the Window menu by choosing Palette.
Below the Palette you will also see a Properties pane (in Figure 5.5
this is titled [JFrame]-Properties). We will not make use of this
Properties pane as there is a more user-friendly way of accessing these
options, so you can close it to allow more space for the Palette.
. In the centre a tabbed pane titled GuiOne.java.
This has buttons for Source and Design, which allow us to toggle
between an interactive design window and the Source Editor. Initially the
Design view is selected. It represents the GUI window to which we are
going to add Swing components. While the Design view is displayed the
Inspector and Palette are also shown. When we switch to the Source
view the Inspector and Palette are hidden.
In the Design view, below these buttons is a Help Bar where tips are
displayed, for example:
If you find these hints distracting you can click on the to hide them.
. At the bottom you may also see a Tasks and/or an Output window. We
shall not be using either of these so you can close them.
NetBeans has automatically generated the Java code that will create and
display a JFrame. A JFrame is a window with a border, a title bar, an
icon in the top-left corner, and the standard buttons for minimising,
maximising and closing the window. If you click on the button labelled
Source the generated code will appear. If you scroll up and down the code
you will see two sections are shaded grey. One of them is currently folded
but can be expanded by clicking on the icon next to it. These shaded
portions are reserved for NetBeans and cannot be edited in the normal way.
We shall see how they can be changed shortly. Code that is not shaded grey
can be edited in the normal way and later we shall be adding our own Java
statements to the automatically generated code.
After a quick look at the code – there is no need to examine it in detail and
you can safely ignore any bits you do not understand – click the Design
button to go back to the Design view.
63
5 Using the NetBeans GUI Builder
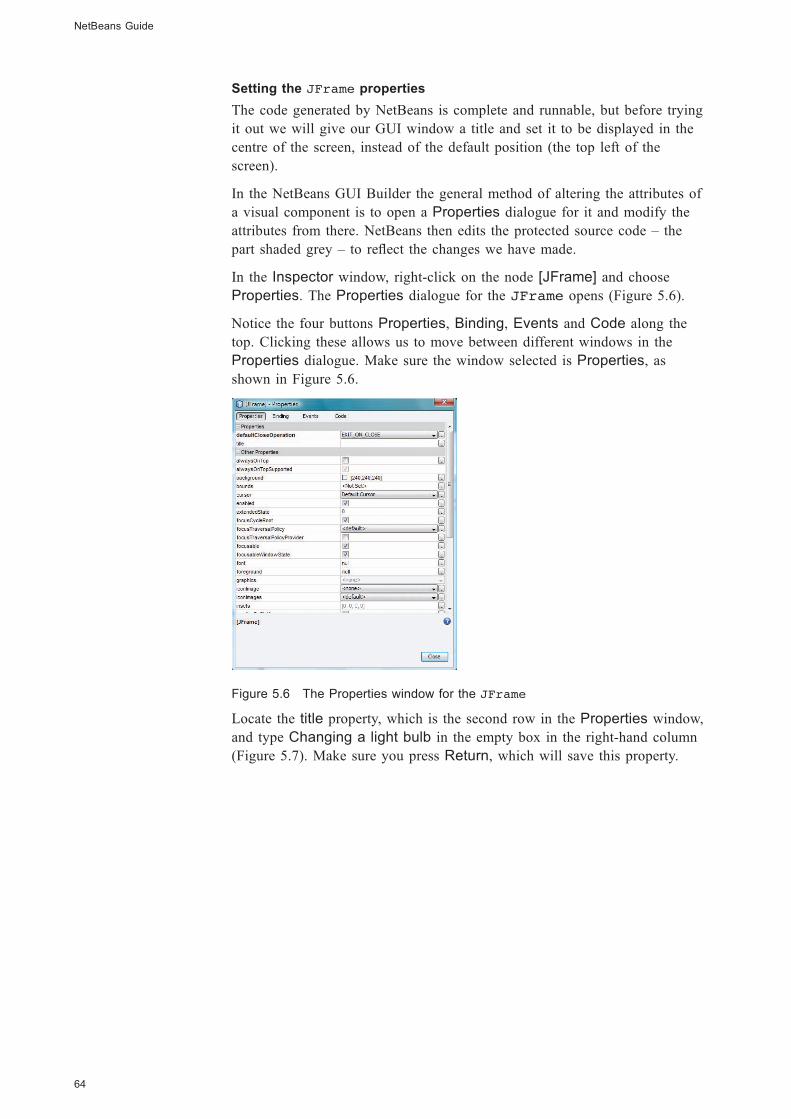
Black plate (64,1)
Setting the JFrame properties
The code generated by NetBeans is complete and runnable, but before trying
it out we will give our GUI window a title and set it to be displayed in the
centre of the screen, instead of the default position (the top left of the
screen).
In the NetBeans GUI Builder the general method of altering the attributes of
a visual component is to open a Properties dialogue for it and modify the
attributes from there. NetBeans then edits the protected source code – the
part shaded grey – to reflect the changes we have made.
In the Inspector window, right-click on the node [JFrame] and choose
Properties. The Properties dialogue for the JFrame opens (Figure 5.6).
Notice the four buttons Properties, Binding, Events and Code along the
top. Clicking these allows us to move between different windows in the
Properties dialogue. Make sure the window selected is Properties, as
shown in Figure 5.6.
Figure 5.6 The Properties window for the JFrame
Locate the title property, which is the second row in the Properties window,
and type Changing a light bulb in the empty box in the right-hand column
(Figure 5.7). Make sure you press Return, which will save this property.
NetBeans Guide
64
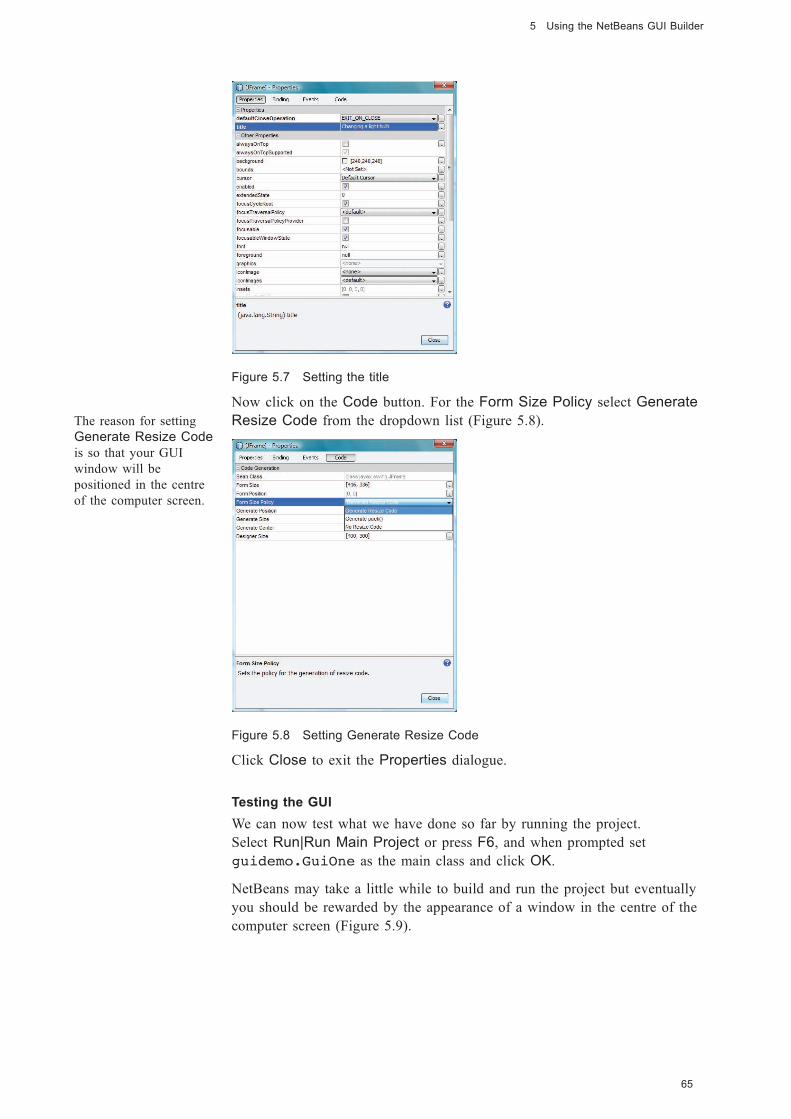
Black plate (65,1)
Figure 5.7 Setting the title
Now click on the Code button. For the Form Size Policy select Generate
Resize Code from the dropdown list (Figure 5.8).
Figure 5.8 Setting Generate Resize Code
Click Close to exit the Properties dialogue.
Testing the GUI
We can now test what we have done so far by running the project.
Select Run|Run Main Project or press F6, and when prompted set
guidemo.GuiOne as the main class and click OK.
NetBeans may take a little while to build and run the project but eventually
you should be rewarded by the appearance of a window in the centre of the
computer screen (Figure 5.9).
65
5 Using the NetBeans GUI Builder
The reason for setting
Generate Resize Code
is so that your GUI
window will be
positioned in the centre
of the computer screen.
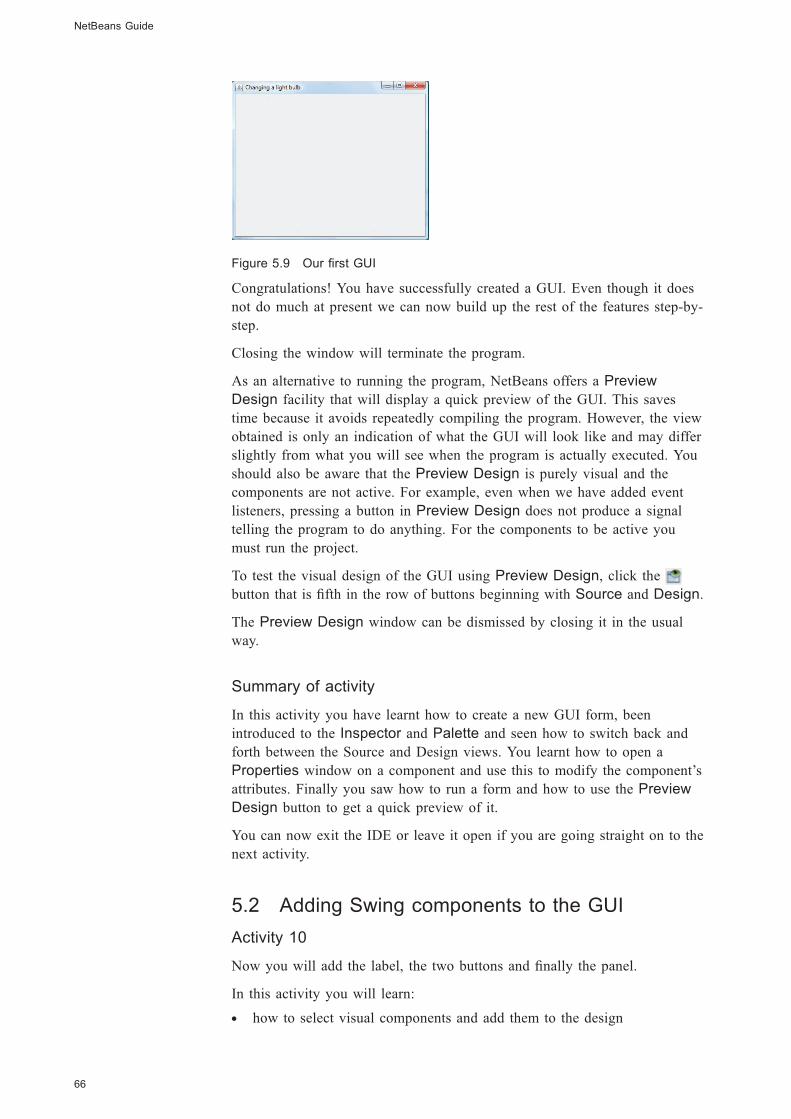
Black plate (66,1)
Figure 5.9 Our first GUI
Congratulations! You have successfully created a GUI. Even though it does
not do much at present we can now build up the rest of the features step-by-
step.
Closing the window will terminate the program.
As an alternative to running the program, NetBeans offers a Preview
Design facility that will display a quick preview of the GUI. This saves
time because it avoids repeatedly compiling the program. However, the view
obtained is only an indication of what the GUI will look like and may differ
slightly from what you will see when the program is actually executed. You
should also be aware that the Preview Design is purely visual and the
components are not active. For example, even when we have added event
listeners, pressing a button in Preview Design does not produce a signal
telling the program to do anything. For the components to be active you
must run the project.
To test the visual design of the GUI using Preview Design, click the
button that is fifth in the row of buttons beginning with Source and Design.
The Preview Design window can be dismissed by closing it in the usual
way.
Summary of activity
In this activity you have learnt how to create a new GUI form, been
introduced to the Inspector and Palette and seen how to switch back and
forth between the Source and Design views. You learnt how to open a
Properties window on a component and use this to modify the component’s
attributes. Finally you saw how to run a form and how to use the Preview
Design button to get a quick preview of it.
You can now exit the IDE or leave it open if you are going straight on to the
next activity.
5.2 Adding Swing components to the GUI
Activity 10
Now you will add the label, the two buttons and finally the panel.
In this activity you will learn:
. how to select visual components and add them to the design
NetBeans Guide
66
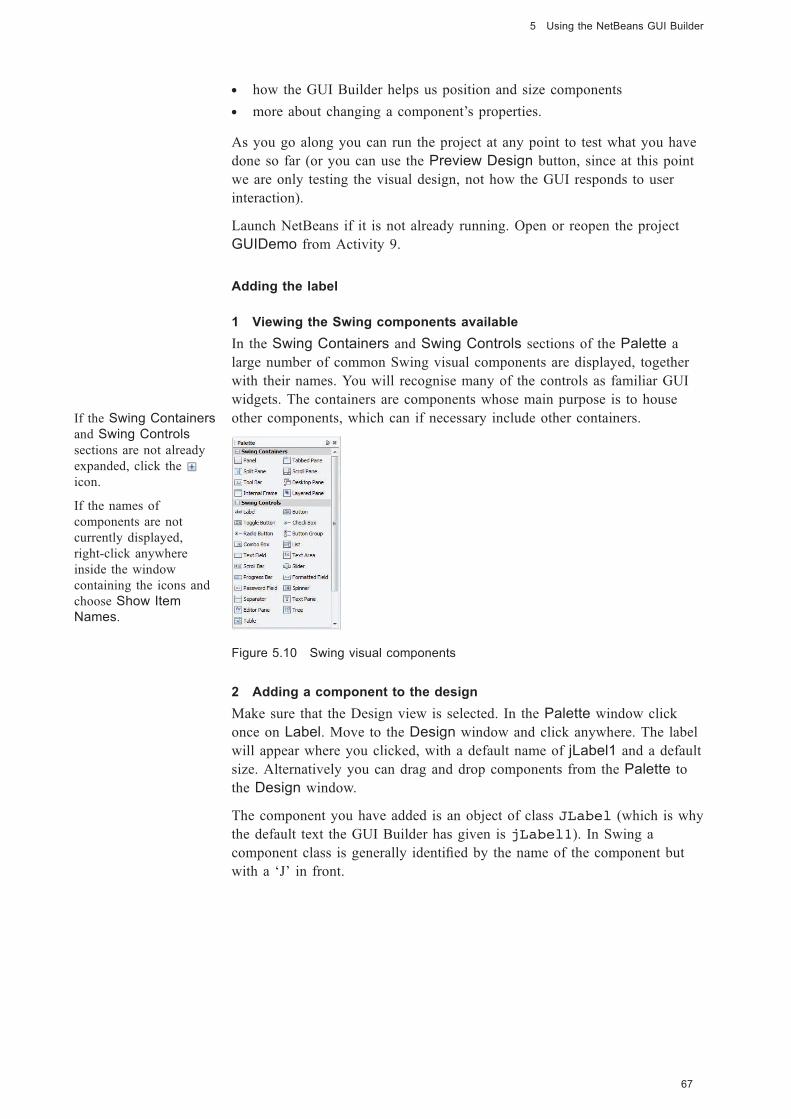
Black plate (67,1)
. how the GUI Builder helps us position and size components
. more about changing a component’s properties.
As you go along you can run the project at any point to test what you have
done so far (or you can use the Preview Design button, since at this point
we are only testing the visual design, not how the GUI responds to user
interaction).
Launch NetBeans if it is not already running. Open or reopen the project
GUIDemo from Activity 9.
Adding the label
1 Viewing the Swing components available
In the Swing Containers and Swing Controls sections of the Palette a
large number of common Swing visual components are displayed, together
with their names. You will recognise many of the controls as familiar GUI
widgets. The containers are components whose main purpose is to house
other components, which can if necessary include other containers.
Figure 5.10 Swing visual components
2 Adding a component to the design
Make sure that the Design view is selected. In the Palette window click
once on Label. Move to the Design window and click anywhere. The label
will appear where you clicked, with a default name of jLabel1 and a default
size. Alternatively you can drag and drop components from the Palette to
the Design window.
The component you have added is an object of class JLabel (which is why
the default text the GUI Builder has given is jLabel1). In Swing a
component class is generally identified by the name of the component but
with a ‘J’ in front.
67
5 Using the NetBeans GUI Builder
If the Swing Containers
and Swing Controls
sections are not already
expanded, click the
icon.
If the names of
components are not
currently displayed,
right-click anywhere
inside the window
containing the icons and
choose Show Item
Names.
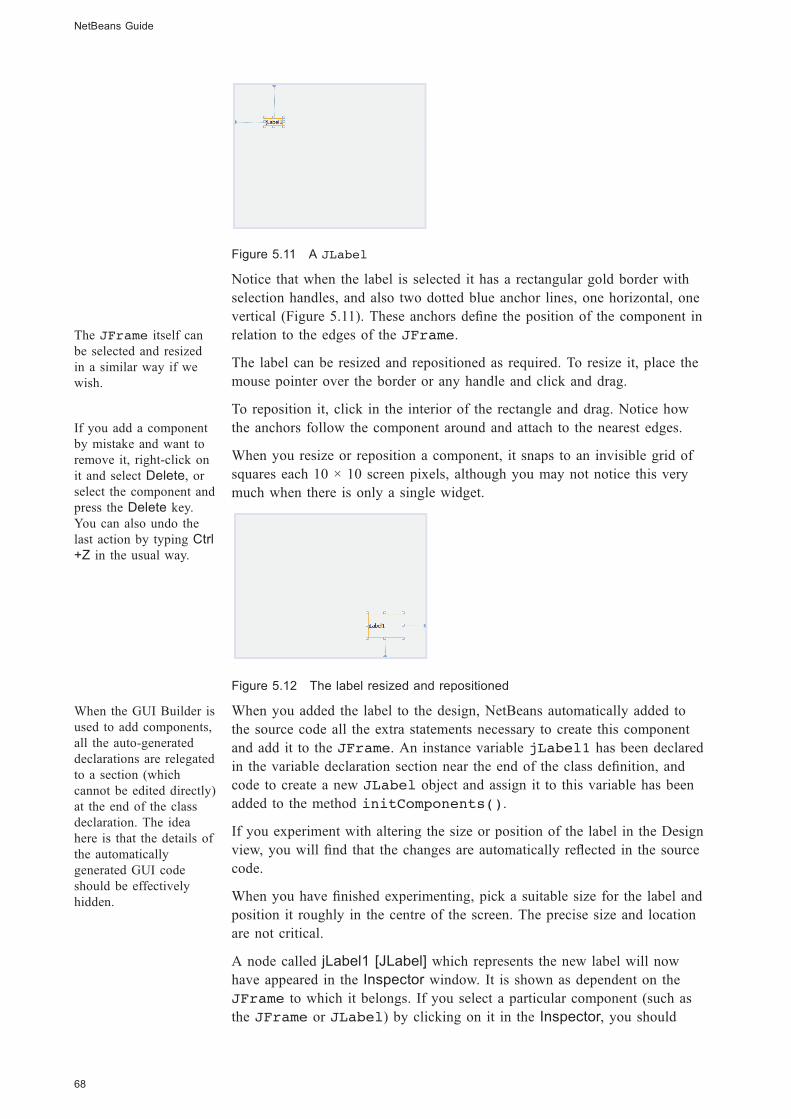
Black plate (68,1)
Figure 5.11 A JLabel
Notice that when the label is selected it has a rectangular gold border with
selection handles, and also two dotted blue anchor lines, one horizontal, one
vertical (Figure 5.11). These anchors define the position of the component in
relation to the edges of the JFrame.
The label can be resized and repositioned as required. To resize it, place the
mouse pointer over the border or any handle and click and drag.
To reposition it, click in the interior of the rectangle and drag. Notice how
the anchors follow the component around and attach to the nearest edges.
When you resize or reposition a component, it snaps to an invisible grid of
squares each 10 × 10 screen pixels, although you may not notice this very
much when there is only a single widget.
Figure 5.12 The label resized and repositioned
When you added the label to the design, NetBeans automatically added to
the source code all the extra statements necessary to create this component
and add it to the JFrame. An instance variable jLabel1 has been declared
in the variable declaration section near the end of the class definition, and
code to create a new JLabel object and assign it to this variable has been
added to the method initComponents().
If you experiment with altering the size or position of the label in the Design
view, you will find that the changes are automatically reflected in the source
code.
When you have finished experimenting, pick a suitable size for the label and
position it roughly in the centre of the screen. The precise size and location
are not critical.
A node called jLabel1 [JLabel] which represents the new label will now
have appeared in the Inspector window. It is shown as dependent on the
JFrame to which it belongs. If you select a particular component (such as
the JFrame or JLabel) by clicking on it in the Inspector, you should
NetBeans Guide
68
The JFrame itself can
be selected and resized
in a similar way if we
wish.
If you add a component
by mistake and want to
remove it, right-click on
it and select Delete, or
select the component and
press the Delete key.
You can also undo the
last action by typing Ctrl
+Z in the usual way.
When the GUI Builder is
used to add components,
all the auto-generated
declarations are relegated
to a section (which
cannot be edited directly)
at the end of the class
declaration. The idea
here is that the details of
the automatically
generated GUI code
should be effectively
hidden.
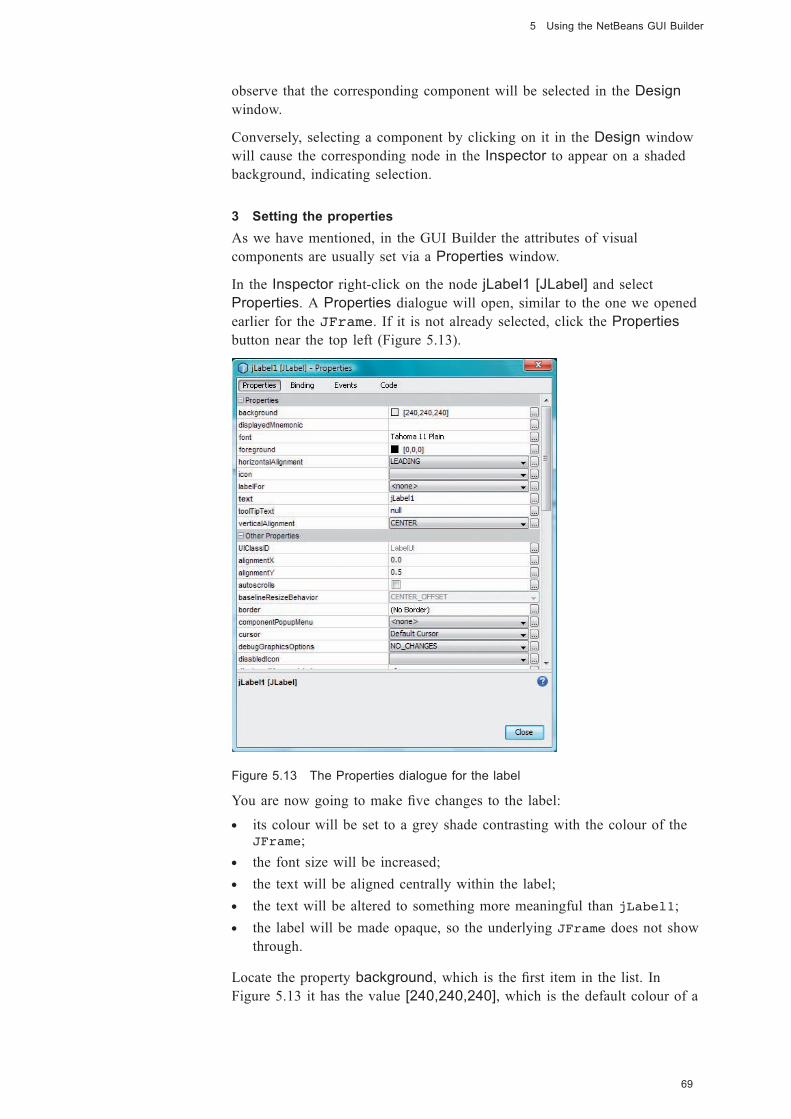
Black plate (69,1)
observe that the corresponding component will be selected in the Design
window.
Conversely, selecting a component by clicking on it in the Design window
will cause the corresponding node in the Inspector to appear on a shaded
background, indicating selection.
3 Setting the properties
As we have mentioned, in the GUI Builder the attributes of visual
components are usually set via a Properties window.
In the Inspector right-click on the node jLabel1 [JLabel] and select
Properties. A Properties dialogue will open, similar to the one we opened
earlier for the JFrame. If it is not already selected, click the Properties
button near the top left (Figure 5.13).
Figure 5.13 The Properties dialogue for the label
You are now going to make five changes to the label:
. its colour will be set to a grey shade contrasting with the colour of theJFrame;
. the font size will be increased;
. the text will be aligned centrally within the label;
. the text will be altered to something more meaningful than jLabel1;
. the label will be made opaque, so the underlying JFrame does not show
through.
Locate the property background, which is the first item in the list. In
Figure 5.13 it has the value [240,240,240], which is the default colour of a
69
5 Using the NetBeans GUI Builder
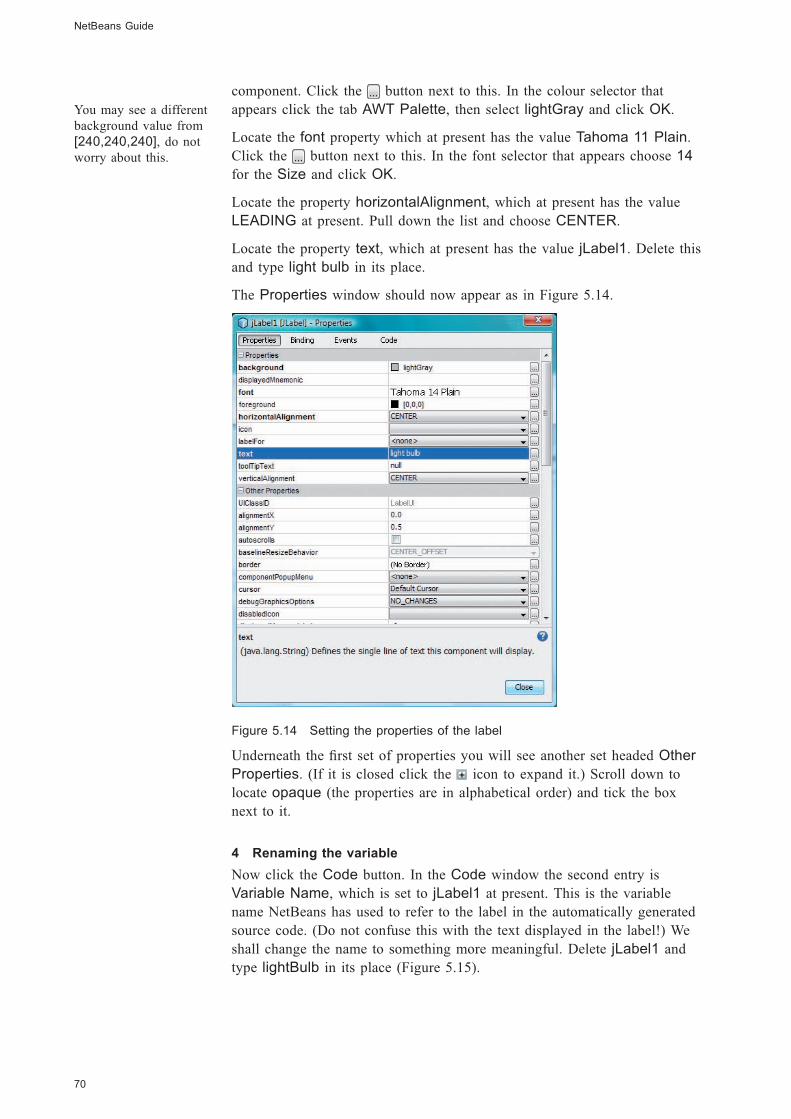
Black plate (70,1)
component. Click the button next to this. In the colour selector that
appears click the tab AWT Palette, then select lightGray and click OK.
Locate the font property which at present has the value Tahoma 11 Plain.
Click the button next to this. In the font selector that appears choose 14
for the Size and click OK.
Locate the property horizontalAlignment, which at present has the value
LEADING at present. Pull down the list and choose CENTER.
Locate the property text, which at present has the value jLabel1. Delete this
and type light bulb in its place.
The Properties window should now appear as in Figure 5.14.
Figure 5.14 Setting the properties of the label
Underneath the first set of properties you will see another set headed Other
Properties. (If it is closed click the icon to expand it.) Scroll down to
locate opaque (the properties are in alphabetical order) and tick the box
next to it.
4 Renaming the variable
Now click the Code button. In the Code window the second entry is
Variable Name, which is set to jLabel1 at present. This is the variable
name NetBeans has used to refer to the label in the automatically generated
source code. (Do not confuse this with the text displayed in the label!) We
shall change the name to something more meaningful. Delete jLabel1 and
type lightBulb in its place (Figure 5.15).
NetBeans Guide
70
You may see a different
background value from
[240,240,240], do not
worry about this.
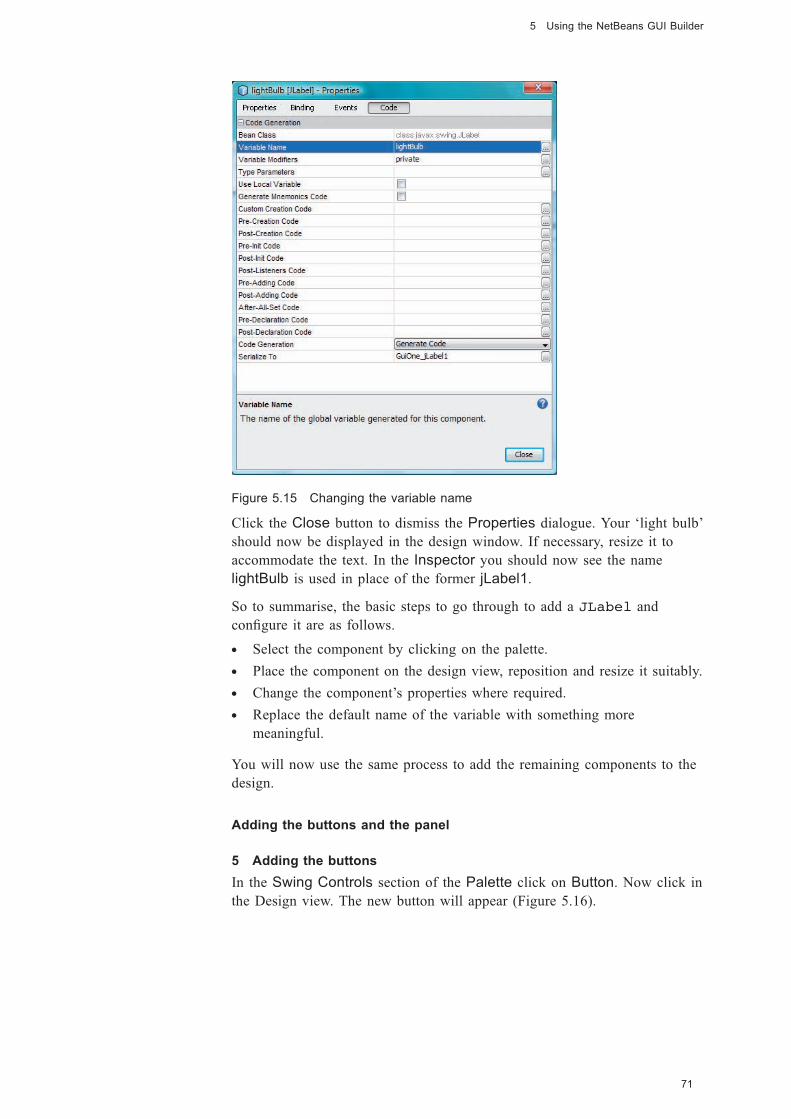
Black plate (71,1)
Figure 5.15 Changing the variable name
Click the Close button to dismiss the Properties dialogue. Your ‘light bulb’
should now be displayed in the design window. If necessary, resize it to
accommodate the text. In the Inspector you should now see the name
lightBulb is used in place of the former jLabel1.
So to summarise, the basic steps to go through to add a JLabel and
configure it are as follows.
. Select the component by clicking on the palette.
. Place the component on the design view, reposition and resize it suitably.
. Change the component’s properties where required.
. Replace the default name of the variable with something more
meaningful.
You will now use the same process to add the remaining components to the
design.
Adding the buttons and the panel
5 Adding the buttons
In the Swing Controls section of the Palette click on Button. Now click in
the Design view. The new button will appear (Figure 5.16).
71
5 Using the NetBeans GUI Builder
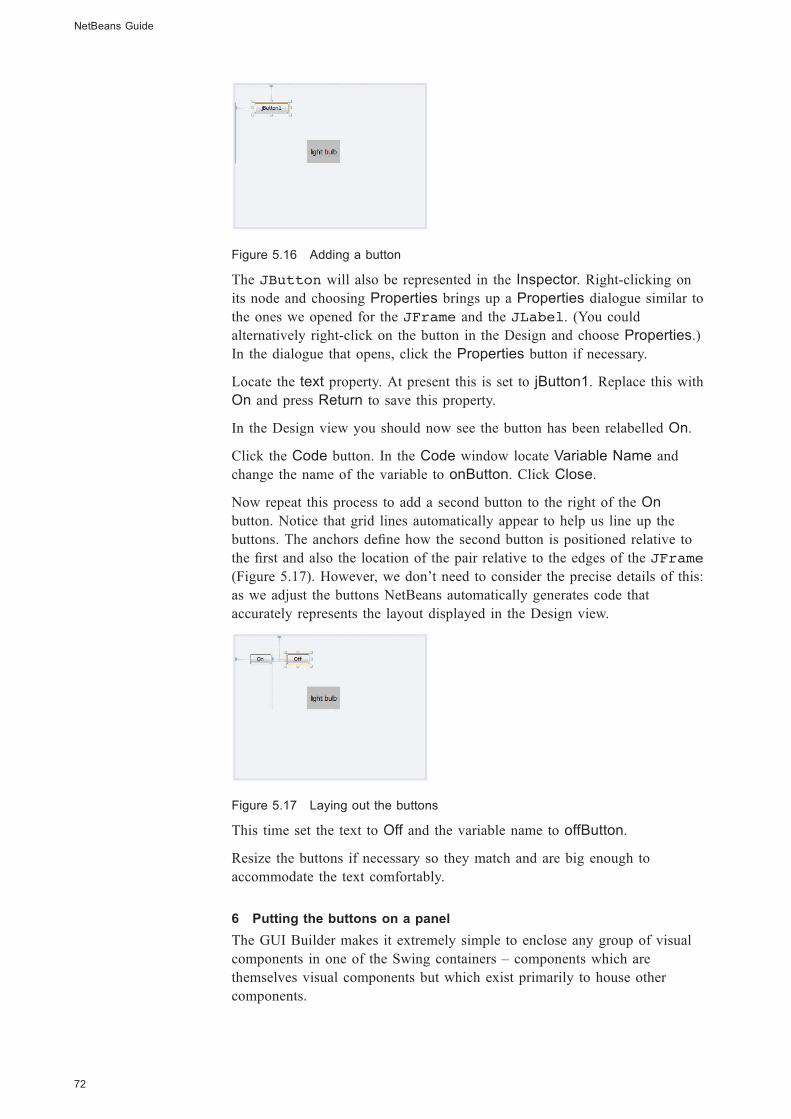
Black plate (72,1)
Figure 5.16 Adding a button
The JButton will also be represented in the Inspector. Right-clicking on
its node and choosing Properties brings up a Properties dialogue similar to
the ones we opened for the JFrame and the JLabel. (You could
alternatively right-click on the button in the Design and choose Properties.)
In the dialogue that opens, click the Properties button if necessary.
Locate the text property. At present this is set to jButton1. Replace this with
On and press Return to save this property.
In the Design view you should now see the button has been relabelled On.
Click the Code button. In the Code window locate Variable Name and
change the name of the variable to onButton. Click Close.
Now repeat this process to add a second button to the right of the On
button. Notice that grid lines automatically appear to help us line up the
buttons. The anchors define how the second button is positioned relative to
the first and also the location of the pair relative to the edges of the JFrame
(Figure 5.17). However, we don’t need to consider the precise details of this:
as we adjust the buttons NetBeans automatically generates code that
accurately represents the layout displayed in the Design view.
Figure 5.17 Laying out the buttons
This time set the text to Off and the variable name to offButton.
Resize the buttons if necessary so they match and are big enough to
accommodate the text comfortably.
6 Putting the buttons on a panel
The GUI Builder makes it extremely simple to enclose any group of visual
components in one of the Swing containers – components which are
themselves visual components but which exist primarily to house other
components.
NetBeans Guide
72
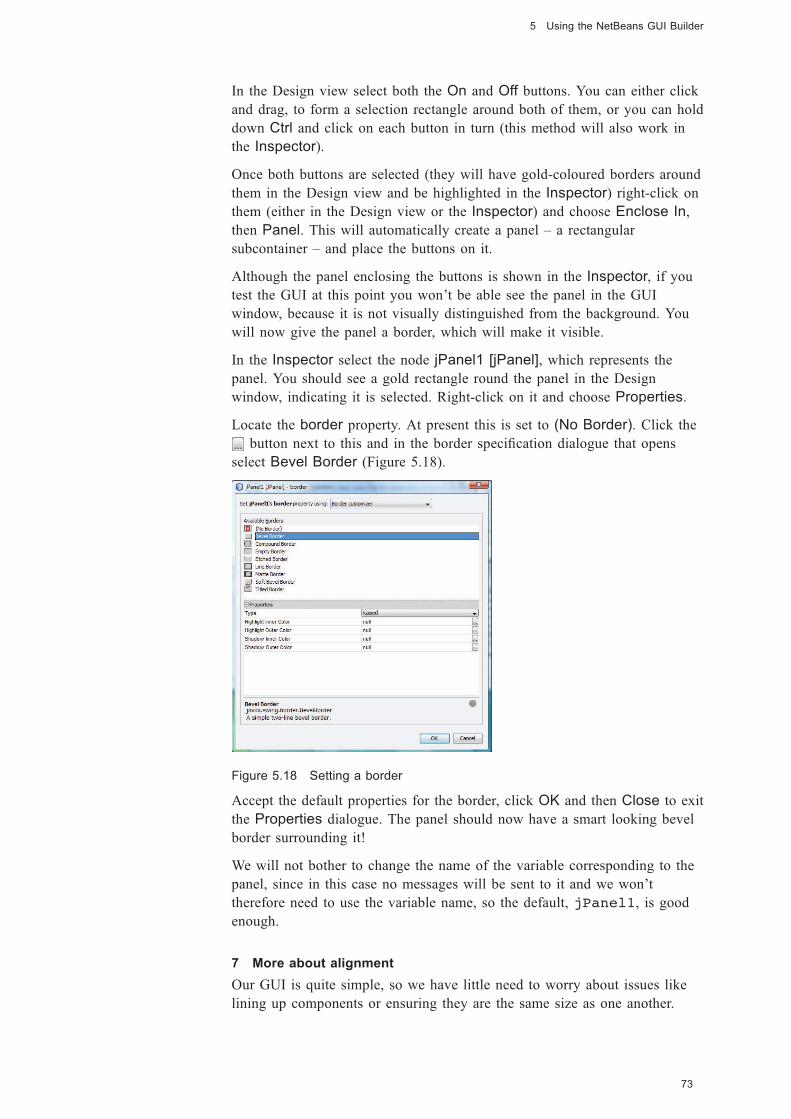
Black plate (73,1)
In the Design view select both the On and Off buttons. You can either click
and drag, to form a selection rectangle around both of them, or you can hold
down Ctrl and click on each button in turn (this method will also work in
the Inspector).
Once both buttons are selected (they will have gold-coloured borders around
them in the Design view and be highlighted in the Inspector) right-click on
them (either in the Design view or the Inspector) and choose Enclose In,
then Panel. This will automatically create a panel – a rectangular
subcontainer – and place the buttons on it.
Although the panel enclosing the buttons is shown in the Inspector, if you
test the GUI at this point you won’t be able see the panel in the GUI
window, because it is not visually distinguished from the background. You
will now give the panel a border, which will make it visible.
In the Inspector select the node jPanel1 [jPanel], which represents the
panel. You should see a gold rectangle round the panel in the Design
window, indicating it is selected. Right-click on it and choose Properties.
Locate the border property. At present this is set to (No Border). Click the
button next to this and in the border specification dialogue that opens
select Bevel Border (Figure 5.18).
Figure 5.18 Setting a border
Accept the default properties for the border, click OK and then Close to exit
the Properties dialogue. The panel should now have a smart looking bevel
border surrounding it!
We will not bother to change the name of the variable corresponding to the
panel, since in this case no messages will be sent to it and we won’t
therefore need to use the variable name, so the default, jPanel1, is good
enough.
7 More about alignment
Our GUI is quite simple, so we have little need to worry about issues like
lining up components or ensuring they are the same size as one another.
73
5 Using the NetBeans GUI Builder
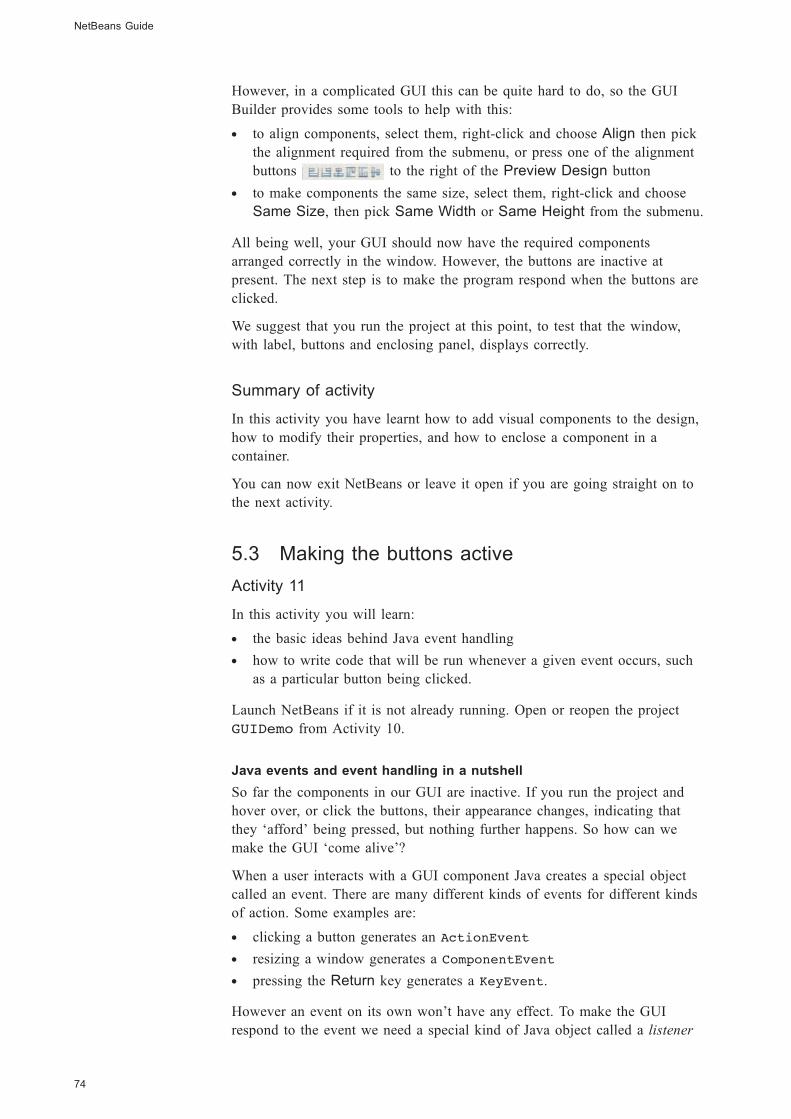
Black plate (74,1)
However, in a complicated GUI this can be quite hard to do, so the GUI
Builder provides some tools to help with this:
. to align components, select them, right-click and choose Align then pick
the alignment required from the submenu, or press one of the alignment
buttons to the right of the Preview Design button
. to make components the same size, select them, right-click and choose
Same Size, then pick Same Width or Same Height from the submenu.
All being well, your GUI should now have the required components
arranged correctly in the window. However, the buttons are inactive at
present. The next step is to make the program respond when the buttons are
clicked.
We suggest that you run the project at this point, to test that the window,
with label, buttons and enclosing panel, displays correctly.
Summary of activity
In this activity you have learnt how to add visual components to the design,
how to modify their properties, and how to enclose a component in a
container.
You can now exit NetBeans or leave it open if you are going straight on to
the next activity.
5.3 Making the buttons active
Activity 11
In this activity you will learn:
. the basic ideas behind Java event handling
. how to write code that will be run whenever a given event occurs, such
as a particular button being clicked.
Launch NetBeans if it is not already running. Open or reopen the project
GUIDemo from Activity 10.
Java events and event handling in a nutshell
So far the components in our GUI are inactive. If you run the project and
hover over, or click the buttons, their appearance changes, indicating that
they ‘afford’ being pressed, but nothing further happens. So how can we
make the GUI ‘come alive’?
When a user interacts with a GUI component Java creates a special object
called an event. There are many different kinds of events for different kinds
of action. Some examples are:
. clicking a button generates an ActionEvent
. resizing a window generates a ComponentEvent
. pressing the Return key generates a KeyEvent.
However an event on its own won’t have any effect. To make the GUI
respond to the event we need a special kind of Java object called a listener
NetBeans Guide
74
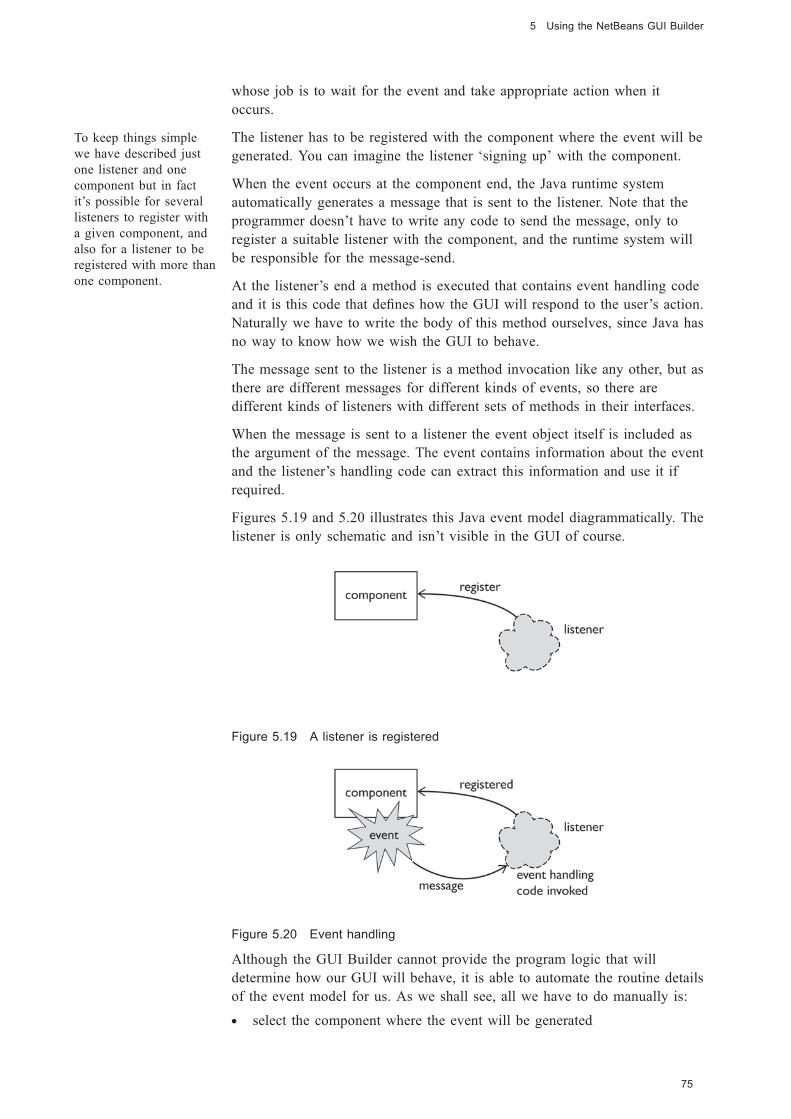
Black plate (75,1)
whose job is to wait for the event and take appropriate action when it
occurs.
The listener has to be registered with the component where the event will be
generated. You can imagine the listener ‘signing up’ with the component.
When the event occurs at the component end, the Java runtime system
automatically generates a message that is sent to the listener. Note that the
programmer doesn’t have to write any code to send the message, only to
register a suitable listener with the component, and the runtime system will
be responsible for the message-send.
At the listener’s end a method is executed that contains event handling code
and it is this code that defines how the GUI will respond to the user’s action.
Naturally we have to write the body of this method ourselves, since Java has
no way to know how we wish the GUI to behave.
The message sent to the listener is a method invocation like any other, but as
there are different messages for different kinds of events, so there are
different kinds of listeners with different sets of methods in their interfaces.
When the message is sent to a listener the event object itself is included as
the argument of the message. The event contains information about the event
and the listener’s handling code can extract this information and use it if
required.
Figures 5.19 and 5.20 illustrates this Java event model diagrammatically. The
listener is only schematic and isn’t visible in the GUI of course.
Figure 5.19 A listener is registered
Figure 5.20 Event handling
Although the GUI Builder cannot provide the program logic that will
determine how our GUI will behave, it is able to automate the routine details
of the event model for us. As we shall see, all we have to do manually is:
. select the component where the event will be generated
75
5 Using the NetBeans GUI Builder
To keep things simple
we have described just
one listener and one
component but in fact
it’s possible for several
listeners to register with
a given component, and
also for a listener to be
registered with more than
one component.
Black plate (76,1)
. choose what type of event we are interested in
. complete the body of the event handling method.
All the rest – setting up and registering the listener – is taken care of for us
by the GUI Builder.
Adding events
In the Inspector, right-click the onButton node. This should correspond to
the button labelled On. You can check that you have the right button
selected by looking at the Design view.
From the menu choose Events. This brings up a submenu of different kinds
of event that can happen in a user interface. We will make our buttons
respond to a mouse click. From the submenu pick Mouse, then
mouseClicked.
NetBeans immediately takes us to the source code window, where a new
method has been automatically created for us:
private void onButtonMouseClicked(java.awt.event.
MouseEvent evt)
{
// TODO add your handling code here:
}
This is inviting us to write the event handling code that specifies what is to
happen when the button onButton receives a mouse click. Since the
purpose of this button is to switch the light bulb on, replace the TODO
comment with the statement:
lightBulb.setBackground(java.awt.Color.YELLOW);
You will remember that we renamed the variable referring to the ‘light bulb’
(really a JLabel of course) to lightBulb. This line of code changes the
colour of our ‘light bulb’ to yellow, to simulate the light coming on.
Now carry out exactly the same steps for the other button, offButton,
whose purpose is to switch the light off. NetBeans will invite us to complete
a second method, like the one above but this time called
offButtonMouseClicked. Replace the TODO comment with the code:
lightBulb.setBackground(java.awt.Color.LIGHT_GRAY);
This line of code changes the colour of our ‘light bulb’ back to grey, to
simulate the light going out.
The program is now complete! If you run the project you should find that
clicking the On button makes the light come on and clicking the Off button
makes it go out.
Removing an event
We often add an event by mistake, or change our minds, and want to remove
an event. This is quite easily done.
NetBeans Guide
76
You can also work
directly in the Design
view. Right-clicking on
the On button will bring
up the same menu. The
only slight disadvantage
of working purely with
the Design view is that
with complicated forms
it would be easy to
select the wrong item by
mistake. This is less
likely to happen when
using the Inspector.
Class Color in the
package java.awt
represents colour objects
in Java graphics.
Remember that the
program must actually be
running for the buttons
to be active. In Preview
Design clicking the
buttons will have no
effect.
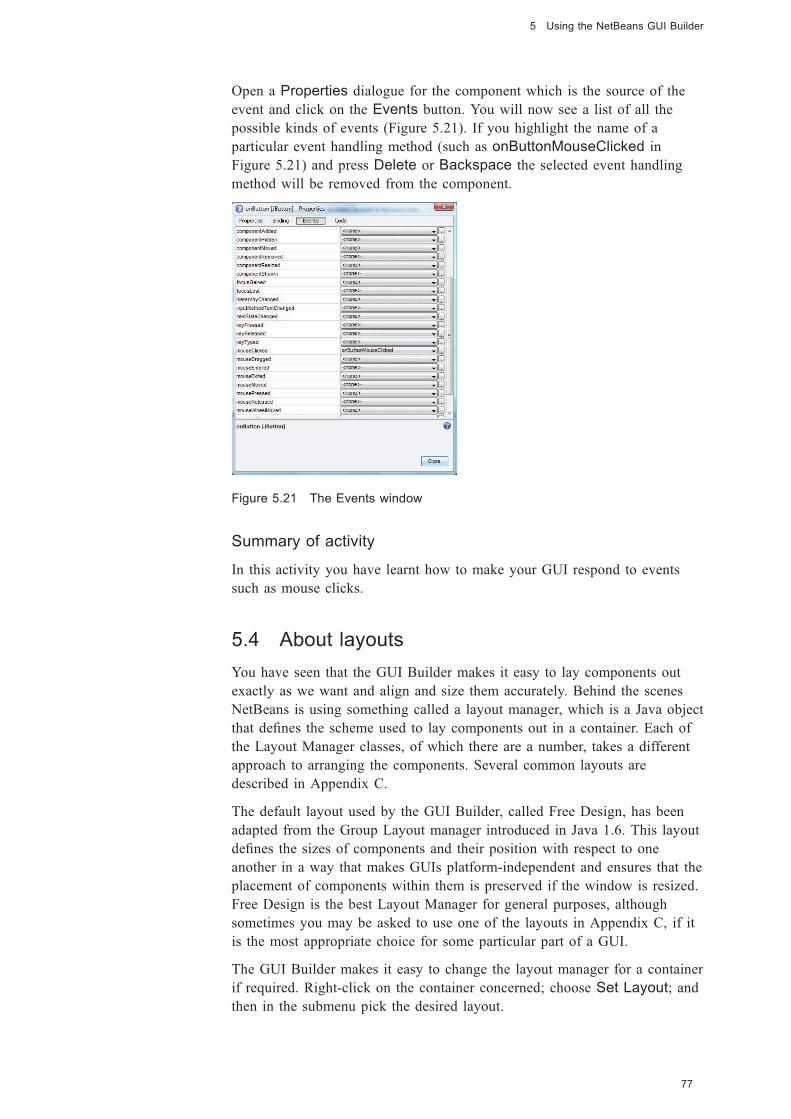
Black plate (77,1)
Open a Properties dialogue for the component which is the source of the
event and click on the Events button. You will now see a list of all the
possible kinds of events (Figure 5.21). If you highlight the name of a
particular event handling method (such as onButtonMouseClicked in
Figure 5.21) and press Delete or Backspace the selected event handling
method will be removed from the component.
Figure 5.21 The Events window
Summary of activity
In this activity you have learnt how to make your GUI respond to events
such as mouse clicks.
5.4 About layouts
You have seen that the GUI Builder makes it easy to lay components out
exactly as we want and align and size them accurately. Behind the scenes
NetBeans is using something called a layout manager, which is a Java object
that defines the scheme used to lay components out in a container. Each of
the Layout Manager classes, of which there are a number, takes a different
approach to arranging the components. Several common layouts are
described in Appendix C.
The default layout used by the GUI Builder, called Free Design, has been
adapted from the Group Layout manager introduced in Java 1.6. This layout
defines the sizes of components and their position with respect to one
another in a way that makes GUIs platform-independent and ensures that the
placement of components within them is preserved if the window is resized.
Free Design is the best Layout Manager for general purposes, although
sometimes you may be asked to use one of the layouts in Appendix C, if it
is the most appropriate choice for some particular part of a GUI.
The GUI Builder makes it easy to change the layout manager for a container
if required. Right-click on the container concerned; choose Set Layout; and
then in the submenu pick the desired layout.
77
5 Using the NetBeans GUI Builder
Black plate (78,1)
6 Using JUnit to test your code
Testing a very small project needs no special techniques. We simply write a
test class with a main method that creates some suitable objects, invokes
the methods under test on these objects, and examines the results to see if
they are what we expect. If the observed results agree with the expected
ones, the code has passed the test. If one or more results are not correct, we
go back and debug the code.
However, this ad hoc approach does not scale up successfully to larger
programs. Creating, managing and running the tests required for projects that
may contain hundreds or thousands of classes is impractical without some
form of automation. This is where JUnit comes in.
JUnit is a framework that makes it easy for us to write tests in a standard
format, to manage the tests we have written, to run them all together and to
generate a report of the results. The tests we write are unit tests – tests of a
single method. We group them into test classes, and can further group the
test classes into test suites.
Many IDEs provide built-in support for JUnit. In this guide you will learn
how to use JUnit from NetBeans, but the basic principles will be similar in
other IDEs.
JUnit is intended to be used in ‘cookbook’ style. That is, behind the scenes
some outstandingly clever code is working for us, but we can generally take
most of it for granted (this is true of all high-level language programming!).
So you will find that as we go along we do not explain everything, only
what you need to know to use JUnit effectively.
Our unit testing is black box. We do not examine the internal workings of
methods, only whether they conform to their specifications, that is, produce
the right results.
How JUnit is used
Before you begin the activities in this section you will find it useful to have
an overview of how JUnit is used.
1 For each class we want to test we create a corresponding test class.
2 In each test class we write test methods, generally one for each test we
want to carry out.
3 In the test methods we include assertions. An assertion is a special
statement that evaluates to true or false depending on whether or not an
observed result agrees with the expected one.
4 We then call on the JUnit test runner, which executes all the test methods
in the test classes. If none of the assertions in a test method evaluate to
false – that is every actual value agrees with the expected one – the test
passes. Otherwise it fails.
5 The test runner then produces a summary of which tests passed and
which failed.
NetBeans Guide
78
A unit test is the smallest
possible test. We can
think of unit tests as the
atoms from which all
larger-scale tests are built
up.
JUnit has effectively
become the standard for
automating unit tests. It
is one of a family of
testing frameworks for
different programming
languages, such as
CppUnit for C++, nUnit
for .NET and so on. The
first of these was sUnit
written by Kent Beck for
the Smalltalk language.
Black plate (79,1)
Note that when the test runner executes the test methods they run in an
environment that is special to JUnit and the test classes do not have to
contain a main method. They do have to contain at least one test method
though.
The first activity is designed to familiarise you with the nuts and bolts of
creating a test class and executing it in the test runner. Once you have got
this grounding, we will show you how you can apply it to a more realistic
example.
At the time of writing NetBeans supports two versions of JUnit – JUnit 3.8.2
which is the traditional JUnit framework and JUnit 4.5 which provides a
simpler and more flexible framework based on annotations. In this guide we
use only version 4.5.
6.1 A simple test case
Activity 12
In this activity you will learn how to:
. create a test class
. add test methods to the test class
. run a test class and interpret the results
. complete a test method by writing an assertion.
Creating a test class
Launch NetBeans if it is not already running. Open the project Documents
\NBGuide2\DryRun. The single package in this project, dryrun,
contains a single class called DummyClass. This class is completely empty
and does nothing. It is there simply so we can look at the details of how to
set up and run a test class containing a test method, in preparation for the
testing activities that come later.
In the Projects window expand the node for project Dry Run. Notice the
folders Test Packages and Test Libraries. If you open the Test Libraries
folder you will see that it contains the libraries for JUnit 3.8.2 and JUnit 4.5,
although as noted you will only be working with JUnit 4.5.
The Test Packages folder is where our test classes go. Normally for each
Java class we are testing there will be a corresponding test class, and the test
classes will be arranged in a package structure that mirrors the package
structure of the classes under test.
Right-click on Test Packages and choose New|Java Class…. Enter
DummyClassTest for the Class Name: and dryrun for the Package:
as in Figure 6.1. Press Finish.
79
6 Using JUnit to test your code
Java annotations are a
way of providing extra
information to the
compiler or the runtime
system. Annotations
begin with the @ symbol,
which represents ‘AT’,
standing for Annotation
Type.
A test class can have any
name you like but
sticking to the
convention that the test
class corresponding to
class SomeClass will
be named
SomeClassTest
makes it easy to match a
class to its test class.
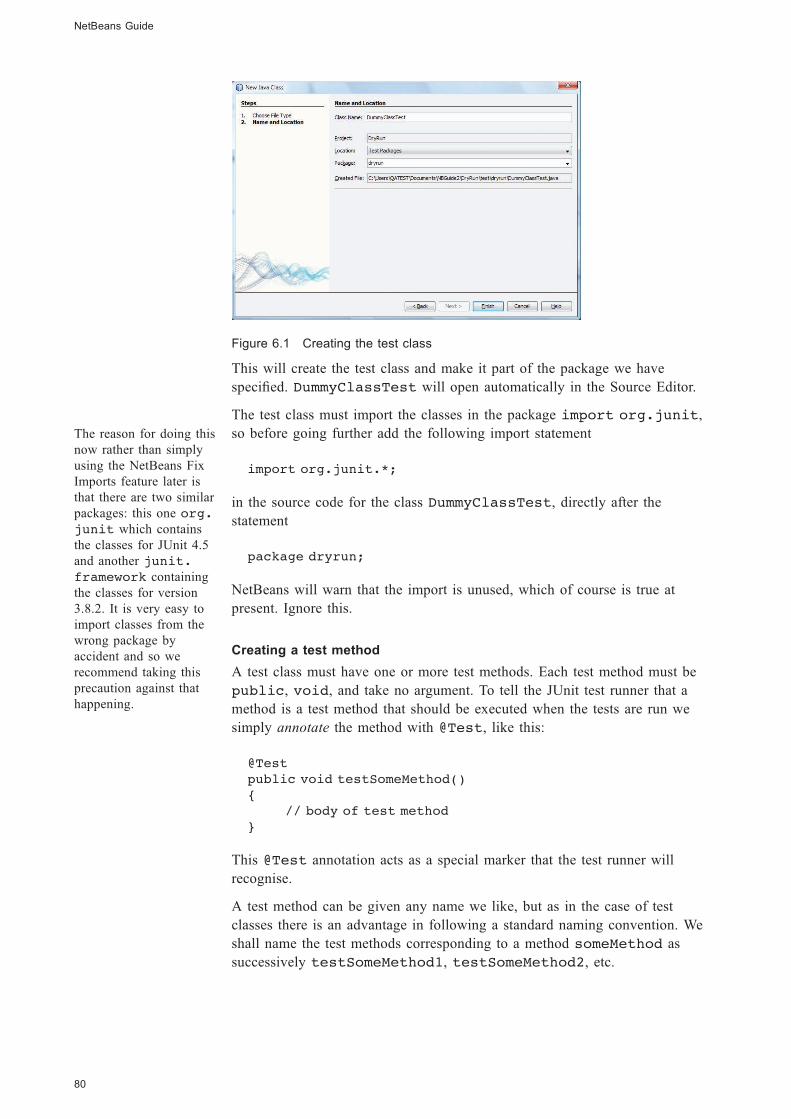
Black plate (80,1)
Figure 6.1 Creating the test class
This will create the test class and make it part of the package we have
specified. DummyClassTest will open automatically in the Source Editor.
The test class must import the classes in the package import org.junit,
so before going further add the following import statement
import org.junit.*;
in the source code for the class DummyClassTest, directly after the
statement
package dryrun;
NetBeans will warn that the import is unused, which of course is true at
present. Ignore this.
Creating a test method
A test class must have one or more test methods. Each test method must be
public, void, and take no argument. To tell the JUnit test runner that a
method is a test method that should be executed when the tests are run we
simply annotate the method with @Test, like this:
@Test
public void testSomeMethod()
{
// body of test method
}
This @Test annotation acts as a special marker that the test runner will
recognise.
A test method can be given any name we like, but as in the case of test
classes there is an advantage in following a standard naming convention. We
shall name the test methods corresponding to a method someMethod as
successively testSomeMethod1, testSomeMethod2, etc.
NetBeans Guide
80
The reason for doing this
now rather than simply
using the NetBeans Fix
Imports feature later is
that there are two similar
packages: this one org.
junit which contains
the classes for JUnit 4.5
and another junit.
framework containing
the classes for version
3.8.2. It is very easy to
import classes from the
wrong package by
accident and so we
recommend taking this
precaution against that
happening.
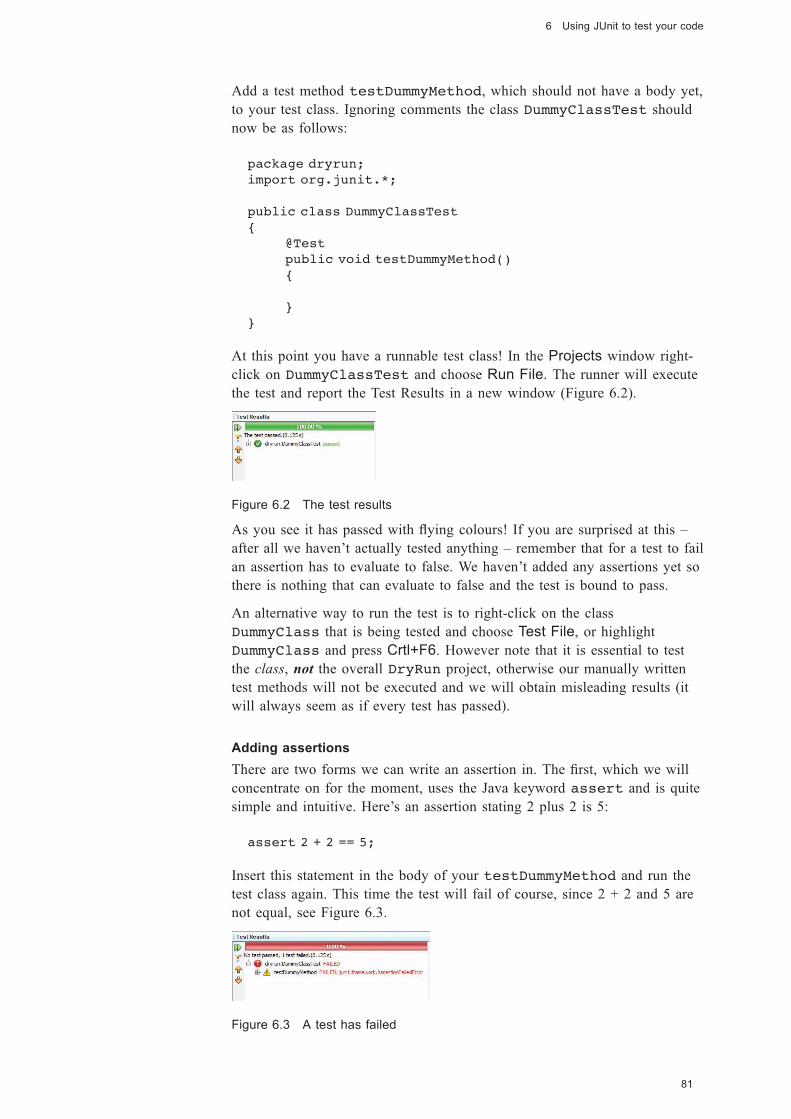
Black plate (81,1)
Add a test method testDummyMethod, which should not have a body yet,
to your test class. Ignoring comments the class DummyClassTest should
now be as follows:
package dryrun;
import org.junit.*;
public class DummyClassTest
{
@Test
public void testDummyMethod()
{
}
}
At this point you have a runnable test class! In the Projects window right-
click on DummyClassTest and choose Run File. The runner will execute
the test and report the Test Results in a new window (Figure 6.2).
Figure 6.2 The test results
As you see it has passed with flying colours! If you are surprised at this –
after all we haven’t actually tested anything – remember that for a test to fail
an assertion has to evaluate to false. We haven’t added any assertions yet so
there is nothing that can evaluate to false and the test is bound to pass.
An alternative way to run the test is to right-click on the class
DummyClass that is being tested and choose Test File, or highlight
DummyClass and press Crtl+F6. However note that it is essential to test
the class, not the overall DryRun project, otherwise our manually written
test methods will not be executed and we will obtain misleading results (it
will always seem as if every test has passed).
Adding assertions
There are two forms we can write an assertion in. The first, which we will
concentrate on for the moment, uses the Java keyword assert and is quite
simple and intuitive. Here’s an assertion stating 2 plus 2 is 5:
assert 2 + 2 == 5;
Insert this statement in the body of your testDummyMethod and run the
test class again. This time the test will fail of course, since 2 + 2 and 5 are
not equal, see Figure 6.3.
Figure 6.3 A test has failed
81
6 Using JUnit to test your code
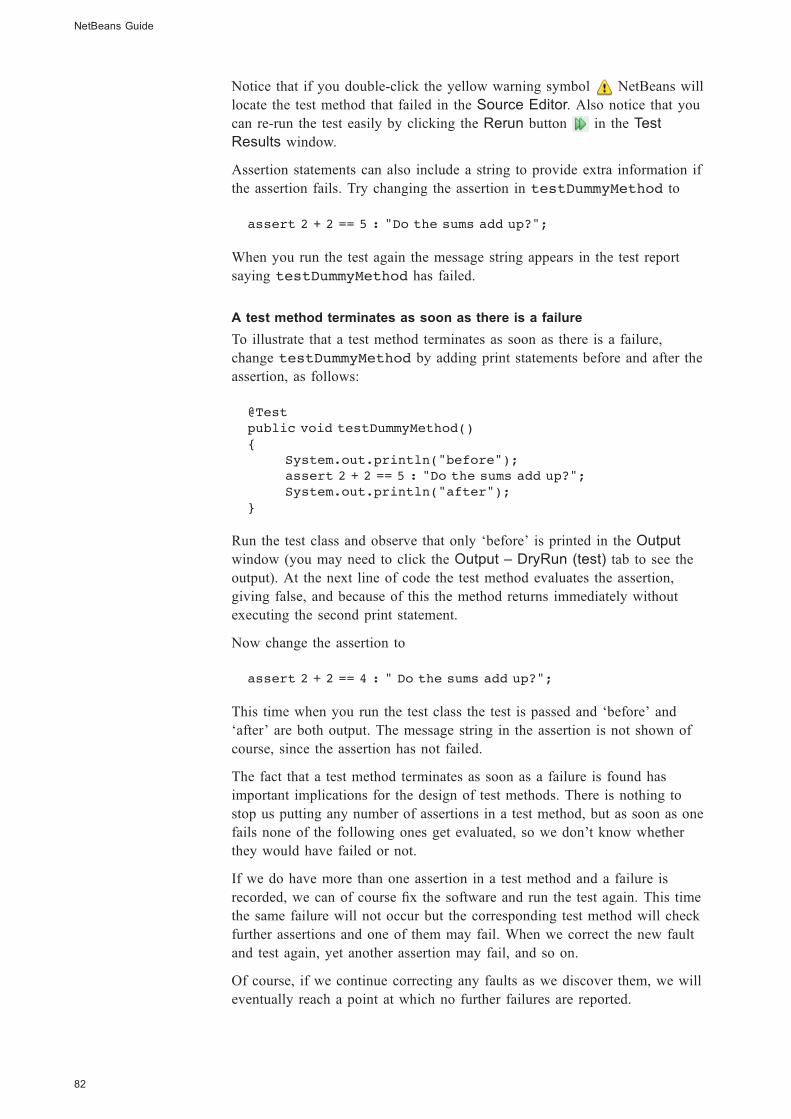
Black plate (82,1)
Notice that if you double-click the yellow warning symbol NetBeans will
locate the test method that failed in the Source Editor. Also notice that you
can re-run the test easily by clicking the Rerun button in the Test
Results window.
Assertion statements can also include a string to provide extra information if
the assertion fails. Try changing the assertion in testDummyMethod to
assert 2 + 2 == 5 : "Do the sums add up?";
When you run the test again the message string appears in the test report
saying testDummyMethod has failed.
A test method terminates as soon as there is a failure
To illustrate that a test method terminates as soon as there is a failure,
change testDummyMethod by adding print statements before and after the
assertion, as follows:
@Test
public void testDummyMethod()
{
System.out.println("before");
assert 2 + 2 == 5 : "Do the sums add up?";
System.out.println("after");
}
Run the test class and observe that only ‘before’ is printed in the Output
window (you may need to click the Output – DryRun (test) tab to see the
output). At the next line of code the test method evaluates the assertion,
giving false, and because of this the method returns immediately without
executing the second print statement.
Now change the assertion to
assert 2 + 2 == 4 : " Do the sums add up?";
This time when you run the test class the test is passed and ‘before’ and
‘after’ are both output. The message string in the assertion is not shown of
course, since the assertion has not failed.
The fact that a test method terminates as soon as a failure is found has
important implications for the design of test methods. There is nothing to
stop us putting any number of assertions in a test method, but as soon as one
fails none of the following ones get evaluated, so we don’t know whether
they would have failed or not.
If we do have more than one assertion in a test method and a failure is
recorded, we can of course fix the software and run the test again. This time
the same failure will not occur but the corresponding test method will check
further assertions and one of them may fail. When we correct the new fault
and test again, yet another assertion may fail, and so on.
Of course, if we continue correcting any faults as we discover them, we will
eventually reach a point at which no further failures are reported.
NetBeans Guide
82
Black plate (83,1)
However, if we want to maximise the information we get from each test run
we should keep the number of assertions per test method as small as
possible and if necessary spilt test methods up to give more methods but
with fewer assertions in each one.
Summary of activity
In this activity you have learnt how to create a test class, how to use the
JUnit test runner and what the test results it produces look like. You have
learnt how to write an assertion in a test method. Finally, you learnt that a
test method terminates as soon as an assertion in it fails, which leads us to
aim at keeping the number of assertions in any one method to a minimum.
In the next activity you will see a slightly more realistic example of testing,
involving more than one class and involving several methods that carry out
significant tasks.
You can now exit the IDE or leave it open if you are going straight on to the
next activity.
6.2 Creating and using test objects
Activity 13
In this activity you will learn how to:
. set up a fixture containing test objects
. test that a method throws an exception where expected
. use a different form of assertion
. develop tests before writing the corresponding methods
. write a complete set of unit tests for a class.
Open the project Documents\NBGuide2\ShoppingSpecification.
This contains, in a single package shopping, three classes:
. Item, which represents an item of shopping with a description and a
price
. Basket, which represents a collection of items that a customer has
gathered
. NullItemException, a user-defined runtime exception that will be
thrown if an attempt is made to add a null item to a shopping list.
The classes Item and NullItemException are already complete and
require no testing.
Basket has methods that allow items to be added and removed, a method
to return a collection containing the items in the basket, and a method to
calculate the total cost of the items.
The only methods in Item are getters for its two attributes, description
and price. These attributes are set by the Item constructor.
83
6 Using JUnit to test your code
You might like to think
of this project as part of
a simplified online
shopping system that is
being developed.
Black plate (84,1)
Generate the Javadoc for the project by highlighting it in the Projects
window and using the Run|Generate Javadoc option as detailed in
Activity 6 or alternatively right-click on the project and choose Generate
Javadoc.
You should take a little time to browse through the Javadoc for Basket and
Item. In particular you should study the detail of the methods in Basket
since this is the class you will be testing.
Next expand the project in the Projects window and open the source of the
class Basket. You will find that its constructor is complete but – with the
exception of the getter method getContents – its methods have not yet
been implemented. The method headers are all complete but the bodies of
the methods have not been written. (The method calculateTotal returns
a temporary value of 0, just so the code will compile.)
This is because we are following a test-first approach to program
development. This is a philosophy in which we begin by using the
specification to produce a set of tests. Code that meets the specification must
be capable of passing these tests.
When we have written the tests, we proceed to write the code and submit it
to the tests. If there are any failures, we correct the code and test it again.
This cycle of test and fix is repeated as many times as necessary, until
eventually we obtain a version of the code that successfully passes all the
tests.
To tie this approach in with JUnit we can use the following procedure.
1 Working from the class specifications, write skeleton classes that contain
empty methods. These methods have headers but do not implement any
behaviour yet, the method bodies are empty.
2 From these classes create corresponding test classes.
3 In the test classes write the unit tests.
4 Fill in the bodies of the methods to be tested, so the behaviour is now
implemented, and run the tests.
5 If there are any failures – discrepancies between expected and actual
results – amend the method code and re-test. Continue the cycle of
testing and correcting until the code passes all the tests.
In our example the classes Item and NullItemException are complete
and you can assume they have already been tested. However, as you have
seen the methods in Basket have not been implemented yet. In line with
the test-first philosophy discussed above, we are going to write the unit tests
for Basket first and only then write the missing code.
NetBeans Guide
84
When you generate the
Javadoc you may notice
in the Output window
two messages saying that
item is not a parameter.
These are because we
have not implemented
the method bodies yet so
you can ignore them!
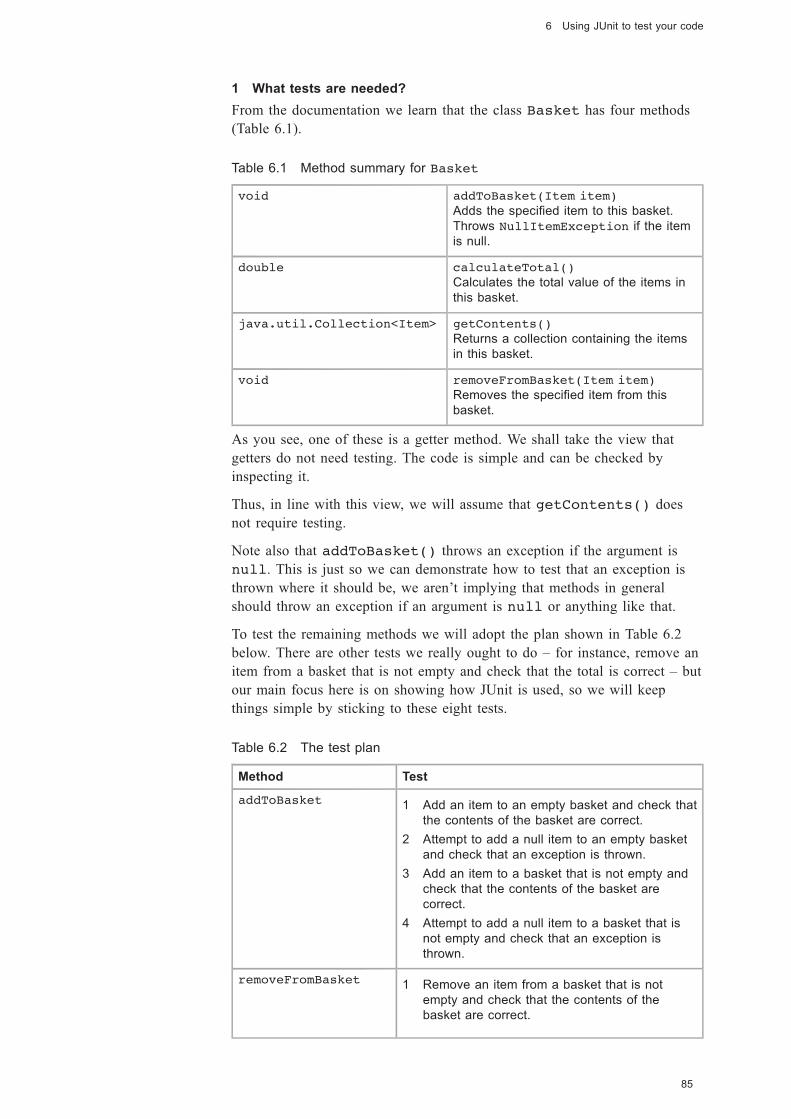
Black plate (85,1)
1 What tests are needed?
From the documentation we learn that the class Basket has four methods
(Table 6.1).
Table 6.1 Method summary for Basket
void addToBasket(Item item)
Adds the specified item to this basket.
Throws NullItemException if the item
is null.
double calculateTotal()
Calculates the total value of the items in
this basket.
java.util.Collection<Item> getContents()
Returns a collection containing the items
in this basket.
void removeFromBasket(Item item)
Removes the specified item from this
basket.
As you see, one of these is a getter method. We shall take the view that
getters do not need testing. The code is simple and can be checked by
inspecting it.
Thus, in line with this view, we will assume that getContents() does
not require testing.
Note also that addToBasket() throws an exception if the argument is
null. This is just so we can demonstrate how to test that an exception is
thrown where it should be, we aren’t implying that methods in general
should throw an exception if an argument is null or anything like that.
To test the remaining methods we will adopt the plan shown in Table 6.2
below. There are other tests we really ought to do – for instance, remove an
item from a basket that is not empty and check that the total is correct – but
our main focus here is on showing how JUnit is used, so we will keep
things simple by sticking to these eight tests.
Table 6.2 The test plan
Method Test
addToBasket 1 Add an item to an empty basket and check that
the contents of the basket are correct.
2 Attempt to add a null item to an empty basket
and check that an exception is thrown.
3 Add an item to a basket that is not empty and
check that the contents of the basket are
correct.
4 Attempt to add a null item to a basket that is
not empty and check that an exception is
thrown.
removeFromBasket 1 Remove an item from a basket that is not
empty and check that the contents of the
basket are correct.
85
6 Using JUnit to test your code
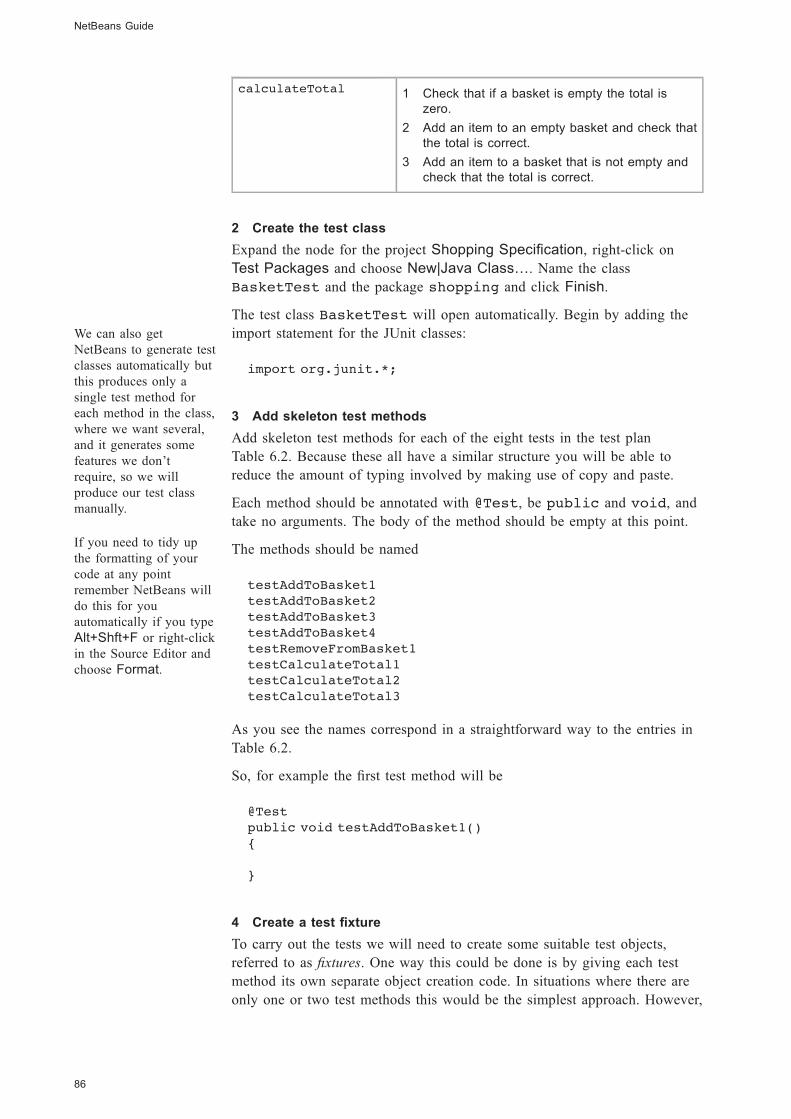
Black plate (86,1)
calculateTotal 1 Check that if a basket is empty the total is
zero.
2 Add an item to an empty basket and check that
the total is correct.
3 Add an item to a basket that is not empty and
check that the total is correct.
2 Create the test class
Expand the node for the project Shopping Specification, right-click on
Test Packages and choose New|Java Class…. Name the class
BasketTest and the package shopping and click Finish.
The test class BasketTest will open automatically. Begin by adding the
import statement for the JUnit classes:
import org.junit.*;
3 Add skeleton test methods
Add skeleton test methods for each of the eight tests in the test plan
Table 6.2. Because these all have a similar structure you will be able to
reduce the amount of typing involved by making use of copy and paste.
Each method should be annotated with @Test, be public and void, and
take no arguments. The body of the method should be empty at this point.
The methods should be named
testAddToBasket1
testAddToBasket2
testAddToBasket3
testAddToBasket4
testRemoveFromBasket1
testCalculateTotal1
testCalculateTotal2
testCalculateTotal3
As you see the names correspond in a straightforward way to the entries in
Table 6.2.
So, for example the first test method will be
@Test
public void testAddToBasket1()
{
}
4 Create a test fixture
To carry out the tests we will need to create some suitable test objects,
referred to as fixtures. One way this could be done is by giving each test
method its own separate object creation code. In situations where there are
only one or two test methods this would be the simplest approach. However,
NetBeans Guide
86
We can also get
NetBeans to generate test
classes automatically but
this produces only a
single test method for
each method in the class,
where we want several,
and it generates some
features we don’t
require, so we will
produce our test class
manually.
If you need to tidy up
the formatting of your
code at any point
remember NetBeans will
do this for you
automatically if you type
Alt+Shft+F or right-click
in the Source Editor and
choose Format.
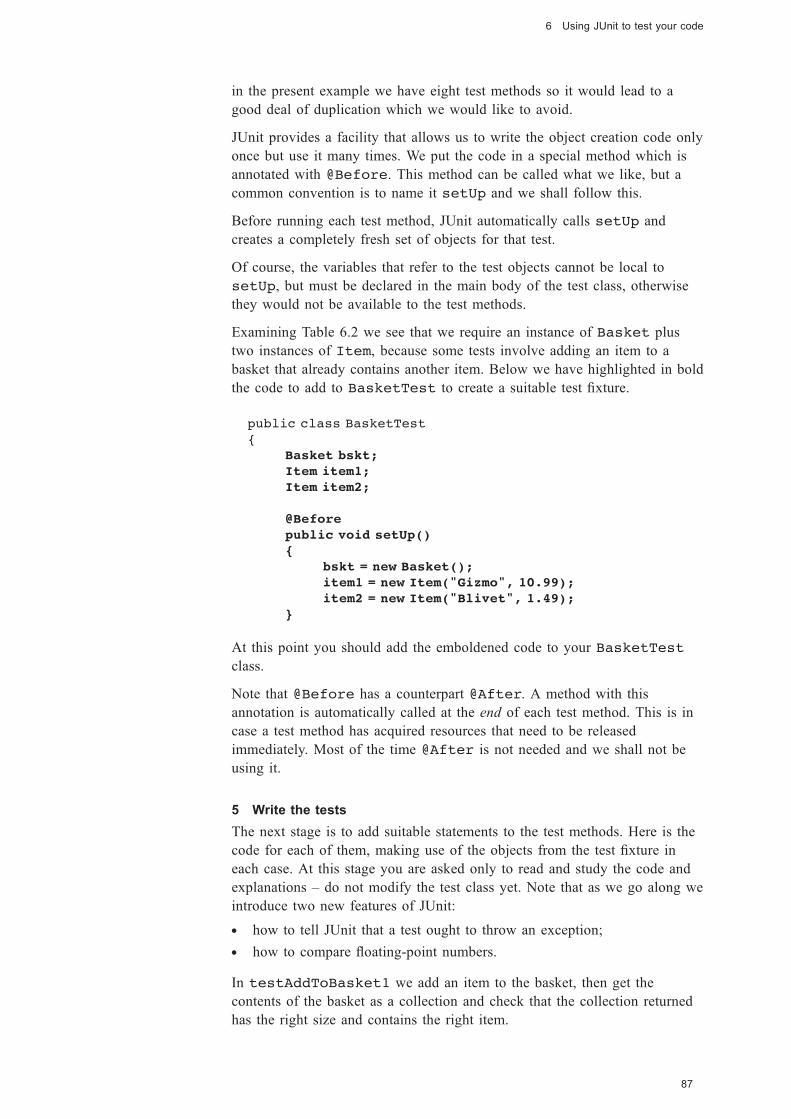
Black plate (87,1)
in the present example we have eight test methods so it would lead to a
good deal of duplication which we would like to avoid.
JUnit provides a facility that allows us to write the object creation code only
once but use it many times. We put the code in a special method which is
annotated with @Before. This method can be called what we like, but a
common convention is to name it setUp and we shall follow this.
Before running each test method, JUnit automatically calls setUp and
creates a completely fresh set of objects for that test.
Of course, the variables that refer to the test objects cannot be local to
setUp, but must be declared in the main body of the test class, otherwise
they would not be available to the test methods.
Examining Table 6.2 we see that we require an instance of Basket plus
two instances of Item, because some tests involve adding an item to a
basket that already contains another item. Below we have highlighted in bold
the code to add to BasketTest to create a suitable test fixture.
public class BasketTest
{
Basket bskt;
Item item1;
Item item2;
@Before
public void setUp()
{
bskt = new Basket();
item1 = new Item("Gizmo", 10.99);
item2 = new Item("Blivet", 1.49);
}
At this point you should add the emboldened code to your BasketTest
class.
Note that @Before has a counterpart @After. A method with this
annotation is automatically called at the end of each test method. This is in
case a test method has acquired resources that need to be released
immediately. Most of the time @After is not needed and we shall not be
using it.
5 Write the tests
The next stage is to add suitable statements to the test methods. Here is the
code for each of them, making use of the objects from the test fixture in
each case. At this stage you are asked only to read and study the code and
explanations – do not modify the test class yet. Note that as we go along we
introduce two new features of JUnit:
. how to tell JUnit that a test ought to throw an exception;
. how to compare floating-point numbers.
In testAddToBasket1 we add an item to the basket, then get the
contents of the basket as a collection and check that the collection returned
has the right size and contains the right item.
87
6 Using JUnit to test your code
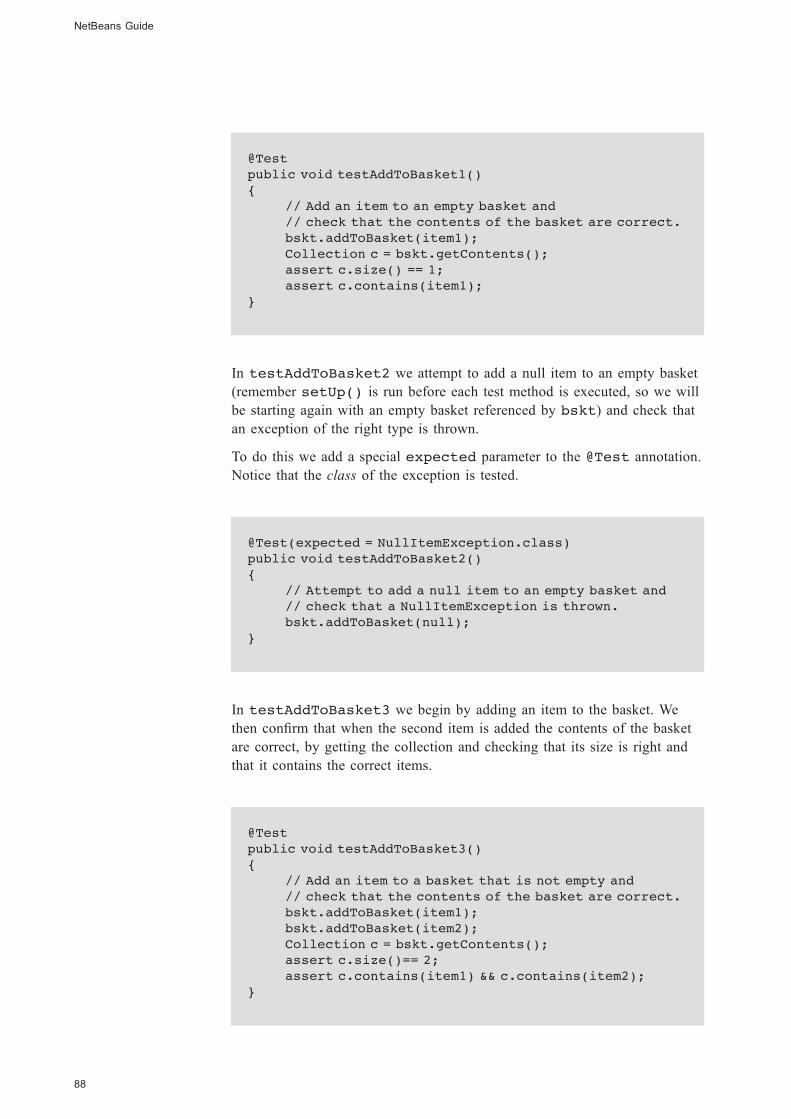
Black plate (88,1)
@Test
public void testAddToBasket1()
{
// Add an item to an empty basket and
// check that the contents of the basket are correct.
bskt.addToBasket(item1);
Collection c = bskt.getContents();
assert c.size() == 1;
assert c.contains(item1);
}
In testAddToBasket2 we attempt to add a null item to an empty basket
(remember setUp() is run before each test method is executed, so we will
be starting again with an empty basket referenced by bskt) and check that
an exception of the right type is thrown.
To do this we add a special expected parameter to the @Test annotation.
Notice that the class of the exception is tested.
@Test(expected = NullItemException.class)
public void testAddToBasket2()
{
// Attempt to add a null item to an empty basket and
// check that a NullItemException is thrown.
bskt.addToBasket(null);
}
In testAddToBasket3 we begin by adding an item to the basket. We
then confirm that when the second item is added the contents of the basket
are correct, by getting the collection and checking that its size is right and
that it contains the correct items.
@Test
public void testAddToBasket3()
{
// Add an item to a basket that is not empty and
// check that the contents of the basket are correct.
bskt.addToBasket(item1);
bskt.addToBasket(item2);
Collection c = bskt.getContents();
assert c.size()== 2;
assert c.contains(item1) && c.contains(item2);
}
NetBeans Guide
88

Black plate (89,1)
In testAddToBasket4 we begin by adding an item to the basket. We
then check that when an attempt is made to add a null item an exception of
the right type is thrown.
@Test(expected = NullItemException.class)
public void testAddToBasket4()
{
// Attempt to add a null item to a basket that is not
// empty and check that an exception is thrown.
bskt.addToBasket(item1);
bskt.addToBasket(null);
}
In testRemoveFromBasket1, we add an item to the basket, then remove
it and check that the basket is empty once more.
public void testRemoveFromBasket1()
{
// Remove an item from a basket that is not empty and
// check that the contents of the basket are correct.
// Put something in the basket
bskt.addToBasket(item1);
Collection c = bskt.getContents();
assert c.size() == 1;
// Take it out again
bskt.removeFromBasket(item1);
c = bskt.getContents();
assert c.isEmpty();
}
The three methods that test calculateTotal involve something new
because we need to compare two floating-point values to see if they agree.
This is not as straightforward as it might seem. You may have sometimes
noticed that on your calculator you can end up with, say, 2.999999999 when
the answer is really 3. This is because floating-point numbers have only a
certain level of accuracy and calculations on them can give results that are
slightly out. Java floating-point calculations work in a similar manner.
This means that when we compare two floating-point values of type float
or double we have to specify how near they must be to each other to be
considered equal. This tolerance is called delta.
It also means we cannot just use a simple assert statement as we have
previously. We need to invoke a static method of the class Assert (part of
the org.junit package).
89
6 Using JUnit to test your code

Black plate (90,1)
The assertion takes the form:
Assert.assertEquals(<(optional) message string>,
<expected value>, <actual value>, delta)
The <expected value> and the <actual value> need to agree to
within delta for the assertion to succeed. For example, assertEquals
(4.99, 5.00, 0.01) will succeed because the difference between the
expected and actual values is not greater than the tolerance 0.01.
In the three tests below we have used assertions that check the total using a
delta that we have set at 0.005, since we are dealing with money for which
0.01 is the smallest possible increment. A value of less than 0.01 is required
to ensure that, for example, the distinct monetary values 10.99 and 10.98 are
considered as unequal by assertion.
@Test
public void testCalculateTotal1()
{
// Check that if a basket is empty the total is zero.
Assert.assertEquals(0, bskt.calculateTotal(),
0.005);
}
@Test
public void testCalculateTotal2()
{
// Add an item to an empty basket and
// check that the total is correct.
bskt.addToBasket(item1);
Assert.assertEquals(10.99, bskt.calculateTotal(),
0.005);
}
@Test
public void testCalculateTotal3()
{
// Add an item to a basket that is not
// empty and check that the total is correct.
bskt.addToBasket(item1);
bskt.addToBasket(item2);
Assert.assertEquals(10.99 + 1.49,
bskt.calculateTotal(),
0.005);
}
NetBeans Guide
90
This is only one of a
whole series of static
methods provided in
Assert. If you are
interested you can
consult the Javadoc for
the class.
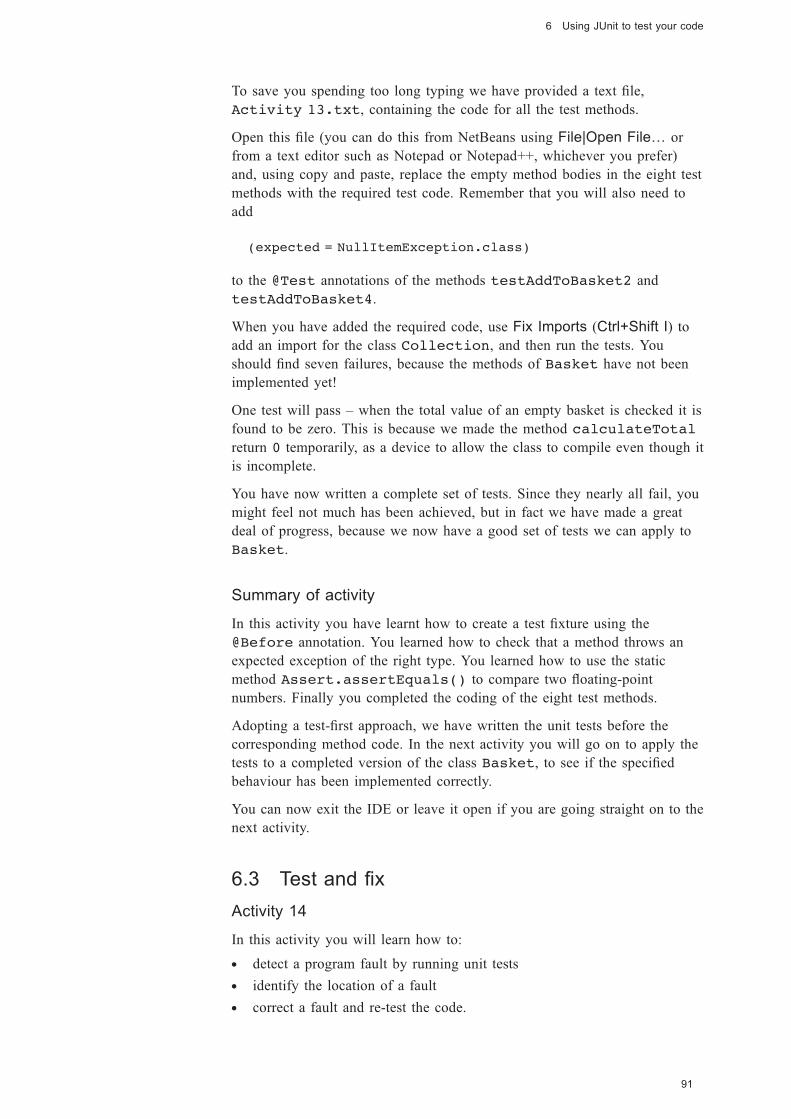
Black plate (91,1)
To save you spending too long typing we have provided a text file,
Activity 13.txt, containing the code for all the test methods.
Open this file (you can do this from NetBeans using File|Open File… or
from a text editor such as Notepad or Notepad++, whichever you prefer)
and, using copy and paste, replace the empty method bodies in the eight test
methods with the required test code. Remember that you will also need to
add
(expected = NullItemException.class)
to the @Test annotations of the methods testAddToBasket2 and
testAddToBasket4.
When you have added the required code, use Fix Imports (Ctrl+Shift I) to
add an import for the class Collection, and then run the tests. You
should find seven failures, because the methods of Basket have not been
implemented yet!
One test will pass – when the total value of an empty basket is checked it is
found to be zero. This is because we made the method calculateTotal
return 0 temporarily, as a device to allow the class to compile even though it
is incomplete.
You have now written a complete set of tests. Since they nearly all fail, you
might feel not much has been achieved, but in fact we have made a great
deal of progress, because we now have a good set of tests we can apply to
Basket.
Summary of activity
In this activity you have learnt how to create a test fixture using the
@Before annotation. You learned how to check that a method throws an
expected exception of the right type. You learned how to use the static
method Assert.assertEquals() to compare two floating-point
numbers. Finally you completed the coding of the eight test methods.
Adopting a test-first approach, we have written the unit tests before the
corresponding method code. In the next activity you will go on to apply the
tests to a completed version of the class Basket, to see if the specified
behaviour has been implemented correctly.
You can now exit the IDE or leave it open if you are going straight on to the
next activity.
6.3 Test and fix
Activity 14
In this activity you will learn how to:
. detect a program fault by running unit tests
. identify the location of a fault
. correct a fault and re-test the code.
91
6 Using JUnit to test your code
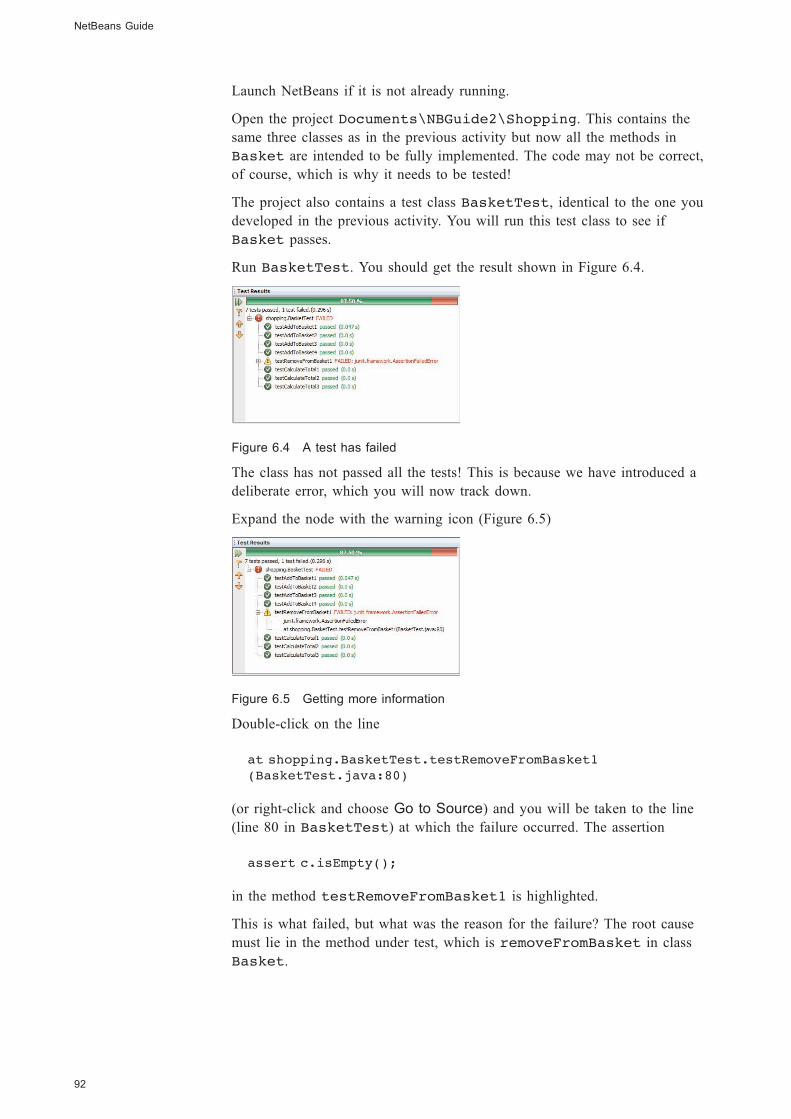
Black plate (92,1)
Launch NetBeans if it is not already running.
Open the project Documents\NBGuide2\Shopping. This contains the
same three classes as in the previous activity but now all the methods in
Basket are intended to be fully implemented. The code may not be correct,
of course, which is why it needs to be tested!
The project also contains a test class BasketTest, identical to the one you
developed in the previous activity. You will run this test class to see if
Basket passes.
Run BasketTest. You should get the result shown in Figure 6.4.
Figure 6.4 A test has failed
The class has not passed all the tests! This is because we have introduced a
deliberate error, which you will now track down.
Expand the node with the warning icon (Figure 6.5)
Figure 6.5 Getting more information
Double-click on the line
at shopping.BasketTest.testRemoveFromBasket1
(BasketTest.java:80)
(or right-click and choose Go to Source) and you will be taken to the line
(line 80 in BasketTest) at which the failure occurred. The assertion
assert c.isEmpty();
in the method testRemoveFromBasket1 is highlighted.
This is what failed, but what was the reason for the failure? The root cause
must lie in the method under test, which is removeFromBasket in class
Basket.
NetBeans Guide
92
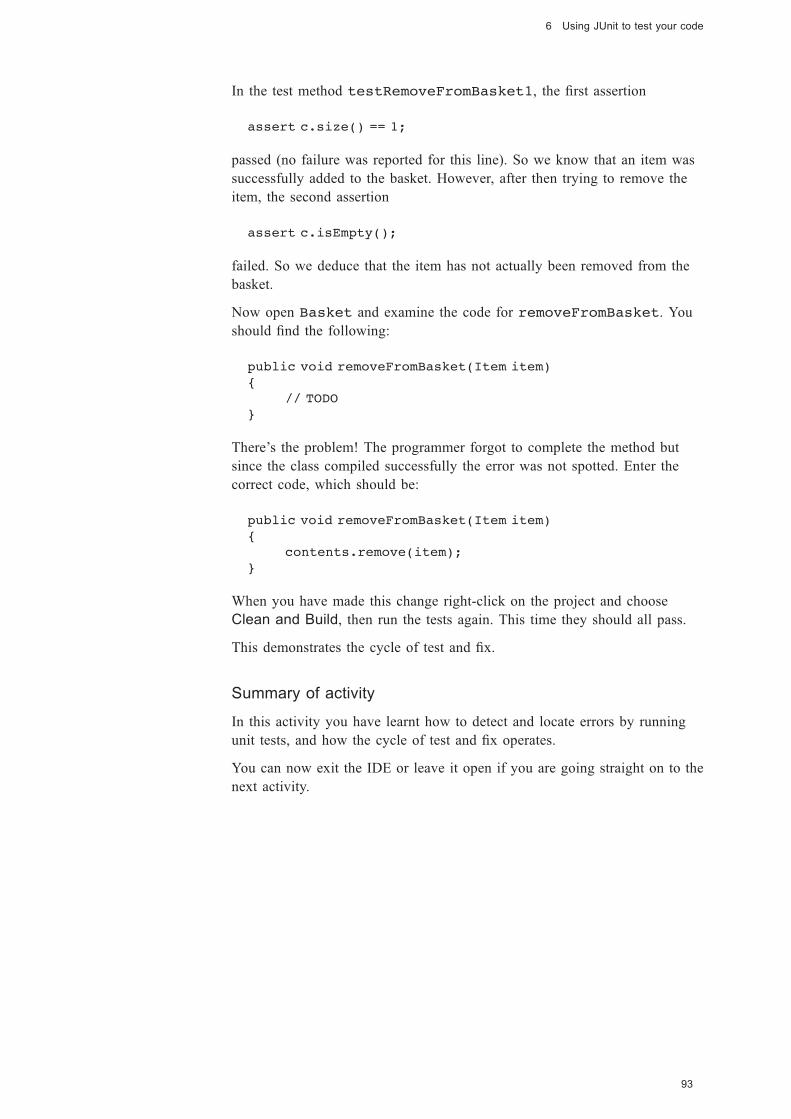
Black plate (93,1)
In the test method testRemoveFromBasket1, the first assertion
assert c.size() == 1;
passed (no failure was reported for this line). So we know that an item was
successfully added to the basket. However, after then trying to remove the
item, the second assertion
assert c.isEmpty();
failed. So we deduce that the item has not actually been removed from the
basket.
Now open Basket and examine the code for removeFromBasket. You
should find the following:
public void removeFromBasket(Item item)
{
// TODO
}
There’s the problem! The programmer forgot to complete the method but
since the class compiled successfully the error was not spotted. Enter the
correct code, which should be:
public void removeFromBasket(Item item)
{
contents.remove(item);
}
When you have made this change right-click on the project and choose
Clean and Build, then run the tests again. This time they should all pass.
This demonstrates the cycle of test and fix.
Summary of activity
In this activity you have learnt how to detect and locate errors by running
unit tests, and how the cycle of test and fix operates.
You can now exit the IDE or leave it open if you are going straight on to the
next activity.
93
6 Using JUnit to test your code
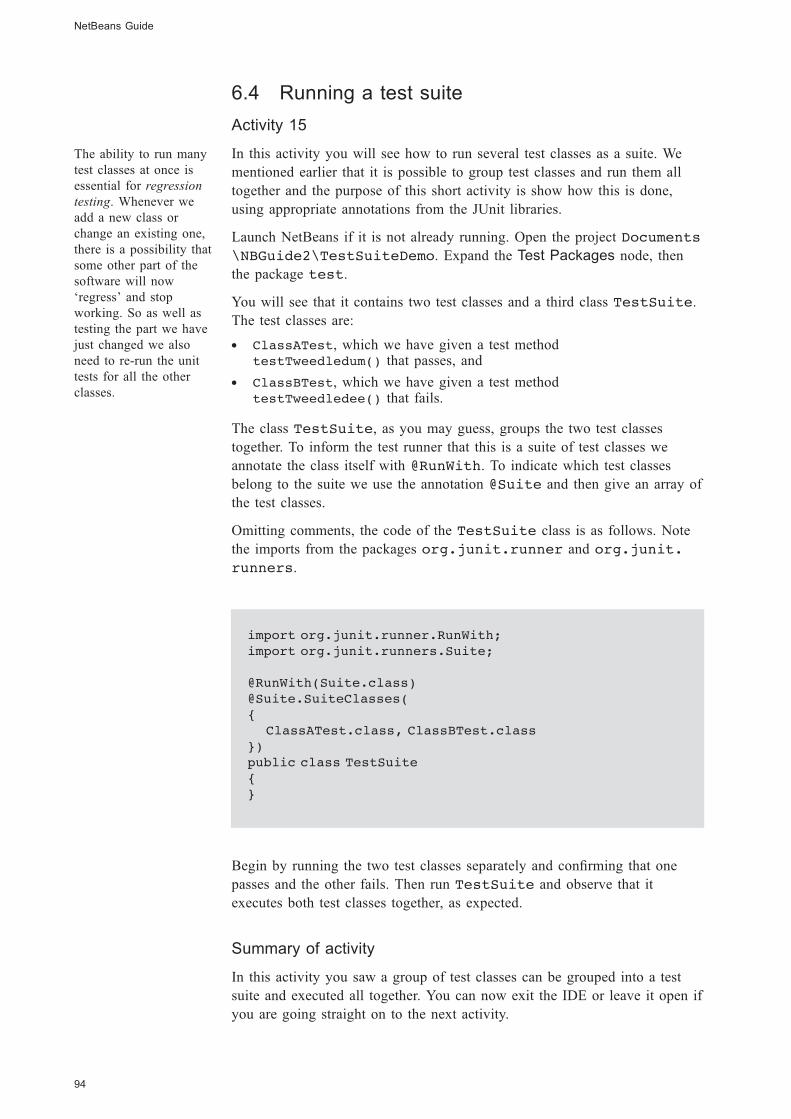
Black plate (94,1)
6.4 Running a test suite
Activity 15
In this activity you will see how to run several test classes as a suite. We
mentioned earlier that it is possible to group test classes and run them all
together and the purpose of this short activity is show how this is done,
using appropriate annotations from the JUnit libraries.
Launch NetBeans if it is not already running. Open the project Documents
\NBGuide2\TestSuiteDemo. Expand the Test Packages node, then
the package test.
You will see that it contains two test classes and a third class TestSuite.
The test classes are:
. ClassATest, which we have given a test methodtestTweedledum() that passes, and
. ClassBTest, which we have given a test methodtestTweedledee() that fails.
The class TestSuite, as you may guess, groups the two test classes
together. To inform the test runner that this is a suite of test classes we
annotate the class itself with @RunWith. To indicate which test classes
belong to the suite we use the annotation @Suite and then give an array of
the test classes.
Omitting comments, the code of the TestSuite class is as follows. Note
the imports from the packages org.junit.runner and org.junit.
runners.
import org.junit.runner.RunWith;
import org.junit.runners.Suite;
@RunWith(Suite.class)
@Suite.SuiteClasses(
{
ClassATest.class, ClassBTest.class
})
public class TestSuite
{
}
Begin by running the two test classes separately and confirming that one
passes and the other fails. Then run TestSuite and observe that it
executes both test classes together, as expected.
Summary of activity
In this activity you saw a group of test classes can be grouped into a test
suite and executed all together. You can now exit the IDE or leave it open if
you are going straight on to the next activity.
NetBeans Guide
94
The ability to run many
test classes at once is
essential for regression
testing. Whenever we
add a new class or
change an existing one,
there is a possibility that
some other part of the
software will now
‘regress’ and stop
working. So as well as
testing the part we have
just changed we also
need to re-run the unit
tests for all the other
classes.
Black plate (95,1)
7 Getting started with the GlassFishServer
The NetBeans IDE allows us to develop projects to be run in an enterprise
server (also referred to as an application server).
An enterprise server is a large-scale system that provides a standard
environment for the execution of software that is intended to be accessible
over the internet (or at least over a local network). For example when you
connect to a web page, that page is likely to have come from an enterprise
server somewhere.
For development purposes we generally start with a client that is on the
same computer as the server and then, once the application has been
developed and tested locally, we deploy it in a distributed setting.
The enterprise server we use is the Oracle GlassFish Server. This is an
industrial-strength product, and if your system were exposed to the internet it
would be possible to use this server to host full-blown websites.
The following activity provides a first taste of using the server. As we shall
see shortly, the server can support several different kinds of project. The one
you will meet in the activity is a Web project which uses a servlet to provide
an HTML page viewable from a browser. You can recognise a Web project
in the Projects window from its distinctive icon, symbolising the World
Wide Web.
7.1 Deploying a Web project
Activity 16
In this activity you will learn:
. what a servlet is and what deployment to a server means
. how to deploy a project from NetBeans
. how to access the deployed servlet from a browser.
Servlet basics
A servlet is an object which runs inside a web server and creates an HTML
page that an end user can view from a browser. Servlets generate the content
of web pages dynamically, and can interact with other Java objects to do so,
which allows for much greater versatility than is possible with static HTML
pages.
95
7 Getting started with the GlassFish Server
The NetBeans icon for a
Web project is .
During the course of this
activity it is possible
your firewall will ask
whether certain programs
should be allowed access
to the internet. If so you
should ensure that in
each case you choose the
option that allows access
and that none of these
programs is blocked.
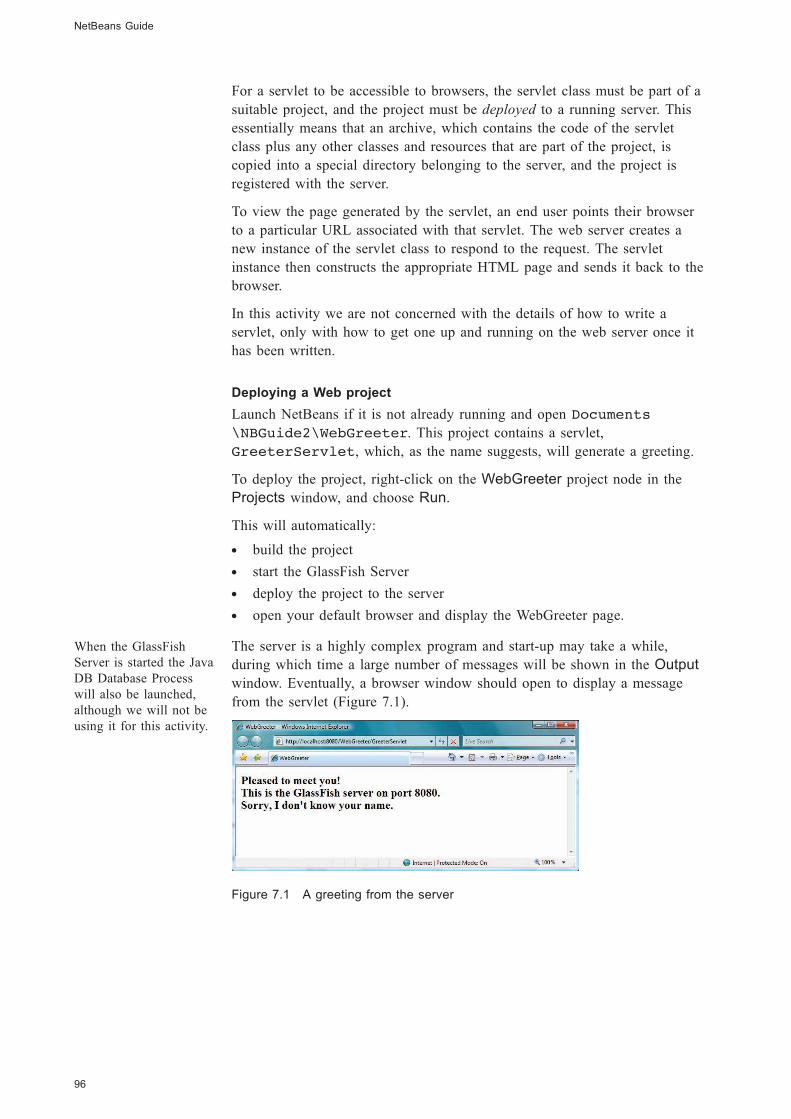
Black plate (96,1)
For a servlet to be accessible to browsers, the servlet class must be part of a
suitable project, and the project must be deployed to a running server. This
essentially means that an archive, which contains the code of the servlet
class plus any other classes and resources that are part of the project, is
copied into a special directory belonging to the server, and the project is
registered with the server.
To view the page generated by the servlet, an end user points their browser
to a particular URL associated with that servlet. The web server creates a
new instance of the servlet class to respond to the request. The servlet
instance then constructs the appropriate HTML page and sends it back to the
browser.
In this activity we are not concerned with the details of how to write a
servlet, only with how to get one up and running on the web server once it
has been written.
Deploying a Web project
Launch NetBeans if it is not already running and open Documents
\NBGuide2\WebGreeter. This project contains a servlet,
GreeterServlet, which, as the name suggests, will generate a greeting.
To deploy the project, right-click on the WebGreeter project node in the
Projects window, and choose Run.
This will automatically:
. build the project
. start the GlassFish Server
. deploy the project to the server
. open your default browser and display the WebGreeter page.
The server is a highly complex program and start-up may take a while,
during which time a large number of messages will be shown in the Output
window. Eventually, a browser window should open to display a message
from the servlet (Figure 7.1).
Figure 7.1 A greeting from the server
NetBeans Guide
96
When the GlassFish
Server is started the Java
DB Database Process
will also be launched,
although we will not be
using it for this activity.
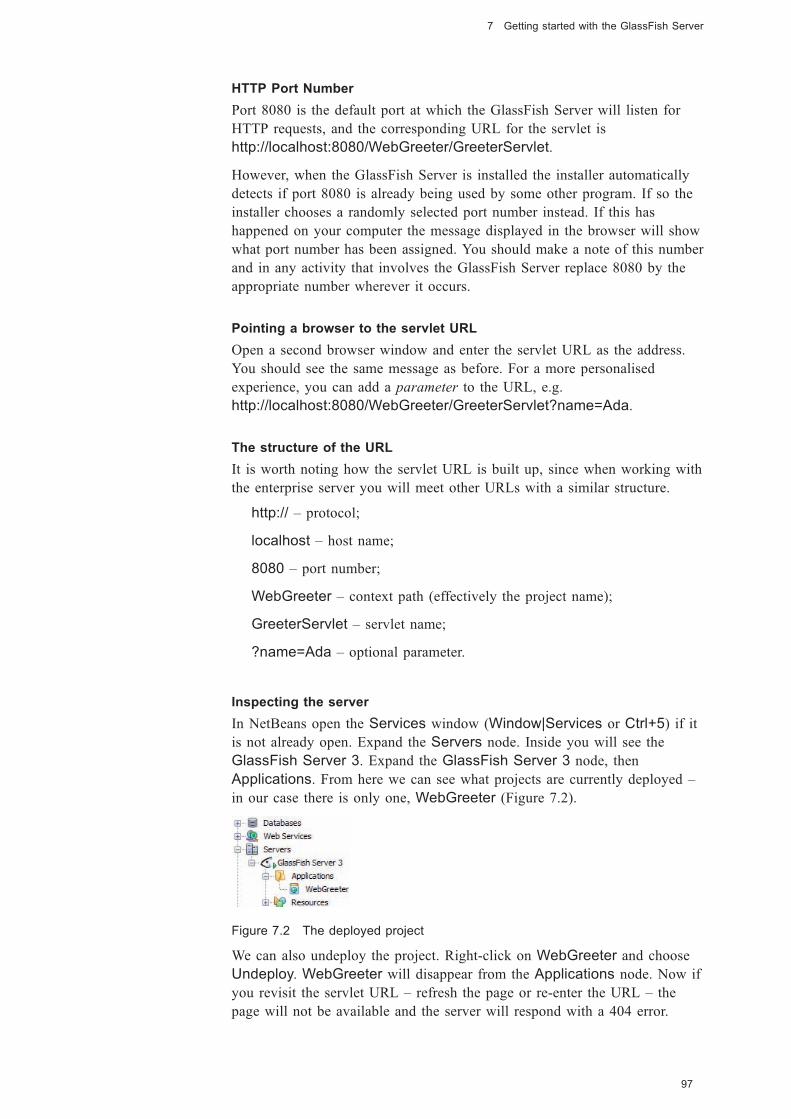
Black plate (97,1)
HTTP Port Number
Port 8080 is the default port at which the GlassFish Server will listen for
HTTP requests, and the corresponding URL for the servlet is
http://localhost:8080/WebGreeter/GreeterServlet.
However, when the GlassFish Server is installed the installer automatically
detects if port 8080 is already being used by some other program. If so the
installer chooses a randomly selected port number instead. If this has
happened on your computer the message displayed in the browser will show
what port number has been assigned. You should make a note of this number
and in any activity that involves the GlassFish Server replace 8080 by the
appropriate number wherever it occurs.
Pointing a browser to the servlet URL
Open a second browser window and enter the servlet URL as the address.
You should see the same message as before. For a more personalised
experience, you can add a parameter to the URL, e.g.
http://localhost:8080/WebGreeter/GreeterServlet?name=Ada.
The structure of the URL
It is worth noting how the servlet URL is built up, since when working with
the enterprise server you will meet other URLs with a similar structure.
http:// – protocol;
localhost – host name;
8080 – port number;
WebGreeter – context path (effectively the project name);
GreeterServlet – servlet name;
?name=Ada – optional parameter.
Inspecting the server
In NetBeans open the Services window (Window|Services or Ctrl+5) if it
is not already open. Expand the Servers node. Inside you will see the
GlassFish Server 3. Expand the GlassFish Server 3 node, then
Applications. From here we can see what projects are currently deployed –
in our case there is only one, WebGreeter (Figure 7.2).
Figure 7.2 The deployed project
We can also undeploy the project. Right-click on WebGreeter and choose
Undeploy. WebGreeter will disappear from the Applications node. Now if
you revisit the servlet URL – refresh the page or re-enter the URL – the
page will not be available and the server will respond with a 404 error.
97
7 Getting started with the GlassFish Server
Black plate (98,1)
Deploying the project from the Projects window
As an alternative to running the project we can deploy it first then point a
browser to the servlet URL.
In the Projects window right-click on WebGreeter and choose Deploy.
After a few moments you should see BUILD SUCCESSFUL displayed in the
Output window. If you now point your browser to the same address as
before you will see the page displayed once more.
Connecting to a remote server
So far you have been connecting to a server running on your own local
machine. Now point your browser to the URL given on your module
website. You should then connect to a version of WebGreeter running on a
server hosted on a computer at The Open University. This will function in
exactly the same manner as the local version, for example you can add an
optional name parameter.
Summary of activity
In this activity you have been introduced to servlets, and learnt how to run a
Web project and see the page generated by the servlet displayed in a browser
window.
You have also learnt how to inspect the server to find out what projects are
deployed, and how to undeploy a project.
You then learned how to view a servlet page without running the project, by
deploying the project then pointing the browser to the servlet URL.
Finally, you connected to a version of the servlet running on a remote server.
7.2 Modules associated with the enterprise server
NetBeans lets us create various kinds of project and module associated with
the enterprise server. If your module uses the GlassFish Server these will be
explained in detail as appropriate, but to give you an initial overview we
have listed them opposite (Table 7.1). You have already come across a Web
module in Activity 16.
You can recognise each kind of project by the distinctive icon NetBeans
uses.
NetBeans Guide
98
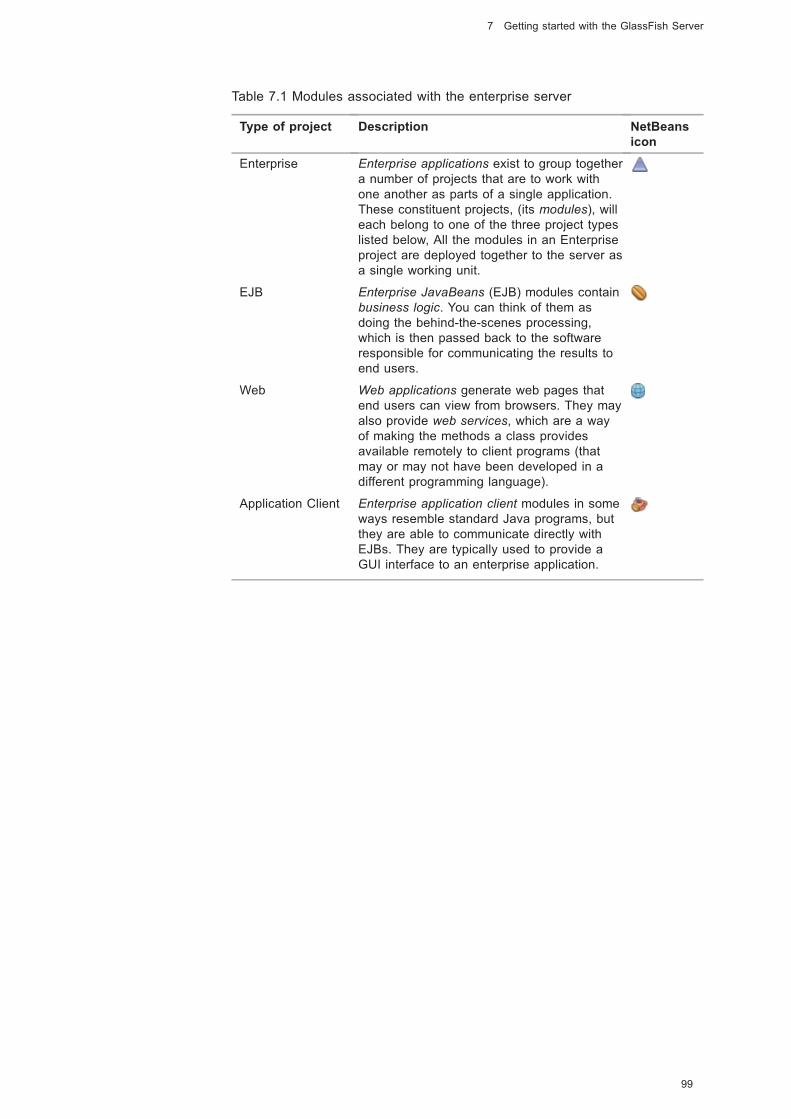
Black plate (99,1)
Table 7.1 Modules associated with the enterprise server
Type of project Description NetBeans
icon
Enterprise Enterprise applications exist to group together
a number of projects that are to work with
one another as parts of a single application.
These constituent projects, (its modules), will
each belong to one of the three project types
listed below, All the modules in an Enterprise
project are deployed together to the server as
a single working unit.
EJB Enterprise JavaBeans (EJB) modules contain
business logic. You can think of them as
doing the behind-the-scenes processing,
which is then passed back to the software
responsible for communicating the results to
end users.
Web Web applications generate web pages that
end users can view from browsers. They may
also provide web services, which are a way
of making the methods a class provides
available remotely to client programs (that
may or may not have been developed in a
different programming language).
Application Client Enterprise application client modules in some
ways resemble standard Java programs, but
they are able to communicate directly with
EJBs. They are typically used to provide a
GUI interface to an enterprise application.
99
7 Getting started with the GlassFish Server
Black plate (100,1)
Appendix A – NetBeans usability hints
Like any other major piece of software, NetBeans allows us to do most
things using keyboard commands as an alternative to mouse operations.
NetBeans also offers toolbar buttons for a number of common tasks. The
NetBeans UI can also be customised as regards font size to improve the user
experience.
Thus, in the first part of this appendix we provide a few general tips for
using NetBeans, then give keyboard shortcuts for the commonest tasks, and
explain how to find a complete list of shortcuts. Most of the shortcuts in
NetBeans follow standard conventions. The second part of the appendix
explains how to change the font size in the NetBeans interface.
Opening Help
Pressing F1 at any point opens NetBeans Help. If there is specific help
mapped to the current context then the relevant page will be displayed.
Selecting multiple items
To select multiple items that form an adjacent group, hold down Shift while
clicking the first and last items.
To select multiple items that are not adjacent, hold down Ctrl while clicking
the items required. To remove an item selected by mistake, click it a second
time while Ctrl is still depressed.
Many operations can be applied to multiple items at the same time by first
selecting the items concerned. For example, if several projects are
highlighted then right-clicking offers us the option to close them all at once.
Opening a contextual menu
Right-clicking on an icon, window or other structural item will usually bring
up a menu of options appropriate to that item.
Alternatively, if the item is selected then Shift+F10 will open the contextual
menu.
Opening a properties window
Right-click on the item and choose Properties from the contextual menu to
open a pop-up window.
Cancelling a wizard or pop-up Properties window
Press Escape or click Cancel.
NetBeans Guide
100
Black plate (101,1)
Closing the current window
Press Ctrl+W.
Accessing the main menus
Alt key combinations give access to menus. To access a menu press Alt
together with the initial letter of the name of the menu, e.g. Alt+F will open
the File menu. Once a menu is selected, use the up and down arrow keys to
move between items. If there are subordinate menus, open them with the
right arrow key and close them with the left arrow key. Press Spacebar to
choose a menu item. Press Alt on its own to close an open menu.
Navigating tree structures
Tree structures are found in many NetBeans windows. You can move around
a tree view by using the arrow keys and Page Up and Page Down, as
shown in the list below.
Key Action
Up arrow/down arrow Move up a node/down a node
Right arrow/left arrow Expand/contract the selected node
Page Up/Page Down Jump to first node/last node
A.1 Shortcut keys
Below are lists of some of the important shortcuts.
Files
Key Action
Ctrl+Shift+N New Project wizard
Ctrl+N New File wizard
Ctrl+S Save
Ctrl+Shift+O Open project
Ctrl+Alt+Shift+ P Print
101
Appendix A – NetBeans usability hints
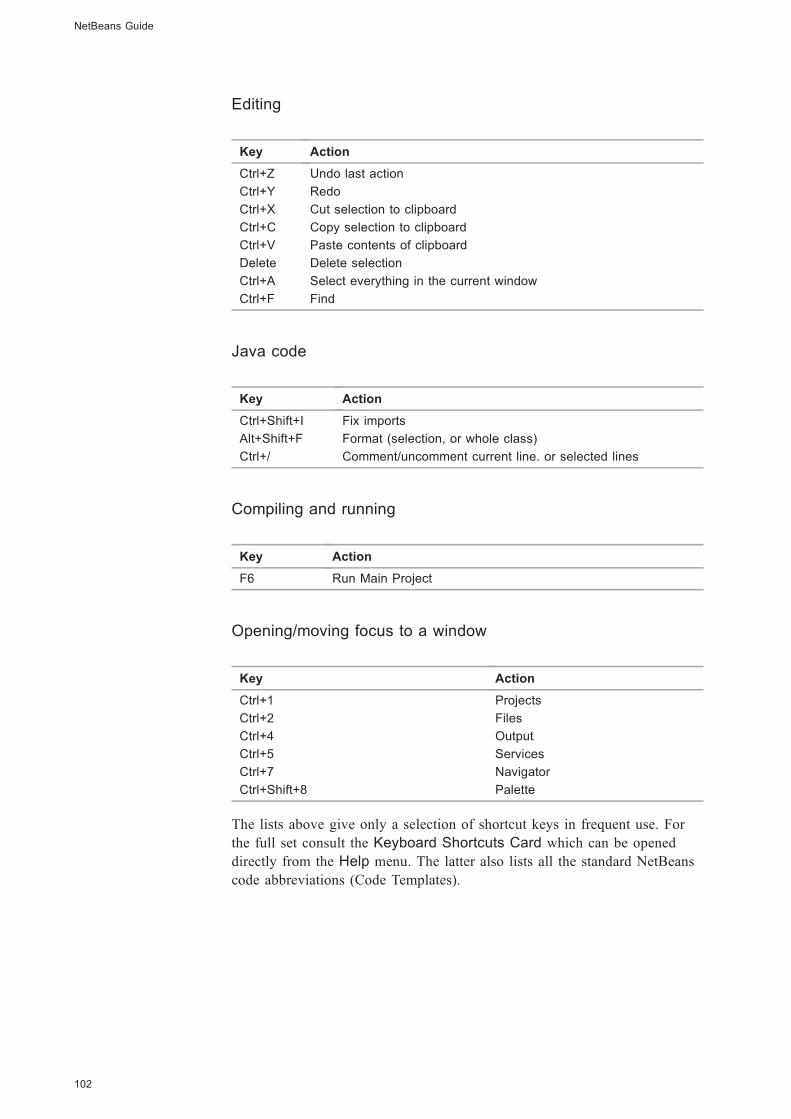
Black plate (102,1)
Editing
Key Action
Ctrl+Z Undo last action
Ctrl+Y Redo
Ctrl+X Cut selection to clipboard
Ctrl+C Copy selection to clipboard
Ctrl+V Paste contents of clipboard
Delete Delete selection
Ctrl+A Select everything in the current window
Ctrl+F Find
Java code
Key Action
Ctrl+Shift+I Fix imports
Alt+Shift+F Format (selection, or whole class)
Ctrl+/ Comment/uncomment current line. or selected lines
Compiling and running
Key Action
F6 Run Main Project
Opening/moving focus to a window
Key Action
Ctrl+1 Projects
Ctrl+2 Files
Ctrl+4 Output
Ctrl+5 Services
Ctrl+7 Navigator
Ctrl+Shift+8 Palette
The lists above give only a selection of shortcut keys in frequent use. For
the full set consult the Keyboard Shortcuts Card which can be opened
directly from the Help menu. The latter also lists all the standard NetBeans
code abbreviations (Code Templates).
NetBeans Guide
102
Black plate (103,1)
A.2 Setting font sizes in NetBeans
This section explains how to set the fonts used in NetBeans to a larger size
for ease of reading.
There are two different font size settings in NetBeans:
. the font used in the Source Editor
. the font used in the IDE generally, for example in the menus or the
Projects window.
Setting the font size for the Editor
Section 3.2 explained how to set the font size used by the Source Editor.
The font size used by other editors – e.g. the HTML Editor – can be set in a
similar way if required.
Setting the font size for the IDE
To alter the font size used in the IDE interface you must modify the file:
C:\Program Files\NetBeans X\etc\netbeans.conf
where X is the NetBeans version, for example
C:\Program Files\NetBeans 6.9.1\etc\netbeans.conf
if you are using NetBeans 6.9.1.
IMPORTANT Before going any further make a copy of this file (so that
you can revert to the original if required).
Using a text editor such as WordPad or Notepad++ (do not use Notepad as it
will display the entire contents of the file on one line), open this file and edit
the long line that begins
netbeans_default_options= "-J-client ..."
by inserting the option –fontsize 18 at the front to give
netbeans_default_options="–fontsize 18 -J-client ..."
You can substitute any size you like for 18. When you next start NetBeans
the IDE will use the font size you have chosen.
103
Appendix A – NetBeans usability hints
It’s possible that in your
installation the string on
the right-hand side will
start with a different
option from the one in
our example.
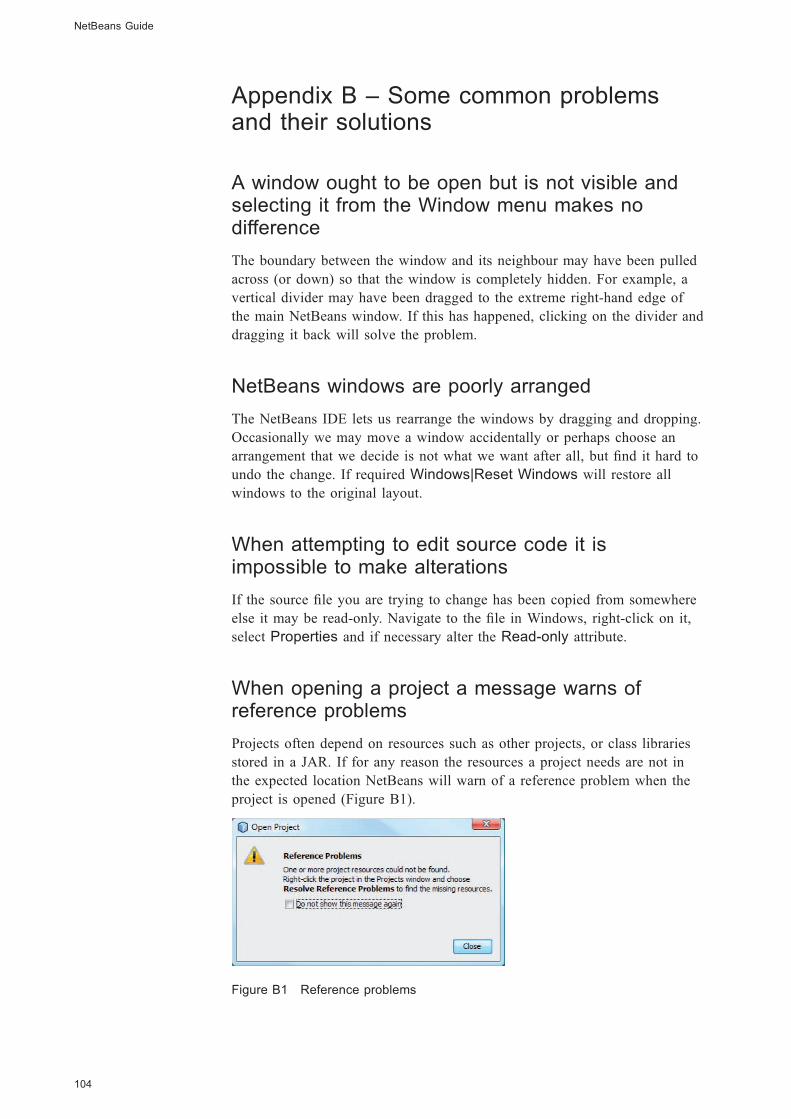
Black plate (104,1)
Appendix B – Some common problemsand their solutions
A window ought to be open but is not visible andselecting it from the Window menu makes nodifference
The boundary between the window and its neighbour may have been pulled
across (or down) so that the window is completely hidden. For example, a
vertical divider may have been dragged to the extreme right-hand edge of
the main NetBeans window. If this has happened, clicking on the divider and
dragging it back will solve the problem.
NetBeans windows are poorly arranged
The NetBeans IDE lets us rearrange the windows by dragging and dropping.
Occasionally we may move a window accidentally or perhaps choose an
arrangement that we decide is not what we want after all, but find it hard to
undo the change. If required Windows|Reset Windows will restore all
windows to the original layout.
When attempting to edit source code it isimpossible to make alterations
If the source file you are trying to change has been copied from somewhere
else it may be read-only. Navigate to the file in Windows, right-click on it,
select Properties and if necessary alter the Read-only attribute.
When opening a project a message warns ofreference problems
Projects often depend on resources such as other projects, or class libraries
stored in a JAR. If for any reason the resources a project needs are not in
the expected location NetBeans will warn of a reference problem when the
project is opened (Figure B1).
Figure B1 Reference problems
NetBeans Guide
104
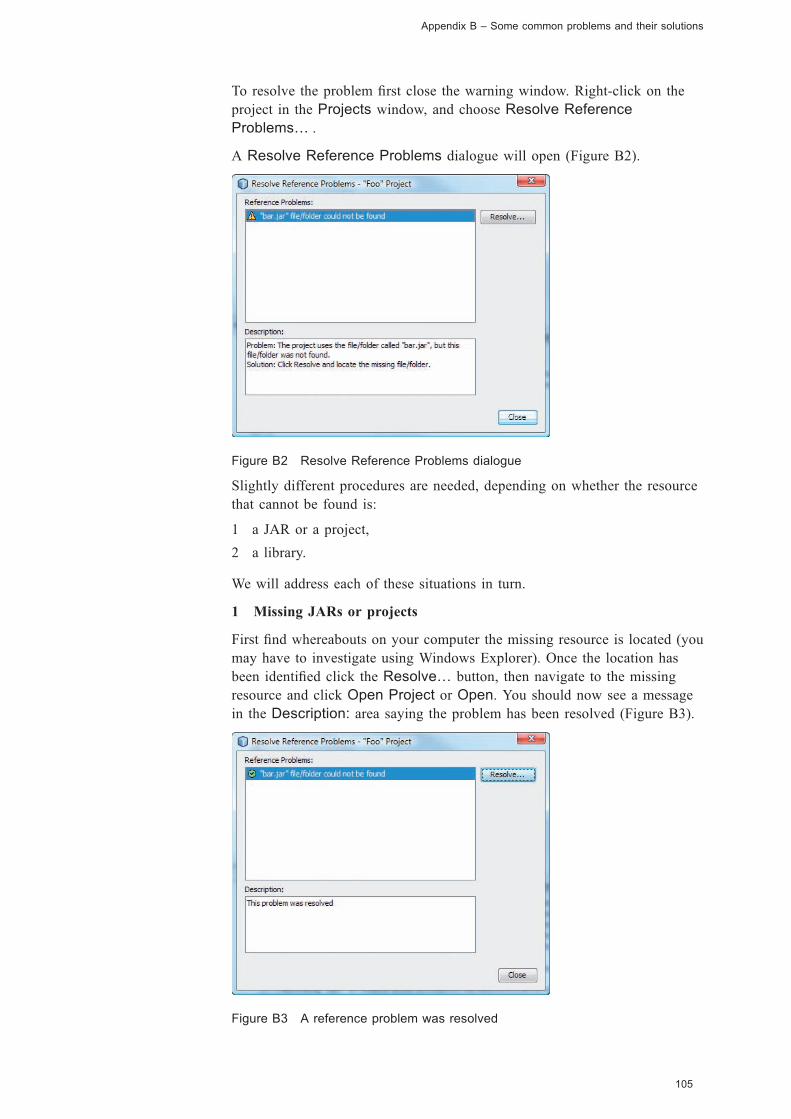
Black plate (105,1)
To resolve the problem first close the warning window. Right-click on the
project in the Projects window, and choose Resolve Reference
Problems… .
A Resolve Reference Problems dialogue will open (Figure B2).
Figure B2 Resolve Reference Problems dialogue
Slightly different procedures are needed, depending on whether the resource
that cannot be found is:
1 a JAR or a project,
2 a library.
We will address each of these situations in turn.
1 Missing JARs or projects
First find whereabouts on your computer the missing resource is located (you
may have to investigate using Windows Explorer). Once the location has
been identified click the Resolve… button, then navigate to the missing
resource and click Open Project or Open. You should now see a message
in the Description: area saying the problem has been resolved (Figure B3).
Figure B3 A reference problem was resolved
105
Appendix B – Some common problems and their solutions
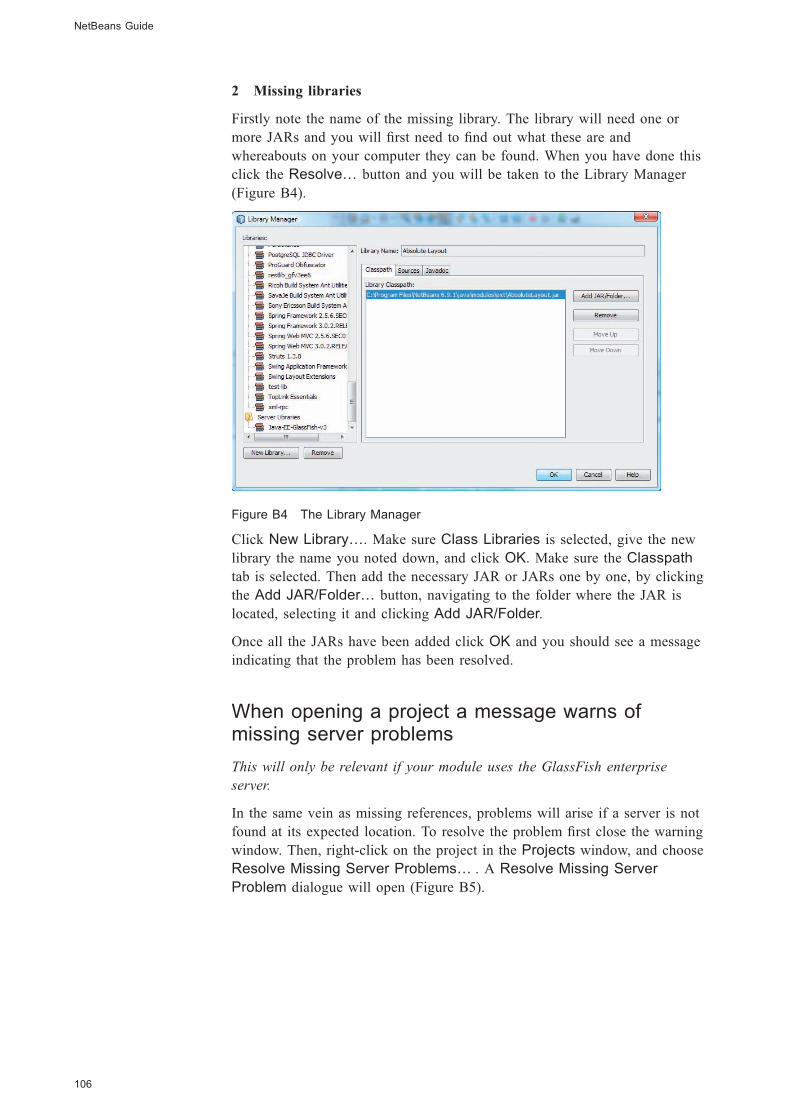
Black plate (106,1)
2 Missing libraries
Firstly note the name of the missing library. The library will need one or
more JARs and you will first need to find out what these are and
whereabouts on your computer they can be found. When you have done this
click the Resolve… button and you will be taken to the Library Manager
(Figure B4).
Figure B4 The Library Manager
Click New Library…. Make sure Class Libraries is selected, give the new
library the name you noted down, and click OK. Make sure the Classpath
tab is selected. Then add the necessary JAR or JARs one by one, by clicking
the Add JAR/Folder… button, navigating to the folder where the JAR is
located, selecting it and clicking Add JAR/Folder.
Once all the JARs have been added click OK and you should see a message
indicating that the problem has been resolved.
When opening a project a message warns ofmissing server problems
This will only be relevant if your module uses the GlassFish enterprise
server.
In the same vein as missing references, problems will arise if a server is not
found at its expected location. To resolve the problem first close the warning
window. Then, right-click on the project in the Projects window, and choose
Resolve Missing Server Problems… . A Resolve Missing Server
Problem dialogue will open (Figure B5).
NetBeans Guide
106
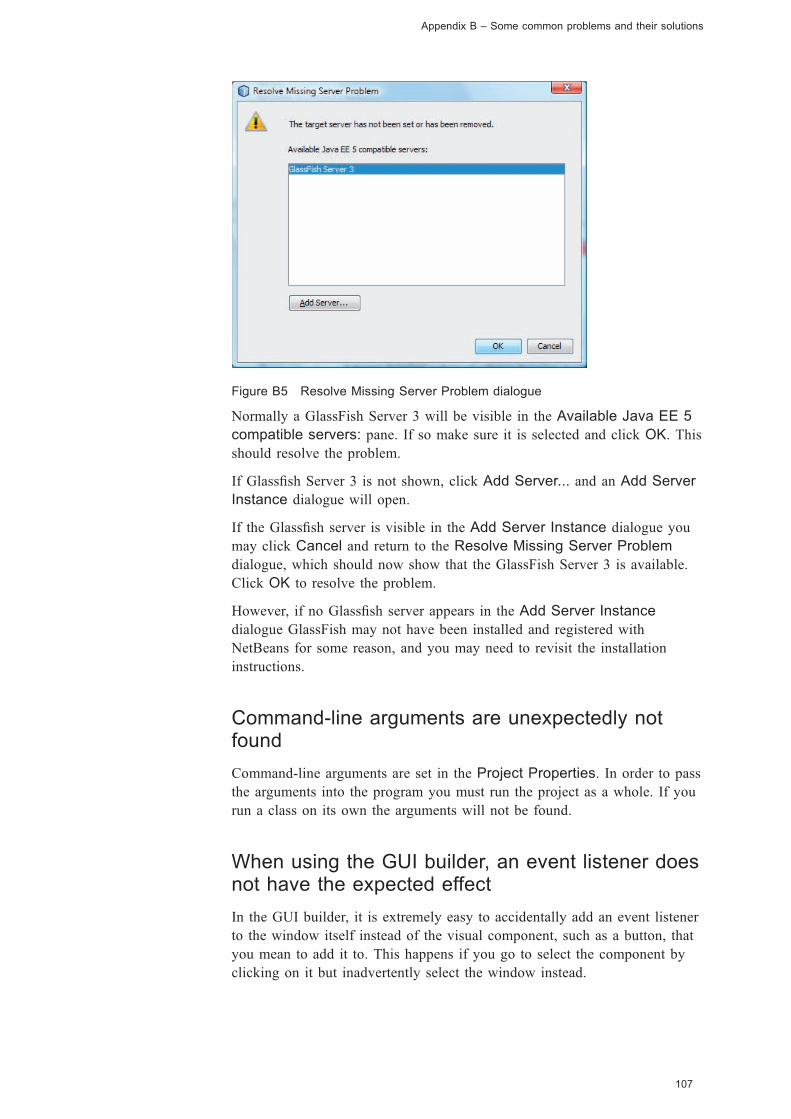
Black plate (107,1)
Figure B5 Resolve Missing Server Problem dialogue
Normally a GlassFish Server 3 will be visible in the Available Java EE 5
compatible servers: pane. If so make sure it is selected and click OK. This
should resolve the problem.
If Glassfish Server 3 is not shown, click Add Server... and an Add Server
Instance dialogue will open.
If the Glassfish server is visible in the Add Server Instance dialogue you
may click Cancel and return to the Resolve Missing Server Problem
dialogue, which should now show that the GlassFish Server 3 is available.
Click OK to resolve the problem.
However, if no Glassfish server appears in the Add Server Instance
dialogue GlassFish may not have been installed and registered with
NetBeans for some reason, and you may need to revisit the installation
instructions.
Command-line arguments are unexpectedly notfound
Command-line arguments are set in the Project Properties. In order to pass
the arguments into the program you must run the project as a whole. If you
run a class on its own the arguments will not be found.
When using the GUI builder, an event listener doesnot have the expected effect
In the GUI builder, it is extremely easy to accidentally add an event listener
to the window itself instead of the visual component, such as a button, that
you mean to add it to. This happens if you go to select the component by
clicking on it but inadvertently select the window instead.
107
Appendix B – Some common problems and their solutions
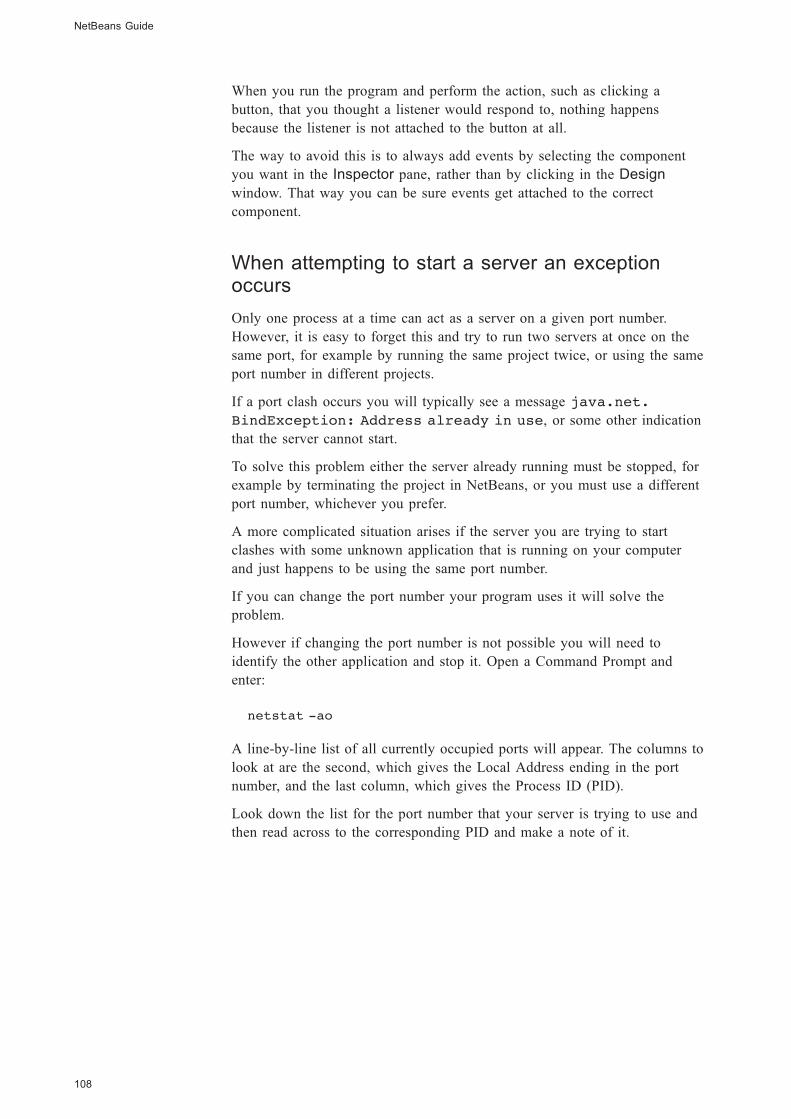
Black plate (108,1)
When you run the program and perform the action, such as clicking a
button, that you thought a listener would respond to, nothing happens
because the listener is not attached to the button at all.
The way to avoid this is to always add events by selecting the component
you want in the Inspector pane, rather than by clicking in the Design
window. That way you can be sure events get attached to the correct
component.
When attempting to start a server an exceptionoccurs
Only one process at a time can act as a server on a given port number.
However, it is easy to forget this and try to run two servers at once on the
same port, for example by running the same project twice, or using the same
port number in different projects.
If a port clash occurs you will typically see a message java.net.
BindException: Address already in use, or some other indication
that the server cannot start.
To solve this problem either the server already running must be stopped, for
example by terminating the project in NetBeans, or you must use a different
port number, whichever you prefer.
A more complicated situation arises if the server you are trying to start
clashes with some unknown application that is running on your computer
and just happens to be using the same port number.
If you can change the port number your program uses it will solve the
problem.
However if changing the port number is not possible you will need to
identify the other application and stop it. Open a Command Prompt and
enter:
netstat -ao
A line-by-line list of all currently occupied ports will appear. The columns to
look at are the second, which gives the Local Address ending in the port
number, and the last column, which gives the Process ID (PID).
Look down the list for the port number that your server is trying to use and
then read across to the corresponding PID and make a note of it.
NetBeans Guide
108
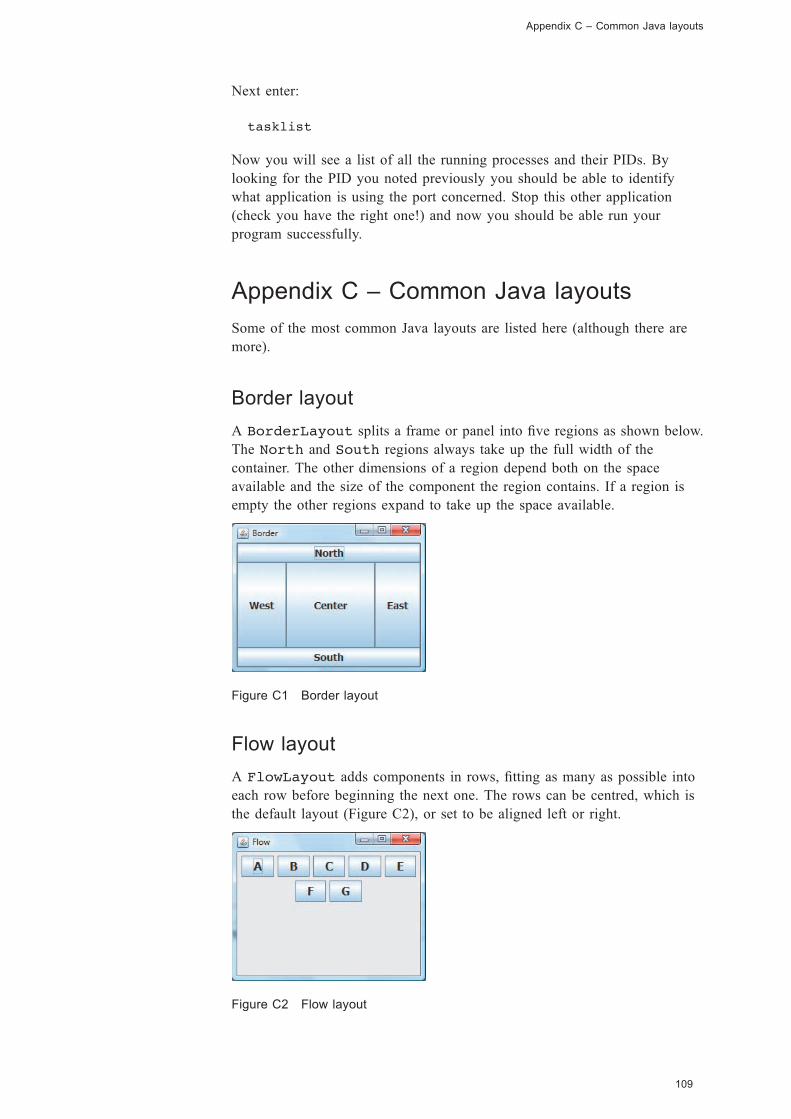
Black plate (109,1)
Next enter:
tasklist
Now you will see a list of all the running processes and their PIDs. By
looking for the PID you noted previously you should be able to identify
what application is using the port concerned. Stop this other application
(check you have the right one!) and now you should be able run your
program successfully.
Appendix C – Common Java layouts
Some of the most common Java layouts are listed here (although there are
more).
Border layout
A BorderLayout splits a frame or panel into five regions as shown below.
The North and South regions always take up the full width of the
container. The other dimensions of a region depend both on the space
available and the size of the component the region contains. If a region is
empty the other regions expand to take up the space available.
Figure C1 Border layout
Flow layout
A FlowLayout adds components in rows, fitting as many as possible into
each row before beginning the next one. The rows can be centred, which is
the default layout (Figure C2), or set to be aligned left or right.
Figure C2 Flow layout
109
Appendix C – Common Java layouts
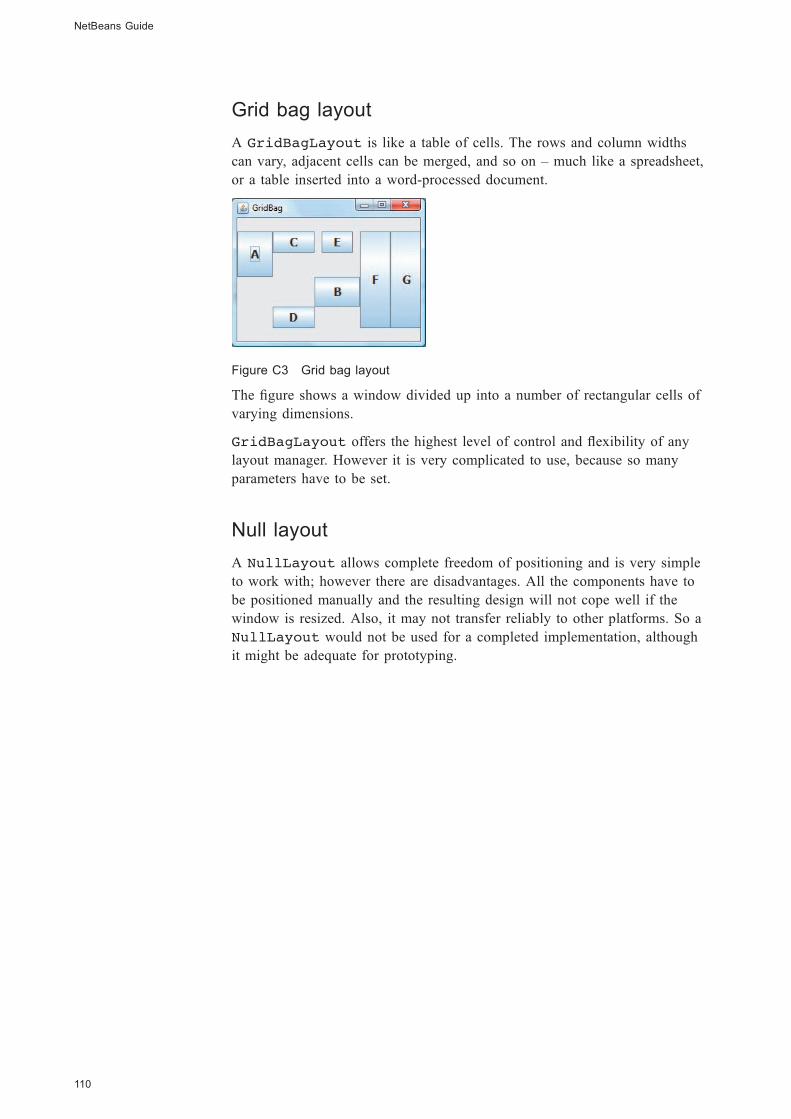
Black plate (110,1)
Grid bag layout
A GridBagLayout is like a table of cells. The rows and column widths
can vary, adjacent cells can be merged, and so on – much like a spreadsheet,
or a table inserted into a word-processed document.
Figure C3 Grid bag layout
The figure shows a window divided up into a number of rectangular cells of
varying dimensions.
GridBagLayout offers the highest level of control and flexibility of any
layout manager. However it is very complicated to use, because so many
parameters have to be set.
Null layout
A NullLayout allows complete freedom of positioning and is very simple
to work with; however there are disadvantages. All the components have to
be positioned manually and the resulting design will not cope well if the
window is resized. Also, it may not transfer reliably to other platforms. So a
NullLayout would not be used for a completed implementation, although
it might be adequate for prototyping.
NetBeans Guide
110
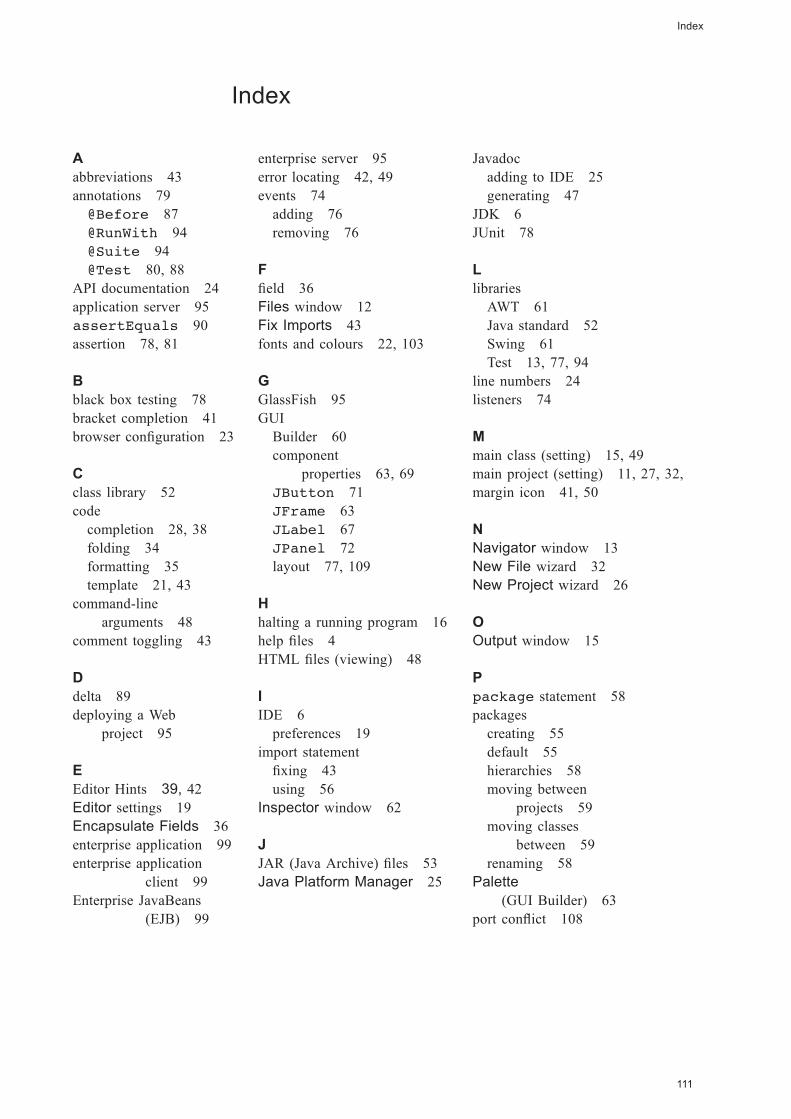
Black plate (111,1)
Index
A
abbreviations 43
annotations 79
@Before 87
@RunWith 94
@Suite 94
@Test 80, 88
API documentation 24
application server 95
assertEquals 90
assertion 78, 81
B
black box testing 78
bracket completion 41
browser configuration 23
C
class library 52
code
completion 28, 38
folding 34
formatting 35
template 21, 43
command-line
arguments 48
comment toggling 43
D
delta 89
deploying a Web
project 95
E
Editor Hints 39, 42
Editor settings 19
Encapsulate Fields 36
enterprise application 99
enterprise application
client 99
Enterprise JavaBeans
(EJB) 99
enterprise server 95
error locating 42, 49
events 74
adding 76
removing 76
F
field 36
Files window 12
Fix Imports 43
fonts and colours 22, 103
G
GlassFish 95
GUI
Builder 60
component
properties 63, 69
JButton 71
JFrame 63
JLabel 67
JPanel 72
layout 77, 109
H
halting a running program 16
help files 4
HTML files (viewing) 48
I
IDE 6
preferences 19
import statement
fixing 43
using 56
Inspector window 62
J
JAR (Java Archive) files 53
Java Platform Manager 25
Javadoc
adding to IDE 25
generating 47
JDK 6
JUnit 78
L
libraries
AWT 61
Java standard 52
Swing 61
Test 13, 77, 94
line numbers 24
listeners 74
M
main class (setting) 15, 49
main project (setting) 11, 27, 32,
margin icon 41, 50
N
Navigator window 13
New File wizard 32
New Project wizard 26
O
Output window 15
P
package statement 58
packages
creating 55
default 55
hierarchies 58
moving between
projects 59
moving classes
between 59
renaming 58
Palette
(GUI Builder) 63
port conflict 108
111
Index
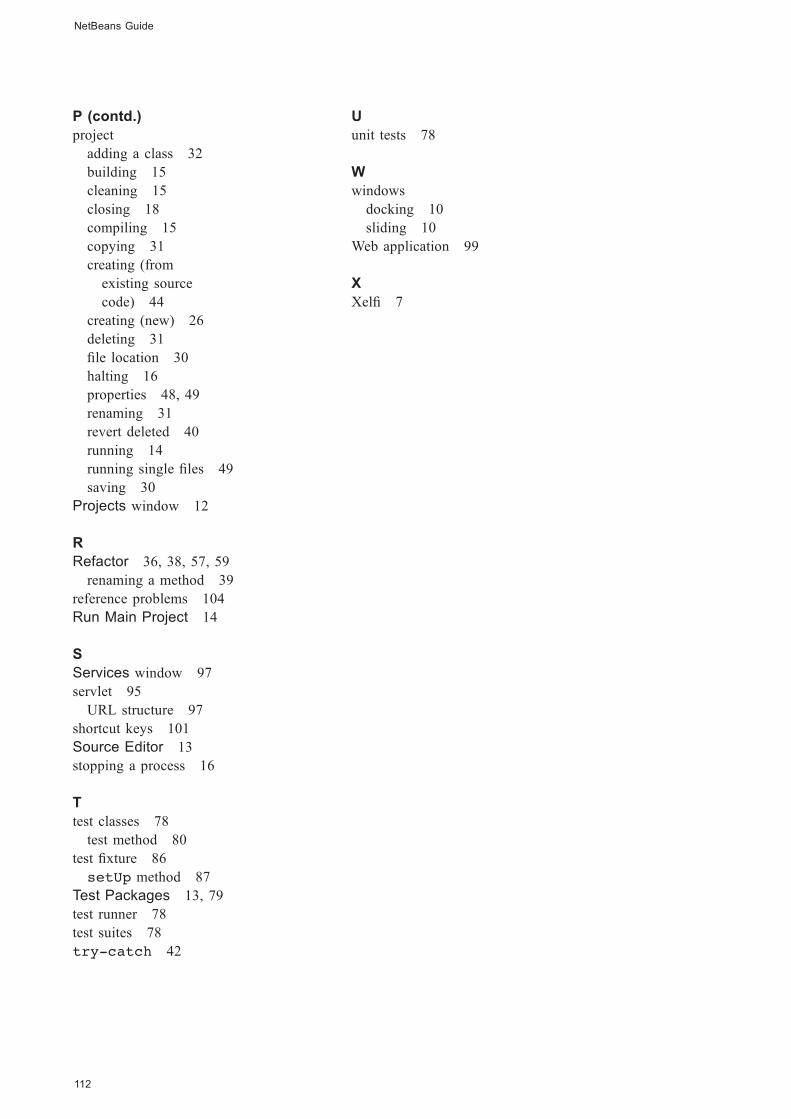
Black plate (112,1)
P (contd.)
project
adding a class 32
building 15
cleaning 15
closing 18
compiling 15
copying 31
creating (from
existing source
code) 44
creating (new) 26
deleting 31
file location 30
halting 16
properties 48, 49
renaming 31
revert deleted 40
running 14
running single files 49
saving 30
Projects window 12
R
Refactor 36, 38, 57, 59
renaming a method 39
reference problems 104
Run Main Project 14
S
Services window 97
servlet 95
URL structure 97
shortcut keys 101
Source Editor 13
stopping a process 16
T
test classes 78
test method 80
test fixture 86
setUp method 87
Test Packages 13, 79
test runner 78
test suites 78
try-catch 42
U
unit tests 78
W
windows
docking 10
sliding 10
Web application 99
X
Xelfi 7
NetBeans Guide
112


