Embed Size (px)
Citation preview

Installation ManualNetBotz®
Handle Kit
NBHN1356
NBHN125
990-9868A-001
Publication Date: March 2017
This handle kit is for use with the NetBotz Rack Monitor 250 (NBRK0250) only.

Schneider Electric IT Corporation Legal DisclaimerThe information presented in this manual is not warranted by the Schneider Electric IT Corporation to be authoritative, error free, or complete. This publication is not meant to be a substitute for a detailed operational and site specific development plan. Therefore, Schneider Electric IT Corporation assumes no liability for damages, violations of codes, improper installation, system failures, or any other problems that could arise based on the use of this Publication.
The information contained in this Publication is provided as is and has been prepared solely for the purpose of evaluating data center design and construction. This Publication has been compiled in good faith by Schneider Electric IT Corporation. However, no representation is made or warranty given, either express or implied, as to the completeness or accuracy of the information this Publication contains.
IN NO EVENT SHALL SCHNEIDER ELECTRIC IT CORPORATION, OR ANY PARENT, AFFILIATE OR SUBSIDIARY COMPANY OF SCHNEIDER ELECTRIC IT CORPORATION OR THEIR RESPECTIVE OFFICERS, DIRECTORS, OR EMPLOYEES BE LIABLE FOR ANY DIRECT, INDIRECT, CONSEQUENTIAL, PUNITIVE, SPECIAL, OR INCIDENTAL DAMAGES (INCLUDING, WITHOUT LIMITATION, DAMAGES FOR LOSS OF BUSINESS, CONTRACT, REVENUE, DATA, INFORMATION, OR BUSINESS INTERRUPTION) RESULTING FROM, ARISING OUT, OR IN CONNECTION WITH THE USE OF, OR INABILITY TO USE THIS PUBLICATION OR THE CONTENT, EVEN IF SCHNEIDER ELECTRIC IT CORPORATION HAS BEEN EXPRESSLY ADVISED OF THE POSSIBILITY OF SUCH DAMAGES. SCHNEIDER ELECTRIC IT CORPORATION RESERVES THE RIGHT TO MAKE CHANGES OR UPDATES WITH RESPECT TO OR IN THE CONTENT OF THE PUBLICATION OR THE FORMAT THEREOF AT ANY TIME WITHOUT NOTICE.
Copyright, intellectual, and all other proprietary rights in the content (including but not limited to software, audio, video, text, and photographs) rests with Schneider Electric IT Corporation or its licensors. All rights in the content not expressly granted herein are reserved. No rights of any kind are licensed or assigned or shall otherwise pass to persons accessing this information.
This Publication shall not be for resale in whole or in part.

Contents
Introduction 1
Rack compatibility . . . . . . . . . . . . . . . . . . . . . . . . . . . . . . 1
Additional documentation . . . . . . . . . . . . . . . . . . . . . . . . . 1
Receiving inspection . . . . . . . . . . . . . . . . . . . . . . . . . . . . 1
Inventory . . . . . . . . . . . . . . . . . . . . . . . . . . . . . . . . . . . . . . . . . . . . . 2
Additional Options . . . . . . . . . . . . . . . . . . . . . . . . . . . . . . . . . . . . . 3
StruxureWare-certified. . . . . . . . . . . . . . . . . . . . . . . . . . . . . . . . . . 3
Installation 4
Physical description. . . . . . . . . . . . . . . . . . . . . . . . . . . . . . . . . . . . 4
How to install the NetBotz Handle Kit . . . . . . . . . . . . . . . . . . . . . 5
Status LEDs . . . . . . . . . . . . . . . . . . . . . . . . . . . . . . . . . . . . . . . . . . 8
How to configure rack access proximity cards. . . . . . . . . . . . . . 9
Installation—Accessories . . . . . . . . . . . . . . . . . . . . . . . . . . . . . . 10
Door switch sensor (optional) . . . . . . . . . . . . . . . . . . . . . 10
Alarm beacon (optional) . . . . . . . . . . . . . . . . . . . . . . . . . 10
Specifications 11
Compliance . . . . . . . . . . . . . . . . . . . . . . . . . . . . . . . . . . . . . . . . . . 13
FCC . . . . . . . . . . . . . . . . . . . . . . . . . . . . . . . . . . . . . . . . 13
Canada . . . . . . . . . . . . . . . . . . . . . . . . . . . . . . . . . . . . . 14
Two Year Limited Factory Warranty . . . . . . . . . . . . . . . . . . . . . . 15
Obtaining service . . . . . . . . . . . . . . . . . . . . . . . . . . . . . . 17
iNetBotz Handle Kit Installation Manual

ii NetBotz Handle Kit Installation Manual

IntroductionThe APC by Schneider Electric NetBotz 125 kHz Handle Kit (NBHN125) and NetBotz 13.56 MHz Handle Kit (NBHN1356) are compatible with the NetBotz Rack Monitor 250 only.
You can connect up to two handles to the Rack Monitor 250. Both handles must be the same model, either two 125 kHZ handles (840-9084A) or two 13.56 MHz handles (840-9085A).
You can configure up to 200 proximity cards in the Rack Monitor 250 user interface. The proximity card type must be the same for both handles.
NOTICE: The Rack Monitor 250 cannot be connected to or networked with any other NetBotz appliances. It uses unique software that is not compatible with other NetBotz products.
Rack compatibility
This manual provides installation instructions for the following racks:
• NetShelter® SX
• NetShelter SX Colocation rack (AR3200)
• NetShelter SV
• Chatsworth GlobalFrame™ Cabinet
NOTICE: For the most recent information on the racks compatible with this product, please check the APC website www.apc.comDCIM Support dcimsupport.apc.com or contact your Schneider Electric representative.
Additional documentation
Unless otherwise noted, the following documentation is available on the product page on the APC web site, www.apc.com. To quickly find a product page on the APC web site, enter the product name or part number in the Search field.
NetBotz Rack Monitor 250 User’s Guide – Includes all details for using, managing, and configuring the system when using a NetBotz Rack Monitor 250 (NBRK0250).
Receiving inspection
Inspect the package and its contents for shipping damage and ensure that the parts included in the shipment match all of the parts listed in the inventory table. Immediately report any shipping damage to the shipping agent. Report missing contents, damage, or other problems to APC or your APC reseller.
The shipping materials are recyclable. Please save them for later use, or dispose of them appropriately.
NetBotz Handle Kit Installation Manual 1

Inventory
Rotation limiter
Keys
Cam screw
Top mounting bracket
M3x14 Pozidriv® mounting screw
Bottom mounting bracket
M3x25 Pozidriv mounting screw (4)
Handle (2)
2 NetBotz Handle Kit Installation Manual
Additional OptionsThe following options are available for the NetBotz Rack Monitor 250Wireless Sensor Pod. For more information, contact your APC representative or the distributor from whom you purchased your product.
• NetBotz 3.65-m (12-ft) Door Switch Sensor for APC Racks (NBES0303)
• NetBotz 15.24-m (50-ft) Door Switch Sensor for Rooms or Third Party Racks (NBES0302)
• NetBotz 125 kHz Handle Kit (NBHN125)
• NetBotz 13.56 MHz Handle Kit (NBHN1356)
• Alarm Beacon (AP9324)
StruxureWare-certifiedThis product is certified for use in Schneider Electric StruxureWare for Data Centers systems.
Not shown:
Cable assembly (2)
Short cam, for use with NetShelter SX (2)
Long cam, for use with NetShelter SV and NetShelter SX Colocatoon (AR3200) (2)
Quick disconnect kit
In line RJ45/RJ45 coupler (2)
Wire tie 8x 0.1 x 0.06 inches (20)
CAT5 RJ45M/RJ45M patch cable
HID 125kHz 26 bit proximity card with APC logo, included with NBHN125 only (2)
NetBotz Handle Kit Installation Manual 3

Installation
Physical descriptionSwing handle with proximity reader
Proximity reader
Status LED
Lock plug
Sensor wire
Lock connector port (not shown)
Proximity reader connector
4 NetBotz Handle Kit Installation Manual

How to install the NetBotz Handle KitUse a #1 Pozidriv® driver to install the handle kit.
Removing front door handle
Removing rear door handle
NetBotz Handle Kit Installation Manual 5

1. Remove the existing rack handle. Remove the cam from the door handle, and save it for step 5.
2. Slide the new handle through the opening in the door.
3. With the swing handle closed, position the rotation limiter () with the arrows in the lower right corner for right hand mounting, or in the lower left for left hand mounting. Ensure the swing handle moves toward the inside of the rack in the open position. Reposition the rotation limiter if necessary.
4. Attach the top mounting bracket () with the M3x14 Pozidriv® screw ().
5. Reattach the cam () with the cam screw ().
6. Attach the bottom mounting bracket () using four M3x24 Pozidriv® screws (), with the tab on the right for right hand mounting, or on the left for left hand mounting.
NOTICE: Make sure the handle wire is outside the mounting bracket and does not interfere with the latch. Do not crimp the wire during installation.
7. Attach the included cable assembly to the proximity reader connector on the handle () and the lock connector port () on the handle wire. Route the cable assembly through the rack door.
NOTICE: Only use the cable assembly that came with the NetBotz Handle Kit.
8. At the hinge between the door and the rack, connect the cable assembly to the RJ45/RJ45 coupler, and then connect the CAT5 cable.
9. Continue routing the CAT5 cable through the rack.
10. Connect the cable to the Handle 1 or Handle 2 port on the Rack Monitor 250.
6 NetBotz Handle Kit Installation Manual

Installing the handle kit
Rotation limiter
Cam from your rack
Cam screw
Top mounting bracket
M3x14 Pozidriv® mounting screw
Bottom mounting bracket
M3x25 Pozidriv® mounting screws (4)
Proximity reader connector
Lock connector
NetBotz Handle Kit Installation Manual 7

Status LEDsThe LED activity on the front of the handle (blue, magenta, red) signifies its status.
LED Activity Status Action
Solid blue LockedThe handle is secured, the cam and lock slide are in the locked position.
Normal. Rack is secured.
Flashing blue/magenta Unlocked electronicallyThe handle is secured, the cam is in the locked position.The lock slide is in the unlocked position.
Normal. Rack can be accessed.
Flashing blue Unlocked manuallyThe handle is open, or the cam is in the unlocked position.
Normal.Rack can be accessed.
Flashing blue/red
Flashing blue/red/red
Handle not fully closedThe cam is open.
The cam is closed. The lock slide is not positioned correctly.
Close handle.
Possible tampering or mechanical failure.Call technical support.
Flashing magenta
Flashing red/magenta
Lock slide errorThe lock slide is locked and not responding electronically.
The lock slide is not responding electronically, and was unlocked manually.
Contact technical support.
Solid blue Unlocked electronicallyThe handle is secured, the cam is in the locked position.The lock slide is in the unlocked position.
Normal. Rack is secured.
8 NetBotz Handle Kit Installation Manual

How to configure rack access proximity cardsYou must access the Rack Monitor 250 user interface to configure proximity cards.
The Rack Monitor 250 with the NetBotz 125 kHz Handle Kit (NBHN125) supports the following 125kHz proximity cards:
• H10301 26-bit
• H10302 - 37 bit
• H10304 - 37bit with facility code
• CORP-1000
The Rack Monitor 250 with the NetBotz 13.56 MHz Handle Kit (NBHN1356) supports the following 13.56MHz proximity cards:
• MIFARE Classic 4-byte UID
• MIFARE Classic 7-byte UID
• MIFARE DESFIRE
• MIFARE PLUS
• iCLASS
To register a new proximity card:
1. Go to Configuration > Device > Rack Access > Lock Properties in the Rack Monitor 250 user interface.
2. Check the box to enable the card reader. Specify the card type for the installed handle(s), the auto-relock time (10 - 60 seconds), and the time to wait before the door open alarm is activated for Door 1, Door 2, or both (1 - 120 minutes). Click Apply.
3. Hold the card in front of the proximity reader on the handle until you hear a beep.
4. Go to Configuration > Device > Rack Access > Unregistered Users.
5. Click the card ID number to specify the user name, door access (Door 1, Door 2, or both), the access schedule (24 x 7 by default), and enable account access.
6. Click Apply.
To view, modify, or delete registered users, go to Configuration > Device > Rack Access > Registered Users.
To enable RADIUS rack access authentication, go to Configuration > Device > Rack Access > RADIUS.
For information about configuring rack access, see the NetBotz Rack Monitor 250 User’s Guide.
NetBotz Handle Kit Installation Manual 9

Installation—AccessoriesDoor switch sensor (optional)
1. Choose a location at the top of the rack to install the door switch and door switch magnet.
2. Connect the door switch to the enclosure frame.
3. Connect the door switch cable to the Door Switch 1 or Switch 2 port on the Rack Monitor 250.
4. Connect the door switch magnet to the enclosure door. For more information, see the installation sheet that came with your door switch sensor (NBES0302 or NBES0303).
Alarm beacon (optional)
1. Install the alarm beacon in a visible position either on the roof of the enclosure or inside the enclosure. The beacon has a magnetic base.
If you install the beacon on the roof, route its cable through the provided holes, as shown.
2. Connect the cable to the Beacon port on the Rack Monitor 250.
You can extend the cable to a maximum of 330 ft (100 m) using RJ-45 couplings and standard CAT5 cables.
aem
0061
a
10 NetBotz Handle Kit Installation Manual

SpecificationsElectrical
Lock
Supply voltage (Vsupply) 12VDC to 24 VDC
Standby current 50mA maximum at 12VDC
Operating current 200mA maximum at 12VDC (with no external mechanical load)
Stall current 1A maximum at 12VDC (limited to 2 seconds)
Operating transit time 1 second maximum (with power present)
Electronic unlock time 3 seconds minimum
Open collector outputs Rated for Vsupply maximum load
Proximity reader
Supply voltage (Vcc) 12VDC to 24 VDC
Operating current 20mA maximum at 12VDC (with no external devices)
Transmit frequency 125kHz FSK
DATA signal voltage 5VDC
DATA pulse interval time 40µs
DATA signal delay 2ms
Handle
Maximum length of CAT5 sensor cable
100 m (330 ft)
NetBotz Handle Kit Installation Manual 11
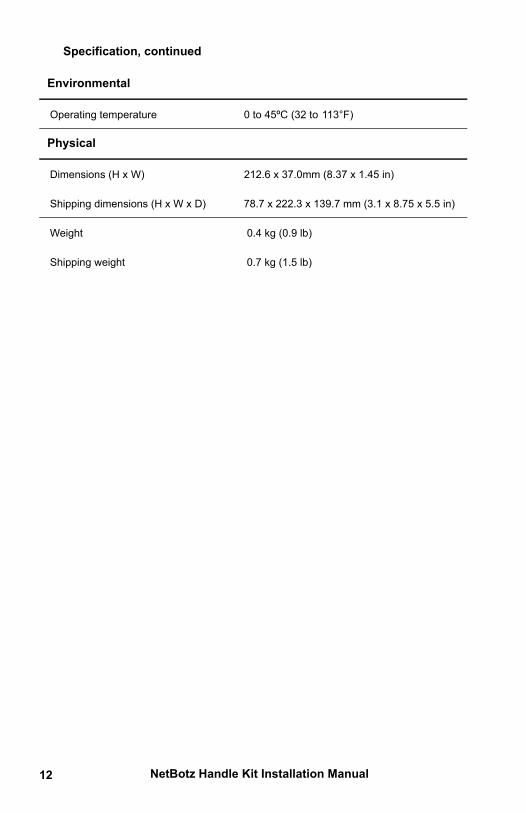
Specification, continued
Environmental
Operating temperature 0 to 45ºC (32 to 113°F)
Physical
Dimensions (H x W) 212.6 x 37.0mm (8.37 x 1.45 in)
Shipping dimensions (H x W x D) 78.7 x 222.3 x 139.7 mm (3.1 x 8.75 x 5.5 in)
Weight 0.4 kg (0.9 lb)
Shipping weight 0.7 kg (1.5 lb)
12 NetBotz Handle Kit Installation Manual

ComplianceFCC
This equipment has been tested and found to comply with the limits for a Class B digital device, pursuant to part 15 of the FCC rules. These limits are designed to provide reasonable protection against harmful interference in a residential installation. This equipment generates, uses and can radiate radio frequency energy and, if not installed and used in accordance with the instructions, may cause harmful interference to radio communications. However, there is no guarantee that interference will not occur in a particular installation. If this equipment does cause harmful interference to radio or television reception, which can be determined by turning the equipment off and on, the user is encouraged to try to correct the interference by one or more of the following measures:
• Reorient or relocate the receiving antenna.
• Increase the separation between the equipment and receiver.
• Connect the equipment into an outlet on a circuit different from that to which the receiver is connected.
• Consult the dealer or an experienced radio/TV technician for help.
FCC Caution: This device complies with Part 15 of the FCC Rules. Operation is subject to the following two conditions:
1. This device may not cause harmful interference and
2. This device must accept any interference received, including interference that may cause undesired operation.
RF Exposure Warning: The equipment complies with RF exposure limits set forth for an uncontrolled environment. The antenna(s) used for this transmitter must not be co-located or operating in conjunction with any other antenna or transmitter.
You are cautioned that changes or modifications not expressly approved by the party responsible for compliance could void your authority to operate the equipment.
NetBotz Handle Kit Installation Manual 13
Canada
This digital apparatus does not exceed the Class B limits for radio noise emissions from digital apparatus as set out in the interference-causing equipment standard entitled “Digital Apparatus,” ICES-003 of Industry Canada.
Cet appareil numérique respecte les limites de bruits radioélectriques applicables aux appareils numériques de Classe B prescrites dans la norme sur le material brouilleur: “Appareils Numériques,” NMB-003 édictée par l’Industrie.
14 NetBotz Handle Kit Installation Manual

Two Year Limited Factory WarrantySchneider Electric IT Corporation (SEIT), warrants its products to be free from defects in materials and workmanship for a period of two (2) years excluding the batteries. The SEIT obligation under this warranty is limited to repairing or replacing, at its own sole option, any such defective products. Repair or replacement of a defective product or parts thereof does not extend the original warranty period.
This warranty applies only to the original purchaser who must have properly registered the product within 10 days of purchase. Products may be registered online at warranty.apc.com.
SEIT shall not be liable under the warranty if its testing and examination disclose that the alleged defect in the product does not exist or was caused by end user’s or any third person’s misuse, negligence, improper installation, testing, operation or use of the product contrary to SEIT’s recommendations or specifications. Further, SEIT shall not be liable for defects resulting from: 1) unauthorized attempts to repair or modify the product, 2) incorrect or inadequate electrical voltage or connection, 3) inappropriate on site operation conditions, 4) Acts of God, 5) exposure to the elements, or 6) theft. In no event shall SEIT have any liability under this warranty for any product where the serial number has been altered, defaced, or removed.
EXCEPT AS SET FORTH ABOVE, THERE ARE NO WARRANTIES, EXPRESS OR IMPLIED, BY OPERATION OF LAW OR OTHERWISE, APPLICABLE TO PRODUCTS SOLD, SERVICED OR FURNISHED UNDER THIS AGREEMENT OR IN CONNECTION HEREWITH.
SEIT DISCLAIMS ALL IMPLIED WARRANTIES OF MERCHANTABILITY, SATISFACTION AND FITNESS FOR A PARTICULAR PURPOSE.
SEIT EXPRESS WARRANTIES WILL NOT BE ENLARGED, DIMINISHED, OR AFFECTED BY AND NO OBLIGATION OR LIABILITY WILL ARISE OUT OF, SEIT’S RENDERING OF TECHNICAL OR OTHER ADVICE OR SERVICE IN CONNECTION WITH THE PRODUCTS.
THE FOREGOING WARRANTIES AND REMEDIES ARE EXCLUSIVE AND IN LIEU OF ALL OTHER WARRANTIES AND REMEDIES. THE WARRANTIES SET FORTH ABOVE CONSTITUTE SEIT’S SOLE LIABILITY AND PURCHASER’S EXCLUSIVE REMEDY FOR ANY BREACH OF SUCH WARRANTIES. SEIT WARRANTIES EXTEND ONLY TO ORIGINAL PURCHASER AND ARE NOT EXTENDED TO ANY THIRD PARTIES.
IN NO EVENT SHALL SEIT, ITS OFFICERS, DIRECTORS, AFFILIATES OR EMPLOYEES BE LIABLE FOR ANY FORM OF INDIRECT, SPECIAL, CONSEQUENTIAL OR PUNITIVE DAMAGES, ARISING OUT OF THE USE, SERVICE OR INSTALLATION OF THE PRODUCTS, WHETHER SUCH DAMAGES ARISE IN CONTRACT OR TORT, IRRESPECTIVE OF FAULT, NEGLIGENCE OR STRICT LIABILITY OR WHETHER SEIT HAS BEEN
NetBotz Handle Kit Installation Manual 15
ADVISED IN ADVANCE OF THE POSSIBILITY OF SUCH DAMAGES. SPECIFICALLY, SEIT IS NOT LIABLE FOR ANY COSTS, SUCH AS LOST PROFITS OR REVENUE, WHETHER DIRECT OR INDIRECT, LOSS OF EQUIPMENT, LOSS OF USE OF EQUIPMENT, LOSS OF SOFTWARE, LOSS OF DATA, COSTS OF SUBSTITUANTS, CLAIMS BY THIRD PARTIES, OR OTHERWISE.
NOTHING IN THIS LIMITED WARRANTY SHALL SEEK TO EXCLUDE OR LIMIT SEIT’S LIABILITY FOR DEATH OR PERSONAL INJURY RESULTING FROM ITS NEGLIGENCE OR ITS FRAUDULENT MISREPRESENTATION OF TO THE EXTENT THAT IT CANNOT BE EXCLUDED OR LIMITED BY APPLICABLE LAW.
To obtain service under warranty you must obtain a Returned Material Authorization (RMA) number from customer support. Customers with warranty claims issues may access the SEIT worldwide customer support network through the SEIT Web site: www.apc.com. Select your country from the country selection drop down menu. Open the Support tab at the top of the web page to obtain information for customer support in your region. Products must be returned with transportation charges prepaid and must be accompanied by a brief description of the problem encountered and proof of date and place of purchase.
16 NetBotz Handle Kit Installation Manual

Obtaining service
To obtain support for problems with your NetBotz Handle Kit:
1. Contact Customer Support using the information on the back cover of this manual. A technician will try to help you solve the problem by phone.
2. If you must return the product, the technician will give you a return material authorization (RMA) number. If the warranty expired, you will be charged for repair or replacement.
3. Pack the unit carefully. The warranty does not cover damage sustained in transit. Enclose a letter with your name, address, RMA number and daytime phone number; a copy of the sales receipt; and a check as payment, if applicable.
4. Mark the RMA number clearly on the outside of the shipping carton.
5. Ship by insured, prepaid carrier to the address provided by the Customer Support technician.
NetBotz Handle Kit Installation Manual 17

18 NetBotz Handle Kit Installation Manual


APC Worldwide Customer SupportCustomer support for this or any other APC product is available at no charge in any of the following ways:
• Visit the APC Web site to access documents in the APC Knowledge Base and to submit customer support requests.– www.apc.com (Corporate Headquarters)
Connect to localized APC Web sites for specific countries, each of which provides customer support information.
– www.apc.com/support/Global support searching APC Knowledge Base and using e-support.
• Contact the APC Customer Support Center by telephone or e-mail.– Local, country-specific centers: go to www.apc.com/support/contact
for contact information.
For information on how to obtain local customer support, contact the APC representative or other distributors from whom you purchased your APC product.
© 2017 APC by Schneider Electric. APC, the APC logo, NetShelter, and NetBotz are owned by Schneider Electric Industries S.A.S. or their affiliated companies. All other trademarks are
property of their respective owners.
3/2017990-9868A-001