Embed Size (px)
Citation preview
© Copyright 2013-2016 NetFlow Logic Corporation. All rights reserved. Patents Pending.
NetFlow Integrator™ Standard
Getting Started and Administration Guide
Version 2.4.6 (Build 2.4.6.0.x)
September 2016
NetFlow Integrator Standard Getting Started and Administration Guide 1
Contents
Overview ....................................................................................................................................................................... 3 How NetFlow Integrator Works .................................................................................................................................. 3 How NFI Updater Works ............................................................................................................................................ 3
NetFlow Integrator Getting Started Guide ................................................................................................................. 4 Before You Install NFI .................................................................................................................................................. 4
Pre-Installation Checklist ........................................................................................................................................... 4 Minimum Requirements ............................................................................................................................................. 4
Supported Platforms .............................................................................................................................................. 4 Virtual Hardware .................................................................................................................................................... 4 Supported Browsers .............................................................................................................................................. 5 Required Network Ports ........................................................................................................................................ 5 Sizing the NFI Virtual Appliance ............................................................................................................................ 5
Installing NFI................................................................................................................................................................. 6 Deploy the NFI Virtual Appliance ............................................................................................................................... 6 Linux RPM Installation ............................................................................................................................................... 7 Linux TAR Installation ................................................................................................................................................ 8 Windows Installation .................................................................................................................................................. 8
NetFlow Integrator Administration Guide ................................................................................................................ 10 Upgrading NFI ............................................................................................................................................................ 10
Upgrading the NFI Virtual Appliance or RPM Installation ........................................................................................ 10 Upgrading TAR Installation ...................................................................................................................................... 10 Upgrading Windows Installation............................................................................................................................... 11
Removing NFI ............................................................................................................................................................. 12 Removing the NFI Virtual Appliance ........................................................................................................................ 12 Removing RPM Installation ..................................................................................................................................... 12 Removing TAR Installation ...................................................................................................................................... 12 Removing Windows Installation ............................................................................................................................... 13
Configuring NFI .......................................................................................................................................................... 13 Configure the Root SSH Password for the NFI Virtual Appliance ............................................................................ 13 Configure the User Password for the NFI ................................................................................................................ 14 Assign a Permanent License to NFI ........................................................................................................................ 14 Start NetFlow Integrator ........................................................................................................................................... 14 Update Input and Output ......................................................................................................................................... 14
Input Summary .................................................................................................................................................... 14 Output Summary ................................................................................................................................................. 15
Starting and Stopping NetFlow Integrator ................................................................................................................ 16 Enabling and Configuring Modules .......................................................................................................................... 16
Configure Top Traffic Monitor Module Parameters .............................................................................................. 17 Data Sets Summary ............................................................................................................................................ 17
Status ...................................................................................................................................................................... 18 Configuring Advanced Features .............................................................................................................................. 18
Output Tab .......................................................................................................................................................... 19 Services Tab ....................................................................................................................................................... 19 Updaters Tab ....................................................................................................................................................... 22 Server Tab ........................................................................................................................................................... 22
Admin ...................................................................................................................................................................... 23 Change Password ............................................................................................................................................... 23 Active Directory Authentication ............................................................................................................................ 23 Disabling Admin Account..................................................................................................................................... 26 Forgot Password ................................................................................................................................................. 27
Licensing ................................................................................................................................................................. 27
NetFlow Integrator Standard Getting Started and Administration Guide 2
License Details .................................................................................................................................................... 27 Apply a License ................................................................................................................................................... 27
Server Configuration Parameters ............................................................................................................................ 28 Linux kernel settings for high-volume processing .................................................................................................... 28 Secure Connection Configuration (HTTPS) ............................................................................................................. 28
Create a local Certificate Signing Request (CSR) ............................................................................................... 29 Import the Certificate ........................................................................................................................................... 29
NFI Updater Getting Started Guide ........................................................................................................................... 30 Before You Install NFI Updater ................................................................................................................................. 30
Pre-Installation Checklist ......................................................................................................................................... 30 Minimum Requirements ........................................................................................................................................... 30
Supported Platforms ............................................................................................................................................ 30 Required Network Ports ...................................................................................................................................... 30 Required Internet Destinations ............................................................................................................................ 31
Installing NFI Updater ................................................................................................................................................ 31 Linux RPM Installation ............................................................................................................................................. 31 Linux TAR Installation .............................................................................................................................................. 32 Windows Installation ................................................................................................................................................ 32
NFI Updater Administration Guide ........................................................................................................................... 34 Upgrading NFI Updater .............................................................................................................................................. 34
Upgrading the NFI Updater RPM Installation ........................................................................................................... 34 Upgrading the NFI Updater TAR Installation ........................................................................................................... 34 Upgrading the NFI Updater Windows Installation .................................................................................................... 35
Removing NFI Updater .............................................................................................................................................. 36 Removing the NFI Updater RPM Installation ........................................................................................................... 36 Removing the NFI Updater TAR Installation ............................................................................................................ 36 Removing the NFI Updater Windows Installation ..................................................................................................... 36
Verifying NFI Updater Status..................................................................................................................................... 37 Verifying NFI Updater Linux Installation ................................................................................................................... 37 Verifying NFI Updater Windows Installation ............................................................................................................. 37
Authentication Configuration.................................................................................................................................... 37 X509 authentication ................................................................................................................................................. 37 User/password authentication.................................................................................................................................. 38 Import the Certificate into NFI Updater truststore .................................................................................................... 39
Proxy Server Configuration....................................................................................................................................... 39
NetFlow Integrator Standard Getting Started and Administration Guide 3
Overview
The NetFlow Integrator™ (NFI) Standard Getting Started Guide provides information about deploying and configuring
NFI including how to configure it to send syslog messages to Splunk®, VMware® vRealize™ Log Insight™, or any
other SIEM system.
Intended Audience
This information is intended for anyone who wants to install, configure, or maintain NFI. The information is written for
experienced Linux system administrators who are familiar with virtual machine technology and datacenter operations.
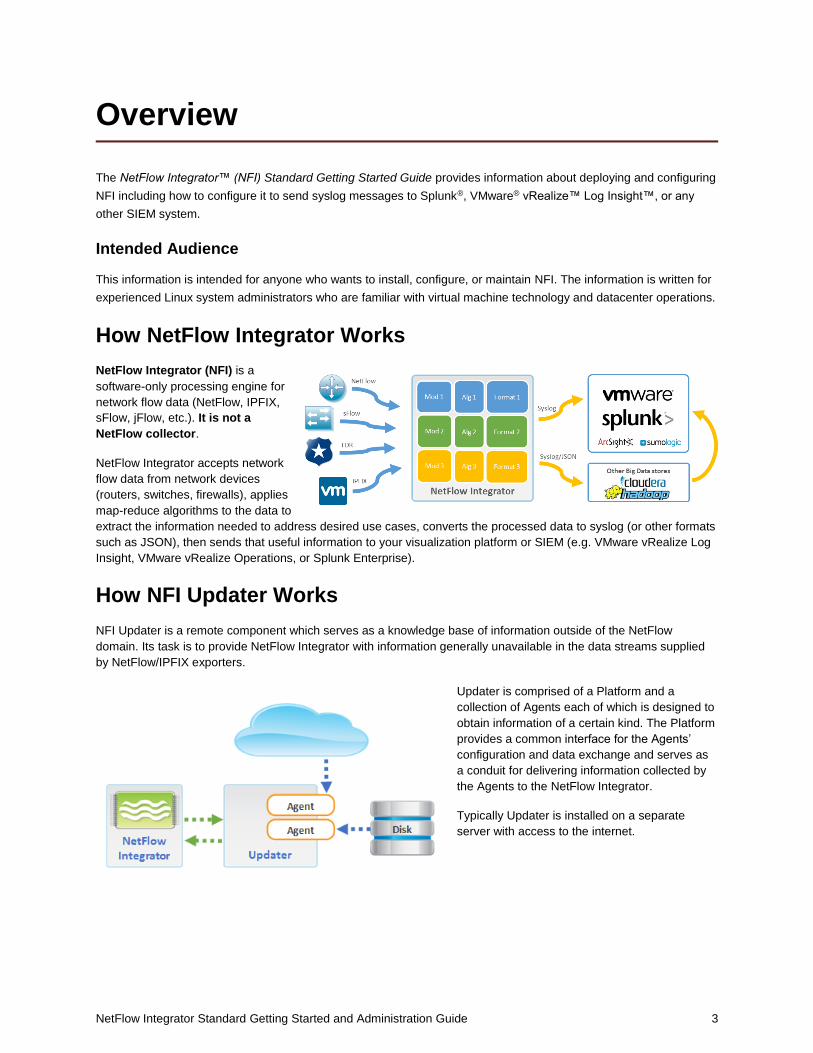
How NetFlow Integrator Works
NetFlow Integrator (NFI) is a
software-only processing engine for
network flow data (NetFlow, IPFIX,
sFlow, jFlow, etc.). It is not a
NetFlow collector.
NetFlow Integrator accepts network
flow data from network devices
(routers, switches, firewalls), applies
map-reduce algorithms to the data to
extract the information needed to address desired use cases, converts the processed data to syslog (or other formats
such as JSON), then sends that useful information to your visualization platform or SIEM (e.g. VMware vRealize Log
Insight, VMware vRealize Operations, or Splunk Enterprise).
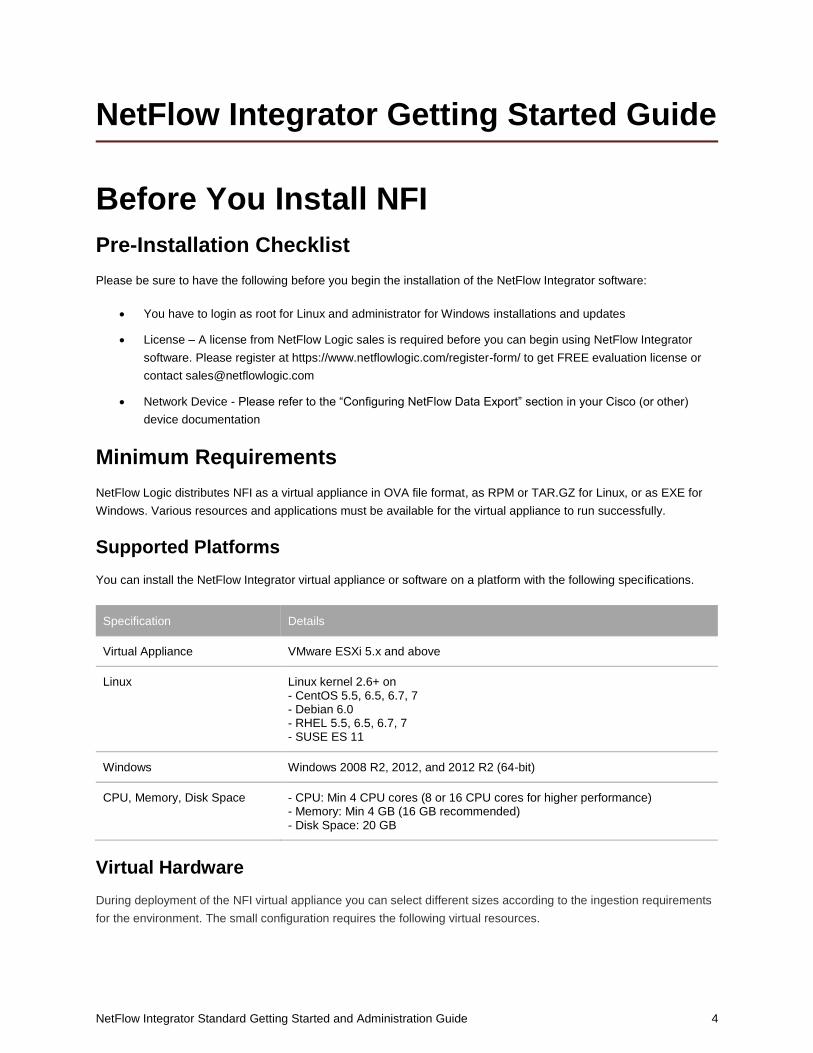
How NFI Updater Works
NFI Updater is a remote component which serves as a knowledge base of information outside of the NetFlow
domain. Its task is to provide NetFlow Integrator with information generally unavailable in the data streams supplied
by NetFlow/IPFIX exporters.
Updater is comprised of a Platform and a
collection of Agents each of which is designed to
obtain information of a certain kind. The Platform
provides a common interface for the Agents’
configuration and data exchange and serves as
a conduit for delivering information collected by
the Agents to the NetFlow Integrator.
Typically Updater is installed on a separate
server with access to the internet.
NetFlow Integrator Standard Getting Started and Administration Guide 4
NetFlow Integrator Getting Started Guide
Before You Install NFI
Pre-Installation Checklist
Please be sure to have the following before you begin the installation of the NetFlow Integrator software:
You have to login as root for Linux and administrator for Windows installations and updates
License – A license from NetFlow Logic sales is required before you can begin using NetFlow Integrator
software. Please register at https://www.netflowlogic.com/register-form/ to get FREE evaluation license or
contact [email protected]
Network Device - Please refer to the “Configuring NetFlow Data Export” section in your Cisco (or other)
device documentation
Minimum Requirements
NetFlow Logic distributes NFI as a virtual appliance in OVA file format, as RPM or TAR.GZ for Linux, or as EXE for
Windows. Various resources and applications must be available for the virtual appliance to run successfully.
Supported Platforms
You can install the NetFlow Integrator virtual appliance or software on a platform with the following specifications.
Specification Details
Virtual Appliance VMware ESXi 5.x and above
Linux Linux kernel 2.6+ on - CentOS 5.5, 6.5, 6.7, 7 - Debian 6.0 - RHEL 5.5, 6.5, 6.7, 7 - SUSE ES 11
Windows Windows 2008 R2, 2012, and 2012 R2 (64-bit)
CPU, Memory, Disk Space - CPU: Min 4 CPU cores (8 or 16 CPU cores for higher performance) - Memory: Min 4 GB (16 GB recommended) - Disk Space: 20 GB
Virtual Hardware
During deployment of the NFI virtual appliance you can select different sizes according to the ingestion requirements
for the environment. The small configuration requires the following virtual resources.
NetFlow Integrator Standard Getting Started and Administration Guide 5
4 vCPUs, 2GHz each
8GB RAM
Approximately 20GB storage space
Supported Browsers
You can use one of the following browsers to connect to the NFI Web user interface.
Mozilla Firefox 38.0 and up
Safari 6.0 , 7.0
Google Chrome 34.0 and 43.0 and up
Required Network Ports
The following network ports must be accessible.
Port Protocol
8443/TCP NetFlow Integrator GUI
9995/UDP NetFlow/IPFIX Ingestion (plus all ports for ingestion as necessary)
20047/TCP and 20048/TCP NetFlow Integrator internal services
Sizing the NFI Virtual Appliance
By default, the NFI virtual appliance has 4 vCPUs, 8GB of virtual memory, and 20GB of disk space provisioned.
Standalone Deployment
You can change the settings according to the environment for which you intend to collect NetFlow.
During the virtual appliance deployment, you can select the size of the appliance as follows.
Option Number of VMs NetFlow Ingest Rate vCPUs Memory
Small 200 2,000 flows/sec 4 8GB
Medium 2,000 20,000 flows/sec 8 16GB
Large 5,000+ 50,000+ flows/sec 16 32GB
NetFlow Integrator Standard Getting Started and Administration Guide 6
Installing NFI
Deploy the NFI Virtual Appliance
To deploy the NFI virtual appliance, follow the standard OVF deployment procedure.
Download the NFI virtual appliance. VMware distributes the NFI virtual appliance as an .ova file. Deploy
the NFI virtual appliance by using the vSphere Client.
Prerequisites
Verify that you have a copy of the NFI virtual appliance .ova file.
Verify that you have permissions to deploy OVF templates to the inventory.
Verify that your environment has enough resources to accommodate the minimum requirements of the NFI
virtual appliance. See Minimum Requirements.
Verify that you read and understand the virtual appliance sizing recommendations. See Sizing the NFI
Virtual Appliance.
Procedure
1. In the vSphere Client, select File > Deploy OVF Template.
2. Follow the prompts in the Deploy OVF Template wizard.
3. On the Deployment Configuration page, select the size of the NFI virtual appliance based on the size of the
environment for which you intend to collect NetFlow.
4. On the Disk Format page, select a disk format.
Thick Provision Lazy Zeroed creates a virtual disk in a default thick format. Space required for the virtual
disk is allocated when the virtual disk is created. The data remaining on the physical device is not erased
during creation, but is zeroed out on demand at a later time, on first write from the virtual appliance.
Thick Provision Eager Zeroed creates a type of thick virtual disk that supports clustering features such as
Fault Tolerance. Space required for the virtual disk is allocated at creation time. In contrast to the flat
format, the data remaining on the physical device is zeroed out when the virtual disk is created. It might
take much longer to create disks in this format than to create other types of disks.
IMPORTANT: Deploy the NFI virtual appliance with thick provisioned eager zeroed disks whenever
possible for better performance and operation of the virtual appliance.
Thin Provision creates a disk in thin format. The disk grows as the data saved on it grows. If your storage
device does not support thick provisioning disks or you want to conserve unused disk space on the NFI
virtual appliance, deploy the virtual appliance with thin provisioned disks.
5. (Optional) On the Properties page, set the networking parameters for the NFI virtual appliance.
If you do not provide network settings, such as IP address, DNS servers, and gateway, NFI utilizes DHCP to set
those settings.
NetFlow Integrator Standard Getting Started and Administration Guide 7
CAUTION Do not specify more than two domain name servers. If you specify more than two domain
name servers, all configured domain name servers are ignored in the NFI virtual appliance.
`
Use comma to separate domain name servers.
6. (Optional) On the Properties page, set the root password for the NFI virtual appliance.
7. Follow the prompts to complete the deployment.
For information on deploying virtual appliances, see the User's Guide to Deploying vApps and Virtual
Appliances.
After you power on the virtual appliance, an initialization process begins. The initialization process takes
several minutes to complete. At the end of the process, the virtual appliance restarts.
8. Navigate to the Console tab and check the IP address of the NFI virtual appliance.
IP Address Prefix Description
https:// The DHCP configuration on the virtual appliance is correct.
http:// The DHCP configuration on the virtual appliance failed. If it is failed:
Power off the NFI virtual appliance.
Right-click the virtual appliance and select Edit Settings.
Set a static IP address for the virtual appliance.
What to do next
To enable SSH connections to the NFI virtual appliance, configure the root password in the virtual appliance
console. See Configure the Root SSH Password for the NFI Virtual Appliance.
The NFI Web interface is available at https://<nfi-host>:8443 where nfi-host is the IP address or
host name of the NFI virtual appliance.
Log in to NetFlow Integrator, apply license, and continue configuration. See Configuring NFI on page 13 for
more information.
Linux RPM Installation
Download the NFI RPM package.
Procedure
To begin the RPM installation of NetFlow Integrator in the default directory /opt/flowintegrator perform the
following:
Open a shell prompt and enter the following command to begin the installation
rpm -ihv <RPM-package>
To begin the RPM installation of NetFlow Integrator in another directory, perform the following:
NetFlow Integrator Standard Getting Started and Administration Guide 8
Open a shell prompt and enter the following command to begin the installation
rpm -ihv --relocate /opt=<new-path> <RPM-package>
What to do next
A message will display indicating that the NetFlow Integrator installation has been successfully completed.
The NFI Web interface to complete the setup is available at https://<nfi-host>:8443 where
nfi-host is the IP address or host name of the NFI server.
Log in to NetFlow Integrator, apply license, and continue configuration. See Configuring NFI on page 13 for
more information.
Linux TAR Installation
Download the NFI TAR package.
Procedure
To begin the TAR installation of NetFlow Integrator in the default directory /opt/flowintegrator perform the
following:
1. Open a shell prompt and enter the following command to un-compress the installer
tar zxvf <TAR-package> -C /opt/flowintegrator
2. Go to the /opt/flowintegrator directory and enter the following command to begin the installation
setup.sh -i
To begin the TAR installation of NetFlow Integrator in another directory, perform the following:
1. Open a shell prompt and enter the following command to un-compress the installer
tar zxvf <TAR-package> -C <directory>
2. Go to the /opt/flowintegrator directory and enter the following command to begin the installation
setup.sh -i
What to do next
A message will display indicating that the NetFlow Integrator installation has been successfully completed.
The NFI Web interface to complete the setup is available at https://<nfi-host>:8443 where nfi-
host is the IP address or host name of the NFI server.
Log in to NetFlow Integrator, apply license, and continue configuration. See Configuring NFI on page 13 for
more information.
Windows Installation
Download the NFI Windows installation package.
Procedure
To begin the Windows installation of NetFlow Integrator perform the following:
NetFlow Integrator Standard Getting Started and Administration Guide 9
1. Open the installation file and click ‘Run’ to launch the installer and Click ‘Next’ To begin the ‘NetFlow Integrator
Setup’
2. Click ‘Next’ to install NetFlow Integrator in the default location:
C:\Program Files\NetFlow Logic\NetFlow Integrator
3. Click on ‘Install’ To begin the installation (follow the installation steps)
4. Click on ‘Finish’ to complete the installation and exit the installer
What to do next
Go to Start > Programs > NetFlow Logic > NetFlow Integrator to open the URL for the login page to complete the
setup using the default browser.
The NFI Web interface to complete the setup is available at https://<nfi-host>:8443 where
nfi-host is the IP address or host name of the NFI server.
Log in to NetFlow Integrator, apply license, and continue configuration. See Configuring NFI on page 13 for
more information.
NetFlow Integrator Standard Getting Started and Administration Guide 10
NetFlow Integrator Administration Guide
Upgrading NFI
CAUTION Before upgrade NetFlow Integrator, please backup all configuration files if they have been
changed manually. For example:
$nfi_home/tomcat/conf/.tomcat_keystore – if default self-signed certificate has been
changed.
$nfi_home/tomcat/conf/.truststore – if NFI Updater certificate has been changed.
$nfi_home/tomcat/conf/server.xml – if keystore password has been changed.
$nfi_home/server/etc/server.cfg – if server configuration has been changed manually (not
from the GUI).
$nfi_home/java/jre8/jre/lib/security/cacerts – if trusted certificates have been imported
into Java Runtime cacerts keystore.
After upgrade, validate default configuration and restore from the backup if it is required.
If you didn’t modify these files, ignore the caution.
Upgrading the NFI Virtual Appliance or RPM Installation
Procedure
To begin the upgrade of NFI Virtual Appliance or RPM perform the following:
1. Open a web browser and go to the NFI URL, entering the NFI hostname or IP address
2. Example:
https://<nfi-host>:8443
3. Click on the ‘Stop’ button at the top of the page to stop the server
4. The ‘Play’ button will turn grey indicating that the NetFlow Integrator has stopped
5. Login directly or SSH and copy the new installation file into the /opt installation directory
6. RPM the NetFlow Integrator for Linux installation file into the /opt installation directory
rpm –Uhv <RPM-package>
7. A message will display indicating that the NFI setup has been successfully completed along with the URL for the
login page
Upgrading TAR Installation
Procedure
To begin the upgrade of NFI TAR installation, perform the following:
NetFlow Integrator Standard Getting Started and Administration Guide 11
1. Open a web browser and go to the NFI URL, entering the NFI hostname or IP address
2. Example:
https://<nfi-host>:8443
3. Click on the ‘Stop’ button at the top of the page to stop the server
4. The ‘Play’ button will turn grey indicating that the NetFlow Integrator has stopped
5. Go to the existing installation directory and enter the following command to begin the uninstall
setup.sh -u
6. Copy the upgrade installation package for Linux into the existing installation directory
7. Open a shell prompt and enter the following command to un-compress the installer
tar zxvf <TAR-package> -C <directory>
8. A message will display indicating that the NFI setup has been successfully completed along with the URL for the
login page
Upgrading Windows Installation
Procedure
To begin the upgrade of NFI on a Windows platform, perform the following:
1. Open a web browser and go to the NFI URL, entering the NFI hostname or IP address
2. Example:
https://<nfi-host>:8443
3. Click on the ‘Stop’ button at the top of the page to stop the server
4. The ‘Play’ button will turn grey indicating that the NetFlow Integrator has stopped
5. Open the upgrade installation file and click ‘Run’ to launch the installer and Click ‘Next’ To begin the ‘NetFlow
Integrator Setup’
6. Click ‘Next’ to install NetFlow Integrator in the default location:
C:\Program Files\NetFlow Logic\NetFlow Integrator
7. Click on ‘Install’ To begin the installation (follow the installation steps)
8. Click on ‘Finish’ to complete the installation and exit the installer
NetFlow Integrator Standard Getting Started and Administration Guide 12
Removing NFI
Removing the NFI Virtual Appliance
Procedure
Manually remove the NetFlow Integrator virtual appliance files from the hypervisor.
Removing RPM Installation
Procedure
To begin the removal of NFI RPM installation, perform the following:
1. Open a web browser and go to the NFI URL, entering the NFI hostname or IP address
2. Example:
https://<nfi-host>:8443
3. Click on the ‘Stop’ button at the top of the page to stop the server
4. The ‘Play’ button will turn grey indicating that the NetFlow Integrator has stopped
5. Open a shell prompt and enter the following command to begin the uninstall
rpm –e flowintegrator
6. Remove the install path if the full uninstall needed
rm -rf <directory>
Removing TAR Installation
Procedure
To begin the removal of NFI TAR installation, perform the following:
1. Open a web browser and go to the NFI URL, entering the NFI hostname or IP address
2. Example: https://<nfi-host>:8443
3. Click on the ‘Stop’ button at the top of the page to stop the server
4. The ‘Play’ button will turn grey indicating that the NetFlow Integrator has stopped
5. Go to the existing installation directory and enter the following command to begin the uninstall
setup.sh -u
6. Leave the installation directory
cd ..
NetFlow Integrator Standard Getting Started and Administration Guide 13
7. Remove the install path if the full uninstall needed
rm -rf <directory>
Removing Windows Installation
Procedure
To begin the removal of NFI Windows installation, perform the following:
1. Go to Control Panel > Programs > Programs and Features and select the NetFlow Integrator program
2. Follow the steps to uninstall the program
NOTE: You may need to manually remove the NetFlow Integrator files from the installation directory prior to restarting
the system.
Configuring NFI
Configure the Root SSH Password for the NFI Virtual
Appliance
By default the SSH connection to the virtual appliance is enabled with root password changeme or the one that was
set during deployment. You can change it from the VMware Remote Console.
Prerequisites
Verify that the NFI virtual appliance is deployed and running.
Procedure
1. In the vSphere Client inventory, click the NFI virtual appliance, and open the Console tab.
2. Click the Console window area. If the splash screen did not appear, press Space button on keyboard.
3. Go to a command line by following the key combination specified on the splash screen.
4. In the console, type root, and press Enter; type current password, and press Enter.
5. Type passwd root and press Enter.
The following message is displayed in the console:
Changing password for user root. New password:
6. Type a new password for the root user, press Enter, type the new password again for the root user, and press
Enter.
The password must consist of at least eight characters, and must include at least one upper case letter, one lower
case letter, one digit, and one special character. You cannot repeat the same character more than four times.
The following message is displayed:
passwd: all authentication tokens updated successfully.
NetFlow Integrator Standard Getting Started and Administration Guide 14
What to do next
You can use the root password to establish SSH connections to the NFI virtual appliance.
Configure the User Password for the NFI
1. Open a web browser and go to the following URL, entering the NetFlow Integrator hostname or IP address:
https://<nfi-host>:8443
2. Click on proceed to continue to the login page
Note: In the event you receive a warning message during login such as ‘The sites security certificate is not
trusted!” click on the ‘proceed anyway’ button to continue to the log in page.
3. Enter the following default credentials on the login page and click ‘Sign In’
Username: admin
Password: changeme
4. Click on ‘Agree’ to accept the license agreement
5. Enter a new password at the change password prompt and click ‘Save’
Assign a Permanent License to NFI
1. Go to top navigation bar, select gear icon > Licensing
2. Click on ‘Choose files’ to upload and apply your license
3. Proceed to the next step
Start NetFlow Integrator
1. Click on the ‘Play’ button next to the NetFlow Integrator status to Start the server
The ‘Play’ button will turn green indicating that the NetFlow Integrator has started and is running
2. Proceed to the next step
Update Input and Output
By default NetFlow Integrator is preconfigured with one active data input port number 9995. To change the default
data input port number or to add additional data inputs, follow the steps below
Input Summary
By default NetFlow Integrator is preconfigured with one active data input port number 9995. To change the default
data input port number or to add additional data inputs, follow the steps below
NetFlow Integrator Standard Getting Started and Administration Guide 15
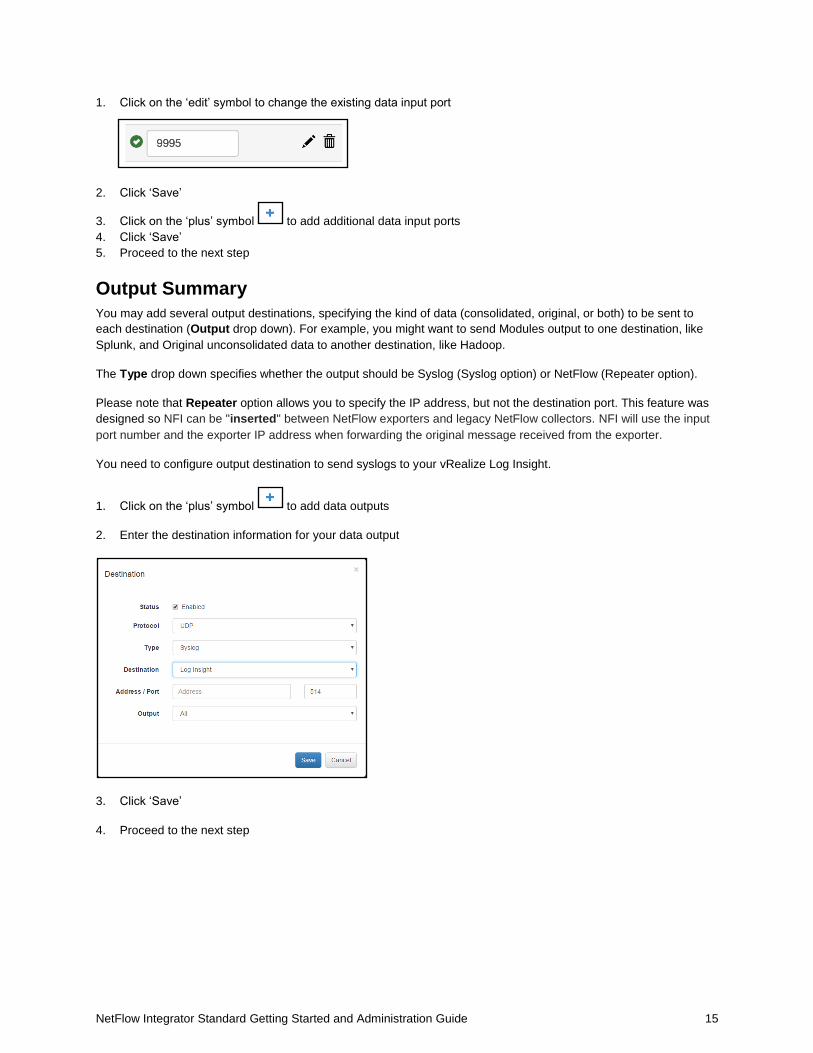
1. Click on the ‘edit’ symbol to change the existing data input port
2. Click ‘Save’
3. Click on the ‘plus’ symbol to add additional data input ports
4. Click ‘Save’
5. Proceed to the next step
Output Summary
You may add several output destinations, specifying the kind of data (consolidated, original, or both) to be sent to
each destination (Output drop down). For example, you might want to send Modules output to one destination, like
Splunk, and Original unconsolidated data to another destination, like Hadoop.
The Type drop down specifies whether the output should be Syslog (Syslog option) or NetFlow (Repeater option).
Please note that Repeater option allows you to specify the IP address, but not the destination port. This feature was
designed so NFI can be "inserted" between NetFlow exporters and legacy NetFlow collectors. NFI will use the input
port number and the exporter IP address when forwarding the original message received from the exporter.
You need to configure output destination to send syslogs to your vRealize Log Insight.
1. Click on the ‘plus’ symbol to add data outputs
2. Enter the destination information for your data output
3. Click ‘Save’
4. Proceed to the next step
NetFlow Integrator Standard Getting Started and Administration Guide 16
Starting and Stopping NetFlow Integrator
Start
Click on the ‘Play’ button next to the NetFlow Integrator Server Status to start the server. A message will display indicating that the server has been started
Stop
Click on the ‘Stop’ button to stop the server
Restart
Click on the ‘Restart’ button to restart the server
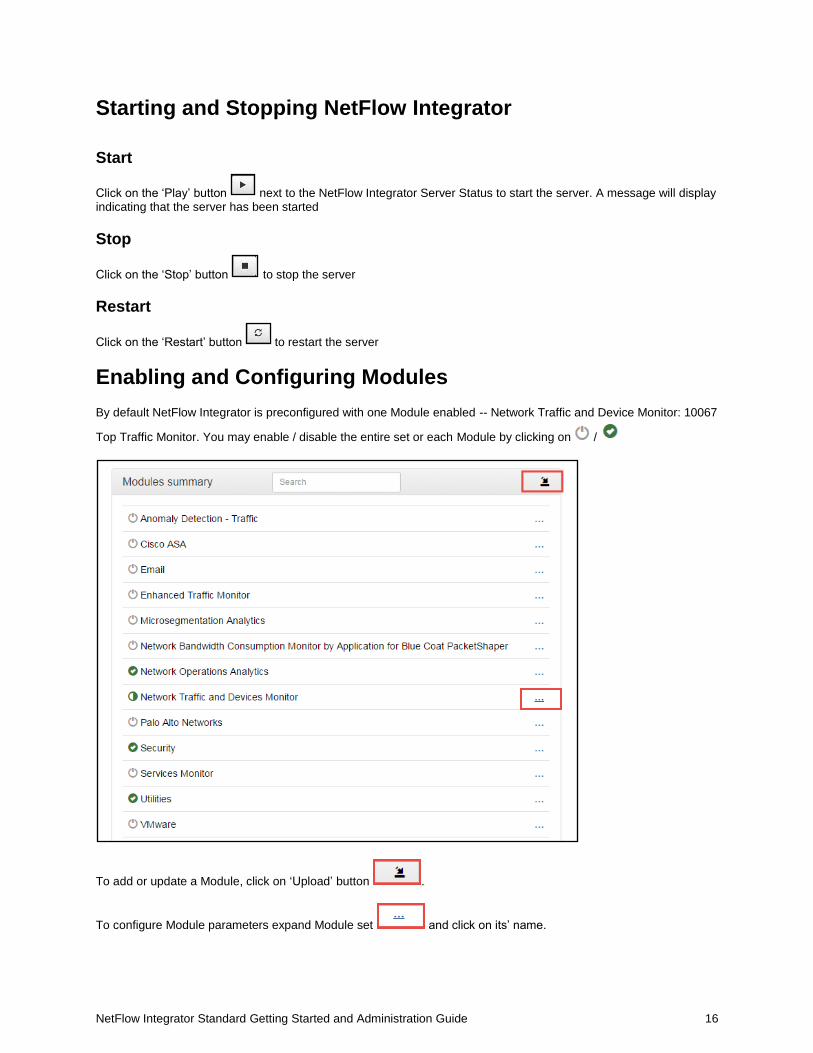
Enabling and Configuring Modules
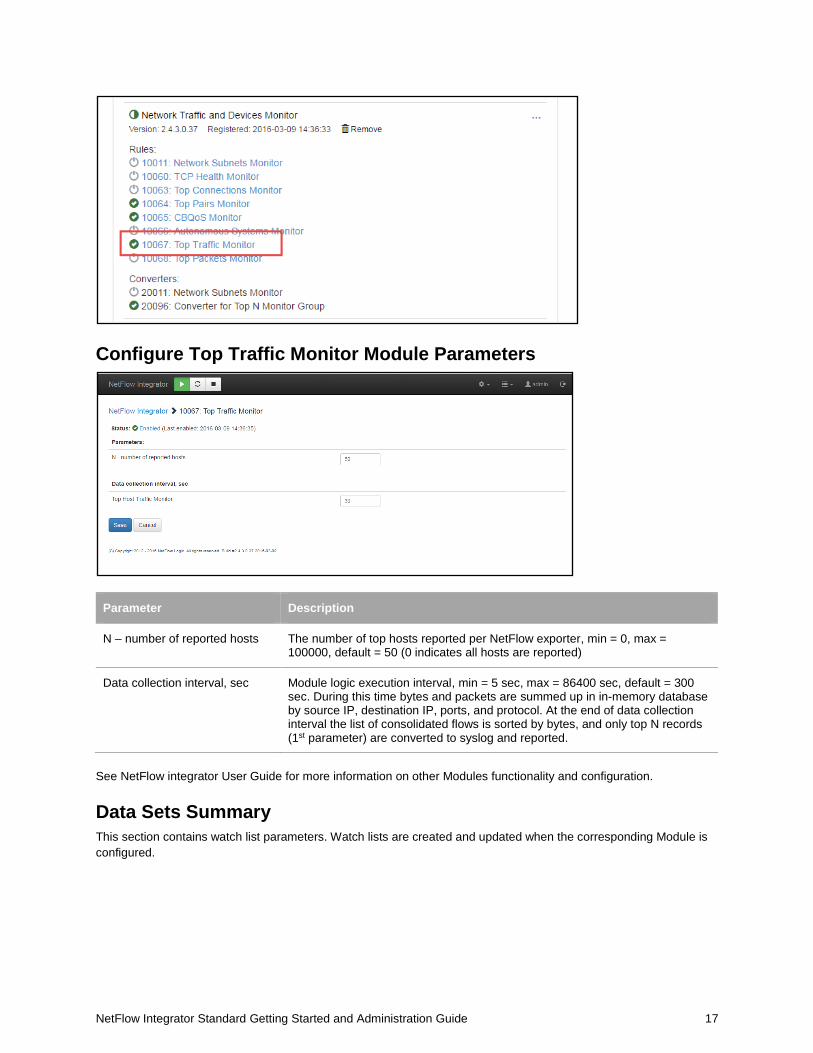
By default NetFlow Integrator is preconfigured with one Module enabled -- Network Traffic and Device Monitor: 10067
Top Traffic Monitor. You may enable / disable the entire set or each Module by clicking on /
To add or update a Module, click on ‘Upload’ button .
To configure Module parameters expand Module set and click on its’ name.
NetFlow Integrator Standard Getting Started and Administration Guide 17
Configure Top Traffic Monitor Module Parameters
Parameter Description
N – number of reported hosts The number of top hosts reported per NetFlow exporter, min = 0, max = 100000, default = 50 (0 indicates all hosts are reported)
Data collection interval, sec Module logic execution interval, min = 5 sec, max = 86400 sec, default = 300 sec. During this time bytes and packets are summed up in in-memory database by source IP, destination IP, ports, and protocol. At the end of data collection interval the list of consolidated flows is sorted by bytes, and only top N records (1st parameter) are converted to syslog and reported.
See NetFlow integrator User Guide for more information on other Modules functionality and configuration.
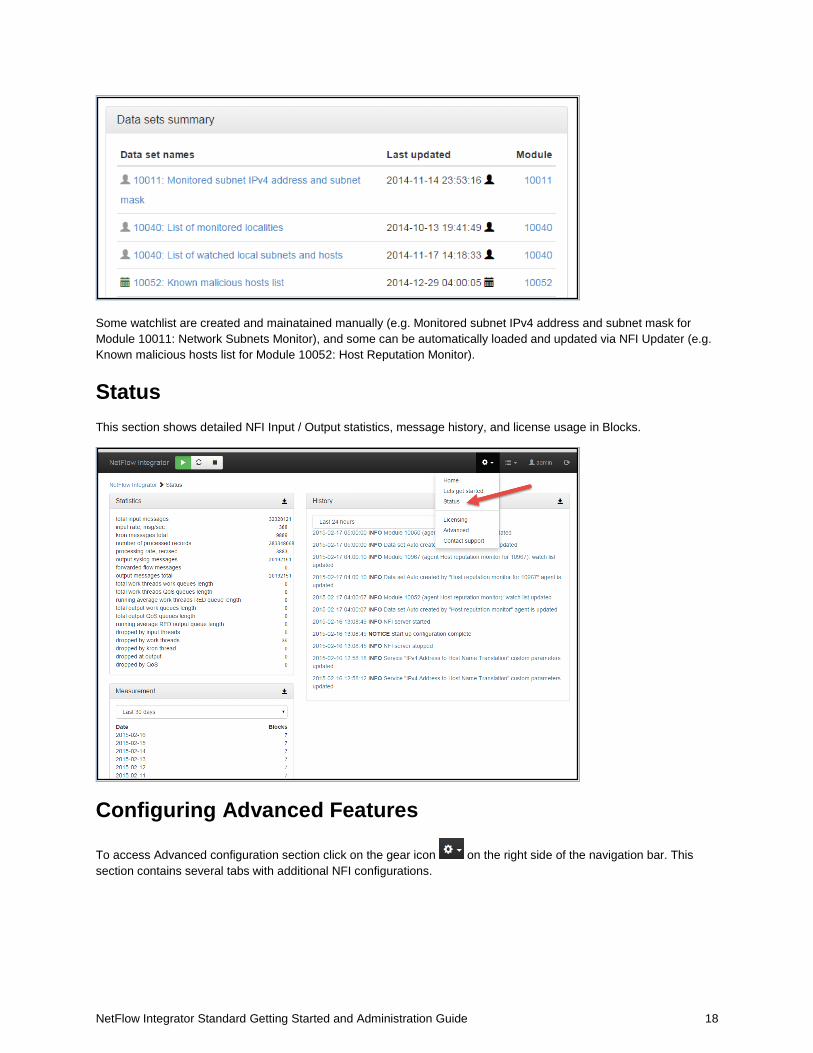
Data Sets Summary
This section contains watch list parameters. Watch lists are created and updated when the corresponding Module is
configured.
NetFlow Integrator Standard Getting Started and Administration Guide 18
Some watchlist are created and mainatained manually (e.g. Monitored subnet IPv4 address and subnet mask for
Module 10011: Network Subnets Monitor), and some can be automatically loaded and updated via NFI Updater (e.g.
Known malicious hosts list for Module 10052: Host Reputation Monitor).
Status This section shows detailed NFI Input / Output statistics, message history, and license usage in Blocks.
Configuring Advanced Features
To access Advanced configuration section click on the gear icon on the right side of the navigation bar. This
section contains several tabs with additional NFI configurations.
NetFlow Integrator Standard Getting Started and Administration Guide 19
Output Tab
This tab allows you to enable / disable original flow output. When this option is enabled, in addition to output from
Modules, all original flow records are also converted to syslog messages one-to-one and sent out. Please note that
you may configure a separate destination for this output, such as your Hadoop cluster.
This tab also contains various syslog options.
Services Tab
This tab allows you to enable and configure NFI built-in services.
IPv4 Address to Host Name Translation
This service is using FQDN resolution to enrich your flow data with real-time domain names. This service is enabled
by default.
Modules state persistence support
This service saves Module state which is used in case NFI server is restarted. It is always enabled and has no
configuration parameters.
Original Flow Data Converter Service
This service is for Blue Coat Packeteer-2 device. It allows you to map ClassIDs to application names.
SNMP Data Retrieval Service
This Service supports protocol version SNMPv2C. It does not support any later versions of the protocol.
The service is always enabled.
Please note that the Service replies in SNMP index fields to be present in Flow records.
NFI Modules query this Service to get SNMP data, passing Exporter IP and Interface SNMP index as parameters.
SNMP information polled from network devices is cached in the Service (OIB + Exporter IP + if SNMP index), until it
expires.
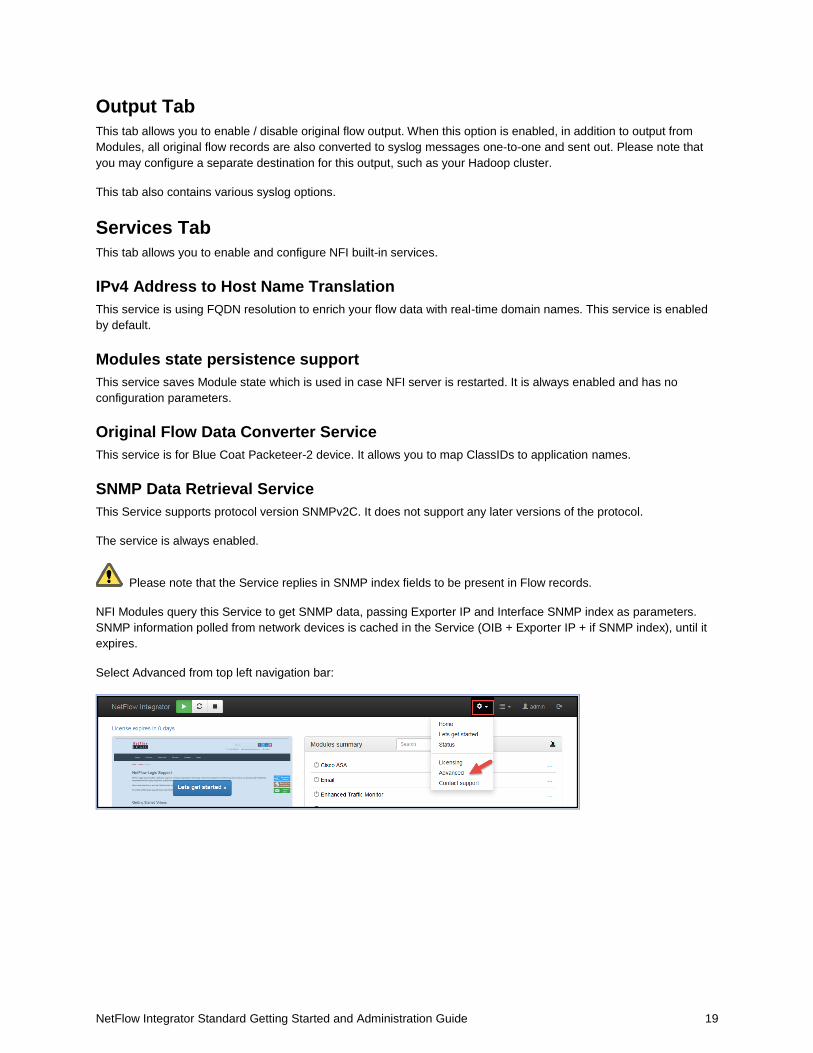
Select Advanced from top left navigation bar:
NetFlow Integrator Standard Getting Started and Administration Guide 20
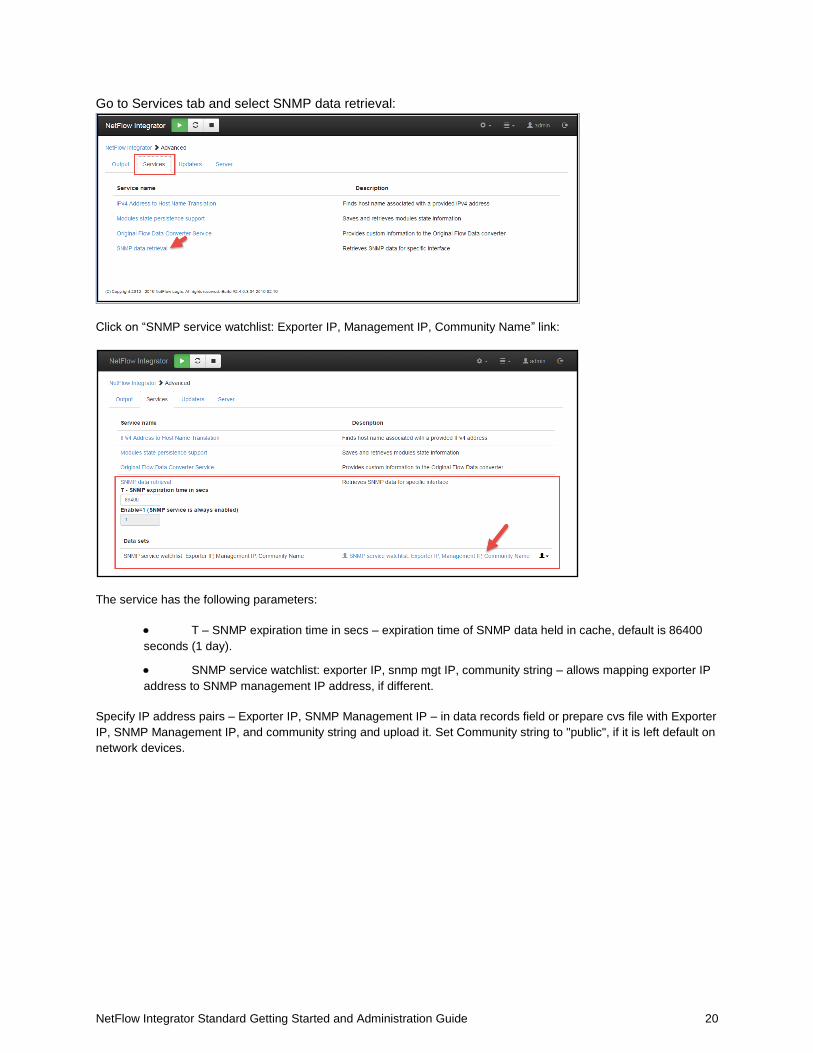
Go to Services tab and select SNMP data retrieval:
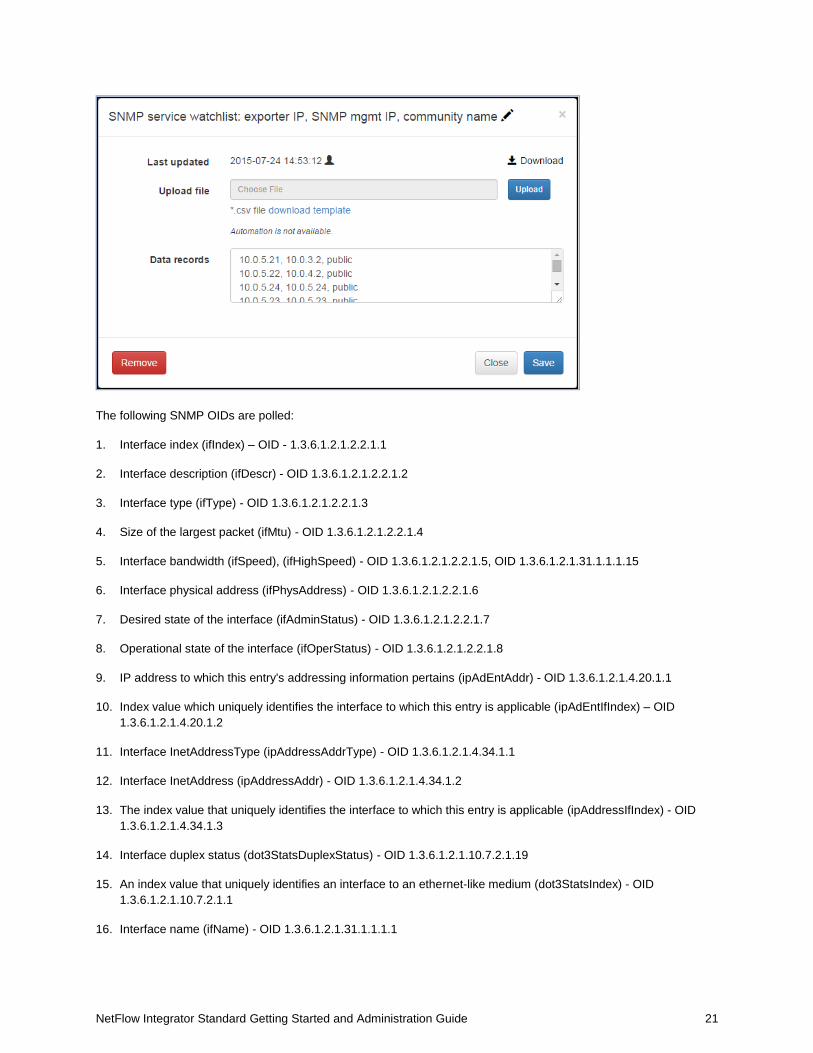
Click on “SNMP service watchlist: Exporter IP, Management IP, Community Name” link:
The service has the following parameters:
T – SNMP expiration time in secs – expiration time of SNMP data held in cache, default is 86400
seconds (1 day).
SNMP service watchlist: exporter IP, snmp mgt IP, community string – allows mapping exporter IP
address to SNMP management IP address, if different.
Specify IP address pairs – Exporter IP, SNMP Management IP – in data records field or prepare cvs file with Exporter
IP, SNMP Management IP, and community string and upload it. Set Community string to "public", if it is left default on
network devices.
NetFlow Integrator Standard Getting Started and Administration Guide 21
The following SNMP OIDs are polled:
1. Interface index (ifIndex) – OID - 1.3.6.1.2.1.2.2.1.1
2. Interface description (ifDescr) - OID 1.3.6.1.2.1.2.2.1.2
3. Interface type (ifType) - OID 1.3.6.1.2.1.2.2.1.3
4. Size of the largest packet (ifMtu) - OID 1.3.6.1.2.1.2.2.1.4
5. Interface bandwidth (ifSpeed), (ifHighSpeed) - OID 1.3.6.1.2.1.2.2.1.5, OID 1.3.6.1.2.1.31.1.1.1.15
6. Interface physical address (ifPhysAddress) - OID 1.3.6.1.2.1.2.2.1.6
7. Desired state of the interface (ifAdminStatus) - OID 1.3.6.1.2.1.2.2.1.7
8. Operational state of the interface (ifOperStatus) - OID 1.3.6.1.2.1.2.2.1.8
9. IP address to which this entry's addressing information pertains (ipAdEntAddr) - OID 1.3.6.1.2.1.4.20.1.1
10. Index value which uniquely identifies the interface to which this entry is applicable (ipAdEntIfIndex) – OID
1.3.6.1.2.1.4.20.1.2
11. Interface InetAddressType (ipAddressAddrType) - OID 1.3.6.1.2.1.4.34.1.1
12. Interface InetAddress (ipAddressAddr) - OID 1.3.6.1.2.1.4.34.1.2
13. The index value that uniquely identifies the interface to which this entry is applicable (ipAddressIfIndex) - OID
1.3.6.1.2.1.4.34.1.3
14. Interface duplex status (dot3StatsDuplexStatus) - OID 1.3.6.1.2.1.10.7.2.1.19
15. An index value that uniquely identifies an interface to an ethernet-like medium (dot3StatsIndex) - OID
1.3.6.1.2.1.10.7.2.1.1
16. Interface name (ifName) - OID 1.3.6.1.2.1.31.1.1.1.1
NetFlow Integrator Standard Getting Started and Administration Guide 22
NFI Utility Module (10003: SNMP Information Monitor)
This Module queries SNMP information from the Service and sends it out in syslog format as follows:
May 22 11:04:51 10.0.5.9 May 22 11:04:51 ff:ff:00:01 nfc_id=20003 exp_ip=10.0.5.21
mgmt_ip=10.0.3.2 sysName=GW02.nfclab ifIndex=2 ifName="Fa0/1"
ifDescr="FastEthernet0/1" ifType=6 ifMtu=1500 ifSpeed=100000000
ifPhysAddress=0016ffffffc7 ifIPAddress=
May 22 11:04:51 10.0.5.9 May 22 11:04:51 ff:ff:00:01 nfc_id=20003 exp_ip=10.0.5.24
mgmt_ip=10.0.5.24 sysName=HP-E2620-48-upper ifIndex=2 ifName="2" ifDescr="2" ifType=6
ifMtu=1500 ifSpeed=100000000 ifPhysAddress=ffffffecffff ifIPAddress=na
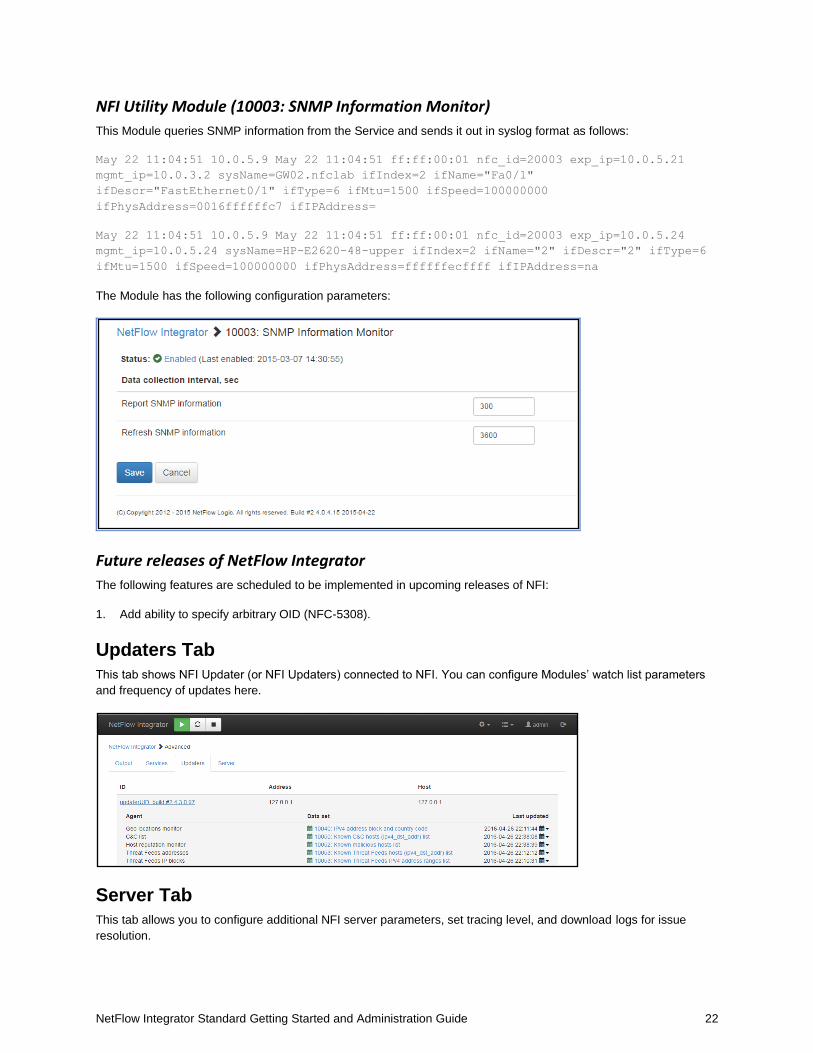
The Module has the following configuration parameters:
Future releases of NetFlow Integrator
The following features are scheduled to be implemented in upcoming releases of NFI:
1. Add ability to specify arbitrary OID (NFC-5308).
Updaters Tab
This tab shows NFI Updater (or NFI Updaters) connected to NFI. You can configure Modules’ watch list parameters
and frequency of updates here.
Server Tab
This tab allows you to configure additional NFI server parameters, set tracing level, and download logs for issue
resolution.
NetFlow Integrator Standard Getting Started and Administration Guide 23
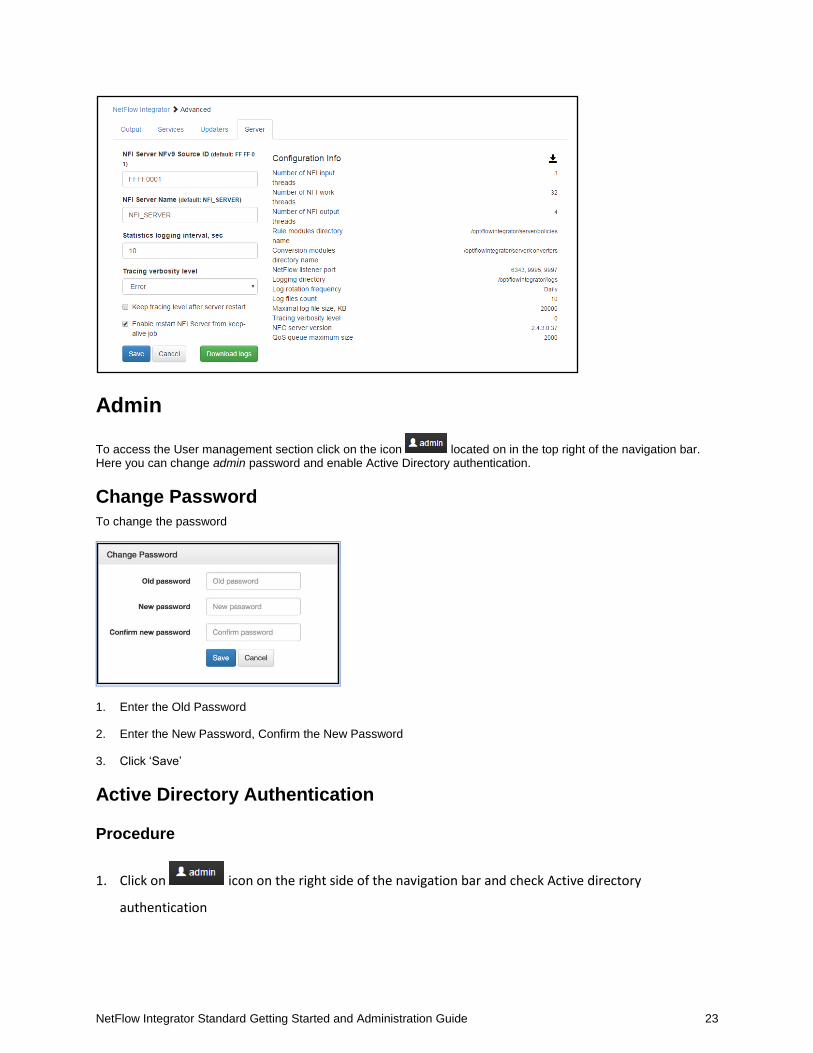
Admin
To access the User management section click on the icon located on in the top right of the navigation bar. Here you can change admin password and enable Active Directory authentication.
Change Password
To change the password
1. Enter the Old Password
2. Enter the New Password, Confirm the New Password
3. Click ‘Save’
Active Directory Authentication
Procedure
1. Click on icon on the right side of the navigation bar and check Active directory
authentication
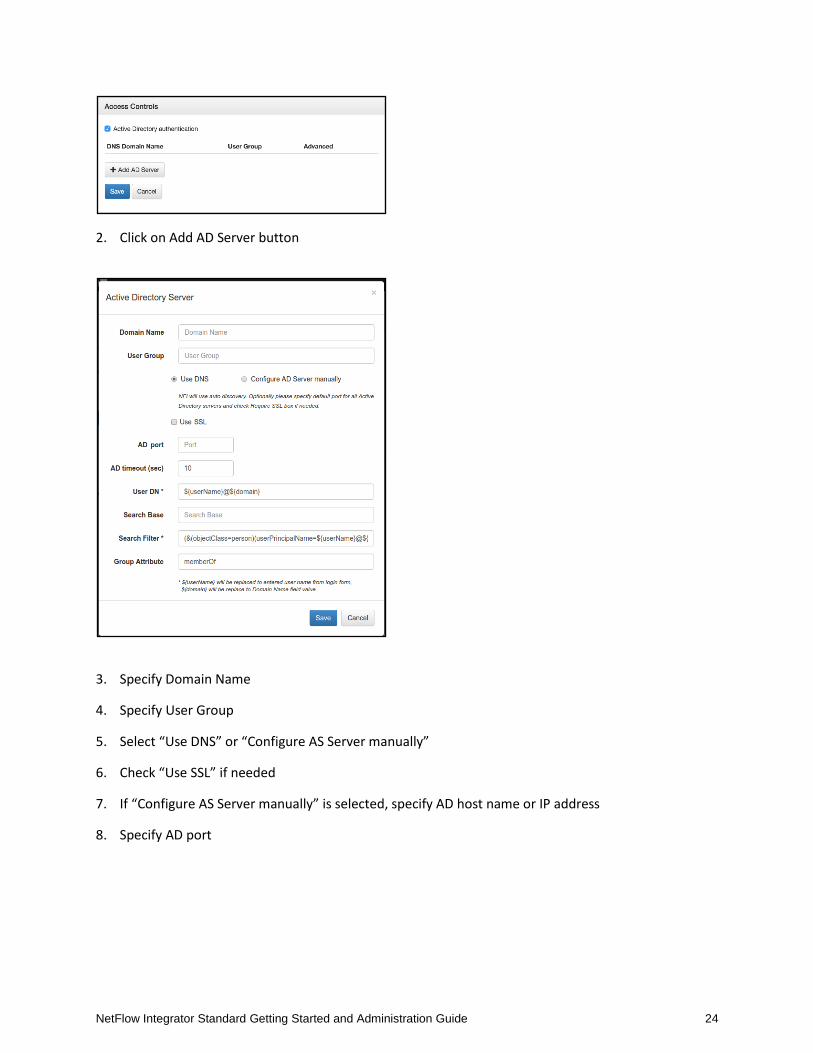
NetFlow Integrator Standard Getting Started and Administration Guide 24
2. Click on Add AD Server button
3. Specify Domain Name
4. Specify User Group
5. Select “Use DNS” or “Configure AS Server manually”
6. Check “Use SSL” if needed
7. If “Configure AS Server manually” is selected, specify AD host name or IP address
8. Specify AD port
NetFlow Integrator Standard Getting Started and Administration Guide 25
9. Press ‘Save’ button to save your settings
The following steps are required if SSL is enabled:
1. Export AD certificate or root CA. Also AD certificate can be exported using following commands:
Linux: echo | openssl s_client -connect <address>:<port> 2>&1 | sed -ne '/-BEGIN CERTIFICATE-/,/-END CERTIFICATE-/p' | cat > AD.crt
Where <address> and <port> are AD server address and port respectively. Default AD server port for SSL
connections is 636 or 3269. Certificate is stored into AD.crt file and can be read using following command:
Windows: C:\Program Files\NetFlow Logic\NetFlow Integrator\java\jre8\bin\keytool.exe –printcert -file AD.crt
Linux: /opt/flowintegrator/java/jre8/bin/keytool -printcert -file AD.crt
2. Import AD certificate or root CA into Java Runtime trusted keystore. Keystore has default password changeit.
Widows: C:\Program Files\NetFlow Logic\NetFlow Integrator\java\jre8\bin\keytool.exe -import -trustcacerts -alias ADName -file AD.crt -keystore C:\Program Files\NetFlow
Logic\NetFlow Integrator\java\jre8\jre\lib\security\cacerts -storepass changeit
Linux: /opt/flowintegrator/java/jre8/bin/keytool -import -trustcacerts -alias ADName -file AD.crt -keystore /opt/flowintegrator/java/jre8/jre/lib/security/cacerts -
storepass changeit
Where ADName and AD.crt are certificate name and file name respectively.
3. Restart NFI Tomcat if certificate has been imported
NetFlow Integrator Standard Getting Started and Administration Guide 26
Windows: Restart NFI Tomcat using Windows Services
Linux: /etc/init.d/tomcat7_nfi restart
For troubleshooting please check logs/nf2sl.log. Logs trace level can be changed in the
/opt/flowintegrator/tomcat/webapps/ROOT/WEB-INF/classes/log4j.xml file. Following lines
should be added after last <category> section and before <root> section:
<category name="com.netflowlogic.nf2sl.service.security.ADAuthenticationProvider">
<priority value="TRACE" />
</category>
Restart NFI Tomcat after changing trace level.
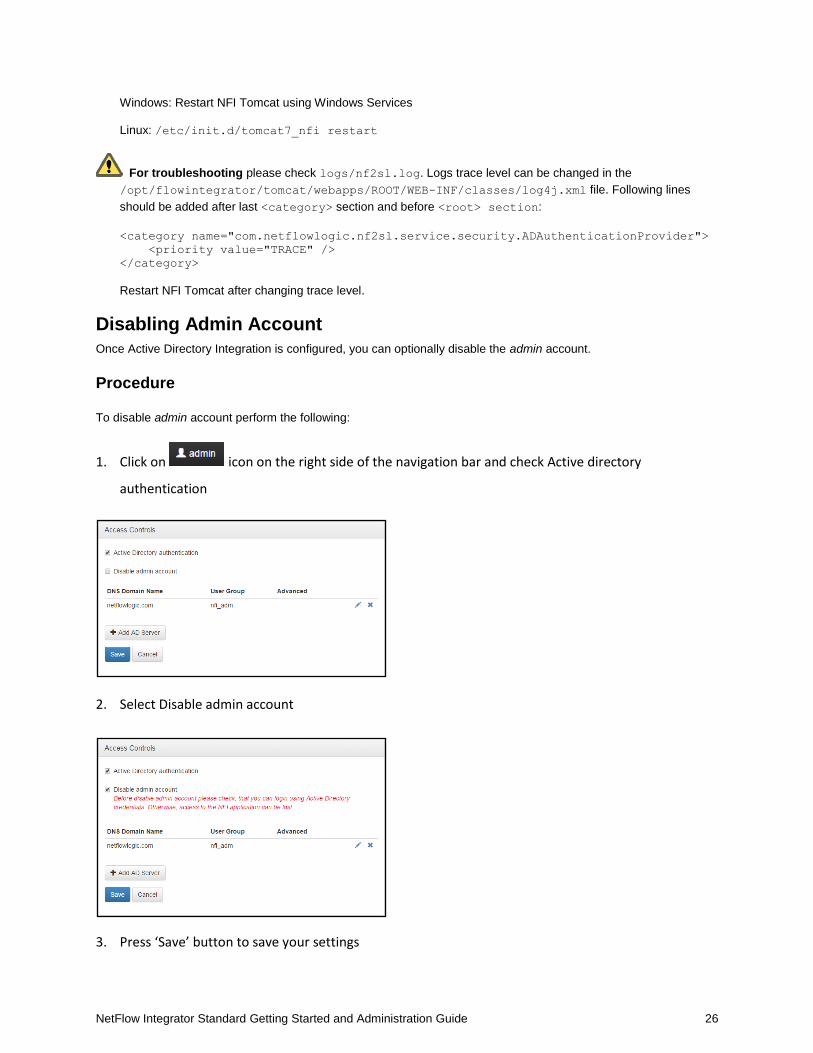
Disabling Admin Account
Once Active Directory Integration is configured, you can optionally disable the admin account.
Procedure
To disable admin account perform the following:
1. Click on icon on the right side of the navigation bar and check Active directory
authentication
2. Select Disable admin account
3. Press ‘Save’ button to save your settings
NetFlow Integrator Standard Getting Started and Administration Guide 27
Forgot Password
In order to reset admin password you will require root or administrator access to the system where NetFlow Integrator
is installed. The password will be reset back to 'changeme'. To reset admin login password perform the following:
1. Go to the directory where the password file is stored
Windows: C:\Program Files\NetFlow Logic\NetFlow Integrator\tomcat\data
Linux: /opt/flowintegrator/tomcat/data
2. Delete the following file: nf2sl_password
3. Restart NFI Tomcat service
Windows: Restart NFI Tomcat using Windows Services
Linux: /etc/init.d/tomcat7_nfi restart
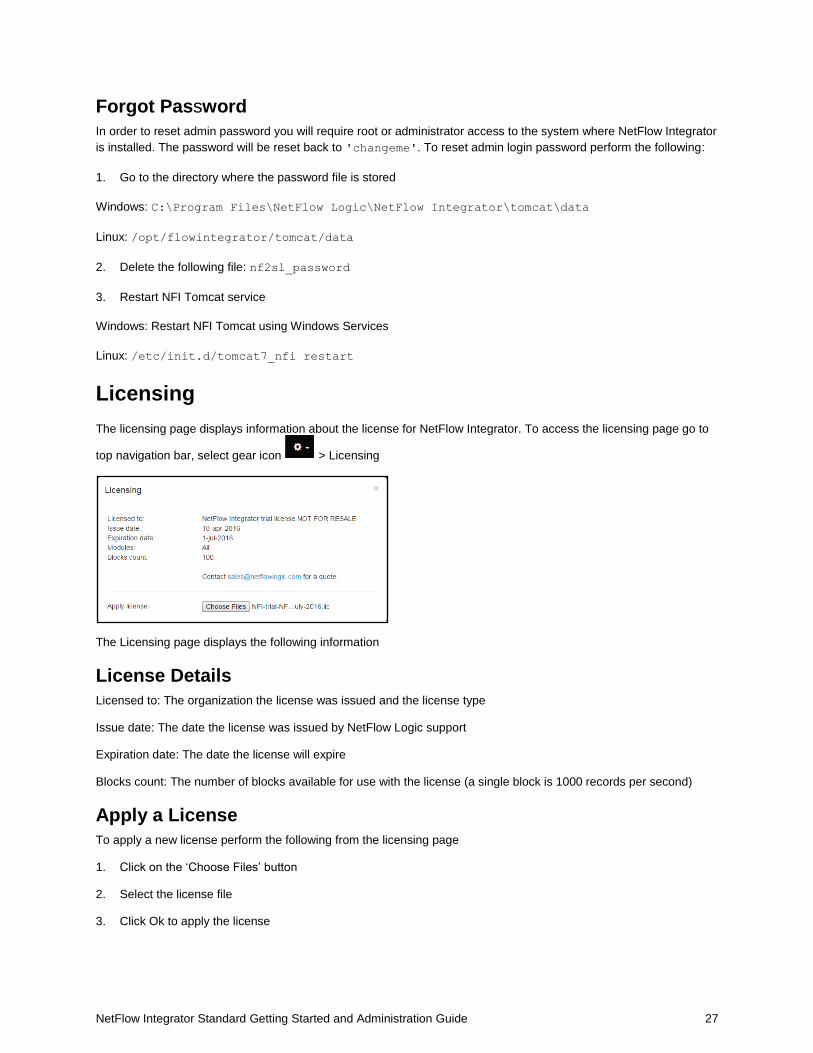
Licensing
The licensing page displays information about the license for NetFlow Integrator. To access the licensing page go to
top navigation bar, select gear icon > Licensing
The Licensing page displays the following information
License Details
Licensed to: The organization the license was issued and the license type
Issue date: The date the license was issued by NetFlow Logic support
Expiration date: The date the license will expire
Blocks count: The number of blocks available for use with the license (a single block is 1000 records per second)
Apply a License
To apply a new license perform the following from the licensing page
1. Click on the ‘Choose Files’ button
2. Select the license file
3. Click Ok to apply the license
NetFlow Integrator Standard Getting Started and Administration Guide 28
Server Configuration Parameters
There are several additional NetFlow Integrator parameters located in <nfi_home>/server/etc/server.cfg
file. You have to restart NetFlow Integrator if you change them. Please contact us at
https://www.netflowlogic.com/connect/support/ if you need assistance.
TRACE_ERR
LOG_DIR ..\..\logs
LOG_ROT_DIR ..\..\logs\bak
LOG_ROT_DAILY
LOG_COUNT 10
LOG_FILE_SIZE_KB 20000
SVR_ID NFI_SERVER
NF_PORT 9995
TIME_ZONE GMT
OFD_OUTPUT JSON
Linux kernel settings for high-volume processing
The default Linux kernel settings are not sufficient for high-volume packet rate. This can lead to dropped packets and
data loss. We recommend that you change both the receive buffer in NFI and the socket read buffer size in Linux
kernel.
To change the receive buffer to <N> bytes, add the following string to <nfi_home>/server/etc/server.cfg:
IT_RCVBUF <N>
The valid values for parameter N are 124928 through 56623104. The default value is 12582912.
To change the socket read buffer size in Linux kernel to <N> bytes for current session, execute (under root privileges) sysctl -w net.core.rmem_max N in a console. To make this change persistent, add the following
string to /etc/sysctl.conf:
net.core.rmem_max=<N>
Then run the following command to reload the settings from the file:
sysctl -p
To check what the socket read buffer size is currently used, execute the following command:
sysctl net.core.rmem_max.
Notes:
1. NFI effectively uses the least size of those buffers.
2. NFI Virtual Appliance has the socket read buffer size 12582912 -- the default value for NFI receive buffer.
Secure Connection Configuration (HTTPS)
This section describes how to install a certificate from a Certificate Authority into Tomcat. Self-signed certificate is
already installed in $NFI_HOME/tomcat/conf/.tomcat_keystore, the keystore password is “password” and
private key password is the same.
NetFlow Integrator Standard Getting Started and Administration Guide 29
If you want to replace self-signed certificate to a new one from a Certificate Authority, use following steps from
http://tomcat.apache.org/tomcat-7.0-doc/ssl-howto.html
HTTPS parameters are configured in the tomcat/conf/server.xml configuration file (Connector section). All
Connector attributes are described here: https://tomcat.apache.org/tomcat-7.0-doc/config/http.html. If keystore path
or password are changed, corresponding Connector attributes should be modified.
Create a local Certificate Signing Request (CSR)
In order to obtain a Certificate from the Certificate Authority of your choice you have to create a so called Certificate
Signing Request (CSR). That CSR will be used by the Certificate Authority to create a Certificate that will identify your
website as "secure". To create a CSR follow these steps:
Delete preinstalled self-signed certificate:
$NFI_HOME/java/jre8/jre/bin/keytool -delete -alias tomcat \
-keystore $NFI_HOME/tomcat/conf/.tomcat_keystore
Create a local Certificate:
$NFI_HOME/java/jre8/jre/bin/keytool -keysize 2048 -genkey -alias tomcat \
-keyalg RSA -keystore $NFI_HOME/tomcat/conf/.tomcat_keystore
Note: In some cases you will have to enter the domain of your website (i.e. www.domain.org) in the field "first-
and lastname" in order to create a working Certificate.
The CSR is then created with:
$NFI_HOME/java/jre8/jre/bin/keytool -certreq -keyalg RSA -alias tomcat \
-file certreq.csr -keystore $NFI_HOME/tomcat/conf/.tomcat_keystore
Now you have a file called certreq.csr that you can submit to the Certificate Authority (look at the documentation
of the Certificate Authority website on how to do this). In return you get a Certificate.
Import the Certificate
Now that you have your Certificate you can import it into your local keystore. First of all you have to import a so called
Chain Certificate or Root Certificate into your keystore. After that you can proceed with importing your Certificate.
Download a Chain Certificate from the Certificate Authority you obtained the Certificate from.
For Verisign.com commercial certificates go to: http://www.verisign.com/support/install/intermediate.html
For Verisign.com trial certificates go to: http://www.verisign.com/support/verisign-intermediate-
ca/Trial_Secure_Server_Root/index.html
For Trustcenter.de go to: http://www.trustcenter.de/certservices/cacerts/en/en.htm#server
For Thawte.com go to: http://www.thawte.com/certs/trustmap.html
Import the Chain Certificate into your keystore
$NFI_HOME/java/jre8/jre/bin/keytool -import -alias root \
-keystore $NFI_HOME/tomcat/conf/.tomcat_keystore \
-trustcacerts -file <filename_of_the_chain_certificate>
And finally import your new Certificate
$NFI_HOME/java/jre8/jre/bin/keytool -import -alias tomcat \
-keystore $NFI_HOME/tomcat/conf/.tomcat_keystore \
-file <your_certificate_filename>

NetFlow Integrator Standard Getting Started and Administration Guide 30
Please see Import the Certificate into NFI Updater truststore section on page 39 in NFI Updater Getting Started
Guide for additional information.
NFI Updater Getting Started Guide
Depending on your requirements NetFlow Integrator and NFI Updater can be installed on the same server or
separately. If you are going to use NFI NetFlow enhancement functionality, such as GeoIP resolution, Cyber Security
Threat Lists – NFI Updater must be installed on the server with Internet access, so it can access and provide NFI with
information generally unavailable in the data streams supplied by NetFlow/IPFIX exporters. NFI Updater is
administered through NetFlow Integrator GUI.
Before You Install NFI Updater
Pre-Installation Checklist
Please be sure to have the following before you begin the installation of the NFI Updater software:
You have to login as root for Linux and administrator for Windows installations and updates
You have successfully installed NetFlow Integrator and you know its IP address
Minimum Requirements
NetFlow Logic distributes NFI Updater as RPM or TAR.GZ for Linux, or as EXE for Windows.
Supported Platforms
You can install the NetFlow Integrator virtual appliance or software on a platform with the following specifications.
Specification Details
Linux Linux kernel 2.6+ on - CentOS 5.5, 6.5, 6.7, 7 - Debian 6.0 - RHEL 5.5, 6.5, 6.7, 7 - SUSE ES 11
Windows Windows 2008 R2, 2012, and 2012 R2 (64-bit)
CPU, Memory, Disk Space - CPU: Min 4 CPU cores (8 CPU cores for higher performance) - Memory: 2 GB - Disk Space: 2 GB
Required Network Ports
The following network ports must be allowed for outbound connections.
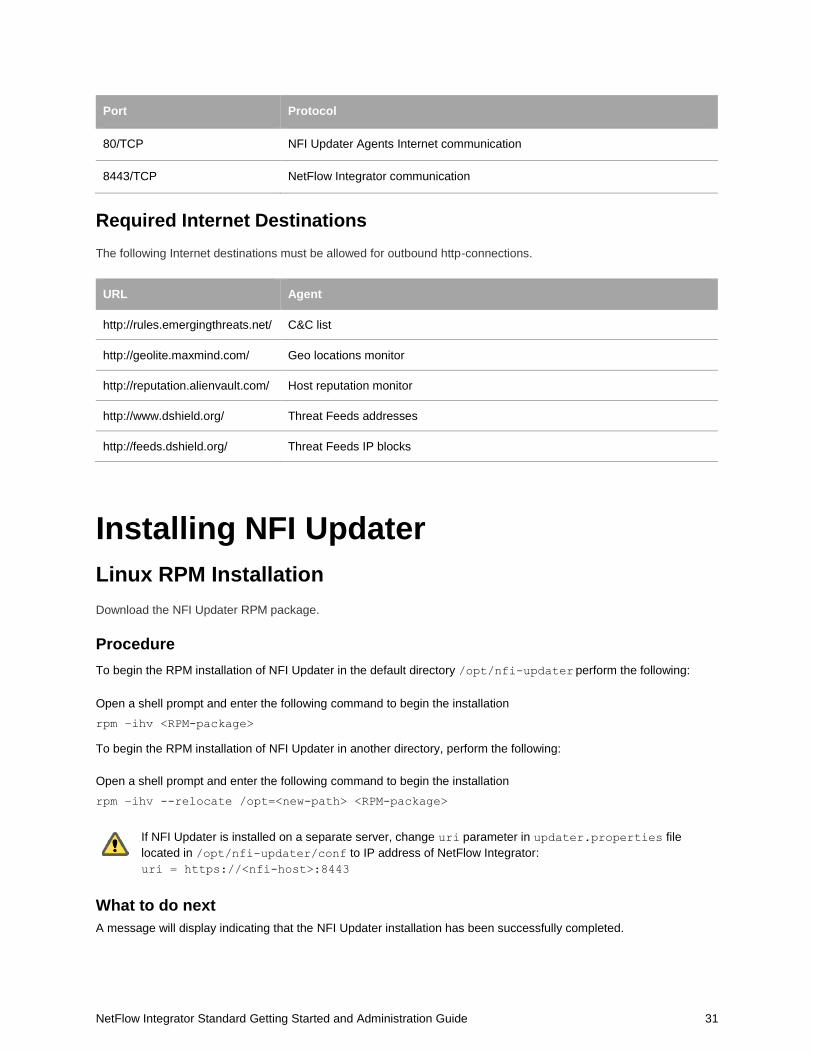
NetFlow Integrator Standard Getting Started and Administration Guide 31
Port Protocol
80/TCP NFI Updater Agents Internet communication
8443/TCP NetFlow Integrator communication
Required Internet Destinations
The following Internet destinations must be allowed for outbound http-connections.
URL Agent
http://rules.emergingthreats.net/ C&C list
http://geolite.maxmind.com/ Geo locations monitor
http://reputation.alienvault.com/ Host reputation monitor
http://www.dshield.org/ Threat Feeds addresses
http://feeds.dshield.org/ Threat Feeds IP blocks
Installing NFI Updater
Linux RPM Installation
Download the NFI Updater RPM package.
Procedure
To begin the RPM installation of NFI Updater in the default directory /opt/nfi-updater perform the following:
Open a shell prompt and enter the following command to begin the installation
rpm –ihv <RPM-package>
To begin the RPM installation of NFI Updater in another directory, perform the following:
Open a shell prompt and enter the following command to begin the installation
rpm –ihv --relocate /opt=<new-path> <RPM-package>
If NFI Updater is installed on a separate server, change uri parameter in updater.properties file
located in /opt/nfi-updater/conf to IP address of NetFlow Integrator:
uri = https://<nfi-host>:8443
What to do next
A message will display indicating that the NFI Updater installation has been successfully completed.
NetFlow Integrator Standard Getting Started and Administration Guide 32
Verify that NetFlow Integrator and NFI Updater are connected by going to NetFlow Integrator >
Advanced > Updaters
Change default updater user’s password. Login into NetFlow Integrator using updater/changeme
credentials and change the password. See Authentication Configuration section on page 37 for more
information.
If you require Proxy Server authentication before NFI Updater can access external URLs, see Proxy Server
Configuration on page 39 for further instructions.
Linux TAR Installation
Download the NFI Updater TAR package.
Procedure
To begin the TAR installation of NFI Updater in the default directory /opt/nfi-updater perform the following:
1. Open a shell prompt and enter the following command to un-compress the installer
tar zxvf <TAR-package> -C /opt/nfi-updater
2. Go to the /opt/nfi-updater directory and enter the following command to begin the installation
setup.sh -i
To begin the TAR installation of NFI Updater in another directory, perform the following:
1. Open a shell prompt and enter the following command to un-compress the installer
tar zxvf <TAR-package> -C <directory>
2. Go to the directory and enter the following command to begin the installation
setup.sh -i
If NFI Updater is installed on a separate server, change uri parameter in updater.properties file
located in /opt/nfi-updater/conf to IP address of NetFlow Integrator:
uri = https://<nfi-host>:8443
What to do next
A message will display indicating that the NFI Updater installation has been successfully completed.
Verify that NetFlow Integrator and NFI Updater are connected by going to NetFlow Integrator >
Advanced > Updaters
Change default updater user’s password. Login into NetFlow Integrator using updater/changeme
credentials and change the password. See Authentication Configuration section on page 37 for more
information.
If you require Proxy Server authentication before NFI Updater can access external URLs, see Proxy Server
Configuration on page 39 for further instructions.
Windows Installation
Download the NFI Updater Windows installation package.
NetFlow Integrator Standard Getting Started and Administration Guide 33
Procedure
To begin the Windows installation of NFI Updater perform the following:
1. Open the installation file and click ‘Run’ to launch the installer and Click ‘Next’ To begin the ‘NFI Updater Setup’
2. Click ‘Next’ to install NFI Updater in the default location:
C:\Program Files\NetFlow Logic\NFI Updater
3. Click on ‘Install’ To begin the installation (follow the installation steps)
4. Click on ‘Finish’ to complete the installation and exit the installer
5. If NFI Updater is installed on a separate server, change uri parameter in updater.properties file
located in C:\Program Files\NetFlow Logic\NFI Updater\conf to IP address of NetFlow Integrator
uri = https://<nfi-host>:8443
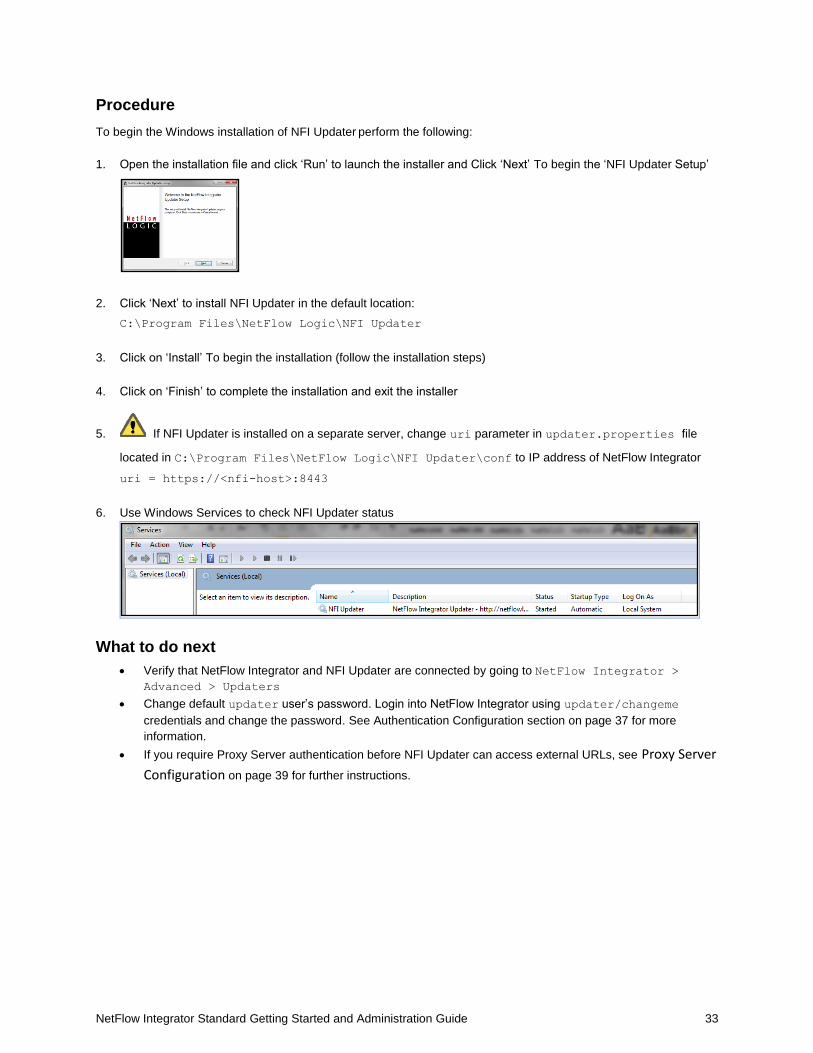
6. Use Windows Services to check NFI Updater status
What to do next
Verify that NetFlow Integrator and NFI Updater are connected by going to NetFlow Integrator >
Advanced > Updaters
Change default updater user’s password. Login into NetFlow Integrator using updater/changeme
credentials and change the password. See Authentication Configuration section on page 37 for more
information.
If you require Proxy Server authentication before NFI Updater can access external URLs, see Proxy Server
Configuration on page 39 for further instructions.
NetFlow Integrator Standard Getting Started and Administration Guide 34
NFI Updater Administration Guide
Upgrading NFI Updater
When upgrading NFI Updater on RHEL 7, the messages like these might be displayed:
Cleaning up / removing...
2:nfi-updater-2.4.0.3.34-linux warning: file /opt/nfi-updater/lib/wasync-
1.4.0.jar: remove failed: No such file or directory
warning: file /opt/nfi-updater/lib/netty-3.9.2.Final.jar: remove failed: No such file
or directory
warning: file /opt/nfi-updater/lib/async-http-client-1.8.11.jar: remove failed: No
such file or directory
This is a normal situation and these messages should be ignored.
CAUTION Before upgrade NFI Updater, please backup all configuration files if they have been changed
during configuration. At least updater.properties and .updater_keystore.
After upgrade, validate default configuration and restore from the backup if it is required.
Upgrading the NFI Updater RPM Installation
Procedure
To begin the upgrade of NFI Updater perform the following:
1. Login directly or SSH and copy the new installation file into the /opt installation directory
2. Backup configuration files from /opt/nfi_updater/conf folder before installation
3. RPM the NetFlow Integrator for Linux installation file into the /opt installation directory
rpm –Uhv <RPM-package>
4. Restore configuration files from step 2 and restart NFI Updater service: /etc/init.d/nfi_updd restart
What to do next
A message will display indicating that the NFI Updater installation has been successfully completed.
Verify the version (Release number) of NFI Updater by going to NetFlow Integrator > Advanced >
Updaters
Upgrading the NFI Updater TAR Installation
Procedure
To begin the upgrade of NFI Updater perform the following:
NetFlow Integrator Standard Getting Started and Administration Guide 35
1. Login directly or SSH and copy the new installation file into the /opt installation directory
2. Backup configuration files from /opt/nfi_updater/conf folder before installation
3. Enter the following command to begin the uninstall
setup.sh -u
4. Copy the upgrade installation package for Linux into the existing installation directory
5. Open a shell prompt and enter the following command to un-compress the installer
tar zxvf <TAR-package> -C <directory>
6. Restore configuration file from step 2
7. Enter the following command and begin the setup
setup.sh -i
What to do next
A message will display indicating that the NFI Updater installation has been successfully completed.
Verify the version (Release number) of NFI Updater by going to NetFlow Integrator > Advanced >
Updaters
Upgrading the NFI Updater Windows Installation
Procedure
To begin the upgrade of NFI Updater perform the following:
1. Backup configuration files from C:\Program Files\NetFlow Logic\NFI Updater\conf folder before
installation
2. Open the upgrade installation file and click ‘Run’ to launch the installer and Click ‘Next’ To begin the ‘NFI
Updater Setup’
3. Click ‘Next’ to install NFI Updater in the default location:
C:\Program Files\NetFlow Logic\NFI Updater
4. Click on ‘Install’ To begin the upgrade (follow the installation steps)
5. Click on ‘Finish’ to complete the installation and exit the installer
6. Restore configuration files from step 1 and restart NFI Updater Windows Service.
NetFlow Integrator Standard Getting Started and Administration Guide 36
Removing NFI Updater
Removing the NFI Updater RPM Installation
Procedure
To remove NFI Updater perform the following:
1. Open a shell prompt and enter the following command to begin the uninstall
rpm –e nfi-updater
2. Remove the install path if the full uninstall needed
rm -rf <directory>
Removing the NFI Updater TAR Installation
Procedure
To remove NFI Updater perform the following:
1. Go to the existing installation directory and enter the following command to begin the uninstall
setup.sh -u
2. Leave the installation directory
cd ..
3. Remove the install path if the full uninstall needed
rm -rf <directory>
Removing the NFI Updater Windows Installation
Procedure
To remove NFI Updater perform the following:
1. Go to Control Panel > Programs > Programs and Features and select the NFI Updater program.
2. Follow the steps to uninstall the program.
NetFlow Integrator Standard Getting Started and Administration Guide 37
Verifying NFI Updater Status
Verifying NFI Updater Linux Installation
Procedure
To verify if NFI Updater is running perform the following:
1. Enter the following command to check the status
/etc/init.d/nfi_updd status
2. For the list of available commands enter the following
/etc/init.d/nfi_updd
Verifying NFI Updater Windows Installation
Procedure
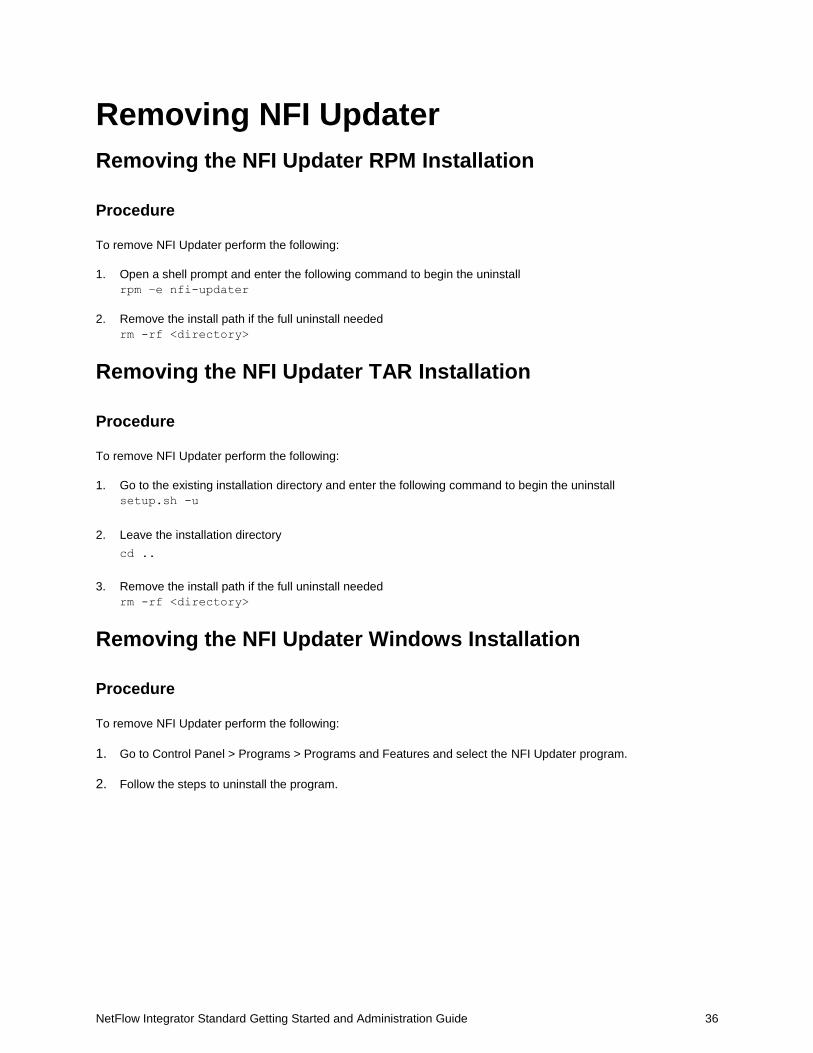
Use Windows Services to check NFI Updater status
Authentication Configuration NFI Updater is authenticated to NetFlow Integrator as updater user. This user has only access to a data set
maintenance and the ability to change password. This user can login using X509 certificate or using user/password
authentication method. Default password for this user is changeme. Please change it after the installation.
By default NFI Updater logins into NetFlow Integrator using X509 certificate. We highly recommend changing default
self-signed certificate to a new one or switching to a user/password authentication method. In any case default
password changing is required.
X509 authentication
Procedure
Create a Certificate Signing Request (CSR) with keytool and generate a Signed Certificate for the CSR:
1. Delete previous certificate:
$UPD_HOME/java/jre8/bin/keytool -delete -alias updater -storepass
password -keystore $UPD_HOME/conf/.updater_keystore
$NFI_HOME/java/jre8/bin/keytool -delete -alias updater -storepass password
$NFI_HOME/tomcat/conf/.trust_keystore
NetFlow Integrator Standard Getting Started and Administration Guide 38
2. Generate the key pair:
$UPD_HOME/java/jre8/bin/keytool keytool -genkey -alias updater -dname
"CN=updater, OU=, O=, L=, ST=, C=" -validity 365 -keyalg RSA -keysize
1024 -storepass password -keypass password -keystore
$UPD_HOME/conf/.updater_keystore
3. Generate the Certificate Signing Request:
$UPD_HOME/java/jre8/bin/keytool -certreq -alias updater -keyalg rsa -storepass
password -keystore $UPD_HOME/conf/.updater_keystore -file updater.csr
4. Generate a signed certificate for the associated Certificate Signing Request.
5. Import the CA certificate into the NetFlow Integrator keystore:
$NFI_HOME/java/jre8/bin/keytool -import -alias root -file CA.crt -
keystore -storepass password $NFI_HOME/tomcat/conf/.trust_keystore
6. Import the signed certificate for the associated updater alias in the keystore:
$NFI_HOME/java/jre8/bin/keytool -import -alias updater -file
updater.crt -keystore -storepass password $NFI_HOME/tomcat/conf/.trust_keystore
Self-Signed certificate can be exported instead of steps 3-5:
$UPD_HOME/java/jre8/bin/keytool -export -alias updater -storepass
password -keystore $UPD_HOME/conf/.updater_keystore -file updater.crt
Notes:
1. Certificate CN field value must be updater.
2. If keystore type, keystore password, key password or key algorithm were changed, these changes have to be
added to the $UPD_HOME/conf/updater.properties file:
keystoreFile = ../conf/.updater_keystore
keystoreType = jks
keystorePass = password
keyPass = password
keyAlgorithm = SunX509
User/password authentication
Procedure
Username/password authentication can be enabled by commenting certificate-related properties and adding following
lines into updater.properties:
user = updater
password = changeme
# keystoreFile = ../conf/.updater_keystore
# keystoreType = jks
# keystorePass = password
# keyPass = password
# keyAlgorithm = SunX509
NetFlow Integrator Standard Getting Started and Administration Guide 39
User password can be changed in the NetFlow Integrator: login as updater user, go to “admin” section, and enter
old password (changeme) and a new password.
Import the Certificate into NFI Updater truststore
NFI and NFI Updater use secure connection (https) for communication. Tomcat certificate and root chain are
imported automatically into $UPD_HOME/conf/.updater_truststore during first connection. If tomcat certificate
is changed, it should be reimported into .updater_truststore file manually or .updater_truststore can be removed. After
these actions NFI Updater service should be restarted.
Certificate fingerprint (md5) can be verified using following command:
$UPD_HOME/java/jre8/jre/bin/keytool -list -keystore $UPD_HOME/conf/.updater_truststore
.updater_truststore type, password and path configuration can be changed in the
$UPD_HOME/conf/updater.properties file.
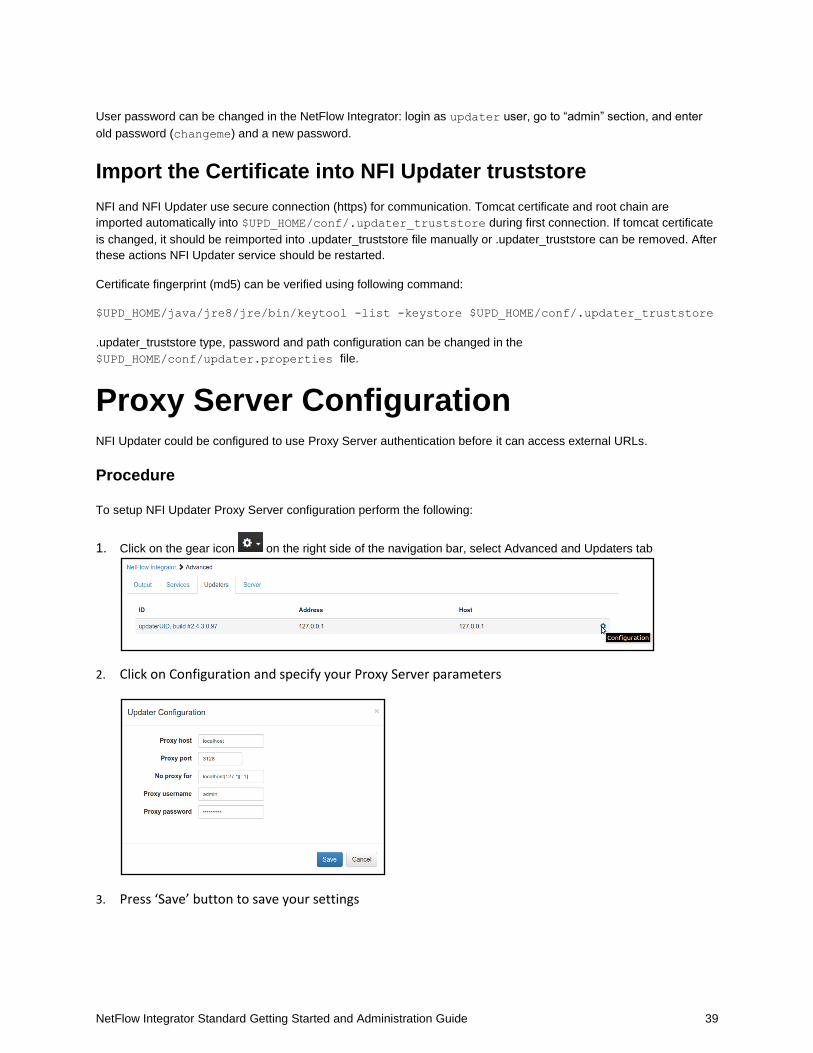
Proxy Server Configuration NFI Updater could be configured to use Proxy Server authentication before it can access external URLs.
Procedure
To setup NFI Updater Proxy Server configuration perform the following:
1. Click on the gear icon on the right side of the navigation bar, select Advanced and Updaters tab
2. Click on Configuration and specify your Proxy Server parameters
3. Press ‘Save’ button to save your settings