Embed Size (px)
Citation preview
NetIQ® Identity ManagerAdministrator’s Guide to Identity Reporting
February 2017

Legal Notice
For information about NetIQ legal notices, disclaimers, warranties, export and other use restrictions, U.S. Government restricted rights, patent policy, and FIPS compliance, see https://www.netiq.com/company/legal/.
Copyright (C) 2017 NetIQ Corporation. All rights reserved.
Contents
About this Book and the Library 7About NetIQ Corporation 9
1 Overview 11
1.1 Identity Reporting . . . . . . . . . . . . . . . . . . . . . . . . . . . . . . . . . . . . . . . . . . . . . . . . . . . . . . . . . . . . . . . . 111.2 Components for Identity Reporting . . . . . . . . . . . . . . . . . . . . . . . . . . . . . . . . . . . . . . . . . . . . . . . . . . 121.3 Basic Setup and Configuration. . . . . . . . . . . . . . . . . . . . . . . . . . . . . . . . . . . . . . . . . . . . . . . . . . . . . . 141.4 Working in Identity Reporting . . . . . . . . . . . . . . . . . . . . . . . . . . . . . . . . . . . . . . . . . . . . . . . . . . . . . . . 151.5 Customizing the Reporting Client WAR on Windows Server . . . . . . . . . . . . . . . . . . . . . . . . . . . . . . . 151.6 Security Considerations . . . . . . . . . . . . . . . . . . . . . . . . . . . . . . . . . . . . . . . . . . . . . . . . . . . . . . . . . . . 17
1.6.1 Authentication Token Exposure . . . . . . . . . . . . . . . . . . . . . . . . . . . . . . . . . . . . . . . . . . . . . . 17
2 Installation 19
3 Getting Started 21
3.1 Accessing Identity Reporting . . . . . . . . . . . . . . . . . . . . . . . . . . . . . . . . . . . . . . . . . . . . . . . . . . . . . . . 213.1.1 Launching Identity Reporting from the Identity Manager Applications Page . . . . . . . . . . . . 213.1.2 Starting Identity Reporting Directly with a URL . . . . . . . . . . . . . . . . . . . . . . . . . . . . . . . . . . 21
3.2 Exploring Identity Reporting . . . . . . . . . . . . . . . . . . . . . . . . . . . . . . . . . . . . . . . . . . . . . . . . . . . . . . . . 223.2.1 Getting Help. . . . . . . . . . . . . . . . . . . . . . . . . . . . . . . . . . . . . . . . . . . . . . . . . . . . . . . . . . . . . 223.2.2 Token Timeout . . . . . . . . . . . . . . . . . . . . . . . . . . . . . . . . . . . . . . . . . . . . . . . . . . . . . . . . . . . 23
4 Using the Overview Page 25
4.1 About the Overview Page . . . . . . . . . . . . . . . . . . . . . . . . . . . . . . . . . . . . . . . . . . . . . . . . . . . . . . . . . 254.2 Viewing the Report Summary. . . . . . . . . . . . . . . . . . . . . . . . . . . . . . . . . . . . . . . . . . . . . . . . . . . . . . . 254.3 Searching for a Report Definition . . . . . . . . . . . . . . . . . . . . . . . . . . . . . . . . . . . . . . . . . . . . . . . . . . . . 264.4 Viewing the List of Recently Completed Reports . . . . . . . . . . . . . . . . . . . . . . . . . . . . . . . . . . . . . . . . 264.5 Viewing the List of Scheduled Reports. . . . . . . . . . . . . . . . . . . . . . . . . . . . . . . . . . . . . . . . . . . . . . . . 264.6 Viewing the Configurations. . . . . . . . . . . . . . . . . . . . . . . . . . . . . . . . . . . . . . . . . . . . . . . . . . . . . . . . . 26
5 Managing the Report Repository 27
5.1 Viewing the Report Definitions . . . . . . . . . . . . . . . . . . . . . . . . . . . . . . . . . . . . . . . . . . . . . . . . . . . . . . 275.2 Modifying a Report Definition . . . . . . . . . . . . . . . . . . . . . . . . . . . . . . . . . . . . . . . . . . . . . . . . . . . . . . . 285.3 Creating a Custom Report Definition Based on an Existing Definition. . . . . . . . . . . . . . . . . . . . . . . . 315.4 Running a Report On Demand. . . . . . . . . . . . . . . . . . . . . . . . . . . . . . . . . . . . . . . . . . . . . . . . . . . . . . 315.5 Deleting a Report Definition . . . . . . . . . . . . . . . . . . . . . . . . . . . . . . . . . . . . . . . . . . . . . . . . . . . . . . . . 315.6 Performing Bulk Actions . . . . . . . . . . . . . . . . . . . . . . . . . . . . . . . . . . . . . . . . . . . . . . . . . . . . . . . . . . . 315.7 Searching for a Report Definition . . . . . . . . . . . . . . . . . . . . . . . . . . . . . . . . . . . . . . . . . . . . . . . . . . . . 325.8 Sorting the List of Reports . . . . . . . . . . . . . . . . . . . . . . . . . . . . . . . . . . . . . . . . . . . . . . . . . . . . . . . . . 335.9 Refreshing the Report Definition List . . . . . . . . . . . . . . . . . . . . . . . . . . . . . . . . . . . . . . . . . . . . . . . . . 33
6 Using the Import Tool 35
6.1 Using the Import Page to Import Report Definitions. . . . . . . . . . . . . . . . . . . . . . . . . . . . . . . . . . . . . . 35
Contents 3
4 Adm
6.2 Using the Download Page to Download Report Definitions and Views . . . . . . . . . . . . . . . . . . . . . . . 36
7 Using the Calendar Page 37
7.1 Viewing the Calendar . . . . . . . . . . . . . . . . . . . . . . . . . . . . . . . . . . . . . . . . . . . . . . . . . . . . . . . . . . . . . 377.1.1 Displaying the Calendar Page . . . . . . . . . . . . . . . . . . . . . . . . . . . . . . . . . . . . . . . . . . . . . . . 377.1.2 Scrolling within the Calendar Display . . . . . . . . . . . . . . . . . . . . . . . . . . . . . . . . . . . . . . . . . 387.1.3 Viewing the Schedule for Today. . . . . . . . . . . . . . . . . . . . . . . . . . . . . . . . . . . . . . . . . . . . . . 38
7.2 Checking the Status of a Schedule Instance . . . . . . . . . . . . . . . . . . . . . . . . . . . . . . . . . . . . . . . . . . . 387.3 Editing the Summary Information for a Schedule Instance . . . . . . . . . . . . . . . . . . . . . . . . . . . . . . . . 387.4 Viewing a Completed Report . . . . . . . . . . . . . . . . . . . . . . . . . . . . . . . . . . . . . . . . . . . . . . . . . . . . . . . 387.5 Editing a Schedule Instance. . . . . . . . . . . . . . . . . . . . . . . . . . . . . . . . . . . . . . . . . . . . . . . . . . . . . . . . 397.6 Deleting a Schedule Instance . . . . . . . . . . . . . . . . . . . . . . . . . . . . . . . . . . . . . . . . . . . . . . . . . . . . . . 407.7 Moving a Single Schedule Instance . . . . . . . . . . . . . . . . . . . . . . . . . . . . . . . . . . . . . . . . . . . . . . . . . . 407.8 Moving All Schedule Instances . . . . . . . . . . . . . . . . . . . . . . . . . . . . . . . . . . . . . . . . . . . . . . . . . . . . . 40
8 Using the Completed and Running Reports Page 41
8.1 Viewing the List of Completed and Running Reports. . . . . . . . . . . . . . . . . . . . . . . . . . . . . . . . . . . . . 418.2 Viewing a Completed Report . . . . . . . . . . . . . . . . . . . . . . . . . . . . . . . . . . . . . . . . . . . . . . . . . . . . . . . 418.3 Viewing the Details for a Report. . . . . . . . . . . . . . . . . . . . . . . . . . . . . . . . . . . . . . . . . . . . . . . . . . . . . 428.4 Deleting a Report . . . . . . . . . . . . . . . . . . . . . . . . . . . . . . . . . . . . . . . . . . . . . . . . . . . . . . . . . . . . . . . . 428.5 Performing Bulk Actions . . . . . . . . . . . . . . . . . . . . . . . . . . . . . . . . . . . . . . . . . . . . . . . . . . . . . . . . . . . 428.6 Searching for a Report . . . . . . . . . . . . . . . . . . . . . . . . . . . . . . . . . . . . . . . . . . . . . . . . . . . . . . . . . . . . 438.7 Sorting the List of Reports . . . . . . . . . . . . . . . . . . . . . . . . . . . . . . . . . . . . . . . . . . . . . . . . . . . . . . . . . 448.8 Refreshing the Completed Report List . . . . . . . . . . . . . . . . . . . . . . . . . . . . . . . . . . . . . . . . . . . . . . . . 44
9 Configuring Settings and Data Collection 45
9.1 Defining the General Settings . . . . . . . . . . . . . . . . . . . . . . . . . . . . . . . . . . . . . . . . . . . . . . . . . . . . . . 459.2 Managing Data Sources. . . . . . . . . . . . . . . . . . . . . . . . . . . . . . . . . . . . . . . . . . . . . . . . . . . . . . . . . . . 469.3 Defining the Identity Vault Settings for Managed Systems. . . . . . . . . . . . . . . . . . . . . . . . . . . . . . . . . 479.4 Defining the Settings for Non-Managed Applications. . . . . . . . . . . . . . . . . . . . . . . . . . . . . . . . . . . . . 489.5 Identity Reporting Events . . . . . . . . . . . . . . . . . . . . . . . . . . . . . . . . . . . . . . . . . . . . . . . . . . . . . . . . . . 509.6 Configuring Sentinel Link Connection . . . . . . . . . . . . . . . . . . . . . . . . . . . . . . . . . . . . . . . . . . . . . . . . 51
10 Creating Custom Report Definitions 53
10.1 About Custom Report Definitions. . . . . . . . . . . . . . . . . . . . . . . . . . . . . . . . . . . . . . . . . . . . . . . . . . . . 5310.2 Starting the Report Packaging Tool . . . . . . . . . . . . . . . . . . . . . . . . . . . . . . . . . . . . . . . . . . . . . . . . . . 5310.3 Creating a New Report Template . . . . . . . . . . . . . . . . . . . . . . . . . . . . . . . . . . . . . . . . . . . . . . . . . . . . 5410.4 Configuring Your JDBC Connection in iReport. . . . . . . . . . . . . . . . . . . . . . . . . . . . . . . . . . . . . . . . . . 5410.5 Setting the Description and Other Strings for Your Report. . . . . . . . . . . . . . . . . . . . . . . . . . . . . . . . . 5510.6 Setting the Report Definition Parameters. . . . . . . . . . . . . . . . . . . . . . . . . . . . . . . . . . . . . . . . . . . . . . 55
10.6.1 Defining the Parameter XML File. . . . . . . . . . . . . . . . . . . . . . . . . . . . . . . . . . . . . . . . . . . . . 5610.6.2 Defining the Type for a Parameter . . . . . . . . . . . . . . . . . . . . . . . . . . . . . . . . . . . . . . . . . . . . 5710.6.3 Defining an OptionQuery Parameter . . . . . . . . . . . . . . . . . . . . . . . . . . . . . . . . . . . . . . . . . . 58
10.7 Customizing the Report in iReport . . . . . . . . . . . . . . . . . . . . . . . . . . . . . . . . . . . . . . . . . . . . . . . . . . . 5910.8 Displaying Parameters and Selected Criteria in the Report . . . . . . . . . . . . . . . . . . . . . . . . . . . . . . . . 6210.9 Building Your Report . . . . . . . . . . . . . . . . . . . . . . . . . . . . . . . . . . . . . . . . . . . . . . . . . . . . . . . . . . . . . 63
inistrator Guide to NetIQ Identity Reporting
11 REST Services for Reporting 65
12 Troubleshooting the Drivers 67
12.1 Issue: No Identity Vaults Presented on the Identity Vaults Screen. . . . . . . . . . . . . . . . . . . . . . . . . . . 6712.2 Issue: Reports Are Missing Identity Vault Data . . . . . . . . . . . . . . . . . . . . . . . . . . . . . . . . . . . . . . . . . 6812.3 Issue: Object Already Exists Error . . . . . . . . . . . . . . . . . . . . . . . . . . . . . . . . . . . . . . . . . . . . . . . . . . . 6912.4 Issue: MSGW Driver is Missing from Identity Vaults Screen . . . . . . . . . . . . . . . . . . . . . . . . . . . . . . . 7012.5 Issue: Managed System Data is Missing from Reports . . . . . . . . . . . . . . . . . . . . . . . . . . . . . . . . . . . 7012.6 Issue: Status of Data Collection is Suspended . . . . . . . . . . . . . . . . . . . . . . . . . . . . . . . . . . . . . . . . . 7212.7 Issue: Status 400 Returned for Status Query . . . . . . . . . . . . . . . . . . . . . . . . . . . . . . . . . . . . . . . . . . 7312.8 Issue: Driver Errors Occur in Multi-Driver Set Environment . . . . . . . . . . . . . . . . . . . . . . . . . . . . . . . . 7312.9 REST Endpoint Troubleshooting . . . . . . . . . . . . . . . . . . . . . . . . . . . . . . . . . . . . . . . . . . . . . . . . . . . . 7312.10 Troubleshooting Reporting Database. . . . . . . . . . . . . . . . . . . . . . . . . . . . . . . . . . . . . . . . . . . . . . . . . 74
13 String Customization 79
13.1 About String Customization in Identity Reporting . . . . . . . . . . . . . . . . . . . . . . . . . . . . . . . . . . . . . . . 7913.2 Customizing the Strings for Identity Reporting. . . . . . . . . . . . . . . . . . . . . . . . . . . . . . . . . . . . . . . . . . 80
A Payload Schema Information 81
A.1 Results Payload Schema . . . . . . . . . . . . . . . . . . . . . . . . . . . . . . . . . . . . . . . . . . . . . . . . . . . . . . . . . . 81A.2 Fault Status Payload Schema . . . . . . . . . . . . . . . . . . . . . . . . . . . . . . . . . . . . . . . . . . . . . . . . . . . . . . 81A.3 Managed System Information Schema . . . . . . . . . . . . . . . . . . . . . . . . . . . . . . . . . . . . . . . . . . . . . . . 82A.4 Entitlements Types Schema. . . . . . . . . . . . . . . . . . . . . . . . . . . . . . . . . . . . . . . . . . . . . . . . . . . . . . . . 83A.5 Entitlements Information Schema . . . . . . . . . . . . . . . . . . . . . . . . . . . . . . . . . . . . . . . . . . . . . . . . . . . 84A.6 Entitlements Assignments Schema . . . . . . . . . . . . . . . . . . . . . . . . . . . . . . . . . . . . . . . . . . . . . . . . . . 84A.7 Accounts Rule Schema . . . . . . . . . . . . . . . . . . . . . . . . . . . . . . . . . . . . . . . . . . . . . . . . . . . . . . . . . . . 84A.8 Account Information Schema . . . . . . . . . . . . . . . . . . . . . . . . . . . . . . . . . . . . . . . . . . . . . . . . . . . . . . . 85A.9 Profile Information Schema . . . . . . . . . . . . . . . . . . . . . . . . . . . . . . . . . . . . . . . . . . . . . . . . . . . . . . . . 86
Contents 5

6 Administrator Guide to NetIQ Identity Reporting
About this Book and the Library
This Identity Reporting Administrator Guide to Identity Reporting describes for Identity Manager and how you can use the features it offers, including user interface and custom report definitions. For installation instructions, see NetIQ Identity Manager Setup Guide.
Intended AudienceThis book provides information for individuals responsible for understanding administration concepts and implementing a secure, distributed administration model.
Other Information in the LibraryThe library provides the following information resources:
Identity Manager Setup Guide
Provides an overview of Identity Manager and its components. This book also provides detailed planning and installation information for Identity Manager.
Designer Administration Guide
Provides information about designing, testing, documenting, and deploying Identity Manager solutions in a highly productive environment.
Administrator’s Guide to the Identity Applications
Describes how to administer the Identity Manager User Application.
User’s Guide to the Identity Applications
Describes the user interface of the Identity Manager User Application and how you can use the features it offers, including identity self-service, the Work Dashboard, role and resource management, and compliance management.
Analyzer Administration Guide
Describes how to administer Analyzer for Identity Manager.
Identity Manager Common Driver Administration Guide
Provides information about administration tasks that are common to all Identity Manager drivers.
Identity Manager Driver Guides
Provide implementation information about Identity Manager drivers.
About this Book and the Library 7

8 Administrator Guide to NetIQ Identity Reporting

About NetIQ Corporation
We are a global, enterprise software company, with a focus on the three persistent challenges in your environment: Change, complexity and risk—and how we can help you control them.
Our ViewpointAdapting to change and managing complexity and risk are nothing new
In fact, of all the challenges you face, these are perhaps the most prominent variables that deny you the control you need to securely measure, monitor, and manage your physical, virtual, and cloud computing environments.
Enabling critical business services, better and faster
We believe that providing as much control as possible to IT organizations is the only way to enable timelier and cost effective delivery of services. Persistent pressures like change and complexity will only continue to increase as organizations continue to change and the technologies needed to manage them become inherently more complex.
Our PhilosophySelling intelligent solutions, not just software
In order to provide reliable control, we first make sure we understand the real-world scenarios in which IT organizations like yours operate — day in and day out. That's the only way we can develop practical, intelligent IT solutions that successfully yield proven, measurable results. And that's so much more rewarding than simply selling software.
Driving your success is our passion
We place your success at the heart of how we do business. From product inception to deployment, we understand that you need IT solutions that work well and integrate seamlessly with your existing investments; you need ongoing support and training post-deployment; and you need someone that is truly easy to work with — for a change. Ultimately, when you succeed, we all succeed.
Our Solutions Identity & Access Governance
Access Management
Security Management
Systems & Application Management
Workload Management
Service Management
About NetIQ Corporation 9
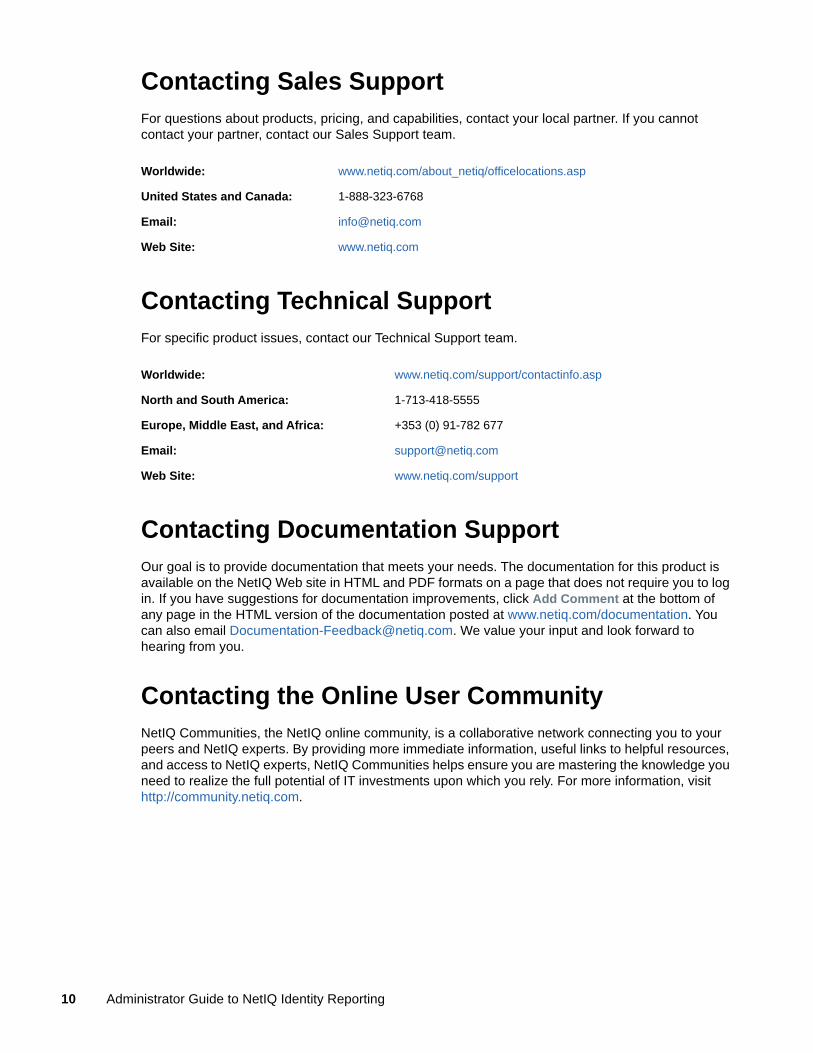
Contacting Sales SupportFor questions about products, pricing, and capabilities, contact your local partner. If you cannot contact your partner, contact our Sales Support team.
Contacting Technical SupportFor specific product issues, contact our Technical Support team.
Contacting Documentation SupportOur goal is to provide documentation that meets your needs. The documentation for this product is available on the NetIQ Web site in HTML and PDF formats on a page that does not require you to log in. If you have suggestions for documentation improvements, click Add Comment at the bottom of any page in the HTML version of the documentation posted at www.netiq.com/documentation. You can also email [email protected]. We value your input and look forward to hearing from you.
Contacting the Online User CommunityNetIQ Communities, the NetIQ online community, is a collaborative network connecting you to your peers and NetIQ experts. By providing more immediate information, useful links to helpful resources, and access to NetIQ experts, NetIQ Communities helps ensure you are mastering the knowledge you need to realize the full potential of IT investments upon which you rely. For more information, visit http://community.netiq.com.
Worldwide: www.netiq.com/about_netiq/officelocations.asp
United States and Canada: 1-888-323-6768
Email: [email protected]
Web Site: www.netiq.com
Worldwide: www.netiq.com/support/contactinfo.asp
North and South America: 1-713-418-5555
Europe, Middle East, and Africa: +353 (0) 91-782 677
Email: [email protected]
Web Site: www.netiq.com/support
10 Administrator Guide to NetIQ Identity Reporting
1 1Overview
This section provides an overview of Identity Reporting.
Section 1.1, “Identity Reporting,” on page 11
Section 1.2, “Components for Identity Reporting,” on page 12
Section 1.3, “Basic Setup and Configuration,” on page 14
Section 1.4, “Working in Identity Reporting,” on page 15
Section 1.5, “Customizing the Reporting Client WAR on Windows Server,” on page 15
Section 1.6, “Security Considerations,” on page 17
1.1 Identity ReportingIdentity Reporting generates reports that show critical business information about various aspects of your Identity Manager configuration, including information collected from Identity Vaults and managed systems such as Active Directory or SAP. Identity Reporting provides a set of predefined report definitions you can use to generate reports. In addition, it gives you the option to import custom reports defined in a third-party tool. The user interface for Identity Reporting makes it easy to schedule reports to run at off-peak times to optimize performance.
NOTE: For details about the predefined reports, see NetIQ Identity Reporting: User’s Guide to Running Reports.
The core of Identity Reporting is the Identity Information Warehouse, an intelligent repository of information about the actual state and the desired state of the Identity Vault and the managed systems within an organization. By querying the warehouse, you can retrieve all the information you need to ensure that your organization is in full compliance with relevant business laws and regulations. The warehouse gives you a 360-degree view of your business entitlements, providing the knowledge you need to see the past and present state of authorizations and permissions granted to identities in your organization. With this knowledge, you can answer even the most sophisticated Governance Risk and Compliance (GRC) queries.
The Identity Information Warehouse uses the following drivers to collect data about an organization:
Data Collection Service Driver
Managed System Gateway Driver
The Data Collection Service Driver uses a push model to collect data about changes made to user accounts, roles, resources, group memberships, and other objects in the vault. The Managed System Gateway Driver can pull information from any managed system that has been enabled for data collection in Identity Manager, as long as it supports entitlements. In addition to maintaining data about identities that are under the full control of the Identity Manager engine, the Identity Information Warehouse collects data about identities that the engine does not manage.
Identity Reporting provides several open integration points. For example, to collect data about third-party applications that are not connected to Identity Manager, you can implement a custom REST endpoint to collect data from these applications. In addition, you can customize the data that the
Overview 11
Identity Vault sends to . To do this, you add a filter to the Data Collection Service Driver to add custom objects or attributes, causing these additional pieces of information to be stored in the warehouse. When this data is available, you can write custom reports to see the information.
1.2 Components for Identity ReportingIdentity Reporting has the following components:
Component Description
Identity Reporting Browser-based application that generates reports by making calls to the Reporting Service.
Predefined Reports Set of predefined report definitions you can use to generate reports.
You can also import custom reports you define in a third-party tool.
For details about the predefined reports, see NetIQ Identity Reporting: User’s Guide to Running Reports.
Report Packaging Tool Facilitates the process of creating new reports.
You can customize reports in iReport and use the Report Packaging Tool to package them for use within Identity Reporting.
Reporting Service Service that retrieves the data needed to generate reports from the Identity Information Warehouse, which contains all report management information (such as report definitions and schedules), database views, and configuration information required for reporting
To produce reports, the Reporting Service invokes the JasperReports engine, which compiles and executes report definitions according to schedules that the Report Administrator defines.
Identity Information Warehouse Repository for the following kinds of information:
Report management information (such as report definitions, report schedules, and completed reports), database views used for reporting, and configuration information. This information is stored in tables within the idm_rpt_cfg schema.
Identity data collected by the Managed System Data Collector, IDM Event-Driven Data Collector, and Application Collector. This data is stored in tables within the idm_rpt_data schema.
Auditing data, which includes events that the Sentinel Log Management for IGA collects and are stored in the public schema within the warehouse
The Identity Information Warehouse stores its data in the Security Information and Event Management (SIEM) database.
12 Administrator Guide to NetIQ Identity Reporting
Data Collection Service Service that collects information from various sources within an organization.
The Data Collection Service includes three subservices:
The Managed System Data Collector uses a pull design model to retrieve data from one or more Identity Vault data sources. The collection runs on a periodic basis, as determined by a set of configuration parameters. To retrieve the data, the collector calls the Managed System Gateway Driver.
The IDM Event-Driven Data Collector uses a push design model to gather event data that the Data Collection Service Driver captures.
The Application Data Collector retrieves data from one or more non-managed applications by calling a REST endpoint written specifically for each application. Non-managed applications are applications within your enterprise that are not connected to the Identity Vault.
Data Collection Service Driver Driver that captures changes to objects stored in an Identity Vault, such as accounts, roles, resources, groups, and team memberships.
The Data Collection Service Driver registers itself with the Data Collection Service and pushes change events (such as data synchronization, add, modify, and delete events) to the Data Collection Service.
The information that the driver captures records changes to these objects:
User accounts and identities
Roles and role levels (hierarchical relationships between roles)
Groups
NOTE: Identity Reporting does not support dynamic groups and only generates reports on static group data.
Group memberships
Provisioning Request Definitions (PRDs)
Separation of Duties (SoDs) definitions and violations
User entitlement associations
Resource definitions and resource parameters
Role and resource assignments
Identity Vault entitlements, entitlement types, and drivers
Managed System Gateway Driver Driver that collects information from managed systems.
To retrieve the managed system data, the driver queries the Identity Vault. The driver retrieves the following information:
List of all managed systems
List of all accounts for the managed systems
Entitlement types, values, and assignments (groupings), and user account profiles for the managed systems
Component Description
Overview 13
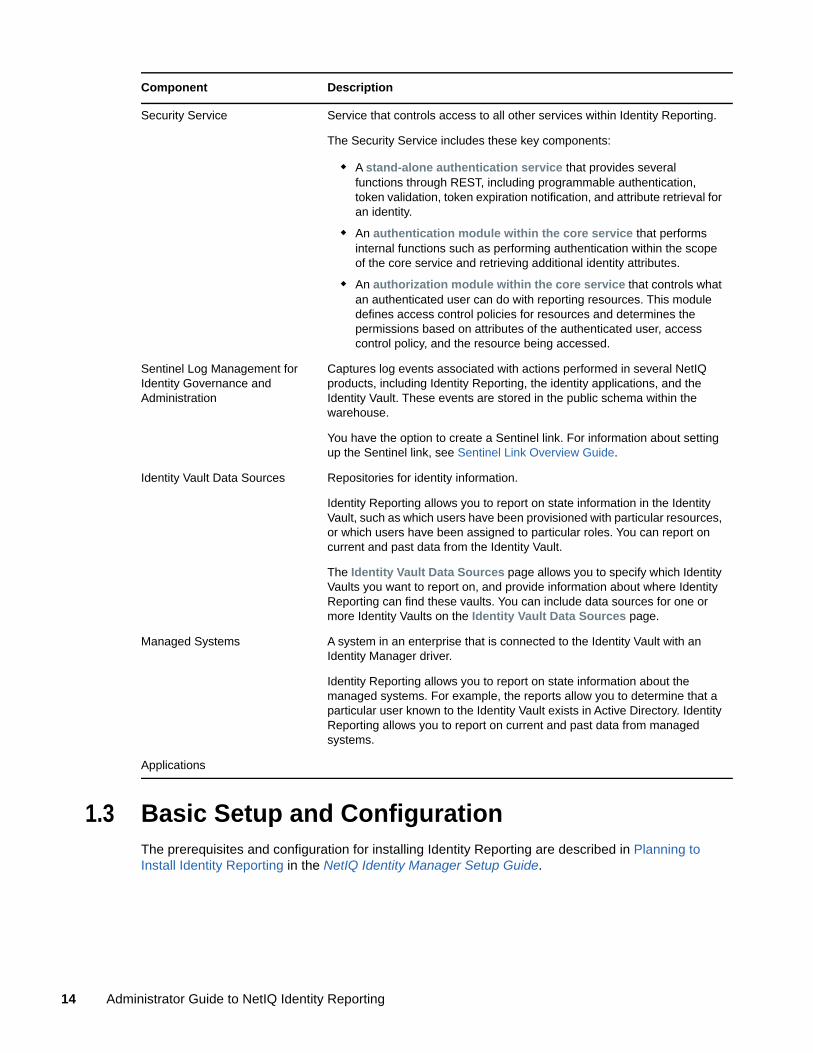
1.3 Basic Setup and ConfigurationThe prerequisites and configuration for installing Identity Reporting are described in Planning to Install Identity Reporting in the NetIQ Identity Manager Setup Guide.
Security Service Service that controls access to all other services within Identity Reporting.
The Security Service includes these key components:
A stand-alone authentication service that provides several functions through REST, including programmable authentication, token validation, token expiration notification, and attribute retrieval for an identity.
An authentication module within the core service that performs internal functions such as performing authentication within the scope of the core service and retrieving additional identity attributes.
An authorization module within the core service that controls what an authenticated user can do with reporting resources. This module defines access control policies for resources and determines the permissions based on attributes of the authenticated user, access control policy, and the resource being accessed.
Sentinel Log Management for Identity Governance and Administration
Captures log events associated with actions performed in several NetIQ products, including Identity Reporting, the identity applications, and the Identity Vault. These events are stored in the public schema within the warehouse.
You have the option to create a Sentinel link. For information about setting up the Sentinel link, see Sentinel Link Overview Guide.
Identity Vault Data Sources Repositories for identity information.
Identity Reporting allows you to report on state information in the Identity Vault, such as which users have been provisioned with particular resources, or which users have been assigned to particular roles. You can report on current and past data from the Identity Vault.
The Identity Vault Data Sources page allows you to specify which Identity Vaults you want to report on, and provide information about where Identity Reporting can find these vaults. You can include data sources for one or more Identity Vaults on the Identity Vault Data Sources page.
Managed Systems A system in an enterprise that is connected to the Identity Vault with an Identity Manager driver.
Identity Reporting allows you to report on state information about the managed systems. For example, the reports allow you to determine that a particular user known to the Identity Vault exists in Active Directory. Identity Reporting allows you to report on current and past data from managed systems.
Applications
Component Description
14 Administrator Guide to NetIQ Identity Reporting

1.4 Working in Identity ReportingIdentity Reporting requires a Web browser to present information and allow users to perform actions quickly and easily.
How styles are rendered: Identity Reporting uses a set of default styles to control the appearance of the user interface. However, you can provide your own styles to customize the interface. The reporting client WAR supports customization through a file called custom.css. It looks for this file in a directory called novl_rpt_custom within the home directory of the user that started the application server on the server where the application server is running. For example, with a SLES install, this would be root, so the home directory is /root. If that file exists, the reporting client uses it to override any styles for the reporting user interface.
To customize the user interface using the custom.css file:
1 Create a new directory in the home directory of the user running the server.
For example, if you are running as root, run the following command:
mkdir /root/novl_rpt_custom
2 Add your custom.css file to the novl_rpt_custom folder created in Step 1.
3 If the application server is already running, refresh your browser to see the changes. Otherwise, restart the application server and clear the cache from your browser.
You can determine whether the file can be found by entering the following URL:
http://[report.server]:8180/IDMRPT/custom/custom.css
How the Back button functions: In Identity Reporting, the Back button takes you to your previous application or to the last Web site you loaded, not to the last page you visited within Identity Reporting. All navigation within Identity Reporting takes place within the initially loaded page.
1.5 Customizing the Reporting Client WAR on Windows ServerThe reporting client WAR supports customization through the custom.css file. To customize the user interface, set the location of the custom.css file using the com.netiq.rpt.css.custom.dir property.
NOTE: The Reporting server process must have read permissions on the custom.css file.
To determine where to place the custom.css file on Windows, use Process Monitor to set up the following filter:
Process name: java.exe
Operation: CreateFile
Result contains: PATH NOT FOUND
PATH contains custom.css
1 Download the ProcessMonitor.zip file from the Microsoft website to a temporary location on your computer.
2 Extract the contents of the unzipped file.
3 Navigate to the folder where you extracted the file, execute the Procmon.exe file.
Overview 15
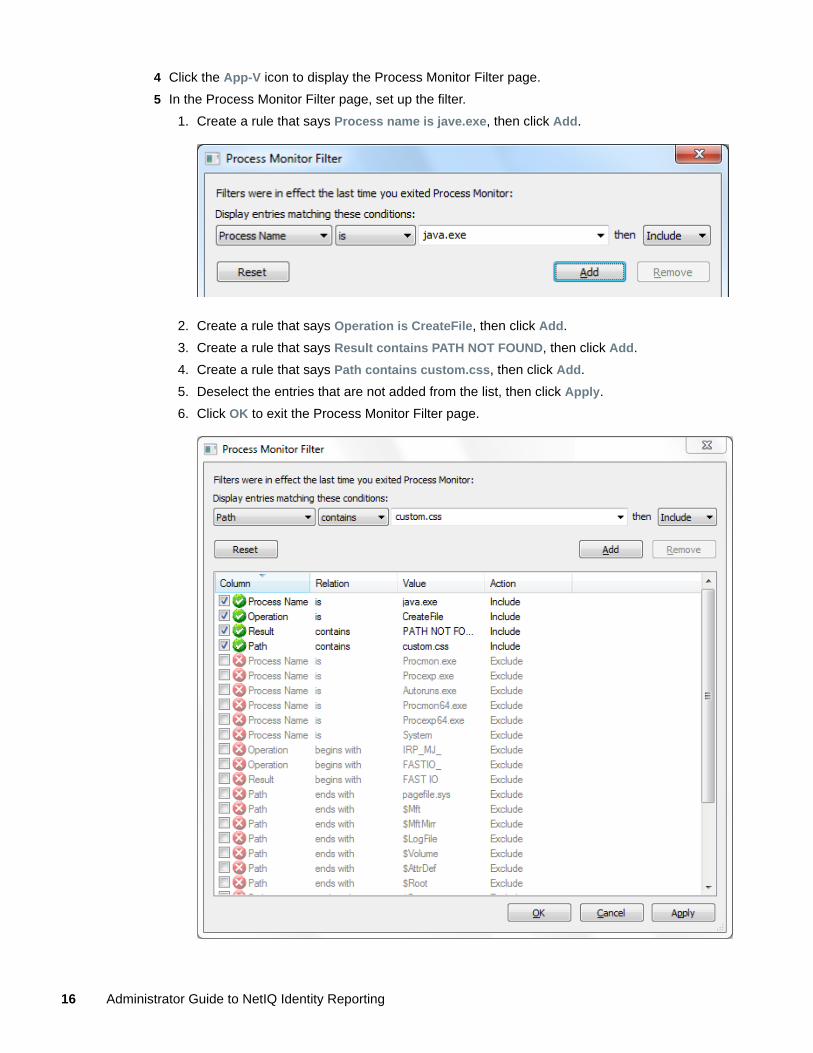
4 Click the App-V icon to display the Process Monitor Filter page.
5 In the Process Monitor Filter page, set up the filter.
1. Create a rule that says Process name is jave.exe, then click Add.
2. Create a rule that says Operation is CreateFile, then click Add.
3. Create a rule that says Result contains PATH NOT FOUND, then click Add.
4. Create a rule that says Path contains custom.css, then click Add.
5. Deselect the entries that are not added from the list, then click Apply.
6. Click OK to exit the Process Monitor Filter page.
16 Administrator Guide to NetIQ Identity Reporting
6 Log in to Identity Reporting in a browser.
7 Look back at Process Monitor to see the path where your Windows system expects to see custom.css.
8 Create the novl_rpt_custom folder in this location, if needed, and copy the custom.css file to the folder.
9 Restart Tomcat.
1.6 Security ConsiderationsThis section describes security considerations to be aware of when working with .
1.6.1 Authentication Token Exposure
On Windows, the authentication token used for login operations is exposed as a URL parameter in the Internet Explorer address bar when users open PDF files for reports. This happens because the browser handles links to PDFs instead of JavaScript handling the links.
Do not copy and paste links to report PDFs. If the token has not yet expired and the user has not logged out, the link receiver, who might not be a legitimate user, is able to access Identity Reporting by using the token given to the legitimate user.
IMPORTANT: Do not try to copy and send links within Identity Reporting, because this action might potentially expose your login information.
Overview 17

18 Administrator Guide to NetIQ Identity Reporting
2 2Installation
Identity Reporting is a component of Identity Information Warehouse (the Warehouse). The installation process for Information Warehouse includes all components needed for the application:
NetIQ Identity Reporting
Identity Manager Managed System Gateway Driver (MSGW driver)
Identity Manager Data Collection Service Driver (DCS driver)
NetIQ Sentinel Log Management for IGA
For installation information, see Installing Identity Reporting in the NetIQ Identity Manager Setup Guide.
Installation 19

20 Administrator Guide to NetIQ Identity Reporting
3 3Getting Started
This section provides instructions about getting started with Identity Reporting.
Section 3.1, “Accessing Identity Reporting,” on page 21
Section 3.2, “Exploring Identity Reporting,” on page 22
3.1 Accessing Identity ReportingYou can launch Identity Reporting from the identity applications or access it directly from a browser.
By default, Identity Manager uses One SSO Provider (SSO) for single sign-on access to Identity Manager components. When you install Identity Reporting, you specify the basic settings for user authentication. However, you can also configure the OSP authentication server to accept authentication from the Kerberos ticket server or SAML IDP. For example, you can use SAML to support authentication from NetIQ Access Manager. For more information, see Using One SSO Provider for Single Sign-on Access in Identity Manager in the NetIQ Identity Manager Setup Guide.
Section 3.1.1, “Launching Identity Reporting from the Identity Manager Applications Page,” on page 21
Section 3.1.2, “Starting Identity Reporting Directly with a URL,” on page 21
NOTE: To access Identity Reporting, LDAP users must be a Report Administrator and be able to read all the attributes in their own user object. Therefore, grant the user read trustee rights to the user’s own nrfMemberOf attribute.
3.1.1 Launching Identity Reporting from the Identity Manager Applications Page
The Applications page of the identity applications can include a link to Identity Reporting for all Identity Manager users and administrators. Log in to the identity applications using the OSP login as a Report Administrator. You can access the Applications page with any supported Web browser, from either a computer or a tablet. For more information, see System Requirements for the Identity Applications in the NetIQ Identity Manager Setup Guide.
3.1.2 Starting Identity Reporting Directly with a URL
To access Identity Reporting directly, open a Web browser and go to the address (URL) for the module (as supplied by your system administrator). The URL will follow this pattern:
http://server:8180/IDMRPT/
Getting Started 21
3.2 Exploring Identity ReportingAfter you log in, Identity Reporting shows a left navigation menu that provides access to various pages that let you perform reporting actions. To navigate to a particular page, click the menu item for the page you want to view.
The following menu choices are available:
Overview (which is open by default)
To learn about this tab and how to work with it, see Chapter 4, “Using the Overview Page,” on page 25.
Repository
To learn about this tab and how to work with it, see Chapter 5, “Managing the Report Repository,” on page 27.
Import
To learn about this tab and how to work with it, see Chapter 6, “Using the Import Tool,” on page 35.
Calendar
To learn about this tab and how to work with it, see Chapter 7, “Using the Calendar Page,” on page 37.
Reports
To learn about this tab and how to work with it, see Chapter 8, “Using the Completed and Running Reports Page,” on page 41.
Settings
To learn about this tab and how to work with it, see Chapter 9, “Configuring Settings and Data Collection,” on page 45.
Data Sources
To learn about this tab and how to work with it, see Chapter 9, “Configuring Settings and Data Collection,” on page 45.
Data Collection
To learn about this tab and how to work with it, see Chapter 9, “Configuring Settings and Data Collection,” on page 45.
3.2.1 Getting Help
While working in Identity Reporting, click the Help link to display the online version of this guide.
22 Administrator Guide to NetIQ Identity Reporting
3.2.2 Token Timeout
Instead of timing out when a user session is idle, Identity Reporting implements a token timeout strategy to manage user logins. The token associated with each user login times out automatically after a specified period of time, regardless of what the user does. After a token timeout occurs, Identity Reporting preserves the user’s data. The user can log in again and resume work without losing any data.
The administrator can set the token timeout value at installation time or configure it later by using the post-installation utility provided with Identity Reporting.
The token timeout feature reduces the risk that an unauthorized user could impersonate a user who had previously logged in to Identity Reporting. After a timeout occurs, the token is no longer valid and cannot be reused. This is not the case with many applications that rely on a conventional session timeout mechanism, because another person can reuse the session information.
Getting Started 23

24 Administrator Guide to NetIQ Identity Reporting
4 4Using the Overview Page
This section provides instructions about using the Overview page in Identity Reporting.
Section 4.1, “About the Overview Page,” on page 25
Section 4.2, “Viewing the Report Summary,” on page 25
Section 4.3, “Searching for a Report Definition,” on page 26
Section 4.4, “Viewing the List of Recently Completed Reports,” on page 26
Section 4.5, “Viewing the List of Scheduled Reports,” on page 26
Section 4.6, “Viewing the Configurations,” on page 26
4.1 About the Overview PageThe Overview page is the first page you see when you log in to Identity Reporting. This page provides an overview of the data in the system. The top of the page includes summary information, such as the number of report definitions and the number of started, failed, and completed reports. The page also includes a search facility that provides a quick way to find report definitions by name.
Below the report summary area, the page shows several additional sections. These sections give you a convenient way to see a list of the most recently completed reports and the reports scheduled to be run. At the bottom of the page, you can find details about Identity Reporting configuration, such as the number of Identity Vaults and non-managed applications configured, and the current setting for data retention.
4.2 Viewing the Report SummaryThe top of the Overview page provides a summary count of the number of report definitions, reports generated today, and completed reports in the system at the current time.
To see a list of the report definitions on the Repository page, click the text that shows the summary count (for example, 17 Report Definitions).
To see a list of the completed reports on the Completed and Running Reports page, click the text that shows the count (for example, 64 completed reports).
Using the Overview Page 25
4.3 Searching for a Report Definition1 Type a search string in the Search report definitions text field.
For complete details about entering a search string, see Section 5.7, “Searching for a Report Definition,” on page 32.
2 Click Go.
The interface displays the Repository page with a list of the reports that satisfy your search criteria.
You can clear the current search criteria and refresh the display by clicking Overview on the left navigation menu, or by clearing the Search report definitions field and clicking the Go button again.
4.4 Viewing the List of Recently Completed ReportsThe Recently Completed Reports section of the page lists the reports that finished most recently.
To open the generated PDF (or CSV) file for a particular report in the list, click the text that shows the report name (for example, Resource Assignments by Resource - 10/1/2010 3:04 PM).
4.5 Viewing the List of Scheduled ReportsThe Upcoming Reports section of the page lists the next five reports that are scheduled to run.
To see a particular scheduled report on the Calendar page, click the text that shows the schedule date for the report (for example, Scheduled on 5/6/2010).
4.6 Viewing the ConfigurationsThe Configurations section of the page shows all of the managed systems and Identity Vaults that have been configured for the reporting system, as well as the retention period specified for the collected data and the date that the data was last collected.
To see the settings for the configured Identity Vaults on the Identity Vault Data Sources page, click the text that shows the number of vaults configured (for example, 1 Identity Vault(s)). To see the settings for the non-managed applications, click the text that shows the number of applications configured (for example, 0 configured Applications).
26 Administrator Guide to NetIQ Identity Reporting
5 5Managing the Report Repository
This section provides instructions about managing the Repository in Identity Reporting page.
Section 5.1, “Viewing the Report Definitions,” on page 27
Section 5.2, “Modifying a Report Definition,” on page 28
Section 5.3, “Creating a Custom Report Definition Based on an Existing Definition,” on page 31
Section 5.4, “Running a Report On Demand,” on page 31
Section 5.5, “Deleting a Report Definition,” on page 31
Section 5.6, “Performing Bulk Actions,” on page 31
Section 5.7, “Searching for a Report Definition,” on page 32
Section 5.8, “Sorting the List of Reports,” on page 33
Section 5.9, “Refreshing the Report Definition List,” on page 33
5.1 Viewing the Report DefinitionsWhen you click Repository in the left navigation menu, the Repository shows the list of reports that have been imported into Identity Reporting.
For each report definition, the list shows the report name and description, as well as any tags that have been specified for the report. The reports that ship with the product include one version with both historical and current state information and one version with only current state information. The reports that include only current state information include “Current State” in the report name.
The Repository includes a special report called Template. This report is included as a subreport within other reports added to the system. It displays a header and footer in any report with which it is included. You cannot delete this report and you should not run it by itself. In addition, this report does not show a check box next to it in the list, because it cannot be included in bulk actions. When you edit the Template item, you do not see the Output Format, Default Notifications, Schedule, and Run Now controls.
Identity Reporting ships with a set of predefined reports. Import these into . After you import them, the reports are included in the list on the Repository page. You can define a new report by copying one of the predefined report definitions and giving it a new name.
For details about the predefined reports, see NetIQ Identity Reporting: User’s Guide to Running Reports.
You cannot create a new report from scratch on the Repository page. To create a new report definition from scratch, design the report layout outside of Identity Reporting, and use the Import facility to import the report into Identity Reporting.
Identity Reporting stores all report definitions, report schedules, and completed reports in the Identity Information Warehouse. These objects are stored in tables within the idm_rpt_cfg schema in the SIEM database.
Managing the Report Repository 27

5.2 Modifying a Report Definition1 Click the name of the report definition in the list on the Repository page.
Alternatively, you can mouse over the report definition (or select the check box beside the name) and click Edit.
When you edit a report definition, a page displays to allow you to make changes to the definition.
The fields at the top of the page allow you to modify the name, description, tags, comments, and output format (PDF or CSV) for the report. Use tags to organize reports according to common words or phrases that suggest how the reports are related. Tag names share a common namespace for all users, so specify tag names that make sense for all users. Tag names cannot be localized.
You can specify one or more tags for a report definition. If you specify multiple tags, separate them with commas. Defined tags are shown in the list displayed on the Repository page, and in the Detail dialog box for a report listed on the Completed and Running Reports page. In the list displayed on the Repository page, the tags are alphabetized to allow for sorting.
NOTE: The next time you edit the report definition, the tags appear in alphabetical order, regardless of how they were originally entered. The tags are also alphabetized in the Repository list, even if you did not alphabetize them when you first entered them.
The other fields on the page are organized into the following sections:
Criteria
Default Notifications
Schedule
2 To edit the criteria for the report, open the Criteria section and make changes as necessary.
The Criteria section does not appear unless the imported definition included one or more report parameters.
The number of fields displayed in the Criteria section and the way these fields behave depend on how they were specified in the original report definition object imported into Identity Reporting.
Identity Reporting supports the following data types for criteria fields:
String
String with Options
Date
Integer
Boolean
Lookup
The control displayed for each data type varies depending on how the parameter is defined in the report definition. For multivalued options, a multi-select control is displayed, but a single value control is displayed for a parameter that only accepts a single value.
Some criteria fields are required by the report definition, but others are optional. If you do not provide a value for a required field, the user interface displays an error message.
The following criteria parameters are available with most of the reports installed with Identity Reporting:
28 Administrator Guide to NetIQ Identity Reporting
If a report definition includes one or more fields for defining dates, such as Date Range, From Date, and To Date, be aware that the date range you specify affects the data returned with the report, not the dates on which the report is run. Therefore, if a report is run monthly, do not define a custom date range that fixes the dates in the From Date and To Date fields. It does not make sense for a monthly scheduled report to report on a fixed date range (such as 3/10/2010 - 3/17/2010). To report on a fixed date range, schedule the report to run only once. For a monthly report, use one of the relative date range settings included in the Date Range field, such as Month to Date. This ensures that the data in the report is updated each month.
Some criteria fields support automatic completion, which allows you to type several characters and then select an item from a list of possible choices. For example, an Identity Vault user(s) field might allow you to type the first few characters of a user’s name and then select the user from a list of users whose names contain the characters you have typed.
Parameter Description
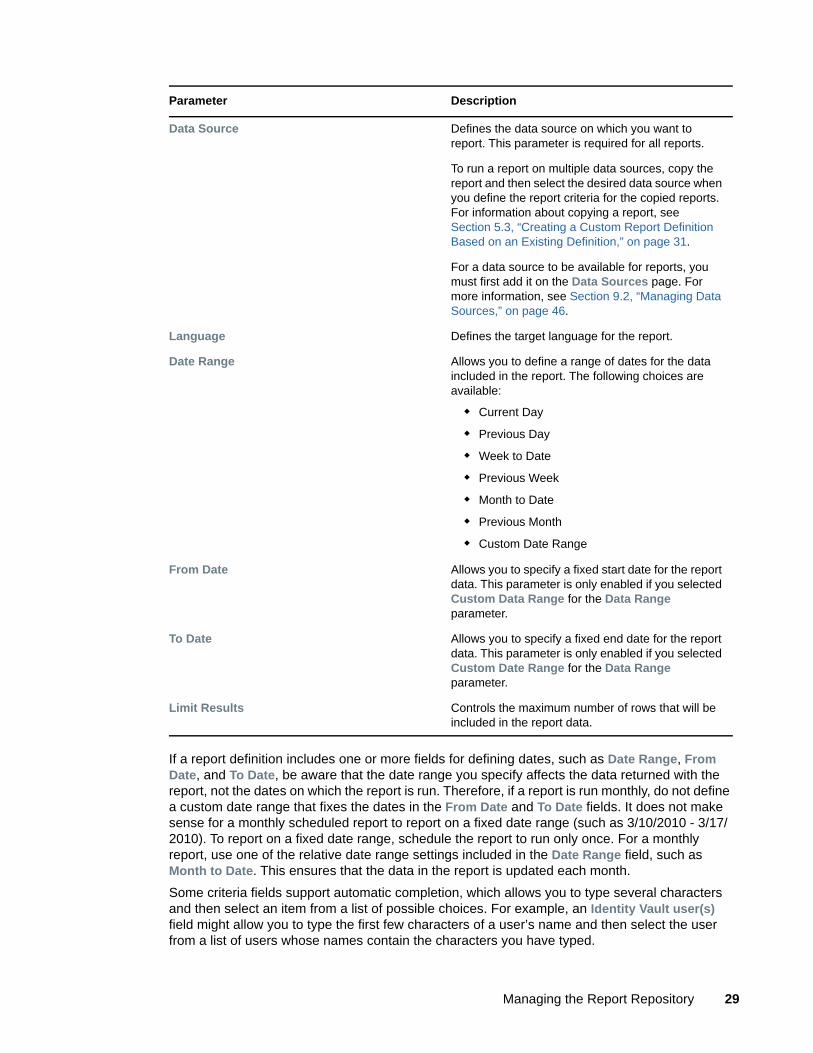
Data Source Defines the data source on which you want to report. This parameter is required for all reports.
To run a report on multiple data sources, copy the report and then select the desired data source when you define the report criteria for the copied reports. For information about copying a report, see Section 5.3, “Creating a Custom Report Definition Based on an Existing Definition,” on page 31.
For a data source to be available for reports, you must first add it on the Data Sources page. For more information, see Section 9.2, “Managing Data Sources,” on page 46.
Language Defines the target language for the report.
Date Range Allows you to define a range of dates for the data included in the report. The following choices are available:
Current Day
Previous Day
Week to Date
Previous Week
Month to Date
Previous Month
Custom Date Range
From Date Allows you to specify a fixed start date for the report data. This parameter is only enabled if you selected Custom Data Range for the Data Range parameter.
To Date Allows you to specify a fixed end date for the report data. This parameter is only enabled if you selected Custom Date Range for the Data Range parameter.
Limit Results Controls the maximum number of rows that will be included in the report data.
Managing the Report Repository 29
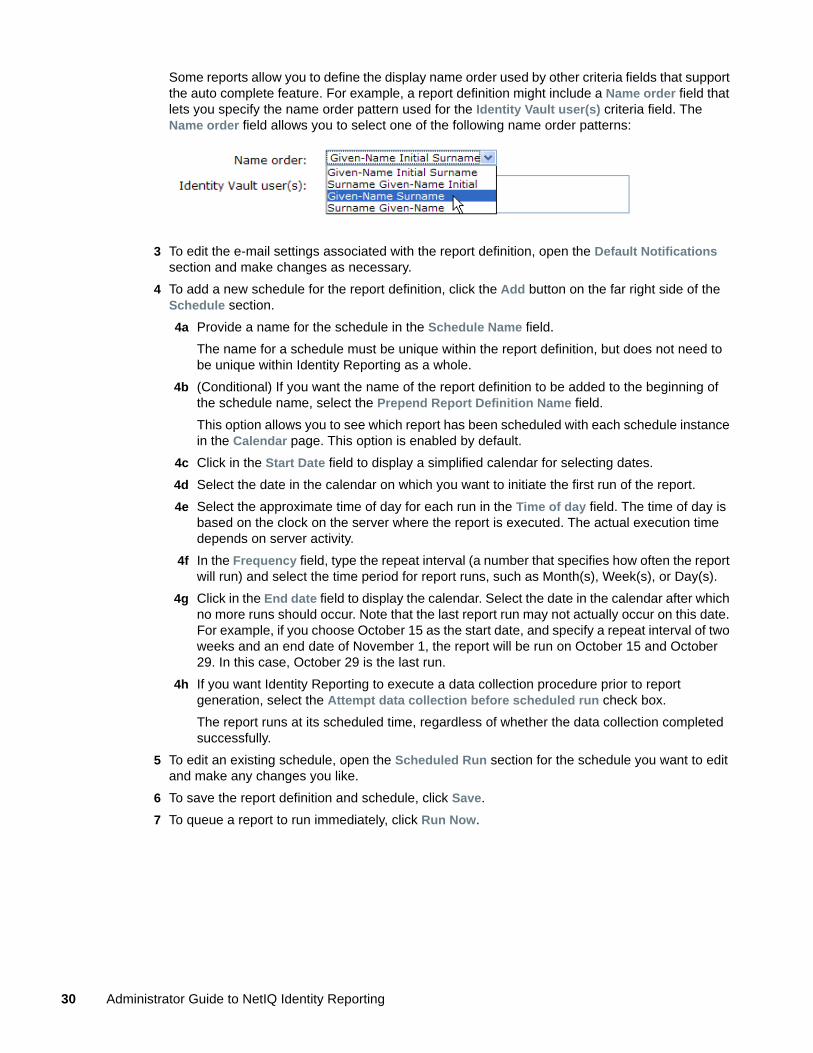
Some reports allow you to define the display name order used by other criteria fields that support the auto complete feature. For example, a report definition might include a Name order field that lets you specify the name order pattern used for the Identity Vault user(s) criteria field. The Name order field allows you to select one of the following name order patterns:
3 To edit the e-mail settings associated with the report definition, open the Default Notifications section and make changes as necessary.
4 To add a new schedule for the report definition, click the Add button on the far right side of the Schedule section.
4a Provide a name for the schedule in the Schedule Name field.
The name for a schedule must be unique within the report definition, but does not need to be unique within Identity Reporting as a whole.
4b (Conditional) If you want the name of the report definition to be added to the beginning of the schedule name, select the Prepend Report Definition Name field.
This option allows you to see which report has been scheduled with each schedule instance in the Calendar page. This option is enabled by default.
4c Click in the Start Date field to display a simplified calendar for selecting dates.
4d Select the date in the calendar on which you want to initiate the first run of the report.
4e Select the approximate time of day for each run in the Time of day field. The time of day is based on the clock on the server where the report is executed. The actual execution time depends on server activity.
4f In the Frequency field, type the repeat interval (a number that specifies how often the report will run) and select the time period for report runs, such as Month(s), Week(s), or Day(s).
4g Click in the End date field to display the calendar. Select the date in the calendar after which no more runs should occur. Note that the last report run may not actually occur on this date. For example, if you choose October 15 as the start date, and specify a repeat interval of two weeks and an end date of November 1, the report will be run on October 15 and October 29. In this case, October 29 is the last run.
4h If you want Identity Reporting to execute a data collection procedure prior to report generation, select the Attempt data collection before scheduled run check box.
The report runs at its scheduled time, regardless of whether the data collection completed successfully.
5 To edit an existing schedule, open the Scheduled Run section for the schedule you want to edit and make any changes you like.
6 To save the report definition and schedule, click Save.
7 To queue a report to run immediately, click Run Now.
30 Administrator Guide to NetIQ Identity Reporting
5.3 Creating a Custom Report Definition Based on an Existing DefinitionTo create a new report definition by making a copy of an existing report definition, mouse over the report definition (or select the check box next to the name) and click Copy.
The interface displays the report definition editing page with a message indicating that the new report was created. The name of the new report definition has a number appended to the name of the original report used for the copy operation.
After the editing page appears, you can make changes to the definition just as you would to any other report definition in the repository. Because the default report name is not very informative, change the name to something more meaningful.
5.4 Running a Report On DemandTo queue a report to run immediately from the Repository list view, mouse over the report definition (or select the check box next to the name) and click Run Now.
Startup process requires extra time before reports can be generated When you first start Identity Reporting, wait 5 minutes before running a report. The startup process consumes a lot of memory, leaving less memory for the report generation. If you do not wait 5 minutes, you might encounter memory errors.
5.5 Deleting a Report DefinitionTo delete a report definition, mouse over the report definition (or select the check box next to the name) and click Delete.
5.6 Performing Bulk ActionsTo run (or delete) several reports at once:
1 Select the check box to the left of each report definition you want to run or delete.
2 Select the operation (Run Now or Delete) in the Bulk Actions drop-down list.
3 Click Apply.
Bulk actions apply to the current page only. If you select several items on one page, then navigate to the next page to select some additional items, a subsequent attempt to perform a bulk action such as Run Now or Delete only applies to the second set of items you selected. The previous selections are retained and still appear selected if you navigate back to the first page. However, the bulk action is not performed on these items.
Managing the Report Repository 31
5.7 Searching for a Report DefinitionTo search for a report definition in the Repository:
1 Type a search string in the Search text field.
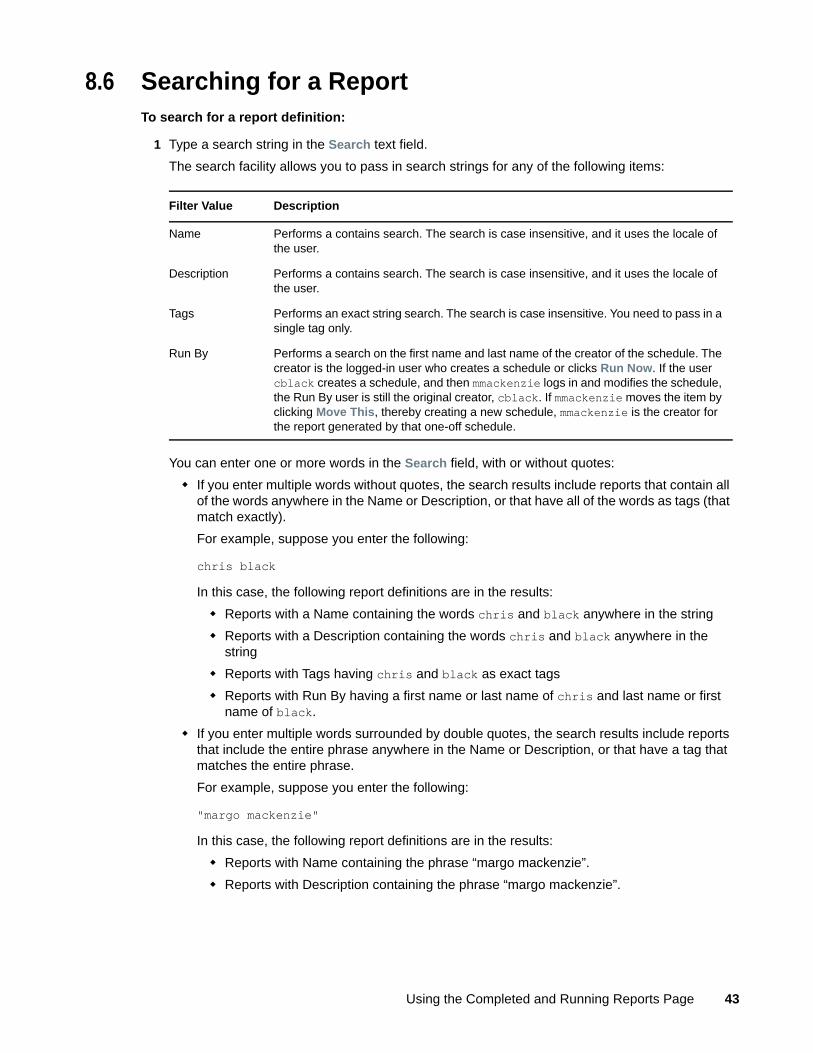
The search facility allows you to pass in search strings for any of the following items:
You can enter one or more words in the Search field, with or without quotes:
If you enter multiple words without quotes, the search results include reports that contain all of the words anywhere in the Name or Description, or that have all of the words as tags (that match exactly).
For example, suppose you enter the following:
identity users
In this case, the following report definitions are in the results:
Reports with a Name containing the words identity and users anywhere in the string
Reports with a Description containing the words identity and users anywhere in the string
Reports with Tags having both identity and users as exact tags
If you enter multiple words surrounded by double quotes, the search results include reports that include the entire phrase anywhere in the Name or Description, or that have a tag that matches the entire phrase.
For example, suppose you enter the following:
"identity users"
In this case, the following report definitions are in the results:
Reports with Name containing the phrase “identity users”.
Reports with Description containing the phrase “identity users”.
Reports with a Tag that exactly matches “identity users”.
2 Click Search.
You can clear the current search criteria and refresh the display by clicking Repository on the left navigation menu, or by emptying the Search field and clicking the Search button again.
Filter Value Description
Name Performs a contains search. The search is case insensitive, and it uses the locale of the user.
Description Performs a contains search. The search is case insensitive, and it uses the locale of the user.
Tags Performs an exact string search. The search is case insensitive. Pass in a single tag only.
32 Administrator Guide to NetIQ Identity Reporting

5.8 Sorting the List of ReportsTo sort the list of reports, click the header for the column on which you want to sort.
The pyramid-shaped sort indicator shows you which column is the new primary sort column. When the sort is ascending, the sort indicator is shown in its normal, upright position. When the sort is descending, the sort indicator is upside down.
5.9 Refreshing the Report Definition ListTo refresh the report definition list, click the refresh icon in the upper right corner of the page.
Managing the Report Repository 33

34 Administrator Guide to NetIQ Identity Reporting
6 6Using the Import Tool
This section provides instructions on using the Import page in Identity Reporting.
Section 6.1, “Using the Import Page to Import Report Definitions,” on page 35
Section 6.2, “Using the Download Page to Download Report Definitions and Views,” on page 36
6.1 Using the Import Page to Import Report DefinitionsThe Import page lets you import report definitions into Identity Reporting. After the reports have been imported, these definitions are available for use throughout Identity Reporting. You can add scheduled runs for the imported definitions and make changes to the settings associated with the report definitions, such as the criteria, default notifications, and configuration. You can also add scheduled runs for the imported report definitions, or use the imported report to create a new report definition.
If you make changes to the Template report, you need to restart the server after importing the new definition. If you don’t restart the server, your changes are not visible in Identity Reporting.
The Import Report Definitions page allows you to import a single report definition (in an RPZ file) or an archive that contains multiple report definitions (in an SPZ file). You can include multiple RPZ and SPZ files in a single import procedure.
To import a report definition:
1 Click Import in the left navigation menu.
2 Select the files you want to include in the import procedure:
2a For each file you want to include, click Browse to the right of Add.
2b Navigate to the file and select it.
2c Click Open.
The page shows the file you added in the Report Definitions To Import section of the page.
2d Repeat Step 2a through Step 2c to include additional files.
3 When you have finished adding the files, review the list of files shown in the Report Definitions To Import section of the page.
To remove a file from the import procedure, click the delete icon to the left of the filename.
4 Specify whether you want to overwrite the contents of any existing report definitions with the same names as those being imported by selecting or clearing the Overwrite existing reports.
When you select this option, the import operation overwrites the contents of existing report definitions that have the same names as those imported. However, some of the fields associated with an existing report definition are retained:
The e-mail addresses to send the report to
Comments added to the report definition
Default report format (CSV or PDF)
Categories defined for the report definition
Using the Import Tool 35
The imported values overwrite all other settings associated with the report definition.
5 Click Import to begin the import procedure.
6 If you want to cancel the import procedure, click the Cancel the import icon to the right of the progress bar.
If you cancel the import procedure, none of the report definitions you selected are imported.
After importing one or more report definitions, you can see the reports and make changes to them on the Repository page.
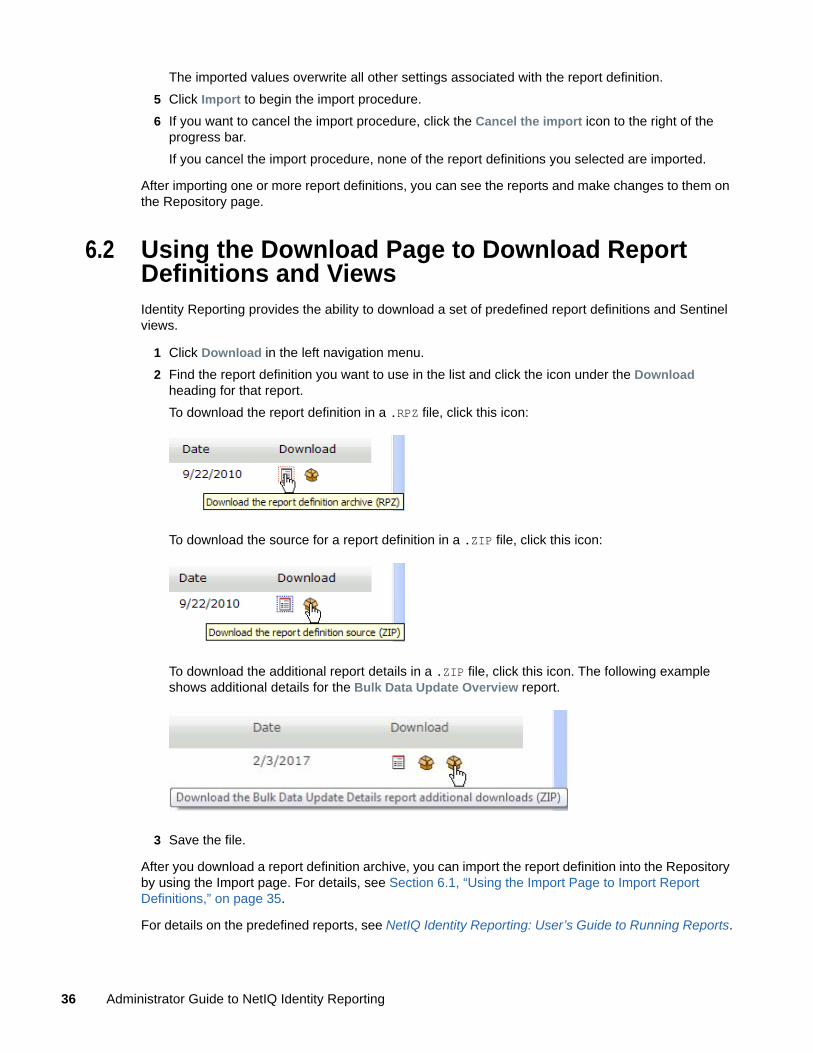
6.2 Using the Download Page to Download Report Definitions and ViewsIdentity Reporting provides the ability to download a set of predefined report definitions and Sentinel views.
1 Click Download in the left navigation menu.
2 Find the report definition you want to use in the list and click the icon under the Download heading for that report.
To download the report definition in a .RPZ file, click this icon:
To download the source for a report definition in a .ZIP file, click this icon:
To download the additional report details in a .ZIP file, click this icon. The following example shows additional details for the Bulk Data Update Overview report.
3 Save the file.
After you download a report definition archive, you can import the report definition into the Repository by using the Import page. For details, see Section 6.1, “Using the Import Page to Import Report Definitions,” on page 35.
For details on the predefined reports, see NetIQ Identity Reporting: User’s Guide to Running Reports.
36 Administrator Guide to NetIQ Identity Reporting

7 7Using the Calendar Page
This section provides instructions on using the Calendar page.
Section 7.1, “Viewing the Calendar,” on page 37
Section 7.2, “Checking the Status of a Schedule Instance,” on page 38
Section 7.3, “Editing the Summary Information for a Schedule Instance,” on page 38
Section 7.4, “Viewing a Completed Report,” on page 38
Section 7.5, “Editing a Schedule Instance,” on page 39
Section 7.6, “Deleting a Schedule Instance,” on page 40
Section 7.7, “Moving a Single Schedule Instance,” on page 40
Section 7.8, “Moving All Schedule Instances,” on page 40
7.1 Viewing the CalendarThis section provides instructions for viewing the calendar.
Section 7.1.1, “Displaying the Calendar Page,” on page 37
Section 7.1.2, “Scrolling within the Calendar Display,” on page 38
Section 7.1.3, “Viewing the Schedule for Today,” on page 38
7.1.1 Displaying the Calendar Page
To display the calendar, click Calendar in the left navigation menu.
The Calendar page shows scheduled reports, as well as reports that have been initiated with the Run Now button. In addition, it shows finished reports, reports that are still in progress, and reports that failed during execution. Finished reports, reports that are still in progress, and failed reports are shown with a gray background, and reports that have not been executed yet appear with a white background. All days that have already passed are shown with a gray background.
The Calendar page presents a continuous view of the calendar, rather than a simple month-by-month view. This means that the data is not separated based on calendar months. Instead, it is presented in chunks of several weeks at a time, where each row corresponds to a week. You can adjust the number of weeks displayed by setting the Calendar Options for the page.
The Calendar page shows scheduled runs in the user’s time zone, not the server’s time zone. However, scheduled runs are executed according to the server’s time zone, and the time stamp on an executed report reflects the time on the server at the time of the run.
The scroll bar for the browser lets you scroll within the current view, but does not move forward to show additional weeks in the calendar.
Using the Calendar Page 37
7.1.2 Scrolling within the Calendar Display
To include an additional row (move forward one week) in the calendar view, press the down-arrow key.
To remove a row (go back one week) in the calendar view, press the up-arrow key.
To scroll down to the next set of weeks in the calendar view, press Ctrl+down-arrow.
You can also scroll down by clicking the Go forward icon.
Alternatively, you can use the mouse wheel to scroll weeks in the calendar view.
To scroll up to the next set of weeks in the calendar view, press Ctrl+up-arrow or click the Go back icon.
7.1.3 Viewing the Schedule for Today
When you first display the Calendar page, today’s report runs are shown in the display. If you scroll away from today’s schedule, you might need to return to it later. If so, click the Today button.
7.2 Checking the Status of a Schedule InstanceTo check the status of a particular schedule instance in the calendar:, mouse over the schedule name.
If the schedule instance is still running, the Calendar shows In Progress under the schedule name.
If the schedule instance has completed processing, the View and Delete links appear under the schedule name.
If the schedule instance has not run yet because it is scheduled for some time in the future, the Edit and Delete links appear under the schedule name.
If the report failed during execution, only the Delete link appears under the schedule name.
7.3 Editing the Summary Information for a Schedule InstanceThe Calendar page displays a pop-up window showing the description, status, and comments for the report, as well as the date and time on which it was run, and the name of the user who ran the report.
If the report failed during execution, the pop-up window indicates this in the status and also provides the reason for the failure.
7.4 Viewing a Completed ReportTo view a generated report, click View under the schedule name.
When you view a report, the generated report appears in a new window. The report is shown in PDF or CSV format, depending on how the report was defined.
38 Administrator Guide to NetIQ Identity Reporting
7.5 Editing a Schedule InstanceTo edit a schedule instance for a report that has not been run yet:
1 Click Edit under the schedule name.
You can also click the report schedule.
Identity Reporting displays a page that lets you edit the report definition and schedule. The page opens to the schedule instance you selected in the Calendar page. However, you can work on a different schedule instance, or create a new one from the editing page. In addition, you can make modifications to the report definition.
The report definition has a one-to-many relationship with schedules, which means that a report definition can have one or more schedules, but a schedule can only be associated with a single report definition.
2 To edit the settings for the schedule, scroll down to the Schedule section of the page and open the section for this scheduled run.
3 Make changes as necessary to the scheduled run.
4 Click Save.
Schedule Property Description
Start date Specifies the date in the calendar on which you want to initiate the first run of the report. This property also determines the date for all subsequent runs.
You can change the start date for a schedule after it has been created, even if the calendar already includes one or more scheduled runs. If you change the start date for a schedule, all of the runs for this schedule shift to the new date.
Time of day Specifies the approximate time of day for each report run. The time of day is based on the clock on the server where the report is executed. The actual execution time depends on server activity.
The run time specified for each schedule instance is set to the hour or the half hour (for example, 1:00 AM or 1:30 PM).
You can change the time of day for a schedule after it has been created. If you change the time of day, all of the runs for this schedule execute at the new time.
Frequency Specifies the repeat interval (a number that specifies how often the report will run) and the time period for report runs: (Month(s), Week(s), or Day(s).
You cannot modify the frequency for a schedule after the schedule has been created.
End date Specifies the date in the calendar after which no more runs should occur. Note that the last report run may not actually occur on this date. For example, if you choose October 15 as the start date, and specify a repeat interval of two weeks and an end date of November 1, the report will be run on October 15 and October 29. In this case, October 29 is the last run.
You can change the end date for a schedule after it has been created.
Use default notifications
Specifies the e-mail settings associated with the schedule instance.
Using the Calendar Page 39
7.6 Deleting a Schedule InstanceTo delete a particular scheduled instance, mouse over the scheduled instance and click Delete.
If you delete the first run in a schedule, the Start date for the schedule is changed to the next upcoming run date. If you delete the last run, the End date for the schedule is not modified.
7.7 Moving a Single Schedule InstanceThe Calendar page allows you to move a single schedule instance by dragging and dropping the item from one date to another within the calendar. However, when you move a single schedule instance, the Calendar page automatically creates a new schedule with a new name and places the moved schedule instance on the new date that you selected as a the target for the move operation.
After you have moved a schedule instance, this run is effectively deleted from the original schedule definition, and is now added to the new schedule definition. All of the text-based attributes from the original schedule instance are copied to the new schedule instance.
The name you specify for the new schedule need not be unique across all of the report definitions within Identity Reporting. However, it does need to be unique within the list of schedules for the report definition.
You cannot move a schedule instance into the past (before the current date and time) or to a day that already has a run scheduled for the same report definition.
To move a single schedule instance to a new date:
1 Select the schedule instance you want to move and drag it to the desired date.
The Calendar page displays the Confirm Move Schedule dialog box.
2 Click Move This.
3 Specify a name for the new schedule and click Move This.
The Calendar page creates the new schedule, moves the scheduled instance, and displays a confirmation message.
7.8 Moving All Schedule InstancesThe Calendar page also allows you to move all of the scheduled runs for a schedule simply by dragging and dropping a particular run within the schedule from one date to another within the calendar. When you move all schedule instances for a particular schedule, the Calendar page retains the original repeat pattern specified in the Frequency field, but updates the start date to reflect the new date for execution of the report.
The target date for the move need not be within the original start and end period dates specified for the schedule. If you move outside the original range of the schedule, the schedule start and end dates change accordingly.
To move all of the scheduled runs for a schedule:
1 Select the schedule instance you want to move and drag it to the desired date.
2 Click Move All.
The Calendar page shifts all of the scheduled runs to align with the new run date.
40 Administrator Guide to NetIQ Identity Reporting
8 8Using the Completed and Running Reports Page
This section provides instructions for using the Completed and Running Reports page in Identity Reporting.
Section 8.1, “Viewing the List of Completed and Running Reports,” on page 41
Section 8.2, “Viewing a Completed Report,” on page 41
Section 8.3, “Viewing the Details for a Report,” on page 42
Section 8.4, “Deleting a Report,” on page 42
Section 8.5, “Performing Bulk Actions,” on page 42
Section 8.6, “Searching for a Report,” on page 43
Section 8.7, “Sorting the List of Reports,” on page 44
Section 8.8, “Refreshing the Completed Report List,” on page 44
8.1 Viewing the List of Completed and Running ReportsTo view a list of completed and running reports, click Reports in the left navigation menu.
The Completed And Running Reports page shows all reports that have completed processing, as well as reports that are still in progress or have failed during execution. The list of reports includes reports that were scheduled, as well as reports that were initiated with the Run Now button. For each report listed, the page shows the report name, data source on which you ran the report, description, run date, and status icon.
If a report is run multiple times very quickly (each run is within a fraction of a second of the other runs), the time format shows one or more periods after AM or PM. For example, you might see “PM.” or “PM..” after the time the report was run.
8.2 Viewing a Completed ReportTo view a completed report, click the View link below the report you want to display.
When you view a report, the generated report appears in a new window. The report is shown in PDF or CSV format, depending on how the report was defined.
IMPORTANT: Please do not try to copy and send links to files within Identity Reporting, because this action might potentially expose your login information.
The View link is not available for reports that are still in progress or have failed.
Using the Completed and Running Reports Page 41

8.3 Viewing the Details for a Report1 Click the Details link below the report for which you want to see the details.
The details are displayed in a pop-up window.
If the report definition includes one or more parameters, a Criteria section is added to the page that shows the parameters.
The fields shown in the pop-up window are not editable, because the report has already been submitted to be run.
The Run By user is the logged-in user who creates a schedule or clicks Run Now. If the user cblack creates a schedule, and then mmackenzie logs in and modifies the schedule, the Run By user is still the original creator, cblack. If mmackenzie moves the item by clicking Move This, thereby creating a new schedule, mmackenzie is the creator for the report generated by that one-off schedule.
2 If the report has completed processing, you can display the generated report from this window by clicking the View link next to the status icon at the top of the window.
This link is not available if the report is still in progress or has failed.
3 To return to the report list, click Close.
This window is non-modal, so you can continue to work outside the window while it is still open.
8.4 Deleting a ReportTo delete a generated report, click the Delete link below the report you want to delete.
If you choose multiple reports by selecting the check box for each report, and then click the Delete link for another report in the list, the delete operation applies only to the report for which you clicked the Delete link.
8.5 Performing Bulk ActionsTo delete several reports at once:
1 Select the check box to the left of each report definition you want to run or delete.
2 Select the operation (Delete) in the Bulk Actions drop-down list.
3 Click Apply.
Bulk actions apply to the current page only. If you select several items on one page, then navigate to the next page to select some additional items, a subsequent attempt to perform a bulk delete only applies to the second set of items you selected. The previous selections are retained and still appear checked if you navigate back to the first page. However, the bulk action is not performed on these items.
42 Administrator Guide to NetIQ Identity Reporting
8.6 Searching for a ReportTo search for a report definition:
1 Type a search string in the Search text field.
The search facility allows you to pass in search strings for any of the following items:
You can enter one or more words in the Search field, with or without quotes:
If you enter multiple words without quotes, the search results include reports that contain all of the words anywhere in the Name or Description, or that have all of the words as tags (that match exactly).
For example, suppose you enter the following:
chris black
In this case, the following report definitions are in the results:
Reports with a Name containing the words chris and black anywhere in the string
Reports with a Description containing the words chris and black anywhere in the string
Reports with Tags having chris and black as exact tags
Reports with Run By having a first name or last name of chris and last name or first name of black.
If you enter multiple words surrounded by double quotes, the search results include reports that include the entire phrase anywhere in the Name or Description, or that have a tag that matches the entire phrase.
For example, suppose you enter the following:
"margo mackenzie"
In this case, the following report definitions are in the results:
Reports with Name containing the phrase “margo mackenzie”.
Reports with Description containing the phrase “margo mackenzie”.
Filter Value Description
Name Performs a contains search. The search is case insensitive, and it uses the locale of the user.
Description Performs a contains search. The search is case insensitive, and it uses the locale of the user.
Tags Performs an exact string search. The search is case insensitive. You need to pass in a single tag only.
Run By Performs a search on the first name and last name of the creator of the schedule. The creator is the logged-in user who creates a schedule or clicks Run Now. If the user cblack creates a schedule, and then mmackenzie logs in and modifies the schedule, the Run By user is still the original creator, cblack. If mmackenzie moves the item by clicking Move This, thereby creating a new schedule, mmackenzie is the creator for the report generated by that one-off schedule.
Using the Completed and Running Reports Page 43
Reports with a Tag that exactly matches “margo mackenzie”.
Reports with Run By having “margo mackenzie” as the first name and last name or last name and first name.
2 Click Search.
You can clear the current search criteria and refresh the display by clicking Reports on the left navigation menu, or by emptying the Search field and clicking the Search button again.
8.7 Sorting the List of ReportsTo sort the list of reports on the Completed and Running Reports page, click the header for the column you want to sort on.
The pyramid-shaped sort indicator shows you which column is the new primary sort column. When the sort is ascending, the sort indicator is shown in its normal, upright position. When the sort is descending, the sort indicator is upside down.
8.8 Refreshing the Completed Report ListClick the refresh icon in the upper right corner of the page.
44 Administrator Guide to NetIQ Identity Reporting

9 9Configuring Settings and Data Collection
This section provides instructions on configuring settings for Identity Reporting.
Section 9.1, “Defining the General Settings,” on page 45
Section 9.2, “Managing Data Sources,” on page 46
Section 9.3, “Defining the Identity Vault Settings for Managed Systems,” on page 47
Section 9.4, “Defining the Settings for Non-Managed Applications,” on page 48
Section 9.5, “Identity Reporting Events,” on page 50
Section 9.6, “Configuring Sentinel Link Connection,” on page 51
9.1 Defining the General SettingsThe General Settings page allows you to define global settings that control the behavior of Identity Reporting.
1 Click Settings in the left navigation menu.
2 To define the general settings:
2a To specify how long completed reports should be retained, specify the unit of time (days, weeks, or months) and a number in the Delete generated reports after field.
2b To specify how often data should be collected, specify the unit of time (days, weeks, or months) and a number in the Collect reporting data from connected systems every field. This value defines a schedule for data collection.
2c To specify how long data should be retained, specify the unit of time (days, weeks, or months) and a number in the Keep collected reporting data for field.
2d To specify the preferred language that will be used for data collection, select the language in the Collect reporting data from Identity Vaults and connected systems in the following language in field. Generated reports will always show data in this language.
NOTE: Step 2a applies to Identity Governance only. Steps 2b to 2d are applicable to Identity Manager.
3 To save your changes, click Save.
4 To manage your data:
4a Click Start Data Collection to collect data from all defined data sources immediately.
When Identity Reporting executes a data collection operation, it stores all data collected in the Identity Information Warehouse. The data are stored in tables within the idm_rpt_data schema in the SIEM database. Some tables are not updated until the objects they contain are assigned to related objects. For example, the categories that are added to the DAL choice lists for roles and resources are not populated in the idmrpt_category table until they have been assigned to an object.
4b Click Delete Collected Data to purge historical data from the reporting database immediately.
Configuring Settings and Data Collection 45
When Identity Reporting executes a data purge operation, it only purges data from the history tables that is older than the retention value specified for the Keep collected reporting data interval setting. Any historical data that is more recent than the retention interval permits will be retained.
To determine whether the data should be retained or purged, Identity Reporting calculates the difference (in seconds) between the current time and the timestamp for the collected data and compares this value to the retention interval. To make the comparison, Identity Reporting translates the retention interval to a value in seconds. For example, if you specify 1 day as the retention interval, Identity Reporting compares the age of the historical data to 864000 seconds.
The Delete Collected Data action does not remove any of the current state data.
Archiving reporting data If you want to archive data in the reporting database, you need to use the archiving tools provided with PostgreSQL. For more information, see the PostgreSQL documentation (http://www.postgresql.org/docs/).
9.2 Managing Data SourcesThe Data Sources page allows you to add, modify, and remove PostgreSQL and Oracle data sources on which you want to run reports. You can select data sources from a pre-defined list of installed Java Naming and Directory Interface (JNDI) data sources that the reporting server manages or define new, external Java Database Connectivity (JDBC) data sources. For a data source to be available when you run reports, you must first add it using this page.
After you add a pre-defined JNDI data source, you can use the Data Sources page to modify the display name. For JDBC data sources, you can modify the display name and the password that Identity Reporting uses to connect to the data source.
You cannot remove the pre-defined data source named IDMRPTCfgDataSourceIdentity Reporting. This is the default data source that Identity Reporting uses to run reports against the internal database.
To add a data source:
1 Click Data Sources in the left navigation menu.
2 Click Add.
3 Select the appropriate method for connecting to the data source.
4 (Conditional) If you are adding a pre-defined data source, select the source from the list.
5 (Conditional) If you are defining a new data source, provide the following information for connecting to the data source:
Name of the data source
DNS name or IP address of the computer that hosts the data source
Whether to use SSL to connect to the data source
Port on which the data source listens
Database name
User name and password for the data source user account
6 (Optional) To test whether Identity Reporting can connect to the data source, click Test Connection.
A successful connection is not required to add the data source.
7 Click Save.
46 Administrator Guide to NetIQ Identity Reporting
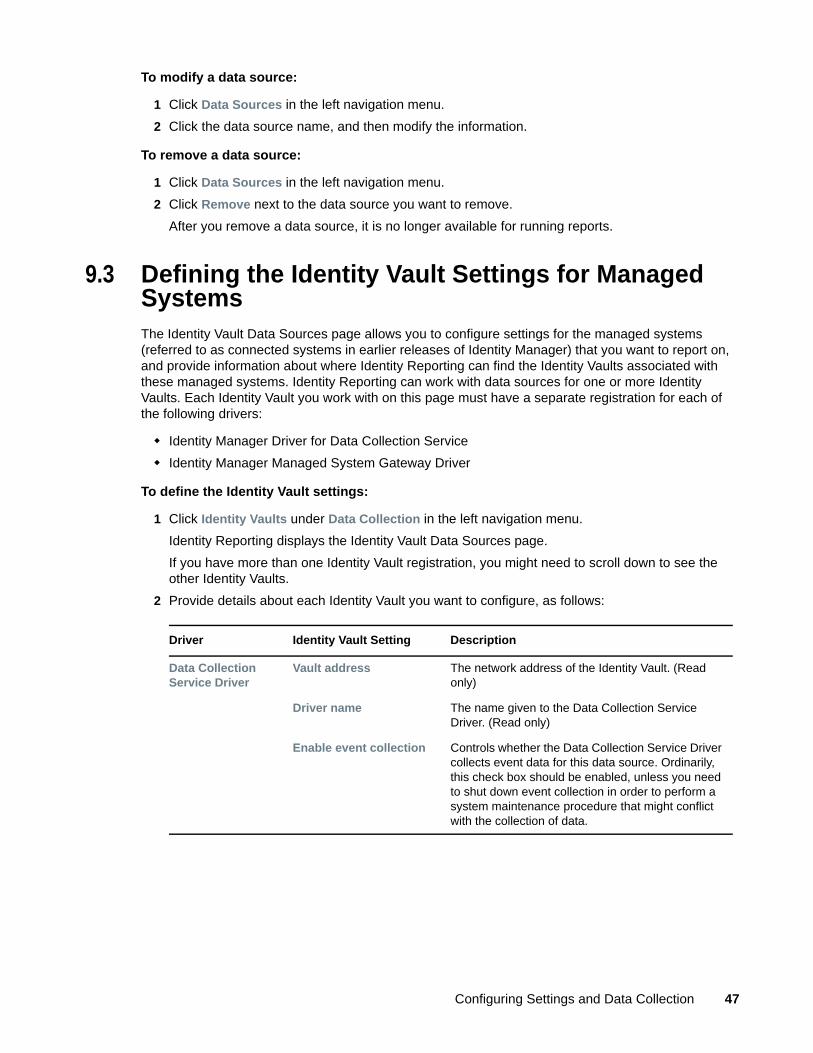
To modify a data source:
1 Click Data Sources in the left navigation menu.
2 Click the data source name, and then modify the information.
To remove a data source:
1 Click Data Sources in the left navigation menu.
2 Click Remove next to the data source you want to remove.
After you remove a data source, it is no longer available for running reports.
9.3 Defining the Identity Vault Settings for Managed SystemsThe Identity Vault Data Sources page allows you to configure settings for the managed systems (referred to as connected systems in earlier releases of Identity Manager) that you want to report on, and provide information about where Identity Reporting can find the Identity Vaults associated with these managed systems. Identity Reporting can work with data sources for one or more Identity Vaults. Each Identity Vault you work with on this page must have a separate registration for each of the following drivers:
Identity Manager Driver for Data Collection Service
Identity Manager Managed System Gateway Driver
To define the Identity Vault settings:
1 Click Identity Vaults under Data Collection in the left navigation menu.
Identity Reporting displays the Identity Vault Data Sources page.
If you have more than one Identity Vault registration, you might need to scroll down to see the other Identity Vaults.
2 Provide details about each Identity Vault you want to configure, as follows:
Driver Identity Vault Setting Description
Data Collection Service Driver
Vault address The network address of the Identity Vault. (Read only)
Driver name The name given to the Data Collection Service Driver. (Read only)
Enable event collection Controls whether the Data Collection Service Driver collects event data for this data source. Ordinarily, this check box should be enabled, unless you need to shut down event collection in order to perform a system maintenance procedure that might conflict with the collection of data.
Configuring Settings and Data Collection 47
3 To save your changes, click Save.
4 To start the data source for the Managed System Gateway Driver, click Start data source to the right of Collection state:
The first time you activate data collection, the state is shown as Initialized, rather than Suspended.
5 To stop a running data source, click Stop data source:
9.4 Defining the Settings for Non-Managed ApplicationsThe Non-Managed Application Data Sources page allows you to specify which non-managed applications you want to report on, and provide information about where Identity Reporting can find these applications. A non-managed application is any application running in an enterprise that you
Managed System Gateway Driver
Collection state Indicates whether the data source is running or suspended. You can use the Start data source and Stop data source buttons to control the data source state.
NOTE: If the identity applications and Identity Reporting are configured from an Advanced Edition .iso file, and the tree to which they are connected is a Standard Edition tree, the collection state of the Managed System Gateway driver may be active when it should not be.
Because Identity Reporting is configured from an Advanced Edition .iso file, it tries to configure the Managed System Gateway driver, and the Managed System Gateway driver registration parameter is set to Yes in the Data Collection Service driver.
Username The user name required to authenticate to the driver. (Read only)
Driver Identity Vault Setting Description
48 Administrator Guide to NetIQ Identity Reporting
want to include in your reports. Each application has its own set of application entitlements, which are distinct from Identity Manager entitlements. The application entitlements might include groups, roles, accounts, profiles, or other types of permissions associated with the application.
If a system is connected to the Identity Vault with an Identity Manager driver, it is referred to as a managed system. The Application Data Sources page is used to configure applications that are not connected to the Identity Vault through Identity Managed drivers. The ability to access managed systems (connected systems) is controlled through the Identity Vaults, which are configured on the Identity Vaults page.
To include information from a non-managed application in your reports, you need to implement a REST endpoint for the application and specify the context for this endpoint in the Context field in the Non-Managed Application Data Sources page. If the endpoint cannot be found, the application data will not be available for reporting.
1 Click Applications under Data Collection in the left navigation menu.
Identity Reporting displays the Non-Managed Application Data Sources page. If any applications have been defined previously, the page shows a separate section for each application. If no applications have been defined, the page is empty.
2 To add a non-managed application, click Add Application.
Identity Reporting displays the Application section on the page.
3 Provide details about the application, as follows:
4 To save your changes, click Save.
Application Setting Description
Application State Controls whether the data source for the application is running or suspended. You can use the Start data source and Stop data source buttons to control the application state.
Display Name A text string you use to identify the application within Identity Reporting.
System address The network address of the application data source (REST endpoint).
Port The port number on which the application data source (REST endpoint) is listening.
Context The context for the REST endpoint associated with the application data source.
To include data from an application in your reports, you need to implement a REST endpoint for the application and specify the context for this endpoint in the Context field. If the endpoint cannot be found, the application data is not available for reporting.
Username The username required to authenticate to the application data source (REST endpoint).
Password The password required to authenticate to the application data source (REST endpoint).
Use SSL Indicates whether communication with this application data source (REST endpoint) uses a Secure Socket Layer (SSL).
Certificate The SSL certificate for the application data source (REST endpoint). Click Browse to locate the certificate file.
Configuring Settings and Data Collection 49
5 To start the data source associated with the application, click the start icon to the right of Application state.
6 To stop a data source that is already running, click the stop icon.
7 To remove the application you just added, click Remove in the upper right corner of the Application section of the page.
9.5 Identity Reporting EventsThe following events are logged for Identity Reporting:
Event ID Process NetIQ Identity Audit Event Severity
31700 Authentication token created Create_Auth_Token Info
31701 Authentication token failed Create_Auth_Token_Failure Error
31702 Authentication token revoked Auth_Token_Revoked Info
31721 DCS driver registration added DCS_Driver_Registration_Add Info
31722 DCS driver registration modified DCS_Driver_Registration_Modify Info
31723 DCS driver collection enabled DCS_Driver_Collection_Enabled Info
31724 DCS driver collection disabled DCS_Driver_Collection_Disabled Info
31725 Data source registered Data_Source_Registered Info
31726 Data source modified Data_Source_Modified Info
31727 Data source removed Data_Source_Removed Info
31728 Data collection suspended Data_Collection_Suspended Info
31729 Data collection activated Data_Collection_Activated Info
31730 Data collection started Data_Collection_Started Info
31731 Data collection completed Data_Collection_Completed Info
31732 Data collection failed Data_Collection_Failed Error
31733 Data collection requested
Data cleanup requested
Data_Collection_Requested
Data_Cleanup_Requested
Info
31771 Report definition created Report_Defn_Created Info
31772 Report definition modified Report_Defn_Modified Info
31773 Report definition deleted Report_Defn_Deleted Info
31774 Schedule created Schedule_Created Info
31775 Schedule modified Schedule_Modified Info
31776 Schedule deleted Schedule_Deleted Info
31777 Report generated Report_Generated Info
31778 Report delivered Report_Delivered Info
50 Administrator Guide to NetIQ Identity Reporting
9.6 Configuring Sentinel Link ConnectionYou can also forward events from Sentinel to Sentinel Log Management for IGA. In a Sentinel Link Solution setup, the Sentinel system that forwards the events is called the sender and the Sentinel system that receives the events is called the receiver. You can simultaneously link multiple Sentinel systems to a single receiver system. To configure a Sentinel link, you need to configure at least two systems: the sender machine and the receiver machine. For more information on configuring Sentinel Link, see Sentinel Link Overview Guide.
Configuring Settings and Data Collection 51

52 Administrator Guide to NetIQ Identity Reporting
10 10Creating Custom Report Definitions
This section provides instructions for creating custom report definitions.
Section 10.1, “About Custom Report Definitions,” on page 53
Section 10.2, “Starting the Report Packaging Tool,” on page 53
Section 10.3, “Creating a New Report Template,” on page 54
Section 10.4, “Configuring Your JDBC Connection in iReport,” on page 54
Section 10.5, “Setting the Description and Other Strings for Your Report,” on page 55
Section 10.6, “Setting the Report Definition Parameters,” on page 55
Section 10.7, “Customizing the Report in iReport,” on page 59
Section 10.8, “Displaying Parameters and Selected Criteria in the Report,” on page 62
Section 10.9, “Building Your Report,” on page 63
10.1 About Custom Report DefinitionsIdentity Reporting ships with a set of predefined report definitions. You can use them as is, or customize them to suit the requirements of your organization. You can also create new report definitions if you prefer to design your reports from scratch.
Skills requirement: To create custom report definitions, you need to have a background in Structured Query Language (SQL). SQL is used to construct the database query for a report.
To facilitate the process of creating new reports, NetIQ provides the NetIQ Identity Manager Report Packaging Tool. You can customize reports in iReport and use the Reporting Packaging Tool to package them. The NetIQ Identity Manager Report Packaging Tool is installed on the same server where you install .
You can use iReport to customize your report definitions. iReport is a free, open source tool made available by the Jasper Reports project. It is available for Windows and Linux. You need to download and install iReport before you begin customizing reports.
You can find the iReport download at this location:
JasperForge.org (http://jasperforge.org/projects/ireport)
On Linux, you need to unpack the TAR file to your home directory. On Windows, you need to run an executable installer.
10.2 Starting the Report Packaging ToolThe NetIQ Identity Manager Report Packaging Tool is installed in the root folder or Identity Reporting installation folder, depending on your environment. By default, the reportpkg.jar file is located in the /opt/netiq/idm/apps/IDMReporting folder.
To start the NetIQ Identity Manager Report Packaging Tool on Linux, execute this command:
java -jar reportpkg.jar
Creating Custom Report Definitions 53
On Windows, simply double-click the JAR file.
10.3 Creating a New Report TemplateThe Report Packaging Tool has three primary functions:
Creating new report templates
Building existing templates
Deploying built templates
The first step in the process is to create a new report template.
1 Select Create in the left navigation menu.
2 On the Create New Report screen, specify the report name and description.
3 Select the location for the report.
4 Click the Create button.
The report contents are written to the location specified for the report.
5 In iReport, open the JRXML report.
This file will always be called TemplateReport.jrxml and be located in the IDM/6.1 directory. You cannot change the name or the location. You can specify the file by this name and location.
10.4 Configuring Your JDBC Connection in iReportBefore customizing your report, you need to configure a new datasource for the reporting PostgreSQL database within iReport. You only need to perform this step once.
1 Launch iReport, if you have not done so already.
2 Click the Report Datasources button on the main toolbar to open the Connections/Datasources dialog box.
3 Click the New button to open the Datasource dialog box.
4 Select Database JDBC Connection and click Next to advance to the Database JDBC connection page.
5 Configure the PostgreSQL JDBC connection:
5a Select the PostgreSQL (org.postgresql.Driver) JDBC driver.
5b Specify the database URL to your database (jdbc:postgresql://localhost:15432/SIEM).
5c Supply your database username and password.
NOTE: Specify the database username and password you use for your PostgreSQL database.
5d Click the Test button to test your database connection.
5e Click OK to close the message box.
5f Save the database connection information.
6 Close the JDBC configuration dialog box.
54 Administrator Guide to NetIQ Identity Reporting
10.5 Setting the Description and Other Strings for Your ReportThe description for your report, and other strings it uses, are defined in the TemplateReport.properties file in the 6.1 directory of your new report. This file contains a set of keys and values for the string that appear in the report. The strings in the TemplateReport.properties file make it possible for your report to support multiple languages.
NOTE: The TemplateReport.properties file must end with a blank line. When you build your report archive, the localized strings defined for the report are appended to the TemplateReport.properties file, so a blank line is necessary to avoid having two lines merged.
To set the report description, you would need to edit the DESC1 key:
DESC1=This report shows all [authentication attempts] by users captured by @CATEGORY@ within the selected date range, grouped by the [domain within which the user account exists] and then grouped by the [account name].MAXROWS=Maximum RowsMAXROWSDESC=Specifies the maximum number of rows to return for this queryUSER_DISPLAY_NAME=IDV User(s)USER_DESCRIPTION=List of Identity Vault users to report on
Edit these properties to change your report description or any other string. You must rebuild and redeploy your report each time you change this file.
10.6 Setting the Report Definition ParametersReports support runtime parameters that allow users to specify values when they run a report. This section provides instructions for defining runtime parameters.
Section 10.6.1, “Defining the Parameter XML File,” on page 56
Section 10.6.2, “Defining the Type for a Parameter,” on page 57
Section 10.6.3, “Defining an OptionQuery Parameter,” on page 58
Creating Custom Report Definitions 55
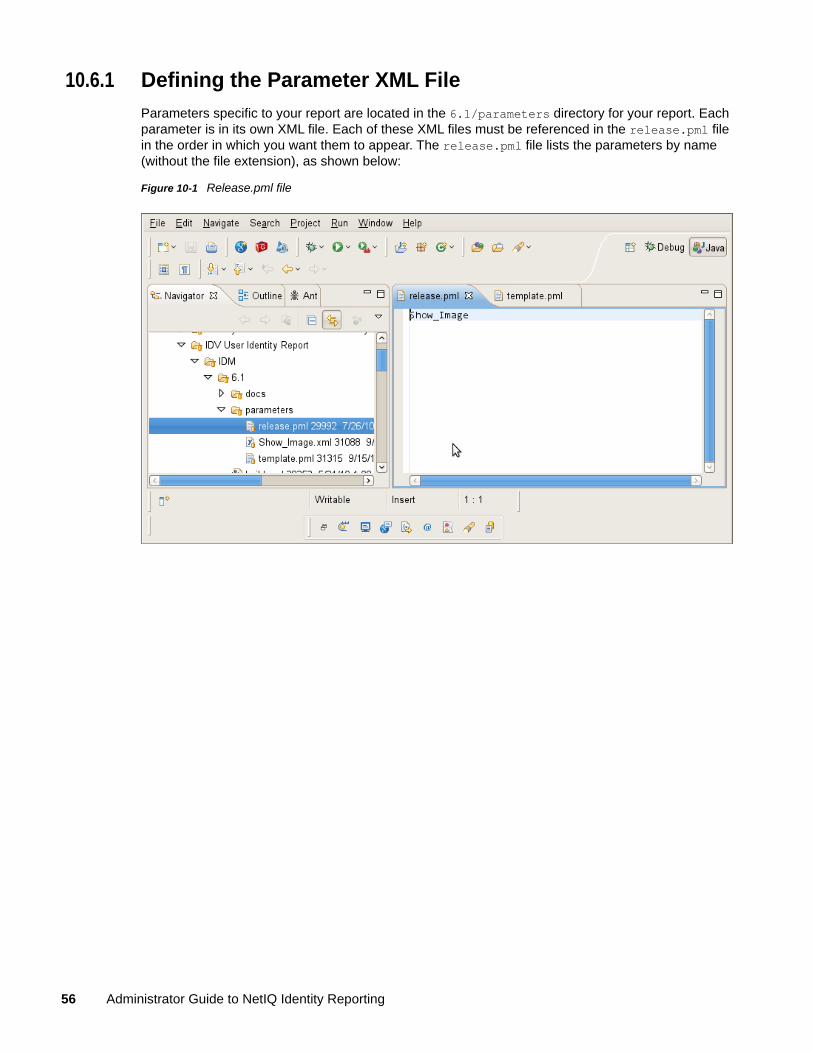
10.6.1 Defining the Parameter XML File
Parameters specific to your report are located in the 6.1/parameters directory for your report. Each parameter is in its own XML file. Each of these XML files must be referenced in the release.pml file in the order in which you want them to appear. The release.pml file lists the parameters by name (without the file extension), as shown below:
Figure 10-1 Release.pml file
56 Administrator Guide to NetIQ Identity Reporting
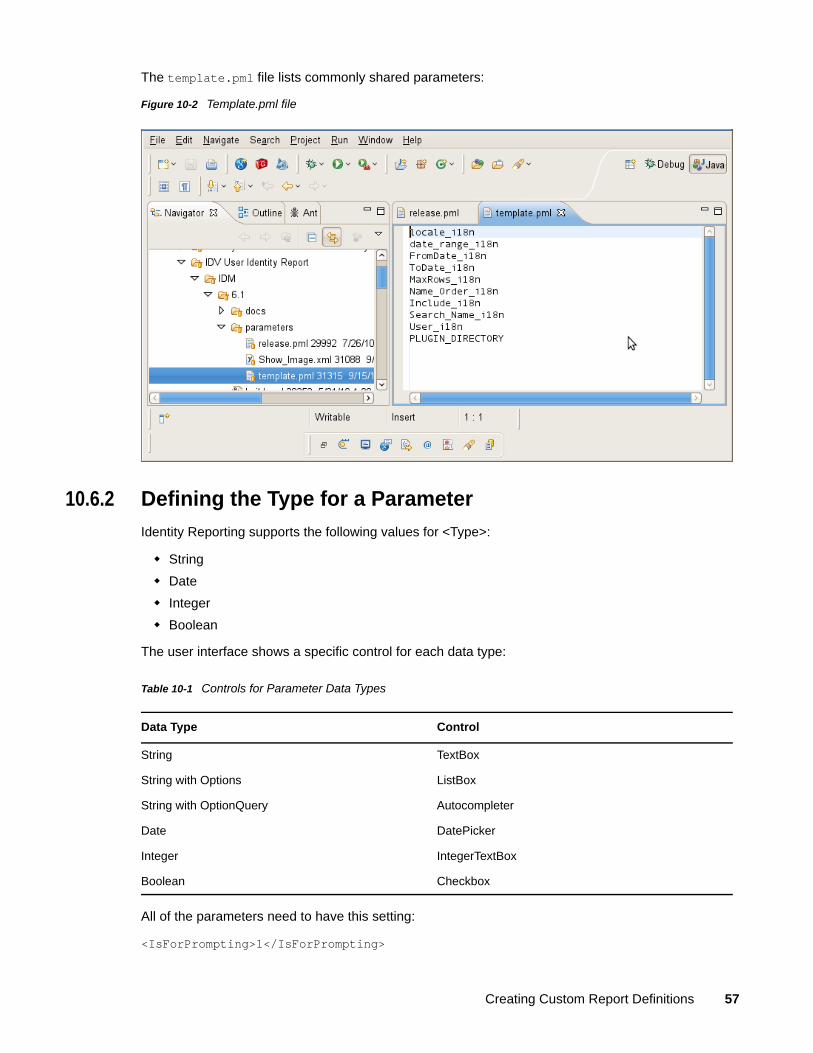
The template.pml file lists commonly shared parameters:
Figure 10-2 Template.pml file
10.6.2 Defining the Type for a Parameter
Identity Reporting supports the following values for <Type>:
String
Date
Integer
Boolean
The user interface shows a specific control for each data type:
Table 10-1 Controls for Parameter Data Types
All of the parameters need to have this setting:
<IsForPrompting>1</IsForPrompting>
Data Type Control
String TextBox
String with Options ListBox
String with OptionQuery Autocompleter
Date DatePicker
Integer IntegerTextBox
Boolean Checkbox
Creating Custom Report Definitions 57
If you know that your report cannot run without a particular value specified, you can mark a parameter as required with the following setting:
<Required>1</Required>
To make an Options parameter or OptionQuery parameter allow for multiple values, you should include these two settings:
<OptionMultivalue>1</OptionMultivalue><OptionMultivalueDelimiter>;</OptionMultivalueDelimiter>
10.6.3 Defining an OptionQuery Parameter
Suppose you want to generate a report that shows role information, and you want to allow the role as a parameter, so that the definition can be scoped at runtime. In this case, you can use an OptionQuery so that Identity Reporting shows you a list and allows for typeahead automatic completion, based on the roles that are stored in the database on which to report. To provide support for this capability, you need to follow a specific syntax that uses cascaded parameters. The syntax ##parameter_name## within the OptionQuery references another parameter definition. NetIQ provides shared common parameters that serve this purpose already, Role_i18n.xml and Search_Role_i18n.xml. They can be reused by specifying them in the template.pml or copied into your local parameters folder and modified to suit your needs.
The User_i18n.xml and Search_Name_i18n.xml are the respective parameters for allowing Identity Vault user to be a parameter. The User_i18n.xml parameter also demonstrates the ability to include a special cascaded parameter, ##NAME_ORDER##. This allows you to localize the Name Order of a name (Given-name Surname vs. Surname Given-name), or allow for a Middle Initial in the name. If you would like your OptionQuery to make use of this feature, follow the name order example shown below.
58 Administrator Guide to NetIQ Identity Reporting
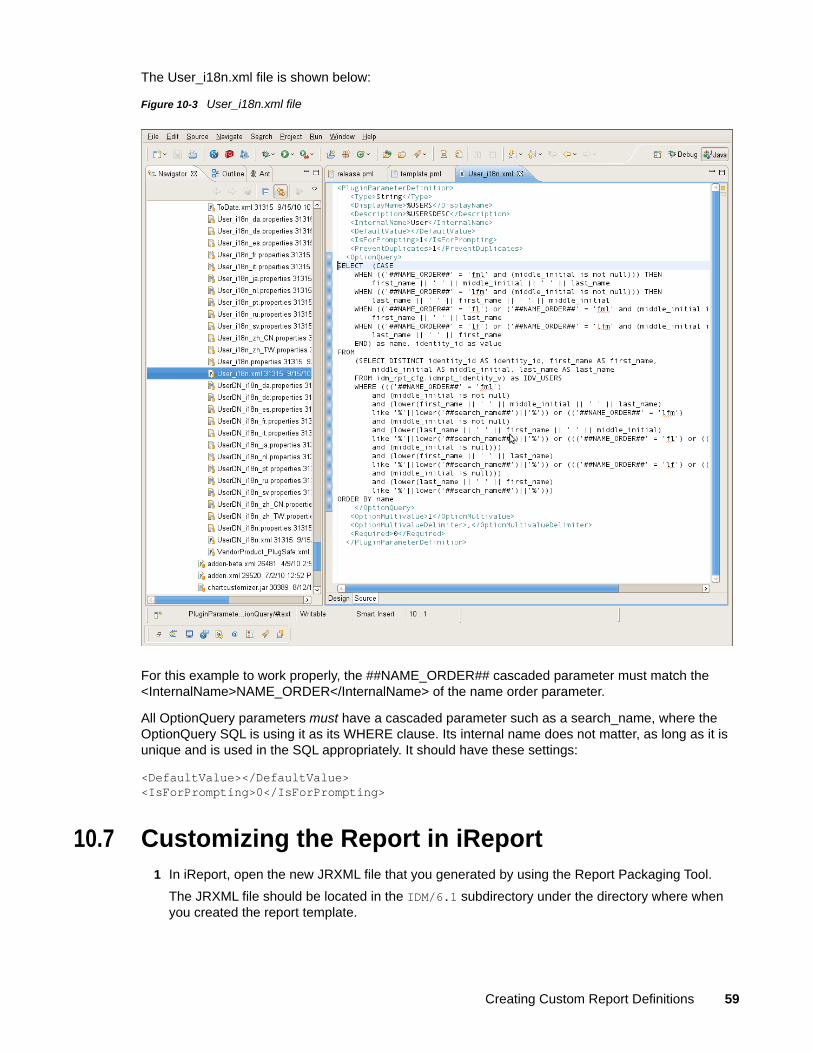
The User_i18n.xml file is shown below:
Figure 10-3 User_i18n.xml file
For this example to work properly, the ##NAME_ORDER## cascaded parameter must match the <InternalName>NAME_ORDER</InternalName> of the name order parameter.
All OptionQuery parameters must have a cascaded parameter such as a search_name, where the OptionQuery SQL is using it as its WHERE clause. Its internal name does not matter, as long as it is unique and is used in the SQL appropriately. It should have these settings:
<DefaultValue></DefaultValue><IsForPrompting>0</IsForPrompting>
10.7 Customizing the Report in iReport1 In iReport, open the new JRXML file that you generated by using the Report Packaging Tool.
The JRXML file should be located in the IDM/6.1 subdirectory under the directory where when you created the report template.
Creating Custom Report Definitions 59
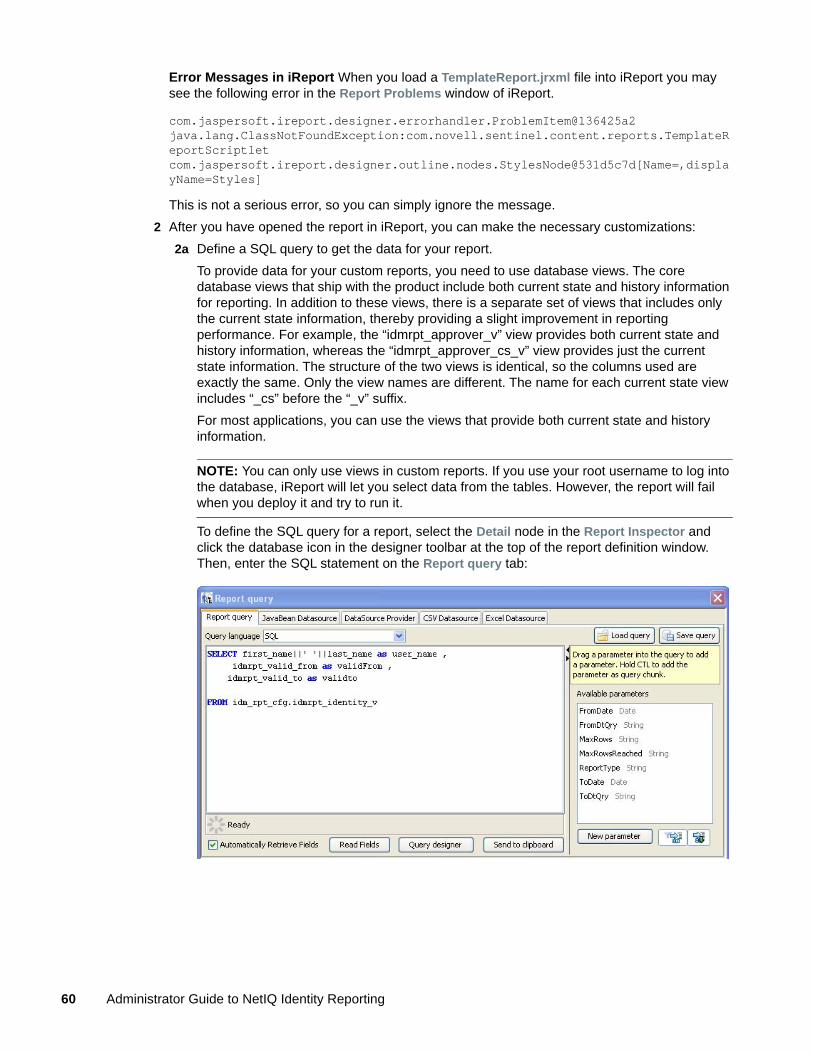
Error Messages in iReport When you load a TemplateReport.jrxml file into iReport you may see the following error in the Report Problems window of iReport.
com.jaspersoft.ireport.designer.errorhandler.ProblemItem@136425a2 java.lang.ClassNotFoundException:com.novell.sentinel.content.reports.TemplateReportScriptlet com.jaspersoft.ireport.designer.outline.nodes.StylesNode@531d5c7d[Name=,displayName=Styles]
This is not a serious error, so you can simply ignore the message.
2 After you have opened the report in iReport, you can make the necessary customizations:
2a Define a SQL query to get the data for your report.
To provide data for your custom reports, you need to use database views. The core database views that ship with the product include both current state and history information for reporting. In addition to these views, there is a separate set of views that includes only the current state information, thereby providing a slight improvement in reporting performance. For example, the “idmrpt_approver_v” view provides both current state and history information, whereas the “idmrpt_approver_cs_v” view provides just the current state information. The structure of the two views is identical, so the columns used are exactly the same. Only the view names are different. The name for each current state view includes “_cs” before the “_v” suffix.
For most applications, you can use the views that provide both current state and history information.
NOTE: You can only use views in custom reports. If you use your root username to log into the database, iReport will let you select data from the tables. However, the report will fail when you deploy it and try to run it.
To define the SQL query for a report, select the Detail node in the Report Inspector and click the database icon in the designer toolbar at the top of the report definition window. Then, enter the SQL statement on the Report query tab:
60 Administrator Guide to NetIQ Identity Reporting
2b Define the report layout.
To define the report layout, you need to add elements to the report definition. iReport supports many different types of report elements. You can choose the elements you need from the Report Elements section of the Palette.
For example, to add a column header, drag the Text Field icon from the Palette onto the header band of the report layout canvas.
To add a data field, drag the field name from the Fields node in the Report Inspector onto the detail band of the report layout canvas.
When you drag a field onto a report, iReport creates an expression to bind the display element to the appropriate database value.
Once you’ve added the fields you need, you can format the fields to suit your requirements by stretching them or moving them on the report canvas.
3 Save your report.
After saving your report, you need to package the report before you can import or deploy it. For details on packaging the report, see Section 10.9, “Building Your Report,” on page 63.
Creating Custom Report Definitions 61
10.8 Displaying Parameters and Selected Criteria in the ReportYou can display parameters and selected criteria in a report. To do this, you need to make some changes in the JRXML file.
First, locate the textField-2 of the TemplateReport.jrxml file, which has “$P{REPORT_SCRIPTLET}.DatePrepare...” showing. This text field is where the selected values of report parameters are displayed. The generated TemplateReport.jrxml file automatically displays the Date/Time Range of the report and the MaxRows parameter and selected value.
$P{REPORT_SCRIPTLET}.DatePrepare($P{ReportType},"F",((new SimpleDateFormat("dd/MM/yyyy HH:mm:ss")).format($P{FromDate})),"D") + " " + $R{HEADER6} + " " + $P{REPORT_SCRIPTLET}.DatePrepare($P{ReportType},"T",((new SimpleDateFormat("dd/MM/yyyy HH:mm:ss")).format($P{ToDate})),"D") + "\n" +java.text.MessageFormat.format($R{MAXROWS_COLON}, newObject[]{$P{MaxRows}.equals("ALL") ? $R{ALL} :$P{MaxRows}})
To add more parameters, simply append to this text field by right-clicking the field and selecting Edit Expression. Add a + “\n” + parameter's label and value for each parameter. To add a label, add the localized label to the properties file as a parameterized string, such as USERS_COLON=Users: {0}. Then, use java.text.MessageFormat to fill in the value.
When the parameter is an OptionQuery, you must also pass the cascaded search name parameter to the JRXML. Then, you can use that value to display on the report for readability instead of showing the IDs. For example, this is the value of textField-2 in the Role Assignments by Member report:
$P{REPORT_SCRIPTLET}.DatePrepare($P{ReportType},"F",((new SimpleDateFormat("dd/MM/yyyy HH:mm:ss")).format($P{FromDate})),"D") + " " + $R{HEADER6} + " " + $P{REPORT_SCRIPTLET}.DatePrepare($P{ReportType},"T",((new SimpleDateFormat("dd/MM/yyyy HH:mm:ss")).format($P{ToDate})),"D") + "\n" +java.text.MessageFormat.format($R{MAXROWS_COLON}, newObject[]{$P{MaxRows}.equals("ALL") ? $R{ALL} :$P{MaxRows}}) + "\n" +java.text.MessageFormat.format($R{NAME_ORDER_COLON}, newObject[]{$P{NAME_ORDER}.equals("lfm") ? $R{NAME_ORDER_LFM} :$P{NAME_ORDER}.equals("fl") ? $R{NAME_ORDER_FL} :$P{NAME_ORDER}.equals("lf") ? $R{NAME_ORDER_LF} : $R{NAME_ORDER_FML}}) + "\n" +java.text.MessageFormat.format($R{USERS_COLON}, new Object[]{(($P{User} != null && $P{User}.size() > 0) ? $P{search_name} : $R{ALL})}) +"" + ($P{Only_Show_SOD}.booleanValue() ? "\n" + $R{SHOW_SOD} : "")
The Role Assignments by Member parameters displayed are:
Data Range
Max Rows
Name Order
Users
Separation of Duties information only
62 Administrator Guide to NetIQ Identity Reporting
10.9 Building Your ReportBefore you deploy your report, you need to build it. The source of the report is a set of properties, images, and the JRXML file. You must bundle these files into a report archive before you can deploy the report template.
The process of building the report archive creates an RPZ file. This is a report definition archive containing your report and the report metadata. There might also be additional files such as images or properties that your report depends on.
1 Select Build in the left-navigation menu in the Report Packaging Tool.
2 On the Build Report screen, specify the report definition.
This is the JRXML file generated when you created your report.
3 Specify the location of your report archive.
4 Select the type of report.
5 Select the template to use for the report header and footer.
6 (Optional) Select to build the report using data source constraints, and then click Next.
Data source constraints declare the tables, views, and databases that the report requires to run successfully and allow Identity Reporting to inform the user that a target data source does not have the required schema to run the report successfully. Data source constraints are not required.
You can also specify SQL test constraints that test whether a report and data source are compatible beyond simply checking for the required views and tables. For example, you can check that a required function or columns in a table exist.
7 (Conditional) Select the type of constraint to add, then specify the constraint name and schema name, if required.
The schema name is optional for tables and views, and required for databases.
For example, if a report requires the idmrpt_role_v view in the idm_rpt_cfg schema, select the View type, enter idmrpt_role_v for the name, and enter idm_rpt_cfg for the schema.
8 (Optional) Add SQL test constraints.
Provide a syntactically correct SQL statement and, optionally, the expected result. For example, to verify that the identity_cleanup function exists, enter the following SQL statement:
SELECT routine_name FROM Information_schema.Routines WHERE
Specific_schema = 'public'
AND routine_name = 'identity_cleanup'
AND Routine_type = 'FUNCTION'
9 Click the Build button to build the RPZ file for your report definition.
After you have built your report, you must import the report in order to use the report. For more information, see Chapter 6, “Using the Import Tool,” on page 35.
Creating Custom Report Definitions 63

64 Administrator Guide to NetIQ Identity Reporting
11 11REST Services for Reporting
Identity Reporting incorporates several REST APIs that enable different features within the reporting functionality. Identity Reporting provides support for the following REST APIs:
Non-Managed Application REST API
Managed Application REST API
Authentication REST API
Reporting REST API
The REST APIs for reporting use the OAuth2 protocol for authentication.
The installation program deploys a special API WAR file, rptdoc.war, which contains the documentation of REST services needed for reporting. The rptdoc.war is automatically deployed when Identity Reporting is installed on Tomcat application server.
To access the REST API documentation on the server where Identity Reporting is installed, specify the path of /rptdoc in the address bar of your browser. For example, if you installed Identity Reporting on a host called servername on port 8180, you can access the REST API documentation at http://servername:8180/rptdoc. If you installed Identity Reporting using https, substitute https for http.
Be aware that while working in a staging or production environment, you must manually delete the rptdoc.war files and folders from your environment on Tomcat.
REST Services for Reporting 65

66 Administrator Guide to NetIQ Identity Reporting
12 12Troubleshooting the Drivers
This section describes many of the most common issues that arise in driver configuration and provides tips for resolving these issues.
Section 12.1, “Issue: No Identity Vaults Presented on the Identity Vaults Screen,” on page 67
Section 12.2, “Issue: Reports Are Missing Identity Vault Data,” on page 68
Section 12.3, “Issue: Object Already Exists Error,” on page 69
Section 12.4, “Issue: MSGW Driver is Missing from Identity Vaults Screen,” on page 70
Section 12.5, “Issue: Managed System Data is Missing from Reports,” on page 70
Section 12.6, “Issue: Status of Data Collection is Suspended,” on page 72
Section 12.7, “Issue: Status 400 Returned for Status Query,” on page 73
Section 12.8, “Issue: Driver Errors Occur in Multi-Driver Set Environment,” on page 73
Section 12.9, “REST Endpoint Troubleshooting,” on page 73
Section 12.10, “Troubleshooting Reporting Database,” on page 74
12.1 Issue: No Identity Vaults Presented on the Identity Vaults ScreenIf you look at the Identity Vaults screen in Identity Reporting, you may notice that no Identity Vaults are listed. You will also see an error message at the top of the screen.
Here are some of the possible causes for this problem:
The Data Collection Service driver is not configured or started.
The Data Collection Service driver is configured incorrectly. Here are some things that may be not be properly defined:
You have specified an invalid user account, account password, or the account does not have sufficient privileges (is not assigned as Report Administrator).
The reporting connection configuration is wrong.
Here are some troubleshooting tips:
Verify that the Data Collection Service driver is configured and running. To do this:
Check in iManager that the driver is present and that the driver state is Running. If it is not running, start the driver.
Check in Designer that the driver configuration points to the reporting services and has a valid account and password configured. If you need to modify the configuration settings, make your changes in Designer. Stop the driver before you redeploy, and start the driver after a successful deployment. NetIQ recommends that you synchronize the driver prior to modifying and redeploying it.
Troubleshooting the Drivers 67
Verify that the identity applications are installed and the Report Administrator role assignment has been processed and assigned to the user account configured in the reporting connection parameters for the Data Collection Service driver.
To verify the role assignment, log into the identity applications with the Role Administrator account. Then, go to the Work Dashboard and look at the list of assigned roles for accounts used by the Data Collection Service driver. If you don’t see the role assigned, verify that the Role and Resource driver has been started.
If the Data Collection Service configuration seems correct, enable DS Trace for the Data Collection Service driver at level 5, and verify that there are no communication or connection errors in the log.
Verify that the Data Collection Service driver is sending registration events to the REST services. The best way to do this is to add the following trace to the idmrptcore_logging.xml file and tail the console log (by using tail -f server.log). You should see trace messages with recognizable DNs, names, and so forth.
<logger name="com.novell.idm.rpt.core.server.events.rptdriver" level="TRACE" additivity="true"/>
12.2 Issue: Reports Are Missing Identity Vault DataIf you notice that some of your reports are missing Identity Vault data, you should look at the following list of possible causes:
Report definition is out of date.
The Data Collection Service driver or Identity Reporting is not started.
The Data Collection Service driver was not migrated. If the driver has not been migrated, the objects are not synchronized into the Identity Information Warehouse.
The timeout setting on the Data Collection Service driver is set too high and the events are not immediately propagated into the database. This could appear to be a problem if you don’t wait until the event is sent and processed.
The Data Collection Service driver is not configured correctly. Here are some things to look at:
Objects are missing from the Filter Policy.
Objects are not under the Data Collection Service scope.
Here are troubleshooting tips:
Verify that the data missing from the reports is present in the idm_rpt_data schema tables:
If the data is present in the database, verify that you have the latest report definitions installed. On the detail page of each report is a field showing the data it was built or customized. You need to compare the date on the detail for that report with the data on the download page http://cdn.novell.com/cached/designer/idmrpt/.
If the data is missing from the database, verify that the Data Collection Service driver is sending events to the REST services and that they are being processed correctly:
1. Make sure there are no errors in event processing. View the JBoss console log (server.log) and look for errors (for example, grep -i "error" server.log)
2. If there are no errors, make sure that the events are being received from the Data Collection Service driver.
68 Administrator Guide to NetIQ Identity Reporting
Add the following trace to the idmrptcore_logging.xml file and tail the console log (by using tail -f server.log). You should see trace messages with recognizable DNs, names, and so forth.
<logger name="com.novell.idm.rpt.core.server.events.rptdriver" level="TRACE" additivity="true"/>
Verify that the Data Collection Service driver is configured and running:
Check in iManager to see that the driver was deployed and the driver state is Running.
Check the following settings for the Data Collection Service driver in iManager:
Reporting connection information
Reporting access account
Data Collection Service driver filter policy
Data Collection Service driver scope
Data Collection Service driver event processing settings
Look at the Time interval between submitting events and the Number of events to be sent in batch. Set these to lower values for more immediate results.
When you are confident that your configuration is correct, and you still don’t see the expected data populated, you need to check for Data Collection Service driver errors. Check the DS Trace from the driver to see if there are errors:
Check the DS Trace from the driver to see if there are any errors.
Enable the driver trace at level 5.
Delete the old trace file (if one exists) and restart the Data Collection Service driver. (The trace file can become very large.)
12.3 Issue: Object Already Exists ErrorIn your server log (server.log), you may see the following error:
Associated object already exists in database with GUID:...
Here are some common causes for this error:
The Data Collection Service driver was removed and re-added/ When you remove the Data Collection Service driver, you must also refresh the database. Otherwise, the new Data Collection Service driver will attempt to re-add the objects that already exist in the database.
There is an overlap in scope between two Data Collection Service drivers. They are both trying to synchronize objects in the database.
Troubleshooting the Drivers 69
12.4 Issue: MSGW Driver is Missing from Identity Vaults ScreenIf you see that the Managed System Gateway Driver is missing from the Identity Vaults screen in Identity Reporting, look at the following list of possible causes:
The Managed System Gateway driver has not been configured and deployed.
The Data Collection Service driver is not configured to register the Managed System Gateway driver.
The Data Collection Service driver is not running or cannot connect to Identity Reporting. The connection may fail if the account that the Data Collection Service driver is configured with does not have sufficient privileges, or if the reporting connection information is wrong in the Data Collection Service driver.
Here are some troubleshooting tips:
Verify in iManager that the Managed System Gateway driver is configured and deployed to the Identity Vault.
Verify that the Data Collection Service driver settings are correct:
In iManager or Designer, verify that the Data Collection Service state is Running.
In Designer, verify that the Managed System Gateway driver parameter section of the Data Collection Service driver is set to register the Managed System Gateway driver.
Verify that the reporting connection information is correct in the Data Collection Service driver configuration. Check the connection URL, account, and password.
12.5 Issue: Managed System Data is Missing from ReportsIf you notice that some of the managed system data is missing from the reports, look at the following list of possible causes:
Reports are not up-to-date.
Pulled data collection has not been activated for the Data Collection Service driver.
The next data collection time is in the future. Data has been changed in the managed system between data collections.
The Managed System Gateway driver is not running.
The Identity Manager driver for the managed system (Active Directory, SAP, and so forth) is not running.
The managed system can be reached by the Identity Manager driver.
The data collection process was suspended because of errors.
Here are some troubleshooting tips:
Check to see if data missing from the report is present in the Identity Information Warehouse.
The data collection services use the idm_rpt_data schema space. Tables starting with the idmrpt_ms_ prefix are used to store data retrieved from the Managed System Gateway driver.
If the data is present, verify that the report definitions are up-to-date. Down, import, and rerun the report that is missing data.
70 Administrator Guide to NetIQ Identity Reporting
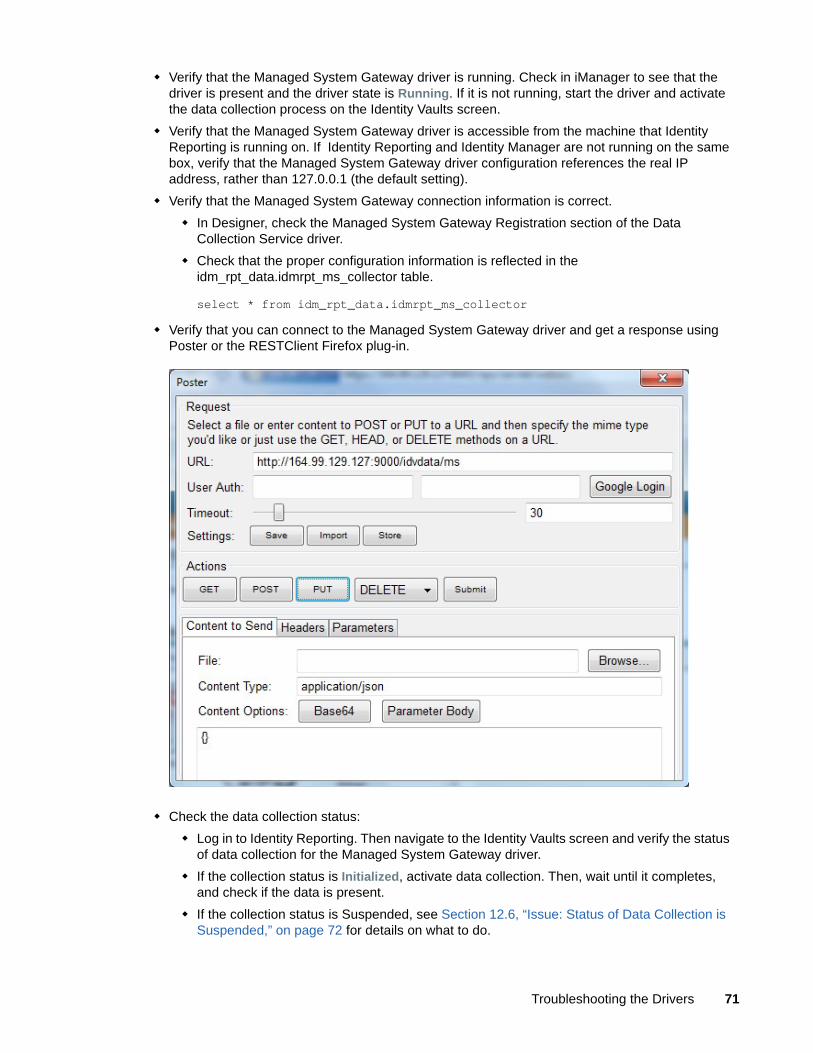
Verify that the Managed System Gateway driver is running. Check in iManager to see that the driver is present and the driver state is Running. If it is not running, start the driver and activate the data collection process on the Identity Vaults screen.
Verify that the Managed System Gateway driver is accessible from the machine that Identity Reporting is running on. If Identity Reporting and Identity Manager are not running on the same box, verify that the Managed System Gateway driver configuration references the real IP address, rather than 127.0.0.1 (the default setting).
Verify that the Managed System Gateway connection information is correct.
In Designer, check the Managed System Gateway Registration section of the Data Collection Service driver.
Check that the proper configuration information is reflected in the idm_rpt_data.idmrpt_ms_collector table.
select * from idm_rpt_data.idmrpt_ms_collector
Verify that you can connect to the Managed System Gateway driver and get a response using Poster or the RESTClient Firefox plug-in.
Check the data collection status:
Log in to Identity Reporting. Then navigate to the Identity Vaults screen and verify the status of data collection for the Managed System Gateway driver.
If the collection status is Initialized, activate data collection. Then, wait until it completes, and check if the data is present.
If the collection status is Suspended, see Section 12.6, “Issue: Status of Data Collection is Suspended,” on page 72 for details on what to do.
Troubleshooting the Drivers 71
Verify that the managed system can be reached:
Check if the Identity Manager driver for the managed system is running.
Check to see if there are any errors in the log for the Identity Manager driver for the managed system. If there are errors, enable driver trace and reactivate data collection.
12.6 Issue: Status of Data Collection is SuspendedYou may see that the data collection status is Suspended on the Identity Vaults screen.
In this case, you should look at the following list of possible causes:
The Managed System Gateway driver is not running.
The Managed System Gateway driver has incorrect connection information.
Errors have occurred in collection services for the Data Collection Service driver.
Here are some troubleshooting tips:
Look at the database to see if it provides any clues about what might be causing the suspension:
The data collection status and failure reasons are stored in the idm_rpt_data.idmrp_ms_collect_state table.
The Managed System Gateway driver registration is stored in the idm_rpt_data.idmrpt_ms_collector table.
The Data Collection Service driver registration is stored in the idm_rpt_data.idmrpt_rpt_driver table:
select ms_collect_id, ms_query_api, ms_collect_time, ms_collect_error from idm_rpt_data.idmrpt_ms_collect_state whereidm_rpt_data.idmrpt_ms_collect_state.ms_collect_state = FALSE;
If you see a failure to connect error:
Verify that the Managed System Gateway driver is running. In iManager, check that the driver is present and the current status is running. If not, start the driver and activate data collection on the Identity Vaults screen.
Verify that the Managed System Gateway driver is accessible from the machine that Identity Reporting is running on. If Identity Reporting and Identity Manager are not running on the same server, verify that the Managed System Gateway driver configuration references the real IP address, rather than 127.0.0.1 (the default setting).
Also, check the Managed System Gateway parameter section.
Check that the proper configuration information is reflected in the idm_rpt_data.idmrpt_ms_collector table.
select * from idm_rpt_data.idmrpt_ms_collector;
If you see an HTTP status other than 200, verify that you can execute a query from a different tool such as Poster or RESTClient.
If you see other kinds of errors, enable logging and reactive data collection.
Enable Managed System Gateway driver trace logging at level 5. Delete the old trace file (if one exists) and restart the Data Collection Service driver.
72 Administrator Guide to NetIQ Identity Reporting
Enabled pulled Data Collection Service driver trace logging.
Add the following trace to the idmrptcore_logging.xml file and tail the console log (by using tail -f server.log). You should see trace messages with recognizable DNs, names, and so forth.
<logger name="com.novell.idm.rpt.core.server.service.DataCollectMgrService" level="TRACE" dditivity="true"/><logger name="com.novell.idm.rpt.core.server.dc" level="TRACE" additivity="true"/>
12.7 Issue: Status 400 Returned for Status QueryYou may see a status 400 returned for a status query REST call (/idvdata/results/{requestId}/status Query). This error may occur when you execute a query with a large data set. With a large data set, a query may cause the Managed System Gateway driver to restart, which resets the session, and causes the data collection to fail.
To fix this problem, set the publisher heartbeat interval to zero.
12.8 Issue: Driver Errors Occur in Multi-Driver Set EnvironmentIf you see Data Collection Service errors occur in a multiple driver set environment, the cause may be that the driver scope is not correctly configured.
To correct this problem, verify the driver scope settings, and make changes as necessary.
12.9 REST Endpoint TroubleshootingTo troubleshoot problems with the REST endpoints, you can use any of the following tools:
Poster (Firefox plug-in)
To install this tool, click on Tools > Add Ons. Then search for Poster. Select this plug-in from the list and click Add to Firefox... button.
RESTClient (Firefox plug-in)
To install this tool, click on Tools > Add Ons. Then search for RESTClient. Select this plug-in from the list and click Add to Firefox... button.
Curl command line client
curl -XGET http://myserver:8180/IDMRPT/version
Troubleshooting the Drivers 73
12.10 Troubleshooting Reporting DatabaseTo troubleshoot the reporting database, you need to clear the reporting database on Role Based Provisioning Dashboard (RBPM). To clear the reporting database, perform the following steps:
1 Stop the DCS and the MSGW drivers. Perform the following steps to stop the drivers:
1a Login to the iManager.
1b Go to Identity Manager Administration > Identity Manager Overview.
1c Select root in the search field and click on the search button.
NOTE: If your tree contains a large number of objects, change the value of the container to where your driver set is located to avoid long search time.
1d On the Driver Sets tab, select the driver set where DCS and MSGW drivers are running.
1e Click on Overview tab on the Driver Set Overview page.
1e1 Right-click in the Green circle on the DCS driver and select Stop driver.
1e2 Right-click in the Green circle on the DCS driver and select Edit properties.
1e3 On the Identity Manager tab, select Driver Configuration.
1e4 Scroll down to the Startup Options section and select the radio button next to Disabled, and press OK.
1f Repeat Step 1e1 to Step 1e2 for the MSGW driver.
1g Logout of the iManager server and close the browser.
2 Suspend Data Collection in the reporting module. Perform the following steps to suspend data collection:
2a Open a new browser and login to the Reporting Module.
2b Select Identity Vaults from the left-hand navigation.
2c Under Data Collection Service Driver, uncheck Enable event collection.
2d Under the Managed System Gateway Driver, press the stop button in the Collection state area.
2e Press the Save button.
2f Select Applications from the left-hand navigation.
NOTE: Suspend any non-managed applications which is defined.
2f1 Press the stop button in the Application state section.
2g Press the Save button to save the configuration settings.
2h Logout of the Reporting Module and close the browser.
3 Issue the clean-up/purge request using REST. Perform the following steps to issue the clean-up/purge request
3a Get the Authorization Token from the OSP module. You can use any browser tool to get an authorization token, such as Poster (Firefox) or Advanced REST Client (Chrome). Perform the following steps to get an authorization token:
3a1 Enter the following parameters in the browser tool:
URL: http://myserver.novell.com:8180/osp/a/idm/auth/oauth2/grant
Method/Action: POST
74 Administrator Guide to NetIQ Identity Reporting
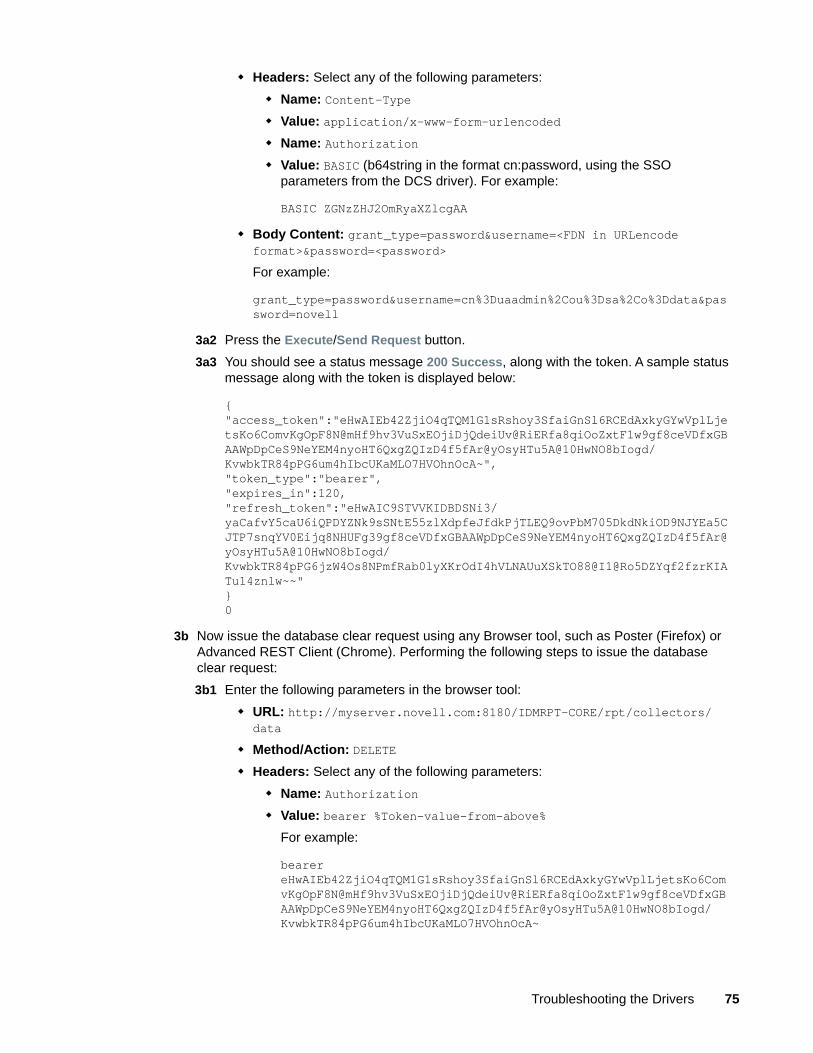
Headers: Select any of the following parameters:
Name: Content-Type
Value: application/x-www-form-urlencoded
Name: Authorization
Value: BASIC (b64string in the format cn:password, using the SSO parameters from the DCS driver). For example:
BASIC ZGNzZHJ2OmRyaXZlcgAA
Body Content: grant_type=password&username=<FDN in URLencode format>&password=<password>
For example:
grant_type=password&username=cn%3Duaadmin%2Cou%3Dsa%2Co%3Ddata&password=novell
3a2 Press the Execute/Send Request button.
3a3 You should see a status message 200 Success, along with the token. A sample status message along with the token is displayed below:
{"access_token":"eHwAIEb42ZjiO4qTQM1G1sRshoy3SfaiGnSl6RCEdAxkyGYwVplLjetsKo6ComvKgOpF8N@mHf9hv3VuSxEOjiDjQdeiUv@RiERfa8qiOoZxtF1w9gf8ceVDfxGBAAWpDpCeS9NeYEM4nyoHT6QxgZQIzD4f5fAr@yOsyHTu5A@10HwNO8bIogd/KvwbkTR84pPG6um4hIbcUKaMLO7HVOhnOcA~","token_type":"bearer","expires_in":120,"refresh_token":"eHwAIC9STVVKIDBDSNi3/yaCafvY5caU6iQPDYZNk9sSNtE55zlXdpfeJfdkPjTLEQ9ovPbM705DkdNkiOD9NJYEa5CJTP7snqYV0Eijq8NHUFg39gf8ceVDfxGBAAWpDpCeS9NeYEM4nyoHT6QxgZQIzD4f5fAr@yOsyHTu5A@10HwNO8bIogd/KvwbkTR84pPG6jzW4Os8NPmfRab0lyXKrOdI4hVLNAUuXSkTO88@I1@Ro5DZYqf2fzrKIATu14znlw~~"}0
3b Now issue the database clear request using any Browser tool, such as Poster (Firefox) or Advanced REST Client (Chrome). Performing the following steps to issue the database clear request:
3b1 Enter the following parameters in the browser tool:
URL: http://myserver.novell.com:8180/IDMRPT-CORE/rpt/collectors/data
Method/Action: DELETE
Headers: Select any of the following parameters:
Name: Authorization
Value: bearer %Token-value-from-above%
For example:
bearer eHwAIEb42ZjiO4qTQM1G1sRshoy3SfaiGnSl6RCEdAxkyGYwVplLjetsKo6ComvKgOpF8N@mHf9hv3VuSxEOjiDjQdeiUv@RiERfa8qiOoZxtF1w9gf8ceVDfxGBAAWpDpCeS9NeYEM4nyoHT6QxgZQIzD4f5fAr@yOsyHTu5A@10HwNO8bIogd/KvwbkTR84pPG6um4hIbcUKaMLO7HVOhnOcA~
Troubleshooting the Drivers 75
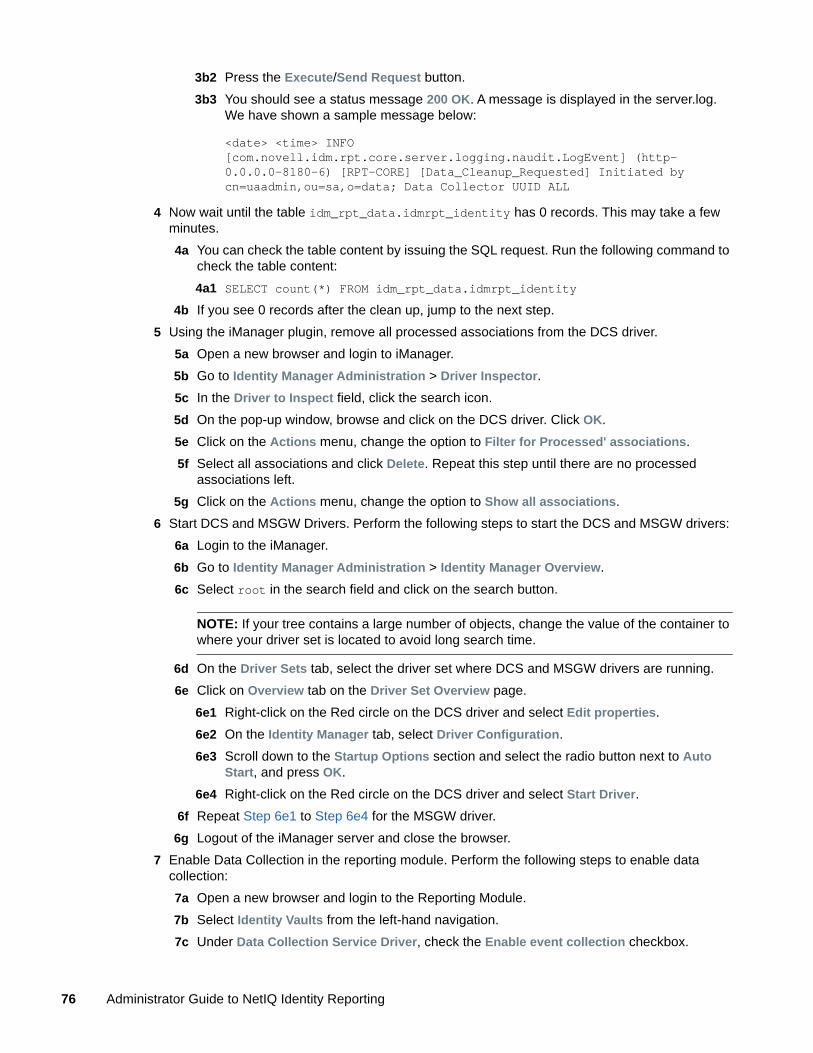
3b2 Press the Execute/Send Request button.
3b3 You should see a status message 200 OK. A message is displayed in the server.log. We have shown a sample message below:
<date> <time> INFO [com.novell.idm.rpt.core.server.logging.naudit.LogEvent] (http-0.0.0.0-8180-6) [RPT-CORE] [Data_Cleanup_Requested] Initiated by cn=uaadmin,ou=sa,o=data; Data Collector UUID ALL
4 Now wait until the table idm_rpt_data.idmrpt_identity has 0 records. This may take a few minutes.
4a You can check the table content by issuing the SQL request. Run the following command to check the table content:
4a1 SELECT count(*) FROM idm_rpt_data.idmrpt_identity
4b If you see 0 records after the clean up, jump to the next step.
5 Using the iManager plugin, remove all processed associations from the DCS driver.
5a Open a new browser and login to iManager.
5b Go to Identity Manager Administration > Driver Inspector.
5c In the Driver to Inspect field, click the search icon.
5d On the pop-up window, browse and click on the DCS driver. Click OK.
5e Click on the Actions menu, change the option to Filter for Processed' associations.
5f Select all associations and click Delete. Repeat this step until there are no processed associations left.
5g Click on the Actions menu, change the option to Show all associations.
6 Start DCS and MSGW Drivers. Perform the following steps to start the DCS and MSGW drivers:
6a Login to the iManager.
6b Go to Identity Manager Administration > Identity Manager Overview.
6c Select root in the search field and click on the search button.
NOTE: If your tree contains a large number of objects, change the value of the container to where your driver set is located to avoid long search time.
6d On the Driver Sets tab, select the driver set where DCS and MSGW drivers are running.
6e Click on Overview tab on the Driver Set Overview page.
6e1 Right-click on the Red circle on the DCS driver and select Edit properties.
6e2 On the Identity Manager tab, select Driver Configuration.
6e3 Scroll down to the Startup Options section and select the radio button next to Auto Start, and press OK.
6e4 Right-click on the Red circle on the DCS driver and select Start Driver.
6f Repeat Step 6e1 to Step 6e4 for the MSGW driver.
6g Logout of the iManager server and close the browser.
7 Enable Data Collection in the reporting module. Perform the following steps to enable data collection:
7a Open a new browser and login to the Reporting Module.
7b Select Identity Vaults from the left-hand navigation.
7c Under Data Collection Service Driver, check the Enable event collection checkbox.
76 Administrator Guide to NetIQ Identity Reporting
7d Under the Managed System Gateway Driver, press the start button in the Collection state area.
7e Press the Save button.
7f Select Applications from the left-hand navigation.
NOTE: Enable any non-managed applications which is defined.
7f1 Press the start button in the Application state section.
7g Press the Save button to save the configuration settings.
7h Logout of the Reporting Module and close the browser.
8 Perform Migrate from the Identity Vault in the DCS Driver.
9 Perform Data Collection.
Troubleshooting the Drivers 77

78 Administrator Guide to NetIQ Identity Reporting
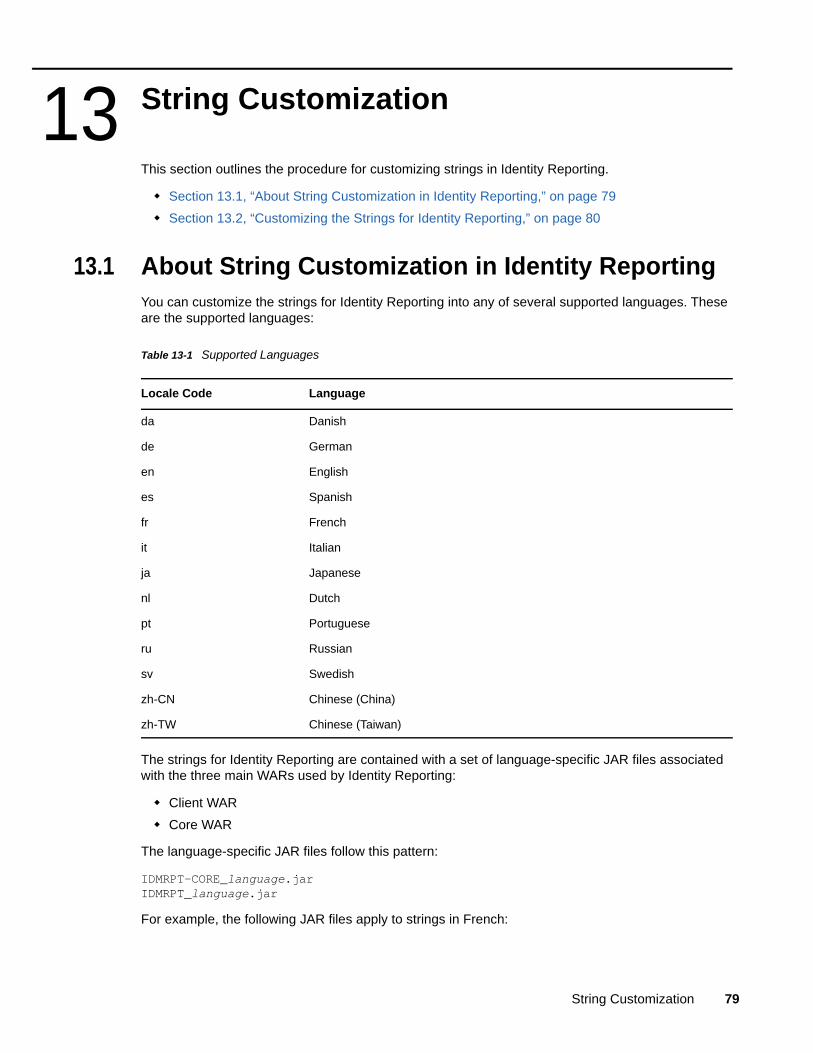
13 13String Customization
This section outlines the procedure for customizing strings in Identity Reporting.
Section 13.1, “About String Customization in Identity Reporting,” on page 79
Section 13.2, “Customizing the Strings for Identity Reporting,” on page 80
13.1 About String Customization in Identity Reporting You can customize the strings for Identity Reporting into any of several supported languages. These are the supported languages:
Table 13-1 Supported Languages
The strings for Identity Reporting are contained with a set of language-specific JAR files associated with the three main WARs used by Identity Reporting:
Client WAR
Core WAR
The language-specific JAR files follow this pattern:
IDMRPT-CORE_language.jarIDMRPT_language.jar
For example, the following JAR files apply to strings in French:
Locale Code Language
da Danish
de German
en English
es Spanish
fr French
it Italian
ja Japanese
nl Dutch
pt Portuguese
ru Russian
sv Swedish
zh-CN Chinese (China)
zh-TW Chinese (Taiwan)
String Customization 79
IDMRPT-CORE_fr.jarIDMRPT_fr.jar
13.2 Customizing the Strings for Identity ReportingTo customize the strings for one of the supported languages:
1 Customize the appropriate language-specific properties JAR file.
2 Add the new JAR file to the appropriate WAR's WEB-INF/lib directory using the jar command.
80 Administrator Guide to NetIQ Identity Reporting
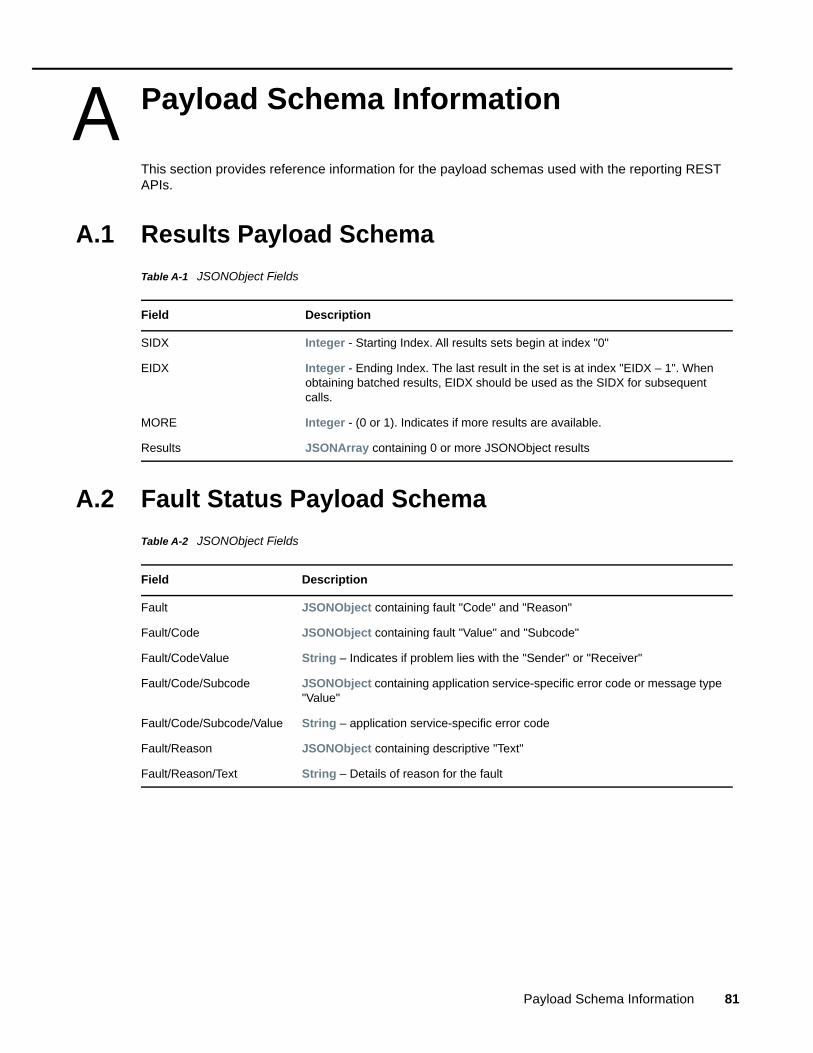
A APayload Schema Information
This section provides reference information for the payload schemas used with the reporting REST APIs.
A.1 Results Payload Schema
Table A-1 JSONObject Fields
A.2 Fault Status Payload Schema
Table A-2 JSONObject Fields
Field Description
SIDX Integer - Starting Index. All results sets begin at index "0"
EIDX Integer - Ending Index. The last result in the set is at index "EIDX – 1". When obtaining batched results, EIDX should be used as the SIDX for subsequent calls.
MORE Integer - (0 or 1). Indicates if more results are available.
Results JSONArray containing 0 or more JSONObject results
Field Description
Fault JSONObject containing fault "Code" and "Reason"
Fault/Code JSONObject containing fault "Value" and "Subcode"
Fault/CodeValue String – Indicates if problem lies with the "Sender" or "Receiver"
Fault/Code/Subcode JSONObject containing application service-specific error code or message type "Value"
Fault/Code/Subcode/Value String – application service-specific error code
Fault/Reason JSONObject containing descriptive "Text"
Fault/Reason/Text String – Details of reason for the fault
Payload Schema Information 81
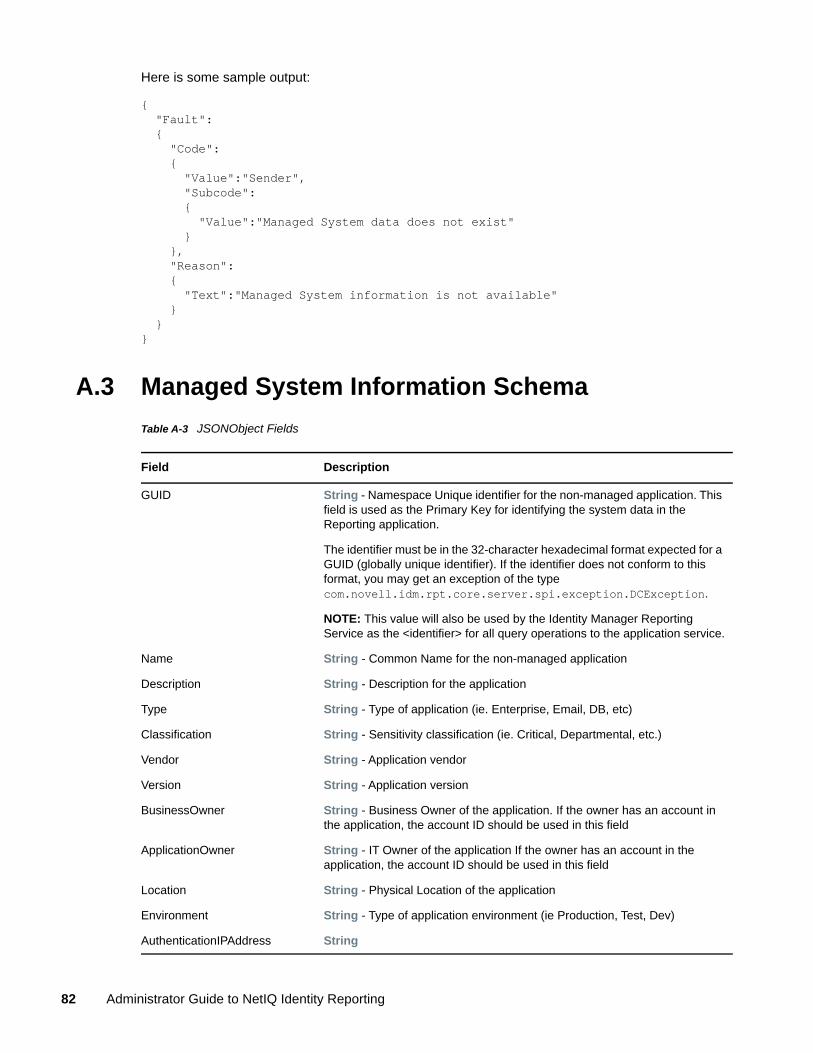
Here is some sample output:
{ "Fault": { "Code": { "Value":"Sender", "Subcode": { "Value":"Managed System data does not exist" } }, "Reason": { "Text":"Managed System information is not available" } }}
A.3 Managed System Information Schema
Table A-3 JSONObject Fields
Field Description
GUID String - Namespace Unique identifier for the non-managed application. This field is used as the Primary Key for identifying the system data in the Reporting application.
The identifier must be in the 32-character hexadecimal format expected for a GUID (globally unique identifier). If the identifier does not conform to this format, you may get an exception of the type com.novell.idm.rpt.core.server.spi.exception.DCException.
NOTE: This value will also be used by the Identity Manager Reporting Service as the <identifier> for all query operations to the application service.
Name String - Common Name for the non-managed application
Description String - Description for the application
Type String - Type of application (ie. Enterprise, Email, DB, etc)
Classification String - Sensitivity classification (ie. Critical, Departmental, etc.)
Vendor String - Application vendor
Version String - Application version
BusinessOwner String - Business Owner of the application. If the owner has an account in the application, the account ID should be used in this field
ApplicationOwner String - IT Owner of the application If the owner has an account in the application, the account ID should be used in this field
Location String - Physical Location of the application
Environment String - Type of application environment (ie Production, Test, Dev)
AuthenticationIPAddress String
82 Administrator Guide to NetIQ Identity Reporting
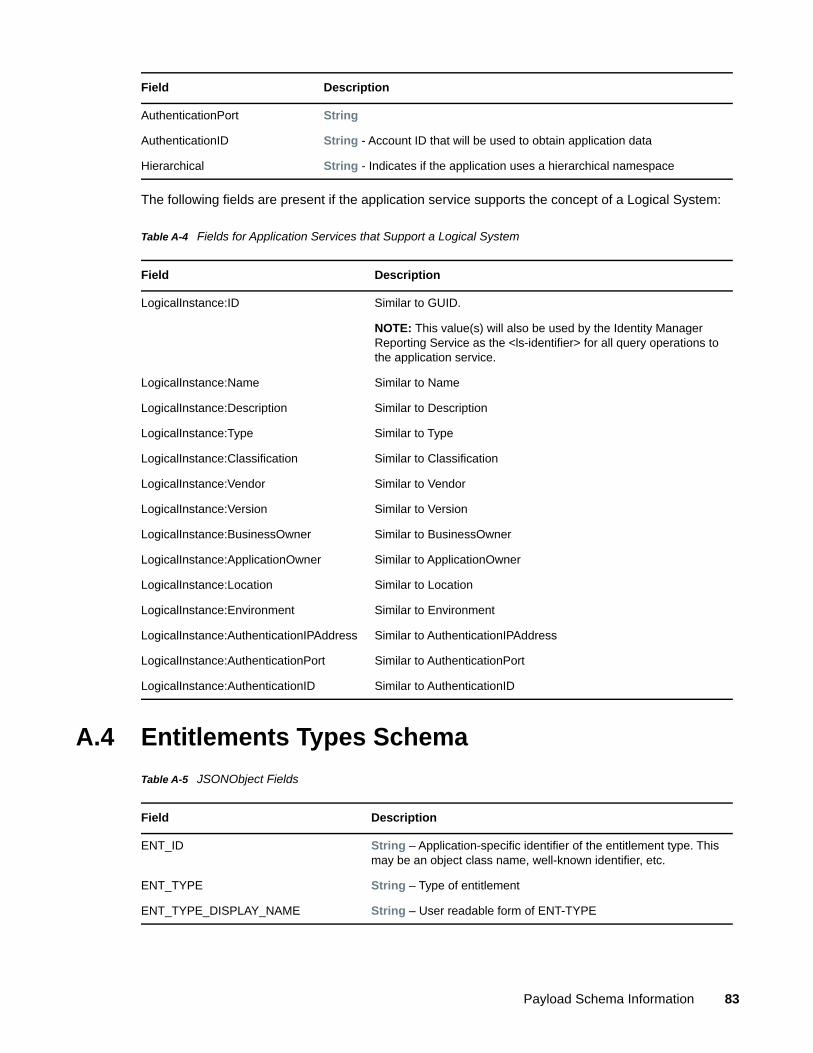
The following fields are present if the application service supports the concept of a Logical System:
Table A-4 Fields for Application Services that Support a Logical System
A.4 Entitlements Types Schema
Table A-5 JSONObject Fields
AuthenticationPort String
AuthenticationID String - Account ID that will be used to obtain application data
Hierarchical String - Indicates if the application uses a hierarchical namespace
Field Description
LogicalInstance:ID Similar to GUID.
NOTE: This value(s) will also be used by the Identity Manager Reporting Service as the <ls-identifier> for all query operations to the application service.
LogicalInstance:Name Similar to Name
LogicalInstance:Description Similar to Description
LogicalInstance:Type Similar to Type
LogicalInstance:Classification Similar to Classification
LogicalInstance:Vendor Similar to Vendor
LogicalInstance:Version Similar to Version
LogicalInstance:BusinessOwner Similar to BusinessOwner
LogicalInstance:ApplicationOwner Similar to ApplicationOwner
LogicalInstance:Location Similar to Location
LogicalInstance:Environment Similar to Environment
LogicalInstance:AuthenticationIPAddress Similar to AuthenticationIPAddress
LogicalInstance:AuthenticationPort Similar to AuthenticationPort
LogicalInstance:AuthenticationID Similar to AuthenticationID
Field Description
Field Description
ENT_ID String – Application-specific identifier of the entitlement type. This may be an object class name, well-known identifier, etc.
ENT_TYPE String – Type of entitlement
ENT_TYPE_DISPLAY_NAME String – User readable form of ENT-TYPE
Payload Schema Information 83
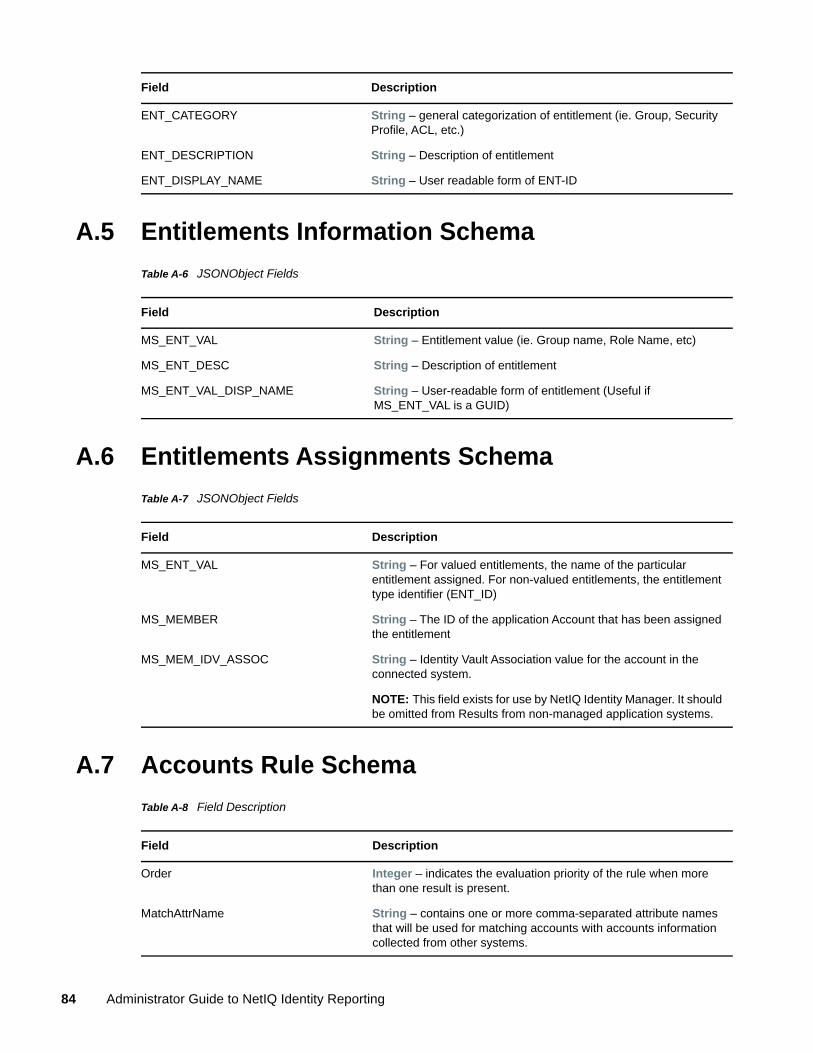
A.5 Entitlements Information Schema
Table A-6 JSONObject Fields
A.6 Entitlements Assignments Schema
Table A-7 JSONObject Fields
A.7 Accounts Rule Schema
Table A-8 Field Description
ENT_CATEGORY String – general categorization of entitlement (ie. Group, Security Profile, ACL, etc.)
ENT_DESCRIPTION String – Description of entitlement
ENT_DISPLAY_NAME String – User readable form of ENT-ID
Field Description
Field Description
MS_ENT_VAL String – Entitlement value (ie. Group name, Role Name, etc)
MS_ENT_DESC String – Description of entitlement
MS_ENT_VAL_DISP_NAME String – User-readable form of entitlement (Useful if MS_ENT_VAL is a GUID)
Field Description
MS_ENT_VAL String – For valued entitlements, the name of the particular entitlement assigned. For non-valued entitlements, the entitlement type identifier (ENT_ID)
MS_MEMBER String – The ID of the application Account that has been assigned the entitlement
MS_MEM_IDV_ASSOC String – Identity Vault Association value for the account in the connected system.
NOTE: This field exists for use by NetIQ Identity Manager. It should be omitted from Results from non-managed application systems.
Field Description
Order Integer – indicates the evaluation priority of the rule when more than one result is present.
MatchAttrName String – contains one or more comma-separated attribute names that will be used for matching accounts with accounts information collected from other systems.
84 Administrator Guide to NetIQ Identity Reporting
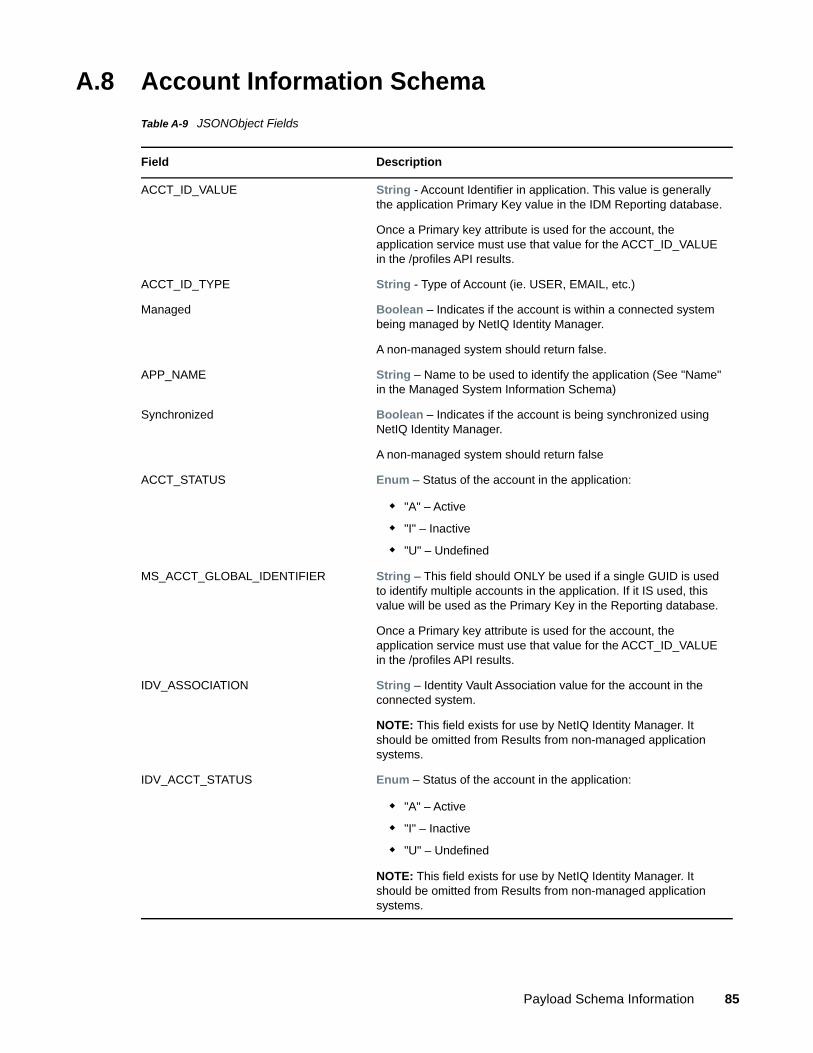
A.8 Account Information Schema
Table A-9 JSONObject Fields
Field Description
ACCT_ID_VALUE String - Account Identifier in application. This value is generally the application Primary Key value in the IDM Reporting database.
Once a Primary key attribute is used for the account, the application service must use that value for the ACCT_ID_VALUE in the /profiles API results.
ACCT_ID_TYPE String - Type of Account (ie. USER, EMAIL, etc.)
Managed Boolean – Indicates if the account is within a connected system being managed by NetIQ Identity Manager.
A non-managed system should return false.
APP_NAME String – Name to be used to identify the application (See "Name" in the Managed System Information Schema)
Synchronized Boolean – Indicates if the account is being synchronized using NetIQ Identity Manager.
A non-managed system should return false
ACCT_STATUS Enum – Status of the account in the application:
"A" – Active
"I" – Inactive
"U" – Undefined
MS_ACCT_GLOBAL_IDENTIFIER String – This field should ONLY be used if a single GUID is used to identify multiple accounts in the application. If it IS used, this value will be used as the Primary Key in the Reporting database.
Once a Primary key attribute is used for the account, the application service must use that value for the ACCT_ID_VALUE in the /profiles API results.
IDV_ASSOCIATION String – Identity Vault Association value for the account in the connected system.
NOTE: This field exists for use by NetIQ Identity Manager. It should be omitted from Results from non-managed application systems.
IDV_ACCT_STATUS Enum – Status of the account in the application:
"A" – Active
"I" – Inactive
"U" – Undefined
NOTE: This field exists for use by NetIQ Identity Manager. It should be omitted from Results from non-managed application systems.
Payload Schema Information 85
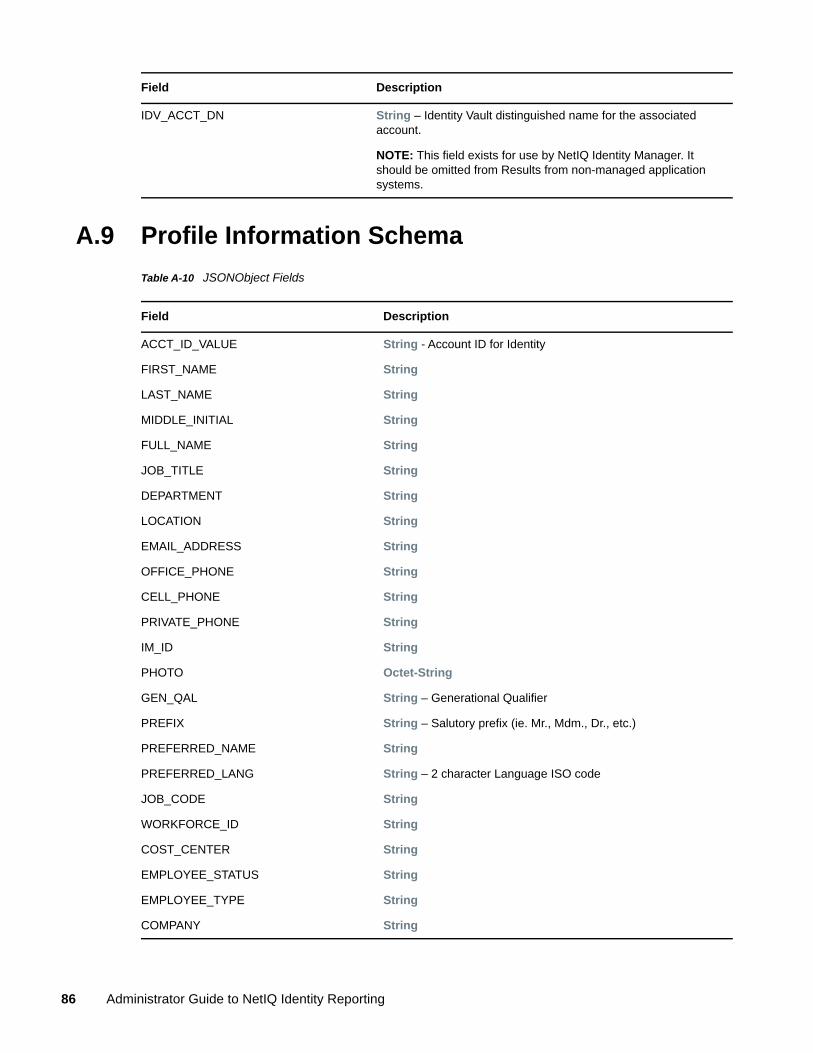
A.9 Profile Information Schema
Table A-10 JSONObject Fields
IDV_ACCT_DN String – Identity Vault distinguished name for the associated account.
NOTE: This field exists for use by NetIQ Identity Manager. It should be omitted from Results from non-managed application systems.
Field Description
Field Description
ACCT_ID_VALUE String - Account ID for Identity
FIRST_NAME String
LAST_NAME String
MIDDLE_INITIAL String
FULL_NAME String
JOB_TITLE String
DEPARTMENT String
LOCATION String
EMAIL_ADDRESS String
OFFICE_PHONE String
CELL_PHONE String
PRIVATE_PHONE String
IM_ID String
PHOTO Octet-String
GEN_QAL String – Generational Qualifier
PREFIX String – Salutory prefix (ie. Mr., Mdm., Dr., etc.)
PREFERRED_NAME String
PREFERRED_LANG String – 2 character Language ISO code
JOB_CODE String
WORKFORCE_ID String
COST_CENTER String
EMPLOYEE_STATUS String
EMPLOYEE_TYPE String
COMPANY String
86 Administrator Guide to NetIQ Identity Reporting
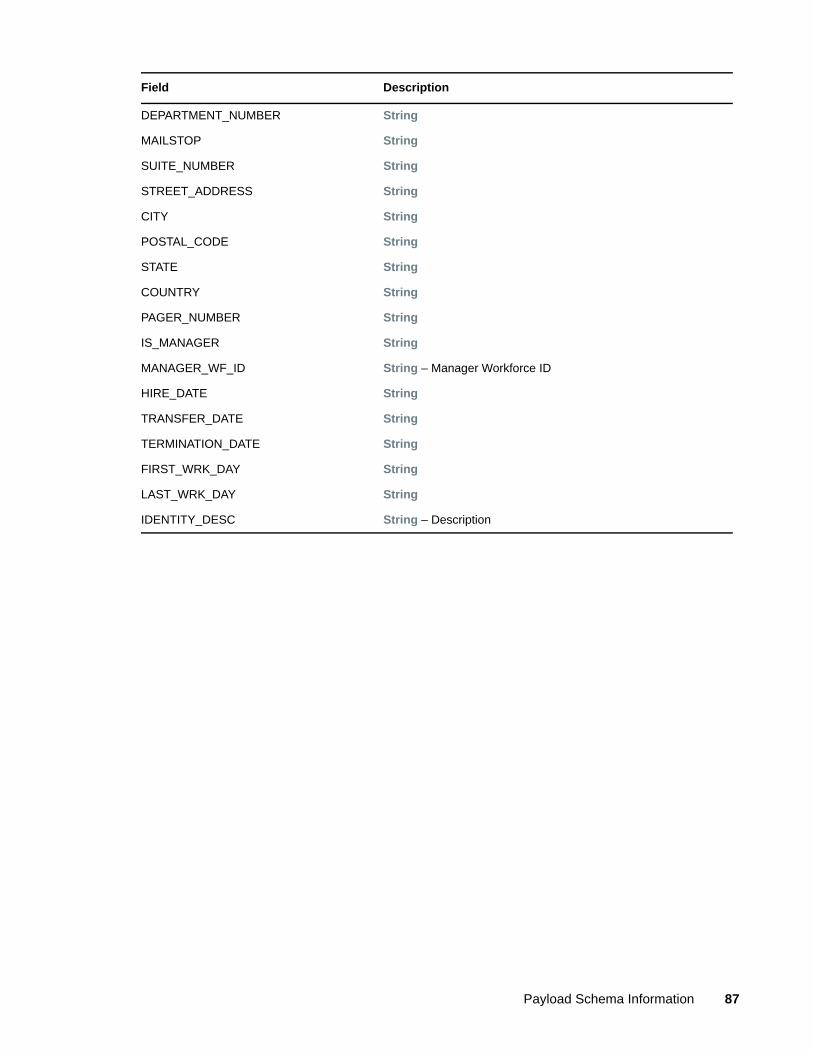
DEPARTMENT_NUMBER String
MAILSTOP String
SUITE_NUMBER String
STREET_ADDRESS String
CITY String
POSTAL_CODE String
STATE String
COUNTRY String
PAGER_NUMBER String
IS_MANAGER String
MANAGER_WF_ID String – Manager Workforce ID
HIRE_DATE String
TRANSFER_DATE String
TERMINATION_DATE String
FIRST_WRK_DAY String
LAST_WRK_DAY String
IDENTITY_DESC String – Description
Field Description
Payload Schema Information 87

88 Administrator Guide to NetIQ Identity Reporting