Embed Size (px)
Citation preview

NetIQ® LDAP Proxy 1.5Installation Guide
October 2016

Legal Notice
For information about legal notices, trademarks, disclaimers, warranties, export and other use restrictions, U.S. Government rights, patent policy, and FIPS compliance, see https://www.netiq.com/company/legal/.
Copyright © 2016 NetIQ Corporation, a Micro Focus company. All Rights Reserved.
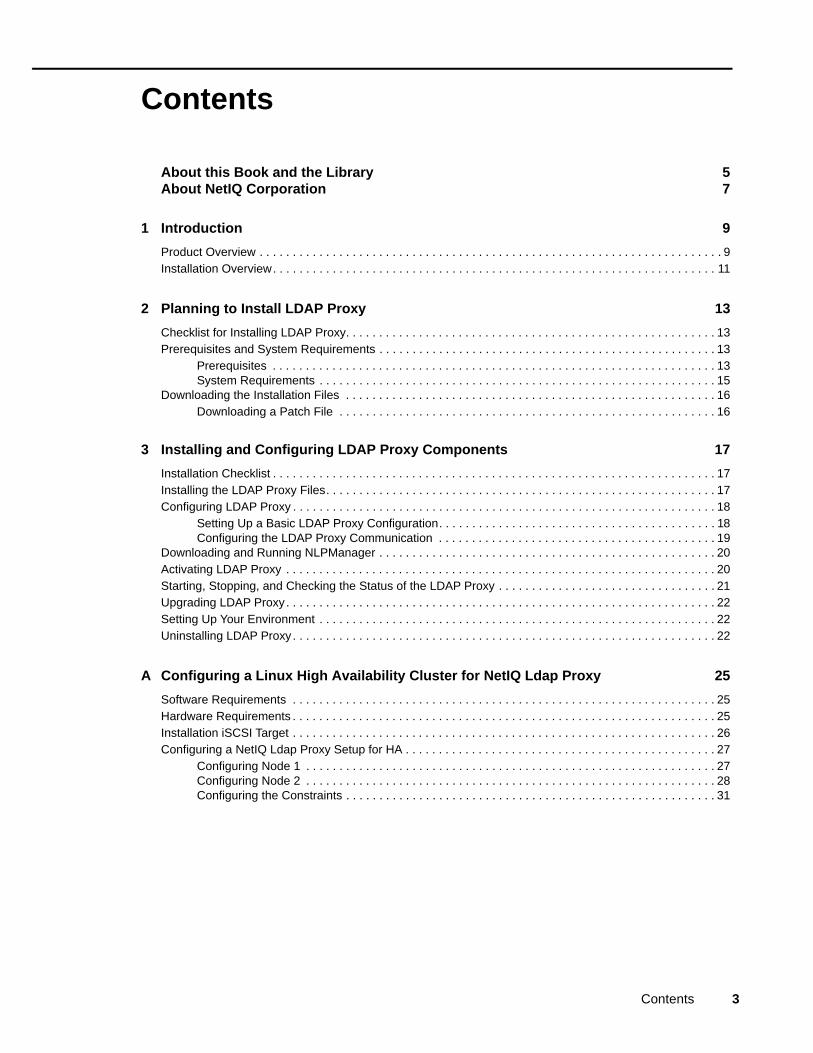
Contents
About this Book and the Library 5About NetIQ Corporation 7
1 Introduction 9
Product Overview . . . . . . . . . . . . . . . . . . . . . . . . . . . . . . . . . . . . . . . . . . . . . . . . . . . . . . . . . . . . . . . . . . . . . . 9Installation Overview. . . . . . . . . . . . . . . . . . . . . . . . . . . . . . . . . . . . . . . . . . . . . . . . . . . . . . . . . . . . . . . . . . . 11
2 Planning to Install LDAP Proxy 13
Checklist for Installing LDAP Proxy. . . . . . . . . . . . . . . . . . . . . . . . . . . . . . . . . . . . . . . . . . . . . . . . . . . . . . . . 13Prerequisites and System Requirements . . . . . . . . . . . . . . . . . . . . . . . . . . . . . . . . . . . . . . . . . . . . . . . . . . . 13
Prerequisites . . . . . . . . . . . . . . . . . . . . . . . . . . . . . . . . . . . . . . . . . . . . . . . . . . . . . . . . . . . . . . . . . . . 13System Requirements . . . . . . . . . . . . . . . . . . . . . . . . . . . . . . . . . . . . . . . . . . . . . . . . . . . . . . . . . . . . 15
Downloading the Installation Files . . . . . . . . . . . . . . . . . . . . . . . . . . . . . . . . . . . . . . . . . . . . . . . . . . . . . . . . 16Downloading a Patch File . . . . . . . . . . . . . . . . . . . . . . . . . . . . . . . . . . . . . . . . . . . . . . . . . . . . . . . . . 16
3 Installing and Configuring LDAP Proxy Components 17
Installation Checklist . . . . . . . . . . . . . . . . . . . . . . . . . . . . . . . . . . . . . . . . . . . . . . . . . . . . . . . . . . . . . . . . . . . 17Installing the LDAP Proxy Files. . . . . . . . . . . . . . . . . . . . . . . . . . . . . . . . . . . . . . . . . . . . . . . . . . . . . . . . . . . 17Configuring LDAP Proxy . . . . . . . . . . . . . . . . . . . . . . . . . . . . . . . . . . . . . . . . . . . . . . . . . . . . . . . . . . . . . . . . 18
Setting Up a Basic LDAP Proxy Configuration. . . . . . . . . . . . . . . . . . . . . . . . . . . . . . . . . . . . . . . . . . 18Configuring the LDAP Proxy Communication . . . . . . . . . . . . . . . . . . . . . . . . . . . . . . . . . . . . . . . . . . 19
Downloading and Running NLPManager . . . . . . . . . . . . . . . . . . . . . . . . . . . . . . . . . . . . . . . . . . . . . . . . . . . 20Activating LDAP Proxy . . . . . . . . . . . . . . . . . . . . . . . . . . . . . . . . . . . . . . . . . . . . . . . . . . . . . . . . . . . . . . . . . 20Starting, Stopping, and Checking the Status of the LDAP Proxy . . . . . . . . . . . . . . . . . . . . . . . . . . . . . . . . . 21Upgrading LDAP Proxy . . . . . . . . . . . . . . . . . . . . . . . . . . . . . . . . . . . . . . . . . . . . . . . . . . . . . . . . . . . . . . . . . 22Setting Up Your Environment . . . . . . . . . . . . . . . . . . . . . . . . . . . . . . . . . . . . . . . . . . . . . . . . . . . . . . . . . . . . 22Uninstalling LDAP Proxy . . . . . . . . . . . . . . . . . . . . . . . . . . . . . . . . . . . . . . . . . . . . . . . . . . . . . . . . . . . . . . . . 22
A Configuring a Linux High Availability Cluster for NetIQ Ldap Proxy 25
Software Requirements . . . . . . . . . . . . . . . . . . . . . . . . . . . . . . . . . . . . . . . . . . . . . . . . . . . . . . . . . . . . . . . . 25Hardware Requirements . . . . . . . . . . . . . . . . . . . . . . . . . . . . . . . . . . . . . . . . . . . . . . . . . . . . . . . . . . . . . . . . 25Installation iSCSI Target . . . . . . . . . . . . . . . . . . . . . . . . . . . . . . . . . . . . . . . . . . . . . . . . . . . . . . . . . . . . . . . . 26Configuring a NetIQ Ldap Proxy Setup for HA . . . . . . . . . . . . . . . . . . . . . . . . . . . . . . . . . . . . . . . . . . . . . . . 27
Configuring Node 1 . . . . . . . . . . . . . . . . . . . . . . . . . . . . . . . . . . . . . . . . . . . . . . . . . . . . . . . . . . . . . . 27Configuring Node 2 . . . . . . . . . . . . . . . . . . . . . . . . . . . . . . . . . . . . . . . . . . . . . . . . . . . . . . . . . . . . . . 28Configuring the Constraints . . . . . . . . . . . . . . . . . . . . . . . . . . . . . . . . . . . . . . . . . . . . . . . . . . . . . . . . 31
Contents 3

4

About this Book and the Library
The NetIQ LDAP Proxy 1.5 Installation Guide explains how to install NetIQ LDAP Proxy 1.5 on Linux.
For the most recent version of the LDAP Proxy 1.5 Installation Guide, see the NetIQ LDAP Proxy 1.5 online documentation (https://www.netiq.com/documentation/ldapproxy/) Web site.
Intended AudienceThe guide is intended for network administrators.
Other Information in the LibraryThe library provides the following information resource:
LDAP Proxy Administration Guide
Describes an overview of NetIQ LDAP Proxy 1.5 and its administration. It also describes how to configure monitoring, analyzing, querying, and modifying directory services by using NetIQ LDAP Proxy.
These guides are available at the NetIQ LDAP Proxy 1.5 documentation Web site (https://www.netiq.com/documentation/ldapproxy/).
About this Book and the Library 5

6 About this Book and the Library

About NetIQ Corporation
We are a global, enterprise software company, with a focus on the three persistent challenges in your environment: Change, complexity and risk—and how we can help you control them.
Our ViewpointAdapting to change and managing complexity and risk are nothing new
In fact, of all the challenges you face, these are perhaps the most prominent variables that deny you the control you need to securely measure, monitor, and manage your physical, virtual, and cloud computing environments.
Enabling critical business services, better and faster
We believe that providing as much control as possible to IT organizations is the only way to enable timelier and cost effective delivery of services. Persistent pressures like change and complexity will only continue to increase as organizations continue to change and the technologies needed to manage them become inherently more complex.
Our PhilosophySelling intelligent solutions, not just software
In order to provide reliable control, we first make sure we understand the real-world scenarios in which IT organizations like yours operate — day in and day out. That's the only way we can develop practical, intelligent IT solutions that successfully yield proven, measurable results. And that's so much more rewarding than simply selling software.
Driving your success is our passion
We place your success at the heart of how we do business. From product inception to deployment, we understand that you need IT solutions that work well and integrate seamlessly with your existing investments; you need ongoing support and training post-deployment; and you need someone that is truly easy to work with — for a change. Ultimately, when you succeed, we all succeed.
Our Solutions Identity & Access Governance
Access Management
Security Management
Systems & Application Management
Workload Management
Service Management
About NetIQ Corporation 7

Contacting Sales SupportFor questions about products, pricing, and capabilities, contact your local partner. If you cannot contact your partner, contact our Sales Support team.
Contacting Technical SupportFor specific product issues, contact our Technical Support team.
Contacting Documentation SupportOur goal is to provide documentation that meets your needs. If you have suggestions for improvements, click comment on this topics at the bottom of any page in the HTML versions of the documentation posted at www.netiq.com/documentation. You can also email [email protected]. We value your input and look forward to hearing from you.
Contacting the Online User CommunityQmunity, the NetIQ online community, is a collaborative network connecting you to your peers and NetIQ experts. By providing more immediate information, useful links to helpful resources, and access to NetIQ experts, Qmunity helps ensure you are mastering the knowledge you need to realize the full potential of IT investments upon which you rely. For more information, visit http://community.netiq.com.
Worldwide: www.netiq.com/about_netiq/officelocations.asp
United States and Canada: 1-888-323-6768
Email: [email protected]
Web Site: www.netiq.com
Worldwide: www.netiq.com/support/contactinfo.asp
North and South America: 1-713-418-5555
Europe, Middle East, and Africa: +353 (0) 91-782 677
Email: [email protected]
Web Site: www.netiq.com/support
8 About NetIQ Corporation

1 1Introduction
NetIQ LDAP Proxy acts as a middleware layer between LDAP clients and LDAP directory servers, and provides support to the LDAP protocol for regulating requests and responses between client applications and directory servers. It provides features such as load balancing, failover, query filtering, data hiding, request denial, centralized auditing and monitoring, and graphical trending of LDAP activities.
LDAP Proxy is completely transparent and can be easily integrated with an existing directory infrastructure. It is extremely easy to deploy, manage, and customize with any LDAP directory.
Product OverviewLDAP Proxy is designed to analyze the network traffic from various interfaces and regulate requests and responses among LDAP server directories, based on policies. LDAP Proxy has the following features:
Load Balancing: LDAP Proxy uses dynamic load balancing algorithms to distribute the load across various servers. The load balancing algorithms use different parameters such as active connections, server response time, and capability. Balance is achieved by grouping at least two back-end servers with the same tree structure into a back-end server group.
Failover Mechanism: LDAP Proxy performs periodic health checks to detect unavailable or slow back-end servers.
A server is marked unavailable or slow based on any of the following conditions:
The connection attempt returns an error
The connection has timed out
The directory server is unhealthy
The proxy receives a connection error on an active connection while sending a request
When a back-end server is unavailable, LDAP Proxy switches active connections to an available back-end server in the server group. Requests that are partially serviced are also routed to a new back-end server, and an LDAP busy result code (51) is sent for the partially serviced requests.
Backing up of LDAP Proxy is achieved by configuring high availability for the LDAP Proxy. For more information, see Appendix A, “Configuring a Linux High Availability Cluster for NetIQ Ldap Proxy,” on page 25.
Identity-based Policies: LDAP Proxy provides a simple but powerful set of policies that allows you to implement a greater level of access control over incoming LDAP requests.
The Network Restriction policy allows you to configure the proxy server as a firewall. You can use this policy to restrict requests based on clients’ network parameters, such as IP address and network address.
Introduction 9

Figure 1-1 LDAP Proxy as a Directory Firewall
The Connection Route policy enables you to route an incoming connection to an appropriate back-end server group. It also determines the identity of an incoming connection and applies required policies before forwarding the processed connection to the associated server group.
The Search Restriction policy facilitates re-encoding of incoming search requests. This helps to implement actions such as hiding containers, restricting search attributes, and restricting the search filter (such as CN=*).
The Operation Restriction policy allows you to restrict LDAP operations such as Bind, Search, Add, Modify, Delete, Modify DN, and Compare. This restriction helps to achieve read-only and search-only functionality for a server group.
The Map Schema policy enables schema compatibility. This helps an application to work with any LDAP directory and allows you to obtain multiple views of the same Directory Information Tree, based on identity.
For more information about each of these policies, refer to NetIQ LDAP Proxy 1.5 Administration Guide.
Live Monitoring: LDAP Proxy uses an Eclipse-based client tool to provide a graphical view of the activities on the proxy server and back-end directory servers. This helps you to monitor the live LDAP traffic, load, and performance of different LDAP operations.
For more information about configuring the events to be monitored by using the NetIQ LDAP Proxy GUI, refer to Configuring Monitoring and Trending Activities.
Trending: LDAP Proxy uses an Eclipse-based client tool to analyze and view the trends of LDAP traffic. It also helps you to analyze the load and performance of the proxy server and back-end directory servers. You can analyze this historical trend data for any given time duration for different LDAP operations. The analyzed data is generated and displayed in an informative and customizable graph.
For more information about configuring the log files for trending, refer to Configuring Monitoring and Trending Activities.
Client 2
Client 1
User 1Request
User 1Request
User 3Request
DeniedRequest
User 3Request
Client 3
DirectoryServer 1
LDAPProxy
DirectoryServer 2
10 Introduction

Auditing: LDAP Proxy allows you to audit the activities on the proxy and back-end directory servers. This helps you to track session details, LDAP policies, and back-end activities. It supports the traditional method of auditing as well as the XDAS-standards based auditing.
Forward Proxy: LDAP Proxy allows you to configure the proxy server as a forward proxy. For instance, there might be a legacy LDAP application that communicates directly to the back-end LDAP server over a clear text channel, compromising security. LDAP Proxy overcomes this limitation by securing the connection between the proxy server and back-end directory servers.
Figure 1-2 LDAP Proxy as a Forward Proxy
Chaining: LDAP Proxy provides a chaining feature that can be leveraged by a back-end server or LDAP client that does not support chaining. This feature also ensures the security of back-end server information.
Request Routing: LDAP Proxy provides you with the latest data for any directory server. In a distributed directory environment, all servers might not have the latest copy of the data because of a network failure or synchronization delay. LDAP Proxy overcomes this limitation by tracking data modifications across different servers.
Installation OverviewYou can install LDAP Proxy 1.5.2 on any of the supported platforms. For information about the supported platforms, see “Prerequisites and System Requirements” on page 13. However, this release does not ship NLPManager. You can continue to use your existing NLPManager with LDAP Proxy 1.5.2.
DirectoryServer
Internet
LDAPProxy
Client 2
Client 1
Client 3
Introduction 11

12 Introduction

2 2Planning to Install LDAP Proxy
This chapter describes the requirements for installing LDAP Proxy.
“Checklist for Installing LDAP Proxy” on page 13
“Prerequisites and System Requirements” on page 13
“Downloading the Installation Files” on page 16
Checklist for Installing LDAP ProxyBefore beginning the installation process, NetIQ recommends that you review the following steps. This checklist provides planning information for a new installation. If you are upgrading from a previous version, do not use this checklist. For more information about upgrading, see “Upgrading LDAP Proxy” on page 22.
Ensure that the servers on which you are installing LDAP Proxy components meet the specified requirements. For more information, see “Prerequisites and System Requirements” on page 13.
Ensure that the dependent libraries are installed for the host operating systems. For more information, see “Prerequisites and System Requirements” on page 13.
Ensure that the communication ports that you want to use are open in the firewall.
NOTE: If you plan to install LDAP Proxy on the same server where eDirectory is installed, ensure that both the products are using different ports to avoid the port conflict.
Install the LDAP Proxy files and NLPManager. For more information, see the following sections:
Installing the LDAP Proxy Files
Downloading and Running NLPManager
(Conditional) Customize the basic proxy configuration. For more information, see “Configuring LDAP Proxy” on page 18.
To monitor, analyze, and manage LDAP events, start the NLPManager console. For more information, see “Downloading and Running NLPManager” on page 20.
(Conditional) Configure LDAP Proxy in a cluster environment.
Prerequisites and System RequirementsBefore installing LDAP Proxy, NetIQ recommends that you review the prerequisites and considerations.
Prerequisites
Your operating system should be running the latest service packs before you begin the installation process.
Planning to Install LDAP Proxy 13

When installing LDAP Proxy, ensure that the computer has one of the following libraries:
libstdc++.so.5
libstdc++.so.6
When installing NLPManager, ensue that you install the following RPMs on your server:
NOTE: Before installing NLPManager on SUSE Linux Enterprise Server (SLES) or Red Hat Enterprise Linux (RHEL), you must install the 32-bit RPMs of the following libraries from the platform specific repositories.
On SLES 10
expat
xorg-x11-libXrender
xorg-x11-libXfixes
pango
libXinerama
freetype
gtk2
On SLES 11
expat
xorg-x11-libXrender
xorg-x11-libXfixes
pango
freetype
gtk2
On RHEL 6
expat
libXrender
libXfixes
libXinerama
freetype
libXcursor
libXcomposite
libXtst
libXt
gtk2
GConf2
libSM
ORBit2
libICE
gtk2-engines
Ensure that the unzip rpm is installed on any Linux platform you are using.
14 Planning to Install LDAP Proxy

IMPORTANT: The installation program installs all the dependent packages for LDAP Proxy. If any of the packages reside in the system, a message stating that the package is already present is displayed.
System Requirements
This section provides the minimum requirements for the server(s) where you want to install LDAP Proxy.
Category Minimum Requirement
Disk Space 2 GB
Memory 1 GB
Operating System You can install LDAP Proxy on one of the following operating systems:
SLES 11
SLES 12 SP1
RHEL 6
RHEL 7
You can install NLPManager on one of the following operating systems:
SLES 10
SLES 11
RHEL 6
Operating System Hotfixes
Before installing LDAP Proxy and NLPManager, NetIQ recommends that you apply the latest operating system patches according to the manufacturer’s automated update facility.
Directory Servers LDAP Proxy supports both eDirectory, Active Directory and OpenLDAP as a back-end server.
eDirectory:
You can use all the supported versions of eDirectory as a back-end server.
NOTE: NetIQ supports installing eDirectory 9.0.x with LDAP Proxy on the same server.
Active Directory:
You might need to set up your Active Directory as a back-end server. For more information, see “Setting Up Your Environment” on page 22.
OpenLDAP:
You might need to set up your OpenLDAP as a back-end server.
Planning to Install LDAP Proxy 15

Downloading the Installation FilesYou must download the installation files from the NetIQ download site.
1 Access the NetIQ Downloads Web site (https://dl.netiq.com/index.jsp).
2 On the Product or Technology menu, select LDAP Proxy.
3 In the Select Version field, select LDAP Proxy 1.5, then click Submit Query.
4 Click the LDAP Proxy 1.5 link, then select the appropriate package for your platform from the list of .gz packages.
5 Follow the on-screen prompts to download the file to a directory on your computer.
IMPORTANT: LDAP Proxy 1.5.2 does not ship NLPManager. You can continue to use your existing NLPManager with LDAP Proxy 1.5.2.
Downloading a Patch File
Before installing a patch, complete the following steps:
1 In a browser, navigate to the NetIQ downloads page.
2 Under Patches, click Search Patches.
3 Specify LDAP Proxy nn patch in the search box.
4 Download and unzip the contents of the file.
5 (Conditional) Apply the patch. For more information, see “Installing the LDAP Proxy Files” on page 17.
16 Planning to Install LDAP Proxy

3 3Installing and Configuring LDAP Proxy Components
This chapter provides guidance for installing NetIQ LDAP Proxy components on Linux platforms.
“Installation Checklist” on page 17
“Installing the LDAP Proxy Files” on page 17
“Configuring LDAP Proxy” on page 18
“Downloading and Running NLPManager” on page 20
“Activating LDAP Proxy” on page 20
“Starting, Stopping, and Checking the Status of the LDAP Proxy” on page 21
“Upgrading LDAP Proxy” on page 22
“Setting Up Your Environment” on page 22
“Uninstalling LDAP Proxy” on page 22
Installation ChecklistInstall LDAP Proxy in a production environment by completing the following checklist:
Ensure that you have the required files for installing LDAP Proxy.
Ensure that you computer meets the system requirements. For more information, see “Prerequisites and System Requirements” on page 13.
Install LDAP Proxy. For more information, see “Installing the LDAP Proxy Files” on page 17.
Configure LDAP Proxy to meet your requirements. For more information, see “Configuring LDAP Proxy” on page 18.
(Conditional) Locate the LDAP Proxy files in the following locations:
Log files: /var/opt/novell/ldapproxy/log
Configuration files: /etc/opt/novell/ldapproxy/conf
Binary files: /opt/novell/ldapproxy/bin
IMPORTANT: Do not upgrade to LDAP Proxy 1.5.2 or install a new version of LDAP Proxy on any server that has other Novell products installed that do not support NICI 3.0. For example eDirectory 8.8.8 or iManager 2.7.7.
Installing the LDAP Proxy Files1 Log in as a root or administrative user to the computer where you want to install the LDAP Proxy
components.
2 If you downloaded the LDAP Proxy installation files from the NetIQ Downloads Web site., identify the .tgz file. For example, ldapproxy_1.5.tgz.
Installing and Configuring LDAP Proxy Components 17

3 To extract the LDAP Proxy folder, enter the following command:
tar -xzf <Filename>.tar.gz
A directory named ldapproxy is created. For more information about downloading the installation files, see “Downloading the Installation Files” on page 16.
4 In a shell, change to the ldapproxy directory by using the cd ldapproxy command.
The ldapproxy directory contains two scripts, nlp-install and nlp-uninstall, for installing and uninstalling LDAP Proxy respectively on a server.
5 Run the nlp-install script by using the ./nlp-install command.
6 On the Welcome page, press ENTER.
7 Read and accept the license agreement, then press Y.
NOTE: You must read through and scroll to the end of the license agreement, before you can accept the license agreement.
8 When the installation is successful, a success message is displayed.
Determine which directory service you want to use. LDAP Proxy includes support for the following LDAP directories:
NetIQ eDirectory
Microsoft Active Directory
Configuring LDAP ProxyThis section describes how to setup a basic LDAP Proxy configuration and establish communication among the components that constitute the LDA Proxy environment.
Setting Up a Basic LDAP Proxy Configuration
The initial setup for LDAP Proxy consists of installing LDAP Proxy files and NLPManager and configuring the proxy settings for your directory server in the nlpconf.xml file. LDAP Proxy bundles a sample nlpconf.xml file with the installation package located in the /etc/opt/novell/ldapproxy/conf directory.
LDAP Proxy can be customized by configuring additional listeners, back-end servers, back-end server groups, and policies.
Listener: The IP address and the port number where the proxy listens for incoming requests. By default, LDAP Proxy is configured to listen on all interfaces. However, you can customize it to listen only on specific interfaces.
Back-end server: The IP address or domain name and port number of the system on which the back-end server is installed. At least one back-end server must be configured. However, if you plan to facilitate load balancing and fault tolerance, a minimum of two back-end servers must be configured.
18 Installing and Configuring LDAP Proxy Components

Connection route policy: Specifies where the connections are to be routed to. A minimum of one Connection Route policy must be configured. For more information, see Accepting or Denying a Client Connection (Client Network Policy) in the NetIQ LDAP Proxy 1.5 Administration Guide.
The <list-policy> node in the nlpconf.xml file contains a sample Connection Route policy that defines where LDAP Proxy must route the incoming connections. Do not delete this node because there must be at least one Connection Route policy defined in the minimum configuration.
You can also define additional policies to customize LDAP Proxy to filter requests, map schemas, and so on. Optionally, you can also define the proxy paths and monitoring events. After modifying the nlpconf.xml file, save the file and start the nlpd service for the changes to take effect.
Configuring the LDAP Proxy Communication
LDAP Proxy can be configured on both secure and non-secure ports. The following sections provide instructions for enabling secure and non-secure connections for your back-end directory that you plan to connect to. Perform the following tasks to bring your LDAP Proxy server up and running:
Configure LDAP Proxy on a secure port. To achieve this, you must configure at least one Listener and Back-end server on a secure port. For more information on how to configure listener on a secure port, see Configuring Listener on a Secure Port in the NetIQ LDAP Proxy 1.5 Administration Guide.
Similarly you can configure Back-end server on a secure port. For more information, see Configuring Back-End Server on a Secure Port in the NetIQ LDAP Proxy 1.5 Administration Guide.
Configure LDAP Proxy on a non-secure port. To achieve this, you must configure at least one Listener and Back-end server on a non-secure port. For more information on how to configure listener on a non-secure port, see Configuring Listener on a Non-Secure Port in the NetIQ LDAP Proxy 1.5 Administration Guide.
Similarly you can configure Back-end server on a non-secure port. For more information, see Configuring Back-End Server on a Non-Secure Port in the NetIQ LDAP Proxy 1.5 Administration Guide.
Ensure that the communication ports that you want to use are open in the firewall.
NOTE: If you plan to install LDAP Proxy on the same server where eDirectory is installed, ensure that both the products are using different ports to avoid the port conflict.
Install the LDAP Proxy files and NLPManager. For more information, see the following sections:
Installing the LDAP Proxy Files
Downloading and Running NLPManager
(Conditional) Customize the basic proxy configuration. For more information, see “Configuring LDAP Proxy” on page 18.
To monitor, analyze, and manage LDAP events, start the NLPManager console. For more information, see “Downloading and Running NLPManager” on page 20.
(Conditional) Configure LDAP Proxy in a cluster environment. For more information, see Appendix A, “Configuring a Linux High Availability Cluster for NetIQ Ldap Proxy,” on page 25.
Installing and Configuring LDAP Proxy Components 19

Downloading and Running NLPManagerThe NetIQ LDAP Proxy Manager (NLPManager) is a graphical utility that enables you to monitor, analyze, and manage LDAP events. For more information, see Configuring Monitoring and Trending Activitiesin the NetIQ LDAP Proxy 1.5 Administration Guide.
1 Download the NetIQ LDAP Proxy file from the NetIQ Downloads Website (https://dl.netiq.com/index.jsp).
2 Extract the NLPManager_1.5-linux.gtk.x86.zip file.
3 Run the following command:
ulimit -n 65535
4 To launch NLPManager, run the following command:
sh NLPManager.sh
NOTE: You should enable X11 forwarding while running NLPManager remotely.
The NetIQ LDAP Proxy Manager window is displayed. Initially, the Welcome page appears in the NetIQ LDAP Proxy Manager window. To view NLPManager user interface, close the Welcome page.
The NLPManager UI consists of the following panes:
The Project Explorer pane that displays the hierarchal depiction of the configuration you define.
The Editor pane that acts as the editor for providing configuration details.
Activating LDAP ProxyYou must activate LDAP Proxy within 90 days of installation by purchasing and installing the product license.
To purchase the LDAP Proxy product license, see the NetIQ LDAP Proxy How to Buy Web page (https://www.netiq.com/products/ldap-proxy/how-to-buy/).
After you purchase a product license, you will receive Customer ID by e-mail from NetIQ. The e-mail also contains a URL to the NetIQ site where you can obtain a Product Activation credential. Click the link to go to the site. Click the license download link and save the Product Activation Credential file in the /etc/opt/novell/ldapproxy/conf/key.txt file. Alternatively, you can activate the product, by using the activate option, as described in “activate” on page 21.
Every time you start LDAP Proxy, the proxy server checks for a successful activation in the predefined location. If found, the LDAP Proxy server displays a success message and starts LDAP Proxy. Else, it displays the remaining days in the evaluation period. This holds good if you are upgrading to successive minor versions or patches of the LDAP Proxy, such as upgrading to LDAP Proxy 1.5 from LDAP Proxy 1.0. However, if you are upgrading to a new major version, the proxy server automatically checks for a valid licence file. If a valid licence file is not found, the proxy server starts the evaluation period of 90 days.
The nlpd script includes the following options to activate, de-activate, and check the activation status of LDAP Proxy.
status
To know the activation status, type /etc/init.d/nlpd status (On SLES 11 & 12 and RHEL 6 & 7). The following message is displayed:
20 Installing and Configuring LDAP Proxy Components

Proxy Major Version: 1Activation status : Not ActivatedChecking for NetIQ LDAP Proxy server... [ OK ]
activate
On SLES 11 and RHEL 6:
To activate the product, type /etc/init.d/nlpd activate /home/user1/key.txt, where /home/user1 is the path to the key file.
On SLES 12 and RHEL 7:
To activate the product, type /opt/novell/ldapproxy/sbin/nlpd --licenseactivation /home/user1/key.txt, where /home/user1 is the path to the key file. The following message is displayed;
Congratulations, You have successfully activated NetIQ LDAP Proxy 1.5.
deactivate
On SLES 11 and RHEL 6:
To deactivate the product, type etc/init.d/nlpd deactivate.
On SLES 12 and RHEL 7:
To deactivate the product, type /opt/novell/ldapproxy/sbin/nlpd --licenseactivation deactivate. The following message is displayed;
NetIQ LDAP Proxy 1.5 has been successfully de-activated.
If you do not remember or do not receive your Customer ID, call the NetIQ Activation Center at 1-800-418-8373 in the U.S. In all other locations, call 1-801-861-8373 (You will be charged for calls made using the 801 area code.). You can also chat with us online (http://support.novell.com/chat/activation).
Starting, Stopping, and Checking the Status of the LDAP Proxy
On SLES 11 and RHEL 6:
Start LDAP Proxy by using the /etc/init.d/nlpd start command.
Stop LDAP Proxy by using the /etc/init.d/nlpd stop command.
Check the status of LDAP Proxy by using the /etc/init.d/nlpd status command.
On SLES 12 and RHEL 7:
Start LDAP Proxy by using the systemctl start nlpd.service command.
Stop LDAP Proxy by using the systemctl stop nlpd.service command.
Check the status of LDAP Proxy by using the systemctl status nlpd.service command.
Installing and Configuring LDAP Proxy Components 21

Upgrading LDAP ProxyTo upgrade LDAP Proxy from version 1.0 or later, install the new version on top of the older version. The upgrade process takes a back-up of the configuration files and restores them automatically without your intervention. Perform the following steps to upgrade LDAP Proxy:
1 Download the LDAP Proxy installation files from the NetIQ Downloads Web site (https://dl.netiq.com/index.jsp).
For more information, see “Downloading the Installation Files” on page 16.
2 Stop the Proxy server.
For information about how to stop Proxy, see “Starting, Stopping, and Checking the Status of the LDAP Proxy” on page 21.
3 Take a backup of nlpconf.xml and nlptrace.conf files.
4 Install LDAP Proxy as instructed in “Installing the LDAP Proxy Files” on page 17.
5 Start LDAP Proxy.
For more information, see “Starting, Stopping, and Checking the Status of the LDAP Proxy” on page 21.
The way LDAP Proxy 1.5.2 stores the listener certificates and keys has changed from the previous versions. The nlp-install script will automatically convert the existing certificates to the new format using the nlpcert utility during upgrade. The nlpcert is a new certificate management utility bundled with the LDAP Proxy package. To run this utility, you do not require any additional configuration. For more information, see Configuring Certificate Information in the NetIQ LDAP Proxy 1.5 Administration Guide.
Setting Up Your EnvironmentYou might need to set up and configure the back-end directory for making LDAP Proxy functional. LDAP Proxy supports the following directories:
NetIQ eDirectory
Active Directory
NOTE: Communication with the Active Directory server over SSL might fail if the CRL information from the CA is not anonymously accessible. To access the CRL information, install the IIS Web server and then publish the CRLs from the CA. You can then configure the CA to mint the certificates to the AD server with this URL.You must remove any LDAP URLs available in the CRL Distribution Point to access the CRL information anonymously.
If there are multiple domain controllers in the Active Directory forest, ensure that each domain controller is added as a back-end server during LDAP Proxy configuration.
Uninstalling LDAP ProxyTo uninstall LDAP Proxy, perform the following actions:
1 Go to the /opt/novell/ldapproxy/sbin directory and run the nlp-uninstall script using the ./nlp-uninstall command.
2 nlp-uninstall does not uninstall the NICI package. To uninstall NICI, refer to the NICI Administration Guide.
22 Installing and Configuring LDAP Proxy Components

NOTE: The uninstallation process does not remove the following directories:
/var/opt/novell/
/opt/novell
/etc/opt/novell
You must remove these directories manually.
Installing and Configuring LDAP Proxy Components 23

24 Installing and Configuring LDAP Proxy Components

A AConfiguring a Linux High Availability Cluster for NetIQ Ldap Proxy
This chapter describes how to configure a high availability cluster for LDAP Proxy in Linux.
It includes the following sections:
“Software Requirements” on page 25
“Hardware Requirements” on page 25
“Installation iSCSI Target” on page 26
“Configuring a NetIQ Ldap Proxy Setup for HA” on page 27
Software RequirementsiSCSI Target
SLES 11
iSCSI Target
YaST2-iSCSI-server
HA Cluster Nodes
SLES 11
open-iSCSI
YaST2-iSCSI-client
HA Pattern
NetIQ LDAP Proxy
Hardware RequirementsiSCSI Target
A minimum of 1 network card
Enough disk space to share as an iSCSI partition
YaST2-iSCSI-server
HA Cluster Nodes
2 network interface cards per node (NIC). One for external access, the other for Heartbeat private connection.
Crossover network cable (for private HA connection).
Configuring a Linux High Availability Cluster for NetIQ Ldap Proxy 25

Installation iSCSI TargetBefore installing iSCSI Target, you must install SLES 11. While installing SLES 11, ensure that you perform the following tasks:
Create a separate partition (for example, /dev/sdc3) for the iSCSI shared storage partition.
At the NetIQ Test Labs, ReiserFS showed more stability than Ext3. However, you may use any supported file system. This partition is mounted by /etc/fstab on the local machine as /shared.
Include the YaST2-iSCSI-server and the iSCSI target packages.
When the SLES 11 install is completed, set it up as the iSCSI server as follows:
1 Launch YaST.
2 Click Network Services > iSCSI Target.
3 In the Service tab, set Service Start to When Booting.
4 In Global, specify the required authentication details. (No authentication is used in this example.)
5 In the Targets tab, click Add twice, and specify the partition (/dev/sdc3) in Path field, as shown in the following figure. Retain the default values for Target, Identifier, and LUN.
6 Click Finish to restart iSCSI services.
iSCSI shared storage is now be available to the HA nodes.
26 Configuring a Linux High Availability Cluster for NetIQ Ldap Proxy

Configuring a NetIQ Ldap Proxy Setup for HAThis section includes the following topics:
“Configuring Node 1” on page 27
“Configuring Node 2” on page 28
“Configuring the Constraints” on page 31
Configuring Node 1
Install SUSE Linux Enterprise Server 11.
While configuring Node 1, set up one network interface card for the externally facing IP address, and the another NIC for an internal address that will be used by HA. In this example, the hostname is node1 and the NICs are: eth0 is 192.0.0.11 (external), and eth1 is 10.0.0.1 (private HA).
Configuring an iSCSI Setup for Node 1
1 Execute the mkdir /shared command.
2 Launch YaST2.
3 Click Network Services > iSCSI Initiator.
4 In the Service tab, set Service Start to When Booting and leave Connected Targets empty.
5 In Discovered Targets, click Discovery. This locates the iSCSI target server’s partition an populates it.
6 Enter the iSCSI target server's IP address (you can also retain the default port).
7 Click Log in (No Authentication). Discovered Targets. The Connected field is automatically populated with the value true.
8 Go to Connected Targets and set Start-Up to automatic.
9 Click Finish.
10 Execute the dmesg command to make the SCSI device /dev/sdb available.
11 Mount the iSCSI target /dev/sdb as /shared, by executing the mount -t reiserfs /dev/sdb /shared command.
You have configured an iSCSI setup.
Installing NetIQ LDAP Proxy for Node 1
1 Before initiating the installaion process, manually create a virtual adapter ifconfig eth0:0 192.0.0.1. This is the virtual IP address of your HA cluster.
2 Install NetIQ LDAP Proxy. For more information about how to install LDAP Proxy, see “Installing the LDAP Proxy Files” in the NetIQ LDAP Proxy 1.5 Installation Guide.
3 Set the LDAP Proxy path to . /opt/novell/ldapproxy/bin/nlppath.
4 Configure the LDAP Proxy instance as follows:
The configuration files must be placed on the /shared, nlp.conf in /root/ folder.
The proxy server to listen on the HA virtual IP address 192.0.0.1.
5 Verify whether the LDAP Proxy server is up and running on Node 1.
6 Shut down Proxy server, by executing the /etc/init.d/nlpd stop command.
Configuring a Linux High Availability Cluster for NetIQ Ldap Proxy 27

7 Copy the following files to the /shared directory:
The conf folder present in the /etc/opt/novell/ldapproxy folder.
The log folder present in the /var/opt/novell/ldapproxy directory.
The nici folder. Create a symbolic link /var/opt/novell/nici in the /shared/nici folder.
8 Change the Proxy paths for config and log directories in the /shared/conf/nlpconf.xml file, as follows:
<proxy-paths> <dir-config>/shared/ldapproxy/conf</dir-config> <dir-log>/shared/ldapproxy/log</dir-log> </proxy-paths>
9 Modify the init script (/etc/init.d/nlpd). The path of nlpconf.xml is fixed in the init script and you must modify it to a variable default_conf_file. In this example, default_conf_file=/shared/conf/nlpconf.xml.
NOTE: If you do not want to modify the init script, you can create a symbolic link /etc/opt/novell/ldapproxy/conf in /shared/conf and copy the files in shared directory as mentioned in Step 7. You must modify the nlpconf file available in the /shared location otherwise changes will not take effect.
Disabling nlpd Start at Boot Time
1 In YaST, navigate to System > System Services (Runlevel).
2 Disable nlpd start at boot. Alternatively, you can edit the appropriate files in the /etc/rc.d runlevels file.
3 Click Finish.
NLPD is shut down on Node 1.
Configuring Node 2
Before configuring Node 2, perform the following steps in Node 1:
1 Shut down the NLPD process, if running, by executing the /etc/init.d/nlpd stop command.
2 Ensure that the NLPD process has stopped and then execute the umount /shared command. Else, the /shared folder will not unmount as expected.
3 Release the virtual IP address, by executing the ifconfig eth0:0 down command.
Perform the following steps in Node 2:
1 Install SLES 11.
2 Set up one NIC for the externally facing IP address, and the another NIC for an internal address that will be used by HA. In this example, the hostname is node2 and the NICs are: eth0 is 192.0.0.12 (external), and eth1 is 10.0.0.2 (private HA).
Configuring an iSCSI Setup for Node 2
1 Execute the mkdir /shared command.
2 Launch YaST.
28 Configuring a Linux High Availability Cluster for NetIQ Ldap Proxy

3 Click Network Services > iSCSI Target.
4 In the Service tab, set Service Start to When Booting and leave Connected Targets empty.
5 In Discovered Targets, click Discovery.
6 Enter the iSCSI target server's IP address (you can also retain the default port).
7 Click Log in (No Authentication). Discovered Targets. The Connected field is automatically populated with the value true.
8 Go to Connected Targets and set Start-Up to automatic.
9 Click Finish.
10 Execute the dmesg command to make the iSCSI device /dev/sdb available.
11 Mount the iSCSI target /dev/sdb as /shared, by executing the mount -t reiserfs /dev/sdb /shared command.
You have configured an iSCSI setup for Node 2.
Installing NetIQ LDAP Proxy for Node 2
To install NetIQ LDAP Proxy for Node 2, follow the steps mentioned in “Installing NetIQ LDAP Proxy for Node 1” on page 27.
To maintain consistence, you can switch to Node 1, by performing the following steps:
On Node 2
1 Shut down the NLPD process, if running, by executing the /etc/init.d/nlpd stop command.
2 Ensure that the NLPD process has stopped and then execute the umount /shared command. Else, the /shared folder will not unmount as expected.
3 Release the virtual IP address, by executing the ifconfig eth0:0 down command.
On Node 1
1 Manually create a virtual adapter ifconfig eth0:0 192.0.0.1, which will be the virtual IP address of the HA cluster.
2 Mount the iSCSI target /dev/sdb as /shared, by executing the mount -t reiserfs /dev/sdb /shared command.
3 Set the eDirectory path as . /opt/novell/ldapproxy/bin/nlppath.
4 Start NLPD, by executing the /etc/init.d/nlpd start command.
Configuring IP Resource
1 Click the Resources tab.
2 On the Primitive tab add a new primitive.
3 Create clusterip resource as follows:
ID: clusterip
Class: ofc
Provider: heartbeat
Type: IPaddr
Configuring a Linux High Availability Cluster for NetIQ Ldap Proxy 29

Initial state of resource: Retain the default value Started or select Inherit from its parent.
Add Monitor Operation: Select this option.
4 On the Instance Attribute tab, add ip 192.0.0.1 and nic= eth0:0.
5 On the Meta Attribute tab, add is-managed = True and resource-stickiness = 100.
6 On the Operation Tab, add Monitor, Start and Stop with default values.
Configuring File System Resource
1 Click the Resources tab.
2 On the Primitive tab add a new primitive.
3 Create clusterip resource as follows:
ID: Shared_Resource
Class: ofc
Provider: heartbeat
Type: Filesystem
Initial state of resource: Retain the default value Started or select Inherit from its parent.
Add Monitor Operation: Select this option.
4 On the Instance Attribute tab, add device = /dev/sdc, directory =/shared and fstype = reiserfs.
5 On the Meta Attribute tab, add is-managed = True and resource-stickiness = 100.
6 On the Operation Tab, add Monitor with default values.
Configuring NetIQ LDAP Proxy (NLPD) Resource
1 Click the Resources tab.
2 On the Primitive tab add a new primitive
3 Create clusterip resource as follows:
ID: NLPD_Process
Class: ofc
Provider: heartbeat
Type: NetIQLDAPProxy
Initial state of resource: Retain the default value Started or select Inherit from its parent.
Add Monitor Operation: Select this option.
4 On the Instance Attribute tab, add device = /dev/sdc, directory =/shared, and fstype = reiserfs.
5 On the Meta Attribute tab, add is-managed = True and resource-stickiness = 100.
6 On the Operation Tab, add Monitor, Start and Stop with default values.
30 Configuring a Linux High Availability Cluster for NetIQ Ldap Proxy

Configuring the Constraints
Resource Colocation
Create colocation constraint, by specifying the following values:
ID: NLPD_Process
Resource: clusterip
With Resource: NetIQLDAPProxy
Score: Infinity
Resource Role: Started
With Resource Role: Started
Resource Order
Add IP and NLPD process order, by specifying the following values:
Resource Order
ID: IP_NLPD
Resource: clusterip
With Resource: NetIQLDAPProxy
Resource Colocation
ID: IP-Shared_Resource
Resource: Shared_Resource
With Resource: clusterip
Configuring a Linux High Availability Cluster for NetIQ Ldap Proxy 31

32 Configuring a Linux High Availability Cluster for NetIQ Ldap Proxy