Embed Size (px)
Citation preview
© 2015 Copy Rights Reserved American Sniper
Safety, Operation and Maintenance Manual with Parts List
Please read before use!
500 PSI Pump, Dual 3-Stage Motor
12-G
allo
n Ca
rpet
Extr
acto
r W
ith
Heat
Reliable Power
Innovative Design
Safe & Easy to Use
Powerful Extracting
Easy Transport
Patented FeaturesImportant Information and Safety InstructionsRegister your Machine – Return your Warranty Registration Card.Serial No:
REGISTER YOUR
MACHINE!
Make a copy of this card for future reference.© 2015 All Rights Reserved American Sniper
American Sniper6 Reservoir Avenue, Greenacre SYDNEY NSW 2190 Australia
Phone: 1300 855 677 | Fax: 02 9796 3395www.steamaster.com.au
New Equipment WarrantyLimited WarrantyAmerican Sniper warrants new equipment against defects in material and workmanship under normal use and service to the original purchaser. Any statutory implied warranties, including any warranty of merchantability or fitness for a particular purpose, are expressly limited to the duration of this written warranty. American Sniper will not be liable for any other damages, including but not limited to indirect or special consequential damages arising out of or in connection with the furnishing, performance, use or inability to use the machine. This remedy shall be the exclusive remedy of the purchaser. The warranty period is subject to the conditions stated below.
Lifetime on Molded Body Parts, 2-Years on Vacuum Motors, 1-Year on Pump and all Electrical Parts, 90-Days on AccessoriesAmerican Sniper warrants the roto-molded body to be free from defects in material and workmanship, under normal use and service for a lifetime. American Sniper warrants the motors to be free from defects in material and workmanship, under normal use and service for two (2) years from the original date of sale. American Sniper warrants the pump and all electrical components to be free from defects in material and workmanship, under normal use and service for one (1) year. Parts replaced or repaired under this warranty are warranted for the remainder of the original warranty period. Service labor charges are covered for one (1) year from the date of purchase, when performed by a American Sniper-authorized service provider.
All warranties exclude shipping expenses and all clients are responsible for all shipping charges needed to complete warranty. Labor is only provided by authorized service centers. If an authorized service center is not near you, it is the purchasers responsibility to take your machine to an authorized service center.
Normal wear items such as capacitors, cords, finishes or switches will be warranted for manufacturing defects for ninety (90) days from the purchase date.
All warranties of motors and associated components will be voided: if the machine is serviced by anyone other than an authorized service provider; if the machine is mechanically modified; if the machine is operated when not operating properly; or if the machine is misused or abused all warranties are voided.
The warranty starts on the purchase date by the original purchaser from American Sniper subject to proof of purchase. The Machine Registration Card must be completed and returned immediately at the time of purchase. If proof of purchase cannot be identified, the warranty start date is ninety (90) days after the inventory stocking date at the distributor’s warehouse.
230 Volt
(2) 12-Gallon, 500 PSI Carpet Extractor
Warranty Registration
See reverse side for warranty information. Make a copy of this card for future reference.
© 2015 All Rights Reserved American Sniper
Please take a moment to register your machine online or fill out the information below and mail back to American Sniper immediately.The warranty starts on the purchase date by the original purchaser subject to proof of purchase. This Machine Registration Card must be completed and returned immediately at the time of purchase. If proof of purchase cannot be identified, the warranty start date is ninety (90) days after the inventory stocking date at the distributor’s warehouse.
Mail to:6 Reservoir Avenue, Greenacre SYDNEY NSW 2190 Australia
Machine Model Purchase Date
Motor Type Serial No.
Place of Purchase
Shipped To
Your Name Phone
Email Fax
Address Line 1
Address Line 2
City State Zip
Comments:
New Equipment WarrantyLifetime warranty on roto-molded body, 2-years on vacuum motors, 1-year on 500 psi pump and all electrical parts, 90-days on accessories and tools.
Warranty PolicyAll equipment is inspected and tested before shipping from the manufacturer. All parts are warranted to be new and free from defects in workmanship and material, under normal use to the original retail purchaser. This warranty limits manufacturer’s liability for defects in workmanship or materials for replacement of defective parts only. The manufacturer accepts no liability for incidental or consequential damages arisen from the use of any equipment, defective or not. This warranty is in lieu of all expressed or implied warranties and is extended only to the original retail purchaser. Manufacturer sales and service representatives are not authorized to waive or alter the terms of this warranty, or to increase the obligations of the manufacturer under the warranty. Parts replaced or repaired under this warranty are warranted for the remainder of the original warranty period.
All warranties exclude shipping expenses and all clients are responsible for all shipping needed to complete warranty. Labor is only provided by authorized service centers. If an authorized service center is not near you, it is the purchasers responsibility to take your machine to an authorized service center.
The manufacturer covers up to one (1) year (365 days) of service labor at the manufacturer’s calculated hourly labor rate/repair time when performed by a manufacturer’s authorized service provider. Ultimately, labor reimbursement costs are at the discretion of the manufacturer. At no time is the manufacturer responsible for travel time to complete on-call repairs. After one (1) year, the original retail purchaser is responsible for all labor costs with no manufacturer reimbursement.
The original purchaser must contact the manufacturer to follow correct RMA/warranty procedures. They must have a copy of the RMA Sheet enclosed in the box with the returned item. No returns shall be authorized unless the proper RMA procedures are followed. It is the responsibility of the distributor to repair the client’s equipment as soon as possible.
The manufacturer charges a 25% restocking fee for any items that are being returned to stock. Items must be new, unused, free of damage and are only good for up to 30 days. After 30 days, the manufacturer does not accept the return of any item(s) for a store credit.
Authorized warranty replacement parts need to come directly from the manufacturer. Any use of any other parts will void warranty. American Sniper does not reimburse for parts used by client that were not supplied directly for the machine under warranty.
The customer must contact the manufacturer prior to working on or changing out of any parts, etc. The manufacturer must issue an RMA Sheet containing approved labor time and replacement parts. Do not send parts or equipment back to the manufacturer without an RMA Number and approval. No labor will be paid for, nor parts cost paid for or reimbursed, that have not previously been approved by the manufacturer. All warranty work must be approved and authorized to qualify, and appropriate warranty procedures must be followed.
The warranty starts on the purchase date by the original purchaser from an authorized American Sniper distributor, subject to proof of purchase. The Machine Registration Form must be completed and sent to the original manufacturer at the time of purchase. If proof of purchase cannot be identified, the warranty start date is ninety (90) days after the date of sale to an authorized American Sniper distributor.
© 2015 Copy Rights Reserved American Sniper
Please fill out the following information:
Model No:
Serial No:
Distributor Name:
Distributor Phone No:
Date of Purchase:
12-Gallon Carpet ExtractorBy American Sniper
12-Gallon, 500 PSI Carpet Extractor (3)
Returned Material Authorization (RMA) ProcedureOriginal purchaser must contact the manufacturer to follow correct RMA/warranty procedures. Must include a copy of RMA Sheet enclosed in the box with returned item. No returns shall be authorized unless the proper RMA procedures are followed. It is the responsibility of the distributor to repair the customer’s equipment as soon as possible. If the distributor does not have the facilities to repair the equipment, it may be shipped or taken to an authorized service center for repair. Customer must contact the manufacturer prior to working on or changing out any parts, etc. Manufacturer must issue an RMA Sheet containing approved labor time and replacement parts. Do not send parts or equipment back to manufacturer without an RMA Number and approval. No labor will be paid for, nor part costs paid for or reimbursed that have not been previously approved by manufacturer. All warranty work must be approved and authorized to qualify and appropriate warranty procedures must be followed.
1.0 Safety InstructionsREAD THIS MANUAL BEFORE USING YOUR CARPET EXTRACTOR. KNOW THE PROPER OPERATION, CORRECT APPLICATIONS AND THE LIMITATIONS OF THIS EQUIPMENT BEFORE USE.
Reduce the Risk of Fire, Electric Shock or Injury:• Use only as described in this manual. Use only the attachments recommended by the
manufacturer.• Test all outlets with an outlet tester before plugging machine into any outlet. Plug cord
into the nearest grounded outlet.• DO NOT unplug by pulling on the cord, grasp the plug. DO NOT pull unit by the
cord.• Keep cord away from heated surfaces.• Never attempt adjustments or repairs while the machine is plugged in.• DO NOT use if cord or plug are damaged.• DO NOT use outdoors, in standing water on wet surfaces.• Pay close attention when using machine near children.• DO NOT pick up flammable or combustible materials or use machine where they may
be present.• DO NOT leave machine outdoors, in extreme heat or cold. Harsh weather elements
will damage components and void warranty.• Lift using only the appropriate handles.• Always wear the appropriate clothing and safety equipment when operating the
machine.• Keep all body parts, hair and loose clothing away from openings and moving parts.• Use extra care when cleaning stairs. Never move the machine up or down stairs with
fluid in the machine.• Use common sense to protect yourself and others from injury when using the machine.
American Sniper6 Reservoir Avenue, Greenacre SYDNEY NSW 2190 Australia
Phone: 1300 855 677 | Fax: 02 9796 3395www.steamaster.com.au
(4) 12-Gallon, 500 PSI Carpet Extractor 12-Gallon, 500 PSI Carpet Extractor (13)
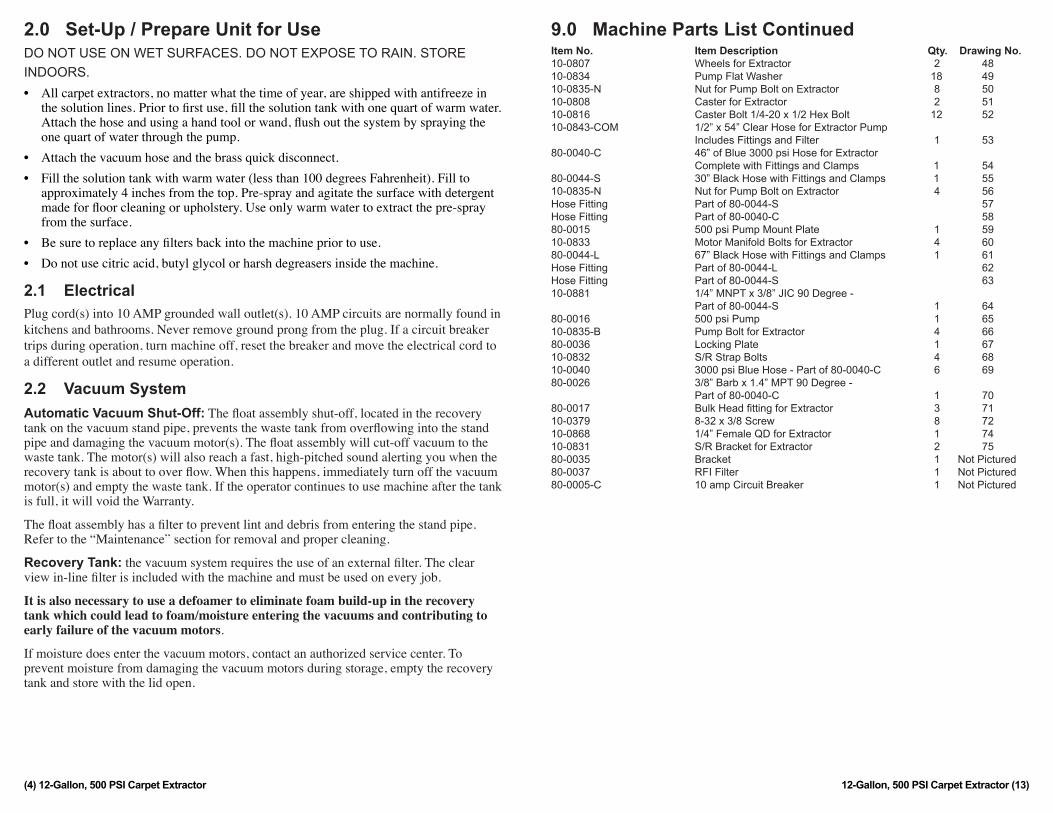
9.0 Machine Parts List ContinuedItem No. Item Description Qty. Drawing No.10-0807 Wheels for Extractor 2 4810-0834 Pump Flat Washer 18 4910-0835-N Nut for Pump Bolt on Extractor 8 5010-0808 Caster for Extractor 2 5110-0816 Caster Bolt 1/4-20 x 1/2 Hex Bolt 12 5210-0843-COM 1/2” x 54” Clear Hose for Extractor Pump Includes Fittings and Filter 1 5380-0040-C 46” of Blue 3000 psi Hose for Extractor Complete with Fittings and Clamps 1 54 80-0044-S 30” Black Hose with Fittings and Clamps 1 5510-0835-N Nut for Pump Bolt on Extractor 4 56Hose Fitting Part of 80-0044-S 57Hose Fitting Part of 80-0040-C 5880-0015 500 psi Pump Mount Plate 1 5910-0833 Motor Manifold Bolts for Extractor 4 6080-0044-L 67” Black Hose with Fittings and Clamps 1 61Hose Fitting Part of 80-0044-L 62Hose Fitting Part of 80-0044-S 6310-0881 1/4” MNPT x 3/8” JIC 90 Degree - Part of 80-0044-S 1 6480-0016 500 psi Pump 1 6510-0835-B Pump Bolt for Extractor 4 6680-0036 Locking Plate 1 6710-0832 S/R Strap Bolts 4 6810-0040 3000 psi Blue Hose - Part of 80-0040-C 6 6980-0026 3/8” Barb x 1.4” MPT 90 Degree - Part of 80-0040-C 1 7080-0017 BulkHeadfittingforExtractor 3 7110-0379 8-32 x 3/8 Screw 8 7210-0868 1/4” Female QD for Extractor 1 7410-0831 S/R Bracket for Extractor 2 7580-0035 Bracket 1 Not Pictured80-0037 RFI Filter 1 Not Pictured80-0005-C 10 amp Circuit Breaker 1 Not Pictured
2.0 Set-Up / Prepare Unit for UseDO NOT USE ON WET SURFACES. DO NOT EXPOSE TO RAIN. STORE INDOORS.• All carpet extractors, no matter what the time of year, are shipped with antifreeze in
the solution lines. Prior to first use, fill the solution tank with one quart of warm water. Attach the hose and using a hand tool or wand, flush out the system by spraying the one quart of water through the pump.
• Attach the vacuum hose and the brass quick disconnect.• Fill the solution tank with warm water (less than 100 degrees Fahrenheit). Fill to
approximately 4 inches from the top. Pre-spray and agitate the surface with detergent made for floor cleaning or upholstery. Use only warm water to extract the pre-spray from the surface.
• Be sure to replace any filters back into the machine prior to use.• Do not use citric acid, butyl glycol or harsh degreasers inside the machine.
2.1 ElectricalPlug cord(s) into 10 AMP grounded wall outlet(s). 10 AMP circuits are normally found in kitchens and bathrooms. Never remove ground prong from the plug. If a circuit breaker trips during operation, turn machine off, reset the breaker and move the electrical cord to a different outlet and resume operation.
2.2 Vacuum SystemAutomatic Vacuum Shut-Off: The float assembly shut-off, located in the recovery tank on the vacuum stand pipe, prevents the waste tank from overflowing into the stand pipe and damaging the vacuum motor(s). The float assembly will cut-off vacuum to the waste tank. The motor(s) will also reach a fast, high-pitched sound alerting you when the recovery tank is about to over flow. When this happens, immediately turn off the vacuum motor(s) and empty the waste tank. If the operator continues to use machine after the tank is full, it will void the Warranty.
The float assembly has a filter to prevent lint and debris from entering the stand pipe. Refer to the “Maintenance” section for removal and proper cleaning.
Recovery Tank: the vacuum system requires the use of an external filter. The clear view in-line filter is included with the machine and must be used on every job.
It is also necessary to use a defoamer to eliminate foam build-up in the recovery tank which could lead to foam/moisture entering the vacuums and contributing to early failure of the vacuum motors.
If moisture does enter the vacuum motors, contact an authorized service center. To prevent moisture from damaging the vacuum motors during storage, empty the recovery tank and store with the lid open.

(12) 12-Gallon, 500 PSI Carpet Extractor 12-Gallon, 500 PSI Carpet Extractor (5)
9.0 Machine Parts ListItem No. Item Description Qty. Drawing No.SN-12-ST-REDGRAN 12-Gallon Solution Tank – Red Granite 1 1Part of Solution Tank Insert Molded in to Solution Tank 280-0017 Bulkhead Fitting for Extractor 1 3 Part of 80-0017 Bulk Head Fitting 410-0846 1/4” MPT Hex Nipple for Extractor 1 510-0845 1/8” Strainer for Extractor 2 680-0080-UN 500 psi Regulator/Unloader 1 780-0026 3/8 Barb x 1/4 MPT 90 Degree 3 810-0826 3/4” Hose Clamp for Extractor 5 980-0001 Extractor Exhaust Hose 0.4 1080-0003-A 1-1/2” Black Lined Gray Hose 2 1110-0806 1-1/2” Grey Hose Barb Fitting for Extractor 1 12Bracket Part of 80-0016 Pump 1 1380-0006 45 Degree Street Elbow 1 1480-0011 90 Degree Street Elbow 1 1510-0803 Splash-proof Switch for Extractor 3 1680-0059 500 psi Gauge 1 1780-0013 500 psi Switch Plate 1 18Connector Part of 80-0059 Gauge 19SN-12-L-REDGRAN 12-Gallon Lid – Red Granite 1 2080-0010 1/4” Brass Tee 2 2180-0011-2 90 Degree Street Elbow 1 2280-0004 1/4” x 4” Brass Nipple 1 2310-0852 1/4” 90 Degree Brass Elbow 3 2410-0804-A Hatch Cover Gasket for Extractor 1 2510-0804 Hatch Cover for Extractor 1 2680-0012 Float Assembly for Extractor 1 2710-0416-A 1-1/2” Black ABS Stand Pipe 1.3 2880-0008 1.5 PVC Female Adapter 1 29SN-12-RT-BLKGRAN 12-Gallon Recovery Tank – Black Granite 1 3010-0805 Dump Valve for Extractor 1 3110-0849 1-1/2” ABS Fitting 1 3210-0155 Hose Cuff Straight 1 3310-0848-B 1-1/2” 90 Degree ABS Street Elbow 3 3410-0833 Motor Manifold Bolts for Extractor 6 3580-0116 Spacer for Motor Screw 6 3610-0810-A 230 Volt 3-Stage Extractor Motor 2 3710-0838-A Complete Pigtail for Extractor 1 3810-0850 Strain Relief for Pigtail - Part of 10-0838-A 3910-0851 Strain Relief Nut for Pigtail - Part of 10-0838-A 3910-0822 Exhaust Grate for Extractor 3 4010-1030-S3 3-Stage Extractor Motor Gasket 2 41SN-12-MFLD Extractor Motor Manifold 2 4210-0830 Hinge Keeper for Extractor 2 4310-0821 Extractor Hinge 2 4410-0820 End Cap for Rod on Extractor 4 45SN-12-MB-BLKGRAN 12-Gallon Motor Base – Black Granite 1 4610-0836 19” Axle for Extractor 1 4710-0807 Wheels for Extractor 2 4810-0834 Pump Flat Washer 18 4910-0835-N Nut for Pump Bolt on Extractor 8 5010-0808 Caster for Extractor 2 5110-0816 Caster Bolt 1/4-20 x 1/2 Hex Bolt 12 5210-0843-COM 1/2” x 54” Clear Hose for Extractor Pump Includes Fittings and Filter 1 53
3.0 Grounding InstructionsDANGER: IMPROPER GROUNDING METHOD CAN RESULT IN A RISK OF ELECTRIC SHOCK.Electrical equipment must be grounded. If the machine should malfunction or breakdown, grounding provides a path of least resistance for electrical current to reduce the risk of electric shock. The plug must be inserted into an appropriate outlet that is properly installed and grounded in accordance with all local codes and ordinances.If repair or replacement of the cord or plug is necessary, DO NOT connect the grounded wire to a flat bed terminal. The grounding wire is the wire with insulation and an outer green surface, with or without yellow stripes.
Grounding MethodThis equipment is designed to run on 230V/50 HZ electrical power. Equipment includes a grounded plug. A 10 amp circuit is required to operate machine. 10 amp circuits are normally found in kitchens and bathrooms. If a circuit breaker trips during operation, reset the breaker and move the electrical cord to a different outlet to resume operation.
WARNING:Improper connection of the equipment grounding conductor can result in a risk of electric shock. Check with a qualified electrician or service person if you are in doubt as to whether the outlet is properly grounded. DO NOT modify the plug provided with the equipment. If the plug will not fit into the outlet, have a proper outlet installed by a qualified electrician.
This is machine is equipped with an Australian 3-prong plug.
(6) 12-Gallon, 500 PSI Carpet Extractor 12-Gallon, 500 PSI Carpet Extractor (11)
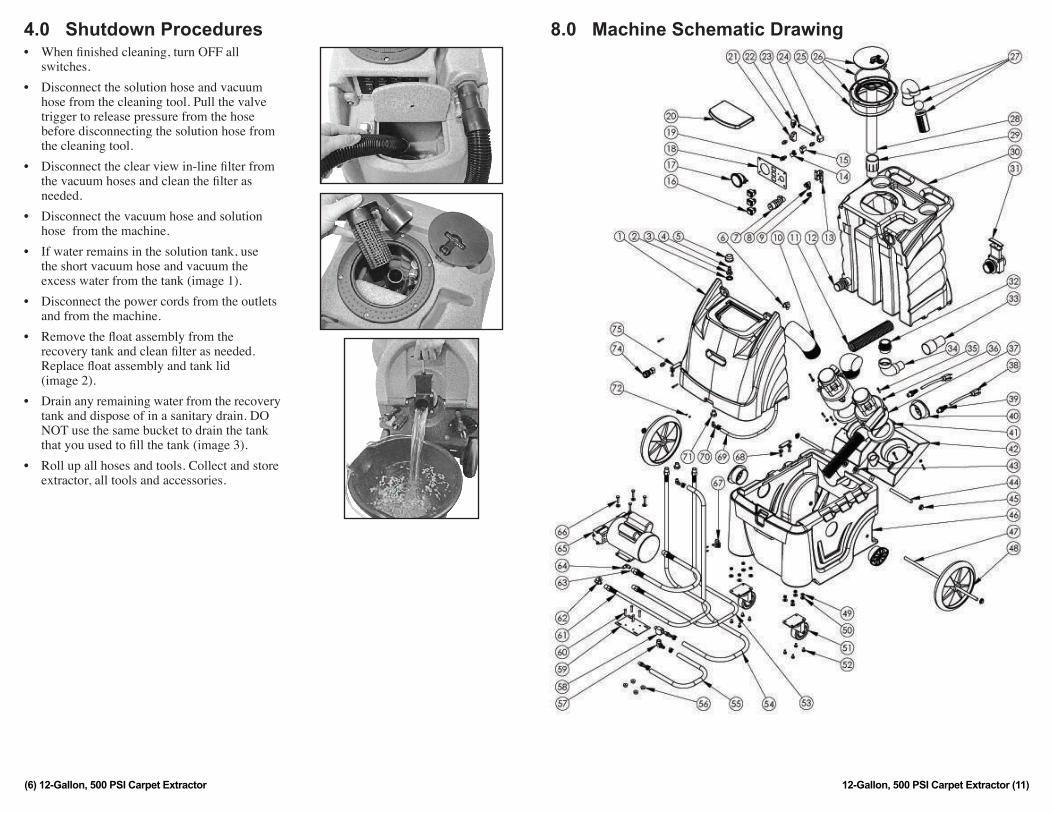
4.0 Shutdown Procedures• When finished cleaning, turn OFF all
switches.• Disconnect the solution hose and vacuum
hose from the cleaning tool. Pull the valve trigger to release pressure from the hose before disconnecting the solution hose from the cleaning tool.
• Disconnect the clear view in-line filter from the vacuum hoses and clean the filter as needed.
• Disconnect the vacuum hose and solution hose from the machine.
• If water remains in the solution tank, use the short vacuum hose and vacuum the excess water from the tank (image 1).
• Disconnect the power cords from the outlets and from the machine.
• Remove the float assembly from the recovery tank and clean filter as needed. Replace float assembly and tank lid (image 2).
• Drain any remaining water from the recovery tank and dispose of in a sanitary drain. DO NOT use the same bucket to drain the tank that you used to fill the tank (image 3).
• Roll up all hoses and tools. Collect and store extractor, all tools and accessories.
8.0 Machine Schematic Drawing
(10) 12-Gallon, 500 PSI Carpet Extractor 12-Gallon, 500 PSI Carpet Extractor (7)
5.0 MaintenanceRegular maintenance is required to keep your Carpet Extractor in proper working condition. Failure to properly maintain your machine could void warranty. Thoroughly clean all equipment and accessories after each use:• Rinse the solution and recover tanks with clean water.• Flush the pump system with clean water, including all hoses and wand(s).• Do not allow water to remain in the tanks after use.• Lubricate all quick disconnects with WD-40 or similar lubricant.• Clean vacuum float assembly screen. WARNING: Disconnect electrical power cord before performing any service or maintenance inside the machine base or before testing or repairing switches or power cords. Failure to do so may result in severe personal injury or death.
Operation IntervalClean Vacuum Assembly Screen Daily- After Each JobRinse Out Recovery Tank DailyFlush Solution Tank and Pump DailyClean Pump-Inlet Filter Weekly - As Needed
5.1 Clean Fresh Water Tank FilterThe fresh water tank filter is located at the bottom of the solution tank. Unscrew the filter counterclockwise and rinse with fresh water. If necessary, use a tooth brush to remove detergent build-up. Note, a heavy build-up is a warning sign that the solution system should be flushed. See the “Flush Chemical System” section.
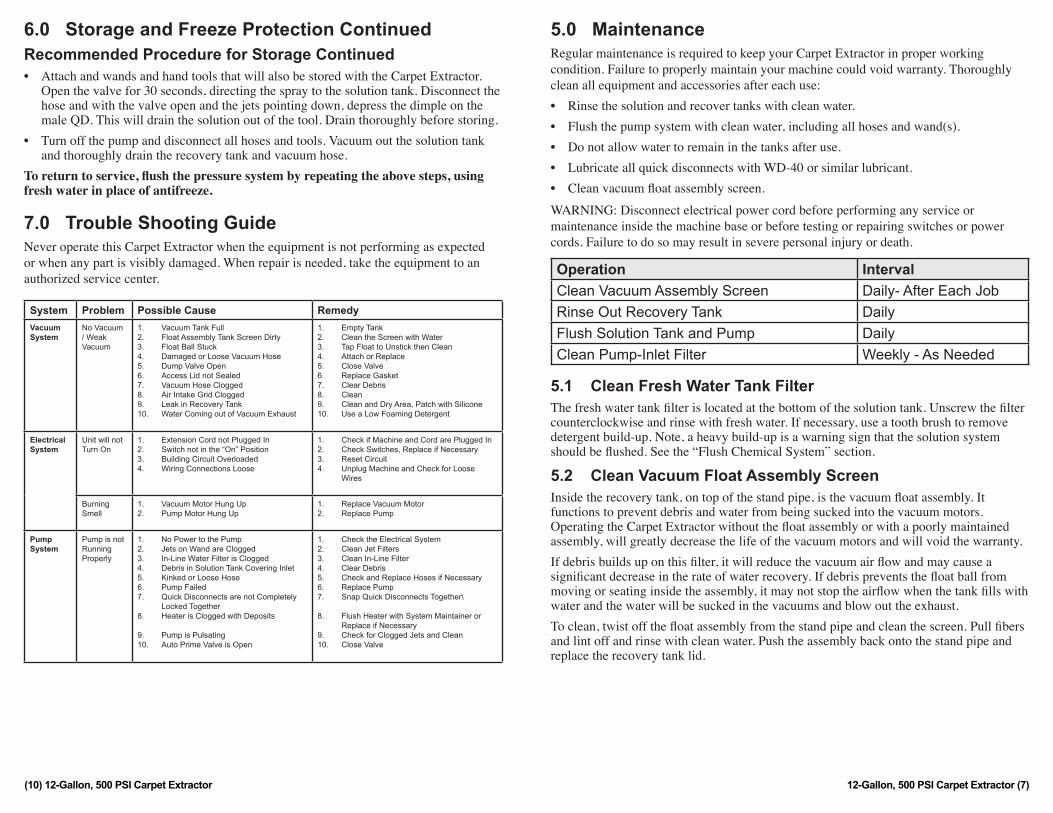
5.2 Clean Vacuum Float Assembly ScreenInside the recovery tank, on top of the stand pipe, is the vacuum float assembly. It functions to prevent debris and water from being sucked into the vacuum motors. Operating the Carpet Extractor without the float assembly or with a poorly maintained assembly, will greatly decrease the life of the vacuum motors and will void the warranty.If debris builds up on this filter, it will reduce the vacuum air flow and may cause a significant decrease in the rate of water recovery. If debris prevents the float ball from moving or seating inside the assembly, it may not stop the airflow when the tank fills with water and the water will be sucked in the vacuums and blow out the exhaust.To clean, twist off the float assembly from the stand pipe and clean the screen. Pull fibers and lint off and rinse with clean water. Push the assembly back onto the stand pipe and replace the recovery tank lid.
6.0 Storage and Freeze Protection ContinuedRecommended Procedure for Storage Continued• Attach and wands and hand tools that will also be stored with the Carpet Extractor.
Open the valve for 30 seconds, directing the spray to the solution tank. Disconnect the hose and with the valve open and the jets pointing down, depress the dimple on the male QD. This will drain the solution out of the tool. Drain thoroughly before storing.
• Turn off the pump and disconnect all hoses and tools. Vacuum out the solution tank and thoroughly drain the recovery tank and vacuum hose.
To return to service, flush the pressure system by repeating the above steps, using fresh water in place of antifreeze.
7.0 Trouble Shooting GuideNever operate this Carpet Extractor when the equipment is not performing as expected or when any part is visibly damaged. When repair is needed, take the equipment to an authorized service center.
System Problem Possible Cause RemedyVacuum System
No Vacuum / Weak Vacuum
1. Vacuum Tank Full2. Float Assembly Tank Screen Dirty3. Float Ball Stuck4. Damaged or Loose Vacuum Hose5. Dump Valve Open6. Access Lid not Sealed7. Vacuum Hose Clogged8. Air Intake Grid Clogged9. Leak in Recovery Tank10. Water Coming out of Vacuum Exhaust
1. Empty Tank2. Clean the Screen with Water3. Tap Float to Unstick then Clean4. Attach or Replace5. Close Valve6. Replace Gasket7. Clear Debris8. Clean9. Clean and Dry Area, Patch with Silicone10. Use a Low Foaming Detergent
Electrical System
Unit will not Turn On
1. Extension Cord not Plugged In2. Switch not in the “On” Position3. Building Circuit Overloaded4. Wiring Connections Loose
1. Check if Machine and Cord are Plugged In2. Check Switches, Replace if Necessary3. Reset Circuit4. Unplug Machine and Check for Loose
Wires
Burning Smell
1. Vacuum Motor Hung Up2. Pump Motor Hung Up
1. Replace Vacuum Motor2. Replace Pump
Pump System
Pump is not Running Properly
1. No Power to the Pump2. Jets on Wand are Clogged3. In-Line Water Filter is Clogged4. Debris in Solution Tank Covering Inlet5. Kinked or Loose Hose6. Pump Failed7. Quick Disconnects are not Completely
Locked Together8. Heater is Clogged with Deposits
9. Pump is Pulsating10. Auto Prime Valve is Open
1. Check the Electrical System2. Clean Jet Filters3. Clean In-Line Filter4. Clear Debris5. Check and Replace Hoses if Necessary6. Replace Pump7. Snap Quick Disconnects Together\
8. Flush Heater with System Maintainer or Replace if Necessary
9. Check for Clogged Jets and Clean10. Close Valve
5.2 Clean Vacuum Float Assembly Screen Continued This screen should be cleaned frequently if the Carpet Extractor is being operated in an environment which has an abnormal build-up of lint and debris, such as cleaning newly installed carpet. Loss of vacuum is most normally associated with lint build-up in this filter at the top of the vacuum stand pipe.
5.3 Rinse Out Recovery TankBuild-up of fine silt and debris can damage the auto-dump pump and dump valve. Clean out the recovery tank on a regular basis to extend the life of these components as well as keep the tank and machine smelling better.To rinse out recovery tank, remove the recovery tank lid and open the dump valve. Place a bucket under the dump valve. Use a hose to rinse the dirt and debris out of the recovery tank. Close the dump valve and spray the tank with deodorizer or disinfectant. Proceed to waste pump cleaning and replace the recovery tank lid. Dispose of dirty water and debris.
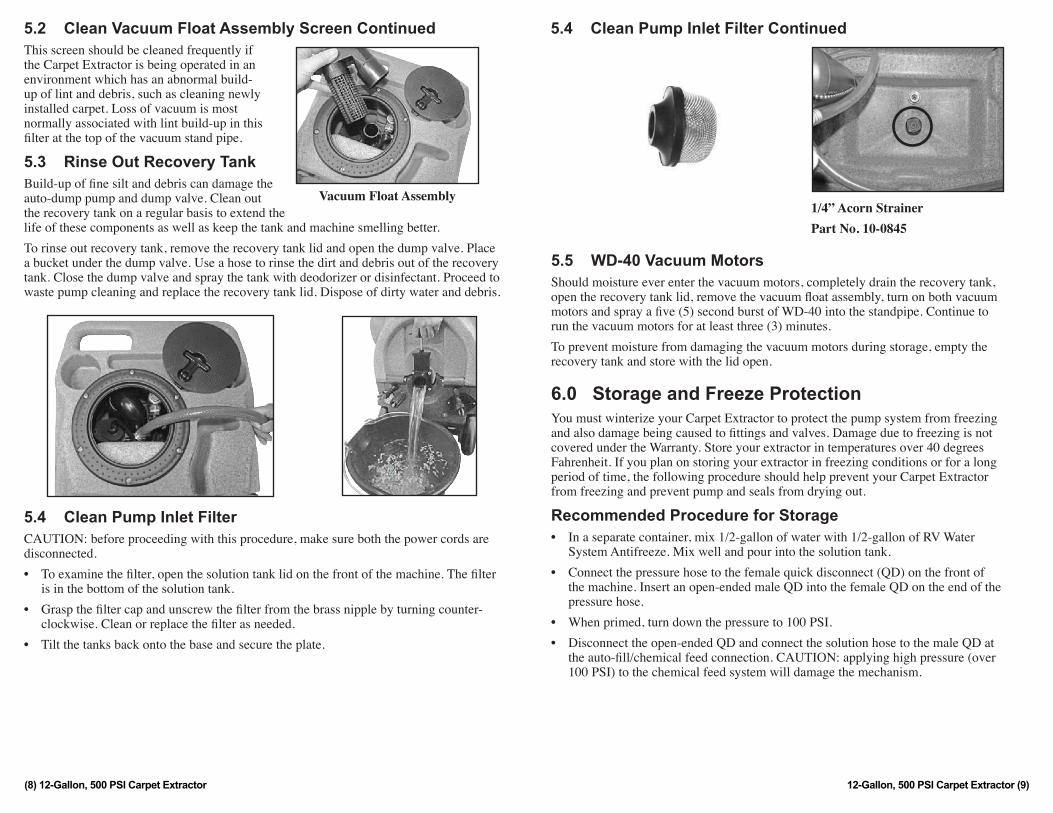
5.4 Clean Pump Inlet FilterCAUTION: before proceeding with this procedure, make sure both the power cords are disconnected.• To examine the filter, open the solution tank lid on the front of the machine. The filter
is in the bottom of the solution tank.• Grasp the filter cap and unscrew the filter from the brass nipple by turning counter-
clockwise. Clean or replace the filter as needed.• Tilt the tanks back onto the base and secure the plate.
(8) 12-Gallon, 500 PSI Carpet Extractor 12-Gallon, 500 PSI Carpet Extractor (9)
Vacuum Float Assembly
5.4 Clean Pump Inlet Filter Continued
1/4” Acorn StrainerPart No. 10-0845
5.5 WD-40 Vacuum MotorsShould moisture ever enter the vacuum motors, completely drain the recovery tank, open the recovery tank lid, remove the vacuum float assembly, turn on both vacuum motors and spray a five (5) second burst of WD-40 into the standpipe. Continue to run the vacuum motors for at least three (3) minutes.To prevent moisture from damaging the vacuum motors during storage, empty the recovery tank and store with the lid open.
6.0 Storage and Freeze ProtectionYou must winterize your Carpet Extractor to protect the pump system from freezing and also damage being caused to fittings and valves. Damage due to freezing is not covered under the Warranty. Store your extractor in temperatures over 40 degrees Fahrenheit. If you plan on storing your extractor in freezing conditions or for a long period of time, the following procedure should help prevent your Carpet Extractor from freezing and prevent pump and seals from drying out.
Recommended Procedure for Storage• In a separate container, mix 1/2-gallon of water with 1/2-gallon of RV Water
System Antifreeze. Mix well and pour into the solution tank.• Connect the pressure hose to the female quick disconnect (QD) on the front of
the machine. Insert an open-ended male QD into the female QD on the end of the pressure hose.
• When primed, turn down the pressure to 100 PSI.• Disconnect the open-ended QD and connect the solution hose to the male QD at
the auto-fill/chemical feed connection. CAUTION: applying high pressure (over 100 PSI) to the chemical feed system will damage the mechanism.
![Sniper Rifles - pmulcahy.compmulcahy.com/PDFs/small_arms/sniper_rifles.pdf · Sniper Rifles sniper_rifles_2.html[12/13/2017 10:15:29 AM] SNIPER RIFLES Armenian Sniper Rifles Australian](https://img.pdfslide.net/doc/110x75/5b38733d7f8b9a4a728d1f41/sniper-rifles-sniper-rifles-sniperrifles2html12132017-101529-am-sniper.jpg)


![Flexible Timing Simulation of RISC-V Processors with Sniper[SNIPER] Disabling performance models [SNIPER] Leaving ROI after 18.26 seconds OUT: RUN: TraceThread [SNIPER] Simulated 5.0M](https://img.pdfslide.net/doc/110x75/5f9647eee6174c19e44e272f/flexible-timing-simulation-of-risc-v-processors-with-sniper-sniper-disabling-performance.jpg)