Embed Size (px)
Citation preview

New Student Registration Instructions
Dear Parent/Guardian:
Bloom Township High School District 206 has transitioned to a new student registration system in an effort to streamline this annual information update process.
PARENTS’ GUIDE TO NEW STUDENT REGISTRATIONEnrollment Express is a data collection system integrated into PowerSchool to share forms with you. Returning student registration can be accessed from your existing Parent Portal
account in PowerSchool. Please follow these steps to complete the returning student
registration for your child(ren) for the upcoming school year.
New Student Registration Steps:1. Follow the instructions on the Web ID and Password letter provided to you to create
an account on our PowerSchool site at:https://sd206.powerschool.com/public/home.html
2. Once logged into PowerSchool please click the Forms icon on the left hand
navigation bar.
3. Select the Enrollment tab at the top.
4. Complete all 7 enrollment forms beginning with the 01. Student Information form and
ending with the 07. Health Information form.
5. After each section, please click the Submit button to save your data and
advance to the next section. If the form submission was successful, a pop-up window will
open thanking you for the submission.
○ SAVE VS. SUBMIT: Along with the Submit button is the Save button. Use the
Save button if you do not yet want or are not yet able to send the form to the
school but do not want to re-enter information already filled out. It is
recommended that you save a form if you have to step away from your computer,
as PowerSchool may log you out for inactivity.
○ When to Save:
• You need to step away from the computer
• You do not have all the required information but have filled out some of the
information
○ When to Submit:
• You are ready to send the form to the school/district.

6. Where applicable, the information we currently have on file for your student(s) will auto
populate into the form fields. Please check for accuracy and make any corrections
needed to existing information.
7. Once you have successfully completed and submitted all sections of the enrollment
form, it will be sent to the school registrar for approval.
○ As you complete forms, the status bar for that category will change from red to
green. A form can have one of five statuses, indicated within the status column:
■ Indicates that the form has not yet been submitted
■ Indicates that the form has been successfully submitted
■ Indicates that the form is waiting for approval
■ Indicates that the form was approved
■ Indicates the form was rejected. A popup will indicate why
it was rejected and what actions need to be taken.
8. Please complete the returning student registration process for each additional child
currently enrolled, by clicking their name(s) at the top of the PowerSchool Parent Portal
account and navigating to the Forms section.
9. APPROVAL: All student registrations require a school employee to verify the information
when it is submitted. Once the final form is submitted, it will go into a pending state until
the administrator approves or rejects the submission. A pop-up window will open on
submission, informing you the form is pending approval.
○ If the form is approved, the status will be changed (see above) and the form
background return to white.
○ If the response to the form was rejected, the form will be highlighted red in the
form list and the status will be rejected. Clicking the form name will display the
form with a red background. A pop-up window will open, letting you know the
form was rejected and the reason the form was rejected, and any actions needed
to be taken.
■ Click the Edit Rejected button to be able to edit your submission. Once
you finish making your changes, resubmit the form. It will return to
pending status. If you have enabled parent notifications on your account
(see set-up information below), you will receive an email when a form’s
status moves from Pending to Approved or Rejected.
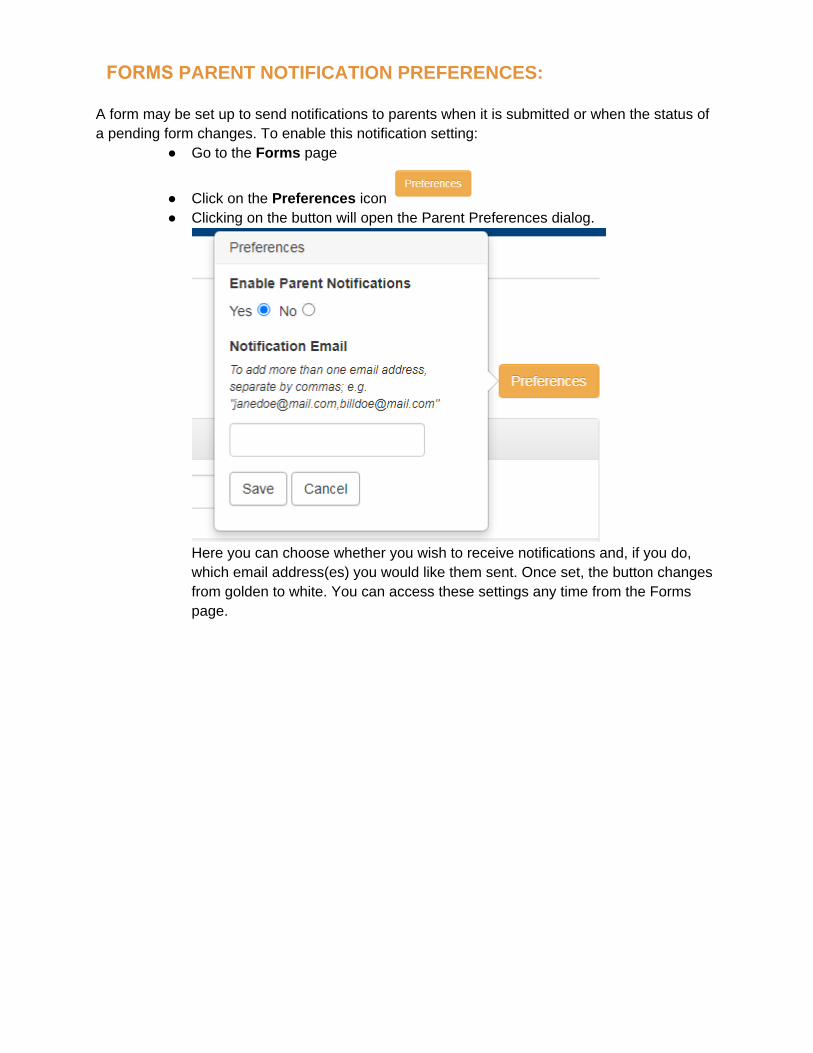
A form may be set up to send notifications to parents when it is submitted or when the status of
a pending form changes. To enable this notification setting:
● Go to the Forms page
● Click on the Preferences icon
● Clicking on the button will open the Parent Preferences dialog.
Here you can choose whether you wish to receive notifications and, if you do,
which email address(es) you would like them sent. Once set, the button changes
from golden to white. You can access these settings any time from the Forms
page.
FORMS PARENT NOTIFICATION PREFERENCES: