Embed Size (px)
Citation preview

1 6/24/2013
New York State Grants Gateway
Vendor User Guide
Version 1.2
2 6/24/2013
Table of Contents
I. Grantee Orientation 3
II. Grant Opportunity Portal Tutorial 10
III. Delegated Administrator Tutorial 26
IV. Document Vault Tutorial 32
3 6/24/2013
I. Grantee Orientation
Welcome to the New York State (NYS) Grants Gateway. The purpose of this section is to
orient new users to all that the Gateway has to offer. It is your checklist to getting started. The
following pages provide a basic overview of the functionality available within the Grants
Gateway.
A. Grant Opportunity Portal B. Registration C. Delegated Administration
D. Grantee Profile: 1. Organization Information
2. Document Vault
3. Prequalification

4 6/24/2013
A. Grant Opportunity Portal
As a new user, the place you will want to start is the Grant Opportunity Portal, which is
open to the public and does not require you to be a registered user. The Portal will allow
you to browse, search and sign‐up to receive notifications regarding State agency grant
funding opportunities.
It is recommended that you experiment with the Browse and Search features. Sign‐up to
receive notifications of upcoming and available funding opportunities and eliminate the
need to check back regularly. See Section II. Grant Opportunity Portal Tutorial for a full
accounting of the available functionality.

5 6/24/2013
B. Registration
NYS Vendors and organizations that would like to become NYS vendors must register their
organization in the Gateway and establish users in the system. To start this process, from
the Grant Opportunity Portal, under Registration, click “Request Access Now!” to view your
options.
Registration is a straightforward process. For existing NYS vendors, there is only one step.
You must submit a Registration Form for Administrators identifying a Delegated
Administrator responsible for managing your organization’s profile and users. The NYS
Grants reform team will create the corresponding account and email your designee their
username and password.
To find out if your organization has already registered, enter its SFS Vendor ID number and
search. If your organization is registered, the search result will include contact information
for its delegated administrator, and you can contact this individual to request access to the
system. If your organization is not registered, the search result will provide a link to the
Request Form for Administrator, which you will need to complete and submit pursuant to
the instructions provided.
6 6/24/2013
If your organization is not currently doing business with NYS, you will need to submit a
Substitute W‐9 Form to obtain a NYS SFS Vendor ID, in addition to the Registration Form for
Administrators, in order to register.
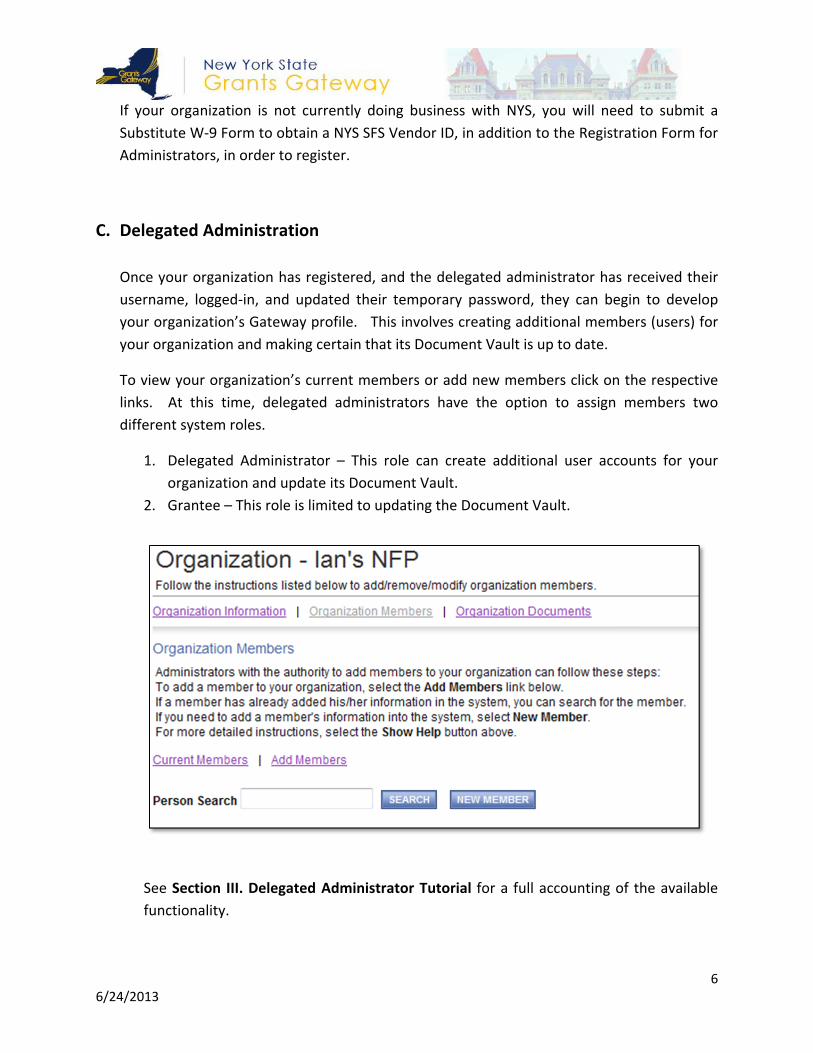
C. Delegated Administration
Once your organization has registered, and the delegated administrator has received their
username, logged‐in, and updated their temporary password, they can begin to develop
your organization’s Gateway profile. This involves creating additional members (users) for
your organization and making certain that its Document Vault is up to date.
To view your organization’s current members or add new members click on the respective
links. At this time, delegated administrators have the option to assign members two
different system roles.
1. Delegated Administrator – This role can create additional user accounts for your
organization and update its Document Vault.
2. Grantee – This role is limited to updating the Document Vault.
See Section III. Delegated Administrator Tutorial for a full accounting of the available
functionality.
7 6/24/2013
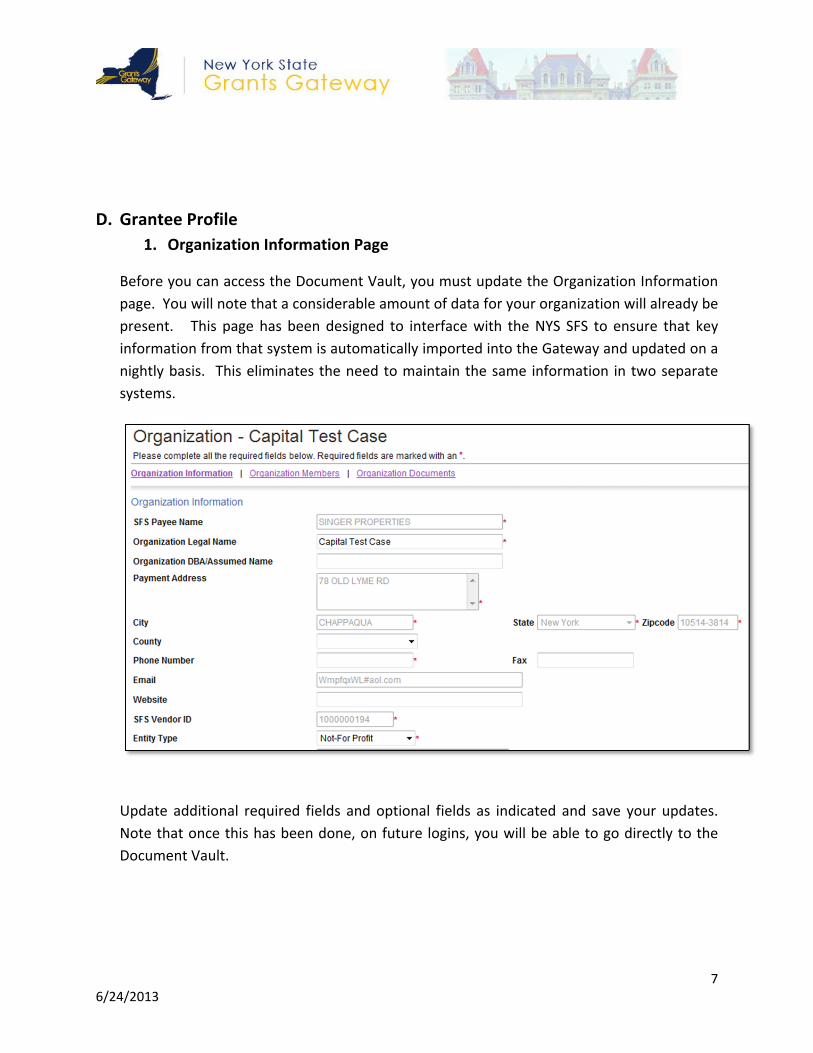
D. Grantee Profile 1. Organization Information Page
Before you can access the Document Vault, you must update the Organization Information
page. You will note that a considerable amount of data for your organization will already be
present. This page has been designed to interface with the NYS SFS to ensure that key
information from that system is automatically imported into the Gateway and updated on a
nightly basis. This eliminates the need to maintain the same information in two separate
systems.
Update additional required fields and optional fields as indicated and save your updates.
Note that once this has been done, on future logins, you will be able to go directly to the
Document Vault.
8 6/24/2013
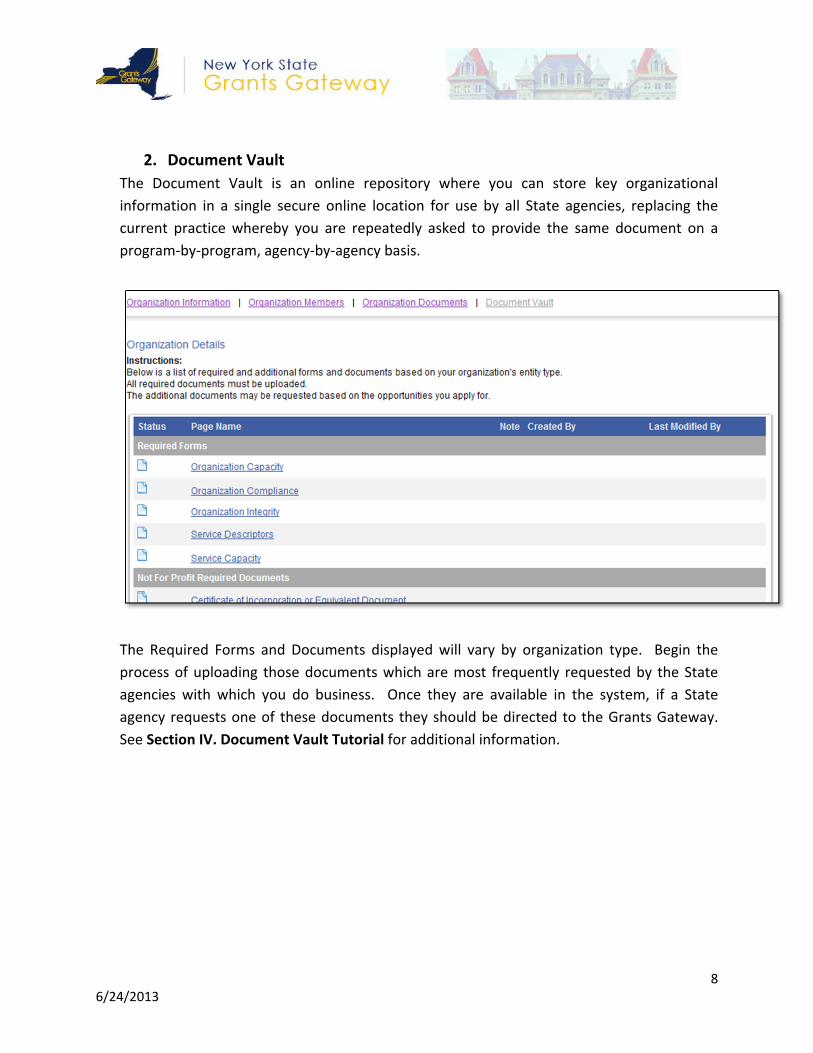
2. Document Vault
The Document Vault is an online repository where you can store key organizational
information in a single secure online location for use by all State agencies, replacing the
current practice whereby you are repeatedly asked to provide the same document on a
program‐by‐program, agency‐by‐agency basis.
The Required Forms and Documents displayed will vary by organization type. Begin the
process of uploading those documents which are most frequently requested by the State
agencies with which you do business. Once they are available in the system, if a State
agency requests one of these documents they should be directed to the Grants Gateway.
See Section IV. Document Vault Tutorial for additional information.
9 6/24/2013
3. Prequalification As part of the overall Grants Reform effort, Not‐for‐profit organizations will use the
Document Vault as tool to complete a Prequalification Application to do business with the
State. This involves uploading a series of required documents; responding to questions
regarding their organization’s capacity, compliance and integrity; and electronically
submitting this information to the State. Once you have completed these tasks, submit
your Prequalification Application for State review. See Section IV. Document Vault Tutorial
for additional information.

10 6/24/2013
II. Grant Opportunity Portal Tutorial
The Grant Opportunity Portal provides a one‐stop shop for anyone interested in locating
grant funding opportunities with State agencies. The following pages provide detailed
information on how to use the functionality within the Grant Opportunity Portal.
A. Grant Opportunity Portal Home B. Browse a list of Grant Opportunities C. Search for specific Grant Opportunities D. Download a Grant Opportunity E. Sign‐up to be notified of upcoming Grant Opportunities F. Update Notification Preferences G. Learn how to become a Registered User H. Logging into the Grants Gateway

11 6/24/2013
A. Grant Opportunity Portal – Home
The Grant Opportunity Portal Home page is available to the public. This page offers a
variety of ways for users to locate grant funding opportunities.
12 6/24/2013
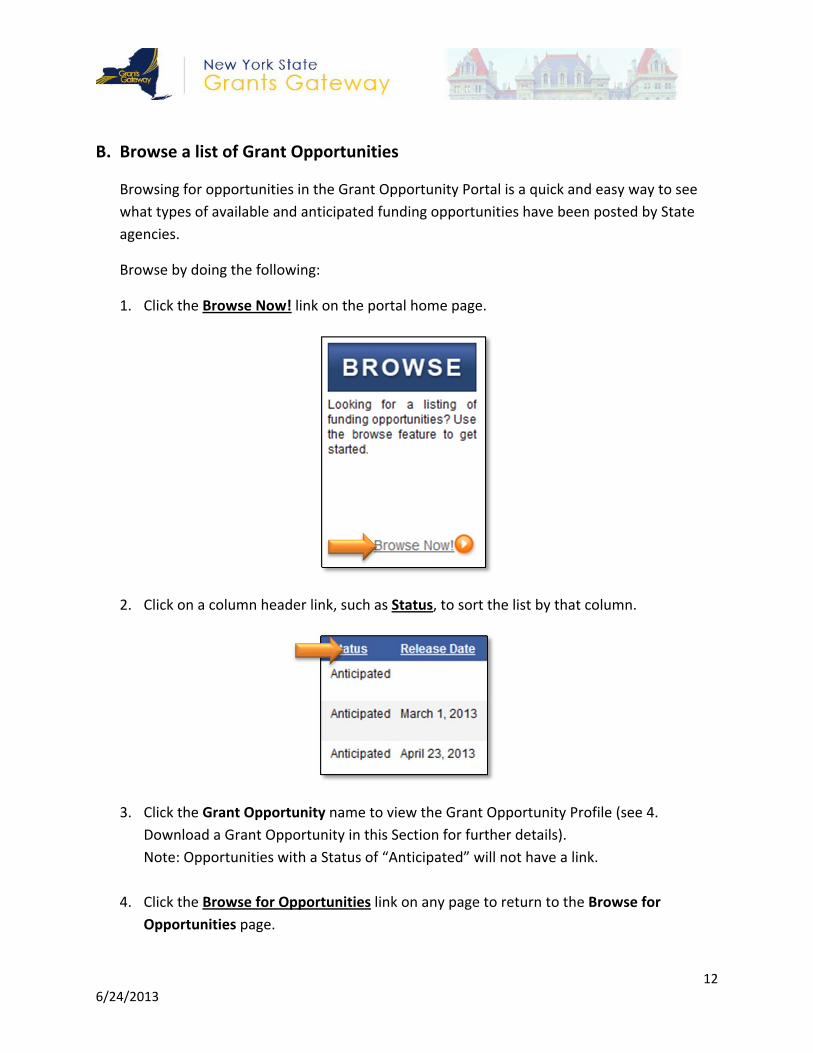
B. Browse a list of Grant Opportunities
Browsing for opportunities in the Grant Opportunity Portal is a quick and easy way to see
what types of available and anticipated funding opportunities have been posted by State
agencies.
Browse by doing the following:
1. Click the Browse Now! link on the portal home page.
2. Click on a column header link, such as Status, to sort the list by that column.
3. Click the Grant Opportunity name to view the Grant Opportunity Profile (see 4.
Download a Grant Opportunity in this Section for further details).
Note: Opportunities with a Status of “Anticipated” will not have a link.
4. Click the Browse for Opportunities link on any page to return to the Browse for
Opportunities page.

13 6/24/2013
C. Browse a list of Grant Opportunities
Looking for a specific Grant Opportunity or type of Grant Opportunity? Interested in what
opportunities will be available in the future? Use the Grant Opportunities Portal Search
functionality to locate funding opportunities.
Search by doing the following:
1. Click the Search Now! link on the portal home page.
2. Enter information in the search fields to narrow your results or click directly on search
to see all opportunities in the Grants Gateway.
NOTE: Hold the Ctrl key and click with the mouse to make multiple selections when
searching by Eligibility, Funding Agency and/or Service Area.

14 6/24/2013
3. Select the SEARCH button.
4. Click the Grant Opportunity name to view the Grant Opportunity Profile (see 4.
Download a Grant Opportunity in this Section for further details).
Note: Opportunities with a Status of “Anticipated” will not have a link.
5. Click the Search for Opportunities link on any page to return to the Search for
Opportunities page.
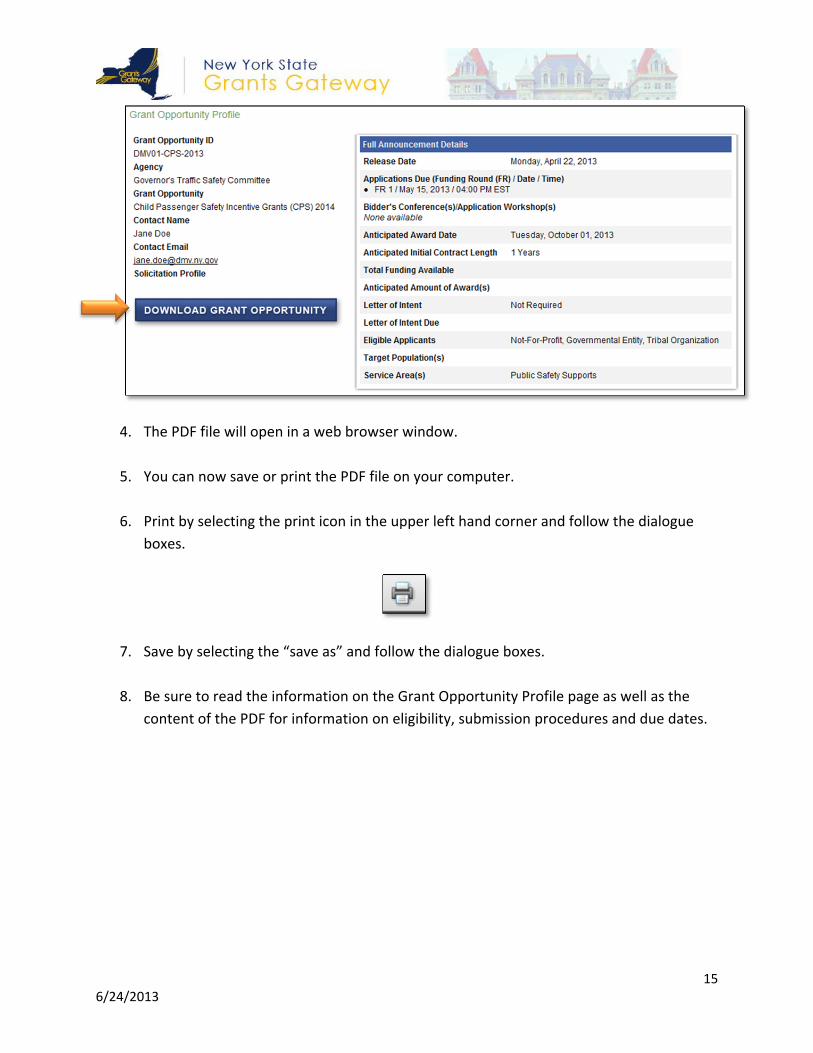
D. Download a Grant Opportunity
The Grant Opportunity Portal allows grantees to download PDF versions of available Grant
Opportunities. These opportunities can then be completed and submitted to the
appropriate State agency.
Download a Grant Opportunity by doing the following:
1. Search or browse for an “Available” opportunity.
2. Click the Grant Opportunity name link to view the Grant Opportunity Profile.
3. Select the DOWNLOAD GRANT OPPORTUNITY button.
15 6/24/2013
4. The PDF file will open in a web browser window.
5. You can now save or print the PDF file on your computer.
6. Print by selecting the print icon in the upper left hand corner and follow the dialogue
boxes.
7. Save by selecting the “save as” and follow the dialogue boxes.
8. Be sure to read the information on the Grant Opportunity Profile page as well as the
content of the PDF for information on eligibility, submission procedures and due dates.

16 6/24/2013
E. Sign‐up to be notified of upcoming Grant Opportunities
If you sign‐up for notifications the Grant Opportunity Portal can keep you automatically
informed about opportunities you might be interested in. Receive notifications by doing the
following:
1. Click the Sign‐up Now! link on the portal home page.
2. Enter your information in the required fields.
NOTE: Required fields are marked with an *.
17 6/24/2013
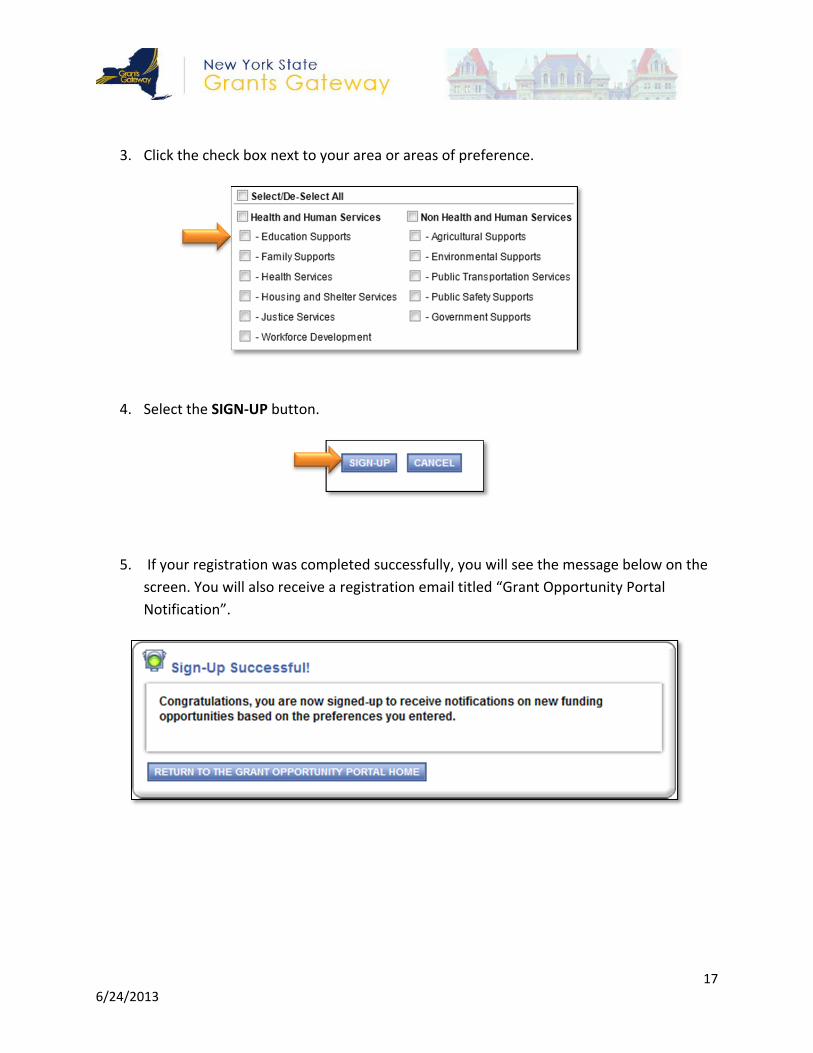
3. Click the check box next to your area or areas of preference.
4. Select the SIGN‐UP button.
5. If your registration was completed successfully, you will see the message below on the
screen. You will also receive a registration email titled “Grant Opportunity Portal
Notification”.
18 6/24/2013
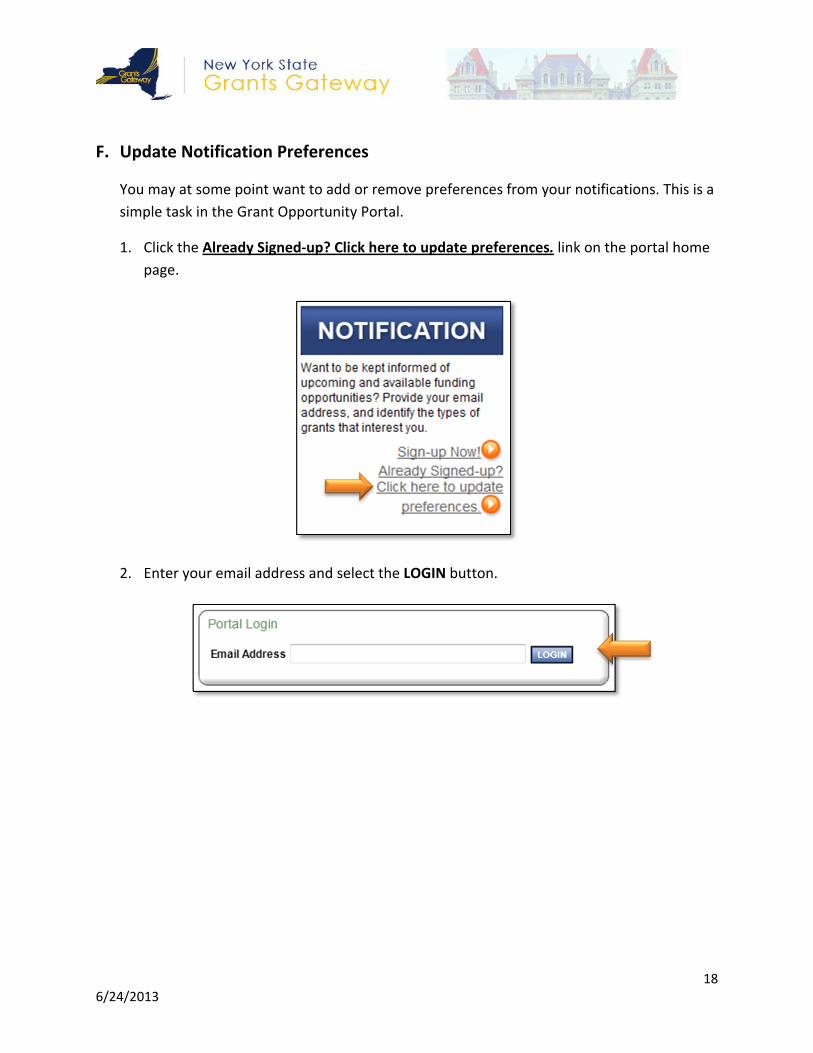
F. Update Notification Preferences
You may at some point want to add or remove preferences from your notifications. This is a
simple task in the Grant Opportunity Portal.
1. Click the Already Signed‐up? Click here to update preferences. link on the portal home
page.
2. Enter your email address and select the LOGIN button.
19 6/24/2013
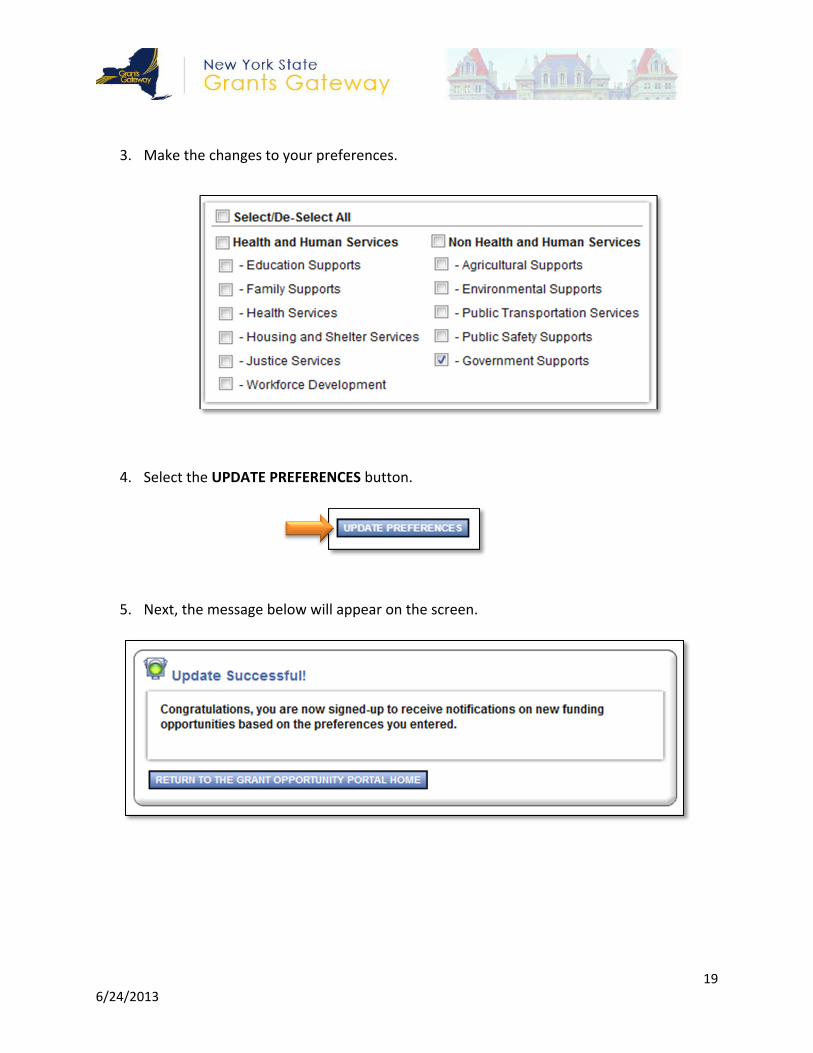
3. Make the changes to your preferences.
4. Select the UPDATE PREFERENCES button.
5. Next, the message below will appear on the screen.

20 6/24/2013
G. Learn how to become a Registered User
Have you done business previously with NYS or would you like to start doing business with
NYS? The first thing you need to do is become a registered user of the Grants Gateway.
1. Click the Request Access Now! link on the portal home page.
2. If you have already received a Grants Gateway username and password via email click
the Click here to login link. See H. Logging into the Grants Gateway in this section for
further information.
3. If your organization currently or previously has had a contract with NYS then the
organization may be registered with the Grants Gateway. To find out enter your
organization’s 10 digit SFS Vendor ID and select the Verify SFS Vendor ID button. If you
don’t know your SFS Vendor ID, check with your finance office.

21 6/24/2013
If your organization has registered you will see your Organization Name and the
name and email address of the person who has been assigned as the Grantee
Delegated Administrator. Click on the Email link to contact the Grantee
Delegated Administrator and request that they give you access to the Grants
Gateway.
If your Organization Name is listed, but the Grantee Delegated Administrator is
not then you should click on the Registration Form link. Download and
complete the Registration Form following the instructions included with the
form.
4. If your organization has not done business with NYS click on the Substitute W‐9 Form
and Registration Form links. Download and complete both forms, follow the
instructions included with the Registration Form.

22 6/24/2013
Once your registration has been processed the individuals that were identified as
Delegated Administrators will receive two emails, one with their username and one with
their password. See H. Logging into the Grants Gateway in this section for further
information.
H. Logging into the Grants Gateway
1. To log in to the Grants Gateway click the Grants Gateway Login link on the Grant
Opportunity Portal Home page.
Enter your Username and Password on the front page of the Grants Gateway and click the
LOGIN button.

23 6/24/2013
2. The first time you login to the Grants Gateway you will be prompted to change your
password.
3. Enter your new Password. Enter your new Password a second time in the Confirm
Password box to ensure that you have entered it correctly. Your new Password must
consist of at least 8 characters/numbers. You must include at least 1 capital letter and
at least 1 number.
4. Click the SAVE button on the menu tab.
5. You will get a ”Page Information” confirmation after the save is complete.
24 6/24/2013
III. Delegated Administrator Tutorial
The Delegated Administrator Tutorial provides a definition of the Roles within the
system currently available for Grantees. It also provides detailed instructions for adding,
modifying and inactivating users.
A. Grantee Roles
B. Creating User Accounts
C. Modifying User Accounts
D. Inactivating User Accounts

25 6/24/2013
A. Grantee Roles
Currently there are two Grantee Roles defined within the Grants Gateway system:
1. Grantee Delegated Administrator – Delegated Administrators are responsible for
maintaining all aspects of user accounts for their organization. In addition, they have
the ability to complete forms, upload documents, and answer organizational
information questions in the Document Vault (see Section IV. Document Vault Tutorial
for additional information).
2. Grantee – Users assigned to this role are able to complete forms, upload documents,
and answer organizational information questions in the Document Vault.
Note – More grantee roles will be made available as additional functionality is rolled
out.
B. Creating User Accounts
Note: It is advisable that you develop a process within your organization for requesting and
authorizing access to the Grants Gateway. You may want to develop a form for this purpose
that contains an official signoff process. The method you choose for authenticating users
being given access to the system is up to your organization, but it is strongly recommended
that you have some type of written approval process.
1. Click the Organization(s) link on the home page.
2. Click on the Organization Members link.

26 6/24/2013
3. Click the Add Members link.
4. Select the NEW MEMBER button.
5. Complete all required fields on the page.
6. Select the appropriate role for the user you are adding.
27 6/24/2013
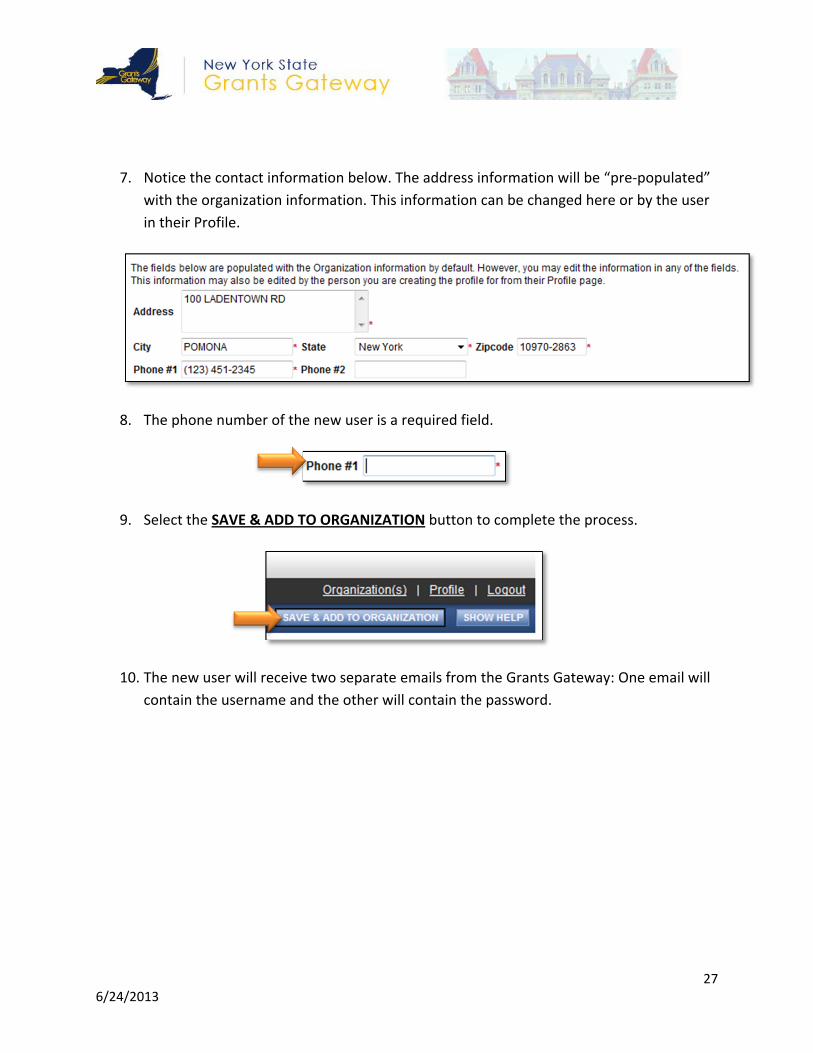
7. Notice the contact information below. The address information will be “pre‐populated”
with the organization information. This information can be changed here or by the user
in their Profile.
8. The phone number of the new user is a required field.
9. Select the SAVE & ADD TO ORGANIZATION button to complete the process.
10. The new user will receive two separate emails from the Grants Gateway: One email will
contain the username and the other will contain the password.

28 6/24/2013
C. Modifying User Accounts
Note: All users in the system are able to update their profile information with the exception
of their role. The Delegated Administrator is responsible for updating user roles when
necessary. In addition, it is recommended that you do a periodic review of user accounts to
ensure that the information within the system is accurate.
1. Click the Organization(s) link on the home page.
2. Click on the Organization Members link.
3. Current users (members) for the organization will be displayed. Click on the user’s
name link in the Person column.
29 6/24/2013
4. Modify the user’s information as appropriate and click the SAVE button.
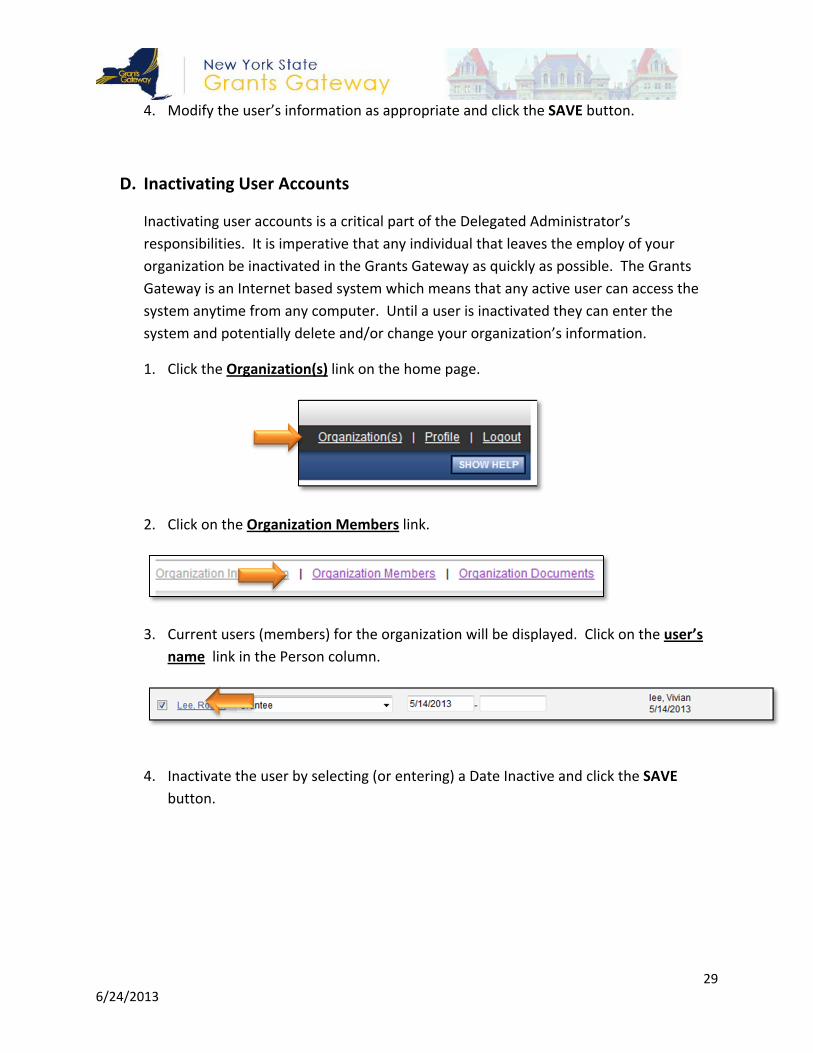
D. Inactivating User Accounts
Inactivating user accounts is a critical part of the Delegated Administrator’s
responsibilities. It is imperative that any individual that leaves the employ of your
organization be inactivated in the Grants Gateway as quickly as possible. The Grants
Gateway is an Internet based system which means that any active user can access the
system anytime from any computer. Until a user is inactivated they can enter the
system and potentially delete and/or change your organization’s information.
1. Click the Organization(s) link on the home page.
2. Click on the Organization Members link.
3. Current users (members) for the organization will be displayed. Click on the user’s
name link in the Person column.
4. Inactivate the user by selecting (or entering) a Date Inactive and click the SAVE
button.

30 6/24/2013

31 6/24/2013
IV. Document Vault Tutorial
The Document Vault Tutorial provides detailed information on populating your
document vault and, if necessary submitting it to be reviewed for prequalification. Note: at
this time prequalification is only required for not‐for profit organizations.
A. Grantee Organization Information
B. Document Vault
C. Prequalification

32 6/24/2013
A. Grantee Organization Information
Before you can populate your Document Vault you must complete your Grantee
Organization Information.
1. Click the Organization(s) link on the home page.
2. On the Organization Information page there are a number of data elements that are
pulled in from the Statewide Financial System (SFS). These data elements are grayed
out and cannot be updated in the Grants Gateway. If this information is inaccurate you
must change it in SFS and it will be imported into the Grants Gateway the following day.
Complete all of the required fields (indicated by *).

33 6/24/2013
You will be asked to select the agency that your organization has done the most
business with (greatest number of contracts) in the last 3 years. If your organization has
not had a contract with a State agency select the one you anticipate contracting with.
3. Click the SAVE button.
4. When the information is captured correctly, you will get the “Green Light” to move
forward.
5. Once you have selected the agency the Document Vault tab will be available on the
menu bar. Click the Document Vault link to being the process of submitting information
for State agency review.
34 6/24/2013
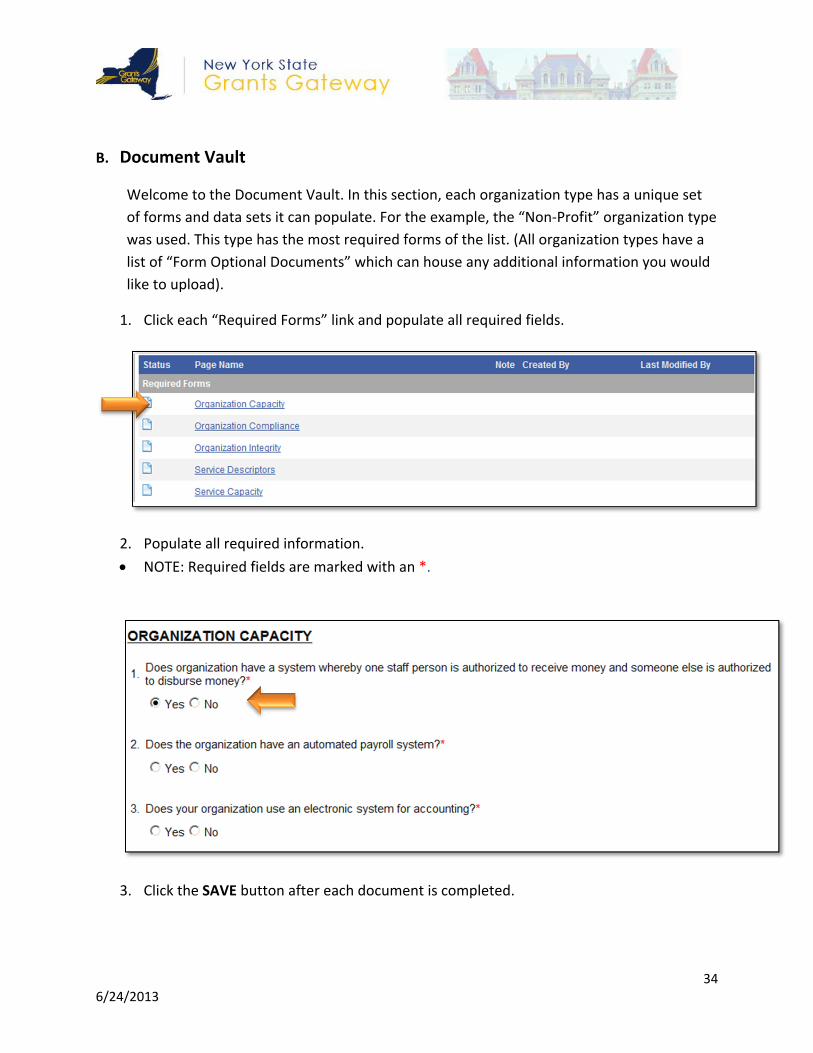
B. Document Vault
Welcome to the Document Vault. In this section, each organization type has a unique set
of forms and data sets it can populate. For the example, the “Non‐Profit” organization type
was used. This type has the most required forms of the list. (All organization types have a
list of “Form Optional Documents” which can house any additional information you would
like to upload).
1. Click each “Required Forms” link and populate all required fields.
2. Populate all required information.
NOTE: Required fields are marked with an *.
3. Click the SAVE button after each document is completed.

35 6/24/2013
4. After confirming that your document has been saved (Created By) scroll to the bottom
of the screen and click the next document in the section.
5. Repeat this process until each of the “Required Forms” is completed and saved.

36 6/24/2013
6. When you are filling out the Service Descriptors form, please use the instructions
below for Question #3.
a. Work left to right when selecting items in the dropdowns. In the example below
on the first line you would select Age and then Children.
b. When you choose an item from the first dropdown (level 1) the second
dropdown (level 2) will be populated with the appropriate associated values.
This will continue until all pertinent selections have been populated.
c. Note that not all items will have corresponding selections for the third and
fourth levels. For example, in the first line below there are no corresponding
values for levels 3 and 4.
7. When you are filling out the Service Capacity form, please use the instructions below.
If you choose yes to question number 1:
Choose one existing or previous contract you have had with a State agency for the
service area you chose, and answer the following questions:
a. Enter existing Contract/Grant ID number: Use State agency generated Contract ID
b. Type: Enter the type of grant (Member Item, Competitive, Non‐competitive)
c. Funding Agency: Enter the State agency that held your contract
d. Funding Source Type: Enter Funding Source (State, Federal, or Unknown)
e. Funder Reference Name: Name of contact at the State agency that worked on your
grant
f. Funding Reference Title: Title of the funding reference
g. Funding Reference Email: Email address of the funding reference
h. Program Name/Description: Name or short description of the project funded
i. Contract Start Date: Date the contract began
j. Contract End Date: Date the contract ended
37 6/24/2013
k. Total Contract Amount: Dollar amount of the contract
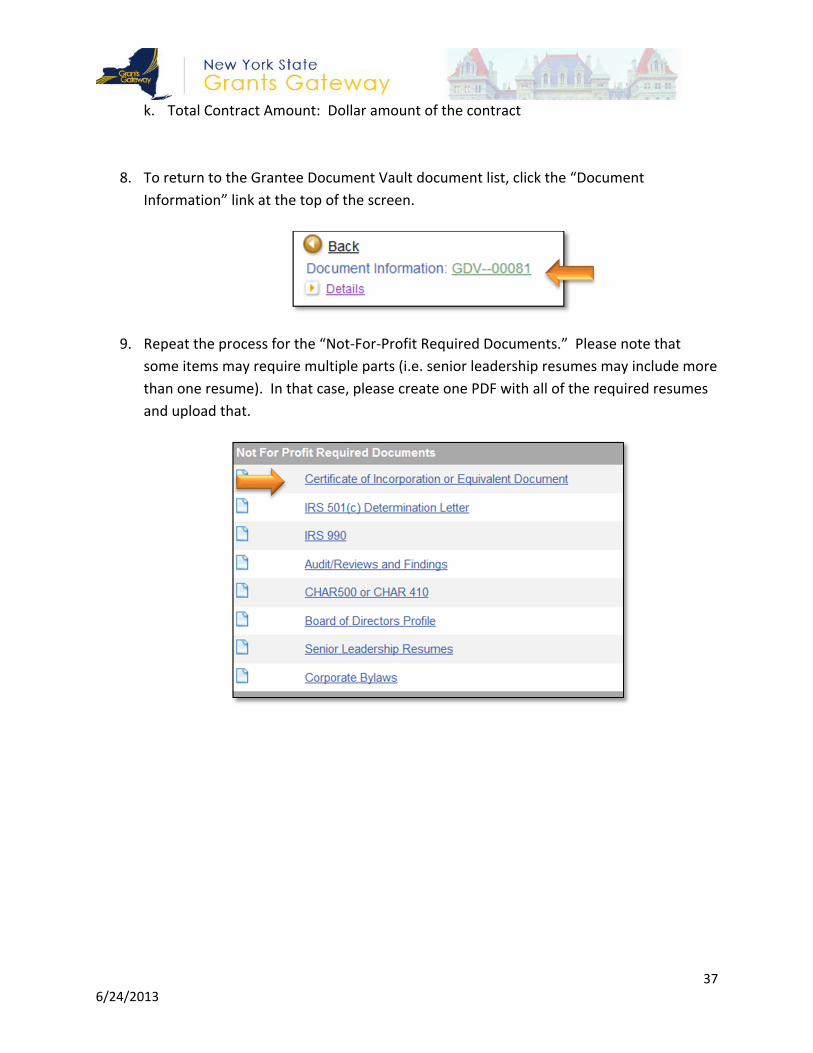
8. To return to the Grantee Document Vault document list, click the “Document
Information” link at the top of the screen.
9. Repeat the process for the “Not‐For‐Profit Required Documents.” Please note that
some items may require multiple parts (i.e. senior leadership resumes may include more
than one resume). In that case, please create one PDF with all of the required resumes
and upload that.
38 6/24/2013
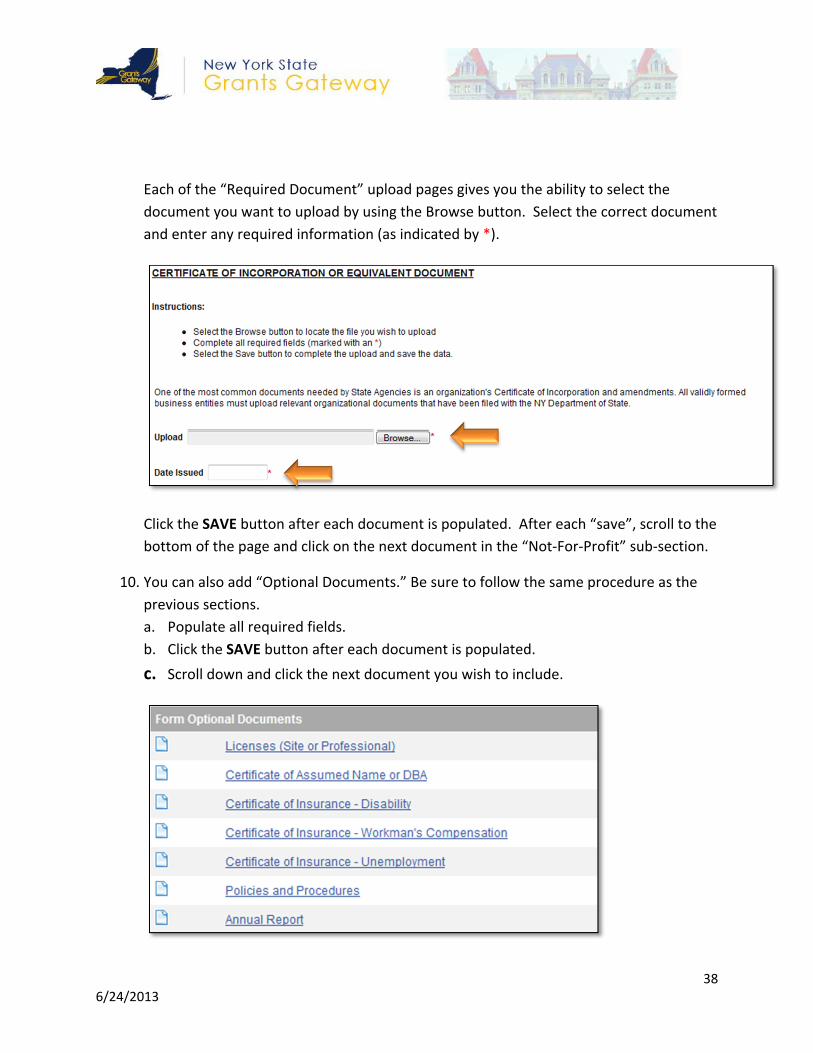
Each of the “Required Document” upload pages gives you the ability to select the
document you want to upload by using the Browse button. Select the correct document
and enter any required information (as indicated by *).
Click the SAVE button after each document is populated. After each “save”, scroll to the
bottom of the page and click on the next document in the “Not‐For‐Profit” sub‐section.
10. You can also add “Optional Documents.” Be sure to follow the same procedure as the
previous sections.
a. Populate all required fields.
b. Click the SAVE button after each document is populated.
c. Scroll down and click the next document you wish to include.

39 6/24/2013
11. Return to the Document Vault main page by clicking the “GDV‐0000” link at the top.
C. Prequalification
Not‐for‐profit organizations will use the Document Vault as tool to complete a
Prequalification Application to do business with the State. Once you have completed
populating your Document Vault, if your organization is a not‐for‐profit you must submit
your Prequalification Application for State review.
1. On the Document Vault main page click the Click Here to Submit your Document Vault
link.
2. Click on the button to submit your Document Vault.
3. You will be asked to attest to two certifications in order to submit. Click on “I agree.” (If
you click on “I do not agree,” your document vault will not be submitted).

40 6/24/2013
4. You can then confirm it has been submitted by clicking on the expand Details button on
your Document Vault.
Once you submit your Document Vault you will not be able to make any changes to it
until a State agency user has reviewed it and reopened it for you.
41 6/24/2013
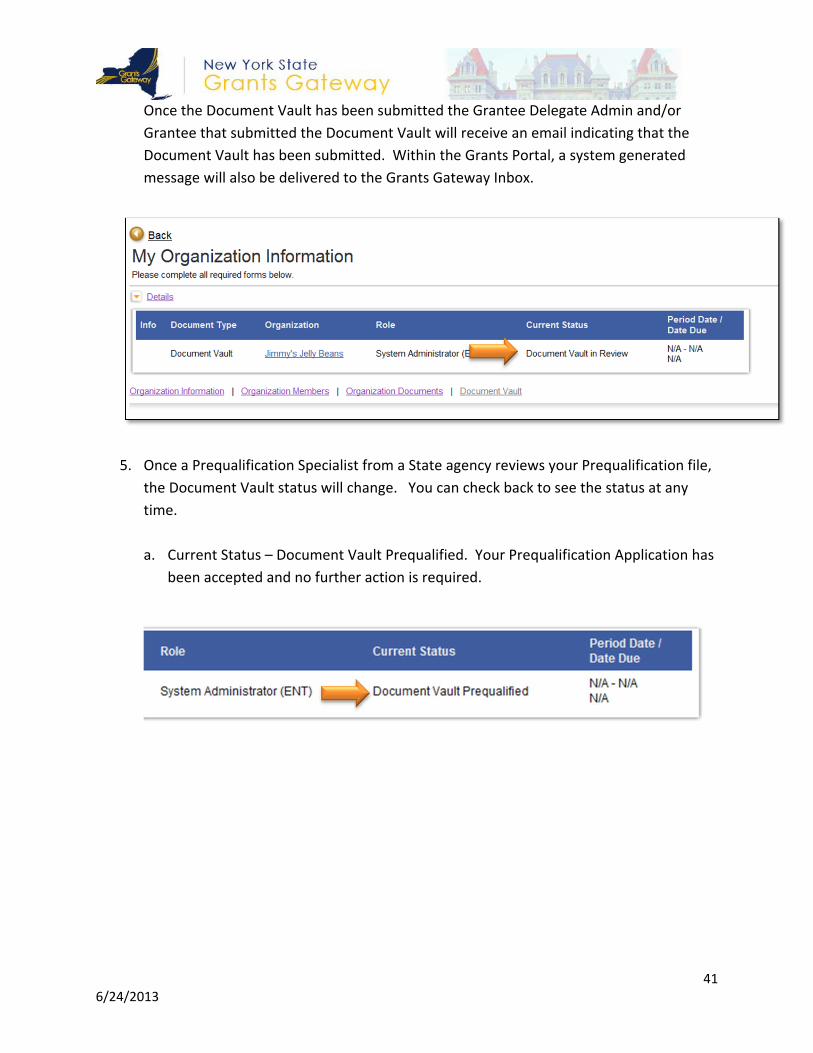
Once the Document Vault has been submitted the Grantee Delegate Admin and/or
Grantee that submitted the Document Vault will receive an email indicating that the
Document Vault has been submitted. Within the Grants Portal, a system generated
message will also be delivered to the Grants Gateway Inbox.
5. Once a Prequalification Specialist from a State agency reviews your Prequalification file,
the Document Vault status will change. You can check back to see the status at any
time.
a. Current Status – Document Vault Prequalified. Your Prequalification Application has
been accepted and no further action is required.

42 6/24/2013
b. Current Status – Document Vault Modifications Required. You will receive an email
from the Gateway if your Document Vault needs modifications. You will also receive
a system generated message in the Grants Portal Inbox.
6. To retrieve the Document Vault for modifications click on Home, My Tasks and the link
for Document Vault.
43 6/24/2013
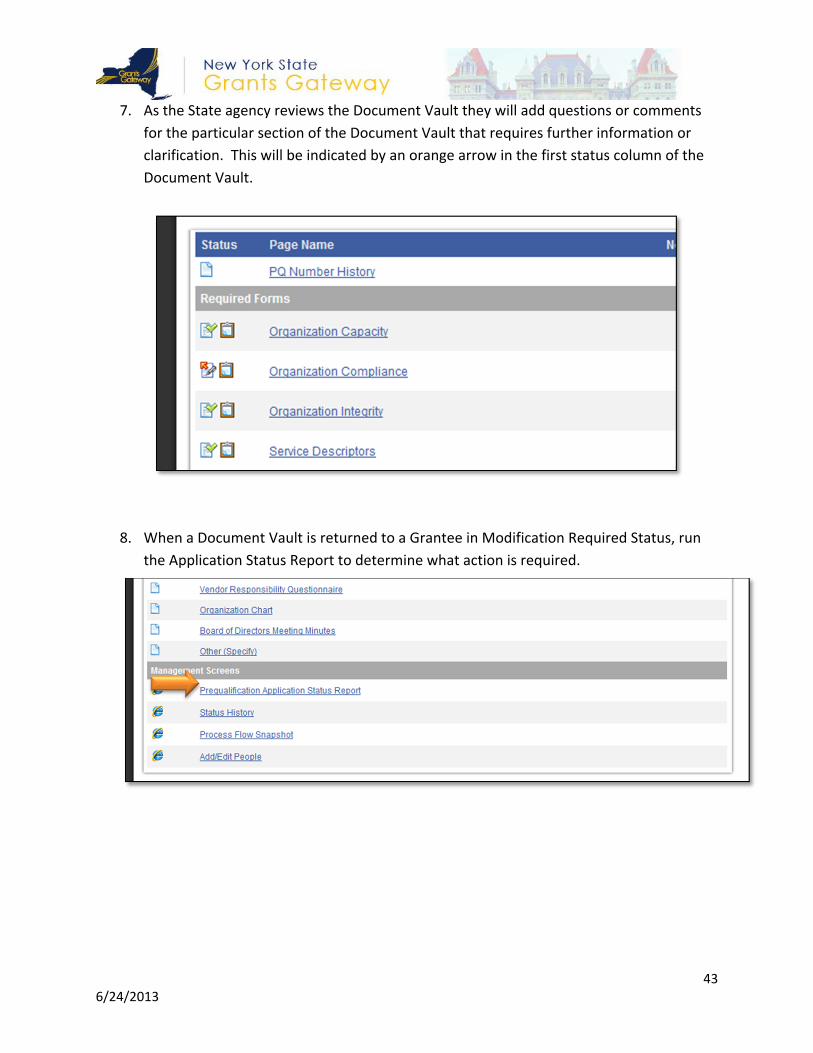
7. As the State agency reviews the Document Vault they will add questions or comments
for the particular section of the Document Vault that requires further information or
clarification. This will be indicated by an orange arrow in the first status column of the
Document Vault.
8. When a Document Vault is returned to a Grantee in Modification Required Status, run
the Application Status Report to determine what action is required.
44 6/24/2013
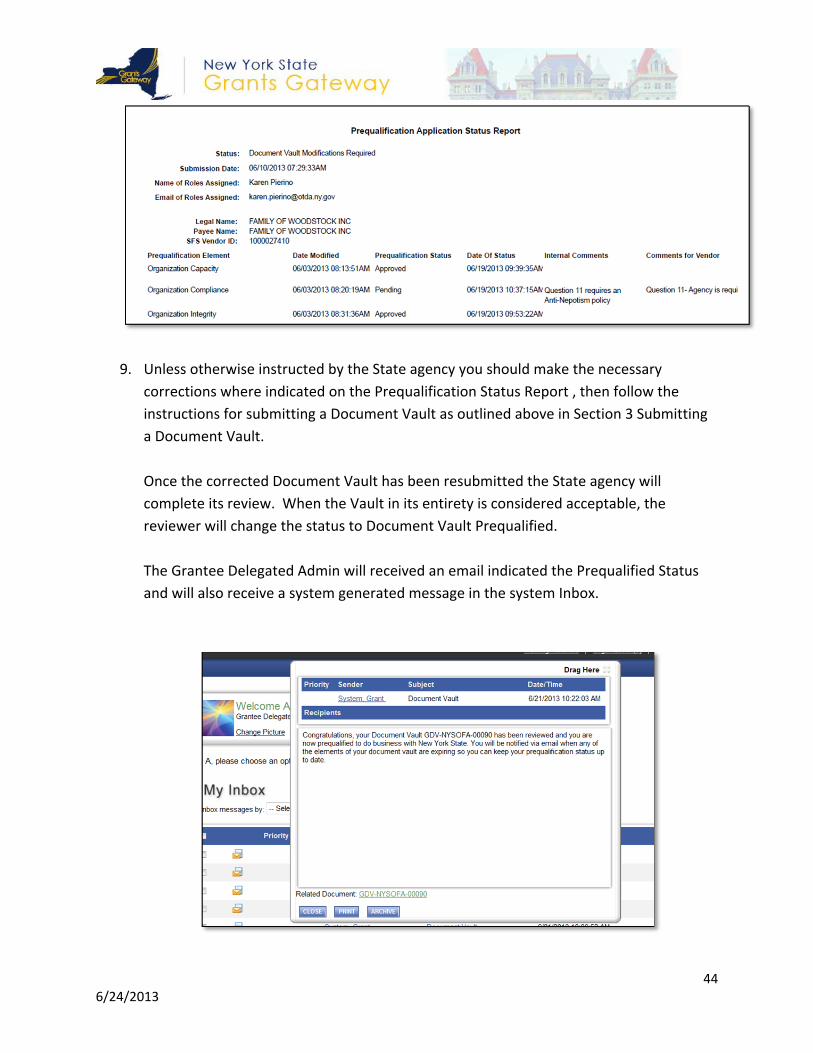
9. Unless otherwise instructed by the State agency you should make the necessary
corrections where indicated on the Prequalification Status Report , then follow the
instructions for submitting a Document Vault as outlined above in Section 3 Submitting
a Document Vault.
Once the corrected Document Vault has been resubmitted the State agency will
complete its review. When the Vault in its entirety is considered acceptable, the
reviewer will change the status to Document Vault Prequalified.
The Grantee Delegated Admin will received an email indicated the Prequalified Status
and will also receive a system generated message in the system Inbox.

45 6/24/2013
Your Task box will no longer be available, which also is an indication that no further
work on the Document Vault Is required.
10. To view the final Prequalification Status Report. click on the Organization(s) link, then
click on Document Vault on the next screen
Notice that the status has changed to Document Vault Prequalified.
To view the final Prequalification Status Report Scroll to the bottom of the Document
Vault page and select Prequalification Status Report.
View the results of the report to confirm that the agency has approved the Document
Vault.

46 6/24/2013
You should print this report for your files.
The Document Vault Submission and Approval process is now complete.
11. If you are required to update a document (such as a license) in an approved Document
Vault you will be instructed to re‐open this Document Vault by selecting “Open Your
Document Vault” link in the middle of the page. The grantee should not select this link
without permission from a State agency.