Embed Size (px)
Citation preview

HAVE A QUESTION? CALL HART CLIENT CARE AT 800-252-2818, or EMAIL US AT [email protected]
ZEBRA / HART SYSTEMS
NEXGEN SYSTEMNEXGEN SYSTEM
VERSION 1 HART 980-01
INVENTORY MANUAL FOR
HAVE A QUESTION? CALL HART CLIENT CARE AT 800-252-2818, or EMAIL US AT [email protected]
Copyright by Zebra / Hart Systems
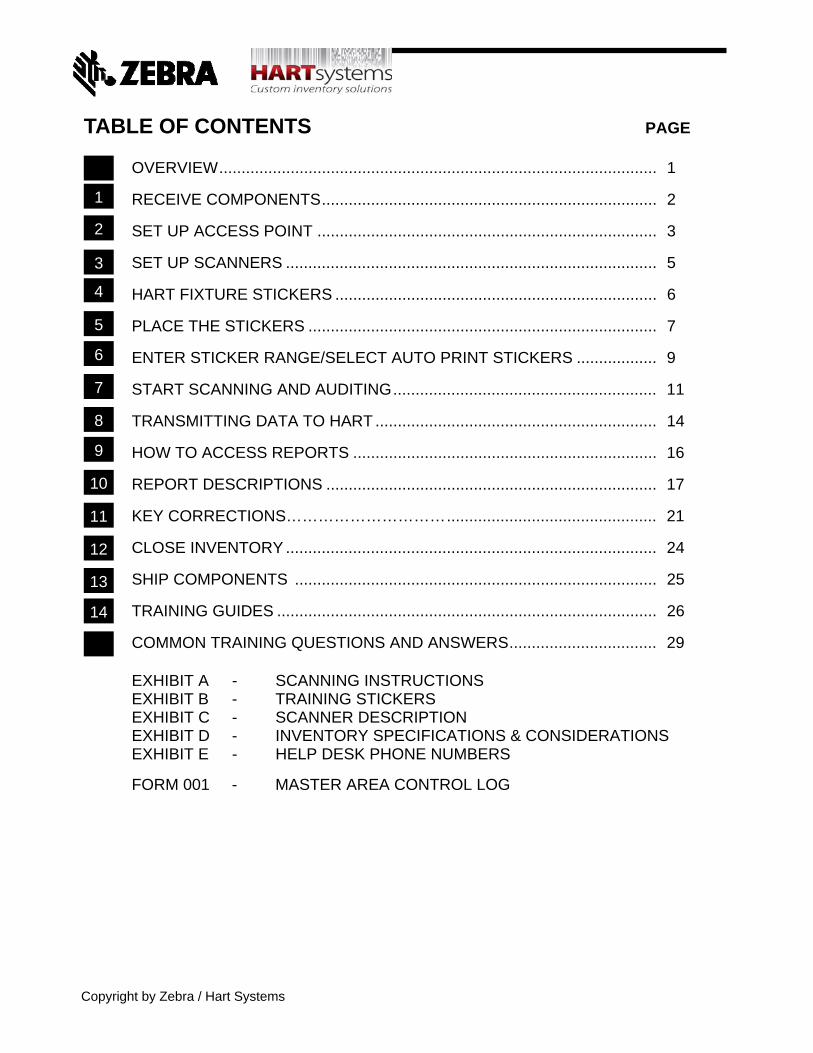
TABLE OF CONTENTS PAGE
OVERVIEW .................................................................................................. 1
RECEIVE COMPONENTS ........................................................................... 2
SET UP ACCESS POINT ............................................................................ 3
SET UP SCANNERS ................................................................................... 5
HART FIXTURE STICKERS ........................................................................ 6
PLACE THE STICKERS .............................................................................. 7
ENTER STICKER RANGE/SELECT AUTO PRINT STICKERS .................. 9
START SCANNING AND AUDITING ........................................................... 11
TRANSMITTING DATA TO HART ............................................................... 14
HOW TO ACCESS REPORTS .................................................................... 16
REPORT DESCRIPTIONS .......................................................................... 17
KEY CORRECTIONS………………………… ............................................... 21
CLOSE INVENTORY ................................................................................... 24
SHIP COMPONENTS ................................................................................. 25
TRAINING GUIDES ..................................................................................... 26
COMMON TRAINING QUESTIONS AND ANSWERS ................................. 29
1
3
2
4
5
6
7
8
9
10
11
12
13
14
EXHIBIT A - SCANNING INSTRUCTIONS EXHIBIT B - TRAINING STICKERS EXHIBIT C - SCANNER DESCRIPTION EXHIBIT D - INVENTORY SPECIFICATIONS & CONSIDERATIONS EXHIBIT E - HELP DESK PHONE NUMBERS
FORM 001 - MASTER AREA CONTROL LOG
HAVE A QUESTION? CALL HART CLIENT CARE AT 800-252-2818, or EMAIL US AT [email protected] PAGE 1
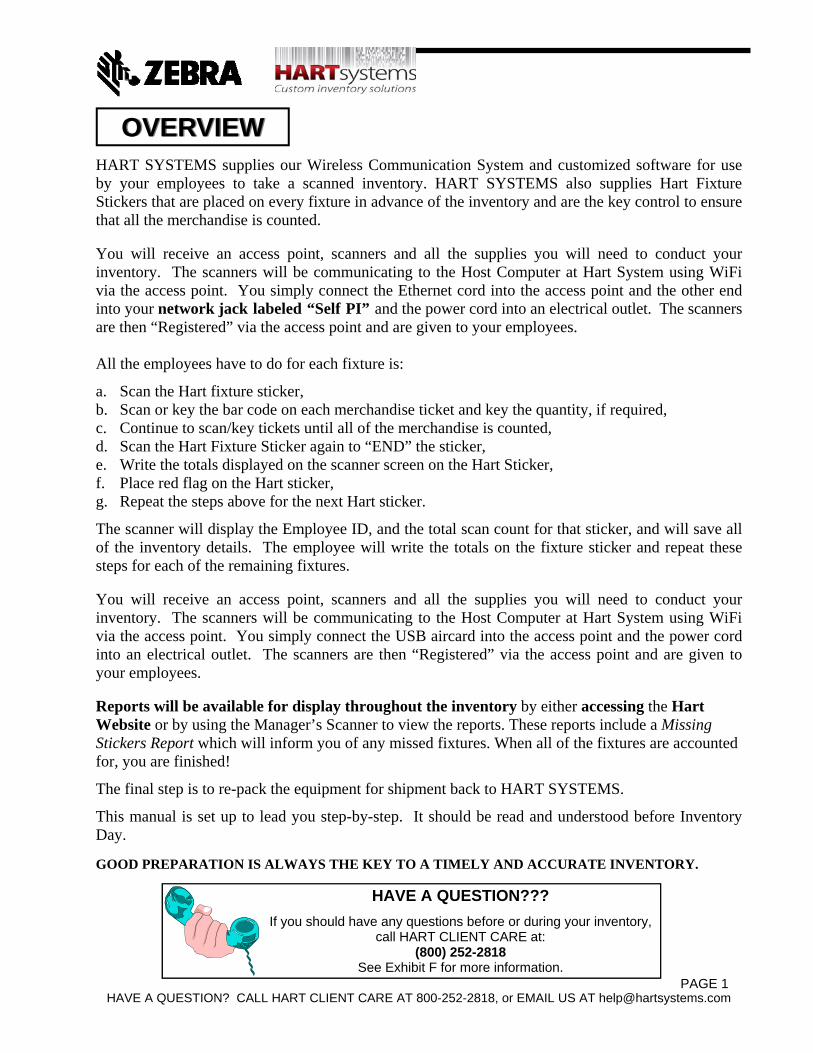
HAVE A QUESTION???
If you should have any questions before or during your inventory, call HART CLIENT CARE at:
(800) 252-2818 See Exhibit F for more information.
HART SYSTEMS supplies our Wireless Communication System and customized software for use by your employees to take a scanned inventory. HART SYSTEMS also supplies Hart Fixture Stickers that are placed on every fixture in advance of the inventory and are the key control to ensure that all the merchandise is counted. You will receive an access point, scanners and all the supplies you will need to conduct your inventory. The scanners will be communicating to the Host Computer at Hart System using WiFi via the access point. You simply connect the Ethernet cord into the access point and the other end into your network jack labeled “Self PI” and the power cord into an electrical outlet. The scanners are then “Registered” via the access point and are given to your employees.
All the employees have to do for each fixture is:
a. Scan the Hart fixture sticker, b. Scan or key the bar code on each merchandise ticket and key the quantity, if required, c. Continue to scan/key tickets until all of the merchandise is counted, d. Scan the Hart Fixture Sticker again to “END” the sticker, e. Write the totals displayed on the scanner screen on the Hart Sticker, f. Place red flag on the Hart sticker, g. Repeat the steps above for the next Hart sticker.
The scanner will display the Employee ID, and the total scan count for that sticker, and will save all of the inventory details. The employee will write the totals on the fixture sticker and repeat these steps for each of the remaining fixtures. You will receive an access point, scanners and all the supplies you will need to conduct your inventory. The scanners will be communicating to the Host Computer at Hart System using WiFi via the access point. You simply connect the USB aircard into the access point and the power cord into an electrical outlet. The scanners are then “Registered” via the access point and are given to your employees. Reports will be available for display throughout the inventory by either accessing the Hart Website or by using the Manager’s Scanner to view the reports. These reports include a Missing Stickers Report which will inform you of any missed fixtures. When all of the fixtures are accounted for, you are finished!
The final step is to re-pack the equipment for shipment back to HART SYSTEMS.
This manual is set up to lead you step-by-step. It should be read and understood before Inventory Day.
GOOD PREPARATION IS ALWAYS THE KEY TO A TIMELY AND ACCURATE INVENTORY.
OVERVIEWOVERVIEW
HAVE A QUESTION? CALL HART CLIENT CARE AT 800-252-2818, or EMAIL US AT [email protected]
RECEIVE COMPONENTSRECEIVE COMPONENTS
1.1
1.2
1.3
1.4
You will receive one box that contains all of the components you will need.
The box will be sealed with tape. . Cut the tape with a knife, do not rip the tape off.
When opening the box, be careful that it is not damaged because you will use the same box to return the components to Hart Systems
Inside the equipment box(es) you will find:
Scanners
Access Points
(2) Scanner Chargers- The scanners have 15+ hours of battery life. However, Charge the Scanners prior to your inventory, it will only take approximately 1-3 hours to fully charge.
(2) USB Air Cards. Do not use these air cards unless directed by Hart Client Care.
Remove the scanners from the foam insert, then remove the foam insert itself
You will also receive the following:
A Shipping Instructions envelope containing labels and documents to be used to ship the box back to Hart Systems when the inventory is completed.
A client survey.
If any equipment is missing, contact the Hart Client Care Desk immediately at 800-252-2818.
The white supply box contains the stickers and supplies for Inventory. Also included is the Hart Control ID Bar Code for your store. You will need this form for setting up the scanners for your store.
The supply box is sent separately from the equipment box(es).
PAGE 2
HAVE A QUESTION? CALL HART CLIENT CARE AT 800-252-2818, or EMAIL US AT [email protected]
SET UP ACCESS POINTSET UP ACCESS POINT
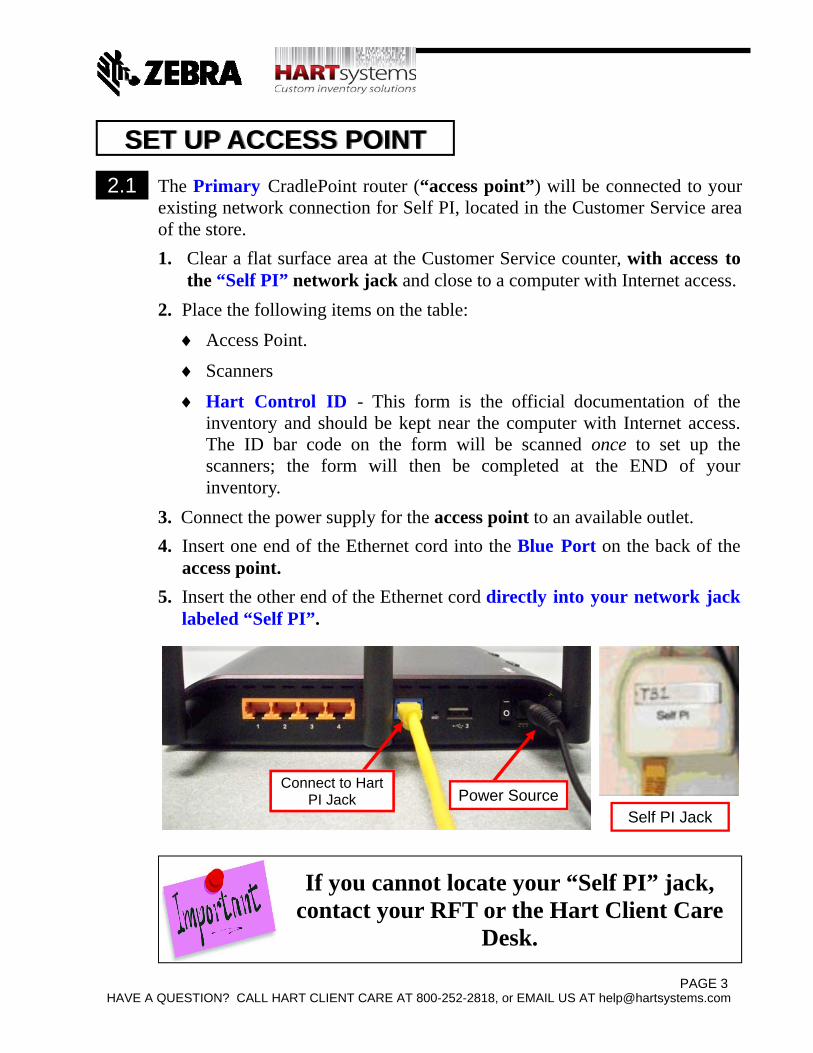
The Primary CradlePoint router (“access point”) will be connected to your existing network connection for Self PI, located in the Customer Service area of the store.
1. Clear a flat surface area at the Customer Service counter, with access to the “Self PI” network jack and close to a computer with Internet access.
2. Place the following items on the table:
Access Point.
Scanners
Hart Control ID - This form is the official documentation of the inventory and should be kept near the computer with Internet access. The ID bar code on the form will be scanned once to set up the scanners; the form will then be completed at the END of your inventory.
3. Connect the power supply for the access point to an available outlet.
4. Insert one end of the Ethernet cord into the Blue Port on the back of the access point.
5. Insert the other end of the Ethernet cord directly into your network jack labeled “Self PI”.
2.1
Power Source Connect to Hart
PI Jack
If you cannot locate your “Self PI” jack, contact your RFT or the Hart Client Care
Desk.
Self PI Jack
PAGE 3
HAVE A QUESTION? CALL HART CLIENT CARE AT 800-252-2818, or EMAIL US AT [email protected] PAGE 4
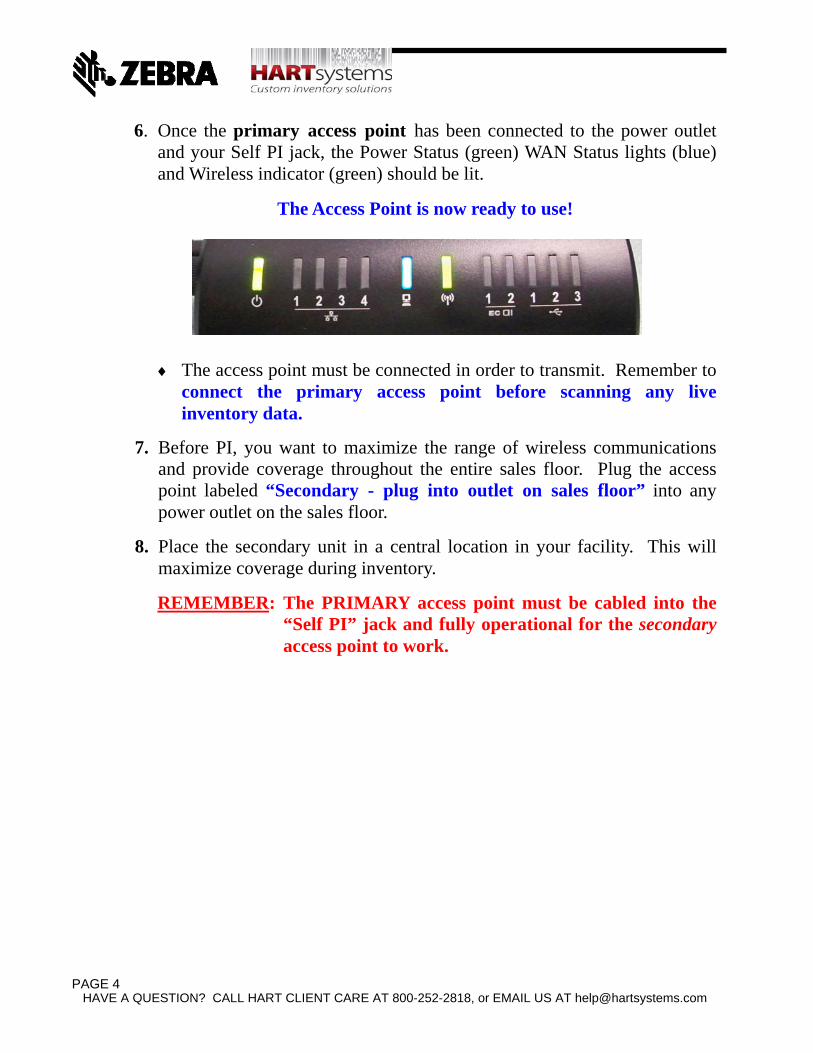
6. Once the primary access point has been connected to the power outlet and your Self PI jack, the Power Status (green) WAN Status lights (blue) and Wireless indicator (green) should be lit.
The Access Point is now ready to use!
The access point must be connected in order to transmit. Remember to connect the primary access point before scanning any live inventory data.
7. Before PI, you want to maximize the range of wireless communications and provide coverage throughout the entire sales floor. Plug the access point labeled “Secondary - plug into outlet on sales floor” into any power outlet on the sales floor.
8. Place the secondary unit in a central location in your facility. This will maximize coverage during inventory.
REMEMBER: The PRIMARY access point must be cabled into the “Self PI” jack and fully operational for the secondary access point to work.
HAVE A QUESTION? CALL HART CLIENT CARE AT 800-252-2818, or EMAIL US AT [email protected]
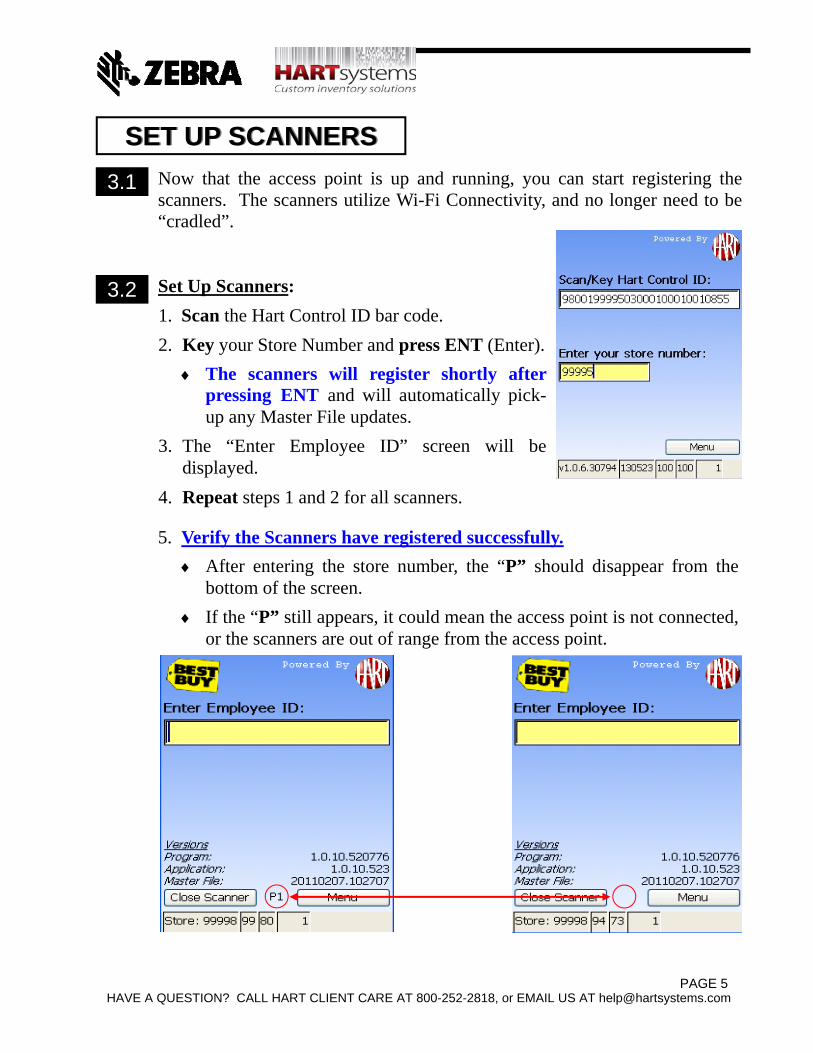
Now that the access point is up and running, you can start registering the scanners. The scanners utilize Wi-Fi Connectivity, and no longer need to be “cradled”. Set Up Scanners:
1. Scan the Hart Control ID bar code.
2. Key your Store Number and press ENT (Enter).
The scanners will register shortly after pressing ENT and will automatically pick-up any Master File updates.
3. The “Enter Employee ID” screen will be displayed.
4. Repeat steps 1 and 2 for all scanners.
5. Verify the Scanners have registered successfully.
After entering the store number, the “P” should disappear from the bottom of the screen.
If the “P” still appears, it could mean the access point is not connected, or the scanners are out of range from the access point.
3.1
SET UP SCANNERSSET UP SCANNERS
3.2
PAGE 5
HAVE A QUESTION? CALL HART CLIENT CARE AT 800-252-2818, or EMAIL US AT [email protected]
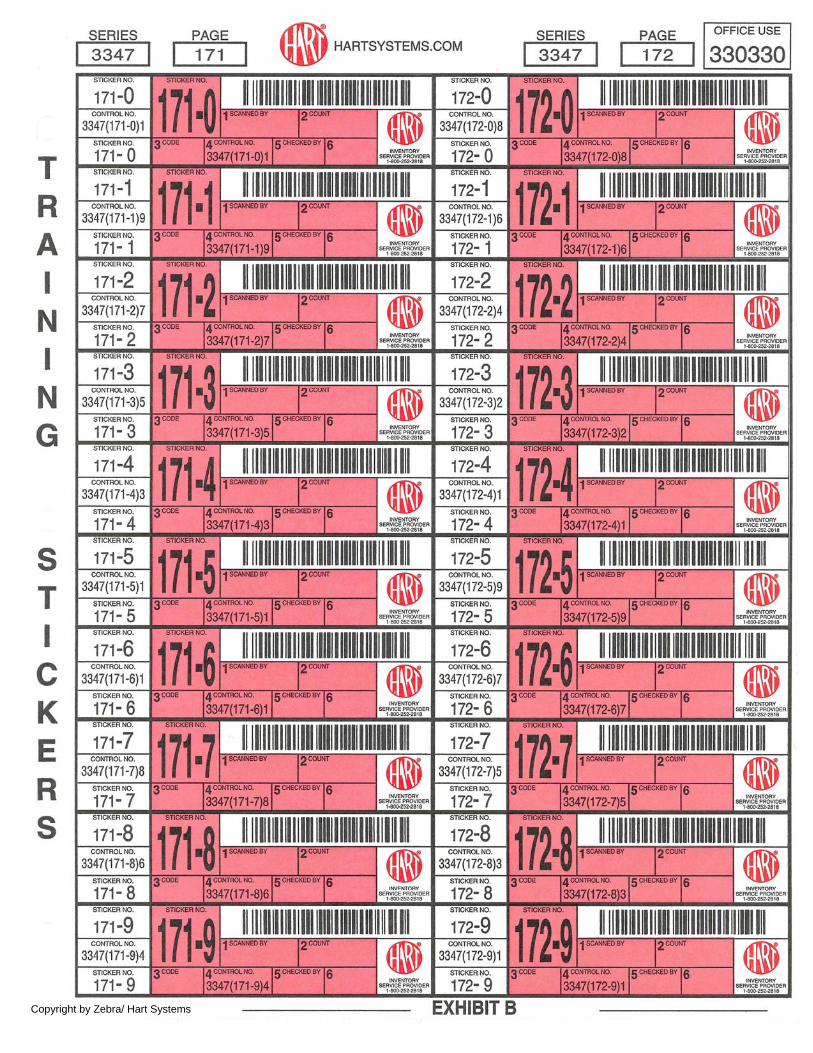
You will be using HART STICKERS to control the fixtures on the Floor Plan.
The stickers are attached to “Fixture Stickers Sheets”.
There are 30 removable stickers on each sheet.
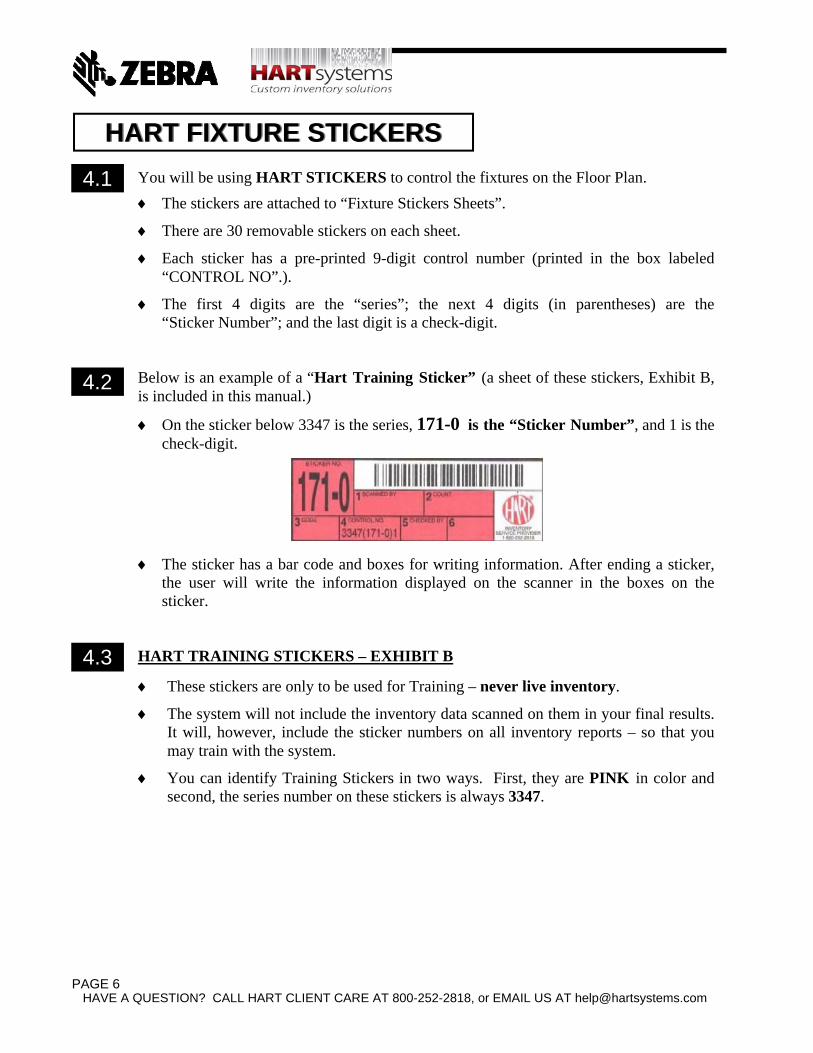
Each sticker has a pre-printed 9-digit control number (printed in the box labeled “CONTROL NO”.).
The first 4 digits are the “series”; the next 4 digits (in parentheses) are the “Sticker Number”; and the last digit is a check-digit.
Below is an example of a “Hart Training Sticker” (a sheet of these stickers, Exhibit B, is included in this manual.)
On the sticker below 3347 is the series, 171-0 is the “Sticker Number”, and 1 is the check-digit.
The sticker has a bar code and boxes for writing information. After ending a sticker, the user will write the information displayed on the scanner in the boxes on the sticker.
HART TRAINING STICKERS – EXHIBIT B
These stickers are only to be used for Training – never live inventory.
The system will not include the inventory data scanned on them in your final results. It will, however, include the sticker numbers on all inventory reports – so that you may train with the system.
You can identify Training Stickers in two ways. First, they are PINK in color and second, the series number on these stickers is always 3347.
4.1
4.2
4.3
HART FIXTURE STICKERSHART FIXTURE STICKERS
PAGE 6
HAVE A QUESTION? CALL HART CLIENT CARE AT 800-252-2818, or EMAIL US AT [email protected]
5.3
5.1
5.2
Be sure to read this entire section before placing any stickers around the store.
The Hart Stickers are the key control to ensure that all merchandise is counted.
Stickers MUST be in place before the inventory begins.
This procedure could take a couple of hours, so plan accordingly.
Do not skip sticker numbers.
The stickers must be laid in a consistent manner. Start with the first sticker number in your pack of stickers and lay the stickers in numerical order.
The “Master Area Control Log” will be used in addition to the Store Map to record the placement of the stickers.
This log is used to record the stickers assigned to the fixtures in each area of the store.
List each area and the beginning sticker number and the ending sticker number assigned for that area of the store.
The employees will be scanning from left to right as they move from one sticker to another.
Lay the stickers so that it will be easy to see where one sticker ends and the next sticker begins.
SECTION MARKERS are the pads of red flags that you received with your supplies.
They can be used to:
Identify completed stickers. Place the section marker over the bar code on the fixture sticker when the sticker has been completed.
5.4
PLACE THE STICKERSPLACE THE STICKERS
PAGE 7
HAVE A QUESTION? CALL HART CLIENT CARE AT 800-252-2818, or EMAIL US AT [email protected]
5.5 Some fixtures will require more than one sticker.
The number of stickers is usually determined by the amount of merchandise on the fixture or the size of the fixture.
In general, the more stickers that are used, the better.
As you walk through the store, make sure that all of the merchandise to be counted has been assigned a sticker.
It should be easy to see which merchandise is assigned to which sticker. If you discover a fixture that does not have a sticker on it, use your remaining stickers.
Be sure to use the very next sticker after the last sticker number used.
This sticker must be recorded on the “Master Area Control Log” and the Store Map. Never destroy or throw away any stickers. Every sticker must be accounted for.
If the bar code on the sticker is damaged, the sticker number can be key-entered. ASSIGN STICKER TO TROUBLE TABLE
Assign last HART sticker to the Trouble Table. ADDITIONAL TIPS FOR APPLYING STICKERS
The sticker should be laid as close as possible to the first piece of merchandise to be scanned.
Do not place stickers directly on merchandise. If the merchandise is sold or moved, the sticker may be lost.
Place the sticker so that it can be easily reached.
Place the stickers in number order.
Place the stickers so that they can easily be seen and written on.
Each sticker should account for no more than approximately 100 items. Sections with Prepaid Phone Cards, Gift Cards, Media Product, Soda and Candy are excluded from this guide line.
The key is to sticker the store in a CONSISTENT manner and to make sure that the sections are small and easy for employees to scan.
5.6
5.7
5.8
5.9
PAGE 8
HAVE A QUESTION? CALL HART CLIENT CARE AT 800-252-2818, or EMAIL US AT [email protected]
Before or during the inventory, you will need to key the range of Stickers that was used in the store. These ranges will be used to provide accurate and detailed reporting by area. The Sticker Ranges will be entered ONLINE via the Hart Systems web site:
Follow steps 1 – 6 in section 9.2 of this manual to access the Hart Systems Inventory Overview for your store.
Click on Inventory Functions and select “Enter Sticker Ranges”.
You can choose from the following areas: Appliances, Best Buy Mobil%, Computers, Customer Services, Digital Imaging, Geek Squad, Home Theatre, Install Bay, Media CD, Media DVD, Media Video Games, Media Software, Media Whse, Merchandise Whse, Media Audio, Race Track, Topstock, Trouble Table and Vehicle.
Click on the area that the sticker range will be entered for, then click the “OK” button.
Enter first (lowest) 9-digit sticker control number used in the selected area in the “Starting Sticker” field on line 1; press the TAB key and enter the last (highest) 9-digit sticker control number in the “Ending Sticker” field.
The sticker control numbers are 9 digits long, for example, 1111(111-1)1 and are printed on the sheets that the stickers were peeled off of in the boxes labeled CONTROL NO. They should also have been written on the Store Map and the Master Area Control Log prior to placing the stickers on the fixtures. Use these documents to aid in entering the starting and ending control numbers for the entire store.
If more than one sticker range was used in the selected area, press the TAB key and enter starting and ending 9-digit sticker control numbers for the remaining ranges; up to 10 separate ranges may be entered for each area.
When finished entering the ranges used in the selected area, click the “OK” button. A confirmation screen will be displayed to indicate that the range(s) for that area have been accepted. If the range(s) entered was not accepted, an error message will be displayed and the range(s) should be checked and re-entered.
Click “OK” from the confirmation screen and select the next area to enter sticker ranges for.
Repeat these steps until ranges have been entered for all areas being inventoried in the store.
During the inventory, you will be able to modify the sticker ranges based on additions and deletions of sticker numbers used. Each time the sticker range is modified, just follow the instructions outlined above to add a new range or modify an existing range.
6.1
6.2
ENTER THE STICKER RANGEENTER THE STICKER RANGE
PAGE 9
HAVE A QUESTION? CALL HART CLIENT CARE AT 800-252-2818, or EMAIL US AT [email protected]
6.3 PRE-SELECT STICKERS FOR AUTO-PRINT
Before the start of the inventory, you may select stickers for auto-printing. Refer to SOP for auto detail SUB classes.
These stickers will only be available for printing after they have been scanned and the data sent to Hart.
Select Inventory Functions on the Overview screen and then click on “Pre-Select Auto-Print Stickers”.
Enter the 4-digit sticker number that you want to auto-print. You will also be able to enter a sticker range.
When finished entering the stickers for auto-print, click OK.
Selected auto-print sticker information will be displayed on the Overview screen under the “Selected Stickers for Auto-Print” heading. The number of stickers selected will be displayed under Selected. As selected stickers are transmitted, the number available for auto-printing will be
displayed under Available. When the stickers are printed, the number of stickers printed will be displayed under
Printed. NOTE: You will not be able to select a sticker for auto-printing after it has been
transmitted. If you realize you would like to have extra verification for a sticker that has already been transmitted, simply print a Sticker Detail Report from the All Reports drop-down menu on the Overview screen.
6.4
PAGE 10
HAVE A QUESTION? CALL HART CLIENT CARE AT 800-252-2818, or EMAIL US AT [email protected]
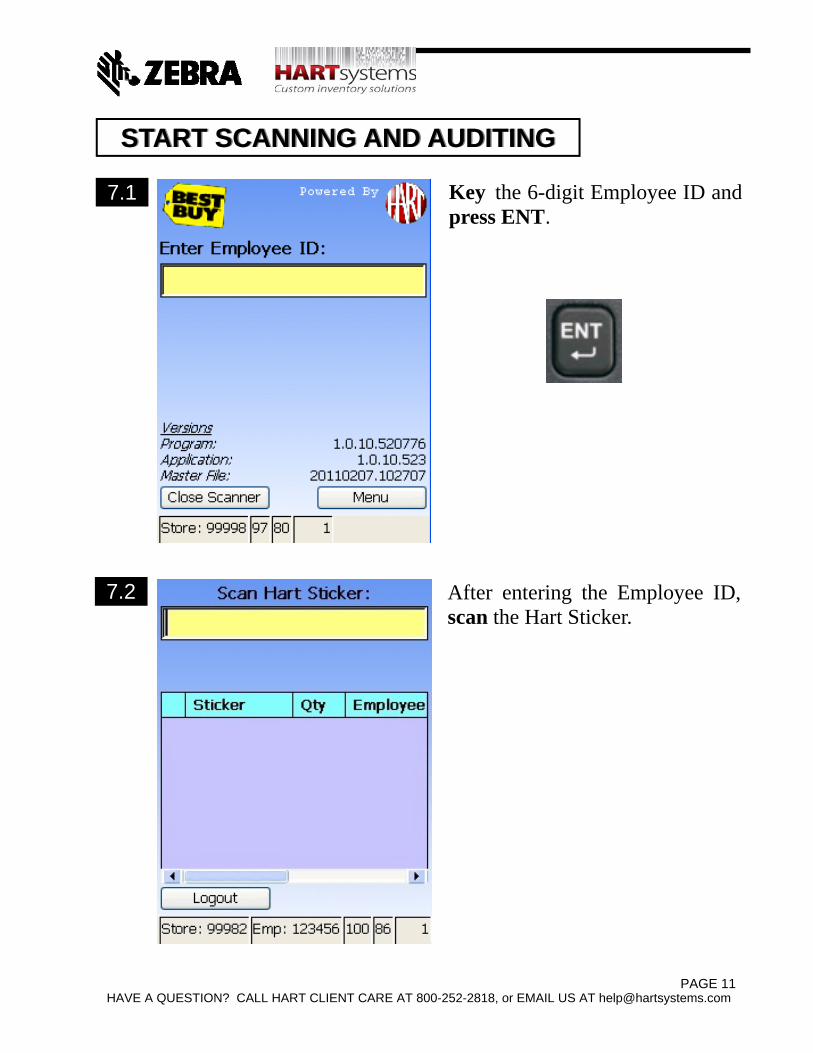
7.1
START SCANNING AND AUDITINGSTART SCANNING AND AUDITING
7.2
Key the 6-digit Employee ID and press ENT.
After entering the Employee ID, scan the Hart Sticker.
PAGE 11
HAVE A QUESTION? CALL HART CLIENT CARE AT 800-252-2818, or EMAIL US AT [email protected]
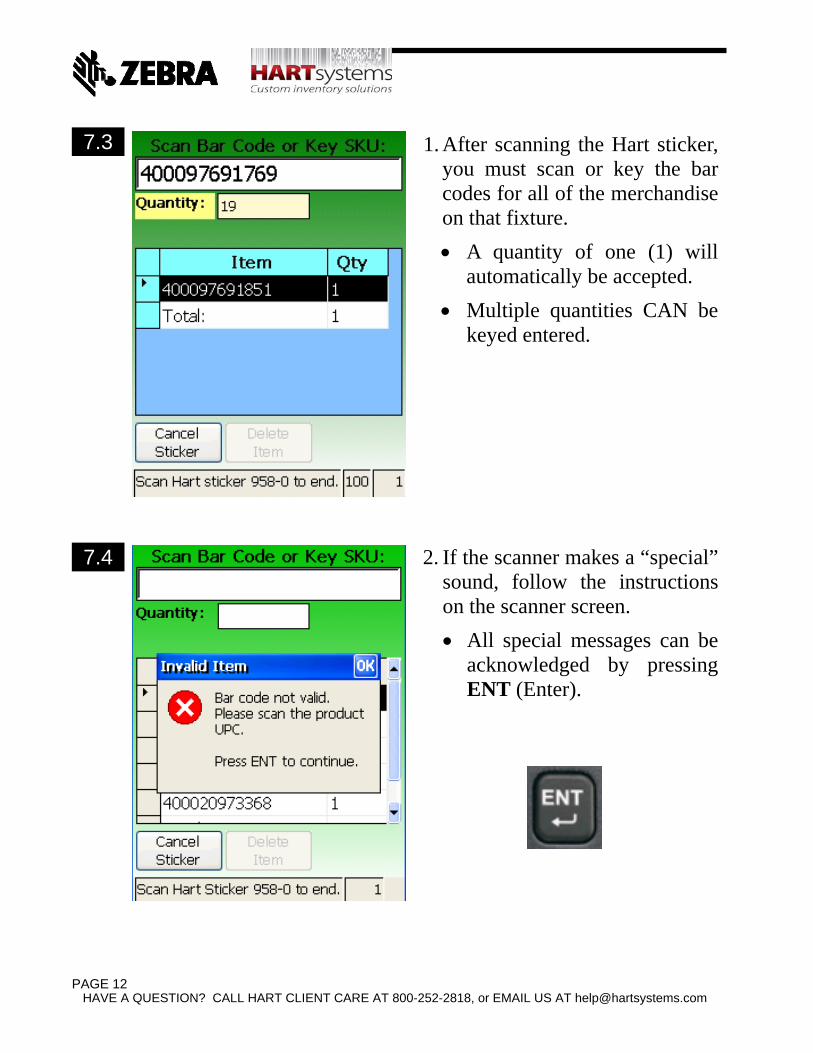
7.3 1. After scanning the Hart sticker, you must scan or key the bar codes for all of the merchandise on that fixture.
A quantity of one (1) will automatically be accepted.
Multiple quantities CAN be keyed entered.
2. If the scanner makes a “special” sound, follow the instructions on the scanner screen.
All special messages can be acknowledged by pressing ENT (Enter).
7.4
PAGE 12
HAVE A QUESTION? CALL HART CLIENT CARE AT 800-252-2818, or EMAIL US AT [email protected]
7.6
7.5
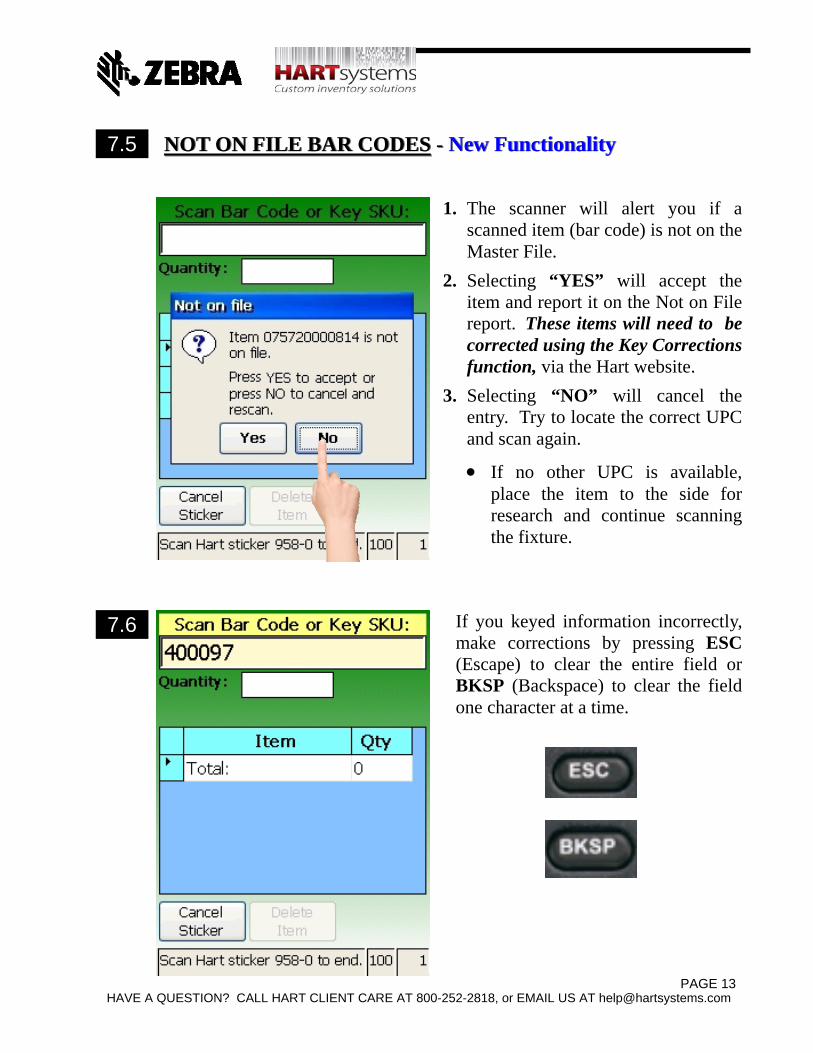
1. The scanner will alert you if a scanned item (bar code) is not on the Master File.
2. Selecting “YES” will accept the item and report it on the Not on File report. These items will need to be corrected using the Key Corrections function, via the Hart website.
3. Selecting “NO” will cancel the entry. Try to locate the correct UPC and scan again.
If no other UPC is available, place the item to the side for research and continue scanning the fixture.
NOT ON FILE BAR CODESNOT ON FILE BAR CODES -- New FunctionalityNew Functionality
If you keyed information incorrectly, make corrections by pressing ESC (Escape) to clear the entire field or BKSP (Backspace) to clear the field one character at a time.
PAGE 13
HAVE A QUESTION? CALL HART CLIENT CARE AT 800-252-2818, or EMAIL US AT [email protected]
8.1
TRANSMITTING DATA TO HARTTRANSMITTING DATA TO HART
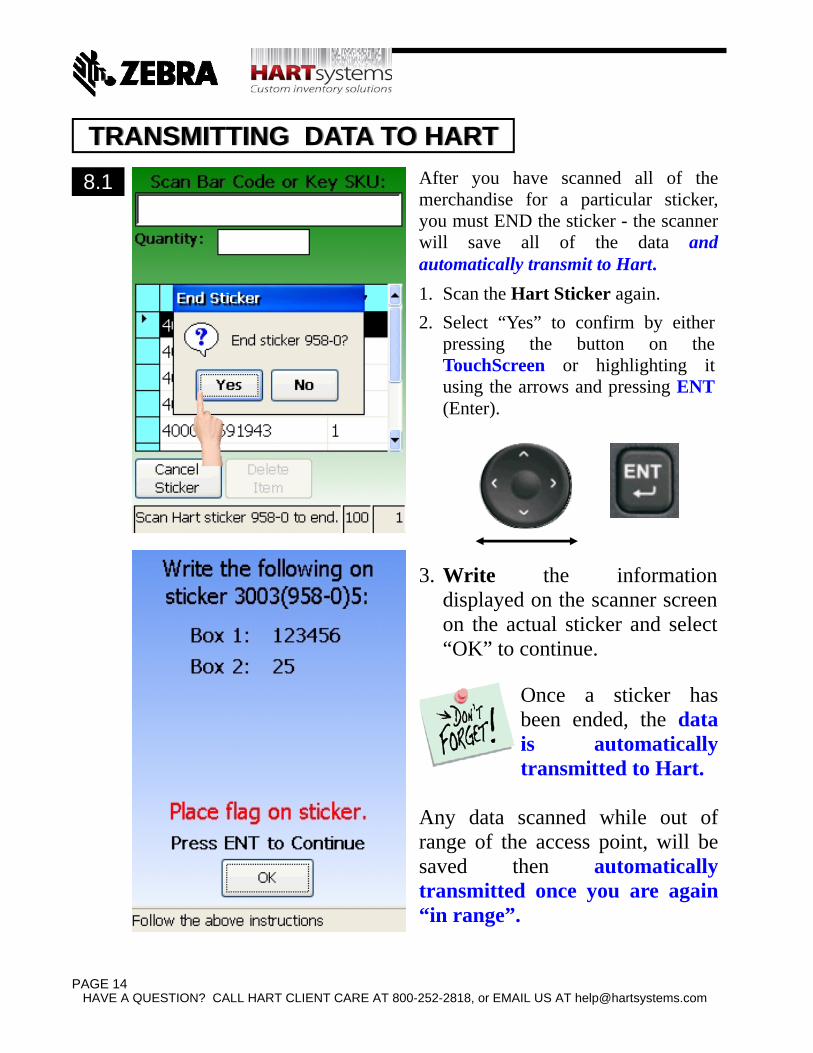
After you have scanned all of the merchandise for a particular sticker, you must END the sticker - the scanner will save all of the data and automatically transmit to Hart.
1. Scan the Hart Sticker again.
2. Select “Yes” to confirm by either pressing the button on the TouchScreen or highlighting it using the arrows and pressing ENT (Enter).
3. Write the information displayed on the scanner screen on the actual sticker and select “OK” to continue.
Once a sticker has been ended, the data is automatically transmitted to Hart.
Any data scanned while out of range of the access point, will be saved then automatically transmitted once you are again “in range”.
PAGE 14
HAVE A QUESTION? CALL HART CLIENT CARE AT 800-252-2818, or EMAIL US AT [email protected]
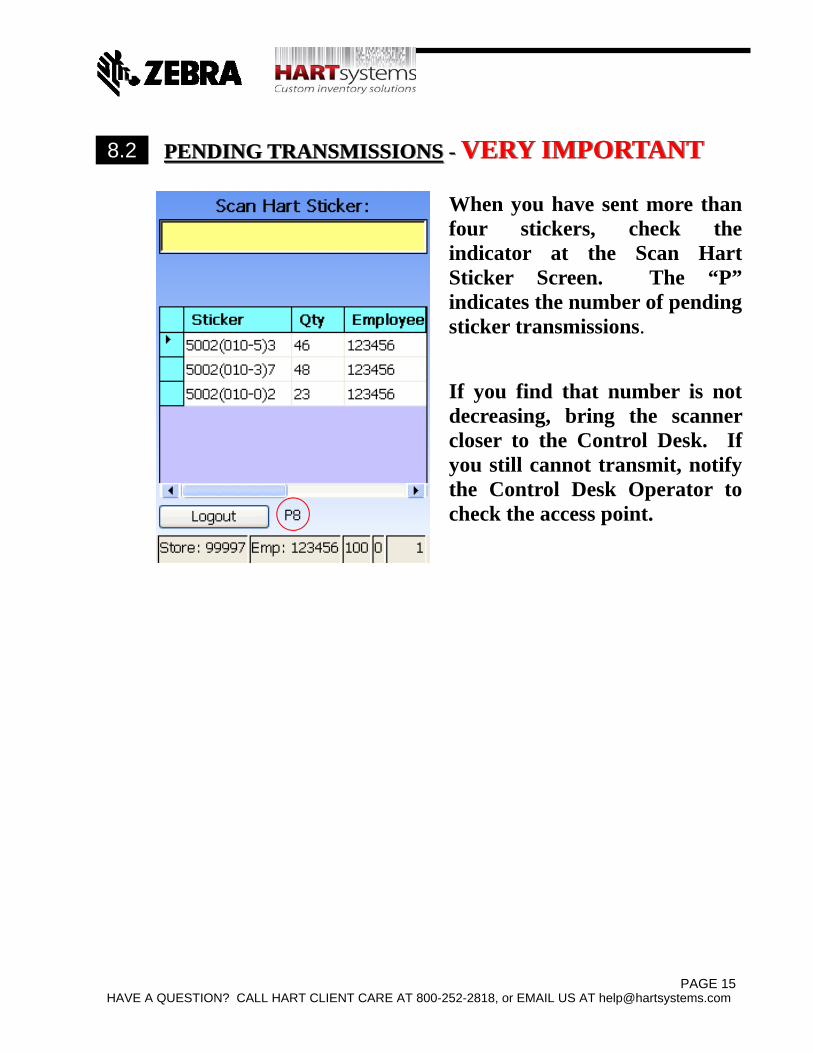
When you have sent more than four stickers, check the indicator at the Scan Hart Sticker Screen. The “P” indicates the number of pending sticker transmissions.
If you find that number is not decreasing, bring the scanner closer to the Control Desk. If you still cannot transmit, notify the Control Desk Operator to check the access point.
8.2 PENDING TRANSMISSIONSPENDING TRANSMISSIONS -- VERY IMPORTANTVERY IMPORTANT
PAGE 15
HAVE A QUESTION? CALL HART CLIENT CARE AT 800-252-2818, or EMAIL US AT [email protected]
9.1
9.2
After data has been sent to Hart, it is processed on the Host Computer. Information about the inventory can then be reviewed in the form of various reports online. These reports are very useful in controlling the various aspects of the inventory. ACCESSING THE REPORTS ONLINE
Throughout your inventory, you can quickly obtain detailed information by viewing or printing your store’s Inventory Reports via the Hart web site. The Hart web site updates in real time so you will be able to obtain up-to-date information after the data from the scanners are transmitted to the Host Computer.
To access the inventory reports via the web:
1. Log onto www.hartsystems.com.
2. Click on the “Client Login” button , on the right side of the screen.
3. Enter your User Name and Password (both entries must be in lowercase) and press ENTER or click on the OK button. Your User Name and Password will be provided to you prior to your inventory.
4. Click in the “Enter Store Number” field and enter your store number.
5. Press TAB to advance to the “Enter Password” field. Enter your store-specific password and press ENTER or click on the OK button.
6. You will now be connected to the “Select PI Year” for your store. You may view (but not alter) any of your prior years data by selecting “2014” or “2015”. Select “2016” for the most current Inventory information
7. You will now be connected to the “Inventory Overview” for your store. Your store number and store name will be displayed on the top. Clicking on any of the underlined items will “drill-down” to more details in that category.
8. You may access additional reports for your store by clicking on “All Reports”, located at the upper left corner of the screen, and making your selection from the drop-down menu.
9. On the upper right hand side of the report screen, is a button to format the report for printing. Click on this link if you wish to print any of the reports.
10. To exit out of one report, click on the “CLOSE” button at the top of the screen and that will bring you back to the “Inventory Overview”.
NOTE: To “Refresh” a report you are currently viewing simply click on the
button at the top right of the screen.
HOW TO ACCESS REPORTSHOW TO ACCESS REPORTS
PAGE 16
HAVE A QUESTION? CALL HART CLIENT CARE AT 800-252-2818, or EMAIL US AT [email protected]
INVENTORY OVERVIEW
Displays a summary of your inventory that includes the total number of stickers sent to Hart, the number of Missing and Empty stickers, as well as the total units.
This report will be used at the end of the inventory to fill in information on the “Inventory Control Form”.
STICKER DETAIL – SINGLE
Displays a line-by-line listing of every item on a particular sticker, in the order in which it was entered.
This report can be used to ensure that each employee is following the proper scanning procedures.
Click the “Correct Sticker” on the upper left portion of the screen to key corrections for that sticker. (See section 11 for more information on Corrections)
NOTE: The Sticker Detail report may be viewed on the Hart web site by viewing the
Sticker Summary, then clicking on the selected sticker number, or by selecting Sticker Detail from the Reports Menu, then keying the 4-digit Sticker Number.
STICKER DETAIL – MULTIPLE
Allows the selection of multiple Sticker Detail Reports for printing.
Up to 20 Stickers can be selected at one time.
Click the box to the right of the sticker you wish to print.
When your selection is complete, click the OK button and print the reports.
This option can be used to print stickers for checking and corrections.
10.1
10.3
NOTE: All reports are available online and the PPM is in charge of research frequency.
10.2
REPORT DESCRIPTIONSREPORT DESCRIPTIONS
PAGE 17
HAVE A QUESTION? CALL HART CLIENT CARE AT 800-252-2818, or EMAIL US AT [email protected]
MISSING STICKERS
The first screen of the Missing Stickers Report displays the areas available, as well as an option for all areas.
Highlight the area you wish to view and click OK.
The Missing Stickers Report for the area selected will be displayed.
Check the following items on this report:
1. Check that your first and last stickers, keyed into the scanner earlier, are correctly identified on the first screen of the report, “Hart Sticker Range”. If either one is not displayed, the sticker range must be re-keyed and sent to Hart.
2. All stickers that are listed under the “Missing Stickers” heading must be either scanned or identified as “Not Used”. Process any “Not Used” stickers as “Empty Stickers”. (See Exhibit A.)
Remember: Any stickers that have been scanned but have not yet been sent to Hart may still appear as “Missing” on this report; therefore, be certain that all scanners have had their data downloaded to Hart.
EMPTY STICKERS
Displays all of the stickers that were scanned as empty.
An empty sticker represents a fixture which contains no merchandise.
This report is used to check that all fixtures that were scanned as empty are actually “empty fixtures” (See Exhibit A for details).
To verify empty stickers, select the “Verify Empty” box and click “Verify Empty Sticker” at the bottom of the report.
PRODUCTIVITY ANALYSIS
Displays the total units scanned, number of line corrections, total unit corrections, total scan time, and the units per hour for each employee. RESCANNED STICKERS
Displays all stickers that were rescanned.
It will list the sticker number, Units, Area, Date/Time, and the Employee ID of the employee who scanned each occurrence of the sticker.
The occurrence that has been accepted is marked by three asterisks (***). Click on the date/time field to view the details of any version of the sticker. To verify rescans, click on the “Verify Rescan” column then click “Verify Rescans” at
the bottom of the report.
10.6
10.5
10.4
10.7
PAGE 18
HAVE A QUESTION? CALL HART CLIENT CARE AT 800-252-2818, or EMAIL US AT [email protected]
RESCANNED STICKER COMPARISON REPORT
Displays the two most recent versions of a rescanned sticker
User can access this report by drilling down on the asterisks of the accepted count on the Rescanned Sticker Report, or by selecting Rescanned Sticker Comparison Report from the Reports Menu, then keying the 4-digit Sticker Number.
STICKERS SCANNED BY EMPLOYEE REPORT
Displays the total units, and area scanned for each sticker scanned by the selected employee.
You will need to enter the Employee ID you would like to review. ITEM LOCATOR REPORT
This report provides the sticker number (s), area, the sequence on the sticker, the units and the employee number for the Item # that is entered.
You will need to enter the bar code that you wish to review. CORRECTIONS AUDIT TRAIL REPORT
For every correction keyed, the date/time, Employee ID, sticker number, Area, line number, Item, the original units, the corrected units and the net change will be displayed. The total net change and the total corrections keyed are displayed at the bottom of the report.
STICKER SUMMARY REPORT
Displays the total units scanned on each of the stickers sent to Hart. Auto-prints indicated with an “A” in the sticker code column.
Once all of the stickers have been sent to Hart, this report will display the Total Units in the entire store.
To correct the sticker, click on the “Correct Sticker” field. (More information on corrections in Section 11)
KEYED UPC/SKU REPORT
This report displays UPC/SKUs that were keyed, with their description and quantities. The total keyed quantity, total percent scanned, total percent keyed and the total units for the store are listed at the end of the report.
Click on the UPC/SKU # to drill down to the Item Locator Report. This report will list all stickers where this SKU # can be located.
10.10
10.8
10.9
10.11
10.12
10.7
PAGE 19
HAVE A QUESTION? CALL HART CLIENT CARE AT 800-252-2818, or EMAIL US AT [email protected]
KEYED UPC/SKU SUMMARY
This report displays a summary by area of the total entries, and the number of these entries that were scanned and keyed, with the percentage keyed; as well as the total units and the number of units scanned and keyed, with the percentage keyed. The totals for each column are at the end of the report.
Click on the Total Entries Keyed to drill down to the Keyed UPC/SKU Report. SCANNED SHELF LABEL REPORT
This report displays all the stickers that a shelf label was scanned on.
It displays the Area, Sticker Number, Sequence on the sticker, UPC, SKU, Model, Description and the Units. NOT ON FILE SKU/UPC REPORT
This report displays the sticker number, Not on File UPC or SKU, Employee ID and quantity of each Not on File item that was scanned or keyed. To correct the sticker where the NOF is located, select “Correct Sticker”. (More information on Corrections in Section 11.) CONTROL LOGS
Once all of the sticker ranges and auto-prints have been entered, you will be able to print your auto populated control logs.
1. Log - Area Audit: Contains all of the sticker numbers, line by line, in the selected area. (14) sticker numbers per page. If a sticker has been selected for auto-print, the text on that line will appear, *** Detail Area ***.
Certain areas will not populate with 100% of the stickers selected. A random selection of stickers will populate for the following areas:
Install Bay: 20% Media CD: 15% Media DVD: 15% Media Warehouse: 15%
2. Log - Master Area Control Log: Lists each area per line, with the range of stickers entered for the area. If more than one range has been selected for the area, the same area will appear on the next line.
3. Log - Team Leader Area Control Log: Contains all of the stickers in the selected area broken down in ranges of (14) stickers per line.
4. Log - Sticker Detail Report Tracking Correction: This log prints, line by line, all of the stickers selected to auto-print.
10.13
10.14
10.15
10.16
PAGE 20
HAVE A QUESTION? CALL HART CLIENT CARE AT 800-252-2818, or EMAIL US AT [email protected]
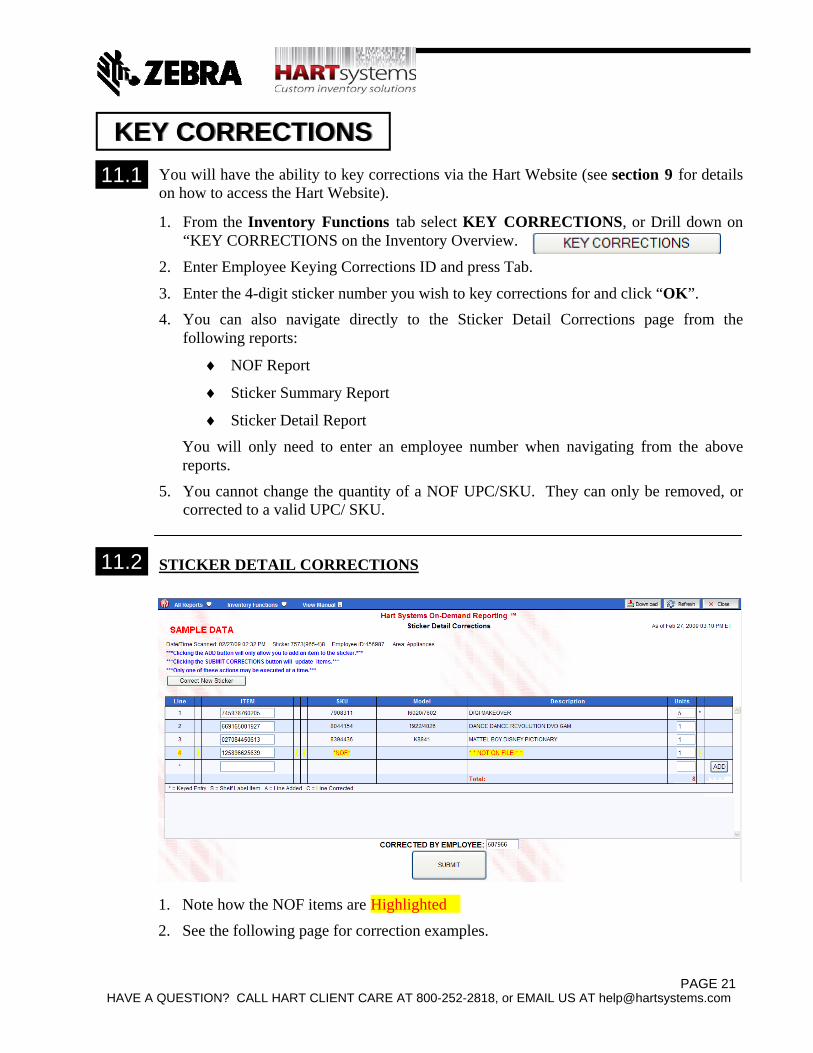
You will have the ability to key corrections via the Hart Website (see section 9 for details on how to access the Hart Website).
1. From the Inventory Functions tab select KEY CORRECTIONS, or Drill down on “KEY CORRECTIONS on the Inventory Overview.
2. Enter Employee Keying Corrections ID and press Tab.
3. Enter the 4-digit sticker number you wish to key corrections for and click “OK”.
4. You can also navigate directly to the Sticker Detail Corrections page from the following reports:
NOF Report
Sticker Summary Report
Sticker Detail Report
You will only need to enter an employee number when navigating from the above reports.
5. You cannot change the quantity of a NOF UPC/SKU. They can only be removed, or corrected to a valid UPC/ SKU.
STICKER DETAIL CORRECTIONS
11.1
11.2
KEY CORRECTIONSKEY CORRECTIONS
1. Note how the NOF items are
2. See the following page for correction examples.
Highlighted
PAGE 21
HAVE A QUESTION? CALL HART CLIENT CARE AT 800-252-2818, or EMAIL US AT [email protected]
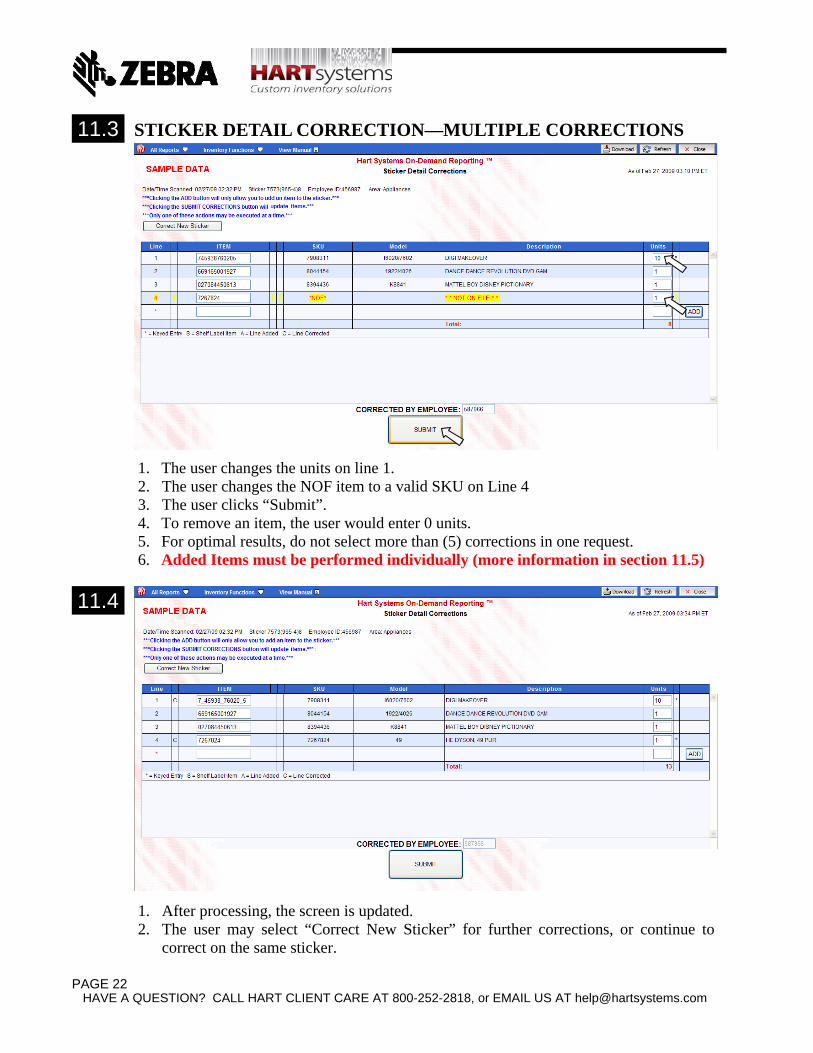
11.3 STICKER DETAIL CORRECTION—MULTIPLE CORRECTIONS
1. The user changes the units on line 1. 2. The user changes the NOF item to a valid SKU on Line 4 3. The user clicks “Submit”. 4. To remove an item, the user would enter 0 units. 5. For optimal results, do not select more than (5) corrections in one request. 6. Added Items must be performed individually (more information in section 11.5)
1. After processing, the screen is updated. 2. The user may select “Correct New Sticker” for further corrections, or continue to
correct on the same sticker.
11.4
PAGE 22

HAVE A QUESTION? CALL HART CLIENT CARE AT 800-252-2818, or EMAIL US AT [email protected]
STICKER DETAIL CORRECTIONS—ADD ITEM 11.5
1. The user adds a valid UPC in the Item field of (2) units. 2. The user selects “Add” to submit the added item. The Submit button will not process
adds. 3. The user cannot perform any other functions when clicking Add.
11.6
1. After processing, the screen is updated.
PAGE 23
HAVE A QUESTION? CALL HART CLIENT CARE AT 800-252-2818, or EMAIL US AT [email protected]
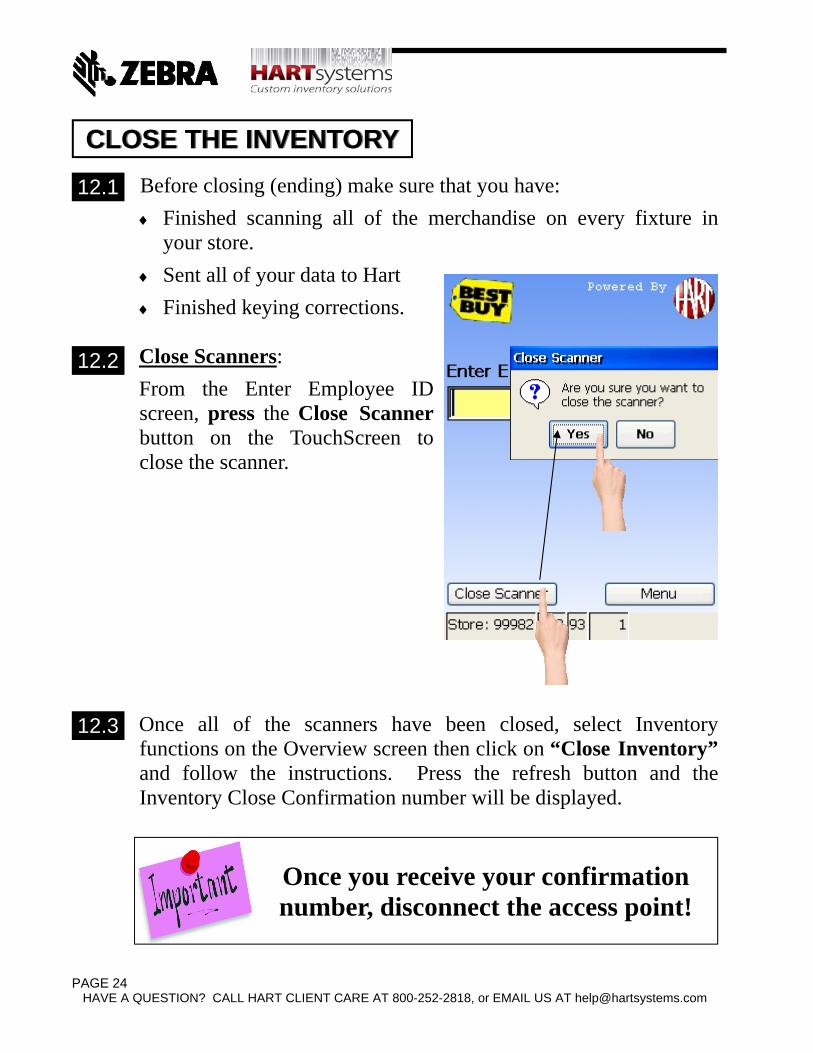
12.1 Before closing (ending) make sure that you have:
Finished scanning all of the merchandise on every fixture in your store.
Sent all of your data to Hart
Finished keying corrections. Close Scanners:
From the Enter Employee ID screen, press the Close Scanner button on the TouchScreen to close the scanner.
12.2
12.3
CLOSE THE INVENTORYCLOSE THE INVENTORY
Once all of the scanners have been closed, select Inventory functions on the Overview screen then click on “Close Inventory” and follow the instructions. Press the refresh button and the Inventory Close Confirmation number will be displayed.
Once you receive your confirmation number, disconnect the access point!
PAGE 24
HAVE A QUESTION? CALL HART CLIENT CARE AT 800-252-2818, or EMAIL US AT [email protected]
Do NOT write on any of the original Hart boxes. Before packing the boxes, read the shipping instructions printed on the Shipping Instructions envelope and any memos that may have been enclosed. All of the components will be shipped in the original boxes. First, place the Access Point back in the foam. Be careful with the antennas.
Second, place the scanners into the foam cavities.
Third, place any paperwork in the box.
Fourth, complete the client survey. Remember to include the client survey with the equipment
Finally, Tape up the boxes.
NOTE: It is very important that the equipment is shipped back according to the agreed upon shipping schedule. If you have any questions regarding the shipping of the equipment, please contact the Hart Client Care Desk at (800) 252-2818 or (631) 439-8200.
Be sure to retain your copies of the shipping receipts after the equipment has been shipped back to Hart. You may need to refer to them at a later time to provide proof of shipment.
13.3
13.2
13.1
SHIP COMPONENTSSHIP COMPONENTS
Don’t forget to complete the client survey before shipping the equipment
back to Hart.
PAGE 25
HAVE A QUESTION? CALL HART CLIENT CARE AT 800-252-2818, or EMAIL US AT [email protected]
Store Managers should schedule a meeting prior to the inventory to review the procedures with the employees who will be scanning.
PRE-INVENTORY MEETING: This meeting will cover learning and practicing the functions of the scanner as well as learning the procedural steps involved in scanning the merchandise. This training pertains to the employees who will actually be scanning the merchandise during the inventory. PRIOR TO TRAINING: Make sure that all of the scanners have been set up.
Become very familiar with the scanner and its functions (see Exhibit A in this manual).
Lay the Hart Stickers on all of the fixtures to be counted throughout the store. TRAINING: Assemble all of the scanning employees together and give the following materials to each of them: Scanner
A few sheets of section markers (red flags)
Pen THE TRAINING SESSION SHOULD TAKE ABOUT 15-30 MINUTES. Give a short speech that touches on the following points: The scanner is a small computer with a built-in laser that “reads” bar codes.
All of the inventory data will be communicated to Hart as the Fixture Sticker is ended.
TRAINING GUIDE
PAGE 26
HAVE A QUESTION? CALL HART CLIENT CARE AT 800-252-2818, or EMAIL US AT [email protected]
The Hart Stickers throughout the store represent individual fixtures, or sections of merchandise to be counted.
Explain how the stickers were placed throughout the store. Use specific examples and show the differences between how the stickers are placed on the shelves or other types of areas.
The SCANNING PROCEDURE is as follows:
1. Scan the Hart Sticker.
2. Scan/Key the merchandise information into the scanner and key the quantity, if required.
3. Scan all the merchandise on the fixture.
4. End the sticker by Scanning the Hart Fixture Sticker again.
5. Write the information displayed on the scanner into the appropriate boxes on the Hart Sticker.
6. Place a Red Flag over the Hart Sticker to identify the sticker as counted.
7. Repeat the steps above for the next sticker.
The scanner makes a “beep” when you scan a bar code or key-enter information. “Any other sound means to look at the scanner screen and follow the instructions”.
The scanner screen will become dark if it is not used for a couple of minutes. This does not affect any of the data in the scanner. When this happens, just press the Scan button and continue from where you left off.
When scanning a sticker, it is important to know where the sticker begins and ends. The sticker is placed as close to the first piece of merchandise as possible and it ends at the next Hart Sticker. The employees should take a step back before scanning the sticker to identify where the sticker begins and where it ends.
When beginning a new section (an aisle, for instance), begin at the far left and work from top to bottom, left to right.
The Hart Stickers are consecutively numbered and, if scanned in order, the scanner will inform you if you have skipped one while scanning.
The goal of the inventory is to count all of the merchandise in the store. If you see an area of merchandise that does not have a sticker placed on it, let the Store Manager know.
If a bar code cannot be scanned, try to manually key-enter the number using the scanner keypad.
TRAINING GUIDE
PAGE 27
HAVE A QUESTION? CALL HART CLIENT CARE AT 800-252-2818, or EMAIL US AT [email protected]
TRAINING GUIDE
PRACTICE SCANNING:
You may want to have the employees practice scanning, or simply watch you scan before beginning the live scanning. If so, you may choose an area of merchandise to practice scanning and place a Training Sticker (Exhibit B in this manual) on the fixture. SET THE SCANNER TO TRAINING MODE:
At the “Set Employee ID” screen, before you enter your Employee ID, Press the Menu icon in the lower right corner. From the Pop-Up Menu, select Training Mode and then select Yes. At the Enter Employee ID screen, you will now see ***Training*** on the bottom of the screen.
If you have already entered your Employee ID, you will need to select Logout on the scanner. The scanner will return to Set Employee ID screen where you can now select Training Mode.
Scan the sticker and merchandise just as if it were live scanning. When a sticker is scanned, the scanner will remind you that “Stickers scanned in Training Mode will not be sent and data will not be registered” just press ENT (Enter) The employee should continue this practice scanning until they feel comfortable with the scanner and the scanning procedures.
Remember: When the scanner is set for this “Training” mode, the stickers and the merchandise bar codes scanned or keyed will NOT be included on any reports or other output.
After Training is completed, it is very important that the scanners are taken out of Training Mode for the Live scanning . The scanners will not transmit data in Training Mode! To exit Training, press the “Menu” button located in lower right corner of the screen. A popup menu will be displayed with “Training Mode” checked and highlighted. Simply press ”Enter” and you will return to the Enter Employee ID screen. ***Training*** should disappear from the bottom of the screen, and the scanner is now ready for live inventory.
PAGE 28
HAVE A QUESTION? CALL HART CLIENT CARE AT 800-252-2818, or EMAIL US AT [email protected]
Listed below are common questions that the employees may have while they are scanning. You may want to review these questions and answers during training.
What if I lose my place in the middle of a sticker while scanning? The scanner has a Review function to help you locate your place. Refer to Exhibit A for more instructions. What if I scan a merchandise ticket in error? A merchandise ticket scanned in error can be “deleted”. Refer to Exhibit A. What if I become confused while scanning and I want to start the sticker over? The sticker can be “canceled”. Refer to Exhibit A for more instructions. What if I “END” a sticker and then realize that I made an error? The sticker and all of the merchandise should be rescanned. The date and time is set into every scanner. When a sticker is rescanned, the first scanning of the sticker will be ignored by the system and the second scanning will be used. When you rescan, you may use any scanner. What if a merchandise ticket is missing or unreadable? Call your Supervisor. How do I know if the scanner is at the point where it is ready to scan a bar code? When the words “SCAN=ON” are displayed in the upper right corner of the scanner display screen, you know that the scanner is ready to scan a bar code.
Q
A
Q
A
Q
A
Q
A
Q
A
Q
A
TRAINING GUIDE
TRAINING GUIDE
PAGE 29
HAVE A QUESTION? CALL HART CLIENT CARE AT 800-252-2818, or EMAIL US AT [email protected]
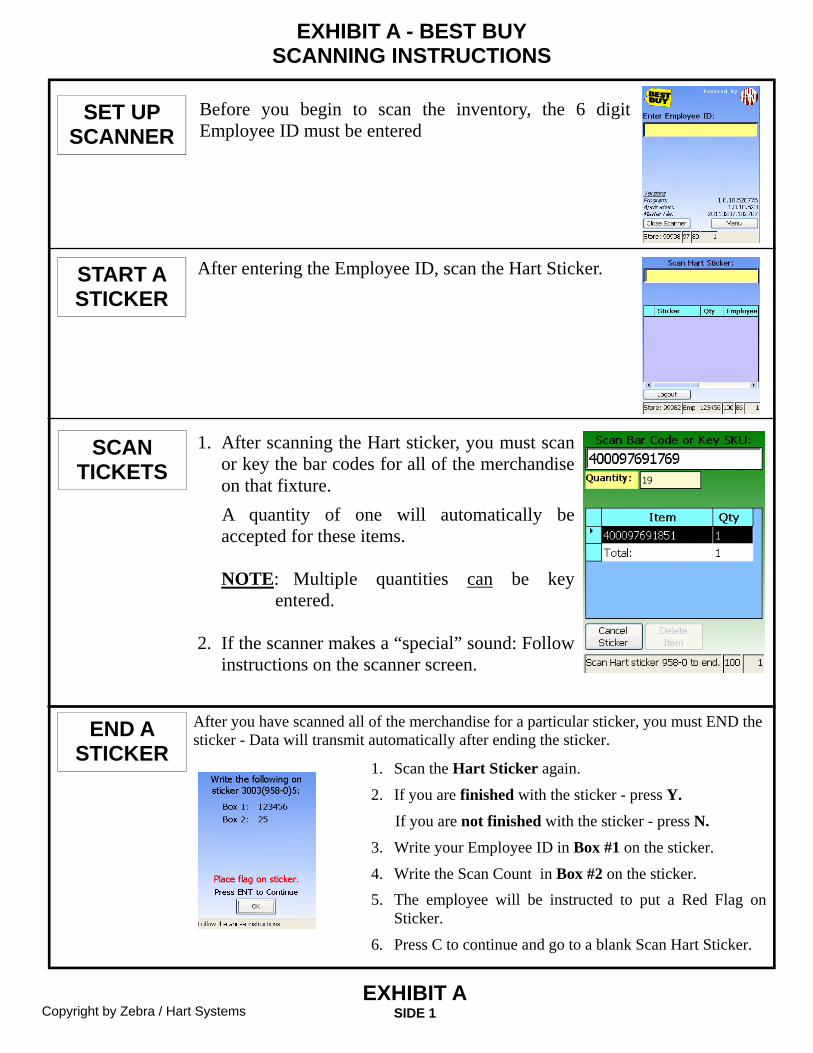
SIDE 1 EXHIBIT A
START A STICKER
END A STICKER
1. Scan the Hart Sticker again.
2. If you are finished with the sticker - press Y.
If you are not finished with the sticker - press N.
3. Write your Employee ID in Box #1 on the sticker.
4. Write the Scan Count in Box #2 on the sticker.
5. The employee will be instructed to put a Red Flag on Sticker.
6. Press C to continue and go to a blank Scan Hart Sticker.
After entering the Employee ID, scan the Hart Sticker.
After you have scanned all of the merchandise for a particular sticker, you must END the sticker - Data will transmit automatically after ending the sticker.
SCAN TICKETS
SET UP SCANNER
Before you begin to scan the inventory, the 6 digit Employee ID must be entered
EXHIBIT A - BEST BUY SCANNING INSTRUCTIONS
1. After scanning the Hart sticker, you must scan or key the bar codes for all of the merchandise on that fixture.
A quantity of one will automatically be accepted for these items. NOTE: Multiple quantities can be key
entered.
2. If the scanner makes a “special” sound: Follow instructions on the scanner screen.
Copyright by Zebra / Hart Systems
HAVE A QUESTION? CALL HART CLIENT CARE AT 800-252-2818, or EMAIL US AT [email protected]
Copyright by Zebra/ Hart Systems
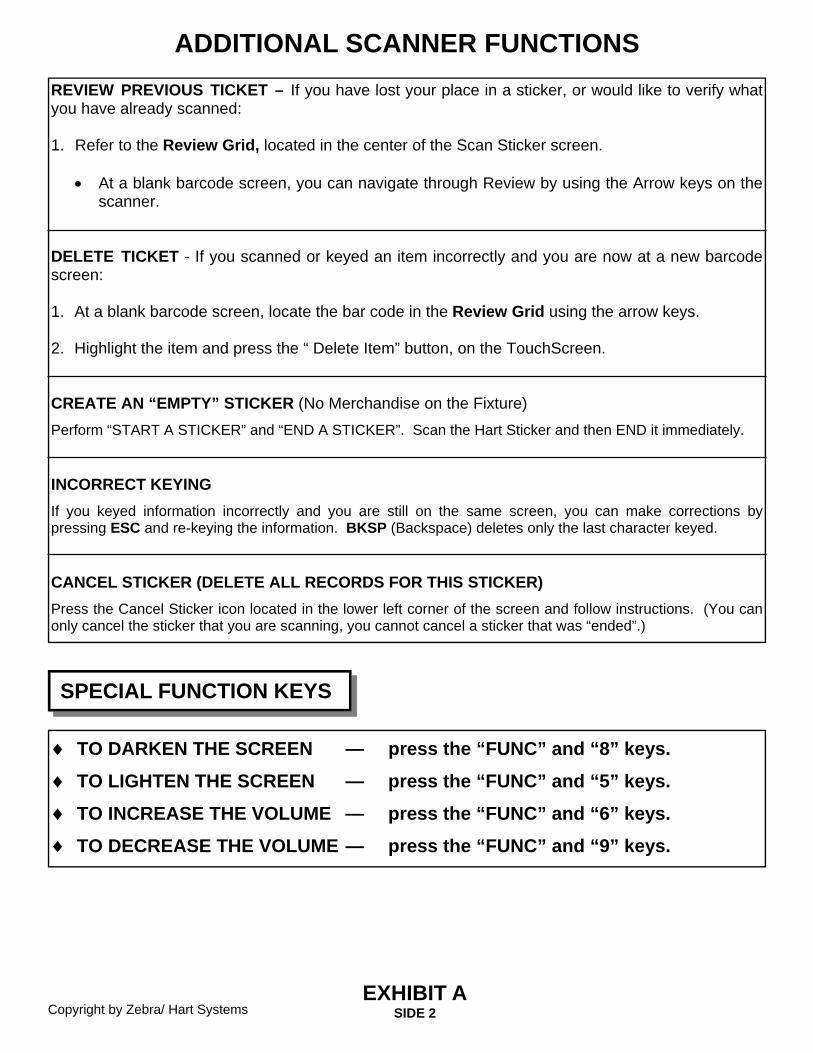
ADDITIONAL SCANNER FUNCTIONS
REVIEW PREVIOUS TICKET – If you have lost your place in a sticker, or would like to verify what you have already scanned: 1. Refer to the Review Grid, located in the center of the Scan Sticker screen.
At a blank barcode screen, you can navigate through Review by using the Arrow keys on the scanner.
DELETE TICKET - If you scanned or keyed an item incorrectly and you are now at a new barcode screen: 1. At a blank barcode screen, locate the bar code in the Review Grid using the arrow keys. 2. Highlight the item and press the “ Delete Item” button, on the TouchScreen. CREATE AN “EMPTY” STICKER (No Merchandise on the Fixture)
Perform “START A STICKER” and “END A STICKER”. Scan the Hart Sticker and then END it immediately. INCORRECT KEYING
If you keyed information incorrectly and you are still on the same screen, you can make corrections by pressing ESC and re-keying the information. BKSP (Backspace) deletes only the last character keyed. CANCEL STICKER (DELETE ALL RECORDS FOR THIS STICKER)
Press the Cancel Sticker icon located in the lower left corner of the screen and follow instructions. (You can only cancel the sticker that you are scanning, you cannot cancel a sticker that was “ended”.)
SIDE 2 EXHIBIT A
SPECIAL FUNCTION KEYS
TO DARKEN THE SCREEN — press the “FUNC” and “8” keys.
TO LIGHTEN THE SCREEN — press the “FUNC” and “5” keys.
TO INCREASE THE VOLUME — press the “FUNC” and “6” keys.
TO DECREASE THE VOLUME — press the “FUNC” and “9” keys.
HAVE A QUESTION? CALL HART CLIENT CARE AT 800-252-2818, or EMAIL US AT [email protected] Copyright by Zebra/ Hart Systems
HAVE A QUESTION? CALL HART CLIENT CARE AT 800-252-2818, or EMAIL US AT [email protected]
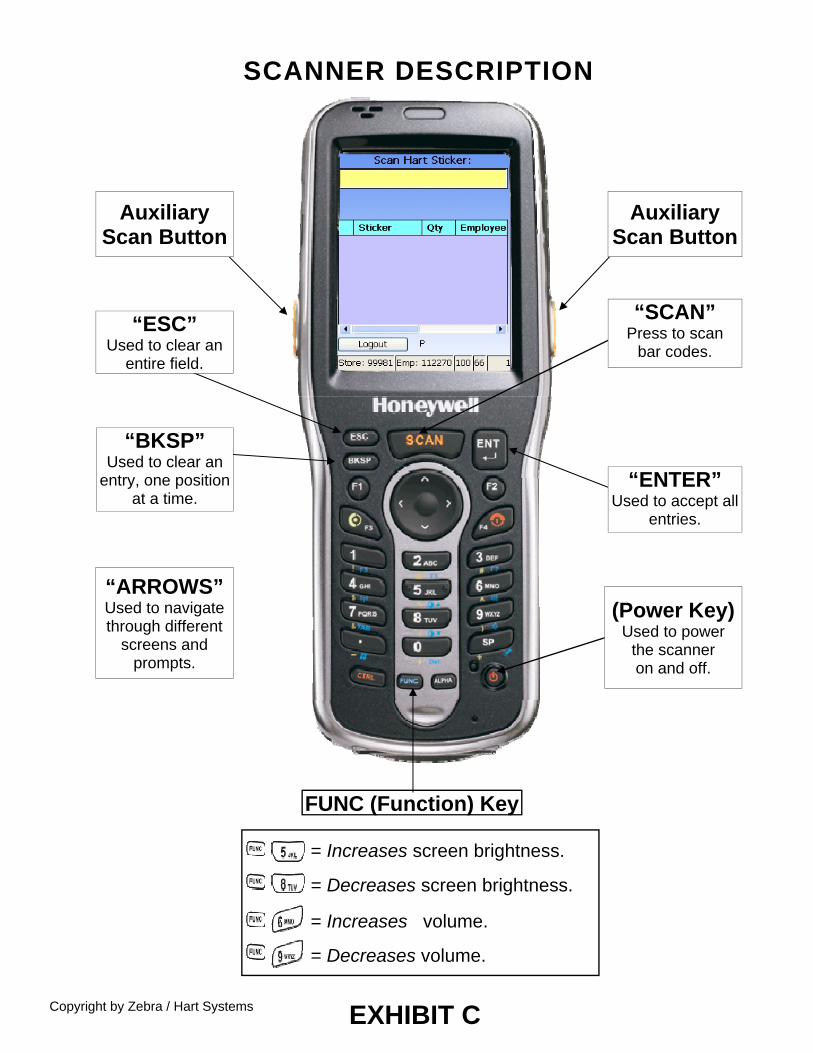
SCANNER DESCRIPTION
EXHIBIT C
“ARROWS” Used to navigate through different
screens and prompts.
Copyright by Zebra / Hart Systems
= Increases screen brightness.
= Decreases screen brightness.
= Increases volume.
= Decreases volume.
FUNC (Function) Key
“BKSP” Used to clear an
entry, one position at a time.
Auxiliary Scan Button
Auxiliary Scan Button
“ESC” Used to clear an
entire field.
“SCAN” Press to scan
bar codes.
“ENTER” Used to accept all
entries.
(Power Key) Used to power
the scanner on and off.
HAVE A QUESTION? CALL HART CLIENT CARE AT 800-252-2818, or EMAIL US AT [email protected]
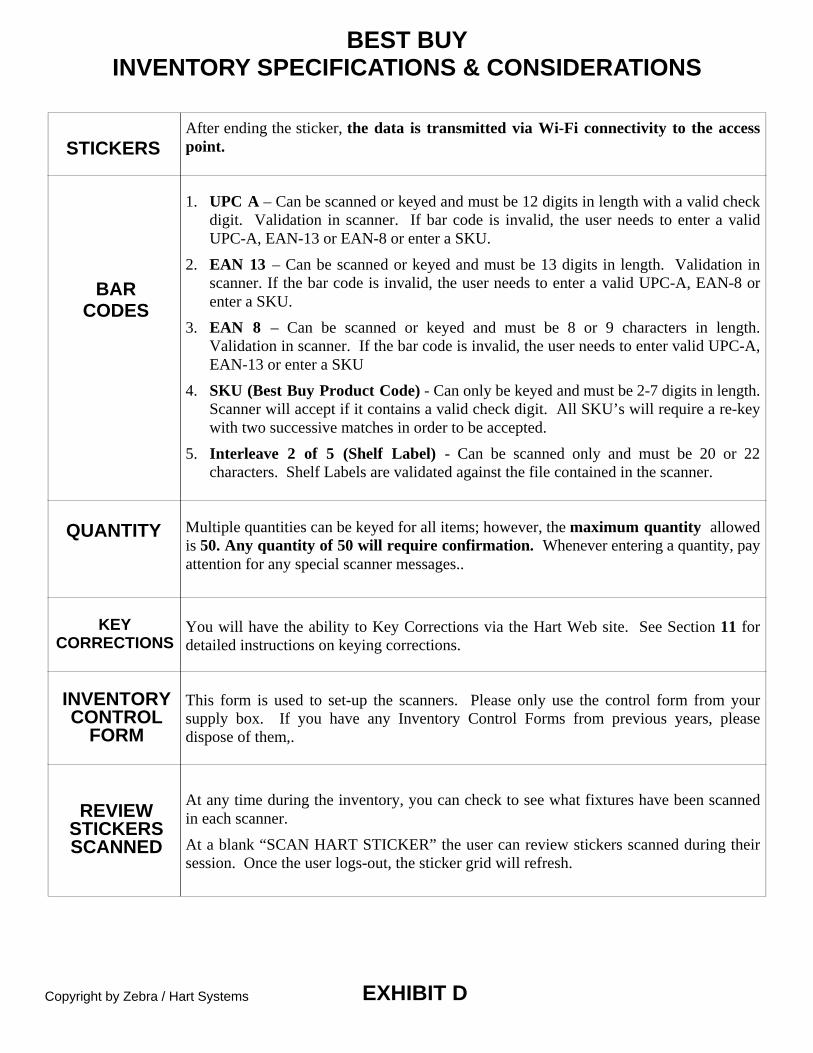
BEST BUY
INVENTORY SPECIFICATIONS & CONSIDERATIONS
After ending the sticker, the data is transmitted via Wi-Fi connectivity to the access point. 1. UPC A – Can be scanned or keyed and must be 12 digits in length with a valid check
digit. Validation in scanner. If bar code is invalid, the user needs to enter a valid UPC-A, EAN-13 or EAN-8 or enter a SKU.
2. EAN 13 – Can be scanned or keyed and must be 13 digits in length. Validation in scanner. If the bar code is invalid, the user needs to enter a valid UPC-A, EAN-8 or enter a SKU.
3. EAN 8 – Can be scanned or keyed and must be 8 or 9 characters in length. Validation in scanner. If the bar code is invalid, the user needs to enter valid UPC-A, EAN-13 or enter a SKU
4. SKU (Best Buy Product Code) - Can only be keyed and must be 2-7 digits in length. Scanner will accept if it contains a valid check digit. All SKU’s will require a re-key with two successive matches in order to be accepted.
5. Interleave 2 of 5 (Shelf Label) - Can be scanned only and must be 20 or 22 characters. Shelf Labels are validated against the file contained in the scanner.
Multiple quantities can be keyed for all items; however, the maximum quantity allowed is 50. Any quantity of 50 will require confirmation. Whenever entering a quantity, pay attention for any special scanner messages..
You will have the ability to Key Corrections via the Hart Web site. See Section 11 for detailed instructions on keying corrections. This form is used to set-up the scanners. Please only use the control form from your supply box. If you have any Inventory Control Forms from previous years, please dispose of them,.
At any time during the inventory, you can check to see what fixtures have been scanned in each scanner.
At a blank “SCAN HART STICKER” the user can review stickers scanned during their session. Once the user logs-out, the sticker grid will refresh.
STICKERS
BAR CODES
INVENTORY CONTROL
FORM
REVIEW STICKERS SCANNED
KEY CORRECTIONS
QUANTITY
Copyright by Zebra / Hart Systems EXHIBIT D
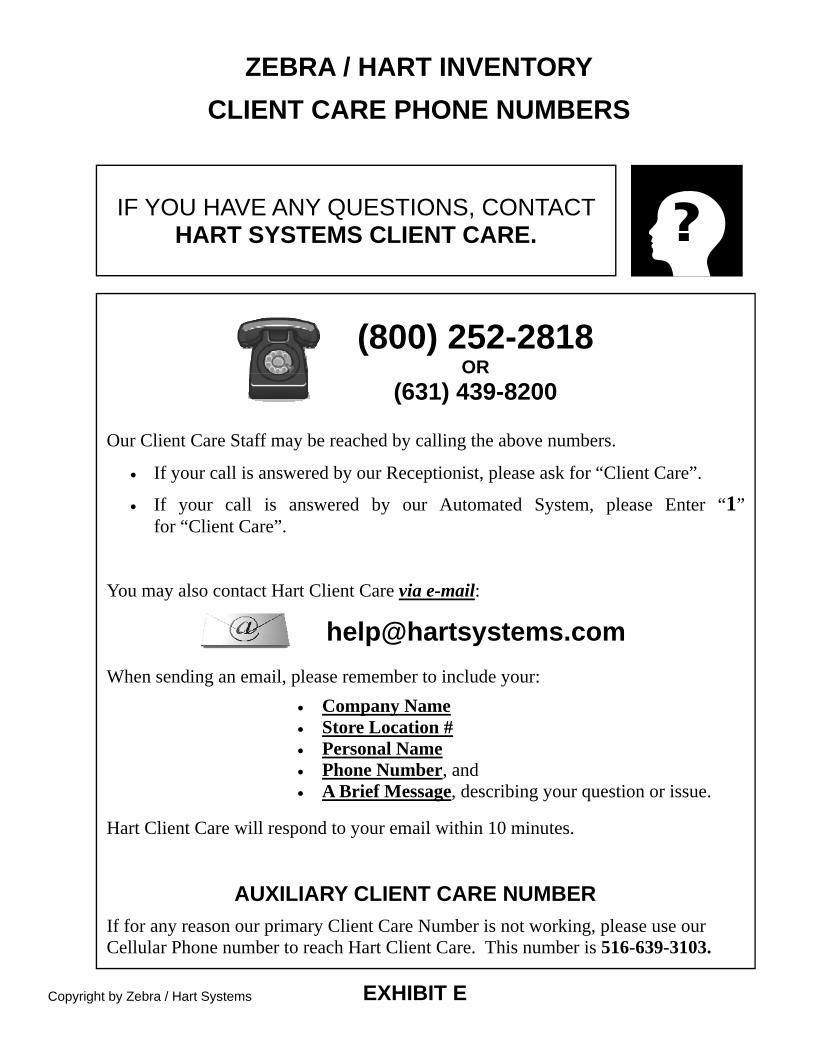
HAVE A QUESTION? CALL HART CLIENT CARE AT 800-252-2818, or EMAIL US AT [email protected]
Copyright by Zebra / Hart Systems EXHIBIT E
Our Client Care Staff may be reached by calling the above numbers.
If your call is answered by our Receptionist, please ask for “Client Care”.
If your call is answered by our Automated System, please Enter “1” for “Client Care”.
You may also contact Hart Client Care via e-mail: When sending an email, please remember to include your:
Company Name Store Location # Personal Name Phone Number, and A Brief Message, describing your question or issue.
Hart Client Care will respond to your email within 10 minutes.
AUXILIARY CLIENT CARE NUMBER
If for any reason our primary Client Care Number is not working, please use our Cellular Phone number to reach Hart Client Care. This number is 516-639-3103.
ZEBRA / HART INVENTORY
CLIENT CARE PHONE NUMBERS
IF YOU HAVE ANY QUESTIONS, CONTACT HART SYSTEMS CLIENT CARE.
(800) 252-2818 OR
(631) 439-8200
HAVE A QUESTION? CALL HART CLIENT CARE AT 800-252-2818, or EMAIL US AT [email protected]
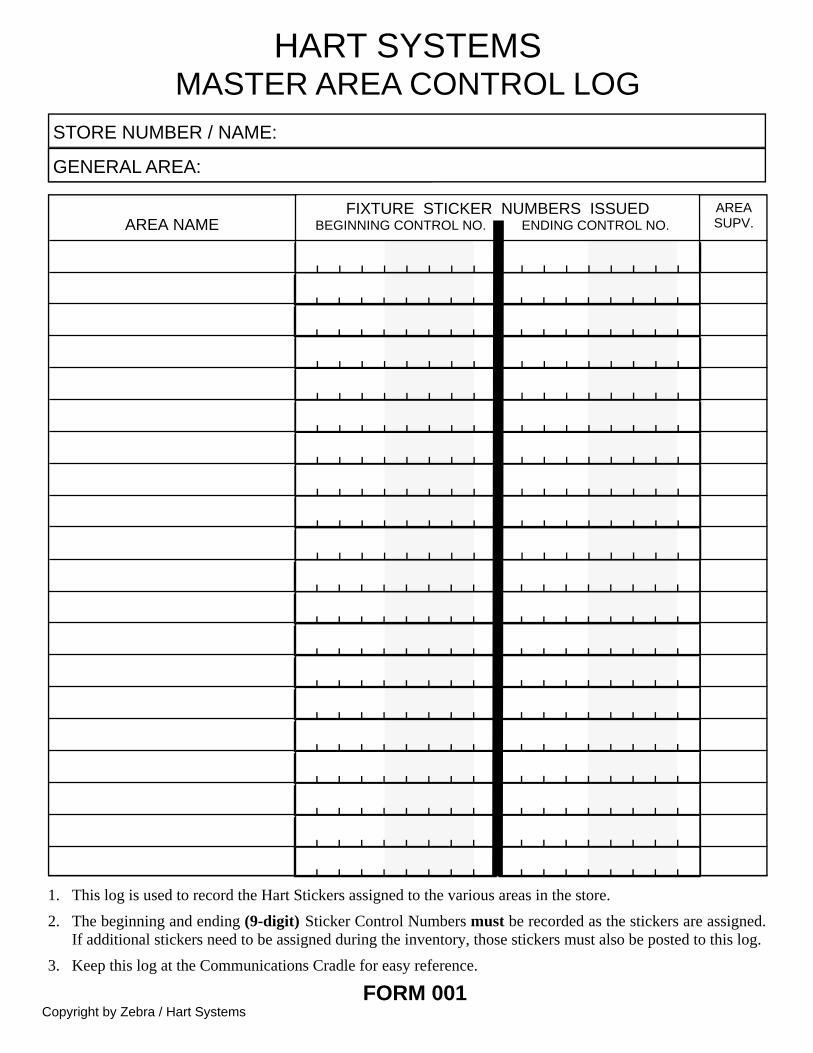
HART SYSTEMS
MASTER AREA CONTROL LOG
FIXTURE STICKER NUMBERS ISSUED BEGINNING CONTROL NO. ENDING CONTROL NO.
AREA NAME
AREA SUPV.
STORE NUMBER / NAME:
GENERAL AREA:
1. This log is used to record the Hart Stickers assigned to the various areas in the store.
2. The beginning and ending (9-digit) Sticker Control Numbers must be recorded as the stickers are assigned. If additional stickers need to be assigned during the inventory, those stickers must also be posted to this log.
3. Keep this log at the Communications Cradle for easy reference.
FORM 001 Copyright by Zebra / Hart Systems

HAVE A QUESTION? CALL HART CLIENT CARE AT 800-252-2818, or EMAIL US AT [email protected]