Embed Size (px)
Citation preview

NextEngine 3D ScannerInstructor’s Manual
Version 2.0Installation version 2.0
February 2013
DEPCOllc
Desired Classroom Objectives .......................................................2
Lesson Outline ..................................................................................3
Installation Guide ............................................................................4
Lesson Review Answer Key ............................................................17
NextEngine 3D Scanner
2 DEPCOllc
After successfully completing NextEngine 3D Scanner, students will
be able to:
• Explain the purpose of OSHA.
• Identify safety guidelines for lasers and the NextEngine 3D scanner.
• Explain the various uses of a 3D scanner.
• Explain how the NextEngine 3D scanner operates.
• Scan, align, trim, and fuse an object.
• Define and explain the Cartesian coordinate system.
• Explain how coordinate systems are used everyday.
• Explain how coordinate systems are used in 3D scanning.
• Identify the components of the RapidWorks user interface.
• Use RapidWorks to optimize mesh data, create surfaces from mesh data, and analyze the deviation between the mesh data and created surfaces.
• Use RapidWorks to separate regions of mesh data, create a section sketch, extrude, surface cut, and fillet.
• Define extrude.
• Explain how the extrude feature is used in RapidWorks.
• Create a nameplate using RapidWorks.
• Create a sketch on a part.
• Create a cut operation.
• Use the linear and circular pattern features in RapidWorks.
• Define and discuss airfoils.
• Scan an airfoil.
• Edit scan data using RapidWorks.
• Use the auto-sketch feature.
Desired Classroom Objectives
Instructor’s Manual
DEPCOllc3
What’s New in RapidWorks 3.5.1New RapidWorks features include:• Enhanced mesh segmentation and
display• Easy and intuitive region editing tools• Auto sketch enhancement• Quick modeling• Auto surfacing enhancement• Fillet selection guide• LiveTransfer™ enhancement• CAD to scan alignment• Unicode and language support• LiveTransfer now supports: SolidWorks
2013, Inventor 2013, Creo Elements Pro 5.0, and Creo Parametric 2.0
• Improved AutoSurfacing performance
Lesson 1In this lesson, the students will learn the purpose of the Occupational Safety and Health Administration (OSHA). They will also learn the safety guidelines for lasers and the NextEngine 3D scanner.
Lesson 2In this lesson, the students will learn to identify various scanners. They will explain the various uses of a 3D scanner, and explain how the NextEngine 3D scanner operates. They will also scan, align, trim, and fuse an object.
Lesson 3In this lesson, the students will define and explain the Cartesian coordinate system. They will also explain how coordinate systems are used everyday and how they are used in 3D scanning.
Lesson Outline
Lesson 4In this lesson, the students will identify components of the RapidWorks user interface. They will use RapidWorks to optimize mesh data, create surfaces from mesh data, and analyze the deviation between the mesh data and created surfaces. They will also learn to separate regions of mesh data, create a section sketch, extrude, surface cut, and fillet.
Lesson 5In this lesson, the students will def ine extrude and explain how the extrude feature is used in RapidWorks. They will also create a sketch on a part, and then use the cut feature to cut through a part.
Lesson 6In this lesson, the students will create a nameplate using RapidWorks.
Lesson 7In this lesson, the students will use the linear and circular pattern features in RapidWorks to create a gear.
Lesson 8In this lesson, the students will define and discuss airfoils. They will also scan an airfoil.
Lesson 9In this lesson, the students will manually edit scan data using RapidWorks.
Lesson 10In this lesson, the students will use the auto-sketch feature to manipulate an airfoil using RapidWorks on their own.
NextEngine 3D Scanner
4 DEPCOllc
Installation Guide
NextEngine 3D Scanner DEPCO Studio MediaRead the manufacturer’s instructions for machine safety and maintenance.
For Windows 2000 or XPInstall NextEngine 3D Scanner DEPCO Studio Media Player
1. Insert the CD-ROM into the CD-ROM drive. If setup starts automatically, skip to step 5.
2. If setup does not start automatically, on the Start menu, click My Computer.
3. In the My Computer box, double-click D.
4. In the D box, double-click Installer.html.
5. In the Warning box, click Yes.
6. On the Web browser, next to Step 1:, click Install Adobe AIR. If Adobe AIR is already installed on the computer, skip to step 15.
7. In the Warning box, click Run.
8. In the Warning box, click Run.
9. In the Adobe AIR Setup box, read the license agreement, and then click I Agree.
10. Click Finish.
11. In the Adobe AIR Updater box, click Update Now.
12. In the Adobe AIR Setup box, click Update.
13. Read the license agreement, and then click I Agree.
14. Click Finish.
Instructor’s Manual
DEPCOllc5
15. On the Web browser, next to Step 2:, click Install DEPCO Studio Media Player. If DEPCO Studio Media player is already installed on the computer, skip to step 21.
16. In the File Download box, click Open.
17. In the Application Install box, click Install.
18. Click to clear the Start application after installation check box.
19. Click Continue.
20. Click Finish.
21. On the Web browser, next to Step 3:, click Install Curriculum.
22. In the Warning box, click Run.
23. In the Warning box, click Run.
24. In the Language Selection box, select an installation language, and then click OK.
25. In the Install DEPCO Curriculum box, click Yes.
26. In the DEPCO Curriculum Setup box, click Next.
27. Click Next.
28. Click Next. The installation process may take several minutes.
29. Click Finish.
For Windows 7Install NextEngine 3D Scanner DEPCO Studio Media Player
1. Insert the CD-ROM into the CD-ROM drive. If setup starts automatically, skip to step 5.
2. If setup does not start automatically, on the Start menu, click Computer.
Installation Guide
NextEngine 3D Scanner
6 DEPCOllc
3. In the Computer box, double-click D.
4. In the D box, double-click Installer.html.
5. In the Warning box, click Yes.
6. On the Web browser, next to Step 1:, click Install Adobe AIR. If Adobe AIR is already installed on the computer, skip to step 14.
7. In the Warning box, click Run.
8. In the Warning box, click Run.
9. In the Adobe AIR Setup box, read the license agreement, and then click I Agree.
10. Click Finish.
11. In the Adobe AIR Updater box, click Update Now.
12. In the Adobe AIR Setup box, click Update.
13. Click Finish.
14. On the Web browser, next to Step 2:, click Install DEPCO Studio Media Player. If DEPCO Studio Media player is already installed on the computer, skip to step 20.
15. In the File Download box, click Open.
16. In the Application Install box, click Install.
17. Click to clear the Start application after installation check box.
18. Click Continue.
19. Click Finish.
20. On the Web browser, next to Step 3:, click Install Curriculum.
21. In the Warning box, click Run.
22. In the Warning box, click Run.
Installation Guide
Instructor’s Manual
DEPCOllc7
Installation Guide
23. In the Language Selection box, select an installation language, and then click OK.
24. In the Install DEPCO Curriculum box, click Yes.
25. In the DEPCO Curriculum Setup box, click Next.
26. Click Next.
27. Click Next. The installation process may take several minutes.
28. Click Finish.
NextEngine 3D Scanner DEPCO StudioFor Windows 7Note: If DEPCO Studio Media Player is installed on the computer, ensure the file path is set up correctly. If you do not have permission to set up the file path, notify the network administrator.
Step 1. Set up the file path
1. On the taskbar, click Start.
2. On the Start menu, click Computer.
3. Double-click C.
4. Double-click Program Files.
5. On the Toolbar, click New folder.
6. Type DEPCO, and then press ENTER.
7. Double-click DEPCO.
8. On the Toolbar, click New folder.
9. Type NextEngine 3D Scanner, and then press ENTER.
10. On the Toolbar, click New folder.
11. Type Student Files, and then press ENTER.

NextEngine 3D Scanner
8 DEPCOllc
Step 2. Download and save module documents
1. Start DEPCO Studio.
2. Click the Curriculum tab.
3. Select a module.
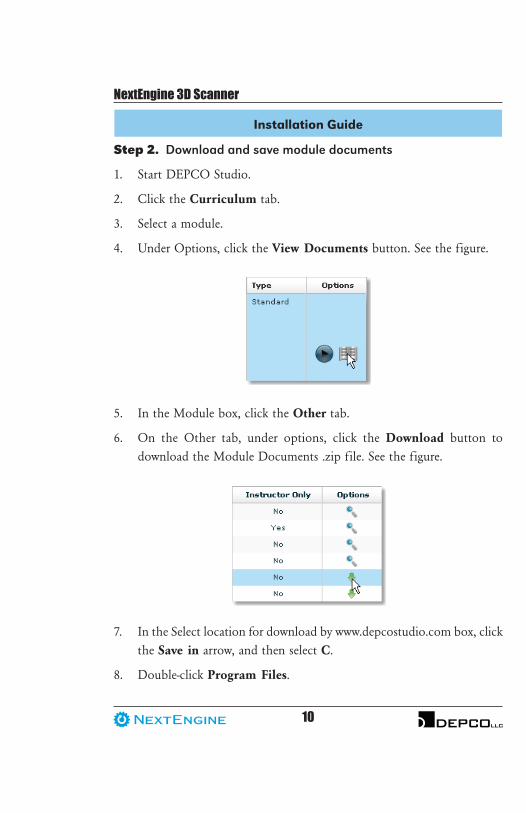
4. Under Options, click the View Documents button. See the figure.
Installation Guide
5. In the Module box, click the Other tab.
6. On the Other tab, under options, click the Download button to download the Module Documents .zip file. See the figure.
7. In the Select location for download by www.depcostudio.com box, click the Save in arrow, and then select C.
8. Double-click Program Files.

Instructor’s Manual
DEPCOllc9
Installation Guide
9. Double-click DEPCO.
10. Double-click NextEngine 3D Scanner.
11. Click Save.
12. Extract the .zip file in the NextEngine 3D Scanner folder.
13. After the file is extracted, delete the .zip file.
For Windows 2000 and XPNote: If DEPCO Studio Media Player is installed on the computer, ensure the file path is set up correctly. If you do not have permission to set up the file path, notify the network administrator.
Step 1. Set up the file path
1. On the taskbar, click Start.
2. On the Start menu, click My Computer.
3. Double-click C.
4. Double-click Program Files.
5. Under File and Folder Tasks, click Make a new folder.
6. Type DEPCO, and then press ENTER.
7. Double-click DEPCO.
8. Under File and Folder Tasks, click Make a new folder.
9. Type NextEngine 3D Scanner, and then press ENTER.
10. Under File and Folder Tasks, click Make a new folder.
11. Type Student Files, and then press ENTER.
NextEngine 3D Scanner
10 DEPCOllc
Step 2. Download and save module documents
1. Start DEPCO Studio.
2. Click the Curriculum tab.
3. Select a module.
4. Under Options, click the View Documents button. See the figure.
Installation Guide
5. In the Module box, click the Other tab.
6. On the Other tab, under options, click the Download button to download the Module Documents .zip file. See the figure.
7. In the Select location for download by www.depcostudio.com box, click the Save in arrow, and then select C.
8. Double-click Program Files.

Instructor’s Manual
DEPCOllc11
Installation Guide
9. Double-click DEPCO.
10. Double-click NextEngine 3D Scanner.
11. Click Save.
12. Extract the .zip file in the NextEngine 3D Scanner folder.
13. After the file is extracted, delete the .zip file.
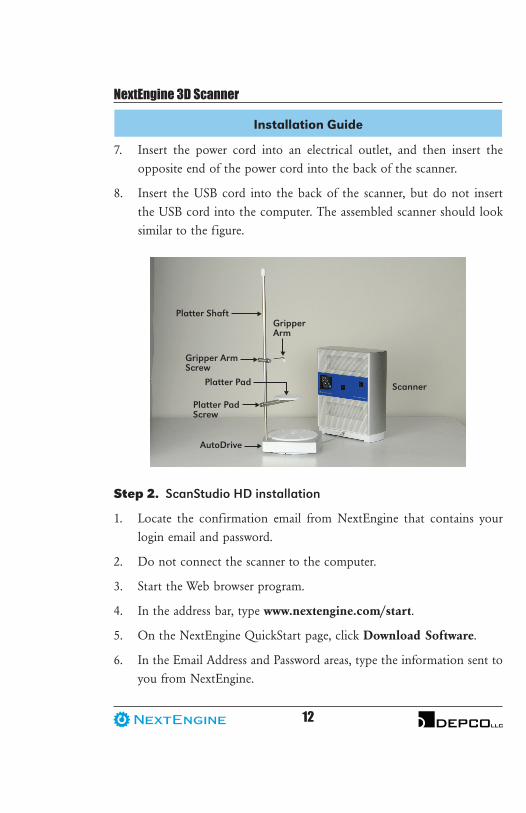
NextEngine 3D Scanner and Software Set UpStep 1. Set up the scanner
1. Locate the following:
• AutoDrive
• Gripper arm
• Platter shaft
• Power cord
• Scanner
• USB cord
2. Screw the Platter Shaft into one of the holes on the AutoDrive.
3. Remove the rubber cap from the top of the Platter Shaft, and then loosen the Gripper Arm Screw.
4. Slide the Gripper Arm onto the Platter Shaft, and then tighten the Gripper Arm Screw.
5. Place the rubber cap on the top of the Platter Shaft.
6. Place the AutoDrive cord in the Macro + slot, and then attach the AutoDrive to the front of the scanner.
NextEngine 3D Scanner
12 DEPCOllc
Installation Guide
7. Insert the power cord into an electrical outlet, and then insert the opposite end of the power cord into the back of the scanner.
8. Insert the USB cord into the back of the scanner, but do not insert the USB cord into the computer. The assembled scanner should look similar to the figure.
Platter ShaftGripper Arm
Scanner
AutoDrive
Gripper ArmScrew
Platter Pad
Platter PadScrew
Step 2. ScanStudio HD installation
1. Locate the confirmation email from NextEngine that contains your login email and password.
2. Do not connect the scanner to the computer.
3. Start the Web browser program.
4. In the address bar, type www.nextengine.com/start.
5. On the NextEngine QuickStart page, click Download Software.
6. In the Email Address and Password areas, type the information sent to you from NextEngine.
Instructor’s Manual
DEPCOllc13
7. Click Download.
8. Click ScanStudio HD.
9. In the File Download – Security Warning box, click Save.
10. Save the file to the Desktop. Note: The download may take several minutes.
11. On the Desktop, double-click ScanStudio HD.exe.
12. In the Open File – Security Warning box, click Run.
13. Click Next.
14. Read the license agreement, and then select Accept.
15. Click Next.
16. Click Next.
17. Click Next.
18. Click Install.
19. In the NextEngine Warning box, click OK. Ensure that the scanner is not connected to the computer.
20. Click Finish.
21. ScanStudio HD opens automatically.
22. When ScanStudio HD opens, the NextWiki opens.
23. Enter your username and password, and then click Send.
24. ScanStudio HD activates. Note: This process may take several minutes.
25. Insert the scanner USB cord into the computer.
26. In the Found New Hardware Wizard box, select Yes, this time only, and then click Next. Note: This step is for XP only.
Installation Guide
NextEngine 3D Scanner
14 DEPCOllc
Installation Guide
27. Click Next.
28. Click Finish.
29. In ScanStudio, on the Edit menu, click Preferences.
30. In the Scan area, click Browse.
31. Click the Look in arrow, and then click C.
32. Double-click Program Files.
33. Double-click DEPCO.
34. Double-click NextEngine.
35. Double-click Module Documents.
36. Click OK.
37. In the ScanStudio HD Preferences box, click OK.
38. On the File menu, click Exit.
Step 3. RapidWorks installation
1. Locate the confirmation email from NextEngine that contains your login email and password.
2. Start the Web browser program.
3. In the address bar, type www.nextengine.com/start.
4. On the NextEngine QuickStart page, click Download Software.
5. In the Email Address and Password areas, type the information sent to you from NextEngine.
6. Click Download.
7. Click RapidWorks.

Instructor’s Manual
DEPCOllc15
8. In the File Download box, click Save.
9. Save the file to the Desktop. Note: The download may take several minutes.
10. On the Desktop, right-click RapidWorks.zip, and then click Extract All.
11. In the Extraction Wizard box, click Next.
12. Click Next. Note: The extraction process may take several minutes.
13. Ensure the Show extracted files check box is selected, and then click Finish.
14. In the RapidWorks box, double-click DVD.
15. Double-click setup.exe.
16. In the Open File – Security Warning box, click Run.
17. In the RapidWorks – InstallShield box, click Next.
18. Read the license agreement, and then select I accept the terms in the license agreement.
19. Click Next.
20. Click Next.
21. Click Install. Note: The installation process may take several minutes.
22. Click Finish.
23. In the DVD box, click the Close button.
Installation Guide
NextEngine 3D Scanner
16 DEPCOllc
Scanning Models1. The models sent with the NextEngine 3D scanner are subject to change.
2. Locate the following:
• airfoil
• golf ball
• red paint pen
3. Use the red paint pen to write the numbers 1–10 all over the golf ball.
4. Use the red paint pen to write the numbers 1–15 or 1–20 all over the airfoil.
Note: The numbers are reference points, which help align the scans.
Installation Guide
Instructor’s Manual
DEPCOllc17
Lesson Review Answer Key
Lesson 11. B2. A3. D4. B5. D
Lesson 21. A2. C3. D4. A5. B
Lesson 31. A2. B3. C4. A5. D Lesson 41. B2. A3. A4. C5. D
Lesson 51. B2. C3. D4. B5. A
Lesson 61. B2. A3. B4. B5. A
Lesson 71. A2. B3. A4. B5. A
Lesson 81. B2. A3. A4. A5. D
Lesson 91. B2. A3. A4. D5. B
Lesson 101. B2. A3. A4. B5. A

DEPCO, LLC

DEPCO, LLC
DEPCO, LLC3305 Airport DrivePittsburg, Kansas 66762Sales 800.767.1062Fax 620.231.0024www.depcollc.com
NextEngine, Inc.401 Wilshire Blvd., Ninth FloorSanta Monica, California 90401Sales 310 883 1888Fax 310 883 1860www.nextengine.com
NextEngine 3D ScannerScan-to-CAD Curriculum
NextEngine collaborated with DEPCO, LLC to create the NextEngine 3D Scanner Scan-to-CAD Curriculum. This curriculum is designed to introduce users to 3D modeling and reverse engineering. Users learn how 3D modeling and reverse engineering are used in the design process by using NextEngine’s 3D Scanner and ScanStudio software to scan models. Users also learn how to create models and modify scan data using RapidWorks software.
DEPCOllc
![LO SCANNER 3D METROLOGICO REALMENTE PORTATILE · PRESENTAZIONE DELLO SCANNER HANDYSCAN 3D. La più facile esperienza di scansione 3D, FRQ PLVXUD]LRQL YHORFL H DIÀGDELOL ... SCANNER](https://img.pdfslide.net/doc/110x75/5c69cdcb09d3f2310b8ba79a/lo-scanner-3d-metrologico-realmente-portatile-presentazione-dello-scanner-handyscan.jpg)