Embed Size (px)
Citation preview

Page | 1
NextGen EHR 5.8
Enhancements

Page | 2
Contents:
Module Updates:_______________________________________
EHR Login Screen………………………………………………Pg. 3
User Preferences………………………………………............Pg. 4
Patient Information Bar……………………………………Pg. 5
Medication Module ….………………………………..….....Pg. 6-10
Orders Module …………………………………….…………..Pg. 11
PAQ………………………………………………………………Pg. 12-15
Allergy Module………………………………………………Pg. 16
Procedure Module…………………………………………Pg. 17-20
Document Module…………………………………………Pg. 21-22
Diagnosis Module …………………………………………Pg. 23-30
Equipment Module………………………………………..Pg. 31
Page | 3
EHR Login Screen:
1.) Enterprise and practice selections are now located on the right side of the screen. The tab key can be used to move through each item and the Pin Pad has been removed.
Page | 4
User Preferences:
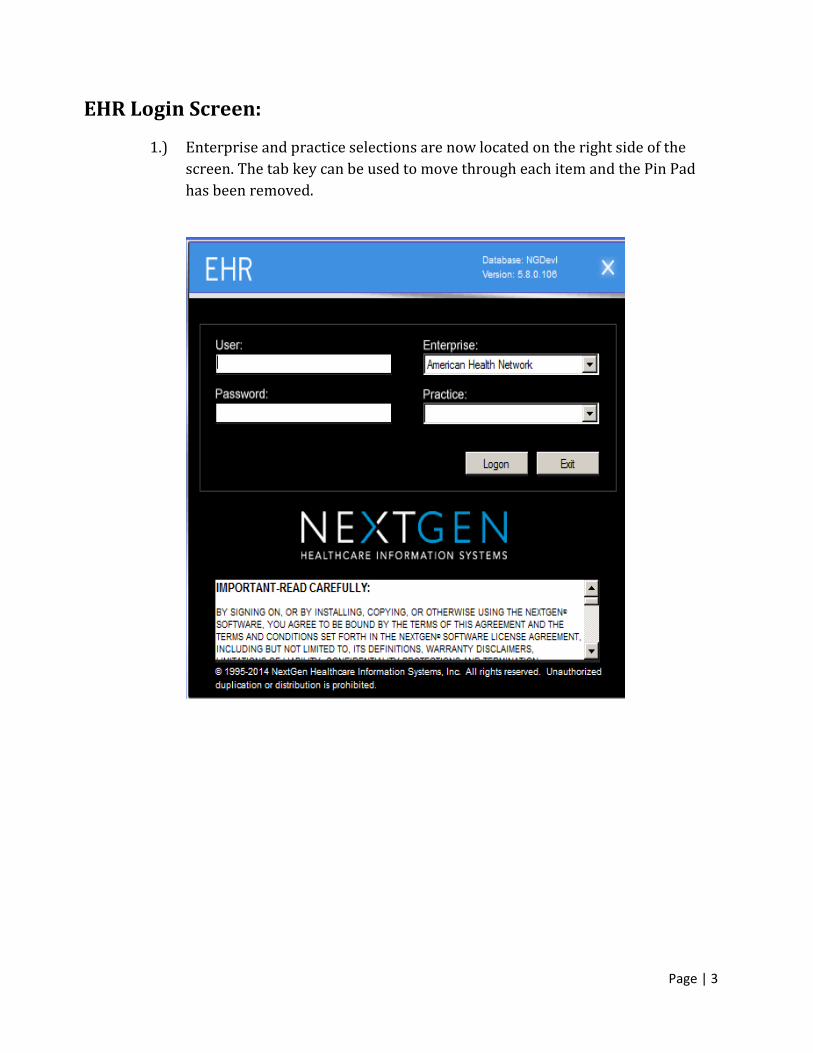
1.) The General Tab: An option has been added to set a default view when opening the Orders Module. Options are “Results View” or “Orders View”. Results view will be selected by default.
2.) The Documents Tab: Spell check has been added as an option. Spell check will be turned on by default.

Page | 5
Patient Information Bar: (per practice option)
1.) The patient Information Bar provides demographic information and will remain visible regardless of the module or template opened. There are four sections of the bar. They are outlined below.
a.) Medical Information – Includes Allergies, Problems, Diagnoses, and
Medications. b.) Demographic Information – Includes three patient demographic items.
Practices can chose from seven options: Preferred language, insurance information, MRN, parent/ guardian, nickname, NextMD indicator, and enterprise chart indicator. (Items will default to insurance, nickname, NextMD Indicator)
c.) Encounter Information – Includes the primary care provider, rendering provider, and referring provider.
d.) Demographic Templates – The PHI Log, Patient Information, and Chart Summary Templates will be added for display.
Hovering - Place your curser over the number next to Allergies, Problems, Diagnoses, or Medication labels. A list of items in the modules will display. Clicking on the number will open the module.
Page | 6
Medication Module:
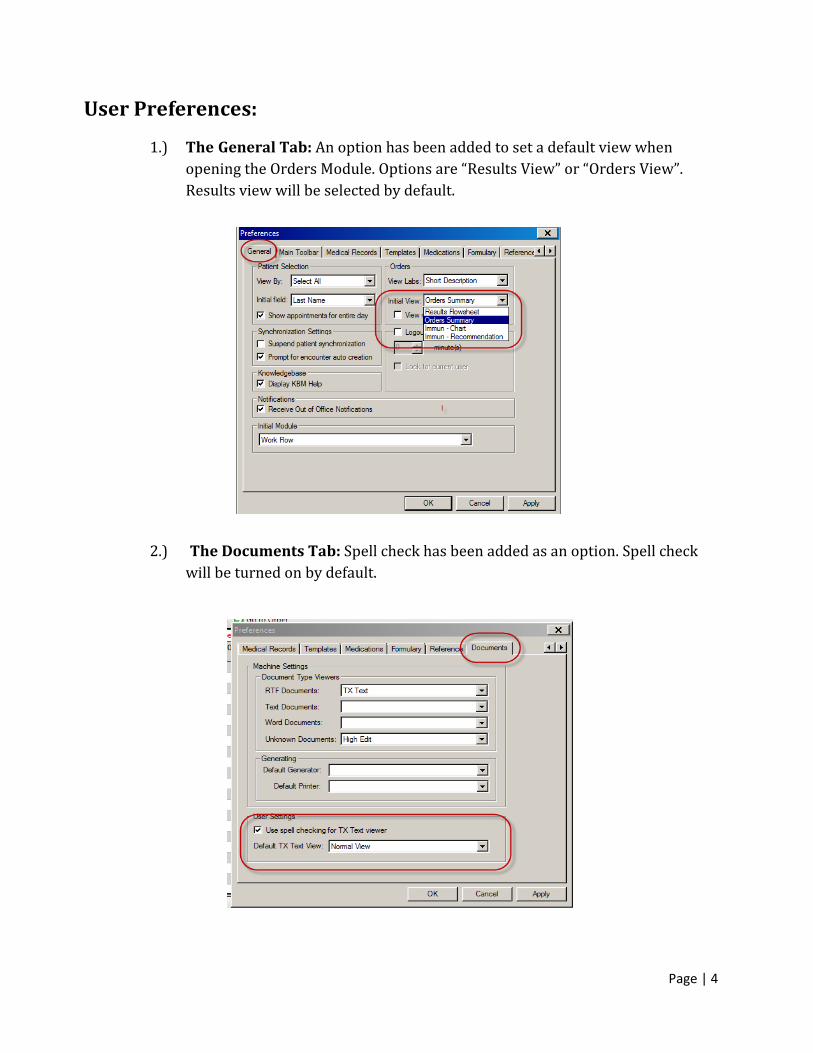
1. Erx and Fax options have been consolidated. There is now a single button called “Send”. The system will automatically select to Erx or Fax, a prescription.
a.) If the system selects ERX, the provider can override the selection by checking “Force to Fax”.
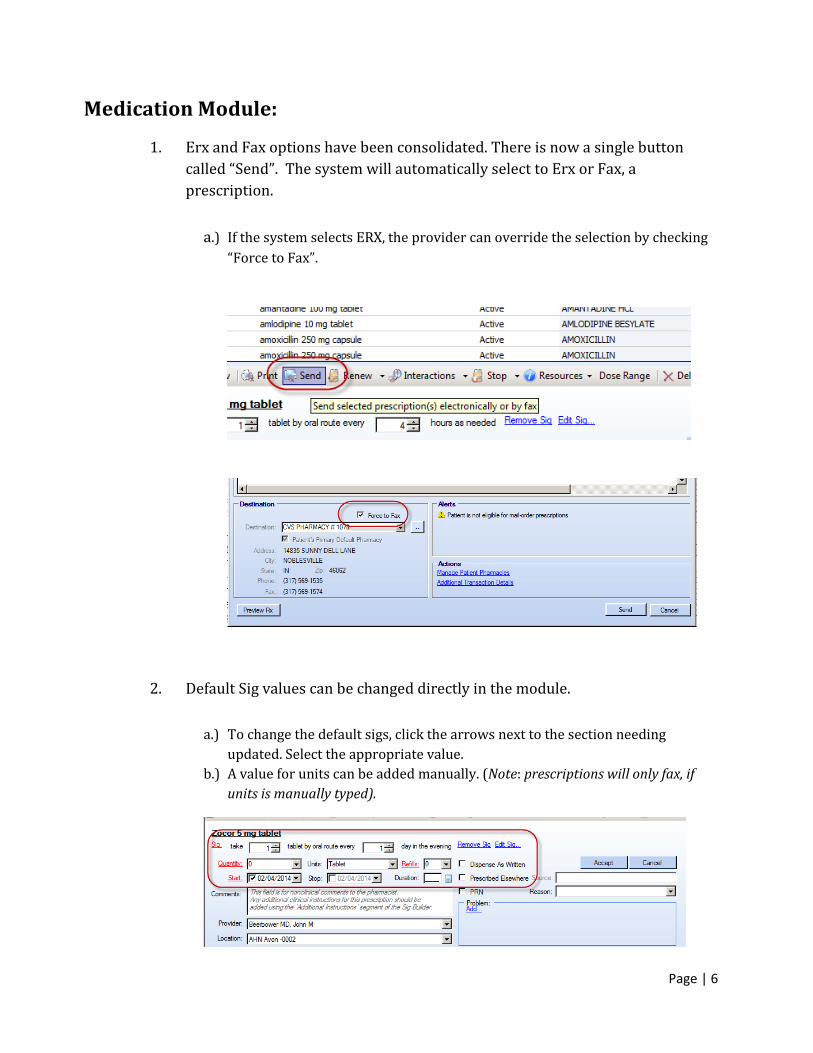
2. Default Sig values can be changed directly in the module.
a.) To change the default sigs, click the arrows next to the section needing updated. Select the appropriate value.
b.) A value for units can be added manually. (Note: prescriptions will only fax, if units is manually typed).
Page | 7
Medication Module (continued):
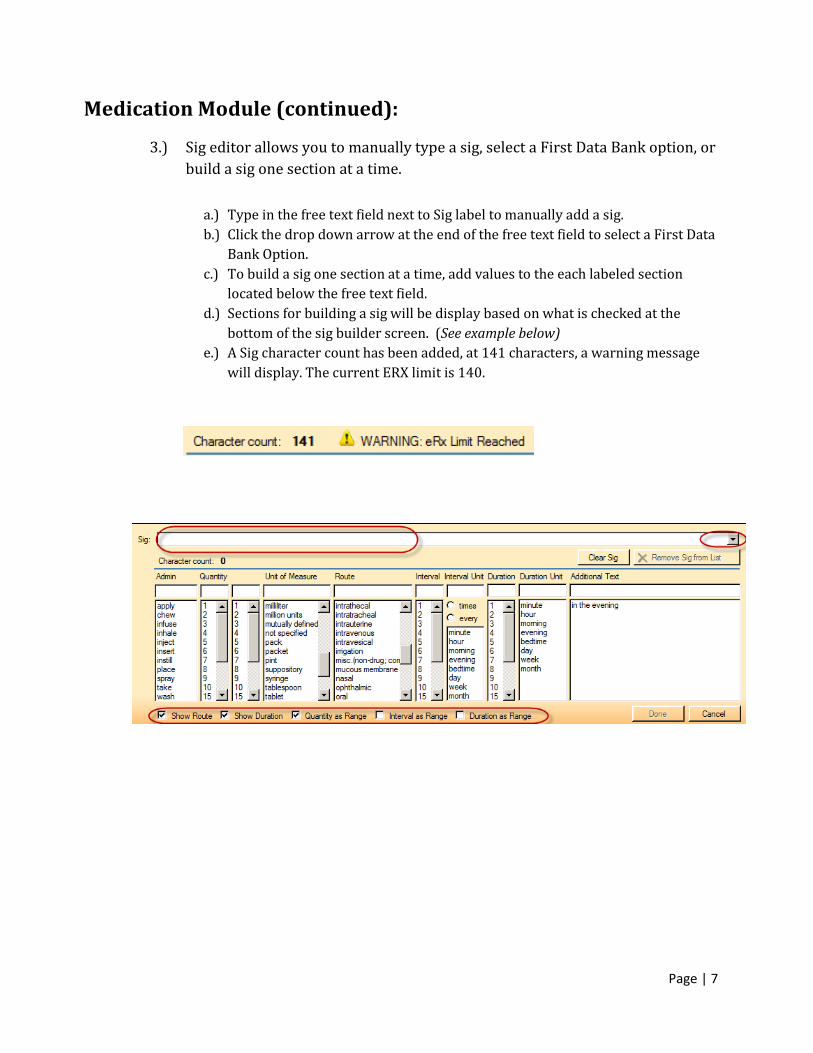
3.) Sig editor allows you to manually type a sig, select a First Data Bank option, or build a sig one section at a time.
a.) Type in the free text field next to Sig label to manually add a sig. b.) Click the drop down arrow at the end of the free text field to select a First Data
Bank Option. c.) To build a sig one section at a time, add values to the each labeled section
located below the free text field. d.) Sections for building a sig will be display based on what is checked at the
bottom of the sig builder screen. (See example below) e.) A Sig character count has been added, at 141 characters, a warning message
will display. The current ERX limit is 140.
Page | 8
Medication Module (continued):
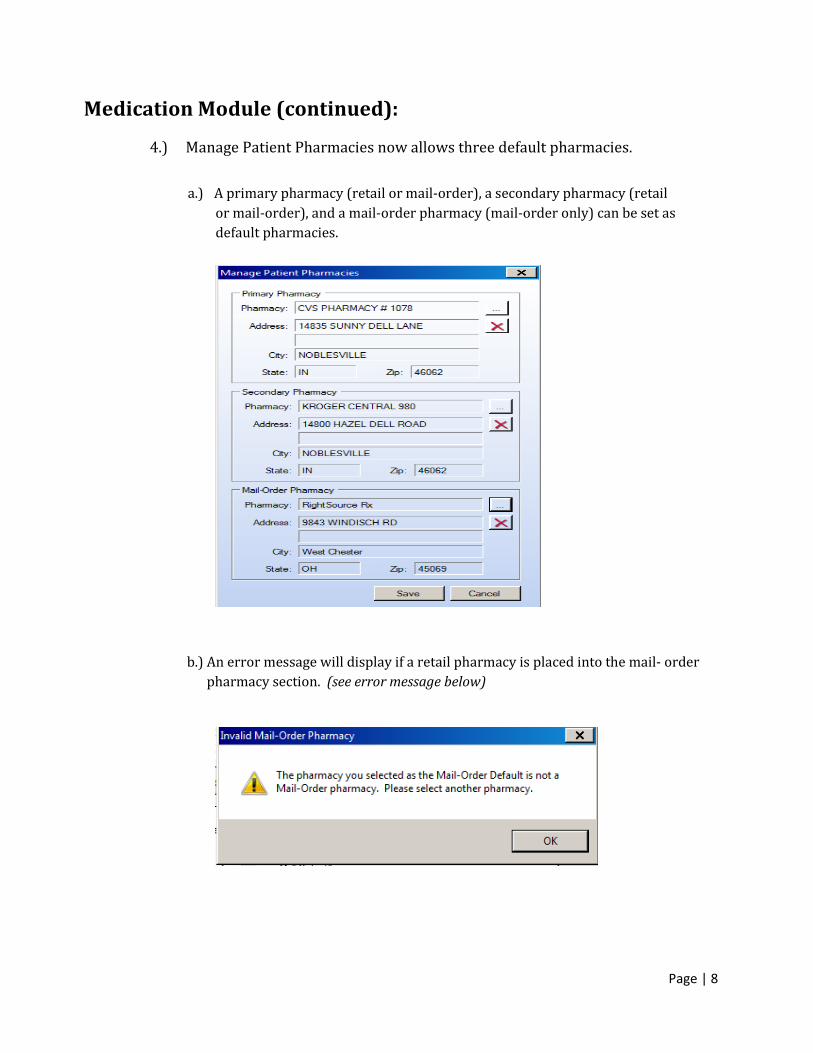
4.) Manage Patient Pharmacies now allows three default pharmacies. a.) A primary pharmacy (retail or mail-order), a secondary pharmacy (retail
or mail-order), and a mail-order pharmacy (mail-order only) can be set as default pharmacies.
b.) An error message will display if a retail pharmacy is placed into the mail- order pharmacy section. (see error message below)
Page | 9
Medication Module (continued):
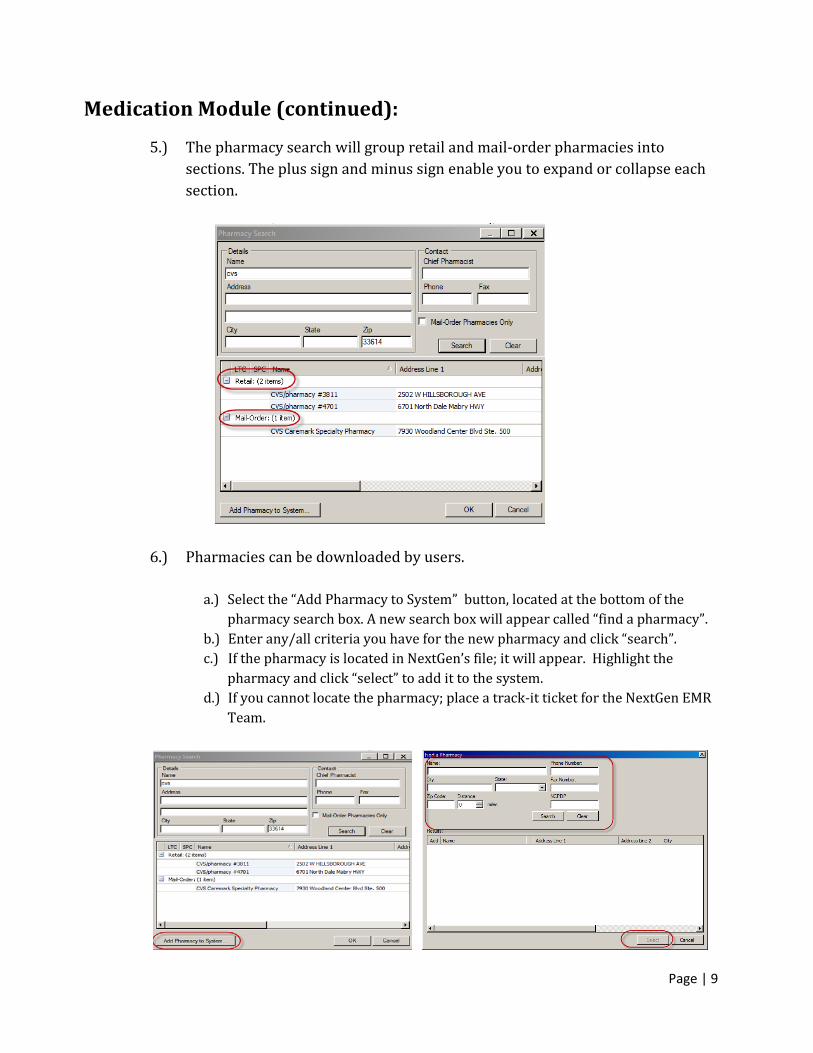
5.) The pharmacy search will group retail and mail-order pharmacies into sections. The plus sign and minus sign enable you to expand or collapse each section.
6.) Pharmacies can be downloaded by users.
a.) Select the “Add Pharmacy to System” button, located at the bottom of the pharmacy search box. A new search box will appear called “find a pharmacy”.
b.) Enter any/all criteria you have for the new pharmacy and click “search”. c.) If the pharmacy is located in NextGen’s file; it will appear. Highlight the
pharmacy and click “select” to add it to the system. d.) If you cannot locate the pharmacy; place a track-it ticket for the NextGen EMR
Team.
Page | 10
Medication Module (continued):
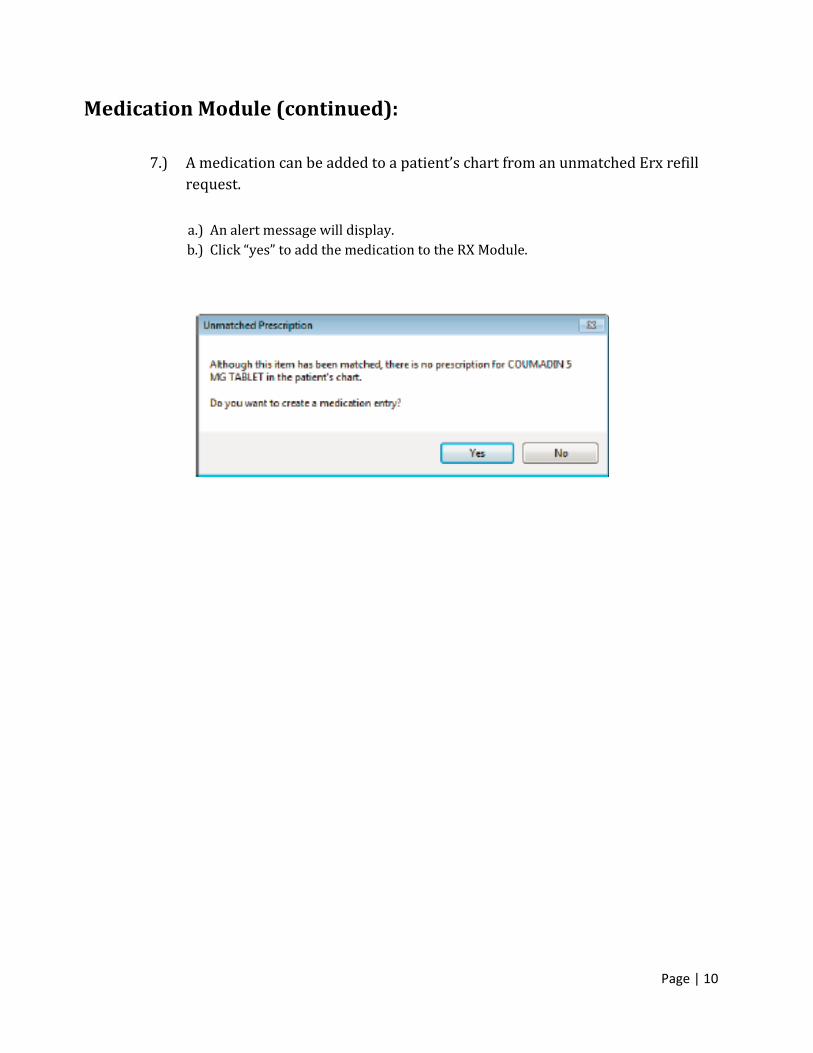
7.) A medication can be added to a patient’s chart from an unmatched Erx refill request.
a.) An alert message will display. b.) Click “yes” to add the medication to the RX Module.
Page | 11
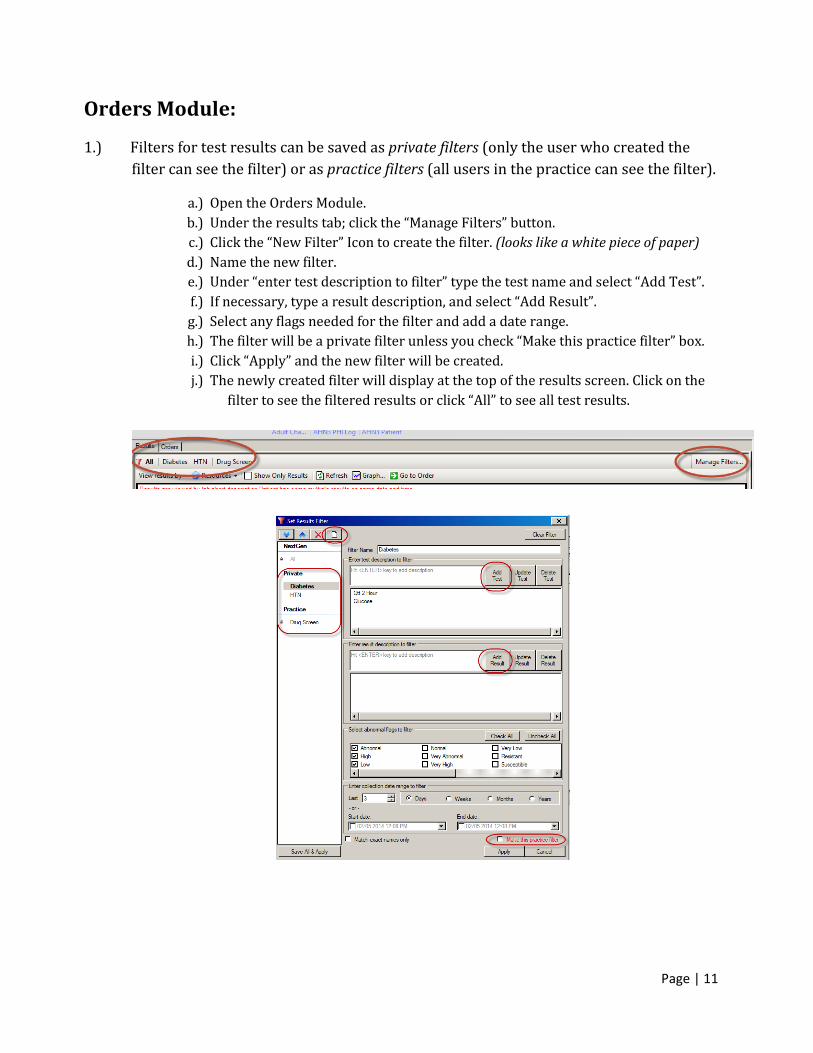
Orders Module:
1.) Filters for test results can be saved as private filters (only the user who created the filter can see the filter) or as practice filters (all users in the practice can see the filter).
a.) Open the Orders Module. b.) Under the results tab; click the “Manage Filters” button. c.) Click the “New Filter” Icon to create the filter. (looks like a white piece of paper) d.) Name the new filter. e.) Under “enter test description to filter” type the test name and select “Add Test”. f.) If necessary, type a result description, and select “Add Result”. g.) Select any flags needed for the filter and add a date range. h.) The filter will be a private filter unless you check “Make this practice filter” box. i.) Click “Apply” and the new filter will be created. j.) The newly created filter will display at the top of the results screen. Click on the
filter to see the filtered results or click “All” to see all test results.
Page | 12
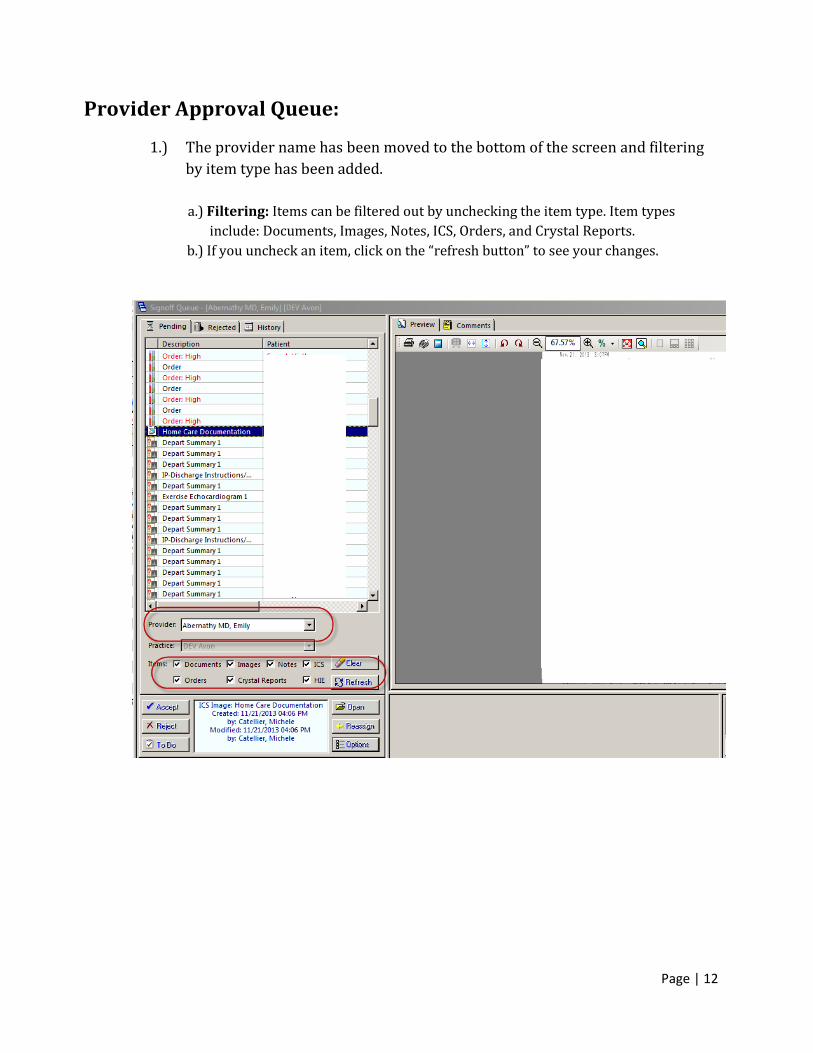
Provider Approval Queue:
1.) The provider name has been moved to the bottom of the screen and filtering by item type has been added. a.) Filtering: Items can be filtered out by unchecking the item type. Item types
include: Documents, Images, Notes, ICS, Orders, and Crystal Reports. b.) If you uncheck an item, click on the “refresh button” to see your changes.
Page | 13
Provider Approval Queue continued:
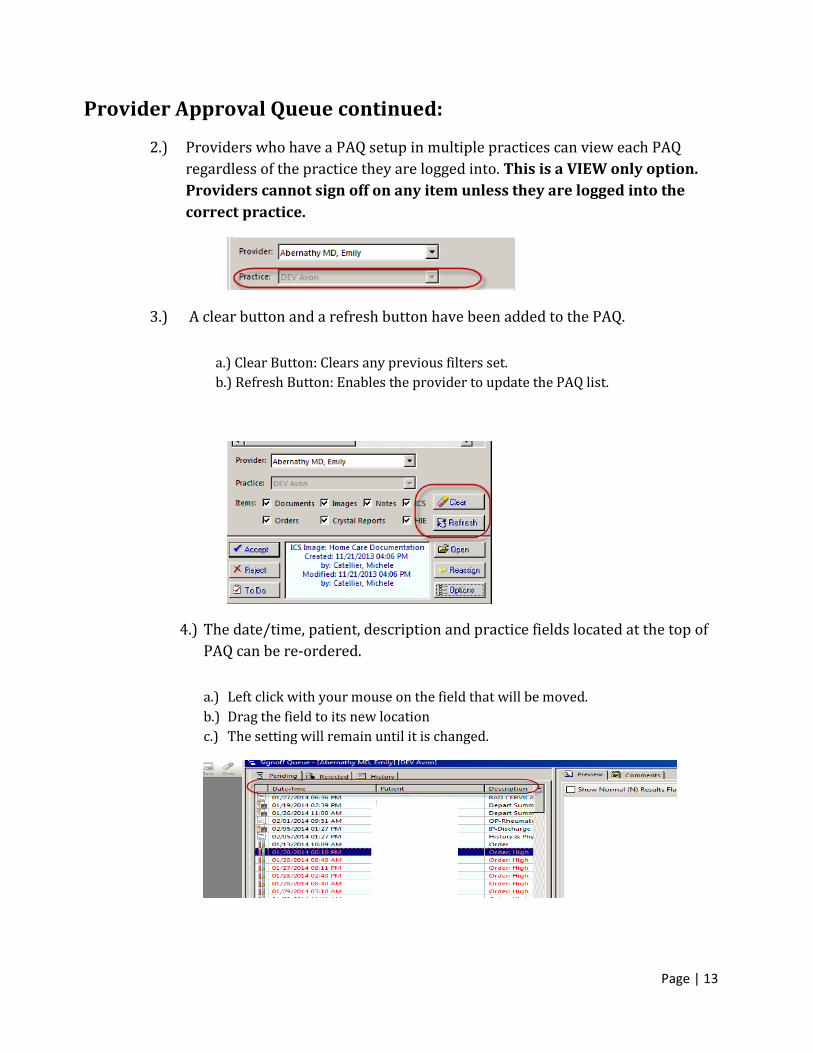
2.) Providers who have a PAQ setup in multiple practices can view each PAQ regardless of the practice they are logged into. This is a VIEW only option. Providers cannot sign off on any item unless they are logged into the correct practice.
3.) A clear button and a refresh button have been added to the PAQ.
a.) Clear Button: Clears any previous filters set. b.) Refresh Button: Enables the provider to update the PAQ list.
4.) The date/time, patient, description and practice fields located at the top of PAQ can be re-ordered. a.) Left click with your mouse on the field that will be moved. b.) Drag the field to its new location c.) The setting will remain until it is changed.
Page | 14
Provider Approval Queue continued:
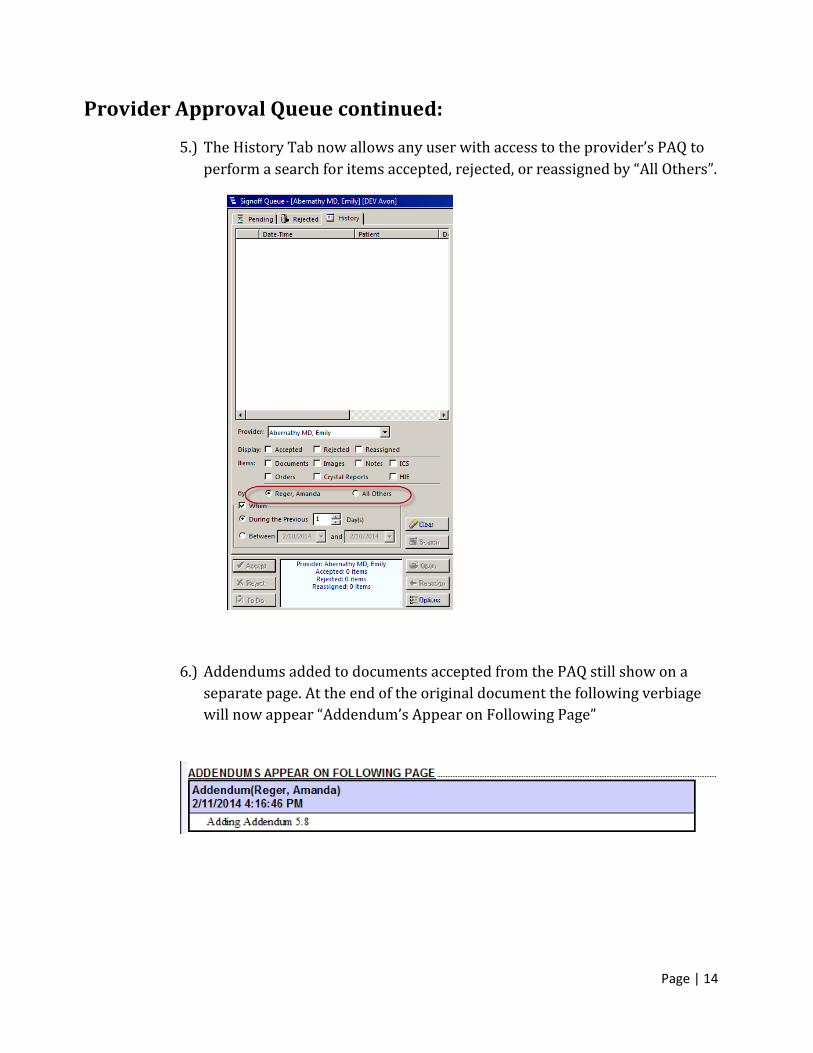
5.) The History Tab now allows any user with access to the provider’s PAQ to perform a search for items accepted, rejected, or reassigned by “All Others”.
6.) Addendums added to documents accepted from the PAQ still show on a separate page. At the end of the original document the following verbiage will now appear “Addendum’s Appear on Following Page”

Page | 15
PAQ Shortcuts:
Provider can use keyboard shortcuts to quickly manage their PAQ.
Keyboard Shortcut
Description Action
Alt+A Accept Highlight an item in the PAQ and enter ALT+A on your keyboard to accept the task.
Alt+R Reject Highlight an item in the PAQ and enter ALT+R on your keyboard to reject the task and remove it from the Pending Tasks list.
Alt+O Open Highlight an item in the PAQ and enter ALT+O on your keyboard to display the patient chart for the patient with the pending item.
Alt+T Task Highlight an item in the PAQ and enter ALT+T on your keyboard to display the New Task dialog box.
Alt+C Add Comment
Highlight an item in the PAQ and enter ALT+C on your keyboard to display your cursor in the Comments field. Once your cursor is displayed in the Comments field and you have typed a comment, you can enter ALT+C once more to add the comment.
Alt+L Set focus to the Items List
Highlight an item in the PAQ and enter ALT+L to shift the focus from the Preview pane to the Items list.
Alt+E Reassign Highlight an item in the PAQ and enter ALT+E on your keyboard to display the Reassign PAQ Item list.
Page | 16
Allergy Module:
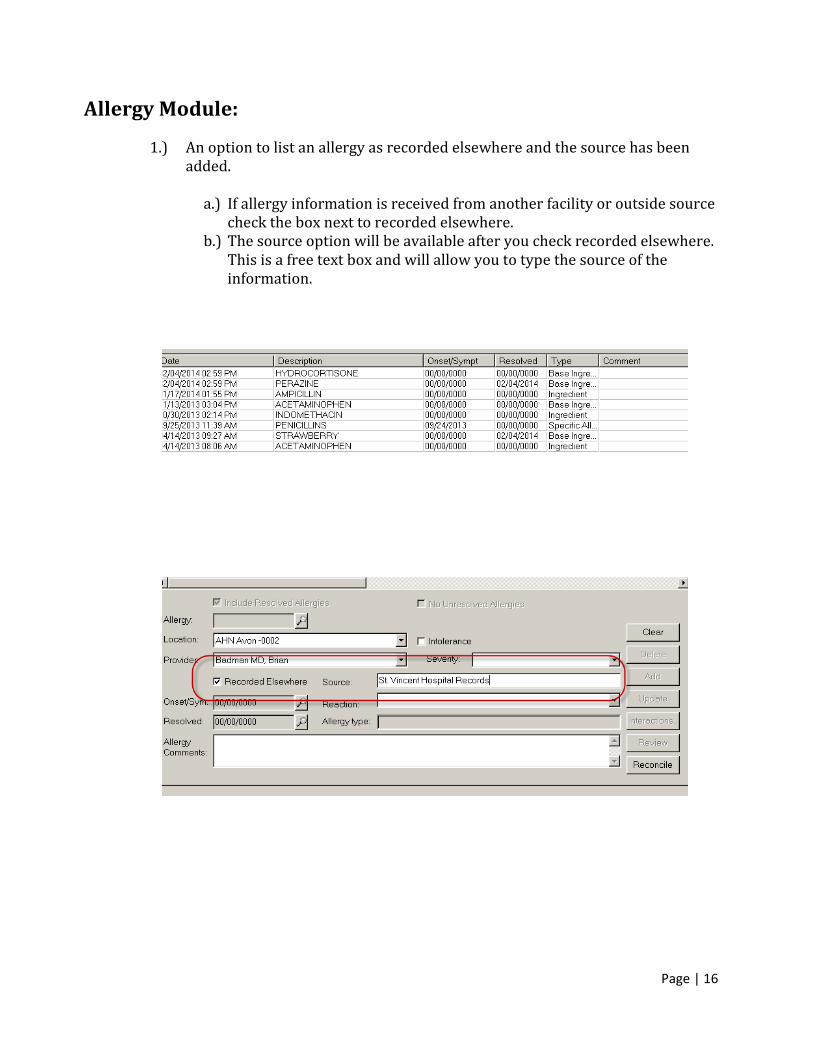
1.) An option to list an allergy as recorded elsewhere and the source has been added.
a.) If allergy information is received from another facility or outside source check the box next to recorded elsewhere.
b.) The source option will be available after you check recorded elsewhere. This is a free text box and will allow you to type the source of the information.

Page | 17
Procedure Module:
1.) A start/stop time option has been added for procedures.
a) If required for your procedure, select the start/stop time check box and
modify the times, as needed.
2.) Procedures can have up to 12 Diagnoses added.
a.) Click the ellipses next to the diagnosis box to search for a diagnosis code.
Page | 18
Procedure Module (Continued):
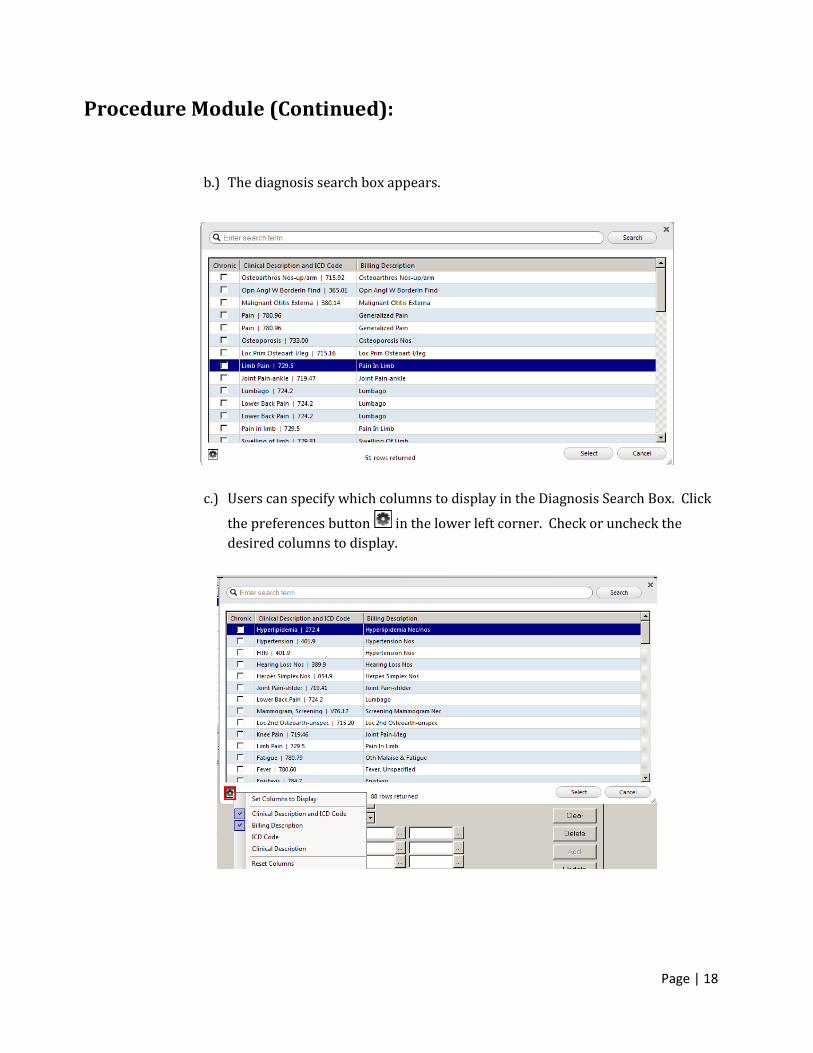
b.) The diagnosis search box appears.
c.) Users can specify which columns to display in the Diagnosis Search Box. Click
the preferences button in the lower left corner. Check or uncheck the desired columns to display.
Page | 19
Procedure Module (Continued):
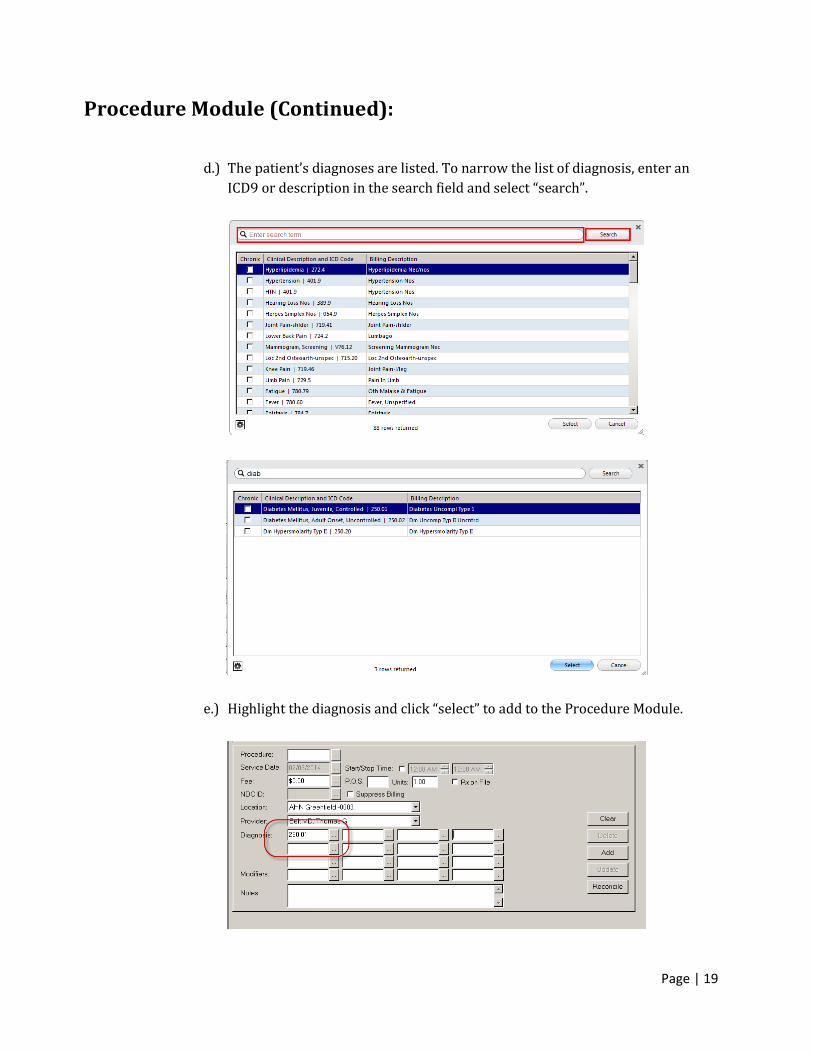
d.) The patient’s diagnoses are listed. To narrow the list of diagnosis, enter an
ICD9 or description in the search field and select “search”.
e.) Highlight the diagnosis and click “select” to add to the Procedure Module.
Page | 20
Procedure Module (Continued):
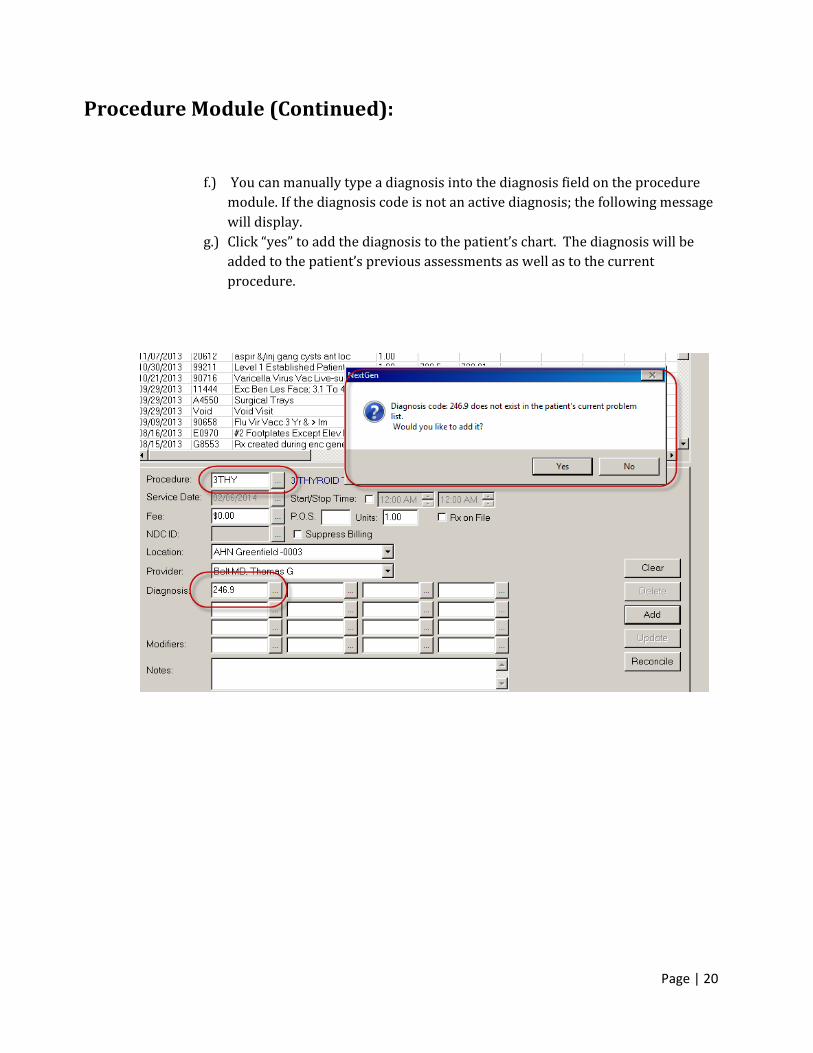
f.) You can manually type a diagnosis into the diagnosis field on the procedure
module. If the diagnosis code is not an active diagnosis; the following message will display.
g.) Click “yes” to add the diagnosis to the patient’s chart. The diagnosis will be added to the patient’s previous assessments as well as to the current procedure.
Page | 21
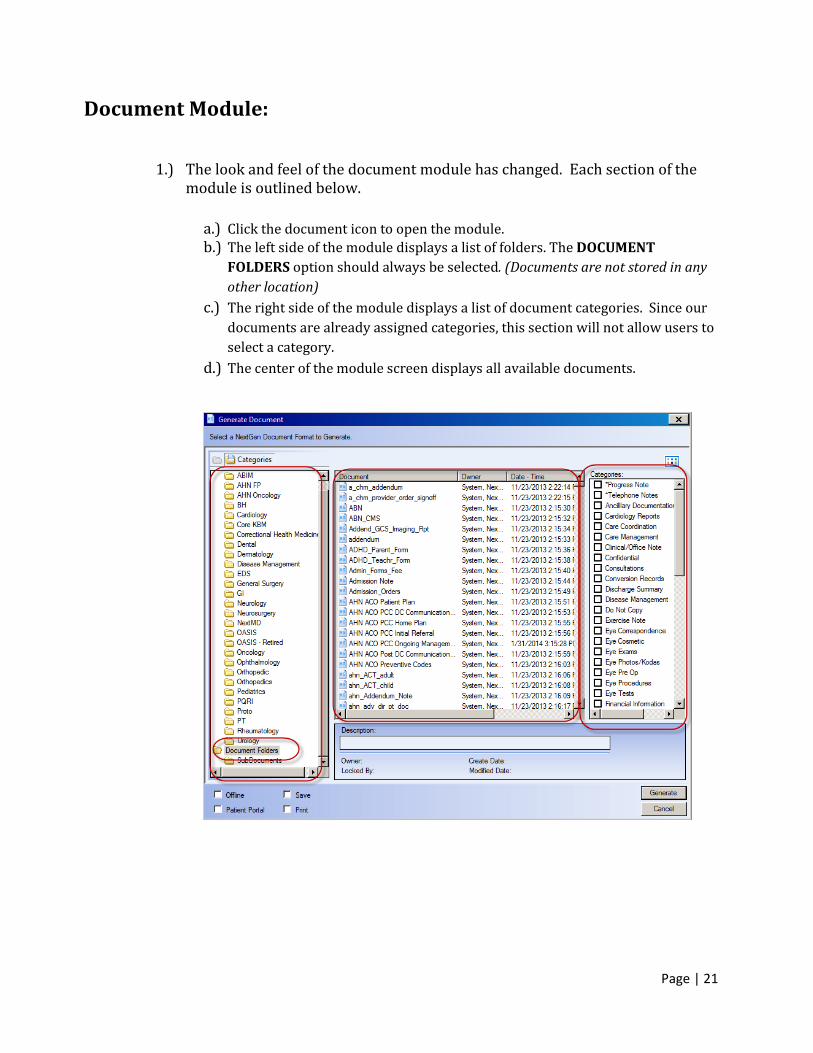
Document Module:
1.) The look and feel of the document module has changed. Each section of the
module is outlined below.
a.) Click the document icon to open the module. b.) The left side of the module displays a list of folders. The DOCUMENT
FOLDERS option should always be selected. (Documents are not stored in any other location)
c.) The right side of the module displays a list of document categories. Since our documents are already assigned categories, this section will not allow users to select a category.
d.) The center of the module screen displays all available documents.
Page | 22
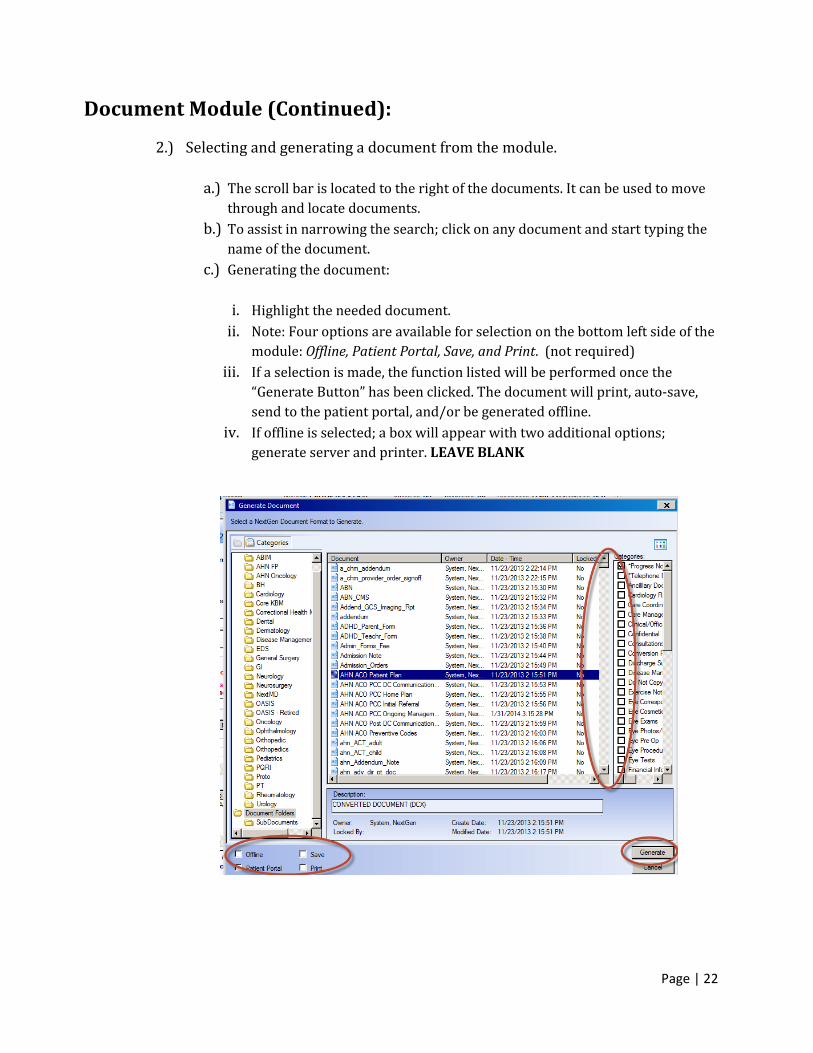
Document Module (Continued):
2.) Selecting and generating a document from the module. a.) The scroll bar is located to the right of the documents. It can be used to move
through and locate documents. b.) To assist in narrowing the search; click on any document and start typing the
name of the document. c.) Generating the document:
i. Highlight the needed document.
ii. Note: Four options are available for selection on the bottom left side of the module: Offline, Patient Portal, Save, and Print. (not required)
iii. If a selection is made, the function listed will be performed once the “Generate Button” has been clicked. The document will print, auto-save, send to the patient portal, and/or be generated offline.
iv. If offline is selected; a box will appear with two additional options; generate server and printer. LEAVE BLANK
Page | 23
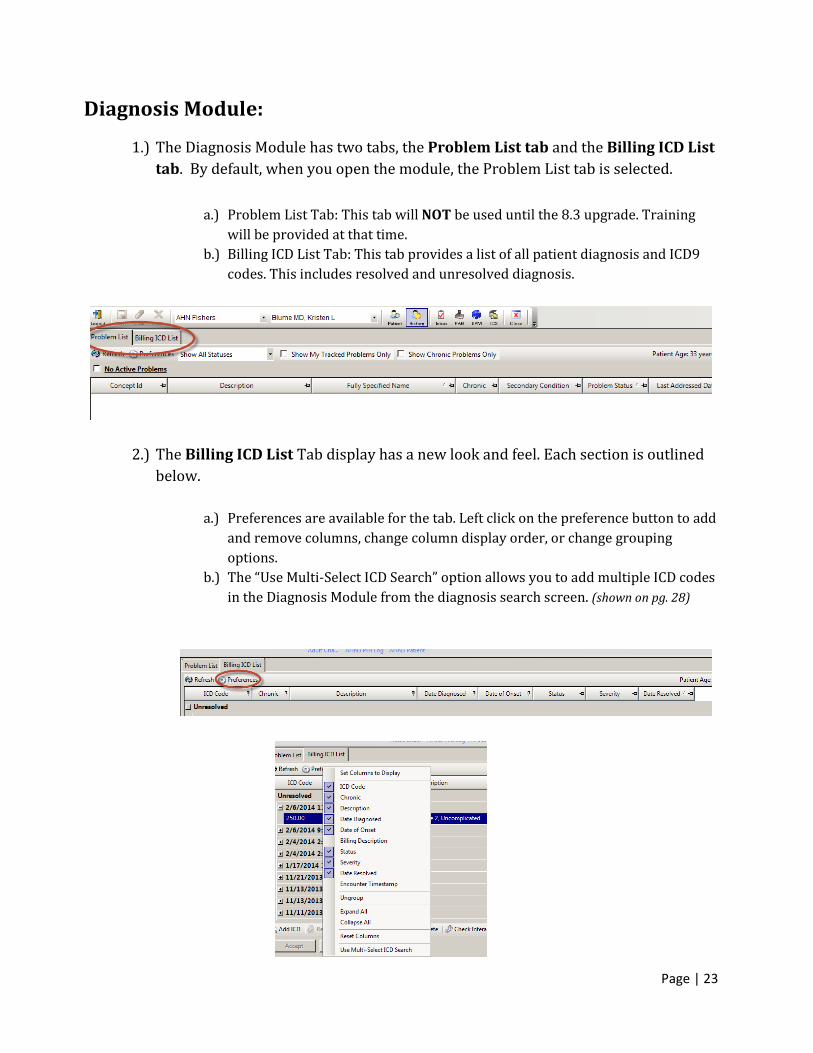
Diagnosis Module:
1.) The Diagnosis Module has two tabs, the Problem List tab and the Billing ICD List tab. By default, when you open the module, the Problem List tab is selected.
a.) Problem List Tab: This tab will NOT be used until the 8.3 upgrade. Training will be provided at that time.
b.) Billing ICD List Tab: This tab provides a list of all patient diagnosis and ICD9 codes. This includes resolved and unresolved diagnosis.
2.) The Billing ICD List Tab display has a new look and feel. Each section is outlined below.
a.) Preferences are available for the tab. Left click on the preference button to add and remove columns, change column display order, or change grouping options.
b.) The “Use Multi-Select ICD Search” option allows you to add multiple ICD codes in the Diagnosis Module from the diagnosis search screen. (shown on pg. 28)
Page | 24
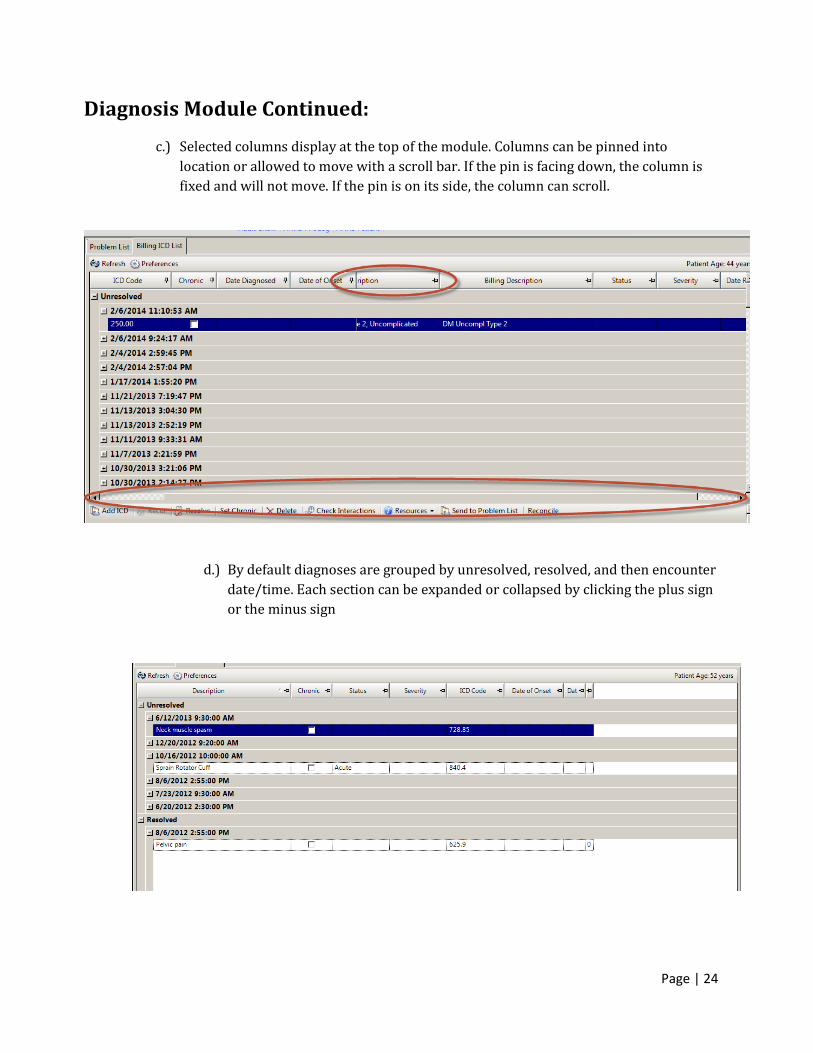
Diagnosis Module Continued:
c.) Selected columns display at the top of the module. Columns can be pinned into location or allowed to move with a scroll bar. If the pin is facing down, the column is fixed and will not move. If the pin is on its side, the column can scroll.
d.) By default diagnoses are grouped by unresolved, resolved, and then encounter
date/time. Each section can be expanded or collapsed by clicking the plus sign or the minus sign
Page | 25
Diagnosis Module Continued:
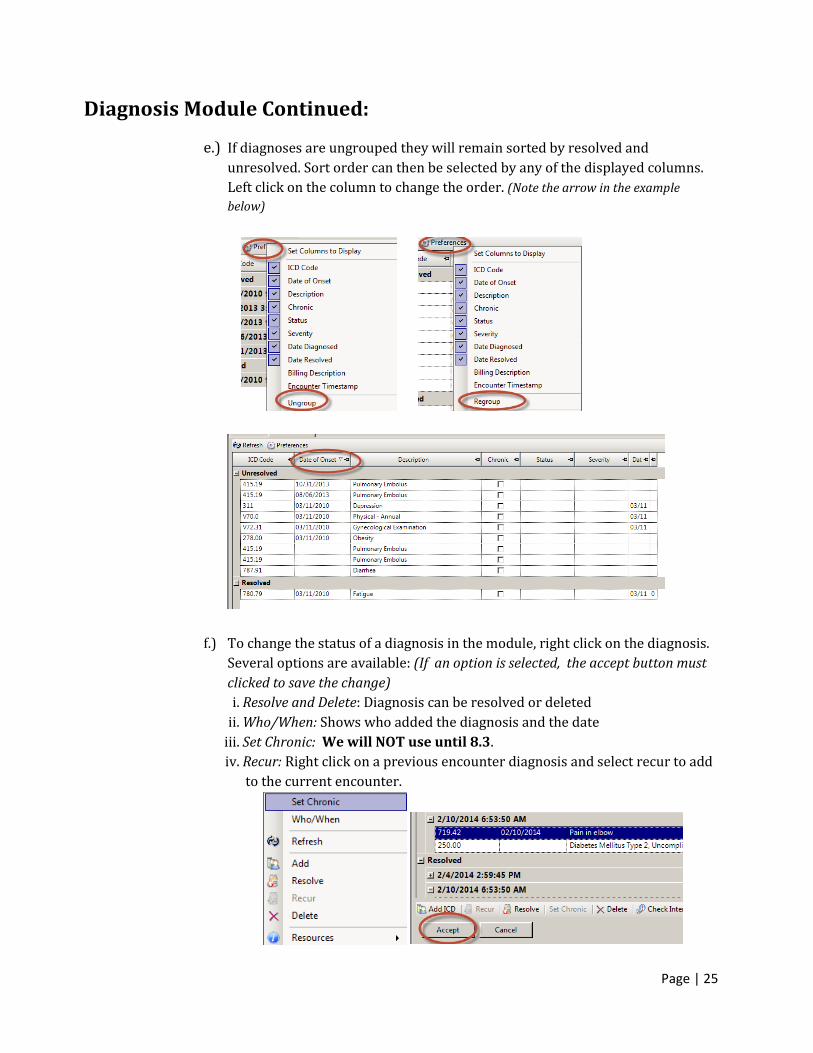
e.) If diagnoses are ungrouped they will remain sorted by resolved and unresolved. Sort order can then be selected by any of the displayed columns. Left click on the column to change the order. (Note the arrow in the example below)
f.) To change the status of a diagnosis in the module, right click on the diagnosis. Several options are available: (If an option is selected, the accept button must clicked to save the change) i. Resolve and Delete: Diagnosis can be resolved or deleted
ii. Who/When: Shows who added the diagnosis and the date iii. Set Chronic: We will NOT use until 8.3. iv. Recur: Right click on a previous encounter diagnosis and select recur to add
to the current encounter.
Page | 26
Diagnosis Module Continued:
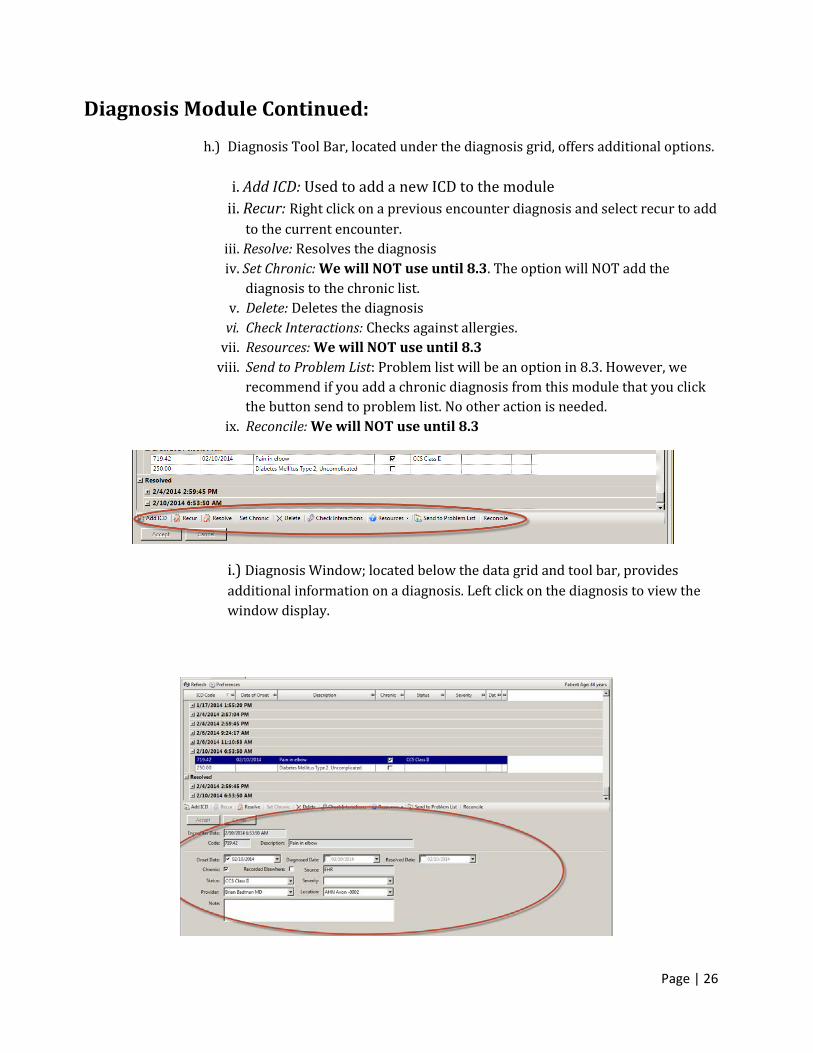
h.) Diagnosis Tool Bar, located under the diagnosis grid, offers additional options.
i. Add ICD: Used to add a new ICD to the module ii. Recur: Right click on a previous encounter diagnosis and select recur to add
to the current encounter. iii. Resolve: Resolves the diagnosis iv. Set Chronic: We will NOT use until 8.3. The option will NOT add the
diagnosis to the chronic list. v. Delete: Deletes the diagnosis vi. Check Interactions: Checks against allergies.
vii. Resources: We will NOT use until 8.3 viii. Send to Problem List: Problem list will be an option in 8.3. However, we
recommend if you add a chronic diagnosis from this module that you click the button send to problem list. No other action is needed.
ix. Reconcile: We will NOT use until 8.3
i.) Diagnosis Window; located below the data grid and tool bar, provides additional information on a diagnosis. Left click on the diagnosis to view the window display.
Page | 27
Diagnosis Module Continued:
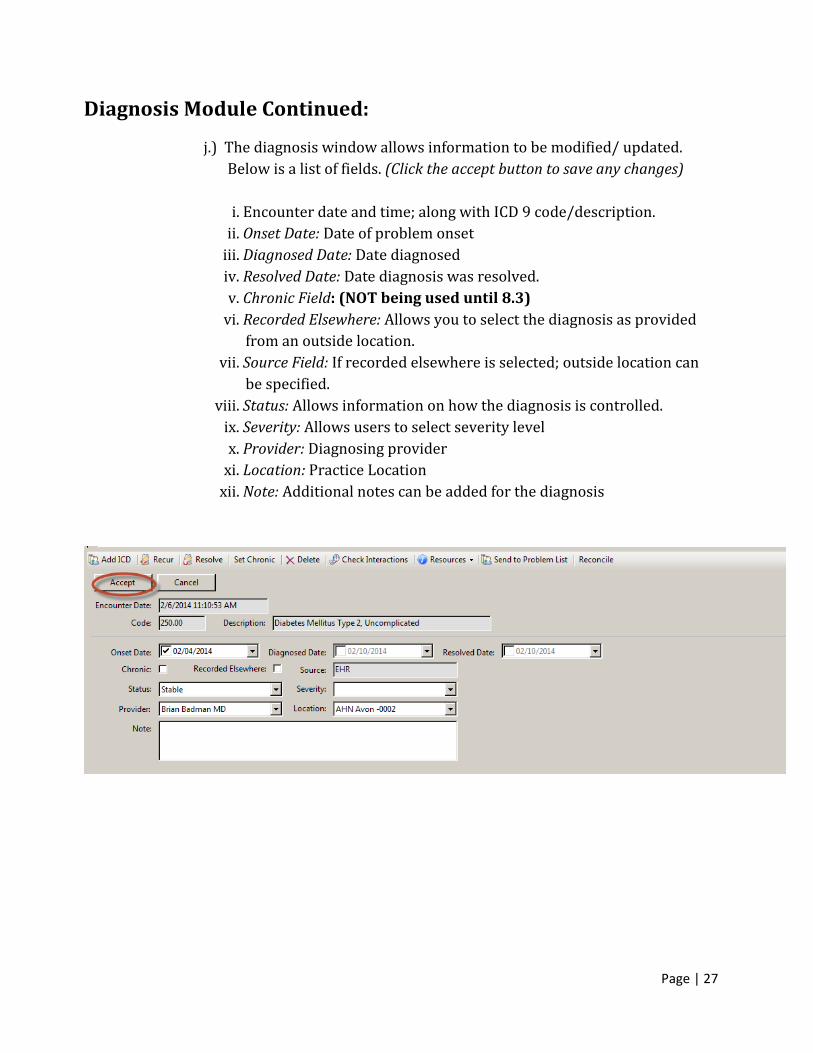
j.) The diagnosis window allows information to be modified/ updated. Below is a list of fields. (Click the accept button to save any changes)
i. Encounter date and time; along with ICD 9 code/description.
ii. Onset Date: Date of problem onset iii. Diagnosed Date: Date diagnosed iv. Resolved Date: Date diagnosis was resolved. v. Chronic Field: (NOT being used until 8.3)
vi. Recorded Elsewhere: Allows you to select the diagnosis as provided from an outside location.
vii. Source Field: If recorded elsewhere is selected; outside location can be specified.
viii. Status: Allows information on how the diagnosis is controlled. ix. Severity: Allows users to select severity level x. Provider: Diagnosing provider
xi. Location: Practice Location xii. Note: Additional notes can be added for the diagnosis
Page | 28
Diagnosis Module Continued:
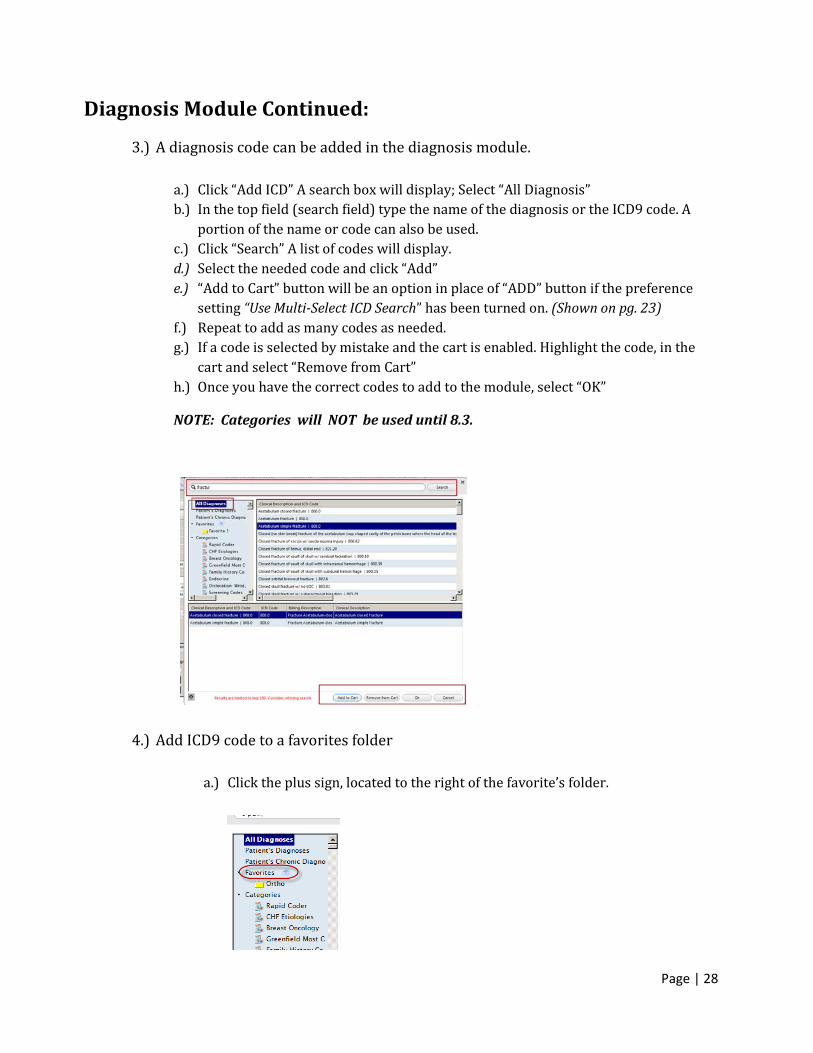
3.) A diagnosis code can be added in the diagnosis module.
a.) Click “Add ICD” A search box will display; Select “All Diagnosis” b.) In the top field (search field) type the name of the diagnosis or the ICD9 code. A
portion of the name or code can also be used. c.) Click “Search” A list of codes will display. d.) Select the needed code and click “Add” e.) “Add to Cart” button will be an option in place of “ADD” button if the preference
setting “Use Multi-Select ICD Search” has been turned on. (Shown on pg. 23) f.) Repeat to add as many codes as needed. g.) If a code is selected by mistake and the cart is enabled. Highlight the code, in the
cart and select “Remove from Cart” h.) Once you have the correct codes to add to the module, select “OK”
NOTE: Categories will NOT be used until 8.3.
4.) Add ICD9 code to a favorites folder
a.) Click the plus sign, located to the right of the favorite’s folder.
Page | 29
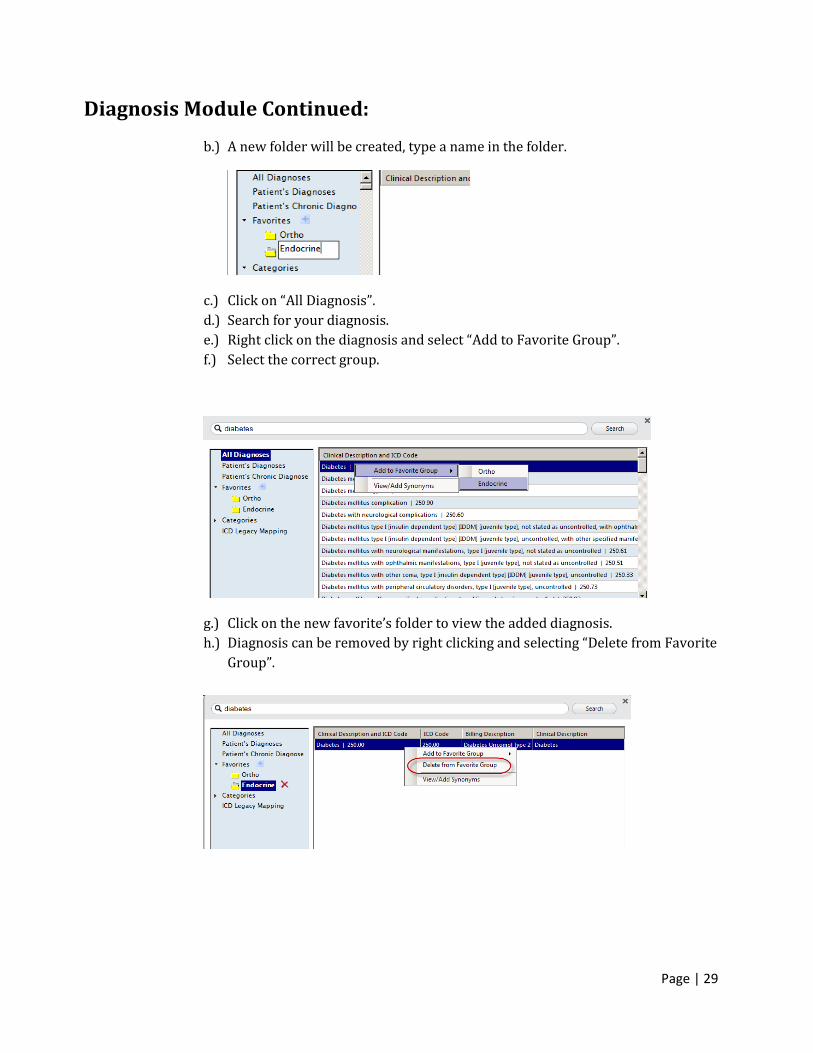
Diagnosis Module Continued:
b.) A new folder will be created, type a name in the folder.
c.) Click on “All Diagnosis”. d.) Search for your diagnosis. e.) Right click on the diagnosis and select “Add to Favorite Group”. f.) Select the correct group.
g.) Click on the new favorite’s folder to view the added diagnosis. h.) Diagnosis can be removed by right clicking and selecting “Delete from Favorite
Group”.

Page | 30
Diagnosis Module Continued:
5.) Columns displayed in the ICD search box can be changed and /or re-arranged.
Select the preference button, located at the bottom left side of the screen.
a.) Checked items will display as a column on the search results grid. Below is a list of options.
b.) The order of the columns can be re-arranged by clicking “Set Columns to Display”. A view preference box displays. Columns can be moved up/down, added and/or removed.
Page | 31
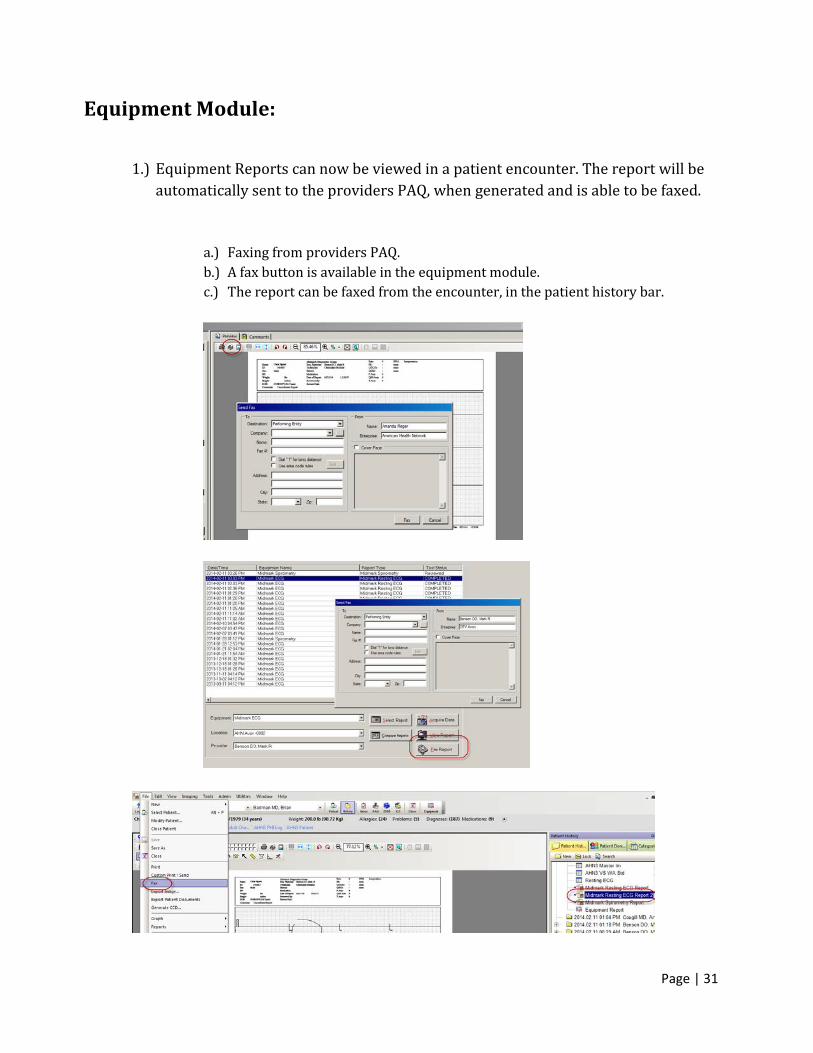
Equipment Module:
1.) Equipment Reports can now be viewed in a patient encounter. The report will be
automatically sent to the providers PAQ, when generated and is able to be faxed.
a.) Faxing from providers PAQ. b.) A fax button is available in the equipment module. c.) The report can be faxed from the encounter, in the patient history bar.