Embed Size (px)
DESCRIPTION
Ghid Nikon D70
Citation preview

Thom Hogan’s
Complete Guideto the Nikon D70
1st Edition
By Thom Hogan byThom Press
Thom Hogan’s Complete Guide to the D70 Page 1

Thom Hogan’s Complete Guide to the Nikon D70 First Edition 2004 Published in the United States by byThom Press Emmaus, PA 18049 http://www.bythom.com
© 2004 Thom Hogan All Rights Reserved All photographs by and © Thom Hogan
This book is not sponsored by Nikon Corporation. Information, data, and procedures described herein are correct to the best of the author’s and publisher’s knowledge; all other liability is expressly disclaimed. Nikkor, Nikon, and Speedlight are registered trademarks of Nikon Corporation, Japan. CompactFlash is a trademark of SanDisk Corporation. All other products or name brands are trademarks of their respective manufacturers.
The author and publisher shall not be responsible for errors contained herein or any damages in connection with the furnishing, performance, or use of the material in this book. In particular, the author and publisher shall not be responsible for any damage to the CCD of the camera of any reader who follows the cleaning instructions contained in this book. Nor shall the author and publisher be responsible for damage to camera electronics by anyone attempting to make their own external power supply based upon the ideas presented in this book. It’s a sad commentary on our society that I even need to include this disclaimer.
1st Edition, version 1.06: 5/22/04
Thom Hogan’s Complete Guide to the D70 Page 2

Acknowledgements As with all my books, a full draft was reviewed by volunteers to weed out unclear language and any misstatements. My thanks go to John Allman, Koen Beets, Paul Beiser, Andrew Burns, Tom Canning, Timothy Farr, Chris Fierro, George Feigelstock, Richard Freeman, Kenneth Gunn, Iain McKerchar, Simon Langham, Thomas Mortensen, Steve Moody, Daniel Neo, Hans-Jürgen Reichelt, Andrew Salamy, Jerry Smith, Andrzej Taramina, Peter Visima, Witold Waldman, and Doug Werner for their thorough review and comments (all told, over 100 single-spaced pages of notes came from the reviewers, which took me several days to integrate). This book is better because of them.
Several Web sites proved useful in researching aspects of this book. While I mention several at appropriate points in the book, two need to be singled out for D70 users:
• Phil Askey’s http://www.dpreview.com not only has some of the most thorough reviews of digital cameras (yes, even more thorough than the ones on my own site), but also has an ongoing forum that’s useful for getting answers to tough questions (select Nikon D70 from the Forums popup in the left navigation panel).
• Rob Galbraith http://www.robgalbraith.com has developed a reputation in the digital photojournalism world for some of the most articulate and detailed explanations of professional digital camera use. Again, an active forum helps get answers to common problems (select Forums in upper left navigation panel and then the Nikon D2H, D1/X/H, D100 and D70 link in the forums).
Thom Hogan’s Complete Guide to the D70 Page 3

About this eBook This eBook was created using Adobe Acrobat 6.0 directly from my original files. I’ve tried to retain as many of the navigational features that Acrobat allows (for example, the Bookmarks section at the left is derived from the Table of Contents and is fully active—click on an entry and you’ll be taken to it). Curiously, trying to create a fully functional eBook using the current iteration of Adobe’s tools is worthy of an eBook itself (most of the chapters would be centered on trying to get promised features to work).
I grant you specific permission to print or have printed by a third party a single copy of this eBook for your own private use. You may not resell that printed copy, but must destroy it if you sell or pass on the original eBook you received to someone else. Do not print a copy if you don’t agree with the previous sentence.
In addition, I grant you specific permission to create a backup copy of this eBook for your own private use. However, note that you must destroy that backup copy and any other copies you have of this work, printed or electronic, if you sell or pass on the original eBook you received.
It is a violation of Copyright law to sell copies of this work. In order to fully protect my property rights, I must pursue any violations that come to my attention. Since any such sale would be considered deliberate on your part, be aware that US law allows up to $150,000 per act in punitive damages to be assessed.1
If you’d like a hard copy of the eBook, you can print a copy for your personal use by selecting PRINT from the FILE menu. It’s possible to print on both sides of the paper and get
I really hate having to be so specific about your rights and mine. But I’ve identified several cases where people were copying and selling my work in competition with me. I don’t know about you, but I find that morally unacceptable. This is my livelihood; I must protect it.
Thom Hogan’s Complete Guide to the D70 Page 4
1

a real book-like experience by using the Print: Odd Pages Only and Print: Even Pages Only options on the Print dialog, but I don’t recommend this unless you’re good at keeping track of paper, know how to properly re-orient the paper for the second pass, and are sure that your printer won’t choke on a page somewhere.
Since there are so many printers available and their dialog boxes all allow different printing options, I can’t help you figure out the most economical or convenient way to print your eBook2. Yes, it even took me a few minutes to figure out how to create front and back copies on my laser printer, so I know it’s a hassle.
Take the resulting printouts to your copy shop, have them trim the edges (the final page size is 5.5 x 8.5” unless you’ve let Acrobat rescale the book to fit the full page) and bind.
If you’re really the type that doesn’t like to struggle through the paper handling idiosyncrasies of your printer, most Kinko’s and similar copy shops can print, collate, and bind a nice portable version of this book for you (show them the statement on the back cover or on the previous page if they balk at printing a Copyrighted work). Make sure they know that the final page size is 5.5” x 8.5”.
Note: Kinko’s and other copy shops should actually refuse to make a copy of this eBook, as it is protected by Copyright. Show them the back cover of the eBook case, my Web page for the eBook, or the sentence a few paragraphs back where I grant you permission to print or have printed a copy for your personal use. If that doesn’t work, have them email me at [email protected] to verify that this is okay.
Since I get the occasional question as to why I don’t publish a paper version, I’ll explain: paper versions not only turn out to be more expensive to produce in the small quantities at which a niche publication like this sells, but they also introduce the problems associated with inventory. Producing this eBook electronically allows me to create it on demand, reducing waste and cost, and to keep it up to date as I learn new things about the camera. It also gives me a chance to correct the inevitable minor typos that somehow creep into every major production. On that last point: I keep a current errata list on my Web site. You’ll find the one for this eBook at http://www.bythom.com/d70guideerrata.htm.
Thom Hogan’s Complete Guide to the D70 Page 5
2

If you encounter a copy shop that doesn’t ask you to show permission to reproduce a copyrighted work, or one that still refuses after being shown permission, I’d like to hear about it. If the former and the copy shop is a chain, it is probably violating direct court orders that mandate that they don’t do this. I’ve not put Digital Rights Management on this file to block all copying and printing, because it’s a hassle for the user. So, please respect my rights and help report those that willingly violate them.
Note: Some Kinko’s now use a special piece of software to print from PDF files, such as the one for this eBook. Since that software first attempts to extract all text from the file and I have selected to block text extraction in Acrobat, this means that such software fails to work with this eBook. They can still print it by simply running Acrobat, but this limits some of the fancier options they can do.
If you experience any problems with this eBook, first check to make sure that you’re using version 5.0 or later of Acrobat Reader. If you continue to have problems, please don’t hesitate to write to me at [email protected].
Thom Hogan’s Complete Guide to the D70 Page 6

Note on the First Edition While this is a first edition, the D70 is enough like the D100 that I’ve been able to re-purpose and rewrite portions of my D100 eBook, which means that much of the information here has been thoroughly vetted.
As I receive comments from readers on any of my books, I update the original files. Since I generate this eBook directly from my files, this means that I am usually able to keep the text nearly error-free while adding or modifying sections to make a point more clearly. Every now and then I make a full pass through the manuscript, augmenting what I’ve previously written with knowledge I’ve learned from using the camera, teaching workshops, and from other sources. When I do that, I iterate the “edition number.”
If you do find an error or confusing wording, take a look at http://www.bythom.com/d70guideerrata.htm to make sure that I haven’t already discovered it, then drop me an email telling me about it.
Thom Hogan’s Complete Guide to the D70 Page 7

Table of Contents A
A
N
T
I
D
T
CKNOWLEDGEMENTS .............................................................3
BOUT THIS EBOOK..................................................................4
OTE ON THE FIRST EDITION ..................................................7
ABLE OF CONTENTS ................................................................8
NTRODUCTION ......................................................................14
DEBUNKING SOME MYTHS.........................................................17CONVENTIONS USED IN THIS BOOK............................................20
70 BASICS...............................................................................22
D70 DESIGN............................................................................22D70 CONTROLS .......................................................................29
Front View .........................................................................29Top View ...........................................................................30Back View..........................................................................31Side View ...........................................................................32
D70 DISPLAYS .........................................................................32D70 Top LCD ....................................................................33D70 Color LCD ..................................................................34D70 Viewfinder..................................................................36
THE D70’S CCD ......................................................................3935mm Film or Digital?........................................................53
POWER....................................................................................56Changing Batteries .............................................................57Alternate Power Sources ....................................................58Internal Clock Battery ........................................................60Battery Life .........................................................................60Battery Notes .....................................................................63
IMAGE STORAGE .......................................................................65CompactFlash ....................................................................68
Solid State CompactFlash........................................................ 68Microdrives ............................................................................ 71Using CompactFlash............................................................... 75Nikon-Approved Cards........................................................... 77CompactFlash Troubleshooting............................................... 78
Image Formats ...................................................................81Pixels ...................................................................................... 83JPEG....................................................................................... 85NEF Format ............................................................................ 92EXIF...................................................................................... 100IPTC ..................................................................................... 103
hom Hogan’s Complete Guide to the D70 Page 8

DPOF and PictBridge ........................................................... 104File Names and Folders....................................................105
Folders ................................................................................. 106File Names ........................................................................... 114
CAMERA SETUP.......................................................................122The SET UP Menu............................................................122
Date, Time, and Language .................................................... 125Programming a Comment ..................................................... 128LCD Brightness Setting.......................................................... 130
Image Quality ..................................................................132Viewfinder Adjustment.....................................................137Resetting the Camera .......................................................138
Resetting Basic Settings......................................................... 138Resetting Custom Settings ..................................................... 139The Last Resort Reset ............................................................ 139
Firmware Version .............................................................140
CAMERA AND SHOOTING CONTROLS ................................142
METERING AND EXPOSURE .......................................................142Metering Modes...............................................................142
Matrix................................................................................... 142Center-weighted ................................................................... 146Spot ..................................................................................... 146
Metering with Digital Requires Care.................................148Options for Evaluating Exposure.......................................150Exposure Modes...............................................................151Scene Exposure Modes ....................................................154ISO Sensitivity ..................................................................157
Auto ISO .............................................................................. 162How ISO Values are Created ................................................ 163ISO Operating Suggestions ................................................... 164
Exposure Bracketing.........................................................166Exposure Compensation...................................................171White Balance..................................................................174Changing Color ................................................................190
LENSES AND FOCUSING........................................................195
The Autofocus System......................................................196Single Servo versus Continuous Servo Autofocus................... 198Autofocus Area Modes ......................................................... 201Autofocus Summary ............................................................. 202Autofocus Assist Lamp .......................................................... 203
Manual Focus ..................................................................204Sharpening.......................................................................205
SHOOTING CONTROLS ............................................................211
Thom Hogan’s Complete Guide to the D70 Page 9

Shutter Releases ...............................................................211Shutter Lag ........................................................................... 211
Motor Drive .....................................................................213Motor Drive Troubleshooting................................................ 215
Self Timer.........................................................................216Remote Control................................................................218Depth of Field Preview.....................................................219
18mm Lens........................................................................... 22120mm Lens........................................................................... 22124mm Lens........................................................................... 22128mm Lens........................................................................... 22235mm Lens........................................................................... 22250mm Lens........................................................................... 22270mm Lens........................................................................... 223
D70 Menus......................................................................224PLAY menu (² icon) ........................................................... 225SHOOTING menu (õ camera icon)..................................... 226CSM (custom settings) menu (Ú pencil icon) ........................ 228SET UP menu (Ø wrench icon)............................................. 228
ERROR MESSAGES ...................................................................231
IMAGE REVIEW AND PLAYBACK ...........................................237
IMAGE REVIEW........................................................................237Image Review Options .....................................................238The PLAY Menu ...............................................................243
Deleting Images.................................................................... 243Dealing with Folders............................................................. 245Slide shows........................................................................... 252Hiding Images ...................................................................... 253Printing Images ..................................................................... 254
Television Playback..........................................................256CONNECTING TO A COMPUTER ................................................258
CUSTOM SETTINGS................................................................263
CUSTOM SETTING #R CUSTOM SETTINGS RESET (MENU RESET) .....266CUSTOM SETTING #1 AUDIO FEEDBACK (BEEP) ..........................267CUSTOM SETTING #2 AUTOFOCUS MODE (AUTOFOCUS) ............268CUSTOM SETTING #3 AUTOFOCUS AREA MODE (AF-AREA MODE) 269CUSTOM SETTING #4 AUTOFOCUS ASSIST LIGHT (AF ASSIST) .......271CUSTOM SETTING #5 AUTOMATIC ISO SETTING (ISO AUTO).......272CUSTOM SETTING #6 LOCK CAMERA WITH NO COMPACTFLASH (NO CFCARD?)..................................................................................275CUSTOM SETTING #7 IMAGE DISPLAY STATUS (IMAGE REVIEW).....276CUSTOM SETTING #8 VIEWFINDER GRID DISPLAY (GRID DISPLAY) 277
Thom Hogan’s Complete Guide to the D70 Page
CUSTOM SETTING #9 EXPOSURE CONTROL INCREMENT (EV STEP).278
10

CUSTOM SETTING #10 EXPOSURE COMPENSATION CONTROL (EXP
COMP)...................................................................................278CUSTOM SETTING #11 CENTERWEIGHT CIRCLE SIZE (CENTER WTD)280CUSTOM SETTING #12 EXPOSURE BRACKETING METHOD (BKT SET)281CUSTOM SETTING #13 BRACKETING ORDER (BKT ORDER) ..........282CUSTOM SETTING #14 APERTURE CONTROL DIAL (COMMAND DIAL)283CUSTOM SETTING #15 AE-LOCK BUTTON USE (AE-L/AF-L) ........284CUSTOM SETTING #16 AE LOCK BEHAVIOR (AE LOCK) ...............287CUSTOM SETTING #17 FOCUS AREA SELECTION WRAP (FOCUS AREA)............................................................................................287CUSTOM SETTING #18 ACTIVE FOCUS SENSOR ILLUMINATION (AF AREA
ILLM) .....................................................................................288CUSTOM SETTING #19 FLASH MODE FOR INTERNAL FLASH (FLASH
MODE)...................................................................................289CUSTOM SETTING #20 FLASH NEEDED INDICATOR (FLASH SIGN) ..291CUSTOM SETTING #21 FLASH SHUTTER SPEED BARRIER (SHUTTER SPD)............................................................................................292CUSTOM SETTING #22 COLOR LCD ACTIVE TIME (MONITOR OFF)293CUSTOM SETTING #23 METER/CAMERA ACTIVE TIME (METER-OFF)294CUSTOM SETTING #24 SELF TIMER DELAY SETTING (SELF-TIMER)...296CUSTOM SETTING #25 REMOTE ACTIVE SETTING (REMOTE)..........297
USING FLASH .........................................................................298
What Happens When Flash is Used .................................298Flash Basics......................................................................299Digital Flash Differences...................................................300More Hidden Flash “Gotchas”.........................................302
Allowable Apertures in Program Mode.................................. 302D70 Flash Head Focal Length Settings .................................. 303
Flash Modes.....................................................................303i-TTL Balanced Fill-Flash ....................................................... 304Standard TTL ........................................................................ 305Summary of i-TTL Flash Modes ............................................. 306Non-TTL Flash Modes........................................................... 306
Setting Flash Options .......................................................309Flash Option Interactions...................................................... 311
Flash Exposure Compensation..........................................312Controlled, Repeatable Flash Results................................315Third Party Flash Units .....................................................318Studio Flash .....................................................................318
D70 INTERNAL FLASH .............................................................318Internal Flash Basics .........................................................321
To Set TTL Flash ................................................................... 321To Set Commander Mode..................................................... 322
Thom Hogan’s Complete Guide to the D70 Page 11

To Set Manual Flash ............................................................. 326Using the Internal Flash for Fill .............................................. 328
EXTERNAL FLASH MODELS FOR THE D70 ...................................329SB-29/SB-29s ...................................................................329
Specifications ....................................................................... 330To Set Manual Flash Exposure............................................... 331SB-29 Flash Durations........................................................... 332Using the Modeling Light ...................................................... 332Using the Focus Illuminator .................................................. 333SB-29 Notes ......................................................................... 333
SB-800 .............................................................................334Specifications ....................................................................... 335To Set TTL Flash ................................................................... 336SB-800 Usable Apertures and Flash Range in TTL mode........ 337To Set Auto Aperture Flash ................................................... 340To Set Manual Flash ............................................................. 341To Set Repeating Flash.......................................................... 344To Manually Set the Zoom Head .......................................... 346To Set the Distance Scale to Feet or Meters........................... 347To Set Flash Exposure Compensation .................................... 348To Set Red-Eye Reduction..................................................... 349SB-800 Notes ....................................................................... 349
Flash Troubleshooting ......................................................351
USING A D70 IN THE FIELD ..................................................353
THE “ROUTINE”......................................................................353General Settings You Make Once.....................................353Things To Do Before You Head Out on a Shoot...............354Check Each Time You Turn the Camera ON ....................355Settings You Change Rarely (and then only for a reason) .356Settings You Change Often ..............................................357Things To Do After Each Shooting Session .......................358
KEEPING TRACK OF BATTERIES ..................................................359TEMPERATURE CONSIDERATIONS ..............................................360FOCAL LENGTH LIMITATIONS ...................................................361
Panoramas .......................................................................366MAINTAINING IMAGE QUALITY.................................................367
How to Interpret Histograms............................................367Dealing with JPEG............................................................370Custom Curves.................................................................372sRGB Versus Adobe RGB.................................................374
SPECIAL LIGHTING ISSUES.........................................................376UV and Infrared ...............................................................376
Ultraviolet ............................................................................ 376Infrared ................................................................................ 377
Thom Hogan’s Complete Guide to the D70 Page 12

Shooting Under Fluorescent Lighting................................378OTHER FIELD SHOOTING ISSUES ...............................................381
Keeping the CCD Clean ...................................................381Camera Doesn’t Write to Card .........................................388Tough Subjects (Color, Moiré, and the Sun) ....................389Humidity..........................................................................393White Balance Settings.....................................................394
WORKING WITH D70 IMAGES..............................................397
D70 RELATED SOFTWARE ........................................................397Nikon View ......................................................................398Nikon Capture .................................................................411
Controlling the Camera......................................................... 413Manipulating Images ............................................................ 422One Image Processed by Capture ......................................... 442
Photoshop NEF Filter .......................................................453Color Profiles and Color Spaces .......................................455
Output on Commercial Printers ............................................ 463Manipulating Levels and Curves.......................................464
Digital Workflow .................................................................. 466Other Useful Software......................................................469
NEF Converters .................................................................... 470Image Editors........................................................................ 473Catalog Programs ................................................................. 475Other Manipulation Tools..................................................... 483
PHOTOSHOP ACTIONS ............................................................486EXCEL WORKBOOKS................................................................487A WORD ABOUT COMPUTERS .................................................488
ACCESSORIES..........................................................................493
LENS COMPATIBILITY ...............................................................495
SPECIFICATIONS ....................................................................499
GETTING SERVICE ..................................................................502
QUESTIONS AND ANSWERS .................................................507
Thom Hogan’s Complete Guide to the D70 Page 13

Introduction The Nikon D70 was announced as being “in development” in December 2003. This early warning of an impending camera was probably due to Canon’s success with the Digital Rebel (300D outside the US). Nikon wanted people to know that they, too, would play in the low cost DSLR game.
On January 28, 2004, Nikon officially introduced the camera at a press conference in Tokyo and released the full specifications. It quickly became apparent that not only did Nikon intend to play in the low-cost DSLR game, but they wanted to dominate. The specifications are nothing short of breathtaking for a US$995 camera introduced only a few years into the DSLR revolution. Indeed, a quick read of the features showed that the D70 was not a de-featured D100, but actually better specified in many areas. In other words, the D70 is in some ways a better camera than the D100, and it sells at a lower price.
The D70 began shipping on March 18, 2004, and was an instant sell-out throughout most of the world.
The D70 steals the best features from previous Nikon bodies, builds on the D100 interface, and adds a few wrinkles of its own. From the D1 series, the D70 inherits the electronic/mechanical shutter trick that provides fast flash sync speeds. From the D2H, the D70 gets the metering, most of the white balance, and the i-TTL flash abilities. The D100 contributes the basic user interface, most autofocus abilities, and its good looks. New on the D70 is a Dynamic Buffering design that allows the camera to actually run at 3 frames a second until it runs out of storage space on a state-of-the-art card, something unique amongst DSLRs. If this all sounds like a technological powerhouse, you’re right, it is.
Thom Hogan’s Complete Guide to the D70 Page 14

Like every Nikon DSLR before it, the D70 was a much talked about camera long before it arrived in users’ hands. The initial US$995 street price surely attracted a new generation of photographers shifting from 35mm film to digital. While I saw a large influx of 35mm SLR users arrive when the D100 first shipped, the D70 has turned that stampede into a tsunami (if you’ll pardon the mixed metaphor).
Some of you reading this may still be pondering whether or not to make the big switch from 35mm to digital. The thing that usually holds serious users back is their fear that there isn’t enough resolution in digital cameras. The argument that 35mm film provides far more resolution than current digital technologies, while essentially true, is a bit misleading (see “35mm Film or Digital?” on page <53>).
Technically, there are still plenty of reasons to use film. While the largest file a D70 generates contains about 6 megapixels3, digital scans from 35mm film easily produce far larger files. For example, Nikon’s own midrange desktop scanner, the Coolscan 5000, generates files from 35mm film slides with a far higher pixel count and color depth than a D70 shot.
These larger digital samplings from the scanner theoretically provide less noise and additional detail4. In practice, I don’t see those differences in prints, partly because all reproduction mechanisms add their idiosyncrasies back into the mix. Most print technologies exhibit something called dot gain5, and others have their own resolution-limiting problems. Most of the amateur world doesn’t need the extra resolution film provides, and even those of us to whom it might be useful find getting higher resolution non-trivial to realize in practice.
3 Individual points where data is collected. 4 The maximum theoretical resolution of a D70 is about 84% of that of most current 35mm slide films on a standard MTF chart (essentially black lines on white background). 5 Dot gain refers to the fact that most ink spreads a bit when it is placed on paper. Epson inkjet printers, for instance, tend to produce individual pixels that spread about 30% on most papers.
Thom Hogan’s Complete Guide to the D70 Page 15

No professional photographer I know who has switched from a 35mm film SLR to a Nikon DSLR model has indicated a wish to go back6. I doubt that amateur D70 users will, either. Sure, some may complain about the need to buy special wide angle lenses, a minor loss of fine detail, having to cope with dust on the CCD, and other adjustments they have to make to their shooting practices. But all of these things can be dealt with and don’t detract from the bottom line: from nature photography to wedding photography, digital cameras are making their mark and rapidly replacing 35mm film cameras. And the D70 has plenty of resolution for the print sizes most amateur photographers generate.
This book is designed to help you get quality results from your Nikon D70 camera. Since the D70 is targeted at advanced amateurs, I assume that you have some basic understanding of photography; this book isn’t the place to learn what an aperture or shutter speed is (check out http://www.bythom.com/bookrecs.htm if you want some recommendations for general photography books.
Nevertheless, I try to explain the concepts and terminology that are necessary to understand how a D70 works. If you find something in this book unclear, or that I’ve assumed knowledge on your part that you don’t have, don’t hesitate to drop me an email asking for an explanation. Not only will I answer your question, but it will give me some insight on what I might want to change in future editions to make the book even clearer.
Besides dealing with the practical side of the camera and showing you how all the basic functions work, I’ll also provide you with some tips on how to squeeze every last bit of image quality out of your camera as well as how to make up for some of its shortcomings.
That’s not to say that they don’t want more resolution. Plus I know of a handful that haven’t transitioned to digital, mostly because their magazine clients and stock agencies are better set up for slide film.
Thom Hogan’s Complete Guide to the D70 Page 16
6
Debunking Some Myths If you haven’t already purchased and started using a D70, you’ve probably been perplexed over some of the contentious and sharply worded posts on some Internet forums concerning several D70 traits, or the rumors that seem to float through some photo shops. Indeed, you may have purchased this book in an attempt to determine which claims are true and which aren’t. Here’s my quick take (many of these things are revisited in detail later in the book):
• Plastic cameras are bad. There seems to be a bias in some people’s minds that metal is better than plastic when it comes to the reliability, durability, and stability of products. Metals can be soft, bendable, and prone to scratching. Or they can be hard, inflexible, and resistant to marring. And so too can plastics. It all depends upon whether the product designers specified the appropriate materials for each critical function. Example: I’ve now seen four examples of a D70 being dropped to the ground from varying heights (no, I’m not drop testing my camera!). Not only does every D70 so abused still work just fine, none even showed any damage from the incident. The D70 is sturdy, appears durable, and I think that any problem with the plastics used in it is with the beholder.
• The D70 isn’t as good as the D100. The thing about highly technical products in a rapidly changing market is that products get better and cheaper. The metering and flash system on the D70 is clearly better than the D100’s. Write speeds are noticeably faster. The controls are a little clearer and simpler. And while the resolution hasn’t improved, some of the characteristics of the sensor have certainly improved. Of course, the D100 has a metal frame (oh, I dealt with that already, didn’t I?).
• The Canon Digital Rebel is better. Reviews of both the D70 and the Digital Rebel are on my Web site if you’re interested in a longer discourse. While the Digital Rebel
Thom Hogan’s Complete Guide to the D70 Page 17

came first and is US$100 less expensive, I find quite a few things about the D70 that make it a clear choice for just about anyone except someone looking for an all-automatic, snap-shot type camera. If you never move the Mode dial off Auto, never plan to shoot anything but JPEG images, never want to set individual image parameters, don’t use flash, and don’t mind a delay until you can shoot when turning your camera on, save the money and buy the Digital Rebel. The rest of the world would be better served by the D70, in my opinion.
• The D70 produces objectionable moiré. As you’ll learn later in this book (see “Tough Subjects,” on page <389>), moiré is a side effect of digital sampling. All digital cameras produce moiré if the color frequency of detail nears the limit of the camera’s resolving abilities. Bayer pattern cameras tend to produce color moiré due to the way the filtration works (more on that later). A few factors mitigate or increase the tendency to produce moiré. On the D100, Nikon’s overall design reduces the tendency to produce moiré at the cost of sharpness. On the D70, Nikon’s design decisions increase the tendency to produce moiré at the benefit of increased acuity. So, yes, the D70 produces color moiré in some situations. That said, it’s not likely to occur often and can be dealt with in post-processing when it does.
• Side to side color shifts appear at certain shutter speeds. At 1/4000 and 1/8000 of a second shutter speeds, it does appear that there is a very slight color shift across the frame on all D70 bodies. Personally, I can’t remember the last time I used such a shutter speed in a real photo situation, but I can understand how some might feel that this is an issue that needs addressing. Fortunately, it’s not really a visible problem unless you grossly manipulate the image in post processing.
• Excessive blooming occurs when the sun appears in your shot. A side effect of the mechanical/electronic shutter in the D70 is that the camera can produce objectionable
Thom Hogan’s Complete Guide to the D70 Page 18

bloom when excessively bright light sources appear in the frame. This is a real problem, but can be worked around (use a neutral density filter and small apertures to get your shutter speed to 1/250 or longer). A related issue occurs when a very bright light source such as the sun is captured at exactly the left or right frame boundary—a special case of blooming may occur directly across the entire frame in JPEG images.
• Grid noise patterns sometimes appear. This problem is subtle, but also appears to be related to the electronic shutter speeds coupled with certain camera settings. Like most D70 image quality issues, you just need to understand what triggers the problem and how to avoid it.
If you were to believe the frantic posts in Internet forums, the D70 is a freaky beast that can’t take pictures without producing an obnoxious and irremovable artifact. In short, there have been plenty of near-hysterical claims about the D70, few of which have some basis in reality.
Funny thing is, this seems to happen with every DSLR camera that gets introduced these days. This is due to two primary reasons: each new camera tends to attract new users who aren’t aware of the realities of digital sampling, and each new camera has its own unique attributes and liabilities that need learning.
That’s why an eBook like this one is so important: I’ll deal with these things in a practical and no nonsense manner, hopefully explaining along the way why “digital” does not equate to “perfect” and how you can use the D70 to consistently produce high quality images regardless of any of its minor imperfections. No such thing as a perfect DSLR exists—but you can perfect the way you use your DSLR.
The bottom line is that the D70 is a camera that, in the right hands and with the right settings, produces state-of-the-art digital images. My goal in this eBook is to help you do just that.
Thom Hogan’s Complete Guide to the D70 Page 19

Conventions Used in this Book In this book I occasionally make comparisons between the D70 and previous Nikon models. In general, whenever this book uses the term D1, I’m referring to the entire D1 family (i.e., the D1, D1h, and D1x). Only when you see an individual model name in the text is what I’ve written model specific. In tables, if there are differences between the cameras, I’ve either added columns for each camera, or separated the information into model specific tables (noted in the table title).
Why am I including some D1 information in this book? Many readers own multiple DSLRs or have experience with previous Nikon models. Moreover, many D70 purchasers followed the D1 and D100 developments but held off buying one until Nikon came out with a camera that was less expensive. The introduction of the D70 was what they were waiting for, though the resulting camera is a bit different than the earlier models they learned about. Finally, it is just good form to know how your camera compares against other Nikon DSLRs.
With software products that are mentioned, including those that Nikon supplies with the camera, I try to identify the version I used for this book when I introduce the product, and note any significant differences between versions that I think you should be aware of. If I refer to a software program generically, as in “use the Unsharp Mask in Photoshop,” this usually applies to the entire range of Photoshop versions.
Specific instructions for software, as in “select Remove Redeye in the JustDoIt menu,” are for the version current as of the publication of this book. Also, you’ll note that I use a different font to distinguish menu items or messages that you’ll see on the computer or camera screens—this makes it easier for you to differentiate what I’m writing about from what you should be seeing on your equipment.
Thom Hogan’s Complete Guide to the D70 Page 20

Instructions that apply to using the camera are marked starting with a õ. Anywhere you see that symbol, grab your D70 and follow along!
As I have with all my previous books, I use my Web site (http://www.bythom.com/d70guideerrata.htm) to report any corrections or clarifications of information or instructions (you’ll also find some helpful product reviews and general articles). Write me at [email protected] if you have any questions or comments.
Thom Hogan
Emmaus, PA
Thom Hogan’s Complete Guide to the D70 Page 21

D70 Basics In this section we’ll look at the controls of the camera, how it’s powered, how images are stored, and the important things you’ll need to set up before you first use it.
D70 Design The D70 is a new Nikon body design, not really based upon any previous camera. Still, you can see contributions from several other Nikon products in the D70. Some of the shooting controls are derived from the N75 and most of the digital controls are derived from the D100. Moreover, in physical looks the D70 looks a lot like a slightly smaller D100.
The D70 model (right) inherits design features from a host of Nikon bodies, but looks most like the D100 (left).
The D70 uses the same mount for interchangeable lenses that Nikon has used since the first F-series camera, introduced in 1959. While Nikon has made many subtle improvements to the mount to support electronic exposure calculations, autofocus, and vibration reduction, the physical attributes have remained largely unchanged. This allows D70 owners to use virtually any manual focus or autofocus lens Nikon has made (for a list of the very few that can’t be used, see “Lens Compatibility,” on page <495>).
Thom Hogan’s Complete Guide to the D70 Page 22

The D70 retains the “button and command dial” interface for most major controls that was first seen on the N8008 (F-801 outside the US) in 1988, and it uses the autofocus system derived from the N80 body. The metering, white balance, and flash systems are derived from the D2H (the D2H metering system is itself derived from the F5).
From the back, the D70 (right) looks like a simplified and slightly smaller D100 (left).
In short, the D70 should prove remarkably familiar to anyone who’s used a recent high-end Nikon 35mm film SLR.
The same is true if you’ve used a D1. For all the complaints about some of Nikon’s design decisions over the years, their cameras have generally been remarkably consistent in user interface, with only modest variations between them. About the only thing that’s changed in the Nikon digital camera interface design since the D1h/D1x were introduced is that the menu system has become better organized, with easier navigation and clearer wording.
That said, the D70 most closely resembles the D100, both in design and function. In many ways, the D70 simply is a refined D100. So the obvious question is: what’s different about a D70 from the D100? Well, the primary differences are found in these areas:
• The CCD sensor has been modestly updated, with the primary advance being the D1’s trick of having the sensor provide electronic “shutter speeds.” In addition, small
Thom Hogan’s Complete Guide to the D70 Page 23
gains in shadow detail (dynamic range) and noise control have been made.
• Matrix metering has been switched to a 1005-element CCD in the viewfinder, ala the F5, D1, and D2H models. This has the additional benefit of allowing the necessary sensing for i-TTL flash (see next).
• The D70 supports what Nikon now calls CLS (Creative Lighting System) flash. CLS is an umbrella term that includes i-TTL7, allows multiple TTL flash, Flash Lock, and more.
• The plastic-on-metal frame construction of the D100 has been replaced with a straight plastic design. Some metal does exist, most notably in the lens mount and shutter areas, but for the most part, the camera is plastic in both frame and shell.
• Several subtle changes appear, as well: more choices in image enhancement, renaming of folders, PictBridge support, automatic rotation of vertical images, combined NEF+JPEG storage, and other new features, for example.
While the D70 is different than the D100 and other Nikon bodies that came before it, if you’ve used any Nikon film or digital SLR, you’ll find much of the D70 very familiar, especially the shooting controls. Still, the D70 differs from the consumer film bodies in a few critical ways:
• When the shutter curtain is open, a small CCD (digital sensor) is revealed instead of film.
One of the drawbacks of writing about such a complex product from a company that loves to use abbreviations and special terms to indicate features is that I can’t simply let a mention of a new term go by un-remarked. I’m not going to try to define every term as it comes up, though I’ll try to put it in context. Here, for example, i-TTL refers to a new generation of TTL (Thru The Lens) flash metering. I’ll cover it exhaustively later in this eBook (see “Using Flash,” on page <298>), so for now just understand that the term i-TTL refers to a new way of controlling flash. As I write this, only the D2H and D70 support i-TTL; that’s how new it is.
Thom Hogan’s Complete Guide to the D70 Page 24
7

• All mechanisms associated with film transport are no longer present. Mechanically, a D70 should be even more reliable than an N80, for example.
• While the processor and software that run the D70’s shooting controls are adapted from the film bodies, they’ve been modified to deal with the all-electronic nature of the D70.
• Substantial additional electronics have been added. In particular, the D70 has added internal memory buffers, an analog-to-digital converter (ADC), a digital signal processor (DSP) and software to analyze and interpolate pixel data, plus additional I/O support. Top that off with new control software that uses the direction pad, new buttons, and the color LCD to provide additional camera options.
Nikon didn’t change the autofocus sensors for the D70; they are the same as those found in an N80. This has a number of implications I’ll discuss at appropriate points later in this eBook, but 35mm users should be aware that the autofocus sensors are found at somewhat different locations in the frame on the D70; whereas the 35mm sensors are quite centrally located, the D70’s sensors are spread further from the center due to the 1.5x change in the angle of view.
Like most Nikon bodies, the D70 has a very robust body that is partially sealed to protect against the elements. You should be able to use the D70 in light rain or mist without having to provide much extra protection. Still, the D70 is more sensitive to environmental and handling factors than a film camera in several areas:
• The exposed LCD. The color LCD on the back of the D70 is particularly exposed and quite vulnerable to scratching. While Nikon supplies a protective cover for use when the camera is being used, be careful, as it’s easy to lose the cover with rough handling.
Thom Hogan’s Complete Guide to the D70 Page 25

• The CCD Sensor. The CCD tends to collect dust, especially if you change lenses often. See “Keeping the CCD Clean,” on page <381>.
• Heat. Microdrives don’t always work well in very hot conditions, so if you use one of these for storage be aware that you might need to keep the camera cool for optimum performance. Likewise, CCD noise tends to increase in very hot environments, though it is still very much in control in almost any situation you’d be comfortable shooting in. Even internally generated heat (from the electronic components) can be a factor in very long exposures.
One question D70 users often ask is this: how is their new camera different than the more expensive D1 and D2 series cameras? Here’s a short list:
• Build quality. The D1 and D2 models are rugged, tightly sealed metal bodies with weatherproof gaskets, and have robust controls. The D70 is a less rugged plastic body, not sealed quite as well, and has a few controls that are of a lesser quality (the Mode dial tends to be a weak point on Nikon bodies that use one, as does the D70). The difference is a bit like the one between a Hummer H2 and a Chevy Trailblazer. Both of those sport utility vehicles can pretty much do the same thing, but one was designed to better take abuse and extreme conditions.
• Autofocus. The D1 models use the CAM1300 autofocus sensors (as do the F100 and F5), while the D2 models use the CAM2000 sensor. The D70 uses the less capable CAM900 (as do the N65, N75, N80, and D100). The difference shows up primarily in low light and off-center subjects, where the D1 and D2 have very significant advantages.
• Flash. The D70 has a built-in flash and a Flash Exposure Compensation button; the D1 and D2 don’t. The D1 and D2 have built-in PC Sync sockets for studio flash; the D70
Thom Hogan’s Complete Guide to the D70 Page 26

requires you to add an accessory (AS-15) to the camera to achieve the same thing.
• CCD. The D70 actually has some advantage here, as it uses a new generation of a chip originally designed by Sony. The D70’s resolution is slightly higher than the D1x and D2H, and doubles that of the D1 and D1h. The high ISO and long exposure traits of the D70 CCD are considerably better than the D1 counterparts (the D2H, however, is every bit the D70’s equal here).
• Speed. The D70 is designed as a consumer body, and maxes out at 3 frames per second and 14 frames in the buffer. The D1 models top out at 5 frames per second and 40 frames in the buffer (D1h). The D2H runs at an unbelievable 8 fps with a 40 frame buffer and an incredibly short viewfinder blackout time. In casual shooting, the difference isn’t significant, but if you shoot sports or fast moving action, you’ll find yourself restricted by the D70’s limits8.
• PC Connection. The D1 models use the much faster IEEE 1394 interface (Firewire). The D2 models use USB 2.0 at HIGH speed (450Mbps transfer rates). The D70 uses the significantly slower USB 1.1 interface, which, curiously, is often labeled USB 2.0 FULL speed (12Mbps transfer rate)9. On the one hand, USB 1.1 is ubiquitous on virtually every Macintosh or PC built in the last two years. But Firewire can be more than an order of magnitude faster in transfer speed (and all Macs have included this interface for the last two years).
8 Yes, I’m aware that when the buffer fills, the D70 can write to some storage cards so fast that it can usually maintain a 1.5fps or faster speed right up until it fills the card. But the autofocus sensors and viewfinder blackout time of the D70 let the camera down for serious sports work. 9 This is confusing, but explainable. The USB organization found that some users were getting confused by the distinction between versions 1.1 and 2.0. Would a USB 1.1 camera work on a USB 2.0 computer (and vice versa)? The answer is yes, as USB 2.0 devices are designed to be backwards compatible. Unfortunately, the solution they decided upon was to allow digital camera manufacturers to call their USB 1.1 implementation USB 2.0 if it supported the 12mbps transfer speed. Eek! The bottom line is that the D70 doesn’t support the faster transfer speeds you’ll find on some cameras.
Thom Hogan’s Complete Guide to the D70 Page 27

• Battery. The D70 uses the same EN-EL3 battery as the D100, a proprietary lithium battery that’s small, light, and works decently in the cold. The D1 models use NiMH technology, which results in larger, heavier batteries that don’t work as well when cold.
• Vertical release and 10-pin control. These are built into D1 and D2 models, but are not available on the D70.
In short, you won’t find many significant differences. The D70 actually sports as many advantages over most D1 models as it does disadvantages. Considering how much less expensive it is, the D70 represents Nikon’s best bargain in ages.
Thom Hogan’s Complete Guide to the D70 Page 28

Note: On the CD I’ve provided a file named D70CALLOUTS.PDF, which has only the following Control and Display sections in it. You can print that out and use it for reference as you follow along in the rest of the book (or laminate it and use it as a field cheat sheet!).
D70 Controls
Front View
1. Focus Mode Selector switch 2. Lens Release button 3. Self-Timer, Red-Eye Reduction, Autofocus Assist lamp 4. Depth of Field Preview button 5. Front Command dial (called sub-command dial in
Nikon manuals) 6. Shutter release 7. Flash Release button (doubles as Flash Options button
and Flash Exposure Compensation button) 8. Lens Alignment mark 9. Autofocus Motor driveshaft 10. Infrared receiver
Thom Hogan’s Complete Guide to the D70 Page 29

Top View
11. Mode dial 12. Flash hot shoe 13. Power switch 14. Exposure Compensation button 15. Metering Method button (doubles as Reset button) 16. Top LCD Command Display panel 17. Focal Plane10 indicator φ 18. Top LCD Illumination button (doubles as Format
button)
What’s a focal plane? It’s the point at which the image is focused (i.e., the surface plane of the CCD for a D70 or the surface plane of the film for a 35mm film camera). In close up (macro) work, it’s sometimes necessary to measure distances from the focal plane, thus the mark.
Thom Hogan’s Complete Guide to the D70 Page 30
10

Back View
19. Bracketing button (doubles as Reset button) 20. Shooting Method button (doubles as Format button) 21. Playback button 22. Delete button 23. Color LCD display 24. Viewfinder Diopter Adjustment lever 25. Viewfinder eyepiece 26. AE/AF Lock button 27. Rear Command dial (main command dial in Nikon
manuals) 28. Autofocus Area Direction pad (doubles as Autofocus
Sensor selector and Direction pad for the menu system)
29. Focus Area Selector lock 30. Menu button 31. Enter button (doubles as Image Quality button) 32. Thumbnail button (doubles as ISO button) 33. Protect button (doubles as Help and White Balance
button) 34. CompactFlash Card slot (under cover) 35. CompactFlash Card Access lamp
Thom Hogan’s Complete Guide to the D70 Page 31

Side View
36. DC In connector 37. Video Out connector 38. USB connector
D70 Displays The D70 features three displays, all of which can present information about the current camera settings.
On the top of the camera is the familiar (to 35mm film users) informational panel (called the Control Panel by Nikon), though it displays additional information not found on the film bodies. This monochrome LCD is primarily used to show the camera’s main shooting modes, exposure settings, frames shot and remaining, and active primary features. Most of the information on the top LCD is associated with camera controls on or near the top of the camera. A few of the areas on this LCD have multiple uses, so pay close attention to the information being presented. In this book, whenever I refer to “top LCD,” I’m referring to this display.
Thom Hogan’s Complete Guide to the D70 Page 32

D70 Top LCD
39. Internal Clock Battery Condition indicator &
40. Audible Feedback indicator 41. Exposure Compensation indicator £
42. Shutter Speed indicator/Exposure Compensation indicator/Flash Compensation indicator/Shots in Bracketing indicator/White Balance Adjustment indicator -88.88
43. Aperture indicator [8.8 44. Bracketing Progress indicator À
45. Flash Exposure Compensation indicator Ù 46. Frames Remaining indicator (based on current image
quality setting; when the shutter release is held partway or fully down, it displays number of frames left in buffer, as in R03) Note: remains displayed even when camera is turned OFF.
47. Over 1000 Frames indicator k 48. White Balance indicators ¯×å®çæãä (<> indicates
you’ve altered the basic value) 49. Flash Options indicator dg
50. Focus Area indicator /
51. Battery Condition indicator !
Thom Hogan’s Complete Guide to the D70 Page 33

52. Image Size indicators (L = large, M = medium, S = small)
53. Image Quality indicators (RAW, FINE, NORM, BASIC)
54. Shooting Method indicator 55. Self-Timer indicator o 56. Infrared Remote indicator 57. Autofocus Mode indicator AF-C AF-S 58. Flexible Program indicator 59. Auto ISO indicator 60. Metering Method indicator 61. Bracketing Active indicator 62. Bracketing Progress indicator
D70 Color LCD
On the back of the camera is a large (~1.8”) color LCD (Nikon refers to this as the “Monitor”), which can be used to review images taken with the D70.
The color LCD displays 100% of the picture when viewing images. If you’ve turned on automatic rotation of vertical images, you can also have the color LCD rotate those images on the display (not particularly recommended, as the image becomes too small in my opinion).
In this book, whenever I refer to the “color LCD,” I’m referring to this display.
Thom Hogan’s Complete Guide to the D70 Page 34

The color LCD is okay for casual previews of images, but don’t count on using it to critically evaluate sharpness or color balance. It’s most useful function is for judging composition and for analyzing information from the image (histogram, highlights, etc.).
63. Frame Number indicator (upper right corner) 21/142
64. Folder Name 100NCD70
65. Filename _DSC0155.JPG
66. Image Quality RAW+BASIC
67. Image Size (L, M, or S) L
68. Protected File indicator n (not shown here)
Note that other information about the photo appears on separate information pages (selected by pressing the < or > keys on the Autofocus Area Direction pad while viewing images).
Nikon supplies a cover for the color LCD (part number BM-4), as the color LCD’s position on the camera back makes it quite vulnerable to damage. The BM-4 plastic cover is “seethrough.” While suitable for seeing the color LCD for setting menu settings, you won’t be able to clearly review images with it on the camera.
The cover removes by lifting outward on the bottom edge to disengage it, then pulling the entire cover diagonally away from the camera body. To reinstall, insert the top of the cover into the indentation just above the color LCD, then press the bottom of the cover towards the camera until it clicks into place.
Thom Hogan’s Complete Guide to the D70 Page 35

D70 Viewfinder
When you look through the viewfinder, you’ll see an information display below the image area. This lighted display is activated when you press the shutter release partway, and it turns OFF automatically with the metering timeout to conserve power. Note that virtually none of the information in the viewfinder pertains to the digital nature of the camera or digital settings; here you’ll primarily see the exposure and mode related information found in most Nikon 35mm film viewfinders. In this book, whenever I refer to the “viewfinder display,” I’m referring to this information.
69. Focus Confirmation indicator = 70. Autofocus Mode indicator b
71. Exposure Lock indicator ¹ 72. Battery Level indicator !
73. Shutter Speed value 88.88 74. Aperture value [8.8 75. Exposure Compensation indicator £
76. Flash Exposure Compensation indicator Ù 77. Manual Exposure display/Exposure Compensation
setting òóô
Thom Hogan’s Complete Guide to the D70 Page 36
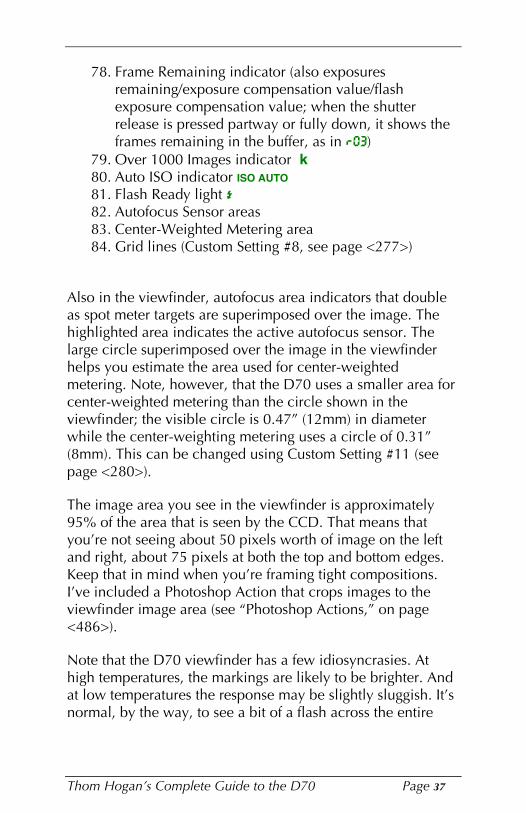
78. Frame Remaining indicator (also exposures remaining/exposure compensation value/flash exposure compensation value; when the shutter release is pressed partway or fully down, it shows the frames remaining in the buffer, as in R03)
79. Over 1000 Images indicator k 80. Auto ISO indicator ISO AUTO
81. Flash Ready light ç 82. Autofocus Sensor areas 83. Center-Weighted Metering area 84. Grid lines (Custom Setting #8, see page <277>)
Also in the viewfinder, autofocus area indicators that double as spot meter targets are superimposed over the image. The highlighted area indicates the active autofocus sensor. The large circle superimposed over the image in the viewfinder helps you estimate the area used for center-weighted metering. Note, however, that the D70 uses a smaller area for center-weighted metering than the circle shown in the viewfinder; the visible circle is 0.47” (12mm) in diameter while the center-weighting metering uses a circle of 0.31” (8mm). This can be changed using Custom Setting #11 (see page <280>).
The image area you see in the viewfinder is approximately 95% of the area that is seen by the CCD. That means that you’re not seeing about 50 pixels worth of image on the left and right, about 75 pixels at both the top and bottom edges. Keep that in mind when you’re framing tight compositions. I’ve included a Photoshop Action that crops images to the viewfinder image area (see “Photoshop Actions,” on page <486>).
Note that the D70 viewfinder has a few idiosyncrasies. At high temperatures, the markings are likely to be brighter. And at low temperatures the response may be slightly sluggish. It’s normal, by the way, to see a bit of a flash across the entire
Thom Hogan’s Complete Guide to the D70 Page 37

display when the autofocus sensors are set to show red (see “Custom Setting #18 Active Focus Sensor Illumination,” on page <288>). Finally, note that Nikon uses O instead of 0 in numbers, which makes things look at bit funny (e.g., 6O for 1/60 shutter speed).
Thom Hogan’s Complete Guide to the D70 Page 38

The D70’s CCD The key element of any digital camera is the image collection device. In the case of the D70, that’s a CCD (Charge Coupled Device). Canon’s D30, D60, 10D and Digital Rebel use a CMOS device (Complementary Metal-Oxide Semiconductor), the primary alternative technology. For the D70, Nikon uses what appears to be a modified Sony ICX413AQ sensor (the sensor used in the Nikon D100 and Pentax *ist Digital body). Rumor has it that this new version is manufactured for Nikon by Sanyo using Nikon-proprietary additions (the “electronic” shutter speeds).
The D70’s CCD (exposed here with the shutter open using the Bulb setting). Any dust or dirt in the mirror box behind the lens seems to ultimately attach itself to the CCD. (In this shot, you can also clearly see the seven gold-plated electrical contacts at the top of the lens mount and the AF motor screw at the bottom left.)
Many newcomers to digital photography are confused by the published information about imaging sensors. Here are the key specifications for the D70 and other Nikon DSLR models, along with the Coolpix 990 and 995 (which I label 99x in the charts) for comparison:
CCD Specifications (Size) Camera Size “ (mm) Pixel Size D70 .93 x .61” (23.7 x 15.6mm) 7.8 microns D100 .93 x .61” (23.7 x 15.6mm) 7.8 microns D1X .93 x .61” (23.7 x 15.6mm) 11.8 x 5.9 microns D1H .93 x .61” (23.7 x 15.6mm) 11.8 microns D1 .93 x .61” (23.7 x 15.6mm) 11.8 microns D2H .93 x .61” (23.7 x 15.6mm) 9.5 microns Coolpix 99x .28 x .21” (7.2 x 5.35mm) 3.45 microns Coolpix 5000 .35 x .26” (8.80 x 6.66mm) 3.4 microns
Thom Hogan’s Complete Guide to the D70 Page 39

CCD Specifications (Pixels) Camera Active Pixels Bit Depth D70 3008 x 2000 12 bits11
D100 3008 x 2000 12 bits D1X 4024 x 1324 12 bits D1H 2012 x 1324 12 bits D1 2012 x 1324 12 bits D2H 2464 x 1632 12 bits Coolpix 99x 2048 x 1536 8 bits Coolpix 5000 2560 x 1920 8 bits
Note: As best as I can tell, Nikon’s size dimensions are for the active area of the chip. Moreover, Nikon has chosen a slightly different active area than the chip manufacturer suggests in some cases (3008 x 2000 instead of 3000 x 2000 for the D100, for example).
Obviously, not all CCDs are built the same, so what are the key differences, and what do they mean?
First, note that the physical size of the D70’s CCD is larger than that of consumer digital cameras, such as the Coolpix models. Likewise, the individual sites used to generate pixels—called photosites by engineers—are much, much larger (even the D1X, which doubles the number of physical photosites in the same space as the other D1 models, has significantly larger photosites than the Coolpix models).
Size of the photosite is directly related to the ability to record a wide and accurate tonal range and inversely related to the amount of noise in the image data. In other words, the far larger photosites of the D70’s CCD enable it to record a range of light more accurately, with better tonality and less noise than the smaller photosites of the Coolpix CCD (12 bits for the
This is actually a bit misleading. Because the D70 only records in Compressed NEF format, you don’t really get the full effect of the 12-bit depth. Instead of 4096 tonal values you’d expect, the D70 only manages to record a little over 800, the equivalent of ~9 to 10 bits of information. I’ll deal with this some more later in this eBook (see “Compressed NEFs,” on page <95>).
Thom Hogan’s Complete Guide to the D70 Page 40
11

D70 compared to 8 bits for the Coolpix12). This is especially true when shooting in dim lighting or at hot temperatures.
While 4 bits per pixel difference in tonal range doesn’t seem like much, it translates into the ability to render 4096 shades (using 12 bits) of an individual color versus 256 (using 8 bits). While the capability of most human eyes is close to what an 8 bit capture contains (our eyes distinguish about 16 million colors, which is what 8-bit RGB produces; 256 x 256 x 256 = 16,777,216), the extra tonality of 12 bit captures is still useful. When we “sharpen” and apply other corrections to an image in post-processing, it is usually easier to keep such manipulations from becoming visible with the extra bits (i.e., we can “hide” some of our manipulation in the extra tonality, and rounding errors have less visible consequences).
As noted in the last footnote, Nikon doesn’t use all 4096 shades in the 12 bit values coming off the CCD. Since the human eye can’t distinguish all the tonal values 4096 values of Red, Green, and Blue can create, Nikon reduces the tonal range to fewer values before they begin a final lossless compression (in NEF files). They call this “visually lossless,” as you can’t really tell that values are being dropped. While this has little or no effect on most images, it is a minor consideration that comes into play if you run multiple compressions on a file or do extreme manipulations. (More on this in the section on NEFs; see “Compressed NEFs,” on page <95>.)
The D70 has slightly less exposure range than is captured by most print films, but slightly more exposure range than most slide films can handle. Better still, the D70 captures dark to bright in a somewhat more predictable fashion13; 35mm film
12 Astute readers will note that I’m quoting the bit depth for NEF files (12 bits), not the value for JPEG files (8 bits) on the D70. We’ll get to what that means when we study file formats in the section on “Image Formats.” 13 “Predictable” isn’t quite the right word to use, as no imaging device I know of has a perfectly predictable response to light. My point is that a D70’s tonality curve is more regular than film’s, which tends to vary more with brightness and exposure length.
Thom Hogan’s Complete Guide to the D70 Page 41

tends to have a widely varying response (density of image) to exposure, producing a distinct S-curve when you plot exposure against density. Worse still, most film has a property called reciprocity failure—the tendency to require a different exposure at extremely short or extremely long shutter speeds. The bottom line on digital tonality is that the shadow areas are less likely to “block up14” in underexposure, as does most slide film, for example.
One thing that is a bit unexpected about the D70’s tonal range is that it is a bit “wider” on the dark side of middle gray than it is on the bright side. The D70 can retain as much as four stops of useful information on the dark side of middle gray, but only about three stops on the bright side. I’ll describe this more when I talk about histograms later in the book (see “How to Interpret Histograms,” on page <367>), but for now, suffice it to say that it is almost always easier to “fix” an underexposed D70 image than it is to recover an overexposed D70 image.
The spectral characteristics of the D70 sensor are interesting. Below is a rough plot of native response of the sensor (after Bayer filtration but before demosaicing).
Imagine a chart with 64 increasingly brighter shades of gray from black to white. If you were to photograph that chart, a “blocked up” shadow area would be one that did not reproduce differences between adjacent dark grays, essentially rendering many of them black (or near black). Because film has a non-linear response to light, many different light values are sometimes produced as black. Fuji Velvia, a slide film favored by many professionals, has a pronounced tendency to render any object underexposed by more than three stops as a rich, velvety black. The same problem can occur at the bright extreme, as well. Blocked up highlights would be all bright objects rendered as the same white (or near white) color.
Thom Hogan’s Complete Guide to the D70 Page 42
14

400 450 475 500 525 550 575 625 675
0
1
425
600 650 700
Blue
0.1 0.2 0.3 0.4 0.5 0.6
0.7
0.8 0.9
Blue Green Red
The numbers across the bottom of the chart are light wave values in nanometers across the visible spectrum. The vertical axis is overall response at that wavelength. Note that at the left edge of the chart the D70 still has a modest but rapidly degrading blue channel response in the ultraviolet spectrum (below 400nm). At the other end, there is plenty of red channel response and a tiny bit of green channel response in the near infrared (above 700nm).
Here’s a blowup of a small piece of a digital image. I’ve taken the color out so that you can see the noise more easily. You can clearly see a mottled effect in both the dark gray wall (at left) and the lighter colored ceiling (right). In real life, the surfaces in this photograph are smooth, and do not exhibit this texture-like effect. If you let your eyes relax, you may even be able to see the horizontal and vertical orientation of the noise (i.e., it’s not truly random).
Thom Hogan’s Complete Guide to the D70 Page 43

CCDs tend to produce more noise15 when left exposed to light for long periods of time, when exposed to low levels of light, when set to a higher ISO value, or when used in very warm environments. Noise shows up in photos as incorrect pixel values, and is usually easiest to see in large areas of a single color (like the sky) or in deep shadow areas (where noise shows up as false detail). The larger the photosite, the less that noise is a factor. Thus, Coolpix users have discovered that pictures they’ve taken on very warm nights (>86°F [30°C]) often exhibit large amounts of incorrect or random pixel information, while D70 users don’t typically see this problem. Indeed, the D70 seems remarkably free from dark current types of noise16.
Note: “Dark current” is the name for a form of thermally induced current that the photosites produce even when they aren’t struck by light photons (thus the “dark” in the name). Dark current doubles every 8°F [~5°C] or so in hot temperatures, but on a D70 generally isn’t significant enough to affect images except in very extreme conditions (very long exposures or very hot temperatures). Each individual CCD sensor tends to have a different dark current noise pattern, much like humans have unique fingerprints. That pattern will change a bit over time, and with temperature. Nikon, like all digital camera makers, masks off some photosites at
15 I’m using the term “noise” here to mean pixel values that are different from what a “perfect sensor” would produce. For example, in a “perfect sensor” three adjacent pixels from an evenly exposed gray card might be rendered with an RGB value of 110,110,110. Most digital sensors aren’t that perfect (and there’s rounding going on somewhere to get to an 8-bit value, so noise tends to get slightly exaggerated), so you might have one pixel that’s 110,109,110, another that’s 110,110,111, and a third that’s 110,110,110. As noise increases, the divergence of those values would increase. For example, if the proper value is 110,110,110, then a value of 102,114,107 is clearly “noisier” (and less accurate) than one of 108,112,108. 16 Sony’s technical specifications for the chip on which the D70’s sensor is based state the “guaranteed operating temperature” of the sensor as being -10 to 60° C, though they don’t give any indication of noise propensity at the temperature extremes. In general, I’ve found that the D70 has very good tolerance to heat (I’ve used it on 100°F+ temperatures in the desert), and noise build-up due to heat seems quite modest compared to some other sensors I work with. In short, if you can stand the heat, your D70 can produce usable images with little additional visible noise build-up. I’ve had my D70 set up for hours in 90° F ambient temperatures, and didn’t see any change in noise propensity from the first image to the last, though the camera was uncomfortably warm to the touch at the end of the sequence.
Thom Hogan’s Complete Guide to the D70 Page 44

the edge of the sensor from light so that they can determine what the sensor thinks is absolute black (read: the average dark current), but this system isn’t foolproof17. Better still, with noise reduction turned on the D70 creates an exact “map” of the dark current in the CCD by taking a second “blank” exposure at slow shutter speeds, allowing the camera to further reduce noise by subtracting the dark current map from the image data.
Finally, photosite size also intersects a bit with lens quality. Many consumer cameras using smaller sensors exhibit very visible chromatic aberration18. On digital sensors any lens focus aberration can fall onto an individual photosite and dominate the color information for that pixel (as you’ll learn later in this section, each photosite only records a single color, so such dominance is not good). (It’s also true that it is difficult to build short focal length lenses in consumer quantities with low aberration properties.)
The D70 gets two significant image-quality benefits from its sensor size:
• Because the overall CCD is smaller than the 35mm film frame, only the central portion of the image circle created by the lens is used (most lens-induced aberrations occur more dramatically as you move towards the edges of the image circle). Moreover, 35mm film lenses tend to be made to higher quality levels than those intended for consumer digital cameras. Thus, fewer aberrations are present in the first place19.
17 On a D70, this “black mask” consists of 70 pixels in the long axis (with most of that on one side), 6 pixels in the short axis. That’s one reason why you sometimes see the chip described as 3110 x 2030 (6.31 megapixels). 18 Chromatic aberration refers to the amount that a lens doesn’t focus all colors at the same point. 19 If you purchased the “kit” version of the D70, which comes with an 18-70mm DX lens, you’re probably aware that the DX designation refers to a lens with a reduced image circle. What I’ve written in this section doesn’t really apply to DX lenses.
Thom Hogan’s Complete Guide to the D70 Page 45

•••••••• •••••••• ••••••••
• Because each photosite is physically large20—larger than film grain, even—any aberration is not likely to fall on an adjacent pixel, and even if it did, it probably wouldn’t dominate that adjoining pixel’s value. Thus, when aberrations do fall on a D70 photosite, the change in pixel value isn’t as extreme as it would be with a smaller sensor. That’s not to say that lens aberrations don’t show up on a D70—they most certainly do—but it takes a significant aberration to show.
A D70 use a Bayer-type filter over the photosites, named for the Kodak engineer who originated the method. Each individual photosite has a colored filter over it so that the underlying photosite is responsive to a particular range of color. Adjacent sites have different colored filters over them. Basically, even-numbered pixel rows alternate filters to produce red and green values, while odd-numbered pixel rows alternate filters to produce green and blue. It’s very important for D70 users to understand what this pattern does, and the consequences it dictates in images.
•••••••• etc. The Bayer Pattern alternates colored filters over the individual photosites.
Many first-time digital users wonder why the green filter is used for twice as many photosites as the blue and red filters. One reason is that photosites, like our eyes, are most receptive to light wavelengths in the 500 to 600 nanometer range (i.e., green). Likewise, green light waves are between the red and blue positions in the spectrum, and are found to some degree in most colors. Duplicating the green value gives the camera a better shot at discriminating between small differences in color and the amount of light (luminance) in a
“Large” is a relative word. If I were to put photosites on the following em dash (on a printed page or at 100% view) – I could fit several hundred on it.
Thom Hogan’s Complete Guide to the D70 Page 46
20

scene. (Photosites are least responsive to blue wavelengths [~400-500 nm], which has a set of problems of its own we’ll discuss later.)
If you’re saving images in NEF format (see “NEF format,” on page <92>), the camera simply saves the values it recorded at each photosite into a file. Software on your computer (Nikon Capture or one of the many third-party RAW file converters that are now available) is then used to interpret the photosite information to produce RGB values and a visible image.
If you’re saving images in JPEG format (see “JPEG,” on page <85>), the camera must first process the photosite data into image data. It does this by a process called interpolation21 . Interpolation looks at a block of photosite data and “guesses” the actual RGB values for any given photosite location (remember, at any given photosite, the camera only produces Red, Green, or Blue data, not all three; interpolation produces the missing two data elements). Interpolation has several serious consequences:
• Green data is the most accurate. Because the Bayer pattern repeats green, the camera has more data from which to make its guess. It also helps that the sensor is most sensitive to the green bandwidth. Moreover, subtle differences in green values actually make for larger perceived differences in colors, especially skin tones (yes, there’s some green value in skin colors).
• Red and Blue data generate the most “noise.” Since both the red and blue photosites aren’t repeated in the Bayer pattern, there’s fewer of those color data points from which to predict each pixel’s value. Worse still, when the light hitting a red or blue photosite is low, noise becomes a significant possibility in the photosite’s value. For
Technically, the actual name given to routines that convert Bayer pattern data into RGB pixel data is demosaicing. (The data is a mosaic of color information, and that mosaic must be reinterpreted into image data, thus the routine is called de-mosaic-ing.) Interpolation is a more general name given to any conversion that involves creating new data from partial or smaller datasets.
Thom Hogan’s Complete Guide to the D70 Page 47
21

• • • • •
example, you’ll sometimes see noise in the red channel of a blue sky, or noise in the blue channel for a skin tone. Since the blue photosites are the least sensitive to light, indoor lighting can be a real problem for the CCD, as very little blue wavelength light is generally produced by incandescent lighting, and the lighting indoors tends to be dim to start with.
• Red to Black and Blue to Black transitions compromise detail. Black is defined as the absence of light in all three channels (R, G, and B). Thus, when you have a pure red area adjacent to a pure black area, the Bayer pattern gets in the way (no value is being reported by the G and B photosites, thus only one in four photosites is providing useful information that can be translated into image detail). Red to Blue transitions can also exhibit a similar problem, though usually not as visually intrusive as the Red to Black or Blue to Black ones.
• • • • • etc. Shooting a scene with only red and black renders three quarters of the photosites inactive, as only the red photosites are providing measurable light values. Compare this example to the previous one and you’ll see that the effective resolution has decreased (I’ve made the patterns the same size).
• Moiré patterns may appear. When the frequency of image detail changes at or near the pitch of the photosites (imagine a photo of the screen on a door where the line intersections of the screen hit almost, but not exactly on the photosites), an artifact of interpolation is often a colored pattern called moiré.
Thom Hogan’s Complete Guide to the D70 Page 48

Moiré shows up as added “detail” not in the original, usually with a color pattern to it. In this example I’ve exaggerated the contrast and color so that you can see wavy patterns that weren’t in the screen being photographed (the original screen is silver with a tight diagonal weave in a regular pattern—those curvy lines and color changes don’t appear in the screen’s pattern). You get moiré most often from things like screen doors, tightly woven fabrics, and any other object that has a small, repeating, regular pattern of detail.
On top of the D70’s CCD sensor sits a “low-pass” filter, sometimes called an anti-aliasing (or AA) filter. The low-pass portion of the filter is used to prevent (as much as is possible22) color aliasing artifacts (like moiré). If you’re getting the idea that at the heart of a D70 lays a “sandwich” of things, you’re correct. Here’s a run-down of the things light has to go through to get to the actual “light-sensing” area on the sensor:
• Low-pass filter (anti-aliasing)
• Microlenses
• Bayer-pattern filters
From a designer’s viewpoint, they must balance the intensity of the anti-aliasing filter with the destruction of resolution. The stronger the anti-aliasing effect, the more the resolution of small detail suffers. Likewise, the less strong the anti-aliasing effect, the easier it is to trigger unwanted moiré. After being criticized for the D100 having too strong an anti-aliasing effect, Nikon appears to have gone to the other end of the reasonable design choices with the D70. Personally, I’d rather have the additional detail and deal with the moiré than vice versa, but some users hate moiré because it requires some post processing skills.
Thom Hogan’s Complete Guide to the D70 Page 49
22

Note: Why is the filter called a “low-pass” filter? Artifacts— unwanted data—are produced by any analog-to-digital conversion. There’s a basic rule of conversion that all input frequencies below something called the Nyquist frequency will be correctly produced, while those above the frequency tend to more easily generate aliasing artifacts (often visible as moiré or color fringing in digital cameras). The filter on the D70’s CCD attempts to pass the data below the Nyquist frequency for the sensor pitch, and reject data above that frequency, thus the name “low pass.”
There’s a one-to-one relationship between the individual filters (R, G, or B) and the underlying photosites. Note that the photosites do not cover the entire surface area of the chip. That’s because power and data circuits run between the photosites. Also note the color shown; I’ve used the colors here to show which color the filter passes on to the photosite.
Nikon also touts the fact that light is “telecentrically” corrected for each individual photosite. Camera lenses “bend” light to focus on the film plane. This can be a problem even with film, as film usually consists of several “layers” of light sensitive material, and light hitting at an angle is recorded at a slightly different position in each layer. In extreme cases— especially if the lens has any chromatic aberration that focuses colors at different points—this results in a loss of color saturation, or in color fringing on detailed objects. To prevent this being a problem in the D70, a small lens-like bit in the low-pass filter on top of each CCD photosite—called a
Thom Hogan’s Complete Guide to the D70 Page 50

microlens—redirects the light so that it enters the CCD perpendicular to the film plane. The result is better color accuracy and saturation.
A question I get asked a lot these days is “how long will this digital camera last?” From the mechanical standpoint, the answer is as long as a film camera. But the Bayer filtration does come into play here. Since the filtration itself is created using dyes, and dyes tend to fade with long-term exposure to light, I suspect that this is going to be the weak link in longevity. The good news is that, even if you take tens of thousands of shots, the sensor is being subjected to light for only fractions of a second at a time. In short, the overall light accumulation for even a heavily used D70 is going to be minimal.
Consumer cameras such as the Coolpix expose their sensors (and thus filters) to light almost constantly, and we’ve yet to see any significant fading problems with units that are several years old. Thus, I don’t expect filter fading to be an issue at all with a D70, even after years of use. Still, I’ve added a new caveat to my cleaning instructions later in this book and on my Web site: clean quickly and not in the presence of high-powered light sources.
One final word about photosites: their light-catching regions don’t fill the entire area the sensor array occupies. This catches some digital newcomers by surprise, as they imagine that the photosites are all jammed up against one another and the entire sensor senses light. The photosites are jammed together, but the light-sensing portions of most sensors, including those in the D70, are smaller than the overall photosite size, partly in order to keep light photons from migrating too easily to adjacent photosites, partly to allow room for other signals on the chip (power and data transfer, primarily).
I’ve sidestepped one issue in this discussion of how a CCD works: how the amount of light (an analog value) becomes
Thom Hogan’s Complete Guide to the D70 Page 51

digital data. To make a very complicated story short, the light photons captured by the individual photosites are converted into electrons at each site. These electrons are moved a row at a time to the edge of the CCD where an Analog-to-Digital converter (ADC) resides. The converter has a relatively simple job, which is to evaluate the number of electrons it sees in each column for the current row and convert that into 12-bit digital values that are then passed on to the rest of the camera’s circuitry.
As early purchasers of the original D1 discovered, the A/D conversion must be absolutely precise, or it too can introduce noise into stored pixel values. Many original D1’s had a defective oscillator circuit, which provided a variable reference frequency to the ADC that in turn caused the camera to record a pattern embedded in the pixel values at high ISO values. The variation in the frequency was very, very small, but when the camera amplified the photosite data, as it had to at high ISO values, this variance was enough to show up as a wavy, regular pattern. Judging from the irregular and low noise levels of the D70, Nikon has come a long way from the early D1 in A/D conversions.
Tip: For a fuller discussion of how CCDs work, see http://www.bythom.com/ccds.htm.
Thom Hogan’s Complete Guide to the D70 Page 52

35mm Film or Digital?
Almost everyone who ponders purchasing a D70 asks the same question: “is the resolution as good as 35mm film?” Some ask this question in a slightly different way (e.g., “can I get professional results with a D70?”), but the issue is essentially the same: just how good are pictures I take with a D70 compared to those with a 35mm film camera?
On a pure resolution level, 35mm film still wins. The D70 generates a maximum of 3008 x 2000 pixel images with 12 bits of data per color channel. Nikon’s own mid-range desktop scanner, the Coolscan 5000, generates 5782 x 3762 pixel images with 16 bits of color data per channel from a full 35mm film frame (expensive drum scanners generate even larger files). Thus, one would be tempted to say that the D70, at best, is one-third as good as 35mm film on a middle-of-the-line desktop scanner (6 megapixels versus 21 megapixels). But that wouldn’t be completely accurate23.
Most color print technologies max out at slightly more than 300 dpi (dots per inch); yet even high-quality magazines don’t reach that level. Inkjet printers often only need about 240 dpi; even the top print technologies generally don’t go beyond 360 dpi). At 300 dpi, a D70 file generates a print size approximately 7 x 10” (~ISO A4). The re-sampling techniques used in Photoshop (or used with a program such as Genuine Fractals) can easily generate images twice the original dimensions with minimal artifacts (essentially unnoticeable at viewing distances).
Note: Those of you who own an Epson inkjet printer probably read that last paragraph and said, “but wait, my inkjet says it prints at 1440 (or 2880) dpi.” A close reading of the
There’s also a school of thought—which I subscribe to—that believes that lack of “noise” in an image is more important than additional resolution. Our eyes and brains are very sensitive to “detail,” but false detail (noise) can be very distracting. To demonstrate this in action, one only has to compare an enlargement from a scan of a grainy film to one from a low-noise digital camera.
Thom Hogan’s Complete Guide to the D70 Page 53
23

Epson manuals, however, shows that their printers don’t necessarily place that many dots every inch, but instead use a spray adjustment technique to simulate that resolution (the size of the dot is varied). The practical resolution of the Epson inkjets is 240 dpi. Even moving the paper the Epson technologies max out at increments of 1/720 of an inch. While it’s a bit out of the scope of this book, there is a reason why printers use higher dpi settings for printing. Note that you can present the printer with 240 dpi and still have it print at 1440 dpi—the printer driver does a very good job of creating the additional information, and with high quality papers you can usually see the difference.
So, the question really should be addressed in a different way: how do you intend to use your images? If the answer is that you’re going to print them on an inkjet printer, virtually any difference you see between a D70-generated image and a scanned 35mm film image is going to be subjective, not objective. Some photographers I know say the D70 image is actually better up to about 8 x 10” (~ISO A4), as the sampling artifacts of the CCD are less objectionable than those from desktop scanners. The D70 image also tends to have less noise in the red and blue channels than most low-cost desktop scanners, at least if you’re using ISO 200.
Nikon’s DSLR models and Kodak’s recent DCS series of cameras have changed the minds of quite a few professionals. Wedding photographers have been especially drawn to digital cameras because of the quick turnaround and ease of touchup they allow. Photojournalists have mostly switched to digital, again because of the fast turnaround for images (and the ability to send them in by modem from the field) coupled with no incremental film expense. Some wildlife photographers have switched to digital because it makes their big lenses work as if they were even bigger (the 10-pound 400mm f/2.8 functions like a 600mm f/2.8; where else can you find such glass?).
In short, if you want the very best available resolution, consider going to a medium format camera (and paying the
Thom Hogan’s Complete Guide to the D70 Page 54

price of doing so). As far as 35mm film versus digital goes, the race is close enough to begin to favor digital for moderate print sizes, due to the lack of film processing and scanning costs. And yes, I’ve put my pocket book where my mouth is— with the introduction of the Nikon D1x in mid-2001, I stopped using most of my film-based cameras and now shoot nearly all digital.
Thom Hogan’s Complete Guide to the D70 Page 55

Power The D70 uses two batteries, only one of which is user accessible. The main battery is a 7.4V, 1400mAh24 lithium EN-EL3 pack, which originally appeared with and works in the D100. Each EN-EL3 battery weighs about 2.8 ounces (80g), which makes carrying multiple batteries painless.
Note: If you carry around extra EN-EL3 batteries, be sure to do so with the supplied plastic cover over the terminals. While the terminals are slightly recessed, they are still exposed, and shorts across the terminals can cause battery damage, explosion, or generate heat that could start a fire.
In the United States, the battery and MH-18 Quick Charger is supplied with the camera; in other parts of the world, the battery and charger may need to be purchased separately. In any case, you’re most likely going to want a spare EN-EL3.
The charger is simple, light, and modestly sized. The battery “docks” in the charger by dropping it down onto the platform and then sliding it into the charging position. The AC power cable is removable.
The design of the EN-EL3 battery makes it impossible to insert it incorrectly into the D70’s battery compartment, so never force it. The same is true of putting the EN-EL3 into the
What’s mAh mean? That stands for milliamp hour. In other words, the battery could provide a constant 1400 milliamps of current for an hour. Since the camera at idle draws less than 3mA, that would mean that the camera could be left on for over 19 days before the battery would go dead. Of course, once you start taking pictures and using the many powered features of the camera, that number drops considerably.
Thom Hogan’s Complete Guide to the D70 Page 56
24

charger. The MH-18 Quick Charger can fully charge a fully depleted EN-EL3 battery in about two hours.
Note: Unlike the NiMH batteries used for the D1, the lithium-based EN-EL3 used with the D70 does not have to be “conditioned” prior to use. I would suggest, however, that you make the first charge a thorough one, waiting until the battery cools before removing it from the charger (i.e., don’t pop it off the minute the light stops blinking.
Changing Batteries
õ The EN-EL3 battery is inserted into the camera as follows:
1. On the bottom of the camera, move the small latch on the battery compartment lid towards the tripod socket (center of the camera). The battery compartment lid should open.
2. Open the lid fully and slide the battery into the camera.
3. Once fully inserted, press the lid back down to the camera bottom until it snaps shut.
õ To remove the battery, pull the battery out in Step 2.
Note: The camera power switch should be in the OFF position before removing (or inserting) an EN-EL3 battery pack. If you change batteries and forget to turn the power OFF while doing so, the D70 sometimes thinks a new card was inserted and a new folder may be created. Multiple folders on a card are a problem that may cause you to forget to
Thom Hogan’s Complete Guide to the D70 Page 57

transfer images (you may have images in folders other than the current one). Moreover, there’s the issue of settings: the D70 does not permanently store a few changes to camera settings until the power switch is turned off. It’s simply a good habit to learn to turn the power off whenever connecting or removing anything from the D70 (lens, battery, storage card, etc.).
õ To charge the EN-EL3:
1. Remove the battery from the camera.
2. Plug the MH-18 charger into a wall socket.
3. Lower the EN-EL3 battery into the cut-out on the top of the MH-18, and then slide the battery towards the indicator lights and into the locked position. The Charge lamp on the MH-18 should begin blinking, indicating that the battery is charging.
Note: When the Charge light glows continuously, that doesn’t necessarily mean the battery is fully charged. If you want to be assured that the battery is fully charged, wait until the Charge light stops blinking and the battery has cooled to room temperature.
Note: You do not have to completely discharge the EN-EL3 before charging it. Lithium batteries do not exhibit the “memory” effects that NiCad batteries did, and thus can be “topped off” at any time without consequences.
The battery charger can’t be used to power the camera, as is the case with some other cameras. This is a serious design flaw, in my estimation, adding extra cords and gadgets a D70 photographer shouldn’t need to deal with.
Alternate Power Sources
As an alternative source of main camera power, you can use the EH-5 AC Adapter, which plugs directly into the DC In socket on the left side of the camera. The AC Adapter provides the camera with 9 volts at 4500mA (i.e., any third
Thom Hogan’s Complete Guide to the D70 Page 58

party battery or adapter that would connect to the DC In socket would have to supply the same voltage25).
Note: Nikon recommends using the EH-5 when cleaning the CCD, so you’ll probably want to obtain one. However, note that when running the D70 from the EH-5 without a charged battery in the camera, if you accidentally “pull the plug” during shooting, any images in the internal buffer are lost, and the CompactFlash card may be corrupted due to an incomplete write cycle. Studio photographers using a EH-5 powered D70 need to be especially careful not to accidentally remove power from their D70’s while shooting, and should leave a charged battery in the camera.
Note: The camera power switch should be in the OFF position before removing or inserting any connection to the DC In slot. Nikon warns that the internal circuitry can be damaged if you unplug the EH-5 while the camera’s power switch is in the ON position, so this may be true of external batteries, as well.
A second option for powering the camera is to use three CR2 batteries in the supplied MS-D70 holder. Since CR2 batteries are expensive and not rechargeable, this isn’t a particularly good option, in my opinion. By the time you exercise this option a few times, you could have simply bought an extra rechargeable EN-EL3 with the money spend on disposable batteries.
On the other hand, the dealer from which I purchased my D70 provided me with three CR2 batteries at no cost so that I could begin using the camera immediately after purchase (the EN-EL3 that comes with the camera needs to be charged). If
You’d also need to find the right connector, which unfortunately, is yet another Nikon-proprietary one. Here’s the trick to get around that: buy the EH-5. Cut the cable from the EH-5 to the camera in half. Wire the cut cable ends with a standard male/female connector set of your choice, and then use the same set on your external battery supply. You must be very careful to keep the voltages and polarities on pins correct. Failure to get these correct could fry the electronics of your camera, making it inoperable. Please read the legal disclaimer on the Copyright page before attempting to make your own external power supply.
Thom Hogan’s Complete Guide to the D70 Page 59
25

you’re going on an extended trip where battery recharging isn’t possible, the CR2 holder gives you another useful option for powering the camera. Still, from an environmental standpoint it’s better if you keep disposable battery use to a minimum.
Internal Clock Battery
An internal, non-accessible battery helps the camera remember the date and time. This battery is charged automatically from the main camera battery or AC power source. Once the main battery or AC power has been available to the D70 for a few days, this special internal battery is fully charged. It should hold that charge for about five months if you were to take the EN-EL3 out of the D70.
If the & icon blinks in the top LCD, that means that the internal battery lost charge and that the correct date and time have been lost. First make sure that the internal battery recharges by putting in a fresh main battery or connecting the camera to AC power, then reset the date and time.
Battery Life
You’ll probably be surprised to learn that the D70 uses very little energy when it sleeps between shots (<3mA). When turned OFF, it uses almost as much (typically <2mA). Thus, it makes little sense to turn the camera OFF between shots (unless you’re using a Microdrive; see “Microdrives,” on page <71>).
Here are some additional tips on power consumption with the D70:
• Using the color LCD increases the D70’s power consumption tenfold, to about 300mA. If you don’t need the color LCD, you can save significant power drain by turning it OFF.
Thom Hogan’s Complete Guide to the D70 Page 60

Note: Most D70 users use the color LCD to review exposure settings, but there’s still a trick you can use to preserve a bit of power. After you’ve reviewed the shot for exposure, press the shutter release partway to activate the metering and autofocus systems. The camera thinks you’re getting ready to take another picture and turns the color LCD off (normally, the image would stay on the color LCD until the LCD time-out is reached or until you pressed the ² button to turn it off).
• Use of autofocus lenses doesn’t significantly contribute to power drain. That’s because it’s a short draw of power. The peak is over 500mA, but since it’s normally such a short time during which this load occurs, it isn’t a big deal (as long as you aren’t repeatedly using autofocus between shots). The difference in power consumption using AF and AF-S lenses is negligible. But VR (vibration reduction) lenses reduce battery life by another 10% or more when the vibration reduction feature is used (the vibration reduction in the lens is powered by the camera). Since many users tend to keep VR active by holding the shutter release partway, VR use can shorten battery life considerably.
• Power consumption is highest when the camera is “active” (metering [200+mA], focusing [500+mA], taking a picture [1000-1600mA depending upon settings], transferring images to the CompactFlash [300mA for solid state cards, more for a Microdrive], etc.). Reducing the amount of time the camera is active (metering and focus active) is key to reducing power consumption. Thus, since writing NEF+JPEG format files to the CompactFlash card takes a bit longer than does writing JPEG files by themselves, you’ll get fewer pictures on a single battery charge when you use the redundant storage option. Likewise, you’ll get fewer pictures per charge if you leave the camera active for longer periods. You can cut the active timeout to 4 seconds via Custom Setting #23 (see “Meter/Camera Active Time,” on page <294>).
Thom Hogan’s Complete Guide to the D70 Page 61

• Power consumption is also high when the camera is connected to a computer [200+mA]. This is one of the reasons I recommend using an external card reader for transferring files. While the camera is connected to the computer via the USB cable and the camera is ON, the camera consumes significantly more power than normal. It’s not unusual to see the battery indicator go from full to half or half to empty when transferring from multiple, large cards or shooting tethered for a long period.
• The lithium-based batteries of the Nikon D70 do not lose capacity over short periods of non-use. If you store the battery for a long period of time, it will probably lose some charge, though. It takes very long periods of time to see significant power reduction on a battery not being used (a month or more).
• Flash chews up batteries. Firing a flash can take as much as a 1000mA, and recharging it can take more than 1500mA. A half hour of constant internal flash use can deplete a D70 battery.
• Microdrive storage uses more power than a standard CompactFlash card. First, during standby the older Microdrives consume about 65mA compared to only 0.2mA for CompactFlash cards (newer ones are more efficient, but still use more power than static cards). During write operations, a Microdrive takes longer to write the same amount of data than a solid state card, increasing power consumption. In short, using a Microdrive results in shorter battery life than using a solid state CompactFlash card (when measured in number of shots per battery charge).
• Cold can affect apparent battery life. Lithium batteries have pretty good cold weather performance, but they still will have a tendency to produce power for shorter periods in very cold conditions. If you must use the camera in cold temperatures, carry a fully charged backup battery with you and keep that in a warm place (some outdoor apparel have inside pockets for just this purpose). As
Thom Hogan’s Complete Guide to the D70 Page 62
performance drops on the battery in use, swap it with the warm one.
Cold doesn’t actually “drain” a battery; it’s the change in internal resistance at low temperatures that causes reduced function. So, once the replaced battery is again warm, it functions normally. As long you’re not dealing with extremely low temperatures (sub-zero), you can usually juggle two batteries this way and get the full number of expected exposures from each.
• Fully charge your batteries. When the charge light begins to glow continuously on the charger, the battery may not be fully charged. If the battery is warm to the touch, leave it on the charger. Remove it only when it cools. While the difference in charge may not be great, it’s often enough to grab a dozen or more extra photos.
• Even with the power off, the battery will discharge. The viewfinder markings (sensor positions, gridlines, etc.) are made visible via an electronic overlay. If you take the battery out of your D70 and look through the viewfinder you’ll see that it is considerably dimmer than usual. Only when the overlay is powered does the viewfinder function normally. While the power drain is very, very small, it does exist. That means that if you left a fully charged battery in the camera and came back two months later, it may be depleted.
Overall, the D70’s battery performance is actually quite good. By minimizing use of a few power-hungry features, you can easily get by on one or two batteries in a day full of shooting (and I mean full).
Battery Notes
The D70’s battery charger can be used worldwide, at any voltage from 100 to 250 volts. You do need to obtain the correct cables and/or adapters for the power socket, however. Sets of socket adapters can be found at any Radio Shack and most travel stores.
Thom Hogan’s Complete Guide to the D70 Page 63

Note: The D70 permanently stores some changes to camera settings only when the power switch is turned to the OFF position. If you change a setting and then remove the battery with the power switch still in the ON position, the camera may not retain your change! This also applies to power provided by the DC in socket (i.e., external batteries and AC power), and it applies to camera setting changes made via USB using Nikon Capture. Get in the habit of turning the power OFF before changing batteries.
Thom Hogan’s Complete Guide to the D70 Page 64

Image Storage While the D70 has an internal memory buffer to temporarily store data obtained from the CCD, it uses a CompactFlash memory card to permanently store digital images.
The A/D Converter, Image Processor, and CF Interface can all access the buffer simultaneously, thus at the heart of the D70 there’s a bit of efficient multitasking going on.
When you take a picture, the data is interpreted by the ADC (Analog-to-Digital Converter) and then moved into an internal memory buffer. Unlike some previous Nikon DSLRs, the D70 allows multiple circuitry to interact with the buffer simultaneously, which translates into better write speed. While the camera is getting another image from the sensor to the ADC, the Image Processor chip is deciphering data already there, dealing with things like creating a thumbnail, demosaicing the data, and making adjustments based upon your control settings. Images that are completed by the Image Processor are grabbed by the CompactFlash interface circuitry and written to the storage card. After an image is written to
Thom Hogan’s Complete Guide to the D70 Page 65

the card, the buffer space it used is freed up. Essentially, three processes are going on in parallel.
Having a memory buffer is a very important concept to understand, as it has practical implications:
• Internal buffer memory space is limited. The D70 can buffer up to 4926 JPEG images, but only 4 NEF images. The camera cannot take additional pictures when the buffer is full. As images are written to the CompactFlash card, buffer space is freed. Anytime that there is enough space remaining in the buffer for an image, the camera can again take a picture. When using the D70 set to the Continuous shooting method, once the buffer is full, the camera slows a bit with most storage cards.
• Internal buffer memory is temporary storage. Images in the buffer are not accessible directly—only the camera’s electronics can touch the buffer memory—and until an image is written to CompactFlash, your photo has not been “saved.” If power is lost with images in the buffer, those images not yet moved to the storage card are also lost. When the camera is writing data from the internal buffer to the card a small green LED lights on the back of the camera (near the bottom of the door that provides access to the card). If that light is ON, do not turn power to the camera OFF.
Why does the camera need an internal buffer? Well, the D70 has to deal with a large amount of raw data for each image (~9.6MB that’s reduced to ~5MB when stored in compressed NEF format). Even at reasonably fast write speeds to CompactFlash permanent storage (~5000Kbps), it takes a measurable amount of time to write these from the camera to the storage card. While JPEG images are much smaller in size, the camera still has to create that image from the original data, which also takes time (though on the D70, Nikon has
26 That’s for JPEG BASIC S. JPEG FINE L allows 7 images in the buffer, and the range is between those two numbers for the various JPEG qualities and sizes.
Thom Hogan’s Complete Guide to the D70 Page 66

built this function into a very fast VLSI27 chip, so this process works much faster than on the D100). Without a buffer, the camera would force you to wait a large amount of time between taking pictures. The buffer allows the D70 to be doing two things at once (take another picture while handling the data for the previous one).
As I’ve noted, Nikon has made quite a few changes to the buffering system, so much so that the buffer on the D70 is the least intrusive of any of the Nikon DSLR models. First, much of the circuitry that deals with the buffer has been custom built into a dedicated chip. In previous Nikon cameras, a generic DSP (digital signal processor) was given a set of instructions to execute, which is less efficient. Moreover, buffer memory on previous Nikon bodies was addressed in a one-thing-at-a-time fashion, whereas the D70 now allows the camera to do multiple things with memory simultaneously, a technique Nikon calls Dynamic Buffering.
The results are quite dramatic. With smaller file sizes (JPEG NORM L format, which are about 1.5Mbs in size) and a fast storage card (e.g., a SanDisk Ultra 40x), the camera’s redesigned buffer and fast writing speed allow the D70 to empty the buffer as fast as it fills it! Thus, you can shoot at 3 frames a second until the card fills up. With larger file sizes (JPEG FINE L and NEF) and slower storage cards, the camera will slow down once the buffer fills.
All in all, however, the relatively small memory buffer on the D70 is not something you’ll find very confining.
Note: Just like the D1 models, the D70 has a nasty design flaw that can cause you to lose images. When you turn the power to the camera OFF, only the current buffer image is transferred to the card before the camera shuts down. All other images in the buffer are lost. The only safe move is to always wait until the green Writing to Card light is
Very Large Scale Integration
Thom Hogan’s Complete Guide to the D70 Page 67
27

completely off before turning the camera power OFF. The good news is that the buffer usually is cleared so fast that you won’t be waiting more than a second or two.
CompactFlash
In the United States, Nikon does not supply a CompactFlash card with the D70 (i.e., you must purchase one separately if your dealer didn’t include one with the camera). CompactFlash cards come in two sizes, Type 1 and Type 2, the primary difference between them being the thickness of the card. CompactFlash storage also comes in two types, solid-state memory, and miniature hard disk.
As I write this, CompactFlash cards are available from a wide range of vendors in sizes ranging from 8MB to 8GB in size (the limit keeps getting pushed up; now that cameras like the D70 support FAT32, we’re a long way from the theoretical limit).
The two types of CompactFlash card vary only in thickness (the top card is a Type 2 card; the bottom card is a Type 1 card). The D70 can accommodate a single card of either type.
The D70 can use Type 1 or Type 2 CompactFlash cards, but holds only one card at a time (i.e., you can’t stack two of the thinner Type 1 cards in the slot). Nevertheless, most D70 users own and use multiple cards. When the card in the camera fills up, they simply swap in an empty card, just like you’d load in blank film after exposing a roll in a 35mm film camera (make sure you turn the camera OFF before swapping cards, and don’t turn the camera OFF until the green light on the back of the camera is no longer lit).
Solid State CompactFlash
Most CompactFlash cards contain nonvolatile memory chips and are of the slim Type 1 variety. These solid-state cards
Thom Hogan’s Complete Guide to the D70 Page 68

have chips that retain information stored on them even when power is not present. While not indestructible, CompactFlash cards are designed to withstand a 10-foot drop without damage, and they’re relatively impervious to the elements (they shouldn’t be immersed in water, however). If you keep your CompactFlash cards in their small, plastic storage containers when not in the camera, they should last as long as the camera does.
The internal mechanisms of CompactFlash cards are only produced by a handful of companies. Thus, both the memory and the controller chip used in many flash cards are the same. Still, read and write speed can vary considerably. Check (http://www.robgalbraith.com) for a detailed discussion and review of current flash cards, along with write speed information when used on a D70. Size of the card? About 1 ¾” x 1 ½” x 1/8” (43 x 38 x 3.3mm)
The memory of a CompactFlash card is organized like a computer disk, complete with file directory, file allocation table (FAT), folders, and files (ironically, I find that a book I wrote over a decade ago, Programmer’s PC Sourcebook, has detailed information on the structure CompactFlash uses). Like a disk, a CompactFlash can develop “bad sectors” over time and files can become “fragmented” if you delete individual files. Fortunately, the act of using the D70’s controls to “format” a CompactFlash card generally removes file fragmentation (as well as the files!). Formatting a card
Thom Hogan’s Complete Guide to the D70 Page 69

using a PC also isolates bad sectors, but only if you avoid using the Quick Format option28.
If you use one of Microsoft’s more recent versions of Windows, such as Windows XP, be sure to specify FAT, not the FAT32 format normally used by a PC29.
CompactFlash cards that have solid-state memory do have a limit to the number of times that they can be written to. Fortunately, you’re not likely to hit that limit (usually in the hundreds of thousands of times) in the lifetime of your D70. For example, if you had a 128MB card that had a stated life of 300,000 writes, and saved only in NEF format, you’d have to shoot somewhere north of 5 million pictures before you hit the card’s write limit. You’re more likely to encounter problems with the D70’s shutter mechanism (typically good for 50,000 cycles) before you will with your CompactFlash card.
Different card types work at different speeds. At the time of this writing, the Lexar 32x and 40x WA30 cards seem to be about the fastest in writing large files on the D70.
28 Virtually all disks and storage devices have a few “bad sectors” on them. That’s normal, and all manufacturers “mark” these sectors with a flag in the tables at the start of the drive, so that the operating system doesn’t use them. But if the flags get erased for some reason, they aren’t restored with Quick Formats (which is what all digital cameras do, by the way). Likewise, if another sector eventually goes bad (which eventually happens on all drives), it isn’t found and marked by Quick Formats. If all that isn’t enough, there is a difference between a “low level” format and “high level,” or “logical format.” Bottom line: if you begin experiencing problems with a single storage card, try performing a full format of it on a PC. This may mark a sector that has gone bad and restore the usefulness of the card. If that still doesn’t correct the problem, you’ll probably have to return the card to the manufacturer for replacement. 29 The D70 supports FAT32, but using FAT32 on cards that are 1GB or smaller is inefficient. Unless you have a card at least 1GB in size, use plain ‘ole FAT. Moreover, Macintosh users don’t have access to FAT32 facilities. 30 The 16x refers to transfer speeds. 1x was the original transfer speed of CD-ROMs on PCs, or 150Kb per second. Thus, 32x cards should be able to write faster than 4800Kbps. The WA stands for Write Acceleration, a special technique that enables the solid-state memory to anticipate writes to the card rather than wait for specific position information.
Thom Hogan’s Complete Guide to the D70 Page 70

Microdrives
Hitachi’s31 Microdrive is a small hard disk mounted inside a Type II style CompactFlash enclosure. There are two older “families” of Microdrives, the original units, dubbed MK1 models (170MB and 340MB), and the more recent MK2 models (512MB and 1GB, and a revision of the 340MB). In late 2003, Hitachi introduced a third generation (family) with 2GB and 4GB versions. The designs of each family are a bit different. Some smaller changes have occurred in the Microdrive series, though none affect D70 use.
Microdrives are remarkably small hard disk drives camouflaged in a CompactFlash case. That means that they have moving mechanisms inside (other types of CompactFlash use static memory chips and have no moving parts).
Photos: Courtesy of International Business Machines Corporation. Unauthorized use not permitted.
Nikon doesn’t recommend using a MK1 version of the original IBM Microdrive in the D70, though versions of the 340MB drive manufactured after mid-2001 (indicated with a letter “D” at the end of the serial number) should work fine, as
The original Microdrives were produced by IBM’s drive division, but Hitachi acquired that division, so new Microdrives are now labeled as Hitachi.
Thom Hogan’s Complete Guide to the D70 Page 71
31

that drive was modified to incorporate changes that appeared in the MK2 drives.
This is all very confusing, so here’s a table that tries to make sense of it all:
Microdrive Compatibility Drive Size Serial # D70 Compatible? 170MB no D at end of SN No 340MB no D at end of SN Yes** 170MB D at end of SN Yes** 340MB D at end of SN Yes** 512MB no 0xx* at end of SN Yes** 1GB no 0xx* at end of SN Yes** 512MB 0xx* at end of SN Yes 1GB 0xx* at end of SN Yes 2GB all models Yes 4GB all models Yes
* “xx” is any two alphabetic characters ** Substantial anecdotal evidence suggests that they are compatible
Nevertheless, there are still issues you need to understand if you choose to use a Microdrive, even on compatible camera models:
• Microdrives are hard disks, thus they have some of the same liabilities as a hard drive. Theoretically, a standard CompactFlash card can be dropped from up to about 10 feet without damaging the device; old-style Microdrives have only half that shock resistance, while newer models have about 75% of the shock resistance of a solid-state memory card.
• Microdrives consume considerably more power than do regular CompactFlash cards (see “Battery Notes,” on page <63>).
• Microdrives generate heat during constant use. Informally, Nikon has stated that one reason they didn’t endorse Microdrives with the original D1 was that the location of
Thom Hogan’s Complete Guide to the D70 Page 72

the CompactFlash slot coincided with the “hot spot” in the camera. While the D70 has shifted the positions of components, heat is still potentially an issue.
• Microdrives have a significantly narrower temperature operating range than do regular CompactFlash cards (the specifications state approximately 41°F to 131°F (5°C to 55°C) for Microdrives versus –13°F to 167°F (-25°C to 75°C) for solid-state memory). If you regularly photograph in cold climates, keep some CompactFlash cards handy.
• Some card readers don’t work readily with Microdrives due to power consumption requirements (especially true if you connect your card reader through a USB hub).
• The mechanical nature of a Microdrive makes it likely to have a shorter usable lifespan than a CompactFlash.
• If the top LCD displays a blinking CHA, a serious miscommunication has occurred between the camera and the Microdrive. Anecdotally, Microdrive users seem to report seeing this warning more often than memory-based cards.
• Microdrives are slower than state-of-the-art solid state CompactFlash cards. A Lexar 40x card might manage to clear a full buffer of NEF images in a couple of seconds, while my 1GB Microdrive takes over 10 seconds to do the same.
If you use a Microdrive with your D70, I’d recommend the following:
• Avoid using it in extremely cold or hot weather.
• Always carry one or more spare CompactFlash cards with you, in case the Microdrive fails. I carry several 512MB memory-based cards with me as backups.
• Turn the power to the D70 OFF when you’re not using it; otherwise, you run a slight risk of the Microdrive overheating. (Note that this seems to conflict with my earlier comment about battery life; the issue here isn’t the battery, but trying to keep the camera electronics from
Thom Hogan’s Complete Guide to the D70 Page 73

generating heat, which ultimately may impair Microdrive use.)
• Copy images from the Microdrive to your computer as soon as it is practically possible. Don’t accumulate images on the drive over the course of several days or weeks if you can avoid it.
• Always format the Microdrive in the D70 between uses. Many of the file-copying software products, such as Nikon View, Nikon PictureProject, and the third-party program DigitalPro, have the ability to erase images from the card after transfer. There’s a difference between erasing images and formatting the drive. In the former, the software products write directly to the directory area on the card, once for each file. Besides clearing out directory information, in camera formatting restores the file allocation table (FAT) and specifically releases all sectors on the disk from use. In practice, I’ve never had a card problem associated with formatting, but I have had problems after file erasure.
Tip: If you have a Microdrive (or CompactFlash card) die on you and you absolutely need the images that were on it, Drivesavers Data Recovery (http://www.drivesavers.com) can perhaps recover them for you, though this is not an inexpensive service (it can range from US$200 to US$2000, with an average bill in the US$800 range)). Other companies that perform the same recovery work include CBL Data Recovery (http://cbltech.com) and ActionFront Data Recovery Labs (http://www.actionfront.com). Note that these services go further than shareware products such as Photo Rescue; drive recovery services have managed to pull data off disk platters of otherwise inoperative drives, and even grab data on drives that have been subjected to fire, water, or odd substances, such as hairspray. They’re useful when you know you’ve got that once-in-a-lifetime shot but experience a catastrophic disk or card failure.
Thom Hogan’s Complete Guide to the D70 Page 74
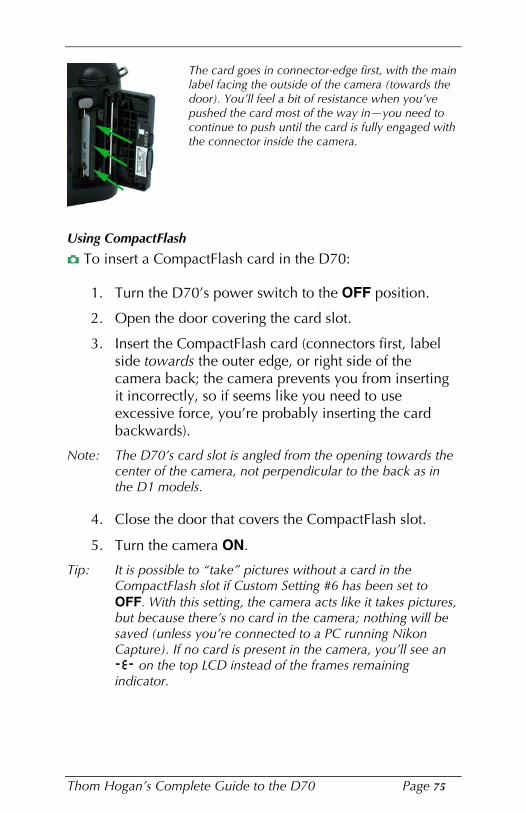
The card goes in connector-edge first, with the main label facing the outside of the camera (towards the door). You’ll feel a bit of resistance when you’ve pushed the card most of the way in—you need to continue to push until the card is fully engaged with the connector inside the camera.
Using CompactFlash
õ To insert a CompactFlash card in the D70:
1. Turn the D70’s power switch to the OFF position.
2. Open the door covering the card slot.
3. Insert the CompactFlash card (connectors first, label side towards the outer edge, or right side of the camera back; the camera prevents you from inserting it incorrectly, so if seems like you need to use excessive force, you’re probably inserting the card backwards).
Note: The D70’s card slot is angled from the opening towards the center of the camera, not perpendicular to the back as in the D1 models.
4. Close the door that covers the CompactFlash slot.
5. Turn the camera ON.
Tip: It is possible to “take” pictures without a card in the CompactFlash slot if Custom Setting #6 has been set to OFF. With this setting, the camera acts like it takes pictures, but because there’s no card in the camera; nothing will be saved (unless you’re connected to a PC running Nikon Capture). If no card is present in the camera, you’ll see an -E- on the top LCD instead of the frames remaining indicator.
Thom Hogan’s Complete Guide to the D70 Page 75

õ If you haven’t previously used the CompactFlash card before inserting it into a D70, or if the card contains images you no longer need, you should format it as follows:
1. Turn the D70’s power switch to the ON position.
2. Hold down the two buttons labeled k for two seconds. (One is just to the left of the viewfinder; the other is just to the right of the top LCD.) When the top LCD begins blinking the label FOR, release the buttons.
3. Immediately press the two k buttons again. Formatting takes a few seconds, and varies with the size of the card being formatted. The top LCD shows FOR in the Frames Remaining indicator while the camera is formatting.
Note: Step #3 is a bit confusing to new D70 users. Apparently, Nikon didn’t think that holding down two buttons once for two seconds was a unique enough combination to preclude accidental formatting. Since erasure is a permanent loss of data, I agree with Nikon’s conservatism here.
Once the card is formatted, the Frames Remaining indicator resets and shows the number of images you can take at the current image quality setting (if that number is larger than 1000, then K is displayed just above the Frames Remaining indicator).
Note: Alternatively, you can use the Format option on the SET UP menu, but the method just documented is quicker, involves fewer button presses, and doesn’t eat up battery power by lighting up the color LCD.
Note: Formatting a CompactFlash card “removes” ALL information and images from the card. Always save your images to a computer before formatting a card! I use the quotes around “removes” because the image data isn’t actually erased; only the directory information that points to it is rewritten. While it is possible to recover images immediately after performing an in-camera format, it is a hassle to do, and
Thom Hogan’s Complete Guide to the D70 Page 76

won’t be fully successful if anything has been written to the card since the format.
The D70 tells you when a CompactFlash card is full by blinking FULL and 0 in the frames remaining indicators (top LCD and viewfinder). The card isn’t necessarily full, however. It just doesn’t have enough room to store another picture at the current image quality setting.
Tip: If you’ve been shooting using NEF or the NEF+JPEG BASIC qualities, both of which chew up considerable space per image, you can often squeeze a few more JPEG-only images onto the card because the JPEG compression makes the resulting image files much smaller.
õ To remove a CompactFlash card from the D70:
1. Turn the D70’s power switch to the OFF position. Important: Before moving to Step 2, confirm that the CompactFlash green access lamp is not lit (the camera does not completely shut down until buffer data is written to the card).
2. Open the door covering the card slot.
3. Press the large rectangular button just above the CompactFlash card. The card should pop out slightly, allowing you to grab its edge.
4. Remove the card from the camera.
5. Insert another card into the slot, if desired.
6. Close the door that covers the CompactFlash slot.
7. Turn the camera ON. Check to make sure the Frames Remaining counter shows, and not CHA.
Nikon-Approved Cards
Nikon makes a big deal about “operation not guaranteed” unless the CompactFlash card has been tested and approved by Nikon. Unfortunately, their list of tested cards is short:
Thom Hogan’s Complete Guide to the D70 Page 77

• SanDisk cards to 1GB (SDCFB, SDCFB, SDCF2B, SDCFH, and SDCFX series).
• Lexar Media 4x, 8x, 10x, 12x, 16x, and 24x cards.
• Lexar Media 24x, 32x, and 40x WA (Write Accelerated) cards.
• Renesas Technology (Hitachi) 16MB, 32MB cards (labeled HB28 c8x).
• 512MB, 1GB, 2GB, and 4GB Microdrives.
I’ve used a wide range of other cards in the D70, and have yet to find any that cause operational issues with the camera. Unfortunately, Nikon doesn’t think that. I’ve received multiple reports from users who’ve contacted Nikon technical support about a digital camera problem and were dismissed out-of-hand for “not using an approved card.” Don’t let it be an issue: spend a couple of dollars to purchase one of the approved cards at a low capacity (e.g., 16MB Renesas) so that you can verify that anything you report isn’t “card related.”
CompactFlash Troubleshooting
Problem: The capacity of your CompactFlash card seems to be a little less than the one stated on the label (e.g., you seem to only be able to store 114MBs of data on a 128MB card). Solution: Actually, this is normal. CompactFlash works just like a disk drive on a computer, with an area set aside for a file allocation table and a file directory. In addition to the reserved space, storage manufacturers sometimes use 1K to mean 1000 instead of the more correct 1K=1024. Also, the number of folders created has a small impact on overall capacity. Like disk drives, sometimes areas of the card are marked as “bad,” and this, too, reduces capacity.
Problem: It seems to take longer to store information on a CompactFlash card than it did when you first obtained it. Solution: If you erase individual files instead of reformatting the card, it’s possible to get file fragmentation on the card. When this happens, data for any given file is non-adjacent, and the camera has to write extra information into the file
Thom Hogan’s Complete Guide to the D70 Page 78

directory. This, in turn, can cause slightly longer write times due to the extra information that must be written in the directory (and on Microdrives, the extra head positioning that must be performed slows the process even more).
Likewise, it’s possible for cards to get lost clusters32 and files on a card. Use the D70’s Format function to erase all information from a card instead of individually deleting files. Alternatively, you can reformat cards on your computer if you have a card reader (it works just like formatting any disk drive—open a window for the drive in Explorer [Windows] or Finder [Macintosh] and use the normal formatting procedure for drives; just make sure that you pick FAT, not FAT32 if you’re using a recent version of Windows, such as XP, and aren’t using a 1GB or larger card).
Problem: You get occasional “black” frames instead of images. Solution: There’s likely a bad sector on the card that isn’t marked as such. Another symptom is sometimes excessively long writes to the card (or the green “writing to card” light stays ON), or you get large black areas through your images. You need to perform a full format33 on the card using a card reader attached to a PC (which should detect and mark bad sectors). However, if black frames appear on more than one of your cards or on a regular basis, you should have your camera checked by Nikon. Black frames are also a possible indication of a shutter problem on D70 bodies.
32 Clusters are the basic unit in which information is stored on disk drives (and CompactFlash). A file is made up of many clusters, and the directory and other information stored at the beginning of the disk keeps track of which clusters belong to which files. When a cluster is “lost,” the information tracking it uses has been damaged or erased. This means that your data may still be intact, but that the structure of the disk is incorrect, hiding that data. As noted elsewhere, having a good disk recovery utility handy can sometimes help you retrieve precious photos you thought the camera had lost forever. 33 Note that the Windows default is to perform a quick format.
Thom Hogan’s Complete Guide to the D70 Page 79

Problem: You can’t find images on the card or the computer complains about damaged files when you try to transfer images from camera to PC. Solution: One of several problems is likely present on the card: (1) the FAT (File Allocation Table, which tracks clusters in use) is corrupt; (2) the directory has incorrect information about files, usually either cross links of data between two images or missing cluster information; or (3) something else is wrong with the data or structure on the card, such as a damaged sector, an incomplete file, an unexpected End-of-File marker, and so on. In every case, you must immediately fix the problem or risk the permanent loss of your image data. You may or may not be able to fix the problem, but if anything gets written to the card before you begin attempting a correction, your ability to recover data is compromised. Macintosh users should be extremely careful when mounting problematic cards on their computers, as several behind-the-scene tasks can write to the card without your knowledge.
So how do you fix the structure and data and recover your images? The best choice is to use a product such as Photo Rescue (http://www.photorescue.com). This tool—versions are now available for both Macintosh and Windows— generally can find and recover images that are the result of most structure errors, though you may have to go into the advanced mode and play with some of the settings in order to do so. Current versions of Photo Rescue understand the NEF format, and can resurrect a raw data file, complete with the proper extension. If you haven’t written anything to the card after the error occurred, you can often recover every image on the card. Note that to use Photo Rescue you need a way to mount the card either by inserting the card into a PCMCIA adapter on a portable, or by putting the card into a card reader attached to your desktop machine.
Another possibility is to use SCANDISK (or the Disk Doctor portion of Norton Utilities). If the error on the card is purely structural and no data has been overwritten or “orphaned”
Thom Hogan’s Complete Guide to the D70 Page 80

(left without a directory entry), you’re likely to recover the images. However, since generalized disk tools know nothing about image file formats, they can’t scan data on the card and resurrect orphaned data or rebuild incomplete image files. Personally, I travel with Photo Rescue installed on my laptop and with both a PCMCIA adapter for my Microdrives and a card reader for other CompactFlash cards.
Problem: Images you shot don’t seem to be recorded on the card. Recovery software finds no record of them, and the file numbering seems sequential. Solution: You probably turned the camera off before the buffer flushed all the images. Remember, when you shut down the camera, only the current image is saved to CompactFlash. All others in the buffer are lost forever. Frankly, I believe this to be a design flaw, but it’s one that was present on the D1 and D100, too.
Problem: A 4GB card only shows 2GB of storage space available. Solution: To fully address the 4Gbs of space on the card it must be formatted using FAT32 formatting. If the card was formatted using FAT (or FAT16 as it is sometimes called), the maximum capacity will be limited to 2GB.
Image Formats
The D70 saves images to the CompactFlash card in two image formats, JPEG and NEF. Saving an image in JPEG format produces data compression that loses information. The NEF format “preserves” the sensor data34. If you want the highest quality image the D70 is capable of, use NEF (though note that the latter requires that you use appropriate software to decipher the data; see “NEF Format,” on page <92>). If you know your way around digital image editing programs and first convert your JPEG files into a lossless format, such as Adobe’s PSD (Photoshop data) format, the actual loss of data
Preserves is in quotes because the D70 doesn’t really preserve the actual 12-bit values, but uses a “visually lossless” compression format.
Thom Hogan’s Complete Guide to the D70 Page 81
34

using JPEG can be kept essentially undetectable, at least at moderate viewing sizes.
I should probably take a moment here and elaborate on a sentence in the previous paragraph (the one that starts “If you want the highest quality…”). The primary difference between JPEG and NEF is that, for JPEG the camera’s electronics have to do all the work of assembling an image from the data and your settings, while with NEF that work is postponed until you get to a computer. JPEG (potentially) suffers from three things that can “harm” image quality:
• The camera’s electronics are static. They’re only as good as the state-of-the-art in 2003 when they were designed. Those of us who’ve been using DSLRs for years know that image processing software is still getting better every year. By delaying the processing, you potentially can take advantage of image techniques that came to be after the camera was designed.
• The camera’s electronics “reduce” the data set. In particular, tonal data is reduced from 12-bits to 8-bits in the process of creating a JPEG. That’s not a big issue if you never post process your images, but it can be if you make drastic changes after the fact.
• The camera uses the settings you made. Make a mistake on setting white balance, sharpening, or some other camera setting? Well, that mistake is encoded into the image data now, and it’ll take post processing to take it back out (if that can be done—not all such mistakes can be undone).
If you’re getting the feeling that I’m strongly in favor of the NEF format, you’re right. For serious photographers, shooting in NEF is like retaining and working with a negative while JPEG is like accepting the print that comes out of the lab. The reason most amateurs avoid NEF format is that they don’t want to spend any time post-processing their images. Fair enough. Just realize that you’re going to have to make some choices about how you shoot with your D70, and JPEG versus
Thom Hogan’s Complete Guide to the D70 Page 82

NEF is one of the key ones. Make sure you’re making the right decision for you35.
Okay, let’s delve into the details so you can better understand what you just read.
Pixels
Before we get to the individual data formats, let’s make sure that we have some basic understanding of the underlying element used in them, pixels.
A pixel is the smallest element of a digital picture. You’ve probably seen camera resolution figures expressed in the form of two numbers, say 3008 x 2000. This means that the camera produces results that have 2000 rows containing 3008 columns of data. At each row/column intersection, there’s a pixel, which is used to describe the color that should be displayed there.
Pixels contain color information, usually expressed as individual values for red, green, and blue36. Each color value is stored in a series of bits. Bits are the smallest data elements computers understand; a single bit has a value of either 1 or 0 (thus, an example 8-bit value is 0100 1101). While the D70 is capable of producing 12-bit values for each color, most computer imaging programs, including Photoshop, normally use 8-bit values for most work37.
In computer jargon, eight bits are called a byte, and most disk and memory storage capacities are expressed in bytes. For
35 JPEG shooters should note that the D70 does a pretty darned good job of rendering into the format. It’s not that JPEG quality is bad, it’s that NEF quality can be better in the right hands. By these comments I don’t mean to try to scare anyone off from shooting JPEG—I do it myself from time to time when the situation warrants it—but only to point out that you give something up by doing so. 36 When I write about the Red channel, Blue channel, and Green channel elsewhere in this eBook, I’m referring to these individual color data points. 37 Photoshop CS now allows most of its image editing tools to function with 16-bit data, but since all consumer printers and almost all commercial printers only accept 8-bit data, some people still use Photoshop only with 8-bit data.
Thom Hogan’s Complete Guide to the D70 Page 83

example, the main memory of your computer might have 67,108,864 bytes (64MBs) of space. The non-round number is caused by the binary nature of computers, where everything is expressed as a power of 2; a thousand in computer counting turns out to actually be 1024, therefore most storage capacities are slightly understated. CompactFlash cards used by the D70 have storage capacities expressed in bytes, as well.
To form one complete digital image you must store 24-bit (for JPEG) or 12-bit (for NEF) values for each pixel. Why 24-bit for JPEG? Remember, we need 8 bits to store each of the three primary colors for JPEG files, while NEF files just contain a single luminance data point for each photosite (the color information is deciphered later). You do this in a compilation of bytes called a file. On a D70 at its highest in-camera resolution, that amounts to a minimum of 18,048,000 bytes of data (3008 x 2000 pixels at 24 bits each), which we’d normally just round off and call 18MB. That means that a file containing that image would contain a string of 144 million 1’s and 0’s (actually, slightly more than that, since most file formats require some additional information that describes the characteristics of the data in the file). To put that in perspective, this eBook only has a bit over a half million characters in it, so if you took every letter in this eBook and made it into a 1 or a 0, you’d need almost 300 eBooks just to contain the data for one image. (Puzzled by the 144 million number? Remember, there are 8 bits in a byte!)
Obviously, we’re talking about a huge amount of data. To help deal with the storage issues all that data raises, Nikon, compresses the image data (i.e., makes image files smaller). This is true for both JPEG and NEF files on a D70.
Thom Hogan’s Complete Guide to the D70 Page 84

JPEG
The D70 normally stores images in JPEG format38 (in Windows, the three-letter file extension limit reduces this to .JPG, so you may also have seen this format referred to as JPG). JPEG (pronounced JAY-peg) stands for Joint Photographic Experts Group, which developed and ratified the original standard for this file format.
JPEG files can be read by a wide variety of programs, and is one of the file formats directly supported by HTML, the standard language from which Web pages are created.
The wide acceptance of the JPEG format means that you can share a JPEG-encoded file with others, regardless of what type of computer or software they have.
To produce a JPEG file from raw digital information, the following steps are performed (note that the words in parentheses are gross oversimplifications to help you understand the process):
1. The image is worked on in 8x8 pixel blocks.
2. The information in each block is run through a series of “transforms” (calculations) to produce a set of 64 “coefficients” (results) that are then “quantized” (compressed)39. Essentially, pixels are converted from numbers into equations (the calculation used is called a Discrete Cosine Transform). Blocks are operated on from top left to bottom right. Essentially, detail within each 8x8 pixel block is reduced, the amount of reduction determined by the amount of quantization (compression) applied.
38 Technically, JPEG isn’t a file format, but simply a data compression scheme. However, the fact that most computers use a file extension of .JPG or .JPEG for such files has caused users to call it a file format. I’ll bow to this common practice in this eBook. 39 An aside: which set of words you use (transforms, coefficients, quantized or calculations, results, compressed) depends upon whether you’re a mathematician or a layperson. A nerdy party trick is to use the vocabulary of the one you aren’t.
Thom Hogan’s Complete Guide to the D70 Page 85

3. The quantized (compressed) results are gathered into a single binary sequence, and this sequence is further encoded in a scheme called modified run-length Huffman algorithm, which generally produces further compression of the information (run-length encoding assigns the shortest bit sequence to the most-often-used pixel value, and the longest bit sequence to the least-used pixel value).
Note that compression happens twice when a JPEG file is created. The first compression is variable in level, but results in permanent loss of information. Generally, it takes a JPEG compression ratio of 10:1 or more to produce annoying artifacts (see “JPEG Artifacts,” below). JPEG compression ratios of 4:1 or lower produce virtually imperceptible artifacts in most common photo scenes. The second compression step (run-length encoding) is lossless, meaning that the original information—in this case, the discrete cosine transform formula—can be fully retrieved.
The D70 can produce photos encoded in JPEG format. The D70 uses approximately 4:1 compression when set to FINE, 8:1 compression when set to NORM, and 16:1 compression when set to the JPEG BASIC option. (This is the “lossy” compression, so FINE is visually “better” than BASIC.)
Note: There is wide variance in the way JPEG compression levels are presented in software user interfaces. Some programs show you the approximate compression amount as a ratio (e.g., 4:1), some use descriptions (e.g., “low,” “moderate,” and “high”), and still others use sliders and other controls to continuously vary the amount of compression. The best programs show you a preview of the resulting compression, letting you visually determine how much compression to use.
One interesting side note about JPEG: the process that converts the pixel values into equations ends up putting the “average” pixel of each 8x8 block in the upper left corner of that block prior to compression. Nikon doesn’t use this
Thom Hogan’s Complete Guide to the D70 Page 86

average pixel directly (the D70 generates the image’s thumbnail using other methods; some Coolpix models use this pixel to generate the thumbnail).
Thus, if you want to create smaller images from the JPEGs that the D70 produces (say for Web use), the highest quality will be obtained if you reduce the size to 1/8 (e.g., 376 x 250 from the L [Large] JPEG size created by a D70). That’s because you’ll force your image editing program to summarize the 8x8 blocks used in generating the JPEG, and minimize any artifacts that might be otherwise produced.
Setting JPEG The D70 allows you to create three sizes of JPEG images:
L = Large = 3008 x 2000 pixels M = Medium = 2240 x 1488 pixels S = Small = 1504 x 1000 pixels
õ To set the D70 to record JPEG images:
1. Press the Þ button to turn on the color LCD.
2. Use the Direction pad to navigate to the SHOOTING MENU (green camera icon tab).
3. Use the Direction pad to navigate to the Image quality option and press the > key on the Direction pad to select it.
Thom Hogan’s Complete Guide to the D70 Page 87

4. Use the Direction pad to navigate to the JPEG quality you wish to use (JPEG Fine, JPEG Normal, or JPEG Basic), and press the > key on the Direction pad to select it.
5. Use the Direction pad to navigate to the Image size option and press the > key on the Direction pad to see the options. If this option is grayed out, make sure that you selected a JPEG quality in Step 4 and not a NEF (raw) quality.
6. Use the Direction pad to navigate to the JPEG size you wish to use (L (3008x2000), M (2240x1488), or S (1504x1000)), and press the > key on the Direction
Thom Hogan’s Complete Guide to the D70 Page 88

pad to select it.
Alternatively, if the LCD is OFF (not showing images or menus), then Image Quality can be set by holding down the QUAL button and rotating the Rear Command dial; Image Size can be set by holding down the QUAL button and rotating the Front Command dial (assumes you haven’t used Custom Setting #14 to change the dial functions).
Top LCD:
JPEG Artifacts JPEG compression produces two primary types of visible artifacts. The higher the compression used, the more visible these artifacts tend to be. Also sharpening set to high levels tends to trigger these artifacts.
The first artifact is best described as “visible blocks” (see example, below). Visible blocks are created because JPEG operates on images in 8x8 pixel blocks.
Blocks are most often seen in areas where there is little detail but a continuously variable color (shading on an unevenly lit wall, for example). The quantization step attempts to throw away minor differences in colors or gradients, but when there is a gradual change of color that spans blocks, the block
Thom Hogan’s Complete Guide to the D70 Page 89

averages sometimes differ enough that you can see the block boundaries.
JPEG “blocks” tend to appear in broad areas of gradually changing color, as in the highly magnified portion of sky, here. To the right of the arrow, you’ll see several left edges of blocks. The blocks don’t always appear in 8x8 pixel size. This sample shows that the compression artifacts can clearly vary from that basic size. This sky, for example, varied gradually from top to bottom, but not left to right, resulting in bands of blockiness rather than distinct blocks. (I’ve exaggerated the contrast to make the blocking more visible.)
Here’s an example of the mosquito artifact caused at edges by JPEG compression. Look closely at the very edges of the letters in this example, the background should be a continuous, even tone (look at the right edge of the g in “Hiking,” where “mosquitoes” appear immediately to the right of the letter, and then drop off rapidly away from the letter). Note also the white that gets inserted between the o and c in “Society.”
A second artifact is usually seen at sharply defined edges (see example, above). At high compression levels, these artifacts can be extremely annoying, and often are called
Thom Hogan’s Complete Guide to the D70 Page 90

“mosquitoes,” as it looks like a large swarm of flying insects was present when you took the picture.
Curiously, applying a small amount of “blur” to the original data before applying JPEG compression reduces the visibility of artifacts and the size of the resulting file. That’s because hard edges contain conflicting data the compression scheme needs to resolve, and more bits are needed to hold that information. Thus, setting high levels of sharpening with JPEG files is generally unadvisable (you’re better off sharpening the image in the computer at a later stage).
Note: If you rotate a JPEG file and resave it, you may lose information! That’s because each 8x8 block must be rotated in place to preserve its compression information. If an image editing program simply grabs rows of pixels and converts them to columns, when you resave the file, a JPEG recompression is again applied to the entire file. If the 8x8 blocks are rotated in place and each block individually placed in the new orientation, JPEG compression is preserved and no new recompression takes place. ACDSee, IrFanView, Photoshop CS and a number of other programs can rotate JPEG files without recompressing. But make sure you know what the programs you use do!
Note: There’s a persistent myth circulating that any time you resave a JPEG file that you’ll force a full recompression of the file, adding artifacts. Well written software doesn’t do this. For example, beginning with version 6.0 of Photoshop, the only recompression that is done on JPEG images that are resaved is on portions of the image that were changed. In other words, if you bring a JPEG file into Photoshop 6 or 7 and make no changes, resaving it results in no degradation of the image.
This is probably a good point to introduce the interaction effect of certain camera features. As I mentioned in the “Debunking Some Myths” section (see page <17>), the D70 does have a few image quality issues that you need to be aware of. JPEG compression has a tendency to increase the
Thom Hogan’s Complete Guide to the D70 Page 91

visibility of some of these things. For example, if you’re shooting a tight fabric pattern—which might generate moiré— you probably should avoid high levels of JPEG compression and sharpening. Put those three things together—moiré, JPEG compression artifacts, and sharpening artifacts—and you’re asking for trouble.
What do I mean by “trouble?” Image defects that won’t be easily removed after the fact. Moiré can often be removed by moiré removal tools (or a bit of well-applied Gaussian Blur), but if these other artifacts get melded into the image data along with moiré, all bets are off.
I’ll describe these interactions more when I get to the shooting suggestions later in this book.
NEF Format
NEF format often confuses D70 novices (Nikon and others sometimes also refer to this format as RAW). Nikon advertises it as the highest quality format, one that preserves the “raw” image photosite data. What Nikon doesn’t tell you is that you need to purchase an additional software product to really get the most from this format40. Nikon Capture 4.1 is what Nikon recommends, but other alternatives exist (see “D70 Related Software,” on page <397>).
The non-trial NEF software you get with the camera is simply a plug-in Import filter for Photoshop. (Starting with Nikon View version 5.1—the D70 initially shipped with version 6.2.1—View also has some rudimentary abilities to deal with NEF files directly, such as convert the NEF image data to the JPEG format.) While the Import filter allows you to bring NEF images into Photoshop41 and gives you some ability to change
40 A fully functional 30-day trial version of Nikon Capture comes with the D70 in the US, or can be downloaded from Nikon’s Web sites. Note that early D70’s came with Capture 4.0; you should download and use the 4.1 updater if you haven’t already done so. 41 Photoshop CS includes a raw conversion capability. In late April Adobe released Raw Converter 2.2, a free update to Photoshop CS that includes D70 support.
Thom Hogan’s Complete Guide to the D70 Page 92

settings, such as exposure and white balance, you don’t have the full control you’ll find in Nikon Capture. But even if the Import filter is all you have available, you’ll still be able to generate better quality images using NEF than you can with any of the JPEG formats.
Note that the data saved in a D70 NEF file is not exactly what comes from the Bayer-pattern CCD in the camera; it’s a “compressed” version of the data (more on this in a bit).
When unpacked, the first pixel in the top row is 12 bits of green data, the second is 12 bits of red data, and this pattern alternates throughout the first row. The second row starts with 12 bits of blue data, then 12 bits of green data, and then this pattern repeats. No interpolation or corrections are applied to this data—NEF files contain essentially what the Analog-to-Digital converter deciphered from the CCD (with that pesky compression I’ll eventually get around to talking about). This is one reason why NEF files require special software to decode; the sensor data must be converted (demosaiced) into RGB data and color corrected.
Tip: If you’re a programming wizard and want to know the exact format of the NEF files, here’s a quick explanation: the file is built in standard TIFF format, and starts with tags for EXIF header information and white balance tables, then a thumbnail image, and finally the pixel data stored in a simple left-to-right, top-to-bottom format.
Many details for the D1 NEF format can be found at http://www.tidalwave.it/projects/nefio/NEF.pdf and the original site that inspired that: http://zulle.pair.com/ghogh/Computers/comp_NEF.html. The D70 format is similar, except that it involves a compression step. The EXIF header includes a preview image in TIFF format by the way. But be aware that the TIFF preview is in Macintosh byte order, so some Windows programs can’t display the preview image directly.
Thom Hogan’s Complete Guide to the D70 Page 93

If you’re a programmer, you might want to examine the C code that can be found at: http://www.cybercom.net/~dcoffin/, it’s the same code that’s formed the basis of Bibble, Photoshop, and other converters. While at first this looks like it only refers to Canon raw files, the code indeed has Nikon NEF support embedded in it, including compressed NEF files42. If you’re just curious about how software converts the Bayer pattern data into RGB data, send your browser to http://www-ise.stanford.edu/~tingchen/main.htm, which contains a dissertation on various methods that are used.
Since I know you’re curious, a simple demosaic routine for the D70 might work something like this (warning, geek speak ahead):
• Decompress the sensor data.
• Convert all data for the green positions into luminance values (Y).
• Obtain luminance values (Y) for red and blue positions by averaging/interpolating the data values for adjacent green positions.
• Calculate the color channels for the red and blue positions: Cr = R – Y while Cb = B – Y.
• Obtain Cr and Cb values for the positions that don’t yet have them by averaging/interpolating the adjacent values.
• Obtain RGB data from the YCrCb43 data: R = Y + Cr, B = Y + Cr, and G = 0.2R + 0.7G + 0.1B.
42 I’m not sure I like the algorithm used for demosaicing in this source code. It uses a well-known approach of taking the R, G, or B value directly for each photosite, then trying to figure out the missing parts of the RGB pixel by looking at a 5x5 matrix surrounding the photosite’s data. One side effect of this approach is that you must use averaging followed by “sharpening” to keep from further aliasing the data; as a result, I sometimes see minor artifacts in files generated by this code that I don’t see in other programs. 43 Geeks will have already guessed that this is essentially CIE Lab Color space, the grandfather of all color processing definitions. You can write demosaicing routines for just about any color space you’d care to define, but most that I know of stick to Lab Color, RGB, and CYM(k).
Thom Hogan’s Complete Guide to the D70 Page 94

Many other demosaic routines exist; the one just given is one of the simplest (especially if you use “averaging” instead of “interpolating” for the missing data44). Thus, each software product that understands the NEF file format tends to perform the interpretation of the photosite data slightly differently (and at different speeds!). If you open an NEF file with Bibble, QImage Pro, Photoshop CS, Capture One, and Nikon Capture side by side, you will see subtle differences in rendering of color and detail. If you’re getting the idea that it might be worthwhile to sample all the NEF converters, you’re right. Fortunately, most have trial versions available. I’ll deal with this more in “D70 Related Software,” on page <397>.)
NEF files are larger than JPEGs:
D70 File Sizes Format File Size JPEG FINE JPEG NORM JPEG BASIC NEF compressed
~2.9MB ~1.6MB ~800KB ~ 4.5 to 6.5MB
All file sizes involve compression, which is variable; therefore the sizes are approximate.
Compressed NEFs One somewhat controversial decision Nikon made with the D70 has to do with the use of only compressed NEF files (all other Nikon DSLRs also support an uncompressed version of the NEF format). This compression is said by Nikon to be either “virtually lossless” or “visually lossless,” meaning that results visually indistinguishable from the original data can be recovered. This isn’t quite the same thing as “lossless,” in which case the actual data would be recovered.
Okay, we’re in footnote hell. An interpolation routine generally tries to do more than just average two adjacent data points. Complex interpolations examine a matrix of adjacent cells, usually a minimum of a 3x3 grid, but sometimes as wide as a 16x16 grid. Obviously, the smaller the grid, the faster the results are generated. But also, the smaller the grid, the cruder the results will be.
Thom Hogan’s Complete Guide to the D70 Page 95
44

I’m not sure I’d term the methodology Nikon uses as “compression,” but here’s how it works: when photosite data comes off the ADC, it has 12 bits of value to it. A value of 0 would represent no data (black), a value of 4095 would represent “saturation” (white). If that was the way we stored the data, we’d need 12 bits to store every photosite’s data. In order to reduce storage size, the D70 (and other Nikon bodies) “compress” NEF data is as follows:
• Values of 0 to 215 are passed on as is.
• Values of 216 through 4095 are split into 653 groups. The manner in which this is done isn’t linear. The last group (almost white) has more values in it than the first45.
Thus, there are 869 possible values (0 through 215, plus the 653 “grouped” values. These 869 possibilities are now compressed using a somewhat traditional run-length encoding algorithm that is truly lossless and packs the data across byte boundaries. The result is that the 12 bits of original data stores in about 6 bits.
To get back to 12 bits of data, a NEF converter such as Capture does the following:
• The run length encoding is reversed to get the 659 data possibilities back.
• The values of 0 through 215 are left untouched.
• Values of 216 through 868 are then expanded to the appropriate point in the 12-bit scale.
The problem, of course, is that from 216 through 4095 there will now be “data gaps” that get progressively larger as we go higher in value—each original 12-bit value in this range was essentially rounded to a different value, with the rounding being more aggressive as we move to brighter and brighter objects.
This mimics the way our eyes work, which are non-linear in nature.
Thom Hogan’s Complete Guide to the D70 Page 96
45

With a single trip through compression/decompression, D70 compressed NEF images are indistinguishable from what you’d see with no compression. Our eyes don’t resolve the small differences that were made in the brightest areas of the photo. That’s partly because our eyes work in a non-linear fashion with brightness, but also because our eyes generally are said to distinguish tonal changes only about equivalent to those produced by 8-bit RGB data. Even with the NEF compression scheme used in the D70, we still have the equivalent to more than 8-bits of original data. Since we almost always reduce 12-bit data down to 8-bits for printing, anyway, the minor tonal loss that compressed NEFs introduces isn’t a big deal.
But if you were able to run this compression/decompression cycle multiple times you’d very quickly see posterization46
effects in our data.
There is a slight possibility that the data loss introduced by NEF compression will show up in some way (assuming you could compare the file to an uncompressed one, which of course the D70 can’t produce). Such changes would appear mostly in the highlight detail, and only if you made very dramatic post-processing changes (abnormally high sharpening amounts, lots of color shift, etc.).
Why NEF? Why do you want to use NEF files? If you have software that can understand this format, you’ll get a more consistent tonal range in your images than with JPEG images and more subtle and accurate colors. Using 12 bits to record color data instead of 8 bits makes gradual (non-edge) transitions look smoother and subtler, even with the data loss due to compression. Post processing exposure changes are more readily done (these are
Posterization is a word used to describe a tonal ramp that has gaps.
Thom Hogan’s Complete Guide to the D70 Page 97
46

47
not really exposure changes, but changing of the linearity47 of the exposure, which is why it works better to correct underexposed images instead of overexposed ones). You also gain full post-shooting control over color correction and white balance decisions (with JPEG, those decisions are irrevocably recorded in the data when the picture is taken). And, as just noted, you can usually “correct” slightly incorrect exposures.
With JPEG, you’re working from the camera’s interpolation of the color and white balance, which may include rounding errors or slight color shifts when reducing the data to only 8 bits. While you can often rebalance images using a program like Photoshop, you’re one step removed from the original information—in digital media, each interpolation of original data can result in lost data or changes to data.
Setting NEF õ To set the camera to record NEF images:
1. Press the Þ button to turn on the color LCD.
2. Use the Direction pad to navigate to the SHOOTING MENU (the green camera icon tab).
You may wonder what “changing the linearity” means. Normally, each rise in bit value has an equal corresponding rise in “brightness”—when we change the linearity, we change the progression. Instead of a data increase of, say, 16 being output as a value 16 higher, we might lower that number (e.g., an increase of 16 is output as an increase of 8) or raise it (e.g., an increase of 16 is output as an increase of 32). Moreover, as shot, images have input-to-output relationship that is a straight line from 0,0 on a graph to 255,255 (you may have seen such a line in Capture or Photoshop’s Curves tool). We can actually change the straight line to a curved one or a complex relationship. I’m getting a little ahead of myself here, but as D70 images come out of the camera, we usually find that a subtle S-shape (rapid rise in the shadows, straight line in the middle, flattening in the highlights) provides the “best” overall image contrast. I mention it here because this intersects with the compressed NEF highlight issue: compressed NEFs lose a bit of the highlight subtlety but that’s actually a fairly normal thing that we’d be doing to our images anyway! Moreover, because of the way inkjet printers work, highlights are sometimes troublesome (white is defined as the lack of any ink placed on the paper, and at the very tip top of the highlight detail differing amounts of ink put down by the printer can sometimes be somewhat annoying, as the “texture” of the image changes slightly because of the fact that almost no ink is being used in those areas.
Thom Hogan’s Complete Guide to the D70 Page 98

3. Use the Direction pad to navigate to the Image quality option and press > key on the Direction pad to select it.
4. Use the Direction pad to navigate to the NEF (Raw) and press the > key on the Direction pad to select it.
Alternatively, if the color LCD is not currently displaying images or menus, hold down the QUAL button on the back of the camera and rotate the Rear Command dial to select RAW (the Top LCD displays the Image Quality setting as you change it); this assumes you haven’t used Custom Setting #14 to change the dial functions.
Top LCD:
Thom Hogan’s Complete Guide to the D70 Page 99

Note that you don’t set the Image Size when you select NEF (RAW) format, as the D70 always records the full 3008x2000 image size.
Note: The Frames Remaining indicator does not properly reflect NEF image sizes. Remember, NEFs are compressed on the D70, but the Frames Remaining indicator does not reflect this. In the best case scenario, you can usually store about 2x the number the camera indicates (e.g., if the camera says 24 frames remain, you really have space for 48). The worst case I’ve seen is 6.6Mbs for a single D70 NEF file, which would be a 1.5x change (e.g., if 24 frames remain, you really get 36 on the card). So we can generally assume that you’ll get something between those two values. Personally I multiple by 2 and then watch carefully when the indicator gets below 10.
Yes, this is very annoying, and it’s been a problem for compressed NEFs on every Nikon DSLR to date. You’d think by now that someone at Nikon would have figured out the average compressed NEF size (which on my first 200 shots worked out to be just a shade under 5.8Mbs; the low was 4.6MBs, the high was 6.6MBs).
EXIF
Even if you’re a seasoned computer graphics pro, you may be surprised to find that JPEG and NEF files contain more than the image data. This extra information about the photo is sometimes referred to as metadata. Nikon D70 cameras follow a standard developed by the JEIDA (a Japanese standards body), sometimes referred to as EXIF. The current standard version is EXIF 2.2.1, and is supported by the firmware in the D70.
The additional data EXIF headers attach to an image includes:
• The name of the camera maker (Nikon).
• Camera model (D70).
• The camera’s firmware version number.
Thom Hogan’s Complete Guide to the D70 Page 100

• Information about the exposure itself: shutter speed, aperture, exposure mode, ISO value, date/time, overall brightness of scene (EV), exposure compensation, focus distance, metering mode, flash mode, focal length, and even the average compression ratio.
• Thumbnail image.
If you’re interested in the esoteric inner workings of your D70, a fuller description of the EXIF file format is available at http://www.exif.org/specifications.html. Note that just understanding the EXIF tags isn’t enough—programs must also know what each of the values each manufacturer assigns means. Bibble, DigitalPro, QImagePro, Photoshop CS, Nikon View, and Nikon Capture all can display EXIF data and fully understand Nikon’s values (see “D70 Related Software,” on page <397>). Some programs may not fully display all the EXIF data values, though.
Not only is looking at EXIF data fun for the merely curious, but if you study the information closely, you may even learn about the idiosyncrasies of your camera and your shooting practices.
Thom Hogan’s Complete Guide to the D70 Page 101

Here’s an EXIF (Shooting Data) window and image shot by a D70 as shown in Nikon View. Note how all the most important exposure data is shown. (Image taken at Zabriske Point, Death Valley National Park.)
EXIF is one of the reasons why you can’t create or edit a JPEG file on your computer, save it back to the camera, and then see it on the camera’s LCD, by the way. When you perform any Save or Update action on your computer, some of the EXIF tags in the file get modified (or removed) in ways that the D70 detects. This is too bad, as it prevents you from editing a series of JPEG files on your computer, then moving them to the camera for playback as a slide show. (In theory, if you replaced the EXIF tag with the correct, camera-consistent information, and didn’t edit the thumbnail, you might be able to display edited pictures on the D70. In practice, I don’t know of anyone who’s successfully doing this.)
Thom Hogan’s Complete Guide to the D70 Page 102

Note: For a program to display the correct EXIF information for an image, it has to know something about the camera and the codes that are stored in the EXIF tags (e.g., “18-70mm F/3.5-4.5” isn’t stored in the lens field, but is instead stored as a short code that is unique to this lens). Now that the Nikon DLSRs have firmly established themselves (and because Nikon used consistent codes for many of the functions in the various digital SLR models), most software programs correctly identify many D70 EXIF data. However, if you find the program you’re using doesn’t, check to make sure that you’re using the latest version. If you are, suggest to the developer that they contact Nikon for the EXIF codes for Nikon cameras.
Note: Older EXIF specifications define the color space as being sRGB, and a number of digital editing programs, including older versions of Photoshop (but not CS), assume that sRGB is the color space of any JPEG file that is opened and has EXIF data. EXIF 2.2.1 has a special way of dealing with color space: the file is named differently for AdobeRGB color space: instead of DSC_####.JPG the file would be named _DSC####.JPG. One advantage of using Nikon View and Nikon Capture is that they correctly apply the right color space profile to the image. Other programs you use may not. See “sRGB Versus Adobe RGB,” on page <374> for more information on this subject.
IPTC
Another type of metadata is sometimes incorrectly referred to as IPTC (International Press Telecommunications Council). IPTC is an organization, and the standard they’ve developed for common digital photo metadata is DNPR (Digital Newsphoto Parameter Record).
Like EXIF data, the DNPR metadata is stored in the photo file. A DNPR-aware program is required to show and edit the DNPR metadata (again, it’s often referred to as IPTC data by many programs). If you shoot photos for news organizations, you need to be aware of this data and have some way of entering it, as most publications require it to be in place with photo submissions—it’s become the primary method by
Thom Hogan’s Complete Guide to the D70 Page 103

which news organizations track captions and photographer credits. IPTC has defined a common set of coding guidelines, but you should also check with the publication you’re working with, as they may have their own specific standards, as well.
Though the D70 doesn’t create any IPTC metadata, some third-party software programs allow you to add it to your D70 files. Nikon View’s image transfer function has a setting that allows you to copy EXIF data into the IPTC fields, which I recommend using. I’ll deal with that in the section on Nikon View later in this book (see “Nikon View,” on page <398>).
To find out more about IPTC, go to the organization’s Web site, http://www.iptc.org.
DPOF and PictBridge
The D70 supports DPOF information in the image files. DPOF stands for Digital Print Order Format and was developed by Canon, Kodak, Fuji, and Matshushita to allow CompactFlash cards (or other storage cards) to contain information that automatically instructs a printer (or photo finishing machine). Amongst other capabilities, DPOF-capable cameras can specify:
• Which photos to print.
• How many copies of each photo to print.
• Whether or not to print a thumbnail index of all the images.
• Whether photos should be rotated.
• User information (name, address, etc.).
• Picture information (title, description, date, etc.).
You select the pictures to print on your D70 by adding them to a Print Set (see “Printing Images,” on page <254>). When you remove the CompactFlash card from your D70 that has a
Thom Hogan’s Complete Guide to the D70 Page 104

defined Print Set and insert it into a DPOF-capable printer, such as the Epson Photo 875, the printer automatically prints out all the photos you’ve selected.
PictBridge is related to DPOF. Think of DPOF as the print data embedded in the image file and PictBridge as the communications protocol to transmit that from camera to printer. Since the D70 supports PictBridge, you can directly connect your camera to a PictBridge-enabled printer and output your photos. Again, I’ll cover this in “Printing Images,” on page <254>.
If you’re confused about why I just covered DPOF in the Image Formats section of the book, remember that DPOF is a set of information that is stored in the image file. PictBridge is a method of using that information to actually make a print with a connected printer. In short, you should get the clear idea that there is much more information living inside your D70 photo files than just the image itself.
File Names and Folders
The D70 follows an industry standard practice for putting images on CompactFlash storage (Design Rule for Camera File Systems, sometimes referred to by the abbreviation DCF; the standard is published at http://www.pima.net/standards/iso/tc42/wg18/ISO12234_all/ N4522_CD1002234-3_Item189-3.PDF). Unfortunately, the designers of this format didn’t make it particularly friendly (for that matter, neither are their URLs). Likewise, many of the standards digital cameras follow are interwoven. DCF is related to the EXIF specification, for example.
Essentially, the standards committees put together by the early digital camera manufacturers were trying to put together a set of rules that made it easier to interchange data and connect devices. So while the standards seem arcane and confusing, remember they’re actually there to make the user experience simpler. That may seem unlikely to you at the moment, but
Thom Hogan’s Complete Guide to the D70 Page 105

the first time you connect a cable between your D70 and your PictBridge-enabled printer and it starts automatically spewing out prints you selected while shooting, it’ll seem worth it. Of course, if those prints don’t start coming out, you’ll need some understanding of how everything works, which is why I’m spending the time to explain all these standards.
Folders
The top-level folder for a digital camera is named DCIM (Digital Camera Images—all image storage occurs in the structure underneath this folder). Within that folder, digital cameras place one or more additional folders, each of which can have up to 999 images in them.
On the D70, Nikon names the first such folder 100NCD70, the second 101NCD70, and so on. Unlike some earlier Nikon bodies, we now have the ability to override the last five characters of the folder names (i.e., the three digit number always is assigned by the camera). If you wanted, you could use the D70’s menu system to change your folder name from 100NCD70 to 100BYTHM. (Note that the folder number stayed the same, but we changed the last five characters.) I’ll get to how you make those changes in a moment. First, we need to deal with something else about the folders that live under the DCIM folder.
For example, if you use multiple cameras, you might find multiple folders under the DCIM folder, thus you need to know how your cameras name folders:
• On a D2H, the folder names begin 101NCD2H, the second 102NCD2H, and so on.
• On a D100, the folder names begin 101ND100, the second 102ND100, and so on.
• On a D1h, the folder names begin 101NCD1H, the second 102NCD1H, and so on.
Thom Hogan’s Complete Guide to the D70 Page 106
• On a D1x, the folder names begin 101NCD1X, the second 102NCD1X, and so on.
• On a Coolpix, the folder names begin 100Nikon, the second 101Nikon, and so on. As on the D70, the Coolpix user can rename the last five characters of the name.
Remember, if you move a CompactFlash card between two different camera types, each will create an appropriate folder name under the DCIM folder! And each camera won’t deal with the images already on the card from another camera. Short of doing a complete card format, you won’t be able to remove a D2H folder that has images in it using a D70.
Other pitfalls occur with multiple cameras, too. Remember that three-digit number? If your D100 is set to use a folder named 145ND100, then if you take that card out of the D100 and put it into your D70 and do something that triggers a new folder creation, the number for the D70’s folder will be incremented to one past what the D100 was using.
Another problem to watch for: if you have multiple folders on a card, the D70 will use the highest numbered one. Okay, it’s a little subtler than that: images are saved into the currently selected folder name with the highest number.
The D70 allows you to do four things with folders:
• Select from existing folders
• Create a new folder
• Rename an existing folder
• Delete all empty folders.
Interestingly, the D100 doesn’t allow you to name folders.
Before I tell you how to do those things, here’s my recommendation: don’t. Consider that recommendation
Thom Hogan’s Complete Guide to the D70 Page 107

boldfaced and italicized if you use multiple DSLR bodies of different models48. Don’t.
Astute readers have noticed my use of the words “pitfall” and “problem” in relation to folders. The classic worst case scenario is this: you use multiple folders to capture images, download the images from only one folder (perhaps because you used a drag and drop method from card to computer instead of using Nikon View’s transfer function), then reformat the card. Bye bye images. I’ve learned the hard way not to get too creative with folders—indeed, if I were to rename them from the base names, I wouldn’t know which folder was created by which camera unless I was paying careful attention in my naming practices.
Okay, you’ve been warned. Should you choose to play with fire, uh, I mean folders, keep reading.
õ To create a new folder:
1. Use the Direction pad to navigate to the SET UP menu (the yellow wrench icon tab).
2. Use the Direction pad to navigate to Folders and press the > key on the Direction pad to select this
I can think of one legitimate reason to start renaming folders: you own multiple D70 bodies and want to track which images came from which camera. Newspapers and other organizations that use “pool cameras” often rename folders so that they can track both which images came from which photographer; this also helps them to backtrack if they find that they’re seeing problems with images from one camera. The D70 provides a better facility for that, though: the Image Comment field. Since this field follows the image around regardless of the folder or file name, you could track what camera produced the image by simply looking at that value. So I’ll stick by my recommendation: stay away from the folder options.
Thom Hogan’s Complete Guide to the D70 Page 108
48

option.
3. Use the Direction pad to navigate to New and press the > key on the Direction pad.
4. In the display that appears, enter the five-character name:
a. Use the Direction pad to navigate to a letter or number.
b. Press the ?n button to select that letter or number.
c. If you need to move the cursor position, hold down the Thumbnail button and rotate the Rear Command dial to move the cursor to the
Thom Hogan’s Complete Guide to the D70 Page 109

appropriate position.
5. When done entering your five-character name, press the Enter button to complete the entry.
To abort the new folder creation process, press the Menu button at any time prior to the last step.
New folders are created automatically by the camera when:
• The number of images in the current folder reaches 999.
• The last filename stored ended in 9999.
• Sometimes when you “touch” the card format or data with something other than a camera or other DCF device (e.g., you put the card into a PC and edit a file on the card).
õ To rename an existing folder:
1. Use the Direction pad to navigate to the SET UP menu (the yellow wrench icon tab).
2. Use the Direction pad to navigate to Folders and press the > key on the Direction pad to select this
Thom Hogan’s Complete Guide to the D70 Page 110

option.
3. Use the Direction pad to navigate to Rename and press the > key on the Direction pad.
4. Use the Direction pad to navigate to the name of the folder you wish to rename and press the > key on the Direction pad.
5. In the display that appears, enter the new five-character name:
a. Use the Direction pad to navigate to a letter or number.
b. Press the ?Protect button to select that letter or number.
c. If you need to move the cursor position, hold down the Thumbnail button and rotate the Rear Command dial to move the cursor to the appropriate position.
Thom Hogan’s Complete Guide to the D70 Page 111

6. When done entering your five-character name, press the Enter button.
To abort the new folder renaming process, press the Menu button at any time prior to the last step.
õ To select a different folder from the current one:
1. Use the Direction pad to navigate to the SET UP menu (the yellow wrench icon tab).
2. Use the Direction pad to navigate to Folders and press the > key on the Direction pad to select this option.
3. Use the Direction pad to navigate to Select folder and press the > key on the Direction pad.
4. Use the Direction pad to navigate to the name of the folder you wish to use and press the > key on the
Thom Hogan’s Complete Guide to the D70 Page 112

Direction pad.
õ To delete all folders that have no images in them (including the current folder, if it meets the criteria!):
1. Use the Direction pad to navigate to the SET UP menu (the yellow wrench icon tab).
2. Use the Direction pad to navigate to Folders and press the > key on the Direction pad to select this option.
3. Use the Direction pad to navigate to Delete and press the > key on the Direction pad.
Thom Hogan’s Complete Guide to the D70 Page 113

4. Use the Direction pad to navigate to Yes.
5. Press the Enter button to complete the deletion process.
Note: If you delete the current folder it may still show up in the menus when after you’ve deleted it, at least until you select another folder in which to store images.
To abort the folder renaming process, press the Menu button at any time prior to the last step.
Should you ever get to a folder name that is numbered 999 and a filename that contains the number 9999 or is the 999th
file in the current folder, the D70 will lock up and refuse to take a photograph. In this situation you must:
1. Turn File No. Seq. OFF (see “File Number Sequencing,” on page <120>).
2. Format the storage card. (Or insert a new storage card.)
File Names
Individual files are normally named DSC_####.XYZ, where #### is a sequential image number and “XYZ” is replaced by the appropriate three-letter file format extension (e.g., JPG or NEF). (The DSC stands for Digital Still Camera, by the way; some digital cameras can create movies, hence the three-letter usage). Thus after you’ve taken a few pictures on a CompactFlash card, the structure looks like this:
Thom Hogan’s Complete Guide to the D70 Page 114

DCIM +---100NCD70 <-- Folder name depends upon camera
+---DSC_0001.JPG DSC_0002.JPG DSC_0003.JPG
Etc.
The folder name and filename are displayed in the bottom left corner of the Color LCD when you review images.
Note: As I mentioned earlier, the file name changes slightly if you shoot using the AdobeRGB color space. Instead of DSC_#### the name becomes _DSC####.
Note: When I shoot with both a Fuji S2 Pro and a Nikon D70, I can immediately tell which images came from which camera: the Fuji uses an F instead of _ in their filenames (e.g., DSCF0001.JPG). If you use more than one digital camera, do yourself a favor and note the different folder and file naming conventions of the two cameras. Some day you’ll be glad you did.
Because the D70 doesn’t provide descriptive file names, you need to develop a discipline in moving images from the camera to your computer. If you don’t, you’ll end up with hundreds, perhaps thousands, of image files that have nothing else to distinguish them than a four digit number (and, of course, if you get to the tens of thousands, you’re going to have duplicate file names).
Nikon View, as well a growing number of third party programs, allows you to automatically transfer files from camera to computer with a renaming scheme of your own choosing (e.g., copy DSC_0001.JPG to PhillyzooApril001.JPG, DSC_0002.JPG to PhillyzooApril002.JPG, etc.). Other programs allow you to rename files once transferred (even Photoshop CS has decent renaming capabilities, as I’ll point out in the software section.)
Thom Hogan’s Complete Guide to the D70 Page 115

If you use one of these programs, I suggest you do the following:
1. Leave the default folder intact on your D70. While you can create and name folders and move between them, capturing some images in one folder, some in another, etc, this can get confusing in practice49. If you need to organize images as you shoot, it’s probably better to use multiple CompactFlash cards, though you’ll need to be careful in labeling them.
For example, if in the morning you shot at the zoo, then in the afternoon went to a museum to shoot, save your zoo photos on one CompactFlash card. Then, before starting to shoot at the museum, take that card out and put in a new one. (If your memory is like mine, you probably ought to write this down and label your cards, just in case a few days pass before you can get the images off the CompactFlash card. The trick I use is to bring a bunch of small envelopes with me, then I just put the card in the envelope, label the envelope, and seal it.)
2. On your computer, create descriptive folder names that match the locales you shot in (e.g., in the example, I’d create folders named PhillyZooApril01 and MomaApril01 on my computer; I add the month and year to the folder name because I often revisit the same sites; also, these folders live in a folder hierarchy that helps me re-find them: e.g., US/PA/Philadelphia/PhillyZoo/PhillyZooApril01).
3. Put each CompactFlash card you shot into your computer’s card reader and use a renaming-capable program like Nikon View’s transfer function to move
As I’ve already noted, I think the primary reason to change folder names is to distinguish between multiple D70 cameras.
Thom Hogan’s Complete Guide to the D70 Page 116
49

images from the card to your computer50. Recent versions of Nikon View do this reliably and quickly on both Macs and PCs, and that’s what I use.
Some Nikon shooters swear by other software, such as DigitalPro, but the key is you really need to use a program that’ll rename files during the copy. If you merely use an operating system copy from card to computer, you can’t easily automate the renaming of the files as they’re copied, which I highly recommend. The reason: eventually you’ll take more than 9999 photos and you’ll end up with duplicate file names that can confuse you and your computer. If you don’t use Sequential File Numbering and also don’t use file renaming during transfer, I’d say you’re headed for a massive file naming confusion on your computer. I’ve seen one fellow’s computer where he had several dozen files all named DSC_0001.JPG!
4. If any of the files you copied in Step 3 are JPEG files51, you should also consider immediately using a product that’ll resave them in a form without compression (you can set up a Photoshop Action, for example, to take all the files in a folder and save a .TIF or .PSD version for editing; there’s just such an Action on this CD for the lazy amongst you, see “Photoshop Actions,” on page <486>). If you don’t perform this step, then you’ll need to be attentive when you open files for manipulation, since some software applies JPEG compression every time you save a file in the JPEG format (i.e., you could end up compressing previously compressed files, adding artifacts). Fortunately,
50 One nice thing about Nikon View’s transfer renaming is that it correctly assigns the same name to both files when you shoot NEF+JPEG BASIC. Thus, you end up with file names such as PhillyZoo_0001.JPG and PhillyZoo_0001.NEF. One bad thing about Nikon View’s transfer function is that it always places both files in the same folder (I prefer having my preview files (JPEGs) in a different folder than my “negatives” (NEFs). 51 If you’re shooting NEF+JPEG BASIC you can safely ignore this advice, as you have a NEF file that isn’t effected in this way.
Thom Hogan’s Complete Guide to the D70 Page 117

Photoshop versions 6.0 and later don’t do that, but beware of touching your JPEG files with other products. (Note also that some programs can perform image rotation without recompressing JPEG images, and some don’t. I find it safer to avoid the problem entirely by moving my files out of JPEG format as soon as possible, even before rotating them.)
5. After verifying that the files you copied in Step 3 are on your computer intact, put the CompactFlash card back in your camera and reformat it so that it is cleared of image files and ready for your next shooting session. If you delete individual files and leave folders instead of reformatting, you’ll eventually end up with file fragmentation on the card, which reduces size and performance. Formatting is the only option that guarantees that the card is optimized for storing new data.
These steps are part of what is sometimes called “digital workflow,” the consecutive actions you make on an image after taking that picture with the camera. The above steps are a simple form of workflow. I’ll describe ways of automating the workflow in “D70 Related Software,” later in this book. What I’ve just described is about the minimum you should do with your image files.
While file names are generally created consecutively (e.g., DSC_0001.JPG, DSC_0002.JPG, etc.), a number of things
52may cause the camera’s numbering to reset:
• Creating a new folder (if Sequential File Numbering is turned OFF; see “File Number Sequence,” on page <120>).
• Using the File Number Sequence option to Reset the file numbers.
Other than the three items listed, a file numbering reset doesn’t necessarily happen every time the other events occur.
Thom Hogan’s Complete Guide to the D70 Page 118
52

• Using the camera reset option (see “Resetting the Camera,” on page <138>).
• Moving a CompactFlash card that already has images on it between different cameras.
• Writing to a CompactFlash card when it is mounted in a card reader attached to a PC.
• Removing the battery without first turning the power switch to the OFF position (same with power supplied to the DC In socket on the front of the camera).
Whatever the cause, you should see that having a camera reset the numbering is not a trivial event. If you develop bad habits that trigger frequent numbering resets, you could end up with a computer filled with images all numbered the same! I can’t say this strongly enough: develop a discipline with your camera use and workflow so that you don’t unintentionally trigger numbering resets, and rename your image files to meaningful names as soon as possible. It’ll save you a lot of grief later.
Yes, Nikon’s defaults and the D70’s default behaviors make no sense in regards to file numbering. Some of that is the standard the D70 tries to follow. Because the file structure of the CompactFlash card is the old DOS-style FAT, file names are limited to eight characters and a three letter extension53, and because the standard takes up four (!) of those characters to designate that the file contains an image (hey guys, that’s what the extension was for!), that didn’t leave much for the camera manufacturers.
Did I say develop a discipline with your camera use and workflow loudly enough? Those of us who shoot tens of
Even the Microsoft programmers found ways around this limitation in the days of DOS, by the way, so there really isn’t any excuse for the standard to limit itself like this. As it is, I’m surprised an enterprising camera company hasn’t figured out that they could use an EXIF tag to store long, meaningful file names and then have their transfer software simply substitute it for the short name when the file is moved!
Thom Hogan’s Complete Guide to the D70 Page 119
53

thousands of images a year for a living are forced to do so by the camera’s behavior. Don’t let losing an image be the catalyst for getting serious about file renaming on transfer. As Nike’s slogan says: just do it!
File Numbering Sequence The D70 allows you to specify when file numbers are reset. You have three choices:
• Off. File numbers are always started at 0001 whenever a new folder is created, when the storage card is formatted, or a new storage card is inserted into the camera.
• On. File numbers are incremented until they reach 9999, at which point a new folder will be created and the file numbering will begin again at 0001.
• Reset. The file number is reset to 1+the current file number in the current folder (if there are no images in the current folder, numbering is reset to 0001).
Of these options, On makes the most sense, and is the one I use on all my Nikon DSLRs. That’s because file name duplication is dangerous—you could accidentally erase or overwrite a file you wanted to keep.
õ To set File Sequence Numbering:
1. Press the Menu button to see the menu system.
2. Use the Direction pad to navigate to the SET UP tab (yellow wrench icon) and press > on the Direction pad to select it.
Thom Hogan’s Complete Guide to the D70 Page 120

3. Use the Direction pad to navigate to File No. Seq. and press the > key on the Direction pad to select it.
4. Use the Direction pad to navigate to the option you wish to set and press the > key on the Direction pad to select it.
Thom Hogan’s Complete Guide to the D70 Page 121

Camera Setup Before using your D70, you need to make a few settings to establish some basic information the camera needs. In this chapter I’ll introduce the SET UP menu, then take you through a few of the things you ought to set the first time you use the camera.
Note: Many of the D70’s settings require navigating options displayed on the color LCD. In general, you use the % and " keys on the Direction pad to navigate up and down between choices, then use the > key to select one. If there are sub-choices, you use again use the % and " keys to navigate up and down between choices, then use the > key to select one. The D70 displays >OK at the end of an option name to indicate that you should press the > key to make your selection. In practice, you’ll find that you quickly adapt to using this navigation and selection method.
The SET UP Menu
A few camera options are set via a menu system displayed on the color LCD. These options are organized in a “tabbed interface” where it sometimes takes several actions to get to them.
õ To get to the SET UP menu, press the Þ button, then use the % and " keys on the Direction pad to navigate to the SET UP tab (the yellow wrench icon at the bottom left of the display—you may have to use the < key to get over to the tabs first!). Press the > key on the Direction pad to get to the individual options within the SET UP menu. You’ll see a short list of options54:
Nikon is up to their old tricks: they’ve changed the order of items on the D70’s menus from those on previous cameras (they’ve also changed some names). This really is silly and can be frustrating to users of multiple Nikon bodies. In particular it’s an issue with the SET UP menu because that’s where the Language option is found. If you shoot with a D1X and a D70, like I do, and if some practical joker switches your menus to Japanese (worse still, the original firmware of the D1X had a bug in the software that would trigger that!), wouldn’t you expect to find the menu option for switching languages in the same spot on the two cameras?
Thom Hogan’s Complete Guide to the D70 Page 122
54

Folders Sets the current recording folder, or allows you to create, delete, and rename folders.
File No. Seq. Sets the way in which the camera numbers files.
Format Wipes all information stored on the CompactFlash card (see “Using CompactFlash,” on page <75>).
CSM Menu Sets whether you see simplified (9 items) or full (25 items) custom setting information.
Date Sets the date and time (see “Date, Time, and Language,” on page <125>).
Thom Hogan’s Complete Guide to the D70 Page 123

LCD brightness Sets the brightness of the color LCD on the back of the camera (see “LCD Brightness Setting,” on page <130>).
Mirror lock-up Enables the mirror to be locked up out of the way for CCD cleaning. This option is grayed out unless the camera is running off power connected to the DC In socket (e.g., the AC Adapter).
Video mode Sets the video format (see “Television Playback,” on page <256>).
Language Sets the language used for the menus on the color LCD (see “Date, Time, and Language,” on page <125>).
Image comment Allows a comment to be appended to your image files (see “Programming a Comment,” on page <128>).
USB Allows you to change the way the camera presents itself to the computer (either as a mass storage device [e.g., like a hard drive], or as a point-to-point device [e.g., like a peripheral that interacts with the computer]).
Dust ref photo Allows you to take a dust removal reference photograph for use with Nikon Capture.
Firmware Ver. Displays the current firmware version of the camera.
Image rotation Enables or disables the automatic image rotation sensor.
Despite the name “SET UP”, not all of the items grouped on this menu are things that you do when you initially set the camera up. I’ll tackle the items in the order and organization I think more appropriate. Right now, we’re simply looking to get the camera set up properly for shooting. Individual settings
Thom Hogan’s Complete Guide to the D70 Page 124

we might change in response to the scene we’re photographing will be dealt with later.
Date, Time, and Language
An internal battery powers a clock/calendar function within the D70. The clock/calendar is used to add information to the EXIF header about when a picture was taken.
Note that the first time you turn on your D70, you’ll be automatically taken to this function (essentially Step 5 in the steps below).
Note: If the & icon is blinking in the top left corner of the top LCD, then the internal battery ran low on power and the date and time were reset. Make sure that the main camera battery is fully charged and reset the date. Don’t take the main battery out for a day or two.
õ Set the time and date using the following steps:
1. Turn the camera ON.
2. Press the Þ button to turn on the color LCD.
3. Use the Direction pad to navigate to the SET UP tab (the yellow wrench icon at the bottom left of the display—you may have to use the < key to get over to the tabs first!).
4. Use the Direction pad to navigate to the Date option. Press the > key to select it.
Thom Hogan’s Complete Guide to the D70 Page 125

5. Use the % and " keys on the Direction pad to set the Year value. Press the > key to move to the next field.
6. Use the % and " keys on the Direction pad to set the Month value. Press the > key to move to the next field.
7. Use the % and " keys on the Direction pad to set the Day value. Press the > key to move to the next field.
8. Use the % and " keys on the Direction pad to set the Hour value. Press the > key to move to the next field.
9. Use the % and " keys on the Direction pad to set the Minute value. Press the > key to move to the next field.
10. Use the % and " keys on the Direction pad to set the Second value.
11. Press the ENTER button to save the data you just entered.
Note: If you pause for 20 seconds or more during Steps 3 through 10, the D70 automatically turns off and cancels any
Thom Hogan’s Complete Guide to the D70 Page 126
changes you’ve made up to that point. Alternatively, you can press the shutter release halfway (or more) during Steps 3 through 10 to cancel the operation.
Note: The camera does not automatically adjust for daylight savings time, though it does know about leap years.
The D70 can display menus on the color LCD in ten languages: English, Chinese, Dutch, German, French, Italian, Japanese, Korean, Spanish, and Swedish. If you’ve purchased an official import of the D70 (i.e., not a gray market55 model), it should already be set to the appropriate language. As with the Date function, the D70 automatically takes you to this setting when you first turn on the camera.
õ If you’d like to change the camera’s displayed language:
1. Turn the camera ON.
2. Press the Þ button to display the Menu system.
3. Use the Direction pad to navigate to the SET UP tab (the yellow wrench icon) and press the > key on the Direction pad to select it.
4. Use the Direction pad to navigate to Language (the second item on the second page of options, and whose current value is shown as a two-letter abbreviation) and press the > key on the Direction pad
Gray market products are those that are brought into a country by someone other than the official importer. Nikon’s warranties generally only apply to officially imported cameras. In the US, especially, Nikon is particularly careful to only repair officially imported cameras.
Thom Hogan’s Complete Guide to the D70 Page 127
55

to select it.
5. On the new menu that appears, use the Direction pad
are in a quasi-alphabetical order—Chinese: German: De Deutsch, English: En English, Spanish: Es Español, French: Fr Français, Korean: , Italian: It Italiano, Japanese: , Netherlands (Dutch) Ne Nederlands Swedish: Sv Svenska). Press the >
, to navigate to the language you desire (the languages
key on the Direction pad to lock in your choice.
Note: Changing the camera’s language only applies to the menus displayed on the color LCD. Information displayed in the viewfinder and on the top LCD and viewfinder remains in anglo-based icons.
Programming a Comment
õ The D70 allows you to place a short comment in the EXIF data of every photograph you take. I suggest that you use it to enter a Copyright notice on your images:
1. Turn the camera ON.
Thom Hogan’s Complete Guide to the D70 Page 128

2. Press the Þ button to display the menu system.
3. Use the Direction pad to navigate to the SET UP tab (the yellow wrench icon) and press the > key on the direction pad to select it.
4. Use the Direction pad to navigate to Image comment (before you set it, the current value is shown as --) and press the > key on the Direction pad to select it.
5. Use the Direction pad to navigate to Input comment and press the > key on the Direction pad to select it.
6. On the input screen that appears:
Thom Hogan’s Complete Guide to the D70 Page 129

a. Use the Direction pad to navigate to the next letter you want to enter.
b. Press the ?n key to enter the selected letter.
c. If you need to move the cursor back to fix something, hold down the Thumbnail button (z) and use the Rear Command dial to move it.
d. If you have more letters to enter, return to Step 6a, otherwise press the ENTER button to return to the previous menu.
7. Use the Direction pad to navigate to Attach comment and press the > key on the Direction pad to select it.
8. Navigate to Done and press the > key to finish.
Tip: I use the comment (c) 2004 Thom Hogan/bythom.com on my D70. You can enter up to 36 characters in your comment. Choose wisely grasshopper. (One person has suggested that you enter IF FOUND CALL ###-####, but remember this is what appears on your images—it doesn’t normally show on the camera itself except during setting.)
LCD Brightness Setting
õ The D70 allows users to set a brightness value for the color LCD monitor on the back of the camera:
1. Press the Þ button to bring up the menu system.
Thom Hogan’s Complete Guide to the D70 Page 130

2. Use the Direction pad to navigate to the SET UP tab (the yellow wrench icon).
3. Use the Direction pad to navigate to LCD brightness and press the > key on the Direction pad to select it.
4. Use the % and " keys on the Direction pad to select brighter or darker display. You’ll see a swatch of patches from black to white to help you assess your adjustment.
5. Press the > key on the Direction pad to confirm your choice.
Novice DSLR users have a tendency to “crank up” the brightness of the color LCD. Moreover, they rely upon it too much to make visual assessments of the photo they just took. Unfortunately, both of these things are wrong.
First, the swatch of patches shown in Step 4 is there to help you get a full tonal range display from black to white with a complete gradation in between. If you arbitrarily set the brightness higher, you’ll note that several of the patches on
Thom Hogan’s Complete Guide to the D70 Page 131

the right side are all white (the opposite, setting too low, would produce multiple black patches on the left side). You’ve effectively told the display to show all bright tones as white—you’ll never be able to see what’s going on in the highlight regions of your image.
The correct setting for the LCD brightness is to see all 10 of the tonal patches distinctly from one another and with even gradations, which almost always means a setting of –1 on the D70.
But the bigger problem is that the color LCD is not color or brightness profiled. If something looks too bright or too red on the color LCD, it may or may not be in your actual photo data. The only way to visually assess an image accurately is to display it on a color-calibrated monitor using the correct color space profile.
Image Quality
I covered it earlier (in “Image Formats,” on page <81>), but since image quality and size settings are something that you normally attribute to “setting up the camera,” this is a good place to summarize the choices and the method of setting them.
The D70 supports four levels of image quality (plus you can record NEF and JPEG BASIC simultaneously):
RAW (NEF) Images are always compressed; you’re saving a visually lossless version of the 12-bit sensor data and a list of camera settings, not a finished image. This is the highest quality image the D70 can create.
FINE (JPEG) Images are compressed at a ratio of about 1:4 and stored as JPEG files. Compression artifacts are present, but generally not visible, and all current camera settings are used to create an 8-bit image from the original data.
Thom Hogan’s Complete Guide to the D70 Page 132

NORM (JPEG) Images are compressed at a ratio of about 1:8 and stored as JPEG files. Compression artifacts are present, and will likely be visible on close examination (especially if sharpening is used or you’re using a high ISO value), and again all camera settings are used to create an 8bit image from the original data.
BASIC (JPEG) Images are compressed at a ratio of about 1:16 and stored as JPEG files. Compression artifacts are present and often visible (especially if sharpening is set or you’re using a high ISO value), and again all camera settings are used to create an 8-bit image from the original data.
You also have a choice of Large, Medium, and Small sizes in the three JPEG formats.
Starting out, you probably should select FINE L (Large) to shoot in, as this results in high quality, reasonable-sized files that can be used in virtually any digital photo software product. It also has the decided advantage—in my humble and slightly sadistic opinion—of showing you when you make other setting mistakes, which helps you learn faster. What do I mean by that? Well, if you get the White Balance setting wrong while shooting JPEG images, the color in your photos will be wrong. If you get White Balance wrong when shooting NEF, you simply change the setting in editing.
Thom Hogan’s Complete Guide to the D70 Page 133

Approximate Images Per Card Format Size 128MB 256MB 512MB 1GB 2GB RAW 5500 JPEG FINE L 2900 JPEG FINE M 1600 JPEG FINE S 800 JPEG NORM L 1500 JPEG NORM M 800 JPEG NORM S 400 JPEG BASIC L 800 JPEG BASIC M 400 JPEG BASIC S 200 NEF+JPEG BASIC L 6300
24 48 95 191 381 45 90 181 362 723 82 164 328 655 1311
164 328 655 1311 2621 87 175 350 699 1398
164 328 655 1311 2621 328 655 1311 2621 5243 164 328 655 1311 2621 328 655 1311 2621 5243 655 1311 2621 5243 10486 21 42 83 166 333
Size is in K (e.g., 5500 is 5.5MBs) and the average I’ve seen in using my camera, not Nikon’s listed sizes.
Note: Not all CompactFlash cards labeled of a particular size actually have the same capacity due to differences in file allocation and marked bad sectors. Moreover, a card marked 256MB often has slightly less than 256MBs of space. With larger capacity cards, actual capacity is typically about 5% less than stated size.
Thus, the numbers in the above table are an approximation only. If you shoot a scene with a great deal of detail and Sharpening set to High on a CompactFlash card that overstates its capacity, you may get far fewer images than listed in these tables, especially with JPEG images. Conversely, if you shoot non-detailed scenes with Sharpening set to OFF on an efficient CompactFlash card, you may get slightly more images than shown. Like EPA mileage labels on cars, what you actually achieve may not be what the manual indicated.
õ To set Image Quality (and Size):
1. Press the Menu button to see the camera menus.
2. Use the Direction pad to navigate to the SHOOTING Menu (green camera icon).
Thom Hogan’s Complete Guide to the D70 Page 134

3. Use the Direction pad to navigate to the Image Quality option. Press the > key on the Direction pad to see the sub-options.
4. Use the Direction pad to navigate to the quality you want to use.
5. Press the > key on the Direction to set the Image Quality. If you’ve set a quality that includes a NEF image, you’re done and can skip the remaining steps.
6. Use the Direction pad to navigate to the Image Size option. Press the > key on the Direction pad to see the
Thom Hogan’s Complete Guide to the D70 Page 135

sub-options.
7. Use the Direction pad to navigate to the size you want to use.
8. Press the > key on the Direction pad to select it.
Alternatively, if the LCD is OFF (not showing images or menus), then Image Quality can be set by holding down the QUAL button and rotating the Rear Command dial; Image Size can be set by holding down the QUAL button and rotating the Front Command dial. (Look at the Top LCD to see what you’re setting.)
Top LCD:
Thom Hogan’s Complete Guide to the D70 Page 136

Viewfinder Adjustment
The D70 allows you to adjust the viewfinder to help accommodate small differences in vision.
Just to the right of the viewfinder eyepiece, you’ll find a small slider. What this lever controls is the diopter value used for the viewfinder. Diopter is a unit of measurement that describes the refractive power of a lens. The default value (the center click stop on the dial) is set at –1 diopter, and the range that’s supported directly by the viewfinder goes from –1.6 diopters to +.5 diopter.
In prescriptions for glasses, negative diopter numbers indicate correction for nearsightedness. In camera viewfinders, the diopter value controls the apparent distance at which the viewfinder appears (the default is 1 meter away, the equivalent of –1 diopter). If your vision isn’t sufficiently able to (or corrected to) focus on objects at that distance, you’ll need to adjust the diopter value.
õ To adjust the diopter value:
1. Defocus the lens on the camera until the scene in the viewfinder is completely blurred.
2. Look carefully at the focus brackets in the viewfinder. Are they sharp and distinct? If not, move the Diopter lever next to the viewfinder eyepiece either up or down until the focus brackets are sharp.
3. Verify the setting by having the camera focus on a subject and checking to see that the image in the viewfinder appears sharp (it may not be perfectly so, as the viewfinder glass tends to diffuse detail slightly, but you should still be able to verify that focus is sharp).
If you wear glasses or contact lenses, make sure to let your optometrist know that you’re a photographer, and that the viewfinder image is formed at a distance of 1 meter with an
Thom Hogan’s Complete Guide to the D70 Page 137

eyepoint relief of 18mm. He may make slight adjustments to your prescription that help you see the image in the viewfinder more clearly.
If you need more correction than the built-in adjustment allows, you can purchase alternative eyepiece correction lenses. You can buy –3, -2, 0, +1, or +2 lenses to add to the viewfinder, and it’s easy to do (they mount in place of the DK16 rubber cup). The range of adjustment remains the same. In other words, if you add a –3 lens, your adjustment range would be from –4.6 to –2.5.
Note: When you use the optional correction diopters, you can’t use the DK-16 rubber eyepiece that comes with the camera, nor can you use the optional right-angle finder.
Resetting the Camera
Because the D70 has an enormous number of user-settable options, Nikon has provided a quick reset system to bring the camera back to the factory default settings. Unlike some of the professional Nikon DSLR bodies, the D70 doesn’t have “banks” of settings so that users can rapidly move between two different camera states, so sometimes the fastest way to move between two different sets of shooting options is to reset the camera to its initial state and then change only those things that you want different from the default.
Resetting Basic Settings
õ To reset the basic camera settings, hold the BKT and Metering Method buttons (both marked with a green •) for more than two seconds. The following basic camera settings are returned to their defaults:
Settings after Reset Setting Default Image quality JPEG Normal Image Size Large ISO Sensitivity ISO 200
Thom Hogan’s Complete Guide to the D70 Page 138

White balance
Focus area
Flexible program
Exposure lock Exposure compensation
Flash Exposure comp.
Flash Value Lock
Auto with 0 adjustment (e.g., + and – adjustments are cancelled) Central sensor (unless Custom Setting #3 was set to Closest Subject Priority). Cancelled (e.g., camera follows regular program table) Off 0 stops (e.g., no exposure compensation set) 0 stops (e.g., no flash exposure compensation set) Off
LCD Illumination Off BracketingFlash options
Off Front curtain sync (e.g., no Slow or Rear Sync option is set)
Resetting Custom Settings
See “Custom Settings Reset,” on page <266>.
The Last Resort Reset
The D70 contains considerable electronics, including a CPU and dedicated digital processors. Like a computer, it can sometimes get confused. If the camera is locked up or displaying unusual or garbled characters, you’ve got one additional option for resetting the camera:
1. Turn the camera OFF.
2. If you’re using battery power, remove and replace the battery. If you’re using AC Power, unplug and reconnect the adapter.
3. On the bottom of the camera is a small opening with a recessed button. Using a small-tipped object (the end of a paper clip works well), press the button.
4. Turn the camera back ON.
Thom Hogan’s Complete Guide to the D70 Page 139

If the camera is now working normally, set the date, time, and any other settings you may have lost (the camera is essentially set back to the way it came from the factory). If the camera still isn’t working properly and you’ve checked to make sure that you haven’t made a setting that is causing a problem, you’ll have to return it to Nikon for servicing (see “Getting Service,” on page <502>).
Firmware Version
The D70 has had no firmware updates as of this writing:
• The first shipping models were labeled A1.00, B1.01.
Note: The two numbers refer to different sections of the software in the camera. Speculation has it that A refers to firmware, while B refers to the user software (menu system).
õ To determine which version you have:
1. Press the Menu button to see the menu system.
2. Use the Direction pad keys to navigate to the SET UP tab (yellow wrench icon).
3. Use the Direction pad keys to navigate to Firmware Ver.
Thom Hogan’s Complete Guide to the D70 Page 140

4. Press the > key on the Direction pad to display the firmware version.
Thom Hogan’s Complete Guide to the D70 Page 141

Camera and Shooting Controls Now that we’ve gotten the basics out of the way, let’s look at the specific controls that come into play as you’re preparing to take a picture. We’ll also look at your options for reviewing the picture you just took, and for connecting the camera to the computer.
Metering and Exposure
Metering Modes
õ On the top of the camera just behind the shutter release, press and hold the Metering Method button while rotating the Rear Command dial. The Top LCD displays the metering method icon for your current selection.
The D70 has three metering modes available:
Matrix
t Matrix metering is a system that divides the image area into pieces (the “matrix”) and analyzes the differences between them. The brightness pattern seen in the matrix is compared against a Nikon-proprietary database of image patterns stored in the D70’s internal memory, and the exposure is set accordingly.
Unlike other consumer Nikon bodies, the D70 uses a dedicated 1005-cell CCD in the viewfinder to provide metering, ala the much more expensive F5 and D1 series cameras.
Thom Hogan’s Complete Guide to the D70 Page 142

The 1005-cell covers most, but not quite all of the image frame. It’s very immune to bright or dark objects at the viewfinder extremes.
If a D-type or G-type lens is used (with or without flash), matrix metering also takes into account the focus distance to help guess where the subject is and what kind of shot you’re taking. Example: normally, the matrix meter slightly discounts brightness in the upper half of the scene, as it thinks this is sky, and unimportant; however, if you’re using a wide angle lens and are focused near infinity, the camera thinks that you’re taking a landscape photo and doesn’t discount the sky exposure as much.
The D70 matrix metering system relies on four key data points:
1. The overall brightness of the scene.
2. The differences in light measured across the sensor data.
3. The focus area that has been selected (which the camera assumes says something about where the “subject” is located).
4. Distance information from the lens.
The key word in item #2 is “differences.” Sky, for example, is usually very bright; near subjects we photograph tend to be less bright. You can probably guess that if the upper left and upper right areas metered are considerably brighter than the lower left and lower right areas, then the camera is going to think you’re taking a picture of someone with sky in the background. In such a case, the sky usually isn’t considered
Thom Hogan’s Complete Guide to the D70 Page 143

important to the exposure, so the camera adjusts its exposure to match what it sees in the other areas. Just remember that it’s the difference in brightness between areas that is a primary key to the matrix metering system, not the actual values measured.
However, note that no meter can perfectly deal with any situation that has a very high contrast range (large variation in brightness), especially ones that exceed the dynamic exposure range of the camera (which, by the way, describes many daylight scenes that include sky). In scenes with a large dynamic range either the bright portions of the scene will have to be overexposed or the dark portions underexposed.
One thing that catches novices by surprise is that the D70’s matrix meter tries to preserve highlight detail over shadow detail in high contrast situations. That’s because a highlight, once overexposed, is unrecoverable on a digital camera (on print film, you could often recover something that was as much as three stops overexposed).
Whether the camera picks the right thing to expose properly depends upon a number of things:
• If the difference in brightness across the entire matrix meter is minimal (by definition, a low contrast scene), the matrix metering is nearly perfect (and the meter tends to use what it sees in the central region, almost like center-weighted metering).
• Nikon’s matrix meters almost universally significantly underexpose off-center subjects in very high contrast situations, especially so if the subject is outside the autofocus sensor areas. The D70 is prone to this, though not as much as some earlier cameras; again, Nikon was trying to keep highlight areas from being blown out. If the camera sees a very bright area anywhere near the center of the frame, watch out, the camera will likely base its exposure there. And if you’re using manual focus and the
Thom Hogan’s Complete Guide to the D70 Page 144

subject is off-center and not in focus according to the nearest sensor, consider the warning doubled.
• Centered subjects that don’t fill more than a third of the frame are also likely to show underexposure in high contrast situations. That’s more true if the lower left and lower right regions have brighter areas in them (relative to the subject). That’s because the camera tends to use an average of the regions in very high contrast scenes, and the subject in this case doesn’t fill enough of the image to influence the average.
• Overall scene brightness plays a part in the final camera decision. Nikon once tried to build a diagram of how brightness and contrast information interacted, but it was very confusing and didn’t reveal much detail useful to the casual photographer. The key point that diagram revealed was that in very bright and very dim scenes, the camera sets exposure differently. If I had to characterize this, I’d do so as follows:
• In very dark scenes, the central region is usually considered the most important, and exposure is biased towards what is seen there.
• In very bright scenes, the camera sets exposure either biased towards the lowest value it sees (usually only when contrast is low), or towards an average across the scene (when contrast is very high).
• The camera biases exposure towards the brightest area in a scene when contrast between regions it is measuring is seen as low, and you’re in “normal” lighting (not too bright, not too dim).
• If the contrast between matrix regions is very low, there’s always a tendency for the matrix meter to set an exposure based upon the central area, regardless of brightness.
Thom Hogan’s Complete Guide to the D70 Page 145

Don’t panic. While that was a lot of detail, we’ll make a bit more sense of how to evaluate an exposure in the Histogram description coming up later in this section.
Center-weighted
u Nikon’s center-weighted metering system measures the entire frame, but effectively separates it into two zones, the central area and the outer area. The exposure is based 75% on the central area, 25% on the outer area. In other words, if the central area metered f/4 at 1/125 and the outer area metered f/16 at 1/125, the exposure would be set somewhere around f/5.6 at 1/125.
Center-weighted metering uses an area slightly smaller (gray area marked 2) than the circle you see in the viewfinder. 75% of the meter value is based on the gray area (2), 25% on the remaining portions of the frame (1).
The central measuring area is slightly smaller (0.31” [8mm]) than the area indicated by the large (0.47” [12mm]) circle in the viewfinder (the one that touches the left- and rightmost autofocus sensor indicators). You can change the size of the central area by using Custom Setting #11 (see “Center Circle Size,” on page <280>), though I personally don’t find this to be an overly useful feature.
Spot
v Spot metering targets a tight 3mm area (approximately 1% of the frame according to Nikon) centered on one of the autofocus sensors. Most professionals tend to use spot metering when they have enough time to do a critical evaluation of a scene. That’s because they can isolate individual bright and dark objects to help make critical exposure decisions.
Thom Hogan’s Complete Guide to the D70 Page 146

The spot meter follows the autofocus sensor being used except when Closest Subject Priority is set (see Custom Setting #3 (see “Autofocus Area Mode,” on page <269>), in which case only the central sensor is used (see also “Metering Compatibility,” below). Use the outer edges of the autofocus brackets to envision the circle of what’s being metered—the actual area is about 50% larger than the brackets in size (see illustration, below).
Spot metering occurs centered on one of the autofocus sensor areas. Note the area metered is larger than the autofocus sensor brackets indicate.
Note: There are a couple of spot metering nuances that catch some users by surprise (and confuses others). Like the N80 (and most other recent Nikon bodies), the D70’s spot meter uses the current autofocus sensor most of the time (see “Metering Compatibility,” below). What does that mean, exactly? After all, in Dynamic Area autofocus the D70 tries to follow subjects that move across the frame, and may use different sensors.
The D70 normally uses the autofocus sensor you selected using the direction pad as the initial sensor. If the camera detects that the subject has moved and moves the autofocus sensor being used, spot metering will follow! If Closest Subject Priority is enabled, the camera uses only the center sensor to meter, regardless of the sensor that ends up being used for focus. (This, by the way, is one of the reasons why I recommend using the custom settings to turn Closest Subject Priority OFF, which thankfully, Nikon has finally decided to make the default.)
Confused? Well, by switching the camera to manual focus you can avoid this confusion: the camera will use the
Thom Hogan’s Complete Guide to the D70 Page 147

currently selected autofocus sensor for spot metering in all cases.
Metering Compatibility Lens Type Matrix Center-weighted Spot AF type D or G Yes1 Yes Yes AF-S or AF-I Yes1 Yes Yes AF-I Teleconverter Yes1 Yes Yes AF (non-D) Yes Yes Yes AI-P2 Yes Yes Yes AI, AI-S, or AI upgraded No No No AI Teleconverters No No No 1
3D metering (distance information used) 2
The PC Micro Nikkor 85mm f/2.8D only meters correctly when not shifted
Metering with Digital Requires Care
For many of you reading this book, the D70 is your first excursion into digital SLR cameras. If you’ve previously used a 35mm SLR body with print film, you’re likely going to be a bit frustrated with exposure when you first start using the D70.
Print film has advantages for casual shooting that you may not have known about, but certainly benefited from:
• Print film has a wide “latitude,” or tolerance to exposure error. Indeed, overexposing print film is something that professionals tend to do routinely, as it has little consequence on highlight detail but increases density of shadow areas.
• Automated print processors “fix” most minor problems. Besides correcting for exposure errors of from –2 to +3 stops, they also rebalance colors.
Thom Hogan’s Complete Guide to the D70 Page 148

When you use a DSLR, you lose both of those advantages. Exposure for digital cameras has to be precise—there is virtually no latitude for error56.
Consumer digital cameras such as the Coolpix do a great deal of image post-processing (a bit like those automated print machines used in the lab where you had your film developed), and often make substantive contrast changes to deal with exposure errors. In some more sophisticated cases, the highlight values are “compressed,” sacrificing bright detail for overall contrast. For snapshot shooting and small print sizes, that’s a tolerable tradeoff. But one reason to move to a DSLR is to get away from a key liability of the consumer digital cameras: propensity for noise (especially in shadow areas). Heavy contrast and exposure modification in camera tends to make any underlying noise properties more visible, thus DSLRs aren’t as aggressive at “fixing” exposures, even though they have better noise tendencies than their consumer cousins.
So, by moving to a DSLR you get more control over what the camera does. Heavy post-processing of images by the camera would prevent you from exercising that control.
Shooting with a DSLR like the D70 is akin to shooting with slide film on a 35mm SLR: to get the best possible image quality out of the camera, you’ll need to be fairly precise in setting exposure. Overexposure results in loss of data.
Nikon’s DSLR designs, to date, all attempt to preserve highlight detail. With a few exceptions I’ll deal with elsewhere, the D70 does, too. In digital, when more light photons hit the sensor than it can hold (i.e., overexposure), no additional data is recorded; the photosite is saturated. This is like a brick wall for exposure: any truly overexposed area will
You’ll hear that NEF files can have their exposure adjusted after the fact. That’s not exactly true. When you use a conversion program to change NEF exposures you don’t actually change the exposure, you change the way the data is interpreted (similar to using a Curve in Photoshop).
Thom Hogan’s Complete Guide to the D70 Page 149
56

simply record as the maximum data value (255,255,255 for 8bit data). This is called “blowing out the highlights.” With inkjet printer technologies, no ink is put down on the paper in areas at the maximum data value, making for a visible discontinuity if you look carefully. Overexposure is therefore bad news.
The matrix metering system in the D70 sometimes has a tendency to produce images that don’t blow out highlights, though this sometimes makes them look a bit dull and underexposed. The simplest way to deal with such images is to change the exposure linearity using a Curve in Photoshop. Another way is to alter the camera’s settings; in particular, you can use a Custom Curve for Tone (see “Custom Curves,” on page <372>).
Take the time to learn how to control exposure with your D70. Fortunately, the camera has some useful tools that’ll help you do just that, which I’ll cover next.
Options for Evaluating Exposure
The D70 has two useful exposure evaluation features that analyze the exposure data after you’ve taken a picture, HISTOGRAM and HIGHLIGHTS. Unlike previous Nikon DSLRs, these features are always “on”—you don’t have to change any settings to have access to them.
Here’s what each feature does:
Histogram One of the information display pages on the color LCD for each image shows an exposure histogram, which helps you evaluate the overall exposure. The horizontal axis is brightness (dark at left, bright at right). The vertical axis is the number of pixels that have that brightness. Essentially, a histogram is a graphical display of how exposure is distributed across the range of values the
Thom Hogan’s Complete Guide to the D70 Page 150

camera recorded (See “How to Interpret Histograms,” on page <367>.)
Highlights One of the information display pages on the color LCD for each image shows locations of pixels that exceed a certain value by blinking them. If a large group of pixels is blinking, you may have overexposed the image (at a minimum, you’re likely losing highlight detail).
Note: Highlights works slightly different on the original D1 than it does on subsequent Nikon digital SLRs, which could be important to understand if you’re upgrading from a D1 to the D70. On the original D1, only pixels that were 255, 255, 255 (absolute white) were blinked. On the D70, pixels “near” absolute white are also blinked (Nikon hasn’t disclosed what level triggers blinking). Basically, Nikon tweaked this function so that it more accurately shows when you will be generating areas that have no usable highlight detail.
Exposure Modes
The D70 has four exposure modes, plus seven so-called Scene exposure modes. Let’s deal with the primary exposure modes first:
P Program—In this exposure mode, the D70 automatically adjusts both the aperture and shutter speed to create a properly exposed image. The combination picked is based upon a predetermined table in the camera (see “Program Exposure Table,” on page <153>). You may override the selection chosen by the camera by rotating the Rear Command dial (called Flexible Program by Nikon).
A Aperture-preferred—You control and choose the aperture setting (using the Front Command dial) and the D70 automatically picks the correct shutter speed to create a properly exposed image. Note that the shutter speed the camera picks is incremented in 1/3 stops with the default camera settings in this mode.
Thom Hogan’s Complete Guide to the D70 Page 151

S Shutter-preferred—You control and choose the shutter speed (using the Rear Command dial) and the D70 automatically picks the correct aperture to create a properly exposed image. The aperture chosen is incremented in 1/3 stops in this mode with the default camera settings.
M Manual—You control and choose both aperture (Front Command dial) and shutter speed (Rear Command dial); the D70 advises you on exposure by activating an analog metering bar in the viewfinder showing what your current choices would produce.
õ To select the exposure mode, turn the Mode dial on the top left of the camera to the desired position (P, A, S, or M).
Note: If the lens mounted on the D70 does not have what Nikon calls a CPU57 (i.e., it is an AI or AI-S lens) and you are in Program, Aperture-priority, or Shutter-priority exposure mode, the camera won’t take a picture and both the top LCD and viewfinder display a blinking F--. Move the Mode dial to the M position (Manual exposure) and control apertures using the aperture ring on the lens.
As noted earlier, the Program exposure mode uses a predetermined combination of aperture and shutter speed based upon how much light is in the scene and the maximum aperture of the lens (it also considers focal length; see table, below).
You can override the program by rotating the Rear Command dial when the meter is active (note, however, that the overall exposure remains the same; in other words, if your override increases the shutter speed, the aperture is decreased, and vice versa). A small asterisk appears next to the ] (e.g., ]*) in the top LCD when you’ve overridden the camera’s program settings. Note also that once you override the program, it
It’s not actually a central processing unit as the name implies, but rather a chip that passes on a set of values that describe a few pieces of data about the lens (maximum aperture, focal length, focus distance).
Thom Hogan’s Complete Guide to the D70 Page 152
57

remains overridden until you change the exposure mode, turn the power switch to OFF, or perform a camera reset.
Program Exposure Table (at ISO 200) EV Wide Angle/Normal Mod. Telephoto Telephoto
1 f/1.4 1 second 2 f/1.4 1/2 3 f/1.4 1/4 4 f/1.4 1/8 5 f/1.7 1/12 6 f/2 1/15 7 f/2.4 1/23 8 f/2.8 1/30 9 f/3.5 1/45 10 f/4 1/60 11 f/4.8 1/90 12 f/5.6 1/125 13 f/6.7 1/180 14 f/8 1/250 15 f/9.5 1/350 16 f/11 1/500 17 f/13 1/750 18* f/16 1/1000 19* f/16 1/2000 20* f/16 1/4000 21* f/22 1/4000
f/2.8 f/2.8 f/2.8 f/2.8f/2.8f/2.8f/2.8f/2.8f/2.8f/2.8f/3.5f/4
f/4.8f/5.6f/6.7f/8
f/9.5f/11f/13f/16f/22
4 seconds 2 seconds 1 second
1/2 1/4 1/8 1/15 1/30 1/60 1/125 1/180 1/250 1/350 1/500 1/750
1/1000 1/1500 1/2000 1/3000 1/4000 1/4000
f/4 8 seconds f/4 4 seconds f/4 2 seconds f/4 1 second f/4 1/2 f/4 1/4 f/4 1/8 f/4 1/15 f/4 1/30 f/4 1/60 f/4 1/125 f/4 1/250 f/4 1/500 f/4 1/1000
f/4.8 1/1500 f/5.6 1/2000 f/6.7 1/3000 f/8 1/4000 f/11 1/4000 f/16 1/4000 f/22 1/4000
* Not possible with matrix metering, as it exceeds the meter’s brightness range
Note: There are two things you should note from this table. First, the camera uses focal length to determine at which point it starts increasing aperture and shutter speed simultaneously. Until that shutter speed is reached, the camera will opt to keep the lens wide open. In the moderate telephoto realm (~70-200mm), the shutter speed is 1/125; for longer telephotos, the shutter speed is 1/1000. Second, in very bright light (EV 18 or higher), you may not get a correct exposure with the matrix meter.
Students who’ve been to my workshops know that I’m not a fan of Program exposure mode. That’s mostly because Program exposure mode has some hidden liabilities when using flash, but also because most users don’t take the time to understand exactly how the camera is making its exposure
Thom Hogan’s Complete Guide to the D70 Page 153

decisions or even that once they’ve overridden the “program” it stays overridden. Don’t be a “lazy” photographer and use Program exposure mode casually. If you’re serious about controlling depth of field, camera shake, subject motion, and a host of other factors that come up while making photographs, get out of Program exposure mode and take more direct control over what the camera is doing. For example, many pros use Aperture-priority exposure mode because the aperture is the most important variable they need to control; sports photographers tend to use Shutter-priority.
Scene Exposure Modes
Nikon calls the additional, special exposure modes “Digital Vari-Program modes” in the D70 manual. They are similar to the Program exposure mode in that the camera makes all the decisions, but each varies the way in which Program exposure mode works. I’m not a big fan of these exposure modes for several reasons:
• The scene exposure modes dramatically limit other camera settings you can make (see table at end of section). Essentially, they treat the camera user (you!) as an idiot that doesn’t know what they’re doing, so they “lock out” virtually all options. You get almost no ability to override the camera, and you’d better hope the camera gets the exposure right, because you don’t get to control the metering method or override the selected exposure in any way. Ouch! Other examples: Optimization settings are set to something Nikon thought was appropriate for the subject, white balance is set to Auto, and flash will be used automatically in low light.
• Except for Close Up exposure mode, all of the Scene exposure modes select the focus sensor using a technique called Closest Subject Priority. What that means is that the autofocus sensor that sees the closest subject is used for focusing, regardless of whether that’s really the subject or not. A classic case is this: you hand your camera to a waiter to take a picture of you at a restaurant and the
Thom Hogan’s Complete Guide to the D70 Page 154

camera sees the table in the bottom sensor as the closest subject. The table is nicely focused, but you aren’t!
• None of the scene exposure modes sets exactly what a professional would for the circumstance; in essence, none of Nikon’s choices make the kind of change a knowledgeable user would in each scenario.
• The Scene exposure modes all have the liabilities of Program exposure mode. When you use flash, those liabilities become extremely problematic.
• The Scene exposure modes set color spaces! Auto, Portrait, and Sports set Color Space 1a (sRGB); Landscape, Close Up, Night Landscape, and Night Portrait set Color Space IIIa (enhanced sRGB).
• All Scene exposure modes set Sharpness and Tone to Auto, Hue to 0, and Saturation to Normal. That’s despite the fact that Nikon uses the words “vivid” in some of their Scene exposure mode descriptions. In particular, I find that the two Auto settings can be problematic, as they are sometimes over aggressive in what they set.
That said, here’s what the seven scene exposure modes are, and what they do:
Auto This is what I call the “waiter mode.” That’s because the camera does everything automatically and doesn’t allow the user to make any changes. In other words, put the camera in Auto, hand it to the waiter, tell him to press the big black button…
Portrait The primary change from the other scene exposure modes is that the camera tends to select a physically larger aperture (e.g., f/4 instead of f/8). Optimization settings are “softened” a bit. The rationale behind this selection is to isolate the subject from the
Thom Hogan’s Complete Guide to the D70 Page 155

background with a shallow depth of field (large aperture) and to not highlight skin blemishes (optimization settings).
Landscape Sort of the opposite of Portrait: smaller apertures are used (e.g., f/11 instead of f/5.6) and optimization settings are “punched up.” Here the idea is to increase depth of field and use saturation to increase color impact.
Close Up The big change here is that you get a chance to select the autofocus sensor used (the central sensor is the default). Again, more vivid optimization settings are used, though it appears that Nikon chose to use a shallower depth-of-field than most professionals would select. The self-timer function and wireless remote can be used (unlike in most of the other scene modes); this helps you reduce camera shake.
Sports The camera tends to keep the shutter speed brief in order to “stop” action. Continuous Servo autofocus is selected so that subject motion is always followed. Flash and the Autofocus Illumination lamp are disabled.
Night Landscape Here’s an example of just how crippling the Scene modes are: you can use an external flash but not the internal flash to light foreground objects! Essentially, night landscape sets long shutter speeds and optimization settings that minimize the appearance of noise. The self-timer function and wireless remote can be used.
Thom Hogan’s Complete Guide to the D70 Page 156

Night Portrait Slow Sync is set so that long shutter speeds allow backgrounds to appear well exposed. This also means that you may get long shutter speeds, which is why Nikon recommends using a tripod. Again, like Night Landscape, optimization settings minimize noise, and the self-timer function and wireless remote can be used.
Things You Can’t Set with Scene Exposure Modes • White balance
• Optimize image
• Metering Method
• Flexible Program
• Exposure Compensation
• Bracketing
• AF Assist (in Landscape, Sports, Night Landscape)
• Flash Sync (in Landscape, Sports, Night Landscape)
• Flash Exposure Compensation
• Internal Flash Mode
Where Scene exposure modes override an existing camera setting, that setting will be restored when you return to the regular exposure modes (Program, Aperture-priority, Shutter-priority, or Manual).
ISO Sensitivity
The D70 allows user controllable ISO values from 200 to 1600, in one-third stop steps. The D70 also has a setting of Auto, which, in theory, causes the camera to vary the ISO value automatically based upon how much light is detected in the scene (see “Automatic ISO Setting,” on page <272>).
õ To set ISO values on the D70:
1. Press the MENU key to show the menu system.
Thom Hogan’s Complete Guide to the D70 Page 157

2. Use the Direction pad to navigate to the SHOOTING Menu (the green camera icon, at the left of the display).
3. Use the Direction pad to navigate to the ISO option and press the > key on the Direction pad to select it.
4. Use the Direction pad to select an ISO value and press the > key on the Direction pad to select it.
õ Alternatively:
1. Make sure the color LCD is off (not showing a picture or menu).
2. Hold down the ISO button and use the Rear Command dial to select an ISO value (shown on the top LCD).
While it may seem that you should simply set the camera to the highest ISO value and leave it there (or use the Auto value), don’t. As you increase the D70’s ISO value, your images gain considerable digital noise. Much as using a higher ISO film in a 35mm film body results in increased visible grain, added digital noise makes an image look rougher (most noticeable in large areas of a single color).
Thom Hogan’s Complete Guide to the D70 Page 158
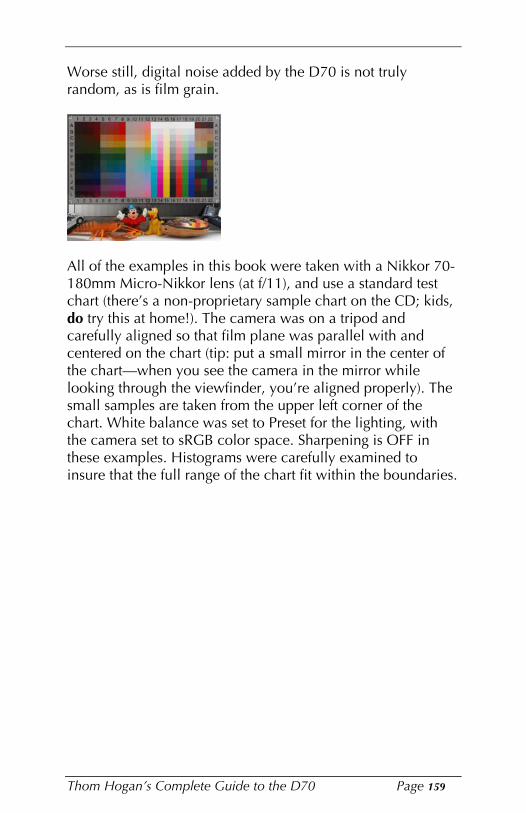
Worse still, digital noise added by the D70 is not truly random, as is film grain.
All of the examples in this book were taken with a Nikkor 70180mm Micro-Nikkor lens (at f/11), and use a standard test chart (there’s a non-proprietary sample chart on the CD; kids, do try this at home!). The camera was on a tripod and carefully aligned so that film plane was parallel with and centered on the chart (tip: put a small mirror in the center of the chart—when you see the camera in the mirror while looking through the viewfinder, you’re aligned properly). The small samples are taken from the upper left corner of the chart. White balance was set to Preset for the lighting, with the camera set to sRGB color space. Sharpening is OFF in these examples. Histograms were carefully examined to insure that the full range of the chart fit within the boundaries.
Thom Hogan’s Complete Guide to the D70 Page 159

ISO 200. At ISO 200 there is a grain-like noise barely visible (see 100% view, bottom), but this is generally not objectionable and rarely shows in prints unless you’re making dramatic sharpening or post processing changes. A simple noise reduction program usually handles this easily and well (see “Other Manipulation Tools,” on page <483>). Overall, the colors and saturation are excellent.
ISO 400. At ISO 400 the results are still holding up well, though the grain-like noise is clearly more visible (look at the gray portion of the chart in the background). Note that we’ve lost just a bit of yellow and red saturation; overall, the colors a less punchy than at ISO 200, but still quite good.
Thom Hogan’s Complete Guide to the D70 Page 160

ISO 800. Note how the red in Mickey Mouse has changed in color by ISO 800. You’re going to see more color changes as you go up in ISO value, with saturation and overall scene contrast suffering the most. But the real problem is that we’re now starting to see “color noise” at this ISO (again, look at the gray background: you should see some clear colored pixels there. The yellows and reds are showing color pollution from the noise, which is why they’re changing in color.
ISO 1600. At the top ISO value, the D70 is showing clear noise patterns everywhere, with the colored noise now very obvious in the grays of the chart. Color saturation and contrast are dramatically reduced by the color noise pollution. Just to show why this noise is so problematic, I’ve added a sharpened 100% view below the unsharpened one. See how speckled the whole image now is? Just for kicks, I ran a very aggressive Neat Image filtration on this sample (see
Thom Hogan’s Complete Guide to the D70 Page 161
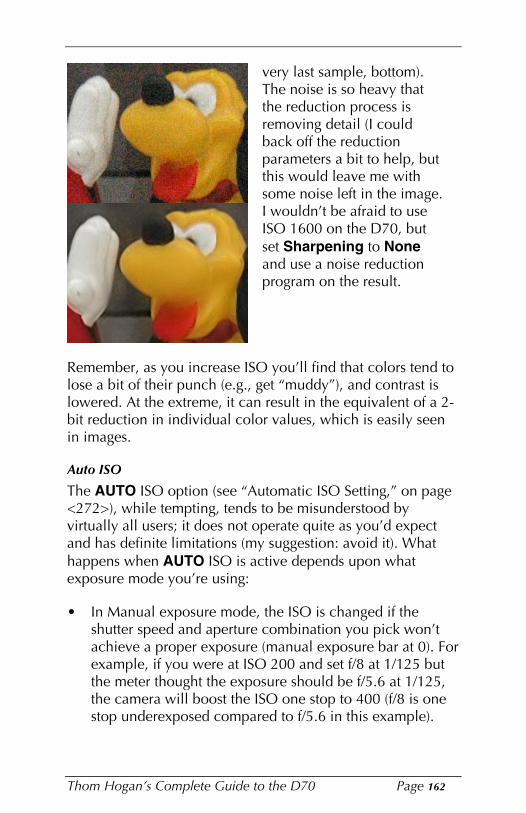
very last sample, bottom). The noise is so heavy that the reduction process is removing detail (I could back off the reduction parameters a bit to help, but this would leave me with some noise left in the image. I wouldn’t be afraid to use ISO 1600 on the D70, but set Sharpening to None and use a noise reduction program on the result.
Remember, as you increase ISO you’ll find that colors tend to lose a bit of their punch (e.g., get “muddy”), and contrast is lowered. At the extreme, it can result in the equivalent of a 2bit reduction in individual color values, which is easily seen in images.
Auto ISO
The AUTO ISO option (see “Automatic ISO Setting,” on page <272>), while tempting, tends to be misunderstood by virtually all users; it does not operate quite as you’d expect and has definite limitations (my suggestion: avoid it). What happens when AUTO ISO is active depends upon what exposure mode you’re using:
• In Manual exposure mode, the ISO is changed if the shutter speed and aperture combination you pick won’t achieve a proper exposure (manual exposure bar at 0). For example, if you were at ISO 200 and set f/8 at 1/125 but the meter thought the exposure should be f/5.6 at 1/125, the camera will boost the ISO one stop to 400 (f/8 is one stop underexposed compared to f/5.6 in this example).
Thom Hogan’s Complete Guide to the D70 Page 162

• In Shutter-priority exposure mode, the ISO is changed when the camera runs out of aperture range to use. For instance, assume that the initial ISO value is 200 and the aperture set by the camera to the lens’ maximum of f/2.8. If the lighting changes such that f/2 is required, the ISO will be boosted one stop to 400 (f/2.8 is one stop underexposed compared to f/2 in this example).
• In Program, Aperture-priority, and the seven Scene exposure modes, ISO isn’t changed until the exposure reaches the extreme at either end of the shutter speed range (you specify the lower limit value when you set AUTO ISO with Custom Setting #5 [the default is 1/30]; the upper limit is always 1/8000). As long as the camera will set a shutter speed between those two extremes, the ISO value won’t change.
An unfortunate limitation of the AUTO ISO option is that you’ll never know exactly what ISO the camera is setting. That’s one of the reasons why I suggest avoiding it, actually. You’ll never know if the shot you just took was at the mostly noise-free ISO 200 value or at the very noisy ISO 1600 value, at least not until it’s too late.
To activate the AUTO ISO option, see the instructions for Custom Setting #5, on page <272>.
How ISO Values are Created
You might wonder how higher ISO values are generated by the camera. All ISO values above 200 are created by amplifying the data coming into the Analog-to-Digital converter. In other words, the CCD always works at the 200 sensitivity, but underexposed data values coming from the photosites are boosted by an amplifier to produce the higher ISO values.
As you might guess, this means minor differences between photosites get magnified and may become visible. Imagine a
Thom Hogan’s Complete Guide to the D70 Page 163

photosite that captures 150 light photons and an adjacent one that receives 155 photons. This difference is insignificant when these are black values and end up getting interpolated into, say, a pixel value of 10,10,10 versus 10,11,10. But if these values are being amplified several times and now represent middle gray values, the difference may be significant.
ISO Operating Suggestions
To optimize image quality, follow these guidelines for setting ISO values:
• Use the lowest ISO setting (200) whenever possible. If you suspect that the scene you’re photographing might produce moiré, use only the lowest ISO value—once noise gets interlocked with moiré, both become very difficult to remove.
• ISO 400 is actually quite close to 200 in quality, so don’t be afraid to use it. Normally you don’t want to give up any image quality at all, but the very slight increase in noise at ISO 400 isn’t worth agonizing over: if it allows you to capture what you need to, use it!
• Use ISO 800 in a pinch, but expect a slight loss of color saturation and a modest amount of noise in large color blocks, such as skies. Both may require a bit of touchup using a software noise reduction tool such as Noise Ninja, dFine, or Neat Image.
• Use ISO 1600 only if you have to, as you’ll almost always need to perform extensive image manipulation to remove visible noise. You’re also likely to need to perform color correction and contrast adjustments.
• Shutter speed before ISO. In dim situations you’re often faced with a choice of using a higher ISO value or a longer shutter speed. Both choices will increase image noise, but which one does so the least? Well, if you can, put the camera on a tripod, turn on long exposure noise reduction (Long exp. NR on the SHOOTING menu) and
Thom Hogan’s Complete Guide to the D70 Page 164

use longer exposures. It’s no contest. You can produce nearly noise-free images with exposures of 10, 20, or even 30 seconds.
• Avoid the AUTO ISO option unless you’re using Shutter-priority exposure mode in order to maintain a particular shutter speed. For example, a sports photographer covering an indoor basketball game would want to maintain a shutter speed of 1/500, so might set AUTO ISO in order to maintain that value, even if it means having to accept some noise in the image.
Tip: For noisy NEF images taken at high ISO values, try using Nikon Capture to convert the image to 16-bit TIFF. Open the resulting file in Photoshop to make your color and image adjustments. Convert the image to Lab Color. Then use the Median filter (on the Filter/Noise menu) to remove noise on the A and B (color) channels. Don’t sharpen the image until you’re satisfied with the results. A Photoshop Action that does this is on the CD that came with this eBook (see “Photoshop Actions,” on page <486>).
Additional ISO-related suggestions:
• Large prints require lower ISO. If you’re going to use an image for printing large prints (8x10 inches or bigger), use only the lowest ISO values. It’s actually easier to fix an underexposed ISO 200 image than it is to get all the noise out of an ISO 1600 image.
• Conversely, small work allows higher ISO. If your work is to be used at small print sizes (5x7 inches or smaller), you can probably work at up to ISO 800 with relative impunity. Still, the higher the ISO value you use, the more likely you’ll spend significant time performing image correction.
• ¼ the size allows any ISO. If you’re going to use the photo at smaller than captured sizes (e.g., for Web or computer display), you can probably use any of the ISO values. When you reduce the image from full resolution to a smaller image size, you’ll often find that some of the
Thom Hogan’s Complete Guide to the D70 Page 165

entire noise pattern disappears (especially true if you get to ¼ size or smaller). Plus, you’ll have far fewer pixels to correct if you do need to fix something. Color saturation is still a minor problem at the higher ISO values, though.
• Noise from ISO values with NEF images can be slightly lower than JPEG. While there’s not a lot of difference in the amount of noise captured by a JPEG versus an NEF (RAW) file, the NEF format does provide more tonal range for colors, meaning that you may be dealing with less value divergence between adjacent pixels. Moreover, JPEG compression manufactures artifacts on any noise in the image. The difference is particularly apparent at ISO 800 and 1600. In general, always try to use the NEF format when using higher ISO values.
Exposure Bracketing
Obtaining correct exposures is important in digital work, as any overexposure kills highlight detail, while significant underexposure tends to mask (hide) shadow detail. The D70’s exposure meter, while quite good, isn’t perfect, so some photographers like to bracket their exposures (i.e., take multiple exposures at slightly different settings).
The D70 has a flexible bracketing system, allowing two or three exposures to be taken at 1/3 stop or ½ stop intervals. It also allows you to set white balance bracketing instead of exposure bracketing (both can’t be set simultaneously).
õ To turn bracketing ON:
1. Hold down the Á button while rotating the Rear Command dial until À appears in the top LCD. When this icon is displayed, exposure bracketing is active.
2. Tell the camera how many pictures and at what intervals by holding down the Á button and rotating the Front Command dial until the top LCD displays your selection (see “D70 Exposure Bracketing Values
Thom Hogan’s Complete Guide to the D70 Page 166

Table,” below).
õ Turning bracketing OFF is easy: simply repeat Step 1, above, but rotate the command dial until BKT no longer appears.
D70 Exposure Bracketing Values Table (Exposures) Top LCD # of Shots Exposures* Iconic Display - 2F 0.3 2 0, -0.3 EV åç - 2F 0.5 2 0, -0.5 EV åç - 2F 0.7 2 0, -0.7 EV åç - 2F 1.0 2 0, -1 EV åç - 2F 1.3 2 0, -1.3 EV åç - 2F 1.5 2 0, -1.5 EV åç - 2F 1.7 2 0, -1.7 EV åç - 2F 2.0 2 0, -2 EV åç + 2F 0.3 2 0, +0.3 EV ãå + 2F 0.5 2 0, +0.5 EV ãå + 2F 0.7 2 0, +0.7 EV ãå + 2F 1.0 2 0, +1 EV ãå + 2F 1.3 2 0, +1.3 EV ãå + 2F 1.5 2 0, +1.5 EV ãå + 2F 1.7 2 0, +1.7 EV ãå + 2F 2.0 2 0, +2 EV ãå
3F 0.3 3 0, -0.3, +0.3 EV ãåç 3F 0.5 3 0, -0.5, +0.5 EV ãåç 3F 0.7 3 0, -0.7, +0.7 EV ãåç 3F 1.0 3 0, -1, +1 EV ãåç 3F 1.3 3 0, -1.3, +1.3 EV ãåç 3F 1.5 3 0, -1.5, +1.5 EV ãåç 3F 1.7 3 0, -1.7, +1.7 EV ãåç 3F 2.0 3 0, -2, +2 EV ãåç
Thom Hogan’s Complete Guide to the D70 Page 167

* Nikon rounds third stop settings to .3 and .7 (they should actually be .333… and .666…). Also, half stop settings (e.g., 0.5 and 1.5) are only available if the Custom Setting #9 is set to ½ stop values.
Note: The order in which the photographs are taken is normally as shown (e.g., correct value, followed by other values from negative to positive, in increasing order). You may change the order using Custom Setting #13.
The D70 has more bracketing options than most photographers tend to use. Because the D70’s meter is accurate, the most commonly used bracketing value is probably 3F 0.3 (or 3F 0.5 if you’ve set the camera for half stop values). In very bright snow or sand conditions, I tend to set 3F 0.7 or 3F 1.0 and an exposure compensation value of +0.7 or +1.0 EV, as the Nikon metering system is often fooled into underexposing in those conditions. By setting exposure compensation, I move the bracketing midpoint from the metered value. (I end up with exposures of +0, +0.7 and +1.4 or +0, +1, and +2.)
When bracketing is active, a quick peak at the Bracketing Progress indicators on the top LCD and viewfinder tell you exactly which images you still have to take:
Indicator Images Remaining to be taken ãåç Normal, under, and over ãå Normal, over åç Normal, under
ã Over ç Under
If you’ve set a three shot sequence and see ãåç, you know that you’re at the start of a new bracketing series. If you’ve set a two shot sequence and only see åç or ãå, then, again, you’ve just started a new bracketing sequence. Any other indicator would tell you that you’re in the middle of a sequence. (This doesn’t apply to white balance bracketing,
Thom Hogan’s Complete Guide to the D70 Page 168

which always takes a full sequence with each shutter press. See “White Balance,” on page <174>.)
One very useful potential of the bracketing system is to increase the dynamic range of your finished shots. Landscape and nature photographers like myself often have a difficult time balancing the exposure for distant objects and the sky against foreground objects that may be in shadow. With film, we used graduated neutral density filters in such situations, but since we’re going to be working with our D70 images in an image editing program such as Photoshop, anyway, why not go ahead and use different exposures for different parts of the scene? Here’s the bare outline of the steps needed:
1. In the field, set your D70 to 3F 1.0 bracketing. In theory, this provides us another stop of detail in the shadows and another stop of detail in the highlights of our final shot when we combine the images later.
2. You need to make sure that neither the focus point nor the aperture changes between shots. The easiest way to do this is to use manual focus and Manual exposure mode. Also, be careful that zoom lenses don’t shift focal length during the bracketing sequence. (You may also want to make sure Tone Compensation isn’t set to Auto, as the camera may vary the tone setting between shots.)
3. With your camera on a tripod, take the bracketed sequence of pictures.
4. In Photoshop, open the three images and place them into three different layers of a new image (sometimes I take a shortcut and just use the two extreme exposures). Use Photoshop’s layering tools to control which parts of each exposure are used in the final image.
Obviously, this technique works best if you have a sharp delineation between the shadow and lit areas of a scene, or
Thom Hogan’s Complete Guide to the D70 Page 169

have areas with little or no interesting detail in which to hide transitions between the exposures. How good your resulting image looks is in large part attributable to your Photoshop skills, but I’ve seen some remarkable images created this way, images that would be very difficult to duplicate with film.
When your camera is set to bracket, a few details sometimes catch new D70 users by surprise:
• In the Continuous frame shooting method, holding down the shutter release only takes the specified number of photos in the bracketing sequence (i.e., either 2 or 3). The camera automatically stops at the end of the bracketing sequence, regardless of whether you continue to hold the shutter release down.
• In the Single frame shooting method, you must press the shutter release once for each picture in the bracketing series. If you turn the camera OFF in the middle of a series, it remembers that when you turn it back ON (i.e., you’re still in the middle of a bracketing sequence, no matter how long an interval has transpired). The same thing is true if your CompactFlash card fills up in the middle of a sequence: replace the card and the next picture picks up the bracketing sequence where it left off.
• Exposure compensation interacts with bracketing values. If you set exposure compensation to –0.3 EV and a bracketing sequence of 3F 0.7, you’d get shots of -0.3, –1, and +0.3 EV, not 0, -0.7, and +0.7 EV.
• When you set bracketing to ON with the camera in manual (M) exposure mode, the D70 changes shutter speeds to accomplish the various exposures, despite your having set a particular shutter speed!
Nikon only mentions flash bracketing in passing in their manuals, and the way they describe the interaction with exposure bracketing confuses many new Nikon users. If you have a Speedlight attached and ON when exposure
Thom Hogan’s Complete Guide to the D70 Page 170

bracketing is set, not only does the camera set different ambient exposure values for each shot, but it varies the output of the Speedlight, as well (remember, the default flash mode is a “balanced” mode, where flash doesn’t assume that it is providing the main exposure). Normally, this is what you want the camera to do. You can tell the camera to use flash-only or camera-only bracketing by using Custom Setting #12 (see “Exposure Bracketing Method,” on page <281>).
Pay careful attention to the top LCD when setting bracketing. If there are decimals in the values (e.g., 0.3 or 1.0), then you’re setting exposure bracketing. If no decimals appear (e.g., you see only 1, 2, or 3), then you’re setting white balance bracketing!
Note: If you shoot in NEF format, Nikon Capture allows a range of after-the-fact exposure adjustment. You can actually save space on your CompactFlash card by simply shooting in NEF format and adjusting its exposure on your computer instead of bracketing a JPEG three-frame sequence. This is especially true if you make sure that your exposure doesn’t have a histogram that extends off the right side of the display.
Exposure Compensation
The D70’s exposure meter, like all modern meters, is set to assume that the subject it’s looking at has a reflectivity of about 13% (sometimes called middle gray, though that’s not quite accurate). For those of you who think the value should be 18% gray, see the essay on my Web site, http://www.bythom.com/graycards.htm.
Camera meters are calibrated to ANSI standards, which use luminance targets, not reflective targets. The approximate reflected gray value for those luminance targets would be about 13% (there’s actually an almost half stop tolerance in the manufacturing standards, so your meter may be a bit off from that, though my experience with dozens of Nikon bodies has rarely indicated any deviation, let alone one that big). If
Thom Hogan’s Complete Guide to the D70 Page 171
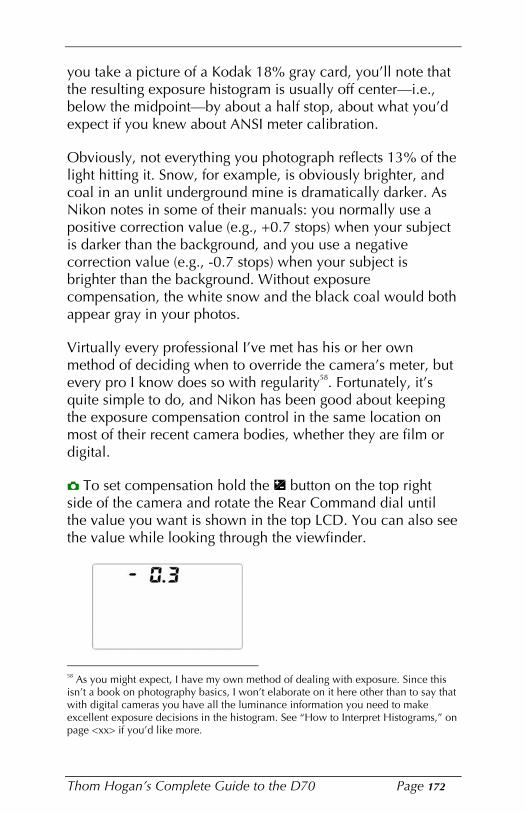
you take a picture of a Kodak 18% gray card, you’ll note that the resulting exposure histogram is usually off center—i.e., below the midpoint—by about a half stop, about what you’d expect if you knew about ANSI meter calibration.
Obviously, not everything you photograph reflects 13% of the light hitting it. Snow, for example, is obviously brighter, and coal in an unlit underground mine is dramatically darker. As Nikon notes in some of their manuals: you normally use a positive correction value (e.g., +0.7 stops) when your subject is darker than the background, and you use a negative correction value (e.g., -0.7 stops) when your subject is brighter than the background. Without exposure compensation, the white snow and the black coal would both appear gray in your photos.
Virtually every professional I’ve met has his or her own method of deciding when to override the camera’s meter, but every pro I know does so with regularity58. Fortunately, it’s quite simple to do, and Nikon has been good about keeping the exposure compensation control in the same location on most of their recent camera bodies, whether they are film or digital.
õ To set compensation hold the £ button on the top right side of the camera and rotate the Rear Command dial until the value you want is shown in the top LCD. You can also see the value while looking through the viewfinder.
As you might expect, I have my own method of dealing with exposure. Since this isn’t a book on photography basics, I won’t elaborate on it here other than to say that with digital cameras you have all the luminance information you need to make excellent exposure decisions in the histogram. See “How to Interpret Histograms,” on page <xx> if you’d like more.
Thom Hogan’s Complete Guide to the D70 Page 172
58

Note: Choose the exposure compensation increment (third or half stops59) with Custom Setting #9 (see page <278>).
Once set, exposure compensation remains set until you use the control again and set a value of 0.0.
Note: In Manual exposure mode, exposure compensation is “invisible.” The zero point of the analog meter display is moved instead of altering the exposure you set. Try it. Set Manual exposure mode and meter something so that the analog meter display is zeroed. Now set exposure compensation. You’ll see that the meter is no longer zeroed (and off by the amount of exposure compensation you set). Personally, I always make sure that exposure compensation is OFF when I use Manual exposure mode.
The D70 supports an alternate method of setting exposure compensation via Custom Setting #10, see “Exposure Compensation,” on page <278>. When you set this alternate method, one of the command dials on the camera is used to adjust compensation values, even when the £ button is not held down! (Which dial is used depends upon your exposure mode and the value of Custom Setting #14.) Frankly, I think this is a dangerous ability because if you forget that you have it set, you may not notice that you’re setting compensation instead of apertures or shutter speeds. Some D70 users do find it useful, though, because they always shoot in one exposure mode (usually Aperture-preferred) and it gives them a convenient way to quickly take an exposure at a value different from the metered one (i.e., take a picture, twirl the Command dial, take another picture at the compensated setting).
Half stops are shown in a series like this: 0.0, 0.5, 1.0, 1.5, 2.0, and so on. Third stops are rounded and are shown as 0.0, 0.3, 0.7, 1, 1.3, 1.7, 2, and so on.
Thom Hogan’s Complete Guide to the D70 Page 173
59

White Balance
All light is not created equal. The perceived color of an object depends upon the light source that illuminates it. Our brains, however, are pretty good at overriding what our eyes see. If someone wearing a white shirt walks from the sun into the shade (where the light is usually “bluer” due to reflections and light scatter), our brain knows that shirt itself isn’t getting bluer, even though the light being reflected by the shirt is now reflecting a bluer light.
Unfortunately, both film and digital cameras respond to light in a fixed fashion, so the resulting image taken with a camera will reveal the shirt to be a bluish white in shade and a bright, neutral white in the sun.
Color temperature is an objective measurement that defines the temperature at which a “black body” object would have to be heated to radiate light in the same wavelengths. Color temperature—the color of light—is expressed in units of Kelvin. Though it measures temperature, units of Kelvin do not get a degree mark, just a K (e.g., 5200K, not 5200°K). Lower numbers indicate a “redder” light (to our eyes), higher numbers indicate bluer light. The light itself isn’t “red,” it just has more red wavelength components than, say, a “bluer” light (which would have more blue wavelength components).
On digital cameras, you set a “white balance” to adjust the CCD to the wavelengths of light being captured. D70’s have eight basic white balance settings:
â or A Automatic white balance. Nikon claims that this function works at any color temperature between 3500K and 8000K. Note that most indoor lighting falls below that range! Moreover, my experience tells me that the D70 isn’t very accurate towards the extremes. I’d say the most accurate range is much narrower, perhaps 4500 to 6000K.
Thom Hogan’s Complete Guide to the D70 Page 174

× Indoor shots using incandescent light bulbs (3000K)
å Indoor shots using fluorescent lighting (4200K)
® Outdoor shots in direct sunlight (5200K)
ç Indoor or outdoor shots lit primarily by flash (5400K)
æ Outdoor shots in overcast skies (6000K)
ã Outdoor shots taken in shaded areas (8000K)
ä Manually set white balance using a white or neutral object (Nikon doesn’t specify a range, but we know that you can manually adjust a D70 from 2700K and 9200K, so the range should be at least that wide)
Note: Digital cameras fare less well using the Automatic white balance setting with light that falls under 4000K (note that Nikon doesn’t recommend Auto below 3500K for the D70; yet I find that even at 4000K the camera tends to set a white balance that’s too high in Kelvin for the light). That’s partially because the blue sensors receive very little information at these so-called “warm” color temperatures, so the minute amount of blue wavelengths being seen by the sensor become a factor.
One novel way of coping with the problem of getting good automatic white balance with indoor light is to simply imitate what we used to do with film: use an 80B filter! The 80B shifts the 2900K color temperature of a 100-watt bulb up to about 4300-4400K (an 80A would push it above 5000K), putting it within the range the camera handles well.
Tip: Nikon’s choice for normal outdoor lighting (5200K) should raise eyebrows, though I haven’t seen anyone specifically comment on it. Daylight film is usually balanced to 5400K, and many digital photographers set their default daylight
Thom Hogan’s Complete Guide to the D70 Page 175

value even higher60. (The origin of the 5400K number, by the way, is interesting—it’s the average measurement of color temperature, taken at noon on summer and winter solstice on the Mall in Washington DC in 1926! Since altitude, time of day, time of year, cloud cover, and distance from the equator all alter daylight color temperature, one value does not apply to every situation.) Don’t be afraid to experiment a bit to find the white balance you like best. In general, I find that Flash is the quickest way for me to set a sunny white balance I like, and I tend to use much higher color temperature values than Nikon suggests for indoor lighting (e.g., Incandescent -2 or –3).
Let’s look at color temperature in action. Since color temperature for daylight was originally determined on the Washington Mall, let’s go there for our test. Below you’ll find a photo taken late in the day (in late April) of the Lincoln Memorial. I’ve tweaked this photo a bit to saturate the colors and tone down the sky (which also has a graduated neutral density filter holding it back), but if you were standing next to me at the time, this would be pretty close to what you saw:
This might be partly a result of using RGB as the color method coupled with the spectral responses of the sensors, which aren’t perfect. The D70’s red spectrum response peaks just a little lower in wavelength than it should, for example.
Thom Hogan’s Complete Guide to the D70 Page 176
60

The left portion of the monument is the area we’ll work with (though note the slight orange areas under the eaves in the front—we’ll be coming back to those in a moment). Let’s look at a number of options for white balance:
From left to right: 3400K, 3800K, 4400K, 4800K, and 5200K. I’ve added just a bit of color saturation to emphasize the cast. All photos taken at the same camera settings and processed through Nikon Capture the same.
You should notice in the above examples that as the color temperature on the camera is set lower than the actual value present in the lighting, a blue cast appears in the photo. (That again brings up Nikon’s choice of 5200K for Daylight—most of the time you’ll find that it generates results that are slightly on the blue side).
The further we get from the actual color temperature, the more distinct that cast is. Note, too, that the cast applies to everything: sky, building, and bushes. It isn’t until you get 5200K that we begin to see some of the warmth that is in the limestone and sky, and it isn’t until we get over 5500K that the greens actually become fully green (no hint of blueness; compare the larger photo with the rightmost small one and look at the greens).
Remember those orange spots on the walls of the Memorial? Those are areas lit by incandescent light, which has a lower color temperature than daylight. Inside the Monument, Lincoln’s bust is mostly lit by incandescent lighting. Here’s another full photo to consider:
Thom Hogan’s Complete Guide to the D70 Page 177

Lincoln Memorial at night, when only the internal overhead lighting contributes to color temperature.
Now we’re dealing with mostly incandescent lighting, which has a lower color temperature (most bulbs used on large buildings like this one are of the Photoflood variety, and about 3200K in output). There’s a bit of overhead fluorescent in the Monument as well, but the incandescent pretty much overwhelms it where Lincoln sits.
From left to right: 3000K, 3200K, 3400K, 5000K, 6000K. All camera settings and Nikon Capture settings otherwise the same.
You should notice in the above examples that as the color temperature on the camera is set higher than the actual value of the lighting, a red/orange cast appears in the photo. The further we get from the actual color temperature, the more distinct that cast is.
So remember that orange cast on the outside of the building? That was caused by setting a color temperature higher than
Thom Hogan’s Complete Guide to the D70 Page 178

the actual color temperature. Most of the building was lit by the sun and sky, so the color temperature on those portions of the building was high (5500K to 6000K based upon my observation). The spots under the eaves that are orange were lit by incandescent light that was close to 3400K. Thus, if the rest of the building is rendered correctly, those spots turn orange.
This illustrates a common problem: in many scenes, there is no single color temperature of light that affects everything. An area in shade on an otherwise sunny day may be slightly higher color temperature than that in direct sun. Indoors you may find both incandescent and fluorescent bulbs lighting different areas. If the different lighting sources are equally mixed on your subject, you can use the Preset method of setting white balance and measure the value off a gray card (see below). But if the areas of different lighting are separate— incandescent lighting a foreground subject and fluorescent lighting a background, for example) you have to pick a color temperature and live with the results, as I did in the photo outside the Lincoln Memorial61.
õ To set the white balance: if the color LCD is off, press and hold the WB button while rotating the Rear Command Dial until the icon for the desired method is shown on the top LCD. The Front Command Dial can be used to control the fine tuning of white balance (setting –3 to +3 increments on the basic value—more on that in a bit).
Other solutions exist. You could filter one or other of the light sources, add light of a different color (e.g., flash) to overwhelm the poor color, turn the troublesome light off, and more.
Thom Hogan’s Complete Guide to the D70 Page 179
61

Alternatively:
1. Press the Menu button.
2. Use the Direction pad to navigate to the SHOOTING menu (green camera tab).
3. Use the Direction pad to select the White bal. option.
4. Press the right key on the Direction pad to see the submenu.
5. Use the Direction pad to select the white balance option you want (up and down takes you between the main options; right takes you to the fine tuning options for the current white balance selection).
Nikon only provides a cryptic system for indicating the fine tuning changes (whole numbers from –3 to +3, where negative numbers set a higher color temperature while positive numbers make the color temperature lower (what was Nikon thinking?). Here’s how these numbers influence each of the white balance settings:
Thom Hogan’s Complete Guide to the D70 Page 180

D70 White Balance Settings Approximate resulting color temperatures are:
_________Approximate Kelvin value_________ -3 -2 -1 0 +1 +2 +3
Incandescent 3300 3200 3100 3000 2900 2800 2700 Fluorescent 7200* 6500* 5000* 4200* 3700* 3000* 2700* Direct Sunlight 5600 5400 5300 5200 5000 4900 4800 Flash 6000 5800 5600 5400 5200 5000 4800 Overcast 6600 6400 6200 6000 5800 5600 5400 Shade 9200 8800 8400 8000 7500 7100 6700
(The asterisk will be dealt with in a few paragraphs; hang in there.) Put another way, here are the changes in color temperature from the middle setting:
Thom Hogan’s Complete Guide to the D70 Page 181

______Change in Kelvin value______________ -3 -2 -1 0 +1 +2 +3
Incandescent +300 +200 +100 0 -100 -200 -300 Fluorescent +3000 +2300 +800 0 -500 -1200 -1500 Direct Sunlight +400 +200 +100 0 -200 -300 -400 Flash +600 +400 +200 0 -200 -400 -600 Overcast +600 +400 +200 0 -200 -400 -600 Shade +1200 +800 +400 0 -500 -900 -1300
You can see that some of the white balance settings have fine tuning increments that are small, others span over a much wider range. You should also see that there is a finite set of values that you can directly set: 2700K, 2800K, 2900K, 3000K, 3100K, 3200K, 3300K, 3700K*, 4200K*, 4800K, 4900K, 5000K, 5200K, 5300K, 5400K, 5600K, 5800K, 6000K, 6200K, 6400K, 6500K*, 6600K, 6700K, 7100K, 7200K*, 7500K, 8000K, 8400K, 8800K, and 9200K.
Let’s put those in context of actual lighting sources:
1930K Candlelight 2700K 2800K 75-watt bulb 2900K 100-watt bulb 3000K 200-watt bulb 3100K 3200K Tungsten lighting 3300K 3400K Standard photolamp 3700K* 4200K* 4800K 4900K 5000K 5200K Carbon arc lighting (movie sets) 5300K 5400K Outdoor sunny daylight standard 5600K
Thom Hogan’s Complete Guide to the D70 Page 182

5800K Typical Nikon flash value 6000K Brand new Nikon flash 6200K 6400K 6500K* 6600K 6700K 7100K Overcast sky 7200K* 7500K 8000K 8400K 8800K 9200K Shaded area in hazy sun
However, what Nikon doesn’t tell you is that the fluorescent values don’t run true (that’s why I’ve labeled the values that can only be set via the Fluorescent setting with asterisks in the above tables). Because fluorescent lighting uses colored phosphors that don’t produce the entire light spectrum, and because those phosphors decay at different rates, most digital cameras have fluorescent settings that attempt to deal with the overabundance of green/blue values such light produces. The D70 does this, too. If you use the fluorescent white balance settings on light that was produced by a continuous spectrum light source (most other lighting), you’re likely to see a cyan and/or green shift.
Note: If you also use a D1H or D1X, most of the values that were just shown are the same, though Nikon has made a few shifts in the Incandescent values. The D70 and D100 share the same values.
The D70 also allows you to measure the lighting in a particular location and manually select an appropriate white balance using the PRE selection. To select and set a white balance of PRE, there are additional steps you must take. The D70 supports two methods of setting manual white balance,
Thom Hogan’s Complete Guide to the D70 Page 183

from a neutral object measured by the camera, or by copying the white balance from another photo.
To set white balance from a neutral reference source (if the white balance is already set to PRE, you can skip to Step 8):
1. If the camera is in Manual exposure mode, set a correct exposure for the gray card you’ll use in Step 9, below, before proceeding.
2. Press the Menu button
3. Use the Direction pad to navigate to the SHOOTING MENU (the green camera icon tab).
4. Use the Direction pad to navigate to the White Bal. option and press the > key on the Direction pad to select it.
5. Navigate to Pre and press the > key on the Direction pad to select it.
6. Navigate to Measure and press the > key on the Direction pad to select it.
7. Press the Menu button to turn the menu system off.
Note: While the screen says “Measure” and implies you’re about to perform that action, what it should really say is “Measurement,” meaning that the camera will use the last (or next) measurement you made (make).
Thom Hogan’s Complete Guide to the D70 Page 184

8. Press and hold the WB button until PAE begins blinking in the top LCD and viewfinder.
other settings also show
9. Place a neutral gray object, such as a gray card, so that it fills the area the camera sees. (I usually defocus the camera so that any random noise or dirt on the card doesn’t influence the measurement.)
10. Press the shutter release as if you’re taking a picture.
11. If an acceptable white balance value was measured, you’ll see GOOD on the top LCD (GD in the viewfinder). If the camera couldn’t get a usable reading, you’ll see NO GD in both the top LCD and the viewfinder. If you see NO GD, return to step 7 and try again.
other settings also show
If you see NO GD instead, check your exposure and try again.
To set a white balance from an existing photo:
1. Press the Menu button
2. Use the Direction pad to navigate to the SHOOTING MENU (the green camera icon tab).
3. Use the Direction pad to navigate to the White Bal. option and press the > key on the Direction pad to select it.
Thom Hogan’s Complete Guide to the D70 Page 185

4. Navigate to Pre and press the > key on the Direction pad to select it.
5. Navigate to Use photo and press the > key on the Direction pad to select it.
6. Navigate to Select image and press the > key on the Direction pad to select it.
7. Use the keypad to navigate to the image you wish to use and press the ENTER key to select it.
8. Press the > key (the cursor should be on This image) to complete the process.
Thom Hogan’s Complete Guide to the D70 Page 186

Note: You can only copy white balance from an image taken with a D70. Curiously, the D70 will show you images from other cameras, but you’ll get an error message (Can only use photo taken with D70) if you select one.
You may wonder why you’d want to copy white balance from an existing picture on the card. Let me give you an example of when this is handy. Let’s say you were assigned to shoot a wedding. During a relatively short period of time you need to take pictures in the wings of the church, at the altar during the ceremony, out on the steps of church, and in several different rooms at the reception. Let’s assume further that all these locations have tricky lighting conditions (any wedding photographer can tell you that they usually do). You’re also going to be moving back and forth amongst those locations and don’t want to chance missing a moment because you were trying to figure out white balance.
You can run around prior to the service and capture custom white balances for each of the locations, taking a picture with the correct white balance at each. Now, as you move from location to location during the wedding, you could quickly grab the white balance from an image you’ve already taken instead of having to go through the entire gray card reading method of setting white balance. No, it doesn’t save a lot of steps, but it saves enough to be effective (moreover, you don’t have to get your gray card out).
Once you’ve assigned a preset value, either via measurement or reference image, you can quickly recall it at any time by simply choosing a white balance of PRE. Unfortunately, there’s no way to store multiple custom white balance settings, though given that this is a consumer camera, that’s a reasonable simplification Nikon chose to make. Working professionals who use a D70 will miss that ability, though.
Note: Practical field tests show that PRE works more consistently using a neutral gray card than it does with a white card (the Nikon manual suggests either). A neutral gray card should,
Thom Hogan’s Complete Guide to the D70 Page 187

by definition, generate a correct exposure and has no color cast (even the 18% gray cards supplied by Kodak are close enough to the actual 13% metering value to prove effective). A white card is often underexposed (as compared to the eventual scene, unless you use Manual exposure mode and exactly followed my instructions, above.) and sometimes contains a colored pigment to make it appear “whiter.” Suggestion: use white in a pinch (but make sure your exposure is correct), but bring a Kodak gray card with you whenever possible and use it for setting white balance.
Tip: You can use slightly colored cards to make the overall color balance warmer (redder) or cooler (bluer). Just pick a light version of the color you want to remove from the scene. For example, to make a warmer (redder) rendition, use Pre and measure on a light blue card. To remove green from fluorescent lights, try using a light green card. If you don’t want to go to the trouble of making your own cards, do what the video pros do: buy a pre-made set from http://www.warmcards.com.
Note: White Balance settings are maintained when the camera is turned OFF and turned back ON.
You can also bracket the white balance settings on the D70:
1. Make sure that Image Quality isn’t set to NEF (white balance bracketing only functions for JPEG images).
2. Set Custom Setting #12 to WB bracketing. (See “Exposure Bracketing Method,” on page <281>).
3. Hold down the Á button while rotating the Rear Command dial until À appears in the top LCD. When this icon is displayed, exposure bracketing is active.
Thom Hogan’s Complete Guide to the D70 Page 188

4. Tell the camera how many pictures and at what white balance intervals by holding down the Á button and rotating the Front Command dial until the top LCD displays your selection (see “D70 White Balance Bracketing Values Table,” below).
õ Turning white balance bracketing OFF is easy: simply repeat Step 2, above, but rotate the Rear Command dial until À no longer appears.
D70 White Balance Bracketing Values Table Top LCD Display # of Shots Exposures 3F 1 ãåç 3 set value, -1, +1 fine tuning 3F 2 ãåç 3 set value, -2, +2 fine tuning 3F 3 ãåç 3 set value, -3, +3 fine tuning + 2F 1 ãå 2 set value, +1 fine tuning + 2F 2 ãå 2 set value, +2 fine tuning + 2F 3 ãå 2 set value, +3 fine tuning - 2F 1 åç 2 set value, -1 fine tuning - 2F 2 åç 2 set value, -2 fine tuning - 2F 3 åç 2 set value, -3 fine tuning
One final word about white balance: if you shoot NEF files, you can select your white balance after the fact (and try out different white balances to see which you like). Both the Nikon Photoshop plug-in and Nikon Capture allow you to choose a white balance before the computer interpolates the final image data62. Be careful of images with blown channels, however. When you blow out a single channel and then later try to adjust white balance using a NEF converter, you may
Actually, all raw converters do, though as of this writing only the Nikon-authored software actually looks directly at the white balance data table stored in the NEF file.
Thom Hogan’s Complete Guide to the D70 Page 189
62

see slight, uncontrollable shifts in the color of highlight detail, especially if you use third party converters63.
Changing Color
Besides white balance, several other camera controls have an influence on the color (and to a lesser degree, exposure) in the image captured by the D70: Optimise image, Tone comp., Saturation, and Color Mode. I’ll deal with Color Mode later in the book (see “Color Profiles and Color Spaces,” on page <455>), but the other controls are, like white balance, controls that you’d tend to set in the field, so we’ll deal with them now.
The D70 tries to simplify the setting of these items (and a few others) by grouping them together under one-word shortcuts on the Optimise image. You can set Normal, Vivid, Sharp, Soft, Direct Print, Portrait, Landscape, and Custom. Only this last option, Custom, allows you to fine tune the individual color and contrast controls. If you set the camera to one of the other options, the camera makes those choices for you:
Sharpness Tone Color Mode
Hue Saturation
Normal Auto Auto 1a 0 Normal Vivid Auto Auto 3a 0 Normal Sharp High Auto 1a 0 Normal Soft Medium
Low Auto 1a 0 Normal
Direct Print
Medium High
Auto 1a 0 Normal
Very early versions of Capture used to display this problem, too. Recent versions of Capture, including the 4.1 version that the D70 uses, seem to use a more sophisticated white balance algorithm that better deals with blown channels. Still, I’ve seen subtle shifts in colors where a channel is blown—for example, the highlights on many blooming flowers in bright light will saturate a channel (usually the Red or Blue), and then parts of the petal will shift color slightly differently as you post process white balance. This is one of the reasons that Michael Reichmann (http://www.luminous-landscape.com) and I have been writing for some time that we want manufacturers to provide channel histograms in addition to luminance histograms. To date, only the Fujifilm S2 Pro and Canon 1D Mark II do so.
Thom Hogan’s Complete Guide to the D70 Page 190
63

Portrait Medium Low
Auto 1a 0 Normal
Landscape Medium High
Auto 3a 0 Normal
In other words, two parameters are changed: sharpening and color mode. I’m not sure how this made anything any easier than just setting the individual parameters directly. My personal advice: use the Custom function fine tune the parameters. That’s because I believe Auto is the wrong choice for Tone and Sharpening—the camera tends to get things wrong in extreme conditions. Moreover, you really want to be in color mode 2 (AdobeRGB) for best image quality, which none of the shortcuts set.
Let’s explore the individual settings that you can manipulate in Custom (at least the ones I don’t deal with elsewhere):
Tone Compensation. This control would be better labeled Contrast Adjustment, as that’s what you’ll see change as you make adjustments. With Tone Compensation, you tell the camera what kind of exposure curve to apply to the sensor data. You may remember a footnote back in the CCD section where I pointed out that CCDs are more regular in capturing brightness values than film. The “normal” regularity is a curve that rapidly rises in the dark values but tapers as it reaches the bright values64. Tone compensation changes the slopes of that curve, which shows up to our eyes as image contrast.
Choosing Low contrast tends to “flatten” and “narrow” the curve (and narrow the resulting histogram), resulting in considerably less overall scene contrast, often at the expense of rich blacks. Choosing High contrast tends to exaggerate the curve (and widen the resulting histogram), producing distinct blacks and whites (which may be blown out) with less
Okay, that’s a gross simplification. I wrote a long article in my Nikon DSLR Report, Issue #5 that describes in gory detail the “normal” way in which brightness values becomes bit values, if you’re so inclined to get beyond the simplification.
Thom Hogan’s Complete Guide to the D70 Page 191
64

subtle gradation in between. Normal is obviously between these two extremes. The Auto setting uses the camera’s matrix meter to take a guess at how to set contrast. If it sees large differences in brightness values, the camera may think it’s dealing with a high contrast scene and lower the contrast (think about that statement; it’s correct). Likewise, it might do the opposite if there are few or small differences in brightness values across the scene.
The final option, Custom, is only useful if you have Capture 4.1 or later and a lot of time on your hands to come up with a contrast adjustment curve of your own (see “Custom Curves,” on page <372>). For NEF images that you’re going to run through Capture, the Tone control is not particularly important. For JPEG images, you need to set something, with Auto being the usual choice. However, I have a tendency to set Low contrast (it’s always easier to add contrast than it is to remove it). I’ll also talk about the Custom setting later in the book (see “Custom Curves,” on page <372>).
Hue. This control adjusts the relative intensity of the red, green, and blue values recorded for pixels. For example, if you increase the hue (warmer), you are actually raising the values of the red and green data relative to the blue. If you lower the hue (cooler), you’re increasing the blue and green data relative to the red65. You can use this control to select increments of ±3° in color change, up to a total of ±9°. Graphic artists will recognize this as being a deviation value on a standard color wheel (R, G, and B being 120° apart in the wheel).
Note: If you also use a D1, you need to be aware that Nikon changed their naming scheme for hue between the original D1 models and the D70. On the D166, you set values
65 Example: you shoot a neutral gray card. All red, green, and blue data values should be equal, say an RGB value of 128, 128, 128. If you increase hue, the data would shift, to say 132, 132, 124. 66 The D1X firmware was updated when the expanded buffer was introduced, and the newer hue control scheme applies to D1x models with updated firmware.
Thom Hogan’s Complete Guide to the D70 Page 192

between 0 and 6, where 3 was the middle position and neutral. On the D70 you set values between -9° and +9°, with 0 being the neutral position. A value of 0 on a D1 corresponds to -9° on a D70; a value of 6 on a D1 corresponds to +9° on a D70. While the change is somewhat confusing, this new scheme has a real-world component (i.e., it isn’t just a set of random numbers made up by Nikon, as was the case for the original D1).
Saturation: Luminance is the overall brightness in an image; chroma is the overall color. When we boost or lower saturation, we’re changing the chroma channels while leaving the luminance untouched. This is generally a control best left for post-processing, especially since you’re only given the choice to reduce (Moderate) or increase (Enhanced) the saturation level, with no real parameter for how much.
õ To set any of the image optimizations:
1. Press the MENU button.
2. Use the Direction pad to navigate to the SHOOTING MENU (the camera icon tab at the left).
3. Use the Direction pad to navigate to the Optimize image option and press the > key on the Direction pad to select it.
4. Use the Direction pad to navigate to Custom and press the > key on the Direction pad to select it.
Thom Hogan’s Complete Guide to the D70 Page 193

5. Navigate to each item you wish to set (Tone comp, Saturation, Hue), and press the > key on the Direction pad to select it:
a. Navigate to the setting you wish to use
b. Press the > key on the Direction pad to select it.
6. Use the Direction pad to navigate to Done and press the > key on the Direction pad to complete the setting. You must complete this step for the settings to take effect!
Thom Hogan’s Complete Guide to the D70 Page 194

Lenses and Focusing The D70 features the traditional Nikon F mount, and thus can use most lenses made for Nikon 35mm film cameras (see “Lens Compatibility,” on page <495> for exceptions).
õ One of the first things you need to do is mount a lens on your D70:
1. Turn the D70’s power switch to the OFF position.
2. Twist the included BF-1A body cap 45 degrees clockwise, and remove it from the camera.
3. Align the mounting mark on the lens67 with the mounting mark on the D70 (see figure, below) and then twist the lens counter-clockwise (when facing the front of the body) until it locks in place.
4. Set the aperture ring on the lens to the smallest aperture (usually f/22, but sometimes f/16 or f/32 or even f/45 on Nikkor lenses) and lock it at that aperture. Failure to set the aperture ring to the smallest aperture will result in FEE being shown on the top LCD (see “Error Messages,” on page <231>).
5. Turn the camera ON.
The white marker on the lens (look for the right pointing arrow in illustration at left) needs to be aligned with the white dot on the camera body (left pointing arrow in illustration).
The “mounting mark” is usually the focus mark on the lens. However, most recent Nikkor lenses have a handy shortcut: on the lens mount one of the screws is painted black (since you’re usually holding the lens so you see the mount, this is useful information). Use the black screw as your alignment point!
Thom Hogan’s Complete Guide to the D70 Page 195
67

Changing lenses follows the same steps, except that you’re removing the mounted lens in Step 2 instead of a body cap (and you have to hold down the lens release button during that step).
Note: When no lens is mounted, you should always protect the CCD from dust by using the BF-1A body cap (see “Keeping the CCD Clean,” on page <381>).
Note: The body cap for the D70 (BF-1A) is different than the one for earlier, manual focus 35mm film cameras (BF-1) and much different than the cheap plastic cap that comes with the N80. Nikon states that the older BF-1 body caps should not be used on the D70. The older body caps (and some generic, third party body caps) don’t accommodate the electrical contacts built into the autofocus lens mounts.
The Autofocus System
The D70 uses the same autofocus system as the N80, with a few modest changes in default settings68. While arguably state-of-the-art, Nikon’s documentation of the autofocus system is not up to the same standard.
Autofocus is achieved using five small contrast sensors (their approximate locations and sizes are marked by brackets in the viewfinder), which look at the contrast of the object they see (autofocus is achieved when contrast is maximized).
You’ll sometimes hear this autofocus system referred to as CAM900, which refers to the sensor parts that do the measurement. CAM1300, used on the F100, F5, and D1 series, is more sophisticated (three cross-hatched sensors), and CAM2000—used on the D2H—is even more elaborate (nine interlocking sensors and two line sensors).
Thom Hogan’s Complete Guide to the D70 Page 196
68

The Nintendo-like control on the back of the D70 is used to choose between autofocus sensors (and to navigate the camera’s menus). If the pad doesn’t seem to be functioning correctly, check the lever in the switch just below the controller to make sure that it isn’t in the L (lock) position or that Closest Subject Priority isn’t set with Custom Setting #3.
The first problem newcomers to Nikon’s system have is that the five sensors are not all alike. The central sensor is “crosshatched,” meaning that it works equally well discerning vertical or horizontal detail. The other four sensors are sensitive to detail in only one direction, meaning that they sometimes don’t lock onto subjects that have patterns or detail oriented in the same direction as the sensor (see figure, below).
There’s another difference between the cross-hatched and line sensors: the cross-hatched focus area has two components to it, both a narrow set of sensors used in bright light and a broader set of sensors that are used in low light. The other four autofocus areas only have narrow sensors, and are not as sensitive in low light. This has consequences for using the camera for in low light! One very subtle change is that the area measured by the central sensor shifts every so slightly down and to the right in low light (since the other sensors don’t have a second low light component, they don’t shift).
Thom Hogan’s Complete Guide to the D70 Page 197

Note that the autofocus sensors extend outside the areas indicated and are narrower than the viewfinder brackets (see lines in illustration). The central sensor is the only cross-hatched one (sensitive to both vertical and horizontal detail), and is also the only autofocus area that has added width for low light situations.
The viewfinder indicates the status of the autofocus system when you press the shutter release (or hold it halfway down):
= The subject is in focus
The D70 can be used in autofocus (the camera does the work of focusing the lens) or manual focus (you focus the lens). You set the type of focusing by moving the Focus Mode lever on the front of the camera to:
AF Autofocus—when you press or partially press the shutter release the camera focuses the lens; the shutter may or may not operate until focus is achieved (this depends upon another setting, which we’ll get to in a moment). If the = Focus Achieved indicator shows in the viewfinder with the shutter release held partway down, focus is either held at that position or follows the subject until you fully press or let go of the shutter release; which again depends upon a secondary setting.
M Manual Focus—the D70 does not attempt to focus the lens and pictures are always taken immediately when the shutter release is fully pressed. (The viewfinder still displays the autofocus confirmation information, though, which is useful in verifying focus in some situations.)
Single Servo versus Continuous Servo Autofocus
Several controls allow you to fine tune the way the camera works when autofocus is active. One of these is something Nikon calls Focus mode.
Thom Hogan’s Complete Guide to the D70 Page 198

• Single-servo AF: the camera finds focus once and locks on that as long as the shutter release is held partway. (If the subject was moving when focus was established, focus will follow the subject.) However, a picture is never taken unless focus is achieved. Put another way, when you press the shutter release the actual shutter opening is delayed until focus is achieved. In low-light or low contrast conditions, where the camera has a hard time detecting focus, there may be a significant lag between pressing the shutter release and the taking of the picture. In bright light, that rarely happens, though.
• Continuous-servo AF: the camera looks for focus and continues to monitor focus as long as the shutter release is held partway. (If a subject starts to move after focus was established, focus still follows the subject.) However, a picture is always taken immediately when the shutter release is fully pressed, even if focus wasn’t achieved.
It’s very important to note the primary difference between Single Servo and Continuous Servo AF. Nikon calls the Single Servo AF mode “focus priority” for a reason—an image is not taken until the camera achieves focus. If the conditions are such that the camera can’t manage to find focus—as sometimes happens with fast moving off-center subjects in low light—you won’t be able to take a picture.
Continuous Servo AF is called “release priority” by Nikon, meaning that the picture is taken immediately upon fully pressing the shutter release, regardless of whether or not focus has yet been achieved. That doesn’t mean the resulting picture is out of focus, however. Sometimes the camera still has enough time to move the focus point on the lens (the D70 has a general idea of where that might be because it compares differences in contrast at multiple points along the way, which gives it a pretty good set of data to guess at where the ultimate focus point might be). Sometimes depth of field is enough to cover any focus error. And sometimes you just get
Thom Hogan’s Complete Guide to the D70 Page 199

lucky. But under release priority, there’s no guarantee that you’ll get an in-focus image if you didn’t first press the shutter release partway and hold it there long enough for the camera to establish a focus point. If I’m in low-light conditions or shooting a low contrast subject, I’ll almost always put the D70 in Single Area AF (see below) and use only the central autofocus sensor, if possible, as this gives the camera the best chance of finding focus. Using AF-S lenses help slightly, too.
I sometimes mockingly refer to Single Servo AF as the Shutter Frustration mode and Continuous Servo AF as the Focus Frustration mode. That’s because until you learn how the Nikon AF system works and can anticipate and avoid the things that keep it from achieving focus, you’ll be frustrated that the shutter release never quite works in a timely fashion if you’re in one autofocus mode and you never quite get in-focus pictures when you’re in the other. If you always shoot in bright light, you might not encounter those problems, but I strongly suggest to every Nikon newcomer that they actually practice focusing in a variety of conditions with the various camera settings.
One point that sometimes gets confused is how the camera uses something called “predictive focus tracking.” When the D70 autofocuses, it always uses predictive focus tracking, however there is a subtle difference in how it is used, which you may have missed in what I’ve already presented and what’s in the Nikon documentation.
The point Nikon tries to make is this: in Single Servo AF predictive focusing is used if the subject is detected as moving towards or away from the camera at the time focus is acquired, but not if the subject was stationary and later starts moving. In Continuous Servo AF predictive focusing is used at any time, even if the subject wasn’t moving when focus was acquired. In other words, in Continuous Servo AF if you focused on a runner in the starting blocks of the 100-meter dash and held the shutter release down partway, once the
Thom Hogan’s Complete Guide to the D70 Page 200

race began and the runner started coming towards you focus would be tracked as long as you held the shutter release partway down. In Single Servo AF, focus would stay at the starting line.
Note: If you’ve migrated to the D70 from the Nikon F5, one focus option in Continuous Servo AF is missing: you can’t set the camera to operate in “focus priority” mode via a custom setting (a technique sometimes called “trap focus” because you focus on a preset point and the camera doesn’t shoot until a subject appears in focus at the trap point. Personally, I don’t miss this feature, but others who’ve made the switch apparently do.
Note: If you’ve migrated to the D70 from any other recent Nikon body, note that the Closest Subject Priority defaults are different on the film and some of the digital bodies! Read on.
You set the Single-servo AF or Continuous AF using Custom Setting #2 (see “Autofocus Mode,” on page <268>). The default is Single-servo.
Autofocus Area Modes
The D70 also has three Autofocus Area modes, which determine how the five individual autofocus sensors are used.
The Autofocus Area mode is set by with Custom Setting #3 (see “Autofocus Area Mode,” on page <269>). Your choices are:
r Single Area AF—the camera only uses the currently selected autofocus sensor for focusing. You control which sensor is used to focus by pressing the keys of the Direction pad on the back of the camera (when the meter is active).
/ Dynamic Area AF—the camera starts by focusing on the subject under the currently selected autofocus sensor, but may move to use another sensor if it detects that the
Thom Hogan’s Complete Guide to the D70 Page 201

subject is moving. You control which sensor the system starts focusing with by pressing the keys of the Direction pad on the back of the camera (when the meter is active).
Closest Subject Priority AF69—the camera always focuses using the sensor that detects the “subject” closest to the camera; you get no choice in which autofocus sensor will be used for focusing.
õ Assuming that you haven’t turned on Closest Subject Priority, the autofocus area that is used as the initial focus point is set by:
1. Move the Focus Area Selector Lock lever to the unlocked position (lever up to the dot position).
2. Make sure the camera is active (press the shutter release partway and release it if the camera isn’t active).
3. Press the keys on the Autofocus Direction pad to change sensors (by default, the directions don’t wrap around, so pressing left continuously just takes you to the left sensor and stops (see “Focus Area Selection Wrap,” on page <287>).
Autofocus Summary
Yes, the autofocus system used in the D70 is quite complex and a bit difficult to understand at first. Here’s a table that summarizes the key options:
Closest Subject Priority (CSP) is a little different on the D70 than on previous Nikon bodies. Usually CSP is a separate function from the Autofocus Area mode (i.e., you can set CSP in either Single Area AF or Dynamic Area AF, or have it OFF for both). Frankly, the D70’s simplification makes a lot of sense to me, especially for a camera at this price point.
Thom Hogan’s Complete Guide to the D70 Page 202
69

Autofocus Settings Summary Focus Mode AF Area Focus Top LCD Active
Mode Area Display Area Selected Shown? by
Single Servo Single Area User r Yes Single Servo Dynamic User b Yes Single Servo Closest Subject Camera / No Cont Servo Single Area User r Yes Cont Servo Dynamic User b Yes Cont Servo Closest Subject Camera / No
I noted earlier that the central autofocus sensor is different than the other four. Because it is more capable in low light and low contrast situations, the central autofocus sensor is special. If you’re having troubles obtaining focus, set your autofocus options to Single Servo and Single Area, and then select the central sensor. Yes, this may require you to focus and reframe. Which in turn may force you to learn how to use the focus lock capabilities of the camera. But the alternative is to miss the shot entirely.
Autofocus Assist Lamp
The D70 has a built-in Autofocus Assist lamp to help the camera focus in low light situations. Unfortunately, it’s generally more hassle than it’s worth:
• The location is poorly chosen. If your hand doesn’t block the light, the lens usually does the job. The D70 manual lists a number of lenses that block the sensor for distances shorter than 3’ (1m), but in practice I’ve found that optimistic; more lenses block the sensor than Nikon claims, and if you use lens hoods the situation is worse.
• Some lenses turn it off! The 80-200mm f/2.8 AF-S lens and all the VR lenses disable the function.
• The range is minimal. Beyond about 10’ (3m), the light isn’t strong enough to make a difference.
Thom Hogan’s Complete Guide to the D70 Page 203

• The light is annoying to subjects. Do you like having a strong white light shined in your face just before being photographed?
• Settings must be correct for it to work. You must be in Single Servo autofocus mode. You must be using the central autofocus sensor or have Closest Subject Priority active.
• The lamp may turn itself off if it gets hot. The lamp can’t be used continuously. So if you’re using the lamp constantly, it’ll eventually shut down until it cools. I can usually get that to happen by five or six shutter release presses.
• It uses more power. When lamp is lit the camera is using a minimum of another 20mA in power. While that figure is relatively low, multiple activations will certainly drain the battery faster, and in low light you may be activating the light repeatedly.
If you’re getting the idea that I don’t like the Autofocus Assist lamp on the D70, you’re right. Fortunately, you can turn it off (see “Active Focus Sensor Illumination,” on page <288>), and the better (red) lamp on the SB-600 or SB-800 is used when one of them is mounted in the hot shoe.
Manual Focus
You can focus lenses manually on a D70. With most Nikkor lenses, you’ll need to move the Focus Mode lever on the front of the D70 to the M (manual) position before doing so. With AF-S lenses, you can focus manually at any time by simply turning the focus ring. With many of Nikon’s professional lenses, the lens itself has a Manual/Autofocus switch that can be used70.
This switch is (somewhat confusingly) labeled M/A for the autofocus position, M for the manual focus position on AF-S lenses. The “M/A” is trying to tell you that the lens will autofocus but you can override it with manual focus at any time by turning the focus ring.
Thom Hogan’s Complete Guide to the D70 Page 204
70

When you focus manually, the D70 still provides a focus aid that’s useful: the focus indicator at the far left of the viewfinder information display displays = if your focus is correct. (The currently selected autofocus sensor is what is used to confirm focus. Make sure you know which one that is!)
Only a couple of caveats exist for this manual focus confirmation function:
• The lens must have a maximum aperture of about f/5.6 or faster. (In high contrast situations, sometimes you can get by with a lens that only opens up to f/8, but don’t count on it.)
• If you use teleconverters or extension tubes, the effective aperture must be f/5.6 of faster. Again, sometimes an effective aperture of f/8 works, but don’t count on it—at best, autofocus will be slow to lock in.
In both of the above cases, you must not be manually stopped down (e.g., have set an aperture of f/11 on the lens aperture ring).
Note: Since we’re talking about manual focus, let me repeat what I write elsewhere several times in this book: Nikon’s manual focus lenses (and those of most third parties) will not meter on the D70. Moreover, very old Nikkor manual focus lenses may damage the D70 if you attempt to mount them. See “Lens Compatibility,” on page <495> for more on this.
Sharpening
While technically not a “focusing” action, image sharpening algorithms increase the apparent sharpness of a photo taken with the D70 when set.
Why is it necessary to sharpen images if the camera is focusing correctly? The process of translating analog information (light) into digital data (pixels) involves a
Thom Hogan’s Complete Guide to the D70 Page 205

procedure called sampling. Edges of sampled objects tend to be rendered in a manner that looks slightly fuzzy to our eyes. (If you want to know more about why this is, get The Manual of Photography, 9th Edition. But be forewarned, analog-to-digital transformation is filled with mathematical concepts and some pretty intimidating formulas. The short version: If the frequency of detail in a scene is higher than the CCD can sample, the detail is under-sampled and combined into a single pixel, and sharp edges tend to gather data from either side.) Sharpening uses contrast adjustments at edge boundaries to trick our eyes into seeing clearly defined edges.
If the green dots are photosites on the CCD and the black lines high contrast detail, when a line falls perfectly on a photosite (top), we get a perfect rendering. If some detail falls on multiple sensors (bottom) the detail is blurred.
The usual technique for sharpening images is to apply a technique called “unsharp masking,” and a variation of that technique is used by the D70. Unsharp masking finds edges by looking for adjacent pixels with value differences. On the brighter side of the edge, unsharp masking lightens the pixels; on the darker side, it darkens the pixels.
Unsharp masks work by exaggerating edges. I started with a medium gray block on the left and a dark gray block on the right, and then applied an Unsharp Mask. Note how on the lighter side of the image the edge was made even lighter, while on the dark side of the edge it was made almost black.
Thom Hogan’s Complete Guide to the D70 Page 206

Most unsharp mask filters have settings for amount (controls how much lighter or darker the values are made), radius (controls how wide an area over which the value shifts are made), and threshold (controls how much of a difference there must be between adjacent pixels before adjustments are made). The D70 doesn’t let you set the individual parameters of the sharpening control; instead, you set an overall “level.”
The D70 has seven image sharpening settings:
None—no sharpening changes are made to the digital data.
Low—a small amount of unsharp masking is applied to the image. Nikon gives no details on how much sharpening is done, but on the D1 they claimed this is equivalent to about a 40% Amount setting in Photoshop.
Medium Low—a little more sharpening than Low.
Normal—a moderate amount of unsharp masking is applied to the image. Again, the D70 documentation makes no claims to the amount, though the D1 documentation claims that this is about equivalent to the 80% Amount setting in Photoshop. Under extreme magnification, the camera’s rendition is cruder and more readily detected than Photoshop’s, though (probably due to the radius chosen).
Medium High—a little more sharpening than Normal.
High—a large amount of unsharp masking is applied to the image. On the D1, Nikon claimed this is about equivalent to the 120% Amount setting in Photoshop, but the D70 appears to sometimes generate a mosaic-like pattern not found in Photoshop filters.
Auto—the camera decides what level of sharpening to use. The manual says that this is based upon the “subject” and “vary shot to shot,” which isn’t very helpful in understanding what the camera might be doing.
Thom Hogan’s Complete Guide to the D70 Page 207

Note: If you’re shooting JPEG images, the above parameters are used to apply sharpening to the actual pixel data that is saved. If you shoot NEF, the “tag” for the sharpening value is stored in the EXIF data and the data is left untouched. However, note that programs such as Nikon Capture often use the camera tags as the default setting for conversion, so unless you override the sharpening value in your NEF conversion program, sharpening may be applied by the program! That’s one reason why I say set sharpening to None if you shoot NEF images.
Sharpening is usually applied twice to images (only one of these potentially occurs in camera). The first sharpening is used to compensate for the anti-aliasing (fuzziness) that is inherent in digital image acquisition. I’d argue that this sharpening should be minimized as much as possible.
A final sharpening should only be applied to an image when you know the reproduction size. For example, I often use a Radius value of 0.3 to 0.5 when sharpening small images destined for the Web or computer view. When printing on an Epson inkjet printer, such as the 1280 or 2200, I sometimes use Radius values as high as 0.8 to 1.2, since I know that the ink tends to spread upon contact with the paper I use, masking the sharpening effect somewhat. (The dot gain on most consumer Epson printers with regular ink and papers is about 30%.)
Many photographers believe that it’s incorrect to apply sharpening to color image data (amongst other problems, the colors can shift due to the methods used to lighten or darken edges). These folk tend to advocate switching the image mode to Color Lab (Adjust/Mode/Color Lab in Photoshop), applying sharpening only to the luminosity layer, then switching back to RGB or CYMK mode (Adjust/Mode/RGB or Adjust/Mode/CYMK). This method also tends to color shift images, though not by as much as the regular method, as Photoshop rounds pixel values during mode conversions. I’ve seen some colors drift by 2 or 3 values (out of 256) making
Thom Hogan’s Complete Guide to the D70 Page 208

this conversion. (For a fuller discussion of sharpening, see http://www.bythom.com/sharpening.htm.)
Tip: In most recent versions of Photoshop, you can run your Unsharp Mask filter as usual, then select Fade Unsharp Mask from the Edit menu (select Luminosity in the Mode pop-up) to achieve the same affect as the Color Lab luminosity trick. This avoids the color shift.
My recommendation is that you turn Sharpening to Low or Medium Low when shooting with a D70 in the JPEG file format. NEF files don’t get sharpened by the camera, but you should still set the camera to a value of None so that your conversion program doesn’t pick up a sharpening value by default. Not only does Photoshop (and other image editing programs) do a better job sharpening images than the D70 does, but you can choose your sharpening methodology based upon how the image is used. Note also that high levels of sharpening also tend to increase the size of JPEG files.
About the only time it makes sense to use in-camera sharpening is when you’re working under tight deadlines and know how the image is likely to be rendered. For example, photographers shooting on deadline for Web sites or newspapers often fall into this category, and should probably select Normal or Medium High sharpening, depending upon whether the scene is normal contrast or low contrast, respectively).
Note: If you’ve set a sharpening level on the D70, it is applied to NEF format files if you’ve left your conversion program in the default settings. This is yet another reason to turn sharpening OFF on the camera (that way the camera’s settings match what you get).
Thom Hogan’s Complete Guide to the D70 Page 209

Sharpening set to None. The slight blurring effect is due to digital aliasing, not lack of sharpness of the lens. Contrast is a bit low, as well.
Sharpening set to Low. Anti-aliasing is reduced with only a bit of false contrast increase. This is a reasonable setting to use if you must use in-camera sharpening.
Sharpening set to High. Look at the border between the yellow and gray background—there’s a visible white rim. Ditto between Mickey’s white hand and his sleeve. Personally, I find this objectionable, and too heavy-handed a sharpening effect.
Thom Hogan’s Complete Guide to the D70 Page 210
Shooting Controls Many of the shooting controls of the D70 have already been covered in earlier sections, but a few important ones remain to be described.
Shutter Releases
The D70 sports the usual shutter release in the right-front top of the camera, but has no option for a vertical release.
Personally, I don’t miss the lack of a built-in vertical release. I, like many professionals, use quick release mounts on my cameras (most of the time the camera is used on a tripod). When I grasp the camera to shoot vertically as Nikon intends me to with the MB-D100 on the D100, my palm then rests on the quick mount, so I don’t miss the absence of a vertical grip at all.
The shutter release controls the activation of the camera’s metering system and the start of autofocus (basically, all systems that need to be “active” during shooting). A partial press of the shutter release turns metering ON and activates the autofocus system. As long as you hold the shutter release partway down, the camera stays active (and uses considerably more power, see “Battery Life,” on page <60>).
If you let go of the shutter release after pushing it partway, the camera stays active based upon how Custom Setting #23 is set (see “Meter/Camera Active Time,” on page <294>). By default, this is six seconds.
Shutter Lag
One thing that catches D70 users unawares is the potential for “lag” in the time between pressing the shutter release and the picture being taken. Since many users migrate to a D70 from a compact digital camera (e.g., Coolpix) to avoid shutter lag, this can be a frustrating aspect of the camera, at least until you understand that the settings you choose contribute to the problem.
Thom Hogan’s Complete Guide to the D70 Page 211

In manual focus and manual exposure mode with no images in the internal memory buffer, the shutter lag on a D70 is actually shorter than that of most 35mm film camera bodies (less than 80 ms). However, as you turn on automated features or put images into the buffer, the lag may actually become significant and difficult to predict.
Here’s a partial list of things that contribute to shutter lag:
• The camera needs to clear the buffer. In the Continuous shooting method (see “Motor Drive,” on page <213>), when the internal memory buffer fills, the D70 must write that information to the CompactFlash card. As enough internal memory becomes available for another image, the D70 again releases the shutter. The same is true for the Single Frame shooting method, though it’s rare that you’ll be poking your finger on the shutter release often enough to outrun the buffer (it’s possible, though I wouldn’t vouch for the stability of the camera—you’d better be shooting at a fast shutter speed to keep image blur to a minimum).
• Autofocus is set to Single Servo. In low contrast scenes and sometimes with moving objects, the autofocus mechanism may take longer than usual to lock into the focus point. If you’ve set Single Servo AF, the camera won’t release the shutter until autofocus is achieved. With telephoto lenses that do not have a built-in motor (i.e., are not AF-I or AF-S), the number of turns the autofocus motor has to make to drive a lens from one extreme focus position to another can also be a factor (generally you don’t see this with wide angle lenses).
• The shutter speed is long. In continuous motor drive, it is possible for long shutter speeds to reduce the camera’s frame rate. While this doesn’t contribute lag to the initial frame in a burst, you may feel like subsequent frames have a built-in lag. Consider, for example, that you have the camera set to shoot continuously and are using a shutter speed of ½ second. Obviously, the absolute best you’re going to get is something less than 2 frames per
Thom Hogan’s Complete Guide to the D70 Page 212

second, not the 3 frames per second maximum the D70 is capable of.
• Redeye reduction is used. The principle behind the red eye reduction scheme Nikon uses is that a bright light fired at a subject for a second prior to exposure reduces the subject’s pupil size, and thus the area in which blood-vessel reflections off the back of the eye can occur is reduced. Unfortunately, this method totally destroys the shutter press to exposure rhythm, as it introduces a particularly long pause before the shutter is released.
• Autofocus Assist lamp is used. In low-light situations when you’re using autofocus, the D70 may resort to using the Autofocus Assist lamp. This introduces a slight delay between pressing the shutter release and the taking of the picture.
• The self timer is set. See “Self Timer,” on page <216>. This one is my favorites at workshops: the student comes to me and says their camera isn’t working. About that point the shutter goes off and the student remembers that they set the self timer. At least with the D70 the white light on the front of the camera winks in a way that’s hard to ignore as the camera is counting down to shutter release. Still, I’ve seen more than one photographer miss that clue.
Motor Drive
One of the D70’s key attributes is its ability to take multiple photos in rapid succession. Most consumer digital cameras are quite limited in this respect, but the D70 operates much like a slow F5, with only a few minor differences.
Two motor drive (shooting method) settings are possible (the button also controls the self timer and remote control capabilities):
S Single-frame. Each time the shutter release is pressed, a single image is recorded (i.e., holding the shutter release
Thom Hogan’s Complete Guide to the D70 Page 213

down past the shot doesn’t take additional pictures). You can take additional pictures (until the buffer fills) without having to wait for the camera to write to the CompactFlash card—you just have to press the shutter release for each one.
C Continuous. Images are recorded as often as 3 frames per second (fps) while you hold the shutter release down. If the buffer fills and you continue to hold the shutter release down, the D70 shoots another picture each time one image has been completely saved to CompactFlash.
Note: Nikon’s motor drive specifications are made with the camera set to manual exposure, manual focus, and a shutter speed of 1/250 second or faster. If you’re using automatic exposure modes, slower shutter speeds, or light is too dim for optimal autofocus, you may experience frame rates lower than Nikon specifies.
õ To change the motor drive setting: Hold down the Shooting Method button and turn the Rear Command dial until S (single frame), C (continuous), or o (self-timer, which is the same as single frame with a delay) shows in the top LCD.
only one icon shows at a time
Since the D70 is so fast at emptying the buffer, you usually won’t encounter any shooting limitations. However, note the following buffer sizes:
D70 Maximum Buffer Capacity Image Format Maximum Exposures* NEF 4 exposures NEF+BASIC LARGE 4 exposures JPEG FINE LARGE 9 exposures JPEG FINE MEDIUM 7 exposures (yes, this is correct)
Thom Hogan’s Complete Guide to the D70 Page 214

JPEG FINE SMALL 19 exposures JPEG NORM LARGE 12 exposures JPEG NORM MEDIUM 7 exposures JPEG NORM SMALL 27 exposures JPEG BASIC LARGE 19 exposures JPEG BASIC MEDIUM 7 exposures JPEG BASIC SMALL 49 exposures
*prior to the internal buffer filling
If the buffer is full and you attempt to take another photo, the camera pauses until space for it is available.
If long exposure noise reduction is turned ON (SHOOTING menu, Long exp. NR option), the number of images allowed in the buffer is lowered:
D70 Maximum Buffer Capacity with Noise Reduction ON Image Format NEF NEF+BASIC LARGE JPEG FINE LARGE JPEG FINE MEDIUM JPEG FINE SMALL JPEG NORM LARGE JPEG NORM MEDIUM JPEG NORM SMALL JPEG BASIC LARGE JPEG BASIC MEDIUM JPEG BASIC SMALL
Maximum Exposures* 3 exposures 3 exposures 7 exposures 5 exposures 17 exposures 10 exposures 5 exposures 25 exposures 17 exposures 5 exposures 47 exposures
*prior to the internal buffer filling
Motor Drive Troubleshooting
Problem: When set to the Continuous shooting method, the camera takes pictures at irregular intervals. Solution: Single Servo autofocus is also set, and in this mode focus operations always have precedence over shutter release (e.g., the camera waits for the autofocus system to refocus the lens on a moving subject before releasing the shutter). Even in Continuous Servo autofocus the camera will sometimes
Thom Hogan’s Complete Guide to the D70 Page 215

“hiccup” while focusing. Set the camera to manual focus and the camera takes pictures at regular intervals.
Problem: Rapid shooting with a flash produces inconsistent exposures. Solution: You probably need to use a Speedlight with faster recycling properties, or you need to set the flash to one of its lower-power manual modes (many Speedlights can fire at motor drive speeds when set to manual flash mode at reduced power; see my Nikon Flash Guide for more details). If you need to shoot with flash with rapid refresh, you should look into getting the high voltage power option for your Speedlight.For example, you can run both a D70 and a Speedlight fromeither a Digital Camera Battery or a Quantum Turbo battery, with the Speedlight being powered at 24v by the battery for faster cycling.
Problem: The D70 shoots at a slower frame rate when the background is dark (as compared to scenes with light backgrounds). Solution: Most recent Nikon bodies exhibit this characteristic.Nikon has not released an explanation for the phenomenon. Switching to manual exposure mode does not change the behavior. Your only choice is to light the background.
Self Timer
The D70 features a variable self timer, which delays the opening of the shutter after the pressing of the shutter release.
õ To turn the self timer ON: hold down the Shooting Method button and turn the Rear Command dial until o shows in the top LCD.
Thom Hogan’s Complete Guide to the D70 Page 216

When the self-timer is set, the camera blinks the Autofocus Assist lamp on the right front of the D70 from the time you press the shutter release until two seconds prior to the exposure, at which point the camera turns the light on continuously to warn you that the exposure is about to be taken.
õ To set the delay value the self timer uses, see “Self Timer Delay Setting,” on page <296>. Note that unlike some Nikon bodies, the D70 only allows settings of 2, 5, 10, or 20 seconds.
Using the self-timer has a few hidden “gotchas” you should be aware of:
• Autofocus is attempted immediately upon shutter release. If you stand in front of the camera and press the shutter release (as you might do before assuming your position away from the camera in a self-portrait), the camera focuses on you standing just in front of the camera; it doesn’t wait until you have assumed your position and the delay has completed! I always trigger self-timer shots from alongside the camera, and then move to position in front of the camera; alternatively, I’ll move the autofocus selector switch to manual focus. With the D70 you can also trigger self timer shots with the infrared remote, so you can also get in final position and use the remote to trigger the camera.
• Pictures aren’t taken if autofocus fails. If the camera fails to find a subject and focus on it, no picture is taken if autofocus is active, even in Continuous Servo autofocus.
• Exposure may be wrong in automatic exposure modes. Stray light can enter the viewfinder and influence exposure settings when using the self timer. Be sure to use the supplied DK-5 Eyepiece Cap if you won’t be looking through the camera when the exposure is taken (or use
Thom Hogan’s Complete Guide to the D70 Page 217

manual exposure mode). And yes, this is a real problem— I’ve seen exposures vary by as much as a full stop!
• Bulb can’t be used with the self timer. The D70 automatically cancels bulb shutter speeds and uses 1/5 second instead. (BULB still appears as the shutter speed!)
• If you press the Depth of Field Preview button while the self timer is active and counting down, the shot will be cancelled.
Remote Control
An optional, wireless remote control is available for the D70. The ML-L3 remote is the same as used for the N75, and is fairly simple in operation. You can do two things with the remote:
• Trigger the shutter release immediately (Nikon calls this the Quick Response mode). To set this, hold down the Motor Drive button and rotate the Rear Command dial until only the remote icon appears on the top LCD. When the camera is set this way, instead of Bulb shutter speed you get ---- shutter speed in Manual exposure mode. The ---- shutter speed is started with the first press of the button on the ML-L3 remote and ends with a second press (or after 30 minutes)71.
• Trigger the shutter release with a delay of two seconds (Nikon calls this the Delayed Remote mode). To set this, hold down the Motor Drive button and rotate the Rear Command dial until both the self timer and remote icon appears on the top LCD.
When the camera is set to either method of remote release, the camera will automatically cancel that after a period of inactivity. By default this length of time is one minute, but you can change it with Custom Setting #25 (see “Remote Active
While you may be tempted to use this for cleaning the CCD, don’t.
Thom Hogan’s Complete Guide to the D70 Page 218
71

Setting,” on page <297>). Also, like the Self Timer, you should cover the eyepiece with the DK-5 accessory if you’re not looking through the viewfinder.
Note: The internal flash must fully recharge before you can take another picture with the remote release, so if you used flash on a shot, it may take a few seconds before another press of the remote’s button triggers another picture.
Depth of Field Preview
The D70 features a Depth of Field Preview button that closes down the aperture to the one that will be used during exposure. This allows you to see the approximate depth of field of the final image.
Note: Immediately after you’ve taken a picture the Depth of Field Preview button doesn’t always work (you can hit it too soon after the previous exposure was taken). Press the shutter release partway to establish an exposure, and then retry the button.
Note: If you press the Depth of Field Preview button while the self timer is active and counting down, the picture will be cancelled!
Many D70 users question whether depth of field on a D70 is the same as on a 35mm film body (assuming the same lens, focus point, and aperture settings). After dealing with this issue for years on D1 and D100 models, I can state conclusively that the answer is “no.”
Depth of field in the 35mm film world is often calculated as follows:
Dis tan ceNearFocus ⎛⎜⎜
=
1+⎛⎜⎜⎝
Dis tan ce *⎛⎜⎝
Aperture ⎞⎟⎠
* hFocalLengt⎞⎟⎟⎞ ⎟⎟⎠⎝ 1000 ⎠
Thom Hogan’s Complete Guide to the D70 Page 219

Dis tan ceFarFocus ⎛⎜⎜
=
1−⎛Dis tan ce *⎛⎜
⎝Aperture ⎞
⎟⎠
* hFocalLengt ⎞⎞⎟⎟⎝
⎜⎜⎝ 1000 ⎟⎟
⎠⎠
But conservative photographers take into account the amount of magnification that the final image undergoes. An 8 x 10” print from a D70 comes from a smaller imaging area than a print from a 35mm film negative, thus undergoes more magnification. Details that were small enough to pass as in focus to our eye at normal viewing distances may appear out of focus when magnified.
I could present a long theoretical discourse and accompanying math regarding the differences between 35mm film and the D70, but that’s a bit beyond the scope of this book. Instead, I’ll present my conclusion: depth of field appears to me to be a bit less than a one stop difference for a D70 than 35mm film, at least for the sized prints that you’re likely to produce (11 x 14” or smaller).
So, if you’re using depth of field or hyperfocal distance charts intended for 35mm film cameras with your D70, simply add a stop for a conservative approach. For example, if your 35mm film chart says that the hyperfocal distance is 50 feet for a 50mm lens at f/2 (which it should if it uses the conservative Zeiss circle of confusion value!), simply use f/2.8 on the D70.
Note: The depth of field markings on most Nikkor lenses appear to be calculated using a circle of confusion of 0.03, with a few older ones possibly using 0.033. Carl Zeiss suggested that the circle of confusion should be 1/1730th of the diagonal measurement of the frame, which for 35mm would be 0.025. That’s the value that I, and many other professionals, use for 35mm. For a D70, the Zeiss number would be 0.016. Since the penalty for goofing up depth of field is an unpublishable image, it pays to use conservative values.
Thom Hogan’s Complete Guide to the D70 Page 220

The tables that follow are calculated for the D70 kit lens using the 0.016 circle of confusion value, and use distances in feet.
18mm Lens Aperture
Distance 2.8 3.5 4 5.6 8 11 16 22 32 0.5 0.49 0.49 0.49 0.48 0.47 0.47 0.45 0.44 0.41 near
0.51 0.51 0.51 0.52 0.53 0.54 0.56 0.59 0.63 far 1 0.96 0.95 0.95 0.93 0.90 0.87 0.82 0.76 0.69 near
1.04 1.05 1.06 1.09 1.13 1.18 1.29 1.45 1.83 far 2 1.85 1.81 1.79 1.72 1.62 1.51 1.36 1.22 1.03 near
2.18 2.23 2.26 2.39 2.61 2.95 3.76 5.60 30.83 far 3 2.67 2.60 2.55 2.40 2.22 2.02 1.76 1.52 1.24 near
3.42 3.55 3.65 3.99 4.65 5.85 10.29 115.92 Infinity far 5 4.14 3.97 3.85 3.53 3.13 2.75 2.28 1.90 1.48 near
6.32 6.76 7.12 8.57 12.35 27.52 Infinity Infinity Infinity far 10 7.05 6.56 6.26 5.44 4.55 3.78 2.95 2.33 1.73 near
17.21 21.00 24.92 61.78 Infinity Infinity Infinity Infinity Infinity far 20 10.87 9.75 9.09 7.46 5.88 4.65 3.45 2.63 1.89 near
125.49 Infinity Infinity Infinity Infinity Infinity Infinity Infinity Infinity far 50 16.10 13.77 12.48 9.60 7.13 5.39 3.84 2.85 2.00 near
Infinity Infinity Infinity Infinity Infinity Infinity Infinity Infinity Infinity far hyperfocal 23.7 19.0 16.6 11.9 8.3 6.0 4.2 3.0 2.1
20mm Lens Aperture
Distance 2.8 3.5 4 5.6 8 11 16 22 32 0.5 0.49 0.49 0.49 0.49 0.48 0.47 0.46 0.45 0.43 near
0.51 0.51 0.51 0.52 0.52 0.53 0.55 0.57 0.60 far 1 0.97 0.96 0.96 0.94 0.92 0.89 0.85 0.80 0.73 near
1.03 1.04 1.05 1.07 1.10 1.14 1.22 1.33 1.57 far 2 1.88 1.85 1.83 1.77 1.68 1.59 1.45 1.32 1.14 near
2.14 2.18 2.21 2.30 2.47 2.70 3.21 4.16 8.16 far 3 2.73 2.67 2.62 2.50 2.33 2.15 1.91 1.68 1.40 near
3.33 3.43 3.50 3.75 4.20 4.95 7.02 14.10 Infinity far 5 4.28 4.13 4.03 3.74 3.38 3.01 2.55 2.15 1.71 near
6.01 6.33 6.59 7.54 9.64 14.79 134.44 Infinity Infinity far 10 7.47 7.02 6.74 5.96 5.08 4.29 3.40 2.73 2.05 near
15.13 17.36 19.40 31.10 324.78 Infinity Infinity Infinity Infinity far 20 11.90 10.81 10.14 8.47 6.79 5.44 4.09 3.15 2.28 near
62.63 134.10 724.89 Infinity Infinity Infinity Infinity Infinity Infinity far 50 18.48 15.97 14.55 11.34 8.52 6.49 4.65 3.47 2.44 near
Infinity Infinity Infinity Infinity Infinity Infinity Infinity Infinity Infinity far hyperfocal 29.3 23.4 20.5 14.6 10.3 7.5 5.1 3.7 2.6
24mm Lens Aperture
Distance 2.8 3.5 4 5.6 8 11 16 22 32 0.5 0.50 0.49 0.49 0.49 0.49 0.48 0.47 0.46 0.45 near
0.51 0.51 0.51 0.51 0.51 0.52 0.53 0.54 0.56 far 1 0.98 0.97 0.97 0.96 0.94 0.92 0.89 0.85 0.80 near
1.02 1.03 1.03 1.05 1.07 1.09 1.14 1.21 1.33 far 2 1.91 1.89 1.88 1.83 1.77 1.70 1.59 1.47 1.32 near
2.10 2.12 2.14 2.20 2.30 2.44 2.70 3.12 4.17 far 3 2.81 2.76 2.73 2.63 2.50 2.36 2.15 1.94 1.67 near
3.22 3.28 3.33 3.48 3.74 4.12 4.97 6.58 14.40 far 5 4.48 4.36 4.29 4.05 3.75 3.43 3.00 2.61 2.14 near
5.66 5.85 6.00 6.52 7.50 9.23 15.01 60.17 Infinity far 10 8.10 7.73 7.48 6.80 5.98 5.20 4.27 3.51 2.71 near
13.08 14.17 15.06 18.89 30.50 131.99 Infinity Infinity Infinity far 20 13.58 12.57 11.94 10.28 8.51 7.00 5.41 4.24 3.13 near
37.91 48.84 61.51 362.16 Infinity Infinity Infinity Infinity Infinity far 50 22.90 20.16 18.58 14.85 11.41 8.85 6.44 4.85 3.44 near
Infinity Infinity Infinity Infinity Infinity Infinity Infinity Infinity Infinity far hyperfocal 42.2 33.7 29.5 21.1 14.8 10.7 7.4 5.4 3.7
Thom Hogan’s Complete Guide to the D70 Page 221

28mm Lens Aperture
Distance 2.8 3.5 4 5.6 8 11 16 22 32 0.5 0.50 0.50 0.49 0.49 0.49 0.49 0.48 0.47 0.46 near
0.50 0.50 0.51 0.51 0.51 0.51 0.52 0.53 0.54 far 1 0.98 0.98 0.98 0.97 0.96 0.94 0.92 0.89 0.85 near
1.02 1.02 1.02 1.03 1.05 1.07 1.10 1.14 1.22 far 2 1.94 1.92 1.91 1.88 1.83 1.77 1.68 1.59 1.45 near
2.07 2.09 2.10 2.14 2.21 2.30 2.47 2.71 3.23 far 3 2.86 2.82 2.80 2.72 2.62 2.50 2.33 2.15 1.90 near
3.16 3.20 3.23 3.34 3.51 3.75 4.22 4.98 7.13 far 5 4.61 4.52 4.46 4.27 4.02 3.74 3.36 2.99 2.53 near
5.47 5.60 5.70 6.03 6.62 7.53 9.78 15.24 219.63 far 10 8.53 8.23 8.02 7.43 6.70 5.96 5.03 4.24 3.36 near
12.09 12.75 13.27 15.27 19.73 31.07 734.07 Infinity Infinity far 20 14.85 13.95 13.37 11.81 10.05 8.47 6.71 5.37 4.03 near
30.62 35.31 39.64 65.29 2209.63 Infinity Infinity Infinity Infinity far 50 26.75 23.96 22.30 18.26 14.35 11.32 8.38 6.38 4.57 near
383.08 Infinity Infinity Infinity Infinity Infinity Infinity Infinity Infinity far hyperfocal 57.4 45.9 40.2 28.7 20.1 14.6 10.0 7.3 5.0
35mm Lens Aperture
Distance 2.8 3.5 4 5.6 8 11 16 22 32 0.5 0.50 0.50 0.50 0.50 0.49 0.49 0.49 0.48 0.48 near
0.50 0.50 0.50 0.50 0.51 0.51 0.51 0.52 0.53 far 1 0.99 0.99 0.99 0.98 0.97 0.96 0.95 0.93 0.90 near
1.01 1.01 1.01 1.02 1.03 1.04 1.06 1.08 1.13 far 2 1.96 1.95 1.94 1.92 1.89 1.85 1.79 1.72 1.61 near
2.04 2.05 2.06 2.09 2.13 2.18 2.27 2.40 2.63 far 3 2.91 2.88 2.87 2.82 2.75 2.66 2.53 2.39 2.19 near
3.10 3.13 3.14 3.21 3.30 3.43 3.68 4.01 4.74 far 5 4.74 4.68 4.64 4.51 4.33 4.12 3.81 3.50 3.08 near
5.29 5.37 5.42 5.61 5.92 6.36 7.26 8.74 13.25 far 10 9.01 8.79 8.64 8.19 7.61 6.98 6.14 5.36 4.43 near
11.24 11.60 11.87 12.83 14.60 17.64 27.01 74.63 Infinity far 20 16.37 15.66 15.19 13.86 12.24 10.69 8.82 7.29 5.66 near
25.70 27.67 29.27 35.93 54.57 155.07 Infinity Infinity Infinity far 50 32.13 29.49 27.86 23.67 19.31 15.70 11.97 9.31 6.80 near
112.67 164.08 243.41 Infinity Infinity Infinity Infinity Infinity Infinity far hyperfocal 89.7 71.8 62.8 44.8 31.4 22.8 15.7 11.4 7.8
50mm Lens Aperture
Distance 2.8 3.5 4 5.6 8 11 16 22 32 0.5 0.50 0.50 0.50 0.50 0.50 0.50 0.49 0.49 0.49 near
0.50 0.50 0.50 0.50 0.50 0.50 0.51 0.51 0.51 far 1 1.00 0.99 0.99 0.99 0.99 0.98 0.97 0.97 0.95 near
1.00 1.01 1.01 1.01 1.01 1.02 1.03 1.04 1.06 far 2 1.98 1.98 1.97 1.96 1.94 1.92 1.89 1.85 1.79 near
2.02 2.03 2.03 2.04 2.06 2.08 2.12 2.17 2.26 far 3 2.95 2.94 2.94 2.91 2.87 2.83 2.76 2.67 2.55 near
3.05 3.06 3.07 3.10 3.14 3.19 3.29 3.42 3.65 far 5 4.87 4.84 4.82 4.75 4.65 4.53 4.34 4.14 3.84 near
5.14 5.17 5.20 5.28 5.41 5.58 5.89 6.31 7.16 far 10 9.49 9.37 9.29 9.03 8.67 8.26 7.65 7.03 6.20 near
10.57 10.72 10.83 11.20 11.81 12.68 14.43 17.31 25.92 far 20 18.04 17.61 17.32 16.44 15.27 14.03 12.35 10.80 8.93 near
22.43 23.13 23.66 25.53 28.97 34.83 52.53 134.68 Infinity far 50 39.30 37.30 36.00 32.37 28.12 24.16 19.56 15.93 12.16 near
68.71 75.80 81.83 109.78 225.15 Infinity Infinity Infinity Infinity far hyperfocal 183.0 146.4 128.1 91.5 64.1 46.6 32.0 23.3 16.0
Thom Hogan’s Complete Guide to the D70 Page 222

70mm Lens Aperture
Distance 2.8 3.5 4 5.6 8 11 16 22 32 0.5 0.50 0.50 0.50 0.50 0.50 0.50 0.50 0.50 0.50 near
0.50 0.50 0.50 0.50 0.50 0.50 0.50 0.50 0.50 far 1 1.00 1.00 1.00 1.00 0.99 0.99 0.99 0.98 0.98 near
1.00 1.00 1.00 1.00 1.01 1.01 1.01 1.02 1.03 far 2 1.99 1.99 1.99 1.98 1.97 1.96 1.95 1.93 1.89 near
2.01 2.01 2.01 2.02 2.03 2.04 2.06 2.08 2.12 far 3 2.98 2.97 2.97 2.95 2.94 2.91 2.87 2.83 2.76 near
3.02 3.03 3.03 3.05 3.07 3.09 3.14 3.19 3.29 far 5 4.93 4.92 4.91 4.87 4.82 4.75 4.65 4.53 4.34 near
5.07 5.08 5.10 5.14 5.20 5.28 5.41 5.58 5.90 far 10 9.73 9.67 9.63 9.48 9.28 9.03 8.65 8.24 7.63 near
10.28 10.35 10.40 10.58 10.84 11.20 11.84 12.72 14.52 far 20 18.96 18.71 18.54 18.01 17.28 16.44 15.21 13.96 12.27 near
21.17 21.48 21.71 22.48 23.74 25.53 29.19 35.27 54.03 far 50 43.91 42.61 41.73 39.14 35.81 32.36 27.89 23.92 19.34 near
58.05 60.49 62.36 69.20 82.83 109.90 241.26 Infinity Infinity far hyperfocal 358.8 287.0 251.1 179.4 125.6 91.3 62.8 45.7 31.4
Note: The Excel workbook used to calculate these tables is provided on the CD. All distances in the above charts are in feet, but the workbook also provides tables in meters, as well. The areas labeled in green are changeable by you, which mean that you can enter your own distances and apertures if the ones I provide aren’t to your liking. The focal lengths in these tables, by the way, are the 35mm marked focal lengths, not the D70 equivalents.
Finally, you should be aware that depth of field is a very contentious subject amongst photographers. Not only are there variants of the circle of confusion formula and methods for using them, but also alternative methods have large followings, as well. Most notably, Harold Merlinger’s The Ins and Outs of Focus (self-published, ISBN 0-9695025-0-8) describes a method that is based upon the object field. Essentially, Merlinger’s thesis has you set the lens at infinity focus and then use an aperture that is the physical size of the smallest detail you want to render. For example, with a 50mm lens on the camera, if you wish to resolve details as small as 5mm (regardless of how close they are to you), you’d need to set the lens to approximately f/11. (Please be aware that the preceding is a gross oversimplification of something that takes Merlinger an entire book to describe.)
Thom Hogan’s Complete Guide to the D70 Page 223

D70 Menus
The D70 uses the color LCD extensively to give you clearer indication of your options and settings. Not only have the custom settings moved to this menu system, but many of the direct digital controls are duplicated with a menu system on the color LCD.
Note: While you use the Autofocus Direction pad to navigate these menus, some new users can’t quite figure out how to move from tab to tab. If you want to move from the PLAY tab to the SHOOTING MENU tab, for example, you may have to press the < key on the Direction pad to select the tab area, then use the % and " keys to select the tab you desire. Use the > key to then move back to the main portion of that menu, and then use the % and " keys again to move between menu items. That all sounds more complicated than it really is. Short course: if you find you can’t get to something, try pressing the < key first.
Here’s a handy summary of the menu hierarchy (my suggested settings, where appropriate, are in green):
Thom Hogan’s Complete Guide to the D70 Page 224

PLAY menu (² icon)
Note: The PLAY menu is disabled and inaccessible if no card is present in the camera.
Delete Selected All
Playback Fldr Current All
Rotate tall Yes (ON)
No (OFF) Slide Show
Start Frame Intvl Hide Image Print Set
Select / set Deselect all?
Note: Primary difference between the D70 and D100 menu is that Histograms, Highlights, and Display Mode are optional and appear in the D100, but are automatically set in the D70.
Thom Hogan’s Complete Guide to the D70 Page 225

SHOOTING menu (õ camera icon)
Optimize image Normal Vivid Sharper Softer
Direct Print Portrait Landscape Custom
Done Sharpening
Auto Normal 0 Low –2 Medium low –1 Medium high +1 High +2
None Tone comp. Auto
Normal 0 Low contrast –2 Medium low –1 Medium high +1 High contrast +2 Custom Color mode
Thom Hogan’s Complete Guide to the D70 Page 226

sRGB Ia Adobe RGB II
sRGB IIIa Saturation
Normal Moderate
Enhanced Hue
9 6 3
0 -3 -6 -9 Long exp. NR
Off On
Image quality NEF (Raw)
JPEG Fine JPEG Normal JPEG Basic NEF+JPEG Basic Image size Large
Medium Small
White Balance Auto Incandescent Fluorescent
Dir Sunlight Flash
Cloudy Shade Preset
Measure
Thom Hogan’s Complete Guide to the D70 Page 227

Use photo ISO
200 to 1600 in third stop settings
Note: Primary difference between the D70 and D100 menus is that many of the individual settings are now grouped under Optimize image.
CSM (custom settings) menu (Ú pencil icon)
Custom Settings 0 through 26 (see “Custom Settings,” starting on page <263>).
SET UP menu (Ø wrench icon)
Note: This is a scrolling menu, meaning that there are more options available than can be seen at one time. When you move past the bottom of the visible options, additional options are revealed72.
Folders Select folder
New Rename
If I have any gripe about Nikon’s option ordering, it is on this menu. The things that you tend to change once (LCD brightness, for example) really should be on the second page and the things you change more often (Dust ref photo) should be on the first page. In general, Nikon still hasn’t glommed on to the frequency with which certain settings are made, and thus you end up having to press more buttons than you should. The function on this menu you perform most often, for example, is Format, which takes an additional two button presses to reach. Fortunately, we have an alternative, more direct method for that function.
Thom Hogan’s Complete Guide to the D70 Page 228
72
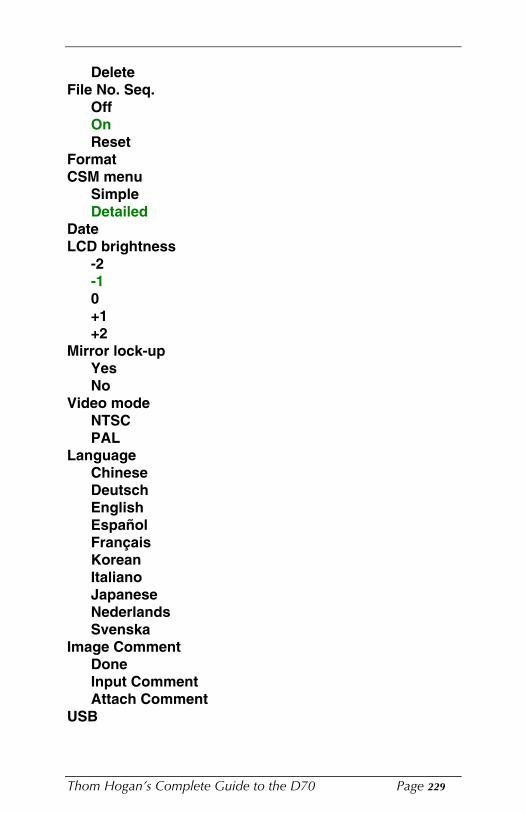
Delete File No. Seq.
Off On Reset
Format CSM menu Simple
Detailed Date LCD brightness
-2 -1 0 +1 +2
Mirror lock-up Yes No
Video mode NTSC PAL
Language Chinese Deutsch English Español Français Korean Italiano Japanese Nederlands Svenska
Image Comment Done
Input Comment Attach Comment USB
Thom Hogan’s Complete Guide to the D70 Page 229

Mass storage PTP
Dust ref photo Yes No
Firmware Current
Image Rotation Automatic Off
Note: The D70 and D100 SET UP menus are quite different, with the D70’s having been reorganized and many more options added.
Thom Hogan’s Complete Guide to the D70 Page 230

Error Messages The D70 viewfinder has a number of indicators that remind you how the camera is set while you’re shooting. But more important is that the viewfinder shows error messages you need to be aware of:
Message Where What it Means Seen
FEE (blinks)
Viewfinder, top LCD
The lens has not been set to the smallest aperture. Solution: Set the aperture ring on the lens to the smallest aperture (usually f/22).
F-- Viewfinder, You’ve attached a lens that top LCD does not have a CPU chip
built-in (normal with AI, AI-S, Nikon extension tubes). Solution: Either change lenses, or set the exposure mode to Manual (M) and then select apertures with the ring on the lens.
• (blinks) Viewfinder Camera cannot obtain autofocus (normally only seen in dim light or low contrast situations, but also seen sometimes with lenses whose maximum aperture is near f/8). Solution: Focus the lens manually. Or turn the Autofocus Assist lamp back on (if you’ve disabled it or set controls that turn it off by default).
Thom Hogan’s Complete Guide to the D70 Page 231

KI Viewfinder, top LCD
Camera cannot set proper exposure and the resulting ambient lighting will be overexposed. Solution: Choose a lower ISO value, if possible. In Program exposure mode, use a neutral density filter or choose another exposure mode; in other exposure modes, choose smaller apertures or shorter shutter speeds.
LO Viewfinder, top LCD
Camera cannot set proper exposure and the resulting ambient lighting will be underexposed. Solution: Choose a higher ISO value, if possible. In Program exposure mode, use flash or choose another exposure mode; in other exposure modes, choose larger apertures or longer shutter speeds, or use flash.
BVLB (blinks)
Viewfinder, top LCD
The camera is indicating that you’ve set the shutter speed to bulb and then switched to Shutter-priority mode. Solution: If you want to use a BULB shutter speed, switch to Manual exposure mode; otherwise set a valid shutter speed (the camera can’t set an aperture when it doesn’t know how long the shutter will be open).
Thom Hogan’s Complete Guide to the D70 Page 232

FULL 0
(blinks) Viewfinder, Top LCD
The card is full of images. Solution: Remove the current storage card and replace with a blank one, or transfer the images to computer via USB and format the storage card. If all you need is a couple more shots, try deleting images you don’t need or setting an Image Quality and Size that uses less storage space.
ÄÅÇ (blinks)
Viewfinder The scene brightness exceeds that which the meter can handle. Solution: Use a neutral density filter in bright situations, flash in dim situations.
Shutter speed (blinks)
Top LCD You’re trying to use flash at a shutter speed higher than the sync speed; the camera will set 1/500. Solution: The camera automatically sets the shutter speed to 1/500 (which shows as the shutter speed in the viewfinder).
ç (blinks) Viewfinder After exposure: flash fired at full power and the resulting image may be underexposed (it may also be correct). Solution: Review the image on the color LCD. If it is underexposed, use a larger aperture or reduce subject distance.
Thom Hogan’s Complete Guide to the D70 Page 233

ERR Viewfinder A camera malfunction has (blinks) and top
LCD occurred. Solution: Press the shutter release again. If the problem persists, take the camera in for servicing. (Also consider performing the steps mentioned in “The Last Resort Reset,” on page <139>.
Some error messages appear only on the top and color LCD:
Message Where Seen
-E- Top LCD
color LCD NO CARD PRESENT
CKA (blinks) Top LCD
THIS color LCD CARD CANNOT BE USED
What it Means
The camera can’t detect a CompactFlash card in the slot. Solution: Check to make sure that you’ve inserted a card and that it is properly engaged in the slot.
The camera is having trouble accessing the CompactFlash card. This may indicate that the card is not formatted correctly or already contains the maximum number of files. Solution: Use a different card, or, if the card you inserted wasn’t formatted properly, try to format it again.
Thom Hogan’s Complete Guide to the D70 Page 234

FOR
CARD IS NOT FORMATED
CURRENT FOLDER CONTAINS NO IMAGES
ALL IMAGES HIDDEN
FILE DOES NOT CONTAIN IMAGE DATA
Top LCD
color LCD
color LCD
color LCD
color LCD
The CompactFlash card you inserted hasn’t been formatted for use in the camera. Solution: Format the card.
Note the FOR message also appears during formatting operation.
You’re attempting to play back images from a folder on a card that contains none. Solution: It’s possible that images are on the card, but in a different folder, so check to make sure that you’ve selected the proper folder. Otherwise, take a picture!
You’re attempting to play back images from a folder on a card where all the images have been hidden. Solution: Unhide at least one image in the current playback folder; alternatively, select all folders for playback.
Usually appears when you’ve overwritten a file using a computer. Solution: try looking at the image on a computer.
Thom Hogan’s Complete Guide to the D70 Page 235

K Top LCD Not really an error. The camera is simply indicating that the CompactFlash card has space for more than 1000 exposures at the current settings.
R00 to R14 Top LCD Not really an error, though Viewfinder many who don’t read the
manual carefully think it is. What the camera is trying to tell you is how many shots remain in the buffer.
Thom Hogan’s Complete Guide to the D70 Page 236

Image Review and Playback The D70 allows images to be reviewed quickly and conveniently.
Image Review õ Quick review is accomplished by pressing the ² button on the back of the camera to turn the color LCD ON. After a brief delay, the most recently taken or displayed image is shown on the color LCD. The camera shows
• the most recently displayed image if you have used the color LCD since taking a picture
• the most recently taken picture if you’ve taken a picture since you last reviewed one.
(Yes, describing this difference is more difficult than it works out to be in practice.)
If no images have yet been stored on the CompactFlash card into the current folder, a message FOLDER CONTAINS NO IMAGES is displayed instead of an image.
õ When you’re done with a quick review, press the ² button again to turn the color LCD OFF, or press the shutter release partway as if you’re taking a picture.
Note: The color LCD has a default power-off time (set via Custom Setting #6, see “Lock Camera with No CompactFlash,” on page <275>). Press the ² button to turn the color LCD back ON. If this is done before the camera’s meter-off time has expired (Custom Setting #23), the color LCD displays the same thing it did when it shut OFF; if the meter-off time has expired, the color LCD displays the most recent image in memory when it comes ON.
If Custom Setting #7 (see “Image Display Status,” on page <276>) is set to ON, the image automatically appears for review on the color LCD after you take a picture.
Thom Hogan’s Complete Guide to the D70 Page 237
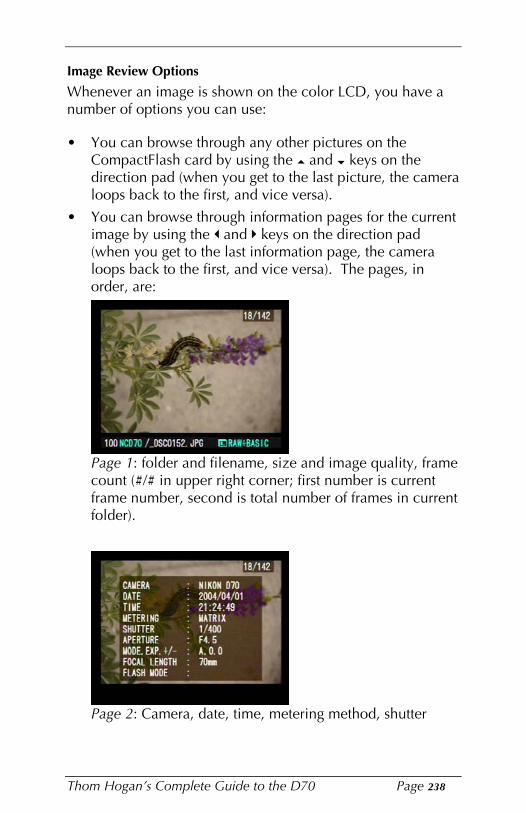
Image Review Options
Whenever an image is shown on the color LCD, you have a number of options you can use:
• You can browse through any other pictures on the CompactFlash card by using the % and " keys on the direction pad (when you get to the last picture, the camera loops back to the first, and vice versa).
• You can browse through information pages for the current image by using the < and > keys on the direction pad (when you get to the last information page, the camera loops back to the first, and vice versa). The pages, in order, are:
Page 1: folder and filename, size and image quality, frame count (#/# in upper right corner; first number is current frame number, second is total number of frames in current folder).
Page 2: Camera, date, time, metering method, shutter
Thom Hogan’s Complete Guide to the D70 Page 238

speed, aperture, exposure mode and compensation, focal length, and flash (if any).
Page 3: Optimization73, ISO, white balance, image size and quality, sharpening, tone, hue, and saturation.
Page 4: overexposed highlights blink
This display page bespeaks of haste. First, the use of the word “Development” instead of “Optimize image” (which probably didn’t fit when the English translation was received into engineering). Then there’s the repeat of image size and quality.
Thom Hogan’s Complete Guide to the D70 Page 239
73

Page 5: histogram (yes, this image is somewhat underexposed; because of the manner in which my video capture works, I had to dial down the exposure so that you could see both the image and histogram).
You can protect the currently viewed image from deletion (but not from a card format) by pressing the n button. A n
icon appears at the left top of the image. Note that protected files are marked with a read-only marker that persists when you move them to a computer.
Tip: In Windows, select the read-only file in a Windows Explorer window. Next select PROPERTIES from the FILE menu. Uncheck the box labeled Read-only to remove the read-only attribute.
On a Macintosh using OS 9.x or OS X, select the read-only file and press Apple - I (that’s an i) to see the General Information box for the file. Uncheck the box labeled Locked to remove the read-only attribute.
• You can delete the currently viewed image by pressing the p button. You’ll be prompted to confirm the deletion:
Thom Hogan’s Complete Guide to the D70 Page 240
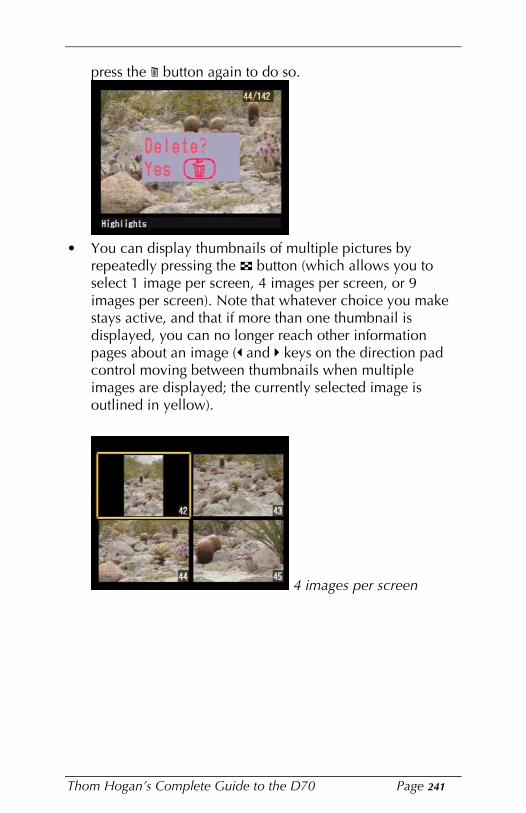
press the p button again to do so.
• You can display thumbnails of multiple pictures by repeatedly pressing the ± button (which allows you to select 1 image per screen, 4 images per screen, or 9 images per screen). Note that whatever choice you make stays active, and that if more than one thumbnail is displayed, you can no longer reach other information pages about an image (< and > keys on the direction pad control moving between thumbnails when multiple images are displayed; the currently selected image is outlined in yellow).
4 images per screen
Thom Hogan’s Complete Guide to the D70 Page 241

9 images per screen
• You can magnify the view by pressing the ENTER key, ±and then using the and Rear Command dial to zoom.
While viewing a magnified image, you can use the ±
button plus Rear Command dial to zoom in on the magnified view (shot, above). You can also use the Direction pad to move around within the magnified image. Press the ENTER button a second time to cancel the magnification (it’s also canceled if the color LCD shuts off due to time-out).
Image reviewing has a different timeout setting than the shooting mode of the camera (the default is 20 seconds; see “Custom Setting #22, Color LCD Active Time,” on page <293>).
Don’t panic if you see the CURRENT FOLDER CONTAINS NO IMAGES message. The camera is trying to tell you that it can find no images in the current folder of the card; that doesn’t mean that there aren’t images on the card. Whenever you see the NO IMAGES message, press the Þ button,
Thom Hogan’s Complete Guide to the D70 Page 242

navigate to PLAY menu, then navigate to Playback fldr and press the > key on the direction pad to select it. Select All and press the > key one more time.
The PLAY Menu
õ Pressing the Þ button and selecting the first tab (²) displays a selection of options on the color LCD:
The % or " keys on the Direction pad are used to navigate between these options (the currently selected option is highlighted; sometimes that’s the tab), and you press the < and > key on the Direction pad to select the highlighted item. Of the options, Slide show, Playback fldr, and Rotate tall are probably the most interesting, as the other items can be done directly on the currently shown (or selected) image, without using the menu system. The following sections detail each of the various PLAY menu options.
Deleting Images
õ You can delete the image that is shown on the color LCD (or the currently selected thumbnails) by pressing the DEL (p) button on the back of the camera. Before actual deletion begins, you’ll be asked for confirmation, which you indicate by pressing the DEL (p) button again (press any button on the back of the camera except for the DEL (p) button to cancel deletion).
Thom Hogan’s Complete Guide to the D70 Page 243

õ Alternatively, you can use the Delete option on the PLAY menu, which can delete either a few images or all of them:
Selected The D70 displays a thumbnail view of the images, nine at a time, and you navigate through them exactly as you would in thumbnail view (< and > key on the Direction pad), while pressing the % or " keys on the direction pad on each image you want to erase (each press is a toggle). You confirm the deletion of all the selected images by pressing the ENTER button, navigating to Yes, and pressing the ENTER button again when prompted.
All The D70 immediately displays a confirmation prompt. Selecting Yes and confirming that by pressing ENTER immediately deletes all photographs on the card except for ones that have been marked as PROTECTED or are
Thom Hogan’s Complete Guide to the D70 Page 244

HIDDEN.
Nikon’s manual says that deleted images cannot be recovered. They can, but not easily, and only if you take immediate action. If you accidentally erase an image (or more) on a card, set that card aside until you can access it with your computer. Use an image recover utility program such as PhotoRescue (http://www.datarescue.com/photorescue/) to recover the deleted file before doing anything else with the card. This works because the act of deletion doesn’t actually remove the data for an image, it simply marks the space used by the file as available. Thus, if you write additional images to a card after deleting a file, you often can’t recover the deleted file, as the D70 has probably used the space for the new images.
Dealing with Folders
I’ve dealt with it earlier, but it’s worth repeating here as we go through the PLAY menu options: the D70 uses folders to organize images stored on the CompactFlash card. Because the D70 follows the DCF digital camera standard (Design Rule for Camera File Systems) agreed to by most manufacturers, there are limitations on folder names and locations.
If you do nothing (i.e., don’t use any of the options on the Playback fldr selection on the PLAY menu or the Folders selection on the SET UP menu), the D70 creates a root folder named DCIM, which in turn contains a folder named 100NCD70 (100NCD1X on the D1X, 100ND100 on the
Thom Hogan’s Complete Guide to the D70 Page 245

D100, 100NIKON on a Coolpix). The first 999 images stored on the card are stored in that folder, then a new folder named 101NCD70 is created and the next 999 images stored there. This process of creating new folders every 999 images continues until you fill the card. Thus, when you examine the structure of the CompactFlash card on your computer, you’ll see something like this:
DCIM +----100NCD70 +----101NCD70
etc.
You can create new folders, but they always have a camera-assigned number as the first three characters (e.g., 100FOLDR), which isn’t particularly flexible.
Here’s the full extent of what you can do with folders on a D70:
õ Create a new folder:
1. Press the MENU button to see the menus on the LCD.
2. Use the Direction pad to navigate to SET UP menu (yellow wrench icon tab).
3. Use the Direction pad to navigate to Folders and press the > key on the Direction pad to select it.
Thom Hogan’s Complete Guide to the D70 Page 246

4. Use the Direction pad to navigate to New and press the > key on the Direction pad to select it.
5. In the display that appears, enter the five-character name:
a. Use the Direction pad to navigate to a letter or number.
b. Press the ?n button to select that letter or number.
c. If you need to move the cursor position, hold down the Thumbnail button and rotate the Rear Command dial to move the cursor to the appropriate position.
d. Press the Enter button to complete the action and return to the menu system.
õ Select which folders to display in playback:
1. Press the MENU button to see the menus on the LCD.
Thom Hogan’s Complete Guide to the D70 Page 247

2. Use the Direction pad to navigate to SET UP menu.
3. Folders and press the >Use the Direction pad to navigate to
key on the Direction pad to select it.
4. Use the Direction pad to navigate to Select folder and press the > key on the Direction pad to select it.
5. Use the Direction pad to choose one of the folders that are listed.
Images are always stored in the currently selected folder, though note that you can’t specify the number. Thus you’re not actually selecting a specific folder, only the last five letters
Thom Hogan’s Complete Guide to the D70 Page 248

of the folder name. In other words, if you were storing images in 100BYTHM when you reach 999 images in that folder or you reach a filename with a number 9999 in it, the camera will start a new folder named 101BYTHM and start saving images there.
Yes, this is confusing. This is one of the reasons why I generally recommend avoiding getting into the whole folder naming business.
õ Rename an existing folder:
1. Press the MENU button to see the menus on the LCD.
2. Use the Direction pad to navigate to SET UP menu (yellow wrench icon tab).
3. Use the Direction pad to navigate to Folders and press the > key on the Direction pad to select it.
4. Use the Direction pad to navigate to Rename and press the > key on the Direction pad to select it.
Thom Hogan’s Complete Guide to the D70 Page 249

5. Use the Direction pad to navigate to the folder you wish to rename and press the > key on the Direction pad to select it.
6. In the display that appears, enter the five-character name:
e. Use the Direction pad to navigate to a letter or number.
f. Press the ?n button to select that letter or number.
g. If you need to move the cursor position, hold down the Thumbnail button and rotate the Rear Command dial to move the cursor to the appropriate position.
õ Delete one or more empty folders:
1. Press the MENU button to see the menus on the LCD.
Thom Hogan’s Complete Guide to the D70 Page 250

2. Use the Direction pad to navigate to the SET UP menu (yellow wrench icon tab).
3. Use the Direction pad to navigate to Folders and press the > key on the Direction pad to select it.
4. Use the Direction pad to navigate to Delete and press the > key on the Direction pad to select it. If the Delete selection is grayed out, there are no empty folders on the card.
5. Use the Direction pad to navigate to Yes and press the ENTER button to confirm. The number of empty folders the camera found that will be deleted is listed after the Delete Empty Folder message if there are
Thom Hogan’s Complete Guide to the D70 Page 251

more than one.
Note: The D70 firmware has a bug in it regarding deleted folders. If you create a folder with no images in it, then delete it, it will still show up in the folder names that can be selected (and may even show as the selected folder), at least until you back out of the menu system and start from scratch.
Slide shows
õ You can make the camera display all the images in the current folder in sequence by selecting the Slide show option from the PLAY menu. When you do so, you’ll see an additional menu that allows you to Start the show, or set the Frame intvl (time each image is displayed). Intervals of 2, 3, 5, and 10 seconds are supported.
Slide shows can be paused by pressing the ENTER button (then select Restart and press the > key on the direction pad to continue), or terminated early by pressing the Þ button (actually, just about any button). At the end of a slide show,
Thom Hogan’s Complete Guide to the D70 Page 252

the pause display is shown, allowing you to restart the show from the beginning if desired.
Obviously, if you’re using the slide show option you probably are displaying images to others, perhaps in a review session. The D70 supports television display of the images for this very situation (see “Television Playback,” on page <256>). Timeouts are handled a little differently in slide show mode, though. The D70 does not power OFF when displaying a slide show unless 10 minutes have passed since you pressed a button on the camera.
Hiding Images
The D70 allows you to “hide” images, which prevents them from displaying in PLAY mode or in slide shows. When copied to a computer, hidden images are marked with both the hidden and read-only attributes, meaning that they don’t normally display in directories.
õ To hide images:
1. Press the Menu button to see the menus on the color LCD.
2. Use the Direction pad to navigate to the PLAY menu.
3. Use the Direction pad to navigate to Hide Image and use the > key on the Direction pad to select it.
4. The D70 displays a thumbnail view of the images, nine at a time. Navigate through them exactly as you
Thom Hogan’s Complete Guide to the D70 Page 253

would in thumbnail view (using the < and > key), pressing the % or " keys on the Direction pad on each image you want to hide (each press toggles).
5. Confirm the hide action by pressing the ENTER button.
Tip: On a Macintosh using OS 9.x, you’ll need a utility such as ResEdit in order to make a file visible again. In ResEdit, select Get File/Folder Info… from the File menu. Uncheck both the File Locked and Invisible boxes to remove the hidden attribute.
Printing Images
The D70 supports the DPOF specification (Digital Print Order Format), which allows you to insert your CompactFlash card into a DPOF enabled printer and automatically get prints of images marked for printing (called the “print set”). Most inkjet printers that allow you to insert a CompactFlash card support DPOF (e.g., the Epson 875), as do most print labs that accept CompactFlash cards for printing.
õ To print images:
1. Press the Menu key to show the menus on the color LCD.
2. Use the Direction pad to navigate to the PLAY menu.
Thom Hogan’s Complete Guide to the D70 Page 254

3. Use the Direction pad to navigate to Print Set and press the > key on the Direction pad to select it.
4. Use the Direction pad to navigate to Select / set and press the > key on the Direction pad to select it.
5. The D70 displays a thumbnail view of the images, nine at a time. Navigate through them exactly as you would in thumbnail view (< and > key), pressing the % key on the direction pad to increase the number of copies you want to print of an image or the " key on the direction pad to decrease the number of copies. A small 1w icon indicates that the image will be printed and the number tells you how many copies you’ve specified.
Thom Hogan’s Complete Guide to the D70 Page 255

6. You confirm the print set by pressing the ENTER button.
Note: DPOF printers expect images using the sRGB color space. If you plan to use the Print Set feature, you should set the color space of your D70 to sRGB (Ia or IIIa74). See “Color Profiles and Color Spaces,” on page <455>.
Television Playback
The video connection (bottom, labeled V-Out) is on the left side of the camera (and interferes with holding the camera when connected to a television). Nikon supplies a short video cable with the camera.
Before connecting the D70 to a television, you must tell the camera what kind of video standard to use:
NTSC The video standard in the US, Canada, and Japan.
PAL The standard in the UK and many European countries.
õ To set the camera’s video standard and connect it to a television:
1. Press the Þ button to display the menus.
The “a” in the numbering scheme indicates that Nikon made a slight change to the sRGB specifications for the D70 from the D100 (i.e., the color profile that accompanies a D70 file is a bit different than the one that accompanies a D100 file).
Thom Hogan’s Complete Guide to the D70 Page 256
74

2. Use the Direction pad to navigate to the SET UP tab (yellow wrench icon) and then the > key on the direction pad to select it.
3. Use the Direction pad to navigate to Video mode, and then the > key on the Direction pad to select it.
4. Use the Direction pad to navigate to either NTSC or PAL, and then the > key on the direction pad to select it.
5. Turn the camera OFF.
6. Plug one end of the EG-D100 video cable into V-Out jack on the left side of the camera, the other into the Video In jack on your television. Your TV must be set to its Aux or similar composite video input setting.
7. Turn the camera ON. Operate the camera as you would normally while reviewing images.
8. When you’re done, turn the camera OFF before unplugging the video cable.
Thom Hogan’s Complete Guide to the D70 Page 257

You may also plug the D70 into a VCR’s Video In connection. Depending upon your VCR and television, to see the image from the D70 you will either have to have the VCR feed the TV’s Aux (composite video) input or tune the television attached to the VCR to a specific channel (usually 3 or 4) after pressing a button on the VCR (usually Aux or Line).
One thing that surprises many D70 users is that the camera still functions normally when connected to a television. Yes, that means that you can take pictures with the camera hooked up to a TV. Anything that would normally be displayed on the color LCD also appears on the television, even if the color LCD has been specifically turned OFF. This facility is useful in studio shooting.
Note: You can turn the camera’s color LCD OFF by pressing the ²
button on the back of the camera. This helps conserve camera battery life, though you should note that battery consumption for the camera is considerably higher as long as it driving an external display device. The D70 continues to show images on a television for up to 10 minutes, after which this connection is turned OFF, regardless of the color LCD’s status or the camera’s timeout settings.
Note: If the camera is connected to a PAL compatible television (and Video Output is set to PAL), output resolution is reduced somewhat, as the camera has to alter the number of bits in the thumbnail to adapt the image to the screen resolution.
Connecting to a Computer
The USB connector is located on the left side of the camera under the rubber door. It is the large, shiny connector situated at the bottom.
Thom Hogan’s Complete Guide to the D70 Page 258

The D70 includes a USB (1.1 compatible75) interface for connecting the camera to computers. This connection type is available on most computers made in the past few years. Your computer must have the appropriate interface available and be configured correctly (Windows users especially need to be sure that the proper drivers are installed and active; most recent Macs will automatically recognize the D70 and start iPhoto, even though you haven’t installed any specific D70 software!).
The D70 comes with a USB cable, though it’s relatively short. If you choose to replace Nikon’s cable with one from a third party, note that ~15 feet (5m) is the maximum distance at which the D70 can reliably communicate with the computer through USB76.
We’ve got one other issue to deal with: how the D70 presents itself on the USB port. Essentially, there are two options:
• Mass Storage device. In this mode, the D70 gets out of the way and acts basically like a (very expensive) card reader. When the camera is successfully attached to the computer, the computer treats the card as a removable disk drive. The only thing the computer can access is the data on the card. This is the default USB mode for the D70, and what you should use if your computer is running an older version of Windows (98, Me, 2000) or Macintosh OS (9.x).
• Point to point device. In this mode, the D70 talks to the computer directly, and the computer can direct what the camera does. Essentially, the USB cable is like a network cable between two intelligent devices. This is the mode you need to be in if you want to control the camera from
75 As I noted earlier, some Nikon literature refers to the USB port as 2.0 compatible— but that doesn’t mean that it supports the fastest USB 2.0 transfer speed, unfortunately. 76 Nikon warns that the use of a hub makes it so that high-speed USB transfers don’t work. Put another way, Nikon disclaims support beyond the usual 15 feet (5m) when the camera is directly connected to a computer USB port.
Thom Hogan’s Complete Guide to the D70 Page 259

the computer using Capture with Windows XP or Macintosh OS-X77.
õ To set the USB connection mode:
1. Press the Menu key to show the menus on the color LCD.
2. Use the Direction pad to navigate to the SET UP tab (yellow wrench icon) and > to select it.
3. Use the Direction pad to navigate to the USB option and the > key to select it.
77 You can use Mass Storage for Windows XP or Macintosh OS-X, but you’ll lose the ability to control the camera from Capture. There’s no penalty for setting PTP on the newer OS versions, thus I recommend that you use PTP for them. There does seem to be a bug in the ointment, though: if you first connect with the camera at the Mass Storage setting and attempt to control the camera via Capture on a Windows system, then switch to PTP, Capture Camera Control won’t always see the camera. The only way I’ve been able to back out of that problem is to de-install the Nikon software, reboot, set the camera to PTP, re-install the Nikon software, and reconnect.
Thom Hogan’s Complete Guide to the D70 Page 260

78
4. Use the Direction pad to navigate to PTP and press the > key to select it.
õ Connect your D70 to the PC as follows (assumes the computer is already configured and ON78, and Nikon View has been installed):
1. Turn the camera OFF.
2. Plug one end of the USB cable into the connector on the lower left of the camera (it’s under the bottom rubber door). The other end plugs into the appropriate connector on your computer. (You can’t get the connections backwards; only one end fits the camera, only one end fits your computer.)
3. Turn the camera ON.
4. The computer should recognize the camera and start up Nikon View, if you’ve got everything connected
If the D70 is connected to the computer and turned ON when you boot (or reboot) your PC running Windows XP or Windows 2000, the computer may see the camera as a mass storage device and perform an integrity check of the “drive” (card in the camera). This is problematic for two reasons. First, do not cancel any such disk scan (usually accompanied by information about scan progress on a blue screen prior to the Windows main screen appearing) and do not reboot. If you interrupt the disk scan, it appears that the formatting of the card can be corrupted. But note that depending upon how large the card in the camera is, you may be waiting a considerable amount of time for the disk scan to complete (measured in minutes). Note that this may be true for some earlier versions of Windows as well—especially if you have “disk health” utilities installed—but I haven’t been able to verify it as I no longer have any systems running older versions of Windows. Is there a way around this problem? Yes, don’t have your camera connected to the computer when you boot!
Thom Hogan’s Complete Guide to the D70 Page 261

correctly. I deal with the remaining steps in the section on Nikon View later in this eBook (see “Nikon View,” on page <398>).
Note: If you’ve got a Macintosh, iPhoto may recognize the DCIM folder on the camera and attempt to start up, as well. To fix this in OS-X, make sure no cameras or card readers with DCIM folders on them are connected to the Macintosh. Open Image Capture (its in the Applications folder). Choose Preferences from the Image Capture menu, then choose No application in the pop-up.
5. When you’re done with the connection, turn the camera OFF before removing the cable. But make sure that all transfers have completed before turning the camera OFF otherwise data may be lost.
Nikon designed the D70 so that it would continue to operate normally while connected to a computer. That means that you can take pictures while the camera is connected to the computer. You can also control the camera from the computer with Nikon Capture, something that is useful in studio situations (see “Nikon Capture,” on page <411>).
Thom Hogan’s Complete Guide to the D70 Page 262

Custom Settings The good news is that many of the camera’s defaults can be overridden or modified. The bad news is that Nikon’s method of making these changes is slightly cumbersome.
Having to scroll through 26 choices can be time-consuming, especially for those of us who use multiple Nikon bodies. Why? Nikon keeps changing the custom setting number for functions that are identical across the bodies. For example, the self-timer function is #16 on the F100, F5 and D1s, but it’s #24 on the D70.
Other identical functions have changed in number, too. That means that you have to read the choices as you scroll through them, slowing you down. Moreover, if you compare Nikon’s method of scrolling (Direction pad keys) with Fuji’s on the FinePix S2 Pro (Rear Command dial), you’ll find that Nikon chose poorly on this option. I can find and set a custom setting on the S2 Pro faster than I can on the D70 (even though the self-timer function is #13 on the S2 Pro; yet another number to remember!). Ironically, Fuji’s method more closely mimics the command dial interface of the Nikon cameras than does Nikon’s method!
Another problem with the D70 custom settings is that you can’t have multiple “banks” of settings. If you need to reconfigure the camera quickly with a broad range of different settings, you have to do it setting by setting.
As if that all weren’t enough, when you first get the camera only 9 of the 25 custom settings accessible. This was perhaps to address the overwhelming button presses needed to navigate deep inside the custom settings. The initial limitation would have been more useful if Nikon had also managed to put the 9 most frequently changed items in the simplified list (the self timer length and flash mode are more important than the no card and beep settings, in my humble opinion). Thus,
Thom Hogan’s Complete Guide to the D70 Page 263

the very first thing you’ll want to do is to enable access to the full set of custom settings.
õ Change to the full set of custom settings by:
1. Pressing the Menu button to bring up the menus on the color LCD.
2. Using the Direction pad to navigate to the SET UP tab (the yellow wrench icon) and press the > key to select it.
3. Using the Direction pad to navigate to CSM menu and press the > key to select it.
4. Using the Direction pad to navigate to Detailed and press the > key to select it.
The good news is that Nikon has added a help function to the custom setting screens, so at least you have a chance of figuring out what the function you’re looking at does. Just press and hold the ? button any time a custom setting menu shows on the color LCD. For example (for Custom Setting
Thom Hogan’s Complete Guide to the D70 Page 264

#10):
õ All custom settings are made by:
1. Pressing the Menu button to bring up the menus on the color LCD.
2. Using the Direction pad to navigate to the custom setting tab (the purple pencil icon) and press the > key to select it.
3. Using the Direction pad to navigate to the custom setting you wish to change and press the > key to select it.
4. Using the Direction pad to make your selections; press the ? button to see help for the custom setting currently being shown.
There are 25 custom settings (plus a reset option), and the values and terminology used for each are sometimes obvious, sometimes cryptic, so follow along closely. I’ll provide a
Thom Hogan’s Complete Guide to the D70 Page 265

complete description of each option, along with my recommendations for each.
Note: In the sections that follow, my name for the custom setting is given first, the name displayed on the D70 in parentheses.
Custom Setting #R Custom Settings Reset (Menu reset) The D70 has a simple method of canceling all user-set custom settings and returning to the defaults. The bad news is that Nikon’s name implies more than it does. Custom Setting #R only resets the custom settings, not all menu values on the camera as Nikon’s name might imply79:
Off No change to custom settings
Reset Reset the custom settings to default values
When you select Reset, the default values are restored for all custom settings. For the record, that means:
CSM #1 Beep On CSM #2 Autofocus AF-S
CSM #3 AF Area mode Single area CSM #4 AF Assist On CSM #5 Auto ISO Off CSM #6 No CF Card Release lock
Due to the subtle changes in criticized design elements, it often seems to me that someone from Nikon reads my negative comments (on the D100 I lambasted Nikon for having the options for this function read On and Off, since Off doesn’t make any sense in conjunction with the word “reset”), here’s another suggestion: rename this function to Reset CSM defaults since it doesn’t reset all menu items.
Thom Hogan’s Complete Guide to the D70 Page 266
79

CSM #7 Image review On CSM #8 Grid display Off CSM #9* EV Step 1/3 Step CSM #10 Exposure Comp. Off
CSM #11 Centerweighting 8mm CSM #12* BKT Set AE & flash CSM #13* BKT Order MTR > Under > Over CSM #14* Command Dial No CSM #15* AE-L/AF-L AE/AF lock CSM #16* AE Lock AE-L button CSM #17* Focus area No wrap CSM #18* AF Area Illum Auto CSM #19 Flash mode TTL CSM #20 Flash sign On CSM #21 Shutter speed 1/60 CSM #22 Monitor off 20 s CSM #23 Meter off 6 s CSM #24 Self timer 10 s CSM #25 Remote 1 min
*Settings that are the same as the D100. (At least nine other D70 custom settings don’t have the same number, but are essentially the same function as one on the D100. See what I mean?)
Recommendation: Since there aren’t banks of settings on the D70 as there were on previous Nikon DSLRs, you don’t use this setting much, if at all.
Custom Setting #1 Audio Feedback (Beep) The D70 can “beep” to remind you of a number of things: when the self timer is running, when a photo is taken with the remote, and when focus has been achieved. Use custom setting #1 to turn this on or off.
On audio feedback is used [default]
Off camera is quiet
Thom Hogan’s Complete Guide to the D70 Page 267

The top LCD shows an icon to tell you when this setting is active or inactive:
beep active beep off
Recommendation: Personally, even though it’s not very loud, I find the beep annoying and disruptive (subjects and people around you react to it), so I suggest turning it off.
Custom Setting #2 Autofocus Mode (Autofocus) As discussed in the section on autofocus, the D70 can autofocus in two ways (the full description of the difference is in “Single Servo versus Continuous,” on page <198>):
AF-S80 Single Servo autofocus [default]
AF-C Continuous Servo
No, this isn’t the same as an AF-S lens (nor do you need an AF-S lens to set this). Apparently Nikon is running out of abbreviations ☺.
Thom Hogan’s Complete Guide to the D70 Page 268
80

The top LCD shows an icon to tell you when this setting is active or inactive:
AF-S Single Servo AF-C Continuous Servo
Recommendations: 1. This is a conditional setting. If you’re taking photos of fast
moving objects, as in sports, Continuous Servo is generally best (though how well it performs will be dependent upon the amount of light and the lens used— bright light and AF-S lenses are best).
2. For most other situations you want to be assured that the camera obtains focus, so you use Single Servo. My suggestion is leave it on the default until you’ve had enough time to experiment with Continuous Servo in practice sessions. Moreover, remember that those outer autofocus sensors are not as capable in low light or low contrast as the central one, so it is sometimes wiser to do a focus-and-recompose with the central sensor than it is to choose one of the outlying ones.
Custom Setting #3 Autofocus Area Mode (AF-area mode) This too, was discussed earlier in the autofocus section (the full description of the difference is in “Autofocus Area Modes,” on page <201>):
Single area Only a single area is used [default]
Dynamic area Area follows subject
Closest subjct Closest area with focus is used
Thom Hogan’s Complete Guide to the D70 Page 269

The top LCD shows an icon to tell you when this setting is active or inactive:
Single area
Dynamic area
Closest Subject Priority area
Recommendations: 1. Again, this is a conditional setting, though with more
twists than Autofocus mode (Custom Setting #2). If you’ve never used a sophisticated autofocus system before, it is probably safest to leave the camera set to the default, Single area. That is because the camera then operates (mostly) the way you probably expect.
2. Use Dynamic area when you’re shooting fast moving action, especially if that action may be moving across the frame. If you do use this setting, pay careful attention to the starting sensor used (e.g., if action is going from top to bottom of the frame, you probably should start autofocus from the top sensor). Avoid spot metering with this setting unless you’ve paid particular attention to what I wrote in the metering section. You may not be metering where you think you are.
3. Photographers either love or hate Closest Subject Priority. On the positive side, it tends to work like magic. I remember one photo I took of my two-year old god-daughter and her parents walking where she had run just a bit ahead of them, and the camera
Thom Hogan’s Complete Guide to the D70 Page 270

correctly focused on her despite the fact I had my autofocus sensor trained on her dad. Magic. But this setting has a host of caveats and interactions (spot metering only in the central sensor, for example), and it sometimes does the absolutely wrong thing. For example, at crowded parties, a typical bad response is that the camera might focus on the shoulder of someone who cut in front of you and is passing just out of the frame when you wanted it to focus on the couple a few feet further on. (Remember, Dynamic autofocus tries to predict subject movement, so if the person passing in front was picked up as the subject, they’re closer to you than the couple you’re photographing, and the camera tries to predict that focus even after the subject has left the sensor that last tracked them.) Up until the D100, Nikon had Closest Subject Priority the default on all the consumer cameras. But I’ve complained so loudly over the years (as have a few others) about all the support hassles that raises. Nikon wisely changed their mind, and now makes it something that you have to set. I still use this setting in certain hectic focusing situations, but since it is always using all five autofocus sensors it’s not a good choice for low light situations.
Custom Setting #4 Autofocus Assist Light (AF assist) In some situations, you may want to guarantee that the Autofocus Assist lamp doesn’t light. The D70 allows you to turn the lamp off, even if the conditions and settings of the camera would otherwise use it:
On Autofocus Assist lamp works as described [default]
Off The Autofocus Assist lamp won’t light under any circumstances.
Thom Hogan’s Complete Guide to the D70 Page 271

Recommendation: 1. Turn it off. Fortunately it only affects the built-in light; any
autofocus assist on your SB-600 or SB-800 is still active (these can be cancelled on the flash, though).
Custom Setting #5 Automatic ISO Setting (ISO auto) Normally, the D70 uses specific ISO values you set (see “ISO Sensitivity,” on page <157>). But you can set the camera to automatically boost ISO values (up to 1600) in low light situations. Nikon says “when optimal exposure can not be achieved at the sensitivity selected by the user,” which doesn’t give you much indication of when the camera changes values. Fortunately, Nikon made a change from the D100: the D70 displays an ISO AUTO indicator in both the top LCD and viewfinder, and this indicator is lit constantly when you’ve enabled AUTO ISO and blinks when the camera has adjusted the ISO. Unfortunately, we still don’t know what ISO the camera sets, though at least now there’s a clear indicator that the value is being changed.
The trigger that causes an ISO adjustment varies depending upon what exposure mode you’re in:
• In Shutter-priority exposure mode, the camera begins boosting the ISO when the shutter speed you select requires an aperture faster than the maximum aperture on the lens. The ISO AUTO in the viewfinder begins blinking to warn you that the camera is changing ISO.
Thom Hogan’s Complete Guide to the D70 Page 272

• In Manual exposure mode the camera boosts the ISO and keeps the exposure bar centered if the light (exposure) changes. The ISO AUTO in the viewfinder begins blinking to warn you that the camera is changing ISO. Your only other clue is that you keep dialing a different shutter speed but the exposure bar continues to indicate a correct exposure.
• In Aperture-priority Program, and the special Scene exposure modes, the camera boosts the ISO only when you hit either 1/8000 or the low end shutter speed you set (see below). The ISO AUTO in the exposure bar begins blinking to warn you that the camera is changing ISO.
Several other aspects of this function to watch out for:
• If the ISO value appears in red on the information pages for a photo after you’ve taken a shot, this indicates that the camera altered the ISO from what you set.
• The ISO value displayed in the menu system is the ISO value you set, not the one that the camera may be setting.
• If the flash is active the camera, unlike the D100, will alter the ISO value. This has consequences on your ambient exposure (if you don’t know what I mean by that, read the flash section and come back).
Off ISO values are those you specifically set and are not automatically altered by the camera [default]
On Under certain circumstances, and if the flash is not active, the camera boosts ISO values in low light
Thom Hogan’s Complete Guide to the D70 Page 273
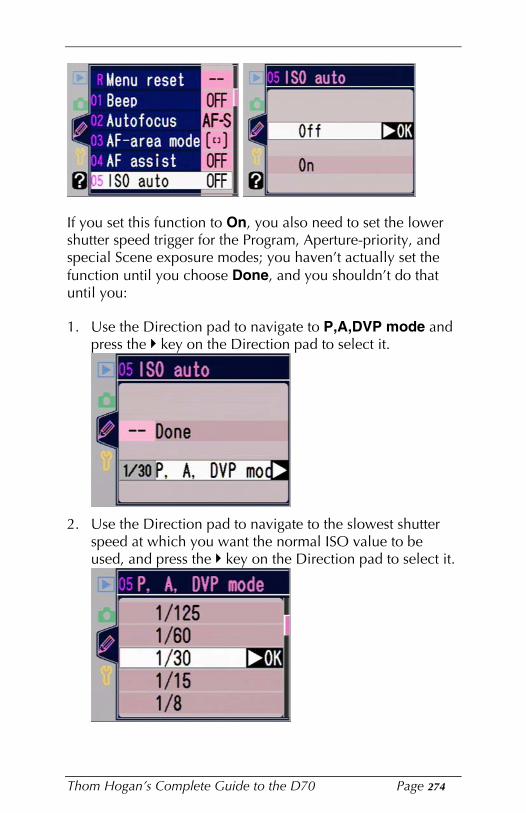
If you set this function to On, you also need to set the lower shutter speed trigger for the Program, Aperture-priority, and special Scene exposure modes; you haven’t actually set the function until you choose Done, and you shouldn’t do that until you:
1. Use the Direction pad to navigate to P,A,DVP mode and press the > key on the Direction pad to select it.
2. Use the Direction pad to navigate to the slowest shutter speed at which you want the normal ISO value to be
>used, and press the key on the Direction pad to select it.
Thom Hogan’s Complete Guide to the D70 Page 274
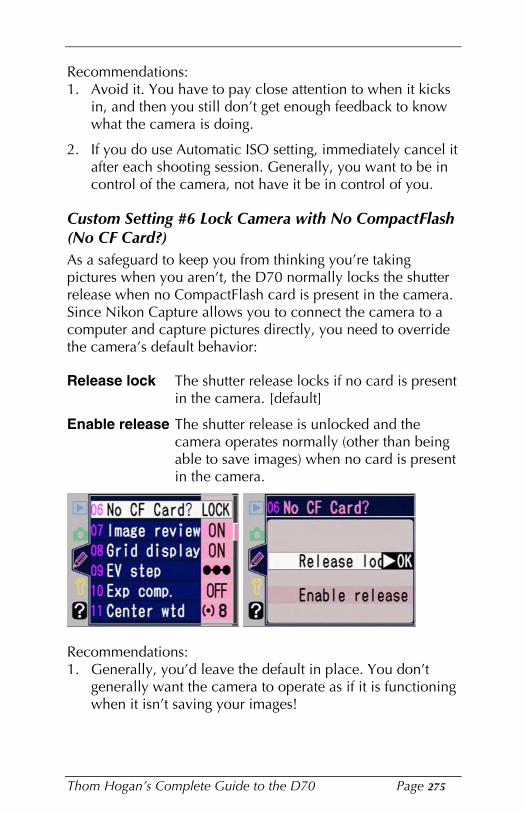
Recommendations: 1. Avoid it. You have to pay close attention to when it kicks
in, and then you still don’t get enough feedback to know what the camera is doing.
2. If you do use Automatic ISO setting, immediately cancel it after each shooting session. Generally, you want to be in control of the camera, not have it be in control of you.
Custom Setting #6 Lock Camera with No CompactFlash (No CF Card?) As a safeguard to keep you from thinking you’re taking pictures when you aren’t, the D70 normally locks the shutter release when no CompactFlash card is present in the camera. Since Nikon Capture allows you to connect the camera to a computer and capture pictures directly, you need to override the camera’s default behavior:
Release lock The shutter release locks if no card is present in the camera. [default]
Enable release The shutter release is unlocked and the camera operates normally (other than being able to save images) when no card is present in the camera.
Recommendations: 1. Generally, you’d leave the default in place. You don’t
generally want the camera to operate as if it is functioning when it isn’t saving your images!
Thom Hogan’s Complete Guide to the D70 Page 275
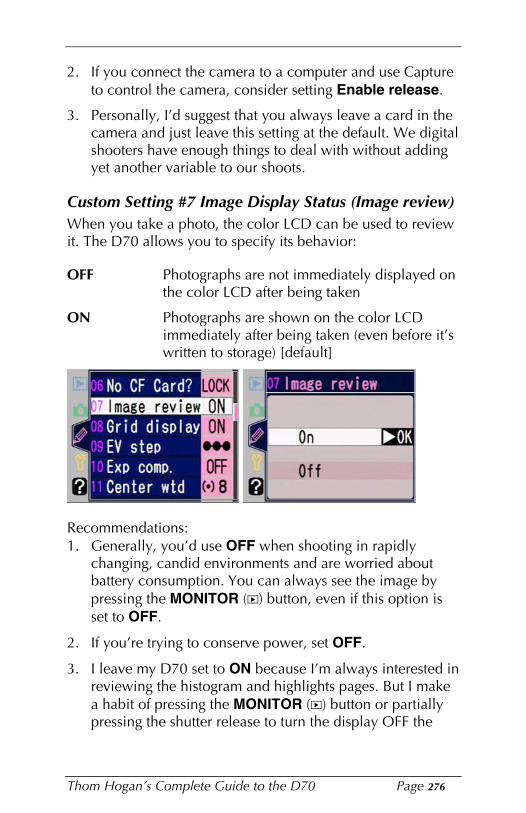
2. If you connect the camera to a computer and use Capture to control the camera, consider setting Enable release.
3. Personally, I’d suggest that you always leave a card in the camera and just leave this setting at the default. We digital shooters have enough things to deal with without adding yet another variable to our shoots.
Custom Setting #7 Image Display Status (Image review) When you take a photo, the color LCD can be used to review it. The D70 allows you to specify its behavior:
OFF Photographs are not immediately displayed on the color LCD after being taken
ON Photographs are shown on the color LCD immediately after being taken (even before it’s written to storage) [default]
Recommendations: 1. Generally, you’d use OFF when shooting in rapidly
changing, candid environments and are worried about battery consumption. You can always see the image by pressing the MONITOR (²) button, even if this option is set to OFF.
2. If you’re trying to conserve power, set OFF.
3. I leave my D70 set to ON because I’m always interested in reviewing the histogram and highlights pages. But I make a habit of pressing the MONITOR (²) button or partially pressing the shutter release to turn the display OFF the
Thom Hogan’s Complete Guide to the D70 Page 276

minute I’m done looking at the photo. That conserves a tiny bit of battery power per image, and that all adds up over the course of filling a 1GB card.
Custom Setting #8 Viewfinder Grid Display (Grid display) When ON, black horizontal and vertical reference lines are superimposed on the viewfinder, making it far easier to see if your horizons are level:
Off Grid is not displayed [default]
On The horizontal and vertical grid is displayed.
Recommendations: 1. Some people are bothered by all the extra lines, some
aren’t. Personally, I like the grid lines and leave them on.
2. However, don’t trust the lines to be perfect! On every Nikon body I own that incorporates them (N80, D100, S2 Pro, Pro 14n, D70), the lines are off by as much as .5% in my measurements, which is enough to still not get horizons looking straight. Indeed, I have a Photoshop Action on my machine that I recorded to re-tilt my D100 images since I’m so consistently off horizontal when using the grids, and I suspect I’ll be using it or something similar with my D70.
Thom Hogan’s Complete Guide to the D70 Page 277

Custom Setting #9 Exposure Control Increment (EV step) Exposure settings (apertures, shutter speeds, exposure compensation, and bracketing) that the D70 uses can be set in one of two increments. The increment chosen with this setting is used for all exposure settings in the camera:
1/3 Step 1/3 stop increments [default]
1/2 Step 1/2 stop increments
Recommendation: 1. It really doesn’t make much sense to set the alternative
values unless you are simultaneously shooting with another camera body that doesn’t support 1/3-stop increments (i.e., you want exposure settings to match between both cameras). If you set 1/2-stop increments, for instance, you could find yourself in situations where you’re underexposing more than necessary to preserve highlight detail. Generally you want to set your brightest point as close to the top end of the D70’s range as possible, and 1/3-stop increments allow you to get closer to the top end than 1/2 stop increments81.
Custom Setting #10 Exposure Compensation Control (Exp comp) Some users think that pressing a button and turning a dial to set exposure compensation is less convenient than other
Technically, we’re talking about a 1/6 stop difference. But every little bit helps.
Thom Hogan’s Complete Guide to the D70 Page 278
81

possibilities. Again, Nikon allows you to change the behavior of the D70:
Off Exposure compensation requires holding in the £ button [default]
On Exposure compensation is set by rotating a Command dial without pressing the £ button. Which Command dial is used depends upon the exposure mode and whether you’ve switched the Command dials using Custom Setting #14:
CSM #14 Exp Mode Exposure Compensation set by OFF A Rear Command dial OFF S, P Front Command dial OFF M, Scene Exp Comp not allowed ON A Front Command dial ON S, P Rear Command dial ON M, Scene Exp Comp not allowed
Recommendations: 1. Any custom setting that requires a table (see above) to
understand the nuances of what each control does is, by my definition, confusing and to be avoided. Especially when the behavior changed is a default one on every Nikon body built to date (which makes changing between bodies problematic, especially if the other body doesn’t have a custom setting to make this setting!). However, some D70 users only have one camera and always use their camera in one exposure mode (usually aperture-
Thom Hogan’s Complete Guide to the D70 Page 279

preferred), and thus find this custom setting useful. Your choice. But know what you’re doing.
2. If you’ve used Nikon 35mm film bodies for any amount of time, the £ button is right where you expect it and works just as you’d expect. I never fiddle with this setting, as not all Nikons allow this custom setting. I prefer to have all my bodies work identically.
Custom Setting #11 Centerweight Circle Size (Center wtd) The centerweighted metering can be adjusted: you can choose the size of the inner circle that produces 75% of the meter weighting. The default is 8mm, which is about the size of the circle shown in the viewfinder. Your choices are:
6mm 6mm circle for 75%
8mm 8mm circle for 75% [default]
10mm 10mm circle for 75%
12mm 12mm circle for 75%
Recommendation: 1. This one is personal, and, I think, somewhat dependent
upon the types of things you shoot. For example, landscape photographers might prefer to use 6mm to lower the impact of the sky on exposures. I’m not a big fan of centerweighted metering, so I simply leave my camera set on the default and use spot metering instead.
Thom Hogan’s Complete Guide to the D70 Page 280

Custom Setting #12 Exposure Bracketing Method (BKT set) Exposure bracketing can be performed entirely with ambient exposure (e.g., altering aperture or shutter speed), with flash exposure (e.g., using flash exposure compensation), or both. This setting allows you to choose how the camera performs this bracketing (it also enables white balance bracketing):
AE & flash If a Speedlight is attached, exposure bracketing is performed by using both flash exposure compensation and ambient exposure alteration82 [default]
AE only Bracketing is performed using only ambient exposure alteration
Flash only Bracketing is performed using only flash exposure compensation
WB bracketing White balance is bracketed instead of exposure
Recommendations: 1. This “feature” catches many D70 users by surprise. Or it
puzzles them. But changing exposure via flash exposure compensation doesn’t look the same as changing it via shutter speed and apertures. This is especially true if you’ve set flash mode options such as Slow Sync. The default setting is okay, but generally is not what most users want. I tend to leave my D70 on AE Only, as I’m
Aperture and shutter speed changes.
Thom Hogan’s Complete Guide to the D70 Page 281
82

using Standard TTL and setting my own flash compensation value. If you use Balanced Fill-Flash, consider leaving the default set.
2. White balance bracketing is an interesting option, though Nikon doesn’t document it nearly well enough, and it would be more helpful if we saw real Kelvin values, not cryptic –1 and +1 indicators. Also, you only press the shutter release once when WB Bracketing is set (unlike bracketing for exposure compensation). You still get your full number of shots, though, each with a different white balance setting. If you’re wondering which white balance values are used, well, you need a white balance table handy to figure it out. Even then, with Nikon’s documentation, it’s not clear what happens. What if, for example, you want a bracket value of +2 but you’re already set at, say, Flash +283? Also, note that the camera doesn’t bracket white balance when this is set if you are taking NEF images (it won’t even allow you to make bracketing active). In short: kudos for the idea; thumbs down for the execution.
Custom Setting #13 Bracketing Order (BKT Order) You can select the order in which the D70 exposes the photographs when automatic bracketing is set (see “Exposure Bracketing,” on page <166>):
Note: Bracketing can set sequences of two or three exposures. The bracketing order describes what happens when all three exposures are taken. If you’ve set bracketing to one of the
83 I’ll answer it: you get Flash +4! What the heck is that? Well, each white balance increment (other than in Fluorescent, where who knows what happens due to the color shifts Nikon makes) is 10 MIRED (MicroREciprocal Degree, a way of calculating color temperature). The footnote on page 51 (of the English manual) is trying to be helpful—though it’s separated by almost two pages worth of stuff from the brief item that tells you about the increment. Amusingly, they only give you a way of calculating MIRED from the color temperature difference, and not vice versa, which is what you need. (I’m wondering if the source for this is page 43 of my Nikon Field Guide). Put a more useful way, each 10 MIRED shift is equivalent to using an 81 or 82 filter (depends upon which way you’re going). A 20 MIRED shift is like an 81A or 82A, a 30 MIRED shift is like an 81B or 82B, etc.
Thom Hogan’s Complete Guide to the D70 Page 282

two-shot sequences, the orders shown below are still correct, but one of the values is left off. For example, if you asked the camera to set bracketing to -2F 0.5, the “overexposed” value is not taken, so just ignore its place in the order.
MTR>Under>Over Correct exposure first, then underexposed, then overexposed [default]
Under>MTR>Over Underexposed first, then correct exposure, then overexposed
Recommendation: 1. Pick one and use only that setting. This is one of those
things where consistency is preferable. Since the D70 names every file with numbers, this becomes even more important. (Though you could browse through the EXIF data to figure out which is which.)
Custom Setting #14 Aperture Control Dial (Command dial) Some D70 users think that the Front Command dial is not as convenient as the Rear Command dial for setting apertures. Fortunately, you can override Nikon’s choice with this custom setting. You might wonder what “No” and “Yes” mean in the context of “Command Dial”:
No Rear Command dial controls shutter speeds, Front Command dial controls apertures [default]
Thom Hogan’s Complete Guide to the D70 Page 283

Yes The Rear Command dial controls apertures, while the Front Command dial controls shutter speeds
Recommendations: 1. You’re on your own here. I don’t have a problem with the
way Nikon designed things to work.
2. If you also use any Nikon film body that doesn’t have custom functions (e.g., N65), leave the D70 set on the default, otherwise you’re likely to get confused when you move back and forth between bodies.
Custom Setting #15 AE-Lock Button Use (AE-L/AF-L) The exposure lock button, AE-L, can be changed to perform one of several functions:
AE/AF Lock Exposure and autofocus are locked when the button is held down [default]
AE Lock only Only exposure is locked when the button is held down (focus is unaffected)
AF Lock only Only autofocus is locked when the button is held down (exposure is unaffected)
AE Lock hold Exposure is locked when the button is pressed and remains locked until the button is pressed a second time (focus is unaffected)
Thom Hogan’s Complete Guide to the D70 Page 284
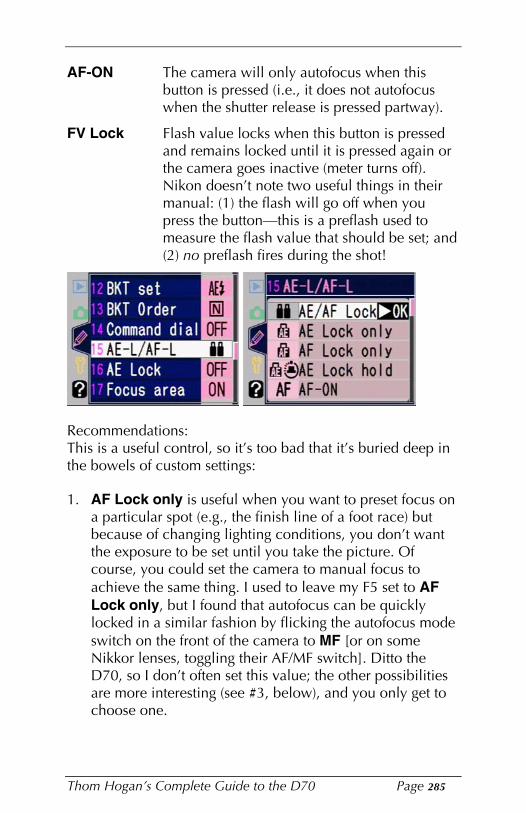
AF-ON The camera will only autofocus when this button is pressed (i.e., it does not autofocus when the shutter release is pressed partway).
FV Lock Flash value locks when this button is pressed and remains locked until it is pressed again or the camera goes inactive (meter turns off). Nikon doesn’t note two useful things in their manual: (1) the flash will go off when you press the button—this is a preflash used to measure the flash value that should be set; and (2) no preflash fires during the shot!
Recommendations: This is a useful control, so it’s too bad that it’s buried deep in the bowels of custom settings:
1. AF Lock only is useful when you want to preset focus on a particular spot (e.g., the finish line of a foot race) but because of changing lighting conditions, you don’t want the exposure to be set until you take the picture. Of course, you could set the camera to manual focus to achieve the same thing. I used to leave my F5 set to AF Lock only, but I found that autofocus can be quickly locked in a similar fashion by flicking the autofocus mode switch on the front of the camera to MF [or on some Nikkor lenses, toggling their AF/MF switch]. Ditto the D70, so I don’t often set this value; the other possibilities are more interesting (see #3, below), and you only get to choose one.
Thom Hogan’s Complete Guide to the D70 Page 285

2. AE Lock Only is useful when you take an exposure reading and then reorient the camera for the final composition. Setting AE/AF Lock sometimes gets in the way of this, as where you point the camera for exposure setting may not be the correct subject-to-camera distance for focus. AE Lock Only is where I usually leave my D70 (and D100, D1X, F100, and F5) set.
3. AF-ON can be very useful if you like to reframe after focusing. Essentially, you use this as a focus lock button, because when you remove your finger from the button after focus has been achieved, the camera won’t focus again when you press the shutter release (in Single Servo AF).
4. Likewise, AF-ON can be useful to create a “trap focus” function:
a. Set Custom Setting #15 to AF-ON.
b. Set the Autofocus Mode to Single Servo (Custom Setting #2).
c. Set the Autofocus Area mode to Single Area (not Dynamic) (Custom Setting #3)
d. If the lens has a focus switch on it, set it to A (Autofocus; on some lenses this is labeled M/A).
e. Pre-focus the lens to a particular distance. The camera shoots when the selected focus bracket is in focus.
4. FV Lock can solve a problem studio photographers have: since no preflash is fired with the actual shutter press, you can trigger remote wireless slaves with ease. If you do this, you’ll need to set your meter active setting (Custom Setting #23) to the longest possible value to avoid having to constantly reset the flash value lock. Another use of FV Lock is to keep preflash from triggering blinking in subjects, though I personally haven’t experienced this problem.
Thom Hogan’s Complete Guide to the D70 Page 286

Custom Setting #16 AE Lock Behavior (AE Lock) Most cameras automatically lock the exposure when the shutter release is pressed partway, but the D70 (and a few other Nikon 35mm film bodies) behave differently:
AE-L Button Exposure locks only when the AE-L button is pressed [default]
+ Release bttn84 Exposure locks when either the shutter release is held partway down or the AE-L button is held.
Recommendation: 1. If you’re used to having exposure lock when you press the
shutter release partway—the behavior of most consumer cameras—then set this option to a value of +Release bttn. Note that if you like to set exposure and then pan over to your final composition, you need to either set this option or get in the habit of using the AE-L button.
Custom Setting #17 Focus Area Selection Wrap (Focus area) The Direction pad on the back of the camera is used to select which autofocus area to use. You can change the behavior of repeatedly pressing the Direction pad:
No wrap Repeated presses stop sensor selection at edge of display [default]
Is that really the abbreviation for button?
Thom Hogan’s Complete Guide to the D70 Page 287
84

Wrap Repeated presses wrap selection around to the opposite side of the display (but continue in the same direction).
Recommendation: 1. I like the wrap-around effect, but you’ll need to try both
options to figure out which you like better.
Custom Setting #18 Active Focus Sensor Illumination (AF area illm) The currently selected autofocus area can be illuminated in one of two ways: a hard to miss red (which uses extra battery power) or a subtle thick black:
Auto The camera decides which illumination to use based upon how bright the scene is; red is used primarily in low light, black the rest of the time [default]
Off The selected focus area is always highlighted in black.
On The selected focus area is always highlighted in red.
Thom Hogan’s Complete Guide to the D70 Page 288

Recommendations: 1. Leave it at the default. It can be very difficult to see the
autofocus sensor area in low light without it being highlighted in red, but you don’t want to waste battery power if you don’t have to.
2. If conservation of batteries is most important, use Off.
Custom Setting #19 Flash Mode for Internal Flash (Flash mode85) Some D70 users are puzzled by why this option is provided. Simple: without it, you can’t use your internal flash to trigger external wireless strobes or flash units86. That’s because the internal flash would otherwise always fire a pre-flash, which sets off remote units prematurely (except for SB-600 and SB800 units set correctly). If you’re a studio photographer, you’ll appreciate this option (you can put an infrared filter over the internal flash’s head so that it doesn’t provide visible light, just the wireless “fire” signal):
TTL Pre-flashes are used; the internal flash is in i-TTL modes [default]
85 I haven’t been commenting (much) upon Nikon’s choice of names, but here’s one where I’d better: this sets the flash mode for the internal Speedlight only! Don’t assume that because you set “flash mode” with a custom setting that it’ll apply to your SB-600 or SB-800; it won’t. Be careful of your interpretation of Nikon’s naming system; fortunately, the Help system now built into the custom settings can sometimes correct any ambiguity in Nikon’s selected name. 86 A better design choice might have been to make the flash options controlled by a custom setting, the flash mode controlled by the flash button. You’d tend to change the former less often than the latter.
Thom Hogan’s Complete Guide to the D70 Page 289

Manual The flash fires at a designated power in Manual flash mode (you select the power in a second menu that appears)
Commander The internal Speedlight serves only as a trigger to external flashes (you must select the remote flash mode—TTL, Auto Aperture, or Manual— in a second menu that appears)
If you select Commander mode, you’ll also need to tell the D70 what flash mode you want the D70 to use (a second settings page appears):
If you select Manual flash mode for either the internal flash mode or the Commander mode, you’ll need to also set the power level on the second settings page that appears:
Thom Hogan’s Complete Guide to the D70 Page 290

Recommendations: 1. The usual value you’ll set is TTL (the default), as this is the
most versatile flash mode for the internal Speedlight.
2. If you’re triggering studio lights visually, select Manual and 1/16 power; this way the internal Speedlight produces only a weak “fill” light from the camera position. (Alternatively, use TTL and FV Lock with the AE-L button).
3. Commander mode is excellent for dealing with two or three off-camera flashes (must be SB-600 or SB-800). I outline how that’s done in the flash section (see page <298>).
Custom Setting #20 Flash Needed Indicator (Flash sign) In the normal exposure modes (Program, Aperture-priority, Shutter-priority, and Manual), flash is not automatically activated. However, the default is to blink the flash indicator in the viewfinder if your shutter speed drops below the value you set in Custom Setting #21 (see next). You can set whether that indicator appears:
On Indicator blinks when flash needed [default]
Off Indicator doesn’t blink
Thom Hogan’s Complete Guide to the D70 Page 291

Recommendation: 1. At first glance this option seems silly. But remember that
the flash indicator also blinks for three seconds when the flash fired at full power. Some photographers, myself included, would prefer not to have the indicator blink at other times as it can be lead to you ignoring it or missing the difference between the full power use of the indicator versus the flash needed use. If you need a reminder to use flash, leave the default set. Otherwise, set this value to Off.
Custom Setting #21 Flash Shutter Speed Barrier (Shutter spd) The section on flash that comes later in the eBook (see “Setting Flash Options,” on page <309>) describes an option called Slow Sync. Essentially, the camera places a lower limit on the shutter speed that can be used when flash is active unless you tell it to ignore that limit. Custom Setting #21 allows you to modify the limit (and the Slow Sync option allows you to remove the limit):
1/60 1/60 second lower limit [default]
1/30 1/30 second lower limit
1/15 1/15 second lower limit
1/8 1/8 second lower limit
1/4 1/4 second lower limit
Thom Hogan’s Complete Guide to the D70 Page 292

Recommendations: 1. I believe everyone should set at least 1/30. Nikon’s 1/60
default is very conservative, and will cause problems in most indoor lighting situations (for the reason why, read the full flash section).
2. I personally set 1/15 because I know I can usually hand hold the camera to that level when using flash as I describe, and it’s the slowest speed where subject motion in the ambient exposure doesn’t become a constant problem (it may be a bit of a problem at 1/15, but I watch for that).
3. If you’re on a tripod with a static subject (landscapes), set the Slow Sync option instead.
Custom Setting #22 Color LCD Active Time (Monitor off) The D70 uses more battery power when the color LCD is active. This function allows you to program the amount of time the LCD stays active when no other activity (button pushing) takes place. Normally, the monitor stays active for 20 seconds after the last activity. This delay can be changed:
10 s Ten second delay before the color LCD is turned off
20 s Twenty second delay before the color LCD is turned off [default]
1 min. One minute delay before the color LCD is turned off
Thom Hogan’s Complete Guide to the D70 Page 293

5 min. Five minute delay before the color LCD is turned off
10 min. Ten minute delay before the color LCD is turned off
Recommendations: 1. If you can tolerate it, change the delay time to a 10
second value. You’ll get slightly more exposures per battery charge (assuming you work quickly and setting the timeout lower doesn’t force you to turn on the color LCD more often).
2. Avoid the 1 to 10-minute delays unless you have a bag full of extra batteries.
3. If you’re working with AC power or any battery connected to the DC In connector, you don’t need to worry about this setting—it is automatically set to 10 minutes and you can’t alter that.
Custom Setting #23 Meter/Camera Active Time (Meteroff) The D70, like all Nikon bodies, has a fairly high power demand when it is active (metering, autofocus, etc.). Thus, Nikon has programmed an aggressive time-out for the camera’s basic functions. Normally, the camera stays active only while the shutter release is held partway down, and for ten seconds after you release it. This delay can be changed:
4 s Four second delay before camera goes inactive
Thom Hogan’s Complete Guide to the D70 Page 294
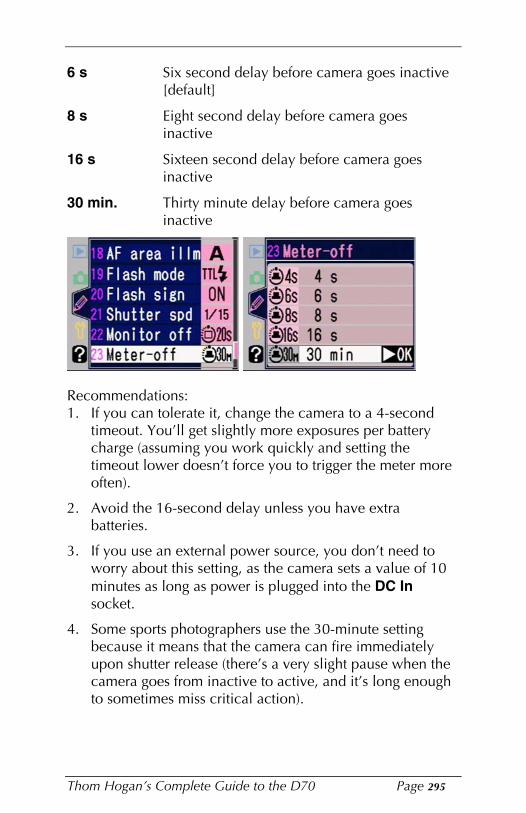
6 s Six second delay before camera goes inactive [default]
8 s Eight second delay before camera goes inactive
16 s Sixteen second delay before camera goes inactive
30 min. Thirty minute delay before camera goes inactive
Recommendations: 1. If you can tolerate it, change the camera to a 4-second
timeout. You’ll get slightly more exposures per battery charge (assuming you work quickly and setting the timeout lower doesn’t force you to trigger the meter more often).
2. Avoid the 16-second delay unless you have extra batteries.
3. If you use an external power source, you don’t need to worry about this setting, as the camera sets a value of 10 minutes as long as power is plugged into the DC In socket.
4. Some sports photographers use the 30-minute setting because it means that the camera can fire immediately upon shutter release (there’s a very slight pause when the camera goes from inactive to active, and it’s long enough to sometimes miss critical action).
Thom Hogan’s Complete Guide to the D70 Page 295

Custom Setting #24 Self Timer Delay Setting (Selftimer) The D70 allows you to set four different delay times for the self timer (the delay time is the time between pressing the shutter release and the shutter actually being opened for exposure):
2s Two second delay
5s Five second delay
10s Ten second delay [default]
20s Twenty second delay
Recommendations: 1. If all you’re looking for is a short delay to counter any
camera movement triggered by your pressing the shutter release, use the 2-second delay. Better still, consider using the infrared remote (see “Remote Control,” on page <218>).
2. Remember, the white self timer lamp on the front of the camera tells you the status of the countdown. It flashes during the first part and then lights steadily during the last two seconds. Likewise, if the Beep function is ON (see “Audio Feedback,” on page <267>), the camera makes audible noises that mimic the light (one beep a second to start, then a steady stream of beeps during the last two seconds).
Thom Hogan’s Complete Guide to the D70 Page 296

Custom Setting #25 Remote Active Setting (Remote) The D70 allows you to set four different times for how long the remote control signal will be looked for before the camera automatically cancels the function. This setting is needed to conserve battery power (the camera consumes more power when it is looking for the remote).
1 min One minute active length [default]
5 min Five minute active length
10 min Ten minute active length
15 min Fifteen minute active length
Recommendation: 1. Keep it as short as you dare. Generally I find Nikon’s
default works fine for me, but some people will want to set the active timer to 5 min.
Thom Hogan’s Complete Guide to the D70 Page 297

Using Flash Flash use with a D70 is different than with most previous Nikon SLRs (only the D2H shares the D70’s flash capabilities). Obviously, I’d love for all readers of this book to rush out and purchase my Nikon Flash Guide. If you’d like an extended discussion of TTL modes and how flash works, if you use 35mm cameras as well as a D70, or if you have a Speedlight other than the SB-800, consider purchasing it. If you are only a D70 user and have only an SB-800 (or the upcoming SB-600), then the sections that follow are probably all you need for basic flash use.
What Happens When Flash is Used
Flash isn’t a magical device that simply fixes every lighting problem you’re facing. Like any tool, you need to understand how it works and how to best use it. The big “gotchas” I encounter most frequently with students are these:
• Flash only lights one distance correctly. Light falls off with the inverse of the distance. If a flash is providing the correct light for 8 feet, by 11 feet the light will be one stop less; at 5.6 feet it will be one stop more. The classic expectation most people have is that flash should light both a subject and a background that’s many feet behind the subject. Won’t happen.
• Two exposures occur when you use flash. Both have to be right. This is an extension of the first thing I presented: if flash is lighting only a subject at one distance correctly, something else has to provide the exposure for the background (ambient) areas. That “something else” is the same thing it always is: aperture, shutter speed, and ISO are the variables you use to control them.
Thom Hogan’s Complete Guide to the D70 Page 298

The D70 does its best guess at making everything work “magically.” As you’ll learn in a bit, the default settings for the camera are to “balance” flash and ambient lighting. That’s not always what you want it to do, and there are things that can keep the camera from succeeding at that.
Flash Basics
A flash produces a burst of light by igniting Xenon gas. It does this in response to a signal from the camera that it’s time to produce flash. For “smart” flashes such as those found in the D70 and the Speedlight models, the amount of light actually produced is determined by when the flash is shut off:
• When a flash fires at full power, it essentially gives everything it has: the Xenon gas ignites and eventually decays to nothing. That takes about 1/1050 of a second on an SB-800.
• When a flash fires at less than full power, this is done by stifling the Xenon flash prematurely. On an SB-800, for example, the “flash” can be shut off in as little as 1/41,600 of a second (1/128 power).
In order to have any variability in flash output, therefore, something has to measure the amount of light produced and make the decision of when to shut the flash off. For the internal flash on the D70, that’s always the D70 (you can also set the flash manually—i.e., to produce a specific amount of light). For external flashes, either the D70 or the flash itself can both measure and control the amount of light.
Yes, this means that the D70 has something inside it that measures the light produced by the flash (the 1005-pixel CCD in the viewfinder is used for this). And like the ambient exposure, the CCD must get its measurements before the
Thom Hogan’s Complete Guide to the D70 Page 299

picture is taken, which is why you’ll see references to something called the preflash87.
If you’re starting to think that there may be more “modes” and settings coming, you’re right. Flash exposure is no different than regular exposure: you have to set the camera/flash to do what you want it to.
Digital Flash Differences
For 35mm film cameras, Nikon TTL88 flash sensors are designed to look at reflections off the shutter curtain before exposure and again off the film during exposure. But the D70 doesn’t have any film, and the CCD sensor doesn’t reflect light the same way that film does, so this second exposure test isn’t performed.
Nikon originally decided to modify its flash system slightly for digital cameras to include a new flash “mode,” called D-TTL, or Digital TTL. D-TTL is supported by the D1 series, the D100, and the D2H, with the SB-28DX, SB-50DX, SB-80DX, and SB-800 being the only flashes to have this new capability. Other flash units, including the original SB-28, cannot be used in TTL flash modes with these previous Nikon DSLRs. Indeed, if you attempt to do so, the shutter release locks and you can’t take pictures until you set the Speedlight to Automatic (A) or Manual (M) flash modes.
With the D70, Nikon has updated the flash system a second time to something Nikon calls i-TTL (they also call the entire
87 The name preflash is a little misleading. Most newcomers expect to see a separate flash from the main flash. But the preflash occurs so close to the actual flash that you often don’t distinguish it from the main flash. If you don’t believe me, set your camera to Rear Sync and a shutter speed of 1 second. Take a picture with flash (don’t worry about exposure at the moment). You should see two distinct flashes. The first, dimmer one is the preflash sequence, the second brighter one is the main flash. Now keep shortening your shutter speed. By the time you hit about 1/8 second, the two flashes are essentially back to back and most people don’t notice that there are two. 88 Just a reminder: TTL stands for Through the Lens. Flash measurements are performed by the camera looking through the lens. In theory, this is the most accurate flash capability.
Thom Hogan’s Complete Guide to the D70 Page 300

set of new flash capabilities CLS, for Creative Lighting System). Unfortunately, a side effect of this update is that only the D70’s internal flash, the SB-800, and the upcoming SB-600 support i-TTL. This is a critical change to note. If you’re coming from another Nikon DSLR and have a DX flash, you’ll still need a new Speedlight to get TTL flash from your D70!
Let me summarize a few things that are different between the three basic Nikon flash technologies before we go on. I realize that some of the terminology may be new to you, but by the end of the section on flash you should be fully up to speed; just come back to this chart then.
TTL D-TTL i-TTL Cameras Virtually all D1 series, D2H, D70 Supporting film cameras D100, D2H
after the FA Flash Units Supporting
All Speedlights since the SB24
SB-28DX, SB50DX, SB80DX, SB-600,
SB-600, SB800, D70 internal
SB-800, D100 internal
Preflash occurs After mirror After mirror Before mirror up, before up, before up, before shutter opens shutter opens shutter opens
Flash Preflash and Preflash only Preflash only Measurement again during occurs exposure Flash 5-segment 5-segment 1005-element Measured by sensor in sensor in CCD in
mirror box mirror box viewfinder Multiple TTL Yes with No Yes with flash cables or cables or built-supported? wireless with in wireless
SU-4 functions TTL controlled Yes, but all No Yes; flashes wirelessly? flashes fire at can fire at
same level different levels (with SB-800)
Thom Hogan’s Complete Guide to the D70 Page 301

D70 and i-TTL is a good news, bad news situation: the good news is that this is arguably the most elaborate, user-controllable, and accurate TTL flash system Nikon has produced. The bad news is that you can only use the very latest flash units with it, which may mean purchasing new equipment. Indeed, if you want to perform multiple flash TTL, you almost certainly will be purchasing a new flash or two.
Like all recent Nikon camera bodies, a flash-ready indicator is displayed in the D70 viewfinder when a flash—internal or external—is fully charged and ready to fire. This same indicator blinks for three seconds after a photograph is taken to indicate that the flash fired at full power, which may indicate underexposure (of the subject). Fortunately, with a D70 you can immediately review the image on the color LCD to determine if this “full power” warning actually meant underexposure.
More Hidden Flash “Gotchas”
One thing that catches a number of D70 users unaware is that the Program exposure mode (and all the special Scene exposure modes) limits apertures that can be used with flash based upon ISO value. And given the relatively high ISO values of the D70 and fast apertures of most pro lenses, you’re quite likely to bump up against this limitation at some point:
Allowable Apertures in Program Mode
ISO Value Range (internal flash) Range (external flash) 200 f/2.8 to f/32 f/5.6 to f/32 250 f/3 to f/32 f/6 to f/32 320 f/3.2 to f/32 f/6.3 to f/32 400 f/3.3 to f/32 f/6.7 to f/32 500 f/3.5 to f/32 f/7.1 to f/32 640 f/3.8 to f/32 f/7.6 to f/32 800 f/4 to f/32 f/8 to f/32 1000 f/4.2 to f/32 f/8.5 to f/32
Thom Hogan’s Complete Guide to the D70 Page 302

1250 f/4.5 to f/32 f/9 to f/32 1600 f/4.8 to f/32 f/9.5 to f/32
Yes, that table means what you think it does: if you set Program exposure mode using flash, those fancy wide apertures of your expensive lenses won’t ever be used.
Another issue to note with the D70 is that the focal lengths the Speedlight uses are geared towards 35mm film, not the D70’s 1.5x field of view reduction. This means that you’ll normally be lighting a wider angle than the D70 is taking in, wasting flash strength. Here’s a handy table to use when shooting with a Speedlight flash:
D70 Flash Head Focal Length Settings
Lens Focal Length Set Flash to 14mm 20mm 17-18mm 24mm 20mm 28mm 24mm 35mm 35mm 50mm 50mm 70mm 60-70mm 85mm >85mm 105mm*
*Assumes SB-800
In other words, if you have a 20mm lens on the D70, manually zoom the flash head to the 28mm mark. The settings in the above table are the closest that guarantee full-frame coverage for the D70’s reduced sensor size, and provide you the maximum flash power for that coverage, extending the distance at which you can shoot with flash.
Flash Modes
Like most Nikon 35mm film camera bodies, the actual method used to calculate flash exposure varies considerably depending upon camera settings, flash settings, and the lens being used. A full discussion of the intricacies of Nikon’s flash system can be found in my Nikon Flash Guide, but what
Thom Hogan’s Complete Guide to the D70 Page 303

follows is a simple recap of what’s available using a D70 (remember, modes marked i-TTL require the internal flash, SB-600, or SB-800).
i-TTL Balanced Fill-Flash
(TTL BL on external flash LCD; no indicator for internal flash): this is the default flash mode for most camera settings. Requires use of a D, G, AF, AF-I, or AF-S lens (basically any lens that has what Nikon calls a CPU in it). The camera balances exposure information from the matrix meter with additional information from the lens (focal length, aperture, and distance at which the lens is focused) and from a series of nearly invisible pre-flashes, which the CCD in the D70’s viewfinder analyzes. When set in this mode, the D70 attempts to balance the flash with the ambient light. Generally, less flash is produced in this mode than if you set the flash manually for the flash-to-subject distance.
Note that no measurement of the light produced by the flash is made by the D70 during the exposure, as is done on the 35mm film camera bodies; the amount of flash produced is completely determined at the end of the pre-flash measurements, which occur before the shutter opens. Thus, if lighting conditions change rapidly, the amount of flash produced may be incorrect. That happens rarely, but the low power of the preflash does make the accuracy of the flash exposure calculations slightly more subject to error than the during exposure re-measurement the film bodies do.
One other slight change that will only be of interest to seasoned Nikon flash users: there is no longer any distinction in the type of Balanced Fill-Flash the camera performs if you use an older autofocus lens (the ones that didn’t provide distance information to the camera). On some older Nikon bodies, subtle differences snuck into Balanced Fill-Flash levels, usually due to the metering system being used.
Note: Unlike the SB-24 and later flashes on film bodies, the SB600 and SB-800 always fire pre-flashes in i-TTL modes, even
Thom Hogan’s Complete Guide to the D70 Page 304

if the flash head is set to a bounce angle (Speedlights used on 35mm bodies cancel pre-flashes if the head is swiveled or angled at anything other than the normal position, relying only on the reflected flash measurement during exposure).
The pre-flash is a series of short pulses, with a regular pattern.
Standard TTL
(TTL on external flash LCD; no indicator for internal flash): This flash mode is available with all autofocus lens types; the camera automatically chooses it if you select spot metering or Manual exposure mode. Unlike the Balanced Fill-Flash mode, Standard TTL attempts only to insure that the flash provides the correct exposure for what the camera thinks is the subject. In other words, the camera does not attempt to balance background exposure with subject exposure, as it does in the Balanced Fill-Flash TTL mode.
Thom Hogan’s Complete Guide to the D70 Page 305

Summary of i-TTL Flash Modes
Flash LCD Exposure Modes Metering TTL Type Displays Modes Performed Internal flash, Program, Matrix, Balanced no display Aperture, Shutter Centerweight Fill Flash Internal flash, Manual* Matrix, Standard no display Centerweight TTL Internal flash, Program, Spot* Standard no display Aperture, Shutter TTL TTL BL Program, Matrix, Balanced
Aperture, Shutter Centerweight Fill Flash TTL Manual* Matrix, Standard
Centerweight TTL TTL Program, Spot* Standard
Aperture, Shutter TTL *Standard TTL mode is set automatically when you select this option.
Note: i-TTL flash modes can also be changed (if the camera isn’t in spot metering or Manual exposure mode) by using the Mode button on the SB-600 or SB-800. In other words, if you see TTL BL on the flash LCD, pressing the Mode button selects TTL instead.
Non-TTL Flash Modes
In the TTL flash modes just described, the D70 performs all the calculations necessary to adjust the flash output level. When you press the shutter release, the camera tells the flash when to start firing and when to stop. The flash simply follows the camera’s orders to turn on and off. Three remaining flash modes, Auto Aperture (ÊÊ), Automatic (Ê), and Manual (Ë) flash, differ in that the flash performs much of the flash exposure calculation and the camera body does not determine when the flash shuts off:
Thom Hogan’s Complete Guide to the D70 Page 306

Auto Aperture (ÊÊ): Unique to the digital bodies using external SB-28DX, SB-80DX, or SB-800 flashes89, in this mode the Speedlight obtains the ISO value and aperture being used from the camera, as well as the signal to start the flash (i.e., “shutter’s open, go ahead”). A sensor on the front of the flash is monitored, and when the amount of light that sensor sees reaches the level the flash calculates it needs, the flash stops firing. This mode is available on the D70 regardless of camera metering method, but only for lenses that have CPUs (autofocus and AI-P lenses). One potential problem with automatic flash mode is that the flash sensor is not seeing the same thing as the camera lens, which can result in errant flash levels.
Automatic (Ê): The best possible flash mode when using any external flash with the D70 other than the SB-600 or SB-800. In Automatic flash mode, the Speedlight (usually90) sees only the signal to start the flash. You must transfer the aperture and ISO used on the camera by setting this manually on the flash. Again, a sensor on the front of the flash is monitored, and when the amount of light it sees reaches the level the flash calculates it needs (based upon aperture setting and ISO value), the flash stops firing. Besides the cumbersome limitation of transferring the aperture and ISO settings to the flash, the flash sensor again doesn’t see the same thing as the camera lens, which can result in errant flash levels.
Note: The classic “trouble case” for both Automatic flash modes is shooting through a doorway: the flash sensor sees light reflecting off the door frame and nearby walls, while the lens may be zoomed in to only see a subject in the next room, well beyond the doorway. If you choose to use Auto Aperture or Automatic flash mode (and if you use a DX flash on the D70, you are forced to choose Automatic flash
89 While it’s unique to those flashes, the D70 only allows Auto Aperture flash mode with the SB-800, and then only if a lens with a CPU is used. This differs from other Nikon bodies. The D2H, for example, allows Auto Aperture with all three of the flashes noted. 90 There are a few Speedlights and third-party flashes that do not communicate anything with the camera and only understand the “fire now” signal.
Thom Hogan’s Complete Guide to the D70 Page 307

mode), you need to always watch to make sure the flash sensor is seeing the same subject as the lens and is not blocked by cables or other objects.
Manual (Ë): In Manual flash mode, the Speedlight fires at a fixed output. It’s up to you to perform the calculations to insure that the proper amount of flash is produced. Many Speedlights have variable power levels, plus their output is also dependent upon what focal length the flash head is set for, thus doing manual flash calculations sometimes takes a bit of time, as well as consulting a Guide Number chart. On the other hand, a correctly made manual flash calculation should always provide exactly the right amount of flash on a subject. The general formula is:
Aperture = GN / Distance
or GN = Distance * Aperture
or Distance = GN / Aperture
Make sure that the GN you plug into those formulas is expressed in the same units as the Distance (feet or meters), and that you’re using the correct GN for the focal length set on the Speedlight. Also, make sure that the GN you look up is for the ISO value set on the camera body (Nikon’s flash manuals all use ISO 100 values; to convert them to ISO 200, multiply those values by 1.4).
Likewise, if you’re using less than full power, make sure you’re using the correct GN for the lower power. Most recent Speedlight models show a distance indicator on their LCD in this mode, though the limited “resolution” of this indicator means you can’t totally rely upon it.
Flash modes can usually be set on the flash unit, too:
Thom Hogan’s Complete Guide to the D70 Page 308

TTL Only available on the internal flash, SB-600, and SB-800. With a Speedlight mounted on the camera, press the Mode button on the back of the flash until TTL BL or TTL is displayed (see “Summary of TTL Flash Modes,” on page <306>). For the internal flash, the flash mode is controlled by CSM #19.
Auto Aperture Only available on the SB-800 with the D70. With the Speedlight mounted on the camera, press the Mode button on the back of the flash until ÊÊ is displayed on the flash LCD. Not available on the internal flash.
Automatic Move the Flash Mode switch on the Speedlight to A (or AUTO), or press the Mode button on the Speedlight until Ê is displayed on the flash unit’s LCD. Available on all Speedlights that support Automatic flash. You’ll need to manually transfer the ISO setting and aperture to the flash. Not available on the internal flash.
Manual Move the Flash Mode switch on the Speedlight to M (or a specific power level, such as ½, ¼, 1/8, etc.), or press the Modebutton on the Speedlight until Ë is displayed on the flash unit’s LCD (specific power levels are usually then set by pressing the + or –buttons on the flash). For the internal flash, the mode is controlled by CSM #19.
Setting Flash Options
Setting the exact flash options used is a bit confusing to Nikon newcomers, as some of them are only available with particular equipment, some settings are done on the camera, and some are done on the flash. Nikon also uses two similar
Thom Hogan’s Complete Guide to the D70 Page 309
terms, “flash sync mode91,” which determines when the flash is fired, and “flash mode,” which determines how the flash is fired and what component does the flash length calculations.
The D70 understands five flash sync options (again, Nikon calls them flash sync modes):
Front Curtain Sync The flash fires when the shutter is first opened and any shutter speed between 1/60 (or other value set by CSM #21) and 1/500 second is allowed in Aperture-priority and Program exposure modes (any shutter speed between 30 seconds and 1/500 is allowed in Shutter-priority and Manual exposure modes). (Note: SB-24, SB-25, and SB-26 flash units should have their Mode switch set to NORMAL.)
Slow Sync e
The flash fires when the shutter is first opened and any shutter speed between 30 seconds and 1/500 second in all exposure modes. Light trails caused by subject movement in long exposures seem to be in front of the subject. (Note: SB-24, SB25, and SB-26 flash units should have their Mode switch set to NORMAL.)
Rear Sync f
The flash fires just before the shutter is closed and any shutter speed between 30 seconds and 1/500 second is allowed in all exposure modes. Light trails caused by subject movement in long exposures seem to follow the subject, a more natural-looking effect than produced by slow sync. (Note: SB-24, SB25, and SB-26 flash units should have their Mode switch set to REAR.)
You’ll note that I’ve chosen to call these items “options” rather than “modes.” Nikon uses the term mode so frequently that it gets very confusing. For example, if I ask a student which flash mode they have set, they’ll sometimes answer “Rear Sync.” That’s not the answer I was looking for. I’ll try to be consistent and use “flash mode” only to refer to the technique by which flash exposure is calculated (TTL, Automatic, Manual, etc.) and “flash options” to all the other flash settings that might alter how the flash behaves.
Thom Hogan’s Complete Guide to the D70 Page 310
91

Redeye Reduction @
The white lamp on the front of the body is fired for approximately one second before exposure in an effort to close the subject’s pupils and reduce redeye. Otherwise, this option is the same as Front Curtain sync. Personally, I’d avoid this option, as it introduces huge shutter release lag, generally annoys subjects, and doesn’t normally improve redeye characteristics enough to make a difference. (Note: SB-24, SB25, and SB-26 flash units should have their Mode switch set to NORMAL.)
Redeye Reduction with Slow sync d
The same as Redeye Reduction, except that longer shutter speeds are allowed in Aperture-priority and Program exposure modes. Personally, I’d avoid this option, as it introduces huge shutter release lag, generally annoys subjects, and doesn’t normally improve redeye characteristics. (Note: this option is only available with SB-26, SB-27, SB-28, SB-28DX, SB-50DX, SB-80DX, SB-600, and SB-800 flash units; the SB-26 should have its Mode switch set to NORMAL.)
ö To set to all flash sync options: hold the Flash Options button down and rotate the Rear Command dial until the appropriate flash mode icon is displayed in the top LCD.
Note: The SB-24, SB-25, and SB-26 also have to be set to NORMAL or REAR depending upon which flash sync option you’re using on the camera.
Since several settings intersect one another for these options, here’s a table that summarizes the information just presented:
Flash Option Interactions
Option Exposure Mode Allowable Shutter Speeds* Front curtain Program, Aperture 1/60 to 1/500 second Front curtain Shutter, Manual 30 seconds to 1/500 second Slow sync Any 30 seconds to 1/500 second Rear sync Any 30 seconds to 1/500 second
Thom Hogan’s Complete Guide to the D70 Page 311

*Note that the aperture range on the camera may further limit the range of shutter speeds that produce correct exposures.
Flash Exposure Compensation
õ To set flash exposure compensation: hold down the Flash Exposure Compensation button and turn the Front Command dial until the top LCD and viewfinder show the compensation value you want to set.
Flash exposure compensation isn’t as straightforward as you might think:
• Balanced Fill-Flash gets in the way. If the camera is set to use balanced fill-flash (the default), you aren’t actually in control of the flash exposure compensation value used by the camera. Nikon’s Balanced Fill-Flash modes already set unknown amounts of flash exposure compensation based upon scene brightness, scene contrast, and a host of other variables. The camera may decide to ignore what you set. Indeed, the classic beginner mistake is to try to use exposure compensation and flash exposure compensation to override the camera’s automatic decisions. The more EV change you ask for, the more the camera will fight you. Solution: Put the camera in Standard TTL mode if you want to set exposure and flash exposure compensations yourself.
• Flash exposure compensation is cumulative. Many Speedlight flash units allow you to set flash exposure compensation. So does the D70 body. These values will be added together. Solution: Pick one place and be consistent in using it. I always set flash exposure compensation on my external Speedlight, for example, and never on the body unless it has an internal flash (some bodies I use don’t have controls for flash exposure compensation; on the other hand, there is an argument for always setting it on the D70 if that’s your only camera: it’s the only place to set flash exposure compensation for the internal flash).
Thom Hogan’s Complete Guide to the D70 Page 312

• You don’t always get what you want. Especially for positive (e.g., +1 EV) values, the flash may not be able to produce the value that you’ve asked for. Students ask me why I produce and carry laminated field charts for the flashes. Because that’s the easiest way to figure out exactly what each flash is and isn’t capable of. With 4 different flash units, as many as 10 zoom settings, and ISO values ranging from 125 (on my D1X) to 1600, that’s more GN and range possibilities than I can keep in my head. Sure, you can often get by with the range display on the flash’s LCD, but then the D70 doesn’t have one of those for its internal flash, does it?
Thom Hogan’s Complete Guide to the D70 Page 313
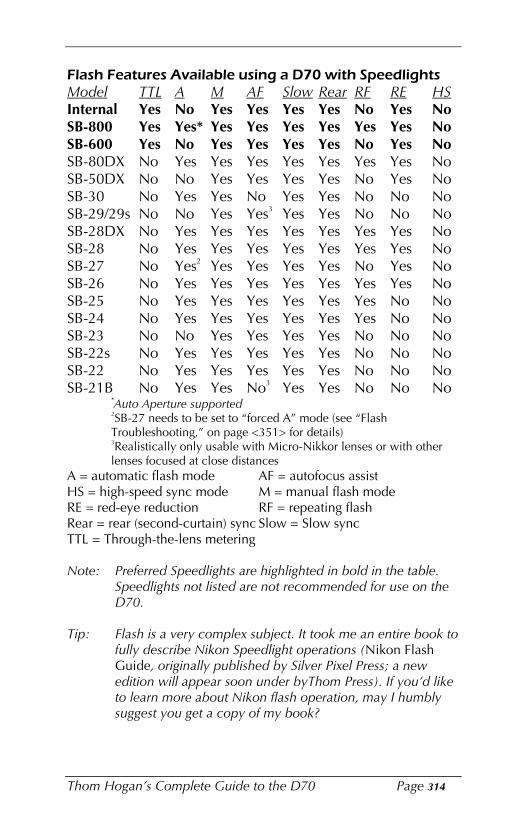
Flash Features Available using a D70 with Speedlights Model TTL A M AF Slow Rear RF RE HS Internal Yes No Yes Yes Yes Yes No Yes No SB-800 Yes Yes* Yes Yes Yes Yes Yes Yes No SB-600 Yes No Yes Yes Yes Yes No Yes No SB-80DX No Yes Yes Yes Yes Yes Yes Yes No SB-50DX No No Yes Yes Yes Yes No Yes No SB-30 No Yes Yes No Yes Yes No No No SB-29/29s No No Yes Yes3 Yes Yes No No No SB-28DX No Yes Yes Yes Yes Yes Yes Yes No SB-28 No Yes Yes Yes Yes Yes Yes Yes No SB-27 No Yes2 Yes Yes Yes Yes No Yes No SB-26 No Yes Yes Yes Yes Yes Yes Yes No SB-25 No Yes Yes Yes Yes Yes Yes No No SB-24 No Yes Yes Yes Yes Yes Yes No No SB-23 No No Yes Yes Yes Yes No No No SB-22s No Yes Yes Yes Yes Yes No No No SB-22 No Yes Yes Yes Yes Yes No No No SB-21B No Yes Yes No3 Yes Yes No No No
*Auto Aperture supported 2SB-27 needs to be set to “forced A” mode (see “Flash Troubleshooting,” on page <351> for details) 3Realistically only usable with Micro-Nikkor lenses or with other lenses focused at close distances
A = automatic flash mode AF = autofocus assist HS = high-speed sync mode M = manual flash mode RE = red-eye reduction RF = repeating flash Rear = rear (second-curtain) sync Slow = Slow sync TTL = Through-the-lens metering
Note: Preferred Speedlights are highlighted in bold in the table. Speedlights not listed are not recommended for use on the D70.
Tip: Flash is a very complex subject. It took me an entire book to fully describe Nikon Speedlight operations (Nikon Flash Guide, originally published by Silver Pixel Press; a new edition will appear soon under byThom Press). If you’d like to learn more about Nikon flash operation, may I humbly suggest you get a copy of my book?
Thom Hogan’s Complete Guide to the D70 Page 314

Controlled, Repeatable Flash Results
At my workshops the number one question I get concerns how to get repeatable results using flash, especially when you use flash for fill. Basically, this requires that you take control of the decisions that are being made instead of letting the camera make the decisions.
If you have the time, it always pays to turn off the automatic flash control and take charge of it yourself. The way I usually teach goes something like this:
1. Put the camera in Manual (M) exposure mode. When using flash, the aperture and shutter speed control the background (ambient light) exposure, flash tends to control the foreground, or subject exposure. In Manual exposure mode you are guaranteed to be completely in control of the background exposure.
2. If you want a full exposure on the background, use the exposure meter to set a value of 0 on the metering bar. If you want the background slightly darker than the foreground subject lit by flash, set an underexposure of the background of -0.3 to -1 stop. (It’s also possible to set the background brighter than the foreground, but that is rarely something you’d want to do.)
3. Turn the flash ON92.
4. Set the flash to Standard TTL mode (on the D70, this is automatic since you’re in Manual exposure mode). (Alternatively, if you want to be very precise, you can use Manual flash mode, but this usually involves more calculation or button pressing than you may have time for.) If you want the flash to fully light the subject, start with a flash exposure compensation value of between -1 and 0
You can power the flash before Step 1, but I intentionally have you turn it ON here because, if you get in the habit of doing this, if you later switch from Manual to Program or Aperture-priority modes, you’ll immediately notice if the camera changes your exposure (at least you should).
Thom Hogan’s Complete Guide to the D70 Page 315
92

EV. You need to experiment a bit to see what looks good to you, and if the subject is white or black, you may need to compensate for that (just as with the main exposure meter, the flash meter in the D70 tries to make the “average” exposure 13% gray. Also, in bright situations, you’d tend to use more flash compensation, in dark situations, less.
If you want the flash to provide fill light on the subject, start with a flash exposure compensation value of about -1 to –1.7 EV for people, from -1.7 to –2.3 EV for objects in shadow. Again, you need to experiment to find the value that looks right to you.
The background exposure you set in Step 2 and the subject exposure you set in Step 4 should be consistent for average toned subjects. In other words, once you determine the compensation values you like, they should remain consistent in other situations, just as long as the subject or background isn’t all white or all black.
For fill flash in general, the advice I’ve been giving for the last two years still stands:
• Put the camera in Aperture-priority exposure mode. Why? Because Program exposure mode restricts apertures you can use, Aperture-priority doesn’t.
• Set the Slow Sync flash option on the camera. Why? Because this removes the 1/60 lower shutter speed limit. On the D70 you have an alternative: use Custom Setting #21 to set the lower shutter speed limit to what you can hand hold. On my D70, I’ve set 1/15.
• Put the flash in Standard TTL mode. Why? Because we want to control the amount of flash used. Normally, the camera makes unknown adjustments when it is in the more advanced balanced fill-flash mode, and these adjustments aren’t repeatable.
Thom Hogan’s Complete Guide to the D70 Page 316

• Dial in Flash Exposure Compensation. Again, -1 EV for people and between -1.7 for objects in shadow are good starting points. Why? We’re using flash to fill in light, not to produce the main light for our subject. I have noticed that I tend to use slightly lower settings than this on the D70 (e.g., -1.3 for people and –2 for things) than I do on the D100, though I’m unsure why this is true.
Every time I post these recommendations on a Web forum, I get a lot of grief from other posters. Specifically:
• Why does Program exposure mode make aperture restrictions with flash? Apparently Nikon made design decisions that had to do with the guaranteed “reach” of the flash in the all-automatic exposure modes. All I know is that if you have an f/2.8 or faster lens and you’re shooting with an external flash in Program exposure mode, you’ve wasted your money on the fast lens.
• Doesn’t Slow Sync give me shutter speeds that will show camera shake? Perhaps. But if you’re in light so dim that you can’t get a 1/60 second shutter speed, you’re probably not using the flash for fill. You probably want the flash to fully light the subject, and when you dial up the flash to provide full light, the flash duration becomes the effective shutter speed (the longest duration of a Nikon flash is 1/830 of a second). You may have to let the background go dark to get “perfectly sharp” photos, but I’ve taken sharp handheld shots this way with exposures as much as 2 seconds using a 200mm focal length.
• Why do I have to use Standard TTL? Because Nikon’s Balanced Fill-Flash mode uses both Flash Exposure Compensation and Exposure Compensation to “balance” the ambient (background) and subject lighting. These compensations are unknown and vary based upon scene contrast, scene brightness, focus distance, and more. Thus, this TTL mode produces results that are not very repeatable. You may take pictures in one set of lighting
Thom Hogan’s Complete Guide to the D70 Page 317

that are good, in another, bad. That’s why I tell you to take control of what the flash is doing and dial in your own compensation.
Third Party Flash Units
The i-TTL flash units required by the D70 to perform TTL mean you are restricted to the SB-600 and SB-800 if you want to purchase an external flash and have the most capabilities available.
It took over two years after D-TTL came out for any third party flashes to support it, so it may be awhile before we see any desirable i-TTL units from other companies.
But even if you want to use Automatic flash mode you’ll find third party flashes (and all the Nikon Speedlights except for the SB-800) lacking. That’s because you’ll have to manually transfer ISO and aperture settings.
Studio Flash
The D70 can be connected to studio lighting by putting an AS-15 Sync Terminal Adapter in the hot shoe and connecting your lights to the PC Sync Socket on this accessory. Note that this connector, like the standard ISO hot shoe on the camera, should be limited to voltages of about 24 volts or less. To play it safe, you can use an isolation connection, such as the Wien Peanut.
The Rear Sync option is only available using Speedlight units in the hot shoe, by the way.
D70 Internal Flash The D70 has a built-in, low-power Speedlight. This internal flash is not automatically popped up (except in the appropriate Scene exposure modes; but I told you to avoid those).
Thom Hogan’s Complete Guide to the D70 Page 318

In dim light, you manually release the flash head (by pressing the flash release button). The only way you can turn off the flash is to push the flash head back down into the retracted position (i.e., if it’s up, this flash is fired with the shutter release).
This internal Speedlight doesn’t zoom the flash head, allow bounce, or any of the other fancy features of the external Speedlight models, but it does provide adequate illumination for many situations you’ll encounter. Coverage is good to about a 20mm lens, assuming that the lens is small and doesn’t block the flash.
When you use the internal Speedlight, you need to be aware that the flash needs some time to recharge between flashes. Nikon doesn’t state a recycling time specification, but generally, it’s only a few seconds (1 or 2 seconds has been my observation, depending upon whether the flash fired at partial power or full power). If you attempt to take another picture using flash before the recharging has completed, the flash may not have enough power to correctly illuminate your picture.
I said that the internal flash is low power. You may wonder what that means. The maximum GN of the internal Speedlight is 49 (15m). That compares to a GN of at least 100 (30m) on an SB-800 at the same coverage area (and the SB-800 can provide even more light with longer lenses). What’s that mean for photographic situations? For a subject at 10 feet, the internal Speedlight would require ~f/4.8, while the SB-800 would require f/10. That’s a difference of more than two stops. (All GNs in this paragraph are stated at ISO 200.)
In practical terms, here’s what the internal flash is capable of:
ISO1600 800 400 200 Range in Ft Range in M f/5.6 f/4 f/2.8 f/2 3’3”-25’3” 1.0-7.7m
f/8 f/5.6 f/4 f/2.8 2’4”-18’1” 0.7-5.5m f/11 f/8 f/5.6 f/4 2’-13’1” 0.6-4m
Thom Hogan’s Complete Guide to the D70 Page 319
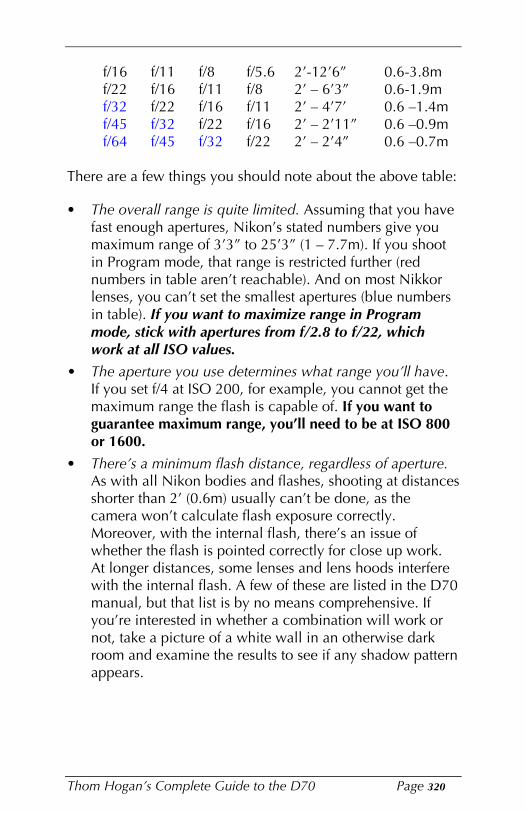
f/16 f/11 f/8 f/5.6 2’-12’6” 0.6-3.8m f/22 f/16 f/11 f/8 2’ – 6’3” 0.6-1.9m f/32 f/22 f/16 f/11 2’ – 4’7’ 0.6 –1.4m f/45 f/32 f/22 f/16 2’ – 2’11” 0.6 –0.9m f/64 f/45 f/32 f/22 2’ – 2’4” 0.6 –0.7m
There are a few things you should note about the above table:
• The overall range is quite limited. Assuming that you have fast enough apertures, Nikon’s stated numbers give you maximum range of 3’3” to 25’3” (1 – 7.7m). If you shoot in Program mode, that range is restricted further (red numbers in table aren’t reachable). And on most Nikkor lenses, you can’t set the smallest apertures (blue numbers in table). If you want to maximize range in Program mode, stick with apertures from f/2.8 to f/22, which work at all ISO values.
• The aperture you use determines what range you’ll have. If you set f/4 at ISO 200, for example, you cannot get the maximum range the flash is capable of. If you want to guarantee maximum range, you’ll need to be at ISO 800 or 1600.
• There’s a minimum flash distance, regardless of aperture. As with all Nikon bodies and flashes, shooting at distances shorter than 2’ (0.6m) usually can’t be done, as the camera won’t calculate flash exposure correctly. Moreover, with the internal flash, there’s an issue of whether the flash is pointed correctly for close up work. At longer distances, some lenses and lens hoods interfere with the internal flash. A few of these are listed in the D70 manual, but that list is by no means comprehensive. If you’re interested in whether a combination will work or not, take a picture of a white wall in an otherwise dark room and examine the results to see if any shadow pattern appears.
Thom Hogan’s Complete Guide to the D70 Page 320
The internal flash can be used in TTL modes or Manual flash mode (see “Custom Setting #19, Flash Mode for Internal Flash,” on page <289> for details on how to set the mode).
Internal Flash Basics
I’ve covered some of the D70’s internal flash use already, but to be consistent with the Nikon Flash Guide and to elaborate on some of the deeper features of the D70’s flash unit, I’m going to provide a step-by-step section, just as I do with the common external flashes in the next section.
To Set TTL Flash
Why would I use TTL flash?
use them at appropriate times and you should be fine.
On the D70, TTL flash is the most sophisticated, automated flash capability you’ll find. Just learn the difference between Balanced Fill-Flash and Standard TTL flash modes and learn to
1. Activate the flash by popping it up.
2. Select the type of TTL to be performed. Basically, you only have one choice: whether to cancel the Balanced Fill-Flash mode (you do so by setting either spot metering or Manual exposure mode). I generally recommend that you not use Balanced Fill Flash.
3. Set the camera to Single Servo AF (flash only operates when the camera achieves focus; this isn’t technically required, but it makes the shutter release more predictable).
4. Set the camera’s exposure mode, if you haven’t already. In Aperture-priority (A), Shutter-priority (S), and Manual (M) exposure modes, make any necessary aperture or shutter speed selections.
Note: In Program exposure mode you can usually override the camera’s selection of aperture and shutter speed combinations by turning the D70’s Rear Command dial
Thom Hogan’s Complete Guide to the D70 Page 321

(when the camera is active). But note that the maximum aperture you can use is restricted in Program exposure mode (the actual value depends upon ISO setting; see “Allowable Apertures in Program Mode,” on page <302>.
5. You’re ready to shoot.
To Set Commander Mode
Why would I use Commander mode?
If you wish to use the D70’s internal flash to trigger external
Commander mode. SB-600 or SB-800’s wirelessly (in TTL), you need to use
1. Use CSM #19 to set Commander mode.
a. Press the Menu button to show the menu system.
b. Use the Direction pad to navigate to the Custom Settings menu. Press the > key to enter the Custom Settings menu.
c. Use the Direction pad to navigate to Custom Setting #19. Press the > key to enter the Flash Mode setting.
d. Use the Direction pad to navigate to Commander mode. Press the > key to enter
Thom Hogan’s Complete Guide to the D70 Page 322

the Commander mode settings.
e. Use the Direction pad to navigate to the flash mode you want Commander mode to control. Most of the time this will be TTL, which is what the remaining steps here assume93. Press the > key to select the flash mode to be used.
2. Activate the flash by popping it up.
3. Select the type of TTL to be performed. Basically, you only have one choice: whether to cancel the Balanced Fill-Flash mode (you do so by setting either spot
Auto Aperture might be useful if you’re using one flash to light a background, another flash to light the subject (just make sure that the sensors on the two flashes don’t see each other’s flash tube or output). Manual flash mode would be useful if you were setting up each flash to fire at a very specific value. But we’re getting a bit out of the scope of this book and talking more about lighting techniques than D70 techniques. If you pick a Commander mode other than TTL, adjust Step 7 to account for the changes the flash mode makes (and if you don’t know what those are, you probably shouldn’t be using those modes!).
Thom Hogan’s Complete Guide to the D70 Page 323
93

metering or Manual exposure mode). I generally recommend that you don’t use Balanced Fill-Flash.
4. Set the camera to Single Servo AF (flash only operates when the camera achieves focus; this isn’t technically required, but it makes the shutter release more predictable).
5. Set the camera’s exposure mode, if you haven’t already. In Aperture-priority (A), Shutter-priority (S), and Manual (M) exposure modes, make any necessary aperture or shutter speed selections.
Note: In Program exposure mode you can usually override the camera’s selection of aperture and shutter speed combinations by turning the D70’s Rear Command dial (when the camera is active). But note that the maximum aperture you can use is restricted in Program exposure mode (the actual value depends upon ISO setting; see “Allowable Apertures in Program Mode,” on page <302>.
6. Orient the remote flashes so that their wireless sensors can see the flash output from the D70.
7. On each remote SB-800, perform the following steps:
a. Press and hold the Sel button for two seconds to get to the sub menu system on the flash.
b. Use the Flash Direction pad to navigate to the wireless icon (top right).
c. Press the Sel button to enter the wireless menu system.
d. Use the Flash Direction pad to navigate to Remote.
e. Press the Sel button to select it.
f. Hold the Sel button until you leave the sub menu system.
g. Press the Sel button until the CH highlights.
Thom Hogan’s Complete Guide to the D70 Page 324

h. Use the Up and Down buttons on the Flash Direction pad to select Channel 3 (the 3 will be larger than the other numbers).
i. Press the Sel button until the GROUP highlights.
j. Use the Up and Down buttons on the Flash Direction pad to select GROUP A.
8. You’re ready to shoot.
Note: If you put a lens that doesn’t have a CPU in it on the D70 (e.g., a manual focus lens), Commander flash mode can’t use Auto Aperture or TTL flash modes, only Manual flash mode.
Nikon includes a drawing showing where remote flashes need to be positioned relative to the D70. I’ve actually found this to be relatively conservative, especially in low light, where the infrared component of the preflash is easily seen by the remote flashes. In general, here are a few positioning guidelines:
• In low light, the remote flash sensor doesn’t always have to have a direct line of sight to the D70’s internal flash. I’ve successfully hidden a remote flash behind the subject (to light the background or provide rim light). This works better over short distances, though.
• You may be able to achieve Nikon’s stated 33 feet (10m) distance (within a 60° angle) in most situations, but beware of situations where there is a great deal of infrared energy present (some incandescent lighting)—you may have to give up some distance where other infrared sources are present, as they’ll overwhelm the sensor and it won’t see the faint output of the D70’s flash.
• I’ve been able to achieve better than 120° angle remote triggers, but only at close distances (10 feet [3m]).
• Triggering the remote flashes is only part of the equation. In general, remote flashes doing TTL need to be within 30° of the camera-subject axis. In other words, the angle
Thom Hogan’s Complete Guide to the D70 Page 325

formed by the flash/subject/camera needs to be 30° or less. Why? Because when subjects are lit from the side, the camera—which after all is doing the flash calculations—doesn’t see the full reflection of the flash’s output and may adjust its exposure incorrectly.
• All remote flashes are firing at essentially the same level, so if you’re using multiple remote SB-800’s, your only ability to change levels is to locate the remote flashes at different distances from the subject. To achieve a 2:1 light ratio (typical portrait lighting), you’d set up the second SB800 at 1.4x the distance from the subject as the first SB800.
To Set Manual Flash
Why would I use Manual flash mode?
that you want the D70 flash to fire at a low power (1/16) so
If you know how to calculate light values, Manual flash mode gives you a precise amount of light. That’s not normally how you’d want to use the D70 flash. The most likely scenario is
as to trigger remote lighting that is sensitive to the IR a flash produces (e.g., studio slaves).
1. Press the Menu button to show the menu system.
a. Use the Direction pad to navigate to the Custom Settings menu. Press the > key to enter the Custom Settings menu.
b. Use the Direction pad to navigate to Custom Setting #19. Press the > key to enter the Flash
Thom Hogan’s Complete Guide to the D70 Page 326

Mode setting.
c. Use the Direction pad to navigate to Manual flash mode. Press the > key to enter the Manual flash mode settings.
d. Use the Direction pad to navigate to the Manual flash power you want to set. Press the > key to select the flash power to be used.
2. Activate the flash by popping it up.
3. Set the camera to Single Servo AF. While not absolutely required, this generally makes the camera’s
Thom Hogan’s Complete Guide to the D70 Page 327

response more predictable (focus must be achieved before flash fires).
4. Focus on your subject by pressing lightly on the shutter release. Note the distance on the scale on the lens.
5. Aperture = GN / Distance. Work the calculation and set the correct aperture. (Determine the GN by looking at the tables, below).
6. Set the D70 to the exposure mode you wish to use, and set your aperture and shutter speed, as usual.
Internal Flash Guide Numbers (Feet) at ISO 200 Output Level GN Full Power 56 ½ Power 39 ¼ Power 28 1/8 Power 20 1/16 Power 14
Internal Flash Guide Numbers (Meters) at ISO 200 Output Level GN Full Power 17 ½ Power 12 ¼ Power 8.5 1/8 Power 6 1/16 Power 4.25
Using the Internal Flash for Fill
While Nikon uses the term “Fill-Flash” to describe the most common flash mode the D70 uses, this is a bit misleading. True fill flash implies that the ambient lighting provides the main light for a subject, while the flash provides significantly less light (just enough to “fill” in shadows).
In Balanced Fill-Flash, the Speedlight sometimes provides the main light for a subject (typical in very dim situations), sometimes a light about equal to the ambient light, or sometimes less light than the ambient light (typical in bright
Thom Hogan’s Complete Guide to the D70 Page 328

conditions, where the subject is already well lit). In only two of the three cases could the mode be considered “fill.”
Professional photographers like to exactly control fill flash levels. The late Galen Rowell94, for instance, wrote extensively about how he often used fill flash at –1.7 stops less than the ambient light. Other photographers suggest flash at anywhere from -.5 to –2 stops less than the ambient light.
Fortunately, the D70 allows you to control the level at which the internal flash fires, so you can set “fill flash” levels directly. To do so:
1. Set the exposure mode to Manual (M). (We want Standard TTL mode.)
2. Set your exposure, as usual.
3. Hold down the Flash Compensation button and rotate the Front Command dial until the flash level you want is displayed in the top LCD and viewfinder (that would be -1.7 if you’re trying to emulate Galen, for example).
4. Pop up the flash.
You’ll want to verify that the flash can provide the amount of flash you’re asking for.
External Flash Models for the D70
SB-29/SB-29s
The SB-29 is an updated and simplified version of Nikon’s macro Speedlight. A “controller” unit plugs into the camera’s hot shoe and connects to the dual tube flash head, which is mounted on the lens with supplied adapters. Introduced in 1999, the SB-29 unfortunately cannot be used in TTL modes
Galen’s death in August 2002 was unexpected, tragic, and to those of us who worked with him, heartbreaking. As I note in the Introduction to my Nikon Flash Guide, much of what I know about Nikon flash was passed down to me from Galen. Galen was a friend, mentor, and colleague. I pass his knowledge on with hope that it will serve you as well as it has served me.
Thom Hogan’s Complete Guide to the D70 Page 329
94

with the D70. In February 2002, Nikon announced the SB29s, which added an additional lower power manual flash mode; it still doesn’t support TTL with the digital cameras.
Specifications
GN: Weight: Size:
Power:
36 (ft), 11 (m) 14.5 oz (410g) (w/o batteries) 5.2” (133mm) tall x 4.7” (119mm) wide x 1.1” (28.5mm) deep (main unit); 4.2” (106.5mm) tall x 3.5” (88.5mm) deep x 2.7” (69mm) wide (controller) four AA batteries
Recycle Time: # of Flashes:
3 seconds minimum (full discharge) ~300 at full manual
Flash Duration: Coverage:
Case: Key Features:
1/1400 20mm lens at distance of 3.3 ft (1m) with flashtubes on sides, 24mm lens with flashtubes set to top and bottom. SS-29 (supplied) TTL flash control on most TTL-capable Nikon bodies; Full, or ¼ power settings. Left, Right, or both flash tubes can be fired. Balance of tubes can be set to 1:4, either direction. The SB-29 can synchronize with additional off-camera flashes, but the SB-29 must be the master flash. Modeling light. Comes with 52mm, 62mm, and 72mm mounting rings. Sync terminal for multiple flash use.
Thom Hogan’s Complete Guide to the D70 Page 330

To Set Manual Flash Exposure
Why would I use Manual flash?
Unfortunately, if you’re using an SB-29 or SB-29s on a D70, this is the only flash mode you can use. Since the SB-29 manual pre-dates the D70, I’ve included instructions here for those of you who want to do macro flash work.
1. On the SB-29’s camera-mounted controller, set the Light Output selector to M or M1/4 or M1/32 (indicates full, quarter, and 1/32 power, respectively).
2. On the SB-29 main unit, set the Flash Module selector to ú, û, or ü, to indicate which flash tubes you want to fire.
3. Set your D70 to Aperture (A) or Manual (M) exposure mode and to any metering method.
4. Determine which aperture to use:
a. If magnification is lower than 1:10, use the formula aperture = GN /flash-to-subject distance to calculate aperture.
b. If magnification is 1:1 to 1:10, use the table on the back of the SB-29’s camera-mounted controller. Use the bottom of the appropriate magnification ratio bar to determine aperture for full power. For example, with a 105mm Micro-Nikkor and ISO 100 and a 1:1 ratio, that would be f/64, so for a D70 close down one- stop (to adjust for ISO 200). Note that you won’t be able to use the SB-29 at full power at some magnifications, as your lenses probably won’t stop down far enough. Use the small point (circle) within the appropriate magnification ratio bar for ¼ power. For example, for the example settings just given,
Thom Hogan’s Complete Guide to the D70 Page 331

the back of the controller would indicate f/45 for ISO 100, so you’d need f/64 on a D70.
5. Set the aperture you determined in Step 4 on the camera, and then make sure that the shutter speed is less than 1/500.
6. Turn the camera-mounted controller to ON or STBY, if it isn’t already. When the ready light lights, take your picture.
Guide Numbers in Manual Mode (ISO 200) One flash module: full power 50 (15.4m) ¼ power 25 (7.7)
Both flash modules: full power: 55 (16.8m) ¼ power 28 (8.4)
SB-29 Flash Durations
Output Both Flashtubes One Flashtube Full 1/1400 1/1250 ¼ 1/5500 1/3300
Using the Modeling Light
Why would I use the Modeling light?
The modeling light helps you see how shadows from the flash will be created. With a ring flash like the SB-29, it’s sometimes difficult to figure out how the light will impact the scene; the Modeling light gives you a way to preview the effect.
1. On the SB-29’s camera-mounted controller, press the button on top labeled MODELING. The modeling light stays on for approximately three seconds under optimum conditions.
Note: This doesn’t work unless the ready light is ON.
Tip: The modeling light is very similar to the Repeating Flash modes of the SB-800. The light fires at 40Hz according to the manual. It might be possible to perform macro Repeating Flash by doing some experiments to calculate a Modeling Light GN.
Thom Hogan’s Complete Guide to the D70 Page 332

Using the Focus Illuminator
Why would I use Focus illuminator?
Actually, when shooting at macro distances, you wouldn’t. That’s because you rarely are in autofocus with macro lenses (autofocus sometimes misses focus by very small amounts, but in macro work that may be enough to ruin a shot).
1. On the SB-29’s camera-mounted controller, press the button labeled with the small lamp (on top, next to the modeling light button). You can press the button again to turn the light OFF.
Note: The small focus help lamp stays on for approximately one minute after you press the button or when you press the shutter release, whichever occurs first.
Note: When shooting at close distances (less than 6” [150mm]), turn the focus illuminator light OFF before taking a picture, otherwise the light may affect exposure.
SB-29 Notes
• Note that the SB-29 flash head unit rotates on lenses that turn the filter ring during focusing. Among other problems, this may cause the flashtubes to be aligned at an angle you don’t want. To cope with this, screw the adapter ring into the lens but don’t mount the SB-29 until you’ve focused. Be careful not to change your focus point as you mount the SB-29 onto the adapter ring.
• Nikon recommends using only the following lenses:
AF Micro-Nikkor 60mm f/2.8D AF Micro-Nikkor 105mm f/2.8D AF Micro-Nikkor 200mm f/4D AF Micro-Nikkor 70-180mm f/4.5-5.6D (MF only)
• Nikon does not recommend that the SB-29 be mounted on autofocus lenses other than the Micro Nikkors, though it can be done. Curiously, none of Nikon’s recommended
Thom Hogan’s Complete Guide to the D70 Page 333

lenses use a 72mm adapter, so why did Nikon provide one?
• The 60mm f/2.8 Micro Nikkor AF requires a UR-3 Adapter Ring to attach the SB-29 main body to the lens, otherwise the weight of the Speedlight impairs autofocus abilities of the lens and could damage it. Attach the UR-3 to the lens first, set the lens at infinity focus, and then attach the SB29 main body to the UR-3. Nikon’s manual warns of damage to the camera when using autofocus Micro Nikkors with the SB-29 attached via the supplied 52mm, 62mm, or 72mm adapter rings and recommends manual focus.
Note: The 62mm filter ring supplied with the SB-29 can be used like the UR-3 on the 105mm f/2.8 Micro Nikkor AF lens (i.e., it can be used to slip over the lens body to provide better support, instead of screwing into the filter ring threads).
• Only lenses with a focal length of 50mm or longer should be used with the SB-29, as vignetting occurs with shorter lenses. Two autofocus zooms, the 28-70mm f/3.5-4.5D and 28-85mm f/3.5-4.5 can be used at 35mm (indeed, perhaps even wider).
SB-800
The SB-800 is—as I write this—the only external flash that can provide TTL flash with the D70. The SB-800 is basically the same flash as the SB-80DX, but with additional features and support for the new i-TTL flash system. The SB-800 was announced in July 2003 and arrived in stores in fall 2003.
Thom Hogan’s Complete Guide to the D70 Page 334

Specifications
GN: Weight: Size:
Power:
125 (ft), 38 (m) (at 35mm head position) 11.8 oz. (335g) (w/o batteries) 5” (127.5mm) tall x 2.8” (80.5mm) wide x 3.6” (91.5mm) deep four AA batteries
Recycle Time: # of Flashes:
6 seconds minimum (full discharge) ~150 at full manual
Flash Duration: Coverage:
Case:
1/1050 to 1/41600 (120 degrees horizontal, 110 degrees vertical) 14mm lens; also supports 17mm, 24mm, 28mm, 35mm, 50mm, 70mm, 85mm, and 105mm coverage SS-800 included
Key Features: TTL flash control on most TTL-capable Nikon bodies, preflash on F90X/N90s or later bodies; Full power TTL, eight power level manual, and Automatic settings. LCD panel shows settings. Rear curtain sync. High Speed sync (not supported on the D70), Repeating flash, and red-eye reduction. The SB-800 can synchronize with up to nine additional flash units, in groups of three controlled by one master flash. Head tilts from –7 degrees below horizontal up to 90 degrees above horizontal, and rotates -270 degrees to plus 180
Thom Hogan’s Complete Guide to the D70 Page 335

degrees clockwise. Built-in diffuser card. Diffusion dome included, sample filter set included. Automatic or Manual wireless remote firing possible. Modeling light. Wide angle autofocus assist light.
To Set TTL Flash
Why would I use TTL flash?
use them at appropriate times and you should be fine.
On the D70, TTL flash is the most sophisticated, automated flash ability you’ll find. Just learn the difference between Balanced Fill-Flash and Standard TTL flash modes and learn to
1. Activate the flash. If it’s already in Standby, a partial press of the shutter release activates it; otherwise, press the power (ON/OFF) button on the SB-800 to turn the flash ON.
2. Select the type of TTL to be performed. Basically, you only have one choice: whether to cancel the “balanced fill-flash” mode (you do so by pressing the Mode button on the flash until only the TTL indicator appears; if TTL BL appears, the camera is in a Balanced Fill-Flash mode; see “Summary of TTL Flash Modes,” on page <306>).
Note: When the D70 is set for spot metering or Manual exposure mode, Standard TTL is set automatically.
3. Set the camera to Single Servo AF (flash only operates when the camera achieves focus; this isn’t technically required, but it makes the shutter release more predictable).
4. Set the camera’s exposure mode, if you haven’t already. In Aperture-priority (A), Shutter-priority (S), and Manual (M) exposure modes, make any necessary aperture or shutter speed selections.
Note: In Program exposure mode you can usually override the camera’s selection of aperture and shutter speed
Thom Hogan’s Complete Guide to the D70 Page 336

combinations by turning the D70’s Rear Command dial (when the camera is active). But note that the maximum aperture you can use is restricted in Program exposure mode (the actual value depends upon ISO setting; see “Allowable Apertures in Program Mode,” on page <302>.
Note: The aperture the D70 (or you) selected also appears on the SB-800’s LCD panel when you partially press the shutter release, as does the allowable flash-to-subject distance range.
Note: The D70 and SB-800 may warn you of several possible errors when you partially press the shutter release to verify settings: - The lens must be set on its minimum aperture, or else the error message FEE appears in the viewfinder.
- Any HI visible in the viewfinder indicates that overexposure (of the background exposure) is likely. - The shutter speed will be automatically reset to 1/500 if you selected a faster shutter speed in Shutter (S) or Manual (M) exposure mode. - In Manual (M) exposure mode, under and overexposure is indicated solely by the analog exposure display. If the exposure bar goes to either side of the $ point, the ambient-only lighting exposure will not be correct.
5. Focus on your subject by pressing lightly on the shutter release. Confirm that the subject is within flash distance by looking at the Shooting Range displayed on the SB-800’s LCD. Assuming you’ve confirmed the distance, you’re ready to shoot.
SB-800 Usable Apertures and Flash Range in TTL mode
14mm ISO 800 400f/4 f/2.8 f/5.6 f/4 f/8 f/5.6 f/11 f/8 f/16 f/11
200 Range in Ft f/2 3.5 - 27 f/2.8 2.5 - 27 f/4 2.0 - 20 f/5.6 2.0 - 14 f/8 2.0 - 10
Thom Hogan’s Complete Guide to the D70 Page 337

f/22 f/16 f/32 f/22
f/32
f/11 2.0 - 7 f/16 2.0 - 4.9 f/22 2.0 - 3.5 f/32 2.0 - 2.5
Range is reduced if diffusion dome is in place
17mm ISO 800 400 200 Range in Ft f/4 f/2.8 f/5.6 f/4 f/8 f/5.6 f/11 f/8 f/16 f/11 f/22 f/16 f/32 f/22
f/32
f/2 3.9 - 44 f/2.8 2.8 - 31 f/4 2.0 - 22 f/5.6 2.0 - 16 f/8 2.0 - 11 f/11 2.0 - 7.8 f/16 2.0 - 5.5 f/22 2.0 - 3.9 f/32 2.0 - 2.8
24mm ISO 800 400 200 Range in Ft f/4 f/2.8 f/5.6 f/4 f/8 f/5.6 f/11 f/8 f/16 f/11 f/22 f/16 f/32 f/22
f/32
f/2 6.6 - 66 f/2.8 4.6 - 52 f/4 3.3 - 37 f/5.6 2.3 - 26 f/8 2.0 - 19 f/11 2.0 - 13 f/16 2.0 - 9.3 f/22 2.0 - 6.6 f/32 2.0 - 4.6
28mm ISO 800 400 200 Range in Ft f/4 f/2.8 f/5.6 f/4 f/8 f/5.6 f/11 f/8 f/16 f/11 f/22 f/16 f/32 f/22
f/2 7.0 - 66 f/2.8 4.9 - 56 f/4 3.5 - 39 f/5.6 2.5 - 28 f/8 2.0 - 20 f/11 2.0 - 14 f/16 2.0 - 10
Thom Hogan’s Complete Guide to the D70 Page 338

f/32 f/22 2.0 - 7.0 f/32 2.0 - 4.9
35mm ISO 800 400 200 Range in Ft f/4 f/2.8 f/5.6 f/4 f/8 f/5.6 f/11 f/8 f/16 f/11 f/22 f/16 f/32 f/22
f/32
f/2 7.8 - 66 f/2.8 5.5 - 62 f/4 3.9 - 44 f/5.6 2.8 - 31 f/8 2.0 - 22 f/11 2.0 - 16 f/16 2.0 - 11 f/22 2.0 - 7.8 f/32 2.0 - 5.5
50mm ISO 800 400 200 Range in Ft f/4 f/2.8 f/5.6 f/4 f/8 f/5.6 f/11 f/8 f/16 f/11 f/22 f/16 f/32 f/22
f/32
f/2 8.8 - 66 f/2.8 6.2 - 66 f/4 4.4 - 50 f/5.6 3.1 - 35 f/8 2.2 - 26 f/11 2.0 - 18 f/16 2.0 - 12 f/22 2.0 - 8.8 f/32 2.0 - 6.2
70mm ISO 800 400 200 Range in Ft f/4 f/2.8 f/5.6 f/4 f/8 f/5.6 f/11 f/8 f/16 f/11 f/22 f/16 f/32 f/22
f/32
f/2 10 - 66 f/2.8 7.0 - 66 f/4 4.9 - 53 f/5.6 3.5 - 39 f/8 2.6 - 27 f/11 2.0 - 19 f/16 2.0 - 13 f/22 2.0 - 9.8 f/32 2.0 - 7.0
Thom Hogan’s Complete Guide to the D70 Page 339

85mm ISO 800 400 200 Range in Ft f/4 f/2.8 f/5.6 f/4 f/8 f/5.6 f/11 f/8 f/16 f/11 f/22 f/16 f/32 f/22
f/32
f/2 10 - 66 f/2.8 7.2 - 66 f/4 5.1 - 56 f/5.6 3.6 - 39 f/8 2.6 - 29 f/11 2.0 - 20 f/16 2.0 - 14 f/22 2.0 - 10 f/32 2.0 - 7.4
105mm ISO 800 400 200 Range in Ft f/4 f/2.8 f/5.6 f/4 f/8 f/5.6 f/11 f/8 f/16 f/11 f/22 f/16 f/32 f/22
f/32
f/2 11 - 66 f/2.8 7.2 - 66 f/4 5.1 - 56 f/5.6 3.6 - 39 f/8 2.6 - 29 f/11 2.0 - 20 f/16 2.0 - 14 f/22 2.0 - 10 f/32 2.0 - 7.8
To Set Auto Aperture Flash
beware of what the flash sensor sees if this is not the case.
Why would I use Auto Aperture Flash?
I’m not sure I would. However, some photographers believe that when flash is the primary source of light that they get slightly “better” images with Auto Aperture flash. As long as you’re operating in an unobstructed space and not too close to white or dark walls, Auto Aperture flash works fine. But
Auto Aperture works only with the SB-800.
1. Activate the flash. If it’s already in Standby, a partial press of the shutter release activates it; otherwise,
Thom Hogan’s Complete Guide to the D70 Page 340

press the power (ON/OFF) button on the SB-800 to turn the flash ON.
2. Press the SB-800’s Mode button until ÊÊ appears on the flash LCD.
3. Set the camera to Aperture-priority (A) or Program (P) exposure mode.
4. Set the camera to Single Servo AF. While not absolutely required, this generally makes the camera’s response more predictable (focus must be achieved before flash fires).
5. Choose the aperture you’re going to shoot at (set exposure).
6. Focus on your subject by pressing lightly on the shutter release. Note the distance on the scale on the lens.
7. Confirm that the subject is within flash distance by looking at the Shooting Range display on the flash unit’s LCD and comparing it to the distance you noted in Step 6. If the range includes the distance in Step 6, you’re ready to shoot; otherwise return to Step 5 and set a new aperture.
Note: If you put a lens that doesn’t have a CPU in it on the D70 (e.g., a manual focus lens), this flash mode is not available and the SB-800 reverts to Manual flash mode.
To Set Manual Flash
Why would I use Manual flash mode?
If you know how to calculate light values, Manual flash mode gives you a precise amount of light. In static situations, such as a posed setup in a studio, such lighting can be carefully calculated and set up prior to the subject arriving. As long as flash positions relative to the camera don’t move, you’ll get exactly repeating amounts of light on each frame.
Thom Hogan’s Complete Guide to the D70 Page 341

1. Activate the flash. If it’s already in Standby, a partial press of the shutter release activates it; otherwise, press the power (ON/OFF) button on the SB-800 to turn the flash ON.
2. Press the SB-800’s Mode button until Ë appears on the LCD.
3. Set the D70 to Aperture-preferred (A) or Manual (M) exposure mode and set your aperture and shutter speed, as usual.
4. Set the camera to Single Servo AF. While not absolutely required, this generally makes the camera’s response more predictable (focus must be achieved before flash fires).
5. Focus on your subject by pressing lightly on the shutter release. Note the distance on the scale on the lens.
6. Simply changing the aperture on the camera causes the SB-800 to match it. You should see the aperture change on the flash unit’s LCD and the Shooting Range distance changes, as well. You have two choices (you can also use a combination of both):
a. Change apertures (on the camera) until the distance noted in Step 5 is also shown in the flash unit’s LCD.
b. Press the < and > buttons on the SB-800 to change the flash’s power level until the distance noted in Step 6 is shown in the flash unit’s LCD.
Note: With lenses that don’t have CPUs (AI and AI-S), the aperture on the camera isn’t linked with the flash, so you should adjust both aperture and flash power settings on the SB-800 until the Shooting Range on the flash unit’s LCD indicates the distance you noted in Step 5, Then set the aperture on the camera to match that shown on the SB-800.
Thom Hogan’s Complete Guide to the D70 Page 342
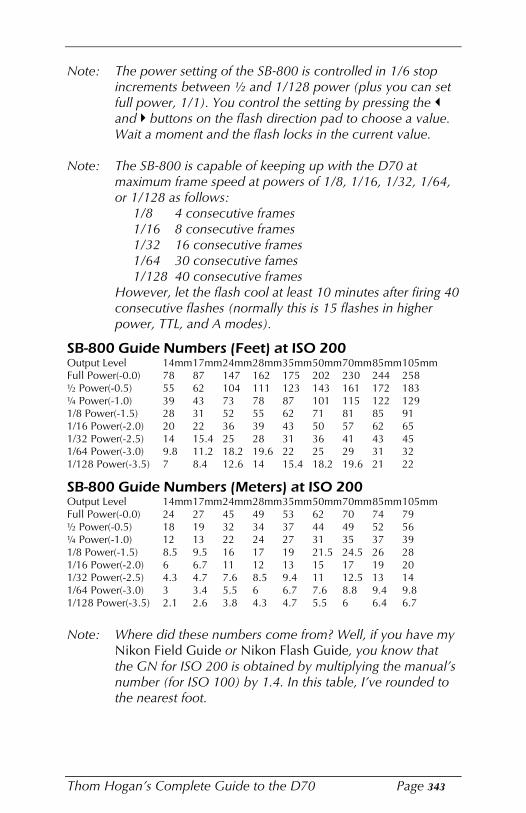
Note: The power setting of the SB-800 is controlled in 1/6 stop increments between ½ and 1/128 power (plus you can set full power, 1/1). You control the setting by pressing the < and > buttons on the flash direction pad to choose a value. Wait a moment and the flash locks in the current value.
Note: The SB-800 is capable of keeping up with the D70 at maximum frame speed at powers of 1/8, 1/16, 1/32, 1/64, or 1/128 as follows:
1/8 4 consecutive frames 1/16 8 consecutive frames 1/32 16 consecutive frames 1/64 30 consecutive fames 1/128 40 consecutive frames
However, let the flash cool at least 10 minutes after firing 40 consecutive flashes (normally this is 15 flashes in higher power, TTL, and A modes).
SB-800 Guide Numbers (Feet) at ISO 200 Output Level 14mm 17mm 24mm 28mm 35mm 50mm 70mm 85mm 105mm Full Power(-0.0) 78 87 147 162 175 202 230 244 258 ½ Power(-0.5) 55 62 104 111 123 143 161 172 183 ¼ Power(-1.0) 39 43 73 78 87 101 115 122 129 1/8 Power(-1.5) 28 31 52 55 62 71 81 85 91 1/16 Power(-2.0) 20 22 36 39 43 50 57 62 65 1/32 Power(-2.5) 14 15.4 25 28 31 36 41 43 45 1/64 Power(-3.0) 9.8 11.2 18.2 19.6 22 25 29 31 32 1/128 Power(-3.5) 7 8.4 12.6 14 15.4 18.2 19.6 21 22
SB-800 Guide Numbers (Meters) at ISO 200 Output Level 14mm 17mm 24mm 28mm 35mm 50mm 70mm 85mm 105mm Full Power(-0.0) 24 27 45 49 53 62 70 74 79 ½ Power(-0.5) 18 19 32 34 37 44 49 52 56 ¼ Power(-1.0) 12 13 22 24 27 31 35 37 39 1/8 Power(-1.5) 8.5 9.5 16 17 19 21.5 24.5 26 28 1/16 Power(-2.0) 6 6.7 11 12 13 15 17 19 20 1/32 Power(-2.5) 4.3 4.7 7.6 8.5 9.4 11 12.5 13 14 1/64 Power(-3.0) 3 3.4 5.5 6 6.7 7.6 8.8 9.4 9.8 1/128 Power(-3.5) 2.1 2.6 3.8 4.3 4.7 5.5 6 6.4 6.7
Note: Where did these numbers come from? Well, if you have my Nikon Field Guide or Nikon Flash Guide, you know that the GN for ISO 200 is obtained by multiplying the manual’s number (for ISO 100) by 1.4. In this table, I’ve rounded to the nearest foot.
Thom Hogan’s Complete Guide to the D70 Page 343

Note: GNs listed are for flash head settings, not lenses!
Output Duration Full Power 1/1050 ½ Power 1/1100 ¼ Power 1/2700 1/8 Power 1/5900 1/16 Power 1/10900 1/32 Power 1/17800 1/64 Power 1/32300 1/128 Power 1/41600
To Set Repeating Flash
Why would I set Repeating Flash?
The usual reason is to repeatedly light a subject that’s moving relative to a static camera while using a longish shutter speed. For example, a dancer quickly moving across the frame against an unlit background, with a shutter speed of 1 second.
1. Activate the flash. If it’s already in Standby, a partial press of the shutter release activates it; otherwise, press the power (ON/OFF) button on the SB-800 to turn the flash ON.
2. Press the flash’s Mode button until ËÏ appears on the LCD.
3. Put the camera in Manual (M) exposure mode.
4. Press the middle button on the flash direction pad (ø)
a. Then press the + and - buttons to choose the flash power setting (only settings between 1/8 and 1/128 are allowed).
b. Press the middle button (ø) again to lock in that value and the next portion of the entry begins flashing.
Thom Hogan’s Complete Guide to the D70 Page 344
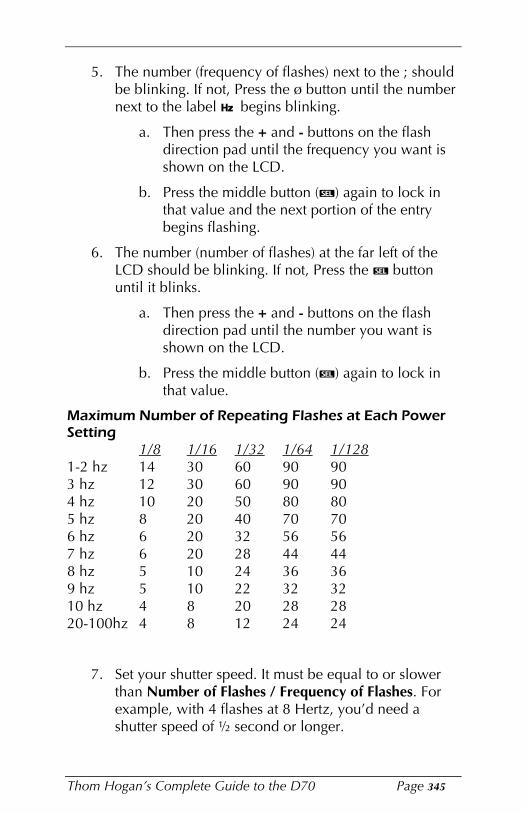
5. The number (frequency of flashes) next to the ; should be blinking. If not, Press the ø button until the number next to the label ; begins blinking.
a. Then press the + and - buttons on the flash direction pad until the frequency you want is shown on the LCD.
b. Press the middle button (ø) again to lock in that value and the next portion of the entry begins flashing.
6. The number (number of flashes) at the far left of the LCD should be blinking. If not, Press the ø button until it blinks.
a. Then press the + and - buttons on the flash direction pad until the number you want is shown on the LCD.
b. Press the middle button (ø) again to lock in that value.
Maximum Number of Repeating Flashes at Each Power Setting
1/8 1/16 1/32 1/64 1/128 1-2 hz 14 30 60 90 90 3 hz 12 30 60 90 90 4 hz 10 20 50 80 80 5 hz 8 20 40 70 70 6 hz 6 20 32 56 56 7 hz 6 20 28 44 44 8 hz 5 10 24 36 36 9 hz 5 10 22 32 32 10 hz 4 8 20 28 28 20-100hz 4 8 12 24 24
7. Set your shutter speed. It must be equal to or slower than Number of Flashes / Frequency of Flashes. For example, with 4 flashes at 8 Hertz, you’d need a shutter speed of ½ second or longer.
Thom Hogan’s Complete Guide to the D70 Page 345

8. Note the distance displayed on the SB-800’s LCD. (Note: changing the zoom head setting also changes the shooting distance.) This is the flash-to-subject distance you must use (e.g., if your subject is further away than this distance, you’re going to have to move closer or change your settings).
Note: Nikon’s flash documentation for repeating flash says the exposure “is the correct exposure for the first flash in the sequence.” Actually, it’s the correct exposure for each flash in the sequence, but if your subject doesn’t move between exposures, the overlap may result in overexposure. If you’re in doubt, bracket (though in this case, you’d bracket the number of exposures or frequency).
Also: place your subject against a dark background or underexpose the background. Failure to do so may result in one of two problems: (1) the background receives light from the multiple flashes and becomes overexposed; or (2) the subject appears to fade into the background (especially true if you’re off by a bit in your distance). If in doubt, bracket your exposures for the background!
To Manually Set the Zoom Head
Why would I zoom the flash head?
Since the flash sets its head to the actual focal length of the camera lens, you’ve wasted a bit of flash power. You can recover that by zooming in one setting. At the other end of the spectrum, sometimes you don’t want to light an entire scene, but just something in the scene. By zooming the flash into that object, the flash will only light that object.
1. Press the < and > buttons on the flash direction pad to change the zoom setting. Each button press selects the next higher logical setting (and you’ll eventually loop back to the lowest setting). The ë symbol appears on the LCD when the setting doesn’t correspond to focal length of the lens.
Thom Hogan’s Complete Guide to the D70 Page 346

Note: To cancel automatic zoom head setting and lock a manual setting, hold the ø button for two seconds to enter the command setting mode for the flash. Next, press the Õ
until you see the m above ê and the words SEL and OFF on the LCD. Then use the < and > buttons to change the value (ON means the manual focus setting is locked, OFF means it isn’t). Hold the ø button for two seconds to complete the setting. To cancel the lock, repeat the process and select the other value.
1. To cancel a manual zoom setting, press the < and > buttons on the flash direction pad until the m no longer appears on the LCD (e.g., until the setting matches the lens being used).
Note: Remember that the Guide Number of the flash changes with the zoom setting.
Note: If you pull out the built-in wide angle adapter and move it into position in front of the flashtube, the SB-800 is set to the 14mm or 17mm focal length and the automatic zoom head function cannot be set to another setting. Likewise, if you put the diffusion dome on the flash head, the SB-800 sets 14mm as the focal length, and this can’t be changed.
To Set the Distance Scale to Feet or Meters
1. Hold the ø button for two seconds to enter the command setting mode for the flash.
2. Press the Õ until you see words SEL and ft (or m) on the LCD.
3. Use the < and > buttons on the flash direction pad to change the value.
4. Hold the ø button for two seconds to complete the setting.
To cancel the lock, repeat the process and select the other value.
Thom Hogan’s Complete Guide to the D70 Page 347

To Set Flash Exposure Compensation
Why would I set Flash Exposure Compensation?
If the flash is providing too much light (blown highlights in subject) or not enough (background brighter than subject) and you’re in Standard TTL, use Flash Exposure Compensation to adjust the level of the flash output.
Use the Ô and Õ buttons to adjust the amount of compensation. The SB-800 allows a maximum of +3 stop and -3 stops of flash compensation, which is indicated in one-third stop increments on the flash compensation indicator.
Note: You may not be able to achieve +3 compensation in some situations.
To cancel compensation, repeat the process outlined above and set a value of 0.0.
Note: Flash compensation does not change the background exposure calculated by the camera.
Note: You can also set flash exposure compensation on the D70 body. If you do this, the value is cumulative with that you set on the flash. Get in the habit of only setting the flash exposure compensation in one place, if possible (hint: the D70 body, since that’s where you’d have to set it for the internal flash).
Tip: It’s probably best to avoid flash compensation in any of the Balanced Fill-Flash TTL modes. You don’t know what level of compensation the camera is already making, so any changes you make are in addition to this unknown, camera-calculated compensation. If you need absolute control, switch to the Auto Aperture or Manual flash modes, where any compensation you dial in will be from a known flash level.
Thom Hogan’s Complete Guide to the D70 Page 348

To Set Red-Eye Reduction
don’t. It doesn’t remove
Why would I set Red-Eye Reduction?
If you didn’t read the earlier section, the short answer is: red-eye, and this ability is annoying
in many ways. So don’t use it. Red-eye is best avoided by getting the flash off camera.
Set Red-eye reduction on the D70 by holding the | button on the camera and turning the Rear Command dial until @ appears on the D70’s LCD).
Note: Red-eye reduction works in most flash modes, but not in the Repeating Flash mode.
SB-800 Notes
• The SB-800 uses the same European style power connector as the SB-28DX, thus the SD-8A is the high performance battery pack to use, not the SD-8.
• The D70’s focus mode should usually be set to Single Servo AF, since the flash will not fire unless the subject is in focus.
• The Autofocus Assist light on the SB-800 is used automatically instead of the one on the D70 if the ambient light is low and you haven’t turned this function off with CSM #18. Autofocus assist only works at distances from 3.3 feet (1m) up to 33 feet (10m), and is only guaranteed to work with lenses from 24mm to 105mm.
Note: The Autofocus Assist illuminator will not function unless the central autofocus sensor is selected or Closest Subject Priority is in effect.
Note: You can turn off the Autofocus Assist illuminator on the SB800 by holding the Sel button down for two seconds and using the SB-800’s Direction pad to navigate to the option and turn it OFF. No AF-ILL will appear in the flash’s LCD.
Thom Hogan’s Complete Guide to the D70 Page 349

• If the [ indicator on the SB-800’s LCD panel is blinking, that means that the flash needs you to set the aperture. This happens in several situations: (1) in Automatic (A) flash mode; or (2) when using lenses without a CPU (AI or AI-S lenses). If the [ is blinking, use the Ô and Õ buttons to set the correct aperture on the flash (e.g., the aperture that matches what is set on the camera).
• The SB-800 has an automatic standby power system. The SB-800 automatically turns off 40 seconds after the camera’s meter turns OFF (STBY is displayed on the flash’s LCD). A light press on the shutter release turns the D70’s light meter back ON, and the SB-800 turns ON at the same time.
Note: The SB-800 has a “special” No Standby mode that can be set, as well as the ability to set different time-out values (80, 160, 300 seconds). Like the other flash command mode settings, you get to this function by holding the Sel button down for two seconds and then navigating the options with the Direction pad on the flash.
• After the flash fires, an icon may appear in the flash’s LCD along with a value. This indicates potential underexposure. This indicator only appears for three seconds after the shot.
• The Rear Sync option must be selected on the camera. (Some earlier flash units had this selection on the flash, so I’ve included this note here just in case folks who previously had one of those Speedlights are wondering.)
• While the SB-800 has “click stops” for commonly used flash head positions (45, 60, 75, and 90 degrees for tilt, every 30 degrees for rotation), you aren’t restricted to those positions. Setting an intermediary position is allowed (though it can easily be dislodged).
• Viewfinder Ready Light Warnings (blinking) occurs in the following conditions:
- When you press the shutter release halfway and the SB800 is not correctly mounted on the hot shoe.
Thom Hogan’s Complete Guide to the D70 Page 350

- After the flash fires at full power, indicating possible underexposure.
Flash Troubleshooting
Problem: Your SU-4 doesn’t seem to trigger the remote flash correctly in TTL mode. Solution: The D70 is not compatible with the SU-4 in TTL modes. Nikon states that you must set the triggering flash unit to Automatic (A) flash mode. A better solution is to purchase additional SB-800’s and use them in wireless TTL mode.
Problem: You can’t get an SB-27 Speedlight to work on a D70. Solution: Non-DX flash units need to be set to Automatic or Manual flash mode, and the SB-27 has some unusual wrinkles concerning Automatic flash mode. If you want to use manual flash mode, just slide the flash mode selector switch on the SB-27 to Ë and perform manual flash as usual. To use Automatic flash mode with the SB-27, you need to open the battery compartment of the flash unit and make sure that the switch inside is not set to TTL (the default). Then, starting with the flash power OFF, hold down the ZOOM button on the SB27 while turning its power switch to AUTO. You may have to perform this last action more than once, as each time you perform it the flash cycles through to only the next available flash mode. You want the “Forced Auto” mode, and the indicator for that is that the Ê on the SB-27’s LCD blinks.
Problem: The Flexible Program function in Program exposure mode doesn’t seem to change the shutter speed or aperture at all; the top LCD shows P* but the shutter speed and aperture don’t change. Solution: Get out of Program mode! If you read the Nikon manuals closely enough, interpret between the lines, consult a good tarot card reader, and sacrifice enough chickens you learn that:
Thom Hogan’s Complete Guide to the D70 Page 351
• In Program exposure mode, the maximum aperture that can be used is highly restricted. On a D70 at the lowest ISO, the largest aperture you can set with an external flash is f/5.6 (f/2.8 with internal flash).
• In Program exposure mode, the minimum shutter speed is locked at 1/60.
• In Program mode in dim conditions (and f/5.6 at 1/60 isn’t all that dim, is it?), you not only are locked into basically one aperture/shutter speed combo, but the ambient light in the scene will be severely underexposed.
At a minimum, you should use the Slow Sync option or CSM #21 to lose the slow shutter speed restriction. But I’d recommend that you switch to Aperture-preferred exposure mode to also remove the aperture limitation.
Thom Hogan’s Complete Guide to the D70 Page 352

95
Using a D70 in the Field Using a D70 is very much like using a Nikon F100 or F5 with slide film95. Very few practical differences enter into the picture. This section deals with those differences and other more generic issues that come up while shooting with the D70. First we’ll start out with a look at broad workflow issues.
The “Routine” Here’s a simple, structured set of things to consider at different points in your shooting routine:
General Settings You Make Once
• Adjust the viewfinder’s diopter setting.
• Set the date, time, and language.
• Set Custom Settings that control camera defaults for how you normally want the camera configured (Beep, Instant review, etc.).
I usually double-check the diopter and custom settings every time I change the battery. It’s easy to dislodge the diopter setting, and if I’ve handed the camera to anyone else (common during workshops) I’ve found it wise to double-check my custom settings at that time, too.
One thing I’ve noticed in answering questions from those who had the first edition of my D100 eBook is that the D100 attracted a great number of folk whose previous SLR experience was only with print film. I expect the same to be true with the D70. In general, print film users are almost uniformly disappointed by the “exposure” produced by the D70 and D100. Print film has the unique quality that a bit of overexposure is actually preferred (it generates denser negatives with more shadow detail). Automated print machines easily correct for modest overexposures (or underexposure for that matter), so most amateurs shooting print film really don’t have as good an idea (and control) of what the camera is doing exposure-wise as they think. I’ve stated it elsewhere, but I’ll state it again: slide film and digital both require that you not let highlight exposure exceed the value that can be recorded. Thus, a “properly exposed” digital image may look underexposed. That’s okay, because we can still pull shadow and mid-range detail out of the image using Curves in Photoshop (or other similar tools).
Thom Hogan’s Complete Guide to the D70 Page 353

Things To Do Before You Head Out on a Shoot
• Clean the mirror box and CCD. I know I’ll get grief over this one, as it’s a lot of hassle, and if you haven’t changed lenses lately it shouldn’t matter, right? Wrong. The CCD has a propensity to attract small particles, regardless of whether you had the lens off or not. Even if the CCD was cleaned last time you used the camera, there’s a chance that another particle has already migrated to the interior of the camera, especially since the mirror flip and curtain open move a bit of air around. Unlike film cameras, where you tend to clean after a shoot, I’ve found it more useful to do all my cleaning with digital bodies before a shoot.
• Likewise, clean your camera bag and accessories. Dust comes from two sources: the environment you shoot in, which requires defensive techniques to control; and unclean working practices, such as allowing a camera bag to accumulate dirt and dust, not cleaning lenses after use, etc. At least start the shooting session with everything clean; it’ll postpone the inevitable dust specks.
• Format the CompactFlash cards you’ll be using. First, though, check to see if it has any files on it (see “Things to do After Each Shooting Session,” on page <358>). Formatting deals with any bad sector and fragmentation problems, and with the D70, helps keep folder proliferation and the renumbering it causes to a minimum.
• Top off your batteries. I carry a converter/charger in my auto just in case I forgot to top off my battery—as a last resort I run a charge while driving to the shoot. Don’t forget the batteries for your flash and accessories, if any.
• Verify that you have everything you need for the shoot. Personally, I like checklists, which keep me from forgetting various cords I might need or my backup storage devices. With a D70, that list needs to include things like the BF-1A camera body cap, and emergency cleaning equipment. If I’m teaching a workshop, I have to remember my video cable and extension.
Thom Hogan’s Complete Guide to the D70 Page 354

Simplified Checklist (a more elaborate, printable checklist is on the disc—look for D70 Checklist):
__ Camera body (bodies)
__ Extra batteries
__ Charger (if needed, with cables)
__ Lenses
__ Lens accessories (filters, hoods, teleconverters, extension tubes)
__ Support (tripod, head, monopod, plates, etc.)
__ Flash
__ Batteries for flash (or cable to external battery)
__ Flash bracket, sync cable (SC-17), etc.
__ Cleaning equipment (AC power, swabs, fluid, air, etc.)
__ Caps (body cap, lens caps, etc.)
__ Storage (CompactFlash cards, Mindstor, etc.)
__ Cards (gray card, white balance card, etc.)
__ Cables (FireWire, video, AC power, etc.)
__ Laptop with Nikon View/Capture and plenty of storage space
__ Other (card reader/PCMCIA adapter, rain cover, etc.)
Check Each Time You Turn the Camera ON
• Check the battery level. Put in fresh battery, if necessary. This is important because if the camera sits unused for a long period of time, the battery will still deplete, as it powers the overlay to the viewfinder even when the camera is turned OFF.
• Check the frames remaining indicator. Format or replace the CompactFlash card, if necessary. If it seems like the frames remaining number is lower than it should be, check your Image Quality setting! Also check to make
Thom Hogan’s Complete Guide to the D70 Page 355

sure that there aren’t images remaining on the card that you haven’t yet saved to the computer.
• Check that you haven’t overridden any settings. Check especially for exposure compensation, bracketing, ISO value, motor drive, and image quality and size settings.
• Take one more careful look at the top LCD. This is a redundancy check for all three previous checks. Moreover, it’ll remind you which exposure and flash mode you’ve set.
Settings You Change Rarely (and then only for a reason)
• Set a motor drive mode. Single frame or Continuous are the primary choices. But you might also set self timer or remote for certain circumstances.
• Set a focus mode. Single Servo, Continuous Servo, and Closest Subject Priority are your choices. Unless you have a reason to choose otherwise, Single Servo is the usual choice.
• Set a metering method. Matrix, centerweight, or spot meter are the choices.
• Set ISO sensitivity. Use the lowest ISO that gives you acceptable shutter speeds.
• Set an exposure mode. Avoid Program exposure mode and the Scene exposure modes if you can. Aperture priority is my usual choice.
• Set a flash mode. This one’s a little tricky. The internal flash mode is controlled with Custom Setting #19, the external flash mode is controlled with the Mode button on the flash. The type of TTL performed (Balanced Fill-Flash, Standard TTL) is affected by other camera settings (spot metering, Manual exposure mode).
• Most Custom Settings. Very few of the custom settings are things that you’d change often.
• Set Image Quality and, if you’re shooting JPEG, an Image Size. Most photographers shoot either NEF, JPEG FINE L (Large), or a specific size determined by their needs.
Thom Hogan’s Complete Guide to the D70 Page 356

I try to make it a practice to check these settings every time I replace a battery or CompactFlash card, just as I used to do when switching rolls of film on a 35mm film body. Always watch the ISO setting! You never want to shoot with a high ISO set unless you absolutely have to, as color saturation is lower and noise is higher, producing poor results.
Settings You Change Often
• Set a white balance value. Auto works only in a limited range of lighting, so learn to recognize when you’re outside that range and set either a specific value or use a gray card with PRE.
• Select a focus area. For Single Area AF you’re selecting the actual sensor used, for Dynamic Area AF you’re selecting the starting focus sensor. In Closest Subject Priority your selection is ignored.
• Set exposure compensation.
• Set exposure bracketing. Pay close attention, though, as the D70 can be set to bracket white balance as well as exposure; the controls are the same and custom setting #12 selects which is in effect.
• Set apertures and/or shutter speeds (or override the Program exposure mode).
It pays to get in the habit of making a quick visual check for these settings as often as possible (e.g., just before every shot, if possible). On a D70, white balance, compensation, and bracketing is shown in the top LCD, while focus area and exposure settings in the top LCD and viewfinder.
Tip: The big “gotchas” are white balance and exposure compensation. When you’re working in a hurry, it’s easy to forget that you overrode the camera for these. Fortunately, the viewfinder reminds you of exposure compensation. Just get in the habit of looking at the white balance setting on the top LCD as often as possible!
Thom Hogan’s Complete Guide to the D70 Page 357

Things To Do After Each Shooting Session
• Move the image files to your computer ASAP. Working in the digital realm requires discipline. Remember, the D70 is labeling files with numbers, and the Nikon DSLRs has the entertaining trait of restarting the numbering in a variety of ways that’ll catch you off guard. If you don’t make it a habit to move files to meaningful folders (and meaningfully rename the files, see “Digital Workflow,” on page <466>), you’ll end up with hundreds of files with similar and possibly duplicate names that you have to slog through to find the one you want. Besides, if you make it a practice to immediately download the image files, you won’t ever accidentally format a card with information you wanted to keep.
• Verify that the files transferred correctly! Open one or two of the files to make sure that they transferred without error. Many serious photographers also burn a CD-ROM backup of their original files at this stage and securely store this as their “original negative.” Personally, I use portable hard drives for backup, as it makes the process faster and I only have to keep track of one extra thing.
• Format the CompactFlash cards immediately after you download the files from them. Yes, I told you to format them just before each shooting session, so this seems redundant. But if you follow both instructions, any card you notice with files on it probably hasn’t been downloaded to the computer yet, giving you one last chance to recover those original files before you erase them.
• If you’re going to shoot again within the next week, put your exhausted batteries on the charger. Since you can’t count on running into a drugstore and buy batteries that’ll run the D70 (CR2 batteries aren’t ubiquitous like AA, plus it’s an expensive habit), you also need to stay disciplined in keeping your batteries topped off, lest you find yourself in a situation where you run out of power at the most
Thom Hogan’s Complete Guide to the D70 Page 358

inopportune time (yes, it’s happened to me; don’t let it happen to you).
• Cancel any special settings you made. In particular, set the camera back to:
- No exposure compensation. - Bracketing OFF. - The lowest ISO value. - Your preferred exposure and flash mode. - Automatic white balance. - Return any one-time custom settings to their usual
value (or, if you’re like me and only use another settings bank for special situations, return the camera to your normal custom settings bank).
• Clean the camera (but not the CCD). Don’t put the camera away dirty, as this just tends to leave dirt and dust around that will eventually make its way into the mirror box. Since I use my D70 in the backcountry, I make a habit of opening all the doors and blowing dirt and dust out of every nook and cranny. I don’t clean my CCD when I return from a shoot, as I’ve noticed that if my camera sits for a day or two, dust always seems to settle on the clean CCD. Thus I always leave my CCD cleaning for just before leaving for shoots.
Keeping Track of Batteries If you use the D70 heavily, as I do, you’ll find that one battery doesn’t always get you through a full day of shooting (it might though). Thus, most D70 users carry multiple batteries with them.
The EN-EL3 battery doesn’t have any mechanism for showing whether it is fully charged or not. If you carry three batteries, as I sometimes do, you need some way of telling the charged batteries from the used ones. Here are some of the methods I’ve heard:
Thom Hogan’s Complete Guide to the D70 Page 359

• Number the batteries. Using some sort of permanent marker, number each of your batteries, and then use them in numbered order. If you pull battery #2 out of the camera, you know to use battery #3 next (and that batteries #1 and #2 need charging). (If you put a small label on the battery you can also put “tick” marks on the label each time you charge it, which helps you balance the use of your batteries.)
• Use rubber bands. When I take a battery off the charger, I slip a small rubber band96 over its body. Since I can’t put the battery into the camera without taking the rubber band off, any battery I find in my pack with the rubber band on must be charged and ready for use. To keep the rubber band from falling off, make sure to wrap it around the battery so that it falls in the “crease.”
Temperature Considerations Several temperature-related issues when using a D70 should be noted:
• Image noise increases with heat. With long exposure times in hot climates, you’ll sometimes see some random bright pixels in your images (“hot pixels”97). If you shoot in hot climates, you might want to look for ways to keep the D70 cool. Be careful of introducing condensation problems by moving the D70 from very cool to very warm conditions, however. If the temperature is over 80°F (27°C) and you shoot images at ½ second or longer, consider turning the Long exp NR function ON (SHOOTING Menu; tab with green camera icon). This captures the noise pattern and subtracts it from your image.
• Batteries and Microdrives don’t like cold. Lithium batteries such as the ones the D70 use do have decent cold
96 Rubber bands are also useful for getting stuck filters off the lens. 97 A “hot” pixel is one that is simply stuck, while a “dead” pixel is one that is totally non-responsive.
Thom Hogan’s Complete Guide to the D70 Page 360

weather performance, but it’s still possible in extreme cold for the battery to fail quickly. Keep a fully charged spare warmed up in an inside coat pocket and swap batteries as needed. Microdrives actually tend to perform better than their stated temperature rating (minimum 41°F [5°C]) because they generate heat during operation and are also warmed slightly by the camera-generated heat. Nevertheless, I’d use memory-based CompactFlash in cold situations, if possible.
Focal Length Limitations Because Nikon chose to retain its F mount on the D70, virtually every lens Nikon has made in the past 30 years can be mounted on a D70. But the field of view you see in the viewfinder is different on a D70 than on a 35mm film body.
The D70 reduces the field of view by about 1.5x. This means that a 14mm lens mounted on a D70 has about the equivalent field of view of a 21mm lens mounted on a 35mm film Nikon body.
Field of view changes when a Nikon lens is mounted on a D70 because the camera’s sensor is physically smaller than the 35mm frame for which it was originally intended. Note that I keep using the term “field of view.” The focal length of a lens is absolutely unchanged when you mount a lens on a D70. Indeed, the resulting image on a D70 is no different than if you took a picture with a 35mm body and then cropped it down to the smaller sensor area of the D70.
Note: I’ve read reports from professionals and editors who should know better that go something like this: “The D70’s 1.5x magnification makes your existing telephotos into even more impressive lenses. It’s like getting a 1.4x extender for free, with no aperture penalty.” Sorry, but that’s not really true. If you mount a 400mm f/2.8 lens on your 35mm body and then crop the resulting image to a ~25mm diagonal section in the middle, you’d get exactly the same image as you get from the D70. Indeed, with Nikon’s best desktop
Thom Hogan’s Complete Guide to the D70 Page 361

scanner, you’d actually have slightly more pixels to work with!
The outer circle is the normal image circle of a 35mm lens. The purple frame is the boundaries of 35mm, the light green is the boundaries of the D70’s sensor. The D70 is seeing only a portion of the area the lens covers.
It is important to understand that, because of the small sensor size, the D70 only uses the innermost portion of the image resolved by the lens. When you read lens tests in magazines or on the Internet, some criticisms of lenses may not apply when that lens is used on a D7098.
For example, most wide angle lenses have light falloff in the corners when used wide open (at their widest aperture). Because the D70’s sensor never sees those corners, light falloff may not be an issue for such lenses mounted on a D70. A good case in point is the Nikkor 18-35mm f/3.5-4.5D ED lens. On a 35mm body with the lens zoomed to 18mm and the aperture set to f/3.5, very visible falloff can be seen in the corners of the image, perhaps as much as a half stop at the extremes. When that same lens is mounted on a D70, the falloff mostly disappears because the D70 doesn’t see that image area! Still, there’s perhaps a fifth of a stop falloff at the settings just cited—lower than you’d see on a 35mm body, but still present.
Chromatic aberration and light falloff, for example, increase with distance from the center, and the D70 doesn’t use the far edges of the image circle of regular 35mm lenses. However, note that DX lenses have an image circle smaller than the 35mm frame and may exhibit edge characteristics.
Thom Hogan’s Complete Guide to the D70 Page 362
98

The 18-70mm f/3.5-4.5G DX lens included with the D70 “kit” uses a smaller image circle than earlier 35mm lenses, so at 18mm and the aperture set to f/3.5, it does show visible falloff on the D70.
Likewise, uncorrected chromatic aberration or lack of flat field focus capability may cause a lens to slightly soften the corners of images when mounted on a 35mm camera. But these issues are likely not as visible when using the D70. To my eye, there is no discernable difference in optical quality between the expensive Nikkor 17-35mm f/2.8D AF-S and the inexpensive Nikkor 18-35mm f/3.5-4.5D, at least when mounted on a D70. But there is when used on a 35mm body.
Note: If you use your lenses on both a 35mm body and the D70, you still must pay close attention to corner issues. While the Nikkor 18-35mm f/3.5-4.5D ED is all a D70 user needs in the way of quality, I find the Nikkor 17-35mm f/2.8D AF-S far better when used on my F5. When I shoot 35mm film— especially with wide angle lenses—I usually choose the more expensive lens.
Overall, here are the key differences between using a lens on a 35mm film body and the D70:
Lens Differences When Used for 35mm film and D70 Item 35mm film D70 Light Falloff Significant in Generally
corners insignificant Sharpness in Often slightly soft Sharp as central corners area Colors in corners Often slightly
muted, chromatic aberration
Edge matches center, little if any chromatic aberration
Angle of view As published Altered (see chart, below)
Linear distortion* Sometimes Reduced significant
Thom Hogan’s Complete Guide to the D70 Page 363
Vignetting w/ Sometimes Reduced Filters significant *E.g., barrel distortion (typical of wide angle lenses) or pincushion distortion (typical of telephoto lenses)
Items such as overall contrast, susceptibility to flare, center sharpness, and overall coloration are virtually identical for both 35mm and D70 use of a lens.
The following table illustrates the angle of view difference for each of the common Nikon focal lengths.
Note: The Lens Angle of View table (on the next page) is slightly different than the one in Nikon’s manuals, as it is derived from precise calculations involving image size and not the generic and rounded 1.5x factor Nikon uses. The D70’s aspect ratio is close to that for 35mm in final pixel size (1.504:1 versus 1.5:1), but the exact “angle of view” depends upon whether you use the horizontal or diagonal axis figures.
Thom Hogan’s Complete Guide to the D70 Page 364

Lens Angle of View 35mm 35mm 35mm 35mm D70 D70 D70 D70 focal Horz Vert Diag Horz Vert Diag equiv length Angle Angle Angle Angle Angle Angle focal
length 14mm 104.2 81.20 114.1 80.49 58.24 90.75 21.5mm 15mm 100.3 77.31 110.5 76.61 54.94 86.80 23mm 17mm 93.27 70.43 103.6 69.75 49.29 79.69 26mm 18mm 90.00 67.38 100.4 66.71 46.85 76.48 27.5mm 20mm 83.97 61.92 94.49 61.29 42.61 70.69 30.5mm 24mm 73.73 53.13 84.06 52.55 36.00 61.17 36.5mm 28mm 65.47 46.39 75.38 45.87 31.13 53.73 42.5mm 35mm 54.43 37.84 63.44 37.40 25.12 44.12 53mm 50mm 39.59 26.99 46.79 26.66 17.73 31.68 75mm 60mm 33.39 22.61 39.65 22.34 14.81 26.60 91mm 70mm 28.84 19.45 34.34 19.21 12.71 22.91 106mm 85mm 23.91 16.07 28.55 15.87 10.48 18.95 129mm
105mm 19.45 13.03 23.28 12.87 8.49 15.38 159mm 135mm 15.18 10.15 18.20 10.03 6.61 11.99 205mm 180mm 11.42 7.62 13.70 7.53 4.96 9.01 273mm 200mm 10.28 6.86 12.34 6.78 4.46 8.11 303mm 300mm 6.86 4.58 8.24 4.52 2.97 5.41 456mm 400mm 5.15 3.43 6.19 3.39 2.23 4.06 608mm 500mm 4.12 2.74 4.95 2.71 1.78 3.25 760mm 600mm 3.43 2.29 4.12 2.26 1.48 2.70 912mm 800mm 2.57 1.71 3.09 1.69 1.11 2.03 1218mm
All angles of view are expressed in degrees. 35mm Frame Size: width = 24mm, length = 36mm, diagonal = 43.2666mm D70 Frame Size: width = 15.6mm, length = 23.7mm, diagonal = 28.3734mm
This “field of view magnification” poses both positive and negative issues for the D70 user:
• Lack of Wide Angle Ability—physical constraints make it difficult to build 35mm film lenses wider than 14mm without introducing significant barrel distortion and other problems. Indeed, to do so even at 14mm is difficult, and involves costly aspherical lens elements to correct chromatic aberration (where colors focus at different points, a problem especially evident in corners of uncorrected wide angle lenses). Thus, using a lens
Thom Hogan’s Complete Guide to the D70 Page 365
originally intended for 35mm on a D70 limits you to an angle of view of only about 92°, while 35mm film users can easily obtain lenses that go as wide as 110°. Fortunately, Nikon started building DX lenses, restoring our wide angle abilities (at the cost of buying new lenses).
• Built in Extender—at the other extreme, the field of view magnification acts a bit like a built-in teleconverter. Wildlife photographers in particular are well known for sticking one or more teleconverters on already long lenses (I’ve watched several mount both a 1.4x and 2.0x converter on a 500mm lens, resulting in an unwieldy and slow [f/11] 1400mm lens). Using a teleconverter not only makes the effective aperture of a lens one or two stops smaller than normal, but it also tends to decrease overall image contrast and quality, especially in the corners. Because the D70 uses only the central area of any lens mounted on it, there is actually a slight increase in overall image quality relative to using teleconverters (on 35mm bodies), especially in the corners of the resulting image.
Panoramas
To get perfect “stitching” of the multiple shots taken for a panorama, you must first correctly position the rotation point of the camera. The location of this rotation point is not the film plane or the tripod socket. It’s the point where the light rays converge before inverting themselves on the way to the film plane. If you know this “entrance pupil distance” (often referred to as the “nodal point” of a lens), then you can easily calculate the proper rotation point.
Note that the D70 normally would rotate around the tripod socket, which is 12.3mm in front of the film plane. But with most lenses, the actual point around which you should rotate will be further forward. With the 18-70mm kit lens, the point is somewhere between 60 and 70mm forward of the tripod socket, depending upon the focal length in use.
Thom Hogan’s Complete Guide to the D70 Page 366

Tip: For information for many lenses, see http://frog.netperson.net/~wiz/photo_resources.html.
Maintaining Image Quality You’ll get the highest quality images out of the D70 if you:
• Shoot NEF format. You have the original sensor data to deal with, and can apply different interpolation routines on it after the fact. If you don’t shoot NEF, see “Dealing with JPEG,” on page <370>.
• Get the exposure right. Incorrect exposure has impacts on all kinds of image quality issues, including visibility of noise, contrast, and much more. See “How to Interpret Histograms,” on page <367>.
• Keep the CCD clean. Even with Photoshop’s Healing Tool, you’ll spend a lot of time cleaning up dust bunnies in large bright areas of images shot at small apertures.
• Shoot at the lowest ISO you can, and use Long Exposure Noise Reduction (on exposures over ½ second), if possible. Once noise is recorded in an image, getting it out is difficult at best, impossible at worst.
• Watch your focus. If you intend to print at sizes larger than 8x10” (~ISO A4), you should realize that depth of field on a D70 is a bit smaller than for the same focal length, focus distance, and aperture combination on a 35mm body (see “Depth of Field Preview,” on page <219>).
• Learn to recognize what triggers moiré. Any regular pattern of small detail can trigger the dreaded moiré. This colored pattern is even more difficult to remove from images than noise. Changing focal length and camera-to-subject distance are your only real tools in reducing moiré.
How to Interpret Histograms
Much has been written about how useful it is to see the exposure histogram on the color LCD after taking a shot.
Thom Hogan’s Complete Guide to the D70 Page 367

However, not everyone understands exactly what he or she is seeing.
The histogram’s horizontal axis ranges from dark valued pixels (0=black) at the left to bright valued pixels (255=white) at the right. The horizontal axis shows the luminance channel and does not tell you anything about the individual Red, Blue, and Green channels.
The vertical axis is the number of pixels in the image with a particular luminance value. This axis scales with the data, and is not particularly important (other than to identify what’s happening with a particular tone vis-à-vis others).
So what does a well-exposed image look like? It’s actually easier to define what constitutes a poorly exposed image. Here are some things to watch for:
• Most pixels skewed to the right of the histogram. If a significant number of pixel values exist at the very right edge, it’s likely the shot is overexposed. Histograms that are “right-heavy” make it difficult to control highlight detail. Check the Highlights display to see if you’ve blown out any highlight detail.
• Most pixels skewed to the left of the histogram. If a significant number of pixel values exist at the very left edge, it’s likely the shot is underexposed. Histograms that are “left heavy” tend to have troublesome shadow detail. If there is little or no exposure shown in the right side of the histogram, you need to add more exposure to the shot. Note that underexposed images are easier to recover detail from than overexposed images.
• Pixels are evenly scattered over the entire width of the histogram. The overall image is likely to be high in overall contrast. Consider varying the lighting, if possible. While a broadly scattered pattern in the histogram is okay, you might not be satisfied with color saturation or contrast of the final image. Consider adding fill lighting in dark areas.
Thom Hogan’s Complete Guide to the D70 Page 368

• Pixels are in a very narrow band in the histogram. The image is likely very low in contrast (or it could be monochromatic, as would be the case of taking a picture of a gray card).
• Any spike at the right edge means lost highlight detail. This is probably the worst thing you can see in a histogram. The higher the line crawls up the right edge of the histogram frame, the more blown-out pixels you have in your image. What makes this bad is that our eyes immediately go to the brightest area of a photo when we view it, and all those pixels stacked up at the right edge of the histogram will eventually print as paper (yuck!).
• Any spike at the left edge means lost shadow detail. Or it could simply mean you have some totally black areas in your shot. Our eyes aren’t bothered as much by dark areas in a picture (unless, I suppose, that area is your subject).
Here’s an example of a usable, but not quite perfect histogram. Notice how there’s a wide array of values from light to dark, but no spike up the left (black) or right (white) edges. The big spike towards the left is the black background. The middle hump is the green leaves and the purple flower. The tail out to the right is the highlights in the flower and caterpillar.
In general, you’re looking for a moderately wide distribution of the pixel values, with the largest peaks for the important portions of your scene somewhere in the middle three-quarters of the range. If you’re working in a scene that has many bright values (e.g., snow), the peaks may be to the right of the histogram. Likewise, if you’re working in a scene that contains many dark values (e.g., unlit, shadow areas), the
Thom Hogan’s Complete Guide to the D70 Page 369

peaks may be to the left of the histogram. Either case is usually okay, as long as you have a wide distribution of pixels and neither extreme runs off the edge of the histogram.
Note: Most users find it easier to “fix” dark images (e.g., increase shadow detail) than to fix bright images (e.g., “pull back” highlight detail). This is even true of NEF images, where you can apply exposure compensation after the fact. However, note that due to the way digital images are captured, noise is more prevalent in the “dark” areas of your image than it is in the bright areas99. Normally you don’t see the noise as it is buried in very dark areas that print at or near black, but when you use post processing techniques to “boost” shadow areas in an image, you’ll also be boosting noise, perhaps into visible range.
Note: Photoshop histograms are calculated a bit differently than those the camera shows. One thing that confuses many NEF shooters is that Photoshop histograms only show the top 8 bits of data. If you use Capture to output 16-bit images to Photoshop, be aware of that!
Dealing with JPEG
If you must shoot JPEG with a D70, you need to master the camera’s digital manipulation settings. In particular, white balance, contrast, and sharpening settings may determine how good the final picture is:
• Consider using low contrast. While the defaults in the D70 have a tendency to use the low contrast Tone setting anyway, there is no guarantee that this is what is set when the camera encounters a wide disparity between the brightest and darkest portions of the image. If contrast is set normal, or worse still, high, you may discover that the highlights are blown out and unrecoverable on your JPEGs
Why? Because the signal to noise ratio for a pixel value of 1,1,1 is lower than one with a value of 254,254,254. Let’s examine a hypothetical example to find out why. Let’s say that your camera has random noise “base” that averages 2 photons. Further, let’s assume that the 1,1,1 value represents a photosite that’s captured 100 photons. The signal to noise ratio for that pixel is 50:1. The 254,254,254 value represents capture of perhaps 10,000 photons, so the signal to noise ratio is 5000:1.
Thom Hogan’s Complete Guide to the D70 Page 370
99

(and the shadow areas may be dark and muddy in color). Remember, the D70 is trying to reduce a 12-bit color value per pixel to 8-bits in JPEG mode, so it must make some decisions on the method by which it does so. Don’t let it. Set contrast to low when shooting JPEGs (you can always manipulate it later in Photoshop).
• Don’t overexpose! Coupled with the contrast changes introduced with the JPEG format is a related issue: any overexposed area in the resulting shot is very likely to have blown-out (detail-less) highlights. You’re better off trying to “recover” information in the shadows on JPEGs than from the highlights. (Someone once tried to explain the math to me, which, since it involved complex Fourier transforms went a bit over my head. But the essence of the message was this: because of the way JPEG transforms individual pixel data into formulas, you’re slightly more able to “recover” useful information in dark areas than bright.)
• Use low or no sharpening. Remember that JPEG introduces compression into the image (after the sharpening step, by the way). The more detail there is in the original image, the more compression is likely to introduce artifacts! (If you’re skeptical about this last statement, try this experiment: take a photograph of something with lots of small detail, such as a newspaper. Fold the newspaper out so that two pages are visible, and frame the full paper in the image. Take your first shot with sharpening off, the second with sharpening set to its highest value, both as JPEGs. Now examine the JPEGs in Photoshop at high magnification. Look at the spaces between letters. I’m willing to bet that the sharpened JPEG shows intermediate marks between the letters, while the unsharpened one doesn’t. Now use Photoshop’s Unsharp Mask on the unsharpened photo and compare again. Which has the sharpest edges and fewest artifacts?)
Thom Hogan’s Complete Guide to the D70 Page 371

Custom Curves
You’ll need Capture and a USB cable between your computer and your D70 to set and use Custom Curves, but if you shoot primarily JPEG images, you may find this ability useful.
1. Connect your D70 to your computer via USB.
2. Start Nikon Capture Camera Control on your computer.
3. Next to the Tone Comp setting (on the Image Processing tab), select Custom in the pop-up and
Thom Hogan’s Complete Guide to the D70 Page 372

then click on the Edit button.
4. Click on the Sample Image button and load a typical image you’ve shot so that you can see the effect your curve will have as you change it.
5. Edit the curve in the histogram/levels area at the left of the dialog. I tend to start with the following changes:
a. Set the Black point (left boxed number below the histogram) to about 3 or so (instead of 0). (If you like Velvia-type blacks, you may want to consider pushing this value even higher.)
b. Click on the diagonal line in two places to create adjustment points: one just to the left of center, one at the ¾’s line.
Thom Hogan’s Complete Guide to the D70 Page 373

c. Move the left adjustment point upwards slightly.
d. Consider changing the “gamma” value (the middle box below the histogram) to a value of 1.1 or even slightly higher.
e. Move the right adjustment back to the ¾ line intersection where it original was.
6. Click the OK button to load the curve to the camera.
7. On the camera, make sure you set Custom as the Tone Compensation value.
What exactly did we do here? Essentially we’ve changed the “linearity” of how the camera converts photosite data to pixel data. We’ve made very dark things go darker but most shadow and midrange details go brighter, which is the adjustment most D70 users make to their images when they expose for the highlights, as I suggest elsewhere. The rightmost adjustment point was used to keep highlight detail from changing. Overall, an image recorded with this curve would tend to have a bit more contrast at the low end, a bit less in the middle tones.
Color fidelity is altered slightly whenever you use post-process data using custom curves (yes, the change occurs post demosaicing). But if you keep your adjustments modest, any color shift can be kept minor and acceptable.
Note: You really only need to use custom curves with JPEG and TIFF images, as you can perform the same sort of function after the fact with NEF images using Nikon Capture.
sRGB Versus Adobe RGB
The D70 allows you to set the “color space” in which the camera operates (see “Color Profiles and Color Spaces,” on page <455>). The default is sRGB, while Adobe RGB and a second sRGB (enhanced green) are optional. Which should you use?
Thom Hogan’s Complete Guide to the D70 Page 374

sRGB is a narrow gamut color profile (the inner “triangle” in the CIE chart, shown above) best suited for computer monitors, while Adobe RGB (the outer triangle) is a wide gamut color profile that is generally better for printing. sRGB tends to produce intense, saturated colors at the expense of detail and subtle tonality. Adobe RGB’s colors are more subdued, but color detail is usually preserved better and the range better matches output devices such as the Epson inkjet printers. In general, most photographers use Adobe RGBunless they know that their images are to be used only on the Web. (And even if you intend to use your images on the Web, you should probably shoot in Adobe RGB, as it ultimately gives you more subtle control over your color.)
So you’ve set your camera to Adobe RGB, what else do you need to do?
In Photoshop, select Color Settings from the Edit menu. On the pop-up for Working RGB, select AdobeRGB. Under Color Management Policies, select Convert to Working RGB and check all the boxes that begin with Ask…
When you open a D70 image in Photoshop, you’ll now (usually) be asked if you’d like to convert to Adobe RGB (you don’t; you want to assign it the working color space; use the Assign Profile command after the image is displayed).
Note: There’s currently a bug that affects color profiles. If image rotation is turned on in the camera and you use AdobeRGB as your color space, the tags that Photoshop reads from this file are incorrect.
Thom Hogan’s Complete Guide to the D70 Page 375

Special Lighting Issues
UV and Infrared
Most of the visible light spectrum seen by humans is between 400 and 700 nanometers (nm) in wavelength. Very roughly speaking, blue pixels are generated from information in the 400 to 500nm span, green pixels from the 500 to 600nm area, and red pixels from data in the 600 to 700nm range. Yet, over half the light (energy) that reaches our planet’s surface is outside this limited spectrum. At the low end, you’ll find ultraviolet light, while at the higher wavelength values lies the infrared.
The D70’s CCD is definitely sensitive to light outside the visible spectrum, despite the fact that the filter array over the individual photosites makes an attempt to block infrared. The D70’s photosites definitely react to near infrared frequencies (say, up to 850nm), and may even reach further. At the other end, it’s quite clear that the CCD can react to ultraviolet, although at not nearly the levels it reacts to infrared. Put another way, the D70’s photosites are highly reactive to the visible spectrum, somewhat reactive to the infrared spectrum, and only modestly reactive to the ultraviolet spectrum.
Ultraviolet
Most glass used in lenses does a poor job of transmitting ultraviolet light through to the imager. That, coupled with the low sensitivity to ultraviolet of the CCD makes taking ultraviolet images difficult, though not impossible.
Nikon made a special lens, the UV Micro Nikkor 105mm f/4.5, specifically for lab work that needed a lens that efficiently passed low wavelength light to the film plane (and also did so without needing focus adjustments). Couple this lens, which passes 70% of the light from 220 to 900 nanometers, with a filter that blocks the visible spectrum and you can take some very interesting pictures.
Thom Hogan’s Complete Guide to the D70 Page 376

Indeed, one Scandinavian photographer, Bjørn Rørslett, has specialized in doing just that (see http://www.naturfotograf.com/index2.html). Coupling a Hoya U-360 filter that blocks the visible spectrum with a Tiffen Hot Mirror filter to hold back the infrared spectrum slightly, he takes what he calls “invisible images” using his D70. (You can also use a Nikon FF or a Wratten 18A to block visible light, by the way.) Note that if you try to duplicate his work with a regular lens, you’ll find that exposure times are quite long (as I noted earlier, most glass in regular lenses isn’t very efficient in passing ultraviolet light), and you may have to fiddle with focus adjustments, as well (lenses are generally optimized to focus only the visible spectrum at the film plane). If you really get into UV photography, note that Nikon made a UV lens, the 105mm UV Micro-Nikkor f/4.5, and a UV flash, the Speedlight SB-140, which, though hard to find, would allow you to take your experiments indoors, as well.
Infrared
Most photographers associate infrared images with the grainy, moody black and white photos generated by Kodak’s old infrared film. You can duplicate those with your D70, too. Typically, you’d place a Wratten 89B filter on your camera (and later use Photoshop to make the conversion to grayscale).
Generally, the D70’s meter is reasonably accurate for infrared photography if the filter doesn’t cut out the entire visible spectrum (white balance should be set normally), though since you’re filtering out a fair amount of light, you’ll end up with tripod-inducing shutter speeds. The Hoya filter I use removes virtually all the visible spectrum, and I find that I have to add significant exposure to what the meter recommends.
If you want to duplicate the grain aspect of Kodak’s infrared film, set one of the two highest ISO values on your camera.
Thom Hogan’s Complete Guide to the D70 Page 377

The exact wavelength at which light is filtered varies considerably in filters labeled as “Infrared.” The visible spectrum ends at about 780 nanometers (and the near-infrared is usually said to start at that point), but “infrared” filters are available to start filtering anywhere from 610 to 1000 nanometers. To add to the confusion, different filter makers use different designations for the filter point. Here’s a table of some of what’s available:
Filter Cutoff Manufacturers RG 610 610 nm Heliopan RG 630 630 Heliopan RG 645 645 Heliopan RG 665 665 Heliopan RG 695 695 Heliopan 89B,BW092 710 Kodak, B&W, others RG 715 715 Heliopan 88A Kodak, others 87,RG 780 780 Heliopan, Kodak, others 87C,RG830,BW093 830 Heliopan, B&W, Kodak RG 850 850 Heliopan RG 1000 1000 Heliopan
Tip: If you want the false-color infrared associated with Kodak’s near-infrared slide films, you can use another technique: stack polarizing filters!
Shooting Under Fluorescent Lighting
Fluorescent lighting makes it particularly difficult to photograph well. Not only is the method used to create the light different than most other light sources, but also there is considerable variance between fluorescent tube manufacturers.
Heat produces the light emitted by the sun, incandescent bulbs, halogen bulbs, and most other sources. Heat-generated light has the property of emitting a continuous spectrum of colors, though the balance of these colors is different for
Thom Hogan’s Complete Guide to the D70 Page 378

various sources (which is one reason why the white balance setting for sunlight is different than for incandescent light, for example). Another property of most light emitters is that their color balance is relatively continuous (e.g., two brief measurements of color temperature taken a second apart would be virtually the same).
Fluorescent lights are neither heat-produced nor continuous. Fluorescent light is produced by periodically striking an ultraviolet arc. The arc is on for about 2 milliseconds, then decays for 2 to 3 milliseconds, then is completely off for 3 to 4 milliseconds; this pattern repeats approximately 120 times a second (in the US; 100 times a second in the UK and Europe, or double the AC frequency). The arc, in turn, excites colored phosphors within the tube, which are what actually emit the visible light. Unfortunately, red, blue, and green phosphors react in differing fashions to the triggering arc. Green phosphors, for example, tend to react quicker and decay slower in reaction to UV triggers, while red phosphors are slow to react and decay quickly.
If you take photographs with shutter speeds faster than 1/125 either early or late in a fluorescent light’s cycle, your images show an additional green cast. If you take photographs at shutter speeds faster than 1/125 midway through a fluorescent light’s cycle, resulting pictures tend to get an additional magenta cast. That’s in addition to any overall cast the tube may have (again, fluorescent color balances vary from manufacturer to manufacturer). Thus, there are two rules to follow when shooting under fluorescent light with a D70:
• Use Preset White Balance to set the overall color balance. (If you shoot under the same lighting all the time, shoot a Macbeth Color Checker chart under the lighting using all variants from –3 to +3 for fluorescent white balance, then examine the neutral gray patches for color casts; if one of the variants has little or no color cast, use that white balance setting in the future.)
Thom Hogan’s Complete Guide to the D70 Page 379

• Shoot only at shutter speeds that are multiples of 1/120 (e.g., 1/125, 1/60, 1/30, 1/15, or in Europe 1/100, 1/50, 1/25). Never use shutter speeds faster than 1/125 (or 1/100 in Europe).
Thom Hogan’s Complete Guide to the D70 Page 380

Other Field Shooting Issues
Keeping the CCD Clean
Probably the most difficult aspect of using a D70 in the field is keeping the CCD clean. To minimize the need to clean the CCD, you should:
• Minimize lens changes, especially in dusty environments. Each time you change lenses, you expose the mirror box area, and ultimately the CCD, to the elements.
• If you can, change lenses with the front of the camera pointed downward. Dust settles downward, thus if you point the front of the camera upwards while changing lenses, you increase the possibility of dust getting into the mirror box.
• Keep the camera in the bag. Assuming you keep your camera bag clean, each ring of protection you can put around the D70 can decrease the chance that dust gets anywhere near the CCD. In dusty Africa, when I’m not using a camera body, I put it in a plastic bag (with the air removed), and then place the plastic bag in my camera case. Then I put my coat over the camera case.
Some D70 users don’t realize that dust appearance in images is aperture related. At very large apertures (e.g., f/1.4), you won’t see the dust in your images. At small apertures (e.g., f/32), it often appears as a nearly in-focus black dot.
Still, even with the utmost care you may find that the CCD collects dust. To examine your D70’s CCD for dust, use one of these methods:
• Take a picture of an evenly lit surface (like a wall or the sky) at the lowest ISO value using the smallest available aperture (e.g., f/22). Examine the resulting image carefully on your computer at 100% size, looking for dark spots. Some D70 users run the resulting image through
Thom Hogan’s Complete Guide to the D70 Page 381

Photoshop’s Auto Levels command, which tremendously exaggerates the dust pattern.
• Set the camera to Bulb (or a 30 second exposure). Remove the lens and trip the shutter so that the mirror moves out of the way. Shine a light into the mirror box so that you can see the surface of the filter that sits over the CCD. Significant dust can usually be seen using this method, but most of the smaller stuff is beyond your ability to see (to put size in perspective, over 200 photosites would occupy the space on this - ).
If you use Capture to convert and edit your NEF images (see “Nikon Capture,” on page <411>), it is possible to use what Nikon calls a “dust reference photo” to perform a software “dust removal.” Here’s how it works:
1. Before taking your photos for a session, make a dust reference photo. Make sure the camera has a lens on it that has a CPU (i.e., no manual focus or older non-D-type autofocus lenses)100.
2. Press the Menu button to see the menu system.
3. Use the Direction pad to navigate to the Set Up tab (yellow wrench icon) and the > key on the Direction pad to enter the Set up menu.
While Nikon states this limitation, I and others have successfully managed to take dust reference shots with older lenses.
Thom Hogan’s Complete Guide to the D70 Page 382
100

4. Use the Direction pad to navigate to the Dust ref photo option and press the > key to select it.
5. Use the Direction pad to highlight Yes and press the > key to select it.
6. Follow the instructions on the display, which instruct you to take a picture of a white object (card or sheet of paper) 10cm (4”) from the front of the lens. Fill the frame with this object.
Thom Hogan’s Complete Guide to the D70 Page 383

7. Press the shutter release. If you get the message EXPOSURE SETTINGS NOT APPROPRIATE followed by the instructions in Step 6 repeated, the image wasn’t good enough; make sure that you’ve got enough light and are only seeing the white card and try again. Otherwise, you’ll end up with a reference photo, which shows up like this on playback:
8. When you convert your NEF image using Capture, make sure the Image Dust Off tool is enabled (green check) and that the tool points to the proper photo (click the Change button if you need to point it to a different reference photo).
While not perfect, this function does work well enough to keep your cloning and post processing fixes to a minimum, but it’s not a replacement for CCD cleaning. You’re sacrificing some detail using this function and dust will continue to build up on the CCD, which means that, short of taking a reference photo for every image you make, it may not correct every defect. Moreover, at some point there will be a dust particle that resists being corrected in this fashion.
Assuming that you have dust on the CCD, there’s not a lot else you can do about it in the field (trying to remove the dust in an environment where dust may still be present can prove to be a very futile endeavor). So the dust reference photo technique is worth using as a stop-gap measure until you can
Thom Hogan’s Complete Guide to the D70 Page 384

get back to an environment that is more conducive to cleaning.
Note: If you see dust in the upper left corner of your image, the actual dust is in the lower right corner of the CCD as you face it. Remember, the lens reverses up for down and left for right to the CCD (software in the camera flips it around so you see the image in the correct orientation.
õ If you’re in a reasonably clean environment and have an EH-5 AC adapter, to clean the CCD:
1. With the camera OFF, plug the EH-5 adapter into the camera (and into an AC wall socket, or better yet, a UPS [uninterruptible power supply]).
2. Remove the lens.
3. Turn the camera ON.
4. Press the MENU button to bring up the menu system.
5. Use the Direction pad to navigate to Mirror lock-up on the SET UP menu (the wrench tab). Press the > key on the Direction pad to select it.
Thom Hogan’s Complete Guide to the D70 Page 385

6. Use the Direction pad to navigate to Yes. Press the > key on the Direction pad to select it.
7. Hold the camera so that dust won’t resettle on the CCD or back in the mirror box.
8. Press the shutter release to raise the mirror and open the shutter curtain, revealing the CCD.
9. Use a manually powered bulb blower—the “baster” type, but remove the camelhair brush at the end. (Note: Nikon technicians advise against using compressed air to clean the CCD.)
or If you’re the braver type, then use a lint-free cloth slightly wet with a neutral solution, such as methanol (99% isopropyl alcohol works in a pinch, but can leave water streaks). The commercial solution is to use Sensor Swabs for Nikon and Eclipse (methanol) solution (see http://www.photosol.com). A slightly more homemade solution is described on my Web site at http://www.bythom.com/cleaning.htm. (Yes, Nikon’s documentation says don’t touch the CCD. But this is the method they use to clean the CCD. Heck, they even sell cleaning kits in Japan. Don’t get the cloth too wet [you’ll leave streaks], and don’t use force in cleaning [you could grind dirt into the filter face]. And, no, I won’t pay to have your CCD replaced if you use this technique and damage your camera. If you’re not comfortable using this technique, then don’t use it.)
Thom Hogan’s Complete Guide to the D70 Page 386

10. Turn the camera OFF. The shutter curtain should close and the mirror should return to its normal position.
11. Remount the lens on the camera.
12. Unplug the EH-5 AC adapter.
Warning: Some D70 owners seem to think they can avoid getting an EH-5. Don’t! If your batteries fail during the cleaning, the shutter curtain closes, and you could end up with a damaged shutter.
Note: Anecdotal evidence seems to indicate that dust is more easily removed from a cold CCD. I wouldn’t advocate putting your D70 in a refrigerator prior to cleaning, though, as condensation becomes an issue. It probably is wise to avoid cleaning the camera immediately after it has been used, though, as the components are probably still warmer than the surrounding environment. Also, if you can postpone a cleaning until you’re in a cooler environment (e.g., an air-conditioned building in warm climes), you’ll probably find it easier to clean your CCD.
If this method fails to remove the dust, you’ll need to have a Nikon service center clean your camera. Remember, Nikon specifically disclaims use of any method that touches the filter array on top of the CCD (e.g., the “swab” method endorsed by Fuji and Kodak).
Toppling a myth: dust clings to the filter array in front of the sensor not because the sensor puts out a static charge, but more because of the laws of gravity and surface tension. If you store your D70 on its back, gravity will have its way, and as the inevitable dust in the air settles, it’ll settle downwards onto the filter surface. If you store the D70 on its bottom, the sensor still manages to “grab” small dust particles due to the mechanics of surface tension. Generally, dust that sticks to the filter this way is easily removed with light bursts of plain air (the blower bulb).
Thom Hogan’s Complete Guide to the D70 Page 387

Worst case scenario: many years of experience with digital SLRs in the field has led me to this conclusion: humidity changes are your worst enemy. What happens is one of two things: (1) any slight dampness (condensation) on the filter will tend to increase the surface tension dynamics and literally suck dust right up to the filter; or (2) dust already on the filter gets condensation on top of it, which “welds” the dust to the filter. Either way, when the humidity lowers and the water vapor dries up, it tends to act as a “sealing coat” on top of the dust. In really bad conditions you may even see a faint ring (dried water) around the dust spot on your images. This kind of dust problem is very difficult to clean, as you have to use both strong wetting and pressure to remove them. I learned this one the hard way by coming down from the cold dry air at 10,000 feet on a Hawaiian volcano to the warm moist air in a garden at sea level in the space of an hour. Not only did it take another couple of hours to rid the condensation out of my lenses, viewfinder, and elsewhere, but it was as if I had baked the dust onto the filter. It took me several tries to get the dust off.
Camera Doesn’t Write to Card
Some photographers have encountered rare problems writing to CompactFlash cards. The symptom is that you take a picture (e.g., press the shutter release), but later you can’t find an image on the card. Anecdotally, early versions of the Microdrive seem to exhibit the problem more often than any other card type, though a few users have reported the same thing using even Nikon-approved memory-based cards.
First, get in the habit of looking at the card write lamp after taking pictures, especially if you’ve taken a series using continuous motor drive. If the lamp doesn’t light at all the D70 has a problem; if the lamp lights but you can’t play back the image from the card, the problem is probably the card. The most likely card problem is an error in formatting or a bad sector, so the first thing you should try (after saving any
Thom Hogan’s Complete Guide to the D70 Page 388

images that are on the card to your computer) is to perform a full format of the card in a known device.
Recently I’ve had several Nikon DSLR users report card writing problems to me that, once we stepped through all the possible causes and solutions, turned out to be caused by the location or way in which the card had been formatted previous to using it in the Nikon body. If all else fails, format a 2GB or smaller card in a reader on a PC using a FAT16 full format, larger cards with a FAT32 full format. Macintosh users need to do this on an IBM PC. Trust me on that one—there are too many subtle variables to go into here—I’ve seen too many cases where the problem was solved with a single full format on a PC.
If a card has repeated problems, try mounting it in your computer’s card reader or PCMCIA slot101 and using a utility program such as Photo Rescue to examine the card. If problems persist, have the card’s manufacturer check it out.
A related problem that’s been reported is that everything seems fine while shooting, but later when you go to examine the images on the card, you get the FOLDER CONTAINS NO IMAGES message. Don’t panic (at least not yet). Your best bet is to immediately remove the card from the camera and examine it on a PC (USB-style card readers are inexpensive enough that there should be one on every D70 owner’s computer). The D70 seems slightly more sensitive to bad sectors and marginal disk errors than a PC. Again, run Photo Rescue or another utility on the card, if possible. If you have to use the D70 to see the images, try turning the camera OFF, removing the card, putting the card back in (and making sure that it is correctly inserted), then turning the camera back ON.
Tough Subjects (Color, Moiré, and the Sun)
Because of the limited resolution of the CCD and the fact that it uses a Bayer arrangement for the red, green, and blue pixel
Also referred to as PC Card or CardBus slot by some manufacturers.
Thom Hogan’s Complete Guide to the D70 Page 389
101

••••••••• ••••••••• •••••••••
• • • • •
• • • • •
sensors, a few subjects tend to prove troublesome for the D70. For example, one classic problem is taking pictures of pure red objects on black backgrounds. To understand why this might be so, consider again the Bayer pattern:
••••••••• etc.
Since green and blue pixels end up recording no value (black = 0), you essentially end up with an array more like this:
In this case, at a minimum, you’ll lose detail.
Two other tough subjects come up when using the D70: subjects with high-frequency information and extremely bright objects (e.g., the sun).
Moiré occurs in photos with repeating detail (full scene on left, blowup of one area on right). (Photo by Naoki Takagaki)
As mentioned earlier, when the sensing frequency (sensor photosite spacing) is very close to the detail frequency (repeating pattern), moiré production is a distinct possibility. Tightly-woven fabrics, screens, or any other detail that occurs repeatedly and with the same spacing are the usual moiré triggers. In the example photos shown above (right is a 250%
Thom Hogan’s Complete Guide to the D70 Page 390

view of a portion of the left), notice how that the false color bars in the railings change pattern and intensity as they get further away from the camera).
The trouble with moiré is this: unless you train yourself to look for pattern repetition, you’ll never see the offending situation prior to taking your picture. Since the color LCD is so small, you may not see that you’ve captured moiré in your shot. Thus, more often than not, D70 users are first surprised by moiré when they get to their computer and examine the image carefully. I can’t say this strongly enough: look for repeating, small patterns in your scene. If you find some, then take one or more of the following precautions:
• Take an extra shot or two at different subject-to-camera distances. Changing your distance relative to an offending subject changes the frequency of the data and may put it outside the moiré trigger point of the D70.
• Take an extra shot or two at different focal lengths. Like changing distance, altering focal length may get the frequency of detail outside the moiré trigger point.
• Consider using a “softening” filter. If you’re shooting a portrait and the offending pattern is the weave of a fabric, sometimes you use a soft focus filter and kill two birds with one stone: not only will the model’s skin be “smoother” and free from blemishes, but the moiré may be reduced or removed. This is a solution I’d only consider for people portraits, however.
• Turn sharpening OFF (or at least lower the value). Sharpening causes changes to edge detail; patterns that cause moiré are all about edges. Essentially, using high levels of sharpening makes the moiré problem more deeply encoded in the data and much more difficult to remove in post processing.
• Consider using NEF format. JPEG compression is like sharpening: it has a tendency to further embed the offending moiré in the data. If you think you may use post
Thom Hogan’s Complete Guide to the D70 Page 391
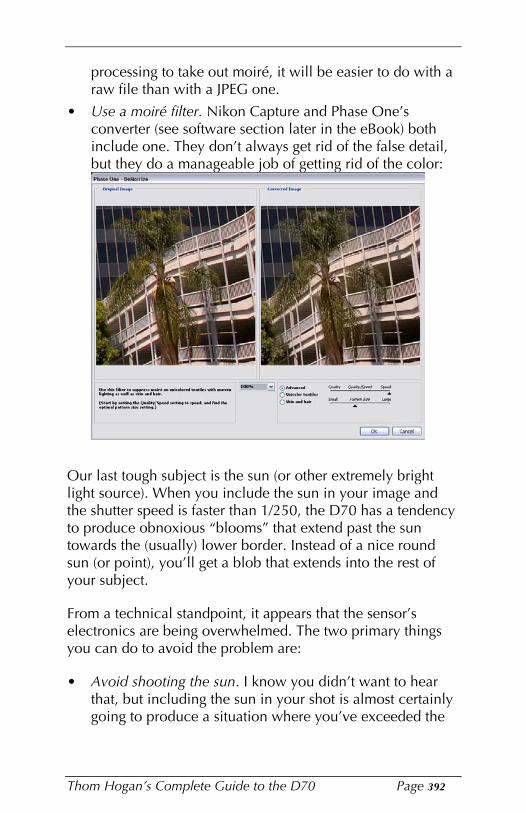
processing to take out moiré, it will be easier to do with a raw file than with a JPEG one.
• Use a moiré filter. Nikon Capture and Phase One’s converter (see software section later in the eBook) both include one. They don’t always get rid of the false detail, but they do a manageable job of getting rid of the color:
Our last tough subject is the sun (or other extremely bright light source). When you include the sun in your image and the shutter speed is faster than 1/250, the D70 has a tendency to produce obnoxious “blooms” that extend past the sun towards the (usually) lower border. Instead of a nice round sun (or point), you’ll get a blob that extends into the rest of your subject.
From a technical standpoint, it appears that the sensor’s electronics are being overwhelmed. The two primary things you can do to avoid the problem are:
• Avoid shooting the sun. I know you didn’t want to hear that, but including the sun in your shot is almost certainly going to produce a situation where you’ve exceeded the
Thom Hogan’s Complete Guide to the D70 Page 392

dynamic range capability of the camera, anyway. The sun itself will likely completely blow out the channels, meaning that when you print this on paper, you’ll put down no ink in that spot.
• Avoid placing the sun at the extreme left or right edge of the frame. I’m unsure what the underlying cause is, but having the sun just at the boundary (remember, the viewfinder shows 95%) can trigger an unusual blooming that affects pixel values all the way across the image.
• Get your shutter speed to 1/250 or longer. Use the smallest possible aperture on your lens. Use a neutral density filter to remove light. Both of these things may be able to get you to a shutter speed of 1/250, at which the bloom problem will go away. Of course you still probably have a scene that exceeds the dynamic range of the camera, but obviously you had a reason for doing so.
Humidity
Nikon’s manuals have several warnings about exposing the camera to high levels of humidity. If you live in a humid climate, it is probably wise to store the camera in a cool, dry area, or with a desiccant in a plastic bag from which the air has been removed.
Changes in humidity can play a part in CCD cleanliness, as I’ve already noted. When condensation forms on the filter, it tends to trap dust particles. Moreover, you can get small “water rings” on the CCD. In general, it pays to be careful when moving the camera from warm to cold or cold to warm environs, especially if there’s any moisture present in the air.
The trick with dealing with temperature and humidity changes is to remove the air surrounding the camera. Place the camera body in a zipper lock bag and remove as much of the air as possible before sealing it (same with each of your lenses).
Thom Hogan’s Complete Guide to the D70 Page 393

White Balance Settings
With Nikon Capture (and other raw conversion programs), D70 users who shoot NEF format images can retroactively apply white balance settings to an image, so many tend to think that they can ignore white balance completely.
White balance intersects with other digital imaging color issues on a D70. First, the photosites covered with blue filters are effectively less sensitive to light than the green or red ones. In low light conditions, this can be troublesome, especially if you’re shooting in a situation where little or no blue wavelengths are present in the first place. Second, many of Nikon’s choices for white balance settings are slightly suspect—either Nikon knows something about the photosite sensitivity and color rendering that they haven’t told users about, or they’ve chosen values based upon visual review, or the actual color temperature values reported in the manual are inaccurate.
Consider the following table:
White Balance Color Temperatures Lighting D70 Film Likely* 100-watt incandescent 3000K 3200K 2900K Sunny daylight (noon) 5200K 5400K 5400K+ Overcast 6000K 5400K 7000K+ Flash 5400K 5400K <6000K
* Source: Nikon Field Guide, typical color temperatures
Using Nikon’s defaults (either in the camera or after the fact with Nikon Capture) tends to produce slightly warm (red) indoor color, and a slightly cool (blue) outdoor color.
Personally, I like having a reference setting, regardless of how I set my D70. With a reference, I can use Photoshop’s color controls to correct any remaining bias. How do you establish a reference? I carry a Kodak gray card and a GretagMacbeth ColorChecker with me whenever possible, and I take a shot with both cards in the scene whenever the lighting changes
Thom Hogan’s Complete Guide to the D70 Page 394

significantly (it’s okay to take this shot using JPEG FINE, by the way—it’s the way I usually identify my color check file, since all the other files are NEFs). If I want to use Pre white balance, then I set it using the gray card.
Of course, you don’t always want to correct for color temperature! One reason why sunrise and sunset scenes look red (or orange) to us is that the color temperature is extremely warm, approximately 3100-3600K depending upon the exact timing of the shot and atmospheric conditions. We perceive it as warm because the change occurs so rapidly (prior to sunrise the color temperature may be 7000K or higher). In such cases, you’d want to set the camera’s white balance to Dir. sunlight and shoot normally, lest you lose the very aspects of the light that intrigued you in the first place.
But probably the most difficult white balance situation to deal with is mixed sources that include frequency-based lights (fluorescent, mercury vapor, carbon arc, etc.). As I noted earlier, you need to set your shutter speed to match frequency-based lights (e.g., 1/60 for fluorescent lights in the US), lest you introduce color errors due to phosphor decay. But that may not be enough. Ask yourself these questions:
• Which lighting type dominates? In mixed source situations, try turning the sources on one at a time and taking a meter reading. One source is likely to dominate, and that should usually be the one you use as your base white balance setting.
• Can you overpower the lighting? A strong flash comes in handy in mixed lighting situations, as you can often make your flash the primary light source (at least if your subject is less than 20 feet (~6m) away. In this case, make flash your white balance setting.
• Will a filter balance errant color? If the problem is a mix of flash and fluorescent, or even incandescent and fluorescent, the primary problem is the fluorescent light. Try using an FLD filter (or a 30M), as the primary problem
Thom Hogan’s Complete Guide to the D70 Page 395

with most fluorescents is going to show up as too much magenta. With mercury vapor in the mix, you want to cut out red, so a 30R should be tried. (Anything more than 30 units of filtration starts to become a major problem with the other light sources; indeed, I’d probably try 10M or 10R first.) Many professional photographers carry filter gels for their flash—essentially they try to filter the flash that they add to the scene to match that of the existing light so that a Pre white balance works better.
• Are the lighting sources lighting distinctly different areas of the scene? If you are using flash to light the subject and fluorescent is lighting the background, you can often use Photoshop’s layering to select the background and color correct it after the fact. In short: set up the shot so that you have distinct areas that can be selected and color corrected.
Thom Hogan’s Complete Guide to the D70 Page 396

Working with D70 Images While most digital image editing issues are outside of the scope of this book, in this section I’ll present an overview of Nikon’s software for the D70, along with a brief description of a few third-party products. We’ll also step through handling images from camera to print.
D70 Related Software
USNikon provides several software products with the D70. In the
102 you get:
• Nikon PictureProject. This is a new product that tries to do a little bit of everything with images (transfer, catalog, retouch, show, print, and archive) and manages to do none of it at all well. I’m not sure why Nikon wasted two CDs and a special folder/manual on this program, but my recommendation is to toss it back in the box and store it in your attic103. You can’t install PictureProject and Nikon View on the same computer, and you’ll want to install Nikon View, so don’t bother installing PictureProject.
• Nikon View. This is a mature program that primarily serves to transfer images from the camera to your computer, and then allows you to organize and browse them. While not as full-featured as some third-party programs, such as ACDSee or iView MediaPro, the primary attraction to Nikon View is that it works very well at the things it does. If you shoot NEF files, you’ll find that not all third-party programs understand them. Good news: Nikon View 6.2 and later understands D70 NEF files just
102 The software bundle does seem to be country specific at the moment. 103 Yes, my reaction to this program is so strong that I’m not even going to waste time trying to describe how to use this anemic wimp of a program. There’s not much to it; if you can’t figure it out from the documentation Nikon supplied, it is an even worse program than I think!
Thom Hogan’s Complete Guide to the D70 Page 397

fine (it had better!). It can even batch them into JPEG files, should you desire.
• Nikon Photoshop plug-in. Hidden beneath the PictureProject and Nikon View installers is the fact that they also install NEF converter plug-ins for Photoshop if they find that program on your computer. Unlike Photoshop CS’s Raw Converter 2.2, the Nikon plug-in is minimal in features.
Note: PictureProject installs a NEF converter plug-in that converts to 8-bit images while Nikon View installs a NEF converter that converts to 16-bit images. Another reason to avoid PictureProject!
• Trial version of Nikon Capture. Nikon also includes a 30day free trial version of Nikon Capture with the D70. Capture is a mature, robust, full-featured converter (indeed, the best converter I’ve seen provided by a camera manufacturer). This is the program you need if you want to shoot and use NEF images to the fullest104.
Nikon View
Nikon View is a software program that is used primarily to move images from a Nikon digital camera to a computer and then view them. The version that Nikon shipped with D100 models changed slightly (minor updates) over time, so it’s probably a good idea to go to the appropriate Nikon Web site and check for any updates, since the same thing is likely to happen during the D70’s life span:
Adobe has introduced Raw Converter 2.2, a free update to Photoshop CS that understands D70 NEF files; this is the primary other NEF option for D70 users as I write this. Other companies are working on converters that understand the D70 format, as well, but the differences in these converters have taken me many pages to describe in my Nikon DSLR Report (see http://www.bythom.com/d1report.htm) and will likely continue to do so when they’re updated. For a rough summary, see http://www.bythom.com/raw.htm.
Thom Hogan’s Complete Guide to the D70 Page 398
104

US http://www.nikonusa.com105
Europe http://www.europe-nikon.com/support Asia http://ww.nikon-asia.com Japan http://ww.klt.co.jp/Nikon
For this eBook, I’ll use the version that’s current as I write this (Version 6.2.2), which may or may not be what you received with your camera. System requirements for the software are modest, except for the fact that you need a USB port if you want to download directly from the camera (or a card reader, as I suggest).
Fortunately, Nikon View supports alternate connections (USB card readers and laptop card slots [with the CompactFlash card mounted in a card slot adapter]). Personally, I find the USB card reader to be the most practical method of getting images from camera to computer.
Why do I suggest a card reader? I have several reasons for my preference:
• I don’t exhaust the camera battery to transfer files (or have to deal with yet another cable snaking over my desk to use the AC adapter).
• I usually come back with multiple cards from shoots. The camera was expensive enough that I don’t really want to use it as a removable disk drive, subjecting it to more wear and tear. When not shooting, I prefer my camera to sit in a protective, dust-free case, not on my desk.
None of these Web sites is set up very well. The Nikon USA site is at best a labyrinth. Here’s how to find D70 related stuff: (1) click on the Digital Tech Support link under Photography; (2) Scroll down and click on the D70 Outfit link; and (3) Click on the Manuals, Guides and Notes link. If you have a specific question about something, type it in the Search Text box and select All Categories (or the appropriate category) from the Category pop up. A shorter way to get to this same spot: http://support.nikontech.com.
Thom Hogan’s Complete Guide to the D70 Page 399
105

• A dedicated card reader allows you to use PC software to retrieve data on damaged cards, to run disk diagnostics on the CompactFlash card, as well as other useful utilities.
• A Firewire or USB 2.0 card reader is going to be considerably faster than the camera in transferring files.
That said, let’s link our D70 and computer and fire up Nikon View.
When you connect your camera via USB cable or insert a card into a reader or card slot, Nikon View automatically starts (at least if you’ve installed it correctly). The program is relatively simple, having only two primary windows: the Transfer window (used to control the movement of images from the card to the computer) and the Browser window (used to show images transferred to the computer). When you first make a connection, you’ll end up seeing the Image Transfer window:
If you’ve previously configured Nikon View’s preferences, all you need to do when you see this window appear is press the big yellow transfer button at the bottom of the window. If you want to rename files during the transfer, you’ll need to change preferences, however.
Before you do your first transfer, click on the screwdriver and wrench icon to bring up the Nikon View Preferences:
Thom Hogan’s Complete Guide to the D70 Page 400
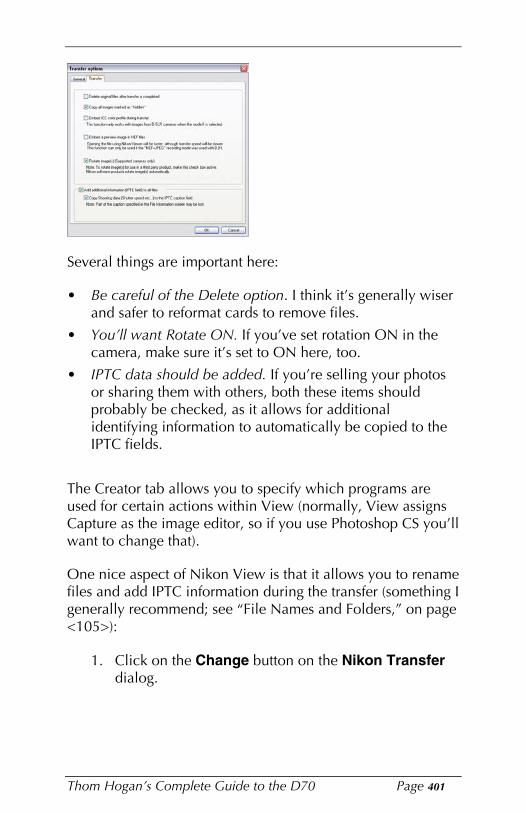
Several things are important here:
• Be careful of the Delete option. I think it’s generally wiser and safer to reformat cards to remove files.
• You’ll want Rotate ON. If you’ve set rotation ON in the camera, make sure it’s set to ON here, too.
• IPTC data should be added. If you’re selling your photos or sharing them with others, both these items should probably be checked, as it allows for additional identifying information to automatically be copied to the IPTC fields.
The Creator tab allows you to specify which programs are used for certain actions within View (normally, View assigns Capture as the image editor, so if you use Photoshop CS you’ll want to change that).
One nice aspect of Nikon View is that it allows you to rename files and add IPTC information during the transfer (something I generally recommend; see “File Names and Folders,” on page <105>):
1. Click on the Change button on the Nikon Transfer dialog.
Thom Hogan’s Complete Guide to the D70 Page 401

2. In the dialog that appears, fill out the File Destination and Naming options.
3. If you want to change the file names during transfer (highly recommended), click the Change radio button and then the Change button under the File naming section and select your options.
Thom Hogan’s Complete Guide to the D70 Page 402

4. Click the OK button when you’re done and you’ll be returned to the File Destination and Naming dialog.
5. Perform the same actions for the folder name (e.g., change the destination folder as desired).
6. Click on the big yellow Transfer button to start the transfer.
If you asked to Start Nikon Browser in the Transfer window, when the transfer completes you’ll be taken to the Browser window, where you can then view, print, and rotate your images (if you still need to):
Thom Hogan’s Complete Guide to the D70 Page 403

In the Browser window, you can only perform a few actions (the icon bar gives you quick access to them). At the top, you’ll see a bar labeled Shooting Data. Click on the arrow at the left edge to reveal this information (or hide it). The data shown is for the currently selected image (highlighted with a selection rectangle around it).
By default, the left of the main window is a standard heirarchical file browser (if for some reason you don’t see this, choose Show Folder Tree from the Navigation submenu on the View menu (that’s View/Navigation/Show Folder Tree in standard Adobe menu notation). This allows you to navigate around amongst all the folders of images you’ve created
Thom Hogan’s Complete Guide to the D70 Page 404

(assuming you’ve been following my workflow suggestions, you’ll have a well-labeled folder for every shoot).
Finally, Nikon View has a rudimentary image viewer in it. Doubleclick on an image thumbnail to invoke it:
When you doubleclick on an image thumbnail, you get the Nikon Viewer window. The icons at the top allow you to zoom in or out and a few other basic options. If you want to manipulate the image in any way, you need Capture, Bibble, QImage Pro, Photoshop, Photoshop Elements, or another image editing program.
Things you can do with Nikon View:
• Batch rename images. Select the images to be renamed, then select Rename Automatically from the File menu.
• Search for a file. Curiously, one of the attributes Nikon allows you to search with is the Scene exposure mode. Sigh. The more interesting ability is to search by filename (which, of course, is one of the reasons why I want you to give files meaningful names in the first place). Select Show Search Control on the Navigation submenu on the View menu.
• Create a slide show. Select the images you want to show (you don’t have to show everything in a folder). Select Slideshow from the Tools menu. Select your options from the slideshow dialog that appears. To hide the option dialog, press Shift+Tab together.
• Email images or a contact sheet of images to a friend. Select the images you want to email. Select Email from the Tools menu. Select your options from the dialog that
Thom Hogan’s Complete Guide to the D70 Page 405

appears. Usually you’ll let Nikon View resize the images to a smaller size for emailing (it’s not proper etiquette to send large files to someone unless they’re expecting them—most email services have storage limits for email, and a handful of 1MB images can quickly fill their mailbox and prevent other mail from being received106).
• Export images to a Web site. Select the images you want to create a Web page for. Select Export as HTML Files from the Tools menu. This brings up the first of three dialogs you need to fill out:
This first dialog is about the overall style of Web page that will be created. Here you set the size, style, and number
Proper etiquette, even for someone you know, would be to ask before sending and tell them what size the images will be. Better still would be to use a public posting service, such as pbase (http://www.pbase.com) and simply email the URL to the recipient. Since we’re on the subject, I should warn you that my email has very aggressive filters on it. If you want me to look at an image, post a modest sized version of it on a public posting service that doesn’t require an account to enter, and send me the URL via email.
Thom Hogan’s Complete Guide to the D70 Page 406
106

of images per page (plus a title for the page).
The second dialog defines what information appears with each image (filename, date, capture data, etc.).
The final dialog tells View where to create the new HTML pages. It’s usually safest to save to a new subfolder so that everything for a set is grouped together in the same place rather than mixed with the rest of your Web pages.
Thom Hogan’s Complete Guide to the D70 Page 407

• Invoke an image editor. Select an image (or images). Choose Edit from the File menu to invoke the editor entered in Preferences. Choose Edit using other program from the File menu and point to the editor you wish to use if you want to use something more sophisticated.
Note: What’s the difference between Nikon Editor and Nikon Capture Editor? Well, the first is free and comes with Nikon View. It contains basic controls only (you can change white balance and exposure for NEF files, for example). Nikon Capture Editor is part of Nikon Capture and is a very sophisticated image editing program. Nikon Editor (the free one) isn’t enough for serious post processing work. If you’re trying to conserve cash, Adobe Photoshop Elements would be the logical choice to use instead.
Before we move on to Nikon Capture, let’s take a quick look at the free Nikon Editor just mentioned.
Thom Hogan’s Complete Guide to the D70 Page 408

Above is a screen shot from a single image opened from Nikon View. I’ve expanded everything that can be expanded, so this is it folks—everything you can do is here to be seen.
At the left is a standard tool palette, with icons for save, open, copy image adjustments, paste image adjustments, zoom, rotate, crop, move (using hand cursor), open in Photoshop, and redeye elimination, amongst others. If you can’t figure out what is what, each tool’s name is revealed if you have your cursor hover over it.
Tip: Cropping usually trips up newcomers to Nikon’s software. You select the crop tool (rectangular marquee) and then select the area of the image you want to leave. The image area outside the selected rectangle darkens to show that it isn’t part of the final image. To change the crop, grab the side or corner and drag it to a new position (or drag the middle of the crop to a new position). The real sticking point is: how do you cancel the crop? Press Command-D (or select Select Entire Image from the Image menu, or doubleclick outside the crop area). It really is that easy. But it usually stops newcomers dead in their tracks, as it doesn’t quite work the way other image editing software does.
The main image window is in the middle, and I’ve opened the Shooting Data display above it. (This image was taken at the sand dunes in Death Valley National Park at a workshop, by the way.)
On the right is a tool palette with four basic areas of control (if the individual controls aren’t showing, click on the arrow just to the left of the palette name to open it). Here’s the full extent of the imaging tools:
• Auto Contrast (Off, With color change, With no color change). This is basically Nikon’s attempt to provide an Auto Levels type of control. While I never use it, it does sometimes make for some very interesting effects if you select With Color Change. This is a control worth
Thom Hogan’s Complete Guide to the D70 Page 409

exploring, but unlike Photoshop’s automatic controls, it doesn’t find the “right” solution very often.
• Sharpening (Off, Low, Medium, High). Your standard Unsharp mask control. Note that the image may already have been sharpened, and this would be adding sharpening. Since you don’t have any control over the parameters used, I’d tend to avoid this control if possible.
• Effect (None, Black and White, Sepia). A quick way to make a monochrome image out of a color one. It appears that Nikon simply throws away the color information rather than optimize the conversion, but this control is fast and easy and quickly lets you see the basic shell of how the image will look in black and white. For more sophisticated ways of generating black and white, see http://www.bythom.com/bandw.htm. The Sepia setting is decent, though.
• Image Size (enter a new size). Allows you to scale the image to a smaller or larger size. Nikon’s resizing abilities have always been overlooked by most people. They actually produce quite decent results (from well done original images) at up to about 2x. In general when downsizing, try to stay in divisible-by-two or by-four sizes, though.
• Red Eye Correction (Automatic, Click on eyes). Works only with 8-bit JPEG images, but allows either automatic or quasi-automatic removal of red-eye. Generally, Click on Eyes is my usual choice here. This works better than the in-camera Red-Eye Reduction options, and is about as fast and convenient as red-eye correction gets.
• Brightness. Changes the overall brightness of the output image (not to be confused with exposure compensation, which changes the underlying data). I’m not a fan of using a crude, overall control like this to fix image defects.
• Contrast. Changes the overall contrast of the image. Again, this isn’t the method I’d use to fix image defects.
Thom Hogan’s Complete Guide to the D70 Page 410

• Red. Varies the amount of red in the image.
• Green. Varies the amount of green in the image.
• Blue. Varies the amount of blue in the image. Using RGB channels to control color shifts is a bit like using a sledge hammer to move a wall stud. Very crude, plus you’ll need to understand how the colors interact to form the full spectrum of colors.
• Exposure Compensation. Allows after-the-fact exposure modification for NEF images. Note that you aren’t really changing the exposure, but the underlying linearity curve for the data. Blown highlights are not recoverable. However, you can recover a missed exposure by as much as –2 stops or +1 stops with relative ease107.
• White Balance (Unchanged, Auto, Incandescent, Direct Sunlight, Standard Fluorescent, High Color Rendering Fluorescent, Shade, Cloudy, Flash). Allows after-the-fact white balance modification for NEF images. Note that you have no fine tuning control, only a basic set of choices. Still, this is often enough to correct color temperature issues to a tolerable choice.
Overall, Nikon Editor is simple, a bit crude, but has just enough capability to make it work in a pinch if need be. If Nikon would only add the Levels/Curves adjustment from the Capture Editor, Nikon Editor would be usable for a lot of simple work. As it stands, though, you’re going to want something else. One such something is Nikon Capture, which we’ll deal with next.
Nikon Capture
Nikon Capture provides support for critical viewing and image manipulation of D70 NEF (and JPEG) format files. Capture is now at version 4.1, and all examples and menu descriptions here assume version 4.1.
The actual range is -2 to +2, but beyond +1 there are objectionable side effects.
Thom Hogan’s Complete Guide to the D70 Page 411
107

Nikon includes a free 30-day trial version of Capture with the D70 (if you didn’t receive it, you can also download it from the Nikon Web sites if you have a valid serial number to enter). I strongly suggest that you load this into your computer and try it. While Capture is a bit different in user interface than most software you’re used to, it’s easy to learn and it has features you won’t find in other products.
While I think Nikon should have provided Capture with the camera—Nikon’s software is much more mature than the competitor’s, so it’s a potential selling point—the program has undergone considerable revision and refinement over the past few years, which I’m sure wouldn’t have happened without the added revenue.
Capture has two primary roles:
• Converting NEF files into usable images (JPEG, TIFF, direct Photoshop transfer).
• Providing direct control and setting of the camera.
Plenty of competitors exist for the first function (see “NEF Converters,” on page <470>”), though Capture holds its own against all comers there. What is unique in Capture, other than a few manipulation tools, is the second function: not only can you take pictures from the computer, but you can make settings from the computer, as well. Hidden amongst that ability is another: you can save camera settings files and load them into the camera with a couple of clicks. For cameras that are shared, this is a godsend. But even for the rest of us, it gives us the ability to save and name a few common camera configurations and get them back without having to thread through every control of the camera.
So I’ll repeat: take a look at Capture. I’ll bet that most of you will find that there’s something there that is useful and worth the money.
Thom Hogan’s Complete Guide to the D70 Page 412

Controlling the Camera
Once Nikon Capture is running with a camera connected to the computer, choose Show Nikon Capture Camera Control from the Tools menu and you’ll see a display that looks like this:
Things to note in the window that appears:
• The top line will tell if your camera is correctly connected.
• The camera control area in the middle is a tabbed dialog; some camera settings are accessed on specific tabs.
• The black bar with green indicators is a representation of what you’d see in the camera viewfinder108.
Oops! Had the lens cap on, so we’re not getting a usable meter reading, thus the LO for aperture (we’re in Shutter-priority exposure mode).
Thom Hogan’s Complete Guide to the D70 Page 413
108

• The buttons at the bottom of the window are the equivalent to the shutter release.
The camera will also have PC displayed in its top LCD.
At this point, you can make camera settings or take a picture.
Taking Pictures with Capture Taking pictures works one of two ways:
• Control the settings and press the shutter release on the camera. The image is automatically transferred to the computer if Nikon Capture is active and the computer and camera are connected properly. No image is stored on the CompactFlash card. (Make sure to save the image on the computer where you can find it!) You control the transfer situation by clicking on the Download Options button.
Note: The Enable controls on the camera body option must be checked for this to work.
• Use Nikon Capture Camera Control to set the camera options and virtually press the shutter release. Again, the image is automatically transferred to the computer and no data is stored on the CompactFlash card in the camera. While most camera controls are available remotely on the computer, the Power switch, Focus Mode Selector lever, Mode dial, and Depth of Field Preview button can only be manipulated directly on the camera. Other limitations you need to be aware of:
• You can’t use the self-timer.
• You can’t see the results of Custom Setting #8 (Grid Display).
• You can’t autofocus without the D70 taking a picture.
Not all error messages that may appear in the D70 viewfinder and color LCD are duplicated in Nikon
Thom Hogan’s Complete Guide to the D70 Page 414

Capture’s simulated LCD panel and viewfinder information display. For example, the flash-ready light does not appear after exposure when the flash fires at full strength.
• Use a combination of camera and computer control and release. Make settings on the computer and press the camera’s shutter release, or make settings on the camera and click the shooting buttons on the computer.
Note: The Enable controls on the camera body option must be checked for this to work.
Note: If the default settings are used, the D70 operates for 15 minutes before it goes into a standby mode. Note, however, that when the camera goes inactive when connected to Nikon Capture, it cannot be reactivated from the PC; you must press a camera control to wake up the D70.
Two “shooting” functions of Capture are often overlooked by new users. First, Capture can batch process NEF images as they’re taken (i.e., high quality images can have image processing manipulations applied as they are taken). This is the way I shoot 16-bit TIFF with the camera, for instance.
To set up a batch session, select Live Batch from the Camera menu:
Thom Hogan’s Complete Guide to the D70 Page 415

Note that you’re given essentially three things to set:
• How the batch is processed. Applying the settings from the camera is the same as leaving these settings in the Unchanged state in Advanced Raw section of the Capture Editor. The camera’s sharpening and other optimization settings will be applied by Capture before saving the image. More interesting is to use either the current settings you’ve set up in Capture, or a set of previously saved Capture settings. For example, I often process with some slight changes made in the LCH tool, especially when I’m shooting under fluorescent lighting conditions. If you’re working in a studio with the D70 tethered, take a test picture under your lighting, then spend some time in Capture figuring out the exact settings you want to use. Save these, then use the Apply settings in option to have them applied to every image in your actual session.
• Where the files get saved and how. The Destination box allows you to pick the folder to save your files in, the filename format to use, and the final save format. You’ll note that I’ve picked 16-bit TIFF in my example; often when shooting for a client, that’s what they want as final output anyway, so that’s what I give them.
• Whether you save an additional copy of the file without processing. Generally, I recommend this, just in case you mess up the batch settings or decide afterwards that those weren’t exactly the settings you wanted. This gives you a fallback at the expense of disk space. Be careful, though: you usually want to save these to a different folder that is carefully named as an archive so that you don’t confuse which image is which, or accidentally overwrite images.
The other unique aspect of picture taking that Capture enables is time lapse photography. Select Time Lapse Photography from the Camera menu. This brings up a dialog that allows you to set the controls necessary for this style of photography:
Thom Hogan’s Complete Guide to the D70 Page 416

Note the Live Batch option: that’s the first other overlooked shooting option I mentioned back for an encore; be sure to set the Live Batch dialog first.
The one caveat to watch with the time lapse option is that you can outrun the transfer speed. Remember, the D70 is really a USB 1.1 device in terms of transfer speed, which is to say it isn’t a particularly fast transfer provider. So if you set NEF format and time lapse of 1 second, you’re going to run into a problem as soon as the camera’s buffer fills: the camera won’t take pictures at the requested interval because it’s still dealing with getting an image transferred to the computer.
Making Settings with Capture As already noted, you can make camera settings with Capture Control. Let’s step through the primary screens and make a few comments as we go:
Thom Hogan’s Complete Guide to the D70 Page 417
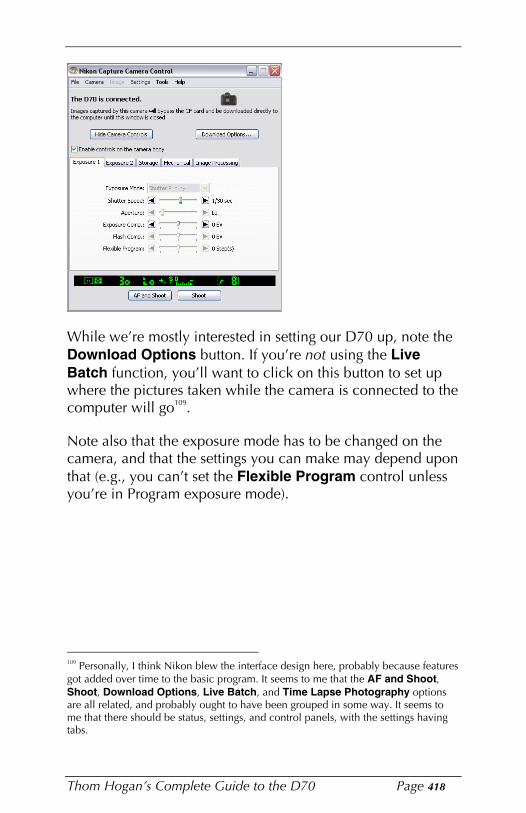
While we’re mostly interested in setting our D70 up, note the Download Options button. If you’re not using the Live Batch function, you’ll want to click on this button to set up where the pictures taken while the camera is connected to the computer will go109.
Note also that the exposure mode has to be changed on the camera, and that the settings you can make may depend upon that (e.g., you can’t set the Flexible Program control unless you’re in Program exposure mode).
Personally, I think Nikon blew the interface design here, probably because features got added over time to the basic program. It seems to me that the AF and Shoot, Shoot, Download Options, Live Batch, and Time Lapse Photography options are all related, and probably ought to have been grouped in some way. It seems to me that there should be status, settings, and control panels, with the settings having tabs.
Thom Hogan’s Complete Guide to the D70 Page 418
109

The second tab has the Direction pad at the top to control the AF sensor area (click the arrow buttons). It also does an interesting thing and throws in one of the Custom Settings, Auto ISO (and yes, this does interact with the Custom Settings dialog that we’ll get to later).
The Storage tab is a bit misnamed (remember, you can override how the image is stored with Live Batch). It really should be named Quality/Size. The Color option isn’t active on the D70 (some earlier Nikon DSLRs could shoot in black and white).
Thom Hogan’s Complete Guide to the D70 Page 419

The Mechanical tab again interacts with the Custom Settings dialog (what you set there appears here and vice versa). Note the battery level monitor!
The final tab is essentially the Optimize image function with the addition of Noise Reduction (long exposure noise reduction) and the option of being able to edit any Custom tone compensation value you set.
We’re not done yet, though. Select Custom Settings from the Camera menu and we get yet another tabbed dialog:
Thom Hogan’s Complete Guide to the D70 Page 420

The Basic tab is the same as the D70’s Simple option for Custom Settings. The same nine functions are available. Some users may find these dialogs easier to use to set the camera than the scrolling Custom Settings menus on the camera, by the way.
Thom Hogan’s Complete Guide to the D70 Page 421

Now comes the payoff for all these tabbed dialogs: you can save and load all these settings in one action:
1. Make all your settings (that’s potentially 8 tabs worth of mousing and clicking).
2. Select Save Camera Settings from the Settings menu and fill out the standard Save dialog that appears.
3. Later, when you want to reset the camera that way, select Load Camera Settings from the Settings menu and navigate the standard Open dialog that appears to the file you saved in Step 2.
I don’t know about you, but that’s a big payoff for me. I use my cameras in a few standard ways, but in between I’m always fiddling with settings to test things for books or to answer a reader’s question about something. Yet I know that I can restore my Thom Landscape D70 setting with a couple of clicks and have my camera set as I want it for nature photography.
Manipulating Images
You may use the combination of Nikon View and Nikon Capture to perform basic file management tasks and to post process images.
Thom Hogan’s Complete Guide to the D70 Page 422

Nikon Capture uses Nikon View’s Browser Window for image browsing (see “Nikon View,” on page <398>). The primary advantage is that when you select a NEF image in the Browser Window and choose to Edit it, you get a Nikon Capture Editor window:
While this may look the same as a full preview in Nikon View, it isn’t. You can open and use two tool palettes, which allow you to perform additional actions:
Thom Hogan’s Complete Guide to the D70 Page 423

The tools on these palettes work a bit unconventionally:
• To open a tool so that you can see its settings, click on the > icon at the left of the tool name. In the tool palettes shown above, no tools are open (we’ll get to the details of each later in this section).
• To change the settings for a tool, you must usually first click in the box to the left of its name. A indicates that you can’t currently change settings and they won’t be used in processing the image, but clicking on it produces a and indicates that you can and they will.
• To save or load the settings for a tool from a file, click the document icon "on the right side, which reveals a menu:
While this function may not seem important at first, it’s very helpful if you want to apply the same correction settings to a series of images.
Before working with Nikon Capture as an image editor, there are a few things you’ll want to set. Select Options from the Tools menu (Nikon Capture Editor menu on the Macintosh) and:
Thom Hogan’s Complete Guide to the D70 Page 424

1. On the General tab:
a. Click the Browse button next to Open saved images in and navigate to the location of your preferred image editor (e.g., Photoshop), and select it.
b. If you save tool settings you want to use on every image, click the Browse button next to “User Default” image adjustments and navigate to the file of those settings you’ve saved and select it.
2. On the Color Management tab:
a. Nikon Capture defaults to the settings of your color display in Windows; on Macintosh it uses whatever is set by ColorSync. If your color management doesn’t seem to be correct, click on the Change Display Profile and navigate to your display’s settings and change them, if needed (not normally necessary).
b. Choose a default working color space (AdobeRGB (1998) is my suggestion for NEF images under Windows; Nikon Adobe RGB 4.0.0.3000 on the Macintosh).
c. If you have a printer profile that you use (see “Color Profiles and Color Spaces,” on page
Thom Hogan’s Complete Guide to the D70 Page 425

<455>), check the Use profile for printing box and browse to your printer profile.
Nikon Capture allows you to make a number of modifications to images. You may:
• Select a portion of the image to output. Select the crop tool (in the tool palette; called “crop cursor” in Nikon documentation). Click on the upper left boundary you want to crop to and, holding the mouse button down, drag the mouse to the lower right boundary you desire. This tool confuses some new users, since they expect to see portions of the image removed when using crop (the way most digital imaging programs work). Nikon Capture doesn’t actually throw anything away until you save, however. And you can move the boundaries of the crop at any time by dragging them to a new location.
• Adjust color. Select Show Tool Palette 1, if necessary, from the View menu. Click the Apply button for Curves (D). Curves and color adjustments are a subject worthy of their own article. For a brief discussion of the important issues, see “Manipulating Levels and Curves,” on page <464>).
• Sharpen the image. Select Show Tool Palette 1, if necessary, from the View menu. Click the Apply button for Unsharp Mask(D). Adjust the Intensity, Halo Width, and Threshold values by dragging the sliders or entering numbers directly to the right of the sliders. An
Thom Hogan’s Complete Guide to the D70 Page 426

exclamation point appears if you aren’t viewing at 100% (you can’t properly evaluate sharpening at reduced magnifications). If you’re going to use this tool, make sure that the Sharpening setting in Advanced Raw is set to None.
• Adjust white balance for NEF images. Select Show Tool Palette 2, if necessary, from the View menu. Click the Apply button for White Balance(D). In the pop-up menu, select Set Color Temperature if you want to use the named, arbitrary values (same as in the camera plus an option named Calculate Automatically), or select Set Gray Point if you want to click in the image on a neutral area and have color casts removed.
• Apply exposure compensation. Select Show Tool Palette 2, if necessary, from the View menu. Click the Apply button for Advanced Raw (D). This opens a tool area that allows you to change a number of camera settings (Exposure Compensation, Sharpening, Tone Compensation, Color Mode, Saturation, and Hue Adjustment [see note at end of section]). Drag the slider or enter a value directly to the right of the slider. Note that you’re not actually changing the exposure, though it will look like it. What you’re doing is adjusting the linearity curve by which data is taken from the raw file and converted to pixels. If you “increase exposure” you may see noise become worse as the low values are shifted into visible range. If you “decrease exposure” you may see posterization110 of highlight data as Capture tries to deal with fitting too few captured values into a larger portion of the exposure.
• Plenty of other options. Color Balance, Noise Reduction, Size/Resolution, and Vignette Control are other tools that allow you to manipulate the NEF image directly.
110 Posterization: gaps in data in a tone ramp. Shows as gaps in histogram.
Thom Hogan’s Complete Guide to the D70 Page 427
Don’t worry, we’re going to go through each tool individually, so that was just a broad sweep through what you can do.
Note: Nikon Capture is not a full-featured image editing program. It has a nice set of tools that allow you to make most of the changes to how the raw CCD data is processed into an image, but it is not a substitute for a full-featured product, such as Adobe Photoshop. Personally, I use Nikon Capture only for its unique tools (camera control, interpolation of NEF images, and post-image manipulation of exposure and white balance on NEF images), and use Photoshop for almost everything else.
Note: Changes you make aren’t permanent if you save your work as a NEF file. Nikon Capture saves the tool settings but doesn’t change the original data. If you save your work as a TIFF or JPEG, obviously the effects of your changes are permanently embedded in the data.
Individual Palette Tools Since many of the help file messages in the Capture Editor are essentially “the widget tool allows you to control the widget,” I’m going to step through each of the tools one by one and try to put a bit more meat on the table than Nikon did.
Thom Hogan’s Complete Guide to the D70 Page 428

First up is the Curves tool. We have four primary things we set with this tool (plus we can do the same for individual channels):
• Black point. The black triangle on the bottom of this control allows you to set what will be “black” in the output. If you had used the full exposure range of the camera, it would normally be 0, but as you can see on this example (sand dune in Death Valley), there wasn’t much scene contrast, so I can pull the black level all the way up to 106. Normally you’ll pull the black level up to the bottom point of your histogram data.
• White point. Like the black point, but now we’re working the right hand (white triangle). Normally you’d pull this down to just above the top of your histogram data.
• Gamma. The middle gray triangle is the gamma point, which controls the definition of what middle gray is. You don’t move this control as often as the others, but sometimes you’ll enter a value slightly larger than 1.0 to boost midrange values on dark images.
Thom Hogan’s Complete Guide to the D70 Page 429

• The “Curve.” The straight line that goes from the black point up to the top of the graph above the white point doesn’t have to be straight. You can click on any point on the line and then use the arrow keys on your keyboard to move that point up, down, left, or right. What you’re changing is the relationship between input value and output value. By default, an increase of 1 in the input value is an increase of 1 in the output value. When you start changing any of the options in this control, you break that relationship and create a new one. In general, many D70 images look a bit “better” with a very slight S curve.
There are more controls and many more nuances in the Curves control than is fitting on a book about the D70. If you’re doing more than I’ve just described, you’re considerably deeper into image processing than the target customer for the camera.
Next on our list is the Color Balance control. The temptation for novices is to use this control for image corrections because it seems simple (brightness, contrast, red, green, blue) and sort of mimics what they’re used to on their televisions. My word of advice: leave it closed and inactive. These adjustments are crude, and there are better ways to do every one of them. Brightness and contrast are better controlled with Curves,
Thom Hogan’s Complete Guide to the D70 Page 430
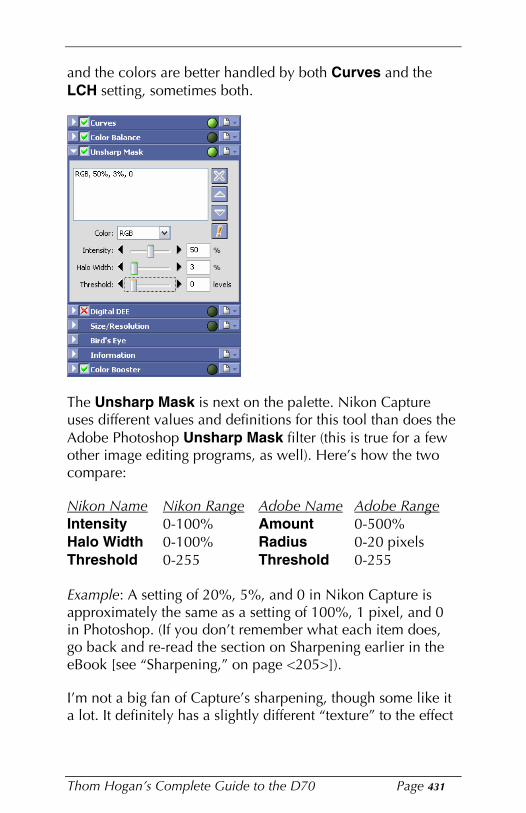
and the colors are better handled by both Curves and the LCH setting, sometimes both.
The Unsharp Mask is next on the palette. Nikon Capture uses different values and definitions for this tool than does the Adobe Photoshop Unsharp Mask filter (this is true for a few other image editing programs, as well). Here’s how the two compare:
Nikon Name Nikon Range Adobe Name Adobe Range Intensity 0-100% Amount 0-500% Halo Width 0-100% Radius 0-20 pixels Threshold 0-255 Threshold 0-255
Example: A setting of 20%, 5%, and 0 in Nikon Capture is approximately the same as a setting of 100%, 1 pixel, and 0 in Photoshop. (If you don’t remember what each item does, go back and re-read the section on Sharpening earlier in the eBook [see “Sharpening,” on page <205>]).
I’m not a big fan of Capture’s sharpening, though some like it a lot. It definitely has a slightly different “texture” to the effect
Thom Hogan’s Complete Guide to the D70 Page 431

than does Photoshop’s similar tool. As you’ll discover in “Other Manipulation Tools,” I suggest that you get a dedicated sharpening tool, as you’ll get more control over the process.
The Digital DEE tool (Dynamic Exposure Extender) is a second way of altering exposures in Capture (Curves was the first; there will be more). In a way, DEE is a method of building a curve that deals with just the shadow area, just the highlight area, or both. (Note that you have to click the More button to see all the controls in this tool.) Threshold is the control that sets the boundary between shadows and highlights (here it’s at 190 out of 255). This control is cruder than Photoshop’s Shadow/Highlight adjustment, but still effective. The defaults are likely to get you in trouble, though. As it comes up, the Threshold is set so that the changes will be applied across too wide a range of values, in my opinion. Set the Highlight adjustment to 0, lower the Threshold to 80, and then try dragging the Shadow adjustment control. Moreover, I find that you can really only effectively use this control for shadows or highlights, not both simultaneously (if that’s what you need to do, use Photoshop’s controls).
Thom Hogan’s Complete Guide to the D70 Page 432

Note: It pays to have Curves open and visible when you’re playing with DEE, as the histogram will be updated and provide you additional feedback.
Capture does an excellent job of resizing images, if you need that (though it only goes to 200%). Indeed, some people think that it does a slightly better job than Photoshop’s bicubic resampling. First, enter the dots per inch for your printer (most inkjet users should enter 240); note that before you enter the dots per inch, you may need to change the width and height units to something other than pixels. Then enter a new value for Width or Height. The Scale value will tell you how much the image had to be scaled to meet your demand.
Thom Hogan’s Complete Guide to the D70 Page 433

The Bird’s Eye option isn’t really a control, but a navigational tool. When you’re zoomed in on an image it shows you the location of your zoom and allows you to drag the red box that shows your current location to another place on the overall image.
Information tells you the position and value of the pixel at the current cursor position on the main image. That’s useful, but there’s an even more useful ability: if you want to compare two (or more) points, click on the crosshair icon, click on a point in the image, and now as you move elsewhere in the image you’ll be able to see how the values differ:
Thom Hogan’s Complete Guide to the D70 Page 434

A little crosshair icon is placed along with a matching number on the image so you can remember which point is which (right-hand image, above).
Color Booster is a saturation control, but with a bit of a difference. If you select a Target Type of People, skin tone colors won’t be boosted but others will. If you select Nature, all colors are boosted.
In the second tool palette, we have an additional set of options:
Thom Hogan’s Complete Guide to the D70 Page 435

The White Balance tool allows you to set a color temperature setting (and actual Kelvin value; as shown here I’ve bumped Cloudy up a bit using Fine Adjustment). You can also select a neutral area of your shot and use it to set white balance:
Hint: the Start button is necessary to begin the process of selecting a pixel or pixels in the image to use as the neutral reference.
Thom Hogan’s Complete Guide to the D70 Page 436

Three controls live in the Noise Reduction tool, and they all do different things:
• Color Noise Reduction: this function is used to reduce the colored patterns noise takes on when you use high ISO values. Don’t bother with it unless you’ve been playing with ISO 800 or higher, as it’ll not have a beneficial effect (and possibly a detrimental one) if the image doesn’t have those artifacts in it.
• Edge Noise Reduction: this function tries to remove noise from distinct edges, which, theoretically, makes them more distinct.
• Color Moire Reduction: this function is probably the most useful for D70 users, though it only works on NEF images and it has limited control. Still, it’s worth a try if you find an image with moiré in it.
But I’d generally say avoid Capture’s Noise Reduction tools. The programs I mention in “Other Manipulation Tools” (see page <483>) do a better job.
Thom Hogan’s Complete Guide to the D70 Page 437

If you took a dust reference photo, here’s the tool that allows you to use it. Click on the Change button and point to the dust reference photo you want to use. This function sometimes takes a long time to process. And you’ll sometimes see the downside: occasionally you’ll get a message like this:
See: you still have to clean your CCDs sometimes, folks.
Vignette Control only works with NEF images. Nikon doesn’t tell us much about the Vignette Control, though their documentation seems to imply that the control varies to correct the amount of light falloff exhibited by the lens detected in the EXIF data. Based upon my experience with it, it’s only marginally accurate at that, though it’s far better than nothing. Don’t expect huge differences that are easily visible.
Thom Hogan’s Complete Guide to the D70 Page 438

Most lenses on the D70 have far less than the 15% center-to-edge difference that would be easily visible to the naked eye.
We’ve now come to two of the more important controls. Advanced Raw is tricky, so be careful. Most people turn it on to allow post shooting exposure compensation (top control). What they don’t notice is that the controls underneath all say Unchanged (I’ve used my normal set here, so only Color Mode is Unchanged in the dialog I show). It’s easy to interpret the word “unchanged” as meaning nothing will be done, but that’s not correct. What it means is that the camera setting will be used for that item. So if you set Sharpening to High on the camera, Unchanged means High! Don’t fall into that trap. Indeed, this is one of the controls where I strongly suggest that you save and load a standard set of values, as I have here.
Note: If you used prior versions of Capture or also use a D1, you need to note that the current versions of Nikon Capture show the Hue adjustment value differently than the D1 (and all versions of Capture up through 2.0). On those products, the Hues were specified as a value from 0 to 6; in Capture 3.0 and later, Hues are shown in values of -9 degrees to +9 degrees. Here’s how the two equate:
Thom Hogan’s Complete Guide to the D70 Page 439

Old New 0 -9 degrees
1 -6 degrees 2 -3 degrees 3 0 degrees 4 +3 degrees
5 +6 degrees 6 +9 degrees
So what are these “degrees?” They are shifts on the traditional color circle, where the three primary colors are 120 degrees apart.
Our last tool is a three-parter: the LCH tool (Lightness, Chroma, Hue). This tool comes to Capture from the Nikon Scan software, where it has been available since version 3 (thus, it’s not a new tool just coded, but a mature one). You’ll note that the Lightness portion of the tool looks exactly like the Curves tool. Yep, it works the same way, so you already know how to use it. Whereas Curves works with RGB data, LCH works with Luminance and Color data (sort of the CIE Color Lab mode, only expressed a bit differently, as we have no A and B channels). Normally, you’re only going to pick one or the other to use (Curves or LCH), not both, as they interact, and you can get lost in the sub effects they have on each other.
Thom Hogan’s Complete Guide to the D70 Page 440
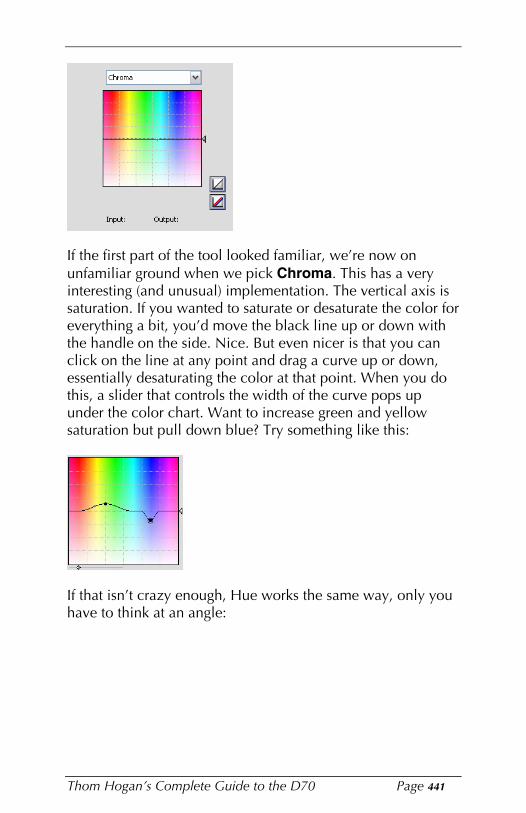
If the first part of the tool looked familiar, we’re now on unfamiliar ground when we pick Chroma. This has a very interesting (and unusual) implementation. The vertical axis is saturation. If you wanted to saturate or desaturate the color for everything a bit, you’d move the black line up or down with the handle on the side. Nice. But even nicer is that you can click on the line at any point and drag a curve up or down, essentially desaturating the color at that point. When you do this, a slider that controls the width of the curve pops up under the color chart. Want to increase green and yellow saturation but pull down blue? Try something like this:
If that isn’t crazy enough, Hue works the same way, only you have to think at an angle:
Thom Hogan’s Complete Guide to the D70 Page 441

If you drag up from where yellow intersects the line, you’re moving yellow towards green; if you drag down, you’re moving yellow towards red. Click on the little number under the color chart to change the angle of interaction between the colors (i.e., how fast the change from one color to another is made).
This control is wickedly crazy, but very fun and useful. Unlike the general Hue control where you’re changing all the colors in relation to one another on the color wheel (you can do that here by moving the line up and down), this control allows you to affect individual colors. This is a control that has to be played with to see its impact, so I suggest you do just that on some of your images. Where I find it most useful is in dealing with slight color tints that occur because of multiple color temperature sources, but I’m sure you’ll find your own use (and I’ll have one coming up in the next section just for kicks).
I’ve really only touched the surface of the Capture Editor tools. While Capture has always had some interesting abilities, recent versions have added some very unique and useful tools (like the LCH tool I just covered).
One Image Processed by Capture
Let’s try to put all the information about the Capture tools together by walking through a NEF image I shot recently with my D70. I’m going to pick an image that is a little unusual so
Thom Hogan’s Complete Guide to the D70 Page 442

that I can show off how some of the tools can make short work of an otherwise tough image111.
I generally start in Nikon View, using my folder structure to quickly get to the image I want to work with. As you can probably see, I have other images similar to the one we’re going to work with. Let’s see how the selected image looks in Nikon Capture:
This kind of step-by-step process is something I try to do in every issue of Nikon DSLR Report (albeit in even more detail), usually with the cover image. So if you find this section useful and interesting, you might want to subscribe. See http://www.bythom.com/d1report.htm for details.
Thom Hogan’s Complete Guide to the D70 Page 443
111

Overall, I’d say the image looks low in contrast, the color is slightly off, and it doesn’t pop in any way, despite the interesting patterns in the sand. The histogram tells the story: there isn’t a lot of range from the darkest to the brightest thing in the scene.
While we’re talking about exposure, note how I’ve placed the exposure at the high end of the histogram. Remember, noise lives in the low values of your capture, so when you have a scene that’s low in contrast, don’t be afraid of pushing the image up to the right end of the histogram. The trick is not to push one or more of the channels past the right edge, which is why I’ve left a wee bit of headroom here.
Normally, you’d work with the Curves tool to “fix” the tonal range adjustment of the histogram. Instead, I’m going to use the LCH tool for this image and show you an alternative way of working. (Remember, the difference is that with Curves
Thom Hogan’s Complete Guide to the D70 Page 444

we’re working directly with the three RGB channels; with LCH we work with luminance separate from color.)
My first adjustment is with the Luminance option of the LCH tool. Here I’ve brought the black point and white point in to better match the data that was captured. Note how the contrast popped right up. Indeed, the image is probably usable as is, but it doesn’t have the warm feeling I remember just before sunset that night.
You may wonder how I figured out where the black and white points should be. Capture has two tools that are excellent for making this adjustment. First, work with the black point. Press the S key on your keyboard (for shadows). You’ll see something like this:
Thom Hogan’s Complete Guide to the D70 Page 445

If you look closely, you’ll see that the black point has moved in past the edge of the histogram’s data. What you’re seeing in the preview pane are areas of the image that are affected (clipped) by the adjustment you made. Drag the black point back and forth until you just start to see colors appear. The colors indicate clipping, and the color itself tells you something about the channel(s) that is (are) clipped. In this example you can see red (red channel clipped), yellow (red and green channels clipped), and green (green channel clipped). Black indicates all channels are clipped.
Next, press the L key (for light). You’ll see something like this:
Thom Hogan’s Complete Guide to the D70 Page 446

Again, I’ve clipped the highlights in the histogram to be able to show you the effect. Clipping almost always starts in a single channel (red, green, or blue—we have some of each in this example). As the clipping becomes more severe, you’ll get combination colors (yellow, purple, or black). In this example, we have some very bad clipping in the sky (and entire area rather than just a few highlight details), which means we’ll have no highlight detail there at all (and no ability to later adjust the color, etc.). I’ll back off my black point and white point to the places where clipping isn’t visible.
Thom Hogan’s Complete Guide to the D70 Page 447

I remember the color being warmer, so I’ve adjusted the white balance higher than it was recorded to bring some of that back. But I’m going to use a different technique to get the remainder of the color.
Thom Hogan’s Complete Guide to the D70 Page 448

I didn’t want to change the sky color, but I did want to change the sand, so I selected the Chroma option and ran a small hump in the yellow red (I may move it a bit to the right, as this is a slight bit more orange than I wanted; I could also do the same thing by using the Hue control). I also dragged the whole line up, which means I’m asking for increased saturation.
Thom Hogan’s Complete Guide to the D70 Page 449

I like brooding, dark images (I’m actually a pretty cheery person, so go figure). One alternative I’m considering is to push the contrast upwards and make the lighting very moody. I discovered the above alternative while playing with the DEE tool on the image trying to recover some highlight detail in the hills and sky (that’s why the Threshold is at 217 and Highlight Adjustment is shifted so high). But I think what I really want is something between the last two adjustments.
Thom Hogan’s Complete Guide to the D70 Page 450

The trick was to go to Advanced Raw and play with the Tone Comp adjustment. This brings up a word of advice: start with all the tools inactive, and turn them on one at a time as you work on the image. You’ll discover new and interesting interactions that way. Sometimes I can’t fully explain what’s happening with the tool interaction, but I like what I see. I generally don’t find that type of serendipitous discovery when I start with all the tools turned on.
From here, I’ll bring the image into Photoshop CS for final work. I need to perform noise reduction with Neat Image and sharpening (notice I didn’t use Capture’s noise reduction or sharpening tools—better alternatives exist, which I’ll get to later in the software section). I’ve got a few spots I need to clone (mostly dust, but there are two defects out on the dunes; I didn’t want to walk out and correct because then I’d have left my footprints!). I’ll also want to select the mountains and sky and see what I can do with them:
Thom Hogan’s Complete Guide to the D70 Page 451

Unfortunately, the dust and haze in the air was obscuring detail in those areas, so I don’t think I’ll be able to recover much detail (the above is done with Advanced Raw exposure compensation at -1 stop, just to see what was hiding in the highlights). Which brings me to another comment: use the tools in your software like a detective. Besides trying to get the “right” settings, don’t be afraid to push them beyond where you’d normally set them—you often discover something about the underlying pixels in your image. What I’ll probably do is something like this:
Essentially, I’ve selected the sky and hills, used Color Balance in Photoshop CS to make the colors less Red/Green and a little more Cyan/Magenta. This puts them more in contrast with the dunes, and a little closer to what we expect.
Here’s where I ended up after playing with a few more tweaks in Photoshop (maybe it was my mood as I worked on this image, but I ended up making it look a lot like it was taken with Kodachrome 64, not a digital camera):
Thom Hogan’s Complete Guide to the D70 Page 452

You’re probably wondering where the hill/sky detail came from. Well, there was some there, though as I expected, not a lot. In Photoshop CS I selected the hills and sky, made my color correction, and then selected the Photoshop Curves tool and adjusted the black and white point for the selection. This simply points out how important it is to have multiple programs handy. Not every software product can do everything well. If Capture has a weakness, it’s that it can’t sub-process a particular area within an image.
Photoshop NEF Filter
Nikon supplies a NEF import filter for Photoshop with the D70. As noted earlier, it is installed when PictureProject or View is installed.
Note: If you have multiple versions of Photoshop on your machine (I have Photoshop 7 and Photoshop CS, for example), you will probably find that the Nikon NEF filter got installed into the older version (the installer isn’t intelligent, and it doesn’t look for multiple versions of Photoshop). The actual plug-in
Thom Hogan’s Complete Guide to the D70 Page 453

name is Nikon NEF Plugin, and it normally lives in the Plug Ins/Photoshop Only/File Formats folder. You can copy it to other Photoshop installations, if necessary.
While the Nikon plug-in is useful for work that needs to be performed quickly and with (mostly) the default settings, it isn’t a very good answer for serious NEF users. That’s because many of the things that Capture does so well—such as allowing you to fine tune white balance, for example—the NEF filter doesn’t (it only allows rotation, gross white balance changes, and exposure changes). For most settings, the plug-in simply looks at the EXIF header information to see what the camera settings were and uses them to interpret the data when it opens the file.
If you use the Photoshop NEF filter for conversions, pay particular attention to your camera settings, most notably White Balance, Sharpening, Tone Compensation, and Hue Adjustment. You should probably set the latter three to Off or Normal.
Thom Hogan’s Complete Guide to the D70 Page 454

Note: NEF images brought into recent versions of Photoshop (5.0 and later) are 16-bit RGB images112. Unfortunately, that has a couple of consequences. First, you need a lot more memory to deal with an image (2x, or 35MBs). Also, in versions previous to Photoshop CS, not many Photoshop tools work with 16-bit images. Nevertheless, perform as many adjustments as possible while your image is in the 16bit format before selecting 8 Bits/Channel in Photoshop.
If you install Nikon View or Nikon PictureProject, you’re going to find that the Nikon plug-in installs and becomes the one that Photoshop uses to open NEF images instead of Photoshop’s native raw converter. If you want to use Photoshop’s converter instead of Nikon’s, you have two choices:
• Choose the converter to use in the popup in the Photoshop Open dialog. You want to select the Camera Raw option.
• Remove the Nikon plug-ins. Remove the plug-ins with Nikon in their name that live in the Photoshop CS/Plug-Ins/Adobe Photoshop Only/File Formats folder.
The first option allows you to use either plug-in, the second will make Adobe’s converter the only one used from within Photoshop. If you have Capture, the second option is probably the wisest (you can always open an image in Capture and have it passed to Photoshop if you want to use Nikon’s conversion).
Color Profiles and Color Spaces
Color management is a topic worthy of its own book (indeed, it has one: Real World Color Management by Bruce Fraser, Chris Murphy, and Fred Bunting). But if you want to get the
16-bit? Aren’t NEF files 12-bit? Yes, they are, but 12-bit isn’t a setting that most computer software allows. Thus, the 12-bit data is placed into a 16-bit container with zeroes padding out the four new, unused bits. If you’re technically minded, the “packing” of the data is placed in the high order bits of the 16-bit container.
Thom Hogan’s Complete Guide to the D70 Page 455
112

best possible results from your camera, you need to know a few things about profiles and color spaces.
The D70 allows the user to choose between two sRGB and one AdobeRGB color space113.
Color spaces (also called gamuts) define the range of colors that are available to be reproduced. Imagine a world where there are only five shades of a red versus a hundred shades of red. Identical scenes would look different in those two worlds, no? Well, in a simplified way, that’s what we face with color reproduction methods. Television screens (and monitors) can reproduce one range of colors, an inexpensive printer another range, and expensive multi-plate print technologies yet a different range. The inks in printing (or the phosphors and shadow mask in monitors) can limit (or increase) the color range.
In a perfect world, your capture device (e.g., your D70) would match your editing device (e.g., your monitor), which in turn would match your printer. In that perfect world, colors captured by the camera are maintained perfectly, right through to the final printed image.
A color space defines how narrow or wide the color range is and what a particular RGB value should represent. The D70 allows you to “set” the color space. Nikon has chosen two logical candidates, sRGB and AdobeRGB, and added a special derivative of the sRGB for outdoor (nature) photographers used to the slightly increased green saturation of most Fuji slide films.
Microsoft and Hewlett-Packard originally co-developed the sRGB color space for computer monitors. Their choice was to
Color profile and color space, what’s the difference? Technically, a color profile is a table of data that accompanies an image and describes how a device renders color. A color space is a CIE Lab definition of the range of colors available. Both essentially do the same thing, but a color profile is custom to a specific device, while a color space is a standardized definition (that a specific device may try to match).
Thom Hogan’s Complete Guide to the D70 Page 456
113

use the lowest-common denominator approach: what was the largest color space that every monitor can reproduce? The result was a narrow range that tends to exaggerate saturation, which also adds a perceptual increase in contrast to most images. If you shoot pictures to be used on Web sites or in computer-based products, sRGB is probably the color space to use, though its narrow nature doesn’t give you much flexibility in subtle color adjustments. Also, if you expect to print directly from your storage card (either on a DPOF or PictBridge-aware printer or at a photofinisher that uses, say, a Fuji Frontier), then you should probably choose one of the two sRGB methods as your color space.
AdobeRGB is a wider color space, intended for print technologies that can reproduce a large range of subtle color differences. If you intend to take pictures for print on inkjet or high-end digital printers, I suggest that you select AdobeRGB as your color space. Note that colors may seem to be less saturated when displayed on your computer (especially if you haven’t profiled your monitor using a product such as Colorvision’s Spyder hardware and Optical software [see the review on my site: http://www.bythom.com/colorvision.htm]), but the color is more representative of what you’ll see in final prints.
The color spaces on the D70 appear to be accurate (more on accuracy in a bit when I talk about color profiles), and I applaud Nikon for giving us a choice. Unfortunately, it’s not just a simple matter of setting the camera’s color space using the options on the SHOOTING Menu (more on that in a bit, too). Instead of embedding the actual color space information, as is traditional, all that choosing a color space does is place a marker in the EXIF data as to what the camera is set to. And a lot of software ignores that marker! Here are some of the things you’re not told in the D70 manual:
• Set your working color space in all your software programs. Any good digital editing software, including
Thom Hogan’s Complete Guide to the D70 Page 457

Nikon Capture and Photoshop, has an option (usually in the Preference or Color Settings menu item) for setting the color space the program uses to display values. Make sure that you set this! Your color space choice should match the camera setting you choose.
• Learn whether your program recognizes the tag or not. For the most part, JPEG files are automatically recognized as being sRGB by most software, regardless of the camera’s chosen color space. That’s probably because the software engineers simply followed the EXIF specification, which used to state that any EXIF file is in the sRGB color
114space . If you use AdobeRGB, you may have to set your program to ignore or discard the color space, or assign the correct one.
• NEF output works a bit differently. Nikon Capture assigns the correct color space and attaches the color profile information to the TIFF and Photoshop PSD files it outputs (assuming that you’ve set the program’s preferences correctly). In other words, it actually passes a real color profile to other software rather than assume the software understands the color space by file name or EXIF data methods.
If you have doubts about whether you’ve got the right settings in each of your programs, shoot a standard color reference in known lighting with the proper white balance setting, such as the GretagMacbeth ColorChecker chart in sunlight with the camera set to the Dir. sunlight white balance setting. Then watch for shifts in color as you bring the resulting image through your workflow. If your monitor is calibrated correctly and your programs set to the right color space settings, you
The latest EXIF standard allows for two file naming conventions, each of which defines a different color space. A DSC_#### file would be sRGB, while a _DSC### file would be AdobeRGB. Unfortunately, not all software has caught up to the EXIF standard changes. (Photoshop CS has, by the way.)
Thom Hogan’s Complete Guide to the D70 Page 458
114

shouldn’t see any color shifts from original to on-screen final version115.
õ To set the color space your camera uses:
1. Press the MENU button to get to access the menu system.
2. Use the Direction pad to navigate to the SHOOTING Menu (the green camera tab).
3. Use the Direction pad to navigate to the Optimize image item and press the > key on the Direction pad to select it.
4. Use the Direction pad to navigate to Custom and press the > key on the Direction pad to select it.
5. Use the Direction pad to navigate to Color mode and press the > key on the Direction pad to select it.
Don’t expect the camera’s color LCD to show color shifts, though. It is not calibrated in any way, and does not show an accurate representation of the color of an image.
Thom Hogan’s Complete Guide to the D70 Page 459
115

6. Use the Direction pad to navigate to your color space and press the > key on the Direction pad to select it.
7. Use the Direction pad to navigate to Done and press the > key on the Direction pad to complete the process.
But simply standardizing on a color space in camera and software isn’t always enough to get perfect color. Slight variances in device abilities can cause them to deviate from the color space. Thus we often “profile” a particular device. That’s exactly what we do with our monitors when we use a calibration tool such as Colorvision’s Spyder.
Color profiles are where color management gets a bit confusing. For example, when you calibrate your monitor with Colorvision’s hardware or software (or any of the alternative choices—I only use Colorvision as an example because its low price and decent quality make it a good match for most D70 users), what happens? Well, Colorvision’s software alters information that your video driver uses to send signals to your monitor. For example, if the Colorvision Spyder detected that your monitor wasn’t producing enough
Thom Hogan’s Complete Guide to the D70 Page 460

blue, it would alter the video driver to produce “more blue” in colors sent to the monitor.
However, the video driver changes only occur for what I’ll call “color aware” programs (on Windows; most Macintosh programs all use the value set in ColorSync). Photoshop, for example, is color aware and the profiled monitor settings the Colorvision makes and installs are used when you’re viewing pictures on your display.
But Nikon Capture on Windows isn’t automatically color aware! You have to use Capture’s Preferences to use “Change Display Profile” to point to the file that the Colorvision software created, even though that was automatically installed into the Windows OS at startup; otherwise it uses a default monitor profile, as in the screenshot, above116. (When you profiled your monitor using the Colorvision Spyder, you saved the profile under a name; that’s the file you want to point to
There’s another issue here that sometimes comes up. If you first profiled your monitor with something like Adobe Gamma, then used the Colorvision Spyder, you may have dueling profiles loaded when you start up your system. The rule: only one monitor profile should be loading when you boot your OS. You can use MSCONFIG to look for whether Adobe Gamma is loading, for example (and if you’re profiling with the Colorvision Spyder, be sure to select Adobe Gamma to not run automatically while you’re in MSCONFIG). Macintosh OS-X users need not worry about this.
Thom Hogan’s Complete Guide to the D70 Page 461
116

with the Monitor Profile option.) Note that Capture also has a preference option for Default RGB Color Space: that’s where you select the color space you set on your camera. Don’t get the Monitor Profile and Default RGB Color Space mixed up!
In this abbreviated color management lesson we only profiled the monitor. In general, once you’ve done this and set your working color spaces correctly, you should be able to take a picture with known colors in it and follow it all the way through to print without seeing any major deviations.
Note the word “major” in the last sentence. If you do see a big color shift, something isn’t right and you shouldn’t try to profile any device until you’ve corrected whatever’s wrong. It might simply be that you got the white balance wrong while shooting or selected a non-default paper while printing. But major deviations of color at this point would indicate that you’ve set something wrong or haven’t correctly profiled your monitor (or have dueling profiles, as was previously discussed.)
If you can follow color from camera to print and get good results, you may see very minor color shifts that you want to correct. My advice: isolate whether the shift occurs camera-to-computer or computer-to-printer. If you see both, work on the camera-to-computer side first.
You should be able to shoot a known color source, such as the GretagMacbeth ColorChecker chart using a custom white balance and see the correct colors on your monitor. While I’ve seen very subtle differences in color rendering between D70s (and especially at higher ISO values), I generally don’t find that profiling the camera is useful, as even small white balance issues will more grossly affect color than individual camera variation.
Thom Hogan’s Complete Guide to the D70 Page 462

Once your camera-to-computer color issues are resolved and you get repeatable, accurate results, then and only then work on the print side. First, examine all the options for your printer driver and make sure that one of those doesn’t “fix” your problem. More often than not, selecting the right paper and ink choices are all that it takes (on Epson inkjets using Epson papers). If you use custom papers or inks, you may have to profile your printer, which is out of the realm of this book (but do go to http://www.inkjetmall.com and look at their paper/ink/profiles; these are as accurate as you can make on your own).
Output on Commercial Printers
While it’s a little bit out of the scope of this book, enough D70 users have asked me about professional printing options that it makes sense to give a brief set of tips here, especially since color issues are usually the biggest complaint.
As I write this, the Fuji Frontier is probably the most ubiquitous automated printer you’ll run into at labs (and Wal-Mart and Costco in the US)117. Thus, I’ll present the overall workflow for it (other printers should be similar—but work with your lab to verify each step I present):
1. Crop, size, adjust, and sharpen your image as usual.
2. Save your edited copy as a PSD file in case you need to revisit your changes.
3. Flatten all layers.
4. Convert the image to 8-bit color (16-bit color isn’t usually supported by commercial printers).
5. Use Photoshop’s Canvas Size tool to make sure that your final image size is one that the Frontier supports (e.g., 8x10” in the US). In other words, if the final crop was 7x9.5” you would use Canvas Size to center that
The popular Noritsu and a few other commercial printers are similar. Try following the directions given here for them—you’ll probably find that it works for them, too.
Thom Hogan’s Complete Guide to the D70 Page 463
117

on an 8x10” canvas. (If you don’t perform this step, the Frontier—and most other automated printers— resizes your image, causing all kinds of ugly artifacts.)
6. Use Photoshop to convert the color space profile you were working in, if necessary, to the one the Frontier uses (sRGB). (If you give a Frontier an image in a color space it doesn’t support, guess what, you get wrong colors!)
7. Save the image as a TIFF or JPEG file. When prompted, do not embed the profile (it’s ignored by the printer, anyway).
8. Save all your images on a CD-R and take them to the printer.
Manipulating Levels and Curves
Most image editing programs allow you to manipulate the color and exposure information via levels, histograms, and curves. A good tool provides a minimum of the following adjustments:
• Combined or separate RGB controls. You can adjust all three color channels simultaneously, or one at a time. Generally, manipulating one color channel on the entire image is risky, as you can distort color balances quite easily. On the other hand, you may want to deal with individual channels if you are working on a selection from the overall image (e.g., manipulate the blue channel of a sky).
• Histogram of values, including individual channel histograms. The histogram tells you important information about your exposure. A histogram that has values going off either end of the display (or significant spikes near the two edges) may have blown out details or muddy shadow areas (which can be partially dealt with using Curves, see below). Spikes elsewhere in a histogram usually indicate that one color value dominates a portion of the exposure, which is often okay (e.g., you took a picture of a yellow
Thom Hogan’s Complete Guide to the D70 Page 464
balloon). A “perfect” histogram would have no values below 5 or above 250, with most of the values spread through the middle and few large spikes. The reason why you want a lack of pixels at the two ends in the “perfect” histogram is that it makes it easier to preserve highlight and shadow detail using most print technologies (if you try to print black values of 0 on most devices, you’ll put too much ink on the paper, risking other problems, as well). Remember this: 0,0,0 prints as the blackest ink your print technology can produce, while 255,255,255 is the color of your paper (i.e., no ink is put down). Rarely do you want either condition. (Side note: the histograms shown in Photoshop are not the same as the D70 displays during shooting. Adobe’s method for calculating the histogram is different; don’t be surprised to see differences.)
• Levels tools that deal with the histogram. You’ll normally see Input and Output values, a midpoint slider (sometimes called Gamma), and controls (usually eyedropper icons) that allow you to pick white, neutral gray, and black points. Be careful with using the tools provided to control the histogram. Many of them change the underlying pixel data (you’ll sometimes even see gaps in the histogram after using one of these tools, which is always a warning that you’ve changed pixel data). Capture doesn’t change the underlying data—it saves the correction information and applies it against the original data as long as you stay in the NEF format.
• Curve control. Initially, the “curve” is usually a straight line from the lower left to the upper right of a graph (sometimes superimposed over the histogram, as in Nikon Capture). This line implies a linear relationship from dark to light (i.e., each step in pixel value is treated equally). Clicking on a point on that line and dragging it up or down allows you to change the relationships. The “flatter” the line between two pixel values, the less difference you’ll see on your screen. The “steeper” the line between two pixel values, the more difference you’ll see. Typically, you don’t move the curve lines very much, if at all. If you
Thom Hogan’s Complete Guide to the D70 Page 465

have muddy shadows, for instance, you might grab the curve line at the ¼ point and drag it upwards a bit. Likewise, to pull out detail in a very bright area (such as snow or a bird’s feathers), you might drag the line down at the ¾ point. The nice thing about using curves to control colors and exposure balance is that the underlying data in the image is not changed118. If you were to later reapply the linear curve to the image, you’d have the original look back.
Digital Workflow
Whether or not you make any changes to color and curve information using a digital editing program, you need to establish a consistent and repeatable workflow when working with digital images. Here is mine:
• Before going out on a shoot, I make sure that I’ve saved all images on my CompactFlash cards, and then I format the cards I’ll be using.
• I always use sequential numbering on my D70 (and D100, D1x, and Coolpix, for that matter). But before heading out, I always perform a camera check to make sure that this and the rest of my custom settings are set to my desired settings.
• In the field, I shoot until I fill a card. I’ve taken to carrying small envelopes with me, and when a card is full, I remove it from the camera, stick it in an envelope, seal the envelope, and write the relevant location data on the outside. Any card I find in an envelope means that it hasn’t been downloaded to the computer yet.
• I try to carry enough CompactFlash storage with me so that I don’t have to perform “field saves,” but if I have my portable computer with me and need to use a card again, I open an envelope, transfer all the data from a card into a
Technically, you need to do this on an Adjustment Layer for this to be true of Photoshop CS. True for Capture with NEF files, however.
Thom Hogan’s Complete Guide to the D70 Page 466
118

folder labeled with the data I wrote on the outside of the envelope.
• I usually shoot only in NEF format, so when I return from a shoot with cards full of images, I not only need to transfer them to the computer, but also need to have them converted to a non-proprietary format. For each card:
1. I create a folder on my computer with the location data (e.g., Patagonia Feb 01). With the latest versions of Nikon View, I simply let it make these folders. For example, I’ll create the top folder as something like HAWAIINOV02 and then let Nikon View put each card transfer in subfolders labeled HAW001, HAW002, etc. These are my “digital negatives.” I usually mark these files with a Read Only attribute so that I don’t accidentally edit them in place119. (Hint: use the Protect function on the camera.)
2. In the top level folder just created, I create another folder labeled CAMERA.
3. I run the batch save and renaming function in Nikon Capture to place images from the card folders into the CAMERA folder. These are my working files.
4. I create a second subfolder under the master called FULL. Whenever I work with an image from the CAMERA folder, I save the Photoshop format result to the FULL folder. Generally, I don’t crop this image. Usually, I only perform color and curve adjustments, then touch up any dust using a clone tool. I never do more than a basic sharpening of the image at this point. I try to avoid using levels adjustments, as that changes the data in the file.
One proofreader of the draft manuscript also suggested write protecting the folder on the computer. This has the side effect of making it so that files can’t get moved out a folder, keeping an entire shoot together. I’m not quite that strict with my files, but it’s a good idea, nonetheless.
Thom Hogan’s Complete Guide to the D70 Page 467
119

5. When I know how I’m going to use the image, I manipulate it again, sizing it, sharpening it, and finally saving it into yet another folder (usually PRINT, MAGAZINE, SLIDESHOW, or WEB). (PRINT is full resolution, cropped, and sharpened for my inkjet, MAGAZINE is full resolution but not sharpened, SLIDESHOW is sized to VGA size in JPEG format at maximum quality, and WEB is sized to 400 pixels maximum in the long axis and saved in JPEG format at moderate quality.)
6. As soon as possible, I save the outer folder (created in Step 1) and all of its contents to a backup drive. If I later make significant changes to images in the subfolders, I’ll save a new version to my backup.
Thus, when all is said and done, I can recover the original image and produce versions on demand for several different uses. The structure of the drive looks something like this:
Patagonia Feb 01+---Patagonia0001
+---PatagoniaFebImage0001.NEF+---PatagoniaFebImage0002.NEFetc.
+---Patagonia0002+---PatagoniaFebImage0125.NEF+---PatagoniaFebImage0126.NEFetc.
+---Patagonia0003+---CAMERA
+---PatagoniaFebImage0001.NEF+---PatagoniaFebImage0126.NEFetc.
+---FULL +---PatagoniaFebImage0001FULL.PSD+---PatagoniaFebImage0126FULL.PSDetc.
+---PRINT +---PatagoniaFebImage0001PRINT.PSD
Thom Hogan’s Complete Guide to the D70 Page 468

+---PatagoniaFebImage0126PRINT.PSDetc.
+---MAGAZINE +---PatagoniaFebImage0001MAG.PSD+---PatagoniaFebImage0126MAG.PSDetc.
+---SLIDESHOW +---PatagoniaFebImage0001SLIDE.JPG+---PatagoniaFebImage0126SLIDE.JPGetc.
+---WEB +---PatagoniaFebImage0001WEB.JPG+---PatagoniaFebImage0126WEB.JPGetc.
You’ll note one other thing about my workflow: by looking at the file name, I can tell you what stage the image is at or what it should be used for. (My actual filenames, by the way, are a bit more compact, as I use a number of abbreviations for place and style; but for the purposes of this book, it seemed wise to use longer, clearer names.)
Other Useful Software
Software for digital cameras falls into what arguably is only a few categories. Basically, to fully exploit your D70’s abilities, you need computer software that:
• Converts NEF data to a common format. NEF is a Nikonproprietary format and usually differs a bit from one model of Nikon camera to another. Moreover, a NEF image isn’t “viewable” as is—it requires software to convert the raw sensor data into a viewable image.
• Allows image editing. An image editing program is our “digital darkroom,” allowing us to make changes to cropping, color, contrast, and a whole host of other image attributes.
• Other (specific) image manipulation tools. While the generalized image editors often do very good jobs with
Thom Hogan’s Complete Guide to the D70 Page 469
the types of manipulations you often do, a few things are still better done by a stand-alone (or plug-in) tool: noise reduction is probably the most notable of such tools, but many of us long-term digital photographers also use dedicated tools for sharpening and moiré correction. Also in this category would be panorama software and programs that correct lens defects, such as linear distortion.
• Catalogs or organizes images. You’ll end up with thousands of digital photos. You need a way to organize and later to conveniently find them. If it also handles archiving to CD, this is a big plus.
I could go on endlessly, as it seems like new digital photography software shows up on my desk every day. But this is a book about the D70, so I’m going to limit my choices of programs to talk about and types of software to things that have some relatively direct link back to the camera.
NEF Converters
Nikon Capture was the original NEF converter. It was followed shortly by two shareware converters, Bibble (MacBibble) and Qimage. Later, additional commercial products appeared. Here’s a quick rundown on what I think of these programs as they relate to the D70:
• Bibble http://www.bibblelabs.com (Win/Mac). Bibble was one of the first three converters to understand Nikon NEFs. A version of Bibble is built into Extensis Portfolio (see below) to help it deal with NEF files. Early versions were a bit unstable, but Bibble 2002 3.1a (Windows) and MacBibble 3.1a are fine (US$99). Downloadable 14-day trial versions are available at the Bibble site. Bibble is written by an individual, Eric Hyman, and thus has a slightly erratic update cycle. A new version is promised shortly, and will probably include D70 NEF support. Current and past versions of Bibble have found a range of supporters, but I’m not a large fan of its conversions: they tend to be slightly oversaturated in color and shadows are
Thom Hogan’s Complete Guide to the D70 Page 470

blocked up a bit. On the other hand, MacBibble is one of the fastest converters for OS-X users, especially those with dual processor G5s.
• Capture One DSLR http://www.c1dslr.com (Win/Mac). Phase One has been making digital backs for medium format cameras for years. In 2003 they introduced a version of their very mature converter product that recognizes DSLR formats. Two versions exist: C1 DSLR Pro (US$499) and C1 DSLR SE (US$249). Downloadable 30-day trial versions are available at the C1 site120. The versions differ mainly in batch workflow and very advanced capabilities—the same converter and basic abilities are in both products. As I write this, they are in beta test of a version that understands the D70 NEF format (scheduled for release in May 2004). On previous Nikon DSLRs, my testing of C1 DSLR Pro has shown that it does an excellent job on tough images. The workflow, once learned, is superb and richly featured. The primary drawbacks to the program are the full price of the Pro version and the huge demands it makes on physical resources (memory, disk cache, etc.). However, if I were a working wedding photographer processing huge numbers of images every weekend, I think Capture One might be my first choice in converters.
• Capture http://www.nikonusa.com (Win/Mac). I’ve already covered Capture in detail, but I think a summary comment here to match the opinions I’m making on the other programs is in order. Capture has evolved into a relatively robust and mature program. It certainly can produce conversions that are on par with, if not better than, virtually any other program. The latest batch of features have elevated it to the level where it can serve as your only conversion program. Yes, the user interface is a bit finicky to deal with at first, but it’s simple enough to master quickly. If Capture has a fault, it’s that the batch
By the way, the demo comes with a permanent, free Photoshop moiré removal plug-in. D70 users should download the demo for that handy tool, if nothing else.
Thom Hogan’s Complete Guide to the D70 Page 471
120

processing capabilities aren’t as flexible and powerful as some of the competitors (C1 DSLR Pro and Photoshop, primarily). Still, Capture remains my primary and favorite conversion program.
• Photoshop CS http://www.adobe.com (Win/Mac). Photoshop CS has a raw converter engine built into it. (You may need the free download of Camera Raw 2.2 to understand D70 NEF files if you’re using an older version of Photoshop.) The primary thing about Photoshop is that it is arguably the top image editor program, so getting a converter built-in means that you’ve simplified your software stack considerably (indeed, if you select Image Editing Tools that are Photoshop plug-ins, then you do all your work essentially in one program). Thus, most people find that Photoshop CS simplifies their workflow. Of course, it’s an expensive program (US$695 street), and a complex one at that. That means that to fully utilize it, you really need to learn it well, which means either hitting the books or attending Photoshop workshops. As a NEF converter, I don’t rank Photoshop CS at the top; both Capture and C1 DSLR Pro do, I think, better and more consistent jobs, especially when you hit problematic images (blown channels being one such instance). When I’m in a hurry, I use Photoshop CS. When I want the best possible conversion, I’ll use Capture or C1 DSLR.
• Qimage http://www.ddisoftware.com (Win only). Qimage is another converter written by an individual, in this case Mike Chaney. Unlike the other converters, Qimage was actually written more as a printing front end (it has a wide array of abilities to create multiple images per page, etc., and produces very high quality prints on top-end printers due to its special pyramid interpolation method). But since the files that need to be printed sometimes are NEF images, Mike invested a fair amount of time to build a converter engine underneath the program. Qimage 2004 (US$44.95) does not currently support the D70, but given Mike’s past history, I’m pretty sure it will shortly. Downloadable 30-day trial versions are available on the
Thom Hogan’s Complete Guide to the D70 Page 472

DDI Software site. As for its conversions, Qimage has always been somewhat unique in its conversions. It has probably the best anti-aliasing of any of the converters, and it tends to render NEF images in a very artifact-free manner. The problem with Qimage is that conversion wasn’t its intended primary function and its interface design is befuddling to newcomers. These two things tend to make it a poor choice for some D70 users. On the other hand, if you print NEF images directly with little or no manipulation, you might love the print production capabilities of the program.
Believe it or not, there are perhaps another half dozen converters out there that understand NEF formats. But none that I’ve looked at belong in the same league as the ones I’ve noted above.
My final recommendation with converters is easy: download the free evaluations and try them. You may prefer one program’s conversion (and ease of use) over another’s. If you had to buy only one, Capture121 and Photoshop CS are the clear choices, though.
Image Editors
Photoshop is the image editor by which all other image editing programs are judged. Indeed, so much so that I’m only going to describe three other programs I feel warrant attention:
• GIMP http://www.gimp.org (Unix/Win/Mac). GIMP stands for GNU Image Manipulation Program. What you’re going to like about the program is that it is free. Indeed, if you’re the programming type, you can even get the source code. Installation on a Unix or Linux system is the typical package experience, which is to say, potentially tricky. On Windows and Mac-OS, look for the links to other sites that provide pre-packaged installers unless you’re the
Capture plus Photoshop Elements is the cost conscious way to go if you can’t justify the full price of Photoshop CS.
Thom Hogan’s Complete Guide to the D70 Page 473
121

technical sort and don’t mind figuring out the way the whole thing gets put together (it requires a runtime installation). Overall, the user interface is a bit cluttered and it’s difficult to organize the windows if you don’t have a big monitor. Still, it’s free and it does most everything Photoshop does. Performance is quite decent, though on most of the things I do image-wise, Photoshop has the edge.
• Photoshop Elements http://www.adobe.com (Win/Mac). Photoshop Elements started as an older version of Photoshop that had been “skinned122” to help novices navigate the myriad Photoshop editing features more easily. The original version was a hybrid that didn’t manage to do the concept justice. With version 2.0, the underlying engine has been updated to a new version of Photoshop and the interface tweaked to make more sense on its own. Essentially, Elements has become Photoshop without the ability to directly manipulate some deeper features, such as layers. As such, it carries with it a rich set of abilities for manipulating an image, with the penalty that, for quite a few of the more advanced techniques you’ll see in Photoshop books or articles, you’ll simply bump your head against the top of Elements’ restricted interface. I’m not a big fan of dummied-down software, partly for that reason—you don’t really grow with it beyond a certain point as you do with a deep, rich tool like Photoshop CS. Still, for the basics of photo correction, Elements is as capable as anything else out there, perhaps more so. Given it’s US$99 cost (often deeply discounted), it’s an okay choice if you’re interested in seeing how much you’re going to get into image manipulation.
• Picture Window Pro http://www.dl-c.com (Windows). Written by Jonathan Sachs, one of the original authors of Lotus 1-2-3, Picture Window is a mostly overlooked gem. For quite some time Jonathan’s photographer-orientation
A term software designers sometimes use to refer to putting a new user interface on top of a known set of stable routines.
Thom Hogan’s Complete Guide to the D70 Page 474
122
has shown through (this is not a tool for graphic artists that has morphed into a digital darkroom, like Photoshop has—the Digital Light & Color tag line says it: “serious software for serious photographers”). Better still, the manual is written from a photographer’s viewpoint, and both in the manual, the help, and the on-line support you’ll find plenty of examples that step you through the basics. Arguably the best feature of the program is the way it deals with color correction, but the Advanced Sharpen, chromatic aberration and moiré reduction tools, will win fans, as well. Personally, I think Picture Window Pro matches up very nicely against the typical D70 customer, since it has a photography-centric vocabulary and design. The current version is 3.5 (US$89.95) and a 30-day downloadable trial is available on the Web site.
Hundreds of other image editors exist (indeed, I helped design one back in 1994). But almost none rise to the levels that Photoshop CS and these three do. A few that do—Corel’s Photo Paint 11, for example—just don’t have a clear enough future to be able to recommend them. Given the fast-changing nature of digital photography, you want to learn a tool that’ll be around for awhile, regardless of what camera you’re using a few years down the pike.
My final recommendation with image editors is this: download the Picture Window Pro and Photoshop Elements trials and check them out. If you’re the technical type and don’t mind a fussy installation, download and try GIMP. But if you’re a cut-to-the-chase kind of person, bite the bullet and purchase Photoshop along with Deke McClelland’s Photoshop One-on-One book.
Catalog Programs
Because digital images pile up fast (they’re free!), you’ll need some way to organize them and something that’ll let you find them quickly later.
Thom Hogan’s Complete Guide to the D70 Page 475

I’ll be upfront with you: I’ve now got a terabyte of images on my network and I don’t use a cataloging program most of the time (when I do, it’s Extensis Portfolio, because it supports NEFs so well). You’ll remember back when I first introduced the concept of workflow that I wrote about thinking about the structure of your folders and filenames right from the beginning. Even if you wanted to (for the love of Pete, why?), you can’t drop more than 9999 digital camera files that have their original name into the same folder without having files overwrite one another. But even if you only had, say, 9998 digital photos, would you want all of them named DSC_#### and living in the same folder?
When I transfer images to my computer, I do it with Nikon View and have that program both rename the file and create a new, renamed folder. Eventually that folder gets moved into a very organized drive hierarchy (this is greatly simplified and just a sample):
INTERNATIONAL CHILE
PATAGONIA LAKE COUNTRY
SANTIAGO ATECAMA
PERU CORDILLERA BLANCA
CUSCO MACCHU PICCHU UNITED STATES
AK DENALI
INLAND PASSAGE KENAI
CA NATIONAL PARKS
YOSEMITE SEQUOIA
KINGS CANYON
Thom Hogan’s Complete Guide to the D70 Page 476

JOSHUA TREE STATE PARKS
ANZA-BORREGO ANZA2002-03 ANZA2003-03-14 ANZA2003-03-16 ANZA2004-03-31 ANZA2004-04-04
BODIE And so on123.
Within that folder structure you’ll find the folders with transferred images (I show that in ANZA-BORREGO, above). Thus, since most of my photo requests (and even my own lookups) are place (or trip) related, I can simply open the folder structure pretty much right to the image I’m looking for. On Macintosh OS-X, you can turn on icon preview and set the Finder to show 128x128 preview icons, which means you can usually even find your images visually using my structure. Remember, too, that if the naming method you use is meaningful, the OS search tools can find you images quickly, too.
The drawback with this system is that I pretty much have to have drive space for all my photos, so my demand for storage space grows substantially every year124. The plus is that every image is available essentially on demand, as fast as the server can serve it to my desktop machine.
My “select” images are all IPTC captioned and cataloged in Portfolio. Thus, if a photo editor calls and asks for a “mountain shot on the West coast” I can type a search query using keywords and pull up the relevant shots I consider my “A” work. This can be done both when I’m at home on my server (where I have direct access) or when I’m on the road
123 I also have similar structures for people and for products, the other types of photos I take. 124 I currently periodically back up onto even more hard drives, which then get taken off site. Some photographers I know use DVD-R for this instead.
Thom Hogan’s Complete Guide to the D70 Page 477
(where I only have the catalog file—one reason why I limit it to my best work).
But you should have noted something in that last paragraph: for that to work, I have to do some extra work. Indeed, if you decide to use a cataloging program to organize your photos, you should know up front that the more effort you put into adding keywords and captioning up front, the easier it will be later on to find things in ways that you might need to (or want to) later. At a minimum, you’d need to enter IPTC keyword or category information for each card transfer. Better still would be to enter data for each and every image individually. Fail to do one of those things for even a small portion of the images you transfer and place in your catalog, and you’ll have made your cataloging program into not much more than a file browser. Which brings us back to my folder structure, doesn’t it?
So, before getting to the individual programs, let me state this: spend a lot of time looking at and learning the organizing abilities of the program you select before you shoot too many images. Consider how you might want to find images later. Imagine the types of queries you might make of the image database (is it by date, by name, by category, by person, by trip, by what?). Armed with those things, come up with a data entry plan that you’ll use for every card of images you’ll transfer to your computer. While most of these programs all have some sort of “automatic cataloging” ability, that doesn’t give you much function if all the program has to go on is filename and EXIF data (at least it’ll get date and time from that).
Put another way: use of any of these programs requires an investment of time on your part in order to get any utility back from them. The more upfront time you spend, the less back end time you’ll spend looking for something.
Thom Hogan’s Complete Guide to the D70 Page 478
• ACDSee http://www.acdsystems.com (Mac/Win) US$49.99, downloadable free trial on the site. This cataloging program was designed for consumer use and is thus a little more approachable than some of the others listed here. Now in version 6, the program has been around long enough that it’s user interface has become pretty straight forward and easy to learn. It does have some useful features for JPEG shooters who archive to CDR or DVD-R, but the built-in image manipulation tools are weak. Unfortunately, ACDSee isn’t the best of programs for handling NEF files—most Nikon DSLR users I know of that use ACDSee and shoot NEF end up putting duplicate JPEGs into the same folder so they can get larger previews. ACDSee supports slide shows, printing, and plug-ins (including image editors). ACDSystems likes to promote the PowerPack, which adds ACD FotoCanvas (image editor) and ACD FotoSlate (photo printing). Of these tools, FotoSlate can be fun and useful, letting you make photo calendars, contact sheets, and cards easily. If you think you might like that capability, buy the PowerPack up front rather than buying FotoSlate as an add-in, you’ll save a few dollars. While ACDSee is reasonably sophisticated and mature, it really is targeted at casual and consumer JPEG use, which does describe many D70 users, but not all. Use the trial to find out if it’s for you.
• Adobe Photoshop Album http://www.adobe.com (Win) US$39.99. Okay, the Adobe PR flacks are about to hunt me down and shoot me for what I’m about to write. If I don’t answer your emails, you’ll know what happened. Album is a product in search of itself. While it has a basic set of features that match up well against the competition, it has a feel as if it were created to match up against the competition. In other words, Adobe thought that they might be missing out on a potential digital imaging market and decided they’d better play there, too. But then Adobe decided that Apple might be too much competition for them with iPhoto, so they decided to stick their foot only into the Windows market. Every time to date that Adobe
Thom Hogan’s Complete Guide to the D70 Page 479

has had that tentative “better not compete with Apple” approach on one of their products, that product really hasn’t developed further125. The bottom line is that Album is approachable and affordable, but it isn’t a gem like Photoshop. Indeed, I’m not even sure that it matches up to the level of some of the other consumer-priced programs I list here. Still, it’s the program I bought my mom for tracking her reference photos she uses for painting. That was all she needed. Perhaps it is for you, too, but don’t expect NEF support or other handy abilities. And at US$39.95, worry about Adobe’s long-term support for the product. In a crowded market, they’re not making enough money on Album to commit development and support resources long term. Something will give.
• Cumulus. http://www.canto.com (Mac/Win) US$99.95 for single user version. This image cataloging program is very useful once you start accumulating lots of digital images on your computer (and archiving them onto CD-Rs if you’re smart). Cumulus has a well-deserved reputation for the robustness of the database behind the cataloging function (used by a number of very large publishers in the multi-user version, by the way). The learning curve for Cumulus is high, but in general, it’s worth it. That’s the good news, believe it or not. The bad news is that Nikon has taken all of the automatic hooks to Cumulus out of View and Cumulus 6 has now unlearned how to understand the NEF format. Frankly, that last part dooms the program for Nikon DSLR users. For JPEG users, it’s far too complex. For NEF users, there are now better choices (Portfolio and DigitalPro3). At one time I spent a great deal of time documenting the optimum workflow for the Nikon DSLR/Cumulus user. Indeed, I spent a fair amount of time cataloging my own images with the program, at considerable pain. Today, however, I simply can’t
Adobe, of course, would argue that you can’t compete with a free product. Sure you can, but you have to be a lot better. The proper response when you are undercut in price is to be the best product, bar none. Adobe doesn’t seem to want to play in markets where they might have competition, which bodes poorly for Album.
Thom Hogan’s Complete Guide to the D70 Page 480
125

recommend it to any Nikon DSLR user. At least not until they resurrect its ability to handle NEF well. When they were last asked when that would be, the answer from them was essentially “we’ll mark that down as a user request.”
• DigitalPro3 http://www.proshooters.com (Win) US$259, 30-day downloadable trial on the site. Partly designed by working professional Moose Petersen, DigitalPro centers around the workflow and cataloging functions a working professional needs. Essentially, it’s a replacement for both Nikon View and any other cataloging program, and it does a very decent job filling in for both. Like Nikon View, DigitalPro can handle the card-to-computer transfer with some slick renaming and re-foldering abilities, and doesn’t miss a beat with NEF images (a few other cataloging programs can do the former, but don’t get along well with NEFs). The cataloging options are a little more approachable than the Cumulus or Portfolio design (though these products shine where multiple users or offline cataloging is needed). Since DigitalPro evolved from two Nikon DSLR users’ experiences, the program has long understood NEF files, though the current version does not yet fully support D70 files (you can organize, view, and open them, but IPTC captioning is not yet supported as I write this). Overall, I’d say that the program caters more to a hard-working professional who sells his images than to amateurs (yes, I know there are cut-down versions of DigitalPro, but if these interest you, I think there are better options elsewhere).
• iPhoto http://www.apple.com (Mac) US$49.95 in iLife, or free with a new Mac. Like most Apple products, iPhoto is a slickly designed consumer product. It doesn’t do everything, but what it does do it does well and in a way that won’t take you forever to learn. It handles card-to-computer transfers well (so well, it’ll pop up over Nikon View when a card is inserted or camera connected unless you change your Preferences). Versions of iPhoto prior to 4.0 were interesting, but severely limited in terms of the
Thom Hogan’s Complete Guide to the D70 Page 481
number of images it could handle and its overall performance. However, the current version (4.0.1) handles JPEG images quite well, and may be all you need if your organizational needs are modest. It’s certainly simple enough to use. It’s only when you start shooting lots of NEF images or need support for different color profiles that you’ll start to find iPhoto wanting (hint: look at the next program).
• iView MediaPro http://www.iview-multimedia.com (Mac and Windows) US$160. Free trial version available on the site. iView MediaPro is yet another browser and organizer program, though one that understands NEF format files and has a few other interesting features. If iPhoto hadn’t appeared, I would have presented my simplified Macintosh workflow using iView, as MediaPro can handle the camera download just as well as iPhoto and correctly tag the color space for incoming JPEGs. This OS X and Windows XP program also supports IPTC and EXIF. International users will love the fact that MediaPro is localized in French, German, Italian, Danish, Dutch, Spanish, Portuguese, Russian, Chinese, and Japanese, as well as English. This is a nice, lean (2MB), and fast cataloger with some interesting additional abilities. Don’t confuse MediaPro with Media, a simpler alternative available for both Macintosh and Windows platforms. It lacks a number of the more useful features of MediaPro and that puts it into the iPhoto and ACDSee realm, which is hotly competitive.
Cataloging programs are proliferating rapidly, though few really seem to have been designed with a photographer in mind. Indeed, that was one of the interesting things about iPhoto when it first appeared: it stood out from many of the others just by the fact that it was so photo-centric and seemed to only be oriented towards the things you’d want to do with a photo. Go figure.
Thom Hogan’s Complete Guide to the D70 Page 482

My final recommendation with cataloging programs boils down to this: if you’re serious about taking digital images, organizing them, and then finding them quickly later, you really need something like Extensis Portfolio. Yes, it’s more difficult to learn to use and costs more. But it has proven to be robust and it understands NEF files better than any other cataloger does except for DigitalPro or iView MediaPro. DigitalPro would be my second choice for Windows users, though it seems a bit disorganized in its design. iView MediaPro would be my second choice for Macintosh users. All of the other cataloging programs I mentioned really only become useful if you primarily shoot JPEG images. If that describes you, then check out the free trials and choose the one that you like best.
Other Manipulation Tools
Literally hundreds of software programs oriented towards digital photography have popped up. While we’ve cut the herd down to a handful of useful products already (see above), we’re still left with a handful of useful products that don’t fit any of the easy categories just listed. I’ll try to keep this list short and concentrate on things that are specifically useful.
First up we have noise reduction software. While the D70 isn’t what I’d call a “noisy” camera, I try to run noise reduction software on every NEF image I create with it. You’ll understand why the first time you have to make a serious manipulation on a broad tonal area devoid of much detail: noise lurks underneath virtually every pixel of every image. Most of the time we don’t see it. But as you start running multiple image adjustments (levels fix, contrast adjustment, color correction, white balance adjustment, and so on), you might start to see what I mean. I don’t know of any DSLR that doesn’t produce noise at some normally invisible level, but which can become visible with the right manipulations. So noise reduction is de rigueur for all image processing, in my opinion (it’s also the first thing you should do after converting
Thom Hogan’s Complete Guide to the D70 Page 483

a NEF into a TIFF or Photoshop file). Unfortunately, none of the converters nor any of the image editors have anything approaching the level of noise reduction available in dedicated noise processors.
Windows users have it better than Macintosh users as far as noise reduction goes, though this is slowly changing. The short list of contestants are: Dfine, Neat Image, and Noise Ninja. The first two are available as Photoshop plug-ins, which improves workflow (you can automate processes with Actions and Droplets). I’m not going to call a winner here. At the level of a typical D70 user, it’s really splitting pixels to try to describe why one might be slightly better than another126. In practice, using any one of these is preferable to not using any. Dfine is probably the most approachable for a novice. Noise Ninja is probably the fastest. I personally use Neat Image. Pick as you will, but use one on any image you’re going to print larger than 8x10”.
• Dfine http://www.nikmultimedia.com US$99.95 (Mac/Win, Photoshop plug-in).
• Neat Image Pro http://www.neatimage.com US$59.90 (Win standalone application; Photoshop plug-in adds US$15). Note that you’ll generally want the Pro version, as it deals with 16-bit files (e.g., NEFs).
• Noise Ninja http://www.picturecode.com US$39 (Win; Mac version coming in May; Photoshop plug-in version also expected shortly).
Another similar category is sharpening products. Here things get muddier: Photoshop, Capture, and virtually every other converter and image editor have Unsharp Mask filters or other similar sharpening tools. Used well and wisely, that may be all you need. That said, there are two reasons to go with a third-party, dedicated sharpening tool: (1) the tool has a more
This is the sort of in-depth analysis I’d save for the Nikon DSLR Report, where I spend a lot of time looking at and describing pixel level differences.
Thom Hogan’s Complete Guide to the D70 Page 484
126
understandable interface or one that is more dedicated to the intended use than setting individual parameters (nik Sharpener is an example of the former); or (2) the tool takes a more refined approach to sharpening than applying edge contrast adjustments to data after a mask created by Gaussian Blur is applied127 (PhotoKit is an example of this).
• FocalBlade http://thepluginsite.com/products/photowiz/focalblade US$49.95 (Win, Photoshop plug-in)
• nik Sharpener Pro http://www.nikmultimedia.com US$79.95 Home edition (Mac/Win, Photoshop plug-in). Inkjet and Complete editions are also available at more cost.
• PhotoKit SHARPENER http://www.pixelgenius.com US$99.95 (Mac/Win, Photoshop plug-in).
Finally, the last tool that I’ll describe here that I find useful is a freeware program called Panorama Tools. Besides serving as a very sophisticated stitching program (better than the built-in tools in Photoshop Elements and Photoshop CS, but far more difficult to set up and use), PT also can remove chromatic aberration and barrel distortions. But be forewarned, this is a program that requires some math understanding and has a bewildering interface to novices. Thus, I’m going to point you at a site that shows some of the abilities of the program and provides tutorials rather than the site for the software (it’s referenced in the site I point you to): http://www.caldwellphotographic.com/TutorialsDistortionAnd ColorFringing.html. Another site that you’ll want to look at if this interests you is http://www.path.unimelb.edu.au/~edersch.
That’s what an Unsharp Mask tool does.
Thom Hogan’s Complete Guide to the D70 Page 485
127

Photoshop Actions On the CD you’ll find a few useful Photoshop Actions. To use them:
1. Start Photoshop.
2. Select Actions from the Window menu. This makes the Actions palette visible.
3. On the Actions palette there’s a small right circle button that pops up the palette menu (look at where the cursor is in the example, below):
4. Select Load Actions and navigate to the BYTHOMACTIONS.ATN file on the CD.
5. The new actions should now appear in the Actions palette. To play one, select it and click the play icon at the bottom of the palette.
Thom Hogan’s Complete Guide to the D70 Page 486

Excel Workbooks On the CD you’ll find several Excel workbooks with useful calculators in them:
• Camera Card Calculations. This workbook allows you to calculate how much storage you need for a trip or shoot. It’s especially useful for calculating how much portable storage you might need for a long trip, such as a vacation or photo tour. The workbook can deal with multiple cameras and a mix of RAW and JPEG shooting.
• D70 Flash Calculations. In this workbook you’ll find several worksheets that perform useful flash calculations, including red-eye reduction, bounce flash, multiple flash GN, and several others.
• D70 Macro Calculations. If you use extension tubes or close up lenses, this workbook has several worksheets that help you deal with the focal length and focus changes, as well as the magnification level.
• D70 Depth of Field. You’ve seen parts of this workbook earlier in this eBook (the Depth of Field Preview section). The actual workbook has Near/Far and Hyperfocal Distance tables in both feet and meters.
• D70 Pocket Lens Calculations. This single worksheet is designed for use on a PDA, such as a Pocket PC. It allows you to quickly enter a focal length, aperture, and distance, and for those settings immediately see the near/far and hyperfocal distances in both feet and meters. It’s what I use at workshops when helping students work on depth of field issues.
To use any of the workbooks, you’ll need Excel or another spreadsheet program that understands the Excel format (the original files were created in Excel 2002):
Thom Hogan’s Complete Guide to the D70 Page 487

1. Start Excel.
2. Select Open from the File menu.
3. Use the Open dialog tools to navigate to the CD and select the workbook you want to use.
4. Click the Open button.
Within the workbooks, I’ve consistently used locked cells to keep you from accidentally changing formulas or reference areas. All you have to do is enter new data in the cells that have the light green background and the rest of the worksheet is automatically updated. Note that many of the workbooks have multiple “sheets”, which are reached via the tabs at the bottom of Excel’s work area.
If you decide to move any of the workbooks to a PDA, you may perform some additional steps. For example, since the workbooks are protected, some PDAs won’t let you transfer the file to them until you supply the password. For this eBook, the password for these files is D70 (note that this password is case sensitive; that’s a capital D). Note that you’re on your own should you use the password to unlock these files—I can’t provide support for modification of these files.
If you have a Palm-based PDA, you may need a third-party product such as QuickOffice to use these workbooks on your device. Also, some products have limitations on the number of characters used in formulas, which may make some of the worksheets fail to work. Again, you’re on your own (hint: usually you have to collapse my long variable names to simple cell references; e.g., circle_of_confusion needs to become $A$4, a reduction of 15 characters).
A Word About Computers If someone told you (or you assumed) that digital photography was going to be cheaper than regular photography because you didn’t have to buy film anymore, you’ve probably already realized that this advice was wrong. Digital photography has
Thom Hogan’s Complete Guide to the D70 Page 488
its own needs, and the accessibility of what used to be professional-only capabilities has turned moms, dads, grandmothers, grandfathers, and even children into would-be digital darkroom aficionados.
Obviously, if you have a D70, you almost certainly have a computer. You may, however, find that this computer needs some massive organ donations to keep up with the new demands you’re making of it. In particular:
• Faster please. While a 1.4GHz Celeron or 500MHz PowerPC processor worked just fine for word processing, email, and Web browsing, you’re going to find that pushing pixels around the screen is going to need all the CPU horsepower you can afford. A 2GHz Pentium 4 or 1GHz G4 is going to be the minimum you want if you really get deep into digital darkroom work, especially if you ever batch process NEFs or use noise reduction software. (You don’t need the fastest processor made for either system; indeed, I’d argue that you should buy one or two steps down and use the money saved on RAM.) Bus and memory speed is also important.
• More please. Next time Microsoft tells you that Windows runs perfectly fine in 256MBs of RAM, please laugh in their face and suggest they get real. 512MB is the absolute minimum you should consider for your digital darkroom, and 1GB is a better choice. Macintosh users don’t fare much better under OS-X, so I’d tend to set the same recommendations. RAM = speed when it comes to pushing pixels around in memory, and that’s what digital photography is all about. Don’t under equip your “enlarger.”
• Insatiable appetite. While needing more RAM is required, you’ll soon find that needing more disk storage space is even more imperative. I currently have a terabyte of storage space, and feel that is totally inadequate to my needs (not all of my images are currently available at my fingertips). The more you shoot, the bigger the need for
Thom Hogan’s Complete Guide to the D70 Page 489

permanent storage. Some folk resort to storing photos on recordable CD-Rs (or DVD-Rs these days). While this is a reasonable backup solution, it very quickly becomes problematic from an access and searching standpoint, even with catalog programs that can bridge discs. At a minimum, compromise and keep your best images on an available hard drive and archive the rest on archival-quality CD-R or DVD-R media that is run through a cataloging program. Even then, I’ll bet you’re going to want a 200GB or larger hard drive for images only.
• More pixels. Assuming you have enough RAM and you’ve bought a converter, an image editor, and a cataloging program, having all of them visible at the same time on the screen along with the image you’re working on takes up display real estate. And you’re going to want a big display to look at your pictures in fine detail as you’re working on them. Or maybe a dual-display set up. Pop for the biggest display you can afford.128 These days, CRT or LCD doesn’t make a big difference, though virtually every serious graphic artist I know pushing pixels still swears that CRTs are more easily calibrated, don’t have color shifts due to head position, and are generally easier to evaluate color on. Whatever you get, you’ll need a monitor calibration tool for serious work.
• Put it on paper. You can’t seriously work in digital photography without at least a “proof” printer at your side. Even if you use professional services for final prints, you’ll want the ability to run test prints. On the plus side, a decent inkjet printer is very inexpensive these days (compared to the rest of the paraphernalia you’ll purchase to support your digital photography habit). On the minus side, ink will cost you a fortune unless you do something
After meeting the above criteria first. I’m tackling these in a logical order. More RAM doesn’t fully solve the bottleneck unless you have a processor that can handle moving all those pixels around and a speedy bus (e.g., 800Mhz front side bus instead of 233Mhz). You don’t need more hard disk space until you start working with more images (which requires that processor and RAM). As you start working with more images, you’ll find that the display could use some “juice.” Eventually, this loops back to needing a faster processor.
Thom Hogan’s Complete Guide to the D70 Page 490
128

about it. Most Epsons can be converted to bottle supplies without voiding your warranty (warning, more equipment cost ahead). But if you do any quantity of printing at all, the cost of a good bottle supply system (~$250) will pay for itself in ink cartridges very rapidly.
• Every port in a storm. I’m afraid to show you the cable nest coming out of my main work machine. At present it has 4 Firewire and 8 USB 2.0 ports, and every one has something plugged into it. At a minimum, you need a USB port for the camera, a card reader, and a monitor calibration device. These all usually need to be primary ports, not ones on external add-on hubs (sometimes powered hubs work fine, especially on the Mac, but note that Nikon and a few other companies specifically decline to support their devices on hubs). Fortunately, adding ports is inexpensive and easy if your computer has an available card slot.
The bottom line, unfortunately, is robust. I know of virtually no one who’s seriously started shooting with a Nikon DSLR who hasn’t spent more upgrading or replacing their computer equipment than they did on the original camera and lens (and remember, the original D1x was $4995, so some of those folk had a ways to spend).
You don’t have to go over-your-head gaga about this. But do make sure that your computer system is capable of keeping up with your digital photography. To recap, here are two minimum set-ups that should work well:
Thom Hogan’s Complete Guide to the D70 Page 491

IBM PC 2.0GHz Pentium 4 or faster (AMD Athlon 2000+ or faster) Fastest bus possible (e.g., 800Mhz front side for Pentiums) 512MB RAM or more Extra 200GB hard drive for images CD-R or DVD-R (or DVD+R or DVD±R) for archiving images 19” monitor (LCD or CRT) or larger 3+ free USB ports
Macintosh 1GHz G4 or faster 512MB RAM or more Extra 200GB hard drive for images SuperDrive for archiving images 19” monitor (LCD or CRT) or larger 2 Firewire, 2 USB ports
Thom Hogan’s Complete Guide to the D70 Page 492

Accessories MB-D70 CR2 Holder. Acts as a substitute for the EN-EL3 battery, allowing three CR2 batteries to power the camera. Comes supplied with the camera.
EN-EL3 Rechargeable Li-ion Battery129. This lithium-ion battery pack is a custom enclosure with a proprietary connector, and provides 7.4 volts at 1400mAh. The EN-EL3 battery can power either the D70 or the D100 model. One EN-EL3 battery is supplied with the camera.
EH-5 AC Adapter. Designed to power the D70 or D100, this adapter can be used with voltage sources of 100-120V or 220-240V, with AC cycles of 50-60 Hz. Separate power cables are available for North America, the UK, Europe, Australia, and Japan, although you can use plug adapters in a pinch. Note that when the camera is plugged into an EH-5, the monitor timeouts (10 minute default) still apply!
MH-18 Multi Charger. Designed specifically for the EN-EL3 battery packs, the MH-18 can charge a fully depleted battery in about two hours. This is the charger that is supplied with the camera.
MH-19 Quick Charger. The MH-19 can charge two EN-EL3 battery packs in succession (you simultaneously plug them in, but the charger only charges one at a time). Moreover, it tends to charge an EN-EL3 a few minutes faster than the MH-18.
DK-5 Eyepiece Cup. This small plastic device is slid in place of the eye cup to shield the viewfinder from receiving light. If you take pictures without looking through the viewfinder and your camera isn’t in Manual exposure mode, you must block
Third party versions of this battery exist. Most that I’m aware of are 1300mAh, and they seem to work adequately. However, Nikon has warned users that some imitation batteries—ones sold as Nikon but not made by them—don’t have all the built-in safeguards as do the genuine Nikon batteries. A genuine EN-EL3 has “Nikon Li-ion Battery Pack” labeled in the crease; at least one imitation being sold as “Nikon” doesn’t.
Thom Hogan’s Complete Guide to the D70 Page 493
129

light coming in through the viewfinder, as your exposure will be incorrect when that stray light reaches the metering system. One DK-5 is supplied with the camera.
EC-AD1 PC Card Adapter. CompactFlash cards can be plugged into this small plastic holder so that they can be used in the ATA-compatible PCMCIA socket of a computer (usually a standard feature of portable computers; sometimes called a CardSlot or PC Card slot). When used in this fashion, the CompactFlash card shows up as another disk drive on your computer, and can be accessed and used like any drive (e.g., you can directly copy, rename, delete, and open files on the CompactFlash card). If you purchase an IBM Microdrive, you usually get a similar adapter that holds Type II cards as well as Type I.
ML-L3 Wireless Remote Control. A battery powered infrared remote control for the D70. This is the only currently available method of triggering the D70 from anything other than the shutter release.
BM-4 LCD Monitor Cover. Generally only available from Nikon service stations. While inexpensive (<US$4), Nikon charges shipping and handling fees that can increase the cost significantly if you don’t order multiple parts.
DR-6 Right Angle Viewing Attachment. Useful for macro, copy stand, and ground-level photography, this allows you to look through the viewfinder at a right angle to the camera orientation. But this option is very pricey.
N5005/N6006 Eyecup. If you want a larger eyecup that lets less light into the viewfinder, try using the half-cup accessory originally available for these two film cameras. However, these are getting very difficult to find, and I don’t believe Nikon still makes them. Alternatively, I’ve found generic eyecups at my local dealer that I was able to modify to fit the D70 by clipping a little off the metal springs, so look around.
Thom Hogan’s Complete Guide to the D70 Page 494

Lens Compatibility All D-type and G-type, AF-I, and AF-S lenses are fully compatible with the D70 and have unlimited use of any of the camera’s features.
Other lens types, and a few specific lenses, either limit the features that can be used on the camera or should not be used at all:
Non-D and Non-G type AF lenses:
• 3D matrix metering is not performed (i.e., distance information isn’t used in the meter’s decision).
• Dust reference photos can’t be taken.
AI-P lenses:
• Autofocus is unavailable and the focus confirmation in the viewfinder only works with lenses with maximum apertures of f/5.6 or larger.
• 3D matrix metering is not performed (i.e., distance information isn’t used in the meter’s decision).
AI and AI-S Nikkors, lenses converted to AI:
• Autofocus is unavailable and the focus confirmation in the viewfinder only works with lenses with maximum apertures of f/5.6 or larger.
• Program (P), Aperture-priority (A), and Shutter-priority (S) exposure modes are unavailable.
• Metering is disabled.
• Apertures must be set on the lens.
• Some reflex (mirror) telephoto lenses may not show focus confirmation in the viewfinder; apertures must be set on the lens.
Thom Hogan’s Complete Guide to the D70 Page 495

Auto- Unavailable Metering Other focus Exposure Limitations Limitations
Modes D-type Yes None None None G-type Yes None None Apertures
can’t be set on lens
Autofocus Yes None Matrix None Non-D, metering Non-G isn’t 3D AI-P No None Matrix None
metering isn’t 3D
AI and No P, A, and S No Some slow AI-S, older lens
Metering lenses may not show
converted focus to AI confirmation.
Apertures must be set on lens.
AI lens No None Matrix Flash focal converted metering length may to CPU* isn’t 3D be off. Special No P, A, and S Metering None case: PC may be off Micro if lens is Nikkor shifted or 85mm not at f/2.8 f/2.8D
*See “Questions and Answers,” on page <502>
In addition, several broad caveats apply when using certain types of lenses or accessories:
• PC Nikkor—exposure reading must be taken and set (locked) with the lens in a non-shifted position.
• Teleconverters—the effective aperture must be f/5.6 or faster for autofocus and viewfinder focus confirmation to work. AF-I type converters otherwise have the same compatibility as AF-I type lenses (i.e., full), while older AI type converters have the same compatibility as AI type lenses (i.e., limited).
Thom Hogan’s Complete Guide to the D70 Page 496

• Bellows and extension tubes—have the same compatibility as AI type lenses, and the effective aperture must be f/5.6 or faster for viewfinder focus confirmation to work.
Finally, some individual lenses have additional limitations:
• TC-16A AF Teleconverter is incompatible and shouldn’t be used.
• Non-AI lenses are incompatible, may cause damage to the camera, and shouldn’t be used (note that most non-AI lenses can be converted to AI).
• Lenses that require the AU-1 focusing unit (e.g., the Nikkor 400mm f/4.5, Nikkor 600mm f/5.6, Nikkor 800mm f/8, and the Nikkor1200mm f/11) are incompatible and shouldn’t be used.
• Fisheye lenses whose rear element sticks into the mirror box and that require mirror lockup (e.g., the Nikkor 6mm f/5.6, Nikkor 8mm f/8, and Nikkor 10mm f/5.6 OP) are incompatible and shouldn’t be used.
• Nikkor 21mm f/4 lenses are incompatible and shouldn’t be used. (Nikon’s note in the manual implies that a later version of this lens might be compatible, but this lens has a rear element that sticks into the mirror box.)
• The K1, K2, PK-1, PK-11, BR-2, and BR-4 rings are incompatible and shouldn’t be used.
• Nikkor ED 180–600mm f/8 with serial numbers 174041 to 174180 are incompatible and shouldn’t be used.
• Nikkor ED 360–1200mm f/8 with serial numbers 174031 to 174127 are incompatible and shouldn’t be used.
• Nikkor 200–600mm f/9.5 with serial numbers 280001 to 300490 are incompatible and shouldn’t be used.
• Lenses for the F3AF (e.g., the Nikkor 80mm f/2.8, Nikkor 200mm f/3.5, and TC-16 Teleconverter) are incompatible and shouldn’t be used.
Thom Hogan’s Complete Guide to the D70 Page 497

• PC Nikkor 28mm f/4 with serial numbers of 180900 or earlier are incompatible and shouldn’t be used.
• PC Nikkor 35mm film f/2.8 with serial numbers 851001 to 906200 are incompatible and shouldn’t be used.
• PC Nikkor 35mm film f/3.5 is incompatible and shouldn’t be used. (Note: Nikon’s manual implies that a newer version of this lens can be used, but Nikon only made one version of this lens! Perhaps they were referring to the later f/2.8 version.)
• Old style Nikkor 1000mm f/6.3 Reflex is incompatible and shouldn’t be used. (This apparently refers to the version that was intended for rangefinder cameras, which have a different lens mount.)
• Nikkor 1000mm f/11 Reflex with serial numbers 142361 to 143000 is incompatible and shouldn’t be used.
• Nikkor 2000mm f/11 Reflex with serial numbers 200111 to 200310 is incompatible and shouldn’t be used.
Thom Hogan’s Complete Guide to the D70 Page 498

Specifications Feature Specification Operating temperature 32-104°F (0-40°C) Operating Humidity <85%
CCD Sensor Size .93 x .61” (23.7 x 15.6mm) Final Image Size 3008 x 2000, 2240 x 1488, or
1504 x 1000 pixels Sensor Dynamic Range 12 bits ISO Sensitivity 200-1600 in 1/3 stop
increments File Formats JPEG (8-bit) and compressed
NEF (12-bit) JPEG Compression 1:4 at Fine, 1:8 at Normal, 1:16
at Basic Storage Media CompactFlash Type I or Type II
Motor Drive 3 fps, 9 frame buffer (4 with NEF)
Self Timer 2, 5, 10, 20 seconds, user settable
White Balance Auto, 6 manual modes, 7-step modification, Manual
Autofocus Modes Single-Servo (S), Continuous-Servo (C), Manual (M)
Autofocus Detection Range TTL phase detection using five sensors (single area or dynamic)
Autofocus Range -1 to 19 EV (at ISO 100) Autofocus Module Nikon Multi-CAM 900 Autofocus Features AE/AF lock button, AF lock on
partial shutter release, close-subject priority option, viewfinder focus confirmation
Thom Hogan’s Complete Guide to the D70 Page 499

Metering Modes
Metering Range
Exposure Compensation
1005-pixel matrix, center-weighted (75/25, circle alterable), spot (1%) 0-20 EV (matrix and center-weighted, ISO 100), 0-20 EV (spot metering, ISO 100) -5 to +5 stops in 1/3 or ½ stop increments
Exposure Bracketing
Metering Features
2 or 3 images at increments of 1/3-stop or ½-stop User selectable center-weighted area, five spot metering areas, spot metering follows focus*, AE/AF lock button
Shutter Mechanical to 1/250, Electronic at faster shutter
Shutter Speeds speeds 30 seconds to 1/8,000 second, in 1/3-or ½-stop intervals, Bulb
Maximum Flash Sync Flash contacts Flash modes
1/500 second ISO-type hot shoe Balanced Fill Flash (i-TTL); Standard TTL; Automatic;
Internal flash
Manual; Red-Eye Reduction; Slow Sync; Rear Curtain Sync i-TTL or Manual flash (full power to 1/16 power) at GN 56 (17m) at ISO 200; Commander mode to control remote flashes
LCD Monitor 1.8” 130k TFT Playback Functions Single frame, thumbnail
playback (9 images), slide show, histogram, highlight display, thumbnail playback,
Thom Hogan’s Complete Guide to the D70 Page 500

magnification of playback image
Viewfinder Coverage 95% Viewfinder Eyepoint 18mm (at –1.0 diopter); 0.75
magnification Viewfinder Adjustment -1.6 to +0.5 diopters
(accessories extend range) Focus Screen B-type BriteView clear matte
screen provided; with on-demand E-type grid
LCD Coverage 100% coverage, both dimensions
LCD Protection nearly transparent BM-4
Video Output NTSC or PAL (user selectable)
Computer Interface USB 1.1 Size 5.5” wide x 4.4” tall x 3.1”
deep (140mm wide x 111mm tall x 78mm deep)
Weight 21 ounces (595g) (w/o battery or card)
* Requires D-type or G-type lens
Thom Hogan’s Complete Guide to the D70 Page 501
Getting Service Assuming that you bought an officially imported camera and not a gray market one, getting service for the D70 should be relatively straightforward. In practice, both Nikon and users make it more difficult than it should be.
I won’t go into the gray market problem here (see http://www.bythom.com/warranty.htm), as it’s an entirely different issue and varies considerably in how it’s handled around the world.
The real problem is that users and Nikon both make assumptions that sometimes are contradictory. Here are the big problems I keep hearing from Nikon users who have troubles with NikonUSA and a few of the other subsidiaries:
• Not under warranty. Unless NikonUSA receives a copy of the warranty card and a copy of a dated sales receipt showing the purchase of the item in question, they typically assume that product is out of warranty. Even for a product that hasn’t been out for a year (the D70), it sure as heck helps to send Nikon a copy of the original purchase receipt (tip: always get the store to put the serial number on the invoice). Registering your product on Nikon’s Web site or sending in the Product Registration card is not enough.
• Second-hand purchase. Nikon warranties aren’t transferable. Again, that purchase receipt is important.
• Impact damage. Don’t try to fool Nikon and claim your camera doesn’t focus and that it should be repaired under warranty after you dropped it and bent the lens mount. Some problems simply occur only because of poor user handling (bent aperture arm and lens mount being two obvious ones). But don’t allow multiple problems to be grouped automatically by Nikon under impact damage. If your camera had a persistent card writing problem before
Thom Hogan’s Complete Guide to the D70 Page 502

you dropped it and damaged the lens mount, make sure that Nikon knows that and that you expect them to fix that problem under warranty.
• Slow service. With new products, service usually slows for all but NPS members (professional photographers). Even they sometimes encounter parts shortages that delay repairs. But a more frequent problem is that Nikon didn’t get all your information and/or is waiting for something from you (repair authorization, proof of purchase, shipping address, etc.). We’ll deal with that in a minute.
• Problem not repaired. A frequent complaint goes something like this: user sends Nikon a camera body with the complaint that focus isn’t accurate, Nikon puts the camera on their test station and finds it is within tolerance, Nikon sends the camera back to the user without changing anything, user complains that the camera wasn’t repaired. You won’t like hearing this, but that’s your fault if it happens to you (I’ll tell you how to avoid it in a moment).
• Small part = expensive repair. Most repairs require tear down of at least part of the camera and quite a bit of testing time. Beyond that, most parts are replaced modularly (e.g., you get an entire new shutter, not just one piece of it, or, heaven forbid, you get an entirely new CCD and filter assembly if you break the filter).
• Where’d it go? NikonUSA ships to street addresses only. Sometimes people wait for return of their product while Nikon waits for a street address instead of a PO Box.
• Diagnosis overload. Once Nikon opens up a camera to be repaired, they generally diagnose any all problems that would need to be fixed to return the camera to factory specifications. Thus, you might send the camera in to be fixed under warranty for a shutter problem and discover you’re going to be billed for impact damage on a bent lens mount. You probably want that fixed, but since you weren’t expecting to have to approve an estimate for
Thom Hogan’s Complete Guide to the D70 Page 503

repair costs, you never followed up with Nikon in a timely fashion and your camera sits waiting for authorization.
Okay, now that I’ve scared you, how do you get quick and complete service out of Nikon? Here’s my list, compiled after talking and corresponding with dozens of users who’ve had troubles with NikonUSA service:
• Document. Take the time to write a clear, complete, and if appropriate, illustrated letter that describes exactly the problem you’ve encountered. If the problem intersects image quality, send a printout of an image that clearly shows the problem. In extreme cases, I’d send a file on CD. What kinds of things am I talking about? Dead pixels, excessive hot pixel problems, other image artifacts, blank or incorrectly written images, and so on. Don’t write a novel; make your note concise and to the point. If you have an expectation, state it. If you included anything other than the item you want repaired, list those things in your note, along with all serial numbers.
• Provide. Find the original warranty form, make a copy of the purchase invoice for the product, and staple them to the note you wrote. Provide these items even if the product is out of warranty! Make sure the serial number is visible on all of these things and matches the item you’re sending in! If the item has been repaired within the last three months, let Nikon know and provide a copy of anything you received back with that previous repair.
• Include. If the problem is exhibited with a particular accessory, you need to send the accessory! Got flash problems with your D70? Send the camera and your flash. Got focus problems? Send the camera, a lens that triggers the problem, and a photo that shows the resulting out-of-focus image problem. Note that if you send an accessory like this, you need to provide the warranty form and purchase invoice for it, too! (And don’t send third-party
Thom Hogan’s Complete Guide to the D70 Page 504

flash units and lenses to Nikon; obviously, they don’t warranty those.)
• Strip. Don’t send the battery (unless you’re having power problems), don’t send your storage card (unless you’re having trouble writing to it and it’s one of Nikon’s tested ones), and don’t send your neckstrap. I actually get a bit overboard here: I take off the eyecup and color LCD protector. On the flip side: do put the body cap on.
• Be accessible. Nikon’s NPS repair request form has places for home phone, work phone, fax, and email address. Seems like a good idea to provide them, but I go even further: I tape a business card to the camera. Also, PO Boxes are no-no with Nikon: give them a street address to ship back to.
• Follow up. In the US, that usually means phoning or checking the Web site that Nikon will point you to once they receive and log your item into service. Be sure you have any number Nikon provides you, along with the serial numbers of the items you sent.
• Authorize. If your repair is going to cost you something (as in the case of impact damage), you’re at some point going to need authorize payment. Usually you should wait for Nikon to ask for it. But if you want to expedite the process, write a note that says “I hereby authorize Nikon to make any repair of up to US$xxx and charge this to my Mastercard/Visa ####### expiration x/xx.” You must sign this authorization. (Nikon will also ship COD, though this is always sent UPS Second Day delivery in the US.)
By now you’re probably wondering about how you get in touch with Nikon service. After all, the phone number is conspicuously missing from the materials provided with the camera. In the US, call 1-800-NIKON-SV (that’s 1-800-645-6678 if you’ve still got a rotary phone that doesn’t have the letters on it). Foreign readers will have to consult the Web site for their local distributor. I once tried to put every number worldwide into one of my books, but some of them changed so rapidly, it became a chore to stay up to date.
Thom Hogan’s Complete Guide to the D70 Page 505

In the US, your equipment will need to be sent to:
Nikon Inc. Attn: Service Dept. 1300 Walt Whitman Road Melville, NY 11747-3064
Or
Nikon Inc. Attn: Service Dept. 19601 Hamilton Avenue Torrance, CA 90502-1309
Thom Hogan’s Complete Guide to the D70 Page 506

Questions and Answers Q: Are there different models of D70 in different parts of the world? A: No. A D70 sold in the United States is the same as the camera sold in Japan and Europe. Servicing and warranty policies tend to vary between countries and regions.
Q: Can I have older manual focus lenses modified to work better with a D70? A: With a few minor caveats, yes. First, if the lens is pre-AI, you should have the lens converted to AI (see http://www.aiconversions.com). Once the lens is AI-compatible, you can mount it on the D70 (some features, such as metering, remain inoperative). To get the lens to meter, you must add what Nikon calls a “CPU chip” to the lens. You can find details about a service to add CPU chips to AI or AI-S lenses, which is all that’s really needed to enable most features of the camera (other than autofocus), by turning your browser to Rolland Elliott’s Web site: http:// home.carolina.rr.com/headshots/Nikonhome.htm. Rolland’s been doing this conversion for several years, and it is well worth the ~US$80 cost if you have a favorite older Nikkor lens. Note, however, that lenses with certain maximum apertures (f/1.2, f/2.5, f/8, and f/11; also zoom lenses with variable maximum apertures) can’t be converted this way, and that the focal length setting communicated to the flash (and flash exposures in i-TTL mode) may be incorrect. Nevertheless, there’s really no drawback to having CPUs added to your older lenses, as the changes are only made in the lens mount, and manual focus 35mm film camera bodies will ignore the CPU.
Q: Is it safe to let the D70 and CompactFlash cards go through airport X-ray machines? A: Yes, though the camera should normally be turned OFF before doing so. The danger is not the X-ray itself (as it is with film), but that these devices tend to have strong magnetic
Thom Hogan’s Complete Guide to the D70 Page 507

fields associated with them. But the brief exposure in an X-ray machine, especially the relatively low-powered ones used in the United States, shouldn’t have any impact on the camera or the CompactFlash media. Likewise, your computer equipment shouldn’t have problems with X-ray machines, either.
Q: I’ve seen CompactFlash cards marked with 8x or 16x speeds. How do I tell which cards are the fastest? A: First, Lexar uses those labels in reference to the peak access speed of a CD-ROM drive. In other words, an 8x CompactFlash isn’t necessarily half as fast as a 16x card. Virtually all of the actual memory chips used in CompactFlash cards are produced by a small handful of manufacturers, and the technical specifications differ little between them. Lexar first made improvements in write speed by implementing an “erase-ahead” function, not by using faster chips. That said, field-testing has shown that the range between various CompactFlash cards can be somewhat dramatic between the lower cost generic cards and state-of-the-art brand name cards. A very good report on a handful of different cards can be found at http://www.robgalbraith.com.
Q: What’s the CPU that Nikon keeps referring to in lenses? Do Nikon lenses really have a computer in them? A: No, there’s not really a computer in Nikon lenses. There is a small chip that provides two or three pieces of information to the camera: the maximum aperture, the focal length, and (on D-type and later lenses) a broad indication of the focus distance currently set. (The focus distance is not exact, but rather one chosen from a small set of possible distances.) Is it really important to use D-type lenses on a D70? If you use flash, yes. With a lens of less than 100mm in focal length and at focus distances of 15 feet (5m) or less, you’ll see visible differences in flash exposures between non-D and D-type lenses in TTL flash modes. With longer focal length lenses and longer focus distances, flash exposures don’t vary much, if at all. In non-flash exposures, you won’t see much difference in
Thom Hogan’s Complete Guide to the D70 Page 508

exposures between non-D and D-type lenses at the same focal length and focus distance, despite Nikon’s claims for improved “3D matrix metering.” What does make a difference for both flash and non-flash use is the maximum aperture information, which is required for the D70 to provide Program and shutter-preferred exposure modes, as well as matrix metering.
Q: Are there any underwater housings for the D70? A: Yes, several have been introduced. Ikelite has a #6807 housing (US$1200, ports extra) that can be used up to 200 feet (60m) http://www.ikelite.com/web_pages/2dslr_d70.html. Sea & Sea has the DX-D70 underwater housing, also good to 200 feet (US$1995 street) http://www.seaandsea.com. As I write this, Nexus has a D70 housing in development; http://www.marinecamera.com. Given the popularity of the camera, I wouldn’t be surprised to see more housings appear shortly.
Q: Can I attach a bellows unit to the D70? A: Yes. The Nikon PB-6 bellows can be attached by using a compatible extension ring (PK-11a, PK-12, PK-13, or PN-11) between the bellows and the camera. Nikon also warns that you may need the PB-6D bellows spacer for some situations. Note that all of these devices are AI compatible, which means no metering will be performed by the D70 and you’ll have to set the camera to Manual exposure mode.
Q: Can the D70’s software be upgraded? A: Yes. As I write this, there have been no upgrades. And, yes, the software will be user upgradeable according to Nikon officials.
Q: Can the D70’s CCD be upgraded later? A: No.
Q: Is there a software development kit (SDK) available to deal with communication to and from the camera and the NEF file format?
Thom Hogan’s Complete Guide to the D70 Page 509

A: Yes and no. You can apply to Nikon for access to some key header files and other information. But an SDK, per se, isn’t available, and access to the header information seems to be a bit arbitrary—some developers find it easy to get, others difficult (and it varies between Europe, the US, and Asia). Again, this is a shame, as it limits the availability of software that might be useful to a photographer. For instance, if an SDK were available, I’d probably have already written several simple utilities to quickly automate my most frequent interactions with the camera.
Thom Hogan’s Complete Guide to the D70 Page 510