Embed Size (px)
Citation preview
En
Printed in JapanTT4I02500801 (S033) 11
8MSA0611-A
No reproduction in any form of this manual, in whole or in part (except for brief quotation in critical articles or reviews), may be made without written authorization from NIKON CORPORATION.
S
B-8
00
(En)
SB-800Autofocus Speedlight
Instruction Manual
i 125
IISO sensitivity...........................................24ISO sensitivity factors...............................43Icons.........................................................13
LLCD panel illuminator.............................119LCD panel ..............................................119
MMASTER .............................................15, 72MODE button............................................30Manual exposure (M) mode.....................29Manual flash .............................................46Manual mode ...........................................42Master flash unit .......................................72Metering system.......................................28Minimum recycling time ...........................19Modeling illuminator .................................66Monitor Preflashes....................................36Mounting foot lock lever...........................22Multi Selector............................................12Multiple flash operation............................72Multiple flash shooting using cords .........90
NNO AF-ILL ................................................62Nikon Creative Lighting System.................5Nikon Diffusion Dome.............................101Non-CPU lenses.......................................16Non-TTL auto flash...................................40Non-TTL auto flash mode.........................38Number of flashes..............................19, 48
OON/OFF button .........................................12
PPower zoom function................................26Programmed auto (P)...............................28
QQuick Recycling Battery Pack .................64
RREMOTE...................................................72Ready-light .........................................20, 33Rear-curtain sync .....................................59Red-eye reduction control........................58Red-eye reduction with slow-sync
flash .....................................................58Remote flash unit .....................................72Repeating flash ........................................48Reset ........................................................12
SSU-4 type wireless multiple flash
shooting ...............................................84Selecting the distance unit (m or ft.)........70Shutter-priority auto exposure (S) ............29Slow-sync flash mode ..............................58Soft Case....................................................6Sound monitor ..........................................89Speedlight Stand......................................75Speedlight parts and their functions........10Standard TTL flash ...................................37Standby function ......................................21Supplied accessories.................................6
TTTL mode .................................................37Test firing ..................................................20
UUnderexposure value in the TTL
auto flash mode ...................................33Using the built-in bounce card ..............101
WWide-Area AF-Assist Illuminator ..........5, 62Wireless flash mode.................................69Wireless master flash unit ........................72Wireless multiple flash shooting...............72Wireless remote flash ...............................72
ZZoom-head position .................................26
Ref
eren
ce in
form
atio
n
For your safety
Before using your product, please read the following safety precautionscarefully and thoroughly to ensure correct and safe use and to helpprevent damage to your Nikon product or injury to yourself or others.For quick reference by those who use the product, please keep thesesafety instructions near the product.
In this manual, safety instructions are indicated with these symbols:
Disregarding instructions marked with this symbol couldresult in personal injury, or death and property damage.
Disregarding instructions marked with this symbol couldresult in property damage.
WARNING
CAUTION

ii
WARNINGS for Speedlights
1 If corrosive liquids seep from the batteries and get in your eyes,immediately wash your eyes with running water and consult with adoctor. Your eyes could be seriously damaged if they are not treated quickly.
2 If corrosive liquids seep from the batteries and come in contact withyour skin or clothes, wash immediately with running water. Prolongedcontact could injure your skin.
3 Never attempt to disassemble or repair the flash unit by yourself, as thiscould result in you receiving an electric shock and could also cause the unitto malfunction; such malfunction could lead to personal injury.
4 If the flash unit is dropped and damaged, do not touch any exposedinterior metal parts. Such parts, especially the speedlight’s capacitor andassociated parts, could be in a high-charge state and if touched couldcause an electric shock. Disconnect the power or remove the batteries andbe sure that you do not touch any of the product’s electrical components,and then bring the flash unit to your local Nikon dealer or authorized servicecenter for repair.
5 If you detect heat, smoke or notice a burning smell, immediately stopoperation and remove the batteries to prevent the unit from catching onfire or melting. Allow the flash unit to cool down so that you can safely touchit and remove the batteries. Then bring the unit to your local Nikon dealer orauthorized service center for repair.
6 The flash unit should never be submerged in liquid or exposed to rain,saltwater or moisture unless it is properly protected from the liquidsand moisture. Underwater use requires a certified underwater housing.If water or moisture gets inside the unit, this could cause the unit to catch onfire or cause an electric shock. In such instances you should immediatelyremove the batteries from the speedlight and then bring the unit to yourlocal Nikon dealer or authorized service center for repair.Note: electronic devices that are penetrated by water or moisture are often
not economically repairable.7 Do not use the unit in the presence of flammable or explosive gas.
If the flash unit is operated in areas where there is a flammable gas,including propane, gasoline and dust, it could cause an explosion or fire.
8 Do not fire the flash unit directly at the driver of a moving car, as thiscould temporarily impair the driver’s vision and cause an accident.
9 Do not fire the flash unit directly into the eyes of someone that is atclose range, as it could damage their eyes’ retinas. Never fire the flash unitcloser than 1 meter from infants.
Pre
para
tion
iii
For your safety
10 Do not fire the unit while the flash head is touching a person or object.Such use can result in the person being burned, and/or their clothes ignitingfrom the heat of the flash’s firing.
11 Keep small accessories out of the reach of children to avoid thepossibility of the accessory being swallowed. If an accessory is accidentallyswallowed, immediately consult with a doctor.
12 Use only the batteries specified in this instruction manual. Batteriesother than those specified could leak corrosive liquids, explode or catch onfire or otherwise not perform satisfactorily.
13 Do not mix battery types, brands or old and new batteries, as thebatteries could leak corrosive liquids, explode or catch on fire. When usingmore than one battery in a product, always use identical batteries that werepurchased at the same time.
14 Non-rechargeable batteries such as manganese, alkaline-manganeseand lithium batteries should never be charged in a battery chargerbecause they could leak corrosive liquids, explode or catch on fire.
15 When using standard size (AA, AAA, C, D) or other commonrechargeable batteries such as NiCd and Ni-MH battery types, or whenrecharging them, be sure to use only the battery charger specified bythe battery maker and read the instructions thoroughly. Do not rechargethese batteries with their terminals reversed in the charger or before thebatteries have cooled off sufficiently because they could leak corrosiveliquids, explode or catch on fire. The same caution also applies to using therechargeable batteries that may be supplied by the photo product’smanufacturer.
CAUTIONS for Speedlights
1 Do not touch the flash unit with wet hands, as this could cause an electric shock.
2 Keep the flash unit away from children to prevent them from putting theunit in or near their mouth, or otherwise touching a dangerous part ofthe product; as such contact could cause an electric shock.
3 Do not apply strong physical shocks to the unit, as this could cause amalfunction that could cause the unit to explode or catch on fire.
4 Never use active agents that contain flammable substances such aspaint thinner, benzene or paint remover to clean the unit, and neverstore the unit in locations containing chemicals such as camphor andnaphthalene, as this could damage the plastic case, cause a fire or causean electric shock.
iv
5 Remove any batteries from the unit before storing the unit for a longtime to prevent the unit from catching on fire or leaking corrosive liquids.
WARNINGS for Batteries
1 Never heat or throw batteries into a fire, as this could cause the batteriesto leak corrosive liquids, generate heat or explode.
2 Do not short-circuit or disassemble the batteries because this couldcause the batteries to leak corrosive liquids, generate heat or explode.
3 Do not mix battery types, brands or old and new batteries, as this couldcause the batteries to leak corrosive liquids, generate heat or explode.
4 Do not install batteries in the reverse direction as this could cause thebatteries to leak corrosive liquids, generate heat or explode. Even if onlyone battery is installed in reverse it will cause the speedlight tomalfunction.
5 Be sure to use the battery charger specified by the battery maker toavoid the possibility of batteries leaking corrosive liquids, generating heat orexploding.
6 Do not carry or store batteries along with metallic materials such asnecklaces and hair pins because such materials could cause the batteriesto short-circuit, leading to battery leakage, heat generation or an explosion.In addition, specially when carrying a quantity of batteries, place themcarefully in a storage case that prevents the battery terminals fromtouching another battery’s terminals because if they touch in reverseorder it could also cause the batteries to short-circuit, leading to batteryleakage, heat generation or an explosion.
7 If corrosive liquids seep from the batteries and get in your eyes,immediately wash your eyes with running water and consult with adoctor. Your eyes could be seriously damaged if they are not treatedquickly.
8 If corrosive liquids seep from the batteries and come in contact withyour skin or clothes, wash immediately with running water. Prolongedcontact could injure your skin.
9 Always follow the warnings and instructions printed on the batteries toavoid activities that could cause the batteries to leak corrosive liquids,generate heat or catch on fire.
10 Be sure to use only batteries specified in this instruction manual, toavoid the possibility of batteries leaking corrosive liquids, generating heat orexploding.
Pre
para
tion
v
For your safety
11 Never open the casing surrounding batteries or use batteries whosecasing has been breached as such batteries could leak corrosive liquids,generate heat or explode.
12 Keep batteries out of the reach of children to help avoid the possibility ofthem being swallowed. If a battery is accidentally swallowed, immediatelyconsult with a doctor.
13 Batteries should not be submerged in water, exposed to rain, moistureor saltwater unless they are properly protected from the wetenvironment. If water or moisture gets inside the batteries, this could causethem to leak corrosive liquids or generate heat.
14 Do not use any battery that appears abnormal in any way, including achange in color or shape. Such batteries could leak corrosive liquids orgenerate heat.
15 Stop recharging rechargeable batteries if you notice that recharging isnot completed within the specified time to help prevent the possibility ofthe battery leaking corrosive liquids or generating heat.
16 When recycling or disposing of batteries, be sure to insulate theirterminals with tape. If the battery’s positive and negative terminals short-circuit after coming into contact with metallic objects, it could cause fire,heat generation or an explosion. Dispose of used batteries in accordancewith local government regulations.
17 Non-rechargeable batteries should never be charged in a batterycharger because they could leak corrosive liquids or generate heat.
18 Remove dead batteries from your equipment immediately, as they couldleak corrosive liquids, generate heat or explode.
CAUTION for Batteries
Do not throw or apply strong physical shocks to the batteries as thiscould cause batteries to leak corrosive liquids, generate heat or explode.
1
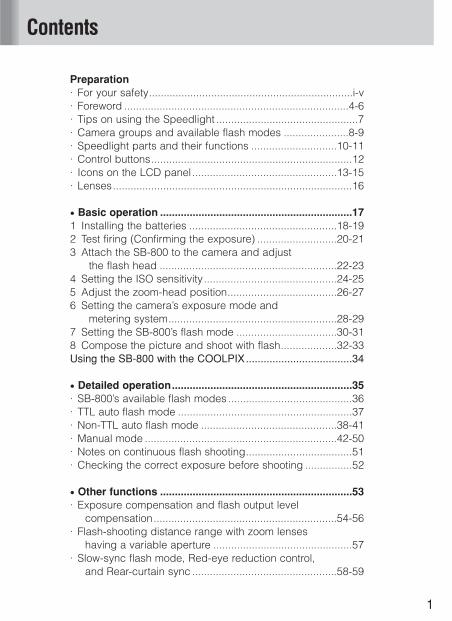
Contents
Preparation· For your safety.....................................................................i-v· Foreword ............................................................................4-6· Tips on using the Speedlight ................................................7· Camera groups and available flash modes ......................8-9· Speedlight parts and their functions .............................10-11· Control buttons....................................................................12· Icons on the LCD panel.................................................13-15· Lenses.................................................................................16
• Basic operation .................................................................171 Installing the batteries ..................................................18-192 Test firing (Confirming the exposure) ...........................20-213 Attach the SB-800 to the camera and adjust
the flash head ............................................................22-234 Setting the ISO sensitivity.............................................24-255 Adjust the zoom-head position.....................................26-276 Setting the camera’s exposure mode and
metering system.........................................................28-297 Setting the SB-800’s flash mode ..................................30-318 Compose the picture and shoot with flash...................32-33Using the SB-800 with the COOLPIX....................................34
• Detailed operation.............................................................35· SB-800’s available flash modes ..........................................36· TTL auto flash mode ...........................................................37· Non-TTL auto flash mode ..............................................38-41· Manual mode .................................................................42-50· Notes on continuous flash shooting....................................51· Checking the correct exposure before shooting ................52
• Other functions .................................................................53· Exposure compensation and flash output level
compensation..............................................................54-56· Flash-shooting distance range with zoom lenses
having a variable aperture ...............................................57· Slow-sync flash mode, Red-eye reduction control,
and Rear-curtain sync .................................................58-59
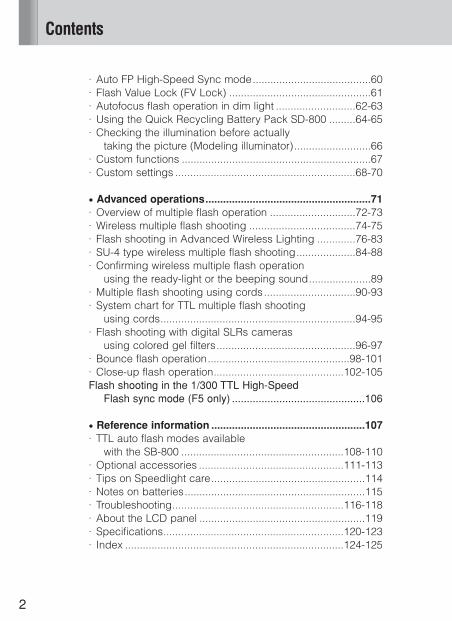
2
Contents
· Auto FP High-Speed Sync mode........................................60· Flash Value Lock (FV Lock) ................................................61· Autofocus flash operation in dim light ...........................62-63· Using the Quick Recycling Battery Pack SD-800 .........64-65· Checking the illumination before actually
taking the picture (Modeling illuminator)..........................66· Custom functions ................................................................67· Custom settings .............................................................68-70
• Advanced operations........................................................71· Overview of multiple flash operation .............................72-73· Wireless multiple flash shooting ....................................74-75· Flash shooting in Advanced Wireless Lighting .............76-83· SU-4 type wireless multiple flash shooting....................84-88· Confirming wireless multiple flash operation
using the ready-light or the beeping sound.....................89· Multiple flash shooting using cords...............................90-93· System chart for TTL multiple flash shooting
using cords..................................................................94-95· Flash shooting with digital SLRs cameras
using colored gel filters...............................................96-97· Bounce flash operation................................................98-101· Close-up flash operation............................................102-105Flash shooting in the 1/300 TTL High-Speed
Flash sync mode (F5 only) .............................................106
• Reference information ....................................................107· TTL auto flash modes available
with the SB-800 .......................................................108-110 · Optional accessories .................................................111-113· Tips on Speedlight care....................................................114· Notes on batteries.............................................................115· Troubleshooting..........................................................116-118· About the LCD panel ........................................................119· Specifications.............................................................120-123· Index ..........................................................................124-125
3
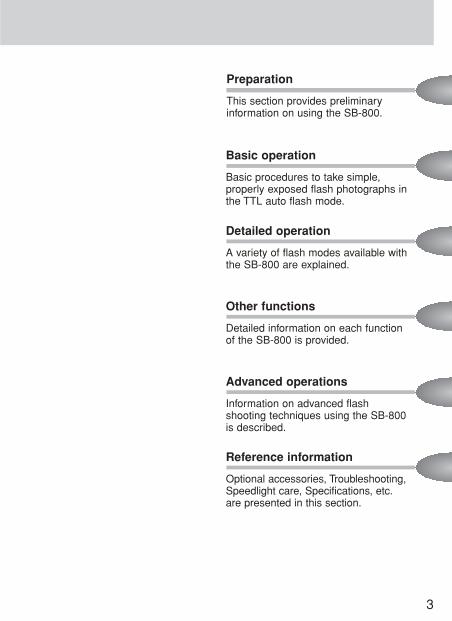
Preparation
This section provides preliminaryinformation on using the SB-800.
Basic operation
Basic procedures to take simple,properly exposed flash photographs inthe TTL auto flash mode.
Detailed operation
A variety of flash modes available withthe SB-800 are explained.
Other functions
Detailed information on each functionof the SB-800 is provided.
Advanced operations
Information on advanced flashshooting techniques using the SB-800is described.
Reference information
Optional accessories, Troubleshooting,Speedlight care, Specifications, etc.are presented in this section.
4
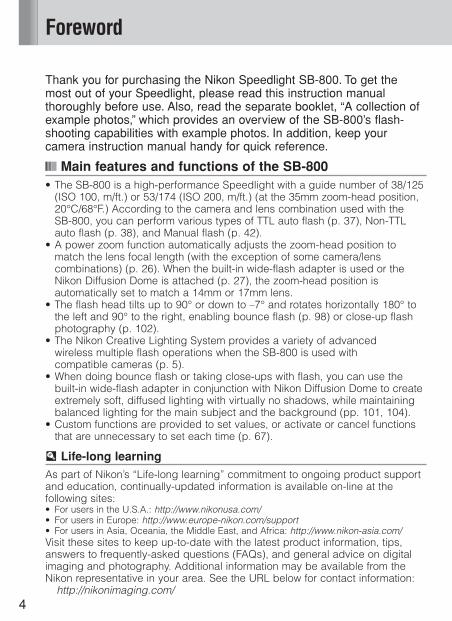
Foreword
Thank you for purchasing the Nikon Speedlight SB-800. To get themost out of your Speedlight, please read this instruction manualthoroughly before use. Also, read the separate booklet, “A collection ofexample photos,” which provides an overview of the SB-800’s flash-shooting capabilities with example photos. In addition, keep yourcamera instruction manual handy for quick reference.
Main features and functions of the SB-800• The SB-800 is a high-performance Speedlight with a guide number of 38/125
(ISO 100, m/ft.) or 53/174 (ISO 200, m/ft.) (at the 35mm zoom-head position,20°C/68°F.) According to the camera and lens combination used with the SB-800, you can perform various types of TTL auto flash (p. 37), Non-TTLauto flash (p. 38), and Manual flash (p. 42).
• A power zoom function automatically adjusts the zoom-head position tomatch the lens focal length (with the exception of some camera/lenscombinations) (p. 26). When the built-in wide-flash adapter is used or theNikon Diffusion Dome is attached (p. 27), the zoom-head position isautomatically set to match a 14mm or 17mm lens.
• The flash head tilts up to 90° or down to –7° and rotates horizontally 180° tothe left and 90° to the right, enabling bounce flash (p. 98) or close-up flashphotography (p. 102).
• The Nikon Creative Lighting System provides a variety of advancedwireless multiple flash operations when the SB-800 is used withcompatible cameras (p. 5).
• When doing bounce flash or taking close-ups with flash, you can use thebuilt-in wide-flash adapter in conjunction with Nikon Diffusion Dome to createextremely soft, diffused lighting with virtually no shadows, while maintainingbalanced lighting for the main subject and the background (pp. 101, 104).
• Custom functions are provided to set values, or activate or cancel functionsthat are unnecessary to set each time (p. 67).
u Life-long learningAs part of Nikon’s “Life-long learning” commitment to ongoing product supportand education, continually-updated information is available on-line at thefollowing sites:• For users in the U.S.A.: http://www.nikonusa.com/• For users in Europe: http://www.europe-nikon.com/support• For users in Asia, Oceania, the Middle East, and Africa: http://www.nikon-asia.com/Visit these sites to keep up-to-date with the latest product information, tips,answers to frequently-asked questions (FAQs), and general advice on digitalimaging and photography. Additional information may be available from theNikon representative in your area. See the URL below for contact information:
http://nikonimaging.com/
5
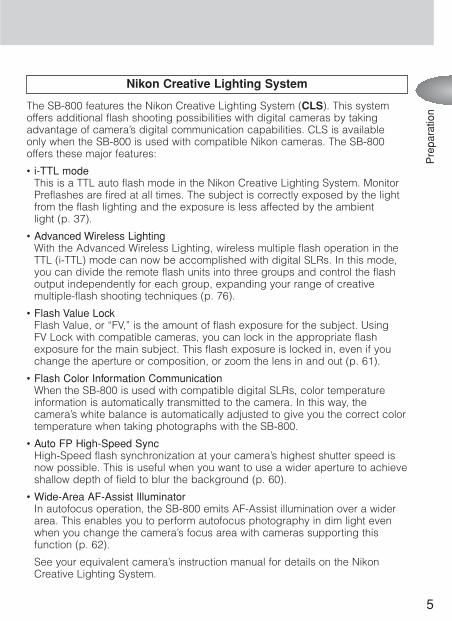
The SB-800 features the Nikon Creative Lighting System (CLS). This systemoffers additional flash shooting possibilities with digital cameras by takingadvantage of camera’s digital communication capabilities. CLS is availableonly when the SB-800 is used with compatible Nikon cameras. The SB-800offers these major features:
• i-TTL modeThis is a TTL auto flash mode in the Nikon Creative Lighting System. MonitorPreflashes are fired at all times. The subject is correctly exposed by the lightfrom the flash lighting and the exposure is less affected by the ambientlight (p. 37).
• Advanced Wireless LightingWith the Advanced Wireless Lighting, wireless multiple flash operation in theTTL (i-TTL) mode can now be accomplished with digital SLRs. In this mode,you can divide the remote flash units into three groups and control the flashoutput independently for each group, expanding your range of creativemultiple-flash shooting techniques (p. 76).
• Flash Value LockFlash Value, or “FV,” is the amount of flash exposure for the subject. UsingFV Lock with compatible cameras, you can lock in the appropriate flashexposure for the main subject. This flash exposure is locked in, even if youchange the aperture or composition, or zoom the lens in and out (p. 61).
• Flash Color Information CommunicationWhen the SB-800 is used with compatible digital SLRs, color temperatureinformation is automatically transmitted to the camera. In this way, thecamera’s white balance is automatically adjusted to give you the correct colortemperature when taking photographs with the SB-800.
• Auto FP High-Speed SyncHigh-Speed flash synchronization at your camera’s highest shutter speed isnow possible. This is useful when you want to use a wider aperture to achieveshallow depth of field to blur the background (p. 60).
• Wide-Area AF-Assist IlluminatorIn autofocus operation, the SB-800 emits AF-Assist illumination over a widerarea. This enables you to perform autofocus photography in dim light evenwhen you change the camera’s focus area with cameras supporting thisfunction (p. 62).
See your equivalent camera’s instruction manual for details on the NikonCreative Lighting System.
Pre
para
tion
Nikon Creative Lighting System
6
Foreword
Notes• Default: Functions and flash modes preset when shipped from the factory
are referred to as “Default” settings in this manual.• CLS: Hereafter, Nikon’s new Speedlight system “Nikon Creative Lighting
System” is abbreviated “CLS.”
Marks used in this manual
• v: Denotes important points to prevent malfunction or shooting failure.
• t: Useful points that should be remembered for better usage of the SB-800.
• u: Provides convenient reference information when using the SB-800
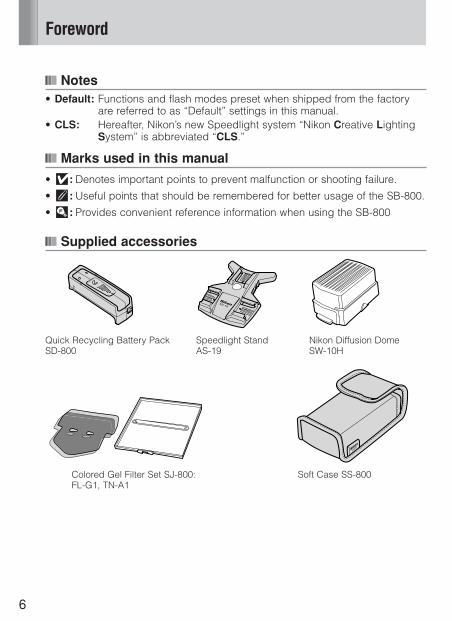
Supplied accessories
Quick Recycling Battery Pack Speedlight Stand Nikon Diffusion Dome SD-800 AS-19 SW-10H
Colored Gel Filter Set SJ-800: Soft Case SS-800FL-G1, TN-A1

7
Tips on using the Speedlight
Take trial shotsMake trial shots before photographing important occasions like weddings orgraduations.
Have Nikon spot-check your Speedlight regularlyNikon recommends that you have your Speedlight serviced by an authorizeddealer or service center at least once every two years.
Using your Speedlight correctlyThe Nikon Speedlight SB-800’s performance has been optimized for use withNikon brand cameras/accessories including lenses.Camera/accessories made by other manufacturers may not meet Nikon’scriteria for specifications, and nonconforming cameras/accessories coulddamage the SB-800’s components. Nikon cannot guarantee the SB-800’sperformance when used with non-Nikon products.
Notes:• The Nikon N90s, N90, N75-Series, N70, N60, N55-Series, N50, N8008, N8008s,
PRONEA 6i, N6006, N6000, N5005, N4004s and N4004 are sold exclusively in the U.S.A.
• The Nikon N80-Series, N65-Series are sold exclusively in the U.S.A. and Central and South America.
• The Nikon N2020 and N2000 are sold exclusively in the U.S.A and Canada.
Pre
para
tion
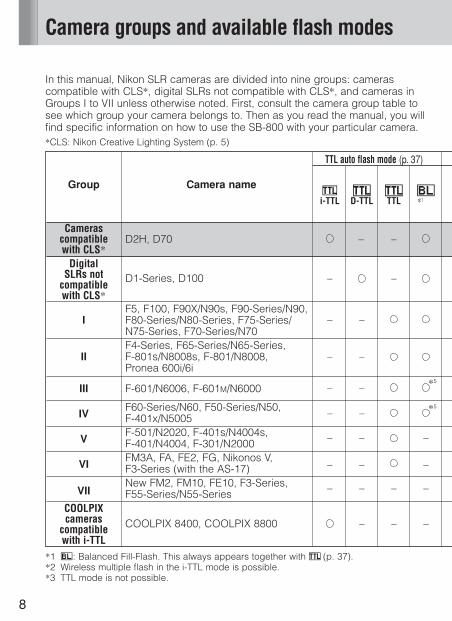
In this manual, Nikon SLR cameras are divided into nine groups: camerascompatible with CLS*, digital SLRs not compatible with CLS*, and cameras inGroups I to VII unless otherwise noted. First, consult the camera group table tosee which group your camera belongs to. Then as you read the manual, you willfind specific information on how to use the SB-800 with your particular camera.*CLS: Nikon Creative Lighting System (p. 5)
8
Camera groups and available flash modes
*1 o: Balanced Fill-Flash. This always appears together with D (p. 37).*2 Wireless multiple flash in the i-TTL mode is possible.*3 TTL mode is not possible.
TTL auto flash mode (p. 37)
Group Camera nameD D D oi-TTL D-TTL TTL *1
Cameras compatible D2H, D70 – –with CLS*
Digital SLRs not D1-Series, D100 – –
compatible with CLS*
F5, F100, F90X/N90s, F90-Series/N90, I F80-Series/N80-Series, F75-Series/
N75-Series, F70-Series/N70– –
F4-Series, F65-Series/N65-Series, II F-801s/N8008s, F-801/N8008, – –
Pronea 600i/6i
III F-601/N6006, F-601M/N6000 *5
– –
IVF60-Series/N60, F50-Series/N50, *5
F-401x/N5005 – –
VF-501/N2020, F-401s/N4004s, – – –F-401/N4004, F-301/N2000
VIFM3A, FA, FE2, FG, Nikonos V, F3-Series (with the AS-17) – – –
VIINew FM2, FM10, FE10, F3-Series, – – – –F55-Series/N55-Series
COOLPIX cameras COOLPIX 8400, COOLPIX 8800 – – –compatible
with i-TTL
9
*4 Distance-priority manual flash p is not possible with D1X and D1H digital cameras.*5 While performing Balanced Fill-Flash, no o icon appears.*6 Repeating flash is not possible with the F3-Series (using the AS-17).
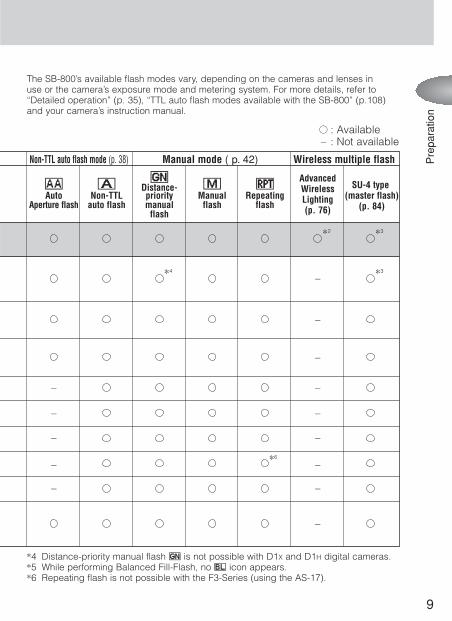
Non-TTL auto flash mode (p. 38) Manual mode ( p. 42) Wireless multiple flash
p AdvancedB A Distance- G q Wireless SU-4 typeAuto Non-TTL priority Manual Repeating Lighting (master flash)
Aperture flash auto flash manual flash flash (p. 76) (p. 84)flash
*2 *3
*4
– *3
–
–
– –
– –
– –
*6
– –
– –
–
The SB-800’s available flash modes vary, depending on the cameras and lenses in use or the camera’s exposure mode and metering system. For more details, refer to“Detailed operation” (p. 35), “TTL auto flash modes available with the SB-800” (p.108) and your camera’s instruction manual.
Pre
para
tion
: Available– : Not available
10
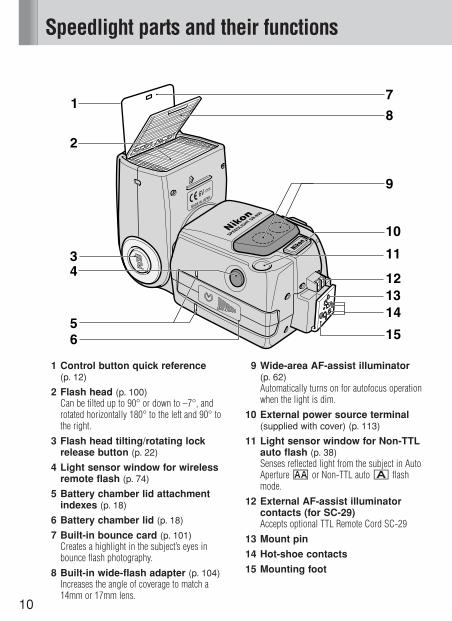
Speedlight parts and their functions
1 Control button quick reference (p. 12)
2 Flash head (p. 100)Can be tilted up to 90° or down to –7°, androtated horizontally 180° to the left and 90° tothe right.
3 Flash head tilting/rotating lockrelease button (p. 22)
4 Light sensor window for wirelessremote flash (p. 74)
5 Battery chamber lid attachmentindexes (p. 18)
6 Battery chamber lid (p. 18)
7 Built-in bounce card (p. 101)Creates a highlight in the subject’s eyes inbounce flash photography.
8 Built-in wide-flash adapter (p. 104)Increases the angle of coverage to match a14mm or 17mm lens.
9 Wide-area AF-assist illuminator(p. 62)Automatically turns on for autofocus operationwhen the light is dim.
10 External power source terminal(supplied with cover) (p. 113)
11 Light sensor window for Non-TTLauto flash (p. 38)Senses reflected light from the subject in AutoAperture B or Non-TTL auto A flashmode.
12 External AF-assist illuminatorcontacts (for SC-29)Accepts optional TTL Remote Cord SC-29
13 Mount pin
14 Hot-shoe contacts
15 Mounting foot
56
34
1
2
9
8
7
11
10
1213
15
14
11
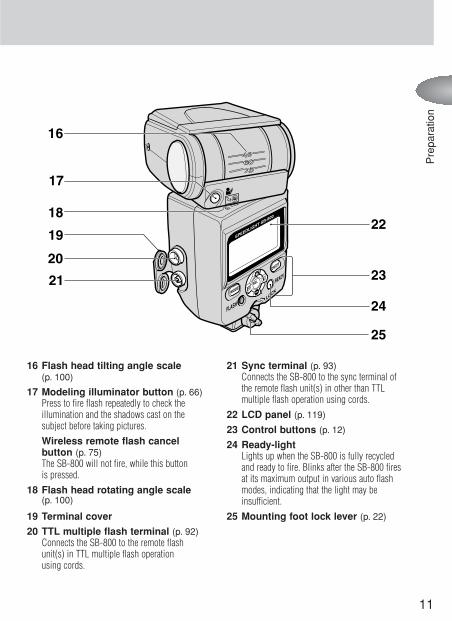
16 Flash head tilting angle scale (p. 100)
17 Modeling illuminator button (p. 66)Press to fire flash repeatedly to check theillumination and the shadows cast on thesubject before taking pictures.Wireless remote flash cancelbutton (p. 75)The SB-800 will not fire, while this button is pressed.
18 Flash head rotating angle scale (p. 100)
19 Terminal cover
20 TTL multiple flash terminal (p. 92)Connects the SB-800 to the remote flashunit(s) in TTL multiple flash operation using cords.
21 Sync terminal (p. 93)Connects the SB-800 to the sync terminal ofthe remote flash unit(s) in other than TTLmultiple flash operation using cords.
22 LCD panel (p. 119)
23 Control buttons (p. 12)
24 Ready-lightLights up when the SB-800 is fully recycledand ready to fire. Blinks after the SB-800 firesat its maximum output in various auto flashmodes, indicating that the light may beinsufficient.
25 Mounting foot lock lever (p. 22)
FLASH
READY
22
21
17
20
18
19
25
24
23
16
Pre
para
tion
12
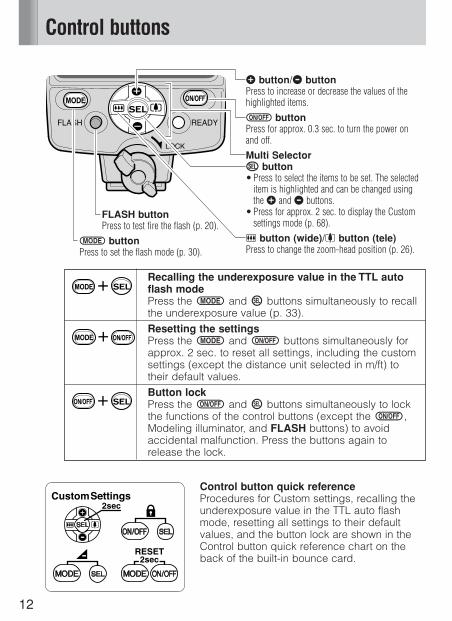
Control buttons
Recalling the underexposure value in the TTL autoflash mode Press the a and g buttons simultaneously to recallthe underexposure value (p. 33).Resetting the settingsPress the a and b buttons simultaneously forapprox. 2 sec. to reset all settings, including the customsettings (except the distance unit selected in m/ft) totheir default values.Button lockPress the b and g buttons simultaneously to lockthe functions of the control buttons (except the b,Modeling illuminator, and FLASH buttons) to avoidaccidental malfunction. Press the buttons again torelease the lock.
e button/f buttonPress to increase or decrease the values of thehighlighted items.b buttonPress for approx. 0.3 sec. to turn the power on and off.Multi Selector g button• Press to select the items to be set. The selected
item is highlighted and can be changed using the e and f buttons.
• Press for approx. 2 sec. to display the Customsettings mode (p. 68).
c button (wide)/d button (tele)Press to change the zoom-head position (p. 26).
FLASH buttonPress to test fire the flash (p. 20).
a buttonPress to set the flash mode (p. 30).
Control button quick referenceProcedures for Custom settings, recalling theunderexposure value in the TTL auto flashmode, resetting all settings to their defaultvalues, and the button lock are shown in theControl button quick reference chart on theback of the built-in bounce card.
13
Icons on the LCD panel
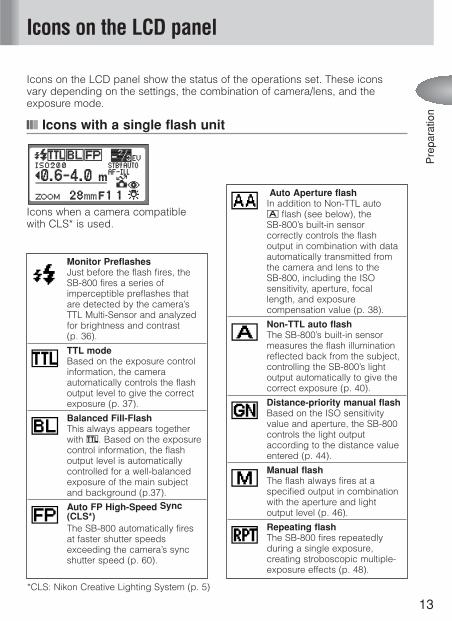
Auto Aperture flashIn addition to Non-TTL auto A flash (see below), the SB-800’s built-in sensorcorrectly controls the flashoutput in combination with dataautomatically transmitted fromthe camera and lens to the SB-800, including the ISOsensitivity, aperture, focallength, and exposurecompensation value (p. 38).
Non-TTL auto flashThe SB-800’s built-in sensormeasures the flash illuminationreflected back from the subject,controlling the SB-800’s lightoutput automatically to give thecorrect exposure (p. 40).
Distance-priority manual flashBased on the ISO sensitivityvalue and aperture, the SB-800controls the light outputaccording to the distance valueentered (p. 44).
Manual flashThe flash always fires at aspecified output in combinationwith the aperture and lightoutput level (p. 46).
Repeating flashThe SB-800 fires repeatedlyduring a single exposure,creating stroboscopic multiple-exposure effects (p. 48).
Icons on the LCD panel show the status of the operations set. These icons vary depending on the settings, the combination of camera/lens, and theexposure mode.
Icons with a single flash unit
Icons when a camera compatiblewith CLS* is used.
Monitor PreflashesJust before the flash fires, theSB-800 fires a series ofimperceptible preflashes thatare detected by the camera’sTTL Multi-Sensor and analyzedfor brightness and contrast (p. 36).
TTL modeBased on the exposure controlinformation, the cameraautomatically controls the flashoutput level to give the correctexposure (p. 37).
Balanced Fill-FlashThis always appears togetherwith D. Based on the exposurecontrol information, the flashoutput level is automaticallycontrolled for a well-balancedexposure of the main subjectand background (p.37).
Auto FP High-Speed Sync(CLS*)The SB-800 automatically firesat faster shutter speedsexceeding the camera’s syncshutter speed (p. 60).
Pre
para
tion
*CLS: Nikon Creative Lighting System (p. 5)
14
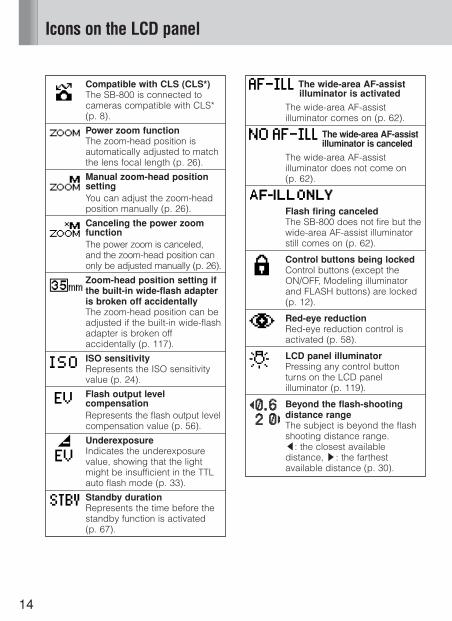
Icons on the LCD panel
The wide-area AF-assistilluminator is activated
The wide-area AF-assistilluminator comes on (p. 62).
The wide-area AF-assistilluminator is canceled
The wide-area AF-assistilluminator does not come on (p. 62).
Flash firing canceledThe SB-800 does not fire but thewide-area AF-assist illuminatorstill comes on (p. 62).
Control buttons being lockedControl buttons (except theON/OFF, Modeling illuminatorand FLASH buttons) are locked (p. 12).
Red-eye reductionRed-eye reduction control isactivated (p. 58).
LCD panel illuminatorPressing any control buttonturns on the LCD panelilluminator (p. 119).
Beyond the flash-shootingdistance rangeThe subject is beyond the flashshooting distance range. Ω: the closest availabledistance, º: the farthestavailable distance (p. 30).
Compatible with CLS (CLS*)The SB-800 is connected tocameras compatible with CLS*(p. 8).
Power zoom functionThe zoom-head position isautomatically adjusted to matchthe lens focal length (p. 26).
Manual zoom-head positionsettingYou can adjust the zoom-headposition manually (p. 26).
Canceling the power zoomfunctionThe power zoom is canceled,and the zoom-head position canonly be adjusted manually (p. 26).
Zoom-head position setting ifthe built-in wide-flash adapteris broken off accidentallyThe zoom-head position can beadjusted if the built-in wide-flashadapter is broken offaccidentally (p. 117).
ISO sensitivityRepresents the ISO sensitivityvalue (p. 24).
Flash output levelcompensationRepresents the flash output levelcompensation value (p. 56).
UnderexposureIndicates the underexposurevalue, showing that the lightmight be insufficient in the TTLauto flash mode (p. 33).
Standby durationRepresents the time before thestandby function is activated (p. 67).
15
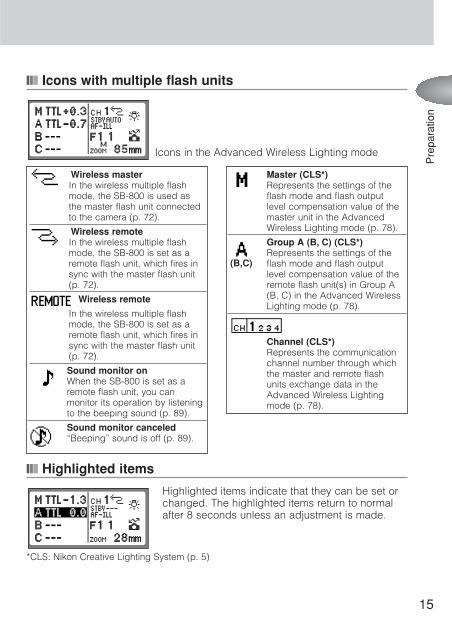
Highlighted items
Highlighted items indicate that they can be set orchanged. The highlighted items return to normalafter 8 seconds unless an adjustment is made.
*CLS: Nikon Creative Lighting System (p. 5)
Icons with multiple flash units
Icons in the Advanced Wireless Lighting mode
Master (CLS*)Represents the settings of theflash mode and flash outputlevel compensation value of themaster unit in the AdvancedWireless Lighting mode (p. 78).
Group A (B, C) (CLS*)Represents the settings of theflash mode and flash outputlevel compensation value of theremote flash unit(s) in Group A(B, C) in the Advanced WirelessLighting mode (p. 78).
Channel (CLS*)Represents the communicationchannel number through whichthe master and remote flashunits exchange data in theAdvanced Wireless Lightingmode (p. 78).
Wireless masterIn the wireless multiple flashmode, the SB-800 is used asthe master flash unit connectedto the camera (p. 72).
Wireless remoteIn the wireless multiple flashmode, the SB-800 is set as aremote flash unit, which fires insync with the master flash unit(p. 72).
Wireless remote
In the wireless multiple flashmode, the SB-800 is set as aremote flash unit, which fires insync with the master flash unit(p. 72).
Sound monitor onWhen the SB-800 is set as aremote flash unit, you canmonitor its operation by listeningto the beeping sound (p. 89).
Sound monitor canceled“Beeping” sound is off (p. 89).
(B,C)
Pre
para
tion
16
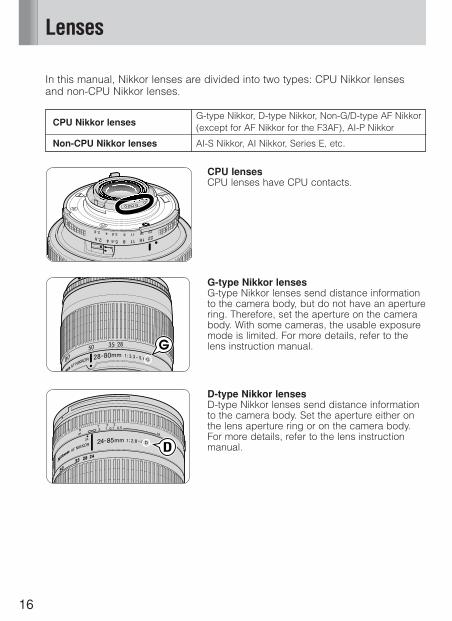
Lenses
In this manual, Nikkor lenses are divided into two types: CPU Nikkor lensesand non-CPU Nikkor lenses.
CPU Nikkor lensesG-type Nikkor, D-type Nikkor, Non-G/D-type AF Nikkor(except for AF Nikkor for the F3AF), AI-P Nikkor
Non-CPU Nikkor lenses AI-S Nikkor, AI Nikkor, Series E, etc.
CPU lensesCPU lenses have CPU contacts.
G-type Nikkor lensesG-type Nikkor lenses send distance information to the camera body, but do not have an aperturering. Therefore, set the aperture on the camerabody. With some cameras, the usable exposuremode is limited. For more details, refer to thelens instruction manual.
D-type Nikkor lensesD-type Nikkor lenses send distance informationto the camera body. Set the aperture either onthe lens aperture ring or on the camera body.For more details, refer to the lens instructionmanual.
Basic operation
In this section, basic procedures areillustrated so that you can easily perform flash photography in the TTL auto flash mode.You can easily perform flash photography byfollowing Steps 1–8 on the left-hand pages.
In this section, basic procedures are described when aCPU lens is mounted on cameras compatible with CLS*,digital SLRs not compatible with CLS*, and cameras inGroups I to II. The SB-800’s available functions and theLCD display vary depending on other camera/lenscombinations.
*CLS: Nikon Creative Lighting System (p. 5)

18
1 Slide open the battery chamber lid in thedirection of the arrow.
2 Install the batteries following the i andj marks as shown. Align the batterychamber lid attachment indexes, thenclose the battery chamber lid by sliding itinto place while pressing down.
v Usable batteriesInstall four AA-type penlight batteries (1.5V or lower) of any of these types:(1) Alkaline-manganese (1.5V) (2) Lithium (1.5V) (3) Nickel (1.5V)(4) NiCd (rechargeable, 1.2V) (5) Ni-MH (Nickel Metal Hydride) (rechargeable, 1.2V)
• When replacing batteries, replace all four (or five when using the Quick RecyclingBattery Pack SD-800) with fresh ones of the same brand.
• High-power manganese batteries are not recommended for use with the SB-800.• Always carry extra batteries when traveling.• For details on batteries, refer to “Notes on batteries” on page 115.
CAUTION!• Do not use batteries not specified in this instruction manual, as this may
cause them to explode, leak corrosive liquids, or catch on fire.• Do not mix battery brands or types, or use old with new batteries.
Otherwise the batteries may explode, leak corrosive liquids, or catch on fire.• Do not recharge non-rechargeable batteries in a battery charger.
Otherwise the batteries may leak corrosive liquids or generate heat.
t Obtaining faster recycling times using 5 batteriesUse the provided Quick Recycling Battery Pack SD-800 to install five batteriesto shorten the recycling time. See page 64 for more details.
1 Installing the batteries
19
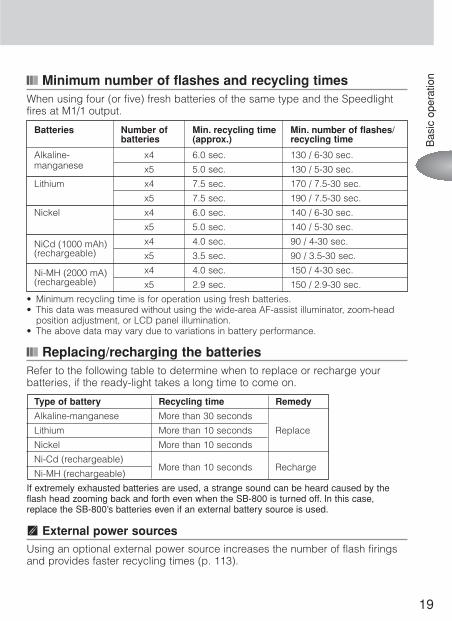
Minimum number of flashes and recycling timesWhen using four (or five) fresh batteries of the same type and the Speedlightfires at M1/1 output.
Batteries Number of Min. recycling time Min. number of flashes/batteries (approx.) recycling time
Alkaline- x4 6.0 sec. 130 / 6-30 sec.manganese x5 5.0 sec. 130 / 5-30 sec.
Lithium x4 7.5 sec. 170 / 7.5-30 sec.
x5 7.5 sec. 190 / 7.5-30 sec.
Nickel x4 6.0 sec. 140 / 6-30 sec.
x5 5.0 sec. 140 / 5-30 sec.
NiCd (1000 mAh) x4 4.0 sec. 90 / 4-30 sec.(rechargeable) x5 3.5 sec. 90 / 3.5-30 sec.
Ni-MH (2000 mA) x4 4.0 sec. 150 / 4-30 sec.(rechargeable) x5 2.9 sec. 150 / 2.9-30 sec.
• Minimum recycling time is for operation using fresh batteries.• This data was measured without using the wide-area AF-assist illuminator, zoom-head
position adjustment, or LCD panel illumination.• The above data may vary due to variations in battery performance.
Replacing/recharging the batteriesRefer to the following table to determine when to replace or recharge yourbatteries, if the ready-light takes a long time to come on.
Type of battery Recycling time Remedy
Alkaline-manganese More than 30 seconds
Lithium More than 10 seconds Replace
Nickel More than 10 seconds
Ni-Cd (rechargeable)More than 10 seconds Recharge
Ni-MH (rechargeable)
If extremely exhausted batteries are used, a strange sound can be heard caused by theflash head zooming back and forth even when the SB-800 is turned off. In this case,replace the SB-800’s batteries even if an external battery source is used.
t External power sourcesUsing an optional external power source increases the number of flash firingsand provides faster recycling times (p. 113).
Bas
ic o
pera
tion
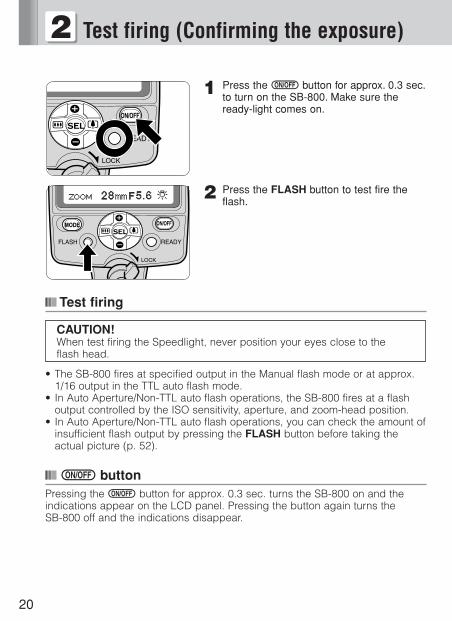
20
1 Press the b button for approx. 0.3 sec.to turn on the SB-800. Make sure theready-light comes on.
2 Press the FLASH button to test fire theflash.
Test firing
CAUTION!When test firing the Speedlight, never position your eyes close to the flash head.
• The SB-800 fires at specified output in the Manual flash mode or at approx.1/16 output in the TTL auto flash mode.
• In Auto Aperture/Non-TTL auto flash operations, the SB-800 fires at a flashoutput controlled by the ISO sensitivity, aperture, and zoom-head position.
• In Auto Aperture/Non-TTL auto flash operations, you can check the amount ofinsufficient flash output by pressing the FLASH button before taking theactual picture (p. 52).
b buttonPressing the b button for approx. 0.3 sec. turns the SB-800 on and theindications appear on the LCD panel. Pressing the button again turns the SB-800 off and the indications disappear.
2 Test firing (Confirming the exposure)
21
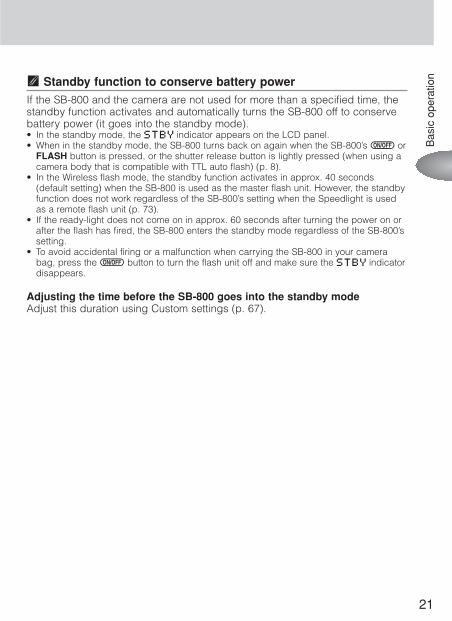
t Standby function to conserve battery powerIf the SB-800 and the camera are not used for more than a specified time, thestandby function activates and automatically turns the SB-800 off to conservebattery power (it goes into the standby mode). • In the standby mode, the R indicator appears on the LCD panel.• When in the standby mode, the SB-800 turns back on again when the SB-800’s b or
FLASH button is pressed, or the shutter release button is lightly pressed (when using acamera body that is compatible with TTL auto flash) (p. 8).
• In the Wireless flash mode, the standby function activates in approx. 40 seconds(default setting) when the SB-800 is used as the master flash unit. However, the standbyfunction does not work regardless of the SB-800’s setting when the Speedlight is usedas a remote flash unit (p. 73).
• If the ready-light does not come on in approx. 60 seconds after turning the power on orafter the flash has fired, the SB-800 enters the standby mode regardless of the SB-800’ssetting.
• To avoid accidental firing or a malfunction when carrying the SB-800 in your camerabag, press the b button to turn the flash unit off and make sure the R indicatordisappears.
Adjusting the time before the SB-800 goes into the standby modeAdjust this duration using Custom settings (p. 67).
Bas
ic o
pera
tion

22
1 Make sure the SB-800 and the camerabody are turned off.
2 Rotate the mounting foot lock lever to theleft, slide the SB-800’s mounting foot intothe camera’s accessory shoe and turn thelock lever to the right.
3 Hold down the flash head tilting/rotatinglock release button to adjust the flashhead to the horizontal/front position.
v Turn the mounting foot lock lever securely until it stopsTo lock the Speedlight in place, turn the lock lever approx. 90° clockwise until itstops. To unlock, turn the lever counterclockwise until it stops.
Lock Unlock
FLASH
3 Attach the SB-800 to the camera and
23
adjust the flash head
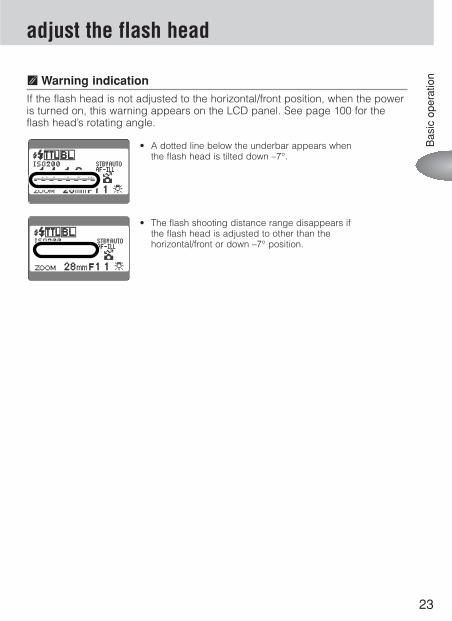
t Warning indicationIf the flash head is not adjusted to the horizontal/front position, when the poweris turned on, this warning appears on the LCD panel. See page 100 for theflash head’s rotating angle.
• A dotted line below the underbar appears when the flash head is tilted down –7°.
• The flash shooting distance range disappears if the flash head is adjusted to other than the horizontal/front or down –7° position.
Bas
ic o
pera
tion
24
In this manual, the sensitivity for digital SLRs and the film speed for film-basedcameras are generally referred to as ISO sensitivity. For cameras compatible with CLS, digital SLRs not compatible with CLS andcameras in Groups I to II, the ISO sensitivity is automatically set and appearson the LCD panel when the camera and SB-800 are turned ON.
Available ISO sensitivity in TTL auto flash operationThe SB-800’s maximum ISO sensitivity range usable in the TTL auto flash modeis ISO 25 to 1000.• The ISO sensitivity range may become narrower, depending on the cameras in use. For
details, see your camera instruction manual.• The flash shooting distance range on the SB-800’s LCD panel varies, depending on the
ISO sensitivity. Therefore, be sure to set the ISO sensitivity correctly.
u Digital data communication with the SB-800When the SB-800 is used with cameras compatible with CLS, digital SLRs notcompatible with CLS and cameras in Groups I to II, digital data communicationis performed. The camera automatically sends the ISO sensitivity to the SB-800. With a CPU lens, the aperture and focal length are automatically set on the SB-800.
u Notes on setting the Speedlight’s ISO sensitivityIn the TTL auto flash mode and Manual flash mode (except Distance-prioritymanual p flash), there is no direct connection between setting the ISOsensitivity on the Speedlight and controlling the flash output level. Setting theISO sensitivity is for correctly displaying the flash shooting distance range orthe shooting distance indication on the Speedlight’s LCD panel.In the Non-TTL auto flash mode (Auto Aperture flash B/Non-TTL auto flashA) and Distance-priority manual p flash operation, the correct exposure canbe obtained by setting the camera’s ISO sensitivity on the Speedlight, becausethe Speedlight controls the flash output. For cameras compatible with CLS,digital SLRs not compatible with CLS, and cameras in Groups I and II, the ISOsensitivity is automatically transferred from the camera to the Speedlight.
4 Setting the ISO sensitivity
25
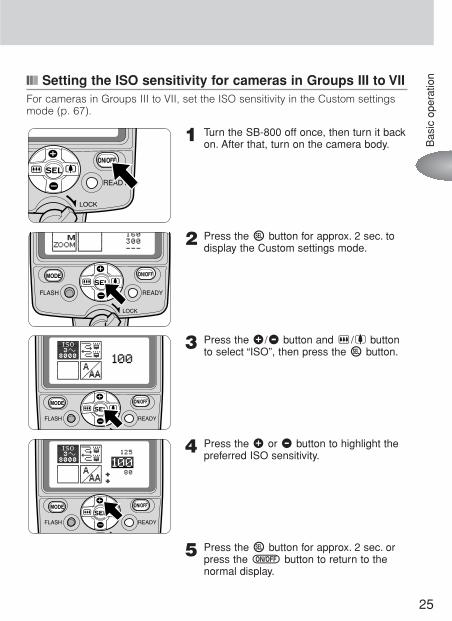
Setting the ISO sensitivity for cameras in Groups III to VIIFor cameras in Groups III to VII, set the ISO sensitivity in the Custom settingsmode (p. 67).
1 Turn the SB-800 off once, then turn it backon. After that, turn on the camera body.
2 Press the g button for approx. 2 sec. todisplay the Custom settings mode.
3 Press the e/f button and c/d buttonto select “ISO”, then press the g button.
4 Press the e or f button to highlight thepreferred ISO sensitivity.
5 Press the g button for approx. 2 sec. orpress the b button to return to thenormal display.
Bas
ic o
pera
tion
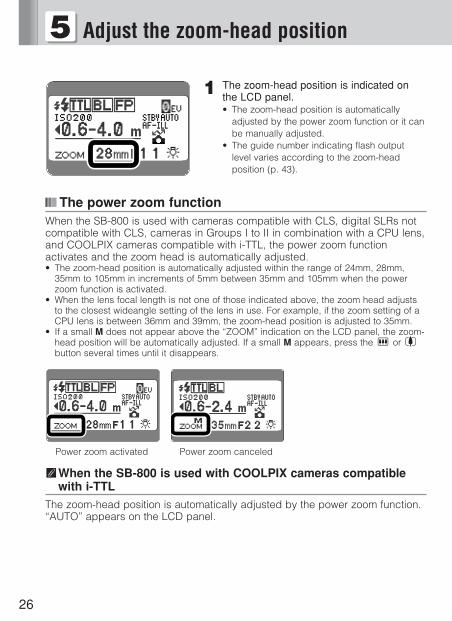
1 The zoom-head position is indicated onthe LCD panel.• The zoom-head position is automatically
adjusted by the power zoom function or it canbe manually adjusted.
• The guide number indicating flash outputlevel varies according to the zoom-headposition (p. 43).
The power zoom functionWhen the SB-800 is used with cameras compatible with CLS, digital SLRs notcompatible with CLS, cameras in Groups I to II in combination with a CPU lens,and COOLPIX cameras compatible with i-TTL, the power zoom functionactivates and the zoom head is automatically adjusted.• The zoom-head position is automatically adjusted within the range of 24mm, 28mm,
35mm to 105mm in increments of 5mm between 35mm and 105mm when the powerzoom function is activated.
• When the lens focal length is not one of those indicated above, the zoom head adjuststo the closest wideangle setting of the lens in use. For example, if the zoom setting of aCPU lens is between 36mm and 39mm, the zoom-head position is adjusted to 35mm.
• If a small M does not appear above the “ZOOM” indication on the LCD panel, the zoom-head position will be automatically adjusted. If a small M appears, press the c or dbutton several times until it disappears.
Power zoom activated Power zoom canceled
tWhen the SB-800 is used with COOLPIX cameras compatiblewith i-TTL
The zoom-head position is automatically adjusted by the power zoom function.“AUTO” appears on the LCD panel.
26
5 Adjust the zoom-head position
27
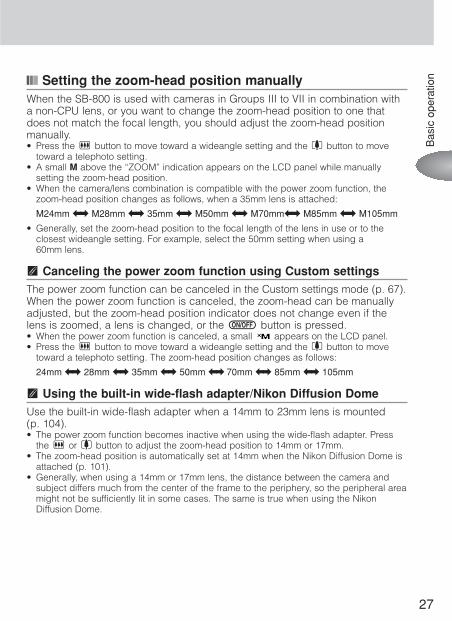
Setting the zoom-head position manuallyWhen the SB-800 is used with cameras in Groups III to VII in combination witha non-CPU lens, or you want to change the zoom-head position to one thatdoes not match the focal length, you should adjust the zoom-head positionmanually.• Press the c button to move toward a wideangle setting and the d button to move
toward a telephoto setting.• A small M above the “ZOOM” indication appears on the LCD panel while manually
setting the zoom-head position.• When the camera/lens combination is compatible with the power zoom function, the
zoom-head position changes as follows, when a 35mm lens is attached:
M24mm ±∞ M28mm ±∞ 35mm ±∞ M50mm ±∞ M70mm±∞ M85mm ±∞ M105mm
• Generally, set the zoom-head position to the focal length of the lens in use or to theclosest wideangle setting. For example, select the 50mm setting when using a 60mm lens.
t Canceling the power zoom function using Custom settingsThe power zoom function can be canceled in the Custom settings mode (p. 67).When the power zoom function is canceled, the zoom-head can be manuallyadjusted, but the zoom-head position indicator does not change even if thelens is zoomed, a lens is changed, or the b button is pressed.• When the power zoom function is canceled, a small appears on the LCD panel.• Press the c button to move toward a wideangle setting and the d button to move
toward a telephoto setting. The zoom-head position changes as follows:
24mm ±∞ 28mm ±∞ 35mm ±∞ 50mm ±∞ 70mm ±∞ 85mm ±∞ 105mm
t Using the built-in wide-flash adapter/Nikon Diffusion DomeUse the built-in wide-flash adapter when a 14mm to 23mm lens is mounted (p. 104).• The power zoom function becomes inactive when using the wide-flash adapter. Press
the c or d button to adjust the zoom-head position to 14mm or 17mm. • The zoom-head position is automatically set at 14mm when the Nikon Diffusion Dome is
attached (p. 101).• Generally, when using a 14mm or 17mm lens, the distance between the camera and
subject differs much from the center of the frame to the periphery, so the peripheral areamight not be sufficiently lit in some cases. The same is true when using the NikonDiffusion Dome.
Bas
ic o
pera
tion
28
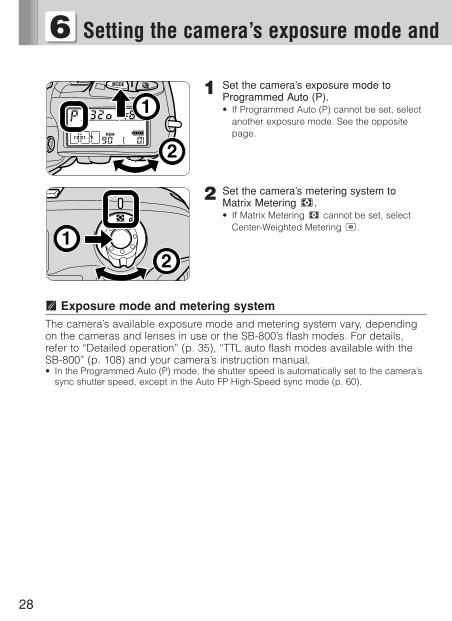
1 Set the camera’s exposure mode toProgrammed Auto (P).• If Programmed Auto (P) cannot be set, select
another exposure mode. See the oppositepage.
2 Set the camera’s metering system toMatrix Metering Y.• If Matrix Metering Y cannot be set, select
Center-Weighted Metering W.
t Exposure mode and metering systemThe camera’s available exposure mode and metering system vary, dependingon the cameras and lenses in use or the SB-800’s flash modes. For details,refer to “Detailed operation” (p. 35), “TTL auto flash modes available with theSB-800” (p. 108) and your camera’s instruction manual.• In the Programmed Auto (P) mode, the shutter speed is automatically set to the camera’s
sync shutter speed, except in the Auto FP High-Speed sync mode (p. 60).
6 Setting the camera’s exposure mode and

29
metering system
u Exposure modes other than Programmed Auto exposure (P)In Shutter-Priority Auto exposure (S) modeBy selecting a slower shutter speed, the proper exposure for the backgroundcan be achieved.• The camera selects the correct aperture. For details, see your camera’s instruction
manual. However, set the shutter speed on the camera after confirming that theautomatically controlled aperture will provide an appropriate shooting distance range foryour subject. Refer to “Flash shooting distance range in the TTL auto flash mode” (p. 31).
• If you set a shutter speed faster than the flash sync speed, the camera automaticallyshifts to its fastest sync speed when the SB-800 is turned on (except in the Auto FPHigh-Speed sync mode) (p. 60).
In Aperture-Priority Auto exposure (A) modeBy selecting the aperture, you can control depth of field and the flash shootingdistance range.• The camera selects the correct shutter speed. For details, see your camera’s instruction
manual.• To determine the aperture, refer to the “Guide number” (p. 43) and “Flash shooting
distance range in the TTL auto flash modes” (p. 31).
In Manual exposure (M) modeBy selecting the shutter speed and aperture, you can control the exposure ofthe background, the depth of field, and the flash shooting distance range.• If you set a shutter speed faster than the flash sync speed, the camera automatically
shifts to its fastest sync speed when the SB-800 is turned on. This is true of all cameras,except mechanical shutter cameras and when using the Auto FP High-Speed syncmode (p. 60).
• To determine the aperture, refer to “Guide number” (p. 43) and “Flash shooting distancerange in the TTL auto flash mode” (p. 31).
Bas
ic o
pera
tion

30
7 Setting the SB-800’s flash mode
1 Press the a button to set the flash mode.• Display Do on the LCD panel.
2 Confirm that the main subject is within theflash shooting distance range.
Selecting the flash modeEvery time you press the a button, the available flash mode icon changes.Refer to “Icons on the LCD panel” (p. 13).
∞ Do ∞ D ∞ B∞p ∞ G ∞ q
∞ A
• Note that the usable flash modes only appear and vary, and the unavailable flash modeswill be skipped and do not appear, when pressing the a button.
• The SB-800’s available flash modes vary, depending on the cameras and lenses in useor the camera’s exposure mode and metering system. Refer to “Detailed operation” (p. 35), “TTL auto flash modes available with the SB-800” (p. 108) and your camera’sinstruction manual.
31
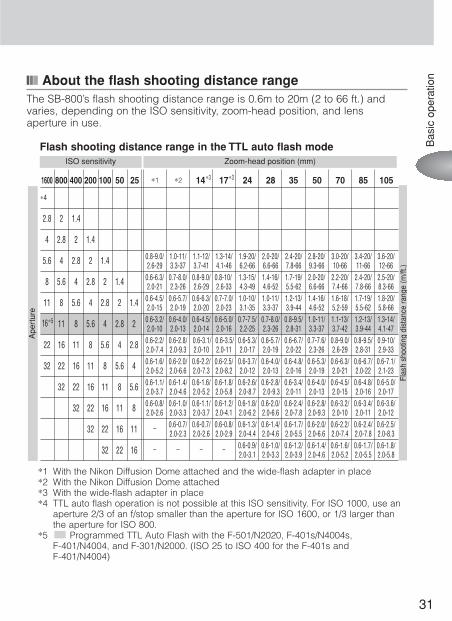
About the flash shooting distance rangeThe SB-800’s flash shooting distance range is 0.6m to 20m (2 to 66 ft.) andvaries, depending on the ISO sensitivity, zoom-head position, and lens aperture in use.
Flash shooting distance range in the TTL auto flash mode
*1 With the Nikon Diffusion Dome attached and the wide-flash adapter in place*2 With the Nikon Diffusion Dome attached*3 With the wide-flash adapter in place*4 TTL auto flash operation is not possible at this ISO sensitivity. For ISO 1000, use an
aperture 2/3 of an f/stop smaller than the aperture for ISO 1600, or 1/3 larger thanthe aperture for ISO 800.
*5 Programmed TTL Auto Flash with the F-501/N2020, F-401s/N4004s, F-401/N4004, and F-301/N2000. (ISO 25 to ISO 400 for the F-401s and F-401/N4004)
Bas
ic o
pera
tion
Ape
rtur
e
Flas
hsh
ootin
gdi
stan
cera
nge
(m/ft
.)
ISO sensitivity Zoom-head position (mm)
1600 800 400 200 100 50 25 ∗1 ∗2 14 17 24 28 35 50 70 85 105
∗4
2.8 2 1.4
4 2.8 2 1.4
5.6 4 2.8 2 1.4
8 5.6 4 2.8 2 1.4
11 8 5.6 4 2.8 2 1.4
16 11 8 5.6 4 2.8 2
22 16 11 8 5.6 4 2.8
32 22 16 11 8 5.6 4
32 22 16 11 8 5.6
32 22 16 11 8
32 22 16 11
32 22 16
0.8-9.0/ 1.0-11/ 1.1-12/ 1.3-14/ 1.9-20/ 2.0-20/ 2.4-20/ 2.8-20/ 3.0-20/ 3.4-20/ 3.6-20/2.6-29 3.3-37 3.7-41 4.1-46 6.2-66 6.6-66 7.8-66 9.3-66 10-66 11-66 12-66
0.6-6.3/ 0.7-8.0/ 0.8-9.0/ 0.8-10/ 1.3-15/ 1.4-16/ 1.7-19/ 2.0-20/ 2.2-20/ 2.4-20/ 2.5-20/2.0-21 2.3-26 2.6-29 2.6-33 4.3-49 4.6-52 5.5-62 6.6-66 7.4-66 7.8-66 8.3-66
0.6-4.5/ 0.6-5.7/ 0.6-6.3/ 0.7-7.0/ 1.0-10/ 1.0-11/ 1.2-13/ 1.4-16/ 1.6-18/ 1.7-19/ 1.8-20/2.0-15 2.0-19 2.0-20 2.0-23 3.1-35 3.3-37 3.9-44 4.6-52 5.2-59 5.5-62 5.8-66
0.6-3.2/ 0.6-4.0/ 0.6-4.5/ 0.6-5.0/ 0.7-7.5/ 0.7-8.0/ 0.8-9.5/ 1.0-11/ 1.1-13/ 1.2-13/ 1.3-14/2.0-10 2.0-13 2.0-14 2.0-16 2.2-25 2.3-26 2.8-31 3.3-37 3.7-42 3.9-44 4.1-47
0.6-2.2/ 0.6-2.8/ 0.6-3.1/ 0.6-3.5/ 0.6-5.3/ 0.6-5.7/ 0.6-6.7/ 0.7-7.6/ 0.8-9.0/ 0.8-9.5/ 0.9-10/2.0-7.4 2.0-9.3 2.0-10 2.0-11 2.0-17 2.0-19 2.0-22 2.3-26 2.6-29 2.8-31 2.9-330.6-1.6/ 0.6-2.0/ 0.6-2.2/ 0.6-2.5/ 0.6-3.7/ 0.6-4.0/ 0.6-4.8/ 0.6-5.3/ 0.6-6.3/ 0.6-6.7/ 0.6-7.1/2.0-5.2 2.0-6.6 2.0-7.3 2.0-8.2 2.0-12 2.0-13 2.0-16 2.0-19 2.0-21 2.0-22 2.1-230.6-1.1/ 0.6-1.4/ 0.6-1.6/ 0.6-1.8/ 0.6-2.6/ 0.6-2.8/ 0.6-3.4/ 0.6-4.0/ 0.6-4.5/ 0.6-4.8/ 0.6-5.0/2.0-3.7 2.0-4.6 2.0-5.2 2.0-5.8 2.0-8.7 2.0-9.3 2.0-11 2.0-13 2.0-15 2.0-16 2.0-170.6-0.8/ 0.6-1.0/ 0.6-1.1/ 0.6-1.2/ 0.6-1.8/ 0.6-2.0/ 0.6-2.4/ 0.6-2.8/ 0.6-3.2/ 0.6-3.4/ 0.6-3.6/2.0-2.6 2.0-3.3 2.0-3.7 2.0-4.1 2.0-6.2 2.0-6.6 2.0-7.8 2.0-9.3 2.0-10 2.0-11 2.0-12
_ 0.6-0.7/ 0.6-0.7/ 0.6-0.8/ 0.6-1.3/ 0.6-1.4/ 0.6-1.7/ 0.6-2.0/ 0.6-2.2/ 0.6-2.4/ 0.6-2.5/2.0-2.3 2.0-2.6 2.0-2.9 2.0-4.4 2.0-4.6 2.0-5.5 2.0-6.6 2.0-7.4 2.0-7.8 2.0-8.3
_ _ _ _ 0.6-0.9/ 0.6-1.0/ 0.6-1.2/ 0.6-1.4/ 0.6-1.6/ 0.6-1.7/ 0.6-1.8/2.0-3.1 2.0-3.3 2.0-3.9 2.0-4.6 2.0-5.2 2.0-5.5 2.0-5.8
∗5
∗3 ∗3
32
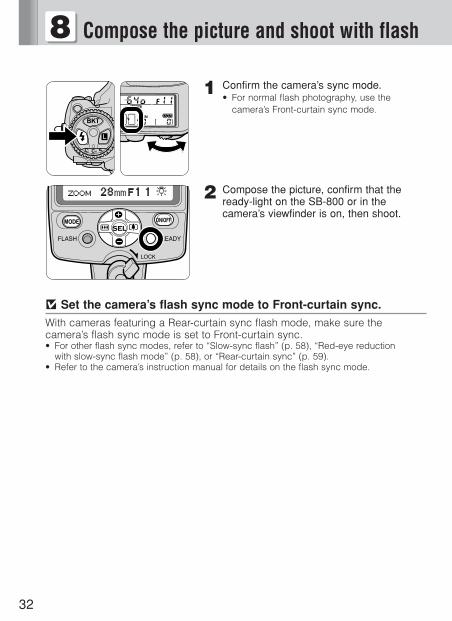
1 Confirm the camera’s sync mode.• For normal flash photography, use the
camera’s Front-curtain sync mode.
2 Compose the picture, confirm that theready-light on the SB-800 or in thecamera’s viewfinder is on, then shoot.
v Set the camera’s flash sync mode to Front-curtain sync.With cameras featuring a Rear-curtain sync flash mode, make sure thecamera’s flash sync mode is set to Front-curtain sync.• For other flash sync modes, refer to “Slow-sync flash” (p. 58), “Red-eye reduction
with slow-sync flash mode” (p. 58), or “Rear-curtain sync” (p. 59).• Refer to the camera’s instruction manual for details on the flash sync mode.
8 Compose the picture and shoot with flash
33
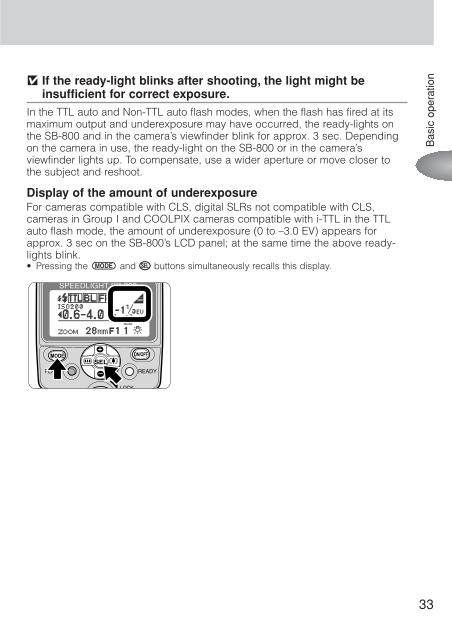
v If the ready-light blinks after shooting, the light might beinsufficient for correct exposure.
In the TTL auto and Non-TTL auto flash modes, when the flash has fired at itsmaximum output and underexposure may have occurred, the ready-lights onthe SB-800 and in the camera’s viewfinder blink for approx. 3 sec. Dependingon the camera in use, the ready-light on the SB-800 or in the camera’sviewfinder lights up. To compensate, use a wider aperture or move closer tothe subject and reshoot.
Display of the amount of underexposureFor cameras compatible with CLS, digital SLRs not compatible with CLS,cameras in Group I and COOLPIX cameras compatible with i-TTL in the TTLauto flash mode, the amount of underexposure (0 to –3.0 EV) appears forapprox. 3 sec on the SB-800’s LCD panel; at the same time the above ready-lights blink.• Pressing the a and g buttons simultaneously recalls this display.
Bas
ic o
pera
tion
34
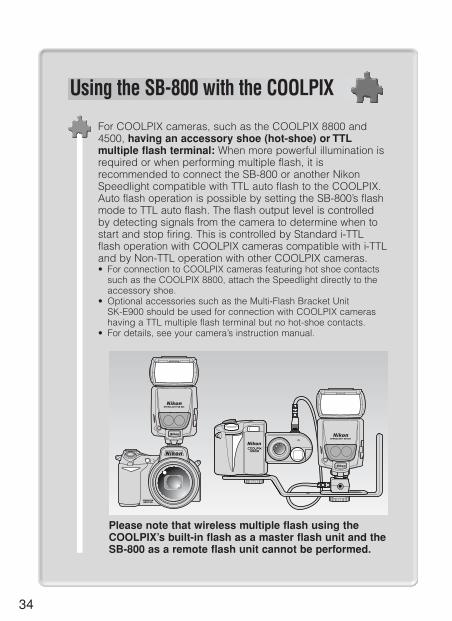
For COOLPIX cameras, such as the COOLPIX 8800 and4500, having an accessory shoe (hot-shoe) or TTLmultiple flash terminal: When more powerful illumination isrequired or when performing multiple flash, it isrecommended to connect the SB-800 or another NikonSpeedlight compatible with TTL auto flash to the COOLPIX.Auto flash operation is possible by setting the SB-800’s flashmode to TTL auto flash. The flash output level is controlledby detecting signals from the camera to determine when tostart and stop firing. This is controlled by Standard i-TTLflash operation with COOLPIX cameras compatible with i-TTLand by Non-TTL operation with other COOLPIX cameras.• For connection to COOLPIX cameras featuring hot shoe contacts
such as the COOLPIX 8800, attach the Speedlight directly to theaccessory shoe.
• Optional accessories such as the Multi-Flash Bracket Unit SK-E900 should be used for connection with COOLPIX camerashaving a TTL multiple flash terminal but no hot-shoe contacts.
• For details, see your camera’s instruction manual.
Please note that wireless multiple flash using theCOOLPIX’s built-in flash as a master flash unit and theSB-800 as a remote flash unit cannot be performed.
Using the SB-800 with the COOLPIX
Detailed operation
This section provides a variety of flashmodes available with the SB-800.Be sure to refer to your camera’s instructionmanual for specific information on camerasettings and functions.
36
SB-800’s available flash modes
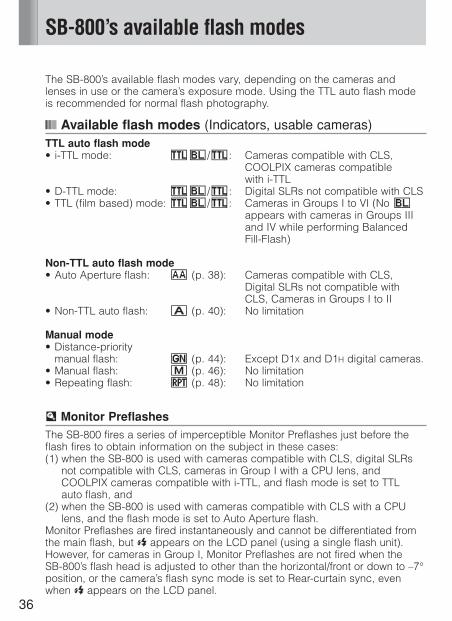
The SB-800’s available flash modes vary, depending on the cameras andlenses in use or the camera’s exposure mode. Using the TTL auto flash modeis recommended for normal flash photography.
Available flash modes (Indicators, usable cameras)TTL auto flash mode• i-TTL mode: Do/D: Cameras compatible with CLS,
COOLPIX cameras compatiblewith i-TTL
• D-TTL mode: Do/D: Digital SLRs not compatible with CLS• TTL (film based) mode: Do/D: Cameras in Groups I to VI (No o
appears with cameras in Groups IIIand IV while performing BalancedFill-Flash)
Non-TTL auto flash mode• Auto Aperture flash: B (p. 38): Cameras compatible with CLS,
Digital SLRs not compatible withCLS, Cameras in Groups I to II
• Non-TTL auto flash: A (p. 40): No limitation
Manual mode• Distance-priority
manual flash: p (p. 44): Except D1X and D1H digital cameras.• Manual flash: G (p. 46): No limitation• Repeating flash: q (p. 48): No limitation
u Monitor PreflashesThe SB-800 fires a series of imperceptible Monitor Preflashes just before theflash fires to obtain information on the subject in these cases: (1) when the SB-800 is used with cameras compatible with CLS, digital SLRs
not compatible with CLS, cameras in Group I with a CPU lens, andCOOLPIX cameras compatible with i-TTL, and flash mode is set to TTLauto flash, and
(2) when the SB-800 is used with cameras compatible with CLS with a CPUlens, and the flash mode is set to Auto Aperture flash.
Monitor Preflashes are fired instantaneously and cannot be differentiated fromthe main flash, but H appears on the LCD panel (using a single flash unit).However, for cameras in Group I, Monitor Preflashes are not fired when the SB-800’s flash head is adjusted to other than the horizontal/front or down to –7°position, or the camera’s flash sync mode is set to Rear-curtain sync, evenwhen H appears on the LCD panel.
Det
aile
d op
erat
ion
37
TTL auto flash mode
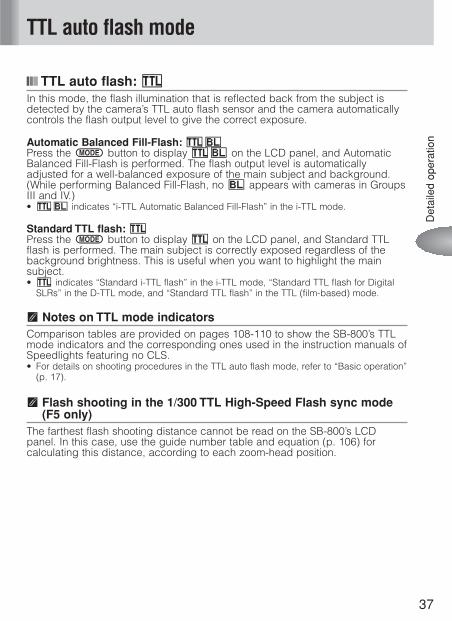
TTL auto flash: DIn this mode, the flash illumination that is reflected back from the subject isdetected by the camera’s TTL auto flash sensor and the camera automaticallycontrols the flash output level to give the correct exposure.
Automatic Balanced Fill-Flash: DoPress the a button to display Do on the LCD panel, and AutomaticBalanced Fill-Flash is performed. The flash output level is automaticallyadjusted for a well-balanced exposure of the main subject and background.(While performing Balanced Fill-Flash, no o appears with cameras in GroupsIII and IV.) • Do indicates “i-TTL Automatic Balanced Fill-Flash” in the i-TTL mode.
Standard TTL flash: DPress the a button to display D on the LCD panel, and Standard TTLflash is performed. The main subject is correctly exposed regardless of thebackground brightness. This is useful when you want to highlight the mainsubject. • D indicates “Standard i-TTL flash” in the i-TTL mode, “Standard TTL flash for Digital
SLRs” in the D-TTL mode, and “Standard TTL flash” in the TTL (film-based) mode.
t Notes on TTL mode indicatorsComparison tables are provided on pages 108-110 to show the SB-800’s TTLmode indicators and the corresponding ones used in the instruction manuals ofSpeedlights featuring no CLS.• For details on shooting procedures in the TTL auto flash mode, refer to “Basic operation”
(p. 17).
t Flash shooting in the 1/300 TTL High-Speed Flash sync mode(F5 only)
The farthest flash shooting distance cannot be read on the SB-800’s LCDpanel. In this case, use the guide number table and equation (p. 106) forcalculating this distance, according to each zoom-head position.
38
Non-TTL auto flash mode
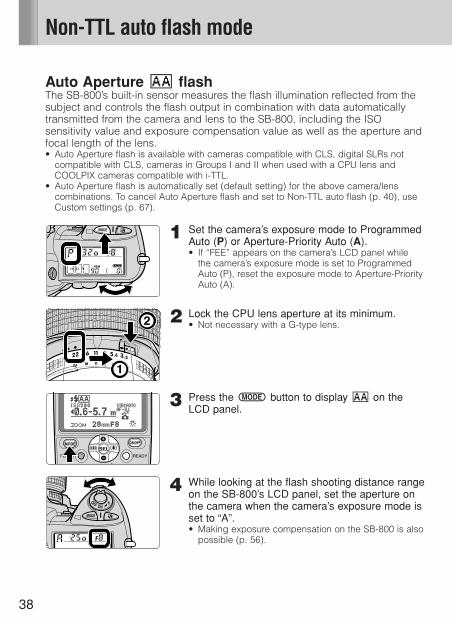
Auto Aperture B flashThe SB-800’s built-in sensor measures the flash illumination reflected from thesubject and controls the flash output in combination with data automaticallytransmitted from the camera and lens to the SB-800, including the ISOsensitivity value and exposure compensation value as well as the aperture andfocal length of the lens.• Auto Aperture flash is available with cameras compatible with CLS, digital SLRs not
compatible with CLS, cameras in Groups I and II when used with a CPU lens andCOOLPIX cameras compatible with i-TTL.
• Auto Aperture flash is automatically set (default setting) for the above camera/lenscombinations. To cancel Auto Aperture flash and set to Non-TTL auto flash (p. 40), useCustom settings (p. 67).
1 Set the camera’s exposure mode to ProgrammedAuto (P) or Aperture-Priority Auto (A).• If “FEE” appears on the camera’s LCD panel while
the camera’s exposure mode is set to ProgrammedAuto (P), reset the exposure mode to Aperture-PriorityAuto (A).
2 Lock the CPU lens aperture at its minimum.• Not necessary with a G-type lens.
3 Press the a button to display B on the LCD panel.
4 While looking at the flash shooting distance rangeon the SB-800’s LCD panel, set the aperture onthe camera when the camera’s exposure mode isset to “A”.• Making exposure compensation on the SB-800 is also
possible (p. 56).
Det
aile
d op
erat
ion
39
5 Compose the picture, confirm that the ready-lightis on, then shoot.• When the flash has fired at its maximum output and
underexposure may have occurred, the ready-light onthe SB-800 blinks for approx. 3 sec. To compensate,use a wider aperture or move closer to the subjectand reshoot.
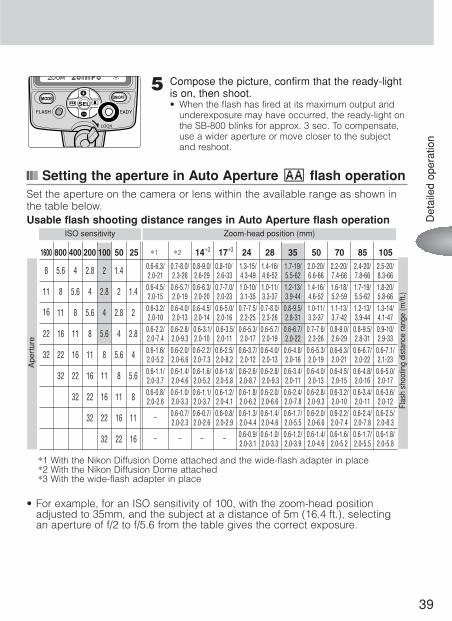
Setting the aperture in Auto Aperture B flash operationSet the aperture on the camera or lens within the available range as shown inthe table below.Usable flash shooting distance ranges in Auto Aperture flash operation
*1 With the Nikon Diffusion Dome attached and the wide-flash adapter in place*2 With the Nikon Diffusion Dome attached*3 With the wide-flash adapter in place
• For example, for an ISO sensitivity of 100, with the zoom-head positionadjusted to 35mm, and the subject at a distance of 5m (16.4 ft.), selecting an aperture of f/2 to f/5.6 from the table gives the correct exposure.
Ape
rtur
e
Flas
hsh
ootin
gdi
stan
cera
nge
(m/ft
.)
ISO sensitivity Zoom-head position (mm)
1600 800 400 200 100 50 25 ∗1 ∗2 14 17 24 28 35 50 70 85 105
8 5.6 4 2.8 2 1.4
11 8 5.6 4 2.8 2 1.4
16 11 8 5.6 4 2.8 2
22 16 11 8 5.6 4 2.8
32 22 16 11 8 5.6 4
32 22 16 11 8 5.6
32 22 16 11 8
32 22 16 11
32 22 16
0.6-6.3/ 0.7-8.0/ 0.8-9.0/ 0.8-10/ 1.3-15/ 1.4-16/ 1.7-19/ 2.0-20/ 2.2-20/ 2.4-20/ 2.5-20/2.0-21 2.3-26 2.6-29 2.6-33 4.3-49 4.6-52 5.5-62 6.6-66 7.4-66 7.8-66 8.3-66
0.6-4.5/ 0.6-5.7/ 0.6-6.3/ 0.7-7.0/ 1.0-10/ 1.0-11/ 1.2-13/ 1.4-16/ 1.6-18/ 1.7-19/ 1.8-20/2.0-15 2.0-19 2.0-20 2.0-23 3.1-35 3.3-37 3.9-44 4.6-52 5.2-59 5.5-62 5.8-66
0.6-3.2/ 0.6-4.0/ 0.6-4.5/ 0.6-5.0/ 0.7-7.5/ 0.7-8.0/ 0.8-9.5/ 1.0-11/ 1.1-13/ 1.2-13/ 1.3-14/2.0-10 2.0-13 2.0-14 2.0-16 2.2-25 2.3-26 2.8-31 3.3-37 3.7-42 3.9-44 4.1-47
0.6-2.2/ 0.6-2.8/ 0.6-3.1/ 0.6-3.5/ 0.6-5.3/ 0.6-5.7/ 0.6-6.7/ 0.7-7.6/ 0.8-9.0/ 0.8-9.5/ 0.9-10/2.0-7.4 2.0-9.3 2.0-10 2.0-11 2.0-17 2.0-19 2.0-22 2.3-26 2.6-29 2.8-31 2.9-330.6-1.6/ 0.6-2.0/ 0.6-2.2/ 0.6-2.5/ 0.6-3.7/ 0.6-4.0/ 0.6-4.8/ 0.6-5.3/ 0.6-6.3/ 0.6-6.7/ 0.6-7.1/2.0-5.2 2.0-6.6 2.0-7.3 2.0-8.2 2.0-12 2.0-13 2.0-16 2.0-19 2.0-21 2.0-22 2.1-230.6-1.1/ 0.6-1.4/ 0.6-1.6/ 0.6-1.8/ 0.6-2.6/ 0.6-2.8/ 0.6-3.4/ 0.6-4.0/ 0.6-4.5/ 0.6-4.8/ 0.6-5.0/2.0-3.7 2.0-4.6 2.0-5.2 2.0-5.8 2.0-8.7 2.0-9.3 2.0-11 2.0-13 2.0-15 2.0-16 2.0-170.6-0.8/ 0.6-1.0/ 0.6-1.1/ 0.6-1.2/ 0.6-1.8/ 0.6-2.0/ 0.6-2.4/ 0.6-2.8/ 0.6-3.2/ 0.6-3.4/ 0.6-3.6/2.0-2.6 2.0-3.3 2.0-3.7 2.0-4.1 2.0-6.2 2.0-6.6 2.0-7.8 2.0-9.3 2.0-10 2.0-11 2.0-12
_ 0.6-0.7/ 0.6-0.7/ 0.6-0.8/ 0.6-1.3/ 0.6-1.4/ 0.6-1.7/ 0.6-2.0/ 0.6-2.2/ 0.6-2.4/ 0.6-2.5/2.0-2.3 2.0-2.6 2.0-2.9 2.0-4.4 2.0-4.6 2.0-5.5 2.0-6.6 2.0-7.4 2.0-7.8 2.0-8.3
_ _ _ _ 0.6-0.9/ 0.6-1.0/ 0.6-1.2/ 0.6-1.4/ 0.6-1.6/ 0.6-1.7/ 0.6-1.8/2.0-3.1 2.0-3.3 2.0-3.9 2.0-4.6 2.0-5.2 2.0-5.5 2.0-5.8
∗3 ∗3

40
Non-TTL auto flash mode
Non-TTL auto A flash The SB-800’s built-in sensor measures the flash illumination reflected from thesubject, automatically controlling the SB-800’s light output to give the correctexposure. This allows you to make exposure compensation (p. 54) easily byvarying the aperture set on the camera or lens.• No limitation on usable cameras.• Auto Aperture flash (p. 38) is automatically set (default setting) when a CPU lens is
mounted on cameras compatible with CLS, digital SLRs not compatible with CLS,cameras in Groups I and II and COOLPIX cameras compatible with i-TTL. To cancelAuto Aperture flash and set to Non-TTL auto flash, use Custom settings (p. 67).
1 Set the camera’s exposure mode to Aperture-Priority Auto (A) or Manual (M).
2 Press the a button to display A on the LCD panel.
3 Press the e or f button to change the aperture,bringing the subject within the flash shootingdistance range.
4 Set the aperture that appears on the SB-800’sLCD panel on the lens or camera.
Det
aile
d op
erat
ion
41
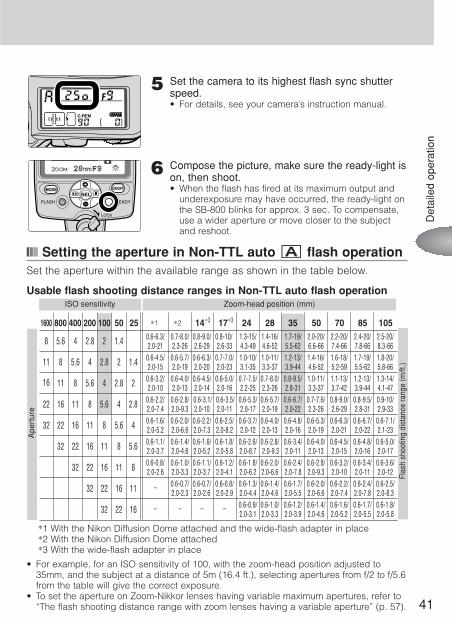
5 Set the camera to its highest flash sync shutterspeed.• For details, see your camera’s instruction manual.
6 Compose the picture, make sure the ready-light ison, then shoot.• When the flash has fired at its maximum output and
underexposure may have occurred, the ready-light onthe SB-800 blinks for approx. 3 sec. To compensate,use a wider aperture or move closer to the subjectand reshoot.
Setting the aperture in Non-TTL auto A flash operationSet the aperture within the available range as shown in the table below.
Usable flash shooting distance ranges in Non-TTL auto flash operation
*1 With the Nikon Diffusion Dome attached and the wide-flash adapter in place*2 With the Nikon Diffusion Dome attached*3 With the wide-flash adapter in place
• For example, for an ISO sensitivity of 100, with the zoom-head position adjusted to35mm, and the subject at a distance of 5m (16.4 ft.), selecting apertures from f/2 to f/5.6from the table will give the correct exposure.
• To set the aperture on Zoom-Nikkor lenses having variable maximum apertures, refer to“The flash shooting distance range with zoom lenses having a variable aperture” (p. 57).
Ape
rtur
e
Flas
hsh
ootin
gdi
stan
cera
nge
(m/ft
.)
ISO sensitivity Zoom-head position (mm)
1600 800 400 200 100 50 25 ∗1 ∗2 14 17 24 28 35 50 70 85 105
8 5.6 4 2.8 2 1.4
11 8 5.6 4 2.8 2 1.4
16 11 8 5.6 4 2.8 2
22 16 11 8 5.6 4 2.8
32 22 16 11 8 5.6 4
32 22 16 11 8 5.6
32 22 16 11 8
32 22 16 11
32 22 16
0.6-6.3/ 0.7-8.0/ 0.8-9.0/ 0.8-10/ 1.3-15/ 1.4-16/ 1.7-19/ 2.0-20/ 2.2-20/ 2.4-20/ 2.5-20/2.0-21 2.3-26 2.6-29 2.6-33 4.3-49 4.6-52 5.5-62 6.6-66 7.4-66 7.8-66 8.3-66
0.6-4.5/ 0.6-5.7/ 0.6-6.3/ 0.7-7.0/ 1.0-10/ 1.0-11/ 1.2-13/ 1.4-16/ 1.6-18/ 1.7-19/ 1.8-20/2.0-15 2.0-19 2.0-20 2.0-23 3.1-35 3.3-37 3.9-44 4.6-52 5.2-59 5.5-62 5.8-66
0.6-3.2/ 0.6-4.0/ 0.6-4.5/ 0.6-5.0/ 0.7-7.5/ 0.7-8.0/ 0.8-9.5/ 1.0-11/ 1.1-13/ 1.2-13/ 1.3-14/2.0-10 2.0-13 2.0-14 2.0-16 2.2-25 2.3-26 2.8-31 3.3-37 3.7-42 3.9-44 4.1-47
0.6-2.2/ 0.6-2.8/ 0.6-3.1/ 0.6-3.5/ 0.6-5.3/ 0.6-5.7/ 0.6-6.7/ 0.7-7.6/ 0.8-9.0/ 0.8-9.5/ 0.9-10/2.0-7.4 2.0-9.3 2.0-10 2.0-11 2.0-17 2.0-19 2.0-22 2.3-26 2.6-29 2.8-31 2.9-330.6-1.6/ 0.6-2.0/ 0.6-2.2/ 0.6-2.5/ 0.6-3.7/ 0.6-4.0/ 0.6-4.8/ 0.6-5.3/ 0.6-6.3/ 0.6-6.7/ 0.6-7.1/2.0-5.2 2.0-6.6 2.0-7.3 2.0-8.2 2.0-12 2.0-13 2.0-16 2.0-19 2.0-21 2.0-22 2.1-230.6-1.1/ 0.6-1.4/ 0.6-1.6/ 0.6-1.8/ 0.6-2.6/ 0.6-2.8/ 0.6-3.4/ 0.6-4.0/ 0.6-4.5/ 0.6-4.8/ 0.6-5.0/2.0-3.7 2.0-4.6 2.0-5.2 2.0-5.8 2.0-8.7 2.0-9.3 2.0-11 2.0-13 2.0-15 2.0-16 2.0-170.6-0.8/ 0.6-1.0/ 0.6-1.1/ 0.6-1.2/ 0.6-1.8/ 0.6-2.0/ 0.6-2.4/ 0.6-2.8/ 0.6-3.2/ 0.6-3.4/ 0.6-3.6/2.0-2.6 2.0-3.3 2.0-3.7 2.0-4.1 2.0-6.2 2.0-6.6 2.0-7.8 2.0-9.3 2.0-10 2.0-11 2.0-12
_ 0.6-0.7/ 0.6-0.7/ 0.6-0.8/ 0.6-1.3/ 0.6-1.4/ 0.6-1.7/ 0.6-2.0/ 0.6-2.2/ 0.6-2.4/ 0.6-2.5/2.0-2.3 2.0-2.6 2.0-2.9 2.0-4.4 2.0-4.6 2.0-5.5 2.0-6.6 2.0-7.4 2.0-7.8 2.0-8.3
_ _ _ _ 0.6-0.9/ 0.6-1.0/ 0.6-1.2/ 0.6-1.4/ 0.6-1.6/ 0.6-1.7/ 0.6-1.8/2.0-3.1 2.0-3.3 2.0-3.9 2.0-4.6 2.0-5.2 2.0-5.5 2.0-5.8
∗3 ∗3
42
Manual mode
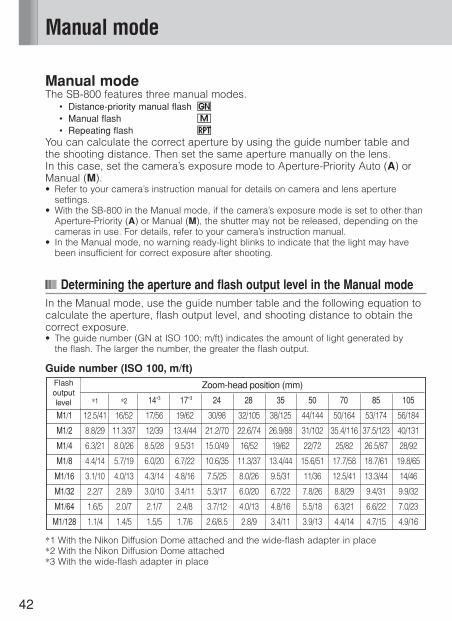
Manual modeThe SB-800 features three manual modes.
• Distance-priority manual flash p
• Manual flash G
• Repeating flash q
You can calculate the correct aperture by using the guide number table andthe shooting distance. Then set the same aperture manually on the lens.In this case, set the camera’s exposure mode to Aperture-Priority Auto (A) orManual (M).• Refer to your camera’s instruction manual for details on camera and lens aperture
settings.• With the SB-800 in the Manual mode, if the camera’s exposure mode is set to other than
Aperture-Priority (A) or Manual (M), the shutter may not be released, depending on thecameras in use. For details, refer to your camera’s instruction manual.
• In the Manual mode, no warning ready-light blinks to indicate that the light may havebeen insufficient for correct exposure after shooting.
Determining the aperture and flash output level in the Manual modeIn the Manual mode, use the guide number table and the following equation tocalculate the aperture, flash output level, and shooting distance to obtain thecorrect exposure.• The guide number (GN at ISO 100; m/ft) indicates the amount of light generated by
the flash. The larger the number, the greater the flash output.
Guide number (ISO 100, m/ft)
*1 With the Nikon Diffusion Dome attached and the wide-flash adapter in place*2 With the Nikon Diffusion Dome attached*3 With the wide-flash adapter in place
Zoom-head position (mm)
∗1 ∗2 14∗3 17∗3 24 28 35 50 70 85 105
M1/1 12.5/41 16/52 17/56 19/62 30/98 32/105 38/125 44/144 50/164 53/174 56/184
M1/2 8.8/29 11.3/37 12/39 13.4/44 21.2/70 22.6/74 26.9/88 31/102 35.4/116 37.5/123 40/131
M1/4 6.3/21 8.0/26 8.5/28 9.5/31 15.0/49 16/52 19/62 22/72 25/82 26.5/87 28/92
M1/8 4.4/14 5.7/19 6.0/20 6.7/22 10.6/35 11.3/37 13.4/44 15.6/51 17.7/58 18.7/61 19.8/65
M1/16 3.1/10 4.0/13 4.3/14 4.8/16 7.5/25 8.0/26 9.5/31 11/36 12.5/41 13.3/44 14/46
M1/32 2.2/7 2.8/9 3.0/10 3.4/11 5.3/17 6.0/20 6.7/22 7.8/26 8.8/29 9.4/31 9.9/32
M1/64 1.6/5 2.0/7 2.1/7 2.4/8 3.7/12 4.0/13 4.8/16 5.5/18 6.3/21 6.6/22 7.0/23
M1/128 1.1/4 1.4/5 1.5/5 1.7/6 2.6/8.5 2.8/9 3.4/11 3.9/13 4.4/14 4.7/15 4.9/16
Flashoutputlevel

43
To calculate the correct apertureCalculate the correct aperture by using this equation and the guide number table,according to the ISO sensitivity, flash output level and zoom-head position that are set:
f/stop (aperture) = Guide number (GN) x ISO sensitivity factor ÷ Shooting distance (m/ft)
• Set the same aperture on both the SB-800 and the camera or lens.
To calculate the guide numberCalculate the guide number by using this equation, according to the shootingdistance and aperture required.
Guide number (GN) = Shooting distance (m/ft) x Aperture ÷ ISO sensitivity factor
• Referring to the guide number table, determine an appropriate flash output levelcorresponding to the guide number obtained above, then set the same value on the SB-800.
• In Distance-priority manual flash operation, the guide number (indicating the amount oflight generated by the flash) is automatically determined by the SB-800 according to the distance value and aperture set.
ISO sensitivity factorsFor sensitivities other than ISO 100, multiply the guide number by the factorsshown in the table below.
Det
aile
d op
erat
ion
ISO 25 50 100 200 400 800 1600
Factors x0.5 x0.71 x1 x1.4 x2 x2.8 x4
44
Manual mode
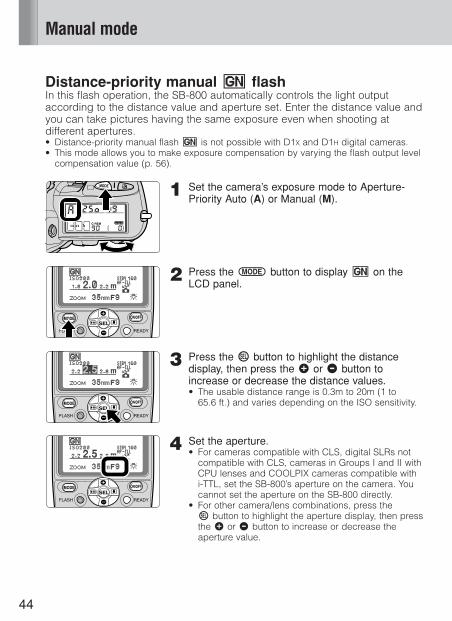
Distance-priority manual p flashIn this flash operation, the SB-800 automatically controls the light outputaccording to the distance value and aperture set. Enter the distance value andyou can take pictures having the same exposure even when shooting atdifferent apertures.• Distance-priority manual flash p is not possible with D1X and D1H digital cameras.• This mode allows you to make exposure compensation by varying the flash output level
compensation value (p. 56).
1 Set the camera’s exposure mode to Aperture-Priority Auto (A) or Manual (M).
2 Press the a button to display p on theLCD panel.
3 Press the g button to highlight the distancedisplay, then press the e or f button toincrease or decrease the distance values.• The usable distance range is 0.3m to 20m (1 to
65.6 ft.) and varies depending on the ISO sensitivity.
4 Set the aperture.• For cameras compatible with CLS, digital SLRs not
compatible with CLS, cameras in Groups I and II withCPU lenses and COOLPIX cameras compatible withi-TTL, set the SB-800’s aperture on the camera. Youcannot set the aperture on the SB-800 directly.
• For other camera/lens combinations, press the g button to highlight the aperture display, then pressthe e or f button to increase or decrease theaperture value.
45
5 Set the aperture that appears on the SB-800’sLCD panel on the lens or camera.• With cameras in Groups III to VII.
6 Confirm that the ready-light is on, then shoot.
Distance values that can be entered when performingDistance-priority manual p flash operation (m/ft.)
0.3/1 0.4/1.3 0.5/1.6 0.6/2 0.7/2.3 0.8/2.6 0.9/3 1.0/3.3 1.3/4.3 1.4/4.6
1.6/5.2 1.8/5.9 2.0/6.6 2.2/7.2 2.5/8.2 2.8/9.2 3.1/10.2 3.5/11.5 4.0/13.1 4.5/14.8
5.0/16.4 5.6/18.4 6.3/20.7 7.1/23.3 8.0/26.2 9.0/29.6 10/32.8 11/36.0 13/42.7 14/45.9
16/52.5 18/59.1 20/65.6
• Choose an appropriate flash shooting distance from the table above. If a desirabledistance value is not found in the table, use a shorter distance. For example, if the desired shooting distance is 2.7m (8.9 ft.), set 2.5m (8.2 ft.) on theLCD panel.
t Beyond the flash-shooting distance range warningIn distance-priority manual flash operation, the distance exceeding theavailable flash shooting distance range cannot be displayed on the LCD panel.Therefore, if the available distance range is shifted by changing the ISOsensitivity, aperture, or zoom-head position after you have set the shootingdistance and aperture, the farthest (or closest) available flash shootingdistance value is highlighted with an arrow pointing toward the available flashshooting distance range.
The figure shows that the farthest available flash shooting distance is 2.5m (8.2 ft.).
Det
aile
d op
erat
ion
46
Manual mode
Manual G flashIn Manual flash photography, you select the aperture and flash output level. In this way, you can control the exposure and flash shooting distance whenshooting subjects where the correct exposure is difficult to obtain in the TTL orNon-TTL auto flash mode. The flash output level can be set from M1/1 (fulloutput) to M1/128 to match your creative preferences.
1 Set the camera’s exposure mode to Aperture-Priority Auto (A) or Manual (M).
2 Press the a button until G appears on the LCD panel.
3 Determine the flash output level and aperture tomatch the flash shooting distance.• For details on determining the flash output level and
the aperture, refer to “Determining the aperture andflash output level in the Manual mode” (p. 42).
4 Press the g button to highlight the flash outputlevel display, then press the e or f button toincrease or decrease the values.• Refer to “Setting the flash output level” (p. 47).
5 Set the aperture.• For cameras compatible with CLS, digital SLRs not
compatible with CLS, cameras in Groups I and II withCPU lenses and COOLPIX cameras compatible withi-TTL, set the SB-800’s aperture on the camera. Youcannot set the aperture on the SB-800 directly.
• For other camera/lens combinations, press the g button to highlight the aperture display, then pressthe e or f button to increase or decrease theaperture value.
• If the ISO sensitivity is correctly set, the flash shootingdistance appears on the LCD panel, matching theflash output level and aperture as set.

47
Det
aile
d op
erat
ion
6 Set the same aperture on your camera or lensthat is set on the SB-800.• With cameras in Groups III to VII.
7 Confirm that the ready-light comes on, then shoot.
Setting the flash output levelPress the g button to highlight the flash output level display. The flash outputlevel changes every time you press the e or f button as shown below.
When you press the f button:∞ 1/1 ∞ 1/2 ∞ 1/2 (–1/3) ∞ 1/2 (–2/3) ∞ 1/4
1/128 ... 1/4 (–2/3) ± 1/4 (–1/3) ±
When you press the e button:∞ 1/128 ∞ 1/128 (+1/3) ∞ 1/128 (+2/3) ∞ 1/64
1/1 ± 1/2 ... 1/64 (+2/3) ± 1/64 (+1/3)±
• The numbers in parentheses represent the adjustable flash output level in ±1/3 stepsexcept between 1/1 and 1/2. Therefore, 1/32 (-1/3) and 1/64 (+2/3) represent the sameflash output level.
• To extend the flash shooting distance, choose a flash output level close to M1/1.
48
Manual mode
Repeating q flashIn Repeating flash operation, the SB-800 fires repeatedly during a singleexposure, creating stroboscopic multiple-exposure effects. This operation isuseful when shooting fast-moving subjects.• In this operation, q appears on the LCD panel. • Be sure to use fresh or fully charged batteries and allow enough time for the flash to
recycle between each repeating flash session.• Also, it is recommended to use a tripod to prevent camera/flash shake, because slower
shutter speeds are used.
Setting the flash output level, the frequency (Hz), and thenumber of repeating flashes per frame
• Frequency (Hz) represents the number of times the flash fires per second.• The actual number of repeating flashes per frame becomes lower than the one set as
the shutter speed increases or the number of flashes per second decreases, becausethe Speedlight fires during a single exposure.
• Referring to the table below, set the flash output level, the frequency, and the number ofrepeating flashes separately for each picture.
Maximum number of repeating flashes per frame
* Frequency (Hz) represents the number of flashes per second.
1 Set the camera’s exposure mode to Manual (M).
Frequency*Flash output level
1/8 1/16 1/32 1/64 1/1281-2 Hz 14 30 60 90 903 Hz 12 30 60 90 904 Hz 10 20 50 80 805 Hz 8 20 40 70 706 Hz 6 20 32 56 567 Hz 6 20 28 44 448 Hz 5 10 24 36 369 Hz 5 10 22 32 32
10 Hz 4 8 20 28 2820-100 Hz 4 8 12 24 24
49
2 Press the a button to display q.
3 Press the g button to highlight the flash outputlevel display, then press the e or f button toincrease or decrease the values.• The available range of the flash output level is
between 1/8 and 1/128.
4 Press the g button.• The flash output level is set, then the frequency
display is highlighted.
5 Repeat the procedures above to set thefrequency and the number of repeating flashesper frame.
Frequency (Hz)Number of repeating flashes per frame
6 Determine the guide number according to theflash output level and zoom-head position set,then calculate the correct aperture from the guidenumber and the shooting distance. Finally set thisaperture on the SB-800.• Refer to “Guide number table” (p. 42) and
“Determining the aperture and flash output level in the Manual mode” (p. 42).
• For cameras compatible with CLS, digital SLRs notcompatible with CLS, cameras in Groups I and II withCPU lenses and COOLPIX cameras compatible withi-TTL, set the SB-800’s aperture on the camera. Youcannot set the aperture on the SB-800 directly.
• If the ISO sensitivity is correctly set, the flash shootingdistance appears on the LCD panel, matching the flash output level and aperture as set.
Det
aile
d op
erat
ion
50
Manual mode
7 Set the same aperture on the camera or lens thatis set on the SB-800.• With cameras in Groups III to VII.
8 Set the shutter speed.• Use the equation to determine the shutter speed and
use that shutter speed or one slower.
Shutter speed = Number of flashes per frame ÷Frequency of flashes (Hz)
• For example, if the number of flashes per frame is 10and frequency is 5 Hz, divide 10 by 5 to get a shutterspeed of 2 sec. or slower.
• Or you can set the shutter speed to B (bulb) toaccommodate any number of repeating flashes.
9 Confirm that the ready-light is on, then shoot.
t Making sure the flash fires correctly before shootingPress the FLASH button to make sure the flash fires correctly as set.
t Exposure compensation in Repeating flash operationThe flash shooting distance calculated in step number 6 is the correctexposure for the first flash in the sequence. Therefore, repeating flash at thisflash output level will result in overexposure of any overlapping images. To prevent this, set a smaller aperture on the camera.

51
Notes on continuous flash shooting
Do not exceed the maximum number of continuous firingsYou should allow the SB-800 to cool off for at least 10 minutes after themaximum number of continuous firings are performed as shown in thetable below:
Max. number of continuous firingsFlash mode Max. number of continuous firings
(at 6 frames/sec.)
TTL auto flashNon-TTL auto flash/Auto Aperture flash 15Manual flash (Flash output level: M1/1, M1/2)
Manual flash (Flash output level: M1/4 to M1/128) 40
Synchronization during continuous flash shootingIt is possible to take up to the number of frames during continuous shooting asshown in the table below. However, if the continuous firings exceed themaximum numbers as shown in the table above, you should allow the SB-800to cool off for at least 10 minutes.
Maximum number of frames during continuous flash shooting (at six frames per sec.)
• With fresh batteries of the same type in both the SB-800 and optional Nikon SD-8A orPower Bracket Unit SK-6/SK-6A.
• Refer to table “Maximum number of repeating flashes per frame” on page 48 whenperforming Repeating flash.
Det
aile
d op
erat
ion
1/8 1/16 1/32 1/64 1/128
Up to 4 Up to 8 Up to 16 Up to 30 Up to 40
SD-7 Alkaline-manganeseAlkaline-manganeseLithiumNiCdNi-MHAlkaline-manganeseLithiumNiCdNi-MH
Up to 6 Up to 10 Up to 40 Up to 40 Up to 40SD-8A
Up to 5 Up to 10Up to 20
Up to 30Up to 40 Up to 40
Up to 5 Up to 10 Up to 40 Up to 40Up to 30
SK-6/SK-6A Up to 5 Up to 10 Up to 20 Up to 40 Up to 40
Up to 5 Up to 10 Up to 30 Up to 40 Up to 40
Batteries inside SB-800
Flash output level
SB-800 only All types
Optional power source
WARNING
52
Checking the correct exposure before shooting
You can determine whether the subject will receive the correct exposure by test firing the SB-800 before actually taking the picture in TTL auto flash, AutoAperture, and Non-TTL auto flash operations. • In manual flash mode, checking the correct exposure cannot be performed by
test firing.
TTL auto flash modePress the SB-800’s a button until B (Auto Aperture flash) or A (Non-TTL auto flash) appears on the LCD panel. Set the same aperture on the SB-800 as set in the TTL auto flash mode. Press the shutter release buttonslightly, then press the FLASH button to fire the flash. If the ready-light blinksafter firing, this indicates the light may have been insufficient for correctexposure. In this case, set a wider aperture on the camera or lens, or movecloser to the subject.
Auto Aperture flashMake the necessary settings on the SB-800 and camera, press the shutterrelease button slightly, then press the FLASH button to fire the flash. If the ready-light blinks after firing, this indicates the light may have been insufficientfor correct exposure. In this case, set a wider aperture on the camera or lens,or move closer to the subject.
Non-TTL auto flashMake the necessary settings on the SB-800 and camera, then press theFLASH button to fire the flash. If the ready-light blinks after firing, this indicatesthe light may have been insufficient for correct exposure. In this case, set awider aperture on the camera or lens, or move closer to the subject.

Other functions
Detailed information on each function of theSB-800 is provided.
54
Exposure compensation and flash output level
Exposure compensation allows you to take well-balanced pictures byintentionally modifying the flash exposure. This is useful when a subject ofextremely high or low reflectivity is included in the scene or when you want tocreate flash photographs to match your creative preferences. • Some plus compensation may be necessary when the background includes a mirror,
white wall, or other highly reflective surface. Likewise, some minus compensation maybe required when the background is dark or includes subjects of low reflectivity.
• Making exposure compensation for both the main subject and background, the mainsubject only without affecting the background, or the background only without affectingthe main subject are possible, depending on the flash shooting situation.
Exposure compensation on the SB-800 can be performed in these ways:
Exposure compensation Available flash mode Usable cameraMaking exposure compensation All flash modes Cameras in all groupsfor both the main subject and backgroundMaking exposure compensation TTL auto flash and Auto Cameras compatible with CLS, for the main subject only Aperture flash digital SLRs not compatible
with CLS, cameras in Groups I to III, and COOLPIX camerascompatible with i-TTL.
Manual flash mode Cameras in all groupsMaking exposure compensation Flash shooting at slow shutter Cameras in all groupsfor the background only speeds
Making exposure compensation for both the main subject and backgroundIn TTL auto flash mode and Auto Aperture flash operationUse the camera’s exposure compensation function to modify both the SB-800’sflash output level and the background exposure. For details, see your camera’sinstruction manual.• The exposure compensation value set on the camera is not displayed on the SB-800’s
LCD panel.• Exposure compensation beyond the usable ISO sensitivity range cannot be performed
(p. 24). For example, with an ISO sensitivity of 100, if you try to make an exposurecompensation of +3 steps on the camera (equivalent to ISO 12), which is out of theusable ISO sensitivity range (ISO 25-1000) of the SB-800. In this case, exposurecompensation up to +2 steps (equivalent to ISO 25) is possible.
55
compensation
Making exposure compensation in Non-TTL auto flash and Manual flashoperationsExposure compensation is performed by intentionally modifying the correctaperture.• In the Non-TTL auto flash mode, the correct exposure can be obtained when the same
aperture is set on the camera as that set on the SB-800. Therefore, to make exposurecompensation, vary the aperture set on the camera while retaining the aperture set onthe SB-800 or vice versa.
• In the Manual flash mode, calculate the proper aperture for the correct exposure fromthe guide number and the shooting distance (p. 43). Then, use a larger or smalleraperture on the camera to make exposure compensation.
• As a basic guide, set a wider aperture on the camera or lens to make the main subjectbrighter or a smaller aperture to make it darker.
Making exposure compensation for the main subject onlyIn TTL auto flash mode and Auto Aperture flash operationMaking exposure compensation for a flash illuminated main subject withoutaffecting the background exposure by adjusting the SB-800’s flash output levelis called flash output level compensation (p. 56).• This compensation can only be performed with cameras compatible with CLS, digital
SLRs not compatible with CLS, cameras in Groups I to III, and COOLPIX camerascompatible with i-TTL.
In Manual flash modeMaking exposure compensation for only the flash illuminated subject byintentionally modifying the SB-800’s flash output level (M1/1 to M1/128).• For cameras in all groups.
Making exposure compensation for the background onlySet the camera’s exposure mode to Shutter-Priority Auto (S) or Manual (M), andset the shutter speed to one slower than its flash sync shutter speed.• With cameras providing slow-sync, set the camera’s flash sync mode to Slow-sync
(p. 58) to bring out background details in low-light situations.• For details, see your camera’s instruction manual.
Oth
er f
unct
ions

56
Exposure compensation and flash output level compensation
Flash output level compensationYou can make exposure compensation for the flash illuminated subject withoutaffecting the background exposure by modifying the SB-800’s flash output level.• Available in TTL auto flash mode, Auto Aperture flash and Distance-priority manual
flash operations.• In the TTL auto flash mode or Auto Aperture flash operation, flash output level
compensation is only available with cameras compatible with CLS, digital SLRs notcompatible with CLS, cameras in Groups I to III, and COOLPIX cameras compatiblewith i-TTL.
• With F-601/N6006 and F-601M/N6000 cameras, make flash output level compensationon the camera. Flash output level compensation cannot be made on the SB-800. Theamount of compensation set on the camera does not appear on the SB-800’s LCDpanel. For details, see your camera’s instruction manual.
• With SLR cameras that have a built-in Speedlight with an exposure compensation function,you can compensate the flash output level on either the camera or the SB-800. For details,see your camera’s instruction manual. If you use both controls, the exposure is modified bythe sum total of both compensation values. In this case, the SB-800’s LCD panel showsonly the compensation value set on the SB-800.
1 Press the g button to highlight the Flash outputlevel compensation value.
2 Press the e or f button to increase or decreasethe compensation in 1/3 steps from –3.0 to +3.0 EV.
3 Press the g button.• The highlighted flash output level compensation value
returns to normal display. The last highlighted numberis the one automatically set.
v Canceling flash output level compensationThe flash output level compensation cannot be canceled by turning the SB-800off. To cancel, press the e or f button to return the compensation value to “0”.
57
Flash shooting distance range with zoom lenses having a variable aperture
With zoom lenses having a variable aperture, take note of the following beforesetting the aperture on the SB-800 and confirming the flash shooting distancerange.• For details, read the instruction manuals of your camera and lenses.
u Lenses having a variable apertureThere are two maximum aperture values indicated in the lens model name ofcertain zoom lenses. For example with the AF Zoom-Nikkor 28-105mm f/3.5-4.5D IF, the maximum aperture at 28mm is f/3.5, but decreases to f/4.5 at105mm.
Setting the aperture on the camera’s LCD panel or in the viewfinderLock the lens aperture at its minimum. After composing the picture by zoomingin or out, read the aperture on the camera’s LCD panel or in the viewfinder.Then set the same aperture on the SB-800’s LCD panel and confirm the flashshooting distance range.
Setting the aperture using the scale on the lensAfter zooming in or out to select the appropriate composition, read the aperture using the aperture scale on the lens. Then set the same aperture on the SB-800’s LCD panel and confirm the flash shooting distance range.
At wideangle zoom settings, read the aperture value at the green index (or line).At telephoto settings, read the aperture value at the yellow index (or dot). At intermediate settings, read the aperture value between the two indexes.
Setting the aperture on the camera’s aperture dial(F-401x/N5005, F-401s/N4004s, F-401/N4004 cameras + CPU lens)After zooming in/out to select the desired composition, set the aperture on thecamera’s aperture dial. Then set the same aperture on the SB-800’s LCD paneland confirm the flash shooting distance range.• Set the camera’s exposure mode to Aperture-Priority Auto (A) or Manual (M).
The aperture cannot be set in the Programmed Auto (P) or Shutter-Priority Auto (S)exposure mode.
• If the aperture dial is set beyond lens’ aperture range, set the lens’ minimum (or maximum) aperture on the SB-800’s LCD panel.
Oth
er f
unct
ions
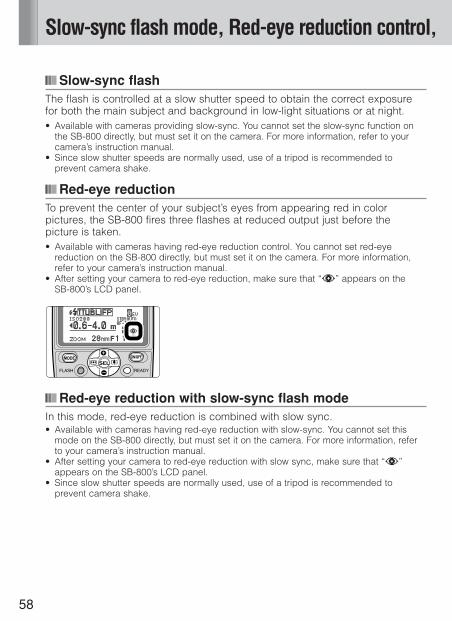
58
Slow-sync flash mode, Red-eye reduction control,
Slow-sync flashThe flash is controlled at a slow shutter speed to obtain the correct exposurefor both the main subject and background in low-light situations or at night.• Available with cameras providing slow-sync. You cannot set the slow-sync function on
the SB-800 directly, but must set it on the camera. For more information, refer to yourcamera’s instruction manual.
• Since slow shutter speeds are normally used, use of a tripod is recommended toprevent camera shake.
Red-eye reductionTo prevent the center of your subject’s eyes from appearing red in colorpictures, the SB-800 fires three flashes at reduced output just before thepicture is taken.• Available with cameras having red-eye reduction control. You cannot set red-eye
reduction on the SB-800 directly, but must set it on the camera. For more information,refer to your camera’s instruction manual.
• After setting your camera to red-eye reduction, make sure that “N” appears on the SB-800’s LCD panel.
Red-eye reduction with slow-sync flash modeIn this mode, red-eye reduction is combined with slow sync.• Available with cameras having red-eye reduction with slow-sync. You cannot set this
mode on the SB-800 directly, but must set it on the camera. For more information, referto your camera’s instruction manual.
• After setting your camera to red-eye reduction with slow sync, make sure that “N”appears on the SB-800’s LCD panel.
• Since slow shutter speeds are normally used, use of a tripod is recommended toprevent camera shake.
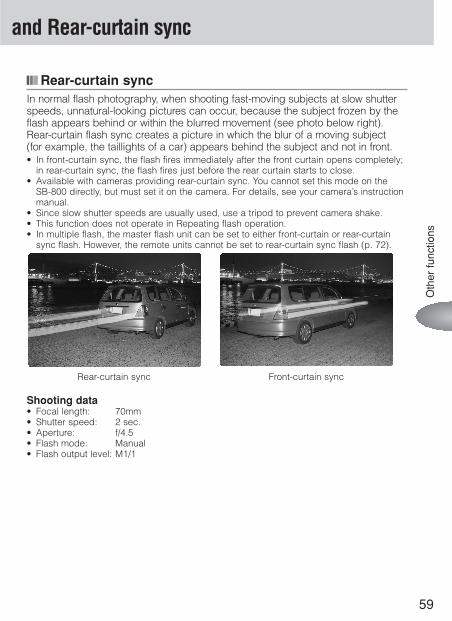
59
and Rear-curtain sync
Rear-curtain syncIn normal flash photography, when shooting fast-moving subjects at slow shutterspeeds, unnatural-looking pictures can occur, because the subject frozen by theflash appears behind or within the blurred movement (see photo below right).Rear-curtain flash sync creates a picture in which the blur of a moving subject (for example, the taillights of a car) appears behind the subject and not in front.• In front-curtain sync, the flash fires immediately after the front curtain opens completely;
in rear-curtain sync, the flash fires just before the rear curtain starts to close.• Available with cameras providing rear-curtain sync. You cannot set this mode on the
SB-800 directly, but must set it on the camera. For details, see your camera’s instructionmanual.
• Since slow shutter speeds are usually used, use a tripod to prevent camera shake.• This function does not operate in Repeating flash operation.• In multiple flash, the master flash unit can be set to either front-curtain or rear-curtain
sync flash. However, the remote units cannot be set to rear-curtain sync flash (p. 72).
Rear-curtain sync Front-curtain sync
Shooting data• Focal length: 70mm• Shutter speed: 2 sec.• Aperture: f/4.5• Flash mode: Manual• Flash output level: M1/1
Oth
er f
unct
ions
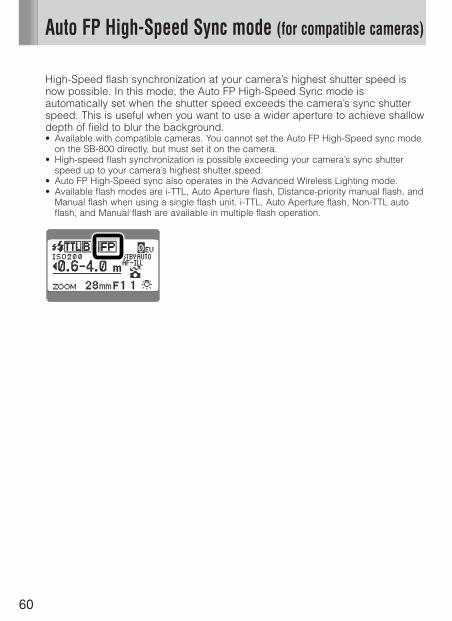
60
Auto FP High-Speed Sync mode (for compatible cameras)
High-Speed flash synchronization at your camera’s highest shutter speed isnow possible. In this mode, the Auto FP High-Speed Sync mode isautomatically set when the shutter speed exceeds the camera’s sync shutterspeed. This is useful when you want to use a wider aperture to achieve shallowdepth of field to blur the background. • Available with compatible cameras. You cannot set the Auto FP High-Speed sync mode
on the SB-800 directly, but must set it on the camera. • High-speed flash synchronization is possible exceeding your camera’s sync shutter
speed up to your camera’s highest shutter speed.• Auto FP High-Speed sync also operates in the Advanced Wireless Lighting mode.• Available flash modes are i-TTL, Auto Aperture flash, Distance-priority manual flash, and
Manual flash when using a single flash unit. i-TTL, Auto Aperture flash, Non-TTL autoflash, and Manual flash are available in multiple flash operation.
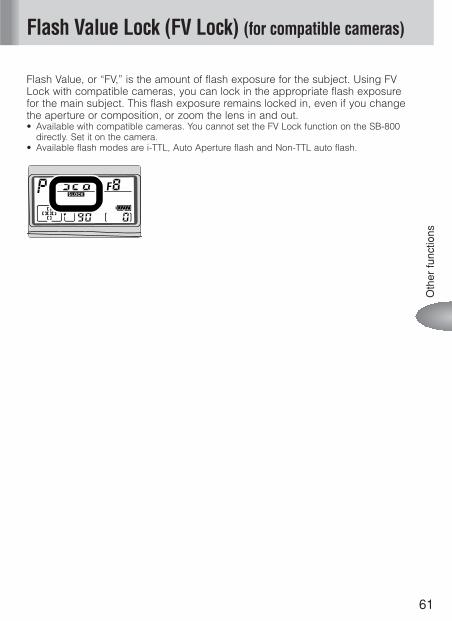
61
Flash Value Lock (FV Lock) (for compatible cameras)
Flash Value, or “FV,” is the amount of flash exposure for the subject. Using FVLock with compatible cameras, you can lock in the appropriate flash exposurefor the main subject. This flash exposure remains locked in, even if you changethe aperture or composition, or zoom the lens in and out.• Available with compatible cameras. You cannot set the FV Lock function on the SB-800
directly. Set it on the camera.• Available flash modes are i-TTL, Auto Aperture flash and Non-TTL auto flash.
Oth
er f
unct
ions
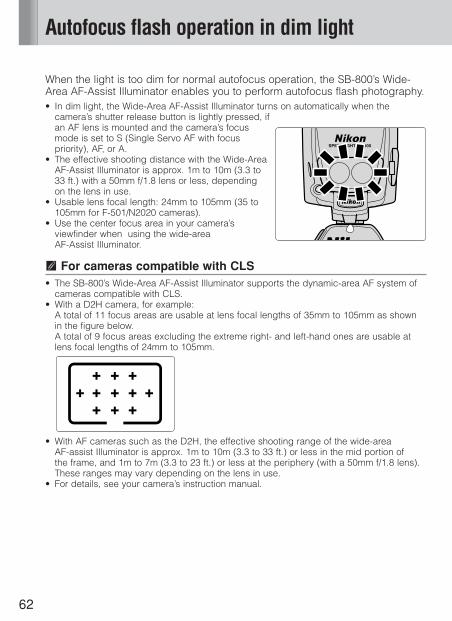
62
Autofocus flash operation in dim light
When the light is too dim for normal autofocus operation, the SB-800’s Wide-Area AF-Assist Illuminator enables you to perform autofocus flash photography. • In dim light, the Wide-Area AF-Assist Illuminator turns on automatically when the
camera’s shutter release button is lightly pressed, ifan AF lens is mounted and the camera’s focusmode is set to S (Single Servo AF with focuspriority), AF, or A.
• The effective shooting distance with the Wide-AreaAF-Assist Illuminator is approx. 1m to 10m (3.3 to33 ft.) with a 50mm f/1.8 lens or less, dependingon the lens in use.
• Usable lens focal length: 24mm to 105mm (35 to105mm for F-501/N2020 cameras).
• Use the center focus area in your camera’sviewfinder when using the wide-area AF-Assist Illuminator.
t For cameras compatible with CLS• The SB-800’s Wide-Area AF-Assist Illuminator supports the dynamic-area AF system of
cameras compatible with CLS. • With a D2H camera, for example:
A total of 11 focus areas are usable at lens focal lengths of 35mm to 105mm as shownin the figure below. A total of 9 focus areas excluding the extreme right- and left-hand ones are usable atlens focal lengths of 24mm to 105mm.
• With AF cameras such as the D2H, the effective shooting range of the wide-area AF-assist Illuminator is approx. 1m to 10m (3.3 to 33 ft.) or less in the mid portion of the frame, and 1m to 7m (3.3 to 23 ft.) or less at the periphery (with a 50mm f/1.8 lens).These ranges may vary depending on the lens in use.
• For details, see your camera’s instruction manual.
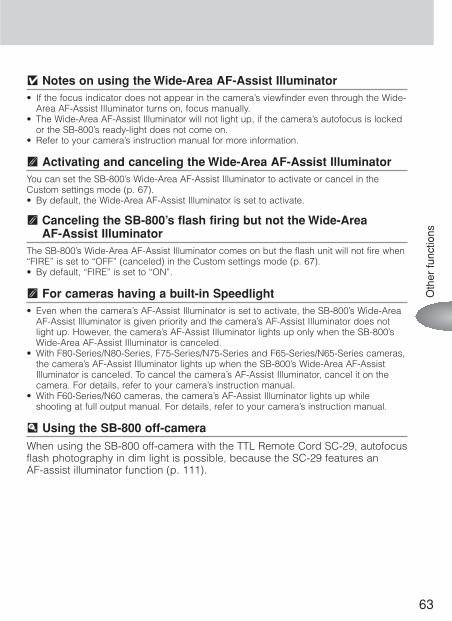
63
v Notes on using the Wide-Area AF-Assist Illuminator• If the focus indicator does not appear in the camera’s viewfinder even through the Wide-
Area AF-Assist Illuminator turns on, focus manually.• The Wide-Area AF-Assist Illuminator will not light up, if the camera’s autofocus is locked
or the SB-800’s ready-light does not come on.• Refer to your camera’s instruction manual for more information.
t Activating and canceling the Wide-Area AF-Assist Illuminator You can set the SB-800’s Wide-Area AF-Assist Illuminator to activate or cancel in theCustom settings mode (p. 67).• By default, the Wide-Area AF-Assist Illuminator is set to activate.
t Canceling the SB-800’s flash firing but not the Wide-Area AF-Assist Illuminator
The SB-800’s Wide-Area AF-Assist Illuminator comes on but the flash unit will not fire when“FIRE” is set to “OFF” (canceled) in the Custom settings mode (p. 67).• By default, “FIRE” is set to “ON”.
t For cameras having a built-in Speedlight• Even when the camera’s AF-Assist Illuminator is set to activate, the SB-800’s Wide-Area
AF-Assist Illuminator is given priority and the camera’s AF-Assist Illuminator does notlight up. However, the camera’s AF-Assist Illuminator lights up only when the SB-800’sWide-Area AF-Assist Illuminator is canceled.
• With F80-Series/N80-Series, F75-Series/N75-Series and F65-Series/N65-Series cameras,the camera’s AF-Assist Illuminator lights up when the SB-800’s Wide-Area AF-AssistIlluminator is canceled. To cancel the camera’s AF-Assist Illuminator, cancel it on thecamera. For details, refer to your camera’s instruction manual.
• With F60-Series/N60 cameras, the camera’s AF-Assist Illuminator lights up whileshooting at full output manual. For details, refer to your camera’s instruction manual.
u Using the SB-800 off-cameraWhen using the SB-800 off-camera with the TTL Remote Cord SC-29, autofocusflash photography in dim light is possible, because the SC-29 features an AF-assist illuminator function (p. 111).
Oth
er f
unct
ions
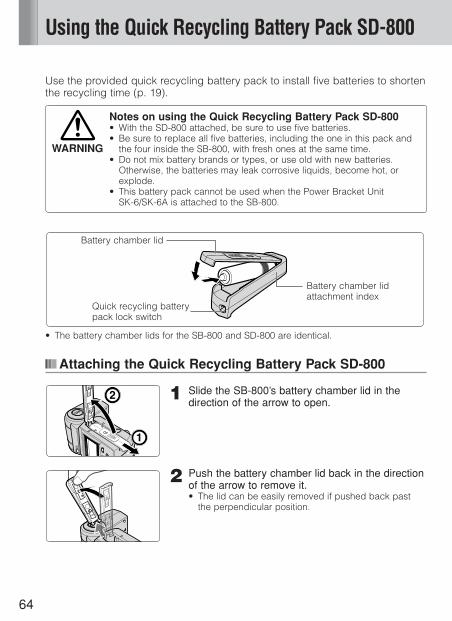
64
Using the Quick Recycling Battery Pack SD-800
Use the provided quick recycling battery pack to install five batteries to shortenthe recycling time (p. 19).
Notes on using the Quick Recycling Battery Pack SD-800• With the SD-800 attached, be sure to use five batteries.• Be sure to replace all five batteries, including the one in this pack and
the four inside the SB-800, with fresh ones at the same time.• Do not mix battery brands or types, or use old with new batteries.
Otherwise, the batteries may leak corrosive liquids, become hot, orexplode.
• This battery pack cannot be used when the Power Bracket Unit SK-6/SK-6A is attached to the SB-800.
• The battery chamber lids for the SB-800 and SD-800 are identical.
Attaching the Quick Recycling Battery Pack SD-800
1 Slide the SB-800’s battery chamber lid in thedirection of the arrow to open.
2 Push the battery chamber lid back in the directionof the arrow to remove it.• The lid can be easily removed if pushed back past
the perpendicular position.
WARNING
Battery chamber lid
Battery chamber lid attachment index
Quick recycling batterypack lock switch

65
3 Install the batteries in accordance with the i andj marks, as shown.
4 Open the SD-800’s battery chamber lid to installan extra battery, following the i and j marks,as shown.
5 Close the battery chamber lid by sliding it intoplace while pressing down.
6 Align the index mark on the SD-800’s batterychamber lid with the corresponding index mark onthe SB-800 and attach the battery pack by slidingit into place.• Be sure to slide the battery pack until the SD-800’s
lock switch clicks into place.
Detaching the SD-800.O
ther
fun
ctio
ns
Index
1 Push up the SD-800’s lockswitch, then slide itto detach.
2 Insert one ofthe hinges ofthe SB-800’sbatterychamber lid,as shown.
3 Insert theother hinge,as shown.
4 Close thebatterychamber lid bysliding it intoplace whilepressing down.
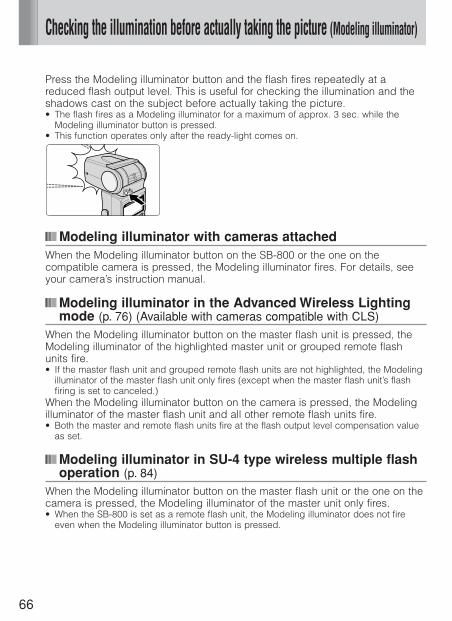
66
Checking the illumination before actually taking the picture (Modeling illuminator)
Press the Modeling illuminator button and the flash fires repeatedly at areduced flash output level. This is useful for checking the illumination and theshadows cast on the subject before actually taking the picture.• The flash fires as a Modeling illuminator for a maximum of approx. 3 sec. while the
Modeling illuminator button is pressed.• This function operates only after the ready-light comes on.
Modeling illuminator with cameras attachedWhen the Modeling illuminator button on the SB-800 or the one on thecompatible camera is pressed, the Modeling illuminator fires. For details, seeyour camera’s instruction manual.
Modeling illuminator in the Advanced Wireless Lightingmode (p. 76) (Available with cameras compatible with CLS)
When the Modeling illuminator button on the master flash unit is pressed, theModeling illuminator of the highlighted master unit or grouped remote flashunits fire.• If the master flash unit and grouped remote flash units are not highlighted, the Modeling
illuminator of the master flash unit only fires (except when the master flash unit’s flashfiring is set to canceled.)
When the Modeling illuminator button on the camera is pressed, the Modelingilluminator of the master flash unit and all other remote flash units fire.• Both the master and remote flash units fire at the flash output level compensation value
as set.
Modeling illuminator in SU-4 type wireless multiple flashoperation (p. 84)
When the Modeling illuminator button on the master flash unit or the one on thecamera is pressed, the Modeling illuminator of the master unit only fires.• When the SB-800 is set as a remote flash unit, the Modeling illuminator does not fire
even when the Modeling illuminator button is pressed.
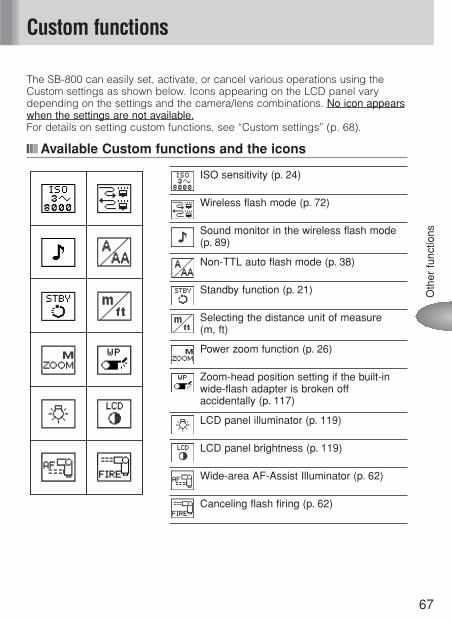
67
Custom functions
The SB-800 can easily set, activate, or cancel various operations using theCustom settings as shown below. Icons appearing on the LCD panel varydepending on the settings and the camera/lens combinations. No icon appearswhen the settings are not available.For details on setting custom functions, see “Custom settings” (p. 68).
Available Custom functions and the icons
ISO sensitivity (p. 24)
Wireless flash mode (p. 72)
Sound monitor in the wireless flash mode(p. 89)
Non-TTL auto flash mode (p. 38)
Standby function (p. 21)
Selecting the distance unit of measure (m, ft)
Power zoom function (p. 26)
Zoom-head position setting if the built-inwide-flash adapter is broken offaccidentally (p. 117)
LCD panel illuminator (p. 119)
LCD panel brightness (p. 119)
Wide-area AF-Assist Illuminator (p. 62)
Canceling flash firing (p. 62)
Oth
er f
unct
ions
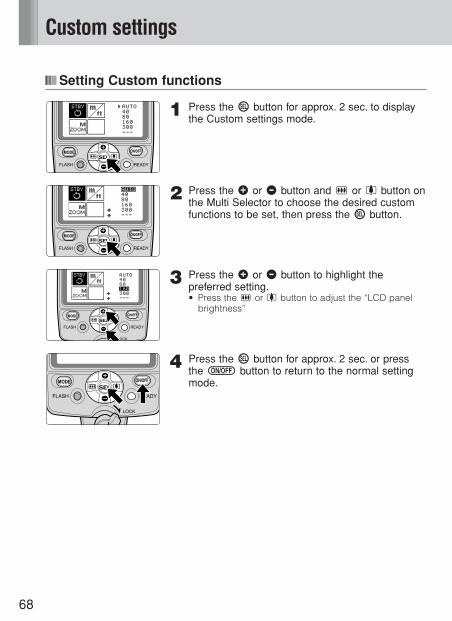
68
Custom settings
Setting Custom functions
1 Press the g button for approx. 2 sec. to displaythe Custom settings mode.
2 Press the e or f button and c or d button onthe Multi Selector to choose the desired customfunctions to be set, then press the g button.
3 Press the e or f button to highlight thepreferred setting.• Press the c or d button to adjust the “LCD panel
brightness”
4 Press the g button for approx. 2 sec. or pressthe b button to return to the normal settingmode.
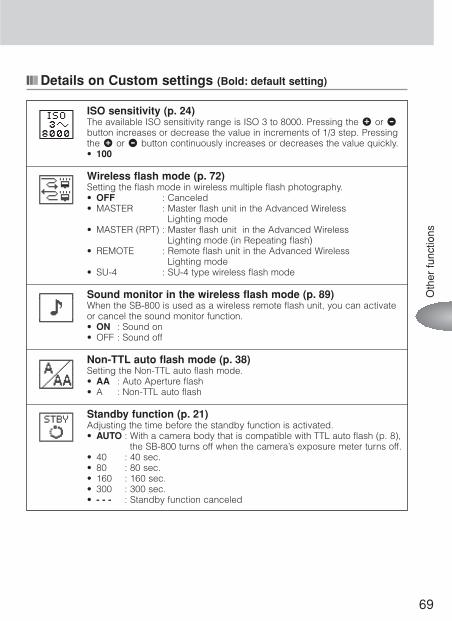
69
Details on Custom settings (Bold: default setting)
ISO sensitivity (p. 24)The available ISO sensitivity range is ISO 3 to 8000. Pressing the e or fbutton increases or decrease the value in increments of 1/3 step. Pressingthe e or f button continuously increases or decreases the value quickly.• 100
Wireless flash mode (p. 72)Setting the flash mode in wireless multiple flash photography.• OFF : Canceled• MASTER : Master flash unit in the Advanced Wireless
Lighting mode• MASTER (RPT) : Master flash unit in the Advanced Wireless
Lighting mode (in Repeating flash)• REMOTE : Remote flash unit in the Advanced Wireless
Lighting mode• SU-4 : SU-4 type wireless flash mode
Sound monitor in the wireless flash mode (p. 89)When the SB-800 is used as a wireless remote flash unit, you can activate or cancel the sound monitor function.• ON : Sound on• OFF : Sound off
Non-TTL auto flash mode (p. 38)Setting the Non-TTL auto flash mode.• AA : Auto Aperture flash• A : Non-TTL auto flash
Standby function (p. 21)Adjusting the time before the standby function is activated. • AUTO : With a camera body that is compatible with TTL auto flash (p. 8),
the SB-800 turns off when the camera’s exposure meter turns off.• 40 : 40 sec.• 80 : 80 sec.• 160 : 160 sec.• 300 : 300 sec.• - - - : Standby function canceled
Oth
er f
unct
ions

70
Custom settings
Selecting the distance unit of measure (m, ft) Setting the distance unit of measure on the LCD panel to either meters “m” or feet “ft”.• m : meters• ft : feet
Power zoom function (p. 26)Setting to activate or cancel the power zoom function, which adjusts thezoom-head position automatically.• OFF : Activated• ON : Canceled
Zoom-head position setting if the built-in wide-flash adapter is broken off accidentally (p. 117)Setting to activate or cancel the zoom-head position setting if the built-inwide-flash adapter is broken off accidentally. When set to ON, the zoom-head position display is framed.• OFF : Manual setting canceled• ON : Manual setting activated
LCD panel illuminator (p. 119)Setting the LCD panel illuminator to turn on or off.• ON : Turn on• OFF : Turn off
LCD panel brightness (p. 119)Adjusting the brightness of the LCD panel. Available brightness levels aregraphically displayed in 9 steps on the LCD panel. Press the c or dbutton to adjust the brightness.
Wide-Area AF-Assist Illuminator (p. 62)Setting to activate or cancel the Wide-Area AF-Assist Illuminator.• ON : Activated (AF-ILL appears on the LCD panel)• OFF : Canceled (NO AF-ILL appears on the LCD panel)
Canceling flash firing (p. 62)Setting to activate or cancel flash firing of the SB-800. When it is set to OFF, the SB-800 does not fire but the Wide-Area AF-Assist Illuminator still comes on.• ON : Firing activated• OFF : Firing canceled (AF-ILL ONLY appears on the LCD panel)
Advanced operations
Information on advanced flash shootingtechniques using the SB-800 is described inthis section.
72
Overview of multiple flash operation
Multiple flash photography allows you to create more natural-looking picturesby using several flash units to emphasize the subject’s shape or eliminateshadows. The following wireless multiple flash operations are available:
Multiple flashoperationAdvanced WirelessLighting (p. 76)
SU-4 type wirelessmultiple flash(p. 84)
Multiple flashoperation using cords(p. 90)
• It’s not possible to use different types of multiple flash operations together.• Wireless multiple flash operation using Speedlights featuring CLS is called “Advanced
Wireless Lighting”.
For cameras compatible with CLS and digital SLRs not compatible with CLS, set themaster flash unit’s flash mode to Auto Aperture B flash or Non-TTL auto A flash in SU-4 type wireless multiple flash operation. In multiple flash operation using cords,multiple flash shooting in M (manual) mode only is possible.
t Master flash unit and remote flash unit(s)In this instruction manual, the flash unit mounted on the camera or the one directlyconnected to the camera via a TTL Remote Cord, such as the SC-17, SC-28 or SC-29, iscalled the master flash unit. All other flash units are called the remote flash units.
Usable cameras
Cameras compatiblewith CLS
No limitation
No limitation(TTL multiple flashoperation is notpossible with digitalSLRs.)
Usable Speedlights
Only those featuring CLS suchas SB-800 for both the masterand remote flash units.Master flash unit: Speedlightscompatible with wireless flashoperation, those compatiblewith the TTL mode, or the built-in Speedlights on cameras soequipped.Remote flash unit: Except theSB-23, all Speedlightscompatible with wireless flashoperation or those connectedto the optional Wireless SlaveFlash Controller SU-4.Speedlights compatible withthe TTL mode. • Speedligthts SB-11, SB-14,
SB-140, and SB-21B cannotbe used with the F-401/N4004 or F-401s/N4004s aseither master or remote flashunits.
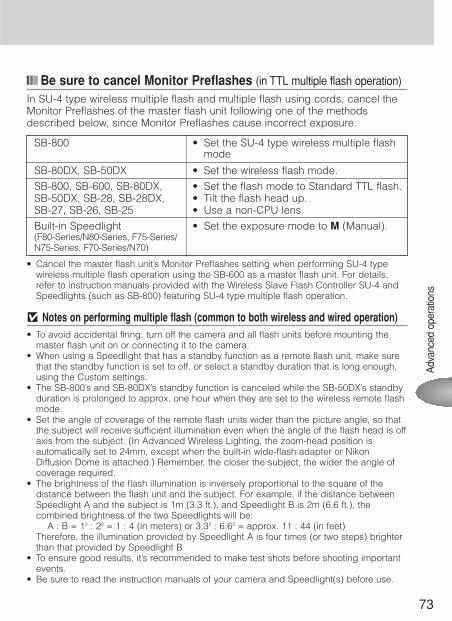
73
Be sure to cancel Monitor Preflashes (in TTL multiple flash operation)
In SU-4 type wireless multiple flash and multiple flash using cords, cancel theMonitor Preflashes of the master flash unit following one of the methodsdescribed below, since Monitor Preflashes cause incorrect exposure.
SB-800 • Set the SU-4 type wireless multiple flash mode
SB-80DX, SB-50DX • Set the wireless flash mode.SB-800, SB-600, SB-80DX, • Set the flash mode to Standard TTL flash.SB-50DX, SB-28, SB-28DX, • Tilt the flash head up.SB-27, SB-26, SB-25 • Use a non-CPU lens.Built-in Speedlight • Set the exposure mode to M (Manual).(F80-Series/N80-Series, F75-Series/N75-Series, F70-Series/N70)
• Cancel the master flash unit’s Monitor Preflashes setting when performing SU-4 typewireless multiple flash operation using the SB-600 as a master flash unit. For details,refer to instruction manuals provided with the Wireless Slave Flash Controller SU-4 andSpeedlights (such as SB-800) featuring SU-4 type multiple flash operation.
v Notes on performing multiple flash (common to both wireless and wired operation)• To avoid accidental firing, turn off the camera and all flash units before mounting the
master flash unit on or connecting it to the camera.• When using a Speedlight that has a standby function as a remote flash unit, make sure
that the standby function is set to off, or select a standby duration that is long enough,using the Custom settings.
• The SB-800’s and SB-80DX’s standby function is canceled while the SB-50DX’s standbyduration is prolonged to approx. one hour when they are set to the wireless remote flashmode.
• Set the angle of coverage of the remote flash units wider than the picture angle, so thatthe subject will receive sufficient illumination even when the angle of the flash head is offaxis from the subject. (In Advanced Wireless Lighting, the zoom-head position isautomatically set to 24mm, except when the built-in wide-flash adapter or NikonDiffusion Dome is attached.) Remember, the closer the subject, the wider the angle ofcoverage required.
• The brightness of the flash illumination is inversely proportional to the square of thedistance between the flash unit and the subject. For example, if the distance betweenSpeedlight A and the subject is 1m (3.3 ft.), and Speedlight B is 2m (6.6 ft.), thecombined brightness of the two Speedlights will be:
A : B = 12 : 22 = 1 : 4 (in meters) or 3.32 : 6.62 = approx. 11 : 44 (in feet)Therefore, the illumination provided by Speedlight A is four times (or two steps) brighterthan that provided by Speedlight B.
• To ensure good results, it’s recommended to make test shots before shooting importantevents.
• Be sure to read the instruction manuals of your camera and Speedlight(s) before use.
Adv
ance
d op
erat
ions
74
Wireless multiple flash shooting
Read the following when setting up the SB-800 as a remote flash unit in theAdvanced Wireless Lighting and SU-4 type wireless multiple flash modes.
Flash set-up in the Advanced Wireless LightingSet up the camera, master flash unit, and remote flash units as shown in thefigure below.
• As a basic guide, the effective shooting distance between the master and remote flashunits is approx. 10m (33 ft.) or less in the front position, and approx. 5 to 7m (16 to 23 ft.) at both sides. These ranges vary slightly depending on the ambient light.
• Be sure to place all remote flash units that are set in the same group close together.• For the effective shooting distance between the master and remote flash units in SU-4
type wireless multiple flash shooting, refer to page 85.
v Setting up the master and remote flash units• In most cases, position the remote flash unit(s) closer to the subject than the camera,
so that light from the master flash unit can reach the light sensor of the remote flashunit(s). This is particularly necessary when holding a remote flash unit in your hand.
• Data communication cannot be performed properly if there is an obstacle between themaster unit and remote flash units.
• Take care not to let light from the remote flash unit enter the camera lens directly orindirectly in TTL auto flash mode. Also, prevent light from entering the master flash unit’slight sensor in Non-TTL auto flash mode. Otherwise, the correct exposure cannot beobtained.
• There is no limit to the number of remote flash units that can be used together. However,if too much light from other remote flash units enters the light sensor of the master flashunit, correct operation may be impossible. Practically, the number of remote flash unitsin Advanced Wireless Lighting should be limited to three for one group.
• Use the provided Speedlight Stand AS-19 for stable placement of the remote flash units.• Be sure to perform test firing after setting up all flash units (p. 20).
Be sure to direct the light sensor window ofthe remote flash unit toward the master flash.
Master flash unit
Less than approx. 10m (33 ft.)
Approx. 5 to 7m (16 to 23 ft.)
Group A
Group C
Group BWithin 30°
Within 30°
Approx. 5 to 7m (16 to 23 ft.)
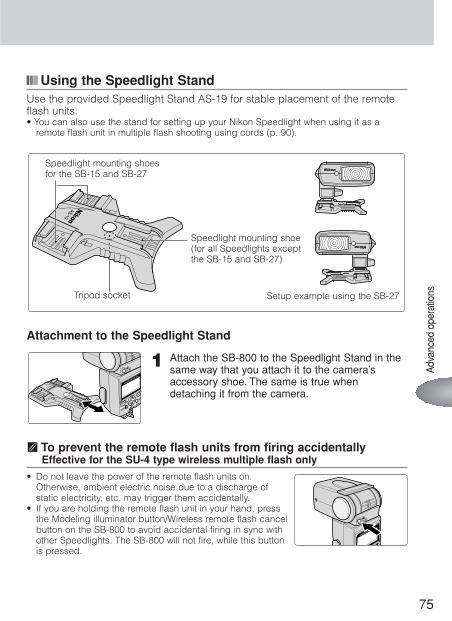
75
Using the Speedlight StandUse the provided Speedlight Stand AS-19 for stable placement of the remoteflash units.• You can also use the stand for setting up your Nikon Speedlight when using it as a
remote flash unit in multiple flash shooting using cords (p. 90).
Attachment to the Speedlight Stand
1 Attach the SB-800 to the Speedlight Stand in thesame way that you attach it to the camera’saccessory shoe. The same is true whendetaching it from the camera.
t To prevent the remote flash units from firing accidentally Effective for the SU-4 type wireless multiple flash only
• Do not leave the power of the remote flash units on.Otherwise, ambient electric noise due to a discharge ofstatic electricity, etc. may trigger them accidentally.
• If you are holding the remote flash unit in your hand, pressthe Modeling illuminator button/Wireless remote flash cancelbutton on the SB-800 to avoid accidental firing in sync withother Speedlights. The SB-800 will not fire, while this buttonis pressed.
FLASH
READ
Adv
ance
d op
erat
ions
Speedlight mounting shoe(for all Speedlights exceptthe SB-15 and SB-27)
Speedlight mounting shoesfor the SB-15 and SB-27
Tripod socket Setup example using the SB-27
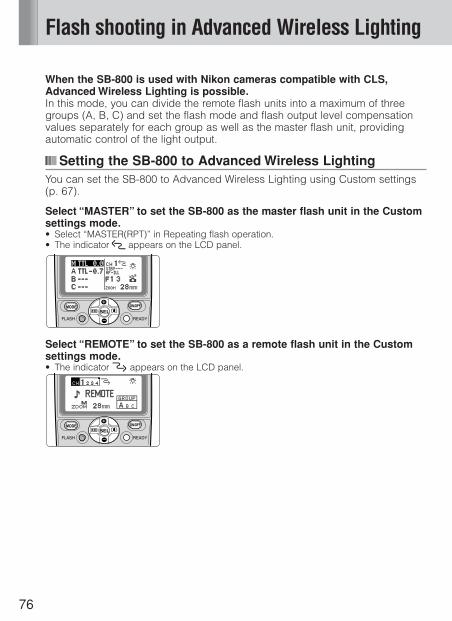
76
When the SB-800 is used with Nikon cameras compatible with CLS,Advanced Wireless Lighting is possible.In this mode, you can divide the remote flash units into a maximum of threegroups (A, B, C) and set the flash mode and flash output level compensationvalues separately for each group as well as the master flash unit, providingautomatic control of the light output.
Setting the SB-800 to Advanced Wireless LightingYou can set the SB-800 to Advanced Wireless Lighting using Custom settings(p. 67).
Select “MASTER” to set the SB-800 as the master flash unit in the Customsettings mode.• Select “MASTER(RPT)” in Repeating flash operation.• The indicator O appears on the LCD panel.
Select “REMOTE” to set the SB-800 as a remote flash unit in the Customsettings mode.• The indicator P appears on the LCD panel.
Flash shooting in Advanced Wireless Lighting
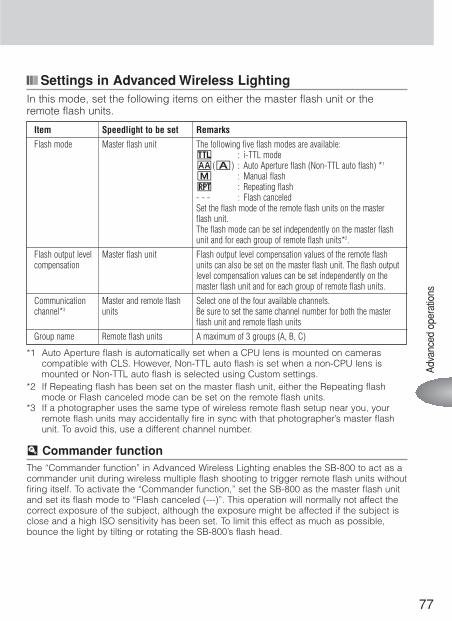
77
Adv
ance
d op
erat
ions
Settings in Advanced Wireless LightingIn this mode, set the following items on either the master flash unit or theremote flash units.
Item Speedlight to be set RemarksFlash mode Master flash unit The following five flash modes are available:
D : i-TTL modeB(A) : Auto Aperture flash (Non-TTL auto flash) *1
G : Manual flashq : Repeating flash- - - : Flash canceledSet the flash mode of the remote flash units on the master flash unit.The flash mode can be set independently on the master flashunit and for each group of remote flash units*2.
Flash output level Master flash unit Flash output level compensation values of the remote flash compensation units can also be set on the master flash unit. The flash output
level compensation values can be set independently on themaster flash unit and for each group of remote flash units.
Communication Master and remote flash Select one of the four available channels.channel*3 units Be sure to set the same channel number for both the master
flash unit and remote flash units
Group name Remote flash units A maximum of 3 groups (A, B, C)
*1 Auto Aperture flash is automatically set when a CPU lens is mounted on camerascompatible with CLS. However, Non-TTL auto flash is set when a non-CPU lens ismounted or Non-TTL auto flash is selected using Custom settings.
*2 If Repeating flash has been set on the master flash unit, either the Repeating flashmode or Flash canceled mode can be set on the remote flash units.
*3 If a photographer uses the same type of wireless remote flash setup near you, yourremote flash units may accidentally fire in sync with that photographer’s master flashunit. To avoid this, use a different channel number.
u Commander functionThe “Commander function” in Advanced Wireless Lighting enables the SB-800 to act as acommander unit during wireless multiple flash shooting to trigger remote flash units withoutfiring itself. To activate the “Commander function,” set the SB-800 as the master flash unitand set its flash mode to “Flash canceled (---)”. This operation will normally not affect thecorrect exposure of the subject, although the exposure might be affected if the subject isclose and a high ISO sensitivity has been set. To limit this effect as much as possible,bounce the light by tilting or rotating the SB-800’s flash head.
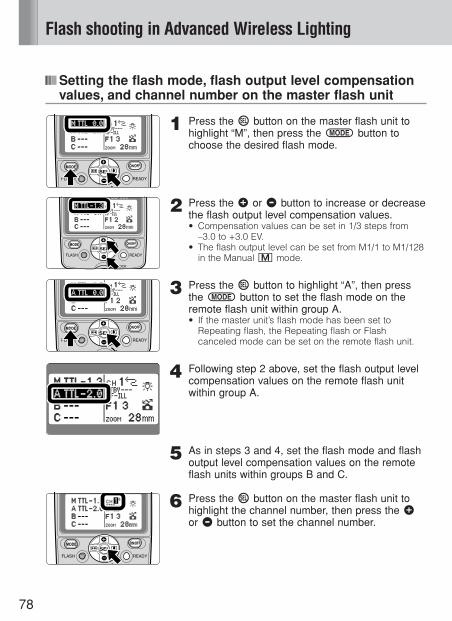
78
Flash shooting in Advanced Wireless Lighting
Setting the flash mode, flash output level compensationvalues, and channel number on the master flash unit
1 Press the g button on the master flash unit tohighlight “M”, then press the a button tochoose the desired flash mode.
2 Press the e or f button to increase or decreasethe flash output level compensation values.• Compensation values can be set in 1/3 steps from
–3.0 to +3.0 EV.• The flash output level can be set from M1/1 to M1/128
in the Manual G mode.
3 Press the g button to highlight “A”, then pressthe a button to set the flash mode on theremote flash unit within group A.• If the master unit’s flash mode has been set to
Repeating flash, the Repeating flash or Flashcanceled mode can be set on the remote flash unit.
4 Following step 2 above, set the flash output levelcompensation values on the remote flash unitwithin group A.
5 As in steps 3 and 4, set the flash mode and flashoutput level compensation values on the remoteflash units within groups B and C.
6 Press the g button on the master flash unit tohighlight the channel number, then press the eor f button to set the channel number.

79
Setting a group and channel number on the remote flash units
1 Press the g button on the remote flash unit tohighlight the channel number, then press the eor f button to set the channel number.• Be sure to choose the same channel number as set
on the master flash unit.
2 Press the g button on the remote flash unit tohighlight the group, then press the e or fbutton to set the group.• For remote flash units where the flash mode and
flash output level compensation values are to be set identically, place these flash units into the same group.
v Notes on using the Nikon D70’s Commander modeBe sure to set the channel number of the remote flash unit to 3 and set the group of the remoteflash unit to Group A when performing wireless multiple flash using the Nikon D70’s built-in flashas a master flash unit (Commander mode). Otherwise, the SB-800 does not fire.
Adv
ance
d op
erat
ions
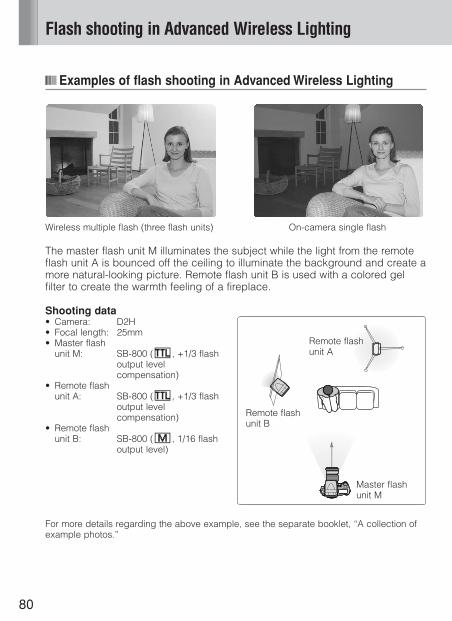
80
Flash shooting in Advanced Wireless Lighting
Examples of flash shooting in Advanced Wireless Lighting
Wireless multiple flash (three flash units) On-camera single flash
The master flash unit M illuminates the subject while the light from the remoteflash unit A is bounced off the ceiling to illuminate the background and create amore natural-looking picture. Remote flash unit B is used with a colored gelfilter to create the warmth feeling of a fireplace.
Shooting data• Camera: D2H• Focal length: 25mm• Master flash
unit M: SB-800 (D, +1/3 flashoutput levelcompensation)
• Remote flash unit A: SB-800 (D, +1/3 flash
output levelcompensation)
• Remote flash unit B: SB-800 (G, 1/16 flash
output level)
For more details regarding the above example, see the separate booklet, “A collection ofexample photos.”
Remote flashunit A
Remote flashunit B
Master flashunit M
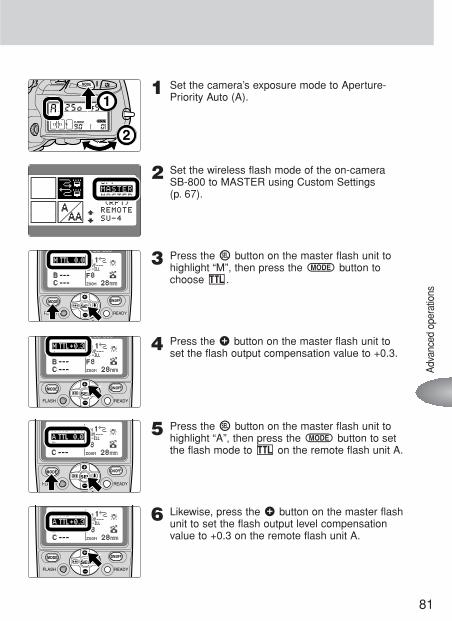
81
Adv
ance
d op
erat
ions
1 Set the camera’s exposure mode to Aperture-Priority Auto (A).
2 Set the wireless flash mode of the on-camera SB-800 to MASTER using Custom Settings (p. 67).
3 Press the g button on the master flash unit tohighlight “M”, then press the a button tochoose D.
4 Press the e button on the master flash unit toset the flash output compensation value to +0.3.
5 Press the g button on the master flash unit tohighlight “A”, then press the a button to setthe flash mode to D on the remote flash unit A.
6 Likewise, press the e button on the master flashunit to set the flash output level compensationvalue to +0.3 on the remote flash unit A.
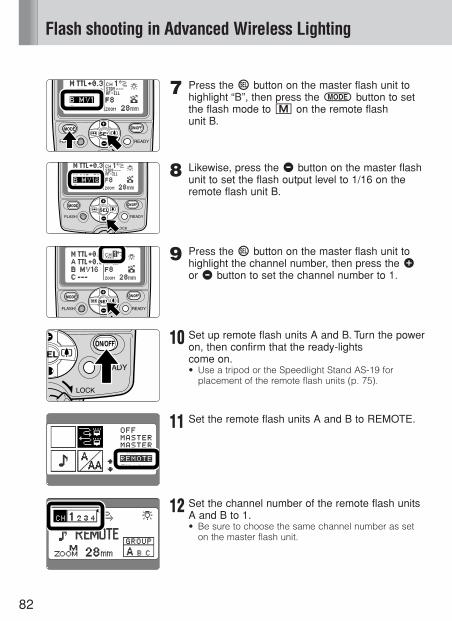
7 Press the g button on the master flash unit tohighlight “B”, then press the a button to setthe flash mode to G on the remote flash unit B.
8 Likewise, press the f button on the master flashunit to set the flash output level to 1/16 on theremote flash unit B.
9 Press the g button on the master flash unit tohighlight the channel number, then press the eor f button to set the channel number to 1.
10 Set up remote flash units A and B. Turn the poweron, then confirm that the ready-lights come on.• Use a tripod or the Speedlight Stand AS-19 for
placement of the remote flash units (p. 75).
11 Set the remote flash units A and B to REMOTE.
12 Set the channel number of the remote flash unitsA and B to 1.• Be sure to choose the same channel number as set
on the master flash unit.
82
Flash shooting in Advanced Wireless Lighting
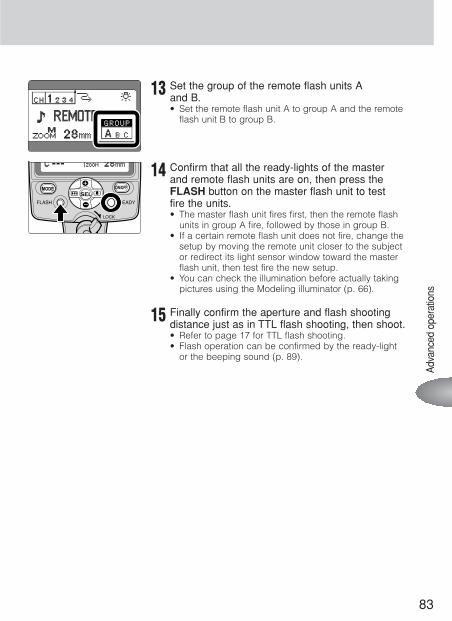
83
Adv
ance
d op
erat
ions
13 Set the group of the remote flash units A and B.• Set the remote flash unit A to group A and the remote
flash unit B to group B.
14 Confirm that all the ready-lights of the master and remote flash units are on, then press theFLASH button on the master flash unit to test fire the units.• The master flash unit fires first, then the remote flash
units in group A fire, followed by those in group B.• If a certain remote flash unit does not fire, change the
setup by moving the remote unit closer to the subjector redirect its light sensor window toward the masterflash unit, then test fire the new setup.
• You can check the illumination before actually takingpictures using the Modeling illuminator (p. 66).
15 Finally confirm the aperture and flash shootingdistance just as in TTL flash shooting, then shoot.• Refer to page 17 for TTL flash shooting.• Flash operation can be confirmed by the ready-light
or the beeping sound (p. 89).
84
SU-4 type wireless multiple flash shooting
SU-4 type wireless multiple flash can be performed in two ways: (1) In the A(auto) mode, in which the wireless remote flash units start and stop firing insync with the master Speedlight, and (2) in the M (manual) mode, in which thewireless remote flash units only start firing in sync with the master Speedlight.• Speedlights featuring wireless multiple flash capability can be used either as the master
or remote flash unit.• Speedlights compatible with TTL auto flash can be used as the master flash unit. The
optional Wireless Slave Flash Controller SU-4 is necessary when you want to use theseSpeedlights as remote flash units. The one exception is the SB-23.
• The camera’s built-in Speedlight can also be used as a master flash unit.• There is no limitation in usable cameras.
Setting the SB-800 to SU-4 type wireless multiple flash To perform SU-4 type wireless multiple flash, set the wireless flash mode to“SU-4” using Custom settings (p. 67).
Master flash and remote flash units• First, set the SB-800’s wireless multiple flash mode to “SU-4” using the Custom settings,
then attach the SB-800 to the camera. The indicator O appears on the LCD paneltelling you that the SB-800 is set as a master flash unit. If you detach the SB-800 fromthe camera, the indicator automatically changes to P signifying that the SB-800 is setas a remote flash unit.
Notes on the master flash unit• When the SB-800 is set as the master flash unit, Monitor Preflashes are canceled. For
other Speedlights, be sure to cancel the master flash unit’s Monitor Preflashes. • The following flash modes are recommended for the master flash unit.
Camera groupMaster flash unit’s flash mode
Cameras compatiblewith CLSDigital SLRs notcompatible with CLSCameras in Groups Ito VI
Icons displayedAll icons
All icons
All icons
Recommended flash modeNon-TTL auto flash mode (B orA)TTL mode is not possible althoughicons are displayed.
TTL mode
85
Adv
ance
d op
erat
ions
Setting the flash mode on the remote flash units
1 Detach the SB-800, which is already set to theSU-4 type wireless multiple flash mode, from thecamera body.
2 The flash mode on the remote flash unit togglesbetween PA (auto) and PM (manual) everytime you press the a button.
A (auto) mode• In the A (auto) mode, the remote flash units start and stop firing in sync with the master
flash unit. • The maximum shooting distance of the SB-800’s light sensor is approx. 7m (23 ft.).
M (manual) mode• In the M (manual) mode, the remote flash units only start firing in sync with the master
flash unit. • The maximum shooting distance of the SB-800’s light sensor is approx. 40m (131 ft.).• The flash output level can be set from M1/1 to M1/128.
FLASH
READY
Wireless multiple flash shooting in the A (auto) mode
1 Set the camera’s exposure mode to Aperture-Priority Auto (A) or Manual (M).
2 Set up all Speedlights as the master and remoteflash units.
3 Set the wireless flash mode of all SB-800’s usedas master and remote flash units to “SU-4.”
4 Press the a button on the remote flash unitto activate the A mode.
5 Set the flash mode of the master flash unit to theD mode.• With Nikon digital SLRs not compatible with CLS,
set the flash mode to Auto Aperture or Non-TTL auto flash.
6 Confirm the aperture and flash shooting distance asin normal TTL auto flash photography, then shoot.• See page 17 for more information on the TTL auto
flash mode.• See pages 38 and 40 concerning use of Auto
Aperture or Non-TTL auto flash with digital SLRs notcompatible with CLS.
• Flash operation can be confirmed by the ready-lightor the beeping sound (p. 89).
FLASH
READY
86
SU-4 type wireless multiple flash shooting
87
Adv
ance
d op
erat
ions
Wireless multiple flash shooting in the M (manual) mode
1 Set the camera’s exposure mode to Aperture-Priority Auto (A) or Manual (M).
2 Set up all Speedlights as the master and remoteflash units.
3 Set the wireless flash mode of all SB-800’s usedas the master and remote flash units to “SU-4.”
4 Press the a button on the remote flash unitto activate the w (manual) mode.
5 Set the flash mode of the master flash unit toManual flash.
6 Confirm the aperture and flash shooting distanceas in normal Manual flash shooting, then shoot.• See page 46 for more information on Manual flash.
FLASH
READY
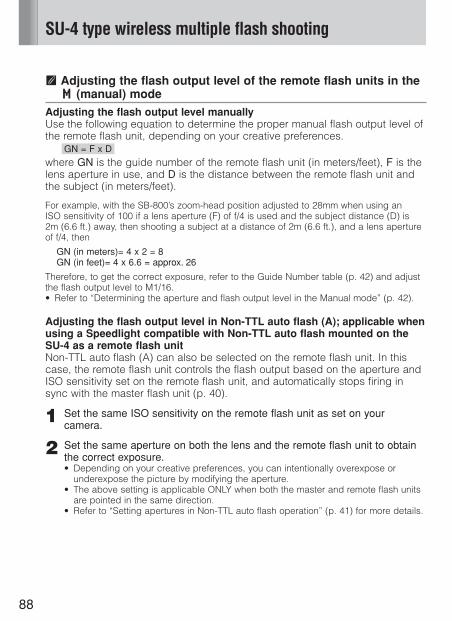
88
t Adjusting the flash output level of the remote flash units in thew (manual) mode
Adjusting the flash output level manuallyUse the following equation to determine the proper manual flash output level ofthe remote flash unit, depending on your creative preferences.
GN = F x D
where GN is the guide number of the remote flash unit (in meters/feet), F is thelens aperture in use, and D is the distance between the remote flash unit andthe subject (in meters/feet).
For example, with the SB-800’s zoom-head position adjusted to 28mm when using an ISO sensitivity of 100 if a lens aperture (F) of f/4 is used and the subject distance (D) is 2m (6.6 ft.) away, then shooting a subject at a distance of 2m (6.6 ft.), and a lens apertureof f/4, then
GN (in meters)= 4 x 2 = 8 GN (in feet)= 4 x 6.6 = approx. 26
Therefore, to get the correct exposure, refer to the Guide Number table (p. 42) and adjustthe flash output level to M1/16.• Refer to “Determining the aperture and flash output level in the Manual mode” (p. 42).
Adjusting the flash output level in Non-TTL auto flash (A); applicable whenusing a Speedlight compatible with Non-TTL auto flash mounted on theSU-4 as a remote flash unitNon-TTL auto flash (A) can also be selected on the remote flash unit. In thiscase, the remote flash unit controls the flash output based on the aperture andISO sensitivity set on the remote flash unit, and automatically stops firing insync with the master flash unit (p. 40).
1 Set the same ISO sensitivity on the remote flash unit as set on yourcamera.
2 Set the same aperture on both the lens and the remote flash unit to obtainthe correct exposure.• Depending on your creative preferences, you can intentionally overexpose or
underexpose the picture by modifying the aperture.• The above setting is applicable ONLY when both the master and remote flash units
are pointed in the same direction.• Refer to “Setting apertures in Non-TTL auto flash operation” (p. 41) for more details.
SU-4 type wireless multiple flash shooting
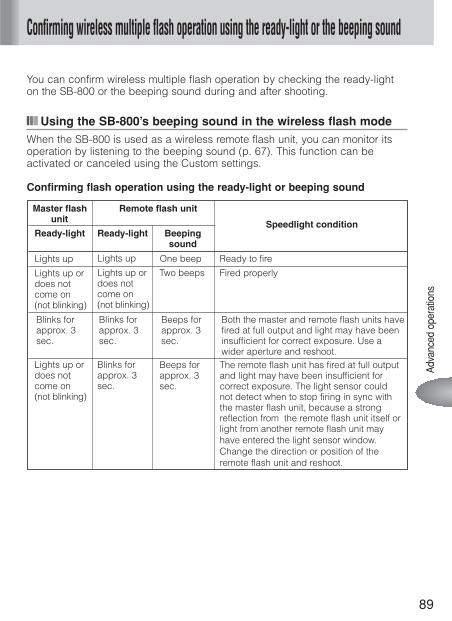
89
Confirming wireless multiple flash operation using the ready-light or the beeping sound
Adv
ance
d op
erat
ions
You can confirm wireless multiple flash operation by checking the ready-lighton the SB-800 or the beeping sound during and after shooting.
Using the SB-800’s beeping sound in the wireless flash modeWhen the SB-800 is used as a wireless remote flash unit, you can monitor itsoperation by listening to the beeping sound (p. 67). This function can beactivated or canceled using the Custom settings.
Confirming flash operation using the ready-light or beeping sound
Lights up ordoes notcome on(not blinking)
Lights up ordoes notcome on(not blinking)
Two beeps Fired properly
Blinks forapprox. 3sec.
Blinks forapprox. 3sec.
Beeps forapprox. 3sec.
Both the master and remote flash units havefired at full output and light may have beeninsufficient for correct exposure. Use awider aperture and reshoot.
Lights up ordoes notcome on(not blinking)
Blinks forapprox. 3sec.
Beeps forapprox. 3sec.
The remote flash unit has fired at full outputand light may have been insufficient forcorrect exposure. The light sensor couldnot detect when to stop firing in sync withthe master flash unit, because a strongreflection from the remote flash unit itself orlight from another remote flash unit may have entered the light sensor window. Change the direction or position of the remote flash unit and reshoot.
Lights up Lights up One beep Ready to fire
Master flash Remote flash unitunit Speedlight condition
Ready-light Ready-light Beeping sound
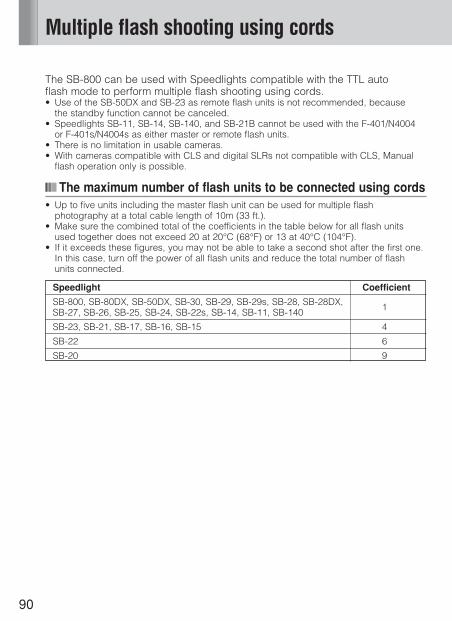
90
The SB-800 can be used with Speedlights compatible with the TTL auto flash mode to perform multiple flash shooting using cords.• Use of the SB-50DX and SB-23 as remote flash units is not recommended, because
the standby function cannot be canceled.• Speedlights SB-11, SB-14, SB-140, and SB-21B cannot be used with the F-401/N4004
or F-401s/N4004s as either master or remote flash units.• There is no limitation in usable cameras.• With cameras compatible with CLS and digital SLRs not compatible with CLS, Manual
flash operation only is possible.
The maximum number of flash units to be connected using cords• Up to five units including the master flash unit can be used for multiple flash
photography at a total cable length of 10m (33 ft.).• Make sure the combined total of the coefficients in the table below for all flash units
used together does not exceed 20 at 20°C (68°F) or 13 at 40°C (104°F).• If it exceeds these figures, you may not be able to take a second shot after the first one.
In this case, turn off the power of all flash units and reduce the total number of flashunits connected.
Speedlight Coefficient
SB-800, SB-80DX, SB-50DX, SB-30, SB-29, SB-29s, SB-28, SB-28DX, SB-27, SB-26, SB-25, SB-24, SB-22s, SB-14, SB-11, SB-140 1
SB-23, SB-21, SB-17, SB-16, SB-15 4
SB-22 6
SB-20 9
Multiple flash shooting using cords
91
Notes on multiple flash shooting using cords• Be sure to see the instruction manuals of your cameras, Speedlights, and accessories.• Refer to “System chart for TTL multiple flash shooting using cords” (p. 94) and your
cameras and Speedlights instruction manuals for proper connection.• Use the optional TTL Multi-Flash Sync Cords SC-27, SC-26, SC-19 or SC-18 to connect
the SB-800 to more than one remote flash unit.• Use the optional Multi-Flash Adapter AS-10, if the remote flash units are not equipped
with multiple flash terminals.• Use the optional Multi-Flash Adapter AS-10 to attach the remote flash unit(s) to a tripod.• Be sure to cancel the master flash unit’s Monitor Preflashes.• Multiple flash shooting using cords can be performed in two modes: (1) TTL multiple
flash; and (2) Manual multiple flash. Performing multiple flash shooting in the Manualmode, however, is not recommended, since it is difficult to obtain the correct exposure.Use the TTL auto flash mode with cameras compatible with TTL auto flash.
• To ensure proper exposure, make test shots before shooting important events.
Adv
ance
d op
erat
ions
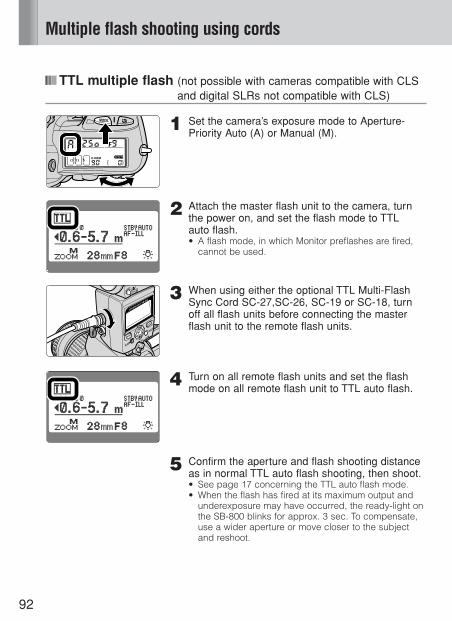
92
Multiple flash shooting using cords
TTL multiple flash (not possible with cameras compatible with CLSand digital SLRs not compatible with CLS)
1 Set the camera’s exposure mode to Aperture-Priority Auto (A) or Manual (M).
2 Attach the master flash unit to the camera, turnthe power on, and set the flash mode to TTL auto flash.• A flash mode, in which Monitor preflashes are fired,
cannot be used.
3 When using either the optional TTL Multi-FlashSync Cord SC-27,SC-26, SC-19 or SC-18, turnoff all flash units before connecting the masterflash unit to the remote flash units.
4 Turn on all remote flash units and set the flashmode on all remote flash unit to TTL auto flash.
5 Confirm the aperture and flash shooting distanceas in normal TTL auto flash shooting, then shoot.• See page 17 concerning the TTL auto flash mode.• When the flash has fired at its maximum output and
underexposure may have occurred, the ready-light onthe SB-800 blinks for approx. 3 sec. To compensate,use a wider aperture or move closer to the subjectand reshoot.
FLASH
READY
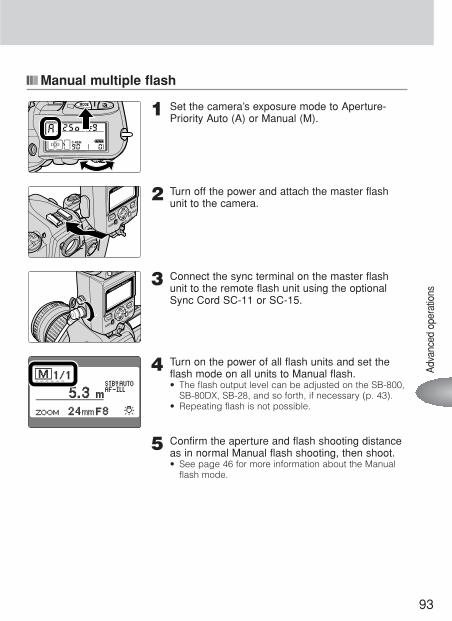
93
Manual multiple flash
1 Set the camera’s exposure mode to Aperture-Priority Auto (A) or Manual (M).
2 Turn off the power and attach the master flashunit to the camera.
3 Connect the sync terminal on the master flashunit to the remote flash unit using the optionalSync Cord SC-11 or SC-15.
4 Turn on the power of all flash units and set theflash mode on all units to Manual flash.• The flash output level can be adjusted on the SB-800,
SB-80DX, SB-28, and so forth, if necessary (p. 43).• Repeating flash is not possible.
5 Confirm the aperture and flash shooting distanceas in normal Manual flash shooting, then shoot.• See page 46 for more information about the Manual
flash mode.
FLASH
READY
FLASH
READY
Adv
ance
d op
erat
ions
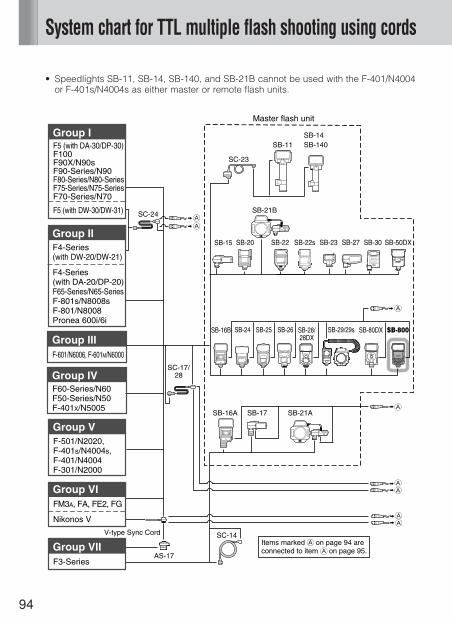
• Speedlights SB-11, SB-14, SB-140, and SB-21B cannot be used with the F-401/N4004or F-401s/N4004s as either master or remote flash units.
94
System chart for TTL multiple flash shooting using cords
SC-24 SB-21B
SB-21ASB-16A SB-17
SC-14
SB-11
SC-23
SB-14SB-140
SB-16B
SB-15
SB-25 SB-26SB-24
SC-17/28
SB-27
AS-17
SB-29/29sSB-28/28DX
SB-22 SB-22sSB-20 SB-23 SB-30 SB-50DX
SB-800SB-80DX
Master flash unit
V-type Sync CordItems marked on page 94 areconnected to item on page 95.
Group I
Group VF-501/N2020, F-401s/N4004s, F-401/N4004F-301/N2000
Group IIIF-601/N6006, F-601M/N6000
Group IIF4-Series(with DW-20/DW-21)
F4-Series(with DA-20/DP-20)F65-Series/N65-SeriesF-801s/N8008sF-801/N8008Pronea 600i/6i
Group VIIF3-Series
Group IVF60-Series/N60F50-Series/N50F-401X/N5005
Group VIFM3A, FA, FE2, FG
Nikonos V
F5 (with DA-30/DP-30)F100F90X/N90sF90-Series/N90F80-Series/N80-SeriesF75-Series/N75-SeriesF70-Series/N70
F5 (with DW-30/DW-31)
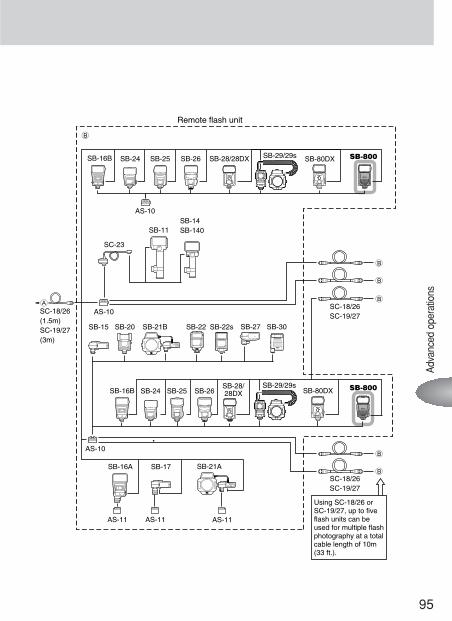
95
Adv
ance
d op
erat
ions
SB-21B
SB-16B
SB-15 SB-22SB-20
SC-18/26 (1.5m)SC-19/27 (3m)
SC-18/26SC-19/27
SC-18/26SC-19/27
SB-25 SB-26 SB-28/28DX
SB-27
SB-24
SB-25 SB-26SB-28/28DXSB-24SB-16B
AS-10
AS-10
AS-10
SB-16A
AS-11 AS-11
SB-17
SB-800
SB-22s
SB-29/29s
SB-30
SB-80DX
SB-11
SC-23
SB-14SB-140
SB-800SB-29/29s SB-80DX
AS-11
SB-21A
Using SC-18/26 or SC-19/27, up to five flash units can be used for multiple flash photography at a total cable length of 10m (33 ft.).
Remote flash unit
96
Flash shooting with digital SLRs cameras using
Supplied with the SB-800, the Colored Gel Filter Set SJ-800 includes two filters:the FL-G1 for taking flash pictures under fluorescent light and the TN-A1 foruse with incandescent/tungsten light.• Colored Gel Filter Set SJ-1 is also available as an option (p. 112).
Using colored gel filters with digital cameras
Purpose Gel filter Adjust the camera’s whitebalance to:
Balances the color of light from FL-G1 Fluorescentthe flash to match that of fluorescent light
Balances the color of light from TN-A1 Incandescentthe flash to match that of incandescent or tungsten light
Creates interesting effects by Optional color gel Flashchanging the light from the filtersflash to a different color
Balancing light from the flashWith digital cameras, if you shoot flash pictures under fluorescent light with thecamera’s white balance set to “Flash,” the main subject illuminated by the flashwill look normal. However, the background will come out green. Tocompensate, use the FL-G1 (green gel filter) to convert the light coming fromthe flash to the same color as fluorescent light, then adjust the camera’s whitebalance to “Fluorescent.” Follow a similar procedure when shooting flashpictures under incandescent/tungsten illumination using the TN-A1 filter. In thiscase, set the white balance to “Incandescent.”• Available with digital cameras featuring white balance. You cannot set the white balance
on the SB-800. Choose an appropriate white balance setting on your digital camera. Formore details, see your camera’s instruction manual.
• When using tungsten film with a film-based camera, use the TN-A1 (forincandescent/tungsten light) filter for more effective results.
vNotes on using colored gel filters• These filters are consumable items. When they extremely fade in color or deteriorate,
purchase optional Colored Gel Filter Set SJ-1.• Colored gel filters may become deformed due to the heat generated from the flash
head. However, this will not affect their performance. When taking pictures usingrepeating flash, do not use these filters, because they may become deformed quicklydue to the heat.
• There is no difference between the front and back of colored gel filters. Even thoughthey may be curled, this will not affect their performance. Likewise, scratches on thesefilters will have no effect on performance.
• The amount of exposure compensation printed on each filter is provided as a guide only.Be sure to make test shots to determine the actual amount of compensation required.
• To remove dust or dirt, wipe the filter lightly with a soft, clean cloth.
97
colored gel filters
How to use colored gels
1 Fold the colored gel filter securely on the line.
2 Insert the colored gel filter between the wide-flashadapter and the flash head.
3 Adjust the white balance setting on your digitalcamera, then shoot.
u Optional Colored Gel Filter Set SJ-1The optional Colored Gel Filter Set SJ-1 contains a total of 20 filters in 8 modelsof colored gels for balancing the color of light or adding specific colors to thescene using a Speedlight (p. 112).• FL-G1 (for fluorescent light) • FL-G2 (for fluorescent light)• TN-A1 (for incandescent/tungsten light) • TN-A2 (for incandescent/tungsten light)• BLUE • YELLOW • RED • AMBER• With the last four filters, adjust your digital camera’s white balance (if available) to
“Flash” for the most effective results.
SHOOTING MENUWhite bal.
AutoIncandescentFluorescentDirect sunlightFlashCloudyShade
Adv
ance
d op
erat
ions
98
Bounce flash operation
With the SB-800 mounted on your camera’s hot shoe, you can tilt or rotate theflash head to bounce the light off the ceiling or walls. This is a good techniqueto use when shooting indoors, because you get more natural-looking picturesof people with softer shadows. Also, you can soften the shadows even more byusing the Nikon Diffusion Dome.
Bounce flash Normal flash
Shooting data: Shooting data:• Camera: D2H • Camera: D2H• Focal length: 60mm • Focal length: 60mm• Speedlight: SB-800 set to D • Speedlight: SB-800 set to D• Aperture: f/8 • Aperture: f/9• Shooting distance: Approx. 4m (13.1 ft.) • Shooting distance: Approx. 4m (13.1 ft.)
For more details on the above example, see the separate booklet, “A collection of example photos”.
Tilting the flash headFor effective bounce flash off theceiling, tilt the flash head up at least50°. Also, make sure that the lightfrom the flash head does not directlyilluminate the subject.• Optimum results are obtained when the
flash head is positioned 1–2m (3.3–6.6 ft.)from the reflecting surface.
90
50
99
1 Set the camera’s exposure mode to Aperture-Priority Auto (A) or Manual (M).
2 Set the camera’s metering system to MatrixMetering Y or Center-Weighted Metering W.
3 Set the flash mode to TTL or Auto Aperture orNon-TTL auto flash.
4 Set the camera’s aperture.• Refer to page 100 for setting the aperture.
5 Adjust the flash head.
6 Make sure that the ready-light is on, then shoot.• When the flash has fired at its maximum output and
underexposure may have occurred, the ready-light onthe SB-800 blinks for approx. 3 sec. To compensate,use a wider aperture or move closer to the subjectand reshoot.
Adv
ance
d op
erat
ions
100
Bounce flash operation
Setting the apertureIn bounce flash, there is a light loss of 2–3 stops when compared with normalflash photography. Therefore, you should use a wider aperture. When the flashhead is adjusted to other than the horizontal/front position, the flash shootingdistance range indicator on the SB-800 disappears. To ensure correctexposure, first confirm the flash shooting distance range and aperture with theflash head in the normal position. Next, set this aperture on the camera, thenadjust the flash head to the appropriate bounce position.• In Non-TTL auto flash operation, set the same aperture on the SB-800.
Setting the flash headAs shown in the illustrations, tilt or rotate the SB-800’s flash head by holdingdown the flash head tilting/rotating lock release button and adjusting the flashhead to match the shooing environment or your creative preferences.
Flash head tilting and rotating anglesThe SB-800’s flash head tilts up 90° and down –7°,and rotates horizontally 180° to the left and 90° tothe right.• Set the flash head at a click stop at the angles shown.• When taking close-up pictures with flash, tilt the flash
head down to the –7° position (p. 102).
Choosing the reflecting surfaceIn color photography, select white or highlyreflective surfaces to bounce the light off of.Otherwise, your pictures will come out with anunnatural color cast similar to that of the reflecting surface.
0°7°
90° 75°60°
45°
0°30°
60°
90°
120°
150°180°
90°60°
30°
101
u Using the built-in bounce cardIn bounce flash photography, use the SB-800’s built-in bounce card to create ahighlight in the subject’s eyes, making the eyes look more vibrant.• As shown in the illustrations, pull out the wide-flash adapter and while holding the
bounce card, slide the wide-flash adapter back into place inside the flash head.• Tilt the flash head up 90° to use this feature most effectively.
u Shooting with the Nikon Diffusion DomeBy attaching the provided Nikon Diffusion Dome over the flash head, you candiffuse the light even more when doing bounce flash, creating extremely softlight with virtually no shadows. With the camera in either the horizontal orvertical position, you get the same effect.• Good results are generally obtained when the flash head is tilted up 60°.• Use of the built-in wide-flash adapter in conjunction with the Nikon Diffusion Dome
results in the maximum amount of diffused light (p. 104).
Nikon Diffusion Dome attached Nikon Diffusion Dome not attached
Attach the Nikon Diffusion Dome as shown in the illustration.• The zoom-head position is automatically set
at 14mm.
90° 50°
Adv
ance
d op
erat
ions
102
Close-up flash operation
When the built-in wide-flash adapter is used, close-up flash shooting can beperformed. The built-in wide-flash adapter diffuses the light from the flash tosoften shadows. When the SB-800 is used off-camera, you can take morenatural-looking close-up pictures.• Be sure to use the wide-flash adapter when taking close-up flash photographs.• Be careful when using a long lens that the light from the flash is not obstructed by the
lens barrel.• Vignetting may occur in close-up flash photography due to the lighting situation, lens in
use, focal length setting, etc. Therefore, make test shots before shooting an importantassignment.
Flash shooting with two flash units Flash shooting with one(light bounced from the side and top) camera-mounted flash unit
Shooting data: Shooting data:• Camera: D2H • Camera: D2H• Focal length: 105mm • Focal length: 105mm• Master flash unit: SB-800 set to D • Master flash unit: SB-800 set to D• Remote flash unit: SB-800 set to D • Aperture: f/10• Aperture: f/22 • Shooting distance: Approx. 1m (3.3 ft.)• Shooting distance: Approx. 1m (3.3 ft.)
Example of close-up shooting with two flash unitsIllumination from the side and topprovided by two flash unitsemphasizes the small subject’scontours. Bounced light from the side softens the shadows.
For more details on the above example, see the separate booklet, “A collectionof example photos”.
From thetop
Remoteflash unit
Masterflash unit
Use either the SC-29, SC-28 or SC-17.
103
1 Set the camera’s exposure mode to Aperture-Priority Auto (A) or Manual (M).
2 Set the camera’s metering system to MatrixMetering Y or Center-Weighted Metering W.
3 Set the SB-800’s flash mode to TTL auto flash.
4 Position the built-in wide-flash adapter over theflash head. Press the c or d button to adjustthe zoom-head position to 14mm or 17mm.
5 Tilt the flash head down to –7°.• When the SB-800 is attached to the camera and used
as the only flash unit, this position is recommended toensure sufficient illumination of the lower portion of thesubject in close-up photography.
• The dotted line below the underbar appears when theflash head is tilted down to this position.
6 Confirm that the ready-light is on, then shoot.• When the flash has fired at its maximum output and
underexposure may have occurred, the ready-light onthe SB-800 blinks for approx. 3 sec. To compensate,use a wider aperture or move closer to the subjectand reshoot.
7°
Adv
ance
d op
erat
ions
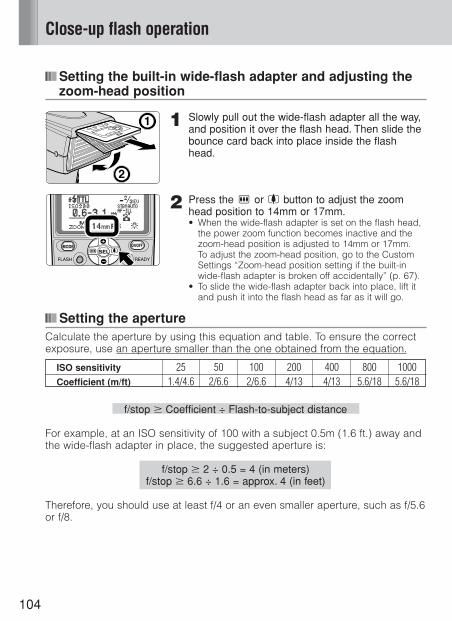
104
Close-up flash operation
Setting the built-in wide-flash adapter and adjusting thezoom-head position
1 Slowly pull out the wide-flash adapter all the way,and position it over the flash head. Then slide thebounce card back into place inside the flashhead.
2 Press the c or d button to adjust the zoomhead position to 14mm or 17mm.• When the wide-flash adapter is set on the flash head,
the power zoom function becomes inactive and thezoom-head position is adjusted to 14mm or 17mm. To adjust the zoom-head position, go to the CustomSettings “Zoom-head position setting if the built-inwide-flash adapter is broken off accidentally” (p. 67).
• To slide the wide-flash adapter back into place, lift itand push it into the flash head as far as it will go.
Setting the apertureCalculate the aperture by using this equation and table. To ensure the correctexposure, use an aperture smaller than the one obtained from the equation.
ISO sensitivity 25 50 100 200 400 800 1000Coefficient (m/ft) 1.4/4.6 2/6.6 2/6.6 4/13 4/13 5.6/18 5.6/18
f/stop Coefficient ÷ Flash-to-subject distance
For example, at an ISO sensitivity of 100 with a subject 0.5m (1.6 ft.) away andthe wide-flash adapter in place, the suggested aperture is:
f/stop 2 ÷ 0.5 = 4 (in meters)f/stop 6.6 ÷ 1.6 = approx. 4 (in feet)
Therefore, you should use at least f/4 or an even smaller aperture, such as f/5.6or f/8.
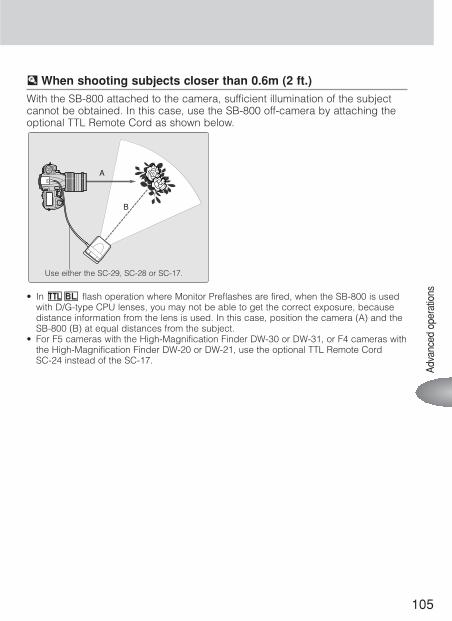
105
u When shooting subjects closer than 0.6m (2 ft.)With the SB-800 attached to the camera, sufficient illumination of the subjectcannot be obtained. In this case, use the SB-800 off-camera by attaching theoptional TTL Remote Cord as shown below.
• In Do flash operation where Monitor Preflashes are fired, when the SB-800 is usedwith D/G-type CPU lenses, you may not be able to get the correct exposure, becausedistance information from the lens is used. In this case, position the camera (A) and theSB-800 (B) at equal distances from the subject.
• For F5 cameras with the High-Magnification Finder DW-30 or DW-31, or F4 cameras withthe High-Magnification Finder DW-20 or DW-21, use the optional TTL Remote Cord SC-24 instead of the SC-17.
A
B
Adv
ance
d op
erat
ions
Use either the SC-29, SC-28 or SC-17.
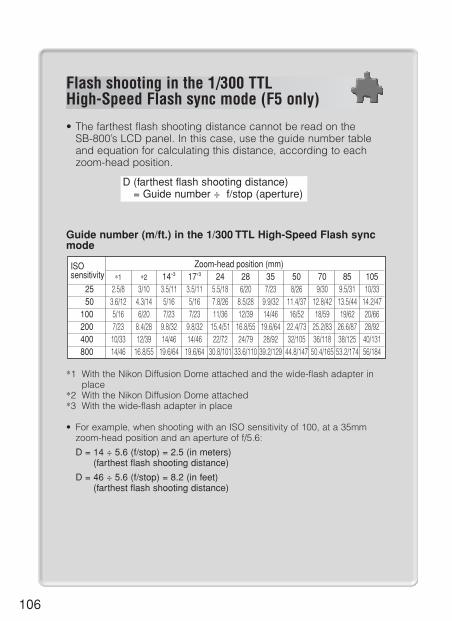
106
• The farthest flash shooting distance cannot be read on the SB-800’s LCD panel. In this case, use the guide number tableand equation for calculating this distance, according to eachzoom-head position.
D (farthest flash shooting distance) = Guide number ÷ f/stop (aperture)
Guide number (m/ft.) in the 1/300 TTL High-Speed Flash syncmode
∗1 With the Nikon Diffusion Dome attached and the wide-flash adapter inplace
∗2 With the Nikon Diffusion Dome attached∗3 With the wide-flash adapter in place
• For example, when shooting with an ISO sensitivity of 100, at a 35mmzoom-head position and an aperture of f/5.6:
D = 14 ÷ 5.6 (f/stop) = 2.5 (in meters) (farthest flash shooting distance)
D = 46 ÷ 5.6 (f/stop) = 8.2 (in feet) (farthest flash shooting distance)
Flash shooting in the 1/300 TTL High-Speed Flash sync mode (F5 only)
ISO Zoom-head position (mm)sensitivity ∗1 ∗2 14∗3 17∗3 24 28 35 50 70 85 105
25 2.5/8 3/10 3.5/11 3.5/11 5.5/18 6/20 7/23 8/26 9/30 9.5/31 10/3350 3.6/12 4.3/14 5/16 5/16 7.8/26 8.5/28 9.9/32 11.4/37 12.8/42 13.5/44 14.2/47
100 5/16 6/20 7/23 7/23 11/36 12/39 14/46 16/52 18/59 19/62 20/66200 7/23 8.4/28 9.8/32 9.8/32 15.4/51 16.8/55 19.6/64 22.4/73 25.2/83 26.6/87 28/92400 10/33 12/39 14/46 14/46 22/72 24/79 28/92 32/105 36/118 38/125 40/131800 14/46 16.8/55 19.6/64 19.6/64 30.8/101 33.6/110 39.2/129 44.8/147 50.4/165 53.2/174 56/184
Reference information
Optional accessories, Troubleshooting,Speedlight care, Specifications, etc. arepresented here.
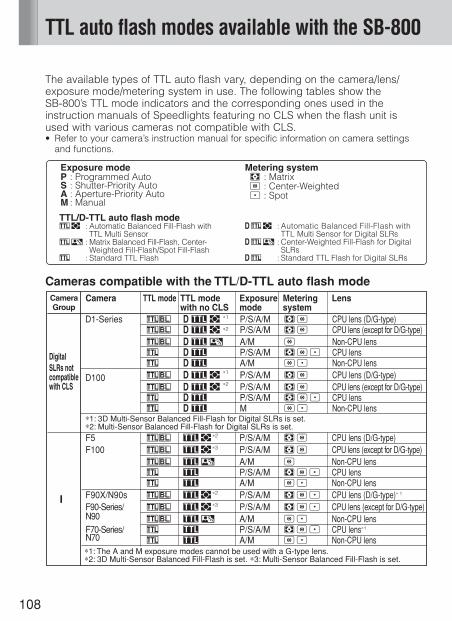
108
TTL auto flash modes available with the SB-800
The available types of TTL auto flash vary, depending on the camera/lens/exposure mode/metering system in use. The following tables show theSB-800’s TTL mode indicators and the corresponding ones used in theinstruction manuals of Speedlights featuring no CLS when the flash unit is used with various cameras not compatible with CLS.• Refer to your camera’s instruction manual for specific information on camera settings
and functions.
Exposure modeP : Programmed Auto S : Shutter-Priority AutoA : Aperture-Priority AutoM : Manual
Metering systemY : MatrixW : Center-WeightedX : Spot
TTL/D-TTL auto flash modeD E : Automatic Balanced Fill-Flash with
TTL Multi SensorD F : Matrix Balanced Fill-Flash, Center-
Weighted Fill-Flash/Spot Fill-FlashD : Standard TTL Flash
C D E : Automatic Balanced Fill-Flash withTTL Multi Sensor for Digital SLRs
C D F : Center-Weighted Fill-Flash for DigitalSLRs
C D : Standard TTL Flash for Digital SLRs
Camera TTL mode with no CLS
TTL mode Exposure Metering Lensmode system
F5 DE∗2 P/S/A/M YW CPU lens (D/G-type)F100 DE∗3 P/S/A/M YW CPU lens (except for D/G-type)
DF A/M W Non-CPU lensD P/S/A/M YWX CPU lensD A/M WX Non-CPU lens
F90X/N90s DE∗2 P/S/A/M YWX CPU lens (D/G-type)∗ 1
F90-Series/ DE∗3 P/S/A/M YWX CPU lens (except for D/G-type)N90 DF A/M WX Non-CPU lensF70-Series/ D P/S/A/M YWX CPU lens∗1
N70 D A/M WX Non-CPU lens∗1: The A and M exposure modes cannot be used with a G-type lens.∗2: 3D Multi-Sensor Balanced Fill-Flash is set. ∗3: Multi-Sensor Balanced Fill-Flash is set.
Do
Do
DoDD
Do
Do
DoDD
I
CameraGroup
D1-Series C D E ∗1 P/S/A/M YW CPU lens (D/G-type)
D100
C D E ∗2
∗1
∗2
P/S/A/M YW CPU lens (except for D/G-type)C D F A/M W Non-CPU lensC D P/S/A/M YWX CPU lensC D A/M WX Non-CPU lens
∗1: 3D Multi-Sensor Balanced Fill-Flash for Digital SLRs is set.∗2: Multi-Sensor Balanced Fill-Flash for Digital SLRs is set.
Digital SLRs not compatible with CLS
C D E P/S/A/M YW CPU lens (D/G-type)C D E P/S/A/M YW CPU lens (except for D/G-type)C D P/S/A/M YWX CPU lensC D
DoDo
DoDD
Do
DoDD M WX Non-CPU lens
Cameras compatible with the TTL/D-TTL auto flash mode
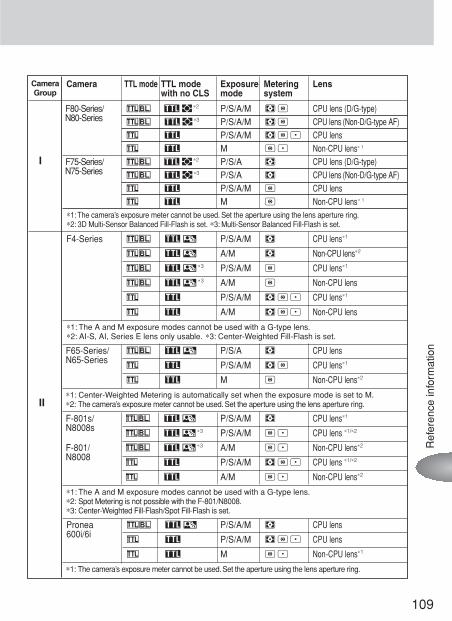
109
Ref
eren
ce in
form
atio
n
Camera TTL mode with no CLS
TTL mode Exposure Metering Lensmode system
F4-Series D F P/S/A/M Y CPU lens∗1
D F A/M Y Non-CPU lens∗2
D F ∗3 P/S/A/M W CPU lens∗1
D F ∗3 A/M W Non-CPU lens
D P/S/A/M YWX CPU lens∗1
D A/M YWX Non-CPU lens
∗1: The A and M exposure modes cannot be used with a G-type lens.∗2: AI-S, AI, Series E lens only usable. ∗3: Center-Weighted Fill-Flash is set.
F65-Series/ D F P/S/A Y CPU lensN65-Series
D P/S/A/M YW CPU lens∗1
D M W Non-CPU lens∗2
∗1: Center-Weighted Metering is automatically set when the exposure mode is set to M.∗2: The camera’s exposure meter cannot be used. Set the aperture using the lens aperture ring.
F-801s/ D F P/S/A/M Y CPU lens∗1
N8008sD F ∗3 P/S/A/M WX CPU lens ∗1/∗2
F-801/ D F ∗3 A/M WX Non-CPU lens∗2
N8008D P/S/A/M YWX CPU lens ∗1/∗2
D A/M WX Non-CPU lens∗2
∗1: The A and M exposure modes cannot be used with a G-type lens.∗2: Spot Metering is not possible with the F-801/N8008.∗3: Center-Weighted Fill-Flash/Spot Fill-Flash is set.
Pronea D F P/S/A/M Y CPU lens600i/6i
D P/S/A/M YWX CPU lens
D M WX Non-CPU lens∗1
∗1: The camera’s exposure meter cannot be used. Set the aperture using the lens aperture ring.
Do
Do
Do
Do
D
D
Do
D
D
Do
Do
Do
D
D
Do
D
D
II
I
CameraGroup
F80-Series/ DE∗2 P/S/A/M YW CPU lens (D/G-type)N80-Series DE∗3 P/S/A/M YW CPU lens (Non-D/G-type AF)
D P/S/A/M YWX CPU lensD M WX Non-CPU lens∗ 1
F75-Series/ DE∗2 P/S/A Y CPU lens (D/G-type)N75-Series DE∗3 P/S/A Y CPU lens (Non-D/G-type AF)
D P/S/A/M W CPU lensD
Do
Do
D
D
Do
Do
D
D M W Non-CPU lens∗1: The camera’s exposure meter cannot be used. Set the aperture using the lens aperture ring.∗2: 3D Multi-Sensor Balanced Fill-Flash is set. ∗3: Multi-Sensor Balanced Fill-Flash is set.
∗ 1
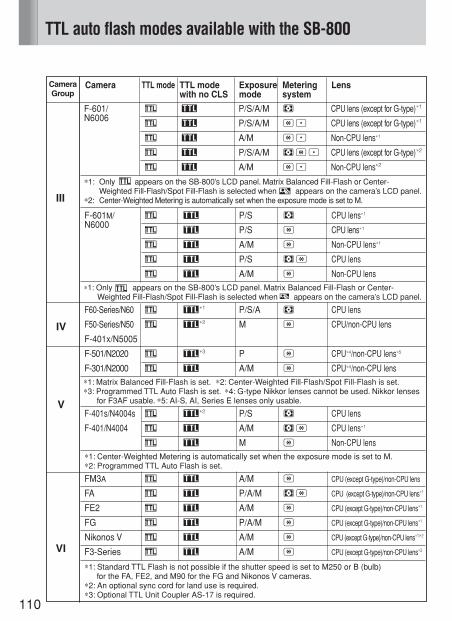
110
TTL auto flash modes available with the SB-800
Camera TTL mode with no CLS
TTL mode Exposure Metering Lensmode system
F-601M/ D P/S Y CPU lens∗1
N6000D P/S W CPU lens∗1
D A/M W Non-CPU lens∗1
D P/S YW CPU lens
D A/M W Non-CPU lens∗1: Only D appears on the SB-800’s LCD panel. Matrix Balanced Fill-Flash or Center-
Weighted Fill-Flash/Spot Fill-Flash is selected when F appears on the camera’s LCD panel.
F60-Series/N60 D∗1 P/S/A Y CPU lens
F50-Series/N50 D∗2 M W CPU/non-CPU lens
F-401x/N5005
F-501/N2020 D∗3 P W CPU∗4/non-CPU lens∗5
F-301/N2000 D A/M W CPU∗4/non-CPU lens∗1: Matrix Balanced Fill-Flash is set. ∗2: Center-Weighted Fill-Flash/Spot Fill-Flash is set. ∗3: Programmed TTL Auto Flash is set. ∗4: G-type Nikkor lenses cannot be used. Nikkor lenses
for F3AF usable. ∗5: AI-S, AI, Series E lenses only usable.
F-401s/N4004s D∗2 P/S Y CPU lens
F-401/N4004 D A/M YW CPU lens∗1
D M W Non-CPU lens∗1: Center-Weighted Metering is automatically set when the exposure mode is set to M.∗2: Programmed TTL Auto Flash is set.
FM3A D A/M W CPU (except G-type)/non-CPU lens
FA D P/A/M YW CPU (except G-type)/non-CPU lens∗1
FE2 D A/M W CPU (except G-type)/non-CPU lens∗1
FG D P/A/M W CPU (except G-type)/non-CPU lens∗1
Nikonos V D A/M W CPU (except G-type)/non-CPU lens∗1/∗2
F3-Series D
D
D
D
D
D
D
D
D
D
D
D
D
D
D
D
D
D
D A/M W CPU (except G-type)/non-CPU lens∗3
∗1: Standard TTL Flash is not possible if the shutter speed is set to M250 or B (bulb) for the FA, FE2, and M90 for the FG and Nikonos V cameras.
∗2: An optional sync cord for land use is required.∗3: Optional TTL Unit Coupler AS-17 is required.
VI
IV
V
CameraGroup
F-601/ D P/S/A/M Y CPU lens (except for G-type)∗1
N6006D P/S/A/M WX CPU lens (except for G-type)∗1
D A/M WX Non-CPU lens∗1
D P/S/A/M YWX CPU lens (except for G-type)∗2
D
D
D
D
D
D A/M WX Non-CPU lens∗2
∗1: Only D appears on the SB-800’s LCD panel. Matrix Balanced Fill-Flash or Center-Weighted Fill-Flash/Spot Fill-Flash is selected when F appears on the camera’s LCD panel.
∗2: Center-Weighted Metering is automatically set when the exposure mode is set to M.III
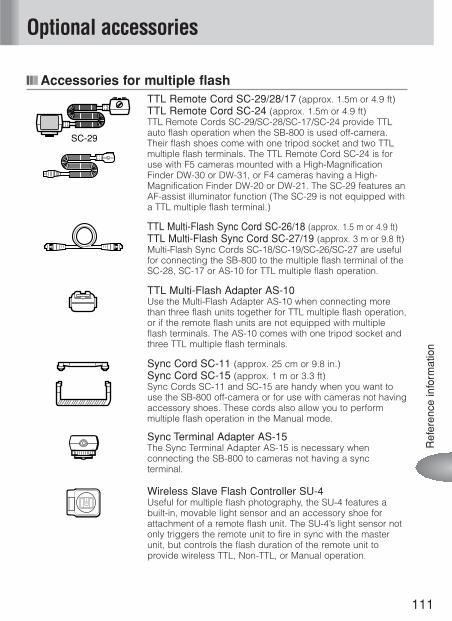
111
Optional accessories
Ref
eren
ce in
form
atio
n
Accessories for multiple flashTTL Remote Cord SC-29/28/17 (approx. 1.5m or 4.9 ft)TTL Remote Cord SC-24 (approx. 1.5m or 4.9 ft)TTL Remote Cords SC-29/SC-28/SC-17/SC-24 provide TTLauto flash operation when the SB-800 is used off-camera.Their flash shoes come with one tripod socket and two TTLmultiple flash terminals. The TTL Remote Cord SC-24 is foruse with F5 cameras mounted with a High-MagnificationFinder DW-30 or DW-31, or F4 cameras having a High-Magnification Finder DW-20 or DW-21. The SC-29 features anAF-assist illuminator function (The SC-29 is not equipped witha TTL multiple flash terminal.)
TTL Multi-Flash Sync Cord SC-26/18 (approx. 1.5 m or 4.9 ft)TTL Multi-Flash Sync Cord SC-27/19 (approx. 3 m or 9.8 ft)Multi-Flash Sync Cords SC-18/SC-19/SC-26/SC-27 are usefulfor connecting the SB-800 to the multiple flash terminal of theSC-28, SC-17 or AS-10 for TTL multiple flash operation.
TTL Multi-Flash Adapter AS-10Use the Multi-Flash Adapter AS-10 when connecting morethan three flash units together for TTL multiple flash operation,or if the remote flash units are not equipped with multipleflash terminals. The AS-10 comes with one tripod socket andthree TTL multiple flash terminals.
Sync Cord SC-11 (approx. 25 cm or 9.8 in.)Sync Cord SC-15 (approx. 1 m or 3.3 ft)Sync Cords SC-11 and SC-15 are handy when you want touse the SB-800 off-camera or for use with cameras not havingaccessory shoes. These cords also allow you to performmultiple flash operation in the Manual mode.
Sync Terminal Adapter AS-15The Sync Terminal Adapter AS-15 is necessary whenconnecting the SB-800 to cameras not having a syncterminal.
Wireless Slave Flash Controller SU-4Useful for multiple flash photography, the SU-4 features abuilt-in, movable light sensor and an accessory shoe forattachment of a remote flash unit. The SU-4’s light sensor notonly triggers the remote unit to fire in sync with the masterunit, but controls the flash duration of the remote unit toprovide wireless TTL, Non-TTL, or Manual operation.
SC-29

TTL Flash Unit Coupler AS-17 for F3-Series camerasDedicated adapter for F3-Series cameras providing TTL flashoperation with Nikon Speedlights such as the SB-800featuring an ISO-type mounting foot (not designed for the F3).
Bracket SK-7A metal plate with attachment screws allowing the cameraand Speedlight to be positioned side by side. Use theoptional TTL Multi-Flash Adapter AS-10 to attach the SB-800to Bracket SK-7.
Multi-Flash Bracket Unit SK-E900(One AS-E900 Multi-Flash Adapter is included with the SK-E900)Multi-Flash Adapter AS-E900The SB-800 can be used as a multiple flash unit with Nikon COOLPIX 900-series digital cameras by attaching theCOOLPIX to Multi-Flash Bracket Unit SK-E900 andconnecting the SB-800 to the multi-flash terminal of theCOOLPIX using the Multi-Flash Adapter AS-E900 (p. 34).
Other accessories
Speedlight Stand AS-19Same as that provided with this SB-800.
Colored Gel Filter Set SJ-1A total of 20 filters in 8 models are provided.Colored gel filters are consumable items and subject to agradual deterioration in color due to the heat generated whenthe flash fires. Therefore, it is recommended to check andreplace these filters when necessary.
112
Optional accessories
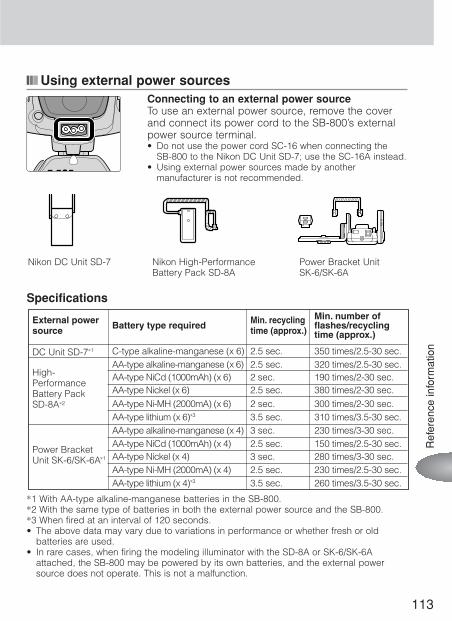
113
Ref
eren
ce in
form
atio
n
Using external power sourcesConnecting to an external power sourceTo use an external power source, remove the coverand connect its power cord to the SB-800’s externalpower source terminal.• Do not use the power cord SC-16 when connecting the
SB-800 to the Nikon DC Unit SD-7; use the SC-16A instead.• Using external power sources made by another
manufacturer is not recommended.
Specifications
∗1 With AA-type alkaline-manganese batteries in the SB-800.∗2 With the same type of batteries in both the external power source and the SB-800.∗3 When fired at an interval of 120 seconds.• The above data may vary due to variations in performance or whether fresh or old
batteries are used.• In rare cases, when firing the modeling illuminator with the SD-8A or SK-6/SK-6A
attached, the SB-800 may be powered by its own batteries, and the external powersource does not operate. This is not a malfunction.
Power Bracket UnitSK-6/SK-6A
Nikon High-PerformanceBattery Pack SD-8A
Nikon DC Unit SD-7
External powersource
DC Unit SD-7∗1
High-PerformanceBattery Pack SD-8A∗2
Power BracketUnit SK-6/SK-6A∗1
C-type alkaline-manganese (x 6)AA-type alkaline-manganese (x 6)AA-type NiCd (1000mAh) (x 6)
AA-type Ni-MH (2000mA) (x 6)AA-type lithium (x 6)∗3
AA-type alkaline-manganese (x 4)AA-type NiCd (1000mAh) (x 4)
AA-type Ni-MH (2000mA) (x 4)AA-type lithium (x 4)∗3
2.5 sec.2.5 sec.2 sec.
2 sec.3.5 sec.3 sec.2.5 sec.
2.5 sec.3.5 sec.
350 times/2.5-30 sec.320 times/2.5-30 sec.190 times/2-30 sec.
AA-type Nickel (x 6) 2.5 sec. 380 times/2-30 sec.300 times/2-30 sec.310 times/3.5-30 sec.230 times/3-30 sec.150 times/2.5-30 sec.
AA-type Nickel (x 4) 3 sec. 280 times/3-30 sec.230 times/2.5-30 sec.260 times/3.5-30 sec.
Battery type required Min. recyclingtime (approx.)
Min. number offlashes/recycling time (approx.)
WARNINGNever use thinner, benzene, or other active agents for cleaning theSpeedlight, as this may damage the Speedlight or cause it to catchon fire. Using these agents may also impair your health.
Cleaning• Use a blower brush to remove dirt and dust from the SB-800 and clean it with a soft,
clean cloth. After using the SB-800 near saltwater, wipe the flash unit with a soft, cleancloth moistened slightly with plain water to remove the salt, then dry it using a dry cloth.
• On rare occasions, the LCD may turn on or turn dark, due to static electricity. This is nota malfunction. The display will soon return to normal.
• Do not drop the SB-800 or hit it against a hard surface, as this may damage its precisionmechanisms. Do not apply strong pressure to the LCD panel.
Storage• Store the SB-800 in a cool, dry place to prevent malfunctions due to high humidity, as
well as the growth of mold or mildew.• Keep the SB-800 away from chemicals such as camphor or naphthalene. Avoid
exposing the SB-800 to magnetic waves from TVs or radios.• Do not use or leave the SB-800 in locations subject to high temperatures such as those
encountered near a heater or stove, as this may cause damage.• When not using the SB-800 for more than two weeks, be sure to remove the batteries to
prevent malfunctions due to battery leakage.• Take the SB-800 out once a month, insert the batteries, and fire the unit several times to
reform the capacitor.• When the SB-800 is stored together with a desiccant, change the desiccant occasionally
since it does not absorb moisture effectively after a while.
Operating location• An extreme temperature change can cause condensation inside the SB-800. When
taking the SB-800 to a very hot place from a very cold place or vice versa, place itinside an airtight container such as plastic bag. Leave it inside for a while, then exposethe SB-800 gradually to the outside temperature.
• Avoid exposing the SB-800 to strong magnetism or radio waves from TVs or high-voltage power transmission towers, as this may cause it to malfunction.
114
Tips on Speedlight care
115
Notes on batteries
Ref
eren
ce in
form
atio
n
Usable batteriesUse four (or five) AA-type batteries (1.5V or lower) of any of the following types.• High-power manganese batteries are not recommended.• Using the Quick Recycling Battery Pack SD-800 (p. 64) or an external power source
(p. 113) increases the number of flashes and provides faster recycling times.
Alkaline-manganese (1.5V)/Nickel (1.5V) batteriesNon-rechargeable. Never attempt to charge these batteries in a batterycharger. Otherwise, they may explode.Lithium (1.5V) batteriesNon-rechargeable. Never attempt to charge these batteries in a batterycharger. Otherwise, they may explode.• Depending on battery specifications, when these batteries become hot, the safety
circuits are activated, cutting off power. This often occurs when the flash unit is operatedin the repeating flash mode. Battery power will recover when the temperature returns tonormal.
NiCd battery (rechargeable, 1.2V) /Ni-MH (rechargeable, 1.2V)Rechargeable. Before recharging the batteries, be sure to read the instructionmanuals for your batteries and battery charger for detailed information on howto handle and recharge the batteries.
Recycling rechargeable
NiCd batteries
Notes on handling batteries• Because flash consumes a large amount of battery power, rechargeable batteries may
not operate properly before reaching the end of their stated lifespan or the number ofcharging/discharging as specified by the battery manufacturer.
• When replacing batteries, replace all four (or five) batteries at the same time. Do not mixbattery types or brands or use old with new batteries.
• When installing batteries, turn off the power of the Speedlight and never reverse thepolarity of the batteries.
• If the battery terminals become soiled, remove dirt and smudges before use, as thismay cause a malfunction.
• Battery power tends to weaken as the temperature drops. It also gradually decreaseswhen batteries are not used for a long time and recovers after a short break followingintensive use. Be sure to check battery power and replace the batteries with fresh ones,if you notice any delays in the recycling time.
• Do not store batteries in locations subject to high temperatures and high humidity.
To protect the earth’s environment, do not disposeof used rechargeable batteries yourself. Instead,take these batteries to your nearest recycling center.
116
Troubleshooting
If a warning indication appears on the SB-800’s LCD panel or inside thecamera’s viewfinder, use the following chart to determine the cause of theproblem before you take your Speedlight to a Nikon service center for repair.
Problems with the SB-800
Problem
The power cannot be turned on.The ready-light does not light up.
The power turns off automatically.A strange sound can be heard causedby the flash head zooming back andforth even when the SB-800 isturned off. The flash shooting distance rangedoes not appear.No D, or o indicator appears in TTL auto flash mode.
The zoom-head position cannot beadjusted to other than 14mm or 17mm.
The SB-800 does not work when control buttons (a button, e/f button, or c/d button) and g button are pressed.
The SB-800 does not fire.
Cause
The batteries are not correctly installed.nBattery power is weak.nThe standby function is activated
and operating.
The batteries are extremely exhausted.
The batteries are extremely exhausted.
The flash head is adjusted to other thanthe horizontal/front or down -7˚ position.The camera’s exposure mode ormetering system is not correctly set or anon-CPU lens is mounted.The built-in wide-flash adapter is in use orthe Nikon Diffusion Dome is attached.
Control buttons are locked.
Canceling flash firing is activated in the Custom settings mode.
Ref.pagep. 18p. 19p. 21
p. 19
p. 19
p. 23
p. 108
p. 12
p. 67
p. 101p. 96
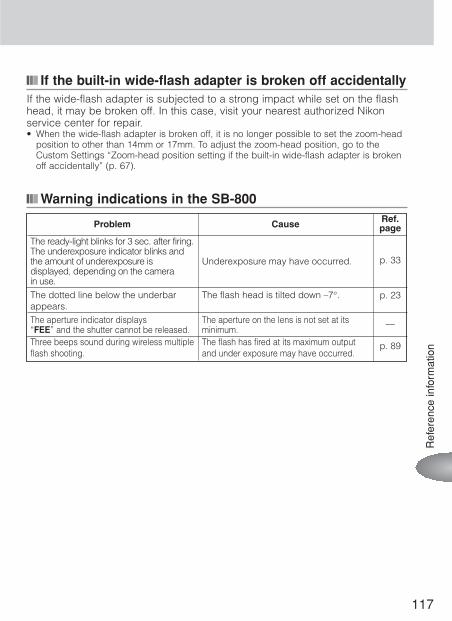
117
Ref
eren
ce in
form
atio
n
If the built-in wide-flash adapter is broken off accidentallyIf the wide-flash adapter is subjected to a strong impact while set on the flashhead, it may be broken off. In this case, visit your nearest authorized Nikonservice center for repair.• When the wide-flash adapter is broken off, it is no longer possible to set the zoom-head
position to other than 14mm or 17mm. To adjust the zoom-head position, go to theCustom Settings “Zoom-head position setting if the built-in wide-flash adapter is brokenoff accidentally” (p. 67).
Warning indications in the SB-800
Problem
The ready-light blinks for 3 sec. after firing.The underexposure indicator blinks andthe amount of underexposure isdisplayed, depending on the camera in use.The dotted line below the underbar appears.
Three beeps sound during wireless multipleflash shooting.
Cause
Underexposure may have occurred.
The flash head is tilted down –7°.
The flash has fired at its maximum output and under exposure may have occurred.
Ref.page
p. 33
p. 23
p. 89
The aperture indicator displays FEE”“ and the shutter cannot be released.
The aperture on the lens is not set at itsminimum.
—
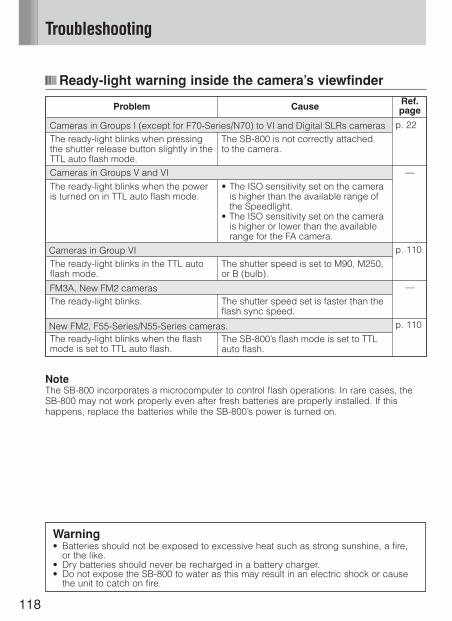
118
Troubleshooting
Ready-light warning inside the camera’s viewfinder
NoteThe SB-800 incorporates a microcomputer to control flash operations. In rare cases, theSB-800 may not work properly even after fresh batteries are properly installed. If thishappens, replace the batteries while the SB-800’s power is turned on.
Warning• Batteries should not be exposed to excessive heat such as strong sunshine, a fire,
or the like.• Dry batteries should never be recharged in a battery charger.• Do not expose the SB-800 to water as this may result in an electric shock or cause
the unit to catch on fire.
Cameras in Groups I (except for F70-Series/N70) to VI and Digital SLRs cameras
Problem
The ready-light blinks when pressingthe shutter release button slightly in theTTL auto flash mode.Cameras in Groups V and VIThe ready-light blinks when the poweris turned on in TTL auto flash mode.
The ready-light blinks in the TTL autoflash mode.
The ready-light blinks.
The ready-light blinks when the flashmode is set to TTL auto flash.
Cause
The SB-800 is not correctly attachedto the camera.
• The ISO sensitivity set on the camera is higher than the available range of the Speedlight.
• The ISO sensitivity set on the camera is higher or lower than the available range for the FA camera.
for the FA camera.
The shutter speed is set to M90, M250,or B (bulb).
The shutter speed set is faster than theflash sync speed.
The SB-800’s flash mode is set to TTLauto flash.
Ref.page
p. 22
—
p. 110
—
p. 110
Cameras in Group VI
FM3A, New FM2 cameras
New FM2, F55-Series/N55-Series cameras.
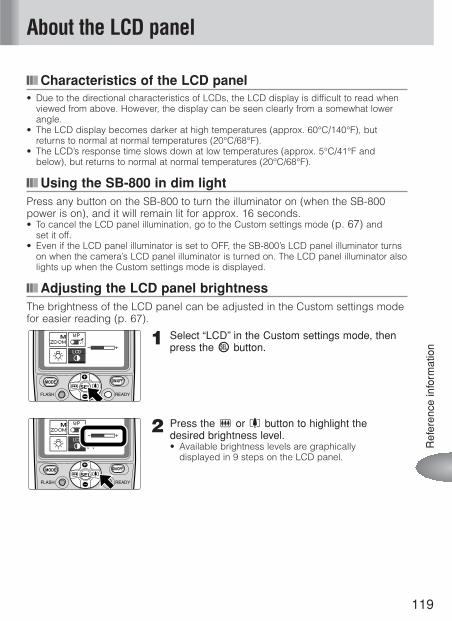
119
About the LCD panel
Ref
eren
ce in
form
atio
n
Characteristics of the LCD panel• Due to the directional characteristics of LCDs, the LCD display is difficult to read when
viewed from above. However, the display can be seen clearly from a somewhat lowerangle.
• The LCD display becomes darker at high temperatures (approx. 60°C/140°F), butreturns to normal at normal temperatures (20°C/68°F).
• The LCD’s response time slows down at low temperatures (approx. 5°C/41°F andbelow), but returns to normal at normal temperatures (20°C/68°F).
Using the SB-800 in dim lightPress any button on the SB-800 to turn the illuminator on (when the SB-800power is on), and it will remain lit for approx. 16 seconds.• To cancel the LCD panel illumination, go to the Custom settings mode (p. 67) and
set it off.• Even if the LCD panel illuminator is set to OFF, the SB-800’s LCD panel illuminator turns
on when the camera’s LCD panel illuminator is turned on. The LCD panel illuminator alsolights up when the Custom settings mode is displayed.
Adjusting the LCD panel brightnessThe brightness of the LCD panel can be adjusted in the Custom settings modefor easier reading (p. 67).
1 Select “LCD” in the Custom settings mode, thenpress the g button.
2 Press the c or d button to highlight the desired brightness level.• Available brightness levels are graphically
displayed in 9 steps on the LCD panel.
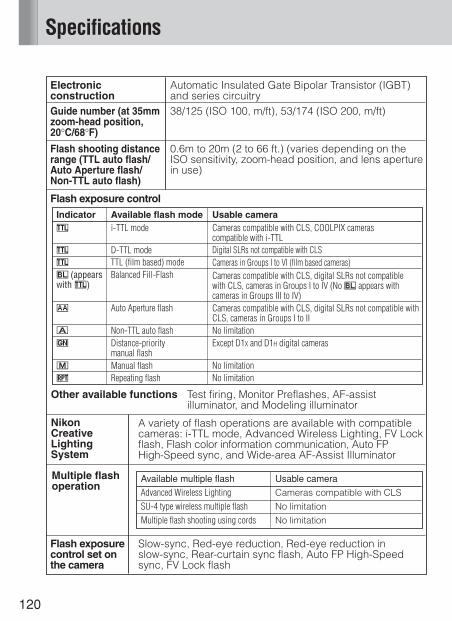
120
Specifications
Electronic construction
Automatic Insulated Gate Bipolar Transistor (IGBT) and series circuitry
Guide number (at 35mm zoom-head position, 20°C/68°F)
38/125 (ISO 100, m/ft), 53/174 (ISO 200, m/ft)
Flash exposure control set on the camera
Slow-sync, Red-eye reduction, Red-eye reduction in slow-sync, Rear-curtain sync flash, Auto FP High-Speed sync, FV Lock flash
Flash shooting distance range (TTL auto flash/Auto Aperture flash/Non-TTL auto flash)
0.6m to 20m (2 to 66 ft.) (varies depending on the ISO sensitivity, zoom-head position, and lens aperture in use)
Flash exposure controlIndicator Available flash mode D i-TTL mode Cameras compatible with CLS, COOLPIX cameras
compatible with i-TTL
No limitationExcept D1X and D1H digital cameras
No limitation
Digital SLRs not compatible with CLSCameras in Groups I to VI (film based cameras) Cameras compatible with CLS, digital SLRs not compatible with CLS, cameras in Groups I to IV (No o appears with cameras in Groups III to IV) Cameras compatible with CLS, digital SLRs not compatible with CLS, cameras in Groups I to II
D D-TTL modeD TTL (film based) modeo (appears with D)
Balanced Fill-Flash
B Auto Aperture flash
A Non-TTL auto flashp Distance-priority
manual flash
q Repeating flashNo limitationG Manual flash
Usable camera
Available multiple flash Usable camera
Advanced Wireless Lighting Cameras compatible with CLS
SU-4 type wireless multiple flash No limitationMultiple flash shooting using cords No limitation
Other available functions Test firing, Monitor Preflashes, AF-assist illuminator, and Modeling illuminator
A variety of flash operations are available with compatible cameras: i-TTL mode, Advanced Wireless Lighting, FV Lock flash, Flash color information communication, Auto FP High-Speed sync, and Wide-area AF-Assist Illuminator
Nikon Creative Lighting System
Multiple flash operation
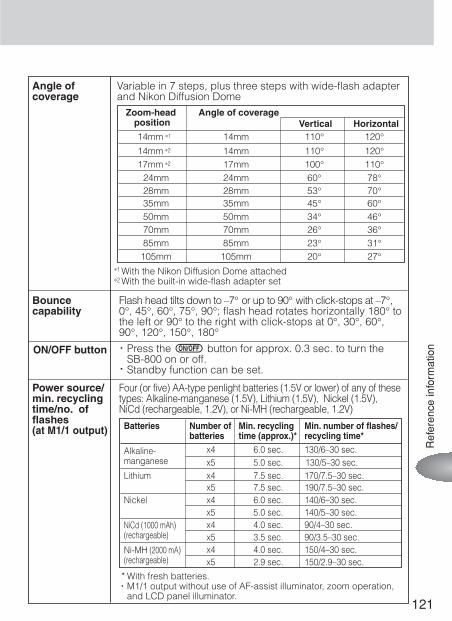
121
Ref
eren
ce in
form
atio
n
Bouncecapability
Flash head tilts down to –7° or up to 90° with click-stops at –7°, 0°, 45°, 60°, 75°, 90°; flash head rotates horizontally 180° to the left or 90° to the right with click-stops at 0°, 30°, 60°, 90°, 120°, 150°, 180°
ON/OFF button nPress the b button for approx. 0.3 sec. to turn the SB-800 on or off.Standby function can be set. n
Power source/min. recyclingtime/no. of flashes (at M1/1 output)
Four (or five) AA-type penlight batteries (1.5V or lower) of any of these types: Alkaline-manganese (1.5V), Lithium (1.5V), Nickel (1.5V), NiCd (rechargeable, 1.2V), or Ni-MH (rechargeable, 1.2V)
* With fresh batteries.M1/1 output without use of AF-assist illuminator, zoom operation, and LCD panel illuminator.
n
Batteries Min. recycling time (approx.)*
Number of batteries
Min. number of flashes/recycling time*
Alkaline-manganese
6.0 sec.x4x5x4x5x4
130/6–30 sec.
Lithium5.0 sec. 130/5–30 sec.
Nickel
7.5 sec. 170/7.5–30 sec.
NiCd (1000 mAh) (rechargeable)
7.5 sec. 190/7.5–30 sec.
Ni-MH (2000 mA) (rechargeable)
6.0 sec. 140/6–30 sec.x5 5.0 sec. 140/5–30 sec.x4 4.0 sec. 90/4–30 sec.x5 3.5 sec. 90/3.5–30 sec.x4 4.0 sec. 150/4–30 sec.x5 2.9 sec. 150/2.9–30 sec.
Angle of coverage
Variable in 7 steps, plus three steps with wide-flash adapter and Nikon Diffusion Dome
∗1 With the Nikon Diffusion Dome attachedWith the built-in wide-flash adapter set∗2
Zoom-head position
Angle of coverageVertical Horizontal
14mm 14mm 110° 120°14mm 14mm 110° 120°17mm 17mm 100° 110°
24mm 24mm 60° 78°28mm 28mm 53° 70°35mm 35mm 45° 60°50mm 50mm 34° 46°70mm 70mm 26° 36°85mm 85mm 23° 31°
105mm 105mm 20° 27°
∗1
∗2
∗2
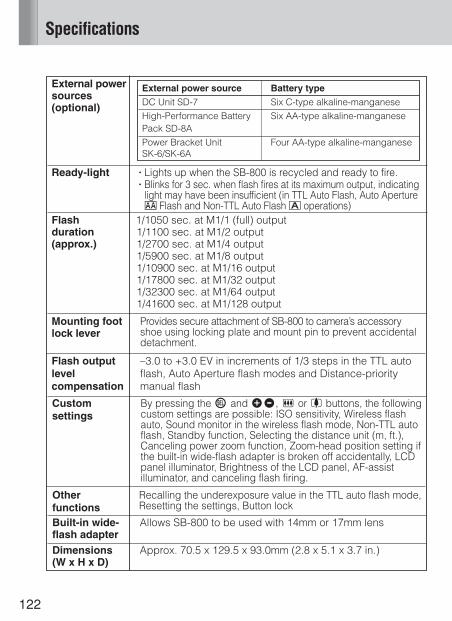
122
Specifications
Other functions
Recalling the underexposure value in the TTL auto flash mode, Resetting the settings, Button lock
Built-in wide- Allows SB-800 to be used with 14mm or 17mm lensflash adapterDimensions Approx. 70.5 x 129.5 x 93.0mm (2.8 x 5.1 x 3.7 in.)(W x H x D)
Mounting foot Provides secure attachment of SB-800 to camera’s accessory shoe using locking plate and mount pin to prevent accidental detachment.
lock lever
Flash outputlevel compensation
–3.0 to +3.0 EV in increments of 1/3 steps in the TTL auto flash, Auto Aperture flash modes and Distance-priority manual flash
Customsettings
By pressing the g and ef, c or d buttons, the following custom settings are possible: ISO sensitivity, Wireless flash auto, Sound monitor in the wireless flash mode, Non-TTL auto flash, Standby function, Selecting the distance unit (m, ft.), Canceling power zoom function, Zoom-head position setting if the built-in wide-flash adapter is broken off accidentally, LCD panel illuminator, Brightness of the LCD panel, AF-assist illuminator, and canceling flash firing.
External power sources (optional)
Ready-light nLights up when the SB-800 is recycled and ready to fire.nBlinks for 3 sec. when flash fires at its maximum output, indicating
light may have been insufficient (in TTL Auto Flash, Auto Aperture B Flash and Non-TTL Auto Flash A operations)
Flash 1/1050 sec. at M1/1 (full) outputduration 1/1100 sec. at M1/2 output(approx.) 1/2700 sec. at M1/4 output
1/5900 sec. at M1/8 output1/10900 sec. at M1/16 output1/17800 sec. at M1/32 output1/32300 sec. at M1/64 output1/41600 sec. at M1/128 output
External power source Battery typeDC Unit SD-7 Six C-type alkaline-manganeseHigh-Performance Battery Six AA-type alkaline-manganesePack SD-8APower Bracket Unit SK-6/SK-6A
Four AA-type alkaline-manganese
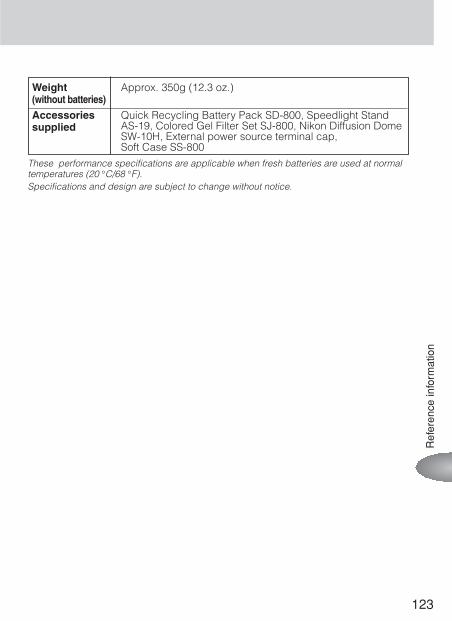
123
Ref
eren
ce in
form
atio
n
Weight Approx. 350g (12.3 oz.)(without batteries)Accessories Quick Recycling Battery Pack SD-800, Speedlight Stand
AS-19, Colored Gel Filter Set SJ-800, Nikon Diffusion Dome SW-10H, External power source terminal cap, Soft Case SS-800
supplied
These performance specifications are applicable when fresh batteries are used at normaltemperatures (20 °C/68 °F).Specifications and design are subject to change without notice.
124
Symbole/f button.............................................12i-TTL mode ...............................................36
AAF-ILL.......................................................62AF-ILL ONLY.............................................62Accessories............................................111Advanced Wireless Lighting ....................76Aperture-priority auto exposure (A) .........29Auto Aperture flash ..................................38Auto FP High-Speed sync........................60Automatic Balanced Fill-Flash .................37
BBatteries ...........................................18, 115Beyond the flash shooting distance
range warning......................................45Bounce flash operation ............................98Built-in wide-flash adapter .....................104Button lock ...............................................12
CCLS.............................................................5COOLPIX..................................................34CPU Nikkor lenses ...................................16Camera groups ..........................................8Canceling flash firing ...............................67Channel ....................................................78Close-up flash operation........................102Colored gel filters .....................................96Communication channel ..........................77Compatible with CLS .................................8Continuous flash shooting........................51Control button quick reference ................12Control buttons.........................................12Custom functions .....................................67
DD-TTL mode .............................................36D-type Nikkor lenses................................16Default settings ..........................................6Digital SLRs not compatible with CLS .......8Distance-priority manual flash .................44Dotted line below the underbar ...............23
EExposure compensation ..........................54Exposure mode ........................................28External power source ...........................113
FFLASH button ...........................................12FV Lock flash............................................61Flash Color Information
Communication......................................5Flash head..............................................100Flash head tilting/rotating lock
release button ......................................22Flash modes.............................................35Flash output level ...............................42, 48Flash output level
compensation value.............................56Flash shooting distance range.................31Flash sync mode......................................32Frequency ................................................48Front-curtain sync ....................................32
GG-type Nikkor lenses................................16Group .........................................................8Guide number ..........................................42
HHighlighted items .....................................15
Index
• Refer to the Speedlight parts and their functions (p. 10) and Icons on the LCD panel (p. 13) for each part name and display indications.
i 125
IISO sensitivity...........................................24ISO sensitivity factors...............................43Icons.........................................................13
LLCD panel illuminator.............................119LCD panel ..............................................119
MMASTER .............................................15, 72MODE button............................................30Manual exposure (M) mode.....................29Manual flash .............................................46Manual mode ...........................................42Master flash unit .......................................72Metering system.......................................28Minimum recycling time ...........................19Modeling illuminator .................................66Monitor Preflashes....................................36Mounting foot lock lever...........................22Multi Selector............................................12Multiple flash operation............................72Multiple flash shooting using cords .........90
NNO AF-ILL ................................................62Nikon Creative Lighting System.................5Nikon Diffusion Dome.............................101Non-CPU lenses.......................................16Non-TTL auto flash...................................40Non-TTL auto flash mode.........................38Number of flashes..............................19, 48
OON/OFF button .........................................12
PPower zoom function................................26Programmed auto (P)...............................28
QQuick Recycling Battery Pack .................64
RREMOTE...................................................72Ready-light .........................................20, 33Rear-curtain sync .....................................59Red-eye reduction control........................58Red-eye reduction with slow-sync
flash .....................................................58Remote flash unit .....................................72Repeating flash ........................................48Reset ........................................................12
SSU-4 type wireless multiple flash
shooting ...............................................84Selecting the distance unit (m or ft.)........70Shutter-priority auto exposure (S) ............29Slow-sync flash mode ..............................58Soft Case....................................................6Sound monitor ..........................................89Speedlight Stand......................................75Speedlight parts and their functions........10Standard TTL flash ...................................37Standby function ......................................21Supplied accessories.................................6
TTTL mode .................................................37Test firing ..................................................20
UUnderexposure value in the TTL
auto flash mode ...................................33Using the built-in bounce card ..............101
WWide-Area AF-Assist Illuminator ..........5, 62Wireless flash mode.................................69Wireless master flash unit ........................72Wireless multiple flash shooting...............72Wireless remote flash ...............................72
ZZoom-head position .................................26
Ref
eren
ce in
form
atio
n
For your safety
Before using your product, please read the following safety precautionscarefully and thoroughly to ensure correct and safe use and to helpprevent damage to your Nikon product or injury to yourself or others.For quick reference by those who use the product, please keep thesesafety instructions near the product.
In this manual, safety instructions are indicated with these symbols:
Disregarding instructions marked with this symbol couldresult in personal injury, or death and property damage.
Disregarding instructions marked with this symbol couldresult in property damage.
WARNING
CAUTION
En
Printed in JapanTT4I02500801 (S033) 11
8MSA0611-A
No reproduction in any form of this manual, in whole or in part (except for brief quotation in critical articles or reviews), may be made without written authorization from NIKON CORPORATION.
S
B-8
00
(En)
SB-800Autofocus Speedlight
Instruction Manual