Embed Size (px)
Citation preview
E/U authorized representativeMDSS GmbHSchiffgraben 41D-30175 HannoverGermany
2885 Loker Ave ECarlsbad, CA 92010 USA
Toll Free Tel: 1-800-321-0607Local: +1-760-795-5440
Fax: +1-760-795-5295www.Breg.com
© 2016 Breg, Inc. All rights reserved.
AW-NJP-122 Rev B 08/16
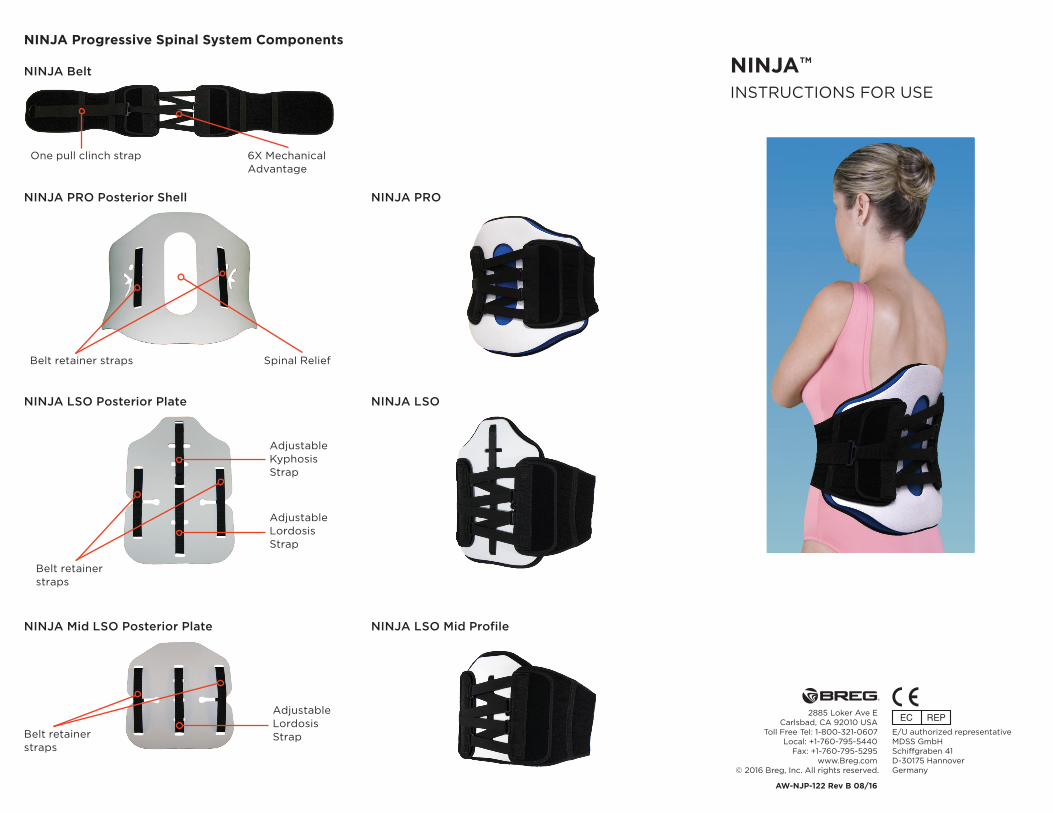
NINJATM
INSTRUCTIONS FOR USE
NINJA Progressive Spinal System Components
NINJA Belt
One pull clinch strap 6X Mechanical Advantage
NINJA PRO Posterior Shell NINJA PRO
Belt retainer straps Spinal Relief
NINJA LSO Posterior Plate
NINJA Mid LSO Posterior Plate
Belt retainer straps
Belt retainer straps
Adjustable Kyphosis Strap
Adjustable Lordosis Strap
Adjustable Lordosis Strap
NINJA LSO
NINJA LSO Mid Profile
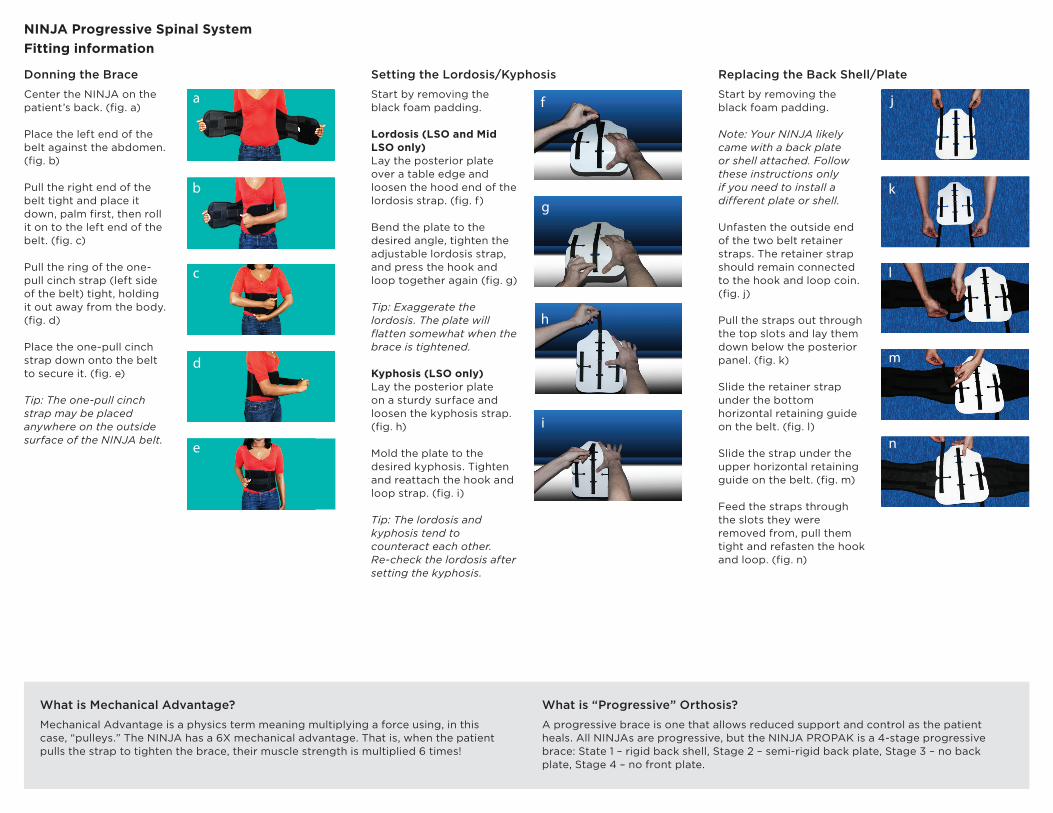
NINJA Progressive Spinal SystemFitting information
Donning the Brace
Center the NINJA on the patient’s back. (fig. a)
Place the left end of the belt against the abdomen. (fig. b)
Pull the right end of the belt tight and place it down, palm first, then roll it on to the left end of the belt. (fig. c)
Pull the ring of the one-pull cinch strap (left side of the belt) tight, holding it out away from the body. (fig. d)
Place the one-pull cinch strap down onto the belt to secure it. (fig. e)
Tip: The one-pull cinch strap may be placed anywhere on the outside surface of the NINJA belt.
What is Mechanical Advantage?
Mechanical Advantage is a physics term meaning multiplying a force using, in this case, “pulleys.” The NINJA has a 6X mechanical advantage. That is, when the patient pulls the strap to tighten the brace, their muscle strength is multiplied 6 times!
What is “Progressive” Orthosis?
A progressive brace is one that allows reduced support and control as the patient heals. All NINJAs are progressive, but the NINJA PROPAK is a 4-stage progressive brace: State 1 – rigid back shell, Stage 2 – semi-rigid back plate, Stage 3 – no back plate, Stage 4 – no front plate.
Setting the Lordosis/Kyphosis
Start by removing the black foam padding.
Lordosis (LSO and Mid LSO only)Lay the posterior plate over a table edge and loosen the hood end of the lordosis strap. (fig. f)
Bend the plate to the desired angle, tighten the adjustable lordosis strap, and press the hook and loop together again (fig. g)
Tip: Exaggerate the lordosis. The plate will flatten somewhat when the brace is tightened.
Kyphosis (LSO only)Lay the posterior plate on a sturdy surface and loosen the kyphosis strap. (fig. h)
Mold the plate to the desired kyphosis. Tighten and reattach the hook and loop strap. (fig. i)
Tip: The lordosis and kyphosis tend to counteract each other. Re-check the lordosis after setting the kyphosis.
Replacing the Back Shell/Plate
Start by removing the black foam padding.
Note: Your NINJA likely came with a back plate or shell attached. Follow these instructions only if you need to install a different plate or shell.
Unfasten the outside end of the two belt retainer straps. The retainer strap should remain connected to the hook and loop coin. (fig. j)
Pull the straps out through the top slots and lay them down below the posterior panel. (fig. k)
Slide the retainer strap under the bottom horizontal retaining guide on the belt. (fig. l)
Slide the strap under the upper horizontal retaining guide on the belt. (fig. m)
Feed the straps through the slots they were removed from, pull them tight and refasten the hook and loop. (fig. n)