Embed Size (px)
Citation preview
Nokia C5–04 User Guide
9223462Issue 1

Contents
Safety 4Battery removing 4
Find help 5In-device help 5Accessibility solutions 5Extended user guide 5Support 5Software updates over the air 6Update device software using yourPC 6Access codes 7
Get started 7Insert the SIM card and battery 7Insert the memory card 9Remove the memory card 11Charge the battery 11Keys and parts 12Switch the device on 13Lock the keys and touch screen 13Home screen 14Access the menu 15Touch screen actions 15Change the ringing tone 16Ovi by Nokia 16About Ovi Store 16
Your device 17Contacts bar 17Antenna locations 17Offline profile 17Shortcuts 18Sensor settings and display rotation 18Headset 19Attach a wrist strap 19
Make calls 19Calls 19
Write text 20
Virtual keyboard 20Handwriting 21Enter text with the virtual keypad 21Touch input settings 23
Contacts 23Save phone numbers and mailaddresses 24Manage names and numbers 24Assign default numbers andaddresses 24Ringing tones, images, and call text forcontacts 25Copy contacts 25SIM services 26
Messaging 27Messaging main view 27Write and send messages 27Set up your e-mail 28E-mail service 29Mail for Exchange 29About Ovi Contacts 30Connect to the service 30Start using Ovi Contacts 30
Music player 31Play music 31Create a playlist 32
Camera 33Activate the camera 33Image capture 33Video recording 34
Gallery 34View and organize files 34View images and videos 35
Share online 35About Share online 35Subscribe to an online sharingservice 36Manage your accounts 36Create a post 36
2 Contents
Post files from Gallery 37
Nokia Video Center 37View and download video clips 37Video feeds 38My videos 39Transfer videos from your PC 39Video center settings 39
Web browser 40Browse the web 40Add a bookmark 40
Positioning (GPS) 41About GPS 41About assisted GPS (A-GPS) 41Hold your device correctly 41
Maps 42Maps overview 42View your location and the map 42Map view 43Change the look of the map 44Download and update maps 44About positioning methods 45Find a location 45View location details 46Save or view a place or route 46Send a place to a friend 47Check in 47Synchronize your Favorites 48Get voice guidance 49Drive to your destination 49Navigation view 50Get traffic and safety information 50Walk to your destination 51Plan a route 52
Connectivity 53
Protect the environment 53Save energy 53Recycle 53
Product and safety information 54
Contents 3
Safety
Read these simple guidelines. Not following them may be dangerous or illegal. Readthe complete user guide for further information.
SWITCH OFF IN RESTRICTED AREASSwitch the device off when cellular phone use is not allowed or when it maycause interference or danger, for example, in aircraft, near medicalequipment, fuel, chemicals, or blasting areas.
ROAD SAFETY COMES FIRSTObey all local laws. Always keep your hands free to operate the vehicle whiledriving. Your first consideration while driving should be road safety.
INTERFERENCEAll wireless devices may be susceptible to interference, which could affectperformance.
QUALIFIED SERVICEOnly qualified personnel may install or repair this product.
KEEP YOUR DEVICE DRYYour device is not water-resistant. Keep it dry.
PROTECT YOUR HEARINGListen to a headset at a moderate level, and do not hold the device near yourear when the loudspeaker is in use.
Battery removingSwitch the device off and disconnect the charger before removing the battery.
4 Safety
Find help
For local services and warranty information, see the separate booklet.
In-device helpYour device contains instructions to help to use the applications in your device.
To open help texts from the main menu, select Menu > Applications > Help and theapplication for which you want to read instructions.
When an application is open, to access the help text for the current view, selectOptions > Help.
When you are reading the instructions, to change the size of the help text, selectOptions > Decrease font size or Increase font size.
You may find links to related topics at the end of the help text.If you select an underlined word, a short explanation is displayed.
Help texts use the following indicators:
Link to a related help topic.Link to the application being discussed.
When you are reading the instructions, to switch between help texts and the applicationthat is open in the background, select Options > Show open apps. and the desiredapplication.
Accessibility solutionsNokia is committed to making mobile phones easy to use for all individuals, includingthose with disabilities. For more information, visit the Nokia website atwww.nokiaaccessibility.com.
Extended user guideAn extended version of this user guide is available on the product support pages of theNokia website. Some applications or functions are explained only in the extended userguide.
SupportWhen you want to learn more about how to use your product or you are unsure howyour device should function, go to www.nokia.com/support, or using a cellular phone,www.nokia.mobi/support. You can also select Menu > Applications > Help in yourdevice.
If this does not resolve your issue, do one of the following:
Find help 5

• Reboot your device. Switch off the device, and remove the battery. After about aminute, replace the battery, and switch on the device.
• Restore the original factory settings.• Update your device software.
If your issue remains unsolved, contact Nokia for repair options. Go to www.nokia.com/repair, or in Latin America, www.nokia-latinoamerica.com/centrosdeservicio. Beforesending your device for repair, always back up the data in your device.
Software updates over the airSelect Menu > Applications > Tools > SW update.
With Software update (network service), you can check if there are updates availablefor your device software or applications, and download them to your device.
After updating your device software or applications using Software update, theinstructions related to the updated applications in the user guide or the helps may nolonger be up to date.
To download the available updates, select . To unmark specific updates that you donot want to download, select the updates from the list.
To view information on an update, select the update and .
To view the status of previous updates, select .
Select Options and from the following:
Update via PC — Update your device using a PC. This option replaces the Start updateoption when updates are only available using the Nokia Software Updater PCapplication.View update history — View the status of previous updates.Settings — Modify the settings, such as the default access point used for downloadingupdates.Disclaimer — View the Nokia license agreement.
Update device software using your PCYou can use the Nokia Ovi Suite PC application to update your device software. You needa compatible PC, a high-speed internet connection, and a compatible USB data cable toconnect your device to the PC.
To get more information and to download the Nokia Ovi Suite application, go towww.ovi.com/suite.
6 Find help
Access codesPIN code — Protect your device and SIM card against unauthorized use. The PIN code(4 - 8 digits) is usually supplied with the SIM card.PIN2 code — This code (4 - 8 digits) is supplied with some SIM cards, and is required toaccess some functions in your device.
If you forget an access code, contact the network service provider whose SIM card is inyour device. After three consecutive incorrect PIN or PIN2 code entries, the code isblocked, and you need the PUK or PUK2 code to unblock it.
PUK code and PUK2 code — These codes (8 digits) are required to change a blocked PINcode or PIN2 code, respectively. If the codes are not supplied with the SIM card, contactthe network service provider whose SIM card is in your device.IMEI number — This number (15 digits) is used to identify valid devices in the GSMnetwork. Devices that are, for example, stolen, can be blocked from accessing thenetwork. The IMEI number for your device can be found under the battery.Lock code (also known as security code) — The lock code helps you to protect your deviceagainst unauthorized use. You can create and change the code, and set the device torequest the code. Keep the new code secret and in a safe place separate from yourdevice. If you forget the code and your device is locked, your device will require serviceand additional charges may apply. Additional charges may apply, and all the personaldata in your device may be deleted. For more information, contact a Nokia Care Pointor your device dealer.
Get started
Insert the SIM card and batterySafe removal. Always switch the device off and disconnect the charger before removingthe battery.
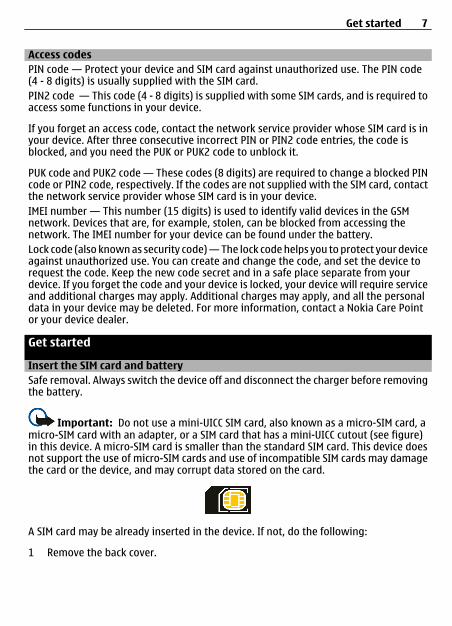
Important: Do not use a mini-UICC SIM card, also known as a micro-SIM card, amicro-SIM card with an adapter, or a SIM card that has a mini-UICC cutout (see figure)in this device. A micro-SIM card is smaller than the standard SIM card. This device doesnot support the use of micro-SIM cards and use of incompatible SIM cards may damagethe card or the device, and may corrupt data stored on the card.
A SIM card may be already inserted in the device. If not, do the following:
1 Remove the back cover.
Get started 7
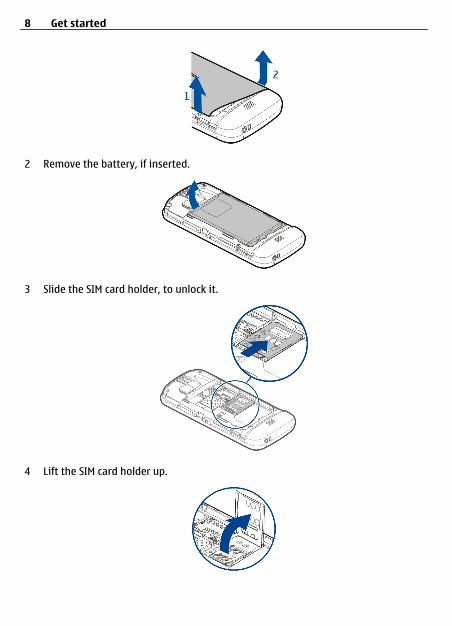
2 Remove the battery, if inserted.
3 Slide the SIM card holder, to unlock it.
4 Lift the SIM card holder up.
8 Get started

5 Make sure the contact area of the SIM card is facing toward the device, and slide theSIM card into the SIM card holder.
6 Lower the SIM card holder into place. Slide the SIM card holder, to lock it.7 Line up the battery contacts, and insert the battery.
8 To replace the cover, direct the top locking catches toward their slots, and pressdown until the cover locks into place.
If the SIM card is not properly in place, the device can only be used in the offline profile.
Insert the memory cardUse only compatible memory cards approved by Nokia for use with this device.Incompatible cards may damage the card and the device and corrupt data stored on thecard.
Get started 9
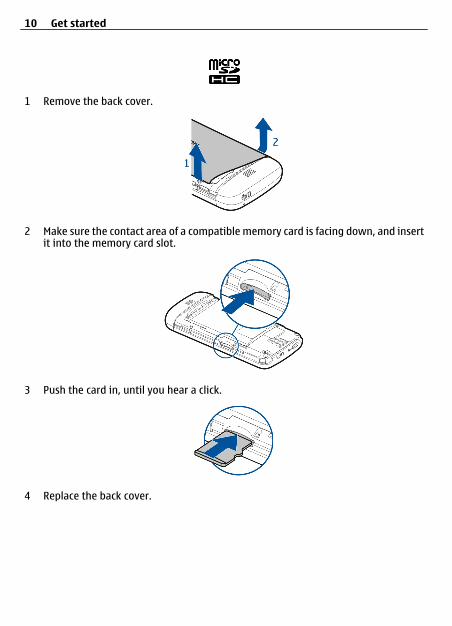
1 Remove the back cover.
2 Make sure the contact area of a compatible memory card is facing down, and insertit into the memory card slot.
3 Push the card in, until you hear a click.
4 Replace the back cover.
10 Get started
Remove the memory card
Important: Do not remove the memory card when an application is using it.Doing so may damage the memory card and the device, and corrupt data stored on thecard.
1 If the device is switched on, before you remove the card, press the power key, andselect Remove memory card.
2 When Remove memory card? Some applications will be closed. is displayed,select Yes.
3 When Remove memory card and press 'OK' is displayed, remove the back coverof the device, and push the card in, until you hear a click.
4 Pull out the memory card, and replace the back cover. If the device is switched on,select OK.
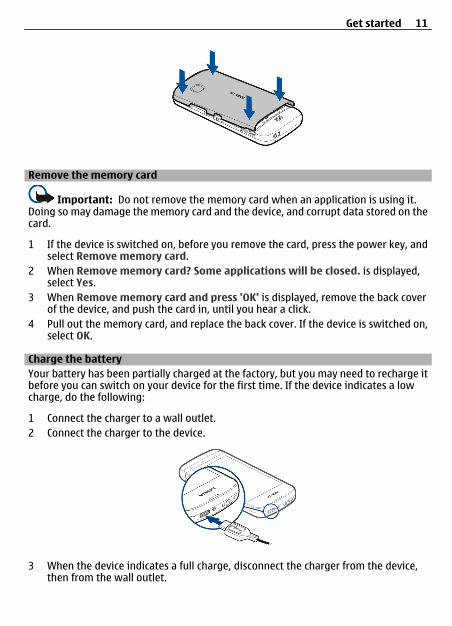
Charge the batteryYour battery has been partially charged at the factory, but you may need to recharge itbefore you can switch on your device for the first time. If the device indicates a lowcharge, do the following:
1 Connect the charger to a wall outlet.2 Connect the charger to the device.
3 When the device indicates a full charge, disconnect the charger from the device,then from the wall outlet.
Get started 11
You do not need to charge the battery for a specific length of time, and you can use thedevice while it is charging. If the battery is completely discharged, it may take severalminutes before the charging indicator appears on the display or before any calls can bemade.
Tip: Disconnect the charger from the wall outlet when the charger is not in use. Acharger that is connected to the outlet consumes power even when it is not connectedto the device.
USB chargingYou can use USB charging when a wall outlet is not available. Data can be transferredwhile charging the device. The efficiency of USB charging power varies significantly, andit may take a long time for charging to start and the device to start functioning.
1 Use a compatible USB data cable to connect your device to a compatible USB device.Depending on the type of the device that is used for charging, it may take a whilefor charging to start.
2 If the device is switched on, select the appropriate USB mode.
Only connect your device to products that have USB-IF logo.
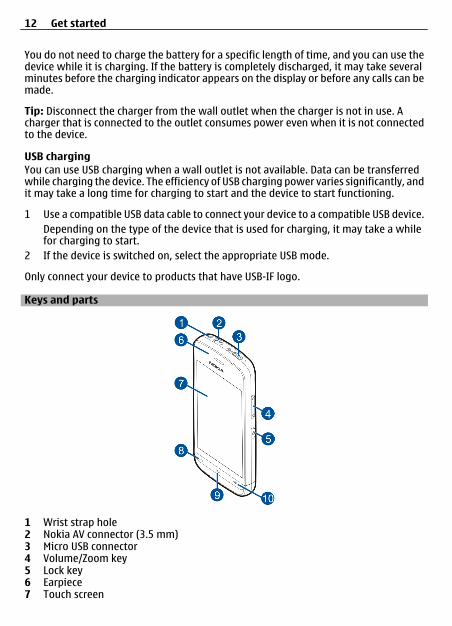
Keys and parts
1 Wrist strap hole2 Nokia AV connector (3.5 mm)3 Micro USB connector4 Volume/Zoom key5 Lock key6 Earpiece7 Touch screen
12 Get started

8 Call key9 Menu key10 End/power key11 Camera lens12 Loudspeaker13 Microphone
Switch the device on
1
Press and hold the power key.2 If the device asks for a PIN code or lock code, enter it, and select OK. To delete a
number, select . The factory setting for the lock code is 12345.3 Select your location. If you accidentally select the wrong location, select Back.4 Enter the date and time. When using the 12-hour time format, to switch between
a.m. and p.m., select any number.
Lock the keys and touch screen
To lock the touch screen and the keys, press the lock key on the side of the device.
To unlock, press the lock key on the side of the device, and select the unlock icon on thescreen.
Get started 13
When the touch screen and keys are locked, the touch screen is switched off and thekeys are inactive.
The screen and keys may be locked automatically after a period of inactivity.To change the settings for automatic screen and key locking, select Menu > Settingsand Phone > Phone mgmt. > Auto. keyguard > Keypad autolock period.
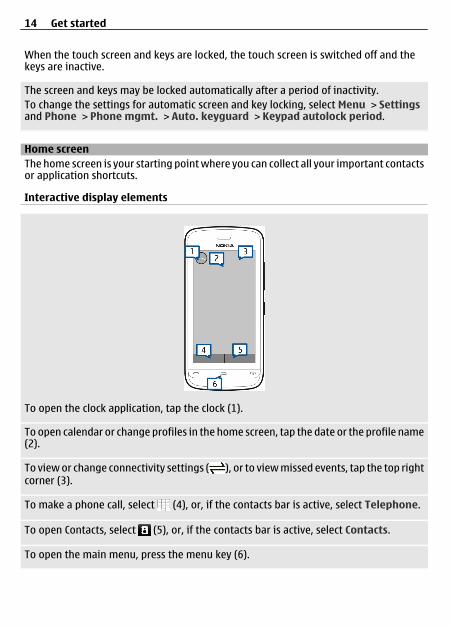
Home screenThe home screen is your starting point where you can collect all your important contactsor application shortcuts.
Interactive display elements
To open the clock application, tap the clock (1).
To open calendar or change profiles in the home screen, tap the date or the profile name(2).
To view or change connectivity settings ( ), or to view missed events, tap the top rightcorner (3).
To make a phone call, select (4), or, if the contacts bar is active, select Telephone.
To open Contacts, select (5), or, if the contacts bar is active, select Contacts.
To open the main menu, press the menu key (6).
14 Get started
Start using the contacts bar
To add a contact to the contacts bar, in the home screen, select and a contact, andfollow the displayed instructions.Contacts need to be saved in the phone memory.
To add a new contact to your contacts list, select > Options > New contact, andfollow the displayed instructions.Contacts added from the contacts bar are always saved to the phone memory.
Change the home screen themeTo change the home screen theme or the shortcuts, select Menu > Settings andPersonal > Home screen.
Access the menu
To access the menu, press the menu key.
To open an application or folder in the menu, select the item.
Touch screen actions
Open an application or other screen elementTap the application or element once.To view the options available for the opened item, select Options or, if available, selectan icon from a toolbar.
Access functions quicklyTap and hold the item. A pop-up menu with available options opens. For example, tosend an image, tap and hold the image, and from the pop-up menu, select theappropriate option.
Tip: To see the options available for an opened item, such as an image or a video, tapthe screen.
SelectIn this user documentation, opening applications or items by tapping them is called"selecting". If you need to select several items in a sequence, the menu items to selectare separated by arrows.For example, to select Options > Help, tap Options, and then tap Help.
Get started 15
ScrollTo scroll up or down in lists that have a scroll bar, drag the slider of the scroll bar.
Touch screen backlightThe touch screen backlight is turned off after a period of inactivity. To turn the screenbacklight on, tap the screen.If the touch screen and keys are locked, tapping the screen does not turn the screenbacklight on.
Change the ringing toneSelect Menu > Settings and Personal > Profiles.
You can use profiles to set and customize the ringing tones, message alert tones, andother tones for different events, environments, or caller groups.To customize a profile, go to the profile, and select Customize.
Ovi by Nokia With Ovi by Nokia, you can find new places and services, and stay in touch with
your friends. You can do, for example, the following:
• Download games, applications, videos, and ringing tones to your device• Find your way with free walk and drive navigation, plan trips, and view locations
on a map• Get a free Ovi Mail account• Buy music
Some items are free of charge, others you may need to pay for.
The available services may also vary by country or region, and not all languages aresupported.
To access Nokia's Ovi services, go to www.ovi.com, and register your own Nokia account.
For more help and information, go to www.ovi.com.
About Ovi Store With Ovi Store, you can download mobile games, applications, videos, pictures,
themes, and ringing tones to your device. Some items are free of charge; others youneed to pay for with your credit card or in your phone bill. The availability of paymentmethods depends on your country of residence and your network service provider. OviStore offers content that is compatible with your mobile device and relevant to yourtastes and location.
16 Get started
Your device
Contacts bar
To add a contact to the home screen, in the home screen, select > Options > Newcontact, and follow the instructions.
To communicate with a contact, select the contact and from the following:
— Call the contact. — Send a message to the contact.
— Add a link to an Ovi contact. If you want to chat to an Ovi contact, select thecontact. The icon changes to . To start chatting, select the icon.
— Refresh the contact's web feeds.
To view past communication events with a contact, select the contact. To view thedetails of a communication event, select the event.
To close the view, select Options > Exit.
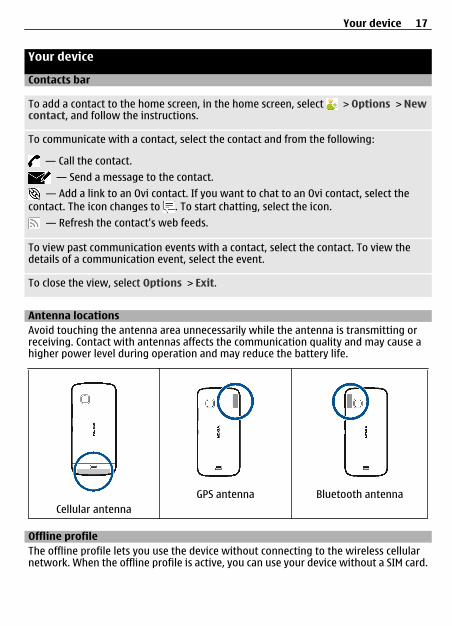
Antenna locationsAvoid touching the antenna area unnecessarily while the antenna is transmitting orreceiving. Contact with antennas affects the communication quality and may cause ahigher power level during operation and may reduce the battery life.
Cellular antennaGPS antenna Bluetooth antenna
Offline profileThe offline profile lets you use the device without connecting to the wireless cellularnetwork. When the offline profile is active, you can use your device without a SIM card.
Your device 17
Activate the offline profilePress the power key briefly, and select Offline.
When you activate the offline profile, the connection to the cellular network is closed.All radio frequency signals to and from the device to the cellular network are prevented.If you try to send messages using the cellular network, they are placed in the Outboxfolder to be sent later.
Important: In the offline profile you cannot make or receive any calls, or useother features that require cellular network coverage. You may be able to call the officialemergency number programmed into your device. To make calls, you must first changeto another profile.
Shortcuts
To switch between open applications, press and hold the menu key.Leaving applications running in the background increases the demand on battery powerand reduces the battery life.
To change the profile, press the power key, and select a profile.
To call your voice mailbox (network service), in the dialer, tap and hold 1.
To open a list of last dialed numbers, in the home screen, press the call key.
To use voice commands, in the home screen, press and hold the call key.
Sensor settings and display rotationWhen you activate the sensors in your device, you can control certain functions byturning the device.
Select Menu > Settings and Phone > Sensor settings.
Select from the following:Sensors — Activate the sensors.Turning control — Select Silencing calls and Snoozing alarms to mute calls andsnooze alarms by turning your device so that the display faces down. SelectAuto-rotatedisplay to rotate the display content automatically when you turn the device on its leftside or back to a vertical position. Some applications and features may not supportrotating the display content.
18 Your device
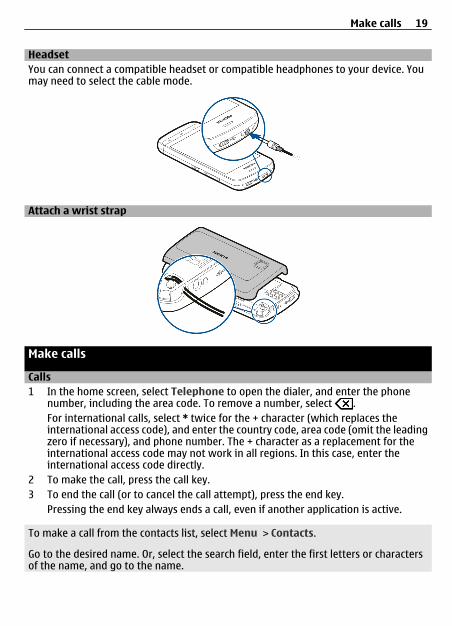
HeadsetYou can connect a compatible headset or compatible headphones to your device. Youmay need to select the cable mode.
Attach a wrist strap
Make calls
Calls 1 In the home screen, select Telephone to open the dialer, and enter the phone
number, including the area code. To remove a number, select .For international calls, select * twice for the + character (which replaces theinternational access code), and enter the country code, area code (omit the leadingzero if necessary), and phone number. The + character as a replacement for theinternational access code may not work in all regions. In this case, enter theinternational access code directly.
2 To make the call, press the call key.3 To end the call (or to cancel the call attempt), press the end key.
Pressing the end key always ends a call, even if another application is active.
To make a call from the contacts list, select Menu > Contacts.
Go to the desired name. Or, select the search field, enter the first letters or charactersof the name, and go to the name.
Make calls 19
To call the contact, press the call key. If you have saved several numbers for a contact,select the desired number from the list, and press the call key.
Write text
Tap any text input field to enter letters, numbers, and special characters.
Your device can complete words based on the built-in dictionary for the selected textinput language. The device also learns new words from your input.
Virtual keyboardYou can use the virtual keyboard in landscape mode.
To activate the virtual keyboard, select > Full screen QWERTY.
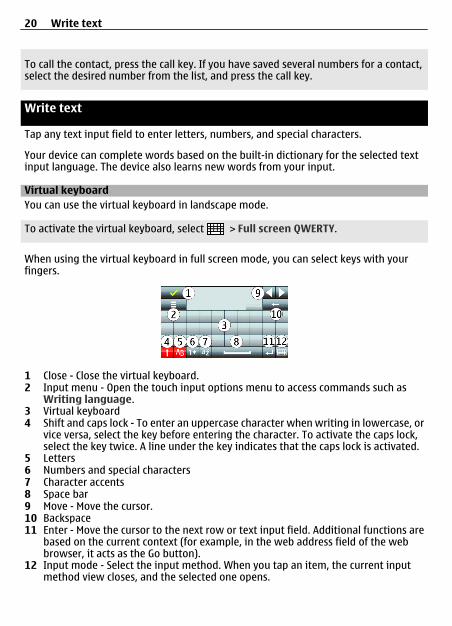
When using the virtual keyboard in full screen mode, you can select keys with yourfingers.
1 Close - Close the virtual keyboard.2 Input menu - Open the touch input options menu to access commands such as
Writing language.3 Virtual keyboard4 Shift and caps lock - To enter an uppercase character when writing in lowercase, or
vice versa, select the key before entering the character. To activate the caps lock,select the key twice. A line under the key indicates that the caps lock is activated.
5 Letters6 Numbers and special characters7 Character accents8 Space bar9 Move - Move the cursor.10 Backspace11 Enter - Move the cursor to the next row or text input field. Additional functions are
based on the current context (for example, in the web address field of the webbrowser, it acts as the Go button).
12 Input mode - Select the input method. When you tap an item, the current inputmethod view closes, and the selected one opens.
20 Write text

HandwritingThe input methods and languages supported by the handwriting recognition vary byregion and may not be available for all languages.
To activate handwriting mode, select > Handwriting.
Write legible, upright characters on the text input area, and leave a space between eachcharacter.
To teach the device your handwriting style, select > Handwriting training.
To enter letters and numbers (default mode), write words as you would normally. Toselect number mode, select . To enter non-Latin characters, select the correspondingicon, if available.
To enter special characters, write them as you would normally, or select and thedesired character.
To delete characters or move the cursor back, swipe backwards (see Figure 1).
To insert a space, swipe forwards (see Figure 2).
Enter text with the virtual keypadVirtual keypadWith the virtual keypad (Alphanumeric keypad), you can enter characters like youwould with a traditional physical keypad with numbers on the keys.
Write text 21
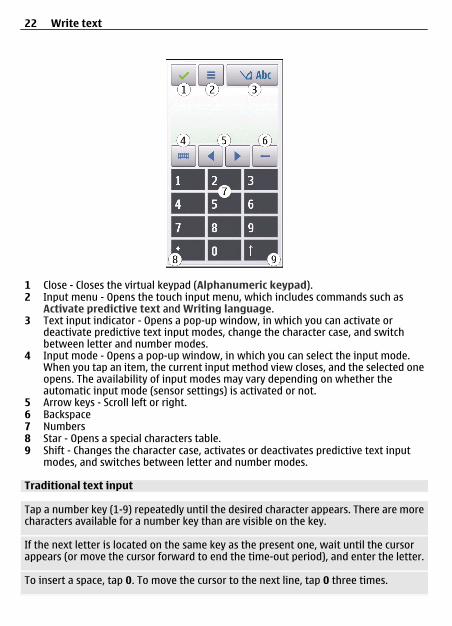
1 Close - Closes the virtual keypad (Alphanumeric keypad).2 Input menu - Opens the touch input menu, which includes commands such as
Activate predictive text and Writing language.3 Text input indicator - Opens a pop-up window, in which you can activate or
deactivate predictive text input modes, change the character case, and switchbetween letter and number modes.
4 Input mode - Opens a pop-up window, in which you can select the input mode.When you tap an item, the current input method view closes, and the selected oneopens. The availability of input modes may vary depending on whether theautomatic input mode (sensor settings) is activated or not.
5 Arrow keys - Scroll left or right.6 Backspace7 Numbers8 Star - Opens a special characters table.9 Shift - Changes the character case, activates or deactivates predictive text input
modes, and switches between letter and number modes.
Traditional text input
Tap a number key (1-9) repeatedly until the desired character appears. There are morecharacters available for a number key than are visible on the key.
If the next letter is located on the same key as the present one, wait until the cursorappears (or move the cursor forward to end the time-out period), and enter the letter.
To insert a space, tap 0. To move the cursor to the next line, tap 0 three times.
22 Write text

Predictive text inputWith predictive text input, to enter a word, select one number key for each letter in theword. Predictive text input is based on a built-in dictionary to which you can add newwords. Predictive text input is not available for all languages.
1 To activate predictive text input for all editors on the device, select > Activateprediction.
2 Write a word. For example, to write "Nokia" when the English dictionary is selected,select 6 for N, 6 for o, 5 for k, 4 for i, and 2 for a.The word suggestion changes after each key selection.
3 If the word is not correct, select * repeatedly, until the correct match is displayed.If the word is not in the dictionary, select Spell, enter the word using traditionaltext input mode, and select OK.If ? is displayed after the word, the word is not in the dictionary. To add a word tothe dictionary, select *, enter the word using traditional text input mode, and selectOK.
4 To insert a punctuation mark, select *.5 To insert a space, select 0.
Touch input settingsSelect Menu > Settings and Phone > Touch input.
To modify text input settings for the touch screen, select from the following:Handwriting training — Open the handwriting training application. Train the deviceto recognize your handwriting better. This option is not available in all languages.Writing language — Define which language-specific characters in your handwritingare recognised and how the virtual keyboard is laid out.Writing speed — Select the writing speed.Guiding line — Display or hide the guiding line in the writing area. The guiding linehelps you write in a straight line, and it also helps the device recognize your writing.Pen trail width — Select the pen trail width for the text written with the stylus.Writing color — Select the color of the text written with the stylus.Adaptive search — Activate adaptive search.Touch screen calibration — Calibrate the touch screen.
Contacts
You can save and update contact information, such as phone numbers, home addresses,or e-mail addresses of your contacts. You can add a personal ringing tone or a thumbnailimage to a contact. You can also create contact groups, which allow you to send textmessages or e-mail to many recipients at the same time.
Contacts 23
To open the contacts list, in the home screen, depending on the home screen theme,select Contacts or .
Save phone numbers and mail addressesYou can save your friends' phone numbers, mail addresses, and other information toyour contacts list.
Select Menu > Contacts.
Add a contact to the contacts list1 Select Options > New contact.2 Select a field, and enter the details. To close the text input, select .
Edit contact informationSelect a contact and Options > Edit.
Add details about a contactSelect a contact and Options > Edit > Options > Add detail.
Manage names and numbersTo copy or delete a contact, or to send a contact as a business card to another device,tap and hold a contact, and select Add to favorites, Edit, or Send as business card.
To delete several contacts at the same time, select Options > Mark/Unmark to markthe desired contacts, and to delete, select Options > Delete.
To listen to the voice tag assigned to a contact, select the contact and Options > Voicetag details > Options > Play voice tag.
When entering contacts or editing voice commands, do not use very short or similarnames for different contacts or commands.
Note: Using voice tags may be difficult in a noisy environment or during anemergency, so you should not rely solely upon voice dialing in all circumstances.
Assign default numbers and addressesIf a contact has several numbers or addresses, a default number or address makes iteasier for you to call or send a message to the contact. The default number is also usedin voice dialing.
1 Select Menu > Contacts.2 Select a contact and Options > Defaults.3 Select a default to which you want to add a number or an address.4 Select a number or an address you want to set as a default.
24 Contacts
5 To exit the Defaults view and save the changes, tap outside the view.
Ringing tones, images, and call text for contactsYou can define a ringing tone for a contact or contact group, and an image and call textfor a contact. When the contact calls you, the device plays the selected ringing tone andshows the call text or image (if the caller’s phone number is sent with the call and yourdevice recognizes it).
Select Menu > Contacts.
Add more fields to a contact details viewSelect the contact and Options > Edit > Options > Add detail.
Define a ringing tone for a contact or contact groupSelect the contact or contact group and Options > Ringing tone, and select a ringingtone.
Remove the ringing tone from a contactSelect Default tone from the list of ringing tones.
Add an image for a contactSelect a contact saved in the device memory and Options > Add image, and select animage from Gallery.
Define a call text for a contactSelect the contact and Options > Add call alert text. Enter the call text, and select
.
View, change or remove the image from a contactSelect a contact and Options > Image, and the desired option.
Copy contacts
When you open the contacts list for the first time, the device asks if you want to copynames and numbers from the SIM card to your device.
To start copying, select Yes.
If you do not want to copy the contacts from the SIM card to your device, select No. Thedevice asks if you want to view the SIM card contacts in the contacts directory. To viewthe contacts, select Yes. The contacts list opens, and the names stored on your SIM cardare indicated with .
Contacts 25
SIM servicesFor availability and information on using SIM card services, contact your SIM card vendor.This may be the network service provider or other vendor.
SIM contactsThe number of contacts that can be stored on the SIM card is limited.
Display contacts stored on the SIM card in the contacts listSelect Options > Settings > Contacts to display > SIM memory.
The numbers you save in the contacts list may not be automatically saved to your SIMcard.
Copy contacts to the SIM cardGo to a contact, and select Options > Copy > SIM memory.
Select the default memory where to save the new contactsSelect Options > Settings > Default saving memory > Phone memory or SIMmemory.
Contacts stored in the device memory can contain more than one phone number andan image.
Fixed dialingWith the fixed dialing service, you can restrict calls from your device to certain phonenumbers. Not all SIM cards support the fixed dialing service. For more information,contact your service provider.
Select Menu > Contacts and Options > SIM numbers > Fixed dial contacts.
You need your PIN2 code to activate and deactivate fixed dialing or edit your fixeddialing contacts. Contact your service provider for your PIN2 code.
Select Options and from the following:Activate fixed dialing or Deactivate fixed dialing — Activate or deactivate fixeddialling.New SIM contact — Enter the contact name and phone number to which calls areallowed.Add from Contacts — Copy a contact from the contacts list to the fixed dialling list.
To send text messages to the SIM contacts while the fixed dialing service is active, youneed to add the text message centre number to the fixed dialing list.
26 Contacts
Messaging
Messaging main viewSelect Menu > Messaging (network service).
Create a new messageSelect New message.
Tip: To avoid rewriting messages that you send often, use saved messages in theTemplates folder in My folders. You can also create and save your own templates.
Messaging contains the following folders: Inbox — Received messages, except e-mail and cell broadcast messages. My folders — Organize your messages into folders.
Mailbox — Connect to your remote mailbox to retrieve your new e-mail messages,or view your previously retrieved e-mail messages offline.
Drafts — Draft messages that have not been sent. Sent — The last messages that have been sent, excluding messages sent using
Bluetooth connectivity or infrared. You can define the number of messages that can besaved in this folder.
Outbox — Messages waiting to be sent are temporarily stored in the Outbox, forexample, when your device is outside network coverage.
Delivery reports — Request the network to send you a delivery report of the textmessages and multimedia messages you have sent (network service).
Write and send messagesSelect Menu > Messaging.
Before you can create a multimedia message or write an e-mail, you must have thecorrect connection settings defined.
If the item you inserted in a multimedia message is too large for the network, the devicemay automatically reduce the size.
Only compatible devices can receive and display multimedia messages. Messages maylook different in different devices.
Check the size limit of e-mail messages with your service provider. If you attempt tosend an e-mail message that exceeds the size limit of the e-mail server, the message isleft in the Outbox folder, and the device will attempt to resend it periodically. Sendingan e-mail requires a data connection, and continuous attempts to resend the e-mail
Messaging 27
may incur charges from your service provider. In the Outbox folder, you can delete suchmessage, or move it to the Drafts folder.
Messaging requires network services.
Send a text or multimedia messageSelect New message.
Send an audio or e-mail messageSelect Options > Create message, and the relevant option.
Select recipients or groups from the contacts listSelect from the toolbar.
Enter the number or e-mail address manuallyTap the To field.
Enter the subject of the e-mail or multimedia messageEnter it in the Subject field, . If the Subject field is not visible, select Options > Messageheader fields to change the fields that are visible.
Write the messageTap the message field.
Add an object to a message or e-mailSelect and the relevant type of content.The message type may change to multimedia message based on the inserted content.
Send the message or e-mailSelect , or press the call key.
You can send text messages that are longer than the character limit for a single message.Longer messages are sent as two or more messages. Your service provider may chargeaccordingly.
Characters with accents, other marks, or some language options, take more space, andlimit the number of characters that can be sent in a single message.
Set up your e-mailTo set up your e-mail, select Menu > Messaging and Mailbox.
You can set up several e-mail accounts, for example, a personal e-mail account and acorporate e-mail account.
To set up e-mail from your home screen, select the relevant plug-in. Alternatively, to setup an e-mail account, select Menu > Applications > Tools > Sett. wizard.
28 Messaging

E-mail serviceThe e-mail service on your Nokia device automatically transfers e-mail from yourexisting e-mail address to your device. You can read, respond to, and organize your e-mails on the go. The service works with a number of internet e-mail providers that areoften used for personal e-mail. Data charges may be applicable when using the service.For information on possible costs, contact your service provider
Set up e-mail on your Nokia device1 Select Menu > Applications > Tools > Sett. wizard.2 When the Settings wizard is opened for the first time, you are asked to define the
e-mail settings after the service provider settings. If you have used the Settingswizard before, select E-mail setup.
3 Accept the terms and conditions to activate the e-mail service.
For more information, see nokia.com/messaging.
Mail for ExchangeWith Mail for Exchange, you can receive your work e-mail to your device. You can readand reply to your e-mails, view and edit compatible attachments, view calendarinformation, receive and reply to meeting requests, schedule meetings, and view, add,and edit contact information.
Use of the Mail for Exchange is limited to over-the-air synchronization of PIM informationbetween the Nokia device and the authorized Microsoft Exchange server.
Mail for Exchange can be set up only if your company has Microsoft Exchange Server. Inaddition, your company's IT administrator must have activated Mail for Exchange foryour account.
Before starting to set up Mail for Exchange, ensure that you have the following:
• A corporate e-mail ID• Your office network user name• Your office network password• Your network domain name (contact your company's IT department)• Your Mail for Exchange server name (contact your company's IT department)
Depending on your company's Mail for Exchange server configuration, you may need toenter other information in addition to those listed. If you do not know the correctinformation, contact your company's IT department.
With Mail for Exchange, the use of the lock code may be mandatory. The default lockcode of your device is 12345, but your company's IT administrator may have set adifferent one for you to use.
To access and edit the Mail for Exchange profile and settings, select Menu >Settings > Phone > Application sett. > Messaging.
Messaging 29
About Ovi ContactsWith Ovi Contacts, you can stay connected to the people who matter most. Search forcontacts, and discover friends in the Ovi community. Keep in touch with your friends -chat, share your location and presence information, and easily follow what your friendsare up to and where they are.
You can also sync your contacts, calendar, and other content between your Nokia deviceand Ovi. Your important information is stored and kept up to date both in your deviceand on the web. With Ovi Contacts, you can make your contacts list dynamic and beconfident that your contacts are stored in Ovi.
You must have a Nokia account to use the service. Create an account on your cellularphone, or go to www.ovi.com on your PC.
Using Ovi Contacts may involve the transmission of large amounts of data through yourservice provider's network. For information about data transmission charges, contactyour network service provider.
Connect to the serviceSelect Menu > Contacts, and open the Ovi tab.
Connect to Ovi ContactsSelect Go online and the connection method.
Close the connectionSelect Options > Sign out.
A packet data connection may generate additional data transmission charges. Forpricing details, contact your service provider.
Select Go online > Options and from the following:
Select — Select the item.Go online — Connect to the service if you are offline.My profile — Edit your profile information.Recommend to friend — Invite a contact to join Ovi Contacts. The invitation is sentas a text message.Settings — Change the Ovi Contacts settings.
Available options may vary.
Start using Ovi ContactsSelect Contacts, and open the Ovi tab.
The Ovi Contacts service is part of Ovi, and uses the same account information.
30 Messaging

If you are new to Ovi and its services, to start using the Ovi Contacts application, youmust register to Ovi by creating a Nokia account.
Create a Nokia account1 Select Ovi Chat, and when prompted, connect to the internet.2 Enter the required information.3 In the My Profile view, enter your profile information. It is mandatory that you
provide your first and last name.4 Select Done.
If you have already registered with Ovi using your PC or mobile device, you can startusing Ovi Contacts with the same account details.
Sign in to Ovi Contacts and activate the serviceSelect Ovi Chat, and enter your user name and password.If you have not yet provided your profile information for Ovi Contacts, do so, and selectDone. It is mandatory that you provide your first and last name.
Music player
Music player supports file formats such as AAC, AAC+, eAAC+, MP3, and WMA. Music playerdoes not necessarily support all features of a file format or all the variations of fileformats.
You can also use Music player to listen to podcasts. Podcasting is a method for deliveringaudio or video content over the internet using either RSS or Atom technologies forplayback on cellular phones and computers.
Listen to music at a moderate level. Continuous exposure to high volume may damageyour hearing.
Play musicSelect Menu > Music > Music player.
Browse songsSelect the desired view. You can browse songs by artist, album, genre, or composer.
Play a songSelect the song.
Tip: To listen to the songs in a random order, select Shuffle play.
Music player 31
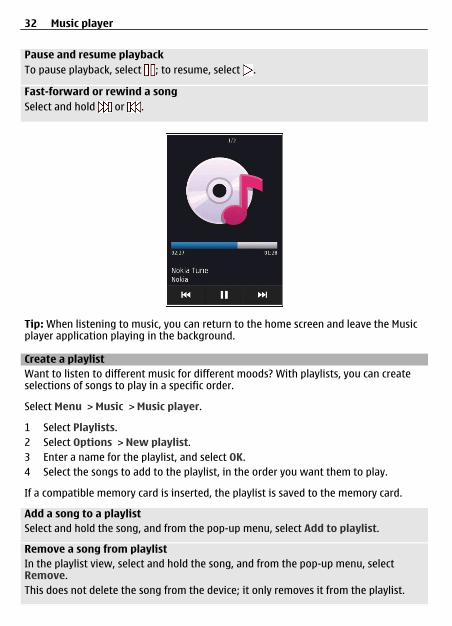
Pause and resume playbackTo pause playback, select ; to resume, select .
Fast-forward or rewind a songSelect and hold or .
Tip: When listening to music, you can return to the home screen and leave the Musicplayer application playing in the background.
Create a playlistWant to listen to different music for different moods? With playlists, you can createselections of songs to play in a specific order.
Select Menu > Music > Music player.
1 Select Playlists.2 Select Options > New playlist.3 Enter a name for the playlist, and select OK.4 Select the songs to add to the playlist, in the order you want them to play.
If a compatible memory card is inserted, the playlist is saved to the memory card.
Add a song to a playlistSelect and hold the song, and from the pop-up menu, select Add to playlist.
Remove a song from playlistIn the playlist view, select and hold the song, and from the pop-up menu, selectRemove.This does not delete the song from the device; it only removes it from the playlist.
32 Music player
Play a playlistSelect Playlists and the playlist.
Tip: Music player automatically creates a playlist for the most played songs, recentlyplayed songs, and recently added songs.
Camera
Your device supports an image capture resolution of 1600 x 1200 pixels. The imageresolution in this guide may appear different.
Activate the camera
To activate the camera, select Menu > Applications > Camera.
Image captureCapture an imageSelect Menu > Applications > Camera.
When capturing an image, note the following:
• Use both hands to keep the camera steady.• The quality of a digitally zoomed image is lower than that of a non-zoomed image.• The camera goes into battery saving mode after about a minute of inactivity.
To switch from video mode to image mode, if necessary, select > .
Zoom in or out when capturing an imageUse the zoom slider.
After capturing an imageAfter you capture an image, select from the following options (available only if you haveselected Options > Settings > Show captured image > Yes):
— Send the image in a multimedia or e-mail message, or through connectionmethods such as Bluetooth connectivity.
To send the image to the person you are talking to, select during a call. — Upload the image to a compatible online album. Delete — Delete the image.
Use the image as wallpaper in the home screenSelect Options > Use image > Set as wallpaper.
Camera 33
Set the image as a default call imageSelect Options > Use image > Set as call image.
Assign the image to a contactSelect Options > Use image > Assign to contact.
Return to the viewfinder to capture a new imageSelect Back.
Video recordingRecord a videoSelect Menu > Applications > Camera.
1 To switch from image mode to video mode, if necessary, select > .2 To pause recording, select Pause. To resume, select Continue. If you pause
recording and do not press any key within one minute, the recording stops.To zoom in or out, use the zoom keys.
3 To stop recording, select Stop. The video is automatically saved in Gallery.
After recording a videoAfter you record a video, select from the following (available only if you have selectedOptions > Settings > Show last captured video > Yes):
Play — Play the video you just recorded. — Upload the image to a compatible online album. Delete — Delete the video.
To return to the viewfinder to record a new video, select Back.
Gallery
To store and organise your images, videos, sound clips, and streaming links, selectMenu > Gallery.
View and organize filesSelect Menu > Gallery.
Select from the following:
Images & videos — View images in the image viewer and videos in Video center. Songs — Open Music player.
Sound clips — Listen to sound clips.
34 Gallery
Other media — View presentations.
indicates files stored on your compatible memory card (if inserted).
Open a fileSelect a file from the list. Videos and files with the .ram file extension open and play inVideo center, and music and sound clips in Music player.
Copy or move filesTo copy or move files to the memory card (if inserted) or device memory, select a file,Options > Organize > Copy or Move, and the appropriate option.
View images and videosSelect Menu > Gallery and Images & videos.
By default, the images, videos, and folders are organized by date and time.
To open a file, select a file from the list. To zoom in an image, use the volume key.
To edit a video or an image, select Options > Edit.
Select an image, Options > Use image, and from the following:Set as wallpaper — Use the image as wallpaper in the home screen.Set as call image — Set the image as a default call imageAssign to contact — Set the image as a call image for a contact.
Select a video, Options > Use video clip, and from the following:Assign to contact — Assign the video as a ringing tone for a contact.As ringing tone — Set the video as a ringing tone.
The toolbar helps you select frequently used functions with images, videos, and folders.
From the toolbar, select from the following: Send — Send your image or video.
Delete — Delete an image or a video.
Share online
About Share onlineSelect Menu > Applications > Share online.
With Share online (network service), you can post your images, video clips, and soundclips from your device to compatible online sharing services, such as albums and blogs.
Share online 35
You can also view and send comments to the posts in these services, and downloadcontent to your compatible Nokia device.
The supported content types and the availability of the Share online service may vary.
Subscribe to an online sharing serviceSelect Menu > Applications > Share online.
1 Go to the service provider's website, and make sure your Nokia device is compatiblewith the service.
2 Create an account as instructed on the website. You receive a username andpassword needed to set up your device with the account.
Activate a service1 Select and hold the service, and from the pop-up menu, select Activate.2 Allow the device to open a network connection. If prompted, select an internet
access point from the list.3 Sign in to your account as instructed on the service provider’s website.
For the availability and cost of the third party services and data transfer costs, contactyour service provider or the relevant third party.
Manage your accounts
To view your accounts, select Options > Settings > My accounts.
To create a new account, select Options > Add new account.
To change the user name or password for an account, select and hold the account name,and from the pop-up menu, select Edit.
To set an account as the default when sending posts from your device, select and holdthe account name, and from the pop-up menu, select Set as default.
To remove an account, select and hold the account name, and from the pop-up menu,select Delete.
Create a postSelect Menu > Applications > Share online.
To post your images or video clips to a service, select and hold the service, and from thepop-up menu, select New upload. If the online sharing service provides channels forposting files, select the desired channel.
To add your image, video, or sound clip to the post, select Options > Add.
36 Share online
Enter a title or description for the post, if available.
To add tags to the post, select Tags:.
To enable the posting of location information contained in the file, select Location:.
To send the post to the service, select Options > Upload.
Post files from Gallery You can post your images and videos from Gallery to an online sharing service.
1 Select Menu > Gallery and your images and videos to post.2 Select Options > Send > Upload and the desired account.3 Edit your post as required.4 Select Options > Upload.
Nokia Video Center
With Nokia Video Center (network service), you can download and stream videos overthe air from compatible internet video services using a packet data connection. You canalso transfer your video clips from a compatible PC to your device and view them inVideo center.
Using packet data access points to download videos may involve the transmission oflarge amounts of data through your service provider's network. Contact your serviceprovider for information about data transmission charges.
Your device may have predefined services.
Service providers may provide free content or charge a fee. Check the pricing in theservice or from the service provider.
View and download video clipsConnect to video services1 Select Menu > Applications > Video center.2 To connect to a service to install video services, select Add new services and the
desired video service from the service catalog.
View a video clip
To browse the content of installed video services, select Video feeds.
The content of some video services is divided into categories. To browse video clips,select a category.
Nokia Video Center 37
To search for a video clip in the service, select Video search. Search may not be availablein all services.
Some video clips can be streamed over the air, but others must be first downloaded toyour device. To download a video clip, select Options > Download. Downloadscontinue in the background if you exit the application. The downloaded video clips aresaved in My videos.
To stream a video clip or view a downloaded one, select Options > Play.When the video clip is playing, to use the control keys for controlling the player, tap thescreen.To adjust the volume, use the volume key.
Select Options and from the following:Resume download — Resume a paused or failed download.Cancel download — Cancel a download.Preview — Preview a video clip. This option is available if supported by the service.Feed details — View information about a video clip.Refresh list — Refresh the list of video clips.Open link in browser — Open a link in the web browser.
Schedule downloads
Setting the application to download video clips automatically may involve thetransmission of large amounts of data through your service provider's network. Forinformation about data transmission charges, contact your service provider.To schedule an automatic download for video clips in a service, select Options >Schedule downloads.Video center automatically downloads new video clips daily at the time you define.
To cancel scheduled downloads, select Manual download as the download method.
Video feedsSelect Menu > Applications > Video center.
The content of the installed video services is distributed using RSS feeds. To view andmanage your feeds, select Video feeds.
Select Options and from the following:Feed subscriptions — Check your current feed subscriptions.Feed details — View information about a video.
38 Nokia Video Center
Add feed — Subscribe to new feeds. Select Via Video directory to select a feed fromthe services in the video directory.Refresh feeds — Refresh the content of all feeds.Manage account — Manage your account options for a particular feed, if available.
To view the videos available in a feed, select a feed from the list.
My videosMy videos is a storage place for all videos in the Video center application. You can listdownloaded videos and video clips recorded with the device camera in separate views.
1 To open a folder and view video clips, select the folder. When a video clip is playing,to use the control keys for controlling the player, tap the screen.
2 To adjust the volume, press the volume key.
Select Options and from the following:Resume download — Resume a paused or failed download.Cancel download — Cancel a download.Video details — View information about a video clip.Find — Find a video clip. Enter a search term that matches the file name.Memory status — View the amount of free and used memory.Sort by — Sort video clips. Select the desired category.Move and copy — Move or copy video clips. Select Copy or Move and the desiredlocation.
Transfer videos from your PCTransfer your own videos from compatible devices using a compatible USB data cable.Only videos which are in a format supported by your device are displayed.
1 To view your device on a PC as a mass memory device where you can transfer anydata files, connect using a compatible USB data cable.
2 Select Mass storage as the connection mode. A compatible memory card needs tobe inserted in the device.
3 Select the video clips you want to copy from your PC.4 Transfer the videos to E:\My Videos on the memory card.
The transferred videos appear in the My videos folder.
Video center settingsIn the Video center main view, select Options > Settings and from the following:Video service selection — Select the video services that you want to appear in Videocenter. You can also add, remove, edit, and view the details of a video service. You cannotedit preinstalled video services.
Nokia Video Center 39
Connection settings — To define the network destination used for the networkconnection, select Network connection. To select the connection manually each timeVideo center opens a network connection, select Always ask.
To set GPRS connection on or off, select Confirm GPRS usage.
To set roaming on or off, select Confirm roaming.Parental control — Set an age limit to videos. The required password is the same asthe device lock code. The factory setting for the lock code is 12345. In video-on-demandservices, videos which have the same or a higher age limit than you have set, are hidden.Preferred memory — Select whether downloaded videos are saved in the devicememory or on a compatible memory card.Thumbnails — Select whether to download and view thumbnail images in video feeds.
Web browser
With the web browser, you can view hypertext markup language (HTML) pages on theweb as originally designed (network service). You can also browse web pages that aredesigned specifically for cellular phones, and use extensible hypertext markup language(XHTML), or the wireless markup language (WML).
To browse the web, you need to have an internet access point defined in your device.
Browse the webSelect Menu > Web.
Go to a web pageFrom the toolbar, select , and enter a web address.
A cache is a memory location that is used to store data temporarily. If you have, or havetried to, access confidential information or a secure service, requiring passwords, clearthe cache after each use.
Empty the cacheSelect Options > Clear privacy data > Cache.
Add a bookmarkIf you visit the same websites all the time, add them to your Bookmarks view, so youcan easily access them.
Select Menu > Web.
While browsing, select > .
40 Web browser
Go to a bookmarked website while browsingSelect and a bookmark.
Positioning (GPS)
You can use applications such as GPS data to calculate your location or measuredistances. These applications require a GPS connection.
About GPSThe availability and quality of GPS signals may be affected by your location, satellitepositions, buildings, natural obstacles, weather conditions and adjustments to GPSsatellites made by the United States government. GPS signals may not be available insidebuildings or underground.
Do not use GPS for precise location measurement, and never rely solely on the locationinformation provided by GPS and cellular networks.
The coordinates in the GPS are expressed using the international WGS-84 coordinatesystem. The availability of the coordinates may vary by region.
About assisted GPS (A-GPS)Your device supports A-GPS (network service). When you activate A-GPS, your devicereceives useful satellite information from an assistance data server over the cellularnetwork. With the help of assisted data, your device can obtain the GPS position faster.
Your device is preconfigured to use the Nokia A-GPS service, if no service provider-specific A-GPS settings are available. The assistance data is retrieved from the Nokia A-GPS service server only when needed.
You must have an internet access point defined in the device to retrieve assistance datafrom the Nokia A-GPS service over a packet data connection.
Define an access point for A-GPSSelect Menu > Applications > Location and Positioning > Positioning server >Access point. Only a packet data internet access point can be used for this service. Yourdevice asks for the internet access point when GPS is used for the first time.
Hold your device correctlyWhen using the GPS receiver, ensure you do not cover the antenna with your hand.
Positioning (GPS) 41

Establishing a GPS connection may take from a couple of seconds to several minutes.Establishing a GPS connection in a vehicle may take longer.
The GPS receiver draws its power from the device battery. Using the GPS receiver maydrain the battery faster.
Maps
Maps overview
Select Menu > Maps.
Welcome to Maps.
Maps shows you what is nearby, helps you plan your route, and guides you where youwant to go.
• Find cities, streets, and services.• Find your way with turn-by-turn directions.• Synchronize your favorite locations and routes between your cellular phone and the
Ovi Maps internet service.• Check weather forecasts and other local information, if available.
Some services may not be available in all countries, and may be provided only in selectedlanguages. The services may be network dependent. For more information, contact yournetwork service provider.
Using the service or downloading content may cause transfer of large amounts of data,which may result in data traffic costs.
Almost all digital cartography is inaccurate and incomplete to some extent. Never relysolely on the cartography that you download for use in this device.
Some content is generated by third parties and not Nokia. The content may beinaccurate and is subject to availability.
View your location and the mapSee your current location on the map, and browse maps of different cities and countries.
42 Maps
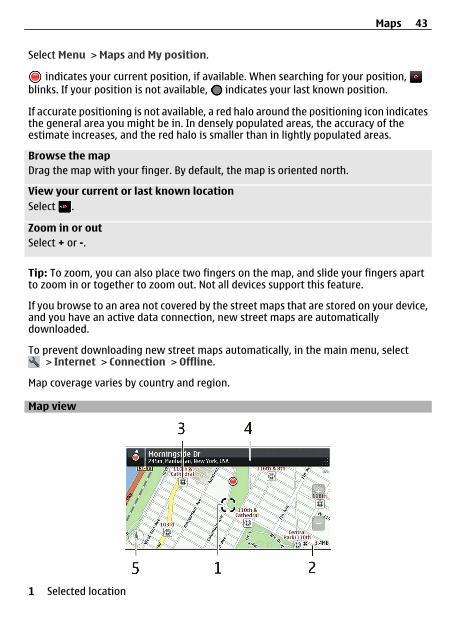
Select Menu > Maps and My position.
indicates your current position, if available. When searching for your position, blinks. If your position is not available, indicates your last known position.
If accurate positioning is not available, a red halo around the positioning icon indicatesthe general area you might be in. In densely populated areas, the accuracy of theestimate increases, and the red halo is smaller than in lightly populated areas.
Browse the mapDrag the map with your finger. By default, the map is oriented north.
View your current or last known locationSelect .
Zoom in or outSelect + or -.
Tip: To zoom, you can also place two fingers on the map, and slide your fingers apartto zoom in or together to zoom out. Not all devices support this feature.
If you browse to an area not covered by the street maps that are stored on your device,and you have an active data connection, new street maps are automaticallydownloaded.
To prevent downloading new street maps automatically, in the main menu, select > Internet > Connection > Offline.
Map coverage varies by country and region.
Map view
1 Selected location
Maps 43
2 Indicator area3 Point of interest (for example, a railroad station or a museum)4 Information area5 Compass
Change the look of the mapView the map in different modes, to easily identify where you are.
Select Menu > Maps and My position.
Select and from the following:Map view — In the standard map view, details such as location names or highwaynumbers, are easy to read.Satellite view — For a detailed view, use satellite images.Terrain view — View at a glance the ground type, for example, when you are travelingoff-road.3D view — For a more realistic view, change the perspective of the map.Landmarks — Display prominent buildings and attractions on the map.Night mode — Dim the colors of the map. When traveling at night, the map is easierto read in this mode.Transit lines — View selected public transportation services, such as metro and trolleyroutes.
The available options and features may vary by region. The unavailable options aredimmed.
Download and update mapsTo avoid cellular data transfer costs, download the latest street maps and voice guidancefiles to your computer, and then transfer and save them to your device.
Use the Nokia Ovi Suite application to download the latest street maps and voiceguidance files to your compatible computer. To download and install Nokia Ovi Suite,go to www.ovi.com.
Tip: Save new street maps to your device before a journey, so you can browse the mapswithout an internet connection when traveling abroad.
If you have an older version of the Maps application installed on your device, when youupdate to the latest version, the country or region maps are deleted. Before using NokiaOvi Suite to download new country or region maps, open and close the Maps application.
Make sure you have the latest version of Nokia Ovi Suite installed on your computer.
44 Maps

About positioning methodsMaps displays your location on the map using GPS, A-GPS, or network (cell ID) basedpositioning.
The global positioning system (GPS) is a satellite-based navigation system used forcalculating your location. Assisted GPS (A-GPS) is a network service that sends you GPSdata, improving the speed and accuracy of the positioning.
With network (cell ID) based positioning, the position is determined through theantenna system your cellular phone is currently connected to.
When you use Maps for the first time, you are prompted to define the internet accesspoint to use to download map information or use A-GPS.
To avoid network service costs, you can disable A-GPS and network (cell ID) basedpositioning in your device positioning settings, but calculating your location may takemuch longer. For more information about positioning settings, see the user guide ofyour device.
The availability and quality of GPS signals may be affected by your location, satellitepositions, buildings, natural obstacles, weather conditions and adjustments to GPSsatellites made by the United States government. GPS signals may not be available insidebuildings or underground.
Do not use GPS for precise location measurement, and never rely solely on the locationinformation provided by GPS and cellular networks.
The trip meter may not be accurate, depending on the availability and quality of yourGPS connection.
Depending on the available positioning methods, the accuracy of positioning may varyfrom a few metres to several kilometers.
Find a locationMaps helps you find specific locations and businesses.
Select Menu > Maps and Search.
1 Enter search words, such as a street address or place name.2 Select .3 Select an item from the list of proposed matches.
The location is displayed on the map.
Return to the list of proposed matchesSelect Search.
Tip: In the search view, you can also select from the list of your previous search words.
Maps 45

Search for different types of nearby placesSelect Categories and a category, such as shopping, accommodation, or transport.
If no search results are found, make sure the spelling of your search words is correct.Problems with your internet connection may also affect results when searching online.
If you have maps of the searched area stored on your device, you can also get searchresults without an active internet connection, to avoid data transfer costs, but the searchresults may be limited.
View location detailsFind more information about a specific location or place, such as a hotel or restaurant,if available.
The available options may vary by region. To view all the available place details, youneed an active internet connection.
Select Menu > Maps and Search.
View the details of a placeSearch for a place. Select the place and its information area.
Rate a placeSearch for a place. Select the place, its information area, Rate, and the star rating. Forexample, to rate a place as being 3 out of 5 stars, select the third star.
When you find a place that does not exist or contains inappropriate information orincorrect details, such as the wrong contact information or location, it is recommendedthat you report it to Nokia.
Report incorrect place informationSelect the place, its information area, Report, and the appropriate option.
Save or view a place or routeSave an address, place of interest, or route, so it can be quickly used later.
Select Menu > Maps.
Save a place1 Select My position.2 Tap the location. To search for an address or place, select Search.3 Tap the location's information area.4 Select Save.
46 Maps
Save a route1 Select My position.2 Tap the location. To search for an address or place, select Search.3 Tap the location's information area.4 To add another route point, select Navigate > Add to route.5 Select Add new route point and the appropriate option.6 Select Show route > Options > Save route.
View a saved placeIn the main view, select Favorites > Places, the place, and Show on map.
View a saved routeIn the main view, select Favorites > Routes and the route.
Send a place to a friendWhen you want to show your friends where a place is on the map, you can send theplace to them.
Select Menu > Maps and My position.
To view the place on the map, your friends don't need to have a Nokia cellular phone,but an active internet connection is required.
1 Select a place and its information area.2 Select Share > Share via SMS or Share via Email.
A mail or text message containing a link to the location on the map is sent to your friend.
Check inWith the Check in feature, you can keep a private record of where you have been. Keepyour social networking friends and contacts up to date with what you are doing, andshare your location on your favorite social networking services.
Select Menu > Maps and Check in.
To check in, you need a Nokia account. To share your location, you also need a socialnetworking service account. The supported social networking services vary by countryor region.
1 Sign in to your Nokia account, or, if you do not yet have one, create the account.2 It is possible to share your location on the social networking services that you use.
When you use Check in for the first time, you can set your account credentials forthe services that you use. To later set up accounts, select .
3 Select your current location.4 Write your status update.
Maps 47

You can post only to selected services that you have set up. To exclude a service,select the service logo. To exclude all the services, keeping your location and statusupdate private, clear the and post on check box.
5 Select Check in.
You may also be able to attach a picture to your post, depending on the socialnetworking service.
View your Check in historySelect .
Checking in and sharing your location requires an internet connection. This may involvethe transmission of large amounts of data and related data traffic costs.
The terms of use of the social networking service apply to sharing your location on thatservice. Familiarize yourself with the terms of use and the privacy practices of thatservice.
Before sharing your location to others, always consider carefully with whom you aresharing it. Check the privacy settings of the social networking service you are using, asyou might share your location with a large group of people.
Synchronize your FavoritesPlan a trip on your computer at the Ovi Maps website, synchronize the saved places androutes with your cellular phone, and access the plan on the go.
To synchronize places or routes between your cellular phone and the Ovi Maps internetservice, you need to be signed in to your Nokia account.
Synchronize saved places and routesSelect Favorites > Synchronize with Ovi. If you do not have a Nokia account, you areprompted to create one.
You can set your device to synchronize your Favorites automatically when you open orclose the Maps application.
Synchronize Favorites automaticallySelect > Synchronization > Synchronization > At start-up and shut-d..
Synchronizing requires an active internet connection, and may involve the transmissionof large amounts of data through your service provider’s network. For informationabout data transmission charges, contact your service provider.
To use the Ovi Maps internet service, go to www.ovi.com.
48 Maps
Get voice guidanceVoice guidance, if available for your language, helps you find your way to a destination,leaving you free to enjoy the journey.
Select Menu > Maps and Drive or Walk.
When you use drive or walk navigation for the first time, you are asked to select thelanguage of the voice guidance, and download the appropriate files.
If you select a language that includes street names, also the street names are said aloud.Voice guidance may not be available for your language.
Change the voice guidance languageIn the main view, select and Navigation > Drive guidance or Walk guidance andthe appropriate option.
Deactivate voice guidanceIn the main view, select and Navigation > Drive guidance or Walk guidance andNone.
Repeat the voice guidance for car navigationIn the navigation view, select Options > Repeat.
Adjust the volume of the voice guidance for car navigationIn the navigation view, select Options > Volume.
Drive to your destinationWhen you need turn-by-turn directions while driving, Maps helps you get to yourdestination.
Select Menu > Maps and Drive.
Drive to a destinationSelect Set destination and the appropriate option.
Drive to your homeSelect Drive home.
You can start driving without a set destination. The map follows your location, andtraffic information is automatically displayed, if available. To set the destination later,select Destination.
By default, the map rotates to your driving direction.
Maps 49
Orient the map to northSelect . To rotate the map back to your driving direction, select .
When you select Drive home or Walk home for the first time, you are prompted todefine your home location.
Change your home location1 In the main view, select .2 Select Navigation > Home Location > Redefine.3 Select the appropriate option.
Change views during navigationSwipe left to select 2D view, 3D view, Arrow view, or Route overview.
Obey all local laws. Always keep your hands free to operate the vehicle while driving.Your first consideration while driving should be road safety.
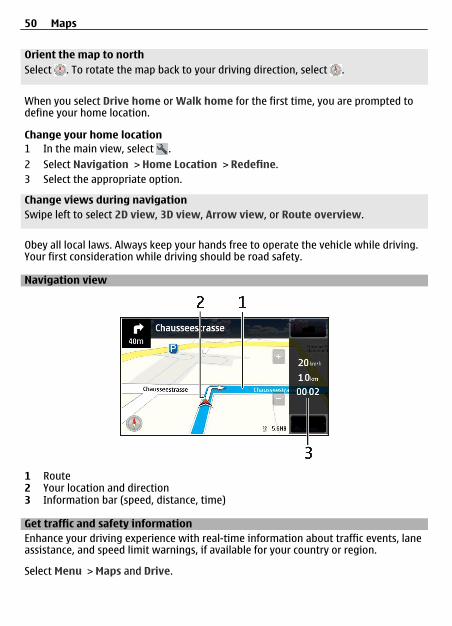
Navigation view
1 Route2 Your location and direction3 Information bar (speed, distance, time)
Get traffic and safety informationEnhance your driving experience with real-time information about traffic events, laneassistance, and speed limit warnings, if available for your country or region.
Select Menu > Maps and Drive.
50 Maps

View traffic events on the mapDuring drive navigation, select Options > Traffic info. The events are displayed astriangles and lines.
Update traffic informationSelect Options > Traffic info > Update traffic info.
When planning a route, you can set the device to avoid traffic events, such as trafficjams or roadworks.
Avoid traffic eventsIn the main view, select > Navigation > Reroute due to traffic.
The location of speed cameras may be shown on your route during navigation, if thisfeature is enabled. Some jurisdictions prohibit or regulate the use of speed cameralocation data. Nokia is not responsible for the accuracy, or the consequences of usingspeed camera location data.
Walk to your destinationWhen you need directions to follow a route on foot, Maps guides you over squares, andthrough parks, pedestrian zones, and even shopping centers.
Select Menu > Maps and Walk.
Walk to a destinationSelect Set destination and the appropriate option.
Walk to your homeSelect Walk home.
You can start walking without a set destination.
By default, the map is oriented to north.
Rotate the map to your walking directionSelect . To rotate the map back to north, select .
When you select Drive home or Walk home for the first time, you are prompted todefine your home location.
Change your home location1 In the main view, select .2 Select Navigation > Home Location > Redefine.3 Select the appropriate option.
Maps 51

Plan a routePlan your journey, and create your route and view it on the map before setting off.
Select Menu > Maps and My position.
Create a route1 Tap the location of your starting point. To search for an address or place, select
Search.2 Tap the location's information area.3 Select Add to route.4 To add another route point, select Add new route point and the appropriate
option.
Change the order of the route points1 Select a route point.2 Select Move.3 Tap the place where you want to move the route point to.
Edit the location of a route pointTap the route point, and select Edit and the appropriate option.
View the route on the mapSelect Show route.
Navigate to the destinationSelect Show route > Options > Start driving or Start walking.
Change the settings for a routeThe route settings affect the navigation guidance and the way the route is displayed onthe map.
1 In the route planner view, open the Settings tab. To get to the route planner viewfrom the navigation view, select Options > Route pts. or Route points list.
2 Set the transportation mode to Drive or Walk. If you select Walk, one-way streetsare regarded as normal streets, and walkways and routes through, for example,parks and shopping centers, can be used.
3 Select the desired option.
Select the walking modeOpen the Settings tab, set the transportation mode to Walk, and select Preferredroute > Streets or Straight line. Straight line is useful on off-road terrain as itindicates the walking direction.
52 Maps
Use the faster or shorter driving routeOpen the Settings tab, set the transportation mode to Drive, and select Routeselection > Faster route or Shorter route.
Use the optimized driving routeOpen the Settings tab, set the transportation mode to Drive, and select Routeselection > Optimized. The optimized driving route combines the advantages of boththe shorter and the faster routes.
You can also choose to allow or avoid using, for example, highways, toll roads, or ferries.
Connectivity
Your device offers several options to connect to the internet or to another compatibledevice or PC.
Protect the environment
Save energyYou do not need to charge your battery so often if you do the following:
• Close applications and data connections, for example, your Bluetooth connection,when not in use.
• Deactivate unnecessary sounds, such as touch screen and key tones.
Recycle
When this device has reached the end of its working life, all of its materials can berecovered as materials and energy. To guarantee the correct disposal and reuse, Nokiaco-operates with its partners through a program called We:recycle. For information onhow to recycle your old Nokia products and where to find collection sites, go towww.nokia.com/werecycle, or using a mobile device, nokia.mobi/werecycle, or call theNokia Contact Center.
Recycle packaging and user guides at your local recycling scheme.
For more information on the environmental attributes of your device, go towww.nokia.com/ecodeclaration.
Connectivity 53

Product and safety information
Accessories
Warning:Use only batteries, chargers, and accessories approved by Nokia for use with this particular model. The use of any other typesmay invalidate any approval or guarantee, and may be dangerous. In particular, use of unapproved chargers or batteries maypresent a risk of fire, explosion, leakage, or other hazard.
For availability of approved accessories, please check with your dealer. When you disconnect the power cord of any accessory,grasp and pull the plug, not the cord.
Network services and costsYour device is approved for use on the WCDMA 2100/1700/900 MHz and GSM/EDGE 850/900/1800/1900 MHz networks . To usethe device, you need a subscription with a service provider.
Using network services and downloading content to your device may result in data traffic costs. Some product features requiresupport from the network, and you may need to subscribe to them.
Take care of your deviceHandle your device, battery, charger and accessories with care. The following suggestions help you protect your warrantycoverage.
• Keep the device dry. Precipitation, humidity, and all types of liquids or moisture can contain minerals that corrodeelectronic circuits. If your device gets wet, remove the battery, and allow the device to dry.
• Do not use or store the device in dusty or dirty areas. Moving parts and electronic components can be damaged.• Do not store the device in high temperatures. High temperatures can shorten the life of the device, damage the battery,
and warp or melt plastics.• Do not store the device in cold temperatures. When the device warms to its normal temperature, moisture can form inside
the device and damage electronic circuits.• Do not attempt to open the device other than as instructed in the user guide.• Unauthorized modifications may damage the device and violate regulations governing radio devices.• Do not drop, knock, or shake the device. Rough handling can break internal circuit boards and mechanics.• Only use a soft, clean, dry cloth to clean the surface of the device.• Do not paint the device. Paint can clog the moving parts and prevent proper operation.• Switch off the device and remove the battery from time to time for optimum performance.• Keep your device away from magnets or magnetic fields.• To keep your important data safe, store it in at least two separate places, such as your device, memory card, or computer,
or write down important information.
During extended operation, the device may feel warm. In most cases, this condition is normal. If you suspect the device is notworking properly, take it to the nearest authorized service facility.
RecycleAlways return your used electronic products, batteries, and packaging materials to dedicated collection points. This way youhelp prevent uncontrolled garbage disposal and promote the recycling of materials. Check product environmental informationand how to recycle your Nokia products at www.nokia.com/werecycle, or with a cellular phone, nokia.mobi/werecycle.
About Digital Rights ManagementWhen using this device, obey all laws and respect local customs, privacy and legitimate rights of others, including copyrights.Copyright protection may prevent you from copying, modifying, or transferring images, music, and other content.
54 Product and safety information

Content owners may use different types of digital rights management (DRM) technologies to protect their intellectual property,including copyrights. This device uses various types of DRM software to access DRM-protected content. With this device you canaccess content protected with WMDRM 10 and OMA DRM 2.0. If certain DRM software fails to protect the content, content ownersmay ask that such DRM software's ability to access new DRM-protected content be revoked. Revocation may also prevent renewalof such DRM-protected content already in your device. Revocation of such DRM software does not affect the use of contentprotected with other types of DRM or the use of non-DRM-protected content.
Digital rights management (DRM) protected content comes with an associated license that defines your rights to use the content.
If your device has OMA DRM-protected content, to back up both the licenses and the content, use the backup feature of NokiaOvi Suite.
Other transfer methods may not transfer the licenses which need to be restored with the content for you to be able to continuethe use of OMA DRM-protected content after the device memory is formatted. You may also need to restore the licenses in casethe files on your device get corrupted.
If your device has WMDRM-protected content, both the licenses and the content will be lost if the device memory is formatted.You may also lose the licenses and the content if the files on your device get corrupted. Losing the licenses or the content maylimit your ability to use the same content on your device again. For more information, contact your service provider.
Some licenses may be connected to a specific SIM card, and the protected content can be accessed only if the SIM card is insertedin the device.
Batteries and chargersBattery and charger informationThis device is intended for use with a BL-4U rechargeable battery. Nokia may make additional battery models available for thisdevice. Always use original Nokia batteries.
This device is intended for use when supplied with power from the following chargers: AC-10U . The exact charger model numbermay vary depending on the type of plug. The plug variant is identified by one of the following: E, X, AR, U, A, C, K, or B.
The battery can be charged and discharged hundreds of times, but it will eventually wear out. When the talk and standby timesare noticeably shorter than normal, you need to replace the battery.
Battery safetyAlways switch the device off and disconnect the charger before removing the battery. When you unplug a charger or anaccessory, hold and pull the plug, not the cord.
When your charger is not in use, unplug it from the electrical plug and the device. Do not leave a fully charged battery connectedto a charger, as overcharging may shorten the battery’s lifetime. If left unused, a fully charged battery will lose its charge overtime.
Always keep the battery between 15°C and 25°C (59°F and 77°F). Extreme temperatures reduce the capacity and lifetime of thebattery. A device with a hot or cold battery may not work temporarily.
Accidental short-circuiting can happen when a metallic object touches the metal strips on the battery, for example, if you carrya spare battery in your pocket. Short-circuiting may damage the battery or the connecting object.
Do not dispose of batteries in a fire as they may explode. Dispose of batteries according to local regulations. Recycle whenpossible. Do not dispose as household garbage.
Do not dismantle, cut, open, crush, bend, puncture, or shred cells or batteries. If a battery leaks, do not let battery liquid touchskin or eyes. If this happens, immediately flush the affected areas with water, or seek medical help.
Do not modify, remanufacture, attempt to insert foreign objects into the battery, or immerse or expose it to water or otherliquids. Batteries may explode if damaged.
Use the battery and charger for their intended purposes only. Improper use, or use of unapproved batteries or chargers maypresent a risk of fire, explosion, or other hazard, and may invalidate any approval or warranty. If you believe the battery or
Product and safety information 55
charger is damaged, take it to a service center for inspection before continuing to use it. Never use a damaged battery orcharger. Only use the charger indoors.
Additional safety informationEmergency callsMake an emergency call1 Ensure the device is switched on.2 Check for adequate signal strength. You may also need to do the following:
• Insert a SIM card.• Remove call restrictions you have activated for your device, such as call restriction, fixed dialing, or closed user
group.• Ensure your device is not in an offline or flight profile.• If the device screen and keys are locked, unlock them.
3 To clear the display, press the end key as many times as needed.4 Select Telephone.5 Enter the official emergency number for your present location. Emergency call numbers vary by location.6 Press the call key.7 Give the necessary information as accurately as possible. Do not end the call until given permission to do so.
Important: Activate both cellular and internet calls, if your device supports internet calls. The device may attemptto make emergency calls both through cellular networks and through your internet call service provider. Connections in allconditions cannot be guaranteed. Never rely solely on any wireless device for essential communications like medicalemergencies.
Small childrenYour device, its battery and accessories are not toys. They may contain small parts. Keep them out of the reach of small children.
Medical devicesOperation of radio transmitting equipment, including wireless phones, may interfere with the function of inadequatelyprotected medical devices. Consult a physician or the manufacturer of the medical device to determine whether they areadequately shielded from external RF energy. Switch off your device when regulations posted instruct you to do so, for example,in hospitals.
Implanted medical devicesManufacturers of medical devices recommend a minimum separation of 15.3 centimeters (6 inches) between a wireless deviceand an implanted medical device, such as a pacemaker or implanted cardioverter defibrillator, to avoid potential interferencewith the medical device. Persons who have such devices should:
• Always keep the wireless device more than 15.3 centimeters (6 inches) from the medical device.• Not carry the wireless device in a breast pocket.• Hold the wireless device to the ear opposite the medical device.• Turn the wireless device off if there is any reason to suspect that interference is taking place.• Follow the manufacturer directions for the implanted medical device.
If you have any questions about using your wireless device with an implanted medical device, consult your health care provider.
56 Product and safety information
Hearing
Warning:When you use the headset, your ability to hear outside sounds may be affected. Do not use the headset where it can endangeryour safety.
Some wireless devices may interfere with some hearing aids.
Your cellular device complies with FCC rules governing hearing aid compatibility. These rules require an M3 microphone orhigher. The M value of your device microphone is marked on the device sales package. To determine the M-rating of your hearingaid and compatibility with this device, consult your hearing health professional. For more information about accessibility, seewww.nokiaaccessibility.com.
To use a telecoil-equipped hearing aid with this device, activate the hearing aid (T switch) and the device telecoil. The soundquality depends on the type of your hearing aid.
Operating environmentThis device meets RF exposure guidelines in the normal use position at the ear or at least 1.5 centimeters (5/8 inch) away fromthe body. Any carry case, belt clip, or holder for body-worn operation should not contain metal and should position the devicethe above-stated distance from your body.
To send data files or messages requires a quality connection to the network. Data files or messages may be delayed until sucha connection is available. Follow the separation distance instructions until the transmission is completed.
VehiclesRadio signals may affect improperly installed or inadequately shielded electronic systems in motor vehicles such as electronicfuel injection, electronic antilock braking, electronic speed control, and air bag systems. For more information, check with themanufacturer of your vehicle or its equipment.
Only qualified personnel should install the device in a vehicle. Faulty installation or service may be dangerous and may invalidateyour warranty. Check regularly that all wireless device equipment in your vehicle is mounted and operating properly. Do notstore or carry flammable liquids, gases, or explosive materials in the same compartment as the device, its parts, or accessories.Remember that air bags inflate with great force. Do not place your device or accessories in the air bag deployment area.
Switch off your device before boarding an aircraft. The use of wireless devices in an aircraft may be dangerous to the operationof the aircraft and may be illegal.
Potentially explosive environmentsSwitch off your device in any area with a potentially explosive atmosphere. Obey all posted instructions. Sparks in such areascould cause an explosion or fire resulting in bodily injury or death. Switch off the device at refueling points such as near gaspumps at service stations. Observe restrictions in fuel depots, storage, and distribution areas; chemical plants; or where blastingoperations are in progress. Areas with a potentially explosive atmosphere are often, but not always, clearly marked. They includeareas where you would be advised to turn off your vehicle engine, below deck on boats, chemical transfer or storage facilitiesand where the air contains chemicals or particles such as grain, dust, or metal powders. You should check with the manufacturersof vehicles using liquefied petroleum gas (such as propane or butane) to determine if this device can be safely used in theirvicinity.
Certification information (SAR)This cellular device meets guidelines for exposure to radio waves.
Your cellular device is a radio transmitter and receiver. It is designed not to exceed the limits for exposure to radio wavesrecommended by international guidelines. These guidelines were developed by the independent scientific organization ICNIRPand include safety margins designed to assure the protection of all persons, regardless of age and health.
The exposure guidelines for cellular devices employ a unit of measurement known as the Specific Absorption Rate or SAR. TheSAR limit stated in the ICNIRP guidelines is 2.0 watts/kilogram (W/kg) averaged over 10 grams of tissue. Tests for SAR are
Product and safety information 57
conducted using standard operating positions with the device transmitting at its highest certified power level in all testedfrequency bands. The actual SAR level of an operating device can be below the maximum value because the device is designedto use only the power required to reach the network. That amount changes depending on a number of factors such as howclose you are to a network base station.
The highest SAR value under the ICNIRP guidelines for use of the device at the ear is 1.18 W/kg .
Use of device accessories may result in different SAR values. SAR values may vary depending on national reporting and testingrequirements and the network band. Additional SAR information may be provided under product information atwww.nokia.com.
Your cellular device is also designed to meet the requirements for exposure to radio waves established by the FederalCommunications Commission (USA) and Industry Canada. These requirements set a SAR limit of 1.6 W/kg averaged over onegram of tissue. The highest SAR value reported under this standard during product certification for use at the ear is 1.42 W/kg and when properly worn on the body is 1.04 W/kg .
Copyright and other notices
DECLARATION OF CONFORMITY
Hereby, NOKIA CORPORATION declares that this RM-720 product is in compliance with the essential requirements and otherrelevant provisions of Directive 1999/5/EC. A copy of the Declaration of Conformity can be found at http://www.nokia.com/phones/declaration_of_conformity/.
© 2011 Nokia. All rights reserved.
Nokia and Nokia Connecting People are trademarks or registered trademarks of Nokia Corporation. Nokia tune is a sound markof Nokia Corporation. Other product and company names mentioned herein may be trademarks or tradenames of theirrespective owners.
Reproduction, transfer, distribution, or storage of part or all of the contents in this document in any form without the priorwritten permission of Nokia is prohibited. Nokia operates a policy of continuous development. Nokia reserves the right to makechanges and improvements to any of the products described in this document without prior notice.
Java and all Java-based marks are trademarks or registered trademarks of Sun Microsystems, Inc.
This product is licensed under the MPEG-4 Visual Patent Portfolio License (i) for personal and noncommercial use in connectionwith information which has been encoded in compliance with the MPEG-4 Visual Standard by a consumer engaged in a personaland noncommercial activity and (ii) for use in connection with MPEG-4 video provided by a licensed video provider. No licenseis granted or shall be implied for any other use. Additional information, including that related to promotional, internal, andcommercial uses, may be obtained from MPEG LA, LLC. See http://www.mpegla.com.
To the maximum extent permitted by applicable law, under no circumstances shall Nokia or any of its licensors be responsiblefor any loss of data or income or any special, incidental, consequential or indirect damages howsoever caused.
The contents of this document are provided "as is." Except as required by applicable law, no warranties of any kind, eitherexpress or implied, including, but not limited to, the implied warranties of merchantability and fitness for a particular purpose,are made in relation to the accuracy, reliability or contents of this document. Nokia reserves the right to revise this documentor withdraw it at any time without prior notice.
58 Copyright and other notices
Reverse engineering of software in the device is prohibited to the extent permitted by applicable law. Insofar as this user guidecontains any limitations on Nokia's representations, warranties, damages and liabilities, such limitations shall likewise limitany representations, warranties, damages and liabilities of Nokia's licensors.The availability of products, features, applications and services may vary by region. For more information, contact your Nokiadealer or your service provider. This device may contain commodities, technology or software subject to export laws andregulations from the US and other countries. Diversion contrary to law is prohibited.The availability of Ovi services may vary by region.
FCC/INDUSTRY CANADA NOTICEYour device may cause TV or radio interference (for example, when using a telephone in close proximity to receiving equipment).The FCC or Industry Canada can require you to stop using your telephone if such interference cannot be eliminated. If you requireassistance, contact your local service facility. This device complies with part 15 of the FCC rules. Operation is subject to thefollowing two conditions: (1) This device may not cause harmful interference, and (2) this device must accept any interferencereceived, including interference that may cause undesired operation. Any changes or modifications not expressly approved byNokia could void the user's authority to operate this equipment.
Some operations and features are SIM card and/or network dependent, MMS dependent, or dependent on the compatibility ofdevices and the content formats supported. Some services are subject to a separate charge.
9223462/Issue 1 EN-US
Copyright and other notices 59


![[XLS] · Web viewadxi 5692-aix 0821 sipo for aix 4.2.x bonus pack non-exportable (bonus pack with icss) ... pupillo umts u110 mobile video eye nokia 6131 nokia 6103 nokia e61](https://img.pdfslide.net/doc/110x75/5a7d25c67f8b9a0a668d9537/xls-viewadxi-5692-aix-0821-sipo-for-aix-42x-bonus-pack-non-exportable-bonus.jpg)