Embed Size (px)
Citation preview

User Guide
9254711
User_guide_English_US.fm Page 1 Thursday, November 9, 2006 2:24 PM
Nokia N800
ENT ARE PROVIDED "AS IS". EXCEPT AS , NO WARRANTIES OF ANY KIND,
NCLUDING, BUT NOT LIMITED TO, THE CHANTABILITY AND FITNESS FOR A DE IN RELATION TO THE ACCURACY,
HIS DOCUMENT. NOKIA RESERVES THE ENT OR WITHDRAW IT AT ANY TIME
oducts and applications and services region. Please check with your ailability of language options.
odities, technology or software subject from the US and other countries. hibited.
ICEio interference (for example, when using eceiving equipment). The FCC or Industry using your device if such interference ire assistance, contact your local service h part 15 of the FCC rules. Operation is ditions: (1) This device may not cause
is device must accept any interference that may cause undesired operation. Any pressly approved by Nokia could void the quipment.
User_guide_English_US.fm Page 2 Thursday, November 9, 2006 2:24 PM
PART NO. 9254711, ISSUE NO. 1© 2006 Nokia. All rights reserved.Nokia, Nokia Connecting People, Nseries, and N800 are trademarks or registered trademarks of Nokia Corporation. Nokia tune is a sound mark of Nokia Corporation. Other product and company names mentioned herein may be trademarks or tradenames of their respective owners.Reproduction, transfer, distribution, or storage of part or all of the contents in this document in any form without the prior written permission of Nokia is prohibited.This product is licensed under the MPEG-4 Visual Patent Portfolio License (i) for personal and noncommercial use in connection with information which has been encoded in compliance with the MPEG-4 Visual Standard by a consumer engaged in a personal and noncommercial activity and (ii) for use in connection with MPEG-4 video provided by a licensed video provider. No license is granted or shall be implied for any other use. Additional information, including that related to promotional, internal, and commercial uses, may be obtained from MPEG LA, LLC. See http://www.mpegla.com.The information contained in this user guidde was written for the Nokia N800 product. Nokia operates a policy of ongoing development. Nokia reserves the right to make changes and improvements to any of the products described in this document without prior notice.TO THE MAXIMUM EXTENT PERMITTED BY APPLICABLE LAW, UNDER NO CIRCUMSTANCES SHALL NOKIA OR ANY OF ITS LICENSORS BE RESPONSIBLE FOR ANY LOSS OF DATA OR INCOME OR ANY SPECIAL, INCIDENTAL, CONSEQUENTIAL OR INDIRECT DAMAGES HOWSOEVER CAUSED.
THE CONTENTS OF THIS DOCUMREQUIRED BY APPLICABLE LAWEITHER EXPRESS OR IMPLIED, IIMPLIED WARRANTIES OF MERPARTICULAR PURPOSE, ARE MARELIABILITY OR CONTENTS OF TRIGHT TO REVISE THIS DOCUMWITHOUT PRIOR NOTICE.
The availability of particular prfor these products may vary byNokia dealer for details, and av
EXPORT CONTROLSThis device may contain commto export laws and regulationsDiversion contrary to law is pro
FCC/INDUSTRY CANADA NOTYour device may cause TV or radthe device in close proximity to rCanada can require you to stop cannot be eliminated. If you requfacility. This device complies witsubject to the following two conharmful interference, and (2) threceived, including interference changes or modifications not exuser's authority to operate this e
© 2006 Nokia. All rights reserved.
....................................................... 15
....................................................... 16ata ............................................... 17....................................................... 17....................................................... 18
......................................19....................................................... 19....................................................... 20...................................................... 21chnology ..................................... 22....................................................... 22ection.......................................... 23ns................................................. 24
.......................................25es................................................. 25
....................................................... 26
......................................27....................................................... 27....................................................... 28....................................................... 28....................................................... 29....................................................... 29vitation (Beta) .......................... 30....................................................... 31
User_guide_English_US.fm Page 3 Thursday, November 9, 2006 2:24 PM
ContentsFor your safety ................................................. 5Overview............................................................ 7Nokia support on the web ........................................................ 7Touch screen ................................................................................. 7
Task navigator ...................................................................... 8Application title area ......................................................... 8Status indicator area.......................................................... 8Minimize and close buttons............................................. 9Application area ................................................................10Toolbar..................................................................................10
Home view...................................................................................10Device control ............................................................................11
Stylus ....................................................................................11Calibrate the touch screen .............................................11Hardware keys....................................................................12
Text input methods...................................................................12On-screen keyboard..........................................................13Full-screen finger keyboard............................................14Handwriting recognition.................................................14Text input settings ............................................................14
Volume control...........................................................................14Device lock ..................................................................................15
Change the lock code.......................................................15Lock touch screen and keys............................................15
Memory management ......Memory card...............Back up and restore d
Help .......................................Search for information.....
Internet connectionsConnectivity settings........WLAN connection..............Mobile phone connection
Bluetooth wireless teSelect a phone............Manually create conn
Disable wireless connectio
Browse the web........Open and browse web pagManage bookmarks ...........
Web communicationAccounts...............................Presence ...............................Contacts ...............................Instant messaging .............Internet call.........................
Nokia Internet Call InWeb camera ................
© 2006 Nokia. All rights reserved.
.......................................43
....................................................... 43
....................................................... 43
....................................................... 43
....................................................... 43
....................................................... 43
....................................................... 43
.......................................44
....................................................... 44
.......................................45...................................................... 45ion guidelines ........................... 46
e ...................................48
ormation.......................49
e notice.........................50
ted Warranty (U.S.) ....52
ed Warranty (Canada)..56
User_guide_English_US.fm Page 4 Thursday, November 9, 2006 2:24 PM
E-mail ...........................................................................................31Create an e-mail account ...............................................31Retrieve and read e-mail messages .............................32Create and send e-mail messages................................33Define basic e-mail settings ..........................................33Define advanced settings................................................34Inbox folder.........................................................................35Outbox folder .....................................................................36Sent folder...........................................................................36Drafts folder........................................................................36
Media player ...................................................37Media sources ............................................................................37Internet radio..............................................................................37UPnP media servers ..................................................................38File formats .................................................................................38
Other applications..........................................40RSS feed reader..........................................................................40Images ..........................................................................................40
Tools.................................................................41Application manager ................................................................41Connection manager ................................................................41Control panel ..............................................................................41File manager ...............................................................................42
Utilities and games..Calculator.............................Clock......................................Notes .....................................PDF reader............................Sketch ...................................Games ...................................
PC connectivity ........Software update ................
Battery information.Charging and dischargingNokia battery authenticat
Care and maintenanc
Additional safety inf
Open source softwar
Nokia One-Year Limi
Nokia One-Year Limit

© 2006 Nokia. All rights reserved. 5
NEAR BLASTING Follow any not use the device where rogress.
Use only in the normal position the product documentation.
RVICE Only qualified personnel product.
TS AND BATTERIES Use only ncements and batteries. Do not patible products.
TANCE Your device is not t. Keep it dry.
IES Remember to make back-up a written record of all important ored in your device.
TO OTHER DEVICES When any other device, read its user led safety instructions. Do not patible products.
User_guide_English_US.fm Page 5 Thursday, November 9, 2006 2:24 PM
For your safetyRead these simple guidelines. Not following them may be dangerous or illegal. Read the complete user guide for further information.
SWITCH ON SAFELY Do not switch the device on when wireless device use is prohibited or when it may cause interference or danger.
ROAD SAFETY COMES FIRST Obey all local laws. Always keep your hands free to operate the vehicle while driving. Your first consideration while driving should be road safety.
INTERFERENCE All wireless devices may be susceptible to interference, which could affect performance.
SWITCH OFF IN HOSPITALS Follow any restrictions. Switch the device off near medical equipment.
SWITCH OFF IN AIRCRAFT Follow any restrictions. Wireless devices can cause interference in aircraft.
SWITCH OFF WHEN REFUELING Do not use the device at a refueling point. Do not use near fuel or chemicals.
SWITCH OFF restrictions. Doblasting is in p
USE SENSIBLYas explained in
QUALIFIED SEmay repair this
ENHANCEMENapproved enhaconnect incom
WATER-RESISwater-resistan
BACK-UP COPcopies or keep information st
CONNECTINGconnecting to guide for detaiconnect incom

© 2006 Nokia. All rights reserved. 6
rythis device may share memory: nd video files; notes, sketch, and
ail messages; and applications. features may reduce the memory features sharing memory. Your ge that the memory is full when
mory feature. In this case, delete r entries stored in the shared ontinuing.
User_guide_English_US.fm Page 6 Thursday, November 9, 2006 2:24 PM
Network servicesContact your service provider for additional instructions for the use of network services and information on what charges will apply. Some networks may have limitations that affect how you can use network services.
Your service provider may have requested that certain features be disabled or not activated in your device. Your device may also have a special configuration.
Shared memoThe following features in bookmarks; image, audio, aother files; contacts; e-mUse of one or more of theseavailable for the remainingdevice may display a messayou try to use a shared mesome of the information omemory features before c

© 2006 Nokia. All rights reserved.
Ove
rvie
w
7
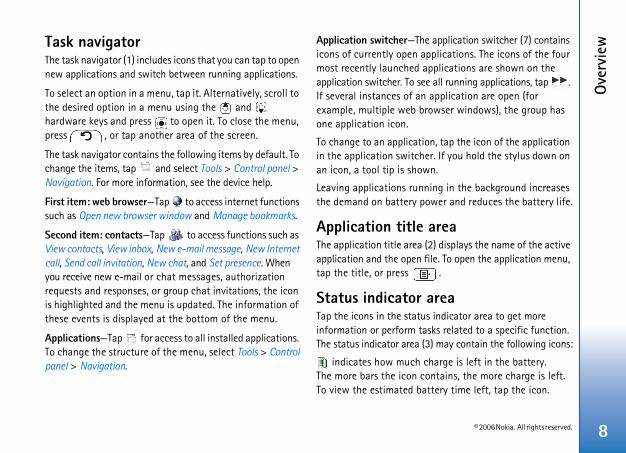
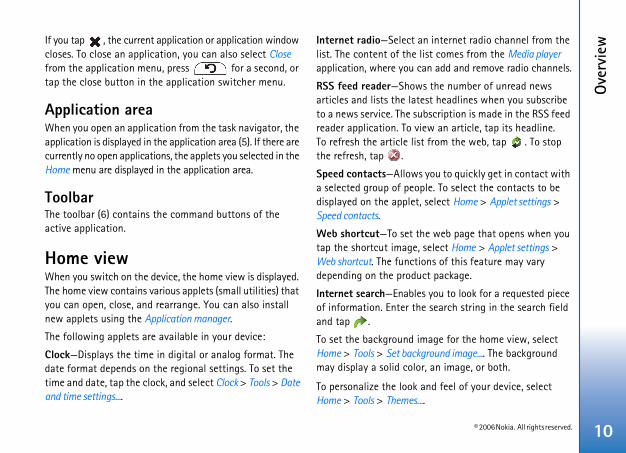
of the task navigator (1), the he status indicator area (3), the s (4), the application area (5), plication switcher (7).
User_guide_English_US.fm Page 7 Thursday, November 9, 2006 2:24 PM
OverviewModel number: Nokia N800-1.
Hereinafter referred to as Nokia N800.
Nokia N800 provides easy broadband access to the internet through a wireless LAN (WLAN)/Wi-Fi or Bluetooth connection with compatible mobile phones. Its wide screen and portable size make it optimal for enjoying the web and internet communications away from your laptop or desktop.
Your compatible WLAN access point must be compliant with the IEEE 802.11b or 802.11g standard.
Read this user guide carefully before using your device. Read also the quick start guide provided with the device and the user guide of your compatible phone, which provides important safety and maintenance information.
The availability of some applications, configurations, and settings may vary according to the software version or your country and sales region.
Nokia support on the webCheck www.nokia.com/support or your local Nokia web site for the latest version of the guide, additional information, downloads, and services related to your Nokia product.
Check also www.nokia.com/n800 to explore the device online features.
Touch screen
The touch screen consistsapplication title area (2), tminimize and close buttonthe toolbar (6), and the ap
© 2006 Nokia. All rights reserved.
Ove
rvie
w
8
application switcher (7) contains plications. The icons of the four plications are shown on the
all running applications, tap . application are open (for wser windows), the group has
n, tap the icon of the application r. If you hold the stylus down on n.
ing in the background increases wer and reduces the battery life.
rea) displays the name of the active
le. To open the application menu, .
rea indicator area to get more ks related to a specific function. ) may contain the following icons:
harge is left in the battery. ntains, the more charge is left. tery time left, tap the icon.
User_guide_English_US.fm Page 8 Thursday, November 9, 2006 2:24 PM
Task navigatorThe task navigator (1) includes icons that you can tap to open new applications and switch between running applications.
To select an option in a menu, tap it. Alternatively, scroll to the desired option in a menu using the and hardware keys and press to open it. To close the menu, press , or tap another area of the screen.
The task navigator contains the following items by default. To change the items, tap and select Tools > Control panel > Navigation. For more information, see the device help.
First item: web browser—Tap to access internet functions such as Open new browser window and Manage bookmarks.
Second item: contacts—Tap to access functions such as View contacts, View inbox, New e-mail message, New Internet call, Send call invitation, New chat, and Set presence. When you receive new e-mail or chat messages, authorization requests and responses, or group chat invitations, the icon is highlighted and the menu is updated. The information of these events is displayed at the bottom of the menu.
Applications—Tap for access to all installed applications. To change the structure of the menu, select Tools > Control panel > Navigation.
Application switcher—Theicons of currently open apmost recently launched apapplication switcher. To seeIf several instances of an example, multiple web broone application icon.
To change to an applicatioin the application switchean icon, a tool tip is show
Leaving applications runnthe demand on battery po
Application title aThe application title area (2application and the open fitap the title, or press
Status indicator aTap the icons in the statusinformation or perform tasThe status indicator area (3
indicates how much cThe more bars the icon coTo view the estimated bat

© 2006 Nokia. All rights reserved.
Ove
rvie
w
9
e set an alarm in the
oth connection to an external tes that the device is set as the luetooth technology, but there
the moment.
akes it possible to display multiple ly. If you have, for example, indicators and want to display a time, they will be shown on are additional lines, they can be rrow icon.
status indicator area, tap panel > Navigation > Status bar.
icon in the task navigator with icon, you receive information , authorization requests and nvitations to .
se buttonsminimize and close buttons (4).
t application is hidden and is shown. To bring the k to the top, tap its icon in
User_guide_English_US.fm Page 9 Thursday, November 9, 2006 2:24 PM
The internet connection icon indicates the status and type of the internet connection and allows you to open and close an internet connection. indicates that a WLAN connection is active, that a packet data connection (for example, GPRS) is active, that a data call connection (for example, GSM data call) is active, that there is no internet connection, or that the device is in the offline mode where no connections are allowed. indicates that a WLAN connection is active, but the device did not receive an IP address from the network. Your connection to the internet is limited.
indicates the volume level and allows you to adjust the master volume and other sound settings. The more bars the icon contains, the higher the volume. When the sounds are muted, the icon is .
indicates the level of display brightness and allows you to adjust the display settings.
The presence icon indicates your presence status and allows you to adjust the presence settings. The icon is visible only after you have created an account for internet call and instant messaging service. indicates that you are online,
that you are away, that you are invisible, or that you are offline.
indicates that the device is connected to a PC through a USB cable.
indicates that you havClock application.
indicates that a Bluetodevice is active. indicavisible device supporting Bis no active connection at
The status indicator area mstatus icons simultaneousinstalled your own status more than seven items atseveral lines. When there accessed by tapping the a
To change the icons in theand select Tools > Control
If you replace the contacta different task navigatorabout new chat messagesresponses, or group chat i
Minimize and cloEvery application has the
If you tap , the currenthe underlying applicationminimized application bacthe application switcher.
© 2006 Nokia. All rights reserved.
Ove
rvie
w
10
internet radio channel from the t comes from the Media player add and remove radio channels.
the number of unread news t headlines when you subscribe scription is made in the RSS feed
an article, tap its headline. rom the web, tap . To stop
ou to quickly get in contact with . To select the contacts to be
elect Home > Applet settings >
web page that opens when you lect Home > Applet settings > s of this feature may vary package.
you to look for a requested piece search string in the search field
ge for the home view, select ound image.... The background an image, or both.
d feel of your device, select
User_guide_English_US.fm Page 10 Thursday, November 9, 2006 2:24 PM
If you tap , the current application or application window closes. To close an application, you can also select Close from the application menu, press for a second, or tap the close button in the application switcher menu.
Application areaWhen you open an application from the task navigator, the application is displayed in the application area (5). If there are currently no open applications, the applets you selected in the Home menu are displayed in the application area.
ToolbarThe toolbar (6) contains the command buttons of the active application.
Home viewWhen you switch on the device, the home view is displayed. The home view contains various applets (small utilities) that you can open, close, and rearrange. You can also install new applets using the Application manager.
The following applets are available in your device:
Clock—Displays the time in digital or analog format. The date format depends on the regional settings. To set the time and date, tap the clock, and select Clock > Tools > Date and time settings....
Internet radio—Select anlist. The content of the lisapplication, where you can
RSS feed reader—Shows articles and lists the latesto a news service. The subreader application. To viewTo refresh the article list fthe refresh, tap .
Speed contacts—Allows ya selected group of peopledisplayed on the applet, sSpeed contacts.
Web shortcut—To set thetap the shortcut image, seWeb shortcut. The functiondepending on the product
Internet search—Enables of information. Enter the and tap .
To set the background imaHome > Tools > Set backgrmay display a solid color,
To personalize the look anHome > Tools > Themes....

© 2006 Nokia. All rights reserved.
Ove
rvie
w
11
select consecutive items, place hlighted item, and drag the stylus
ore items to the selection, place hlighted item and drag the stylus ve a selection, tap a single item.
an item, hold the stylus down on g the item to its new location, To drag and drop multiple items, ection, and start the drag from
ate a context-sensitive menu, down on an item.
ch screends inaccurately, you may need to Tools > Screen calibration. If the ond at all, you can also access
in the home view and using the menu. Follow the instructions
, discolored, or bright dots may is a characteristic of this type of y contain pixels or dots that ormal, not a fault.
User_guide_English_US.fm Page 11 Thursday, November 9, 2006 2:24 PM
To add or remove applets from the application area, select Home > Select applets..., and mark or unmark the desired applet.
To arrange applets in the home view, select Home > Edit layout. In the layout mode you can rearrange the applets by dragging them. You can also resize some applets in the layout mode. To accept the layout, tap . To discard the changes you made, tap .
Device controlYou can control the device in two ways: tap the screen with the stylus or press the hardware keys on the device.
StylusUsing the stylus enables different functions depending on the context. The stylus can be used in the following ways:
• Single tap—To activate controls and other interactive interface components, tap them once with the stylus. A single tap may open a list, activate a button in a dialog or a link on a web page, select a check box, and activate a text input method from a text field.
• Highlight and activate—To highlight an item, tap it once with the stylus. To activate or open the item, tap it again.
• Multiple selection—Tothe stylus on a non-higover the items. To add mthe stylus on a non-higover the items. To remo
• Drag and drop—To draga highlighted item, draand release the stylus. perform a multiple selthe highlighted item.
• Tap and hold—To activbriefly hold the stylus
Calibrate the touIf the touch screen responcalibrate it. Select Home >touch screen does not respthis function by pressing
and to navigate in on the screen.
A small number of missingappear on the screen. Thisdisplay. Some displays maremain on or off. This is n
© 2006 Nokia. All rights reserved.
Ove
rvie
w
12
keypress activates the application press displays the home view of
hodsbers, and special characters in llow you to tap characters with
Handwriting recognition allows rectly onto the screen using the
text field with the stylus or your appears on the touch screen and ds or the handwriting recognition viously used text input method.
put methods, tap on the recognition view, and select red option. Start writing.
words based on the built-in text input language. The device m your input.
User_guide_English_US.fm Page 12 Thursday, November 9, 2006 2:24 PM
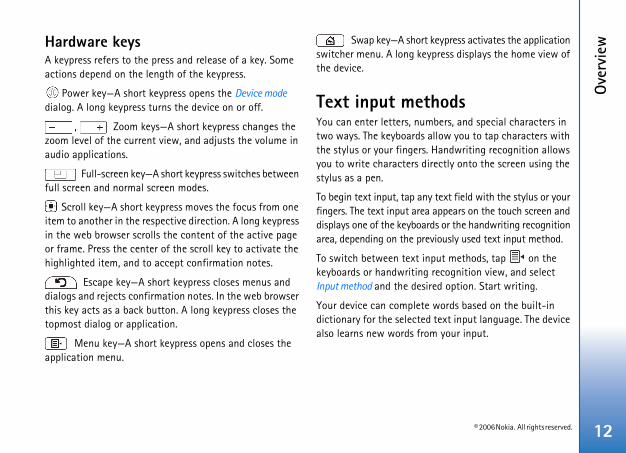
Hardware keysA keypress refers to the press and release of a key. Some actions depend on the length of the keypress.
Power key—A short keypress opens the Device mode dialog. A long keypress turns the device on or off.
, Zoom keys—A short keypress changes the zoom level of the current view, and adjusts the volume in audio applications.
Full-screen key—A short keypress switches between full screen and normal screen modes.
Scroll key—A short keypress moves the focus from one item to another in the respective direction. A long keypress in the web browser scrolls the content of the active page or frame. Press the center of the scroll key to activate the highlighted item, and to accept confirmation notes.
Escape key—A short keypress closes menus and dialogs and rejects confirmation notes. In the web browser this key acts as a back button. A long keypress closes the topmost dialog or application.
Menu key—A short keypress opens and closes the application menu.
Swap key—A short switcher menu. A long keythe device.
Text input metYou can enter letters, numtwo ways. The keyboards athe stylus or your fingers.you to write characters distylus as a pen.
To begin text input, tap anyfingers. The text input areadisplays one of the keyboararea, depending on the pre
To switch between text inkeyboards or handwritingInput method and the desi
Your device can completedictionary for the selectedalso learns new words fro

© 2006 Nokia. All rights reserved.
Ove
rvie
w
13
a space. This area also shows
When you press the shift key, the aracters are displayed in this area.
letes the character to the left of
he cursor to the next row or text unctions are based on the current in the web address field of the s a go button).
10)—Opens a view, in which you only used special characters, character accents.
on-screen keyboard and n input area.
es on top of the on-screen g:
User_guide_English_US.fm Page 13 Thursday, November 9, 2006 2:24 PM
On-screen keyboard
• Tabulator key (1)—Adds a tabulator space or moves the cursor to the next available text input field.
• [Caps] (2)—Locks the uppercase characters of the keyboard. In the handwriting recognition mode, switches between the normal and special character recognition modes.
• Shift key (3)—Allows you to enter an uppercase character in the on-screen keyboard mode when you write in lowercase. When you tap this key in the handwriting recognition mode, the last lowercase character switches to uppercase, and vice versa.
• Input menu key (4)—Opens the text input menu, which includes commands such as Edit > Copy, Cut, and Paste. You can also access the text input settings from the text input menu.
• On-screen keyboard (5)
• Space bar (6)—Inserts word completion.
• Numeric keyboard (7)—most common special ch
• Backspace key (8)—Dethe cursor.
• Enter key (9)—Moves tinput field. Additional fcontext (for example, web browser, it acts a
• Special character key (can select from commsymbols, and language
• Close (11)—Closes the handwriting recognitio
To use handwriting gesturkeyboard, do the followin
Draw gesture 1 for a backspace or gesture 2 fora space. Draw gesture 3 ona letter to switch betweenuppercase and lowercase letters or gesture 4 to adda line break.

© 2006 Nokia. All rights reserved.
Ove
rvie
w
14
ers and numbers (default mode), lly write them.
s, tap [Abc1] in the left pane of the characters as you normally
n and after words, draw them in
andwriting style, tap on the elect Tools > Teach.
s on the handwriting recognition
sttings, tap , and select Tools > settings. For more information,
lme, tap to access the sound crease the volume, drag the d position. The master volume settings in the device.
User_guide_English_US.fm Page 14 Thursday, November 9, 2006 2:24 PM
Full-screen finger keyboardTo begin text input with the finger keyboard, tap the text input field with your fingers. The finger keyboard opens in the full screen mode.
The finger keyboard displays buttons and functions similar to the other text input methods; however, not all of the special characters are available.
To close the finger keyboard, tap in the upper right corner of the keyboard.
To change the finger keyboard settings, tap , and select Tools > Control panel > Text input settings > Thumb board.
When using the finger keyboard, use only clean hands and regularly clean the touch screen by wiping the screen gently with a dry, soft cloth.
Handwriting recognitionYou can use the stylus as a pen to write text. Write legible, upright characters on the text input area, and leave a small horizontal gap between each character. Do not use cursive writing.
To write common charactwrite words as you norma
To write special characterthe input area, and write write them.
To insert new characters ithe intended positions.
To teach the device your hon-screen keyboard, and s
To use handwriting gesturearea, do the following:
Draw gesture 1 for a backspace or gesture 2 for a space.
Text input settingTo define the text input seControl panel > Text inputsee the device help.
Volume controTo adjust the master volusettings. To decrease or involume slider to the desireoverrides all other volume

© 2006 Nokia. All rights reserved.
Ove
rvie
w
15
ain, and tap OK.
y of these dialogs, the device ed.
ret and in a safe place separate
e device lock code, you must take kia authorized service facility. To he software must be reloaded, and aved in the device may be lost.
and keysnd keys, briefly press , and
d keys > OK. To unlock the touch and .
ementory consumption, tap , and l > Memory.
e and used memory, select the
card as additional virtual memory pen the Virtual page, and select itional virtual memory is always at you are currently using in the .
User_guide_English_US.fm Page 15 Thursday, November 9, 2006 2:24 PM
Warning: Listen to music at a moderate level. Continuous exposure to high volume may damage your hearing. Do not hold the device near your ear when the loudspeaker is in use, because the volume may be extremely loud.
Device lockTo prevent unauthorized use of your device, change the lock code, and set the device to automatically lock after a certain time-out period.
To lock the device, briefly press , select Lock device, and tap OK. To unlock the device, enter the lock code, and tap OK.
To edit the device lock settings, tap , and select Tools > Control panel > Device lock.
To set the time-out period, tap Autolock period, and select the desired time.
Change the lock codeTo change the lock code, do the following:
1. Tap , and select Tools > Control panel > Device lock > Change lock code.
2. Enter the current lock code (the default code is 12345), and tap OK.
3. Enter the new code, and tap OK.
4. Enter the new code ag
If you tap Cancel in anlock code is not chang
Keep the new code secfrom your device.
Note: If you lose ththe device to a Nounlock the device, tall data you have s
Lock touch screenTo lock the touch screen aselect Lock touch screen anscreen and keys, press
Memory managTo view current user memselect Tools > Control pane
To view the amount of freStorage page.
To use part of the memory for running applications, oExtend virtual memory. Addtied to the memory card thinternal memory card slot

© 2006 Nokia. All rights reserved.
Ove
rvie
w
16
pter)
apter)
ort the write ards.
iMediaCards (MMC), Reduced cards, microSD cards, or miniSD or use with this device. Nokia andards for memory cards, but ully compatible with this device. amage the card and the device n the card.
can only use FAT 16/32 mory cards with this device.
ontents of the memory card, r, and tap the memory card in
, select File manager >
select File manager > Memory is permanently deleted from the
User_guide_English_US.fm Page 16 Thursday, November 9, 2006 2:24 PM
Heavy usage of the extended virtual memory may affect the durability of the memory card.
Important: Do not remove the memory card in the middle of an operation when the card is being accessed. Removing the card in the middle of an operation may damage the memory card as well as the device, and data stored on the card may be corrupted.
To free memory, delete data in File manager or other applications. To find and delete files of a certain size, use the Search application.
The applications display error messages when you try to move, copy, or save files, and when there is not enough memory on the device or the memory card.
Memory cardYour device has two memory card slots. There is an internal slot under the back cover and another slot under the memory card cover on the front corner of the device. Both memory cards can be inserted and removed when the device is powered (hot swap feature).
The supported memory card formats are as follows:
• MultiMediaCard (MMC), (full size)
• Reduced Size MMC (with adapter)
• SD card (full size)
• miniSD card (with ada
• microSD card (with ad
This device does not suppprotection feature of SD c
Use only compatible MultSize MultiMediaCards, SDcards approved by Nokia fuses approved industry stsome brands may not be fIncompatible cards may dand corrupt data stored o
The size limit is 2 GB. Youformatted compatible me
To view and manage the ctap , select File managethe folder list.
To rename a memory cardMemory card > Rename....
To format a memory card,card > Format.... All data memory card.
© 2006 Nokia. All rights reserved.
Ove
rvie
w
17
backup, select the backup and
ure that the E-mail application ays back up settings and e-mail
the backup when no settings or re present in the application, for after updating the software on
, for example, is not backed up:
you restore backups from ons,
settings,
and
evice help, which provides key features, applications,
sk navigator, tap , and
lication, tap the application ommand from the menu enu).
User_guide_English_US.fm Page 17 Thursday, November 9, 2006 2:24 PM
Back up and restore dataYou can back up data to a compatible memory card and restore it, if necessary. The backup appears as a folder on the memory card. You can also secure the backups with a password.
To back up data, do the following:
1. Tap , and select Tools > Backup/Restore > New backup.
2. In the Backup selection dialog, change the name of the backup; tap the name, and enter a new one. If both memory cards are installed, define the desired location of the backup using a choice list.
3. In the Data selection dialog, select whether you want to back up all data or only the specified data types.
To protect the backup with a password, tap Protect with password, enter twice the password you want to use, and tap OK.
To restore data, do the following:
1. Tap , and select Tools > Backup/Restore.
2. Select the backup on the memory card that you want to restore. Tap Restore.
If you have protected the backup with a password, the Password needed dialog is displayed. Enter the password, and tap OK.
To delete an unnecessary tap Delete.
Important: To ensworks properly, alwmessages. Restoree-mail messages aexample, directly your device.
The following information
• theme settings, when previous product versi
• Bluetooth connectivity
• installed applications,
• browser settings.
HelpYour Nokia N800 offers dadditional information onand dialogs of the device.
To access help from the taselect Help.
To access help from an apptitle, and select the help c(usually under the Tools m
© 2006 Nokia. All rights reserved.
Ove
rvie
w
18
rch to e-mail messages, s; or select all items on your al search options, tap Options.
OK. Results appear in the
time, tap on the toolbar.
r device operates with Boolean at all search words must match.
limit the number of search words nction is not case-sensitive.
User_guide_English_US.fm Page 18 Thursday, November 9, 2006 2:24 PM
To browse help topics, tap the following:
or to see other help topics if you have recently viewed several help topics
to see a list of recently viewed help topics
to search for the text that you have entered in the search field.
To access help related to the contents of a dialog (context-sensitive help), tap the [?] button on the dialog.
Search for informationTo search for items on your device, do the following:
1. Tap , and select Search.
2. Enter a search word or multiple search words. The more search words you use, the more accurate the search results.
3. If needed, limit the seacontacts, or bookmarkdevice. To set addition
4. To start the search, tapSearch results window.
To stop the search at any
The search function in youAND logic, which means thIf you get too few results, and options. The search fu
© 2006 Nokia. All rights reserved.
Inte
rnet
con
nect
ions
19
ect the time after which the automatically if the connection a idle time for packet-switched GPRS), Data call idle time for s (such as GSM data call), and tions created through a WLAN
charges may apply to the ns. Check with your service st the idle times accordingly.
k may also have idle timers that ernet connection to break, dle timers of the device.
User_guide_English_US.fm Page 19 Thursday, November 9, 2006 2:24 PM
Internet connectionsYour device allows you to access the internet either through a wireless LAN (WLAN) or a mobile phone that supports Bluetooth wireless technology.
Connectivity settingsTo edit and create internet connections and to adjust connection creation logic, tap , and select Tools > Control panel > Connectivity.
On the General page, define the following settings:
Connect automatically—Select which connections are used automatically. This setting applies only to networks and connections you have saved in your device.
Search interval—Define how often connections are searched in the background.
Tip: Once you have saved one or more WLAN(s) in Tools > Control panel > Connectivity > Connections, the device searches for those connections every 10 minutes by default, while there is no ongoing connection. To disable the search in the background in order to save battery power, set the search interval value to Never.
On the Idle times page, selinternet connection ends is not used. Use Packet datdata connections (such ascircuit-switched data callWLAN idle time for connecaccess point.
Note: Time-basedinternet connectioprovider, and adju
Note: The networmay cause the intregardless of the i

© 2006 Nokia. All rights reserved.
Inte
rnet
con
nect
ions
20
e WLAN networks are shown after about each WLAN connection:
connection:
example, a public access point in
(wired equivalent privacy
i-Fi protected access WPA ing WPA1 and WPA2)
e network affects the settings ou tap Next.
indicate that the data gateway and the content server ted resource is stored) is secure. s the data transmission between ent server.
twork
User_guide_English_US.fm Page 20 Thursday, November 9, 2006 2:24 PM
WLAN connectionWhen you access an application that requires an internet connection, the device uses the WLAN connections you have saved by default. If you have not saved any connections or they are unavailable, you are asked to select the connection (internet access point) to use. You can save the network after selecting it from the list. However, if your WLAN network name is set as hidden, you must configure the settings manually.
To define WLAN connections manually, tap , and select Tools > Control panel > Connectivity > Connections > New. The welcome page of the internet setup wizard is displayed. Tap Next to proceed to the Connection setup: Name and type dialog.
1. Define the following settings:
Connection name:—Enter a descriptive name for the connection.
Connection type:—Select WLAN
2. Tap Next. The device asks whether you want to scan for available WLAN networks. Tap Yes to start the scan, or No to skip it.
If you select Yes, all availablthe scan with information
• Security level of WLAN
—No security (for an airport)
—Medium securityWEP authentication)
—High security (Wauthentication, includ
The security level of ththat are shown when y
The security icon does nottransmission between the(or place where the requesThe service provider securethe gateway and the cont
• Name of the WLAN ne
• WLAN signal strength
© 2006 Nokia. All rights reserved.
Inte
rnet
con
nect
ions
21
ays enable one of the available thods to increase the security of AN connection. Using encryption k of unauthorized access to
ings, if requested, and tap Next.
settings. To define advanced .
to define advanced settings, for ternet access point requires the
have restrictions on the use th your local authorities for
N, or allowing such features to ile using other features, increase wer and reduce the battery life.
onnection the internet over a cellular
following:
d data service with your cellular
User_guide_English_US.fm Page 21 Thursday, November 9, 2006 2:24 PM
• if the WLAN network is already defined for an internet connection setup that you have saved in the device
Select the desired connection and tap Next.
If you select No, the following settings are shown:
Network name (SSID)—Enter the name of the WLAN network. If you are the administrator of the network, ensure that the name of the network is unique. When you connect to the internet over WLAN, the connection is based on this information. If the field is dimmed and cannot be edited, the scanned SSID contains characters entered in an unknown character set, and not standard character sets (UTF-8) as the device expects.
Network is hidden—You must select this option if the name of your WLAN is hidden. When this option is selected, your device actively searches for the hidden WLAN when you establish an internet connection.
Network mode—Select the Infrastructure or Ad hoc mode. The infrastructure mode is used with the internet connections.
Security method—Select None (no security), WEP (medium security), WPA pre-shared key (high security), or WPA with EAP (high security).
Important: Alwencryption meyour wireless Lreduces the risyour data.
Fill in the security sett
3. Tap Finish to save thesettings, tap Advanced
Tip: You may needexample, if your inuse of proxies.
Some places, like France, of wireless LAN. Check wimore information.
Features using wireless LArun in the background whthe demand on battery po
Mobile phone cBefore you can connect tonetwork, you must do the
• Subscribe to the desireservice provider
© 2006 Nokia. All rights reserved.
Inte
rnet
con
nect
ions
22
technology, or allowing such kground while using other and on battery power and
es not require that the compatible 0 be in line of sight, but both 0 meters (32 feet) of each
subject to interference from s or other electronic devices.
s to devices using Bluetooth t trust.
ed for internet connection, tap rol panel > Phone. Although only d as a phone at a time, you can our Nokia N800. To pair a phone the following:
nnection on your mobile phone.
evice dialog opens, and your h for compatible devices that less technology.
e from the list of found devices, ce generates a passcode.
User_guide_English_US.fm Page 22 Thursday, November 9, 2006 2:24 PM
• Acquire proper internet settings from your cellular service provider.
Tip: Your device includes a settings database (Mobile operator setup wizard) with predefined settings of some cellular service providers.
Note: All cellular operators and settings are not listed, and some settings may also be out of date.
• Pair a compatible mobile phone with your device. Your device needs an external modem (phone), which is connected to your device with Bluetooth wireless technology.
Bluetooth wireless technologyThis device is compliant with Bluetooth Specification 2.0 supporting the following profiles: DUN (Dial-up Networking Profile), FTP (File Transfer Profile) client only, SAP (SIM Access Profile), HID (Human Interface Device Profile), SPP (Serial Port Profile), and OPP (Object Push Profile). To ensure interoperability between other devices supporting Bluetooth technology, use Nokia approved enhancements for this model. Check with the manufacturers of other devices to determine their compatibility with this device.
There may be restrictions on using Bluetooth technology in some locations. Check with your local authorities or service provider.
Features using Bluetooth features to run in the bacfeatures, increase the demreduce the battery life.
A Bluetooth connection dophone and the Nokia N80devices should be within 1other. Connections can beobstructions, such as wall
Do not create connectiontechnology that you do no
Select a phoneTo select a phone to be us
and select Tools > Contone device can be selectepair several devices with ywith your Nokia N800, do
1. Activate a Bluetooth co
2. Tap New. The Select a ddevice begins to searcsupport Bluetooth wire
3. Select the desired phonand tap OK. Your devi
© 2006 Nokia. All rights reserved.
Inte
rnet
con
nect
ions
23
onnectionnnections manually, tap and > Connectivity > Connections > f the internet setup wizard is ceed to the Connection setup:
: Name and type dialog, define the
er a descriptive name for
t the type of network service over ess the internet. To use a packet- a cellular network, such as GPRS
ct Packet data. To use a circuit-in a cellular network, such as cuit-switched data; network ll.
twork manually if you have not obile phone with your device. lar network over which the kes place: GSM/UMTS or CDMA.
User_guide_English_US.fm Page 23 Thursday, November 9, 2006 2:24 PM
4. In the Pair with device dialog, use the generated passcode or replace it with a passcode of your own. Define whether the paired device should be trusted (your phone can connect to the Nokia N800 without notification) or not after it is paired, select or unselect Set as trusted device. Tap OK, and enter the same passcode on your compatible phone.
5. After successful pairing, the mobile operator setup wizard is presented. Use it for saving your internet connection settings. If you have already saved the settings or plan to save them later from the Control panel, tap Cancel. You can access the wizard afterwards by tapping and selecting Tools > Control panel. In the control panel, select Control panel > Tools > Mobile operator setup wizard....
6. Tap Finish to save the settings.
Tip: Set your Nokia N800 as a trusted device from the Bluetooth connectivity menu of your phone. This way you allow your Nokia N800 to access your phone, and you do not have to confirm the connection every time you activate it. For more information, refer to the user guide of your phone.
If you change the Bluetooth connectivity name of your phone, it is not updated to your Nokia N800 automatically. To update the name, pair the Nokia N800 with your phone again.
Manually create cTo define mobile phone coselect Tools > Control panelNew. The welcome page odisplayed. Tap Next to proName and type dialog.
1. In the Connection setupfollowing settings:
Connection name—Entthe connection.
Connection type:—Selecwhich you want to accswitched data service in(network service), seleswitched data service HSCSD (high-speed cirservice), select Data ca
2. You must select the nepaired a compatible mSelect the type of celluinternet connection ta
© 2006 Nokia. All rights reserved.
Inte
rnet
con
nect
ions
24
ettings. To define advanced . For more information, see the
s connectionsoth connections, briefly press , p OK.
fly press , select Normal mode,
e mode, you cannot use features ork or Bluetooth connection. To
ou must first set the device back the device has been locked, enter
User_guide_English_US.fm Page 24 Thursday, November 9, 2006 2:24 PM
3. In the connection setup dialog, define the following settings:
Access point name—Enter the name of the internet access point. Obtain the name from your internet service provider. This setting is only shown if you selected packet-switched data connection (such as GPRS) and your phone uses a GSM cellular network.
Dial-up number—Enter the modem telephone number of the internet access point.
User name—Enter a user name, if required. The user name is usually provided by the internet service provider.
Password—Enter a password, if required. The password is usually provided by the internet service provider.
Prompt password at every login—Select this option if you want to enter your password every time you log on to an internet server, or if you do not want to save your password in the device.
Tip: It is common in GPRS packet data networks that the access point name is internet or it is left blank, the dial-up number is *99#, and the user name and password may be left blank. For CDMA packet data network settings, contact your service provider.
4. Tap Finish to save the ssettings, tap Advanceddevice help.
Disable wirelesTo disable WLAN and Bluetoselect Offline mode, and ta
To enable connections, brieand tap OK.
Note: In the offlinthat require a netwuse the features, yto normal mode. Ifthe lock code.

© 2006 Nokia. All rights reserved.
Brow
se t
he w
eb
25
tion that is used to store data ied to access or have accessed equiring passwords, empty the information or services you have cache. To empty the cache, > Cache.
or smaller size, press defined zoom level from the
eb > View > Zoom and the
ull screen size, press . press again.
ptimized size, select Web > web page is fit to the width of es are zoomed and scaled
er settings, select Web > Tools > tion, see the device help.
current web page, hold the age for a second, and select ontext-sensitive menu.
rk, hold the stylus down on the ct Add link to Bookmarks....
User_guide_English_US.fm Page 25 Thursday, November 9, 2006 2:24 PM
Browse the webTo open the browser, tap , and select Open new browser window or a bookmark.
Before you can connect to the internet, you must define the proper internet connection settings. For detailed instructions, see “Internet connections”, p. 19.
Important: Use only services that you trust and that offer adequate security and protection against harmful software.
Open and browse web pagesTo open a web page, tap the address field at the bottom of the screen, enter the address with the on-screen keyboard, and tap .
If you saved a bookmark of a web page that you want to visit, tap , and select the desired bookmark.
To reload the page, hold the stylus down briefly on and select Reload. To stop loading the page, tap .
To browse and scroll a web page, drag a page in the desired direction with the stylus, use the scroll keys, or drag the scroll bars on the right side and bottom of the screen.
To browse recently visited pages, tap or .
A cache is a memory locatemporarily. If you have trconfidential information rcache after each use. The accessed are stored in theselect Web > Tools > ClearTo view a page in a largeror . To select a preapplication menu, select Wdesired zoom level.
To view the web page in fTo return to normal view,
To view the web page in oView > Optimized view. Thethe screen; text and imagdifferently, if necessary.
To change the web browsSettings. For more informa
To add a bookmark to thestylus down on the web pAdd bookmark... from the c
To save a link as a bookmalink for a second, and sele
© 2006 Nokia. All rights reserved.
Brow
se t
he w
eb
26
e bookmarks or links preinstalled sites provided by third parties okia does not endorse or assume
s. If you choose to access them, recautions, for security or content, ernet site.
User_guide_English_US.fm Page 26 Thursday, November 9, 2006 2:24 PM
Manage bookmarksTo manage the bookmarks you saved in the device, tap , and select Manage bookmarks. In the bookmark manager, you can add, move, copy, rename, delete, and open bookmarks and folders.
The bookmark folders are shown on the left, and the bookmarks in the selected folder on the right. To open a folder and a bookmark contained in it, tap the folder, and tap the bookmark twice.
Your device may have somfor or may allow access tonot affiliated with Nokia. Nany liability for these siteyou should take the same pas you would with any int

© 2006 Nokia. All rights reserved.
Web
com
mun
icat
ion
27
elect Jabber or Google Talk to confirm whether you want to Jabber or Google Talk account ate a new account. If you select r or Google Talk account, you connection, because you register e.
e a new Google Talk account, tap ge where a new Gmail account
ou have successfully created the the wizard.
me, define the following
ser name for the account. If you Talk user name, enter the full ything before @gmail.com).
word for the account.
the password again. This option selected to create a new
User_guide_English_US.fm Page 27 Thursday, November 9, 2006 2:24 PM
Web communicationTo communicate over the web, you must have an active network connection and registered user accounts and passwords for internet call, instant messaging, and e-mail services with service providers outside Nokia.
You can have multiple accounts for internet call and instant messaging services. By default, your device supports the Jabber and Google Talk services. You can also create a new account for Jabber and Google Talk services if you do not have an existing one.
It is recommended to use wireless LAN connection for internet calls.
AccountsTo access the account setup wizard, tap , and select Tools > Control panel > Accounts > New.
To complete and save the account settings, define the following:
1. Account setup: Welcome—Tap Next to begin the account setup.
2. Account setup: Service—Select the desired service from the list, and tap Next.
3. Account setup: Select—Sservice. You are asked start using an existingwith this device, or creto create a new Jabbeneed an active internetthe new account onlin
If you selected to creatNext to open a web pacan be created. After ynew account, return to
4. Account setup: User nauser settings:
User name—Enter the uare defining a Google Gmail user name (ever
Password—Enter a pass
Verify password—Enteris only available if youJabber account.
© 2006 Nokia. All rights reserved.
Web
com
mun
icat
ion
28
yed as “offline” to all the contacts esence information. However, you unication with your contacts. All support this status.
cted you from the presence communication.
tatus, tap on the status presence status sets the status
e same time.
ttings, tap , and select sence.
ation and start communications , and select View contacts.
displays the contact information e lists available groups, and the shows the contacts of the resence status.
tacts > Contact > New contact....
em into the desired groups. to many groups, and a group s.
User_guide_English_US.fm Page 28 Thursday, November 9, 2006 2:24 PM
To define the advanced settings for the selected account, tap Advanced. All accounts do not necessarily have advanced settings. For more information, see the device help.
To save the account settings, tap Finish.
To edit the settings of an account, set your presence status to Off, select the account, and tap Edit. To delete an account, select the account, and tap Delete.
PresencePresence is a network service that allows you to share your status with those who have access to the service and request it.
When you create and register an account for internet call and instant messaging service, your presence status is connected to that account. Your presence status can be one of the following:
On—You are displayed as “online” to all the contacts that have access to your presence information. You are able to send and receive communication
Away—You are displayed as “away” to all the contacts that have access to your presence information. You are able to send and receive communication.
Invisible—You are displathat have access to your prare still able to start commservices do not necessarily
Off—You are disconneserver and cannot receive
To change your presence sindicator area. Selecting ato all your accounts at th
To define your presence seTools > Control panel > Pre
ContactsTo manage contact informwith your contacts, tap
The main view of Contactsin two panes: the left pancontent pane on the rightselected group and their p
To add a contact, select Con
To group contacts, drag thYou can assign a contact can contain many contact

© 2006 Nokia. All rights reserved.
Web
com
mun
icat
ion
29
aging application, tap , and
account, you are requested to ons on the screen to complete ings.
t Chat > Enter chat room.... In the er the name of the chat room in lect the room from the list of join the chat room, tap OK.
ted by a password, the Enter d. To join the protected chat,
d, and tap OK.
essage, tap the text field in the ssage, and tap .
ssages, tap and select the
s always displayed at the bottom
n the upper right corner of
ice over internet protocol (VoIP) d receive calls over the internet.
User_guide_English_US.fm Page 29 Thursday, November 9, 2006 2:24 PM
To create a new group of contacts, select Contacts > Group > New group.
To search for a contact, tap in the toolbar. Enter the search words, and tap .
Select a contact from the list, and tap it. In the Contact dialog, tap an available channel for communication:
to give a call to the contact
to chat with the contact
to send an e-mail message to the contact
Before you can start to communicate with your contacts, you need to send an authorization request or response. An authorization request is normally sent automatically when you add a new contact. When a recipient receives an authorization request and accepts it, the sender sees the recipient’s presence status and can start communication. When you remove a contact from your address book, the authorization is also removed.
Instant messagingThis application allows you to instantly communicate with people over the internet. To use this feature, you must have an active network connection, a registered instant messaging account with a service provider, and a presence status that allows sending and receiving messages. By default, your device supports the Jabber and Google Talk services.
To access the Instant messselect New chat.
If you have not defined ando so. Follow the instructiand save the account sett
To enter a chat room, selecEnter chat room dialog, entthe Room name field, or sepreviously used rooms. To
If the chat room is protecpassword dialog is displayeenter the correct passwor
To write and send a chat mchat toolbar, enter the me
To add smileys to your medesired smiley.
The most recent message iof the list.
To end the chat, tap ithe screen.
Internet callInternet call is based on vothat allows you to make an

© 2006 Nokia. All rights reserved.
Web
com
mun
icat
ion
30
. When you end a call, a call
red in a log. The log remains in evice is powered on. If the device ted.
internet calls with video. 0 for more information about calls.
ll Invitation (Beta)nvitation (Beta) you can invite and video calls through chat or rts communication between a compatible PC or two Nokia have an internet connection
ture.
ion (Beta) is not a final and and it may contain errors affecting eta software is provided “as is” ind, express or implied, including ss for a particular purpose.
t Call Invitation (Beta), tap , n, and tap OK. name shown to your contacts
User_guide_English_US.fm Page 30 Thursday, November 9, 2006 2:24 PM
To use this feature, you must have an active network connection, a registered internet call account with a service provider, and a presence status that allows receiving calls (On or Away).
Warning: Emergency calls are not supported.
To access the Internet call application, tap , and select New Internet call.If you have not defined an account, you are requested to do so. Follow the instructions on the screen to complete and save the account settings.You can only have one internet call at a time. No group or conference calls are possible.The Incoming call dialog is displayed when you receive an incoming internet call. To answer the call, tap . To reject the call, tap . To silence the call, tap . To block the call, tap , and select Block caller. All incoming call requests from that caller are rejected, and you receive no indication of them.To adjust the volume of an internet call, drag the volume slider with the stylus. To mute a call, tap below the volume slider. When the call is muted, you can listen to what the other person is saying, but that person cannot hear your voice. To unmute the call, tap the icon again.
Warning: Do not hold the device near your ear when the loudspeaker is in use, because the volume may be extremely loud.
To end an internet call, tapsummary is displayed.
All recent calls are registethe device as long as the dis rebooted, the log is dele
Nokia N800 also supportsSee www.nokia.com/n80services supporting video
Nokia Internet CaWith Nokia Internet Call Icontacts to internet voicee-mail. This feature suppoNokia N800 device and a N800 devices. You need toto set up and use this fea
Nokia Internet Call Invitatthoroughly tested product, its proper operation. The bwithout warranty of any kimplied warranties of fitne
1. To set up Nokia Interneselect Send call invitatio
2. Enter a desired displayand tap OK.
© 2006 Nokia. All rights reserved.
Web
com
mun
icat
ion
31
il messages, you must have an and a registered e-mail account r appropriate settings, contact r.
accountnt, do the following:
ew inbox. The e-mail account
ttings for a remote e-mail > Accounts > New account... l account.
setup 1/4 and from the
a descriptive name for
e e-mail protocol that your recommends. This setting can be cannot be changed after you save exit the wizard. Tap Next.etup 2/4 and from the
e. The name is shown in the ssages that you send.
User_guide_English_US.fm Page 31 Thursday, November 9, 2006 2:24 PM
After a successful setup, you can invite contacts to internet voice or video calls through chat or e-mail by tapping and selecting Send call invitation.
In second time use, you can call your invited contacts directly through the contacts list (after your contact has also set up the feature). Tap and select View contacts.
Web cameraYou can use the web camera to send video stream in the call handling application. If video call has not been activated, the application shows video stream in idle view as a preview.
The web camera is located in the upper left corner of your device.
To launch the web camera, press the camera inwards in its slot and it pops out. You can rotate the camera forwards and backwards.
To define whether the call idle camera preview is launched when the camera is launched, in the internet call application, select Tools > Settings and select or unselect the Start when camera opened: box.
In the internet call application, if a call is active and you launch the web camera, the video preview is displayed unless you have unselected the Start when camera opened: box.
E-mailTo send and receive e-maactive internet connectionwith a service provider. Fothe e-mail service provide
Create an e-mail To create an e-mail accou
1. Tap , and select Visetup wizard opens.
If you already saved seaccount, select E-mail to create a new e-mai
2. Select E-mail account following settings:
Account name—Enter your account.
Account type—Select the-mail service providerselected only once and the account settings or
3. Select E-mail account sfollowing settings:
Name—Enter your namsender field of the me
© 2006 Nokia. All rights reserved.
Web
com
mun
icat
ion
32
host name or IP address may be the host name or IP address of erver (POP3 or IMAP4). For you access your internet service over a cellular network, you may the SMTP server of the cellular you may need to configure as s as you have internet access mailbox having a different e or IP address.
his option and Configure if you ection specific servers. Tap Next.
etup 4/4 and tap Advanced to ettings, or tap Finish to complete
you need to modify the advanced mation, see the device help.
e-mail messagesu are not automatically received r remote mailbox on the e-mail
messages, you must first connect e the messages.
User_guide_English_US.fm Page 32 Thursday, November 9, 2006 2:24 PM
User name—Enter your user name given to you by your e-mail service provider. The user name is needed when you log in to your mailbox.
Password—Enter your password. The password is needed when you log in to your mailbox. If you leave this field empty, you are prompted for a password when you try to connect to your mailbox on the e-mail server.
E-mail address—Enter the e-mail address given to you by your e-mail service provider. The address must contain the @ character. Replies to your messages are sent to this address. Tap Next.
4. Select E-mail account setup 3/4 and from the following settings:
Incoming server—Enter the host name or IP address of the POP3 or IMAP4 server that receives your e-mail.
Outgoing server (SMTP)—Enter the host name or IP address of the server through which your e-mail is sent. Tap Next.
Simple mail transfer protocol (SMTP) servers are used when sending e-mail. To be able to send e-mail, you must define the SMTP host name or IP address, which you obtain from the service provider of the connection you use.
Use connection-specific SMTP servers:—Select this option if you want to use connection specific SMTP servers for sending e-mail messages.
Tip: The SMTP different from the incoming sexample, whenprovider e-mailneed to utilizenetwork. Thus,many mailboxenetworks, eachSMTP host nam
SMTP servers:—Select twant to configure conn
5. Select E-mail account sdefine optional e-mail sthe mailbox setup.
It is very common that settings. For more infor
Retrieve and readE-mail messages sent to yoby your device, but by youserver. To read your e-mailto the mailbox and retriev

© 2006 Nokia. All rights reserved.
Web
com
mun
icat
ion
33
-mail messagesessage, do the following:
w e-mail message.
-mail address. Add a semicolon parate multiple recipients. If the cts, tap , and select the .
write the message. To send the
il settingsions, select E-mail > Tools > lowing:
ne whether messages are not.
eve e-mail automatically may f large amounts of data through ork. Contact your service
bout data transmission charges.
—Define which connection type tically.
User_guide_English_US.fm Page 33 Thursday, November 9, 2006 2:24 PM
To retrieve e-mail messages from a remote mailbox, select E-mail > New Message > Send & receive, or tap in the toolbar. This option retrieves messages from all accounts set for the device.
If you want to receive messages only from a specific account, in the application main view, hold the stylus on the for a second, and select the desired account.
If you have e-mail messages in the Outbox folder, these messages are sent simultaneously.
To retrieve the contents of a selected message, tap the message header. You can set the device to only download message headers. If the mailbox type is IMAP4, you can also download a message without attachments. To open a message, tap the header of the message twice.
To disconnect from a mailbox, tap the internet connection icon on the status indicator area, and select Disconnect. The internet connection ends.
To open an unread message from the task navigator, tap , and select the desired message.
Important: Exercise caution when opening messages. E-mail messages may contain malicious software or otherwise be harmful to your device or PC.
Create and send eTo create a new e-mail m
1. Tap , and select Ne
2. Write the recipient’s e(;) or a comma (,) to serecipients are in Contarecipients from the list
3. Fill in the subject, andmessage, tap .
Define basic e-maTo edit various e-mail optSettings... and from the fol
Updating pageUpdate automatically—Defiretrieved automatically or
Setting the device to retriinvolve the transmission oyou service provider’s netwprovider for information a
Update when connected viais used to update automa
© 2006 Nokia. All rights reserved.
Web
com
mun
icat
ion
34
settings> Manage.... Select the account to the last page, and tap finished defining your basic he Advanced settings for dialog , outgoing, and other options for
provider for appropriate settings.
etrieved from the mailbox on e connection is established. if the mailbox type is IMAP4.
elect this option if you want to ver after you retrieve them to only available if the mailbox
Define the number of new t to display in the inbox folder. rs and the total amount of r exceeds this limit, the older option is only available if the
User_guide_English_US.fm Page 34 Thursday, November 9, 2006 2:24 PM
Update interval—Define how often messages are updated. The default value is 15 minutes.
Play sound when message arrives—Define whether a sound is played when new message arrives.
Composing pageDefault message format—Select the type of messages that you can write and send with your device. The options are Formatted text (HTML) and Plain text.
Include original in reply—Select this option to include the original message when replying to a message.
Request read receipt—Select this option to receive a notification after the recipient opens your message. You can only receive a notification if the recipient’s e-mail application supports this feature.
Clean-up pageClean-up Sent folder—Define here whether you want the sent folder to be emptied or not.
Remove messages older than—Define here the clean-up interval. The default value is 30 days.
Define advanced Select E-mail > Accounts you wish to edit, proceed Advanced after you have e-mail account settings. Tallows you to set incomingyour e-mail account.
Please contact your service
Incoming pageRetrieve—Specify what is rthe e-mail server when thMessages is only available
Leave messages on server—Sleave messages on the seryour device. This option istype is POP3.
No. of messages to retrieve—message headers you wanIf you retrieve new headeheaders in the inbox foldeheaders are removed. Thismailbox type is IMAP4.

© 2006 Nokia. All rights reserved.
Web
com
mun
icat
ion
35
—Select this option if you want sages you create.
efault—Select this option if you -mail messages. Using this option authenticates your identity and at the message is from you.
for:—Select the situations in ion is displayed.
received messages. The headers own in bold.
ssage.
sage.
the sender of a message and to eld.
age.
ge.
t messages and receive all
elect E-mail > Tools >
User_guide_English_US.fm Page 35 Thursday, November 9, 2006 2:24 PM
Password authentication—Select this option to encrypt the sending of passwords to an e-mail server. This option is only available if the mailbox type is POP3. This option is automatically set to Normal if the account type is IMAP4.
Security—Specify a security setting for the server connection for incoming e-mail messages.
Incoming e-mail port—Enter the port number of the incoming e-mail server. Normally you do not have to change the default value.
Outgoing pageSMTP authentication—Select the authentication method for the SMTP server. Some SMTP servers require that the user is authenticated before e-mail can be sent.
User name—Enter your user name for the SMTP server. By default, your device displays the user name you have entered for the incoming server in E-mail account setup 2/4.
Password—Enter your password for the SMTP server. By default, your device displays the password you have entered for the incoming server in E-mail account setup 2/4.
Security—Specify a security setting for the server connection for outgoing e-mail messages.
Outgoing e-mail port—Enter the port number of the outgoing e-mail server. Normally you do not have to change the default value.
Security pageEncrypt messages by defaultto encrypt the e-mail mes
Digitally sign messages by dwant to sign digitally the erequires a certificate thatverifies to the recipient th
Display security indicationwhich the security indicat
Inbox folderThe Inbox folder contains of unread messages are sh
Tap to send a new me
Tap to reply to a mes
Tap to send a reply tothe recipients in the CC fi
Tap to forward a mess
Tap to delete a messa
Tap to send all unsennew messages.
To search for a message, sSearch messages....
© 2006 Nokia. All rights reserved.
Web
com
mun
icat
ion
36
t this option to allow automatic .
n—Select how often the sent
n save unfinished messages or o send later.
User_guide_English_US.fm Page 36 Thursday, November 9, 2006 2:24 PM
Outbox folderMessages waiting to be sent are saved temporarily in the Outbox folder. The status of each message is shown next to the message header. To send the selected message again, tap . To cancel the sending of the selected message, tap .
Sent folderAfter a message is sent, it is moved to the Sent folder. To specify the cleaning up of the Sent folder, select E-mail > Tools > Settings... > Clean-up.
Define the following:Clean-up Sent folder—Selecdeletion of sent messages
Remove messages older thamessages are deleted.
Drafts folderIn the Drafts folder, you camessages that you want t

© 2006 Nokia. All rights reserved.
Med
ia p
laye
r
37
media stored locally. You can s by different categories, for by artist.
edia stored locally.
links to radio streams.
so appear on the list if they
listen to internet radio channels udio streams. The internet radio and ASX, M3U, PLS, RAM, RPM,
cessarily support all features of iations of file formats.
a radio channel to the list from ng on the format of the stream.
arch for the desired radio he stylus down on the link for context sensitive menu.
User_guide_English_US.fm Page 37 Thursday, November 9, 2006 2:24 PM
Media playerThe Media player application makes it possible to experience media. You can listen to music and other audio files stored on your device or a compatible memory card (if inserted) and audio streams from the internet. You can also watch video clips stored on your device or memory card, or watch streaming videos from the internet.
Through the media player, you can also stream content from available universal plug and play (UPnP) media servers. Tap , and select Media player.
Media sourcesYou can access and launch media clips by using the media player Library. The media player scans your device and your memory cards automatically (when inserted). The found media clips and the available UPnP media servers are displayed in the Library automatically.
Scanning the memory card takes some time, so content in the card may not be available immediately after inserting the card.
The media player library includes the following top categories by default:
• Music—Includes audio browse your audio clipexample, by album or
• Video—Includes video m
• Internet radio—Includes
UPnP media servers alare available.
Internet radioWith Internet radio you canor any other compatible asupports MP3 file format,WAX, and WPL playlists.
Internet radio does not nea file format or all the var
There are two ways to addthe web browser, dependi
1. In the web browser, sechannel stream, hold ta second, and use the
© 2006 Nokia. All rights reserved.
Med
ia p
laye
r
38
ilable for most operating systems rms and enable you to store and tures, video, audio, and
s as a UPnP client and can ervers as long as they are al network as your device and
y.
ion supports M3U and PLS other playlists, such as ASX, upported only partially.
ormats are: AAC, AMR, AWB, , and WMA.
eamable audio formats are: AAC, 3, RA, and WAV. Streaming
he bandwidth availability.
User_guide_English_US.fm Page 38 Thursday, November 9, 2006 2:24 PM
Select the Add link to media library... menu item if it is on the menu. The radio channel is added to the list of radio channels in the media library.
If the Add link to media library... menu item is not provided, select Copy link location.
2. In Media player, select Tools > Add radio channel to library...
Tap the web address field, and paste the link of the radio channel stream. Select to save the link to the stream as a radio channel, and tap OK.
To listen to a radio channel, select Media player > Library >Internet radio and the desired channel from the list, and tap .
To stop listening, tap .
To adjust the volume, tap , and drag the slider with the stylus. To close the volume control dialog, tap anywhere outside it.
UPnP media serversUPnP technology allows devices to connect seamlessly and simplifies the implementation of networks for data sharing, communications, and entertainment in the home environment.
UPnP media servers are avaand many hardware platfoshare your media files (picmultimedia files).
Your Nokia N800 functionauto-detect UPnP media sconnected to the same locare configured accordingl
File formatsThe media player applicatplaylist file formats. SomeWAX, WPL, and WVX are s
The supported audio file fM4A, MP2, MP3, RA, WAV
The supported network strAMR, AWB, M4A, MP2, MPperformance depends on t
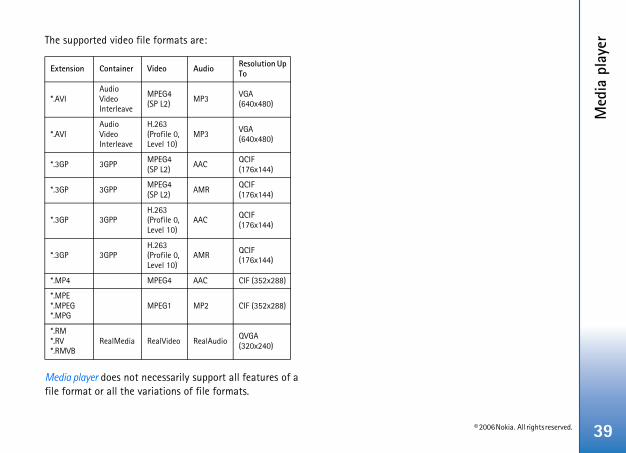
© 2006 Nokia. All rights reserved.
Med
ia p
laye
r
39
User_guide_English_US.fm Page 39 Thursday, November 9, 2006 2:24 PM
The supported video file formats are:
Media player does not necessarily support all features of a file format or all the variations of file formats.
Extension Container Video Audio Resolution Up To
*.AVIAudio Video Interleave
MPEG4 (SP L2) MP3 VGA
(640x480)
*.AVIAudio Video Interleave
H.263(Profile 0, Level 10)
MP3 VGA (640x480)
*.3GP 3GPP MPEG4 (SP L2)
AAC QCIF (176x144)
*.3GP 3GPPMPEG4 (SP L2) AMR
QCIF (176x144)
*.3GP 3GPPH.263(Profile 0, Level 10)
AAC QCIF (176x144)
*.3GP 3GPPH.263(Profile 0, Level 10)
AMR QCIF (176x144)
*.MP4 MPEG4 AAC CIF (352x288)
*.MPE *.MPEG *.MPG
MPEG1 MP2 CIF (352x288)
*.RM *.RV*.RMVB
RealMedia RealVideo RealAudioQVGA (320x240)
© 2006 Nokia. All rights reserved.
Oth
er a
pplic
atio
ns
40
the selected one, tap on d select the desired option.
d feeds are updated, and the old ave not saved them for later use.
ss , or tap . To set the rticles, select Refresh feeds.
automatically, update when y other network, and select setting to update the feeds the feeds are not refreshed
your device, compatible mobile p , and select Images.
the following file formats: BMP, NG, SVG Tiny, TIF, TIFF, and does not necessarily support all .
User_guide_English_US.fm Page 40 Thursday, November 9, 2006 2:24 PM
Other applicationsRSS feed readerYou can receive and read RSS news feeds from service providers. The service provider may be a news agency, entertainment site, or an individual who writes an online diary or journal.
Tap , and select RSS feed reader. The news folders and feeds you have created are shown on the left. There may also be predefined folders and feeds.
To subscribe to a news feed, do the following:
1. In the web browser, search for a link labeled XML or RSS and tap the link. Alternatively, use the context-sensitive menu to copy the address of the link. Hold the stylus down on the link for a second, and select Copy link location.
2. In RSS feed reader, tap on the application toolbar, and paste the address of the news feed to the Add feed dialog.
The RSS feed reader supports the following file formats: Rich Site Summary, RDF Site Summary, Really Simple Syndication (all are also known as RSS), and Atom.
To refresh all feeds or onlythe application toolbar, anThe articles of the selectearticles are deleted if you h
To stop the refreshing, prerefresh method of news a
You can update the feedsconnected to WLAN or anthe update interval. If theautomatically is disabled, automatically.
ImagesTo view images stored on phone, or memory card, ta
The image viewer supportsGIF, ICO, JPE, JPEG, JPG, PWBMP. The image viewer variations of a file format

© 2006 Nokia. All rights reserved.
Tool
s
41
settings for internet call and s.
etooth connectivity name of nd set its visibility.
and manage digital certificates
internet connections are used es for all connection types. ccess points.
ome city, date, time, and enable ings zone option.
tomatic device lock, set the ge the device lock code.
tness of the display, set the screen and keys, switch the LED how soon the display brightness nd how soon the display is
igure items related to an rd supporting Bluetooth
User_guide_English_US.fm Page 41 Thursday, November 9, 2006 2:24 PM
ToolsApplication managerWith Application manager, you can install new applications and other extensions from the application catalogs (repositories) on the internet and from the inbox, web links, or the File manager. You can also view and update installed packages and uninstall them.
Tap , and select Tools > Application manager.
Important: Only install and use applications and other software from trusted sources.
Connection managerTo monitor and manage connections established with the device, tap , and select Tools > Connection manager.
Control panelTo perform configuration and customization tasks, tap , and select Tools > Control panel. Select from the following functions and settings:
About product—View information about your device and end-user licenses.
Accounts—Define accountinstant messaging service
Bluetooth—Change the Bluyour Nokia N800 device, a
Certificate manager—View on your device.
Connectivity—Define whichautomatically. Set idle timCreate and edit internet a
Date and time—Select the hor disable the daylight sav
Device lock—Turn on the autime-out period, and chan
Display—Change the brighautomatic lock for touch lights off or on, and definedecreases to save power aturned off.
Hardware keyboard—Confexternal hardware keyboawireless technology.

© 2006 Nokia. All rights reserved.
Tool
s
42
e device, select Control panel > is function does not affect the alled.
ngs from the mobile operator anel > Tools > Mobile operator
ove, copy, rename, delete, and able in the device, paired devices y and supporting file transfer, or them.
ays the shared content of ers.
nager. The main folders are subfolders and files on the right.
User_guide_English_US.fm Page 42 Thursday, November 9, 2006 2:24 PM
Language & region—Select your region and device language.
Memory—View the memory status of the device and the inserted memory card.
Navigation—Customize the content of the task navigator area, and modify the menu.
Phone—Pair a phone with your device.
Presence—Select your presence status, and set the auto-away period.
Screen calibration—Calibrate the touch screen.
Sounds—Set the master volume, or mute all device sounds. Select the level of system alerts, key sounds, and touch screen sounds.
Text input settings—Teach the device your handwriting style, set default and alternative text input languages, set character recognition speed, and turn word completion on or off.
Themes—Customize the look and feel of your device.
To open a function or a group of settings, tap it once.
To restore original factory settings, select Control panel > Tools > Restore original settings.... This function does not affect the content you have created, security codes, passwords, the device language, or game scores. However, it removes, for example, account user names defined for instant messaging and internet call.
To clear user data from thTools > Clear user data.... Thapplications you have inst
To install connection settidatabase, select Control psetup wizard....
File managerIn File manager, you can mopen files and folders availusing Bluetooth technologmemory cards inserted in
The File manager also displavailable UPnP media serv
Tap , and select File mashown on the left and the
© 2006 Nokia. All rights reserved.
Utili
ties
and
gam
es
43
able document format (PDF), tap DF reader.
d send them through e-mail, tap ketch. All sketches are saved in
ames.
nd select Games and the desired p screen, tap Play.
ow to use the tools, utilities, and the device help.
User_guide_English_US.fm Page 43 Thursday, November 9, 2006 2:24 PM
Utilities and gamesCalculator
Note: This calculator has limited accuracy and is designed for simple calculations.
To access the calculator, tap , and select Utilities > Calculator.
ClockTo set the date and time, select an analog or digital clock, set alarms, and access language and regional settings, tap
, and select Utilities > Clock, or tap the date and time on the right of the screen.
NotesTo create and save text notes, and send them through e-mail, tap , and select Utilities > Notes.
The notes application supports the following file formats: ascii (plain text with no formatting) and .note.html (formatted text). The application does not support the full .html file format.
PDF readerTo view documents in port
, and select Utilities > P
SketchTo draw simple images an
, and select Utilities > S.png format.
GamesYour device has a set of g
To start a game, tap , agame. In the game start-u
For more information on hgames in your device, see

© 2006 Nokia. All rights reserved.
PC c
onne
ctiv
ity
44
teftware on your device, you must rnet Tablet Software Update PC. You must also have the USB battery for your device.
he software update, check
version number of the current device, tap , and selectnel > About product.
User_guide_English_US.fm Page 44 Thursday, November 9, 2006 2:24 PM
PC connectivityYou can connect your device to a compatible PC with the supplied Nokia Connectivity Cable DKE-2 (USB). Use the USB data cable to transfer files to a compatible memory card and to update the latest software on your device.
When the USB cable is connected, the memory card of your Nokia N800 is listed as a mass storage device on your PC, and is displayed on your device. To be able to transfer files from the PC to the device, you must have a compatible memory card installed in the device.
When the USB cable is connected, you cannot access the information on the memory card with your device. However, you can transfer files from your PC to the memory card, and view the contents of the memory card on your PC.
Important: Do not remove the USB cable in the middle of an operation when the device is being accessed. Removing the cable in the middle of an operation may damage the memory card as well as the device, and data stored may be corrupted. When you are finished with file transfer, do not just pull the USB cable from the PC, but follow the proper procedures to disconnect your device from the PC. For more information, see the user guide of your PC.
Software updaTo be able to update the sofirst install the Nokia InteWizard on your compatiblecable and a fully charged
For more information on twww.nokia.com/n800.
Tip: To check the software on your Tools > Control pa

© 2006 Nokia. All rights reserved.
Batt
ery
info
rmat
ion
45
ttery. Accidental short-circuiting object such as a coin, clip,
ection of the positive (+) and e battery. (These look like metal might happen, for example, ttery in your pocket or purse. nals may damage the battery or
or cold places, such as in a inter conditions, will reduce the e battery. Always try to keep the 25°C (59°F and 77°F). A device
may not work temporarily, even harged. Battery performance is peratures well below freezing.
s in a fire as they may explode. if damaged. Dispose of batteries ns. Please recycle when possible. ld waste.
User_guide_English_US.fm Page 45 Thursday, November 9, 2006 2:24 PM
Battery informationCharging and dischargingYour device is powered by a rechargeable battery. The battery can be charged and discharged hundreds of times, but it will eventually wear out. When the operating and standby times are noticeably shorter than normal, replace the battery. Use only Nokia approved batteries, and recharge your battery only with Nokia approved chargers designated for this device.
If a replacement battery is being used for the first time or if the battery has not been used for a prolonged period, it may be necessary to connect the charger, then disconnect and reconnect it to begin charging the battery.
Unplug the charger from the electrical plug and the device when not in use. Do not leave a fully charged battery connected to a charger, since overcharging may shorten its lifetime. If left unused, a fully charged battery will lose its charge over time.
If the battery is completely discharged, it may take several minutes before the charging indicator appears on the display.
Use the battery only for its intended purpose. Never use any charger or battery that is damaged.
Do not short-circuit the bacan occur when a metallicor pen causes direct connnegative (-) terminals of thstrips on the battery.) Thiswhen you carry a spare baShort-circuiting the termithe connecting object.
Leaving the battery in hotclosed car in summer or wcapacity and lifetime of thbattery between 15°C andwith a hot or cold batterywhen the battery is fully cparticularly limited in tem
Do not dispose of batterieBatteries may also explodeaccording to local regulatioDo not dispose as househo

© 2006 Nokia. All rights reserved.
Batt
ery
info
rmat
ion
46
logram ld see hands and
en ngle.
logram , you dots
ly.
User_guide_English_US.fm Page 46 Thursday, November 9, 2006 2:24 PM
Do not dismantle or shred cells or batteries. In the event of a battery leak, do not allow the liquid to come in contact with the skin or eyes. In the event of such a leak, flush your skin or eyes immediately with water, or seek medical help.
Nokia battery authentication guidelinesAlways use original Nokia batteries for your safety. To check that you are getting an original Nokia battery, purchase it from an authorized Nokia dealer, look for the Nokia Original Enhancements logo on the packaging, and inspect the hologram label using the following steps:
Successful completion of the four steps is not a total assurance of the authenticity of the battery. If you have any reason to believe that your battery is not an authentic, original Nokia battery, you should refrain from using it, and take it to the nearest authorized Nokia service point or dealer for assistance. Your authorized Nokia service point or dealer will inspect the battery for authenticity. If authenticity cannot be verified, return the battery to the place of purchase.
Authenticate hologram1 When looking at the ho
on the label, you shouthe Nokia connecting symbol from one anglethe Nokia Original Enhancements logo whlooking from another a
2 When you angle the holeft, right, down, and upshould see 1, 2, 3, and 4on each side respective

© 2006 Nokia. All rights reserved.
Batt
ery
info
rmat
ion
47
ot authentic?t your Nokia battery with the authentic Nokia battery, please
ke it to the nearest authorized ler for assistance. The use of a ed by the manufacturer may be in poor performance and damage ncements. It may also invalidate applying to the device.
iginal Nokia batteries, visit
User_guide_English_US.fm Page 47 Thursday, November 9, 2006 2:24 PM
3 Scratch the side of the label to reveal a 20-digit code, for example, 12345678919876543210. Turn the battery so that the numbers are facing upwards. The 20-digit code reads starting from the number at the top row followed by the bottom row.
4 Confirm that the 20-digit code is valid by following the instructions at www.nokia.com/batterycheck.
What if your battery is nIf you cannot confirm thahologram on the label is ando not use the battery. TaNokia service point or deabattery that is not approvdangerous and may result to your device and its enhaany approval or warranty
To find out more about orwww.nokia.com/battery.
© 2006 Nokia. All rights reserved.
Care
and
mai
nten
ance
48
hake the device. Rough handling it boards and fine mechanics.
icals, cleaning solvents, or strong e device.
e. Paint can clog the moving er operation.
loth to clean any lenses, such as sor, and light sensor lenses.
p of data you want to keep, such ar notes.
m time to time for optimum f the device and remove
qually to your device, battery, ent. If any device is not working arest authorized service facility
User_guide_English_US.fm Page 48 Thursday, November 9, 2006 2:24 PM
Care and maintenanceYour device is a product of superior design and craftsmanship and should be treated with care. The following suggestions will help you protect your warranty coverage.
• Keep the device dry. Precipitation, humidity, and all types of liquids or moisture can contain minerals that will corrode electronic circuits. If your device does get wet, remove the battery, and allow the device to dry completely before replacing it.
• Do not use or store the device in dusty, dirty areas. Its moving parts and electronic components can be damaged.
• Do not store the device in hot areas. High temperatures can shorten the life of electronic devices, damage batteries, and warp or melt certain plastics.
• Do not store the device in cold areas. When the device returns to its normal temperature, moisture can form inside the device and damage electronic circuit boards.
• Do not attempt to open the device other than as instructed in this guide.
• Do not drop, knock, or scan break internal circu
• Do not use harsh chemdetergents to clean th
• Do not paint the devicparts and prevent prop
• Use a soft, clean, dry ccamera, proximity sen
• Use chargers indoors.
• Always create a backuas contacts and calend
• To reset the device froperformance, power ofthe battery.
These suggestions apply echarger, or any enhancemproperly, take it to the nefor service.
© 2006 Nokia. All rights reserved.
Addi
tiona
l saf
ety
info
rmat
ion
49
essages, this device requires e network. In some cases, r messages may be delayed until ble. Ensure the above separation ollowed until the transmission
netic. Metallic materials may be o not place credit cards or other ear the device, because m may be erased.
User_guide_English_US.fm Page 49 Thursday, November 9, 2006 2:24 PM
Additional safety informationSmall childrenYour device and its enhancements may contain small parts. Keep them out of the reach of small children.
Operating environmentThis device meets RF exposure guidelines when used either in the normal use position or when positioned at least 1.0 centimeters (3/8 inches) away from the body. When a carry case, belt clip, or holder is used for body-worn operation, it should not contain metal and should position the device the above-stated distance from your body.
To transmit data files or ma quality connection to thtransmission of data files osuch a connection is availadistance instructions are fis completed.
Parts of the device are magattracted to the device. Dmagnetic storage media ninformation stored on the
© 2006 Nokia. All rights reserved.
Ope
n so
urce
sof
twar
e no
tice
50
riod of three (3) years from the this product by Nokia.
art on the work of the
Format© is the Copyright ncorporated. GIF SM is a Service erve Incorporated.
ware developed by:
Carnegie Mellon University /computing/)
l University
r use in the OpenSSL Toolkit rg/)
Software Limited
c (http://www.xfree86.org/)
User_guide_English_US.fm Page 50 Thursday, November 9, 2006 2:24 PM
Open source software noticeThis product includes certain open source or other software originated from third parties that is subject to the GNU General Public License (GPL), GNU Library/Lesser General Public License (LGPL) and different and/or additional copyright licenses, disclaimers and notices.
The exact terms of GPL, LGPL and some other licenses are provided to you with this product and in addition all referred licenses, disclaimers and notices are reproduced and available at http://www.maemo.org. Please refer to the exact terms of the GPL and LGPL regarding your rights under said license. You may obtain a complete corresponding machine-readable copy of the source code of such software under the GPL or LGPL at http://www.maemo.org. Alternatively, Nokia offers to provide such source code to you on CD-ROM for a charge covering the cost of performing such distribution, such as the cost of media, shipping and handling, upon written request to Nokia at:
Source Code RequestsMultimediaNokia CorporationP.O.Box 407FI-00045 Nokia GroupFINLAND
This offer is valid for a pedate of the distribution of
This software is based in pIndependent JPEG Group.
The Graphics Interchangeproperty of CompuServe IMark property of CompuS
This product includes soft
• Computing Services at(http://www.cmu.edu
• Tommi Komulainen <T
• The Australian Nationa
• The OpenSSL Project fo(http://www.openssl.o
• Gregory M. Christy
• Pedro Roque Marques
• Eric Rosenquist, Strata
• The XFree86 Project, Inand its contributors

© 2006 Nokia. All rights reserved.
Nok
ia O
ne-Y
ear
Lim
ited
War
rant
y (U
.S.)
51
IA, Corp. NVIDIA design patents d foreign countries.
NO REPRESENTATION ABOUT IS SOURCE CODE FOR ANY ED "AS IS" WITHOUT EXPRESS Y OF ANY KIND. NVIDIA, CORP. ANTIES WITH REGARD TO THIS ING ALL IMPLIED WARRANTIES
AND FITNESS FOR A PARTICULAR T SHALL NVIDIA, CORP. BE IAL, INDIRECT, INCIDENTAL, AMAGES, OR ANY DAMAGES ING FROM LOSS OF USE, DATA IN AN ACTION OF CONTRACT, R TORTIOUS ACTION, ARISING TION WITH THE USE OR
IS SOURCE CODE.
User_guide_English_US.fm Page 51 Thursday, November 9, 2006 2:24 PM
• The FreeType Team
• Regents of the University of California
• Paul MacKerras <[email protected]>
• Purdue Research Foundation
• OpenEvidence Project for use in the OpenEvidence Toolkit (http://www.openevidence.org/)
• Eric Young ([email protected])
• Tim Hudson ([email protected])
• Copyright © 1996 NVIDpending in the U.S. an
NVIDIA, CORP. MAKESTHE SUITABILITY OF THPURPOSE. IT IS PROVIDOR IMPLIED WARRANTDISCLAIMS ALL WARRSOURCE CODE, INCLUDOF MERCHANTABILITY PURPOSE. IN NO EVENLIABLE FOR ANY SPECOR CONSEQUENTIAL DWHATSOEVER RESULTOR PROFITS, WHETHERNEGLIGENCE OR OTHEOUT OF OR IN CONNECPERFORMANCE OF TH
© 2006 Nokia. All rights reserved.
Nok
ia O
ne-Y
ear
Lim
ited
War
rant
y (U
.S.)
52
under the limited warranty shall e of the Product at the time the roduct for repair, determined by nsumer for the Product less a usage. Nokia shall not be liable for ages. These remedies are the medies for breach of warranty.
ia, the Consumer must prove the chase of the Product by a dated bill d receipt.
r the cost of shipping the Product ar the cost of shipping the Product fter the completion of service anty.
e no coverage or benefits under any of the following conditions
n subjected to abnormal use, , improper storage, exposure to ss, unauthorized modifications, tions, unauthorized repair, misuse, nt, alteration, improper installation, re not the fault of Nokia, including ipping.
User_guide_English_US.fm Page 52 Thursday, November 9, 2006 2:24 PM
Nokia One-Year Limited Warranty (U.S.)Nokia Inc. (“Nokia”) warrants that this device (“Product”) is free from defects in material and workmanship that result in Product failure during normal usage, according to the following terms and conditions:
1. The limited warranty for the Product extends for ONE (1) year beginning on the date of the purchase of the Product. This one year period is extended by each whole day that the Product is out of your possession for repair under this warranty.
2. The limited warranty extends only to the original purchaser (“Consumer”) of the Product and is not assignable or transferable to any subsequent purchaser/end-user.
3. The limited warranty extends only to Consumers who purchase the Product in the United States of America.
4. During the limited warranty period, Nokia will repair, or replace, at Nokia’s sole option, any defective parts, or any parts that will not properly operate for their intended use with new or refurbished replacement items if such repair or replacement is needed because of product malfunction or failure during normal usage. No charge will be made to the Consumer for any such parts. Nokia will also pay for the labor charges incurred by Nokia in repairing or replacing the defective parts. The limited warranty does not cover defects in appearance, cosmetic, decorative or structural items, including framing, and any non-operative parts.
Nokia’s limit of liabilitybe the actual cash valuConsumer returns the Pthe price paid by the Coreasonable amount for any other losses or damConsumer’s exclusive re
5. Upon request from Nokdate of the original purof sale or dated itemize
6. The Consumer shall beato Nokia. Nokia shall beback to the Consumer aunder this limited warr
7. The Consumer shall havthis limited warranty ifare applicable:
a) The Product has beeabnormal conditionsmoisture or dampneunauthorized connecneglect, abuse, accideor other acts which adamage caused by sh
© 2006 Nokia. All rights reserved.
Nok
ia O
ne-Y
ear
Lim
ited
War
rant
y (U
.S.)
53
nt because of distance (more than good cause, the Consumer shall aid and insured to Nokia.com/support for the address of the
you.
include a return address, daytime r fax number, complete description of purchase and service agreement ses related to removing the Product are not covered under this
billed for any parts or labor charges mited warranty. The Consumer will y expenses related to reinstallation
Product under the limited warranty receipt of the Product. If Nokia irs covered under this limited ays, or after a reasonable number the same defect, Nokia at its replacement Product or refund
f the Product less a reasonable some states the Consumer may aner if the repair of the Product
(10) days.
User_guide_English_US.fm Page 53 Thursday, November 9, 2006 2:24 PM
b) The Product has been damaged from external causes such as collision with an object, or from fire, flooding, sand, dirt, windstorm, lightning, earthquake or damage from exposure to weather conditions, an Act of God, or battery leakage, theft, blown fuse, or improper use of any electrical source, damage caused by computer or internet viruses, bugs, worms, Trojan Horses, cancelbots or damage caused by the connection to other products not recommended for interconnection by Nokia.
c) Nokia was not advised in writing by the Consumer of the alleged defect or malfunction of the Product within fourteen (14) days after the expiration of the applicable limited warranty period.
d) The Product serial number plate or the enhancement data code has been removed, defaced or altered.
e) The defect or damage was caused by the defective function of the cellular system or by inadequate signal reception by the external antenna, or viruses or other software problems introduced into the Product.
8. Nokia does not warrant uninterrupted or error-free operation of the Product. If a problem develops during the limited warranty period, the Consumer shall take the following step-by-step procedure:
a) The Consumer shall return the Product to the place of purchase for repair or replacement processing.
b) If “a” is not convenie50 miles) or for othership the Product prepSee www.nokiausa.repair center nearest
c) The Consumer shall phone number and/oof the problem, proof(if applicable). Expenfrom an installation limited warranty.
d) The Consumer will benot covered by this libe responsible for anof the Product.
e) Nokia will repair the within 30 days aftercannot perform repawarranty within 30 dof attempts to repairoption, will provide athe purchase price oamount for usage. Inhave the right to a lotakes more than ten

© 2006 Nokia. All rights reserved.
Nok
ia O
ne-Y
ear
Lim
ited
War
rant
y (U
.S.)
54
UNITIVE OR CONSEQUENTIAL BUT NOT LIMITED TO LOSS OF OR PROFITS, LOSS OF SAVINGS OR A, PUNITIVE DAMAGES, LOSS OF R ANY ASSOCIATED EQUIPMENT, OF ANY SUBSTITUTE EQUIPMENT ME, THE CLAIMS OF ANY THIRD USTOMERS, AND INJURY TO FROM THE PURCHASE OR USE OF ING FROM BREACH OF THE F CONTRACT, NEGLIGENCE, STRICT EGAL OR EQUITABLE THEORY, F THE LIKELIHOOD OF SUCH
LL NOT BE LIABLE FOR DELAY IN NDER THE LIMITED WARRANTY, G THE PERIOD THAT THE PRODUCT
limitation of how long an implied e year warranty limitation may not
mer). Some states do not allow the f incidental and consequential he above limitations or exclusions e Consumer). This limited warranty cific legal rights and the Consumer ts which vary from state to state.
User_guide_English_US.fm Page 54 Thursday, November 9, 2006 2:24 PM
Please contact the Customer Service Center at Nokia at the telephone number listed at the end of this warranty if you need a loaner and the repair of the Product has taken or is estimated to take more than ten (10) days.
f) If the Product is returned during the limited warranty period, but the problem with the Product is not covered under the terms and conditions of this limited warranty, the Consumer will be notified and given an estimate of the charges the Consumer must pay to have the Product repaired, with all shipping charges billed to the Consumer. If the estimate is refused, the Product will be returned freight collect. If the Product is returned after the expiration of the limited warranty period, Nokia’s normal service policies shall apply and the Consumer will be responsible for all shipping charges.
9. You (the Consumer) understand that the product may consist of refurbished equipment that contains used components, some of which have been reprocessed. The used components comply with Product performance and reliability specifications.
10. ANY IMPLIED WARRANTY OF MERCHANTABILITY, OR FITNESS FOR A PARTICULAR PURPOSE OR USE, SHALL BE LIMITED TO THE DURATION OF THE FOREGOING LIMITED WRITTEN WARRANTY. OTHERWISE, THE FOREGOING LIMITED WARRANTY IS THE CONSUMER’S SOLE AND EXCLUSIVE REMEDY AND IS IN LIEU OF ALL OTHER WARRANTIES, EXPRESS OR IMPLIED. NOKIA SHALL NOT BE LIABLE FOR
SPECIAL, INCIDENTAL, PDAMAGES, INCLUDINGANTICIPATED BENEFITSREVENUE, LOSS OF DATUSE OF THE PRODUCT OCOST OF CAPITAL, COSTOR FACILITIES, DOWNTIPARTIES, INCLUDING CPROPERTY, RESULTINGTHE PRODUCT OR ARISWARRANTY, BREACH OTORT, OR ANY OTHER LEVEN IF NOKIA KNEW ODAMAGES. NOKIA SHARENDERING SERVICE UOR LOSS OF USE DURINIS BEING REPAIRED.
11. Some states do not allowwarranty lasts, so the onapply to you (the Consuexclusion or limitation odamages, so certain of tmay not apply to you (thgives the Consumer spemay also have other righ

© 2006 Nokia. All rights reserved.
Nok
ia O
ne-Y
ear
Lim
ited
War
rant
y (U
.S.)
55
r breach of warranty must be hteen (18) months following t.
his limited warranty may be
IA-2U (1-888-665-4228)1900-24-NOKIA (1-800-246-6542)a.com/support
User_guide_English_US.fm Page 55 Thursday, November 9, 2006 2:24 PM
12. Nokia neither assumes nor authorizes any authorized service center or any other person or entity to assume for it any other obligation or liability beyond that which is expressly provided for in this limited warranty including the provider or seller of any extended warranty or service agreement.
13. This is the entire warranty between Nokia and the Consumer, and supersedes all prior and contemporaneous agreements or understandings, oral or written, relating to the Product, and no representation, promise or condition not contained herein shall modify these terms.
14. This limited warranty allocates the risk of failure of the Product between the Consumer and Nokia. The allocation is recognized by the Consumer and is reflected in the purchase price.
15. Any action or lawsuit focommenced within eigpurchase of the Produc
16. Questions concerning tdirected to: Nokia Inc. Telephone: 1-888-NOKFacsimile: (813) 249-96TTY/TDD Users Only: 1-8Website: www.nokiaus
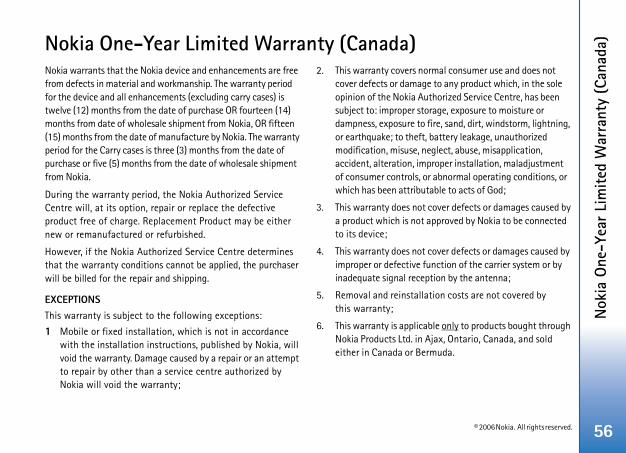
© 2006 Nokia. All rights reserved.
Nok
ia O
ne-Y
ear
Lim
ited
War
rant
y (C
anad
a)
56
mal consumer use and does not to any product which, in the sole
thorized Service Centre, has been rage, exposure to moisture or ire, sand, dirt, windstorm, lightning, battery leakage, unauthorized glect, abuse, misapplication, roper installation, maladjustment abnormal operating conditions, or able to acts of God;
over defects or damages caused by pproved by Nokia to be connected
over defects or damages caused by nction of the carrier system or by tion by the antenna;
tion costs are not covered by
le only to products bought through jax, Ontario, Canada, and sold muda.
User_guide_English_US.fm Page 56 Thursday, November 9, 2006 2:24 PM
Nokia One-Year Limited Warranty (Canada)Nokia warrants that the Nokia device and enhancements are free from defects in material and workmanship. The warranty period for the device and all enhancements (excluding carry cases) is twelve (12) months from the date of purchase OR fourteen (14) months from date of wholesale shipment from Nokia, OR fifteen (15) months from the date of manufacture by Nokia. The warranty period for the Carry cases is three (3) months from the date of purchase or five (5) months from the date of wholesale shipment from Nokia.
During the warranty period, the Nokia Authorized Service Centre will, at its option, repair or replace the defective product free of charge. Replacement Product may be either new or remanufactured or refurbished.
However, if the Nokia Authorized Service Centre determines that the warranty conditions cannot be applied, the purchaser will be billed for the repair and shipping.
EXCEPTIONSThis warranty is subject to the following exceptions:
1 Mobile or fixed installation, which is not in accordance with the installation instructions, published by Nokia, will void the warranty. Damage caused by a repair or an attempt to repair by other than a service centre authorized by Nokia will void the warranty;
2. This warranty covers norcover defects or damageopinion of the Nokia Ausubject to: improper stodampness, exposure to for earthquake; to theft, modification, misuse, neaccident, alteration, impof consumer controls, orwhich has been attribut
3. This warranty does not ca product which is not ato its device;
4. This warranty does not cimproper or defective fuinadequate signal recep
5. Removal and reinstallathis warranty;
6. This warranty is applicabNokia Products Ltd. in Aeither in Canada or Ber

© 2006 Nokia. All rights reserved.
Nok
ia O
ne-Y
ear
Lim
ited
War
rant
y (C
anad
a)
57
warranty, the warranty repairs or the original warranty conditions, date of purchase.
IS THE PURCHASER’S SOLE AND N LIEU OF ALL OTHER WARRANTIES, LUDING BUT NOT LIMITED TO ANY RCHANTABILITY OR FITNESS FOR USE.
limitations on how long an implied limitations may not apply to you.
CATIONS, CONTACT YOUR SERVICE OR DIRECTLY TO:
anadaSouth3
to the Nokia Authorized Service /retailer/dealer shall prepay ies, insurance. Nokia shall have no ng this shipment.
atically registered, no further nsumer.
User_guide_English_US.fm Page 57 Thursday, November 9, 2006 2:24 PM
7. Removal, alteration, or defacing of the Serial Number Plate, or the enhancement Date Code Labels will void the warranty.
In no event shall Nokia be liable for incidental, special, or consequential damages, direct or indirect, loss of anticipated benefits or profits, loss of use of its device, resulting from the use of its device, or its enhancements, or arising from any breach of this warranty.
CLAIM PROCEDUREIn order to obtain warranty performance, return the defective unit to the Nokia Authorized Service Centre with transportation charges prepaid (shipping of the repaired unit may be paid by Nokia, in which case Nokia shall have risk of loss or damage during this shipment).
The proof of date of purchase will be required before in-warranty service is rendered.
Maintenance and service may be obtained in any authorized service centre in Canada.
EXTENSION OF WARRANTY PERIODWhen a repair is made, an extra 90-day service warranty is given to the labour and parts of the repair concerned. If replacement of a faulty unit is applied, instead of repairing, this 90-day service warranty is applied to the replaced unit.
Besides this 90-day servicereplacements do not affect which are determined by the
THE FOREGOING WARRANTYEXCLUSIVE REMEDY AND IS IEXPRESSED OR IMPLIED, INCIMPLIED WARRANTY OR MEA PARTICULAR PURPOSE OR
Some provinces do not allowwarranty lasts, so the above
FOR WARRANTY SERVICE LOPROVIDER/RETAILER/DEALER
Solectron Global Services C213 Harry Walker Parkway, Newmarket, Ontario L3Y 8TCanadaTel: 1-888-226-6542
For products being returnedCentre, the service providershipping charges, taxes, dutrisk for loss or damage duri
NOTE: As warranty is automaction is required by the co


![[A2DP] [AVRCP]...Nokia 2660 ———— — Nokia 2730 classic — Nokia 3109 classic — — Nokia 3110 classic — — Nokia 3120 classic — Nokia 3500 classic — — Nokia 5130](https://img.pdfslide.net/doc/110x75/61006683abc96516e4462928/a2dp-avrcp-nokia-2660-aaaa-a-nokia-2730-classic-a-nokia-3109.jpg)