Embed Size (px)
Citation preview

1/124
www.zyxel.com
NXC series NXC2500/NXC5500
Wireless LAN controller
Firmware Version 4.20~4.30
Edition 1, 9/2016
Troubleshooting Guide
Default Login Details
LAN Port IP Address https://192.168.1.1
User Name admin
Password 1234

2/124
www.zyxel.com
1 Basic Information .................................................................................................................. 4
1.1 Check Firmware Version .................................................................................................... 4
1.2 Issue Definition ...................................................................................................................... 4
1.3 Device Configuration File .................................................................................................. 5
1.3 Collect System Log .............................................................................................................. 6
1.4 Collect dmesg and/or disklog .......................................................................................... 7
2 Capture Packets ................................................................................................................... 8
2.1 Capture Ethernet Packets ................................................................................................. 8
2.1.1 Use WLAN controller/AP .............................................................................................. 8
2.1.2 Use AP CLI (AP cannot save captured packets) ................................................... 9
2.1.3 Use PC ............................................................................................................................. 9
2.1.4 Set Mirror Port on Switch ............................................................................................ 10
2.2 Capture Wireless Packets ................................................................................................ 10
2.2.1 Capture with WLAN Controller and Managed AP .............................................. 10
2.2.2 Use Linux ....................................................................................................................... 11
2.2.3 Use Windows ................................................................................................................ 12
3 Console connection setting .............................................................................................. 12
3.1 The type of Console Cables ............................................................................................ 12
3.2 Serial Console Settings ...................................................................................................... 14
4 Managed AP ....................................................................................................................... 17
4.1 Symptom: Managed AP doesn’t show on the AP management list ...................... 17
4.2 Symptom: Managed AP offline ...................................................................................... 24
4.3 Symptom: Managed AP error with conflict .................................................................. 31
4.4 Symptom: Managed AP keep updating ...................................................................... 39
5 Wireless ................................................................................................................................ 43
5.1 Symptom: Cannot see the SSID name. ......................................................................... 43
5.2 Symptom: Connection Failure ........................................................................................ 48
5.3 Symptom: Wireless low throughput ................................................................................ 51
6 Captive Portal ..................................................................................................................... 52

3/124
www.zyxel.com
6.1 Symptom: Cannot see the Captive Portal on wireless device (cannot find the
webpage) or NXC managed page is redirected instead of Captive Portal .............. 53
6.2 Symptom: Login denied ................................................................................................... 64
7 Roaming .............................................................................................................................. 69
7.1 What is Roaming ................................................................................................................ 69
7.2 What’s the setting conditions of roaming .................................................................... 69
7.3 The Limitation of roaming ................................................................................................ 71
7.4 Symptom: Why station can’t connect to the AP2 ...................................................... 71
7.5 Symptom: Why station disconnect during roaming ................................................... 74
8 802.1X authentication ........................................................................................................ 75
8.1 Symptom: the 802.1X authentication failed with Remote Authentication Dial in
User Service (RADIUS) .............................................................................................................. 76
8.2 Symptom: the 802.1X authentication failed with Active Directory (AD) server .... 93
8.3 Symptom: the 802.1X authentication failed with Lightweight Directory Access
Protocol (LDAP) server ......................................................................................................... 109
8.4 The configuration of windows computer for 802.1X authentication.................... 119

4/124
www.zyxel.com
1 Basic Information
1.1 Check Firmware Version
1 Access NXC via GUI shows FW version.
Figure 1 DASHBOARD > Dashboard > Device Information
2 Access NXC via SSH/Telnet/Console shows FW version.
Figure 2 Tera Term > NXC > Router# show version
3 If the Firmware version is not the latest version, please upgrade the firmware
version to the latest version.
1.2 Issue Definition
Report issue with some conditions:
Issue symptom:
Describe what you observe, NOT JUST GUESS.
Issue condition:
Describe how to reproduce this issue.
Topology:
Show all the effective network devices in the environment.

5/124
www.zyxel.com
Figure 3 Example of Network Topology
Important key points in the topology
Gateway of each subnet
DHCP server
Auth. Server (RADIUS or AD)
VLAN settings
1.3 Device Configuration File
Download startup-config.conf.
Figure 4 MAINTENANCE > File Manager > Configuration File
Figure 5 Tera Term > NXC > Router# show running-config

6/124
www.zyxel.com
If there are multiple devices in environment, collect the config files of all
devices as possible.
If there are multiple tagged VLAN in environment, make sure have the
switch config of VLAN settings are correct.
Make sure NXC is the only AP controller (replies to CAPWAP Discovery
Request) in the network.
1.3 Collect System Log
Collect System log via controller GUI.
Figure 6 MONITOR > Log > View Log or View AP Log
Check system log via Terminal Software.
Figure 7 Tera Term > NXC > Router# show logging entries

7/124
www.zyxel.com
Indicate the date/time and IP/MAC address of the device in report.
Set log to external syslog server or email to monitor device log if system
log flushes frequently.
1.4 Collect dmesg and/or disklog
Collect demesg file via Terminal Software.
Figure 8 Tera Term > NXC > Router# debug system dmesg
Collect disklog file via Terminal Software.
Figure 9 Tera Term > NXC > Router# debug system disklog show

8/124
www.zyxel.com
Note: The dmesg will be cleared after rebooted, but the disklog will be kept
in device.
2 Capture Packets
2.1 Capture Ethernet Packets
2.1.1 Use WLAN controller/AP
Capture packets via controller GUI.
1 Set the parameters and press ‘Capture’
Figure 10 MAINTENANCE > Diagnostics > Packet Capture > Capture
2 Download the packet.
Figure 11 MAINTENANCE > Diagnostics > Packet Capture > Files

9/124
www.zyxel.com
3 Check packets via CLI on controller.
Figure 12 Tera Term > NXC > Router# packet-trace interface <interface>
Press “Ctrl+c” to end of packets capturing.
2.1.2 Use AP CLI (AP cannot save captured packets)
Check packets via CLI on AP.
Figure 13 Tera Term > NXC > Router# packet-trace interface vlan0
Press “Ctrl+c” to end of packets capturing.
Note: ‘vlan0’ is an example of interface you want to capture packets with.
Add port or ip-proto, src-host, dst-host to the command to filter the
captured result.
The saved captured files can be downloaded via GUI or FTP.
2.1.3 Use PC
Capture the packet on PC should install some software. For example:
Windows needs to install Winpcap first: http://www.winpcap.org/
Download Wireshark at: https://www.wireshark.org/

10/124
www.zyxel.com
Winpcap is also bundled with Wireshark.
The new Win10pcap is able to capture packets with 802.1Q VLAN tags:
http://www.win10pcap.org/
Win10pcap supports only Win7 and later windows system.
2.1.4 Set Mirror Port on Switch
Select the source port, destination port, and the flow direction, then
connect the capture device to the destination port and start capture.
2.2 Capture Wireless Packets
2.2.1 Capture with WLAN Controller and Managed AP
1 Set up a MON profile on controller.
Figure 14 CONFIGURATION > Object > MON Profile > MON Profile > Edit
2 Set ‘Scan Channel Mode’ to manual, and select the channel you want to
capture packets.
Figure 15 CONFIGURATION > Object > MON Profile > MON Profile > Edit

11/124
www.zyxel.com
3 Set a managed AP to MON mode, and apply the MON profile.
Select the MON mode AP and press ‘Capture’
Figure 16 MAINTENANCE > Diagnostics > Wireless Frame Capture > Capture
2.2.2 Use Linux
1 Use the following command to set your WLAN card into monitor mode:
$ sudo ifconfig wlan0 down
$ sudo iwconfig wlan0 mode monitor
$ sudo ifconfig wlan0 up
$ sudo iwconfig wlan0 channel 11 (Change 11 to the channel you want to
use for capture)

12/124
www.zyxel.com
2 Then open Wireshark and capture the interface wlan0.
Please refer to the KB for more detailed instructions:
http://kb.zyxel.com/KB/searchArticle!viewDetail.action?articleOid=015072
&lang=EN
2.2.3 Use Windows
Windows does not support wireless monitor mode natively, you will need
extra software (e.g. OmniPeek Network Analysis Software) and USB adapter
with specialized driver to capture wireless packets.
OmniPeek Network Analysis:
https://www.savvius.com/products/application_performance/omnipeek_f
amily/omnipeek_network_analysis
3 Console connection setting
3.1 The type of Console Cables
1 For NXC5500/ WAC6500 series AP:
PN: 1-005-05000003
Figure 17 RJ-45-to-DB-9 Console Cable Color Codes
Figure 18 RJ-45-to-DB-9 Console Cable Color Codes
2 For NWA5301-NJ
PN: 1-005-05000002
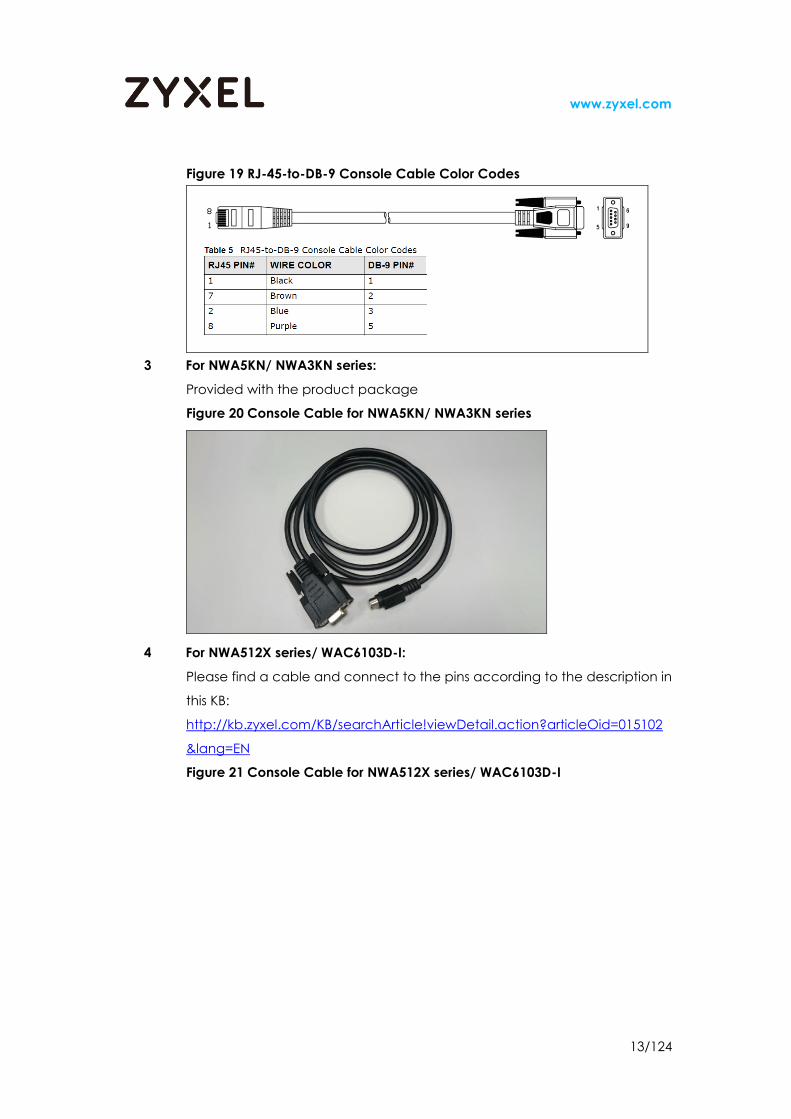
13/124
www.zyxel.com
Figure 19 RJ-45-to-DB-9 Console Cable Color Codes
3 For NWA5KN/ NWA3KN series:
Provided with the product package
Figure 20 Console Cable for NWA5KN/ NWA3KN series
4 For NWA512X series/ WAC6103D-I:
Please find a cable and connect to the pins according to the description in
this KB:
http://kb.zyxel.com/KB/searchArticle!viewDetail.action?articleOid=015102
&lang=EN
Figure 21 Console Cable for NWA512X series/ WAC6103D-I
14/124
www.zyxel.com
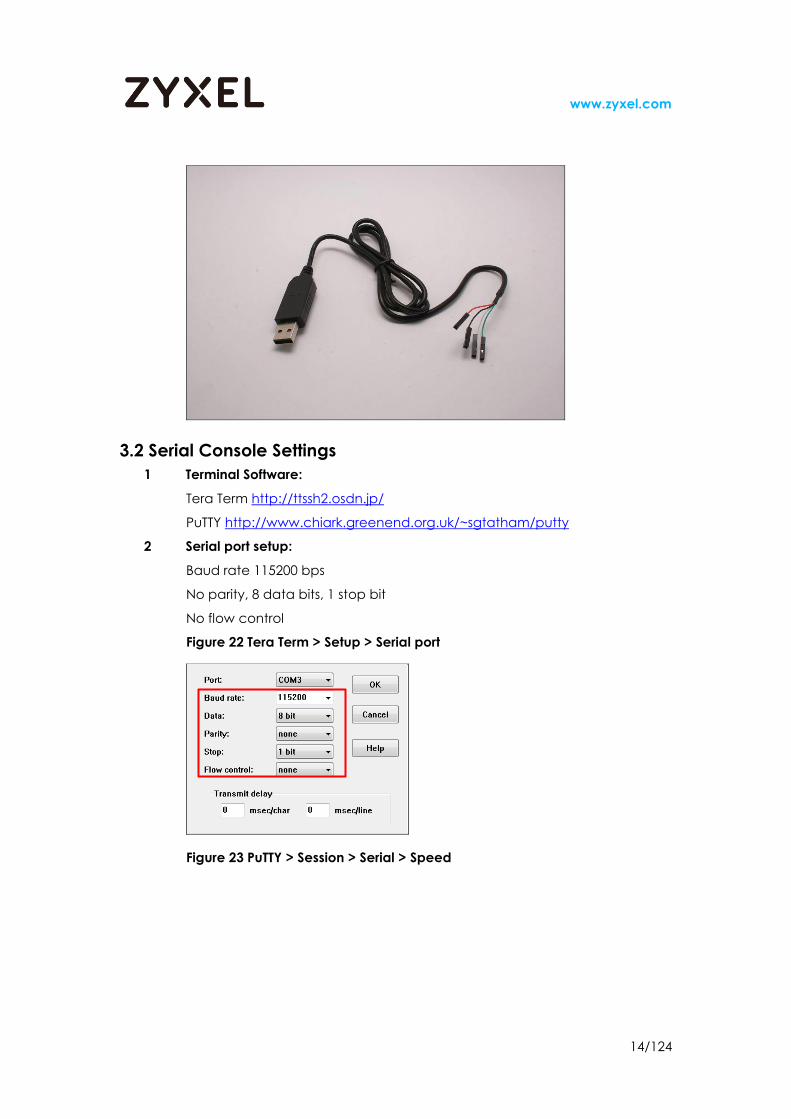
3.2 Serial Console Settings
1 Terminal Software:
Tera Term http://ttssh2.osdn.jp/
PuTTY http://www.chiark.greenend.org.uk/~sgtatham/putty
2 Serial port setup:
Baud rate 115200 bps
No parity, 8 data bits, 1 stop bit
No flow control
Figure 22 Tera Term > Setup > Serial port
Figure 23 PuTTY > Session > Serial > Speed

15/124
www.zyxel.com
3 Save log:
Enable Timestamp for log in Tera Term, which will record the time slot with
logs.
Figure 24 Tera Term > File > Log
Figure 25 PuTTY > Logging > All session output

16/124
www.zyxel.com
4 Enable console log level 8 (show console debug messages)
Hot key for enable console log level 8: ‘Send break + 8’ to serial console.
Figure 26 TeraTerm > Control > Send break and press ‘8’
Figure 27 PuTTY > move cursor to the top bar (right click) > Special
Command > Break > press ‘8’

17/124
www.zyxel.com
4 Managed AP
Figure 28 The following table describes the icons in this screen.
4.1 Symptom: Managed AP doesn’t show on the AP
management list
If the AP mode was changed to the managed and it doesn’t show on the
AP list after wait a long times, please follow the steps to troubleshooting.
Figure 29 MONITOR > AP Information > AP List
Note: If AP had managed by other controller before, please reset AP first.
The procedure of the troubleshooting:
1. Check the configuration of the controller (USG/ ZyWALL/ NXC).
2. Does AP get the IP?
3. Check the mode of unified AP.
4. Check the CAPWAP status of AP.
5. Can managed AP and NXC communicate with each other?
6. Information collection and report the issue to the HQ.
1 Check the configuration of controller (USG/ ZyWALL/ NXC)
If the topology has USG or ZyWALL devices, please make sure “Registration
Type” is “Manual” to avoid the managed APs are controlled by them.
USG/ ZyWALL:

18/124
www.zyxel.com
Select “Manual” for registration type.
Figure 30 CONFIGURATION > Wireless > Controller > configuration
NXC:
Select “Always Accept” or “Manual” for registration type.
Always Accept: Controller trusts the managed AP automatically.
Manual: User trusts the managed AP.
Figure 31 CONFIGURATION > Wireless > Controller > configuration
If the option is “Manual”, don’t forget to trust the managed AP.
Figure 32 MONITOR > Wireless > AP Information > AP List > Add to Mgnt. AP
List
The icon of AP become gray after the controller managed the AP
successfully.
Figure 33 MONITOR > Wireless > AP Information > AP List > Add to Mgnt. AP
List
2 Does AP get the IP?
Check IP address via DHCP table or access AP by console cable.

19/124
www.zyxel.com
DHCP table:
If the DHCP server is one of the ZyXEL devices - UAG, ZyWALL and NXC, you
can check the IP by GUI.
Figure 34 DASHBOARD > Dashboard > System Status
Figure 35 DASHBOARD > Dashboard > System Status > DHCP Table
Console:
Get the IP by connecting console cable to access AP via terminal software.
Figure 36 Tera Term > AP > Router > show interface all
If the IP address doesn’t get the IP, it will show 0.0.0.0. Please check Ethernet
traffic between the DHCP server and AP.
Check the DHCP server if send the IP address to managed AP.
Check the DHCP server pool is full?
Check the switch configuration, like port blocked, VLAN setting…etc.
Capture the Ethernet packets by Wireshark.
Figure 37 The process of AP asks the IP from DHCP server.
Figure 38 AP gets the IP.

20/124
www.zyxel.com
Figure 39 AP broadcast the CAPWAP packet to controller
When AP gets the IP, you will see the IP shows on the console.
Figure 40 Tera Term > AP > Router > show interface all
3 Check the mode of unified AP
If the AP is unified access point, please access the AP via SSH or console
cable to check the mode.
Figure 41 The table of the Module of Unified Access Point
The Module of Unified Access Point
NWA5121-N NWA5121-NI NWA5123-NI NWA5301-NJ
NWA3160-N NWA3560-N NWA3550-N
Check the mode of the unified AP via console cable or SSH.
Console:
Figure 42 Tera Term > AP > Router > show hybrid-mode
If the mode is “controller” or “standalone”, please change the
configuration to the “managed”. The configuration can be changed by
console or GUI.
Figure 43 Tera Term > AP > Router > configure terminal > hybrid-mode
managed
AP GUI:
Auto: AP broadcast the CAPWAP packet let controller know.
If the DHCP server set Option 138 with controller IP, the APs get the IP from
DHCP server will get the AC-IP and find the controller directly.
Figure 44 CONFIGURATION > MGNT Mode > Managed AP > Auto

21/124
www.zyxel.com
Manual: Set the AC-IP by user.
Figure 45 CONFIGURATION > MGNT Mode > Managed AP > Static IP
Note: If you have many managed APs on site will set AC-IP, we suggest that
set the AC-IP on the DHCP with option 138. The managed APs get the IP will
also know the AC-IP and send the CAPWAP packet to controller ask for
managing.
4 Check the CAPWAP status of AP
If the AP is managed by the controller, the AC-IP shows the controller’s IP
and the SM-state is RUN(8).
Figure 46 Tera Term > AP > Router > show capwap ap info > SM-State
If the SM-State doesn’t show RUN(8), please check the AC-IP.
Figure 47 Tera Term > AP > Router > show capwap ap info > SM-State

22/124
www.zyxel.com
Write the AC-IP address by console:
Figure 48 Tera Term > AP > Router > show capwap ap ac-ip
If you know the AC-IP, you can also write the IP directly via console.
Figure 49 Tera Term > AP > Router > configure terminal > capwap ap ac-ip
<AC-IP1> <AC-IP2> > write > exit > rebot
Note: If there is only one controller in the topology, write the controller’s IP in
the <AC-IP1> and put any IP in the <AC-IP2>.
5 Can managed AP and NXC communicate with each other?
Access managed AP and NXC by console or SSH and ping to each other to
check the status of network traffic.
Managed AP ping to controller successfully:
Figure 50 Tera Term > AP > Router > ping <AC-IP>
Controller ping managed AP successfully:
Figure 51 Tera Term > NXC > Router > ping <AP-IP>
Ping loss:
If the managed AP or controller pings to each other fail, you have to check

23/124
www.zyxel.com
the Ethernet device or network cable.
Figure 52 Tera Term > NXC > Router > ping <AP-IP>
Check switch, router or firewall whether blocks the traffic or CAPWAP
port 5246.
Trace route:
Use trace route to find the packets are dropped out on where.
Figure 53 Tera Term > AP > Router > traceroute <AC-IP>
Use Wireshark capture CAPWAP packets between controller and managed
AP to check the status of network traffic.
6 Information collection and report the issue to the HQ.
Capture the related logs file from controller and managed AP.
Collect log files of controller by GUI:
Capture the entire category to provide RD completed information.
Figure 54 MAINTENANCE > Diagnostics > Diagnostics > Collect on Controller
> Collect Now.
Note: Capture the logs need to spend some time, please kindly wait.
Collect log files of managed AP by controller GUI
Select the managed AP to the Collected APs.
Figure 55 MAINTENANCE > Diagnostics > Diagnostics > Collect on AP >
Collect Now.

24/124
www.zyxel.com
Download log files.
Figure 56 MAINTENANCE > Diagnostics > Diagnostics > Files > Download
Provide topology/controller config/packet/remote access/Diagnostic info
to HQ to do advanced check.
4.2 Symptom: Managed AP offline
If the AP has managed by controller before and the color of AP icon is gray,
please follow the steps to troubleshooting.
Figure 57 MONITOR > AP Information > AP List
The procedure of the troubleshooting:
1. Check the configuration of the controller (USG/ ZyWALL/ NXC).
2. Does AP get the IP?
3. Check the CAPWAP status of AP.

25/124
www.zyxel.com
4. Can managed AP and NXC communicate with each other?
5. How to know APs off-line cause by external factors?
6. Information collection and report the issue to the HQ.
1 Check the configuration of controller (USG/ ZyWALL/ NXC).
If customer’s topology has USG or ZyWALL, please make sure “Registration
Type” is “Manual” to avoid the managed APs are controlled by them.
USG/ ZyWALL
Select “Manual” for registration type.
Figure 58 CONFIGURATION > Wireless > Controller > configuration
NXC
Select “Always Accept” or “Manual” for registration type.
Always Accept: Controller trusts the managed AP automatically.
Manual: User trusts the managed AP.
Figure 59 CONFIGURATION > Wireless > Controller > Configuration
If the option is “Manual”, don’t forget to trust the managed AP.
Figure 60 MONITOR > Wireless > AP Information > AP List > Add to Mgnt. AP
List
The icon of AP become gray after the controller managed the AP
successfully.
Figure 61 MONITOR > Wireless > AP Information > AP List

26/124
www.zyxel.com
2 Does AP get the IP?
Check IP address via DHCP table or access AP by console cable.
DHCP table:
If the DHCP server is one of the ZyXEL devices - UAG, ZyWALL and NXC, you
can check the IP by GUI.
Figure 62 DASHBOARD > Dashboard > System Status
Figure 63 DASHBOARD > Dashboard > System Status > DHCP Table
Console:
Get the IP by connecting console cable to access AP via terminal software.
Figure 64 Tera Term > AP > Router > show interface all
If the IP address doesn’t get the IP, it will show 0.0.0.0. Please check Ethernet
traffic between the DHCP server and AP.
Check the DHCP server if send the IP address to managed AP.
Check the DHCP server pool is full?

27/124
www.zyxel.com
Check the switch configuration, like port blocked, VLAN setting…etc.
Capture the Ethernet packets by Wireshark.
Figure 65 The process of AP asks the IP from DHCP server.
Figure 66 AP gets the IP.
Figure 67 AP broadcast the CAPWAP packet to controller
When AP gets the IP, you will see the IP shows on the console.
Figure 68 Tera Term > AP > Router > show interface all
3 Check the CAPWAP status of AP
If the AP is managed by the controller, the AC-IP shows the controller’s IP
and the SM-state is RUN(8).
Figure 69 Tera Term > AP > Router > show capwap ap info > SM-State
If the SM-State doesn’t show RUN(8), please check the AC-IP.
Figure 70 Tera Term > AP > Router > show capwap ap info > SM-State
How to write the AC-IP address by console?
Figure 71 Tera Term > AP > Router > show capwap ap ac-ip

28/124
www.zyxel.com
If you know the AC-IP, you can also write the IP directly via console.
Figure 72 Tera Term > AP > Router > configure terminal > capwap ap ac-ip
<AC-IP1> <AC-IP2> > write > exit > rebot
Note: If there is only one controller in the topology, write the controller’s IP in
the <AC-IP1> and put any IP in the <AC-IP2>.
4 Can managed AP and NXC communicate with each other?
Access managed AP and NXC by console or SSH and ping to each other to
check the status of network traffic.
Managed AP ping to controller successfully:
Figure 73 Tera Term > AP > Router > ping <AC-IP>
Controller ping managed AP successfully:
Figure 74 Tera Term > NXC > Router > ping <AP-IP>
Ping loss
If the managed AP or controller pings to each other fail, you have to check
the Ethernet device or network cable.
Figure 75 Tera Term > NXC > Router > ping <AP-IP>

29/124
www.zyxel.com
Check switch, router or firewall whether blocks the traffic or CAPWAP
port 5246.
Trace Route:
Use trace route to find the packets are dropped out on where.
Figure 76 Tera Term > AP > Router > traceroute <AC-IP>
Use Wireshark capture CAPWAP packets between controller and managed
AP to check the status of network traffic.
5 How to know APs off-line cause by external factors?
Check the last offline time of off-line APs.
Last Offline Time: This displays the most recent time the AP went off-line. N/A
displays if the AP has either not come on-line or gone off-line since NXC last
started up.
Figure 77 MONITOR > Wireless > AP Information > AP List
If all the APs or a group of APs show offline at the same time, there might the
power supply issue on the PoE SW or configuration of SW.
Please check by following steps.
Does someone turn off the switch or some devices in the topology?
Does the switch block the port of VLAN for APs traffic?
Is the voltage stable in customer site?
If some of APs offline with random time, please check by following steps.
30/124
www.zyxel.com
Does the network cable plug-in the port properly.
Does the network cable have a good qualify?
Does someone touch the network cable or turn off the APs?
Check the PoE status of switch. Does the PoE SW power off the port?
Does AP reboot?
If AP has rebooted, the AP system uptime will shorter than
controller system uptime.
Figure 78 Tera Term > AP > Router > show system uptime
Note: If AP off-line isn’t caused by external factors, please collect the logs.
6 Information collection and report the issue to the HQ.
Capture the related logs file from controller and managed AP.
Collect log files of controller by GUI
Capture the entire category to provide RD completed information.
Figure 79 MAINTENANCE > Diagnostics > Diagnostics > Collect on Controller
> Collect Now.
Note: Capture the logs need to spend some time, please kindly wait.
Collect log files of managed AP by controller GUI
Select the managed AP to the Collected APs.
Figure 80 MAINTENANCE > Diagnostics > Diagnostics > Collect on AP >
Collect Now.

31/124
www.zyxel.com
Download log files.
Figure 81 MAINTENANCE > Diagnostics > Diagnostics > Files > Download
Provide topology/controller config/packet/remote access/Diagnostic info
to HQ to do advanced check.
4.3 Symptom: Managed AP error with conflict
When the color of managed AP icon is red, it means AP has configuration
conflict.
Figure 82 MONITOR > Wireless > AP Information > AP List.
Select the error managed AP and gets more information, which will show
you the message where the configuration is incorrect.
Figure 83 MONITOR > Wireless > AP Information > AP List > More Information

32/124
www.zyxel.com
There is some information you have to know the troubleshooting and follow
the order of the steps.
The procedure of the troubleshooting:
1. Check the configuration of the controller
2. Check AP’s wireless card
3. Information collection and report the issue to the HQ
1 Check the configuration of the controller
Example of VLAN Conflict: mismatches management VLAN ID
Figure 84 MONITOR > Wireless > AP Information > AP List
Check the system log.
Figure 85 MONITOR > Log > View Log
The managed AP was set with management VLAN ID 10, but the controller
is set with management VLAN ID 1.
Change management VLAN ID by GUI. Select the managed AP to modify
the managed VLAN ID.
Figure 86 CONFIGURATION > Wireless > AP Management > Mgnt. AP List >
Edit

33/124
www.zyxel.com
Figure 87 CONFIGURATION > Wireless > AP Management > Mgnt. AP List >
Edit > Edit AP List > VLAN Settings
Check the “Override Group VLAN setting” and “Force Overwrite VLAN
Config” boxes to modify the VLAN ID of controller for having same
management VLAN ID as the managed AP. Changing “Management
VLAN ID” to 10, and unchecking “As Native VLAN” box which make
NWA5160-N sending out packet with VLAN ID 10 tag.
Note: Check the As Native VLAN means the packets with VLAN ID untag.
Apply the configuration and checking management VLAN ID of controller.
Figure 88 MONITOR > Wireless > AP Information > AP List
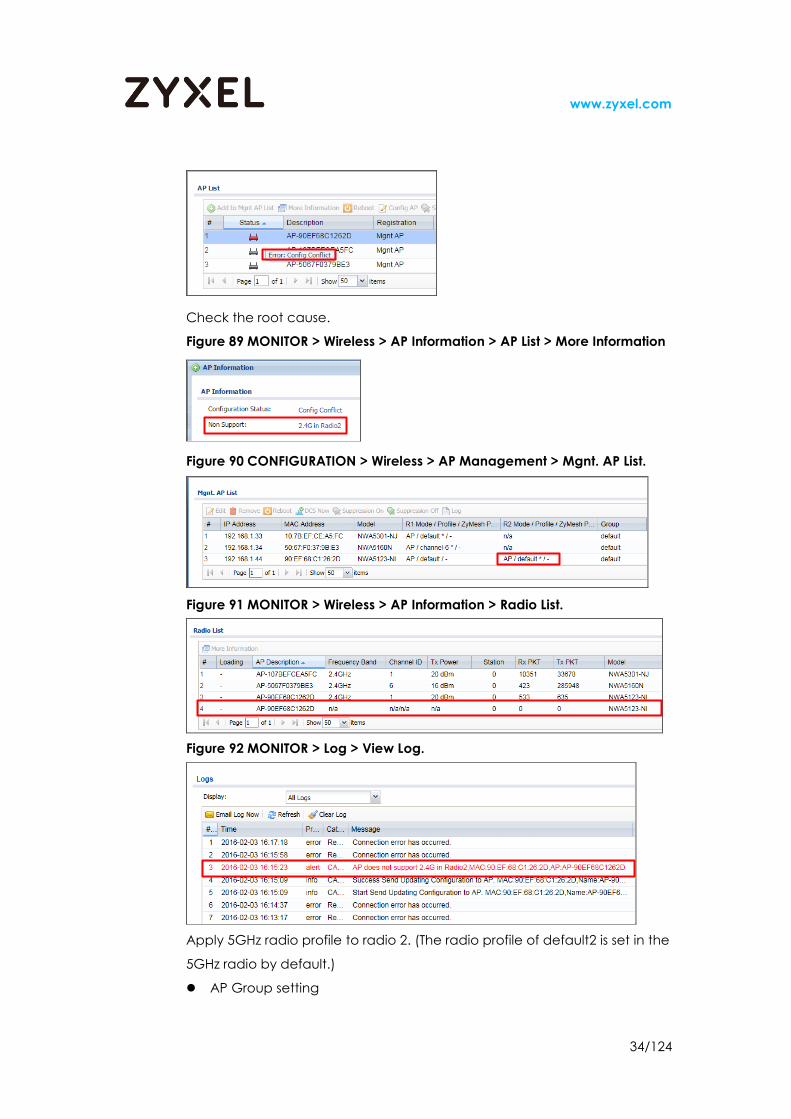
Example of Configuration Conflict about the radio profile: the radio 2 was
set in 2.4GHz.
v
34/124
www.zyxel.com
Check the root cause.
Figure 89 MONITOR > Wireless > AP Information > AP List > More Information
Figure 90 CONFIGURATION > Wireless > AP Management > Mgnt. AP List.
Figure 91 MONITOR > Wireless > AP Information > Radio List.
Figure 92 MONITOR > Log > View Log.
Apply 5GHz radio profile to radio 2. (The radio profile of default2 is set in the
5GHz radio by default.)
AP Group setting

35/124
www.zyxel.com
Figure 93 CONFIGURATION > Wireless > AP Management > AP Group > Edit >
Radio 2 Setting
Edit Managed AP by single
Figure 94 CONFIGURATION > Wireless > AP Management > Mgnt. AP List >
Edit
Check managed AP status on controller.
Figure 95 MONITOR > Wireless > AP Information > AP List
Note: Make sure radio 1 and 2 are activated and applied with the correct
profiles.
2 Check AP’s wireless card
There are two symptoms when the wireless card has problem.
LED WLAN is off
SSID doesn’t broadcast
Check controller’s MAC address incorrect? Is there any status show n/a?
Figure 96 MONITOR > Wireless > AP Information > Radio List

36/124
www.zyxel.com
Tx/Rx PKT count, Rx FCS Error Count, Tx Retry Count and TX Power show zero.
Figure 97 MONITOR > Wireless > AP Information > Radio List
Check the WLAN status of managed AP with n/a via console.
Figure 98 Tera Term > Router > show interface all
Check the wireless card status of managed AP via console.
Figure 99 For different models, please use different CLIs
Model NWA3K-N /
NWA5K-N
NWA5301-NJ / NWA5120 series AP.
CLI Router> show
wlan all
Check status by 2 CLIs
1. Router>_debug show file
/proc/interrupts
2. Router> _debug wireless_dbg
iwconfig
Wireless Card status
Normal
status
unknown
card
1. Display: PCI wifi1
2. Display wlan-1-1 and wlan-2-1 info
Abnormal
status
None 1. No PCI wifi1 info
2. No wlan-2-1 info
Example of NWA3K-N with normal status: It shows unknow card.
Figure 100 Tera Term > AP > Router > show wlan all

37/124
www.zyxel.com
Example of NWA3K-N with abnormal status: It shows none.
Figure 101 Tera Term > AP > Router> show wlan all
Example of NWA5120 series with normal status: It shows PCI wifi1 and the
information of interface.
Figure 102 Tera Term > AP > Router >_debug show file /proc/interrupts
Figure 103 Tera Term > AP > Router> _debug wireless_dbg iwconfig
Example of NWA5120 series with abnormal status: There is no PCI wifi1 info.
Figure 104 Tera Term > AP > Router>_debug show file /proc/interrupts

38/124
www.zyxel.com
There is no wlan-2-1 info.
Figure 105 Tera Term > AP > Router> _debug wireless_dbg iwconfig
Let the managed AP implement cold start (unplug/plug in the power of
managed AP). If wireless card status still in abnormal, please RMA the AP.
3 Information collection and report the issue to the HQ
Capture the related logs file from controller and managed AP.
Collect log files of controller by GUI
Capture the entire category to provide RD completed information.
Figure 106 MAINTENANCE > Diagnostics > Diagnostics > Collect on Controller
> Collect Now.
Note: Capture the logs need to spend some time, please kindly wait.
Collect log files of managed AP by controller GUI
Select the managed AP to the Collected APs.
Figure 107 MAINTENANCE > Diagnostics > Diagnostics > Collect on AP >
Collect Now.

39/124
www.zyxel.com
Download log files.
Figure 108 MAINTENANCE > Diagnostics > Diagnostics > Files >
Download
Provide topology/controller config/packet/remote access/Diagnostic info
to HQ to do advanced check.
4.4 Symptom: Managed AP keep updating
If a group of APs has upgraded the FW and there is a several AP still keeps
updating, please collect the info to HQ by following steps.
Controller:
Figure 109 MONITOR > Wireless > AP Information > AP List
Managed AP:
Check the status of managed AP via console. It shows updating(7).
Figure 110 Tera Term > AP > Router > show capwap ap inof

40/124
www.zyxel.com
This issue may cause by below reasons:
1. For NWA3000-N series, it could be caused by boot code version is 1.13
2. Unstable network connection between controller and managed AP
3. Upgrade process could not pass through NAT if Controller or managed
is in different network
4. Collect the information
To clarify the root cause, please follow the steps.
1 For NWA3000-N series, check the boot code version and FW version
This step is only for NWA3000-N series.
The original design of NWA3000-N series with boot code version v1.13 was
not supported by controller. Hence, it would keep update after the AP in
the managed mode.
If the boot code version is newer than v1.13 and still have issue, we suggest
to use upgrade the firmware to 2.23 patch 8 or above.
AP in standalone mode
Check the boot code version
Figure 111 NWA3560-N > DASHBOARD > Device Information > Firmware
Version
AP in managed mode
Figure 112 Tera Term > AP > Router> show version
Note:
If the boot module is v1.13, please upgrade the FW to v2.23 patch 2
and then upgrade to the FW v2.23 patch 8.

41/124
www.zyxel.com
If the boot module is newer than v1.13, please upgrade the FW to the
2.23 patch 8.
2 Unstable network connection between controller and managed AP
Ping test between controller and managed AP via SSH to check the
network connection on both directions is stable (no long latency or ping
drop).
AP ping to controller and trace route of AC.
Figure 113 Tera Term > AP > Router > ping <AC-IP>
According the result of trace route, you will know which path cost the more
time for response.
Figure 114 Tera Term > AP> Router > traceroute <AC-IP>
Controller ping to AP
Figure 115 Tera Term > NXC > Router > ping <AP-IP>
Note: By default, the maximum number of AP for FW upgrading is 10 units at
one time. If the first group (maximum 10 APs) upgrades firmware failed, the
AP will be released and upgraded again on the next group.
3 Upgrade process could not pass through NAT if Controller or managed AP is
in different network.
Ensure that the firewall does not block CAPWAP port. (The CAPWAP default
port is 5246.)
4 Information collection and report the issue to the HQ.
Capture the related logs file from controller and managed AP.
Collect log files of controller by GUI
Capture the entire category to provide RD completed information.
Figure 116 MAINTENANCE > Diagnostics > Diagnostics > Collect on
Controller > Collect Now.

42/124
www.zyxel.com
Note: Capture the logs need to spend some time, please kindly wait.
Collect log files of managed AP by controller GUI
Select the managed AP to the Collected APs.
Figure 117 MAINTENANCE > Diagnostics > Diagnostics > Collect on AP >
Collect Now.
Download log files.
Figure 118 MAINTENANCE > Diagnostics > Diagnostics > Files > Download
Provide topology/controller config/packet/remote access/Diagnostic info
to HQ to do advanced check.

43/124
www.zyxel.com
5 Wireless
5.1 Symptom: Cannot see the SSID name.
There are some information you have to know from customer and follow the
order of the questions you will know how to troubleshooting.
The procedure of the troubleshooting:
1. Check the configuration of the controller (USG/ ZyWALL/ NXC).
2. Information collection and report the issue to the HQ.
1 Check the configuration of controller (USG/ ZyWALL/ NXC).
Check the SSID status whether it is hidden?
Figure 119 CONFIGURATION > Objetct > AP Profile > SSID > SSID List > Edit
Check the SSID if binding with the radio profile?
Figure 120 Configuration > AP Management > AP Group > Edit AP Group
Profiled<name> > Radio Setting

44/124
www.zyxel.com
Check the radios if binding the correct band? (Radio 1 is 2.4GHz band and
radio 2 is 5GHz band)
Figure 121 CONFIGURATION > Object > AP Profile > Radio > Edit
Figure 122 CONFIGURATION > Wireless > AP Management > AP Group > Edit
The AP using the channel is the Weather Radar?
If using the channels has overlap with the 112~120 must waiting 10 min and
using the DFS channels need waiting 1 min just will be seen the SSID.
Figure 123 Configuration > Object > AP Profile > Radio > Edit

45/124
www.zyxel.com
Note: If using the tunnel mode and then the CAPWAP is disconnected (AP
status on NXC AP information is “offline”) the SSID also will be cannot see the
SSID. (Please refer the topic for “Managed AP”)
2 Information collection and report the issue to the HQ.
Capture the related logs file from controller and managed AP.
Collect log files of controller by GUI
Capture the entire category to provide RD completed information.
Figure 124 MAINTENANCE > Diagnostics > Diagnostics > Collect on
Controller > Collect Now.
Note: Capture the logs need to spend some time, please kindly wait.
Collect log files of managed AP by controller GUI
Select the managed AP to the Collected APs.
Figure 125 MAINTENANCE > Diagnostics > Diagnostics > Collect on AP >
Collect Now.

46/124
www.zyxel.com
Download log files.
Figure 126 MAINTENANCE > Diagnostics > Diagnostics > Files > Download
Provide topology/controller config/packet/remote access/Diagnostic info
to HQ to do advanced check.
Capture the packet for wireless
Use OmniPeek (software) to capture wireless packet between STA and AP.
If the user cannot use the OmniPeek (software) to capture wireless packet,
please use another NWA3000-N series and NWA5000 –N series to set monitor
mode to capture wireless packet, and packet capture feature on NXC
series AP on the standalone mode capture the wireless packet.
Note: Capture the wireless packet and provide the AP MAC address、client
MAC address、station info to HQ to verify the packet.
Station devices detail information:
Devices mode
Devices drive version
Devices wireless card MAC address and IP address
The client connecting AP MAC address and IP address
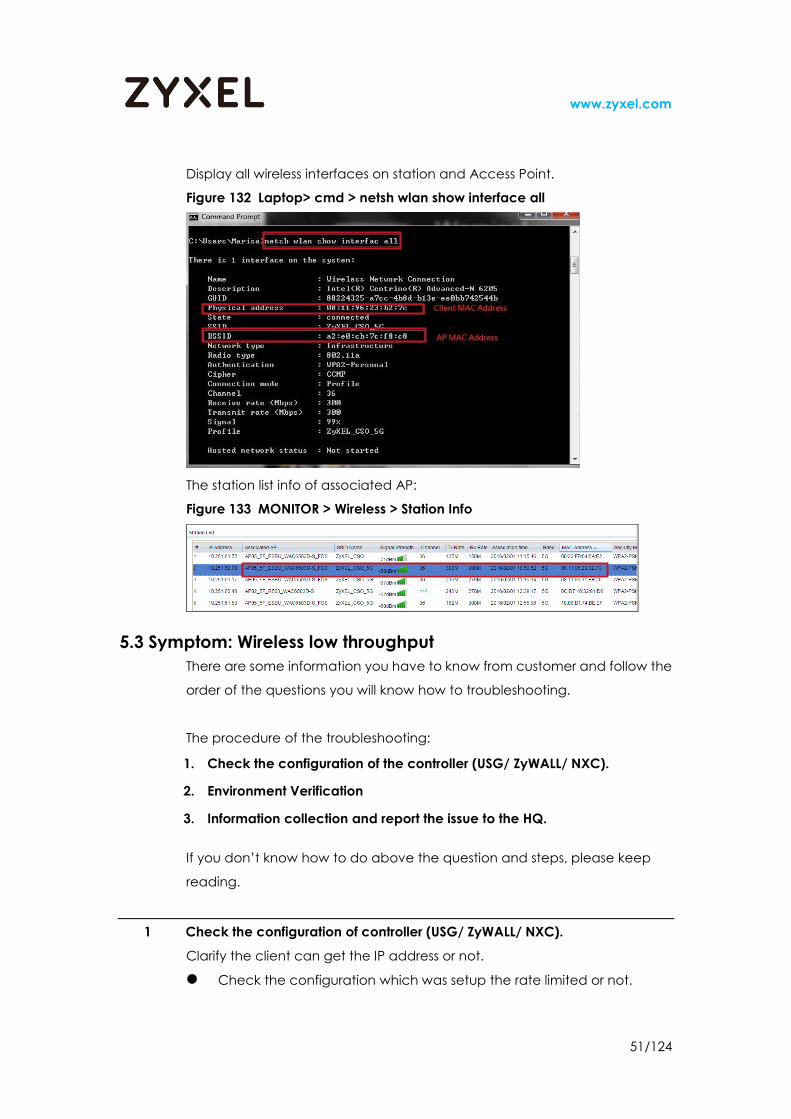
Display all wireless interfaces on station and Access Point.
Figure 127 Laptop> cmd > netsh wlan show interface all

47/124
www.zyxel.com
The station list info of associated AP:
Figure 128 MONITOR > Wireless > Station Info

48/124
www.zyxel.com
5.2 Symptom: Connection Failure
There are some information you have to know from customer and follow the
order of the questions you will know how to troubleshooting.
The procedure of the troubleshooting:
1. Check the configuration of the controller (USG/ ZyWALL/ NXC).
2. Environment Verification
3. Information collection and report the issue to the HQ.
If you don’t know how to do above the question and steps, please keep
reading.
1 Check the configuration of controller (USG/ ZyWALL/ NXC).
Clarify which kind of connection is failed.
Check the configuration which was setup the mac-filter or not.
Check the AP output power which was set to excessive AP output
power or low output power or not.
If the 802.1x authentication fails, please refer the 802.1x
troubleshooting Guide.
Check the configuration of controller to see if the router’s security is
interfering. If you were using WPA or WPA2 already, try changing the
encryption mode from TKIP to AES.
Check the AP’s configuration which was setup the RSSI threshold or
not.
If there are the logs which were indicated AP CAPWAP status is offline
or error, please refer the CAPWAP troubleshooting.
2 Environment Verification.
Make sure the wireless site survey performance is exceptionally.
Check the AP’s signal strength directly by the utility of the station. Using the
SSID scanning free application “NetSurveyor” to scan the environment and
check the AP signal and co-channel / overlapping.

49/124
www.zyxel.com
Using the Wi-spy to scanning the environment have others interference.
3 Information collection and report the issue to the HQ.
Capture the related logs file from controller and managed AP.
Collect log files of controller by GUI
Capture the entire category to provide RD completed information.
Figure 129 MAINTENANCE > Diagnostics > Diagnostics > Collect on
Controller > Collect Now
Note: Capture the logs need to spend some time, please kindly wait.
Collect log files of managed AP by controller GUI
Select the managed AP to the Collected APs.
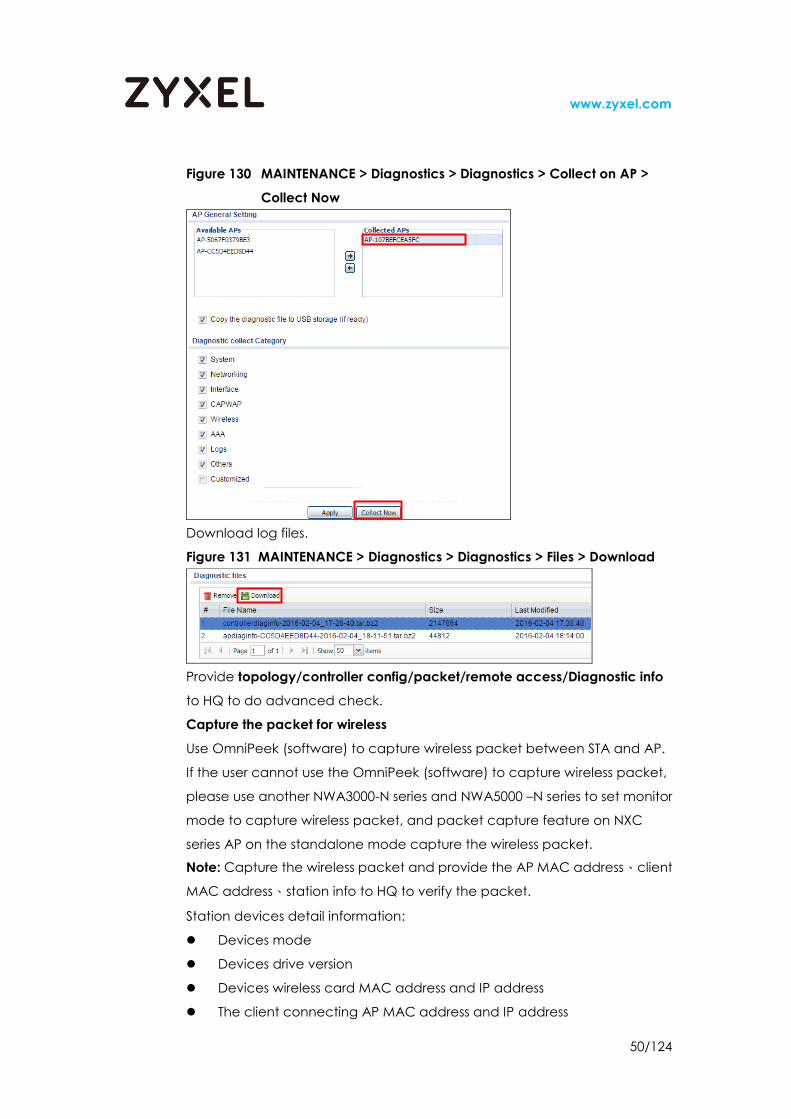
50/124
www.zyxel.com
Figure 130 MAINTENANCE > Diagnostics > Diagnostics > Collect on AP >
Collect Now
Download log files.
Figure 131 MAINTENANCE > Diagnostics > Diagnostics > Files > Download
Provide topology/controller config/packet/remote access/Diagnostic info
to HQ to do advanced check.
Capture the packet for wireless
Use OmniPeek (software) to capture wireless packet between STA and AP.
If the user cannot use the OmniPeek (software) to capture wireless packet,
please use another NWA3000-N series and NWA5000 –N series to set monitor
mode to capture wireless packet, and packet capture feature on NXC
series AP on the standalone mode capture the wireless packet.
Note: Capture the wireless packet and provide the AP MAC address、client
MAC address、station info to HQ to verify the packet.
Station devices detail information:
Devices mode
Devices drive version
Devices wireless card MAC address and IP address
The client connecting AP MAC address and IP address
51/124
www.zyxel.com
Display all wireless interfaces on station and Access Point.
Figure 132 Laptop> cmd > netsh wlan show interface all
The station list info of associated AP:
Figure 133 MONITOR > Wireless > Station Info
5.3 Symptom: Wireless low throughput
There are some information you have to know from customer and follow the
order of the questions you will know how to troubleshooting.
The procedure of the troubleshooting:
1. Check the configuration of the controller (USG/ ZyWALL/ NXC).
2. Environment Verification
3. Information collection and report the issue to the HQ.
If you don’t know how to do above the question and steps, please keep
reading.
1 Check the configuration of controller (USG/ ZyWALL/ NXC).
Clarify the client can get the IP address or not.
Check the configuration which was setup the rate limited or not.

52/124
www.zyxel.com
Check the AP output power is 100% or not. We suggest the AP power is
50% or less than 50%, it is because the client’s output power is less than
AP, so it will caused the AP can be sent the packet for client but the
packet cannot be reached by AP.
Check the security mode of configuration which was setup with TKIP or
AES.
Check the AP which has setup the RSSI threshold or not. If the client
reaches the RSSI threshold, the client can’t connect the AP
successfully.
2 Environment Verification
Make sure the wireless site survey performance is exceptionally.
Check the client which was connected with far AP or near one. If the
station is a laptop, use the CMD command “netsh wlan show interface”
to check the laptop which connects with nearby client AP or not.
Client can ping to the gateway, Internet or not? Using the CMD
command “ping” and ping to the Gateway and Internet on the same
time to verify the high latency which was bottleneck on Internet or AP.
Check the client which was connected with far AP or near one. Using
the CMD command “tracert” to show you the path your traffic takes
when you are attempting to connect to another machine.
Check the distance of AP which the transmit AP to the receive station.
Check the security of APs’ configuration. The security mode is setup
with TKIP mode, and it will cause the client cannot reach 802.11n type.
3 Information collection and report the issue to the HQ.
Collect the basic information on AP.
Capture the Ethernet packets between DHCP server and AP, if the
client cannot get IP address.
Collect the AP and NXC controller log via diagnostics.
Provide the station devices detail information.
6 Captive Portal The process of captive portal redirect on controller
1. User tries to access Internet and open browser.
2. Captive Portal intercepts and sends Login Page.
3. Username / Password entered are sent to authentication server.

53/124
www.zyxel.com
4. Authentication server authenticates. If NXC Controller DNS query the URL
successfully. NXC controller will redirect Captive Portal to client’s laptop.
5. After successful authentication, user is allowed to access Internet.
Figure 134 The flow chart of captive portal redirect on AP
6.1 Symptom: Cannot see the Captive Portal on wireless device
(cannot find the webpage) or NXC managed page is redirected
instead of Captive Portal
The captive portal cannot be redirected on the device or device access
internet doesn’t blocked by captive portal.
There are key points for you to set the captive portal:
The traffic is blocked by captive portal must can access internet.
The valid DNS server is necessary.
If NXC controller is not a gateway, the interface for captive portal must
write the gateway address.
The procedure of the troubleshooting:
1. Check the station get the IP can access Ethernet when disable captive
portal.
2. The station get the IP can resolve the URL by valid DNS.
3. Check the configuration of the NXC.
Redirect on Controller

54/124
www.zyxel.com
Redirect on AP
4. Check the topology.
NXC controller location.
Internal or external Captive Portal?
5. Check the network.
6. If the user login to the captive portal before?
7. Information collection and report the issue to the HQ.
1 Check the station get the IP can access Ethernet when disable captive
portal.
Use CLI to confirm the computer if gets the IP and DNS address.
Figure 135 Computer > cmd > ipconfig /all
If the station doesn’t get the IP, you will see the incorrect IP and DNS address
station get.

55/124
www.zyxel.com
Confirm the computer can access internet.
Figure 136 Computer > cmd > ping 8.8.8.8
2 The station get the IP can resolve the URL by valid DNS.
If station gets the IP and DNS address, you can ping the global website to
resolve the URL by valid DNS.
Figure 137 Computer > cmd > ping www.google.com
Use CLI to resolve global website.
Figure 138 Computer > cmd > nslookup www.google.com

56/124
www.zyxel.com
3 Check the configuration of the NXC.
If the NXC controller is not a gateway, please check the interface for station
doing captive portal whether write the gateway IP address.
Assume the stations in the VLAN10 must blocked by captive portal. The
interface VLAN10 in the NXC controller must write the correct gateway IP
address, otherwise; the NXC cannot redirect the correct captive portal
page.
Figure 139 CONFIGURATION > Network > VLAN > VLAN10 > IP Address
Assignment
There are two types for user to set the authentication policy – Redirect on
controller and Redirect on AP.
Note: Do not enable captive portal redirect on the NXC controller and on
the Managed AP simultaneously.
Redirect on controller
Enable the function of Captive Portal.
Figure 140 CONFIGURATION > Captive Portal > Captive Portal

57/124
www.zyxel.com
Enable the auth. policy to “force” the source traffic.
Figure 141 CONFIGURATION > Captive Portal > Redirect on Controller >
Authentication Policy Rule
Figure 142 CONFIGURATION > Captive Portal > Redirect on Controller >
Authentication Policy Rule
Note: Make sure the traffic matches the User Authentication Policy. As
above screenshot, the traffic must from the range
192.168.10.33~192.168.10.200, otherwise; the NXC will not able to block the
traffic and redirect the Captive Portal to users.
Traffic must go through NXC when you redirect the captive portal on NXC
controller.
If the traffic doesn’t pass-through the NXC and it goes between switches or
routers, the NXC cannot monitor the traffic to block station access internet
and the captive portal would not be redirected.
To let the traffic go back to NXC, set tunnel for Forwarding Mode of SSID.

58/124
www.zyxel.com
Figure 143 Configuration > Object > AP Profile > SSID
Figure 144 CONFIGURATION > Object > AP Profile > SSID > SSID List
For NXC2500
If a NXC2500 acts as a bridge switch, the uplink port must be set to P1 for
authenticating the traffic via the Captive Portal from the clients.
Redirect on AP
Enable the function of Captive Portal.
Figure 145 CONFIGURATION > Captive Portal > Captive Portal

59/124
www.zyxel.com
Enable the auth. policy to “force” the source traffic. The auth. policy rule in
Redirect on AP is an SSID-based policy to filter the traffic from AP.
Note: The forwarding mode of SSID must be local bridge.
Figure 146 CONFIGURATION > Captive Portal > Redirect on AP >
Authentication Policy Rule
Figure 147 CONFIGURATION > Captive Portal > Redirect on AP >
Authentication Policy Rule > Edit
Create an auth. policy group profile and include the rule entry.
Figure 148 CONFIGURATION > Captive Portal > Redirect on AP >
Authentication Policy Rule Group> Edit

60/124
www.zyxel.com
Select the policy for the AP group
Note: Portal redirect on the AP still needs the controller to be involved in the
authentication flow. If the connection to the controller is lost, there is an
option to skip authentication.
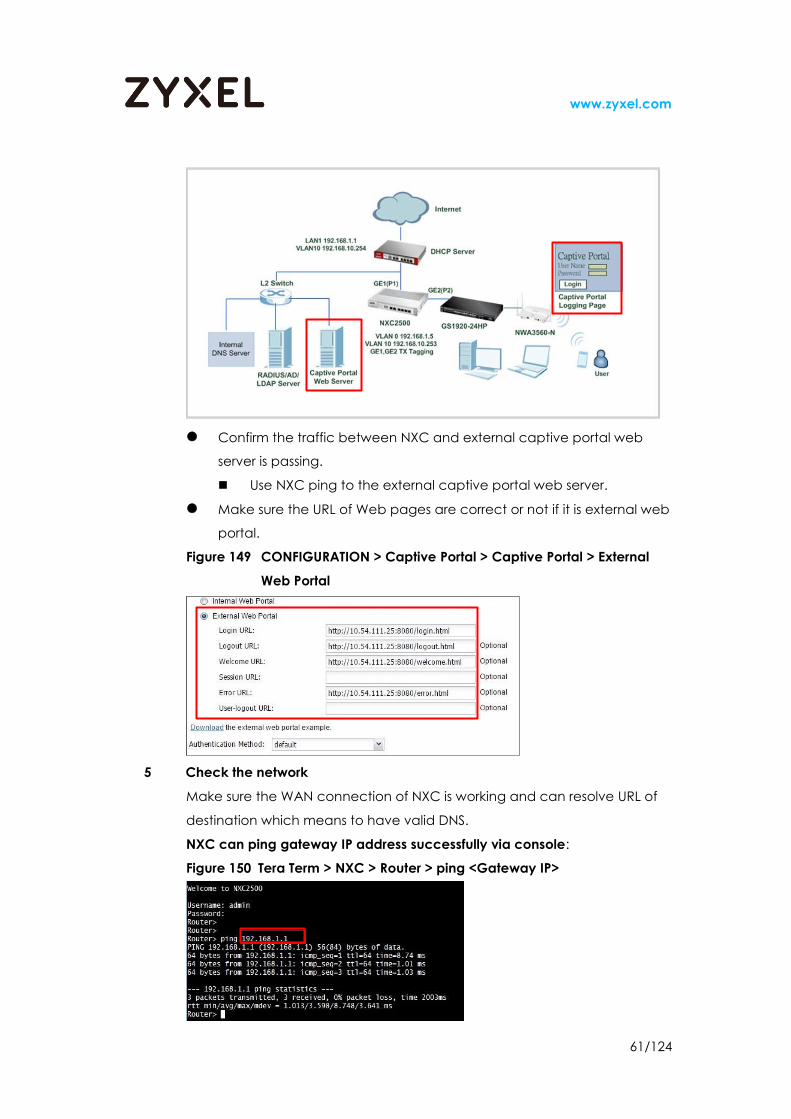
4 Check the topology. Internal or external Captive Portal web server?
Internal: Login page hosted on NXC.
External: Login page hosted on external web server and then NXC will
redirect the login page to external web server.
61/124
www.zyxel.com
Confirm the traffic between NXC and external captive portal web
server is passing.
Use NXC ping to the external captive portal web server.
Make sure the URL of Web pages are correct or not if it is external web
portal.
Figure 149 CONFIGURATION > Captive Portal > Captive Portal > External
Web Portal
5 Check the network
Make sure the WAN connection of NXC is working and can resolve URL of
destination which means to have valid DNS.
NXC can ping gateway IP address successfully via console:
Figure 150 Tera Term > NXC > Router > ping <Gateway IP>

62/124
www.zyxel.com
NXC can ping and resolve the global website such as Google (IPv4)
successfully via console:
Figure 151 Tera Term > NXC > Router > ping <Public DNS IP>
6 If the user login to the captive portal before?
If the user has logged into the captive portal before and didn’t log out, the
station will still remain in the user list until the authentication times out.
Figure 152 MONITOR > System Status > Login Users
Assume the user “joy” was logged into the Captive Portal and did not
logout, the device will not see Captive Portal again and access internet
directly.
7 Information collection and report the issue to the HQ.
Check the IP table which has station’s IP who doesn’t do the captive portal
via CLI.
Figure 153 Tera Term > Router > debug system iptables list table nat > Chain
FORCE AUTH

63/124
www.zyxel.com
Check if user is still existed after user logout from NXC captive portal. If you
still could see user’s IP address (192.168.10.33 as below screenshot) from the
“Chain FORCE_AUTH”, it means the device (192.168.10.33) is used to access
NXC via other account (like admin).
Check the authentication policy is written in firewall NAT table in “Chain
FORCE_AUTH_POLICY”.
As below screenshot, NXC will block source IP from range
192.168.10.33~192.168.10.200 which is the authentication policy configured
from CONGIGURATION > Captive Portal.
Figure 154 Tera Term > NXC > Router > debug system iptables list table nat
> Chain FORCE_AUTH_POLICY
Capture the packets on NXC.
Please adjust Captured Packet Files to 100 MB to avoid oversize.
Figure 155 MAINTENANCE > Diagnostics > Packet Capture > Capture

64/124
www.zyxel.com
Station can ping NXC and station opens new browser
Webpage is not redirected to Captive Portal (can’t find the webpage)
Stop capturing packet and download the captured files
Please indicate the IP of NXC, AP, station and the URL of the webpage
which station is going to open.
Download log files.
Figure 156 MAINTENANCE > Diagnostics > Diagnostics > Files > Download
Provide topology/controller config/packet/remote access/Diagnostic info
to HQ to do advanced check.
6.2 Symptom: Login denied
The error massage shows “login denied”.
Figure 157 The login page of NXC’s captive portal

65/124
www.zyxel.com
The procedure of the troubleshooting:
1. Login account doesn’t exist in server or password is incorrect.
2. Admin type cannot login captive portal page
3. Information collection and report the issue to the HQ.
1 Login account doesn’t exist in server or password is incorrect.
The error massage will be “login denied” if login name is not existed in server
or password is not correct.
Please check the user name is created in the server
Check the password is correct.
2 Admin type cannot login captive portal page
The error massage will be “Login denied: Verify user has failed” if login name
is admin type.
Figure 158 The login page of NXC’s captive portal

66/124
www.zyxel.com
3 Information collection and report the issue to the HQ.
Check the System & debug log of NXC
System log on NXC could know why login denied in first place.
Figure 159 MONITOR > Log > View log
Choose debug log for more user information:
Figure 160 CONFIGURATION > Log & Report > Log Setting > System log > Edit
> Active Log and Alert (AC) > User
67/124
www.zyxel.com
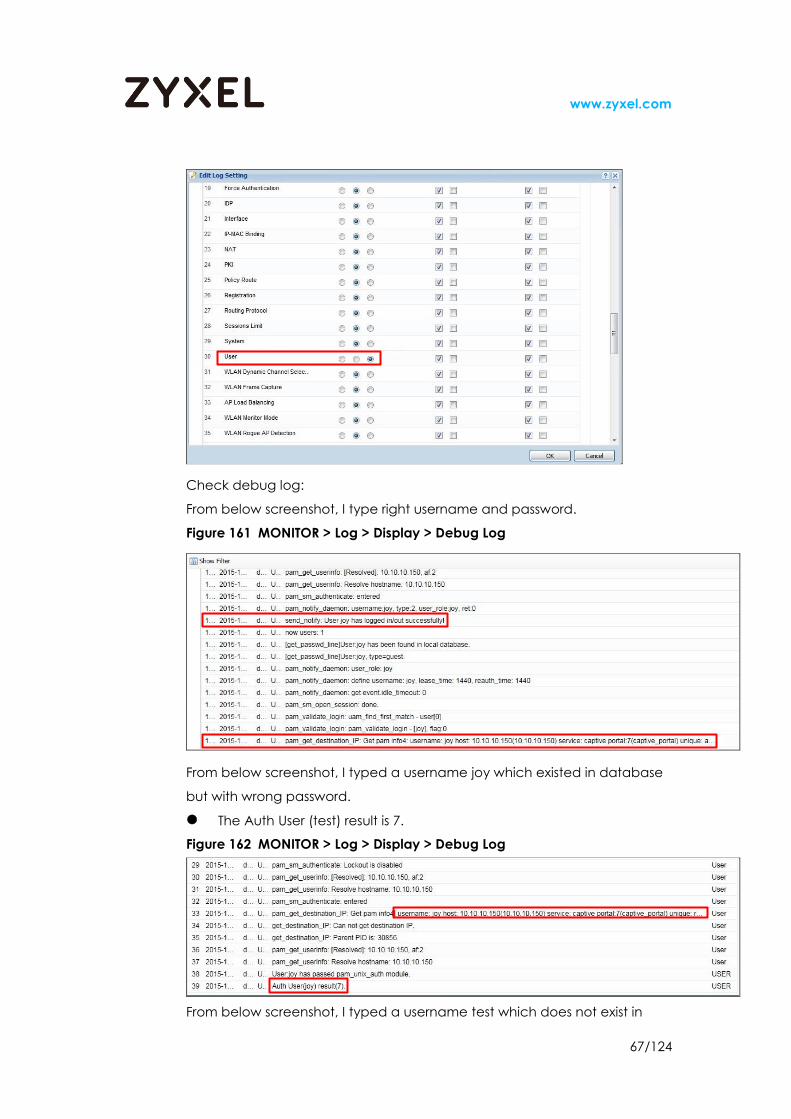
Check debug log:
From below screenshot, I type right username and password.
Figure 161 MONITOR > Log > Display > Debug Log
From below screenshot, I typed a username joy which existed in database
but with wrong password.
The Auth User (test) result is 7.
Figure 162 MONITOR > Log > Display > Debug Log
From below screenshot, I typed a username test which does not exist in

68/124
www.zyxel.com
database.
The Auth User (test) result is 9.
Figure 163 MONITOR > Log > Display > Debug Log
Choose other debug log for more information:
Active log and alert (AC): account, captive portal, authentication server,
force authentication
Figure 164 CONFIGURATION > Log & Report > Log Setting > System log > Edit
> Active Log and Alert (AC)
Active log and alert (AP): account, force authentication, user.
Figure 165 CONFIGURATION > Log & Report > Log Setting > System log > Edit
> Active Log and Alert (AC)

69/124
www.zyxel.com
7 Roaming
7.1 What is Roaming
When WiFi user walks from one AP’s coverage to the other AP’s without
disconnection, we call roaming.
For example, station 2 wants to walk from AP1’s coverage to AP2’s. Station 2
“Reassociation “ with AP2 first, and then “Deathauthentication” with AP1.
Figure 166 The Process of Roaming
7.2 What’s the setting conditions of roaming
The APs need to set the same SSID, security, and the same DHCP server.
Figure 167 CONFIGURATION > Object > AP profile > SSID > SSID List > Add

70/124
www.zyxel.com
Figure 168 Configuration > Wireless > AP Management > Mgnt. AP List > Edit
AP List > Radio1 Setting
Checking the APs coverage range should overlap. (You may use the
application to scan the signal, like inSSIDer)
Figure 169 inSSIDer
The station usually disconnect with AP when the RSSI lower than -60dBm, so
the overlapping edge should not lower than -60dBm to avoid signal too
weak for connection.
We can check the RSSI of connected station on AP by CLI.
Signal strength = RSSI-95 (ex. 59-95= -36dBm)

71/124
www.zyxel.com
Figure 170 Tera Term > AP > Router> show wlan slot1 list all sta
7.3 The Limitation of roaming
“Band Select” may potentially cause interruptions for time-sensitive
applications because of roaming delays
The connection might be not stable if the “Load Balance” is enabled
and the station number is reached to the maximum number. The
roaming station may connect to the AP and disconnection soon.
To set the threshold in radio might cause disconnection between AP
and station. When the overlap area RSSI is lower than threshold value,
station is not able to connect to AP.
7.4 Symptom: Why station can’t connect to the AP2
If the station can’t connect to AP2 when roaming, please follow the steps to
troubleshooting.
1. Check AP2’s the SSID, Security, and DHCP server are the same as AP1.
2. Check radio threshold
3. Does station always connect to AP1?
1 Check AP2’s the SSID, Security, and DHCP server are the same as AP1
If using the controller to control managed APs, it’s better to make AP1 and
AP2 in the same AP group that has the same SSID and security.
AP1 and AP2 should use the same DHCP server and in the same subnet.
NXC
Use AP group to set the same configuration for AP1 and AP2.
Figure 171 CONFIGURATION > Wireless > AP Management > AP Group >
Radio1 Setting

72/124
www.zyxel.com
Figure 172 CONFIGURATION > Wireless > AP Management > AP Group > AP
List
Standalone AP
Configure standalone AP SSID and Radio by below GUI page.
Figure 173 CONFIGURATION > Object > SSID > SSID List > Edit SSID Profile
Figure 174 CONFIGURATION > Wireless > AP Management > WLAN Setting
2 Check radio threshold.
When the threshold is enable and set to the value higher than the

73/124
www.zyxel.com
overlapped area RSSI value, the station is not able to connect with AP.
For example, the station signal threshold is -50dBmm, but the overlapped
area RSSI is -60 to -65dBmm. Station is not able to connect with AP.
The threshold is disabled in default setting, and can change in GUI.
Figure 175 CONFIGURATION > Object > AP Profile > Radio > Edit Radio
Profile > Show Advanced Settings
3 Does station always connect to AP1?
If AP1’s coverage is too large to overlap most of AP2’s, station is able to
keep connecting with AP.
The power strength of AP is able to change.

74/124
www.zyxel.com
Figure 176 Configuration > Wireless > AP Management > Mgnt. AP List > Edit
AP List
7.5 Symptom: Why station disconnect during roaming
If the station disconnect during roaming, please follow the steps to
troubleshooting.
1. Check AP2’s the SSID, Security, and DHCP server are the same as AP1.
2. Check “Band Select” is disable
3. Check AP1 and AP2’s coverage overlap
4. Check the RSSI of overlapped area.
1 Check AP2’s the SSID, Security, and DHCP server are the same as AP1
Please refer to the troubleshooting step 1 of previous symptom for checking
the configuration.
2 Check “Band Select” is disable
If band select enables, station needs to spend more time to connect with
AP and causes the roaming disconnection.
Figure 177 Configuration > Object > AP profile > SSID > Edit SSID Profile

75/124
www.zyxel.com
3 Check AP1 and AP2’s coverage overlap
If the AP1 and AP2’s coverage don’t overlap, the station disconnect when
roaming.
4 Check RSSI of overlapped area
If the RSSI is lower than -65dBm, the station might disconnect because of
weak signal.
8 802.1X authentication How should we do when the 802.1X authentication failed with RADIUS, AD
and LDAP? There are three phases for you to find what the problem let the
authentication failed is. The check order is configuration, network and
information collection. First, we have to confirm that the configurations are
the same and then check the network is no problem. If there is no problem

76/124
www.zyxel.com
for configuration and network and the issue is still existed, then collect the
regarding information for us to realize the symptom as soon as possible and
fix it.
Topology:
There is an example for wireless station is authenticated by external
authenticated server via NXC5500, which has managed VLAN on NXC5500
is VLAN 1 with IP range 192.168.100.x. USG100 acts as a DHCP server to
assign an IP address to the device. Wireless stations pass authentication by
using AD/LDAP/RADIUS accounts.
8.1 Symptom: the 802.1X authentication failed with Remote
Authentication Dial in User Service (RADIUS)
The procedure of the troubleshooting:
1. Check the configuration of the controller and RADIUS server.
2. Check the port number of RADIUS server
3. Ping the external RADIUS server and AP
4. Information collection and report the issue to the HQ.
5. Analysis for System logs and Packets.
1 Check the configuration of the controller and RADIUS server.
There are many authentication failed cause by the error settings, so it is
necessary to check the configuration of NXC correctly when the
authentication failed.

77/124
www.zyxel.com
Check the information of RADIUS is correct or not in the NXC.
Note: Enter the correct password is same as the password in the RADIUS
server for Key field.
Figure 178 CONFIGURATION > Object > AAA Server > RADIUS > Edit.
Check the information in the RADIUS is correct or not.
Figure 179 Windows2008 RADIUS server > Network Policy Server > RADIUS
Clients > New user
Select the RADIUS server you create.
Figure 180 CONFIGURATION > Object > Auth. Method > Authentication
Method > Add
Make sure the security list select the 802.1X authentication and correct
RADIUS server.

78/124
www.zyxel.com
Figure 181 CONFIGURATION > Object > AP profile > SSID > Security List > Edit
Since RADIUS server support EAP protocol and depend on the topology,
you can select the Internal or External for RADIUS server type.
RADIUS server type: Internal
If use the EAP protocol by built-in FreeRADIUS of NXC, you need to add the
NXC information in the RADIUS server be a trusted client.
Figure 182 Windows2008 RADIUS server > Network Policy Server > RADIUS
Clients > New user
RADIUS server type: External
NXC setting:
Figure 183 CONFIGURATION > Object > AP Profile > SSID > Security List >
Radius Server Type

79/124
www.zyxel.com
Figure 184 CONFIGURATION > Object > AP Profile > SSID > Security List >
Radius Authentication Settings
RADIUS server setting:
If use the EAP protocol by RADIUS server, you need to add the AP
information in the RADIUS server be a trusted client.
Figure 185 Windows2008 RADIUS server > Network Policy Server > RADIUS
Clients > New user

80/124
www.zyxel.com
Check the security profile with 802.1X authentication.
Figure 186 CONFIGURATION > Object > AP profile > SSID > SSID List > Edit
Check AP whether set the AP profile that you created.
2 Check the port number of RADIUS server
To confirm the network traffic, please make sure the port of server is same as
that configured in the NXC5500 and login the console of NXC and RADIUS
server.
Figure 187 Check the port number
The default port of RADIUS server in the NXC is 1812. If you have the firewall
in network, please check those ports also are opened in the firewall.
3 Ping the external RADIUS server and AP
To confirm the network traffic, please make sure the port of server is same as
that configured in the NXC5500 and login the console of NXC and RADIUS
server.
Figure 188 Ping the external RADIUS server and AP
Confirm the fluent network traffic between AP and external RADIUS server.
NXC ping to external RADIUS server and AP.
Figure 189 Tera Term > NXC > Router > ping <RADIUS server’s IP> and AP’s IP

81/124
www.zyxel.com
External RADIUS server pings to NXC and AP.
Figure 190 RADIUS server > cmd > ping <device’s IP>
Packet trace by NXC
To confirm that the NXC has communication with external RADIUS server
when the station do the 802.1X authentication.
The default port of RADIUS server is 1812.
After typing the CLI command, and then let the station connect to the SSID
to do the authentication.
If NXC can access the RADIUS server, it will show those messages after
station connect the SSID and do the 802.1X authentication. (KB# 011033
show the detail information of RADIUS Access Request packet)
Trace the packets between Radius server and client.
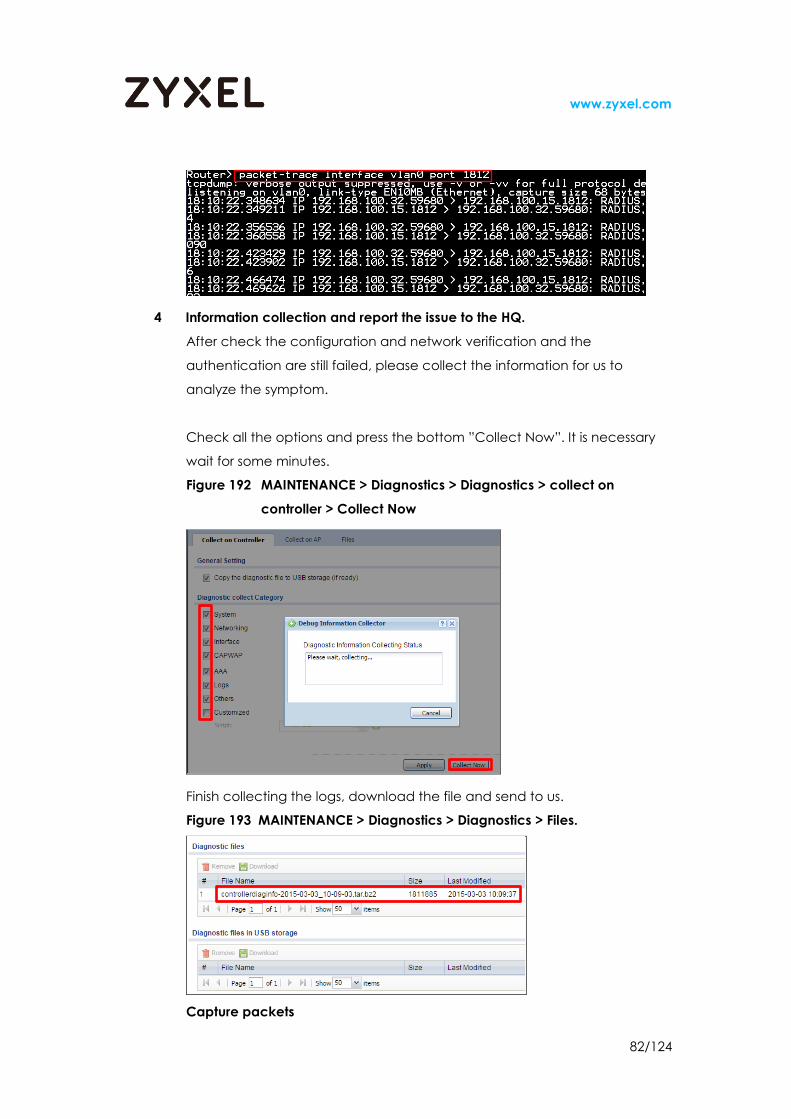
Figure 191 Tera Term > NXC > packet-trace interface <INTERFACE> port
<port number>
The IP of AP
The IP of RADIUS server
The IP of NXC
The IP of AP
82/124
www.zyxel.com
4 Information collection and report the issue to the HQ.
After check the configuration and network verification and the
authentication are still failed, please collect the information for us to
analyze the symptom.
Check all the options and press the bottom ”Collect Now”. It is necessary
wait for some minutes.
Figure 192 MAINTENANCE > Diagnostics > Diagnostics > collect on
controller > Collect Now
Finish collecting the logs, download the file and send to us.
Figure 193 MAINTENANCE > Diagnostics > Diagnostics > Files.
Capture packets

83/124
www.zyxel.com
Select the interface and press the bottom “Capture” before station
connect the SSID and do the 802.1X authentication.
Figure 194 MAINTENANCE > Diagnostics > Packet Capture.
The CLI command and debug log
Follow below steps to retrieve the 802.1x debug log
Login by console or SSH using admin account
Figure 195 Tera Term > NXC > Router> enable > debug authentication
server log move to ftp
Login controller by ftp server using admin account
Download the /tmp/RADIUS.log from the ftp
Figure 196 Computer > cmd > ftp <NXC’s IP> > cd/tmp > ls > get radius.log

84/124
www.zyxel.com
5 Analysis for System logs and Packets
Normal log and packets:
From AC:
STA Association. MAC: XX:XX:XX:XX:XX:XX, AP:
Ext-User <user account> from 802.1x has logged in EnterpriseWLAN
Figure 197 MONITOR > Log > View log
From AP:
Station had associated. Interface: wlan-X-X Station: XX:XX:XX:XX:XX:XX
Station had authorized. Interface: wlan-X-X Station: XX:XX:XX:XX:XX:XX
Figure 198 MONITOR > Log > View AP log

85/124
www.zyxel.com
RADIUS Server Event log:
Network Policy Server granted full access to a user because the host met
the defined health policy.
Figure 199 Windows2008 RADIUS server > Event Viewer > Custom Views >
ServerRoles > Network Policy and Access Servers
Figure 200 RADIUS_server.txt

86/124
www.zyxel.com
Packet: Access-Accept
Figure 201 Wireshark > Success_RADIUS.cap
RADIUS.log
Figure 202 Success_RADIUS.cap > Wireshark
No response from external RADIUS server:
From AC:
RADIUS: rejecting the user <user account>
Figure 203 MONITOR > Log > View Log
From AP
Station had associated. Interface: wlan-X-X Station: XX:XX:XX:XX:XX:XX
Station had disassoc. Interface: wlan-X-X Station: XX:XX:XX:XX:XX:XX
Figure 204 MONITOR > Log > View AP Log

87/124
www.zyxel.com
Packet: Access-Reject
Figure 205 no radius server.cap > Wireshark
RADIUS.log
Figure 206 lack of any response from home server.log
Unknown user or wrong password:
From AC
RADIUS: rejecting the user <user account>
Figure 207 MONITOR > Log > View Log
From AP
Station had associated. Interface: wlan-X-X Station: XX:XX:XX:XX:XX:XX

88/124
www.zyxel.com
Station had disassoc. Interface: wlan-X-X Station: XX:XX:XX:XX:XX:XX
Figure 208 MONITOR > Log > View AP Log
RADIUS Server
Network Policy Server denied access to a user.
Figure 209 Windows2008 RADIUS server > Event Viewer > Custom Views >
ServerRoles > Network Policy and Access Servers
Figure 210 Wrong_password.txt
v

89/124
www.zyxel.com
Figure 211 Wrong_password.txt
Packet
Figure 212 Wireshark > Wrong_password.cap
RADIUS.log
Untrusted Controller
From AC
STA is blocked by Auth Failed(AAA Profile: <profile name>), MAC:
XX:XX:XX:XX:XX:XX, Interface:wlan-X-X
RADIUS: rejecting the user <user account>
Figure 213 MONITOR > Log > View Log
v
v

90/124
www.zyxel.com
From AP
STA is blocked by Auth Failed(AAA Profile: <profile name>), MAC:
XX:XX:XX:XX:XX:XX, Interface:wlan-X-X
Station had associated. Interface: wlan-X-X Station: XX:XX:XX:XX:XX:XX
Station had disassoc. Interface: wlan-X-X Station: XX:XX:XX:XX:XX:XX
Figure 214 MONITOR > Log > View AP Log
RADIUS Server
A RADIUS message was received from the invalid RADIUS client IP address
192.168.100.15.
Figure 215 Windows2008 RADIUS server > Event Viewer > Custom Views >
ServerRoles > Network Policy and Access Servers
Figure 216 Untrusted AC.txt
v
v
v

91/124
www.zyxel.com
Packet
Figure 217 Wireshark > untrusted AC.cap
RADIUS.log
Figure 218 untrusted AC_radius.log
Untrusted AP
From AC
STA is blocked by Hostapd3. MAC: XX:XX:XX:XX:XX:XX, Interface:wlan-X-X
Figure 219 MONITOR > Log > View Log
From AP
Station has associated. Interface: wlan-X-X Station: XX:XX:XX:XX:XX:XX
v
v

92/124
www.zyxel.com
Station has deauth. reason <reason code>, flag= Interface:wlan-X-X ,
Station: XX:XX:XX:XX:XX:XX
Station is blocked. reason <reason code>,event by Hostapd3,
Interface:wlan-X-X , Station: XX:XX:XX:XX:XX:XX
Figure 220 MONITOR > Log > View AP Log
RADIUS Server
A RADIUS message was received from the invalid RADIUS client IP address
192.168.100.32.
Figure 221 Windows2008 RADIUS server > Event Viewer > Custom Views >
ServerRoles > Network Policy and Access Servers
Figure 222 Untrusted AP.txt
v

93/124
www.zyxel.com
Packet: Access-Request
Figure 223 Wireshark > untrusted AP.cap
RADIUS.log
No RADIUS.log in the AC controller and AP
8.2 Symptom: the 802.1X authentication failed with Active
Directory (AD) server
The procedure of the troubleshooting:
1. Check the configuration of the controller and AD server.
2. Check the port number of AD server.
3. Ping the AD server and AP
4. Ping the domain name
5. Information collection and report the issue to the HQ.
6. Analysis for System logs and Packets.
1 Check the configuration of the controller and AD server.
Check the information of AD server on the NXC.
Figure 224 CONFIGURATION > Object > AAA Server > Active Directory > Edit

94/124
www.zyxel.com
Check the AD server information of NXC.
There is an example with windows 2008 R2 AD server let us to double
*Please confirm that the AD server pick up the Advanced Features of View
before you check the information of DN.
Figure 225 Windows2008 RADIUS server > Active Directory Users and
Computers > View > Advanced Fwatures
Base DN: write the domain name
Go to the AD server and open the Active Directory Users and Computers.
Right click the domain name and go to Properties > Attribute Editor >

95/124
www.zyxel.com
distinguishedName > view. It will show you the content that can be copied
and pasted to the NXC in the field of Base DN.
Figure 226 Windows2008 RADIUS server > Active Directory Users and
Computers > Domain name(right click) > Properties >
distinguished Name
Bind DN: write the username who has privilege to set the configuration of
AD server and group setting. In our server, the account of Administrator has
the complete privilege for setting. The information of account is same as the
account of login AD server.
Bind DN: CN=Administrator,CN=Users,DC=zyxel,DC=cso,DC=com
Password : The password of Administrator
Go to the AD server and open the Active Directory Users and Computers.
Select the Users and right click the Administrator and go to Properties >
Attribute Editor > distinguishedName > view. It will show you the content that
can be copied and pasted to the NXC in the field of Bind DN.
Figure 227 Windows2008 RADIUS server > Active Directory Users and
Computers > Users > Administrator (right click) > Properties >
attribute Editor > distinguished Name

96/124
www.zyxel.com
Server Authentication
User name (Must be a user who has rights to add a machine to the
domain.)
Password: write the password of user name.
(You can also write the Administrator account that has complete
rights.)
Realm: write the domain name
Figure 228 Windows2008 RADIUS server > Active Directory Users and
Computers > Domain name
NetBIOS Name: Go to the AD server and open the Active Directory Users
and Computers. Right click the domain name and go to Properties >
General. It will show you the content that can be copied and pasted to
the NXC in the field of NetBIOS.
Figure 229 Windows2008 RADIUS server > Active Directory Users and
Computers > Domain name (right click) > Properties > General

97/124
www.zyxel.com
After finish entering the information of AD server, you can input an account
id of AD server for testing to make sure NXC can capture the user
information by correct AD configuration.
The Test Status will show you the message about the result of user
authentication.
Figure 230 CONFIGURATION > Object > AAA Server > Active Direction > Edit
Active Direction > Configuration Validation > Test
Make sure the time of NXC and AD server both have the correct time.
Figure 231 CONFIGURATION > System > Date/Time > Time Zone Setup
Set the domain name as you set on the AD server.
Figure 232 CONFIGURATION > System > Host name.

98/124
www.zyxel.com
Add the information of domain zone.
Figure 233 Public DNS server: write the IP of DNS server can resolve the
domain name. If you have no additional DNS server, you can
write the IP of AD server.
Figure 234 CONFIGURATION > System > DNS > Domain Zone Forwarder >
Add.
Select the AD server you create.
Figure 235 CONFIGURATION > Object > Auth. Method > Add.
Make sure the security list select the 802.1X authentication and correct AD
server. Since AD server doesn’t support EAP protocol, so NXC has built-in
FreeRADIUS server provide EAP protocol for station authentication. The
RADIUS Type must select Internal when the external authenticated server is
AD server.
If AD server installs IAS or NPS that support EAP protocol, the RADIUS server
type of NXC can be select External option.
Figure 236 CONFIGURATION > Object > AP profile > SSID > Security List.

99/124
www.zyxel.com
Check the security profile with 802.1X authentication.
Figure 237 CONFIGURATION > Object > AP profile > SSID > SSID List.
Check AP whether set the AP profile that you created.
Check the AD server whether receive the information from NXC5500 and
add the NXC5500 in the computers list automatically.
Figure 238 Windows2008 RADIUS server > Active Directory Users and
Computers > Computers

100/124
www.zyxel.com
2 Check the port number of AD server.
To confirm the network traffic, please make sure the port of server is same as
that configured in the NXC5500 and login the console of NXC and RADIUS
server.
Check the port number
The default port of AD server in the NXC is 389. If you have the firewall in
network, please check those ports also are opened in the firewall.
3 Ping the AD server and AP
To confirm the network traffic, please make sure the port of server is same as
that configured in the NXC5500 and login the console of NXC and AD
server.
Confirm the fluent network traffic between AP and AD server.
NXC ping to external AD server and AP
Figure 239 Tera Term > NXC > Router > ping <AD server’s IP> and AP’s IP
AD server pings to NXC and AP.
Figure 240 AD server > cmd > ping <NXC’s IP> and AP’s IP
The IP of AP
The IP of AD server
The IP of NXC
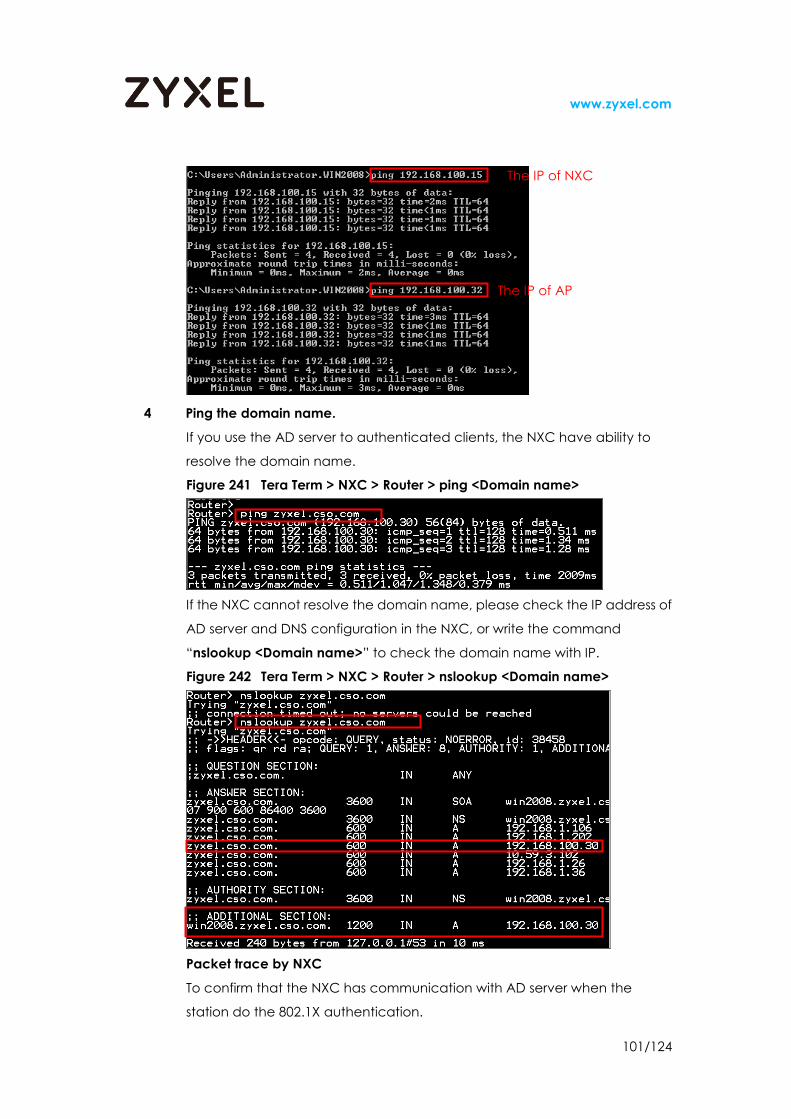
101/124
www.zyxel.com
4 Ping the domain name.
If you use the AD server to authenticated clients, the NXC have ability to
resolve the domain name.
Figure 241 Tera Term > NXC > Router > ping <Domain name>
If the NXC cannot resolve the domain name, please check the IP address of
AD server and DNS configuration in the NXC, or write the command
“nslookup <Domain name>” to check the domain name with IP.
Figure 242 Tera Term > NXC > Router > nslookup <Domain name>
Packet trace by NXC
To confirm that the NXC has communication with AD server when the
station do the 802.1X authentication.
The IP of AP
The IP of NXC

102/124
www.zyxel.com
The default port of AD server is 389.
[CLI]: packet-trace interface <INTERFACE> port <port number>
After typing the CLI command, and then let the station connect to the SSID
to do the authentication.
5 Information collection and report the issue to the HQ.
After check the configuration and network verification and the
authentication are still failed, please collect the information for us to
analyze the symptom.
Check all the options and press the bottom ”Collect Now”. It is necessary
wait for some minutes.
Figure 243 MAINTENANCE > Diagnostics > Diagnostics > collect on
controller > Collect Now.
Finish collecting the logs, download the file and send to us.
Figure 244 MAINTENANCE > Diagnostics > Diagnostics > Files.
Capture packets
Select the interface and press the bottom “Capture” before station
connect the SSID and do the 802.1X authentication.

103/124
www.zyxel.com
Figure 245 MAINTENANCE > Diagnostics > Packet Capture.
The CLI command and debug log
Follow below steps to retrieve the 802.1x debug log
Login by console or SSH using admin account
Figure 246 Tera Term > NXC > Router> enable > debug authentication
server log move to ftp
Login controller by ftp server using admin account
Download the /tmp/RADIUS.log from the ftp
Figure 247 Computer > cmd > ftp <NXC’s IP> > cd/tmp > ls > get radius.log
6 Analysis for System logs and Packets.
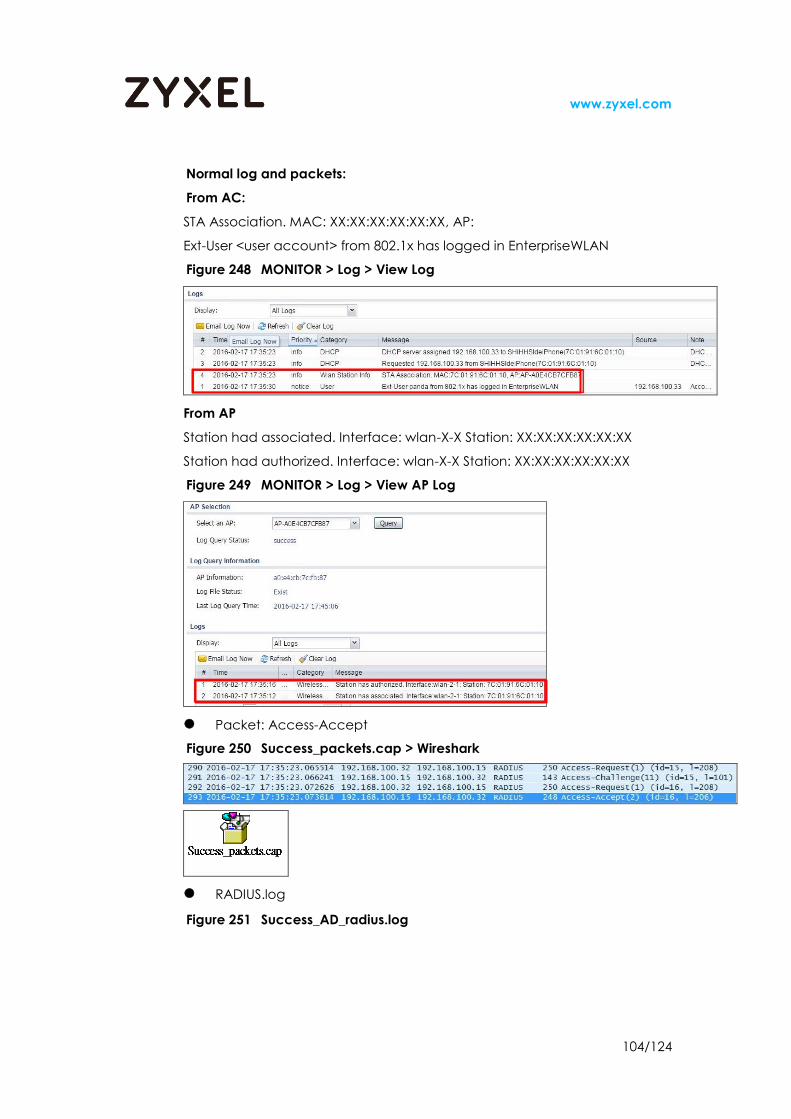
104/124
www.zyxel.com
Normal log and packets:
From AC:
STA Association. MAC: XX:XX:XX:XX:XX:XX, AP:
Ext-User <user account> from 802.1x has logged in EnterpriseWLAN
Figure 248 MONITOR > Log > View Log
From AP
Station had associated. Interface: wlan-X-X Station: XX:XX:XX:XX:XX:XX
Station had authorized. Interface: wlan-X-X Station: XX:XX:XX:XX:XX:XX
Figure 249 MONITOR > Log > View AP Log
Packet: Access-Accept
Figure 250 Success_packets.cap > Wireshark
RADIUS.log
Figure 251 Success_AD_radius.log

105/124
www.zyxel.com
No response from AD server
From AC
RADIUS: rejecting the user <user account>
Figure 252 MONITOR > Log > View Log
From AP
Station had associated. Interface: wlan-X-X Station: XX:XX:XX:XX:XX:XX
Station had disassoc. Interface: wlan-X-X Station: XX:XX:XX:XX:XX:XX
Figure 253 MONITOR > Log > View AP Log
Packet: Access-Reject
Figure 254 Wireshark > no ad server.cap

106/124
www.zyxel.com
RADIUS.log
Figure 255 no ad server_radius.log
Unknown user or wrong password
From AC
RADIUS: rejecting the user <user account>
Figure 256 MONITOR > Log > View Log or View AP Log
From AP
Figure 257 MONITOR > Log > View AP Log

107/124
www.zyxel.com
Packet: Access-Reject
Figure 258 Wrong_password-AD.cap > wireshark
RADIUS.log
Figure 259 Wrong_password-AD_radius.txt
Wrong DNS
From AC
Figure 260 MONITOR > Log > View Log
From AP
Figure 261 MONITOR > Log > View AP Log
v
v
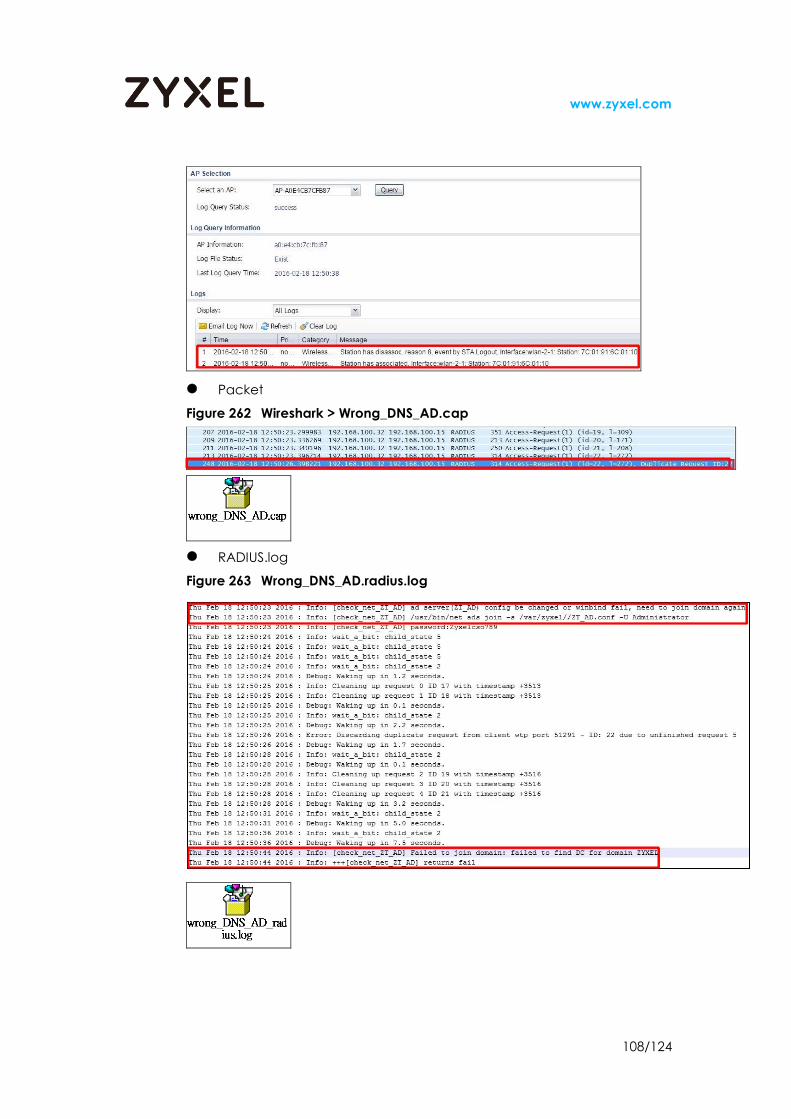
108/124
www.zyxel.com
Packet
Figure 262 Wireshark > Wrong_DNS_AD.cap
RADIUS.log
Figure 263 Wrong_DNS_AD.radius.log
v
v
v

109/124
www.zyxel.com
8.3 Symptom: the 802.1X authentication failed with Lightweight
Directory Access Protocol (LDAP) server
The procedure of the troubleshooting:
1. Check the configuration of the controller and LDAP server.
2. Check the port number of LDAP server.
3. Ping the LDAP server and AP
4. Information collection and report the issue to the HQ.
5. Analysis for System logs and Packets
1 Check the configuration of the controller and LDAP server.
Configure LDAP setting
Figure 264 LDAP settings
Figure 265 LDAP server > Users and Computers
Check the information of LDAP is correct or not.
Figure 266 CONFIGURATION > Object > AAA Server > LDAP > Edit

110/124
www.zyxel.com
Base DN: write the domain name
Bind DN: enter a user who has privilege to set the configuration of LDAP. In
the example, the account of Administrator “ldapadmin” has the complete
privilege for setting. The information of account is same as the account of
login LDAP.
After finish to enter the information of LDAP, you can input an account id of
LDAP for testing whether the information of LDAP is correct or not.
Note: The Test Status will show you the message about the result of user
authentication.
Figure 267 CONFIGURATION > Object > AAA Server > LDAP > Edit LDAP >
Configuration Validation > Test

111/124
www.zyxel.com
Select the LDAP server you create.
Figure 268 CONFIGURATION > Object > Auth. Method > Authentication
method > Add
Make sure the security list select the 802.1X authentication and correct
LDAP server. Since LDAP server doesn’t support EAP protocol and cannot
be an authentication server, so NXC has built-in FreeRADIUS server provide
EAP protocol for station authentication. The RADIUS server type must select
Internal when the external authenticated server is LDAP server.
Figure 269 CONFIGURATION > Object > AP profile > SSID > Security List >
Add
Check the security profile with 802.1X authentication.
Figure 270 CONFIGURATION > Object > AP profile > SSID > SSID List

112/124
www.zyxel.com
Check AP whether set the AP profile that you created.
2 Check the port number of LDAP server
To confirm the network traffic, please make sure the port of server is same as
that configured in the NXC5500 and login the console of NXC and LDAP
server.
Check the port number
The default port of LDAP server in the NXC is 389. If you have the firewall in
network, please check those ports also are opened in the firewall.
3 Ping the LDAP server and AP
To confirm the network traffic, please make sure the port of server is same as
that configured in the NXC5500 and login the console of NXC and LDAP
server.
Confirm the fluent network traffic between AP and LDAP server.
NXC ping to external LDAP server and AP
Figure 271 Tera Term > NXC > Router > ping <LDAP server’s IP> and AP’s IP
LDAP server pings to NXC and AP.
Figure 272 AD server > cmd > ping <NXC’s IP> and AP’s IP
The IP of AP
The IP of LDAP server
The IP of NXC

113/124
www.zyxel.com
Packet trace by NXC
To confirm that the NXC has communication with LDAP server when the
station do the 802.1X authentication.
The default port of LDAP server is 389.
[CLI]: packet-trace interface <INTERFACE> port <port number>
After typing the CLI command, and then let the station connect to the SSID
to do the authentication.
4 Information collection and report the issue to the HQ.
After check the configuration and network verification and the
authentication are still failed, please collect the information for us to
analyze the symptom.
Check all the options and press the bottom ”Collect Now”. It is necessary
wait for some minutes.
Figure 273 MAINTENANCE > Diagnostics > Diagnostics > collect on
controller > Collect Now.
The IP of AP
The IP of NXC

114/124
www.zyxel.com
Finish collecting the logs, download the file and send to us.
Figure 274 MAINTENANCE > Diagnostics > Diagnostics > Files.
Capture packets
Select the interface and press the bottom “Capture” before station
connect the SSID and do the 802.1X authentication.
Figure 275 MAINTENANCE > Diagnostics > Packet Capture.

115/124
www.zyxel.com
The CLI command and debug log
Follow below steps to retrieve the 802.1x debug log
Login by console or SSH using admin account
Figure 276 Tera Term > NXC > Router> enable > debug authentication
server log move to ftp
Login controller by ftp server using admin account
Download the /tmp/RADIUS.log from the ftp
Figure 277 Computer > cmd > ftp <NXC’s IP> > cd/tmp > ls > get radius.log
5 Analysis for System logs and Packets
Normal log and packets
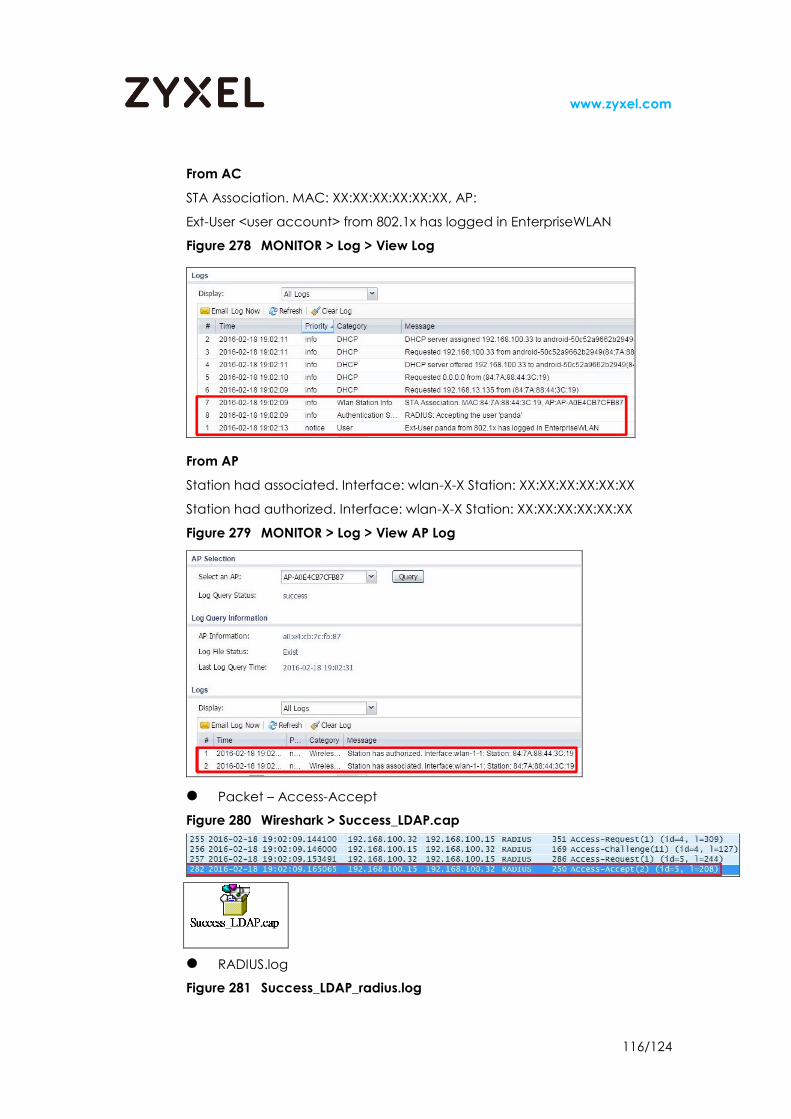
116/124
www.zyxel.com
From AC
STA Association. MAC: XX:XX:XX:XX:XX:XX, AP:
Ext-User <user account> from 802.1x has logged in EnterpriseWLAN
Figure 278 MONITOR > Log > View Log
From AP
Station had associated. Interface: wlan-X-X Station: XX:XX:XX:XX:XX:XX
Station had authorized. Interface: wlan-X-X Station: XX:XX:XX:XX:XX:XX
Figure 279 MONITOR > Log > View AP Log
Packet – Access-Accept
Figure 280 Wireshark > Success_LDAP.cap
RADIUS.log
Figure 281 Success_LDAP_radius.log

117/124
www.zyxel.com
No response from external LDAP server
From AC
RADIUS: rejecting the user <user account>
Figure 282 MONITOR > Log > View Log
From AP
Station had associated. Interface: wlan-X-X Station: XX:XX:XX:XX:XX:XX
Station had disassoc. Interface: wlan-X-X Station: XX:XX:XX:XX:XX:XX
Figure 283 MONITOR > Log > View AP Log
Packet: Access-Reject
Figure 284 Wireshark > no_LDAP_server_radius.cap
RADIUS.log

118/124
www.zyxel.com
Figure 285 no_LDAP_server_radius.log
Unknown user or wrong password
From AC
Figure 286 MONITOR > Log > View Log
From AP
Figure 287 MONITOR > Log > View AP Log
Packet: Access-Reject
Figure 288 Wireshark > wrong_password_LDAP.cap
RADIUS.log

119/124
www.zyxel.com
Figure 289 wrong_password_LDAP_radius.log
8.4 The configuration of windows computer for 802.1X
authentication
The computer with windows OS have to add a connection for connecting
the SSID with 802.1X authentication, or it will be failed to connect.
The configuration of device with windows 8 OS connect the SSID with 802.1X
Open the “Network and Sharing Center”.
Figure 290 Computer > open Network and Sharing Center
Click “Set up a new connection or network”.
Figure 291 Computer > open Network and Sharing Center > Set up a new
connection or network
Select “Manually connect to a wireless network”.
Figure 292 Computer > open Network and Sharing Center > Set up a new
connection or network > Manually connect to a wireless
network

120/124
www.zyxel.com
Write the SSID you set in the field of “Network name” on the NXC5500 and
select Security type and Encryption type you set in the AP profile of
NXC5500.
Figure 293 Computer > open Network and Sharing Center > Set up a new
connection or network > Manually connect to a wireless
network
Click “Change connection settings”.
Figure 294 Computer > open Network and Sharing Center > Set up a new
connection or network > Manually connect to a wireless
network
Click Settings for more settings.
Figure 295 Computer > open Network and Sharing Center > Set up a new
connection or network > Manually connect to a wireless
network > Change connection settings > security

121/124
www.zyxel.com
Uncheck the “Validate server certificate” and then click Configure…
Figure 296 Computer > open Network and Sharing Center > Set up a new
connection or network > Manually connect to a wireless
network > Change connection settings > security > settings
Uncheck “Automatically use my Windows login name and password (and
domain if any).” Go back to Protected EAP Properties and click “OK”.
Figure 297 Computer > open Network and Sharing Center > Set up a new
connection or network > Manually connect to a wireless
network > Change connection settings > security > settings >
configure…
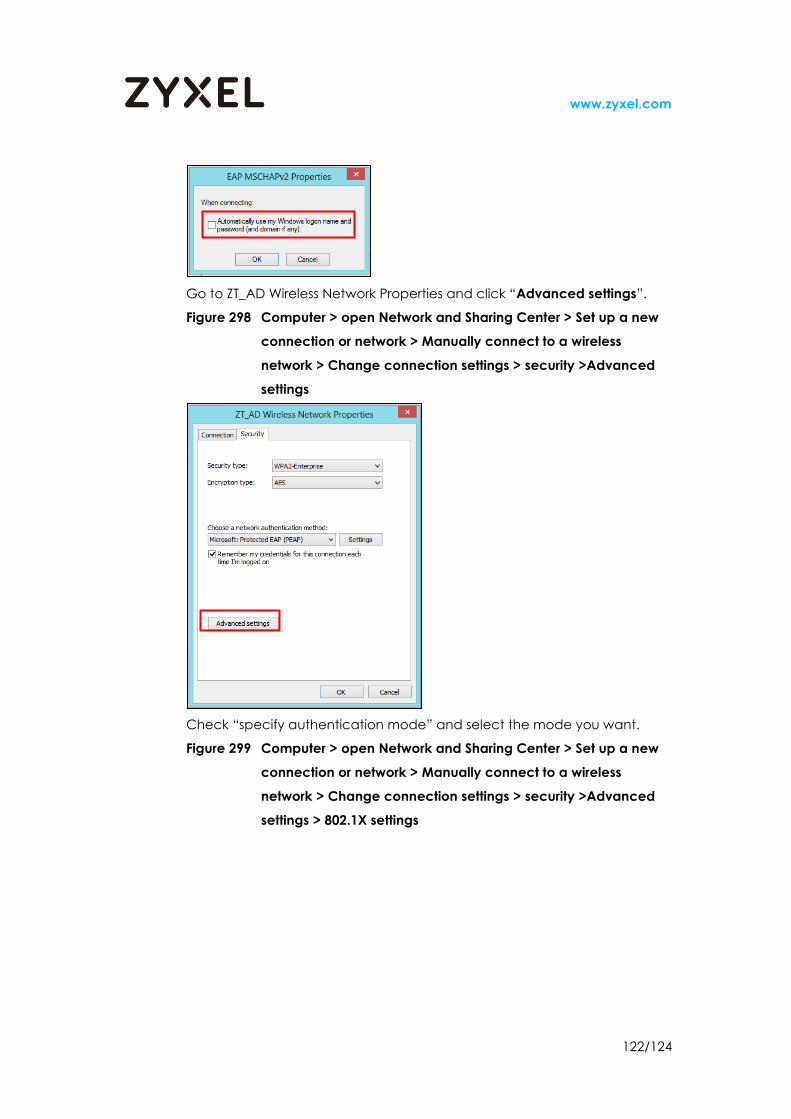
122/124
www.zyxel.com
Go to ZT_AD Wireless Network Properties and click “Advanced settings”.
Figure 298 Computer > open Network and Sharing Center > Set up a new
connection or network > Manually connect to a wireless
network > Change connection settings > security >Advanced
settings
Check “specify authentication mode” and select the mode you want.
Figure 299 Computer > open Network and Sharing Center > Set up a new
connection or network > Manually connect to a wireless
network > Change connection settings > security >Advanced
settings > 802.1X settings

123/124
www.zyxel.com
Return to ‘Wireless Network Connection’, click the SSID you set manually
before.
Noted: If the ‘Encryption type’ setting does not meet the setting on
NXC5500, you will see a red cross shown on the picture.
Enter the username and password created on Windows server 2008 AD. The
wireless authentication will succeed.

124/124
www.zyxel.com


![Prezentace a vysvětlení programového prostředí NXC · programového prostředí NXC Úvod ... HANSEN, John. NXC Programmer’s Guide [online]. 2010-05-30 [cit. 2010-05-23]. The](https://img.pdfslide.net/doc/110x75/5b89b1ac7f8b9abe1e8e361c/prezentace-a-vysvetleni-programoveho-prostredi-nxc-programoveho-prostredi.jpg)