Embed Size (px)
Citation preview
OARDC Graduate Student Poster Competition
Handbook for preparing posters
Compiled by Constance J. Britton OARDC Librarian
With information provided by Gary Warren and Bonnie DeArmitt, OARDC Communications and Technology and Jody Lanham, OARDC Wooster Campus Information Technology
February 7, 2014
2/7/2014
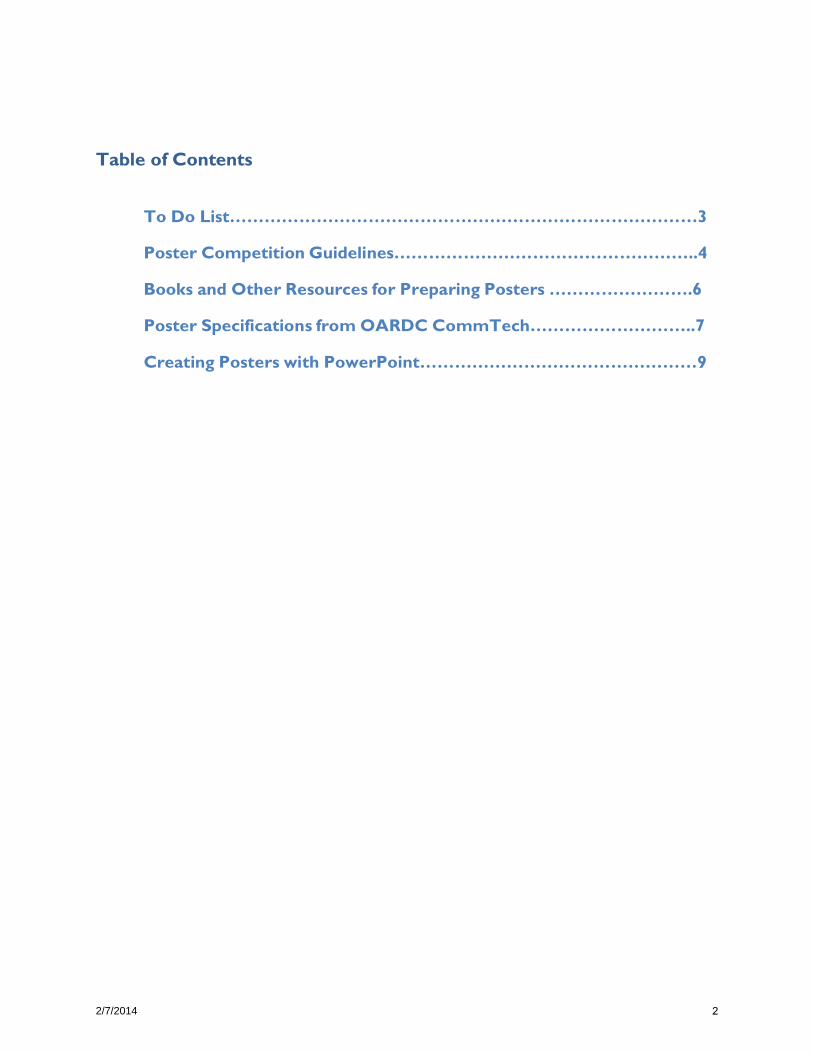
Table of Contents
To Do List………………………………………………………………………3
Poster Competition Guidelines……………………………………………..4
Books and Other Resources for Preparing Posters …………………….6
Poster Specifications from OARDC CommTech………………………..7
Creating Posters with PowerPoint…………………………………………9
2
2/7/2014
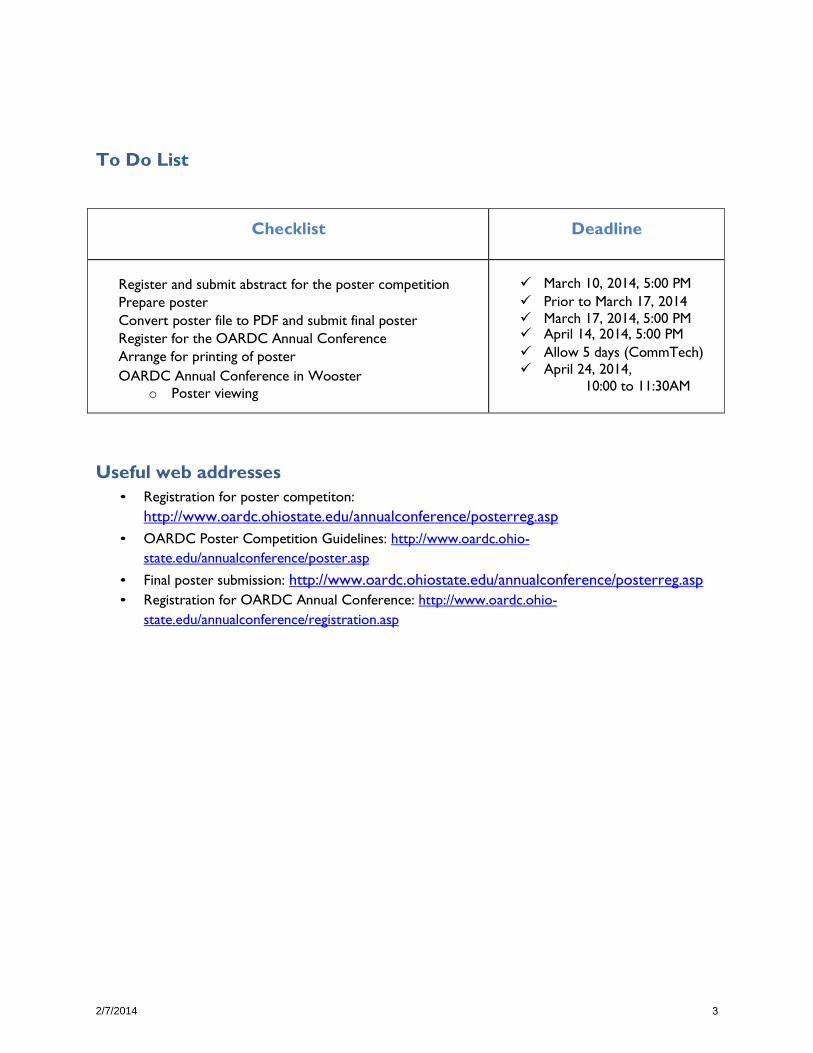
To Do List
Checklist
Deadline
Register and submit abstract for the poster competition Prepare poster Convert poster file to PDF and submit final poster Register for the OARDC Annual Conference Arrange for printing of poster OARDC Annual Conference in Wooster
o Poster viewing
March 10, 2014, 5:00 PM Prior to March 17, 2014 March 17, 2014, 5:00 PM April 14, 2014, 5:00 PM Allow 5 days (CommTech) April 24, 2014,
10:00 to 11:30AM
Useful web addresses • Registration for poster competiton:
http://www.oardc.ohiostate.edu/annualconference/posterreg.asp • OARDC Poster Competition Guidelines: http://www.oardc.ohio-
state.edu/annualconference/poster.asp
• Final poster submission: http://www.oardc.ohiostate.edu/annualconference/posterreg.asp • Registration for OARDC Annual Conference: http://www.oardc.ohio-
state.edu/annualconference/registration.asp
3
2/7/2014
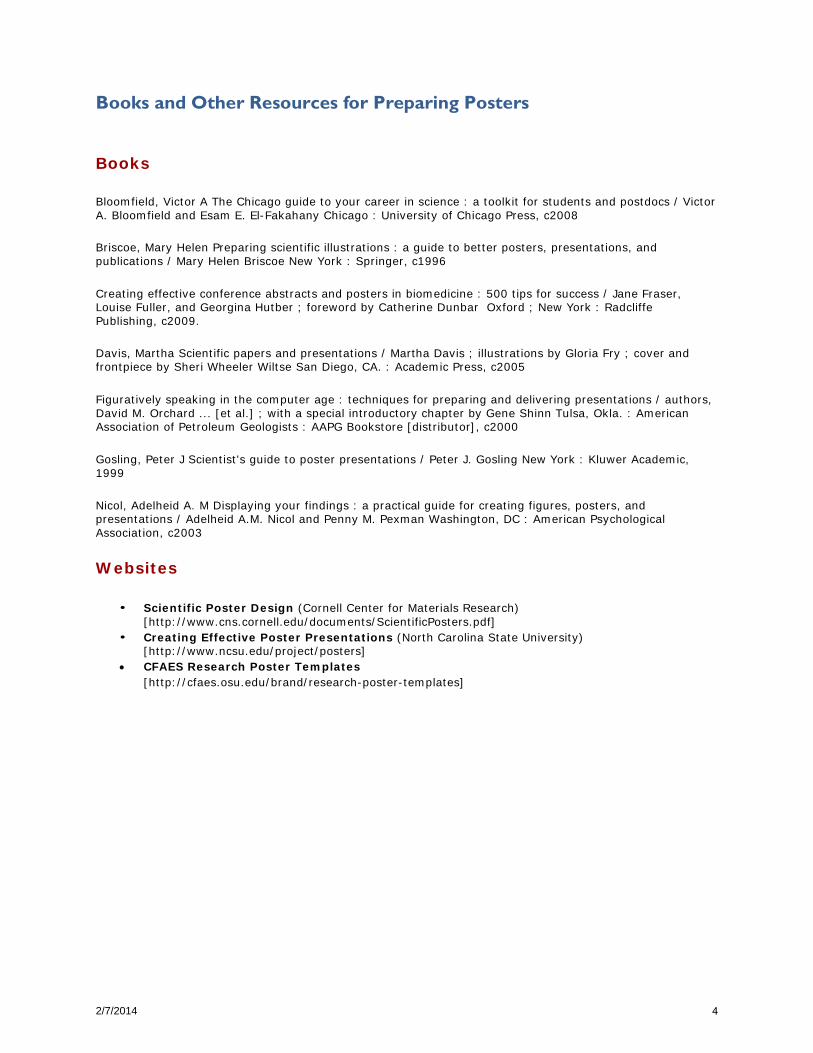
Books and Other Resources for Preparing Posters Books
Bloomfield, Victor A The Chicago guide to your career in science : a toolkit for students and postdocs / Victor A. Bloomfield and Esam E. El-Fakahany Chicago : University of Chicago Press, c2008
Briscoe, Mary Helen Preparing scientific illustrations : a guide to better posters, presentations, and publications / Mary Helen Briscoe New York : Springer, c1996
Creating effective conference abstracts and posters in biomedicine : 500 tips for success / Jane Fraser, Louise Fuller, and Georgina Hutber ; foreword by Catherine Dunbar Oxford ; New York : Radcliffe Publishing, c2009.
Davis, Martha Scientific papers and presentations / Martha Davis ; illustrations by Gloria Fry ; cover and frontpiece by Sheri Wheeler Wiltse San Diego, CA. : Academic Press, c2005
Figuratively speaking in the computer age : techniques for preparing and delivering presentations / authors, David M. Orchard ... [et al.] ; with a special introductory chapter by Gene Shinn Tulsa, Okla. : American Association of Petroleum Geologists : AAPG Bookstore [distributor], c2000
Gosling, Peter J Scientist's guide to poster presentations / Peter J. Gosling New York : Kluwer Academic, 1999
Nicol, Adelheid A. M Displaying your findings : a practical guide for creating figures, posters, and presentations / Adelheid A.M. Nicol and Penny M. Pexman Washington, DC : American Psychological Association, c2003
Websites
• Scientific Poster Design (Cornell Center for Materials Research) [http://www.cns.cornell.edu/documents/ScientificPosters.pdf]
• Creating Effective Poster Presentations (North Carolina State University) [http://www.ncsu.edu/project/posters]
• CFAES Research Poster Templates [http://cfaes.osu.edu/brand/research-poster-templates]
4
2/7/2014
2014 OARDC Annual Conference
Guidelines for Graduate Student Poster Competition
• Deadline for Entry: Registration at the following web address must be received by Monday, March 10, 2014 at 5:00 pm @ http://www.oardc.ohiostate.edu/annualconference/posterreg.asp All participants are responsible for registering and uploading their abstract on the website. Participants must submit his/her name, degree sought, department, advisor’s name and email address, and an abstract including title of the poster and authors. An e-mail confirmation will be sent to the entrant to acknowledge receipt of registration and acceptance of the abstract. (The web site will be closed for submission by the deadline. There will be no late submissions)
• Poster Upload: A PDF file of all posters must be submitted to the poster registration site by Monday, March 17, 2014, at 5:00 PM. To do this, you will need to have registered your poster and uploaded the abstract by March 10, 2014.
• Time: Posters must be set up by 9:00 am on April 24, 2014. Posters will be displayed in the Shisler Center, Wooster campus. Access to the area will be from 7:30 am to 9:00 a.m. Posters should remain up until 3:15pm. Posters must be removed immediately following the conference.
• Eligibility: Competition is open to any currently enrolled M.S. or Ph.D. student, or those who received their graduate degrees after Spring Quarter, 2013, working on or supported by an OARDC or College of Food, Agricultural and Environmental Sciences supported project. Postdocs (Research Scientists are excluded) and Research assistants/associates that are not currently working on an advanced degree are also invited. Entrants may present only posters on original research they have conducted while at The Ohio State University. Each entrant may present only one poster.
• Awards: Awards will be given to posters under all the categories. Number of awards under each category will be decided based on the number of posters submitted to the conference. First, second, and third place posters will receive an award of $500, $300, and $150, respectively. Winners will be announced at the conference.
• Evaluation: Award winners will be selected by consensus of a faculty committee. Due to time constraints, critiques of posters will not be provided. Evaluations will be based on presentation, content, and impact of the research. The diversity of the audience at this Conference should be considered when designing posters. Abbreviations should be kept to a minimum.
• Poster Size - one sided: no larger than 42" H x 36" displayed horizontally or vertically. Display boards and 1-inch straight pins for mounting will be provided for display of posters.
• Format: Posters should include: 1. Title Banner - with title, author(s), and department(s) - Entrant must be first
author. 2. Abstract - a maximum 250-word summary of the study and findings. 3. Introduction - a clear and concise statement of the rationale, hypothesis, and
justification for the project, the objectives of the research, and general approach.
4. Materials and Methods - an outline of the key materials and methods defining how the experiment or study was conducted.
5. Results - tables, figures, photos, etc., showing and documenting experimental findings and analyses.
6. Conclusions and Discussion - statement of the conclusions from the study results and a brief explanation of the study’s scientific rigor, discoveries and
5
2/7/2014
their significance, and congruence or lack of with the body of scientific knowledge.
• Acknowledgments and References - brief acknowledgment of other contributors who are not authors, and key literature references to the study, if required.
• Logos. Posters should include an appropriate logo of the college brand and other logos related to sponsors or granting agencies. Guidelines on the use of university logos may be found on the OSU website: http://www.osu.edu/brand/ . CFAES guidelines, logos and PowerPoint templates can be found at: http://cfaes.osu.edu/brand/home/
• Legibility: All text and figures should be readable from a distance of 1 meter, including captions and figure legends. Illustrations should be relatively large with heavy lines. Colors may be used to accent features or visibility.
• Continuity: The presentation should be a coherent series of statements and supporting illustrations, with each leading to the next, which show the flow of the presentation and the progression of the study.
• Attendance: Participants are requested to be in attendance at his/her poster to answer questions of conference participants during poster viewing times on April 24: 10:00 – 11:30 am.
6
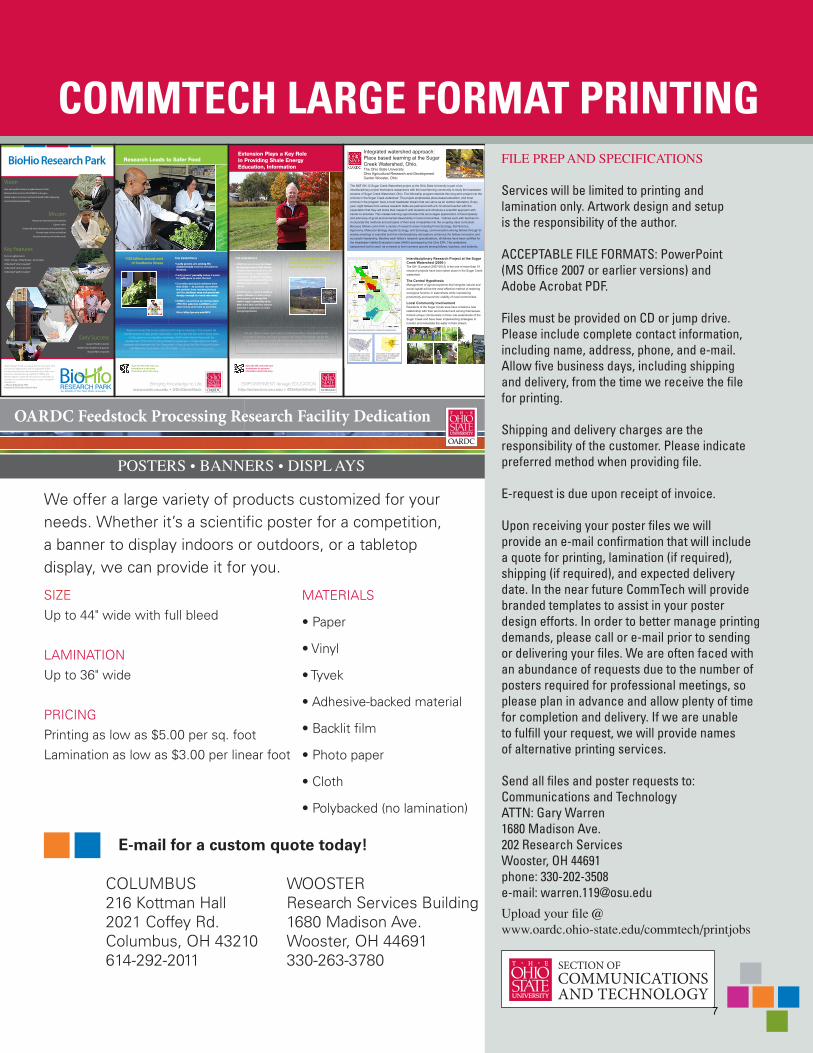
FILE PREP AND SPECIFICATIONS
Services will be limited to printing andlamination only. Artwork design and setupis the responsibility of the author.
ACCEPTABLE FILE FORMATS: PowerPoint(MS Office 2007 or earlier versions) andAdobe Acrobat PDF.
Files must be provided on CD or jump drive.Please include complete contact information,including name, address, phone, and e-mail.Allow five business days, including shippingand delivery, from the time we receive the filefor printing.
Shipping and delivery charges are theresponsibility of the customer. Please indicatepreferred method when providing file.
E-request is due upon receipt of invoice.
Upon receiving your poster files we willprovide an e-mail confirmation that will includea quote for printing, lamination (if required),shipping (if required), and expected deliverydate. In the near future CommTech will providebranded templates to assist in your posterdesign efforts. In order to better manage printingdemands, please call or e-mail prior to sendingor delivering your files. We are often faced withan abundance of requests due to the number ofposters required for professional meetings, soplease plan in advance and allow plenty of timefor completion and delivery. If we are unableto fulfill your request, we will provide namesof alternative printing services.
Send all files and poster requests to:Communications and TechnologyATTN: Gary Warren1680 Madison Ave.202 Research ServicesWooster, OH 44691phone: 330-202-3508e-mail: [email protected]
We offer a large variety of products customized for yourneeds. Whether it’s a scientific poster for a competition,a banner to display indoors or outdoors, or a tabletopdisplay, we can provide it for you.
SIZEUp to 44" wide with full bleed
LAMINATIONUp to 36" wide
PRICINGPrinting as low as $5.00 per sq. footLamination as low as $3.00 per linear foot
MATERIALS
• Paper
• Vinyl
• Tyvek
• Adhesive-backed material
• Backlit film
• Photo paper
• Cloth
• Polybacked (no lamination)
E-mail for a custom quote today!
COLUMBUS216 Kottman Hall2021 Coffey Rd.Columbus, OH 43210614-292-2011
WOOSTERResearch Services Building1680 Madison Ave.Wooster, OH 44691330-263-3780
POSTERS • BANNERS • DISPL AYS
COMMTECH LARGE FORMAT PRINTINGBioHio Research Park
Mission
Vision
Key Features
Nurture an environment of creativity
Capture value
Create and attract businesses and organizations
Provide state-of-the-art facilities
Increase awareness of market needs
Early Successquasar: 60 jobs in 2 years
Rubber from dandelions & guayule
Natural ber composite
Jobs and wealth creation in agbioscience in Ohio
National distinction for OSU/OARDC and region
Global impact on human and animal health while improving
environmental sustainability
Focus on agbioscience
Public • Private • Philanthropic • Partnership
Understand “what is needed”
Understand “what is possible”
Understand “path to market”
“BioHio Research Park is a unique asset for the region. With our focus on agbioscience and our supportive public-private partnership the opportunities for job creation and economic development are significant. OARDC and Wooster, Wayne County offer the perfect combination of strengths for innovative technology to impact the global marketplace.”– Shauna R Brummet, PhD President & CEO BioHio Research Park
Research Leads to Safer Food
the essentials
•Leafy greens are among the riskiest foods in terms of foodborne illnesses.
•Leafygreens’porositymakesiteasierforpathogenstoentertheleaf.
•Currentlyusedliquidsanitizershavetheirlimits—airpocketscanpreventthesanitizerfromreachingtheleaf,andthesanitizer may not penetrate deeply enough to reach microbes.
•OARDCresearchersaretestingmore effective gaseous sanitizers,anddeterminingwhenbesttousethem.
More: http://go.osu.edu/HCJ
Scan the QR code with your smartphone to get more information about this story.
“Everyone knows that a new sanitizing technology is necessary. This research will benefit growers of leafy greens nationwide — but the fact that this work is being done
in Ohio gives us a competitive advantage. And it works hand-in-hand with the development of the Ohio Produce Marketing Agreement, a collaborative food-safety
standards effort between the Ohio Department of Agriculture, the Ohio Produce Growers and Marketers Association, and Ohio State.” —BOBBy JOnES, ThE ChEf’S GArDEn, hurOn
$152billion:annualcost of foodborne illness
Sudhir Sastry, left, Gonul Kaletunc, and Ahmed Yousef (not pictured) believe that using gaseous (not liquid) sanitizers will keep leafy greens safer from disease-causing pathogens.
www.oardc.osu.edu•@DirSteveSlackBringing Knowledge to Life
the essentials
•OSUExtensionformedtheShale Energy Education Work Group, bringingtogetherfacultyandstaff fromacrossthecollegeandtheuniversitytoexamine economic, environmental, community, and safety issuesregardingshale energy.
•OSUExtensionregularlyupdates public officialsonshaleenergydevelopment,andkeeps the state’s legal community up-to- date;morethan120Ohiolawyersattendedasymposiumonshale energylegalissues.
Scan the QR code with your smartphone to get more information about this story.
8,000=numberofOhioans whohaveattendedExtension’s shaleenergymeetings
Extension Plays a Key Role in Providing Shale Energy Education, Information
“We got offered a lease, but I wasn’t comfortable with it. A paralegal told me to contact Extension, and I got in contact with Steve Schumacher. He set the matter straight. As an outside person who doesn’t have a stake in this game,
his word had a lot of influence. It made all the difference in the world.”
—FrEd ScHWArz, WHo IS noW FormIng A lAndoWnErS group In lIckIng county
http://extension.osu.edu•@DirKeithSmithEmpoWErmEnt through EducAtIon
Integrated watershed approach: Place based learning at the Sugar Creek Watershed, Ohio. The Ohio State University Ohio Agricultural Research and Development Center Wooster, Ohio
The NSF GK-12 Sugar Creek Watershed project at the Ohio State University is part of an interdisciplinary project that teams researchers with the local farming community to study the headwater streams of Sugar Creek Watershed, Ohio. The fellowship program extends this long-term project into the schools in the Sugar Creek watershed. The project emphasizes place-based education, and most schools in the program have a local headwater stream that can serve as an outdoor laboratory. Every year, eight fellows from various research fields are partnered with a K-12 school teacher with the expectation that they will share their research with students and introduce a scientific approach with hands on activities. This creates learning opportunities that encourages appreciation of biocomplexity and advocacy of good environmental stewardship in local communities. Fellows work with teachers to incorporate the methods and principles of their area of expertise into the on-going class curriculum. Because fellows come from a variety of research areas including Forest Ecology, Soil Science, Agronomy, Molecular Biology, Aquatic Ecology, and Sociology, communication among fellows through bi-weekly meetings is essential and this interdisciplinary atmosphere enhances the fellows innovative and successful leadership. Besides each fellow’s research specializations, all fellows have been certified for the Headwater Habitat Evaluation Index (HHEI) developed by the Ohio EPA. This watershed assessment tool is used as a means to form common ground among fellows, teachers, and students.
Interdisciplinary Research Project at the Sugar Creek Watershed (2000-) The GK-12 project (2007-2012) is the one of more than 10 research projects have been taken place in the Sugar Creek watershed.
The Central Hypothesis Management of agroecosystems that integrate natural and social capital will be the most effective method of restoring ecological function in watersheds while maintaining productivity and economic viability of local communities.
The Sugar Creek watershed and its component subwatersheds.
Local Community Involvement Residents of the Sugar Creek area have created a new relationship with their environment and among themselves, formed unique communities in three sub-watersheds of the Sugar Creek and have been implementing strategies to monitor and remediate the water in their stream.
The Mississippi river and its tributaries; the Sugar Creek is shown as a headwater of the Mississippi watersheds.
The location of the Sugar Creek and its location as a headwater tributary in the Muskingum River watershed.
Muskingum River
Sugar Creek
State of Ohio
OARDC Feedstock Processing Research Facility Dedication OARDC Feedstock Processing Research Facility Dedication
Upload your file @www.oardc.ohio-state.edu/commtech/printjobs
7

COMMTECH DIGITAL PRINT CENTER CAPABILITIES
DIGITAL PRINTINGFull color printing on our new Bizhub C7000B&W copyingLarge format printing
WHAT WE PRINTBrochures, flyers, letterhead, postcards, booklets, forms, business cards, newsletters, dissertations, posters, signage, and more.
MAILING SERVICES / VARIABLE PRINTINGTabbingBulk MailingVariable Data Text, and Images
BINDERY SERVICESFoldingSaddle Stitching (Booklets)CuttingHole Punching PaddingShrink wrappingCoil bindingSpiral BindingStaplingLaminationPerfing/Scoring
LARGE FORMATUp to 44” wideClothPaperPolybacked materialVinylClothCanvasMounting on foam Core
8.5x11 11x17 12x18
B&W $.03 $.05
B&W Color Stock
$.05 $.08
B&W Cover Stock/Brights
$.08 $.12
Color $.25 $.40
Color Cover Stock
$.35 $.55
PRINTING • BINDERY • MAILING • LARGE FORMAT
PRICING
E-mail for a custom quote today!
COLUMBUS216 Kottman Hall2021 Coffey Rd.Columbus, OH 43210614-292-2011
WOOSTERResearch Services Building1680 Madison Ave.Wooster, OH 44691330-263-3780
Communications and Technology1680 Madison Ave.202 Research Services rm 202Wooster, OH 44691phone: 330-202-3508e-mail: [email protected] your file @www.oardc.ohio-state.edu/commtech/printjobs
8
2/7/2014
PowerPoint P er
The How, What, W ere
When & W
How to create attractive and informative posters using PowerPoint 2007 – how to set them up, how to import graphics and other elements, what
steps are necessary in the creation process, what elements should be included, where to go or where to send the file for printing, when they
should be submitted and why you need to follow these guidelines!
OARDC Employee Development
By
Jody Lanham
Bonnie DeArmitt
9
2/7/2014
CREATING POSTERS WITH POWERPOINT WHY POWERPOINT?
Although there are many software programs that will create posters (and realistically, some of these programs are a BETTER choice but much more complicated to use), PowerPoint is an excellent choice because it is readily accessible, compatible with most word processing and spreadsheet programs, and quite powerful, yet user friendly.
SETUP ‐ CREATING A NEW POSTER
When PowerPoint first opens, you get the layout for a title page of a Blank Presentation. You will want to choose the blank slide layout since you will be adding all of your own elements, such as title, text boxes and graphics, backgrounds, etc., to the layout. While the “placeholders” you see for a title slide will not print unless you enter text into them, they can be a bit distracting.
To choose the blank slide layout, select the Home tab, then click the Layout button on the Slides portion of the “Ribbon” (the graphical toolbar that has replaced most of the menus and toolbar buttons in previous versions of PowerPoint!). Locate the blank slide layout option (third from top on left side) and click. For other layout options simply click the one you want. You can add any elements you wish to the slide later - either manually or by clicking layout and choosing something different.
SETTING THE POSTER SIZE
To choose the size of your poster, that is, height and width:
1. Click the Design tab.
2. Click on the Page Setup button (very first on left). A dialog box will appear.
10
2/7/2014
3. In the Slides Sized for box, click the drop-down arrow and choose Custom.
4. Enter the height and width in the fields provided (PowerPoint is limited to 56” x 56”).
5. Choose either portrait (long) or landscape (wide) orientation in the slides portion of the dialog box.
One thing to keep in mind when choosing the size is the limitation of the printer to be used for final printing of the poster. If you don’t know what that limitation is, try to find out BEFORE selecting the size for your poster. If you have to resize it later, the text boxes and images will adjust to fit and will likely be out of proportion to the original setting. The plotter in CommTech that is used for most of OARDC’s poster printing is limited to 41” wide. If you want your poster laminated (highly recommended), the poster can be no wider than 36”.
SETUP YOUR POSTER WORKSPACE
In order to make creating your poster easier, you can set up the workspace so that certain elements of PowerPoint are visible: for example, the ruler can be displayed horizontally and/or vertically to help size and place objects that are added to the poster. Additionally, you may find it useful to have gridlines displayed in order to help align objects that you add to your poster layout. To turn on, or view, these helpful elements, click on the View tab, then check the boxes next to the Ruler and the Gridlines options on the Show/Hide portioin of the Ribbon.
Another element that can be quite useful to have displayed when setting up your poster is the
drawing guides. This is a set of non-printing (like the ruler and gridlines, and placeholders) lines that intersect the poster workspace horizontally and vertically. You can move these by clicking on them and dragging them with your mouse. Drawing guides are helpful in aligning and arranging objects on the poster. To turn on these drawing guides either press Alt-F9 on your keyboard (pressing it again turns them off) or right-click in a blank area of the poster workspace and choose Grid and Guides from the menu that appears. A dialog box will appear from which you can make selections such as the grid spaceing, object snapping and the display of drawing guides. Once you have added the guides, you can
drag them to new locations with your mouse and/or hold down the CTRL key as you drag to add more drawing guides.
Tip: To temporarily override grid settings, press ALT as you drag or draw an object.
11
2/7/2014
SAVING YOUR POSTER Save your poster early and save it often! To save your poster go to the Microsoft Office Button and choose Save. Choose a location that you can recall later on, perhaps even create a special folder under My Documents (in Vista the default location will be Documents) called Posters. Give your poster file a name that is readily recognizable, for example powerpoint_posters_workshop- yourname.ppt(x) for the 2007 office version, .ppt for compatibility mode. When submitting your posters through email or file upload (to be discussed later) you should make sure your name is part of the filename since you may not be directly communicating with the person printing your poster at the time of submission. Once you have given your poster a name and location, you can perform subsequent saves simply by clicking on the disk icon on the Quick Access Toolbar (the little toolbar just to the right of the Microsoft Office Button).
You should always save more than one copy of your file, and on more than one media. For example, save the file in different places on your hard drive (the most reliable storage media), and also save it on a form of removable media. These include floppy disks (IF your file wil fit!), zip disk media (fast becoming obsolete but better than nothing!), a CDR/RW (not the best choice as you cannot edit directly on this media type), or a USB drive (the small “pen” or “flash” type are best because they are very mobile and easily store in a pocket or on a lanyard around your neck.
BACKGROUND
PowerPoint has many options for backgrounds. Choose carefully… the background should not detract from the poster content. The colors should be soft, and if textured, should be selected to enhance and complement the content of the poster.
12
2/7/2014
To place a background on your poster, click on the Design tab, then click on the background section, select from the Background Styles drop-down list, or click on the Background dialog box launcher. Choose the fill or picture style option and make additional selections in the corresponding window.
TIP: When using a picture background, create your poster FIRST, then insert the background. The large size of the picture will create lengthy delays when your poster refreshes each time an action is performed. Note: A picture background will slow down the printing time for the poster considerably.
TEXT
To insert text on your poster, you can either create a text box or add another drawing object to contain your text. Click on the Insert tab on the Ribbon, then choose what you wish to insert. Most objects that you insert will permit text to be typed within the boundaries; you can format the text to wrap, to overlap the edges, to fit to the shape or to have the shape fit the text.
To format the object containing the text, right-click on it and choose Format Object, then make selections from the available dialog box.
If your text already exists in another document there is no need to retype it; simply select the existing text, right-click and choose Copy, then right-click on the text box or object and choose Paste. If the pasted results are not what you expected, undo the Paste and from the Home tab click on the Paste drop-down box and choose Paste Special. Make a choice from the list to see if the results are more satisfactory. You can additionally select the text in the object and format it using the Formatting options on the Ribbon tabs, or right-click and choose from the menu.
FONTS
For large blocks of text, use standard reading fonts such as Times New Roman or Century Schoolbook. These serif fonts are designed to help the reader follow the flow of text from one letter, from one word, to the next; fonts such as Brush Script or Bauhaus do not read well, so they should be avoided. For titles and headings a sans serif font such as Helvetica or Arial should be used. These fonts are designed to get the reader’s attention; serif fonts such as those mentioned above are best suited for body text. OSU’s preferred publication fonts are Minion and Univers.
Keep in mind that this is a poster, not a report. Your audience is interested in taking a quick look, not in
13
2/7/2014
reading lengthy descriptions of scientific information. They need to be left with a good impression as they move on to the next poster, or to the next item on their agenda. The text should describe as simply as possible the purpose of the poster itself and any pictures or drawings. Contact information can be provided for the viewer to learn more about your poster and your research or project.
CHARTS AND GRAPHS
You can insert and handle charts and graphs in either of two ways:
1. creating a chart with PowerPoint;
2. inserting a chart or graph from another application.
Creating a Chart with PowerPoint
When you create a chart by going to the Insert menu and then clicking on the Chart button of the Illustrations portion of the Ribbon, a dialog box appears with many types of charts, including subtypes, from which to choose. Once you select a chart type and click OK, a sample datasheet also appears; enter your data and the chart will be formatted accordingly.
You can select the type of chart you want (pie, bar, line, combination, etc.) by going to the Chart menu and selecting Chart Type.
After you create a chart, you can enter your own data on the datasheet, import data from a text file or Lotus 1-2-3 file, import a Microsoft Excel worksheet or chart, or copy and paste data from another program. Note that PowerPoint also *comes with a program that creates organization charts.
14
2/7/2014
Inserting a Chart or Graph from Another Application
Several options exist for getting your chart or graph created in another application into you PowerPoint poster. One method is to select and copy the chart/graph from the program used. Then from within PowerPoint, click on the Home tab and choose Paste Special from the Paste option drop-down menu. From the available option select Picture (enhanced metafile) which imports the file in as a graphic file. Once pasted in, the image cannot be manipulated or changed within PowerPoint because it is not linked to the original. If, on the other hand, you paste a chart or graph directly into PowerPoint, or if you choose one of the other Paste Special options, you can double-click it and it will allow you to change data via the original application. Using this second option, when the document is printed, however, the text tends to move around and the chart my change in appearance. A graphic file created by the “Paste Special, Enhanced Metafile” command is usually better for printing purposes.
In some instances you may need to use the Save As… and save the chart or graph as a .jpg or .tif file and then insert it as an image as sometimes the methods above can cause problems when the poster is printed. You may need to experiment with these various options for best results.
TIPS: You should keep a copy of the original file (and include it with your poster file) that was used to create the chart or graph so that if you need to choose another option to insert it into the poster, you can; if you simply create it and insert it, and don’t keep the original, you will be unable to reinsert it using one of the other Paste Special options later on.
TABLES
You can create a table in PowerPoint, or you can use Microsoft Word, Microsoft Excel, or Microsoft Access to create a table. Excel and Word can automatically format the table for you; in Access the entire datasheet can be formatted.
• For a table you can easily include in a PowerPoint table, use Word
• For a table that includes complex graphics formatting (such as bulleted lists, custom tabs,
numbering, hanging indents, individual cell formatting, and cells split diagonally) use Word
• For a table that includes complex calculations, statistical analysis, or charts, use Excel
• For a table that won’t display or print as expected, try saving as or exporting as a .jpg or
.tif format then inserting into the poster as an image
15
2/7/2014
To insert a table
1. Copy the table from the program you used to create it.
2. In PowerPoint, select Paste Special from the Paste options drop-down list on the Home tab, then select Picture (Enhanced Metafile). This imports the file as a graphic file; it cannot be manipulated or changed because it is not linked to the original, but like the chart, a table inserted as a graphic may be much better for printing purposes.
3. If the table is created in Word, the best
way to insert it is to simply copy it and paste it in.
To create a table in PowerPoint
If your table is simple, this is the easiest way!
1. Click on the Insert tab, then click on
the Table button on the Tables portion of the Ribbon.
2. Select the number of rows and
columns needed by dragging your mouse across the diagram.
3. Enter the desired text in the cells,
pressing Tab or clicking to move from cell to cell. If you need more rows, you can press Tab from the last cell in the table.
4. Format the table by clicking on the Design tab – choose a style, shading, border, text
color, etc. from the available options.
GRAPHICS – Photos and Figures Digital images are representations of pictures, drawings or graphics stored electronically as files in a variety of file types. Digital imaging refers to the process of acquiring, editing and presenting digital images. Among the most common file types that can be imported into PowerPoint are: .wmf, .jpg, .bmp, .gif, and .tif. Each file type has unique properties and advantages:
• .wmf – this image format is scaleable within PowerPoint.
• . jpg – an efficient and recommended format when saved at medium-high quality settings
(low compression).
16
2/7/2014
• .tif – preserves maximum image quality, but file sizes can be large.
• .gif – good for graphics but may not be rescaled; supports ony minimum colors but allows for transparency.
• .bmp – larger file size but preserves image quality; may be only usable option from some applications.
Did you know: Images captured from web pages are of very low resolution and if enlarged will appear pixilated in your poster. These graphics are not recommended for poster presentations. If you find images on the web that you think would illustrate your ideas well, contact the web page creator if possible to see if you can obtain a higher quality copy of the image.
A word about image resolution
Our recommendation is that a photographic or drawing image should be at least 200 pixels per inch at the final size desired in your poster. For instance, if you wish an image to be 5 inches wide by 4 inches deep in the final poster, the image resolution should be 750 pixels wide x 600 pixels deep. Resolutions up to 300 pixels per inch may deliver better final image quality, but will not be noticeably better-looking and will add considerably to the file size. In this application, the terms dpi (dots per inch) and ppi (pixels per inch) are used interchangeably.
Inserting images and other important image considerations
• Insert graphics by selecting Picture from the Insert Tab’s Illustration section.
• Preserve the aspect ratio of your images by using the Shift key while you resize graphics.
• If you are scanning images for your poster, be sure the images are scanned at from 150 to
300 dpi/ppi. This will allow for resizing if necessary.
• Avoid using pictures you find on the web (see “Did you know” box above). They are usually optimized at 72 dpi/ppi and can look very grainy or pixilated if resized.
• Avoid using WordArt in your posters; it does not print well at larger sizes.
• The .tif format is good for printing images. .Jpg is an excellent choice at the higher
quality image settings; the .jpg format is a good compromise of image quality and efficient file size. *Warning – we have experienced printing problems with very high resolution .jpg files saved at the maximum quality, especially if they are extremely large in file size (25-30 MB). Use the high quality setting instead and/or decrease the resolution if you can.
17
2/7/2014
• Make all significant changes to an image in
an application other than PowerPoint. However, you can crop, resize, and perform some contrast and brightness adjustments within PowerPoint.
• Slides, photographs and drawings that are
not in a digital format can be scanned and saved as graphic files. We encourage you to save the file as a .tif or .jpg (at a high quality setting). It is important that you scan your images at the size you need them to be printed out. For example, if the image is going to be 8 inches x 10 inches, you need to set the scanner for that image size, at 150-300 dpi/ppi. Keep in mind that the larger the file, the longer it will take to print; smaller files are also easier to manipulate and manage.
Modifying images
Once inserted, your images can be rotated or cropped, lightened or darkened, changed to grayscale, or have a border added. You can adjust such settings by selecting your image, then clicking on the Format tab on the Ribbon. Choose from the resulting sections such as the adjust options, picture styles, arrange, size, etc. Alternately, you can right-click on your image and choose Format Picture from the menu.
ARTWORK – shapes, smartart and clipart
PowerPoint comes with a set of ready-made shapes that you can use in your posters. The shapes can be resized, rotated, flipped, colored and combined with other shapes to make more complex shapes. The Illustrations section of the Insert tab contains several categories of shapes, including lines, connectors, basic shapes, flowchart elements, stars and banners and callouts. You can add text to a shape clicking in the shape and typing. Many shapes have an adjustment handle (a yellow diamond) that can be used to change a special aspect of a shape.
18
2/7/2014
Position, align and space text in a shape When text is attached to a shape, such as a callout or a flowchart symbol, you can change the position of the text, change the shape of the object to fit the text, make the text wrap inside the object or change the amount of space between the text and the edge of the object. To attach your text to an object, click the object and type the text. Note: you can also use the same procedures to position, align and space text that was added by using the Text Box button on the text section of the Insert tab.
Add and format a line
1. Click the Shapes button, point to the Lines, and then click the line style you want.
2. Drag your mouse to draw the line. To constrain the line to draw at 15-degree angles from
its starting point, hold down the shift key as you drag. To lengthen the line in opposite directions from the first end point, hold down the CTRL key as you drag.
3. You can format the line by selecting it then clicking on the Format contextual tab. From
the Shape Styles menu, choose among the options such as line width, color, shadow, etc. Alternately you can right-click the line, choose Format Shape and make the desired enhancements. This procedure can be applied to most any shape or line.
LAYOUT CONSIDERATIONS
Grouping, aligning and ordering
To group objects so that they behave as one (this is convenient when you want to move or copy a complex set of drawing objects), hold the Shift key while you click on each object to include in the group. Then click on the Group button on the Arrange section of the Format contextual tab.
Another layout option is object alignment relevant to one another. For example, you can line up objects so that they are even at their top, bottom, left, or right or along a center relevant to the first object selected. Us the Arrange drop-down option to choose. Note, the other options on the Arrange section of the Format contextual tab: rotate, bring to front, etc. You can use these additionally to make modifications to the order and placement of objects on your poster.
SAVING YOUR POSTER TO SEND TO THE PRINTER
To prepare for printing of your poster, save it to a separate file as well as make a backup copy. Since the file will likely be quite large, you will be unable to save to a small floppy disk. Two good mediums are the USB pen/flash drive and a CD-ROM. If you are using graphics in your
19
2/7/2014
poster, be sure to include a copy of each of the image files separately along with your poster file. This is useful if the image gets corrupted and needs to be reinserted, or if it needs to be modified in Photoshop because of a printing or size restriction issue, to then be reinserted after modification.
To Save
1. On the Microsoft Office Button menu choose Save As.
2. Choose a location form the icons on the left or from the Save in drop-down list. In the
File name box, enter a name for the poster file. Use a name that is very descriptive of the poster and that includes your name, such as FruitFlyFavoritePlants_JodyLanham.ppt.
3. In all cases you should embed the TrueType fonts. This will make the text typeface
information part of your file so that if the printing service doesn’t have the same fonts you are using, they will still print correctly. To do this, select the Save Options feature from the Tools drop-down list in the Save window.
4. Click Save. Remember to do this again, saving to another location for a backup copy.
GETTING THE POSTER TO COMM TECH PRINTING SERVICE
You can get your poster file(s) to CommTech services a number of ways. You can bring it over personally or send it on your storage media using the mail. You can email it, if it is less than ten (10) megabytes. You can submit it electronically using the online web-based file transfer service, the OARDC File Upload Site, located at: http://oardc.osu.edu/commtech/printjobs/default1.asp. This is useful since the file size is not limited. Once the file has been received at CommTech, it may take several days to get it printed. It is a good idea to submit your file and printing instructions to CommTech at least two weeks before the poster is needed if at all possible.
If you have questions or concerns regarding any part of the creation and/or process of printing your poster please be sure to contact either Gary (3508, [email protected] )
CREATING A PDF
You may need to create a pdf (Adobe’s Portable Document Format) version of the file for various reasons – generally a smaller file size; readable on computers that do not have PowerPoint installed; consistent formatting no matter what computer or operating system it is viewed on. To do this, choose File, Print and select the Adobe PDF or PDFWriter from the printer list. Click OK and a pdf file will be created with the same name as the document name, ending in .pdf instead of .docx or .doc. You can also choose to create the pdf by clicking on the Create Adobe PDF button on the toolbar.
20
2/7/2014
COST FOR PRINTING OF YOUR POSTER (THIS INFO SUBJECT TO CHANGE): Since prices are subject to change depending on the cost of supplies, this short list is just to give you an idea of what you can expect to spend on a poster:
24” X 36” = $30.00 poster only;
24” X 48” = $40.00 poster only; Lamination is $3.00 per linear ft. Add 1 ft. lead in and 1 ft. tail end waste. We can laminate up to 36" wide.
As the poster size increases, the cost increases proportionally. Call CommTech (330-202-3508) for more specific pricing information.
21