Embed Size (px)
Citation preview

©2018 Cook Biotech Inc. CBI-D43087-EN
cookbiotech.eu
OASIS® Extracellular Matrix - Application and Management Guide
OASIS Extracellular Matrix supports the body’s own healing process by providing a natural, intact extracellular matrix.1
OASIS provides flexibility and versatility for different needs of acute and chronic wounds including: pressure ulcers, venous ulcers, chronic vascular ulcers, diabetic ulcers, trauma wounds (abrasions, lacerations, skin tears), second-degree burns, donor sites/grafts, draining wounds, surgical wounds (post-Mohs’ surgery, post-laser surgery, podiatric, wound dehiscence)
1
Prepare Debride wound bed thoroughly to remove any barriers that could prevent OASIS from integrating directly with viable tissue (e.g., devitalized tissue, slough, debris, or coagulated blood). Ensure that excessive bleeding, excessive exudate, and any infection are controlled before applying OASIS.
2Apply OASIS Select appropriate size of OASIS. Position and cut sheet to cover wound surface, extending slightly beyond wound edges. If multiple sheets are necessary to cover wound, overlap edges slightly. User may choose to secure sheet with tape, sutures, or staples.
Rehydrate Gently rehydrate OASIS with sterile saline.3
4
Protect with non-adherent dressing Apply porous, non-adherent dressing over OASIS and fixate using fixation method of choice. This non-adherent dressing will help secure and protect OASIS during secondary dressing changes, while allowing fluid management to be controlled by secondary layers. To prevent damage to newly incorporating OASIS, ensure that non-adherent dressing is only changed when ready to assess wound, typically after 3-7 days.
Apply
1 Hodde J, Janis A, Ernst D, Zopf D, Sherman D, Johnson C. Effects of sterilization on an extracellular matrix scaffold: Part I. Composition and matrix architecture. J Mater Sci Mater Med. 2007;18:537-543.
©2018 Cook Biotech Inc. CBI-D43087-EN
cookbiotech.eu
5
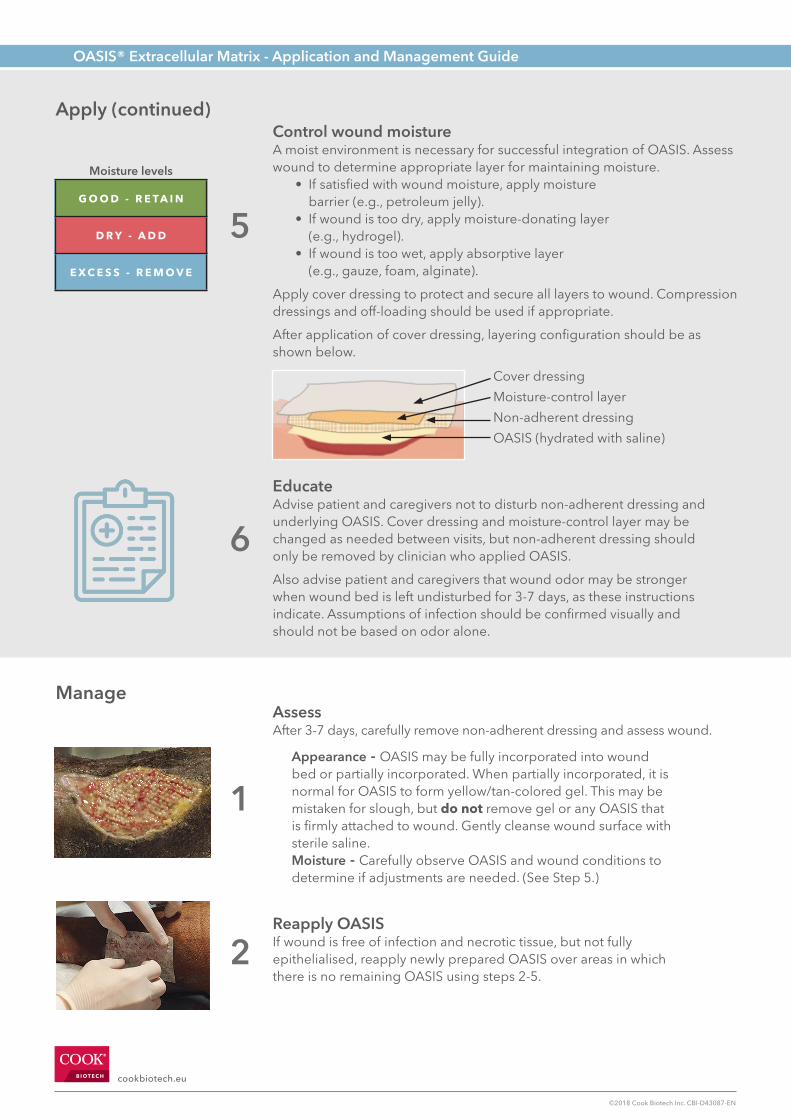
Control wound moisture A moist environment is necessary for successful integration of OASIS. Assess wound to determine appropriate layer for maintaining moisture. • If satisfied with wound moisture, apply moisture barrier (e.g., petroleum jelly). • If wound is too dry, apply moisture-donating layer (e.g., hydrogel). • If wound is too wet, apply absorptive layer (e.g., gauze, foam, alginate).
Apply cover dressing to protect and secure all layers to wound. Compression dressings and off-loading should be used if appropriate.
After application of cover dressing, layering configuration should be as shown below.
1
Assess After 3-7 days, carefully remove non-adherent dressing and assess wound.
Appearance - OASIS may be fully incorporated into wound bed or partially incorporated. When partially incorporated, it is normal for OASIS to form yellow/tan-colored gel. This may be mistaken for slough, but do not remove gel or any OASIS that is firmly attached to wound. Gently cleanse wound surface with sterile saline. Moisture - Carefully observe OASIS and wound conditions to determine if adjustments are needed. (See Step 5.)
2Reapply OASIS If wound is free of infection and necrotic tissue, but not fully epithelialised, reapply newly prepared OASIS over areas in which there is no remaining OASIS using steps 2-5.
Manage
G O O D - R E TA I N
D R Y - A D D
E X C E S S - R E M O V E
Moisture levels
Cover dressing
Moisture-control layer
Non-adherent dressing
OASIS (hydrated with saline)
Apply (continued)
6
Educate Advise patient and caregivers not to disturb non-adherent dressing and underlying OASIS. Cover dressing and moisture-control layer may be changed as needed between visits, but non-adherent dressing should only be removed by clinician who applied OASIS.
Also advise patient and caregivers that wound odor may be stronger when wound bed is left undisturbed for 3-7 days, as these instructions indicate. Assumptions of infection should be confirmed visually and should not be based on odor alone.
OASIS® Extracellular Matrix - Application and Management Guide