Embed Size (px)
DESCRIPTION
OBIA_Installation_Guide
Citation preview

OBIEE – OBIA – ODI
Installation Document
Author: Oracle
Creation Date: Feb 24, 2013
FMW Version: 11.1.1.7.0

OBIEE – OBIA – ODI Installation Document
File Ref: OBIEE_OBIA_ODI Installation on Linux
OBIEE – OBIA – ODI Installation Document
1.1 Change Record
Date Author Version Change Reference
24-Feb-14 Gary Rao 0.1 Added section - Installation
1.2 Reviewers
Name Position
OBIEE – OBIA – ODI Installation Document
File Ref: OBIEE_OBIA_ODI Installation on Linux
OBIEE – OBIA – ODI Installation Document
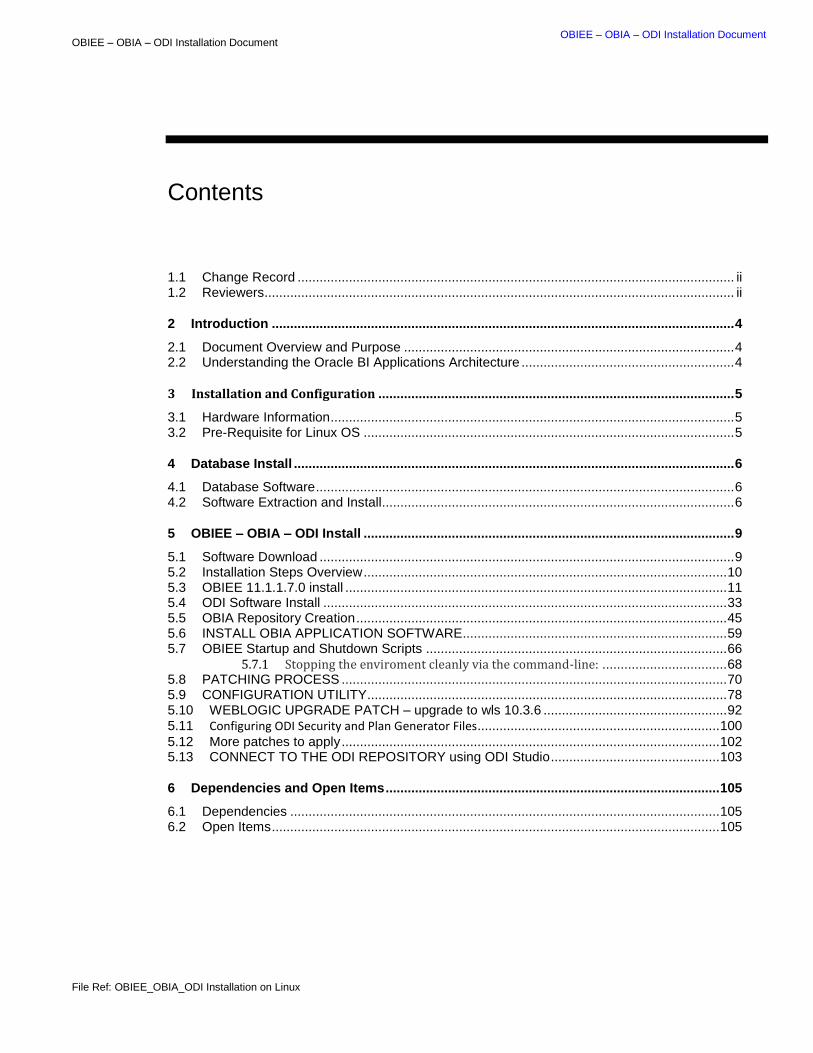
Contents
1.1 Change Record ....................................................................................................................... ii 1.2 Reviewers ................................................................................................................................ ii
2 Introduction .............................................................................................................................. 4
2.1 Document Overview and Purpose .......................................................................................... 4 2.2 Understanding the Oracle BI Applications Architecture .......................................................... 4
3 Installation and Configuration ................................................................................................. 5
3.1 Hardware Information .............................................................................................................. 5 3.2 Pre-Requisite for Linux OS ..................................................................................................... 5
4 Database Install ........................................................................................................................ 6
4.1 Database Software .................................................................................................................. 6 4.2 Software Extraction and Install................................................................................................ 6
5 OBIEE – OBIA – ODI Install ..................................................................................................... 9
5.1 Software Download ................................................................................................................. 9 5.2 Installation Steps Overview ................................................................................................... 10 5.3 OBIEE 11.1.1.7.0 install ........................................................................................................ 11 5.4 ODI Software Install .............................................................................................................. 33 5.5 OBIA Repository Creation ..................................................................................................... 45 5.6 INSTALL OBIA APPLICATION SOFTWARE ........................................................................ 59 5.7 OBIEE Startup and Shutdown Scripts .................................................................................. 66
5.7.1 Stopping the enviroment cleanly via the command-line: .................................. 68 5.8 PATCHING PROCESS ......................................................................................................... 70 5.9 CONFIGURATION UTILITY .................................................................................................. 78 5.10 WEBLOGIC UPGRADE PATCH – upgrade to wls 10.3.6 .................................................. 92 5.11 Configuring ODI Security and Plan Generator Files .................................................................. 100 5.12 More patches to apply ....................................................................................................... 102 5.13 CONNECT TO THE ODI REPOSITORY using ODI Studio .............................................. 103
6 Dependencies and Open Items ........................................................................................... 105
6.1 Dependencies ..................................................................................................................... 105 6.2 Open Items .......................................................................................................................... 105

Rackspace- OBIEE-OBIA-ODI Installation
File Ref: OBIEE_OBIA_ODI Installation on Linux
2 INTRODUCTION
2.1 Document Overview and Purpose
In this document, we will go through the steps required to install, and configure OBIEE 11.1.1.7.0, and Oracle BI Applications 11.1.1.7.1. The objective of this article is to create OBIEE/Oracle BI Applications 11.1.1.7.1 environment with Oracle Data Integrator 11g along with tools such as Oracle BI Applications Configuration Manager and the Load Plan Generator for ODI 11g.
2.2 Understanding the Oracle BI Applications Architecture
Oracle BI Applications 11.1.1.7.1 uses Oracle Data Integrator 11g (11.1.1.7) to perform data loads, along with a number of Java-based applications that are deployed into managed servers within the Oracle Business Intelligence WebLogic domain. The figure below shows the Oracle BI Applications logical product architecture, showing you how the usual WebLogic Server managed server deployed as part of an Oracle Business Intelligence BI domain extended to include new Oracle BI Applications-related Java applications, and a new managed server added that contains Oracle Data Integrator-related Java applications

Rackspace- OBIEE-OBIA-ODI Installation
File Ref: OBIEE_OBIA_ODI Installation on Linux
3 INSTALLATION AND CONFIGURATION
In this document, we will install OBIEE 11.1.1.7.0, Oracle BI Applications 11.1.1.7.1 and ODI into a fresh Linux environment that has access to an Oracle 11gR2 database to hold the various repository schemas and the BI Applications data warehouse.
3.1 Hardware Information
Server for Database : 10.12.250.210
Server for OBIEE/ODI/OBIA : 10.12.250.211
3.2 Pre-Requisite for Linux OS
Install pre-requirements for Linux OS as below.
Download and copy the appropriate yum configuration file in place, by running the following commands as root
Recommended for Oracle Linux 5
# cd /etc/yum.repos.d # wget https://public-yum.oracle.com/public-yum-el5.repo
# yum install oracle-validated
The "/etc/hosts" file must contain a fully qualified name for the server.
<IP-address> <fully-qualified-machine-name> <machine-name>
For example: 127.0.0.1 localhost.localdomain localhost
Check the ping with hostname

Rackspace- OBIEE-OBIA-ODI Installation
File Ref: OBIEE_OBIA_ODI Installation on Linux
4 DATABASE INSTALL
Install Oracle Database – this can be on the same server or on another server
4.1 Database Software
Download Oracle Database from technet.oracle.com
4.2 Software Extraction and Install
Unzip the files
The extracted files in the database folder:
Run the command ./runInstaller

Rackspace- OBIEE-OBIA-ODI Installation
File Ref: OBIEE_OBIA_ODI Installation on Linux
NOTE: IN case of erorr as below …Error in CreateOUIProcess(): 13 : Permission denied Then “$ export TMP=$HOME/tmp” and continue with installation
Rackspace- OBIEE-OBIA-ODI Installation
File Ref: OBIEE_OBIA_ODI Installation on Linux
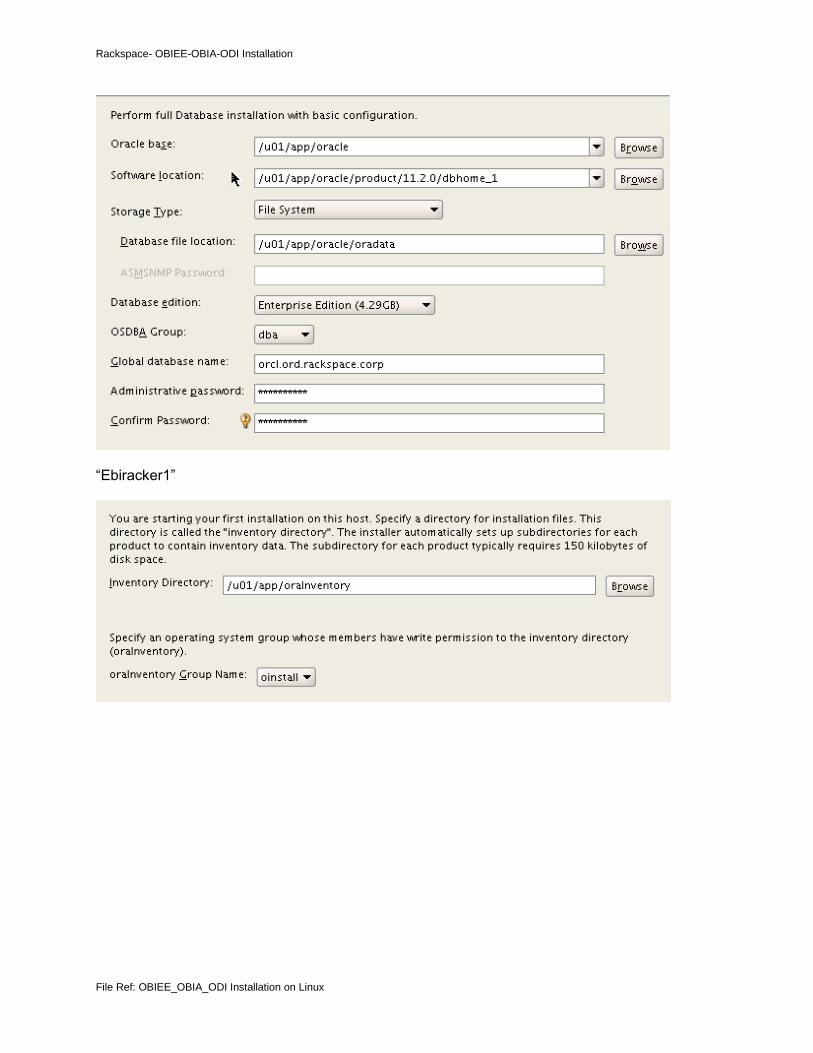
“Ebiracker1”

Rackspace- OBIEE-OBIA-ODI Installation
File Ref: OBIEE_OBIA_ODI Installation on Linux
5 OBIEE – OBIA – ODI INSTALL
5.1 Software Download
The next steps are to install OBIEE/OBIA/ODI Software
Download software from edelivery.oracle.com. Suite: Oracle Business Intelligence Applications 11.1.1.7.1 Media Pack for Linux x86-64

Rackspace- OBIEE-OBIA-ODI Installation
File Ref: OBIEE_OBIA_ODI Installation on Linux
Download Java:
Go to below URL, download relevant JDK (jdk1.6)and install it.
http://www.oracle.com/technetwork/java/javase/downloads/index.html
Unzip the Oracle Files in their respective folders
5.2 Installation Steps Overview
The installation steps are as follows:
1. RCU for OBIEE 2. OBIEE 11.1.1.7.1 (with defaulted Weblogic 10.3.5, which is upgraded later) 3. ODI (software install only) 4. RCU for OBIA 5. OBIA 6. Upgrade weblogic to 10.3.6 (need to download the patch)
NOTE: As part of the installation process will require you to upgrade Oracle WebLogic Server from version 10.3.5 to 10.3.6, and to do this you will need to download the upgrade installer for WebLogic Server 10.3.6 from My Oracle Support, by loading download patch no. 13529623 and following article 1421307.1, to give you a file called wls1036_upgrade_generic.jar.
Rackspace- OBIEE-OBIA-ODI Installation
File Ref: OBIEE_OBIA_ODI Installation on Linux
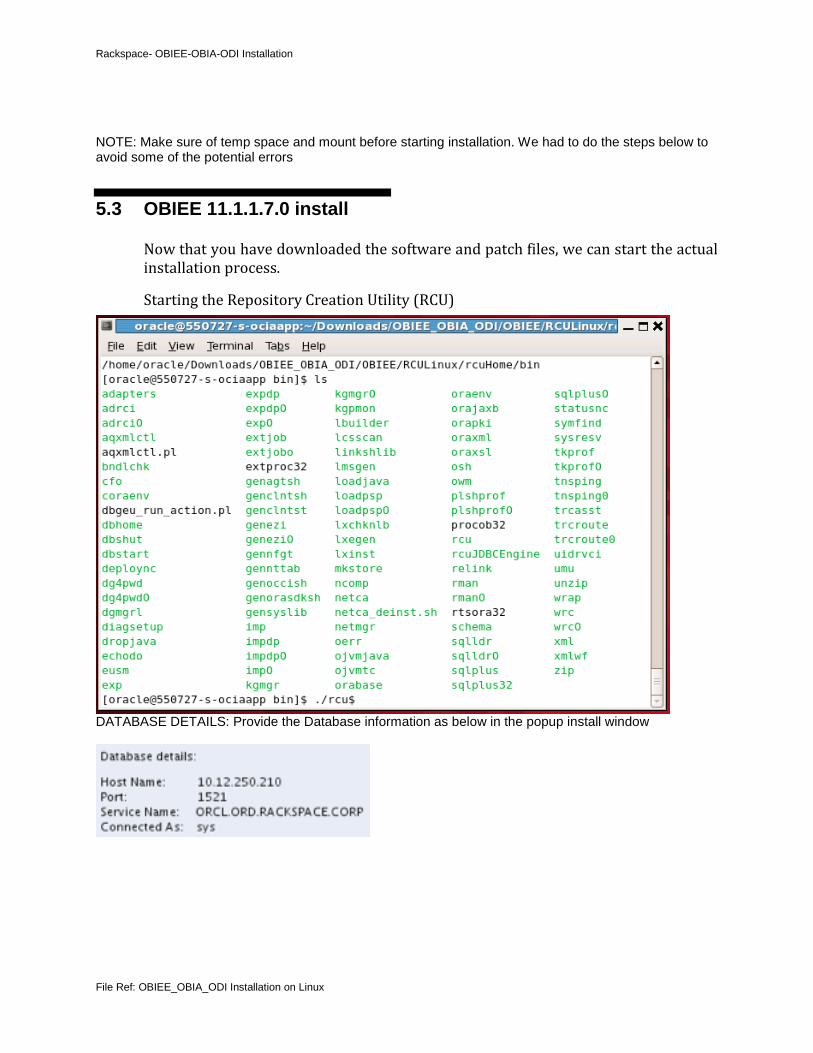
NOTE: Make sure of temp space and mount before starting installation. We had to do the steps below to avoid some of the potential errors
5.3 OBIEE 11.1.1.7.0 install
Now that you have downloaded the software and patch files, we can start the actual installation process.
Starting the Repository Creation Utility (RCU)
DATABASE DETAILS: Provide the Database information as below in the popup install window

Rackspace- OBIEE-OBIA-ODI Installation
File Ref: OBIEE_OBIA_ODI Installation on Linux
Provide the prefix like RSTST, for it to enable to create
a. Schema Name: RSTST_BIPLATFORM b. Schema Name: RSTST_MDS
Rackspace- OBIEE-OBIA-ODI Installation
File Ref: OBIEE_OBIA_ODI Installation on Linux
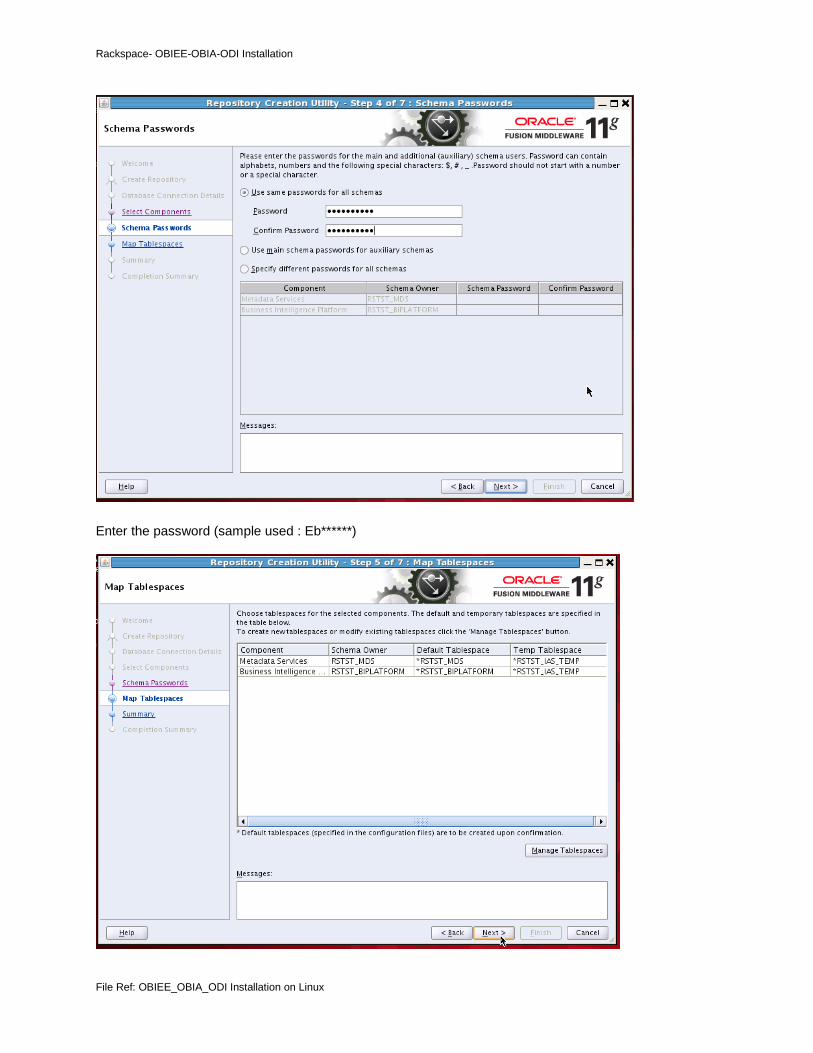
Enter the password (sample used : Eb******)
Rackspace- OBIEE-OBIA-ODI Installation
File Ref: OBIEE_OBIA_ODI Installation on Linux
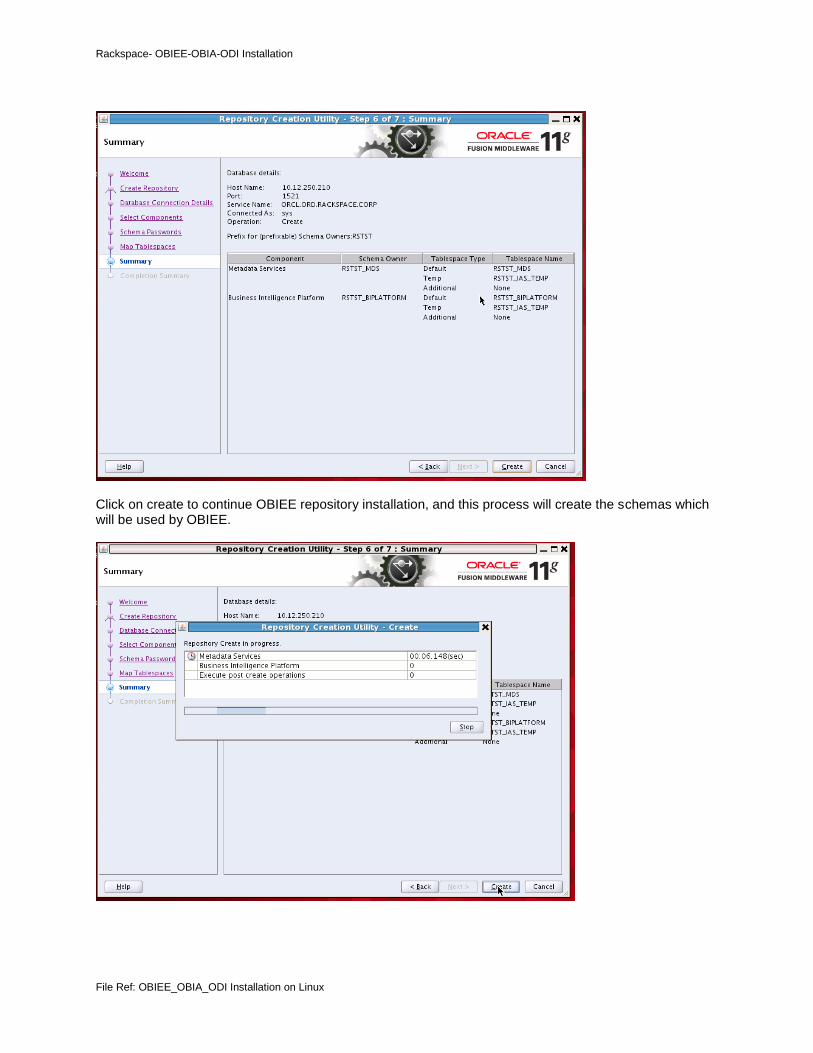
Click on create to continue OBIEE repository installation, and this process will create the schemas which will be used by OBIEE.
Rackspace- OBIEE-OBIA-ODI Installation
File Ref: OBIEE_OBIA_ODI Installation on Linux
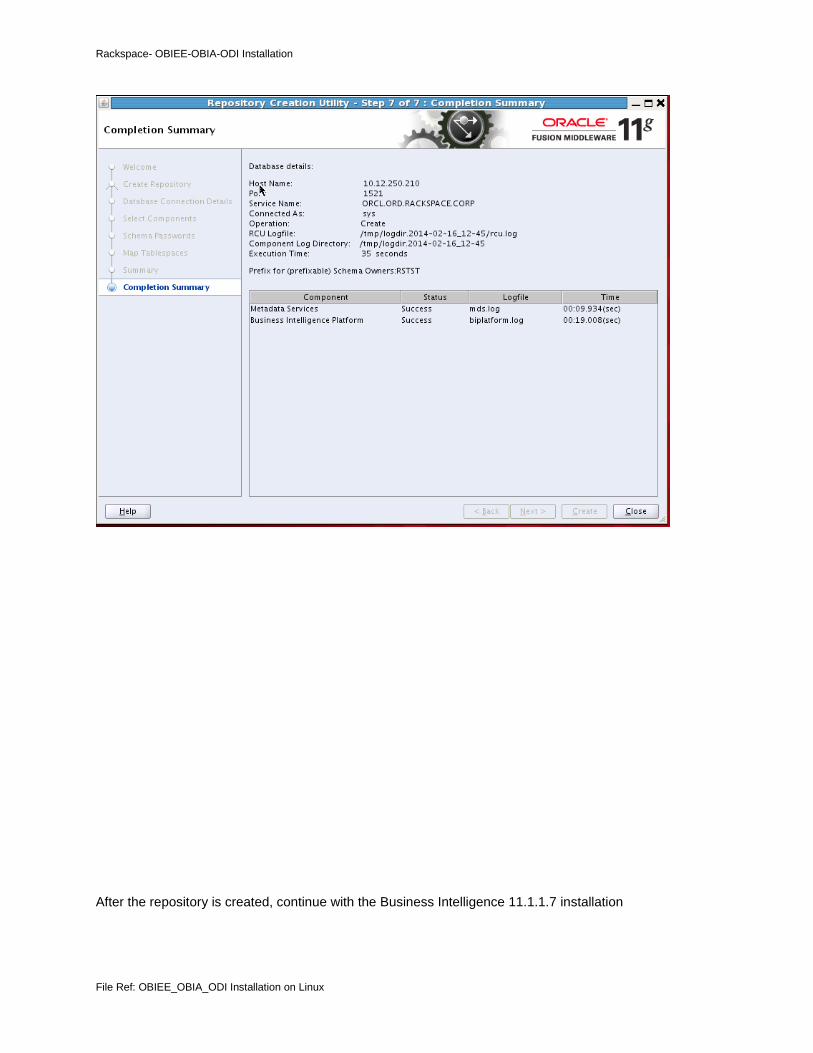
After the repository is created, continue with the Business Intelligence 11.1.1.7 installation

Rackspace- OBIEE-OBIA-ODI Installation
File Ref: OBIEE_OBIA_ODI Installation on Linux
Navigate to the right path to execute OBIEE installer, which would be in “bishiphome Disk1”

Rackspace- OBIEE-OBIA-ODI Installation
File Ref: OBIEE_OBIA_ODI Installation on Linux
Click Next to continue

Rackspace- OBIEE-OBIA-ODI Installation
File Ref: OBIEE_OBIA_ODI Installation on Linux
Choose Skip Software Updates and Click Next to continue
Rackspace- OBIEE-OBIA-ODI Installation
File Ref: OBIEE_OBIA_ODI Installation on Linux
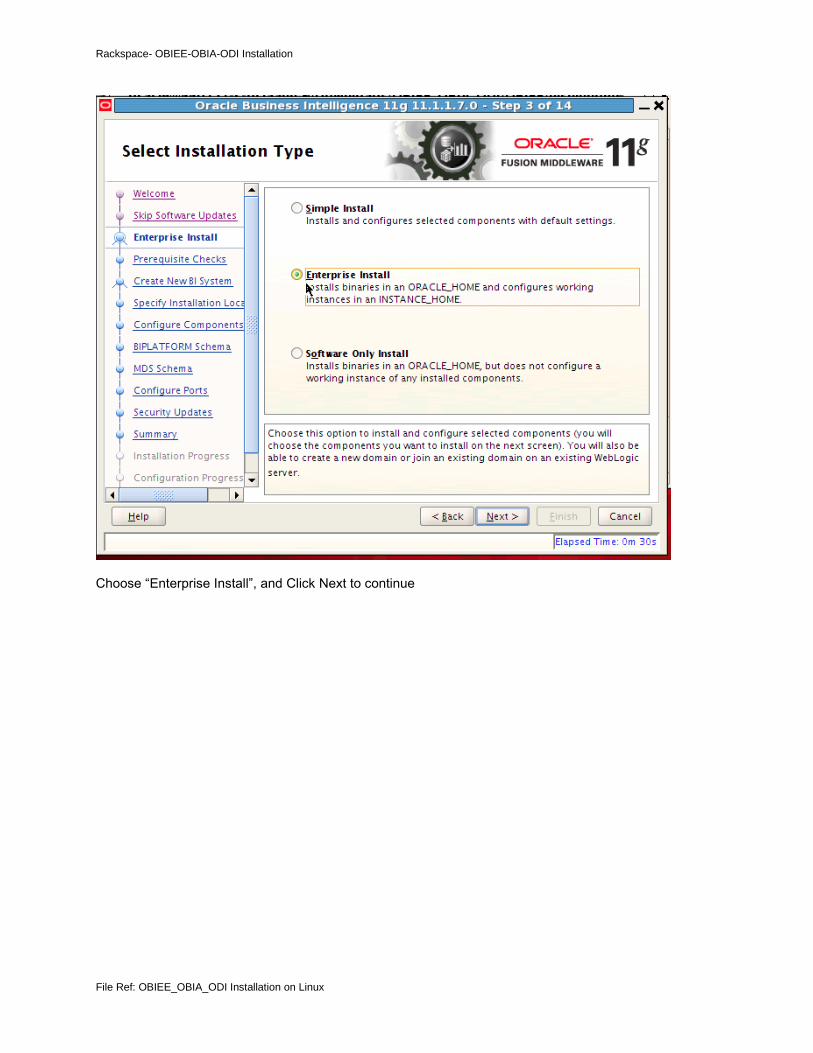
Choose “Enterprise Install”, and Click Next to continue

Rackspace- OBIEE-OBIA-ODI Installation
File Ref: OBIEE_OBIA_ODI Installation on Linux
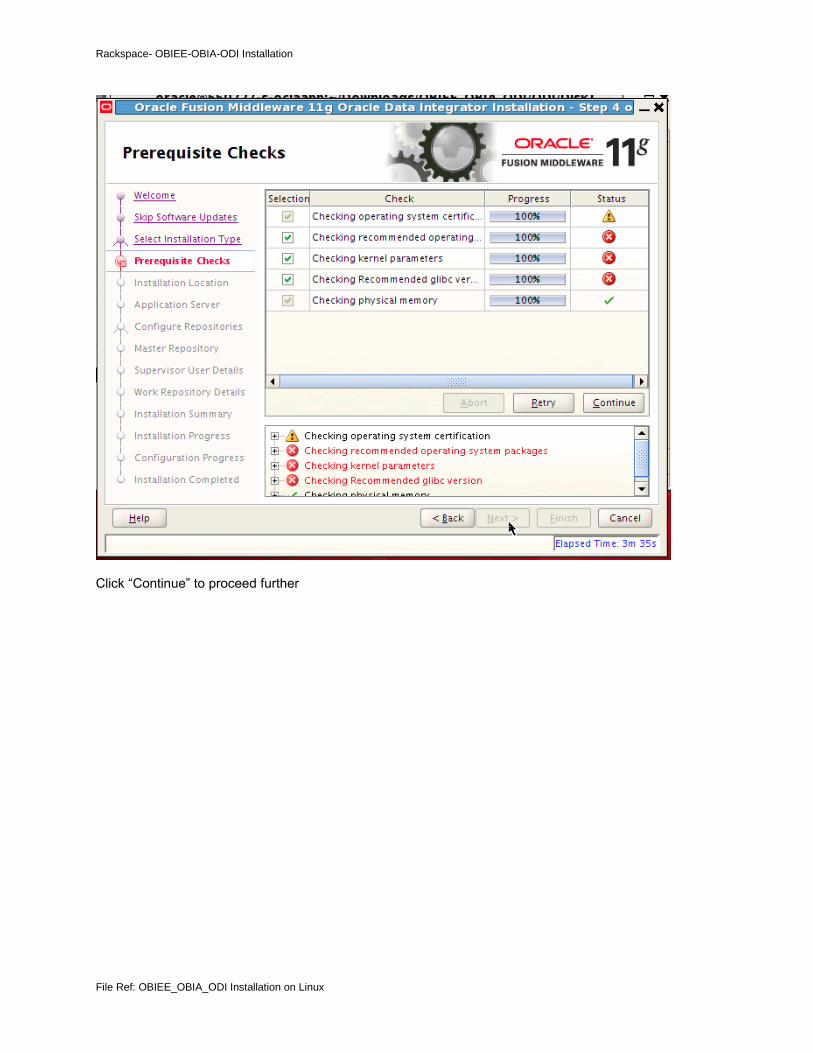
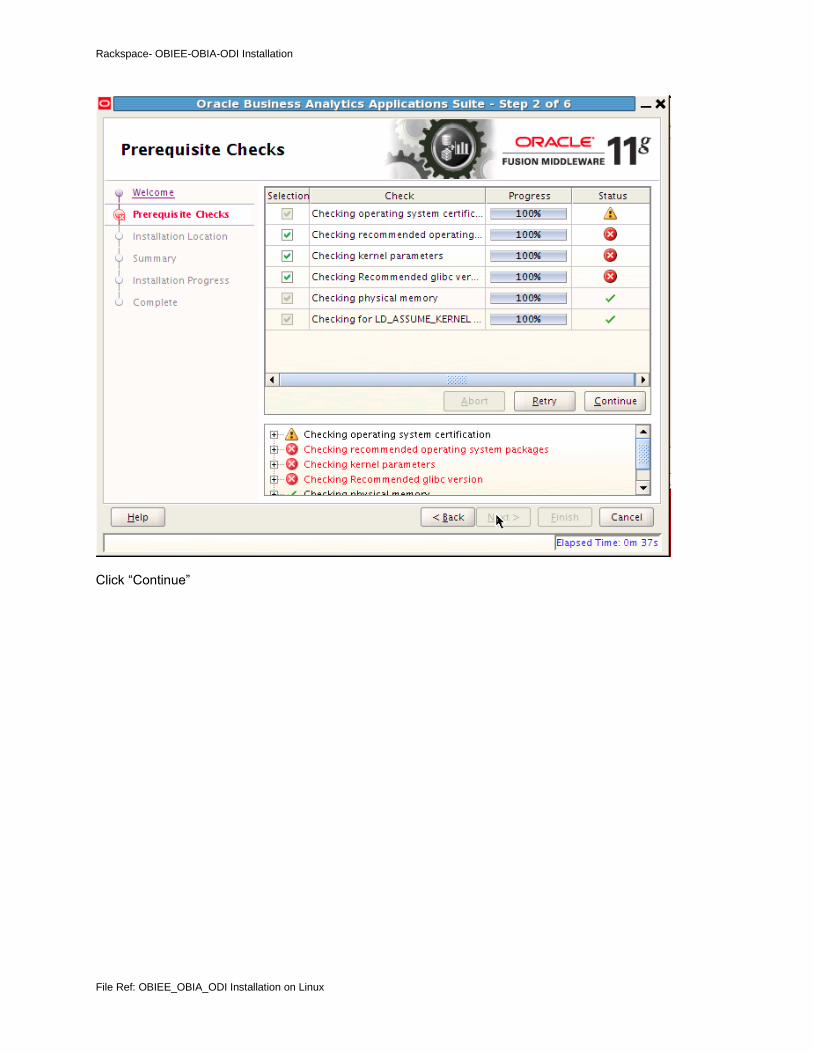
Click on “Continue”

Rackspace- OBIEE-OBIA-ODI Installation
File Ref: OBIEE_OBIA_ODI Installation on Linux
Enter the username “weblogic”, and the Password (Eb**********). Leave the other defaults
Rackspace- OBIEE-OBIA-ODI Installation
File Ref: OBIEE_OBIA_ODI Installation on Linux
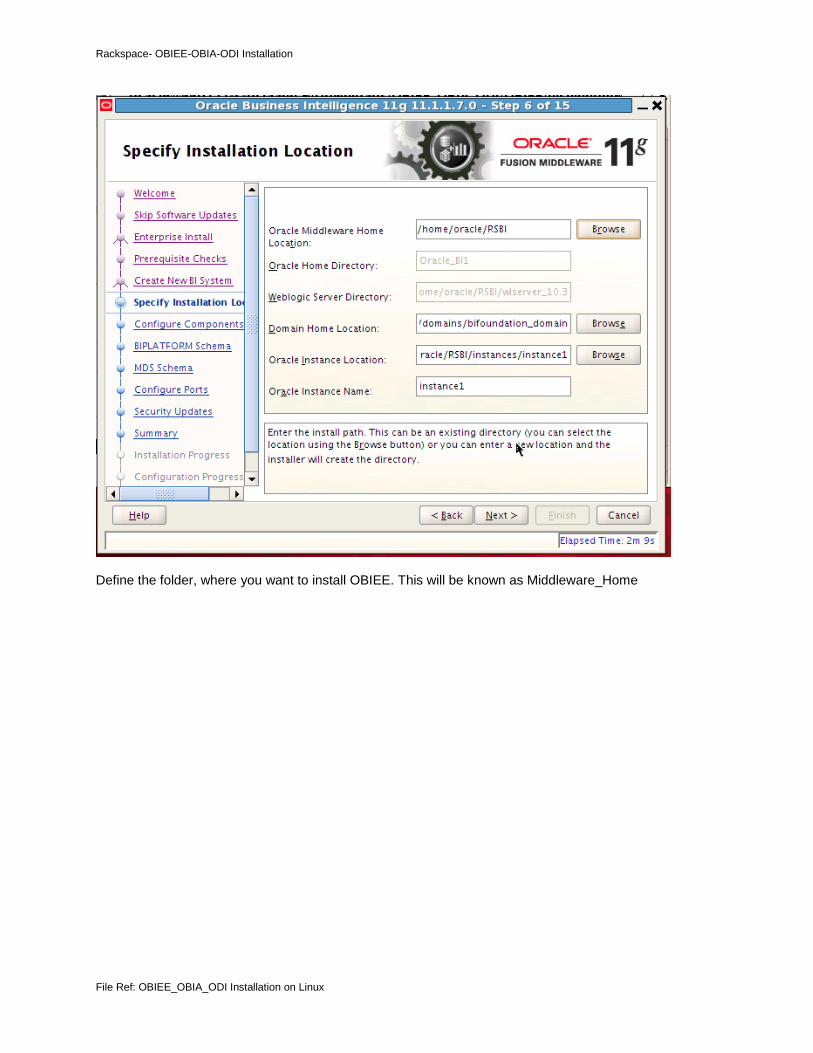
Define the folder, where you want to install OBIEE. This will be known as Middleware_Home

Rackspace- OBIEE-OBIA-ODI Installation
File Ref: OBIEE_OBIA_ODI Installation on Linux
Choose the products required, and in our case, we chose BIEE, and BIPublisher
Rackspace- OBIEE-OBIA-ODI Installation
File Ref: OBIEE_OBIA_ODI Installation on Linux
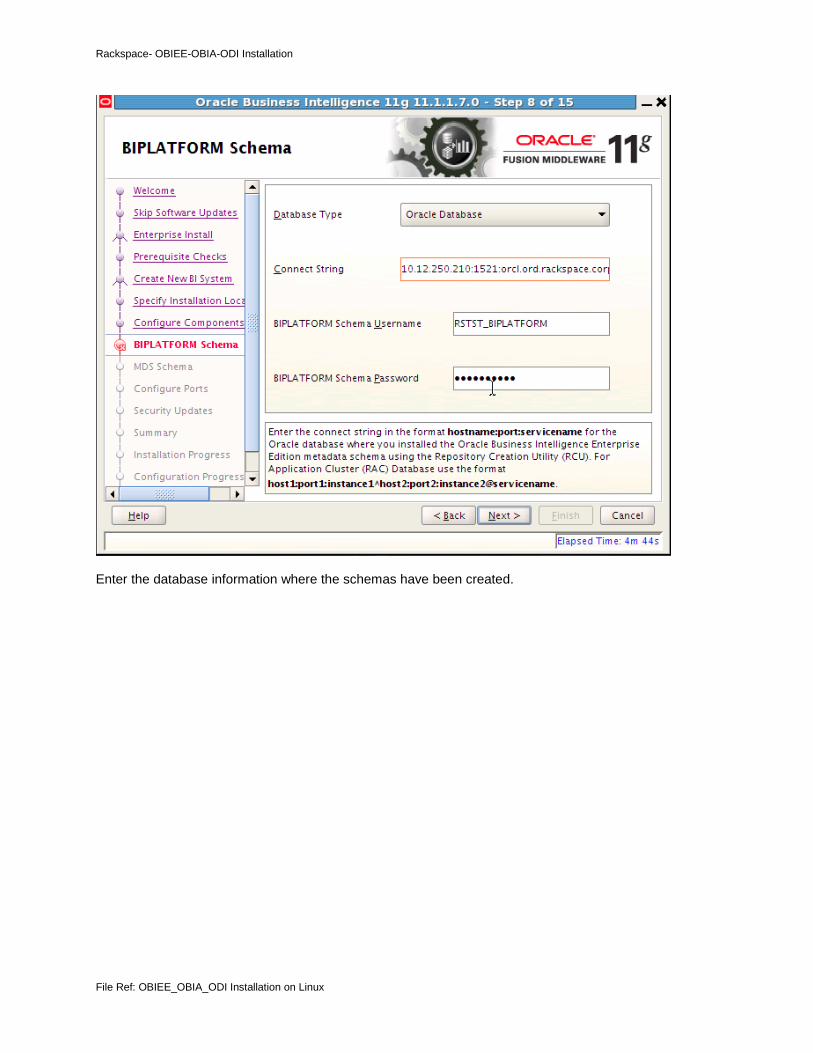
Enter the database information where the schemas have been created.
Rackspace- OBIEE-OBIA-ODI Installation
File Ref: OBIEE_OBIA_ODI Installation on Linux
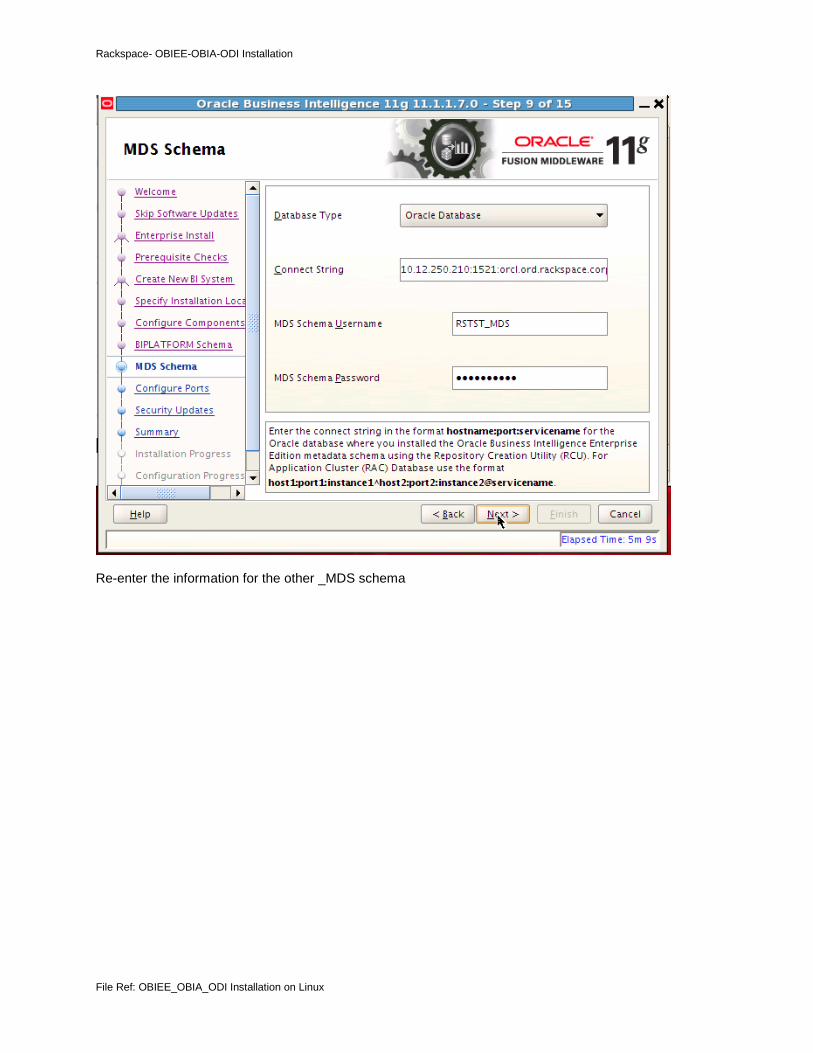
Re-enter the information for the other _MDS schema

Rackspace- OBIEE-OBIA-ODI Installation
File Ref: OBIEE_OBIA_ODI Installation on Linux
Choose Auto port configuration, and click “Next” to continue

Rackspace- OBIEE-OBIA-ODI Installation
File Ref: OBIEE_OBIA_ODI Installation on Linux
click “Yes” to continue

Rackspace- OBIEE-OBIA-ODI Installation
File Ref: OBIEE_OBIA_ODI Installation on Linux
Click on Install to continue.

Rackspace- OBIEE-OBIA-ODI Installation
File Ref: OBIEE_OBIA_ODI Installation on Linux

Rackspace- OBIEE-OBIA-ODI Installation
File Ref: OBIEE_OBIA_ODI Installation on Linux
The installation process starts with creating Domain and checks off the tasks.

Rackspace- OBIEE-OBIA-ODI Installation
File Ref: OBIEE_OBIA_ODI Installation on Linux
Once complete, click “Next” to continue

Rackspace- OBIEE-OBIA-ODI Installation
File Ref: OBIEE_OBIA_ODI Installation on Linux
Save the post-installation information, and click “Finish”

Rackspace- OBIEE-OBIA-ODI Installation
File Ref: OBIEE_OBIA_ODI Installation on Linux
The OBIEE Login page pops up in the browser once installation is successful.
5.4 ODI Software Install
Now you can install Oracle Data Integrator 11g, making sure that you do not choose the option to configure repositories, as a later stage in the configuration process will do this for you
Navigate to the installation folder in OBI Disk1 runInstaller

Rackspace- OBIEE-OBIA-ODI Installation
File Ref: OBIEE_OBIA_ODI Installation on Linux
Identify the folder with jdk1.6, and provide the information while executing the installer. The screen shot is as above
Click “Next” to continue

Rackspace- OBIEE-OBIA-ODI Installation
File Ref: OBIEE_OBIA_ODI Installation on Linux
Skip Software Updates, and Click “Next” to continue
Rackspace- OBIEE-OBIA-ODI Installation
File Ref: OBIEE_OBIA_ODI Installation on Linux
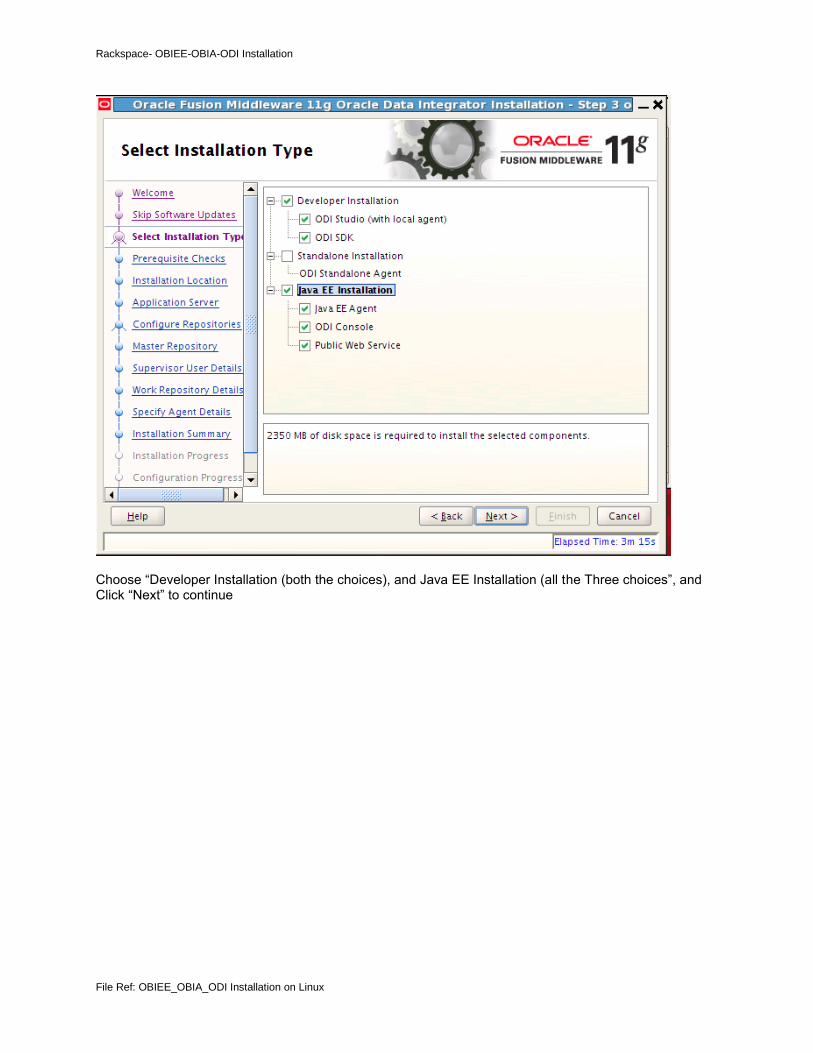
Choose “Developer Installation (both the choices), and Java EE Installation (all the Three choices”, and Click “Next” to continue
Rackspace- OBIEE-OBIA-ODI Installation
File Ref: OBIEE_OBIA_ODI Installation on Linux
Click “Continue” to proceed further

Rackspace- OBIEE-OBIA-ODI Installation
File Ref: OBIEE_OBIA_ODI Installation on Linux
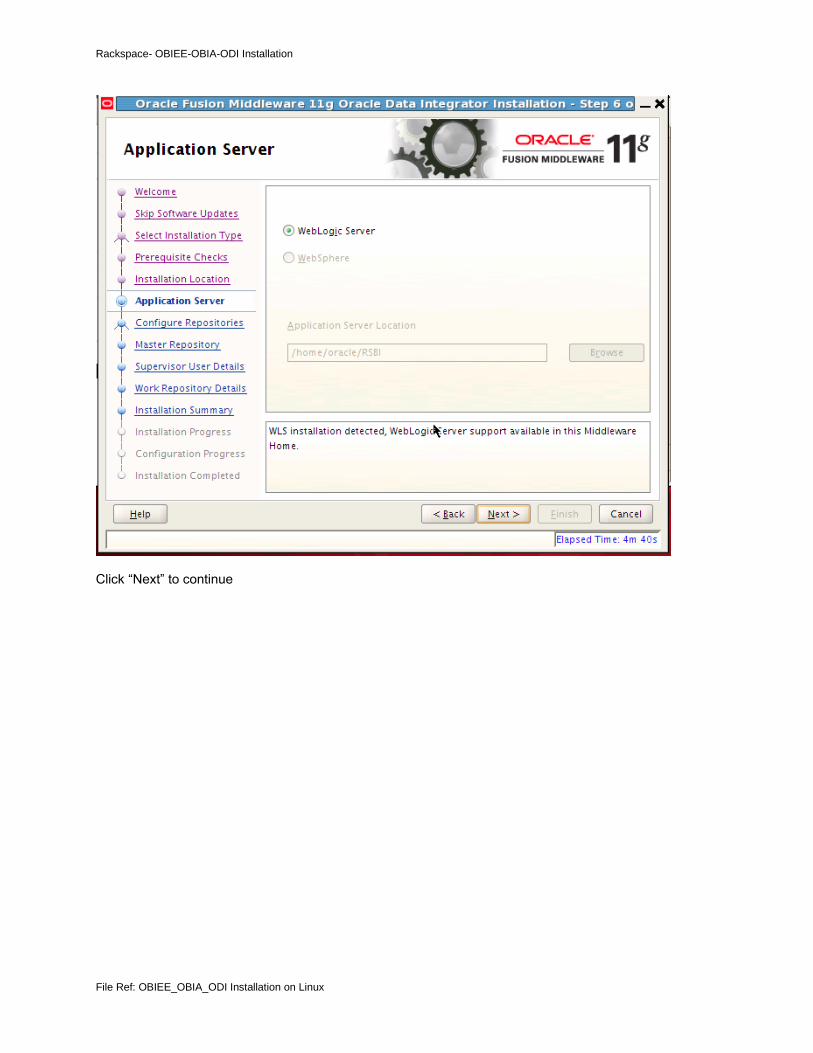
Make sure you give the existing “Middleware_Home” path. In this case it is “/home/oracle/RSBI
Rackspace- OBIEE-OBIA-ODI Installation
File Ref: OBIEE_OBIA_ODI Installation on Linux
Click “Next” to continue

Rackspace- OBIEE-OBIA-ODI Installation
File Ref: OBIEE_OBIA_ODI Installation on Linux
Make Sure you choose the second option “Skip Repository Configuration”, and Click “Next” to continue

Rackspace- OBIEE-OBIA-ODI Installation
File Ref: OBIEE_OBIA_ODI Installation on Linux
Save the pre-install information in a file, and Click “Install”

Rackspace- OBIEE-OBIA-ODI Installation
File Ref: OBIEE_OBIA_ODI Installation on Linux
The installation is in progress

Rackspace- OBIEE-OBIA-ODI Installation
File Ref: OBIEE_OBIA_ODI Installation on Linux
Once the installation is complete, Click “Next” to continue

Rackspace- OBIEE-OBIA-ODI Installation
File Ref: OBIEE_OBIA_ODI Installation on Linux
Save the post-installation information for future reference, and click Finish

Rackspace- OBIEE-OBIA-ODI Installation
File Ref: OBIEE_OBIA_ODI Installation on Linux
5.5 OBIA Repository Creation
(OBIA RCU) – The next step in this installation process is to use an additional, special version of the Repository Creation Utility to create the additional repository and other schemas used by Oracle BI Applications 11.1.1.7.1. During the installation process, we will need to provide the following information The database, where the schemas can be created Database Type: Oracle Database Host Name: 10.12.250.210 Port: 1521 Service name: orcl Username: sys Password: Eb************** Role: SYSDBA We also need to provide the information as below, as in example, we had given Oracle Business Analytics Warehouse : RSTST_DW Oracle Business Intelligence Applications Components : RSTST _BIACOMP Oracle Data Integration Master and Work Repositories : RSTST _BIA_ODIREPO IMPORTANT NOTE: The source folder from BIAPPS which contains the dbf files need to be saved in a folder in the database server, so that can be referred in the installation below
Navigate to the path where, we can execute the ./rcu for BIAPPS

Rackspace- OBIEE-OBIA-ODI Installation
File Ref: OBIEE_OBIA_ODI Installation on Linux
Click “Next” to continue

Rackspace- OBIEE-OBIA-ODI Installation
File Ref: OBIEE_OBIA_ODI Installation on Linux
Choose “Create”, and Click “Next” to continue

Rackspace- OBIEE-OBIA-ODI Installation
File Ref: OBIEE_OBIA_ODI Installation on Linux
Enter the database credentials, where the schemas can be created, and Click “Next” to continue
Rackspace- OBIEE-OBIA-ODI Installation
File Ref: OBIEE_OBIA_ODI Installation on Linux
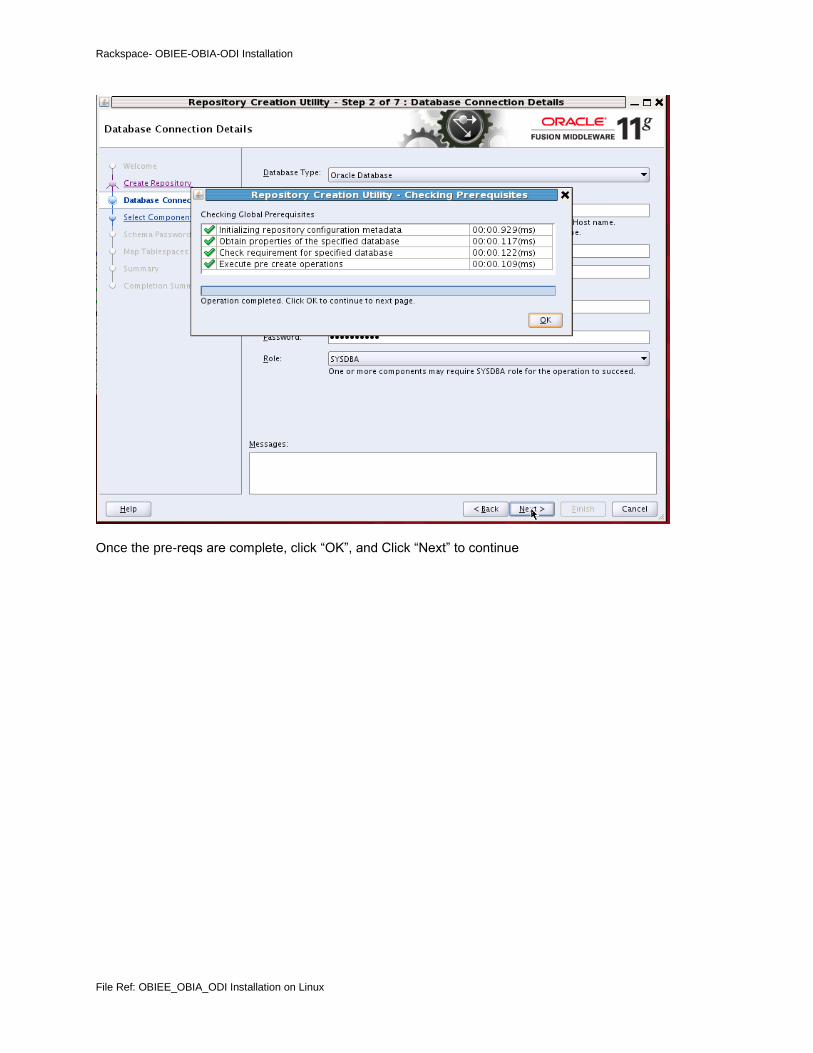
Once the pre-reqs are complete, click “OK”, and Click “Next” to continue
Rackspace- OBIEE-OBIA-ODI Installation
File Ref: OBIEE_OBIA_ODI Installation on Linux
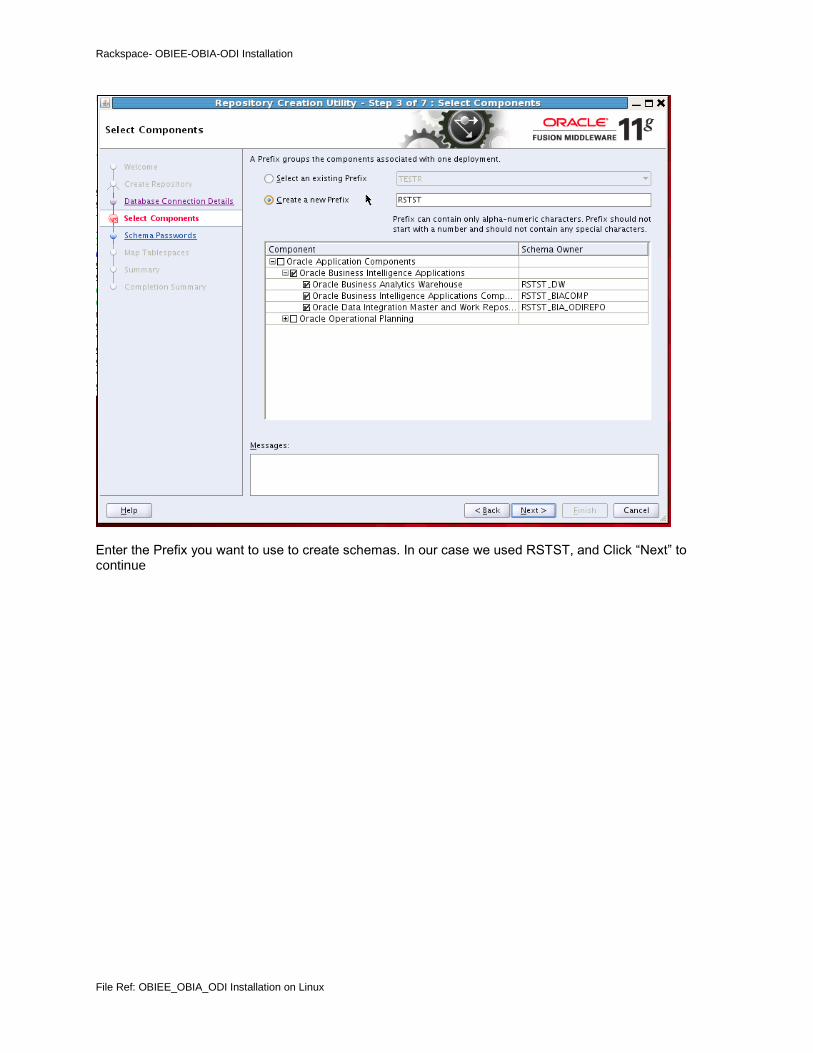
Enter the Prefix you want to use to create schemas. In our case we used RSTST, and Click “Next” to continue

Rackspace- OBIEE-OBIA-ODI Installation
File Ref: OBIEE_OBIA_ODI Installation on Linux
Click “OK”, and Click “Next” to continue
Rackspace- OBIEE-OBIA-ODI Installation
File Ref: OBIEE_OBIA_ODI Installation on Linux
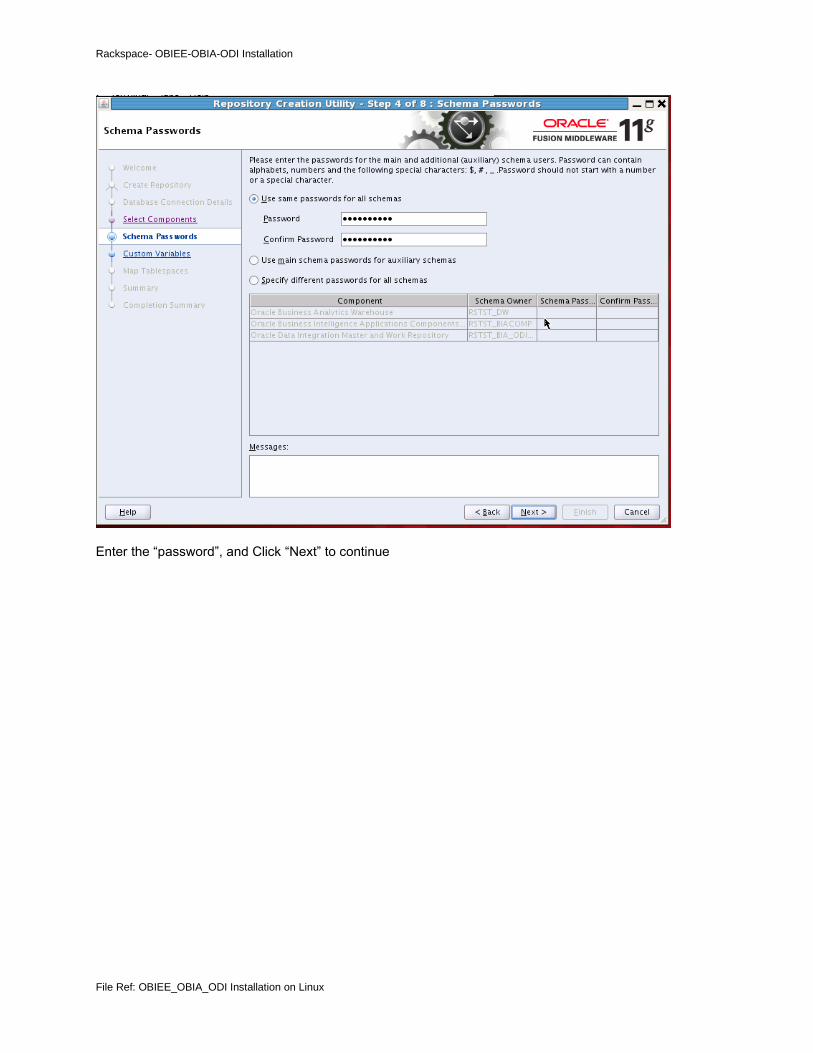
Enter the “password”, and Click “Next” to continue

Rackspace- OBIEE-OBIA-ODI Installation
File Ref: OBIEE_OBIA_ODI Installation on Linux
Define the path of the “schema” folder in the database server where the db files are located.
Example: /u01/installers/biapps_rcu/rcu/integration/biapps/schema

Rackspace- OBIEE-OBIA-ODI Installation
File Ref: OBIEE_OBIA_ODI Installation on Linux
Select the table space it should have more space to install all the .dmp files for each schema it is recommended to have more than 15 GB (future purpose) and click on Create it takes some time (around 30 mins)

Rackspace- OBIEE-OBIA-ODI Installation
File Ref: OBIEE_OBIA_ODI Installation on Linux
Rackspace- OBIEE-OBIA-ODI Installation
File Ref: OBIEE_OBIA_ODI Installation on Linux
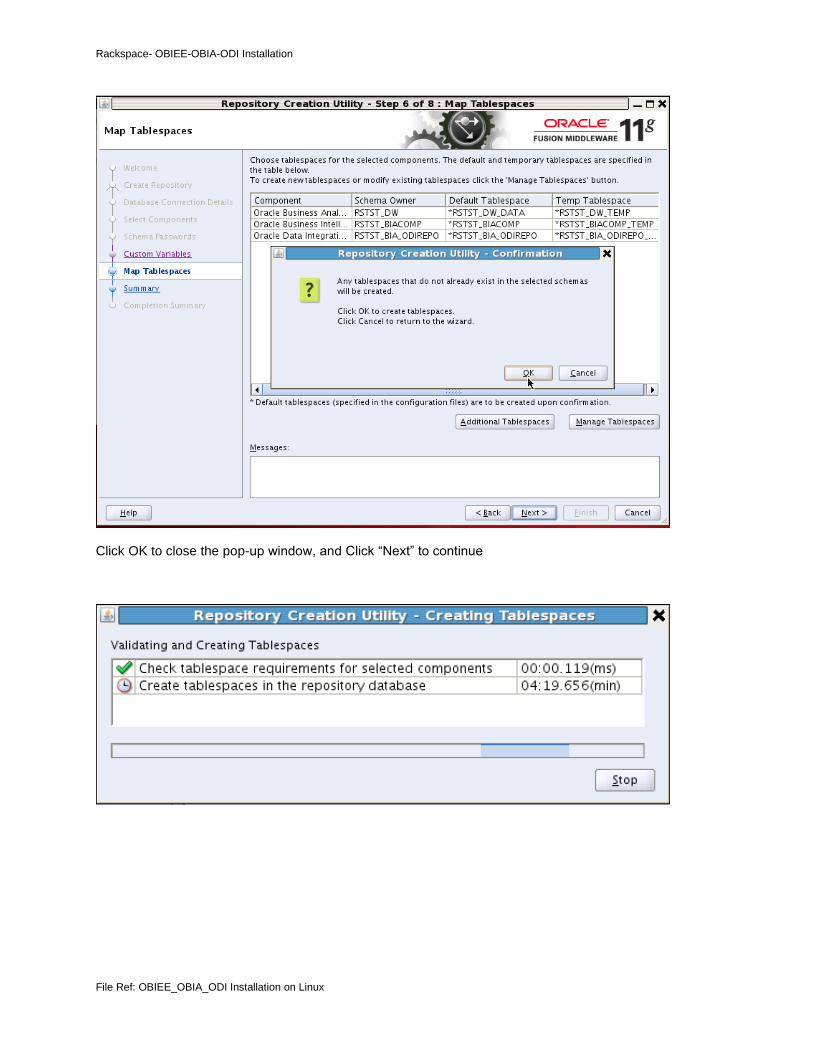
Click OK to close the pop-up window, and Click “Next” to continue
Rackspace- OBIEE-OBIA-ODI Installation
File Ref: OBIEE_OBIA_ODI Installation on Linux
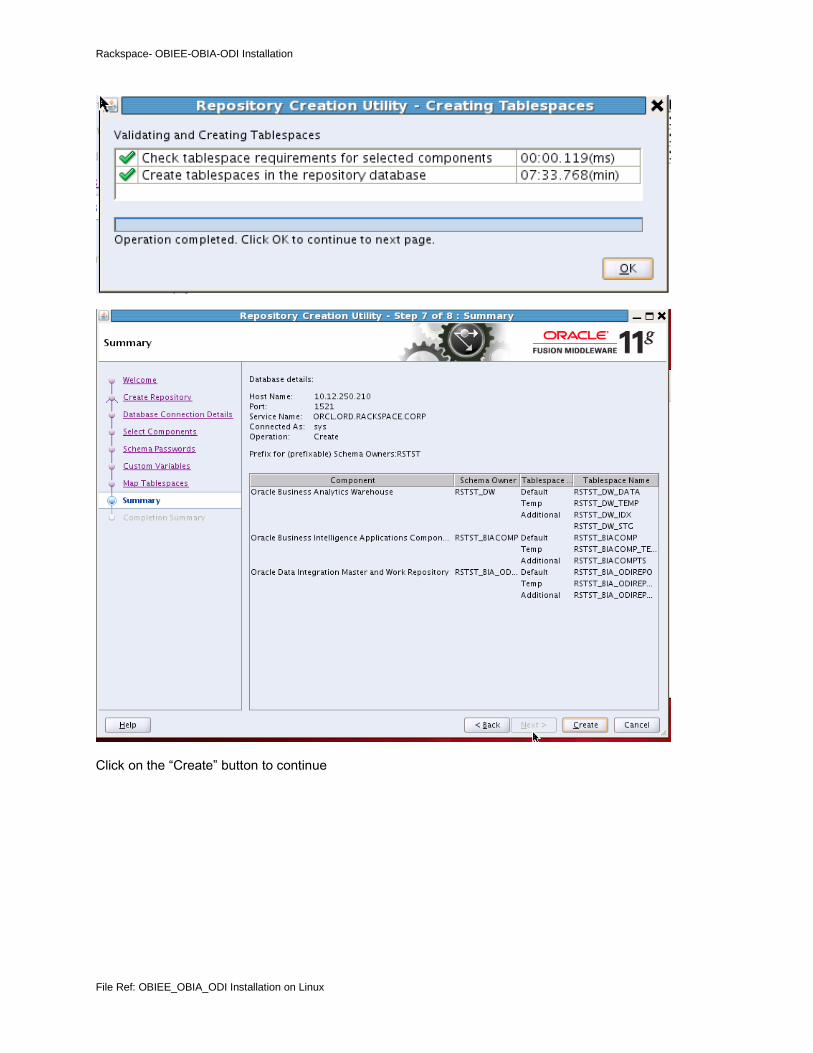
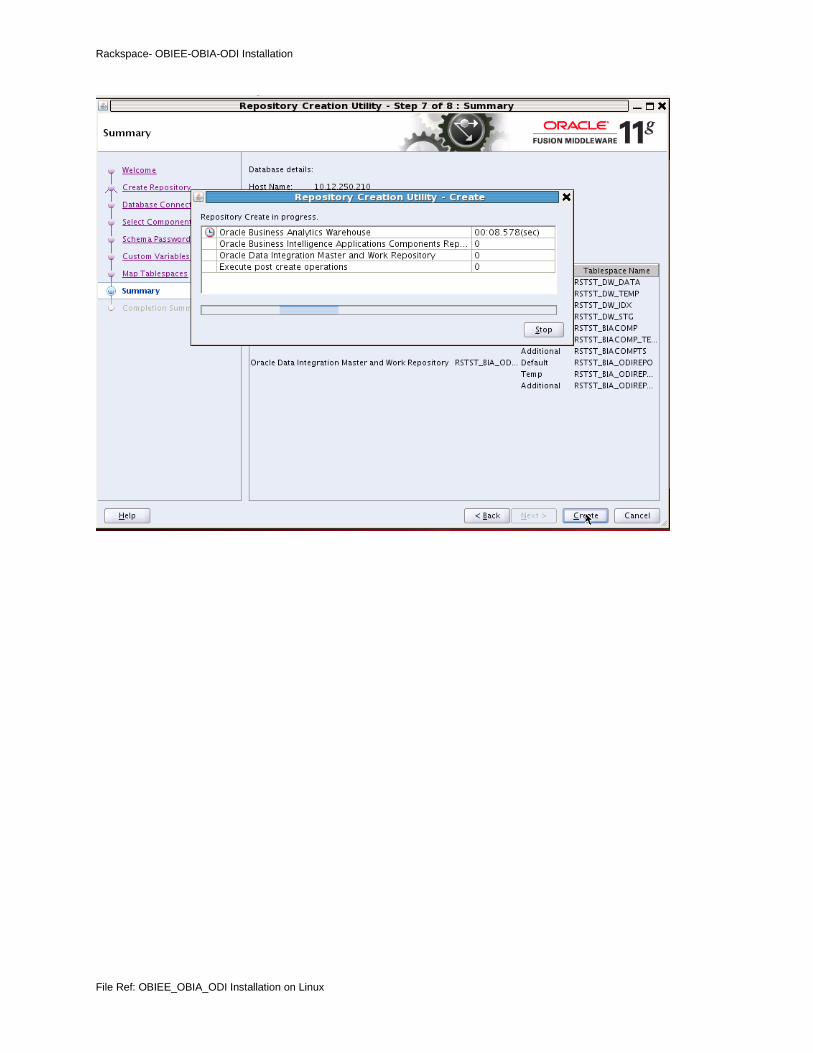
Click on the “Create” button to continue
Rackspace- OBIEE-OBIA-ODI Installation
File Ref: OBIEE_OBIA_ODI Installation on Linux

Rackspace- OBIEE-OBIA-ODI Installation
File Ref: OBIEE_OBIA_ODI Installation on Linux
Once complete, click on “Close”.
5.6 INSTALL OBIA APPLICATION SOFTWARE
Navigate to the ‘biappsshiphome’ folder to access the ‘runInstaller’ file, and make sure to define the jdk1.6 path for the jreLoc. It would be like the screenshot below cd biappsshiphome/Disk1

Rackspace- OBIEE-OBIA-ODI Installation
File Ref: OBIEE_OBIA_ODI Installation on Linux
Click on “Next” to continue
Rackspace- OBIEE-OBIA-ODI Installation
File Ref: OBIEE_OBIA_ODI Installation on Linux
Click “Continue”
Rackspace- OBIEE-OBIA-ODI Installation
File Ref: OBIEE_OBIA_ODI Installation on Linux
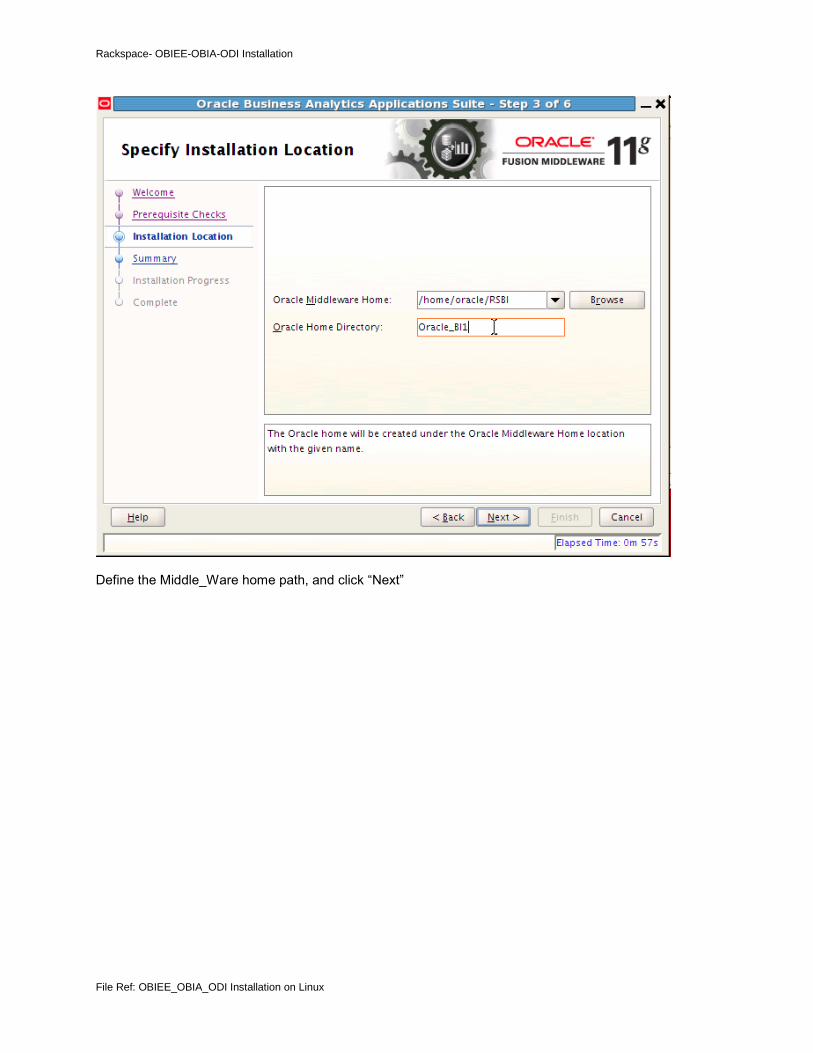
Define the Middle_Ware home path, and click “Next”

Rackspace- OBIEE-OBIA-ODI Installation
File Ref: OBIEE_OBIA_ODI Installation on Linux
Save the pre-install information, and click “Install” to continue

Rackspace- OBIEE-OBIA-ODI Installation
File Ref: OBIEE_OBIA_ODI Installation on Linux
Installation process continues
Rackspace- OBIEE-OBIA-ODI Installation
File Ref: OBIEE_OBIA_ODI Installation on Linux
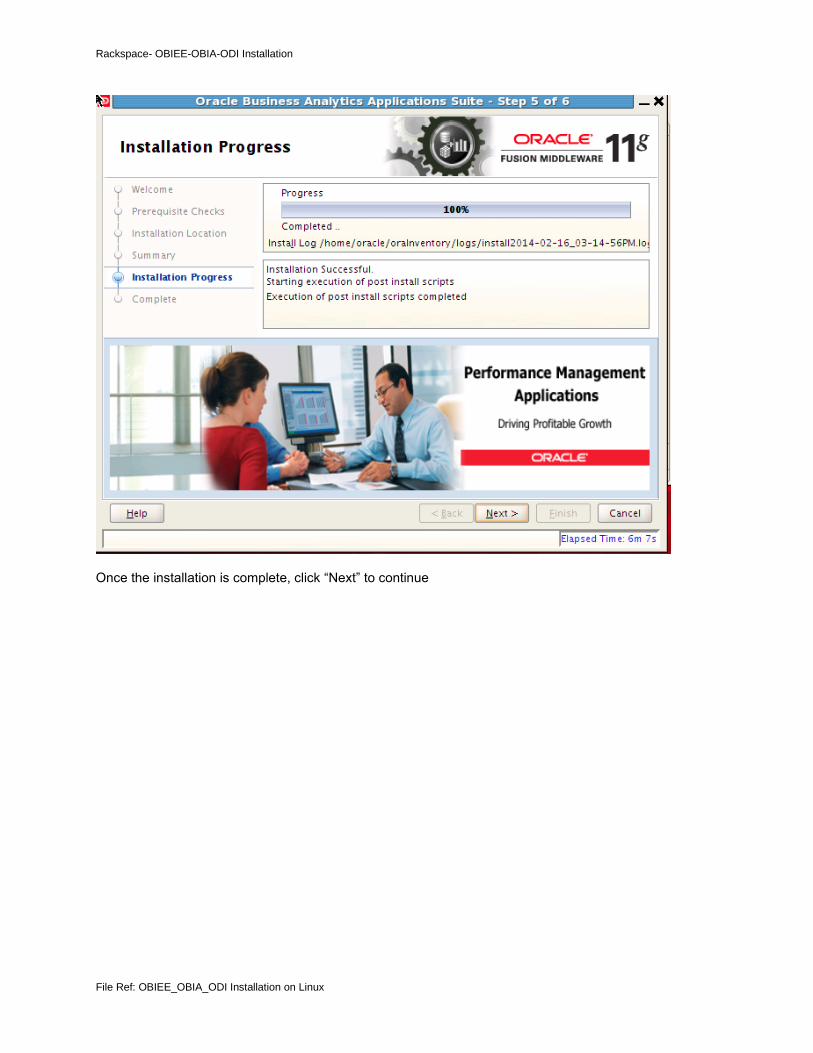
Once the installation is complete, click “Next” to continue

Rackspace- OBIEE-OBIA-ODI Installation
File Ref: OBIEE_OBIA_ODI Installation on Linux
And Click Finish
The previous step installed the Oracle Business Intelligence Applications software, and now you need to apply various patches to it and the other components you installed earlier on. Oracle have supplied a script that uses the zip archive utility you downloaded earlier on to apply the patches, and this script uses a parameter file that allows you to specify where the patch files are located.
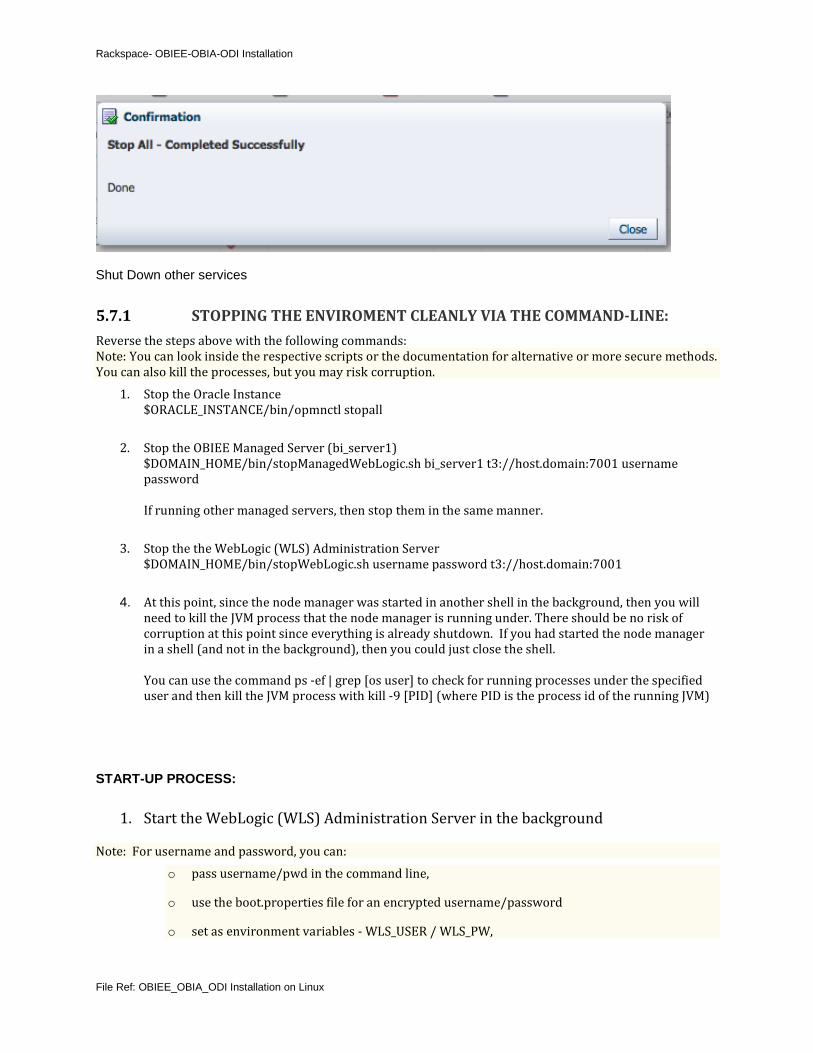
NOTE: Before you start the patching process though, shut down all of your BI-related products from the OBIEE Enterprise Manager. E.g.: http://10.12.250.211:7001/em.
Stop all the other services, including weblogic, and Node Manager. The sample scripts to start and stop services are as below:
5.7 OBIEE Startup and Shutdown Scripts
SHUTDOWN PROCESS: Stop all BI Services, including the node manager, and Process Manager Services

Rackspace- OBIEE-OBIA-ODI Installation
File Ref: OBIEE_OBIA_ODI Installation on Linux
Rackspace- OBIEE-OBIA-ODI Installation
File Ref: OBIEE_OBIA_ODI Installation on Linux
Shut Down other services
5.7.1 STOPPING THE ENVIROMENT CLEANLY VIA THE COMMAND-LINE:
Reverse the steps above with the following commands: Note: You can look inside the respective scripts or the documentation for alternative or more secure methods. You can also kill the processes, but you may risk corruption.
1. Stop the Oracle Instance $ORACLE_INSTANCE/bin/opmnctl stopall
2. Stop the OBIEE Managed Server (bi_server1) $DOMAIN_HOME/bin/stopManagedWebLogic.sh bi_server1 t3://host.domain:7001 username password If running other managed servers, then stop them in the same manner.
3. Stop the the WebLogic (WLS) Administration Server $DOMAIN_HOME/bin/stopWebLogic.sh username password t3://host.domain:7001
4. At this point, since the node manager was started in another shell in the background, then you will need to kill the JVM process that the node manager is running under. There should be no risk of corruption at this point since everything is already shutdown. If you had started the node manager in a shell (and not in the background), then you could just close the shell. You can use the command ps -ef | grep [os user] to check for running processes under the specified user and then kill the JVM process with kill -9 [PID] (where PID is the process id of the running JVM)
START-UP PROCESS:
1. Start the WebLogic (WLS) Administration Server in the background
Note: For username and password, you can:
o pass username/pwd in the command line,
o use the boot.properties file for an encrypted username/password
o set as environment variables - WLS_USER / WLS_PW,

Rackspace- OBIEE-OBIA-ODI Installation
File Ref: OBIEE_OBIA_ODI Installation on Linux
o or pass WLS_USER /WLS_PW in the start scripts. Please see the Oracle WebLogic documentation to determine what meets your need. In these examples, you can name the logs whatever you desire.
Execute: nohup sh $DOMAIN_HOME/bin/startWebLogic.sh -Dweblogic.management.username=weblogic -Dweblogic.management.password=[_your_password_] > wls_start.log & Next, tail the log to determine if the server started completely. execute: tail -f [log name] wait until you see: <WebLogicServer> <BEA-000360> <Server started in RUNNING mode> there should be no further lines after this. If successful, proceed to step 3. If errors, correct them and restart. Note: This takes some time. The terms "takes some time", "starts fast", "starts slow", "takes xx amount of time" are all relative terms depending upon resources in your environment.
2. Start Node Manager
Note: In this example, the username and password are embedded in script via WLS_USER and WLS_PW. If you need another method or a more secure method, like a boot.properties file, then please see: Oracle Fusion Middleware Managing Server Startup and Shutdown for Oracle WebLogic Server 11g Release 1 (10.3.1) Execute: nohup sh $WL_HOME/server/bin/startNodeManager.sh > startNodeManager.log & Next, tail the log to determine if the server started completely. tail -f [log name] Look for <INFO> <Secure socket listener started on port 9556> Note: starts fast
3. Start the OBI Managed Server from the Enterprise Manager
4. Start the OBIEE System Components ( BI Servers -- c++ bits)
$ORACLE_INSTANCE/bin/opmnctl startall

Rackspace- OBIEE-OBIA-ODI Installation
File Ref: OBIEE_OBIA_ODI Installation on Linux
Next, execute: opmnctl status or opmnctl status -l (lower case L) to ensure the processes are started properly/completely. The output will look similar to this: $ORACLE_INSTANCE/bin/opmnctl status -l Processes in Instance: instance1 ---------------------------------+--------------------+---------+----------+------------+----------+-----------+------ ias-component | process-type | pid | status | uid | memused | uptime | ports ---------------------------------+--------------------+---------+----------+------------+----------+-----------+------ coreapplication_obiccs1 | OracleBIClusterCo~ | 11741 | Alive | 70916792 | 55188 | 0:01:01 | N/A coreapplication_obisch1 | OracleBIScheduler~ | 11740 | Alive | 70916789 | 122388 | 0:01:01 | N/A coreapplication_obijh1 | OracleBIJavaHostC~ | 11739 | Alive | 70916790 | 1186088 | 0:01:01 | javahost:9810 coreapplication_obips1 | OracleBIPresentat~ | 11742 | Alive | 70916791 | 261576 | 0:01:01 | N/A coreapplication_obis1 | OracleBIServerCom~ | 11738 | Alive | 70916788 | 150904 | 0:01:01 | N/A
5.8 PATCHING PROCESS
To prepare the parameter file for the patching utility, use a text editor such as WordPad or Notepad to edit the c:/Middleware/Oracle_BI1/tools/bin/apply_patches_import.txt file Go to the path as below:
edit the txt file
and change the parameters by defining the right path as shown in example below:
# Required - Java home

Rackspace- OBIEE-OBIA-ODI Installation
File Ref: OBIEE_OBIA_ODI Installation on Linux
JAVA_HOME=/home/oracle/RSBI/Oracle_BI1/jdk
# Required - Inventory Location
INVENTORY_LOC=/home/oracle/oraInventory
ORACLE_HOME=/home/oracle/RSBI/Oracle_BI1
MW_HOME=/home/oracle/RSBI/
COMMON_ORACLE_HOME=/home/oracle/RSBI/oracle_common
WL_HOME=/home/oracle/RSBI/wlserver_10.3
SOA_HOME=/scratch/aime/work/mw_home/Oracle_SOA1
ODI_HOME=/home/oracle/RSBI/Oracle_ODI_1
# Required - An existing writable directory to create logs and temp patch
files
WORKDIR=/home/oracle/tmp
# Required - Path of patch directory till the release patch-set folder which
is inside patches4fa/dist.
# i;e the patch-set folder for a particular release to apply patch from
# eg; /scratch/aime/tmp/ps1/biappsshiphome/patches4fa/dist/ps6rc3
PATCH_ROOT_DIR=/home/oracle/Downloads/OBIEE_OBIA_ODI/fmwplatformpatchesforOBI
A
Then, with the same text editor application, open the APPLY_PATCHES.pl file in the same directory and modify
the following lines within the download_patch routine, from the default:

Rackspace- OBIEE-OBIA-ODI Installation
File Ref: OBIEE_OBIA_ODI Installation on Linux

Rackspace- OBIEE-OBIA-ODI Installation
File Ref: OBIEE_OBIA_ODI Installation on Linux
Once the patches are successfully applied, we get the message as above

Rackspace- OBIEE-OBIA-ODI Installation
File Ref: OBIEE_OBIA_ODI Installation on Linux
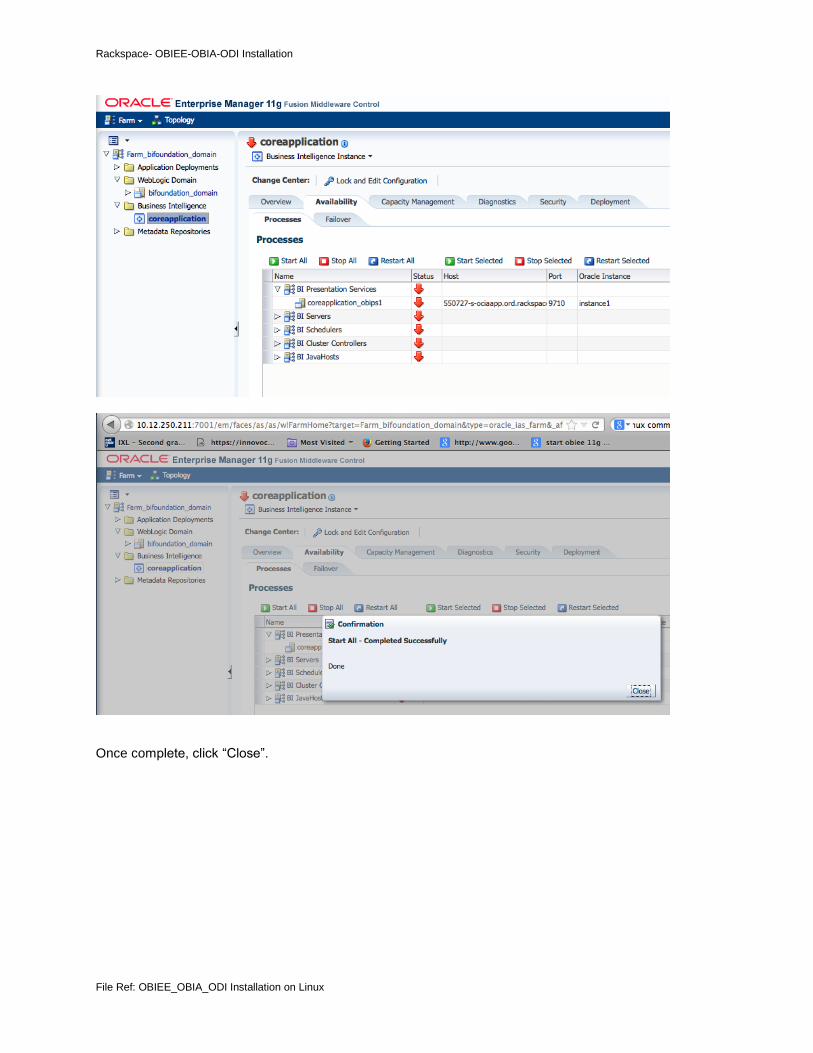
START UP ALL SERVICES – including Weblogic, etc… Start the WebLogic (WLS) Administration Server in the background nohup sh $DOMAIN_HOME/bin/startWebLogic.sh -Dweblogic.management.username=weblogic -
Dweblogic.management.password=[_your_password_] > wls_start.log &
Start Node Manager nohup sh $WL_HOME/server/bin/startNodeManager.sh > startNodeManager.log &

Rackspace- OBIEE-OBIA-ODI Installation
File Ref: OBIEE_OBIA_ODI Installation on Linux
Start the OBI Managed Server (bi_server1 -- default - java bits) From the EM UI, start the managed server

Rackspace- OBIEE-OBIA-ODI Installation
File Ref: OBIEE_OBIA_ODI Installation on Linux
Start the BI Services
Rackspace- OBIEE-OBIA-ODI Installation
File Ref: OBIEE_OBIA_ODI Installation on Linux
Once complete, click “Close”.

Rackspace- OBIEE-OBIA-ODI Installation
File Ref: OBIEE_OBIA_ODI Installation on Linux
5.9 CONFIGURATION UTILITY
Next step in the installation process is to use the Configuration Utility to extend the Oracle BI Domain to include the new Oracle BI Applications Java components, and add an additional WebLogic Server managed server for the Oracle Data Integrator Java components. Before you do this though, make sure that the Node Manager and Oracle Process Manager services are started, and you have restarted your Oracle Business Intelligence installation using To start the Configuration Utility, type in the following commands

Rackspace- OBIEE-OBIA-ODI Installation
File Ref: OBIEE_OBIA_ODI Installation on Linux
When the Configuration Utility starts, at the Extend BI Domain page enter the following values:
Hostname: [pre-completed for you] Port: 7001

Rackspace- OBIEE-OBIA-ODI Installation
File Ref: OBIEE_OBIA_ODI Installation on Linux
User Name: weblogic User Password: Ebi*********
Click “Next” to continue

Rackspace- OBIEE-OBIA-ODI Installation
File Ref: OBIEE_OBIA_ODI Installation on Linux
Enter the “Middleware_Home” information, and click “Next” to continue
Rackspace- OBIEE-OBIA-ODI Installation
File Ref: OBIEE_OBIA_ODI Installation on Linux
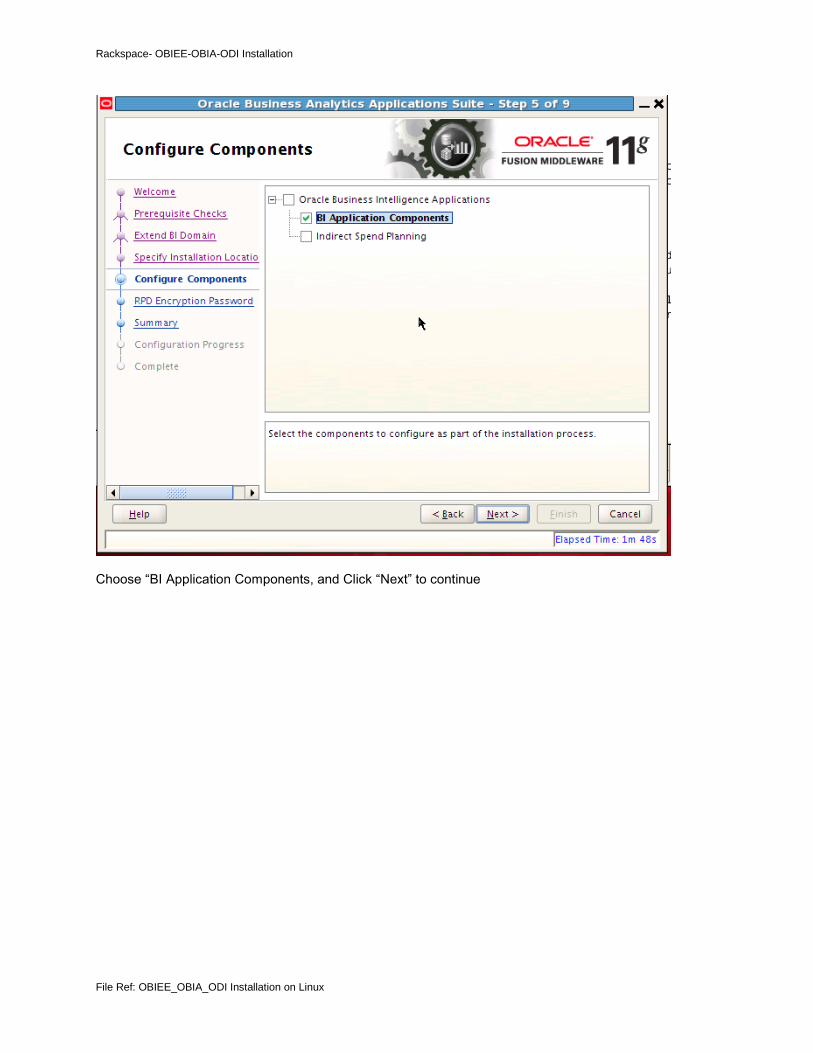
Choose “BI Application Components, and Click “Next” to continue

Rackspace- OBIEE-OBIA-ODI Installation
File Ref: OBIEE_OBIA_ODI Installation on Linux
Enter the RPD Password : Eb*********, and Click “Next” to continue

Rackspace- OBIEE-OBIA-ODI Installation
File Ref: OBIEE_OBIA_ODI Installation on Linux
Use biapps_admin (do not use weblogic, …), and the password is Eb**********. Click “Next” to continue

Rackspace- OBIEE-OBIA-ODI Installation
File Ref: OBIEE_OBIA_ODI Installation on Linux
Enter the MDS schema name and password as it is created in the database, and Click “Next” to continue

Rackspace- OBIEE-OBIA-ODI Installation
File Ref: OBIEE_OBIA_ODI Installation on Linux
Enter the DW credentials, and Click “Next” to continue

Rackspace- OBIEE-OBIA-ODI Installation
File Ref: OBIEE_OBIA_ODI Installation on Linux
Enter the ODIREPO credentials, and Click “Next” to continue

Rackspace- OBIEE-OBIA-ODI Installation
File Ref: OBIEE_OBIA_ODI Installation on Linux
Choose “Auto Port configuration”, and Click “Next” to continue

Rackspace- OBIEE-OBIA-ODI Installation
File Ref: OBIEE_OBIA_ODI Installation on Linux
Save the information, and Click “Next” to continue

Rackspace- OBIEE-OBIA-ODI Installation
File Ref: OBIEE_OBIA_ODI Installation on Linux
The process shows the configuration progress

Rackspace- OBIEE-OBIA-ODI Installation
File Ref: OBIEE_OBIA_ODI Installation on Linux
Once complete, Click “Next” to continue

Rackspace- OBIEE-OBIA-ODI Installation
File Ref: OBIEE_OBIA_ODI Installation on Linux
And finally Click “Finish”.
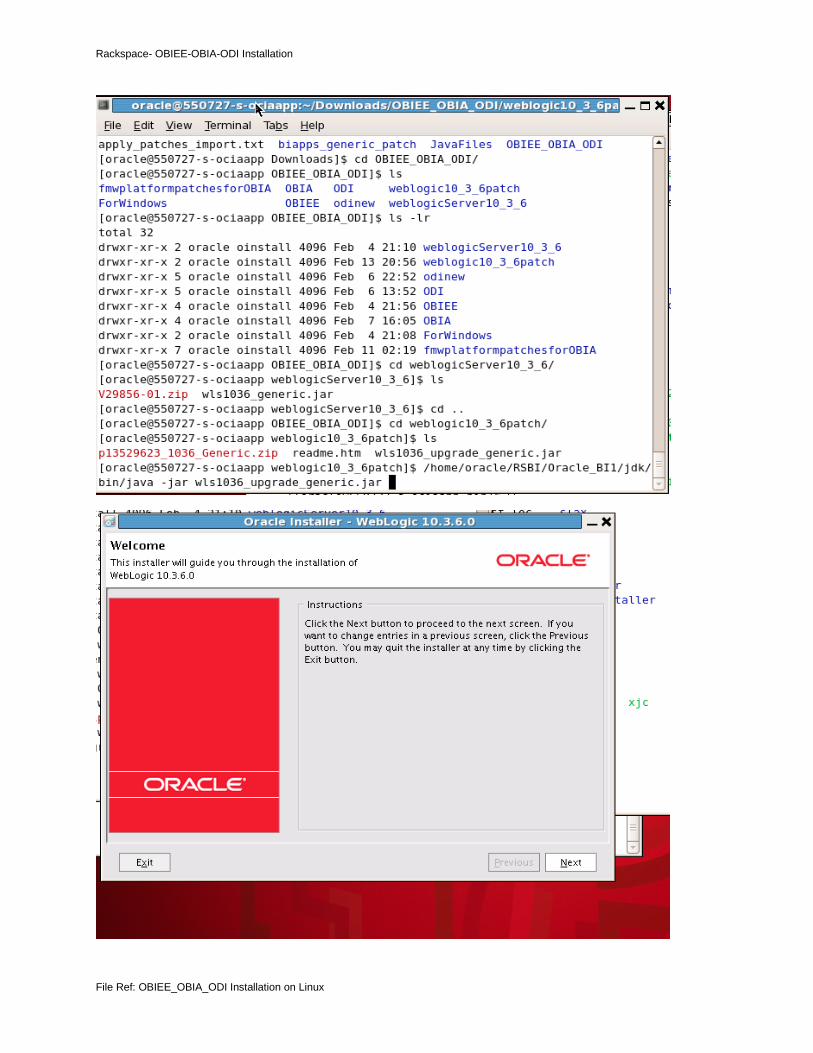
5.10 WEBLOGIC UPGRADE PATCH – upgrade to wls 10.3.6
As Oracle Business Intelligence 11.1.1.7 comes with version 10.3.5 of Oracle WebLogic Server, you will now have to upgrade it to version 10.3.6 using the upgrade installer you obtained previously from My Oracle Support.
Before you do this though, start by shutting-down WebLogic Server and the various Oracle Business Intelligence system components in the shut down process mentioned previously.
Unzip the upgrade installer patch file and start the installer as below:
Rackspace- OBIEE-OBIA-ODI Installation
File Ref: OBIEE_OBIA_ODI Installation on Linux

Rackspace- OBIEE-OBIA-ODI Installation
File Ref: OBIEE_OBIA_ODI Installation on Linux
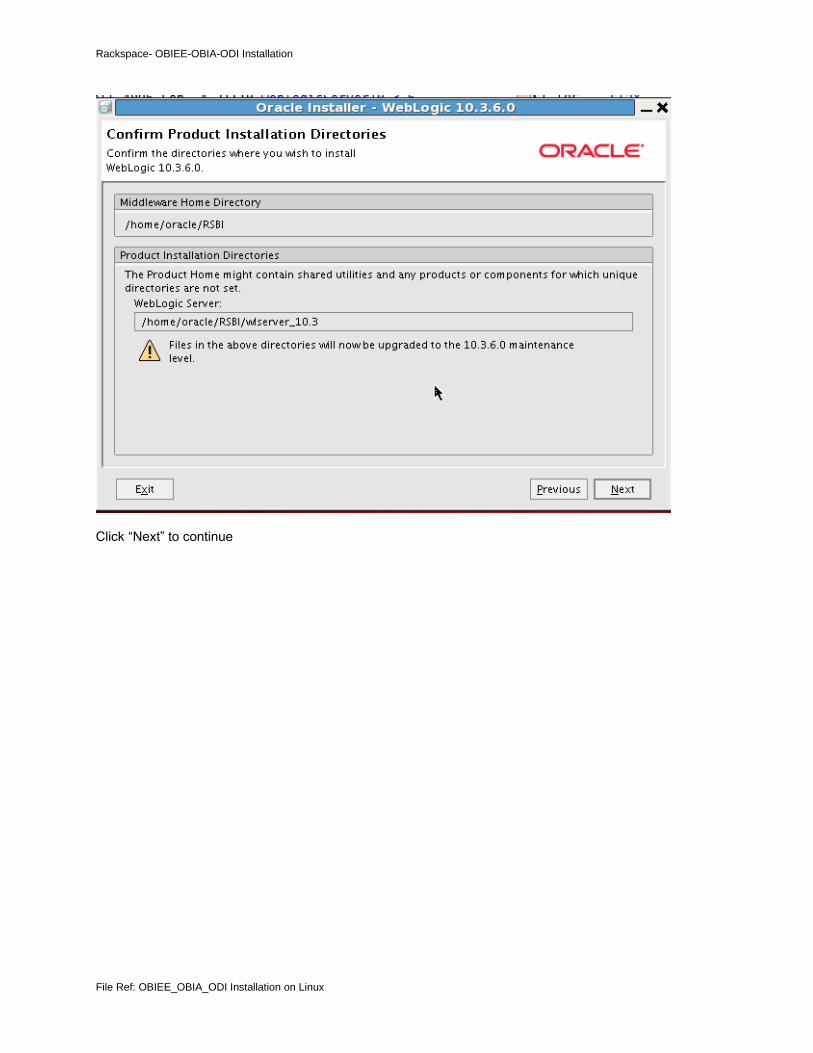
Click “Next” to continue
Choose “Existing Middleware Home, and Click “Next” to continue

Rackspace- OBIEE-OBIA-ODI Installation
File Ref: OBIEE_OBIA_ODI Installation on Linux
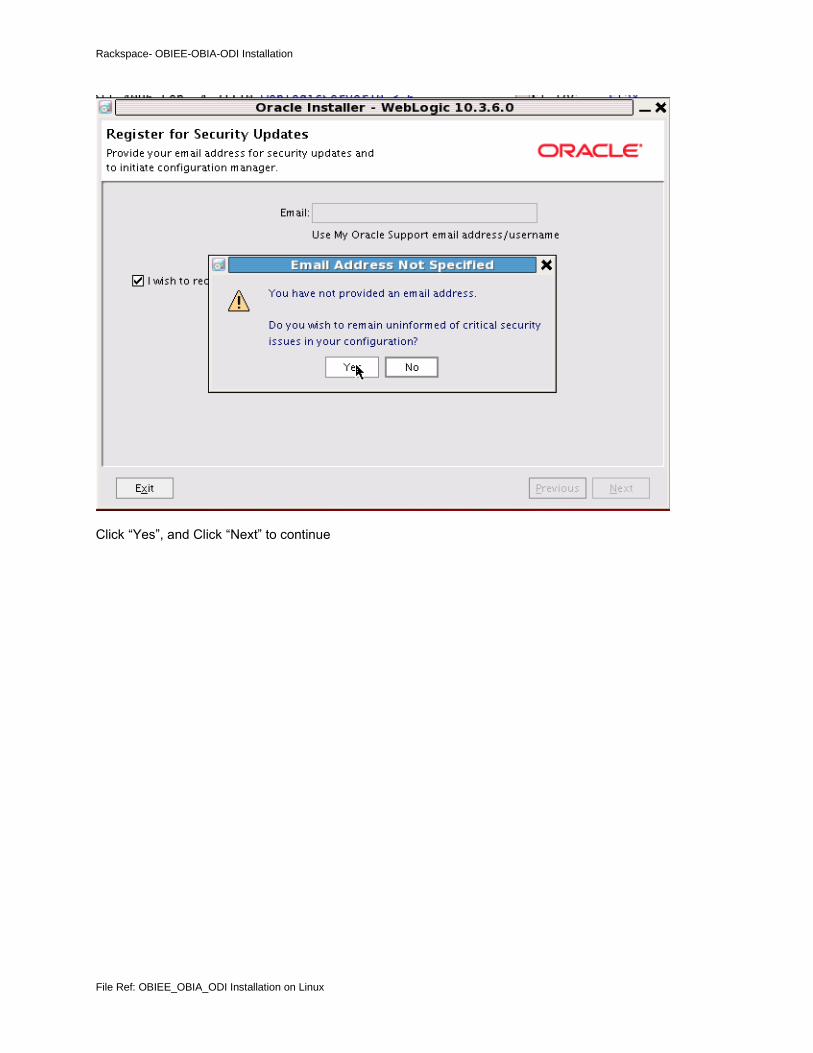
Uncheck “I wish to receive security updates ….”, and Click “Next” to continue
Rackspace- OBIEE-OBIA-ODI Installation
File Ref: OBIEE_OBIA_ODI Installation on Linux
Click “Yes”, and Click “Next” to continue

Rackspace- OBIEE-OBIA-ODI Installation
File Ref: OBIEE_OBIA_ODI Installation on Linux
Click “Next” to continue
Rackspace- OBIEE-OBIA-ODI Installation
File Ref: OBIEE_OBIA_ODI Installation on Linux
Click “Next” to continue
Rackspace- OBIEE-OBIA-ODI Installation
File Ref: OBIEE_OBIA_ODI Installation on Linux
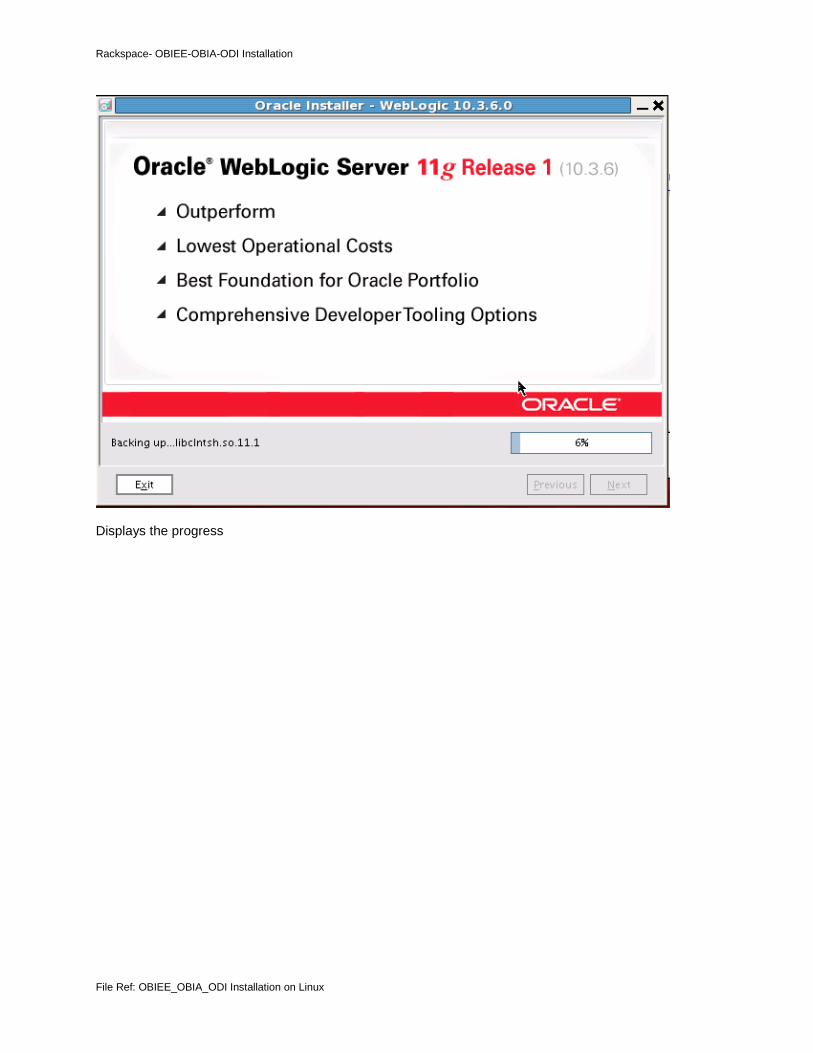
Displays the progress

Rackspace- OBIEE-OBIA-ODI Installation
File Ref: OBIEE_OBIA_ODI Installation on Linux
Click done once complete.
NOTE: A number of post-installation steps now have to be performed, starting by configuring Oracle Data Integrator to use Fusion Middleware rather than standalone security.
5.11 Configuring ODI Security and Plan Generator Files
To perform this security configuration, run the following commands
(Example screen shots are below)
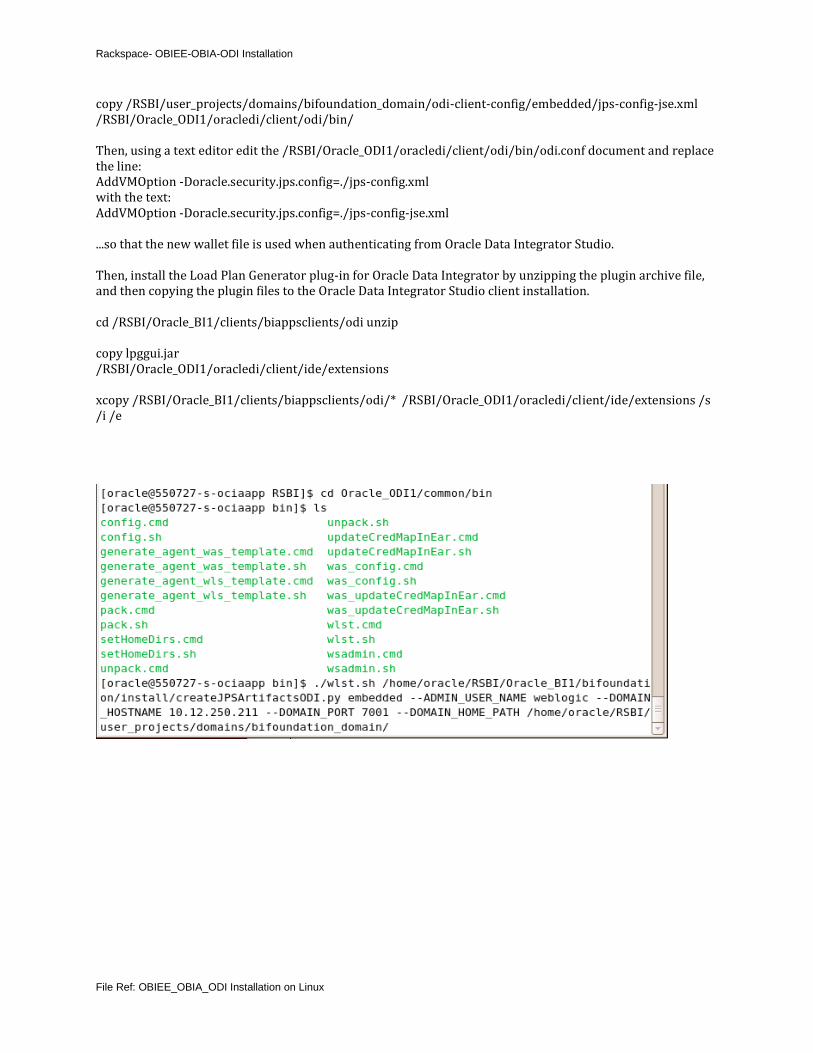
/RSBI/Oracle_BI1/common/bin/wlst.cmd /RSBI/Oracle_BI1/bifoundation/install/createJPSArtifactsODI.py embedded --ADMIN_USER _NAME weblogic --DOMAIN_HOSTNAME obia111171w64 --DOMAIN_PORT 7001 --DOMAIN_HOME_ PATH /RSBI/user_projects/domains/bifoundation_domain When prompted, enter Ebi******* as the password for the WebLogic Server administration user. Then, issue the following command-line commands to copy across the wallet files created by the above steps to where Oracle Data Integrator is installed: copy /RSBI/user_projects/domains/bifoundation_domain/odi-client-config/embedded/cwallet.sso /RSBI/Oracle_ODI1/oracledi/client/odi/bin/
Rackspace- OBIEE-OBIA-ODI Installation
File Ref: OBIEE_OBIA_ODI Installation on Linux
copy /RSBI/user_projects/domains/bifoundation_domain/odi-client-config/embedded/jps-config-jse.xml /RSBI/Oracle_ODI1/oracledi/client/odi/bin/ Then, using a text editor edit the /RSBI/Oracle_ODI1/oracledi/client/odi/bin/odi.conf document and replace the line: AddVMOption -Doracle.security.jps.config=./jps-config.xml with the text: AddVMOption -Doracle.security.jps.config=./jps-config-jse.xml ...so that the new wallet file is used when authenticating from Oracle Data Integrator Studio. Then, install the Load Plan Generator plug-in for Oracle Data Integrator by unzipping the plugin archive file, and then copying the plugin files to the Oracle Data Integrator Studio client installation. cd /RSBI/Oracle_BI1/clients/biappsclients/odi unzip copy lpggui.jar /RSBI/Oracle_ODI1/oracledi/client/ide/extensions xcopy /RSBI/Oracle_BI1/clients/biappsclients/odi/* /RSBI/Oracle_ODI1/oracledi/client/ide/extensions /s /i /e

Rackspace- OBIEE-OBIA-ODI Installation
File Ref: OBIEE_OBIA_ODI Installation on Linux
5.12 More patches to apply
NOTE: Stop all your Oracle Business Intelligence services. run the following SQL script to update the Oracle ATG repository data: from sqlplus login to RSTST_biacomp and run the fndtbs_11170_upg.sql RSTST_biacomp/Ebi********* @/RSBI/Oracle_BI1/sdf/DW/ATGPF/sql/fndtbs_11170_upg.sql The patches that upgraded Oracle Business Intelligence as part of this installation also delivered an updated version of the Oracle BI Administration tool, which needs to be installed in Windows Desktop/workstation. To install this within your Windows, copy the required files, and install them accordingly: /installers/patches/biappsshiphome/generic unzip BISHIPHOME_11_1_1_7_0_GENERIC_130409_1210_16492220.zip 16492220/files/clients/biserver/biee_client_install_x64.exe

Rackspace- OBIEE-OBIA-ODI Installation
File Ref: OBIEE_OBIA_ODI Installation on Linux
When prompted for an install location, choose c:/obi_client/, and also distribute this installer to all other developers working with Oracle Business Intelligence Applications 11.1.1.7.1. The installation process also imported some files that the data loading process later on will require. To place these files in the correct location, again from the command prompt enter the following commands: Mkdir /RSBI/Oracle_ODI1/oracledi/etl xcopy /RSBI/Oracle_BI1/biapps/etl /RSBI/Oracle_ODI1/oracledi/etl /s /i /e /RSBI/
5.13 CONNECT TO THE ODI REPOSITORY using ODI Studio
Start the ODI Studio, by using the ./odi.sh command from /RSBI/Oracle_ODI1/oracledi directory
Click on the Connect to Repository link, when the Oracle Data Integrator login dialog is shown, press the "+" (New) button to bring up the Repository Connection Information dialog. Enter the following details to create the connection:
Login Name: BI Admin User: biadmin Password: Eb********
User: RSTST_BIA_ODIREPO Password: Eb********* Driver List: Oracle JDBC Drive Driver Name : oracle.jdbc.OracleDriver URL : jdbc:oracle:thin:@obia111171w64:1521:orcl Work Repository : BIAPPS_WORKREP
Once you've created this connection and used it to log into Oracle Data Integrator Studio, click on the BI Apps Project > Mappings folder, and then you'll see the pre-built data loading routines that you use to load the Oracle Business Analytics data warehouse, as shown in the figure below.
You have now performed the install part of the process.

Rackspace- OBIEE-OBIA-ODI Installation
File Ref: OBIEE_OBIA_ODI Installation on Linux

Rackspace- OBIEE-OBIA-ODI Installation
File Ref: OBIEE_OBIA_ODI Installation on Linux
6 DEPENDENCIES AND OPEN ITEMS
6.1 Dependencies
Dependency Dependency On (Product) Description
6.2 Open Items


![Spartan Quark Gyro Installation Guide [Doc. v1.0]](https://img.pdfslide.net/doc/110x75/61fb1ed72e268c58cd5a6326/spartan-quark-gyro-installation-guide-doc-v10.jpg)