Embed Size (px)
Citation preview
OBS Plugin for PTZ Cameras
User Manual
COPYRIGHT ©2021 AVer Information Inc. All rights reserved. All rights of this object belong to AVer Information Inc. Reproduced or transmitted in any form or by any means without the prior written permission of AVer Information Inc. is prohibited. All information or specifications are subject to change without prior notice.
TRADEMARKS “AVer” is a trademark owned by AVer Information Inc. Other trademarks used herein for description purpose only belong to each of their companies.
DISCLAIMER No warranty or representation, either expressed or implied, is made with respect to the contents of this documentation, its quality, performance, merchantability, or fitness for a particular purpose. Information presented in this documentation has been carefully checked for reliability; however, no responsibility is assumed for inaccuracies. The information contained in this documentation is subject to change without notice. In no event will AVer Information Inc. be liable for direct, indirect, special, incidental, or consequential damages arising out of the use or inability to use this product or documentation, even if advised of the possibility of such damages.
Help
Global Download Center: https://www.aver.com/download-center Technical Support: https://www.aver.com/technical-support USA Download Center: https://www.averusa.com/pro-av/support/ Technical Support: https://averusa.force.com/support/s/contactsupport European Headquarters Download Center: https://www.avereurope.com/download-center Technical Support: https://www.avereurope.com/technical-support
Contact Information Global AVer Information Inc. https://www.aver.com 8F, No.157, Da-An Rd., Tucheng Dist., New Taipei City 23673, Taiwan Tel: +886 (2) 2269 8535 USA AVer Information Inc. https://www.averusa.com 668 Mission Ct., Fremont, CA 94539, USA Tel: +1 (408) 263 3828 Toll-free: +1 (877) 528 7824 Technical support: [email protected] European Headquarters AVer Information Europe B.V. https://www.avereurope.com Westblaak 140, 3012KM, Rotterdam, Netherlands Tel: +31 (0) 10 7600 550 Technical support: [email protected]
Contents
PREFACE ................................................................................................................. 4
MINIMUM SYSTEM REQUIREMENT .................................................................... 4
PART ONE: .............................................................................................................. 5
OPEN BROADCASTER SOFTWARE STUDIO .................................................... 5
Camera Live View ................................................................................................. 5
Live View of Multiple Cameras ............................................................................. 7
PART TWO: ............................................................................................................ 10
AVER OBS PLUGIN FOR PTZ CAMERAS ......................................................... 10
Downloading OBS Plugin for PTZ Cameras ...................................................... 10
Connection .......................................................................................................... 10
Operation ............................................................................................................. 11
Install OBS Plugin for PTZ Cameras ............................................................. 11
Start .............................................................................................................. 13
Add a Camera ............................................................................................... 17
Camera Control ............................................................................................ 19 PTZ and Focus...................................................................................... 19 Preset Point ........................................................................................... 20 Tracking Control .................................................................................... 20
Check/Delete/Edit/Add a Camera ................................................................. 22 Check Camera Network Connection Status/Delete a Camera ............. 23 Edit Camera .......................................................................................... 25 Add a Camera ....................................................................................... 27
Camera Web User Interface ......................................................................... 30
Camera Information ...................................................................................... 31

4
PREFACE Open Broadcaster Software Studio is a free software for video recording and live streaming. Download OBS Studio here: https://obsproject.com/download. With AVer OBS Plugin for PTZ Cameras, operating PTZ control is instinctive and easy. Preset points and tracking control make video conferencing and streaming smooth and effortless.
MINIMUM SYSTEM REQUIREMENT Basic Requirements: Windows:
DirectX 10.1 compatible GPU Windows 8 / 8.1 / 10 OBS Studio version number: v26 or later.
macOS:
Intel CPU (PPC is not supported) OpenGL 3.3 compatible GPU macOS High Sierra (10.13) or later OBS Studio version number: v27 or later.
For details regarding the system requirements for OBS Studio, please visit: https://obsproject.com/wiki/System-Requirements.
5
PART ONE:
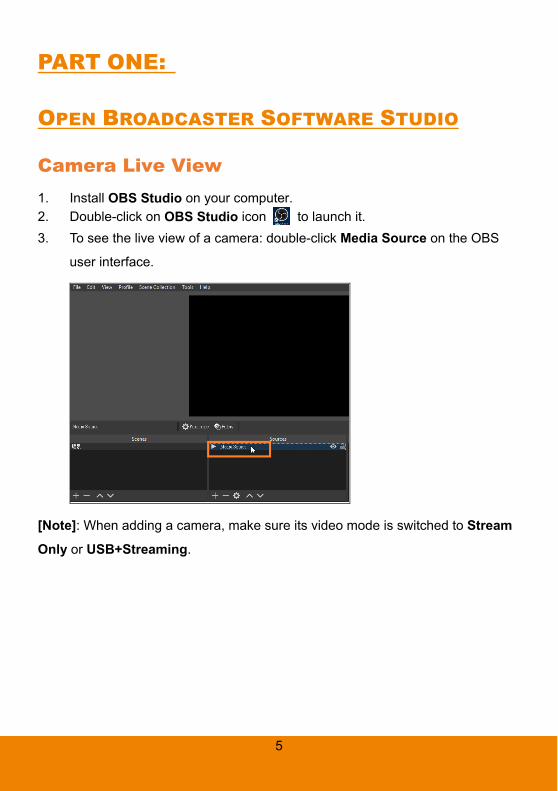
OPEN BROADCASTER SOFTWARE STUDIO
Camera Live View 1. Install OBS Studio on your computer. 2. Double-click on OBS Studio icon to launch it. 3. To see the live view of a camera: double-click Media Source on the OBS
user interface.
[Note]: When adding a camera, make sure its video mode is switched to Stream
Only or USB+Streaming.
6
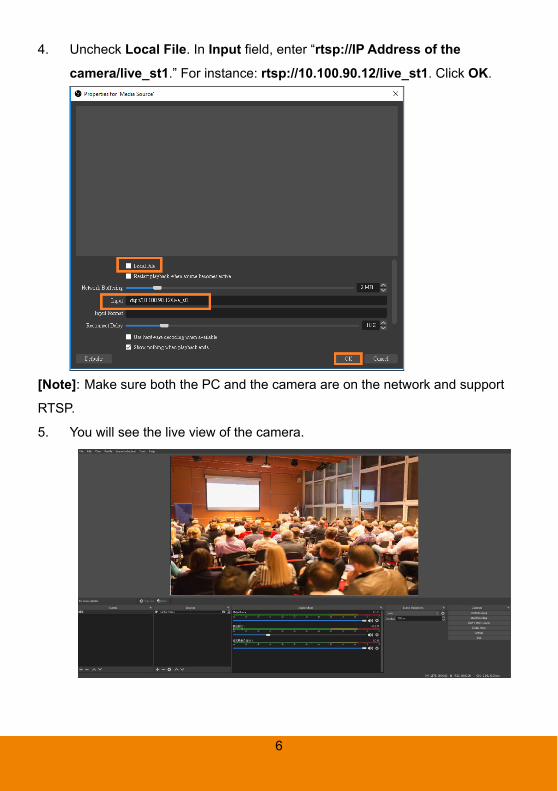
4. Uncheck Local File. In Input field, enter “rtsp://IP Address of the
camera/live_st1.” For instance: rtsp://10.100.90.12/live_st1. Click OK.
[Note]: Make sure both the PC and the camera are on the network and support
RTSP.
5. You will see the live view of the camera.
7
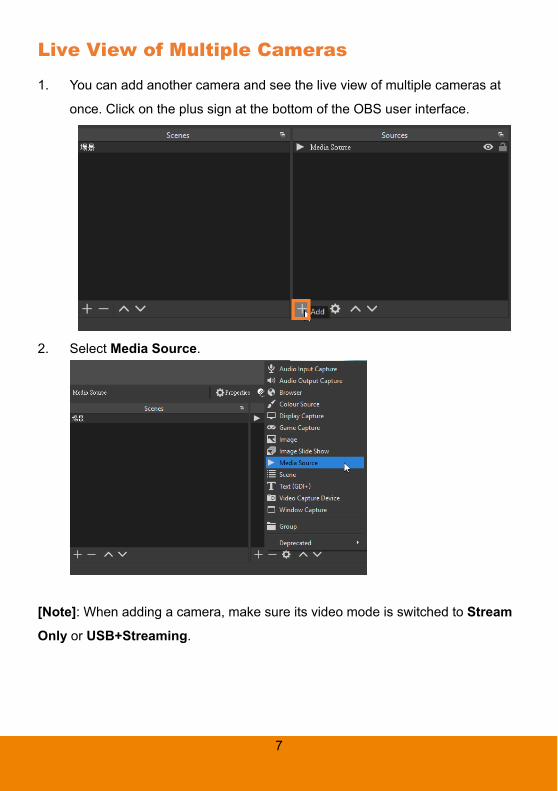
Live View of Multiple Cameras
1. You can add another camera and see the live view of multiple cameras at
once. Click on the plus sign at the bottom of the OBS user interface.
2. Select Media Source.
[Note]: When adding a camera, make sure its video mode is switched to Stream
Only or USB+Streaming.
8
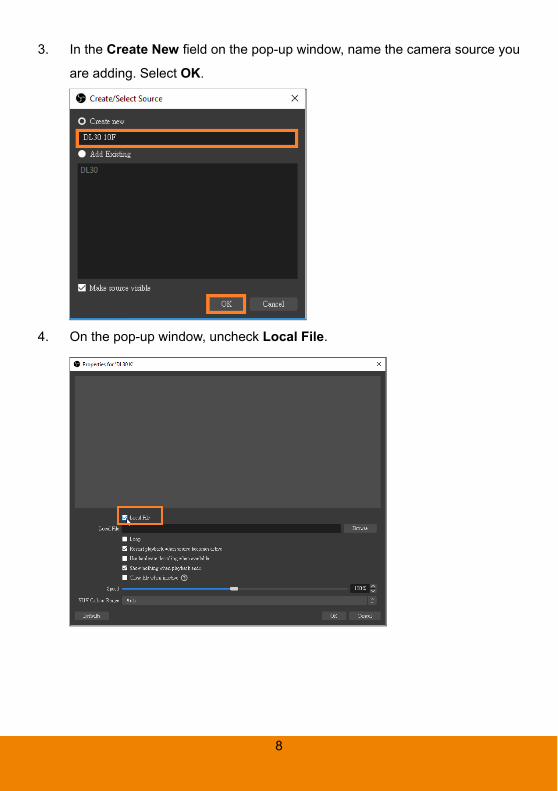
3. In the Create New field on the pop-up window, name the camera source you
are adding. Select OK.
4. On the pop-up window, uncheck Local File.
9
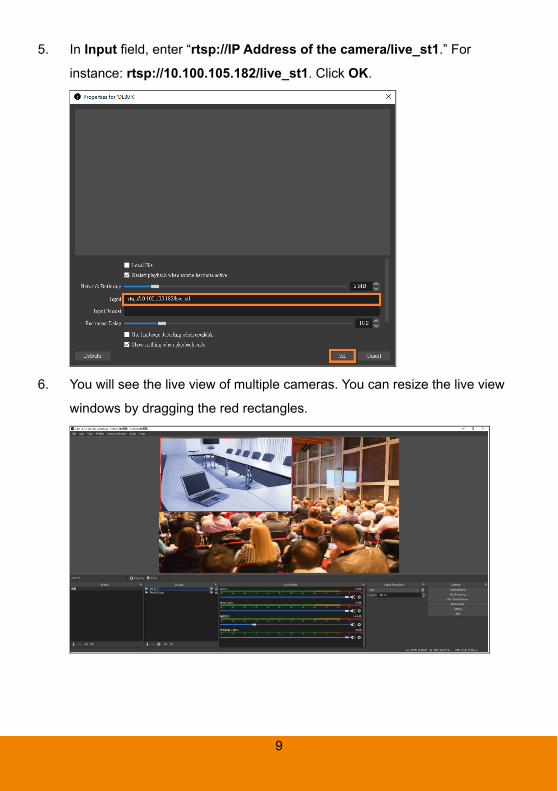
5. In Input field, enter “rtsp://IP Address of the camera/live_st1.” For
instance: rtsp://10.100.105.182/live_st1. Click OK.
6. You will see the live view of multiple cameras. You can resize the live view
windows by dragging the red rectangles.
10
PART TWO:
AVER OBS PLUGIN FOR PTZ CAMERAS
Downloading OBS Plugin for PTZ Cameras Please download the software from the following web links:
Global: https://www.aver.com/download-center
USA: https://www.averusa.com/education/support/
European Headquarters: https://www.avereurope.com/download-center
Connection
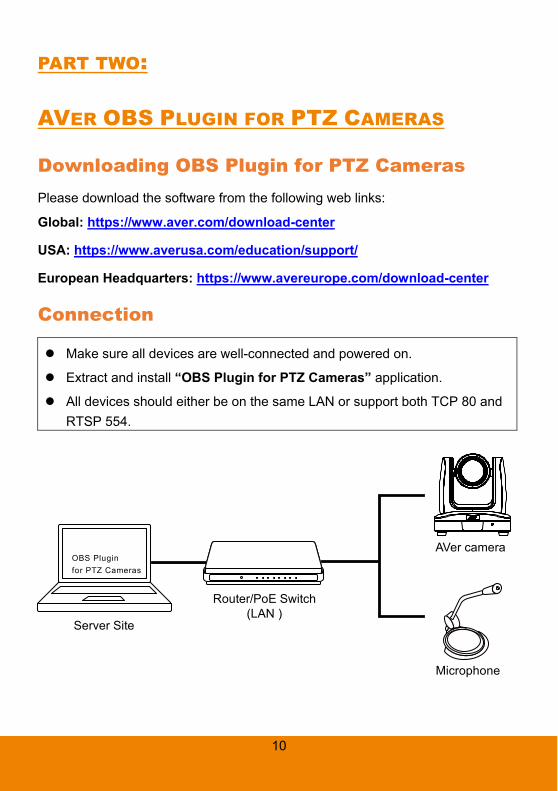
Make sure all devices are well-connected and powered on.
Extract and install “OBS Plugin for PTZ Cameras” application.
All devices should either be on the same LAN or support both TCP 80 and RTSP 554.
AVer camera
Router/PoE Switch(LAN )
Server Site
OBS Pluginfor PTZ Cameras
Microphone
11
Operation
Install OBS Plugin for PTZ Cameras
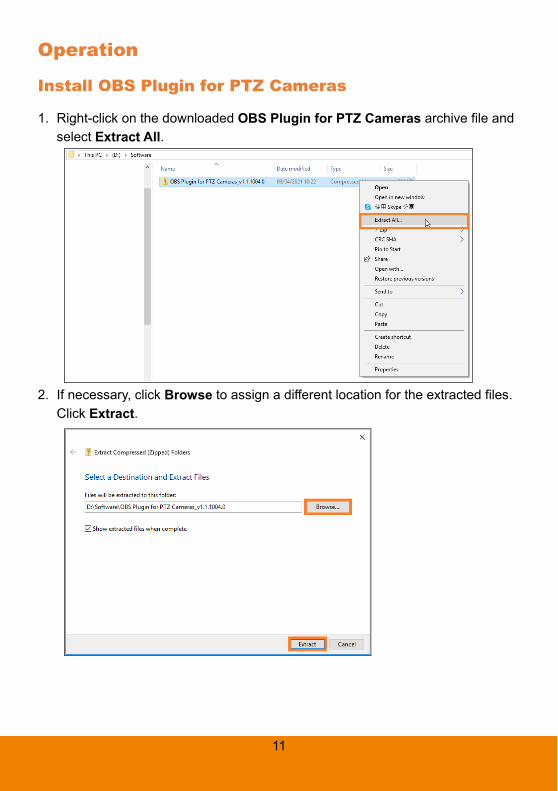
1. Right-click on the downloaded OBS Plugin for PTZ Cameras archive file and select Extract All.
2. If necessary, click Browse to assign a different location for the extracted files. Click Extract.
12
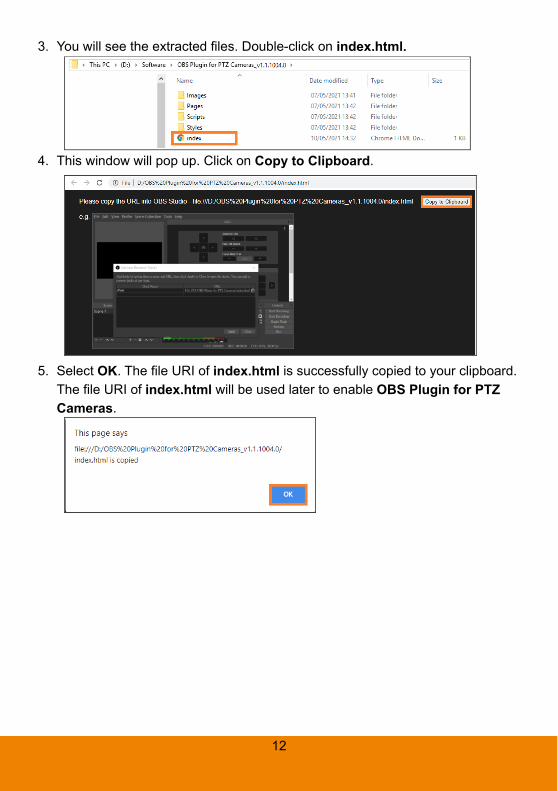
3. You will see the extracted files. Double-click on index.html.
4. This window will pop up. Click on Copy to Clipboard.
5. Select OK. The file URI of index.html is successfully copied to your clipboard. The file URI of index.html will be used later to enable OBS Plugin for PTZ Cameras.
13
Start
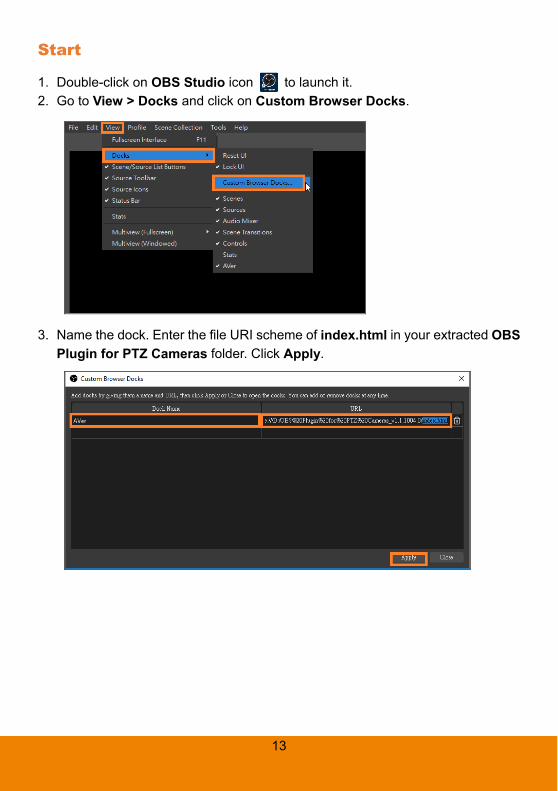
1. Double-click on OBS Studio icon to launch it. 2. Go to View > Docks and click on Custom Browser Docks.
3. Name the dock. Enter the file URI scheme of index.html in your extracted OBS Plugin for PTZ Cameras folder. Click Apply.
14
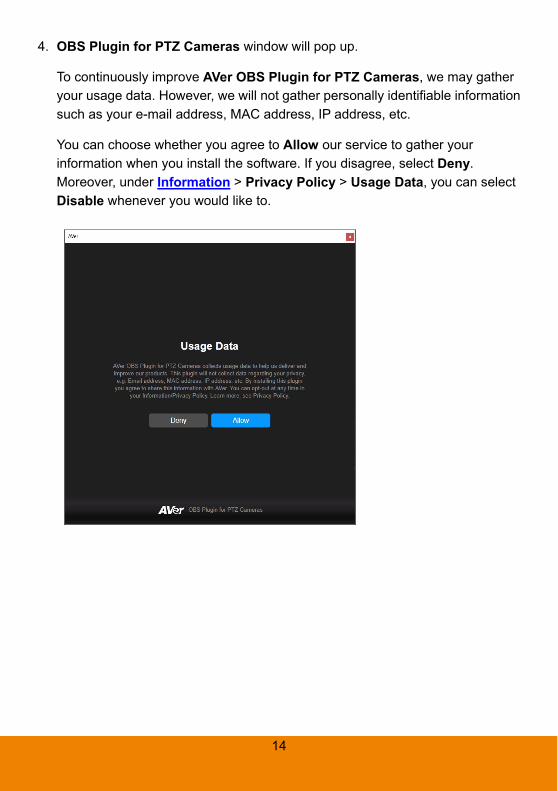
4. OBS Plugin for PTZ Cameras window will pop up.
To continuously improve AVer OBS Plugin for PTZ Cameras, we may gather your usage data. However, we will not gather personally identifiable information such as your e-mail address, MAC address, IP address, etc.
You can choose whether you agree to Allow our service to gather your information when you install the software. If you disagree, select Deny. Moreover, under Information > Privacy Policy > Usage Data, you can select Disable whenever you would like to.
15
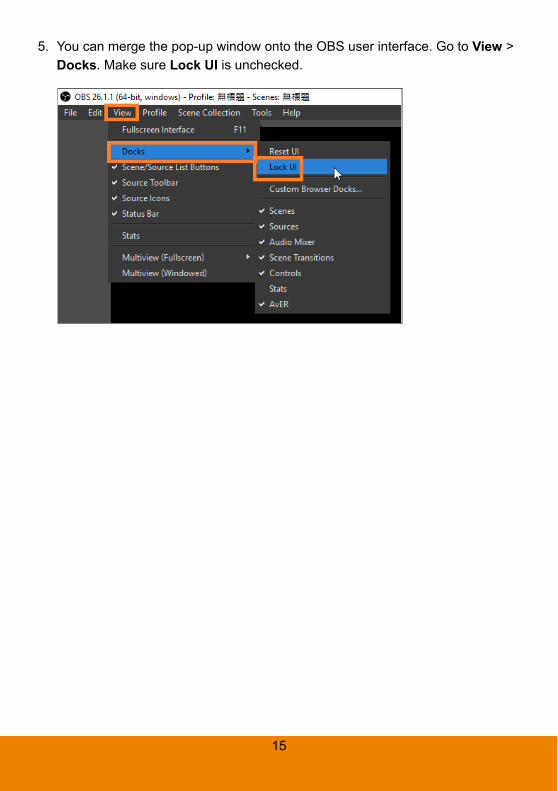
5. You can merge the pop-up window onto the OBS user interface. Go to View > Docks. Make sure Lock UI is unchecked.
16
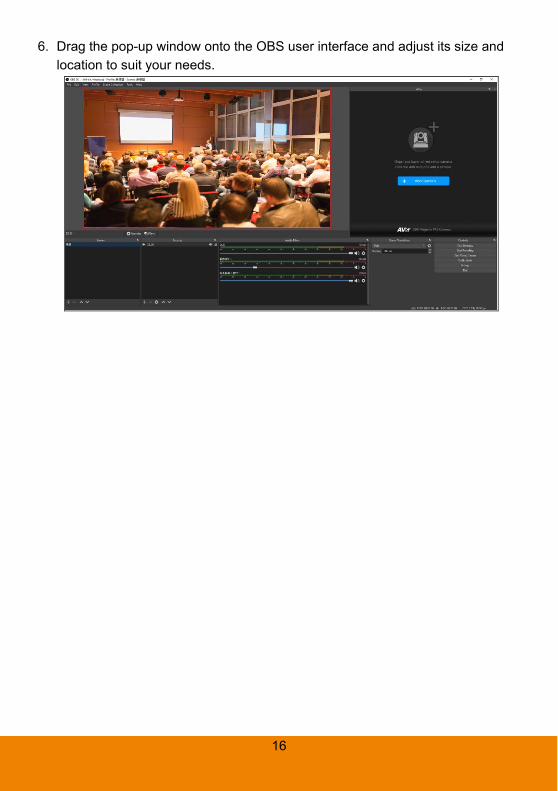
6. Drag the pop-up window onto the OBS user interface and adjust its size and location to suit your needs.
17
Add a Camera
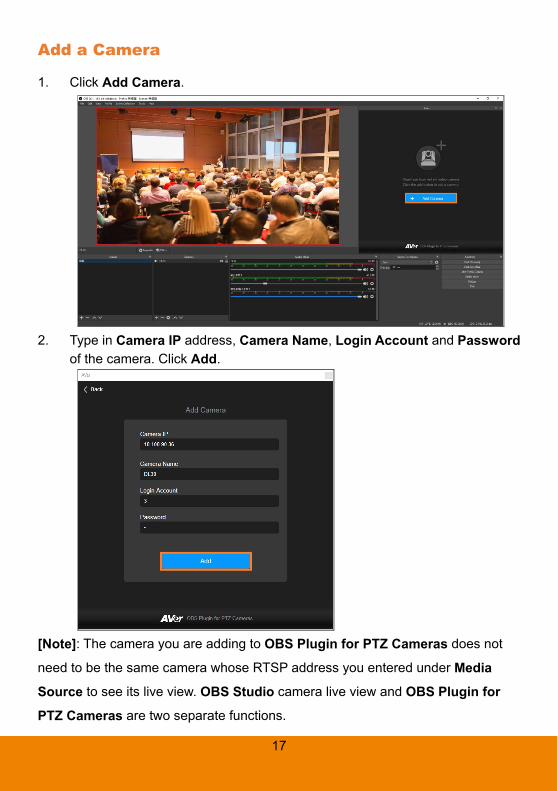
1. Click Add Camera.
2. Type in Camera IP address, Camera Name, Login Account and Password of the camera. Click Add.
[Note]: The camera you are adding to OBS Plugin for PTZ Cameras does not
need to be the same camera whose RTSP address you entered under Media
Source to see its live view. OBS Studio camera live view and OBS Plugin for
PTZ Cameras are two separate functions.
18
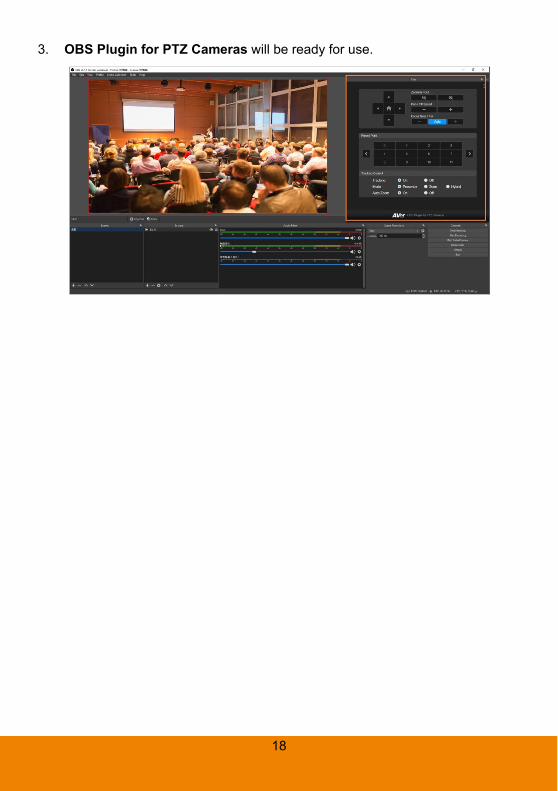
3. OBS Plugin for PTZ Cameras will be ready for use.
19
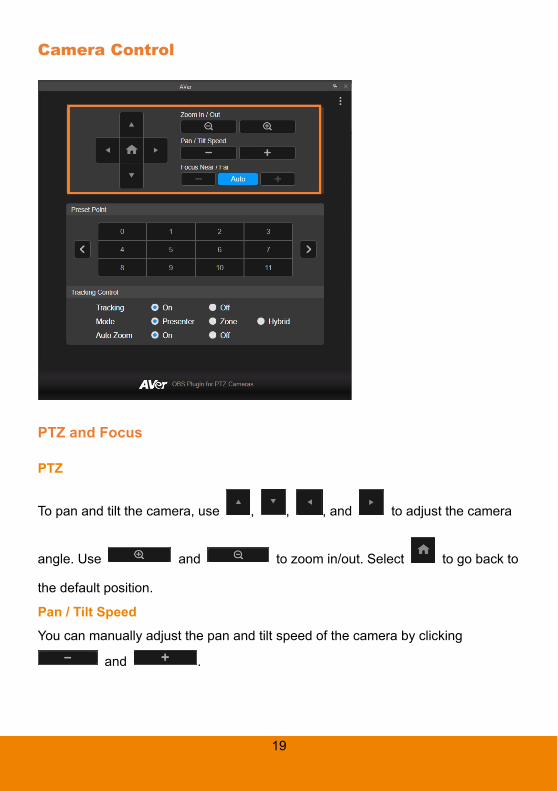
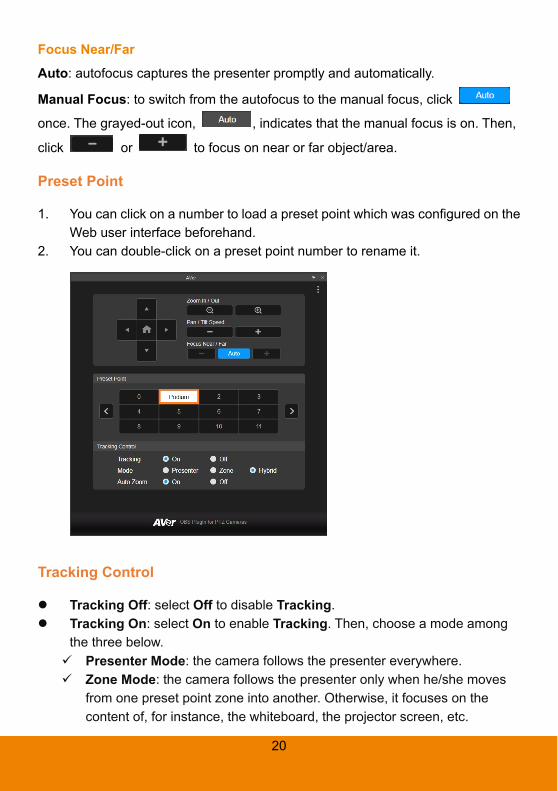
Camera Control
PTZ and Focus
PTZ
To pan and tilt the camera, use , , , and to adjust the camera
angle. Use and to zoom in/out. Select to go back to
the default position.
Pan / Tilt Speed You can manually adjust the pan and tilt speed of the camera by clicking
and .
20
Focus Near/Far Auto: autofocus captures the presenter promptly and automatically.
Manual Focus: to switch from the autofocus to the manual focus, click
once. The grayed-out icon, , indicates that the manual focus is on. Then,
click or to focus on near or far object/area.
Preset Point
1. You can click on a number to load a preset point which was configured on the Web user interface beforehand.
2. You can double-click on a preset point number to rename it.
Tracking Control
Tracking Off: select Off to disable Tracking. Tracking On: select On to enable Tracking. Then, choose a mode among
the three below. Presenter Mode: the camera follows the presenter everywhere. Zone Mode: the camera follows the presenter only when he/she moves
from one preset point zone into another. Otherwise, it focuses on the content of, for instance, the whiteboard, the projector screen, etc.

21
Hybrid Mode: after selecting Hybrid Mode, you can benefit from the advantages of both the Presenter Mode and Zone Mode. Under Hybrid Mode, the camera tracks and captures the presenter’s movement. As the presenter enters the previously configured preset point zone, the camera steers to focus on the content of the zone, such as the whiteboard and the projector screen. Auto Zoom is available under Presenter Mode and Hybrid Mode.
When Auto Zoom is On, the camera can zoom in and out automatically to keep up with the presenter’s walking back and forth and body language. When Auto Zoom is Off, the camera stops zooming in/out automatically and shoots the presenter according to the shot size of Preset 1 so that the camera footage remains stable.
[Note 1]: Refer to a camera’s user manual to check if it supports Tracking Control. [Note 2]: Access the camera Web user interface to configure Tracking Control.
22
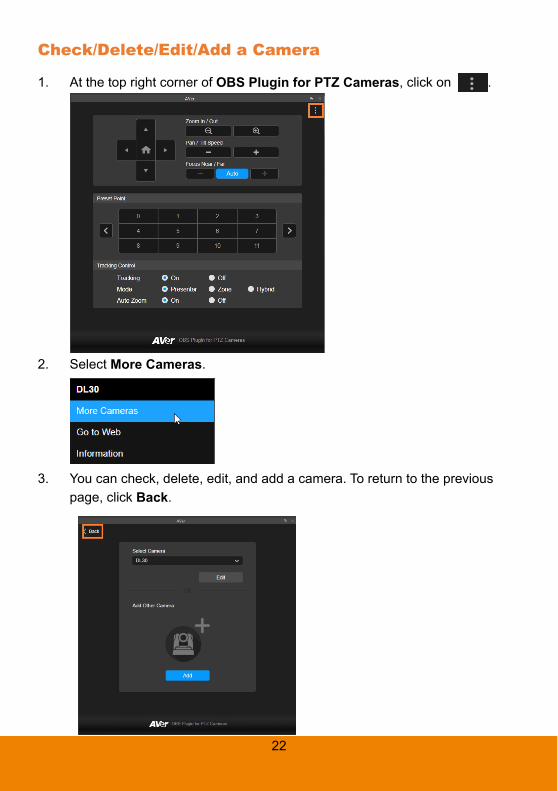
Check/Delete/Edit/Add a Camera
1. At the top right corner of OBS Plugin for PTZ Cameras, click on .
2. Select More Cameras.
3. You can check, delete, edit, and add a camera. To return to the previous
page, click Back.
23
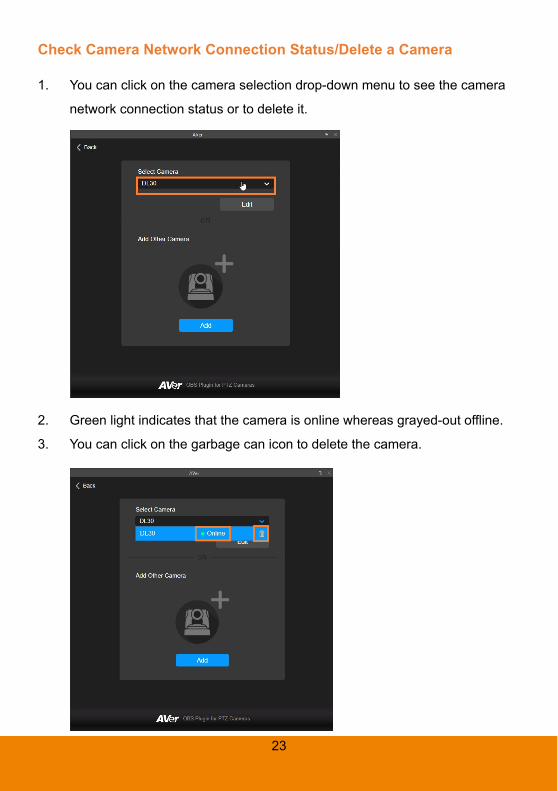
Check Camera Network Connection Status/Delete a Camera
1. You can click on the camera selection drop-down menu to see the camera
network connection status or to delete it.
2. Green light indicates that the camera is online whereas grayed-out offline.
3. You can click on the garbage can icon to delete the camera.
24
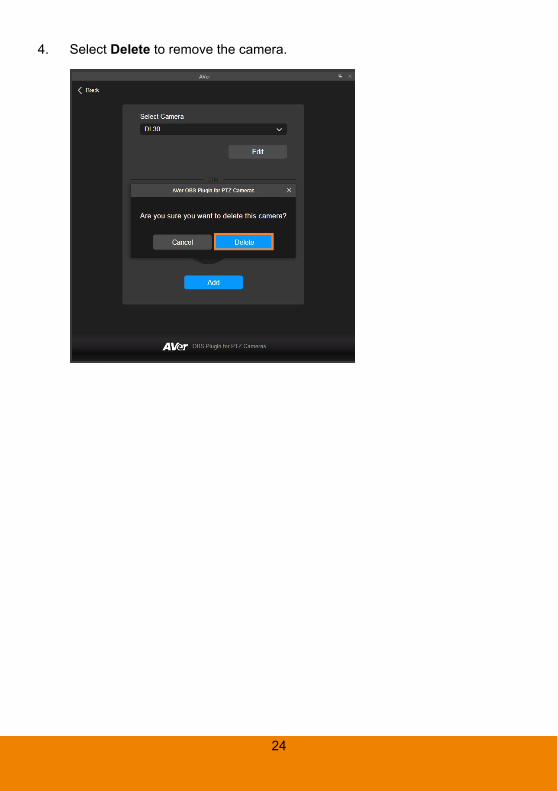
4. Select Delete to remove the camera.
25
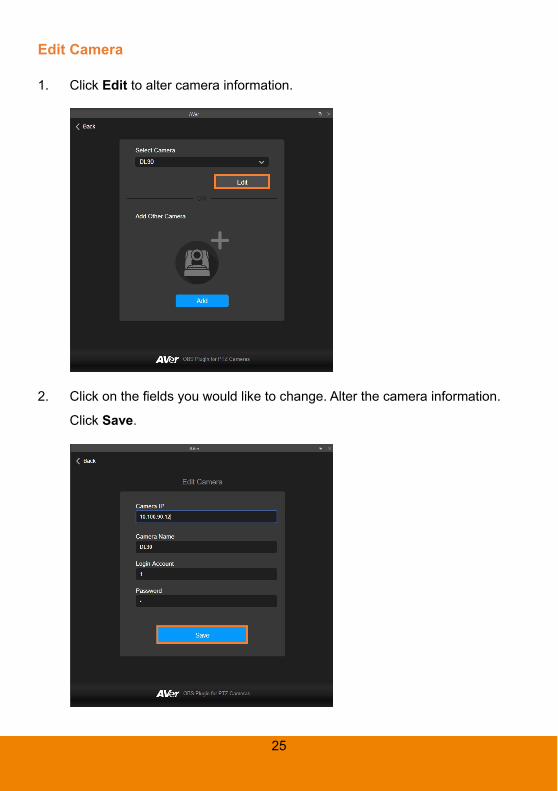
Edit Camera
1. Click Edit to alter camera information.
2. Click on the fields you would like to change. Alter the camera information.
Click Save.
26
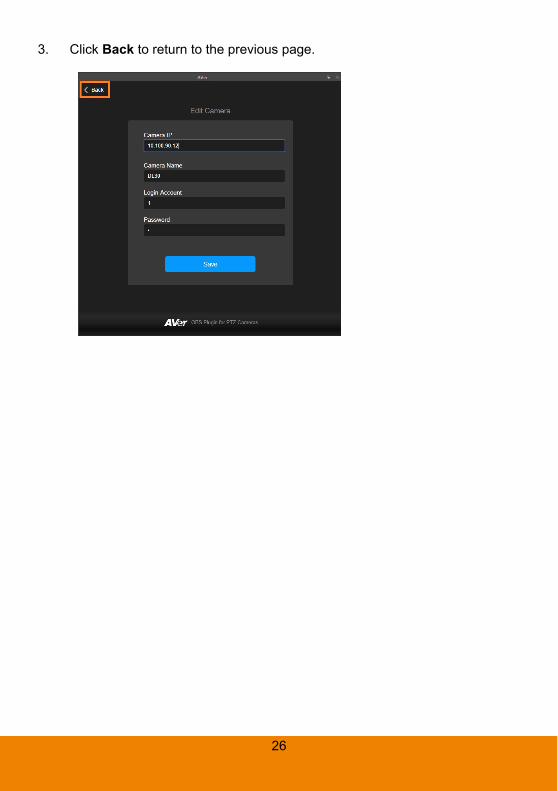
3. Click Back to return to the previous page.
27
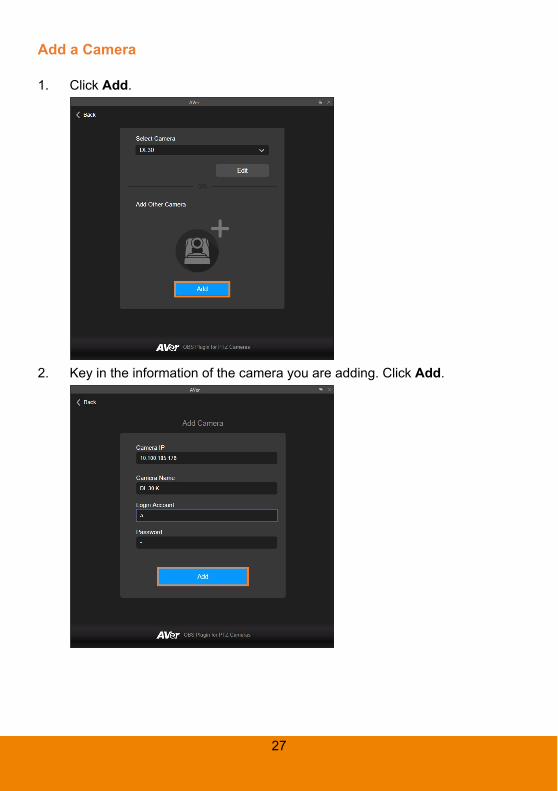
Add a Camera
1. Click Add.
2. Key in the information of the camera you are adding. Click Add.
28
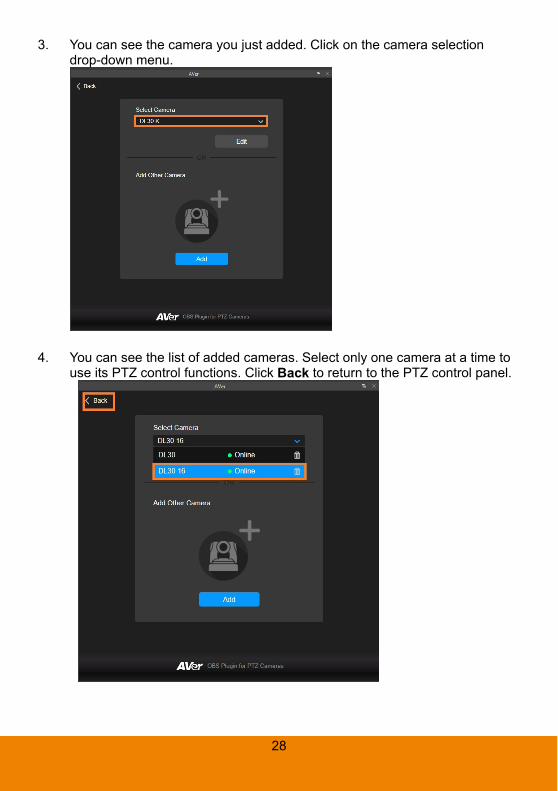
3. You can see the camera you just added. Click on the camera selection drop-down menu.
4. You can see the list of added cameras. Select only one camera at a time to
use its PTZ control functions. Click Back to return to the PTZ control panel.
29
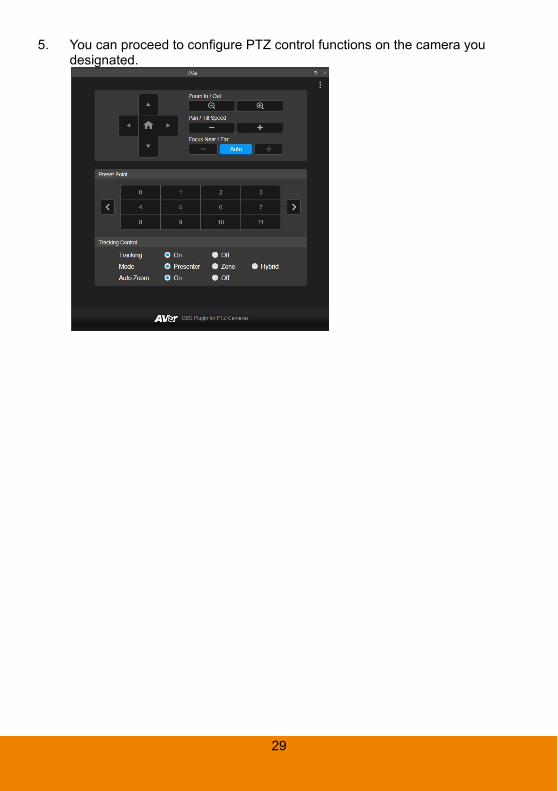
5. You can proceed to configure PTZ control functions on the camera you designated.
30
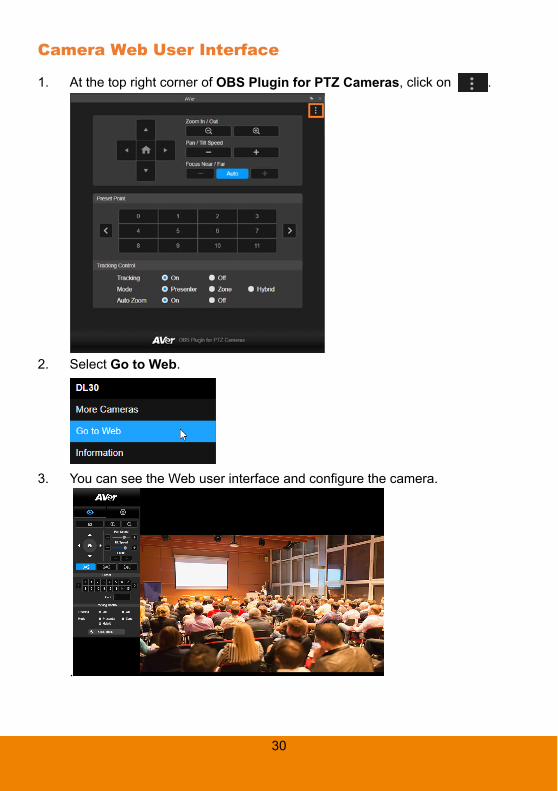
Camera Web User Interface
1. At the top right corner of OBS Plugin for PTZ Cameras, click on .
2. Select Go to Web.
3. You can see the Web user interface and configure the camera.
.
31
Information
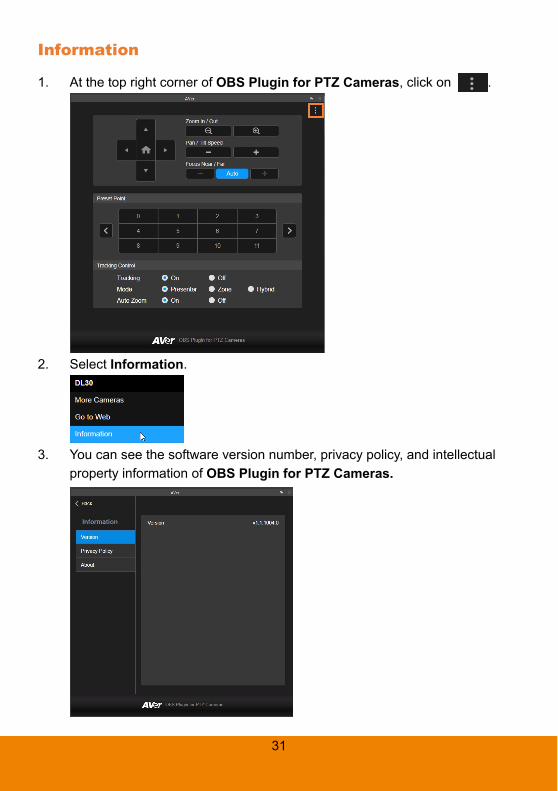
1. At the top right corner of OBS Plugin for PTZ Cameras, click on .
2. Select Information.
3. You can see the software version number, privacy policy, and intellectual
property information of OBS Plugin for PTZ Cameras.

32
4. Select Privacy Policy. From the Usage Data drop-down menu, you can choose to Enable or Disable Usage Data collection whenever you would like to. You can read the End User License Agreement.
33
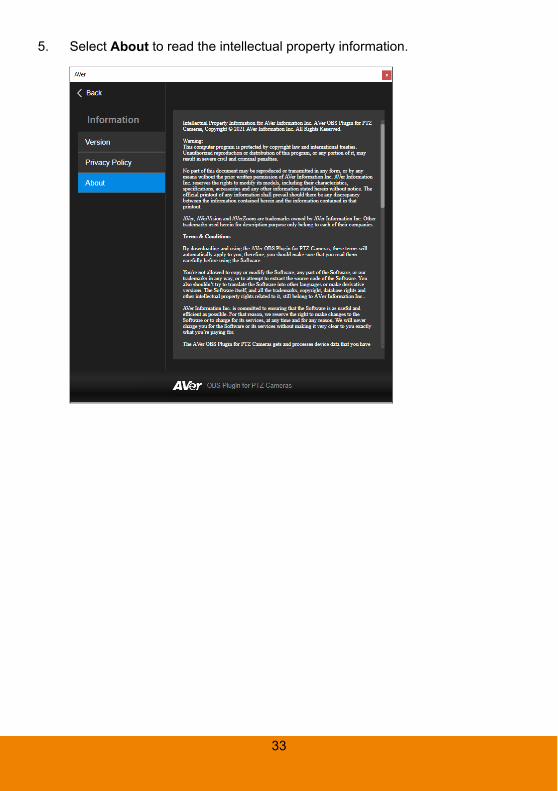
5. Select About to read the intellectual property information.