Embed Size (px)
Citation preview

Plot-1441, Opp. IOCL Petrol Pump, CRP Square, BhubaneswarWebsite : www.vanik.org | Phone : 0674-6556677, 8093-556677
COMPUTER
SKILL TEST
A.S.O.(ASSISTANT SECTION OFFICER)
OPSC(ODISHA PUBLIC SERVICE COMMISSION)
VANIK PublicationsCorporate Office : 1441, Opp. IOCL Petrol Pump, CRPF Square, Bhubaneswar-751015
E-mail : [email protected]
Contact : 0674-2559977
Visit us at : www.vanikpublications.com
COMPUTER SKILL TESTCopyright © by VANIK Publications.All rights are reserved. No part of this publication may be reproduced, stored in or introduced into aretrieval system, or transmitted in any form or by any means (electronic, mechanical, photo-copying,recording or otherwise), without the prior written permission of the above mentioned publisher of thisbook.
First Edition : 2019
© All rights reserved by VANIK Publications. No part of this book may be reproduced or utilized in any form without thewritten permission from the publisher.
Price: ` 250
ontents...CChapter-1 M.S. OFFICE ............................................................. (4-212)
MICROSOFT WORD ...................................................... 5MICROSOFT EXCEL ...................................................... 54MICROSOFT POWERPOINT .......................................... 122MICROSOFT ACCESS .................................................... 212
Chapter-2 USAGE OF INTERNET SERVICES & OUTLOOK EXPRESS............................................................................ 213Chapter-3 FILES, FOLDERS & WINDOWS....................................... 220Practice Sets (5 Sets) ................................................................ (231-240)
Sets -1 ........................................................................... 232Sets -2 ........................................................................... 234Sets -3 ........................................................................... 236Sets -4 ........................................................................... 237Sets -5............................................................................ 239
Chapter- 1MS OFFICE
1 MS OFFICE
MICROSOFT WORD 2007Microsoft Word is a word processing software package. You can use it to type letters, reports, andother documents. It gives you the ability to use your computer for desktop publishing.
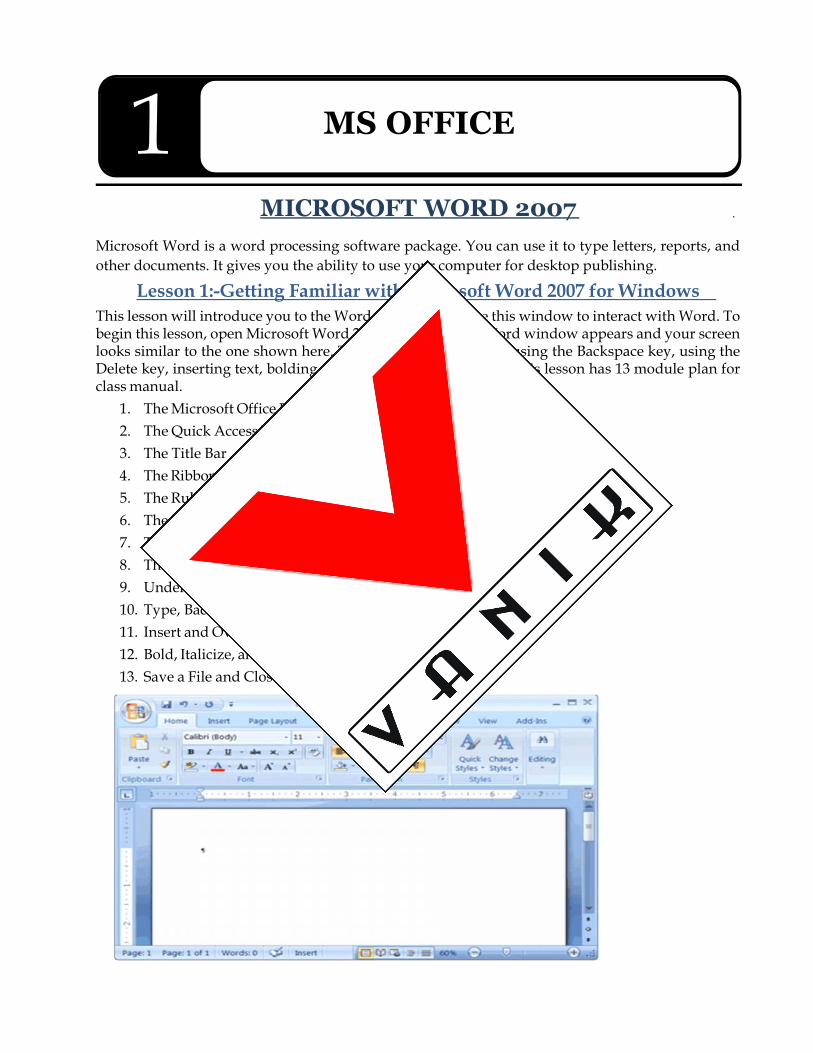
Lesson 1:-Getting Familiar with Microsoft Word 2007 for WindowsThis lesson will introduce you to the Word window. You use this window to interact with Word. Tobegin this lesson, open Microsoft Word 2007. The Microsoft Word window appears and your screenlooks similar to the one shown here. This lesson covers typing, using the Backspace key, using theDelete key, inserting text, bolding, underlining, and italicizing. This lesson has 13 module plan forclass manual.
1. The Microsoft Office Button2. The Quick Access Toolbar3. The Title Bar4. The Ribbon5. The Ruler6. The Text Area7. The Vertical and Horizontal Scroll Bars8. The Status Bar9. Understanding Document Views10. Type, Backspace, and Delete11. Insert and Overtype12. Bold, Italicize, and Underline13. Save a File and Close Word
Computer Skill Test6
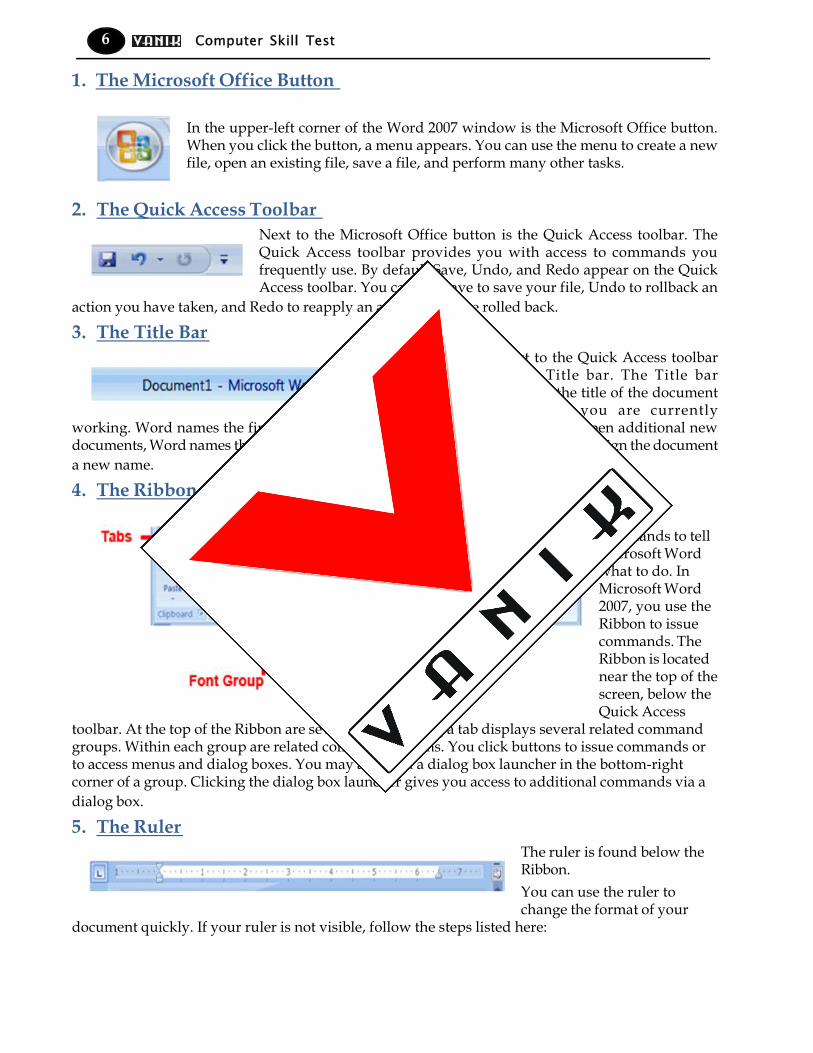
1. The Microsoft Office Button
In the upper-left corner of the Word 2007 window is the Microsoft Office button.When you click the button, a menu appears. You can use the menu to create a newfile, open an existing file, save a file, and perform many other tasks.
2. The Quick Access ToolbarNext to the Microsoft Office button is the Quick Access toolbar. TheQuick Access toolbar provides you with access to commands youfrequently use. By default Save, Undo, and Redo appear on the QuickAccess toolbar. You can use Save to save your file, Undo to rollback an
action you have taken, and Redo to reapply an action you have rolled back.
3. The Title BarNext to the Quick Access toolbaris the Title bar. The Title bardisplays the title of the documenton which you are currently
working. Word names the first new document you open Document1. As you open additional newdocuments, Word names them sequentially. When you save your document, you assign the documenta new name.
4. The RibbonYou usecommands to tellMicrosoft Wordwhat to do. InMicrosoft Word2007, you use theRibbon to issuecommands. TheRibbon is locatednear the top of thescreen, below theQuick Access
toolbar. At the top of the Ribbon are several tabs; clicking a tab displays several related commandgroups. Within each group are related command buttons. You click buttons to issue commands orto access menus and dialog boxes. You may also find a dialog box launcher in the bottom-rightcorner of a group. Clicking the dialog box launcher gives you access to additional commands via adialog box.
5. The RulerThe ruler is found below theRibbon.You can use the ruler tochange the format of your
document quickly. If your ruler is not visible, follow the steps listed here:
M.S. OFFICE 7
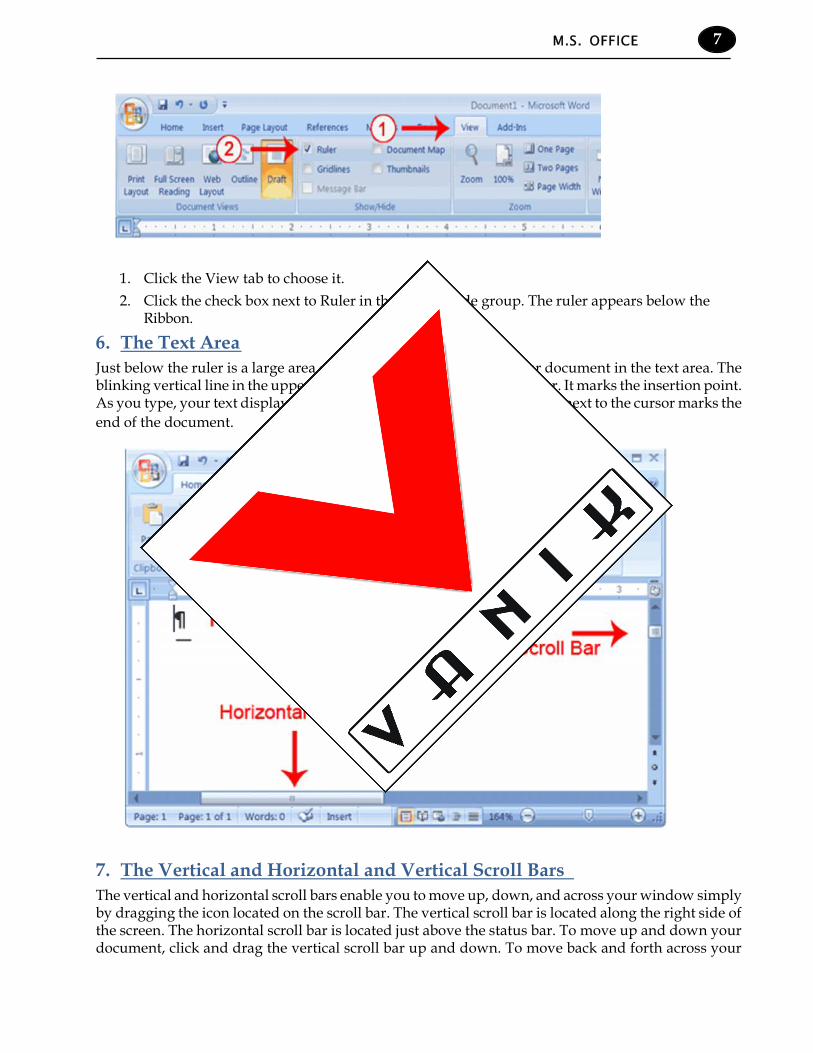
1. Click the View tab to choose it.2. Click the check box next to Ruler in the Show/Hide group. The ruler appears below the
Ribbon.
6. The Text AreaJust below the ruler is a large area called the text area. You type your document in the text area. Theblinking vertical line in the upper-left corner of the text area is the cursor. It marks the insertion point.As you type, your text displays at the cursor location. The horizontal line next to the cursor marks theend of the document.
7. The Vertical and Horizontal and Vertical Scroll BarsThe vertical and horizontal scroll bars enable you to move up, down, and across your window simplyby dragging the icon located on the scroll bar. The vertical scroll bar is located along the right side ofthe screen. The horizontal scroll bar is located just above the status bar. To move up and down yourdocument, click and drag the vertical scroll bar up and down. To move back and forth across your
Computer Skill Test8
document, click and drag the horizontal scroll bar back and forth. You won’t see a horizontal scrollbar if the width of your document fits on your screen.
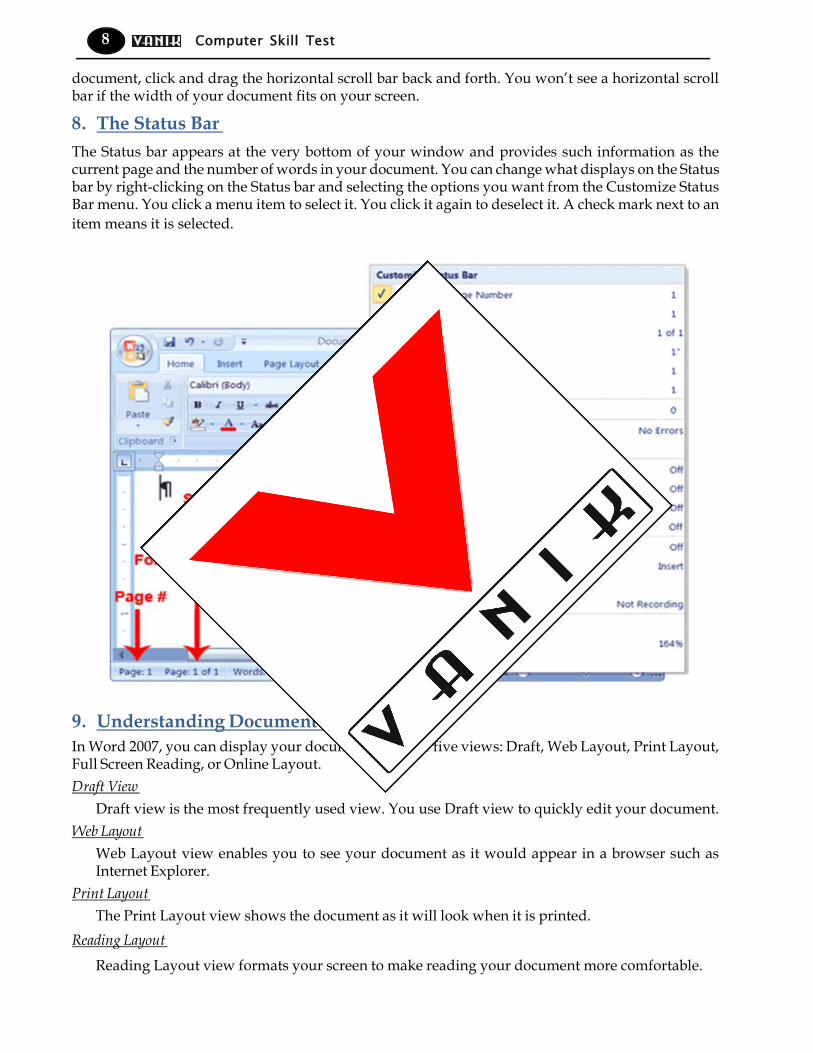
8. The Status BarThe Status bar appears at the very bottom of your window and provides such information as thecurrent page and the number of words in your document. You can change what displays on the Statusbar by right-clicking on the Status bar and selecting the options you want from the Customize StatusBar menu. You click a menu item to select it. You click it again to deselect it. A check mark next to anitem means it is selected.
9. Understanding Document ViewsIn Word 2007, you can display your document in one of five views: Draft, Web Layout, Print Layout,Full Screen Reading, or Online Layout.Draft View
Draft view is the most frequently used view. You use Draft view to quickly edit your document.Web Layout
Web Layout view enables you to see your document as it would appear in a browser such asInternet Explorer.
Print LayoutThe Print Layout view shows the document as it will look when it is printed.
Reading Layout
Reading Layout view formats your screen to make reading your document more comfortable.
M.S. OFFICE 9
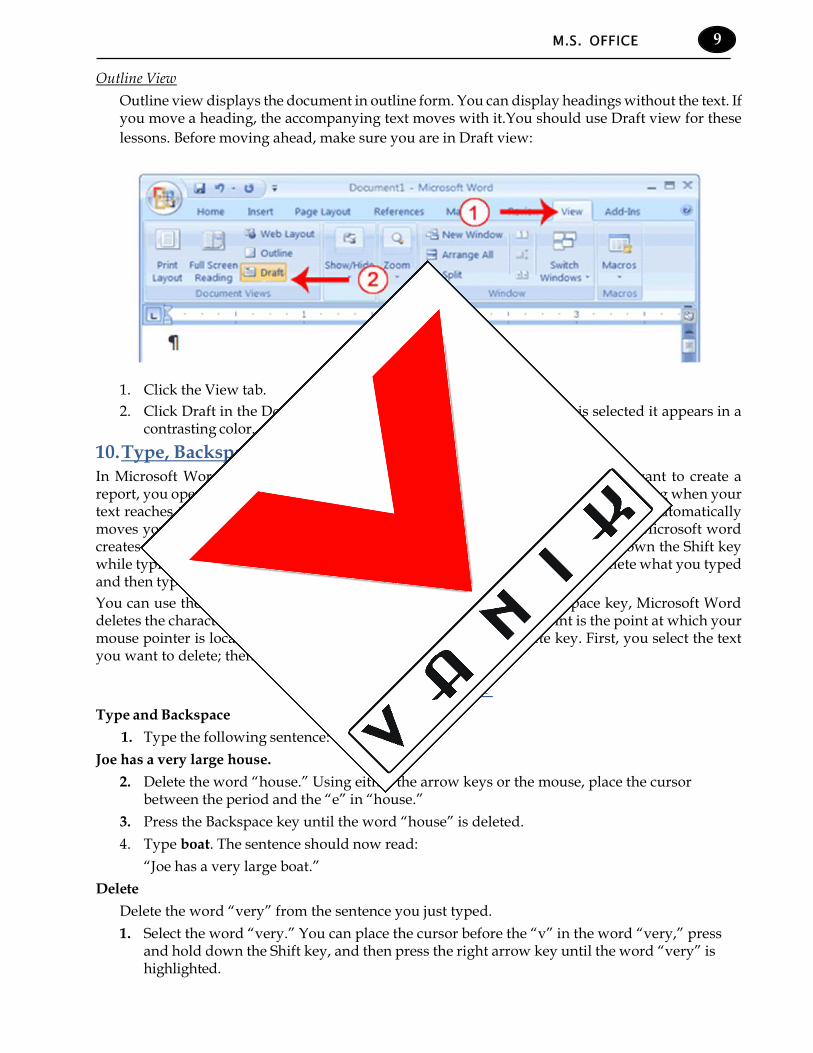
Outline ViewOutline view displays the document in outline form. You can display headings without the text. Ifyou move a heading, the accompanying text moves with it.You should use Draft view for theselessons. Before moving ahead, make sure you are in Draft view:
1. Click the View tab.2. Click Draft in the Document Views group. When the Draft option is selected it appears in a
contrasting color.10.Type, Backspace, and DeleteIn Microsoft Word, you create documents by typing them. For example, if you want to create areport, you open Microsoft Word and then begin typing. You do not have to do anything when yourtext reaches the end of a line and you want to move to a new line—Microsoft Word automaticallymoves your text to a new line. If you want to start a new paragraph, press Enter. Microsoft wordcreates a blank line to indicate the start of a new paragraph. To capitalize, hold down the Shift keywhile typing the letter you want to capitalize. If you make a mistake, you can delete what you typedand then type your correction.You can use the Backspace key to delete. Each time you press the Backspace key, Microsoft Worddeletes the character that precedes the insertion point. The insertion point is the point at which yourmouse pointer is located. You can also delete text by using the Delete key. First, you select the textyou want to delete; then you press the Delete key.
EXERCISE - 1Type and Backspace
1. Type the following sentence: Joe has a very large house.
2. Delete the word “house.” Using either the arrow keys or the mouse, place the cursorbetween the period and the “e” in “house.”
3. Press the Backspace key until the word “house” is deleted.4. Type boat. The sentence should now read:
“Joe has a very large boat.”Delete
Delete the word “very” from the sentence you just typed.1. Select the word “very.” You can place the cursor before the “v” in the word “very,” press
and hold down the Shift key, and then press the right arrow key until the word “very” ishighlighted.
Computer Skill Test10
2. Press the Delete key. The sentence should now read: “Joe has a large boat.”
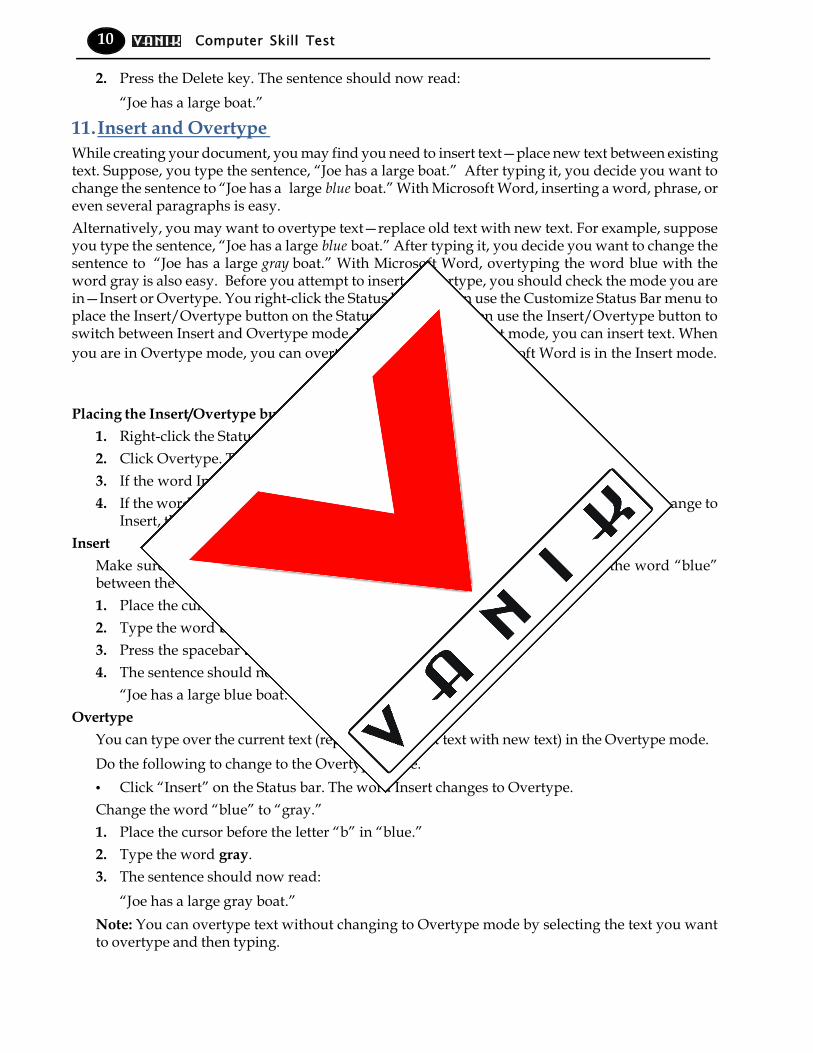
11.Insert and OvertypeWhile creating your document, you may find you need to insert text—place new text between existingtext. Suppose, you type the sentence, “Joe has a large boat.” After typing it, you decide you want tochange the sentence to “Joe has a large blue boat.” With Microsoft Word, inserting a word, phrase, oreven several paragraphs is easy.Alternatively, you may want to overtype text—replace old text with new text. For example, supposeyou type the sentence, “Joe has a large blue boat.” After typing it, you decide you want to change thesentence to “Joe has a large gray boat.” With Microsoft Word, overtyping the word blue with theword gray is also easy. Before you attempt to insert or overtype, you should check the mode you arein—Insert or Overtype. You right-click the Status bar and then use the Customize Status Bar menu toplace the Insert/Overtype button on the Status bar. You can then use the Insert/Overtype button toswitch between Insert and Overtype mode. When you are in Insert mode, you can insert text. Whenyou are in Overtype mode, you can overtype text. By default, Microsoft Word is in the Insert mode.
EXERCISE - 2Placing the Insert/Overtype button on the Status bar
1. Right-click the Status bar. The Customize Status Bar menu appears.2. Click Overtype. The Insert/Overtype button appears on the Status bar.3. If the word Insert appears on the Status bar, you are in Insert mode.4. If the word Overtype appears on the Status bar, click the word Overtype and it will change to
Insert, thereby changing Word to Insert mode.Insert
Make sure you are in Insert mode before proceeding. You are going to insert the word “blue”between the words “large” and “boat.”1. Place the cursor after the space between the words “large” and “boat.”2. Type the word blue.3. Press the spacebar to add a space.4. The sentence should now read:
“Joe has a large blue boat.”Overtype
You can type over the current text (replace the current text with new text) in the Overtype mode.Do the following to change to the Overtype mode. Click “Insert” on the Status bar. The word Insert changes to Overtype.Change the word “blue” to “gray.”1. Place the cursor before the letter “b” in “blue.”2. Type the word gray.3. The sentence should now read:
“Joe has a large gray boat.”Note: You can overtype text without changing to Overtype mode by selecting the text you wantto overtype and then typing.

M.S. OFFICE 11
12.Bold, Italicize, and UnderlineWhen creating a document, you may need to emphasize particular words or phrases by bolding,underlining, or italicizing. Also, certain grammatical constructs require that you bold, underline, oritalicize. You can bold, underline, and italicize when using Word. You also can combine thesefeatures—in other words, you can bold, underline, and italicize a single piece of text.
When you need to perform a task in Microsoft Word, you can usually choose from several methods.The exercises that follow show you how to bold, underline, or italicize using four different methods:using the launcher, the Ribbon, the Mini-toolbar/context menu, and the keyboard.
EXERCISE - 3Type the following exactly as shown. Remember, pressing the Enter key starts a new paragraph.Press the Enter key at the end of each of the following lines to start a new paragraph.
Launcher: Bold Italicize Underline these words. All three Regular
Ribbon: Bold Italicize Underline these words. All three Regular
Mini Toolbar: Bold Italicize Regular
Keys: Bold Italicize Underline these words. All three Regular
Your screen should look similar to the one shown here.
Computer Skill Test12
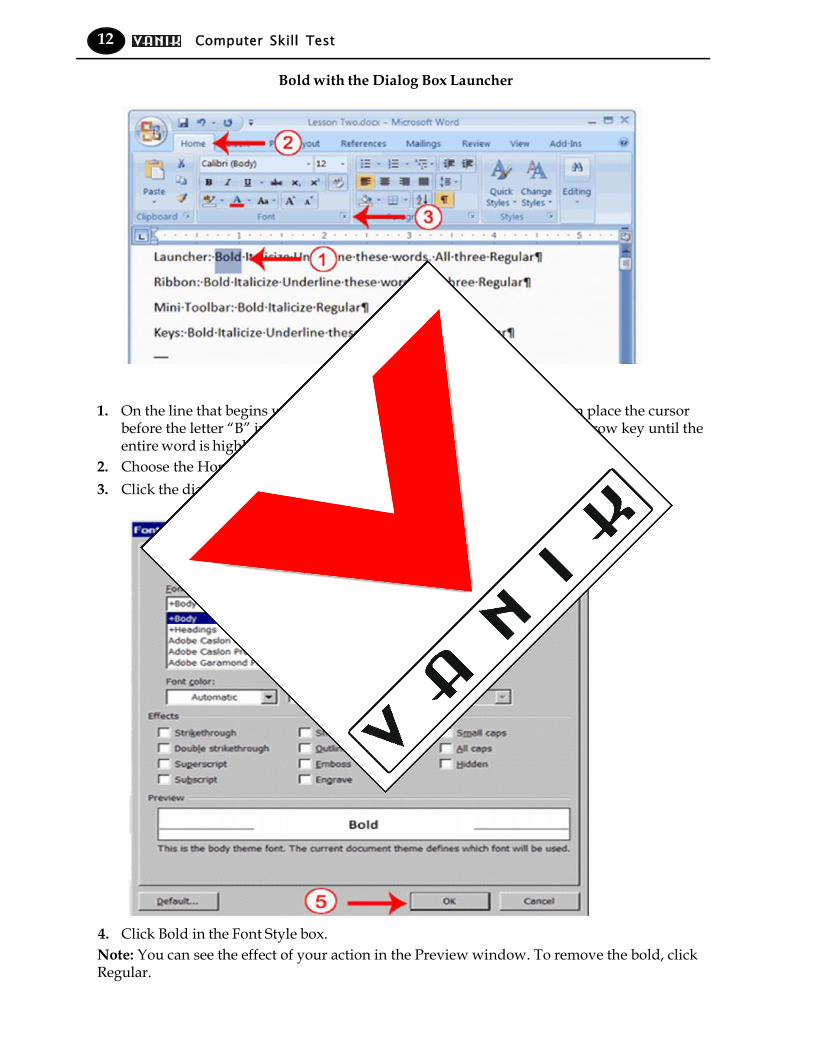
Bold with the Dialog Box Launcher
1. On the line that begins with Launcher, select the word “Bold.” You can place the cursorbefore the letter “B” in “Bold.” Press the Shift key; then press the right arrow key until theentire word is highlighted.
2. Choose the Home tab.3. Click the dialog box launcher in the Font group. The Font dialog box appears.
4. Click Bold in the Font Style box.Note: You can see the effect of your action in the Preview window. To remove the bold, clickRegular.
M.S. OFFICE 13
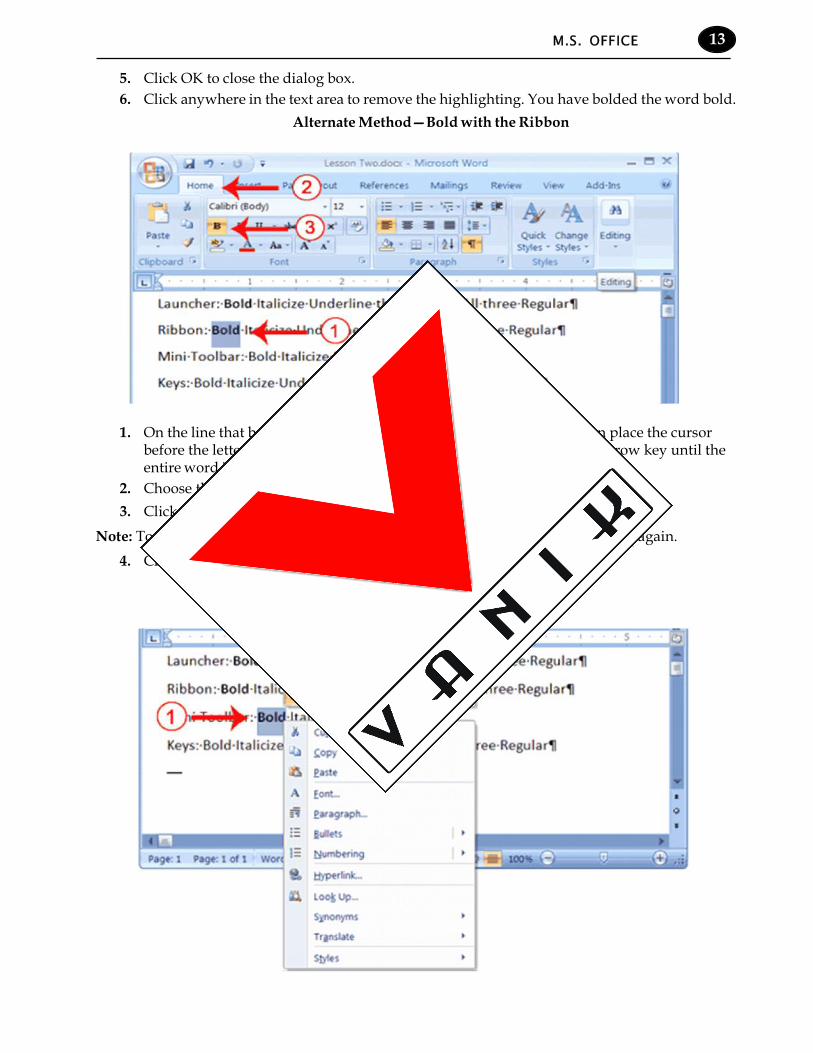
5. Click OK to close the dialog box.6. Click anywhere in the text area to remove the highlighting. You have bolded the word bold.
Alternate Method—Bold with the Ribbon
1. On the line that begins with “Ribbon,” select the word “Bold.” You can place the cursorbefore the letter “B” in “Bold.” Press the Shift key; then press the right arrow key until theentire word is highlighted.
2. Choose the Home tab.3. Click the Bold button in the Font group. You have bolded the word bold.
Note: To remove the bold, you can select the text and then click the Bold button again.4. Click anywhere in the text area to remove the highlighting.
Alternate Method - Bold with the Mini Toolbar
Computer Skill Test14
1. On the line that begins with “Mini Toolbar,” select the word “Bold.” You can place thecursor before the letter “B” in “Bold. “Press the Shift key; then press the right arrow keyuntil the entire word is highlighted.
2. Right-click. The Mini toolbar appears.3. Click the Bold button . You have bolded the word bold.
Alternate Method—Bold with Keys1. On the line that begins with “Keys,” select the word “Bold.” You can place the cursor
before the letter “B” in “Bold.” Press the Shift key; then press the right arrow key until theentire word is highlighted.
2. Press Ctrl+b (hold down the Ctrl key while pressing b). Note: To remove the Bold, press Ctrl+b again. You can also remove formatting by pressing
Ctrl+spacebar.3. Click anywhere in the text area to remove the highlighting.
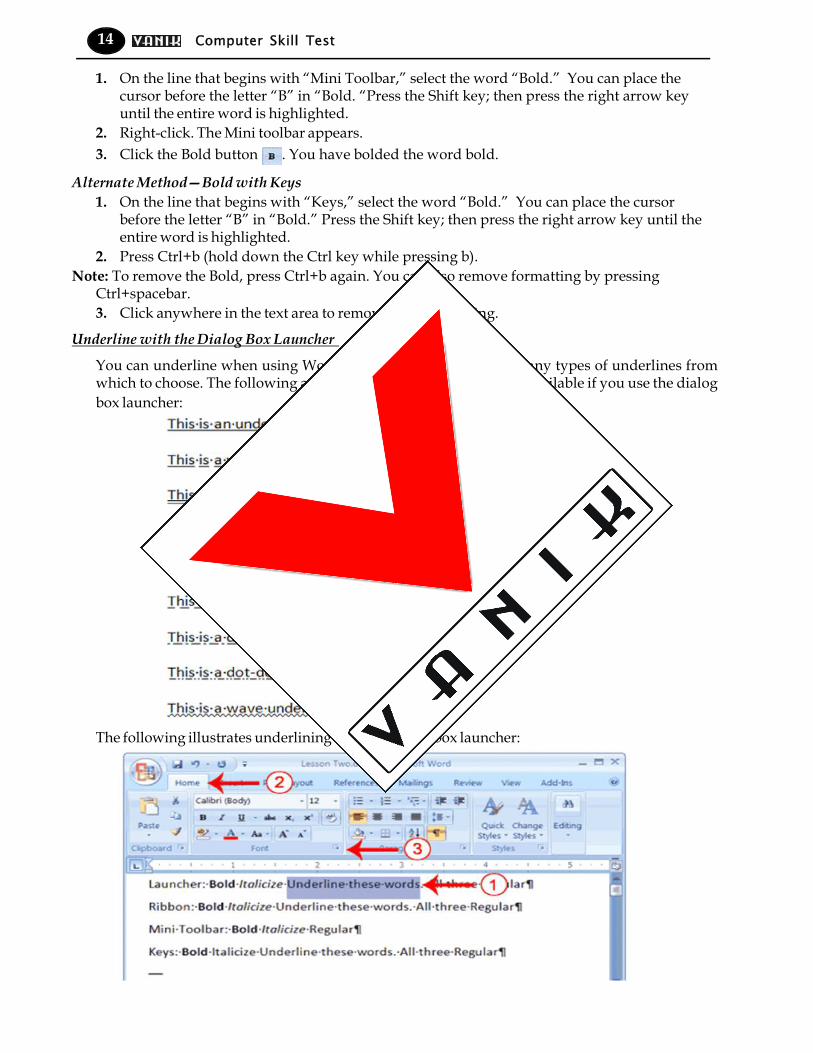
Underline with the Dialog Box Launcher
You can underline when using Word. Word provides you with many types of underlines fromwhich to choose. The following are some of the underlines that are available if you use the dialogbox launcher:
The following illustrates underlining with the dialog box launcher:
M.S. OFFICE 15
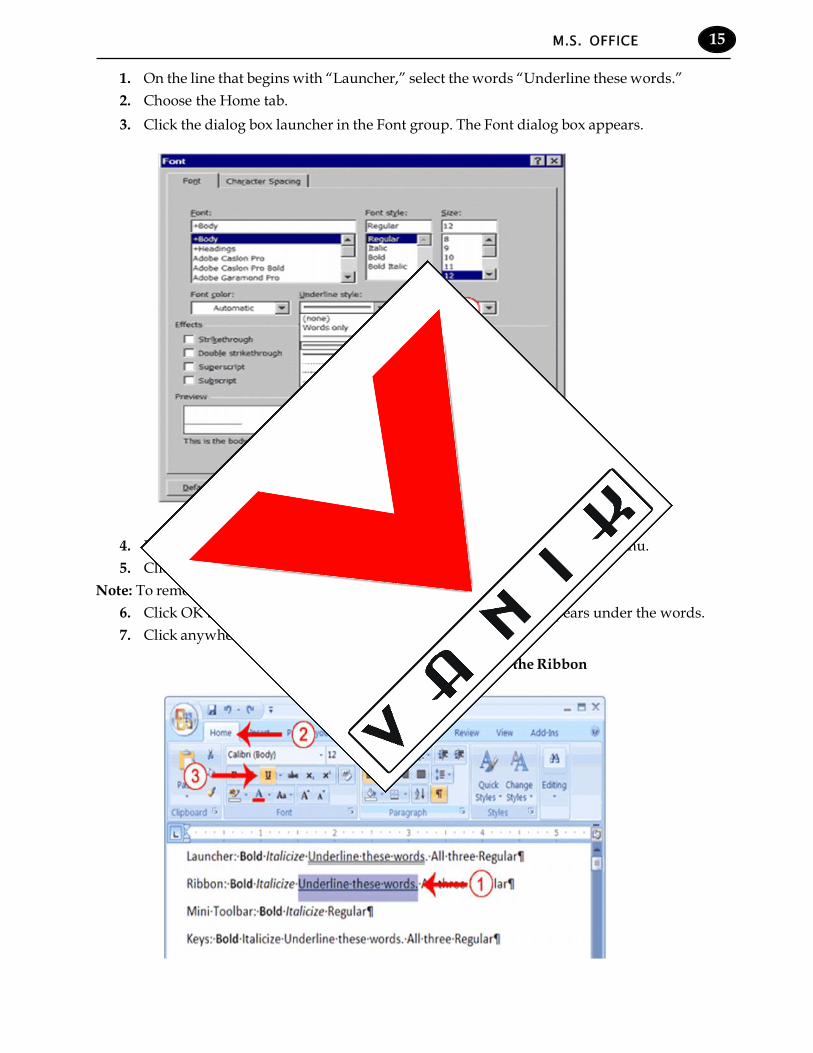
1. On the line that begins with “Launcher,” select the words “Underline these words.”2. Choose the Home tab.3. Click the dialog box launcher in the Font group. The Font dialog box appears.
4. In the Underline Style box, click the down arrow to open the pull-down menu.5. Click the type of underline you wish to use.
Note: To remove an underline, you select none from the pull-down menu.6. Click OK to close the dialog box. The underline you selected appears under the words.7. Click anywhere in the text area to remove the highlighting.
Alternate Method—Underline with the Ribbon