Embed Size (px)
Citation preview

Th e acceptance or denial of all entries are at the discretion of Safari Club International, its Board and committees . Entries are subject to review by the Record Book Committee of SCI at any time .
Text by Jack Schwabland and L . Irvin Barnhart/Complex Antler Measuring Supplement contributed by Gabriel Paz and Gilbert Aguilar Revised September 2019
Offi cial Measurer’s Manual

2 SCI Measuring Manual
Table of ContentsINTRODUCTION . . . . . . . . . . . . . . . . . . . . . . . . . . . . . . . . . . . . . . . . . . . . . . . . . . . . . . . . . . . . . . . . . . . . . . . . . . . 4
GENERAL INSTRUCTIONS FOR ALL ENTRIESWho may measure . . . . . . . . . . . . . . . . . . . . . . . . . . . . . . . . . . . . . . . . . . . . . . . . . . . . . . . . . . . . . . . . . . . . . . . . . . . . . 4Who may enter . . . . . . . . . . . . . . . . . . . . . . . . . . . . . . . . . . . . . . . . . . . . . . . . . . . . . . . . . . . . . . . . . . . . . . . . . . . . . . . . . 4What may be entered . . . . . . . . . . . . . . . . . . . . . . . . . . . . . . . . . . . . . . . . . . . . . . . . . . . . . . . . . . . . . . . . . . . . . . . . . . . . 4Where to enter . . . . . . . . . . . . . . . . . . . . . . . . . . . . . . . . . . . . . . . . . . . . . . . . . . . . . . . . . . . . . . . . . . . . . . . . . . . . . . . . . . 5When to enter . . . . . . . . . . . . . . . . . . . . . . . . . . . . . . . . . . . . . . . . . . . . . . . . . . . . . . . . . . . . . . . . . . . . . . . . . . . . . . . . . . . 5How to enter . . . . . . . . . . . . . . . . . . . . . . . . . . . . . . . . . . . . . . . . . . . . . . . . . . . . . . . . . . . . . . . . . . . . . . . . . . . . . . . . . . . . 6 When to measure . . . . . . . . . . . . . . . . . . . . . . . . . . . . . . . . . . . . . . . . . . . . . . . . . . . . . . . . . . . . . . . . . . . . . . . . . . . . . . . 6Measuring tools, methods, fractions, etc . . . . . . . . . . . . . . . . . . . . . . . . . . . . . . . . . . . . . . . . . . . . . . . . . . . . . . . . . . . . 6 Damaged and/or repaired trophies . . . . . . . . . . . . . . . . . . . . . . . . . . . . . . . . . . . . . . . . . . . . . . . . . . . . . . . . . . . . . . . . 7 Sawn-apart or split skulls . . . . . . . . . . . . . . . . . . . . . . . . . . . . . . . . . . . . . . . . . . . . . . . . . . . . . . . . . . . . . . . . . . . . . 7 Carding off a broken horn, tusk or antler point . . . . . . . . . . . . . . . . . . . . . . . . . . . . . . . . . . . . . . . . . . . . . . . . . 7 Photographs . . . . . . . . . . . . . . . . . . . . . . . . . . . . . . . . . . . . . . . . . . . . . . . . . . . . . . . . . . . . . . . . . . . . . . . . . . . . . . . . 8 Certification . . . . . . . . . . . . . . . . . . . . . . . . . . . . . . . . . . . . . . . . . . . . . . . . . . . . . . . . . . . . . . . . . . . . . . . . . . . . . . . . . 8 Remeasurement . . . . . . . . . . . . . . . . . . . . . . . . . . . . . . . . . . . . . . . . . . . . . . . . . . . . . . . . . . . . . . . . . . . . . . . . . . . . . 8 Major Awards and Alternative Method Awards . . . . . . . . . . . . . . . . . . . . . . . . . . . . . . . . . . . . . . . . . . . . . . . . 9 Criteria for accepting animals . . . . . . . . . . . . . . . . . . . . . . . . . . . . . . . . . . . . . . . . . . . . . . . . . . . . . . . . . . . . . . . . . 9 Lawful and ethical hunting . . . . . . . . . . . . . . . . . . . . . . . . . . . . . . . . . . . . . . . . . . . . . . . . . . . . . . . . . . . . . . . . . . . 9METHODS FOR MEASURING HORNS Method 1 For most animals with simple horns . . . . . . . . . . . . . . . . . . . . . . . . . . . . . . . . . . . . . . . . . . . 11 Method 2 For spiral-horned animals . . . . . . . . . . . . . . . . . . . . . . . . . . . . . . . . . . . . . . . . . . . . . . . . . . . . 13 Method 3 For most wild cattle . . . . . . . . . . . . . . . . . . . . . . . . . . . . . . . . . . . . . . . . . . . . . . . . . . . . . . . . . 14 Method 4 For African buffalo . . . . . . . . . . . . . . . . . . . . . . . . . . . . . . . . . . . . . . . . . . . . . . . . . . . . . . . . . . 15 Method 5 For common wildebeest and takin . . . . . . . . . . . . . . . . . . . . . . . . . . . . . . . . . . . . . . . . . . . . 17 Method 6 For black wildebeest . . . . . . . . . . . . . . . . . . . . . . . . . . . . . . . . . . . . . . . . . . . . . . . . . . . . . . . . . 18 Method 7 For muskox . . . . . . . . . . . . . . . . . . . . . . . . . . . . . . . . . . . . . . . . . . . . . . . . . . . . . . . . . . . . . . . . 19 Method 8 For rhinoceros . . . . . . . . . . . . . . . . . . . . . . . . . . . . . . . . . . . . . . . . . . . . . . . . . . . . . . . . . . . . . . 20 Method 9 For multi-horned sheep . . . . . . . . . . . . . . . . . . . . . . . . . . . . . . . . . . . . . . . . . . . . . . . . . . . . . 21 Method 10 For pronghorn antelope . . . . . . . . . . . . . . . . . . . . . . . . . . . . . . . . . . . . . . . . . . . . . . . . . . . . . 22 Method 11 For wild sheep, bharal, aoudad and tur . . . . . . . . . . . . . . . . . . . . . . . . . . . . . . . . . . . . . . . . 23
METHODS FOR MEASURING TUSKS Method 12 For hippopotamus, pigs, water deer and musk deer . . . . . . . . . . . . . . . . . . . . . . . . . . . . 25 Method 13 For walrus . . . . . . . . . . . . . . . . . . . . . . . . . . . . . . . . . . . . . . . . . . . . . . . . . . . . . . . . . . . . . . . . . . 26 Method 14 For elephant . . . . . . . . . . . . . . . . . . . . . . . . . . . . . . . . . . . . . . . . . . . . . . . . . . . . . . . . . . . . . . . . 27
METHOD FOR MEASURING SKULLS Method 15 For carnivores, peccaries and water chevrotain . . . . . . . . . . . . . . . . . . . . . . . . . . . . . . . . . 27
METHODS FOR BODY MEASUREMENTS Method 16-C For crocodilians . . . . . . . . . . . . . . . . . . . . . . . . . . . . . . . . . . . . . . . . . . . . . . . . . . . . . . . . . . . . 28 Method 16-D For darted carnivores . . . . . . . . . . . . . . . . . . . . . . . . . . . . . . . . . . . . . . . . . . . . . . . . . . . . . . . 28

SCI Measuring Manual 3
GENERAL INSTRUCTIONS FOR DEER ENTRIES Measuring length of main beam . . . . . . . . . . . . . . . . . . . . . . . . . . . . . . . . . . . . . . . . . . . . . . . . . . . . . . . . . . . . . . 29 Points and tines, valid or not? . . . . . . . . . . . . . . . . . . . . . . . . . . . . . . . . . . . . . . . . . . . . . . . . . . . . . . . . . . . . . . . . 29 Determining what is a valid tine . . . . . . . . . . . . . . . . . . . . . . . . . . . . . . . . . . . . . . . . . . . . . . . . . . . . . . . . . . . . . . 29 Deer antlers: Typical and non-typical . . . . . . . . . . . . . . . . . . . . . . . . . . . . . . . . . . . . . . . . . . . . . . . . . . . . . . . . . 30 Measuring a tine that grows from the main beam . . . . . . . . . . . . . . . . . . . . . . . . . . . . . . . . . . . . . . . . . . . . . . 30 Measuring a tine that grows from another tine . . . . . . . . . . . . . . . . . . . . . . . . . . . . . . . . . . . . . . . . . . . . . . . . 31 Measuring a tine that grows from a palm . . . . . . . . . . . . . . . . . . . . . . . . . . . . . . . . . . . . . . . . . . . . . . . . . . . . . 31 Webbed antlers . . . . . . . . . . . . . . . . . . . . . . . . . . . . . . . . . . . . . . . . . . . . . . . . . . . . . . . . . . . . . . . . . . . . . . . . . . . . 32 Two tines with a common base . . . . . . . . . . . . . . . . . . . . . . . . . . . . . . . . . . . . . . . . . . . . . . . . . . . . . . . . . . . . . . 32 Antlers with many tines . . . . . . . . . . . . . . . . . . . . . . . . . . . . . . . . . . . . . . . . . . . . . . . . . . . . . . . . . . . . . . . . . . . . . 33 Number of points as supplemental information . . . . . . . . . . . . . . . . . . . . . . . . . . . . . . . . . . . . . . . . . . . . . . . 33 Measuring circumferences . . . . . . . . . . . . . . . . . . . . . . . . . . . . . . . . . . . . . . . . . . . . . . . . . . . . . . . . . . . . . . . . . . . 35 Measuring span and spread . . . . . . . . . . . . . . . . . . . . . . . . . . . . . . . . . . . . . . . . . . . . . . . . . . . . . . . . . . . . . . . . . . 35 Antlers in velvet . . . . . . . . . . . . . . . . . . . . . . . . . . . . . . . . . . . . . . . . . . . . . . . . . . . . . . . . . . . . . . . . . . . . . . . . . . . . 36 Photographs (all deer entries) . . . . . . . . . . . . . . . . . . . . . . . . . . . . . . . . . . . . . . . . . . . . . . . . . . . . . . . . . . . . . . . . 36 Photographs (Columbia black-tailed deer) . . . . . . . . . . . . . . . . . . . . . . . . . . . . . . . . . . . . . . . . . . . . . . . . . . . . 36
METHODS FOR MEASURING ANTLERS Complex Antler Measuring Supplement for Red Deer and Non-Typical White-tailed Deer . . . . . . . . 36 Method 17-T For white-tailed deer with typical antlers . . . . . . . . . . . . . . . . . . . . . . . . . . . . . . . . . . . . . . 43 Method 17-NT For white-tailed deer with non-typical antlers . . . . . . . . . . . . . . . . . . . . . . . . . . . . . . . . . . 46 Method 18-T For mule deer and black-tailed deer with typical antlers . . . . . . . . . . . . . . . . . . . . . . . . . 48 Method 18-NT For mule deer and black-tailed deer with non-typical antlers . . . . . . . . . . . . . . . . . . . . 50 Method 19-T For elk or wapiti with typical antlers (except Roosevelt elk and tule elk) . . . . . . . . . . . . . . . . . . . . . . . . . . . . . . . . . . . . . . . . . . . . 50 Method 19-NT For elk or wapiti with non-typical antlers, and for all Roosevelt elk and tule elk . . . . . . . . . . . . . . . . . . . . . . . . . . . . . . . . . . . . . . . . . . 54 Method 20 For red deer and related deer . . . . . . . . . . . . . . . . . . . . . . . . . . . . . . . . . . . . . . . . . . . . . . . . . 56 Method 21-T For axis deer, hog deer, sambar, rusa deer, sika deer . . . . . . . . . . . . . . . . . . . . . . . . . . . . 58 and roe deer with typical antlers Method 21-NT For axis deer, hog deer, sambar, rusa deer, sika deer and roe deer with non-typical antlers . . . . . . . . . . . . . . . . . . . . . . . . . . . . . . . . . . . . . . . . . 61 Method 22 For the larger deer not specified in other methods . Includes barasingha, white-lipped deer, brow-antlered deer, Père David deer, marsh deer, pampas deer and huemul . . . . . . . . . . . . . . . . . . . . . . . . . 63 Method 23 For caribou and reindeer . . . . . . . . . . . . . . . . . . . . . . . . . . . . . . . . . . . . . . . . . . . . . . . . . . . . 64 Method 24 For fallow deer . . . . . . . . . . . . . . . . . . . . . . . . . . . . . . . . . . . . . . . . . . . . . . . . . . . . . . . . . . . . . . 67 Method 25-P For moose with palmated antlers . . . . . . . . . . . . . . . . . . . . . . . . . . . . . . . . . . . . . . . . . . . . . 69 Method 25-C For moose with cervine (unpalmated) antlers . . . . . . . . . . . . . . . . . . . . . . . . . . . . . . . . . . 71 Method 26-T For muntjac and brocket deer with typical antlers and for all pudu and tufted deer Method 26-NT For muntjac and brocket deer with non-typical antlers . . . . . . . . . . . . . . . . . . . . . . . . . 73 Method 50 For wild turkey . . . . . . . . . . . . . . . . . . . . . . . . . . . . . . . . . . . . . . . . . . . . . . . . . . . . . . . . . . . . . . 74SCI RECORD BOOK MINIMUMS . . . . . . . . . . . . . . . . . . . . . . . . . . . . . . . . . . . . . . . . . . . . . . . . . . . . . . . . . . 75
MEASUREMENT CONVERSION TABLES . . . . . . . . . . . . . . . . . . . . . . . . . . . . . . . . . . . . . . . . . . . . . . . . . . 82QUARTER CONVERSION TABLE FOR CIRCUMFERENCE MEASUREMENTS . . . . . . . . . . . . . . 85

4 SCI Measuring Manual
INTRODUCTION
The Safari Club International measuring system was initially developed by SCI founder and chairman emeritus C . J . McElroy in 1977 for use in the SCI Record Book of Big Game Animals and the various awards programs . Although a number of changes have been made since then, it remains a consistent, universal system under which similar animals from all parts of the world are measured and scored in the same way .
The Record Book Committee is responsible for administering the measuring system and making clarifications and changes as needed; for setting minimum scores for the Record Book and for Medallions, and for reviewing and adjusting these minimums from time to time; for appointing, instructing and certifying SCI measurers and monitoring their performance; for reviewing and ruling on entries for the Record Book and for Medallions; for choosing the recipients of the Young Hunter Award and the Alternative Method the Major Awards . The committee also maintains a continual study of the world’s game animals, keeps abreast of current taxonomic opinion, and reviews and revises the categories of animals as deemed desirable .
In 1993, the methods for measuring deer antlers were greatly revised so as to give more credit for mass and more closely reflect established international standards of animal evaluation . We know these changes have created a great deal of work and inconvenience for everyone, but we believe they have vastly improved the SCI measurement system . For details, please refer to the general instructions for deer entries and to the specific instructions for Methods 17-26 .
Questions and suggestions should be addressed to Record Book Office, Safari Club International, 4800 West Gates Pass Road, Tucson, AZ 85745 . Telephone 800-997-0177 . Fax 520/618/3534 .
GENERAL INSTRUCTIONS FOR ALL ENTRIES
It is very important that measurers know and understand these general instructions, because due to space constraints much of the information contained here does not appear in the specific instructions for individual methods or on the entry forms .
The following instructions are in effect as of September 2019 and supersede all previous instructions and guidelines .
This manual cannot address every possible animal configuration or measuring problem that might occur . Any measurer encountering a situation not covered here should ask for guidance from the Record Book Office at the SCI Membership and Business Operations Center, or from any member of the Record Book Committee
WHO MAY MEASURE
1 . All SCI measurers must be members of SCI (Life, National, or International Members) . There are two levels of SCI measurer: Official and Master . To become an Official Measurer, one must either attend the Official Measurer’s Course and pass the written examination, or purchase a Home Study Kit and pass the written examination with a score of 80% or better .(The Home Study Kit may be purchased from the Record Book and World Hunting
Awards Department, Safari Club International, 4800 West Gates Pass Road, Tucson, Arizona 85745 .) To become a Master Measurer, one must already be an Official Measurer for at least one year & take the Master Measurer’s Course .The course will consist of a 4-hour instructional seminar and scoring the provided 25 animals within 3% accuracy in the allocated time . Twelve of the twenty five animals to be scored will be antlered game . Only a Master Measurer may certify an overall Top 20 entry or one that is nominated for a Major Award .
2 . All new entries that rank in the overall Top 20 of a Record Book category, and all entries nominated for a Major Award, must be certified, which means they must be measured by a Master Measurer 60 days or more after the date of harvest (for exceptions see Methods 8, 14, 16-C and 16-D) . Record Book entries that rank below the overall Top 20, and entries for the other awards programs, are not required to be certified; therefore, may be measured by any SCI Official Measurer, including the owner or hunter of that animal .
3 . Those interested in becoming measurers should contact the Record Book Department, Safari Club International, 4800 West Gates Pass Road, Tucson, Arizona 85745, for information . Each measurer is supplied with a measuring kit that contains a plastic-coated steel cable, a flexible 1/4- inch plastic measuring tape, a pair of calipers, a calculator, a measurer’s manual, a fraction conversion table, and a supply of entry forms .
4 . A Master Measurer may not certify his/her own trophies or any trophies which he/she is associated with . All overall Top 20 entries must be certified by a non biased third party Master Measurer . This means a guide, outfitter, family member, or anyone associated with hunting companies used on the hunt, may not certify an entry for a client or family member . This also includes the booking agent, Professional Hunter, or anyone else involved with the hunt in any way .
5 . An SCI measurer may not accept payment for measuring animals, however, may be reimbursed for travel expenses .
WHO MAY ENTER
6 . Only members of SCI (Life, National, Youth and International Members) may enter animals for the Record Book or the award programs . Animals taken in years prior to membership are eligible for entry upon joining . Spouses and children of SCI members are not eligible to enter their animals unless they also are members .
WHAT MAY BE ENTERED
7 . Animals that have been measured by an SCI Official or Master Measurer using the SCI measuring system, and whose scores meet the current minimum standards, are eligible for the Record Book and for Medallions (for exceptions see Methods 8, 14, 16-C and 16-D) . The entrant need not have been a member of SCI at the time the animal was taken,but must be a member when it is entered for the Record Book or a Medallion .
All measurements being submitted to the SCI Record Book
SCI Measuring Manual 5
Department must be signed by an SCI Official or Master Measurer who measured the animal . It is not permissible to submit a re-measurement or original entry that was estimated, substantiated, or verified without actually measuring the animal for any reason . If an entry cannot be measured again, it will be at the Record Book Committee’s discretion to permit the entry .
For members who want to enter an animal taken into their World Hunting Awards Program and not list the animal in the Record Book or if your animal does not meet the SCI minimum; you have the option to enter your animal as a Photo Entry . A photo entry will apply to your World Hunting Award Records, but is not entered into the SCI Record Book . The fee for a Photo Entry is $20 .00(USD) . In addition, we now recognize older age animals with the Methuselah entry award for only $20 .00 (USD) . You also have an option to purchase a Methuselah coin for your entry at only $25 .00 (USD) with an option to purchase a plaque .
8 . Animals taken by the following alternative methods (handgun, muzzleloader, bow and arrow, crossbow, shotgun, and harpoon) will be identified as such in the general Record Book and may be ranked separately . Alternative-method trophies in the general Record Book are subject to the same minimum scores as those taken by rifle, with the exception of archery entries . Animals taken with a bow are subject to their own minimum score requirements . Please note that an alternative-method trophy must be taken entirely by the alternative weapon; any animal wounded by an alternative weapon and finished off with a rifle will be accepted only as a rifle harvest .
9 . Certain darted animals that have been tranquilized and revived as part of a conservation program or study by a government or other institution may be accepted at the discretion of the committee . When so, they will be identified as such in the Record Book and ranked separately . They are subject to the same minimum scores as rifle-taken animals if measured by the same method, but if measured by a different method (for example, Method 16-D) the minimum may be different .
10 . Picked-up or otherwise acquired (not hunted) animals owned by regular members are eligible for the Record Book and for Medallions . These are animals not actually hunted by the owner, but that have been found, given or purchased . They will be identified as such in the Record Book and will not be ranked with animals that were hunted . They are subject to the same minimum scores as rifle-taken animals . They are not eligible for Major Awards .
Sheds will be accepted into the Record Book, but only as Pick-ups . Antler sheds can be entered into the Record Book but the measurer must estimate the inside spread and can be no wider than the longest of the main beams .
WHERE TO ENTER
11 . Entries are to be submitted to the Record Book Department, Safari Club International, 4800 West Gates Pass Road, Tucson, Arizona 85745 or online at www .SafariClub .org . Record Book entries must be accompanied by the correct
entry fees or a major credit card account number, and by the appropriate photographs .
WHEN TO ENTER: RECORD BOOK
12 . In recent years, the deadline for Record Book entries to be received at the SCI Membership and Business Operations Center has varied from book to book . Deadline notices are published in the SAFARI Times and also will appear in certain mailings to members and measurers as well as on line at www .SafariClub .org . If in doubt, members should contact the Record Book Office, Safari Club International, 4800 West Gates Pass Road, Tucson, Arizona 85745, or please call 800-997-0177 for information .
Record Book entries should be submitted well before the deadline, ideally as soon as they have been measured . If a last-minute entry contains errors or omissions or presents classification problems, it may not be possible to resolve them in time for the entry to be included in the next Record Book or be considered for a Major Award in the appropriate time period .
WHEN TO ENTER: MEDALLION PLAQUES
13 . Medallion Plaques are attractive 4X6 walnut plaques that may be ordered by members for any or all of their Record Book entries . Medallion plaques are available at a cost of $55 each . There are three levels: bronze, silver and gold . The bronze level is the Record Book minimum score for that animal . The silver and gold levels are determined by computer so there will be one-third each gold, silver and bronze based on the number of Record Book entries in that category . A Medallion Plaque may be ordered at the same time that an animal is submitted for the Record Book, or for a previously entered animal, but not for a trophy that has never been entered . Once a Medallion has been approved, the plaque will be ordered and shipped directly to the member . The Photo Medallion Plaque was introduced by the Record Book Department in 2005 to honor the hunt . The Photo Medallion Plaque features a 3 .75”x5” photograph (photos need to be horizontal with a light background) of your favorite hunt laser engraved on metal . The plaque honors the hunt by listing the hunter’s name, the species taken, and the
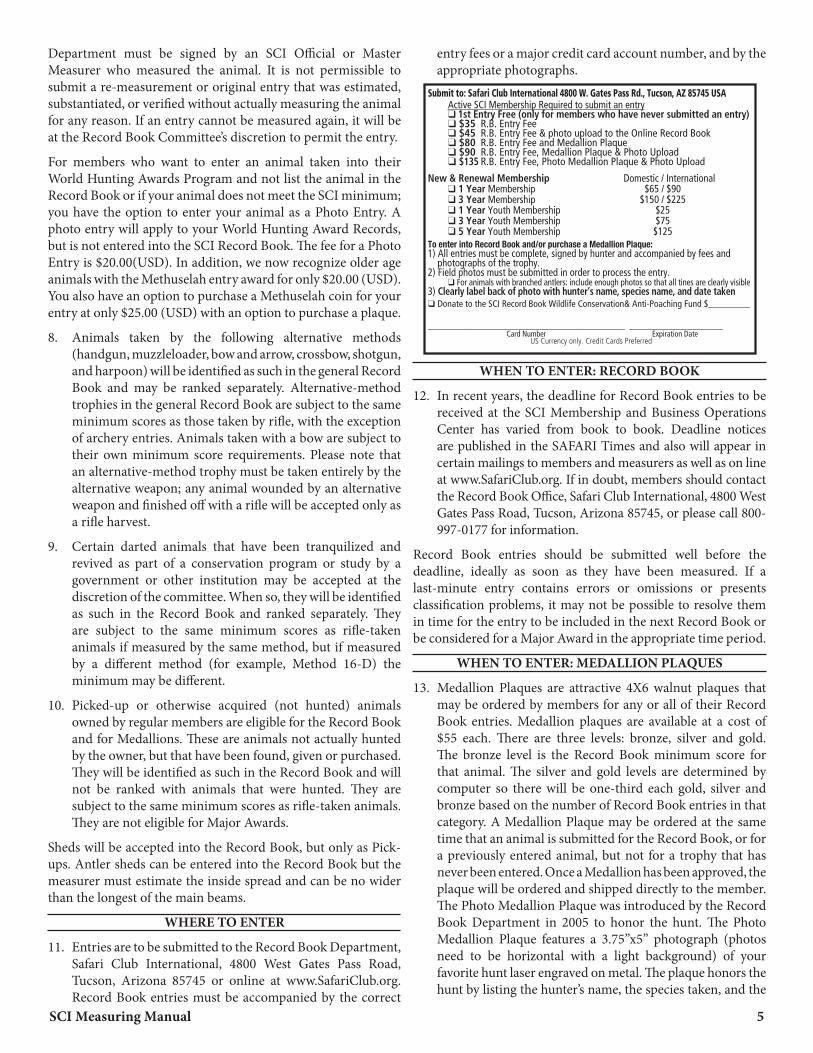
Submit to: Safari Club International 4800 W. Gates Pass Rd., Tucson, AZ 85745 USA Active SCI Membership Required to submit an entry q 1st Entry Free (only for members who have never submitted an entry) q $35 R.B. Entry Fee q $45 R.B. Entry Fee & photo upload to the Online Record Book q $80 R.B. Entry Fee and Medallion Plaque q $90 R.B. Entry Fee, Medallion Plaque & Photo Upload q $135 R.B. Entry Fee, Photo Medallion Plaque & Photo Upload
New & Renewal Membership Domestic / International q 1 Year Membership $65 / $90 q 3 Year Membership $150 / $225 q 1 Year Youth Membership $25 q 3 Year Youth Membership $75 q 5 Year Youth Membership $125To enter into Record Book and/or purchase a Medallion Plaque:1) All entries must be complete, signed by hunter and accompanied by fees and photographs of the trophy. 2) Field photos must be submitted in order to process the entry. q For animals with branched antlers: include enough photos so that all tines are clearly visible3) Clearly label back of photo with hunter’s name, species name, and date takenq Donate to the SCI Record Book Wildlife Conservation& Anti-Poaching Fund $_________
____________________________________________ _____________________ Card Number Expiration Date
US Currency only. Credit Cards Preferred

6 SCI Measuring Manual
date taken . The Photo Medallion Plaque makes a great gift for the avid hunter . You may download an order form from the SCI website and submit your photo medallion to the Record Book Department for $100 each, plus shipping and handling . Top Ten & Top Twenty Plaques have also become very popular for members who have taken an animal that ranks in the top ten or top twenty of a category . These plaques feature a 3 .75” x 5” photo . Horizontal photographs work best on this one-of-a-kind plaque . This plaque makes a great gift and can be ordered by downloading the order form from the SCI website and submitting your photo to the Record Book Department . The Top Ten & Top Twenty Plaque costs are $125 + $15 for shipping .
HOW TO ENTER: FILLING OUT THE ENTRY FORM
14 . Each animal must be entered on a separate entry form . It must be the current and correct entry form for that type of animal and measurement method, (obsolete forms are to be discarded) . Entry forms have a date in the lower right hand corner indicating when they were last updated . The most current set of score sheets to date were updated 09/19 . The entry form must be completely filled out before it will be accepted . It must be legible, preferably typewritten or printed in black ink .
When measuring the antlers, horns or tusks of an animal, the measurer should always record the measurements as the animal’s left or right . This is to say if you are viewing the animal from the front, the measurer’s left is the animals right side and vice versa . In addition to the country and the state or province, the locality where the animal was taken must be shown on the entry form (i .e ., the name of the area, property, game management unit, nearest county, nearest town, nearby geographic feature, etc) . The entry will not be accepted unless this information is provided . The name of the guide or professional hunter and/or the name of the safari or hunting company that employs them and is responsible for the logistics and ground arrangements in the hunting area must be shown on the entry form . (We do not want the name of your hunt broker or booking agent back home .) Without this information, the entry will not be accepted unless an exemption is granted by the Committee . Some reasons for an exemption: (a) If you did not use a guide or hunting company, but truly guided and outfitted yourself, you may enter “self ” in the appropriate space . (b) If you do not wish to publicize your guide or hunting company because of unsatisfactory performance, you may leave the space blank and explain why . All measurers are required to sign and date each entry form for any species they measure .
An animal may be entered for both the Record Book and a Medallion Plaque on the same entry form at the same time . An animal may also be entered for both a Record Book Entry and a Photo Medallion Plaque on the same form with the latest version of entry forms . An entry that is only for a Medallion Plaque will not be accepted unless that animal is already entered for the Record Book .
It is required that all Record Book entries have a minimum of 1 field photograph to accompany the entry form that clearly
shows both horns, antlers, skulls, or tusks and the hunter in the field with the animal . If submitting antler game, please include a minimum of 3 additional photographs showing different views of the antlers . All photos need not be in the field . Only one field photo as described above needs to be included .
WHEN TO MEASURE: GREEN OR DRY?
15 . Most animals may be measured immediately, with no drying-out period required . However, any animal that ranks in the overall Top 20 of a Record Book species category, must be certified by a Master Measurer 60 days or more after the date of harvest . At no time during the 60 -day drying period is the animal permitted to be frozen or manipulated from the natural drying process . (Exceptions are crocodilians and darted animals, which are measured green and, therefore, cannot be certified as a overall Top 20 animal) . Turkeys do not require 60-day dry measurement at any time to be entered into the Record Book, but will need to be scored by a Master Measurer in order to be certified if it ranks in the top 20 overall . An animal that is a potential overall Top 20 that is taken within sixty days of the Major Awards deadline (March 31st of the year prior to the convention) should be measured by a Master Measurer and submitted to the Record Book Department to qualify for the following year Major Awards Program .
16 . All rhinoceros horns, whether in the overall Top 20 or not, must be measured at least 60 days after the date of harvest . This is because rhinoceros horns shrink so much in drying that it would be meaningless to combine green and dry measurements in the same list . (An exception is made for horns of darted rhinoceroses, which are measured green . See instructions for Method 8) .All elephant tusks, whether in the overall Top 20 or not, may be measured green and no longer require the 60-day dry measurement to be certified into the record book . This change was made because SCI accepts Customs documentations that include the certified weight of the tusks as a reference when we are unable to weigh the tusks due to import or taxidermy alterations .
MEASURING TOOLS, METHODS, FRACTIONS, ETC .
17 . Measurements and weights will be accepted by either the U .S . customary system of weights and measures (pounds, feet and inches) or by the metric system (Système International) . The measurer must note on the entry form if the metric system was used . Metric measurements and weights will be converted to the U .S . system by computer in the SCI Membership and Business Operations Center .
18 . Most measurements are to be taken with a steel cable (which may be plastic-coated) or a flexible 1/4-inch steel or plastic measuring tape . The inside span of deer antlers and outside spread of moose antlers are best taken with a carpenter’s folding extension ruler; if a steel tape is used instead, it must be pulled tightly and not allowed to sag . We also recommend using a cloth sewing tape for the chest and head circumferences of darted carnivores, because

SCI Measuring Manual 7
it is less likely to harm the animal . With most animals, measurements are to be in inches to the nearest 1/8th of an inch (U .S . system), or in centimeters to the nearest 0 .1 centimeter (metric system) . Measurements in inches that occur halfway or more between 1/8ths of an inch are to be recorded on the entry form as the next higher 1/8th . Those occurring less than halfway between l/8ths revert to the next lower 1/8th .
All fractions must be recorded on the entry form in 1/8ths of an inch: 1/8, 2/8 (not 1/4), 3/8, 4/8 (not 1/2), 5/8, 6/8 (not 3/4), and 7/8 . Metric measurements that occur halfway or more between 0 .1 of a centimeter are to be recorded as the next higher 0 .1 cm . Those occurring less than halfway between 0 .1 cm revert to the next lower 0 .1 cm .
19 . Certain small horns, tusks and antlers are to be measured to the nearest 1/16th of an inch (U .S . system) or in centimeters to the nearest 0 .1 centimeter (metric system) . These include horns of four-horned antelope, duikers, dik-diks and other pygmy antelopes (Method 1-A); tusks of hippopotamus, pigs, water deer and musk deer (Method 12); and antlers of muntjacs, brocket deer, puku and tufted deer (Method 26) . When measuring circumferences of very small horns, tusks and antlers, a more accurate measurement can often be obtained by using a cloth or plastic sewing tape, or by wrapping a piece of paper around the horn base and marking the points of intersection . This is an exception to the normal rule requiring a steel tape or cable (see instructions for Methods 1, 12 and 26) . With these animals, measurements in inches that occur halfway or more between 1/16ths of an inch are to be recorded as the next higher 1/16th, while those occurring less than halfway between l/16ths revert to the next lower 1/16th . All fractions must be recorded on the entry form in 1/16ths of an inch: 1/16, 2/16 (not 1/8), 3/16, 4/16 (not 1/4), etc .
20 . Elephant tusks are to be weighed in pounds to the nearest 1/2 pound (U .S . system) or in kilograms to the nearest 0 .1 kg (100 grams) (metric system) . They may be weighed on any accurate weighing device or scales, either balance or spring . Tusks that can no longer be weighed may be accepted by using the weights shown on the export documents of the country of origin or by submitting the weight increments engraved on each tusk by the country they were exported from . (see instructions for Method 14) . Weights in pounds that occur halfway or more between 1/2 pounds are to be recorded as the next higher 1/2 pound, while those occurring less than halfway between 1/2 pounds revert to the next lower 1/2 pound . Metric weights that occur halfway or more between 0 .1 of a kilogram are to be recorded as the next higher 0 .1 kg, while those occurring less than halfway between 0 .1 kg revert to the next lower 0 .1 kg .
21 . Skull measurements are to be taken with a pair of calipers or between carpenter’s squares, or between any two smooth, parallel objects that are at right angles to the horizontal axis of the skull . Measurements are to be taken in inches to the nearest 1/16th of an inch (U .S . system) or in centimeters to the nearest 0 .1 cm (metric system) (see instructions for Method l5) .
22 . Body-length measurements of crocodilians are to be taken with a steel cable (which may be plastic coated) or a flexible 1/4-inch steel measuring tape, and are to be in feet and inches to the nearest 1/2 inch (U .S . system) or in centimeters to the nearest full cm (metric system) (see instructions for Method 16-C) . Note: This field measurement must be taken with the crocodile and/or alligator flat on the ground lying on its belly and must not be taken while hanging . A field measurement taken when hanging may be asked to be remeasured and/or may not be accepted by the SCI Record Book Committee .
Measurements in inches that occur halfway or more between 1/2 inches are to be recorded as the next higher 1/2 inch, while those occurring less than halfway between 1/2 inches revert to the next lower 1/2 inch .
Metric measurements that occur halfway or more between full centimeters are to be recorded as the next higher full cm, while those occurring less than halfway between full centimeters revert to the next lower full cm .
DAMAGED AND/OR REPAIRED ANIMALS
23 . With damaged, unrepaired animals (broken horns or antler tines, gunshot skulls, etc .), only existing horn, antler or skull material may be measured . Missing material may not be estimated nor allowed for . The damage must be described on the entry form . With damaged animals that have been repaired, only the original horn, antler or skull material from that animal may be measured, and then only when in its original state or acceptably put back together so as not to increase any measurement . Any other material, either natural or taxidermic, that has been added to the animal must not be measured . The damage and repair must be described on the entry form, and photographs that show it clearly will be required .
SAWN-APART OR SPLIT SKULLS
24 . Skulls of animals with large horns or antlers are often sawn or otherwise split in two to facilitate transportation, then rejoined by the taxidermist . Split and rejoined skulls of species where the spread or tip-to-tip measurement is counted as part of the score will not be accepted unless the measurer is completely satisfied that, as rejoined, the original spread has not been exceeded . No sawn-apart or split skull from any species will be accepted unless the measurer is satisfied that both horns or antlers are from the same animal .
(Fig . 1)

8 SCI Measuring Manual
CARDING OFF A BROKEN HORN, TUSK OR ANTLER POINT (FIG . 1, 2 & 3)
25 . When measuring the length of a horn, tusk or antler point, if the tip is broken or broomed so that its far end is not on the line of measurement, “card” it off with a straightedge held at a right angle to the axis of the horn, tusk or point, and end the measurement where the straightedge intersects the line of measurement . Do not measure across the flattened end of a broken tip .
When measuring the length of a horn by following the center of its front surface, and the lowest place at the base of the front surface (on the forehead) is not in the center of the horn, “card” it off with a straightedge held at a right angle to the axis of the horn and begin the measurement where the straightedge intersects the line of measurement (Fig . 2 .) .
When measuring the length of a tusk that has a jagged base (or root end), and the farthest point on the edge of the base is not on the line of measurement, “card” it off with a straightedge held at a right angle to the axis of the tusk and begin the measurement where the straightedge intersects the line of measurement (Fig . 3) .
PHOTOGRAPHS: ALL ENTRIES 26 . Each entry must be accompanied by one or more sharply
focused field photo(s) . Field photographs are required . Horns or antlers must be shown clearly . Photographs must show the animal’s distinguishing characteristics well enough to permit identification and classification . For example: waterbuck (rump pattern); bontebok (horns, rump, belly and lower legs); forest duikers (complete head and body); black-tailed deer (tail and metatarsal glands) . If a member cannot produce a field photo for a Record Book entry or photo entry of an animal, they must provide color photographs of the mounted trophy and must sign a “No Field Photo Affidavit” for each such entry . For antlered game trophies, three photographs of the mounted trophy, each taken from a different angle, or sufficient photographs
to show all the points, must be submitted . The affidavit must be on a form provided by SCI .
ABNORMAL ANIMALS 27 . The Committee reserves the right to judge whether an
animal is sufficiently abnormal to be considered a freak, and to reject any such animal, or to accept it under certain conditions, as it sees fit .
CERTIFICATION
28 . The Record Book Committee officially approves the score and ranking of each entry . At no time should a score be considered or advertised as an SCI official score until it has been officially ranked in the SCI Record Book . All animals (see exceptions) that rank in the overall Top 20 of a Record Book animal category must be certified by a non biased third party Master Measurer . This means a guide, outfitter, family member or anyone associated with the hunting companies used may not certify an entry for a client or family member . This also includes the booking agent, PH or anyone involved in the hunt . To be certified, an animal must be measured by a Master Measurer 60 days or more after the date of harvest . A Master Measurer may not certify his own animals, nor those of a close family member . The owner of an animal that is to be certified is expected to cooperate fully with the Committee; failure to do so will result in the animal being dropped from the Record Book .
A Record Book animal category consists of a particular kind of animal in one of the six world areas (Africa, North America, etc .) . The method of take (rifle, handgun, etc .) and whether the animal is indigenous or non-indigenous do not matter . For example, all typical Rocky Mountain elk taken in North America make up one category, with the overall Top 20 being the animals that have the 20 highest overall scores, regardless of whether they are indigenous or non-indigenous, or whether they were taken with rifle, handgun, muzzleloader, bow and arrow, or crossbow . There is not a separate overall Top 20 for indigenous typical Rocky Mountain elk, another for non-indigenous, another for those taken with a rifle, another for handgun, etc . Please note, however, that all non-typical Rocky Mountain elk – indigenous, non-indigenous and all methods of take – will make up a different category .
Exceptions to the certification requirement include crocodilians and darted animals, which are measured green and cannot be certified; certain elephant tusks that cannot be weighed and for which export document weights are used; and picked-up or otherwise acquired (not hunted) animals, which do not count in the overall Top 20 of a category and are not required to be certified .
If certified measurements are of a previously entered, uncertified animal, they must be submitted on a new entry form . The remeasurement box should be checked, the former score and entry number filled in if known . There is no charge .
REMEASUREMENT: COMMITTEE’S RIGHT TO REVIEW AND REMEASURE
29 . The Committee reserves the right to review any entry and remeasure any animal at any time . The owner of an
(Fig . 2)
(Fig . 3)

SCI Measuring Manual 9
animal that is to be remeasured is expected to cooperate fully with the Committee; failure to do so will result in the animal being dropped from the Record Book . The new measurements must be submitted on a new entry form . The remeasurement box should be checked, the former score and entry number filled in if known . There is no charge .
i . Certification Panel Score - a minimum of three SCI Official Measurers scoring together to provide a consensus on any Record Book entry after the 60-day drying period . Record Book Committee Subchairs can approve the use of a panel score to certify an overall Top 20 Record Book entry when a Master Measurer is not available to certify the entry . Each measurer who assists with a panel score should include his or her name, measurer number and signature on the score sheet .
ii . Master Measurer Panel Score - two or more Master Measurers who cooperatively measure a complex or overall Top 20 Record Book entry to assure that the species is measured accurately and completely . A Master Measurer Panel Score is not required but can be used to provide a consensus and ensure consistency . Each measurer who assists with a panel score should include his or her name, measurer number and signature on the score sheet .
REMEASUREMENT: CHANGE IN METHOD
30 . The Committee may change or clarify any measurement method at any time . Any entry in the Record Book whose score would be increased by a change or clarification of method may, at the member’s option, be remeasured and resubmitted for future editions .
Any entry whose score would be decreased by a change or clarification of method must be remeasured and resubmitted . If this is not done, the Committee reserves the right to adjust the measurements by applying a formula, or to drop the entry from future editions, as it sees fit .
It is not permissible to submit a re-measurement that was estimated, or the original measurements were substantiated or verified for any reason . If the animal cannot be measured for any reason, it is up to the Record Book Committee to convert this entry to a Photo Entry or remove it from a member’s records . The remeasurements must be submitted on a new entry form . The remeasurement box should be checked, the former score and entry number filled in if known . There is no charge .
Video Web Scoring is now available in instances when there are no Master Measurers in the area or if the Record Book committee or measuring coordinator request for one to be completed to certify a Top 10 Red Deer or in some cases any animal we accept into Record Book . Additional requests for video web scoring will be done on an entry by entry basis and at the discretion of SCI Record Book and Record Book Committee .
REMEASUREMENT: INCORRECTLY MEASURED ANIMALS
31 . A member who believes his animal was measured incorrectly may have it remeasured at any time . The remeasurements must be submitted on a new entry form . The remeasurement
box should be checked, the former score and entry number filled in if known . There is no charge .
Please note, however, that “shopping around” for a better score is not acceptable and may result in disqualification of the entry .
MAJOR AWARDS AND ALTERNATIVE METHOD AWARDS
32 . The Major Awards and Alternative Method Awards are presented annually at the SCI Hunters’ Convention . They are chosen from Record Book entries that were taken during the previous awards period . The Major Awards are given for the top three animals, plus the seven runner-ups, from each world area . Alternative Method Awards are given for the top animals taken with handgun, muzzleloader, archery, and crossbow . To be eligible for one of these awards:
a . The animal must have been taken during the appropriate time period, which is April 1 through March 31 of the previous year . (For a Major Award to be presented at the 2020 Convention, the time period was April 1, 2018, through March 31, 2019 .) However, at the discretion of the Committee, an animal that was taken in an earlier time period, but not received from an international location or measured until later, may be ruled eligible by the Record Book Committee . It is the responsibility of the entrant to petition the Record Book Committee for such a ruling . Also, any animal that has been held up by the Record Book Committee or by the SCI Membership and Business Operations Center for any reason, or that has been overlooked by the Record Book Committee will be eligible the following year . b . Only potential Major Award entries have to be certified by a Master Measurer . (60 days or more after date of harvest) . Entries eligible for an Alternative Method Award are not required to be certified unless they are overall Top 20 entries in the Record Book . Go to www .SafariClub .org for a current list of Master Measurers . It must have been lawful to export and import at the time the trophy was taken except those species SCI accepts due to CITES . c . The entry must have been received at the SCI Membership and Business Operations Center by April of the previous year . (For a Major Award presented at the 2020 Convention, the deadline was April 1, 2019 .)
CRITERIA FOR ACCEPTING ANIMALS 33 . An entry must meet the following criteria to be accepted for
the Record Book: a . The animal must have been taken in accordance with the laws of the country in which it was taken at the time it was taken . b . It must have been lawful to export and import at the time the trophy was taken except those species SCI accepts due to CITES .
LAWFUL AND ETHICAL HUNTING 34 . Every entry form must have the following statement
signed and dated by the person entering it before it can be accepted: I certify that, to the best of my knowledge, I took this animal without violating the wildlife laws or ethical
10 SCI Measuring Manual
hunting practices of the country, state or province in which I hunted and, furthermore, that the laws of my country have not been violated by my taking or importing this animal .
35 . Animals shot from or driven by helicopter or other aircraft will not be accepted for the Record Book .
36 . All entries must be accompanied with a color photograph . In the case of branch antlered game, a frontal, left side and right side picture must accompany the entry .
37 . The Record Book Committee of Safari Club International defines an “Estate” category in the Record Book of Big Game Animals as follows: An “Estate” will be any property or area that uses an artificial or unnatural restrictive barrier, in most cases a fence, which restricts or confines the movement of game animals .The restrictive barrier may consist of multiple sides, or only one side .If the artificial barrier is used in conjunction with a natural barrier such as a bluff, canyon, river, lake or other natural barriers, then the enclosed area is also considered an “Estate .” Any game animal taken within the confines of such an “Estate” will be considered for the “Estate Taken” category of that species .Any game animal taken that was raised, or kept for a long period of time, within the confines of an “Estate” and then intentionally or unintentionally released outside of the “Estate” will only be considered for the “Estate Taken” category of that species . If an animal does not fall into this category it will be considered free range .
SCI Fair Chase Requirements for Record Book Entries of Estate Animals are as follows . An Estate animal must meet the following criteria in order to be qualified for entry into the Record Book . The animal must have freely resided on the hunted property and the area to be hunted for six months, or longer . The animal must be part of a breeding herd that is resident on the hunted property . The operators of the hunted property must provide freely available and ample amounts of cover, food and water at all times . The hunted property must provide escape cover that allows the animals to elude hunters for extended periods of time and multiple occurrences . Escape cover, in the form of rugged terrain or topography, and/or dense thickets or stands of woods, shall collectively comprise at least 50% of the hunted property . The animal must exhibit its natural flight/survival instincts . No zoo animal, exhibited animal or tame animal may be considered for entry into the Record Book . Hunting methods employed cannot include driving, herding or chasing the animal to the hunter . SCI supports prevention, management and research of all wildlife diseases as it pertains to high-fenced and non-high- fenced hunting areas .
38 . Hybridization of game animals, or the interbreeding of two different species, can occur as a natural event or in a captive breeding environment when two compatible species share the same habitat . Hybridization as a natural event in nature does not occur on a wide scale basis . SCI believes that the creation of a hybrid is probably not in the best interest of either of the contributing species . Hybrids from many species have been created in captive breeding programs around the world, some to create a better venison
carcass for commercial meat sales, and some to create a larger animal of a certain species for animal hunting purposes . Most captive breeding programs have produced hybrids that will not pass as pure specimens of either of the contributing species such as Hybrid Sheep common in many U .S . states and South America; Hybrid Ibex, which is a cross between various Ibex species and/or various goats; and cross breeding among the various species of Sika Deer in several countries just to mention a few .
It is the intent of the Record Book Department to maintain categories of animals from around the world that are genetically pure to their species .Therefore, the only hybrid species that will be accepted into the Safari Club International Record Book of Big Game Animals are the Hybrid Sheep and Hybrid Ibex found in the North America Introduced and South America categories, and the Hybrid Red Deer, (a Red Deer and Maral Stag cross), which is a naturally occurring hybrid in Asia . Other mixed origin species such as common eland and common lechwe are accepted as Exotics from North America .
Sometimes an entry is received that is suspected of being a hybrid .An example would be a cross between a Red Deer and Elk, Elk and Sika Deer, or Red Deer and Sika Deer .After a thorough investigation of the entry, and the eventual inability to label it as genetically pure to a particular species, and at the discretion of the committee, this animal may be allowed into the Record Book, but only in the category of the larger of the two species . All other animals suspected of being hybrid will be rejected and the registration fee refunded .
39 . SCI opposes the captive-bred hunting of any species unless the hunting operator, or an association of hunting operators, can demonstrate that the hunting meets SCI’s fair chase standards . This statement is all inclusive for all Record Book species . Some species may require an affidavit to be filled out and signed for acceptance into our Record Books .
40 . The Record Book Committee understands that there are members who enjoy supporting and contributing to SCI’s anti-poaching and conservation efforts but wish to remain anonymous even when submitting their entries into the Record Book . Effective September 2017, SCI members will have the option to request for their Record Book entries to appear in the Record Book anonymously by using their Record Book Member ID in place of their name (the Record Book ID number is not an SCI membership number) . This option was created for those who wish to participate in the Record Book Program but do not want their name published in the Record Book . To inquire about making your Record Book entries anonymous or to obtain your Record Book Member ID, please contact the SCI Record Book Department at 520-620-1220 or email them at SCIRecordBook@safariclub .org .

SCI Measuring Manual 11
Method 1 For most animals with simple horns (including hartebeest) .
I . LENGTH OF HORN
Measure the length of each horn on its front surface . Follow the center of the front surface from the base of the horn to the tip, and keep parallel to the hairlike grain of the horn material . The front surface will always begin in front on the forehead, but in some horns its orientation will change as the horn twists and turns . The direction of the grain must be followed carefully for the full length of the measurement . In most species, the horns have rings, or cross-ridges, or knobs on the front surface, and the measurement should go across the tops of these protuberances where they are the largest, because that will be the center-line of the front surface . Keep the tape or cable tight; do not press it down into depressions .
Begin the measurement at the lowest place on the front surface of the horn, which will normally be in the center . If the lowest place is not in the center, it should be carded off . End the measurement at the horn tip . If the tip is broken so that its far end is not on the line of measurement, card it off in the same manner; do not measure across the flattened end of a broken horn tip .
The cable should always be used to measure the length of horns that have multiple or compound curves, such as those of hartebeest, impala and springbok .
With springbok, keep the measurement on the front surface at all times, following the direction of the grain . Do not make the common mistake of beginning on the front surface, then crossing the grain to finish on the outer curve (Fig .1) .
With hartebeest, the line of measurement may be difficult to trace because of how the horns turn and twist, and the front surface will not always face forward . It may be easiest to locate the correct line from the heavy tops of the rings at midlength, then follow the grain each way to the tip and the base . It may also help to mark the center-line of the horn with colored pencil or chalk before measuring (Fig 2) .
With bezoar ibex, the measurement follows the sharp keel of the horn, with the cable or tape pulled tightly across the high points, not pressed down into depressions (Fig . 3) .
When measuring the widely spread, sharply curved horns of Sudan bohor reedbuck , be careful to follow the direction of the grain . Keep the measurement on the front surface and over the largest part of the horn rings . This measurement will normally be on the inner curve of the horns (Fig . 4) .
(Fig . 1)
(Fig . 2)
(Fig . 3)
(Fig . 4)

12 SCI Measuring Manual
II . CIRCUMFERENCE OF HORN AT BASE (Fig .5)
Measure the circumference of each horn at the base, or as close to the base (or hairline) as possible, while holding the tape tightly in a continuous loop . Keep the tape above (toward the horn tip) any scallops or natural irregularities in the edge of the base so that the tape is on or above horn material, not bone, hair, or taxidermic material--at all times . This measurement should be at the same angle as the base of the horn; it need not be at a right angle . Keep the tape tight; do not press it down into depressions . Do not “walk” the tape around the edge of an irregularly shaped base .
In horns that have protruding rings, or knobs, or cross-ridges such as on ibex (Fig . 6) there may or may not be a knob at the base of the horn . This is because horns grow continuously from the base and produce new rings throughout the life of the animal, so that at different times there may be either a knob or a depression at the actual horn base . If there is a knob or ring at the exact base of the horn (or hairline), the circumference measurement should be taken there . If not, in order to be fair, the measurement should be taken around the knob or ring that is nearest to the horn base .
When measuring circumferences of very small horns such as those of four-horned antelope, duikers, dik-diks, and other pygmy antelopes, (Method 1-A) a more accurate measurement can often be obtained with a cloth or plastic sewing tape, or by wrapping a narrow piece of paper around the horn base and marking the points of intersection . This is an exception to the normal rule requiring a steel tape or cable (Fig . 7) .
III . TOTAL SCORE
Total all measurements . When measuring in inches, record fractions in 1/16ths of an inch for four-horned antelope, duikers, dik-diks and other pygmy antelopes . (Method 1-A) Record fractions in 1/8ths of an inch for all other animals . Record all metric measurements to 0 .1 cm .
With four-horned antelope or chousingha, (Method 1-A) measure all four horns . As the entry form has spaces for only two horns, the measurer should create spaces for the extra pair . Be sure to label the front and rear horns .
With reedbuck (all species): (Method 1-B)
(1) Measure only hard, black horn . The softer pulpy material at the base of the horns (which is incipient or green horn that can boil away) must not be included in the measurement .
(Fig . 5)
(Fig . 6)
(Fig . 8)
(Fig . 7)

SCI Measuring Manual 13
Method 2 For spiral-horned animals . Includes eland, bongo, kudu, nyala, sitatunga, bushbuck, addax, blackbuck, markhor,
racka sheep, Chiltan wild goat, and feral goat .
I . LENGTH OF HORN
Measure the length of each horn around its spiral twist, from the base to the tip . The spiral twist is always parallel to the hairlike grain of horn material . This measurement should be taken with a cable .
The horns of most species have one or more distinct spiral ridges, or keels . In most species, the ridge that begins on the forehead is the strongest and will be the obvious line of measurement . Begin at the base of the ridge and measure along its top until it flattens out near the tip of the horn . When the ridge is no longer visible, the spiral twisting will have ceased, and the measurement should then follow the grain of the horn directly to the tip .
In some species, the spiral ridge that begins on the forehead is rounded and less distinct, making it more difficult to follow . With these horns, the measurer should begin at the lowest point of the horn base on the forehead and carefully follow the grain of the horn around the spiral twist to the tip . The grain may be indistinct in places where the horn has been rubbed, but with care it can always be followed .
With addax and blackbuck, the measurement follows the center of the broad spiral ridge where the rings or cross ridges are heaviest . Instead of on the forehead, this measurement begins near the center of the skull where the horns are nearest each other, and very carefully follows the grain of the horn around the multiple spirals to the tip . This is a difficult measurement to take accurately and should be done several times to ensure correctness . It must be done with the cable . Most measurers find it helpful to mark the line of measurement in advance with colored pencil or chalk .
With markhor horns, measure the longer of the two spiral ridges . Usually – though not always – this will be the ridge that begins at the rear of the horn . The measurement follows the top of the ridge . Be sure to note on the entry form which ridge was measured (Fig . 2) .
measure the longerof the two ridges.
If a horn tip is broken so that its far end is not on the line of measurement, it should be carded off; do not measure across the flattened end of a broken horn tip .
II . CIRCUMFERENCE OF HORN AT BASE (Fig 3 .)
Measure the circumference of each horn at its base, or as close to the base (or hairline) as possible, while holding the tape tightly in a continuous loop . Keep the tape above (toward the horn tip) any scallops or natural irregularities in the edge of the base so that the tape is on or above horn material--not bone, hair, or taxidermic material--at all times . This measurement should be at the same angle as the base of the horn; therefore, it probably will not be at a right angle . Keep the tape tight; do not press it down into depressions or valleys . Do not “walk” the tape around the edge of an irregularly shaped base .
With eland and greater kudu, the circumferences are difficult to measure accurately because of the deep scalloping of the horn base and the valley created by the pronounced spiral ridge . Great care must be taken to keep the tape above the scallops, while at the same time maintaining the angle of the actual base and keeping the tape tight . The valley alongside the spiral ridge must be spanned with a tight tape; do not press the tape down into it . If possible, this measurement should be taken with the assistance of another person, because it really takes more than two hands .
III . TOTAL SCORE
Total all measurements . When measuring in inches, record fractions in 1/8ths of an inch . Record metric measurements to 0 .1 cm .
(Fig . 3)
(Fig . 2)

14 SCI Measuring Manual
Method 3 For most wild cattle . Includes gaur, gayal, banteng,
yak, water buffalo, tamaraw, anoa and bison .
With these animals, be careful to measure only hard, black horn that will not boil away . Do not measure green horn, gristle or skin . When measuring a mounted head, be careful not to measure fiberglass or other taxidermic material .
I . LENGTH OF HORN (Fig . 1)
Measure the length of each horn on its outer curve . Follow the most pronounced part of the outer curve from the base of the horn to the tip, and keep parallel to the hairlike grain of the horn material . Do not deviate from the direction of the grain; it must be followed carefully the full length of the horn .
Most species have round horns that grow out from the sides of the head and then upward and inward in a simple curve so that the line of measurement is obvious . Yak and kouprey horns are similar, except that the tips turn backward to form a multiple curve; with these horns the direction of the grain must be followed carefully and the cable should be used . It may be easiest to begin the measurement at the horn tip and follow the grain along the outer curve until the base is encountered . Another way is to locate the outer curve at midpoint, then follow the grain each way to the base and the tip . It may be helpful to mark the line of the measurement with a pencil or piece of chalk before starting .
Water buffalo have horns that are triangular in cross section and grow outward and backward in a simple curve . Here, the measurement is taken on the frontal edge of the horn, just under the intersection of the top and frontal surfaces . Please note that the length measurement is to be of the frontal edge only; it is not permissible to card off the angled base from its rear edge, which usually extends farther inward than the frontal edge . If the front corner of the horn base is broken, it is permissible to card it off and begin the measurement at the point where the cards intersect . If the horn tip is broken so that its far end is not on the line of measurement, it should also be carded off; do not measure across the flattened end of a broken horn tip (Fig . 2) .
II . CIRCUMFERENCE OF HORN AT BASE (Fig . 3)
Measure the circumference of each horn at its base, or as close to the base as possible while holding the tape tightly in a continuous loop and keeping it above any scallops or malformations . Keep the tape on or above hard, black horn material at all times--not on green horn, gristle, bone, or taxidermic material . The measurement should be at the same angle as the base of the horn; it need not be at a right angle . Do not press the tape down into indentations . Do not “walk” the tape around the edge of an irregularly shaped base .
III . TOTAL SCORE
Total all measurements . When measuring in inches, record fractions in 1/8ths of an inch . Record metric measurements to 0 .1 cm .
(Fig . 1)
(Fig . 2)
WATER BUFFALO

SCI Measuring Manual 15
Method 4 For African buffalo
Be careful to measure only hard, black horn that will not boil away . Do not measure green horn, hair, skin or bone . When measuring a mounted head, be careful not to measure fiberglass or other taxidermic material .
I . TIP-TO-TIP MEASUREMENT OF HORNS
Measure the combined lengths of both horns from tip to tip across the forehead . First, mark the lowest point on the bottom curve of each horn, using pencil or chalk . These are Points A (Fig . 1) . Next, hold a straightedge across the forward edges of both bosses and mark where the straightedge touches the bosses . These are Points B (Fig . 2) . (When measuring a mounted head, it may be necessary to bend the straightedge or press it down into the hair of the nose ridge in order to contact the bosses .)
Using the cable, begin the measurement at one horn tip and follow the hairlike grain of the horn around its outer curve to its lowest point (Point A) . Pivot the cable at Point A and measure the shortest distance along the underside of the horn to the forward edge of the boss (Point B), keeping the cable in contact with the horn while doing so . The line from Point A to Point B will be across the grain of the horn, not parallel to it . From Point B, bridge the forehead directly to Point B on the other horn . Keep the cable tight; do not press it down into the boss gap . In some mounted heads where the hair and skin extend above the plane of the bosses, it may be necessary to use calipers to measure across the forehead between the two Points B . Continue the measurement on the other horn, following the same line from Point B to Point A and on to the opposite horn tip where the measurement ends (Fig . 3) .
If a horn tip is broken so that its far point is not on the line of measurement, it should be carded off; do not measure across the flattened end of a broken horn tip .
II . WIDTH OF BOSS (Fig . 4)
Measure the surface width of each horn boss at its widest place . This measurement should be at approximately a right angle to the longitudinal axis of the horn . Once the widest place has been determined with calipers, the measurement will be of the top surface of the boss, plus the surfaces of the rear edge, plus the surface of any front edge that exists .
(Fig . 1)
(Fig . 3)
(Fig . 4
(Fig . 2)

16 SCI Measuring Manual
First, use a pair of calipers held at approximately a right angle to the longitudinal axis of each horn to locate the widest part of the boss as viewed from above . Use pencil or chalk to mark where the calipers touch the outside edges of the boss . These are Points C, which determine the path of the width measurement .
Next, hook the tape under the black horn material at the bottom of the rear edge of the boss and measure in a straight line up the rear edge and over the top of the boss through both Points C . In horns with thin bosses, the black horn sometimes ends at front Point C without forming a measurable front edge, in which case the measurement will end at front Point C . But in horns with thicker bosses, the measurement will go through front point C and continue down the front edge of the boss, finishing where the hard black horn ends at the bottom of the front edge . Be sure to measure only hard black horn . Do not measure soft “green” horn (which will boil away), or skull bone . Keep the tape tight; do not press it down into depressions .
III . TOTAL SCORE
Total all measurements . When measuring in inches, record fractions in 1/8ths of an inch . Record metric measurements to 0 .1 cm .
SUPPLEMENTAL INFORMATION
Measure the greatest outside spread of the horns in a straight line, using a tight tape at a right angle to the longitudinal axis of the skull . This will not count in the score, but may appear in the Record Book as supplemental information, as it is a traditional measurement for this species .
(Fig . 5)
SCI Measuring Manual 17
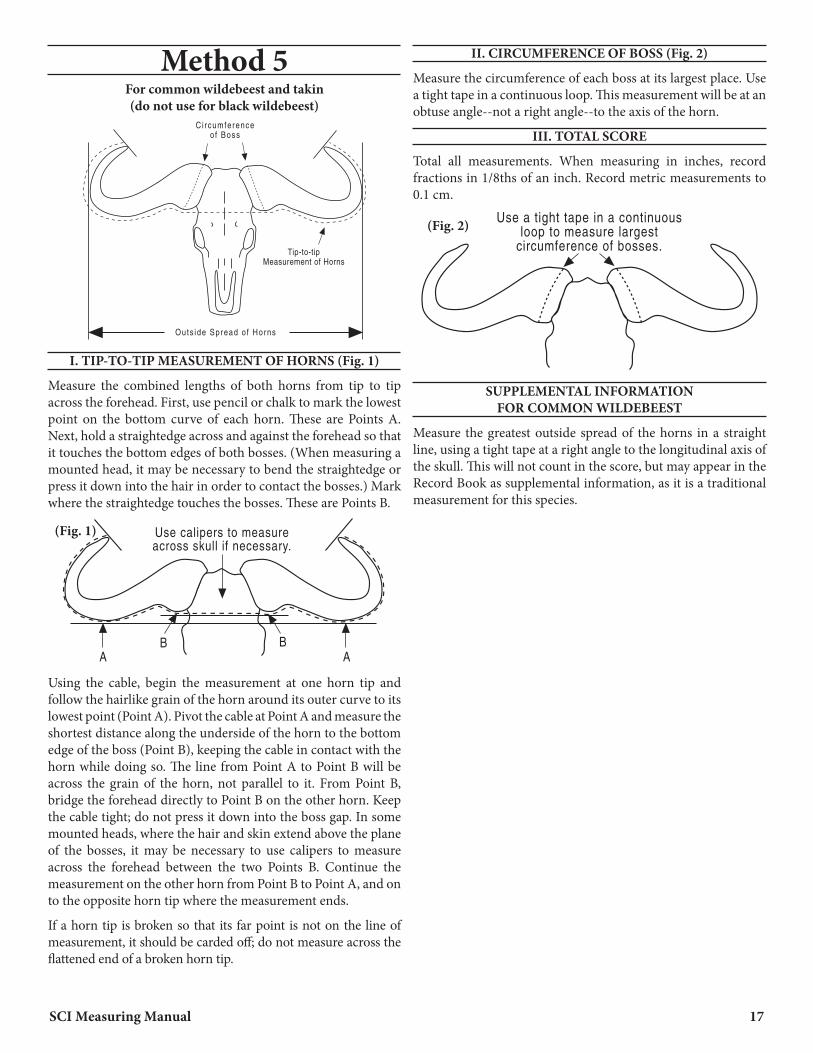
Method 5 For common wildebeest and takin (do not use for black wildebeest)
I . TIP-TO-TIP MEASUREMENT OF HORNS (Fig . 1)
Measure the combined lengths of both horns from tip to tip across the forehead . First, use pencil or chalk to mark the lowest point on the bottom curve of each horn . These are Points A . Next, hold a straightedge across and against the forehead so that it touches the bottom edges of both bosses . (When measuring a mounted head, it may be necessary to bend the straightedge or press it down into the hair in order to contact the bosses .) Mark where the straightedge touches the bosses . These are Points B .
Using the cable, begin the measurement at one horn tip and follow the hairlike grain of the horn around its outer curve to its lowest point (Point A) . Pivot the cable at Point A and measure the shortest distance along the underside of the horn to the bottom edge of the boss (Point B), keeping the cable in contact with the horn while doing so . The line from Point A to Point B will be across the grain of the horn, not parallel to it . From Point B, bridge the forehead directly to Point B on the other horn . Keep the cable tight; do not press it down into the boss gap . In some mounted heads, where the hair and skin extend above the plane of the bosses, it may be necessary to use calipers to measure across the forehead between the two Points B . Continue the measurement on the other horn from Point B to Point A, and on to the opposite horn tip where the measurement ends .
If a horn tip is broken so that its far point is not on the line of measurement, it should be carded off; do not measure across the flattened end of a broken horn tip .
II . CIRCUMFERENCE OF BOSS (Fig . 2)
Measure the circumference of each boss at its largest place . Use a tight tape in a continuous loop . This measurement will be at an obtuse angle--not a right angle--to the axis of the horn .
III . TOTAL SCORE
Total all measurements . When measuring in inches, record fractions in 1/8ths of an inch . Record metric measurements to 0 .1 cm .
SUPPLEMENTAL INFORMATION FOR COMMON WILDEBEEST
Measure the greatest outside spread of the horns in a straight line, using a tight tape at a right angle to the longitudinal axis of the skull . This will not count in the score, but may appear in the Record Book as supplemental information, as it is a traditional measurement for this species .
(Fig . 2)
(Fig . 1)

18 SCI Measuring Manual
Method 6 For black wildebeest (do not use for common wildebeest)
Be careful to measure only hard, black horn . Do not measure bone, skin, hair or taxidermic material .
I . TIP-TO-TIP MEASUREMENT OF HORNS (Fig . 1)
Measure the combined lengths of both horns from tip to tip, going under the bottom curves and across the tops of the bosses . First, mark the lowest point on the bottom curve of each horn, using pencil or chalk . These are Points A . Next, hold a straightedge across the tops of both bosses and mark where it touches the bosses . These are Points B .
Using the cable, begin the measurement at one horn tip and follow the hairlike grain of the horn around its outer curve to its lowest place (Point A) . Hold the cable at Point A and continue to follow the grain of the horn around the outer curve as long as the grain follows a straight line that points toward the top of the boss . When the grain begins to curve inward toward the skull, leave it and measure directly to the top of the boss (Point B) . This part of the measurement will be on the back side of the horn and will be across the grain of the horn, not parallel to it . From Point B, bridge the boss gap directly to Point B on the other horn . Keep the cable tight; do not press it down into the boss gap . Continue the measurement on the other horn, following the same line from Point B to Point A and on the opposite horn tip where the measurement ends .
If a horn tip is broken so that its far point is not on the line of measurement, it should be carded off; do not measure across the flattened end of a broken horn tip .
II . WIDTH OF BOSS (Fig . 2)
Measure the surface width of each boss at its widest place . (In black wildebeest, the horn boss faces forward, so the wide part of the boss is called the front surface .) This measurement will usually be at somewhat of an angle to the center-line of the skull (the angle will vary with individual horns) . Once the widest place has been determined with calipers, the measurement will be of the front surface of the boss, plus the back side of the rounded top of the boss, plus the surface of any bottom edge that may exist .
First, use a pair of calipers to locate the widest part of each boss as viewed from the front . The widest place will be from the rounded top of the boss (normally at the same place as Point B in Instruction I) down to the bottom edge of the boss just before it changes to rounded horn . Use pencil or chalk to mark where the calipers touch . These are Points C, which will determine the path of the width measurement . Be sure that the lower Point C is on the actual boss, not on rounded horn .
Next, hook the tape under the black horn material at the rear of the boss and measure in a straight line up and over the rounded top of the boss through upper Point C and down the front surface to lower Point C, as this normally is where the black horn ends at the bottom of the boss without forming a measurable edge . However, a few heads may exhibit a narrow edge of black horn turning inward (toward the skull) beyond lower Point C; if such an edge occurs it should be included in this measurement . Keep the tape tight; do not press it down into depressions . Do not measure the circumference of the boss .
III . TOTAL SCORE
Total all measurements . When measuring in inches, record fractions in 1/8ths of an inch . Record metric measurements to 0 .1 cm .
CROSS-SECTION OF HORN SHOWING BOSS MEASUREMENT
(Fig . 1)
(Fig . 2)

SCI Measuring Manual 19
METHOD 7 For muskox
Be careful to measure only hard, black horn . Do not measure bone, skin, hair or taxidermic material .
I . TIP-TO-TIP MEASUREMENT OF HORNS
Measure the combined lengths of both horns from tip to tip across the tops of the bosses . Before beginning the measurement, hold a straightedge across the tops of both bosses at their center and mark where it touches the bosses, using pencil or chalk . These are Points A; the length measurement will be taken through these points
Using the cable, begin the measurement at one horn tip and follow the center of the top surface of the horn to the top of the boss (Point A) . Keep parallel to the grain of the horn, which is very pronounced and easy to follow . (Some measurers prefer to begin at Point A and follow the grain to the horn tip .) From Point A, bridge the boss gap directly to Point A on the other horn . Keep the cable tight; do not push it down into the boss gap . Continue the measurement on the other horn, following the grain to the opposite horn tip where the measurement ends .
If a horn tip is broken so that its far point is not on the line of measurement, it should be carded off; do not measure across the flattened end of a broken horn tip .
II . WIDTH OF BOSS
Measure the surface width of each horn boss at its widest place . (The wide part of a muskox horn boss is called the top surface, although it actually has about a 45 degree angle .) This measurement should be at approximately a right angle to the longitudinal axis of the horn . Once the widest place has been determined with calipers, the measurement will be of the top surface of the boss, plus the surface of its rear edge, plus the surface of any front edge that may exist .
First, use a pair of calipers held at approximately a right angle to the longitudinal axis of the horn to locate the widest part of each boss as viewed from the above . Use pencil or chalk to mark where the calipers touch the outside edges of the boss . These are Points B, which will determine the path of the width measurement .
Next, hook the tape under the horn at the bottom of the rear edge of the boss, and measure in a straight line up the rear edge and over the top of the boss through both Points B . The measurement usually ends at front Point B, as this is normally where the horn ends at the front of the boss without forming a measureable edge . However, a few heads may exhibit a narrow edge of horn turning downward (toward the skull) beyond front Point B; if such an edge occurs it should be included in the measurement . Be careful to measure horn material only; do not confuse horn material with skull bone, which has a rather similar coloration . Keep the tape tight; do not press it down into depressions .
III . TOTAL SCORE
Total all measurements . When measuring in inches, record fractions in 1/8ths of an inch . Record metric measurements to 0 .1 cm .

20 SCI Measuring Manual
Method 8 For rhinoceros
All rhinoceros horns (except from darted specimens), whether in the overall Top 20 or not, must be measured 60 days or more after date of harvest in order to be accepted . This is because rhinoceros horns shrink so much while drying that it would be meaningless to combine green and dry measurements in the same list .
Be careful to measure only actual horn when measuring a mounted head, not fiberglass or other taxidermic material . Some mounted heads contain plastic reproductions of the horns, with the actual horns kept elsewhere or disposed of . Measurements of plastic reproductions will not be accepted .
Please note: Green measurements are accepted for horns of darted black rhinos and southern white rhinos in Africa but will not qualify for Top 20 ranking overall . Darted animals can be submitted as Record Book entries and will appear in a darted category . These are animals that have been tranquilized and revived unharmed as part of a scientific program or study . Of necessity, the horns are measured on the animal in the field by the guide, biologist or government official; therefore, it will not be possible to have certified measurements .
I . LENGTH OF HORN (Fig . 1)
Measure the length of each horn on its front surface . Follow the center of the front surface from the base of the horn to the tip, and keep parallel to the hairlike grain of the horn material . If the horn tip is broken so that its far end is not on the line of measurement, it should be carded off; do not measure across the flattened end of a broken horn tip .
II . CIRCUMFERENCE OF HORN AT BASE (Fig . 2)
Measure the circumference of each horn at the base, or as close to the base as possible while holding the tape tightly in a continuous loop . Keep the tape on actual horn material--not gristle, skin or taxidermic material--at all times . Do not “walk” the tape around the irregularly shaped edge of the base . This measurement need not be at a right angle to the axis of the horn .
III . TOTAL SCORE
Total all measurements . When measuring in inches, record fractions in 1/8ths of an inch . Record metric measurements to 0 .1 cm .
(Fig . 1)
(Fig . 2)

SCI Measuring Manual 21
Method 9 For multi-horned sheep
I . LENGTH OF HORN
Measure the length of each horn on its longest surface, from the base to the tip . If a horn tip is broken so that its far end is not on the line of measurement, it should be carded off; do not measure across the flattened end of a broken tip . For a horn to count, it must have a distinct base off the skull and cannot split from another horn .
II . CIRCUMFERENCE OF HORN AT BASE
Measure the circumference of each horn at the base, or as close to the base (or hairline) as possible while holding the tape tightly in a continuous loop and keeping it above any scallops or malformations . The measurement should be at the same angle as the base of the horn; it need not be at a right angle .
III . TOTAL SCORE
Total all measurements . When measuring in inches, record fractions in 1/8ths of an inch . Record metric measurements to 0 .1 cm .

22 SCI Measuring Manual
Method 10 For pronghorn antelope
I . LENGTH OF HORN
Measure the length of each horn on its outer surface . Follow the center of the outer surface from the base of the horn to the tip, and keep parallel to the hairlike grain of the horn material . Do not deviate from the direction of the grain; it must be followed the full length of the measurement .
Begin the measurement at the lowest place on the outer surface of the horn . As the edge of the horn base is characteristically jagged, its lowest point may not be on the line of measurement . If not, it should be carded off . Do not card off from the base of the inner surface of the horn, even though it may extend lower than the base of the outer surface .
End the measurement at the horn tip . If the tip is broken so that its far point is not on the line of measurement, card it off in the same manner; do not measure across the flattened end of a broken horn tip .
II . CIRCUMFERENCE OF HORN AT BASE
Measure the circumference of each horn at its base . Use a tight tape in a continuous loop at a right angle to the axis of the horn . Keep the tape above the jagged edge of the base and entirely on horn material--not on bone, hair or taxidermic material, or across air space .
III . CIRCUMFERENCE OF HORN AT QUARTERS
Measure the circumferences of each horn at 1/4, 1/2 and 3/4 the distance from the base to the tip, based on the length of the longer horn . First, divide the length of the longer horn (Measurement
I) by four . (Quarter-length tables are provided in the measuring kit .) Then, beginning at the base, mark both horns with pencil at these same distances--the shorter horn must be marked at the same distances from its base as the longer horn . Measure the circumference of each horn at these three marks, using a tight tape in a continuous loop at a right angle to the axis of the horn . (Note: If the shorter horn is broken off very short, the third quarter mark may occur beyond the broken end, making Measurement C-3 impossible to obtain .)
In some unusual heads with exceptionally high prongs, the prong may be in the way of the C-2 measurement . If so, the measurer should include the prong in the C-2 measurement; however, the measurement that is recorded for C-2 must not exceed (though it may equal) the greater of Measurements II (base circumference) or C-1 (1st quarter circumference) . Details must be noted on the entry form .
Record each circumference on the proper line . Circumferences are numbered in sequence, C-1, C-2 and C-3 .
IV . LENGTH OF PRONG
This measurement is taken from the tip of the prong around to the rear edge of the horn . Begin at the tip of the prong and follow the gentle ridge on its outer surface near its upper edge until the prong joins the main horn . Mark this point with a pencil, then pivot the tape until it forms a right angle to the axis of the main horn, and continue measuring around the horn to the midpoint of its rear edge, where the measurement ends .
If the tip of the prong is broken so that its far point is not on the line of measurement, card it off in the same manner as the horn tip or base . Do not measure across the flattened end of a broken prong .
V . TOTAL SCORE
Total all measurements . When measuring in inches, record fractions in 1/8ths of an inch . Record metric measurements to 0 .1 cm .
Please Note: Pronghorns often have protuberances on their horns, but usually they are too small to increase any measurement . In case of a large protuberance, either (1) move the tape very slightly to avoid it, or (2) measure up to one side of it, add its calipered thickness, then continue the measurement from its other side .
SUPPLEMENTAL INFORMATION
In certain pronghorn populations, a few individuals may grow a secondary pair of small, simple horns . Measurers are requested to record on the entry form the lengths and base circumferences of any secondary horns as supplemental information .

SCI Measuring Manual 23
Method 11 For wild sheep, aoudad and tur
I . LENGTH OF HORN (Fig . 1)
Measure the length of each horn on its outer curve . With most sheep, the line of measurement is on the front surface of the horn fairly close to the frontal-orbital edge (or ridge), which is the one that begins on the forehead . Measure from the lowest point at the base of the horn to the tip, following the hairlike grain of the horn material .
Do not deviate from the direction of the grain; it must be followed carefully the full length of the measurement . Keep the cable or tape tight; do not press it down into depressions .
With Cyprian mouflon, Armenian mouflon, blue sheep, aoudad, east Caucasian tur and many *mid-Caucasian tur, the measurement differs from that of most sheep in that it incorporates the “three inch rule” (Fig . 2) at the beginning, then pivots and follows the frontal-nuchal edge (or ridge) of the horn to the tip . (The frontal-nuchal edge does not begin on the forehead, but near the center of the skull where the horns are nearest each other .) To locate the pivot point, measure three inches
(7 .62 cm) from the base of the frontal-nuchal edge toward the tip, and mark this point with a pencil . The actual measurement then
begins at the lowest point of the horn base on the forehead and goes in a direct line to the pivot point (pencil mark), crossing the grain of the horn enroute, then pivots and follows the frontal-nuchal edge to the horn tip . Keep the cable or tape tight; do not press it down into depressions . The three-inch rule was adopted in 1987 . Before then, our instructions were not specific enough for these rather confusing horns, and different measurers were interpreting them differently . The purpose of the three-inch rule is to ensure that all these horns will be measured the same way .
If the horn tip is broken so that its far end is not on the line of measurement, it should be carded off; do not measure across the flattened end of a broken horn tip .
*Mid-Caucasian tur are intermediate between east Caucasian tur (which have horns like a blue sheep) and west Caucasian tur (which have horns like an ibex) . All tur with horns like a blue sheep should be measured by the three-inch rule .
II . CIRCUMFERENCE OF HORN AT BASE (Fig . 3)
Measure the circumference of each horn at its base, or as close to the base (or hairline) as possible while holding the tape tightly in a continuous loop and keeping it above any scallops or malformations . Keep the tape on horn material at all times--not on bone or hair, or across air space . The measurement should be at the same angle as the base of the horn; it need not be at a right angle . Do not press the tape down into depressions . Do not “walk” the tape around the edge of an irregularly shaped base .
West Caucasian tur horns (Fig . 4) have protruding rings or cross--ridges like an ibex, however, there may or may not be a ring at the base of the horn . This is because horns grow continuously from the base and produce new rings throughout the life of the animal, so that at different times there may be either a protruding ring or a depression at the actual horn base . If there is a protruding ring at the exact base of the horn, take the circumference measurement around it . If not, in order to be fair, take the measurement around the ring that is nearest to the horn base .
(Fig . 4)
(Fig . 3) (Fig . 1)
(Fig . 2)

24 SCI Measuring Manual
III . CIRCUMFERENCE OF HORN AT QUARTERS (Fig . 5)
Measure the circumferences of each horn at 1/4, 1/2 and 3/4 the distance from the base to the tip, based on the length of the longer horn . First, divide the length of the longer horn (Measurement I) by four . (Quarter-length tables are provided in the measuring kit .) Then, beginning at the base, mark both horns with pencil at these same distances--the shorter horn must be marked at the same distances from its base as the longer horn . (It may be helpful to put pieces of masking tape at the points where the quarter measurements will occur, and put the pencil marks on the tape for easier viewing .) Measure the circumference of each horn at these three marks, using a tight tape in a continuous loop at a right angle to the axis of the horn . (Note: If the shorter horn is broken off very short, the third quarter mark may fall beyond its broken end, making Measurement C-3 impossible to obtain .)
Should a growth ring or other depression occur at one of the quarters, it is permissible to avoid it by taking the measurement further toward the horn tip (but not toward the base) . With west Caucasian tur horns, which have protruding rings or cross-ridges like on those of an ibex, if a quarter does not occur at a protruding ring, it is permissible to take the measurement around the nearest ring toward the horn tip (but not toward the base) .
Record each circumference on the proper line . Circumferences are numbered in sequence, C-1, C-2 and C-3 .
IV . TOTAL SCORE
Total all measurements . When measuring in inches, record fractions in 1/8ths of an inch . Record metric measurements to 0 .1 cm .
(Fig . 5)

SCI Measuring Manual 25
Method 12 For hippopotamus, pigs, water deer and musk deer
Effective June 1, 2014 all feral boar will be required to have their upper and lower tusks to be accepted into the SCI Record Book of Big Game Animals . It is at the discretion of the sub-chair whether or not species submitted moving forward will be accepted into the Record Book and additional photos may be required . If not approved by the sub-chair, feral boar entries will automatically be converted into photo entries .
With hippopotamus, wild boar, bushpig, red river hog and most Asian pigs, measure the two lower tusks . With warthog, giant forest hog, water deer and musk deer, measure the two upper tusks . With babirusa, measure all four tusks . When the base of a tusk is filled with plaster or other taxidermic material, be careful to measure only
he actual tusk; do not measure taxidermic material . When a tusk cannot be removed from a mounted head, record only what is measurable . Do not record “estimated” tusk material that is inside the head and cannot be measured .
Special note:• If Feral Boar have four independent tusks emerging from the lower jaw, all four tusks will be measured and recorded in the Method 12 NT box .
I . LENGTH OF TUSK
Measure the length of each tusk on its outer curve, from the farthest point on the base to the tip . Because the base, or root end, of the tusk is characteristically jagged, its farthest point may not be on the line of measurement . If it is not, it should be carded off . If the tip of the tusk is broken, card it off in the same manner; do not measure across the flattened end of a broken tusk .
II . CIRCUMFERENCE OF TUSK AT LARGEST PLACE
Measure the circumference of each tusk at its largest place, which normally will be near the gumline . Use a tight tape at a right angle to the axis of the tusk .
When measuring circumferences of very small tusks such as water deer, a more accurate measurement can often be obtained with a cloth or plastic sewing tape, or by wrapping a narrow piece of paper around the tusk and marking the points of intersection . This is an exception to the normal rule requiring a steel tape or cable . (Fig . 1)
III . TOTAL SCORE
Total all measurements . When measuring in inches, record fractions in 1/16ths of an inch . Record metric measurements to 0 .1 cm .
This is a 1993 change from previous instructions to record fractions in 1/8ths . All tusk measurements in previous editions should be remeasured and resubmitted on a new Method 12 entry form (no charge) . The remeasurement box should be checked, the former score and entry number filled in if known .
(Fig . 1)

26 SCI Measuring Manual
Method 13 For walrus
I . LENGTH OF TUSK
Measure the length of each tusk on its outer curve, from the farthest point on the base to the tip . As the base, or root end, of the tusk is characteristically jagged, its far point may not be on the line of measurement . If it is not, it should be carded off . If the tip of the tusk is broken, card it off in the same manner; do not measure across the flattened end of a broken tusk .
II . CIRCUMFERENCE OF TUSK AT BASE
Measure the circumference of each tusk at its base . Use a tight tape in a continuous loop at a right angle to the axis of the tusk . Keep the tape above the jagged edges of the base .
III . CIRCUMFERENCE OF TUSK AT QUARTERS
Measure the circumferences of each tusk at 1/4, 1/2, and 3/4 the distance from the base to the tip, based on the length of the longer tusk . First, divide the length of the longer tusk (Measurement I) by four . (Quarter-length tables are provided in the measuring kit .) Then, beginning at the base, mark both tusks with pencil at these same places--the shorter tusk must be marked the same distances from its base as the longer tusk . Measure the circumference of each tusk at these three marks, using a tight tape in a continuous loop at a right angle to the axis of the tusk . (Note: If the shorter tusk is broken off very short, the third quarter mark may fall beyond its broken end, making Measurement C-3 impossible to obtain .)
Record each circumference on the proper line . Circumferences are numbered in sequence, C-1, C-2 and C-3 .
IV . TOTAL SCORE
Total all measurements . When measuring in inches, record fractions in 1/8ths of an inch . Record metric measurements to 0 .1 cm .
SUPPLEMENTAL INFORMATION
If possible, measure the length and circumference of each tusk . Measure the length over the outer curve of the tusk, carding off the jagged root end if necessary . Measure the circumference at the largest place, which is normally near the gumline, at a right angle to the longitudinal axis of the tusk . Record U .S . system supplemental measurements in inches to the nearest 1/8th inch, metric measurements in centimeters to the nearest 0 .1 cm . These measurements will not count in the score, but may appear in the Record Book as supplemental information .

SCI Measuring Manual 27
Method 14For Elephant
I . WEIGHT OF TUSK
Weigh each tusk to the nearest 1/2 pound, or to the nearest 0 .1 kg (100 grams) .
Weights may be taken on any accurate weighing device or scale (either balance or spring) . Be sure to weigh only actual tusk material, which means that only loose tusks may be weighed . Do not weigh tusks that are mounted in pedestals, or with base ends that contain plaster or other taxidermic material . As a practical necessity, tusks that can no longer be weighed may be accepted for the Record Book by using the weights shown on the export documents of the country of origin . The measurer must judge whether those weights seem reasonable for the tusks at hand, and should reject them if they do not . It will not be possible to have certified weights for such tusks .
All elephant tusks, whether in the Top 20 or not, may be measured green and no longer require the 60-day dry measurement to be certified into the record book . This change was made because SCI accepts Customs documents that include the certified weight of the tusks as a reference when we are unable to weigh the tusks due to import or taxidermy alterations .
II . TOTAL SCORE
Total the weights . Weights in pounds are to be recorded to the nearest 1/2 pound, metric weights to the nearest 0 .1 kg .
SUPPLEMENTAL INFORMATION
If possible, measure the length and circumference of each tusk . Measure the length over the outer curve of the tusk, carding off the jagged root end if necessary . Measure the circumference at the largest place, which is normally near the gumline, at a right angle to the longitudinal axis of the tusk . Record U .S . system supplemental measurements in inches to the nearest 1/8th inch, metric measurements in centimeters to the nearest 0 .1 cm . These measurements will not count in the score, but may appear in the Record Book as supplemental information .
Method 15 For carnivores, peccaries and water chevrotain
I . LENGTH OF SKULL
Measure the length of the skull parallel to its longitudinal axis . This measurement may include the lower jaw and normal teeth, if that will increase the measurement .
II . WIDTH OF SKULL
Measure the width of the skull at a right angle to its longitudinal axis . This measurement is taken across the zygomatic arches, or cheek bones .
III . TOTAL SCORE
Total the measurements . When measuring in inches, record fractions in 1/16ths of an inch . Metric measurements are recorded to 0 .1 cm .
Damaged skulls: Only existing skull material may be measured . Missing skull material must not be estimated or allowed for . Details of any skull damage should be noted on the entry form .
Repaired skulls: Only original skull material from the same animal may be measured, either in its original state, or acceptably put back together so as not to increase any measurement . Any other material, either natural or taxidermic, that has been added to the skull is not to be measured . Details of skull repair must be noted on the entry form, and photographs clearly showing the repair will be required . The Record Book Committee reserves the right to require a repaired animal to be submitted for inspection .

28 SCI Measuring Manual
Method 16-C For crocodilians
I .LENGTH OF BODY INCLUDING TAIL
Measure the body length from the tip of the nose to the tip of the tail . The measurement should be taken “over the curves” along the center of the back . Keep the tape or cable in contact with the skin as much as possible, but keep it tight and do not push it down into depressions . Card off the nose and tail at a right angle to the body length .
This is a field measurement taken before skinning . Note: This field measurement must be taken with the crocodile and/or alligator flat on the ground lying on its belly and must not be taken while hanging . A field measurement taken when hanging may be asked to be remeasured and/or may not be accepted by the SCI Record Book Committee . If an SCI measurer is not available, the measurement may be taken by the guide . It will not be possible to have certified measurements for these animals .
Measurements of full body mounts will also be accepted, as there has proven to be little or no stretching of the skin in such cases .
The total score is the body length in feet and inches to the nearest 1/2 inch, or in centimeters to the nearest full cm .
SCI Record Book policy states that only the method of take used to kill the animal should be recorded on the entry . If a firearm is used in conjunction with an alternative method, the “rifle” category should be selected . For example, when taking alligator with an alternative method, if a firearm or bang stick is used to deliver the coup de gras, the method of take will be certified as a rifle entry .
Method 16-D For darted carnivores (jaguar, cougar, mountain lion)
This new method was adopted in 1997 for carnivores that have been darted (tranquilized and revived) as part of a conservation program or study by a government or other institution .
Of necessity, these are field measurements that may be taken by the guide, biologist or government official . A cloth sewing tape is recommended for the circumference measurements, because it is less likely to harm the animal .
I . LENGTH OF BODY INCLUDING TAIL (BETWEEN PEGS)
Measure the body length from the tip of the nose to the last bone in the tail . Take this measurement in a straight line “between pegs .” Use a tight tape; do not allow it to sag .
II . CIRCUMFERENCE OF CHEST
Measure the circumference of the chest at the thorax, which is the largest place (do not measure around the belly of a pregnant female) . Measure at a right angle to the body length .
III . CIRCUMFERENCE OF HEAD
Measure the circumference of the head from top to bottom . Measure at the largest place, which will be in front of the ears, going over the zygomatic arches and jawbones .
IV .TOTAL SCORE
Total all measurements . When measuring in inches, record fractions in 1/8ths of an inch . Record metric measurements to 0 .1 cm .
SUPPLEMENTAL INFORMATION
Record the weight of the animal, if known .

SCI Measuring Manual 29
General Instructions for Antlered Game Entries
Most deer antlers are much more complex and difficult to measure than other animals . The following paragraphs should be read carefully before measuring deer antlers .
I . MEASURING LENGTH OF MAIN BEAM (Fig . 1)
1 . In all antlered deer (except palmated moose), the main antler beams are measured from the bottom edge of the burr (or coronet) to the tip . The measurement follows the center of the antlers outer curve and is essentially parallel to the longitudinal blood grooves . The center of the outer curve is easiest to locate at midlength, especially after the tines have been marked off from the beam with a pencil line . Many measurers then prefer to begin at the beam tip and follow the grooves around the outer curve to the burr; however, this measurement can be taken in either direction . Begin (or end) the measurement where the center-line of the outer curve intersects the base of the burr . This will be on the side of the head and behind the eye, not in front on the forehead . Do not press the cable into the corner where the antler beam meets the burr . (Fig . 2) Always use the cable for this measurement .
II . POINTS AND TINES, VALID OR NOT? (Fig . 3)
2 . The “points” on a deer antler consist of the beam tip plus the valid tines . The beam tips are the tips of the main antler beams . The tines are the secondary points--the branches that grow from the main beams, or from other tines (parent tines), or from the palms in certain species . Thus, a tine is always a point, but a point is not always a tine (it may be the beam tip) .
To be valid, a point or tine must meet certain conditions . The beam tip is always a valid point because it is part of the main beam,
and the main beam is always considered a valid point . Other projections may or may not qualify as valid tines, depending on their length and relative width (see Deer Instruction 3) .
III . DETERMINING WHAT IS A VALID TINE (Fig . 4)
3 . To qualify as a valid tine on any deer antler except caribou/reindeer (Method 23), fallow deer (Method 24), muntjac and brocket deer (Method 26), a projection must be at least one inch long (U .S . system), or 2 .5cm long (metric system), and no wider than its length . On antlers of caribou/ reindeer, fallow deer, muntjac and brocket deer, a valid tine must be at least 1/2 inch long (U .S .) or 1 .3 cm long (metric), and no wider than its length . The width of a tine means its projected or calipered width–not the width over its rounded surface .
When determining whether a projection qualifies as a valid tine, its length and width must be measured at the same place . However, for this purpose the place of measurement does not need to be at the actual base of the projection, but may be anywhere along its length that is at least one inch from the tip (1/2 inch in caribou, fallow deer, muntjac and brocket deer) and where the length equals or exceeds the width at that place . Starting at the tip of the projection measure down one inch (1/2 inch in caribou, fallow deer, muntjac and brocket deer) If the
(Fig . 1)
(Fig . 2)
(Fig . 3)
ELK
WHITE-TAILED DEER
(Fig . 4)

30 SCI Measuring Manual
length equals or exceeds the calipered width anywhere from this point to the base, then the entire projection qualifies as a valid tine (see illustration) . Once the measurer is satisfied that a tine is valid, its entire length from tip to base should be measured and recorded .
IV . DEER ANTLERS: TYPICAL AND NON-TYPICAL (Fig . 5, 6 & 7)
4 . SCI has separate categories for typical and non-typical antlers of certain deer species (see Methods 17, 18, 19, 21 and 26) . To be considered typical, the antler beams and tines must grow in the typical manner and location, and they must form the typical pattern for that species . In each of these species, the length of each typical tine has a specific identification number: T-1, T-2, T-3, etc ., and its length measurement must be shown on the proper line on the entry form . Any typical tines that are missing are to be identified by a zero or a dash .
Any non-typical tines–those that do not grow in the typical manner and location for that species– are numbered in sequence from the base of each antler: NT-1, NT-2, NT-3, etc ., and their length measurements must be shown on the proper line on the entry form .
As of 2006, SCI allows the owner to choose whether deer antlers measured by Methods 17, 18, 19, or 21 are listed as typical or non-typical . If antlers measured by these methods have one or more non-typical tines whose total lengths equal 3% or more of the typical score, the antlers may be recorded as non-typical if the owner chooses . For example, a white-tailed deer head with a typical score of 150, and 4 4/8 inches (3%) or more of non-typical tine length, may be considered non-typical with a score of 154 4/8 .
However, as of 2014, If antlers measured on Methods 17,18, 19, or 21 and their total non-typical tine length exceeds 15% of the typical score, then they must be entered as non-typical and cannot be placed in the typical category . For example, a white-tailed deer, that scores 250 0/8, that has more than 37 4/8 inches of non-typical tine length, must be classified in the non-typical category . If this same deer has less than or up to 37 4/8 inches of non-typical tine length, then it may be recorded as typical and the non-typical tines will be disregarded from the score . If antlers measured by methods 17, 18, 19, or 21 have one or more non-typical tines whose total lengths amount to less than 3% of the typical score, the antlers will be recorded as typical . For example, a white-tailed deer head with a typical score of 150, and less than 4 4/8 inches (under 3%) of non-typical tine length, will be considered typical with the score of 150, and the non-typical tine (s) will be recorded only as supplemental information; they do not count in the score, but also don’t count against it .
As of May 2016, SCI requires all existing non-typical tines to be recorded as supplemental information on any entry being submitted for the typical category . All scorable points on a typical or non-typical animal must be scored and entered on the entry form . Any typical entry form submitted without the existing non-typical tines measured will be declined and a re-measurement will be requested .
The 2006 rule change for Methods 17,18, 19, or 21 does not apply to Method 26 . Of antlers measured by Method 26, both muntjac and brocket deer will occasionally grow non-typical tines . Such heads are usually measured as non-typical; however they may be measured as typical at the owner’s request, but only the typical tines will count in the score .
V . MEASURING A TINE THAT GROWS FROM THE MAIN BEAM (Fig . 8)
5 . A tine is always measured from the side of the antler beam . It is never correct to measure a tine from the top of an antler beam because the gradual curve between the beam and the
WHITE-TAILEDDEER WITH TYPICAL
ANTLERS
WHITE-TAILEDDEER WITH
NON-TYPICAL ANTLERS
MULEDEER WITH
TYPICAL ANDNON-TYPICAL
ANTLERSWHITE-TAILED
DEER
(Fig . 6)
(Fig . 7)
(Fig . 5)
(Fig . 8)

SCI Measuring Manual 31
tine makes it difficult to determine the correct location of the tine base and is likely to give an incorrect tine length measurement . A tine should be measured on its outer curve, which will be its longest surface . Most tines curve inward toward the center of the antlers so that their outer curve rises from the outside of the main beam; these tines should be measured from the outside of the beam . Some tines, however, curve outward, and they should be measured from the inside of the main beam . If a tine has no distinct outer curve, or if it is S-shaped, measure both sides and record the longer one . Sometimes a tine (usually a brow tine) will curve in line with the antler beam . Such a tine should be treated as an exception to the rule and not measured on its outer curve, for that would mean measuring it from the top of the antler beam, which is incorrect . Instead, it should be measured on its longest surface that rises from a side of the antler beam .
A tine is measured from its base to its tip, therefore it is important to determine the exact location of the base (Fig . 9) . To do this correctly, the tine should be marked off (or “dissected”) from the side of the antler beam with a pencil line . Lay the cable or tape along the top of the antler beam and across the base of the tine to show how the beam would look if the tine did not exist . Draw a pencil line along the bottom edge of the cable or tape from one side of the tine to the other (Fig . 10) . Put a mark at the center of this baseline and measure from the mark to the tip of the tine, following the center of the tine’s surface . If the surface of the tine is at all crooked, a more accurate measurement will be obtained with the cable .
VI . MEASURING A TINE THAT GROWS FROM ANOTHER TINE (Fig . 11)
6 . Such a tine should be marked off from its parent tine and measured in the same way as a tine that grows from an antler beam (see Deer Instruction 5) . Be sure to measure from the side of the parent tine, not from the top edge of the tine .
VII . MEASURING A TINE THAT GROWS FROM A PALM (Fig . 12 & 13)
7 . This instruction applies to caribou/reindeer, fallow deer and moose . In these species, a tine that grows from the edge of a palm should be marked off from the palm edge and measured in the same way as a tine that grows from the main beam or from another tine (see Deer Instructions 5 and 6) . Be sure to measure from the side of the palm, not from the top edge of the palm .
MULE DEER
FALLOW DEER
MOOSE
(Fig . 9)
(Fig . 12)
(Fig . 11)
(Fig . 13)
(Fig . 10)

32 SCI Measuring Manual
Sometimes a tine will grow from the surface of a palm . Such a tine should be measured on its longest surface where the base of that surface can be located accurately . Lay the cable or tape along the surface of the palm to show how it would appear if the tine did not exist . Draw a pencil line along the lower edge of the cable or tape from one side of the tine to the other, then put a mark at the center of this baseline . Measure from this mark to the tip of the tine, following the center of tine’s surface .
VIII . WEBBED ANTLERS (Fig . 14)
8 . This instruction does not apply to caribou/ reindeer, fallow deer or moose . In these species, antler palmation is a universal characteristic that is considered highly desirable by hunters, so it is measured and included as part of the score . When webbing occurs in other deer, such as white-tailed deer, elk/wapiti, red deer and sika deer, it occurs only in a small percentage of animals and is not considered important to animal quality; therefore, it is not scored . Because webbing in these species can present problems by interfering with normal measurements of tine length, main beam length and beam circumference, SCI treats it as though it does not exist, as follows:
a . Measuring tine length: Obviously, antler tines that are partly covered up by webbing will be shorter than if the webbing had not formed . To measure such tines from the web edge would unfairly penalize that animal as compared with similar antlers without webbing . Therefore, when measuring a webbed tine in these species, the measurer should carefully draw a pencil line to show the upper edge of the antler beam (or parent tine) as it would appear if the webbing had not developed, and measure the length of the tine from this pencil line to the tip . The pencil line is normally drawn on the back side of the antlers, as this will be the smoothest surface and will allow most tines to be measured on their outer curve .
Some red deer, especially estate-bred specimens, will exhibit extensive webbing . Such antlers can be very complex and difficult to measure . If a measurer has any questions, he should contact the Record Book Office at the SCI Membership and Business Operations Center, or any member of the Record Book Committee .
Whenever webbing is penciled off from a beam or parent tine, and tine lengths are measured from the pencil line, this must be noted on the entry form .
b . Measuring length of main beam: In webbed antlers
of these species, the length of the main beam should be measured after the webbing has been penciled-off (as described in paragraph a . above) . The measurement should follow the center of the designated antler beam--the part below the pencil line- .and should not go over any webbing .
c . Beam circumference: Webbing that interferes with a normal beam circumference measurement presents a major problem . When a tine measurement includes the webbing above the pencil line (as described in paragraph a . above), that same webbing must not be included in the circumference of the main beam . And, unfortunately, it is not possible to actually measure the circumference of the beam below the pencil line without drilling a hole through the webbing for the measuring tape, which would ruin the antlers . In a case like this, when a circumference cannot be measured, we use the value of the preceding normal circumference measurement . (This must be noted on the entry form .)
For example, in white-tailed deer antlers, any webbing would probably affect only C-3 and C-4, with C-1 and C-2 being normal beam circumferences without webbing . If webbing interferes with a normal C-3 measurement, and the C-1 and C-2 circumferences are normal, the measurer should use the bigger of the C-1 and C-2 circumferences for the C-3 measurement . In Addition, if the C-4 circumference is webbed and none of the previous measurements are webbed, the measurer may use the largest of the 3 previous circumferences as the C-4 measurement . If webbing occurs between the T1 and T2, interfering with your C2 circumference, and the C1 circumference is normal then use C1 as your C2 circumference . If there is webbing interfering with both the C1 and C2 circumferences, then use the C3 circumference as your C1 and C2 circumference .
In elk/wapiti antlers, webbing normally occurs only in the tops, where it would affect only the C-4 circumference . If webbing interferes with a normal C-4 measurement, and C-3 is a normal beam measurement, the measurer should use the C-3 value for C-4 as well .
In red deer and sika deer antlers, webbing normally occurs only in the crown where it does not affect any circumferences .
Webbing rarely occurs in other deer species, but if you should encounter such a head and do not know how to measure it, please contact the Record Book and World Hunting Awards Office at the SCI Membership and Business Operations Center for instructions .
IX . TWO TINES WITH A COMMON BASE (Fig . 15)
9 . “Double tines” that are joined at the base and have some amount of webbing between them are sometimes seen, especially in white-tailed deer and caribou/reindeer . In order to qualify as valid double tines (instead of as a tine with a branch growing from it), four conditions must be met: (1) each projection should be at least 3/8ths of an inch from its tip to where the tine splits; (2) each of the two projections must qualify as a valid tine when measured
WHITE-TAILEDDEER
(Fig . 14)

SCI Measuring Manual 33
from its tip to the main beam; (3) the blood grooves of each projection must clearly connect to the main beam and not to each other; (4) the baseline (cross section of bases of both projections) must appear as a figure eight on at least one side .
A
B
C
D
E F
FIG 15A
3/8”
Both double tines must grow in line with the main beam in order for both to be considered typical . However, please note that some, or all tines in certain deer species must grow in a specific location to be considered typical . If such a specifically located tine is part of a double tine, only one of the double tines can be considered typical, with the other being non-typical . The tine selected as typical will normally be the longer and/or the one that appears most typical by its contour and location .
X . ANTLERS WITH MANY TINES
10 . When measuring antlers that have a great number of tines (such as Père David deer, caribou/reindeer, and non-typical white-tailed deer), it is easy to lose count and either miss some tines or measure the same ones twice . Our suggestion is to mark each tine (but not the beam tips) with pieces of masking tape, then remove the tape as each tine is measured . If done carefully, when all tape has been removed all tines will have been measured .
XI . NUMBER OF POINTS AS SUPPLEMENTAL INFORMATION (Fig . 16)
11 . With all deer entries, the number of antler points--typical, non-typical and total--must be shown as supplemental information as indicated on the entry form . The total points on an antler will always be one more than the number of tines on that antler because the main beam tip is also recorded as a point (except in palmated moose, Method 25-P, where the main beam is not measured) .
XII . MEASURING CIRCUMFERENCES
12 . Regardless of whether deer antlers are typical or non-typical, measurers must be careful to measure circumferences between the designated typical tines, disregarding any non-typical tines that may be present . Please refer to the individual method for details .
White-tailed deer (Fig . 17): When measuring white-tailed deer antlers (Methods 17-T and 17-NT), four circumferences are taken of the main beam . This holds true regardless of the number of tines or how they are arranged . (For example, a mature tropical whitetail may have only 2-3 points to a side, yet four beam circumferences are required .)
Mule deer and black-tailed deer (Fig . 18): When measuring mule deer and black-tailed deer antlers (Methods 18-T and 18-NT), four circumferences are taken: three of the main beam and one of the second typical tine (T-2) .
Elk or wapiti (Fig . 19): When measuring elk or wapiti antlers (Methods 19-T and 19-NT), four circumferences are taken of the main beam .
WHITE-TAILEDDEER
MULEDEER
ELK/WAPITI
(Fig . 15)
(Fig . 16)
(Fig . 17)
(Fig . 18)
(Fig . 19)

34 SCI Measuring Manual
Red deer and related deer (Fig . 20): When measuring antlers of red deer, Bukharan deer, Yarkand deer, hangul, Tibetan deer, shou, McNeill Deer and Gansu deer (Method 20), three circumferences are taken: one of the burr (or coronet) and two of the main beam .
Axis deer, hog deer, sambar, rusa deer, sika deer and roe deer (Figs . 21, 22, 23): When measuring antlers of these species (Methods 21-T and 21-NT), two circumferences are taken: one of the burr and one of the main beam .
Caribou/reindeer (Fig . 24): When measuring Fallow deer (Fig . 25): When measuring fallow, caribou and reindeer antlers (Method 23), two deer antlers (Method 24), two circumferences are circumferences are taken: one of the main beam taken: one of the burr and one of the palm .
Moose (Fig . 26): When measuring moose antlers (Methods 25-P and 25-C), one circumference is taken of the main beam .
All other deer: When measuring all other deer antlers (Methods 22 and 26), one circumference is taken of the burr .
All main beam circumferences (and the circumference of the second typical tine (T-2) in mule deer and black-tailed deer) must be taken with a tight tape at a right angle to the axis of the beam (or to the axis of T-2 in Method 18), at the smallest place between designated typical tines, disregarding any non-typical tines that may be present . This holds true for non-typical antlers as well typical antlers . Before measuring main
RED DEER
RUSADEER
CARIBOU/REINDEER
SITKADEER
ROEDEER
(Fig . 21)
(Fig . 24)
(Fig . 25)
(Fig . 23)
(Fig . 20)
(Fig . 22)

SCI Measuring Manual 35
beam circumferences, the measurer must sort out the typical tines from any non-typical tines, and must be careful to record circumference measurements only at the smallest place between designated typical tines . (Fig . 27)
Please note: You may occasionally encounter a broken tine in a typical location that no longer qualifies as valid because it is broken off too short . Even though it no longer is a valid typical tine, it should still be used to locate circumferences (Fig . 28) .
When a main beam circumference is taken halfway between the last typical tine and the beam tip (see individual method for details), the place of measurement is located as follows: Find the center of the base of the last typical tine where it meets the main beam, then draw a pencil line across the beam at a right angle to its length . Measure from this line to the beam tip and divide by two (Fig . 29) . Please see Deer Instruction 8-c for what to do when palmation interferes with a normal beam circumference measurement .
Burr circumferences (Fig . 30) are to be taken with a tight tape in a continuous loop, going over the top of normal (less than 1/2 inch or 1 .3 cm) pearling . Do not press the tape into indentations . Projections growing from the burr that are 1/2 inch or 1 .3 cm long or longer must not be included in the measurement . Avoid such projections if possible, but if one cannot be avoided measure from one side of it around the burr to its other side and add its calipered thickness .
When the two burrs are touching (common in European roe deer) so that a circumference of each cannot be taken, measure around the burr as far as possible and add the calipered width of the area of contact . (Fig . 31)
XIII . MEASURING SPAN AND SPREAD (Fig . 32)
13 . What most deer hunters mean by “spread” in deer antlers (for example, “the buck had a 30-inch spread”) is the greatest outside spread . However, this does not agree with the world’s major measuring systems . With most deer, SCI and the other systems all record something very different, namely the inside span of the main antler beams . (The other systems may also record the outside spread, but only as supplemental information, not as part of the score .) For most deer, the inside span is the distance between the main beams at the widest place, at a right angle to the longitudinal axis of the skull . As the measurement is between the main beams, the measurer must first distinguish the main beams from the tines . This is not always obvious, especially with non-typical antlers, so the measurer should carefully read the instructions for the method being used, and study the
ELK
(Fig . 27)
(Fig . 28)
(Fig . 30)
(Fig . 31)
(Fig . 32)
(Fig . 29)

36 SCI Measuring Manual
illustration . For red deer and related deer (Method 20) the inside span is taken at the widest place between the main beams at or below the first crown tines, at a right angle to the longitudinal axis of the skull . This is so measurers will be consistent in where this measurement is taken, because the tops of large red deer antlers can be very confusing . With the very small deer--muntjac, brocket deer, puku and tufted deer--SCI does not include the inside span measurement in the score, because these antlers are so small that the span would represent an excessive proportion of the total . It is, however, recorded as supplemental information . The moose is the only deer in which we use the greatest outside spread of the antlers . The measurement is a straight line between perpendiculars at a right angle to the longitudinal axis of the skull . The greatest outside spread is a very important factor in animal quality for moose in North America (less so in Europe) and is used in all major measuring systems .
XIV . ANTLERS IN VELVET
14 . Measurements of cervids antlers in velvet are acceptable . This must be noted on the entry form, and 2% is to be deducted from the total score .
XV . PHOTOGRAPHS (ALL DEER ENTRIES)
15 . With deer entries, enough good quality, close-up photographs (prints, not slides) must be supplied so that all antler points (both tines and beam tips) are clearly visible, so that they can be compared with the measurements on the entry form . One photograph may suffice for simple antlers; however, three (left side, right side, and either front or rear) are recommended for most . With complex antlers (such as those of red deer, fallow deer, caribou/reindeer, Père David deer, non-typical mule deer and non-typical white-tailed deer) more than three may be needed . Suggestions: (1) Photos taken from behind and a little above usually show the tines best . (2) Photos should be taken against a plain, uncluttered and light-colored background . (3) Ideally, the right side/left side photos should show only one antler, with cardboard or cloth behind it to block the other antler from view .
XVI . PHOTOGRAPHS (COLUMBIA BLACK-TAILED DEER)
16 . Columbia black-tailed deer entries from hybrid areas (see Record Book distribution text) must be accompanied by photographs of (1) the face, (2) the upper surface of the tail, and (3) a metatarsal gland with a ruler or other object of known size beside it for comparison .
COMPLEX ANTLER MEASURING SUPPLEMENT FOR RED DEER AND
NON-TYPICAL WHITE-TAILED DEER INTRODUCTION
These Supplemental Instructions have been created to help measurers around the world to consistently and accurately score complex deer species with the red deer and white-tailed deer being the focus . This supplement was created as a compliment to the “General Instructions for Deer Entries” section of the current SCI Measuring Manual and this supplement is intended to further expand on those instructions as they relate to characteristics found on complex antlers .
I . MEASURING LENGTH OF MAIN BEAM
First, it is necessary to determine the main beams and each main beam tip (also read Section II below to help identify the main beam tip) . In most red deer, the main beams will be easy to identify, and the beam tips will clearly be the rearmost points . However, when an antler has complex crown points, it may be difficult to decide which one should be the tip of the main beam . When in doubt, the measurer should choose the one that appears to be the logical beam tip because of its contour, size and location . Measurers may use the example provided in the SCI Measuring Manual for a red deer to find the main beams that mimic a typical red deer main beam . In all antlered deer (except palmated moose), the main beams are measured from the bottom edge of the burr (or coronet) to the tip . The measurement follows the center of the antler’s outer curve and is essentially parallel to the longitudinal blood grooves . The center of the outer curve is easiest to locate at mid-length, especially after the tines have been marked off from the beam with a pencil line* . Many measurers then prefer to begin at the beam tip and follow the grooves around the outer curve to the burr; however, this measurement can be taken in either direction . Begin (or end) the measurement where the center-line of the outer curve intersects the base of the burr . This will be on the side of the head and behind the eye (not in front on the forehead) . Do not press the cable into the corner where the antler beam meets the burr . The measurement should follow the center of the designated antler beam—in between the marks indicating the sides of the main beam- .and should not go over any webbing .
*Labeling the main beam is a critical step in measuring complex species and will help any measurer to understand where to measure tines back to . Some measurers draw the main beams using a pencil, chalk or markers . Using tape also can be used and many of the photos in this supplement provide examples of using tape to mark off beams of tines . Labeling the main beam is also important to avoid measuring the main beam twice with antlers that have many tines . Using tape or drawing in beams and tines is also referred to “mapping” the antler . The intent of mapping an antler is to provide a reference as to how a measurer has determined the shape and contour of the main beams and tines when the contour of a tine or main beam is hidden by webbing .
When measuring antlers that have a great number of tines

SCI Measuring Manual 37
(such as red deer, caribou/ reindeer, and non-typical white-tailed deer), it is easy to lose count and either miss some tines or measure the same tines twice . We suggest that measurers mark each tine (mark main beam tips differently) with pieces of masking tape, then remove the tape as each tine is measured . If done carefully, when all tape has been removed, all tines will have been measured . Labeling the tape with the appropriate tine number will also help measurers to assure they measure each tine only once .
II . CHOOSING A MAIN BEAM TIP
The main beam on a Red Deer is the beam that follows the contour and shape of the main antler beams . The main beam may sometimes get lost or mixed up with crown tines that come out of the crown area . Following the main beam out of the crown, try to determine the most prominent growth coming out of the crown area that would mimic the main beam configuration of a “typical” red stag, and one that is always preserved in any stag, regardless of how complex they might be .
Always label the main beam tip to make sure it is only measured one time in the length of main beam measurement . Look for predominant blood groove patterns to help determine which tine is the main antler tip . Remnant blood grooves will help a measurer determine how a tine or beam grew, but blood grooves do not ultimately define tines and in some cases blood grooves may not match from side to side .
Look at the beam from all sides -front, back, left, and right to form a 3-D picture of the beam . Your three-dimensional picture that you are constructing of the total antler will resemble that of a tree, with a trunk, large branches growing from the trunk and smaller branches growing off the large branches . After every tine has been marked off at the origin of its growth, then you are ready to start measuring and recording those measurements .
(Photo 1 - Front View with the arrows pointing to the designated Main Beam Tips . Tape was used to help dissect tines from tines or tines from the main beam)
Think of the main beam as one long-tine . It will have tapered growth, meaning that as you get towards the tip, the beam will become smaller .
(Photo 1A – Is the rear view of photo 1 showing the designated main beam tips . Tape was used to help dissect tines from tines or tines from the main beam)
The measurer should draw a line (or use tape, string, cable, etc .) to help define the outside of the main beam as it would appear if the tines and webbing did not exist . (Photos 1 & 2 show white and yellow tape that mark the sides of the tines and the main beam)
The drawn-in line will make it easier to determine the center of the antler’s outer curve, which the length of the main beam measurement must follow . (Photos 2A & 2B show the dashed lines where the measurement will take place)
Marking the outside of the main beam with a line will also help the measurer determine the point of origin of tines growing off the main beam . (See Photo 2B)
(Photo 2A - shows the Blue Arrow pointing to the black dashed line where the measurement will take place . Yellow tape was used to demonstrate the sides of tines)
When a tine, webbing or other antler material interferes with any measurement, be sure to caliper around the obstruction, being sure to measure to the caliper point in front and back of the obstruction and add in the caliper width to the total measurement .
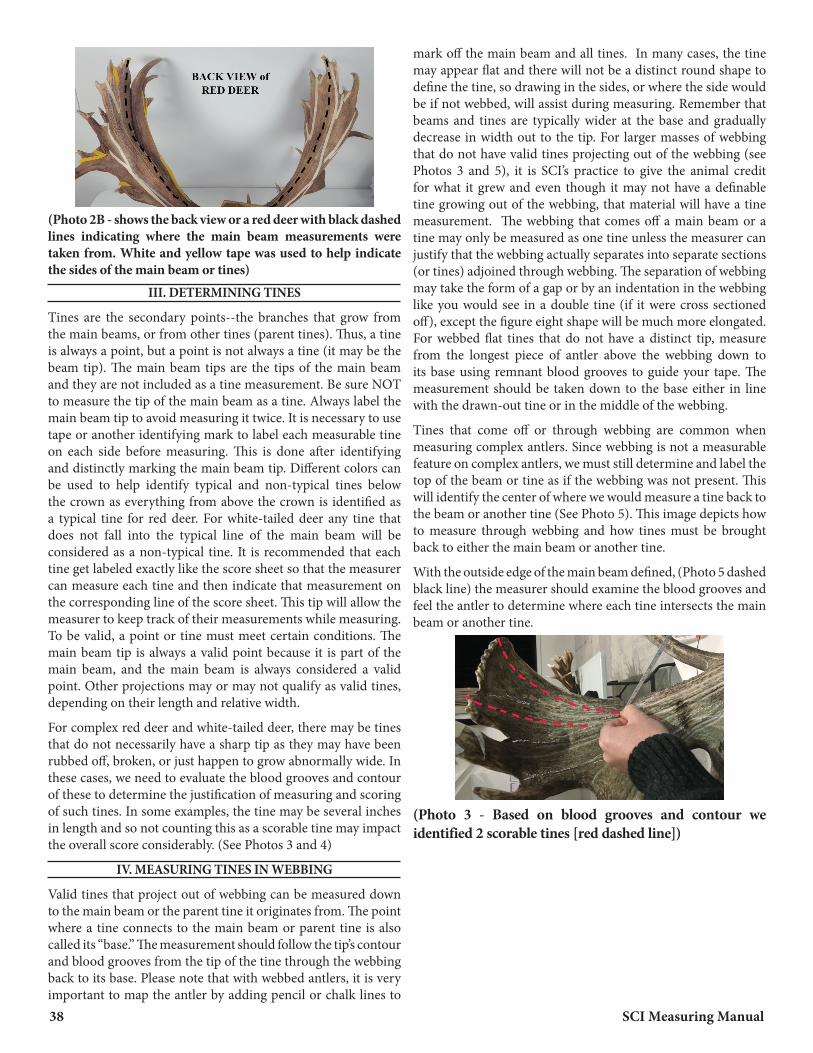
38 SCI Measuring Manual
(Photo 2B - shows the back view or a red deer with black dashed lines indicating where the main beam measurements were taken from . White and yellow tape was used to help indicate the sides of the main beam or tines)
III . DETERMINING TINES
Tines are the secondary points--the branches that grow from the main beams, or from other tines (parent tines) . Thus, a tine is always a point, but a point is not always a tine (it may be the beam tip) . The main beam tips are the tips of the main beam and they are not included as a tine measurement . Be sure NOT to measure the tip of the main beam as a tine . Always label the main beam tip to avoid measuring it twice . It is necessary to use tape or another identifying mark to label each measurable tine on each side before measuring . This is done after identifying and distinctly marking the main beam tip . Different colors can be used to help identify typical and non-typical tines below the crown as everything from above the crown is identified as a typical tine for red deer . For white-tailed deer any tine that does not fall into the typical line of the main beam will be considered as a non-typical tine . It is recommended that each tine get labeled exactly like the score sheet so that the measurer can measure each tine and then indicate that measurement on the corresponding line of the score sheet . This tip will allow the measurer to keep track of their measurements while measuring . To be valid, a point or tine must meet certain conditions . The main beam tip is always a valid point because it is part of the main beam, and the main beam is always considered a valid point . Other projections may or may not qualify as valid tines, depending on their length and relative width .
For complex red deer and white-tailed deer, there may be tines that do not necessarily have a sharp tip as they may have been rubbed off, broken, or just happen to grow abnormally wide . In these cases, we need to evaluate the blood grooves and contour of these to determine the justification of measuring and scoring of such tines . In some examples, the tine may be several inches in length and so not counting this as a scorable tine may impact the overall score considerably . (See Photos 3 and 4)
IV . MEASURING TINES IN WEBBING
Valid tines that project out of webbing can be measured down to the main beam or the parent tine it originates from . The point where a tine connects to the main beam or parent tine is also called its “base .” The measurement should follow the tip’s contour and blood grooves from the tip of the tine through the webbing back to its base . Please note that with webbed antlers, it is very important to map the antler by adding pencil or chalk lines to
mark off the main beam and all tines . In many cases, the tine may appear flat and there will not be a distinct round shape to define the tine, so drawing in the sides, or where the side would be if not webbed, will assist during measuring . Remember that beams and tines are typically wider at the base and gradually decrease in width out to the tip . For larger masses of webbing that do not have valid tines projecting out of the webbing (see Photos 3 and 5), it is SCI’s practice to give the animal credit for what it grew and even though it may not have a definable tine growing out of the webbing, that material will have a tine measurement . The webbing that comes off a main beam or a tine may only be measured as one tine unless the measurer can justify that the webbing actually separates into separate sections (or tines) adjoined through webbing . The separation of webbing may take the form of a gap or by an indentation in the webbing like you would see in a double tine (if it were cross sectioned off), except the figure eight shape will be much more elongated . For webbed flat tines that do not have a distinct tip, measure from the longest piece of antler above the webbing down to its base using remnant blood grooves to guide your tape . The measurement should be taken down to the base either in line with the drawn-out tine or in the middle of the webbing .
Tines that come off or through webbing are common when measuring complex antlers . Since webbing is not a measurable feature on complex antlers, we must still determine and label the top of the beam or tine as if the webbing was not present . This will identify the center of where we would measure a tine back to the beam or another tine (See Photo 5) . This image depicts how to measure through webbing and how tines must be brought back to either the main beam or another tine .
With the outside edge of the main beam defined, (Photo 5 dashed black line) the measurer should examine the blood grooves and feel the antler to determine where each tine intersects the main beam or another tine .
(Photo 3 - Based on blood grooves and contour we identified 2 scorable tines [red dashed line])
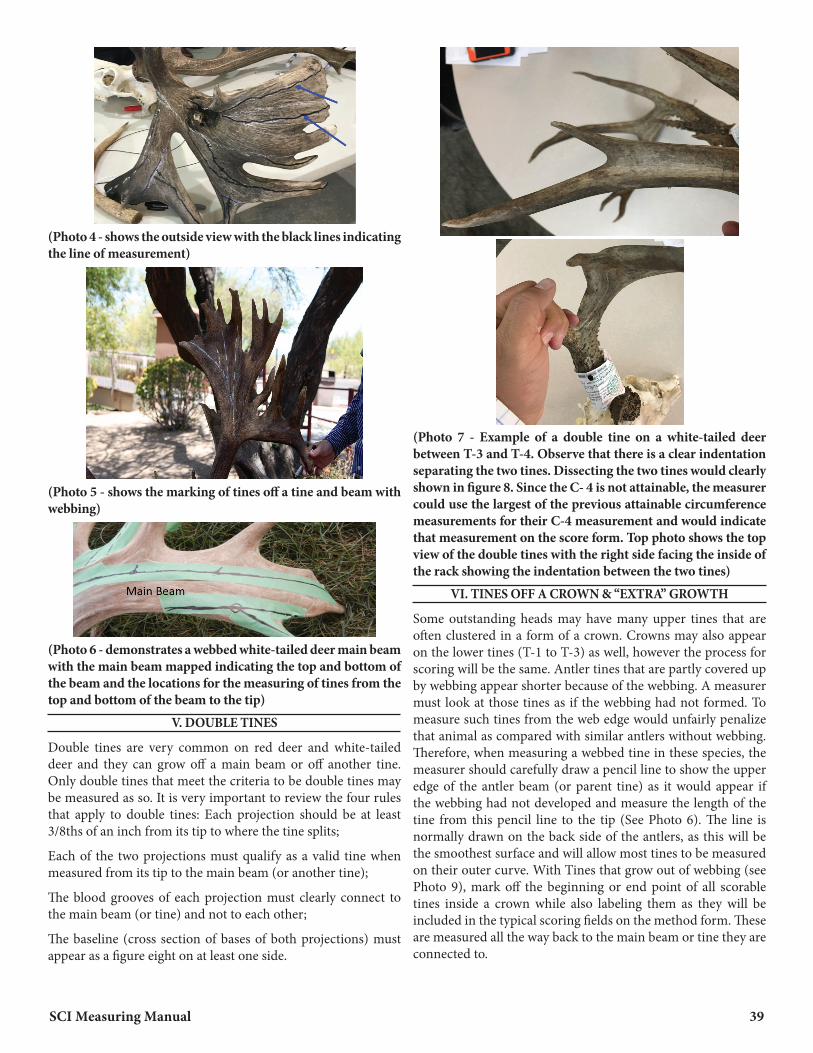
SCI Measuring Manual 39
(Photo 4 - shows the outside view with the black lines indicating the line of measurement)
(Photo 5 - shows the marking of tines off a tine and beam with webbing)
(Photo 6 - demonstrates a webbed white-tailed deer main beam with the main beam mapped indicating the top and bottom of the beam and the locations for the measuring of tines from the top and bottom of the beam to the tip)
V . DOUBLE TINES
Double tines are very common on red deer and white-tailed deer and they can grow off a main beam or off another tine . Only double tines that meet the criteria to be double tines may be measured as so . It is very important to review the four rules that apply to double tines: Each projection should be at least 3/8ths of an inch from its tip to where the tine splits;
Each of the two projections must qualify as a valid tine when measured from its tip to the main beam (or another tine);
The blood grooves of each projection must clearly connect to the main beam (or tine) and not to each other;
The baseline (cross section of bases of both projections) must appear as a figure eight on at least one side .
(Photo 7 - Example of a double tine on a white-tailed deer between T-3 and T-4 . Observe that there is a clear indentation separating the two tines . Dissecting the two tines would clearly shown in figure 8 . Since the C- 4 is not attainable, the measurer could use the largest of the previous attainable circumference measurements for their C-4 measurement and would indicate that measurement on the score form . Top photo shows the top view of the double tines with the right side facing the inside of the rack showing the indentation between the two tines)
VI . TINES OFF A CROWN & “EXTRA” GROWTH
Some outstanding heads may have many upper tines that are often clustered in a form of a crown . Crowns may also appear on the lower tines (T-1 to T-3) as well, however the process for scoring will be the same . Antler tines that are partly covered up by webbing appear shorter because of the webbing . A measurer must look at those tines as if the webbing had not formed . To measure such tines from the web edge would unfairly penalize that animal as compared with similar antlers without webbing . Therefore, when measuring a webbed tine in these species, the measurer should carefully draw a pencil line to show the upper edge of the antler beam (or parent tine) as it would appear if the webbing had not developed and measure the length of the tine from this pencil line to the tip (See Photo 6) . The line is normally drawn on the back side of the antlers, as this will be the smoothest surface and will allow most tines to be measured on their outer curve . With Tines that grow out of webbing (see Photo 9), mark off the beginning or end point of all scorable tines inside a crown while also labeling them as they will be included in the typical scoring fields on the method form . These are measured all the way back to the main beam or tine they are connected to .

40 SCI Measuring Manual
(Photo 8 - the yellow arrows point to bottom of the tine coming off the beam – this is where you begin your measurement . Some tines are mapped out using tape)
There may be extra “growth(s)” on complex antlers that we would need to determine if it qualifies as a tine . One thing to note is that antlers are solid and that is a major factor to consider when determining if a “growth” is measurable . In most cases these “growth(s)” should not count towards the score as they would not qualify as a measurable tine . (See Photo 9A and 9B)
For complex antlers, there may be more than one crown on each side, however these should always follow the same rules of measuring back to the main beam or to another tine . When having to take measurements of tines that are inside the crown, they still must meet the one-inch rule and measured back appropriately . See Fig . 6 for an example of where this may occur .
(Photo 9A - On the left, circled in red, shows a non-measurable growth . Photo 9B on the right, circled in green, shows two possible places (blue dashed lines) to measure this tine, taking the one yielding the longest length and recording it on the method entry form)
In Photo 9A, a “growth” appears to have grown on this tine or beam . We must determine if we can measure this as a scorable tine . In addition, we must be aware of not measuring any taxidermy material on a repaired tine or beam . We must have full confidence that the repair does not affect the original score of that tine .
In Photo 9B, although there appears to clearly be a broken tine we would still be able to measure down the outer curve or even the center of the tine . When measuring the center-line of the tine we must caliper the gap so as not to include in the score for that tine measurement or overall score .
VII . MEASURING A TINE
Basic Rule: Only measure a tine back to the main beam or to another tine .
Tines should be measured from the center at its base to the tip at its longest length . The exception would be the brow tine (T-1) in Red Deer, which sprouts close to the burr and points forward and upward . This measurement is taken on the side down the center of the tine (see Photo 10) . All other tines you can measure from the outside (usually the longest length) and in some occasions the inside if it happens to yield a longer measurement .
(Photo 10 - the brow tine measurement should be taken as the green dashed line demonstrates, while the red dashed line measurement is incorrect since it originates on the burr) . Tines either grow off a main beam or off another
(Photo 11 - includes the dashed line where measurement will take place for each of these two tines that grow from a parent tine . Notice that the yellow tape marks off the top of the parent tine and the tine is measured back to the middle of the base)
For complex red deer antlers, there may be more than one crown on each side, however these should always follow the same rules of measuring back to the main beam or to another tine . When having to take measurements of tines that are inside the crown, they still must meet the one-inch rule and measured back appropriately . See Photo 8 for an example of where this may occur .
VIII . MEASURING CIRCUMFERENCES
Basic Rule: A true circumference of the main beam can only be measured around the main beam . You may not measure a circumference that includes any webbing or tine material in this measurement .
When measuring white-tailed deer antlers (Methods 17-T and 17-NT), four circumferences are taken of the main beam . This holds true regardless of the number of tines or how they are arranged . If any circumference includes webbing or any antler material that is not solely main beam, the measurer cannot take an accurate circumference of the main beam and must revert back to another circumference (additional details and scenarios

SCI Measuring Manual 41
are included in the General Instructions for Deer Entries 8c) .
For Red Deer, measure the circumference of the burr (or coronet) at the base of each antler and two circumference measurements (C-1 and C-2) . C-1 is measured between T-2 and T-3 and C-2 is taken between the T-3 and T-4 . Measure the circumference of the main beam at the smallest place . If T-2 is absent, measure at the smallest place between the first typical (brow) tine (T-1) and T-3 . If T-3 is absent, measure at the smallest place between T-2 and the first upper or crown tine, which will make this measurement the same as C-2 .
Please note: You may occasionally encounter a broken tine in a typical location that no longer qualifies as valid because it is broken off too short . Even though it no longer is a valid typical tine, it should still be used to locate circumferences (General Instructions for Deer Entries Photo28) .
For complex antlers, webbing may be present that may make it difficult to measure the circumference(s) accurately . In these complex antlers the webbing mostly affects the main beam after the T-2 or the C-2 circumference measurement . If this is the case and you can attain a C-1 circumference measurement as normal, then use the C-1 as your C-2 measurement (See Photo 12) . In the rare case that webbing affects both the C-1 and the C-2 measurements, then use the burr circumference measurement as both your C-1 and C-2 measurements . Please make sure that anytime you must duplicate circumference measurements, that you note it on the entry form .
(Photo 12 - Blue Arrow shows a C-2 that includes webbing and tines that do not allow a true circumfernce of main beam measurement . In this case, use the C-1 circumference and note that on your score form .)
(Figure 12b – another example of a webbed circumference . Chalk line was added to what the measurer believed was the main beam . The group who measured this stag actually concluded that the circumference would not be attainable because of the tine growing out of the main beam at that location)
Special consideration for webbed antlers without the ability to get any circumference measurements . This is only to be used in a rare situation with complex antlers when a measurer cannot attain any circumferences measurements .
Choose a circumference location where the least amount of webbing exists and make marks at the location where the main beam and webbing or tine (obstruction) meet on the outside and inside of the main beam . This is done by marking off the top of the main beam below the webbing with a pencil or chalk . For this example, we will label the marks “a” and “b .”
Measure the attainable circumference around the main beam antler from “a” to “b” and record that measurement .
Next, use a caliper to find the distance between “a” and “b” by placing the caliber tips at both marks (“a” and “b”) . Make sure the caliper is tight and remove it without increasing or decreasing the width . Measure the width of the caliper tips .
Add the circumference of the main beam measurement with the calipered measurement and this will provide you with the best main beam circumference for that location .
In some situations, there may be more than one obstruction (webbing or tines) that restrict your ability to take a circumference . If this occurs, the measurer should mark off the circumference measurements that are attainable and use a caliper to find the distance between the obstructions and add all the measurements to help determine the circumference of the main beam .
If only one true circumference measurement is attainable for both sides, use that one circumference and note that on the score form . For all other scenarios please see the General Instructions Deer Entries .
(Photos 13A, 13B and 13C – demonstrate measuring a circumference that is webbed when duplicating another circumference is impossible . Point B is the top of the main beam on the inside of the antlers)

42 SCI Measuring Manual
IX . MEASURING THE INSIDE SPAN OF THE MAIN BEAMS FOR RED DEER
1st Quarter
2nd Quarter
3rd Quarter
1st Quarter
2nd Quarter
3rd Quarter
(Figure 2) Measure the inside span of the main antler beams at or below the 3rd quarter of the main beams . To determine the quarters of the main beams, divide the length of the longer main beam (quarter length tables are provided in the back pages of the measuring manual) and mark off each quarter . The measurement must be taken at or below the 3rd quarter at a right angle to the longitudinal axis of the skull, and parallel to its horizontal axis . (See Figure 2) This new range for the inside span of main antler beams is to account for the original method of taking the inside span for red deer at or below the 1st crown tine and to ensure the span remained an important feature for red stags that hunters favor . Over the years, measurers have observed that red stags with complex antlers have lower crown tines which has resulted in lower inside span measurements that are much narrower than the inside span of the main antler beams . This new method will allow for measurers to measure any place they wish, within the three quarters, on the inside of the main antler beams without using the tip to tip measurement . In red deer, we refer to the main antler mass that contains the main beams as the “main antler beams .” Measurers must use caution not to use any tines or other material for this measurement and be sure to measure the inside of the antler mass that contains the main beam in it . The measurement is taken from the inside of the mass as opposed to where the main beam has been mapped out .
For example – If a stag has a 40-inch right main beam and a 37-inch left main beam they will use the longer of the two (the 40-inch main beam) and divide the beams into quarters . The first quarter will be 10 inches from the burr, the second quarter would be 20 inches from the burr and the third quarter would be 30 inches from the burr . Using the proposed method, a measurer could mark off his main beams at 30 inches from the burr and measure the widest inside span at or below this quarter .
If you are measuring a complex antler and this particular method is not appropriately capturing the true inside span, then please contact SCI Record Book to discuss . Any changes or approvals that come from the SCI Measuring Coordinator or Record Book must be noted on the Method Form before being submitted for approval to the Committee .
(Photo 14A – demonstrates a front view of the inside span of the main antler beams . Observe that the stag’s left side antler has a tine that appears to look like the main beam when in fact the other mass is the main antler beam)
(Photo 14B - The Red arrow demonstrates the inside span of the main antler beams at the 3rd quarter of the main beam on a complex red deer (quarters determined by the length of the longest main beam) . The blue dotted lines indicate the area you can measure to determine the widest between the main beams . The main beams have the black dashed lines .)
Some complex antlered deer, especially estate-bred specimens, will exhibit extensive webbing and/or non-typical characteristics . Such antlers can be very complex and difficult to measure, and this supplement was created to help measurers to understand and map out those characteristics to help them measure them accurately . If a measurer has any questions, please contact the Record Book Department at the SCI Membership and Business Operations Center at (800) 997-0177, or measuring@safariclub .org . Also, the Record Book Department now can video conference to assist in mapping and understanding how to measure complex deer and it would be our pleasure to assist measurers worldwide to measure any complex species .
PANEL SCORING CERTIFICATION FOR RED DEER
In 2019, the SCI Record Book Committee (RBC) stipulated that any Red Deer that falls into the Overall Top Ten rankings will require a live video conference to panel score that entry. The video panel score will include the on-site Master Measurer or Official Measurer, and a Master Measurer from SCI staff, or the RBC Measuring Consultant, or another experienced Master Measurer designated by the Record Book Department or RBC Measuring Consultant to certify the entry and forward it to the Committee for approval.
(Fig . 2)

SCI Measuring Manual 43
Method 17-T For white-tailed deer with typical antlers
Antlers that have any non-typical tines are normally measured as non-typical; however, they may be measured as typical at the owner’s request, provided the non-typical tine length will not exceed 15% of the typical score . When measured as typical, only typical tines will count in the score, the non-typical tines will be counted as supplemental information
Please carefully read the General Instructions for Deer Entries before measuring deer antlers .
I . LENGTH OF MAIN BEAM (Fig . 1)
In white-tailed deer with typical antlers, the main beams end at the front points and are easily identified .
Measure the length of each main antler beam from the bottom edge of the burr (or coronet) to the tip . If a beam tip is broken so that its far point is not on the line of measurement, it should be carded off . The measurement follows the center-line of the antler’s outer curve and is essentially parallel to the longitudinal blood grooves . Begin the measurement where the center-line of the outer curve intersects the bottom edge of the burr . This will be on the side of the head and behind the eye, not in front on the forehead . Do not press the cable into the corner where the antler beam meets the burr . Always use the cable for this measurement .
II . LENGTH OF TYPICAL TINES (Fig . 2)
Measure the length of each valid typical tine on each antler . If a tine is broken so that its far point is not on the line of measurement, it should be carded off . A valid tine must be at least 1 inch or 2 .5 cm long, and no wider than its length . A
typical tine is one that grows in the typical location and manner for that species . Be sure not to measure the tip of the main beam as a tine . While the beam tip is always a typical point, it is not a tine, and its length is already included in the length of the main beam (Measurement I) .
Each typical tine on a white-tailed deer antler has a specific identification number: T-1, T-2, T-3, etc ., as illustrated . Record its length on the proper line on the entry form . Any typical tines that are missing are to be identified by a zero or a dash .
There is no set limit to the number of typical tines that could grow on a white-tailed deer antler; however, it is unlikely to exceed six or seven . To be considered typical, a tine must grow in a typical manner and location, and form the typical pattern for that species . A typical brow tine (T-1), if present, must grow upward from the top of the beam and not from the side or bottom of the beam, or from the burr . The other typical tines must grow upward from the beam in typical fashion, not from the side or bottom of the beam, or from another tine .
In white-tailed deer, only one tine (not both) of a double brow tine may be treated as typical (normally the longer one), the other being non-typical . However, both tines of a double tine growing elsewhere on the main beam can be typical .
III . CIRCUMFERENCE OF MAIN BEAM (Fig . 3, 4 & 5)
Measure the circumference of each main antler beam at the four places indicated below . Circumferences must be taken at a right angle to the longitudinal axis of the antler at the smallest place between typical tines, disregarding any non-typical tines that may be present .
C-1 . Between the burr and T-1 . Measure the circumference of the main antler beam at the smallest place between the burr and the typical brow tine, or “eyeguard” (T-1) . If T-1 is absent, measure at the smallest place between the burr and second typical tine (T-2),
(Fig . 1)
(Fig . 2)
(Fig . 3)

44 SCI Measuring Manual
which will make this measurement the same as C-2 .
C-2 . Between T-1 and T-2 . Measure the circumference of the main antler beam at the smallest place between the typical brow tine (T-1) and second typical tine (T-2) . If T-1 is absent, measure at the smallest place between the burr and T-2, which will make this measurement the same as C-1 .
C-3 . Between T-2 and T-3 . Measure the circumference of the main antler beam at the smallest place between the second typical tine (T-2) and third typical tine (T-3) . If T-3 is absent, measure at the smallest place between the center of the base of T-2 and the beam tip, which will make this measurement the same as C-4 .
C-4 . Between T-3 and T-4 . Measure the circumference of the main antler beam at the smallest place between the third typical tine (T-3) and fourth typical tine (T-4) . If T-4 is absent, measure halfway between the center of the base of T-3 and the beam tip .
IV . ADDITIONAL INSTRUCTIONS FOR TROPICAL WHITE-TAILED DEER
In these tiny deer, a mature animal buck may have only 2-3 points to a side, but four circumference measurements must still be taken of the main beam . Here is how you do it .
If T-1 (typical brow tine) is absent, measure both C-1 and C-2 at the same place . This will be at the smallest diameter between the burr and T-2 .
If both T-3 and T-4 are absent, measure both C-3 and C-4 at the same place . This will be halfway between the center of the base of T-2 and the beam tip . (This is a common type of antler in mature animal-class tropical whitetails .)
If an antler has only two points--T-2 plus the beam tip--measure C-1 and C-2 at the same place, which will be at the smallest diameter or circumference between the burr and T-2, and measure C-3 and C-4 at the same place, which will be halfway between center of the base of T-2 and the beam tip .
If T-4 (fourth typical tine) is absent, measure C-4 halfway between the center of the base of T-3 and the beam tip . (This is the antler one is likely to see in an exceptional tropical whitetail .)
If an antler has only two points--T-1 and the beam tip--measure C-2, C-3 and C-4 at the same place . This will be halfway between the center of the base of T-1 and the beam tip . (Antlers like this are commonly seen on mature tropical whitetails, often combined with a 3-point antler on the other side .)
(Fig . 4)
(Fig . 5)

SCI Measuring Manual 45
If an antler is a simple spike (no tines at all), measure all four circumferences at the same place . This will be halfway between the base of the burr (not the top of the burr) and the beam tip . (It is possible that if a spike antler was long and massive and the other antler had 3-4 points, the total score could be enough to make Record Book minimums .)
V . INSIDE SPAN OF MAIN BEAMS (FIG . 6)
Measure the inside span of the main antler beams at the widest place . This measurement must be at a right angle to the longitudinal axis of the skull, and parallel to its horizontal axis .
VI . TOTAL SCORE
Total all measurements . When measuring in inches, record fractions in 1/8ths of an inch . Record metric measurements to 0 .1 cm . If antlers are in velvet, deduct 2% from total score .
SUPPLEMENTAL INFORMATION
Record the length of each valid non-typical tine, if any are present . Number them in sequence, starting at the base of each antler: NT-1, NT-2, etc . Record the number of typical points (typical tines plus beam tip) on each antler . Record the number of non-typical tines (if any are present) on each antler . Record the total number of points (all tines plus beam tip) on each antler .
(Fig . 6)

46 SCI Measuring Manual
Method 17-NT For white-tailed deer with non-typical antlers
Antlers will be accepted as non-typical only if the total length of non-typical tines equals 3% or more of the typical score (see Deer Instruction 4) . If the total non-typical score exceeds 15% of the total typical score then it must be entered as a non-typical . Please carefully read the General Instructions for Deer Entries before measuring deer antlers . See additional SCI Complex Antler Measuring Supplement for measuring complex Red Deer and Non-typical White-tailed Deer .
I . LENGTH OF MAIN BEAM (FIG . 1)
First, it is necessary to determine the main beams and their tips . The main beams are usually easy to identify in white-tailed deer, because they will end at the front points; however, some non-typical antlers may have more than one projection at the end of the beam . If so, choose the one that appears to be the logical beam tip because of its contour, size and location .
Measure the length of each main antler beam from the bottom edge of the burr (or coronet) to the tip . If a beam tip is broken so that its far point is not on the line of measurement, it should be carded off . The measurement follows the center of the antler’s outer curve, and is essentially parallel to the longitudinal blood grooves . Begin the measurement where the center-line of the outer curve intersects the bottom edge of the burr . This will be on the side of the head and behind the eye, not in front on the forehead . Do not press the cable into the corner where the antler beam meets the burr . Always use the cable for this measurement .
II . LENGTH OF TYPICAL TINES (FIG . 2)
Even though in this method all tines are measured and included in the score, it still is necessary to identify the typical tines, because the beam circumferences must be measured between typical tines, disregarding any non-typical tines that may be present .
Measure the length of each valid typical tine on each antler . If a tine is broken so that its far point is not on the line of measurement, it should be carded off . A valid tine must be at least 1 inch or 2 .5 cm long, and no wider than its length . A typical tine is one that grows in the typical location and manner . Be sure not to measure the tip of the main beam as a tine . While the beam tip is always a typical point, it is not a tine, and its length is already included in the length of the main beam (Measurement I) .
Each typical tine on white-tailed deer antlers has a specific identification number: T-1, T-2, T-3, etc ., as illustrated . Record its length on the proper line on the entry form . Any typical tines that are missing are to be identified by a zero or a dash .
There is no set limit to the number of typical tines that can grow on a white-tailed deer antler; however, it is unlikely to exceed six or seven . To be considered typical, a tine must grow in a typical manner and location, and form the typical pattern for that species . A typical brow tine (T-1), if present, must grow upward from the top of the beam and not from the side or bottom of the beam, or from the burr . The other typical tines must grow upward from the beam in typical fashion, not from the side or bottom of the beam, or from another tine .
In white-tailed deer, only one tine (not both) of a double brow tine may be treated as typical (normally the longer one), the other being non-typical . However, both tines of a double tine growing elsewhere on the main beam can be typical .
III . LENGTH OF NON-TYPICAL TINES (FIG . 3)
(Fig . 1)
(Fig . 2)
(Fig . 3)

SCI Measuring Manual 47
Measure the length of each valid non-typical tine on each antler . If a tine is broken so that its far point is not on the line of measurement, it should be carded off .
A valid tine must be at least one inch or 2 .5 cm long, and no wider than its length . Non-typical tines are those that do not qualify as typical .
IV . CIRCUMFERENCE OF MAIN BEAM (FIG . 4)
Measure the circumference of each main antler beam at the four places indicated below . Circumferences must be taken at a right angle to the longitudinal axis of the antler at the smallest place between typical tines, disregarding the non-typical tines .
C-l . Between the burr and T-1 . Measure the circumference of the main antler beam at the smallest place between the burr and the typical brow tine, or “eyeguard” (T-1) . If T-1 is absent, measure at the smallest diameter or circumference between the burr and second typical tine (T-2), which will make this measurement the same as C-2 .
C-2 . Between T-1 and T-2 . Measure the circumference of the main antler beam at the smallest place between the typical brow tine (T-1) and second typical tine (T-2) . If T-1 is absent, measure at the smallest place between the burr and T-2, which will make this measurement the same as C-1 .
C-3 . Between T-2 and T-3 . Measure the circumference of the main antler beam at the smallest circumference between the second typical tine (T-2) and third typical tine (T-3) . If T-3 is absent, measure at the smallest place between the center of the base of T-2 and the beam tip, which will make this measurement the same as C-4 .
C-4 . Between T-3 and T-4 . Measure the circumference of the main antler beam at the smallest place between the third typical tine (T-3) and fourth typical tine (T-4) . If T-4 is absent, measure halfway between the center of the base of T-3 and the beam tip .
Additional instructions for tropical white-tailed deer (see page 52 for illustrations)
Tropical white-tail; a mature animal buck may have only 2-3 points to a side, but four circumference measurements must still be taken of the main beam . Here is how you do it .
If T-1 (typical brow tine) is absent, measure both C-1 and C-2 at the same place . This will be at the smallest place between the burr and T-2 .
If T-4 (fourth typical tine) is absent, measure C-4 halfway
between the center of the base of T-3 and the beam tip . (This is the antler formation one is likely to see in a mature tropical whitetail .)
If both T-3 and T-4 are absent, measure both C-3 and C-4 at the same place . This will be halfway between the center of the base of T-2 and the beam tip . (This is a common type of antler in mature animal-class tropical whitetails .)
If an antler has only two points--T-1 and the beam tip--measure C-2, C-3 and C-4 at the same place . This will be halfway between the center of the base of T-1 and the beam tip . (Antlers like this are commonly seen on mature tropical whitetails, often combined with a 3-point antler on the other side .)
If an antler has only two points--T-2 plus the beam tip--measure C-1 and C-2 at the same place, which will be at the smallest place between the burr and T-2, and measure C-3 and C-4 at the same place, which will be halfway between T-2 and the beam tip .
If an antler is a simple spike (no tines at all), measure all four circumferences at the same place . This will be halfway between the base of the burr (not the top of the burr) and the beam tip . (It is possible that if a spike antler was long and heavy and the other antler had 3-4 points, the head might score well enough to make the Record Book minimum as a tropical whitetail .)
V . INSIDE SPAN OF MAIN BEAMS (FIG . 5)
Span
Measure the inside span of the main antler beams at the widest place . This measurement is to be at a right angle to the longitudinal axis of the skull, and parallel to its horizontal axis .
VI . TOTAL SCORE
Total all measurements . When measuring in inches, record fractions in 1/8ths of an inch . Record metric measurements to 0 .1 cm . If antlers are in velvet, deduct 2% from total score .
SUPPLEMENTAL INFORMATION
Record the total number of points (all tines plus beam tip) on each antler .
(Fig . 4)
(Fig . 5)

48 SCI Measuring Manual
Method 18-T For mule deer and black-tailed deer with typical antlers
Antlers that have any non-typical tines are normally measured as non-typical; however, they may be measured as typical at the owner’s request, provided the non-typical tine length will not exceed 15% of the typical score . When measured as typical, only typical tines will count in the score, the non-typical tines will be counted as supplemental information .
Please carefully read the General Instructions for Deer Entries before measuring deer antlers .
I . LENGTH OF MAIN BEAM (FIG . 1)
In mule deer and black-tailed deer with typical antlers, the main beams end at the front points and are easily identified .
Measure the length of each main antler beam from the bottom edge of the burr (or coronet) to the tip . If a beam tip is broken so that its far point is not on the line of measurement, it should be carded off . The measurement follows the center of the antler’s outer curve and is essentially parallel to the longitudinal blood grooves . Begin the measurement where the center-line of the outer curve intersects the burr . This will be on the side of the head and behind the eye, not in front on the forehead . Do not press the cable into the corner where the antler beam meets the burr . Always use the cable for this measurement .
II . LENGTH OF TYPICAL TINES (FIG . 2)
Measure the length of each valid typical tine on each antler . If a tine is broken so that its far point is not on the line of measurement, it should be carded off . A valid tine must be at least 1 inch or 2 .5 cm long, and no wider than its length . A typical tine is one that grows in the typical location and manner for that species . Be sure not to measure the tip of the main beam as a tine . While the beam tip is always a typical point, it is not a tine, and its length is already included in the length of the main beam (Measurement I) .
Each of the four typical tines that can occur on a mule deer or black-tailed deer antler has a specific identification number: T-1, T-2, T-3 and T-4, as illustrated .
Record the length of each typical tine on the proper line on the entry form . Any typical tines that are missing are to be identified by a zero or a dash .
Mule deer and black-tailed deer can have a maximum of five typical points on each antler: four typical tines, including one typical brow tine (or “eyeguard”), plus the beam tip . If the typical brow tine (T-1) is absent (it often is), there can be no more than four typical points (three typical tines plus the beam tip) on that antler . Black-tailed deer often fail to develop the T-3 tine, in which case there can be no more than four typical points on that antler, including T-1 (if present) and the beam tip, or three typical points if T-1 is absent .
To be considered typical, a tine must grow in a typical manner and location, and form the typical pattern for that species . A typical brow tine (T-1), if present, must grow upward from the top of the main beam--not from the side or bottom of the beam, or from the burr . The other typical points (maximum of four) must grow upward in two forks, with T-2 and T-3 forming one fork, and T-4 and the beam tip forming the other . (Both T-2 and T-4 grow from the main beam . T-3 normally grows from T-2; however, sometimes the growth pattern seems reversed, with T-2 appearing to grow from T-3 . If so, please disregard it, because T-3 should always be measured as if it grew from T-2 .)
In mule deer and black-tailed deer, only one tine (not both) of a double tine can be treated as typical (normally the longer one), the other being non-typical .
(Fig . 1)
(Fig . 2)

SCI Measuring Manual 49
III . CIRCUMFERENCE OF MAIN BEAM (FIG . 3)
Measure the circumference of each main antler beam at the four places indicated below . Circumferences must be taken at a right angle to the longitudinal axis of the antler at the smallest place between typical tines, disregarding any non-typical tines that may be present .
C-1 . Between the burr and T-1 . Measure the circumference of the main antler beam at the smallest place between the burr and the typical brow tine, or “eyeguard” (T-1) . If T-1 is absent, measure at the smallest place between the burr and second typical tine (T-2), which will make this measurement the same as C-2 (Fig . 4) .
C-2 . Between T-1 and T-2 . Measure the circumference of the main antler beam at the smallest place between the typical brow tine (T-1) and second typical tine (T-2) . If T-1 is absent, measure at the smallest place between the burr and T-2, which will make this measurement the same as C-1 (Fig . 4) .
C-3 . Between the main beam and T-3 . Measure the circumference of the second typical tine (T-2) at the smallest place between its juncture with the main beam and the third typical tine (T-3) . If T-3 is absent, measure halfway between the tip of T-2 and the center of its base where it joins the main beam (Fig . 5) .
C-4 . Between T-2 and T-4 . Measure the circumference of the main antler beam at the smallest place between the second typical tine (T-2) and fourth typical tine (T-4) . If T-4 is absent, measure halfway between the beam tip and the center of the base of T-2 where it joins the main beam (Fig . 6) .
IV . INSIDE SPAN OF MAIN BEAMS (FIG . 7)
Span
Measure the inside span of the main antler beams at the widest place . This measurement is to be at a right angle to the longitudinal axis of the skull, and parallel to its horizontal axis .
V . TOTAL SCORE
Total all measurements . When measuring in inches, record fractions in 1/8ths of an inch . Record metric measurements to 0 .1 cm . If antlers are in velvet, deduct 2% from total score .
SUPPLEMENTAL INFORMATION
Record the length of each non-typical tine, if any are present . Number them in sequence, starting at the base of each antler: NT-1, NT-2, etc .
Record the number of typical points (typical tines plus beam tip) on each antler .
Record the number of non-typical tines (if any are present) on each antler .
Record the total number of points (all tines plus beam tip) on each antler .
(Fig . 3)
(Fig . 4)
(Fig . 5)
(Fig . 6)
(Fig . 7)

50 SCI Measuring Manual
Method 18-NT For mule deer and black-tailed deer with non-typical antlers
Antlers will be accepted as non-typical only if the total length of non-typical tines equals 3% or more of the typical score (see Deer Instruction 4) .
Please carefully read the General Instructions for Deer Entries before measuring deer antlers .
I . LENGTH OF MAIN BEAM (FIG . 1)
First, it is necessary to determine the main beams and their tips . The main beams are usually easy to identify in mule deer and black-tailed deer, because they will end at the front points; however, some non-typical antlers may have more than one projection at the end of the beam . If so, choose the one that appears to be the logical beam tip from its contour, size and location .
Measure the length of each main antler beam from the bottom edge of the burr (or coronet) to the tip . If a beam tip is broken so that its far point is not on the line of measurement, it should be carded off . The measurement follows the center of the antler’s outer curve and is essentially parallel to the longitudinal blood grooves . Begin the measurement where the center-line of the outer curve intersects the burr . This will be on the side of the head and behind the eye, not in front on the forehead . Do not press the cable into the corner where the antler beam meets the burr . Always use the cable for this measurement .
II .LENGTH OF TYPICAL TINES (FIG . 2)
Even though in this method all tines are measured and included in the score, it still is necessary to identify the typical tines, because the circumference measurements must be taken between typical tines, disregarding any non-typical tines that may be present
Measure the length of each valid typical tine on each antler . If a tine is broken so that its far point is not on the line of measurement, it should be carded off . A valid tine is at least 1 inch or 2 .5 cm long, and no wider than its length . A typical tine is one that grows in the typical location and manner . Be sure not to measure the tip of the main beam as a tine . While the beam tip is always a typical point, it is not a tine, and its length is already included in the length of the main beam (Measurement I) .
Each of the four typical tines that can occur on a mule deer or black-tailed deer antler has a specific identification number: T-1, T-2, T-3 and T-4, as illustrated .
Record the length of each typical tine on the proper line on the entry form . Any typical tines that are missing are to be identified by a zero or a dash . Mule deer and black-tailed deer can have a maximum of five typical points on each antler: four typical tines, including one typical brow tine (or “eyeguard”), plus the beam tip . If the typical brow tine (T-1) is absent (it often is), there can be no more than four typical points (three typical tines plus the beam tip) on that antler . Black-tailed deer often fail to develop the T-3 tine, in which case there can be no more than four typical points on that antler, including T-1 (if present) and the beam tip, or three typical points if T-1 is absent .
To be considered typical, a tine must grow in a typical manner and location, and form the typical pattern for that species . A typical brow tine (T-1), if present, must grow upward from the top of the main beam--not from the side or bottom of the beam, or from the burr . The other typical points (maximum of four) must grow upward in two forks, with T-2 and T-3 forming one fork, and T-4 and the beam tip forming the other . (Both T-2 and T-4 grow from the main beam . T-3 normally grows from T-2; however, sometimes the growth pattern seems reversed, with T-2 appearing to grow from T-3 . If so, please disregard it, because T-3 should always be measured as if it grew from T-2 .)
In mule deer and black-tailed deer, only one tine (not both) of a double tine can be treated as typical (normally the longer one), the other being non-typical .
(Fig . 2)
(Fig . 1)

SCI Measuring Manual 51
III .LENGTH OF NON-TYPICAL TINES (FIG . 3)
Measure the length of each valid non-typical tine on each antler . If a tine is broken so that its far point is not on the line of measurement, it should be carded off . A valid tine must be at least on inch or 2 .5 cm long, and no wider than its length . Non-typical tines are those that do not qualify as typical .
Record the length of each non-typical tine on the proper line on the entry form . They are to be numbered in sequence, starting at the base of each antler: NT-1, NT-2, NT-3, etc .
IV . CIRCUMFERENCE OF MAIN BEAM
Measure the circumference of each main antler beam at the four places indicated below . Circumferences must be taken at a right angle to the longitudinal axis of the antler at the smallest place between typical tines, disregarding the non-typical tines (Fig . 4) .
C-1 . Between the burr and T-1 Measure the circumference of the main antler beam at the smallest place between the burr and the typical brow tine, or “eyeguard” (T-1) . If T-1 is absent, measure at the smallest place between the burr and second typical tine (T-2), which will make this measurement the same as C-2 (Fig . 5) .
C-2 . Between T-1 and T-2 Measure the circumference of the
main antler beam at the smallest place between the typical brow tine (T-1) and second typical tine (T-2) . If T-1 is absent, measure at the smallest place between the burr and T-2, which will make this measurement the same as C-1 (Fig . 5) .
C-3 . Between the main beam and T-3 Measure the circumference of the second typical tine (T-2) at the smallest place between its juncture with the main beam and the third typical tine (T-3) . If T-3 is absent, measure halfway between the tip of T-2 and the center of its base where it joins the main beam (Fig . 6) .
C-4 . Between T-2 and T-4 Measure the circumference of the main antler beam at the smallest place between the second typical tine (T-2) and fourth typical tine (T-4) . If T-4 is absent, measure halfway between the beam tip and the center of the base of T-2 where it joins the main beam .
V . INSIDE SPAN OF MAIN BEAMS (FIG . 7)
Span
Measure the inside span of the main antler beams at the widest place . This measurement is to be at a right angle to the longitudinal axis of the skull, and parallel to its horizontal axis .
VI . TOTAL SCORE
Total all measurements . When measuring in inches, record fractions in 1/8ths of an inch . Record metric measurements to 0 .1 cm . If antlers are in velvet, deduct 2% from total score .
SUPPLEMENTAL INFORMATION
Record the total number of points (all tines plus beam tip) on each antler .
(Fig . 7)
(Fig . 6)
(Fig . 4)
(Fig . 3)
(Fig . 5)
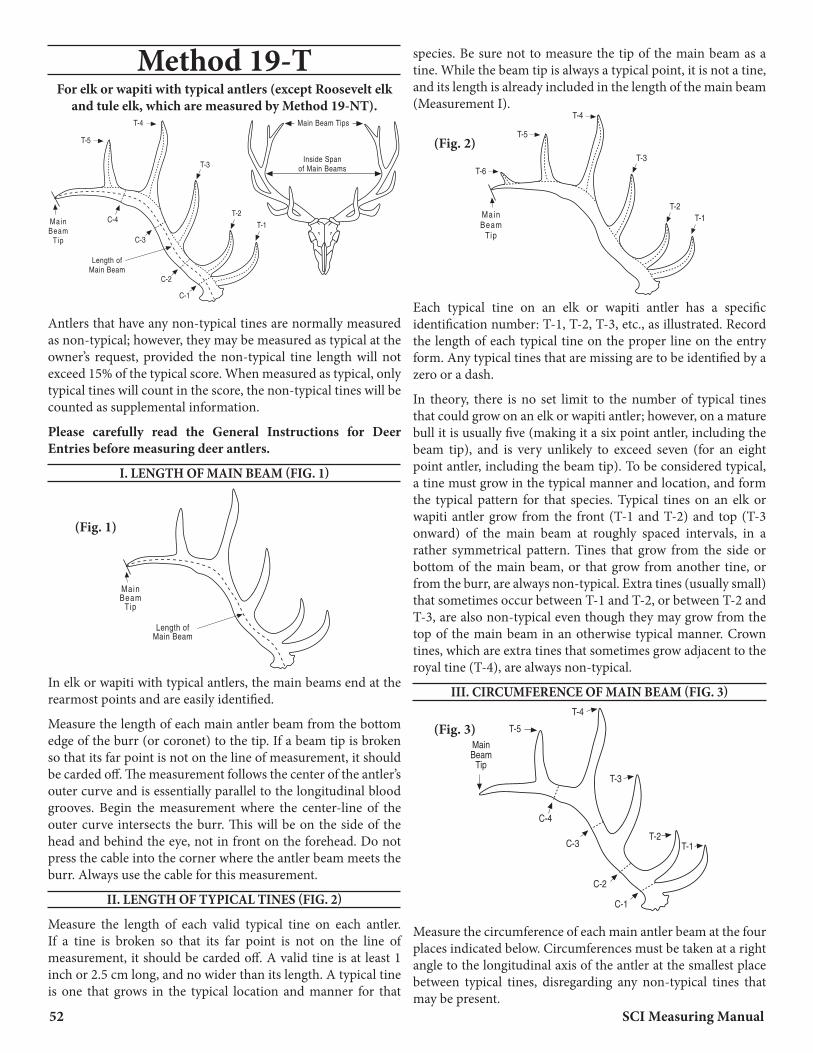
52 SCI Measuring Manual
Method 19-T For elk or wapiti with typical antlers (except Roosevelt elk
and tule elk, which are measured by Method 19-NT) .
Antlers that have any non-typical tines are normally measured as non-typical; however, they may be measured as typical at the owner’s request, provided the non-typical tine length will not exceed 15% of the typical score . When measured as typical, only typical tines will count in the score, the non-typical tines will be counted as supplemental information .
Please carefully read the General Instructions for Deer Entries before measuring deer antlers .
I . LENGTH OF MAIN BEAM (FIG . 1)
In elk or wapiti with typical antlers, the main beams end at the rearmost points and are easily identified .
Measure the length of each main antler beam from the bottom edge of the burr (or coronet) to the tip . If a beam tip is broken so that its far point is not on the line of measurement, it should be carded off . The measurement follows the center of the antler’s outer curve and is essentially parallel to the longitudinal blood grooves . Begin the measurement where the center-line of the outer curve intersects the burr . This will be on the side of the head and behind the eye, not in front on the forehead . Do not press the cable into the corner where the antler beam meets the burr . Always use the cable for this measurement .
II . LENGTH OF TYPICAL TINES (FIG . 2)
Measure the length of each valid typical tine on each antler . If a tine is broken so that its far point is not on the line of measurement, it should be carded off . A valid tine is at least 1 inch or 2 .5 cm long, and no wider than its length . A typical tine is one that grows in the typical location and manner for that
species . Be sure not to measure the tip of the main beam as a tine . While the beam tip is always a typical point, it is not a tine, and its length is already included in the length of the main beam (Measurement I) .
Each typical tine on an elk or wapiti antler has a specific identification number: T-1, T-2, T-3, etc ., as illustrated . Record the length of each typical tine on the proper line on the entry form . Any typical tines that are missing are to be identified by a zero or a dash .
In theory, there is no set limit to the number of typical tines that could grow on an elk or wapiti antler; however, on a mature bull it is usually five (making it a six point antler, including the beam tip), and is very unlikely to exceed seven (for an eight point antler, including the beam tip) . To be considered typical, a tine must grow in the typical manner and location, and form the typical pattern for that species . Typical tines on an elk or wapiti antler grow from the front (T-1 and T-2) and top (T-3 onward) of the main beam at roughly spaced intervals, in a rather symmetrical pattern . Tines that grow from the side or bottom of the main beam, or that grow from another tine, or from the burr, are always non-typical . Extra tines (usually small) that sometimes occur between T-1 and T-2, or between T-2 and T-3, are also non-typical even though they may grow from the top of the main beam in an otherwise typical manner . Crown tines, which are extra tines that sometimes grow adjacent to the royal tine (T-4), are always non-typical .
III . CIRCUMFERENCE OF MAIN BEAM (FIG . 3)
Measure the circumference of each main antler beam at the four places indicated below . Circumferences must be taken at a right angle to the longitudinal axis of the antler at the smallest place between typical tines, disregarding any non-typical tines that may be present .
(Fig . 1)
(Fig . 2)
(Fig . 3)

SCI Measuring Manual 53
C-1 . Between T-1 and T-2 . Measure the circumference of the main antler beam at the smallest place between the first typical (or brow) tine (T-1) and the second typical (or bez, or bay) tine (T-2) . If T-1 is absent, measure at the smallest place between the burr and T-2 . If T-2 is absent, measure at the smallest place between T-1 and the third typical (or trez, or tray) tine (T-3), which will make this measurement the same as C-2 .
C-2 . Between T-2 and T-3 . Measure the circumference of the main antler beam at the smallest place between the second typical (or bez, or bay) tine (T-2) and the third typical (or trez, or tray) tine (T-3) . If T-2 is absent, measure at the smallest place between the first typical (or brow) tine (T-1) and T-3, which will make this measurement the same as C-1 . If T-3 is absent, measure at the smallest place between T-2 and the fourth typical (or royal) tine (T-4), which will make this measurement the same as C-3 .
C-3 . Between T-3 and T-4 . Measure the circumference of the main antler beam at the smallest place between the third typical (or trez, or tray) tine (T-3) and the fourth typical (or royal) tine (T-4) . If T-3 is absent, measure at the smallest place between the second typical (or bez, or bay) tine (T-2) and T-4, which will make this measurement the same as C-2 . If T-4 is absent, measure at the smallest place between T-3 and the fifth typical tine (T-5), making this measurement the same as C-4 .
C-4 . Between T-4 and T-5 . Measure the circumference of the main antler beam at the smallest place between the fourth typical (or royal) tine (T-4) and the fifth typical tine (T-5) . If T-5 is absent, measure halfway between the center of the base of T-4 and the beam tip . If T-4 is absent, measure at the smallest place between the third typical (or trez, or tray) tine (T-3) and T-5, making this measurement the same as C-3 .
IV . INSIDE SPAN OF MAIN BEAMS (FIG . 4)
Measure the inside span of the main antler beams at the widest place . This measurement should be at a right angle to the longitudinal axis of the skull, and parallel to its horizontal axis .
V . TOTAL SCORE
Total all measurements . When measuring in inches, record fractions in 1/8ths of an inch . Record metric measurements to 0 .1 cm . If antlers are in velvet, deduct 2% from total score .
SUPPLEMENTAL INFORMATION
Record the length of each non-typical tine, if any are present . Number them in sequence, starting at the base of each antler: NT-1, NT-2, etc . Record the number of typical points (typical tines plus beam tip) on each antler . Record the number of non-typical tines (if any are present) on each antler . Record the total number of points (all tines plus beam tip) on each antler .
(Fig . 4)
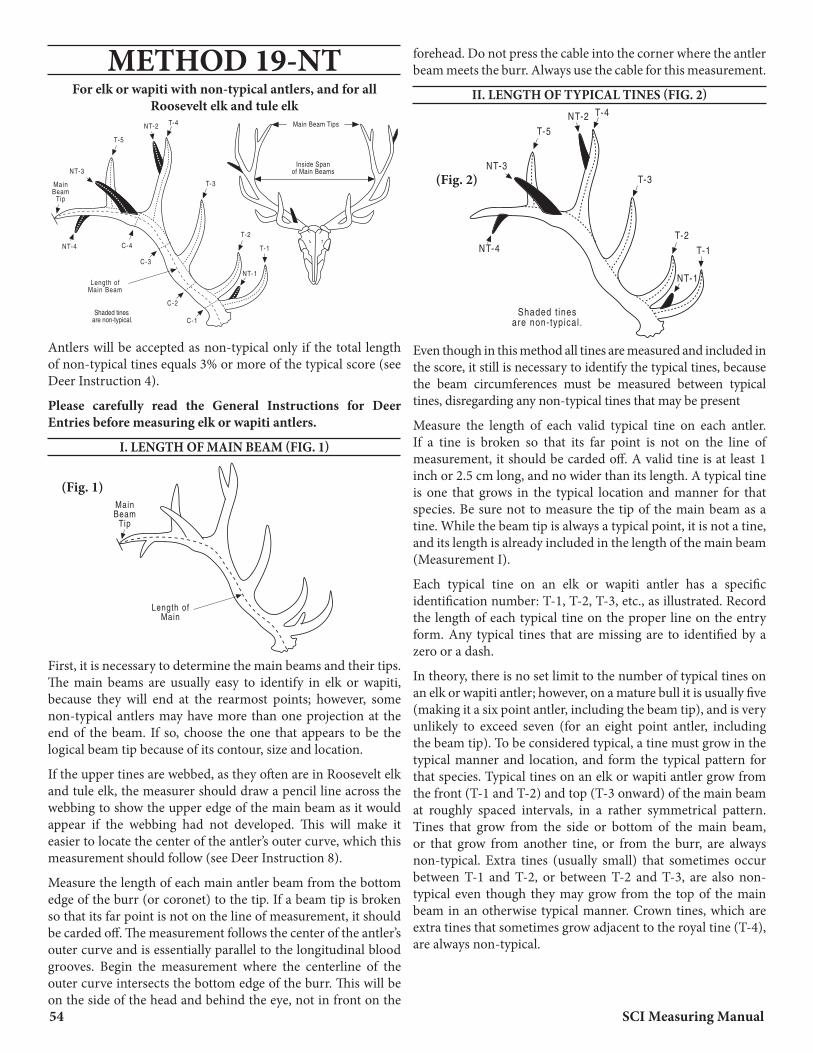
54 SCI Measuring Manual
METHOD 19-NT For elk or wapiti with non-typical antlers, and for all
Roosevelt elk and tule elk
Antlers will be accepted as non-typical only if the total length of non-typical tines equals 3% or more of the typical score (see Deer Instruction 4) .
Please carefully read the General Instructions for Deer Entries before measuring elk or wapiti antlers .
I . LENGTH OF MAIN BEAM (FIG . 1)
First, it is necessary to determine the main beams and their tips . The main beams are usually easy to identify in elk or wapiti, because they will end at the rearmost points; however, some non-typical antlers may have more than one projection at the end of the beam . If so, choose the one that appears to be the logical beam tip because of its contour, size and location .
If the upper tines are webbed, as they often are in Roosevelt elk and tule elk, the measurer should draw a pencil line across the webbing to show the upper edge of the main beam as it would appear if the webbing had not developed . This will make it easier to locate the center of the antler’s outer curve, which this measurement should follow (see Deer Instruction 8) .
Measure the length of each main antler beam from the bottom edge of the burr (or coronet) to the tip . If a beam tip is broken so that its far point is not on the line of measurement, it should be carded off . The measurement follows the center of the antler’s outer curve and is essentially parallel to the longitudinal blood grooves . Begin the measurement where the centerline of the outer curve intersects the bottom edge of the burr . This will be on the side of the head and behind the eye, not in front on the
forehead . Do not press the cable into the corner where the antler beam meets the burr . Always use the cable for this measurement .
II . LENGTH OF TYPICAL TINES (FIG . 2)
Even though in this method all tines are measured and included in the score, it still is necessary to identify the typical tines, because the beam circumferences must be measured between typical tines, disregarding any non-typical tines that may be present
Measure the length of each valid typical tine on each antler . If a tine is broken so that its far point is not on the line of measurement, it should be carded off . A valid tine is at least 1 inch or 2 .5 cm long, and no wider than its length . A typical tine is one that grows in the typical location and manner for that species . Be sure not to measure the tip of the main beam as a tine . While the beam tip is always a typical point, it is not a tine, and its length is already included in the length of the main beam (Measurement I) .
Each typical tine on an elk or wapiti antler has a specific identification number: T-1, T-2, T-3, etc ., as illustrated . Record the length of each typical tine on the proper line on the entry form . Any typical tines that are missing are to identified by a zero or a dash .
In theory, there is no set limit to the number of typical tines on an elk or wapiti antler; however, on a mature bull it is usually five (making it a six point antler, including the beam tip), and is very unlikely to exceed seven (for an eight point antler, including the beam tip) . To be considered typical, a tine must grow in the typical manner and location, and form the typical pattern for that species . Typical tines on an elk or wapiti antler grow from the front (T-1 and T-2) and top (T-3 onward) of the main beam at roughly spaced intervals, in a rather symmetrical pattern . Tines that grow from the side or bottom of the main beam, or that grow from another tine, or from the burr, are always non-typical . Extra tines (usually small) that sometimes occur between T-1 and T-2, or between T-2 and T-3, are also non-typical even though they may grow from the top of the main beam in an otherwise typical manner . Crown tines, which are extra tines that sometimes grow adjacent to the royal tine (T-4), are always non-typical .
(Fig . 1)
(Fig . 2)

SCI Measuring Manual 55
III . LENGTH OF NON-TYPICAL TINES (FIG . 3)
Measure the length of each valid non-typical tine on each antler . If a tine is broken so that its far point is not on the line of measurement, it should be carded off . A valid tine must be at least one inch or 2 .5 cm long, and no wider than its length . Non-typical tines are those that do not qualify as typical .
If the upper tines are palmated, please see Deer Instruction 8 for how to measure them .
Record the length of each valid non-typical tine on the proper line on the entry form . They are to be numbered in sequence, starting at the base of each antler .
IV . CIRCUMFERENCE OF MAIN BEAM (FIG . 4)
Measure the circumference of each main antler beam at the four places indicated below . Circumferences must be taken at a right angle to the longitudinal axis of the antler at the smallest place between typical tines, disregarding the non-typical tines .
C-1 . Between T-1 and T-2 . Measure the circumference of the main antler beam at the smallest place between the first typical (or brow) tine (T-1) and the second typical (or bez, or bay) tine (T-2) . If T-1 is absent, measure at the smallest place between the burr and T-2 . If T-2 is absent, measure at the smallest place between T-1 and the third typical (or trez, or tray) tine (T-3), which will make this measurement the same as C-2 .
C-2 . Between T-2 and T-3 . Measure the circumference of the main antler beam at the smallest place between the second typical (or bez, or bay) tine (T-2) and the third typical (or trez, or tray) tine (T-3) . If T-2 is absent, measure at the smallest place
between the first typical (or brow) tine (T-1) and T-3, which will make this measurement the same as C-1 . If T-3 is absent, measure at the smallest place between T-2 and the fourth typical (or royal) tine (T-4), which will make this measurement the same as C-3 .
C-3 . Between T-3 and T-4 . Measure the circumference of the main antler beam at the smallest place between the third typical (or trez, or tray) tine (T-3) and the fourth typical (or royal) tine (T-4) . If T-3 is absent, measure at the smallest place between the second typical (or bez, or bay) tine (T-2) and T-4, which will make this measurement the same as C-2 . If T-4 is absent, measure at the smallest place between T-3 and the fifth typical tine (T-5), making this measurement the same as C-4 .
C-4 . Between T-4 and T-5 . Measure the circumference of the main antler beam at the smallest place between the fourth typical (or royal) tine (T-4) and the fifth typical tine (T-5) . If T-5 is absent, measure halfway between the center of the base of T-4 and the beam tip . If T-4 is absent, measure at the smallest place between the third typical (or trez, or tray) tine (T-3) and T-5, making this measurement the same as C-3 .
If the upper tines are palmated, please see Deer Instruction 8 for how to measure C-4 .
V . INSIDE SPAN OF MAIN BEAMS (FIG . 5)
Measure the inside span of the main antler beams at the widest place . This measurement should be at a right angle to the longitudinal axis of the skull, and parallel to its horizontal axis .
VI . TOTAL SCORE
Total all measurements . When measuring in inches, record fractions in 1/8ths of an inch . Record metric measurements to 0 .1 cm . If antlers are in velvet, deduct 2% from total score .
SUPPLEMENTAL INFORMATION
Record the total number of points (all tines plus beam tip) on each antler .
(Fig . 3)
(Fig . 4)
(Fig . 5)

56 SCI Measuring Manual
Method 20 For red deer and related deer . Includes Bukharan deer, Yarkand deer, hangul, Tibetan deer, shou, McNeill deer
and Gansu deer .
1st Quarter
2nd Quarter
3rd Quarter
1st Quarter
2nd Quarter
3rd Quarter
SCI does not have separate categories for typical and non-typical antlers in these species, so all tines will count in the score . The following instructions are written for red deer, as their antlers are the most complex; however, their relatives (which tend to have simpler, uncrowned antlers, usually with five points to a side) are measured in the same way .
Please carefully read the general instructions for deer entries before measuring deer antlers . See additional SCI Complex Antler Measuring Supplement for measuring complex Red Deer and Non-typical White-tailed Deer .
I . LENGTH OF MAIN BEAM (FIG . 1)
First, it is necessary to determine the main beams and their tips . In most red deer, the main beams will be easy to identify and the beam tips will clearly be the rearmost points . However, when an antler has complex crown points, it may be difficult to decide which one should be the tip of the main beam . When in doubt, the measurer should choose the one that appears to be the logical beam tip because of its contour, size and location(Fig . 2) .
If the upper tines are webbed, the measurer should draw a pencil line across the webbing to show the upper edge of the main beam as it would appear if the webbing had not developed . This
will make it easier to locate the center of the antler’s outer curve, which this measurement should follow (see Deer Instruction 8) .
Measure the length of each main antler beam from the bottom edge of the burr (or coronet) to the tip . If a beam tip is broken so that its far point is not on the line of measurement, it should be carded off . The measurement follows the center of the outer curve and is essentially parallel to the longitudinal blood grooves . Begin the measurement where the center-line of the outer curve intersects the burr . This will be on the side of the head and behind the eye, not in front on the forehead . Do not press the cable into the corner where the antler beam meets the burr . Always use the cable for this measurement .
II . LENGTH OF TYPICAL TINES ON LOWER MAIN BEAM (FIG . 2)
Even though in this method all tines are measured and included in the score, it is still necessary to identify the typical tines on the lower main antler beam (below the top or crown points), because the beam circumferences must be measured between typical tines, disregarding any non-typical tines that may be present .
Measure the length of each valid typical tine on the lower main beam . If a tine is broken so that its far point is not on the line of measurement, it should be carded off . A valid tine must be at least 1 inch or 2 .5 cm long, and no wider than its length . A red deer antler can have no more than three typical tines on the lower beam . To be considered typical, they must grow from the front or top of the beam in the typical manner and location,and form the typical pattern for the species . The first typical (or brow) tine (T-1) sprouts close to the burr and points forward and upward . The second typical (or bez, or bay) tine (T-2) grows close to T-1 and also points forward and upward . The third typical (or trez, or tray) tine (T-3) grows well up the antler beam from T-2 and points outward and upward . It is common for individual deer to lack the bez tine (T-2) on one or both antlers . It is important for the measurer to identify the typical T-1, T-2 and T-3 tines on the lower beam so that the two beam circumferences will be measured at the correct places .
Record the length of each valid typical lower-beam tine on the proper line on the entry form . Any typical tines missing from the lower beam are to be identified by a zero or a dash .
(Fig . 1)
(Fig . 2)
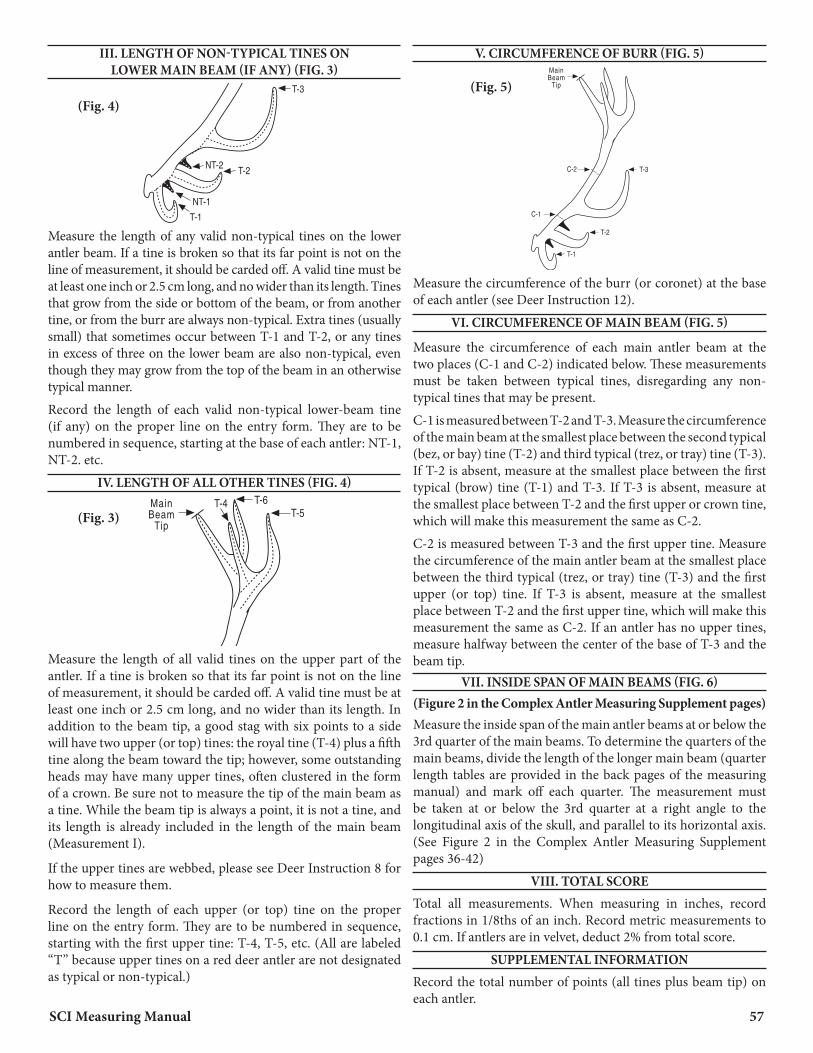
SCI Measuring Manual 57
III . LENGTH OF NON-TYPICAL TINES ON LOWER MAIN BEAM (IF ANY) (FIG . 3)
Measure the length of any valid non-typical tines on the lower antler beam . If a tine is broken so that its far point is not on the line of measurement, it should be carded off . A valid tine must be at least one inch or 2 .5 cm long, and no wider than its length . Tines that grow from the side or bottom of the beam, or from another tine, or from the burr are always non-typical . Extra tines (usually small) that sometimes occur between T-1 and T-2, or any tines in excess of three on the lower beam are also non-typical, even though they may grow from the top of the beam in an otherwise typical manner .
Record the length of each valid non-typical lower-beam tine (if any) on the proper line on the entry form . They are to be numbered in sequence, starting at the base of each antler: NT-1, NT-2 . etc .
IV . LENGTH OF ALL OTHER TINES (FIG . 4)
Measure the length of all valid tines on the upper part of the antler . If a tine is broken so that its far point is not on the line of measurement, it should be carded off . A valid tine must be at least one inch or 2 .5 cm long, and no wider than its length . In addition to the beam tip, a good stag with six points to a side will have two upper (or top) tines: the royal tine (T-4) plus a fifth tine along the beam toward the tip; however, some outstanding heads may have many upper tines, often clustered in the form of a crown . Be sure not to measure the tip of the main beam as a tine . While the beam tip is always a point, it is not a tine, and its length is already included in the length of the main beam (Measurement I) .
If the upper tines are webbed, please see Deer Instruction 8 for how to measure them .
Record the length of each upper (or top) tine on the proper line on the entry form . They are to be numbered in sequence, starting with the first upper tine: T-4, T-5, etc . (All are labeled “T” because upper tines on a red deer antler are not designated as typical or non-typical .)
V . CIRCUMFERENCE OF BURR (FIG . 5)
Measure the circumference of the burr (or coronet) at the base of each antler (see Deer Instruction 12) .
VI . CIRCUMFERENCE OF MAIN BEAM (FIG . 5)
Measure the circumference of each main antler beam at the two places (C-1 and C-2) indicated below . These measurements must be taken between typical tines, disregarding any non-typical tines that may be present .
C-1 is measured between T-2 and T-3 . Measure the circumference of the main beam at the smallest place between the second typical (bez, or bay) tine (T-2) and third typical (trez, or tray) tine (T-3) . If T-2 is absent, measure at the smallest place between the first typical (brow) tine (T-1) and T-3 . If T-3 is absent, measure at the smallest place between T-2 and the first upper or crown tine, which will make this measurement the same as C-2 .
C-2 is measured between T-3 and the first upper tine . Measure the circumference of the main antler beam at the smallest place between the third typical (trez, or tray) tine (T-3) and the first upper (or top) tine . If T-3 is absent, measure at the smallest place between T-2 and the first upper tine, which will make this measurement the same as C-2 . If an antler has no upper tines, measure halfway between the center of the base of T-3 and the beam tip .
VII . INSIDE SPAN OF MAIN BEAMS (FIG . 6) (Figure 2 in the Complex Antler Measuring Supplement pages)Measure the inside span of the main antler beams at or below the 3rd quarter of the main beams . To determine the quarters of the main beams, divide the length of the longer main beam (quarter length tables are provided in the back pages of the measuring manual) and mark off each quarter . The measurement must be taken at or below the 3rd quarter at a right angle to the longitudinal axis of the skull, and parallel to its horizontal axis . (See Figure 2 in the Complex Antler Measuring Supplement pages 36-42)
VIII . TOTAL SCORE Total all measurements . When measuring in inches, record fractions in 1/8ths of an inch . Record metric measurements to 0 .1 cm . If antlers are in velvet, deduct 2% from total score .
SUPPLEMENTAL INFORMATION Record the total number of points (all tines plus beam tip) on each antler .
(Fig . 4) (Fig . 5)
(Fig . 3)

58 SCI Measuring Manual
Method 21-T For axis deer, hog deer, sambar, rusa deer, roe deer
and sika deer with typical antlersThis method is used for axis deer, hog deer, sambar, rusa deer and roe deer, which typically have a 3x3 antler configuration, and for sika deer, which typically have a 4x4 configuration . Such 3x3 and 4x4 antlers, provided they have grown in the typical manner and location and exhibit the typical pattern for that species, are considered typical and should be measured by Method 21-T . But any additional tines are non-typical, and antlers with even one non-typical tine may be considered non-typical and could be measured by Method 21-NT if they pass the 3% non-typical rule .
Please carefully read the general instructions for deer entries before measuring deer antlers .
I . LENGTH OF MAIN BEAM
First, it is necessary to determine the main antler beams and their tips, and this varies with the species . It is important that the main beams in each species are always designated in the same way, because the inside span measurement (Measurement V) is taken between the main beams and it must be done consistently for all antlers of that species .
In typical hog deer and roe deer (Fig . 1), the main beams end at the outer top points . These are easily identified, because the second tine is much shorter than the beam tip and is directed inward and backward instead of upward .
In typical axis deer, sambar and sika deer (Fig . 2), the SCI rule is that the main beams end at the outer top points . This rule must
always be followed, even though many sambar antlers, some sika deer antlers, and occasional axis deer antlers will have inner tops that are higher than the outer tops .
In typical rusa deer (Fig . 3), the SCI rule is that the main beams end at the inner top points, even though an occasional head may have outer tops that are higher .
Measure the length of each main antler beam from the bottom edge of the burr (or coronet) to the tip . If a beam tip is broken so that its far point is not on the line of measurement, it should be carded off . The measurement follows the center of the antler’s outer curve and is essentially parallel to the longitudinal blood grooves . Begin the measurement where the center-line of the outer curve intersects the bottom edge of the burr . This will be on the side of the head and behind the eye, not in front on the forehead . Do not press the cable into the corner where the antler beam meets the burr . Always use the cable for this measurement .
II . LENGTH OF TYPICAL TINES
Measure the length of each valid typical tine on each antler . If a tine is broken so that its far point is not on the line of measurement, it should be carded off . A valid tine must be at least one inch or 2 .5 cm long, and no wider than its length . A typical tine is one that grows in the typical location and manner for that species . Be sure not to measure the tip of the main beam as a tine . While the beam tip is always a typical point, it is not a tine, and its length is already included in the length of the main beam (Measurement I) .
Record the length of each valid typical tine on the proper line on the entry form . Tines should be numbered in sequence, beginning at the base of the antler . Any typical tines that are missing are to be identified by a zero or a dash .
Hog deer, roe deer, axis deer, sambar and rusa deer can have only two typical tines per antler, or three total points per antler (two tines plus the beam tip) (Fig . 4, 5 & 6) .
ROEDEER
SIKADEER
RUSADEER
(Fig . 1)
(Fig . 3)
(Fig . 2)

SCI Measuring Manual 59
Typical tines in hog deer consist of a brow tine (T-1) that grows up from the burr, and a second tine (T-2) that grows from the upper part of the main beam, but is much shorter than the beam tip and is directed inward and backward .
In roe deer (Fig . 5), the first typical tine (T-1) sprouts well above the burr and grows upward in line with the beam . The second typical tine (T-2) grows from the upper part of the main beam and points inward and backward . Typical tines in axis deer and sambar include a good-sized brow tine (T-1) that sprouts close to the burr and grows upward and outward, and an inner top tine (T-2) that branches from the upper part of the main beam and grows inward and upward to form a forward-facing terminal fork (Fig . 4) . In sambar, the inner top tines are usually lower than the beam tips, but they can be higher or the same height .
Typical tines in rusa deer (Fig . 6) consist of a good-sized brow tine (T-1) that grows outward and upward from close to the
burr, and an outer top tine (T-2) that branches forward, outward and upward from less than halfway up the main beam to form a terminal fork that is more-or-less parallel to the longitudinal axis of the skull . T-2 is usually much shorter than the main beam .
In contrast, a sika deer (Fig . 7) can have three (and only three) typical tines per antler, for a total of four points on a side, including the beam tip . They are a strong brow tine (T-1) that grows close to the burr, a small second tine (T-2) that grows well up the main beam, and an inner top tine (T-3) that grows inward, forward and upward to form a forward-facing terminal fork . In sika deer, the inner tips are usually much shorter than the beam tips, but in some heads they may be higher .
(FIG . 10) III . CIRCUMFERENCE OF BURR (FIG . 8, 9 & 10)
Measure the circumference of the burr (or coronet) at the base of each antler (see Deer Instruction 12) .
IV . CIRCUMFERENCE OF MAIN BEAM
In these species, one circumference of each main antler beam is made at the location indicated below .
In axis deer, hog deer, sambar, rusa deer (Fig . 8) and sika deer (Fig . 9), measure between T-1 and T-2 . Measure the circumference of the main beam at a right angle to its longitudinal axis at the smallest place between the first typical (or brow) tine (T-1) and the second typical tine (T-2) . If T-1 (brow) is missing, measure at the smallest place between the burr and T-2 . If T-2 is missing, measure halfway between T-1 and the beam tip (except in sika deer (Fig . 9) measure at the smallest place between T-1 and T-3) .
AXISDEER
ROEDEER
RUSADEER
SIKADEER
(Fig . 4)
(Fig . 5)
(Fig . 6)
(Fig . 7)
RUSADEER
(Fig . 8)

60 SCI Measuring Manual
In roe deer (Fig . 10), measure between the burr and T-1 . Measure the circumference of the main beam at a right angle to its longitudinal axis at the smallest place between the burr (or coronet) and the first typical tine (T-1) .
V . INSIDE SPAN OF MAIN BEAMS (FIG . 8, 9 & 10)
Measure the inside span of the main antler beams at the widest place . Be careful to take this measurement between the main beams as they are designated in Measurement I; do not measure between tines . Measure at a right angle to the longitudinal axis of the skull and parallel to its horizontal axis .
VI . TOTAL SCORE
Total all measurements . When measuring in inches, record fractions in 1/8ths of an inch . Record metric measurements to 0 .1 cm . If antlers are in velvet, deduct 2% from total score .
SUPPLEMENTAL INFORMATION
Record the number of typical points (typical tines plus beam tip) on each antler .
Method 21-NT For axis deer, hog deer, sambar, rusa deer, roe deer and sika
deer with non-typical antlers In this method, all tines will count in the score, regardless of whether they are typical or non-typical . Antlers with tines in excess of 4x4 in sika deer and 3x3 in the other species named above may be considered non-typical if they pass the 3% non-typical rule and could be measured by this method .
Please carefully read the general instructions for deer entries before measuring deer antlers .
(Fig . 10)
ROEDEER
SIKADEER
(Fig . 9)
ROEDEER
SIKADEER
RUSADEER
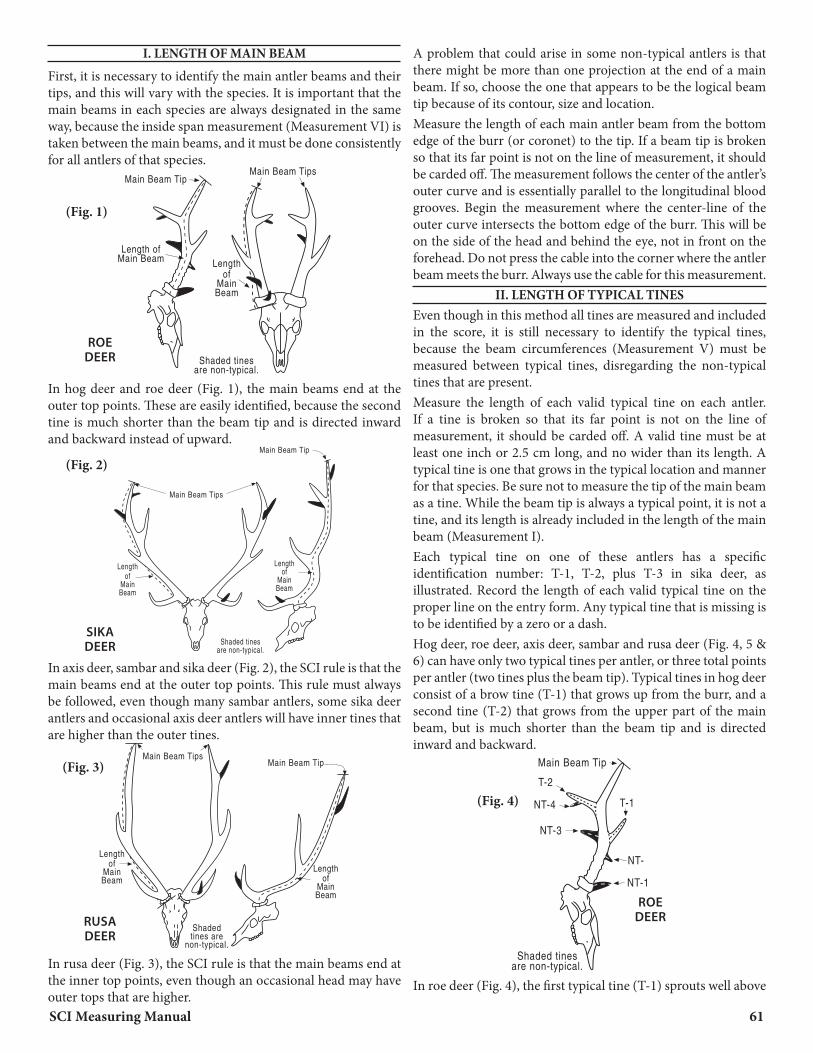
SCI Measuring Manual 61
I . LENGTH OF MAIN BEAM
First, it is necessary to identify the main antler beams and their tips, and this will vary with the species . It is important that the main beams in each species are always designated in the same way, because the inside span measurement (Measurement VI) is taken between the main beams, and it must be done consistently for all antlers of that species .
In hog deer and roe deer (Fig . 1), the main beams end at the outer top points . These are easily identified, because the second tine is much shorter than the beam tip and is directed inward and backward instead of upward .
In axis deer, sambar and sika deer (Fig . 2), the SCI rule is that the main beams end at the outer top points . This rule must always be followed, even though many sambar antlers, some sika deer antlers and occasional axis deer antlers will have inner tines that are higher than the outer tines .
In rusa deer (Fig . 3), the SCI rule is that the main beams end at the inner top points, even though an occasional head may have outer tops that are higher .
A problem that could arise in some non-typical antlers is that there might be more than one projection at the end of a main beam . If so, choose the one that appears to be the logical beam tip because of its contour, size and location . Measure the length of each main antler beam from the bottom edge of the burr (or coronet) to the tip . If a beam tip is broken so that its far point is not on the line of measurement, it should be carded off . The measurement follows the center of the antler’s outer curve and is essentially parallel to the longitudinal blood grooves . Begin the measurement where the center-line of the outer curve intersects the bottom edge of the burr . This will be on the side of the head and behind the eye, not in front on the forehead . Do not press the cable into the corner where the antler beam meets the burr . Always use the cable for this measurement .
II . LENGTH OF TYPICAL TINES Even though in this method all tines are measured and included in the score, it is still necessary to identify the typical tines, because the beam circumferences (Measurement V) must be measured between typical tines, disregarding the non-typical tines that are present . Measure the length of each valid typical tine on each antler . If a tine is broken so that its far point is not on the line of measurement, it should be carded off . A valid tine must be at least one inch or 2 .5 cm long, and no wider than its length . A typical tine is one that grows in the typical location and manner for that species . Be sure not to measure the tip of the main beam as a tine . While the beam tip is always a typical point, it is not a tine, and its length is already included in the length of the main beam (Measurement I) . Each typical tine on one of these antlers has a specific identification number: T-1, T-2, plus T-3 in sika deer, as illustrated . Record the length of each valid typical tine on the proper line on the entry form . Any typical tine that is missing is to be identified by a zero or a dash . Hog deer, roe deer, axis deer, sambar and rusa deer (Fig . 4, 5 & 6) can have only two typical tines per antler, or three total points per antler (two tines plus the beam tip) . Typical tines in hog deer consist of a brow tine (T-1) that grows up from the burr, and a second tine (T-2) that grows from the upper part of the main beam, but is much shorter than the beam tip and is directed inward and backward .
In roe deer (Fig . 4), the first typical tine (T-1) sprouts well above
(Fig . 1)
(Fig . 2)
(Fig . 3)
ROEDEER
SIKADEER
RUSADEER
(Fig . 4)
ROEDEER
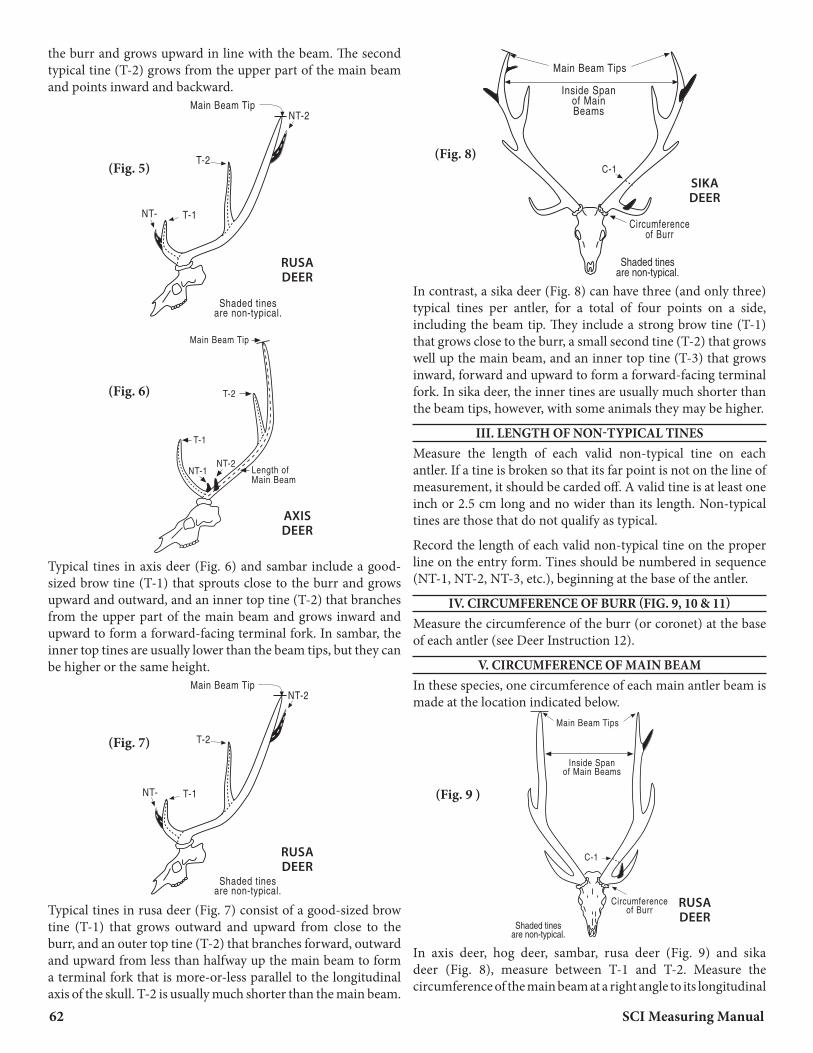
62 SCI Measuring Manual
the burr and grows upward in line with the beam . The second typical tine (T-2) grows from the upper part of the main beam and points inward and backward .
Typical tines in axis deer (Fig . 6) and sambar include a good-sized brow tine (T-1) that sprouts close to the burr and grows upward and outward, and an inner top tine (T-2) that branches from the upper part of the main beam and grows inward and upward to form a forward-facing terminal fork . In sambar, the inner top tines are usually lower than the beam tips, but they can be higher or the same height .
Typical tines in rusa deer (Fig . 7) consist of a good-sized brow tine (T-1) that grows outward and upward from close to the burr, and an outer top tine (T-2) that branches forward, outward and upward from less than halfway up the main beam to form a terminal fork that is more-or-less parallel to the longitudinal axis of the skull . T-2 is usually much shorter than the main beam .
In contrast, a sika deer (Fig . 8) can have three (and only three) typical tines per antler, for a total of four points on a side, including the beam tip . They include a strong brow tine (T-1) that grows close to the burr, a small second tine (T-2) that grows well up the main beam, and an inner top tine (T-3) that grows inward, forward and upward to form a forward-facing terminal fork . In sika deer, the inner tines are usually much shorter than the beam tips, however, with some animals they may be higher .
III . LENGTH OF NON-TYPICAL TINES Measure the length of each valid non-typical tine on each antler . If a tine is broken so that its far point is not on the line of measurement, it should be carded off . A valid tine is at least one inch or 2 .5 cm long and no wider than its length . Non-typical tines are those that do not qualify as typical .
Record the length of each valid non-typical tine on the proper line on the entry form . Tines should be numbered in sequence (NT-1, NT-2, NT-3, etc .), beginning at the base of the antler .
IV . CIRCUMFERENCE OF BURR (FIG . 9, 10 & 11) Measure the circumference of the burr (or coronet) at the base of each antler (see Deer Instruction 12) .
V . CIRCUMFERENCE OF MAIN BEAM In these species, one circumference of each main antler beam is made at the location indicated below .
In axis deer, hog deer, sambar, rusa deer (Fig . 9) and sika deer (Fig . 8), measure between T-1 and T-2 . Measure the circumference of the main beam at a right angle to its longitudinal
(Fig . 5)
(Fig . 6)
(Fig . 7)
RUSADEER
AXISDEER
RUSADEER
(Fig . 8)
(Fig . 9 )
RUSADEER
SIKADEER

SCI Measuring Manual 63
axis at the smallest place between the first typical (or brow) tine (T-1) and the second typical tine (T-2) . If T-1 (brow) is missing, measure at the smallest place between the burr and T-2 . If T-2 is missing, measure halfway between T-1 and the beam tip (except in sika deer, measure at the smallest place between T-1 and T-3) . Be sure to measure between typical tines, disregarding any non-typical tines that may be present .
In roe deer (Fig . 11), measure between the burr and T-1 . Measure the circumference of the main beam at a right angle to its longitudinal axis at the smallest place between the burr (or coronet) and the first typical tine (T-1), disregarding any non-typical tines that may be present .
VI . INSIDE SPAN OF MAIN BEAMS (FIG . 9, 10 & 11) Measure the inside span of the main antler beams at the widest place . Be careful to take the measurement between the main beams as designated in Measurement I; do not measure between tines . Measure at a right angle to the longitudinal axis of the skull and parallel to its horizontal axis .
VII . TOTAL SCORE Total all measurements . When measuring in inches, record fractions in 1/8ths of an inch . Record metric measurements to 0 .1 cm . If antlers are in velvet, deduct 2% from total score .
SUPPLEMENTAL INFORMATION Record the total number of points (all tines plus beam tip) on each antler .
Method 22 For the larger deer not specified in other methods . Includes
barasingha, white-lipped deer, brow-antlered deer, Père David deer, marsh deer, pampas deer and huemul .(Do not use this method for muntjac, brocket deer, pudu or tufted
deer, because they are measured by Method 26 .)
SCI does not have separate categories for typical and non-typical antlers in these species, so all tines will count in the score .
Please carefully read the general instructions for deer entries before measuring deer antlers .
I . LENGTH OF MAIN BEAM (FIG . 1)
First determine which are the main beams and which are their tips . In white-lipped deer, marsh deer, pampas deer and huemul the main beams will end at the rearmost point or at one of the rearmost points . In barasingha, brow-antlered deer and Père David deer the main beams will end at the front points . It usually will be apparent which are the main beams, but if in doubt follow the line of strongest antler growth .
Measure the length of the main antler beam from the bottom edge of the burr to the tip . If a beam tip is broken so that its far point is not on the line of measurement, it should be carded off .The measurement follows the center of the antler’s outer curve and is essentially parallel to the longitudinal blood grooves . Begin the measurement where the center-line of the outer curve intersects the bottom edge of the burr . This will be on the side of the head and behind the eye, not in front on the forehead . Do not press the cable into the corner where the antler beam meets the burr . Always use the cable for this measurement .
ROEDEER
(Fig . 11)
PÉREDAVIDDEER
(Fig . 1)

64 SCI Measuring Manual
II . LENGTH OF ALL TINES (FIG . 2)
Measure the length of each valid tine on each antler . If a tine is broken so that its far point is not on the line of measurement, it should be carded off . A valid tine must be at least 1 inch or 2 .5 cm long, and no wider than its length . Be sure not to measure the tip of the main beam as a tine . While the beam tip is always a typical point, it is not a tine, and its length is already included in the length of the main beam (Measurement I) . Record the length of each valid tine on the proper line on the entry form . Tines should be numbered in sequence (T-1, T-2, T-3, etc .), beginning at the base of the antler .
III . CIRCUMFERENCE OF BURR (FIG . 2) Measure the circumference of the burr (or coronet) at the base of each antler (see Deer Instruction 12) .
IV . INSIDE SPAN OF MAIN BEAMS (FIG . 3)
Measure the inside span of the main antler beams at the widest place . Be careful to take this measurement between the main beams as they were designated in Measurement I, and not between tines . Measure at a right angle to the longitudinal axis of the skull and parallel to the horizontal axis .
V . TOTAL SCORE Total all measurements . When measuring in inches, record fractions in 1/8ths of an inch . Record metric measurements to 0 .1 cm . If antlers are in velvet, deduct 2% from total score .
SUPPLEMENTAL INFORMATION Record the total number of points (all tines plus beam tip) on each antler .
Method 23 For caribou and reindeer
I . LENGTH OF MAIN BEAM (FIG . 1)
First, identify the main beams and locate their tips . The main beams will usually curve forward over the head in the shape of the letter “C” and end at the lowest front point, but occasionally they will project backward (as in wapiti and red deer) and end at one of the rear points . If in doubt as to which is the main beam, follow the line of strongest antler growth . If there is more than one point or projection at the end of the beam, choose the one that appears to be the most logical beam tip; it will normally exhibit the strongest growth and provide the longest beam measurement . Please note that the projection chosen as the beam tip must be located at the end of the beam; it must not grow from the top of the beam . (Fig . 2)
PÉREDAVIDDEER
PÉREDAVIDDEER
BARASINGHA
(Fig . 2)
(Fig . 3)
(Fig . 1)
(Fig . 2)

SCI Measuring Manual 65
Measure the length of each main antler beam from the bottom edge of the burr (or coronet) to the tip . If a beam tip is broken so that its far point is not on the line of measurement, it should be carded off . The measurement follows the center of the antler’s outer curve and is essentially parallel to the longitudinal blood grooves . Begin the measurement where the center-line of the outer curve intersects the burr . This will be on the side of the head and behind the eye, not in front on the forehead . Do not press the cable into the corner where the antler meets the burr . Where the antler beam is palmated, the measurement follows the center of the palmation (this is easiest to determine after marking off the tines that grow from the palm edge) . Always use the cable for this measurement .
II . LENGTH OF ALL TINES (FIG . 3)
Measure the length of each valid tine on each antler . If a tine is broken so that its far point is not on the line of measurement, it should be carded off . In this species, a valid tine must be at least 1/2 inch or 1 .3 cm long, and no wider than its length . Please note that while the main beam tip is always considered a point, it is not a tine and must not be measured as one, because its length is already included in the length of the main beam (Measurement I) .
Although caribou antlers (Fig . 4) can show great diversity, they normally grow in a regular pattern . The brow tine (first major tine) on one antler usually is palmated and extends forward over the face as a vertical “shovel .” The brow tine on the other antler is normally a single spike, although sometimes both antlers will have palmated shovels (“double shovels”) . The bez (or bay) tine (second major tine) is usually horizontally palmated on both antlers, but the palmation is less extensive than on the shovel . Palmated brow and bez tines normally have points growing from the edge of the palmation . A palmated brow tine or bez tine is measured as one long tine from its baseline on the main beam
to its tip, which will normally be its farthest projection and will give the greatest length measurement . If there is more than one projection that could qualify as the tip of the tine, the measurer should select the most logical one by virtue of its contour, size and location . The line of measurement should be a smooth line (usually curving) that normally follows the principal blood groove (or grooves) running from the main beam to the tip . If the blood groove is indistinct, the measurer should follow the center of the palmation . A palmated tine should be measured on its outer curve; however, if it has no distinct outer curve, or is S-shaped, measure both sides and record the longer one . All secondary tines that grow from the palm must be measured from the edge of the palm; the palm itself must not be included in these measurements (see Deer Instruction 7) .
A brow tine that develops as a single spike is measured like any other simple tine . Above the bez tine, there is usually (but not always) one more tine on the lower beam . This is the back tine, which, if present, is normally a single spike extending backward .
The upper part of the main beam is usually palmated and will have a number of top tines that mainly grow upward from the palmation . Top tines must be measured from the edge of the palmation; do not include the palmation in the measurement . The top tines will often have secondary tines growing from them; these are measured in the usual way .
Valid tines on caribou and reindeer antlers are not limited to those described above, but may be located almost anywhere . With these antlers, a tine is acceptable wherever it grows as long as it qualifies as valid per General Instruction 28 .
Record the length of each valid tine on the proper line on the entry form . Tines should be numbered in sequence (T-1, T-2, T-3, etc .), beginning at the base of the antler . Please note that the entry form has spaces for 30 tines per antler . If an antler has more than 30 tines, continue this chart on the back of the entry form .
III . CIRCUMFERENCE OF MAIN BEAM (FIG . 5)
Measure the circumference of the main antler beam at the smallest place between the brow tine and the bez tine . If the brow tine is absent, measure the circumference at the smallest place between the burr and the bez tine . If the bez tine is absent, measure at the smallest place between the brow tine and the next tine along the main beam .
(Fig . 3)
(Fig . 4) (Fig . 5)
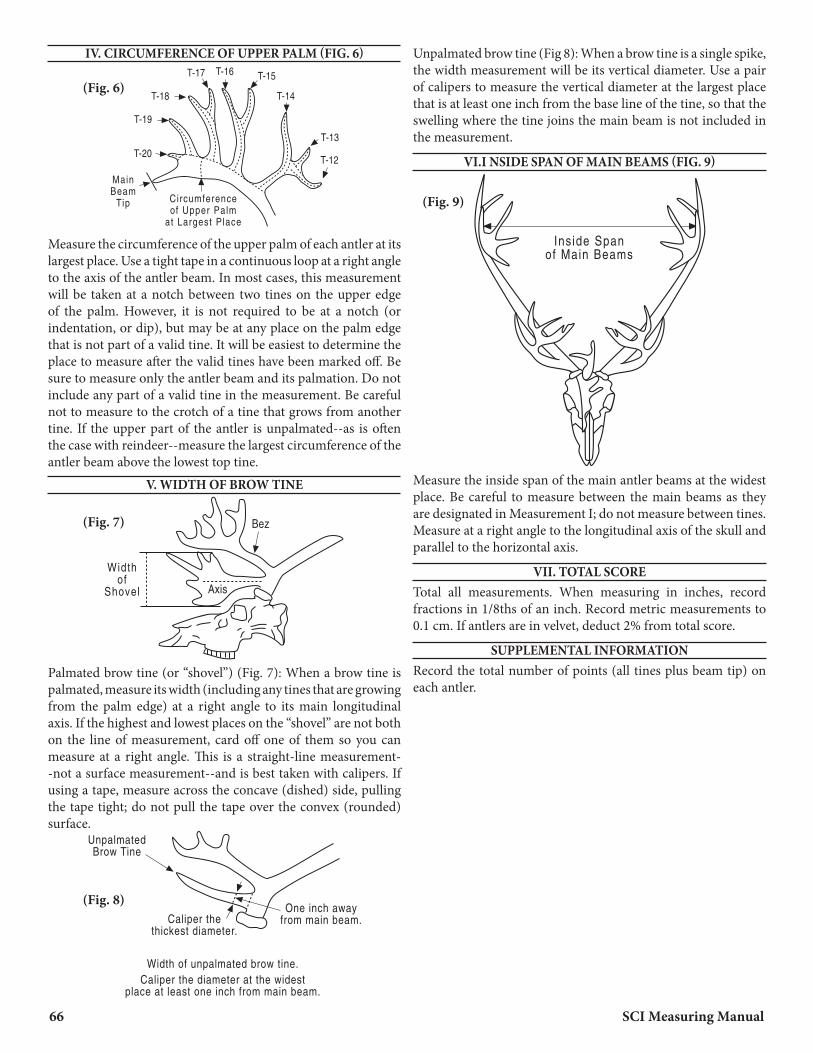
66 SCI Measuring Manual
IV . CIRCUMFERENCE OF UPPER PALM (FIG . 6)
Measure the circumference of the upper palm of each antler at its largest place . Use a tight tape in a continuous loop at a right angle to the axis of the antler beam . In most cases, this measurement will be taken at a notch between two tines on the upper edge of the palm . However, it is not required to be at a notch (or indentation, or dip), but may be at any place on the palm edge that is not part of a valid tine . It will be easiest to determine the place to measure after the valid tines have been marked off . Be sure to measure only the antler beam and its palmation . Do not include any part of a valid tine in the measurement . Be careful not to measure to the crotch of a tine that grows from another tine . If the upper part of the antler is unpalmated--as is often the case with reindeer--measure the largest circumference of the antler beam above the lowest top tine .
V . WIDTH OF BROW TINE
Palmated brow tine (or “shovel”) (Fig . 7): When a brow tine is palmated, measure its width (including any tines that are growing from the palm edge) at a right angle to its main longitudinal axis . If the highest and lowest places on the “shovel” are not both on the line of measurement, card off one of them so you can measure at a right angle . This is a straight-line measurement--not a surface measurement--and is best taken with calipers . If using a tape, measure across the concave (dished) side, pulling the tape tight; do not pull the tape over the convex (rounded) surface .
Unpalmated brow tine (Fig 8): When a brow tine is a single spike, the width measurement will be its vertical diameter . Use a pair of calipers to measure the vertical diameter at the largest place that is at least one inch from the base line of the tine, so that the swelling where the tine joins the main beam is not included in the measurement .
VI .I NSIDE SPAN OF MAIN BEAMS (FIG . 9)
Measure the inside span of the main antler beams at the widest place . Be careful to measure between the main beams as they are designated in Measurement I; do not measure between tines . Measure at a right angle to the longitudinal axis of the skull and parallel to the horizontal axis .
VII . TOTAL SCORE Total all measurements . When measuring in inches, record fractions in 1/8ths of an inch . Record metric measurements to 0 .1 cm . If antlers are in velvet, deduct 2% from total score .
SUPPLEMENTAL INFORMATION Record the total number of points (all tines plus beam tip) on each antler .
(Fig . 6)
(Fig . 7)
(Fig . 8)
(Fig . 9)

SCI Measuring Manual 67
Method 24 For fallow deer
In this species, SCI does not distinguish between typical and non-typical antlers, and all tines will count in the score .
Fallow deer antlers normally have two forward-pointing tines on the lower beam: a brow tine immediately above the burr and a second tine some distance above that . Above the second tine, the antlers become flattened and palmate, with a number of tines growing off the top and rear edges of the palmation .
Please carefully read the general instructions for deer entries before measuring deer antlers .
I . LENGTH OF MAIN BEAM (FIG . 1)
Measure the length of each main antler beam . If a beam tip is broken so that its far point is not on the line of measurement, it should be carded off .The measurement begins at the bottom edge of the burr (or coronet) and follows the outer curve of the antler stem and palm to the tip of the antler . The most distant projection at the top of the palm is considered the antler tip, so as to give the greatest measurement and reflect the true length of the antler .
Begin where the center-line of the outer curve intersects the burr . This will be on the side of the head and behind the eye,
not in front on the forehead . Do not press the cable into the corner where the antler beam meets the burr . On the antler stem, the measurement follows the center of its outer curve . On the palm, it follows the center of the palmation (which is easiest to determine after marking off the tines that grow from the palm edge) . Always use the cable for this measurement .
Fallow deer antlers sometimes have a vertically split palm (Fig .3) . If so, one side is considered part of the main beam while the lesser side is treated as a tine . It will usually be obvious which side should be which . The designation that is made here must also be followed in Measurements II and IV .
II . LENGTH OF ALL TINES (FIG . 2)
Measure the length of each valid tine on each antler . If a tine is broken so that its far point is not on the line of measurement, it should be carded off . In this species, a valid tine must be at least 1/2 inch or 1 .3 cm long, and no wider than its length . Please note that while the main beam tip is always considered a point, it is not a tine and must not be measured as one, because its length is already included in the length of the main beam (Measurement I) .
With fallow deer antlers, a valid tine may be located anywhere . Most tines will grow from the main beams and the outer edge of the palms, but occasionally tines will grow from the inner edge of the palms or from the palm surface . All such tines are acceptable in fallow deer if they qualify as valid tines in other respects .
In the case of a split palm (Fig . 3), the side that is not considered part of the main beam must be measured as a tine . The designation that was made for Measurement I must also be used here and for Measurement IV .
(Fig . 2)
(Fig . 1)
(Fig . 3)
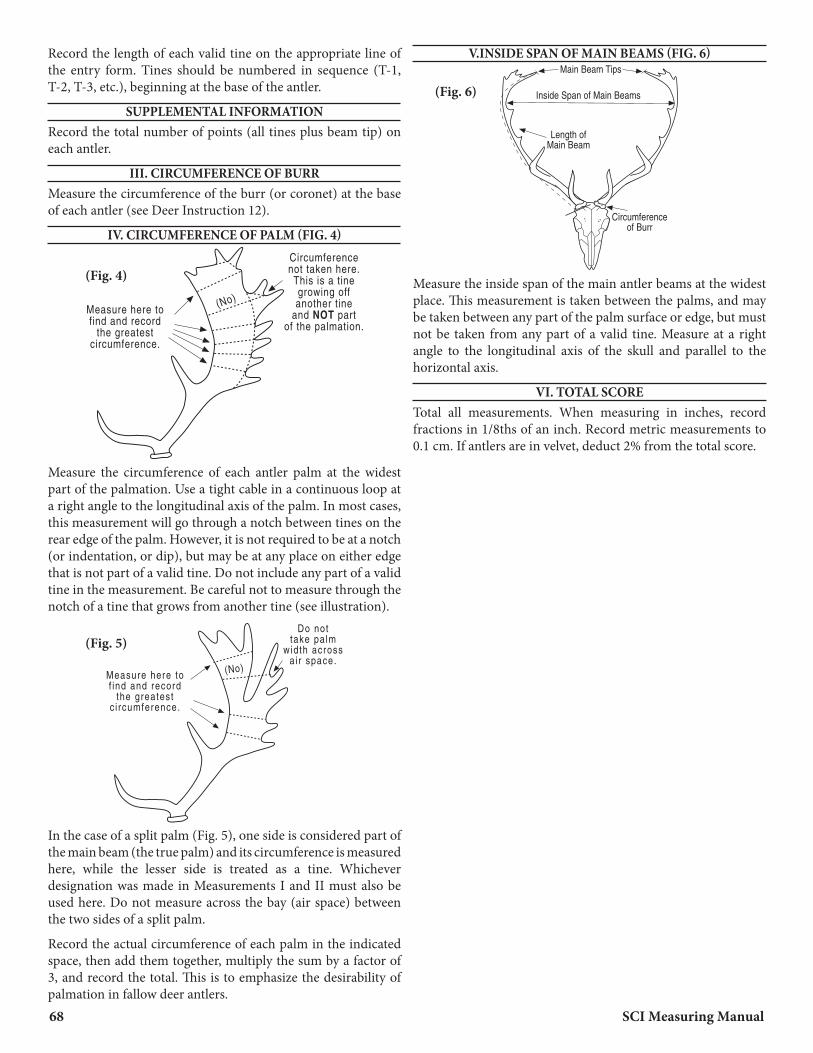
68 SCI Measuring Manual
Record the length of each valid tine on the appropriate line of the entry form . Tines should be numbered in sequence (T-1, T-2, T-3, etc .), beginning at the base of the antler .
SUPPLEMENTAL INFORMATION Record the total number of points (all tines plus beam tip) on each antler .
III . CIRCUMFERENCE OF BURR Measure the circumference of the burr (or coronet) at the base of each antler (see Deer Instruction 12) .
IV . CIRCUMFERENCE OF PALM (FIG . 4)
Measure the circumference of each antler palm at the widest part of the palmation . Use a tight cable in a continuous loop at a right angle to the longitudinal axis of the palm . In most cases, this measurement will go through a notch between tines on the rear edge of the palm . However, it is not required to be at a notch (or indentation, or dip), but may be at any place on either edge that is not part of a valid tine . Do not include any part of a valid tine in the measurement . Be careful not to measure through the notch of a tine that grows from another tine (see illustration) .
In the case of a split palm (Fig . 5), one side is considered part of the main beam (the true palm) and its circumference is measured here, while the lesser side is treated as a tine . Whichever designation was made in Measurements I and II must also be used here . Do not measure across the bay (air space) between the two sides of a split palm .
Record the actual circumference of each palm in the indicated space, then add them together, multiply the sum by a factor of 3, and record the total . This is to emphasize the desirability of palmation in fallow deer antlers .
V .INSIDE SPAN OF MAIN BEAMS (FIG . 6)
Measure the inside span of the main antler beams at the widest place . This measurement is taken between the palms, and may be taken between any part of the palm surface or edge, but must not be taken from any part of a valid tine . Measure at a right angle to the longitudinal axis of the skull and parallel to the horizontal axis .
VI . TOTAL SCORE Total all measurements . When measuring in inches, record fractions in 1/8ths of an inch . Record metric measurements to 0 .1 cm . If antlers are in velvet, deduct 2% from the total score .
(Fig . 4)
(Fig . 5)
(Fig . 6)

SCI Measuring Manual 69
Method 25-P For moose with palmated antlers
This method is designed to emphasize the desirability of palmation, long tines and outside spread, because these are the features that determine animal quality in moose antlers in the opinion of most hunters . We have elected to apply a 2X factor to palm measurements instead of measuring palm circumferences, because–while circumferences are a good method for perfectly flat palms- they are unfair to cupped or bent palms; as SCI always measures circumferences with a tight tape, the convex (back) surface would get full credit, but the concave (front) surface would not .
Please carefully read the general instructions for deer entries before measuring moose antlers .
I . LENGTH OF PALM (FIG . 1 & 2) First, turn the antlers upside down, because all palm measurements are taken on the under (or rear) surface . Next, determine which of the projections that grow from the palm edges will qualify as valid tines and mark them off with a pencil line . Once the valid tines are marked off, what remains is the palmation that is to be measured and recorded as Measurements I and II . Please note that any projections on the palm edges that do not qualify as valid tines may be measured as palmation . (Fig . 1)
Measure the length of each complete antler palm (the main and brow palms combined) on its under (or rear) surface . The measurement should be a straight line that is as parallel as
possible to the inner edge of the palm . Pull the tape tight across the palm surface; do not press it down into depressions . Begin and end the measurement at the midpoint of palm thickness . Measure from the highest place of palmation on the upper edge of the main (upper) palm to the lowest place of palmation on the brow (lower) palm . The highest palmation will often be at a notch between tines . However, it is not required to be at a notch (or indentation, or dip), but may be at any place on the palm edge that is not part of a valid tine . This measurement is permitted to pass over the open bay (if one is present) between the main palm and the brow palm . If there is no brow palm, or if the brow palm consists only of a single tine, the measurement should be of the main palm only . (Fig . 2) If the brow palm consists of a forked tine, the measurement should end at the fork .
Record the actual length of each palm in the indicated space, then add them together, multiply by a factor of 2, and record the total . This is to emphasize the desirability of palmation in moose antlers .
II . WIDTH OF PALM (FIG . 3)
Measure the width of each antler palm on its under surface . Measure the widest place of palmation at a right angle to the inner edge of the palm . If the inner edge of the palm is not straight, use a straightedge to approximate its direction and measure at a right angle to the straightedge . Pull the tape tight across the palm surface; do not press it down into depressions . Begin and end the measurement at the midpoint of palm thickness . The measurement may either be of the main (upper) palm or the brow (lower) palm--whichever is wider . Usually, the measurement will be taken from the inner edge of the palm to a notch between tines on the outer edge . However, it is not required to be at a notch (or indentation, or dip), but may be at any place on the outer edge that is not part of a valid tine .
Record the actual width of each palm in the indicated space, then add them together, multiply by a factor of 2, and record the total . This is to emphasize the desirability of palmation in moose antlers .
(Fig . 3)
(Fig . 1)
(Fig . 2)

70 SCI Measuring Manual
III . LENGTH OF ALL TINES (FIG . 4)
Measure the length of each valid tine on each antler . If a tine is broken so that its far point is not on the line of measurement, it should be carded off . To qualify as a tine on a moose antler, a projection must be at least one inch or 2 .5 cm long and no wider than its length .
In palmated moose antlers, a valid tine may be located anywhere . Most tines will grow from the outer edge of the palms, or from a brow tine so as to form a fork; however, tines may sometimes grow from the palm surface, or from the inner edge of a palm, or from the burr, or from another tine . All such tines are acceptable in moose if they qualify as valid tines in other respects .
Record the length of each valid tine on the appropriate line . Tines should be numbered in sequence (T-1, T-2, T-3, etc .), beginning at the base of the antler .
IV . CIRCUMFERENCE OF MAIN BEAM (FIG . 4) Measure the circumference of each main antler beam at the smallest place . Use a tight tape at a right angle to the axis of the beam .
V . GREATEST OUTSIDE SPREAD (FIG . 4) Measure the greatest outside spread of the antlers .
This measurement is a straight line between perpendiculars at a right angle to the longitudinal axis of the skull . It is best taken with a carpenter’s folding extension rule . If a steel tape is used, it must be pulled tight and not allowed to sag .
VI . TOTAL SCORE Total all measurements . When measuring in inches, record fractions in 1/8ths of an inch . Record metric measurements to 0 .1 cm . If antlers are in velvet, deduct 2% from total score .
SUPPLEMENTAL INFORMATION Record the total number of tines on each antler .
(Fig . 4)

SCI Measuring Manual 71
Method 25-C For moose with cervine (unpalmated) antlers
This method was adopted in 1997 in order to measure antlers of Amur moose, which usually lack palmation, and has since been applied to Yakutia moose . If an animal has a little palmation, or has palmation on one antler but not on the other, it may be measured either by Method 25-P or 25-C, as the owner prefers; however, the choice of method will be subject to approval by the Record Book . Both antlers must be measured by the same method . The same animal may not be entered for the Record Book both as a palmated moose and as a cervine moose .
Please Note: Some cervine moose antlers may have a little palmation . When measuring such antlers by Method 25-C, any palmation must be disregarded . The measurer is to carefully draw a pencil line on the palmation to show how the edge of the main antler beam (or parent tine) would appear if palmation had not developed . The tines are then measured from this pencil line to the tip . Furthermore, the main beam length measurement must follow the center of the designated beam (on the other side of the pencil line from the tines) and is not to go over any palmation .
Please carefully read the general instructions for deer entries before measuring moose antlers .
I . LENGTH OF MAIN BEAM (FIG . 1)
First, turn the antlers upside down, because all measurements will probably be taken on the under (rear) surface . Next, locate the tips of the main antler beams . In cervine moose, the beam tips will almost always be the inner tines, which will probably
also be the highest points on the antlers . If in doubt, the measurer should choose the points that appear to be the most logical beam tips .
Measure the length of each main antler beam from the bottom edge of the burr (or coronet) to the tip . If a beam tip is broken so that its far point is not on the line of measurement, it should be carded off . The measurement is taken on the underside (or rear) of the antler, following the center of the outer curve, and is essentially parallel to the longitudinal blood grooves . Begin where the center-line of the outer curve intersects the bottom edge of the burr . Do not press the cable into the corner where the beam meets the burr . Always use the cable for this measurement .
II . LENGTH OF ALL TINES (FIG . 2)
Measure the length of each valid tine on each antler . If a tine is broken so that its far point is not on the line of measurement, it should be carded off . To qualify as a valid tine on a moose antler, a projection must be at least one inch or 2 .5 cm long and no wider than its length .
In cervine moose antlers, a tine may be located anywhere . Most tines will grow from the main beam, or from a brow tine so as to form a fork; however tines may occasionally grow from other tines, or from the burr .
Record the length of each valid tine on the appropriate line . Tines should be numbered in sequence (T-1, T-2, T-3, etc .), beginning at the base of the antler .
III . CIRCUMFERENCE OF MAIN BEAM (FIG . 3)
Measure the circumference of each main antler beam at the smallest place between the burr and the first tine . Use a tight tape at a right angle to the axis of the beam .
(Fig . 2)
(Fig . 1) (Fig . 3)

72 SCI Measuring Manual
IV . GREATEST OUTSIDE SPREAD (FIG . 3) Measure the greatest outside spread of the antlers . This measurement is a straight line between perpendiculars at a right angle to the longitudinal axis of the skull . It is best taken with a carpenter’s folding extension rule . If a steel tape is used, it must be pulled tight and not allowed to sag .
V . TOTAL SCORE Total all measurements . When measuring in inches, record fractions in 1/8ths of an inch . Record metric measurements to 0 .1 cm . If antlers are in velvet, deduct 2% from total score .
SUPPLEMENTAL INFORMATION Record the total number of points (all tines plus beam tip) on each antler .

SCI Measuring Manual 73
Method 26-T, 26-NTFor all antlers of muntjac, brocket deer,
pudu and tufted deer
All tines (if present) in these tiny deer can count in the score, but some will be typical and some non-typical (see special instructions) .
Special instructions for muntjac: A typical muntjac antler consists of a simple main beam and often (but not always) one brow tine that grows forward from the burr . Muntjac antlers will occasionally have additional tines besides the single brow tine; these are always non-typical and must be recorded as non-typical on the entry form . Muntjac antlers that have any non-typical tines are normally measured as non-typical; however, they may be measured as typical at the owner’s request . When measured as typical, only the typical tines will count in the score; any non-typical tines will be recorded only as supplemental information . The measurer should mark either the 26-T or 26-NT box on the entry form to show which method was used .
Special instructions for brocket deer: A typical brocket deer antler is a simple spike with no tines at all . But occasionally an antler will have a brow tine (usually very short) . Any tine on a brocket deer antler is non-typical and must be recorded as non-typical on the entry form . Brocket deer antlers that have any tines at all are normally measured as non-typical; however, they may be measured as typical at the owner’s request . When measured as typical, only the main beams will count in the score; any tines will be recorded only as supplemental information . The measurer should mark either the 26-T or 26-NT box on the entry form to show which method was used .
Special instructions for pudu and tufted deer: Antlers of these species are simple spikes without tines . As such, they are always typical .
Please carefully read the general instructions for deer entries before measuring deer antlers .
I . LENGTH OF MAIN BEAM Measure the length of each main antler beam . Measure the longest surface from the bottom edge of the burr (or coronet) to the tip . Do not press the cable into the corner where the antler beam meets the burr .
II . LENGTH OF TYPICAL TINES (MUNTJAC ONLY) Measure the length of the valid typical brow tine (if present) on each antler . A valid tine must be at least 1/2 inch or 1 .3 cm long, and no wider than its length . A muntjac can have only one typical tine per antler, If present, it will be a brow tine growing forward from the burr, and its length should be recorded on the T-1 line on the entry form .
Please note: A brocket deer cannot have any typical tines, as tines are considered non-typical in this animal . Pudu and tufted deer never have tines .
III . LENGTH OF NON-TYPICAL TINES (MUNTJAC AND BROCKET DEER ONLY)
Measure the length of each valid non-typical tine (if any) on each antler, and record its length on the proper line on the entry form . Any non-typical tines should be numbered in sequence, beginning at the base of the antler (NT-1, NT-2, etc .) .
NOTE: On muntjac antlers, any tines other than one typical brow tine per antler are non-typical .
On brocket deer antlers, all tines are non-typical . Pudu and tufted deer do not have tines .
IV . CIRCUMFERENCE OF BURR Measure the circumference of the burr (or coronet) at the base of each antler (see Deer Instruction 12) .
V . TOTAL SCORE Total all measurements . When measuring in inches, record fractions in 1/16ths of an inch . Record metric measurements to 0 .1 cm . If antlers are in velvet, deduct 2% from total score .
SUPPLEMENTAL INFORMATION Record the total number of typical points on each antler . In muntjac, this will be the beam tip plus one brow tine, if present . In brocket deer, pudu and tufted deer, this will be the beam tip only . Record the number of non-typical points (if present) on each antler .
Record the total number of points (beam tip plus any points) on each antler . Record the inside span of the main antler beams at the widest place . Measure at a right angle to the longitudinal axis of the skull, and parallel to the horizontal axis .

74 SCI Measuring Manual
Method 50 For all species of wild turkey with a single beard .
Baseof Spur
All measurements on the Turkey are done in 1/16 increments . The SCI measuring system does not include the weight of the turkey when calculating the final score, weight cannot be re-measured and therefore is listed as supplemental information .
I . MEASURING SPURS Both the right and left spurs are measured . The measurement should begin at the center point of the spur that has been dissected off from the leg at a 90 degree angle to the base of the spur . Hold the cable tightly and continue measuring by following the curvature of the spur to the tip . This measurement can be taken from the left or right side of the spur where it joins the leg . The measurement will be multiplied by 10 to establish the total score of each spur . Only the longest spur on each leg will be included in the overall score .
II . MEASURING THE BEARD A beard must be measured from the base (thickest area attached to the chest) to the tip or longest feather in the beard . Use a multiplier of 2 (ex: 8-8/16 x 2 = a total score of 17) to receive the total score for the beard .
III . DRY MEASUREMENT Turkeys do not require a 60 day dry period to be scored . If a turkey does fall into the overall Top 20, then the turkey must be scored by a Master Measurer in order to be certified in the Record Book .
IV . TOTAL SCORE Add together the total points of the spurs, and length of the beard .
Method 50-NT For all species of wild turkey with multiple beards .
Baseof Spur
All measurements on the Turkey are done in 1/16 increments . The SCI measuring system does not include the weight of the turkey when calculating the final score, weight cannot be re-measured and therefore is listed as supplemental information .
I . MEASURING SPURS Both the right and left spurs are measured . The measurement should begin at the center point of the spur that has been dissected off from the leg at a 90 degree angle to the base of the spur . Hold the cable tightly and continue measuring by following the curvature of the spur to the tip . This measurement can be taken from the left or right side of the spur where it joins the leg . The measurement will be multiplied by 10 to establish the total score of each spur . Only the longest spur on each leg will be included in the overall score .
II . MEASURING THE BEARD A beard must be measured from the base (thickest area attached to the chest) to the tip or longest feather in the beard . Use a multiplier of 2 (ex: 8-8/16 x 2 = a total score of 17) to receive the total score for the beard .
For Turkeys with multiple beards, measure the length of each beard from the base to the tip of the longest feather . Each beard must have an independent base growing from the breast plate to be counted as a separate beard .
III . DRY MEASUREMENT Turkeys do not require a 60 day dry period to be scored . If a turkey does fall into the overall Top 20, then the turkey must be scored by a Master Measurer in order to be certified in the Record Book .
IV . TOTAL SCORE Add together the total points of the spurs, and length of the beard .
SPUR MEASUREMENT
SPUR MEASUREMENT

SCI Measuring Manual 75
AFRICA (NATIVE)Carnivores
African lion 24 24 15Africa lion (South A. & Namibia) 24 24 15African leopard 14 12 15African cheetah 11 10 15Serval 6 5 5/16 15Caracal 6 5 15African golden cat ED 5 15African civet 7 6 6/16 15Spotted hyena 15 15 15Brown hyena ED 12 15African striped hyena ED 12 15Genet cat ED ED 15Palm civet ED ED 15African Wild Cat 5 4 8/16 15Aardwolf 0 0 15
Thick-skinned GameForrest elephant ED ED 14African elephant 90 60 14Black rhinoceros 56 50 8Northern white rhinoceros ED ED 8Southern white rhinoceros 70 63 8Southern white rhino (darted) 76 68 16-DCape or southern buffalo 101 90 4Nile buffalo 70 63 4C.A. Savanna buffalo 65 58 4W.A.Savanna buffalo 55 49 4Dwarf forest buffalo 40 36 4E.A. Savanna buffalo 65 58 4
Spiral-horned AntelopesCentral African giant eland 110 91 2Cape eland 77 69 2Livingstone eland 79 70 2East African eland 74 67 2Western bongo 70 63 2Kenya bongo 70 ED 2Eastern (Kenya) bongo 70 63 2Central African bongo 70 63 2Southern greater kudu 121 108 2Eastern Cape greater kudu 98 89 2East African greater kudu 109 ED 2Abyssinian greater kudu 98 89 2Western greater kudu 72 65 2Mountain nyala 75 67 2Common nyala 63 56 2Zambezi sitatunga 60 56 2Forest sitatunga 50 45 2East African sitatunga 50 45 2Sesse Islands sitatunga ED ED 2Lesser kudu 62 55 2
Harnessed bushbuck 25 22 2Nile bushbuck 29 26 2Abyssinian bushbuck 25 23 2Menelik bushbuck 29 26 2East African bushbuck 33 30 4/8 2Chobe bushbuck 33 29 2Limpopo bushbuck 33 29 2Cape bushbuck 31 28 2
Sable, Roan, Oryx, AddaxGiant sable antelope ED 110 1Common sable antelope 96 86 1Roosevelt sable antelope 61 54 1Western roan antelope 63 56 1Sudan roan antelope 68 61 1East African roan antelope 58 ED 1Southern roan antelope 67 59 1Golden Kalahari gemsbok 80 72 1Kalahari gemsbok (Namibia) 80 72 1Kalahari gemsbok 81 72 1 (R.S.A., Zimbabwe, Botswana)Angolan gemsbok 82 50 1Fringe-eared oryx 60 54 1Beisa oryx 72 63 1Scimitar-horned oryx ED ED 1Scimitar-horned oryx 68 65 1Addax 77 57 2
Waterbuck, Lechwe, Kob, ReedbuckCommon or ringed waterbuck 67 60 1Sing-sing waterbuck ED 54 1East African defassa waterbuck 64 54 1Crawshay defassa waterbuck 55 50 1Angolan defassa waterbuck 63 50 1Kafue Flats lechwe 68 61 1Red lechwe 58 52 1Black lechwe 55 49 1Common lechwe (non-indigenous) 58 50 1Nile lechwe 64 57 1Central African kob 40 36 1Western African kob 36 32 1White-eared kob 49 44 1Uganda kob 49 44 1Puku 45 40 1Common reedbuck 21 18 1BEastern bohor reedbuck 14 12 1BAbyssinian bohor reedbuck 13 11 1BSudan bohor reedbuck 19 17 1BNigerian bohor reedbuck 16 14 1BNagor reedbuck 13 11 1BWestern mountain reedbuck ED 5 1BSouthern mountain reedbuck 11 9 1BChanler mountain reedbuck 8 7 1BVaal rhebok 16 14 1
SCI Record Book MinimumsSome animals shown below are listed as endangered or are on CITES Appendix I; however, they may be accepted for the Record Book if taken prior to date of listing or under certain circumstances . Please refer to Criteria for Accepting Score Sheets on page 12, paragraph 33, or contact the Record Book and World Hunting Awards Office at the SCI Membership and Business Operations Center in Tucson, Arizona, for instructions .
The bowhunting minimums listed below will be used only in the Bowhunting Record Book . Bowhunting animals that appear in the general Record Book are subject to the same minimum scores as animals taken by rifle .
“E .D .” means there is no set minimum at present . Entries for these animals will be accepted at the discretion of the Record Book . For a current listing of minimums, please visit www .SafariClub .org .
Min. Min MethodGen. Bow
Min. Min MethodGen. Bow

76 SCI Measuring Manual
Wildebeest, Hartebeest, DamaliscsBlack wildebeest 72 63 6Blue wildebeest 70 54 5Cookson wildebeest 70 63 5Nyasa wildebeest 64 50 5White-bearded wildebeest 68 61 5Cape or red hartebeest 62 53 1Coke hartebeest 50 45 1Kenya highland hartebeest ED 50 1Neumann hartebeest 51 45 1Swayne hartebeest ED 40 1Lelwel hartebeest 60 54 1Western hartebeest 60 56 1Lichtenstein hartebeest 53 48 1Jackson hartebeest ED ED 1Korrigum 58 52 1Tiang 52 46 1Topi 45 40 1Tsessebe 40 36 1Hirola or Hunter antelope ED 38 1Blesbok 40 35 1White blesbok 39 35 1Bontebok 37 32 1
ImpalasEast African impala 60 45 1Southern impala 52 46 1Angolan or black-faced impala 47 42 1Black Impala ED ED 1
GazellesSouthern Grant gazelle 56 50 1Roberts gazelle ED 46 1Northern Grant gazelle 56 50 1Peters gazelle 51 46 1Bright gazelle 51 46 Sudan Soemmerring gazelle 35 4/8 34 1Somali Soemmerring gazelle 38 34 1Dama gazelle ED 20 1Red-fronted gazelle or korin 25 22 1Heuglin gazelle ED 20 1Thomson gazelle 34 30 1Mongalla gazelle 29 26 1Atlas gazelle ED 25 1Slender-horned gazelle ED 25 1Sahara dorcas gazelle 29 26 1Egyptian dorcas gazelle ED 18 1Eritrean gazelle 24 22 1Isabelline gazelle ED 18 1Pelzeln gazelle ED ED 1Speke or flabby-nosed gazelle ED ED 1Kalahari springbok 35 33 1Angolan springbok 34 25 1South African springbok 30 27 1Black springbok 30 4/8 23 1White springbok 28 20 1Copper springbok 25 23 1Southern gerenuk 34 30 1Northern gerenuk 34 30 1Dibatag ED 22 1
Pygmy AntelopesKlipspringer 10 9 1-ACommon oribi 13 11 8/16 1-AHaggard oribi ED 7 8/16 1-ASteenbok 8 7 3/16 1-A
Cape grysbok 5 4 1-ASharpe grysbok 5 4 8/16 1-ALivingstone suni 9 8 1-AEast African suni 6 5 6/16 1-ARoyal antelope ED 2 8/16 1-ABates pygmy antelope 1 1 1-ASalt dik-dik 6 5 5/16 1-APhillips dik-dik ED 6 1-AHarar dik-dik ED 4 1-ASwayne dik-dik ED ED 1-AGuenther dik-dik 8 7 1-AKirk dik-dik 8 7 1-ADamara dik-dik 7 6 1-AZanzibar Suni 0 0 1-A
DuikersSouthern bush duiker 11 9 1-AAngolan bush duiker 11 8 1-AEast African bush duiker 11 10 1-AWestern bush duiker 10 9 1-AJentink duiker ED 6 1-AYellow-backed duiker 13 11 1-AAbbott duiker ED 7 1-ABay duiker 6 4 1-APeters duiker 6 5 6/16 1-AWeyns duiker ED 5 6/16 1-AGabon or white-bellied duiker ED 4 8/16 1-ABlack-fronted duiker ED 5 1-AOgilby duiker 5 4 8/16 1-AZebra duiker 2 1 13/16 1-ABlack duiker 4 2 9/16 1-AHarvey red duiker 6 5 1-ANatal red duiker 8 7 6/16 1-ARed-flanked duiker 7 6 8/16 1-AMaxwell duiker 3 2 11/16 1-ABlue duiker 4 4/16 3 9/16 1-A
Goats & SheepNubian ibex 51 45 1Nubian ibex (non-indigenous) ED ED 1Aoudad or Barbary sheep 90 81 11Walia or Abyssunuan ibex ED ED 1Water Chevrotain ED 6 15
Hippos & PigsCommon hippopotamus 50 45 12Pygmy hippopotamus ED 12 8/16 12Warthog 29 26 12Giant forest hog 14 12 12Bushpig 12 9 12Red river hog 11 9 10/16 12Barbary wild boar 15 11 12
CrocodilesNile crocodile 9’7” 8’7” 16-C
Min. Min MethodGen. Bow
Min. Min MethodGen. Bow

SCI Measuring Manual 77
AFRICA (INTRODUCED)Water buffalo 75 62 3Himalayan tahr 34 30 1European mouflon 99 6/8 91 11Hog deer (T) 40 40 21-THog deer (NT) ED ED 21-NTEuropean fallow deer 150 130 24American Bison 54 48 3Arabian Oryx 55 44 1European Red Deer 185 160 20Javan Rusa Deer (typical) 100 90 21TBlackbuck 43 40 2Javan Rusa Deer (non-typical) 110 100 21NTFeral Boar9 8/16 8 1/16 12Bongo 70 63 2Axis Deer (typical) 100 90 21TAxis Deer (non-typical) 110 95 21NTMulti-horned Sheep 55 45 9Pere David Deer 150 135 22Nubian Ibex (non-indigenous) 70 60 1Common Lechwe 58 50 1Aoudad or Barbary Sheep 100 90 11Addax (non-indigenous) 63 57 2Scimitar-horned Oryx (non-indigenous) 68 64 1Feral Goat 40 30 2
NORTH AMERICA (NATIVE)Carnivores
American alligator 8’1” 7’3” 16C Jaguar 14 12 15Jaguar (darted) 90 86 16-DCougar or mountain lion 14 12 15Cougar or mountain lion (darted) 120 110 16-DCanada lynx 8 7 4/16 15Bobcat 7 6 15Alaska brown bear 25 20 15Common grizzly bear 22 19 15Barren ground grizzly bear 20 17 15Polar bear (airplane) 22 20 15Polar bear (dogsled) 20 18 15Continental (inland) black bear 18 16 15Coastal (Pacific) black bear 19 16 15Gray wolf 14 12 15Wolverine 9 8 15Pacific walrus 102 90 13Atlantic walrus 80 80 13
Horned GameAmerican bison 54 48 3Barren ground muskox 61 54 7Greenland muskox 60 50 7American mountain goat 26 23 1Dall sheep 146 120 11Stone sheep 150 122 11Rocky Mountain bighorn sheep 155 139 11California bighorn sheep 145 128 11Mexican desert bighorn sheep 150 ED 11N. Baja desert bighorn sheep 155 ED 11S. Baja desert bighorn sheep 150 ED 11Pronghorn 70 63 10Wood bison 0 0 3Nelson desert bighorn Sheep 145 0 11Fannin Sheep 150 122 11
DeerRocky Mountain elk (T) 264 237 19-TRocky Mountain elk (NT) 281 252 19-NTRoosevelt elk 247 223 19-NTRoosevelt elk 249 222 19-NTTule elk 245 221 19-NTAlaska-Yukon moose 310 279 25-PWestern Canada moose 274 246 25-PEastern Canada moose 214 190 25-PShiras moose 210 189 25-PAlaska-Yukon barren ground caribou 335 301 23Central Canada barren ground caribou 300 270 23Arctic islands caribou 242 225 23Mountain caribou 322 289 23Quebec-Labrador caribou 301 270 23Woodland caribou 227 210 23Rocky Mountain mule deer (T) 155 138 18-TRocky Mountain mule deer (NT) 163 163 18-NTDesert mule deer (T) 151 140 18-TDesert mule deer (NT) 180 160 18-NTColumbia black-tailed deer (T) 95 85 18-TColumbia black-tailed deer (NT) 117 110 18-NTSitka black-tailed deer (T) 80 72 18-TSitka black-tailed deer (NT) 94 80 18-NTAnticosti white-tailed deer (T) 60 54 17-TAnticosti white-tailed deer (NT) 60 54 17-NTCarmen Mountain white-tailed deer (T) 60 ED 17-TCarmen Mountain white-tailed deer (NT) ED ED 17-NTColombia white-tailed deer (T) 70 45 17-TColombia white-tailed deer (NT) 80 ED 17-NTMex. cen. plateau white-tailed deer ED ED 17-TMex. Gulf Coast white-tailed deer ED ED 17-TMex. Pacific Coast white-tailed deer ED ED 17-TMex. Texanus white-tailed deer (T) 125 ED 17-TMex. Texanus white-tailed deer (NT) ED ED 17-NTMid-western white-tailed deer (T) 125 115 17-TMid-western white-tailed deer (NT) 135 125 17-NTNorthwestern white-tailed deer (T) 125 101 17-TNorthwestern white-tailed deer (NT) 150 135 17-NTNortheastern white-tailed deer (T) 125 112 17-TNortheastern white-tailed deer (NT) 148 133 17-NTSoutheastern white-tailed deer (T) 110 100 17-TSoutheastern white-tailed deer (NT) 120 110 17-NTTexas white-tailed deer (T) 125 112 17-TTexas white-tailed deer (NT) 138 120 17-NTCoues white-tailed deer (T) 80 72 17-TCoues white-tailed deer (NT) 98 90 17-NTCentral American white-tailed deer (T) 30 27 17-TCentral American white-tailed deer (NT) ED ED 17-NTRed brocket deer (T) 8 6 12/16 26-TRed brocket deer (NT) ED ED 26-NTGray-brown brocket deer (T) ED ED 26-TGray-brown brocket deer (NT) ED ED 26-NTYucatan gray-brown brocket deer (T) 10 9 26-TYucatan gray-brown brocket deer (NT) 12 ED 26-NTTiburon Island Mule Deer (T) 180 160 18TTiburon Island Mule Deer (NT) 180 160 18NT
Pigs & RelativesCollared peccary or javelina 12 ED 15 White-lipped peccary 12 10 15
Min. Min MethodGen. Bow
Min. Min MethodGen. Bow

78 SCI Measuring Manual
TurkeysEastern wild turkey (T) 30 ED 50-TEastern wild turkey (NT) 35 30 50-NTGould’s wild turkey (T) 24 ED 50-TGould’s wild turkey (NT) 29 25 50-NTMerriam’s wild turkey (T) 24 ED 50-TMerriam’s wild turkey (NT) 29 ED 50-NTOcellated turkey (T) 25 20 50-TOcellated turkey (NT) 25 20 50-NTOsceola turkey (T) 38 38 50-TOsceola turkey (NT) 43 ED 50-NTRio Grande turkey (T) 26 ED 50-TRio Grande turkey (NT) 29 ED 50-NT
NORTH AMERICA (INTRODUCED)Cattle
Yak 60 54 3Water buffalo 75 67 3European bison 50 45 3European bison (free range) 50 45 3Guar 0 60 2
AntelopesNilgai 25 22 1Nilgai (free range) 25 22 1Dorcas gazelle ED 26 1Frindge-eared oryx ED 52 1Common eland 77 69 2Common eland (free range) ED ED 2Bongo 70 63 2Greater kudu ED 108 2Common nyala ED 50 2Sitatunga ED 50 2Sable antelope 90 81 1Roan antelope ED 66 1Gemsbok 80 72 1Gemsbok (free range) 80 72 1Beisa oryx ED 50 1Scimitar-horned oryx 80 72 1Scimitar-horned oryx (free range) ED 64 1Arabian oryx 55 50 1Addax 63 57 2Waterbuck 68 62 1Waterbuck (free range) ED 56 1Common lechwe 58 52 1Nile lechwe 55 49 1Black wildebeest ED 63 6White-bearded wildebeest ED 62 5Blesbok 39 35 1Impala ED 46 1Grant gazelle 50 45 1Dama gazelle 30 27 1Thomson gazelle 34 30 1Goitered gazelle 31 28 1Springbok 30 27 1Blackbuck 54 48 2Blue Wildebeest 70 54 5
Goats, Sheep & RelativesChamois ED 18 1Himalayan tahr 37 33 1Bezoar or Persian ibex 70 63 1Bezoar or Persian ibex (free range) 75 60 1Nubian ibex 70 63 1Alpine ibex ED 61 1Asian ibex ED 56 1
Asian ibex (free range) ED ED 1West Caucasian tur 121 108 11Markhor 63 56 2Hybrid ibex 65 58 1Feral goat 70 63 2Feral goat (free range) 56 56 2Aoudad or Barbary sheep 115 103 11Aoudad or Barbary sheep (free range) 115 103 11European mouflon 105 94 11European mouflon (free range) 105 94 11Armenian mouflon 100 90 11Armenian mouflon (free range) 100 90 11Red sheep 100 90 11Red sheep (free range) 101 90 11Afghan urial 104 94 11Transcaspian urial ED 110 11Hawaiian black sheep 105 94 11Texas Dall sheep 106 95 11Hybrid sheep 90 79 11Hybrid sheep (free range) 105 94 11Multi-horned sheep ED 62 9Corsican Sheep (free range) 105 94 11Corsican Sheep 105 94 11Chiltan Wild Goat 0 0 2Chinese Blue Sheep 78 0 11Himalayan Tahr 0 30 1
DeerRed deer 187 168 20Barasingha 129 116 22Brow-antlered or Eld deer 140 126 22Rusa deer ED 92 21-TSika deer (T) 85 76 21-TSika deer (NT) 96 86 21-NTSambar (T) ED 94 21-TSambar (NT) ED 100 21-NTSambar (T) (free range) ED 94 21-TAxis deer (T) 120 103 21-TAxis deer (NT) 127 114 21-NTAxis deet (T) (free range) 121 108 21-TChinese water deer ED 6 12Hog deer (T) 52 47 21-THog deer (NT) ED ED 21-NTEuropean fallow deer 171 153 24European fallow deer (free range) 169 154 24Père David deer 152 136 22Reindeer 253 228 23Indian muntjac ED 12 26-TReeves muntjac (T) 10 9 26-TReeves muntjac (NT) ED 12 26-NTReindeer (free range) 264 228 23
PigsFeral boar 15 13 12Feral boar (free range) 15 13 12
SOUTH AMERICA (NATIVE)Carnivores
Jaguar 16 14 10/16 15Jaguar (darted) 145 130 3/8 16-DPuma or cougar 11 9 15Spectacled Bear 13 12 6/16 15Common spectacled caiman 4’4” 3’11” 16-C
Min. Min MethodGen. Bow
Min. Min MethodGen. Bow

SCI Measuring Manual 79
DeerSouth American white-tailed deer (T) 32 29 17-TSouth American white-tailed deer (NT) 40 35 17-NTMarsh deer 98 89 22Pampas deer 41 37 22Peruvian huemul or taruca 58 52 22Chilean huemul ED ED 22Red brocket deer (T) 7 6 26-TRed brocket deer (NT) 16 7 26-NTGray-brown brocket deer (T) 10 7 26-TGray-brown brocket deer (NT) 11 8 26-NTNorthern pudu 5 5 26-T
Pigs & RelativesCollared peccary 12 11 15White-lipped peccary 12 11 15
MiscellaneousCapybara 13 9 8/16 15
SOUTH AMERICA (INTRODUCED)Horned Game
Water buffalo 75 66 7/8 3Water buffalo (estate) 75 67 3Blackbuck 54 49 2Blackbuck (estate) 54 47 2Alpine ibex 69 62 1Feral goat 60 52 2Feral goat (estate) 60 51 2European mouflon 101 91 11European mouflon (estate) 101 91 11Multi-horned sheep 55 45 9Hybrid ibex (estate) 50 45 1Hybrid sheep 90 79 11Himalayan tahr ED ED 1Feral Goat (free range) 60 52 2Feral Goat 60 51 2
DeerRed deer 220 183 20Red deer (estate) 225 187 20Axis deer (T) 105 94 21-TAxis deer (NT) 115 111 21-NTAxis deer (T) (estate) 105 92 21-TAxis deer (NT) (estate) 115 92 21-NTEuropean fallow deer 160 136 24European fallow deer (estate) 160 139 24Père David deer ED ED 22Père David deer (estate) 200 180 22
PigsFeral boar 15 13 15/16 12
EUROPE (NATIVE)Carnivores
Eurasian lynx ED 8 4/16 15Eurasian brown bear 18 18 15Gray wolf 14 12 15
Horned GameEuropean bison (eastern) 40 36 3European bison (western) 40 36 3Russian saiga ED 28 1Pyrenean chamois 20 18 1Cantabrian chamois 18 16 1Alpine chamois 22 20 1Carpathian chamois 24 21 5/8 1Balkan chamois 19 17 1/8 1Tatra chamois
Gredos ibex 70 63 1Beceite ibex 69 62 1Ronda ibex 56 50 3/8 1Alpine ibex 65 59 1Kri Kri ibex 50 50 1Southeastern Spanish ibex 63 57 5/8 1Central European mouflon (typical horns) 105 94 4/8 11Iberian mouflon 90 85 11Balearean goat ED 36 2Dalmatian wild sheep ED ED 11Racka sheep ED ED 2Soay sheep 60 54 11
DeerEnglish red deer ED ED 20European red deer 220 200 20European white red deer ED ED 20Iberian red deer 190 180 20Spanish red deer 200 160 20Scottish red deer 144 130 20European fallow deer 170 153 24European roe deer (T) 36 33 21-TEuropean roe deer (NT) 44 40 21-NTSiberian Roe Deer (T) ED 40 4/8 21-TSiberian Roe Deer (NT) ED 43 7/8 21-NTEuropean Moose (Palmated Antlers) 127 114 25-PEuropean Moose (Cervine Antlers) ED 69 6/8 25-CReindeer 228 206 23Reindeer (Iceland) ED ED 23
PigsEurasian wild boar 15 13 4/16 12
EUROPE (INTRODUCED)Horned Game
Feral goat 55 50 2Aoudad or Barbary sheep 90 85 11Himalayan tahr ED 30 1
DeerAxis deer ED 87 4/8 21-TWapiti or maral (T) ED 168 4/8 19-TWapiti or maral (NT) ED 168 4/8 19-NTManchurian Sika deer (T) 85 76 21-TManchurian Sika deer (NT) ED 89 21-NTJapanese Sika deer (T) 64 60 21-TJapanese Sika deer (NT) ED 87 21-NTHog deer (T) 55 50 21-THog deer (NT) 55 50 21-NTPére David deer 180 170 22Scottish red deer (non-indigenous) 201 180 20White-tailed deer (T) ED 61 7/8 17-TWhite-tailed deer (NT) ED 66 17-NTReeves muntjac (T) 10 9 26-TReeves muntjac (NT) ED ED 26-NTWater deer 7 6 12
ASIA (NATIVE)Carnivores
Gharial or Gavial ED ED 16-CPhilippine jungle cat ED ED 15 Bengal tiger 19 ED 15Indo-Chinese tiger ED ED 15Sumatran tiger ED ED 15Asian leopard 14 6/16 ED 15Eurasian lynx ED ED 15Eurasian brown bear ED ED 15Siberian brown bear 17 14 15
Min. Min MethodGen. Bow
Min. Min MethodGen. Bow

80 SCI Measuring Manual
Kamchatka brown bear ED 18 15Amur brown bear ED ED 15Himalayan brown bear ED ED 15Tibetan Brown bear ED ED 15Mideastern brown bear ED 14 15Asian black bear ED ED 15Sloth bear ED 13 15Gray wolf 13 ED 15Asian striped hyena ED ED 15Wolverine ED ED 15Pacific walrus 102 90 13Asian Wild Cat 0 0 15
CattleGreenland muskox ED ED 5Indian gaur ED ED 3Indo-Chinese gaur ED ED 3Malayan gaur ED ED 3Indo-Chinese banteng ED ED 3Javan banteng ED ED 3Feral yak ED ED 3Water buffalo 80 72 3Forest buffalo ED ED 3Lowland anoa ED ED 3Mountain anoa ED ED 3Tamaraw ED ED 3
AntelopesNilgai or blue bull 24 ED 1Four-horned antelope or chousingha ED ED 1-ABorani Sommerring gazelle ED ED 1Arabian Mountain gazelle ED ED 1Indian gazelle or Chinkara 23 ED 1Mhorr gazelle ED ED 1Palestine gazelle ED ED 1Kennion gazelle ED ED 1Persian goitered gazelle 31 ED 1Yarkand goitered gazelle ED ED 1Hillier goitered gazelle 30 ED 1Mongolian gazelle 24 ED 1Tibetan gazelle or goa 23 ED 1Przewalski gazelle ED ED 1Blackbuck or Indian antelope ED ED 2Russian saiga 30 ED 1Tibetan antelope or chiru ED ED 1Arabian Oryx 55 44 1
Goats, Sheep & RelativesTakin (all ssp) ED ED 5Serow (all sp/ssp) ED ED 1Goral (all sp/ssp) ED ED 1Caucasian chamois 17 ED 1Anatolian chamois 21 ED 1Himalayan tahr 37 ED 1Nilgiri tahr ED ED 1Bezoar ibex 70 ED 1Sindh ibex 69 ED 1Nubian ibex ED ED 1Mid-Asian ibex 95 ED 1Himalayan ibex ED ED 1Persian desert ibex ED ED 1Siberian ibex 82 ED 1Gobi ibex 80 ED 1Hybrid ibex ED ED 1West Caucasian tur 110 ED 11Mid-Caucasian tur ED ED 11
East Caucasian tur 130 ED 11Bukharan markhor ED ED 2Astor markhor ED ED 2Kashmir markhor ED ED 2Kabul markhor ED ED 2Sulaiman markhor ED ED 2Chiltan wild goat ED ED 2Himalayan blue sheep 100 ED 11Chinese blue sheep 78 ED 11Chinese blue sheep (estate) ED ED 11Dwarf Blue sheep ED ED 11Konya mouflon ED ED 11Armenian mouflon 110 ED 11Cyprian mouflon ED ED 11Esfahan mouflon 95 ED 11Konya mouflon (darted) ED ED 11Laristan mouflon ED ED 11Shiraz mouflon ED ED 11Red sheep 102 ED 11Kerman sheep ED ED 11Trans-Caspian urial 110 ED 11Afghan urial 96 ED 11Blanford urial 100 ED 11Ludakh urial ED ED 11Punjab urial 98 ED 11Altai argali 210 ED 11Hangay argali 173 ED 11Gobi argali 160 ED 11Gansu argali ED ED 11Kuruktag argali ED ED 11Northern China argali ED ED 11Tibetan argali ED ED 11Marco Polo argali 180 ED 11Tian Shan argali 159 ED 11Littledale argali ED ED 11Sair argali ED ED 11Karaganda argali 164 ED 11Severtzov argali ED ED 11Chinese blue sheep (estate) ED ED 11Kamchatka snow sheep 135 ED 11Koryak snow sheep ED ED 11Siberian snow sheep 130 ED 11Okhotsk snow sheep 134 ED 11Putorana snow sheep ED ED 11Yakutia snow sheep 135 ED 11
DeerMideastern red deer ED 168 20Bukharan deer ED ED 20Bawean or Kuhl deer ED ED 21-TCalamian deer ED ED 21-TGansu deer ED ED 20Gansu deer (estate) ED ED 20Himalayan musk deer ED ED 12Siberian musk deer ED ED 12Indochinese hog deer ED ED 21-TSri Lanka hog deer ED ED 21-TLittle red brocket deer ED ED 26-TMouse deer ED ED 15Javan mouse deer ED ED 15White-lipped or Thorold deer (estate) ED ED 22Red Deer/wapiti hybrid ED ED 20Tian Shan wapiti or maral (T) 214 ED 19-TTian Shan wapiti or maral (NT) ED ED 19-NTAlashan wapiti ED ED 19-T
Min. Min MethodGen. Bow
Min. Min MethodGen. Bow

SCI Measuring Manual 81
Altai wapiti or maral (T) 224 ED 19-TAltai wapiti or maral (NT) ED ED 19-NTManchurian wapiti or izyubr (T) ED ED 19-TManchurian wapiti or izyubr (NT) ED ED 19-NTWhite-lipped or Thorold deer ED ED 22Barasingha or swamp deer (all ssp) ED ED 22Brow-antlered or Eld deer (all ssp) ED ED 22Sika deer (all ssp) (T) ED ED 21-TSika deer (all ssp) (NT) ED ED 21-NTSambar (all ssp) (T) ED ED 21-TSambar (all ssp) (NT) ED ED 21-NTRusa deer (all ssp) (T) ED ED 21-TRusa deer (all SSP) (NT) ED ED 21-NTAxis deer (T) ED ED 21-TAxis deer (NT) ED ED 21-NTIndian hog deer (T) ED ED 21-TIndian hog deer (NT) ED ED 21-NTEuropean roe deer (T) ED ED 21-TEuropean roe deer (NT) ED ED 21-NTSiberian roe deer (T) 47 ED 21-TSiberian roe deer (NT) 52 ED 21-NTChinese roe deer (T) ED ED 21-TChinese roe deer (NT) ED ED 21-NTAmur moose (palmated antlers) ED ED 25-PAmur moose (cervine antlers) ED ED 25-CChukotka moose (palmated antlers) 366 ED 25-PEuropean moose ED ED 25-PYakutia moose (palmated antlers) ED ED 25-PYakutia moose (cervine antlers) ED ED 25-CReindeer 221 ED 23Indian muntjac (T) 10 ED 26-TIndian muntjac (NT) ED ED 26-NTOther muntjac species (T) ED ED 26-TOther muntjac species (NT) ED ED 26-NTTufted deer (all ssp) ED ED 26-TWater deer (all ssp) ED ED 12
PigsEurasian wild boar 15 ED 12Feral boar ED ED 12Javan warty pig ED ED 12Banded pig ED ED 12Bearded pig ED ED 12Other Asian pigs ED ED 12
Thick-skinned gameIndian rhinoceros ED ED 8
SOUTH PACIFIC (INTRODUCED)Horned Game
Arapawa 99 89 11Banteng 60 54 3Banteng(estate) 60 56 3Water buffalo 80 72 3Water buffalo (estate) 80 72 3Blackbuck 50 45 2Blackbuck (estate) 50 45 2Chamois 20 18 1Himalayan tahr 37 33 1Feral goat 55 49 2Feral goat (estate) 59 53 2Feral ox 39 35 3
DeerRed deer 185 166 20Wapiti (T) 250 225 19-TWapiti (NT) 260 234 19-NTSika deer (T) (estate) 90 81 21-TSika deer (NT) (estate) 131 118 21-NTSambar (T) (estate) 108 98 21-TSambar (NT) (estate) ED 90 21-NTJavan Rusa deer (T) (free range) 100 90 21-TJavan Rusa deer (NT) (free range) 116 103 21-NTJavan Rusa deer (T) (estate) 115 101 21-TJavan Rusa deer (NT) (estate) 116 101 21-NTMoluccan Rusa deer (T) 76 68 21-TMoluccan Rusa deer (NT) ED 94 21-NTMoluccan Rusa deer (T)(estate) 85 73 21-TMoluccan Rusa deer (NT) (estate) 95 83 21-NTAxis deer (T) 100 90 21-TAxis deer (NT) ED 87 4/8 21-NTAxis deer (T) (estate) 92 80 21-TAxis deer (NT) (estate) 100 90 21-NTHog deer (T) 55 50 21-THog deer (NT) ED 50 21-NTHog deer (T) (estate) 50 45 21-THog deer (NT) (estate) ED 45 21-NTEuropean fallow deer 150 135 24European fallow deer (estate) 153 138 24White-tailed deer (T) 75 67 17-TWhite-tailed deer (NT) (free range) ED 75 17-NTWhite-tailed deer (T) (estate) 59 53 17-T
PigsFeral boar 15 13 12
CarnivoresRed fox ED ED 15
TurkeysSouth Pacific wild turkey (feral) 20 19 50-TSouth Pacific wild turkey (feral)(NT) 0 61 4/16 50-NT
Min. Min MethodGen. Bow
Min. Min MethodGen. Bow

82 SCI Measuring Manual
1/64 .015625 .397
1/32 .03125 .794
3/64 .406875 1.191
1/16 .0625 1.588
5/64 .078125 1.984
3/32 .09375 2.381
7/64 .109375 2.778
1/8 .125 3.175
9/64 .140625 3.572
5/32 .15625 3.969
11/64 .171875 4.366
3/16 .1875 4.763
13/64 .203125 5.159
7/32 .21875 5.556
15/64 .2343475 5.953
1/4 .250 6.350
17/64 .265625 6.747
9/32 .28125 7.144
19/64 .296875 7.541
5/16 .3125 7.938
21/64 .328125 8.334
11/32 .34375 8.731
23/64 .359375 9.128
3/8 .375 9.525
25/64 .390625 .9922
11/32 .40625 10.319
27/64 .421875 10.716
7/16 .4375 11.113
29/64 .453125 11.509
15/32 .46875 11.906
31/64 .484375 12.303
1/2 .500 12.700
33/64 .515625 13.097
17/32 .53125 13.494
35/64 .546875 13.891
9/16 .5625 14.288
37/64 .578125 14.684
19/32 .59375 15.081
39/64 .609375 15.478
5/8 .625 15.875
41/64 .640625 16.272
21/32 .65625 16.669
43/64 .671875 17.066
11/16 .6875 17.463
45/64 .703125 17.859
23/32 .71875 18.256
47/64 .734375 18.653
3/4 .750 19.050
49/64 .765625 19.447
25/32 .78125 19.844
51/64 .796875 20.241
13/16 .8125 20.638
53/64 .828125 21.034
27/32 .84375 21.431
55/64 .859375 21.828
7/8 .875 22.225
57/64 .89625 22.622
29/32 .90625 23.019
59/64 .921875 23.416
15/16 .9375 23.813
61/64 .953125 24.209
31/32 .96875 24.606
63/64 .984375 25.003
1 1.000 25.400
Inches Milli Fractions Decimals meters
Inches Milli Fractions Decimals meters
Decimal and Millimeter Equivalents of Fractions

SCI Measuring Manual 83
Decimal and Millimeter Equivalents of Fractions
.1 .00394
.2 .00787
.3 .01181
.4 .01575
.5 .01968
.6 .02362
.7 .02756
.8 .03149
.9 .03543
1. .03937
1.5 .05905
2. .07874
2.5 .09842
3. .11811
3.5 .13779
4. .15748
4.5 .17716
5. .19685
5.5 .21653
6. .23622
6.5 .25590
7. .27559
7.5 .29527
8. .31496
8.5 .34464
9. .35433
9.5 .37401
10. .39370
10.5 .41338
11. .43307
11.5 .45275
12. .47244
12.5 .49212
13. .51181
13.5 .53149
14. .55118
14.5 .57086
15. .59055
15.5 .61023
16. .62992
16.5 .64960
17. .66929
17.5 .68897
18. .70866
18.5 .72834
19. .74803
19.5 .76771
20. .78740
20.5 .80708
21. .82677
21.5 .84645
22. .86614
22.5 .88582
23. .90551
23.5 .92519
24. .94488
24.5 .96456
25. .98425
25.5 1.00393
26. 1.02362
26.5 1.04330
27. 1.06299
27.5 1.08267
28. 1.10236
28.5 1.12204
29. 1.14173
29.5 1.16141
30. 1.18110
30.5 1.20078
31. 1.22047
31.5 1.24015
32. 1.25984
32.5 1.27952
33. 1.29921
33.5 1.31889
34. 1.33858
34.5 1.35826
35. 1.37795
35.5 1.39763
36. 1.41732
36.5 1.43700
37. 1.45669
37.5 1.47637
38. 1.49606
38.5 1.51574
39. 1.53543
39.5 1.55511
40. 1.57480
40.5 1.59488
41. 1.61417
41.5 1.63385
42. 1.65354
42.5 1.67322
43. 1.69291
43.5 1.71259
44. 1.73228
44.5 1.75196
45. 1.77165
45.5 1.79133
46. 1.81102
46.5 1.83070
47. 1.85039
47.5 1.87007
48. 1.88976
48.5 1.90944
49. 1.92913
49.5 1.94881
50. 1.96850
M/m Inches M/m Inches M/m Inches

84 SCI Measuring Manual
Decimal and Millimeter Equivalents of Fractions
50.5 1.98818
51. 2.00787
51.5 2.02755
52. 2.04724
52.5 2.06692
53. 2.08661
53.5 2.10629
54. 2.12598
54.5 2.14566
55. 2.16535
55.5 2.18503
56. 2.20472
56.5 2.22440
57. 2.24409
57.5 2.26377
58. 2.28346
58.5 2.30314
59. 2.32283
59.5 2.34251
60. 2.36220
60.5 2.38188
61. 2.40157
61.5 2.42125
62. 2.44094
62.5 2.46062
63. 2.48031
63.5 2.49999
64. 2.51968
64.5 2.53936
65. 2.55905
65.5 2.57873
66. 2.59842
66.5 2.61810
67. 2.63779
67.5 2.65754
68. 2.67716
68.5 2.69684
69. 2.71653
69.5 2.73621
70. 2.75590
70.5 2.77558
71. 2.79527
71.5 2.81495
72. 2.83464
72.5 2.85432
73. 2.87401
73.5 2.89369
74. 2.91338
74.5 2.93306
75. 2.95275
75.5 2.97243
76. 2.99212
76.5 3.01180
77. 3.03149
77.5 3.05117
78. 3.07086
78.5 3.09054
79. 3.11023
79.5 3.12991
80. 3.14960
80.5 3.16928
81. 3.18897
81.5 3.20865
82. 3.22834
82.5 3.24802
83. 3.26771
83.5 3.28739
84. 3.30708
84.5 3.32676
85. 3.34645
85.5 3.36613
86. 3.38682
86.5 3.40550
87. 3.42519
87.5 3.44487
88. 3.46456
88.5 3.48424
89. 3.50393
89.5 3.52361
90. 3.54330
90.5 3.56298
91. 3.58267
91.5 3.60235
92. 3.62204
92.5 3.64172
93. 3.66141
93.5 3.68109
94. 3.70078
94.5 3.72046
95. 3.74015
95.5 3.75983
96. 3.77952
96.5 3.79920
97. 3.81889
97.5 3.83857
98. 3.85826
98.5 3.87794
99. 3.89763
99.5 3.91731
100. 3.93700
M/m Inches M/m Inches M/m Inches

SCI Measuring Manual 85
10 2 4/8 5 7 4/810 1/8 2 4/8 5 1/8 7 5/810 2/8 2 5/8 5 1/8 7 6/810 3/8 2 5/8 5 2/8 7 6/810 4/8 2 5/8 5 2/8 7 7/810 5/8 2 5/8 5 3/8 810 6/8 2 6/8 5 3/8 8 1/810 7/8 2 6/8 5 4/8 8 1/811 2 6/8 5 4/8 8 2/811 1/8 2 6/8 5 5/8 8 3/811 2/8 2 7/8 5 5/8 8 4/811 3/8 2 7/8 5 6/8 8 4/811 4/8 2 7/8 5 6/8 8 5/811 5/8 2 7/8 5 7/8 8 6/811 6/8 3 5 7/8 8 7/811 7/8 3 6 8 7/812 3 6 912 1/8 3 6 1/8 9 1/812 2/8 3 1/8 6 1/8 9 2/812 3/8 3 1/8 6 2/8 9 2/812 4/8 3 1/8 6 2/8 9 3/812 5/8 3 1/8 6 3/8 9 4/812 6/8 3 2/8 6 3/8 9 5/812 7/8 3 2/8 6 4/8 9 5/813 3 2/8 6 4/8 9 6/813 1/8 3 2/8 6 5/8 9 7/813 2/8 3 3/8 6 5/8 1013 3/8 3 3/8 6 6/8 1013 4/8 3 3/8 6 6/8 10 1/813 5/8 3 3/8 6 7/8 10 2/813 6/8 3 4/8 6 7/8 10 3/813 7/8 3 4/8 7 10 3/814 3 4/8 7 10 4/814 1/8 3 4/8 7 1/8 10 5/814 2/8 3 5/8 7 1/8 10 6/814 3/8 3 5/8 7 2/8 10 6/814 4/8 3 5/8 7 2/8 10 7/814 5/8 3 5/8 7 3/8 1114 6/8 3 6/8 7 3/8 11 1/814 7/8 3 6/8 7 4/8 11 1/815 3 6/8 7 4/8 11 2/815 1/8 3 6/8 7 5/8 11 3/815 2/8 3 7/8 7 5/8 11 4/815 3/8 3 7/8 7 6/8 11 4/815 4/8 3 7/8 7 6/8 11 5/815 5/8 3 7/8 7 7/8 11 6/815 6/8 4 7 7/8 11 7/815 7/8 4 8 11 7/816 4 8 12 16 1/8 4 8 1/8 12 1/816 2/8 4 1/8 8 1/8 12 2/816 3/8 4 1/8 8 2/8 12 2/816 4/8 4 1/8 8 2/8 12 3/816 5/8 4 1/8 8 3/8 12 4/8
16 6/8 4 2/8 8 3/8 12 5/816 7/8 4 2/8 8 4/8 12 5/817 4 2/8 8 4/8 12 6/817 1/8 4 2/8 8 5/8 12 7/817 2/8 4 3/8 8 5/8 13 17 3/8 4 3/8 8 6/8 13 17 4/8 4 3/8 8 6/8 13 1/817 5/8 4 3/8 8 7/8 13 2/817 6/8 4 4/8 8 7/8 13 3/817 7/8 4 4/8 9 13 3/818 4 4/8 9 13 4/818 1/8 4 4/8 9 1/8 13 5/818 2/8 4 5/8 9 1/8 13 6/818 3/8 4 5/8 9 2/8 13 6/818 4/8 4 5/8 9 2/8 13 7/818 5/8 4 5/8 9 3/8 14 18 6/8 4 6/8 9 3/8 14 1/818 7/8 4 6/8 9 4/8 14 1/819 4 6/8 9 4/8 14 2/819 1/8 4 6/8 9 5/8 14 3/819 2/8 4 7/8 9 5/8 14 4/819 3/8 4 7/8 9 6/8 14 4/819 4/8 4 7/8 9 6/8 14 5/819 5/8 4 7/8 9 7/8 14 6/819 6/8 5 9 7/8 14 7/819 7/8 5 10 14 7/820 5 10 15 20 1/8 5 10 1/8 15 1/820 2/8 5 1/8 10 1/8 15 2/820 3/8 5 1/8 10 2/8 15 2/820 4/8 5 1/8 10 2/8 15 3/820 5/8 5 1/8 10 3/8 15 4/820 6/8 5 2/8 10 3/8 15 5/820 7/8 5 2/8 10 4/8 15 5/821 5 2/8 10 4/8 15 6/821 1/8 5 2/8 10 5/8 15 7/821 2/8 5 3/8 10 5/8 16 21 3/8 5 3/8 10 6/8 16 21 4/8 5 3/8 10 6/8 16 1/821 5/8 5 3/8 10 7/8 16 2/821 6/8 5 4/8 10 7/8 16 3/821 7/8 5 4/8 11 16 3/822 5 4/8 11 16 4/822 1/8 5 4/8 11 1/8 16 5/822 2/8 5 5/8 11 1/8 16 6/822 3/8 5 5/8 11 2/8 16 6/822 4/8 5 5/8 11 2/8 16 7/822 5/8 5 5/8 11 3/8 17 22 6/8 5 6/8 11 3/8 17 1/822 7/8 5 6/8 11 4/8 17 1/823 5 6/8 11 4/8 17 2/823 1/8 5 6/8 11 5/8 17 3/823 2/8 5 7/8 11 5/8 17 4/823 3/8 5 7/8 11 6/8 17 4/8
LENGTH 1st Qtr. 2nd Qtr. 3rd Qtr. LENGTH 1st Qtr. 2nd Qtr. 3rd Qtr.
SCI Quarter Conversion Chart(use for Circumference Quarters and Red Deer Inside Span)

86 SCI Measuring Manual
23 4/8 5 7/8 11 6/8 17 5/823 5/8 5 7/8 11 7/8 17 6/823 6/8 6 11 7/8 17 7/823 7/8 6 12 17 7/824 6 12 18 24 1/8 6 12 1/8 18 1/824 2/8 6 1/8 12 1/8 18 2/824 3/8 6 1/8 12 2/8 18 2/824 4/8 6 1/8 12 2/8 18 3/824 5/8 6 1/8 12 3/8 18 4/824 6/8 6 2/8 12 3/8 18 5/824 7/8 6 2/8 12 4/8 18 5/825 6 2/8 12 4/8 18 6/825 1/8 6 2/8 12 5/8 18 7/825 2/8 6 3/8 12 5/8 19 25 3/8 6 3/8 12 6/8 19 25 4/8 6 3/8 12 6/8 19 1/825 5/8 6 3/8 12 7/8 19 2/825 6/8 6 4/8 12 7/8 19 3/825 7/8 6 4/8 13 19 3/826 6 4/8 13 19 4/826 1/8 6 4/8 13 1/8 19 5/826 2/8 6 5/8 13 1/8 19 6/826 3/8 6 5/8 13 2/8 19 6/826 4/8 6 5/8 13 2/8 19 7/826 5/8 6 5/8 13 3/8 20 26 6/8 6 6/8 13 3/8 20 1/826 7/8 6 6/8 13 4/8 20 1/827 6 6/8 13 4/8 20 2/827 1/8 6 6/8 13 5/8 20 3/827 2/8 6 7/8 13 5/8 20 4/827 3/8 6 7/8 13 6/8 20 4/827 4/8 6 7/8 13 6/8 20 5/827 5/8 6 7/8 13 7/8 20 6/827 6/8 7 13 7/8 20 7/827 7/8 7 14 20 7/828 7 14 21 28 1/8 7 14 1/8 21 1/828 2/8 7 1/8 14 1/8 21 2/828 3/8 7 1/8 14 2/8 21 2/828 4/8 7 1/8 14 2/8 21 3/828 5/8 7 1/8 14 3/8 21 4/828 6/8 7 2/8 14 3/8 21 5/828 7/8 7 2/8 14 4/8 21 5/829 7 2/8 14 4/8 21 6/829 1/8 7 2/8 14 5/8 21 7/829 2/8 7 3/8 14 5/8 22 29 3/8 7 3/8 14 6/8 22 29 4/8 7 3/8 14 6/8 22 1/829 5/8 7 3/8 14 7/8 22 2/829 6/8 7 4/8 14 7/8 22 3/829 7/8 7 4/8 15 22 3/830 7 4/8 15 22 4/830 1/8 7 4/8 15 1/8 22 5/830 2/8 7 5/8 15 1/8 22 6/830 3/8 7 5/8 15 2/8 22 6/830 4/8 7 5/8 15 2/8 22 7/830 5/8 7 5/8 15 3/8 23 30 6/8 7 6/8 15 3/8 23 1/8
30 7/8 7 6/8 15 4/8 23 1/831 7 6/8 15 4/8 23 2/831 1/8 7 6/8 15 5/8 23 3/831 2/8 7 7/8 15 5/8 23 4/831 3/8 7 7/8 15 6/8 23 4/831 4/8 7 7/8 15 6/8 23 5/831 5/8 7 7/8 15 7/8 23 6/831 6/8 8 15 7/8 23 7/831 7/8 8 16 23 7/832 8 16 24 32 1/8 8 16 1/8 24 1/832 2/8 8 1/8 16 1/8 24 2/832 3/8 8 1/8 16 2/8 24 2/832 4/8 8 1/8 16 2/8 24 3/832 5/8 8 1/8 16 3/8 24 4/832 6/8 8 2/8 16 3/8 24 5/832 7/8 8 2/8 16 4/8 24 5/833 8 2/8 16 4/8 24 6/833 1/8 8 2/8 16 5/8 24 7/833 2/8 8 3/8 16 5/8 25 33 3/8 8 3/8 16 6/8 25 33 4/8 8 3/8 16 6/8 25 1/833 5/8 8 3/8 16 7/8 25 2/833 6/8 8 4/8 16 7/8 25 3/833 7/8 8 4/8 17 25 3/834 8 4/8 17 25 4/834 1/8 8 4/8 17 1/8 25 5/834 2/8 8 5/8 17 1/8 25 6/834 3/8 8 5/8 17 2/8 25 6/834 4/8 8 5/8 17 2/8 25 7/834 5/8 8 5/8 17 3/8 26 34 6/8 8 6/8 17 3/8 26 1/834 7/8 8 6/8 17 4/8 26 1/835 8 6/8 17 4/8 26 2/835 1/8 8 6/8 17 5/8 26 3/835 2/8 8 7/8 17 5/8 26 4/835 3/8 8 7/8 17 6/8 26 4/835 4/8 8 7/8 17 6/8 26 5/835 5/8 8 7/8 17 7/8 26 6/835 6/8 9 17 7/8 26 7/835 7/8 9 18 26 7/836 9 18 27 36 1/8 9 18 1/8 27 1/836 2/8 9 1/8 18 1/8 27 2/836 3/8 9 1/8 18 2/8 27 2/836 4/8 9 1/8 18 2/8 27 3/836 5/8 9 1/8 18 3/8 27 4/836 6/8 9 2/8 18 3/8 27 5/836 7/8 9 2/8 18 4/8 27 5/837 9 2/8 18 4/8 27 6/837 1/8 9 2/8 18 5/8 27 7/837 2/8 9 3/8 18 5/8 28 37 3/8 9 3/8 18 6/8 28 37 4/8 9 3/8 18 6/8 28 1/837 5/8 9 3/8 18 7/8 28 2/837 6/8 9 4/8 18 7/8 28 3/837 7/8 9 4/8 19 28 3/838 9 4/8 19 28 4/838 1/8 9 4/8 19 1/8 28 5/8
LENGTH 1st Qtr. 2nd Qtr. 3rd Qtr. LENGTH 1st Qtr. 2nd Qtr. 3rd Qtr.

SCI Measuring Manual 87
38 2/8 9 5/8 19 1/8 28 6/838 3/8 9 5/8 19 2/8 28 6/838 4/8 9 5/8 19 2/8 28 7/838 5/8 9 5/8 19 3/8 29 38 6/8 9 6/8 19 3/8 29 1/838 7/8 9 6/8 19 4/8 29 1/839 9 6/8 19 4/8 29 2/839 1/8 9 6/8 19 5/8 29 3/839 2/8 9 7/8 19 5/8 29 4/839 3/8 9 7/8 19 6/8 29 4/839 4/8 9 7/8 19 6/8 29 5/839 5/8 9 7/8 19 7/8 29 6/839 6/8 10 19 7/8 29 7/839 7/8 10 20 29 7/840 10 20 30 40 1/8 10 20 1/8 30 1/840 2/8 10 1/8 20 1/8 30 2/840 3/8 10 1/8 20 2/8 30 2/840 4/8 10 1/8 20 2/8 30 3/840 5/8 10 1/8 20 3/8 30 4/840 6/8 10 2/8 20 3/8 30 5/840 7/8 10 2/8 20 4/8 30 5/841 10 2/8 20 4/8 30 6/841 1/8 10 2/8 20 5/8 30 7/841 2/8 10 3/8 20 5/8 31 41 3/8 10 3/8 20 6/8 31 41 4/8 10 3/8 20 6/8 31 1/841 5/8 10 3/8 20 7/8 31 2/841 6/8 10 4/8 20 7/8 31 3/841 7/8 10 4/8 21 31 3/842 10 4/8 21 31 4/842 1/8 10 4/8 21 1/8 31 5/842 2/8 10 5/8 21 1/8 31 6/842 3/8 10 5/8 21 2/8 31 6/842 4/8 10 5/8 21 2/8 31 7/842 5/8 10 5/8 21 3/8 32 42 6/8 10 6/8 21 3/8 32 1/842 7/8 10 6/8 21 4/8 32 1/843 10 6/8 21 4/8 32 2/843 1/8 10 6/8 21 5/8 32 3/843 2/8 10 7/8 21 5/8 32 4/843 3/8 10 7/8 21 6/8 32 4/843 4/8 10 7/8 21 6/8 32 5/843 5/8 10 7/8 21 7/8 32 6/843 6/8 11 21 7/8 32 7/843 7/8 11 22 32 7/844 11 22 33 44 1/8 11 22 1/8 33 1/844 2/8 11 1/8 22 1/8 33 2/844 3/8 11 1/8 22 2/8 33 2/844 4/8 11 1/8 22 2/8 33 3/844 5/8 11 1/8 22 3/8 33 4/844 6/8 11 2/8 22 3/8 33 5/844 7/8 11 2/8 22 4/8 33 5/845 11 2/8 22 4/8 33 6/845 1/8 11 2/8 22 5/8 33 7/845 2/8 11 3/8 22 5/8 34 45 3/8 11 3/8 22 6/8 34 45 4/8 11 3/8 22 6/8 34 1/8
45 5/8 11 3/8 22 7/8 34 2/845 6/8 11 4/8 22 7/8 34 3/845 7/8 11 4/8 23 34 3/846 11 4/8 23 34 4/846 1/8 11 4/8 23 1/8 34 5/846 2/8 11 5/8 23 1/8 34 6/846 3/8 11 5/8 23 2/8 34 6/846 4/8 11 5/8 23 2/8 34 7/846 5/8 11 5/8 23 3/8 35 46 6/8 11 6/8 23 3/8 35 1/846 7/8 11 6/8 23 4/8 35 1/847 11 6/8 23 4/8 35 2/847 1/8 11 6/8 23 5/8 35 3/847 2/8 11 7/8 23 5/8 35 4/847 3/8 11 7/8 23 6/8 35 4/847 4/8 11 7/8 23 6/8 35 5/847 5/8 11 7/8 23 7/8 35 6/847 6/8 12 23 7/8 35 7/847 7/8 12 24 35 7/848 12 24 36 48 1/8 12 24 1/8 36 1/848 2/8 12 1/8 24 1/8 36 2/848 3/8 12 1/8 24 2/8 36 2/848 4/8 12 1/8 24 2/8 36 3/848 5/8 12 1/8 24 3/8 36 4/848 6/8 12 2/8 24 3/8 36 5/848 7/8 12 2/8 24 4/8 36 5/849 12 2/8 24 4/8 36 6/849 1/8 12 2/8 24 5/8 36 7/849 2/8 12 3/8 24 5/8 37 49 3/8 12 3/8 24 6/8 37 49 4/8 12 3/8 24 6/8 37 1/849 5/8 12 3/8 24 7/8 37 2/849 6/8 12 4/8 24 7/8 37 3/849 7/8 12 4/8 25 37 3/850 12 4/8 25 37 4/850 1/8 12 4/8 25 1/8 37 5/850 2/8 12 5/8 25 1/8 37 6/850 3/8 12 5/8 25 2/8 37 6/850 4/8 12 5/8 25 2/8 37 7/850 5/8 12 5/8 25 3/8 38 50 6/8 12 6/8 25 3/8 38 1/850 7/8 12 6/8 25 4/8 38 1/851 12 6/8 25 4/8 38 2/851 1/8 12 6/8 25 5/8 38 3/851 2/8 12 7/8 25 5/8 38 4/851 3/8 12 7/8 25 6/8 38 4/851 4/8 12 7/8 25 6/8 38 5/851 5/8 12 7/8 25 7/8 38 6/851 6/8 13 25 7/8 38 7/851 7/8 13 26 38 7/852 13 26 39 52 1/8 13 26 1/8 39 1/852 2/8 13 1/8 26 1/8 39 2/852 3/8 13 1/8 26 2/8 39 2/852 4/8 13 1/8 26 2/8 39 3/852 5/8 13 1/8 26 3/8 39 4/852 6/8 13 2/8 26 3/8 39 5/852 7/8 13 2/8 26 4/8 39 5/8
LENGTH 1st Qtr. 2nd Qtr. 3rd Qtr. LENGTH 1st Qtr. 2nd Qtr. 3rd Qtr.

88 SCI Measuring Manual
53 13 2/8 26 4/8 39 6/853 1/8 13 2/8 26 5/8 39 7/853 2/8 13 3/8 26 5/8 40 53 3/8 13 3/8 26 6/8 40 53 4/8 13 3/8 26 6/8 40 1/853 5/8 13 3/8 26 7/8 40 2/853 6/8 13 4/8 26 7/8 40 3/853 7/8 13 4/8 27 40 3/854 13 4/8 27 40 4/854 1/8 13 4/8 27 1/8 40 5/854 2/8 13 5/8 27 1/8 40 6/854 3/8 13 5/8 27 2/8 40 6/854 4/8 13 5/8 27 2/8 40 7/854 5/8 13 5/8 27 3/8 41 54 6/8 13 6/8 27 3/8 41 1/854 7/8 13 6/8 27 4/8 41 1/855 13 6/8 27 4/8 41 2/855 1/8 13 6/8 27 5/8 41 3/855 2/8 13 7/8 27 5/8 41 4/855 3/8 13 7/8 27 6/8 41 4/855 4/8 13 7/8 27 6/8 41 5/855 5/8 13 7/8 27 7/8 41 6/855 6/8 14 27 7/8 41 7/855 7/8 14 28 41 7/856 14 28 42 56 1/8 14 28 1/8 42 1/856 2/8 14 1/8 28 1/8 42 2/856 3/8 14 1/8 28 2/8 42 2/856 4/8 14 1/8 28 2/8 42 3/856 5/8 14 1/8 28 3/8 42 4/856 6/8 14 2/8 28 3/8 42 5/856 7/8 14 2/8 28 4/8 42 5/857 14 2/8 28 4/8 42 6/857 1/8 14 2/8 28 5/8 42 7/857 2/8 14 3/8 28 5/8 43 57 3/8 14 3/8 28 6/8 43 57 4/8 14 3/8 28 6/8 43 1/857 5/8 14 3/8 28 7/8 43 2/857 6/8 14 4/8 28 7/8 43 3/857 7/8 14 4/8 29 43 3/858 14 4/8 29 43 4/858 1/8 14 4/8 29 1/8 43 5/858 2/8 14 5/8 29 1/8 43 6/858 3/8 14 5/8 29 2/8 43 6/858 4/8 14 5/8 29 2/8 43 7/858 5/8 14 5/8 29 3/8 44 58 6/8 14 6/8 29 3/8 44 1/858 7/8 14 6/8 29 4/8 44 1/859 14 6/8 29 4/8 44 2/859 1/8 14 6/8 29 5/8 44 3/859 2/8 14 7/8 29 5/8 44 4/859 3/8 14 7/8 29 6/8 44 4/859 4/8 14 7/8 29 6/8 44 5/859 5/8 14 7/8 29 7/8 44 6/859 6/8 15 29 7/8 44 7/859 7/8 15 30 44 7/860 15 30 45
LENGTH 1st Qtr. 2nd Qtr. 3rd Qtr.