Embed Size (px)
Citation preview

1
Philmont Scout Ranch
17 Deer Run Rd.
Cimarron, NM 87714
Official Philmont Shakedown Guide – Part 1
Revised: September 1st, 2017
Refer to Philmont’s website: www.philmontscoutranch.org for updates to this guide and the
most up-to-date information regarding your trek.
This guide is intended to be an all-encompassing tool for crews to utilize in order to prepare for an
upcoming Philmont trek. It is highly recommended that crews participate in at least two shakedown
hikes prior to their trek. To help facilitate this, we have split this guide into two separate documents to
allow the crew to focus on different topics on each hike.
In Part 1, we will cover crew leadership positions, gear and food selection, conditioning tips, and
backcountry camping practices used at Philmont.
Crew Positions • Crew Leader – Responsible for organizing the crew, assigning duties, making decisions, and
recognizing the capabilities of each crew member. He/she leads by example and practices
servant leadership to allow the crew to have an enjoyable and successful trek. The Crew
Leader should have leadership capabilities that are respected by everyone and should be
selected prior to the first shakedown hike. Successful Crew Leaders exhibit the following traits:
positive attitude, attentiveness to all crew members’ needs, and the ability to identify and
resolve conflicts before they develop into larger issues.
• Chaplain’s Aide – Responsible for leading the crew in following the 12th point of the Scout
Law. They help the crew earn the Duty To God Award and lead daily devotionals from the
Eagles Soaring High Booklet as well as facilitating Roses, Thorns, and Buds each night. The
Chaplain’s Aide should be selected by the crew prior to the first shakedown hike. On the
shakedown hikes, it is a great time to start Roses, Thorns, and Buds with the crew. During
Roses, Thorns, and Buds each crew member will say their rose (something they liked about
the day), thorn (something they disliked about the day), and bud (what they are looking forward
to tomorrow or in the near future). Each crew member should be allowed to talk uninterrupted
to allow this exercise to facilitate crew bonding.
• Wilderness Pledge Guia (Guide) – Responsible for helping the crew understand and follow
the principles of the Philmont Wilderness Pledge and Leave No Trace. They help the crew
earn the Wilderness Pledge Achievement Award with the help of the Ranger. They also help
enforce Philmont’s bear procedures. The Philmont Wilderness Pledge reads as follows:
Through good Scout camping, I pledge to preserve the beauty
and splendor of the Philmont wilderness. I commit myself to:
1. An absence of litter and graffiti
2. Respect for wildlife
3. Conservation and proper use of water
4. Respect for trails and trail signs
5. Proper use of campsites
2
The seven principles of Leave No Trace are:
1. Plan Ahead and Prepare 5. Minimize Campfire Impacts 2. Travel and Camp on Durable Surfaces 6. Respect Wildlife 3. Dispose of Waste Properly 7. Be Considerate of Other Visitors 4. Leave What You Find
The Wilderness Pledge Guia should be selected by the crew prior to the first shakedown hike
and should help the crew follow these two wilderness ethics both at home and at Philmont.
• Lead Advisor – The Lead Advisor is the principal Advisor responsible for coordinating a
successful Philmont experience for each member of the crew. All adults support the Lead
Advisor in accomplishing the duties of the Advisor. Advisors’ main role is to coach, mentor,
and support the Crew Leader, Chaplain Aide, and Wilderness Pledge Guia. By doing this, the
youth leaders will gain leadership experience throughout the trek and will be able to help all
members of the crew develop into a strong team. The second primary role of advisors is to
ensure the safety and well-being of each crew member:
First aid treatment; Administration of required medications; Proper water purification;
Any time a stove is in use; Guidance and support of the crew through emergency situations.
Advisors also help foster positive crew dynamics, help settle disputes between members of
the crew, assist with administering proper discipline if required, and ensure that the crew
operates following all youth protection guidelines.
Gear Selection Your Ranger will cover a gear shakedown with you in Base Camp before you depart for the
backcountry. The purpose of the gear shakedown is to ensure everyone has the appropriate gear and
clothing before leaving for the wilderness and to make sure unnecessary items are stored in Base
Camp to save weight and bulk. Here is a list of the items most commonly asked about while preparing
for a trek:
• Backpacks – Internal frame packs are highly functional and most
commonly used. The pack needs to have a padded hip belt.
Anything between a 65-85 liter carrying capacity will fit personal
gear, crew gear, food, and water. To properly pack an internal
frame backpack, place the heavy gear along the spine and close
to the hiker’s back to keep the center of gravity forward and low.
Lighter gear should be packed at the top of the backpack and on
the outer edges of the main compartment. Sleeping bags usually
fit at the bottom of the pack. Avoid having loose/dangling gear, as
it is more likely to get caught in vegetation and requires you to
exert more energy to offset its swaying motion. Backpacks are
available for rent from Outfitting Services in Base Camp for $30
(this includes a pack cover as well). This is a great option for youth
who you know will outgrow a pack in a year or two.
o A video titled: “How To Pack A Backpack” can be found on YouTube at:
https://www.youtube.com/watch?v=MA9nSJ7RuYY
o A video titled: “How To Fit A Backpack” can be found on YouTube at:
http://www.youtube.com/watch?v=V8OMUn-tFoY&list=PL34836244149F115A
3
• Boots – Mid- to high-top boots are highly recommended for ankle support on rocky, uneven
trails. Boots should be well broken in before a Philmont trek. Waterproof boots are
recommended: keeping your feet dry is one of the biggest keys to a successful trek.
o A video titled: “Choosing Your Hiking Boots” can be found on YouTube at:
http://www.youtube.com/watch?v=fG5UICHIWA8&list=PL34836244149F115A
• Stream Crossing Shoes – Due to recent changes in annual weather patterns, streams at
Philmont are running at their highest levels in 15 years. It is impossible to keep your feet dry
in many stream crossings. It is highly recommended to bring camp shoes that can double as
stream crossing shoes to prevent having to use hiking boots to cross knee-deep water. Old
tennis shoes work great for camp/stream crossing shoes because they are lightweight, closed
toed, can pack up small, and don’t cost anything since you already have them and can easily
recycle them at the end of the trek. After crossing a stream, tie the stream crossing shoes to
the outside of your pack to let them dry off. They will be dry by the time you get to camp and it
will be nice to let your feet flex and air out while wearing these shoes.
• Tents – Philmont requires closed-walled tents to prevent rodents, snakes, scorpions, and
spiders from entering your sleeping facility. Two-person tents are required, as it is often difficult
to find a spot to set up a larger tent in forested campsites. Mountain Safety Research (MSR)
partnered with Philmont in 2012 and developed the Thunder Ridge tent specifically for use at
Philmont. The MSR Thunder Ridge is a two-person, three-season tent and is available for
crews to use free of charge while on their Philmont trek. Each MSR Thunder Ridge tent is
washed using Nikwax Tech Wash® upon returning to Base Camp to ensure all Philmont-issued
tents are clean and waterproof. Ground cloths (not provided) are required for use with the MSR
Thunder Ridge tents and the dimensions of the tent are 88” x 54”. Lightweight materials such
as Tyvek work great as ground cloths and are affordable if purchased in bulk for the crew.
• Sleeping Bags – Philmont recommends a 20oF temperature rating on sleeping bags.
Synthetic bags are easier to care for than down bags but a synthetic bag will not compress as
small and will weigh more than a down equivalent. If a down bag is used at Philmont, it is
recommended that the person using it is very experienced in its care since down loses all
insulation value once wet. Sleeping pads are also highly encouraged for added warmth.
• Stoves – White gas stoves are most commonly used at Philmont. Models such as the MSR
WhisperLite, MSR DragonFly, and the Optimus Nova are great stoves for a Philmont
backpacking trek. White gas stoves are preferred by most crews because they are more
efficient at higher elevations and colder temperatures and the fuel bottles are refillable, making
them more environmentally friendly than canister stoves. Canister stoves such as the MSR
4
WhisperLite Universal and Optimus Vega are acceptable stoves for a Philmont trek due to
their design of separating the canister from the stove, making it much more stable and safer
than a typical canister stove that screws on directly above the fuel canister. Although they
should not be used for cooking meals, canister stoves such as the MSR PocketRocket,
Optimus Crux, and Jetboils work great for small items like boiling water for coffee. (It is
important to never use a windscreen with one of these stoves due to the fact that the heat
source and fuel are both in the same enclosed space, making it highly combustible.)
Backcountry commissary camps can refill white gas and have canister fuel available for
purchase. It is recommended that a crew has approximately 6 oz. of white gas carrying
capacity per person. Open flame stoves without a shutoff valve like BioLite stoves or alcohol
stoves are not allowed at Philmont for safety reasons and wildfire risk.
o A video titled: “Choosing The Right Stove For Philmont” can be found on Philmont’s
YouTube channel at: http://www.youtube.com/watch?v=aqWkvuVDJzc
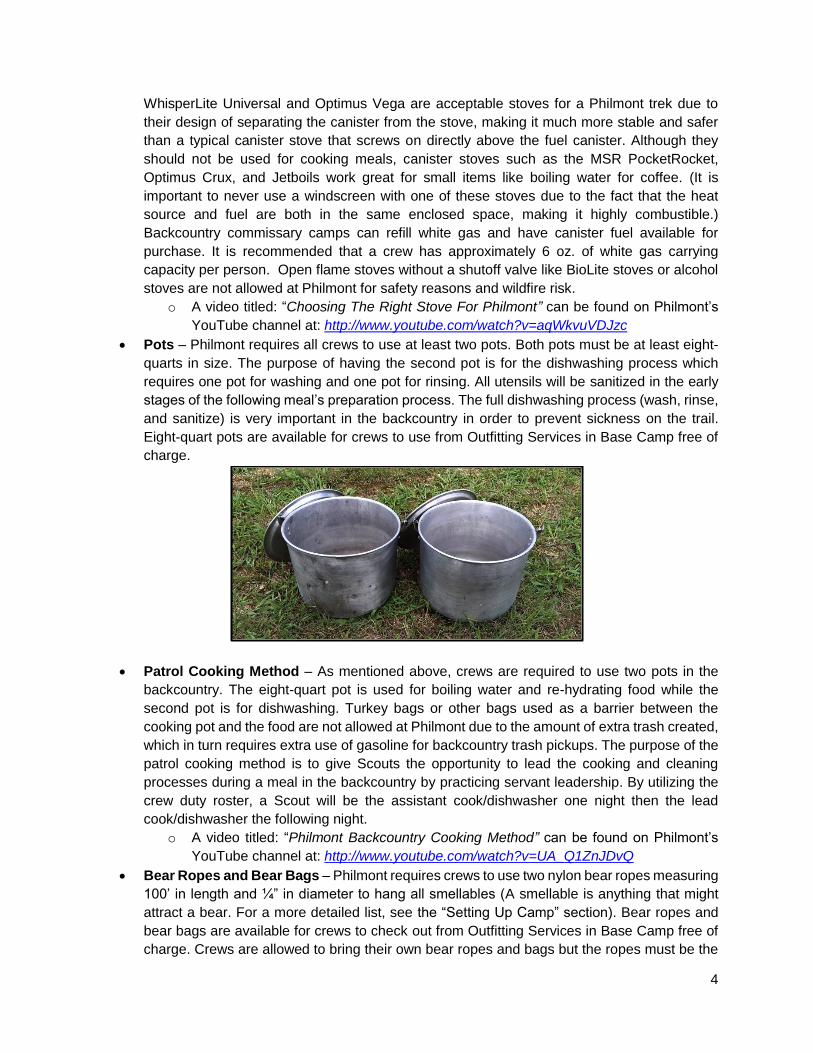
• Pots – Philmont requires all crews to use at least two pots. Both pots must be at least eight-
quarts in size. The purpose of having the second pot is for the dishwashing process which
requires one pot for washing and one pot for rinsing. All utensils will be sanitized in the early
stages of the following meal’s preparation process. The full dishwashing process (wash, rinse,
and sanitize) is very important in the backcountry in order to prevent sickness on the trail.
Eight-quart pots are available for crews to use from Outfitting Services in Base Camp free of
charge.
• Patrol Cooking Method – As mentioned above, crews are required to use two pots in the
backcountry. The eight-quart pot is used for boiling water and re-hydrating food while the
second pot is for dishwashing. Turkey bags or other bags used as a barrier between the
cooking pot and the food are not allowed at Philmont due to the amount of extra trash created,
which in turn requires extra use of gasoline for backcountry trash pickups. The purpose of the
patrol cooking method is to give Scouts the opportunity to lead the cooking and cleaning
processes during a meal in the backcountry by practicing servant leadership. By utilizing the
crew duty roster, a Scout will be the assistant cook/dishwasher one night then the lead
cook/dishwasher the following night.
o A video titled: “Philmont Backcountry Cooking Method” can be found on Philmont’s
YouTube channel at: http://www.youtube.com/watch?v=UA_Q1ZnJDvQ
• Bear Ropes and Bear Bags – Philmont requires crews to use two nylon bear ropes measuring
100’ in length and ¼” in diameter to hang all smellables (A smellable is anything that might
attract a bear. For a more detailed list, see the “Setting Up Camp” section). Bear ropes and
bear bags are available for crews to check out from Outfitting Services in Base Camp free of
charge. Crews are allowed to bring their own bear ropes and bags but the ropes must be the
5
same dimensions as Philmont’s (100’ x ¼”) and the bags must be able to be tied or clipped to
the rope. Pulley systems are not allowed for use at Philmont due to their tendency to get
jammed, their weight, and their lack of having two tie-off points. Two tie-off points are required
so that if a bear cuts one line, the bags will still be suspended by the second line.
o A video titled: “How to Hang a Bear Bag” can be found on Philmont’s YouTube channel
at: https://www.youtube.com/watch?v=DN2y50oUcS8
• Water Purification – Katadyn Micropur® tablets are issued to purify untreated water at
Philmont. These tablets are lightweight, pack down to almost nothing, and are provided for
free. They kill protozoa, bacteria, and viruses whereas filters are only effective against
protozoa and bacteria. You may bring water filters if you would like but it is not necessary due
to the Micropur tablets you will receive in Base Camp.
o A video titled: “What You Need To Safely Treat Water In The Backcountry” can be
found on YouTube at: http://www.youtube.com/watch?v=GZAiUVfpDuI
Menu The Philmont trail menu is easy to replicate and your crew can practice cooking on your shakedowns
with the same kind of food you will be eating on your trek. Although the 2018 trail food menu may
differ, here are examples of a few trail meals Philmont used in 2017:
Breakfast
Instant oatmeal
Pop Tarts
Granola bar
Turkey sausage links
Hot cocoa mix
Lunch
Club crackers
Cheese wedges
Beef and cheese stick
Honey Stinger chews
Corn Nuts
Gatorade
Dinner
Jambalaya pasta
Beef stick
Fruit and nut trail mix
Pecan sandies
The complete 2018 trail meal menu is available online at:
http://philmontscoutranch.org/TrekPreparation/Dining.aspx.
Look to the icons on the right side of the webpage for links to the ingredients list. The 2018 menu will
be posted after April 1st, 2018.
2017 trail meals are available for purchase for $5.00 a bag. Each bag feeds two people. 2017 trail
meals can be purchased online at:
http://philmontscoutranch.org/~/link.aspx?_id=D5BEC69924704397B0C27E881D87CB69&_z=z
6
Physical Preparedness It is crucial to successful individual and crew experiences that hikers are in strong physical condition
for their Philmont trek. In order to get into physical shape that is appropriate for a Philmont trek, crew
members need to start exercising at least eight months in advance. The most important aspects to
focus on are aerobic/cardiovascular and lower body strength. Here are some activity suggestions for
getting in shape:
• Go to your local high school football stadium and run/walk up the bleachers for an hour-long
session twice a week. Turn it into a crew experience and have every crew member join,
ensuring that everyone is in great shape. Once this activity becomes easy for you, bring your
fully loaded backpack with you to get an idea of how your pack will feel, allowing you to tinker
with your pack and figure out which settings work best.
• Go cycling twice a week. The distance is up to you: the leg workout combined with the
cardiovascular aspect makes cycling a great preparation activity for backpacking.
• Keep track of your exercises by recording a logbook and post the activities you did over the
past week on a crew-wide board at each troop meeting. This will let others know how dedicated
you are to your trek and your crew and it will keep everyone accountable for getting into shape.
In addition to physical activity, eating right will go a long way in helping you get in shape for Philmont.
A balanced diet is essential to healthy living and as Scouts we have all pledged to keep ourselves
physically strong. It is crucial that all crew members – youth and advisors – be in excellent physical
condition for their trek: the crew will be able to get to camp faster and have more time for program
opportunities such as rock climbing, shooting, horseback riding, etc. while also having more energy in
general. The hard work put into exercising now will pay off tenfold by the time of your trek.
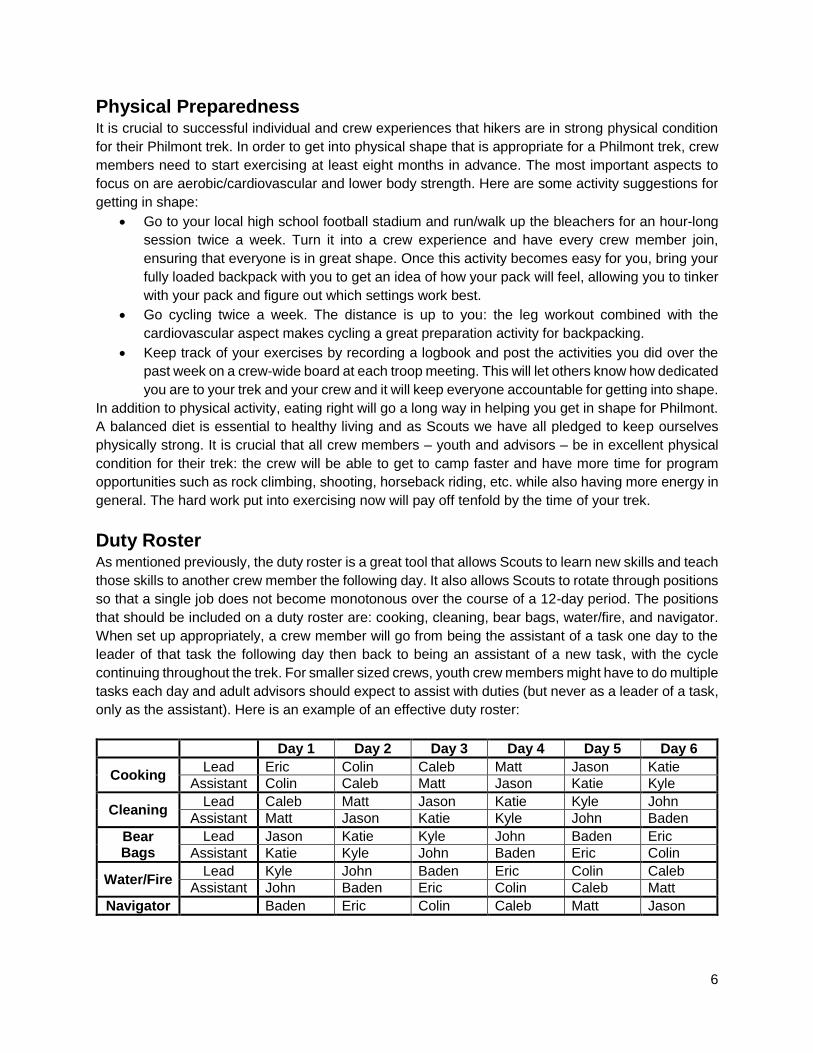
Duty Roster As mentioned previously, the duty roster is a great tool that allows Scouts to learn new skills and teach
those skills to another crew member the following day. It also allows Scouts to rotate through positions
so that a single job does not become monotonous over the course of a 12-day period. The positions
that should be included on a duty roster are: cooking, cleaning, bear bags, water/fire, and navigator.
When set up appropriately, a crew member will go from being the assistant of a task one day to the
leader of that task the following day then back to being an assistant of a new task, with the cycle
continuing throughout the trek. For smaller sized crews, youth crew members might have to do multiple
tasks each day and adult advisors should expect to assist with duties (but never as a leader of a task,
only as the assistant). Here is an example of an effective duty roster:
Day 1 Day 2 Day 3 Day 4 Day 5 Day 6
Cooking Lead Eric Colin Caleb Matt Jason Katie
Assistant Colin Caleb Matt Jason Katie Kyle
Cleaning Lead Caleb Matt Jason Katie Kyle John
Assistant Matt Jason Katie Kyle John Baden
Bear Bags
Lead Jason Katie Kyle John Baden Eric
Assistant Katie Kyle John Baden Eric Colin
Water/Fire Lead Kyle John Baden Eric Colin Caleb
Assistant John Baden Eric Colin Caleb Matt
Navigator Baden Eric Colin Caleb Matt Jason

7
The duty roster should be written by the Crew Leader before the trek occurs. Here is a general
guideline for each of the four positions:
• Cooking – Responsible for setting up the cooking area, boiling water, sterilizing dishes, and
re-hydrating and serving the food.
• Cleaning – Responsible for boiling water for dishwashing, washing and rinsing dishes and
utensils, stacking dishes by the sump, and emptying dirty wash water into the sump using the
food strainer and “yum-yum bags” (yum-yum bags hold the dirty scrubby pad piece and leftover
food particles from the cleaning process). The crew members responsible for cleaning also
ensure the food strainer, scraper, yum-yum bags, and trash are hung in the oops bag at night.
• Bear Bags – Responsible for dividing bear bags from oops bags (bear bags will stay hung
until the following morning; oops bags hold the night’s dinner, personal toiletries, medications,
the first aid kit, etc. and are accessible for dinner and in case of an emergency), throwing bear
rope over the bear cable, hoisting the bags, and tying the ropes off to trees. The two crew
members responsible for bear bags should get the rest of the crew to help with the lifting and
lowering of the bags due to weight and safety concerns.
• Water/Fire – Responsible for finding the closest water source, purifying, and bringing water
back to camp. At some camps it will be a spring, well, or stream, all of which need to be purified.
At other camps the water will already be purified and accessible from spigots. Water crew
members should ask the rest of the crew to give them any of their empty bottles or bladders
that need to be refilled. The crew members in charge of water retrieval can usually enlist the
help of the advisors to help carry the water back to camp. Additionally, the crew members
responsible for water retrieval will also be responsible for the building, lighting, supervision,
and extinguishing of a campfire if there is no fire ban and your crew chooses to build one.
Details for how to build a fire at Philmont can be found in the “Setting Up Camp” section of this
guide.
• Navigator – Sets pace and hikes at the front of the crew, carrying a map and compass. At any
trail junctions, orients the map and confers with the rest of the crew on which way to go.
Backcountry Skills • Navigation – Before you begin hiking, always remember to check your map. To do this
effectively, you must first orient your map. Orienting the map involves using a compass to align
the map with true north. To find true north, you must account for declination (the angle
difference between true and magnetic north). Declination changes depending on where you
are on the globe; here is a map showing the degrees of declination for the lower 48 states:
8
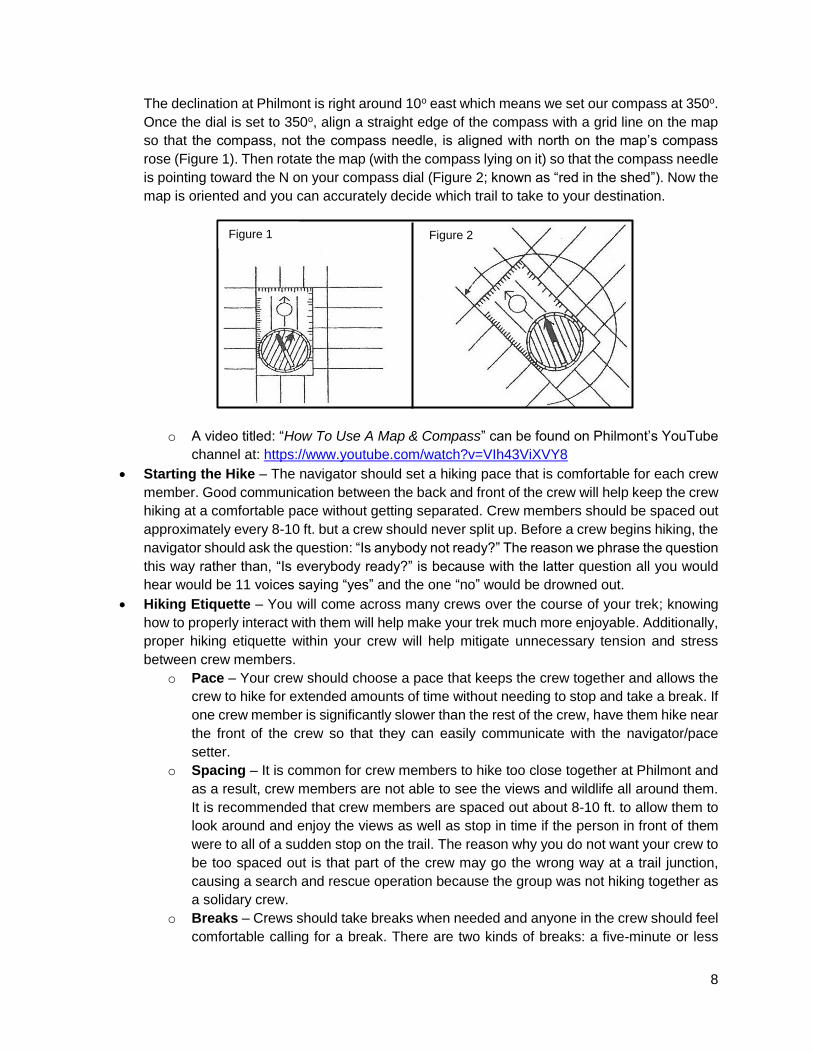
The declination at Philmont is right around 10o east which means we set our compass at 350o.
Once the dial is set to 350o, align a straight edge of the compass with a grid line on the map
so that the compass, not the compass needle, is aligned with north on the map’s compass
rose (Figure 1). Then rotate the map (with the compass lying on it) so that the compass needle
is pointing toward the N on your compass dial (Figure 2; known as “red in the shed”). Now the
map is oriented and you can accurately decide which trail to take to your destination.
o A video titled: “How To Use A Map & Compass” can be found on Philmont’s YouTube
channel at: https://www.youtube.com/watch?v=VIh43ViXVY8
• Starting the Hike – The navigator should set a hiking pace that is comfortable for each crew
member. Good communication between the back and front of the crew will help keep the crew
hiking at a comfortable pace without getting separated. Crew members should be spaced out
approximately every 8-10 ft. but a crew should never split up. Before a crew begins hiking, the
navigator should ask the question: “Is anybody not ready?” The reason we phrase the question
this way rather than, “Is everybody ready?” is because with the latter question all you would
hear would be 11 voices saying “yes” and the one “no” would be drowned out.
• Hiking Etiquette – You will come across many crews over the course of your trek; knowing
how to properly interact with them will help make your trek much more enjoyable. Additionally,
proper hiking etiquette within your crew will help mitigate unnecessary tension and stress
between crew members.
o Pace – Your crew should choose a pace that keeps the crew together and allows the
crew to hike for extended amounts of time without needing to stop and take a break. If
one crew member is significantly slower than the rest of the crew, have them hike near
the front of the crew so that they can easily communicate with the navigator/pace
setter.
o Spacing – It is common for crew members to hike too close together at Philmont and
as a result, crew members are not able to see the views and wildlife all around them.
It is recommended that crew members are spaced out about 8-10 ft. to allow them to
look around and enjoy the views as well as stop in time if the person in front of them
were to all of a sudden stop on the trail. The reason why you do not want your crew to
be too spaced out is that part of the crew may go the wrong way at a trail junction,
causing a search and rescue operation because the group was not hiking together as
a solidary crew.
o Breaks – Crews should take breaks when needed and anyone in the crew should feel
comfortable calling for a break. There are two kinds of breaks: a five-minute or less
Figure 1 Figure 2
9
break and a 20-minute or more break. The reason for the two different breaks is the
lactic acid buildup that will occur in your muscles after resting for more than five
minutes. Lactic acid will leave your muscles feeling sluggish and you will exert much
more energy if you hike during lactic acid buildup. After 20 minutes, the lactic acid will
dissipate and your muscles will be able to move unrestricted. Additionally, make sure
to never step on the critical edge of the trail, especially when taking breaks. The critical
edge is the outside (or downhill) edge of the trail and stepping on it will weaken it and
lead to the erosion of the trail.
o Passing a crew – If you encounter another crew heading in the same direction you
are hiking, take a five minute break. If you approach them again, take another five
minute break. If you approach them a third time, ask if you may pass. If you do pass
the other crew, do not stop for at least 45 minutes to prevent the two crews from
leapfrogging one another.
o Another crew passes you – As stated earlier, a crew hiking behind you will probably
ask if they can pass you. If they do, let them hike in front since you may not have seen
them the other two times they approached you. Once passed, taking a five minute
break is a good idea just to give the two crews spacing.
o Right of way – When two crews meet on a hill and are hiking opposite directions, the
crew hiking uphill has the right of way and the crew hiking downhill should step off the
trail allowing the other crew to pass. The reason for this is that it is harder to get your
momentum going uphill than downhill.
o Pack animals – Cavalcade crews or crews with a burro always have the right of
way. Listen to the directions of the Horseman or Wrangler for which side of the trail to
move to.
o Stream crossings – Cross streams and bridges one person at a time. Unbuckle
your hip belt and sternum strap so that if you fall in, you can quickly escape your
pack and avoid drowning. The navigator should continue about 30 ft. up the trail and
wait for the rest of the crew. When the last person crosses the stream they should
call out “All across” then the navigator will ask the question: “Is anybody not ready?”
before hiking on.
o Trekking poles – If you decide to use trekking poles on your trek, make sure to use
rubber tips to save our trails from erosion. Trekking poles can reduce the impact on
your knees by up to 25% while backpacking but we have found that trails erode
much quicker when the sharp tip of the poles are exposed.
• Setting Up Camp – When you arrive at your day’s destination, you will need to start setting
up camp before anything else. The general rule of thumb is to take care of crew gear before
personal gear. The order of campsite setup is as follows:
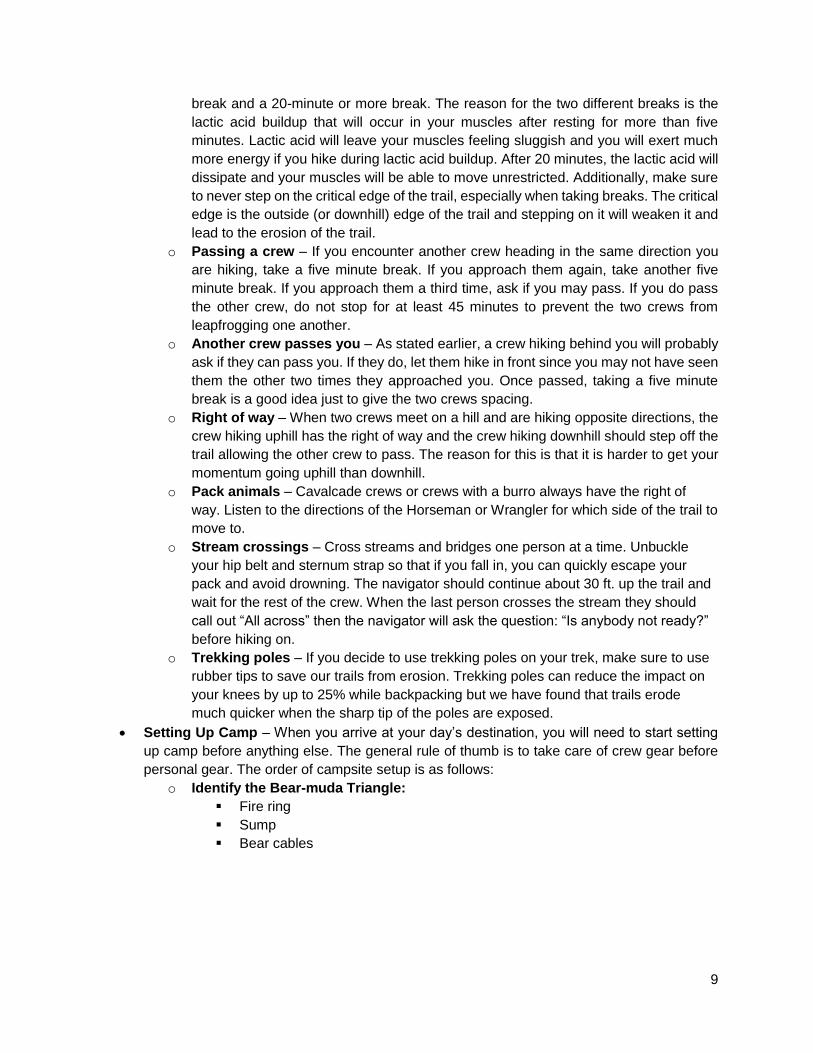
o Identify the Bear-muda Triangle:
▪ Fire ring
▪ Sump
▪ Bear cables
10
• Smellables always stay inside the Bear-muda Triangle
o Smellables include but are not limited to:
• Food
• Trash
• Water bottles that have ever
had anything other than
water in them
• Unwashed dishes
• Squishy bowls
• Medicine
• Feminine hygiene products
• Tobacco
• Soap and shampoo
• Extra batteries
• Film from disposable
cameras
• Deodorant (should not have
or use on trail)
• Foot powder
• Toothpaste/toothbrush
• First aid kit
• Chap stick
• Sunscreen
• Insect repellant
• Food strainer, yum-yum bag,
and condiments bag
• Clothes that have food or
drink spilled on them
• Vomit
• Roll of duct tape
o Create three piles of gear around the fire ring:
▪ Food
▪ Crew gear – dining fly, stoves, pots, bear ropes, bear bags, toilet paper, etc.
▪ Personal smellables – toiletries, medications, etc.
o Decide what will go in the bear bags and what will go in the oops bag
▪ Typically, all food other than the night’s dinner will go in the bear bags along
with anything else that will not be needed until morning.
▪ The oops bag typically has the night’s dinner, the cleaning supply bag,
personal smellables, the first aid kit, and smellable water bottles (a water bottle
that has ever had anything other than water in it).
o Hang bear bags:
▪ Always check that there are at least two tie-off points behind you before
throwing the rope.
▪ Never attach a rock, carabiner, water bottle, or anything of weight to the rope
prior to throwing over. The reasons for this are: 1) the weight could wrap
around the cable and the rope will get stuck; 2) the weight could swing back
around and hit someone; and 3) the carabiner could clip onto the cable.

11
▪ The rope should have a loop exactly in the middle. Fold the rope back so that
you are throwing a 50 ft. double-line. Throw the end with the loop and make
sure to hold the tail ends.
▪ Once the bear rope is over the cable, attach a weight-bearing carabiner to the
loop you threw over the cable.
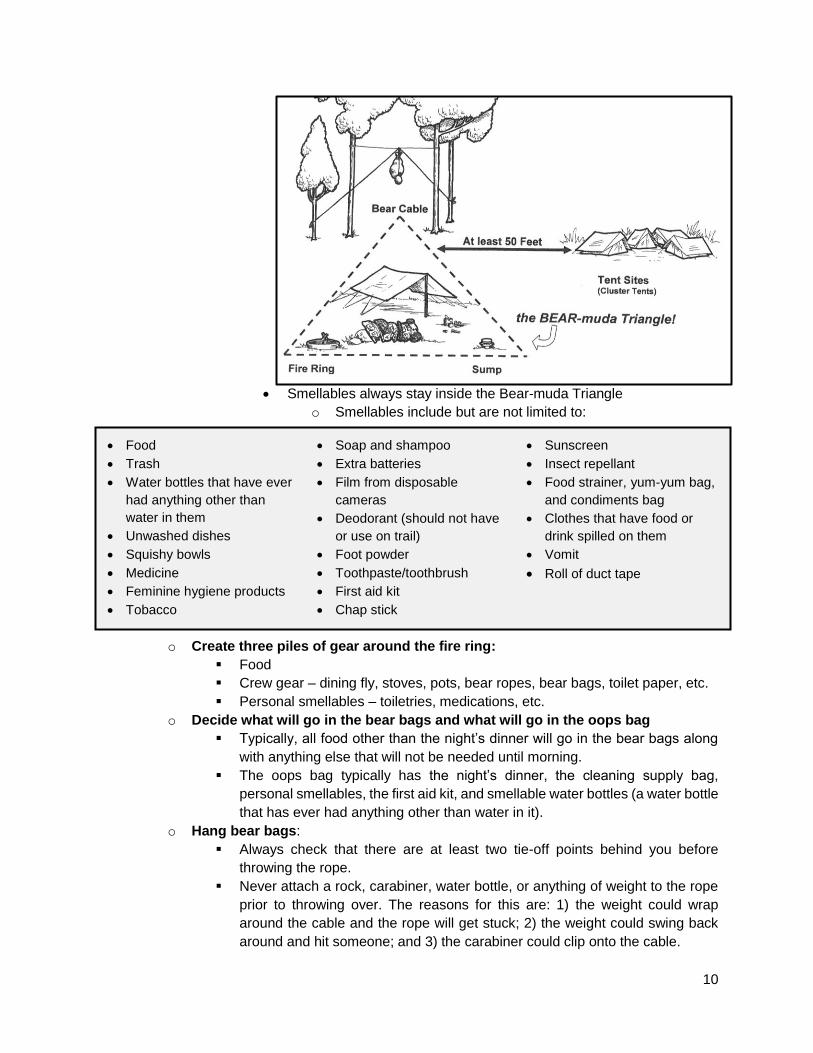
▪ Tie the bear bags to alternating sides of the loop by using lark’s head knots.
1. Make a loop 2. Put your hand through the loop
3. Grab the two pieces of rope and pull through the loop
12
4. Make sure the entire top of the bag is through the knot
5. Move the knots as close to the carabiner as possible
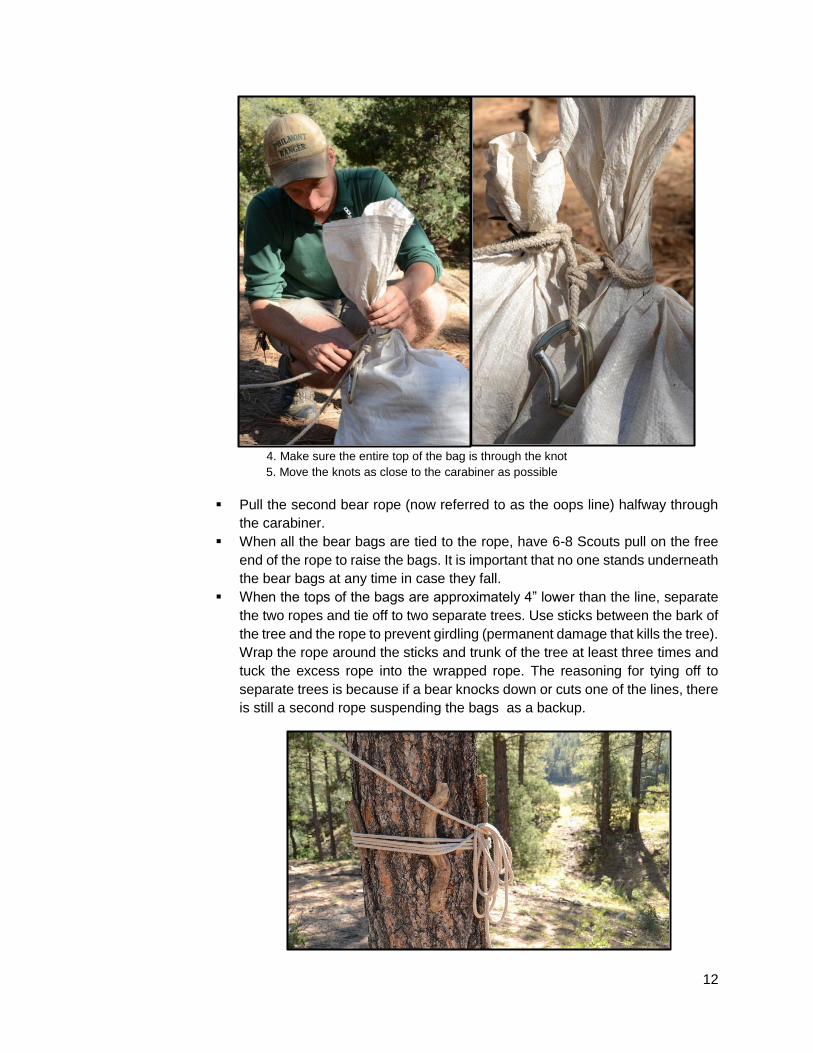
▪ Pull the second bear rope (now referred to as the oops line) halfway through
the carabiner.
▪ When all the bear bags are tied to the rope, have 6-8 Scouts pull on the free
end of the rope to raise the bags. It is important that no one stands underneath
the bear bags at any time in case they fall.
▪ When the tops of the bags are approximately 4” lower than the line, separate
the two ropes and tie off to two separate trees. Use sticks between the bark of
the tree and the rope to prevent girdling (permanent damage that kills the tree).
Wrap the rope around the sticks and trunk of the tree at least three times and
tuck the excess rope into the wrapped rope. The reasoning for tying off to
separate trees is because if a bear knocks down or cuts one of the lines, there
is still a second rope suspending the bags as a backup.

13
▪ If you will not be cooking dinner within the next 30 minutes, hang the oops bag.
▪ Tie-off the oops bag near the center loop of the oops line by using a lark’s head
knot. Pull the oops line to raise the oops bag to the bear bags and tie the two
ends of the oops line to two unused trees. (If there are no unused trees, you
may tie the oops line to the same trees the bear line is tied to. Make sure to
leave at least a foot of separation between the oops and bear lines.) Wrap the
rope around the sticks and trunk of the trees just like with the bear rope and
tuck the excess rope away.
▪ The bear bags should be more than a person’s wingspan away from the closest
tree (at least 6 ft.) and high enough that the tallest person in the crew cannot
touch them while jumping (about 10 ft.). These spacing requirements are intact
so that a bear cannot climb the tree or stand on their hind legs and reach the
bags.
o Set up the dining fly
▪ Must go inside the Bear-muda Triangle, near the fire ring.
▪ Whenever you are setting up the dining fly or a tent, keep in mind the four W’s:
• Wind – set up so that a corner is facing into the wind for stability
• Water – avoid setting up over drainages that would flood when it rains
• Wildlife – Avoid setting up over game trails, ant hills, gopher holes, etc.
• Widow makers – avoid setting up under dead trees or limbs that could
fall on you
▪ Using a 25’ x 1/8” rope and two small sticks, attach the dining fly to the rope
using lark’s head knots and tie-off to two poles using a clove hitch. (Hiking
poles can be substituted in place of the aluminum poles.)
▪ Use a taut-line hitch to stake the rope into the ground.
▪ Stake the four corners. Stake the two sides too if you have extra stakes.

14
▪ The dining fly is a great place to eat if it is raining. No open flames should be
under the dining fly at any time. Stoves, fuel bottles, and toilet paper should be
stored under the dining fly at night. Packs should not be piled up under the
dining fly because if one person left a smellable in their pack, every pack would
be destroyed. It is better for everyone to put their pack cover on and lean their
pack against a tree in the fire ring area. Additionally, packs are never clean
and should be kept in the Bear-muda triangle at all times, not near tents.
▪ The dining fly may be tied to trees. This allows the dining fly to be tied in either
the standard A-frame style (shown above) or a lean-to style. It also enables
you to determine which style works best for the environmental element you are
trying to eliminate (ex. A-frame for rain, hail, and wind; Lean-to for sun and
shade).
• The dining fly must still be setup within the Bear-muda Triangle.
• When securing to trees, sticks must be placed between the rope and
tree to prevent damage to the tree (as with bear bags).
• If tying to trees, lines need to be tied at either 3 ft. and lower or 7 ft.
and higher – tying between these heights may lead to injury.
• Wrap the rope around the tree at least one full rotation then tie a taut-
line hitch to make the fly adjustable and sturdy enough to remain
secured in high winds.
o Set up tents
▪ Tents must be at least 50 ft. away from any part of the Bear-muda Triangle.
▪ Remember to check the four W’s before setting up your tent.
▪ Tents should be placed in a tight cluster about 5-7 ft. apart and not in any
geometric shapes like circles, squares, or lines. The reason for this is because
an animal may feel trapped if it walks inside the circle and may become
aggressive. Also, if the tents are set-up in a line, there is the possibility that a
deer would try jumping over a tent without seeing the tents behind it, knocking
them down and injuring people inside.
▪ There should be no isolated tents as the majority of bear attacks involving tents
happen to an isolated tent.
▪ Some people have inquired about using hammocks on their trek but they are
not allowed at Philmont due to damage on trees (girdling), the safety concern
15
of someone walking into it at night, wildlife doing damage to it, and weather
concerns.
▪ The only items allowed inside a tent are a sleeping bag, sleeping pad, sleep
clothes, flashlight, book, eyeglasses (no contacts), rain jacket, fleece, boots,
socks, camp shoes, and emergency medication such as EpiPens®, inhalers,
and diabetic medication. (All emergency medication should be wrapped in a
sock and placed inside the right boot.)
o A video titled: “How To Setup A Campsite” can be found on Philmont’s YouTube
channel at: https://www.youtube.com/watch?v=BPnwAUhQjMA
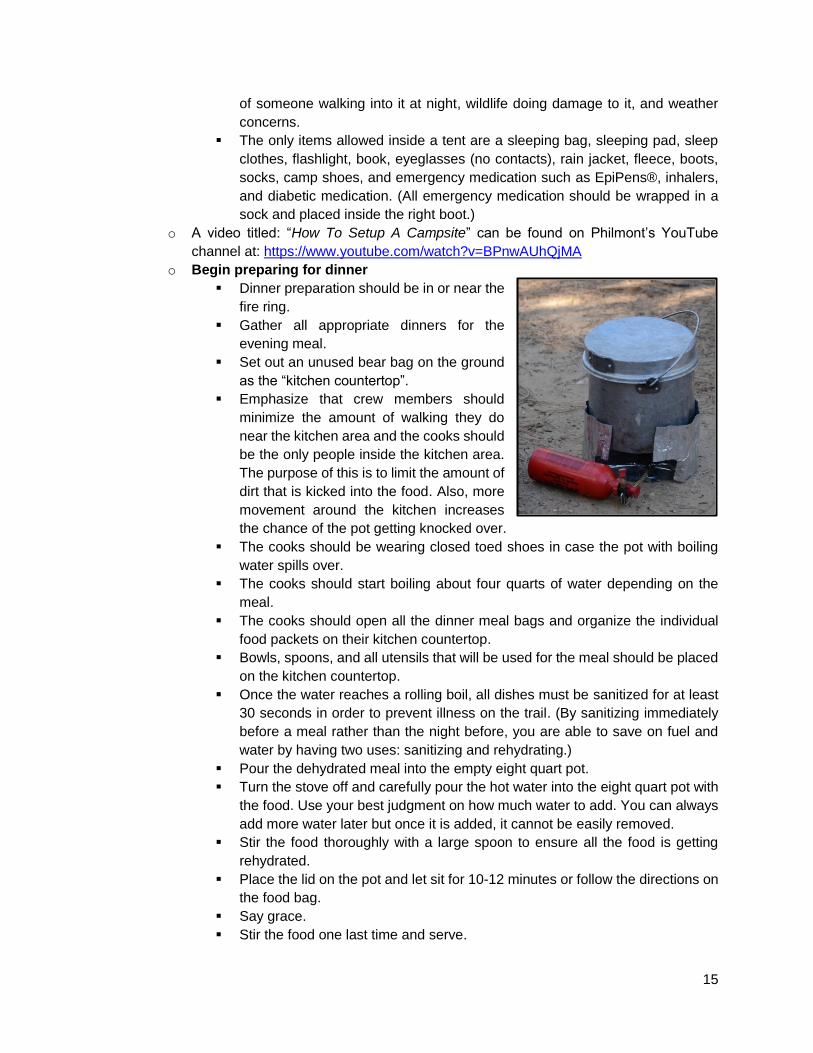
o Begin preparing for dinner
▪ Dinner preparation should be in or near the
fire ring.
▪ Gather all appropriate dinners for the
evening meal.
▪ Set out an unused bear bag on the ground
as the “kitchen countertop”.
▪ Emphasize that crew members should
minimize the amount of walking they do
near the kitchen area and the cooks should
be the only people inside the kitchen area.
The purpose of this is to limit the amount of
dirt that is kicked into the food. Also, more
movement around the kitchen increases
the chance of the pot getting knocked over.
▪ The cooks should be wearing closed toed shoes in case the pot with boiling
water spills over.
▪ The cooks should start boiling about four quarts of water depending on the
meal.
▪ The cooks should open all the dinner meal bags and organize the individual
food packets on their kitchen countertop.
▪ Bowls, spoons, and all utensils that will be used for the meal should be placed
on the kitchen countertop.
▪ Once the water reaches a rolling boil, all dishes must be sanitized for at least
30 seconds in order to prevent illness on the trail. (By sanitizing immediately
before a meal rather than the night before, you are able to save on fuel and
water by having two uses: sanitizing and rehydrating.)
▪ Pour the dehydrated meal into the empty eight quart pot.
▪ Turn the stove off and carefully pour the hot water into the eight quart pot with
the food. Use your best judgment on how much water to add. You can always
add more water later but once it is added, it cannot be easily removed.
▪ Stir the food thoroughly with a large spoon to ensure all the food is getting
rehydrated.
▪ Place the lid on the pot and let sit for 10-12 minutes or follow the directions on
the food bag.
▪ Say grace.
▪ Stir the food one last time and serve.

16
o Eat dinner
▪ Make sure to be careful while eating: any clothing that has food spilled on it
needs to be hung in the bear bags at night.
▪ Encourage your crew to eat all of the food as this will make the cleanup process
much easier.
▪ Consolidate the trash into one empty meal bag and collect the other empty
meal bags, shiny food wrappers (Terracycle), and paperboard for recycling.
o Cleanup
▪ Once the food is all gone, use the leftover hot water (no longer boiling and now
warm) to pour into the dirty food pot, now referred to as the “wash pot”. Add 3-
4 drops of Campsuds® biodegradable soap into the wash pot and cut a small
1.5” x 2” piece off of a scrubby pad.
▪ Pour one quart of water into the pot that was used to boil the water originally.
This pot is now referred to as the “rinse pot”.
▪ Gather all dishes and utensils used in the dinner and begin scrubbing them in
the wash pot starting with the cleanest items first, rinsing them in the rinse pot,
and stacking them up by the sump to dry for the night.
▪ Once all the dishes are cleaned, scrub the wash pot of all the food particles
and bring the wash pot, rinse pot, food strainer, scraper, and two yum-yum
(Ziploc®) bags over to the sump.
o A video titled: “How To Wash Dishes” can be found on Philmont’s YouTube Channel
at: https://www.youtube.com/watch?v=eLt8XjCG7So
o Sump
▪ Pour the wash water through the food strainer and into the sump.
▪ Use the scraper to remove all food particles from the food strainer and place
the food particles into one yum-yum bag.
▪ Pour the rinse water into the wash pot and swirl around to rinse out any
remaining soap or food.
▪ Pour the rinse water out of the wash pot through the food strainer and into the
sump.
17
▪ Clean away any food particles from the food strainer and sump screen by using
the scraper. Place the food particles and used scrubby pad in the yum-yum
bag and treat as trash by hanging them up in the oops bag at night.
▪ Place the food strainer and scraper into the unused yum-yum bag and also
hang them up in the oops bag at night.
o Hang oops bag
▪ Let crew members brush their teeth, remove contacts, take medication, etc.
▪ Have every crew member double check their pockets, pack, and the campsite
in general for any smellables. The Wilderness Pledge Guia should reinforce
bear procedures every night on trail.
▪ Pack up all trash, food, ditty bags, first aid kit, and smellable water bottles into
the oops bag. Ideally, smellable water bottles should be empty so that the oops
bag is not as heavy to lift.
▪ In order to save space, you should clip your smellable bottles onto the oops
rope, outside of the bags.
▪ Tie the oops bag to the oops line, raise the bag, and tie-off to two unused trees
using sticks around the trunk.
o Campfire
▪ Make sure campfires are allowed where you are camping. Due to Philmont’s
arid landscape and high winds, a fire ban is common during the summer
months.
▪ Sticks should be no longer than your forearm and no wider around than your
wrist.
▪ Keep the fire small, no higher than 18”.
▪ Keep a pot of water nearby and never leave the campfire unattended.
▪ Burn all wood to ash and pour water over the fire and stir with a stick when the
fire is out to ensure the fire is “out cold”. You should feel comfortable putting
your hand in the ash since it is cold.
o Breaking camp
▪ The Crew Leader should be responsible for waking the crew. A normal time to
wake up is anywhere between 5:30 and 6:00am. People should pack up their
personal gear first (sleeping bags, tents, etc.) then get the bear bags down and
finish packing their packs.
▪ Lead by the Wilderness Pledge Guia, make sure to “fluff your duff” by returning
the appearance of your tent site to what it was before your tent was placed. To
rejuvenate the grass, pine needles, etc. that was under your tent, use your
hands or feet to gently rearrange the material into a position that is more
natural than the imprinted rectangle left by your tent.
▪ Form a line with your crew to police the area, picking up all trash and making
sure no gear is left behind.
▪ Pack out cold ashes from campfire ring by using an empty meal bag. Ashes
should be dispersed 30 minutes outside of camp and 100 ft. off the trail.
▪ Some crews prefer to eat breakfast while hiking or 30 minutes down the trail
as an extra incentive to get out of camp early.
18
Conducting a Shakedown Hike As mentioned earlier, crews are highly recommended to participate in at least two shakedown hikes
before their Philmont trek. These shakedowns will vary from crew to crew depending on where you
are from but three-day/two-night trips covering between 15-25 miles over as much elevation change
as possible is recommended for a crew. On these shakedown hikes, it is possible for Scouts to receive
credit towards a few merit badges with a little extra preparation. The Camping, Cooking, Hiking, and
Backpacking merit badges all have requirements that can be completed through these shakedown
hikes while preparing for a Philmont trek. The requirements that can be earned from the Camping
merit badge are: 2, 3, 4, 5, 6, 7, 8, and 9b; from Cooking: 5, 6, and 7; from Hiking: 2, 3, 4, and count
towards the hikes for 5, 6, and 7; and from Backpacking: 1, 2, 3, 4, 5, 6, 7, 8, 9, and 10.
In the early stages of your crew’s preparation for Philmont, it is recommended that every member of
your crew signs a “crew member contract.” This contract should be written by the crew and tailored to
the crew’s specific needs. Examples of topics used in crew member contracts are: exercise at least
three times a week for no less than an hour each session, pay deposits on time, participate in two
shakedown hikes, etc. It is found that crews who sign one of these contracts are usually more prepared
and have a more successful trek because of it.
After the two shakedown hikes, a third crew activity of completing seven hours of conservation work
is recommended to build additional comradery amongst the crew as well as get you the additional
seven hours needed for the 50 Miler Award. The 50 Miler Award requires 10 hours of conservation
work in addition to a 50 mile trek and your expedition at Philmont will get you three hours already. This
extra time spent bonding with your crew is a great way to all get on the same page as well as get a
rarely earned award out of it too.
Although the campsites your crew will stay at during your shakedown hikes probably will not have
sumps or bear cables, you can begin to practice Philmont’s alternative low-impact method. Here are
the directions for making and using low-impact sumps and bear bags:
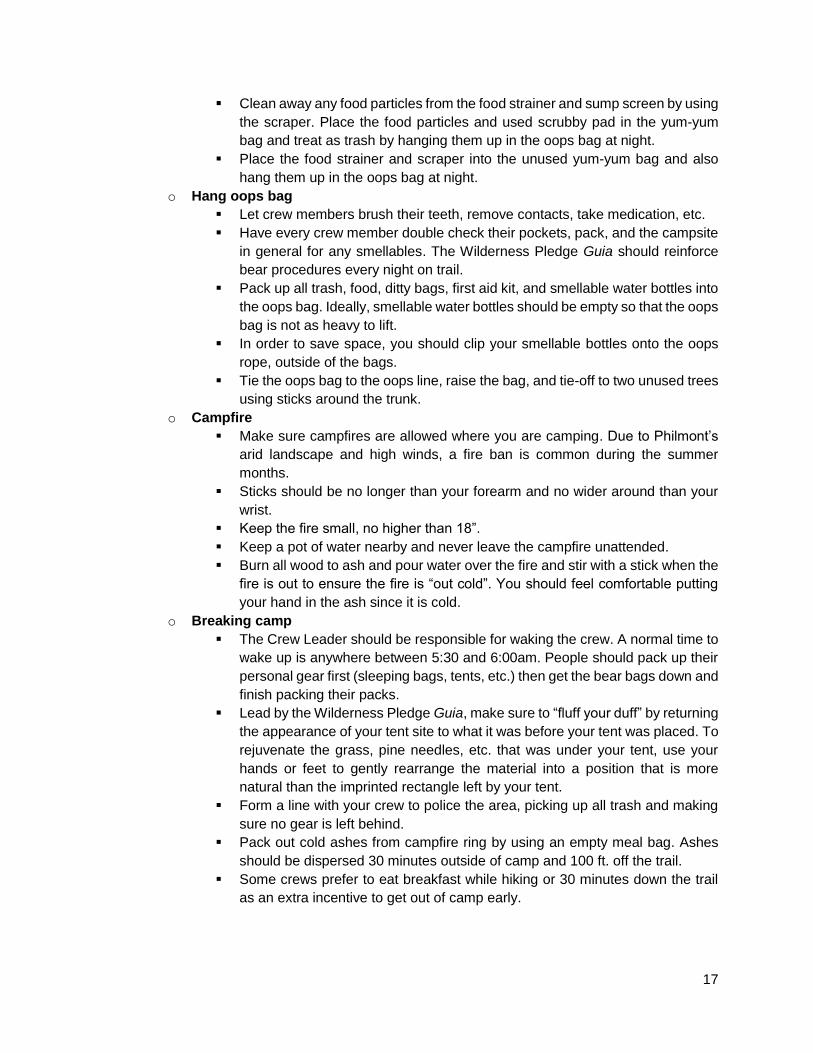
Low-Impact Sump
• Take a gallon size Ziploc® bag (trail meal
bags work great too) and poke about 20
small holes in the bottom.
• Fill ¼ of the bag with pine needles.
• Pour the rinse water into the wash pot
• Pour the water from the wash pot, through
the food strainer, through the bag, and into
the second pot.
• Then pour the water through the food
strainer, bag, and into the other pot a second
time and repeat until no more food particles
drip into the pot.
• Distribute the water in a rainbow-like fashion
200 ft. from camp and water sources.
• Rinse the pots.
• Pack out the bag with pine needles as trash.
19
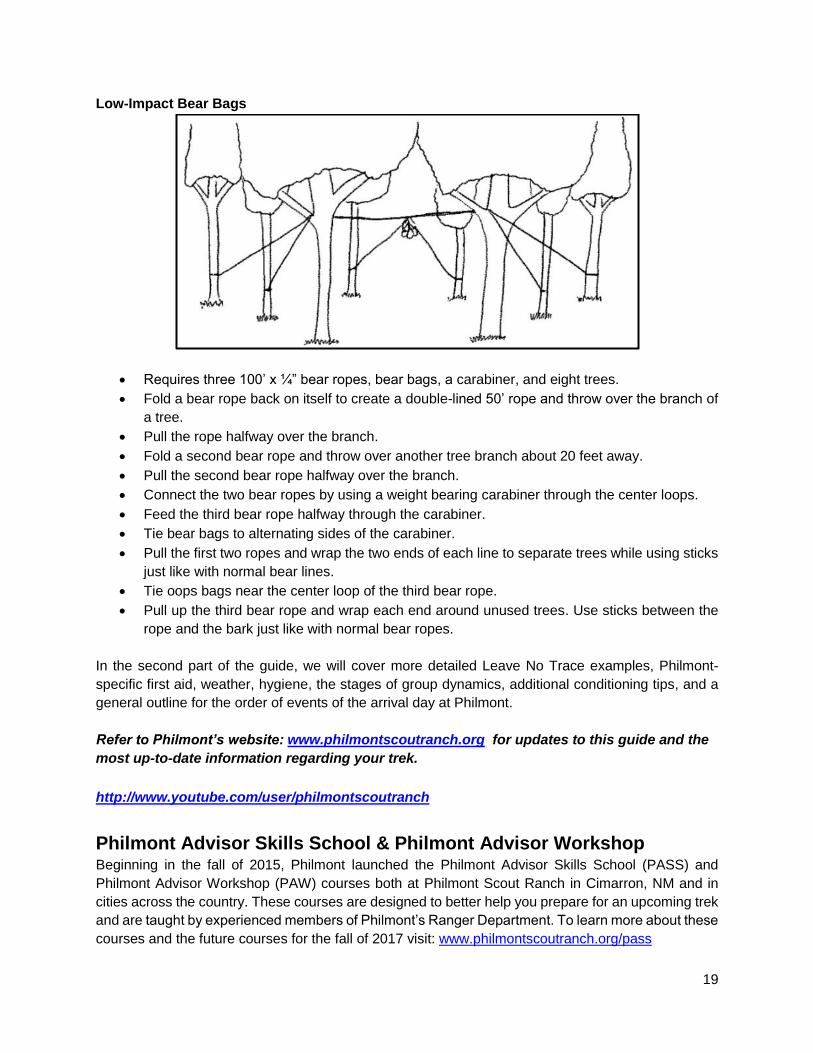
Low-Impact Bear Bags
• Requires three 100’ x ¼” bear ropes, bear bags, a carabiner, and eight trees.
• Fold a bear rope back on itself to create a double-lined 50’ rope and throw over the branch of
a tree.
• Pull the rope halfway over the branch.
• Fold a second bear rope and throw over another tree branch about 20 feet away.
• Pull the second bear rope halfway over the branch.
• Connect the two bear ropes by using a weight bearing carabiner through the center loops.
• Feed the third bear rope halfway through the carabiner.
• Tie bear bags to alternating sides of the carabiner.
• Pull the first two ropes and wrap the two ends of each line to separate trees while using sticks
just like with normal bear lines.
• Tie oops bags near the center loop of the third bear rope.
• Pull up the third bear rope and wrap each end around unused trees. Use sticks between the
rope and the bark just like with normal bear ropes.
In the second part of the guide, we will cover more detailed Leave No Trace examples, Philmont-
specific first aid, weather, hygiene, the stages of group dynamics, additional conditioning tips, and a
general outline for the order of events of the arrival day at Philmont.
Refer to Philmont’s website: www.philmontscoutranch.org for updates to this guide and the
most up-to-date information regarding your trek.
http://www.youtube.com/user/philmontscoutranch
Philmont Advisor Skills School & Philmont Advisor Workshop Beginning in the fall of 2015, Philmont launched the Philmont Advisor Skills School (PASS) and
Philmont Advisor Workshop (PAW) courses both at Philmont Scout Ranch in Cimarron, NM and in
cities across the country. These courses are designed to better help you prepare for an upcoming trek
and are taught by experienced members of Philmont’s Ranger Department. To learn more about these
courses and the future courses for the fall of 2017 visit: www.philmontscoutranch.org/pass

20