Embed Size (px)
Citation preview
Copyright reserved© Witech Co., Ltd.
Website: www.arm9board.net Email: [email protected] Tel: +86-871-5899845
OK6410 Users Manual
Part 2 – Embedded Linux
Copyright@2010-2011 http://www.arm9board.net
Copyright reserved© Witech Co., Ltd.
Website: www.arm9board.net Email: [email protected] Tel: +86-871-5899845
COPYRIGHT STATEMENT Contents (content being images, text, programs and scripts) of
this manual is copyright © Witech Co., Ltd. All rights expressly
reserved.
Any content of the manual printed or downloaded may not be sold,
licensed, transferred, copied or reproduced in whole or in part in any
manner or in or on any media to any person without the prior written
consent of Witech Systems Ltd. including but not limited to:
transmission by any method
storage in any medium, system or program
display in any form
performance
hire, lease, rental or loan
Requests for permission to reproduce material from this manual
should be addressed to Witech Systems Ltd.

Copyright reserved© Witech Co., Ltd.
Website: www.arm9board.net Email: [email protected] Tel: +86-871-5899845
About Embedded Linux
Embedded Linux is the use of Linux in embedded computer systems such as mobile phones,
personal digital assistants, media players, set-top boxes, and other consumer electronics devices,
networking equipment, machine control, industrial automation, navigation equipment and medical
instruments.
See http://en.wikipedia.org/wiki/Embedded_Linux for more information.
About this manual This manual illustrates developing Embedded Linux for and running Embedded Linux on the
OK6410 development board. Procedures in this manual are taken in WMware Workstation 6.5.2
under Windows XP SP2.

Copyright reserved© Witech Co., Ltd.
Website: www.arm9board.net Email: [email protected] Tel: +86-871-5899845
Table of contents Chapter One: Building Development Environment ...................................6
1.1 Installing VMware Workstation ..........................................................................................6 1.2 Installing UBUNTU9.10 in VMware..................................................................................6 1.3 Setting Automatic Login .....................................................................................................7 1.4 Transmitting data via FTP...................................................................................................8
1.4.1 Setting Network Parameters.....................................................................................8 1.4.2 Installing vsftpd Service.........................................................................................11 1.4.3 Installing FTP tool..................................................................................................11
1.5 Installing Cross-Compiler .................................................................................................13 Chapter Two: Compiling UBOOT and Linux Kernel ..............................14
2.1 Compiling u-boot-1.1.6.....................................................................................................14 2.2 Compiling Linux Kernel ...................................................................................................14
2.2.1 Configurations........................................................................................................14 2.2.2 Compiling Kernel...................................................................................................15
Chapter Three: Burning Linux to OK6410...............................................16 3.1 Burning U-BOOT .............................................................................................................16
3.1.1 Fusing SDboot to SD card......................................................................................16 3.1.2 Setting Boot Mode .................................................................................................16 3.1.3 Installing USB Driver ............................................................................................17 3.1.4 Burning U-BOOT to NAND Flash ........................................................................18 3.1.5 Setting Nand Flash Boot ........................................................................................20 3.1.6 Setting U-BOOT parameters ..................................................................................20
3.3 Burning File System..........................................................................................................21 3.3.1 Burning CRAMFS Filesystem ...............................................................................21 3.3.2 Mounting NFS Filesystem .....................................................................................22
Chapter Four: OK6410 Function Test in Linux........................................24 4.1 SD/MMC Card Driver Test ...............................................................................................24 4.2 Touch Screen Calibration ..................................................................................................24 4.3 USB Host Test...................................................................................................................25
4.3.1 USB Mouse ............................................................................................................25 4.3.2 USB Keyboard .......................................................................................................25 4.3.3 USB Disk ...............................................................................................................26
4.4 Audio Test .........................................................................................................................26 4.5 Network Test .....................................................................................................................27
4.5.1 Configurations........................................................................................................27 4.5.2 PING ......................................................................................................................27 4.5.3 Browsing Web Pages..............................................................................................28 4.5.4 Telnet Service.........................................................................................................28 4.5.5 FTP Service ............................................................................................................29 4.5.6 Web Servr (boa) .....................................................................................................30
4.6 Temperature Sensor Test ...................................................................................................30
Copyright reserved© Witech Co., Ltd.
Website: www.arm9board.net Email: [email protected] Tel: +86-871-5899845
4.7 LED Test ...........................................................................................................................30 4.8 Button Test ........................................................................................................................30 4.9 Camera Test.......................................................................................................................31 4.10 Transmitting Files via Serial Ports ..................................................................................31
4.10.1 Sending Files to PC..............................................................................................31 4.10.2 Receiving Files from PC ......................................................................................31
Appendix I: Hyper-Terminal.....................................................................33 Appendix II: Minicom Operation Instructions .........................................35 Appendix III: Making CRAMFS Filesystem ...........................................40 Appendix IV: Basic Linux Commands.....................................................41
Copyright reserved© Witech Co., Ltd.
Website: www.arm9board.net Email: [email protected] Tel: +86-871-5899845
Chapter One: Building Development Environment The environment for developing Linux includes a VMware virtual machine and an Ubuntu
Linux distribution running in the VMware virtual machine.
1.1 Installing VMware Workstation VMware Workstation is a virtual machine software suite for x86 and x86-64 computers from
VMware, a division of EMC Corporation. This software suite allows users to set up multiple x86
and x86-64 virtual computers and to use one or more of these virtual machines simultaneously
with the hosting operating system. Each virtual machine instance can execute its own guest
operating system, such as Windows, Linux, BSD variants, or others. In simple terms, VMware
Workstation allows one physical machine to run multiple operating systems simultaneously. Other
VMware products help manage or migrate VMware virtual machines across multiple host
machines.
More information about VMware Workstation can be found at www.vmware.com.
1.2 Installing UBUNTU9.10 in VMware The latest Ubuntu disk image can be downloaded from http://www.ubuntu.com, also a disk
image for Ubuntu 9.10 is provided in the shipped DVD. In this manual we take the Ubuntu9.10 for
illustration.
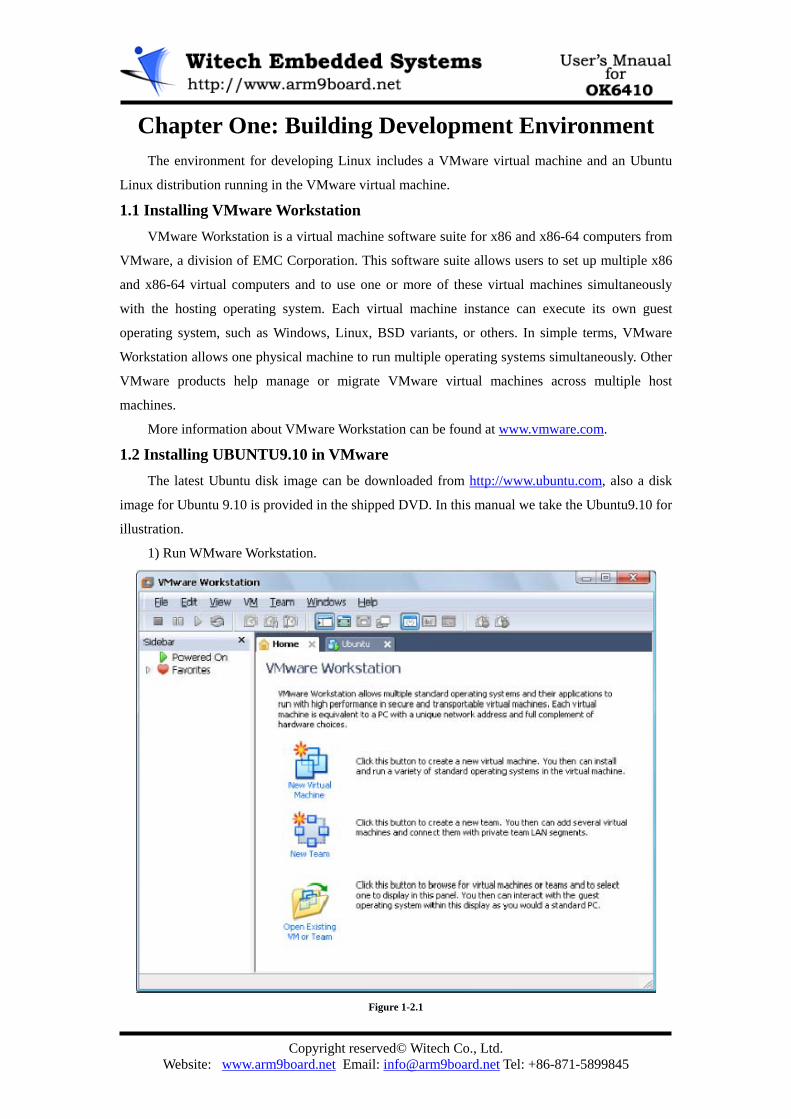
1) Run WMware Workstation.
Figure 1-2.1

Copyright reserved© Witech Co., Ltd.
Website: www.arm9board.net Email: [email protected] Tel: +86-871-5899845
2) Click the menu item “File-> New-> Virtual Machine”
3) Follow the “New Virtual Machine Wizard” to Create a New Virtual Machine
4) “Customize Hardware” according to your hardware environment, please pay attention to
the “Processors” option.
5) Ubuntu will be started as soon as the installation completes.
Figure 1-2.2
1.3 Setting Automatic Login
♦ Start a terminal (by clicking the Application menu-> Accessories-> Terminal), and type the
following commands in the terminal: sudo –s
sudo passwd
to setup the root user.
♦ Then edit the configuration file “/etc/gdm/custom.conf” sudo gedit /etc/gdm/custom.conf

Copyright reserved© Witech Co., Ltd.
Website: www.arm9board.net Email: [email protected] Tel: +86-871-5899845
as below:
[daemon]
TimedLoginEnable=true
AutomaticLoginEnable=true
TimedLogin=root
AutomaticLogin=root
TimedLoginDelay=30
Figure 1-3.1
1.4 Transmitting data via FTP With the FTP (File Transfer Protocol) we can transmit data between the Host and the virtual
machine.
1.4.1 Setting Network Parameters
Click the VMware menu “VM” then select the item “Settings”. In the coming Virtual
Machine Settings window, set the Network Adapter as “Bridged”. As shown in the figure 1-4.1:

Copyright reserved© Witech Co., Ltd.
Website: www.arm9board.net Email: [email protected] Tel: +86-871-5899845
Figure 1-4.1
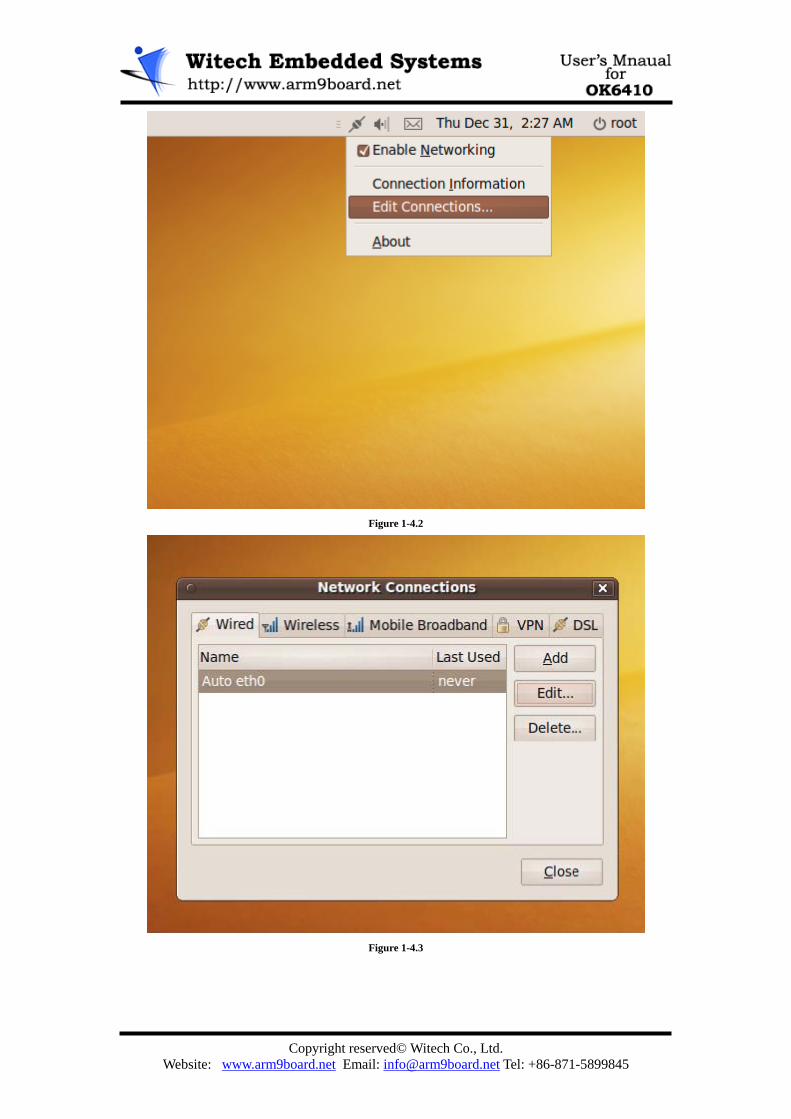
Then start Ubuntu. Click the network icon on the task bar and then select “Edit Connections”
and edit the item “Auto eth0”:
Copyright reserved© Witech Co., Ltd.
Website: www.arm9board.net Email: [email protected] Tel: +86-871-5899845
Figure 1-4.2
Figure 1-4.3

Copyright reserved© Witech Co., Ltd.
Website: www.arm9board.net Email: [email protected] Tel: +86-871-5899845
Figure 1-4.4
1.4.2 Installing vsftpd Service
♦ Open the Terminal (Applications menu-> Accessories-> Terminal) and type the command
below to install the vstftpd service. sudo apt-get install vsftpd
♦ Create a new folder in the root directory and change its access authority. mkdir /witech
chmod 777 /witech
♦ Edit the vsftpd configuration file, as below: sudo gedit /etc/vsftpd.conf
anonymous_enable=NO
local_enable=YES
write_enable=YES
local_root=/witech
♦ Then restart the vsftpd service: sudo /etc/init.d/vsftpd restart
1.4.3 Installing FTP tool
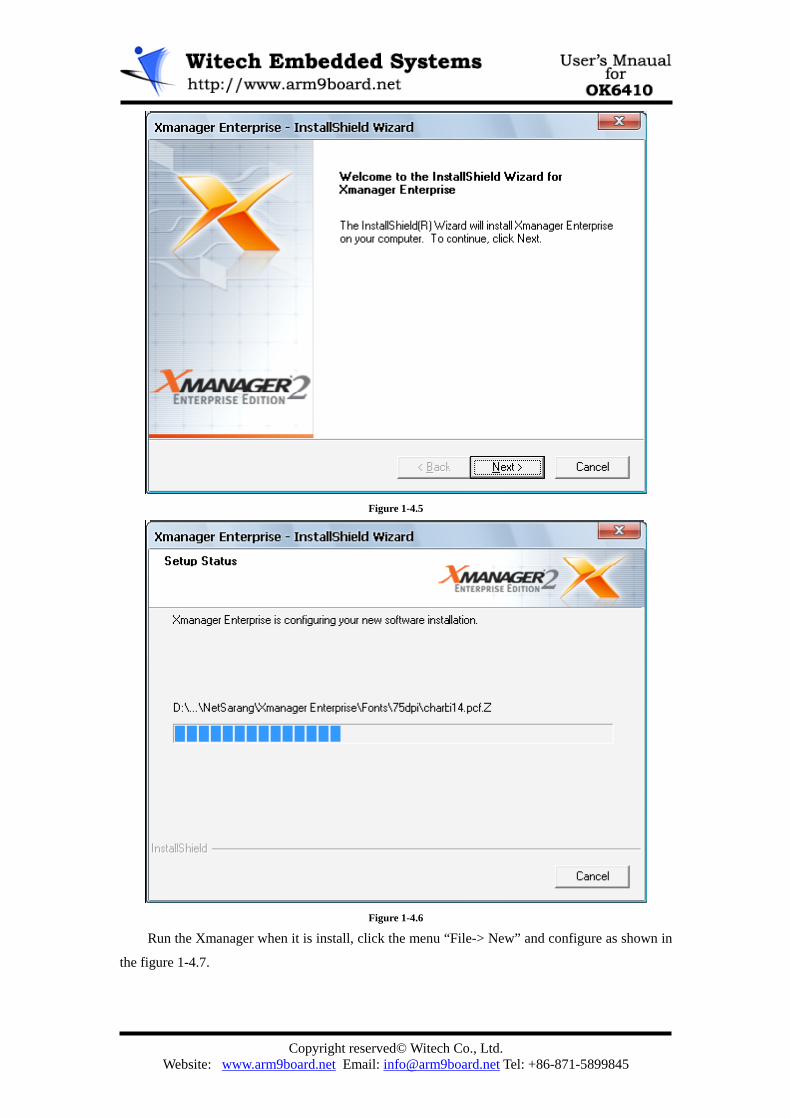
A FTP tool named “Xmanager” is provided in the shipped DVD. Find the “xme21.exe” in the
folder “Tools” and double click it to install the Xmanager:
Copyright reserved© Witech Co., Ltd.
Website: www.arm9board.net Email: [email protected] Tel: +86-871-5899845
Figure 1-4.5
Figure 1-4.6
Run the Xmanager when it is install, click the menu “File-> New” and configure as shown in
the figure 1-4.7.

Copyright reserved© Witech Co., Ltd.
Website: www.arm9board.net Email: [email protected] Tel: +86-871-5899845
Figure 1-4.7
After doing these we should be able to transmit data via FTP. Please note that it would be
unwise to work as “root” when transmitting via FTP.
1.5 Installing Cross-Compiler Cross compiling, to be simple, means to compile executable code for a platform (a
development board for example) on another platform (a PC for instance). Before cross compiling, we have to install cross compiler tool chains first. A cross compiler
named as “Cross-4.2.2-eabi.tar.bz2” has been enclosed in the DVD, to install the cross compiler: Transmit the file “Cross-4.2.2-eabi.tar.bz2” to Ubuntu through FTP and execute the
commands below: cd /witech //enter the directory “witech”
mkdir /usr/local/arm //create a directory “arm” in “/usr/local”
tar xjvf cross-4.2.2-eabi.tar.bz2 -C /usr/local/arm //un-zip the
cross-compiler to “/usr/local/arm”.
The cross compiler will be installed in “/usr/local/arm/4.2.2-eabi”.

Copyright reserved© Witech Co., Ltd.
Website: www.arm9board.net Email: [email protected] Tel: +86-871-5899845
Chapter Two: Compiling UBOOT and Linux Kernel 2.1 Compiling u-boot-1.1.6
U-boot, short for Universal Bootloader, is an open source bootloader that boots Linux on the
OK6410. The source code of u-boot can be found in the folder “\linux-2.6.28\u-boot-1.1.6” in the
DVD.
Copy the source code “uboot1.1.6_OK6410_v1.0.tgz” to the directory “/witech” and un-zip it: tar xzf uboot1.1.6_OK6410_v1.0.tgz
The commands below compile the u-boot bootloader: cd uboot1.1.6
make smdk6410_config
make
When the compilation is done, the u-boot binary named as “u-boot.bin” will be found in the
directory “uboot1.1.6”, which we can burn to the OK6410 and use as Linux bootloader.
2.2 Compiling Linux Kernel For the OK6410 we provide the Linux-26.28 kernel. Find the kernel source code named as
“linux2.6.28_OK6410_v1.0.tgz” in the folder “linux2.6.28\kernel” in the shipped DVD, copy it to
the directory “witech” and un-zip it: tar xzf linux2.6.28_OK6410_v1.0.tgz
2.2.1 Configurations
1) We might need to install the “libcurses5” before we can execute the make menuconfig
command. sudo apt-get install libncurses5-dev
2) Restore the default configuration: cd linux2.6.28
cp OK6410_CFG .config (note the blank between the “G” and “.”)
3) Configure LCD type:
The OK6410 Linux system supports 3.5”, 4.3”, 5.6”, 7”, and 8” LCDs, as well as VGA
output.
Model Number Manufacturer Size (inch) Resolution
WXCAT35 Wanxin 3.5 320 x 240
WXCAT43 Wanxin 4.3 480 x 272
AT056 Innolux 5.6 640 x 480
AT070 Innolux 7 800 x 480
AT080 Innolux 8 800 x 600
VGA800 VGA output 800 x 600
The LCD types are selected in “Device Drivers-> Graphics support->Support for frame
buffer devices”

Copyright reserved© Witech Co., Ltd.
Website: www.arm9board.net Email: [email protected] Tel: +86-871-5899845
2.2.2 Compiling Kernel
The command below compiles the Linux kernel into “zImage” binary: make zImage
When the compilation completes the binary image “zImage” will be found in the directory
“arch/arm/boot”.
Copyright reserved© Witech Co., Ltd.
Website: www.arm9board.net Email: [email protected] Tel: +86-871-5899845
Chapter Three: Burning Linux to OK6410 3.1 Burning U-BOOT
This section is tested through in Windows XP SP3.
3.1.1 Fusing SDboot to SD card
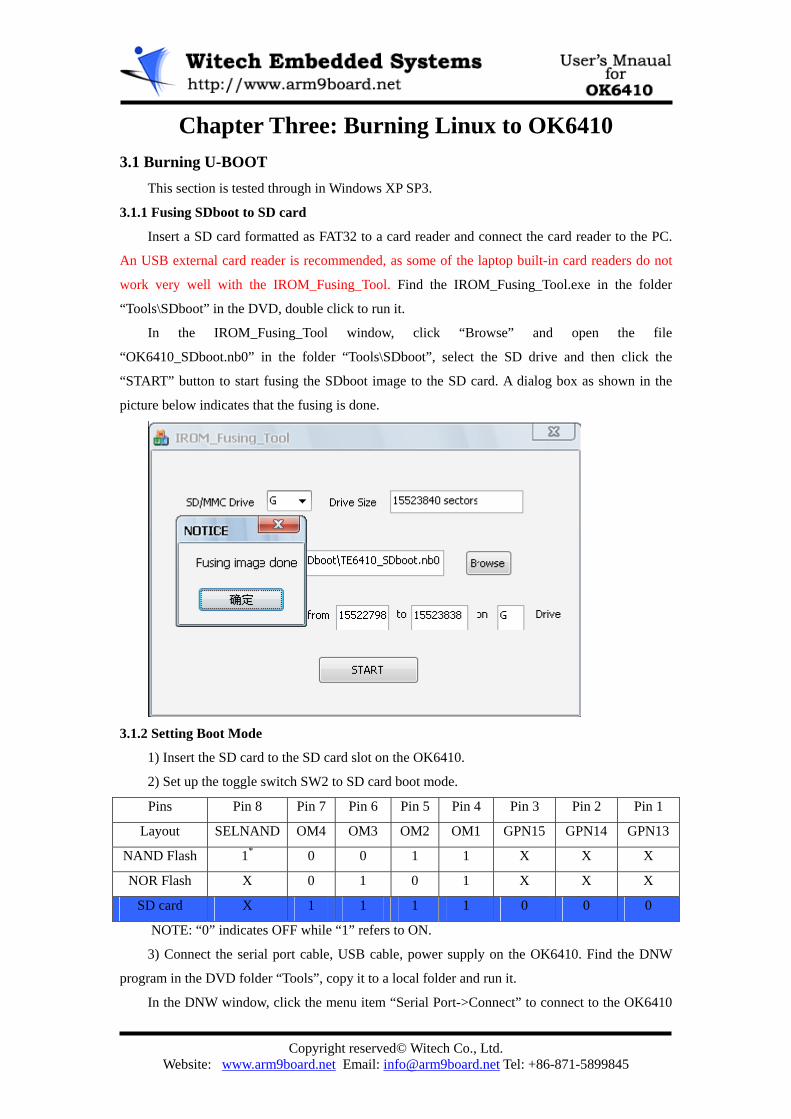
Insert a SD card formatted as FAT32 to a card reader and connect the card reader to the PC.
An USB external card reader is recommended, as some of the laptop built-in card readers do not
work very well with the IROM_Fusing_Tool. Find the IROM_Fusing_Tool.exe in the folder
“Tools\SDboot” in the DVD, double click to run it.
In the IROM_Fusing_Tool window, click “Browse” and open the file
“OK6410_SDboot.nb0” in the folder “Tools\SDboot”, select the SD drive and then click the
“START” button to start fusing the SDboot image to the SD card. A dialog box as shown in the
picture below indicates that the fusing is done.
3.1.2 Setting Boot Mode
1) Insert the SD card to the SD card slot on the OK6410.
2) Set up the toggle switch SW2 to SD card boot mode.
Pins Pin 8 Pin 7 Pin 6 Pin 5 Pin 4 Pin 3 Pin 2 Pin 1
Layout SELNAND OM4 OM3 OM2 OM1 GPN15 GPN14 GPN13
NAND Flash 1* 0 0 1 1 X X X
NOR Flash X 0 1 0 1 X X X
SD card X 1 1 1 1 0 0 0
NOTE: “0” indicates OFF while “1” refers to ON.
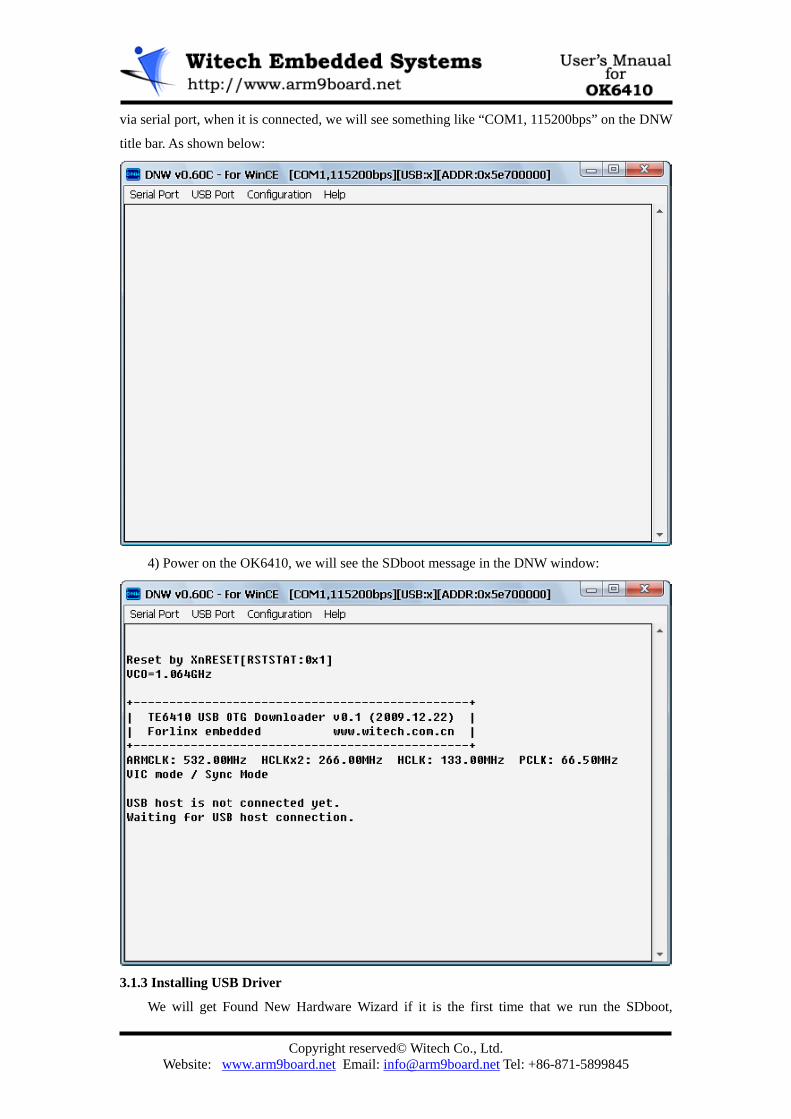
3) Connect the serial port cable, USB cable, power supply on the OK6410. Find the DNW
program in the DVD folder “Tools”, copy it to a local folder and run it.
In the DNW window, click the menu item “Serial Port->Connect” to connect to the OK6410
Copyright reserved© Witech Co., Ltd.
Website: www.arm9board.net Email: [email protected] Tel: +86-871-5899845
via serial port, when it is connected, we will see something like “COM1, 115200bps” on the DNW
title bar. As shown below:
4) Power on the OK6410, we will see the SDboot message in the DNW window:
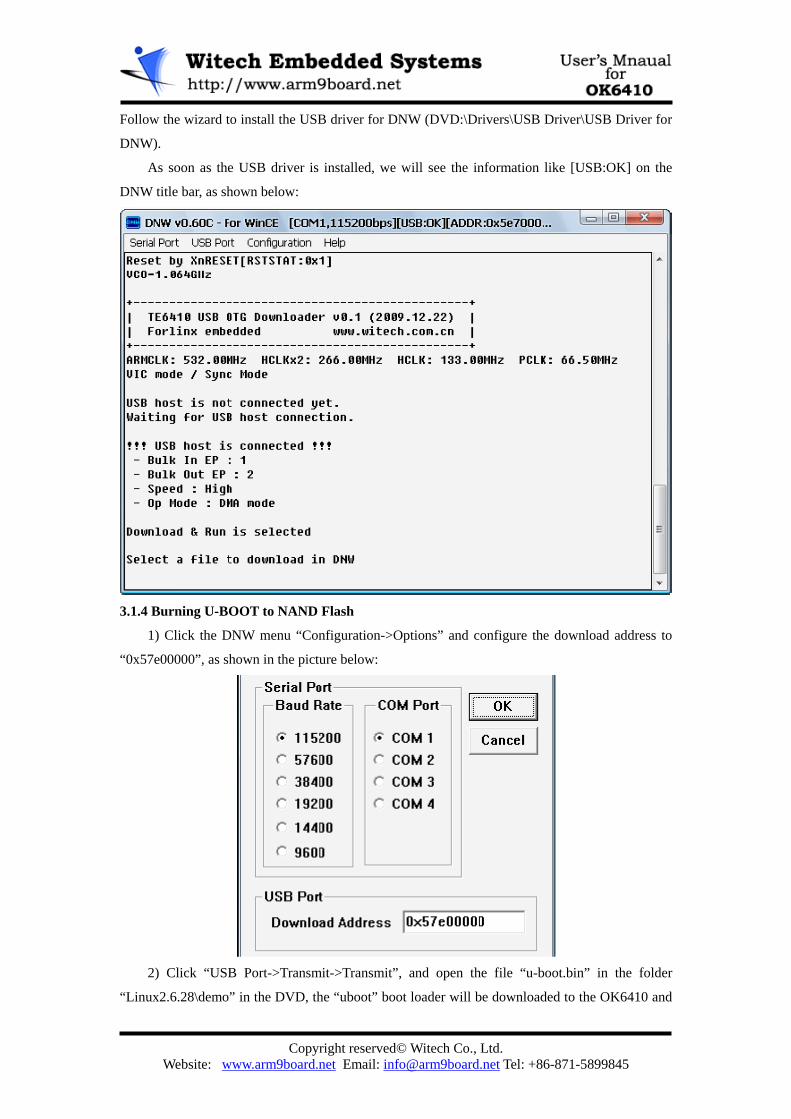
3.1.3 Installing USB Driver
We will get Found New Hardware Wizard if it is the first time that we run the SDboot,
Copyright reserved© Witech Co., Ltd.
Website: www.arm9board.net Email: [email protected] Tel: +86-871-5899845
Follow the wizard to install the USB driver for DNW (DVD:\Drivers\USB Driver\USB Driver for
DNW).
As soon as the USB driver is installed, we will see the information like [USB:OK] on the
DNW title bar, as shown below:
3.1.4 Burning U-BOOT to NAND Flash
1) Click the DNW menu “Configuration->Options” and configure the download address to
“0x57e00000”, as shown in the picture below:
2) Click “USB Port->Transmit->Transmit”, and open the file “u-boot.bin” in the folder
“Linux2.6.28\demo” in the DVD, the “uboot” boot loader will be downloaded to the OK6410 and

Copyright reserved© Witech Co., Ltd.
Website: www.arm9board.net Email: [email protected] Tel: +86-871-5899845
booted as soon as it is downloaded. Press the Space Bar during the boot delay to enter the u-boot
command line. As shown below:
3) In the u-boot console, type the command below and press Enter: dnw c0008000
4) Click the DNW menu “USB Port-> Transmit-> Transmit” and open “u-boot.bin” in the
coming pop-up window to download the u-boot to the RAM:

Copyright reserved© Witech Co., Ltd.
Website: www.arm9board.net Email: [email protected] Tel: +86-871-5899845
5) Erase the Nand Flash: nand erase 0 100000
6) Type the command below to program the u-boot to the Nand: nand write c0008000 0 100000
3.1.5 Setting Nand Flash Boot
Pins Pin 8 Pin 7 Pin 6 Pin 5 Pin 4 Pin 3 Pin 2 Pin 1
Layout SELNAND OM4 OM3 OM2 OM1 GPN15 GPN14 GPN13
NAND Flash 1* 0 0 1 1 X X X
NOR Flash X 0 1 0 1 X X X
SD card X 1 1 1 1 0 0 0
3.1.6 Setting U-BOOT parameters
The boot command “bootcmd” and boot argument “bootargs” have to be configured before
running a Linux kernel. In the u-boot, we can take the command “setenv” to configure the
parameters, and saveenv to save the changes. Set the “bootcmd” and “bootargs” as below: setenv bootargs "root=/dev/mtdblock2 console=ttySAC0,115200"

Copyright reserved© Witech Co., Ltd.
Website: www.arm9board.net Email: [email protected] Tel: +86-871-5899845
setenv bootcmd nand read 0xc0008000 0x100000 0x300000\;bootm
0xc0008000
saveenv
We can print all the parameters by using printenv
3.2 Burning Linux Kernel 1. Before burning the Linux kernel, make sure that the steps in the chapter one has been all
done, i.e., make sure that the u-boot has been burnt, u-boot parameters has been set, and the
OK6410 boots from NAND Flash.
2. Once the above mentioned steps are finished, restart the OK6410 and press any key during
the boot delay to enter the u-boot command line.
3. Download the kernel image to the RAM, by doing these below:
a). type dnw c0008000 in the console;
b). Click the DNW menu “USB Port-> Transmit-> Transmit” and open the zImage file
that you want to download to the OK6410. Demo image can be found in the DVD in the
folder “Linux2.6.28\demo”.
4. Erase the NAND Flash, by executing the command below: nand erase 100000 300000
5. Execute the following to write the kernel image to the NAND Flash: nand write.e c0008000 100000 300000
3.3 Burning File System Currently the Linux 2.6.28 system on the OK6410 supports YAFFS2 and CRAMFS
filesystems. In the folder “Linux2.6.28\Filesystems” in the DVD you will find demos for both
filesystems:
OK6410_yaffs2_v1.0.tgz --YAFFS2 filesystem;
OK6410_touch_v1.0.cramfs --CRAMFS filesystem demo that supports touch screen;
OK6410_mouse_v1.0.cramfs --CRAMFS filesystem demo that supports USB mouse;
3.3.1 Burning CRAMFS Filesystem
1. Enter the U-BOOT command line and download the filesystem image to RAM: dnw c0008000
2. Erase the mtdblock2 partition: nand erase 400000 5000000
3. Write the cramfs filesystem into NAND Flash: nand write.e c0008000 400000 5000000
4. Edit the boot parameters to add cramfs filesystem support: setenv bootargs "root=/dev/mtdblock2 rootfstype=cramfs
console=ttySAC0,115200"
5. Do not forget to save the environment after you modified the perameters: saveenv
6. Now we can restart the OK6410, the system should now booting the CRAMFS filesystem.

Copyright reserved© Witech Co., Ltd.
Website: www.arm9board.net Email: [email protected] Tel: +86-871-5899845
7. Once the touch screen is calibrated, we can copy the file “pointercal” to the directory
“/mnt/disk”, so that the calibration data can be read every time when we restart the system
thereafter. If in any case we need to re-calibrate the touch screen, we just need to delete the file
“pointercal” from “/mnt/disk”. The command below copies the file to “/mnt/disk”: cp /etc/pointercal /mnt/disk/pointercal
3.3.2 Mounting NFS Filesystem
1. Set up shared directory for NFS, “/witech/root” for example.
Type the command below to make the directory: Mkdir /witech/root
Copy the file “OK6410_yaffs2_v1.0.tgz” to the directory and un-tar it: tar –zxf OK6410_yaffs2_v1.0.tgz
2. Set up the IP address of the Host Ubuntu. On my machine I set it as 192.168.0.231.
3. Configure the NFS service on the Host. Open a new console and execute the following
commands: sudo apt-get install portmap
sudo apt-get install nfs-kernel-server
sudo gedit /etc/exports
and add the following to the end of the file “/etc/exports” in the upcoming text editor: /witech *(rw,sync,no_root_squash)
4. Start the NFS service: sudo /etc/init.d/portmap restart
sudo /etc/init.d/nfs-kernel-server restart
5. Configure the boot arguments on the OK6410: setenv bootargs "root=/dev/nfs
nfsroot=192.168.0.231:/witech/root
ip=192.168.0.232:192.168.0.231:192.168.0.201:255.255.255.0:arm9bo
ard.net:eth0:off console=ttySAC0,115200"
note that there is no Enter between this command.
And saveenv
By now we should have done all the necessary setups and NFS filesystem should be mounted
automatically as soon as we restarted the OK6410.
3.3.3 Burning YAFFS2 Filesystem
1. In the u-boot console you type the command below to erase the NAND Flash partition: nand erase 400000 5000000
2. Restart the OK6410 and enter the Linux command line, NFS filesystem should be mounted
if it has been setup correctly.
3. Make sure that the YAFFS2 filesystem (OK6410_yaffs2_v1.0.tgz) has been copied to the
NFS shared directory already. And execute the command below to burn the YAFFS2 filesystem: writeyaffs
Copyright reserved© Witech Co., Ltd.
Website: www.arm9board.net Email: [email protected] Tel: +86-871-5899845
4. Reboot the system and setup the u-boot boot arguments: setenv bootargs "root=/dev/mtdblock2 rootfstype=yaffs2
console=ttySAC0,115200"
Again, please do remember to saveenv every time after you modified the parameters.
Copyright reserved© Witech Co., Ltd.
Website: www.arm9board.net Email: [email protected] Tel: +86-871-5899845
Chapter Four: OK6410 Function Test in Linux In this chapter we test the drivers and services in the Linux system, Hyper-Terminal is
recommend to be taken as the serial port console.
4.1 SD/MMC Card Driver Test As soon as a SD card is inserted into the SD card slot, it will be mounted automatically to the
directory “/sdcard” and we should be able to view the files in the card with File Manager.
We can also mount/unmount the SD card using the commands below: mkdir /tmp/sd
mount /dev/sdcard /tmp/sd
umount /mnt/sd
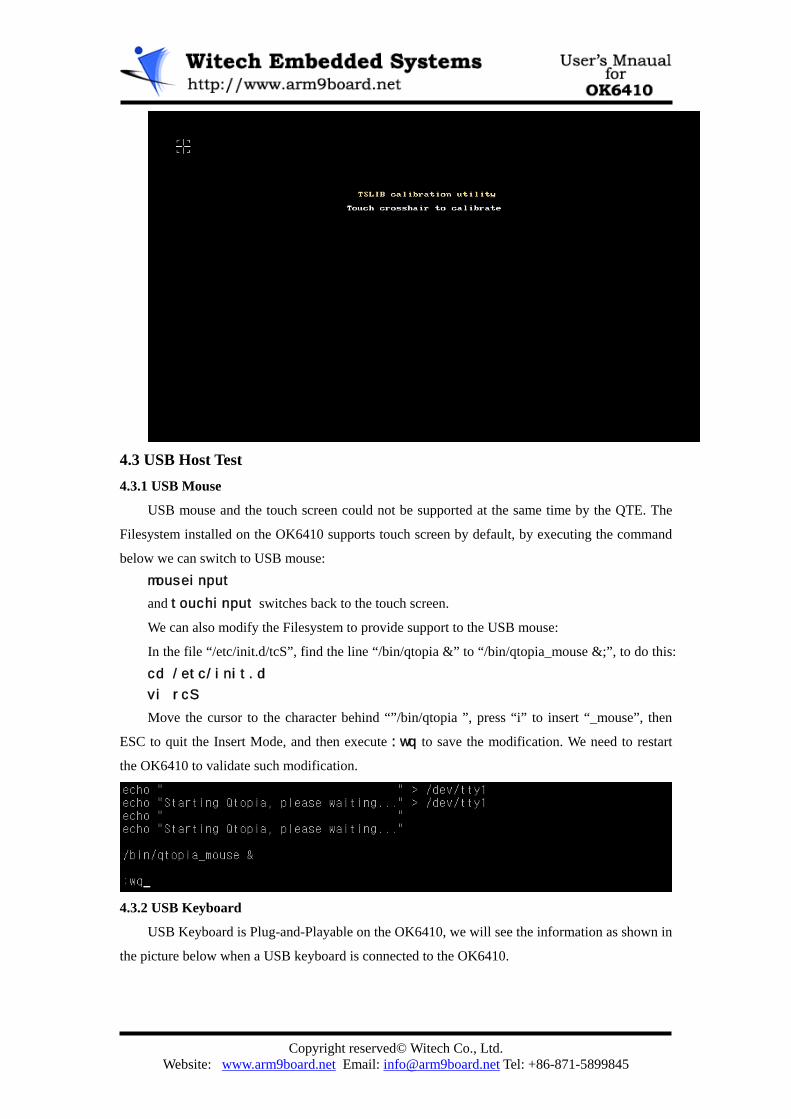
4.2 Touch Screen Calibration A recalibration tool can be found in the “Settings” panel in the QT interface, run it and then
we can recalibrate the touch screen.
The touch screen calibration data is stored in the file “/etc/pointercal”, we also can delete this
file (and restart the system) if we need to recalibrate the touch screen. rm /etc/pointercal
reboot
Note: The QTE is not able to support touch screen and mouse at the same time, so you will
not be able to calibrate the touch screen while using a filesystem that supports USB mouse.
Copyright reserved© Witech Co., Ltd.
Website: www.arm9board.net Email: [email protected] Tel: +86-871-5899845
4.3 USB Host Test 4.3.1 USB Mouse
USB mouse and the touch screen could not be supported at the same time by the QTE. The
Filesystem installed on the OK6410 supports touch screen by default, by executing the command
below we can switch to USB mouse: mouseinput
and touchinput switches back to the touch screen.
We can also modify the Filesystem to provide support to the USB mouse:
In the file “/etc/init.d/tcS”, find the line “/bin/qtopia &” to “/bin/qtopia_mouse &;”, to do this: cd /etc/init.d
vi rcS
Move the cursor to the character behind “”/bin/qtopia ”, press “i” to insert “_mouse”, then
ESC to quit the Insert Mode, and then execute :wq to save the modification. We need to restart
the OK6410 to validate such modification.
4.3.2 USB Keyboard
USB Keyboard is Plug-and-Playable on the OK6410, we will see the information as shown in
the picture below when a USB keyboard is connected to the OK6410.

Copyright reserved© Witech Co., Ltd.
Website: www.arm9board.net Email: [email protected] Tel: +86-871-5899845
4.3.3 USB Disk
Just like the SD card, USB disk will be automatically mounted to the directory “/udisk” as
soon as it is connected:
The device file for the USB disk can be found at “/dev/udisk”, we can unmount the disk by
typing the following commands: umount /udisk
mkdir /tmp/udisk
mount /dev/udisk /tmp/udisk
4.4 Audio Test Some audio/video files for testing the audio/video function have been included in the
Filesystem, which can be found in the “Documents” panel in the Qtopia interface. Double click
the files and connect a earphone to the OK6410 to test the audio function.
Copyright reserved© Witech Co., Ltd.
Website: www.arm9board.net Email: [email protected] Tel: +86-871-5899845
4.5 Network Test 4.5.1 Configurations
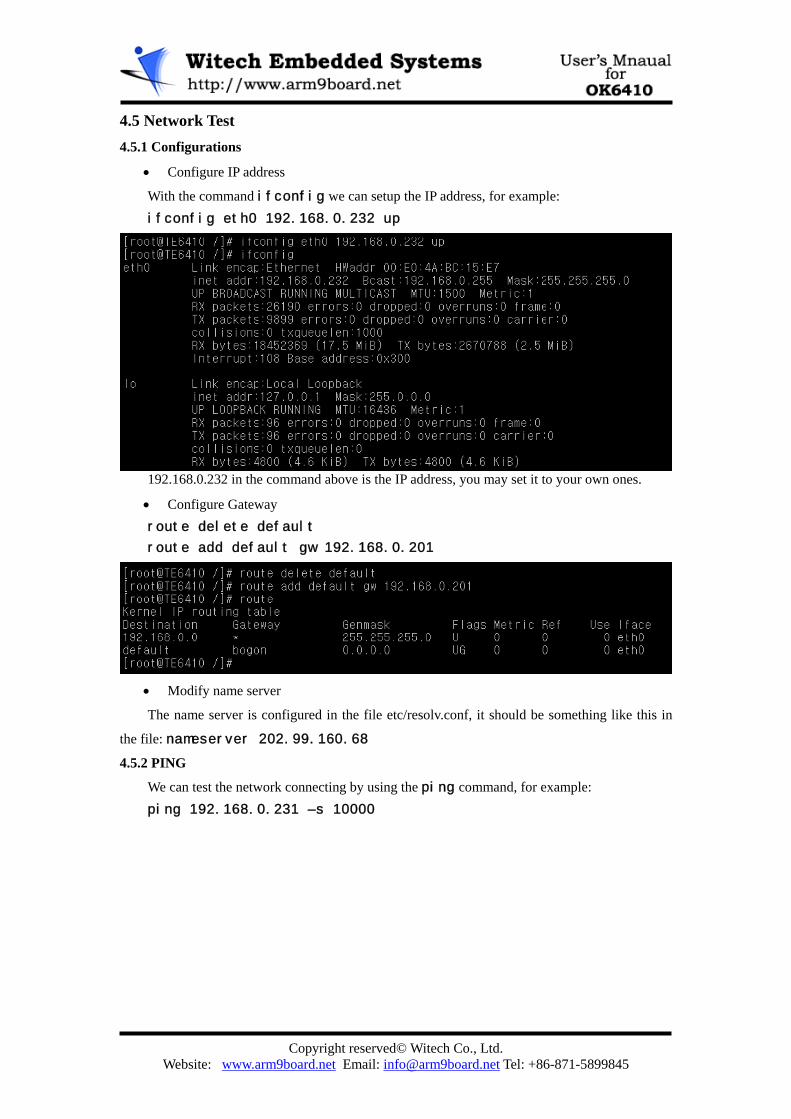
• Configure IP address
With the command ifconfig we can setup the IP address, for example: ifconfig eth0 192.168.0.232 up
192.168.0.232 in the command above is the IP address, you may set it to your own ones.
• Configure Gateway route delete default
route add default gw 192.168.0.201
• Modify name server
The name server is configured in the file etc/resolv.conf, it should be something like this in
the file: nameserver 202.99.160.68
4.5.2 PING
We can test the network connecting by using the ping command, for example: ping 192.168.0.231 –s 10000

Copyright reserved© Witech Co., Ltd.
Website: www.arm9board.net Email: [email protected] Tel: +86-871-5899845
4.5.3 Browsing Web Pages
As long as the network is configured correctly, we can run the Browser in the “Applications”
panel to browse web pages:
4.5.4 Telnet Service
• About Telnet
Telnet (teletype network) is a network protocol used on the Internet or local area networks to
provide a bidirectional interactive communications facility. Typically, telnet provides access to a
command-line interface on a remote host via a virtual terminal connection which consists of an 8-
bit byte oriented data connection over the Transmission Control Protocol (TCP).
In order to use Telnet:
A: Programs containing telnet protocol has to be installed on the local machine;
B: Telnet service has to be started on the remote Host;
C: The IP address or domain name has to be known;

Copyright reserved© Witech Co., Ltd.
Website: www.arm9board.net Email: [email protected] Tel: +86-871-5899845
D: User name and password are need for logging in.
• Visiting OK6410 via TELNET
On the OK6410, Telnet service is already enabled in the file “/etc/init.d/rcS”. As soon as we
set up the IP address, the OK6410 can be used as a telnet server.
Run the Windows Command line in the Host PC, and type telnet 192.168.0.232
Enter “root” after the “login” prompt to log in. Thereafter we can operate on the PC files and
folders on the board, as shown in the picture below:
4.5.5 FTP Service
A FTP command routine should have been installed in both Linux and Windows, through which we can visit remote Host and transmit data, in the precondition that the remote host provides FTP service and access permission.
On the OK6410 the FTP service is provided. By executing vsftpd& in the Linux command line we can start the FTP service.
When the FTP service is started, we can log in to the OK6410 with FTP softwares or IE with user name “root”.

Copyright reserved© Witech Co., Ltd.
Website: www.arm9board.net Email: [email protected] Tel: +86-871-5899845
4.5.6 Web Servr (boa)
The boa web server has been included in the OK6410 BSP, we can start the web server by
type the command boa in the Hyper-Terminal/DNW program
Then we should be able to run an IE explorer and open the web page that stored on the
OK6410: http://192.168.0.232
4.6 Temperature Sensor Test The device file corresponding to the temperature sensor should be “TEM0”. A test program
can be found in the directory “/test”, enter the following commands to run: cd /test
./tem_test
4.7 LED Test Device file for the LEDs is “leds”. cd /test
./led_test
4.8 Button Test Device file for the button is /dev/input/event0. cd /test
./key_test

Copyright reserved© Witech Co., Ltd.
Website: www.arm9board.net Email: [email protected] Tel: +86-871-5899845
4.9 Camera Test Copy the file “demo\testcamera” from the DVD to a SD card, connect the camera, insert the
SD card and start the OK6410.
Run the testcamera program, we should see the preview of the camera on the LCD.
NOTE: The testcamera program provided in the DVD is for 4.3” LCD only. To use it on
other LCDs you will have to modify the source code and re-compile it, the source code of the
testcamera program can be found in the “camera_480272_64xx.tar.gz”.
4.10 Transmitting Files via Serial Ports 4.10.1 Sending Files to PC
Right click on the Hyper-Terminal window and select the option “Receive File” in the right
click menu. Set up the folder to store the received file and then click Close:
And type the command below in the command line: sz /root/Documents/Demo1.jpg
4.10.2 Receiving Files from PC

Copyright reserved© Witech Co., Ltd.
Website: www.arm9board.net Email: [email protected] Tel: +86-871-5899845
In the Hyper-Terminal console, “cd” into the directory that you want to store the received file,
and right click on the Hyper-Terminal window, select the option “Send File” and select the file in
the coming dialog box and click Send.
Copyright reserved© Witech Co., Ltd.
Website: www.arm9board.net Email: [email protected] Tel: +86-871-5899845
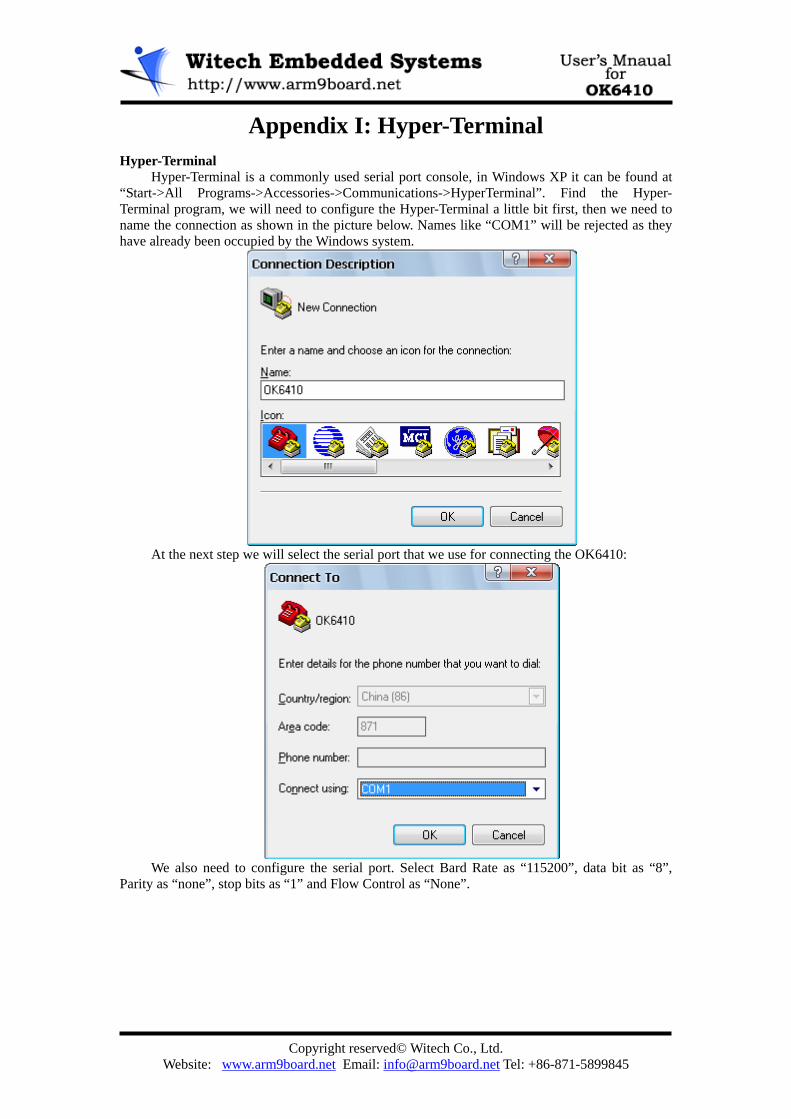
Appendix I: Hyper-Terminal Hyper-Terminal
Hyper-Terminal is a commonly used serial port console, in Windows XP it can be found at “Start->All Programs->Accessories->Communications->HyperTerminal”. Find the Hyper-Terminal program, we will need to configure the Hyper-Terminal a little bit first, then we need to name the connection as shown in the picture below. Names like “COM1” will be rejected as they have already been occupied by the Windows system.
At the next step we will select the serial port that we use for connecting the OK6410:
We also need to configure the serial port. Select Bard Rate as “115200”, data bit as “8”,
Parity as “none”, stop bits as “1” and Flow Control as “None”.

Copyright reserved© Witech Co., Ltd.
Website: www.arm9board.net Email: [email protected] Tel: +86-871-5899845
Serial port connection will be created when the configuration is done, we will see the Hyper-
Terminal interface as shown in the picture below:
Save the connection as “OK6410.ht”, so that we don’t have to configure the Hyper-Terminal
every time. Now if we power up the OK6410, we can see the bootloader message in the Hyper-Terminal
window.
Copyright reserved© Witech Co., Ltd.
Website: www.arm9board.net Email: [email protected] Tel: +86-871-5899845
Appendix II: Minicom Operation Instructions Minicom is a friendly serial port terminal program in Linux, just like the HyperTerminal in
Windows. SYNOPSIS minicom [-somMlwz8] [-c on|off] [-S script] [-d entry] [-a on|off] [-t term] [-p pty] [-C
capturefile] [configuration] DESCRIPTION minicom is a communication program which somewhat resembles the shareware program
TELIX but is free with source code and runs under most unices. Features include dialing directory with auto-redial, support for UUCP-style lock files on serial devices, a separate script language interpreter, capture to file, multiple users with individual configurations, and more.
COMMAND-LINE -s Setup. Root edits the system-wide defaults in /etc/minirc.dfl with this option. When it is
used, minicom does not initialize, but puts you directly into the configuration menu. This is very handy if minicom refuses to start up because your system has changed, or for the first time you run minicom. For most systems, reasonable defaults are already compiled in.
-o Do not initialize. Minicom will skip the initialization code. This option is handy if you quitted from minicom without resetting, and then want to restart a session. It is potentially dangerous though: no check for lock files etc. is made, so a normal user could interfere with things like uucp... Maybe this will be taken out later. For now it is assumed, that users who are given access to a modem are responsible enough for their actions.
-m Override command-key with the Meta or ALT key. This is the default in 1.80 and it can also be configured in one of minicom’s menus, but if you use different terminals all the time, of which some don’t have a Meta or ALT key, it’s handy to set the default command key to Ctrl-A and use this option when you have a keyboard supporting Meta or ALT keys. Minicom assumes that your Meta key sends the ESC prefix, not the other variant that sets the highest bit of the character.
-M Same as -m, but assumes that your Meta key sets the 8th bit of the character high (sends 128 + character code).
-z Use terminal status line. This only works on terminals that support it and that have the relevant information in their termcap or terminfo database entry.
-l Literal translation of characters with the high bit set. With this flag on, minicom will try to translate the IBM line characters to ASCII. Many PC-unix clones will display charachter correctly without translation (Linux in a special mode, Coherent and Sco).
-L Ditto but assume screen uses an ISO8859 character set. -w Turns linewrap on at startup by default. -a Attribute usage. Some terminals, notably Televideo’s, have rotten attribute handling (serial
instead of parallel). By default, minicom uses ’-a on’, but if you are using such a terminal you can (must!) supply the option ’-a off’. The trailing ’on’ or ’off’ is needed.
-t Terminal type. With this flag, you can override the environment TERM variable. This is handy for use in the MINICOM environment variable; one can create a special termcap entry for use with minicom on the console, that initializes the screen to raw mode so that in conjunction with the -l flag, the IBM line characters are displayed untranslated.
-c Color usage. Some terminals (such as the Linux console) support color with the standard ANSI escape sequences. Because there is apparently no termcap support for color, these escape sequences are hard-coded into minicom. Therefore this option is off by default. You can turn it on with ’-c on’. This, and the ’-m’ option, are good candidates to put into the MINICOM environment variable.
-S script. Run the named script at startup. So far, passing username and password to a startup script is not supported. If you also use the -d option to start dialing at startup, the -S script will be run BEFORE dialing the entries specified with -d.
-d Dial an entry from the dialing directory on startup. You can specify an index number, but also a substring of the name of the entry. If you specify a name that has multiple entries in the directory, they are all tagged for dialing. You can also specify multiple names or index numbers by separating them with commas. The dialing will start from the first entry specified after all other

Copyright reserved© Witech Co., Ltd.
Website: www.arm9board.net Email: [email protected] Tel: +86-871-5899845
program initialization procedures are completed. -p Pseudo terminal to use. This overrides the terminal port defined in the configuration files,
but only if it is a pseudo tty. The filename supplied must be of the form (/dev/)tty[p-z/][0-f], (/dev/)pts[p-z/][0-f] or (/dev/)pty[p-z/][0-f]. For example, /dev/ttyp1, pts/0 or /dev/ptyp2.
-C filename. Open capture file at startup. -T Disable the display of the online time in the status bar. -7 7bit mode for terminals which aren’t 8bit capable. 8bit is default if the environment is
configured for this via LANG or LC_ALL, 7bit otherwise. -8 8bit characters pass through without any modification. ’Continuous’ means no
locate/attribute control sequences are inserted without real change of locate/attribute. This mode is to display 8bit multibyte characters such as Japanese. Not needed in every language with 8bit characters. (For example displaying Finnish text doesn’t need this.)
When minicom starts, it first searches the MINICOM environment variable for command-line
arguments, which can be over-ridden on the command line. Thus, if you have done MINICOM=’-m -c on’ export MINICOM
or the equivalent, and start minicom, minicom will assume that your terminal has a Meta or <ALT> key and that color is supported. If you then log in from a terminal without color support, and you have set MINICOM in your startup (.profile or equivalent) file, and don’t want to re-set your environment variable, you can type ’minicom -c off’ and run without color support for that session.
Configuration The configuration argument is more interesting. Normally, minicom gets its defaults from a
file called "minirc.dfl". If you however give an argument to minicom, it will try to get its defaults from a file called "minirc.configuration". So it is possible to create multiple configuration files, for different ports, different users etc. Most sensible is to use device names, such as tty1, tty64, sio2 etc. If a user creates his own configuration file, it will show up in his home directory as ’.minirc.dfl’.
USE Minicom is window based. To popup a window with the function you want, press Control-A
(from now on, we will use C-A to mean Control-A), and then the function key (a-z or A-Z). By pressing C-A first and then ’z’, a help screen comes up with a short summary of all commands. This escape key can be altered when minicom is configured (-s option or C-A O), but we’ll stick to Control-A for now.
For every menu the next keys can be used: UP arrow-up or ’k’ DOWN arrow-down or ’j’ LEFT arrow-left or ’h’ RIGHT arrow-right or ’l’ CHOOSE Enter CANCEL ESCape. The screen is divided into two portions: the upper 24 lines are the terminal-emulator screen. In
this window, ANSI or VT100 escape sequences are interpreted. If there is a line left at the bottom, a status line is placed there. If this is not possible the status line will be showed every time you press C-A. On terminals that have a special status line that will be used if the termcap information is complete and the -k flag has been given.
Possible commands are listed next, in alphabetical order. C-A Pressing C-A a second time will just send a C-A to the remote system. If you have changed your "escape character" to something other than C-A, this works analogously for that character.
A Toggle ’Add Linefeed’ on/off. If it is on, a linefeed is added before every carriage return displayed on the screen.
B Gives you a scroll back buffer. You can scroll up with u, down with d, a page up with b, a page down with f, and if you have them the arrow and page up/page down keys can also be used. You can search for text in the buffer with s (case-sensitive) or S (case-insensitive). N will find the next occurrence of the string. c will enter citation mode. A text cursor appears and you specify the start line by hitting Enter key. Then scroll back mode will finish and the contents with prefix ’>’
Copyright reserved© Witech Co., Ltd.
Website: www.arm9board.net Email: [email protected] Tel: +86-871-5899845
will be sent. C Clears the screen. D Dial a number, or go to the dialing directory. E Toggle local echo on and off (if your version of minicom supports it). F A break signal is sent to the modem. G Run script (Go). Runs a login script. H Hangup. I Toggle the type of escape sequence that the cursor keys send between normal and
applications mode. (See also the comment about the status line below). J Jump to a shell. On return, the whole screen will be redrawn. K Clears the screen, runs kermit and redraws the screen upon return. L Turn Capture file on off. If turned on, all output sent to the screen will be captured in the file
too. M Sends the modem initialization string. If you are online and the DCD line setting is on, you
are asked for confirmation before the modem is initialized. O Configure minicom. Puts you in the configuration menu. P Communication Parameters. Allows you to change the bps rate, parity and number of bits. Q Exit minicom without resetting the modem. If macros changed and were not saved, you will
have a chance to do so. R Receive files. Choose from various protocols (external). If you have the filename selection
window and the prompt for download directory enabled, you’ll get a selection window for choosing the directory for downloading. Otherwise the download directory defined in the Filenames and paths menu will be used.
S Send files. Choose the protocol like you do with the receive command. If you don’t have the filename selection window enabled (in the File transfer protocols menu), you’ll just have to write the filename(s) in a dialog window. If you have the selection window enabled, a window will pop up showing the filenames in your upload directory. You can tag and untag filenames by pressing spacebar, and move the cursor up and down with the cursor keys or j/k. The selected filenames are shown highlighted. Directory names are shown [within brackets] and you can move up or down in the directory tree by pressing the spacebar twice. Finally, send the files by pressing ENTER or quit by pressing ESC.
T Choose Terminal emulation: Ansi(color) or vt100. You can also change the backspace key here, turn the status line on or off, and define delay (in milliseconds) after each newline if you need that.
W Toggle linewrap on/off. X Exit minicom, reset modem. If macros changed and were not saved, you will have a chance
to do so. Y Paste a file. Reads a file and sends its contests just as if it would be typed in. Z Pop up the help screen. DIALING DIRECTORY By pressing C-A D the program puts you in the dialing directory. Select a command by
pressing the capitalized letter or moving cursor right/left with the arrow keys or the h/l keys and pressing Enter. You can add, delete or edit entries and move them up and down in the directory list. By choosing "dial" the phone numbers of the tagged entries, or if nothing is tagged, the number of the highlighted entry will be dialed. While the modem is dialing, you can press escape to cancel dialing. Any other key will close the dial window, but won’t cancel the dialing itself. Your dialing directory will be saved into a the file ".dialdir" in your home directory. You can scroll up and down with the arrow keys, but you can also scroll complete pages by pressing the PageUp or PageDown key. If you don’t have those, use Control-B (Backward) and Control-F (Forward). You can use the space bar to tag a number of entries and minicom will rotate trough this list if a connection can’t be made. A ’>’ symbol is drawn in the directory before the names of the tagged entries.
The "edit" menu speaks for itself, but I will discuss it briefly here. A - Name The name for this entry
B - Number and its telephone number.

Copyright reserved© Witech Co., Ltd.
Website: www.arm9board.net Email: [email protected] Tel: +86-871-5899845
C - Dial string # Which specific dial string you want to use to connect. There are three different dial strings
(prefixes and suffixes) that can be configured in the Modem and dialing menu. D - Local echo can be on or off for this system (if your version of minicom supports it). E - Script The script that must be executed after a successful connection is made (see the
manual for runscript) F - Username The username that is passed to the runscript program. It is passed in the environment string
"$LOGIN". G - Password The password is passed as "$PASS". H - Terminal Emulation Use ANSI or VT100 emulation. I - Backspace key sends What code (Backspace or Delete) the backspace key sends. J - Linewrap Can be on or off. K - Line settings Bps rate, bits, parity and number of stop bits to use for this connection. You can choose
current for the speed, so that it will use whatever speed is being used at that moment (useful if you have multiple modems).
L - Conversion table You may spacify a character conversion table to be loaded whenever this entry answers,
before running the login script. If this field is blank, the conversion table stays unchanged. The edit menu also shows the latest date and time when you called this entry and the total
number of calls there, but doesn’t let you change them. They are updated automatically when you connect.
The moVe command lets you move the highlighted entry up or down in the dialing directory with the up/down arrow keys or the k and j keys. Press Enter or ESC to end moving the entry.
CONFIGURATION By pressing C-A O you will be thrown into the setup menu. Filenames and paths This menu defines your default directories. A - Download directory where the downloaded files go to. B - Upload directory where the uploaded files are read from. C - Script directory Where you keep your login scripts. D - Script program Which program to use as the script interpreter. Defaults to the program "runscript", but if you
want to use something else (eg, /bin/sh or "expect") it is possible. Stdin and stdout are connected to the modem, stderr to the screen.
If the path is relative (ie, does not start with a slash) then it’s relative to your home directory, except for the script interpreter.
E - Kermit program Where to find the executable for kermit, and it’s options. Some simple macro’s can be used
on the command line: ’%l’ is expanded to the complete filename of the dial out-device, ’%f’ is expanded to the serial port file descriptor and ’%b’ is expanded to the current serial port speed.
F - Logging options Options to configure the logfile writing. A - File name Here you can enter the name of the logfile. The file will be written in your home directory,
and the default value is "minicom.log". If you blank the name, all logging is turned off.

Copyright reserved© Witech Co., Ltd.
Website: www.arm9board.net Email: [email protected] Tel: +86-871-5899845
B - Log connects and hangups This option defines whether or not the logfile is written when the remote end answers the call
or hangs up. Or when you give the hangup command yourself or leave minicom without hangup while online.
C - Log file transfers Do you want log entries of receiving and sending files. The ’log’ command in the scripts is not affected by logging options B and C. It is always
executed, if you just have the name of the log file defined. Save setup as dfl Save the parameters as the default for the next time the program is started. Instead of dfl, any
other parameter name may appear, depending on which one was used when the program was started.
Save setup as.. Save the parameters under a special name. Whenever Minicom is started with this name as an
argument, it will use these parameters. This option is of course privileged to root. Exit Escape from this menu without saving. This can also be done with ESC. Exit from minicom Only root will see this menu entry, if he/she started minicom with the ’-s’ option. This way, it
is possible to change the configuration without actually running minicom. STATUS LINE The status line has several indicators that speak for themselves. The mysterious APP or NOR
indicator probably needs explanation. The VT100 cursor keys can be in two modes: applications mode and cursor mode. This is controlled by an escape sequence. If you find that the cursor keys do not work in, say, vi when you’re logged in using minicom then you can see with this indicator whether the cursor keys are in applications or cursor mode. You can toggle the two with the C-A I key. If the cursor keys then work, it’s probably an error in the remote system’s termcap initialization strings (is).

Copyright reserved© Witech Co., Ltd.
Website: www.arm9board.net Email: [email protected] Tel: +86-871-5899845
Appendix III: Making CRAMFS Filesystem Step 1, Copy “cramfsck”, “mkcramfs”, “OK6410_touch_v1.0.cramfs” to the Ubuntu.
Step 2, Execute sudo ./cramfsck -x myfs OK6410_touch_v1.0.cramfs to
de-compress the source code of cramfs system to the directory “myfs”
Step 3, Add anything you want to the cramfs source code.
Step 4, execute sudo ./mkcramf s myfs/ myfs.cramfs to compress the source
code into Filesystem image “myfs.cramfs”.

Copyright reserved© Witech Co., Ltd.
Website: www.arm9board.net Email: [email protected] Tel: +86-871-5899845
Appendix IV: Basic Linux Commands ls Display the contents of the current directory ls -a Display also hidden files and hidden directories cp filename /path/dir_name Copy filename into directory /path/dir_name cp -r dir_name /path/dir_name2 Copy the entire dir_name into /path/dir_name2 cp filename1 filename2 /path/dir_name Copy filename1 and filename2 into /path/dir_name
rm name Remove a file or directory called name
rm -r name Remove an entire directory as well as its included files and subdirectories
mv filename /path/dir_name Move filename into /path/dir_name mv filename1 filename2 Rename filename1 to filename2 cat filename Display filenames contents more filename Display filename in pages. Use spacebar to view next page head filename Display filenames first 10 lines head -15 filename Display filenames first 15 lines tail filename Display filenames last 10 lines tail -15 filename Display filenames last 15 lines pwd Display current directory cd /path/dir_name Change to directory /path/dir_name cd .. Go 1 directory up mkdir dir_name Create directory dir_name rmdir dir_name Delete directory dir_name Finding files and text within files
updatedb Update (create first time used) a database of all files under the root directory /
locate filename Find file filename searching in the database find / -name filename Starting from the root directory search for the file called filename find / -name *filename Same as above but search for file containing the string filename
Copyright reserved© Witech Co., Ltd.
Website: www.arm9board.net Email: [email protected] Tel: +86-871-5899845
grep string /path/dir_name Starting from /path/dir_name search for all files containing string
which application_name Search $path for application app_name whereis application_name Search $path, man pages and source files for application_name
Archived files Decompress tar -xzf filename.tgz Decompress tzg file tar -xzf filename.tar.gz Decompress tar.gz file tar -xjf filename.tar.bz2 Decompress tar.bz2 file Compress tar -czf filename.tar /path/dir_name Compress directory /path/dir_name to filename.tar gzip -c filename > filename.gz Compress /path/dir_name to filename.tar.gz bzip2 -c filename > filename.bz2 Compress /path/dir_name to filename.tar.bz2
Using rpm files rpm -hiv package.rpm Install rpm called package.rpm rpm -hiv --force package.rpm Install rpm called package.rpm by force rpm -hUv package.rpm Upgrade rpm called package.rpm rpm -e package.rpm Delete rpm called package.rpm rpm -qpil package.rpm List files in not-installed rpm called package.rpm rpm -ql package.rpm List files in installed rpm called package.rpm rpm -q str List installed rpms containing the string str rpm -qf /path/application_name Display the rpm that contains application application_name
Starting and Stoping startx Start the X system shutdown -h now Shutdown the system now and do not reboot halt Same as above shutdown -r now Reboot reboot Same as above shutdown -r +10 Reboot in 10 minutes Mounting filesystems mount -t vfat /dev/sd(a)(1) /mnt/c_drive
Mount the first partition 1 of the first hard disk drive a which is in fat32 vfat dormat under /mnt/c_drive directory
mount -t iso9660 /dev/cdrom /mnt/cdrom Mount cdrom under /mnt/cdrom directory
umount /mnt/hda1 Unmout the above
User administration users Display users currently logged in adduser username Create a new user called username passwd username Define password for user called username

Copyright reserved© Witech Co., Ltd.
Website: www.arm9board.net Email: [email protected] Tel: +86-871-5899845
who List logged-in users whoami Display current user finger username Displays info about user username su Log in as root from current login su - Log in as root from current login and take root's path exit Exit from console login (ie, logout). Processes command Execute command in the foreground command & Execute command in the background ctrl+z Suspend a program ctrl+c Interrupt a program ps List all processes kill -9 pid Kill process with id pid top Monitor processes in real time Networking hostname List the system's hostname ifconfig Set/Display network information host ip Resolves ip's hostname ping ip/hostname Check if ip/hostname is reachable traceroute ip/hostname Find network path to ip/hostname
System Information uname -a General system information fdisk -l List partition tables cp filename /path/dir_name Copy filename into directory /path/dir_name df -T -h List filesystem disk space usage lspci List PCI devices lsusb List USB devices free -m