Embed Size (px)
Citation preview

Printing with White and Clear Toner on the OKI C941dn
With your C941dn Multimedia Production Platform device from OKI, you can demonstrate your creativity or broaden your printed offerings by producing materials on a wide range of media in CMYK plus White or Clear gloss toner.
The C941dn not only gives you the opportunity to produce vibrant mock-ups, stationery, invitations, brochures, packaging prototypes, point-of-sale material, watermarks, window graphics, labels, etc., but to do so quickly and easily—as well as cost-effectively.
In the pages that follow, see step-by-step instructions for file preparation and printing—to help ensure the best possible results from your C941dn.
This guide assumes that the C941dn driver has been installed from the disc provided with your printer. Also, drivers can be downloaded from www.okidata.com.
Contents:
Printing from a PC 2Printing from a Mac® 4Fiery® XF User Info 7Adobe Photoshop® File Prep 7
Adobe® InDesign® File Prep 8Adobe Illustrator File Prep 9Creating a High-Res PDF 10

General guidelines for applying Clear or White toner
1. First be sure the printer driver is configured for White or Clear toner, depending upon the spot color installed in the printer.
2. Clear and White can be utilized by nearly all applications with very little effort. The OKI driver provides a number of automated techniques for applying Clear and White to the entire document.
3. If you are creating a document that has very specific items or areas that are to utilize the spot color, you will have to use Adobe Illustrator, Photoshop (or similar) to indicate where the OKI Spot Color is to be applied.
Printing with Clear or White toner from a PCConfigure the printer driver for White or Clear toner
1. From the START menu, select Devices and Printers (Printers and Faxes). Then Right-click on the OKI C941 and select Printer Properties
2. Click on the Device Settings tab.
3. Near the bottom of the list of settings, change Spot Color Toner to correspond with the toner installed in your printer. Keep in mind that if you later install a different Spot Color, this setting will also need to be changed.
2
B
A
Printing from Acrobat Reader
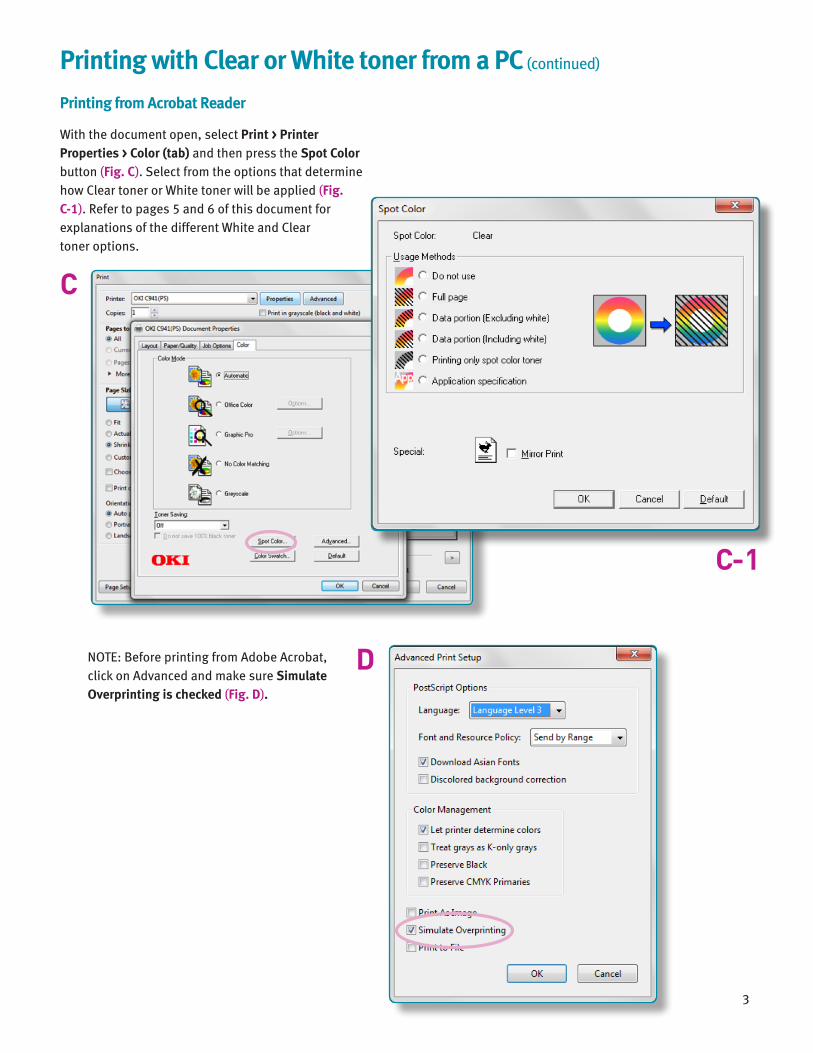
With the document open, select Print > Printer Properties > Color (tab) and then press the Spot Color button (Fig. C). Select from the options that determine how Clear toner or White toner will be applied (Fig. C-1). Refer to pages 5 and 6 of this document for explanations of the different White and Clear toner options.
Printing with Clear or White toner from a PC (continued)
3
C
C-1
DNOTE: Before printing from Adobe Acrobat, click on Advanced and make sure Simulate Overprinting is checked (Fig. D).

>
EH
F I
G J
To print using White or Clear toner you must first specify “White” or “Clear” in the print driver:
1. Open System Preferences and click on the Print & Scan icon (Fig. E)
2. Make sure that the OKI-C941dn printer is chosen on the left hand side of the Print & Scan dialogue box (Fig. F). Click the Options & Supplies button to access the print driver settings (also Fig. F)
3. Click the Driver button and choose “White” or “Clear” from the Spot Color Toner menu (Fig. G)
To print using Clear toner, click the Printer button at the bottom of the Print dialogue box (Fig. H):
1. Make sure that OKI-C941dn is chosen in the Printer menu (Fig. I)
2. In the Layout menu choose Printer Features and in the Feature Sets menu choose General 1 (Figs. I & J)
3. Under General 1 in Feature Sets, you’ll find several options for adding Clear toner to your layout (see next page (Fig. K) for Usage Methods)
Printing with Clear or White toner from a Mac®
4

Printing with Clear toner from a Mac®
Usage Methods gives you several options for adding Clear toner to your layout (Fig. J). The graphics at right indicate the Clear toner coverage that results from each selection. The purple coloration shows where clear toner will print on top of the elements in the page layout. Layout 4 assumes a color paper stock with only clear toner printed on it. Layout 5 shows a watermark repeat pattern that can be created with clear toner.
Special Note: The reference to white in the Usage Methods menu refers to white pixels or the white portion of an image that would drop out to the white of the paper stock. In this case white is NOT referring to white toner.
See instructions on the next page for printing with White toner (Fig. L)
K
Sample page layout
5
1
2
3
4
5

To print using White toner, follow steps on page 4, Fig. E through Fig. J, selecting “White” in Fig. G (Spot Color Toner). General 1 under Feature Sets will then give you two options for applying White toner to your layout. (Fig. J)
Click on the Order of Superposition menu and choose from “Print white on the color” or “Print white under the color. (Fig. L)
Printing with White toner from a Mac®
M
L
To print white only on a colored paper stock, set up your artwork in black. Go to the Usage Methods menu (Fig. M) and choose Prints only spot color toner. This will print your black artwork as white.
Original page layout
100% white toner is printed under the bouquet of flowers along with a gradation of white as the background of the invitation. Color is printed on top of the white toner.
The color portion of the image is printed in reverse (backwards reading) on transpar-ent media and a white rectangular area is printed on top of the color so that it reads properly when viewing the image through the transparent media.
6

Creating soft or faded edge effects in clear gloss toner requires the use of a raster based program like Adobe Photoshop.
1. Open the photo you would like to enhance with clear gloss toner.
2. Create a new layer then select an area of the photo to be in clear gloss toner or import vector art from Adobe Illustrator and past it into the new layer. Either way the new layer art must be designated as solid black for 100% clear gloss toner. Feather or soften the layer edges as desired.
3. Copy the selected art.
4. In the channels pallet, scroll down to “New Spot Channel” and name it SpotColor_Clear. Your selection will automatically be pasted into the new spot channel. (Fig. N)
NOTE: If your Photoshop file will be imported into Adobe InDesign, make sure to designate the same spot PMS color on the SpotColor_Clear layers in Adobe InDesign (Fig. P)
5. Save the PSD file and place in InDesign on the SpotColor_Clear layer.
NOTE: The preview image will look darker where the SpotColor_Clear channel appears on your page layout
Printing clear gloss toner only in select areas of your page layout.Adobe® Photoshop file preparation for “Application Specification” printing.
7
Original Photo
Clear Gloss Toner Layer
New Spot Channel Layer in InDesign
N
Note to Fiery® XF Server Users: You must create a spot color alias within XF in order to print artwork containing the spot color names (SpotColor_Clear, SpotColor_White)
Within XF select Tools select Color Editor > Printer Color System and create a duplicate name for Clear_Ink and
White_Ink that are renamed SpotColor_Clear and SpotColor_White.
For more information and support for XF Server please go to www.okidata.com, click Support, Search Knowledgebase and search for OKIDoc 4267.
Make specific areas of clear toner on your page layout
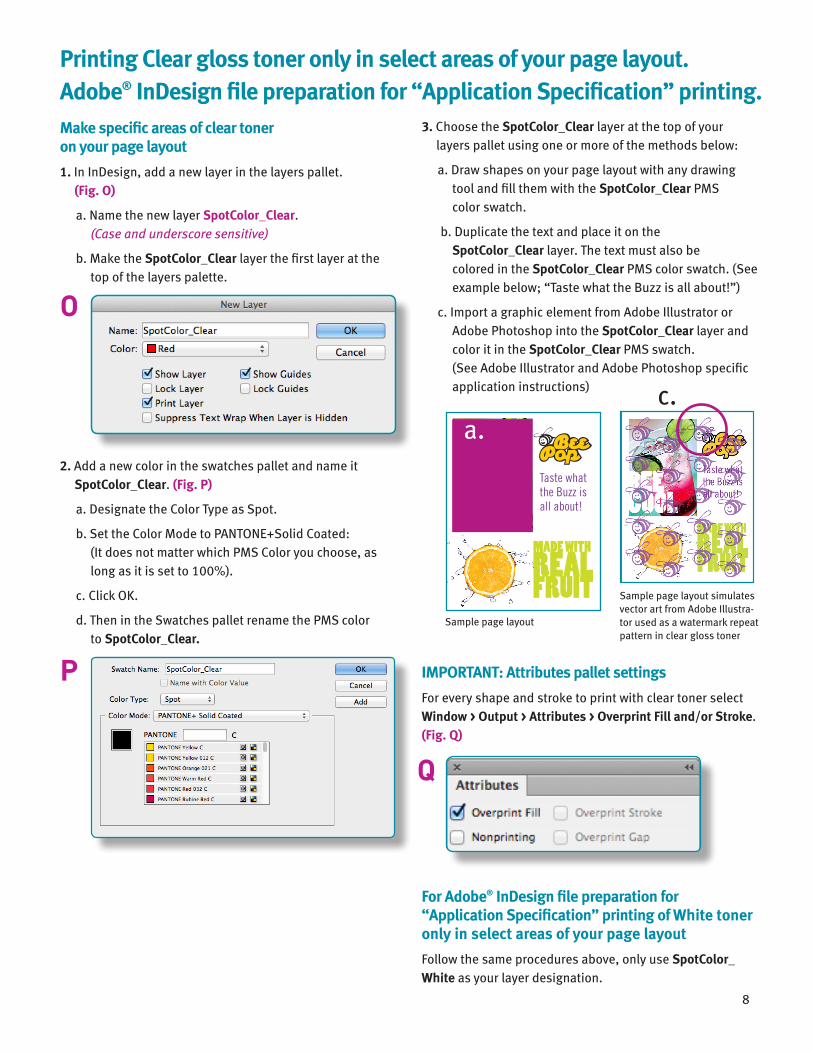
1. In InDesign, add a new layer in the layers pallet. (Fig. O)
a. Name the new layer SpotColor_Clear. (Case and underscore sensitive)
b. Make the SpotColor_Clear layer the first layer at the top of the layers palette.
2. Add a new color in the swatches pallet and name it SpotColor_Clear. (Fig. P)
a. Designate the Color Type as Spot.
b. Set the Color Mode to PANTONE+Solid Coated: (It does not matter which PMS Color you choose, as long as it is set to 100%).
c. Click OK.
d. Then in the Swatches pallet rename the PMS color to SpotColor_Clear.
3. Choose the SpotColor_Clear layer at the top of your layers pallet using one or more of the methods below:
a. Draw shapes on your page layout with any drawing tool and fill them with the SpotColor_Clear PMS color swatch.
b. Duplicate the text and place it on the SpotColor_Clear layer. The text must also be colored in the SpotColor_Clear PMS color swatch. (See example below; “Taste what the Buzz is all about!”)
c. Import a graphic element from Adobe Illustrator or Adobe Photoshop into the SpotColor_Clear layer and color it in the SpotColor_Clear PMS swatch. (See Adobe Illustrator and Adobe Photoshop specific application instructions)
IMPORTANT: Attributes pallet settings
For every shape and stroke to print with clear toner select Window > Output > Attributes > Overprint Fill and/or Stroke. (Fig. Q)
Printing Clear gloss toner only in select areas of your page layout.Adobe® InDesign file preparation for “Application Specification” printing.
O
P
Q
Sample page layout
Sample page layout simulates vector art from Adobe Illustra-tor used as a watermark repeat pattern in clear gloss toner
c.
8
For Adobe® InDesign file preparation for “Application Specification” printing of White toner only in select areas of your page layout
Follow the same procedures above, only use SpotColor_White as your layer designation.
a.
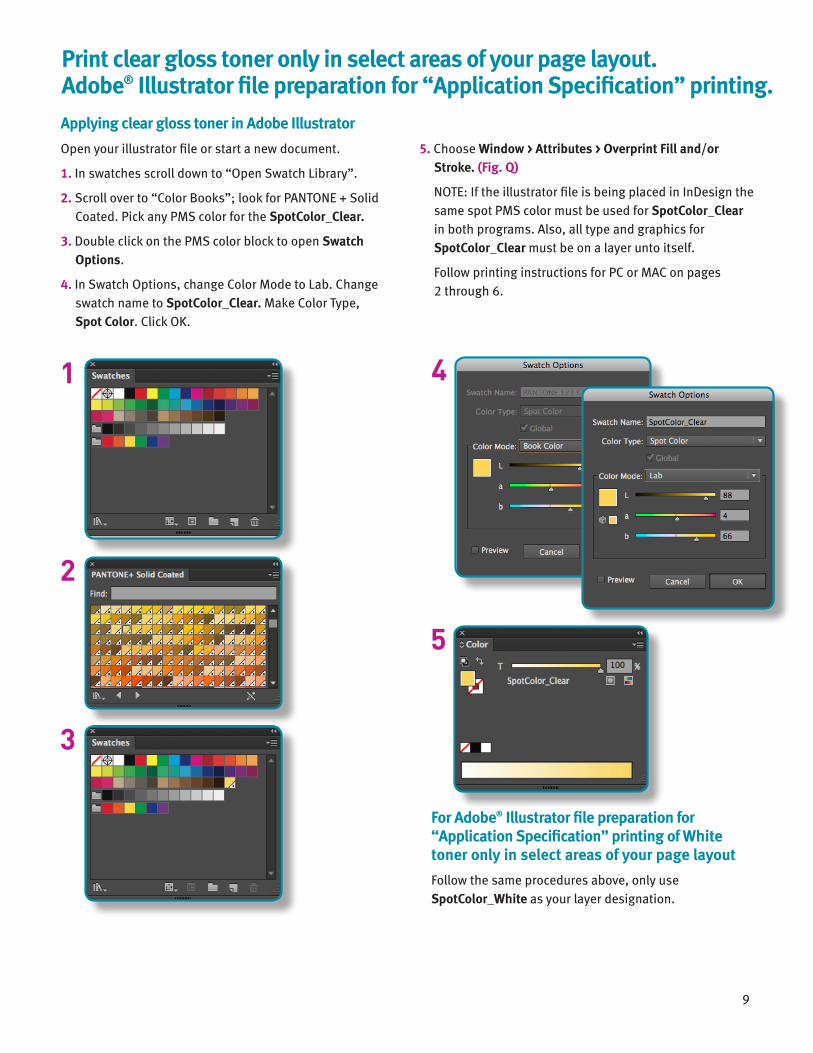
Applying clear gloss toner in Adobe Illustrator
Open your illustrator file or start a new document.
1. In swatches scroll down to “Open Swatch Library”.
2. Scroll over to “Color Books”; look for PANTONE + Solid Coated. Pick any PMS color for the SpotColor_Clear.
3. Double click on the PMS color block to open Swatch Options.
4. In Swatch Options, change Color Mode to Lab. Change swatch name to SpotColor_Clear. Make Color Type, Spot Color. Click OK.
5. Choose Window > Attributes > Overprint Fill and/or Stroke. (Fig. Q)
NOTE: If the illustrator file is being placed in InDesign the same spot PMS color must be used for SpotColor_Clear in both programs. Also, all type and graphics for SpotColor_Clear must be on a layer unto itself.
Follow printing instructions for PC or MAC on pages 2 through 6.
Print clear gloss toner only in select areas of your page layout. Adobe® Illustrator file preparation for “Application Specification” printing.
1 4
5
2
3
9
For Adobe® Illustrator file preparation for “Application Specification” printing of White toner only in select areas of your page layout
Follow the same procedures above, only use SpotColor_White as your layer designation.
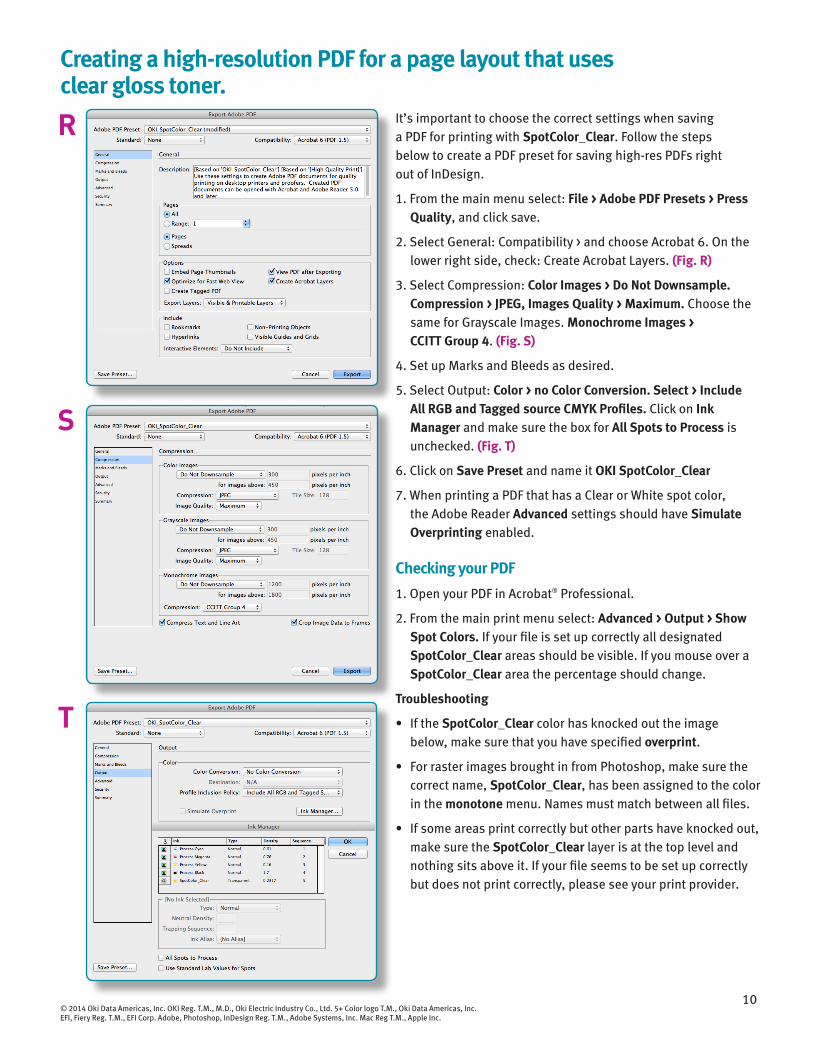
Creating a high-resolution PDF for a page layout that uses clear gloss toner.
It’s important to choose the correct settings when saving a PDF for printing with SpotColor_Clear. Follow the steps below to create a PDF preset for saving high-res PDFs right out of InDesign.
1. From the main menu select: File > Adobe PDF Presets > Press Quality, and click save.
2. Select General: Compatibility > and choose Acrobat 6. On the lower right side, check: Create Acrobat Layers. (Fig. R)
3. Select Compression: Color Images > Do Not Downsample. Compression > JPEG, Images Quality > Maximum. Choose the same for Grayscale Images. Monochrome Images > CCITT Group 4. (Fig. S)
4. Set up Marks and Bleeds as desired.
5. Select Output: Color > no Color Conversion. Select > Include All RGB and Tagged source CMYK Profiles. Click on Ink Manager and make sure the box for All Spots to Process is unchecked. (Fig. T)
6. Click on Save Preset and name it OKI SpotColor_Clear
7. When printing a PDF that has a Clear or White spot color, the Adobe Reader Advanced settings should have Simulate Overprinting enabled.
Checking your PDF
1. Open your PDF in Acrobat® Professional.
2. From the main print menu select: Advanced > Output > Show Spot Colors. If your file is set up correctly all designated SpotColor_Clear areas should be visible. If you mouse over a SpotColor_Clear area the percentage should change.
Troubleshooting
• If the SpotColor_Clear color has knocked out the image below, make sure that you have specified overprint.
• For raster images brought in from Photoshop, make sure the correct name, SpotColor_Clear, has been assigned to the color in the monotone menu. Names must match between all files.
• If some areas print correctly but other parts have knocked out, make sure the SpotColor_Clear layer is at the top level and nothing sits above it. If your file seems to be set up correctly but does not print correctly, please see your print provider.
R
S
T
10© 2014 Oki Data Americas, Inc. OKI Reg. T.M., M.D., Oki Electric Industry Co., Ltd. 5+ Color logo T.M., Oki Data Americas, Inc. EFI, Fiery Reg. T.M., EFI Corp. Adobe, Photoshop, InDesign Reg. T.M., Adobe Systems, Inc. Mac Reg T.M., Apple Inc.