Embed Size (px)
Citation preview
July, 2007 i
OMB Internet Apportionment System
User Guide

July, 2007 ii
OMB Internet Apportionments – User Guide
Table of Contents
Introduction ................................................................................................................... 1 Log On .............................................................................................................................. 2 Create Template-- Using OMB’s Latest Data ..................................................... 5 Create A Blank Template ......................................................................................... 16 Validate (Draft) Request ......................................................................................... 17 Formatting and Printing .......................................................................................... 32 Validate Incremental Request............................................................................... 34 Re-Validate (Final) Request ................................................................................... 36 Send Request ............................................................................................................... 37 Run Reports.................................................................................................................. 43 View Results................................................................................................................. 46 Navigation Tab ............................................................................................................ 47 Recent Change Tabs.................................................................................................. 48 Appendix I: Format of Excel Spreadsheets ..................................................... 51 Appendix II: Naming Your Files .......................................................................... 56

1
Introduction
This guide aims should help you – agency staffers who prepare and \ or approve apportionments – to learn about and effectively use OMB’s secure, web-based apportionment system. Other staffers should also find the guide helpful. OMB Circular A-11 requires all executive branch agencies to use OMB's web-based apportionment system to send apportionment requests to OMB. The apportionment system will help you to: prepare apportionment requests, send requests to OMB, and run reports against previously approved apportionments. OMB examining divisions use the system to send electronic copies of approved apportionment to agencies, and run reports against previously approved apportionments. Here is a summary of the process:
1. You can use the Create Template tab in the system to create an Excel file that serves as a draft request. Save the Excel file to your PC or a network drive.
2. Fill in all the necessary information on the Request worksheet in the Excel file. Put the text of any footnotes on the Footnotes worksheet. You may also add additional worksheets with backup information.
3. You can use the Run Reports tab in the system to create reports that help you complete your request.
4. You must use the Validate Request tab in the system to ensure that your draft request has no formatting or mathematical errors. The system does not let you send a file with errors to OMB.
5. If your draft request has errors, you can see a list of errors using the View Results tab in the system. You can fix the errors, save the draft request, and try to validate the file again.
6. When your draft request has no errors, you can use the View Results tab in the system to find a new Excel file that you can submit to OMB. You must download this file – which has a tab named Appor_Req_to_OMB – to your PC or network drive.
7. You can use the Send to OMB tab in the system to send your final request to OMB – if you have permission to do so. [If not, give the final request to the appropriate people in your agency.] The system attaches your final request to an email that goes to staffers at OMB and your agency.
8. When OMB approves the apportionment, you or the appropriate people in your agency will receive an email that includes an Excel file with the approved apportionment. You can run the Submission/Approval report to see if your request has been approved.
The following pages take you through the process in detail.

2
Log On
The apportionment system is part of OMB’s MAX computer system. The easiest way to access the apportionment system is to go to the MAX Homepage, which is located at: https://max.omb.gov/maxportal/ From the MAX Homepage, you should click the link to go to the apportionment system. You can also go to the apportionment system directly from:
https://max.omb.gov/apportionment If you don’t have a MAX ID, you can register for one at:
https://max.omb.gov/maxportal/registrationForm.do

3
Log On
The logon page for the apportionment system looks like this. Your User ID is your email address. If you forgot your password, click the “forgot password” link, and follow the instructions to re-set your password.

4
Log On
To reset your password, put in your email address and click Submit. You will receive an email in short order with a link to a web page where you can reset your password.

5
Create Template-- Using OMB’s Latest Data
When you log into the apportionment system, you will go to the Create Template tab. You might notice that the tab name is shaded. To go to another tab, just click the tab like you do with other Windows applications. You can use Create Template to make a starting point for your apportionment request: an Excel spreadsheet based on the latest apportionment data in OMB’s database. If a Treasury Appropriation Fund Symbol (TAFS) does not have approved data in the system, follow the procedure described in the Create a Blank Template section of this user guide.

6
Create Template-- Using OMB’s Latest Data Here is some information you will provide when creating a template:
Fiscal Year. You can create a template using data from the current fiscal or the prior fiscal year. When you prepare carry-over requests or your first initial apportionments for the year, you may find it helpful to create a template using the previous year’s data. Agency. You must pick the agency you want to work with. The system automatically fills in the agency name if you work with only one agency. Bureau. You may create a template for all bureaus within an agency, or you may create a template for just one bureau. Treasury Account. You may create a template for a specific Treasury account or for all Treasury accounts in the agency \ bureau you chose. Period of Availability. You may create a template for those TAFSs that have a specific period of availability, e.g. No-Year TAFSs. Template Format. You can choose to create a template that uses either the condensed format (this shows only those lines with amounts) or the expanded format (this shows all lines, whether or not they have amounts. Place Holder Options. If you use the condensed format, you can put in placeholder lines that do not have amounts.

7
Create Template-- Using OMB’s Latest Data
Once you select an agency, you can choose to create a template for the entire agency, or for just one bureau within the agency. In the example above, the system shows all bureaus in the Department of Education. When it comes time to prepare a reapportionment request, there will be many occasions when you just need to work with several TAFSs in a given bureau or operating division. By choosing a specific bureau, you will limit the information that comes back in the Excel spreadsheet.

8
Create Template-- Using OMB’s Latest Data
You can also limit the amount of information you bring back by choosing a single Treasury account and \ or choosing a specific period of availability. In the print screen above, the system would only return data for the College Housing and Academic Facilities Loans Program account.

9
Create Template-- Using OMB’s Latest Data
In this example, the bureau drop-down only provides three bureaus within the Department of Commerce. However, Commerce has many more bureaus than that. The system enables OMB and agency administrators to limit the number of bureaus that a user may work with. It’s up to you (the agency staff) to figure out who should have access to which bureaus within your agency. While the agency Budget Office is always involved in apportionments, we (OMB) encourage agencies to request user IDs for folks in your accounting \ finance offices.

10
Create Template-- Using OMB’s Latest Data
At the end of a fiscal year, you will submit reapportionment requests for no-year and multi-year TAFSs. The purpose of these requests is to provide you with the authority to use the carry-over balance when the next fiscal year begins. These requests do not include budget authority. At the time appropriations pass, you will need to submit a new request that has the new budget authority and reductions (if any). If you create a template using the data from the initial apportionment request, the template will not contain BA or reduction lines. To help you create the most useful template possible, the system allows you to insert place-holders for BA and \ or reduction lines. See the print screen above.

11
Create Template-- Using OMB’s Latest Data
You can choose the expanded format to create a template that has all lines, whether or not a line has an amount. By choosing the condensed format, your template will only include lines that have amounts. [All templates will include lines for BEA Category, reporting categories, and adjustment authority.]

12
Create Template-- Using OMB’s Latest Data
Once you make your selections, click the Create Template button. After you create a template, the system will take you to the View Results tab. Notice in this picture that the tab is shaded. Also notice that the comment column has the name of the agency or bureau that you selected; in this case, a template was created for the Department of Commerce.
13
Create Template-- Using OMB’s Latest Data
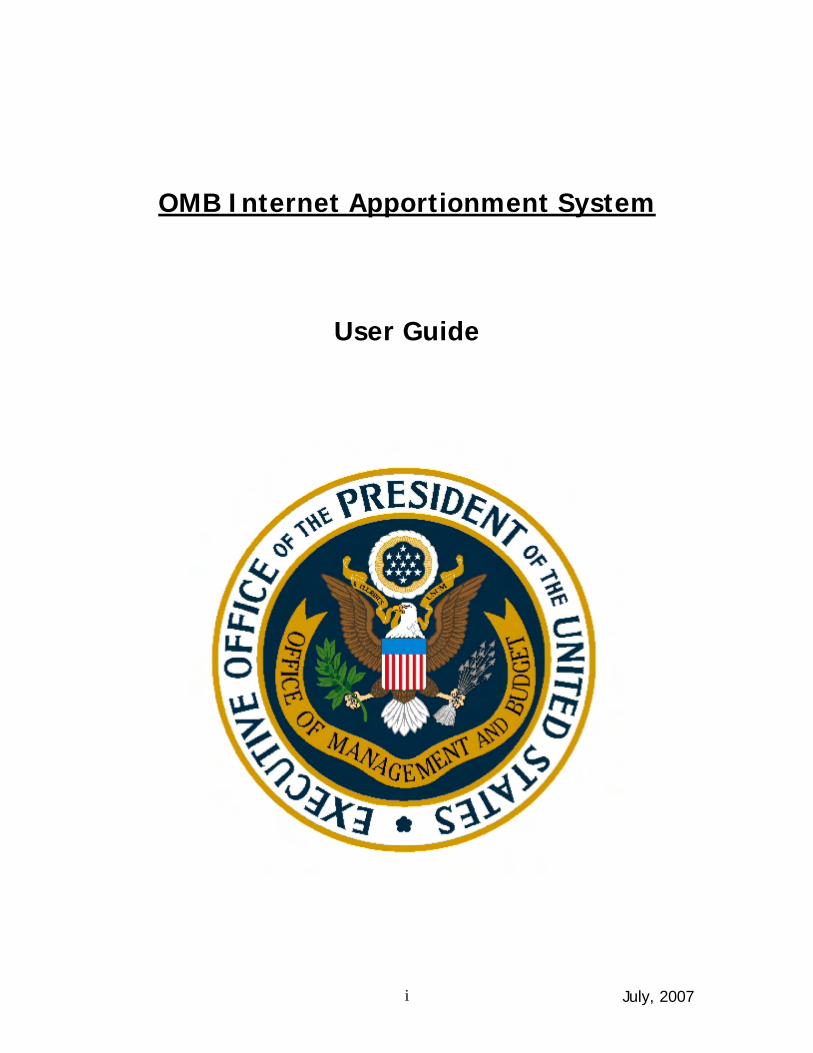
To open the Excel file you just created, click the Get Data link. After clicking the link, you will most likely see a screen that looks like this. Every agency does things differently, so it’s possible the screen will look a little different, and in some agencies you may not see a File Download screen at all.

14
Create Template-- Using OMB’s Latest Data
When you use the create template tab, you create an Excel file with three tabs. The print screen above shows the Request tab from an Excel file created by the system. In addition to the TAFS, line number, line split, line title headings, and hidden columns E and F that show allocation account information, the Request tab has four amount columns: Previous Approved, Agency Request, OMB Action, and Memo Obligations. Here are some things to keep in mind with respect to the amount columns. Source of Previous Approved, Agency Request, OMB Action columns The Excel file has the same amounts for the Previous Approved, Agency Request, and OMB Action columns. These are the latest approved amounts in the system.

15
Create Template-- Using OMB’s Latest Data Formulas in Previous Approved, Agency Request, OMB Action columns The amounts on line 7 use formulas with the Excel SUM function when there are two or more lines that add to Line 7. On Line 12, the system uses the Excel SUM function and an IF formula to make sure that Line 7 equals Line 12. Amounts on lines other than 7 and 12 in the Previous Approved and OMB Action columns are just straight numbers, and do not contain formulas. Amounts on lines other than 7 and 12 in the OMB Action column use an equals formula (e.g. = K31) that points to the Agency Request column.

16
Create A Blank Template
If your TAFS does not have approved data in the apportionment system, you may prefer to create a Blank Template that has no amounts as a starting point to create a request. To do this, you need to uncheck the box at the top right of the Create Template screen that says *Use Latest Data. When using this option, you must select an Agency and Bureau from the list boxes. You must also type in other information, e.g. Treasury Agency, Treasury Account, and period of availability (FY1 and FY2). After you type in the information, click the Create Template button.

17
Validate (Draft) Request
Before you send a request to OMB or forward a request for someone else in your agency to review or send to OMB, you must use the Validate Request tab to make sure that your file adds properly and includes all the required information. When you successfully validate a draft request, the system will create a new file that you will download to your PC or network drive. You will send this new file – the final request – to OMB or elsewhere in your agency. The apportionment system uses about 30 edits to ensure that your numbers add properly, you included all the necessary information, and the file is formatted to work with the system. You can go to the Support/Links page to find a list of the edits.

18
Validate (Draft) Request Here is some information you will provide when validating a request:
Fiscal Year. You normally can only pick a single fiscal year. However, in August and September you can validate a request for the current fiscal year or the following year; this is because you must provide carry-over requests to OMB in late August. File. You will choose a file to validate. The file can reside on your hard disk or on a network drive at your agency. Comment. You can optionally put in a comment when you validate a request. The comment appears on the View Results tab of the system. Validate. You can validate a request, re-validate a request that you already validated, or validate an incremental request. At this time, only one agency uses incremental requests. Previous Approved. You can choose where the previous approved amount comes from when you validate a request. The default is to use the OMB database. You may also take the previous approved column from the file you are validating. Create Tabs. When you validate a request, you can choose to create a new, validated file that uses the expanded format or the condensed format. Briefly, the expanded format includes all lines whether or not they have amounts while the condensed format only includes lines that have amounts. Signature Blocks. You can choose to put a signature block at the end of the Excel file or to put signature blocks at the end of each page in the Excel file.
To validate a Request tab, you need to pick Request tab from the list of Validate options. See the print screen on the previous page. The system allows you to minimize the information you put on the Request tab. Here are two examples that show how.

19
Validate (Draft) Request First, you can create a Request tab using the system’s Create Template option. If you do this, the tab might look like the print screen below where all of the necessary information is filled in.

20
Validate (Draft) Request Second, you can create your own Request tab without using the Create Template portion of the system. For example, you might start out by working from a copy of the last approved apportionment that OMB sent you. Alternately, you might have a “system” that produces a Request tab. Finally, you might want to create the Request tab by hand. You have many options in creating the Request tab that you will validate with the system. The system allows you to prepare a Request tab that has amounts in only the Agency Request column. You do not even need to fill in names for line stubs (e.g. Line 3A1 is appropriation) in many cases. The Request tab is really more of a draft request that the system converts into a final request with all standard line stubs, other formatting such as agency, bureau and account names, and three columns of amounts (Previous Approved, Agency Request, and OMB Action). In the print screen below, note that the only column with amounts is the Agency Request column. So long as you use valid line numbers and line splits and these amounts add properly, the system will validate this file. See Appendix I for a list of the columns you must use in the Request tab, e.g. Column A must be used for the Treasury Agency codes.

21
Validate (Draft) Request When you successfully validate the Request tab, the system creates a new Excel file for you to send to OMB. The file includes a tab, Appor_Req_To_OMB, which you can format in one of two ways.
Condensed. If you choose to create a condensed Appor_Req_To_OMB tab, your validated file will contain only lines with non-zero amounts.
Expanded. If you choose to create an expanded Appor_Req_To_OMB tab, your validated file will contain every line from the SF 132 for each TAFS in your request tab. Even if your Request tab did not contain all of the possible lines on the apportionment, the system automatically puts these lines into the validated Appor_Req_To_OMB tab.
After making your selections, click the Browse button and you will see a screen that looks like the one on the next page.

22
Validate (Draft) Request
The browse button will open a window that looks like this. You can pick a file in the same way you pick files to open from Explorer and many software packages. Once you highlight the file you want, click open. After selecting the file, you can put in a very short comment, which will appear on the View Results tab. Click the Validate Request button.

23
Validate (Draft) Request
After validating the request, the system will take you to the View Results tab. To figure out which file is which, you can look at the column headings on the View Results tab. The headings tell you the kind of activity, date created, status, result, and comment. You can sort the information in these columns by clicking the column header. Once you know what file you want to open, click the Get Data link.
24
Validate (Draft) Request
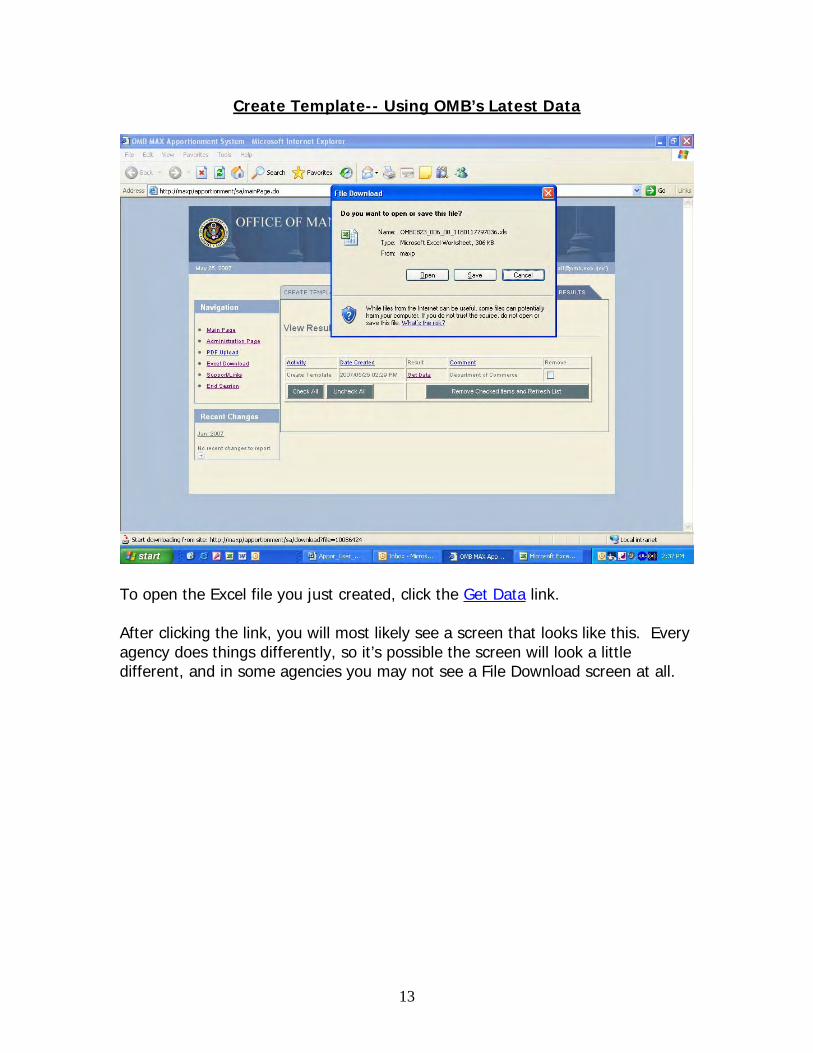
When you successfully validate a file that has a Request tab, you will create a new Excel file that has up to four new tabs. The system also copies any other tabs, such as footnotes, from the request file to the new validated file. The example above shows the expanded format. The format you choose will depend on how your OMB examining division prefers to receive your request. Note that columns A through F are hidden to improve the appearance of the printed file.

25
Validate (Draft) Request
The print screen above uses the condensed format, and only shows lines that have amounts. The print screen on the previous page, by contrast, shows all lines, whether or not they have amounts. Lines 7 and 12 for each TAFS in the Appor_Req_To_OMB tab use Excel SUM statements, and Line 12 also includes an Edit Check that warns you if Line 12 does not equal Line 7. The numbers in the OMB Action column are formulas that point to the cells in the Agency Request column. The system works this way so that if you decide to update the agency request column then the OMB Action column automatically changes.

26
Validate (Draft) Request
Agencies report their first quarter SF 133s to OMB in late January. Once SF 133 data are in OMB’s system, the system will automatically pull the latest SF 133 data into the Apportionment vs. SF 133 Report tab. The print screen above shows what this tab looks like.

27
Validate (Draft) Request
The Transfers tab shows non-expenditure transfers recorded in the Financial Management Service (FMS) GWA System for each TAFS in your request. These data include the debit and credit TAFS for each transaction. FMS provides OMB with updated data each week, typically on Mondays.
28
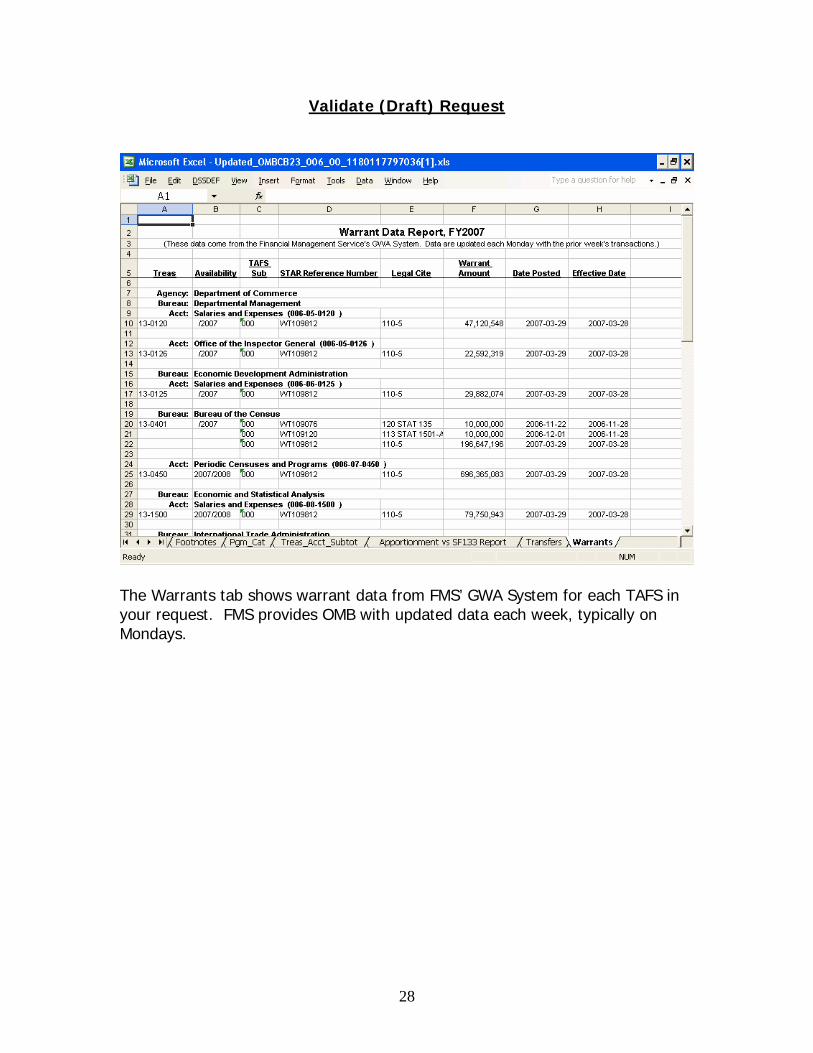
Validate (Draft) Request
The Warrants tab shows warrant data from FMS’ GWA System for each TAFS in your request. FMS provides OMB with updated data each week, typically on Mondays.

29
Validate (Draft) Request
If your request includes two or more periods of availability for the same Treasury account, the Treas_Acct_Subtot tab adds these periods of availability together. You may find this useful in some cases.

30
Validate (Draft) Request
When you validate a request that has errors, the View Results tab will have an entry where the status says, Get Errors. Click the link to see the errors.

31
Validate (Draft) Request
The error messages look like those in the print screen above. The Excel row number refers to the row number in your spreadsheet, and the message tells you what’s wrong. In this particular case, rows 18 and 45 in the Excel file do not have accurate line split information. The idea is that you should be able to use this file to quickly identify and fix any problems in your apportionment request.

32
Formatting and Printing
When you validate a file, the system applies formatting so the apportionment will print in a readable format. The system hides columns A through F, adds the SF 132 header, puts a signature block after the last TAFS, bolds certain rows, uses a portrait orientation, and so on. You can see how the file will print by selecting Print Preview from the File menu.

33
Formatting and Printing
Agencies and OMB examining divisions may change certain elements of the formatting to improve readability. For example, you may find that printing the request in a landscape format improves readability, particularly in cases when the request includes a large number of TAFSs. So long as you abide by the conventions in Appendix I, which describe which data must appear in which column of the Excel file, OMB and the agencies can mutually agree to use different formatting that better serves your needs.
34
Validate Incremental Request
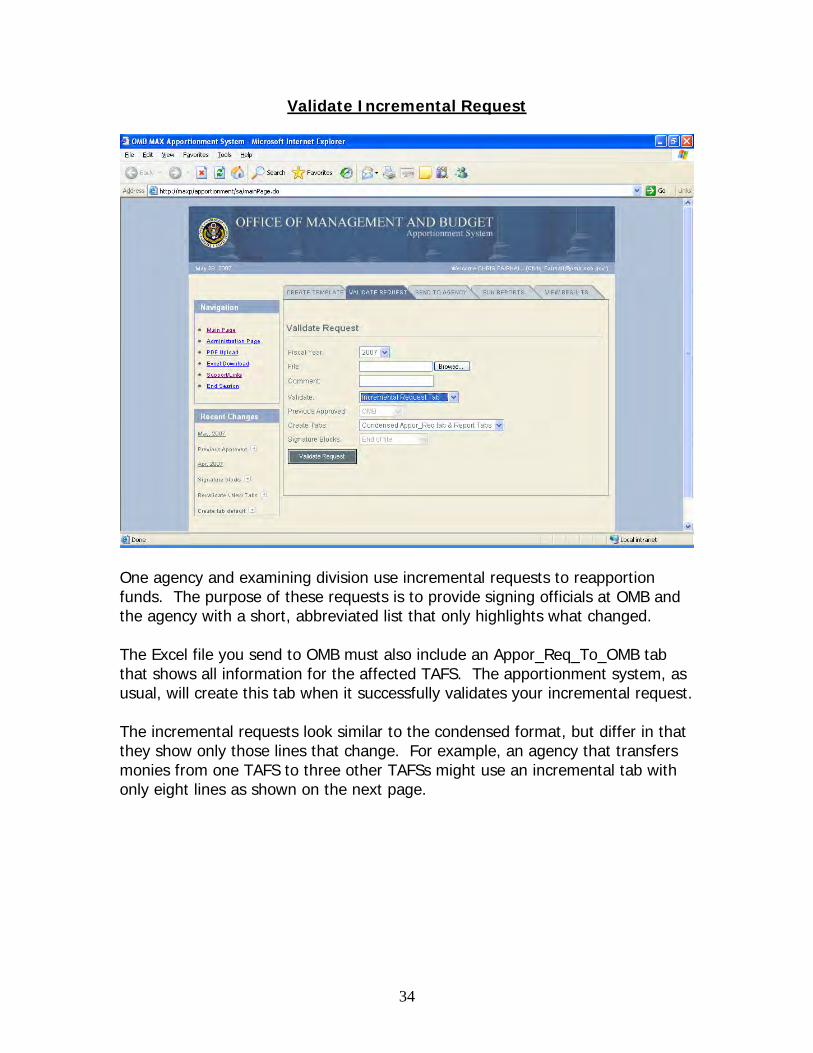
One agency and examining division use incremental requests to reapportion funds. The purpose of these requests is to provide signing officials at OMB and the agency with a short, abbreviated list that only highlights what changed. The Excel file you send to OMB must also include an Appor_Req_To_OMB tab that shows all information for the affected TAFS. The apportionment system, as usual, will create this tab when it successfully validates your incremental request. The incremental requests look similar to the condensed format, but differ in that they show only those lines that change. For example, an agency that transfers monies from one TAFS to three other TAFSs might use an incremental tab with only eight lines as shown on the next page.

35
Validate Incremental Request
As part of validating an incremental request, you will select an Excel file with a tab named Incremental_Req by clicking the Browse button to pull up a list of files on your PC. After selecting the file you want, you click the Validate Request button. If your incremental request passes the edits, the system will create a new Excel file with the following tabs:
Incremental_Req tab, Any other tabs in the Excel file A condensed Appor_Req_To_OMB tab A warrants tab A non-expenditure transfer tab An apportionment vs. SF 133 tab
If your incremental request fails one or more edits, the system will provide you with a list of errors.

36
Re-Validate (Final) Request
If you need to change an apportionment request you already validated, you can re-validate before sending the file to OMB. To re-validate, select your Excel file using the Browse button, and pick the Re-validate Appor_Req Tab option; see the print screen above. You can choose whether to have the system create additional tabs, e.g. the latest apportionment vs. SF 133. If you do not create additional tabs and your file validates successfully, the View Results tab will display a message and contain an entry telling you that the file was successfully revalidated. If you choose to create additional tabs and your file validates successfully, the View Results tab will contain a new Excel file. If your file has errors, you will be able to view your errors just as you can when you validate a file for the first time.
37
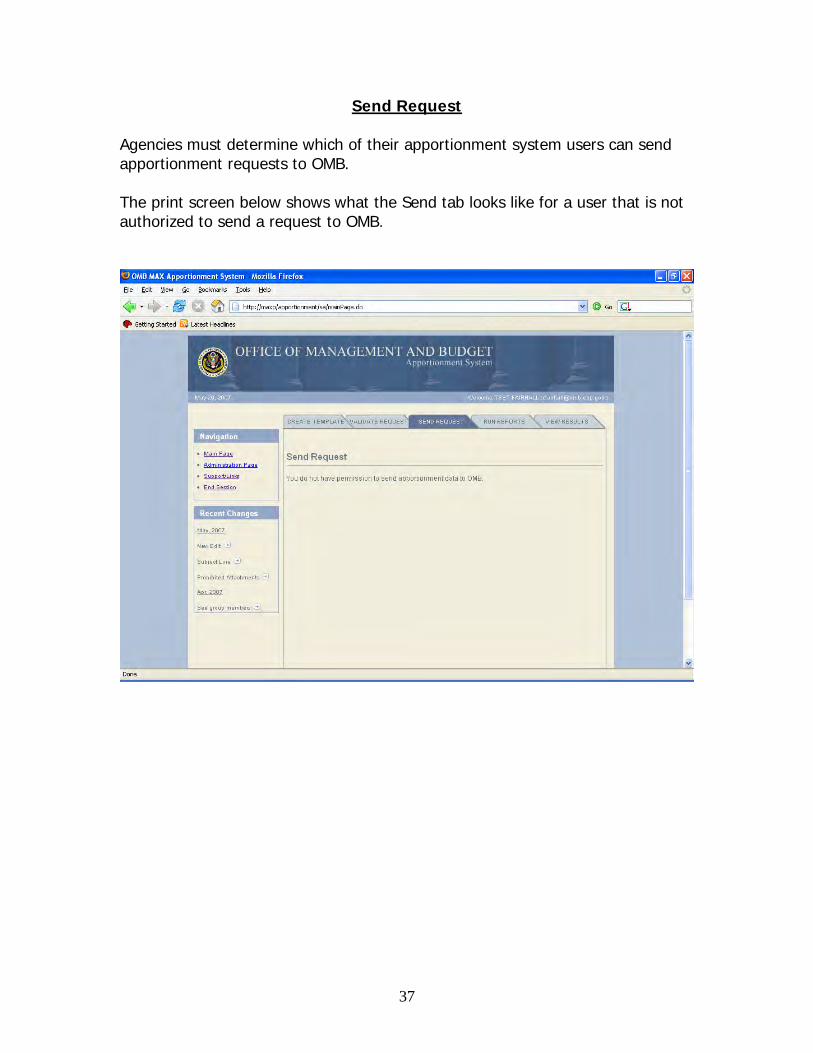
Send Request Agencies must determine which of their apportionment system users can send apportionment requests to OMB. The print screen below shows what the Send tab looks like for a user that is not authorized to send a request to OMB.

38
Send Request The print screen below shows what the Send tab looks like for agency users who can send apportionment requests to OMB
The first thing you do when sending a request to OMB is select the fiscal year of the apportionment. Typically, you can only choose the current fiscal year, but for a 6-7 week period starting in mid August you can send in a request for either the current fiscal year or the following fiscal year. As with the Validate Request tab, you pick the apportionment file you want to send to OMB. You can send up to nine different files at one time. Each time you add a file, the screen will show the file you selected, as well as let you remove a file you picked by accident.

39
In the print screen above, the user selected two files. You can remove either of the files by clicking the Remove button. You may also send up to three attachments. See the print screen on the next page.

40
You should fill out the Subject Line, which will become the subject line in the email that you send to OMB. You should write a message just as you would when sending a regular email. The system puts the message into the body of the email you send.

41
Send Request
If you belong to more than one group you can choose which group to send the request to. You can also highlight the name of a group in the drop-down menu, and click the link that says, Click to see group members. Each group includes OMB and agency users. Sometimes you may want to remove a person from the email if, for example, she or he will be out of the office for a while.

42
Send Request
To remove a person from the request you are about to send, just uncheck the box next to the person’s name. In the print screen above, Seth and Katherine would not receive the email.

43
Run Reports
In the Run Reports tab, you can run the following reports: Approved Apportioned Amounts Approved Apportionment Dates Approved Apportionment vs. SF 133 Warrants Non-Expenditure Transfers Submission \ Approval Dates Accounts Exempt from Apportionment Master Account File
History All Reports Group Members (Email Distribution List) Recent (and not so recent) Changes To run a report, choose a fiscal year, agency, bureau, and report type, and click the Run Report button. The system will take you to the View Results tab, where you can click the Get Data link to save or open your report.

44
Run Reports
As of June 2007, you can run the following reports from the apportionment system. The Approved Apportioned Amounts report shows each TAFS that OMB has approved using the web-based system, the line number, the approved amount, and the upload date. The Approved Apportionment Dates show those TAFSs that OMB approved and uploaded into the system. The report also shows when OMB uploaded the data. The Approved Apportionment vs. SF 133 report shows the approved amounts from the most recent apportionment or re-apportionment as well as the latest SF 133 for each TAFS with an uploaded approved apportionment and SF 133 submitted via FACTS II. The Warrants report shows appropriation warrants posted in STAR, the Federal government's central accounting system administered by the Department of the Treasury's Financial Management Service (FMS). Data are updated weekly. Additional warrants reports are available at:
https://max.omb.gov/maxportal/appropriationsWarrants.do The Non-expenditure Transfers report shows nonexpenditure transfers posted in STAR, the Federal government’s accounting system administered by the Department of the Treasury’s Financial Management Service. Data are updated weekly. Additional nonexpenditure transfer reports are available at:
http://www.whitehouse.gov/omb/reports/transfers/index.html The Submission \ Approval Dates report lists the dates of submitted and approved apportionment requests for each TAFS with an uploaded approved apportionment. Dates for submitted requests are only shown for requests submitted using the internet apportionment system.

45
Run Reports
The Accounts Exempt from Apportionment report shows Treasury Accounts that are exempt from apportionment. The Master Account File report lists all TAFSs having budget execution data, e.g. apportionments, warrants, SF 133s, in a fiscal year. The report shows when the agency last submitted a request, when OMB last approved an apportionment, and information from the SF 133 and other sources. The History report shows summary information (lines and amounts) for each TAFS that OMB has reapportioned at least one time. The All Reports report shows information from all of the reports except group members and Recent Changes. This report can take several minutes to run. The Group Members (Email Distribution List) report shows the name and email address for each member of every group you are in. When you send a request to OMB, or OMB sends back an approved apportionment, every member of the group will receive the email with the attached Excel file. The Recent (and not so recent) Changes report shows a list of all changes made to the apportionment system since about May 2007. You can also see the recent changes by clicking on the Recent Changes tabs in the system.

46
View Results Each time you create a template, validate a request, or run a report, you will create an entry on the results tab. To delete entries that you no longer want, check the box in the Remove column, and click the Remove Checked Items and Refresh button.
OMB will also remove entries that have been on the view results tab for more than two weeks.

47
Navigation Tab
Each major tab in the system – Create Template, Validate Request, Send, Run Reports and View Results – contains a Navigation Tab. Based on the portions of the system you can work with, you may see five selections in the Navigation Tab. Here is what the options in the Navigation tab allow you to do.
Main Page. If you are working in a different section of the apportionment system, e.g. Support/Links, click the Main Page link to return to the Create Template tab. All apportionment users will see this link. Administration Page. Click this link to go to the Administration Page. You will only see this link if you are an administrator. Excel Download. Click this link to go to a page where you can download apportionment requests (Excel files) your agency sent to OMB or that OMB approved and returned to your agency. As of August 2007, all apportionment users will see this link. Support/Links. Click this link to go to a page that has reference materials for the apportionment system. The materials include a user guide and administrator guide, as well as links to other sites. All apportionment users will see this link. End Session. Click this link to end your session and log out of the apportionment system.

48
Recent Change Tabs
Each major tab, e.g. Create Template or Run Reports, in the apportionment system includes a Recent Changes tab. The Recent Changes tab includes a very brief description of any recent changes. Clicking the arrow next to the brief description brings up an additional tab that more fully describes the change.

49
Recent Change Tabs
In the print screen above you will see a description for a new report called the Master Account File.

50
Recent Change Tabs
The system shows different changes based on the tab you are currently working with. The specific changes on the print screen above differ from the changes you see while on the Run Reports tab (see previous page).

51
Appendix I: Format of Excel Spreadsheets This appendix describes what columns and cells you must use in the Request tab. This is particularly important for agencies that create their own Request tabs rather than creating the Request tab using the ‘Create Template’ portion of the system. Required Cell Cell A2 must contain the words: FY 2007 Apportionment For FY 2008 apportionments, you will use: FY 2008 Apportionment Optional Header Row You can include a row with column headers as shown below. The system does not require you to use headers in the Request tab, but you will find that using headers improves readability.

52
Appendix I: Format of Excel Spreadsheets
Required Columns – 2007 Apportionments The system requires that you put certain information, e.g. Treasury agency, line number and line split, in specific columns for each TAFS in the request tab. The information is described in sections 120 and 121 of OMB Circular A-11. The table below shows what information you must put in each column for 2007 Apportionments.
Information Column Required \ Optional Treasury Agency A Required for all rows in TAFS FY1 B Use only for multi-year TAFS FY2 C Required for all rows in TAFS Treasury Account D Required for all rows in TAFS Allocation Account E Use if necessary Allocation Sub Account F Use if necessary Line Number G Required for all rows in TAFS Line Split H Required for reduction lines Bureau Title / Account Title / Line Title / Line Split Title
I Required for Category B stubs, or if you use Line Splits
Previous Approved Amount
J Optional
Agency Request K Required for all rows in TAFS Agency Footnote L Use if necessary OMB Action M Optional OMB Footnote N Use if necessary Memo Obligations O Use if necessary Previously Approved Footnote
P Optional

53
Appendix I: Format of Excel Spreadsheets Required Columns – 2008 Apportionments There is a slight change in the columns you will use for 2008 apportionments. In 2007, you put the previously approved footnote in Column P. In 2008, you will put the previously approved footnote in column K. This change will keep the previous approved amount and previously approved footnote next to each other. The table below shows what information you must put in each column for 2008 Apportionments.
Information Column Required \ Optional Treasury Agency A Required for all rows in TAFS FY1 B Use only for multi-year TAFS FY2 C Required for all rows in TAFS Treasury Account D Required for all rows in TAFS Allocation Account E Use if necessary Allocation Sub Account F Use if necessary Line Number G Required for all rows in TAFS Line Split H Required for reduction lines Bureau Title / Account Title / Line Title / Line Split Title
I Required for Category B stubs, or if you use Line Splits
Previous Approved Amount
J Optional
Previously Approved Footnote
K Optional
Agency Request L Required for all rows in TAFS Agency Footnote M Use if necessary OMB Action N Optional OMB Footnote O Use if necessary Memo Obligations P Use if necessary

54
Appendix I: Format of Excel Spreadsheets
When you successfully validate the Request tab, the system will create a new tab named Appor_Req_To_OMB, as shown in the print screen above. Both tabs use the same format, e.g. Column A has Treasury Agency, and Column K has Agency Request. With three exceptions, the data on the Appor_Req_To_OMB tab comes from the Request tab. Amounts in the OMB Action column, other than the sums on lines 7 and 12, use an equals formula (e.g. = K31) that points to the Agency Request column. Many of the titles and stubs in Column I come from the system. The only exceptions are Category B stubs and lines that use line splits. While the system requires you to place certain information in specific columns, for presentation purposes you may want to hide certain columns. The table below provides suggestions for agencies and their OMB counterparts to consider when printing hard copies of the Appor_Req_To_OMB tab for OMB signature.

55
Appendix I: Format of Excel Spreadsheets
Information Column Consider Hiding Row Treasury Agency A FY1 B FY2 C Treasury Account D Allocation Account E Allocation Sub Account F
You might consider hiding these columns to improve readability. Note on the print screen in the previous page that the TAFS is also displayed in Column I.
Line Number G Line Split H Bureau Title / Account Title / Line Title / Line Split Title
I
You may not hide information in these columns.
Previous Approved Amount
J You may hide this on the initial apportionment requests.
Previously Approved Footnote
K You may hide this on the initial apportionment requests.
Agency Request L Agency Footnote M OMB Action N OMB Footnote O Memo Obligations P
You may not hide information in these columns.

56
Appendix II: Naming Your Files All agencies now prepare their requests in Excel files, and as agencies and OMB examining divisions often need to find one or more of these files from a shared drive, you need to make sure that the Excel files have meaningful names. For example, many files submitted through the web-based apportionment system have names like apportionment_request.xls, secondrequest.xls, carry-over.xls, and so on. By contrast, many other files have meaningful names that include the name of the agency and\or account, and \ or the Treasury Appropriation Fund Symbol (TAFS). In reviewing the names of the files, we have found that agencies using the most meaningful names follow common-sense conventions. This appendix describes those conventions, and strongly recommends that you follow them. Naming Conventions Here are four naming conventions you should follow.
First, include the fiscal year of the request. This is especially important in August and September when you submit both re-apportionments and carry-over requests. Second, include your agency abbreviation, e.g. ED for the Department of Education, DOE for the Department of Energy, SBA for the Small Business Administration, and so on. The reason the agency name is so important is that OMB examining divisions work with a large number of agencies, and having the agency abbreviation in the file name will help OMB find the file more readily. Third, many apportionments include only a single TAFS. For these requests, put the TAFS information into the file name. Fourth, the file name should indicate the revision number. For example, the initial apportionment may include the word Initial. A carry-over request may include the phrase carry-over. The 4th reapportionment request may include the phrase Revis_4.

57
Appendix II: Naming Your Files Here are some sample file names that use these conventions.
FY08_DOE_89-X-0100_CarryOver FY08_DOE_89-X-0100_InitialReq FY08_DOE_89-X-0100_ReApp-2 FY08_DOE_89-X-0100_ReApp-3 FY08_DOE_89-X-0100_ReApp-4 Ag_2008_12-X-4336_003_CarryOver Ag_2008_12-X-4336_003_InitialReq Ag_2008_12-X-4336_003_Revis-2 Ag_2008_12-X-4336_003_Revis-3 Ag_2008_12-X-4336_003_Revis-4
Agreeing on Naming Conventions Reaching agreement on naming conventions can be as difficult as agreeing on what color to paint the living room. ☺ There are lots of conventions that work, but the key thing is to talk with all the parties involved and make sure everyone signs onto the approach. System Naming Conventions When agencies validate a file using the apportionment system, the system will keep the file name you start with and attach the suffix _Updated at the end of the file.