Embed Size (px)
Citation preview
Rugged M
achin
e V
isio
n
Advanced D
igital M
achin
e V
isio
n C
am
era
s
Control Application Installation
Installation, Capture Card, and Application Notes
Version 5.0.1.1 and later
May2017
Control App Notes Page 2
Rugged M
achin
e V
isio
n
Advanced D
igital M
achin
e V
isio
n C
am
era
s
Introduction
The Camera Link specification details the camera communication inter-face using clallserial.dll. This clallserial.dll communicates to the capture card specific clser***.dll’s where *** is the capture card manufacturer unique identifier, per the Camera Link specification. The illunis control app requires the clallserial.dll and installs it to the in-stallation application folder, but also requires the registry to be properly configured and the capture specific dll’s to be in the location specified in the registry.
Document revision:
Prerequisite Software Necessary The user can check the status of these items in the Control Panel -> Pro-grams, and Features listing. If necessary, download and install the fol-lowing prerequisites.
1. .NET Framework 4.5 to be installed from: https://www.microsoft.com/en-us/download/details.aspx?id=30653 2. Visual C++ 2013 Redistributable from: https://www.microsoft.com/en-us/download/details.aspx?id=40784
For Linescan Control App See the baud rate note on page 9
Revision Date Comments
4.0.3.3 1/30/2015 Re-write
5.0.1.1 2/2016 Update
5/2017 Update

Control App Notes Page 3
Per the Camera Link 1.1 Spec All camera control applications connect to clallserial.dll, which dynamically loads the DLL file(s) specific to the frame grabber(s) application references. It then routes all calls to the correct DLL file.
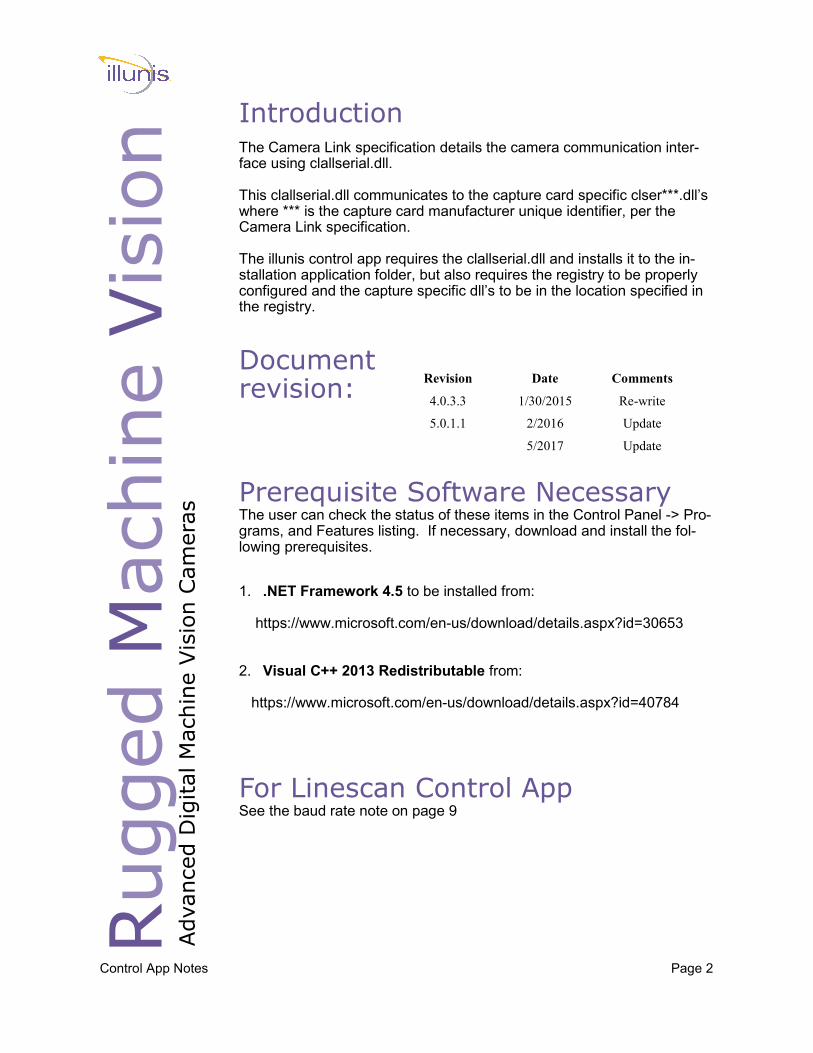
Clallserial.dll is required to be in the illunis control application executable folder. This is done by the illunis control application installer. When clallserial.dll is loaded by the illunis control application - it looks at the Registry entry: HKEY_LOCAL_MACHINE\SOFTWARE\Cameralink CLSERIALPATH. The location pointed to by CLSERIALPATH is typically C:\Cameralink\Serial, BUT could be any path that a capture card install might create. The only important thing is that the capture card communication dll(s), clser***.dll must be at this path location. Clallserial.dll should NOT be in this location.
When the application is run, clallserial.dll dynamically loads from the application directory and queries the manufacturer name and port names individually. It returns a complete system-wide list of Camera Link serial ports to the application. The required manufacturer-specific DLL files are loaded, and clallserial.dll manages to pass the application calls to the appropriate DLL for the port specified by the application. If the user has more than one clser***.dll, the illunis con-trol application will show the list to the user. This allows the user to select the port they would like to connect to. If there is only one clser***.dll the illunis control application will just connect to it.
Illunis camera control app
Clallserial.dll
clserxxx.dll clseryyy.dll clserzzz.dll
Control App Notes Page 4
Registry Setup
Typically, if the capture card communication dll is spec 1.1 compliant, the user will find this directory already created. Any capture card specific dll — named clserxxx.dll MUST be in this directory location in order for the illunis control app to communicate properly. If the capture card communication dll is not spec 1.1 compliant, the illunis control applica-tion will not function. The illunis control app installs clallserial.dll for the appropriate operating system (32 or 64 bit) in the application folder. Depending on the application version, some documentation may be installed in the application folder as well. If the registry entry above does not exist—create it as well as the directory C:\CameraLink\Serial In either case—copy paste and clser***.dll files to C:\CameraLink\Serial
Control App Notes Page 5
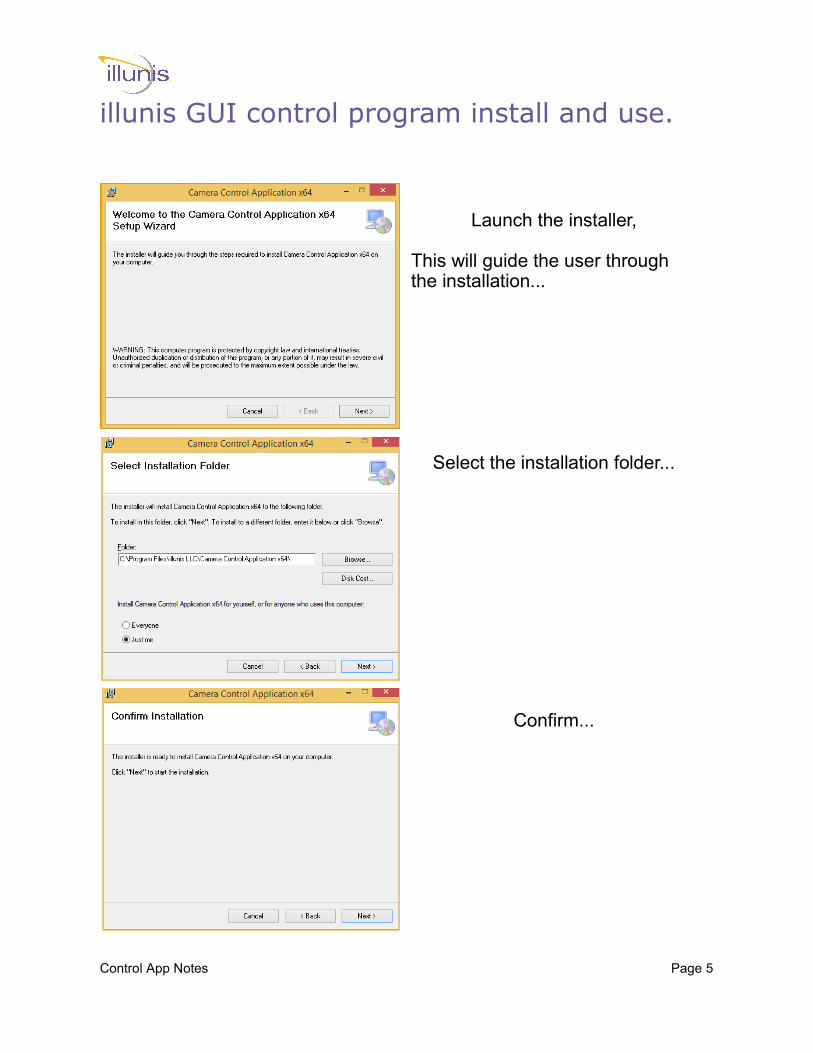
illunis GUI control program install and use.
Launch the installer,
This will guide the user through the installation...
Select the installation folder...
Confirm...
Control App Notes Page 6
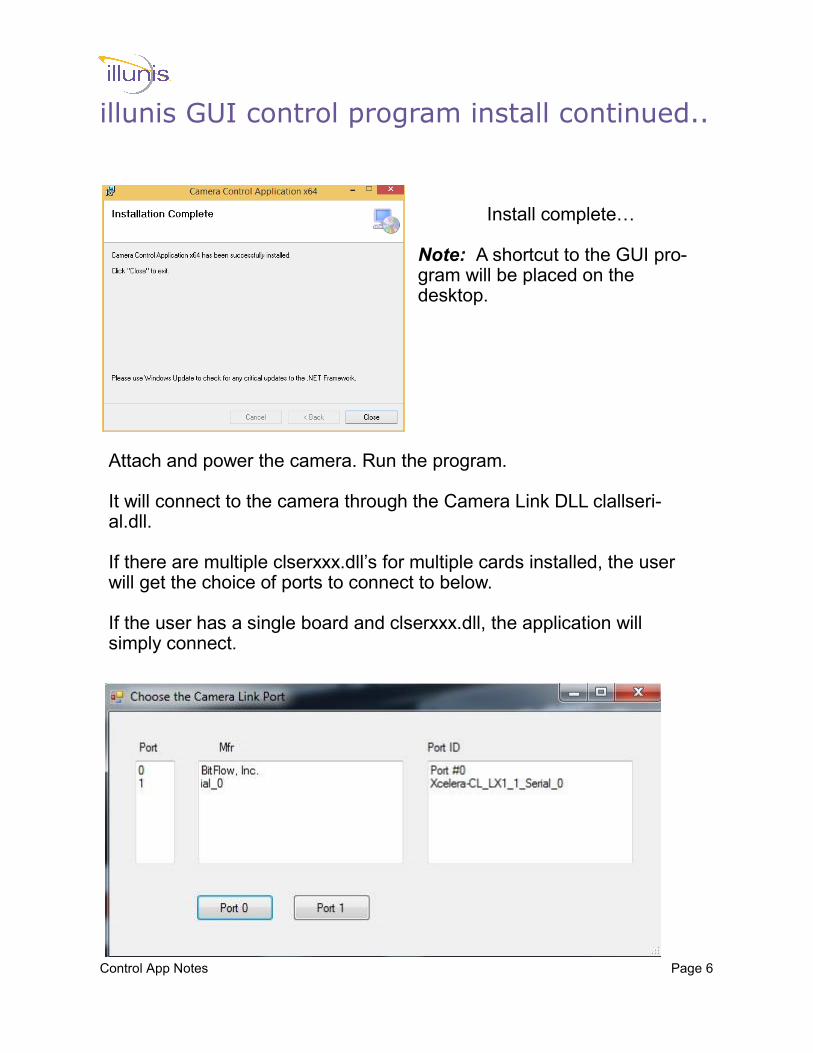
illunis GUI control program install continued..
Install complete…
Note: A shortcut to the GUI pro-gram will be placed on the desktop.
Attach and power the camera. Run the program. It will connect to the camera through the Camera Link DLL clallseri-al.dll. If there are multiple clserxxx.dll’s for multiple cards installed, the user will get the choice of ports to connect to below. If the user has a single board and clserxxx.dll, the application will simply connect.

Control App Notes Page 7
illunis GUI control program continued...
Disabled Menus
By default, sensitive menu items are disabled to prevent inadvertent changes to the camera state. To enable them, a new shortcut has to be created on the desktop. First, delete the desktop shortcut created by the in-staller.
Create a new shortcut
Navigate to the program in-stall directory and right click on the file with the illunis icon and extension .exe. Choose ->Send to -> Desktop. This creates a new desktop shortcut icon.

Control App Notes Page 8
Desktop Shotrcut continued..
Right click on the newly created desktop icon and select Properties.
Add a space and the word expert after the close quote on the Target: line of the dia-log box: .exe” expert Choose OK When the program is launched, the menus will be enabled. Be careful! The user could change items that may re-quire the camera to be re-turned to the factory to be re-stored.
Control App Notes Page 9
illunis GUI control program continued...
General Comments: The control application is designed to allow the user to communicate with the camera until the user application takes over these functions. All buttons and sliders show the command that is executed in the application main window. Also, in the main window there is a generic read and write section allowing the user to send any command that can be found in the manual to the camera and see its response. NOTE: If the user changes a camera mode - the user will have to make the corresponding change in the capture environment as they are independent.
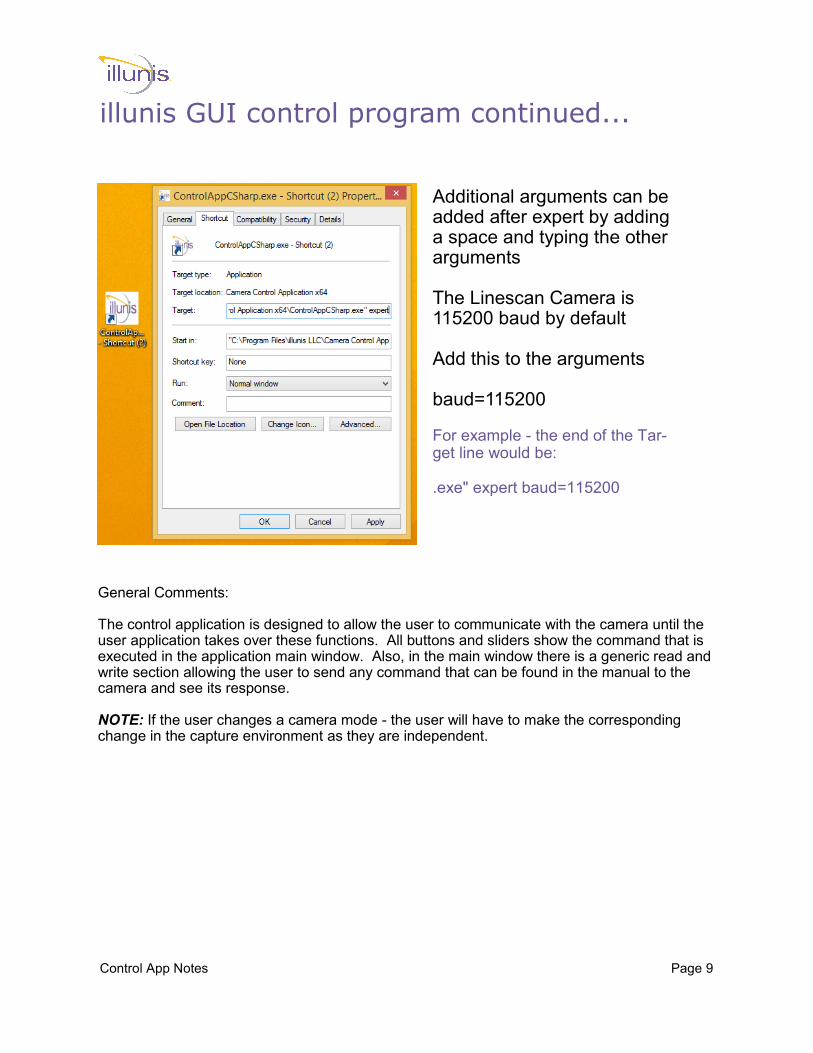
Additional arguments can be added after expert by adding a space and typing the other arguments The Linescan Camera is 115200 baud by default Add this to the arguments baud=115200 For example - the end of the Tar-get line would be: .exe" expert baud=115200