Embed Size (px)
Citation preview
1
OnApp Cloud 2.3 | API Guide | v1.5 | 12th April 2012
v2.3
API Guide
A comprehensive description of API requests with code and output samples.
Document version 1.5 Document release date 12th April 2012 document revisions

2
OnApp Cloud 2.3 | API Guide | v1.5 | 12th April 2012
Contents
1. Introduction ................................................................................................................. 15
1.1 Documentation conventions....................................................................................................... 16
1.2 FAQs ............................................................................................................................................ 16
2. Roles ............................................................................................................................ 18
2.1 Get the list of roles ...................................................................................................................... 18
2.2 Get role details ............................................................................................................................ 19
2.3 Edit a role .................................................................................................................................... 19
2.4 Add a new role ............................................................................................................................ 20
2.5 Delete a role ................................................................................................................................ 20
2.6 Edit a user’s role assignment ...................................................................................................... 21
2.7 Get the list of all permissions ...................................................................................................... 21
3. Billing plans .................................................................................................................. 23
3.1 Get the list of billing plans .......................................................................................................... 24
3.2 Add a billing plan ......................................................................................................................... 25
3.3 Get billing plan details ................................................................................................................ 26
3.4 Edit a billing plan ......................................................................................................................... 26
3.5 Delete a billing plan .................................................................................................................... 27
3.6 View base resources for a billing plan ........................................................................................ 27
3.7 Add base resource limits to a billing plan ................................................................................... 28
3.7.1 Add Virtual Machines base resource limits ........................................................................................... 28
3.7.2 Add other base resource limits .............................................................................................................. 29
3.7.3 Add limits for template groups and hypervisor zones ........................................................................... 30
3.7.4 Add limits for data store zones .............................................................................................................. 31
3.7.5 Add limits for network zones ................................................................................................................. 32
3.7.6 Add limits for edge groups ..................................................................................................................... 33
3.7.7 Add limits for backup server zones ........................................................................................................ 34
3.8 Edit base resources of a billing plan ............................................................................................ 36
3.9 Delete a base resource from a billing plan ................................................................................. 36
3.10 Get CPUs details .......................................................................................................................... 36
3.11 Get CPU Priority details ............................................................................................................... 38

3
OnApp Cloud 2.3 | API Guide | v1.5 | 12th April 2012
3.12 Get memory details .................................................................................................................... 39
3.13 Get disk size details ..................................................................................................................... 40
3.14 Get IP address details .................................................................................................................. 41
3.15 Get VM monit details .................................................................................................................. 43
3.16 Get virtual machine details ......................................................................................................... 44
3.17 Get template details ................................................................................................................... 45
3.18 Get template & backup storage details ...................................................................................... 46
3.19 Get backup details ...................................................................................................................... 47
3.20 Get template groups details ....................................................................................................... 48
3.21 Get hypervisor zones details ....................................................................................................... 49
3.22 Get data store zone details ......................................................................................................... 50
3.23 Get network zone details ............................................................................................................ 52
3.24 Get edge group details ................................................................................................................ 54
3.25 Get backup server zone details ................................................................................................... 55
4. Currencies .................................................................................................................... 57
4.1 Get the list of currencies ............................................................................................................. 57
4.2 Get currency details .................................................................................................................... 58
4.3 Edit currencies............................................................................................................................. 59
4.4 Add a currency ............................................................................................................................ 60
4.5 Delete a currency ........................................................................................................................ 61
5. Users ............................................................................................................................ 62
5.1 Get the list of users ..................................................................................................................... 62
5.2 Get user details ........................................................................................................................... 65
5.3 Create a user ............................................................................................................................... 65
5.4 Edit a user ................................................................................................................................... 66
5.5 Generate API key......................................................................................................................... 67
5.6 Suspend a user ............................................................................................................................ 69
5.7 Activate a user ............................................................................................................................ 69
5.8 Delete a user ............................................................................................................................... 69
5.9 View user’s statistics ................................................................................................................... 70
5.10 View user's statistics for a particular period ............................................................................... 71

4
OnApp Cloud 2.3 | API Guide | v1.5 | 12th April 2012
5.11 View billing statistics for a user .................................................................................................. 74
5.12 See user’s monthly bills .............................................................................................................. 74
5.13 See user’s payments ................................................................................................................... 75
5.14 Add a payment ............................................................................................................................ 75
5.15 Edit a payment ............................................................................................................................ 76
5.16 Delete a payment ........................................................................................................................ 76
5.17 See VMs of a particular user ....................................................................................................... 77
5.18 See user limits ............................................................................................................................. 77
5.19 Hypervisors used by a users’ VMs............................................................................................... 78
5.20 User’s data store zones ............................................................................................................... 79
5.21 User’s network zones .................................................................................................................. 79
6. User additional fields .................................................................................................... 80
6.1 Get the list of additional fields .................................................................................................... 80
6.2 See an additional field details ..................................................................................................... 80
6.3 Create new additional field ......................................................................................................... 81
6.4 Edit additional field ..................................................................................................................... 82
6.5 Delete additional field ................................................................................................................. 82
6.6 Search a user by additional field parameter ............................................................................... 82
7. User groups .................................................................................................................. 84
7.1 Get the list of user groups ........................................................................................................... 84
7.2 Get the user group details .......................................................................................................... 84
7.3 Create a user group ..................................................................................................................... 84
7.4 Edit a user group ......................................................................................................................... 85
7.5 Delete a user group ..................................................................................................................... 85
8. Whitelist IPs ................................................................................................................. 87
8.1 Get the list of whitelist IPs .......................................................................................................... 87
8.2 Get whitelist IPs details ............................................................................................................... 87
8.3 Edit a whitelisted IP..................................................................................................................... 88
8.4 Add a whitelisted IP .................................................................................................................... 88
8.5 Delete a whitelisted IP ................................................................................................................ 89
9. Firewall Rules for VMs .................................................................................................. 90

5
OnApp Cloud 2.3 | API Guide | v1.5 | 12th April 2012
9.1 Get the list of firewall rules ......................................................................................................... 90
9.2 Edit a firewall rule ....................................................................................................................... 91
9.3 Add a firewall rule ....................................................................................................................... 91
9.4 Apply a firewall rule .................................................................................................................... 92
9.5 Delete a firewall rule ................................................................................................................... 93
9.6 Set default firewall rules ............................................................................................................. 93
10. Data store zones ....................................................................................................... 95
10.1 Get the list of data store zones ................................................................................................... 95
10.2 Add a data store zone ................................................................................................................. 95
10.3 Get data store zone details ......................................................................................................... 96
10.4 Edit a data store zone ................................................................................................................. 96
10.5 Delete a data store zone ............................................................................................................. 97
10.6 Get the list of data stores attached to a data store zone ........................................................... 97
10.7 Attach a data store to a data store zone .................................................................................... 99
10.8 Detach a data store from a data store zone ............................................................................... 99
11. Network zones ........................................................................................................ 100
11.1 Get the list of network zones .................................................................................................... 100
11.2 Add a network zone .................................................................................................................. 100
11.3 Get network zone details .......................................................................................................... 101
11.4 Edit a network zone .................................................................................................................. 101
11.5 Delete a network zone .............................................................................................................. 102
11.6 Attach a network to a network zone ........................................................................................ 102
11.7 Remove a network from a network zone ................................................................................. 102
12. Hypervisor zones ..................................................................................................... 104
12.1 Get the list of hypervisor zones ................................................................................................ 104
12.2 Add a hypervisor zone .............................................................................................................. 104
12.3 Get hypervisor zone details ...................................................................................................... 105
12.4 Edit a hypervisor zone ............................................................................................................... 105
12.5 Delete a hypervisor zone .......................................................................................................... 106
12.6 Get the list of hypervisors attached to hypervisor zone ........................................................... 106
12.7 Attach/remove a hypervisor from a hypervisor zone ............................................................... 107

6
OnApp Cloud 2.3 | API Guide | v1.5 | 12th April 2012
12.8 Get the list of data store joins attached to a hypervisor zone ................................................. 107
12.9 Add a data store join to a hypervisor zone ............................................................................... 107
12.10 Remove a data store join from a hypervisor zone ................................................................ 108
12.11 Get the list of network joins attached to this hypervisor zone ............................................ 109
12.12 Attach a new network join to a hypervisor zone .................................................................. 109
12.13 Remove a network join from a hypervisor zone ................................................................... 110
13. Backup server zones ................................................................................................ 111
13.1 Get the list of backup server zones ........................................................................................... 111
13.2 Get backup server zone details ................................................................................................. 111
13.3 Create a backup server zone ..................................................................................................... 112
13.4 Edit a backup server zone ......................................................................................................... 112
13.5 Delete a backup server zone ..................................................................................................... 113
13.6 Get the list of servers assigned to backup server zone ............................................................ 113
13.7 Assign backup server to backup server zone ............................................................................ 114
13.8 Unasign backup server from backup server zone ..................................................................... 115
14. Hypervisors ............................................................................................................. 116
14.1 Get the list of hypervisors ......................................................................................................... 116
14.2 Get the list of unassigned hypervisors ...................................................................................... 117
14.3 Get hypervisor details ............................................................................................................... 118
14.4 Add a new hypervisor ............................................................................................................... 120
14.5 Edit a hypervisor ....................................................................................................................... 121
14.6 Reboot a hypervisor .................................................................................................................. 121
14.7 Get the list of VMs running on the hypervisor ......................................................................... 122
14.8 Get the list of data store joins attached to the hypervisor ....................................................... 122
14.9 Add a data store join to the hypervisor .................................................................................... 123
14.10 Remove a data store join from the hypervisor ..................................................................... 123
14.11 Get the list of network joins of the hypervisor ..................................................................... 124
14.12 Add a network join to the hypervisor ................................................................................... 124
14.13 Remove a network join from the hypervisor ........................................................................ 125
14.14 Delete a hypervisor ............................................................................................................... 125
15. Networks ................................................................................................................ 127

7
OnApp Cloud 2.3 | API Guide | v1.5 | 12th April 2012
15.1 Get the list of networks ............................................................................................................ 127
15.2 Get network details ................................................................................................................... 127
15.3 Edit a network ........................................................................................................................... 128
15.4 Rebuild VM network ................................................................................................................. 129
15.5 Add a network ........................................................................................................................... 129
15.6 Delete a network ....................................................................................................................... 130
16. Network Interfaces.................................................................................................. 131
16.1 Get the list of VM network interfaces ...................................................................................... 131
16.2 Get network interface details ................................................................................................... 132
16.3 Edit a network interface ........................................................................................................... 132
16.4 Add a network interface to a VM .............................................................................................. 132
16.5 Delete a network interface ....................................................................................................... 133
17. IP Addresses ............................................................................................................ 135
17.1 Get the list of network IP addresses ......................................................................................... 135
17.2 Edit an IP address ...................................................................................................................... 136
17.3 Create an IP address record ...................................................................................................... 136
17.4 Delete an IP address ................................................................................................................. 137
18. IP address joins ....................................................................................................... 139
18.1 Get the list of IP address joins................................................................................................... 139
18.2 Assign an IP address join to a VM ............................................................................................. 140
18.3 Delete an IP address join........................................................................................................... 140
19. Data stores .............................................................................................................. 142
19.1 Get the list of data stores.......................................................................................................... 142
19.2 Get data store details ................................................................................................................ 142
19.3 Add a new data store ................................................................................................................ 143
19.4 Edit a data store ........................................................................................................................ 144
19.5 Delete a data store .................................................................................................................... 145
20. Backup servers ........................................................................................................ 146
20.1 Get the list of backup servers ................................................................................................... 146
20.2 Get backup server details ......................................................................................................... 147
20.3 Add new backup server ............................................................................................................. 149

8
OnApp Cloud 2.3 | API Guide | v1.5 | 12th April 2012
20.4 Edit a backup server .................................................................................................................. 150
20.5 Delete a backup server ............................................................................................................. 150
20.6 Search backups ......................................................................................................................... 151
21. Disks ....................................................................................................................... 154
21.1 Get the list of disks .................................................................................................................... 154
21.2 Get the list of VM disks ............................................................................................................. 155
21.3 Add a new disk .......................................................................................................................... 155
21.4 Edit a disk .................................................................................................................................. 156
21.5 Migrate a disk ........................................................................................................................... 156
21.6 Delete a disk .............................................................................................................................. 157
21.7 View disk IOPS ........................................................................................................................... 158
21.8 Build a disk ................................................................................................................................ 158
21.9 Unlock a disk ............................................................................................................................. 159
21.10 Enable autobackups for a disk .............................................................................................. 159
21.11 Disable autobackups for a disk ............................................................................................. 160
21.12 Get the list of schedules for a disk ........................................................................................ 160
21.13 Add a schedule to a disk ....................................................................................................... 161
21.14 Get the list of backups available for a disk ........................................................................... 162
22. Templates ............................................................................................................... 164
22.1 Get the list of system templates ............................................................................................... 164
22.2 Get the list of custom templates (user templates) ................................................................... 165
22.3 Get the template details ........................................................................................................... 165
22.4 Make a template public ............................................................................................................ 167
22.5 Delete a template ..................................................................................................................... 167
23. Template groups ..................................................................................................... 168
23.1 See the list of template groups ................................................................................................. 168
23.2 Get template group details ....................................................................................................... 168
23.3 Edit a template group ............................................................................................................... 169
23.4 Add a template group ............................................................................................................... 170
23.5 Delete a template group ........................................................................................................... 171
23.6 Get the list of templates attached to a group .......................................................................... 171

9
OnApp Cloud 2.3 | API Guide | v1.5 | 12th April 2012
23.7 Attach a template to a group .................................................................................................... 172
23.8 Detach a template from a group .............................................................................................. 172
23.9 Change price for a template in the group ................................................................................. 173
24. Software Licenses .................................................................................................... 174
24.1 Get the list of software licenses ................................................................................................ 174
24.2 Get software license details ...................................................................................................... 175
24.3 Edit a software license .............................................................................................................. 176
24.4 Add a software license .............................................................................................................. 176
24.5 Delete a software license .......................................................................................................... 177
25. Resolvers ................................................................................................................ 178
25.1 Get the list of resolvers ............................................................................................................. 178
25.2 Get resolver details ................................................................................................................... 178
25.3 Edit a resolver ........................................................................................................................... 179
25.4 Add a resolver ........................................................................................................................... 179
25.5 Delete a resolver ....................................................................................................................... 180
26. Virtual Machines ..................................................................................................... 181
26.1 Get the list of VMs .................................................................................................................... 181
26.2 Get VM details .......................................................................................................................... 184
26.3 Create a VM .............................................................................................................................. 184
26.4 Build a VM ................................................................................................................................. 186
26.5 Edit a VM ................................................................................................................................... 187
26.6 Change a VM owner .................................................................................................................. 188
26.7 Reset root password ................................................................................................................. 188
26.8 Set SSH keys .............................................................................................................................. 189
26.9 Migrate a VM ............................................................................................................................ 189
26.10 Set VIP status ........................................................................................................................ 190
26.11 Destroy a VM......................................................................................................................... 190
26.12 Resize a VM ........................................................................................................................... 190
26.13 Suspend a VM ....................................................................................................................... 191
26.14 Unsuspend a VM ................................................................................................................... 192
26.15 Unlock a VM .......................................................................................................................... 192

10
OnApp Cloud 2.3 | API Guide | v1.5 | 12th April 2012
26.16 Start up a VM ........................................................................................................................ 192
26.17 Shut down a VM .................................................................................................................... 193
26.18 Stop a VM .............................................................................................................................. 193
26.19 Reboot a VM ......................................................................................................................... 193
26.20 Reboot in recovery ................................................................................................................ 194
26.21 Segregate a VM ..................................................................................................................... 194
26.22 Open a VM console ............................................................................................................... 195
26.23 Billing statistics for a VM ....................................................................................................... 195
27. VM Autoscaling ....................................................................................................... 198
27.1 Get the list of autoscaling rules for a VM ................................................................................. 198
27.2 Create autoscaling rule for VM ................................................................................................. 199
27.3 Edit autoscaling rule for a VM ................................................................................................... 200
27.4 Delete autoscaling rules ............................................................................................................ 200
28. Load Balancers ........................................................................................................ 201
28.1 Get the list of load balancing clusters ....................................................................................... 201
28.2 Get load balancing cluster details ............................................................................................. 205
28.3 Edit load balancing cluster details ............................................................................................ 206
28.4 Add a load balancing cluster ..................................................................................................... 207
28.5 Add nodes to cluster type ......................................................................................................... 210
28.6 Remove nodes from cluster type .............................................................................................. 211
28.7 Configure autoscaling type ....................................................................................................... 211
28.8 Delete a load balancing cluster ................................................................................................. 213
28.9 Configure load balancing cluster ports ..................................................................................... 213
28.10 Get the list of load balancers ................................................................................................ 214
28.11 Get load balancer details ...................................................................................................... 216
28.12 Edit a load balancer ............................................................................................................... 217
28.13 Start up a load balancer ........................................................................................................ 218
28.14 Stop a load balancer .............................................................................................................. 218
28.15 Shut down a load balancer.................................................................................................... 218
28.16 Unlock a load balancer .......................................................................................................... 219
28.17 Rebuild a load balancer ......................................................................................................... 219
11
OnApp Cloud 2.3 | API Guide | v1.5 | 12th April 2012
28.18 Suspend a load balancer ....................................................................................................... 219
28.19 View load balancer billing statistics ...................................................................................... 220
29. CDN Edge Servers .................................................................................................... 224
29.1 View edge servers ..................................................................................................................... 224
29.2 View edge server details ........................................................................................................... 226
29.3 Create edge server .................................................................................................................... 226
29.4 Edit edge server ........................................................................................................................ 228
29.5 Reboot edge server ................................................................................................................... 228
29.6 Reboot in recovery .................................................................................................................... 229
29.7 Startup edge server ................................................................................................................... 229
29.8 Shut down edge Server ............................................................................................................. 229
29.9 Stop edge server ....................................................................................................................... 230
29.10 Rebuild edge server .............................................................................................................. 230
29.11 Suspend/unsuspend edge server .......................................................................................... 231
29.12 Rerun edge creation scripts .................................................................................................. 231
29.13 Unlock edge server................................................................................................................ 232
29.14 Delete edge server ................................................................................................................ 232
29.15 Migrate edge server .............................................................................................................. 232
29.16 Open the server console ....................................................................................................... 233
29.17 Segregate edge server........................................................................................................... 233
29.18 Reset root password ............................................................................................................. 234
29.19 Change edge server owner ................................................................................................... 234
29.20 Set VIP status ........................................................................................................................ 235
29.21 Edit admin note ..................................................................................................................... 235
29.22 CDN edge server disks ........................................................................................................... 236
29.23 CDN edge server backups ..................................................................................................... 236
29.24 CDN edge server network interfaces .................................................................................... 237
29.25 IP address joins ..................................................................................................................... 237
29.26 Rebuild Network for edge server .......................................................................................... 238
29.27 Firewall rules for CDN edge servers ...................................................................................... 238
29.28 Billing statistics for CDN edge server .................................................................................... 239

12
OnApp Cloud 2.3 | API Guide | v1.5 | 12th April 2012
30. CDN Resources ........................................................................................................ 243
30.1 Enable CDN ............................................................................................................................... 243
30.2 View the list of CDN resources .................................................................................................. 243
30.3 View CDN resource basic details ............................................................................................... 244
30.4 View CDN resource advanced details ....................................................................................... 245
30.5 View the list of available edge groups ...................................................................................... 246
30.6 Create CDN Resource ................................................................................................................ 248
30.7 Create CDN Resource with advanced settings .......................................................................... 248
30.8 Edit CDN resource ..................................................................................................................... 250
30.9 Edit CDN resource advanced settings ....................................................................................... 251
30.10 Prefetch CDN resource content ............................................................................................ 251
30.11 Purge CDN resource content ................................................................................................ 252
30.12 Delete CDN resource ............................................................................................................. 252
30.13 View bandwidth statistics ..................................................................................................... 253
30.14 View billing statistics for a resource ..................................................................................... 254
31. CDN Edge groups ..................................................................................................... 256
31.1 View CDN edge groups .............................................................................................................. 256
31.2 View CDN edge group details.................................................................................................... 256
31.3 Create CDN edge group ............................................................................................................ 259
31.4 Edit CDN edge group ................................................................................................................. 259
31.5 Delete CDN edge group ............................................................................................................ 260
31.6 Assign location to the group ..................................................................................................... 260
31.7 Unassign location from the group ............................................................................................ 261
32. CDN usage statistics ................................................................................................ 262
33. DNS setup ............................................................................................................... 263
33.1 Get DNS domain details ............................................................................................................ 263
33.2 Set up DNS domain ................................................................................................................... 263
33.3 Edit DNS domain ....................................................................................................................... 264
33.4 Get the list of glue records ........................................................................................................ 264
34. DNS zone ................................................................................................................ 266
34.1 Get the list of own DNS zones ................................................................................................... 266

13
OnApp Cloud 2.3 | API Guide | v1.5 | 12th April 2012
34.2 Get the list of users DNS zones ................................................................................................. 266
34.3 Get the domain zone details ..................................................................................................... 267
34.4 Add new DNS zone .................................................................................................................... 268
34.5 Delete DNS zone ....................................................................................................................... 268
34.6 Get the list of name servers ...................................................................................................... 269
34.7 Get the list of DNS Zone Records .............................................................................................. 269
34.8 Get a particular record’s details ................................................................................................ 273
34.9 Create DNS record .................................................................................................................... 274
34.10 Edit DNS records ................................................................................................................... 275
34.11 Delete a record...................................................................................................................... 277
35. Backups .................................................................................................................. 278
35.1 Get the list of VM backups ........................................................................................................ 278
35.2 Create a disk backup ................................................................................................................. 279
35.3 Convert a backup to a template ............................................................................................... 279
35.4 Restore a backup ....................................................................................................................... 280
35.5 Delete a backup ........................................................................................................................ 280
36. Autobackup presets ................................................................................................ 282
36.1 Get the list of autobackup presets ............................................................................................ 282
36.2 Get autobackup preset details .................................................................................................. 283
36.3 Edit an autobackup preset ........................................................................................................ 283
37. Schedules ................................................................................................................ 285
37.1 Get the list of schedules ............................................................................................................ 285
37.2 Get schedule details .................................................................................................................. 286
37.3 Edit a schedule .......................................................................................................................... 287
37.4 Delete a schedule ...................................................................................................................... 288
38. License .................................................................................................................... 289
38.1 Get license details ..................................................................................................................... 289
38.2 Edit license details..................................................................................................................... 289
39. SSH keys .................................................................................................................. 291
39.1 View SSH keys ........................................................................................................................... 291
39.2 Add a SSH key ............................................................................................................................ 291

14
OnApp Cloud 2.3 | API Guide | v1.5 | 12th April 2012
39.3 Edit a SSH key ............................................................................................................................ 292
39.4 Delete a SSH key. ...................................................................................................................... 292
40. Statistics ................................................................................................................. 294
41. Background task daemon ........................................................................................ 296
41.1 Start background task daemon ................................................................................................. 296
41.2 Stop background task daemon ................................................................................................. 296
41.3 Reload background task daemon ............................................................................................. 297
41.4 Get background task daemon status ........................................................................................ 297
42. Transactions ............................................................................................................ 298
42.1 Get the list of transactions ........................................................................................................ 298
42.2 Get the list of a VM’s transactions ............................................................................................ 299
42.3 Get a particular transaction’s details ........................................................................................ 300
43. Logs ........................................................................................................................ 301
43.1 Get the list of log items ............................................................................................................. 301
43.2 Get log item details ................................................................................................................... 301
44. System configuration .............................................................................................. 303
44.1 View system configuration........................................................................................................ 303
45. Version ................................................................................................................... 307
46. Document revisions ................................................................................................. 308

15
OnApp Cloud 2.3 | API Guide | v1.5 | 12th April 2012
1. Introduction The API enables cloud integration with third party applications – for example, a billing application like Ubersmith. You can manage every aspect of your cloud through the API.
• The OnAPP API is RESTful • All function calls respond to xml and JSON requests • All function calls need authentication (Basic HTTP or API key)
To authenticate using HTTP Basic, just use your username/password combination. Curl example:
curl –u user:userpass To authenticate using API key, put your account email as a login and the key to the server as a password.
XML example
curl –u user:userpass -H 'Accept: application/xml' -H 'Content-type: application/xml' http://onapp.test/virtual_machines.xml
JSON example
curl -u [email protected]:88c3d9ecfa2de8497e038cb5a1a5e2ce62ba0e755 -H 'Accept: application/json' -H 'Content-type: application/json' http://onapp.test/users.json
The API returns appropriate HTTP status codes for every request:
200 OK The request completed successfully
201 Scheduled The request has been accepted and scheduled for processing
403 Forbidden The request is correct, but could not be processed.
404 Not Found The requested URL is incorrect or the resource does not exist. For example, if you request to delete a user with ID {5}, but there is no such a user in the cloud, you will get a 404 error.
422 Unprocessable Entity The sent parameters are erroneous.
500 Internal Server Error An error occurred. Please contact support.

16
OnApp Cloud 2.3 | API Guide | v1.5 | 12th April 2012
1.1 Documentation conventions
The table below represents all the existing formatting and naming conventions:
Convention Explanation Example user:userpass stands for username:password
combination
Admin:123456
onapp.test stands for address, where your Control Panel is located
Example.com
:id stands for the resource ID
23
italics all the parameters are italicised
currency_code
*(asterisk) marks the required parameters
label *
monospace indicates request examples in XML or Json
GET /roles.xml
code marks the console request and response examples
curl -i -X DELETE -u user:userpass --url http://onapp.test/roles/:id.xml
emphasis notes, warnings, and other important information
The role for a particular user is output on /users/:id request
1.2 FAQs
Q: Is it possible to enable API access via https?
A: We can enable https for your cloud, which can be used for both WebUI access and API access. Or you can do so yourself: the Apache config file is located at
/etc/httpd/conf.d/onapp.conf
Q: Can you create a VM on behalf of another user?
A: No. It is possible to switch VM owners, however. Refer to Change a VM owner section for details.
Q: How are passwords stored – in plain text?
A: No, passwords are not stored in plain text. Except for a login and password combination, you can use email + API key combination to authorize a user via the API. API keys can be generated and changed

17
OnApp Cloud 2.3 | API Guide | v1.5 | 12th April 2012
easily on a user’s profile page (as well as through the API). For security reasons we recommend users authenticate through the API key, not the login and password.
Q: Which parameters are required, and which are optional?
A: Required parameters are marked in this guide with an asterisk (*)

18
OnApp Cloud 2.3 | API Guide | v1.5 | 12th April 2012
2. Roles This class manages roles assigned to users. A role itself maintains a set of permissions that gives an access to cloud resources and control panel functionality. You can easily regulate roles (and users in turn) using view/edit/delete options.
2.1 Get the list of roles
This method gets the list of all the roles available in the system:
GET /roles.xml GET /roles.json
XML Output example
<?xml version="1.0" encoding="UTF-8"?> <roles> <role> <label>Administrator</label> <created_at>2010-05-26T13:34:58Z</created_at> <updated_at>2010-07-18T21:16:14Z</updated_at> <id>1</id> <identifier>admin</identifier> <permissions> <permission> <label>Any action on virtual machines</label> <created_at>2010-05-26T13:34:58Z</created_at> <updated_at>2010-05-26T13:34:58Z</updated_at> <id>1</id> <identifier>virtual_machines</identifier> </permission>
... <permission></permission> </permissions> </role> </roles>
Where: roles – an array of all roles with their details and assigned permissions label – role title created_at – the date in the [YYYY][MM][DD]T[hh][mm][ss]Z format updated_at – the date when the role was updated in the [YYYY][MM][DD]T[hh][mm][ss]Z format id – role ID identifier – role identifier permissions – an array with all the permissions assigned to this role, where:
• label – permission tytel (permission on an action) • created_at – time in [YYYY][MM][DD]T[hh][mm][ss]Z format • updated_at – time in [YYYY][MM][DD]T[hh][mm][ss]Z format

19
OnApp Cloud 2.3 | API Guide | v1.5 | 12th April 2012
• id – permission ID • identifier – permission identifier
2.2 Get role details
This method will output the details for a particular user role.
GET /roles/:id.xml GET /roles/:id.json XML Output example
<?xml version="1.0" encoding="UTF-8"?> <role> <label>TT</label> <created_at type="datetime">2011-02-11T11:20:00Z</created_at> <updated_at type="datetime">2011-02-11T13:56:44Z</updated_at> <id type="integer">3</id> <identifier>gkue74amkiznb7</identifier> <permissions type="array"> <permission> <label>Any action Sysadmin Tools</label> <created_at type="datetime">2011-02-11T10:35:16Z</created_at> <updated_at type="datetime">2011-02-11T10:35:16Z</updated_at> <id type="integer">4</id> <identifier>sysadmin_tools.read</identifier> </permission> </permissions> </role>
For details refer Get the list of roles section
The role for a particular user is output on /users/:id request
2.3 Edit a role
Use the Put method to edit a role:
PUT /roles/:id.xml PUT /roles/:id.json
XML Request example
curl -i -X PUT -u user:userpass -H 'Accept: application/xml' -H 'Content-type: application/xml' -d '<role><label>changed</label><permission_ids type="array"><permissions_id>12</permissions_id><permissions_id>14</permissions_id><permissions_id>6</permissions_id><permissions_id>1</permissions_id></permission_ids></role>' --url http://onapp.test/roles/:id.xml
JSON Request example

20
OnApp Cloud 2.3 | API Guide | v1.5 | 12th April 2012
curl -i -X PUT -u user:userpass -H 'Accept: application/json' -H 'Content-type: application/json' -d '{"role":{"label":"jsonchanged","permission_ids":[1,2,3,4,5,6,7,8,9]}}' --url http://onapp.test/roles/:id.json
Where you can change:
label – role title
permission_ids – ID of permissions, which you want to assign to this role
2.4 Add a new role POST /roles.xml POST /roles.json
XML Request example
curl -i -X POST -u user:userpass -H 'Accept: application/xml' -H 'Content-type: application/xml' -d '<role><label>New_role_xml</label><permission_ids type="array"><permission_id>12</permission--_id><permission_id>14</permission--_id><permission_id>16</permission_id><permission_id>11</permission_id><permission_id>10</permission_id><permission_id>35</permission_id></permission_ids></role>' --url http://onapp.test/roles.xml
JSON Request example
curl -i -X POST -u user:userpass -H 'Accept: application/json' -H 'Content-type: application/json' -d '{"role":{"label":"New_role_json","permission_ids":[12,14,16,11,10,35]}}' --url http://onapp.test/roles.json
The following parameters should be sent:
label * the new role label (required) permission-id the ID of the permission you would like to assign to this
role (optional)
2.5 Delete a role
Use the following method to delete a user role:
DELETE /roles/:id.xml DELETE /roles/:id.json
XML Request example
curl -i -X DELETE -u user:userpass --url http://onapp.test/roles/:id.xml

21
OnApp Cloud 2.3 | API Guide | v1.5 | 12th April 2012
JSON Request example
curl -i -X DELETE -u user:userpass --url http://onapp.test/roles/:id.json
This returns an HTTP 200 response if the role is deleted, or HTTP 404 if the user with the specified ID isn’t found.
2.6 Edit a user’s role assignment
To change a role, assigned to the user, add new role (or set of roles), use this request:
PUT /users/:id.xml PUT /users/:id.json XML Request example
curl -i -X PUT -u user:userpass -H 'Accept: application/xml' -H 'Content-type: application/xml' -d '<user><role_ids>3</role_ids><role_ids>1</role_ids></user>' --url http://onapp.test/users/:id.xml
JSON Request example
curl -i -X PUT -u user:userpass -H 'Accept: application/json' -H 'Content-type: application/json' -d '{"user":{role_ids:[“3”,”1”]}}' --url http://onapp.test/users/:id.json
Where:
role_ids – ID of role(s) you want to assign to the user
This returns an HTTP 200 response if roles are changed, or HTTP 404 if the specified role ID isn’t found.
2.7 Get the list of all permissions
To get the list of all available permissions, use the following request:
GET /permissions.xml GET /permissions.json
Output example

22
OnApp Cloud 2.3 | API Guide | v1.5 | 12th April 2012
<?xml version="1.0" encoding="UTF-8"?> <permissions> <permission> <label>Any action on virtual machines</label> <created_at>2010-05-26T13:34:58Z</created_at> <updated_at>2010-05-26T13:34:58Z</updated_at> <id>1</id> <identifier>virtual_machines</identifier> </permission> ... <permission></permission> ... </permissions>
Where:
label – permission title (permission on an action) created_at – time in [YYYY][MM][DD]T[hh][mm][ss]Z format updated_at – time in [YYYY][MM][DD]T[hh][mm][ss]Z format id – permission ID identifier – permission identifier

23
OnApp Cloud 2.3 | API Guide | v1.5 | 12th April 2012
3. Billing plans This class manages billing plans, which incorporate prices and resource limits for users. Billing plans can be associated with hypervisor, network and data store zones, as well as template groups. Consequently, these plans enable you to control overall user resource limits, and limits for resources in different zones of the cloud.
To manage billing plans and their resources for a particular user, specify the request by a user_id parameter, e.g: GET /users/:user_id/billing_plans/:billing_plan_id/base_resources.xml
These are the resources you can limit and set prices for, along with the units in which they are measured:
Virtual Machine resources Unit
CPU CPU core/hour
CPU Priority CPU priority/hour
Disk Size GB/hour
Memory Mb/hour
IP Address IP/hour
Virtual Machine VM/hour
Template & Backup Storage GB/hour
Data store zone resources
Disk size GB/hour
Data read Gb/per Gb
Data written Gb/per Gb
Input requests per request
Output requests per request

24
OnApp Cloud 2.3 | API Guide | v1.5 | 12th April 2012
Network zone resources
IP Address IP
Port Speed MB/hour
Data received Gb/per Gb
Data sent Gb/per Gb
3.1 Get the list of billing plans
To get the list of billing plans created in your cloud, use the following method: GET /billing_plans.xml GET /billing_plans.json
XML Output example
<?xml version="1.0" encoding="UTF-8"?> <billing_plans type="array"> <billing_plan> <label>default billing</label> <created_at type="datetime">2011-02-11T12:35:17+02:00</created_at> <base_resources type="array"> <base_resource> <created_at type="datetime">2011-02-14T16:11:51+02:00</created_at> <limits> <limit_free>4</limit_free> <limit>12</limit> </limits> <updated_at type="datetime">2011-02-14T16:11:51+02:00</updated_at> <billing_plan_id type="integer">1</billing_plan_id> <id type="integer">14</id> <unit nil="true"></unit> <label>CPU</label> <resource_name>cpu</resource_name> <prices> <price_on>5.000000</price_on> <price_off>2.000000</price_off> </prices> </base_resource> <updated_at type="datetime">2011-03-19T10:13:33+02:00</updated_at> <monthly_price type="decimal">20.0</monthly_price> <id type="integer">103</id> <show_price type="boolean">true</show_price> <currency_code>USD</currency_code> </billing_plan> </billing_plans>

25
OnApp Cloud 2.3 | API Guide | v1.5 | 12th April 2012
Explanation of the data returned:
Label the billing plan name created_at the date in the [YYYY][MM][DD]T[hh][mm][ss]Z format updated_at the date when the billing plan was updated in the
[YYYY][MM][DD]T[hh][mm][ss]Z format Id the billing type ID base_resources an array o resource limits and prices for the resources included into this
plan currency_code the currency that users are charged in within this billing plan show_price true if users can see the prices set up for them, otherwise false. monthly_price monthly fee for this billing plan
3.2 Add a billing plan
To add a new billing plan:
POST /billing_plans.xml POST /billing_plans.json
XML Request example
curl -i -X POST http://onapp.test/billing_plans.xml -d ‘<billing_plan><label>billing_label</label><currency_code></currency_code><monthly_price>10</monthly_price></billing_plan>’ -u user:userpass -H 'Accept: application/xml' -H 'Content-type: application/xml'
JSON request example
curl -i -X POST http://onapp.test/billing_plans.json -d ‘{billing_plan:{label:”billing_label”,currency_code:””,monthly_price:”10”}}’ -u user:userpass -H 'Accept: application/json' -H 'Content-type: application/json'
The following parameters should be sent:
label * the billing plan name currency_code the currency that users will be charged in within this billing
plan. Optional, if none specified USD will be applied monthly_price * Set monthly fee for plan usage.

26
OnApp Cloud 2.3 | API Guide | v1.5 | 12th April 2012
Response example:
{"billing_plan":{"label":"billing label","created_at":"2011-04-19T14:01:34+03:00","updated_at":"2011-04-19T14:01:34+03:00","base_resources":[],"id":105,"monthly_price":"10","currency_code":"","show_price":null}}
3.3 Get billing plan details
This method outputs the details for a particular billing plan:
GET /billing_plans/:id.xml GET /billing_plans/:id.json
Output example
<?xml version="1.0" encoding="UTF-8"?> <billing_plan> <label>user33</label> <created_at type="datetime">2011-01-14T14:06:45Z</created_at> <updated_at type="datetime">2011-01-14T16:15:16Z</updated_at> <id type="integer">13</id> <currency_code>EUR</currency_code> <show_price type="boolean">false</show_price> </billing_plan>
Explanation of the data returned:
label the billing plan name created_at the date in the [YYYY][MM][DD]T[hh][mm][ss]Z
format updated_at the date when the billing plan was updated in the
[YYYY][MM][DD]T[hh][mm][ss]Z format
id the billing type ID currency_code the currency that users are charged in within this
billing plan show_price True, if users can see the prices set up for them,
otherwise false.
3.4 Edit a billing plan
To edit an existing plan:
PUT /billing_plans/:id.xml PUT /billing_plans/:id.json
XML Request example
27
OnApp Cloud 2.3 | API Guide | v1.5 | 12th April 2012
curl -i -X PUT http://onapp.test/billing_plans/:billing_plan_id.xml -d ‘<billing_plan><label>new_label</label><currency_code></currency_code><monthly_price>10</monthly_price></billing_plan>’ -u user:userpass -H 'Accept: application/xml' -H 'Content-type: application/xml'
JSON Request example
curl -i -X PUT http://onapp.test/billing_plans/:billing_plan_id.json -d ‘{billing_plan:{label:”new_label”,currency_code:””,monthly_price:”10”}}’ -u user:userpass -H 'Accept: application/json' -H 'Content-type: application/json'
With this method you can edit the following parameters:
label the desired billing plan name
currency_code the code of the currency you're going to charge in. Currently, you can choose between USD, EUR or GBP.
show_price Specify if users can see plan prices
3.5 Delete a billing plan
To delete a billing plan:
DELETE /billing_plans/:id.xml DELETE /billing_plans/:id.json
XML Request example
curl -i -X DELETE http://onapp.test/billing_plans/:billing_plan_id.xml -u user:userpass -H 'Accept: application/xml' -H 'Content-type: application/xml'
JSON Request example
curl -i -X DELETE http://onapp.test/billing_plans/billing_plan_id.json -u user:userpass -H 'Accept: application/json' -H 'Content-type: application/json'
Returns HTTP 200 response on successful processing, and HTTP 404 when there is no billing plan with a requested ID, or URL is incorrect.
3.6 View base resources for a billing plan
To view which base resources were added to a particular billing plan, use the following method:
GET /billing_plans/:billing_plan_id/base_resources.xml GET /billing_plans/:billing_plan_id/base_resources.json
28
OnApp Cloud 2.3 | API Guide | v1.5 | 12th April 2012
This API call returns only those base resources (and their details), which are assigned to this billing plan. See the following sections to learn more about base resources and their details.
3.7 Add base resource limits to a billing plan
To add base resources to the billing plan, use the following request: POST /billing_plans/:billing_plan_id/base_resources.xml POST /billing_plans/:billing_plan_id/base_resources.json
Base resources can be priced differently: some may have different prices, depending whether VM is on or off (Virtual Machines base resource limits); some of the resources are charged per unit, regardless if they are on or off (Other base resource limits); another type of resource serves only as a limit to the billing plan, without any charges (Template groups limits, Hypervisor zone limits). See below for examples of each.
3.7.1 Add Virtual Machines base resource limits
XML Request example
curl -i -X POST http://onapp.test/billing_plans/:billing_plan_id/base_resources.xml -d '<base_resource><resource_class>Resource::[resource_name]</resource_class><billing_plan_id>21</billing_plan_id><limit>30</limit><limit_free>10</limit_free><prices><price_on>10</price_on><price_off>5</price_off></prices></base_resource>' -u user:userpass -H 'Accept: application/xml' -H 'Content-type: application/xml'
JSON Request example
curl -i -X POST http://onapp.test/billing_plans/:billing_plan_id/base_resources.json - d'{"base_resource":{"resource_class":"Resource::[resource_name]","billing_plan_id":"21","limits":{"limit":"30","limit_free":"10"},"prices":{"price_on":"10","price_off":"5"}}}' -u user:userpass -H 'Accept: application/json' -H 'Content-type: application/json' Parameters: resource_class * - the name of the base resource you add to the billing plan in the following format: Resource:[resource_name], where [resource_name] can be:
[resource_name] UI Label
Cpu CPU limit Cpu_share CPU priority limit Memory Memory limit Disk_size Disk Size limit Ip_address IP Address limit

29
OnApp Cloud 2.3 | API Guide | v1.5 | 12th April 2012
id * - the ID of the billing plan. You have to send it, even though it is in the URL address
limit - sets maximum amount of units of the resource
limit_free - amount of units which are given for free
price_on - price, when the VM is on
price_off - price, when the VM is off
3.7.2 Add other base resource limits
XML Request example
curl -i -X POST http://onapp.test/billing_plans/:billing_plan_id/base_resources.xml -d '<base_resource><resource_class>Resource::[resource_name]</resource_class><billing_plan_id>21</billing_plan_id><limit>30</limit><limit_free>10</limit_free><prices><price>10</price></prices></base_resource>' -u user:userpass -H 'Accept: application/xml' -H 'Content-type: application/xml'
JSON Request example
curl -i -X POST http://onapp.test/billing_plans/:billing_plan_id/base_resources.json -d'{"base_resource":{"resource_class":"Resource::[resource_name]","billing_plan_id":"21","limits":{"limit":"30","limit_free":"10"},"prices":{"price":"10"}}}' -u user:userpass -H 'Accept: application/json' -H 'Content-type: application/json' Parameters: resource_class * - the name of the base resource you add to the billing plan in the following format: Resource:[resource_name], where [resource_name] can be:
[resource_name] UI Label
Vm_monit Monit limit Vm_limit Virtual Machine limit Template Template limit Storage_disk_size Templates & Backups Storage limit Backup Backups limit
id * - the ID of the billing plan. You have to send it, even though it is in the URL address
limit - sets maximum amount of units of the resource
limit_free - amount of units which are given for free
price – price per unit

30
OnApp Cloud 2.3 | API Guide | v1.5 | 12th April 2012
3.7.3 Add limits for template groups and hypervisor zones
XML Request example
curl -i -X POST -u user:userpass -H'Content-type: application/xml' -H'Accept: application/xml' http://onapp.test/billing_plans/21/base_resources.xml -d'<base_resource><resource_class>Resource::[resource_name]</resource_class><billing_plan_id>21</billing_plan_id><target_id>22</target_id><target_type>[target_type]</target_type></base_resource>'
JSON Request example
curl -i -X POST -u user:userpass -H'Content-type: application/json' -H'Accept: application/json' http://onapp.test/billing_plans/21/base_resources.json -d'{"base_resource":{"resource_class":"Resource::[resource_name]","billing_plan_id":"21","target_id":"22","target_type":"[target_type]"}}'
Parameters: resource_class * -the name of the base resource you add to the billing plan in the following format: Resource:[resource_name], where [resource_name] can be:
[resource_name] UI Label
TemplateGroup Limits for Template Groups HypervisorGroup Limits for Hypervisor Zones
id * -the ID of the billing plan. You have to send it, even though it is in the URL address
target_type* - the type of the group you add to the billing plan limits:
[target_type] UI Label
ImageTemplateGroup Limits for Template Groups
HypervisorGroup Limits for Hypervisor Zones
target_id* - the ID of the group (or zone) you add to billing plan limits
Check the ID of the necessary group (zone) with following calls: GET /settings/image_template_groups.xml(json) GET /settings/hypervisor_zones.xml(json)

31
OnApp Cloud 2.3 | API Guide | v1.5 | 12th April 2012
3.7.4 Add limits for data store zones
By adding data store zone resources to a billing plan, you limit the user only to the data stores in that zone.
XML Request example
curl -i -X POST -u uesr:userpass -H'Content-type: application/xml' -H'Accept: application/xml' http://onapp.test/billing_plans/:billing_plan_id/base_resources.xml d'<base_resource><resource_class>Resource::DataStoreGroup</resource_class><billing_plan_id>41</billing_plan_id><target_id>56</target_id><target_type>DataStoreGroup</target_type><limits><limit_free>1</limit_free><limit>20</limit><limit_reads_completed_free>2</limit_reads_completed_free><limit_data_written_free>3</limit_data_written_free><limit_data_read_free>4</limit_data_read_free><limit_writes_completed_free>5</limit_writes_completed_free></limits><prices><price_data_written>6</price_data_written><price_off>7</price_off><price_on>8</price_on><price_data_read>9</price_data_read><price_writes_completed>10</price_writes_completed><price_reads_completed>11</price_reads_completed></prices><limit_type>hourly</limit_type></base_resource>'
JSON Request example
curl -i -X POST -u user:userpass -H'Content-type: application/json' -H'Accept: application/json' http://onapp.test/billing_plans/:billing_plan_id/base_resources.json -d'{"base_resource":{"resource_class":"Resource::DataStoreGroup","billing_plan_id":"41","target_id":"56","target_type":"DataStoreGroup","limits":{"limit_free":"1","limit":"20","limit_reads_completed_free":"2","limit_data_written_free":"3","limit_data_read_free":"4","limit_writes_completed_free":"5"},"limit_type":"hourly","prices":{"price_data_written":"6","price_off":"7","price_on":"8","price_data_read":"9","price_writes_completed":"10","price_reads_completed":"11"}}}'
Where:
resource_class * -the name of the base resource you add to the billing plan in the following format: Resource::[DataStoreGroup]
billing_plan_id * - the ID of the billing plan. You have to send it, even though it is in the URL address
target_type * - the type of the group you add to the billing plan limits: [DataStoreGroup]
target_id * - the ID of the group (or zone) you add to billing plan limits
Check the ID of the necessary data store zone with GET /data_store_zones.xml.xml(json) call.
limit_free – free disk space on data store zone
limit – maximum available disk space
limit_type – limit type set for the resource; can be hourly or monthly
limit_data_written_free - the amount of data users get for free for write operations (in GB)

32
OnApp Cloud 2.3 | API Guide | v1.5 | 12th April 2012
limit_data_read_free - the amount of data users get for free for read operations (in GB)
limit_reads_completed_free - the maximum number (in millions) of Input requests which can happen at once
limit_writes_completed_free - the maximum number (in millions) of Output requests which can happen at once
price_data_read – price per GB of data for read operations
price_data_written - price per GB of data for write operations
price_on – price per GB of disk size, when VM is on
price_off - price per GB of disk size, when VM is off
price_writes_completed – price per million of Output requests which can happen at once
price_reads_completed - price per million of Input requests which can happen at once
3.7.5 Add limits for network zones
By adding network zone resources to a billing plan, you limit the user only to the network(s) in that zone.
XML Request example
curl -i -X POST -u user:userpass -H'Content-type: application/xml' -H'Accept: application/xml' http://onapp.test/billing_plans/:billing_plan_id/base_resources.xml -d'<base_resource><resource_class>Resource::NetworkGroup</resource_class><billing_plan_id>41</billing_plan_id><target_id>33</target_id><target_type>NetworkGroup</target_type><limits><limit_ip>20</limit_ip><limit_rate>20</limit_rate><limit_data_sent_free>1</limit_data_sent_free><limit_rate_free>2</limit_rate_free><limit_ip_free>3</limit_ip_free><limit_data_received_free>4</limit_data_received_free></limits><prices><price_ip_off>6</price_ip_off><price_ip_on>2</price_ip_on><price_rate_off>3</price_rate_off><price_rate_on>4</price_rate_on><price_data_sent>5</price_data_sent><price_data_received>6</price_data_received></prices><limit_type>hourly</limit_type></base_resource>'
JSON Request example
curl -i -X POST -u user:userpass -H'Content-type: application/json' -H'Accept: application/json' http://onapp.test/billing_plans/:billing_plan_id/base_resources.json -d'{"base_resource":{"resource_class":"Resource::NetworkGroup","billing_plan_id":"41","target_id":"33","target_type":"NetworkGroup","limits":{"limit_ip":"20","limit_rate":"20","limit_data_sent_free":"1","limit_rate_free":"2","limit_ip_free":"3","limit_data_received_free":"4"},"limit_type":"hourly","prices":{"price_ip_off":"6","price_ip_on":"2","price_rate_off":"3","price_rate_on":"4","price_data_sent":"5","price_data_received":"6"}}}'
Where:

33
OnApp Cloud 2.3 | API Guide | v1.5 | 12th April 2012
resource_class * -name of the base resource you add to the billing plan in the following format: Resource::NetworkGroup
billing_plan_id * - ID of the billing plan. You have to send it, even though it is in the URL address
target_type * - type of the group you add to the billing plan limits: [NetworkGroup]
target_id * - ID of the network zone you add to billing plan limits
Check the ID of the necessary network zone with GET /network_zones.xml.xml(json) call.
limit_ip - the total amount of IP addresses
limit_ip_free - the amount of IP addresses users get for free
limit_data_sent_free - the amount of data users can send for free
limit_data_received_free - the amount of data users can receive for free
limit_rate - the total available port speed users
limit_rate_free - the port speed users get for free
price_ip_on – price per IP when VM is on
price_ip_off - price per IP when VM is off
price_rate_on – price for port speed (Mbps) when VM is on
price_rate_off - price for port speed (Mbps) when VM is off
price_data_sent – price for sent data per GB per hour
price_data_received – price for received data per GB per hour
limit_type – limit type set for the resource; can be hourly or monthly
3.7.6 Add limits for edge groups
By assigning edge groups to a billing plan, you set the prices for the bandwidth users signed up for this plan consume.
XML request example:

34
OnApp Cloud 2.3 | API Guide | v1.5 | 12th April 2012
curl -i -X POST -u user:userpass http://onapp.test/billing_plans/15/resource_edge_groups.xml -d '<base_resource><target_id>4</target_id><price>10.5</price><billing_plan_id>15</billing_plan_id><target_type>EdgeGroup</target_type></base_resource>' -H 'Accept: application/xml' -H 'Content-type: application/xml'
Json request example:
curl -i -X POST -d '{"base_resource":{"target_id":"4","price":"10","billing_plan_id":"15","target_type":"EdgeGroup"}}' -u user:userpass http://onapp.test/billing_plans/15/resource_edge_groups.json -H 'Accept: application/json' -H 'Content-type: application/json'
Where:
target_id* – the ID of the edge group you add to a billing plan
price – price per Gb of bandwidth
billing_plan_id* - ID of the billing plan. You have to send it, even though it is in the URL address
target_type* - type of the group you add to the billing plan limits: [EdgeGroup]
3.7.7 Add limits for backup server zones
By adding backup server zone resources to a billing plan, you limit the user only to the backup servers in that zone.
XML Request example
curl -i -X POST -u user:userpass http://onapp.test/billing_plans/:id/base_resources.xml -d '<base_resource><resource_class>Resource::BackupServerGroup</resource_class><billing_plan_id>182</billing_plan_id><target_id>28</target_id><target_type>BackupServerGroup</target_type><limits><limit_backup_free>2</limit_backup_free><limit_backup>10</limit_backup><limit_backup_disk_size_free>2</limit_backup_disk_size_free><limit_backup_disk_size>10</limit_backup_disk_size><limit_template_free>2</limit_template_free><limit_template>10</limit_template><limit_template_disk_size_free>2</limit_template_disk_size_free><limit_template_disk_size>10</limit_template_disk_size></limits><prices><price_backup>50</price_backup><price_backup_disk_size>50</price_backup_disk_size><price_template_disk_size>50</price_template_disk_size><price_template>50</price_template></prices></base_resource>' -H 'Accept: application/xml' -H 'Content-type: application/xml'
JSON Request example

35
OnApp Cloud 2.3 | API Guide | v1.5 | 12th April 2012
curl -i -X POST -u user:userpass http://onapp.test/billing_plans/:id/base_resources.json -d '{"base_resource": {"resource_class": "Resource::BackupServerGroup","billing_plan_id": "182","target_id": "28","target_type": "BackupServerGroup","limits":{"limit_backup_free":"2", "limit_backup":"10", "limit_backup_disk_size_free":"2", "limit_backup_disk_size":"10", "limit_template_free":"2", "limit_template":"10", "limit_template_disk_size_free":"2", "limit_template_disk_size":"10"}, "prices": {"price_backup":"50", "price_backup_disk_size":"50", "price_template_disk_size":"50", "price_template":"50"}}}' -H 'Accept: application/json' -H 'Content-type: application/json'
Where:
label – name of the backup server zone assigned to the billing plan
resource_name – the name of the base resource. In this case it is BackupServerGroup
created at – the date in the [YYYY][MM][DD]T[hh][mm][ss]Z format
target_id – backup server zone id
limits – an array of limits set up for this resource
limit_backup_free –the number of backups user gets for free
limit_backup – the total number of backups allowed
limit_backup_disk_size_free –disk size user gets for free to store their backups
limit_backup_disk_size – maximum backup disk size allowed
limit_template_disk_size – maximum template disk size allowed
limit_template – the total number of templates allowed
limit_template_free –the number of templates user gets for free
limit_template_disk_size_free – template disk size user gets for free
updated at – the date in the [YYYY][MM][DD]T[hh][mm][ss]Z format
billing_plan_id * - the ID of the billing plan
id – resource ID
unit – a unit per which the price is set
price_backup – price per backup over limit
price_template – price per template over limit

36
OnApp Cloud 2.3 | API Guide | v1.5 | 12th April 2012
price_template_disk_size – price per GB of template disk size over limit
limit type – this parameter doesn’t mean anything for backup server zone resource
3.8 Edit base resources of a billing plan
To change limits and prices for a base resource, use the following request:
PUT /billing_plans/:billing_plan_id/base_resources/:id.xml PUT /billing_plans/:billing_plan_id/base_resources/:id.json
XML Request example
curl -i -X PUT -u user:userpass --url http://onapp.test/billing_plans/:billing_plan_id/base_resources/:id.xml -d '<base_resource><prices><price_on>0.1</price_on><price_off>0.01</price_off></prices></base_resource>' -H 'Accept: application/xml’ -H 'Content-type: application/xml'
JSON Request example
curl -i -X PUT -u user:userpass --url http://onapp.test/billing_plans/:billing_plan_id/base_resources/:id.json -d '{"base_resource":{"prices":{"price_on":0.1,"price_off":0.01}}}' -H 'Accept: application/json' -H 'Content-type: application/json'
You can check ID of the required base resource with GET method.
3.9 Delete a base resource from a billing plan DELETE /billing_plans/:billing_plan_id/base_resources/:id.xml DELETE /billing_plans/:billing_plan_id/base_resources/:id.json XML Request example
curl -i -X DELETE -u user:userpass http://onapp.test/billing_plans/:billing_plan_id/base_resources/:id.xml JSON Request example
curl -i -X DELETE -u user:userpass http://onapp.test/billing_plans/:billing_plan_id/base_resources/:id.json
3.10 Get CPUs details
To get details for CPU resource of a particular billing plan, use the following methods:
GET /billing_plans/:billing_plan_id/base_resources/:id.xml GET /billing_plans/:billing_plan_id/base_resources/:id.json

37
OnApp Cloud 2.3 | API Guide | v1.5 | 12th April 2012
You can check ID of the required base resource with GET method: GET /billing_plans/:billing_plan_id/base_resources.xml GET /billing_plans/:billing_plan_id/base_resources.json
An array of billing plan and CPU resource details will be returned.
XML Output example
<base_resource> <label>CPU</label> <created_at type="datetime">2012-03-15T15:35:42+02:00</created_at> <target_id nil="true"/> <limits> <limit_free>10</limit_free> <limit>50</limit> </limits> <updated_at type="datetime">2012-03-15T15:35:42+02:00</updated_at> <billing_plan_id type="integer">375</billing_plan_id> <id type="integer">1355</id> <unit nil="true"/> <resource_name>cpu</resource_name> <prices> <price_on>1.00000000</price_on> <price_off>1.00000000</price_off> </prices> <limit_type>hourly</limit_type> </base_resource>
Where:
label – name of the edge group assigned to the billing plan
created_at – the date in the [YYYY][MM][DD]T[hh][mm][ss]Z format
limits – an array of limits set up for this resource
limit free - the number of CPU cores that users get for free
limit - the total number of CPU cores
billing_plan_id * - the ID of the billing plan
id – resource ID
resource_name – the name of the base resource. In this case it is CPU
price_on - the prices per CPU core per hour for powered on VMs
price_off - the prices per CPU core per hour for powered off VMs

38
OnApp Cloud 2.3 | API Guide | v1.5 | 12th April 2012
limit_type – hourly or monthly limit type set for the resource
3.11 Get CPU Priority details
To get details of a particular CPU priority resource, use the following method:
GET /billing_plans/:billing_plan_id/base_resources/:id.xml GET /billing_plans/:billing_plan_id/base_resources/:id.json
You can check ID of the required base resource with GET method: GET /billing_plans/:billing_plan_id/base_resources.xml GET /billing_plans/:billing_plan_id/base_resources.json
XML Output example
<base_resource> <label>CPU Priority</label> <created_at type="datetime">2012-03-15T15:45:16+02:00</created_at> <target_id nil="true"/> <limits> <limit_free>10</limit_free> <limit>60</limit> </limits> <updated_at type="datetime">2012-03-15T15:45:16+02:00</updated_at> <billing_plan_id type="integer">375</billing_plan_id> <id type="integer">1358</id> <unit nil="true"/> <resource_name>cpu_share</resource_name> <prices> <price_on>1.00000000</price_on> <price_off>2.00000000</price_off> </prices> <limit_type>hourly</limit_type> </base_resource>
The system will output the details of the billing plan, as well as the following CPU Shares resource details:
label – name of the edge group assigned to the billing plan
created_at – the date in the [YYYY][MM][DD]T[hh][mm][ss]Z format
limits – an array of limits set up for this resource
limit - the total of CPU Priority allowed within this billing plan (in %)
limit free - the limit of CPU Priority users get for free within this billing plan (in %)
updated at – the date in the [YYYY][MM][DD]T[hh][mm][ss]Z format

39
OnApp Cloud 2.3 | API Guide | v1.5 | 12th April 2012
billing_plan_id * - the ID of the billing plan
id – resource ID
resource_name – the name of the base resource. In this case it is CPU priority
price_on - the price for the resource for powered on VMs
price_off - the price for the resource for powered off VMs
limit_type – hourly or monthly limit type set for the resource
3.12 Get memory details
To get details of a Memories resource for a particular billing plan, use the following method:
GET /billing_plans/:billing_plan_id/base_resources/:id.xml GET /billing_plans/:billing_plan_id/base_resources/:id.json
You can check ID of the required base resource with GET method: GET /billing_plans/:billing_plan_id/base_resources.xml GET /billing_plans/:billing_plan_id/base_resources.json
XML Output example
<base_resource> <label>Memory</label> <created_at type="datetime">2012-03-15T15:55:59+02:00</created_at> <target_id nil="true"/> <limits> <limit_free>50</limit_free> <limit>1000</limit> </limits> <updated_at type="datetime">2012-03-15T15:55:59+02:00</updated_at> <billing_plan_id type="integer">375</billing_plan_id> <id type="integer">1360</id> <unit>mb</unit> <resource_name>memory</resource_name> <prices> <price_on>1.00000000</price_on> <price_off>2.00000000</price_off> </prices> <limit_type>hourly</limit_type> </base_resource>
Where:
label – name of the edge group assigned to the billing plan

40
OnApp Cloud 2.3 | API Guide | v1.5 | 12th April 2012
created_at – the date in the [YYYY][MM][DD]T[hh][mm][ss]Z format
limits – an array of limits set up for this resource
limit_free - the amount of free RAM users get
limit - the entire amount of RAM
updated at – the date in the [YYYY][MM][DD]T[hh][mm][ss]Z format
billing_plan_id * - the ID of the billing plan
id – resource ID
unit – a unit per which the price is set
resource_name – the name of the base resource. In this case it is memory
price_on - the price for memory per MB for powered on VM
price_off - the price for memory per MB for powered off VM
limit_type – hourly or monthly limit type set for the resource
3.13 Get disk size details
To see details for a Disk size resource:
GET /billing_plans/:billing_plan_id/base_resources/:id.xml GET /billing_plans/:billing_plan_id/base_resources/:id.json
You can check ID of the required base resource with GET method: GET /billing_plans/:billing_plan_id/base_resources.xml GET /billing_plans/:billing_plan_id/base_resources.json
XML Output example
<base_resource> <label>Disk Size</label> <created_at type="datetime">2012-03-15T15:59:37+02:00</created_at> <target_id nil="true"/> <limits> <limit_free>10</limit_free> <limit>100</limit> </limits> <updated_at type="datetime">2012-03-15T15:59:37+02:00</updated_at> <billing_plan_id type="integer">375</billing_plan_id> <id type="integer">1361</id>

41
OnApp Cloud 2.3 | API Guide | v1.5 | 12th April 2012
<unit>gb</unit> <resource_name>disk_size</resource_name> <prices> <price_on>5.00000000</price_on> <price_off>4.00000000</price_off> </prices> <limit_type>hourly</limit_type> </base_resource>
Where:
label – name of the edge group assigned to the billing plan
created_at – the date in the [YYYY][MM][DD]T[hh][mm][ss]Z format
limits – an array of limits set up for this resource
limit_free - the number of free GBs users can allocate to their disks
limit - the total number of GB users can allocate to their disks
updated at – the date in the [YYYY][MM][DD]T[hh][mm][ss]Z format
billing_plan_id * - the ID of the billing plan
id – resource ID
resource_name – the name of the base resource. In this case it is disk size
unit – a unit per which the price is set
price_on - the prices per GB for powered on VM’s per hour
price_off - the prices per GB for powered off VM’s per hour
limit_type – hourly or monthly limit type set for the resource
3.14 Get IP address details
To get details for an IP Address resource:
GET /billing_plans/:billing_plan_id/base_resources/:id.xml GET /billing_plans/:billing_plan_id/base_resources/:id.json You can check ID of the required base resource with GET method: GET /billing_plans/:billing_plan_id/base_resources.xml GET /billing_plans/:billing_plan_id/base_resources.json
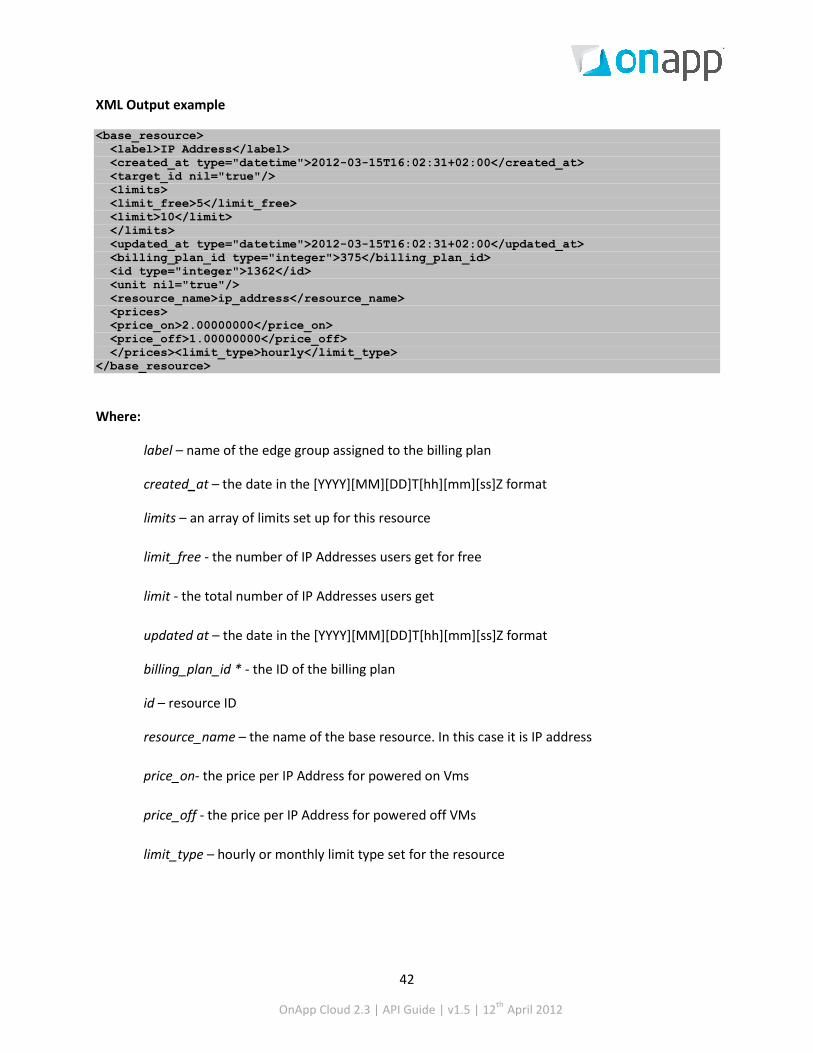
42
OnApp Cloud 2.3 | API Guide | v1.5 | 12th April 2012
XML Output example
<base_resource> <label>IP Address</label> <created_at type="datetime">2012-03-15T16:02:31+02:00</created_at> <target_id nil="true"/> <limits> <limit_free>5</limit_free> <limit>10</limit> </limits> <updated_at type="datetime">2012-03-15T16:02:31+02:00</updated_at> <billing_plan_id type="integer">375</billing_plan_id> <id type="integer">1362</id> <unit nil="true"/> <resource_name>ip_address</resource_name> <prices> <price_on>2.00000000</price_on> <price_off>1.00000000</price_off> </prices><limit_type>hourly</limit_type> </base_resource>
Where:
label – name of the edge group assigned to the billing plan
created_at – the date in the [YYYY][MM][DD]T[hh][mm][ss]Z format
limits – an array of limits set up for this resource
limit_free - the number of IP Addresses users get for free
limit - the total number of IP Addresses users get
updated at – the date in the [YYYY][MM][DD]T[hh][mm][ss]Z format
billing_plan_id * - the ID of the billing plan
id – resource ID
resource_name – the name of the base resource. In this case it is IP address
price_on- the price per IP Address for powered on Vms
price_off - the price per IP Address for powered off VMs
limit_type – hourly or monthly limit type set for the resource

43
OnApp Cloud 2.3 | API Guide | v1.5 | 12th April 2012
3.15 Get VM monit details
The number of VMs using Autoscaling a user can create for free as well as total amount of such VMs. You can also set the price for the VMs using Autoscaling (per VM).
GET /billing_plans/:billing_plan_id/base_resources/:id.xml GET /billing_plans/:billing_plan_id/base_resources/:id.json
You can check ID of the required base resource with GET method: GET /billing_plans/:billing_plan_id/base_resources.xml GET /billing_plans/:billing_plan_id/base_resources.json
XML Output example
<base_resource> <label>Monit</label> <created_at type="datetime">2012-03-15T16:14:03+02:00</created_at> <target_id nil="true"/> <limits> <limit_free>5</limit_free> <limit>10</limit> </limits> <updated_at type="datetime">2012-03-15T16:14:03+02:00</updated_at> <billing_plan_id type="integer">375</billing_plan_id> <id type="integer">1363</id> <unit nil="true"/> <resource_name>vm_monit</resource_name> <prices> <price>1.00000000</price> </prices> <limit_type>hourly</limit_type> </base_resource>
Where:
label – name of the edge group assigned to the billing plan
created_at – the date in the [YYYY][MM][DD]T[hh][mm][ss]Z format
limits – an array of limits set up for this resource
limit – maximum number of VM using Autoscaling
limit_free - the number of VMs using Autoscaling a user can create for free
updated at – the date in the [YYYY][MM][DD]T[hh][mm][ss]Z format
billing_plan_id * - the ID of the billing plan
id – resource ID
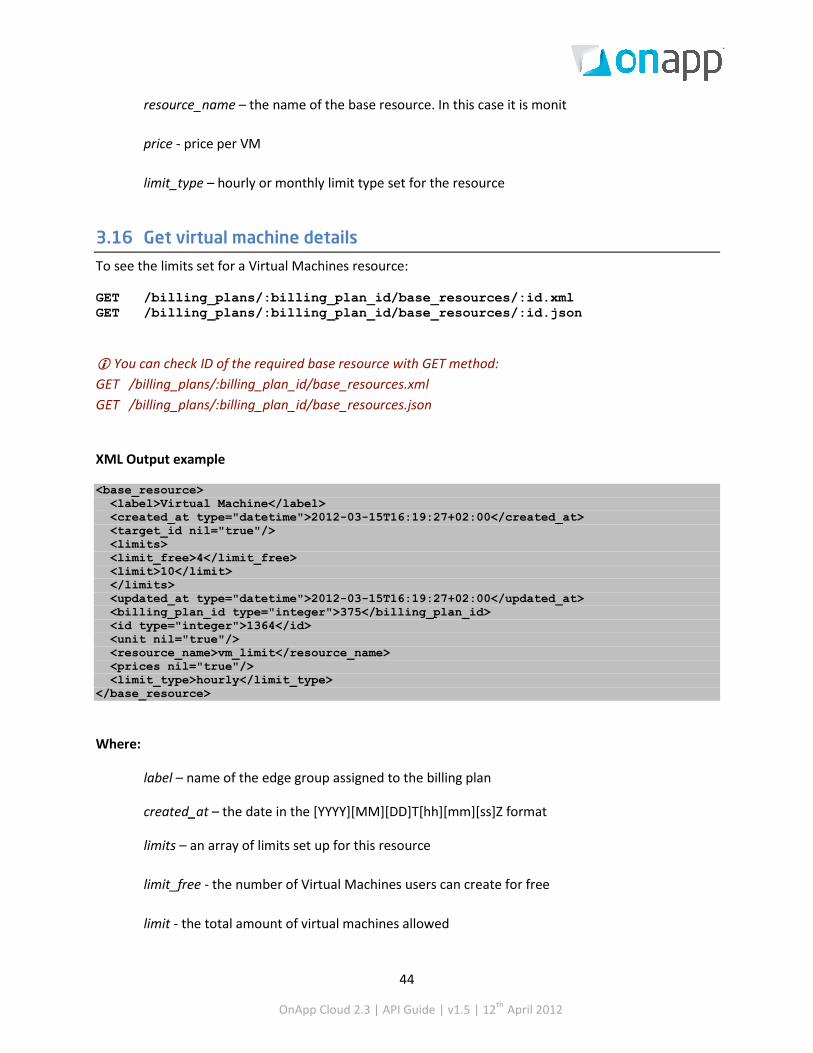
44
OnApp Cloud 2.3 | API Guide | v1.5 | 12th April 2012
resource_name – the name of the base resource. In this case it is monit
price - price per VM
limit_type – hourly or monthly limit type set for the resource
3.16 Get virtual machine details
To see the limits set for a Virtual Machines resource:
GET /billing_plans/:billing_plan_id/base_resources/:id.xml GET /billing_plans/:billing_plan_id/base_resources/:id.json
You can check ID of the required base resource with GET method: GET /billing_plans/:billing_plan_id/base_resources.xml GET /billing_plans/:billing_plan_id/base_resources.json
XML Output example
<base_resource> <label>Virtual Machine</label> <created_at type="datetime">2012-03-15T16:19:27+02:00</created_at> <target_id nil="true"/> <limits> <limit_free>4</limit_free> <limit>10</limit> </limits> <updated_at type="datetime">2012-03-15T16:19:27+02:00</updated_at> <billing_plan_id type="integer">375</billing_plan_id> <id type="integer">1364</id> <unit nil="true"/> <resource_name>vm_limit</resource_name> <prices nil="true"/> <limit_type>hourly</limit_type> </base_resource>
Where:
label – name of the edge group assigned to the billing plan
created_at – the date in the [YYYY][MM][DD]T[hh][mm][ss]Z format
limits – an array of limits set up for this resource
limit_free - the number of Virtual Machines users can create for free
limit - the total amount of virtual machines allowed

45
OnApp Cloud 2.3 | API Guide | v1.5 | 12th April 2012
updated at – the date in the [YYYY][MM][DD]T[hh][mm][ss]Z format
billing_plan_id * - the ID of the billing plan
id – resource ID
resource_name – the name of the base resource. In this case it is virtual machine
limit_type – hourly or monthly limit type set for the resource
3.17 Get template details GET /billing_plans/:billing_plan_id/base_resources/:id.xml GET /billing_plans/:billing_plan_id/base_resources/:id.json
You can check ID of the required base resource with GET method: GET /billing_plans/:billing_plan_id/base_resources.xml GET /billing_plans/:billing_plan_id/base_resources.json
XML Output example
<base_resource> <label>Template</label> <created_at type="datetime">2012-03-15T16:27:37+02:00</created_at> <target_id nil="true"/> <limits> <limit_free>10</limit_free> <limit>30</limit> </limits> <updated_at type="datetime">2012-03-15T16:27:37+02:00</updated_at> <billing_plan_id type="integer">375</billing_plan_id> <id type="integer">1365</id> <unit>gb</unit> <resource_name>template</resource_name> <prices> <price>5.00000000</price> </prices> <limit_type>hourly</limit_type> </base_resource>
Where:
label – name of the edge group assigned to the billing plan
created_at – the date in the [YYYY][MM][DD]T[hh][mm][ss]Z format
limits – an array of limits set up for this resource
limit_free - the number of custom templates users can create for free

46
OnApp Cloud 2.3 | API Guide | v1.5 | 12th April 2012
limit - the total amount of custom templates allowed
updated at – the date in the [YYYY][MM][DD]T[hh][mm][ss]Z format
billing_plan_id * - the ID of the billing plan
id – resource ID
resource_name – the name of the base resource. In this case it is template
price – price per template
limit_type – hourly or monthly limit type set for the resource
3.18 Get template & backup storage details
To get details about the disk space limits and prices allocated to Backups and Templates, use the following method:
GET /billing_plans/:billing_plan_id/base_resources/:id.xml GET /billing_plans/:billing_plan_id/base_resources/:id.json
You can check ID of the required base resource with GET method: GET /billing_plans/:billing_plan_id/base_resources.xml GET /billing_plans/:billing_plan_id/base_resources.json
XML Output example
<base_resource> <label>Templates & Backups Storage</label> <created_at type="datetime">2012-03-15T15:51:17+02:00</created_at> <target_id nil="true"/> <limits> <limit_free>4</limit_free> <limit>1000</limit> </limits> <updated_at type="datetime">2012-03-15T15:51:17+02:00</updated_at> <billing_plan_id type="integer">375</billing_plan_id> <id type="integer">1359</id> <unit>gb</unit> <resource_name>storage_disk_size</resource_name> <prices> <price>3.00000000</price> </prices> <limit_type>hourly</limit_type> </base_resource>
Where:

47
OnApp Cloud 2.3 | API Guide | v1.5 | 12th April 2012
label – name of the edge group assigned to the billing plan
created_at – the date in the [YYYY][MM][DD]T[hh][mm][ss]Z format
limits – an array of limits set up for this resource
limit_free - the amount of free disk space (in GB) users can allocate to store backups and templates together
limit - the total disk space users can allocate to store backups and templates together
updated at – the date in the [YYYY][MM][DD]T[hh][mm][ss]Z format
billing_plan_id * - the ID of the billing plan
id – resource ID
resource_name – the name of the base resource. In this case it is template & backup storage
unit – a unit per which the price is set
price - price per GB
limit_type – hourly or monthly limit type set for the resource
3.19 Get backup details GET /billing_plans/:billing_plan_id/base_resources/:id.xml GET /billing_plans/:billing_plan_id/base_resources/:id.json You can check ID of the required base resource with GET method: GET /billing_plans/:billing_plan_id/base_resources.xml GET /billing_plans/:billing_plan_id/base_resources.json XML Output example
<base_resource> <label>Backups</label> <created_at type="datetime">2012-03-15T16:37:56+02:00</created_at> <target_id nil="true"/> <limits> <limit_free>10</limit_free> <limit>50</limit> </limits> <updated_at type="datetime">2012-03-15T16:37:56+02:00</updated_at> <billing_plan_id type="integer">375</billing_plan_id> <id type="integer">1366</id> <unit>gb</unit> <resource_name>backup</resource_name> <prices> <price>5.00000000</price>
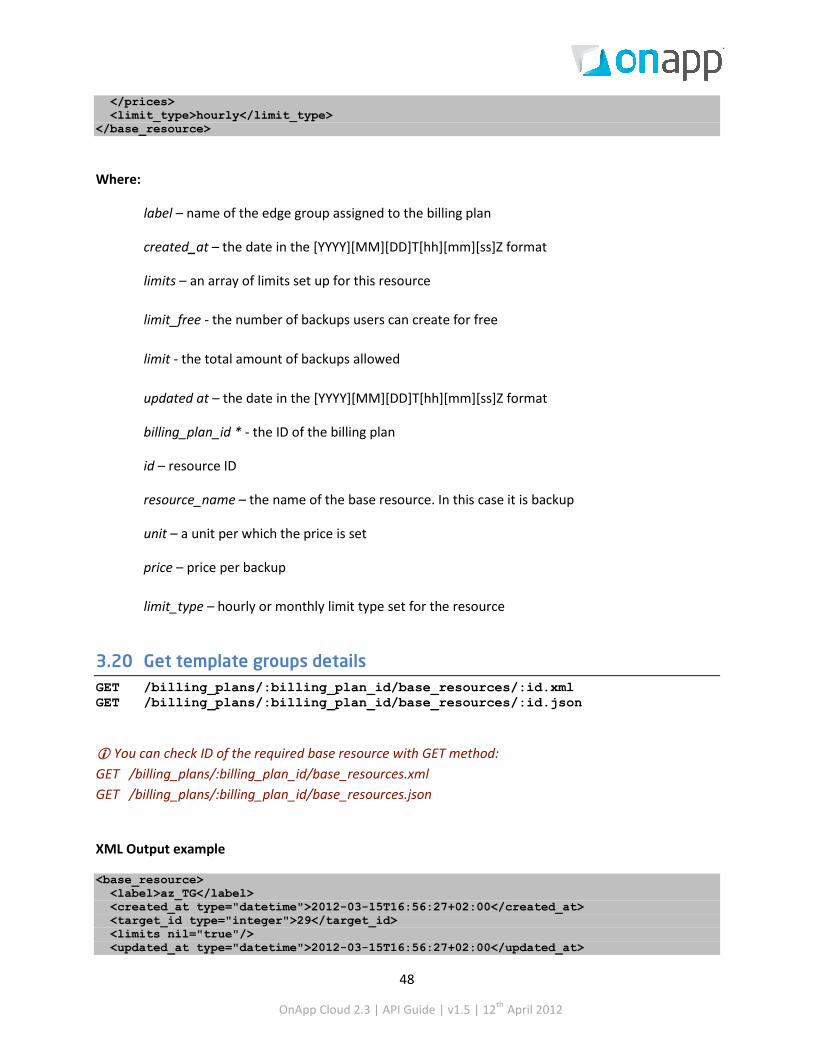
48
OnApp Cloud 2.3 | API Guide | v1.5 | 12th April 2012
</prices> <limit_type>hourly</limit_type> </base_resource>
Where:
label – name of the edge group assigned to the billing plan
created_at – the date in the [YYYY][MM][DD]T[hh][mm][ss]Z format
limits – an array of limits set up for this resource
limit_free - the number of backups users can create for free
limit - the total amount of backups allowed
updated at – the date in the [YYYY][MM][DD]T[hh][mm][ss]Z format
billing_plan_id * - the ID of the billing plan
id – resource ID
resource_name – the name of the base resource. In this case it is backup
unit – a unit per which the price is set
price – price per backup
limit_type – hourly or monthly limit type set for the resource
3.20 Get template groups details GET /billing_plans/:billing_plan_id/base_resources/:id.xml GET /billing_plans/:billing_plan_id/base_resources/:id.json
You can check ID of the required base resource with GET method: GET /billing_plans/:billing_plan_id/base_resources.xml GET /billing_plans/:billing_plan_id/base_resources.json
XML Output example
<base_resource> <label>az_TG</label> <created_at type="datetime">2012-03-15T16:56:27+02:00</created_at> <target_id type="integer">29</target_id> <limits nil="true"/> <updated_at type="datetime">2012-03-15T16:56:27+02:00</updated_at>

49
OnApp Cloud 2.3 | API Guide | v1.5 | 12th April 2012
<billing_plan_id type="integer">375</billing_plan_id> <id type="integer">1368</id> <unit nil="true"/> <resource_name>template_group</resource_name> <prices nil="true"/> <limit_type>hourly</limit_type> </base_resource>
Where:
label - the name of the template group you set as a limit to the current billing plan
created_at – the date in the [YYYY][MM][DD]T[hh][mm][ss]Z format
target_id – the id of the template group
updated at – the date in the [YYYY][MM][DD]T[hh][mm][ss]Z format
billing_plan_id * - the ID of the billing plan
id – resource ID
resource_name – the name of the base resource. In this case it is template group
limit_type – hourly or monthly limit type set for the resource
When you add a template group to a billing plan, you limit the number of preconfigured system templates available to a user signed up for this billing plan – they can only choose from templates available in that template group.
3.21 Get hypervisor zones details GET /billing_plans/:billing_plan_id/base_resources/:id.xml GET /billing_plans/:billing_plan_id/base_resources/:id.json
You can check ID of the required base resource with GET method: GET /billing_plans/:billing_plan_id/base_resources.xml GET /billing_plans/:billing_plan_id/base_resources.json
XML Output example
<base_resource> <label>hvz</label> <created_at type="datetime">2012-03-15T16:59:18+02:00</created_at>

50
OnApp Cloud 2.3 | API Guide | v1.5 | 12th April 2012
<target_id type="integer">1</target_id> <limits nil="true"/> <updated_at type="datetime">2012-03-15T16:59:18+02:00</updated_at> <billing_plan_id type="integer">375</billing_plan_id> <id type="integer">1369</id> <unit nil="true"/> <resource_name>hypervisor_group</resource_name> <prices nil="true"/> <limit_type>hourly</limit_type> </base_resource>
Where:
label - the name of the hypervisor zone you set as a limit to the current billing plan
created_at – the date in the [YYYY][MM][DD]T[hh][mm][ss]Z format
target_id – the id of the hypervisor zone
updated at – the date in the [YYYY][MM][DD]T[hh][mm][ss]Z format
billing_plan_id * - the ID of the billing plan
id – resource ID
resource_name – the name of the base resource. In this case it is hypervisor zone
limit_type – hourly or monthly limit type set for the resource
By adding hypervisor zone resources to a billing plan, you limit the user only to the hypervisors in that zone.
3.22 Get data store zone details GET /billing_plans/:billing_plan_id/base_resources/:id.xml GET /billing_plans/:billing_plan_id/base_resources/:id.json
You can check ID of the required base resource with GET method: GET /billing_plans/:billing_plan_id/base_resources.xml GET /billing_plans/:billing_plan_id/base_resources.json
XML Output example:
<base_resource> <label>dsz</label> <created_at type="datetime">2012-03-15T17:05:33+02:00</created_at> <target_id type="integer">2</target_id> <limits> <limit_reads_completed_free>20</limit_reads_completed_free>
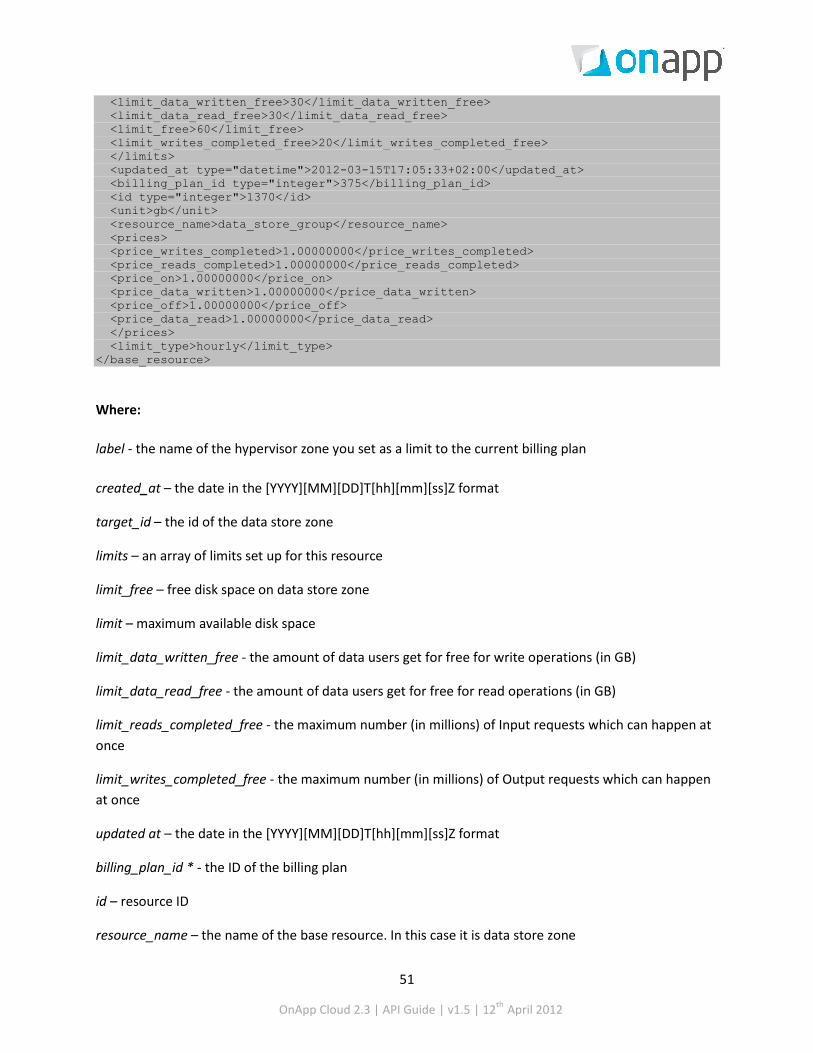
51
OnApp Cloud 2.3 | API Guide | v1.5 | 12th April 2012
<limit_data_written_free>30</limit_data_written_free> <limit_data_read_free>30</limit_data_read_free> <limit_free>60</limit_free> <limit_writes_completed_free>20</limit_writes_completed_free> </limits> <updated_at type="datetime">2012-03-15T17:05:33+02:00</updated_at> <billing_plan_id type="integer">375</billing_plan_id> <id type="integer">1370</id> <unit>gb</unit> <resource_name>data_store_group</resource_name> <prices> <price_writes_completed>1.00000000</price_writes_completed> <price_reads_completed>1.00000000</price_reads_completed> <price_on>1.00000000</price_on> <price_data_written>1.00000000</price_data_written> <price_off>1.00000000</price_off> <price_data_read>1.00000000</price_data_read> </prices> <limit_type>hourly</limit_type> </base_resource>
Where:
label - the name of the hypervisor zone you set as a limit to the current billing plan
created_at – the date in the [YYYY][MM][DD]T[hh][mm][ss]Z format
target_id – the id of the data store zone
limits – an array of limits set up for this resource
limit_free – free disk space on data store zone
limit – maximum available disk space
limit_data_written_free - the amount of data users get for free for write operations (in GB)
limit_data_read_free - the amount of data users get for free for read operations (in GB)
limit_reads_completed_free - the maximum number (in millions) of Input requests which can happen at once
limit_writes_completed_free - the maximum number (in millions) of Output requests which can happen at once
updated at – the date in the [YYYY][MM][DD]T[hh][mm][ss]Z format
billing_plan_id * - the ID of the billing plan
id – resource ID
resource_name – the name of the base resource. In this case it is data store zone
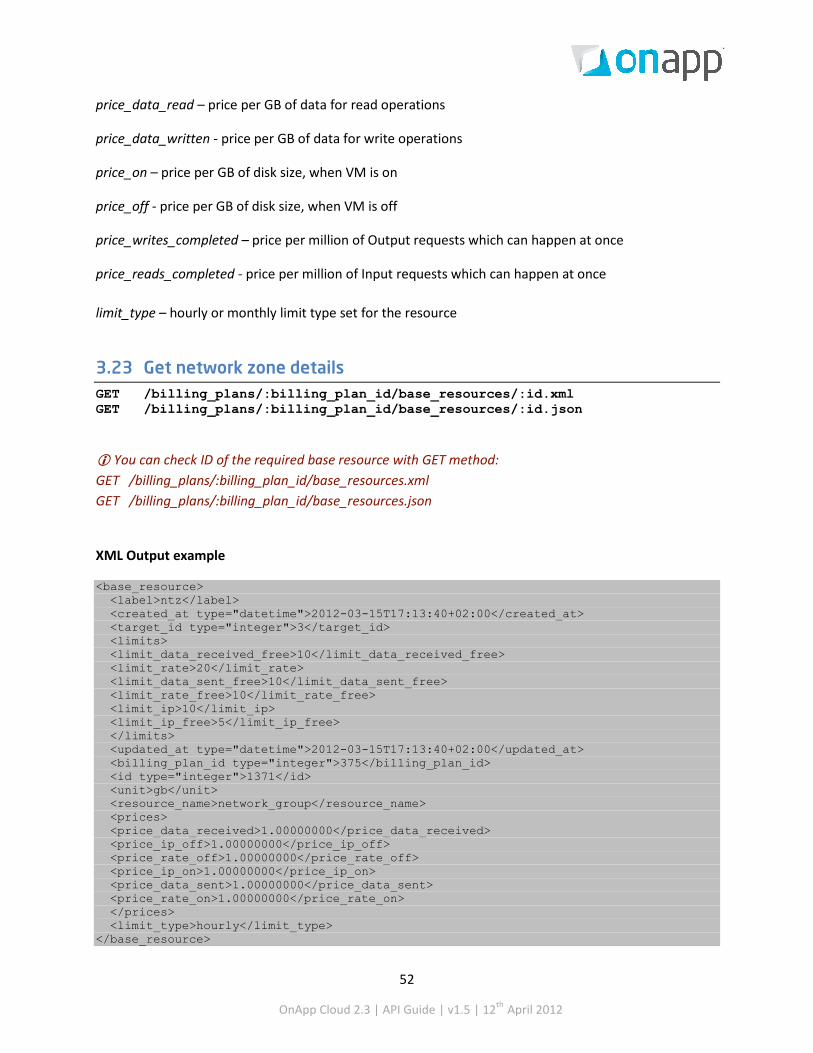
52
OnApp Cloud 2.3 | API Guide | v1.5 | 12th April 2012
price_data_read – price per GB of data for read operations
price_data_written - price per GB of data for write operations
price_on – price per GB of disk size, when VM is on
price_off - price per GB of disk size, when VM is off
price_writes_completed – price per million of Output requests which can happen at once
price_reads_completed - price per million of Input requests which can happen at once
limit_type – hourly or monthly limit type set for the resource
3.23 Get network zone details GET /billing_plans/:billing_plan_id/base_resources/:id.xml GET /billing_plans/:billing_plan_id/base_resources/:id.json
You can check ID of the required base resource with GET method: GET /billing_plans/:billing_plan_id/base_resources.xml GET /billing_plans/:billing_plan_id/base_resources.json
XML Output example
<base_resource> <label>ntz</label> <created_at type="datetime">2012-03-15T17:13:40+02:00</created_at> <target_id type="integer">3</target_id> <limits> <limit_data_received_free>10</limit_data_received_free> <limit_rate>20</limit_rate> <limit_data_sent_free>10</limit_data_sent_free> <limit_rate_free>10</limit_rate_free> <limit_ip>10</limit_ip> <limit_ip_free>5</limit_ip_free> </limits> <updated_at type="datetime">2012-03-15T17:13:40+02:00</updated_at> <billing_plan_id type="integer">375</billing_plan_id> <id type="integer">1371</id> <unit>gb</unit> <resource_name>network_group</resource_name> <prices> <price_data_received>1.00000000</price_data_received> <price_ip_off>1.00000000</price_ip_off> <price_rate_off>1.00000000</price_rate_off> <price_ip_on>1.00000000</price_ip_on> <price_data_sent>1.00000000</price_data_sent> <price_rate_on>1.00000000</price_rate_on> </prices> <limit_type>hourly</limit_type> </base_resource>

53
OnApp Cloud 2.3 | API Guide | v1.5 | 12th April 2012
Where:
label - the name of the hypervisor zone you set as a limit to the current billing plan
created_at – the date in the [YYYY][MM][DD]T[hh][mm][ss]Z format
target_id – the id of the data store zone
limits – an array of limits set up for this resource
limit_ip - the total amount of IP addresses
limit_ip_free - the amount of IP addresses users get for free
limit_data_sent_free - the amount of data users can send for free
limit_data_received_free - the amount of data users can receive for free
limit_rate - the total available port speed users
limit_rate_free - the port speed users get for free
updated at – the date in the [YYYY][MM][DD]T[hh][mm][ss]Z format
billing_plan_id * - the ID of the billing plan
id – resource ID
resource_name – the name of the base resource. In this case it is network zone
price_ip_on – price per IP when VM is on
price_ip_off - price per IP when VM is off
price_rate_on – price for port speed (Mbps) when VM is on
price_rate_off - price for port speed (Mbps) when VM is off
price_data_sent – price for sent data per GB per hour
price_data_received – price for received data per GB per hour
limit_type – hourly or monthly limit type set for the resource

54
OnApp Cloud 2.3 | API Guide | v1.5 | 12th April 2012
3.24 Get edge group details
To get details about the backup server zone limits and prices, use the following method:
GET /billing_plans/:billing_plan_id/base_resources/:id.xml GET /billing_plans/:billing_plan_id/base_resources/:id.json
You can check ID of the required base resource with GET method:
GET /billing_plans/:billing_plan_id/base_resources.xml
GET /billing_plans/:billing_plan_id/base_resources.json
XML Output example
<base_resource> <label>WHMCS Edge Group</label> <resource_name>backup_server_group</resource_name> <created_at type="datetime">2012-03-15T18:08:57+02:00-09T09:48:21Z</created_at> <target_id type="integer">30</target_id> <limits> <limit_free type="integer">0</limit_free> </limits> <updated_at type="datetime">2012-03-15T18:08:57+02:00</updated_at> <billing_plan_id type="integer">375</billing_plan_id> <id type="integer">1374</id> <unit>gb</unit> <resource_name>edge_group</resource_name> <prices> <price>2.00000000</price> </prices> <limit_type>hourly</limit_type> </base_resource
Where:
label – name of the edge group assigned to the billing plan
created_at – the date in the [YYYY][MM][DD]T[hh][mm][ss]Z format
target_id – backup server zone id
limits – an array of limits set up for this resource
limit_ free –the number of GB user gets for free
updated at – the date in the [YYYY][MM][DD]T[hh][mm][ss]Z format
billing_plan_id * - the ID of the billing plan
resource_name – the name of the base resource. In this case it is edge group

55
OnApp Cloud 2.3 | API Guide | v1.5 | 12th April 2012
id – resource ID
unit – a unit per which the price is set
price – price per GB over limit
limit_type – hourly or monthly limit type set for the resource
3.25 Get backup server zone details
To get details of the backup server zone limits and prices, use the following method:
GET /billing_plans/:billing_plan_id/base_resources/:id.xml GET /billing_plans/:billing_plan_id/base_resources/:id.json
You can check ID of the required base resource with GET method: GET /billing_plans/:billing_plan_id/base_resources.xml GET /billing_plans/:billing_plan_id/base_resources.json
XML Output example
<base_resource> <label>bsz</label> <created_at type="datetime">2012-03-15T17:38:14+02:00</created_at> <target_id type="integer">28</target_id> <limits> <limit_backup_free>200</limit_backup_free> <limit_backup_disk_size_free>50200</limit_backup_disk_size_free> <limit_template_disk_size>100150</limit_template_disk_size> <limit_template>2070</limit_template> <limit_template_free>530</limit_template_free> <limit_backup_disk_size>100</limit_backup_disk_size> <limit_backup>40</limit_backup> <limit_backup_disk_size>450</limit_backup_disk_size> <limit_backup/> <limit_template_disk_size_free>50</limit_template_disk_size_free> <limit_backup_free>20</limit<updated_at type="datetime">2012-02-09T09:48:21Z</updated_at> <id type="integer">787</id> <prices><price_backup_free>1.00000000</price_backup> </limits> <updated_at type="datetime">2012-03-15T17:38:14+02:00</updated_at> <billing_plan_id type="integer">375</billing_plan_id> <id type="integer">1372</id> <unit>gb</unit> <resource_name>backup_server_group</resource_name> <prices> <price_backup_disk_size>1.00000000</price_backup_disk_size> <price_template_disk_size>1.00000000</price_template_disk_size> <price_template>1.00000000</price_template> <price_backup>1.00000000</price_backup> </prices> <limit_type>hourly</limit_type> </base_resource>

56
OnApp Cloud 2.3 | API Guide | v1.5 | 12th April 2012
Where:
label – name of the backup server zone assigned to the billing plan
resource_name – the name of the base resource. In this case it is backup server group.
created at – the date in the [YYYY][MM][DD]T[hh][mm][ss]Z format
target_id – backup server zone id
limits – an array of limits set up for this resource
limit_backup_free –the number of backups user gets for free
limit_backup – the total number of backups allowed
limit_backup_disk_size_free –disk size user gets for free to store their backups
limit_backup_disk_size – maximum backup disk size allowed
limit_template_disk_size – maximum template disk size allowed
limit_template – the total number of templates allowed
limit_template_free –the number of templates user gets for free
limit_template_disk_size_free – template disk size user gets for free
updated at – the date in the [YYYY][MM][DD]T[hh][mm][ss]Z format
billing_plan_id * - the ID of the billing plan
id – resource ID
unit – a unit per which the price is set
price_backup – price per backup over limit
price_template – price per template over limit
price_template_disk_size – price per GB of template disk size over limit.
limit_ type – hourly or monthly limit type set for the resource

57
OnApp Cloud 2.3 | API Guide | v1.5 | 12th April 2012
4. Currencies This class allows you to set up the currency for your payments. There are four currencies in a default installation: USD, EUR, GBP and JPY. You can add more currencies at any time.
4.1 Get the list of currencies
To get the list of available currencies, use the following request:
GET /settings/currencies.xml GET /settings/currencies.json XML Output example
<?xml version="1.0" encoding="UTF-8"?> <currencies> <currency> <name>United States dollar</name> <format>%u%n</format> <created_at>2011-03-02T12:09:36+02:00</created_at> <code>USD</code> <updated_at>2011-03-22T16:12:41+02:00</updated_at> <id>1</id> <unit>$</unit> <separator>.</separator> <precision>5</precision> <precision_for_unit>2</precision_for_unit> <delimiter>,</delimiter> </currency> </currencies> Where:
name – the currency label
format - how the currency is displayed in the control panel. The following parameters are used: %n ( for the digits), %u ( for the currency symbol)
created_at – the date when the record in DB was added
updated_at – the date when the record in DB was updated
code - three-character currency code that is generally used to represent the currency
id – the ID of the currency
unit – a currency symbol
separator - a character used to format decimal numbers, e.g 100.99
precision - the number of digits after the delimiter. This parameter is used when showing the costs total for a certain period, e.g. Outstanding amount, Total Cost, Payments.

58
OnApp Cloud 2.3 | API Guide | v1.5 | 12th April 2012
precision_per_unit - the number of digits after the delimiter. The precision per unit parameter is used to display the prices for the resources , e.g. for CPU, Disk size, RAM, IP, Data stores, Edge servers, Disks, Backups, Templates, etc.
delimiter - a grouping character used to separate thousands, e.g: 100,000,000.
4.2 Get currency details
To get details for a particular currency, use the following request:
GET /settings/currencies/:id.xml GET /settings/currencies/:id.json
XML Output example
<?xml version="1.0" encoding="UTF-8"?> <currency> <name>British pound</name> <format>%u%n</format> <created_at>2011-03-02T12:09:36+02:00</created_at> <code>GBP</code> <updated_at>2011-03-22T15:31:10+02:00</updated_at> <id>2</id> <unit>£</unit> <separator>.</separator> <precision>1</precision> <precision_for_unit>2</precision_for_unit> <delimiter>,</delimiter> </currency>
Where:
name – the currency label
format - how the currency is displayed in the control panel. The following parameters are used: %n ( for the digits), %u ( for the currency symbol)
created_at – the date when the record in DB was added
updated_at – the date when the record in DB was updated
code - three-character currency code that is generally used to represent the currency
id – the ID of the currency
unit – a currency symbol
separator - a character used to format decimal numbers, e.g 100.99

59
OnApp Cloud 2.3 | API Guide | v1.5 | 12th April 2012
precision - the number of digits after the delimiter. This parameter is used when showing the costs total for a certain period, e.g. Outstanding amount, Total Cost, Payments.
precision_per_unit - the number of digits after the delimiter. The precision per unit parameter is used to display the prices for the resources , e.g. for CPU, Disk size, RAM, IP, Data stores, Edge servers, Disks, Backups, Templates, etc.
delimiter - a grouping character used to separate thousands, e.g: 100,000,000.
4.3 Edit currencies
To edit details of a currency, use the following request:
PUT /settings/currencies/:id.xml PUT /settings/currencies/:id.json XML Request example
curl -i -X PUT -u user:userpass -H 'Accept: application/xml' -H 'Content-type: application/xml' -d '<currency><name>British_changed</name><unit>§</unit><format>%n%u</format><separator>.</separator><precision>2</precision><precision_for_unit>4</precision_for_unit><delimiter>,</delimiter></currency>' --url http://onapp.test/settings/currencies/:id.xml
JSON Request example
curl -i -X PUT -u user:userpass -H 'Accept: application/json' -H 'Content-type: application/json' -d '{"currency":{"name":"British_changed","unit":"§","format":"%n%u","separator":".","precision":"4", "precision_for_unit":"4","delimiter":","}}' --url http://onapp.test/settings/currencies/:id.json Parameters:
name – the currency label
unit – a currency symbol ($, €, £, etc. )
format - how the currency is displayed in the control panel. The following parameters are used: %n ( for the digits), %u ( for the currency symbol)
code - three-character currency code that is generally used to represent the currency
separator - a character used to format decimal numbers, e.g 100.99
precision - the number of digits after the delimiter to display the costs
precision_for_unit – the numberof digits after the delimiter to display the prices for resources
delimiter - a grouping character used to separate thousands, e.g: 100,000,000.

60
OnApp Cloud 2.3 | API Guide | v1.5 | 12th April 2012
4.4 Add a currency
To add a currency, use the following request:
POST /settings/currencies.xml POST /settings/currencies.json XML Request example
curl -i -X POST -u user:userpass -H 'Accept: application/xml' -H 'Content-type: application/xml' -d '<currency><name>Ukreinian Gruvna</name><unit>§</unit><format>%n%u</format><code>UAH</code><separator>.</separator><precision>2</precision><precision_for_unit>4</precision_for_unit><delimiter>,</delimiter></currency>' --url http://onapp.test/settings/currencies.xml
JSON Request example
curl -i -X POST -u user:userpass -H 'Accept: application/json' -H 'Content-type: application/json' -d '{"currency":{"name":"Polski Zloti","unit":"§","format":"%n%u","code":"POZ","separator":".","precision":"4","precision_for_unit":"4","delimiter":","}}' --url http://onapp.test/settings/currencies.json
Parameters:
name *– the currency label
unit * – a currency symbol ($, €, £, etc. )
format * - how the currency is displayed in the control panel. The following parameters are used: %n ( for the digits), %u ( for the currency symbol)
code * - three-character currency code that is generally used to represent the currency
separator * - a character used to format decimal numbers, e.g.: 100.99
precision * - the number of digits after the delimiter to display the costs
precision_for_unit – the numberof digits after the delimiter to display the prices for resources
delimiter * - a grouping character used to separate thousands, e.g.: 100,000,000.
JSON Output example
{"currency":{"name":"Polski Zloti","created_at":"2011-04-19T17:20:26+03:00","format":"%n%u","code":"POZ","updated_at":"2011-04-19T17:20:26+03:00","id":7,"unit":"§","separator":".","precision":4,"delimiter":","}}

61
OnApp Cloud 2.3 | API Guide | v1.5 | 12th April 2012
4.5 Delete a currency
To delete a currency, use the following request:
DELETE /settings/currencies/:id.xml DELETE /settings/currencies/:id.json
XML Request example
curl -i -X DELETE -u user:userpass --url http://onapp.test/settings/currencies/:id.xml
JSON Request example
curl -i -X DELETE -u user:userpass --url http://onapp.test/settings/currencies/:id.json
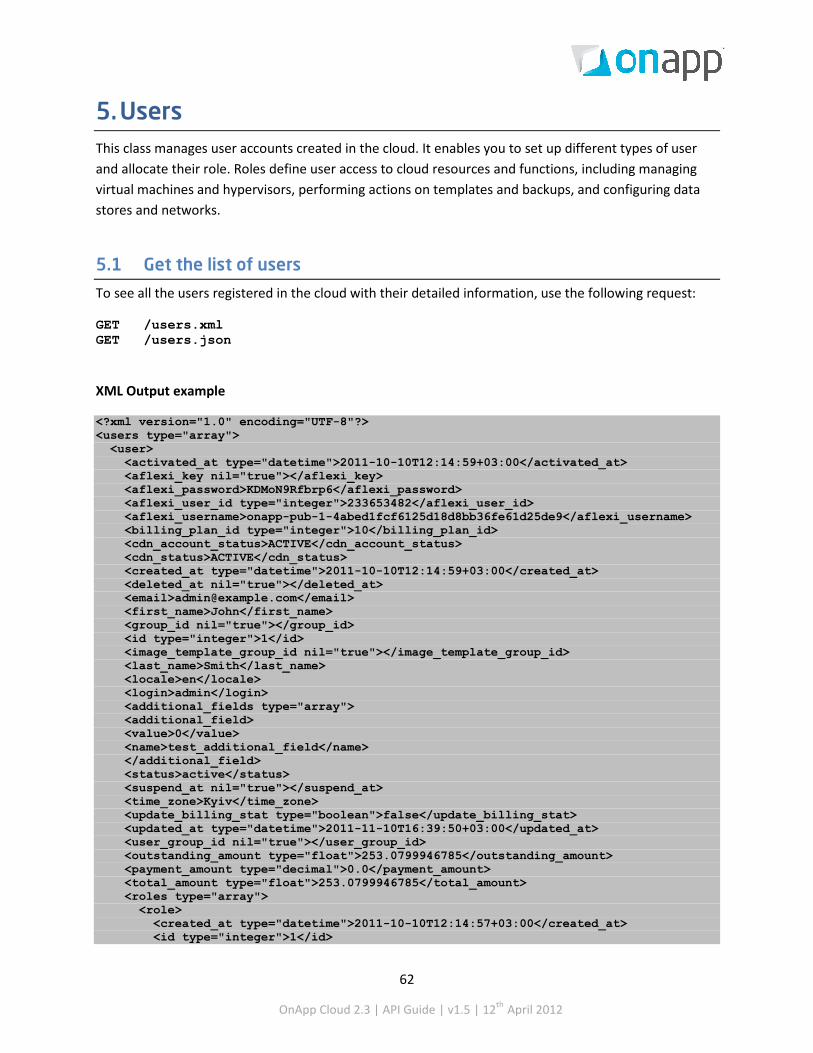
62
OnApp Cloud 2.3 | API Guide | v1.5 | 12th April 2012
5. Users This class manages user accounts created in the cloud. It enables you to set up different types of user and allocate their role. Roles define user access to cloud resources and functions, including managing virtual machines and hypervisors, performing actions on templates and backups, and configuring data stores and networks.
5.1 Get the list of users
To see all the users registered in the cloud with their detailed information, use the following request:
GET /users.xml GET /users.json
XML Output example
<?xml version="1.0" encoding="UTF-8"?> <users type="array"> <user> <activated_at type="datetime">2011-10-10T12:14:59+03:00</activated_at> <aflexi_key nil="true"></aflexi_key> <aflexi_password>KDMoN9Rfbrp6</aflexi_password> <aflexi_user_id type="integer">233653482</aflexi_user_id> <aflexi_username>onapp-pub-1-4abed1fcf6125d18d8bb36fe61d25de9</aflexi_username> <billing_plan_id type="integer">10</billing_plan_id> <cdn_account_status>ACTIVE</cdn_account_status> <cdn_status>ACTIVE</cdn_status> <created_at type="datetime">2011-10-10T12:14:59+03:00</created_at> <deleted_at nil="true"></deleted_at> <email>[email protected]</email> <first_name>John</first_name> <group_id nil="true"></group_id> <id type="integer">1</id> <image_template_group_id nil="true"></image_template_group_id> <last_name>Smith</last_name> <locale>en</locale> <login>admin</login> <additional_fields type="array"> <additional_field> <value>0</value> <name>test_additional_field</name> </additional_field> <status>active</status> <suspend_at nil="true"></suspend_at> <time_zone>Kyiv</time_zone> <update_billing_stat type="boolean">false</update_billing_stat> <updated_at type="datetime">2011-11-10T16:39:50+03:00</updated_at> <user_group_id nil="true"></user_group_id> <outstanding_amount type="float">253.0799946785</outstanding_amount> <payment_amount type="decimal">0.0</payment_amount> <total_amount type="float">253.0799946785</total_amount> <roles type="array"> <role> <created_at type="datetime">2011-10-10T12:14:57+03:00</created_at> <id type="integer">1</id>
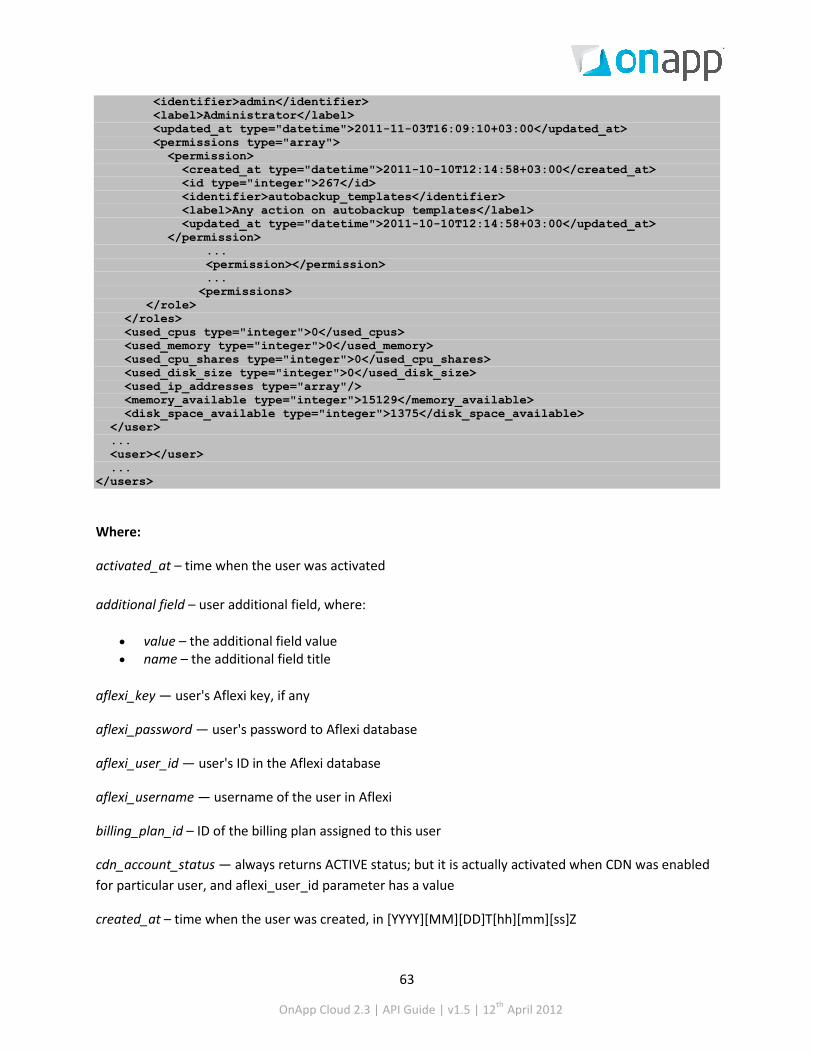
63
OnApp Cloud 2.3 | API Guide | v1.5 | 12th April 2012
<identifier>admin</identifier> <label>Administrator</label> <updated_at type="datetime">2011-11-03T16:09:10+03:00</updated_at> <permissions type="array"> <permission> <created_at type="datetime">2011-10-10T12:14:58+03:00</created_at> <id type="integer">267</id> <identifier>autobackup_templates</identifier> <label>Any action on autobackup templates</label> <updated_at type="datetime">2011-10-10T12:14:58+03:00</updated_at> </permission> ... <permission></permission> ... <permissions> </role> </roles> <used_cpus type="integer">0</used_cpus> <used_memory type="integer">0</used_memory> <used_cpu_shares type="integer">0</used_cpu_shares> <used_disk_size type="integer">0</used_disk_size> <used_ip_addresses type="array"/> <memory_available type="integer">15129</memory_available> <disk_space_available type="integer">1375</disk_space_available> </user> ... <user></user> ... </users>
Where:
activated_at – time when the user was activated
additional field – user additional field, where:
• value – the additional field value • name – the additional field title
aflexi_key — user's Aflexi key, if any
aflexi_password — user's password to Aflexi database
aflexi_user_id — user's ID in the Aflexi database
aflexi_username — username of the user in Aflexi
billing_plan_id – ID of the billing plan assigned to this user
cdn_account_status — always returns ACTIVE status; but it is actually activated when CDN was enabled for particular user, and aflexi_user_id parameter has a value
created_at – time when the user was created, in [YYYY][MM][DD]T[hh][mm][ss]Z

64
OnApp Cloud 2.3 | API Guide | v1.5 | 12th April 2012
deleted_at – time when the user was deleted
email – user’s email
first_name – user’s first name
id — the ID of a user in the database
image_template_group — the ID of associated template group, if any
last_name — the user's last name
locale — locale (language) associated with user
login — user's login name
status – status of the user’s account (active, suspended or deleted)
suspend_at – time when the system should suspend a user
time_zone — the time zone of the user
updated_at — time when user's profile data was updated
user_group_id – ID of the user group assigned to this user
outstanding_amount – the amount of money the user is due to pay
payment_amount – amount of money the user has actually paid
total_amount – sum total of outstanding and payment amount
roles — an array of user roles to which this account is assigned to, where
• label – role title • id – role ID • identifier – role identifier • permissions – an array with permissions assigned to this role
o label – permission title o id – permission ID o identifier – permission identifier
used_cpus — number of CPU cores allocated to all VMs and edge servers of the user
used_disk_size – size of all user disks in GB
used_memory – the amount of RAM used by the user (MB)
used_cpus – the amount of CPUs used by the user

65
OnApp Cloud 2.3 | API Guide | v1.5 | 12th April 2012
used_ip_addresses – an array of IP addresses associated with the user
memory_available — the amount of RAM available to this user (MB)
disk_space_available – disk space available for the user (GB)
5.2 Get user details
To get details for a particular user account:
GET /users/:id.xml GET /users/:id.json For details and output example refer to Get the list of users
5.3 Create a user
Use the POST method to create a new user account:
POST /users.xml POST /users.json
XML Request example
curl -i -X POST -d '<user><login>111111losj</login><email>[email protected]</email><password_confirmation>password_test1</password_confirmation><first_name>TestApiName</first_name><last_name>TestAPIName</last_name><password>password_test1</password><user_group_id>1</user_group_id><billing_plan_id>1</billing_plan_id><role_ids>1</role_ids><additional_fields type="array"><additional_field><name>additional_field_name</name><value>custom_value</value></additional_field></additional_fields><time_zone>Kyiv</time_zone><locale>en</locale></user>' -u user:userpass http://onapp.test/users.xml -H 'Accept: application/xml' -H 'Content-type: application/xml'
JSON Request example
curl -i -X POST -d '{"user":{"login":"111111losj","email":"[email protected]","password_confirmation":"password_test1","first_name":"1111","last_name":"1311","password":"password_test1","user_group_id":"1","billing_plan_id":"1","role_ids":"[1,2]"}}', "additional_fields type='array'":{"additional_field":{"name":"additional_field_name","value":"custom_value"}}}}' -u user:userpass http://onapp.test/users.json -H 'Accept: application/json' -H 'Content-type: application/json'
Returns HTTP 201 on successful creation, or HTTP 422 if a user with such a login/email already exists.
Required parameters:
email * - user’s email address
66
OnApp Cloud 2.3 | API Guide | v1.5 | 12th April 2012
first_name * - user’s first name
last_name * - user’s last name
login * - login of the user. It can consist of 4-40 characters, letters [A-Za-z], digits [0-9], dash [ - ], lower dash [ _ ], [@]. You can use both lower- and uppercase letters
password * - user’s password. (min – 6 characters)
password_confirmation * - confirmation of the password (retype the password)
Optional parameters: role – assigns a role to a user
time_zone - time zone of the user. Set by default
locale - local of the user. Set by default
status – user’s status (active, suspended, etc)
billing_plan_id – set by default, if not selected
additional field – an array of custom fields assigned to the user, where:
o name: the name of a particular additional field o value:the value which you want to assign to this additional field
role_ids – ID of the role, assigned to the user
user_group_id – ID of the group, to which the user is attached
suspend_after_hours – time in hours, after which the user will be suspended
suspend_at – time in [YYYY][MM][DD] T[hh][mm][ss]Z format, when the user will be suspended
5.4 Edit a user
To edit a user, use this request:
PUT /users/:id.xml PUT /users/:id.json
XML Request example

67
OnApp Cloud 2.3 | API Guide | v1.5 | 12th April 2012
curl -i -X PUT -d '<user><email>[email protected]</email><password_confirmation>qwe123</password_confirmation><first_name>NewName</first_name><last_name>NewLastName</last_name><password>qwe123</password><user_group_id>36</user_group_id><billing_plan_id>2</billing_plan_id><role_ids>2</role_ids> <additional_fields type="array"><additional_field><name>additional_field_name</name><value>custom_value</value></additional_field></additional_fields><suspend_at>2011-08-01 12:47:08</suspend_at></user>' -u user:userpass http://onapp.test/users/:id.xml -H 'Accept: application/xml' -H 'Content-type: application/xml'
JSON Request example
curl -i -X PUT -d '{"user":{"email":"[email protected]","password_confirmation":"qwe123","first_name":"jsonNewName","last_name":"jsonNewLastName","password":"qwe123","user_group_id":"37","billing_plan_id":"3","role_ids:"2","additional_fields type='array'":{"additional_field":{"name":"additional_field_name","value":"custom_value"}}}}',"suspend_at":"2011-08-01 12:47:10"}}' -u user:userpass http://onapp.test/users/:id.json -H 'Accept: application/json' -H 'Content-type: application/json'
Where you can edit:
user email; password; first_name and last_name; user_group, associated with the user ; additional field and its value; billing_plan; assigned role (or roles) and auto-suspend (suspend_at) parameters.
To disable user auto-suspending, leave the suspend_at field empty.
5.5 Generate API key
Use the following request to generate a new API key:
POST /users/:id/make_new_api_key.xml POST /users/:id/make_new_api_key.json XML Request example
curl -i -X POST -u user:userpass http://onapp.test/users/:id/make_new_api_key.xml -H 'Accept: application/xml' -H 'Content-type: application/xml' JSON Request example
curl -i -X POST -u user:userpass http://onapp.test/users/:id/make_new_api_key.json -H 'Accept: application/json' -H 'Content-type: application/json'
XML Output example
curl -i -X POST -u admin:dev5dot130 http://109.123.105.130/users/1033/make_new_api_key.xml -H 'Accept: application/xml' -H 'Content-type: application/xml' HTTP/1.1 200 OK

68
OnApp Cloud 2.3 | API Guide | v1.5 | 12th April 2012
Date: Mon, 19 Dec 2011 11:45:25 GMT Server: Apache/2.2.3 (CentOS) X-Powered-By: Phusion Passenger (mod_rails/mod_rack) 3.0.1 ETag: "781538aa145a713491a2a87b7c61e989" X-UA-Compatible: IE=Edge,chrome=1 X-Runtime: 0.436403 Cache-Control: max-age=0, private, must-revalidate Set-Cookie: _session_id=a0f5aa6334b23a1c012bcde1a06a83a7; path=/; HttpOnly Status: 200 Connection: close Transfer-Encoding: chunked Content-Type: application/xml; charset=utf-8 <?xml version="1.0" encoding="UTF-8"?> <user> <used_cpus type="integer">0</used_cpus> <aflexi_user_id nil="true"></aflexi_user_id> <payment_amount type="decimal">0.0</payment_amount> <created_at type="datetime">2011-12-19T11:41:17Z</created_at> <activated_at type="datetime">2011-12-19T11:41:17Z</activated_at> <used_cpu_shares type="integer">0</used_cpu_shares> <suspend_at nil="true"></suspend_at> <remember_token_expires_at nil="true"></remember_token_expires_at> <cdn_account_status>ACTIVE</cdn_account_status> <aflexi_password nil="true"></aflexi_password> <updated_at type="datetime">2011-12-19T11:45:25Z</updated_at> <deleted_at nil="true"></deleted_at> <cdn_status>INACTIVE</cdn_status> <billing_plan_id type="integer">1</billing_plan_id> <api_key>939751c7b98798df9fc127a69884a5d2ac499b9f</api_key> <update_billing_stat type="boolean">false</update_billing_stat> ...

69
OnApp Cloud 2.3 | API Guide | v1.5 | 12th April 2012
5.6 Suspend a user
To suspend a user account, use the following method:
POST /users/:id/suspend.xml POST /users/:id/suspend.json XML Request example
curl -i -X GET -u user:userpass http://onapp.test/users/:id/suspend.xml -H 'Accept: application/xml' -H 'Content-type: application/xml' JSON Request example
curl -i -X GET -u user:userpass http://onapp.test/users/:id/suspend.json -H 'Accept: application/json' -H 'Content-type: application/json'
5.7 Activate a user
To activate a suspended user account, use the following method:
POST /users/:id/activate_user.xml POST /users/:id/activate_user.json XML Request example
curl -i -X GET -u user:userpass http://onapp.test/users/:id/activate.xml -H 'Accept: application/xml' -H 'Content-type: application/xml' JSON Request example
curl -i -X GET -u user:userpass http://onapp.test/users/:id/activate.json -H 'Accept: application/json' -H 'Content-type: application/json'
5.8 Delete a user
Use the DELETE method to remove a user account from the cloud:
DELETE /users/:id.xml DELETE /users/:id.json
XML Request example
curl -i -X DELETE -u user:userpass http://onapp.test/users/:id.xml -H 'Accept: application/xml' -H 'Content-type: application/xml'

70
OnApp Cloud 2.3 | API Guide | v1.5 | 12th April 2012
JSON Request example
curl -i -X DELETE -u user:userpass http://onapp.test/users/:id.json -H 'Accept: application/json' -H 'Content-type: application/json'
Returns HTTP 200 response on successful deletion, or HTTP 404 when a user with the ID specified is not found.
When you delete a user their status becomes DELETED, so they cannot perform any actions on their VMs; however, statistics, backups and billing details are still available for Administrator. To completely erase a user from the system, run DELETE /users/:id again.
5.9 View user’s statistics
User’s statistics show the summary of the resources used by a particular user and their costs (which are set in the billing plan assigned to the user). To see the statistics, use this API call:
GET onapp.test/users/:user_id/user_statistics.xml GET onapp.test/users/:user_id/user_statistics.json XML Output example
<?xml version="1.0" encoding="UTF-8"?> <user_stat> <backup_count_cost type="float">0.0</backup_count_cost> <currency_code>USD</currency_code> <total_cost type="float">96500.0004196997</total_cost> <user_resources_cost type="float">96500.0004196997</user_resources_cost> <template_count_cost type="float">0.0</template_count_cost> <storage_disk_size_cost type="float">0.0</storage_disk_size_cost> <edge_group_cost type="float">0.00041969971744038</edge_group_cost> <backup_cost type="float">96500.0</backup_cost> <template_cost type="float">0.0</template_cost> <user_id type="integer">1</user_id> <backup_disk_size_cost type="float">0.0</backup_disk_size_cost> <monit_cost type="float">0.0</monit_cost> <stat_time nil="true"></stat_time> <template_disk_size_cost type="float">0.0</template_disk_size_cost> <vm_cost type="float">0.0</vm_cost> <vm_stats type="array"> <vm_stat> <total_cost type="float">0.0</total_cost> <virtual_machine_id type="integer">0</virtual_machine_id> <usage_cost type="float">0.0</usage_cost> <vm_resources_cost type="float">0.0</vm_resources_cost> </vm_stat> </vm_stats> </user_stat>
Where:
71
OnApp Cloud 2.3 | API Guide | v1.5 | 12th April 2012
vm_stat – billing statistics on virtual machines, owned by the user
virtual_machine _id – ID of the VM, for which this statistics are generated
total_cost – sum total of VM costs (usage_cost + vm_resource_cost)
usage_cost –costs for actual usage of the VM
vm_resource_cost – cost for the resources, which VM is using (cpu, cpu priority, RAM, disk size, IP addresses)
backup_count_cost - cost per backup per hour for the backups of a particular Backup server zone. The price is set by the Limits for backup server zone.
backup_disk_size_cost - cost per GB per hour for the backups of a particular Backup server zone. The price is set by the Limits for backup server zone.
backup_cost – cost per backup per hour
currency_code - the currency set for this user
template_count_cost - cost per template per hour for the templates of a particular Backup server zone. The price is set by the Limits for backup server zone.
template_disk_size_cost - cost per GB per hour for the templates of a particular Backup server zone.
template_cost — total template costs (cost per template per hour)
edge_group_cost - total edge group costs
user_id - the ID of the user for whom the statistics are generated
stat_time - a particular point of time for which these statistics are generated
storage_disk_size_cost – costs for disk size used for backups/templates storage (cost per GB per hour) user_resources_cost — sum total of all backups/templates/monitis monitors costs (backup_cost+storage_disk_size_cost+template_cost+monit_cost)
total_cost — overall sum total of all costs (vm_cost+user_resources_cost)
monit_cost – total costs for VMs using monitis monitors (cost for VM per hour)
vm_cost – total VMs costs (sum total of all user VMs)
5.10 View user's statistics for a particular period
To view the hourly cost and amount of the resources used by a user:

72
OnApp Cloud 2.3 | API Guide | v1.5 | 12th April 2012
GET /users/:user_id/user_statistics.xml?hourly_stats GET /users/:user_id/user_statistics.json?hourly_stats
XML request example:
curl -i -X GET -H 'Accept: application/xml' -H 'Content-type: application/xml' -u user:userpass http://onapp.test/users/:user_id/user_statistics.xml?hourly_stats
JSON request example:
curl -i -X GET -H 'Accept: application/json' -H 'Content-type: application/json' -u user:userpass http://onapp.test/users/:user_id/user_statistics.json?hourly_stats
XML Output example:
<?xml version="1.0" encoding="UTF-8"?> <user_stats type="array"> <user_stat> <backup_count_cost type="float">0.0</backup_count_cost> <user_resources_cost type="float">0.0</user_resources_cost> <currency_code>USD</currency_code> <total_cost type="float">0.0</total_cost> <template_count_cost type="float">0.0</template_count_cost> <storage_disk_size_cost type="float">0.0</storage_disk_size_cost> <edge_group_cost type="float">0.0</edge_group_cost> <backup_cost type="float">0.0</backup_cost> <template_cost type="float">0.0</template_cost> <user_id type="integer">4</user_id> <backup_disk_size_cost type="float">0.0</backup_disk_size_cost> <monit_cost type="float">0.0</monit_cost> <stat_time type="datetime">2012-03-13T11:43:36Z</stat_time> <template_disk_size_cost type="float">0.0</template_disk_size_cost> <vm_cost type="integer">0</vm_cost> <vm_stats type="array"/> </user_stat> <user_stat> <backup_count_cost type="float">0.0</backup_count_cost> <user_resources_cost type="float">0.0</user_resources_cost> <currency_code>USD</currency_code> <total_cost type="float">0.0</total_cost> <template_count_cost type="float">0.0</template_count_cost> <storage_disk_size_cost type="float">0.0</storage_disk_size_cost> <edge_group_cost type="float">0.0</edge_group_cost> <backup_cost type="float">0.0</backup_cost> <template_cost type="float">0.0</template_cost> <user_id type="integer">4</user_id> <backup_disk_size_cost type="float">0.0</backup_disk_size_cost> <monit_cost type="float">0.0</monit_cost> <stat_time type="datetime">2012-03-13T12:43:37Z</stat_time> <template_disk_size_cost type="float">0.0</template_disk_size_cost> <vm_cost type="integer">0</vm_cost> <vm_stats type="array"/> </user_stat> ... </user_stats>

73
OnApp Cloud 2.3 | API Guide | v1.5 | 12th April 2012
For parameters description, refer to View user's statistics section.
To view the cost and amount of the resources used for a particular period:
GET /users/:user_id/user_statistics.xml?hourly_stats&period[startdate]=YYYY-MM-DD+hh%3Amm%3Ass&period[enddate]=YYYY-MM-DD+hh%3Amm%3Ass GET /users/:user_id/user_statistics.json?hourly_stats&period[startdate]=YYYY-MM-DD+hh%3Amm%3Ass&period[enddate]=YYYY-MM-DD+hh%3Amm%3Ass XML request example:
curl -i -X GET -H 'Accept: application/xml' -H 'Content-type: application/xml' -u user:userpass "http://onapp.test/users/:user_id/user_statistics.xml?hourly_stats&period[startdate]=2012-03-15+06:58:16&period[enddate]=2012-03-15+08:58:16"
JSON request example:
curl -i -X GET -H 'Accept: application/json' -H 'Content-type: application/json' -u user:userpass "http://onapp.test/users/:user_id/user_statistics.json?hourly_stats&period[startdate]=2012-03-15+06:58:16&period[enddate]=2012-03-15+08:58:16"
XML Output example:
<?xml version="1.0" encoding="UTF-8"?> <user_stats type="array"> <user_stat> <backup_count_cost type="float">0.0</backup_count_cost> <user_resources_cost type="float">0.0</user_resources_cost> <currency_code>USD</currency_code> <total_cost type="float">0.0</total_cost> <template_count_cost type="float">0.0</template_count_cost> <storage_disk_size_cost type="float">0.0</storage_disk_size_cost> <edge_group_cost type="float">0.0</edge_group_cost> <backup_cost type="float">0.0</backup_cost> <template_cost type="float">0.0</template_cost> <user_id type="integer">4</user_id> <backup_disk_size_cost type="float">0.0</backup_disk_size_cost> <monit_cost type="float">0.0</monit_cost> <stat_time type="datetime">2012-03-15T06:58:16Z</stat_time> <template_disk_size_cost type="float">0.0</template_disk_size_cost> <vm_cost type="integer">0</vm_cost> <vm_stats type="array"/> </user_stat> <user_stat> <backup_count_cost type="float">0.0</backup_count_cost> <user_resources_cost type="float">0.0</user_resources_cost> <currency_code>USD</currency_code> <total_cost type="float">0.0</total_cost> <template_count_cost type="float">0.0</template_count_cost> <storage_disk_size_cost type="float">0.0</storage_disk_size_cost> <edge_group_cost type="float">0.0</edge_group_cost> <backup_cost type="float">0.0</backup_cost> <template_cost type="float">0.0</template_cost> <user_id type="integer">4</user_id>

74
OnApp Cloud 2.3 | API Guide | v1.5 | 12th April 2012
<backup_disk_size_cost type="float">0.0</backup_disk_size_cost> <monit_cost type="float">0.0</monit_cost> <stat_time type="datetime">2012-03-15T07:58:17Z</stat_time> <template_disk_size_cost type="float">0.0</template_disk_size_cost> <vm_cost type="integer">0</vm_cost> <vm_stats type="array"/> </user_stat> </user_stats>
For parameters description, refer to View user's statistics section.
5.11 View billing statistics for a user
To view billing statistics for a particular user, use the following method:
GET /users/:user_id/vm_stats.xml GET /users/:user_id/vm_stats.json
If the account was created less than three months ago, the statistics are generated for the entire period of operation of the account. You can also define a shorter period by setting Start and End time in the API call:
GET /users/:user_id/vm_stats.xml?period[startdate]=YYYY-MM-DD+hh%3Amm%3Ass&period[enddate]=YYYY-MM-DD+hh%3Amm%3Ass GET /users/:user_id/vm_stats.json?period[startdate]=YYYY-MM-DD+hh%3Amm%3Ass&period[enddate]=YYYY-MM-DD+hh%3Amm%3Ass
The generated billing statistics will show the billing details for all virtual machines, load balancers and edge servers owned by this particular user. For the output examples and the explanation of the fields returned, refer to corresponding sections:
• Billing statistics for a VM • View load balancer billing statistics • Billing statistics for CDN edge servers
5.12 See user’s monthly bills
To get data on user’s monthly bills for a year, use this request
GET onapp.com/users/:user_id/monthly_bills.xml GET onapp.com/users/:user_id/monthly_bills.json XML output example
<?xml version="1.0" encoding="UTF-8"?> <vm_stats type="array"> <vm_stat>

75
OnApp Cloud 2.3 | API Guide | v1.5 | 12th April 2012
<month type="integer">5</month> <cost type="float">167.371330738068</cost> </vm_stat> </vm_stats> Where: month — number of a month cost — total user costs, charged for that month (monthly price+costs for resources and usage. See section View user’s statistics)
5.13 See user’s payments
To get the list of user payments: GET onapp.com/users/:user_id/payments.xml GET onapp.com/users/:user_id/payments.json XML output example
<?xml version="1.0" encoding="UTF-8"?> <payments type="array"> <payment> <created_at type="datetime">2011-03-15T20:00:41+07:00</created_at> <updated_at type="datetime">2011-03-15T20:00:41+07:00</updated_at> <amount type="decimal">2000.0</amount> <invoice_number>001</invoice_number> <id type="integer">2</id> <user_id type="integer">1</user_id> </payment> </payments>
Where:
amount — money amount in the currency set in the billing plan
invoice_number — optional number of invoice
id — payment ID
user_id — ID of the user
5.14 Add a payment
To add a payment record to your DB, use this request:
POST /users/:user_id/payments.xml POST /users/:user_id/payments.json XML Request example
76
OnApp Cloud 2.3 | API Guide | v1.5 | 12th April 2012
curl –i –X POST –d ’<payment><amount>12</amount><invoice_number>123</invoice_number></payment>’ –H ‘Accept: application/xml’ –H ‘Content-type: application/xml’-u user:userpass –url http://onapp.test/users/:user_id/payments.xml
JSON Request example
curl –i –X POST –d ‘{“payment”:{“amount”:”12”,”invoice_number”:”123”}}’ –H ‘Accept: application/json’ –H ‘Content-type: application/json’-u user:userpass -–url http://onapp.test/users/:user_id/payments.json
Where you have to send:
amount * - amount of the payment (should be higher than zero)
invoice_number - optional number of the invoice
5.15 Edit a payment
You can change the invoice number or the payment amount with the following request:
PUT /users/:user_id/payments/:id.xml PUT /users/:user_id/payments/:id.json XML Request example
curl –i –X PUT –d ’<payment><amount>99</amount><invoice_number>66</invoice_number></payment>’ –H ‘Accept: application/xml’ –H ‘Content-type: application/xml’-u user:userpass –url http://onapp.test/users/:user_id/payments/:id.xml JSON Request example
curl –i –X PUT –d ‘{“payment”:{“amount”:”99”,”invoice_number”:”66”}}’ –H ‘Accept: application/json’ –H ‘Content-type: application/json’-u user:userpass -–url http://onapp.test/users/:user_id/payments/:id.json
5.16 Delete a payment DELETE /users/:user_id/payments/payment_id.xml DELETE /users/:user_id/payments/payment_id.json
XML Request example
curl –i –X DELETE –u user:userpass --url http://onapp.test//users/:user_id/payments/payment_id.xml JSON Request example
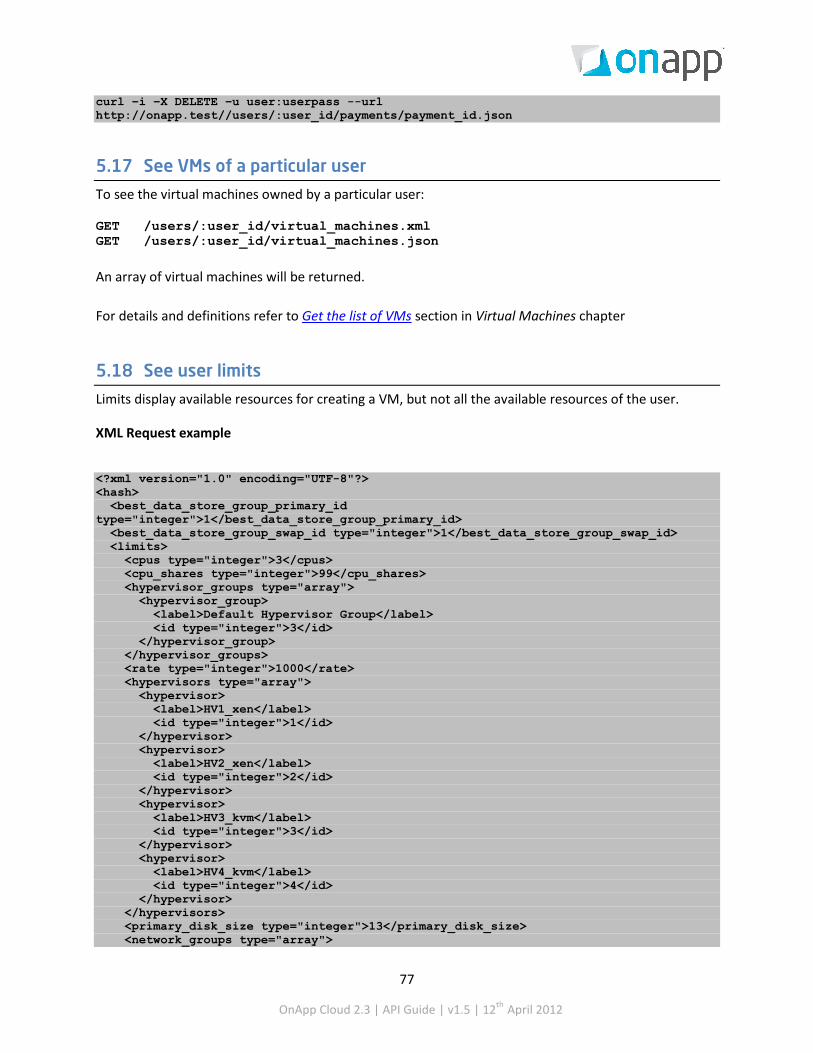
77
OnApp Cloud 2.3 | API Guide | v1.5 | 12th April 2012
curl –i –X DELETE –u user:userpass --url http://onapp.test//users/:user_id/payments/payment_id.json
5.17 See VMs of a particular user
To see the virtual machines owned by a particular user:
GET /users/:user_id/virtual_machines.xml GET /users/:user_id/virtual_machines.json
An array of virtual machines will be returned.
For details and definitions refer to Get the list of VMs section in Virtual Machines chapter
5.18 See user limits
Limits display available resources for creating a VM, but not all the available resources of the user.
XML Request example
<?xml version="1.0" encoding="UTF-8"?> <hash> <best_data_store_group_primary_id type="integer">1</best_data_store_group_primary_id> <best_data_store_group_swap_id type="integer">1</best_data_store_group_swap_id> <limits> <cpus type="integer">3</cpus> <cpu_shares type="integer">99</cpu_shares> <hypervisor_groups type="array"> <hypervisor_group> <label>Default Hypervisor Group</label> <id type="integer">3</id> </hypervisor_group> </hypervisor_groups> <rate type="integer">1000</rate> <hypervisors type="array"> <hypervisor> <label>HV1_xen</label> <id type="integer">1</id> </hypervisor> <hypervisor> <label>HV2_xen</label> <id type="integer">2</id> </hypervisor> <hypervisor> <label>HV3_kvm</label> <id type="integer">3</id> </hypervisor> <hypervisor> <label>HV4_kvm</label> <id type="integer">4</id> </hypervisor> </hypervisors> <primary_disk_size type="integer">13</primary_disk_size> <network_groups type="array">
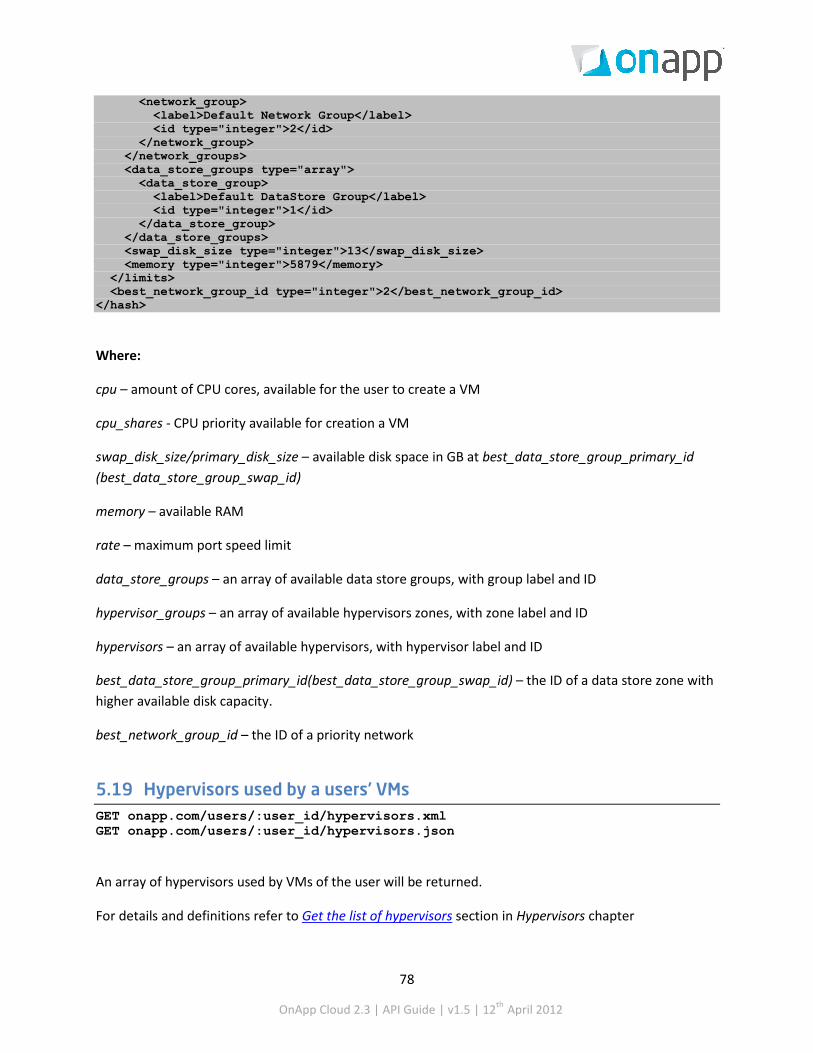
78
OnApp Cloud 2.3 | API Guide | v1.5 | 12th April 2012
<network_group> <label>Default Network Group</label> <id type="integer">2</id> </network_group> </network_groups> <data_store_groups type="array"> <data_store_group> <label>Default DataStore Group</label> <id type="integer">1</id> </data_store_group> </data_store_groups> <swap_disk_size type="integer">13</swap_disk_size> <memory type="integer">5879</memory> </limits> <best_network_group_id type="integer">2</best_network_group_id> </hash>
Where:
cpu – amount of CPU cores, available for the user to create a VM
cpu_shares - CPU priority available for creation a VM
swap_disk_size/primary_disk_size – available disk space in GB at best_data_store_group_primary_id (best_data_store_group_swap_id)
memory – available RAM
rate – maximum port speed limit
data_store_groups – an array of available data store groups, with group label and ID
hypervisor_groups – an array of available hypervisors zones, with zone label and ID
hypervisors – an array of available hypervisors, with hypervisor label and ID
best_data_store_group_primary_id(best_data_store_group_swap_id) – the ID of a data store zone with higher available disk capacity.
best_network_group_id – the ID of a priority network
5.19 Hypervisors used by a users’ VMs GET onapp.com/users/:user_id/hypervisors.xml GET onapp.com/users/:user_id/hypervisors.json
An array of hypervisors used by VMs of the user will be returned.
For details and definitions refer to Get the list of hypervisors section in Hypervisors chapter

79
OnApp Cloud 2.3 | API Guide | v1.5 | 12th April 2012
5.20 User’s data store zones
To see data store zones assigned to user’s VMs, use this request
GET onapp.com/users/:user_id/data_store_zones.xml GET onapp.com/users/:user_id/data_store_zones.json
For details and definitions refer to Get the list of data store zones section in Data store zones chapter
5.21 User’s network zones
To get the list of network zones associated with a user:
GET onapp.com/users/:user_id/network_zones.xml GET onapp.com/users/:user_id/network_zones.json
For details and definitions refer to Get the list of network zones section in Network zones chapter

80
OnApp Cloud 2.3 | API Guide | v1.5 | 12th April 2012
6. User additional fields User Additional Fields allow administrators to create custom fields and use them to create/edit additional information in a user’s profile.
6.1 Get the list of additional fields GET /user_additional_fields.xml GET /user_additional_fields.json
XML Request example
curl -u user:userpass http://onapp_test/user_additional_fields.xml
JSON Request example
curl -u user:userpass http://onapp_test/user_additional_fields.json
XML Output example
<?xml version="1.0" encoding="UTF-8"?> <user_additional_fields type="array"> <user_additional_field> <name>test_edited_by_api</name> <default_value>0</default_value> <data_type>integer</data_type> <id type="integer">1</id> </user_additional_field>
Where:
name – the additional field name. default value – information which will be displayed if the user hasn't specified information for this field, or if they enter information that doesn't match the preset data type. data type - integer/string additional field data type. id – the additional field id.
6.2 See an additional field details
To get details of a particular additional field, use the following request:
GET /settings/user_additional_fields/:id.xml GET /settings/user_additional_fields/:id.json

81
OnApp Cloud 2.3 | API Guide | v1.5 | 12th April 2012
XML Output example
<?xml version="1.0" encoding="UTF-8"?> <user_additional_fields type="array"> <user_additional_field> <name>test_edited_by_api</name> <default_value>0</default_value> <data_type>integer</data_type> <id type="integer">1</id> </user_additional_field>
For details refer to Get the list of additional fields section.
6.3 Create new additional field
To create a user additional field – use this request:
POST /user_additional_fields.xml POST /user_additional_fields.json
XML Request example
curl -i -X POST -d '<user_additional_field><name>TestField</name><data_type>string</data_type><default_value>testvalue</default_value></user_additional_field>' -u user:userpass http://onapp_test/user_additional_fields.xml -H 'Accept: application/xml' -H 'Content-type: application/xml'
JSON Request example
curl -i -X POST -d '{"user_additional_field":{"name":"TestField","data_type":"string","default_value":"TestName"}}' -u user:userpass http://onapp_test/user_additional_fields.json -H 'Accept: application/json' -H 'Content-type: application/json'
Where:
name* - the unique Additional Field name. (maximum length 256 characters.) data_type* - integer/string additional field data type. default_value* - information which will be displayed if the user hasn't specified information for this field, or if they enter information that doesn't match the preset data type.(maximum length 256 symbols.)
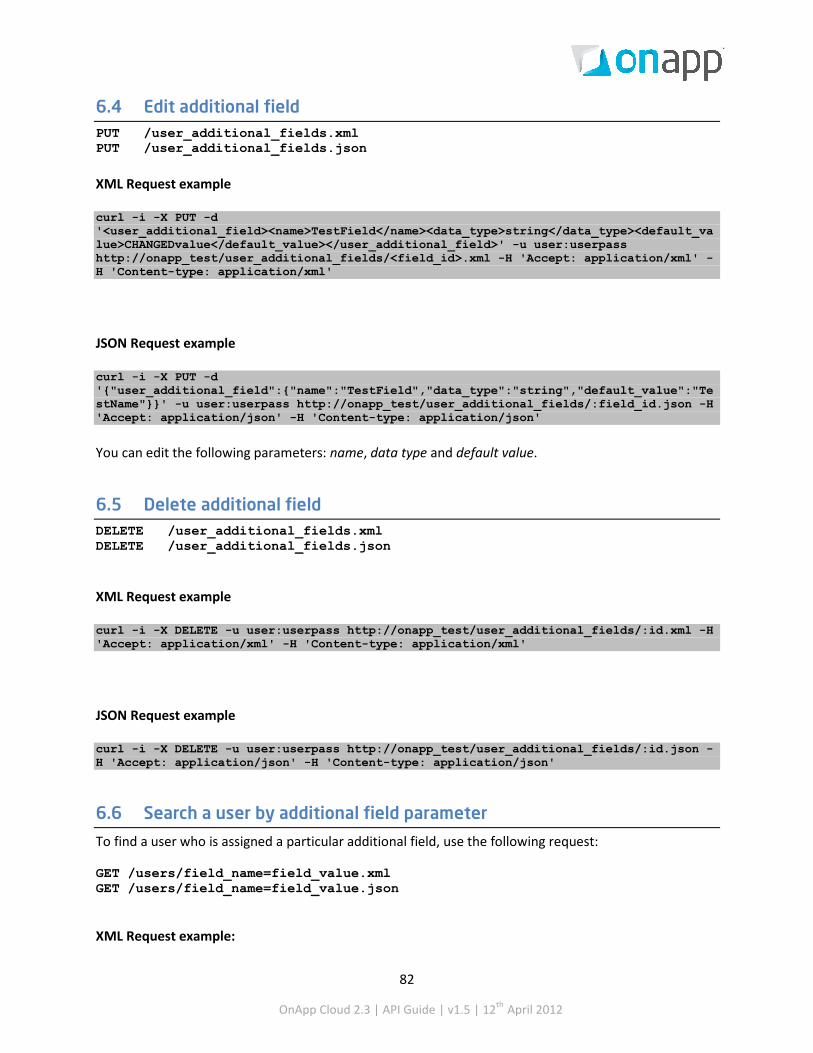
82
OnApp Cloud 2.3 | API Guide | v1.5 | 12th April 2012
6.4 Edit additional field PUT /user_additional_fields.xml PUT /user_additional_fields.json
XML Request example
curl -i -X PUT -d '<user_additional_field><name>TestField</name><data_type>string</data_type><default_value>CHANGEDvalue</default_value></user_additional_field>' -u user:userpass http://onapp_test/user_additional_fields/<field_id>.xml -H 'Accept: application/xml' -H 'Content-type: application/xml'
JSON Request example
curl -i -X PUT -d '{"user_additional_field":{"name":"TestField","data_type":"string","default_value":"TestName"}}' -u user:userpass http://onapp_test/user_additional_fields/:field_id.json -H 'Accept: application/json' -H 'Content-type: application/json'
You can edit the following parameters: name, data type and default value.
6.5 Delete additional field DELETE /user_additional_fields.xml DELETE /user_additional_fields.json
XML Request example
curl -i -X DELETE -u user:userpass http://onapp_test/user_additional_fields/:id.xml -H 'Accept: application/xml' -H 'Content-type: application/xml'
JSON Request example
curl -i -X DELETE -u user:userpass http://onapp_test/user_additional_fields/:id.json -H 'Accept: application/json' -H 'Content-type: application/json'
6.6 Search a user by additional field parameter
To find a user who is assigned a particular additional field, use the following request:
GET /users/field_name=field_value.xml GET /users/field_name=field_value.json
XML Request example:
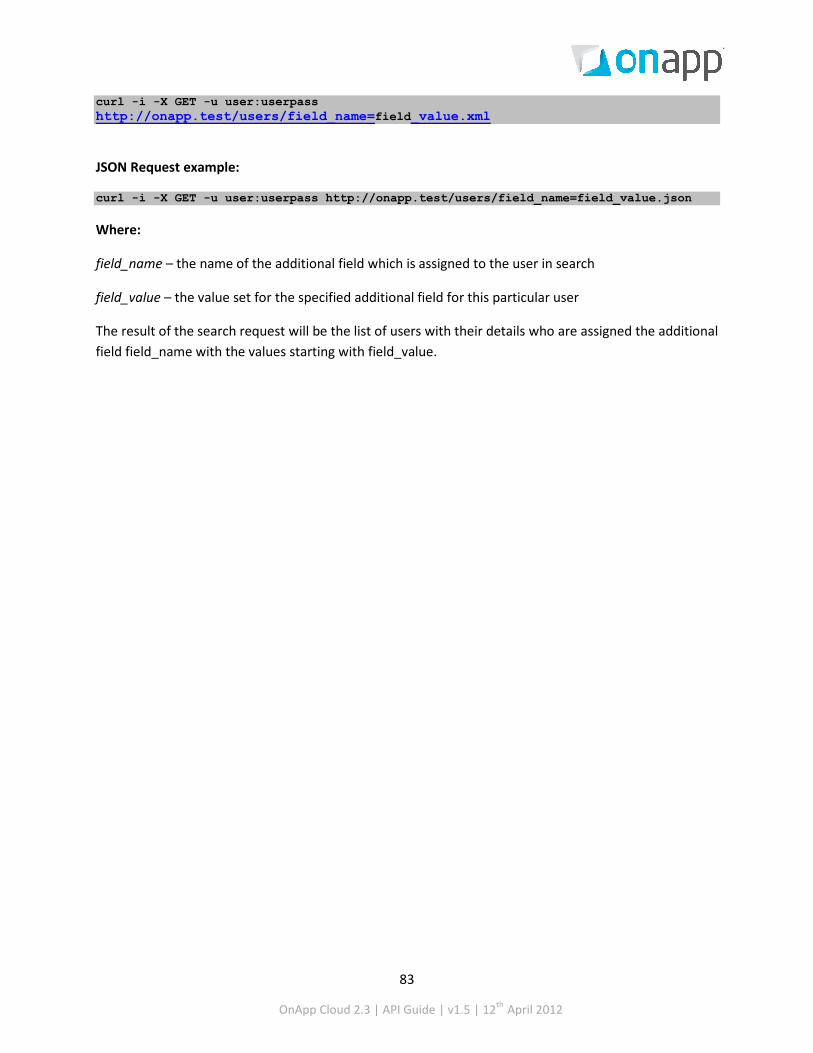
83
OnApp Cloud 2.3 | API Guide | v1.5 | 12th April 2012
curl -i -X GET -u user:userpass http://onapp.test/users/field_name=field_value.xml
JSON Request example:
curl -i -X GET -u user:userpass http://onapp.test/users/field_name=field_value.json Where:
field_name – the name of the additional field which is assigned to the user in search
field_value – the value set for the specified additional field for this particular user
The result of the search request will be the list of users with their details who are assigned the additional field field_name with the values starting with field_value.
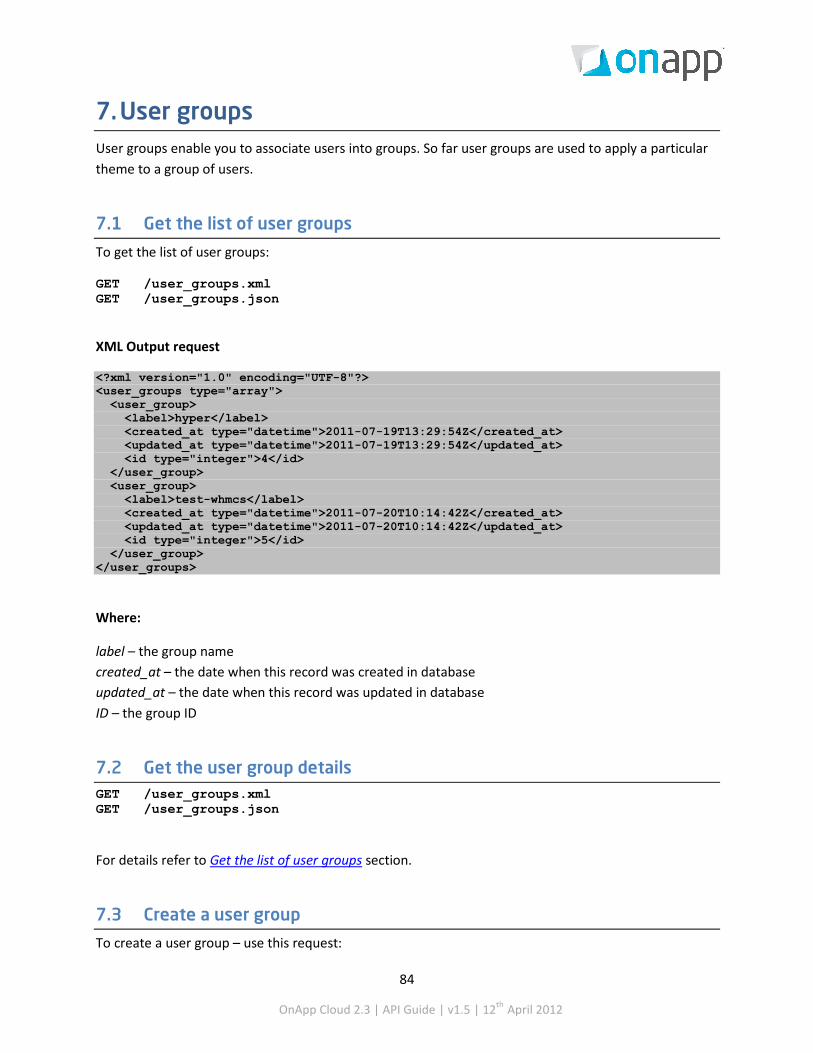
84
OnApp Cloud 2.3 | API Guide | v1.5 | 12th April 2012
7. User groups User groups enable you to associate users into groups. So far user groups are used to apply a particular theme to a group of users.
7.1 Get the list of user groups
To get the list of user groups:
GET /user_groups.xml GET /user_groups.json
XML Output request
<?xml version="1.0" encoding="UTF-8"?> <user_groups type="array"> <user_group> <label>hyper</label> <created_at type="datetime">2011-07-19T13:29:54Z</created_at> <updated_at type="datetime">2011-07-19T13:29:54Z</updated_at> <id type="integer">4</id> </user_group> <user_group> <label>test-whmcs</label> <created_at type="datetime">2011-07-20T10:14:42Z</created_at> <updated_at type="datetime">2011-07-20T10:14:42Z</updated_at> <id type="integer">5</id> </user_group> </user_groups>
Where:
label – the group name created_at – the date when this record was created in database updated_at – the date when this record was updated in database ID – the group ID
7.2 Get the user group details GET /user_groups.xml GET /user_groups.json
For details refer to Get the list of user groups section.
7.3 Create a user group
To create a user group – use this request:

85
OnApp Cloud 2.3 | API Guide | v1.5 | 12th April 2012
POST /user_groups.xml POST /user_groups.json
XML Request example
curl -i -X POST http://onapp.test/user_groups.xml -d '<?xml version="1.0" encoding="UTF-8"?><pack><label>TEST_XML</label></pack>' -u user:userpass -H 'Accept: application/xml' -H 'Content-type: application/xml'
JSON Request example
curl -i -X POST http://onapp.test/user_groups.json -d '{"pack":{"label":"TEST_JSON"}}' -u user:userpass -H 'Accept: application/json' -H 'Content-type: application/json'
7.4 Edit a user group
To edit a user group (change the name of the user group) - use this request:
PUT /user_groups/:id.xml PUT /user_groups/:id.json XML Request example
curl -i -X PUT http://onapp.test/user_groups/:id.xml -d '<user_group><label>NEW LABEL</label></user_group>' -u user:userpass -H 'Accept: application/xml' -H 'Content-type: application/xml'
JSON Request example
curl -i -X PUT http://onapp.test/user_groups/:id.json -d '{"user_group":{"label":"NEW LABEL"}}' -u user:userpass -H 'Accept: application/json' -H 'Content-type: application/json'
7.5 Delete a user group
To delete a user group:
DELETE /user_groups/:user_group_id.xml DELETE /user_groups/:user_group_id.json
XML Request example
curl -i -X DELETE http://onapp.test/user_groups/:id.xml -u user:userpass -H 'Accept: application/xml' -H 'Content-type: application/xml'
JSON Request example

86
OnApp Cloud 2.3 | API Guide | v1.5 | 12th April 2012
curl -i -X DELETE http://onapp.test/user_groups/:id.json -u admin:dev5dot130 -H 'Accept: application/json' -H 'Content-type: application/json'
Returns 200 response on successful deletion, or 404 response if no user group with such ID exists in the DB

87
OnApp Cloud 2.3 | API Guide | v1.5 | 12th April 2012
8. Whitelist IPs A white List is a list of IPs from which a particular user may access the control panel. Once an IP has been added to the white list, a user will not be able to access the control panel from any other IP. All methods are available to Whitelist IPs class.
8.1 Get the list of whitelist IPs
To get the list of IPs entered to the list:
GET /users/:user_id/user_white_lists.xml GET /users/:user_id/user_white_lists.json Output example
<?xml version="1.0" encoding="UTF-8"?> <user_white_lists> <user_white_list> <created_at>2011-04-21T15:38:14+03:00</created_at> <updated_at>2011-04-21T15:38:14+03:00</updated_at> <id>2</id> <user_id>8</user_id> <ip>192.168.112.1</ip> <description>My IP</description> </user_white_list> ... <user_white_list></user_white_list> ... </user_white_lists> Where:
created_at –the date when this record in DB was created
updated_at – the date when this record in DB was updated
id – the record ID
user_id – the ID of a user for whom this whitelist was created
ip – the IP from which this user can log in to CP
description – an optional description
8.2 Get whitelist IPs details
To get details for a particular whitelist, use the following request:
GET /users/:user_id/user_white_lists/:id.xml GET /users/:user_id/user_white_lists/:id.json

88
OnApp Cloud 2.3 | API Guide | v1.5 | 12th April 2012
XML Output example
<?xml version="1.0" encoding="UTF-8"?> <user_white_list> <created_at>2011-04-21T15:38:14+03:00</created_at> <updated_at>2011-04-21T15:38:14+03:00</updated_at> <id>2</id> <user_id>8</user_id> <ip>192.168.112.1</ip> <description>My IP</description> </user_white_list> Where:
created_at – the date when this record in DB was created
updated_at – the date when this record in DB was updated
id – the record ID
user_id – the ID of a user for whom this whitelist was created
ip – the IP from which this user can log in to CP
description – an optional description
8.3 Edit a whitelisted IP
To edit a whitelisted IP, use the following request:
PUT /users/:user_id/user_white_lists/:id.xml PUT /users/:user_id/user_white_lists/:id.json XML Request example
curl -i -X PUT -H 'Accept: application/xml' -H 'Content-type: application/xml' -u user:userpass -d '<user_white_list><ip>127.0.0.123</ip></user_white_list>' http://onapp.test/users/:user_id/user_white_lists/:id.xml JSON Request example
curl -i -X PUT -H 'Accept: application/json' -H 'Content-type: application/json' -d '{"user_white_list":{"ip":"109.123.105.129","description":"udr"}}' -u user:userpass http://onapp.test/users/:user_id/user_white_lists/:id.json
8.4 Add a whitelisted IP
To add an IP to the list of whitelisted IPs:
POST /users/:user_id/user_white_lists.xml POST /users/:user_id/user_white_lists.json XML Request example

89
OnApp Cloud 2.3 | API Guide | v1.5 | 12th April 2012
curl -i -X POST -H 'Accept: application/xml' -H 'Content-type: application/xml' -u user:userpass -d '<user_white_list><ip>127.0.0.111</ip></user_white_list>'http://onapp.test/users/9/user_white_lists.xml
JSON Request example
curl -i -X POST -H 'Accept: application/json' -H 'Content-type: application/json' -d '{"user_white_list":{"ip":"109.123.105.178","description":"qsas"}}' -u user:userpass http://onapp.test/users/:user_id/user_white_lists.json
Where:
ip * - IP address, from which a user can login to the Control panel
8.5 Delete a whitelisted IP
To delete a whitelisted IP, use the following request:
DELETE /users/:user_id/user_white_lists/:id.xml DELETE /users/:user_id/user_white_lists/:id.json
XML Request example
curl -X DELETE -H 'Accept: application/xml' -H 'Content-type: application/xml' -u user:userpass http://onapp.test/users/:user_id/user_white_lists/:id.xml
JSON Request example
curl -X DELETE -H 'Accept: application/json' -H 'Content-type: application/json' -u user:userpass http://onapp.test/users/:user_id/user_white_lists/:id.json

90
OnApp Cloud 2.3 | API Guide | v1.5 | 12th April 2012
9. Firewall Rules for VMs Firewall rules are applied to the VMs of your cloud to prevent unauthorized or unwanted requests to their network interfaces. You can configure your firewall to Accept/Drop specific request types. All methods are available for this class.
9.1 Get the list of firewall rules
To get the list of firewall rules assigned to a VM, use the following request:
GET /virtual_machines/:virtual_machine_id/firewall_rules.xml GET /virtual_machines/:virtual_machine_id/firewall_rules.json <?xml version="1.0" encoding="UTF-8"?> <firewall_rules> <firewall_rule> <position>1</position> <address> </address> <created_at>2011-04-20T12:52:10+03:00</created_at> <command>ACCEPT</command> <updated_at>2011-04-20T12:52:10+03:00</updated_at> <port>21</port> <protocol>TCP</protocol> <id>1</id> <network_interface_id>5</network_interface_id> </firewall_rule> </firewall_rules> Where:
position – the rule priority
address* – the IP address for which this rule is active. If none is specified, all IPs will be subject to this rule.
created_at – the date when the record in DB was created
command – the action which will be performed with the IP specified by the address parameter
updated_at – the date when the record was updated in DB
port – the port for which this rule is active. If the field is empty, the rule will apply to all ports
protocol – the IP protocol (TCP or UDP)for which this rule is active
id – the ID of this record
network_interface_id – the ID of a network interface for which this rule is active

91
OnApp Cloud 2.3 | API Guide | v1.5 | 12th April 2012
9.2 Edit a firewall rule
To edit a firewall rule, use the following request:
PUT /virtual_machines/:virtual_machine_id/firewall_rules/:id.xml PUT /virtual_machines/:virtual_machine_id/firewall_rules/:id.json
XML Request example
curl -i -X PUT -H 'Accept: application/xml' -H 'Content-type: application/xml' -u user:userpass -d '<firewall_rule><address>192.168.128.133</address><command>ACCEPT</command><port>70</port><protocol>TCP</protocol><network_interface_id>105</network_interface_id></firewall_rule>' http://onapp.test/virtual_machines/:virtual_machine_id/firewall_rules/:id.xml
JSON Request example
curl -i -X PUT -H 'Accept: application/json' -H 'Content-type: application/json' -u user:userpass -d '{"firewall_rule":{"address":"192.168.128.133","command":"ACCEPT","port":"70","protocol":"TCP","network_interface_id":"105"}}' –url http://onapp.test/virtual_machines/:virtual_machine_id/firewall_rules/:id.json
You can edit the following parameters:
address* - Set the IP address for which this rule is active.
• Leave the empty field to apply this rule to all IPs • Enter hyphen-separated IPs to apply the rule to an IP range (e.g. 192.168.1.1-192.168.1.10) • Enter the IPs with slash to apply the rule to CIDR (e.g. 192.168.1.1/24)
command - sets the command to ACCEPT or DROP the abovementioned IPs
port - sets the port addresses
• Leave the empty field to apply the rule to all ports • Enter colon-separated ports to apply the rule to a port range (e.g. 1024:1028) • Enter comma-separated ports to apply the rule to the list of ports (e.g. 80,443,21)
protocol - protocol type (TCP or UDP)
network_interface_id - interface of the network
9.3 Add a firewall rule
To add a firewall rule, use the request listed below. After you add a rule, you have to apply it to initiate a transaction responsible for running firewall rules. See the Apply a firewall rule section for details:

92
OnApp Cloud 2.3 | API Guide | v1.5 | 12th April 2012
To add a firewall rule, use the following request:
POST /virtual_machines/:virtual_machine_id/firewall_rules.xml POST /virtual_machines/:virtual_machine_id/firewall_rules.json
XML Request example
curl -i -X POST -H 'Accept: application/xml' -H 'Content-type: application/xml' -u user:userpass -d '<?xml version="1.0" encoding="UTF-8"?><firewall_rule><address></address><command>DROP</command><port></port><protocol>TCP</protocol><network_interface_id>105</network_interface_id></firewall_rule>' –url http://onapp.test/virtual_machines/:virtual_machine_id/firewall_rules.xml
JSON Request example
curl -i -X POST -H 'Accept: application/json' -H 'Content-type: application/json' -u user:userpass -d '{"firewall_rule":{"command":"DROP","protocol":"TCP","network_interface_id":"105"}}' –url http://onapp.test/virtual_machines/:virtual_machine_id/firewall_rules.json
Send the following parameters:
address* - Set the IP address for which this rule is active.
• Leave the empty field to apply this rule to all IPs • Enter hyphen-separated IPs to apply the rule to an IP range (e.g. 192.168.1.1-192.168.1.10) • Enter the IPs with slash to apply the rule to CIDR (e.g. 192.168.1.1/24)
command * - sets the command to ACCEPT or DROP the abovementioned IPs
port - sets the port addresses
• Leave the empty field to apply the rule to all ports • Enter colon-separated ports to apply the rule to a port range (e.g. 1024:1028) • Enter comma-separated ports to apply the rule to the list of ports (e.g. 80,443,21)
protocol * - protocol type (TCP or UDP)
network_interface_id * - interface of the network
9.4 Apply a firewall rule
To apply firewall rules for a VM:
POST /virtual_machines/:virtual_machine_id/update_firewall_rules.xml POST /virtual_machines/:virtual_machine_id/update_firewall_rules.json

93
OnApp Cloud 2.3 | API Guide | v1.5 | 12th April 2012
XML request example:
curl -i -X POST -u user:userpass -H 'Accept: application/xml' --url http://onapp.test/virtual_machines/28/update_firewall_rules.xml
JSON request example:
curl -i -X POST -u user:userpass -H 'Accept: application/xml' --url http://onapp.test/virtual_machines/28/update_firewall_rules.json
9.5 Delete a firewall rule
To delete a firewall rule, use the flowing request:
DELETE /virtual_machines/:virtual_machine_id/firewall_rules/:id.xml DELETE /virtual_machines/:virtual_machine_id/firewall_rules/:id.json XML Request example
curl -i -X DELETE -H 'Accept: application/xml' -H 'Content-type: application/xml' -u user:userpass --url http://onapp.test/virtual_machines/:virtual_machine_id/firewall_rules/:id.xml
JSON Request example
curl -i -X DELETE -H 'Accept: application/json' -H 'Content-type: application/json' -u user:userpass --url http://onapp.test/virtual_machines/:virtual_machine_id/firewall_rules/:id.json
9.6 Set default firewall rules
To set default firewall rules for a VM (either DROP or ACCEPT), you need to set the rule for each network interface the VM is using. To do so, check the network interface ID and run the following request:
POST /virtual_machines/:virtual_machine_id/network_interfaces/:id.xml POST /virtual_machines/:virtual_machine_id/network_interfaces/:id.json
XML Request example
curl -i -X PUT -u user:userpass -H 'Accept: application/xml' -H 'Content-type: application/xml' -d '<network_interface><default_firewall_rule>ACCEPT</default_firewall_rule></network_interface>' --url http://onapp.test/virtual_machines/:virtual_machine_id/network_interfaces/:network_interface_id.xml
JSON Request example

94
OnApp Cloud 2.3 | API Guide | v1.5 | 12th April 2012
curl -i -X PUT -u user:userpass -H 'Accept: application/json' -H 'Content-type: application/json' -d '{"network_interface":{"default_firewall_rule":"DROP"}}' --url http://onapp.test/virtual_machines/:virtual_machine_id/network_interfaces/:network_interface_id.json
Where:
default_firewall_rule * - set default firewall rule for the particular VM network interface – either DROP or ACCEPT

95
OnApp Cloud 2.3 | API Guide | v1.5 | 12th April 2012
10. Data store zones This class manages all the Data store zones created in the cloud. A data store zone consists of several data stores sharing the same permissions and assigned to the same billing plan. By setting up different zones, you can create different tiers of storage with different pricing and performance.
10.1 Get the list of data store zones
To get the list of available data store zones, use the following method:
GET /data_store_zones.xml GET /data_store_zones.json
You will get an array of data store zones set up within your cloud.
XML Output example
<?xml version="1.0" encoding="UTF-8"?> <data-store-groups type="array"> <data-store-group> <label>DSZ_1</label> <created_at type="datetime">2011-01-11T11:11:15Z</created_at> <updated_at type="datetime">2011-01-17T12:56:41Z</updated_at> <id type="integer">5</id> </data-store-group>
Where:
label The data store zone title created_at the date in the [YYYY][MM][DD]T[hh][mm][ss]Z format updated_at the date when the Data store zone was updated in the
[YYYY][MM][DD]T[hh][mm][ss]Z format id The data store zone ID
10.2 Add a data store zone
Use the following methods to create a new Data store zone:
POST /data_store_zones.xml POST /data_store_zones.json
XML Request example
curl -i -X POST http://onapp.test/data_store_zones.xml -d '<?xml version="1.0" encoding="UTF-8"?><pack><label>TEST_XML</label></pack>' -u user:userpass -H 'Accept: application/xml' -H 'Content-type: application/xml'
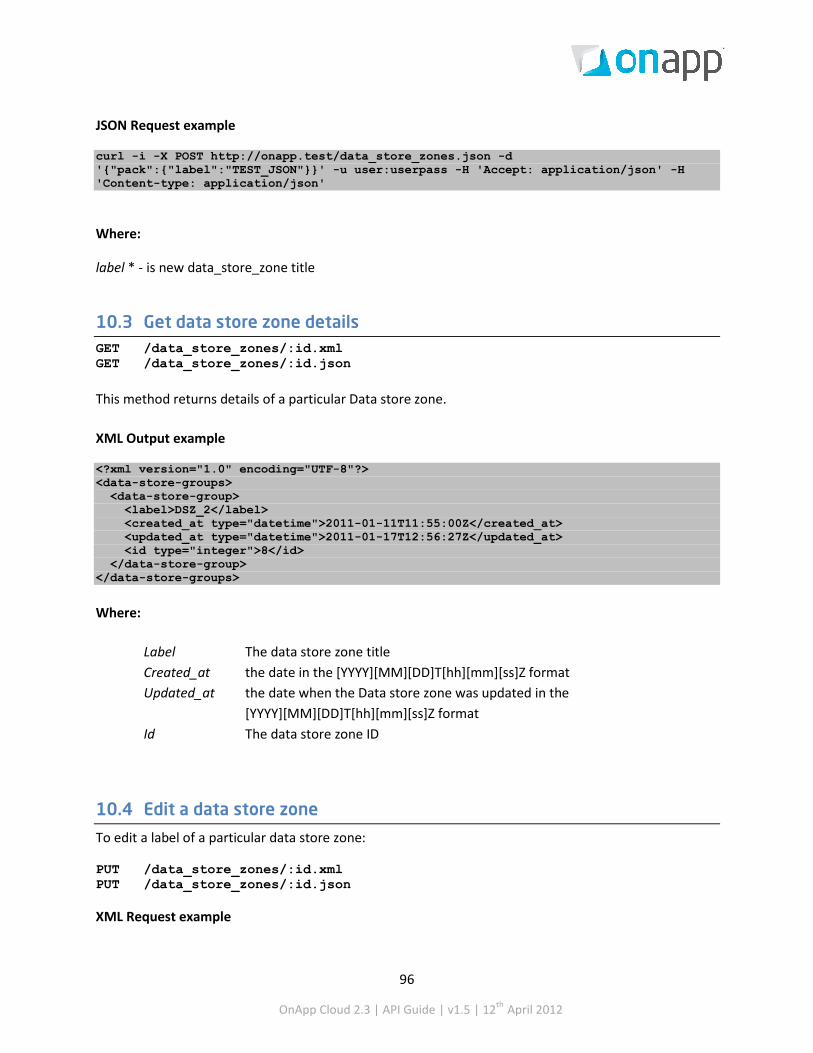
96
OnApp Cloud 2.3 | API Guide | v1.5 | 12th April 2012
JSON Request example
curl -i -X POST http://onapp.test/data_store_zones.json -d '{"pack":{"label":"TEST_JSON"}}' -u user:userpass -H 'Accept: application/json' -H 'Content-type: application/json'
Where:
label * - is new data_store_zone title
10.3 Get data store zone details GET /data_store_zones/:id.xml GET /data_store_zones/:id.json
This method returns details of a particular Data store zone.
XML Output example
<?xml version="1.0" encoding="UTF-8"?> <data-store-groups> <data-store-group> <label>DSZ_2</label> <created_at type="datetime">2011-01-11T11:55:00Z</created_at> <updated_at type="datetime">2011-01-17T12:56:27Z</updated_at> <id type="integer">8</id> </data-store-group> </data-store-groups>
Where:
Label The data store zone title Created_at the date in the [YYYY][MM][DD]T[hh][mm][ss]Z format Updated_at the date when the Data store zone was updated in the
[YYYY][MM][DD]T[hh][mm][ss]Z format Id The data store zone ID
10.4 Edit a data store zone
To edit a label of a particular data store zone:
PUT /data_store_zones/:id.xml PUT /data_store_zones/:id.json XML Request example

97
OnApp Cloud 2.3 | API Guide | v1.5 | 12th April 2012
curl -X PUT http://onapp.test/data_store_zones/:id.xml -d ’<data_store_group><label>Data_Store_Name</label></data_store_group>’ -u user:userpass -H 'Accept: application/xml' -H 'Content-type: application/xml' JSON Request example
curl -X PUT http://onapp.test/data_store_zones.json -d ‘{data_store_group: {label:”Data_Store_name”}}’ -u user:userpass -H 'Accept: application/json' -H 'Content-type: application/json'
10.5 Delete a data store zone
To delete a particular data store zone:
DELETE /data_store_zones/:id.xml DELETE /data_store_zones/:id.json XML Request example
curl -X DELETE http://onapp.test/data_store_zones/:id.xml -u user:userpass -H 'Accept: application/xml' -H 'Content-type: application/xml'
JSON Request example
curl -X DELETE http://onapp.test/data_store_zones/:id.json -u user:userpass -H 'Accept: application/json' -H 'Content-type: application/json'
You will get a 200 status response on success, and 404 if there is no such a data store zone with a requested ID or you entered incorrect URL.
10.6 Get the list of data stores attached to a data store zone GET /data_store_zones/:data_store_group_id/data_stores.xml GET /data_store_zones/:data_store_group_id/data_stores.json On success, an array of data stores is returned.
XML Output example
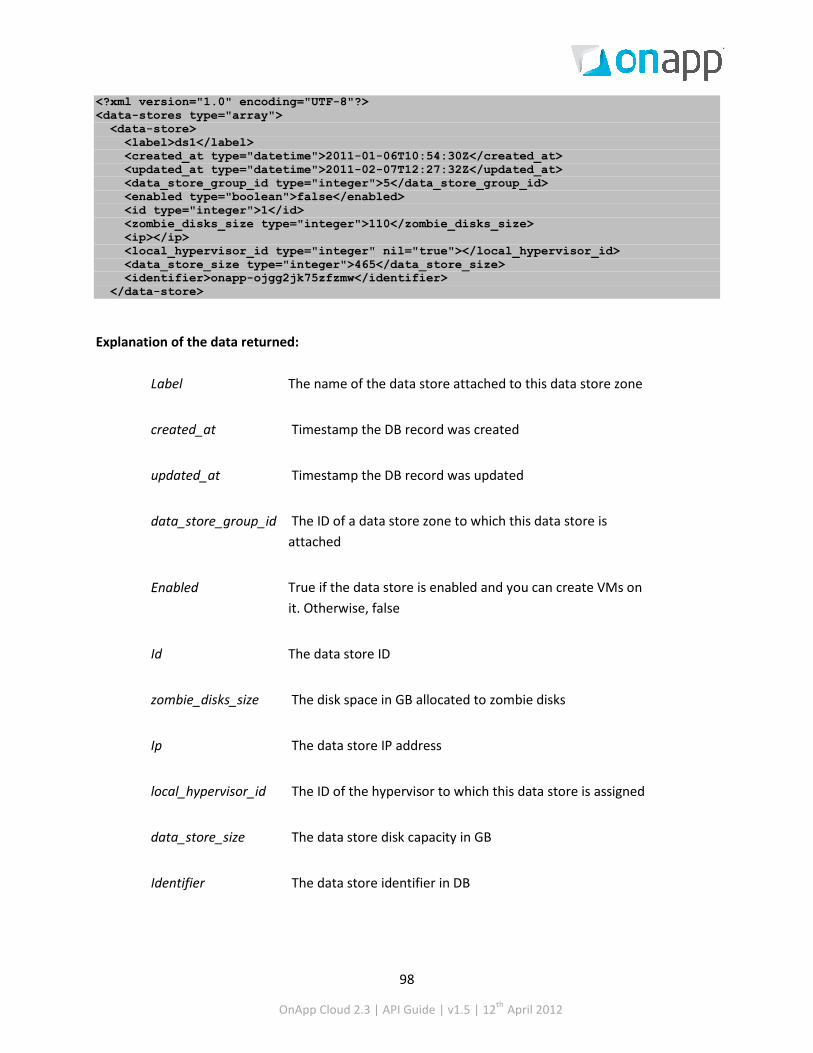
98
OnApp Cloud 2.3 | API Guide | v1.5 | 12th April 2012
<?xml version="1.0" encoding="UTF-8"?> <data-stores type="array"> <data-store> <label>ds1</label> <created_at type="datetime">2011-01-06T10:54:30Z</created_at> <updated_at type="datetime">2011-02-07T12:27:32Z</updated_at> <data_store_group_id type="integer">5</data_store_group_id> <enabled type="boolean">false</enabled> <id type="integer">1</id> <zombie_disks_size type="integer">110</zombie_disks_size> <ip></ip> <local_hypervisor_id type="integer" nil="true"></local_hypervisor_id> <data_store_size type="integer">465</data_store_size> <identifier>onapp-ojgg2jk75zfzmw</identifier> </data-store>
Explanation of the data returned:
Label The name of the data store attached to this data store zone
created_at Timestamp the DB record was created
updated_at Timestamp the DB record was updated
data_store_group_id The ID of a data store zone to which this data store is attached
Enabled True if the data store is enabled and you can create VMs on it. Otherwise, false
Id The data store ID
zombie_disks_size The disk space in GB allocated to zombie disks
Ip The data store IP address
local_hypervisor_id The ID of the hypervisor to which this data store is assigned
data_store_size The data store disk capacity in GB
Identifier The data store identifier in DB

99
OnApp Cloud 2.3 | API Guide | v1.5 | 12th April 2012
10.7 Attach a data store to a data store zone POST /data_store_zones/:data_store_zone_id/data_stores/:id/attach.xml POST /data_store_zones/:data_store_zone_id/data_stores/:id/attach.json
XML Request example
curl -X POST http://onapp.test/data_store_zones/:data_store_zone_id/data_stores/:data_store_id/attach.xml -u user:userpass -H 'Accept: application/xml' -H 'Content-type: application/xml'
JSON Request example
curl -X POST http://onapp.test/data_store_zones/:data_store_zone_id/data_stores/:data_store_id/attach.json -u user:userpass -H 'Accept: application/json' -H 'Content-type: application/json' Using this request you attach an unassigned data store (:data_store_id *) to a data store zone (:data_store_zone_id *)
10.8 Detach a data store from a data store zone POST /data_store_zones/:data_store_group_id/data_stores/:id/detach.xml POST /data_store_zones/:data_store_group_id/data_stores/:id/detach.json
XML Request example
curl -X POST http://onapp.test/data_store_zones/:data_store_zone_id/data_stores/:data_store_id/detach.xml -u user:userpass -H 'Accept: application/xml' -H 'Content-type: application/xml'
JSON Request example
curl -X POST http://onapp.test/data_store_zones/:data_store_zone_id/data_stores/:data_store_id/detach.json -u user:userpass -H 'Accept: application/json' -H 'Content-type: application/json'
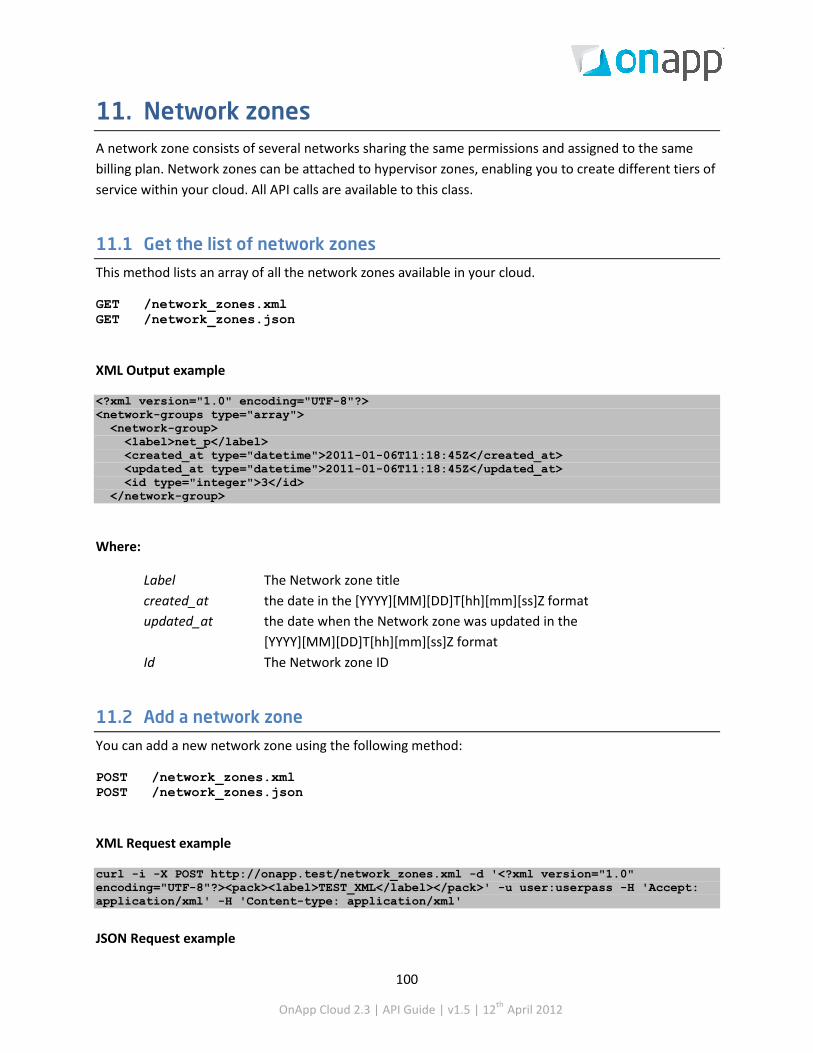
100
OnApp Cloud 2.3 | API Guide | v1.5 | 12th April 2012
11. Network zones A network zone consists of several networks sharing the same permissions and assigned to the same billing plan. Network zones can be attached to hypervisor zones, enabling you to create different tiers of service within your cloud. All API calls are available to this class.
11.1 Get the list of network zones
This method lists an array of all the network zones available in your cloud.
GET /network_zones.xml GET /network_zones.json
XML Output example
<?xml version="1.0" encoding="UTF-8"?> <network-groups type="array"> <network-group> <label>net_p</label> <created_at type="datetime">2011-01-06T11:18:45Z</created_at> <updated_at type="datetime">2011-01-06T11:18:45Z</updated_at> <id type="integer">3</id> </network-group>
Where:
Label The Network zone title created_at the date in the [YYYY][MM][DD]T[hh][mm][ss]Z format updated_at the date when the Network zone was updated in the
[YYYY][MM][DD]T[hh][mm][ss]Z format
Id The Network zone ID
11.2 Add a network zone
You can add a new network zone using the following method:
POST /network_zones.xml POST /network_zones.json
XML Request example
curl -i -X POST http://onapp.test/network_zones.xml -d '<?xml version="1.0" encoding="UTF-8"?><pack><label>TEST_XML</label></pack>' -u user:userpass -H 'Accept: application/xml' -H 'Content-type: application/xml' JSON Request example

101
OnApp Cloud 2.3 | API Guide | v1.5 | 12th April 2012
curl -i -X POST http://onapp.test/network_zones.json -d '{"pack":{"label":"TEST_JSON"}}' -u user:userpass -H 'Accept: application/json' -H 'Content-type: application/json'
Where the only required parameter is label * - new network zone title
11.3 Get network zone details
To get a particular network zone details:
GET /network_zones/:id.xml GET /network_zones/:id.json
XML Output example
<?xml version="1.0" encoding="UTF-8"?> <network-groups type="array"> <network-group> <label>network_zone</label> <created_at type="datetime">2011-01-06T11:18:45Z</created_at> <updated_at type="datetime">2011-01-06T11:18:45Z</updated_at> <id type="integer">8</id> </network-group>
Where:
label The Network zone title created_at the date in the [YYYY][MM][DD]T[hh][mm][ss]Z format updated_at the date when the Network zone was updated in the
[YYYY][MM][DD]T[hh][mm][ss]Z format
id The Network zone ID
11.4 Edit a network zone
You can edit a label and an ID of a particular network zone using the PUT method:
PUT /network_zones/:id.xml PUT /network_zones/:id.json XML Request example
curl -X POST http://onapp.test/network_zones/:id.xml -d ’<network_group><label>Network_Name</label></network_group>’ -u user:userpass -H 'Accept: application/xml' -H 'Content-type: application/xml' JSON Request example

102
OnApp Cloud 2.3 | API Guide | v1.5 | 12th April 2012
curl -X POST http://onapp.test/network_zones/:id.json -d ‘{network_group: {label:”Network_name”}}’ -u user:userpass -H 'Accept: application/json' -H 'Content-type: application/json'
11.5 Delete a network zone
To delete a network zone, use the following API call:
DELETE /network_zones/:id.xml DELETE /network_zones/:id.json XML Request example
curl -X DELETE http://onapp.test/network_zones/:id.xml -u user:userpass -H 'Accept: application/xml' -H 'Content-type: application/xml'
JSON Request example
curl -X DELETE http://onapp.test/network_zones/:id.json -u user:userpass -H 'Accept: application/json' -H 'Content-type: application/json'
You will get a 200 status response on success, and 404 if there is no such a network zone with a requested ID or you entered incorrect URL.
11.6 Attach a network to a network zone POST /network_zones/:network_zone_id/networks/:id/attach.xml POST /network_zones/:network_zone_id/networks/:id/attach.json XML Request example
curl -X POST http://onapp.test/network_zones/:network_zone_id/networks/:network_id/attach.xml -u user:userpass -H 'Accept: application/xml' -H 'Content-type: application/xml' JSON Request example
curl -X POST http://onapp.test/network_zones/:network_zone_id/networks/:network_id/attach.json -u user:userpass -H 'Accept: application/json' -H 'Content-type: application/json' This request attaches network (:network_id *) to a network zone (:network_zone_id *)
11.7 Remove a network from a network zone POST /network_zones/:network_zone_id/networks/:id/detach.xml POST /network_zones/:network_zone_id/networks/:id/detach.json

103
OnApp Cloud 2.3 | API Guide | v1.5 | 12th April 2012
XML Request example
curl -X POST http://onapp.test/network_zones/:network_zone_id/networks/:network_id/detach.xml -u user:userpass -H 'Accept: application/xml' -H 'Content-type: application/xml'
JSON Request example
curl -X POST http://onapp.test/network_zones/:network_zone_id/networks/:network_id/detach.json -u user:userpass -H 'Accept: application/json' -H 'Content-type: application/json'

104
OnApp Cloud 2.3 | API Guide | v1.5 | 12th April 2012
12. Hypervisor zones A hypervisor zone consists of several hypervisors sharing the same permissions and assigned to the same billing plan. This class manages all the hypervisor zones created in the cloud. Hypervisor zones can have data stores and networks attached to them. The combination of hypervisor, data store and network zones can be used to create private clouds and tiered services for customers. All API calls are available to this class.
12.1 Get the list of hypervisor zones
To get an array of hypervisor zones set up within your cloud, use the following request:
GET /settings/hypervisor_zones.xml GET /settings/hypervisor_zones.json
XML Output example
<hypervisor-groups type="array"> <hypervisor-group> <label>HV_1</label> <created_at type="datetime">2011-01-11T11:11:15Z</created_at> <updated_at type="datetime">2011-01-17T12:56:41Z</updated_at> <id type="integer">5</id> </hypervisor-group>
Where:
Label The hypervisor zone title
created_at The date in the [YYYY][MM][DD]T[hh][mm][ss]Z format
updated_at The date when the hypervisor zone was updated in the [YYYY][MM][DD]T[hh][mm][ss]Z format
Id The hypervisor zone ID
12.2 Add a hypervisor zone
To add a new hypervisor zone, send the following request:
POST /settings/hypervisor_zones.xml POST /settings/hypervisor_zones.json
XML Request example
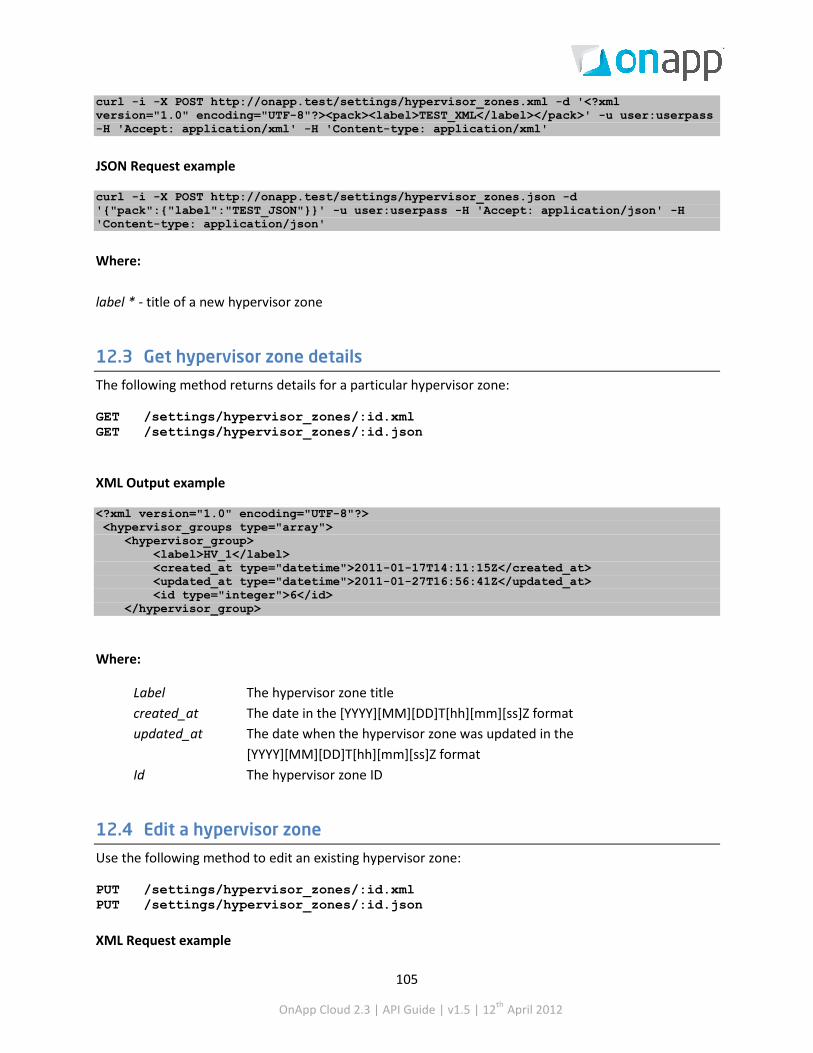
105
OnApp Cloud 2.3 | API Guide | v1.5 | 12th April 2012
curl -i -X POST http://onapp.test/settings/hypervisor_zones.xml -d '<?xml version="1.0" encoding="UTF-8"?><pack><label>TEST_XML</label></pack>' -u user:userpass -H 'Accept: application/xml' -H 'Content-type: application/xml' JSON Request example
curl -i -X POST http://onapp.test/settings/hypervisor_zones.json -d '{"pack":{"label":"TEST_JSON"}}' -u user:userpass -H 'Accept: application/json' -H 'Content-type: application/json' Where: label * - title of a new hypervisor zone
12.3 Get hypervisor zone details
The following method returns details for a particular hypervisor zone:
GET /settings/hypervisor_zones/:id.xml GET /settings/hypervisor_zones/:id.json
XML Output example
<?xml version="1.0" encoding="UTF-8"?> <hypervisor_groups type="array"> <hypervisor_group> <label>HV_1</label> <created_at type="datetime">2011-01-17T14:11:15Z</created_at> <updated_at type="datetime">2011-01-27T16:56:41Z</updated_at> <id type="integer">6</id> </hypervisor_group>
Where:
Label The hypervisor zone title created_at The date in the [YYYY][MM][DD]T[hh][mm][ss]Z format updated_at The date when the hypervisor zone was updated in the
[YYYY][MM][DD]T[hh][mm][ss]Z format Id The hypervisor zone ID
12.4 Edit a hypervisor zone
Use the following method to edit an existing hypervisor zone:
PUT /settings/hypervisor_zones/:id.xml PUT /settings/hypervisor_zones/:id.json
XML Request example
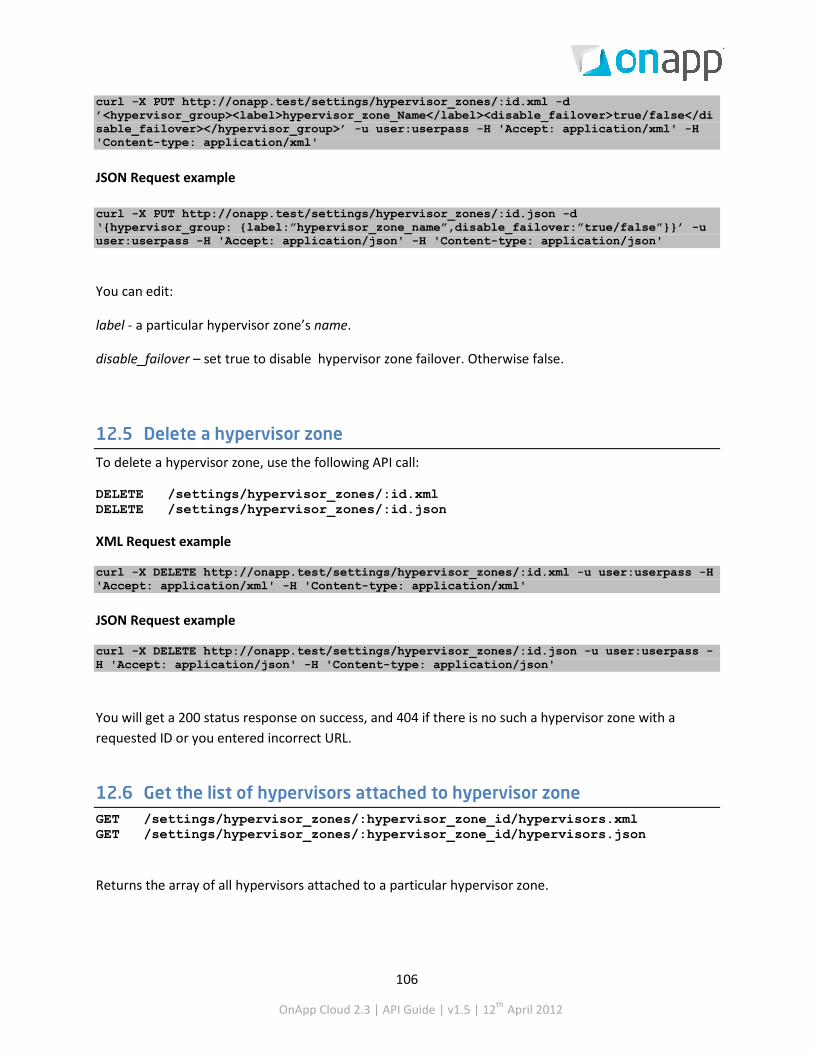
106
OnApp Cloud 2.3 | API Guide | v1.5 | 12th April 2012
curl -X PUT http://onapp.test/settings/hypervisor_zones/:id.xml -d ’<hypervisor_group><label>hypervisor_zone_Name</label><disable_failover>true/false</disable_failover></hypervisor_group>’ -u user:userpass -H 'Accept: application/xml' -H 'Content-type: application/xml'
JSON Request example
curl -X PUT http://onapp.test/settings/hypervisor_zones/:id.json -d ‘{hypervisor_group: {label:”hypervisor_zone_name”,disable_failover:”true/false”}}’ -u user:userpass -H 'Accept: application/json' -H 'Content-type: application/json'
You can edit:
label - a particular hypervisor zone’s name.
disable_failover – set true to disable hypervisor zone failover. Otherwise false.
12.5 Delete a hypervisor zone
To delete a hypervisor zone, use the following API call:
DELETE /settings/hypervisor_zones/:id.xml DELETE /settings/hypervisor_zones/:id.json XML Request example
curl -X DELETE http://onapp.test/settings/hypervisor_zones/:id.xml -u user:userpass -H 'Accept: application/xml' -H 'Content-type: application/xml' JSON Request example
curl -X DELETE http://onapp.test/settings/hypervisor_zones/:id.json -u user:userpass -H 'Accept: application/json' -H 'Content-type: application/json'
You will get a 200 status response on success, and 404 if there is no such a hypervisor zone with a requested ID or you entered incorrect URL.
12.6 Get the list of hypervisors attached to hypervisor zone GET /settings/hypervisor_zones/:hypervisor_zone_id/hypervisors.xml GET /settings/hypervisor_zones/:hypervisor_zone_id/hypervisors.json
Returns the array of all hypervisors attached to a particular hypervisor zone.

107
OnApp Cloud 2.3 | API Guide | v1.5 | 12th April 2012
12.7 Attach/remove a hypervisor from a hypervisor zone
You can attach an unassigned hypervisor to a HVZ, change the zone it is assigned to or remove it from the zone by editing a hypervisor.
12.8 Get the list of data store joins attached to a hypervisor zone GET /settings/hypervisor_zones/:hypervisor_zone_id/data_store_joins.xml GET /settings/hypervisor_zones/:hypervisor_zone_id/data_store_joins.json
XML Output example
<?xml version="1.0" encoding="UTF-8"?> <data_store_joins type="array"> <data_store_join> <created_at type="datetime">2011-01-17T13:16:31Z</created_at> <target_join_type>HypervisorGroup</target_join_type> <updated_at type="datetime">2011-01-17T13:16:31Z</updated_at> <data_store_id type="integer">2</data_store_id> <hypervisor_id type="integer" nil="true"></hypervisor_id> <id type="integer">7</id> <target_join_id type="integer">9</target_join_id> </data_store_join> </data_store_joins>
Where:
created_at Timestamp in DB when the record was created
target_join_type HypervisorGroup for data store joins
updated_at Timestamp in DB when the record was updated
data_store_id The ID of a data store attached to a hypervisor zone
hypervisor_id The ID of a hypervisor to which a data store is attached
id The data store join ID
target_join_id The ID of a hypervisor zone for which a join is created
12.9 Add a data store join to a hypervisor zone POST /settings/hypervisor_zones/:hypervisor_zone_id/data_store_joins.xml POST /settings/hypervisor_zones/:hypervisor_zone_id/data_store_joins.json

108
OnApp Cloud 2.3 | API Guide | v1.5 | 12th April 2012
XML Request example
curl -i -X POST http://onapp.test/settings/hypervisor_zones/:hypervisor_zone_id/data_store_joins.xml -d '<data_store_id>:data_store_id</data_store_id>' -u admin:passwod -H 'Accept: application/xml' -H 'Content-type: application/xml'
JSON Request example
curl -i -X POST http://onapp.test/settings/hypervisor_zones/:hypervisor_zone_id/data_store_joins.json -d '{data_store_id:”:data_store_id”}' -u admin:passwod -H 'Accept: application/json' -H 'Content-type: application/json' This request attaches a particular data store join (:data_store_id *) to a specific hypervisor zone (:hypervisor_zone_id )
12.10 Remove a data store join from a hypervisor zone DELETE /settings/hypervisor_zones/:hypervisor_zone_id/data_store_joins/:id.xml DELETE /settings/hypervisor_zones/:hypervisor_zone_id/data_store_joins/:id.json XML Request example
curl -i -X DELETE http://onapp.test/settings/hypervisor_zones/:hypervisor_zone_id/data_store_joins/:data_store_join_id.xml -u admin:passwod -H 'Accept: application/xml' -H 'Content-type: application/xml'
JSON Request example
curl -i -X DELETE http://onapp.test/settings/hypervisor_zones/:hypervisor_zone_id/data_store_joins/:data_store_join_id.json -u admin:passwod -H 'Accept: application/json' -H 'Content-type: application/json'
Where:
:id * – is an ID of data store join
Returns HTTP 200 response on successful deletion, or HTTP 404 when a data store join with the ID specified is not found, or the URL requested is incorrect.

109
OnApp Cloud 2.3 | API Guide | v1.5 | 12th April 2012
12.11 Get the list of network joins attached to this hypervisor zone GET /settings/hypervisor_zones/:hypervisor_zone_id/network_joins.xml GET /settings/hypervisor_zones/:hypervisor_zone_id/network_joins.json
An array of network joins is returned on successful request.
XML Output example
<?xml version="1.0" encoding="UTF-8"?> <network_joins type="array"> <network_join> <created_at type="datetime">2011-02-01T12:27:52Z</created_at> <network_id type="integer">1</network_id> <target_join_type>HypervisorGroup</target_join_type> <updated_at type="datetime">2011-02-01T12:27:52Z</updated_at> <hypervisor_id type="integer" nil="true"></hypervisor_id> <id type="integer">6</id> <interface>eth2</interface> <target_join_id type="integer">1</target_join_id> </network_join> </network_joins>
Where:
created_at The timestamp when the record was created
network_id The ID of a network attached to this zone
target_join_type HypervisorGroup for a network join
updated_at The timestamp when the record was updated
hypervisor_id The ID of a hypervisor to which this network is assigned
id The network join ID
Interface The network join interface
target_join_id The ID of a HV zone to which this network join is attached
12.12 Attach a new network join to a hypervisor zone POST /settings/hypervisor_zones/:hypervisor_zone_id/network_joins.xml POST /settings/hypervisor_zones/:hypervisor_zone_id/network_joins.json
XML Request example

110
OnApp Cloud 2.3 | API Guide | v1.5 | 12th April 2012
curl -i -X POST http://onapp.test/settings/hypervisor_zones/:hypervisor_zone_id/network_joins.xml -d '<network_join><network_id>4</network_id><interface>interface_test</interface></network_join>' -u admin:passwod -H 'Accept: application/xml' -H 'Content-type: application/xml'
JSON Request example
curl -i -X POST http://onapp.test/settings/hypervisor_zones/:hypervisor_zone_id/network_joins.json -d '{"network_join":{"network_id":"5","interface":"interface_test2"}}' -u admin:passwod -H 'Accept: application/json' -H 'Content-type: application/json'
Send the following parameters:
network_id *- ID of the network you wish to attach interface *- the name of the appropriate network interface
12.13 Remove a network join from a hypervisor zone DELETE /settings/hypervisor_zones/:hypervisor_zone_id/network_joins/:id.xml DELETE /settings/hypervisor_zones/:hypervisor_zone_id/network_joins/:id.json
XML Request example
curl -i -X DELETE http://onapp.test/settings/hypervisor_zones/:hypervisor_zone_id/network_joins/:network_join_id.xml -u admin:passwod -H 'Accept: application/xml' -H 'Content-type: application/xml'
JSON Request example
curl -i -X DELETE http://onapp.test/settings/hypervisor_zones/:hypervisor_zone_id/network_joins/:network_join_id.json -u admin:passwod -H 'Accept: application/json' -H 'Content-type: application/json'
Returns HTTP 200 response on successful deletion, or HTTP 404 when a resolver with the ID specified is not found, or the URL requested is incorrect.

111
OnApp Cloud 2.3 | API Guide | v1.5 | 12th April 2012
13. Backup server zones Backup server zone consists of several backup servers that share the same user permissions and are assigned to one billling plan. Backup server zones can be used for organizing and managing backup servers and creating different tiers of servers for customers.
13.1 Get the list of backup server zones
To get the list of backup server zones:
GET /settings/backup_server_zones.xml GET /settings/backup_server_zones.json
XML Response example
<?xml version="1.0" encoding="UTF-8"?> <backup_server_groups type="array"> <backup_server_group> <label>bsz</label> <created_at type="datetime">2012-01-04T11:50:40Z</created_at> <updated_at type="datetime">2012-01-04T11:50:40Z</updated_at> <id type="integer">28</id> </backup_server_group> </backup_server_groups>
Where:
label – backup server zone title
id – backup server zone ID
13.2 Get backup server zone details
To get the backup server zone details:
GET /settings/backup_server_zones/:id.xml GET /settings/backup_server_zones/:id.json
XML Response example
<backup_server_group> <label>bsz</label> <created_at type="datetime">2012-01-04T11:50:40Z</created_at> <updated_at type="datetime">2012-01-04T11:50:40Z</updated_at> <id type="integer">28</id> </backup_server_group>
112
OnApp Cloud 2.3 | API Guide | v1.5 | 12th April 2012
Where:
label – backup server zone title
id – backup server zone ID
13.3 Create a backup server zone
To create a backup server zone, use the following request:
POST /settings/backup_server_zones.xml POST /settings/backup_server_zones.json
XML Request example
curl -i -X POST -u user:userpass http://onapp.test/backup_server_zones.xml -d '<backup_server_group><label>az_val_xml</label></backup_server_group>' -H 'Accept: application/xml' -H 'Content-type: application/xml'
JSON Request example
curl -i -X POST -u user:userpass http://onapp.test/backup_server_zones.json -d '{"backup_server_group":{"label":"az_val_json"}}' -H 'Accept: application/json' -H 'Content-type: application/json'
Where:
label *– title of a new backup server zone
13.4 Edit a backup server zone PUT /settings/backup_server_zones/:id.xml PUT /settings/backup_server_zones/:id.json
XML Request example
curl -i -X PUT -u user:userpass http://onapp.test/backup_server_zones/:id.xml -d '<backup_server_group><label>az_val_change</label></backup_server_group>' -H 'Accept: application/xml' -H 'Content-type: application/xml'
JSON Request example
curl -i -X PUT -u user:userpass http://onapp.test/backup_server_zones/:id.json -d '{"backup_server_group":{"label":"az_val_change"}}' -H 'Accept: application/json' -H 'Content-type: application/json'

113
OnApp Cloud 2.3 | API Guide | v1.5 | 12th April 2012
Where:
label *– specify a new label of the backup server zone
13.5 Delete a backup server zone
To delete a backup server zone, use the following API call:
DELETE /settings/backup_server_zones/:id.xml DELETE /settings/backup_server_zones/:id.json
XML Request example
curl -i -X DELETE -u user:userpass http://onapp.test/backup_server_zones/:id.xml -H 'Accept: application/xml' -H 'Content-type: application/xml'
JSON Request example
curl -i -X DELETE -u user:userpass http://onapp.test/backup_server_zones/:id.json -H 'Accept: application/json' -H 'Content-type: application/json'
13.6 Get the list of servers assigned to backup server zone
To get the list of servers assigned to the backup server zone, use the following request:
GET /settings/backup_server_zones/:backup_server_zone_id/backup_servers.xml GET /settings/backup_server_zones/:backup_server_zone_id/backup_servers.json
JSON Request example
curl -i -X GET -u user:userpass http://onapp.test/backup_server_zones/:backup_server_zone_id/backup_servers.json -H 'Accept: application/json' -H 'Content-type: application/json'
XML Request example
curl -i -X GET -u user:userpass http://onapp.test/backup_server_zones/:backup_server_zone_id/backup_servers.xml -H 'Accept: application/xml' -H 'Content-type: application/xml'
XML Output example
<?xml version="1.0" encoding="UTF-8"?> <backup_servers type="array"> <backup_server> <label>az_val_ue_xml</label>

114
OnApp Cloud 2.3 | API Guide | v1.5 | 12th April 2012
<created_at type="datetime">2012-02-10T15:14:53Z</created_at> <updated_at type="datetime">2012-02-10T15:31:13Z</updated_at> <backup_server_group_id type="integer">55</backup_server_group_id> <id type="integer">25</id> <enabled type="boolean">true</enabled> <backups type="array"/> <capacity type="integer">40</capacity> <ip_address>172.0.0.2</ip_address> </backup_server> </backup_servers>
Where:
backup_servers –the array of backup servers assigned to this zone with the following details:
label – backup server label
created at – the date in the [YYYY][MM][DD]T[hh][mm][ss]Z format
updated at – the date in the [YYYY][MM][DD]T[hh][mm][ss]Z format
backup_server_group_id – the ID of the backup server zone the backup server belongs to
id – the backup server ID
enabled – backup server parameter; if “enabled” = true, the backup server is enabled; if enabled=false, the backup server is disabled.
backups – the list of backups stored at the backup server
capacity – the backup server capacity
ip_address – the backup server IP
13.7 Assign backup server to backup server zone POST /settings/backup_server_zones/:backup_server_zone_id/backup_servers/:backup_server_id/attach.xml POST /settings/backup_server_zones/:backup_server_zone_id/backup_servers/:backup_server_id/attach.json
Using this request you attach an unassigned backup server (:backup_server_id *) to a backup server zone (:backup_server_zone_id *)
XML Request example

115
OnApp Cloud 2.3 | API Guide | v1.5 | 12th April 2012
curl -i -X POST -u user:userpass http://onapp.test/backup_server_zones/:backup_server_zone_id/backup_servers/:backup_server_id/attach.xml -H 'Accept: application/xml' -H 'Content-type: application/xml'
JSON Request example
curl -i -X POST -u user:userpass http://onapp.test/backup_server_zones/:backup_server_zone_id/backup_servers/:backup_server_id/attach.json -H 'Accept: application/json' -H 'Content-type: application/json'
13.8 Unasign backup server from backup server zone POST /settings/backup_server_zones/backup_server_zone_id/backup_server/:backup_server_id/detach.xml POST /settings/backup_server_zones/backup_server_zone_id/backup_server/:backup_server_id/detach.json
Using this request you detach an assigned backup server (:backup_server_id *) from a backup server zone (:backup_server_zone_id *)
XML Request example
curl -i -X POST -u user:userpass http://onapp.test/backup_server_zones/:backup_server_zone_id/backup_servers/:backup_server_id/detach.xml -H 'Accept: application/xml' -H 'Content-type: application/xml'
JSON Request example
curl -i -X POST -u user:userpass http://onapp.test/backup_server_zones/:backup-server_zone_id/backup_servers/:backup_server_id/detach.json -H 'Accept: application/json' -H 'Content-type: application/json'

116
OnApp Cloud 2.3 | API Guide | v1.5 | 12th April 2012
14. Hypervisors Hypervisors provide hardware resources for virtual machines. A specific physical hypervisor server supplies the CPU, RAM and storage capacity from the Data Stores attached to that hypervisor. All API calls are available to this class.
14.1 Get the list of hypervisors GET /settings/hypervisors.xml GET /settings/hypervisors.json
Returns the array of available hypervisors.
XML Output example
<?xml version="1.0" encoding="UTF-8"?> <hypervisors type="array"> <hypervisor> <label>hv2</label> <called_in_at type="datetime">2011-08-30T13:30:31+03:00</called_in_at> <used_cpu_resources type="integer">135</used_cpu_resources> <free_memory type="integer">1670</free_memory> <spare type="boolean">false</spare> <created_at type="datetime">2011-08-10T12:33:45+03:00</created_at> <total_cpus type="integer">2</total_cpus> <hypervisor_type>xen</hypervisor_type> <updated_at type="datetime">2011-08-30T13:30:31+03:00</updated_at> <xen_info nil="true"></xen_info> <id type="integer">2</id> <hypervisor_group_id type="integer">1</hypervisor_group_id> <enabled type="boolean">true</enabled> <total_memory type="integer">6135</total_memory> <cpu_cores type="integer">2</cpu_cores> <health>HEALTH</health> <failure_count type="integer">0</failure_count> <memory_overhead type="integer">465</memory_overhead> <online type="boolean">true</online> <locked type="boolean">false</locked> <ip_address>109.123.105.165</ip_address> <disable_failover type="boolean">true</disable_failover> <memory_allocated_by_running_vms type="integer">3404</memory_allocated_by_running_vms> <total_memory_allocated_by_vms type="integer">5580</total_memory_allocated_by_vms> <free_disk_space type="integer">273</free_disk_space> </hypervisor> ... <hypervisor></hypervisor> ... </hypervisors>
Where:

117
OnApp Cloud 2.3 | API Guide | v1.5 | 12th April 2012
hypervisor – an array of all hypervisors in the cloud and their details label – the hypervisor title called_in_at – the date when the hypervisor was called in the [YYYY][MM][DD]T[hh][mm][ss]Z format spare – true if no VMs are assigned, otherwise false created_at – the date in the [YYYY][MM][DD]T[hh][mm][ss]Z format hypervisor_type – the type of hypervisor (currently XEN or KVM) updated_at – the date when the record was made in the DB in the [YYYY][MM][DD]T[hh][mm][ss]Z format total_cpus – the total number of hypervisor CPU cores cpu_cores –the number of cores per CPU total_memory – total RAM (MB) of hypervisor free_memory – free RAM (MB) of hypervisor used_cpu_resources –the percentage of used CPU resources xen_info – the info on the Xen. This attribute is deprecated and will be removed in OnApp 2.4 id – the hypervisor ID hypervisor_group_id – the ID of a hypervisor zone to which this hypervisor is attached enabled – true if hypervisor is enabled and you can run VMs on it, otherwise false health – the array of the xm_info, disk, log_output. This attribute is deprecated and will be removed in OnApp 2.4 failure_count – the number of failures memory_overhead – shows the total memory overhead online – true if online, otherwise false locked – true if hypervisor is locked, otherwise false ip_address – the hypervisor IP address disable_failover – true if hypervisor failover is disabled. Otherwise false. memory_allocated_by_running_vms - the hypervisor RAM in MB allocated to the VMs, which are currently running on this HV total_memory_allocated_by_vms – the hypervisor RAM in MB allocated to all VMs of this HV free_disk_space – free GBs of hypervisor
14.2 Get the list of unassigned hypervisors GET /hypervisors/not_grouped.xml GET /hypervisors/not_grouped.json
XML Output example
<?xml version="1.0" encoding="UTF-8"?> <hypervisors type="array"> <hypervisor> <label>Test_HV</label> <called_in_at type="datetime">2011-07-14T22:01:25+07:00</called_in_at> <spare type="boolean">false</spare>
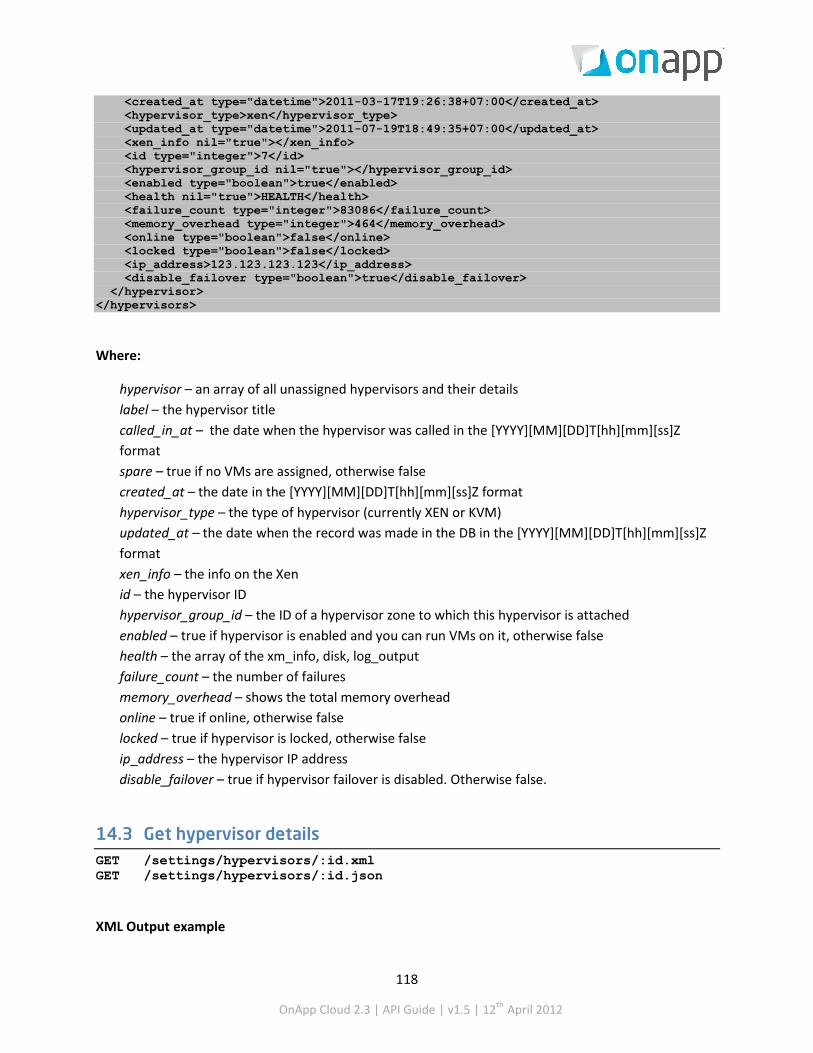
118
OnApp Cloud 2.3 | API Guide | v1.5 | 12th April 2012
<created_at type="datetime">2011-03-17T19:26:38+07:00</created_at> <hypervisor_type>xen</hypervisor_type> <updated_at type="datetime">2011-07-19T18:49:35+07:00</updated_at> <xen_info nil="true"></xen_info> <id type="integer">7</id> <hypervisor_group_id nil="true"></hypervisor_group_id> <enabled type="boolean">true</enabled> <health nil="true">HEALTH</health> <failure_count type="integer">83086</failure_count> <memory_overhead type="integer">464</memory_overhead> <online type="boolean">false</online> <locked type="boolean">false</locked> <ip_address>123.123.123.123</ip_address> <disable_failover type="boolean">true</disable_failover> </hypervisor> </hypervisors>
Where:
hypervisor – an array of all unassigned hypervisors and their details label – the hypervisor title called_in_at – the date when the hypervisor was called in the [YYYY][MM][DD]T[hh][mm][ss]Z format spare – true if no VMs are assigned, otherwise false created_at – the date in the [YYYY][MM][DD]T[hh][mm][ss]Z format hypervisor_type – the type of hypervisor (currently XEN or KVM) updated_at – the date when the record was made in the DB in the [YYYY][MM][DD]T[hh][mm][ss]Z format xen_info – the info on the Xen id – the hypervisor ID hypervisor_group_id – the ID of a hypervisor zone to which this hypervisor is attached enabled – true if hypervisor is enabled and you can run VMs on it, otherwise false health – the array of the xm_info, disk, log_output failure_count – the number of failures memory_overhead – shows the total memory overhead online – true if online, otherwise false locked – true if hypervisor is locked, otherwise false ip_address – the hypervisor IP address disable_failover – true if hypervisor failover is disabled. Otherwise false.
14.3 Get hypervisor details GET /settings/hypervisors/:id.xml GET /settings/hypervisors/:id.json
XML Output example

119
OnApp Cloud 2.3 | API Guide | v1.5 | 12th April 2012
<?xml version="1.0" encoding="UTF-8"?> <hypervisor> <called_in_at type="datetime">2010-08-09T12:55:01Z</called_in_at> <label>HV1</label> <created_at type="datetime">2010-04-27T15:34:11Z</created_at> <hypervisor_type>xen</hypervisor_type> <spare type="boolean">false</spare> <disable_failover type="boolean">true</disable_failover> <enabled type="boolean">true</enabled> <updated_at type="datetime">2010-08-09T12:55:04Z</updated_at> <id type="integer">1</id> <xen-info type="yaml" nil="true"></xen_info> <failure-count type="integer">0</failure_count> <health> <xm_info>{XM Info}</xm_info> <xm_list>{XM List}</xm_list> <vgdisplay>{VG Display}</vgdisplay> <uptime>13:54:55 up 32 days, 23:56, 1 user, load average: 0.01, 0.45, 0.58</uptime> </health> <memory-overhead type="integer">800</memory_overhead> <ip_address>{IP_Address}</ip_address> <locked type="boolean">false</locked> <online type="boolean">true</online> <memory_allocated_by_running_vms type="integer">3404</memory_allocated_by_running_vms> <total_memory_allocated_by_vms type="integer">5580</total_memory_allocated_by_vms> <free_disk_space type="integer">273</free_disk_space> </hypervisor>
Where:
called_in_at the date when the hypervisor was called in the [YYYY][MM][DD]T[hh][mm][ss]Z format
created_at the date in the [YYYY][MM][DD]T[hh][mm][ss]Z format failure_count the number of failures health the array of the xm_info, disk, memory, and xm_list
variables Id the Hypervisor ID ip_address the Hypervisor IP address label the Hypervisor Label locked true if the Hypervisor is locked, otherwise false memory_overhead shows the total memory overhead online true if online, otherwise false spare true if spare, otherwise false updated_at the date when the Group was updated in the
[YYYY][MM][DD]T[hh][mm][ss]Z format xen_info the info on the Xen enabled true if hypervisor is enabled and you can run VMs on it,
otherwise false

120
OnApp Cloud 2.3 | API Guide | v1.5 | 12th April 2012
hypervisor_type the type of hypervisor (currently XEN or KVM) hypervisor_group_id the ID of a hypervisor zone to which this hypervisor is
attached disable_failover memory_allocated_by_running_vms
true if hypervisor failover is disabled. Otherwise false. the hypervisor RAM in MB allocated to the VMs, which are currently running on this HV
total_memory_allocated_by_vms the hypervisor RAM in MB allocated to all VMs of this HV free_disk_space GBs of hypervisor
14.4 Add a new hypervisor POST /settings/hypervisors.xml POST /settings/hypervisors.json
XML Request example
curl -X POST http://onapp.test/settings/hypervisors.xml -d '<hypervisor> <label>HV_LABEL</label><ip_address>HV_IP</ip_address><memory_overhead>HV_Memory</memory_overhead><hypervisor_type>kvm/xen</hypervisor_type><enabled>true/false</enabled> <disable_failover>true/false</disable_failover><hypervisor_group_id>HV_Group_id</hypervisor_group_id></hypervisor>’ -u user:userpass -H 'Accept: application/xml' -H 'Content-type: application/xml'
JSON Request example
curl -X POST http://onapp.test/settings/hypervisors.json -d '{hypervisor: {label:"HV_LABEL",ip_address:"HV_IP", memory_overhead:”HV_Memory”, hypervisor_type:"kvm/xen", enabled:"true/false", disable_failover:”true/false”, hypervisor_group_id:”HV_Group_id”}}' -u user:userpass -H 'Accept: application/json' -H 'Content-type: application/json'
To add a new hypervisor, send the following parameters:
ip_address * the Hypervisor IP address
label * the name of the Hypervisor
hypervisor_type * specify if this is Xen or KVM hypervisor
memory_overhead Optional parameter which sets memory overhead dedicated for functional need of a hypervisor
enabled Optional parameter, set True to enable a hypervisor.
hypervisor_group_id * The ID of the group to which this hypervisor is

121
OnApp Cloud 2.3 | API Guide | v1.5 | 12th April 2012
assigned.
disable_failover Optional parameter. Set true to disable hypervisor failover. Otherwise false.
14.5 Edit a hypervisor PUT /settings/hypervisors/:id.xml PUT /settings/hypervisors/:id.json
XML Request example
curl -X PUT http://onapp.test/settings/hypervisors/:id.xml -d '<hypervisor> <label>HV_LABEL</label><ip_address>HV_IP</ip_address><memory_overhead>HV_Memory</memory_overhead><hypervisor_type>kvm/xen</hypervisor_type><enabled>true/false</enabled><disable_failover>true/false</disable_failover><hypervisor_group_id>HV_Group_id</hypervisor_group_id></hypervisor>’ -u user:userpass -H 'Accept: application/xml' -H 'Content-type: application/xml'
JSON Request example
curl -X PUT http://onapp.test/settings/hypervisors/:id.json -d '{hypervisor: {label:"HV_LABEL",ip_address:"HV_IP", memory_overhead:”HV_Memory”, hypervisor_type:"kvm/xen", enabled:"true/false", disable_failover:”true/false”, hypervisor_group_id:”HV_Group_id”}}' -u user:userpass -H 'Accept: application/json' -H 'Content-type: application/json'
You can edit the following parameters:
ip_address - the Hypervisor IP address label - the name of the Hypervisor hypervisor_type - specify if this is Xen or KVM hypervisor memory_overhead - Optional parameter which sets memory overhead dedicated for functional need of a hypervisor enabled - Optional parameter, set True to enable a hypervisor. hypervisor_group_id - set ID of the hypervisor zone to attach this hypervisor to it, or send the empty value to remove the hypervisor from the hypervisor zone. disable_failover – set true to disable hypervisor failover. Otherwise false.
14.6 Reboot a hypervisor POST /settings/hypervisors/:hypervisor_id/reboot.xml POST /settings/hypervisors/:hypervisor_id/reboot.json
XML Request example

122
OnApp Cloud 2.3 | API Guide | v1.5 | 12th April 2012
curl -X POST http://onapp.test/settings/hypervisors/:hypervisor_id/reboot.xml -d '<hypervisor><confirm>1</confirm><force_reboot>1</force_reboot></hypervisor>’ -u user:userpass -H 'Accept: application/xml' -H 'Content-type: application/xml'
JSON Request example
curl -X POST http://onapp.test/settings/hypervisors/:hypervisor_id/reboot.json -d '{confirm:"1",force_reboot:"1"}' -u user:userpass -H 'Accept: application/json' -H 'Content-type: application/json'
An HTTP 201 response is returned on a successful reboot. Unsuccessful reboot responses include HTTP 404 (resource not found – e.g. if the Hypervisor isn’t online) and HTTP 422 (request cannot be processed – e.g. if parameters were incorrect).
14.7 Get the list of VMs running on the hypervisor GET /hypervisors/:hypervisor_id/virtual_machines.xml GET /hypervisors/:hypervisor_id/virtual_machines.json
Returns the list of virtual machines deployed on the hypervisor. For details, see Get the list of VMs section.
14.8 Get the list of data store joins attached to the hypervisor
To get the list of hypervisor data store joins (data stores which are attached to the hypervisor), use the following request:
GET /settings/hypervisors/:hypervisor_id/data_store_joins.xml GET /settings/hypervisors/:hypervisor_id/data_store_joins.json
XML Output example
<?xml version="1.0" encoding="UTF-8"?> <data_store_joins type="array"> <data_store_join> <created_at type="datetime">2011-10-11T12:50:02+03:00</created_at> <data_store_id type="integer">2</data_store_id> <hypervisor_id nil="true"></hypervisor_id> <id type="integer">7</id> <target_join_id type="integer">2</target_join_id> <target_join_type>Hypervisor</target_join_type> <updated_at type="datetime">2011-10-11T12:50:02+03:00</updated_at> </data_store_join> ... <data_store_join></data_store_join> ... </data_store_joins>

123
OnApp Cloud 2.3 | API Guide | v1.5 | 12th April 2012
Where:
data_store_id - the ID of the data store, which is attached to the hypervisor
hypervisor_id - reserved parameter
id - the join ID
target_join_id - the ID of the join target; in this case it is the hypervisor ID
target_join_type - type of join target; in this case it is Hypervisor
14.9 Add a data store join to the hypervisor
To add a data store to the hypervisor, use the following request to create a data store join:
POST /settings/hypervisors/:hypervisor_id/data_store_joins.xml POST /settings/hypervisors/:hypervisor_id/data_store_joins.json
XML Request example
curl -i -X POST http://onapp.test/settings/hypervisors/:hypervisor_id/data_store_joins.xml -d '<data_store_id>5</data_store_id>' -u admin:passwod -H 'Accept: application/xml' -H 'Content-type: application/xml'
JSON Request example
curl -i -X POST http://onapp.test/settings/hypervisors/:hypervisor_id/data_store_joins.json -d '{"data_store_id":"5"}' -u admin:passwod -H 'Accept: application/json' -H 'Content-type: application/json'
This request creates a data store join, attaching a data store (data_store_id *) to a specified hypervisor.
14.10 Remove a data store join from the hypervisor DELETE /settings/hypervisors/:hypervisor_id/data_store_joins/:id.xml DELETE /settings/hypervisors/:hypervisor_id/data_store_joins/:id.json
XML Request example
curl -i -X DELETE http://onapp.test/settings/hypervisors/:hypervisor_id/data_store_joins/:data_store_join_id.xml -u admin:passwod -H 'Accept: application/xml' -H 'Content-type: application/xml'

124
OnApp Cloud 2.3 | API Guide | v1.5 | 12th April 2012
JSON Request example
curl -i -X DELETE http://onapp.test/settings/hypervisors/:hypervisor_id/data_store_joins/:data_store_join_id.json -u admin:passwod -H 'Accept: application/json' -H 'Content-type: application/json'
14.11 Get the list of network joins of the hypervisor
To see the network joins of the hypervisor, use the following request:
GET /settings/hypervisors/:hypervisor_id/network_joins.xml GET /settings/hypervisors/:hypervisor_id/network_joins.json
XML Output example
<?xml version="1.0" encoding="UTF-8"?> <network_joins type="array"> <network_join> <created_at type="datetime">2011-11-15T13:27:38+03:00</created_at> <hypervisor_id nil="true"></hypervisor_id> <id type="integer">5</id> <interface>eth0</interface> <network_id type="integer">1</network_id> <target_join_id type="integer">2</target_join_id> <target_join_type>Hypervisor</target_join_type> <updated_at type="datetime">2011-11-15T13:27:38+03:00</updated_at> </network_join> </network_joins>
Where:
hypervisor_id – reserved parameter
id - the network join ID
interface - label of the network interface used to create a network join
target_join_id - the ID of the join target; in this case it is the hypervisor ID
target_join_type - type of join target; in this case it is Hypervisor
14.12 Add a network join to the hypervisor
To create a network join (assign the network to the hypervisor), use the following request:
POST /settings/hypervisors/:hypervisor_id/network_joins.xml POST /settings/hypervisors/:hypervisor_id/network_joins.json
XML Request example

125
OnApp Cloud 2.3 | API Guide | v1.5 | 12th April 2012
curl -i -X POST http://onapp.test/settings/hypervisors/:hypervisor_id/network_joins.xml -d '<network_join><network_id>4</network_id><interface>interface_test</interface></network_join>' -u user:userpass -H 'Accept: application/xml' -H 'Content-type: application/xml'
JSON request example
curl -i -X POST http://onapp.test/settings/hypervisors/:hypervisor_id/network_joins.json -d '{"network_join":{"network_id":"4", "interface":"interface_test"}}' -u user:userpass -H 'Accept: application/json' -H 'Content-type: application/json'
Send the following parameters:
network_id * - ID of the network you wish to attach
interface * - the name of the appropriate network interface
14.13 Remove a network join from the hypervisor DELETE /settings/hypervisors/:hypervisor_id/network_joins/:id.xml DELETE /settings/hypervisors/:hypervisor_id/network_joins/:id.json
XML Request example
curl -i -X DELETE http://onapp.test/settings/hypervisors/:hypervisor_id/network_joins/:network_join_id.xml -u admin:passwod -H 'Accept: application/xml' -H 'Content-type: application/xml'
JSON Request example
curl -i -X DELETE http://onapp.test/settings/hypervisors/:hypervisor_id/network_joins/:network_join_id.json -u admin:passwod -H 'Accept: application/json' -H 'Content-type: application/json'
Returns HTTP 200 response on successful deletion or HTTP 404 when a resolver with the ID specified is not found, or the URL requested is incorrect.
14.14 Delete a hypervisor DELETE /settings/hypervisors/:id.xml DELETE /settings/hypervisors/:id.json
XML Request example
126
OnApp Cloud 2.3 | API Guide | v1.5 | 12th April 2012
curl -i -X DELETE http://onapp.test/settings/hypervisors/:hypervisor_id.xml -u user:userpass -H 'Accept: application/xml' -H 'Content-type: application/xml'
JSON Request example
curl -i -X DELETE http://onapp.test/settings/hypervisors/:hypervisor_id.json -u user:userpass -H 'Accept: application/json' -H 'Content-type: application/json'
Returns HTTP 200 response on successful deletion, or HTTP 404 when a hypervisor with the ID specified is not found, or the URL requested is incorrect.

127
OnApp Cloud 2.3 | API Guide | v1.5 | 12th April 2012
15. Networks The class enables you to modify network configurations. The network resources available to the entire cloud can be configured in the system Control Panel or via API. Specific network resources can be set up manually, and automatically on VM creation.
15.1 Get the list of networks GET /settings/networks.xml GET /settings/networks.json
XML Output example
<?xml version="1.0" encoding="UTF-8"?> <networks type="array"> <network> <label>Public Network</label> <created_at type="datetime">2011-02-11T12:46:09+02:00</created_at> <network_group_id type="integer">3</network_group_id> <updated_at type="datetime">2011-02-11T13:20:09+02:00</updated_at> <id type="integer">1</id> <vlan type="integer" nil="true"/> <identifier>4ikgi2ges03kma</identifier> </network> </networks>
Where:
created_at the date in the [YYYY][MM][DD]T[hh][mm][ss]Z format Id the network ID Label the optional Network label updated_at the date when the Network was updated in the
[YYYY][MM][DD]T[hh][mm][ss]Z format Vlan the VLAN this network belongs to network_group_id the ID of the network zone to which this network is attached
15.2 Get network details GET /settings/networks/:id.xml GET /settings.networks/:id.json
XML Output example
<?xml version="1.0" encoding="UTF-8"?> <network> <label>public</label> <created_at type="datetime">2010-10-28T19:55:40+07:00</created_at> <updated_at type="datetime">2010-12-29T22:31:15+07:00</updated_at>

128
OnApp Cloud 2.3 | API Guide | v1.5 | 12th April 2012
<network_group_id type="integer">2</network_group_id> <vlan type="integer">391</vlan> <id type="integer">1</id> <identifier>hc9fut4iogxt7p</identifier> </network>
Where:
label — the optional Network label created_at – the date in the [YYYY][MM][DD]T[hh][mm][ss]Z format updated_at — the date when the record was updated in the [YYYY][MM][DD]T[hh][mm][ss]Z format network_group_id — the ID of the network zone to which this network is attached id — the network ID vlan — the VLAN this network belongs to identifier — network identifier
15.3 Edit a network PUT /settings/networks/:id.xml PUT /settings/networks/:id.json
XML Request Example
curl -i -X PUT -u user:userpass -H 'Accept: application/xml' -H 'Content-type: application/xml' -d '<network><label>Network API test</label><network_group_id>3</network_group_id><vlan>1</vlan></network>' --url http://onapp.test/settings/networks/:id.xml
JSON Request Example
curl -i -X PUT -u user:userpass -H 'Accept: application/json' -H 'Content-type: application/json' -d '{"network":{"label":"Network API TEST","network_group_id":15,"vlan":2}}' --url http://onapp.test/settings/networks/:id.json Parameters:
id – the network ID
label - the network name
vlan – the VLAN this network belongs to
network_group_id – the ID of the network zone to which this network is attached

129
OnApp Cloud 2.3 | API Guide | v1.5 | 12th April 2012
15.4 Rebuild VM network
To rebuild the network for a particular VM, use the following request:
POST /virtual_machines/:virtual_machine_id/rebuild_network.xml POST /virtual_machines/:virtual_machine_id/rebuild_network.json
XML Request example
curl -X POST -u user:userpass http://onapp.test/virtual_machines/:virtual_machine_id/rebuild_network.xml -H 'Accept: application/xml' -H 'Content-type: application/xml'
JSON Request example
curl -X POST -u user:userpass http://onapp.test/virtual_machines/:virtual_machine_id/rebuild_network.json -H 'Accept: application/json' -H 'Content-type: application/json'
15.5 Add a network POST /settings/networks.xml POST /settings/networks.json XML Request example
curl -i -X POST -u user:userpass -H 'Accept: application/xml' -H 'Content-type: application/xml' -d '<network><label>Network API test 34</label><network_group_id>15</network_group_id><vlan>34</vlan></network>' --url http://onapp.test/settings/networks.xml
JSON Request example
curl -i -X POST -u user:userpass -H 'Accept: application/json' -H 'Content-type: application/json' -d '{"network":{"label":"Network API TEST 2","network_group_id":3,"vlan":true}}' --url http://onapp.test/settings/networks.json
Parameters:
label * - the network name
vlan – the VLAN this network belongs to
network_group_id – the ID of the network zone to which this network is attached

130
OnApp Cloud 2.3 | API Guide | v1.5 | 12th April 2012
15.6 Delete a network DELETE /settings/networks/:id.xml DELETE /settings/networks/:id.json XML Request example curl -i -X DELETE -u user:userpass --url http://onapp.test/settings/networks/:id.xml JSON Request example curl -i -X DELETE -u user:userpass --url http://onapp.test/settings/networks/:id.json

131
OnApp Cloud 2.3 | API Guide | v1.5 | 12th April 2012
16. Network Interfaces This class represents the methods required to manage Network Interfaces. Network interfaces connect VMs with the network. You can allocate several network interfaces to a VM.
16.1 Get the list of VM network interfaces
To get the list of network interfaces allocated to this particular VM:
GET /virtual_machines/:virtual_machine_id/network_interfaces.xml GET /virtual_machines/:virtual_machine_id/network_interfaces.json
XML Output example
<?xml version="1.0" encoding="UTF-8"?> <network_interfaces type="array"> <network_interface> <label>eth0</label> <usage nil="true"></usage> <created_at type="datetime">2011-03-18T17:45:07+07:00</created_at> <updated_at type="datetime">2011-04-08T18:57:20+07:00</updated_at> <primary type="boolean">true</primary> <usage_month_rolled_at nil="true"></usage_month_rolled_at> <id type="integer">502</id> <mac_address>00:16:3e:50:35:52</mac_address> <usage_last_reset_at nil="true"></usage_last_reset_at> <default_firewall_rule>DROP</default_firewall_rule> <rate_limit type="integer">0</rate_limit> <virtual_machine_id type="integer">518</virtual_machine_id> <network_join_id type="integer">4</network_join_id> <identifier>pdfjrtpkday9e1</identifier> </network_interface> ... <network_interface></network_interface> ... </network_interfaces>
Where:
label - network interface name
created_at - the timestamp in the database when this network interface was created
updated_at - the timestamp in the database when this network interface was updated
primary - True if this network interface is primary, otherwise false
id - the ID of this network interface
mac_address – network interface mac address
132
OnApp Cloud 2.3 | API Guide | v1.5 | 12th April 2012
rate_limit - port speed in Mbps
identifier - the identifier in the database of this network interface
network_join_id - the ID of the network join to which this network interface belongs
virtual_machine_id - the ID of a virtual machine to which this network interface is attached
16.2 Get network interface details
To get a particular network interface details:
GET /virtual_machines/:virtual_machine_id/network_interfaces/:id.xml GET /virtual_machines/:virtual_machine_id/network_interfaces/:id.json This request will output details for a network interface. The explanation of the fields is the same as for Get the list of VM network interfaces method.
16.3 Edit a network interface
To edit network interface details:
PUT /virtual_machines/:virtual_machine_id/network_interfaces/:id.xml PUT /virtual_machines/:virtual_machine_id/network_interfaces/:id.json XML Request example
curl -i -X PUT -u user:userpass -H 'Accept: application/xml' -H 'Content-type: application/xml' -d '<network_interface><label>eth0(test)</label><rate_limit>64</rate_limit><primary>true</primary></network_interface>' --url http://onapp.test/virtual_machines/:virtual_machine_id/network_interfaces/:id.xml
JSON Request example
curl -i -X PUT -u user:userpass -H 'Accept: application/json' -H 'Content-type: application/json' -d '{"network_interface":{"label":"eth0(test 2)","rate_limit":"32","primary":"false"}}' --url http://onapp.test/virtual_machines/:virtual_machine_id/network_interfaces/:id.json
You can change rate_limit and label parameters.
16.4 Add a network interface to a VM
To add a new network interface:

133
OnApp Cloud 2.3 | API Guide | v1.5 | 12th April 2012
POST /virtual_machines/:virtual_machine_id/network_interfaces.xml POST /virtual_machines/:virtual_machine_id/network_interfaces.json
XML Request example
curl -i -X POST -u user:userpass -H 'Accept: application/xml' -H 'Content-type: application/xml' -d '<network_interface><label>qwert</label><rate_limit>64</rate_limit><network_join_id>3</network_join_id></network_interface>' --url http://onapp.test/virtual_machines/:virtual_machine_id/network_interfaces.xml
JSON Request example
curl -i -X POST -u user:userpass -H 'Accept: application/json' -H 'Content-type: application/json' -d '{"network_interface":{"label":"qwert","rate_limit":"64","network_join_id":"3"}}' --url http://onapp.test/virtual_machines/:virtual_machine_id/network_interfaces.json
Where:
label * - give the label of a network interface you wish to attach
rate_limit* - set the port speed of a network interface you wish to attach
network_join_id * - set the ID of a physical network used to attach this network interface
primary * – set 1 if the interface is primary. Otherwise false.
16.5 Delete a network interface
To delete a network interface from a virtual machine:
DELETE /virtual_machines/:virtual_machine_id/network_interfaces/:id.xml DELETE /virtual_machines/:virtual_machine_id/network_interfaces/:id.json
XML Request example
curl -i -X DELETE -u user:userpass --url http://onapp.test/virtual_machines/:virtual_machine_id/network_interfaces/:id.xml
JSON Request example
curl -i -X DELETE -u user:userpass --url http://onapp.test/virtual_machines/:virtual_machine_id/network_interfaces/:id.json

134
OnApp Cloud 2.3 | API Guide | v1.5 | 12th April 2012
This returns an HTTP 200 response if the network interface is deleted, or HTTP 404 if the network interface with the specified ID isn’t found or the requested URL is incorrect.

135
OnApp Cloud 2.3 | API Guide | v1.5 | 12th April 2012
17. IP Addresses This class represents all the IP addresses in your installation. Use the following methods to edit, create new and delete an existing IP addresses in your cloud.
17.1 Get the list of network IP addresses GET /settings/networks/:network_id/ip_addresses.xml GET /settings/networks/:network_id/ip_addresses.json XML Output example
<?xml version="1.0" encoding="UTF-8"?> <ip_addresses type="array"> <ip_address> <netmask>255.255.255.240</netmask> <disallowed_primary type="boolean">true</disallowed_primary> <address>83.170.81.179</address> <created_at type="datetime">2010-10-28T19:56:50+07:00</created_at> <updated_at type="datetime">2011-05-17T17:53:23+07:00</updated_at> <network_id type="integer">1</network_id> <network_address>83.170.81.176</network_address> <broadcast>83.170.81.191</broadcast> <id type="integer">2</id> <gateway>83.170.81.177</gateway> <free type="boolean">false</free> </ip_address>
... <ip_address></ip_address> ... </ip_addresses>
Where:
ip_addresses – an array with all IP addresses in the selected network netmask — netmask for the IP address disallowed_primary – true if not allowed to be used as primary (for VM build), otherwise false address – IP address created_at — the date in the [YYYY][MM][DD]T[hh][mm][ss]Z format updated_at — the date when the Network was updated in the [YYYY][MM][DD]T[hh][mm][ss]Z format network_id –the ID of the network network_address – the address of the network broadcast – broadcast address id –the ID of the IP address gateway – gateway address free – true if free, otherwise false

136
OnApp Cloud 2.3 | API Guide | v1.5 | 12th April 2012
17.2 Edit an IP address PUT /settings/networks/:network_id/ip_addresses/:id.xml PUT /settings/networks/:network_id/ip_addresses/:id.json
XML Request example
curl -i -X PUT -H 'Accept: application/xml' -H 'Content-type: application/xml' -u user:userpass -d '<ip_address><address>109.123.105.192</address><netmask>255.255.255.240</netmask><broadcast>109.123.105.191</broadcast><network_address>109.123.105.176</network_address><disallowed_primary>true</disallowed_primary><gateway>109.123.105.177</gateway></ip_address>' --url http://onapp.test/settings/networks/:network_id/ip_addresses/:id.xml
JSON Request example
curl -i -X PUT -H 'Accept: application/json' -H 'Content-type: application/json' -u user:userpass -d '{"ip_address":{"address":"109.123.105.186","netmask":"255.255.255.240","broadcast":"109.123.105.191",“disallowed_primary”:”true”,"network_address":"109.123.105.176","gateway":"109.123.105.177"}}' --url http://onapp.test/settings/networks/:network_id/ip_addresses/:id.json
The following parameters can be passed to be changed:
address, netmask, broadcast, network_address, gateway, disallowed_primary option (all strings)
Returns HTTP 201 on success.
You can get the list of IPs assigned to a VM with GET /virtual_machines/:id request.
17.3 Create an IP address record POST /settings/networks/:network_id/ip_addresses.xml POST /settings/networks/:network_id/ip_addresses.json
XML Request example
curl -i -X POST -H 'Accept: application/xml' -H 'Content-type: application/xml' -u user:userpass -d '<ip_address><address>109.123.105.192</address><netmask>255.255.255.240</netmask><broadcast>109.123.105.191</broadcast><disallowed_primary>true</disallowed_primary><network_address>109.123.105.176</network_address><gateway>109.123.105.177</gateway></ip_address>' --url http://onapp.test/settings/networks/:network_id/ip_addresses.xml
JSON Request example

137
OnApp Cloud 2.3 | API Guide | v1.5 | 12th April 2012
curl -i -X POST -H 'Accept: application/json' -H 'Content-type: application/json' -u user:userpass -d '{"ip_address":{"address":"109.123.105.192","netmask":"255.255.255.240","broadcast":"109.123.105.191",“disallowed_primary”:”true”,"network_address":"109.123.105.176","gateway":"109.123.105.177"}}' --url http://onapp.test/settings/networks/:network_id/ip_addresses.json Parameters:
address* - IP address
netmask* - network mask
broadcast* - a logical address at which all devices connected to a multiple-access communications network are enabled to receive datagrams.
network_address* - IP address of the network
gateway* - gateway address
disallowed_primary – set true, not to use this address as primary (for VM build). Otherwise, set false
XML Output example
<?xml version="1.0" encoding="UTF-8"?> <ip-addresses type="array"> <ip_address> <address>109.123.105.192</address> <netmask>255.255.255.240</netmask> <created_at type="datetime">2010-04-27T16:58:01Z</created_at> <broadcast>109.123.105.191</broadcast> <network_address>109.123.105.176</network_address> <network-id type="integer">1</network_id> <updated_at type="datetime">2010-04-27T16:58:01Z</updated_at> <id type="integer">1</id> <gateway>109.123.105.177</gateway> </ip_address> </ip_addresses>
17.4 Delete an IP address DELETE /settings/networks/:network_id/ip_addresses/:id.xml DELETE /settings/networks/:network_id/ip_addresses/:id.json XML Request example curl -i -X DELETE -u user:userpass --url http://onapp.test/settings/networks/:network_id/ip_addresses/:id.xml
JSON Request example

138
OnApp Cloud 2.3 | API Guide | v1.5 | 12th April 2012
curl -i -X DELETE -u user:userpass --url http://onapp.test/settings/networks/:network_id/ip_addresses/:id.json

139
OnApp Cloud 2.3 | API Guide | v1.5 | 12th April 2012
18. IP address joins An IP address allocated to a VM is an IP address join. , use the following methods to view, assign and delete an existing IP address joins in your cloud.
18.1 Get the list of IP address joins
To get the list of IP address assignments for a particular VM:
GET /virtual_machines/:virtual_machine_id/ip_addresses.xml GET /virtual_machines/:virtual_machine_id/ip_addresses.json
An array of IP addresses is returned:
<?xml version="1.0" encoding="UTF-8"?> <ip_address_joins type="array"> <ip_address_join> <ip_address_id type="integer">5</ip_address_id> <created_at type="datetime">2011-07-19T12:29:10Z</created_at> <updated_at type="datetime">2011-07-19T12:29:10Z</updated_at> <ip_address> <netmask>255.255.255.240</netmask> <disallowed_primary type="boolean">false</disallowed_primary> <address>109.123.105.182</address> <created_at type="datetime">2011-07-14T15:43:09Z</created_at> <updated_at type="datetime">2011-07-14T15:43:09Z</updated_at> <network_id type="integer">1</network_id> <network_address>109.123.105.176</network_address> <broadcast>109.123.105.191</broadcast> <id type="integer">5</id> <free type="boolean">false</free> <gateway>109.123.105.177</gateway> </ip_address> <id type="integer">46</id> <network_interface_id type="integer">34</network_interface_id> </ip_address_join> </ip_address_joins>
Where:
ip_address_joins – an array of all IP addresses, assigned to VM
ip_address _id – ID of IP address
created_at - the timestamp in DB when this record was created
updated_at - the timestamp in DB when this record was updated
ip_address – an array of IP address, assigned to the VM (for details see section Get the list of network IP addresses)
id – ID of the IP address join

140
OnApp Cloud 2.3 | API Guide | v1.5 | 12th April 2012
network_interface_id - the ID of the network interface to which this IP address should be assigned
18.2 Assign an IP address join to a VM
Use the following class to assign an IP Address to a virtual machine:
POST /virtual_machines/:virtual_machine_id/ip_addresses.xml POST /virtual_machines/:virtual_machine_id/ip_addresses.json
XML Request example
curl -i -X POST -H 'Accept: application/xml' -H 'Content-type: application/xml' -u user:userpass -d '<ip_address_join><ip_address_id>13</ip_address_id><network_interface_id>84</network_interface_id></ip_address_join>' --url http://onapp.test/virtual_machines/:virtual_machine_id/ip_addresses.xml
JSON Request example
curl -i -X POST -H 'Accept: application/json' -H 'Content-type: application/json' -u user:userpass -d '{"ip_address_join":{"ip_address_id":"13","network_interface_id":"84"}}' --url http://onapp.test/virtual_machines/:virtual_machine_id/ip_addresses.json
Where:
ip_address_id * enter the ID of the IP you wish to attach to this VM network_interface_id * specify the ID of network interface this IP address should be assigned to
18.3 Delete an IP address join
To delete an IP address assignment from a particular VM, you have to remove the IP and rebuild the network. There are two API calls for IP deletion: one unassigns an address, but actually leaves it on a VM, and the second removes the address, rebuilds the network and thus reboots a VM.
To delete an IP address without rebuilding a network:
DELETE /virtual_machines/:virtual_machine_id/ip_addresses/:id.xml DELETE /virtual_machines/:virtual_machine_id/ip_addresses/:id.json
XML Request example
curl -i -X DELETE -u user:userpass —url http://onapp.test/virtual_machines/:virtual_machine_id/ip_addresses/:id.xml

141
OnApp Cloud 2.3 | API Guide | v1.5 | 12th April 2012
JSON Request example
curl -i -X DELETE -u user:userpass —url http://onapp.test/virtual_machines/:virtual_machine_id/ip_addresses/:id.json To delete an IP address and rebuild a network: DELETE /virtual_machines/:virtual_machine_id/ip_addresses/:id.xml?rebuild_network=1 DELETE /virtual_machines/:virtual_machine_id/ip_addresses/:id.json?rebuild_network=1 XML Request example curl -i -X DELETE -u user:userpass —url http://onapp.test/virtual_machines/:virtual_machine_id/ip_addresses/:id.xml?rebuild_network=1
JSON Request example
curl -i -X DELETE -u user:userpass —url http://onapp.test/virtual_machines/:virtual_machine_id/ip_addresses/:id.json?rebuild_network=1
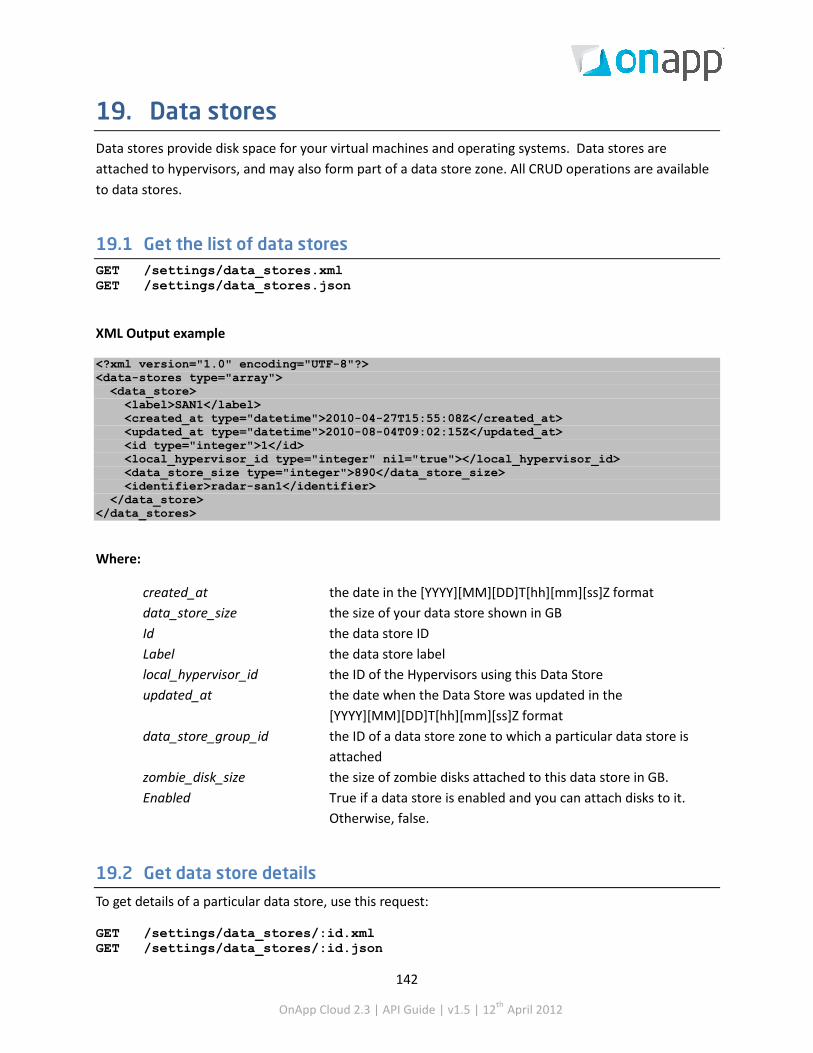
142
OnApp Cloud 2.3 | API Guide | v1.5 | 12th April 2012
19. Data stores Data stores provide disk space for your virtual machines and operating systems. Data stores are attached to hypervisors, and may also form part of a data store zone. All CRUD operations are available to data stores.
19.1 Get the list of data stores GET /settings/data_stores.xml GET /settings/data_stores.json
XML Output example
<?xml version="1.0" encoding="UTF-8"?> <data-stores type="array"> <data_store> <label>SAN1</label> <created_at type="datetime">2010-04-27T15:55:08Z</created_at> <updated_at type="datetime">2010-08-04T09:02:15Z</updated_at> <id type="integer">1</id> <local_hypervisor_id type="integer" nil="true"></local_hypervisor_id> <data_store_size type="integer">890</data_store_size> <identifier>radar-san1</identifier> </data_store> </data_stores>
Where:
created_at the date in the [YYYY][MM][DD]T[hh][mm][ss]Z format data_store_size the size of your data store shown in GB Id the data store ID Label the data store label local_hypervisor_id the ID of the Hypervisors using this Data Store updated_at the date when the Data Store was updated in the
[YYYY][MM][DD]T[hh][mm][ss]Z format data_store_group_id the ID of a data store zone to which a particular data store is
attached zombie_disk_size the size of zombie disks attached to this data store in GB. Enabled True if a data store is enabled and you can attach disks to it.
Otherwise, false.
19.2 Get data store details
To get details of a particular data store, use this request:
GET /settings/data_stores/:id.xml GET /settings/data_stores/:id.json

143
OnApp Cloud 2.3 | API Guide | v1.5 | 12th April 2012
XML Output example
<?xml version="1.0" encoding="UTF-8"?> <data_store> <label>SAN1</label> <created_at type="datetime">2010-10-28T03:18:51+07:00</created_at> <updated_at type="datetime">2011-07-19T21:21:42+07:00</updated_at> <zombie_disks_size type="integer">93</zombie_disks_size> <id type="integer">1</id> <enabled type="boolean">true</enabled> <data_store_group_id type="integer">1</data_store_group_id> <ip nil="true"></ip> <local_hypervisor_id nil="true"></local_hypervisor_id> <identifier>onapp-9yblt1m70pdtdp</identifier> <data_store_size type="integer">500</data_store_size> <raw_stats type="array"/> </data_store>
Where:
created_at — the date in the [YYYY][MM][DD]T[hh][mm][ss]Z format data_store_size — the size of your data store shown in GB id — the data store ID label — the data store label local_hypervisor_id — the ID of the Hypervisors using this Data Store updated_at — the date when the Data Store was updated in the [YYYY][MM][DD]T[hh][mm][ss]Z format data_store_group_id — the ID of a data store zone to which a particular data store is attached zombie_disk_size — the size of zombie disks attached to this data store in GB. enabled — true if a data store is enabled and you can attach disks to it. Otherwise, false.
19.3 Add a new data store POST /settings/data_stores.xml POST /settings/data_stores.json
XML Output example
curl -i -X POST http://onapp.test/settings/data_stores.xml -d ‘<data_store><label>:DS_label</label><data_store_group>DS_zone_id</data_store_group><ip>:DS_ip</ip><enabled>true/false</enabled><data_store_size>DS_size</data_store_size></data_store>’ -u user:userpass -H 'Accept: application/xml' -H 'Content-type: application/xml'
JSON Request example

144
OnApp Cloud 2.3 | API Guide | v1.5 | 12th April 2012
curl -i -X POST http://onapp.test/settings/data_stores.json -d ‘{data_store:{label:"DS_label",data_store_group:"DS_zone_id",ip"DS_ip",enabled:"true/false",data_store_size:"DS_size"}}’ -u user:userpass -H 'Accept: application/json' -H 'Content-type: application/json'
Parameters:
label * - the data store name
data_store_group * - the group to which this DS is assigned
ip * - the data store IP
enabled * - set 1 if data store is enabled, otherwise set 0
data_store_size * - set size in GB
19.4 Edit a data store PUT /settings/data_stores/:id.xml PUT /settings/data_stores/:id.json
You can edit the data store disk capacity and label.
XML Request example
curl -i -X PUT http://onapp.test/settings/data_stores/:data_store_id.xml -d ‘<data_store><label>:DS_label</label><data_store_group>DS_zone_id</data_store_group><ip>:DS_ip</ip><enabled>true/false</enabled><data_store_size>DS_size</data_store_size></data_store>’ -u user:userpass -H 'Accept: application/xml' -H 'Content-type: application/xml'
JSON Request example
curl -i -X PUT http://onapp.test/settings/data_stores/:data_store_id.json -d ‘{data_store:{label:"DS_label",data_store_group:"DS_zone_id",ip"DS_ip",enabled:"true/false",data_store_size:"DS_size"}}’ -u user:userpass -H 'Accept: application/json' -H 'Content-type: application/json'
XML Output example
<?xml version="1.0" encoding="UTF-8"?> <data_store> <data_store_size>{SIZE}</data_store_size> <label>{LABEL}</label> </data_store>

145
OnApp Cloud 2.3 | API Guide | v1.5 | 12th April 2012
19.5 Delete a data store DELETE /settings/data_stores/:id.xml DELETE /settings/data_stores/:id.json
XML Request example
curl -i -X DELETE http://onapp.test/settings/data_stores/:data_store_id.xml -u user:userpass -H 'Accept: application/xml' -H 'Content-type: application/xml'
JSON Request example
curl -i -X DELETE http://onapp.test/settings/data_stores/:data_store_id.json -u user:userpass -H 'Accept: application/json' -H 'Content-type: application/json'
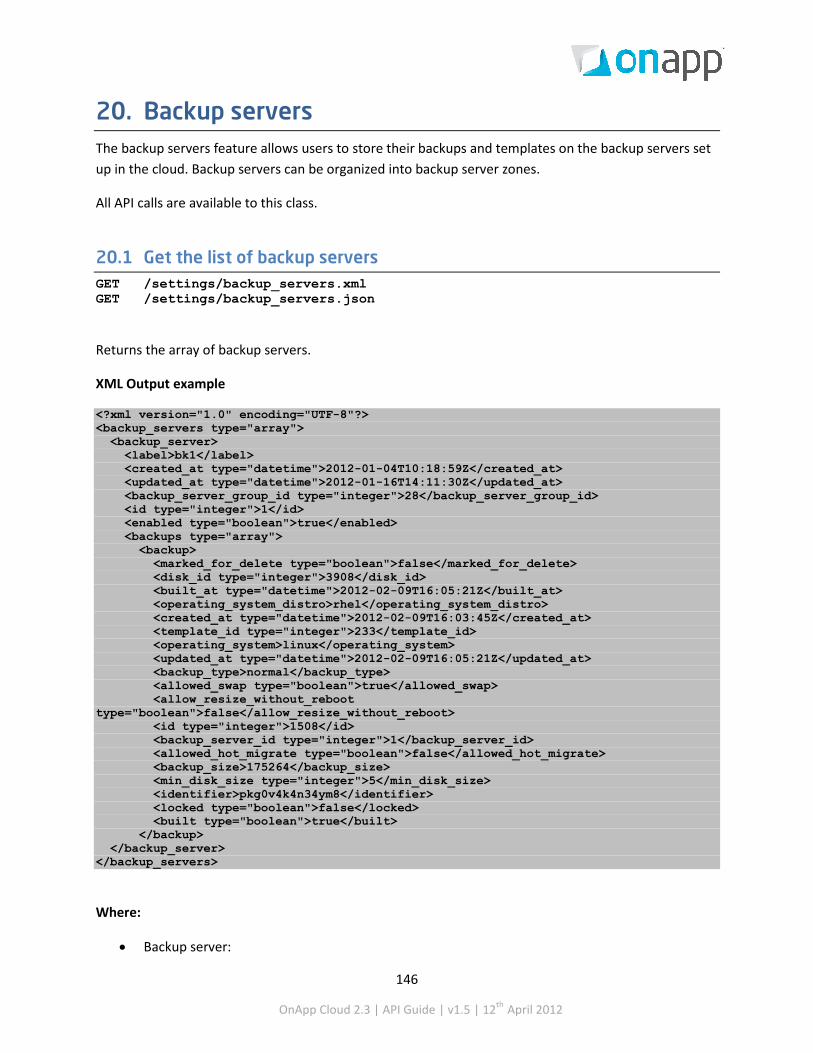
146
OnApp Cloud 2.3 | API Guide | v1.5 | 12th April 2012
20. Backup servers The backup servers feature allows users to store their backups and templates on the backup servers set up in the cloud. Backup servers can be organized into backup server zones.
All API calls are available to this class.
20.1 Get the list of backup servers GET /settings/backup_servers.xml GET /settings/backup_servers.json
Returns the array of backup servers.
XML Output example
<?xml version="1.0" encoding="UTF-8"?> <backup_servers type="array"> <backup_server> <label>bk1</label> <created_at type="datetime">2012-01-04T10:18:59Z</created_at> <updated_at type="datetime">2012-01-16T14:11:30Z</updated_at> <backup_server_group_id type="integer">28</backup_server_group_id> <id type="integer">1</id> <enabled type="boolean">true</enabled> <backups type="array"> <backup> <marked_for_delete type="boolean">false</marked_for_delete> <disk_id type="integer">3908</disk_id> <built_at type="datetime">2012-02-09T16:05:21Z</built_at> <operating_system_distro>rhel</operating_system_distro> <created_at type="datetime">2012-02-09T16:03:45Z</created_at> <template_id type="integer">233</template_id> <operating_system>linux</operating_system> <updated_at type="datetime">2012-02-09T16:05:21Z</updated_at> <backup_type>normal</backup_type> <allowed_swap type="boolean">true</allowed_swap> <allow_resize_without_reboot type="boolean">false</allow_resize_without_reboot> <id type="integer">1508</id> <backup_server_id type="integer">1</backup_server_id> <allowed_hot_migrate type="boolean">false</allowed_hot_migrate> <backup_size>175264</backup_size> <min_disk_size type="integer">5</min_disk_size> <identifier>pkg0v4k4n34ym8</identifier> <locked type="boolean">false</locked> <built type="boolean">true</built> </backup> </backup_server> </backup_servers>
Where:
• Backup server:
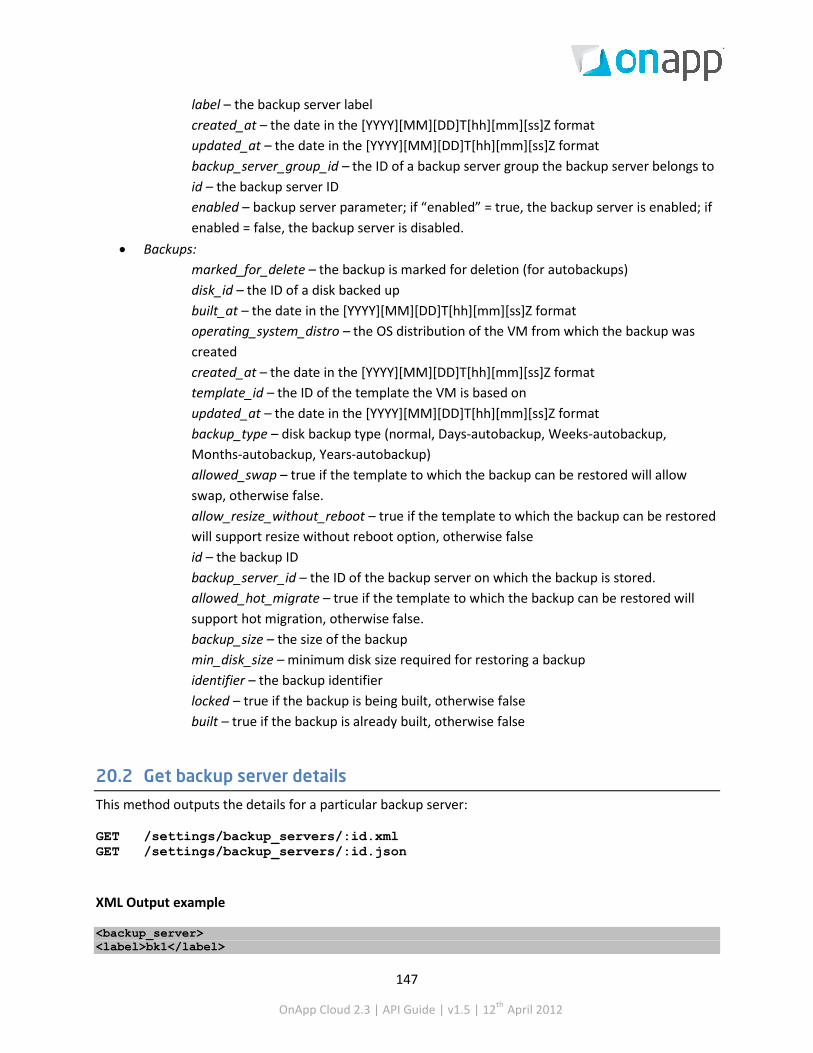
147
OnApp Cloud 2.3 | API Guide | v1.5 | 12th April 2012
label – the backup server label created_at – the date in the [YYYY][MM][DD]T[hh][mm][ss]Z format updated_at – the date in the [YYYY][MM][DD]T[hh][mm][ss]Z format backup_server_group_id – the ID of a backup server group the backup server belongs to id – the backup server ID enabled – backup server parameter; if “enabled” = true, the backup server is enabled; if enabled = false, the backup server is disabled.
• Backups: marked_for_delete – the backup is marked for deletion (for autobackups) disk_id – the ID of a disk backed up built_at – the date in the [YYYY][MM][DD]T[hh][mm][ss]Z format operating_system_distro – the OS distribution of the VM from which the backup was created created_at – the date in the [YYYY][MM][DD]T[hh][mm][ss]Z format template_id – the ID of the template the VM is based on updated_at – the date in the [YYYY][MM][DD]T[hh][mm][ss]Z format backup_type – disk backup type (normal, Days-autobackup, Weeks-autobackup, Months-autobackup, Years-autobackup) allowed_swap – true if the template to which the backup can be restored will allow swap, otherwise false. allow_resize_without_reboot – true if the template to which the backup can be restored will support resize without reboot option, otherwise false id – the backup ID backup_server_id – the ID of the backup server on which the backup is stored. allowed_hot_migrate – true if the template to which the backup can be restored will support hot migration, otherwise false. backup_size – the size of the backup min_disk_size – minimum disk size required for restoring a backup identifier – the backup identifier locked – true if the backup is being built, otherwise false built – true if the backup is already built, otherwise false
20.2 Get backup server details
This method outputs the details for a particular backup server:
GET /settings/backup_servers/:id.xml GET /settings/backup_servers/:id.json
XML Output example
<backup_server> <label>bk1</label>
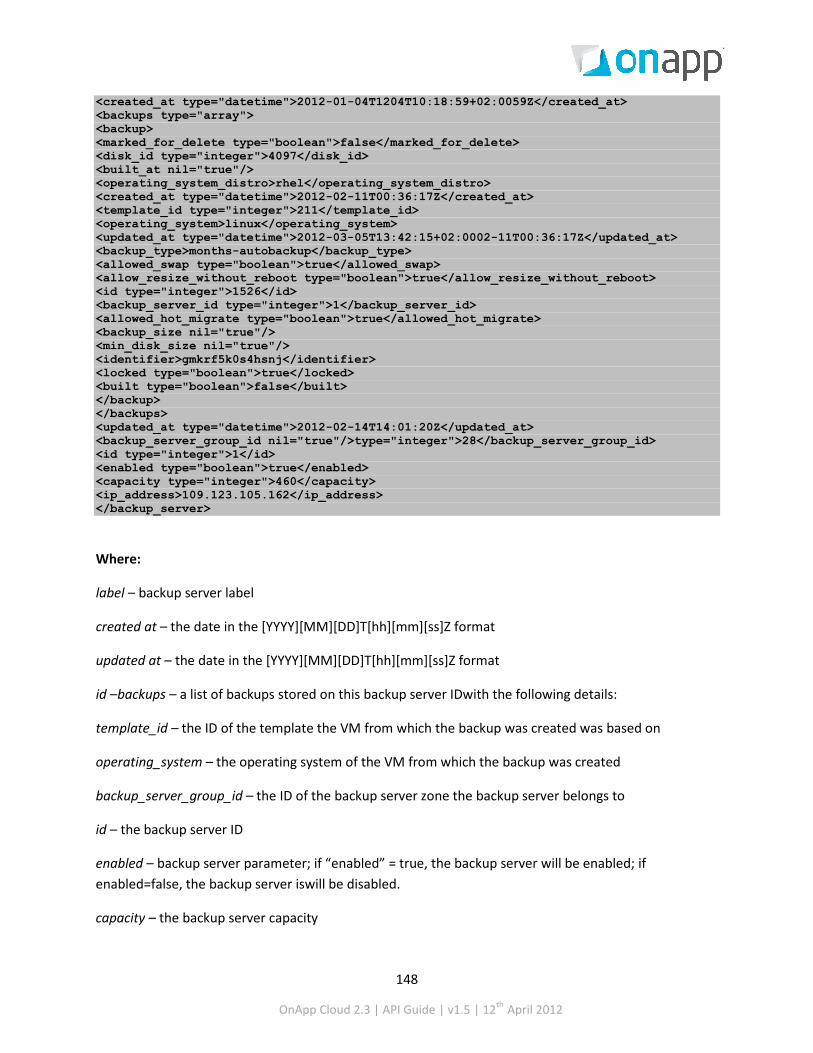
148
OnApp Cloud 2.3 | API Guide | v1.5 | 12th April 2012
<created_at type="datetime">2012-01-04T1204T10:18:59+02:0059Z</created_at> <backups type="array"> <backup> <marked_for_delete type="boolean">false</marked_for_delete> <disk_id type="integer">4097</disk_id> <built_at nil="true"/> <operating_system_distro>rhel</operating_system_distro> <created_at type="datetime">2012-02-11T00:36:17Z</created_at> <template_id type="integer">211</template_id> <operating_system>linux</operating_system> <updated_at type="datetime">2012-03-05T13:42:15+02:0002-11T00:36:17Z</updated_at> <backup_type>months-autobackup</backup_type> <allowed_swap type="boolean">true</allowed_swap> <allow_resize_without_reboot type="boolean">true</allow_resize_without_reboot> <id type="integer">1526</id> <backup_server_id type="integer">1</backup_server_id> <allowed_hot_migrate type="boolean">true</allowed_hot_migrate> <backup_size nil="true"/> <min_disk_size nil="true"/> <identifier>gmkrf5k0s4hsnj</identifier> <locked type="boolean">true</locked> <built type="boolean">false</built> </backup> </backups> <updated_at type="datetime">2012-02-14T14:01:20Z</updated_at> <backup_server_group_id nil="true"/>type="integer">28</backup_server_group_id> <id type="integer">1</id> <enabled type="boolean">true</enabled> <capacity type="integer">460</capacity> <ip_address>109.123.105.162</ip_address> </backup_server>
Where:
label – backup server label
created at – the date in the [YYYY][MM][DD]T[hh][mm][ss]Z format
updated at – the date in the [YYYY][MM][DD]T[hh][mm][ss]Z format
id –backups – a list of backups stored on this backup server IDwith the following details:
template_id – the ID of the template the VM from which the backup was created was based on
operating_system – the operating system of the VM from which the backup was created
backup_server_group_id – the ID of the backup server zone the backup server belongs to
id – the backup server ID
enabled – backup server parameter; if “enabled” = true, the backup server will be enabled; if enabled=false, the backup server iswill be disabled.
capacity – the backup server capacity
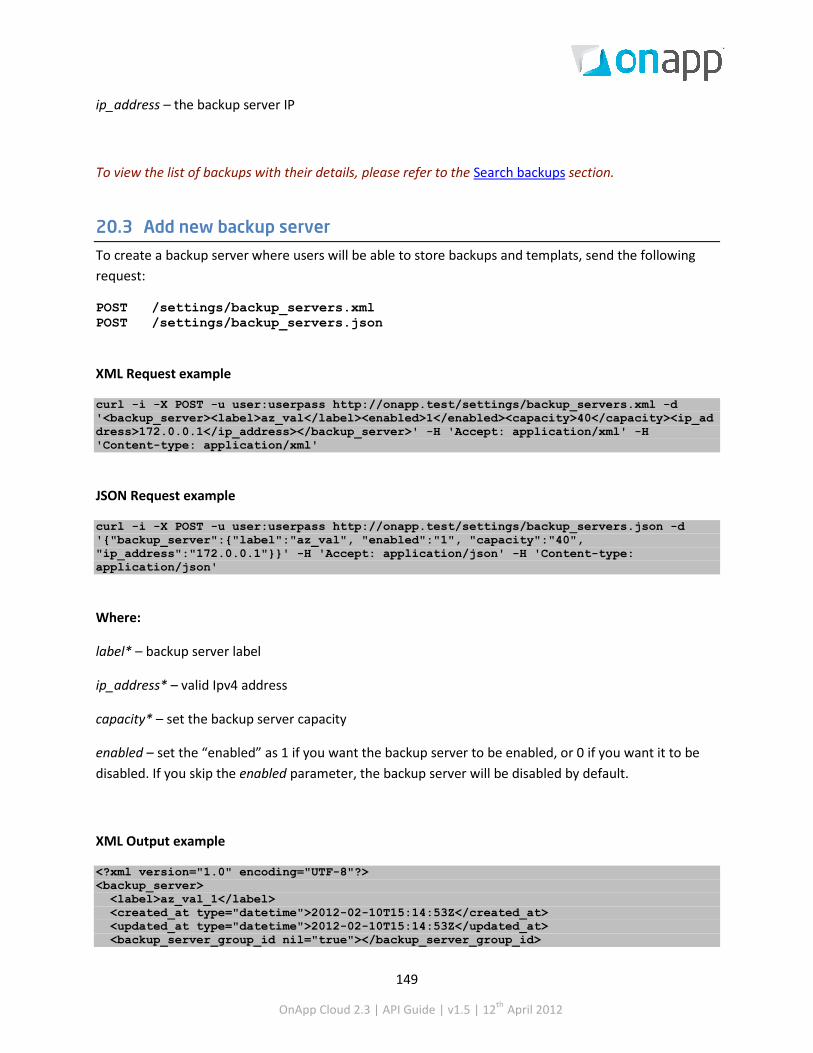
149
OnApp Cloud 2.3 | API Guide | v1.5 | 12th April 2012
ip_address – the backup server IP
To view the list of backups with their details, please refer to the Search backups section.
20.3 Add new backup server
To create a backup server where users will be able to store backups and templats, send the following request:
POST /settings/backup_servers.xml POST /settings/backup_servers.json
XML Request example
curl -i -X POST -u user:userpass http://onapp.test/settings/backup_servers.xml -d '<backup_server><label>az_val</label><enabled>1</enabled><capacity>40</capacity><ip_address>172.0.0.1</ip_address></backup_server>' -H 'Accept: application/xml' -H 'Content-type: application/xml'
JSON Request example
curl -i -X POST -u user:userpass http://onapp.test/settings/backup_servers.json -d '{"backup_server":{"label":"az_val", "enabled":"1", "capacity":"40", "ip_address":"172.0.0.1"}}' -H 'Accept: application/json' -H 'Content-type: application/json'
Where:
label* – backup server label
ip_address* – valid Ipv4 address
capacity* – set the backup server capacity
enabled – set the “enabled” as 1 if you want the backup server to be enabled, or 0 if you want it to be disabled. If you skip the enabled parameter, the backup server will be disabled by default.
XML Output example
<?xml version="1.0" encoding="UTF-8"?> <backup_server> <label>az_val_1</label> <created_at type="datetime">2012-02-10T15:14:53Z</created_at> <updated_at type="datetime">2012-02-10T15:14:53Z</updated_at> <backup_server_group_id nil="true"></backup_server_group_id>

150
OnApp Cloud 2.3 | API Guide | v1.5 | 12th April 2012
<id type="integer">25</id> <enabled type="boolean">true</enabled> <backups type="array"/> <capacity type="integer">40</capacity> <ip_address>172.0.0.2</ip_address> </backup_server>
20.4 Edit a backup server
Use the following method to edit a backup server:
PUT /settings/backup_server/:id.xml PUT /settings/backup_server/:id.json
XML Request example
curl -i -X PUT -u user:userpass http://onapp.test/settings/backup_servers/:id.xml -d '<backup_server><label>az_val_ue_xml</label><enabled>1</enabled><capacity>40</capacity><ip_address>172.0.0.2</ip_address></backup_server>' -H 'Accept: application/xml' -H 'Content-type: application/xml'
JSON Request example
curl -i -X PUT -u user:userpass http://onapp.test/settings/backup_servers/:id.json -d '{"backup_server":{"label":"az_val_ue_json", "enabled":"1", "capacity":"40", "ip_address":"172.0.0.1"}}' -H 'Accept: application/json' -H 'Content-type: application/json'
Where:
label – backup server label
enabled – set the “enabled” as 1 if you want the backup server to be enabled, or 0 if you it to be disabled. If you skip the enabled parameter, the backup server will be disabled by default.
capacity* – set the backup server capacity
ip_address* – valid Ipv4 address
You will get a 200 status response on success, and 404 if there is no such a backup server with a requested ID or you entered incorrect URL.
20.5 Delete a backup server DELETE /settings/backup_servers/:id.xml DELETE /settings/backup_servers/:id.json

151
OnApp Cloud 2.3 | API Guide | v1.5 | 12th April 2012
XML Request example
curl -i -X DELETE -u user:userpass http://onapp.test/settings/backup_servers/:id.xml -H 'Accept: application/xml' -H 'Content-type: application/xml'
JSON Request example
curl -i -X DELETE -u user:userpass http://onapp.test/settings/backup_servers/:id.json -H 'Accept: application/json' -H 'Content-type: application/json'
You will get a 200 status response on success, and 404 if there is no such a backup server with a requested ID or you entered incorrect URL.
20.6 Search backups
To find a backup stored at a particular backup server, use the following request:
GET /settings/backup_servers/:id/backups_search.xml GET /settings/backup_servers/:id/backups_search.json
You can set the following search parameters:
size – set the size [from] and [to] backup search parameters to search backups by their size
date – set the date [startdate] and [enddate]backup search parameters to search for backups created between two dates.
The following request returns the array of backups created between 02/01/12 and 02/24/2012 dates
and having the size from 10 to 300 GB.
XML Request example
curl -i -X GET -u user:userpass 'http://onapp.test/settings/backup_servers/1/backups_search.xml?size[from]=10&size[to]=300&period[startdate]=02/01/12&period[enddate]=02/24/2012&searching=az' -H 'Accept: application/xml' -H 'Content-type: application/xml'
JSON Request example
curl -i -X GET -u user:userpass 'http://onapp.test/settings/backup_servers/1/backups_search.json?size[from]=10&size[to]=300&period[startdate]=02/01/12&period[enddate]=02/24/2012&searching=az' -H 'Accept: application/json' -H 'Content-type: application/json'

152
OnApp Cloud 2.3 | API Guide | v1.5 | 12th April 2012
Please be aware that some Unix command shells can output an error because of square brackets. To prevent the error, use the back slash escape symbol. The example curl with back slashes is as follows:
XML Request example
curl -i -X GET -u user:userpass 'http://onapp.test/settings/backup_servers/1/backups_search.xml?size\[from\]=10&size\[to\]=300&period\[startdate\]=02/01/12&period\[enddate\]=02/24/2012&searching=az' -H 'Accept: application/xml' -H 'Content-type: application/xml'
JSON Request example
curl -i -X GET -u user:userpass 'http://onapp.test/settings/backup_servers/1/backups_search.json?size\[from\]=10&size\[to\]=300&period\[startdate\]=02/01/12&period\[enddate\]=02/24/2012&searching=az' -H 'Accept: application/json' -H 'Content-type: application/json'
XML Output example
<?xml version="1.0" encoding="UTF-8"?> <backups type="array"> <backup> <marked_for_delete type="boolean">false</marked_for_delete> <disk_id type="integer">3908</disk_id> <built_at type="datetime">2012-02-09T16:05:21Z</built_at> <operating_system_distro>rhel</operating_system_distro> <created_at type="datetime">2012-02-09T16:03:45Z</created_at> <template_id type="integer">233</template_id> <operating_system>linux</operating_system> <updated_at type="datetime">2012-02-09T16:05:21Z</updated_at> <backup_type>normal</backup_type> <allowed_swap type="boolean">true</allowed_swap> <allow_resize_without_reboot type="boolean">false</allow_resize_without_reboot> <id type="integer">1508</id> <backup_server_id type="integer">1</backup_server_id> <allowed_hot_migrate type="boolean">false</allowed_hot_migrate> <backup_size>175264</backup_size> <min_disk_size type="integer">5</min_disk_size> <identifier>pkg0v4k4n34ym8</identifier> <locked type="boolean">false</locked> <built type="boolean">true</built> </backup> </backups>
Where:
• backups – an array of backups stored on the backup server:
For details refer to Get The List Of Backup Servers section.
• marked_for_delete – the backup is marked for deletion (for autobackups) • disk_id – the ID of a disk backed up • built_at – the date in the [YYYY][MM][DD]T[hh][mm][ss]Z format
153
OnApp Cloud 2.3 | API Guide | v1.5 | 12th April 2012
• operating_system_distro – the OS distribution of the VM from which the backup was created • created_at – the date in the [YYYY][MM][DD]T[hh][mm][ss]Z format • template_id – the ID of the template the VM is based on • updated_at – the date in the [YYYY][MM][DD]T[hh][mm][ss]Z format • backup_type – disk backup type (normal, Days-autobackup, Weeks-autobackup, Months-
autobackup, Years-autobackup) • allowed_swap – true if the template to which the backup can be restored will allow swap,
otherwise false. • allow_resize_without_reboot – true if the template to which the backup can be restored will
support resize without reboot option, otherwise false • id – the backup ID • backup_server_id – the ID of the backup server on which the backup is stored. • allowed_hot_migrate – true if the template to which the backup can be restored will support hot
migration, otherwise false. • backup_size – the size of the backup • min_disk_size – minimum disk size required for restoring a backup • identifier – the backup identifier • locked – true if the backup is being built, otherwise false • built – true if the backup is already built, otherwise false
Note that the backup search returns only the list of backups, stored on a specified backup server, which a user has permission to see ( own backups or all backups). For instructions on how to see the list of all backup servers, refer to Get the list of all backup servers section.

154
OnApp Cloud 2.3 | API Guide | v1.5 | 12th April 2012
21. Disks Disks provide space for virtual machine data. A disk is a partition of a data store that is allocated to a specific virtual machine. All CRUD operations are available for Disks.
21.1 Get the list of disks GET /settings/disks.xml GET /settings/disks.json
XML Output example
<?xml version="1.0" encoding="UTF-8"?> <disks type="array"> <disk> <has_autobackups type="boolean">false</has_autobackups> <created_at type="datetime">2011-07-19T12:29:10Z</created_at> <updated_at type="datetime">2011-07-19T12:34:46Z</updated_at> <disk_size type="integer">5</disk_size> <add_to_linux_fstab nil="true"></add_to_linux_fstab> <primary type="boolean">true</primary> <id type="integer">64</id> <data_store_id type="integer">1</data_store_id> <mount_point nil="true"></mount_point> <is_swap type="boolean">false</is_swap> <disk_vm_number type="integer">1</disk_vm_number> <virtual_machine_id type="integer">34</virtual_machine_id> <identifier>c719u80sv5mwdi</identifier> <locked type="boolean">false</locked> <built type="boolean">true</built> </disk> ... <disk></disk> ... </disks>
Where:
created_at the date when the disk was created in the [YYYY][MM][DD]T[hh][mm][ss]Z format
disk-size the size of a disk updated_at the date when the disk was updated in
the [YYYY][MM][DD]T[hh][mm][ss]Z format primary true if the disk is primary. Otherwise false. data_store_id the ID of the data store this disk is located Id the disk ID disk_vm_number the number of virtual machines using this disk

155
OnApp Cloud 2.3 | API Guide | v1.5 | 12th April 2012
is_swap true if this is a swap disk. Otherwise false. virtual_machine_id the ID of the virtual machine using this disk. built true if the disk is built. Otherwise false. locked true if the disk is locked. Otherwise false. has_autobackups true if the disk has automatic backups set up. Otherwise
false.
21.2 Get the list of VM disks
To get the list of disks available for a particular VM, use the following request:
GET /virtual_machines/:virtual_machine_id/disks.xml GET /virtual_machines/:virtual_machine_id/disks.json
XML Output example
<?xml version="1.0" encoding="UTF-8"?> <disks type="array"> <disk> <created_at type="datetime">2011-07-19T12:29:10Z</created_at> <updated_at type="datetime">2011-07-19T12:34:46Z</updated_at> <disk_size type="integer">5</disk_size> <add_to_linux_fstab nil="true"></add_to_linux_fstab> <primary type="boolean">true</primary> <id type="integer">64</id> <data_store_id type="integer">1</data_store_id> <has_autobackups type="boolean">false</has_autobackups> <mount_point nil="true"></mount_point> <is_swap type="boolean">false</is_swap> <disk_vm_number type="integer">1</disk_vm_number> <virtual_machine_id type="integer">34</virtual_machine_id> <identifier>c719u80sv5mwdi</identifier> <locked type="boolean">false</locked> <built type="boolean">true</built> </disk> ... <disk></disk> ... </disks>
For description of the data returned refer to Get the list of disks section
21.3 Add a new disk POST /virtual_machines/:virtual_machine_id/disks.xml POST /virtual_machines/:virtual_machine_id/disks.json
XML Request example

156
OnApp Cloud 2.3 | API Guide | v1.5 | 12th April 2012
curl -i -X POST http://onapp.test/virtual_machines/:virtual_machine_id/disks.xml -d ‘<disk><disk_size>disk_size</disk_size><data_store_id>store_id</data_store_id><mount_point></mount_point><is_swap></is_swap><add_to_linux_fstab></add_to_linux_fstab></disk>’ -u user:userpass -H 'Accept: application/xml' -H 'Content-type: application/xml'
JSON Request example
curl -i -X POST http://onapp.test/virtual_machines/:virtual_machine_id/disks.json -d ’{disk:{disk_size:”disk_size”,data_store_id:”data_store_id”, mount_point:”mount_point”,is_swap:””,add_to_linux_fstab:””}}’ -u user:userpass -H 'Accept: application/json' -H 'Content-type: application/json'
To add a new disk, send the following required parameters:
data_store_id * - The ID of a data store where this disk is located
disk-size * - The disk space in GB
is_swap - Set true if this is a swap disk
mount_point - a physical location in the partition used as a root filesystem
add_to_linux_fstab - Set true to add
require_format_disk – set true to format disk
21.4 Edit a disk PUT /settings/disks/:id.xml PUT /settings/disks/:id.json XML Request example curl -i -X PUT http://onapp.test/virtual_machines/:VM_id/disks/:disk_id.xml -d ‘<disk><disk_size>new_disk_size</disk_size></disk>’ -u user:userpass -H 'Accept: application/xml' -H 'Content-type: application/xml' JSON Request example curl -i -X PUT http://onapp.test/virtual_machines/:VM_id/disks/disk_id.json -d ’{disk:{disk_size:”new_disk_size”}}’ -u user:userpass -H 'Accept: application/json' -H 'Content-type: application/json'
Currently you can edit the size parameter.
You also can edit a disk through another URL: onapp.test/virtual_machines/:virtual_machines_id/disks/:id
21.5 Migrate a disk
To migrate a VM disk to another data store, use the following request:

157
OnApp Cloud 2.3 | API Guide | v1.5 | 12th April 2012
POST /virtual_machines/:virtual_machine_id/disks/:disk_id/migrate.xml POST /virtual_machines/:virtual_machine_id/disks/:disk_id/migrate.json
XML Request example
curl -i -X POST -u user:userpass http://onapp.test/virtual_machines/:virtual_machine_id/disks/:disk_id/migrate.xml -d '<disk><data_store_id>6</data_store_id></disk>' -H 'Accept: application/xml' -H 'Content-type: application/xml'
JSON Request example
curl -i -X POST -u user:userpass http://onapp.test/virtual_machines/:virtual_machine_id/disks/:disk_id/migrate.json -d {"disk":{"data_store_id":"6"}} -H 'Accept: application/json' -H 'Content-type: application/json'
Where:
data_store_id * - the ID of a data store you migrate the disk to.
Note, that you can move disks only between data stores which are attached to the same hypervisor or hypervisor group.
21.6 Delete a disk DELETE /settings/disks/:id.xml DELETE /settings/disks/:id.json XML Request example
curl -i -X DELETE http://onapp.test/virtual_machines/:virtual_machine_id/disks/:disk_id.xml -u user:userpass -H 'Accept: application/xml' -H 'Content-type: application/xml'
JSON Request example
curl -i -X DELETE http://onapp.test/virtual_machines/:virtual_machine_id/disks/:disk_id.json -u user:userpass -H 'Accept: application/json' -H 'Content-type: application/json'
Returns HTTP 200 response on successful deletion, or HTTP 404 when a disk with the ID specified is not found, or the URL requested is incorrect.

158
OnApp Cloud 2.3 | API Guide | v1.5 | 12th April 2012
21.7 View disk IOPS
To view Input/Output statistics for your disks, use the following method:
GET /settings/disks/:id/usage.xml GET /settings/disks/:id/usage.json
XML Output example
<?xml version="1.0" encoding="UTF-8"?> <disk_hourly_stats type="array"> <disk_hourly_stat> <disk_id type="integer">64</disk_id> <created_at type="datetime">2011-07-19T13:00:10Z</created_at> <updated_at type="datetime">2011-07-19T13:00:10Z</updated_at> <writes_completed type="integer">345685</writes_completed> <stat_time type="datetime">2011-07-19T13:00:00Z</stat_time> <data_written type="integer">11061920</data_written> <data_read type="integer">53840</data_read> <id type="integer">1028</id> <user_id type="integer">13</user_id> <virtual_machine_id type="integer">34</virtual_machine_id> <reads_completed type="integer">1684</reads_completed> </disk_hourly_stat> ... <disk_hourly_stat></disk_hourly_stat> ... </disk_hourly_stats>
Where:
disk_id - the ID of a disk created_at - the timestamp in DB when the record was created updated_at - the timestamp in DB when the record was updated data_read – the amount of data read from this disk data_written - the amount of data written to the disk stat_time - the time when statistics were generated writes_completed - the number of completed write operations reads_completed - the number of completed read operations user_id – ID of the user whose VM is using this disk virtual_machine_id – ID of the VM using this disk
21.8 Build a disk
To build a disk, use the following methods:
POST /settings/disks/:id/build.xml POST /settings/disks/:id/build.json

159
OnApp Cloud 2.3 | API Guide | v1.5 | 12th April 2012
XML Request example
curl -i -X POST http://onapp.test/settings/disks/:disk_id/build.xml -u user:userpass -H 'Accept: application/xml' -H 'Content-type: application/xml' JSON Request example curl -i -X GET http://onapp.test/settings/disks/:disk_id/build.json -u user:userpass -H 'Accept: application/json' -H 'Content-type: application/json' Where: disk_id * - the ID of the disk you want to build
21.9 Unlock a disk
To unlock a disk, use the following methods:
POST /settings/disks/:disk_id/unlock.xml POST /settings/disks/:disk_id/unlock.json XML Request example curl -i -X POST http://onapp.test/settings/disks/:disk_id/unlock.xml -u user:userpass -H 'Accept: application/xml' -H 'Content-type: application/xml' JSON Request example curl -i -X POST http://onapp.test/settings/disks/:disk_id/unlock.json -u user:userpass -H 'Accept: application/json' -H 'Content-type: application/json'
21.10 Enable autobackups for a disk
You can enable autobackups for a disk using the following methods:
POST /settings/disks/:disk_id/autobackup_enable.xml POST /settings/disks/:disk_id/autobackup_enable.json
XML Request example
curl -i -X POST http://onapp.test/settings/disks/:disk_id/autobackup_enable.xml -u user:userpass -H 'Accept: application/xml' -H 'Content-type: application/xml' JSON Request example
curl -i -X POST http://onapp.test/settings/disks/:disk_id/autobackup_enable.json -u user:userpass -H 'Accept: application/json' -H 'Content-type: application/json' Where: disk_id * - is the ID of the disk, for wich you want to enable autobackup

160
OnApp Cloud 2.3 | API Guide | v1.5 | 12th April 2012
21.11 Disable autobackups for a disk
To disable autobackups for a disk, use the following method:
POST /settings/disks/:id/autobackup_disable.xml POST /settings/disks/:id/autobackup_disable.json
XML Request example
curl -i -X POST http://onapp.test/settings/disks/:disk_id/autobackup_disable.xml -u user:userpass -H 'Accept: application/xml' -H 'Content-type: application/xml' JSON Request example curl -i -X POST http://onapp.test/settings/disks/:disk_id/autobackup_disable.json -u user:userpass -H 'Accept: application/json' -H 'Content-type: application/json' Where: disk_id * - the ID of the disk for which you want to disable autobackup
21.12 Get the list of schedules for a disk
To get a list of schedules for a particular disk, use the following methods:
GET /settings/disks/:disk_id/schedules.xml GET /settings/disks/:disk_id/schedules.json XML Output example <?xml version="1.0" encoding="UTF-8"?> <schedules> <schedule> <duration>1</duration> <created_at>2011-07-20T15:16:16Z</created_at> <target_id>112</target_id> <updated_at>2011-07-27T15:16:18Z</updated_at> <period>days</period> <action>autobackup</action> <start_at>2011-07-28T15:16:16Z</start_at> <id>33</id> <user_id>1</user_id> <schedule_logs> <schedule_log> <created_at>2011-07-27T15:16:18Z</created_at> <updated_at>2011-07-27T15:16:18Z</updated_at> <schedule_id>33</schedule_id> <id>10</id> <log_output></log_output> <status>complete</status> </schedule_log> ... <schedule_log></Schedule_log> ... <params nil="true"></params> <failure_count>0</failure_count> <status>enabled</status> <target_type>Disk</target_type>
161
OnApp Cloud 2.3 | API Guide | v1.5 | 12th April 2012
</schedule> ... <schedule></schedule> </schedules> Where: duration - the number specifying how often a backup should be taken target_id – ID of the action target period - the time period (days, weeks, months, or years) action – the action performed start_at – time, when the action starts id – schedule id user_id – ID of the disk (action target) user schedule_logs – an array with schedule log details, where
• schedule_id – ID of a schedule • id – ID of the schedule log • log_output – an array with log details • status – status of the action (complete, failed, etc.)
failure_count – number of failures during the action status – schedule status (enabled or disabled) target_type – type of the target
21.13 Add a schedule to a disk
You can add a schedule to a disk using the following method:
POST /settings/disks/:disk_id/schedules.xml POST /settings/disks/:disk_id/schedules.json
XML Request example
curl -i -X POST http://onapp.test/settings/disks/:disk_id/schedules.xml -d ‘<schedule><action>autobackup</action><duration>1</duration><period>days</period></schedule>’ -u user:userpass -H 'Accept: application/xml' -H 'Content-type: application/xml'
JSON Request example
curl -i -X POST http://onapp.test/settings/disks/:disk_id/schedules.json -d ‘{schedule:{action:”autobackup”,duration:”1”,period:”days”}}’ -u user:userpass -H 'Accept: application/json' -H 'Content-type: application/json'
Where:
162
OnApp Cloud 2.3 | API Guide | v1.5 | 12th April 2012
action * set Autobackup to add a backup schedule
duration* specify duration
period * set the period (days/weeks/months)
21.14 Get the list of backups available for a disk
To get the list of backups available to a particular disk, use the following method:
GET /settings/disks/:disk_id/backups.xml GET /settings/disks/:disk_id/backups.json
An array of backups with their details is returned on success.
XML Output example
<?xml version="1.0" encoding="UTF-8"?> <backups type="array"> <backup> <disk_id type="integer">112</disk_id> <built_at type="datetime">2011-07-27T15:19:47Z</built_at> <operating_system_distro>rhel</operating_system_distro> <created_at type="datetime">2011-07-27T15:16:18Z</created_at> <template_id type="integer">1</template_id> <operating_system>linux</operating_system> <updated_at type="datetime">2011-07-27T15:19:47Z</updated_at> <backup_type>days-autobackup</backup_type> <allowed_swap type="boolean">true</allowed_swap> <allow_resize_without_reboot type="boolean">true</allow_resize_without_reboot> <id type="integer">12</id> <backup_server_id type="integer">1</backup_server_id> <allowed_hot_migrate type="boolean">true</allowed_hot_migrate> <backup_size>315552</backup_size> <min_disk_size type="integer">5</min_disk_size> <identifier>ytfgbj2drbs2d7</identifier> <locked type="boolean">false</locked> <built type="boolean">true</built> </backup> ... <backup></backup> ... </backups> Where: backup – an array of backup details disk_id – ID of the disk built_at – time, when the disk was built operating_system_distro – distribution of the operating system template_id – ID of the template, used for assigned VM operating_system – OS of the virtual machine, which is allocated at this disk backup_type – type of the backup (type of period: days/weeks/months/years)

163
OnApp Cloud 2.3 | API Guide | v1.5 | 12th April 2012
allowed_swap – true, if this is a swap disk; otherwise false allow_resize_without_reboot – true, if VM’s CPU and RAM can be resized without reboot id – ID of the backup backup_server_id – the ID of the backup server where the backup is stored allowed_hot_migrate – true, if hot migration is allowed backup_size - size of the backup in Kilobytes min_disk_size – minimum disk size required in GB identifier – identifier in the DB locked – true, if the disk is locked built - true, if the disk is built
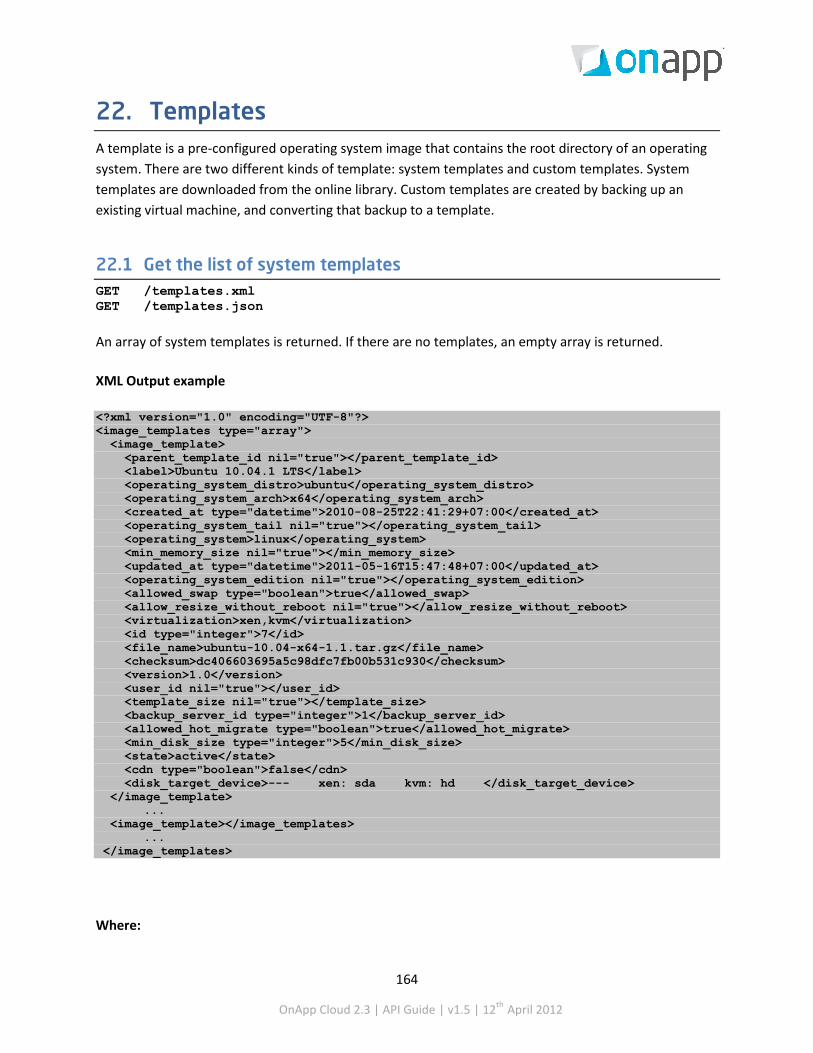
164
OnApp Cloud 2.3 | API Guide | v1.5 | 12th April 2012
22. Templates A template is a pre-configured operating system image that contains the root directory of an operating system. There are two different kinds of template: system templates and custom templates. System templates are downloaded from the online library. Custom templates are created by backing up an existing virtual machine, and converting that backup to a template.
22.1 Get the list of system templates GET /templates.xml GET /templates.json
An array of system templates is returned. If there are no templates, an empty array is returned.
XML Output example
<?xml version="1.0" encoding="UTF-8"?> <image_templates type="array"> <image_template> <parent_template_id nil="true"></parent_template_id> <label>Ubuntu 10.04.1 LTS</label> <operating_system_distro>ubuntu</operating_system_distro> <operating_system_arch>x64</operating_system_arch> <created_at type="datetime">2010-08-25T22:41:29+07:00</created_at> <operating_system_tail nil="true"></operating_system_tail> <operating_system>linux</operating_system> <min_memory_size nil="true"></min_memory_size> <updated_at type="datetime">2011-05-16T15:47:48+07:00</updated_at> <operating_system_edition nil="true"></operating_system_edition> <allowed_swap type="boolean">true</allowed_swap> <allow_resize_without_reboot nil="true"></allow_resize_without_reboot> <virtualization>xen,kvm</virtualization> <id type="integer">7</id> <file_name>ubuntu-10.04-x64-1.1.tar.gz</file_name> <checksum>dc406603695a5c98dfc7fb00b531c930</checksum> <version>1.0</version> <user_id nil="true"></user_id> <template_size nil="true"></template_size> <backup_server_id type="integer">1</backup_server_id> <allowed_hot_migrate type="boolean">true</allowed_hot_migrate> <min_disk_size type="integer">5</min_disk_size> <state>active</state> <cdn type="boolean">false</cdn> <disk_target_device>--- xen: sda kvm: hd </disk_target_device> </image_template> ... <image_template></image_templates> ... </image_templates>
Where:
165
OnApp Cloud 2.3 | API Guide | v1.5 | 12th April 2012
image_templates – an array of all system templates and their details parent_template_id – true if this is a system template label – the template title operating_system_distro – operating system distribution operating_system_arch – architecture of the operating system created_at – the date in the [YYYY][MM][DD]T[hh][mm][ss]Z format operating_system_tail – tail of the OS operating_system – operating system name min_memory_size – true if minimum memory size is required updated_at — the date when the Network was updated in the [YYYY][MM][DD]T[hh][mm][ss]Z format operating_system_edition – edition of the OS allowed_swap – true if swap is allowed, otherwise false allowed_resize_without_reboot – true if resize without reboot is allowed, otherwise false virtualization – type of virtualization (xen or kvm) which is compatible with this template id – ID of template file_name – the name of the template file checksum – file checksum version – version of the file backup_server_id – the ID of the backup server where the template is stored allowed_hot_migrate – true if hot migration is allowed, otherwise false min_disk_size – minimum disk size required to build a VM on this template (GB) state – state of the template (active, inactive) cdn – true if this template can be used for building edge servers. Otherwise false. disk_target_device – the prefix indicating the method of translating the disk to a VM by hypervisor
22.2 Get the list of custom templates (user templates) GET /templates/user.xml GET /templates/user.json The request returns the array of custom templates. An empty array is returned if there are no Custom templates.
Contrary to the System templates, the Custom templates parent_template_id parameter indicates the ID of a system template, which has been converted into custom one.
22.3 Get the template details GET /templates/:id.xml GET /templates/:id.json XML output example

166
OnApp Cloud 2.3 | API Guide | v1.5 | 12th April 2012
<?xml version="1.0" encoding="UTF-8"?> <image_template> <parent_template_id nil="true"></parent_template_id> <label>Debian 5.0 (Lenny) x64</label> <operating_system_distro>ubuntu</operating_system_distro> <operating_system_arch></operating_system_arch> <created_at type="datetime">2010-08-25T22:41:29+07:00</created_at> <operating_system_tail nil="true"></operating_system_tail> <operating_system>linux</operating_system> <min_memory_size nil="true"></min_memory_size> <updated_at type="datetime">2011-05-16T15:47:48+07:00</updated_at> <operating_system_edition nil="true"></operating_system_edition> <allowed_swap type="boolean">true</allowed_swap> <allow_resize_without_reboot nil="true"></allow_resize_without_reboot> <virtualization>xen,kvm</virtualization> <id type="integer">8</id> <file_name>debian-501-2.0.tar.gz</file_name> <checksum>5081c49c6fce9547ef1ae3e50a9dad3c</checksum> <version>2.0</version> <user_id nil="true"></user_id> <template_size nil="true"></template_size> <backup_server_id type="integer">1</backup_server_id> <allowed_hot_migrate nil="true"></allowed_hot_migrate> <min_disk_size type="integer">5</min_disk_size> <state>active</state> <cdn type="boolean">false</cdn> <disk_target_device>--- xen: sda kvm: hd </disk_target_device> </image_template>
Where:
parent_template_id – true if this is a system template label – the template title operating_system_distro – operating system distribution operating_system_arch – architecture of the operating system created_at – the date in the [YYYY][MM][DD]T[hh][mm][ss]Z format operating_system_tail – tail of the OS operating_system – operating system name min_memory_size – minimum RAM required for the template. If no minimum RAM is required – remains empty updated_at — the date when the Network was updated in the [YYYY][MM][DD]T[hh][mm][ss]Z format operating_system_edition – edition of the OS allowed_swap – true if swap is allowed, otherwise false allowed_resize_without_reboot – true if resize without reboot is allowed, otherwise false virtualization – type of virtualization (xen, kvm) id – ID of template file_name – name of the template file checksum – file checksum version – version of the file

167
OnApp Cloud 2.3 | API Guide | v1.5 | 12th April 2012
backup_server_id – the ID of the backup server where the template is stored allowed_hot_migrate – true if hot migration is allowed, otherwise false min_disk_size – minimum disk size in GB state – state of the template (active or inactive) cdn – true if this template can be used for building edge servers. Otherwise false. disk_target_device – the prefix indicating the method of translating the disk to a VM by hypervisor
22.4 Make a template public POST /templates/:id/make_public.xml POST /templates/:id/make_public.json
XML Request example
curl -i -X POST -H 'Accept: application/xml' -H 'Content-type: applicaton/xml' -u user:userpass --url http://onapp.test/templates/:id/make_public.xml
JSON Request example
curl -i -X POST -H 'Accept: application/json' -H 'Content-type: applicaton/json' -u user:userpass --url http://onapp.test/templates/:id/make_public.json
If a template is queued to be moved to a public list successfully, an HTTP 201 response is returned.
Only Custom templates can be made public.
22.5 Delete a template
To delete a template from the system:
DELETE /templates/:id.xml DELETE /templates/:id.json
XML Request example
curl -i -x DELETE -u user:userpass htttp://onapp.test/templates/:id.xml -H'Content-type: application/xml' -H'Accept: application/xml'
JSON Request example
curl -i -x DELETE -u user:userpass htttp://onapp.test/templates/:id.xml -H'Content-type: application/json' -H'Accept: application/json'
The system won't delete the template if it is used by any VMs.

168
OnApp Cloud 2.3 | API Guide | v1.5 | 12th April 2012
23. Template groups Template Groups is the class that organizes all VM templates into separate groups. Each template group can be associated with a billing plan, in order to control which templates are available to different users.
23.1 See the list of template groups
To get the list of all template groups created on the system:
GET /settings/image_template_groups.xml GET /settings/image_template_groups.json Output example
<?xml version="1.0" encoding="UTF-8"?> <image_template_groups type="array"> <image_template_group> <label>Test</label> <created_at type="datetime">2011-04-20T15:56:00+03:00</created_at> <updated_at type="datetime">2011-04-20T15:56:00+03:00</updated_at> <id type="integer">4</id> </image_template_group> </image_template_groups> Where:
label – the group name
created_at – the date when this record was created in database
updated_at – the date when this record was updated in database
ID – the group ID
23.2 Get template group details
To get details of a particular template group, use the following request:
GET /settings/image_template_groups/:id.xml GET /settings/image_template_groups/:id.json Output example
<?xml version="1.0" encoding="UTF-8"?> <image_template_groups type="array"> <image_template_group> <label>Test</label> <created_at type="datetime">2011-04-20T15:56:00+03:00</created_at> <updated_at type="datetime">2011-04-20T15:56:00+03:00</updated_at> <id type="integer">4</id> </image_template_group> </image_template_groups>

169
OnApp Cloud 2.3 | API Guide | v1.5 | 12th April 2012
Where:
label – the group name
created_at – the date when this record was created in database
updated_at – the date when this record was updated in database
ID – the group ID
23.3 Edit a template group
To edit details of a template group:
PUT /settings/image_template_groups/:id.xml PUT /settings/image_template_groups/:id.json XML Request example
curl -i -X PUT -H 'Accept: application/xml' -H 'Content-type: application/xml' -u user:userpass -d '<image_template_group><label>zaza</label><options_attributes><mak>1</mak><kms_host>ededde.fe</kms_host><kms_port>5453</kms_port><kms>1</kms><own>1</own><kms_server_label>wqqdwwqw</kms_server_labelown>1</own></options_attributes></image_template_group>' --url http://onapp.test/settings/image_template_groups/:image_template_group_id.xml
JSON Request example
curl -i -X PUT -H 'Accept: application/json' -H 'Content-type: application/json' -u user:userpass -d '{"image_template_group":{"label":"zaza", "options_attributes":{"mak":"1","kms_host":"ededde.fe", "kms_port":"5453", "kms":"1", "own":"1", "kms_server_label":"wqwqw", "own":"1"}}}' --url http://onapp.test/settings/image_template_groups/:image_template_group_id.json Possible parameters:
label – template group name
options attributes – template group configuration attributes:
kms_host – KMS server host name
kms_port – KMS server port
mak – MAK windows licensing type
kms – KVM windows type
own – users’own license

170
OnApp Cloud 2.3 | API Guide | v1.5 | 12th April 2012
kms_server_label – KMS server name
XML Response example
HTTP/1.1 200 OK Date: Tue, 28 Feb 2012 11:55:53 GMT Server: Apache/2.2.3 (CentOS) X-Powered-By: Phusion Passenger (mod_rails/mod_rack) 3.0.1 X-UA-Compatible: IE=Edge,chrome=1 X-Runtime: 0.122994 Cache-Control: no-cache Set-Cookie: _session_id=6596bf326a9a8569ba51d7e8048b28be; path=/; HttpOnly Status: 200 Connection: close Transfer-Encoding: chunked Content-Type: application/xml; charset=utf-8 Delete Template Group
23.4 Add a template group
To add a template group, use the following request:
POST /settings/image_template_groups.xml POST /settings/image_template_groups.json XML Request example
curl -i -X POST -H 'Accept: application/xml' -H 'Content-type: application/xml' -u user:userpass -d '<image_template_group><label>asasasa</label><options_attributes><mak>1</mak><kms_host>ededde.fe</kms_host><kms_port>5453</kms_port><kms>1</kms><own>1</own><kms_server_label>wqqdwwqw</kms_server_label></options_attributes></image_template_group>' --url http://onapp.test/settings/image_template_groups.xml
JSON Request example
curl -i -X POST -H 'Accept: application/json' -H 'Content-type: application/json' -u user:userpass -d '{"image_template_group":{"label":"azaza", "options_attributes":{"mak":"1","", "kms_host":"ededde.fe", "kms_port":"5453", "kms":"1", "own":"1", "kms_server_label":"wqwqw"}}}' --url http://onapp.test/settings/image_template_groups.json Where:
label – template group name
options attributes – template group configuration attributes:
kms_host – KMS server host name
kms_port – KMS server port
mak – MAK windows licensing type

171
OnApp Cloud 2.3 | API Guide | v1.5 | 12th April 2012
kms – KVM windows type
own – users’own license
kms_server_-label – KMS server name
If label is the only parameter set, the MAK window licensing type will be set on default
23.5 Delete a template group DELETE /settings/image_template_groups/:id.xml DELETE /settings/image_template_groups/:id.json
XML Request example
curl -i -X DELETE -u user:userpass --url http://onapp.test/settings/image_template_groups/:image_template_group_id.xml
JSON Request example
curl -i -X DELETE -u user:userpass --url http://onapp.test/settings/image_template_groups/:image_template_group_id.xml
23.6 Get the list of templates attached to a group
To get the list of templates attached to a template group, use the following request:
GET /settings/image_template_groups/:image_template_group_id/relation_group_templates.xml GET /settings/image_template_groups/:image_template_group_id/relation_group_templates.json Output example
<?xml version="1.0" encoding="UTF-8"?> <relation_group_templates type="array"> <relation_group_template> <price type="decimal">10.0</price> <created_at type="datetime">2011-04-21T15:06:08+03:00</created_at> <template_id type="integer">1</template_id> <updated_at type="datetime">2011-04-21T15:06:08+03:00</updated_at> <id type="integer">2</id> <image_template_group_id type="integer">4</image_template_group_id> </relation_group_template> </relation_group_templates> Where:
price – the price for the template attached to this template group

172
OnApp Cloud 2.3 | API Guide | v1.5 | 12th April 2012
created_at – the date when this record was created in DB
template_id – the ID of a template attached to this template group
updated_at – the date when this record was updated in DB
id – the ID of this relation
image_template_group – the ID of template group to which this template is attached
23.7 Attach a template to a group
To attach a template to a group, use the following request:
POST /settings/image_template_groups/:image_template_group_id/relation_group_templates.xml POST /settings/image_template_groups/:image_template_group_id/relation_group_templates.json XML Request example
curl -i -X POST -H 'Accept: application/xml' -H 'Content-type: application/xml' -u user:userpass -d '<relation_group_templates><template_id>12</template_id><image_template_group_id>29</image_template_group_id></relation_group_templates>' --url http://onapp.test/settings/image_template_groups/:image_template_groups_id/relation_group_templates.xml
JSON Request example
curl -i -X POST -H 'Accept: application/json' -H 'Content-type: application/json' -u user:userpass -d '{“relation_group_templates”:{"template_id":"12","image_template_group_id":"29"}}' --url http://onapp.test/settings/image_template_groups/:image_template_groups_id/relation_group_templates.json
Returns HTTP 201 response on success.
23.8 Detach a template from a group
To detach a template attached to a template group:
DELETE /settings/image_template_groups/:image_template_group_id/relation_group_templates/:id.xml DELETE /settings/image_template_groups/:image_template_group_id/relation_group_templ

173
OnApp Cloud 2.3 | API Guide | v1.5 | 12th April 2012
ates/:id.json XML Request example
curl -i -X DELETE -u user:userpass http://onapp.test/settings/image_template_groups/:image_template_group_id/relation_group_templates/:id.xml
JSON Request example
curl -i -X DELETE -u user:userpass http://onapp.test/settings/image_template_groups/:image_template_group_id/relation_group_templates/:id.json
23.9 Change price for a template in the group
You can change the price for a template in a particular template group using the following request:
PUT /settings/image_template_groups/:image_template_group_id/relation_group_templates/:id.xml PUT /settings/image_template_groups/:image_template_group_id/relation_group_templates/:id.json XML Request example
curl -i -X PUT -H 'Accept: application/xml' -H 'Content-Type: application/xml' -u user:userpass -d '<relation_group_template><price>2</price></relation_group_template>' --url http://onapp.test/settings/image_template_groups/:image_template_group_id/relation_group_templates/:id.xml
JSON Request example
curl -i -X PUT -H 'Accept: application/json' -H 'Content-Type: application/json' -u user:userpass -d '{"relation_group_template":{"price":"2"}}' --url http://onapp.test/settings/image_template_groups/:image_template_group_id/relation_group_templates/:id.json

174
OnApp Cloud 2.3 | API Guide | v1.5 | 12th April 2012
24. Software Licenses When you create a virtual machine from a template based on a licensed Operating System, or other licensed software, you need to add a valid license to the system. Use the software_licenses API class to manage licenses. All methods are available to this class.
24.1 Get the list of software licenses
To get the list of available software licenses, use the following requests:
GET /software_licenses.xml GET /software_licenses.json Output example
<?xml version="1.0" encoding="UTF-8"?> <software_licenses type="array"> <software_license> <created_at type="datetime">2011-02-18T01:34:33+02:00</created_at> <updated_at type="datetime">2011-03-16T00:31:08+02:00</updated_at> <license>TZXTC-R4GGG-9TT3V-DYDY4-T628B</license> <total type="integer">20</total> <arch>x64</arch> <id type="integer">3</id> <distro>2008</distro> <count type="integer">7</count> <tail> </tail> <edition>ENT</edition> </software_license> Where:
created_at – the date when the record in DB was created
updated_at - the date when the record in DB was updated
license – the license for the software on which the template will be based
total – the total number of machines allowed by the license
arch – Windows OS architecture (x64 or x86)
id – the ID of the record
distro – Windows OS distribution (2003, 2008, Windows 7)
count – the number of licenses used of a total allowed
tail – parameter specifies the updated release of Windows OS distribution. If updated, than parameter is R2, otherwise – empty.

175
OnApp Cloud 2.3 | API Guide | v1.5 | 12th April 2012
edition – Windows OS edition or an array of editions if allowed by the license (STD – Standard, ENT –Enterprise, WEB – web and DC – Data center)
24.2 Get software license details
To get details for a particular software license, use the following method:
GET /software_licenses/:id.xml GET /software_licenses/:id.json
XML Output example
<?xml version="1.0" encoding="UTF-8"?> <software_license> <created_at type="datetime">2011-03-01T12:42:03+02:00</created_at> <updated_at type="datetime">2011-03-08T13:54:17+02:00</updated_at> <license>TTXTC-R6FFF-9FF3V-DYDY4-T628B</license> <total type="integer">100</total> <arch>x86</arch> <id type="integer">11</id> <distro>2003</distro> <count type="integer">2</count> <tail></tail> <edition type="array"> <string>STD</string> </edition> </software_license> Where:
created_at – the date when the record in DB was created
updated_at - the date when the record in DB was updated
license – the license for the software on which the template will be based
total – the total number of machines allowed by the license
arch – Windows OS architecture (x64 or x86)
id – the ID of the record
distro – Windows OS distribution (2003, 2008, Windows 7)
count – the number of licenses used of a total allowed
tail – parameter specifies the updated release of Windows OS distribution. If updated, than parameter is R2, otherwise – empty.
edition – Windows OS edition or an array of editions if allowed by the license (STD – Standard, ENT –Enterprise, WEB – web and DC – Data center)

176
OnApp Cloud 2.3 | API Guide | v1.5 | 12th April 2012
24.3 Edit a software license
To edit a software license details:
PUT /software_licenses/:id.xml PUT /software_licenses/:id.json XML Request example
curl -i -X PUT -H 'Accept: application/xml' -H 'Content-type: application/xml' -u user:userpass -d '<software_license><arch>x64</arch><total>1</total><distro>2003</distro><count>1</count><tail>R2</tail><edition type="array"><edition>WEB</edition></edition><license>RRRRR-IIIII-JJJJJ-KKKKK-WWWWW</license></software_license>' --url http://onapp.test/software_licenses/:id.xml
You can edit the following parameters:
arch - Windows OS architecture (x64 or x86)
total - the total number of machines allowed by the license
distro - Windows OS distribution (2003, 2008, Windows 7)
count - the number of licenses used of a total allowed
tail - parameter specifies the updated release of Windows OS distribution. If updated, than parameter is R2, otherwise – empty
edition - Windows OS edition or an array of editions if allowed by the license (STD – Standard, ENT –Enterprise, WEB – web and DC – Data center)
license - the license for the software on which the template will be based
24.4 Add a software license
You can add a software license using the following request:
POST /software_licenses.xml POST /software_licenses.json XML Request example
curl -i -X POST -H 'Accept: application/xml' -H 'Content-type: application/xml' -u user:userpass -d '<software_license><arch>x64</arch><total>1</total><distro>2003</distro><count>1</count><tail>R2</tail><edition type="array"><edition>WEB</edition></edition><license>RRRRR-IIIII-JJJJJ-KKKKK-EEEEE</license></software_license>' --url http://onapp.test/software_licenses.xml

177
OnApp Cloud 2.3 | API Guide | v1.5 | 12th April 2012
To add a software license send the following parameters:
arch * - Windows OS architecture (x64 or x86)
total * - the total number of machines allowed by the license
distro * - Windows OS distribution (2003, 2008, Windows 7)
count *- the number of licenses used of a total allowed
tail * - parameter specifies the updated release of Windows OS distribution. If updated, than parameter is R2, otherwise – empty
edition * - Windows OS edition or an array of editions if allowed by the license (STD – Standard, ENT –Enterprise, WEB – web and DC – Data center)
license * - the license for the software on which the template will be based
24.5 Delete a software license
To delete a software license, use the following request:
DELETE /software_licenses/:id.xml DELETE /software_licenses/:id.json
XML Request example
curl -i -X DELETE -u user:userpass --url http://onapp.test/software_licenses/:id.xml JSON Request example
curl -i -X DELETE -u user:userpass --url http://onapp.test/software_licenses/:id.json
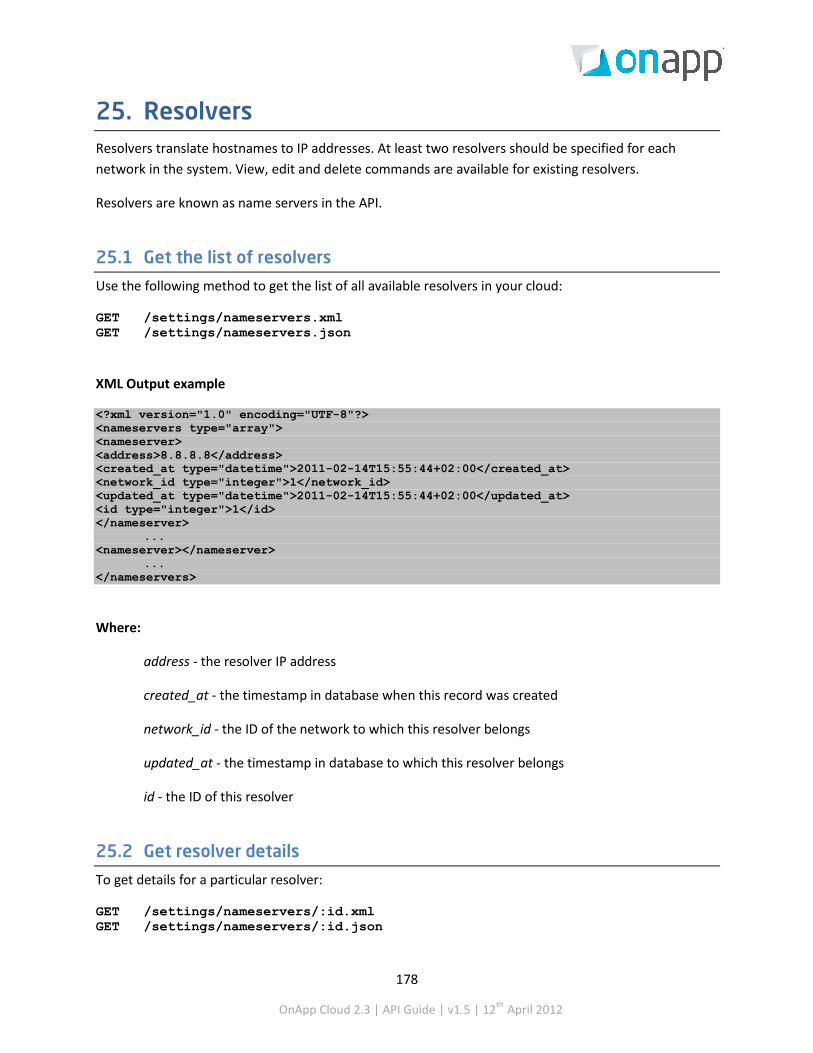
178
OnApp Cloud 2.3 | API Guide | v1.5 | 12th April 2012
25. Resolvers Resolvers translate hostnames to IP addresses. At least two resolvers should be specified for each network in the system. View, edit and delete commands are available for existing resolvers.
Resolvers are known as name servers in the API.
25.1 Get the list of resolvers
Use the following method to get the list of all available resolvers in your cloud:
GET /settings/nameservers.xml GET /settings/nameservers.json
XML Output example
<?xml version="1.0" encoding="UTF-8"?> <nameservers type="array"> <nameserver> <address>8.8.8.8</address> <created_at type="datetime">2011-02-14T15:55:44+02:00</created_at> <network_id type="integer">1</network_id> <updated_at type="datetime">2011-02-14T15:55:44+02:00</updated_at> <id type="integer">1</id> </nameserver>
... <nameserver></nameserver>
... </nameservers>
Where:
address - the resolver IP address
created_at - the timestamp in database when this record was created
network_id - the ID of the network to which this resolver belongs
updated_at - the timestamp in database to which this resolver belongs
id - the ID of this resolver
25.2 Get resolver details
To get details for a particular resolver:
GET /settings/nameservers/:id.xml GET /settings/nameservers/:id.json

179
OnApp Cloud 2.3 | API Guide | v1.5 | 12th April 2012
XML Output example
<?xml version="1.0" encoding="UTF-8"?> <nameserver> <address>8.8.8.8</address> <created_at type="datetime">2011-02-14T15:55:44+02:00</created_at> <network_id type="integer">1</network_id> <updated_at type="datetime">2011-02-14T15:55:44+02:00</updated_at> <id type="integer">1</id> </nameserver>
The parameters are the same as for Get the list of resolvers section.
25.3 Edit a resolver
Use the following method to edit a resolver:
PUT /settings/nameservers/:id.xml PUT /settings/nameservers/:id.json
XML Request example
curl -i -X PUT -H 'Accept: application/xml' -H 'Content-type: application/xml' -u user:userpass -d '<nameserver><adress>128.123.123.123</address><network_id>3</network_id></nameserver>' --url http://onapp.test/settings/nameservers/:id.xml
JSON Request example
curl -i -X PUT -H 'Accept: application/json' -H 'Content-type: application/json' -u user:userpass -d '{"nameserver":{"address":"129.123.123.123","network_id":"6"}}' --url http://onapp.test/settings/nameservers/:id.json
You can edit the address and network_id parameters.
25.4 Add a resolver
To add a new resolver, use the following method:
POST /settings/nameservers.xml POST /settings/nameservers.json
XML Request Example

180
OnApp Cloud 2.3 | API Guide | v1.5 | 12th April 2012
curl -i -X POST -H 'Accept: application/xml' -H 'Content-type: application/xml' -u user:userpass -d '<nameserver><address>124.123.123.123</address><network_id>1</network_id></nameserver>' --url http://onapp.test/settings/nameservers.xml
JSON Request example
curl -i -X POST -H 'Accept: application/json' -H 'Content-type: application/json' -u user:userpass -d '{"nameserver":{"address":"126.123.123.123","network_id":"1"}}' --url http://onapp.test/settings/nameservers.json
Set the following parameters:
address * - the resolver IP address
network_id * - the ID of the network to which this resolver should belong
25.5 Delete a resolver
To delete a resolver:
DELETE /settings/nameservers/:id.xml DELETE /settings/nameservers/:id.json
XML Request example
curl -i -X DELETE -u user:userpass --url http://onapp.test/settings/nameservers/:id.xml
JSON Request example
curl -i -X DELETE -u user:userpass --url http://onapp.test/settings/nameservers/:id.json
Returns HTTP 200 response on successful deletion, or HTTP 404 when a resolver with the ID specified is not found, or the URL requested is incorrect.

181
OnApp Cloud 2.3 | API Guide | v1.5 | 12th April 2012
26. Virtual Machines Virtual machines in OnApp are based on templates and deployed on hypervisors. VMs have their own root accounts, so that VM owners can fully control, configure and manage their machines. All CRUD operations are possible for the Virtual Machines class.
26.1 Get the list of VMs
To get the list of VM, use the following request:
GET /virtual_machines.xml GET /virtual_machines.json
XML Output example
<?xml version="1.0" encoding="UTF-8"?> <virtual_machines> <virtual_machine> <add_to_marketplace nil="true"></add_to_marketplace> <aflexi_id nil="true"></aflexi_id> <admin_note nil="true"></admin_note> <allow_resize_without_reboot type="boolean">true</allow_resize_without_reboot> <allowed_hot_migrate type="boolean">true</allowed_hot_migrate> <allowed_swap type="boolean">true</allowed_swap> <booted type="boolean">true</booted> <built type="boolean">true</built> <cpu_shares type="integer">1</cpu_shares> <cpus type="integer">1</cpus> <created_at type="datetime">2011-11-01T17:11:58+03:00</created_at> <enable_autoscale type="boolean">true</enable_autoscale> <enable_monitis type="boolean">true</enable_monitis> <hostname>autobackup</hostname> <hypervisor_id type="integer">2</hypervisor_id> <id type="integer">373</id> <identifier>iskngs9dve0hdg</identifier> <initial_root_password>791791</initial_root_password> <label>YR_autobackup</label> <local_remote_access_port type="integer">5903</local_remote_access_port> <locked type="boolean">false</locked> <max_memory type="integer">2048</max_memory> <memory type="integer">128</memory> <min_disk_size type="integer">5</min_disk_size> <note nil="true"></note> <operating_system>linux</operating_system> <operating_system_distro>rhel</operating_system_distro> <recovery_mode type="boolean">false</recovery_mode> <remote_access_password>os3ajolb1buj</remote_access_password> <state>new</state> <strict_virtual_machine_id nil="true"></strict_virtual_machine_id> <suspended type="boolean">false</suspended> <template_id type="integer">8</template_id> <template_label>CentOS 5.6 x86</template_label> <update_billing_stat type="boolean">false</update_billing_stat> <updated_at type="datetime">2011-11-04T13:22:25+03:00</updated_at> <user_id type="integer">5</user_id> <vip nil="true"></vip>

182
OnApp Cloud 2.3 | API Guide | v1.5 | 12th April 2012
<xen_id type="integer">12</xen_id> <ip_addresses type="array"> <ip_address> <created_at type="datetime">2011-10-10T12:31:12+03:00</created_at> <disallowed_primary type="boolean">false</disallowed_primary> <id type="integer">2</id> <network_id type="integer">1</network_id> <updated_at type="datetime">2011-11-01T17:39:13+03:00</updated_at> <user_id nil="true"></user_id> <free type="boolean">false</free> <address>109.123.105.180</address> <gateway>109.123.105.177</gateway> <network_address>109.123.105.176</network_address> <broadcast>109.123.105.191</broadcast> <netmask>255.255.255.240</netmask> </ip_address> </ip_addresses> <monthly_bandwidth_used type="integer">2613</monthly_bandwidth_used> <total_disk_size type="integer">6</total_disk_size> </virtual_machine> ... <virtual_machine></virtual_machine> ... </virtual_machine>
Where:
add_to_marketplace — empty for VMs; used for edge servers only
aflexi_id — empty for VMs; used for edge servers only
admin_note — an optional note of the administrator
allow_resize_without_reboot — true if resize without reboot is possible; otherwise false
allowed_hot_migrate — true if the template, on which the VM is based, supports hot migration; otherwise false
allowed_swap — true if swap disk is allowed (depends on the template the VM is based on); otherwise false
booted — true if the VM is running; otherwise false
built — true if the VM is built; otherwise false
cpus — the number of allocated CPU cores
cpu_shares — CPU priority in percent’s
created_at — the date in the [YYYY][MM][DD]T[hh][mm][ss]Z format
enable_autoscale — true if autoscaling is allowed for this VM
hostname — the name of your host

183
OnApp Cloud 2.3 | API Guide | v1.5 | 12th April 2012
hypervisor_id — the ID of the hypervisor used by this VM
id — the VM ID
identifier — the VM identifier
initial_root_password — the VM root password
ip_addresses — an array of ip addresses with their details assigned to this VM
label — the VM label
local_remote_access_port — the port ID used for console access
locked — true if the VM is locked; otherwise false
max_memory — maximum amount of RAM which can be allocated to the VM by the hypervisor
memory — the RAM size allocated to this VM
min_disk_size — the minimum disk size required to build a VM from a specified template
monthly_bandwidth_used — the bandwidth used this month
note — an optional reminder for this VM made by a user account
operating_system — operating system used by the VM
operating_system_distro — the distribution of the OS from which this VM is built
recovery_mode — true if recovery mode allowed. Otherwise false
remote_access_password — the password for the remote access
state – parameter reserved for future use
strict_virtual_machine_id — the ID of a virtual machine that will never reside on the same HV with this VM
suspended — true if VM is suspended, otherwise false
template_id — the ID of the template the VM is based on
template_label — the name of the template from which this VM is built
total_disk_size — the total disk size in GB of all disks assigned to VM
updated_at — the date when the VM was updated in the [YYYY][MM][DD]T[hh][mm][ss]Z format
user_id — the ID of a user assigned to this VM
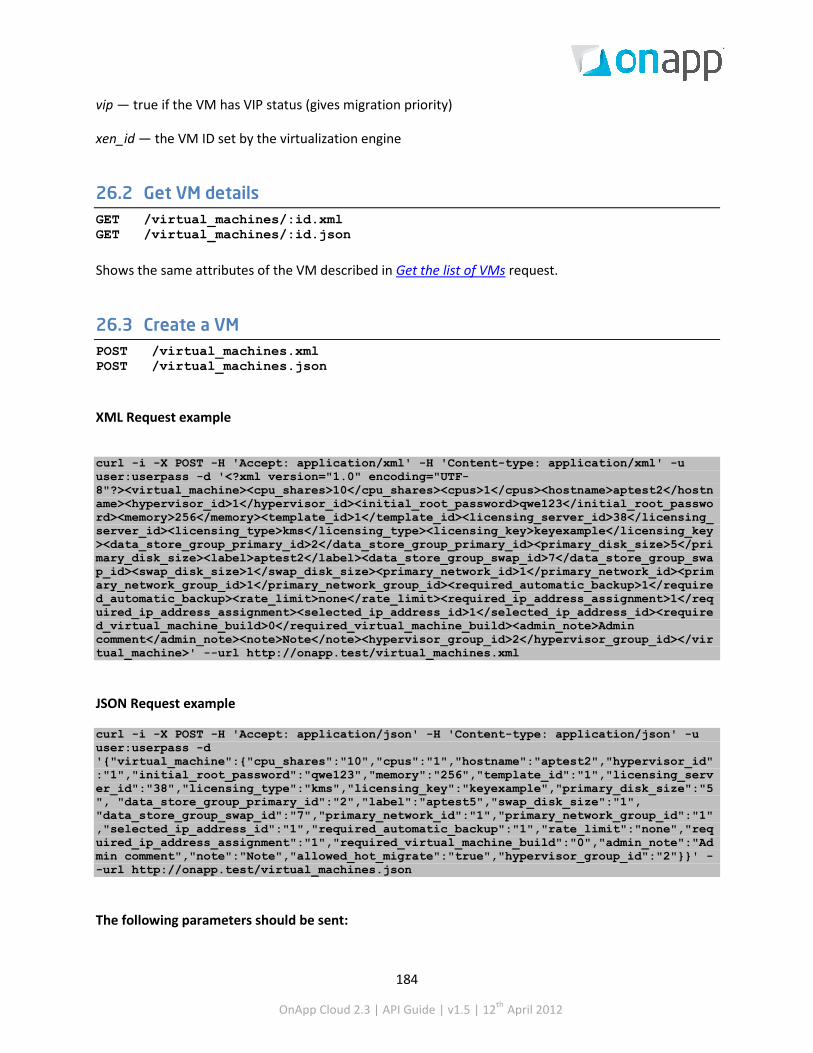
184
OnApp Cloud 2.3 | API Guide | v1.5 | 12th April 2012
vip — true if the VM has VIP status (gives migration priority)
xen_id — the VM ID set by the virtualization engine
26.2 Get VM details GET /virtual_machines/:id.xml GET /virtual_machines/:id.json
Shows the same attributes of the VM described in Get the list of VMs request.
26.3 Create a VM POST /virtual_machines.xml POST /virtual_machines.json
XML Request example
curl -i -X POST -H 'Accept: application/xml' -H 'Content-type: application/xml' -u user:userpass -d '<?xml version="1.0" encoding="UTF-8"?><virtual_machine><cpu_shares>10</cpu_shares><cpus>1</cpus><hostname>aptest2</hostname><hypervisor_id>1</hypervisor_id><initial_root_password>qwe123</initial_root_password><memory>256</memory><template_id>1</template_id><licensing_server_id>38</licensing_server_id><licensing_type>kms</licensing_type><licensing_key>keyexample</licensing_key><data_store_group_primary_id>2</data_store_group_primary_id><primary_disk_size>5</primary_disk_size><label>aptest2</label><data_store_group_swap_id>7</data_store_group_swap_id><swap_disk_size>1</swap_disk_size><primary_network_id>1</primary_network_id><primary_network_group_id>1</primary_network_group_id><required_automatic_backup>1</required_automatic_backup><rate_limit>none</rate_limit><required_ip_address_assignment>1</required_ip_address_assignment><selected_ip_address_id>1</selected_ip_address_id><required_virtual_machine_build>0</required_virtual_machine_build><admin_note>Admin comment</admin_note><note>Note</note><hypervisor_group_id>2</hypervisor_group_id></virtual_machine>' --url http://onapp.test/virtual_machines.xml
JSON Request example
curl -i -X POST -H 'Accept: application/json' -H 'Content-type: application/json' -u user:userpass -d '{"virtual_machine":{"cpu_shares":"10","cpus":"1","hostname":"aptest2","hypervisor_id":"1","initial_root_password":"qwe123","memory":"256","template_id":"1","licensing_server_id":"38","licensing_type":"kms","licensing_key":"keyexample","primary_disk_size":"5", "data_store_group_primary_id":"2","label":"aptest5","swap_disk_size":"1", "data_store_group_swap_id":"7","primary_network_id":"1","primary_network_group_id":"1","selected_ip_address_id":"1","required_automatic_backup":"1","rate_limit":"none","required_ip_address_assignment":"1","required_virtual_machine_build":"0","admin_note":"Admin comment","note":"Note","allowed_hot_migrate":"true","hypervisor_group_id":"2"}}' --url http://onapp.test/virtual_machines.json
The following parameters should be sent:

185
OnApp Cloud 2.3 | API Guide | v1.5 | 12th April 2012
memory * Amount of RAM assigned to the VM.
cpus * Number of CPUs assigned to the VM.
cpu_shares Optional parameter. For KVM hypervisor the CPU priority value is always 100. For XEN, set a custom value. The default value for XEN is 1..
Hostname * Set the host name for this VM.
label * User-friendly VM description.
primary_disk_size * Set the disk space for this VM.
swap_disk_size * Set swap space. There is no swap disk for Windows-based VMs.
data_store_group_primary_id Set the ID of the data store zone to which this primary disk is allocated.
data_store_group_swap_id Set the ID of the data store zone to which this swap disk is allocated.
primary_network_id The ID of the primary network. Optional parameter that can be used only if it is assigned to the network zone.
primary_network_group_id The ID of the primary network group. Optional parameter.
required_automatic_backup Set 1 if you need automatic backups.
rate_limit Set max port speed. Optional parameter: if none set, the system sets port speed to unlimited.
required_ip_address_assignment * Set 1 if you wish the system to assign an IP automatically
selected_ip_address_id Assign the IP address.
required_virtual_machine_build * Set 1 to build VM automatically
admin_note Enter a brief comment for the VM. Optional parameter.
Note A brief comment a user can add to a VM.
template_id * The ID of a template from which a VM should be built
licensing_server_id The ID of a licensing server/template group – this parameter is for Windows XP/7 virtual machines only

186
OnApp Cloud 2.3 | API Guide | v1.5 | 12th April 2012
licensing_type The type of a licence: MAK, KMS or user own license. This parameter is for Windows XP/7 virtual machines only
licensing_key The key of a license. This parameter is for Windows XP/7 virtual machines only
hypervisor_group_id The ID of the hypervisor zone in which the VM will be created. Optional: if no hypervisor zone is set, the VM will be built in any available hypervisor zone.
hypervisor_id The ID of a hypervisor where the VM will be built. Optional: if no hypervisor ID is specified, the VM will be built on the hypervisor with the least available RAM (but sufficient RAM for the VM.)
initial_root_password The root password for a VM. Optional, if none specified, the system will provide a random password. It can consist of 6-32 characters, letters [A-Za-z], digits [0-9], dash [ - ] and lower dash [ _ ]. You can use both lower- and uppercase letters.
26.4 Build a VM
To build or re-build a VM, use the following methods:
POST /virtual_machines/:virtual_machine_id/build.xml POST /virtual_machines/:virtual_machine_id/build.json
XML Request example
curl -i -X POST -H 'Accept: application/xml' -H 'Content-type: application/xml' -u user:userpass -d '<?xml version="1.0" encoding="UTF-8"?><virtual_machine><template_id>1</template_id><required_startup>1</required_startup></virtual_machine>' --url http://onapp.test/virtual_machines/:virtual_machine_id/build.xml
JSON Request example
curl -i -X POST -H 'Accept: application/json' -H 'Content-type: application/json' -u user:userpass -d '{"virtual_machine":{"template_id":"1","required_startup":"1"}}' --url http://onapp.test/virtual_machines/:virtual_machine_id/build.json
Where:
template_id * The ID of a template from which a VM should be built.

187
OnApp Cloud 2.3 | API Guide | v1.5 | 12th April 2012
required_startup Set to 1 if you wish to start a VM after it is built. Otherwise set to 0.
Instead of virtual machine ID (:virtual_machine_id) you may use virtual machine identifier (:virtual_machine_identifier).
26.5 Edit a VM PUT /virtual_machines/:id.xml PUT /virtual_machines/:id.json
XML Request example
curl -i -X PUT -H 'Accept: application/xml' -H 'Content-type: application/xml' -u user:userpass -d '<?xml version="1.0" encoding="UTF-8"?><virtual_machine><label>Test_API_Edit</label><memory>512</memory><cpu_shares>40</cpu_shares><cpus>4</cpus><allow_migration>1</allow_migration><allow_cold_resize>1</allow_cold_resize></virtual_machine>' --url http://onapp.test/virtual_machines/:id.xml
JSON Request example
curl -i -X PUT -H 'Accept: application/json' -H 'Content-type: application/json' -u user:userpass -d '{"virtual_machine":{"label":"Test_API_Edit","memory":"512","cpu_shares":"40","cpus":"4","allow_migration":"1","allow_cold_resize":"1"}}' --url http://onapp.test/virtual_machines/:id.json
You can edit the following parameters:
label - the VM name
memory - the amount of RAM allocated to this VM in Mb
cpus - the number of CPUs of this VM
cpu_shares - CPU priority percentage
allow_migration - set 1 to migrate a VM to a HV with sufficient resources if a hypervisor has insufficient space to resize. Otherwise, set 0.
allow_cold_resize – set 1 to switch to cold resize when hot resize failed
If the VM is modified successfully, an HTTP 201 response is returned. If scheduling for changes fails, an HTTP 422 response is returned.

188
OnApp Cloud 2.3 | API Guide | v1.5 | 12th April 2012
26.6 Change a VM owner
Use the following request to reassign a VM to another user:
POST /virtual_machines/:virtual_machine_id/change_owner.xml POST /virtual_machines/:virtual_machine_id/change_owner.json
XML Request example
curl -i -X POST -H 'Accept: application/xml' -H 'Content-type: application/xml' -u user:userpass -d '<user_id>4</user_id>' --url http://onapp.test/virtual_machines/:virtual_machine_id/change_owner.xml
JSON Request example
curl -i -X POST -H 'Accept: application/json' -H 'Content-type: application/json' -u user:userpass -d "{'user_id':'1'}" --url http://onapp.test/virtual_machines/:virtual_machine_id/change_owner.json
Required parameter:
user_id * – input ID of a new VM owner
Instead of virtual machine ID (:virtual_machine_id) you may use virtual machine identifier (:virtual_machine_identifier).
26.7 Reset root password
You can reset a VM password using the following method:
POST /virtual_machines/:virtual_machine_id/reset_password.xml POST /virtual_machines/:virtual_machine_id/reset_password.json
XML Request example
curl -i -X POST -H 'Accept: application/xml' -H 'Content-type: application/xml' -u user:userpass --url http://onapp.test/virtual_machines/:virtual_machine_id/reset_password
JSON Request example
curl -i -X POST -H 'Accept: application/json' -H 'Content-type: application/json' -u user:userpass --url http://onapp.test/virtual_machines/:virtual_machine_id/reset_password

189
OnApp Cloud 2.3 | API Guide | v1.5 | 12th April 2012
Where: virtual_machine_id * - id of the VM, for which you want to reset password.
26.8 Set SSH keys
To assign SSH keys of all administrators and a VM owner to a VM, use the following request:
POST /virtual_machines/:virtual_machine_id/set_ssh_keys.xml POST /virtual_machines/:virtual_machine_id/set_ssh_keys.json
XML Request example
curl -X POST -u user:userpass http://onapp.test/virtual_machines/:virtual_machine_id/set_ssh_keys.xml -H 'Accept: application/xml' -H 'Content-type: application/xml'
JSON Request example
curl -X POST -u user:userpass http://onapp.test/virtual_machines/:virtual_machine_id/set_ssh_keys.json -H 'Accept: application/json' -H 'Content-type: application/json'
26.9 Migrate a VM
You can migrate a VM to another hypervisor with the following method:
POST /virtual_machines/:virtual_machine_id/migrate.xml POST /virtual_machines/:virtual_machine_id/migrate.json
XML Request example
curl -i -X POST -H 'Accept: application/xml' -H 'Content-type: application/xml' -u user:userpass -d "<virtual_machine><destination>1</destination><cold_migrate_on_rollback>1</cold_migrate_on_rollback></virtual_machine>" --url http://onapp.test/virtual_machines/:virtual_machine_id/migrate.xml
JSON Request example
curl -i -X POST -H 'Accept: application/json' -H 'Content-type: application/json' -u user:userpass -d '{"virtual_machine":{"destination":"1","cold_migrate_on_rollback":"1"}}' --url http://onapp.test/virtual_machines/:virtual_machine_id/migrate.json
Where:

190
OnApp Cloud 2.3 | API Guide | v1.5 | 12th April 2012
Destination* The ID of a target hypervisor where you migrate a VM
cold_migrate_on_rollback Set to 1 if you wish to switch to a cold migration if hot migration fails. Otherwise set to 0.
26.10 Set VIP status
To set/remove VIP status for a VM, use the following request:
POST /virtual_machines/:id/set_vip.xml POST /virtual_machines/:id/set_vip.json
XML Request example
curl -i -X POST -H 'Accept: application/xml' -H 'Content-type: application/xml' -u user:userpass --url http://onapp.test/virtual_machines/:virtual_machine_id/set_vip.xml
JSON Request example
curl -i -X POST -H 'Accept: application/json' -H 'Content-type: application/json' -u user:userpass --url http://onapp.test/virtual_machines/:virtual_machine_id/set_vip.json
26.11 Destroy a VM DELETE /virtual_machines/:id.xml DELETE /virtual_machines/:id.json XML Request example
curl -i -X DELETE -u user:userpass --url http://onapp.test/virtual_machines/:id.xml JSON Request example
curl -i -X DELETE -u user:userpass --url http://onapp.test/virtual_machines/:id.json
26.12 Resize a VM
To resize a VM:
POST /virtual_machines/:virtual_machine_id/resize.xml POST /virtual_machines/:virtual_machine_id/resize.json
XML Request example

191
OnApp Cloud 2.3 | API Guide | v1.5 | 12th April 2012
curl -i -X POST -H 'Accept: application/xml' -H 'Content-type: application/xml' -u user:userpass -d '<?xml version="1.0" encoding="UTF-8"?><virtual_machine><memory>512</memory><cpus>2</cpus><cpu_shares>30</cpu_shares><allow_cold_resize>1</allow_cold_resize></virtual_machine>' --url http://onapp.test/virtual_machines/:virtual_machine_id/resize.xml
JSON Request example
curl -i -X POST -H 'Accept: application/json' -H 'Content-type: application/json' -u user:userpass -d '{"virtual_machine":{"memory":"512","cpus":"2","cpu_shares":"30","allow_cold_resize":"1"}}' --url http://onapp.test/virtual_machines/:virtual_machine_id/resize.json
You can change the following parameters:
memory - the amount of RAM allocated to your VM in MB
cpus - the number of CPUs
cpu_shares - cpu priority in %
allow_cold_resize – set 1 to switch to cold resize when hot resize failed
You can also resize a VM using the PUT method (see Edit a VM section).
26.13 Suspend a VM
To suspend a VM:
POST /virtual_machines/:id/suspend.xml POST /virtual_machines/:id/suspend.json XML Request example
curl -i -X POST -u user:userpass --url http://onapp.test /virtual_machines/:virtual_machine_id/suspend.xml
JSON Request example
curl -i -X POST -u user:userpass --url http://onapp.test /virtual_machines/:virtual_machine_id/suspend.json
Where:
virtual_machine_id * - ID of a VM you want to suspend.
192
OnApp Cloud 2.3 | API Guide | v1.5 | 12th April 2012
26.14 Unsuspend a VM
To activate a VM again, use the same request as to suspend it:
POST /virtual_machines/:id/suspend.xml POST /virtual_machines/:id/suspend.json
For details refer to Suspend a VM section
26.15 Unlock a VM
To unlock a VM:
POST /virtual_machines/:virtual_machine_id/unlock.xml POST /virtual_machines/:virtual_machine_id /unlock.json XML Request example
curl -i -X POST -u user:userpass --url http://onapp.test/virtual_machines/:virtual_machine_id/unlock.xml
JSON Request example
curl -i -X POST -u user:userpass --url http://onapp.test/virtual_machines/:virtual_machine_id/unlock.json
26.16 Start up a VM
To start up a VM:
POST /virtual_machines/:virtual_machine_id /startup.xml POST /virtual_machines/:virtual_machine_id /startup.json
XML Request example
curl -i -X POST -u user:userpass --url http://onapp.test/virtual_machines/:virtual_machine_id/startup.xml
JSON Request example
curl -i -X POST -u user:userpass --url http://onapp.test/virtual_machines/:virtual_machine_id/startup.json
193
OnApp Cloud 2.3 | API Guide | v1.5 | 12th April 2012
26.17 Shut down a VM
To shut down a VM:
POST /virtual_machines/:virtual_machine_id/shutdown.xml POST /virtual_machines/:virtual_machine_id/shutdown.json XML Request example
curl -i -X POST -u user:userpass --url http://onapp.test/virtual_machines/:virtual_machine_id/shutdown.xml
JSON Request example
curl -i -X POST -u user:userpass --url http://onapp.test/virtual_machines/:virtual_machine_id/shutdown.json
26.18 Stop a VM
To stop a VM:
POST /virtual_machines/:virtual_machine_id/stop.xml POST /virtual_machines/:virtual_machine_id/stop.json XML Request example
curl -i -X POST -u user:userpass --url http://onapp.test/virtual_machines/:virtual_machine_id/stop.xml
JSON Request example
curl -i -X POST -u user:userpass --url http://onapp.test/virtual_machines/:virtual_machine_id/stop.json
26.19 Reboot a VM
To reboot a VM:
POST /virtual_machines/:virtual_machine_id/reboot.xml POST /virtual_machines/:virtual_machine_id/reboot.json XML Request example
curl -i -X POST -u user:userpass --url http://onapp.test/virtual_machines/:virtual_machine_id/reboot.xml
JSON Request example

194
OnApp Cloud 2.3 | API Guide | v1.5 | 12th April 2012
curl -i -X POST -u user:userpass --url http://onapp.test/virtual_machines/:virtual_machine_id/reboot.json An HTTP 201 response is returned on a successful reboot. Unsuccessful reboot responses include HTTP 404 (resource not found – e.g. if the VM isn’t online) and HTTP 422 (request cannot be processed – eg if parameters were incorrect).
26.20 Reboot in recovery
To reboot a VM in recovery mode with a temporary login (“root”) and password (“recovery”), use the following API calls:
POST /virtual_machines/:virtual_machine_id/reboot.xml?mode=recovery POST /virtual_machines/:virtual_machine_id/reboot.json?mode=recovery XML Request example curl -i -X POST -u user:userpass --url http://onapp.test/virtual_machines/:virtual_machine_id/reboot.xml?mode=recovery JSON Request example curl -i -X POST -u user:userpass --url http://onapp.test/virtual_machines/:virtual_machine_id/reboot.json?mode=recovery
26.21 Segregate a VM
To segregate a VM (that is, instruct it never to reside on the same hypervisor as another VM), use the following method:
POST /virtual_machines/:virtual_machine_id/strict_vm.xml POST /virtual_machines/:virtual_machine_id/strict_vm.json
XML Request example
curl -i -X POST -H 'Accept: application/xml' -H 'Content-type: application/xml' -u user:userpass -d '<?xml version="1.0" encoding="UTF-8"?><virtual_machine><strict_virtual_machine_id>bb6oa3eqdzpcgl</strict_virtual_machine_id></virtual_machine>' --url http://onapp.test/virtual_machines/:virtual_machine_id/strict_vm.xml
JSON Request example
curl -i -X POST -H 'Accept: application/json' -H 'Content-type: application/json' -u user:userpass -d '{"virtual_machine":{"strict_virtual_machine_id":"gv03xz1x31t53h"}}' --url http://onapp.test/virtual_machines/:virtual_machine_id/strict_vm.json
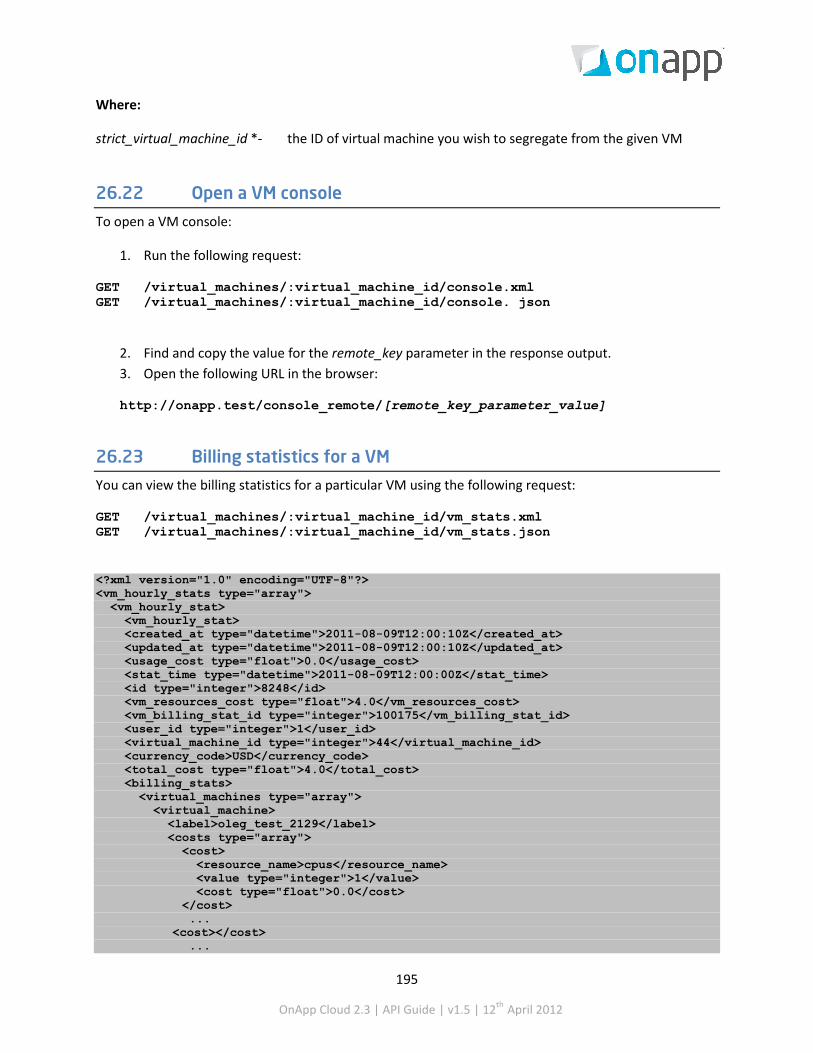
195
OnApp Cloud 2.3 | API Guide | v1.5 | 12th April 2012
Where:
strict_virtual_machine_id *- the ID of virtual machine you wish to segregate from the given VM
26.22 Open a VM console
To open a VM console:
1. Run the following request:
GET /virtual_machines/:virtual_machine_id/console.xml GET /virtual_machines/:virtual_machine_id/console. json
2. Find and copy the value for the remote_key parameter in the response output. 3. Open the following URL in the browser:
http://onapp.test/console_remote/[remote_key_parameter_value]
26.23 Billing statistics for a VM
You can view the billing statistics for a particular VM using the following request:
GET /virtual_machines/:virtual_machine_id/vm_stats.xml GET /virtual_machines/:virtual_machine_id/vm_stats.json
<?xml version="1.0" encoding="UTF-8"?> <vm_hourly_stats type="array"> <vm_hourly_stat> <vm_hourly_stat> <created_at type="datetime">2011-08-09T12:00:10Z</created_at> <updated_at type="datetime">2011-08-09T12:00:10Z</updated_at> <usage_cost type="float">0.0</usage_cost> <stat_time type="datetime">2011-08-09T12:00:00Z</stat_time> <id type="integer">8248</id> <vm_resources_cost type="float">4.0</vm_resources_cost> <vm_billing_stat_id type="integer">100175</vm_billing_stat_id> <user_id type="integer">1</user_id> <virtual_machine_id type="integer">44</virtual_machine_id> <currency_code>USD</currency_code> <total_cost type="float">4.0</total_cost> <billing_stats> <virtual_machines type="array"> <virtual_machine> <label>oleg_test_2129</label> <costs type="array"> <cost> <resource_name>cpus</resource_name> <value type="integer">1</value> <cost type="float">0.0</cost> </cost> ... <cost></cost> ...

196
OnApp Cloud 2.3 | API Guide | v1.5 | 12th April 2012
</costs> <id type="integer">44</id> </virtual_machine> </virtual_machines> <network_interfaces type="array"> <network_interface> <label>eth0</label> <costs type="array"> <cost> <resource_name>ip_addresses</resource_name> <value type="integer">1</value> <cost type="float">0.0</cost> </cost> ... <cost></cost> ... </costs> <id type="integer">45</id> </network_interface> </network_interfaces> <disks type="array"> <disk> <label>#106</label> <costs type="array"> <cost> <resource_name>disk_size</resource_name> <value type="integer">5</value> <cost type="float">3.0</cost> </cost> </cost> ... <cost></cost> ... </costs> </billing_stats> </vm_hourly_stat> </vm_hourly_stats>
Where:
created_at – the timestamp in DB when this record was created updated_at – the date when these statistics were updated cost – the total amount of money owed by this particular VM for the resources spent at stat_time updated_at – the time stamp in DB when this record was updated stat_time – the particular hour for which these statistics were generated id – the ID of these statistics user_id - the ID of VM owner currency_code - currency in which this virtual machine is charged within the billing plan billing_stats - an array of billing details for the resources used by this VM virtual_machine - an array of virtual machine billing details:
• label - VM name • costs - An array of VM resources with their total prices for the period specified in the stat-time
parameter, where:

197
OnApp Cloud 2.3 | API Guide | v1.5 | 12th April 2012
o resource_name - the resource in question. This can be cpu_shares, cpus, memory, cpu_usage and template
o value - the amount of resources allocated to this VM. For the templates resource, this parameter means a template ID in database.
o cost - the total due for this resource o id - Virtual machine ID
network_interfaces - an array of network interfaces used by this VM with their billing statistics:
• label - network interface name used in OnApp • id - network interface ID • costs - an array of network interface related resources with their total prices for the period
specified in the stat-time parameter, where: o resource_name - the resource in question. This can be ip_addresses, rate, data_received and
data_sent o value - the amount of resources used by this network interface (the number of IPs, the port
speed in Mb per second, the Data sent and received in Gb ) o cost - the total due for the resource
disks - an array of disks used by this VM with their billing details:
• label - disk name used in UI • id - disk ID used in database • costs - an array of disk related resources with their total prices for the period specified in the stat-
time parameter, where: o resource_name - the resource in question. This can be disk_size, data_read, data_written,
reads_completed and writes_completed o value - the amount of resources used (Gbs of disk size, Gbs of data read/writen, the number
of reads/writes) o cost - the total due for the resource
total_cost – the total amount of money owed for the VM specified by id parameter for a particular hour specified by stat_time parameter (total_cost = vm_resources_cost + usage_cost) vm_resources_cost – the amount of money due for the VM resources for the particular hour specified by stat_time parameter (memory, disks, templates) usage_cost – the total due for VM usage for this particular hour specified by stat_time parameter (data sent/received, bandwidth, CPU usage)
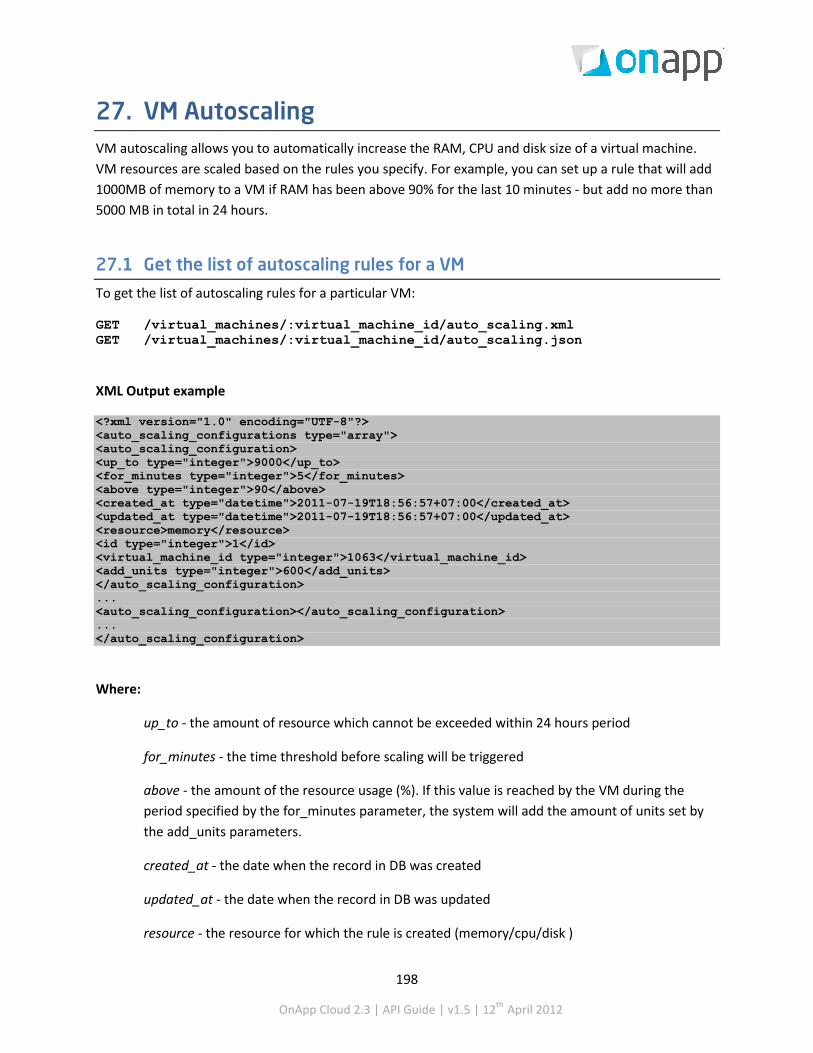
198
OnApp Cloud 2.3 | API Guide | v1.5 | 12th April 2012
27. VM Autoscaling VM autoscaling allows you to automatically increase the RAM, CPU and disk size of a virtual machine. VM resources are scaled based on the rules you specify. For example, you can set up a rule that will add 1000MB of memory to a VM if RAM has been above 90% for the last 10 minutes - but add no more than 5000 MB in total in 24 hours.
27.1 Get the list of autoscaling rules for a VM
To get the list of autoscaling rules for a particular VM:
GET /virtual_machines/:virtual_machine_id/auto_scaling.xml GET /virtual_machines/:virtual_machine_id/auto_scaling.json
XML Output example
<?xml version="1.0" encoding="UTF-8"?> <auto_scaling_configurations type="array"> <auto_scaling_configuration> <up_to type="integer">9000</up_to> <for_minutes type="integer">5</for_minutes> <above type="integer">90</above> <created_at type="datetime">2011-07-19T18:56:57+07:00</created_at> <updated_at type="datetime">2011-07-19T18:56:57+07:00</updated_at> <resource>memory</resource> <id type="integer">1</id> <virtual_machine_id type="integer">1063</virtual_machine_id> <add_units type="integer">600</add_units> </auto_scaling_configuration> ... <auto_scaling_configuration></auto_scaling_configuration> ... </auto_scaling_configuration>
Where:
up_to - the amount of resource which cannot be exceeded within 24 hours period
for_minutes - the time threshold before scaling will be triggered
above - the amount of the resource usage (%). If this value is reached by the VM during the period specified by the for_minutes parameter, the system will add the amount of units set by the add_units parameters.
created_at - the date when the record in DB was created
updated_at - the date when the record in DB was updated
resource - the resource for which the rule is created (memory/cpu/disk )

199
OnApp Cloud 2.3 | API Guide | v1.5 | 12th April 2012
id - the ID of the rule
virtual_machine_id - the ID of the VM to which this rule applies
add_units - the amount of resource units which the system should add if the rule is met
27.2 Create autoscaling rule for VM
To create autoscaling rule for a virtual machine, use this request:
POST /virtual_machines/:virtual_machine_id/auto_scaling.xml POST /virtual_machines/:virtual_machine_id/auto_scaling.json XML Request example
curl -X POST -u user:userpass http://onapp.test/virtual_machines/:virual_machine_id/auto_scaling.xml -H 'Accept: application/xml' -H 'Content-type: application/xml' -d '<auto_scaling_configuration><up_to>22</up_to><for_minutes>10</for_minutes><above>5</above><resource>cpu</resource><add_units>22</add_units><enabled>1</enabled><allow_cold_resize>1</allow_cold_resize></auto_scaling_configuration>'
JSON Request example
curl -X POST -u user:userpass http://onapp.test/virtual_machines/:virual_machine_id/auto_scaling.json -H 'Accept: application/json' -H 'Content-type: application/json' -d '"auto_scaling_configuration":{"above":5,"for_minutes":10,"up_to":11,"resource":"cpu","add_units":"22","enabled":”1”,"allow_cold_resize":"1"}'
Where:
up_to * - the amount of resource which cannot be exceeded within 24 hours period
for_minutes * - the time threshold before scaling will be triggered
above * - the amount of the resource usage (%). If this value is reached by the VM for the period specified by the for_minutes parameter, the system will add the amount of units set by the add_units parameters.
resource * - the resource for which the rule is created (memory/cpu/disk )
add_units * - the amount of resource units which the system should add if the rule is met
enabled * - set 1 to enable, or 0 to disable
allow_cold_resize – set 1 to switch to cold resize when hot resize failed

200
OnApp Cloud 2.3 | API Guide | v1.5 | 12th April 2012
27.3 Edit autoscaling rule for a VM
At present you cannot edit separate elements of autoscaling rule. To change a rule for a VM you have to create a new rule, using the same request as in Create autoscaling rule section.
27.4 Delete autoscaling rules
To delete autoscaling rules, use this request:
DELETE /virtual_machines/:virtual_machine_id/auto_scaling.xml DELETE /virtual_machines/:virtual_machine_id/auto_scaling.json XML Request example
curl -i -X DELETE -u user:userpass --url http://onapp.test/virtual_machines/:virtual_machine_id/auto_scaling.xml
JSON Request example
curl -i -X DELETE -u user:userpass --url http://onapp.test/virtual_machines/:virtual_machine_id/auto_scaling.json
This will delete all autoscaling rules, set for this VM.

201
OnApp Cloud 2.3 | API Guide | v1.5 | 12th April 2012
28. Load Balancers Load balancers distribute requests evenly between clustered virtual machines (nodes), so that no virtual machine is overloaded. Together with nodes, load balancers form Load Balancing Clusters. There are two options of load balancing clusters:
Cluster type
In this case you specify which VMs (nodes) will participate in a load balancing cluster. You can add and remove clustered VMs as required.
Autoscaling type
In this case you indicate minimum and maximum number of nodes for a cluster, as well as autoscaling parameters for automatic adding or removing nodes from the cluster. The system creates required number of identical nodes, with the same resource allocation and the same template for each node.
Load balancing clusters of both typesuse the same requests. Only some parameters differ.
28.1 Get the list of load balancing clusters
To get the list of load balancing clusters, use the following request:
GET /load_balancing_clusters.xml GET /load_balancing_clusters.json
Load balancing cluster array includes details on load balancers and attached nodes.
XML Output example
<?xml version="1.0" encoding="UTF-8"?> <load_balancing_clusters type="array"> <load_balancing_cluster> <name>asdas</name> <created_at type="datetime">2011-07-20T17:54:31Z</created_at> <load_balancer_password>ce45tqsb3jub</load_balancer_password> <load_balancer_id type="integer">60</load_balancer_id> <config> <max_node_amount></max_node_amount> <min_node_amount></min_node_amount> </config> <nodes type="array"> <load_balancing_cluster_node> <cluster_id type="integer">5</cluster_id> <ip_address_id type="integer">1</ip_address_id> <created_at type="datetime">2011-07-20T17:54:31Z</created_at> <updated_at type="datetime">2011-07-20T17:54:31Z</updated_at> <id type="integer">10</id> <virtual_machine_id type="integer">41</virtual_machine_id> </load_balancing_cluster_node> </nodes>

202
OnApp Cloud 2.3 | API Guide | v1.5 | 12th April 2012
<updated_at type="datetime">2011-07-20T17:54:31Z</updated_at> <ports type="array">
<port>80</port> </ports> <id type="integer">5</id> <user_id type="integer">1</user_id> <load_balancer> <label>asdas</label> <cpus type="integer">1</cpus> <operating_system_distro>lbva</operating_system_distro> <created_at type="datetime">2012-02-28T10:58:56Z</created_at> <template_id type="integer">6</template_id> <operating_system>linux</operating_system> <enable_autoscale nil="true"/> <cpu_shares type="integer">10</cpu_shares> <updated_at type="datetime">2012-02-28T12:30:58Z</updated_at> <memory type="integer">512</memory> <local_remote_access_port type="integer">5901</local_remote_access_port> <allowed_swap type="boolean">true</allowed_swap> <recovery_mode type="boolean">false</recovery_mo de> <allow_resize_without_reboot type="boolean">true</allow_resize_without_reboot> <ip_addresses type="array"> <ip_address> <address>109.123.105.180</address> <disallowed_primary type="boolean">false</disallowed_primary> <created_at type="datetime">2012-01-20T16:02:01Z</created_at> <broadcast>109.123.105.191</broadcast> <free type="boolean">false</free> <updated_at type="datetime">2012-01-20T16:02:01Z</updated_at> <network_id type="integer">1</network_id> <netmask>255.255.255.240</netmask> <network_address>109.123.105.176</network_address> <id type="integer">65</id> <gateway>109.123.105.177</gateway> </ip_address> </ip_addresses> <xen_id type="integer">42</xen_id> <update_billing_stat type="boolean">false</update_billing_stat> <id type="integer">307</id> <hypervisor_id type="integer">1</hypervisor_id> <enable_monitis type="boolean">false</enable_monitis> <user_id type="integer">6</user_id> <allowed_hot_migrate type="boolean">true</allowed_hot_migrate> <admin_note nil="true"/> <vip nil="true"/> <suspended type="boolean">false</suspended> <strict_virtual_machine_id nil="true"/> <note nil="true"/> <total_disk_size type="integer">6</total_disk_size> <template_label>Load Balancer Virtual Appliance</template_label> <hostname>lb.oleg.test.com</hostname> <booted type="boolean">true</booted> <remote_access_password>i1pyx4gnsmkl</remote_access_password> <min_disk_size type="integer">5</min_disk_size> <initial_root_password>z1daxmf66z6q</initial_root_password> <identifier>ju3149gpa8dyio</identifier> <add_to_marketplace nil="true"/> <monthly_bandwidth_used type="integer">4318</monthly_bandwidth_used> <state>new</state> <locked type="boolean">false</locked> <built type="boolean">true</built> </load_balancer> <node_attributes nil="true"></node_attributes>

203
OnApp Cloud 2.3 | API Guide | v1.5 | 12th April 2012
<identifier>593089089b16c9c998a43fa2a732028f615ae703</identifier> <cluster_type>cluster</cluster_type> <image_template_id nil="true"></image_template_id> </load_balancing_cluster> </load_balancing_clusters>
Description:
load_balancing_clusters – an array of all load balancing clusters (may be both cluster and autoscaling types)
name - load balancing cluster name
created_at - the date when the cluster was created
load_balancer_password – root password, which is generated automatically
load_balancer_id - the ID of a load balancer added to this cluster
config – configuration array, where:
• max_node_amount – maximum number of nodes (for autoscaling types; remains empty for cluster types)
• min_node_amount – minimum number of nodes (for autoscaling types; remains empty for cluster types)
nodes - an array of load balancing cluster nodes with VM details:
• cluster_id - the ID of load balancing cluster to which this node belongs • ip_address_id – the ID of VM IP address added to a cluster • id – node ID • virtual_machine_id – the ID of VM added to a cluster
updated_at – the date when the cluster was updated
ports – the array of ports on which this cluster runs
port – the cluster port
id – ID of the cluster
user_id – ID of the load balancing cluster owner
load_balancer
• label – the load balancer name • cpus – the number of CPU cores allocated to this load balancer

204
OnApp Cloud 2.3 | API Guide | v1.5 | 12th April 2012
• operating_system_distro – the distribution of the OS • created_at – the date in the [YYYY][MM][DD]T[hh][mm][ss]Z format • template_id – ID of the LB template • operating_system - the OS on which the load balancing cluster is based • enable_autoscale – true if autoscaling is enabled, otherwise false • cpu_shares – the CPU priority of this load balancing cluster • updated_at - the date in the [YYYY][MM][DD]T[hh][mm][ss]Z format • memory – the amount of RAM allocated to this load balancing cluster • local_remote_access_port – the port ID used for used for console access • allowed_swap – true if swap disks are allowed, otherwise false • recovery_mode – true if recovery mode is allowed, otherwise false • allow_resize_without_reboot – true if you can resize a VM’s CPU and RAM without
rebooting it • ip_addresses - an array of IP addresses assigned to this load balancer and their details: • disallowed_primary – true if not allowed to be used as primary (for Load Balancer build),
otherwise false • broadcast – broadcast address • free – true if free, otherwise false • network_id – the ID of a network attached to this load balancer • netmask – netmask for the IP address • network_address – the address of the network • gateway – gateway address • xen_id – the VM ID set by the virtualization engine • id – the load balancing cluster ID • hypervisor_id – the ID of the hypervisor used by this load balancing cluster • enable_monitis – true if monitis is enabled, otherwise false • user_id –the ID of the user who owns this load balancing cluster • allowed_hot_migrate – true if hot migration is allowed • admin_note – an optional text note • vip – true if the VIP status is set, otherwise false • suspend – true if suspended, otherwise false • strict_virtual_machine_id – the ID of a VM that will never reside in this load balancing
cluster • note – an optional text, added as a note • total_disk_size – the load balancer disk size • template_label – the name of the template on which this load balancing cluster is based • hostname – the host name for this load balancer • booted - true if the machine is booted, otherwise false • remote_access_password – the password for remote access • min_disk_size – the minimum disk size in GB required for a specified template

205
OnApp Cloud 2.3 | API Guide | v1.5 | 12th April 2012
• initial_root_password – the VM root password • identifier – identifier of the load balancer in the database • monthly_bandwidth_used – the bandwidth used this month • locked – true if locked, otherwise false • built – true if the load balancing cluster is built, otherwise false
node_attributes – an array of node attributes for autoscaling type, including cpu_shares, memory (RAM), rate_limit (port speed) and cpus (remains empty for cluster type)
identifier – the LB identifier in the DB
cluster_type – the type of the cluster (either cluster or autoscaleout)
image_template_id – the ID of a template on which the nodes of this load balancer are based (empty for cluster type)
28.2 Get load balancing cluster details
To get details for a particular load balancing cluster, use the following request:
GET /load_balancing_clusters/:id.xml GET /load_balancing_clusters/:id.json
XML Output example
<?xml version="1.0" encoding="UTF-8"?> <load_balancing_cluster> <name>qqet</name> <created_at type="datetime">2011-04-27T19:22:02+03:00</created_at> <load_balancer> <label>test.test</label> <cpus type="integer">1</cpus> <operating_system_distro>lbva</operating_system_distro> <created_at type="datetime">2012-02-28T10:58:56Z</created_at> <template_id type="integer">6</template_id> <operating_system>linux</operating_system> <enable_autoscale nil="true"/> <cpu_shares type="integer">10</cpu_shares> <updated_at type="datetime">2012-02-28T12:30:58Z</updated_at> <memory type="integer">512</memory> <local_remote_access_port type="integer">5901</local_remote_access_port> <allowed_swap type="boolean">true</allowed_swap> <recovery_mode type="boolean">false</recovery_mo de> <allow_resize_without_reboot type="boolean">true</allow_resize_without_reboot> <ip_addresses type="array"> <ip_address> <address>109.123.105.180</address> <disallowed_primary type="boolean">false</disallowed_primary> <created_at type="datetime">2012-01-20T16:02:01Z</created_at> <broadcast>109.123.105.191</broadcast> <free type="boolean">false</free> <updated_at type="datetime">2012-01-20T16:02:01Z</updated_at> <network_id type="integer">1</network_id>

206
OnApp Cloud 2.3 | API Guide | v1.5 | 12th April 2012
<netmask>255.255.255.240</netmask> <network_address>109.123.105.176</network_address> <id type="integer">65</id> <gateway>109.123.105.177</gateway> </ip_address> </ip_addresses> <xen_id type="integer">42</xen_id> <update_billing_stat type="boolean">false</update_billing_stat> <id type="integer">307</id> <hypervisor_id type="integer">1</hypervisor_id> <enable_monitis type="boolean">false</enable_monitis> <user_id type="integer">6</user_id> <allowed_hot_migrate type="boolean">true</allowed_hot_migrate> <admin_note nil="true"/> <vip nil="true"/> <suspended type="boolean">false</suspended> <strict_virtual_machine_id nil="true"/> <note nil="true"/> <total_disk_size type="integer">6</total_disk_size> <template_label>Load Balancer Virtual Appliance</template_label> <hostname>lb.oleg.test.com</hostname> <booted type="boolean">true</booted> <remote_access_password>i1pyx4gnsmkl</remote_access_password> <min_disk_size type="integer">5</min_disk_size> <initial_root_password>z1daxmf66z6q</initial_root_password> <identifier>ju3149gpa8dyio</identifier> <add_to_marketplace nil="true"/> <monthly_bandwidth_used type="integer">4318</monthly_bandwidth_used> <state>new</state> <locked type="boolean">false</locked> <built type="boolean">true</built> </load_balancer> <load_balancer_id type="integer">55</load_balancer_id> <config> <ports type="array"> <port>80</port> </ports> </config> <nodes type="array"/> <updated_at type="datetime">2011-04-27T19:22:02+03:00</updated_at> <id type="integer">10</id> <user_id type="integer">1</user_id> <node_attributes nil="true"></node_attributes> <image_template_id nil="true"></image_template_id> </load_balancing_cluster> The description of the attributes is the same as for the Get the list of load balancing clusters request.
28.3 Edit load balancing cluster details
To edit a particular load balancing cluster parameters, use the following request:
PUT /load_balancing_clusters/:id.xml PUT /load_balancing_clusters/:id.json
JSON Request example

207
OnApp Cloud 2.3 | API Guide | v1.5 | 12th April 2012
curl -X PUT -d '{"load_balancing_cluster":{"port":"80","load_balancer_attributes":{"label":"label1", "rate_limit":"0"}}' -u user:userpass http://onapp.test/load_balancing_clusters/:load_balancing_cluster_id.json -H 'Accept: application/json' -H 'Content-type: application/json'
Where:
load_balancing_cluster * – an array with load balancing cluster details, where:
port *- edit port on which the load balancing cluster runs
load_balancer_attributes * – an array of LB instance, where:
label * – the LB title
rate_limit * – the port speed for the LB
Using this request you can edit the following load balancing cluster parameters: port, label and rate limit and add node to the load balancing cluster. To see how to add and remove nodes from the cluster type, see the Remove nodes from cluster type and Add nodes to cluster type sections.
28.4 Add a load balancing cluster
To add a cluster type or an autoscaling type use the following request:
POST /load_balancing_clusters.xml POST /load_balancing_clusters.json
XML Request example to add a cluster type
curl -i -X POST -H 'Content-Type: application/xml' -H 'Accept: application/xml' -d '<load_balancing_cluster><ports type="array"><port>80</port><port>25001</port></ports><nodes_attributes type="array"><nodes_attribute><ip_address_id>59</ip_address_id><virtual_machine_id>536</virtual_machine_id></nodes_attribute><nodes_attribute><ip_address_id>60</ip_address_id><virtual_machine_id>537</virtual_machine_id></nodes_attribute></nodes_attributes><cluster_type>cluster</cluster_type><load_balancer_attributes><label>YR_xml</label><rate_limit>0</rate _limit><hostname>yr.cluster.xml</hostname><primary_network_group_id>3</primary_network_group_id><hypervisor_group_id>1</hypervisor_group_id><hypervisor_id>1</hypervisor_id></load_balancer_attributes></load_balancing_cluster>' -u user:userpass --url http://onapp.test/load_balancing_clusters.xml
JSON Request example to add a cluster type
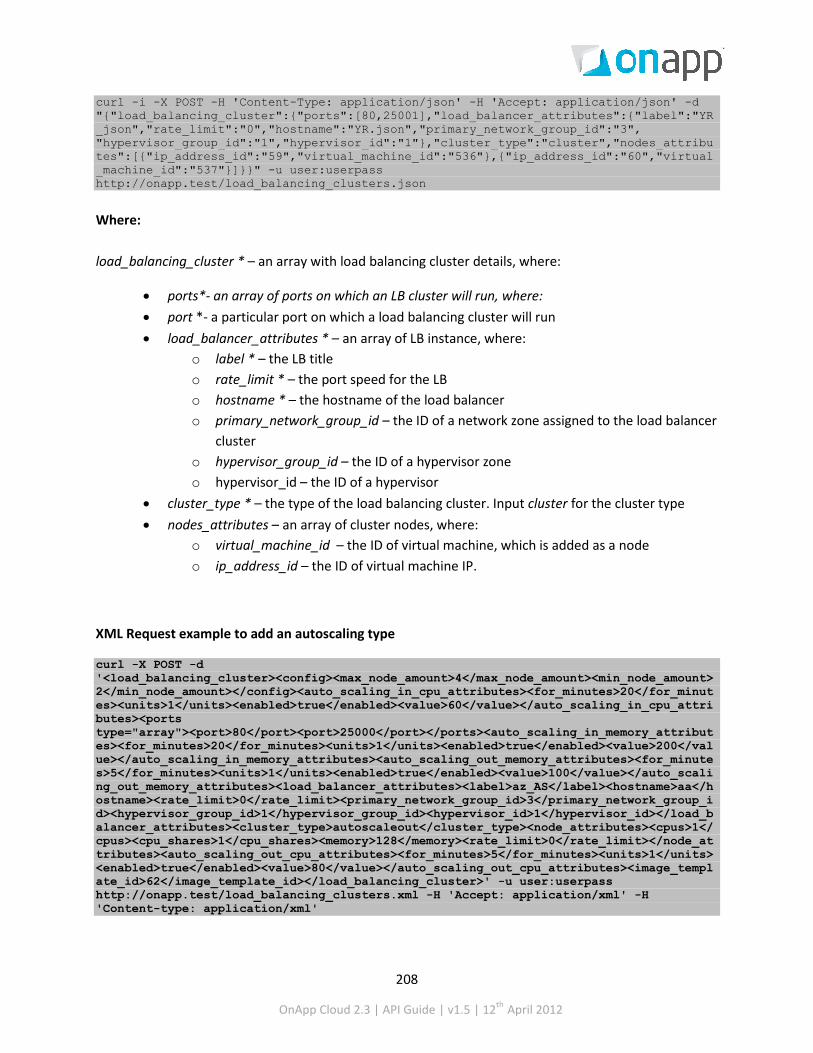
208
OnApp Cloud 2.3 | API Guide | v1.5 | 12th April 2012
curl -i -X POST -H 'Content-Type: application/json' -H 'Accept: application/json' -d "{"load_balancing_cluster":{"ports":[80,25001],"load_balancer_attributes":{"label":"YR_json","rate_limit":"0","hostname":"YR.json","primary_network_group_id":"3", "hypervisor_group_id":"1","hypervisor_id":"1"},"cluster_type":"cluster","nodes_attributes":[{"ip_address_id":"59","virtual_machine_id":"536"},{"ip_address_id":"60","virtual_machine_id":"537"}]}}" -u user:userpass http://onapp.test/load_balancing_clusters.json
Where: load_balancing_cluster * – an array with load balancing cluster details, where:
• ports*- an array of ports on which an LB cluster will run, where: • port *- a particular port on which a load balancing cluster will run • load_balancer_attributes * – an array of LB instance, where:
o label * – the LB title o rate_limit * – the port speed for the LB o hostname * – the hostname of the load balancer o primary_network_group_id – the ID of a network zone assigned to the load balancer
cluster o hypervisor_group_id – the ID of a hypervisor zone o hypervisor_id – the ID of a hypervisor
• cluster_type * – the type of the load balancing cluster. Input cluster for the cluster type • nodes_attributes – an array of cluster nodes, where:
o virtual_machine_id – the ID of virtual machine, which is added as a node o ip_address_id – the ID of virtual machine IP.
XML Request example to add an autoscaling type
curl -X POST -d '<load_balancing_cluster><config><max_node_amount>4</max_node_amount><min_node_amount>2</min_node_amount></config><auto_scaling_in_cpu_attributes><for_minutes>20</for_minutes><units>1</units><enabled>true</enabled><value>60</value></auto_scaling_in_cpu_attributes><ports type="array"><port>80</port><port>25000</port></ports><auto_scaling_in_memory_attributes><for_minutes>20</for_minutes><units>1</units><enabled>true</enabled><value>200</value></auto_scaling_in_memory_attributes><auto_scaling_out_memory_attributes><for_minutes>5</for_minutes><units>1</units><enabled>true</enabled><value>100</value></auto_scaling_out_memory_attributes><load_balancer_attributes><label>az_AS</label><hostname>aa</hostname><rate_limit>0</rate_limit><primary_network_group_id>3</primary_network_group_id><hypervisor_group_id>1</hypervisor_group_id><hypervisor_id>1</hypervisor_id></load_balancer_attributes><cluster_type>autoscaleout</cluster_type><node_attributes><cpus>1</cpus><cpu_shares>1</cpu_shares><memory>128</memory><rate_limit>0</rate_limit></node_attributes><auto_scaling_out_cpu_attributes><for_minutes>5</for_minutes><units>1</units><enabled>true</enabled><value>80</value></auto_scaling_out_cpu_attributes><image_template_id>62</image_template_id></load_balancing_cluster>' -u user:userpass http://onapp.test/load_balancing_clusters.xml -H 'Accept: application/xml' -H 'Content-type: application/xml'
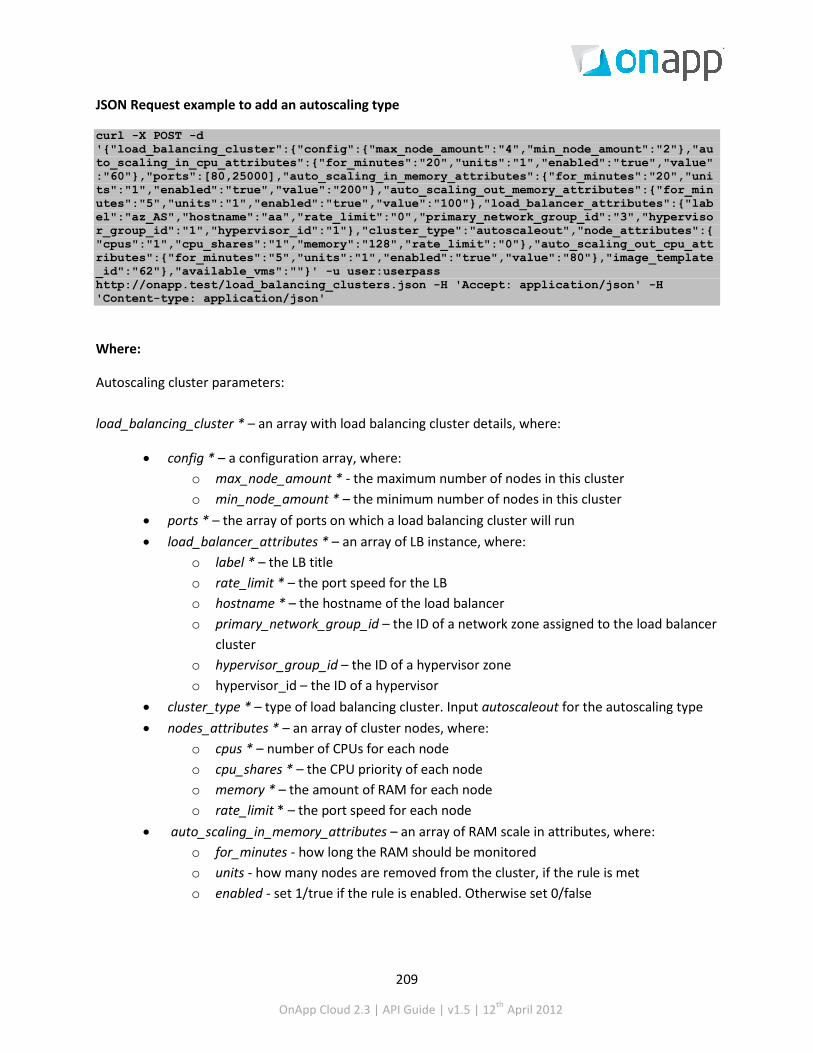
209
OnApp Cloud 2.3 | API Guide | v1.5 | 12th April 2012
JSON Request example to add an autoscaling type
curl -X POST -d '{"load_balancing_cluster":{"config":{"max_node_amount":"4","min_node_amount":"2"},"auto_scaling_in_cpu_attributes":{"for_minutes":"20","units":"1","enabled":"true","value":"60"},"ports":[80,25000],"auto_scaling_in_memory_attributes":{"for_minutes":"20","units":"1","enabled":"true","value":"200"},"auto_scaling_out_memory_attributes":{"for_minutes":"5","units":"1","enabled":"true","value":"100"},"load_balancer_attributes":{"label":"az_AS","hostname":"aa","rate_limit":"0","primary_network_group_id":"3","hypervisor_group_id":"1","hypervisor_id":"1"},"cluster_type":"autoscaleout","node_attributes":{"cpus":"1","cpu_shares":"1","memory":"128","rate_limit":"0"},"auto_scaling_out_cpu_attributes":{"for_minutes":"5","units":"1","enabled":"true","value":"80"},"image_template_id":"62"},"available_vms":""}' -u user:userpass http://onapp.test/load_balancing_clusters.json -H 'Accept: application/json' -H 'Content-type: application/json'
Where:
Autoscaling cluster parameters: load_balancing_cluster * – an array with load balancing cluster details, where:
• config * – a configuration array, where: o max_node_amount * - the maximum number of nodes in this cluster o min_node_amount * – the minimum number of nodes in this cluster
• ports * – the array of ports on which a load balancing cluster will run • load_balancer_attributes * – an array of LB instance, where:
o label * – the LB title o rate_limit * – the port speed for the LB o hostname * – the hostname of the load balancer o primary_network_group_id – the ID of a network zone assigned to the load balancer
cluster o hypervisor_group_id – the ID of a hypervisor zone o hypervisor_id – the ID of a hypervisor
• cluster_type * – type of load balancing cluster. Input autoscaleout for the autoscaling type • nodes_attributes * – an array of cluster nodes, where:
o cpus * – number of CPUs for each node o cpu_shares * – the CPU priority of each node o memory * – the amount of RAM for each node o rate_limit * – the port speed for each node
• auto_scaling_in_memory_attributes – an array of RAM scale in attributes, where: o for_minutes - how long the RAM should be monitored o units - how many nodes are removed from the cluster, if the rule is met o enabled - set 1/true if the rule is enabled. Otherwise set 0/false

210
OnApp Cloud 2.3 | API Guide | v1.5 | 12th April 2012
o value - the amount of RAM (MB). If this value is reached by the cluster during the period specified by the for_minutes parameter, the system will remove the amount of units set by the units parameters.
• auto_scaling_in_cpu_attributes – an array of CPU scale in attributes, similar to RAM scale in attributes
• auto_scaling_out_memory_attributes - an array of RAM scale out attributes, where: o for_minutes - how long the RAM should be monitored o units - how many nodes are added to the cluster if the rule is met o enabled - set 1/true to enable the rule. Otherwise set false/0. o value - the amount of RAM (MB). If this value is reached by the cluster during the
period specified by the for_minutes parameter, the system will add the amount of units set by the units parameters
• auto_scaling_out_cpu_attributes – an array of CPU scale out attributes, similar to RAM scale out attributes
28.5 Add nodes to cluster type
To add new VMs (nodes) to a cluster type, use the following request:
PUT /load_balancing_clusters/:id.xml PUT /load_balancing_clusters/:id.json
JSON Request example
curl -i -X PUT -d'{"load_balancing_cluster":{"nodes_attributes":{"[:VM_id]":{"ip_address_id":"2","virtual_machine_id":"278"},"[:VM_id]":{"ip_address_id":"7","virtual_machine_id":"277"}}}}' -u user:userpass http://onapp.test/load_balancing_clusters/:id.json -H 'Accept: application/json' -H 'Content-type: application/json',"primary_network_group_id":"3","hypervisor_group_id":"1","hypervisor_id":"1
You add new nodes by editing nodes_attributes array, where you add new nodes to already existing ones:
load_balancing_cluster – an array, with load balancing cluster details:
o primary_network_group_id – the ID of a network zone assigned to the load balancer cluster
o hypervisor_group_id – the ID of a hypervisor zone o hypervisor_id – the ID of a hypervisor
• nodes_attributes – an array where you may add new nodes o [:VM_id] –input ID of the VM you add to the cluster. Node parameters:
ip_address_id – the ID of virtual machine IP

211
OnApp Cloud 2.3 | API Guide | v1.5 | 12th April 2012
id – input id of the existing node or omit it for a new node virtual_machine_id – input the ID of the VM
• id – input the cluster ID
28.6 Remove nodes from cluster type
To remove nodes from cluster type, use the following request:
PUT /load_balancing_clusters/:id.xml PUT /load_balancing_clusters/:id.json
JSON Request example
curl -X PUT -d'{"load_balancing_cluster":{"nodes_attributes":{"[:VM_id]":{"_destroy":"1", "virtual_machine_id":"420"}}}}' -u user:userpass http://onapp.test/load_balancing_clusters/:id.json -H 'Accept: application/json' -H 'Content-type: application/json',"primary_network_group_id":"3","hypervisor_group_id":"1","hypervisor_id":"1
Where:
load_balancing_cluster – an array, with load balancing cluster details:
• primary_network_group_id – the ID of a network zone assigned to the load balancer cluster • hypervisor_group_id – the ID of a hypervisor zone • hypervisor_id – the ID of a hypervisor • nodes_attributes – an array where you may remove nodes
o [:VM_id] – set “0” (zero) for the node you want to delete. Node parameters: ip_address_id – the ID of virtual machine IP destroy – set 1/true to remove this node from the cluster virtual_machine_id – input the ID of the VM
• id – input the cluster ID
28.7 Configure autoscaling type
You may change minimum/maximum number of nodes of autoscaling type, as well as change the autoscaling attributes for RAM and CPU.
To configure autoscaling type, use the following request:
PUT /load_balancing_clusters/:id.xml PUT /load_balancing_clusters/:id.json

212
OnApp Cloud 2.3 | API Guide | v1.5 | 12th April 2012
XML Request example
curl -X PUT -d '<load_balancing_cluster><config><max_node_amount>4</max_node_amount><min_node_amount>2</min_node_amount></config><auto_scaling_in_cpu_attributes><for_minutes>20</for_minutes><units>1</units><enabled>true</enabled><value>60</value></auto_scaling_in_cpu_attributes><ports type="array"><port>80</port><port>25000</port></ports><auto_scaling_in_memory_attributes><for_minutes>20</for_minutes><units>1</units><enabled>true</enabled><value>200</value></auto_scaling_in_memory_attributes><auto_scaling_out_memory_attributes><for_minutes>5</for_minutes><units>1</units><enabled>true</enabled><value>100</value></auto_scaling_out_memory_attributes><load_balancer_attributes><label>az_AS</label><hostname>aa</hostname><rate_limit>0</rate_limit><primary_network_group_id>3</primary_network_group_id><hypervisor_group_id>1</hypervisor_group_id><hypervisor_id>1</hypervisor_id></load_balancer_attributes><node_attributes><cpus>1</cpus><cpu_shares>1</cpu_shares><memory>128</memory><rate_limit>0</rate_limit></node_attributes><auto_scaling_out_cpu_attributes><for_minutes>5</for_minutes><units>1</units><enabled>true</enabled><value>80</value></auto_scaling_out_cpu_attributes><image_template_id>62</image_template_id></load_balancing_cluster>' -u user:userpass http://onapp.test/load_balancing_clusters.xml -H 'Accept: application/xml' -H 'Content-type: application/xml'
JSON Request example
curl -X PUT -d'{"load_balancing_cluster":{"config":{"max_node_amount":"4","min_node_amount":"1"},"auto_scaling_in_cpu_attributes":{"for_minutes":"20","units":"1","enabled":"true","value":"60"},"ports":["80"],"auto_scaling_in_memory_attributes":{"for_minutes":"20","units":"1","enabled":"true","value":"200"},"auto_scaling_out_memory_attributes":{"for_minutes":"5","units":"1","enabled":"true","value":"100"},"load_balancer_attributes":{"label":"az_AS","hostname":"aa","rate_limit":"0","primary_network_group_id":"3","hypervisor_group_id":"1","hypervisor_id":"1"},"cluster_type":"autoscaleout","node_attributes":{"cpus":"1","cpu_shares":"1","memory":"128","rate_limit":"0"},"auto_scaling_out_cpu_attributes":{"for_minutes":"5","units":"1","enabled":"true","value":"80"},"image_template_id":"4"},"available_vms":""}' -u user:userpass http://onapp.test/load_balancing_clusters/45.json -H 'Accept: application/json' -H 'Content-type: application/json'
Where you may change:
Number of nodes
• max_node_amount – maximum number of nodes for the cluster • min_node_amount – minimum number of nodes for the cluster
Autoscale in/out attributes for RAM and CPU
• for_minutes - how long the resource should be monitored • units - how many nodes are removed or added to the cluster, if the rule is met • enabled - set 1/true if the rule is enabled. Otherwise set 0/false • value - the amount of resource. If this value is reached by the cluster during the period
specified by the for_minutes parameter, the system will remove the amount of units set by the units parameter.

213
OnApp Cloud 2.3 | API Guide | v1.5 | 12th April 2012
28.8 Delete a load balancing cluster
To delete a load balancing cluster, use the following request:
DELETE /load_balancing_clusters/:id .xml DELETE /load_balancing_clusters/:id .json You can also delete it using this request:
DELETE /load_balancers/:id.xml DELETE /load_balancers/:id.json
XML Request example
curl -i -X DELETE -u user:userpass --url http://onapp.test/load_balancers/:id.xml
JSON Request example
curl -i -X DELETE -u user:userpass --url http://onapp.test/load_balancers/:id.json
If you delete a cluster type – the nodes (VMs) will remain in the system. If you delete an autoscaling type - all its nodes will be deleted as well.
28.9 Configure load balancing cluster ports
To set the list of ports on which a load balancing cluster runs, use the following requests:
PUT /load_balancing_clusters/:id.xml PUT /load_balancing_clusters/:id.json XML Request example
curl -i -X PUT -H 'Content-Type: application/xml' -H 'Accept: application/xml' -d '<load_balancing_cluster><ports type="array"><port>8080</port><port>25025</port> </ports></load_balancing_cluster>' -u user:userpass --url http://onapp.test/load_balancing_clusters/:id.xml
JSON Request example
curl -X PUT -d '{"load_balancing_cluster":{"ports":[8080,25025]}}' -u onapp_user:userpass http://onapp.test/load_balancing_clusters/:id.json -H 'Accept: application/json' -H 'Content-type: application/json'
Where:
Ports* – the array of ports on which a load balancing cluster will run

214
OnApp Cloud 2.3 | API Guide | v1.5 | 12th April 2012
Port* – a particular port
28.10 Get the list of load balancers
To get the list of available load balancers, use the following request:
GET /load_balancers.xml GET /load_balancers.json
XML Output example
<?xml version="1.0" encoding="UTF-8"?> <load_balancers type="array"> <load_balancer> <label>test.test</label> <cpus type="integer">1</cpus> <operating_system_distro>lbva</operating_system_distro> <created_at type="datetime">2012-02-28T10:58:56Z</created_at> <template_id type="integer">6</template_id> <operating_system>linux</operating_system> <enable_autoscale nil="true"/> <cpu_shares type="integer">10</cpu_shares> <updated_at type="datetime">2012-02-28T12:30:58Z</updated_at> <memory type="integer">512</memory> <local_remote_access_port type="integer">5901</local_remote_access_port> <allowed_swap type="boolean">true</allowed_swap> <recovery_mode type="boolean">false</recovery_mo de> <allow_resize_without_reboot type="boolean">true</allow_resize_without_reboot> <ip_addresses type="array"> <ip_address> <address>109.123.105.180</address> <disallowed_primary type="boolean">false</disallowed_primary> <created_at type="datetime">2012-01-20T16:02:01Z</created_at> <broadcast>109.123.105.191</broadcast> <free type="boolean">false</free> <updated_at type="datetime">2012-01-20T16:02:01Z</updated_at> <network_id type="integer">1</network_id> <netmask>255.255.255.240</netmask> <network_address>109.123.105.176</network_address> <id type="integer">65</id> <gateway>109.123.105.177</gateway> </ip_address> </ip_addresses> <xen_id type="integer">42</xen_id> <update_billing_stat type="boolean">false</update_billing_stat> <id type="integer">307</id> <hypervisor_id type="integer">1</hypervisor_id> <enable_monitis type="boolean">false</enable_monitis> <user_id type="integer">6</user_id> <allowed_hot_migrate type="boolean">true</allowed_hot_migrate> <admin_note nil="true"/> <vip nil="true"/> <suspended type="boolean">false</suspended> <strict_virtual_machine_id nil="true"/> <note nil="true"/> <total_disk_size type="integer">6</total_disk_size> <template_label>Load Balancer Virtual Appliance</template_label> <hostname>lb.oleg.test.com</hostname>
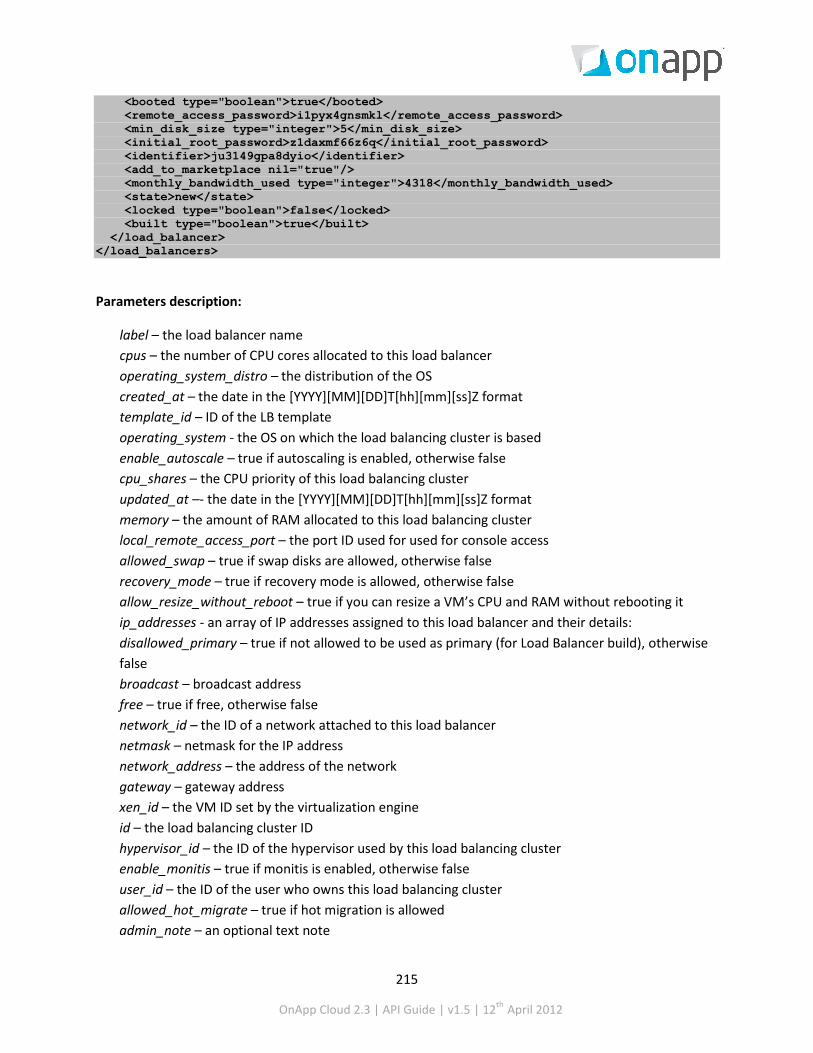
215
OnApp Cloud 2.3 | API Guide | v1.5 | 12th April 2012
<booted type="boolean">true</booted> <remote_access_password>i1pyx4gnsmkl</remote_access_password> <min_disk_size type="integer">5</min_disk_size> <initial_root_password>z1daxmf66z6q</initial_root_password> <identifier>ju3149gpa8dyio</identifier> <add_to_marketplace nil="true"/> <monthly_bandwidth_used type="integer">4318</monthly_bandwidth_used> <state>new</state> <locked type="boolean">false</locked> <built type="boolean">true</built> </load_balancer> </load_balancers>
Parameters description:
label – the load balancer name cpus – the number of CPU cores allocated to this load balancer operating_system_distro – the distribution of the OS created_at – the date in the [YYYY][MM][DD]T[hh][mm][ss]Z format template_id – ID of the LB template operating_system - the OS on which the load balancing cluster is based enable_autoscale – true if autoscaling is enabled, otherwise false cpu_shares – the CPU priority of this load balancing cluster updated_at –- the date in the [YYYY][MM][DD]T[hh][mm][ss]Z format memory – the amount of RAM allocated to this load balancing cluster local_remote_access_port – the port ID used for used for console access allowed_swap – true if swap disks are allowed, otherwise false recovery_mode – true if recovery mode is allowed, otherwise false allow_resize_without_reboot – true if you can resize a VM’s CPU and RAM without rebooting it ip_addresses - an array of IP addresses assigned to this load balancer and their details: disallowed_primary – true if not allowed to be used as primary (for Load Balancer build), otherwise false broadcast – broadcast address free – true if free, otherwise false network_id – the ID of a network attached to this load balancer netmask – netmask for the IP address network_address – the address of the network gateway – gateway address xen_id – the VM ID set by the virtualization engine id – the load balancing cluster ID hypervisor_id – the ID of the hypervisor used by this load balancing cluster enable_monitis – true if monitis is enabled, otherwise false user_id – the ID of the user who owns this load balancing cluster allowed_hot_migrate – true if hot migration is allowed admin_note – an optional text note

216
OnApp Cloud 2.3 | API Guide | v1.5 | 12th April 2012
vip – true if the VIP status is set, otherwise false suspend – true if suspended, otherwise false strict_virtual_machine_id – the ID of a VM that will never reside in this load balancing cluster note – an optional text, added as a note total_disk_size – the load balancer disk size template_label – the name of the template on which this load balancing cluster is based hostname – the host name for this load balancer booted - true if the machine is booted, otherwise false remote_access_password – the password for remote access min_disk_size – the minimum disk size in GB required for a specified template initial_root_password – the VM root password identifier – identifier of the load balancer in the database monthly_bandwidth_used – the bandwidth used this month state - locked – true if locked, otherwise false built – true if the load balancing cluster is built, otherwise false
28.11 Get load balancer details
To get details for a particular load balancer, use the following request:
GET /load_balancers/:id.xml GET /load_balancers/:id.json XML Output example
<?xml version="1.0" encoding="UTF-8"?> <load_balancers type="array"> <load_balancer> <label>test.test</label> <cpus type="integer">1</cpus> <operating_system_distro>lbva</operating_system_distro> <created_at type="datetime">2012-02-28T10:58:56Z</created_at> <template_id type="integer">6</template_id> <operating_system>linux</operating_system> <enable_autoscale nil="true"/> <cpu_shares type="integer">10</cpu_shares> <updated_at type="datetime">2012-02-28T12:30:58Z</updated_at> <memory type="integer">512</memory> <local_remote_access_port type="integer">5901</local_remote_access_port> <allowed_swap type="boolean">true</allowed_swap> <recovery_mode type="boolean">false</recovery_mo de> <allow_resize_without_reboot type="boolean">true</allow_resize_without_reboot> <ip_addresses type="array"> <ip_address> <address>109.123.105.180</address> <disallowed_primary type="boolean">false</disallowed_primary> <created_at type="datetime">2012-01-20T16:02:01Z</created_at> <broadcast>109.123.105.191</broadcast> <free type="boolean">false</free> <updated_at type="datetime">2012-01-20T16:02:01Z</updated_at> <network_id type="integer">1</network_id>

217
OnApp Cloud 2.3 | API Guide | v1.5 | 12th April 2012
<netmask>255.255.255.240</netmask> <network_address>109.123.105.176</network_address> <id type="integer">65</id> <gateway>109.123.105.177</gateway> </ip_address> </ip_addresses> <xen_id type="integer">42</xen_id> <update_billing_stat type="boolean">false</update_billing_stat> <id type="integer">307</id> <hypervisor_id type="integer">1</hypervisor_id> <enable_monitis type="boolean">false</enable_monitis> <user_id type="integer">6</user_id> <allowed_hot_migrate type="boolean">true</allowed_hot_migrate> <admin_note nil="true"/> <vip nil="true"/> <suspended type="boolean">false</suspended> <strict_virtual_machine_id nil="true"/> <note nil="true"/> <total_disk_size type="integer">6</total_disk_size> <template_label>Load Balancer Virtual Appliance</template_label> <hostname>lb.oleg.test.com</hostname> <booted type="boolean">true</booted> <remote_access_password>i1pyx4gnsmkl</remote_access_password> <min_disk_size type="integer">5</min_disk_size> <initial_root_password>z1daxmf66z6q</initial_root_password> <identifier>ju3149gpa8dyio</identifier> <add_to_marketplace nil="true"/> <monthly_bandwidth_used type="integer">4318</monthly_bandwidth_used> <state>new</state> <locked type="boolean">false</locked> <built type="boolean">true</built> </load_balancer>
For parameters description refer to a Get the list of load balancers section.
28.12 Edit a load balancer
To edit a load balancer, use this request:
PUT /load_balancers/:id.xml PUT /load_balancers/:id.json JSON Request example
curl -i -X PUT -d '{"load_balancer":{label:"Pasha2", hostname:"Pasha2", rate_limit:10}}' -u user:userpass http://onapp.test/load_balancers/:id -H 'Accept: application/json' -H 'Content-type: application/json' Where you can edit:
label – the LB label
hostname – hostname, associated with the LB
rate_limit – the port speed, set for the LB

218
OnApp Cloud 2.3 | API Guide | v1.5 | 12th April 2012
28.13 Start up a load balancer
To start up a load balancer, use the following request:
POST onapp.test/load_balancers/:load_balancer_id/startup.xml POST onapp.test/load_balancers/:load_balancer_id/startup.json XML Request example
curl -i -X POST -H 'Accept: application/xml' -H 'Content-type: application/xml' -u user:userpass --url http://onapp.test/load_balancers/:load_balancer_id/startup.xml JSON Request example
curl -i -X POST -H 'Accept: application/json' -H 'Content-type: application/json' -u user:userpass --url http://onapp.test/load_balancers/:load_balancer_id/startup.json
28.14 Stop a load balancer
To stop a load balancer, use the following request:
POST /load_balancers/:load_balancer_id/stop.xml POST /load_balancers/:load_balancer_id/stop.json XML Request example
curl -i -X POST -H 'Accept: application/xml' -H 'Content-type: application/xml' -u user:userpass --url http://onapp.test/load_balancers/:load_balancer_id/stop.xml
JSON Request example
curl -i -X POST -H 'Accept: application/json' -H 'Content-type: application/json' -u user:userpass --url http://onapp.test/load_balancers/:load_balancer_id/stop.json
28.15 Shut down a load balancer
To shut down a load balancer, use the following request:
POST /load_balancers/:load_balancer_id/shutdown.xml POST /load_balancers/:load_balancer_id/shutdown.json
XML Request example
curl -i -X POST -H 'Accept: application/xml' -H 'Content-type: application/xml' -u user:userpass --url http://onapp.test/load_balancers/:load_balancer_id/shutdown.xml
JSON Request example

219
OnApp Cloud 2.3 | API Guide | v1.5 | 12th April 2012
curl -i -X POST -H 'Accept: application/json' -H 'Content-type: application/json' -u user:userpass --url http://onapp.test/load_balancers/:load_balancer_id/shutdown.json
28.16 Unlock a load balancer
To unlock a load balancer:
POST /load_balancers/:load_balancer_id/unlock.xml POST /load_balancers/:load_balancer_id/unlock.json
XML Request example
curl -i -X POST -H 'Accept: application/xml' -H 'Content-type: application/xml' -u user:userpass --url http://onapp.test/load_balancers/:load_balancer_id/unlock.xml
JSON Request example
curl -i -X POST -H 'Accept: application/json' -H 'Content-type: application/json' -u user:userpass --url http://onapp.test/load_balancers/:load_balancer_id/unlock.json
28.17 Rebuild a load balancer
To rebuild a load balancer, use the following request:
POST /load_balancers/:load_balancer_id/rebuild.xml POST /load_balancers/:load_balancer_id/rebuild.json
XML Request example
curl -X POST -u user:userpass http://onapp.test/load_balancers/:load_balancer_id/rebuild.xml -H 'Accept: application/xml' -H 'Content-type: application/xml'
JSON request example
curl -X POST -u user:userpass http://onapp.test/load_balancers/:load_balancer_id/rebuild.json -H 'Accept: application/json' -H 'Content-type: application/json'
28.18 Suspend a load balancer
To suspend a load balancer:
POST /load_balancers/:load_balancer_id/suspend.xml POST /load_balancers/:load_balancer_id/suspend.json

220
OnApp Cloud 2.3 | API Guide | v1.5 | 12th April 2012
XML Request example
curl -i -X POST -H 'Accept: application/xml' -H 'Content-type: application/xml' -u user:userpass --url http://onapp.test/load_balancers/:load_balancer_id/suspend.xml
JSON Request example
curl -i -X POST -H 'Accept: application/json' -H 'Content-type: application/json' -u user:userpass --url http://onapp.test/load_balancers/:load_balancer_id/suspend.json
To unsuspend a load balancer, use the same request again.
28.19 View load balancer billing statistics
To view billing statistics for a load balancer:
GET /load_balancers/:identifier/vm_stats.xml GET /load_balancers/:identifier/vm_stats.json
Define a shorter period by setting Start and End time in the API call: GET /load_balancers/:identifier/vm_stats.xml?period[startdate]=YYYY-MM-DD+hh%3Amm%3Ass&period[enddate]=YYYY-MM-DD+hh%3Amm%3Ass GET /load_balancers/:identifier/vm_stats.json?period[startdate]=YYYY-MM-DD+hh%3Amm%3Ass&period[enddate]=YYYY-MM-DD+hh%3Amm%3Ass
XML output example:
<?xml version="1.0" encoding="UTF-8"?> <vm_stats type="array"> <vm_hourly_stat> <created_at type="datetime">2011-11-01T00:00:16Z</created_at> <usage_cost type="float">0.0</usage_cost> <updated_at type="datetime">2011-11-01T00:00:16Z</updated_at> <stat_time type="datetime">2011-11-01T00:00:00Z</stat_time> <vm_resources_cost type="float">0.0</vm_resources_cost> <total_cost type="float">0.0</total_cost> <id type="integer">9596</id> <vm_billing_stat_id type="integer">7807</vm_billing_stat_id> <user_id type="integer">1</user_id> <billing_stats> <virtual_machines type="array"> <virtual_machine> <label>qapl-cluster</label> <costs type="array"> <cost> <value type="integer">10</value> <cost type="float">0.0</cost> <resource_name>cpu_shares</resource_name>

221
OnApp Cloud 2.3 | API Guide | v1.5 | 12th April 2012
</cost> </costs> <id type="integer">351</id> </virtual_machine> </virtual_machines> <network_interfaces type="array"> <network_interface> <label>eth0</label> <costs type="array"> <cost> <value type="integer">2</value> <cost type="float">0.0</cost> <resource_name>ip_addresses</resource_name> </cost> ... <cost></cost> ... </costs> <id type="integer">401</id> </network_interface> </network_interfaces> <disks type="array"> <disk> <label>#770</label> <costs type="array"> <cost> <value type="integer">5</value> <cost type="float">0.0</cost> <resource_name>disk_size</resource_name> </cost> ... <cost></cost> ... </costs> <id type="integer">770</id> </disk> </disks> <load_balancers type="array"> <load_balancer> <label>qapl-cluster</label> <costs type="array"> <cost> <value type="integer">2</value> <cost type="float">0.0</cost> <resource_name>template</resource_name> </cost> </costs> <id type="integer">351</id> </load_balancer> </load_balancers> </billing_stats> <virtual_machine_id type="integer">351</virtual_machine_id> <currency_code>USD</currency_code> </vm_hourly_stat> </vm_stats>
Where:
created_at - the timestamp in DB when this record was created

222
OnApp Cloud 2.3 | API Guide | v1.5 | 12th April 2012
updated_at - the date when these statistics were updated
usage_cost - the total due for LB usage for this particular hour specified by stat_time parameter (data sent/received, bandwidth, CPU usage)
total_cost - the total amount of money owed by this particular LB for the resources spent at stat_time
total_cost - the total amount of money owed for the LB specified by id parameter for a particular hour specified by stat_time parameter (total_cost = vm_resources_cost + usage_cost)
vm_resources_cost - the amount of money due for the LB resources for the particular hour specified by stat_time parameter (memory, disks, templates)
stat_time - the particular hour for which these statistics were generated
id - the ID of these statistics
user_id - the ID of LB owner
currency_code - currency in which this load balancer is charged within the billing plan
billing_stats - an array of billing details for the resources used by this LB
virtual_machines - an array of LB billing details:
• label - LB name • costs - an array of LB resources with their total prices for the period specified in the stat-time
parameter, where o resource_name - the resource in question. This can be cpu_shares, cpus, memory,
template, cpu_usage o value - the amount of resources allocated to this VM. Here are the units of measurment
for each type of resource_name: cpu_shares – CPU priority percentage cpus - number of CPU cores memory - amount of RAM in Mb cpu_usage - CPU time in seconds cost - the total due for this resource id - load balancer ID
network_interfaces - an array of network interfaces used by this LB with their billing statistics:
o label - network interface name used in OnApp o id - network interface ID o costs - an array of network interface related resources with their total prices for the period
specified in the stat-time parameter, where:

223
OnApp Cloud 2.3 | API Guide | v1.5 | 12th April 2012
o resource_name - the resource in question. This can be ip_addresses, rate, data_received and data_sent
o value - the amount of resources used by this network interface.Here are the units of measurment for each type of resource_name: ip_addresses - number of IPs rate - the port speed in Mb per second data_received - amount of received data in Kb data_sent - amount of sent data in Kb
o cost - the total due for the resource
disks - an array of disks used by this LB with their billing details:
• label - disk name used in UI • id - disk ID used in database • costs - an array of disk related resources with their total prices for the period specified in the
stat-time parameter, where: o resource_name - the resource in question. This can be disk_size, data_read,
data_written, reads_completed and writes_completed o value - the amount of resources used. Here are the units of measurment for each type
of resource_name: disk_size - size in GB data_read - read data in Kb data_written - amount of written data in Kb reads - number read operations writes - number of write operations
o cost - the total due for the resource
load_balancers - an array of load balancer billing details:
• label - load balancer name • id - the load balancer ID • costs - an array of load balancer related resources with their total prices for the period specified
in the stat-time parameter, where: o value - the template ID in this case. o cost - the total due for the resource. o resource_name - currently for load balancers only template resource is supported.

224
OnApp Cloud 2.3 | API Guide | v1.5 | 12th April 2012
29. CDN Edge Servers CDN edge servers are the virtual machines which form a Content Delivery Network. In this network the web content is cached and delivered to end users from the server which is closest to the user or has the best availability.
29.1 View edge servers
To view all edge servers in the cloud with their details, use the following request:
GET /edge_servers.xml GET /edge_servers.json
XML Output example
<?xml version="1.0" encoding="UTF-8"?> <edge_servers type="array"> <edge_server> <label>QAVP XEN server</label> <cpus type="integer">1</cpus> <aflexi_id nil="true"></aflexi_id> <ip_addresses type="array"></ip_addresses> <operating_system_distro>ubuntu</operating_system_distro> <created_at type="datetime">2011-10-13T08:58:00Z</created_at> <template_id type="integer">14</template_id> <operating_system>linux</operating_system> <enable_autoscale nil="true"></enable_autoscale> <cpu_shares type="integer">1</cpu_shares> <updated_at type="datetime">2011-10-13T12:45:19Z</updated_at> <memory type="integer">512</memory> <local_remote_access_port type="integer">5900</local_remote_access_port> <allowed_swap type="boolean">true</allowed_swap> <recovery_mode type="boolean">false</recovery_mode> <allow_resize_without_reboot type="boolean">false</allow_resize_without_reboot> <xen_id type="integer">2</xen_id> <update_billing_stat type="boolean">true</update_billing_stat> <id type="integer">118</id> <hypervisor_id type="integer">2</hypervisor_id> <enable_monitis nil="true"></enable_monitis> <user_id type="integer">1</user_id> <allowed_hot_migrate type="boolean">false</allowed_hot_migrate> <admin_note nil="true"></admin_note> <total_disk_size type="integer">20</total_disk_size> <vip nil="true"></vip> <suspended type="boolean">false</suspended> <strict_virtual_machine_id nil="true"></strict_virtual_machine_id> <note nil="true"></note> <template_label>Debian 6.0 x64</template_label> <hostname>second.qavp</hostname> <booted type="boolean">true</booted> <remote_access_password>ra3g57xkaxij</remote_access_password> <min_disk_size type="integer">5</min_disk_size> <initial_root_password>6ok0637src0y</initial_root_password> <identifier>lf1jf5j4fpw9u5</identifier> <add_to_marketplace type="boolean">false</add_to_marketplace> <monthly_bandwidth_used type="integer">0</monthly_bandwidth_used>

225
OnApp Cloud 2.3 | API Guide | v1.5 | 12th April 2012
<state>new</state> <locked type="boolean">false</locked> <built type="boolean">true</built> </edge_server> </edge_servers>
Where:
label – an arbitrary name of the edge server
cpus – number of CPU cores allocated to this edge server
aflexi_id – the server identifier of the edge
ip_addresses – an array of assigned IP addresses
operating_system_distro – the distribution of the Operating System
template_id – the ID of the template, on which the edge server is based
operating_system – type of Operating System
enable_autoscale – false; not available for edge servers
cpu_shares – the CPU priority percentage
memory – the amount of RAM resources allocated to this edge server
local_remote_access_port – the port ID used for console access
allowed_swap – true if swap is allowed; otherwise false
recovery_mode – true if the server is booted in the recovery mode; otherwise false
allow_resize_without_reboot – true if adjusting resource allocation without reboot is possible; otherwise false
xen_id – the edge server ID set by the virtualization engine
update_billing_stat - deprecated attribute; will be removed in upcoming release
id – the edge server ID in OnApp CP database
hypervisor_id – the ID of the hypervisor, on which the server is deployed
enable_monitis - deprecated attribute; will be removed in upcoming release
user_id – the ID of the user, who is the server owner
allowed_hot_migrate – true if hot migration is allowed; otherwise false

226
OnApp Cloud 2.3 | API Guide | v1.5 | 12th April 2012
admin_note – an optional reminder for this VM created by an administrator
total_disk_size – total disk space in GB of primary and swap disks
vip – true if the server has VIP status for migration; otherwise false
suspended – true if suspended; otherwise false
strict_virtual_machine_id - the ID of a virtual machine (or edge server) that will never reside on the same HV with this server
note - an optional reminder for this VM made by a user account
template_label – label of the template on which the server is based; currently – Debian 6.0 x64
hostname – the name of your host
booted – true if the server is booted; otherwise false
remote_access_password – the password for remote access
min_disk_size – minimum disk space required by the template
initial_root_password – the server root password
identifier – the edge server identifier
add_to_marketplace - true if this edge server is added to the marketplace; otherwise false
monthly_bandwidth_used – the bandwidth used by the server for this month
state – deprecated attribute; will be removed in upcoming release
locked – true if locked; otherwise false
29.2 View edge server details
To view the edge server details:
GET /edge_servers/:id.xml GET /edge_servers/:id.json
For details refer to View edge servers section.
29.3 Create edge server
To create an edge server, use the following API call:
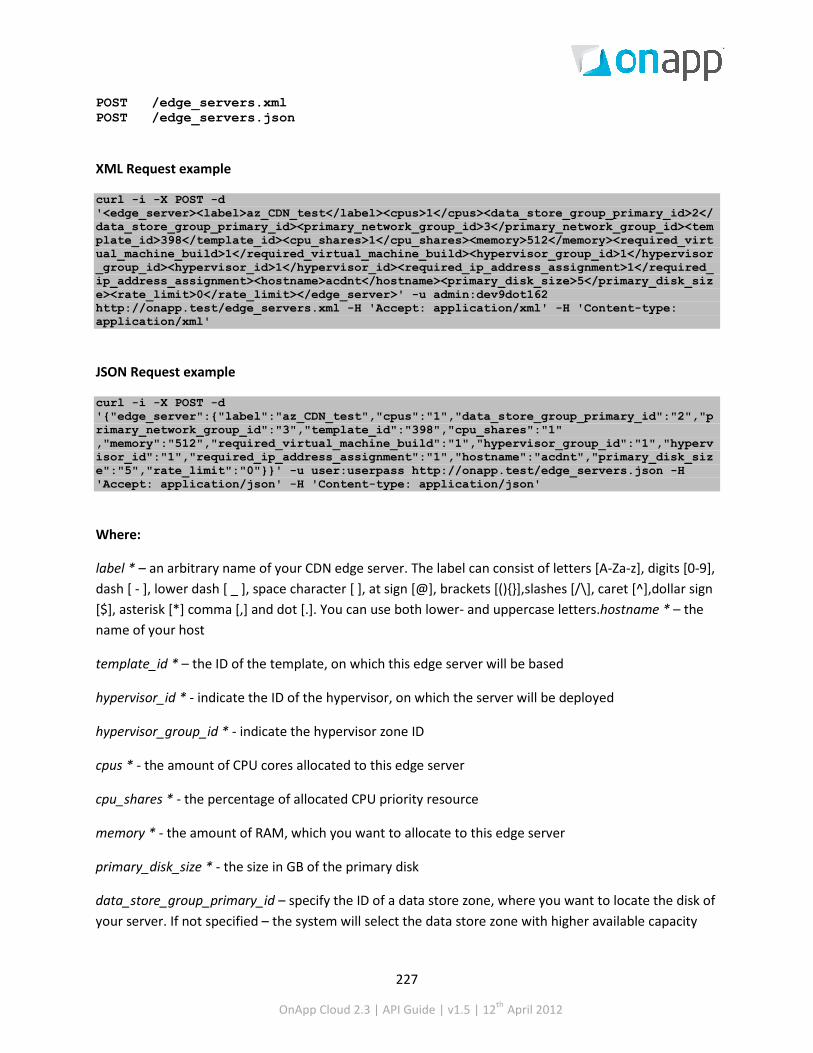
227
OnApp Cloud 2.3 | API Guide | v1.5 | 12th April 2012
POST /edge_servers.xml POST /edge_servers.json
XML Request example
curl -i -X POST -d '<edge_server><label>az_CDN_test</label><cpus>1</cpus><data_store_group_primary_id>2</data_store_group_primary_id><primary_network_group_id>3</primary_network_group_id><template_id>398</template_id><cpu_shares>1</cpu_shares><memory>512</memory><required_virtual_machine_build>1</required_virtual_machine_build><hypervisor_group_id>1</hypervisor_group_id><hypervisor_id>1</hypervisor_id><required_ip_address_assignment>1</required_ip_address_assignment><hostname>acdnt</hostname><primary_disk_size>5</primary_disk_size><rate_limit>0</rate_limit></edge_server>' -u admin:dev9dot162 http://onapp.test/edge_servers.xml -H 'Accept: application/xml' -H 'Content-type: application/xml'
JSON Request example
curl -i -X POST -d '{"edge_server":{"label":"az_CDN_test","cpus":"1","data_store_group_primary_id":"2","primary_network_group_id":"3","template_id":"398","cpu_shares":"1" ,"memory":"512","required_virtual_machine_build":"1","hypervisor_group_id":"1","hypervisor_id":"1","required_ip_address_assignment":"1","hostname":"acdnt","primary_disk_size":"5","rate_limit":"0"}}' -u user:userpass http://onapp.test/edge_servers.json -H 'Accept: application/json' -H 'Content-type: application/json'
Where:
label * – an arbitrary name of your CDN edge server. The label can consist of letters [A-Za-z], digits [0-9], dash [ - ], lower dash [ _ ], space character [ ], at sign [@], brackets [(){}],slashes [/\], caret [^],dollar sign [$], asterisk [*] comma [,] and dot [.]. You can use both lower- and uppercase letters.hostname * – the name of your host
template_id * – the ID of the template, on which this edge server will be based
hypervisor_id * - indicate the ID of the hypervisor, on which the server will be deployed
hypervisor_group_id * - indicate the hypervisor zone ID
cpus * - the amount of CPU cores allocated to this edge server
cpu_shares * - the percentage of allocated CPU priority resource
memory * - the amount of RAM, which you want to allocate to this edge server
primary_disk_size * - the size in GB of the primary disk
data_store_group_primary_id – specify the ID of a data store zone, where you want to locate the disk of your server. If not specified – the system will select the data store zone with higher available capacity

228
OnApp Cloud 2.3 | API Guide | v1.5 | 12th April 2012
primary_network_group_id – indicate the network zone ID
required_virtual_machine_build – set “1” to build the server automatically after creation. Otherwise set “0”
required_ip_address_assignment - set “1” if you want IP address to be assigned automatically after creation. Otherwise set “0”
29.4 Edit edge server
To change the server label and resource allocation:
PUT /edge_servers/:id.xml PUT /edge_servers/:id.json
XML Request example
curl -i -X PUT -d '<edge_server><label>az_CDN_test_1</label><cpus>1</cpus><cpu_shares>10</cpu_shares><memory>512</memory></edge_server>' -u onapp.test http://onapp.test/edge_servers/:id.xml -H 'Accept: application/xml' -H 'Content-type: application/xml'
JSON Request example
curl -i -X PUT -d '{"edge_server":{"label":"az_CDN_test_3","cpus":"1","cpu_shares":"20","memory":"512"}}' -u onapp.test http://onapp.test/edge_servers/:id.json -H 'Accept: application/json' -H 'Content-type: application/json'
Where:
label – an arbitrary name of your CDN edge server
cpus - the amount of CPU cores allocated to this edge server
cpu_shares - the percentage of allocated CPU priority resource
memory - the amount of RAM, which you want to allocate to this edge server
29.5 Reboot edge server
To reboot the edge server:
POST /edge_servers/:edge_server_id/reboot.xml POST /edge_servers/:edge_server_id/reboot.json

229
OnApp Cloud 2.3 | API Guide | v1.5 | 12th April 2012
XML Request example
curl -i -X POST -u user:userpass http://onapp.test/edge_servers/:edge_server_id/reboot.xml -H 'Accept: application/xml' -H 'Content-type: application/xml'
JSON Request example
curl -i -X POST -u user:userpass http://onapp.test/edge_servers/:edge_server_id/reboot.json -H 'Accept: application/json' -H 'Content-type: application/json'
29.6 Reboot in recovery
To reboot the edge server in recovery mode with a temporary login (“root”) and password (“recovery”), use the following API calls:
POST /edge_servers/:edge_server_id/reboot.xml?mode=recovery POST /edge_servers/:edger_server_id/reboot.json?mode=recovery XML Request example curl -i -X POST -u user:userpass --url http://onapp.test/edge_servers/:edger_server_id/reboot.xml?mode=recovery JSON Request example curl -i -X POST -u user:userpass --url http://onapp.test/edge_servers/:edge_server_id/reboot.json?mode=recovery
29.7 Startup edge server POST /edge_servers/:edge_server_id/startup.xml POST /edge_servers/:edge_server_id/startup.json
XML Request example
curl -i -X POST -u user:userpass http://onapp.test/edge_servers/:edge_server_id/startup.xml -H 'Accept: application/xml' -H 'Content-type: application/xml'
JSON Request example
curl -i -X POST -u user:userpass http://onapp.test/edge_servers/:edge_server_id/startup.json -H 'Accept: application/json' -H 'Content-type: application/json'
29.8 Shut down edge Server
To terminate the edge server gracefully:
230
OnApp Cloud 2.3 | API Guide | v1.5 | 12th April 2012
POST /edge_servers/:edge_server_id/shutdown.xml POST /edge_servers/:edge_server_id/shutdown.json
XML Request example
curl -i -X POST -u user:userpass http://onapp.test/edge_servers/:edge_server_id/shutdown.xml -H 'Accept: application/xml' -H 'Content-type: application/xml'
JSON Request example
curl -i -X POST -u user:userpass http://onapp.test/edge_servers/:edge_server_id/shutdown.json -H 'Accept: application/json' -H 'Content-type: application/json'
29.9 Stop edge server
To terminate the edge server forcefully:
POST /edge_servers/:edge_server_id/stop.xml POST /edge_servers/:edge_server_id/stop.json
XML Request example
curl -i -X POST -u user:userpass http://onapp.test/edge_servers/:edge_server_id/stop.xml -H 'Accept: application/xml' -H 'Content-type: application/xml'
JSON Request example
curl -i -X POST -u user:userpass http://onapp.test/edge_servers/:edge_server_id/stop.json -H 'Accept: application/json' -H 'Content-type: application/json'
29.10 Rebuild edge server
To rebuild (or build manually) the edge server, use the following request:
POST /edge_servers/:edge_server_id/build.xml POST /edge_servers/:edge_server_id/build.json
XML Request example
curl -i -X POST -u user:userpass http://onapp.test/edge_servers/:edge_server_id/build.xml -d'<?xml version="1.0" encoding="UTF-8"?><edge_server><template_id>398</template_id><required_startup>1</required_startup></edge_server>'-H 'Accept: application/xml' -H 'Content-type: application/xml'

231
OnApp Cloud 2.3 | API Guide | v1.5 | 12th April 2012
JSON Request example
curl -i -X POST -u user:userpass http://onapp.test/edge_servers/:edge_server_id/build.json -d '{"edge_server":{"template_id":"398","required_startup":"1"}}' -H 'Accept: application/json' -H 'Content-type: application/json'
Where you have to send:
template_id * - the ID of the template on which this server will be based
required_startup – set “1” to start up the server automatically after build. Otherwise set “0”
29.11 Suspend/unsuspend edge server POST /edge_servers/:edge_server_id/suspend.xml POST /edge_servers/:edge_server_id/suspend.json
XML Request example
curl -i -X POST -u user:userpass http://onapp.test/edge_servers/:edge_server_id/suspend.xml -H 'Accept: application/xml' -H 'Content-type: application/xml'
JSON Request example
curl -i -X POST -u user:userpass http://onapp.test/edge_servers/:edge_server_id/suspend.json -H 'Accept: application/json' -H 'Content-type: application/json'
To unsuspend the server, run the request again.
29.12 Rerun edge creation scripts
When an edge server is built, the system will run the scripts for creation of an edge server. You can do it manually, using the following request:
POST /edge_servers/:edge_server_id/rerun_edge_scripts.xml POST /edge_servers/:edge_server_id/rerun_edge_scripts.json XML Request example
curl -i -X GET -u user:userpass http://onapp.test/edge_servers/:edge_server_id/rerun_edge_scripts.xml -H 'Accept:application/xml' -H 'Content-type:application/xml'
232
OnApp Cloud 2.3 | API Guide | v1.5 | 12th April 2012
JSON Request example
curl -i -X GET -u user:userpass http://onapp.test/edge_servers/:edge_server_id/rerun_edge_scripts.json -H 'Accept:application/json' -H 'Content-type:application/json'
29.13 Unlock edge server
To unlock the edge server:
POST /edge_servers/:edge_server_id/unlock.xml POST /edge_servers/:edge_server_id/unlock.json
XML Request example
curl -i -X POST -u user:userpass http://onapp.test/edge_servers/:edge_server_id/unlock.xml -H 'Accept: application/xml' -H 'Content-type: application/xml'
JSON Request example
curl -i -X POST -u user:userpass http://onapp.test/edge_servers/:edge_server_id/unlock.json -H 'Accept: application/json' -H 'Content-type: application/json'
29.14 Delete edge server DELETE /edge_servers/:id.xml DELETE /edge_servers/:id.json
XML Request example
curl -i -X DELETE -u user:userpass http://onapp.test/edge_servers/:id.xml -H 'Accept: application/xml' -H 'Content-type: application/xml'
JSON Request example
curl -i -X DELETE -u user:userpass http://onapp.test/edge_servers/:id.json -H 'Accept: application/json' -H 'Content-type: application/json'
29.15 Migrate edge server
To migrate an edge server to another hypervisor, use the following request:
POST /edge_servers/:edge_server_id/migrate.xml POST /edge_servers/:edge_server_id/migrate.json
233
OnApp Cloud 2.3 | API Guide | v1.5 | 12th April 2012
XML Request example
curl -i -X POST -H 'Accept: application/xml' -H 'Content-type: application/xml' -u user:userpass -d "<edge_server><destination>1</destination><cold_migrate_on_rollback>1</cold_migrate_on_rollback></edge_server>" --url http://onapp.test/edge_servers/:edge_server_id/migrate.xml
JSON Request example
curl -i -X POST -H 'Accept: application/json' -H 'Content-type: application/json' -u user:userpass -d '{"edge_server":{"destination":"1","cold_migrate_on_rollback":"1"}}' --url http://onapp.test/edge_servers/:edge_server_id/migrate.json
Where:
destination * - the ID of a target hypervisor, to which you migrate the edge server
cold_migrate_on_rollback - set 1 if you wish to switch to a cold migration if hot migration fails. Otherwise set 0.
29.16 Open the server console
To open an edge server console:
1. Run the following request:
GET /edge_servers/:edge_server_id/console.xml GET /edge_servers/:edge_server_id/console.json
2. Find and copy the value for the remote_key parameter in the response output. 3. Open the following URL in the browser:
http://onapp.test/console_remote/[remote_key_parameter_value]
29.17 Segregate edge server
To segregate an edge server (that is, instruct it never to reside on the same hypervisor as another VM or edge server), use the following method:
POST /edge_servers/:edge_server_id/strict_vm.xml POST /edge_servers/:edge_server_id/strict_vm.json
XML Request example

234
OnApp Cloud 2.3 | API Guide | v1.5 | 12th April 2012
curl -i -X POST -H 'Accept: application/xml' -H 'Content-type: application/xml' -u user:userpass -d '<?xml version="1.0" encoding="UTF-8"?><edge_server><strict_virtual_machine_id>bb6oa3eqdzpcgl</strict_virtual_machine_id></edge_server>' --url http://onapp.test/edge_servers/:edge_server_id/strict_vm.xml
JSON Request example
curl -i -X POST -H 'Accept: application/json' -H 'Content-type: application/json' -u user:userpass -d '{"edge_server":{"strict_virtual_machine_id":"gv03xz1x31t53h"}}' --url http://onapp.test/edge_servers/:edge_server_id/strict_vm.json
Where:
strict_virtual_machine_id * - the ID of virtual machine you wish to segregate from the given edge server
29.18 Reset root password
You can reset password of the edge server using the following method:
POST /edge_servers/:edge_server_id/reset_password.xml POST /edge_servers/:edge_server_id/reset_password.json
XML Request example
curl -i -X POST -H 'Accept: application/xml' -H 'Content-type: application/xml' -u user:userpass --url http://onapp.test/edge_servers/:edge_server_id/reset_password.xml
JSON Request example
curl -i -X POST -H 'Accept: application/json' -H 'Content-type: application/json' -u user:userpass --url http://onapp.test/edge_servers/:edge_server_id/reset_password.json
29.19 Change edge server owner
Use the following request to reassign an edge server to another user:
POST /edge_servers/:edge_server_id/change_owner.xml POST /edge_servers/:edge_server_id/change_owner.json
XML Request example
curl -i -X POST -H 'Accept: application/xml' -H 'Content-type: application/xml' -u user:userpass -d '<user_id>4</user_id>' --url http://onapp.test/edge_servers/:edge_server_id/change_owner.xml
JSON Request example

235
OnApp Cloud 2.3 | API Guide | v1.5 | 12th April 2012
curl -i -X POST -H 'Accept: application/json' -H 'Content-type: application/json' -u user:userpass -d "{'user_id':'1'}" --url http://onapp.test/edge_servers/:edge_server_id/change_owner.json
Required parameter:
user_id * – input ID of a new server owner
29.20 Set VIP status
To give your edge server a migration priority, set the VIP status for it with the following request:
POST /edge_servers/:edge_server_id/set_vip.xml POST /edge_servers/:edge_server_id/set_vip.json
XML Request example
curl -i -X POST -H 'Accept: application/xml' -H 'Content-type: application/xml' -u user:userpass --url http://onapp.test/edge_servers/:edge_server_id/set_vip.xml
JSON Request example
curl -i -X POST -H 'Accept: application/json' -H 'Content-type: application/json' -u user:userpass --url http://onapp.test/edge_servers/:edge_server_id/set_vip.json
Run the same request again to remove the VIP status.
29.21 Edit admin note
To edit/make an admin note, use the following request:
PUT /edge_ersvers/:edge_server_id.xml PUT /edge_servers/:edge_server_id.json XML Request example
curl -i -X PUT -u user:userpass http://onapp.test/edge_servers/:edge_server_id.xml -d '<edge_server><admin_note>agfagwe tiuuytjgh yuytu</admin_note></edge_server>' -H 'Accept:application/xml' -H 'Content-type:application/xml'
JSON Request example
curl -i -X PUT -u user:userpass http://onapp.test/edge_servers/:edge_server_id.json -d '{"edge_server":{"admin_note":"kjfjhjtrtjt"}}' -H 'Accept:application/json' -H 'Content-type:application/json'

236
OnApp Cloud 2.3 | API Guide | v1.5 | 12th April 2012
Where:
admin_note – enter the text of your note.
29.22 CDN edge server disks
Since CDN edge servers are VMs in their essence, you may perform all the same actions with edge disks as with VM disks. The only difference would be in the routes for the following requests:
To add a disk to CDN edge server:
POST /edge_servers/:edge_server_id/disks.xml POST /edge_servers/:edge_server_id/disks.json Parameters description and request example.
To view the edge server disks:
GET /edge_servers/:edge_server_id/disks.xml GET /edge_servers/:edge_server_id/disks.json Parameters description and output example.
For other possible requests refer to corresponding sections of Disks chapter.
29.23 CDN edge server backups
You can create backups for the edge server and later on use the backups to restore the disks.
To get the list of all backups made for this edge server:
GET /edge_servers/:edge_server_id/backups.xml GET /edge_servers/:edge_server_id/backups.json Parameters description and output example.
To create a backup of a disk, use the following method:
POST /settings/disks/:disk_id/backups.xml POST /settings/disks/:disk_id /backups.json Request example.
To restore a disk from a backup, use the following method:
POST /backups/:backup_id/restore.xml POST /backups/:backup_id/restore.json Request example.
To delete a backup:
DELETE /backups/:id.xml DELETE /backups/:id.json

237
OnApp Cloud 2.3 | API Guide | v1.5 | 12th April 2012
Request example.
29.24 CDN edge server network interfaces
Here is the list of API calls for managing CDN edge servers’ network interfaces. Edge servers’ network interfaces have the same attributes as network interfaces of virtual machines.
To get the list of network interfaces allocated to this particular edge server:
GET /edge_servers/:edge_server_id/network_interfaces.xml GET /edge_servers/:edge_server_id/network_interfaces.json Parameters description and output example.
To get a particular network interface details:
GET /edge_servers/:edge_server_id/network_interfaces/:id.xml GET /edge_servers/:edge_server_id/network_interfaces/:id.json Parameters description and output example.
To edit network interface details:
PUT /edge_servers/:edge_server_id/network_interfaces/:id.xml PUT /edge_servers/:edge_server_id/network_interfaces/:id.json Parameters description and request example.
To add a new network interface:
POST /edge_servers/:edge_server_id/network_interfaces.xml POST /edge_servers/:edge_server_id/network_interfaces.json Parameters description and request example.
To delete a network interface from the edge server:
DELETE /edge_servers/:edge_server_id/network_interfaces/:id.xml DELETE /edge_servers/:edge_server_id/network_interfaces/:id.json Parameters description and request example.
29.25 IP address joins
An IP address allocated to an edge server is an IP address join. Use the following methods to view, assign and delete IP address joins of your CDN edge servers.
To get the list of IP address assignments for a particular edge server:
GET /edge_servers/:edge_server_id/ip_addresses.xml GET /edge_servers/:edge_server_id/ip_addresses.json Parameters description and output example.
To assign an IP Address to an edge server:

238
OnApp Cloud 2.3 | API Guide | v1.5 | 12th April 2012
POST /edge_servers/:edge_server_id/ip_addresses.xml POST /edge_servers/:edge_server_id/ip_addresses.json Parameters description and request example.
To delete an IP address assignment from a particular VM:
DELETE /edge_servers/:edge_server_id/ip_addresses/:id.xml DELETE /edge_servers/:edge_server_id/ip_addresses/:id.json Parameters description and request example.
29.26 Rebuild Network for edge server
It is required to rebuild network after any changes on IP address joins or network interfaces. To rebuild network, use the following request:
POST /edge_servers/:edge_server_id/rebuild_network.xml POST /edge_servers/:edge_server_id/rebuild_network.json
XML Request example
curl -i -X POST -u user:userpass http://onapp.test/edge_servers/:edge_server_id/rebuild_network.xml -H 'Accept: application/xml' -H 'Content-type: application/xml'
JSON Request example
curl -i -X POST -u user:userpass http://onapp.test/edge_servers/:edge_server_id/rebuild_network.json -H 'Accept: application/json' -H 'Content-type: application/json'
29.27 Firewall rules for CDN edge servers
Firewall rules for CDN edge servers function in the same way as for VMs. Use the following requests to see, add, edit and delete firewall rules.
To get the list of firewall rules assigned to a VM, use the following request:
GET /edge_servers/:edge_server_id/firewall_rules.xml GET /edge_servers/:edge_server_id/firewall_rules.json Parameters description and output example.
To edit a firewall rule, use the following request:
PUT /edge_servers/:edge_server_id/firewall_rules/:id.xml PUT /edge_servers/:edge_server_id/firewall_rules/:id.json Parameters description and request example.
To add a firewall rule, use the following request:
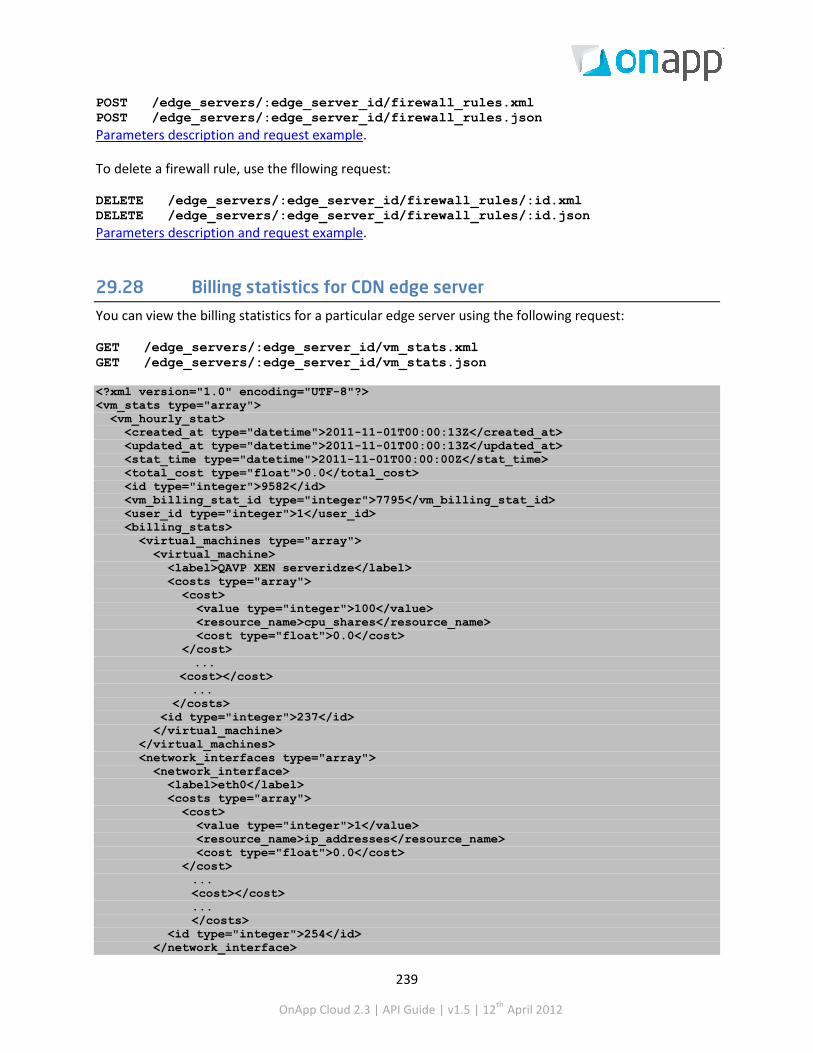
239
OnApp Cloud 2.3 | API Guide | v1.5 | 12th April 2012
POST /edge_servers/:edge_server_id/firewall_rules.xml POST /edge_servers/:edge_server_id/firewall_rules.json Parameters description and request example.
To delete a firewall rule, use the fllowing request:
DELETE /edge_servers/:edge_server_id/firewall_rules/:id.xml DELETE /edge_servers/:edge_server_id/firewall_rules/:id.json Parameters description and request example.
29.28 Billing statistics for CDN edge server
You can view the billing statistics for a particular edge server using the following request:
GET /edge_servers/:edge_server_id/vm_stats.xml GET /edge_servers/:edge_server_id/vm_stats.json <?xml version="1.0" encoding="UTF-8"?> <vm_stats type="array"> <vm_hourly_stat> <created_at type="datetime">2011-11-01T00:00:13Z</created_at> <updated_at type="datetime">2011-11-01T00:00:13Z</updated_at> <stat_time type="datetime">2011-11-01T00:00:00Z</stat_time> <total_cost type="float">0.0</total_cost> <id type="integer">9582</id> <vm_billing_stat_id type="integer">7795</vm_billing_stat_id> <user_id type="integer">1</user_id> <billing_stats> <virtual_machines type="array"> <virtual_machine> <label>QAVP XEN serveridze</label> <costs type="array"> <cost> <value type="integer">100</value> <resource_name>cpu_shares</resource_name> <cost type="float">0.0</cost> </cost> ... <cost></cost> ... </costs> <id type="integer">237</id> </virtual_machine> </virtual_machines> <network_interfaces type="array"> <network_interface> <label>eth0</label> <costs type="array"> <cost> <value type="integer">1</value> <resource_name>ip_addresses</resource_name> <cost type="float">0.0</cost> </cost> ... <cost></cost> ... </costs> <id type="integer">254</id> </network_interface>

240
OnApp Cloud 2.3 | API Guide | v1.5 | 12th April 2012
</network_interfaces> <disks type="array"> <disk> <label>#499</label> <costs type="array"> <cost> <value type="integer">20</value> <resource_name>disk_size</resource_name> <cost type="float">0.0</cost> </cost> ... <cost></cost> ... </costs> <id type="integer">499</id> </disk> </disks> <edge_servers type="array"> <edge_server> <label>QAVP XEN serveridze</label> <costs type="array"> <cost> <value type="integer">14</value> <resource_name>template</resource_name> <cost type="float">0.0</cost> </cost> </costs> <id type="integer">237</id> </edge_server> </edge_servers> </billing_stats> <usage_cost type="float">0.0</usage_cost> <virtual_machine_id type="integer">237</virtual_machine_id> <currency_code>USD</currency_code> <vm_resources_cost type="float">0.0</vm_resources_cost> </vm_hourly_stat> </vm_stats>
Where:
created_at – the timestamp in DB when this record was created updated_at – the date when these statistics were updated cost – the total amount of money owed by this particular edge server for the resources spent at stat_time stat_time – the particular hour for which these statistics were generated id – the ID of these statistics user_id - the ID of edge server owner currency_code - currency in which this virtual machine is charged within the billing plan billing_stats - an array of billing details for the resources used by this edge server virtual_machine - an array of edge server billing details:
• label – name of the edge server • costs - an array of edge server resources with their total prices for the period specified in the stat-
time parameter, where:

241
OnApp Cloud 2.3 | API Guide | v1.5 | 12th April 2012
o resource_name - the resource in question. This can be cpu_shares, cpus, memory, cpu_usage and template
o value - the amount of resources allocated to this edge server. Here are the units of measurment for each type of resource_name: cpu_shares - CPU priority percentage cpus - number of CPU cores memory - amount of RAM in Mb cpu_usage - CPU time in seconds
o cost - the total due for this resource o id - Virtual machine ID
network_interfaces - an array of network interfaces used by this edge server with their billing statistics:
• label - network interface name used in OnApp • id - network interface ID • costs - an array of network interface related resources with their total prices for the period
specified in the stat-time parameter, where: o resource_name - the resource in question. This can be ip_addresses, rate, data_received and
data_sent o value - the amount of resources used by this network interface. Here are the units of
measurment for each type of resource_name: ip_addresses - number of IPs rate - the port speed in Mb per second data_received - amount of received data in Kb data_sent - amount of sent data in Kb
o cost - the total due for the resource
disks - an array of disks used by this edge server with their billing details:
• label - disk name used in UI • id - disk ID used in database • costs - an array of disk related resources with their total prices for the period specified in the stat-
time parameter, where: o resource_name - the resource in question. This can be disk_size, data_read, data_written,
reads_completed and writes_completed o value - the amount of resources used. Here are the units of measurment for each type of
resource_name: disk_size - size in GB data_read - read data in Kb data_writen - amount of written data in Kb reads - number read operations writes - number of write operations

242
OnApp Cloud 2.3 | API Guide | v1.5 | 12th April 2012
o cost - the total due for the resource
edge_server - an array of edge server with its billing details:
• label – edge server name used in UI • id – server ID used in database • costs - an array of related resources with their total prices for the period specified in the stat-time
parameter, where: o resource_name - the resource in question. In this case - template o value – here, the template ID in the database o cost - the total due for the resource
total_cost – the total amount of money owed for the edge server specified by id parameter for a particular hour specified by stat_time parameter (total_cost = vm_resources_cost + usage_cost) vm_resources_cost – the amount of money due for the edge server resources for the particular hour specified by stat_time parameter (memory, disks, templates) usage_cost – the total due for edge server usage for this particular hour specified by stat_time parameter (data sent/received, bandwidth, CPU usage)

243
OnApp Cloud 2.3 | API Guide | v1.5 | 12th April 2012
30. CDN Resources A CDN resource is a host (e.g. a specific web server), the content of which you are going to distribute over the network of edge servers. The list of servers taking part in distributing/caching of data is limited to the locations added to those edge groups assigned to the resource.
30.1 Enable CDN
Before a user can make use of CDN resources, it is necessary to enable CDN first.
To enable CDN, run the following request:
POST /cdn_resources/enable.xml POST /cdn_resources/enable.json XML request example:
curl -i -X POST http://onapp.test/cdn_resources/enable.xml -u user:userpass -H 'Accept: application/xml' -H 'Content-type: application/xml'
JSON request example:
curl -i -X POST http://onapp.test/cdn_resources/enable.json -u user:userpass -H 'Accept: application/json' -H 'Content-type: application/json'
30.2 View the list of CDN resources
To see all CDN resources in the cloud, use the following request:
GET /cdn_resources.xml GET /cdn_resources.json
XML Output example
<?xml version="1.0" encoding="UTF-8"?> <cdn_resources type="array"> <cdn_resource> <created_at type="datetime">2011-10-13T15:25:43+05:30</created_at> <resource_type>HTTP_PULL</resource_type> <updated_at type="datetime">2011-10-13T15:25:43+05:30</updated_at> <origins_for_api type="array"> <origins_for_api> <value>qa2.onappdev.com</value> <key></key> </origins_for_api> </origins_for_api> <id type="integer">2</id> <user_id type="integer">1</user_id> <cdn_hostname>cdn.qa2.onappdev.com</cdn_hostname> <aflexi_resource_id>211714645</aflexi_resource_id> <last_24h_cost type="float">0.0</last_24h_cost>

244
OnApp Cloud 2.3 | API Guide | v1.5 | 12th April 2012
</cdn_resource> ... <cdn_resource></cdn_resource> ... </cdn_resources>
Where:
resource_type – currently, only HTTP PULL
origins_for_api – the path from which the CDN requests the content
value – the path to the content
key – access key, if any
id – the resource ID in the database
user_id – the ID of the user, who owns the resource
cdn_hostname - the hostname which will serve static content
aflexi_resource_id – the resource ID in the Aflexi database
last_24h_cost - the amount due for the last 24 hours
30.3 View CDN resource basic details
To view details of the particular CDN resource:
GET /cdn_resources/:id.xml GET /cdn_resources/:id.json
XML Output example:
<?xml version="1.0" encoding="UTF-8"?> <cdn_resource> <origins_for_api type="array"> <origin> <value>testhost2.com.uk</value> <key></key> </origin> </origins_for_api> <created_at type="datetime">2012-02-24T13:10:43+02:00</created_at> <status>ACTIVE</status> <last_24h_cost type="float">0.0</last_24h_cost> <resource_type>HTTP_PULL</resource_type> <updated_at type="datetime">2012-02-24T13:10:43+02:00</updated_at> <id type="integer">1</id> <user_id type="integer">1</user_id> <cdn_hostname>testhost.com.uk</cdn_hostname> <aflexi_resource_id>903435027</aflexi_resource_id>
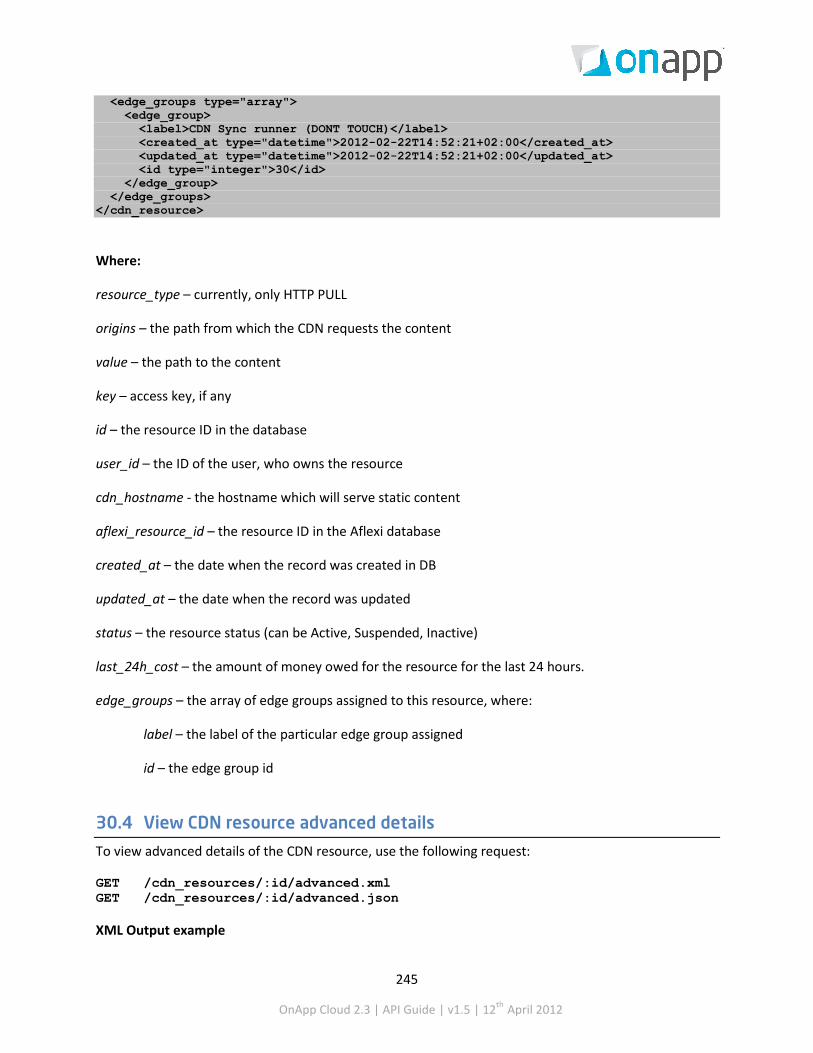
245
OnApp Cloud 2.3 | API Guide | v1.5 | 12th April 2012
<edge_groups type="array"> <edge_group> <label>CDN Sync runner (DONT TOUCH)</label> <created_at type="datetime">2012-02-22T14:52:21+02:00</created_at> <updated_at type="datetime">2012-02-22T14:52:21+02:00</updated_at> <id type="integer">30</id> </edge_group> </edge_groups> </cdn_resource>
Where:
resource_type – currently, only HTTP PULL
origins – the path from which the CDN requests the content
value – the path to the content
key – access key, if any
id – the resource ID in the database
user_id – the ID of the user, who owns the resource
cdn_hostname - the hostname which will serve static content
aflexi_resource_id – the resource ID in the Aflexi database
created_at – the date when the record was created in DB
updated_at – the date when the record was updated
status – the resource status (can be Active, Suspended, Inactive)
last_24h_cost – the amount of money owed for the resource for the last 24 hours.
edge_groups – the array of edge groups assigned to this resource, where:
label – the label of the particular edge group assigned
id – the edge group id
30.4 View CDN resource advanced details
To view advanced details of the CDN resource, use the following request:
GET /cdn_resources/:id/advanced.xml GET /cdn_resources/:id/advanced.json XML Output example

246
OnApp Cloud 2.3 | API Guide | v1.5 | 12th April 2012
<?xml version="1.0" encoding="UTF-8"?> <cdn_resource><password_unauthorized_html>anytext</password_unauthorized_html> <url_signing_on type="boolean">true</url_signing_on> <cache_expiry type="integer">90</cache_expiry> <url_signing_key>dcahcgDAD</url_signing_key> <hotlink_policy>ALLOW_BY_DEFAULT</hotlink_policy> <publisher_name>admin</publisher_name> <domains>www.example.com</domains> <password_on type="boolean">true</password_on> <ip_access_policy>ALLOW_BY_DEFAULT</ip_access_policy> <passwords> <qqqqqq>wwwwwww</qqqqqq> </passwords> <country_access_policy>BLOCK_BY_DEFAULT</country_access_policy> </cdn_resource>
Where:
password_unauthorized_html – the message that is displayed when there is unauthorized access
hotlink_policy – displays the hotlink policy; either NONE (disabled), ALLOW_BY_DEFAULT or BLOCKED_BY_DEFAULT
country_policy – displays access policy to the CDN resource’s content for specified countries; either NONE (disabled), ALLOW_BY_DEFAULT or BLOCKED_BY_DEFAULT
ip_access_policy – displays access policy from a range of IP addresses; either NONE (disabled), ALLOW_BY_DEFAULT or BLOCKED_BY_DEFAULT
publisher_name – login name of the user, who created the resource
domains
password_on – true, if the access to the resource is restricted; otherwise false
passwords – an array of username and password for restricted access in the following format:
<username>password</username>
cache_expiry – cache expiry in minutes
url_signing_on – true if the access requires URL signing; otherwise false
url_signing_key – the key for URL signing; a signed URL looks like:
http://example.com/filename?hash=url-signing-key==
30.5 View the list of available edge groups
To view the list of all the edge groups and their locations, which are available to create CDN resources on, use the following request:

247
OnApp Cloud 2.3 | API Guide | v1.5 | 12th April 2012
GET /cdn_resources/available_edge_groups.xml GET /cdn_resources/available_edge_groups.json
The list of available edge groups is defined by the billing plan to which a user is assigned.
XML Output example:
<?xml version="1.0" encoding="UTF-8"?> <edge_groups type="array"> <edge_group> <label>eg01</label> <edge_group_locations type="array"> <edge_group_location> <city>dallas</city> <price type="decimal">0.7</price> <created_at type="datetime">2012-03-01T11:16:10+02:00</created_at> <country>US</country> <aflexi_location_id type="integer">147</aflexi_location_id> <updated_at type="datetime">2012-03-01T11:16:10+02:00</updated_at> <id type="integer">10</id> <operator>WK</operator> <edge_group_id type="integer">35</edge_group_id> </edge_group_location> </edge_group_locations> <created_at type="datetime">2012-03-01T11:09:28+02:00</created_at> <updated_at type="datetime">2012-03-01T11:09:28+02:00</updated_at> <id type="integer">35</id> </edge_group> </edge_groups>
Where:
edge_groups – the array of edge groups with their locations available for a user to create a CDN resource on.
edge_group – the particular edge group details:
label – the edge group label
edge_group_locations – the array of locations assigned to this group:
edge_group_location – the list of details for a particular edge group
city – the city where the edge server is located
price - price per GB of sold excess bandwidth
created_at – the date when the record was created in DB
country – ther country where the server is located

248
OnApp Cloud 2.3 | API Guide | v1.5 | 12th April 2012
aflexi_location_id – the ID of this location in Aflexi database
updated_at – the date when the record was updated in DB
id – the location ID
operator – the location operator
edge_group_id – the ID of the edge group to which this location is assigned
30.6 Create CDN Resource
To create a CDN resource, use the following request:
POST /cdn_resources.xml POST /cdn_resources.json
XML Request example
curl -i -X POST -d '<cdn_resource><cdn_hostname>az.test.api</cdn_hostname><edge_group_ids type="array"><edge_group_id type="integer">1</edge_group_id></edge_group_ids><resource_type>HTTP_PULL</resource_type><origin>origin4.com</origin></cdn_resource>' -u admin:dev7dot194 http://onapp.test/cdn_resources.xml -H 'Accept: application/xml' -H 'Content-type: application/xml'
JSON Request example
curl -i -X POST -d '{"cdn_resource":{"edge_group_ids":["1"],"resource_type":"HTTP_PULL","origin":"originr2.com","cdn_hostname":"cdn.test92.com"}}' -u admin:changeme http://onapp.test/cdn_resources.json -H 'Accept: application/json' -H 'Content-type: application/json'
Where you have to send:
origin * - the path from which the CDN requests the content
cdn_hostname * - indicate the hostname which will serve static content
resource_type * - currently, only HTTP_PULL
edge_group_ids * - indicate the ID(s) of required CDN edge groups
30.7 Create CDN Resource with advanced settings
To create a CDN resource with advanced settings, use the following request:

249
OnApp Cloud 2.3 | API Guide | v1.5 | 12th April 2012
POST /cdn_resources.xml POST /cdn_resources.json
JSON Request example
curl -i -X POST -d '{"cdn_resource":{"ip_access_policy":"ALLOW_BY_DEFAULT","ip_addresses":"10.10.10.10, 20.20.20.0/24","hotlink_policy":"ALLOW_BY_DEFAULT","domains":"www.yoursite.come mirror.yoursite.com", "resource_type":"HTTP_PULL", "edge_group_ids":["1","3"], "form_pass":{"pass":["534254rgertw5w65"], "user":["herh"]}, "country_access_policy":"ALLOW_BY_DEFAULT", "countries":"", "cache_expiry":"10", "origin":"az.za","cdn_hostname":"az.advanced.api", "password_on":"treytryertyrty", "url_signing_on":"1","password_unauthorized_html":"agafgshgthweregtrherh","url_signing_key":"DMF1ucDxtqgxwYQ"},"advanced_settings":"1"}' -u user:userpass http://onapp.test/cdn_resources.json -H 'Accept: application/json' -H 'Content-type: application/json'
Where:
origin * - the path from which the CDN requests the content
cdn_hostname * - indicate the hostname which will serve static content
resource_type * - currently, only HTTP_PULL
edge_group_ids * - indicate the ID(s) of required CDN edge groups
advanced_settings * - set 1 to enable advanced settings
ip_access_policy - configure a rule to enable/disable access to the CDN resource’s content for a range of IP addresses:
• ALLOW_BY_DEFAULT - to enable • BLOCK_BY_DEFAULT - to disable • NONE - to switch off the rule
ip_addresses - IP address(es) related to ip_access_policy parameter; The comma-separated list of IP addresses or IP ranges allowed/blocked by default. Use the following format "10.10.10.10, 20.20.20.0/24"
hotlink_policy - configure a rule to enable/disable hotlink policy regarding the domains specified by the domains parameter:
• ALLOW_BY_DEFAULT - to enable • BLOCK_BY_DEFAULT - to disable • NONE - to switch off the rule
domains - domains related to hotlink_policy
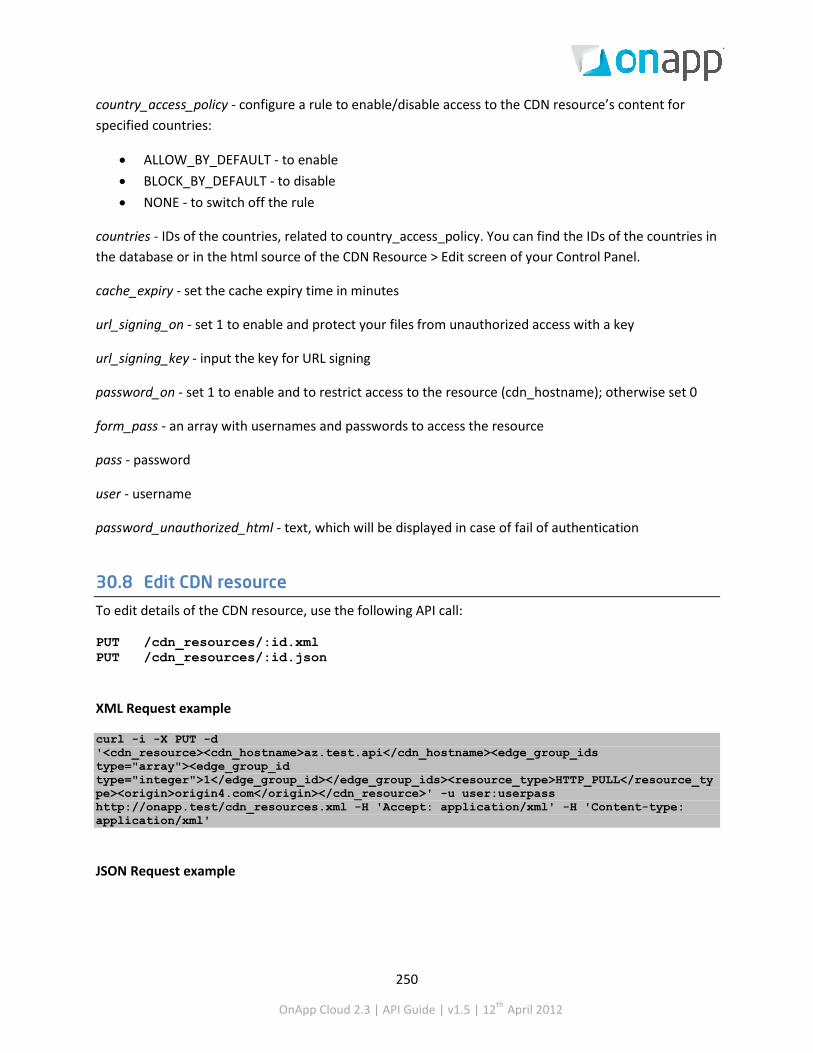
250
OnApp Cloud 2.3 | API Guide | v1.5 | 12th April 2012
country_access_policy - configure a rule to enable/disable access to the CDN resource’s content for specified countries:
• ALLOW_BY_DEFAULT - to enable • BLOCK_BY_DEFAULT - to disable • NONE - to switch off the rule
countries - IDs of the countries, related to country_access_policy. You can find the IDs of the countries in the database or in the html source of the CDN Resource > Edit screen of your Control Panel.
cache_expiry - set the cache expiry time in minutes
url_signing_on - set 1 to enable and protect your files from unauthorized access with a key
url_signing_key - input the key for URL signing
password_on - set 1 to enable and to restrict access to the resource (cdn_hostname); otherwise set 0
form_pass - an array with usernames and passwords to access the resource
pass - password
user - username
password_unauthorized_html - text, which will be displayed in case of fail of authentication
30.8 Edit CDN resource
To edit details of the CDN resource, use the following API call:
PUT /cdn_resources/:id.xml PUT /cdn_resources/:id.json
XML Request example
curl -i -X PUT -d '<cdn_resource><cdn_hostname>az.test.api</cdn_hostname><edge_group_ids type="array"><edge_group_id type="integer">1</edge_group_id></edge_group_ids><resource_type>HTTP_PULL</resource_type><origin>origin4.com</origin></cdn_resource>' -u user:userpass http://onapp.test/cdn_resources.xml -H 'Accept: application/xml' -H 'Content-type: application/xml'
JSON Request example

251
OnApp Cloud 2.3 | API Guide | v1.5 | 12th April 2012
curl -i -X PUT -d '{"cdn_resource":{"edge_group_ids":["1"],"resource_type":"HTTP_PULL","origin":"originr2.com","cdn_hostname":"cdn.test92.com"}}' -u user:userpass http://onapp.test/cdn_resources.json -H 'Accept: application/json' -H 'Content-type: application/json'
Where you can edit all strings:
origin - the path from which the CDN requests the content
cdn_hostname - indicate the hostname which will serve static content
resource_type - currently, only HTTP_PULL
edge_group_ids - indicate the ID(s) of required CDN edge groups
30.9 Edit CDN resource advanced settings
To edit advanced settings of the CDN resource, use the following request:
PUT /cdn_resources/:id.xml PUT /cdn_resources/:id.json
curl -i -X PUT -d '{"cdn_resource":{"ip_access_policy":"ALLOW_BY_DEFAULT", "hotlink_policy":"ALLOW_BY_DEFAULT", "resource_type":"HTTP_PULL", "edge_group_ids":["1"], "form_pass":{"pass":["", "534254rgertw5w65"], "user":["", "asdh"]}, "country_access_policy":"ALLOW_BY_DEFAULT", "cache_expiry":"10", "origin":"az.za", "cdn_hostname":"az.advanced.api.edit", "password_on":"[FILTERED]", "url_signing_on":"1", "password_unauthorized_html":"[FILTERED]", "ip_addresses":"", "url_signing_key":"DMF1ucDxtqgxwYQ"}, "advanced_settings":"1"}' -u user:userpass http://onapp.test/cdn_resources/3.json -H 'Accept: application/json' -H 'Content-type: application/json
For parameters description, refer to Create CDN resource with advanced settings section.
30.10 Prefetch CDN resource content
To pre-populate HTTP PULL content to the CDN, use the following API call:
POST /cdn_resources/:id/prefetch.xml POST /cdn_resources/:id/prefetch.json
XML Request example
curl -i -X POST -u user:userpass http://onapp.test/cdn_resources/:cdn_resource_id/prefetch.xml -d '<prefetch_paths>/home/123.jpeg</prefetch_paths>' -H 'Accept:application/xml' -H 'Content-type:application/xml'
JSON Request example

252
OnApp Cloud 2.3 | API Guide | v1.5 | 12th April 2012
curl -i -X POST -u user:userpass http://onapp.test/cdn_resources/:cdn_resource_id/prefetch.json -d '{"prefetch_paths":"/home/123.jpeg"}' -H 'Accept:application/json' -H 'Content-type:application/json'
Where:
prefetch_path *– path to the file you want to prefetch
30.11 Purge CDN resource content
To remove content from HTTP Pull cache, use the following request:
POST /cdn_resources/: id/purge.xml POST /cdn_resources/: id/purge.json XML Request example
curl -i -X POST -u user:userpass http://onapp.test/cdn_resources/:cdn_resource_id/purge.xml -d '<purge_paths>/home/123.jpeg</purge_paths>' -H 'Accept:application/xml' -H 'Content-type:application/xml'
JSON Request example
curl -i -X POST -u user:userpass http://onapp.test/cdn_resources/:cdn_resource_id/purge.json -d '{"purge_paths":"/home/123.jpeg"}' -H 'Accept:application/json' -H 'Content-type:application/json'
Where:
purge_path – path to the content you want to remove
30.12 Delete CDN resource
To delete a CDN resource:
DELETE /cdn_resources/:id.xml DELETE /cdn_resources/:id.json
XML Request example
curl -i -X DELETE -u user:userpass http://onapp.test /cdn_resources/:id.xml
JSON Request example

253
OnApp Cloud 2.3 | API Guide | v1.5 | 12th April 2012
curl -i -X DELETE -u user:userpass http://onapp.test/cdn_resources/:id.json
30.13 View bandwidth statistics To get bandwidth statistics for the resources or a particular resource, use the following request:
GET /cdn_resources/bandwidth.xml GET /cdn_resources/bandwidth.json
You can also define a shorter period, specify a particular resource or location and set the type:
GET /cdn_resources/bandwidth.xml?start=2011-09-01&end=2012-09-01&resources[]=787341593&locations[]=18&type=MBPS GET /cdn_resources/bandwidth.json?start=2011-09-01&end=2012-09-01&resources[]=787341593&locations[]=18&type=MBPS
Where:
start – the start date to generate statistics in the YYYY-MM-DD format
end – the end date to generate statistics in the YYYY-MM-DD format
resources – the identifier of the resource in Aflexi database. To get the identifier, check with aflexi_resource_id parameter in the GET /cdn_resources/:id.{format} request.
locations – the ID of the location
type – the statistics type (MBPS or GB).
XML output example:
<?xml version="1.0" encoding="UTF-8"?> <stats type="array"> <stat> <non_cached type="float">144.0</non_cached> <cached type="float">1456.0</cached> <date type="datetime">2012-02-15T00:00:00+00:00</date> </stat> </stats>
Where:
non_cached – the amount of content which is not cached
cached – the amount of data cached
date – the point of time for which the statistics is generated

254
OnApp Cloud 2.3 | API Guide | v1.5 | 12th April 2012
30.14 View billing statistics for a resource To view billing statistics for a resource:
GET /cdn_resources/:id/billing.xml GET /cdn_resources/:id/billing.json
You can also define a shorter period by setting Start and End date:
GET /cdn_resources/:id/billing.xml?period[startdate]=YYYY-MM-DD+hh%3Amm%3Ass&period[enddate]=YYYY-MM-DD+hh%3Amm%3Ass GET /cdn_resources/:id/billing.json?period[startdate]=YYYY-MM-DD+hh%3Amm%3Ass&period[enddate]=YYYY-MM-DD+hh%3Amm%3Ass
XML output example:
<?xml version="1.0" encoding="UTF-8"?> <edge_statistics type="array"> <edge_statistic> <data_non_cached type="integer">9000000</data_non_cached> <created_at type="datetime">2012-02-18T00:15:00Z</created_at> <data_cached type="integer">91000000</data_cached> <updated_at type="datetime">2012-02-18T00:15:00Z</updated_at> <id type="integer">1846</id> <cdn_resource_id type="integer">60</cdn_resource_id> <user_id type="integer">1552</user_id> <edge_group_location_id type="integer">47</edge_group_location_id> <edge_id type="integer">393278157</edge_id> <location_id type="integer">210</location_id> <edge_group_id type="integer">22</edge_group_id> <cost type="float">0.0103</cost> </edge_statistic> </edge_statistics>
<user_hourly_stats type="array"> <user_hourly_stat> <edge_group_label>WHMCS Edge Group</edge_group_label> <target_id type="integer">7</target_id> <cost type="float">12.0000004172325</cost> <stat_time type="datetime">2012-03-01T11:00:00Z</stat_time> <value type="decimal">2.4</value> </user_hourly_stat>
Where:
data_non_cached – the amount of data which is not cached
created_at – the date when the record was created in DB

255
OnApp Cloud 2.3 | API Guide | v1.5 | 12th April 2012
data_cached – the amount of data which is cached
updated_at – the date when the record was updated in DB
id – the ID of these statistics
cdn_resource_id - the ID of the CDNresource for which these statistics are generated
user_id – the ID of the user who owns a resource
edge_group_location_id – the ID of the join of the location and edge group
edge_id - the ID of the edge server in Aflexi DB
edge_id
location_id - the ID of the location
edge_group_id – the ID of the edge group
edge_ - the ID of the edge group_id

256
OnApp Cloud 2.3 | API Guide | v1.5 | 12th April 2012
31. CDN Edge groups CDN edge groups are groups of edge servers – your own, and those you subscribe to from the CDN marketplace. They are usually grouped by location, so they represent a pool of servers for a given geographical area. Once you have created an edge group containing edge servers in specific locations, you can then assign the group (or groups) to a specific CDN resource. You need to associate CDN Edge groups with billing plans to make them available for users.
31.1 View CDN edge groups
To view CDN edge groups available in the cloud:
GET /edge_groups.xml GET /edge_groups.json
XML Output example
<?xml version="1.0" encoding="UTF-8"?> <edge_groups type="array"> <edge_group> <label>tredty</label> <created_at type="datetime">2011-10-11T12:58:40Z</created_at> <updated_at type="datetime">2011-10-11T12:58:40Z</updated_at> <id type="integer">1</id> </edge_group> ... <edge_group></edge_group> ... </edge_groups>
Where:
label – the edge group label
id – the group id in the database
31.2 View CDN edge group details
To view the edge group details, use the following request:
GET /edge_groups/:id.xml GET /edge_groups/:id.json
XML Output example
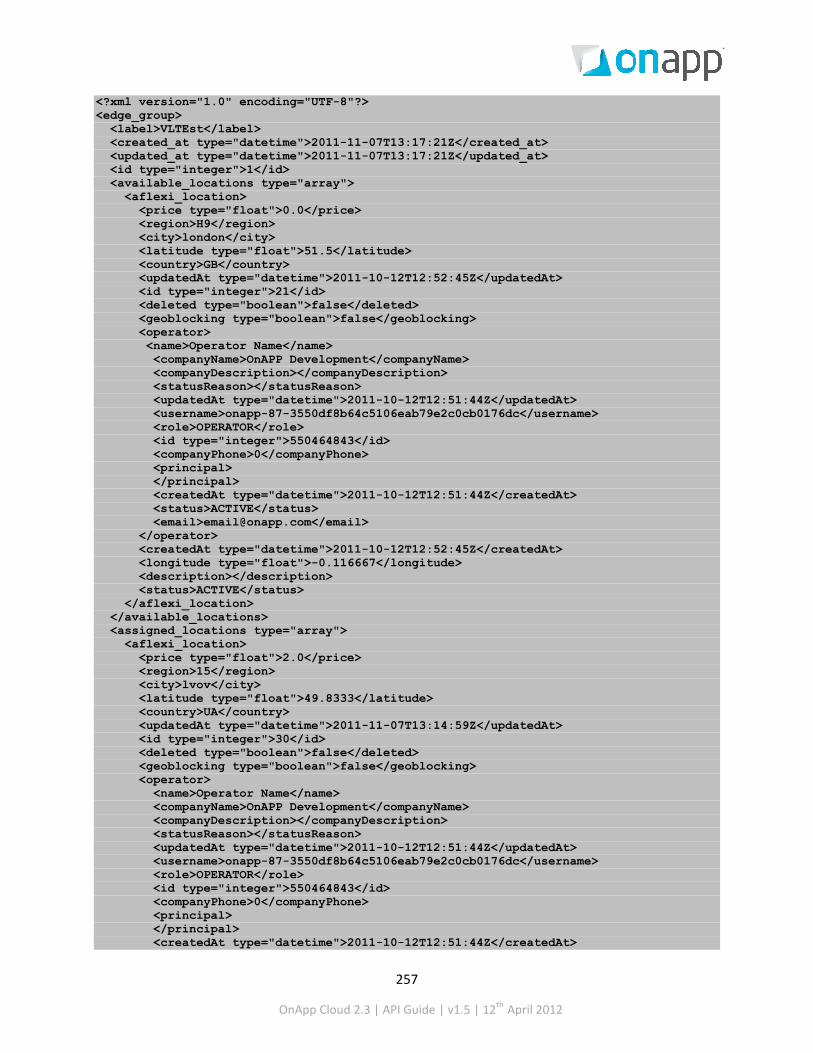
257
OnApp Cloud 2.3 | API Guide | v1.5 | 12th April 2012
<?xml version="1.0" encoding="UTF-8"?> <edge_group> <label>VLTEst</label> <created_at type="datetime">2011-11-07T13:17:21Z</created_at> <updated_at type="datetime">2011-11-07T13:17:21Z</updated_at> <id type="integer">1</id> <available_locations type="array"> <aflexi_location> <price type="float">0.0</price> <region>H9</region> <city>london</city> <latitude type="float">51.5</latitude> <country>GB</country> <updatedAt type="datetime">2011-10-12T12:52:45Z</updatedAt> <id type="integer">21</id> <deleted type="boolean">false</deleted> <geoblocking type="boolean">false</geoblocking> <operator> <name>Operator Name</name> <companyName>OnAPP Development</companyName> <companyDescription></companyDescription> <statusReason></statusReason> <updatedAt type="datetime">2011-10-12T12:51:44Z</updatedAt> <username>onapp-87-3550df8b64c5106eab79e2c0cb0176dc</username> <role>OPERATOR</role> <id type="integer">550464843</id> <companyPhone>0</companyPhone> <principal> </principal> <createdAt type="datetime">2011-10-12T12:51:44Z</createdAt> <status>ACTIVE</status> <email>[email protected]</email> </operator> <createdAt type="datetime">2011-10-12T12:52:45Z</createdAt> <longitude type="float">-0.116667</longitude> <description></description> <status>ACTIVE</status> </aflexi_location> </available_locations> <assigned_locations type="array"> <aflexi_location> <price type="float">2.0</price> <region>15</region> <city>lvov</city> <latitude type="float">49.8333</latitude> <country>UA</country> <updatedAt type="datetime">2011-11-07T13:14:59Z</updatedAt> <id type="integer">30</id> <deleted type="boolean">false</deleted> <geoblocking type="boolean">false</geoblocking> <operator> <name>Operator Name</name> <companyName>OnAPP Development</companyName> <companyDescription></companyDescription> <statusReason></statusReason> <updatedAt type="datetime">2011-10-12T12:51:44Z</updatedAt> <username>onapp-87-3550df8b64c5106eab79e2c0cb0176dc</username> <role>OPERATOR</role> <id type="integer">550464843</id> <companyPhone>0</companyPhone> <principal> </principal> <createdAt type="datetime">2011-10-12T12:51:44Z</createdAt>

258
OnApp Cloud 2.3 | API Guide | v1.5 | 12th April 2012
<status>ACTIVE</status> <email>[email protected]</email> </operator> <createdAt type="datetime">2011-11-07T13:14:59Z</createdAt> <longitude type="float">24.0</longitude> <description></description> <status>ACTIVE</status> </aflexi_location> ... <aflexi_location></aflexi_location> ... </assigned_locations> </edge_group>
Where:
available_locations – an array of all available locations
assigned_locations – an array of locations, which are assigned to the group
aflexi_location – an array of location details
city – city where the edge server is located
region – region where the edge server is located
price – price per GB of sold excess bandwidth
latitude – latitude of the server location
longitude – longitude of the server location
country – country where the server is located
updatedAt – date when the location was updated
deleted – true if the location is deleted; otherwise false
id – the ID of location in the OnApp CP data base
operator – an array with details on location operator
• name – name of the operator • companyName – name of the company to whom this location belongs • companyDescription – optional description of the company • username - username of the user • role – role of the user: OPERATOR - a user that operates the cloud and enables the CDN for it;
PUBLISHER – a user that creates CDN resources in OnApp CP • id – the ID of the user in OnApp Dashboard, which is also stored in OnApp CP database to
reference the users
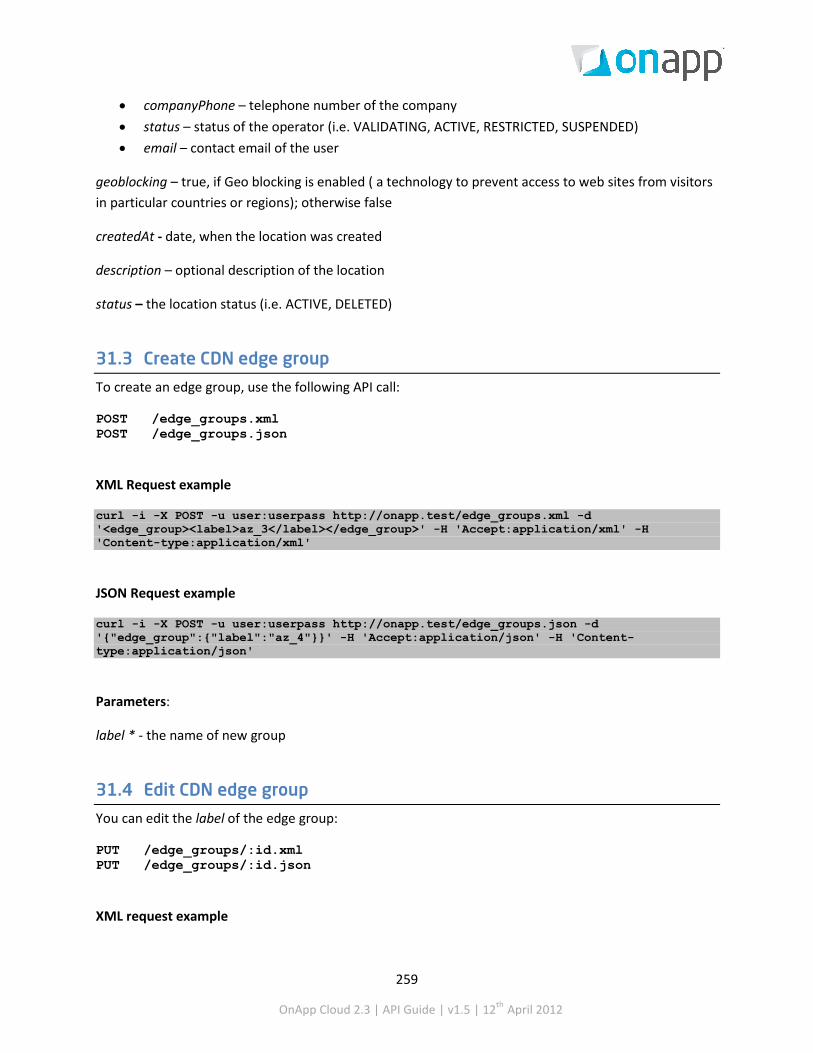
259
OnApp Cloud 2.3 | API Guide | v1.5 | 12th April 2012
• companyPhone – telephone number of the company • status – status of the operator (i.e. VALIDATING, ACTIVE, RESTRICTED, SUSPENDED) • email – contact email of the user
geoblocking – true, if Geo blocking is enabled ( a technology to prevent access to web sites from visitors in particular countries or regions); otherwise false
createdAt - date, when the location was created
description – optional description of the location
status – the location status (i.e. ACTIVE, DELETED)
31.3 Create CDN edge group
To create an edge group, use the following API call:
POST /edge_groups.xml POST /edge_groups.json
XML Request example
curl -i -X POST -u user:userpass http://onapp.test/edge_groups.xml -d '<edge_group><label>az_3</label></edge_group>' -H 'Accept:application/xml' -H 'Content-type:application/xml'
JSON Request example
curl -i -X POST -u user:userpass http://onapp.test/edge_groups.json -d '{"edge_group":{"label":"az_4"}}' -H 'Accept:application/json' -H 'Content-type:application/json'
Parameters:
label * - the name of new group
31.4 Edit CDN edge group
You can edit the label of the edge group:
PUT /edge_groups/:id.xml PUT /edge_groups/:id.json
XML request example
260
OnApp Cloud 2.3 | API Guide | v1.5 | 12th April 2012
curl -i -X PUT -u user:userpass http://onapp.test/edge_groups/:id.xml -d '<edge_group><label>az_5</label></edge_group>' -H 'Accept:application/xml' -H 'Content-type:application/xml'
JSON Request example
curl -i -X PUT -u user:userpass http://onapp.test/edge_groups/:id.json -d '{"edge_group":{"label":"az_6"}}' -H 'Accept:application/json' -H 'Content-type:application/json'
31.5 Delete CDN edge group
To delete the edge group, use the following request:
DELETE /edge_groups/:id.xml DELETE /edge_groups/:id.json
XML Request example
curl -i -X DELETE -u user:userpass http://onapp.test/edge_groups/:id.xml -H 'Accept:application/xml' -H 'Content-type:application/xml'
JSON Request example
curl -i -X DELETE -u user:userpass http://onapp.test/edge_groups/:id.json -H 'Accept:application/json' -H 'Content-type:application/json'
31.6 Assign location to the group
CDN edge group details return the array of all locations available to your cloud. Check the ID of the required location and assign it to the group with the following API call:
POST /edge_groups/:edge_group_id/assign.xml POST /edge_groups/:edge_group_id/assign.json
XML Request example
curl -i -X POST -u user:userpass http://onapp.test/edge_groups/1/assign.xml -d '<location>175</location>' -H 'Accept:application/xml' -H 'Content-type:application/xml'
JSON Request example
curl -i -X POST -u user:userpass http://onapp.test/edge_groups/1/assign.json -d '{"location":"175"}' -H 'Accept:application/json' -H 'Content-type:application/json'

261
OnApp Cloud 2.3 | API Guide | v1.5 | 12th April 2012
Where:
location * - input the ID of the required location
31.7 Unassign location from the group
To remove a location from the group, use the following method:
POST /edge_groups/:edge_group_id/unassign.xml POST /edge_groups/:edge_group_id/unassign.json
XML Request example
curl -i -X POST -u user:userpass http://onapp.test/edge_groups/1/unassign.xml -d '<location>175</location>' -H 'Accept:application/xml' -H 'Content-type:application/xml'
JSON Request example
curl -i -X POST -u user:userpass http://onapp.test/edge_groups/1/unassign.json -d '{"location":"175"}' -H 'Accept:application/json' -H 'Content-type:application/json'

262
OnApp Cloud 2.3 | API Guide | v1.5 | 12th April 2012
32. CDN usage statistics CDN usage statistics shows the detailed information on all the resources used by CDN.
GET /cdn_usage_statistics.xml GET /cdn_usage_statistics.json XML Output example:
<?xml version="1.0" encoding="UTF-8"?> <cdn_stats> <cdn_stat> <edge_group_id>30</edge_group_id> <cached>0.0</cached> <user_id>1530</user_id> <location_id>331</location_id> <non_cached>0.0</non_cached> </cdn_stat> </cdn_stats>
Where:
edge_group_id - the ID of the edge group in use
cached - the amount of data cached
user_id - the ID of the OnApp user
location_id - the ID of the location assigned to this particular edge group (edge_group_id) in OnApp
non_cached - the amount of data non-cached

263
OnApp Cloud 2.3 | API Guide | v1.5 | 12th April 2012
33. DNS setup The DNS setup chapter provides OnApp customers with information how to create a DNS hostname. After you create a DNS hostname, you get access to creating and managing DNS zones.
33.1 Get DNS domain details
To view the DNS domain details, send the following request:
GET /settings/dns_setup.xml GET /settings/dns_setup.json XML Output example <?xml version="1.0" encoding="UTF-8"?> <dns_setup> <domain>mydns.com</domain> </dns_setup>
Where:
domain – DNS domain name.
33.2 Set up DNS domain
To set up DNS domain, use the following methods:
POST /settings/dns_setup.xml POST /settings/dns_setup.json XML Request example curl -i -H 'Accept: application/xml' -H 'Content-type: application/xml' -u user:userpass http://onapp.test/settings/dns_setup.xml -X POST -d "<dns_setup><domain>new-mydns.com</domain></dns_setup>" JSON Request example curl -i -H 'Accept: application/json' -H 'Content-type: application/json' -u user:userpass http://onapp.test/settings/dns_setup.json -X PUT -d '{"dns_setup": {"domain": "my-dns2.com"}}' Where:
The only required parameter is domain * – DNS domain name.
XML Response example <?xml version="1.0" encoding="UTF-8"?> <dns_setup>

264
OnApp Cloud 2.3 | API Guide | v1.5 | 12th April 2012
<domain>mydns.com</domain> </dns_setup>
33.3 Edit DNS domain
To edit DNS domain, send the following request: PUT /settings/dns_setup.xml PUT /settings/dns_setup.json XML Request example curl -i -H 'Accept: application/xml' -H 'Content-type: application/xml' -u user:userpass http://onapp.test/settings/dns_setup.xml -X PUT -d "<dns_setup><domain>my-dns.com</domain></dns_setup>" JSON Request example curl -i -H 'Accept: application/json' -H 'Content-type: application/json' -u user:userpass http://onapp.test/settings/dns_setup.json -X PUT -d '{"dns_setup": {"domain": "my-dns2.com"}}'
Where:
The only required parameter is domain * – DNS domain name.
You will get a 200 status response on success and 404 if the domain name is invalid or you entered incorrect URL.
33.4 Get the list of glue records
To get the list of glue records, use the following request: GET /settings/dns_setup/glue_records.xml GET /settings/dns_setup/glue_records.json XML Output example
<?xml version="1.0" encoding="UTF-8"?> <hash> <ns1>109.23.125.206</ns1> <ns2>109.23.125.206</ns2> <ns3>109.23.125.206</ns3> <ns4>109.23.125.206</ns4> </hash>
Where:
ns1, ns2, ns3, ns4 – DNS domain glue records.

265
OnApp Cloud 2.3 | API Guide | v1.5 | 12th April 2012

266
OnApp Cloud 2.3 | API Guide | v1.5 | 12th April 2012
34. DNS zone OnApp DNS Zone feature allows you to manage your and your clients’ domain DNS. Each time DNS zone, record or setup settings are refreshed, the DNS configuration is immediately updated on the DNS vendor server.
34.1 Get the list of own DNS zones
To get the list of your own DNS zones:
GET /dns_zones.xml GET /dns_zones.json
XML Response example
<?xml version="1.0" encoding="UTF-8"?> <dns_zones type="array"> <dns_zone> <name>dns_example</name> <created_at type="datetime">2011-12-19T12:51:02Z</created_at> <updated_at type="datetime">2011-12-19T12:51:02Z</updated_at> <id type="integer">5</id> <user_id type="integer">1</user_id> </dns_zone>
Where:
name – DNS zone name
created_at – the date when the DNS zone was created in the [YYYY][MM][DD]T[hh][mm][ss]Z format
updated_at – the date when the DNS zone was updated in the [YYYY][MM][DD]T[hh][mm][ss]Z format
id – DNS zone ID
user_id – the ID of a user who has created a DNS zone
34.2 Get the list of users DNS zones
To get the list of DNS zones created by users:
GET /dns_zones/user.xml GET /dns_zones/user.json
XML Output example

267
OnApp Cloud 2.3 | API Guide | v1.5 | 12th April 2012
<?xml version="1.0" encoding="UTF-8"?> <dns_zones type="array"> <dns_zone> <name>yoyohow.com</name> <created_at type="datetime">2011-12-30T11:56:55Z</created_at> <updated_at type="datetime">2011-12-30T11:56:55Z</updated_at> <id type="integer">13</id> <user_id type="integer">1</user_id> </dns_zone> </dns_zones>
Where:
name – DNS zone name
created_at – the date in the [YYYY][MM][DD]T[hh][mm][ss]Z format
updated_at – the date when the DNS zone was updated in the [YYYY][MM][DD]T[hh][mm][ss]Z format
id – DNS zone ID
user_id – the ID of a user who has created a DNS zone
34.3 Get the domain zone details
The following method returns details for a particular domain zone:
GET /dns_zones/:id.xml GET /dns_zones/:id.json
XML Output example
<?xml version="1.0" encoding="UTF-8"?> <dns_zone> <name>abc3.com</name> <created_at type="datetime">2011-12-19T12:51:02Z</created_at> <updated_at type="datetime">2011-12-19T12:51:02Z</updated_at> <id type="integer">5</id> <user_id type="integer">1</user_id> </dns_zone>
Where:
name– DNS zone name
created_at – the date when the DNS zone was created in the [YYYY][MM][DD]T[hh][mm][ss]Z format
updated_at – the date when the DNS zone was updated in the [YYYY][MM][DD]T[hh][mm][ss]Z format
id – DNS zone ID

268
OnApp Cloud 2.3 | API Guide | v1.5 | 12th April 2012
user_id – the ID of a user who has created a DNS zone
34.4 Add new DNS zone
Use the following methods to create a new DNS zone:
POST /dns_zones.xml POST /dns_zones.json
XML Request example
curl -i -X POST http://onapp.test/dns_zones.xml -d '<dns_zone><name>domain.com</name><auto_populate>1</auto_populate></dns_zone>' -u user:userpass -H 'Accept: application/xml' -H 'Content-type: application/xml'
JSON Request example
curl -i -X POST http://onapp.test/dns_zones.json -d '{"dns_zone":{"name":"domain.com", "auto_populate":"1" }}' -u user:userpass -H 'Accept: application/json' -H 'Content-type: application/json'
Where:
name * – name of a DNS zone you create
auto_populate – autopopulate option lets you automatically import your existing DNS settings. To autopopulate your DNS settings, set the autopopulate value 1, otherwise set 0.
You will get a 200 status response on success, and 404 if there is no DNS zone with a requested ID or you entered incorrect URL.
34.5 Delete DNS zone
To delete a DNS zone, use the following API call:
DELETE /dns_zones/:id.xml DELETE /dns_zones/:id.json
XML Request example
Curl -i -X DELETE --url http://onapp.test/dns_zones/:dns_zone_id.xml -u user:userpass
JSON Request example
curl -i -X DELETE --url http://onapp.test/dns_zones/:dns_zone_id.json -u user:userpass

269
OnApp Cloud 2.3 | API Guide | v1.5 | 12th April 2012
You will get a 200 status response on success, and 404 if there is no DNS zone with a requested ID or you entered incorrect URL.
34.6 Get the list of name servers
To get the list of name servers, use the following request: GET /dns_zones/name_servers.xml GET /dns_zones/name_servers.json XML Output example
<?xml version="1.0" encoding="UTF-8"?> <strings type="array"> <string>ns1.qaonapp.com</string> <string>ns2.qaonapp.com</string> <string>ns3.qaonapp.com</string> <string>ns4.qaonapp.com</string> </strings>
34.7 Get the list of DNS Zone Records
Use the following API calls to view DNS zone records:
GET /dns_zones/:dns_zone_id/records.xml GET /dns_zones/:dns_zone_id/records.json
XML Output example
<?xml version="1.0" encoding="UTF-8"?> dns_zone> <name>example.com</name> <created_at type="datetime">2012-01-19T16:53:47Z</created_at> <updated_at type="datetime">2012-01-19T16:53:47Z</updated_at> <id type="integer">322</id> <user_id type="integer">1</user_id> <records> <MX type="array"> <dns_record> <name>@</name> <ttl type="integer">3600</ttl> <priority type="integer">10</priority> <id type="integer">3540</id> <type>MX</type> <hostname>mx1.me.com.akadns.net</hostname> </dns_record> </MX> <SRV type="array"> <dns_record> <name>_xmpp._tcp</name> <ttl type="integer">86400</ttl> <port type="integer">5222</port> <weight type="integer">1</weight> <priority type="integer">0</priority> <id type="integer">4533</id><type>SRV</type>

270
OnApp Cloud 2.3 | API Guide | v1.5 | 12th April 2012
<hostname>jabber.example.com</hostname> </dns_record> </SRV> <A type="array"> <dns_record> <name>@</name> <ttl type="integer">20</ttl> <id type="integer">3547</id> <type>A</type> <ip>17.172.192.8</ip> </dns_record> </A> <CNAME type="array"> <dns_record> <name>www</name> <ttl type="integer">3600</ttl> <id type="integer">3551</id> <type>CNAME</type> <hostname>www.me.com.edgekey.net</hostname> </dns_record> </CNAME> <AAAA type="array"> <dns_record> <name>sdfgeg</name> <ttl type="integer">456</ttl> <id type="integer">4052</id> <type>AAAA</type> <ip>::</ip> </dns_record> </AAAA> <TXT type="array"> <dns_record> <name>@</name> <ttl type="integer">3600</ttl> <id type="integer">3546</id> <txt>v=spf1 ip4:17.0.0.0/8 ~all</txt> <type>TXT</type> </dns_record> </TXT> <NS type="array"> <dns_record> <name>@</name> <ttl type="integer">86400</ttl> <id type="integer">3555</id> <type>NS</type> <hostname>ns1.testeteststestt.com</hostname> </dns_record> </NS> <SOA type="array"> <dns_record> <name>@</name> <serial type="integer">2010111206</serial> <primaryNs>ns1.testeteststestt.com</primaryNs> <retry type="integer">172800</retry> <ttl type="integer">86400</ttl> <id type="integer">3539</id> <refresh type="integer">12096007</refresh> <type>SOA</type> <minimum type="integer">1200</minimum> <expire type="integer">2592000</expire> <hostmaster>admin.example.com</hostmaster> </dns_record> </SOA>

271
OnApp Cloud 2.3 | API Guide | v1.5 | 12th April 2012
</records> </dns_zone> Where:
name – DNS zone name.
created_at – the date when the DNS zone was created in the [YYYY][MM][DD]T[hh][mm][ss]Z format
updated_at - the date when the DNS zone was updated in the [YYYY][MM][DD]T[hh][mm][ss]Z format
id – DNS zone ID
user_id – the ID of a user who has created a DNS zone
The array of DNS records sorted by type with their details:
MX – the array of mail exchange records with the following parameters:
name – DNS domain set for the record
ttl – time to live value
id – DNS zone ID
type – the type of the record. For this array, it is MX
priority - the mail server preference
hostname – DNS hostname
SRV – the array of service records with the following parameters:
name – DNS domain set for the record
ttl – time to live value
port – the port on this target host of this service.
weight – the proportion of traffic the server pointed to will handle.
priority – the priority of the target host
id – DNS zone ID
hostname – DNS hostname
A – the array of A host records with the following parameters:
name – DNS domain set for the record

272
OnApp Cloud 2.3 | API Guide | v1.5 | 12th April 2012
ttl – time to live value
id – DNS zone ID
type – the type of the record. For this array, it is A
ip – domain IP
CNAME – the array of CNAME records with the following parameters:
name – DNS domain set for the record
ttl – time to live value
id – DNS zone ID
type – the type of the record. For this array, it is CNAME
hostname – DNS hostname
AAAA – the array of AAAA record with the following parameters:
name – DNS domain set for the record
ttl – time to live value
id – DNS zone ID
type – the type of the record. For this array, it is AAAA
ip – domain IP
TXT – the array of TXT record with the following parameters:
name – DNS domain set for the record
ttl – time to live value
id – DNS zone ID
txt – TXT value
type - the type of the record. For this array, it is TXT
NS – the array of name server records with the following parameters:
name – DNS domain set for the record
ttl – time to live value

273
OnApp Cloud 2.3 | API Guide | v1.5 | 12th April 2012
id – DNS zone ID
type – the type of the record. For this array, it is NS
hostname – DNS hostname
SOA – the array of start of authority record with the following parameters:
name – DNS domain set for the record
serial – DNS zone serial number
primary Ns – primary name server
retry - the amount of time your secondary name servers will wait to contact the primary name server again if the last attempt failed
ttl – time to live value
id – DNS zone ID
refresh – the number of seconds between update requests
type – DNS record name. For this array, it is SOA
minimum – value of negative caching (in seconds)
expire - the number of seconds a server will wait before considering the data invalid if it cannot reach the primary name server
hostmaster – a hostmaster e-mail address
34.8 Get a particular record’s details GET /dns_zones/:dns_zone_id/records/:record_id.xml GET /dns_zones/:dns_zone_id/records/:record_id.json
XML Output example
<?xml version="1.0" encoding="UTF-8"?> <dns_record> <name>sub2</name> <ttl type="integer">121</ttl> <id type="integer">2689</id> <type>A</type> <ip>127.0.0.0</ip> </dns_record>
Where:

274
OnApp Cloud 2.3 | API Guide | v1.5 | 12th April 2012
name – DNS zone name.
ttl – the time to live value
type – the record type. This can be one of the following records: NS, A, AAAA, CNAME, MX, TXT or SRV
id – DNS zone ID
ip – domain IP
34.9 Create DNS record
To create a DNS record:
POST /dns_zones/:dns_zone_id/records.xml POST /dns_zones/:dns_zone_id/records.json
XML Request example
curl –i-X POST http://onapp.test/dns_zones/:dns_zone_id/records.xml -d "<dns_record><name>test</name><ttl>111</ttl><type>A</type><ip>127.1.1.1</ip></dns_record>" -u user:userpass -H 'Accept: application/xml' -H 'Content-type: application/xml'
JSON Request example
curl -i -X POST http://onapp.test/dns_zones/:dns_zone_id/records.json -d '{"dns_record":{"name":"TEST_NAME",ttl:"111",type:"A",ip:"127.1.1.1"}}' -u user:userpass -H 'Accept: application/json' -H 'Content-type: application/json'
Where:
name * – DNS record name
ttl * – the time to live value
type * – the record type
ip * – host IP ( for A and AAAA records)
XML Response example
<?xml version="1.0" encoding="UTF-8"?> <dns_record> <name>test23</name> <ttl>111</ttl> <id type="integer">2696</id> <type>A</type> <ip>127.1.1.1</ip> </dns_record>

275
OnApp Cloud 2.3 | API Guide | v1.5 | 12th April 2012
34.10 Edit DNS records
To edit a DNS record:
PUT /dns_zones/:dns_zone_id/records/:record_id.xml PUT /dns_zones/:dns_zone_id/records/:record_id.json
XML Request example
curl –i-X PUT http://onapp.test/dns_zones/:dns_zone_id/records/:record_id.xml -d "<dns_record><name>test</name><ttl>86400</ttl></dns_record>" -u user:userpass -H 'Accept: application/xml' -H 'Content-type: application/xml'
JSON Request example
curl -i -X PUT http://onapp.test/dns_zones/:dns_zone_id/records/:record_id.json -d '{"dns_record":{"name":"TEST_NAME",ttl:"111"}}' -u user:userpass -H 'Accept: application/json' -H 'Content-type: application/json'
You can edit the following parameters for the following DNS records:
MX record:
name * – DNS domain set for the record
ttl * – time to live value
priority * – the mail server preference
hostname * – DNS hostname
SRV record:
name * – DNS domain set for the record
ttl * – time to live value
port * – the port on this target host of this service.
weight * – the proportion of traffic the server pointed to will handle.
priority * – the priority of the target host
hostname * – DNS hostname
A record:
name * – DNS domain set for the record

276
OnApp Cloud 2.3 | API Guide | v1.5 | 12th April 2012
ttl * – time to live value
ip * – domain IP
CNAME record
name * – DNS domain set for the record
ttl * – time to live value
hostname * – DNS hostname
AAAA record
name * – DNS domain set for the record
ttl * – time to live value
ip * – domain IP
TXT record
name * – DNS domain set for the recor
ttl * – time to live value
txt * – TXT value
NS record
name * – DNS domain set for the record
ttl * – time to live value
hostname * – DNS hostname
SOA record
name * – DNS domain set for the record
serial * – zone serial number
primary Ns * – primary name server
retry * – the amount of time your secondary name servers will wait to contact the primary name server again if the last attempt failed (in seconds)
ttl * – time to live value
refresh * – the number of seconds between update requests

277
OnApp Cloud 2.3 | API Guide | v1.5 | 12th April 2012
minimum * – value of negative caching (in seconds)
expire * – the number of seconds a server will wait before considering the data invalid if it cannot reach the primary name server
hostmaster * – a hostmaster email address
XML Response example
<?xml version="1.0" encoding="UTF-8"?> <dns_record> <name>@</name> <ttl type="integer">1001</ttl> <id type="integer">2680</id> <type>NS</type> <hostname>ns1.worldcdn-beta-operator.doubleukay.com</hostname> </dns_record>
You will get a 200 status response on success, and 404 if there is no DNS zone with a requested ID or you entered incorrect URL.
34.11 Delete a record
To delete a record:
DELETE /dns_zones/:dns_zone_id/records/:record_id.xml DELETE /dns_zones/:dns_zone_id/records/:record_id.json
XML Request example
curl -i-X DELETE --url http://onapp.test/dns_zones/:dns_zone_id/records/:record_id.xml -u user:userpass
JSON Request example
curl -X DELETE --url http://onapp.test/dns_zones/:dns_zone_id/record/:record_id.json -u user:userpass

278
OnApp Cloud 2.3 | API Guide | v1.5 | 12th April 2012
35. Backups Lists the backups taken of that virtual machine, and provides tools to restore a backup, delete backups, and convert backups to templates.
35.1 Get the list of VM backups GET /virtual_machines/:virtual_machine_id/backups.xml GET /virtual_machines/:virtual_machine_id/backups.json
An array of backups is returned. If there are no backups, an empty array is returned.
XML Output example
<?xml version="1.0" encoding="UTF-8"?> <backups type="array"> <backup> <marked_for_delete type="boolean">false</marked_for_delete> <disk_id type="integer">4180</disk_id> <built_at type="datetime">2011-02-18T23:38:51Z</built_at> <disk_id type="integer">38</disk_id> <created_at type="datetime">2011-02-18T23:35:54Z</created_at> <operating_system_distro>rhel</operating_system_distro> <operating_system>linux</operating_system> <template_id type="integer">19</template_id> <allowed_swap type="boolean">true</allowed_swap> <backup_type>normal</backup_type> <updated_at type="datetime">2011-02-18T23:38:51Z</updated_at> <allow_resize_without_reboot type="boolean">true</allow_resize_without_reboot> <id type="integer">15</id> <backup_server_id type="integer">1</backup_server_id> <allowed_hot_migrate type="boolean">true</allowed_hot_migrate> <backup_size>442788</backup_size> <identifier>c4th2akcgycse7</identifier> <min_disk_size type="integer">0</min_disk_size> <built type="boolean">true</built> <locked type="boolean">false</locked> </backup> </backups>
Where:
marked_for_delete – the backup is marked for deletion (for autobackups)
built_at – the date when the disk backup was built
disk_id – the id of a disk backed up
created_at – the date when the record in the database was created
updated_at – the date when this record in database was updated

279
OnApp Cloud 2.3 | API Guide | v1.5 | 12th April 2012
operating_system_distro – the OS distribution of the VM backed up
operating_system – the OS of the VM backed up
template_id – the ID of a template from which the VM backed up was built
allowed_swap – True if swap disk is allowed for VM backed up
backup_type – Disk backup
allowed_resize_without_reboot – True if resizing CPU & RAM is allowed without restarting the VM backed up
ID – the ID of this backup
backup_server_id – the ID of the backup server on which the backup is stored
allowed_hot_migrate – True if hot migration is allowed for the VM backed up
backup_size – the disk space taken by this backup in MB
min_disk_size – the minimum disk size
built – true if the VM backed up has been built
locked – true if the VM backed up has been locked
35.2 Create a disk backup
To create a backup of a disk, use the following method:
POST /settings/disks/:disk_id/backups.xml POST /settings/disks/:disk_id /backups.json
XML Request example
curl -i -X POST -H 'Accept: application/xml' -H 'Content-type: application/xml' -u user:userpass --url http://onapp.test/settings/disks/:disk_id/backups.xml JSON Request example
curl -i -X POST -H 'Accept: application/json' -H 'Content-type: application/json' -u user:userpass --url http://onapp.test/settings/disks/:disk_id/backups.json
35.3 Convert a backup to a template
You can convert a backup into a custom template. A label for a template can be set with the backup[label], minimum disk size and minimum memory size parameters.

280
OnApp Cloud 2.3 | API Guide | v1.5 | 12th April 2012
POST /backups/:backup_id/convert.xml POST /backups/:backup_id/convert.json
XML Request example
curl -i -X POST -H 'Accept: application/xml' -H 'Content-type: application/xml' -u user:userpass -d'<?xml version="1.0" encoding="UTF-8" ?><backup><label>template.label</label><min_disk_size>50</min_disk_size><min_memory_size>1024</min_memory_size></backup>' --url http://onapp.test/backups/:backup_id/convert.xml
JSON Request example
curl -i -X POST -H 'Accept: application/json' -H 'Content-type: application/json' -u user:userpass -d'{"backup":{"label":"backup_label", "min_disk_size":"20", "min_memory_size":"512"}}' –url http://onapp.test/backups/:backup_id/convert.json
35.4 Restore a backup
You can restore a disk from a backup, using the following method:
POST /backups/:backup_id/restore.xml POST /backups/:backup_id/restore.json
XML Request example
curl -i -X POST -H 'Accept: application/xml' -H 'Content-type: application/xml' -u user:userpass --url http://onapp.test/backups/:backup_id/restore.xml JSON Request example
curl -i -X POST -H 'Accept: application/json' -H 'Content-type: application/json' -u user:userpass --url http://onapp.test/backups/:backup_id/restore.json
35.5 Delete a backup
To delete a disk backup:
DELETE /backups/:id.xml DELETE /backups/:id.json XML Request example
curl -i -X DELETE -H 'Accept: application/xml' -H 'Content-type: application/xml' -u user:userpass --url http://onapp.test/backups/:id.xml
JSON Request example

281
OnApp Cloud 2.3 | API Guide | v1.5 | 12th April 2012
curl -i -X DELETE -H 'Accept: application/json' -H 'Content-type: application/json' -u user:userpass --url http://onapp.test/backups/:id.json
An HTTP 200 response is returned on success, an HTTP 404 error is returned if a requested backup does not exist.

282
OnApp Cloud 2.3 | API Guide | v1.5 | 12th April 2012
36. Autobackup presets Autobackup presets are a simple way to set up an automatic backup schedule when Virtual Machines are created. Once configured, they can be applied to a VM automatically when the Automatic Backups Required parameter is enabled during VM creation.
36.1 Get the list of autobackup presets
To get the list of available autobackup presets, use the following request:
GET /autobackup_presets.xml GET /autobackup_presets.json
An array of autobackup presets is returned. If there are no presets, an empty array is returned.
XML Output example
<?xml version="1.0" encoding="UTF-8"?> <autobackup_templates type="array"> <autobackup_template> <duration type="integer">1</duration> <created_at type="datetime">2011-07-14T15:01:38Z</created_at> <updated_at type="datetime">2011-07-28T11:49:52Z</updated_at> <period>days</period> <id type="integer">1</id> <enabled type="boolean">true</enabled> </autobackup_template> <autobackup_template> <duration type="integer">1</duration> <created_at type="datetime">2011-07-14T15:01:38Z</created_at> <updated_at type="datetime">2011-07-28T11:50:21Z</updated_at> <period>weeks</period> <id type="integer">2</id> <enabled type="boolean">true</enabled> </autobackup_template> ... <autobackup_template></autobackup_template> ... </autobackup_templates>
Explanation of the data returned:
duration the number specifying how often a backup should be taken created at the date in the [YYYY][MM][DD]T[hh][mm][ss]Z format period the time period (days, weeks, months, or years) updated at the date when the autobackup preset was updated in the
[YYYY][MM][DD]T[hh][mm][ss]Z format enabled true if the autobackup preset is enabled, otherwise false. id the ID of the autobackup preset

283
OnApp Cloud 2.3 | API Guide | v1.5 | 12th April 2012
36.2 Get autobackup preset details
This method will output the details for a particular autobackup preset.
GET /autobackup_presets/:id.xml GET /autobackup_presets/:id.json
XML Output example
<?xml version="1.0" encoding="UTF-8"?> <autobackup_template> <duration type="integer">1</duration> <created_at type="datetime">2011-01-06T10:49:43Z</created_at> <period>days</period> <updated_at type="datetime">2011-01-06T10:49:43Z</updated_at> <enabled type="boolean">true</enabled> <id type="integer">1</id> </autobackup_template>
Where:
duration edit the number specifying how often a backup should be taken created_at the date in the [YYYY][MM][DD]T[hh][mm][ss]Z format period specifies the time period (days, weeks, months, or years) updated_at the date when the autobackup preset was updated in the
[YYYY][MM][DD]T[hh][mm][ss]Z format enabled set True if autobackup preset is enabled, otherwise False id edit an autobackup preset ID
36.3 Edit an autobackup preset
To edit an autobackup preset, use the following method:
PUT /autobackup_presets/:id.xml PUT /autobackup_presets/:id.json
XML Request example
curl -i -X PUT -H 'Accept: application/xml' -H 'Content-type: application/xml' -u user:userpass -d'<?xml version="1.0" encoding="UTF-8"?><autobackup_template><duration>5</duration><period>days</period><enabled>false</enabled></autobackup_template>' --url http://onapp.test/autobackup_presets/:id.xml
JSON Request example
curl -i -X PUT -H 'Accept: application/json' -H 'Content-type: application/json' -u user:userpass -d'{"autobackup_template":{"duration":"5","period":"weeks","enabled": "false"}}' --url http://onapp.test/autobackup_presets/:id.json
You can edit the following parameters:

284
OnApp Cloud 2.3 | API Guide | v1.5 | 12th April 2012
duration Edit the number specifying how often a backup should be taken enabled Set True if autobackup preset is enabled, otherwise False
Every autobackup_preset_id has its defined period (either days, or weeks, or months, or years), which cannot be altered.

285
OnApp Cloud 2.3 | API Guide | v1.5 | 12th April 2012
37. Schedules Schedules are concerned with backups scheduled for virtual machines in the cloud. When a schedule is no longer needed, it can be deleted so that the task will no longer run.
37.1 Get the list of schedules
This method outputs an array of the disk backups scheduled within your cloud. If there are no schedules, an empty array is returned.
GET /schedules.xml GET /schedules.json
XML Output example
<?xml version="1.0" encoding="UTF-8"?> <schedules> <schedule> <duration>1</duration> <created_at>2011-07-20T15:16:16Z</created_at> <target_id>112</target_id> <updated_at>2011-07-28T15:16:18Z</updated_at> <period>days</period> <action>autobackup</action> <start_at>2011-07-29T15:16:16Z</start_at> <id>33</id> <user_id>1</user_id> <schedule_logs> <schedule_log> <created_at>2011-07-28T15:16:17Z</created_at> <updated_at>2011-07-28T15:16:17Z</updated_at> <schedule_id>33</schedule_id> <id>12</id> <log_output></log_output> <status>complete</status> </schedule_log> ... <schedule_log></schedule_logs> ... <params nil="true"></params> <failure_count>0</failure_count> <status>enabled</status> <target_type>Disk</target_type> </schedule> </schedules>
Where:
duration How often a disk backup is taken created_at The date in the [YYYY][MM][DD]T[hh][mm][ss]Z format target_id The disk ID for which a backup is taken

286
OnApp Cloud 2.3 | API Guide | v1.5 | 12th April 2012
Period Time period for a backup schedule (days, weeks, months, or years) updated_at The date when a schedule was updated in the
[YYYY][MM][DD]T[hh][mm][ss]Z format Action Currently, only autobackup action is performed by schedules Id Schedule ID start_at The date when a backup started in the [YYYY][MM][DD]T[hh][mm][ss]Z
format user_id The ID of a user who created this schedule failure_count The number of requests processed until the task fails Status The status of the backup schedule (enabled, disabled, or failed) target_type Currently, you can schedule backup of Disks only
37.2 Get schedule details
Use this method to get details for a particular disk backup schedule:
GET /schedules/:id.xml GET /schedules/:id.json XML Output Example
<?xml version="1.0" encoding="UTF-8"?> <schedules> <schedule> <duration>1</duration> <created_at>2011-07-20T15:16:16Z</created_at> <target_id>112</target_id> <updated_at>2011-07-28T15:16:18Z</updated_at> <period>days</period> <action>autobackup</action> <start_at>2011-07-29T15:16:16Z</start_at> <id>33</id> <user_id>1</user_id> <schedule_logs> <schedule_log> <created_at>2011-07-28T15:16:17Z</created_at> <updated_at>2011-07-28T15:16:17Z</updated_at> <schedule_id>33</schedule_id> <id>12</id> <log_output></log_output> <status>complete</status> </schedule_log> ... <schedule_log></schedule_logs> ... <params nil="true"></params> <failure_count>0</failure_count> <status>enabled</status> <target_type>Disk</target_type> </schedule>
Where:

287
OnApp Cloud 2.3 | API Guide | v1.5 | 12th April 2012
Duration How often a disk backup is taken created_at The date in the [YYYY][MM][DD]T[hh][mm][ss]Z format target_id The disk ID for which a backup is taken Period Time period for a backup schedule (days, weeks, months, or years) updated_at The date when a schedule was updated in the
[YYYY][MM][DD]T[hh][mm][ss]Z format Action Currently, only autobackup action is performed by schedules Id Schedule ID start_at The date when a backup started in the [YYYY][MM][DD]T[hh][mm][ss]Z
format user_id The ID of a user who created this schedule failure_count The number of requests processed until the task fails Status The status of the backup schedule (enabled, disabled, or failed) target_type Currently, you can schedule backup of Disks only
37.3 Edit a schedule
To edit a schedule, use the following method:
PUT /schedules/:id.xml PUT /schedules/:id.json
XML Request example
curl -i -X PUT -H 'Accept: application/xml' -H 'Content-type: application/xml' -d'<?xml version="1.0" encoding="UTF-8"?><schedule><duration>3</duration><period>days</period><status>enabled</status></schedule>' -u user:userpass --url http://onapp.test/schedules/:id.xml
JSON Request example
curl -i -X PUT -H 'Accept: application/json' -H 'Content-type: application/json' -d'{"schedule":{"duration":"1","period":"years","status":"enabled"}}' -u user:userpass --url http://onapp.test/schedules/:id.json
Currently, you can edit the following parameters:
duration* How often a disk backup is taken
period* Time period for a backup schedule (days, weeks, months, or years)
status* Set enabled to activate a schedule.

288
OnApp Cloud 2.3 | API Guide | v1.5 | 12th April 2012
37.4 Delete a schedule DELETE /schedules/:id.xml DELETE /schedules/:id.json XML Request example
curl -i -X DELETE -H 'Accept: application/xml' -H 'Content-type: application/xml' -u user:userpass --url http://onapp.test/schedules/:id.xml
JSON Request example
curl -i -X DELETE -H 'Accept: application/json' -H 'Content-type: application/json' -u user:userpass --url http://onapp.test/schedules/:id.json
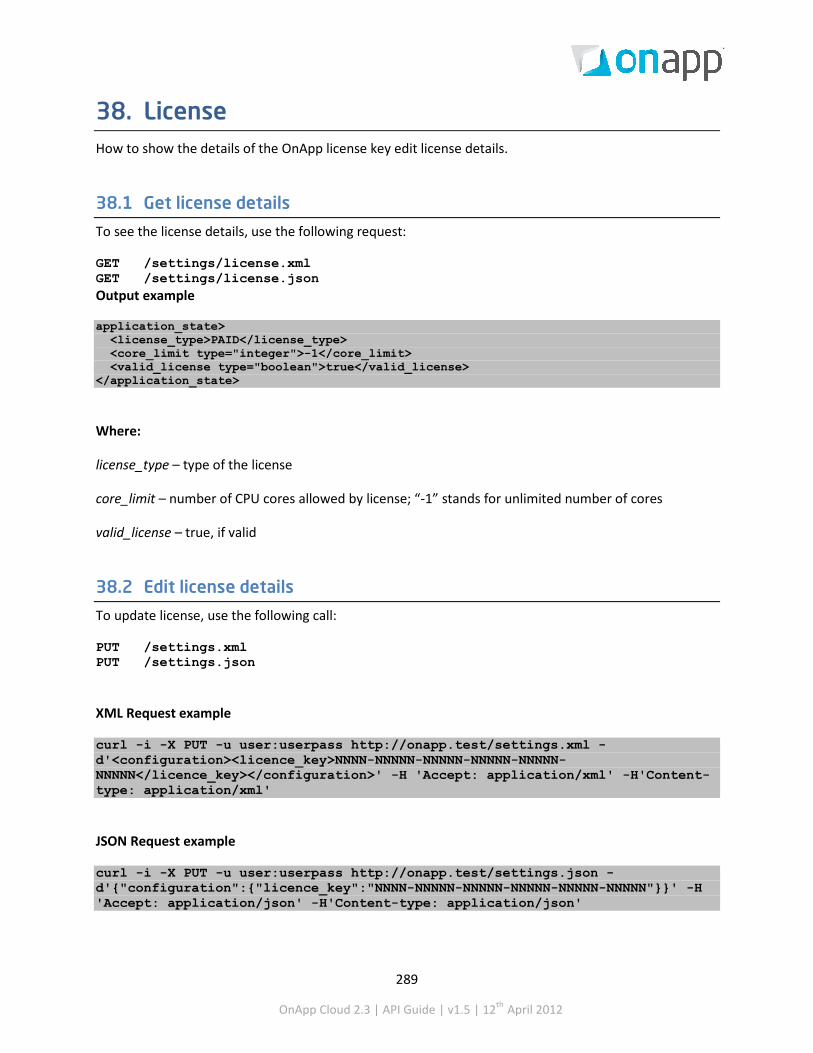
289
OnApp Cloud 2.3 | API Guide | v1.5 | 12th April 2012
38. License How to show the details of the OnApp license key edit license details.
38.1 Get license details
To see the license details, use the following request:
GET /settings/license.xml GET /settings/license.json Output example
application_state> <license_type>PAID</license_type> <core_limit type="integer">-1</core_limit> <valid_license type="boolean">true</valid_license> </application_state>
Where:
license_type – type of the license
core_limit – number of CPU cores allowed by license; “-1” stands for unlimited number of cores
valid_license – true, if valid
38.2 Edit license details
To update license, use the following call:
PUT /settings.xml PUT /settings.json
XML Request example
curl -i -X PUT -u user:userpass http://onapp.test/settings.xml -d'<configuration><licence_key>NNNN-NNNNN-NNNNN-NNNNN-NNNNN-NNNNN</licence_key></configuration>' -H 'Accept: application/xml' -H'Content-type: application/xml'
JSON Request example
curl -i -X PUT -u user:userpass http://onapp.test/settings.json -d'{"configuration":{"licence_key":"NNNN-NNNNN-NNNNN-NNNNN-NNNNN-NNNNN"}}' -H 'Accept: application/json' -H'Content-type: application/json'

290
OnApp Cloud 2.3 | API Guide | v1.5 | 12th April 2012
Where:
license_key – the key of your OnApp license

291
OnApp Cloud 2.3 | API Guide | v1.5 | 12th April 2012
39. SSH keys
39.1 View SSH keys
To see all the keys in the cloud, use the following request:
GET /settings/ssh_keys.xml GET /settings/ssh_keys.json XML Output example:
<?xml version="1.0" encoding="UTF-8"?> <ssh_keys type="array"> <ssh_key> <created_at type="datetime">2011-09-13T16:10:02Z</created_at> <updated_at type="datetime">2011-09-13T16:10:02Z</updated_at> <id type="integer">3</id> <user_id type="integer">1</user_id> <key>ssh-rsa AAAAB3NzaC1yc2EAAAABJQAAAIEAqzsLk+oPP9Qxz0Xgpqoe9DqNV7Qe3+oig/o6Ubt30Yh+Zarf8NXctqqeamC1KrlMt12d0AWd38dZ0CU6Eru/2ciwzz2IB0MLrTyjfLCNe2CW64uNjhSS1SH6gSjJUYwHSi7jUBl0vlGtJ7jswBdhgaKkjk1vXH3YFLTHPuKU+pc= [email protected] </key> </ssh_key> </ssh_keys> Where: ssh_key – an array which displays the key info id – the SSH key ID user_id – ID of the user to whom the key belongs key – SSH key
39.2 Add a SSH key
To add SSH keys to a user profile, use the following call:
POST /user/:user_id/ssh_keys.xml POST /user/:user_id/ssh_keys.json
XML Request example
curl -X POST -u user:userpass http://onapp.test/users/:user_id/ssh_keys.xml -H 'Accept: application/xml' -H 'Content-type: application/xml' –d’<ssh_key><key> ssh-rsa AAAAB3NzaC1yc2EAAAABJQAAAIEAqzsLk+oPP9Qxz0Xgpqoe9DqNV7Qe3+oig/o6Ubt30Yh+Zarf8NXctqqeamC1KrlMt12d0AWd38dZ0CU6Eru/2ciwzz2IB0MLrTyjfLCNe2CW64uNjhSS1SH6gSjJUYwHSi7jUBl0vlGtJ7jswBdhgaKkjk1vXH3YFLTHPuKU+pc= [email protected]</key></ssh_key>’
JSON Request example

292
OnApp Cloud 2.3 | API Guide | v1.5 | 12th April 2012
curl -X POST -u user:userpass http://onapp.test/users/:user_id/ssh_keys.json -H 'Accept: application/json' -H 'Content-type: application/json' –d’{“ssh_key”:{“key”:” ssh-rsa AAAAB3NzaC1yc2EAAAABJQAAAIEAqzsLk+oPP9Qxz0Xgpqoe9DqNV7Qe3+oig/o6Ubt30Yh+Zarf8NXctqqeamC1KrlMt12d0AWd38dZ0CU6Eru/2ciwzz2IB0MLrTyjfLCNe2CW64uNjhSS1SH6gSjJUYwHSi7jUBl0vlGtJ7jswBdhgaKkjk1vXH3YFLTHPuKU+pc= [email protected]”}}’
Where:
key * - a SSH key in the following format: ssh-[type] [ascii-symbols allowed for base64 string] [user credentials]
39.3 Edit a SSH key
To edit a SSH key you may use both types of requests:
PUT /users/:user_id/ssh_keys/:id.xml PUT /users/:user_id/ssh_keys/:id.json
or
PUT /settings/ssh_keys/:id.xml PUT /settings/ssh_keys/:id.json
XML Request example
curl -X POST -u user:userpass http://onapp.test/users/:user_id/ssh_keys/:id.xml -H 'Accept: application/xml' -H 'Content-type: application/xml' –d’<ssh_key><key> ssh-rsa AAAAB3NzaC1yc2EAAAABJQAAAIEAqzsLk+oPP9Qxz0Xgpqoe9DqNV7Qe3+oig/o6Ubt30Yh+Zarf8NXctqqeamC1KrlMt12d0AWd38dZ0CU6Eru/2ciwzz2IB0MLrTyjfLCNe2CW64uNjhSS1SH6gSjJUYwHSi7jUBl0vlGtJ7jswBdhgaKkjk1vXH3YFLTHPuKU+pc= [email protected]</key></ssh_key>’
JSON Request example
curl -X POST -u user:userpass http://onapp.test/users/:user_id/ssh_keys/:id.json -H 'Accept: application/json' -H 'Content-type: application/json' –d’{“ssh_key”:{“key”:” ssh-rsa AAAAB3NzaC1yc2EAAAABJQAAAIEAqzsLk+oPP9Qxz0Xgpqoe9DqNV7Qe3+oig/o6Ubt30Yh+Zarf8NXctqqeamC1KrlMt12d0AWd38dZ0CU6Eru/2ciwzz2IB0MLrTyjfLCNe2CW64uNjhSS1SH6gSjJUYwHSi7jUBl0vlGtJ7jswBdhgaKkjk1vXH3YFLTHPuKU+pc= [email protected]”}}’
39.4 Delete a SSH key.
To delete a SSH from the system (and from the user profile), use the following request:
DELETE /settings/ssh_keys/:id.xml DELETE /settings/ssh_keys/:id.json

293
OnApp Cloud 2.3 | API Guide | v1.5 | 12th April 2012
XML Request example
curl -X DELETE -u user:userpass http://onapp.test/settings/ssh_keys/:id.xml -H 'Accept: application/xml' -H 'Content-type: application/xml'
JSON Request example
curl -X DELETE -u user:userpass http://onapp.test/settings/ssh_keys/:id.json -H 'Accept: application/json' -H 'Content-type: application/json'

294
OnApp Cloud 2.3 | API Guide | v1.5 | 12th April 2012
40. Statistics Statistics show detailed information on the resources used by virtual machines.
Get daily stats (information on the resources used by virtual machines):
GET /usage_statistics.xml GET /usage_statistics.json
Only the GET method is available for statistics. This method sends back usage statistics for all virtual machines in the cloud (per VM for the last 48 hours).
XML Output example
<?xml version="1.0" encoding="UTF-8"?> <vm_stats> <vm_stat> <data_sent>0.0</data_sent> <reads_completed>328892.0</reads_completed> <data_received>0.0</data_received> <cpu_usage>2813.0</cpu_usage> <virtual_machine_id>883</virtual_machine_id> <writes_completed>193395.0</writes_completed> <data_read>1315568.0</data_read> <user_id>1</user_id> <data_written>773580.0</data_written> </vm_stat> ... <vm_stat></vm_stat> ... </vm_stats>
Explanation of the data returned
data_sent - the amount of Kilobytes sent by this VM
reads_completed - the number of read operations performed by the disk
data_received - the amount of Kilobytes received by this VM
cpu_usage - shows how long (in seconds) the VM has been using CPU for the last 72 hours or during the specified period
virtul_machine_id - the ID of the VM for which these statistics are generated
writes_completed - the number of write operations performed by the disk
data_read - the amount of data read from a disk in Kilobytes
295
OnApp Cloud 2.3 | API Guide | v1.5 | 12th April 2012
data_written - the amount of data written to a disk in Kilobytes
Other statistics generated in the system:
• View user’s statistics • View billing statistics for a user • View disk IOPS (Input/Output statistics) • Billing statistics for a VM • Billing statistics for CDN edge servers • View Load balancer billing statistics

296
OnApp Cloud 2.3 | API Guide | v1.5 | 12th April 2012
41. Background task daemon Background task daemon starts/stops/reloads/checks status of all background tasks that run in the system.
41.1 Start background task daemon
To start background task daemon, run:
POST /sysadmin_tools/daemon/start.xml POST /sysadmin_tools/daemon/start.json
Request example:
curl -i -X POST -u user:userpass http://onapp.test/sysadmin_tools/daemon/start.xml 'Accept: application/xml' -H 'Content-type: application/xml'
Response example:
<?xml version="1.0" encoding="UTF-8"?> <daemon> <status>Online</status> </daemon>
41.2 Stop background task daemon
To stop background task daemon:
POST /sysadmin_tools/daemon/stop.xml POST /sysadmin_tools/daemon/stop.json
Request example:
curl -i -X POST -u user:userpass http://onapp.test/sysadmin_tools/daemon/stop.xml 'Accept: application/xml' -H 'Content-type: application/xml'
Response example:
<?xml version="1.0" encoding="UTF-8"?> <daemon> <status>Offline</status> </daemon>

297
OnApp Cloud 2.3 | API Guide | v1.5 | 12th April 2012
41.3 Reload background task daemon
To reload a background task daemon:
POST /sysadmin_tools/daemon/reload.xml POST /sysadmin_tools/daemon/reload.json
Request example:
curl -i -X POST -u user:userpass http://onapp.test/sysadmin_tools/daemon/reload.xml -H 'Accept: application/xml' -H 'Content-type: application/xml'
Response example:
<?xml version="1.0" encoding="UTF-8"?> <daemon> <status>OK</status> </daemon>
41.4 Get background task daemon status
To get backgrounbd task daemon status:
GET /sysadmin_tools/status.xml GET /sysadmin_tools/status.json
Request example:
curl -i -X GET -u user:userpass http://onapp.test/sysadmin_tools/daemon/status.xml -H 'Accept: application/xml' -H 'Content-type: application/xml'
Response example:
<?xml version="1.0" encoding="UTF-8"?> <daemon> <status>Online</status> </daemon>

298
OnApp Cloud 2.3 | API Guide | v1.5 | 12th April 2012
42. Transactions This class represents all the operations happening in your cloud, such as VM provisioning, OS configuring, VM start up, operations with disks, and so on.
42.1 Get the list of transactions GET /transactions.xml GET /transactions.json
XML Output example:
<?xml version="1.0" encoding="UTF-8"?> <transactions type="array"> <transaction> <pid type="integer">2632</pid> <created_at type="datetime">2011-07-20T08:28:54Z</created_at> <start_after type="datetime">2011-07-20T08:28:54Z</start_after> <updated_at type="datetime">2011-07-20T08:28:59Z</updated_at> <actor nil="true"></actor> <priority type="integer">10</priority> <parent_type>VirtualMachine</parent_type> <action>startup_virtual_machine</action> <id type="integer">1547</id> <user_id type="integer">13</user_id> <dependent_transaction_id nil="true"></dependent_transaction_id> <allowed_cancel type="boolean">true</allowed_cancel> <parent_id type="integer">34</parent_id> <started_at type="datetime">2011-07-20T08:28:56Z</started_at> <params> </params> <log_output></log_output> <status>complete</status> <identifier>huilp6uzskz8rr</identifier> </transaction> ... <transaction></transaction> ... </transactions> Where: pid — external process ID created_at — the time when the record of transaction was made in the database, in the [YYYY][MM][DD]T[hh][mm][ss]Z format start_after — the time after which the transaction may start, in the [YYYY][MM][DD]T[hh][mm][ss]Z format finished_at — reserved detail updated_at — the date in the [YYYY][MM][DD]T[hh][mm][ss]Z format actor — reserved detail priority — priority of the transaction (reserved detail) parent_type — the type of the transaction target (virtual machine, disk, hypervisor)

299
OnApp Cloud 2.3 | API Guide | v1.5 | 12th April 2012
action — the type of transaction performed id —transaction ID user_id —ID of the user who performed the transaction dependent_transaction_id —ID of the transaction that the current transaction depends on. For independent transactions this remains empty. allowed_cancel —true if cancellation is allowed. Otherwise false. parent_id — ID of the target VM, disk or hypervisor started_at —time when the transaction was started, in the the [YYYY][MM][DD]T[hh][mm][ss]Z format params —parameters of the transaction log_output —an array with log output details status —status of the transaction (complete, failed, pending, etc) identifier —identifier of the virtual machine
42.2 Get the list of a VM’s transactions GET /virtual_machines/:virtual_machine_id/transactions.xml GET /virtual_machines/:virtual_machine_id/transactions.json
XML Output example
<?xml version="1.0" encoding="UTF-8"?> <transactions type="array"> <transaction> <pid type="integer">2632</pid> <created_at type="datetime">2011-07-20T08:28:54Z</created_at> <start_after type="datetime">2011-07-20T08:28:54Z</start_after> <updated_at type="datetime">2011-07-20T08:28:59Z</updated_at> <actor nil="true"></actor> <priority type="integer">10</priority> <parent_type>VirtualMachine</parent_type> <action>startup_virtual_machine</action> <id type="integer">1547</id> <user_id type="integer">13</user_id> <dependent_transaction_id nil="true"></dependent_transaction_id> <allowed_cancel type="boolean">true</allowed_cancel> <parent_id type="integer">34</parent_id> <started_at type="datetime">2011-07-20T08:28:56Z</started_at> <params> </params> <log_output></log_output> <status>complete</status> <identifier>huilp6uzskz8rr</identifier> </transaction> ... <transaction></transaction> ... </transactions> Where: pid — external process ID

300
OnApp Cloud 2.3 | API Guide | v1.5 | 12th April 2012
created_at — the time when the record of transaction was made in the database, in the [YYYY][MM][DD]T[hh][mm][ss]Z format start_after — the time after which the transaction may start, in the [YYYY][MM][DD]T[hh][mm][ss]Z format finished_at — reserved detail updated_at — the date in the [YYYY][MM][DD]T[hh][mm][ss]Z format actor — reserved detail priority — priority of the transaction (reserved detail) parent_type — type of the transaction target (virtual machine, disk, hypervisor) action — the type of transaction performed id —transaction ID user_id —ID of the user who performed the transaction dependent_transaction_id —ID of the transaction that the current transaction depends on. For independent transactions this remains empty. allowed_cancel —true if cancellation is allowed. Otherwise false. parent_id — ID of the target VM, disk or hypervisor started_at —time when the transaction was started in the the [YYYY][MM][DD]T[hh][mm][ss]Z format params —parameters of the transaction log_output —an array with log output details status —status of the transaction (complete, failed, pending, etc) identifier —identifier of the virtual machine
42.3 Get a particular transaction’s details GET /transactions/:id.xml GET /transactions/:id.json For details refer to the Get the list of transactions section.

301
OnApp Cloud 2.3 | API Guide | v1.5 | 12th April 2012
43. Logs OnApp logs all cloud management actions that take place on cloud resources, including virtual machines, disks, data stores, hypervisors, templates and networks, as well as alerts and notifications.
43.1 Get the list of log items GET /logs.xml GET /logs.json
XML Output example
<?xml version="1.0" encoding="UTF-8"?> <log_items type="array"> <log_item> <created_at type="datetime">2011-07-25T15:26:44+07:00</created_at> <target_id type="integer">22386</target_id> <updated_at type="datetime">2011-07-25T15:26:44+07:00</updated_at> <id type="integer">22903</id> <target_type>Transaction</target_type> <status>Complete</status> <action>RebootVirtualMachine</action> </log_item> ... <log_item></log_item> ... </log_items> Where: created_at – time in the [YYYY][MM][DD]T[hh][mm][ss]Z format updated_at – time in the [YYYY][MM][DD]T[hh][mm][ss]Z format id – log item ID target_id – ID of the transaction (item in the transaction list. See Get the list of transaction) target_type – type of log item (either Transaction or Alert). action - the action name status - the action status (Complete, Warn, Pending, or Failed)
43.2 Get log item details GET /logs/:id.xml GET /logs/:id.json
XML Output example
<?xml version="1.0" encoding="UTF-8"?> <log_item> <created_at type="datetime">2011-07-25T15:26:44+07:00</created_at>

302
OnApp Cloud 2.3 | API Guide | v1.5 | 12th April 2012
<target_id type="integer">22386</target_id> <updated_at type="datetime">2011-07-25T15:26:44+07:00</updated_at> <id type="integer">22903</id> <target_type>Transaction</target_type> <status>Complete</status> <action>RebootVirtualMachine</action> </log_item> For details refer to Get the list of log items.
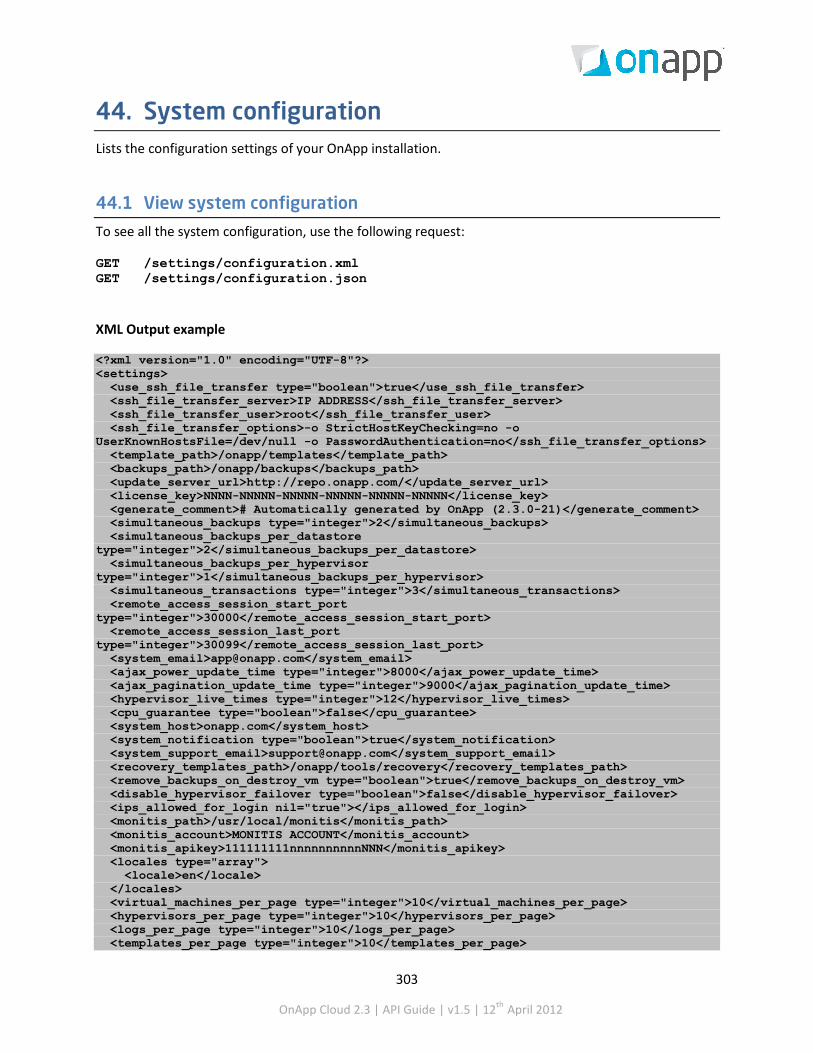
303
OnApp Cloud 2.3 | API Guide | v1.5 | 12th April 2012
44. System configuration Lists the configuration settings of your OnApp installation.
44.1 View system configuration
To see all the system configuration, use the following request:
GET /settings/configuration.xml GET /settings/configuration.json
XML Output example
<?xml version="1.0" encoding="UTF-8"?> <settings> <use_ssh_file_transfer type="boolean">true</use_ssh_file_transfer> <ssh_file_transfer_server>IP ADDRESS</ssh_file_transfer_server> <ssh_file_transfer_user>root</ssh_file_transfer_user> <ssh_file_transfer_options>-o StrictHostKeyChecking=no -o UserKnownHostsFile=/dev/null -o PasswordAuthentication=no</ssh_file_transfer_options> <template_path>/onapp/templates</template_path> <backups_path>/onapp/backups</backups_path> <update_server_url>http://repo.onapp.com/</update_server_url> <license_key>NNNN-NNNNN-NNNNN-NNNNN-NNNNN-NNNNN</license_key> <generate_comment># Automatically generated by OnApp (2.3.0-21)</generate_comment> <simultaneous_backups type="integer">2</simultaneous_backups> <simultaneous_backups_per_datastore type="integer">2</simultaneous_backups_per_datastore> <simultaneous_backups_per_hypervisor type="integer">1</simultaneous_backups_per_hypervisor> <simultaneous_transactions type="integer">3</simultaneous_transactions> <remote_access_session_start_port type="integer">30000</remote_access_session_start_port> <remote_access_session_last_port type="integer">30099</remote_access_session_last_port> <system_email>[email protected]</system_email> <ajax_power_update_time type="integer">8000</ajax_power_update_time> <ajax_pagination_update_time type="integer">9000</ajax_pagination_update_time> <hypervisor_live_times type="integer">12</hypervisor_live_times> <cpu_guarantee type="boolean">false</cpu_guarantee> <system_host>onapp.com</system_host> <system_notification type="boolean">true</system_notification> <system_support_email>[email protected]</system_support_email> <recovery_templates_path>/onapp/tools/recovery</recovery_templates_path> <remove_backups_on_destroy_vm type="boolean">true</remove_backups_on_destroy_vm> <disable_hypervisor_failover type="boolean">false</disable_hypervisor_failover> <ips_allowed_for_login nil="true"></ips_allowed_for_login> <monitis_path>/usr/local/monitis</monitis_path> <monitis_account>MONITIS ACCOUNT</monitis_account> <monitis_apikey>111111111nnnnnnnnnnNNN</monitis_apikey> <locales type="array"> <locale>en</locale> </locales> <virtual_machines_per_page type="integer">10</virtual_machines_per_page> <hypervisors_per_page type="integer">10</hypervisors_per_page> <logs_per_page type="integer">10</logs_per_page> <templates_per_page type="integer">10</templates_per_page>

304
OnApp Cloud 2.3 | API Guide | v1.5 | 12th April 2012
<network_ip_addresses_per_page type="integer">10</network_ip_addresses_per_page> <billing_plans_per_page type="integer">10</billing_plans_per_page> <permissions_per_page type="integer">25</permissions_per_page> <disks_per_page type="integer">10</disks_per_page> <schedules_per_page type="integer">10</schedules_per_page> <transactions_per_page type="integer">10</transactions_per_page> <default_vm_os>Linux</default_vm_os> <default_vm_template type="integer">0</default_vm_template> <default_firewall_policy>ACCEPT</default_firewall_policy> <app_name>OnApp</app_name> <show_ip_address_selection_for_new_vm type="boolean">true</show_ip_address_selection_for_new_vm> <backup_taker_delay type="integer">5</backup_taker_delay> <billing_stat_updater_delay type="integer">5</billing_stat_updater_delay> <cluster_monitor_delay type="integer">15</cluster_monitor_delay> <hypervisor_monitor_delay type="integer">5</hypervisor_monitor_delay> <schedule_runner_delay type="integer">5</schedule_runner_delay> <transaction_runner_delay type="integer">5</transaction_runner_delay> </settings>
Where:
use_ssh_file_transfer - set true to allow secure file access, transfer and management to a remote server
ssh_file_transfer_server - the address of the remote server
ssh_file_transfer_user - the login used for remote server authentication. A password is not required, as it is required that you store a host key
ssh_file_transfer_options - SSH protocol options that set the rules and behavior of how to log into the remote server
template_path - path to the directory where templates will be stored
backups_path - path to the directory where backups will be stored
update_server_url - URL address where OnApp software updates are downloaded from
license_key - license key of your OnApp CP
generate_comment - this text is added by OnApp to system configuration files, such as resolv.conf
simultaneous_backups - the maximum allowed number of simultaneous hypervisor and data store backup processes
simultaneous_backups_per_datastore - the maximum number of simultaneous data store backup processes
simultaneous_backups_per_hypervisor - the maximum number of simultaneous hypervisor backup processes

305
OnApp Cloud 2.3 | API Guide | v1.5 | 12th April 2012
simultaneous_transactions - the number of transaction runners which the daemon will execute at the same time
remote_access_session_start_port - the first port in the range, which are used to remotely connect to virtual machines using the integrated VNC console
remote_access_session_last_port - the last port in the range, which are used to remotely connect to virtual machines using the integrated VNC console
system_email - the email address from which help requests and email alerts are sent
ajax_power_update_time - how often VM status is refreshed on the Virtual Machines screen in ms
ajax_pagination_update_time - how often the dashboard, logs and other items are refreshed in ms
hypervisor_live_times - determines how many times the Control Panel server will attempt to contact a hypervisor before failover is initiated
cpu_guarantee - if true, the system will make sure there is enough CPU on the cloud to create a new VM
system_host –the system host server IP or URL; email alerts link to transaction logs for alert events, and those logs are opened from the server configured here
system_notification - set true to enable email alerts
system_support_email - the email address to which the system will send alerts about failed transactions and change of hypervisor status
recovery_templates_path - path to the directory where recovery templates will be stored
remove_backups_on_destroy_vm - set true to remove all VM backups after this VM was deleted
disable_hypervisor_failover - true, if hypervisor failover will not initiate after meeting the value of the hypervisor_live_times parameter
ips_allowed_for_login - list of IP addresses allowed for login to OnApp CP
monitis_path - path to the directory where Monitis client (to enable autoscale) will be installed
monitis_account - name of the Monitis account
monitis_apikey - API key to access the Monitis account
locales - an array of locals (the locale code) available for the users
virtual_machines_per_page - number of virtual machines displayed per page
hypervisors_per_page - number of hypervisors displayed per page

306
OnApp Cloud 2.3 | API Guide | v1.5 | 12th April 2012
logs_per_page - number of logs displayed per page
templates_per_page - number of templates displayed per page
network_ip_addresses_per_page - number of IP addresses displayed per page
billing_plans_per_page - number of billing plans displayed per page
permissions_per_page - number of permissions displayed per page
disks_per_page - number of disks displayed per page
schedules_per_page - number of schedules displayed per page
transactions_per_page - number of transactions displayed per page
default_vm_os - default OS to create a new VM
default_vm_template - default VM template to create a new virtual machine
default_firewall_policy - default firewall policy for all VMs (unless set otherwise for a particular VM)
app_name - application name displayed on the login screen
show_ip_address_selection_for_new_vm - set true to enable IP address assignment during VM creation
backup_taker_delay - frequency in seconds for launching the Backup Taker task
billing_stat_updater_delay - frequency in seconds for launching the Billing Stats Monitor task
cluster_monitor_delay - frequency in seconds for launching the Cluster Monitor task
hypervisor_monitor_delay - frequency in seconds for launching the Hypervisor Monitor task
schedule_runner_delay - frequency in seconds for launching the Schedule Runner task
transaction_runner_delay - frequency in seconds for launching the Transaction Runner task

307
OnApp Cloud 2.3 | API Guide | v1.5 | 12th April 2012
45. Version To check the version of your cloud installation, use the following request:
GET /version.xml GET /version.json
XML Output example
<?xml version="1.0" encoding="UTF-8"?> <onapp> <version>2.2 </version> </onapp>
Json Output example
{"version":"2.2"}

308
OnApp Cloud 2.3 | API Guide | v1.5 | 12th April 2012
46. Document revisions V1.5, 12th April 2012
Added:
• Created separate License section. • New billing plan limit for data store and network zones • Backup server zones chapter • Backup servers chapter • Add limits for backup server zones section • Get backup server zone resource details section • DNS setup chapter • DNS zone chapter • Apply a Firewall rule section • Background task daemon chapter • User additional fields chapter • Documentation conventions section. • View user's statistics for a particular period section • Added CDN usage statistics chapterAdded Enable CDN section to the CDN Resources chapter • Added View billing statistics for a resource section
Updated:
• Updated incorrect Create CDN Edge Group API request • API output examples in Get backup server details and Search backups sections • API calls in Billing plans chapter • Deleted an IP address join section • Edit a role and Add a new role sections with the correct parameters • API calls in Convert a backup to a template section • Load Balancers section with the latest parameters • Create a VM section adds info on new Windows licensing type • Changed CPU share parameter to CPU priority • Get the list of backups available for a disk section • Get the list of system templates section • Get the list of VM backups section • Hypervisors chapter with the latest parameters • Create a virtual machine section with the info on setting data store zone for primary and swap
disks • The Currencies chapter with the precision_for_unit parameter • Added label description in Create edge server section

309
OnApp Cloud 2.3 | API Guide | v1.5 | 12th April 2012
• Added additional fields array in XML output in Get the list of users section • Edited XML and JSON request examples in Create a user and Edit a user sections • Edited XML Output example in View CDN resource advanced details section • Corrected Reboot a hypervisor XML request example. • View user's statistics section • Updated Logs chapter with the new parameters • Updated Edit a hypervisor zone section
V1.4, 12th January 2012
• Corrected a typo in xml for Add a payment and Edit a payment sections (</payment>, not </payments>
V1.3, 8th December 2011
• Added o Get the list of data store joins attached to the hypervisor section o Add a data store join to the hypervisor o Remove a data store join from the hypervisor o Get the list of network joins of the hypervisor o Add a network join to the hypervisor o Remove a network join from the hypervisor o System configuration chapter o View a CDN resource advanced details o Create a CDN resource with advanced settings o Edit CDN resource advanced settings
• Updated o Edit a VM, Resize a VM, Create autoscaling rule for a VM with the info on setting cold
resize o Get the list of hypervisors, Get the list of unassigned hypervisors, Get hypervisor details,
Add a new hypervisor, and Edit a hypervisor sections with the latest parameters. o Removed redundant parameters from View CDN edge group details section o Corrected request for Delete a payment section
V1.2, 14th November 2011
• Added o CDN Resources chapter. o Migrate edge server section. o Open the server console section. o Segregate edge server section. o Reset root password section.

310
OnApp Cloud 2.3 | API Guide | v1.5 | 12th April 2012
o Change edge server owner section. o Set VIP status section. o Edit admin note section. o Billing statistics for CDN edge server section. o CDN edge server backups section. o CDN edge server network interfaces section. o IP address joins section. o Firewall rules for CDN edge servers section. o Reboot in recovery section. o Create CDN edge group section. o Edit CDN edge group section. o Delete CDN edge group section. o Assign location to the group section. o Unassign location from the group section. o Add limits for edge groups section
• Updated:
o View CDN edge group details section. o View billing statistics for a user section o parameters for Get the list of system templates and Get the template details sections o output example and parameters description for Get the list of VMs section o output example and parameters description for Get the list of users section o error codes returned when you Edit a VM
• Replaced Add disk to edge server, Resize edge server disk and Delete edge server disk sections
with CDN edge server disks section.
v1.1, 14th October 2011
• Added: o CDN Edge Servers chapter o CDN Edge Groups chapter o Delete a template section
v1.0, 3rd October 2011
• Added: o SSH keys chapter. o Migrate a disk section. o Get the list of VMs running on the hypervisor section. o Set VIP status section.

311
OnApp Cloud 2.3 | API Guide | v1.5 | 12th April 2012
o Reboot in recovery section. o Set SSH keys section. o Rebuild VM network section. o Add nodes to cluster type section. o Remove nodes from cluster type section. o Configure autoscaling type section. o Rebuild a load balancer section. o Attach/remove a hypervisor from a hypervisor zone section. o See user limits section.
• Updated
o Add base resources to a billing plan section. Now it consists of the following subsections: Add Virtual Machines base resource limits, Add other base resource limits, Add limits for template groups and hypervisor zones, Add limits for data store zones and Add limits for network zones.
o Add a load balancing cluster section. o Create a user and Create a VM sections now contain password validation requirements. o Edit a user group section contains both XML and JSON request examples. o Delete a user group section contains both XML and JSON request examples. o Get the list of hypervisors section contains updated XML output example and
parameters description. o Attach a template to a group section contains both XML and JSON request examples. o Detach a template from a group section contains both XML and JSON request examples. o Make a template public section updated with both XML and JSON request examples.
• Cosmetic changes. • Other detail is unchanged from v 1.1 of the API Guide for OnApp 2.2