Embed Size (px)
Citation preview

OneGate
Users Manual
September 16th, 2011

P a g e | 2
Users Manual
Table of Contents 1. INTRODUCTION ................................................................................................................................... 3 2. GLOSSARY ........................................................................................................................................... 4 3. ICONS .................................................................................................................................................. 5 4. IDENTIFICATION .................................................................................................................................. 6
4.1. USERID & PASSWORD ....................................................................................................................... 6 4.1.1. Requesting a Userid & Passwaord ......................................................................................... 6 4.1.2. Identification via a Userid & Password .................................................................................. 6
4.2. ELECTRONIC CERTIFICATE.................................................................................................................... 6 4.2.1. Requesting an Electronic Certificate ...................................................................................... 6 4.2.2. Logging on with an Electronic Certificate .............................................................................. 6
5. APPLICATION ....................................................................................................................................... 9 5.1. PROFILE ......................................................................................................................................... 9 5.2. REPORTS .......................................................................................................................................11
5.2.1. Overview .............................................................................................................................11 5.2.2. Control Panel .......................................................................................................................12 5.2.3. Selection & Management of Forms ......................................................................................13 5.2.4. Fill in Data ...........................................................................................................................19
5.3. EXCHANGES ...................................................................................................................................27 5.3.1. Messages ............................................................................................................................28 5.3.2. File Exchange Log ................................................................................................................30
5.4. UPLOAD ........................................................................................................................................36 5.4.1. XML-Upload ........................................................................................................................36
5.5. ABOUT..........................................................................................................................................37 6. EXTRA FUNCTIONS..............................................................................................................................38
6.1. SEARCH CRITERIA IN THE APPLICATION ..................................................................................................38 6.2. REPPORTING BY E-MAIL & WEBSERVICES...............................................................................................38 6.3. SENDING MESSAGES ........................................................................................................................38
7. APPENDICES .......................................................................................................................................40 APPENDIX A: COOKIES ............................................................................................................................40
8. INDEX .................................................................................................................................................42

P a g e | 3
Users Manual
1. INTRODUCTION
Any society that has reached a certain level of sophistication needs data and information to function well. Its citizens and businesses feed a never-ending stream of data to government bodies and statistical institutions alike.
Until recently reporting relied on paper and pencils. The technological revolution has replaced those instruments by computers, emails and internet based forms.
OneGate is an example of such an internet based reporting tool. It has not been developed to implement a limited number or reports; OneGate is a generic application that can generate and diffuse a whole range of reports and forms.
OneGate is the successor of the application CSSR (Central Server for Statistical Reporting).
One Gate evolves all the time to accommodate the ever changing needs of the declarers and the data collecting institutions. We try to describe the functions of OneGate as completely as possible. Completeness and exactitude are the ideals we try to achieve without nurturing any illusions about the feasibility of the undertaking. We cannot exclude small differences between the current manual and the last version of the software. The manual will be adapted to the extent possible after major updates of OneGate.

P a g e | 4
Users Manual
2. GLOSSARY
The following terms and concepts are used throughout the manual:
User: This is the "real" person using the application to report the data. Every user is identified in One Gate either through a userid (with a password) or through a certificate. The identification (or id) will in practice be shared by several people.
Declarer: A declarer is a legal body held to report certain data. More often than not this body will be a corporation or business. A declarer is properly and uniquely identified by an identifier like the Belgian KBO-number or the financial institution's BIC-number. Declarers and users may interact in different ways:
Very often the user and the declarer will be one and the same person (e.g. the owner of a small business).
A single user may report for several declarers. A typical scenario would be an employee in an accounting company that is doing the books for several corporations - including the statistical reporting. The accounting company is acting on behalf of the corporations.
Several users may share the statistical reporting for a single large corporation. Every department is responsible for its own reporting and each of these may have its own identification in the One Gate system.
In the manual we will often mix the concepts of user and declarer. The context should make the exact meaning clear.
Domain: A well defined subset of statistical reporting.
Report: A statistical declaration for a given period and with a certain regularity or frequency. A report may contain many forms. For clarity and ease of use forms may be split up into sections.
Section: A part of a larger form meant to keep the reporting well organized and to split the reporting into logically coherent units. The section is a collection of items or questions that belong logically together.
Institute : The institute is a body that collects data using OneGate. Examples are the National Bank of Belgium, The Banking Committee (FSMA) and others.
Data Collection Manager: In every institute one or more people are responsible for the data collection follow-up. They will get in touch with the declarers should reporting problems occur. On the other hand, every declarer may contact these people using the OneGate internal message exchange service.
Domain Manager: These are the people who define the reports and forms. Every declarer may contact the Domain Manager using the OneGate internal message exchange service.

P a g e | 5
Users Manual
3. ICONS
Many OneGate functions are available through buttons bearing an icon. The main ones are briefly explained in the following list:
Return to the previous window.
Return to the previous page in a list.
Proceed to the next page in a list.
Get access to documents and information.
Send a message to a manager.
Create a new declaration.
Delete one or more elements.
Close the declaration for a given period.
Re-open a closed form
Import a declaration from a file (csv).
Export a declaration to a file (csv, xml).
Printing or exporting a declaration's summary (pdf).
Report "nothing to report". This is a so called nihil-report.
Reinitialize the form.
Validate the contents of a report.
Save and validate the declaration.
Retrieve the history of file exchanges.
Save and validate the entered data
or Deletion of data or messages
Add a single line
Add multiple lines

P a g e | 6
Users Manual
4. IDENTIFICATION
OneGate allows one to identify using either a userid and password or a certificate.
4.1. USERID & PASSWORD
4.1.1. REQUESTING A USERID & PASSWAORD You can request a username and password by mailing to the authorisation managers of the application. Please mention the following informations in your email:
your company-number, the name of your company, name and telephone-number of a contact person, the domains to which you request access (if known) and if you'd like access to the production- or test-environment.
Contactinformation can be found on the website op OneGate.
4.1.2. IDENTIFICATION VIA A USERID & PASSWORD After launching the application using one of the URL's the user will see a dialog box inviting him to fill in his userid and password (see Figure 1).
Remark: Passwords are case sensitive.
Figure 1: identification with a userid and password
After a successful logon the user will be sent to the "Profile"-page. Here he can manage his personal data. See section 5.1 for more information.
4.2. ELECTRONIC CERTIFICATE
With an Electronic Certificate, you will get an even higher decree of confidentiality. For some enquiries it is compulsory to use an Electronic Certificate.
4.2.1. REQUESTING AN ELECTRONIC CERTIFICATE When requesting an Electronic Certificate, the declarer has to fill in the necessary forms and take contact with the authorisation desk of the application. The complete procedure, needed documents and contact-information can be found on the website of the application.
4.2.2. LOGGING ON WITH AN ELECTRONIC CERTIFICATE The following dialog box will be displayed. Don't pay attention to the security warning. The application (EntrustTruePassApplet) will retrieve the necessary certificates from the certificate cache of your browser.

P a g e | 7
Users Manual
Click the button "Run" to continue. The dialog box "Select Certificate" shows whatever certificates available. Click the "View Certificate" button - or double click a certificate - to see more details on a certificate.

P a g e | 8
Users Manual
Having selected a certificate you will be prompted to log on. Your userid will already be filled in - the id is part of the certificate in this case - and you just have to type your password. Remember you choose this password when you registered the certificate. Don't forget passwords are case sensitive.
When the logon succeeds you will arrive at your "Profile"-page. See section 5.1 for more details on this part of the application.

P a g e | 9
Users Manual
5. APPLICATION
On top of the webpage representing the OneGate application you will find several tabs. Each of these tabs represent a major function of the application. The following list enumerates these functions:
Profile: Modifying your personal profile Reports: Declaring and consulting reports Exchanges: Checking messages in the OneGate communication system Upload: Transfering data to OneGate using Xml-files About: Checking the application's version
We discuss these five tabs in the next sections of this document.
5.1. PROFILE
After a successful logon the user will be invited to provide some information in a window called "My Personal Profile" (see Figure 2).
Figure 2: My personal profile - providing user information
The user can provide some personal information such as his first and last name, his address etc. Most fields will be empty on the first use. Only "Language" and "Country" will have default values. The user will find whatever changes he has made to his personal information on the next visit of the application. The application uses a cookie1 to store this information, unless the browser
1 See Annex 1

P a g e | 10
Users Manual
settings prevent or complicate the use of cookies. The information can be modified on any subsequent visit.
There is only one mandatory field: the email address. The mandatory character of the field is made clear by the presence of an asterisk (or star). The address is mandatory because the Data Collection Manager needs someone to get in touch with should any problems occur in a declaration.
The program will display the following error message when you try to save a profile without an email address:
The program will perform an elementary check on the email address (it should correspond to the following pattern: ...@...). An error message will be displayed whenever the pattern is violated2:
Sometimes the user will be responsible for several declarers. In that case you will see a hyperlink following the declarer's id in the "Declarer" section. The link is called "All Declarers" and clicking it will show you the list of declarers you are to report for. Select one of the declarers. The choice you make will influence the table of contents of reports you will see next.
The last declarer that was selected will be part of the profile too.
2 The application will not check whether the email address really exists. The check is a formal one only.

P a g e | 11
Users Manual
5.2. REPORTS
The Tab "Reports" gives an overview of your reporting-obligations and gives the declarer the possibility to fill in these reports.
5.2.1. OVERVIEW Select the tab "Reports". See Figure 3 for a screen shot.
Figure 3 : Reports
The screen presents a table of contents (TOC) composed of two types of elements: Domains and Reports.
A Domain - as explained before - is a well defined subset of statistical reporting like the Balance of Payments, Foreign Trade and so on.
The Domain acts as a container for Reports from that statistical subset. Each domain is composed of reports.
The user will only see the domains and reports for which the declarer he represents at that moment must report. The Table of Contents for two different declarers will very likely be different.
The title of the domain has an icon attached to it. Clicking the button allows the user to send a message to the Domain Manager. In this example the message will be sent to the manager of the domain Euroclear Reporting. More information about the messaging-system can be found in section 6.3.

P a g e | 12
Users Manual
5.2.2. CONTROL PANEL Select a report from the main Table of Contents. The next page will show a summary of the periods that have been prepared (or initialized) for data entry. For each period the status will be displayed. The screen on the page is called the Control panel.
Figure 4: Control Panel
The Control Panel displays the following information:
Period: This is the period for which reporting is expected. It is in the format year-period. For monthly reports the period part will be the month of the year: 2009-12 means December 2009. Quarterly reports will take either 3,6,9 of 12 in period - the last month of each quarter.
Initial: A check in this column means no data have yet been reported for this period. Error: A check indicates that errors were detected during the report's validation. Warning: A check also indicates that errors were detected during the report's validation but
the errors are not considered serious enough to prevent the data from being accepted. Some data did not conform to some of the constraints defined by the Domain Manager but they are still acceptable.
Ok: No errors were detected in the report. Open: The user can still modify the data of the report. The report hasn't been closed yet.
Data are already saved in OneGate but the user can return to the report and apply some changes.
Closed: The report was closed and no more changes are possible. The user can still consult the data.

P a g e | 13
Users Manual
Some remarks: Error/Warning/Ok are mutually exclusive states: only one of these states will be
checked at any time. The state Ok, Error or Warning is the "worst" or minimal value for all forms of the
report. As soon as OneGate detects fatal problems in a single form the state of the report will be changed to Error. Ok means all forms conform to the constraints.
Open and Closed are of course mutually exclusive states.
5.2.3. SELECTION & MANAGEMENT OF FORMS In this chapter, we discuss how reports and forms can be opened, filled in, closed, sent....
Selection The user has selected a period in the Control Panel and he will get a list of forms available for that period (see Figure 5). In the example four forms are available.
Figure 5: The Forms of a report for a given period
In the header we will get the identity of the "Declarer" (e.g. KBO 0423747369) and of the "User" (e.g. 800-00047820-03).
The page presents a summary of the forms that compose the report. For each form we see the following information items:
A checkbox to select the form. Some of the functions need at least one form to be selected before they perform (see further on).
Form: a description of the form

P a g e | 14
Users Manual
Required Before: the user is informed of the deadline for reporting. In Figure 5 data for "Depot by Customer" for December 2009 should be reported before January 20th, 2010. This is informative only, changes can be made as long as the report is open.
Last Update: the timestamp of the last modification of the data. This timestamp is also updated when the user closes a report.
State: Indicates the result of the validation of the form (Ok, Error or Warning) Lifecycle: Is the form in its Initial state or is it Open or Closed? Nihil: Indicates whether the user has reported "Nihil" for the form. "Nihil" means there is
nothing to report but the reporting has been done. As far as the reporting obligation is concerned the user is OK.
There is a whole list of buttons on top of the table. The function of these buttons is described in the following sections.
: Close a report
: Import data into a form.
: Export data from a form or report
: Print a summary of the report
: Declare "Nihil" for a form.
: Reinitialize a form.
: Validate a form.
: Send a message to the Data Collection Manager
Most functions require the user to select one or more forms - use the checkbox in from of the form to do so. You will be warned when no form is selected and when you try to perform an action requiring at least one form:
Closing a Form This action will close all the forms of the report. Closing a report means the reported values become official. From that moment on no more data can be modified in this report3. The application needs you to confirm this action before closing the report.
Figure 6: Confirming Closing a Report
3 Some forms may be reopened by a Domain Manager.

P a g e | 15
Users Manual
The exact behavior of the function depends on the "Closure Rule" defined for the report. Some reports cannot be closed.
The column "Lifecycle" (see previous section: "Selection") will be adapted for all forms.
Remark: A report cannot be closed when errors are detected. The icon to close the report will not be available.
Import of Data The function - and the icon that represents it - will not be available when import of data into the form is not allowed. The Domain Manager decides whether this facility is available for a given report. Select the form that will be the destination of the imported data. The application will warn you when no form was selected:
In section 5.2.4.2 we discuss more in detail how this functionality works.
Export of Data This function creates a file containing the data of the form or report.
You can use the result of the export function as a template for the definition of import files.
Depending on the selections you have made in the list of forms you will be offered the choice between exporting to a CSV-file or exporting to an XML-file.
XML comes in two flavors, either as a file with the data of the selected form(s) or as a file containing all the data of the report.
The first will be called XML, the second is called XML-Report. The option you get depends on the number of forms selected.
The table below describes all three possibilities.
Number of selected Forms CSV XML XML-report 0 X 1 X X X
2..N X
P a g e | 16
Users Manual
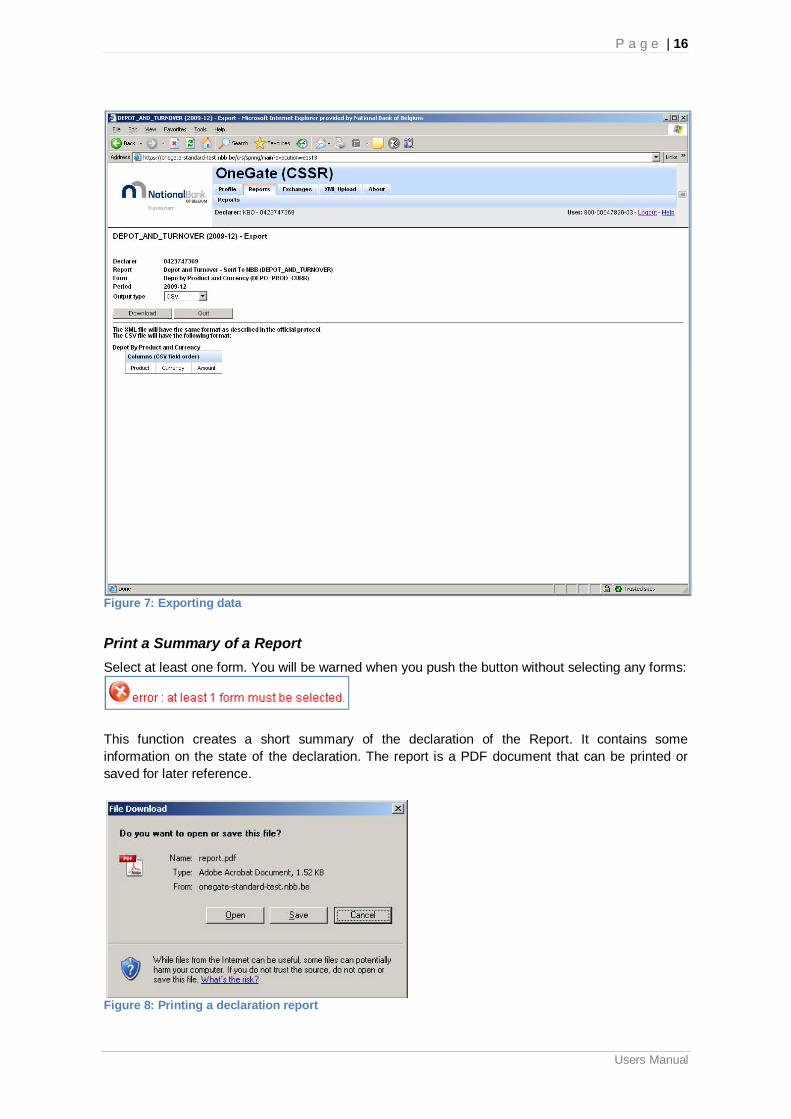
Figure 7: Exporting data
Print a Summary of a Report Select at least one form. You will be warned when you push the button without selecting any forms:
This function creates a short summary of the declaration of the Report. It contains some information on the state of the declaration. The report is a PDF document that can be printed or saved for later reference.
Figure 8: Printing a declaration report

P a g e | 17
Users Manual
Declare "Nihil" for a Form One or more forms can be explicitly declared as "Nihil". This means that the declarer has fulfilled his reporting obligation but there was nothing to report.
Caution: "Nihil" will replace any values that were already entered into the form(s). One Gate will ask for confirmation before proceeding to the Nihil action.
Figure 9: Confirming the Nihil action on a form
The function needs at least one form to be selected; you will be warned if no form is selected:
The program informs you if the operation has succeeded:
The Domain Manager may decide that some forms should never be set to "Nihil". You will be warned of this:
One Gate will adapt the columns "State", "Lifecycle" and "Nihil" (see section "Selection") for any form that was set to "Nihil".
Reinitializing a Form The selected forms will be reset to their initial values - this means empty fields or default values if any were defined for the form. Modifications to the initial data will be lost - including "Nihil" data.
Figure 10: Confirming the reinitialization of a form
The function needs at least one form to be selected; you will be warned if no form is selected:
The column "Lifecycle" of any form affected by the function will be reset to "Initial". The column "Nihil" will be reset if necessary. If all goes well you will be rewarded with the following message:
Sending a message to the Data Collection Manager Every report is monitored by a so called Data Collection Manager. He must make sure that reports are filled in on time and without errors. The user can get in touch with this manager using the

P a g e | 18
Users Manual
internal communication system of OneGate. Messages sent to this manager will always refer to a specific report or form for a given period.
See section 6.3 for more information on this functionality.
Initializing a Form "on Demand" Sometimes one gets the impression that the report is empty. There seems to be no forms in this report (see Figure 11). In fact we are dealing here with reports or forms that must be submitted infrequently.
Normal reporting is quite regular. There is a fixed frequency for submitting the reports; the frequency may be monthly, quarterly etc. Also the declarer is often supposed to submit the report before a given date (remember the property "Required Before"). But some reports are quite irregular and sometimes even completely ad hoc. Every so often the declarer has something to submit. It is difficult for the Data Collection Manager to prepare or initialize this kind of report. The task of initializing the report and its forms is therefore transferred to the user.
In Figure 11 you will find the icon , it creates and initializes a new declaration. The form receives an initial date and it is ready to be completed. The user can modify the data until the form is closed or until the final submission date is reached. This date is defined by the Data Collection Manager.
Figure 11 : Form "on Demand"

P a g e | 19
Users Manual
5.2.4. FILL IN DATA There are three ways in which a declarer can fill in Forms in the Internet Application:
1. Manually (entering data by hand), 2. By uploading a CSV-file or 3. By uploading an XML-file.
However, these three option are not available for each report. The manager of the report must activate these options explicitly.
5.2.4.1. Manually
Selection of a Section The user selected a form and he will now see a list of sections (Figure 12). This is just another list of entries in which a choice must be made. In many cases there will be only one section in the form so this step will be skipped.
Again, both the declarer's and the user's identity are mentioned in the heading.
Use the icon to get to the documentation on the form - if any is available.
The only meaningful action on this page is the selection of a section. The section is where the real report data will be found.

P a g e | 20
Users Manual
Figure 12: The sections of a form
Icons When filling in data in the Sections, the following icons will be visible:
: Savings of Data
of : Deletion of Data
: Adding a single line
: Adding multiple lines
Filling in the Data The Domain manager enjoys some freedom in OneGate in defining the forms: we will find Record Oriented Input (called Single Detail), Lists, Lists of Details and Tables. The choice depends on the nature and the subject of the report. First we will describe the available formats. The common functions will be described in a separate section.
Single Detail By "Detail" we mean a reporting of several chunks of information on a very specific item. There is only one element to report upon, but there are several aspects to that element. A typical example would be a form where someone types in his personal data like name, address etc. Figure 13 gives an example. In this case we ask the user to report on a single transaction.

P a g e | 21
Users Manual
Figure 13: Single Detail data-entry
List Lists will be used whenever the amount of input data is variable or when the number of combinations of X and Y is too high to be presented in a Table - see further - (imagine a table with all countries combined with all currencies).
Every line in the list is an item to be reported. The user is supposed to enter data in every field, either directly by typing the value or by making a choice from a list of predefined values.
Import/Export and Intra/Extra are examples of the second option. Click on the small icon to see the list of acceptable values for the given field (eg. Figure 15).
Figure 14: List
Figure 15: Selection of predefined values in a pop-up window
The user can always delete lines by clicking the eraser icon ( ) in the first column.
An empty report - when the state is Initial - has a fixed number of lines for data-entry. You can always add new lines with the icon.
On top of the list you will see a checkbox called "Show Errors Only" (Figure 16) . Checking the box will limit the lines displayed to those that have validation errors. This option is very useful when the report is voluminous and when you want to have an idea about the erroneous lines.
Figure 16: Checkbox to limit the contents of the list to erroneous lines

P a g e | 22
Users Manual
List with Details This is in fact a list where every item can be presented as a Single Detail. It will be used when many items must be reported - hence the use of a list - but each of the items is too complex to be presented as a succession of data-entry fields.
In the list you will find a pencil icon - - that will give the details of the items. Figure 17 illustrates this layout.
Figure 17: Detail from a List with Details
The page offers a couple of navigation tools: : scroll to the next item : scroll to the previous item : scroll to the first item : scroll to the last item
On top of the navigation pane (Figure 04) you will see the New icon that you can use to add a new item to the list.
Table Tables are often composed of predefined elements like codes for questions, countries and currencies. These elements will be used to draw the X and the Y-axis of the table. Elements may be combined; one could repeat a list of currencies for every country in the axis.
In most cases X and Y will be fixed dimensions. The data will be entered in the intersections of X and Y. For every combination of X and Y there will be a potential input (Figure 18).
In some cases the Domain Manager will allow the user to report several times for the same combination. For example, instead of having just one value for INTRA and IMPORT there will be
several entries. If this is the case you will find some small icons in the left hand margin: , ,
. Their function is to
add a single line( ),
to add several lines ( ) or
to delete the line ( ).
Figure 18: Table

P a g e | 23
Users Manual
Validation Rules Some forms contain validation rules. These rules can be to set restrictions on the possible data-entries (e.g. maximum- and minimum-values) or to check coherence between entered data (e.g. sum of distinct fields is equal to another field).
When you save the data the set of rules will be executed on the data. Faulty data - data that violate a rule - will appear against a red background.
Figure 19: Validation Errors
A small example: In the example in Figure 19 we had a simple validation rule: Amount < 20.000. Amount is the name of the variable that receives the data in this example. We put the value 1.000.000 in the cell on the crossroads of Intra and Import - a clear violation of the rule. In the Control Panel this report will get the State Error.
When you move the mouse over the red area a tooltip will display the validation rule that was violated.
To remind you: In sections that present the data as a list you can always limit the number of displayed
lines to the ones that are faulty by checking the option: .
Validating a form means executing the rules defined for the given form(s). The user is informed directly whether data he has introduced are problematic or not. The result is a validation report and it is available as a document in HTML or XML. It is up to the user to choose the appropriate format of the validation report - he is offered the choice in the dialog box in Figure 20.
Figure 20: Choice of file format for the validation report
Figure 21 shows an example of a validation report in HTML:

P a g e | 24
Users Manual
Figure 21: Validation report in HTML
The validation report in XML can be visualized in your browser or saved to disk (Figure 22). The result of an XML Validation Report can be seen in Figure 23.
Figure 22: Open or save an XML validation report

P a g e | 25
Users Manual
Figure 23: Validation report in XM format
5.2.4.2. Uploading of a CSV-file For some Forms, it is possible to upload a CSV-file with input-data. This data will be used as input for the form. This function - and the corresponding icon - are unavailable when a CSV-import is not allowed. The manager of the report must activate this function explicitly.
If import into the form is allowed you will get the following page (Figure 24):

P a g e | 26
Users Manual
Figure 24: Importing data using a CSV-file
Use the "Browse" button in "Open File" to select the file that contains the data to be imported. The page will give a detailed description of the structure the file should respect to import the data. When the form consists of several sections, there will be a description for every section.
The option "Type" determines whether the imported data will be added to data already present (option "Append") or whether existing data will be overwritten by the imported values (option "Replace").
Having selected a file you can import the data with the button "Upload".
The system confirms the operation with the following message:

P a g e | 27
Users Manual
Figure 25: The Ticket Number after a succesful import of data via CSV
The ticket number - CSV-307 in the example - is a reference to a message in the OneGate exchange system. This message will also include a validation report on the import. Clicking the hyperlink here will send you to the page where the message can be consulted. See section 5.3.2 for more details.
Remark: The name CSV means "Comma Separated Values". A file following this convention separates the parts of a single registration - or record - by means of a fixed character. In OneGate we use the semi-colon or ';' as a separator. Example: BRADY;USD;100.2 for the example in Figure 24.
OneGate will only accept '; ' as a separator. This implies that ';' should not appear in any field. Example: National Bank of Belgium;Brussels: OneGate will see two fields instead of one.
We use the term 'CSV file' for the import file. We only mean to say that the import file has to respect a given layout - the ';' separator in this case. The real extension of the file name is not important. OneGate will happily accept any filename as long as the format is respected.
The treatment of records that violate the protocol will depend on the kind of violation and on the definition of the section:
Records with extra fields will simply be rejected from the import. Records in the wrong order might or might not be accepted depending on the type of the
data that is expected. Switching two numerical values will be acceptable to OneGate but the reporting will be wrong of course.
5.2.4.3. Uploading an XML-file The Internet-application OneGate also gives the possibility to fill in reports by uploading an XML-file. This functionality is available in the tab "Upload". See section 5.4.1 for more details.
5.3. EXCHANGES
The tab "Exchanges" offers two important functions of the OneGate system:
A function to read the messages that were sent and received. Go to the menu "Messages" (section 5.3.1).
A function to follow-up XML file upload in the menu "File Exchange Log" (section 5.3.2).
OneGate uses its own internal system for message exchanges. It is not a classical email application; the messages will never transit through public email servers. The communication remains entirely within the OneGate environment. This gives users a higher level of security while

P a g e | 28
Users Manual
in public email security and privacy are rather low. Every communication between the external user and the system is encrypted
5.3.1. MESSAGES The menu "Messages" has two functions: "Incoming" and "Outgoing". The meaning is unambiguous:
incoming messages have been sent from the system to the user. System is to be understood broadly here; it covers human managers of OneGate and certain program routines. E.g. when a user uploads a file he will receive a message from the file upload routine. The message contains a reference number that allows the user to follow-up the processing of his file.
Outgoing messages have been sent by the external user to a manager. Remember the
mail icon - - in the personal profile page and in the list of forms. Using this function generates outgoing messages. From this tab it is not possible to send any messages.
Incoming Messages Figure 26 gives a screenshot of the "Incoming Messages" tab.
Figure 26: Incoming messages
The interface is self-explaining. For every message the following information is displayed: a checkbox to select a message. The checkbox on top of the list selects all messages. an optional icon to indicate the importance of the message.
o means "not too important" while o a message with the icon would better be read as soon as possible.

P a g e | 29
Users Manual
"Normal" messages have no special icon. An icon that indicates the read status of the message.
o : has been read or o : still unread.
An optional paperclip ( ) indicating the presence of attachments. A timestamp of the moment the message was received. The contents of the message.
Use the to remove selected messages from the list.
Click a message to get to the details of it. The example in Figure 27 shows a message with an attachment. The message has been sent by the validation system and the result of the validation is written to the file feedback.xml. The name of the attachment is a hyperlink; click the name to get to the contents of the file.
You can delete the message on this page using the button "Delete".
Figure 27: Detail of an Incoming Message
Outgoing Messages The page for outgoing messages is very similar. There will of course be no indication of the read status of the message. Figure 28 shows the outgoing messages page - empty in this case.
Clicking a message will show the details of the message - including any attachments. Messages in the "Message Detail" page can be deleted using the button "Delete".

P a g e | 30
Users Manual
Remark: A Message Detail will always refer to the context from which the message was sent. The sender and the receiver will always be identified and the contents and attachments are displayed. Depending on the correspondent - a Domain manager (DOM) or a Data Collection Manager (DCM) - some extra information will be available:
Info DOM DCM Domain X X Report X Form X Period X
Figure 28: Outgoing messages
5.3.2. FILE EXCHANGE LOG OneGate was developed to upload as much information as possible using files. The user doesn't have to type in everything by hand. Forms and even full reports can be uploaded using a CSV- or an XML-file. The file will be processed on the server, the data will be written to the database and the result of the processing will be stored in a feedback file. These feedback files can be consulted through the "File Exchange Log" function.
Each time the user presents a file to the system, OneGate will generate a reference-number. It is called a ticket-number. File processing is an asynchronous4 process for the time being. OneGate 4 A synchronous processing mode is planned for the near future.
P a g e | 31
Users Manual
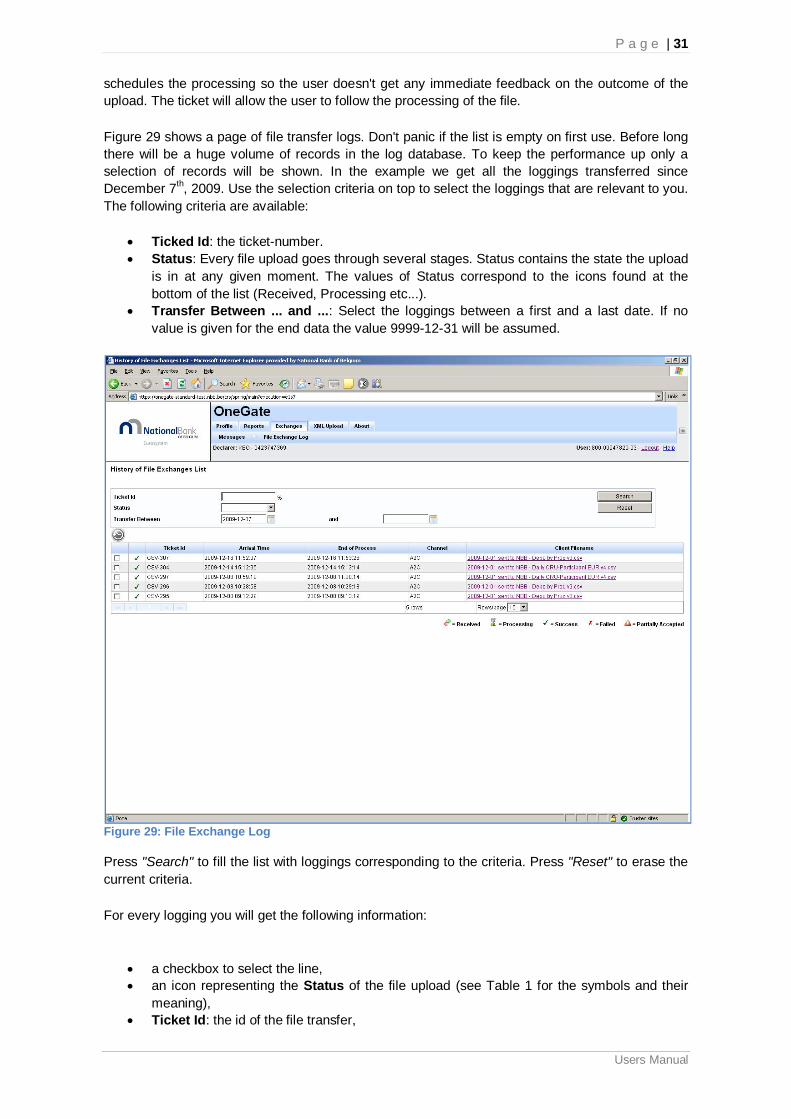
schedules the processing so the user doesn't get any immediate feedback on the outcome of the upload. The ticket will allow the user to follow the processing of the file.
Figure 29 shows a page of file transfer logs. Don't panic if the list is empty on first use. Before long there will be a huge volume of records in the log database. To keep the performance up only a selection of records will be shown. In the example we get all the loggings transferred since December 7th, 2009. Use the selection criteria on top to select the loggings that are relevant to you. The following criteria are available:
Ticked Id: the ticket-number. Status: Every file upload goes through several stages. Status contains the state the upload
is in at any given moment. The values of Status correspond to the icons found at the bottom of the list (Received, Processing etc...).
Transfer Between ... and ...: Select the loggings between a first and a last date. If no value is given for the end data the value 9999-12-31 will be assumed.
Figure 29: File Exchange Log
Press "Search" to fill the list with loggings corresponding to the criteria. Press "Reset" to erase the current criteria.
For every logging you will get the following information:
a checkbox to select the line, an icon representing the Status of the file upload (see Table 1 for the symbols and their
meaning), Ticket Id: the id of the file transfer,

P a g e | 32
Users Manual
Arrival Time: the timestamp of the moment the file was received by OneGate, End of Process: the timestamp of the end of the processing, Channel: indicates how the file was uploaded (see Table 2 for the options) and Client Filename: the original name of the file.
Symbol Description
The processing was succesfully ended
The processing failed. There were problems. The processing succeeded partially. The data were accepted
but there were some problems. The report will get the error status "Warning"
Data are currenctly processed.
The file was received but processing hasn't started yet. Table 1: Processing Status of a File
Channel Description U2A The file was uploaded using the tab XML Upload in
the application One Gate (CSSR) A2C The data of a form were uploaded using a CSV file
(see Importing data into a form) Table 2: Channels for File Uploa
A number of functions are available to the user: Retrieving the history of a file upload Consulting the details of a file upload.
Retrieve the history of a file upload
Select a log entry and press the button . An entry needs to be selected for the function to work properly.
You will get the "Follow-up List" page. It details the messages that were generated during the processing of the file.

P a g e | 33
Users Manual
Figure 30: History of a file transfer
In the example (Figure 30) we can see that file "2009-12-01 send to NBB - Depo by prodv3.csv" was uploaded. The system has generated a ticket (CSV-307) that refers to a feedback file: feedback.xml. Both the original file and the feedback file are available for inspection through the hyperlink.
For every file the user loads two messages will be generated by the system: a message to confirm the reception and a message to tell you the result of the processing.
For every message the following information is available: An icon indicating the importance of the message.
o means "not too important" while o a message with the icon means it is an important meassge.
An icon that tells you whether the message refers to something
o received on the system ( ) or
o sent by the system ( ).
The legend at the bottom takes the point of view of the user ( =sent; =received). Received on: a timestamp of the reception of the message. Message: the contents of the message. Attachments: a hyperlink to any files received or sent during file upload.
Click a line to see the details of the message (See Figure 31).

P a g e | 34
Users Manual
Figure 31: Detail of a Message

P a g e | 35
Users Manual
Consult the details of a file upload Click a line to see the details. Figure 32 shows the page:
Figure 32: Details of a file upload log
The information is similar to what you get in "History of File Exchanges List". Some extra information is available:
Protocol: How was the file transferred? using HTTPS of SMTPS (secure email). Email: Where were notifications5 sent to? Document Id: Identification of the document
There is some extra information on the uploaded file: Client Filename: The name of the file. It is a hyperlink so you can easily check the
contents. Size in kBytes. Encrypted: Was the file encrypted before being sent? Signed: Was the file signed electronically before being sent? Zipped: Was the file compressed before being sent?
Press the button "History" to see the details of the file upload (see the previous section "Retrieving the History of a File upload").
5 It was said before that OneGate doesn't use public email protocols to send and receive messages. The messages never leave the application. But OneGate will send the user a public email message to warn him that messages are available in OneGate. These e-mails are notifications.

P a g e | 36
Users Manual
5.4. UPLOAD
As mentioned earlier, there are three ways for the declarer to fill in reports in the Internet-application.
1. Manually, 2. By uploading a CSV-file or 3. By uploading an XML-file.
The first two option have been discussed earlier in the document. In this section of the document, we discuss the third.
5.4.1. XML-UPLOAD Go to the tab "XML Upload" to upload XML-files in OneGate. This is the only type of file acceptable in this part of the application6.
Non XML-files can be loaded into the system using the message exchange system. Any file can be added as an attachment to a file.
Figure 33: Upload of XML files
Press the "Browse"-button to select a file. Having selected a file a button labeled "Upload" will be available. Press that button to start the file transfer. You will get the following message:
6 The contents of other types of files will not be processed but you will find your file in the File Exchange Log. So there is a way to store other types of files in OneGate should it be necessary.

P a g e | 37
Users Manual
Figure 34: Confirmation of file transfer
To follow-up the file transfer use the functions described in section 5.3.2 ("File Exchange Log").
5.5. ABOUT
Go to "About" to check the current version of OneGate.
Figure 35: About

P a g e | 38
Users Manual
6. EXTRA FUNCTIONS
6.1. SEARCH CRITERIA IN THE APPLICATION
Several windows offer the user the chance to select the information that will be displayed. In that case you will find several fields in the upper halve where search criteria might be filled in. The amount of information is limited to whatever the user wishes to see. But keep the following remarks in mind:
Windows like this are often empty when they are first displayed. This doesn't mean there's no infomation available - the program simply hasn't made any selections. Clicking the button Search - even with empty search criteria - will retrieve information from the database.
Some search criteria fields are followed by a '%' character. The character acts as a wildcard.
The search criteria are case sensitive.
6.2. REPPORTING BY E-MAIL & WEBSERVICES
These are specialised functionalities and fall outside the scope of this document. They are treated in separate documentation.
6.3. SENDING MESSAGES
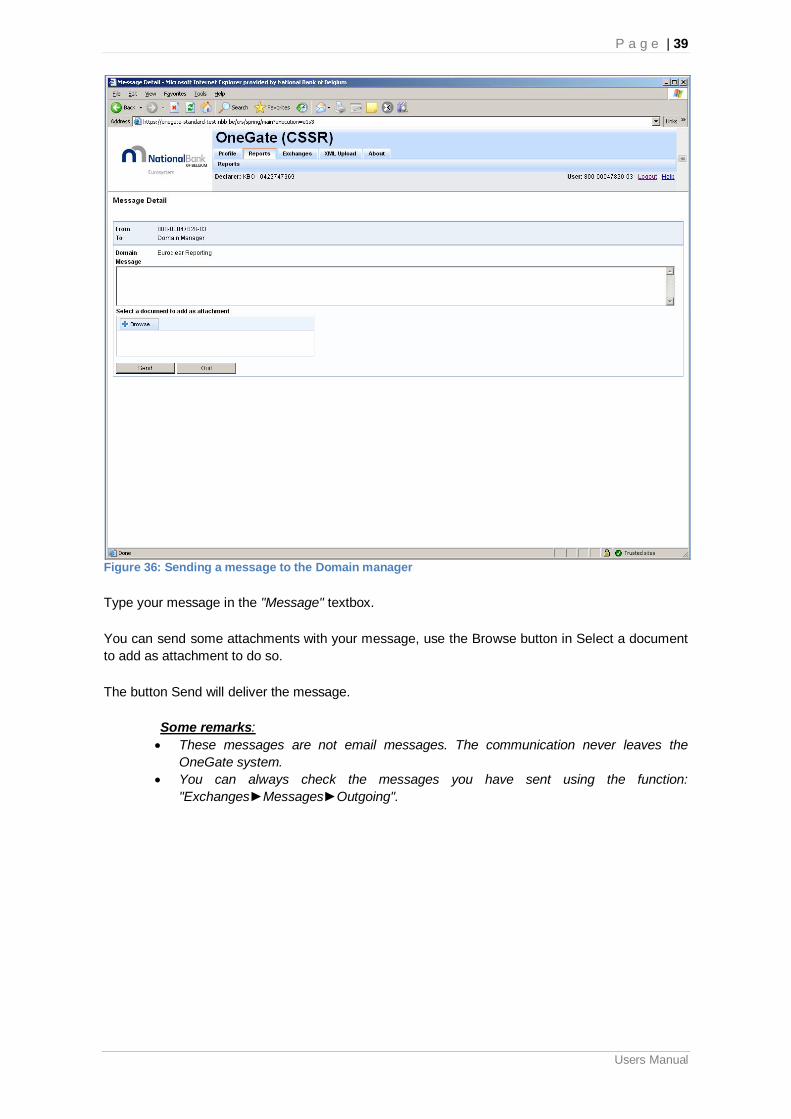
Throughout the application, the icon is used to show the declarer that he/she can send a message (e.g. to Domain Manager or Data Collection Manager). Figure 36 shows a screenshot of this functionality.
P a g e | 39
Users Manual
Figure 36: Sending a message to the Domain manager
Type your message in the "Message" textbox.
You can send some attachments with your message, use the Browse button in Select a document to add as attachment to do so.
The button Send will deliver the message.
Some remarks: These messages are not email messages. The communication never leaves the
OneGate system. You can always check the messages you have sent using the function:
"Exchanges Messages Outgoing".

P a g e | 40
Users Manual
7. APPENDICES
APPENDIX A: COOKIES
In Internet Explorer 6 kun je de instellingen voor cookies als volgt wijzigen:
Tools Internet Options Privacy
Klik Advanced om de instellingen te wijzigen:
Vink "Override automatic cookie handling" aan om de standaardinstellingen te wijzigen. Voor het onderscheid tussen First-party en Third-part cookies zie: http://support.microsoft.com/kb/260971/en-us
Indien je de optie "Prompt" gekozen hebt zal Internet Explorer (in dit geval versie 6) bevestiging vragen voor de cookie bewaard wordt:

P a g e | 41
Users Manual
Andere browsers hebben gelijkaardige opties om met cookies om te gaan. Zie daarvoor de documentatie van de browser.

P a g e | 42
Users Manual
8. INDEX
All Declarers .............................................. 10 Closing a Form .......................................... 14 Control Panel ............................................ 12 CSSR .......................................................... 3 CSV-upload ............................................... 25 Data Collection Manager ............................. 4 Documentation of Forms ........................... 19 Domain ....................................................... 4 Electronic Certificate .................................... 6 Email Address ........................................... 10 Exporting Data .......................................... 15 File Exchange Log ..................................... 30 File history ................................................. 32 Icons overview ............................................ 5
Nihil .......................................................... 17 On Demand .............................................. 18 Password .................................................... 6 Printing Data ............................................. 16 Profile ......................................................... 9 Reinitialization ........................................... 17 Report ......................................................... 4 Section ..................................................... 19 Sending a Message .................................. 38 UserID ........................................................ 6 Validation Report ...................................... 23 Validation Rules ........................................ 23 XML-upload .............................................. 36