Embed Size (px)
Citation preview

Medical Reimbursement Account (MRA) participants can submit reimbursement claims online. Log in to your spending account website and follow these instructions.
Online Claims Submission User Guide
Once you log into your spending account website, click Online Claim Submission from the menu which will take you to this screen.
Claim OptiOnS
You will see the following option:
• Healthcare Claim
Once you select the claim type, you will then be able to enter the claim data.
Claim information must be entered in these fields:
• Coverage Code Select the of health care expense you are submitting, such as general medical or dental.
• Date of Service(s)
• provider name
• Claim amount
• patient name
• patient Date of Birth
• If the expense is Covered by insurance
Saving a new Claim
Once you enter the appropriate claim data, you can either Save a new Claim or Cancel Changes.
• Save a new Claim Lets you proceed with entering claim data.
• Canceling the Changes Will remove the claim data you just entered.
Once you Save a new Claim, you will see the Summary of Claim Expenses below the claim entry area. You can either:
• Click on edit to update the claim data just entered or
• Delete the Selected item just entered or
• Continue by clicking next Step
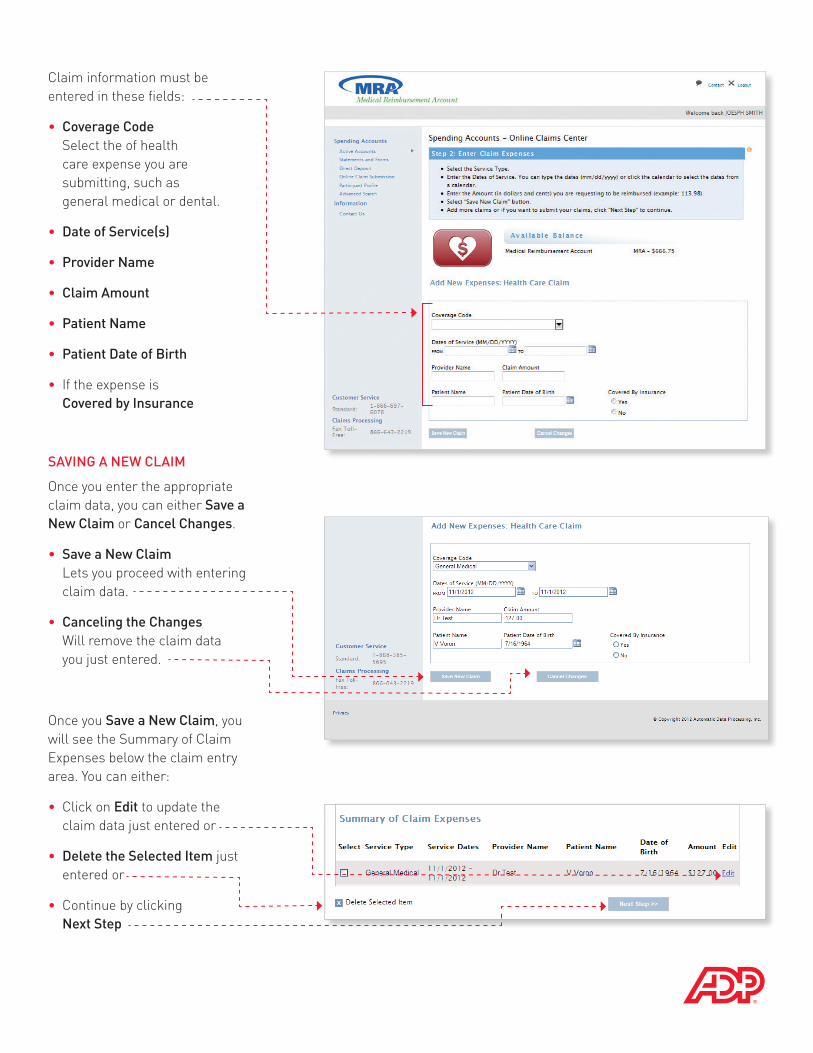
Once you click next Step, you will have two options to submit your expenses.
1. Upload receipt images which you have scanned and saved as a .PDF, TIF or .JPG file.
2. Generate a claim form to be e-mailed to you so that you can print and use as a cover letter to fax or mail your receipts.
generate Form or Upload Receipt are listed under the Summary of Claim Expenses.
If you select generate Form, this page will display where you must verify your e-mail address and certify that you agree to the claim certification terms and conditions listed on the page.
To certify that you understand the claim certification terms and conditions, check the box, then click i Certify.

Once you have certified the claim, you will see a summary of the claim expense and have the ability to either:
• add more Claims or
• Return to account
Your online claim submission cover letter will be e-mailed to you. You must place the cover letter in front of your receipts and appropriate documentation prior to faxing or mailing your information.

UplOaDing DOCUmentatiOn
If you selected Upload Receipts from the Summary of Claims Expenses, you will then be able to automatically load a copy of your receipts to provide documentation for the claim.
Please make sure the images of the receipts are in PDF, .TIF or .JPG format and saved in a convenient location on your computer.
To upload a receipt, click on the Browse button and navigate to the applicable document. Once the document has been loaded, the Browse button is grayed out and the document name is listed beneath the “Please select an image” area, as shown.

Once the document has been loaded, you must click on the Upload button to load it to the applicable claim record. You will then be able to see that the image has been attached to the claim, as shown by the check mark in the image column.
Claim CeRtiFiCatiOn
Once you validate the image was loaded to the correct claim, you must click on next Step, which will then take you to the claim certification page.

You will then see a confirmation page as if you were going to send in the claim documentation.
The spending account will display a new Alert message on the Active Accounts page once ADP has generated a Claim Receipt Form. This message will remain for 15 days.