Embed Size (px)
Citation preview

Page 0 of 68
Prepared By:
ONLINE LEARNING WORKSHOP
2020 WORKBOOK & USER GUIDE FOR PARTICIPANTS

Page 1 of 68
Workshop Itinerary
SESSION ACTIVITIES ESTIMATED TIME Introduction and Logging in
Welcome remarks
Objective of workshop
Why e-learning
Logging -in
8.30 – 8.45 am
Course Setting, and Navigation
Familiarizing with UUM Online Learning course page
Determine the best setting for your course
Customizing your course
Navigating in UUM Online Learning
8.45 – 9.15 am
Profile Edit and update profile 9.15 – 9.25 am
Group Why set up groups
Example of online group activities
Setting up groups
9.25 – 9.40 am
Blended Learning Blended Learning Components
Checking Blended Learning Status
Component for Resources o Label o Page o Folder
9.40 – 10.25 am
BREAK
Component for Resources
Component for Resources o File o Book o URL
11.00 – 12.00 pm
Component for Activity
Component for Activity (cover only 1-5) o Forum o URL o Choice o Feedback o Chat o Wiki o Database o Glossary o Lesson o SCORM o Survey o Workshop
12.00 – 1.00 pm
BREAK Component for Assessment
Assignment
Turnitin Assignment
Quiz
URL
2.30 – 4.30 pm
Closing Q & A
Evaluation Form
4.30 – 5.00 pm

Page 2 of 68
Table of Contents
Introduction ...................................................................................................................... 3
Online Learning ................................................................................................................ 4
Why e-learning? ............................................................................................................... 5
UUM Online Learning (learning.uum.edu.my) ................................................................. 6
Page Layout and Blocks .................................................................................................... 8
Course Settings ................................................................................................................. 9
Course Customization .................................................................................................... 11
Navigation In Online Learning ........................................................................................ 13
Update Profile ................................................................................................................ 13
Groups ............................................................................................................................ 15
Blended Learning ............................................................................................................ 21
Uploading Course Materials ........................................................................................... 22
Adding Activities ............................................................................................................. 23
URL ................................................................................................................................. 23
Choice ............................................................................................................................. 25
Chat ................................................................................................................................ 28
Forum ............................................................................................................................. 31
Assignments ................................................................................................................... 37
Turnitin Assignment ....................................................................................................... 45
Quiz ................................................................................................................................. 50
UUM ONLINE LEARNING Icons ....................................................................................... 66
What have you learnt? ................................................................................................... 67
Basic Guide ..................................................................................................................... 68
3 Principles of Effective Online Pedagogy .................................................................. 68

Page 3 of 68
Introduction ONLINE LEARNING WORKSHOP This workshop aims to equip academics from Universiti Utara Malaysia with the technical skills to use
their E-learning portal, UUM Online Learning to achieve optimum delivery. At the end of the
workshop, participants will be able to: Set up various learning activities available in UUM Online Learning to engage students Identify strategies that encourage active student participation in UUM Online Learning
UUM ONLINE LEARNING E-LEARNING PORTAL UUM Online Learning is a platform designed to support the Teaching and Learning in Universiti Utara
Malaysia (UUM) and provides an effective learning environment where students can reflect, create
and share knowledge and skills while collaborating with lecturers, tutors and peers. UUM Online
Learning is available 24/7 for students to access their learning materials and to communicate with
peers or even lecturers.
REQUIREMENTS
1. UUM Online Learning is compatible with most modern web browsers, including the recent version
of Firefox , Chrome, Internet Explorer and Apple Safari.
Browser Minimum version Recommended version
Google Chrome 30.0 Latest
Mozilla Firefox 25.0 Latest
Apple Safari 6 Latest
Microsoft Internet Explorer 9 Latest
2. For UUM Online Learning to function correctly, it is recommended that the following requirements be met:
Pop-ups are enabled Cookies are enabled Java is installed, up-to-date and enabled Flash Player is up to date

Page 4 of 68
Online Learning Do you agree with the statements below regarding online learning? Discuss with your group members and note down the discussion points.
Online learning… is easier to teach is providing access to lectures is more cost efficient requires less teacher time easier management of courses is more easily repeated

Page 5 of 68
Why e-learning?
Fill-in the first and second column based on what you already know and then discuss
with your colleagues on how to implement these strategies in your class using UUM
Online Learning
What do I know Why is it How can I
about: important implement this in
my class using
UUM Online Learning
Peer-to-peer learning
Assignment that capitalizes on collaboration
Students take lead

Page 6 of 68
UUM Online Learning (learning.uum.edu.my)
You can login to UUM Online Learning directly from http://learning5.uum.edu.my or through UUM Portal at https://portal.uum.edu.my and click UUM Online Learning Link on top of the screen.
If Login to UUM Online Learning through direct link (http://learning5.uum.edu.my): 1) Locate the Login area on the top right-hand corner of the page. 2) Choose I’m a Staff from a drop down and type in your username and password (the same
username and password as your UUM staff ID) and click on Login button.
UUM Online Learning Login area on the top right-hand corner
UUM Online Learning front page
Once you have logged-in, you will see all your courses that you are teaching in the middle of the screen.
Page 7 of 68
Course displayed in Dashboard
Lecture enrolled
in two courses
here
Course might be in
this tab depends on
course start & end
date settings

Page 8 of 68 Page Layout and Blocks
Course pages in UUM Online Learning is arranged in a three‐column format. The two side columns
are made up of small boxes called blocks. Blocks contain extra information of the content contained
in the centre of the page. Some blocks help you to navigate more easily.
There are two ways for students to access their course resources and activities: 1) The first is through the main content area (the middle of the page). 2) The second is to use the Navigation block.
The administration block is only viewable to lecturers. This is where lecturers can set the course settings. To do that, click on Edit settings.
Page Layout and Block in UUM Online Learning
Click to hide
the blocks
Navigation
block
Main content
area Administration
block

Page 9 of 68 Course Settings
1. Go to Administration Block and click
2. Under “Edit course settings” you may customize your course page to include your course
synopsis, change course format (topics format, weekly format etc) and set maximum file size
allowed to be uploaded in your course.
Administration Block
Course Settings Page
Click Edit Settings to
change course Settings
You can also hide this course from your
students. This is useful when you are setting
up / designing your course for the first time.
The course end date is used for determining
whether a course should be included in a
user's list of courses. When the end date is
past, the course is no longer listed in the
navigation and is listed as past in the course
overview. The course end date may also be
used by custom reports. Users can still enter
the course after the end date; in other
words the date does not restrict access.
Click Edit Settings to
change course Settings
You may write your course synopsis here.
This should be short and concise explaining
what your course is about
Page 10 of 68
Once you’re done, click on Save and display to save the new settings.
Changing the format will change the way
the contents of your course appear
You can also set the maximum allowable file
size to upload
In a course you can assign a context(activity)
to a group.

Page 11 of 68
Course Customization
1. In your course page, click on the ‘Turn editing on’ button at the top right-hand corner (Figure 5.1). This button works like a toggle button. When it is clicked, it will show ‘Turn editing off’ in which you can click it again to turn it off. ‘Turn Editing On’ link also can be found in Administration Block.
Turn Editing On Buttton
2. The course page is divided to sections by topic numbers by default. To edit the name for
the topic, click the pencil icon located beside Topic title as shown below or click Edit topic:
Edit Summary Button
1
2

Page 12 of 68
Edit Topic Name
3. Type the title of your topic in the Section name field. If the field is inactive, uncheck the
‘Custom’ check box. 4. Click Save Changes when you are done.
Type in your Section
Name such as
Introduction
4
3
Untick first

Page 13 of 68
Navigation In Online Learning Use breadcrumb trail to navigate in Online Learning or click at My Courses
Navigate using Breadcrumb
Update Profile
1) To edit your profile, click on ‘Profile’ link under your name located on the right side of the screen. Then click Edit Profile.
View Profile link
2) This will lead to the edit profile page. Here, you should be able to see your username, e-mail
and a profile picture from UUM database.
View Profile link
Breadcrumb
Trail

Page 14 of 68 Scroll down and fill-up the other details like description of yourself and your interests. You should also invite your students to do the same on their first day of class or before they enter their first class. This would allow you to get to know them and vice-versa.
Edit Profile page
4) Click the ‘update profile’ button at the bottom of the screen (Figure 2.3) when you are done to
save your changes.
Update File button

Page 15 of 68
Groups
This feature allows a lecturer to group students within a course. This will allow the lecturer to create online group activities e.g. Group Forums, Group Assignments. To have students working on different activities, not even seeing activities for other groups (such as group A writing a report, group B using a forum, and group C creating a wiki), you need to put them in groups first, such as group A, B, and C, THEN you must place each group in their own grouping, such as Grouping A containing Group A, Grouping B containing group B, etcetera.
Creating Groups To create group within a course:
1. Under Administration block, click on Users and then click on Groups (Figure 4.1).
‘Groups’ link
‘Groups’ link

Page 16 of 68

Page 17 of 68 2. You will see this page (Figure 4.2). Click on ‘Create group’ button. Take note that the ‘Auto-
create groups’ function is also useful when you want students to be grouped randomly.
Creating groups
3. Next, fill in the group name, for example, Group 1 and then scroll down and click on Save
changes button.
Creating groups
4. Repeat the steps to create all the groups you need for your course. All the created groups
will be listed in the create group page (Figure 4.4). The number in parentheses next to
the group name indicates the number of students in the group. As there are no students
enrolled yet, the number zero (0) is shown.

Page 18 of 68
Assigning Students into Groups
1. To add members into the group, click on Add/remove users.
Add or remove user button
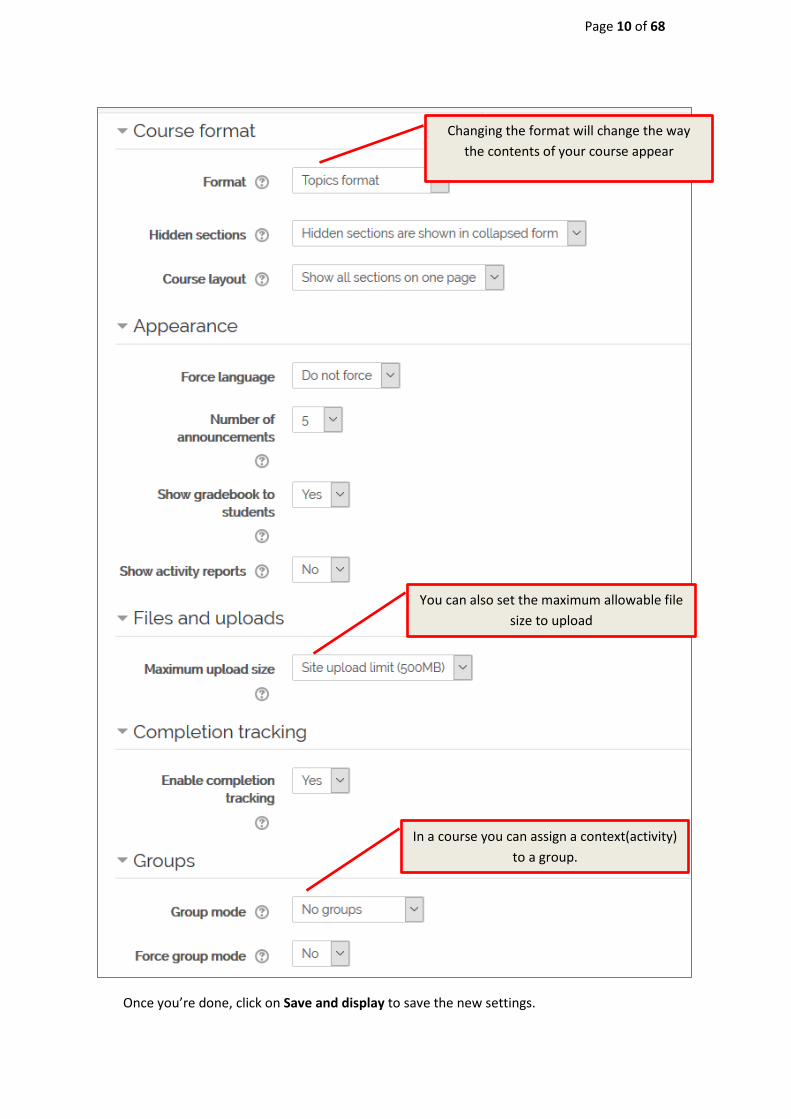
Page 19 of 68 Creating Grouping To create a grouping:
1. Under Groups window, click on Grouping Tab (Figure 4.5). Click on ‘Create grouping’ button.
Grouping Tab
2. Next, fill in the grouping name, for example, Grouping 1 and then scroll down and click
on Save changes button
Creating Grouping
3. Repeat the steps to create all the grouping you need for your course. All the created
grouping will be listed in the create grouping page (Figure 4.6). The group name
indicates the number of groups in the grouping. Click icon as below to identify group in
each groupings.

Page 20 of 68
Create Grouping Page
Assigning Groups into Grouping
1. To add groups into the grouping, click on Add
Add/Remove Groups

Page 21 of 68
Blended Learning
Blended Learning Components
Blended Learning is the combination of face-to-face learning and online learning. Blended Learning Components are divided into three categories:
1. Activity 2. Resources 3. Assessment
Component for Resources
(8)
Component for Activity
(3)
Component for Assessment
(2)
Blended Learning Component

Page 22 of 68
Uploading Course Materials
1. To upload a file, Select Course that you want to upload
2. Click Turn Editing On, on your course page.
Select location to add files
3. Select the file and drag to the topic/section that you want it to appear.
Drag and drop function to upload files

Page 23 of 68
Adding Activities
Creating activities for your course can be challenging, especially the first time you try doing them.
Make frequent use of the context-sensitive help buttons that are sprinkled on the various
activity construction pages
1. To start creating any learning activity or link resources to the course page, make sure the
‘Turn editing on’ button is switched on. 2. Next, click on the ‘Add an activity or resource’ button. You will be able to see a pop-up like
in Figure 6.1 below.
Add an activity or resource pop-up
3. There is a variety of resources and activities available in UUM ONLINE LEARNING. In this guide
we will look at the basic functions.
URL The URL function enables you to add links to external websites or videos from Youtube or any other resources. It could be

Page 24 of 68 linked to Web 2.0.
1. Under ‘Add an activity or resource’, select URL. You will
see the ‘Adding a new URL’ page. 2. Type the name and description of the video 3. Copy the link and paste it in the ‘External URL’ box.
Then, click on Save and return to course button.
URL setting page
Display Setting
4. At the appearance box, choose how the video will be
shown as- Automatic, embedded, Open or Pop Up. 5. Next, save and return to course.

Page 25 of 68
Choice Choice is a very simple tool, where the lecturer asks a question and specifies a choice of multiple responses.
Adding Choice Activity
1. To add a Choice, select Choice from the Activity menu. 2. The Adding a new Choice page will open.
Setting Choice
Add title of
this Choice
Add Description of this
Choice

Page 26 of 68
Set the option
You can specify a limit for each
option. For example only 5 learners
are allowed for each option.
You can specify maximum number of
learners in each option.
Enter the option for each learners
and set the limit
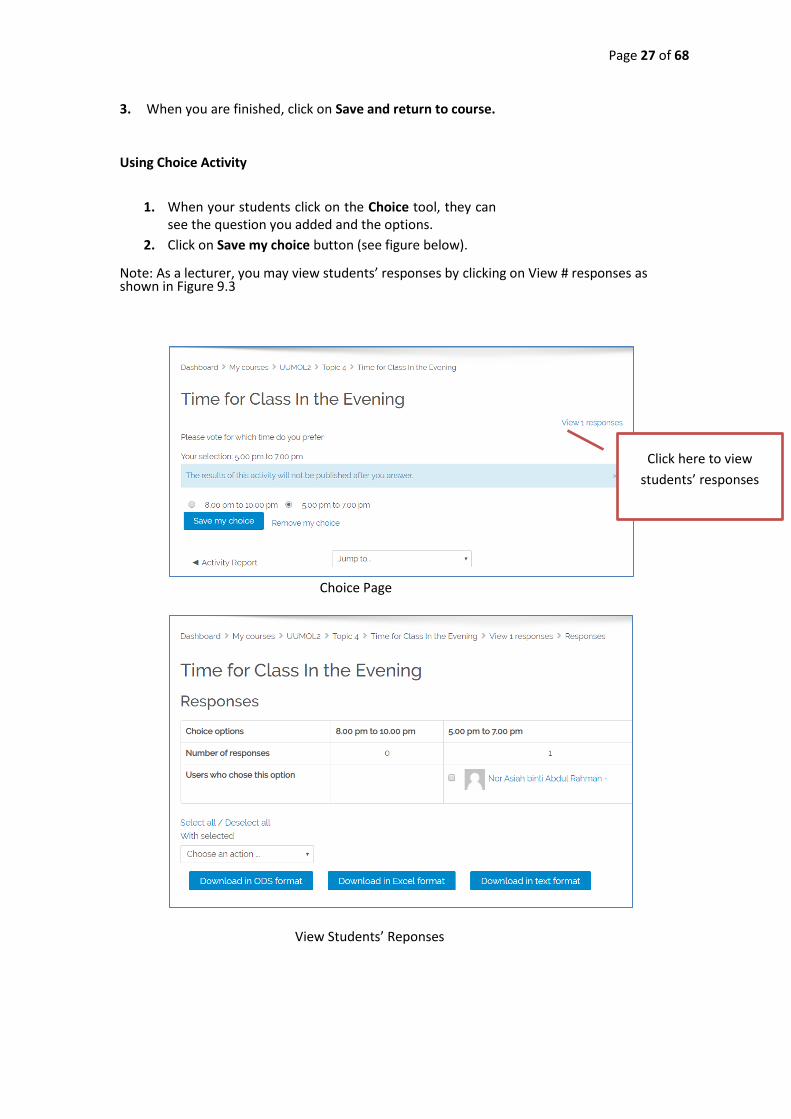
Page 27 of 68 3. When you are finished, click on Save and return to course. Using Choice Activity
1. When your students click on the Choice tool, they can see the question you added and the options.
2. Click on Save my choice button (see figure below). Note: As a lecturer, you may view students’ responses by clicking on View # responses as shown in Figure 9.3
Choice Page
View Students’ Reponses
Click here to view
students’ responses

Page 28 of 68
Responses page
Chat
The Chat tool allows participants to have a real-time synchronous discussion via the web. This tool is
similar to MSN, and the Yahoo Messenger etc. This is a useful way to get different understanding of
each other and the topic being discussed - the mode of using a chat room is quite different from the
asynchronous forums. The Chat activity contains a number of features for managing and reviewing
chat discussions.
To add the Chat activity, click on the Add an activity from the drop down menu on the topic/week where you want to place it and click on Chat. Adding a new Chat page will open (Figure 2)
Chat Setting Page
Type the name of your
chat room
Type the instruction
This sets whether or not to announce
when the chat room will be in session.
The chat is open if you choose ‘Don’t
publish any chat times’
Set the date and time
for chat session

Page 29 of 68 Using the Chat Activity
1. Click on the Chat activity on your course homepage. This is what your students will see as well.
Chat page
2. Click on “Click here to enter the chat now”, the Chat window pane will appear.
Chat Window Pane
Note: As a lecturer, you can view the past chat logs even if you did not participate. For each of the past
sessions you can see users who participated in this session and number of messages sent by each user.
Click here to enter the chat room
Current (online) users will appear
here
The conversation between users
will appear here
Type the message here

Page 30 of 68
Link to view past chat sessions
Click to view past chat session

Page 31 of 68 Forum
Forum Discussion boards in UUM ONLINE LEARNING are called Forums. Lecturers and students can discuss
topics, post messages and respond to students or lecturers’ posts. Forums are used to generate
educational discussions that trigger construction of knowledge via social interactions. Here are the
steps to create Forum Discussion.
Adding Forum Activity
Discussion boards in UUM ONLINE LEARNING are called Forums. Lecturers and students can discuss
topics, post messages and respond to students or lecturers’ posts. Forums are used to generate
educational discussions that trigger construction of knowledge via social interactions. Here are the
steps to create Forum Discussion.
As mentioned before, to start creating any learning activity or link resources to the course page, the ‘Turn editing on’ button must be toggled on to enable the editing function.
1. Click the ‘Turn editing on’ button and click on ‘Add an activity or resource’ link.
Forum Icon
2. In the pop-up window, select ‘Forum’ function listed under ACTIVITIES.
Then, click ‘Add’ button.
Adding forum as an activity
Page 32 of 68
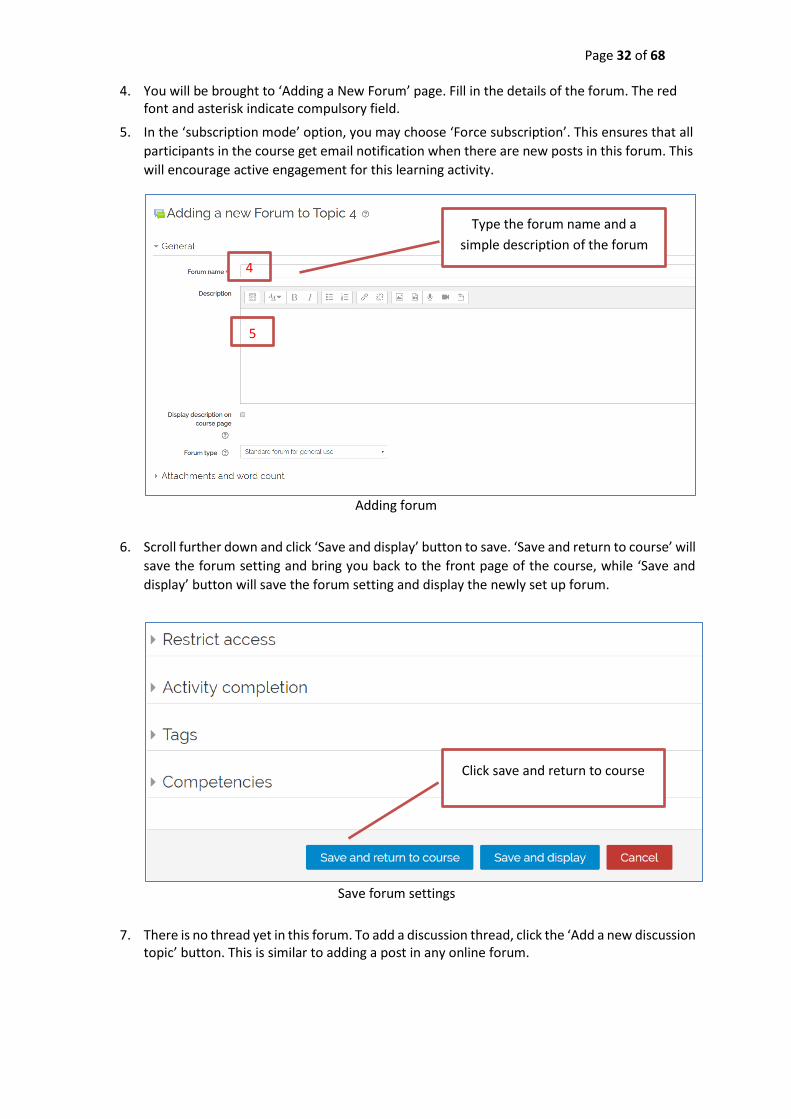
4. You will be brought to ‘Adding a New Forum’ page. Fill in the details of the forum. The red font and asterisk indicate compulsory field.
5. In the ‘subscription mode’ option, you may choose ‘Force subscription’. This ensures that all
participants in the course get email notification when there are new posts in this forum. This
will encourage active engagement for this learning activity.
Adding forum
6. Scroll further down and click ‘Save and display’ button to save. ‘Save and return to course’ will
save the forum setting and bring you back to the front page of the course, while ‘Save and
display’ button will save the forum setting and display the newly set up forum.
Save forum settings
7. There is no thread yet in this forum. To add a discussion thread, click the ‘Add a new discussion topic’ button. This is similar to adding a post in any online forum.
Type the forum name and a
simple description of the forum
4
5
Click save and return to course

Page 33 of 68
‘Add a New Discussion Topic’ button
8. Type the title for your discussion topic in the ‘subject’ field, and the intended message in the ‘Message’ box.
Details about the New Discussion
9. If you have any attachment (i.e: image or pdf file), add it in the Attachment section. 10. Finally, click ‘Post to forum’ button to post the message.
Every forum must have a topic
discussion. You can have multiple
topic discussion
Type the discussion details and
description

Page 34 of 68
‘Post to forum’ button
Add attachment to the discussion
Click post to forum
Page 35 of 68
Instructional Feedback
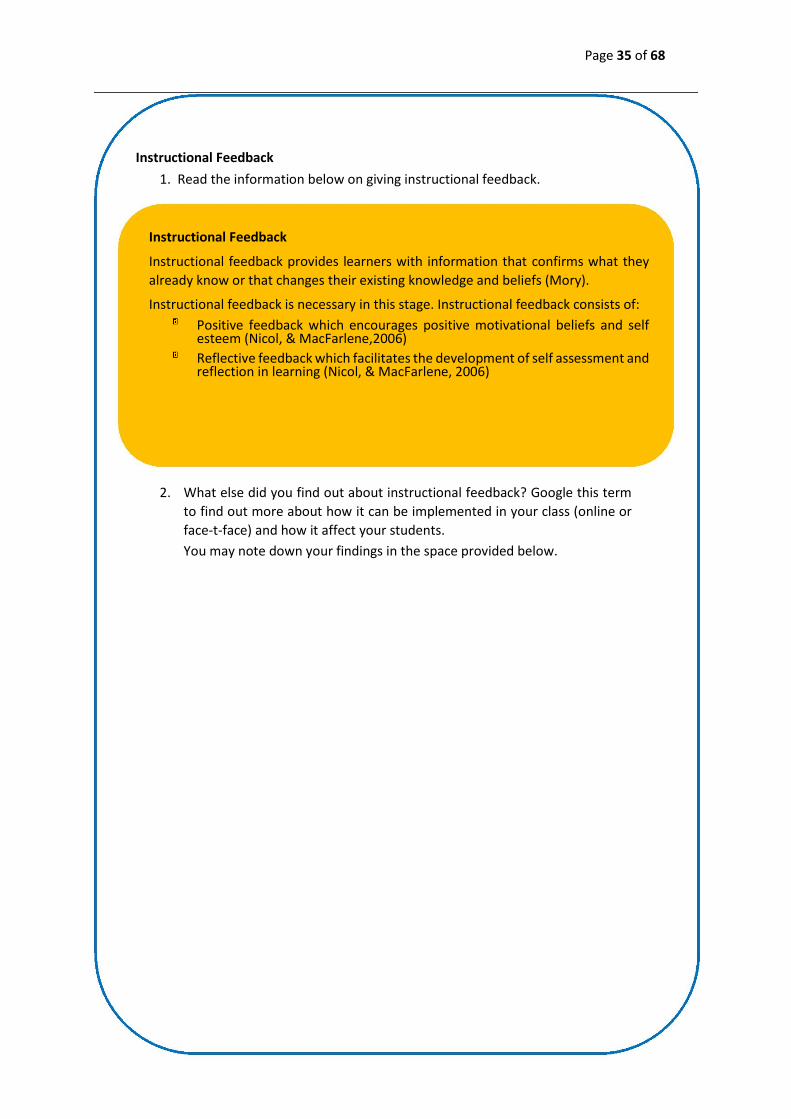
1. Read the information below on giving instructional feedback.
Instructional Feedback
Instructional feedback provides learners with information that confirms what they
already know or that changes their existing knowledge and beliefs (Mory).
Instructional feedback is necessary in this stage. Instructional feedback consists of:
Positive feedback which encourages positive motivational beliefs and self esteem (Nicol, & MacFarlene,2006)
Reflective feedback which facilitates the development of self assessment and reflection in learning (Nicol, & MacFarlene, 2006)
2. What else did you find out about instructional feedback? Google this term
to find out more about how it can be implemented in your class (online or
face-t-face) and how it affect your students. You may note down your findings in the space provided below.

Page 36 of 68
Examples of forum use Which of the examples shown by the instructor will be suitable for you to implement in your own class?
Forum as a platform to discuss / debate certain topic or issues
Forum as a platform for lecturers to find out students’ expectation of the class
Forum as a platform for students to introduce themselves at the beginning of the class
Forum specific for group members only
Forum as a platform to find out how the students are progressing in the class
Forum as a platform for students to voice out their feedback. Open throughout the semester
Forum as a platform for weekly reflections

Page 37 of 68
Assignments
This function allows you to collect work from students, review it and provide feedback, including grades. The submissions and grades are only viewable to the particular student and their respective lecturers. Only lecturers may set up the assignment platform.
Set up a platform for students to submit files
1. To add an Assignment activity, select Assignment from the Activity menu.
2. The Adding a new Assignment page will open. You will see a screen like below for you to fill up the assignment name and description.
Adding a new assignment page
Descriptions should include:- Precise instructions regarding the assignment - Information related to the assignment like
Descriptions should include:
- Precise instructions regarding the a

Page 38 of 68
Set available and due-date of a submission The settings for available date and due date are as below. You may change these settings at any time.
Referring to the figure below, if you set the ‘Require that students accept the submission
statement’ to Yes, students will need to acknowledge that this assignment is their own work.
The statement is as shown in the next figure
Due date • Students who submitted after
this date will be considered as late submission
• Due date is also marked in calendar
Always show description Sets whether to show assignment description to students always or just after Allow submission from date
Cut-off date If enabled, students will be
prevented from submitting after
the date shown
Allow submissions from • Prevents students to submit
before date shown. • Students can still see the
instructions and materials attached but unable to see ‘Submit’ button

Page 39 of 68
Online text students are able to
compose and edit text on screen.
Maximum number of files
student can upload
Maximum size per file
Accepted file types can be
restricted by entering a list of file
extensions. If the field is left
empty, then all file types are
allowed.
If enabled, students will have to click a Submit
button to declare their submission as final. This
allows students to keep a draft version of the
submission on the system. If this setting is changed
from "No" to "Yes" after students have already
submitted those submissions will be regarded as
final.
Require that students accept the submission
statement for all submissions to this assignment.
If enabled students will be divided into groups
based on the default set of groups or a custom
grouping. A group submission will be shared among
group members and all members of the group will
see each others changes to the submission.

Page 40 of 68
Declaration page when required student to accept
submission statement is set to yes

Page 41 of 68

Page 42 of 68 Submitting An Assignment
The following steps shows how student can submit assignment and view their grade

Page 43 of 68 Edit Submission To edit a submitted assignment, students first need to download the assignment file and work on it offline. Then re-upload the new file Follow the steps below to confirm the submission

Page 44 of 68
Once you have graded the assignment, students will be able to view them.

Page 45 of 68
Turnitin Assignment
1. From My Course, select the course you want to create Turnitin Assignment
2. Click on Turn Editing Button button.
3. Click Add an Activity or Resources
4. Choose Turnitin Assignment 2
Type in Turnitin
Assignment Name and
summary
Choose Turnitin
Assignment 2

Page 46 of 68
Submission Type is
whether File Upload or
Text Submission
Turnitin only allows
40MB file size
Set the start, end &
post date
Page 47 of 68
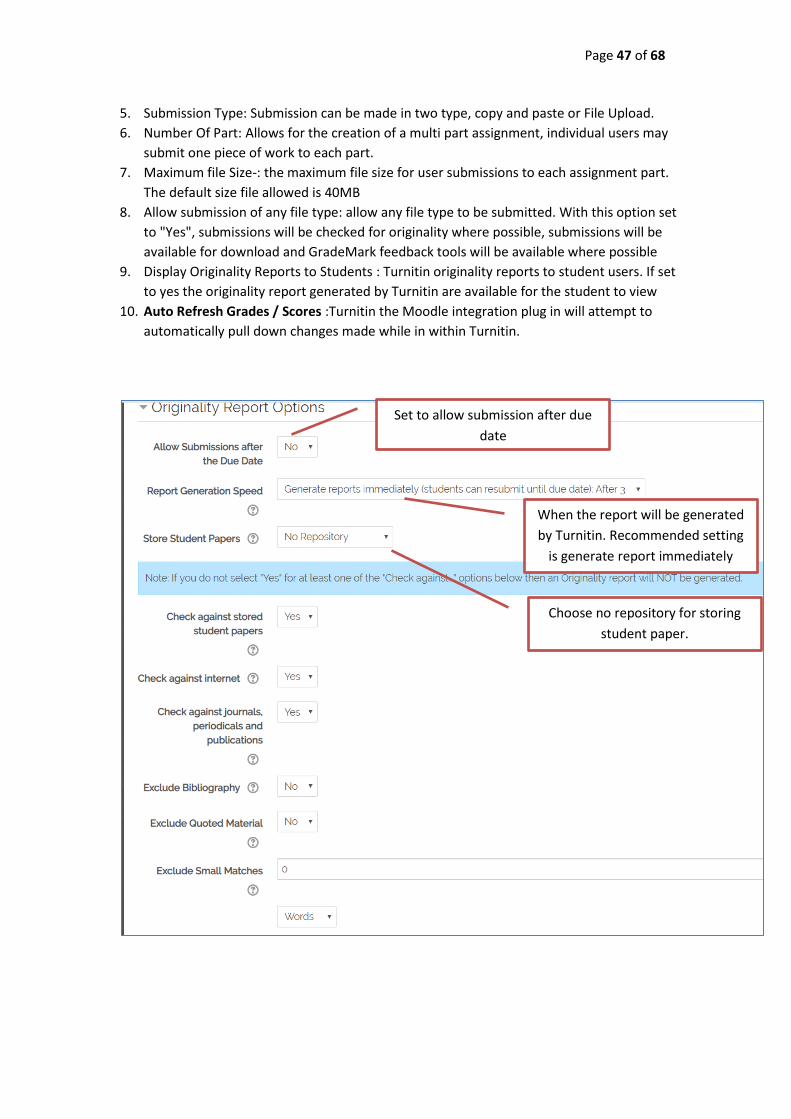
5. Submission Type: Submission can be made in two type, copy and paste or File Upload.
6. Number Of Part: Allows for the creation of a multi part assignment, individual users may
submit one piece of work to each part.
7. Maximum file Size-: the maximum file size for user submissions to each assignment part.
The default size file allowed is 40MB
8. Allow submission of any file type: allow any file type to be submitted. With this option set
to "Yes", submissions will be checked for originality where possible, submissions will be
available for download and GradeMark feedback tools will be available where possible
9. Display Originality Reports to Students : Turnitin originality reports to student users. If set
to yes the originality report generated by Turnitin are available for the student to view
10. Auto Refresh Grades / Scores :Turnitin the Moodle integration plug in will attempt to
automatically pull down changes made while in within Turnitin.
Set to allow submission after due
date
When the report will be generated
by Turnitin. Recommended setting
is generate report immediately
Choose no repository for storing
student paper.

Page 48 of 68
Submitting Turnitin Assignment 1. Click the assignment title in course page 2. Submit your paper by dragging files to page upload. Once submitted, Turnitin will reply a
digital receipt as a proof.
Click Submit paper to start submit
your assignment
Drag files to submit
Click Add Submission

Page 49 of 68
3. The result will be displayed immediately depends on the settings that have been set.
Click on the
percentage to see the
details

Page 50 of 68
Quiz
Quiz
The Quiz tool is used to create on-line tests, which consist of various question types. These quizzes
can either be available as assignments (i.e. students can decide themselves when and how they do
them and sometimes they can take the quiz more than once), or they can be made available only
during a monitored in-class exam. The quiz may also have feedback, where it can explain to the students the reason for that answer.
Quiz function in UUM Online Learning allows the lecturer to design and build quizzes consisting of
a variety of question types, including multiple choice, true-false and short answer questions. All
questions created by lecturers will remain in the Question bank and can be used/reused for
different set of quiz. A Quiz can be configured for multiple attempts. Each attempt at a question is automatically marked and the lecturer can choose whether to give feedback and / or show the correct answers Creating Questions in Question Bank
1. Under Administration block, click on ‘Question bank’.
Question bank

Page 51 of 68
2. Click on ‘Create new question’ button.
3. A menu will appear for you to choose the question type. Select the question type that you
would like to create and click on Next button.
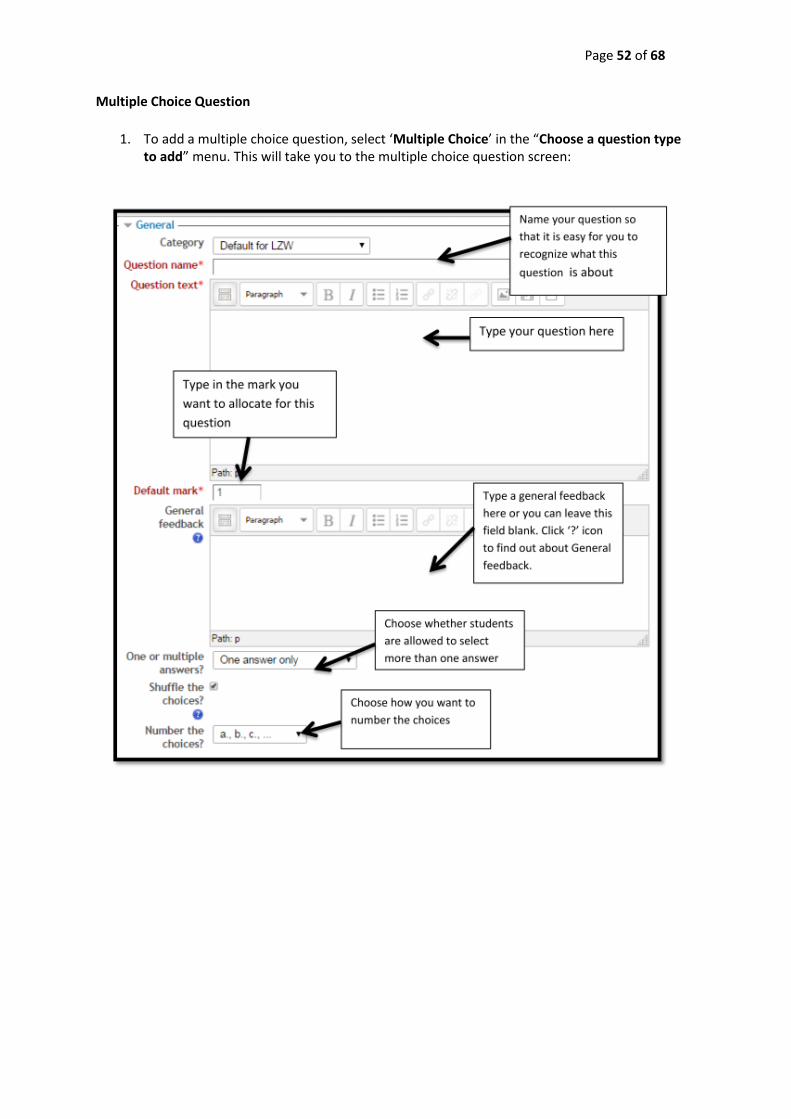
Page 52 of 68 Multiple Choice Question
1. To add a multiple choice question, select ‘Multiple Choice’ in the “Choose a question type
to add” menu. This will take you to the multiple choice question screen:
Page 53 of 68
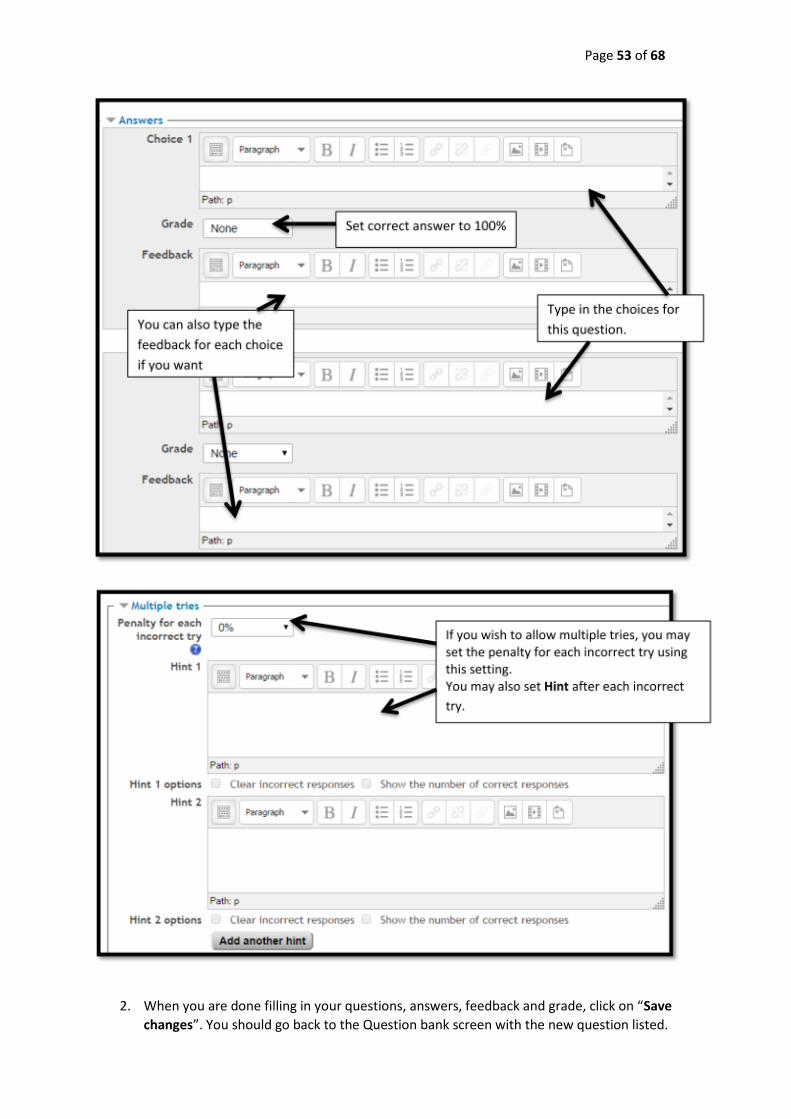
2. When you are done filling in your questions, answers, feedback and grade, click on “Save
changes”. You should go back to the Question bank screen with the new question listed.

Page 54 of 68
True/False
1. To add a true/false question, select ‘true/false’ in “Choose a question type to add” menu. This will take you to the true/false question screen as below:
Once everything is according to statement Save changes”. This will take you to
the questions page. You should see your question added to the question bank.

Page 55 of 68 Short Answer
1. To add a short answer question, select “Short answer” in the “Choose a question type to
add” menu. This will take you to the short answer question screen:
2. Once you are done, click on “Save changes”. This will take you back to the question bank screen, and the new question should be there.

Page 56 of 68 Matching
1. To add a matching question, select ‘Matching’ in the “Choose a question type to add”
menu. This will take you to the matching question screen:

Page 57 of 68
.
2. Once you are finished, click on “Save changes”. This will take you to the question bank
screen, and the new question should be there.

Page 58 of 68

Page 59 of 68 Essay
1. To add an essay question, select ‘Essay’ in the “Choose a question type to add” menu. This
will take you to the essay question screen:
2. Once you are done, click on “Save changes”. This will take you back to the question bank screen, and the new question should be there.

Page 60 of 68 Setting up Quiz
Creating a new Quiz is a two-step process. In the first step, you create the quiz activity and set its options. In the second step, you add the required questions to the quiz.
1. Click on Add an activity or resource and select Quiz.
2. Key in name of the quiz (or exercise) and fill up the description section with instructions for
students.
3. By enabling the open and close quiz, you may specify when the quiz is accessible for your
students to begin.
4. Under the ‘Time Limit’ if you ‘Enable’ it by putting a check in the box, you can set how much
time you want to give to the students. If you set, for example 50 minutes, the system will show a countdown (from 50 to 0 minutes). Please note that students will have only 50

Page 61 of 68
minutes regardless of the time they start doing, as long as they take the quiz during the specified duration. When the timer runs out, the quiz is submitted automatically with whatever answers that students managed to answer.
You can set Attempts allowed
more than one if this is an
exercise / revision
Grading method is for
attempts allowed more than
one
This will set how many
questions per page
The students can only ses the
feedback or marks after
completed the entire quiz.
Page 62 of 68
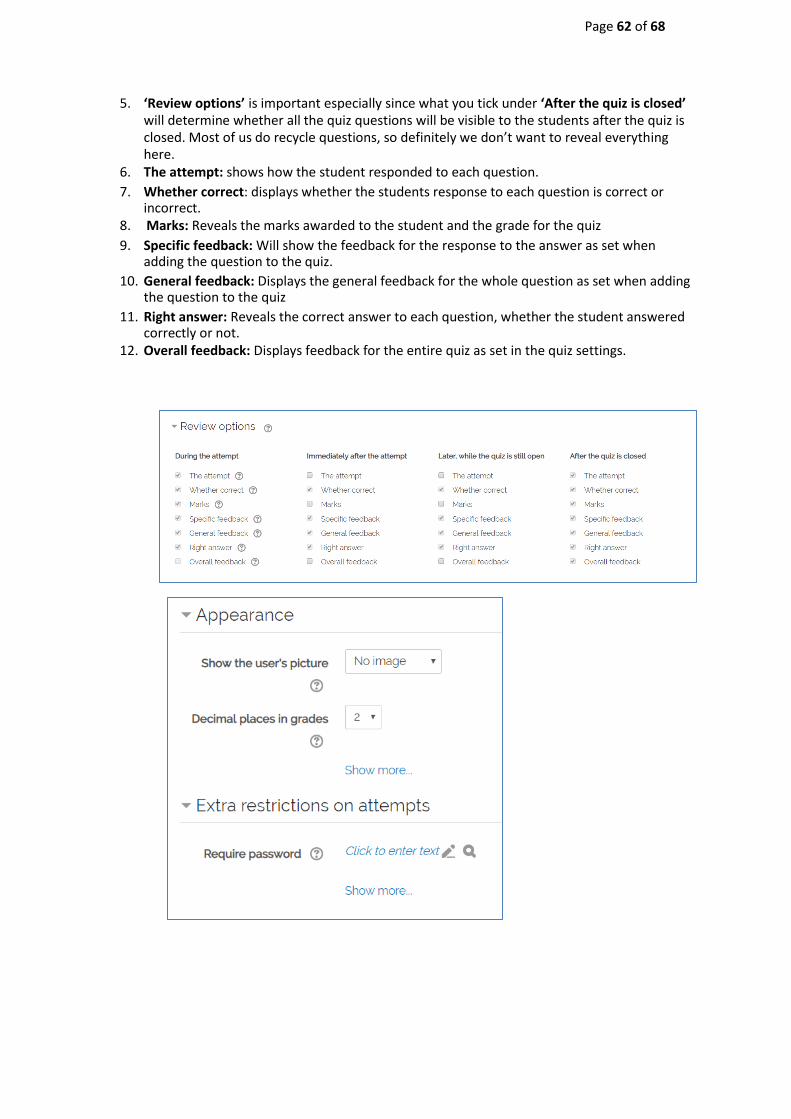
5. ‘Review options’ is important especially since what you tick under ‘After the quiz is closed’
will determine whether all the quiz questions will be visible to the students after the quiz is closed. Most of us do recycle questions, so definitely we don’t want to reveal everything here.
6. The attempt: shows how the student responded to each question. 7. Whether correct: displays whether the students response to each question is correct or
incorrect. 8. Marks: Reveals the marks awarded to the student and the grade for the quiz 9. Specific feedback: Will show the feedback for the response to the answer as set when
adding the question to the quiz. 10. General feedback: Displays the general feedback for the whole question as set when adding
the question to the quiz 11. Right answer: Reveals the correct answer to each question, whether the student answered
correctly or not. 12. Overall feedback: Displays feedback for the entire quiz as set in the quiz settings.
Page 63 of 68
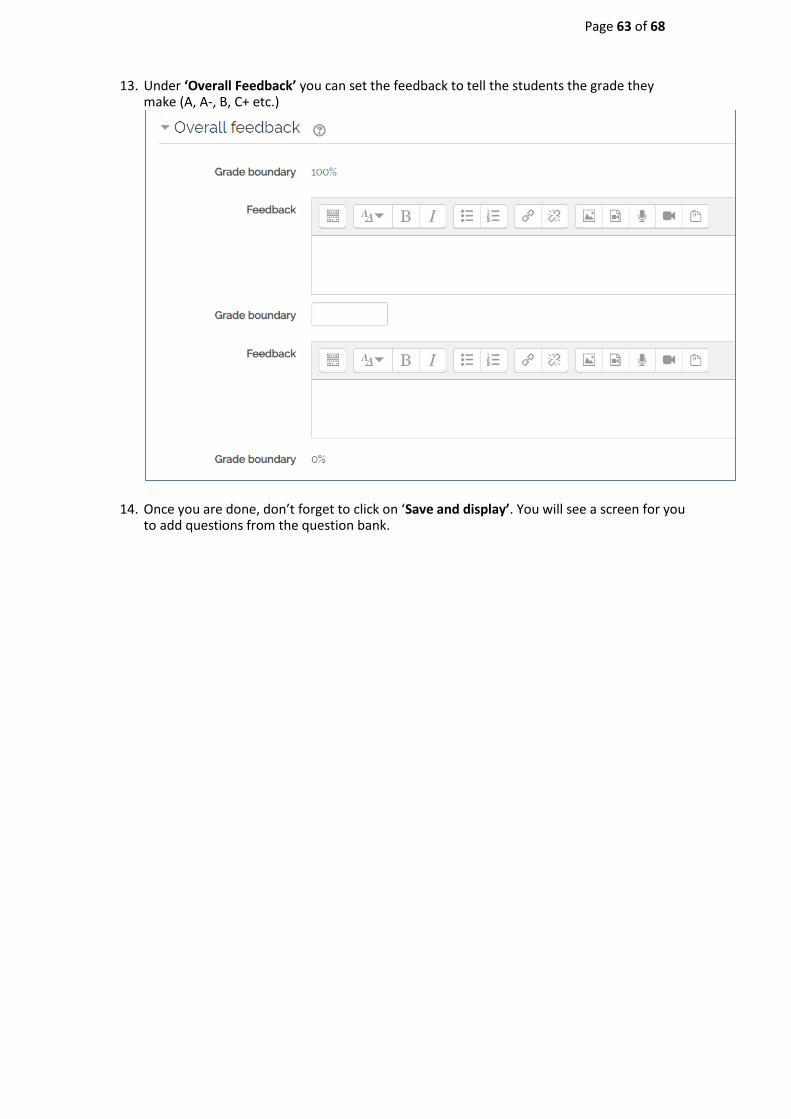
13. Under ‘Overall Feedback’ you can set the feedback to tell the students the grade they
make (A, A-, B, C+ etc.)
14. Once you are done, don’t forget to click on ‘Save and display’. You will see a screen for you to add questions from the question bank.

Page 64 of 68 Adding Questions to Quiz
1. Click on ‘Edit Quiz’ button and then click on ‘Show’ beside question bank contents
Edit quiz button
2. Select the questions that you want to add and click on ‘Add to quiz’ button in ‘Question
Bank Contents’ blocks on the right hand side.
Click Add to add
question

Page 65 of 68
Adding questions to quiz
Editing final quiz
3. Click ‘Save’ button once you’re done editing.
Select the questions you
want to add to a quiz

Page 66 of 68
UUM ONLINE LEARNING Icons
Here are some of useful icons that are available all over UUM ONLINE LEARNING and the functions:
ICON FUNCTION
Update
Edit (usually title or text)
Move
Delete
Show
Hide
Help
More information

Page 67 of 68
What have you learnt?
Are you able to do the things below?
Yes No login and navigate in UUM Online Learning? edit and customize your course page? edit and update your profile?
upload and display resources on the course page? add URL? create ‘Groups’ within a course and assigning students into groups? create choice activity? create and manage discussion forums? create and mark assignments?
create different types of questions in question bank?
set-up online quiz Add questions to quiz
Page 68 of 68
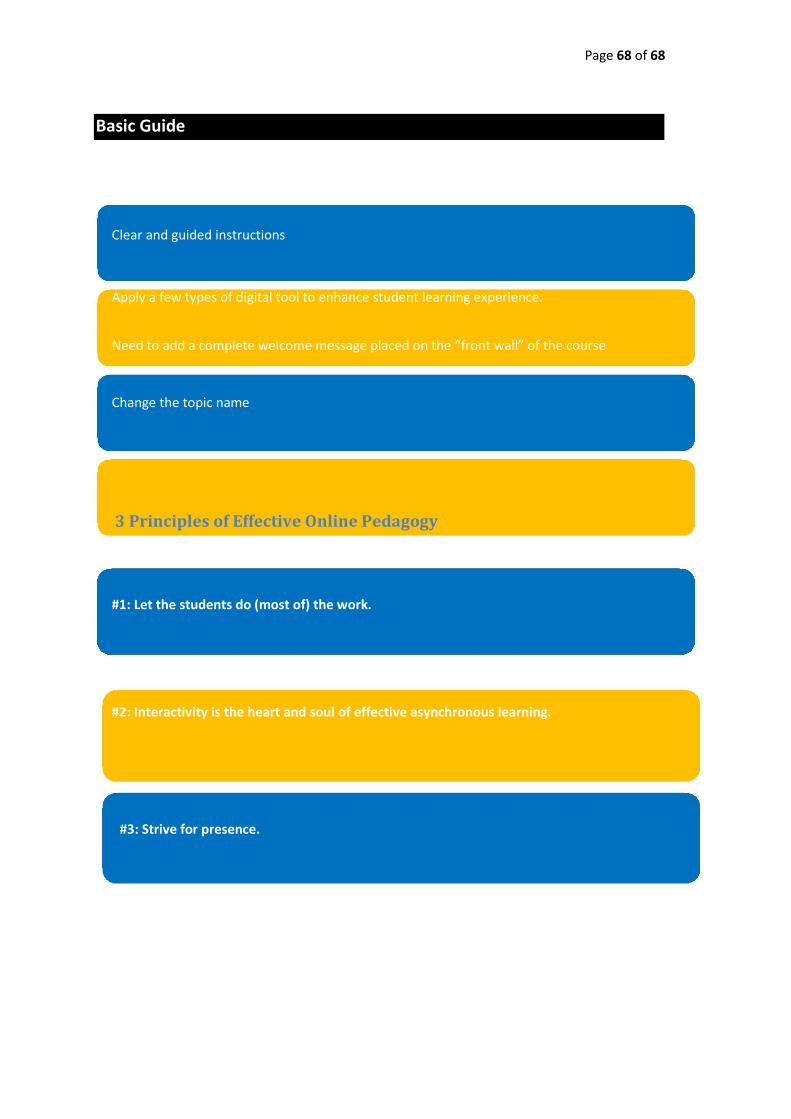
Basic Guide
Clear and guided instructions
Apply a few types of digital tool to enhance student learning experience.
Need to add a complete welcome message placed on the “front wall” of the course
Change the topic name
3 Principles of Effective Online Pedagogy
#1: Let the students do (most of) the work.
#2: Interactivity is the heart and soul of effective asynchronous learning.
#3: Strive for presence.