Embed Size (px)
Citation preview
OnYourMap JS APIGetting Started
Version 1.2.3
Onyourmap Group
HeadquartersOnYourMap SAChemin du Trési 6D1028 PréverengesSuisse
Long. = 6.53125
Lat. = 46.52346
Tel. +41 - 21 - 651 30 30
Fax. +41 - 21 - 651 30 35
Location BernOnyourmap AGWaldeggstrasse 473097 LibefeldSchweiz
Long. = 7.419312
Lat. = 46.932275
Tel. +41 - 31 - 511 80 00
Fax. +41 - 31 - 511 80 49
Location ParisOnYourMap SARue des Saussaies 375008 ParisFrance
Long. = 2.316746
Lat. = 48.871048
Tel. +33 9 5087 0500
Fax. +33 1 7376 9212
http://www.onyourmap.com
This document contains confidential information that remains the property OnYourMap, and may not becopied, circulated or distributed without prior written consent of OnYourMap.
Copyright c©2006-2011, OnYourMap SA.
OnYourMap JS APIGetting Started
Contents
1 Change Notes 4
2 Loading Scripts 5
3 Start Example 5
4 Aliases 6
5 Display Map 75.1 GeoKit Configuration . . . . . . . . . . . . . . . . . . . . . . . . . . . . . . . . . . . . . . . . 75.2 What is a position . . . . . . . . . . . . . . . . . . . . . . . . . . . . . . . . . . . . . . . . . . 75.3 Map Configuration . . . . . . . . . . . . . . . . . . . . . . . . . . . . . . . . . . . . . . . . . . 8
5.3.1 Set Bound To Map . . . . . . . . . . . . . . . . . . . . . . . . . . . . . . . . . . . . . . 95.3.2 Set Bound To Zoom Levels . . . . . . . . . . . . . . . . . . . . . . . . . . . . . . . . . 9
5.4 Is Map Loaded ? . . . . . . . . . . . . . . . . . . . . . . . . . . . . . . . . . . . . . . . . . . . 95.5 Window Resize . . . . . . . . . . . . . . . . . . . . . . . . . . . . . . . . . . . . . . . . . . . 95.6 State Of The Map . . . . . . . . . . . . . . . . . . . . . . . . . . . . . . . . . . . . . . . . . . 105.7 Copyright . . . . . . . . . . . . . . . . . . . . . . . . . . . . . . . . . . . . . . . . . . . . . . 11
6 Overlays 116.1 Marker . . . . . . . . . . . . . . . . . . . . . . . . . . . . . . . . . . . . . . . . . . . . . . . . 116.2 Custom Marker . . . . . . . . . . . . . . . . . . . . . . . . . . . . . . . . . . . . . . . . . . . 126.3 Polyline . . . . . . . . . . . . . . . . . . . . . . . . . . . . . . . . . . . . . . . . . . . . . . . 136.4 Polygon . . . . . . . . . . . . . . . . . . . . . . . . . . . . . . . . . . . . . . . . . . . . . . . 14
6.4.1 LinearRing . . . . . . . . . . . . . . . . . . . . . . . . . . . . . . . . . . . . . . . . . . 156.4.2 Style . . . . . . . . . . . . . . . . . . . . . . . . . . . . . . . . . . . . . . . . . . . . . 156.4.3 Display . . . . . . . . . . . . . . . . . . . . . . . . . . . . . . . . . . . . . . . . . . . . 15
6.5 Ellipse . . . . . . . . . . . . . . . . . . . . . . . . . . . . . . . . . . . . . . . . . . . . . . . . 166.6 Circle . . . . . . . . . . . . . . . . . . . . . . . . . . . . . . . . . . . . . . . . . . . . . . . . . 166.7 Info Window . . . . . . . . . . . . . . . . . . . . . . . . . . . . . . . . . . . . . . . . . . . . . 16
6.7.1 Customized Info Window . . . . . . . . . . . . . . . . . . . . . . . . . . . . . . . . . . 176.8 Add Overlays . . . . . . . . . . . . . . . . . . . . . . . . . . . . . . . . . . . . . . . . . . . . 176.9 Remove Overlays . . . . . . . . . . . . . . . . . . . . . . . . . . . . . . . . . . . . . . . . . . 176.10 Remove All Overlays . . . . . . . . . . . . . . . . . . . . . . . . . . . . . . . . . . . . . . . . 17
7 Map Controls 187.1 Map Chooser . . . . . . . . . . . . . . . . . . . . . . . . . . . . . . . . . . . . . . . . . . . . 187.2 Zoom Slider . . . . . . . . . . . . . . . . . . . . . . . . . . . . . . . . . . . . . . . . . . . . . 187.3 Mini Map . . . . . . . . . . . . . . . . . . . . . . . . . . . . . . . . . . . . . . . . . . . . . . . 197.4 Scale Bar . . . . . . . . . . . . . . . . . . . . . . . . . . . . . . . . . . . . . . . . . . . . . . 19
8 Map Type Customization 198.1 Update Map Type . . . . . . . . . . . . . . . . . . . . . . . . . . . . . . . . . . . . . . . . . . 208.2 Add OYM Map Type . . . . . . . . . . . . . . . . . . . . . . . . . . . . . . . . . . . . . . . . . 208.3 Add Map Type . . . . . . . . . . . . . . . . . . . . . . . . . . . . . . . . . . . . . . . . . . . . 21
8.3.1 Zoom Index . . . . . . . . . . . . . . . . . . . . . . . . . . . . . . . . . . . . . . . . . 218.3.2 Tile Index . . . . . . . . . . . . . . . . . . . . . . . . . . . . . . . . . . . . . . . . . . 22
August 4, 2011 Copyright c©2006-2011, OnYourMap SA. 2/44
OnYourMap JS APIGetting Started
9 Context Menu 229.1 Css Classes . . . . . . . . . . . . . . . . . . . . . . . . . . . . . . . . . . . . . . . . . . . . . 249.2 Content . . . . . . . . . . . . . . . . . . . . . . . . . . . . . . . . . . . . . . . . . . . . . . . 24
9.2.1 Build Context Menu . . . . . . . . . . . . . . . . . . . . . . . . . . . . . . . . . . . . . 249.2.2 Map Context Menu . . . . . . . . . . . . . . . . . . . . . . . . . . . . . . . . . . . . . 269.2.3 Overlay Context Menu . . . . . . . . . . . . . . . . . . . . . . . . . . . . . . . . . . . . 26
10 Events 26
11 Services 2711.1 Geocoding . . . . . . . . . . . . . . . . . . . . . . . . . . . . . . . . . . . . . . . . . . . . . . 27
11.1.1 com.oym.geokit.FreeFormRequest . . . . . . . . . . . . . . . . . . . . . . . . . . . . . 2711.1.2 com.oym.geokit.GeocodeRequest . . . . . . . . . . . . . . . . . . . . . . . . . . . . . 28
11.2 Reverse Geocoding . . . . . . . . . . . . . . . . . . . . . . . . . . . . . . . . . . . . . . . . . 2811.2.1 com.oym.geokit.ReverseGeocodeNearestRequest . . . . . . . . . . . . . . . . . . . . 2911.2.2 com.oym.geokit.ReverseGeocodeRadiusRequest . . . . . . . . . . . . . . . . . . . . . 2911.2.3 com.oym.geokit.ReverseGeocodeBoundingBoxRequest . . . . . . . . . . . . . . . . . 30
11.3 Auto Complete . . . . . . . . . . . . . . . . . . . . . . . . . . . . . . . . . . . . . . . . . . . . 3011.4 Routing . . . . . . . . . . . . . . . . . . . . . . . . . . . . . . . . . . . . . . . . . . . . . . . . 31
11.4.1 com.oym.geokit.RouteRequest . . . . . . . . . . . . . . . . . . . . . . . . . . . . . . . 3111.5 POI . . . . . . . . . . . . . . . . . . . . . . . . . . . . . . . . . . . . . . . . . . . . . . . . . . 3111.6 Search POI . . . . . . . . . . . . . . . . . . . . . . . . . . . . . . . . . . . . . . . . . . . . . 32
12 Modules 3312.1 Route Module . . . . . . . . . . . . . . . . . . . . . . . . . . . . . . . . . . . . . . . . . . . . 33
12.1.1 Route View . . . . . . . . . . . . . . . . . . . . . . . . . . . . . . . . . . . . . . . . . 3312.1.2 RouteView delegate . . . . . . . . . . . . . . . . . . . . . . . . . . . . . . . . . . . . . 3412.1.3 Changing Start/Via/End/New Overlay . . . . . . . . . . . . . . . . . . . . . . . . . . . 35
12.2 Autocomplete Module . . . . . . . . . . . . . . . . . . . . . . . . . . . . . . . . . . . . . . . . 3512.3 Drawing Module . . . . . . . . . . . . . . . . . . . . . . . . . . . . . . . . . . . . . . . . . . . 36
12.3.1 Polylines/Polygons . . . . . . . . . . . . . . . . . . . . . . . . . . . . . . . . . . . . . 3712.3.2 Circle . . . . . . . . . . . . . . . . . . . . . . . . . . . . . . . . . . . . . . . . . . . . . 3812.3.3 Delegate . . . . . . . . . . . . . . . . . . . . . . . . . . . . . . . . . . . . . . . . . . . 38
13 Utilities 3813.1 Translation . . . . . . . . . . . . . . . . . . . . . . . . . . . . . . . . . . . . . . . . . . . . . . 3813.2 Conversion . . . . . . . . . . . . . . . . . . . . . . . . . . . . . . . . . . . . . . . . . . . . . . 38
13.2.1 KM to MI . . . . . . . . . . . . . . . . . . . . . . . . . . . . . . . . . . . . . . . . . . . 3813.2.2 Pixel To Position . . . . . . . . . . . . . . . . . . . . . . . . . . . . . . . . . . . . . . . 3913.2.3 Position To Pixel . . . . . . . . . . . . . . . . . . . . . . . . . . . . . . . . . . . . . . . 3913.2.4 Pixel To Meter . . . . . . . . . . . . . . . . . . . . . . . . . . . . . . . . . . . . . . . . 39
14 Events 3914.1 Map Events . . . . . . . . . . . . . . . . . . . . . . . . . . . . . . . . . . . . . . . . . . . . . 3914.2 Mouse Events On Map . . . . . . . . . . . . . . . . . . . . . . . . . . . . . . . . . . . . . . . 4014.3 Overlay Events . . . . . . . . . . . . . . . . . . . . . . . . . . . . . . . . . . . . . . . . . . . 42
August 4, 2011 Copyright c©2006-2011, OnYourMap SA. 3/44
OnYourMap JS APIGetting Started
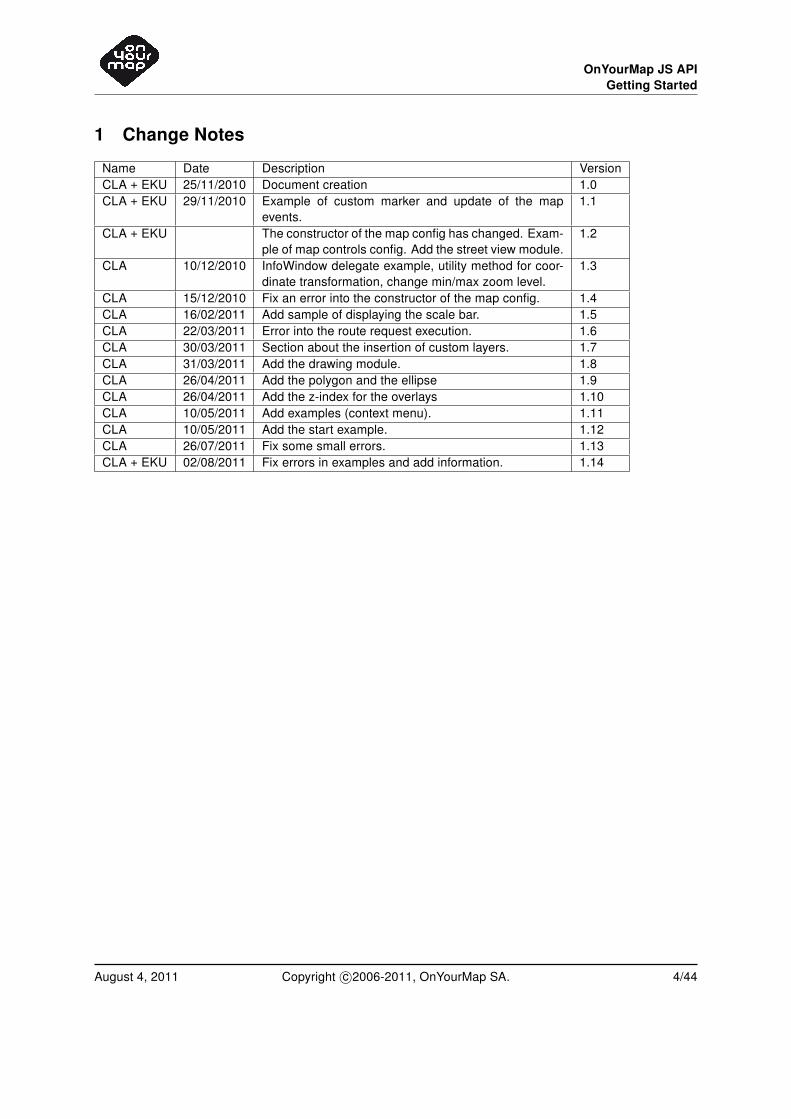
1 Change Notes
Name Date Description VersionCLA + EKU 25/11/2010 Document creation 1.0CLA + EKU 29/11/2010 Example of custom marker and update of the map
events.1.1
CLA + EKU The constructor of the map config has changed. Exam-ple of map controls config. Add the street view module.
1.2
CLA 10/12/2010 InfoWindow delegate example, utility method for coor-dinate transformation, change min/max zoom level.
1.3
CLA 15/12/2010 Fix an error into the constructor of the map config. 1.4CLA 16/02/2011 Add sample of displaying the scale bar. 1.5CLA 22/03/2011 Error into the route request execution. 1.6CLA 30/03/2011 Section about the insertion of custom layers. 1.7CLA 31/03/2011 Add the drawing module. 1.8CLA 26/04/2011 Add the polygon and the ellipse 1.9CLA 26/04/2011 Add the z-index for the overlays 1.10CLA 10/05/2011 Add examples (context menu). 1.11CLA 10/05/2011 Add the start example. 1.12CLA 26/07/2011 Fix some small errors. 1.13CLA + EKU 02/08/2011 Fix errors in examples and add information. 1.14
August 4, 2011 Copyright c©2006-2011, OnYourMap SA. 4/44
OnYourMap JS APIGetting Started
2 Loading Scripts
First of all, the geokit must be loaded in your web page. To do this like all other JavaScript scripts, you mustinsert the script tag in the header of your page.
Exemple:
< s c r i p t type="text/javascript" src="http://maps.onyourmap.com/js3/scripts/oym-1.2.3.js"></ s c r i p t >
All the geokit is contained into the namespace "com.oym". The object you will use into your web page iswithin the namespace "com.oym.geokit". You can start the loading of the GeoKit with the command load.
Exemple:
com.oym. load ("dhtml" ) ;
This command will load all the required script in an asynchronous way to avoid the blocking of the page.Once that all the scripts are loaded the function onModulesLoaded() is called. This is the only place whereyou can not choose the callback’s name. In this method you can instanciate the GeoKit object.
function onModulesLoaded ( ) {//Here you can instanciate the geokit.
}
If you want to call another method and/or in another context than the window, you can call this method withtwo more parameters: the name of the callback and the context in which it is called.
com.oym. load (’dhtml’ , ’myCallbackName’ , myContext ) ;
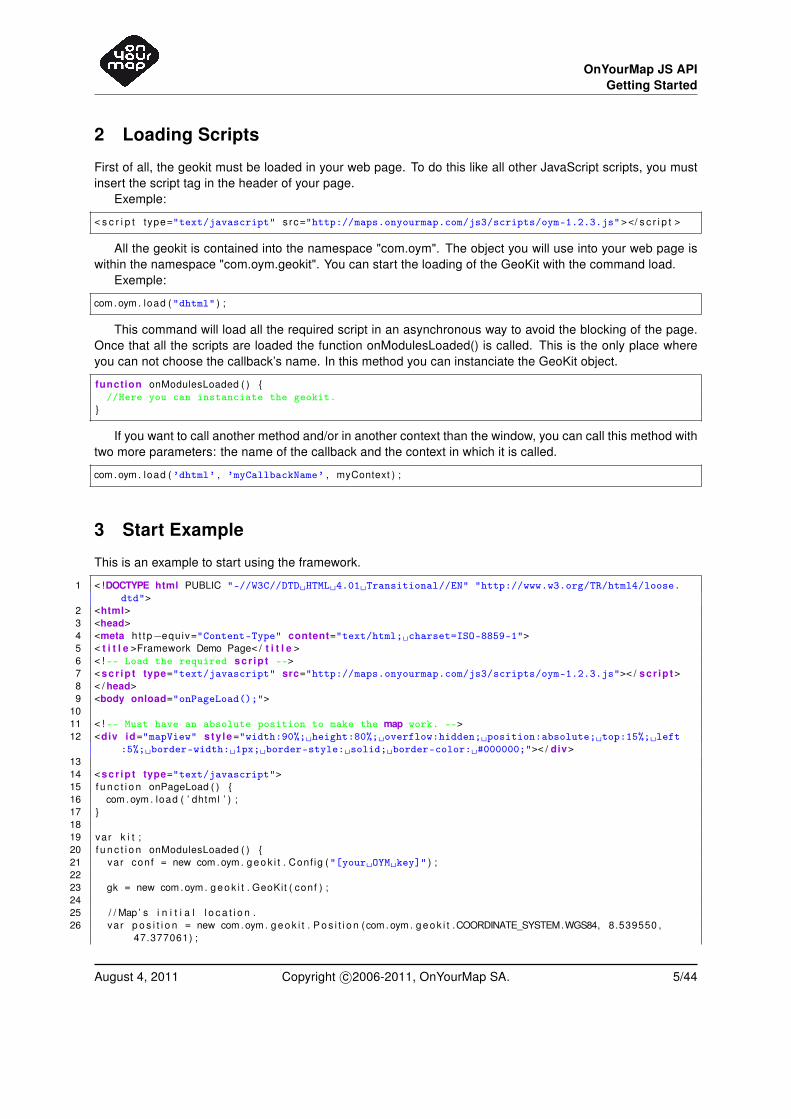
3 Start Example
This is an example to start using the framework.
1 < !DOCTYPE html PUBLIC "-//W3C//DTD␣HTML␣4.01␣Transitional//EN" "http://www.w3.org/TR/html4/loose.dtd">
2 <html>3 <head>4 <meta ht tp−equiv="Content-Type" content="text/html;␣charset=ISO-8859-1">5 < t i t l e >Framework Demo Page< / t i t l e >6 < ! -- Load the required scr ip t -->7 <scr ip t type="text/javascript" src="http://maps.onyourmap.com/js3/scripts/oym-1.2.3.js">< / scr ip t>8 < / head>9 <body onload="onPageLoad();">
1011 < ! -- Must have an absolute position to make the map work. -->12 <div id="mapView" sty le="width:90%;␣height:80%;␣overflow:hidden;␣position:absolute;␣top:15%;␣left
:5%;␣border-width:␣1px;␣border-style:␣solid;␣border-color:␣#000000;">< / div>1314 <scr ip t type="text/javascript">15 f u n c t i o n onPageLoad ( ) {16 com.oym. load ( ’ dhtml ’ ) ;17 }1819 var k i t ;20 f u n c t i o n onModulesLoaded ( ) {21 var conf = new com.oym. geok i t . Conf ig ("[your␣OYM␣key]" ) ;2223 gk = new com.oym. geok i t . GeoKit ( conf ) ;2425 / / Map ’ s i n i t i a l l o c a t i o n .26 var p o s i t i o n = new com.oym. geok i t . Pos i t i on (com.oym. geok i t .COORDINATE_SYSTEM.WGS84, 8.539550 ,
47.377061) ;
August 4, 2011 Copyright c©2006-2011, OnYourMap SA. 5/44
OnYourMap JS APIGetting Started
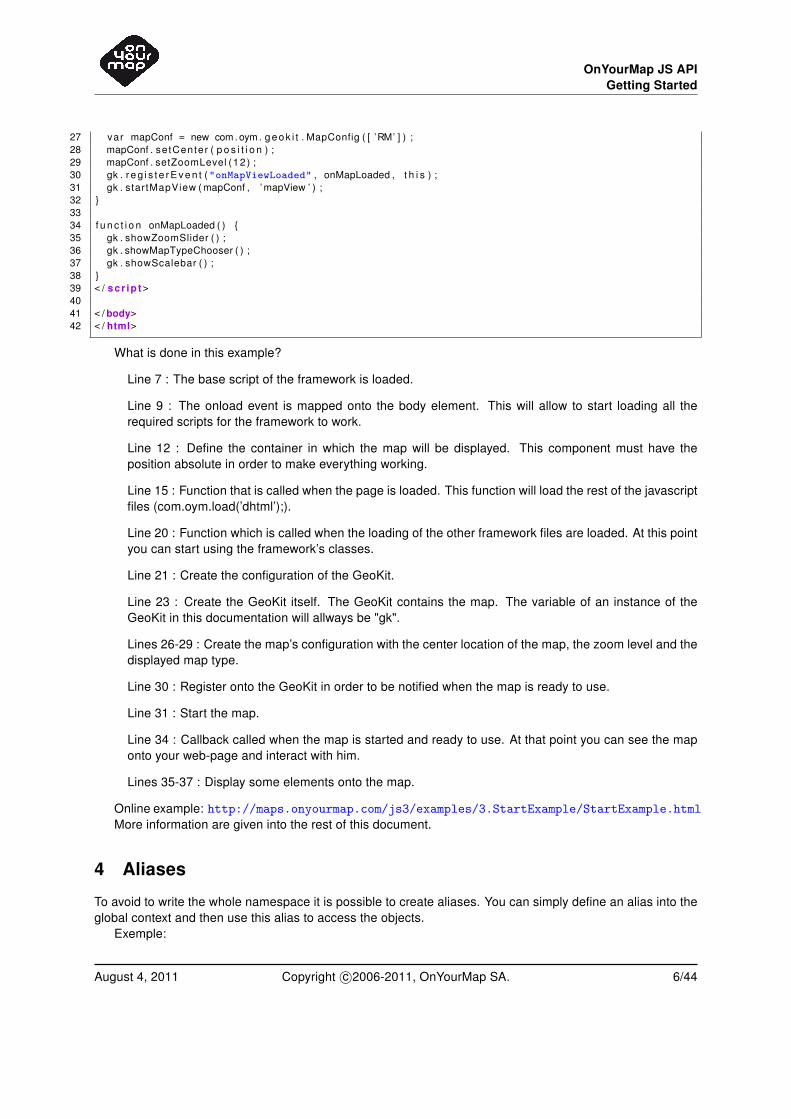
27 var mapConf = new com.oym. geok i t . MapConfig ( [ ’RM’ ] ) ;28 mapConf . setCenter ( p o s i t i o n ) ;29 mapConf . setZoomLevel (12) ;30 gk . reg i s te rEven t ("onMapViewLoaded" , onMapLoaded , t h i s ) ;31 gk . startMapView ( mapConf , ’mapView ’ ) ;32 }3334 f u n c t i o n onMapLoaded ( ) {35 gk . showZoomSlider ( ) ;36 gk . showMapTypeChooser ( ) ;37 gk . showScalebar ( ) ;38 }39 < / scr ip t>4041 < / body>42 < / html>
What is done in this example?
Line 7 : The base script of the framework is loaded.
Line 9 : The onload event is mapped onto the body element. This will allow to start loading all therequired scripts for the framework to work.
Line 12 : Define the container in which the map will be displayed. This component must have theposition absolute in order to make everything working.
Line 15 : Function that is called when the page is loaded. This function will load the rest of the javascriptfiles (com.oym.load(’dhtml’);).
Line 20 : Function which is called when the loading of the other framework files are loaded. At this pointyou can start using the framework’s classes.
Line 21 : Create the configuration of the GeoKit.
Line 23 : Create the GeoKit itself. The GeoKit contains the map. The variable of an instance of theGeoKit in this documentation will allways be "gk".
Lines 26-29 : Create the map’s configuration with the center location of the map, the zoom level and thedisplayed map type.
Line 30 : Register onto the GeoKit in order to be notified when the map is ready to use.
Line 31 : Start the map.
Line 34 : Callback called when the map is started and ready to use. At that point you can see the maponto your web-page and interact with him.
Lines 35-37 : Display some elements onto the map.
Online example: http://maps.onyourmap.com/js3/examples/3.StartExample/StartExample.htmlMore information are given into the rest of this document.
4 Aliases
To avoid to write the whole namespace it is possible to create aliases. You can simply define an alias into theglobal context and then use this alias to access the objects.
Exemple:
August 4, 2011 Copyright c©2006-2011, OnYourMap SA. 6/44
OnYourMap JS APIGetting Started
1 var k i t = com.oym. geok i t ;2 // usage exemple3 var gk = new k i t . GeoKit ( . . . ) ;
5 Display Map
To display a map, there is only two steps:
• Create a GeoKit config and instanciate a GeoKit.
• Create a mapping config and start the view into the GeoKit instance.
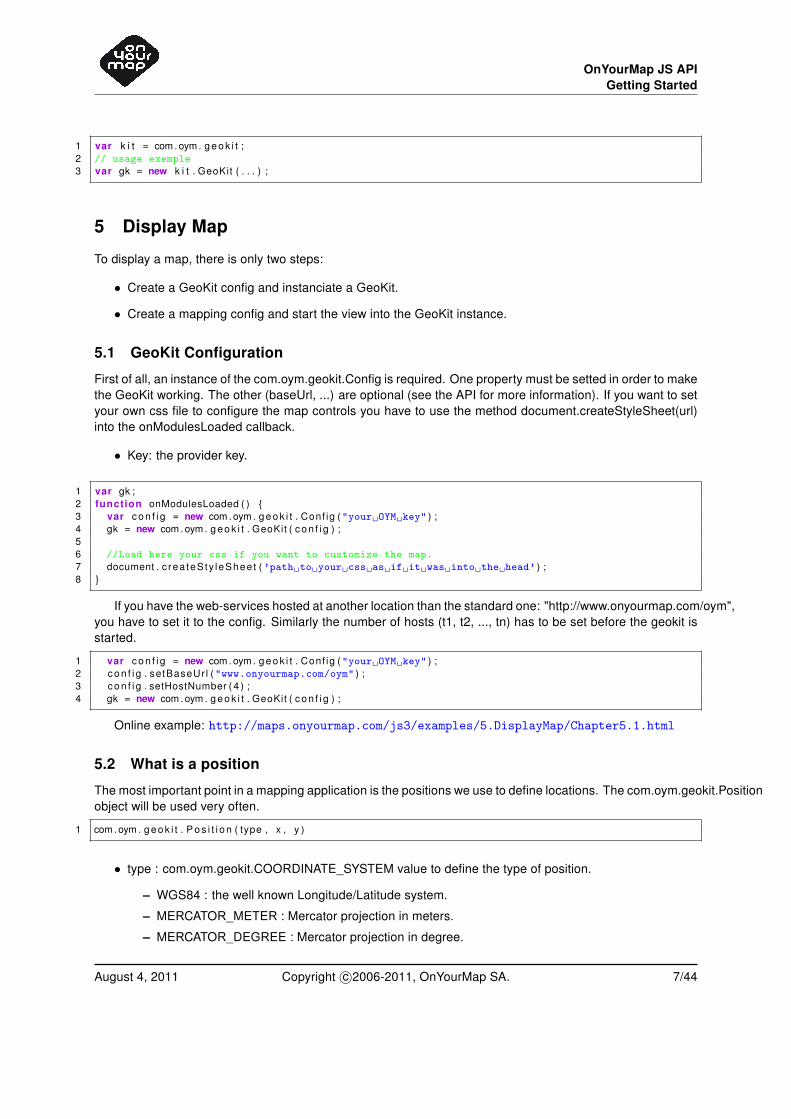
5.1 GeoKit Configuration
First of all, an instance of the com.oym.geokit.Config is required. One property must be setted in order to makethe GeoKit working. The other (baseUrl, ...) are optional (see the API for more information). If you want to setyour own css file to configure the map controls you have to use the method document.createStyleSheet(url)into the onModulesLoaded callback.
• Key: the provider key.
1 var gk ;2 function onModulesLoaded ( ) {3 var con f i g = new com.oym. geok i t . Conf ig ("your␣OYM␣key" ) ;4 gk = new com.oym. geok i t . GeoKit ( con f i g ) ;56 //Load here your css if you want to customize the map.7 document . c reateSty leSheet (’path␣to␣your␣css␣as␣if␣it␣was␣into␣the␣head’ ) ;8 }
If you have the web-services hosted at another location than the standard one: "http://www.onyourmap.com/oym",you have to set it to the config. Similarly the number of hosts (t1, t2, ..., tn) has to be set before the geokit isstarted.
1 var con f i g = new com.oym. geok i t . Conf ig ("your␣OYM␣key" ) ;2 con f i g . setBaseUrl ("www.onyourmap.com/oym" ) ;3 con f i g . setHostNumber ( 4 ) ;4 gk = new com.oym. geok i t . GeoKit ( con f i g ) ;
Online example: http://maps.onyourmap.com/js3/examples/5.DisplayMap/Chapter5.1.html
5.2 What is a position
The most important point in a mapping application is the positions we use to define locations. The com.oym.geokit.Positionobject will be used very often.
1 com.oym. geok i t . Pos i t i on ( type , x , y )
• type : com.oym.geokit.COORDINATE_SYSTEM value to define the type of position.
– WGS84 : the well known Longitude/Latitude system.
– MERCATOR_METER : Mercator projection in meters.
– MERCATOR_DEGREE : Mercator projection in degree.
August 4, 2011 Copyright c©2006-2011, OnYourMap SA. 7/44
OnYourMap JS APIGetting Started
– LAMBERT2 : French coordinate system.
• x : the value of the x axis.
• y : the value of the y axis.
WGS84 is the most used system that’s why there is a shortcut to create WGS84 Position
1 com.oym. geok i t . WGS84Position ( x , y )
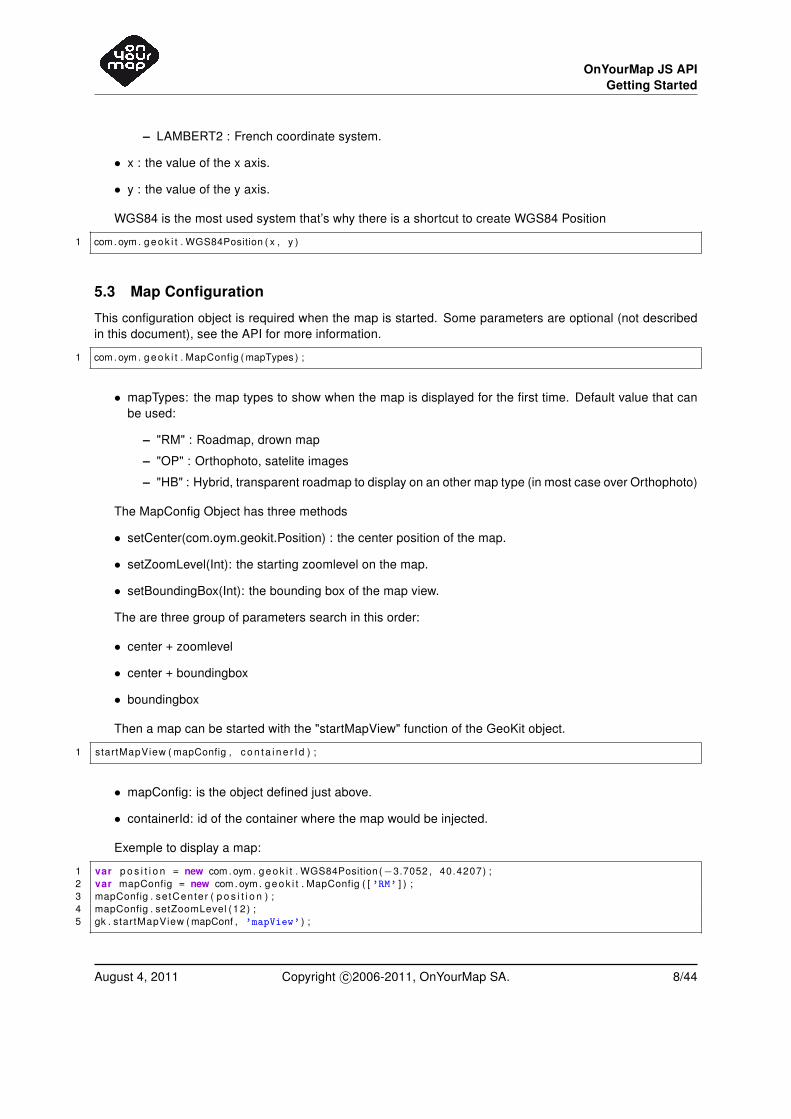
5.3 Map Configuration
This configuration object is required when the map is started. Some parameters are optional (not describedin this document), see the API for more information.
1 com.oym. geok i t . MapConfig ( mapTypes ) ;
• mapTypes: the map types to show when the map is displayed for the first time. Default value that canbe used:
– "RM" : Roadmap, drown map
– "OP" : Orthophoto, satelite images
– "HB" : Hybrid, transparent roadmap to display on an other map type (in most case over Orthophoto)
The MapConfig Object has three methods
• setCenter(com.oym.geokit.Position) : the center position of the map.
• setZoomLevel(Int): the starting zoomlevel on the map.
• setBoundingBox(Int): the bounding box of the map view.
The are three group of parameters search in this order:
• center + zoomlevel
• center + boundingbox
• boundingbox
Then a map can be started with the "startMapView" function of the GeoKit object.
1 startMapView ( mapConfig , con ta i ne r I d ) ;
• mapConfig: is the object defined just above.
• containerId: id of the container where the map would be injected.
Exemple to display a map:
1 var p o s i t i o n = new com.oym. geok i t . WGS84Position (−3.7052 , 40.4207) ;2 var mapConfig = new com.oym. geok i t . MapConfig ( [ ’RM’ ] ) ;3 mapConfig . setCenter ( p o s i t i o n ) ;4 mapConfig . setZoomLevel (12) ;5 gk . startMapView ( mapConf , ’mapView’ ) ;
August 4, 2011 Copyright c©2006-2011, OnYourMap SA. 8/44

OnYourMap JS APIGetting Started
5.3.1 Set Bound To Map
If you don’t want to allow the user to see the whole world, you can define some bound to the map. They areset into the map config as the forth parameter of the constructor. It is optional and if not given, the whole worldis allowed to be seen. The minimum allowed zoom level will also be computed according to this bounds inorder to never display something outside.
1 var center = new com.oym. geok i t . WGS84Position (7.4195 , 46.9323) ;2 var bound = new com.oym. geok i t . Bound (3 new com.oym. geok i t . WGS84Position (5 , 45) ,4 new com.oym. geok i t . WGS84Position (8 , 48) ) ;5 var mapConfig = com.oym. geok i t . MapConfig ( [ ’RM’ ] , bound ) ;6 k i t . startMapView ( mapConfig , ’myMapContainer’ ) ;
Online example: http://maps.onyourmap.com/js3/examples/5.DisplayMap/Chapter5.3.1.html
5.3.2 Set Bound To Zoom Levels
You also have the possibility to limit the interval of zoom levels the user can see. These limits are set directlyinto the map config.
1 var center = new com.oym. geok i t . WGS84Position (7.4195 , 46.9323) ;2 //Build the config with an initial center, zoom level and map types. No bounds3 //are given => the whole world is displayed. The allowed zoom levels are between4 //5 and 15 included.5 var mapConfig = com.oym. geok i t . MapConfig ( [ ’RM’ ] , bound , null , 5 , 15) ;6 gk . startMapView ( mapConfig , ’myMapContainer’ ) ;
These min/max zoom levels can also be modified after the initialization of the map by using the methodssetMinZoomLevel and setMaxZoomLevel. Calling these methods will update the limit of the zoom levels. Ifthe current zoom level is outside the new bound, it will be updated automatically.
Online example: http://maps.onyourmap.com/js3/examples/5.DisplayMap/Chapter5.3.2.html
5.4 Is Map Loaded ?
When it is required to draw something on the map you need to know if the map has been loaded or not. Inorder to do that you must register a function on the "onMapLoaded" event with "registerEvent" function on theGeoKit object just after is declaration.
Exemple:
1 function onModulesLoaded ( ) {2 var con f i g = new com.oym. geok i t . Conf ig ("your␣OYM␣key" ) ;3 gk = new com.oym. geok i t . GeoKit ( con f i g ) ;4 var center = new com.oym. geok i t . WGS84Position (7.4195 , 46.9323) ;5 var mapConfig = com.oym. geok i t . MapConfig ( [ ’RM’ ] ) ;6 gk . reg i s te rEven t (’onMapViewLoaded’ ,7 onMapLoaded ,8 th is ) ;9 }
1011 function onMapLoaded ( ) {12 }
5.5 Window Resize
This is the web-page responsibility to catch the window.onresize event. The framework will not do it. Thus,in the catch of this event, you have to call the updateView() method on the geokit to force it to update. This
August 4, 2011 Copyright c©2006-2011, OnYourMap SA. 9/44

OnYourMap JS APIGetting Started
method will update the map view and the mini map view and load the new tiles if required. It will also recomputethe size of the rectangle into the mini map.
5.6 State Of The Map
You can change the state of the map at any time during the mapview life time. All of the changes can beanimated but if the flag is not given the change is animated.
• setCenter - Change the center of the map.
• setZoomLevel - Change the zoom level.
• setCenterAndZoomLevel - Change both the center and the zoom level. Allows to animate both changeat one time.
• moveDirection - Move the map in a given direction by a certain ratio of the viewport (default is 1/4).
• zoomIn - Make a zoom in direction of the ground by zooming "delta" zoom levels.
• zoomOut - Make a zoom in direction of the sky by zooming "delta" zoom levels.
• setBoundingBox - Set the bounding box that must be displayed onto the map. A gap around the bound-ing box can be given. If the bounding box is a single point it zooms to the deepest zoom level.
• setDisplayedMapTypes - Set the map types to display as an array of the map types id.
1 //Set the new center. Animated.2 gk . setCenter (new com.oym. geok i t . WGS84Position (7 , 46) ) ;3 . . .4 //Set the new zoom level. Animated.5 gk . setZoomLevel ( 7 ) ;6 . . .7 //Set both center and zoom level.8 //Not animated because the flag is given.9 gk . setCenterAndZoomLevel ( center , 5 , fa lse ) ;
10 . . .11 //Move in north direction by default distance.12 gk . moveDirect ion (com.oym. geok i t . DIRECTION .N) ;13 . . .14 //Zoom in by 3 levels. If we are currently at level x, the new is x + 3.15 gk . zoomIn ( 3 ) ;16 . . .17 //Set the bounding box with a gap of 10 pixels around.18 gk . setBoundingBox (myBound , true , 10) ;19 . .20 //Change the displayed map types to satelite+hybrid.21 gk . setDisplayedMapTypes ( [ ’OP’ , ’HB’ ] ) ;
You can also retrieve these values at any time using the methods:
• getCenter
• getZoomLevel
• getBoundingBox
• getDisplayedMapTypes
Online example: http://maps.onyourmap.com/js3/examples/5.DisplayMap/Chapter5.5.1.html
August 4, 2011 Copyright c©2006-2011, OnYourMap SA. 10/44

OnYourMap JS APIGetting Started
5.7 Copyright
A copyright is displayed into the map’s container. This copyright is a list of all the map providers. It is basedon a CSS to define its style and can thus being configured. You can also insert a personal piece of HTMLbefore the list of map providers.
1 gk . se tCopyr igh tConf ig (’my␣class␣name’ , ’my␣personal␣html␣code’ ) ;
This method takes two parameters:
• CSS class name: This is the name of the CSS class you want the copyright to take.
• Base HTML: This is a string which contains some HTML you want to insert before the list of mapproviders. In this HTML you can insert image tag with your logo for example.
Online example: http://maps.onyourmap.com/js3/examples/5.DisplayMap/Chapter5.6.html
6 Overlays
There is different kind of overlays:
• Marker - Element pinned at a single map location.
• Polyline - Line that connects map location (e.g. route).
• Polygon - Cover a map area.
• Ellipse - As its name says ...
An order between the markers can be defined. By order we mean which one is displayed on top of theohters. This concept is represented by the z index. The z index of an overlay can be changed at any time evenwhen the overlay is displayed onto the map. The change is applied using the method setZIndex(unsigned int).Only positiv values are valid, if a negative one is given, it is replaced by 0. 0 means bottom and increasingvalues means more on top.
6.1 Marker
The marker is an overlay used to show a precise location defines by a position. It is composed by one requiredparameter : the position. A default picture will be drawn as marker but it is possible to draw a custom pictureas marker with a MarkerIcon object.
1 com.oym. geok i t . Marker ( pos i t i on ,2 [ markerIcon ] )
• position: position of the marker.
• markerIcon: the marker image configuration as a com.oym.geokit.MarkerIcon (optional).
The MarkerIcon is defined by three properties
1 com.oym. geok i t . MarkerIcon ( s ize , o f f s e t , u r l )
• size: the image size. It is used to define the center of the overlay, but can be null.
• offset: the offset from the center of the image
August 4, 2011 Copyright c©2006-2011, OnYourMap SA. 11/44

OnYourMap JS APIGetting Started
• url: the url of the icon
Exemple:
1 var i con = new com.oym. geok i t . MarkerIcon (2 new com.oym. geok i t . Size (27 , 33) ,3 new com.oym. geok i t . P i x e l P o s i t i o n (10 , −11) ,4 ’url␣image’ ) ;5 var mark = new com.oym. geok i t . Marker (6 new com.oym. geok i t . WGS84Position (−3.7052 , 40.4207) , icon ) ;78 gk . addOverlay ( mark ) ;
Online example: http://maps.onyourmap.com/js3/examples/6.Overlays/Chapter6.1.1.htmlThere is a possible way to do a group of marker. One Marker is the master and the others are slaves. Only
the master Marker has a position, the others are placed in function of the offset (null as the first constructorparameter).
Exemple
1 var icon1 = new com.oym. geok i t . MarkerIcon (2 new com.oym. geok i t . Size (30 , 30) ,3 new com.oym. u t i l s . P i x e l P o s i t i o n (10 , −11) ,4 ’url␣image’ ) ;5 var icon2 = new com.oym. geok i t . MarkerIcon (6 new com.oym. geok i t . Size (15 , 15) ,7 new com.oym. u t i l s . P i x e l P o s i t i o n (10 , −11) ,8 ’url␣image’ ) ;9
10 var mark1 = new com.oym. geok i t . Marker (11 new com.oym. geok i t . WGS84Position (−3.7052 ,40.4207) , icon112 ) ;1314 var mark2 = new com.oym. geok i t . Marker ( null , icon2 ) ;15 mark1 . addOverlay ( mark2 , true ) ;1617 gk . addOverlay ( mark1 ) ;
Online example: http://maps.onyourmap.com/js3/examples/6.Overlays/Chapter6.1.2.html
6.2 Custom Marker
If you want to display marker that are not only images but anything else as video, buttons, complex DOM, etc,you can do it with the class com.oym.geokit.CustomMarker.
1 com.oym. geok i t . CustomMarker (dom, pos i t i on , s ize , o f f s e t ) ;
• dom - The is the dom object you want to display as the marker. There is two ways to build this dom:
– document.getElementById(’element id’) This method retreive an object from the dom page (seeListing 1).
– Creating an element from nothing (see Listing 2).
• position The position of the marker into the world (as a com.oym.geokit.Position or WGS84Position).
• size The size of the overlay in pixel. It is used to define the center of the overlay, but can be null.
• offset The offset from its position in pixel.
August 4, 2011 Copyright c©2006-2011, OnYourMap SA. 12/44
OnYourMap JS APIGetting Started
Listing 1: Custom marker with getElementById to get the DOM
1 var dom = document . getElementById (’element␣id’ ) ;2 var marker = new com.oym. geok i t . CustomMarker (dom, myPosit ion , mySize , myOffset ) ;3 gk . addOverlay ( marker ) ;
Listing 2: Custom marker with creating the DOM from nothing
1 var dom = document . createElement (’div’ ) ;2 dom. innerHTML = ’your␣html␣code’ ;3 var marker = new com.oym. geok i t . CustomMarker (dom, myPosit ion , mySize , myOffset ) ;4 gk . addOverlay ( marker ) ;
The example present a way to add a div as the DOM element, but you can insert any other DOM elementas well.
Online example: http://maps.onyourmap.com/js3/examples/6.Overlays/Chapter6.2.html
6.3 Polyline
The polyline is declined in three different objects:
• com.oym.geokit.Polyline
• com.oym.geokit.PixelPolyline
• com.oym.geokit.LeveledPolyline
com.oym.geokit.Polyline It is a geographical polyline. Its points are world locations and a line is drawnlinking them all.
1 com.oym. geok i t . P o l y l i n e ( pos i t i ons , strokeWidth , s t rokeColor , s t rokeOpaci ty , [ s t r okeS ty l e ] , [ bounds] )
• positions: the positions making the polyline.
• strokeWidth: the polyline width.
• strokeColor: the polyline color.
• strokeOpacity: the polyline opacity.
• strokeStyle: the style of the line as a com.oym.geokit.STROKE_STYLE. If not given, the polyline is solid.(optional)
• bounds: the polyline bounds (optional).
com.oym.geokit.LeveledPolyline This kind of polyline is an optimized polyline where an array of levelview is given in parallel of the positions. This kind of polyline is recommanded to display routes from theOnyourmap services which gives these levels. If you don’t have the levels (route from other web-services orother polylines) you have to use the com.oym.geokitPolyline. The levels are used with a bitmask function thatindicates whether this location is valid for a given zoom level.
1 com.oym. geok i t . Leve ledPo ly l ine ( pos i t i ons , l eve l s , bi tmaskFunct ion , strokeWidth ,2 s t rokeColor , s t rokeOpaci ty , [ s t r okeS ty l e ] , [ bounds ] )
• positions: the positions making the polyline.
August 4, 2011 Copyright c©2006-2011, OnYourMap SA. 13/44
OnYourMap JS APIGetting Started
• levels: the levels from which the polyline must be drawn.
• strokeWidth: the polyline width.
• strokeColor: the polyline color.
• strokeOpacity: the polyline opacity.
• strokeStyle: the style of the line as a com.oym.geokit.STROKE_STYLE. If not given, the polyline is solid.(optional)
• bounds: the polyline bounds. (optional)
1 //Example of route into the callback.2 function rou teCa l lback ( rou te ) {3 var p o l y l i n e = new com.oym. geok i t . Leve ledPo ly l ine ( rou te . g e t A l l P o i n t s ( ) ,4 rou te . getLevels ( ) , rou te . bi tmaskFunct ion , 3 , ’#FF0000’ , 1 .0 ,5 com.oym. geok i t .STROKE_STYLE.NONE, rou te . getBounds ( ) ) ;6 gk . addOverlay ( p o l y l i n e ) ;7 }
Online example: http://maps.onyourmap.com/js3/examples/6.Overlays/Chapter6.3.html
com.oym.geokit.PixelPolyline This kind of polyline is non geographic and is used to drawn something thatwon’t change when you switch zoom level. The points are given in pixel (x, y) as com.oym.geokit.PixelPosition.
1 com.oym. geok i t . P i x e l P o l y l i n e ( po in ts , center , s ize , o f f s e t , st rokeWidth , s t rokeColor , s t rokeOpaci ty ,[ s t r okeS ty l e ] )
• positions: the positions making the polyline.
• center: the center
• size: the size of the container of the polyline
• offset: the polyline offset.
• strokeWidth: the polyline width.
• strokeColor: the polyline color.
• strokeOpacity: the polyline opacity.
• strokeStyle: the style of the line as a com.oym.geokit.STROKE_STYLE. If not given, the polyline is solid.(optional)
6.4 Polygon
The polygon is a set of linear ring. A linear ring is a simple form without holes and insels.
1 com.oym. geok i t . Polygon ( r ings , [ po lygonSty le ] , [ bound ] )
Where rings is an array (even if there is only one element) of linear rings (see Section 6.4.1), polygonStyleis the style of the polygon and is optional (see Section 6.4.2) and bound is the bound in which the polygonfits. The bound is also optional.
August 4, 2011 Copyright c©2006-2011, OnYourMap SA. 14/44
OnYourMap JS APIGetting Started
6.4.1 LinearRing
A linear ring is a simple data structure that is not directly displayed onto the map. To display it, you have touse the Polygon structure. The linear ring contains a list of position which represent this ring.
1 com.oym. geok i t . L inearRing ( pos i t i ons , [ bound ] )
The attribute "positions" is an array of com.oym.geokit.Position. The bound parameter is optional.
6.4.2 Style
The style of the polygon is customizable. The following elements can be set:
• strokeWidth : The border width in point.
• strokeColor : The border color.
• strokeOpacity : The border opacity.
• strokeStyle : The border style.
• fillColor : The inner color.
• fillOpactiy : the inner opacity.
This style is built by using the following constructor:
1 com.oym. geok i t . PolygonSty le = function ( strokeWidth , s t rokeColor , s t rokeOpaci ty , s t rokeSty le ,f i l l C o l o r , f i l l O p a c i t y )
If you want to use the default values for one (or more) of this attributes, you can set null instead of a value.The default values are:
• strokeWidth : 3.
• strokeColor : #0000FF.
• strokeOpacity : 1.0.
• strokeStyle : com.oym.geokit.STROKE_STYLE.NONE (solid).
• fillColor : #0000FF.
• fillOpactiy : 0.5.
6.4.3 Display
To display the linear rings you’ve created you have to gather them into a polygon. The polygon is an overlayand can be displayed directly by using the addOverlay method from the geokit.
1 //Create your linear rings.2 var r i n g = new com.oym. geok i t . L inearRing ( [ pos i t i on1 , pos i t i on2 , p o s i t i o n 3 ] ) ;34 //Create the polygon.5 var polygon = new com.oym. geok i t . Polygon ( [ r i n g ] ) ;67 //Display the polygon.8 gk . addOverlay ( polygon ) ;
Online exemple: http://maps.onyourmap.com/js3/examples/6.Overlays/Chapter6.4.html
August 4, 2011 Copyright c©2006-2011, OnYourMap SA. 15/44

OnYourMap JS APIGetting Started
6.5 Ellipse
The ellipse is specified by a center (map location) and two radius (along x and y axis). The radius are specifiedin meter. The style of the ellipse is defined by the class com.oym.geokit.EllipseStyle that has exactly the sameparameters than the PolygonStyle (see Section 6.4.2) and the same default value too. An example of ellipsecan be seen in Figure 1.
1 com.oym. geok i t . E l l i p s e ( center , xRadius , yRadius , s t y l e )
Figure 1: Ellipse with x-radius of 10km and y-radius of 2.5km
6.6 Circle
The circle is only a special case of the Ellipse where the x-radius is equal to the y-radius.
6.7 Info Window
An info window can be displayed when a marker is selected (left-click). To specify the content of the infowindow you have to:
1. Set the marker as selectable (setSelectable on the marker).
2. Set its content (setInfoWindowContent on the marker).
1 var m = new com.oym. geok i t . Marker ( p o s i t i o n ) ;2 m. se tSe lec tab le ( true ) ;3 m. setInfoWindowContent (’your␣html␣code␣as␣a␣string’ ) ;4 gk . addOverlay (m) ;
Online example: http://maps.onyourmap.com/js3/examples/6.Overlays/Chapter6.7.html
August 4, 2011 Copyright c©2006-2011, OnYourMap SA. 16/44
OnYourMap JS APIGetting Started
6.7.1 Customized Info Window
You can create your own info window that is opened when the marker is selected (left-click). The info windowsystem is based on the concept of delegate. You have to provide to the system a delegate that will create theinfo window on request. This delegate must have the method getInfoWindowOverlay:
1 getInfoWindowOverlay = function ( pos i t i on , o f f s e t , content , over lay ) ;
Where:
• position The marker position.
• offset The marker offset to be able to position correctly the info window.
• content The html text you’ve set with the setInfoWindowContent method.
• overlay The selected overlay itself.
If you want a button that closes the info window, you have to integrate it directly into the info windowand handle yourself its selection. When selected, you can remove the info window as any other overlay(kit.removeOverlay(id)). The id of the info window can be retreived with the getId() method.
1 iwDelegate = function ( ) {2 th is . getInfoWindowOverlay = function ( pos i t i on , o f f s e t , content , over lay ) {3 //Build and return your own info window here.4 var dom = document . createElement ("div" ) ;5 dom. innerHTML = ’<div␣style="background:red">’ + content + ’</div>’ ;6 var s ize = new com.oym. geok i t . Size (200 , 200) ;7 return new com.oym. geok i t . CustomMarker (dom, pos i t i on , s ize , o f f s e t ) ;8 } ;9 } ;
1011 gk . setInfoWindowDelegate (new iwDelegate ( ) ) ;
Online example: http://maps.onyourmap.com/js3/examples/6.Overlays/Chapter6.7.1.html
6.8 Add Overlays
For each kind the method to display it on the map is the same. There is an optional parameter to indicate ifthey are draggables.
1 gk . addOverlay ( over lay , [ draggable ] ) ;
6.9 Remove Overlays
The overlays are removed by id.
1 gk . removeOverlay ( myOverlay . ge t Id ( ) ) ;
6.10 Remove All Overlays
The geokit proposes a way to remove all the overlay at once.
1 gk . removeAl lOver lays ( ) ;
Online example: http://maps.onyourmap.com/js3/examples/6.Overlays/Chapter6.8-6.10.html
August 4, 2011 Copyright c©2006-2011, OnYourMap SA. 17/44
OnYourMap JS APIGetting Started
7 Map Controls
To help the user to have a more friendly map to work with, the GeoKit offers methods to set a zoom slider anda map chooser widget.
• showZoomSlider() : Display a zoom slider.
• showMapTypeChooser() : Display the three default map chooser button.
• showMiniMap(displayedMapTypes, rectangleStyle) : Display the mini map. The displayedMapTypeparameter is the map type you want to display into the mini map. The second parameter is optionaland can be used to customize the style of the rectangle displayed on the map.
• showScalebar(unit) : Display the scale bar. The unit can be "KM" or "MI" and is optional. If not given,"KM" is used.
7.1 Map Chooser
The map chooser can be configurated. It is possible to customize the style of the button with a css overwriting.
1 #mapChooserButton {2 border−s t y l e : groove ;3 border−width : 1px ;4 }
It is possible to choose the button to show: In order to do that it is needed to create a com.oym.geokit.MapTypeChooserConfig and to give it as parameter of the function showMapTypeChooser(). The MapType-ChooserConfig as the following methods:
• setRight : number of pixel from the right of the map DIV.
• setTop : number of pixel from the top of the map DIV.
• setButtonArray : array of array (0: array of map types, 1: text to display)
Exemple:
1 var mtcConfig = new com.oym. geok i t . MapTypeChooserConfig ( ) ;23 var but tonAr ray = new Array ;4 but tonAr ray . push ( [ [ "RM" ] , "Roadmap" ] ) ;5 but tonAr ray . push ( [ [ "OP" ] , "Orthophoto" ] ) ;6 but tonAr ray . push ( [ [ "OP" ,"HB" ] , "Hybrid" ] ) ;78 mtcConfig . se tR igh t (10) ;9 mtcConfig . setTop (10) ;
10 mtcConfig . se tBut tonAr ray ( bu t tonAr ray ) ;1112 gk . showMapTypeChooser ( mtcConfig ) ;
Online example: http://maps.onyourmap.com/js3/examples/7.MapControls/Chapter7.1.html
7.2 Zoom Slider
You can choose the place where you want to show the zoomslider. The give the optionnal config (com.oym.geokit.ZoomSliderConfig). It has two methods to set the left and top offset.
August 4, 2011 Copyright c©2006-2011, OnYourMap SA. 18/44
OnYourMap JS APIGetting Started
7.3 Mini Map
The mini map is a small map that display a bigger part of the world. This object can be expanded or reducewith the toggle button or directly to the geokit by using the expandMiniMap() and reduceMiniMap().
The style of the mini map can be changed by css. The mini map has the id: "#miniMap". You can alsocustomize the layout of the toggle button by defining the css classes:
• a#miniMapToggle.miniMapOn : When the map is expanded.
• a#miniMapToggle.miniMapOff : When the map is reduced.
To ensure your css is taken into account for the map, you have to load it into the onModulesLoadedcallback by using the method: document.createStyleSheet(’your css file’);
You can customize the rectangle which represents the main map onto the mini map. This can be done bygiving a second argument to the showMiniMap method. This parameter is a com.oym.geokit.PixelPolygonOptions.
1 gk . showMiniMap ( [ ’RM’ ] , new com.oym. geok i t . P ixe lPolygonOpt ions (2 5 , //Stroke width3 ’#FF0000’ , //Stroke color4 1.0 , //Stroke opacity5 com.oym. geok i t .STROKE_STYLE.NONE, //Stroke style6 ’#00FF00’ , //Fill color7 0 .3 ) ) ; //Fill opacity.
Online example: http://maps.onyourmap.com/js3/examples/7.MapControls/Chapter7.3.html
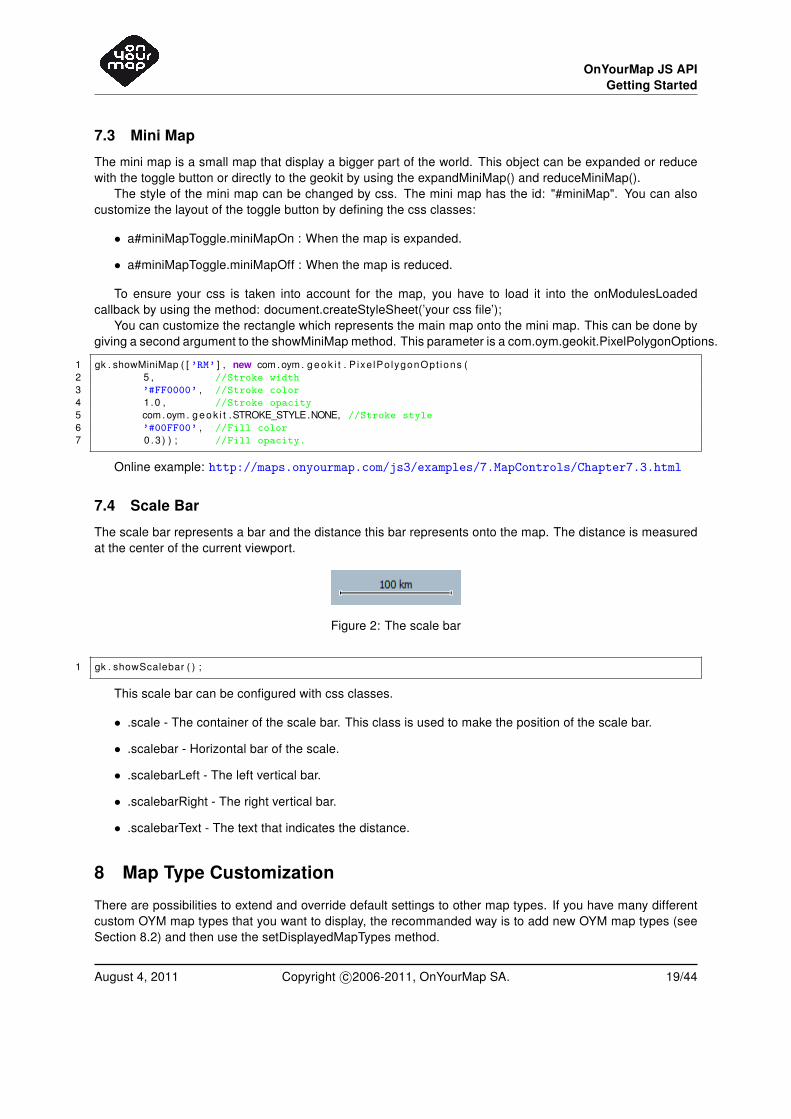
7.4 Scale Bar
The scale bar represents a bar and the distance this bar represents onto the map. The distance is measuredat the center of the current viewport.
Figure 2: The scale bar
1 gk . showScalebar ( ) ;
This scale bar can be configured with css classes.
• .scale - The container of the scale bar. This class is used to make the position of the scale bar.
• .scalebar - Horizontal bar of the scale.
• .scalebarLeft - The left vertical bar.
• .scalebarRight - The right vertical bar.
• .scalebarText - The text that indicates the distance.
8 Map Type Customization
There are possibilities to extend and override default settings to other map types. If you have many differentcustom OYM map types that you want to display, the recommanded way is to add new OYM map types (seeSection 8.2) and then use the setDisplayedMapTypes method.
August 4, 2011 Copyright c©2006-2011, OnYourMap SA. 19/44

OnYourMap JS APIGetting Started
8.1 Update Map Type
The GeoKit contains a method to change the three default map types ("RM", "OP", "HB"). You can changetheir extension, tile size and properties.
1 setExtensionForMapType (name, extension , t i l e s i z e , [ i sTransparen t ] , [ minZoomLevel ] , [ maxZoomLevel ] ) ;
• Name: the name of the map type to change
– "RM" : Roadmap, drown map
– "OP" : Orthophoto, satelite images
– "HB" : Hybrid, transparent roadmap to display on an other map type (in most case over Orthophoto)
• extension: The Tridoo mapping extention name
• tilesize: The tile size
• isTransparent: True if the map type is transparent. This parameter is optional and takes the defaultvalue if not given ("RM" => false, "OP" false, "HB" => true). (optional)
• minZoomLevel: The smallest zoom level where tiles exist for this map type. If not given, default valuesare taken ("RM" => 1, "OP" => 1, "HB" => 1). (optional)
• maxZoomLevel: The biggest zoom level where tiles exist for this map type. If not given, default valuesare taken ("RM" => 17, "OP" => 18, "HB" => 17). (optional)
Exemple:
1 gk . setExtensionForMapType ("RM" , "png_yell" , 256) ;
8.2 Add OYM Map Type
If you give a name in the method setExtensionForMapType(...) that is not one of the three default map types,this will create a new OnYourMap map type with the given extension. In this case the default values forparameters are:
• isTransparent: false
• minZoomLevel: 1
• maxZoomLevel: 18
1 //Create a new map type with default value for isTransparent, minZoomLevel and maxZoomLevel.2 gk . setExtensionForMapType ("MY_RM" , "my␣extension" , 256) ;3 //Create a new map type by specifying every values.4 gk . setExtensionForMapType ("MY_RM" , "my␣extension" , 256 , true , 1 , 17) ;
Online example: http://maps.onyourmap.com/js3/examples/8.MapTypeCustomization/Chapter8.2.html
August 4, 2011 Copyright c©2006-2011, OnYourMap SA. 20/44
OnYourMap JS APIGetting Started
8.3 Add Map Type
As presented into the previous sections, you are able to customize the map types provided by the OYMplatform. You also have the possibility to add map types that are completely independant from the OYMplatform. This new map type must be splited into square tiles for each zoom level you want to display. Toachieve this goal, you have to use the method:
1 addMapType (name, t i l e S i z e , f c t , context , copyr igh t , isTransparent , minZoomLevel , maxZoomLevel )
The parameters are the following:
• name: The name of the map type. This name is used to identify the map type especially when you callthe method setDisplayedMapTypes.
• tileSize: The size of each tiles as an integer (e.g. if your tiles are 256x256 pixels large, give 256 asnumber).
• fct: The function that will return the url of the tile according to the tile number (x, y, z. See section 8.3.2).
• context: The context in which the function is called.
• copyright: A context-free function that returns the an array of string to display into the copyright compo-nent of the map.
• isTransparent: Flag (boolean) that indicates if the map type is transparent or not. This is important toindicate it correctly to avoid strange graphical behavior at the end of the zoom when two different zoomlevel are displayed at the same type.
• minZoomLevel: The minimum zoom level valid for this map type (See section 8.3.1).
• maxZoomLevel: The maximum zoom level valid for this map type (See section 8.3.1).
Example:
1 function getOSMTile ( x , y , z ) {2 return "http://tile.openstreetmap.org/" + z + "/" + x + "/" + y + ".png" ;3 } ;45 function onModulesLoaded ( ) {6 //Initialize the geokit ...78 gk . addMapType ("OSM" , 256 , getOSMTile , this , function ( ) { return [ "OpenStreetMap" ] ; } , false , 1 ,
18) ;9
10 //Define the map config ...1112 var mapConf = new com.oym. geok i t . MapConfig ( [ "OSM" ] ) ;1314 //Start the map view ...15 } ;
Online example: http://maps.onyourmap.com/js3/examples/8.MapTypeCustomization/Chapter8.3.html
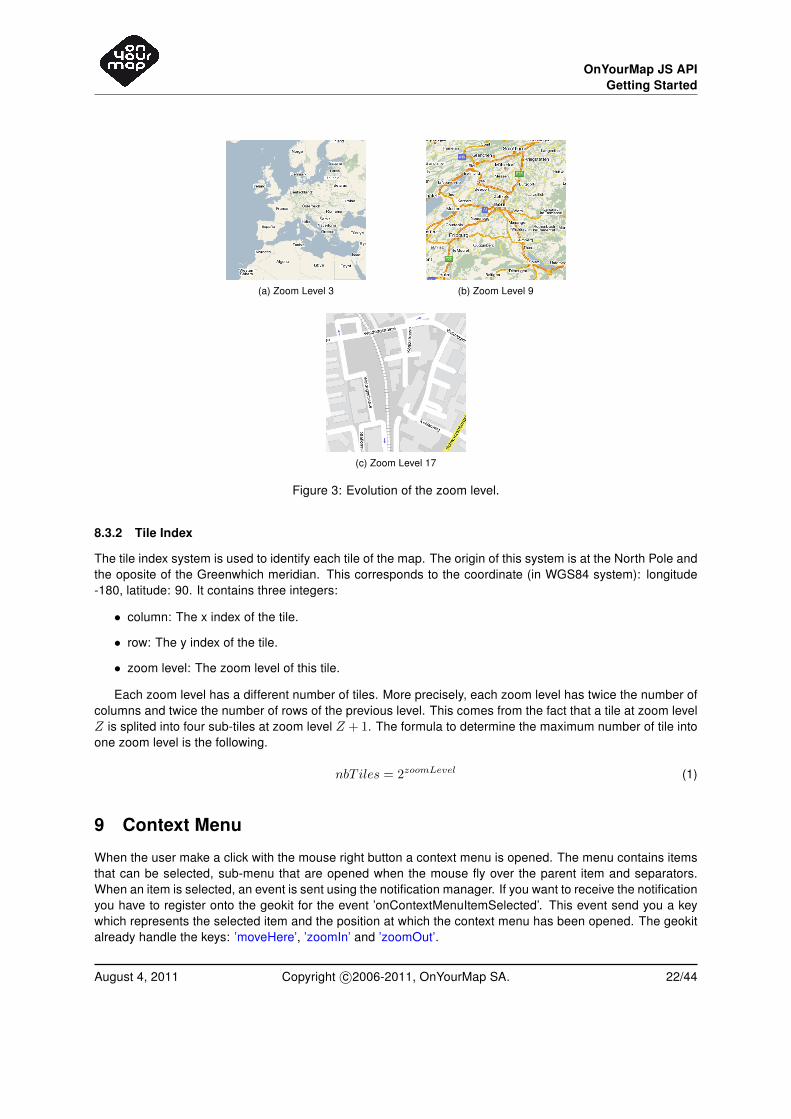
8.3.1 Zoom Index
The zoom index is an integer. It increases in direction of the ground (see Figure 3).
August 4, 2011 Copyright c©2006-2011, OnYourMap SA. 21/44
OnYourMap JS APIGetting Started
(a) Zoom Level 3 (b) Zoom Level 9
(c) Zoom Level 17
Figure 3: Evolution of the zoom level.
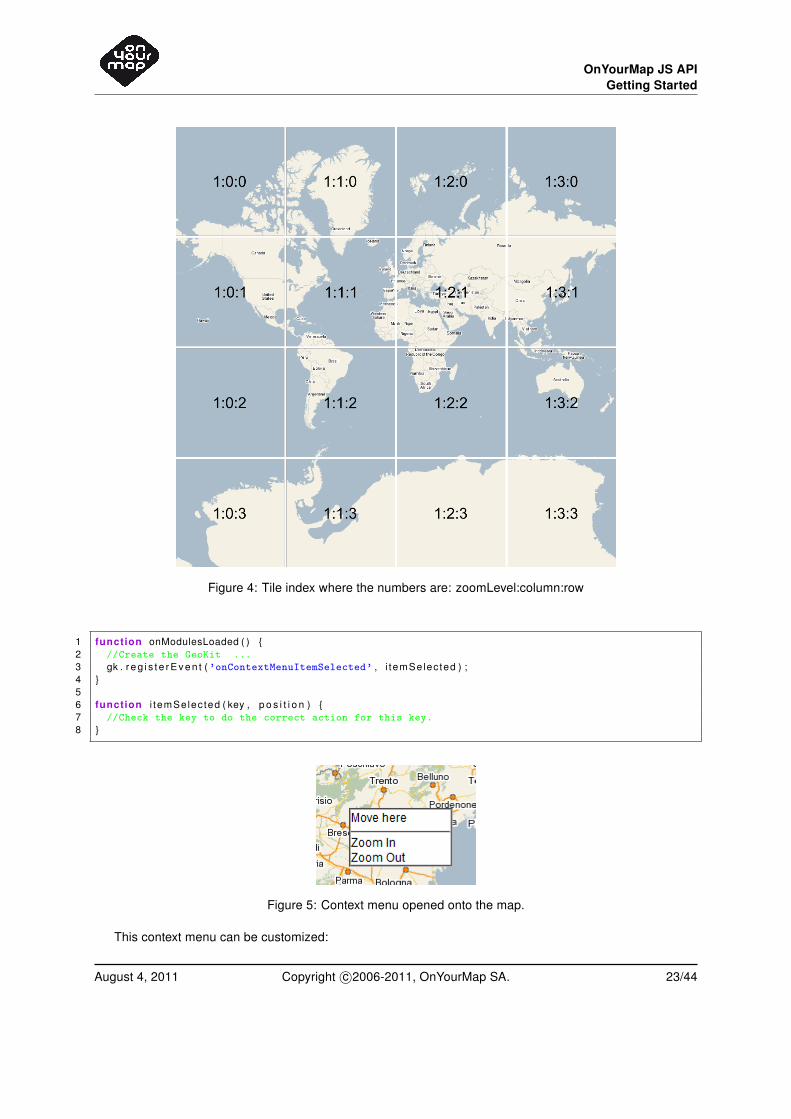
8.3.2 Tile Index
The tile index system is used to identify each tile of the map. The origin of this system is at the North Pole andthe oposite of the Greenwhich meridian. This corresponds to the coordinate (in WGS84 system): longitude-180, latitude: 90. It contains three integers:
• column: The x index of the tile.
• row: The y index of the tile.
• zoom level: The zoom level of this tile.
Each zoom level has a different number of tiles. More precisely, each zoom level has twice the number ofcolumns and twice the number of rows of the previous level. This comes from the fact that a tile at zoom levelZ is splited into four sub-tiles at zoom level Z + 1. The formula to determine the maximum number of tile intoone zoom level is the following.
nbT iles = 2zoomLevel (1)
9 Context Menu
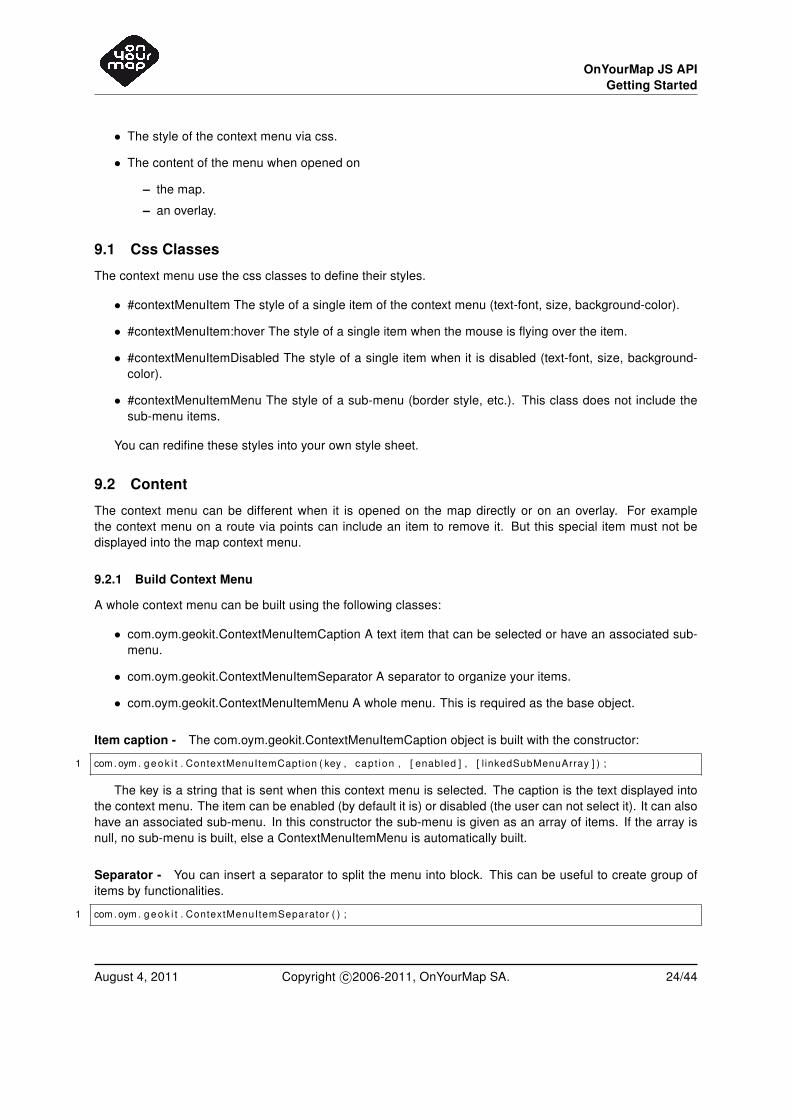
When the user make a click with the mouse right button a context menu is opened. The menu contains itemsthat can be selected, sub-menu that are opened when the mouse fly over the parent item and separators.When an item is selected, an event is sent using the notification manager. If you want to receive the notificationyou have to register onto the geokit for the event ’onContextMenuItemSelected’. This event send you a keywhich represents the selected item and the position at which the context menu has been opened. The geokitalready handle the keys: ’moveHere’, ’zoomIn’ and ’zoomOut’.
August 4, 2011 Copyright c©2006-2011, OnYourMap SA. 22/44
OnYourMap JS APIGetting Started
Figure 4: Tile index where the numbers are: zoomLevel:column:row
1 function onModulesLoaded ( ) {2 //Create the GeoKit ...3 gk . reg i s te rEven t (’onContextMenuItemSelected’ , i temSelected ) ;4 }56 function i temSelected ( key , p o s i t i o n ) {7 //Check the key to do the correct action for this key.8 }
Figure 5: Context menu opened onto the map.
This context menu can be customized:
August 4, 2011 Copyright c©2006-2011, OnYourMap SA. 23/44
OnYourMap JS APIGetting Started
• The style of the context menu via css.
• The content of the menu when opened on
– the map.
– an overlay.
9.1 Css Classes
The context menu use the css classes to define their styles.
• #contextMenuItem The style of a single item of the context menu (text-font, size, background-color).
• #contextMenuItem:hover The style of a single item when the mouse is flying over the item.
• #contextMenuItemDisabled The style of a single item when it is disabled (text-font, size, background-color).
• #contextMenuItemMenu The style of a sub-menu (border style, etc.). This class does not include thesub-menu items.
You can redifine these styles into your own style sheet.
9.2 Content
The context menu can be different when it is opened on the map directly or on an overlay. For examplethe context menu on a route via points can include an item to remove it. But this special item must not bedisplayed into the map context menu.
9.2.1 Build Context Menu
A whole context menu can be built using the following classes:
• com.oym.geokit.ContextMenuItemCaption A text item that can be selected or have an associated sub-menu.
• com.oym.geokit.ContextMenuItemSeparator A separator to organize your items.
• com.oym.geokit.ContextMenuItemMenu A whole menu. This is required as the base object.
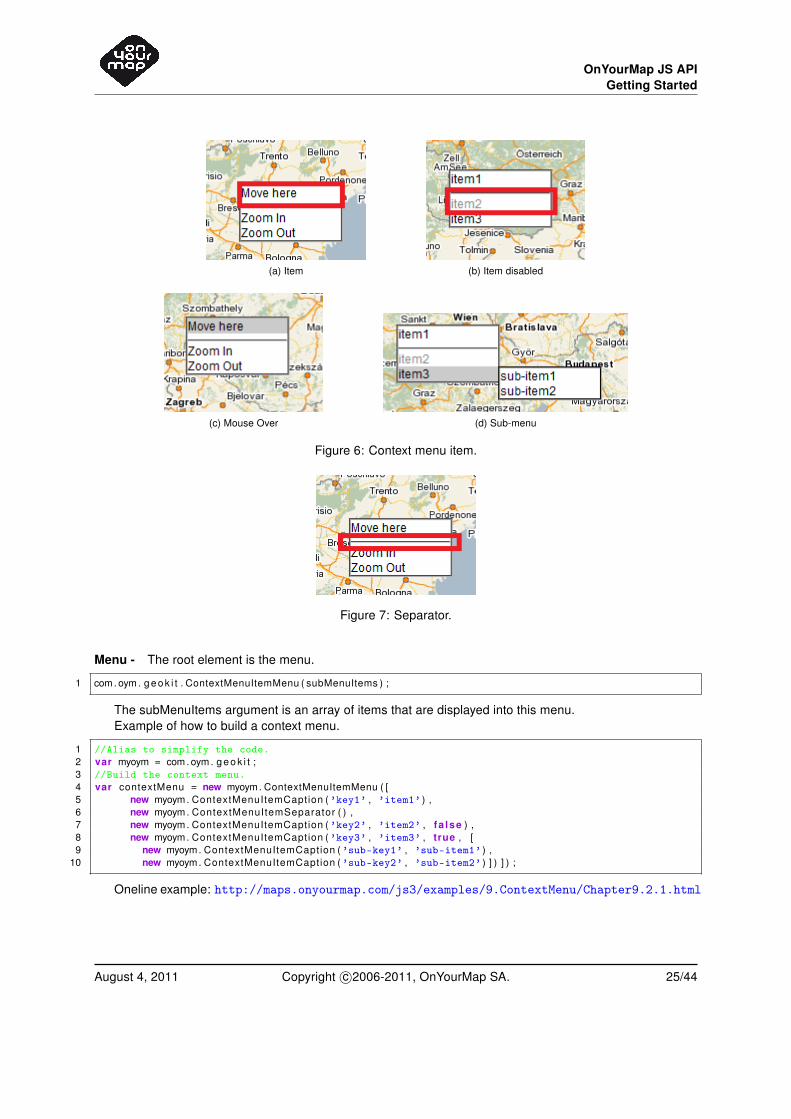
Item caption - The com.oym.geokit.ContextMenuItemCaption object is built with the constructor:
1 com.oym. geok i t . ContextMenuItemCaption ( key , capt ion , [ enabled ] , [ l inkedSubMenuArray ] ) ;
The key is a string that is sent when this context menu is selected. The caption is the text displayed intothe context menu. The item can be enabled (by default it is) or disabled (the user can not select it). It can alsohave an associated sub-menu. In this constructor the sub-menu is given as an array of items. If the array isnull, no sub-menu is built, else a ContextMenuItemMenu is automatically built.
Separator - You can insert a separator to split the menu into block. This can be useful to create group ofitems by functionalities.
1 com.oym. geok i t . ContextMenuItemSeparator ( ) ;
August 4, 2011 Copyright c©2006-2011, OnYourMap SA. 24/44
OnYourMap JS APIGetting Started
(a) Item (b) Item disabled
(c) Mouse Over (d) Sub-menu
Figure 6: Context menu item.
Figure 7: Separator.
Menu - The root element is the menu.
1 com.oym. geok i t . ContextMenuItemMenu ( subMenuItems ) ;
The subMenuItems argument is an array of items that are displayed into this menu.Example of how to build a context menu.
1 //Alias to simplify the code.2 var myoym = com.oym. geok i t ;3 //Build the context menu.4 var contextMenu = new myoym. ContextMenuItemMenu ( [5 new myoym. ContextMenuItemCaption (’key1’ , ’item1’ ) ,6 new myoym. ContextMenuItemSeparator ( ) ,7 new myoym. ContextMenuItemCaption (’key2’ , ’item2’ , fa lse ) ,8 new myoym. ContextMenuItemCaption (’key3’ , ’item3’ , true , [9 new myoym. ContextMenuItemCaption (’sub-key1’ , ’sub-item1’ ) ,
10 new myoym. ContextMenuItemCaption (’sub-key2’ , ’sub-item2’ ) ] ) ] ) ;
Oneline example: http://maps.onyourmap.com/js3/examples/9.ContextMenu/Chapter9.2.1.html
August 4, 2011 Copyright c©2006-2011, OnYourMap SA. 25/44

OnYourMap JS APIGetting Started
9.2.2 Map Context Menu
To change the context menu opened when the mouse right click is done onto the map, you have to use themethod setMapContextMenu on the GeoKit object. This function must be called when the map is loaded.
1 //Set the context menu for the map.2 gk . setMapContextMenu ( contextMenu ) ;
9.2.3 Overlay Context Menu
By default, no context menu is associated to an overlay. A menu can be linked using the method setCon-textMenu onto the overlay itself.
1 //Set the context menu for this overlay.2 myOverlay . setContextMenu ( contextMenu ) ;
The parameters sent into the event (onContextMenuItemSelected) are the same than for the map and thesame for each overlay. To be able to get the id of the overlay on which the event occurs, you have to insert itsid into the key of the items.
1 var baseKey = ’removePoint’ ;23 //When you create the context menu.4 marker . setContextMenu (new com.oym. geok i t . ContextMenuItemMenu ( [5 new com.oym. geok i t . ContextMenuItemCaption ( baseKey + marker . ge t Id ( ) ,6 t e x t ) ] ) ) ;78 function onItemSelected ( key , p o s i t i o n ) {9 i f ( key . subs t r i ng (0 , baseKey . leng th ) == baseKey ) {
10 var markerId = key . subs t r i ng ( baseKey . length , key . leng th ) ;1112 //Do what you want with this id.13 }14 }
Oneline example: http://maps.onyourmap.com/js3/examples/9.ContextMenu/Chapter9.2.3.html
10 Events
The way the geokit communicates with your web pages is based on a notification system. This system doesnot include the request you can make on the geokit such as calculate route, geocode, etc. which use thecallback system. The notification are used for the event that can come at any time such as the mouse events.
A list of the events that can be sent is described in Section 14. To receive an event you have to registeronto the geokit. Once registered, when the event occur, the function is called within the given context. Thismethod is called each time this event is fired. You can register as many function as you want on the sameevent.
1 gk . reg i s te rEven t ( eventName , function , con tex t ) ;
If you want to stop being notified for an event, you simply need to unregister. You need to give again thefunction and the context because the identify this registration.
1 gk . unreg is te rEven t ( eventName , function , con tex t ) ;
August 4, 2011 Copyright c©2006-2011, OnYourMap SA. 26/44

OnYourMap JS APIGetting Started
11 Services
The geokit contains functions to call services.
• Geocoding: service to encode an adresse into a position.
• Reverse Geocoding: find the address corresponding to a position.
• Routing: calculate a route between position.
• POI: a criteria based search of point of interest.
The call to the service is done through the method:
1 gk . executeRequest ( request , ca l lback , con tex t ) ;
The callback is the method which is called when the response is recieved from the service. It is called intothe given context. The requests that can be sent are one of the following:
• Geocoding (free form or complete address) see Section 11.1
• Reverse Geocoding see Section 11.2
• Auto complete see Section 11.3
• Routing see Section 11.4
• POI search see Section 11.5
The service can return errors for different reason. An error object is returned instead of the normal result.For example the error comes instead of the list of address in the case of a geocoding request. The way todetect the error into the callback is the following:
1 function ca l l back ( response ) {2 i f ( response . i s E r r o r == true ) {3 //Handle the error. You can get the code and the message with the methods4 //response.getCode() and response.getMessage().5 }6 }
11.1 Geocoding
The geocoding consist to find a position fram an address or a text. Two requests can perform geocoding:
• com.oym.geokit.FreeFormRequest
• com.oym.geokit.GeocodeRequest
11.1.1 com.oym.geokit.FreeFormRequest
The FreeFormRequest can be given to geocode a free formed text.
1 com.oym. geok i t . FreeFormRequest ( f ree , [ count ry ] , [ language ] )
Constructor parameters:
• free : The free formed text String.
August 4, 2011 Copyright c©2006-2011, OnYourMap SA. 27/44

OnYourMap JS APIGetting Started
• country : The ISO3166 code (optional).
• language : The ISO639-1 language code (optional).
The result is an array of com.oym.geokit.Address. Each of them is an address that matches the requestyou made. They are ordered by matching to the request. The first is the address that matches at most therequest.
Code exemple:
1 function geocode ( ) {23 var request = new com.oym. geok i t . FreeFormRequest (’Paris’ ) ;4 gk . executeRequest ( request , handleGeoResult , th is ) ;56 }7 function handleGeoResult ( addresses ) {8 //Check the error.9 i f ( addresses . i s E r r o r == true ) {
10 //Handle the error.11 }1213 var coord ina te = addresses [ 0 ] . ge tPos i t i on ( ) ;14 }
Online example: http://maps.onyourmap.com/js3/examples/11.Services/Chapter11.1.1.html
11.1.2 com.oym.geokit.GeocodeRequest
The geocode request allows you to specify the different field (city, country, street, ...) seperately.
1 function geocode ( ) {23 var request = new com.oym. geok i t . GeocodeRequest ( ) ;4 request . setCountry (’FR’ ) ;5 request . s e t C i t y (’Paris’ ) ;6 gk . executeRequest ( request , handleGeoResult , th is ) ;78 }9 function handleGeoResult ( addresses ) {
10 //Check the error.11 i f ( addresses . i s E r r o r == true ) {12 //Handle the error.13 }1415 //Do what you want with the array of addresses.16 }
Online example: http://maps.onyourmap.com/js3/examples/11.Services/Chapter11.1.2.html
11.2 Reverse Geocoding
The reverse-geocoding consist to find an address from a position Three requests can perform reverse-geocoding:
• com.oym.geokit.ReverseGeocodeNearestRequest
• com.oym.geokit.ReverseGeocodeRadiusRequest
• com.oym.geokit.ReverseGeocodeRadiusRequest
August 4, 2011 Copyright c©2006-2011, OnYourMap SA. 28/44
OnYourMap JS APIGetting Started
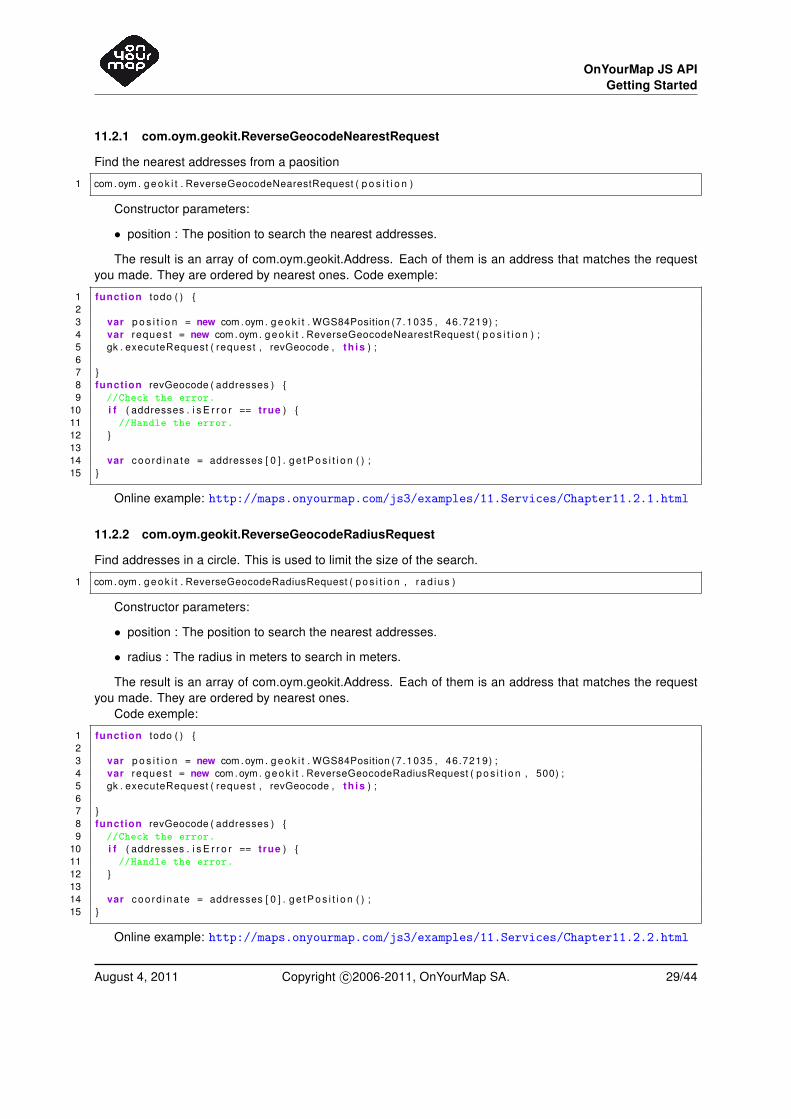
11.2.1 com.oym.geokit.ReverseGeocodeNearestRequest
Find the nearest addresses from a paosition
1 com.oym. geok i t . ReverseGeocodeNearestRequest ( p o s i t i o n )
Constructor parameters:
• position : The position to search the nearest addresses.
The result is an array of com.oym.geokit.Address. Each of them is an address that matches the requestyou made. They are ordered by nearest ones. Code exemple:
1 function todo ( ) {23 var p o s i t i o n = new com.oym. geok i t . WGS84Position (7.1035 , 46.7219) ;4 var request = new com.oym. geok i t . ReverseGeocodeNearestRequest ( p o s i t i o n ) ;5 gk . executeRequest ( request , revGeocode , th is ) ;67 }8 function revGeocode ( addresses ) {9 //Check the error.
10 i f ( addresses . i s E r r o r == true ) {11 //Handle the error.12 }1314 var coord ina te = addresses [ 0 ] . ge tPos i t i on ( ) ;15 }
Online example: http://maps.onyourmap.com/js3/examples/11.Services/Chapter11.2.1.html
11.2.2 com.oym.geokit.ReverseGeocodeRadiusRequest
Find addresses in a circle. This is used to limit the size of the search.
1 com.oym. geok i t . ReverseGeocodeRadiusRequest ( pos i t i on , rad ius )
Constructor parameters:
• position : The position to search the nearest addresses.
• radius : The radius in meters to search in meters.
The result is an array of com.oym.geokit.Address. Each of them is an address that matches the requestyou made. They are ordered by nearest ones.
Code exemple:
1 function todo ( ) {23 var p o s i t i o n = new com.oym. geok i t . WGS84Position (7.1035 , 46.7219) ;4 var request = new com.oym. geok i t . ReverseGeocodeRadiusRequest ( pos i t i on , 500) ;5 gk . executeRequest ( request , revGeocode , th is ) ;67 }8 function revGeocode ( addresses ) {9 //Check the error.
10 i f ( addresses . i s E r r o r == true ) {11 //Handle the error.12 }1314 var coord ina te = addresses [ 0 ] . ge tPos i t i on ( ) ;15 }
Online example: http://maps.onyourmap.com/js3/examples/11.Services/Chapter11.2.2.html
August 4, 2011 Copyright c©2006-2011, OnYourMap SA. 29/44
OnYourMap JS APIGetting Started
11.2.3 com.oym.geokit.ReverseGeocodeBoundingBoxRequest
Find addresses in a square
1 com.oym. geok i t . ReverseGeocodeBoundingBoxRequest ( pos i t ionLL , posi t ionUR )
• positionLL : The lower left position.
• positionUR : The upper right position.
The result is an array of com.oym.geokit.Address. Each of them is an address that matches the requestyou made. They are ordered by nearest ones. Code exemple:
1 function todo ( ) {23 var pos i t i onLL = new com.oym. geok i t . WGS84Position (7.1510 , 46.7948) ;4 var posi t ionUR = new com.oym. geok i t . WGS84Position (7.1527 , 46.7951) ;56 var request = new com.oym. geok i t . ReverseGeocodeBoundingBoxRequest ( pos i t ionLL , posi t ionUR ) ;7 gk . executeRequest ( request , revGeocode , th is ) ;89 }
10 function revGeocode ( addresses ) {11 //Check the error.12 i f ( addresses . i s E r r o r == true ) {13 //Handle the error.14 }1516 var coord ina te = addresses [ 0 ] . ge tPos i t i on ( ) ;17 }
Online example: http://maps.onyourmap.com/js3/examples/11.Services/Chapter11.2.3.html
11.3 Auto Complete
The auto complete service allows you to ask for suggestions while the user is typing. This service doesnot give you a list of addresses but a list of string. To contact this service you have to create an AutoCom-pleteRequest.
1 com.oym. geok i t . AutoCompleteRequest ( toComplete , [ p r o f i l e ] )
Constructor parameters:
• toComplete : The text (String) to auto-complete.
• profile : The profile name (String) for the auto-completion engine (Optional).
This will return you an array of com.oym.geokit.Suggestion.
1 function autoComplete ( t e x t ) {2 var request = new com.oym. geok i t . AutoCompleteRequest ( t e x t ) ;3 gk . executeRequest ( request , acResult , th is ) ;4 }56 function acResul t ( suggest ions ) {7 //Check the error.8 i f ( suggest ions . i s E r r o r == true ) {9 //Handle the error.
10 }1112 //Do whatever you want with the suggestions.13 }
Online example: http://maps.onyourmap.com/js3/examples/11.Services/Chapter11.3.html
August 4, 2011 Copyright c©2006-2011, OnYourMap SA. 30/44
OnYourMap JS APIGetting Started
11.4 Routing
The routing consist to calculate a route between two or more locations. There is one request object to do that:
• com.oym.geokit.RouteRequest
The route view system (see Section 12.1.1) hides you a part of this and handle the drag-drop of thestart/via/end points.
11.4.1 com.oym.geokit.RouteRequest
The RouteRequest allows you to parameter the request according to your needs.
1 com.oym. geok i t . RouteRequest ( )
Exemple methods to calculate a route.
• setStartPosition : the start position
• setEndPosition : the end position
• setViaPoints : the via points as an array if some.
• setLanguage : the ISO639-1 language code
• setTransportMode : the mode of transportation (com.oym.geokit.ROUTING_TRANSPORT)
The result is an com.oym.geokit.Route object.Code exemple:
1 function computeRoute ( ) {23 var req = new com.oym. geok i t . RouteRequest ( ) ;4 req . s e t S t a r t P o s i t i o n (new com.oym. geok i t . WGS84Position (7.4195 , 46.9323) ) ;5 req . setEndPos i t ion (new com.oym. geok i t . WGS84Position (2.3171 , 48.8712) ) ;6 req . setLanguage (’en’ ) ;7 req . setTransportMode (com.oym. geok i t .ROUTING_TRANSPORT.CAR_FASTEST) ;8 gk . executeRequest ( req , routeCal lback , th is ) ;9
10 }11 function rou teCa l lback ( rou te ) {12 //Check the error.13 i f ( rou te . i s E r r o r == true ) {14 //Handle the error.15 }1617 //Handle the route.18 }
Online example: http://maps.onyourmap.com/js3/examples/11.Services/Chapter11.4.1.html
11.5 POI
The POI service consist to find interessting information throught different search that can be display on a map.
August 4, 2011 Copyright c©2006-2011, OnYourMap SA. 31/44
OnYourMap JS APIGetting Started
11.6 Search POI
The POI search request let the user search trougth different parameters:
1 com.oym. geok i t . POISearchRequest ( [ user ] , [ password ] )
• user : the user account.
• password : the password of the user account.
Exemple:
1 function todo ( ) {2 var poiReq = new com.oym. geok i t . POISearchRequest ("default" , "default" ) ;3 poiReq . setFree ("paris" ) ;4 poiReq . s e t F i l t e r E x p r e s s i o n ("(BUSINESS_NAME_NORM==hotel)" ) ;5 poiReq . addA t t r i bu tes ("BUSINESS_NAME" ) ;6 poiReq . addA t t r i bu tes ("PHONE" ) ;7 gk . executeRequest ( poiReq , poiResponseHandler , th is ) ;8 }9 function poiResponseHandler ( po is ) {
10 //Check the error.11 i f ( po is . i s E r r o r == true ) {12 //Handle the error.13 }1415 //Treat the response.16 }
The returned answer is a com.oym.geokit.POISearchResponse object.
• getSatusCode : the status code.
– > 0 means pois found. The code represents the total number of responses for the search.
– = 0 means no match found (address is ok, but there is no poi within the radius).
– = -2 means ambiguous geocoding (see AmbigiousAddress tags to get a potential list of solutions).
– = -3 means no match found (no poi within the bounding box).
• getSessionKey : a String defining the request. The session-key needs to be sent when asking the nextbucket of pois. If not, a new search will be done, skipping the cache mechanism.
• getCenter : com.oym.geokit.Position providing the coordinates of the center of the search. Useful whensearching by a freeform address.
• getBounds : com.oym.geokit.Bound providing the coordinates of the bounding box containing everypois but also with a center defined as the center of the search. (x1,y1) is the upper right corner, and(x2,y2) is the lower left corner.
• getAddressFullName : String value providing a display form for the freeform address which has beenused as center of the search.
• Country : String value providing the country of the search.
• getPois : com.oym.geokit.POI array > all the interessing value.
Definition of each com.oym.geokit.POI:
• getId : a String defining an unique POI.
August 4, 2011 Copyright c©2006-2011, OnYourMap SA. 32/44
OnYourMap JS APIGetting Started
• getPosition : com.oym.geokit.Position value representing the coordinates of the POI.
• getStartDate : n Integer value representing the start date if the POI has been defined as an event.(contains 0 is not defined)
• getEndDate : an Integer value representing the end date if the POI has been defined as an event.(contains 0 is not defined)
• getLastupdate: an Integer value representing the last time the POI has been modified by an update(or creation time if never updated). The value corresponds to the difference, measured in seconds,between this time and midnight, January 1, 1970 UTC.
• getDistance : an Integer value representing the distance between the center of the search and theposition of the POI. In meters.
• getAttributes : array(key, value) representing an attribute key and its value for the POI.
Online example: http://maps.onyourmap.com/js3/examples/11.Services/Chapter11.6.htmlTo have more informations on the objects watch the API reference.
12 Modules
12.1 Route Module
There is two ways to calculate a route:The route service part let the user do himself a route but he must handle everythings. This is why the
geokit offer a routing module to handle the biggest part of it. All are hidden in the com.oym.geokit.RouteViewclass.
12.1.1 Route View
If you don’t want to handle the display of the route on the map, you can use the com.oym.geokit.RouteViewobject. This object has the following functionalities.
• Calculate the route and display it automatically on the map.
• Display a marker for each start/vias/end points.
• Add a drag-drop system to move the start/vias/end points. The route is automatically re-calculated.
• Add a mouse tracking system to add a via point when clicking on the polyline.
• Call a callback when a new route is computed.
Constructor:
1 com.oym. geok i t . RouteView ( geok i t , maxNumberOfVia , [ routeViewDelegate ] ) ;
Parameters:
• geokit: the geokit reference.
• maxNumberOfVia: the maximum number of via markers.
• routeViewDelegate: the delegate of the route view. (optional)
August 4, 2011 Copyright c©2006-2011, OnYourMap SA. 33/44
OnYourMap JS APIGetting Started
1 var rv = new com.oym. geok i t . RouteView ( gk , 5) ;2 var req = new com.oym. geok i t . RouteRequest ( ) ;3 req . s e t S t a r t P o s i t i o n (new com.oym. geok i t . WGS84Position (7.4195 , 46.9323) ) ;4 req . setEndPos i t ion (new com.oym. geok i t . WGS84Position (8.4195 , 47.9323) ) ;5 req . se tV iaPo in ts ( [ new com.oym. geok i t . WGS84Position (2.3171 , 48.8712) ] ) ;6 req . setTransportMode (com.oym. geok i t .ROUTING_TRANSPORT.CAR_FASTEST) ;7 req . se tUn i t (com.oym. geok i t .ROUTING_UNIT .KM) ;8 rv . ca lcu la teRoute ( req ) ;
If you want to receive the routes when they are re-computed (for example drag-drop), you can set acallback that will be called. To do this:
1 function rou teCa l lback ( rou te ) {2 //Do whatever you want with the route.3 }45 //Insert this line before calculating the route.6 routeView . setRouteCal lback ( routeCal lback , nul l ) ;
Online example: http://maps.onyourmap.com/js3/examples/12.Modules/Chapter12.1.1.html
12.1.2 RouteView delegate
The route view has standard parameters but the user want to enhance with his own start, end and via markers.For that reason, it is possible to add a delegate at the creation of the routeview.
The delegate must implement the following functions:
• getStartOverlay(position) : The start overlay must be returned. The index is not given because it allwaysbe zero.
• getViaOverlay(position, index) : The via overlay must be returned. The index of the via is given to definea custom via for each via.
• getEndOverlay(position, index) : The end overlay must be returned. The index will be the number ofmarker minus one.
• getNewViaOverlay(position) : The new via overlay must be returned (this is the one who follow thepolyline).
• getRouteOverlay(positions, levels, bitmaskFunction, trunkCode) : An array of overlays must be returned.If you want to display only one overlay, you must return an array with one element. The trunkCode isthe section style code.
• getVirtualLineOverlay(positions) : The polyline to display between the previous and the next markerduring a drag-drop.
Exemple:
1 rvDelegate = function ( ) {2 th is . __viaMarkerIcon = new com.oym. geok i t . MarkerIcon (3 new com.oym. geok i t . Size (14 , 14) , new com.oym. geok i t . P i x e l P o s i t i o n (0 , 0) ,4 ’http://img.maponair.com/moa6_graphics/symbols/redBall.png’ ) ;5 th is . __star tEndMarkerIcon = new com.oym. geok i t . MarkerIcon (6 new com.oym. geok i t . Size (14 , 14) , new com.oym. geok i t . P i x e l P o s i t i o n (0 , 0) ,7 ’http://img.maponair.com/moa6_graphics/symbols/greenBall.png’ ) ;89 th is . ge tS ta r tOver lay = function ( p o s i t i o n ) {
10 return new com.oym. geok i t . Marker ( pos i t i on , th is . __star tEndMarkerIcon ) ;11 } ;12 th is . getViaOver lay = function ( pos i t i on , index ) {
August 4, 2011 Copyright c©2006-2011, OnYourMap SA. 34/44

OnYourMap JS APIGetting Started
13 return new com.oym. geok i t . Marker ( pos i t i on , th is . __viaMarkerIcon ) ;14 } ;15 th is . getEndOverlay = function ( pos i t i on , index ) {16 return new com.oym. geok i t . Marker ( pos i t i on , th is . __star tEndMarkerIcon ) ;17 } ;18 th is . getNewViaOverlay = function ( p o s i t i o n ) {19 return new com.oym. geok i t . Marker ( pos i t i on , th is . __viaMarkerIcon ) ;20 } ;21 th is . getRouteOverlay = function ( pos i t i ons , l eve l s , bi tmaskFunct ion , trunkCode ) {22 return [new com.oym. geok i t . Leve ledPo ly l ine ( pos i t i ons ,23 leve l s ,24 bi tmaskFunct ion ,25 3 ,26 ’#0000FF’ ,27 0 .45) ] ;28 } ;29 th is . ge tV i r t ua l L i neOve r l ay = function ( p o s i t i o n s ) {30 return new com.oym. geok i t . P o l y l i n e ( pos i t i ons ,31 3 ,32 ’#00FF00’ ,33 0.45 ,34 com.oym. geok i t . POLYLINE_STYLE .DASH) ;35 } ;36 } ;3738 var rv = new com.oym. geok i t . RouteView ( gk , 5 , new rvDelegate ( ) ) ;
Online example: http://maps.onyourmap.com/js3/examples/12.Modules/Chapter12.1.2.html
12.1.3 Changing Start/Via/End/New Overlay
Once the route is displayed onto the map it handles automatically the drap-drop of the current start/via/endpoints. When the mouse is close to the route, a new via points is displayed and follows the mouse. If youmake a drag-drop on it, the route is recomputed with this new via point. This point is not displayed if themaximum number of via is reached.
12.2 Autocomplete Module
To simplify the autocomplete integration the geokit deliver a module who create the autocomplete box on aninput text field.
Constructor:
1 com.oym. geok i t . AutocompleteModule ( geok i t , input , [ baseLocat ion ] , [ dataSet ] , [ displayRange ] ) ;
Parameters:
• geokit: the geokit reference
• input: input text field that you can get with the function document.getElementById.
• input: if the autocomplete service you want to use is not hosted at the same location than the rest of theservices, you can set it here. (optional)
• input: if the autocomplete service you use uses a different dataset. (optional)
• input: set false if you don’t want the matching range into the suggestions to be displayed in bold.(optional)
Exemple:
August 4, 2011 Copyright c©2006-2011, OnYourMap SA. 35/44
OnYourMap JS APIGetting Started
1 function onModulesLoaded ( ) {2 //After com.oym.geokit.GeoKit initialization3 inTx t = document . getElementById (’inText’ ) ;4 var ac = new com.oym. geok i t . AutocompleteModule ( gk , i nTx t ) ;56 }
Online example: http://maps.onyourmap.com/js3/examples/12.Modules/Chapter12.2.htmlIt is possible to change the look & feel of the control with the following CSS overwriting:
1 #autocompleteBox {2 border−width : 5px ;3 border−co lo r : ye l low ;4 border−s t y l e : groove ;5 }67 #autocompleteItem {8 background−co lo r : #FFFFFF ;9 fon t−s ize : 12px ;
10 fon t−f a m i l y : A r i a l ;11 }12 #autocompleteItem . s e l e c t {13 background−co lo r : #CCCCCC;14 }
It is also possible to disable/enable the control with disable() / enabale() methods (per default is it en-abled).
12.3 Drawing Module
The drawing module allows you to draw manually (with the mouse) onto the map. You can draw to types ofobjects:
• Polylines/Polygons
• Circles
The module is started by using the following method onto the GeoKit:
1 startDrawingModule ( type , ca l lback , context , delegate )
with the following parameters:
• type - The type of object you want to draw (POLYLINE (and polygon) or CIRCLE). Use the enumerationcom.oym.geokit.DRAWING_MODULE_TYPE.
• callback - The method called when the drawing completes. The parameters are different according tothe type of drawing you want. See sections above for more details.
• context - The context in which the callback is called.
• delegate - The delegate that will build the overlays to display. See next sections for more details (seeSection 12.3.3).
Once this method returns, you can draw onto the map by using your mouse. There can only be onedrawing module started at a time. Thus, if you call this method when a drawing module is already started, itwill be stopped before the new one is started. Moreover, when you complete your drawing (see next sectionsto know how to complete the drawing), the module is automatically stopped and cleaned. During the drawing,
August 4, 2011 Copyright c©2006-2011, OnYourMap SA. 36/44
OnYourMap JS APIGetting Started
the panning is still active and you still can zoom in/out with the mouse wheel. The double click action (moveand zoom in) is disabled because this action is used to end the drawing.
The module can be stopped programmatically by calling the method:
1 stopDrawingModule ( )
Calling this method will not call the callback you gave when the module was started.
12.3.1 Polylines/Polygons
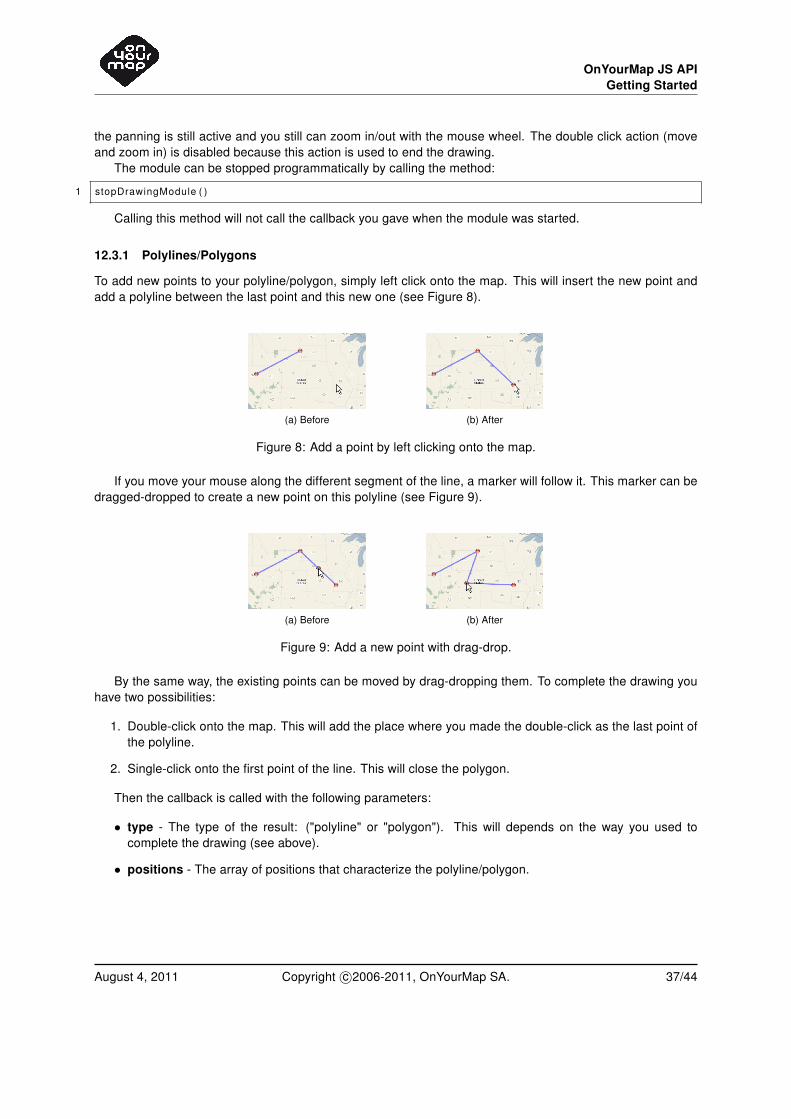
To add new points to your polyline/polygon, simply left click onto the map. This will insert the new point andadd a polyline between the last point and this new one (see Figure 8).
(a) Before (b) After
Figure 8: Add a point by left clicking onto the map.
If you move your mouse along the different segment of the line, a marker will follow it. This marker can bedragged-dropped to create a new point on this polyline (see Figure 9).
(a) Before (b) After
Figure 9: Add a new point with drag-drop.
By the same way, the existing points can be moved by drag-dropping them. To complete the drawing youhave two possibilities:
1. Double-click onto the map. This will add the place where you made the double-click as the last point ofthe polyline.
2. Single-click onto the first point of the line. This will close the polygon.
Then the callback is called with the following parameters:
• type - The type of the result: ("polyline" or "polygon"). This will depends on the way you used tocomplete the drawing (see above).
• positions - The array of positions that characterize the polyline/polygon.
August 4, 2011 Copyright c©2006-2011, OnYourMap SA. 37/44
OnYourMap JS APIGetting Started
12.3.2 Circle
To draw a circle, you must at first (single left) click at the center position of the circle onto the map. Thenmoving the mouse will show you wich circle it creates. A double click will complete the drawing and call thecallback with the following parameters:
• type - The type of the result: ("circle").
• center - The center position of the circle.
• radius - The radius of the circle.
12.3.3 Delegate
You can define a delegate if you want to provide your own overlays during the drawing. If you don’t give anydelegate, a default one will be used. The delegate must implement the following methods:
• getMarker(position, index, total) - Return a marker to display for the index-th points. For the polyline/poly-gon drawing only.
• getPolyline(positions, startPointIndex, endPointIndex, total) - Return a polyline to display to join thestartPointIndex-th and the endPointIndex-th points. For the polyline/polygon drawing only.
• getMouseMarker(position) - Return the marker that follows the mouse. For the polyline/polygon drawingonly.
• getEllipse(position, xRadius, yRadius) - Return the ellipse to draw. This object must have the functionssetXRadius and setYRadius. For the circle drawing only.
13 Utilities
13.1 Translation
The route instructions comes in a way they are not readable by the user. To display it, the geokit has a way todecode the instruction and transform it into a string. The language of the text is the one given into the load ofthe scripts. If no language is given, english is used.
1 function rou teCa l lback ( rou te ) {2 var i n s t r u c t i o n s = route . g e t I n s t r u c t i o n s ( ) ;3 var decoded = [ ] ;4 f o r ( var i = 0 ; i < i n s t r u c t i o n s . leng th ; i ++) {5 decoded . push ( gk . decode Ins t ruc t i on ( i n s t r u c t i o n s [ i ] ) ) ;6 }7 }
The formatting of the distance and the time is the user’s work.Online example: http://maps.onyourmap.com/js3/examples/13.Utilities/Chapter13.1.html
13.2 Conversion
13.2.1 KM to MI
You can transform the coordinates from kilometers to miles and from miles to kilometers with these methodsof the geokit:
• kmToMiles(dist)
• milesToKm(dist)
August 4, 2011 Copyright c©2006-2011, OnYourMap SA. 38/44
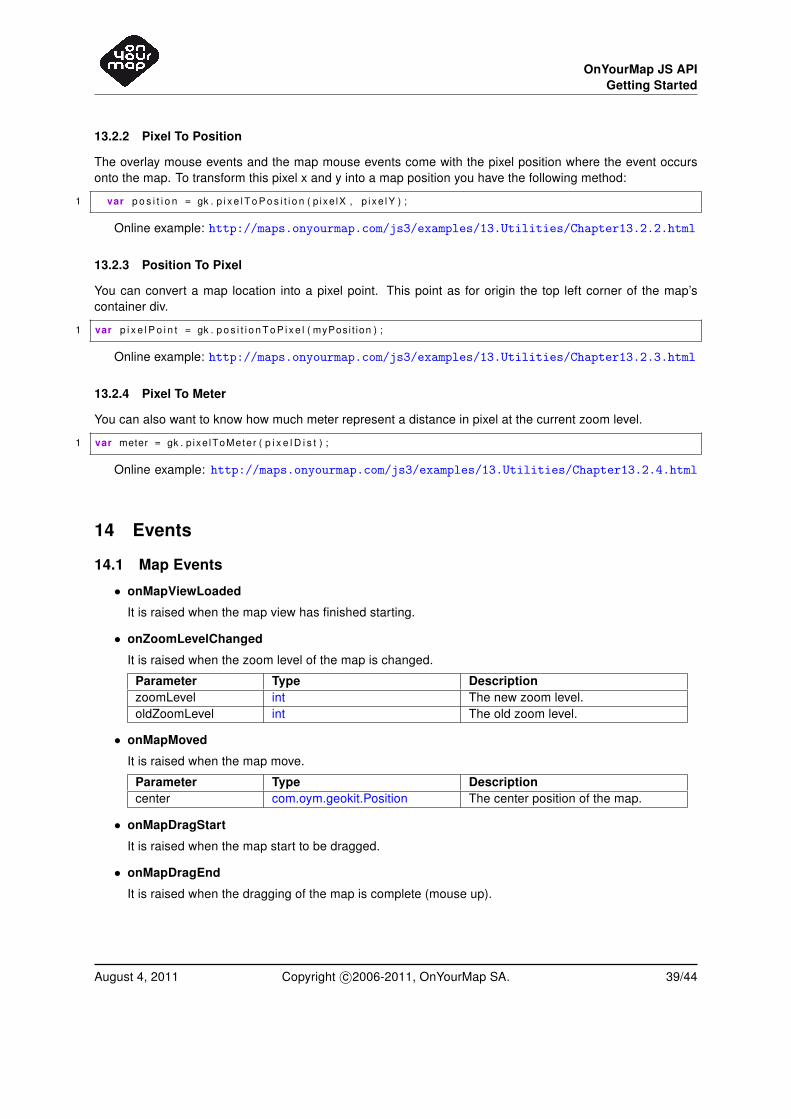
OnYourMap JS APIGetting Started
13.2.2 Pixel To Position
The overlay mouse events and the map mouse events come with the pixel position where the event occursonto the map. To transform this pixel x and y into a map position you have the following method:
1 var p o s i t i o n = gk . p i xe lToPos i t i on ( p ixe lX , p ixe lY ) ;
Online example: http://maps.onyourmap.com/js3/examples/13.Utilities/Chapter13.2.2.html
13.2.3 Position To Pixel
You can convert a map location into a pixel point. This point as for origin the top left corner of the map’scontainer div.
1 var p i x e l P o i n t = gk . pos i t i onToP i xe l ( myPosi t ion ) ;
Online example: http://maps.onyourmap.com/js3/examples/13.Utilities/Chapter13.2.3.html
13.2.4 Pixel To Meter
You can also want to know how much meter represent a distance in pixel at the current zoom level.
1 var meter = gk . p ixe lToMeter ( p i x e l D i s t ) ;
Online example: http://maps.onyourmap.com/js3/examples/13.Utilities/Chapter13.2.4.html
14 Events
14.1 Map Events
• onMapViewLoaded
It is raised when the map view has finished starting.
• onZoomLevelChanged
It is raised when the zoom level of the map is changed.
Parameter Type DescriptionzoomLevel int The new zoom level.oldZoomLevel int The old zoom level.
• onMapMoved
It is raised when the map move.
Parameter Type Descriptioncenter com.oym.geokit.Position The center position of the map.
• onMapDragStart
It is raised when the map start to be dragged.
• onMapDragEnd
It is raised when the dragging of the map is complete (mouse up).
August 4, 2011 Copyright c©2006-2011, OnYourMap SA. 39/44
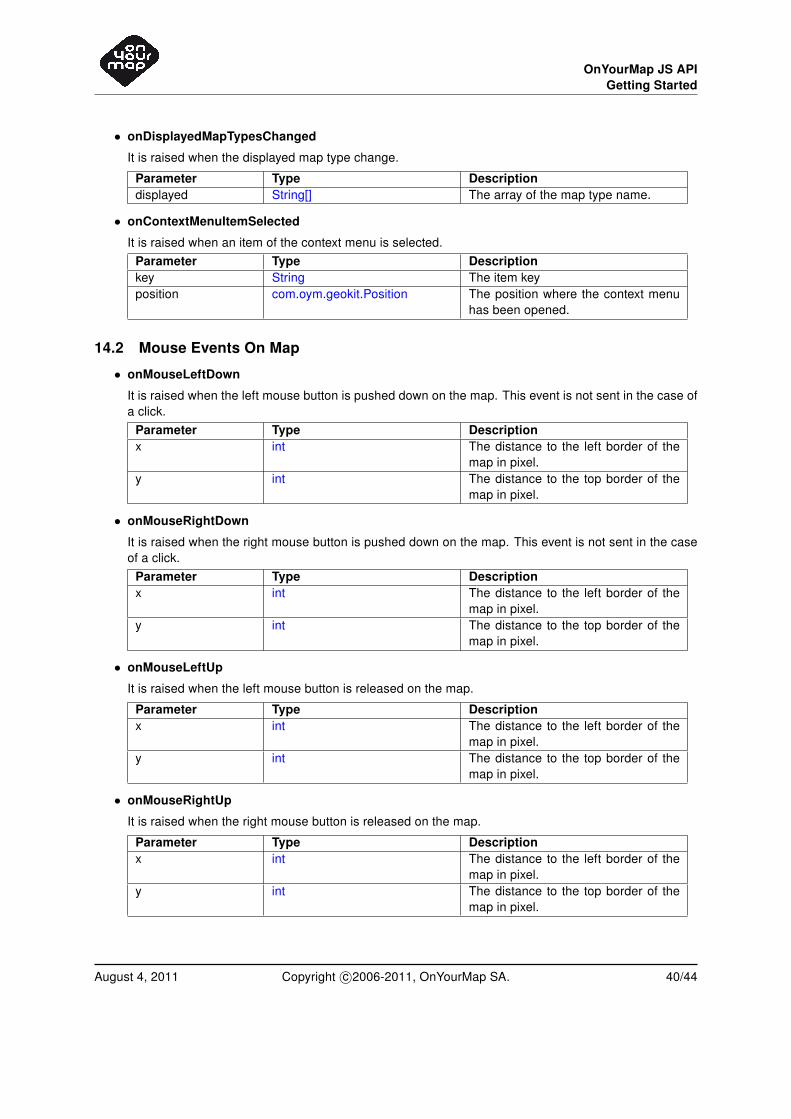
OnYourMap JS APIGetting Started
• onDisplayedMapTypesChanged
It is raised when the displayed map type change.
Parameter Type Descriptiondisplayed String[] The array of the map type name.
• onContextMenuItemSelected
It is raised when an item of the context menu is selected.
Parameter Type Descriptionkey String The item keyposition com.oym.geokit.Position The position where the context menu
has been opened.
14.2 Mouse Events On Map
• onMouseLeftDown
It is raised when the left mouse button is pushed down on the map. This event is not sent in the case ofa click.
Parameter Type Descriptionx int The distance to the left border of the
map in pixel.y int The distance to the top border of the
map in pixel.
• onMouseRightDown
It is raised when the right mouse button is pushed down on the map. This event is not sent in the caseof a click.
Parameter Type Descriptionx int The distance to the left border of the
map in pixel.y int The distance to the top border of the
map in pixel.
• onMouseLeftUp
It is raised when the left mouse button is released on the map.
Parameter Type Descriptionx int The distance to the left border of the
map in pixel.y int The distance to the top border of the
map in pixel.
• onMouseRightUp
It is raised when the right mouse button is released on the map.
Parameter Type Descriptionx int The distance to the left border of the
map in pixel.y int The distance to the top border of the
map in pixel.
August 4, 2011 Copyright c©2006-2011, OnYourMap SA. 40/44

OnYourMap JS APIGetting Started
• onMouseMove
It is raised when the mouse move on the map.
Parameter Type Descriptionx int The distance to the left border of the
map in pixel.y int The distance to the top border of the
map in pixel.
• onMouseWheel
It is raised when the mouse wheel event occurs onto the map.
Parameter Type Descriptionx int The distance to the left border of the
map in pixel.y int The distance to the top border of the
map in pixel.delta int The number of wheel step.
• onLeftClick
It is raised when the left mouse button make a click (down-up without move) on the map. This event isnot sent in the case of a double click.
Parameter Type Descriptionx int The distance to the left border of the
map in pixel.y int The distance to the top border of the
map in pixel.
• onRightClick
It is raised when the rightmouse button make a click (down-up without move) on the map.
Parameter Type Descriptionx int The distance to the left border of the
map in pixel.y int The distance to the top border of the
map in pixel.
• onDblClick
It is raised when the left mouse button make a double-click on the map. In this case, no down, up andclick event are sent.
Parameter Type Descriptionx int The distance to the left border of the
map in pixel.y int The distance to the top border of the
map in pixel.
• onMouseOver
It is raised when the mouse comes from outside the map onto the map.
Parameter Type Descriptionx int The distance to the left border of the
map in pixel.y int The distance to the top border of the
map in pixel.
August 4, 2011 Copyright c©2006-2011, OnYourMap SA. 41/44

OnYourMap JS APIGetting Started
• onMouseOut
It is raised when the mouse goes out from the map.
Parameter Type Descriptionx int The distance to the left border of the
map in pixel.y int The distance to the top border of the
map in pixel.
14.3 Overlay Events
Only the events that were previously enabled using the enableEvent(key).
• onOverlayMouseLeftDown
It is raised when the left mouse button is pushed down on an overlay.
Parameter Type Descriptionoverlay com.oym.geokit.AbstractOverlay The overlay on which the event oc-
curs.x int The distance in pixel from the left map
border.y int The distance in pixel from the top map
border.e Event The mouse event recieved from the
browser.
• onOverlayMouseRightDown
It is raised when the right mouse button is pushed down on an overlay.
Parameter Type Descriptionoverlay com.oym.geokit.AbstractOverlay The overlay on which the event oc-
curs.x int The distance in pixel from the left map
border.y int The distance in pixel from the top map
border.e Event The mouse event recieved from the
browser.
• onOverlayMouseLeftUp
It is raised when the left mouse button is released on the overlay.
Parameter Type Descriptionoverlay com.oym.geokit.AbstractOverlay The overlay on which the event oc-
curs.x int The distance in pixel from the left map
border.y int The distance in pixel from the top map
border.e Event The mouse event recieved from the
browser.
August 4, 2011 Copyright c©2006-2011, OnYourMap SA. 42/44
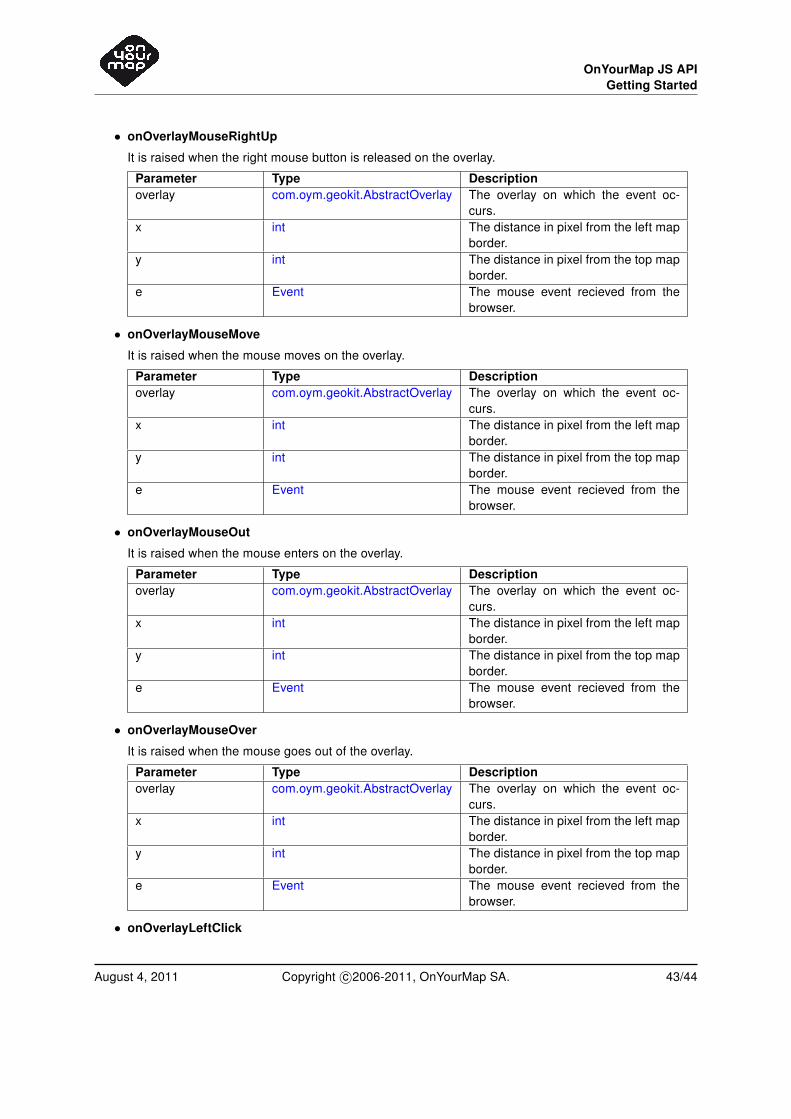
OnYourMap JS APIGetting Started
• onOverlayMouseRightUp
It is raised when the right mouse button is released on the overlay.
Parameter Type Descriptionoverlay com.oym.geokit.AbstractOverlay The overlay on which the event oc-
curs.x int The distance in pixel from the left map
border.y int The distance in pixel from the top map
border.e Event The mouse event recieved from the
browser.
• onOverlayMouseMove
It is raised when the mouse moves on the overlay.
Parameter Type Descriptionoverlay com.oym.geokit.AbstractOverlay The overlay on which the event oc-
curs.x int The distance in pixel from the left map
border.y int The distance in pixel from the top map
border.e Event The mouse event recieved from the
browser.
• onOverlayMouseOut
It is raised when the mouse enters on the overlay.
Parameter Type Descriptionoverlay com.oym.geokit.AbstractOverlay The overlay on which the event oc-
curs.x int The distance in pixel from the left map
border.y int The distance in pixel from the top map
border.e Event The mouse event recieved from the
browser.
• onOverlayMouseOver
It is raised when the mouse goes out of the overlay.
Parameter Type Descriptionoverlay com.oym.geokit.AbstractOverlay The overlay on which the event oc-
curs.x int The distance in pixel from the left map
border.y int The distance in pixel from the top map
border.e Event The mouse event recieved from the
browser.
• onOverlayLeftClick
August 4, 2011 Copyright c©2006-2011, OnYourMap SA. 43/44
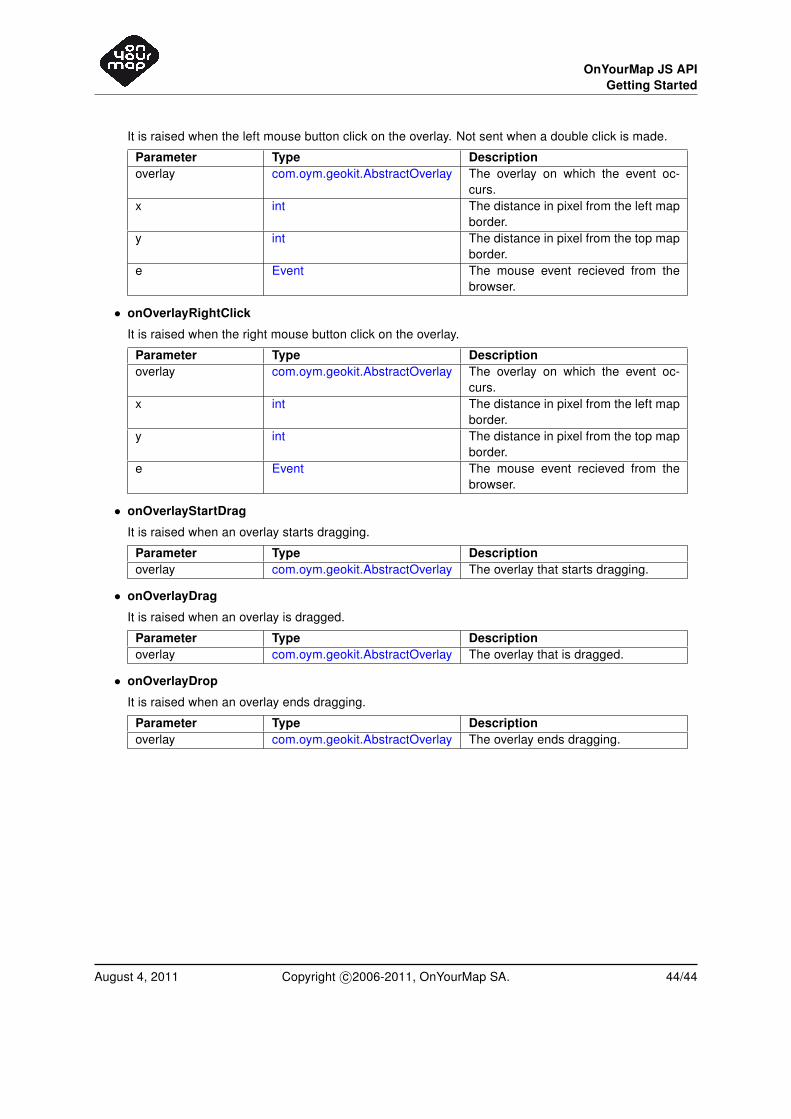
OnYourMap JS APIGetting Started
It is raised when the left mouse button click on the overlay. Not sent when a double click is made.
Parameter Type Descriptionoverlay com.oym.geokit.AbstractOverlay The overlay on which the event oc-
curs.x int The distance in pixel from the left map
border.y int The distance in pixel from the top map
border.e Event The mouse event recieved from the
browser.
• onOverlayRightClick
It is raised when the right mouse button click on the overlay.
Parameter Type Descriptionoverlay com.oym.geokit.AbstractOverlay The overlay on which the event oc-
curs.x int The distance in pixel from the left map
border.y int The distance in pixel from the top map
border.e Event The mouse event recieved from the
browser.
• onOverlayStartDrag
It is raised when an overlay starts dragging.
Parameter Type Descriptionoverlay com.oym.geokit.AbstractOverlay The overlay that starts dragging.
• onOverlayDrag
It is raised when an overlay is dragged.
Parameter Type Descriptionoverlay com.oym.geokit.AbstractOverlay The overlay that is dragged.
• onOverlayDrop
It is raised when an overlay ends dragging.
Parameter Type Descriptionoverlay com.oym.geokit.AbstractOverlay The overlay ends dragging.
August 4, 2011 Copyright c©2006-2011, OnYourMap SA. 44/44